1
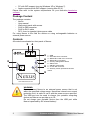
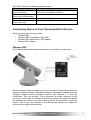
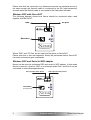
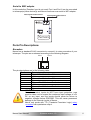
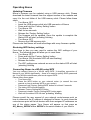
USER MANUAL
PORT I
PORT II
STATUS
ON/OFF
AUX
USB
ENCODERS
9-25V DC
Nexus
www.astrodevices.com
User Guide for Nexus
Version 1.2
Firmware version 1.X
Last revised on January 12, 2012
Printed in Australia
Copyright
Copyright © 2012, Astro Devices. All rights reserved.
No part of this manual may be reproduced or transmitted in any form for any
purpose other than the purchaser’s personal use, without the express written
permission of Astro Devices.
Astro Devices reserves the right to make changes and improvements to its
product without providing a notice.
Precautions and Safety
Electricity
Do not handle power plug and adapter with wet hands.
Electrical shock may result.
Immediately power off the product and unplug the DC
adapter and/or batteries if smoke or odours emit from the
product.
Immediately power off the product and unplug the DC
adapter and/or batteries if water or other liquids are
present.
Product
Do not drop or subject the device to impact.
Keep it away from harsh environments including humid,
dusty, and smoky areas.
Do not use excessive force on the connectors or attempt
to disassemble the device.
Do not place heavy objects on the product. Damage to
your products may result from improper use.
Technical Support
Astro Devices
198 The Esplanade,
SYLVANIA, NSW 2224
AUSTRALIA
ABN 75 270 616 917
E-Mail: [email protected]
Website: http://www.astrodevices.com
Thank you
Thank you for purchasing Nexus WiFi electronic telescope interface. We hope
you enjoy it! This user manual will get you started and help you make the most
of your Nexus.
Introduction
Nexus is a computerised WiFi wireless adapter for your telescope. It works with
most popular telescopes – on equatorial or Alt-Azimuth mounts.
Nexus can be configured to function as a DSC and/or RS232 to WiFi adapter.
Nexus, a 9V battery, two optical encoders, cable and a tablet or computer will
transform your telescope into a computerised telescope making locating all
those hard to find objects an easy task. Also Nexus communicates wirelessly
with your tablet or personal computer so you will find no wires to trip over in the
darkness.
You will need planetarium software in order to use Nexus.
Product Features
Below is a short outline of main features of your Nexus.
•
•
•
•
•
•
•
•
•
•
•
•
•
•
•
•
•
Supports extended Ouranos, Bbox, Sky Commander and ServoCAT
communication protocols
Handles TTL quadrature optical encoders with practically unlimited
number of pulses per second
Dual power source – internal 9V battery or external 9-25V DC
o
o
o
o
Operating temperature range from -20 C to +50 C (-5 F to +120 F)
Humidity 10%-90% non-condensing
FCC / CE/ IC certified 2.4GHz IEEE 802.11b/g transceiver
Supports Adhoc and infrastructure WiFi networks
Supports WPS (WiFi Protected Setup)
Secure Wi-Fi authentication schemes (WEP/WPA/WPA2)
Class I WiFi device (up to 150 meters)
Uses 2412 ~ 2484MHz Unlicensed ISM band (channels 1-14)
Two RS232 ports
USB providing up to 1A, 5V power
Uses a 32-bit MIPS CPU.
Power consumption (without encoders connected) – 45 mA from 9V
batteries or 35 mA from 12V DC external power
Reverse polarity protection
RoHS compliant
System Requirements
Nexus uses a WiFi communication module and requires one of the following to
be connected to:
• iOS devices (iPhone, iPad, iPod touch) running iOS 3.0+
• Android devices with WiFi that support Ad-hoc connection or have
support for WiFi access point running Android 2.2+
Nexus User Manual
firmware version 1.0
2
• PC with WiFi support (running Windows XP or Windows 7).
• Apple computers with WiFi support (running Mac OS X).
Please also refer to the system requirements for your favourite planetarium
software.
Package Content
The package contains:
- Nexus
- User manual
- Wall mount panel with screws
- RJ45 to DB9 converter
- RJ45 to RJ12 cable
- DC 2.1mm to cigarette lighter power cable
For using Nexus in the field we advise on using rechargeable batteries or
external power source.
Controls
All controls are situated on front panel of Nexus:
3
4
PORT I
PORT II
5
STATUS
2
6
7
ON/OFF
1
8
AUX
USB
ENCODERS
9-25V DC
Nexus
9
1 – USB
2 – Encoders RJ45 connector
3 – RS232 RJ12 with 3.3V connector
4 – RS232 RJ12 connector
5 – Factory settings/WPS button
6 – Status LED
7 – ON/OFF push button
8 – 2.1mm DC connector
9 – auxiliary 3.5mm port/remote shutter
control
www.astrodevices.com
WARNING:
Do not connect Nexus to an external power source that is not
within the specified voltage range. Nexus has internal over-current
protection but it is safer to use it with the power source specified.
The USB port can be used to charge your portable computing
device and Nexus can provide up to 1A.
Do not charge your portable device from the USB port while
Nexus is powered by 9V internal battery!
3
firmware version 1.0
Nexus User Manual
The status LED reports different states of Nexus:
Blinking type
Description
Fast pulsating blinking
A computing device is connected to Nexus or
(once a second)
Nexus is connected to a WLAN
Slow pulsating blinking
Nexus is not connected
(once every two seconds)
ON
Updating firmware
Flashing
Error/Change Mode
(once a second)
Connecting Nexus to Your Telescope/Other Devices
Nexus can operate in various modes:
• Wireless DSC
• Wireless DSC connected to ServoCat
• Wireless DSC and Serial to WiFi adapter
• Serial to WiFi adapter
Wireless DSC
The following diagram illustrates how Nexus is connected to a telescope:
Nexus constantly detects pulses sent by the encoders and translates them into
absolute angular positions. Planetarium software periodically (depending on the
settings) requests current encoders’ position and converts it to real sky
coordinates. Then the position of the telescope is usually reflected on the
screen by a cross hair. An alignment procedure needs to be performed before
the planetarium software can start showing where the telescope is pointing.
Please refer to the user manual of the planetarium software for details on
performing the alignment procedure.
Nexus User Manual
firmware version 1.0
4
Please note that the connection to a telescope mounted on equatorial mount is
the same except the Azimuth cable is connected to the RA (right ascension)
encoder while the Altitude cable is connected to the Declination encoder.
Wireless DSC with ServoCAT
The following diagram shows how Nexus should be connected when used
together with ServoCAT:
DSC
PC port
PORT I
PORT II
STATUS
ON/OFF
Encoders
AUX
ENCODERS
USB
9-25V DC
Nexus
www.astrodevices.com
Where ‘DSC’ and ‘PC Port’ are the names of the ports on ServoCAT.
Please note that a two star alignment should be performed before ServoCAT
can track and execute goto commands.
Wireless DSC and Serial to WiFi adapter
Nexus can be used as a wireless DSC and serial to WIFi adapter. In this mode
Nexus is used for a ‘push-to’ DSC on a telescope while Port I and Port II can be
connected to other telescopes/devices.
Telescope №2/other device
Telescope №3/other device
PORT I
PORT II
STATUS
ON/OFF
Encoders
(Telescope №1)
AUX
USB
ENCODERS
9-25V DC
Nexus
www.astrodevices.com
5
firmware version 1.0
Nexus User Manual
Serial to WiFi adapter
In this mode the ‘Encoders’ port is not used. Port I and Port II can be connected
to telescope(s)/other device(s) and Nexus functions as a serial to WiFi adapter.
Telescope №1/other device
Telescope №2/other device
PORT I
PORT II
STATUS
ON/OFF
AUX
ENCODERS
USB
9-25V DC
Nexus
www.astrodevices.com
Ports Pin Descriptions
Encoders
Nexus has a standard RJ-45 connector to connect it to rotary encoders of your
telescope. The pins are numbered according to the following diagram:
PIN 1
USB
PIN 8
ENCODERS
The pin descriptions are in the following table:
Pin
Description
1
Channel B of Azimuth or RA encoder
2
+5 V
3
Channel A of Azimuth or RA encoder
4
Ground
5
Channel B of Altitude or Declination encoder
6
+5V
7
Channel A of Altitude or Declination encoder
8
Ground
WARNING:
Nexus’s encoders’ inputs do NOT have input protection, care
must be taken not to exceed the maximum input voltage of +5V
DC on any input, and the inputs should never be driven to
negative voltages below GROUND. This will cause permanent
damage to the internal circuits of Nexus.
Nexus only works with TTL (Transistor-Transistor Logic) rotary
encoders with quadrature output.
Nexus User Manual
firmware version 1.0
6
RS232 ports (Port I and Port II)
PORT I
PIN 6
PIN 1
PIN 6
PIN 1
Nexus has two RS-232 ports. It uses a standard RJ-12 connector. The pins are
numbered according to the following diagram:
PORT II
The pins description is as follows:
Port
Pin
Description
1
Ground
2
TxD – transmitted data (output)
Port I
3
RxD – received data (input)
4
Ground
5
Ground
6
+3.3V (up to 500mA)
1
Ground
2
TxD – transmitted data (output)
Port II
3
RxD – received data (input)
4
Ground
5
Ground
6
No connection
Auxiliary Port
The port can be used to control the shutter release of DSLRs. The port uses a
standard 3.5mm TRS jack. The following diagram shows the pin numbering for
the 3.5mm TRS plug to be used with the port:
3
2
1
The pins’ description to shutter control is as follows:
Pin
Description
1
Ground
2
Focus
3
Shutter release
7
firmware version 1.0
Nexus User Manual
Connecting To Tablet/PC/Mac
Nexus communicates with planetarium software using one or more TCP/IP
ports. Nexus’s default TCP/IP ports’ configuration is described in the following
table:
TCP/IP
port
Port
4060
4061
4062
4070
Port I
Port II
USB
4060
4061
4062
4063
4070
Connection
DSC mode
Astro Devices communication
protocol
Sky Commander
communication protocol
ServoCAT
communication
protocol
Configuration protocol
Sky Commander
communication protocol
ServoCAT communication
protocol
ServoCAT communication
protocol
DSC+Serial to WiFi
Astro Devices communication
protocol
Port I
Port II
USB
Configuration protocol
Serial port parameters,
baudrate, data bits, stop bits,
parity
19200, 8, 1, no
19200, 8, 1, no
19200, 8, 1, no
9600, 8, 1, no
9600, 8, 1, no
9600, 8, 1, no
Nexus is operating in ad-hoc mode by default. The default SSID of Nexus is
AD_Nexus_XXXXX where XXXXX is the serial number of your Nexus. The
serial number is printed of the back of your Nexus. The SSID can be changed
using the configuration utility. The default IP address of your Nexus is
169.254.1.1.
Note: The WiFi Configuration setup may differ based on the
brand of the computer used and on the OS running on that
device. Please refer to the user manual of the devices and the
OS. The TCP/IP port used for configuration is always 4070 and
cannot be changed.
Please refer to the user manual of your planetarium software for the explanation
on setting up the communications with telescope. Some software is designed to
operate a telescope directly through a serial port. You can use a special utility –
virtual serial port driver for you computer. A number of utilities of this type is
available with many of them free:
COM2TCP - with a 45-day free trial, by AstroGeeks
HW VSP 3 - Free for personal use
Nexus User Manual
firmware version 1.0
8
Operating Nexus
Updating Firmware
Nexus’s firmware can be updated using a USB memory stick. Please
download the latest firmware from the support section of our website and
copy it to the root folder of the USB memory stick. Please follow these
steps:
• Turn Nexus OFF
• Insert the USB memory stick into USB connector of Nexus
• Press and hold the ‘Factory Setting’ button
• Turn Nexus ON
• Wait for two seconds
• Release the ‘Factory Setting’ button
• The firmware will be updated. Once the update is complete the
Status LED will start ‘pulsating’ blinking
• Turn Nexus OFF
• Remove the USB memory stick
Please note that Nexus will reset all settings with every firmware update.
Restoring WiFi factory settings
From time to time you may need to restore the WiFi settings of your
Nexus. The following steps will allow you to reset them:
• Turn Nexus OFF
• Press and hold the ‘Factory Setting’ button
• Turn Nexus ON (the status LED will start flashing)
• Release the button
• The WiFi settings are restored as soon as the status LED will start
‘pulsating’ blinking
Connecting Nexus to a WLAN using WPS
You may connect Nexus to a WLAN using WPS. It simplifies connection of
Nexus to your WLAN significantly – there is no need to specify SSID, password
etc. Your WLAN router/access point must support WPS.
Please follow these steps:
• Turn Nexus ON
• Press the WPS button on your network router (or consult the user
manual on how to activate WPS on your router)
• Press and hold ‘Factory Setting/WPS’ button for at least 2 seconds
• The status LED will start flashing
• Release ‘Factory Setting/WPS’ button
• Press and release ‘Factory Setting/WPS’ button again
• Wait until the status LED will start ‘pulsating’ blinking
Please consult the user manual of your network router/access point on
how to determine the IP address it assigned to Nexus. In most cases the
router/access point will list all devices with their assigned IP addresses on
one of the status pages. Your Nexus will appear on that page as
AD_Nexus_XXXXX where XXXXX is the serial number of your Nexus.
9
firmware version 1.0
Nexus User Manual
List of Compatible Planetarium Software
Nexus is compatible with most planetarium software packages that support
Ouranos or Bbox protocols. You can also use planetarium software that
supports ASCOM platform (http://ascom-standards.org). The table below lists
just a few software packages that Nexus was tested with.
Software Name
Platform
Protocol
Website
Astromist
Cartes du Ciel
iOS
Windows
http://www.astromist.com/
http://sourceforge.net/projects/skychart/
DeepSky
Windows
Hallo northern sky
Windows
Megastar
SkySafari Plus/Pro
Windows
Android
iOS
MacOS X
Windows
Ouranos
Orion IntelliScope Mounts
(ASCOM platform)
Orion IntelliScope Mounts
(ASCOM platform)
Orion IntelliScope Mounts
(ASCOM platform)
Bbox/Sky Wizard CTI
Basic Encoder System
Orion IntelliScope Mounts
(ASCOM platform)
BBox
Basic Encoder System
http://www.starrynightstore.com
Starry Night®
TheSky 6
Voyager-4.5
Windows
Windows
MacOS X
http://www.deepsky2000.net
http://www.hnsky.org/
http://www.willbell.com/
http://www.southernstars.com/
http://www.bisque.com
http://www.carinasoft.com
Suppliers of Encoders/Telescope Encoder kits
Nexus is compatible with most quadrature rotary encoders with TTL level
outputs and powered with 5V. The following table lists just some of suppliers
selling encoders or telescope encoder kits.
Supplier
Hardware
Sky
Engineering,
Inc
Encoders/
Telescope
encoder kits
Telescope
encoder kits
Encoders/
Telescope
encoder kits
Encoders/
Telescope
encoder kits
Encoders/
Telescope
encoder kits
Encoders/
Telescope
encoder kits
Encoders/
Telescope
encoder kits
US Digital
Encoders
Wildcard
Innovations
SUPRA Praha
Galileo
Intercon
Spacetec
Aurora Astro
Products
JMI
Telescopes
Nexus User Manual
Country
Website
Australia
http://www.wildcard-innovations.com.au/
Czech Republic
http://www.celestron.cz/
France/
Switzerland
http://www.galileo.cc/
Germany
http://www.intercon-spacetec.de/
USA
http://AuroraAstro.com/
USA
http://www.jmitelescopes.com/
USA
http://skyeng.com/
USA
http://www.usdigital.com/
firmware version 1.0
10
FREQUENTLY ASKED QUESTIONS (FAQ)
Q: How long does the battery last?
A: That depends on a number of different factors – type of encoders used,
operating temperature, the type of the battery. It also depends on the mode
Nexus is running in. For example, the 9V Duracell Coppertop battery will last 45 hours with Nexus operating as a Serial to WiFi adapter. However the same
battery will last only two hours when Nexus is used as a wireless DSC with S2
optical encoders (each encoder draws up to 57mA from 5V source!).
Q: Can I use a rechargeable battery?
A: Yes, Nexus will operate with rechargeable 9V batteries (the actual voltage
for them is usually 8.4V).
Q: What type of batteries is recommended for operating in cold conditions?
A: The most economical type of batteries is 12V SLA (sealed lead acid). Lithium
batteries have very good performance in cold conditions but they are quite
expensive. Rechargeable Lithium batteries (Li-Poly) are not recommended as
Nexus does not the required low voltage cut-out level and they can be
discharged below the recommended level.
Q: Can I use non-optical encoders?
A: Yes, the firmware processes pulses from standard quadrature encoders.
They can be optical, capacitive or magnetic encoders. Any of them can be used
as long as they provide TTL level quadrature output.
Q: Does Nexus use external power when both external power and the battery
are inserted?
A: Nexus uses only external power source if the 2.1mm DC plug is inserted into
the external power connector.
Q: Does Nexus have a built-in charger for the installed battery?
A: No, Nexus does not charge the battery when the external power is
connected to it.
Q: How can I determine the resolution of my encoder?
A: Just multiply the CPR (counts per revolution) of your encoder by four and
then multiply the result by the ratio of the gears it is connected to your telescope
(if you have any).
11
firmware version 1.0
Nexus User Manual
Communication Protocols
Astro Devices Protocol
The following table lists the main command set supported by Nexus DSC
communication protocol.
Command
Description
Example of input
Returns
V
or
V
Return the firmware version
information
V
Astro Devices Nexus v1.0<CR>
R10000<tab>9000<CR>
R
Z10000 9000<CR>
*
Set initial encoders’ positions
I0<tab>0<CR>
R
Query encoders’ positions
Q
+1888 -2190<CR>
Query encoders’ resolutions
H
8192 8192<CR>
A0_45.123_78.245<cr>
Y - success
E - error
AI_0<cr>
Y - success
E - error
R# #<CR>
or
R#<tab>#<CR>
Z# #<CR>
or
Z#<tab>#<CR>
I# #
or
I#<tab>#<CR>
Q
H
or
r
A<0|1>_<RA >_<Dec><cr>
AI_<0|90><cr>
O
o
F
f
<CR>
Where
<CR>
<tab>
_
Set encoders’ resolution.
Please note that the values set
are not saved into flash
memory and will be reset upon
a power cycle.
Set encoders’ resolution
Please note that the values set
are not saved into flash
memory and will be reset upon
a power cycle.
Align on an object. Please note
that the coordinates should be
using epoch 2000 if Nexus is
used with ServoCat.
Initial telescope alignment at 0
degrees (horizontal) or at 90
degrees (vertical)
Release shutter
Close shutter
Activate ‘focus’
Deactivate ‘focus’
Query the current position. The
current position will be valid
only once the star alignment is
performed
O<cr>
o<cr>
F<cr>
f<cr>
<CR>
12.345_67.890<CR>
- carriage return (or ‘Enter’) character with a decimal value of 13
- tab character with a decimal value of 9.
- space character with a decimal value of 32.
Nexus Configuration Protocol
Nexus can be configured to operate in different modes. The configuration is
performed by communicating with Nexus using TCP/IP port number 4070.
Each command has the following syntax:
<set/get>_<parameter 1>[_<parameter 2>]_<value><CR>
Nexus will send back the value requested or ‘OK” in case of a ‘set’ command.
The returned packet will be equal ‘ERR’ in case of invalid requests. The return
packets are always terminated with <CR>.
The following table lists all command parameters:
Nexus User Manual
firmware version 1.0
12
Parameter 1
Parameter 2
Value
Description
Examples
WiFi configuration
CHANNEL
0-14
Specifies the WiFi channel to be used. Please note that the
value of 0 should only be used when Nexus is setup to operate
in infrastructure mode.
Specifies whether to use DHCP: 0 – disabled, 1 – enabled
DHCP
0,1
IPADDRESS
xxx.xxx.xxx.xxx
IPMASK
NTYPE
PASSWORD
xxx.xxx.xxx.xxx
0 - infrastructure
4 – adhoc
up to 32 bytes
SSID
up to 64 bytes
Specifies SSID
TRANSPOWER
1÷12
Specifies the transmission power to be used by the WiFi
module. Please note that the value of 1 specifies the minimum
power and the battery will last longer at that level.
Specifies the IP address to be used. The IP address will only be
used when DHCP is disabled.
Specifies the IP mask.
Specifies the network mode to be used by Nexus.
Specifies the password to be used to connect to a WiFi network.
set CHANNEL 7<cr>
get CHANNEL<cr>
set DHCP 0<cr>
get DHCP<cr>
set IPADDRESS 169.254.1.1<cr>
set IPMASK 255.255.0.0<cr>
set PASSWORD Pass123<cr>
get PASWORD<cr>
set SSID MyNexus<cr>
get SSID<cr>
Physical Port
PORTI
PORTII
USB
13
baudrate
9600÷230400
databits
8,9
parity
0, 1, 2
protocol
0÷2
stopbits
1,2
firmware version 1.0
Sets the baud rate to be used on the port specified. The value
specified is in bits per second.
Sets the number of data bits.
Sets the parity to be used on the ports specified:
0 – none
1 – odd
2 – even
Specifies the communication protocol to be connected to the
physical port
0 - Astro Devices communication protocol
1 - SkyCommander communication protocol
2 - ServoCat communication protocol
Specifies the number of stop bits.
Nexus User Manual
set PORTI baudrate 19200<cr>
get PORTII baudrate<cr>
set PORTII databits 8<cr>
get PORTI databits<cr>
set PORTII parity 0<cr>
get PORTI parity<cr>
set PORTI protocol 1<cr>
get PORTI protocol<cr>
set PORTI stopbits 8<cr>
Parameter 1
Parameter 2
Value
Description
Examples
get PORTII stopbits<cr>
PORT
0÷5
1024÷65535
Sets the TCP/IP port number to be used with virtual port (0÷5)
PORTCONNECT
0÷5
0÷7
Specifies the connection type for the virtual port (0÷5), The
connection type can be equal to one of the following values:
0 - Astro Devices communication protocol
1 - SkyCommander communication protocol
2 - ServoCat communication protocol
3 - Configuration communication protocol
4 - Connect to PortI
5 - Connect to PortII
6 - Connect to USB
7 - no connection
AZENCRES
RAENCRES
128÷4294967296
set AZENCRES 10000<cr>
get RAENCRES<cr>
ALTENCRES
DECENCRES
128÷4294967296
MOUNTERR
Z1 Z2 Z3
Specifies the azimuth/RA encoder resolution. The default value
is set to 10000. The value specified is in ticks per revolution.
Please note that both commands (AZENCRES and
RAENCRES) set the same value.
Specifies the altitude/declination encoder resolution. The default
value is set to 10000. The value specified is in ticks per
revolution. The value specified is in ticks per revolution. Please
note that both commands (ALTENCRES and DECENCRES) set
the same value.
Specifies the mount fabrication errors in degrees.
MOUNTTYPE
0 – Alt/Az
1 - Equatorial
Saves the configuration into flash memory.
set CONFIGURE<cr>
Port Routing
set PORT 0 4060<cr>
get PORT 5<cr>
Digital Setting Circles
CONFIGURE
Nexus User Manual
firmware version 1.0
14
set DECENCRES 8192<cr>
get ALTENCRES<cr>
set MOUNTERR 0.12 0.3 0.1<cr>
get MOUNTERR<cr>
set MOUNTTYPE 0<cr>
get MOUNTTYPE<cr>
Agencies’ Approvals
Nexus uses a WiFi module that has the following qualifications/approvals:
1. FCC: Nexus contains Transmitter Module FCC IDENTIFIER: T9JRN171.
2. CE: Registration Number.: U9M21103-4249-C.
3. Canada: Certification No. 6514A-RN171
Warranty
Nexus is covered by a one-year limited warranty. Please refer to the enclosed
warranty certificate for full details.
15
firmware version 1.0
Nexus User Manual
Technical Support
You can find the latest version of the manual and firmware in the support
section of our website. Please feel free to e-mail us should you require further
technical assistance.
Technical Support
You can find software updates and user documentation on the Astro Devices website.
http://www.astrodevices.com
e-mail: mailto:[email protected]?subject=Nexus support
Nexus User Manual
firmware version 1.0
16
Glossary
Ad-hoc mode is a method for wireless devices to directly communicate with
each other
CPR stands for Counts Per Revolution.
PC is a personal computer. It includes computers running Windows, Linux or
Mac OS.
SSID (Service Set Identifier) is the name of a wireless local area network
(WLAN),
Standby mode is when the Nexus is passively waiting for a connection with a
Tablet/PC.
TTL stands for Transistor-Transistor Logic
WPS stands for WiFi Protected Setup
17
firmware version 1.0
Nexus User Manual
Printed in Australia