1
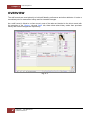
Staff Management
Chapter 3
STAFF MANAGEMENT
CONTENTS
Overview .......................................................................................... 2
How to Enter New Staff Members .................................................. 3
How to Edit / View Staff details ...................................................... 4
Handling Staff Rosters ................................................................... 5
How to Set / Edit Staff Rosters ........................................................... 5
Removing Staff from the Diary ........................................................... 7
How to View Staff Sales History .................................................... 8
Staff Access Levels ........................................................................ 9
Step 1: Create Access Levels ............................................................. 9
Step 2: Assign Access Rights for Each Access Level ................... 10
Step 3: Assign Staff Members an Access Level and Password .... 10
Step 4: Setting the Idle Seconds Before Log Off Time ................... 11
Staff Performance and Statistics ................................................. 12
Set Target and Shop Statistics ......................................................... 14
HAIRLINKSQL User Manual v4.5
Updated 01/05/2012
1
Chapter 3
Staff Management
OVERVIEW
The staff records are used primarily to hold staff details, preferences and other attributes. It is also a
centralised point for transaction lookup and for timetable changes.
As a staff record is linked to a client record, most of the tabs are identical to the client record with
the exception of the ‘History’ tab and ‘Staff’ tab, these show sales history rather than purchase
history and roster management respectively.
Fig. 3 - 1
2
HAIRLINKSQL User Manual v4.5
Updated 01/05/2012
Staff Management
Chapter 3
HOW TO ENTER NEW STAFF MEMBERS
Staff member‟s records are linked to client records. To add a new staff member the client must be
created first. The client information is then transferred across to the new staff record. To add a new
staff record, follow the steps below.
1. Create the client record for the new staff member.
2. Click on the ‘Staff’ button
3. The staff search form will now be displayed. Click on the ‘New’ button.
4. Click on ‘OK’ to insert a new staff record.
5. A client search form will now be displayed. Search for the client you wish to enter as a staff
member.
6. A new staff record will now be created. The staff record will be automatically populated with
details from the selected client.
7. Enter the staff ID. This must be unique to this staff member, and at least two characters long
but no longer than five. We usually suggest the staff members initials are used for the staff
id, but you can use any system you prefer.
8. Save the Staff record by clicking on the tick in the bottom right hand corner.
9. If you have not set the password a prompt will appear telling you that their password is
„password‟. Click ‘OK’.
HAIRLINKSQL User Manual v4.5
Updated 01/05/2012
3
Chapter 3
Staff Management
HOW TO EDIT / VIEW STAFF DETAILS
The staff search function is used in many areas of the program. However, regardless of what you
are doing, when searching for a staff member, the same search options and dialogue boxes are
used throughout the program.
1. Click on the ‘Staff’ icon to activate this module.
2. This will display the staff search window.
Fig. 3 - 2
3. Enter your search criteria and click ‘F12: Search’ to begin the search.
ID
The staff members ID / username
First Name
The staff member‟s first name.
Last Name
The staff member‟s first name.
Status
Whether the staff member is ‘active’ or ‘inactive’.
Working
Whether the staff member is rostered onto a diary. Set this to
‘Either’ if you are unsure.
4. The search results are now displayed. To navigate through the list use the keyboard cursor
keys (up and down arrow keys) or use the scroll bar at the right hand side of the window.
5. To make a selection double-click on a line in the results window, or using the keyboard move
the highlight to the line required then press the ‘F12: Accept’ key to select.
6. Edit the staff details as required and click on the tick button to save.
4
HAIRLINKSQL User Manual v4.5
Updated 01/05/2012
Staff Management
Chapter 3
HANDLING STAFF ROSTERS
The staff rosters function is used to add new staff members to a diary, remove staff members from a
diary and edit a staff member‟s diary details. Other functions include setting the diary that the staff
member is to appear in and the working times for that staff member.
How to Set / Edit Staff Rosters
1. Click on the ‘Staff’ icon to activate this module.
2. Search for the staff member you wish to edit the roster for.
3. Once the staff record is open click on the ‘8: Staff’ tab.
4. Enter a ‘Started’ date if this has not already been done.
5. Click on the ‘F11: Roster (Click for details)’ button.
6. The ‘Weekly Timetable’ will open.
Fig. 3 - 3
7. Select the diary you want to create a roster for using the ‘Prev Diary’ and ‘Next Diary’
buttons.
8. Place a tick in the ‘Allocate staff ‘XXXX’ to this diary’ check box.
9. Click on the ‘Timetable 1’ tab.
10. In the ‘Type’ field choose the type of diary you wish to create.
HAIRLINKSQL User Manual v4.5
Updated 01/05/2012
5
Chapter 3
Staff Management
Normal
Where you would enter your normal / everyday roster. Must be used for
revolving rosters
Holiday
The holiday timetable takes precedent over any other timetable. It kicks
in on the ‘Start On’ date and runs until the ‘Expire After’ date. This
timetable cannot be used as a revolving roster.
11. Enter the ‘Start On’ date that you want this timetable to become active on.
12. Enter the ‘Weeks’ you want the timetable to run for. Once the weeks runs out the timetable
will finish and move on to the next timetable if one exists.
13. Enter the ‘Expire On’ date. The timetable will become inactive and expire after this date.
You do not have to enter a date if the timetable is indefinite.
14. Place a ‘check’ in the days you wish to roster the staff member on for by putting a cross in
the ‘Rostered’ column checkbox.
15. Next, enter the start and finish times for the staff member in 24 hour format by entering times
into the ‘Start1’ and ‘Finish1’ columns. For example if a staff member is rostered on from
8:00am to 5:00pm, you would enter 08:00 in the ‘Start1’ column and 17:00 in the ‘Finish1’
column.
Note: You can enter up to five start and finish times. This is useful if
you have a fixed break during the day during which you don‟t want
appointments made. For example you may have a lunch break every
day from 12pm to 1pm.
16. Click on the red tick button in the bottom right hand corner of the timetable window and this
will save the changes made.
17. If you run multiple timetables that change from week to week click on the “Timetable 2” tab
and repeat steps 9 – 13 for the number of timetables you wish to run. For example, if
Joanne works Mondays one week then Tuesday the next week, set her up in timetable one
with her Monday hours, then set her up in timetable two with her Tuesday hours. On both
timetables, set the ‘Weeks’ to 1 and use the „Start On‟ date in timetable one to specify which
week her Monday roster first starts.
Note: Multiple timetables will run in order from ‘Timetable 1’ up to
‘Timetable 9’. The timetable will first check the ‘Start On’ and ‘Expire
on’ dates to make sure the timetable is active.
If the timetable is active, it will run for the number of weeks specified in
the ‘Weeks’ field. Once the ‘Weeks’ limit is reached, the diary will
move onto the next timetable. When the last timetable is finished it will
cycle back to ‘Timetable 1’ or the next active timetable.
6
HAIRLINKSQL User Manual v4.5
Updated 01/05/2012
Staff Management
Chapter 3
Removing Staff from the Diary
Once a staff member has left you may need to have them removed from the diary. To remove a
staff member from the diary follow the steps below.
1. Check the diary for any future appointments or locks. These must be transferred to another
staff members or cancelled before the staff member can be taken off the diary.
TIP: You can print out a report of all future appointments for a staff
member by clicking on the ‘Print’ button at the bottom of the diary,
then selecting the ‘All Future Appts for a Staff Member’ option.
2. Search for the staff member you wish to edit the roster for.
3. Once the staff record is open click on the ‘8: Staff’ tab.
4. If the staff member has left the business enter a date in the ‘Finish’ date field.
5. Click on the ‘F11: Roster (Click for details)’ button. This will open the ‘Weekly Timetable’.
6. Next, remove all checks from the ‘Rostered’ column and set all the ‘Start’ and ‘Finish’
times to 00:00.
7. Remove the tick from ‘Allocate staff ‘XXXX’ to this diary’.
8. Click on the tick button to save changes.
9. Click on the ‘Exit’ button to close the staff member‟s timetable.
10. Next click on the ‘1: Personal’ tab.
11. Change the ‘Status’ field to ‘Inactive’.
12. Click on the tick button to save changes.
13. Once the background has processed the staff member should be removed from the diary. If
the staff member still appears on the diary and their name appears at the top of their column
in red letters, then there are still appointments on the diary for this staff member. Either
move or delete these appointments (or locks) and the staff member will be removed from the
diary.
HAIRLINKSQL User Manual v4.5
Updated 01/05/2012
7
Chapter 3
Staff Management
HOW TO VIEW STAFF SALES HISTORY
1. Click on the ‘Staff’ icon to activate this module.
2. Search for the staff member you wish to edit the roster for.
3. Once the staff record is open click on the ‘8: History’ tab.
4. The sales history will now be displayed. You can filter the sales history by changing the filter
fields (the Date Range, Client, Product, Category-1, Category-2 and Prd Class fields).
Fig. 3 - 4
8
HAIRLINKSQL User Manual v4.5
Updated 01/05/2012
Staff Management
Chapter 3
STAFF ACCESS LEVELS
HairlinkSQL can be set up to require users to log in before they can access certain functions. For
example, if only managers can authorise a refund, you could set HairlinkSQL up to ask for a
username and password when the refund function is accessed. If the user has not been assigned to
the Manager access level then they will not be able to do a refund.
Step 1: Create Access Levels
The first step is to create the access levels that you want to assign staff members to. For example,
Junior Staff, Senior Staff and Managers.
1. Go to the ‘Options’ menu and then select ‘Setup’.
2. Log in with your usename and password.
3. Click on the ‘Staff’ button and then the ‘Access’ tab.
4. Enter the names of the level you wish to use in the ‘Access Names’ section.
NOTE: The first 3 levels of Default, Owner and Desk are entered by
default and cannot be changed.
HAIRLINKSQL User Manual v4.5
Updated 01/05/2012
9
Chapter 3
Staff Management
Step 2: Assign Access Rights for Each Access Level
The second step involves assigning tasks to each Access Level you have created. For example, the
manager might be able to do everything while senior staff can do everything except view the
financial reports.
1. Go to the ‘Options’ menu and then select ‘Setup’.
2. Log in with your usename and password.
3. Click on the ‘Staff’ button and then the ‘Access’ tab.
4. In the User Access Levels section there will be multiple columns with tick boxes.
Each column represents an Access Level that you entered in step 1 . Each tick box
represents a task that can be performed by that Access Level. For example, if you would like
Senior Staff to be able to do Bill discounts place a tick in the Senior staff column on the Bill
Discounts line. Once finished close out of Setup.
NOTE: If you do not want users to log in to perform a function make
sure the default column is ticked. For example, it may be time
consuming to log in every time a bill is done. If this is an issue place a
tick in the Default column on the Billing line. It is also highly
recommended for the owner column to have all boxes ticked.
Step 3: Assign Staff Members an Access Level and Password
The third step is to assign staff members to an access level and set them up with a password.
1. Open the staff record and click on the ‘8: Staff tab’.
2. The manager or owner will need to log in before any details can be changed.
3. In the ‘Access Level’ field select the level you wish to assign the staff member to, eg.
Senior Staff.
4. Click into the ‘Enter New Password’ field and enter the staff members new password,
repeat this step in the ‘Re-Enter Password’ field.
5. Press enter on the keyboard and select ‘OK’ to the prompt and click on the tick button in the
bottom right hand corner of the staff record to save.
NOTE: The username that each staff member will use to log in is the
ID found in the ‘Staff ID’ field on the ‘1: Personal’ tab of the staff
record
10
HAIRLINKSQL User Manual v4.5
Updated 01/05/2012
Staff Management
Chapter 3
Step 4: Setting the Idle Seconds Before Log Off Time
Finally you may want to set the idle seconds before log out. For example, once the manager has
SQL
logged on and finished doing a refund, Hairlink
can automatically log the manager off after a
predetermined amount of time. This ensures that if the manager forgets to log off manually other
users do not have access to functions that only the manager can do.
1. Go to the ‘Options’ menu and then select ‘Setup’.
2. Log in with your usename and password.
3. Click on the ‘Misc’ button and then the ‘At Startup’ tab.
4. In the ‘Idle Secs Before Log Out’ field enter, in seconds, how long it should take to log a
user off when no one is using the computer.
NOTE: This setting needs to be set on each PC. This means that in
the managers office the idle seconds before log out can be set longer
as they are probably the only user that will use that PC. Whereas at
reception where many people may use the computer you can set a
shorter log out period.
HAIRLINKSQL User Manual v4.5
Updated 01/05/2012
11
Chapter 3
Staff Management
STAFF PERFORMANCE AND STATISTICS
The Staff Performance and Statistics feature complements the staff performance and productivity
reports and provides a quick and easy way for staff to review their own performance for the week. It
allows them to determine what areas they have been performing well in and what areas require
more attention. Each tab of the Staff Statistics window is designed to evaluate different areas of
their performance. To view the staff statistics screen, open any staff record, browse to the Staff tab
and click Staff Statistics.
Fig. 3 - 8
Target Tab: This tab displays a graphical view of the staff member‟s retail and service sales in
comparison to pre-set targets. The top section reveals all the actual figures in a table view and
displays exactly how far over or under the target they have achieved. This tab allows the staff
member to quickly see if they are performing as expected overall.
The target tab has a number of different display options, it can be viewed for a single day, a week, a
month or you can specify a custom date range. You may choose what period you are viewing using
the Previous, Current and Next buttons. The targets can be changed by managers on this screen
or changed for all staff members at once in the Set Target and Shop Statistics screen described
below. The working hours are automatically calculated by the amount of open time available in the
diary for that period.
Client Graph Tab: This displays a graphical breakdown of the number of clients seen broken down
into client types. New clients, regular clients and retail only clients.
Client Stats Tab: A table view of sales broken down by client types, much like the staff
performance report. Also allows you to compare this staff member‟s sales vs the entire business.
Sales (Dollars) Tab: Displays a line graph showing a 7 week comparison of retail, service and total
sales compared to targets. This tab is great for comparing performance trends over several weeks.
Using the tick boxes provided you can select information to plot on the graph for analysis.
12
HAIRLINKSQL User Manual v4.5
Updated 01/05/2012
Staff Management
Chapter 3
Sales (Numbers) Tab: Displays various client number statistics in a line graph. New Clients,
Regular Clients, Rebooked, Requested, Retail Only, Male and Female. Using tick boxes provided
you can select information to plot on the graph for analysis.
Category (Dollars): A horizontal bar graph showing weekly sales totals by product category sorted
from highest to lowest. This is great for showing which product ranges the staff member may be
neglecting when selling.
Category (Numbers): A horizontal bar graph the same as Cat (Dollars) but displayed in terms of
quantity sold rather than dollar value.
Category (Totals): Table view displaying total sales for categories in quantities and dollar value
sorted alphabetically.
HAIRLINKSQL User Manual v4.5
Updated 01/05/2012
13
Chapter 3
Staff Management
Set Target and Shop Statistics
The new Staff Target screen is designed to be used by a manager to set hourly sales targets for
each staff member, this is multiplied by the total hours working for that period to get a total staff
target. These targets will vary greatly depending on the staff member and what role they perform.
The „retail %‟ field specifies what percentage of total sales should be retail items.
IMPORTANT: The total hours working does not take into account paid or unpaid locks. Total hours
worked for a staff member should be treated as an estimate only.
The Clinic Total tab is for displaying statistics in graph form for all staff members at once allowing
you to compare staff member‟s performance in many different ways different ways. If you are
wishing to compare information for a single staff member you are better off using the Staff
Performance and Statistics screen instead.
To view Staff Targets and Clinic Totals, go to Actions | Set Target and Shop Statistics.
Fig. 3 - 9
14
HAIRLINKSQL User Manual v4.5
Updated 01/05/2012