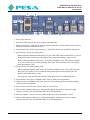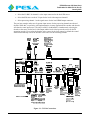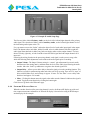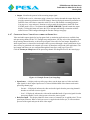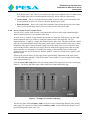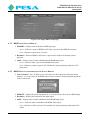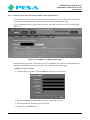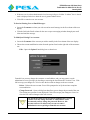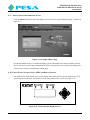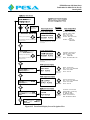
1
USER GUIDE
C22
HIGH DEFINITION DUAL-CHANNEL IP
STREAMING ENCODER/DECODER
Publication: 81-9059-0731-0, Rev. B
www.PESA.com
January 2015
Phone: 256.726.9200
PESA XSTREAM C22 USER GUIDE
Publication 81-9059-0731-0, Rev. B
January 2015
Thank You for Choosing PESA!!
We appreciate your confidence in our products. PESA produces quality, state-of-the-art A/V processing, routing
and distribution equipment designed to deliver our users the highest degree of performance, dependability and
versatility available anywhere. We want you to know that if you ever have a question or concern with a PESA
product, we have a team of engineers, technicians and customer service professionals available 24/7 every day
of the year to help resolve the issue.
Again thank you for choosing PESA, and we look forward to a long-term partnership with you and your facility.
SERVICE AND ORDERING
ASSISTANCE
PESA
103 Quality Circle, Suite 210
Huntsville AL 35806 USA
www.PESA.com
CUSTOMER SERVICE DEPARTMENT
Tel: 256.726.9222 (24/7)
Toll Free: 800.323.7372
Fax: 256.726.9268
Email: [email protected]
MAIN OFFICE
Tel: 256.726.9200
Fax: 256.726.9271
© 2015, 2014, PESA, All Rights Reserved.
No part of this publication (including text, illustrations, tables, and charts) may be reproduced, stored in any retrieval
system, or transmitted in any form or by any means, including but not limited to electronic, mechanical, photocopying,
recording or otherwise, without the prior written permission of PESA.
Microsoft and Windows are either registered trademarks or trademarks of Microsoft Corporation in the United States and/or
other countries.
All information, illustrations, and specifications contained in this publication are based on the latest product information
available at the time of publication approval. The right is reserved to make changes at any time without notice.
Printed in the United States of America.
January 2015 – Rev B
October 2014 – Rev A
I
PESA XSTREAM C22 USER GUIDE
Publication 81-9059-0731-0, Rev. B
January 2015
TABLE OF CONTENTS
CHAPTER 1
ABOUT THIS USER GUIDE....................................................................................... 1-1
1.1
1.2
Documentation and Safety Overview.............................................................................. 1-1
Cautions and Notes ........................................................................................................ 1-1
CHAPTER 2
INTRODUCTION ........................................................................................................ 2-1
2.1
2.2
2.3
2.3.1
2.3.2
2.3.3
2.4
2.5
2.6
2.6.1
2.6.2
2.7
2.8
2.9
2.10
2.11
2.12
2.13
2.14
Overview ....................................................................................................................... 2-1
Brief Functional Description .......................................................................................... 2-2
Channel 1 and 2 Local Video (SDI/SFP/HDMI) Inputs................................................... 2-4
BNC Connectors (I/O 1 and I/O 2) ................................................................................. 2-4
SFP Module Cage (Channels 1 and 2) ............................................................................ 2-5
HDMI /DVI Connector (HDMI IN)................................................................................ 2-5
IP Streaming Decoder Function...................................................................................... 2-5
IP Streaming Encoder Function ...................................................................................... 2-6
Channel 1 and 2 Local Video (BNC/SFP) Outputs.......................................................... 2-7
BNC Connectors (I/O 1 and I/O 2) ................................................................................. 2-7
SFP Module Cage (Channels 1 and 2) ............................................................................ 2-7
Local HDMI Output...................................................................................................... 2-7
Analog Auxiliary Audio Inputs ...................................................................................... 2-8
Audio Mixing Functions................................................................................................. 2-8
Analog Audio Outputs ................................................................................................... 2-8
Internal Test Pattern Generator ....................................................................................... 2-9
Features ......................................................................................................................... 2-9
Front and Rear Panel Layout .......................................................................................... 2-9
Specifications............................................................................................................... 2-11
CHAPTER 3
INSTALLATION.......................................................................................................... 3-1
3.1
3.2
3.2.1
3.2.2
3.2.3
3.2.4
3.2.5
3.2.6
3.2.7
3.2.8
3.3
3.4
3.5
3.6
3.7
3.8
Location Considerations ................................................................................................. 3-1
Connect Video, Audio and Network Cables to C22 ........................................................ 3-1
Bi-Directional I/O Connections ...................................................................................... 3-1
Local Video Input .......................................................................................................... 3-3
Local Video Output........................................................................................................ 3-3
External SYNC Reference Input..................................................................................... 3-3
Auxiliary Analog Audio Input ........................................................................................ 3-4
Gig-E Network............................................................................................................... 3-5
Analog (Line) Audio Output .......................................................................................... 3-5
Power Input Connector................................................................................................... 3-6
Initial Power-Up............................................................................................................. 3-6
Recommended Web Browsers for C22 Webcenter Access .............................................. 3-6
Connect C22 to Facility Network and Access Webcenter................................................ 3-7
Modifying Network Parameters and IP Address Data ..................................................... 3-8
C22 Rack Mount Extender Frame................................................................................... 3-9
Power Distribution/Fan Module Redundant Power, Alarms and LEDs......................... 3-11
II
PESA XSTREAM C22 USER GUIDE
Publication 81-9059-0731-0, Rev. B
January 2015
TABLE OF CONTENTS (CONT.)
CHAPTER 4
4.1
4.2
4.2.1
4.2.2
4.2.3
4.3
4.4
4.4.1
4.4.2
4.4.3
4.4.4
4.4.5
4.4.6
4.4.7
4.4.8
4.5
4.5.1
4.5.2
4.6
4.6.1
4.6.2
4.7
4.7.1
4.7.2
4.8
4.9
4.10
4.10.1
4.10.2
OPERATION................................................................................................................ 4-1
The PESA Xstream C22 Webcenter User Interface......................................................... 4-1
Landing Page ................................................................................................................. 4-2
Page Header Controls and Displays ................................................................................ 4-2
Menu Select Tabs........................................................................................................... 4-3
Menu Display Area ........................................................................................................ 4-3
Processing Channel User Interface Page ......................................................................... 4-3
C22 Processing Channel Configuration .......................................................................... 4-4
Select Local Input and Local Output Ports...................................................................... 4-5
Select Input Signal Sources for the Encoder and Local Output........................................ 4-7
Configure IP Streaming Decoder .................................................................................... 4-8
Configure IP Streaming Encoder .................................................................................. 4-10
IP Audio Setup Control Page........................................................................................ 4-20
Network IP Output Display .......................................................................................... 4-21
Configure Local Video Output through Frame Sync ..................................................... 4-22
Local Audio Setup Control Page .................................................................................. 4-23
HDMI/DVI Input and Output Configuration................................................................. 4-24
HDMI Input Status Display ......................................................................................... 4-25
HDMI Output Configuration and Status Display........................................................... 4-25
Auxiliary Audio Setup Page ......................................................................................... 4-26
Analog Inputs............................................................................................................... 4-26
Audio Outputs.............................................................................................................. 4-27
System Settings Configuration (Admin Level Users Only) ........................................... 4-27
Device Settings ............................................................................................................ 4-28
Network Settings.......................................................................................................... 4-29
Users Set-up Page Functions (Admin Level Users Only) .............................................. 4-30
About (System Information) Page ................................................................................ 4-32
Front Panel System Status LEDs and Display Device ................................................... 4-32
Status LEDs ................................................................................................................. 4-33
LCD Display Device .................................................................................................... 4-33
CHAPTER 5
GLOSSARY OF TERMS ............................................................................................. 5-1
5.1
Terms and Definitions .................................................................................................... 5-1
CHAPTER 6
MAINTENANCE AND REPAIR................................................................................. 6-1
6.1
6.2
6.3
6.4
6.5
Periodic Maintenance ..................................................................................................... 6-1
PESA Customer Service................................................................................................. 6-1
Repair ............................................................................................................................ 6-1
Replacement Parts.......................................................................................................... 6-1
Factory Service .............................................................................................................. 6-1
III
PESA XSTREAM C22 USER GUIDE
Publication 81-9059-0731-0, Rev. B
January 2015
LIST OF FIGURES
FIGURE 2-1 PESA XSTREAM C22 – FRONT VIEW AND REAR VIEW.................................................................2-2
FIGURE 2-2 PESA XSTREAM C22 FUNCTIONAL BLOCK DIAGRAM .................................................................2-3
FIGURE 3-1
FIGURE 3-2
FIGURE 3-3
FIGURE 3-4
FIGURE 3-5
C22 I/O CONNECTIONS ................................................................................................................3-2
EXTENDER FRAME REAR VIEW..................................................................................................3-10
EXTENDER FRAME FRONT VIEW ................................................................................................3-10
POWER DISTRIBUTION MODULE ................................................................................................3-10
AUDIBLE ALARM JUMPER SETTINGS ..........................................................................................3-11
FIGURE 4-1 WEBCENTER USER INTERFACE LOGIN PAGE ................................................................................4-1
FIGURE 4-2 EXAMPLE PROCESSING CHANNEL USER INTERFACE PAGE ...........................................................4-3
FIGURE 4-3 EXAMPLE DECODER SETUP PAGE ................................................................................................4-8
FIGURE 4-4 EXAMPLE ENCODER SETUP PAGE ..............................................................................................4-11
FIGURE 4-5 EXAMPLE IP AUDIO SETUP PAGE ...............................................................................................4-21
FIGURE 4-6 EXAMPLE FRAME SYNC SETUP PAGE .........................................................................................4-22
FIGURE 4-7 EXAMPLE LOCAL AUDIO SETUP PAGE .......................................................................................4-23
FIGURE 4-8 EXAMPLE HDMI SETUP PAGE ...................................................................................................4-25
FIGURE 4-9 EXAMPLE AUXILIARY AUDIO SETUP PAGE ................................................................................4-26
FIGURE 4-10 EXAMPLE SYSTEM SETTINGS PAGE..........................................................................................4-28
FIGURE 4-11 EXAMPLE NETWORK SETTINGS PAGE ......................................................................................4-29
FIGURE 4-12 EXAMPLE USER ADMINISTRATION PAGE .................................................................................4-30
FIGURE 4-13 EXAMPLE ABOUT PAGE .........................................................................................................4-32
FIGURE 4-14 C22 FRONT PANEL DISPLAY DEVICES......................................................................................4-32
FIGURE 4-15 FRONT PANEL DISPLAY SCREEN NAVIGATION FLOW ...............................................................4-34
IV
PESA XSTREAM C22 USER GUIDE
Publication 81-9059-0731-0, Rev. B
January 2015
Chapter 1 About This User Guide
1.1
DOCUMENTATION AND SAFETY OVERVIEW
This User Guide provides instructions for installation and operation of the PESA XSTREAM C22 High
Definition Dual-Channel IP Streaming Encoder/Decoder designed and produced by PESA.
It is the responsibility of all personnel involved in the installation, operation, and maintenance of the
equipment to know all the applicable safety regulations for the areas in which they will be working.
Under no circumstances should any person perform any procedure or sequence in this manual if the
procedural sequence will directly conflict with local Safety Practices. Local Safety Practices shall
remain as the sole determining factor for performing any procedure or sequence outlined in this
document.
1.2
CAUTIONS AND NOTES
Cautions and Notes are addendum statements used in this guide that supply necessary information
pertaining to the text or topic they address. Caution statements typically notify you of steps or
procedures that could impede installation or operation; and/or cause damage to the equipment. Notes are
additional statements that typically provide added information that can simplify and/or enhance the use
or operating characteristics of the equipment. Examples of the graphic symbol used to identify each type
of statement and the nature of the statement content are shown below:
Caution statements identify conditions or practices that can result in
personal injury and/or damage to equipment if the instructions contained in
the statement are not complied with.
Notes are for information purposes only. However, they may contain
invaluable information important to the correct installation, operation,
and/or maintenance of the equipment.
1-1
PESA XSTREAM C22 USER GUIDE
Publication 81-9059-0731-0, Rev. B
January 2015
Chapter 2 Introduction
2.1
OVERVIEW
PESA’s XSTREAM C22 is a highly versatile, dual channel encoder/decoder device for high definition
video processing, audio processing and IP streaming. Each processing channel is totally independent
from the other and can function as a remote client for decoding an H.264 IP stream or an encoder to
broadcast an IP output stream from a variety of input signal sources. In some configurations, a C22
processing channel can simultaneously perform decoding and encoding functions, such as decoding an
IP camera for use as the encoder video input source.
Each processing channel offers video and audio input and output interface in various signal formats at
resolutions up to 1080p/60, through rear panel connectors. The C22 also accepts input from a source of
external, analog sync reference that allows local output video signals to be sync locked for use in
broadcast and other high-end video environments.
An independent audio mixer function is provided for each encoder and decoder that allows audio
associated with the input or output video source to be blended or replaced with a source of local
auxiliary audio. All audio processing is dual channel for full L/R stereo or other applications.
Housed in a small footprint, modular chassis with an external power supply, the PESA XStream C22
includes a front panel display device and channel status LEDs for real-time status monitoring of each
processing channel. PESA offers a rack mount kit that allows up to two C22 modules to be installed in a
single 1 RU frame with a built-in power supply module that can provide power for both modules.
An integrated web server supports a browser-based webcenter user interface for password-protected
access to all operating controls and functions of the device. Since day-to-day on-site user intervention is
not required, a C22 may be installed virtually anywhere and controlled from virtually any computer
running a compatible web browser application on the local Ethernet or from practically anywhere in the
world over the internet.
Installation of the C22 is straight forward and webcenter operation is very intuitive.
A typical PESA XSTREAM C22 device is shown by Figure 2-1.
2-1
PESA XSTREAM C22 USER GUIDE
Publication 81-9059-0731-0, Rev. B
January 2015
Figure 2-1 PESA XSTREAM C22 – Front View and Rear View
2.2
BRIEF FUNCTIONAL DESCRIPTION
System architecture of the PESA XSTREAM C22 is based on a dual channel signal processing engine.
Both processing channels, 1 and 2, contain four essentially independent functional areas as listed below
and shown by the block diagram, Figure 2-2. In the following list, x indicates the processing channel
shown on the diagram:
Channel x Streaming Decoder – Extracts H.264 video and AAC audio signals from a remote server
over an IP stream. These decoded signals are an available source for local output from the processing
channel, and are also available as an input source for the IP streaming encoder function.
Channel x Local A/V Inputs – Through rear panel connectors, a local source of video and audio may
be supplied as an available input source for the IP encoder and local output functions of the
processing channel.
Channel x Streaming Encoder – Produces a streaming output from a selected video and audio input
source and broadcasts the stream over an IP network. Video and audio inputs for the IP stream may be
selected as either the local A/V input source or the video and audio outputs from the IP stream
decoder. Video format, data rate and other output stream parameters are set through the webcenter
control application. The output stream is active as long as the encoder is communicating with a
remote client to access the stream.
Channel x Local A/V Outputs – Each processing channel can produce a local video output signal
with embedded audio that may be used as a program source or for monitoring. Signal source for the
local output is selected as either the A/V output from the IP stream decoder or the A/V signals from
the local input. A unique feature of C22 is the ability to frame-sync the local video output signal to a
source of external analog sync reference.
Local input and output signal connections for both video and audio are made through rear panel
connectors. Each processing channel is independently configured for a variety of I/O applications
through pages of the webcenter control application. Each rear panel BNC connector and SFP signal path
is bi-directional and can function as either an input or output port, depending on configuration of the
processing channel.
2-2
PESA XSTREAM C22 USER GUIDE
Publication 81-9059-0731-0, Rev. B
January 2015
All channel functions are always available in the sense that there is no control option in the webcenter to
select a function of the processing channel as either being “on” or “off”; however, with any specific
processing application, a particular function may or may not be actively used. Depending on its
operating configuration, each processing channel can function as an encoder, decoder or in some
instances can operate simultaneously as an encoder and decoder.
H.264 IP
Video
Decoder
IP Streaming
Input
AAC IP
Audio
Decoder
Decoded IP V ideo
2
Decoded IP Audio
Processing
Channel 1
Local Input V ideo
Encoder Source
Selector
Local Input A udio
Video
Processing
Encoder Video
L/R Dual Channel
Primary Audio
2
L/R Dual Channel
Auxiliary Audio
2
H.264
Encoder
Encoder
Audio
Audio Mixer
Encoder Ch 1
Gain, Delay,
Mute
2
AAC
Encoder
A
Rear Panel
Connectors
BNC I/O 1
SFP 1
HDMI IN
Channel 1
Local Input
A/V Signal
Processing
and Source
Selection
Dual
Channel
Mixer
Aud IN 2
2
Local I nput Video
Local Output
Source
Selector
Local I nput Audio
Internal Test Pattern
Video
Processing
Video
Processing
Channel 1
Decoded IP Audio
L/R Dual Channel
Primary Audio
L/R Dual Channel
Auxiliary Audio
2
Audio Mixer
Local Output
Proc Ch 1
2
Channel 1
Local Output
Video & Audio
Phantom Power
Source +48V
Analog Gain
Adjust
ADC
2
L/R Dual
Channel
Aux
Audio
Internal Test
Pattern Gen
Local Out
Audio
2
Rear Panel
Connectors
BNC I/O 1
Gain, Delay,
Mute
Video
HDMI Source
Select
Channel 2
Local Output
Video & Audio
2
Audio
HDMI Out Audio
Rear Panel
Connectors
BNC I/O 2
SFP 2
HDMI IN
Channel 2
Local Input
A/V Signal
Processing
and Source
Selection
H.264 IP
Video
Decoder
IP Streaming
Input
Audio
Embedder
AAC IP
Audio
Decoder
2
Local Input Audio
Local Output
Source
Selector
Decoded IP Video
Decoded IP Audio
Video
Processing
Video
Processing
Channel 2
Local Input Video
L/R Dual Channel
Primary Audio
2
Processing
Channel 2
2
Encoder Source
Selector
2
Local Out
Audio
Video
Processing
Encoder Video
L/R Dual Channel
Primary Audio
2
L/R Dual Channel
Auxiliary Audio
2
HDMI OUT
C
To Analog Audio Output
Source Selector
D
To Analog Audio Output
Source Selector
Rear Panel
Connectors
Frame
Sync
Audio Mixer
Local Output
Proc Ch 2
2
L/R Dual Channel
Auxiliary Audio
BNC I/O 2
Gain, Delay,
Mute
Audio
Embedder
B
D
2
2
A
C
E
2
2
Analog
Audio
Output
Source
Selector
2
Audio Mixer
Encoder Ch 2
Gain Adjust
SFP 2
H.264
Encoder
Encoder
Audio
2
Gain, Delay,
Mute
AAC
Encoder
E
2
SFP 1
To Analog Audio Output
Source Selector
HDMI
XMTR
2
Internal Test Pattern
To Analog Audio Output
Source Selector
Frame
Sync
B
Rear Panel
Connectors
Aud IN 1
Decoded IP Video
IP Streaming
Output
DAC
IP Streaming
Output
To Analog Audio Output
Source Selector
Dual Channel Analog
Audio Output
OUT 1/2
Figure 2-2 PESA XSTREAM C22 Functional Block Diagram
For example, as long as the IP decoder function has a valid connection to an external IP streaming
source, the decoder is operating, whether or not its decoded video and audio is selected as a source by
either the encoder or local output functions. In similar manner, the IP encoder function can broadcast an
output stream as long as it receives a valid input signal and is configured with valid operating
parameters for the IP output and encoder processing engine, regardless of the operational state of the IP
decoder function.
2-3
PESA XSTREAM C22 USER GUIDE
Publication 81-9059-0731-0, Rev. B
January 2015
Front panel mounted LEDs provide a visual indication of the operational status of each IP streaming
function of each processing channel.
Each processing channel allows you to select one of two possible sources of signal input for both the IP
streaming encoder and local video output functions. One being the decoded audio and video from an IP
stream taken from the channel decoder function, and the second being a local source applied to one of
the rear panel I/O connectors. Through the webcenter control page, the local input may be selected from
one of the I/O connection options. If the incoming video signal has embedded audio, it will be decoded
and available as a separate signal associated with the video.
The IP streaming encoder and local A/V output functions of each processing channel offer independent
audio mixing functions. In all cases, the primary audio input for each function is the audio signal
associated to or deembedded from the selected video signal.
Each functional area shown in the block diagram is discussed in the following paragraphs.
2.3
CHANNEL 1 AND 2 LOCAL VIDEO (SDI/SFP/HDMI) INPUTS
Each C22 processing channel can accept an input of SDI video through either the rear panel BNC
connector or an SFP module. An NTSC/PAL analog video source may be used for local input if the C22
SFP module cage is equipped with the proper module for converting the signal.
In addition, C22 also provides one native HDMI connector for connection of an HDMI video input. This
input may be selected as a video source for either processing channel. With an adapter cable, this
connector may also be used to connect a source of DVI video.
A second HDMI video source may be used for local input if the C22 SFP module cage is equipped with
the proper module for signal conversion.
Regardless of which connector it enters, the local video input source is selected through the webcenter,
and the incoming video becomes one of the source signals available to both the encoder function and the
local A/V output function of the processing channel.
When an SDI video source with embedded audio is selected, audio signals 1 and 2 of embed group 1 are
always extracted as the audio signal pair that becomes the primary audio signal associated with the local
video input signal. If an HDMI signal is selected, dual channel audio extracted from the video signal
becomes the primary audio paired with the video signal source. Audio mixing and selection is discussed
further in Paragraphs 2.8 and 2.9.
Each input video connection option is introduced in the following paragraphs.
2.3.1 BNC CONNECTORS (I/O 1 AND I/O 2)
Both processing channels provide a bi-directional rear panel BNC connector that can accept an input or
provide an output of SDI video at a resolution up to 1080p/60. By default, this connector is selected an
input port. Depending on the specific installation application, it may be configured through the
webcenter as an output port, refer to Paragraph 4.4.1. It is not possible to simultaneously use the BNC
connector for input and output signal connection.
2-4
PESA XSTREAM C22 USER GUIDE
Publication 81-9059-0731-0, Rev. B
January 2015
2.3.2 SFP MODULE CAGE (CHANNELS 1 AND 2)
A single rear panel SFP module cage is shared between processing channels 1 and 2. This cage supports
a wide variety of plug-in modules that greatly expand the I/O capabilities of the C22. With most SFP
modules, one input or output path of a dual SFP module is dedicated to each C22 processing channel.
As with the BNC connector, each SFP channel path is bi-directional, and may function as an input port
or output port, depending on the module used and processing channel configuration. Due to module
characteristics, some SFP modules occupy the entire SFP cage, but provide signal interface with only
one of the C22 processing channels. Each available SFP module with dual channel input, dual output or
mixed input/output signal handling capability is listed below:
• Dual Fiber or BNC Input Module
Channel 1 SDI input
Channel 2 SDI input
• Dual Fiber or BNC Output Module
Channel 1 SDI output
Channel 2 SDI output
• Fiber I/O Module
Channel 1 SDI output thru fiber
Channel 2 SDI input thru fiber
• Dual A/D Input Module
Channel 1 analog input thru BNC
Channel 2 analog input thru BNC
• HDMI Input Module
Channel 2 input for HDMI signal thru mini-HDMI connector
No connection available for Channel 1
• HDMI Output Module
Channel 1 HDMI signal output thru mini-HDMI connector
No connection available for Channel 2
2.3.3 HDMI /DVI CONNECTOR (HDMI IN)
A single native HDMI input connector allows direct connection of an HDMI source to the C22. By
using an adapter cable, this connector also accepts an input of DVI video. The HDMI or DVI input
video can be selected as a source signal port on either processing channel.
The C22 will not accept an HDMI input source with HDCP protection.
2.4
IP STREAMING DECODER FUNCTION
A decoder function for capturing H.264 video at resolutions up to 720p/60, and AAC audio from an IP
stream is available for each C22 processing channel. In order to capture a source from a network stream
the C22 functions as an RTSP client and must initiate a connection with the server streaming the desired
signal. Specifics of the connection including the channel identifier or filename, password protection, etc.
vary by streaming source. Through the webcenter, parameters for each C22 decoder channel may be
specified for the address and streaming channel of the desired video and audio streams.
2-5
PESA XSTREAM C22 USER GUIDE
Publication 81-9059-0731-0, Rev. B
January 2015
Operating firmware of the C22 includes access capability for some common network cameras. If you
wish to capture a streaming source from an RTSP server that is not currently contained in the library of
devices, you may be able to configure the Generic RTSP function to capture the stream.
A video decoder extracts video in H.264 format and an AAC decoder extracts dual channel (L/R stereo)
audio from the Ethernet stream. Video and audio signals from the decoders become one of the source
signals available to both the encoder function and the local A/V output function of the processing
channel. The decoded dual channel (stereo) audio signal becomes the primary audio signal associated
with the decoded H.264 video signal. Audio mixing and selection is discussed further in Paragraphs 2.8
and 2.9.
Input streaming of video at a resolution greater than 720p/60 cannot be decoded by the C22 at this time.
2.5
IP STREAMING ENCODER FUNCTION
Both processing channels of the C22 provide an independent encoder function that encodes video and
audio source signals into an IP output stream of H.264 video and AAC encoded audio.
Video and audio source signals for the IP stream output are derived from either the decoder or the local
input to the processing channel. In most configurations, you may select either the decoder output or the
local input as the streaming encoder source signals. The exception to this is if you have selected the
output of the decoder as the source signal for local output from the C22 channel. In this case, by default,
the output of the decoder becomes the source signals for both the local output and the streaming
encoder. It is not possible to select the local input as the source for the encoder, and simultaneously
select the output of the decoder as the source signals for the local output.
A software implementation of a stereo audio mixer is provided for each encoder channel. Audio from
the selected input source for the encoder enters the mixer function as the primary audio source. The
mixer also receives a source of Auxiliary audio derived from an external analog source through C22 rear
panel connectors. Through a webcenter control page, primary audio may be blended as desired, or
replaced entirely with the auxiliary audio signals. The mixer function also allows you to swap stereo
channels, mute channels, and set output gain and delay as desired prior to audio entering the streaming
encoder.
In all cases, the primary audio signal from the encoder channel input source selector follows the video
signal source selection. If a DVI video source signal is selected, there is no primary audio output from
the source selector and the auxiliary audio signal may be selected through the encoder channel mixing
function, if desired.
Each encoder allows you to select either the Real-Time Streaming Protocol (RTSP) or Real-Time
Messaging Protocol (RTMP) as the streaming output format.
When RTSP is selected for a processing channel, the IP stream from that encoder connects with a client
device over an RTP transport using the RTSP communication protocol. RTSP encoded IP streams may
be password protected such that any RTSP client attempting to establish a connection with the server
channel must have the correct username and password in order to complete the connection.
The RTMP protocol is normally selected when the C22 is used to publish streaming media or
programming to a content distribution network (CDN) over a TCP internet transport.
Parameters and options entered through the Encoder Setup menu page allow you to configure each C22
output stream.
2-6
PESA XSTREAM C22 USER GUIDE
Publication 81-9059-0731-0, Rev. B
January 2015
2.6
CHANNEL 1 AND 2 LOCAL VIDEO (BNC/SFP) OUTPUTS
Both C22 processing channels provide a local SDI video output signal, with embedded audio. Source
signals for local output can be selected through a source selector device as decoded video and audio
from the decoder or the local video and audio input signals to the processing channel.
In most configurations, source selection for the local output and the streaming decoder are independent.
The exception to this is if you have selected the output of the streaming decoder as the source signal for
local output. In this case, by default, the output of the decoder becomes the source signals for both the
local output and the streaming encoder.
It is not possible to select the local input as the source for the encoder, and
simultaneously select the output of the decoder as the source signals for the
local output.
When an external sync reference signal is supplied to the rear panel Reference input connector, a frame
synchronizer function locks the video from the selector to the external sync source. By providing sync
lock, SDI video from the C22 may be incorporated into broadcast routing and production applications,
or other high-end video installations.
A software implementation of a stereo audio mixer is provided for each local output processing channel,
prior to the output embedder. Audio from the selected source enters the local output audio mixer as the
primary audio source. The mixer also receives a source of auxiliary audio derived from an external
analog source through C22 rear panel connectors. Through a webcenter control page, primary audio
may be blended as desired, or replaced entirely with the auxiliary audio signals. The mixer also allows
you to swap stereo channels, mute channels and set output gain as desired prior to audio entering the
SDI embedder. Dual channel audio from the mixer is always embedded into the SDI video signal as
audio signals 1 and 2 of embed group 1.
Local SDI output video for each processing channel is available at the rear panel of the C22 through
either the rear panel BNC connector or an SFP module.
2.6.1 BNC CONNECTORS (I/O 1 AND I/O 2)
See Paragraph 2.3.1.
2.6.2 SFP MODULE CAGE (CHANNELS 1 AND 2)
See Paragraph 2.3.2.
2.7
LOCAL HDMI OUTPUT
A single native HDMI output connector (HDMI OUT) is provided on the rear panel of the C22.
Through a webcenter control page, you may select the local output of processing channel 1 or 2 as the
source signals. The local audio mix for the channel is embedded into the HDMI video output.
2-7
PESA XSTREAM C22 USER GUIDE
Publication 81-9059-0731-0, Rev. B
January 2015
2.8
ANALOG AUXILIARY AUDIO INPUTS
The PESA XSTREAM C22 accepts two inputs of microphone or line level, balanced or unbalanced,
analog audio from external sources through rear panel connectors. These audio inputs may be the left
and right channels of a stereo pair, or two monaural signals. Connection method to the C22 is different
with balanced and unbalanced sources, refer to Paragraph 3.2.5.
Regardless of their source, audio input signals are processed using the Auxiliary Audio Setup page of
the webcenter to derive the auxiliary audio source for all internal audio mixing functions of the C22.
Through the webcenter page, a software implementation of an audio fader allows you to individually set
the master gain level of each input signal. You may also add +20 dB gain to either input, if needed,
through a switchable audio boost function.
A switchable source of phantom power is available if condenser microphones are used. Phantom power
can only be applied to balanced inputs, and can be turned on or off to both audio input channels through
the webcenter. Phantom power is applied to both inputs if activated and can not be individually applied
to an input channel.
2.9
AUDIO MIXING FUNCTIONS
A software implementation of a two-channel stereo audio mixer is incorporated into each of the two
streaming encoders and the two local A/V output functions, for a total of four software controlled mixer
functions. With each mixer, the primary audio input is always the audio signal associated with the video
source selected for the processing channel. The second source for each mixer is always the auxiliary
audio inputs.
Each mixer function is totally independent of the others and allows you to create a unique output audio
mix for the encoder output and local video output for each processing channel. Through the webcenter
you may custom blend or replace each primary audio source with the auxiliary audio source, you may
pan or swap stereo channels or produce a mono mix of both source signals.
With all processing channels, following the software mixer you may apply gain, mute and delay
adjustments to each audio source prior to the AAC encoders or the SDI embedders. In addition, the
post-mix audio for each channel is available as a source signal for the analog audio output function.
2.10 ANALOG AUDIO OUTPUTS
A source of dual channel (stereo) audio is available as unbalanced, line level analog outputs through a
rear panel 3.5mm TRS connector for use as a program or monitor audio source.
You may select the source for the analog output audio from any of the following:
• Post-mix audio signals from the encoder function of either processing channel
• Post-mix audio signals from the local A/V output function of either processing channel
• Audio signal source selected for HDMI output.
Through the webcenter control page you may independently apply gain adjustment to each analog audio
output channel
2-8
PESA XSTREAM C22 USER GUIDE
Publication 81-9059-0731-0, Rev. B
January 2015
2.11 INTERNAL TEST PATTERN GENERATOR
An internal test pattern generator may be selected as the local input for either processing channel. When
selected, the test pattern generator supplies a video and dual channel audio signal that may be selected
as the input source for either the encoder or local output from the processing channel.
2.12 FEATURES
• Captures video and audio signals from a variety of signal formats and sources
• Two processing channels for video and audio – each provides a streaming encoder and decoder
• Mixing functions to create custom audio track for each video signal
• Two simultaneous and independent IP output streams, selectable as RTSP or RTMP
• Single Unicast, Multiple Unicast or Multicast streaming mode may be selected individually for
either of the output streams
• HDMI output
• Two line level, analog audio output connections
• Dual RJ-45 Gig-E network connection ports – either may be used for network connection
• Built-in Ethernet switch function allows network daisy-chain connection with a downstream
device through second RJ-45 port
• Support RTP, RTCP, RTSP and RTMP protocols
• Multiple CDN interface options pre-installed
2.13 FRONT AND REAR PANEL LAYOUT
1. Front panel USB connector (for future product implementation)
2. Streaming function status monitoring LEDs for processing channels 1 and 2
3. System status display
4. Display navigation button
2-9
PESA XSTREAM C22 USER GUIDE
Publication 81-9059-0731-0, Rev. B
January 2015
5. Power input connector
6. Rear panel USB connector (for future product implementation)
7. Ethernet connectors – either may be used for network connection, second connector may be used to
daisy-chain a downstream Ethernet device
8. Dual channel (stereo) audio output connector; 3.5mm TRS connector for unbalanced output audio
9. Input connector for auxiliary analog audio
When connecting unbalanced audio to the C22, the 3.5mm TRS connector labeled IN 1/2 receives
analog audio from external sources for both auxiliary audio input channels, inputs 1 and 2
When connecting balanced audio to the C22, the three conductors of the TRS connector labeled
IN 1/2 are wired to receive a balanced analog audio signal from an external source for auxiliary
audio input channel 1 only
10. Input connector for auxiliary analog audio
When connecting balanced audio to the C22, the three conductors of the 3.5mm TRS connector
labeled IN 2 are wired to receive a balanced analog audio signal from an external source for
auxiliary audio input channel 2 only
This connector is not used when the auxiliary audio inputs are from an unbalanced source
11. Input connector for a source of HDMI or DVI video for either processing channel
12. Output connector for HDMI or DVI video from the C22 processing channel selected through the
webcenter control application
13. Input connector for video sync reference from an external source
14. Bi-directional connector that may be configured through the webcenter as an input or output
connector for SDI video with embedded audio for processing channel 1
15. SFP cage supports a variety of input or output modules for processing channels 1 and 2
16. Bi-directional connector that may be configured through the webcenter as an input or output
connector for SDI video with embedded audio for processing channel 2
2-10
PESA XSTREAM C22 USER GUIDE
Publication 81-9059-0731-0, Rev. B
January 2015
2.14 SPECIFICATIONS
VIDEO INPUTS
HDMI
Number
Resolution
HDCP Support
BNC
Direction
Number
Type
Formats
Return Loss
Equalization
SFP
Direction
Number
Formats
Reference
Number
Type
Termination
Source
IP Video
Connection
Format
Connector
Supported IP
Cameras:
1, HDMI or DVI, can be used with either processing channel
720p, 1080p
No
Input or Output, software configurable
2 BNC connectors
Standard 75 Ohm
SMPTE ST-292 (720p, 1080i), ST-424 (1080p)
≥15dB 1MHz to 1.5GHz; ≥10dB, 1.5GHz to 3GHz.
200m auto-equalization Belden 1694A or equivalent at 1.5Gbps;
140m auto-equalization Belden 1694A or equivalent at 3.0Gbps
Input or Output, software configurable
Varies, depending on SFP module used
Varies, depending on SFP module used
1 BNC connector
Analog
75 Ohm, internal
Tri-level sync
Color black
RTP/RTSP
H.264 (MPEG 4/Part 10)
2 RJ-45 for 100/1000 Gig-E port
Axis M1054
Axis M1114
Generic RTSP
Support for additional IP cameras is being added on a regular
basis. Contact PESA if the specific camera you are using is not
listed, or attempt data capture using the Generic RTSP Capture
capability of the C22. Refer to Paragraph 4.4.3.2.
2-11
PESA XSTREAM C22 USER GUIDE
Publication 81-9059-0731-0, Rev. B
January 2015
AUDIO INPUTS
Source
Number
- Analog audio, line/mic level, 2 channels
- De-embedded from SDI video input, up to 2 available sources
- AAC audio decoded from IP stream associated with IP video input signal, up
to 4 available sources
- Test tone, internally generated
2 Audio processing channels, stereo
Analog Audio
Type
Format
Audio Level
3.5mm TRS connector
Balanced or unbalanced input (output is unbalanced only)
Mic level with user selectable “phantom power” or
line level inputs
Gain Adjustment +12dB to -40dB line level/+59dB to 0 dB mic level
IP STREAMING
Number
2 Individually addressable IP streams; each containing video from either the
decoder output or the local video input of its’ processing channel, plus the audio
signal associated with the video input
Streaming Mode Single unicast, multiple unicast or multicast – independently selectable for each
stream
Connection
RTP/RTSP or RTMP
Format
Video: H.264 (MPEG 4/Part 10),
Audio: AAC
Video Resolution 720p, 30fps; 720p, 60fps; 1080p, 30fps; 1080p, 60fps
Streaming Rates (selectable) 0.5Mb, 0.75Mb, 1Mb, 2Mb, 4Mb, 6Mb, 8Mb, 10Mb
Connector
2 RJ-45 for 100/1000 Gig-E Ethernet port
AUDIO/VIDEO OUTPUTS
HDMI
Number
Resolution
SDI
Number
1 Selected from either video processing channel, plus audio
signal associated with selected video source
720p, 60fps, 1080p, 60fps
Up to 2, One SDI output may be software configured to bi-directional BNC for
each processing channel – if the BNC is not used as a video input port for the
channel
One additional SDI output for each processing channel may be added through SFP
outputs, with proper SFP module installed in rear panel cage
SDI (with external HDMI to HD-SDI converter kit)
Number
1, using available accessories
2-12
PESA XSTREAM C22 USER GUIDE
Publication 81-9059-0731-0, Rev. B
January 2015
AUDIO/VIDEO OUTPUTS (Cont.)
SFP
Direction
Number
Formats
Input or Output, software configurable
Varies, depending on SFP module used
Varies, depending on SFP module used
AUDIO OUTPUTS
Analog
Number
2 Audio Channels, unbalanced, line level, 3.5mm TRS connector
NETWORK CONNECTIONS
Number
Type
2 RJ-45*
Gig-E (100/1000) Ethernet
RECOMMENDED WEB BROWSERS FOR WEBCENTER ACCESS
Google Chrome, Ver. 36.0 or later
Mozilla Firefox, Ver. 24.0 or later
Apple Safari, Ver. 6.2 or later
Internet Explorer, Ver. 10.0 or later
MECHANICAL
Mechanical
Weight
6.75 in W X 1.65 in H X 6.25 in D
171.45 mm X 41.91 mm X 158.75 mm
1.6 lbs, 0.726 kg
ENVIRONMENTAL and MISCELLANEOUS
DC Voltage Input
Control
Control Connection
Network Control
Operational Temp
Operational Humidity
+12 VDC, ±0.5 VDC @ 2.0 A
Ethernet
RJ-45
Supports PESA web-based control
0-50 degrees C
90% Non-condensing
*Connection to only one network port is required for C22 operation, the second port may be used
to daisy-chain a downstream device. Refer to Paragraph 3.2.6.
2-13
PESA XSTREAM C22 USER GUIDE
Publication 81-9059-0731-0, Rev. B
January 2015
Chapter 3 Installation
3.1
LOCATION CONSIDERATIONS
PESA’s XSTREAM C22 is a small-footprint device that can be installed as an individual module on a
desktop; or up to two modules may be installed in a standard 19 inch equipment rack using the available
rack mount extender frame. When the extender frame is used, power for the modules is provided by the
frame’s power distribution module.
Regardless of installation location, be sure to allow adequate space around the module or rack frame for
ventilation. The C22 uses forced air fan cooling and must be located such that there is no obstruction
blocking the top or sides of the module.
Also consider access to video and audio cabling and a convenient Ethernet network drop.
3.2
CONNECT VIDEO, AUDIO AND NETWORK CABLES TO C22
All video, audio and network connections to the C22 are made through connectors located on the rear
panel, as shown by Figure 3-1 and introduced in the following paragraphs. Use these resources as a
reference when completing connections to the module.
To ensure compatibility with virtually any A/V system installation or application, the PESA XSTREAM
C22 provides audio and video interface through many of the most common industry-standard formats
and connectors.
3.2.1 BI-DIRECTIONAL I/O CONNECTIONS
One rear panel BNC connector and one channel of a dual channel SFP module are provided for each
processing channel; both of which are bi-directional, and may be individually configured as either an
input or output connection port for the channel. However, neither connector may be used simultaneously
as an input and output connector.
When planning a C22 installation, you must consider what functions of each processing channel will be
required for the application and the signal format and connector type you will be using to supply a local
input signal to the channel, or the signal format and connector type you will need for connecting the
local A/V output from the channel to an external device or destination. In some applications, you may
require both an input connection and an output connection for the channel.
As an example, suppose you would like to configure processing channel 1 to decode the streaming
video from an IP camera, and then through the channel encoder, insert an audio signal with the IP
camera video and stream the audio and video signals over an IP output stream to a remote client. In
addition, you want to simultaneously use the processing channel as a format converter to produce a local
HDMI output signal from a local SDI video source. For this application, through the webcenter control
pages you could:
• Configure the channel 1 decoder as a client to decode the IP stream from the desired IP camera
• Select the output from the channel 1 decoder as the input source for the channel 1 H.264 encoder
• Use the encoder audio mixer function to insert auxiliary audio as the source for the channel 1
AAC encoder
3-1
PESA XSTREAM C22 USER GUIDE
Publication 81-9059-0731-0, Rev. B
January 2015
• Select the I/O BNC for channel 1 as the input connector for the local SDI source
• Select the SDI source as the A/V input for the local video output on channel 1
• Select processing channel 1 as the signal source for the local HDMI output connector.
The previous example makes use of separate input sources for the processing channel encoder and
decoder. While this is a perfectly valid implementation, in many applications the encoder and decoder
will share the same input source. The only invalid I/O combination is simultaneously selecting the
decoder as the source for the local video output and the local video input as the source for the IP
streaming encoder. If you select the decoder as the source for the local output, by default the control
software automatically selects the decoder as the source for the streaming encoder.
Figure 3-1 C22 I/O Connections
3-2
PESA XSTREAM C22 USER GUIDE
Publication 81-9059-0731-0, Rev. B
January 2015
3.2.2 LOCAL VIDEO INPUT
When connecting video sources to either C22 processing channel, you may use the rear panel BNC
connector or, with the proper SFP module installed, the SFP channel. SDI video signals up to 1080p/60
resolution may be connected through the BNC connector when configured as an input port. Depending
on the type of SFP input module installed, the SFP channel can accept an input of SDI video up to
1080p/60 over either fiber or coaxial cable, or an input of analog video over coax cable through a mini
BNC connector.
An HDMI video output from a playout device or other source may be connected directly to the HDMI
IN connector as an input for either processing channel.
A single channel SFP module is also available that accepts an input of HDMI video fixed as an input for
processing channel 2. If this module is used, however, there is no SFP input or output port available for
processing channel 1.
Connect video sources to the rear panel connectors using Figure 3-1 as a guide. If the video signal
contains embedded audio, the audio signal is extracted and becomes the primary audio signal associated
to the video. If the video input does not contain embedded audio, such as analog or DVI video for
example, the primary audio signal associated to the video will be silence data.
Regardless of which input port is used, only one signal source may be selected through the webcenter as
the active local input signal for each processing channel.
3.2.3 LOCAL VIDEO OUTPUT
Connections for output video from the C22 may be made through the rear panel BNC connector or, with
the proper SFP module installed, the SFP channel. SDI video signals up to 1080p/60 resolution are
supported by the BNC connector when configured as an output port. Depending on the type of SFP
output module installed, the SFP channel can provide SDI video output signals up to 1080p/60 over
either fiber or coaxial cable.
An HDMI video output signal with embedded audio is available at the HDMI OUT connector. The local
video output signal from either processing channel 1 or 2 may be selected as the source for the HDMI
output.
A single channel SFP module is also available that adds an additional HDMI output dedicated only to
the local video output from processing channel 1. If this module is used, however, there is no SFP input
or output port available for processing channel 2.
Make connections to the rear panel video output connector ports using Figure 3-1 as a guide.
3.2.4 EXTERNAL SYNC REFERENCE INPUT
A sync reference source from an external analog sync generator can be supplied to the C22 for frame
synchronization of the local video output. C22 detects when a sync source is attached to the Reference
input connector and automatically begins syncing the video output to the reference.
Supplying a source of sync reference to the C22 is not a requirement for operation, and if no sync source
is detected, the non-synchronized local output is still available.
The C22 will accept virtually any analog (NTSC/PAL) reference signal, such as tri-sync, color or black.
3-3
PESA XSTREAM C22 USER GUIDE
Publication 81-9059-0731-0, Rev. B
January 2015
3.2.5 AUXILIARY ANALOG AUDIO INPUT
Rear panel input connections are provided for dual channel (stereo) analog audio from an external
source that becomes the auxiliary audio source for all internal audio mixing functions.
Auxiliary audio connections are made through 3.5mm TRS connectors on the chassis rear panel as
shown by Figure 3-1. These connectors accept microphone or line level, balanced or unbalanced, analog
audio input signals. The connector(s) used and the pin-outs for connection depend on whether the source
signals are balanced or unbalanced.
When balanced signal sources are used, such as microphones, a switchable source of phantom power
(+48 VDC) is available. Phantom power may be turned on or off to both audio input channels through a
webcenter control page. Phantom power is applied to both inputs if activated and can not be individually
applied to an input channel.
Connect analog audio sources to the C22 as follows:
Unbalanced Audio Sources
With unbalanced audio sources, such as the output from a computer, both connections are made through
the rear panel connector labeled IN 1/2, and the connector labeled IN 2 is not used. Use the following
diagram and pin-out chart when completing audio connections. When connecting the C22 input to a
3.5mm stereo output from a computer or many other audio playout devices, the left and right pinouts are
pin-for-pin compatible. With most devices, a 3.5mm male-to-male cable may be used for connection.
Audio In
Rear Panel Connector
Input 1 (Left) +
Input 2 (Right) +
COMMON GND
IN 1/2
IN 1/2
IN 1/2
Pin
Tip (T)
Ring (R)
Sleeve (S)
Ring (R)
Tip (T)
Sleeve (S)
Balanced Audio Sources
When attaching balanced audio sources, such as microphones with XLR cable connectors or the
balanced output from a pro audio or pro-sumer type device, a source connection is made through each
rear panel audio connector. Use the following diagram and pin-out chart when completing audio
connections.
A switchable source of phantom power (+48VDC) may be applied to the input connectors when
balanced input sources are used.
Be sure that phantom power is off unless a microphone that
requires it is attached to the analog input connector.
3-4
PESA XSTREAM C22 USER GUIDE
Publication 81-9059-0731-0, Rev. B
January 2015
Audio In
Rear Panel Connector
Pin
Input 1 +
Input 1 Shield (GND)
IN 1/2
IN 1/2
IN 1/2
Tip (T)
Ring (R)
Sleeve (S)
Input 2 +
Input 2 Shield (GND)
IN 2
IN 2
IN 2
Tip (T)
Ring (R)
Sleeve (S)
Ring (R)
Tip (T)
Sleeve (S)
3.2.6 GIG-E NETWORK
C22 has a 2 port Ethernet switch built-in. You may use either RJ-45 port for connection to the Ethernet.
Refer to Paragraphs 3.5 and 3.6 for IP addressing and network connection information.
Every C22 module has a 2 port Ethernet switch built-in. You may use the
open connector as a connection point for another device. Often, this feature
is used to daisy-chain C22 modules. Be aware, however, that if the directly
connected module is removed or loses power, the downstream device will
also lose connection to the Ethernet.
3.2.7 ANALOG (LINE) AUDIO OUTPUT
Two unbalanced, line level analog audio outputs, designated Audio Output 1 and 2, are available
through a single 3.5mm rear panel connector. These outputs may be used as a program or monitor audio
source.
You may select the source for the analog output audio from any of the following:
• Post-mix audio signals from the encoder of either processing channel
• Post-mix audio signals from the local A/V output of either processing channel
• Audio from signal source selected for the HDMI output.
Through the webcenter you may also apply gain adjustment to the analog audio output.
Use the following diagram and pin-out chart when completing audio output connections:
3-5
PESA XSTREAM C22 USER GUIDE
Publication 81-9059-0731-0, Rev. B
January 2015
Audio Output
Rear Panel Connector
Pin
Output Channel 1 +
AUDIO OUT 1/2
Tip (T)
Output Channel 2 +
COMMON GND
AUDIO OUT 1/2
AUDIO OUT 1/2
Ring (R)
Sleeve (S)
Ring (R)
Tip (T)
Sleeve (S)
3.2.8 POWER INPUT CONNECTOR
Operating power (12 VDC, 2.0 A) from an external supply is attached to this connector. When a module
is used standalone, power is derived from a furnished external power supply “brick.” If a module is
mounted in a rack frame, power for all modules in the frame, plus the frame cooling fans, is derived
from a single power brick connected to the frame power distribution panel. A cable connects between
the frame power distribution panel and the module power input connector, refer to Paragraph 3.7.
There are no power switches on the C22 module and power is applied simply by connecting the main
power cord to a source of primary power.
3.3
INITIAL POWER-UP
Provide a source of power for the C22 power supply module or rack frame power supply. Verify your
connections before you apply power for the first time.
Also verify that C22’s default IP address is compatible with your facility LAN, you may need to consult
your IT administrator for this. If the IP address needs to be changed to accommodate your network,
refer to Paragraphs 3.5 and 3.6.
Apply power to the power supply module. Allow the C22 to complete its boot-up sequence. Boot-up is
complete and the unit is ready to operate when the IP address appears in the front panel LCD display
device.
3.4
RECOMMENDED WEB BROWSERS FOR C22 WEBCENTER ACCESS
The webcenter software control application integrated into the C22 processing engine allows access to
configuration and control functions of the module through pages of a web browser running on a network
connected device. The following list identifies web browser applications recommended by PESA for
best compatibility with the C22 webcenter.
Google Chrome, Ver. 36.0 or later
Mozilla Firefox, Ver. 24.0 or later
Apple Safari, Ver. 6.2 or later
Internet Explorer, Ver. 10.0 or later
3-6
PESA XSTREAM C22 USER GUIDE
Publication 81-9059-0731-0, Rev. B
January 2015
3.5
CONNECT C22 TO FACILITY NETWORK AND ACCESS WEBCENTER
Successful connection with the C22 webcenter control application through a web browser verifies
proper integration of the module into the facility network. Install the C22 module on the facility network
and establish connection with its webcenter control application as follows:
1. Factory default IP address and network parameters for the PESA XSTREAM C22 are:
IP Address – 192.168.1.100
Subnet Mask – 255.255.255.0
Gateway – 192.168.1.1
2. Verify that the factory default parameters are compatible with your facility network, and that the
default IP address will not cause a network conflict before applying power to C22.
3. Verify that one of the C22 Ethernet ports is connected to the facility network.
4. Once you have established network communication with C22, you may change the operating
network communication parameters of the device for network compatibility through the
webcenter control application. Refer to Paragraph 3.6.
5. If factory default parameters are not compatible, and you can not access the webcenter over the
facility network, it will be necessary to modify the network parameters with the C22 and an
isolated PC in a direct Ethernet connection while not connected to the LAN as follows:
A. Log the PC off of the network and remove the Ethernet cable connection to the PC.
B. Open the Windows Control Panel and configure the PC with a unique IP address and
compatible Ethernet parameter settings for network communication with the C22 using its
factory default network settings.
C. Use a Cat5 network cable to directly connect C22 rear panel Ethernet connector to the PC
Ethernet connector. A crossover Cat5 cable is not required for this connection.
D. Apply power to C22 and allow it to complete boot-up sequence.
E. Beginning with Step 6, perform the remaining steps of Paragraph 3.5 presented here and
the steps of Paragraph 3.6 to change the network parameters of C22 as necessary for LAN
compatibility using the webcenter control application. When you have completed changing
the network parameters, continue to Step F, below.
F. Remove power to the C22.
G. Reconfigure the PC for communication on the facility LAN.
H. Reconnect the PC and C22 to the facility Ethernet.
I. Apply power to the C22 and allow it to complete boot-up sequence.
J. You should now be able to connect to the C22 webcenter over the facility network.
6. If not already powered-up from previous step, apply power to C22 and allow it to complete bootup sequence.
7. Open a web browser on a network connected PC and enter the IP address of the C22 in the
browser URL address bar. Currently set IP address of C22 module is shown by the front panel
display
8. The Login screen as shown below should open
3-7
PESA XSTREAM C22 USER GUIDE
Publication 81-9059-0731-0, Rev. B
January 2015
9. If the login screen does not open, or you receive a communication error message, open a
command entry window from the Windows Start button and ping the C22 IP address.
10. If the ping is successful, try using a different web browser. Refer to Paragraph 3.4.
11. If the ping is not successful, consult your facility IT administrator for possible network conflicts.
3.6
MODIFYING NETWORK PARAMETERS AND IP ADDRESS DATA
For network compatibility or organization, it may be necessary to modify the default C22 network
parameters. Your IT administrator may provide you with a specific IP address or other network settings
for the module. Modify the operating network parameters as follows:
1. Open the C22 webcenter control application to the login screen. Refer to Paragraph 3.5.
2. Login to webcenter using the default administrator account with the following credentials:
•
Username – admin
•
Password – a
3. Select the System button from the landing page as shown here to open the System Settings
display page.
3-8
PESA XSTREAM C22 USER GUIDE
Publication 81-9059-0731-0, Rev. B
January 2015
4. From the Systems Settings display page, click the Settings button to open the System Settings
parameter entry page, as shown here.
5. Enter the desired network communication parameters in the cells
6. Click Save to apply the new network parameter settings.
7. C22 will restart with new settings.
3.7
C22 RACK MOUNT EXTENDER FRAME
PESA’s optional extender frame allows you to mount up to two C22 modules in a 1 RU chassis frame.
Power for both modules is derived from a removable power distribution/fan module. Jumper type
power cables are used to supply power to each unit from the distribution module.
As shown in Figures 3-2 and 3-3, C22 modules are installed from the rear of the chassis and secured
using the captive thumbscrew on the front. It is easier, though certainly not a requirement, to install
modules into the extender frame before mounting the frame in the equipment rack. Install modules as
follows:
1. Slide each C22 module into the desired mounting slot through the rear of the frame as shown in
Figure 3-2.
2. Install the power distribution module into the center slot of the frame.
3. Secure modules by tightening captive thumb screws on the front of the frame as shown in Figure
3-3.
4. Install a power jumper between any of the four power output connectors and the input power
connector on each C22 module as shown in Figures 3-2 and 3-4.
5. Mount the extender frame in an equipment rack at this time, if you chose to install modules with
extender frame out of the rack.
6. Ensure at least 50% of the open air space on either side of the extender frame is free of cables or
any other obstructions that may restrict air flow.
7. Connect the power output lead from the external 12VDC power supply to either of the main
power input connectors on the distribution module as shown in Figure 3-4.
3-9
PESA XSTREAM C22 USER GUIDE
Publication 81-9059-0731-0, Rev. B
January 2015
8. If using a second, redundant, external power supply connect the lead from the redundant supply to
the unused power input connector.
9. Do not connect the external power supply(s) to a source of primary power until connections to the
C22 modules are completed as directed in Paragraph 3.3.
Figure 3-2 Extender Frame Rear View
Figure 3-3 Extender Frame Front View
Figure 3-4 Power Distribution Module
3-10
PESA XSTREAM C22 USER GUIDE
Publication 81-9059-0731-0, Rev. B
January 2015
3.8
POWER DISTRIBUTION/FAN MODULE REDUNDANT POWER, ALARMS AND LEDS
As shown by Figure 3-4, there are two power input connectors – one for connection to the main external
power supply, and the second for connection to a second external power “brick” for automatic power
redundancy. One external power supply connected to either of the power input connectors can supply
power for both C22 modules. While some load sharing may occur when a redundant power supply is
used, the second supply, if connected, serves as a self-switching back-up power supply in the event the
main supply should ever fail.
The power distribution module contains two circuit boards each with one input power connector, two
output power connectors, status monitor LEDs and audible alarm mode select pins. In Figure 3-4, these
are identified as Power Board 1 and Power Board 2. Even though the input power connector, status
LEDs and alarm jumpers are specific to board 1 or 2, all four output connectors are always powered and
monitored for loss of output.
There are two status LEDs on each board identified as Alarm and Power (PWR). When power from an
external supply is attached to either of the input connectors the green PWR LED associated with the
board lights as an indication that power is present. The ALARM LED is red and when lit indicates one
of two possible error conditions is occurring with the distribution module:
•
There is a failure with one or both of the cooling fans
•
There is a failure of at least one of the power output connections
In addition to the visual alarm LED, there is an audible alarm in the module that can be activated or
deactivated for either or both power boards through the jumper pins to the right of the LEDs. Power
distribution modules are shipped from the factory with the audible alarm disabled. Connect the jumper
as shown in Figure 3-5 for the desired audible alarm function:
1
1
2
2
3
3
Audible Alarm Off
As Shipped for
Jumper Storage
Audible Alarm On
Jumper Pins 1&2
Figure 3-5 Audible Alarm Jumper Settings
3-11
PESA XSTREAM C22 USER GUIDE
Publication 81-9059-0731-0, Rev. B
January 2015
Chapter 4 Operation
4.1
THE PESA XSTREAM C22 WEBCENTER USER INTERFACE
All set-up and control functions of the PESA XSTREAM C22 are performed through pages of the
webcenter software control application. A web server integrated into the C22 processing engine
supports the application. Webcenter is a graphical user interface (GUI) that may be accessed by most
common web browsers through a network connected device. Refer to Paragraph 3.4.
With your C22 installed on the LAN and powered-up, point your web browser to the IP address of the
C22 module to access the webcenter user interface pages.
An example of the webcenter login display is shown by Figure 4-1.
Figure 4-1 Webcenter User Interface Login Page
From the login page you may access the user interface for the first time by entering the default
credentials shown below, followed by clicking the Login button:
- Username: admin
- Password: a
Using the default credentials, you will be logged in to the permanent administrator account. This
account can never be deleted; however, you may change the username or password at any time. Through
this account, additional users may be added and assigned administrator or staff access privileges.
Staff level users have full access to processing channel configuration menus and pages, but do not have
access to the System page or Users page. Only an administrator can add or delete users, change user
passwords or modify system operating parameters.
There is no “backdoor” access for lost passwords. When you change the
password of the permanent administrator account, be sure to make a
notation of the “new” password and store in a safe place.
4-1
PESA XSTREAM C22 USER GUIDE
Publication 81-9059-0731-0, Rev. B
January 2015
4.2
LANDING PAGE
Following login, the application initially opens to the user interface (UI) page for processing channel 1,
as shown below.
4.2.1 PAGE HEADER CONTROLS AND DISPLAYS
Regardless of which control page is selected from the menu select tabs, the page header is always shown
and contains the following controls and displays:
- Users – Allows an administrative level user to add users to the C22 system, edit user accounts and
grant or revoke administrative access privileges.
- Logout – Logs user out of a C22 webcenter session.
- About – Provides system software/firmware revision data and other C22 information.
- Web server communication activity indicators – Provide visual display of web server activity.
- User Guide – Opens a copy of the C22 User Guide.
4-2
PESA XSTREAM C22 USER GUIDE
Publication 81-9059-0731-0, Rev. B
January 2015
4.2.2 MENU SELECT TABS
Menu select tabs on the landing page allow you to access the following control pages:
- Channel 1 – Opens Webcenter set-up page for processing channel 1, which is also the landing
page after user login. Refer to Paragraph 4.3.
- Channel 2 – Opens Webcenter set-up page for processing channel 2. Refer to Paragraph 4.3.
- HDMI – Selects signal source for local HDMI output. Refer to Paragraph 4.5.
- Auxiliary Audio – Contains controls to configure analog audio inputs and software “faders” to set
level of auxiliary audio source. Also contains controls to select source for local analog audio
output, and software “faders” to set level of local analog audio outputs. Refer to Paragraph 4.6.
- System – Available only to administrative level users; opens control page for C22 system set-up
parameters. Refer to Paragraph 4.7.
4.2.3 MENU DISPLAY AREA
When any menu select tab is clicked, the control page for that function is displayed in the main display
area of the browser page.
4.3
PROCESSING CHANNEL USER INTERFACE PAGE
Set-up and control functions for each C22 processing channel are entered through its main user interface
(UI) page. Select a processing channel by clicking the Channel 1 or Channel 2 menu select tab. An
example UI page for processing channel 1 is shown by Figure 4-2.
Figure 4-2 Example Processing Channel User Interface Page
Notice the processing channel UI page is in the form of a flow diagram that depicts selection buttons for
each processing function of the channel shown in relative position to signal flow. Clicking any button
on the diagram brings up the function-specific control page for the selected processing function.
4-3
PESA XSTREAM C22 USER GUIDE
Publication 81-9059-0731-0, Rev. B
January 2015
Processing channel set-up follows a logical flow from left to right, with input selection options on the
left, mode select and functional set-up menu buttons in the center and output selection options on the
right. Lines on the flow diagram connecting various selection buttons light to indicate signal path
routing through the processing channel.
Each functional area is briefly introduced below:
• Network IP (Input) – Displays IP address and status of the streaming source, when decoder is
active.
• Local Input – Radio buttons allow selection of local video source for selected processing channel.
• Decoder Setup – Opens decoder control page.
• Mode Select – Clicking the Mode Select button toggles through the input signal source selection
options for the streaming encoder and local video output processing channel functions. As each
option is toggled, the selected input source is graphically displayed in the signal routing box for
each functional area
• Encoder Setup – Opens control pages for selecting output stream parameters and streaming
encoder configuration.
• IP Audio Setup – Opens control page for a two channel audio mixer. Use “faders” and channel
panning options to create a custom stereo audio track for AAC encoder output.
• Frame Sync Setup – Allows selection of signal source and frame sync parameters for local video
output from selected processing channel.
• Local Audio Setup - Opens control page for a two channel audio mixer. Use “faders” and channel
panning options to create a custom stereo audio track for embedding into local SDI video output.
• Network IP (Output) – Displays output protocol of the streaming signal when the processing
channel encoder is active.
If RTSP mode is active, a character string is shown in a window beneath the output display that
provides connection parameters for RTSP channel. Entering displayed connection parameters to
an RTSP client will initiate a connection with C22 server and establish a streaming transport.
You may use a “copy and paste” function to easily transfer the string data to the RTSP client.
If RTMP mode is active, a click button labeled RTMP PUBLISH is placed beneath the output
display. Clicking this button will cause the C22 to attempt establishing a connection with the
remote client or CDN configured through the Encoder Settings setup page.
• Local Output – Displays output ports currently available for local signal outputs, and video format
of the output signal. A radio button allows you to select whether rear panel BNC connector for
processing channel is configured as an input port or an output port.
4.4
C22 PROCESSING CHANNEL CONFIGURATION
Configuring a C22 processing channel for a specific task or application is very straightforward thanks to
the logical flow sequence of the webcenter control pages. Select Channel 1 or Channel 2 from the
menu tabs to open the configuration page for the respective processing channel.
4-4
PESA XSTREAM C22 USER GUIDE
Publication 81-9059-0731-0, Rev. B
January 2015
Generally, you will perform steps of the following set-up sequence that are applicable to your specific
application:
- If the application requires use of an SFP module for either input or output capability, install the
module into the rear panel SFP cage. Refer to Paragraphs 2.3.2 and 2.6.2.
- If a local video input signal to the processing channel, video output signal from the processing
channel, or both an input and output signal are required for the application, use the Local Input and
Local Output radio buttons to select the input and output ports you wish to use for the local video
signals. Refer to Paragraph 4.4.1.
- Toggle the Mode Select button to choose the desired input signal source (decoder output or local
video input) for the network streaming Encoder and the Local Video output. Refer to Paragraph
4.4.2.
- Configure the processing channel decoder with the IP stream parameters if the application requires
the C22 to function as an RTSP client. When the decoder is configured, the stream IP address and
type are shown by the Network IP display area on the left side of the page. Refer to Paragraph
4.4.3.
- Configure the processing channel encoder with the IP stream parameters and the streaming data
parameters if the application requires the C22 to function as an RTSP or RTMP server. When the
encoder is streaming data to a remote client, the communication parameters and output format are
shown by the Network IP display area on the right side of the page. Refer to Paragraph 4.4.4.
- Modify the audio source signal as desired prior to the AAC encoder using the IP Audio Setup page.
Refer to Paragraph 4.4.5.
- If the installation application requires a local video output from the C22 processing channel, select
the source and configure the frame sync parameters. Refer to Paragraph 4.4.7.
- Modify the audio source signal for embedding into the local video output as desired. Refer to
Paragraph 4.4.8.
Each step of the channel configuration process is discussed in the following paragraphs.
4.4.1 SELECT LOCAL INPUT AND LOCAL OUTPUT PORTS
Local video input and output connections are made through rear panel connectors. Radio buttons on the
UI page allow you to select the active connectors and assign each as an input or output port for the
processing channel.
• BNC I/O Connector – A single radio button labeled Coax Output Enable, located in the Local
Output display area, determines whether the BNC is configured as an input or output port. By
default, this button is not checked and the BNC is selected as an input port, as shown here.
4-5
PESA XSTREAM C22 USER GUIDE
Publication 81-9059-0731-0, Rev. B
January 2015
• When this button is checked, as shown below, the BNC serves as a connector for the local video
output signal of the processing channel and the resolution of the video signal leaving the connector
is displayed. When the BNC is selected as an output port, the option button for Coax does not
appear in the Local Input option buttons.
• Local Input Options – Click the radio button to select the local input source connection from the
following options:
- Coax – when this button is displayed as an input option, click it to select the BNC as the
active connector for the video input signal.
- SFP – Click the SFP button to select the SFP channel as the active connector for the video
input signal. If the SFP channel is not used as an input port, C22 checks for the presence of
an output module in the SFP cage. If an output module is detected, the SFP button is
removed from the Local Input option listing.
- HDMI – Click the HDMI button to select the video signal present at the rear panel HDMI IN
connector as the active video input signal. You may simultaneously select the HDMI input
for channels 1 and 2, if desired.
- Test Pattern – Click this button to insert an internally generated test pattern as the video
input signal for the channel.
• Local Output Options – With either processing channel, both its BNC connector and its SFP
channel can be configured as an output port for local video. Select the BNC as the output port by
clicking the Coax Output Enable radio button. Be aware that clicking the coax enable button will
deactivate the BNC as an input port. Be sure the BNC port is not in use as an input before clicking
the button.
By default, if the SFP channel is not selected from the Local Input options list as an input port, it is
available as an output port for use with an SFP output module. C22 auto detects when an output
module is installed in the SFP cage. When an output module is installed, the SFP radio button is
removed from the Local Input options listing.
When an input or output port has an active signal present, the resolution of the signal at the
connector is displayed beside each listing entry, as shown in the example illustrations.
Local input and output selection depend on how your device is configured.
4-6
PESA XSTREAM C22 USER GUIDE
Publication 81-9059-0731-0, Rev. B
January 2015
4.4.2 SELECT INPUT SIGNAL SOURCES FOR THE ENCODER AND LOCAL OUTPUT
For both the streaming encoder and the local video output, you may select the input source as either the
output from the processing channel streaming decoder or the local video input signal. Source selection is
made by sequentially clicking the Mode Select button. With each button click, the source selection
toggles between one of three possible input combinations. Source selection is indicated graphically by
highlighted lines showing the signal routing between processing channel functional areas. Each
combination is shown in the following illustrations.
• Decoded video from the channel decoder function provides input signal for both the encoder and
the local video output, as shown below.
• The local input video signal source to the C22 provides input signal for both the encoder and the
local video output, as shown here.
• Decoded video from the channel decoder function provides input signal for the encoder, and the
local video input is selected as the signal source for the local video output, as shown here.
4-7
PESA XSTREAM C22 USER GUIDE
Publication 81-9059-0731-0, Rev. B
January 2015
4.4.3 CONFIGURE IP STREAMING DECODER
4.4.3.1
Decoder Setup Control Page
The decoder function for either C22 processing channel may be configured and activated by establishing
a valid communication connection between the C22 as a client and a remote streaming server. Anytime
the decoder is receiving valid data, the front panel Decoder LED for the processing channel will light.
Refer to Paragraph 4.10.
Click the Decoder Setup button in the processing channel flow diagram to access the control page,
Figure 4-3. The page is in the form of data entry cells.
Figure 4-3 Example Decoder Setup Page
Anytime a new entry or change to an existing entry is made to any cell on the page, the SAVE and
CANCEL buttons are displayed below the data entry cells, as shown in the following illustration.
Once you have made all required entries or edits to the page, click the Save button to apply the changes
and remove the button display. Click Cancel to clear changes you have entered without saving or
applying the changes. You will be prompted to verify the cancel operation.
4-8
PESA XSTREAM C22 USER GUIDE
Publication 81-9059-0731-0, Rev. B
January 2015
The purpose of each cell is introduced below:
Device Type – A pull-down menu in the Device Type
column opens to a listing of configuration options for the C22
RTSP client function, including a generic RTSP device entry.
The listed IP cameras are pre-defined for the C22 client. Each
Device Type pull-down menu currently contains the
following options:
• Generic RTSP & Generic RTSP (TCP)
Selecting the Generic RTSP function allows the RTSP client to capture video from certain
compatible IP network streams when all of the required connection parameters are known for the
RTSP server and entered in the fields on this page for the video processing channel. Refer to
paragraph 4.4.3.2. If the RTSP stream you are decoding is broadcast over the local area network
(LAN) of the facility, use the Generic RTSP selection. Use the Generic RTSP (TCP) selection if
the streaming source is broadcast over a wide area network (WAN).
• Axis M1054, Axis M1114 & Axis M1054 (TCP), Axis M1114 (TCP)
The remaining items in the current listing identify by brand and model number the IP cameras
currently pre-defined for the C22. Selecting any of these choices automatically configures the
RTSP client to receive streaming video from the selected device. If the IP camera stream you are
decoding is broadcast over the local area network (LAN) of the facility, use the non-TCP list entry
for the device. The list entry with the transmission control protocol (TCP) suffix should be selected
if the data stream from the IP camera is broadcast over a wide area network (WAN).
Supported IP streaming devices are added as required; therefore,
the pull-down menu in your webcenter version may not exactly
match the example list shown here. However, the functions are
the same regardless of the actual content of the list.
Input Stream Parameter Fields – The remaining cells allow you to enter specific parameters for the IP
video device or stream. Username and Password fields allow you to enter the secure access
information for the indicated IP stream. RTSP IP Address and RTSP Port parameter data should be
supplied to you by a network administrator or other source.
If Generic RTSP mode is selected, the Username field is where you enter the filename or channel
name of the desired video stream from the RTSP server, and the Password field is not used.
4.4.3.2
Generic RTSP Stream Capture
If you wish to capture a streaming source from an RTSP server that is not currently contained in C22’s
library of devices, you may be able to configure the Generic RTSP function to capture the stream.
Generic RTSP mode is selected from the Device Type listing, refer to Paragraph 4.4.3.1.
4-9
PESA XSTREAM C22 USER GUIDE
Publication 81-9059-0731-0, Rev. B
January 2015
In order to communicate with a server using Generic RTSP, the server must be sending the stream using
the RTSP communication protocol over an RTP transport stream. To initiate the client/server
handshake, you must have the following information:
• IP address and access port number of the RTSP server
• Filename, other identifying name or character string to identify the stream you wish to capture
Generic RTSP capture communicates only with open access servers (no password or other security
measure required).
When you select Generic RTSP mode from the Input Video menu, C22 builds a character string using
parameter data you enter in the fields of the input source row, in the following syntax. Text shown in
brackets < > identifies the field by column name where data for the string is entered:
rtsp:// <RTSP IP Address> : <RTSP Port> / <Username>
where:
• Parameter data you enter in the RTSP IP Address field is the IP address C22 uses to attempt
communication with the RTSP server
• Parameter data you enter in the RTSP Port field is the access port C22 uses to communicate with the
server application.
• Parameter data you enter in the Username field is the character string of the filename, channel
name, or other identifying name or character string that identifies the stream you wish to capture
When you save the data entries on the Decoder Setup page, C22 immediately attempts to initiate
communication with the specified RTSP server. If the connection is accepted, decoded video appears as
the input source for the indicated processing channel.
4.4.4 CONFIGURE IP STREAMING ENCODER
Each processing channel of the PESA XSTREAM C22 provides a streaming encoder function that
produces an IP output stream containing an H.264 encoded video signal and an AAC encoded audio
signal associated with the video. Streaming output for either channel may be selected as compliant with
the RTSP or RTMP protocol, and each channel may be independently configured through the Encoder
Setup page.
Anytime either encoder is transmitting data using the RTSP protocol, the front panel Encoder LED for
the processing channel will light. Refer to Paragraph 4.10.
Configuring the C22 to stream over an IP network requires two set-up steps. You must first configure
the IP output stream (Paragraph 4.4.4.1) and then configure the parameters and operating modes of the
encoder (Paragraph 4.4.4.6).
Click the Encoder Setup button in the processing channel flow diagram to access the control page, as
by Figure 4-4. The page is in the form of data entry cells that allow you to configure the encoder
settings. The display box on the right side of the page displays the current IP stream settings.
4-10
PESA XSTREAM C22 USER GUIDE
Publication 81-9059-0731-0, Rev. B
January 2015
Figure 4-4 Example Encoder Setup Page
Anytime a new entry or change to an existing entry is made to any cell on the page, the SAVE and
CANCEL buttons are displayed below the data entry cells, as shown here.
Once you have made all required entries or edits to the page, click the Save button to apply the changes
and remove the button display. Click Cancel to clear changes you have entered without saving or
applying the changes. You will be prompted to verify the cancel operation.
The purpose of each area of the Encoder Setup page is introduced in the following paragraphs:
4.4.4.1
IP Stream Settings
Each stream can be configured to connect with external devices, clients or service providers using the
RTP/RTSP or RTMP protocol.
When streaming in Real Time Streaming Protocol (RTSP) mode, the C22 encoder is functioning as a
server to one or more clients that request connection with the output stream and establish handshake
with the C22 server. This protocol would typically be used when the C22 is streaming content or
programming to any number of client devices over a local area network such as within a facility or
campus.
Selecting Real Time Messaging Protocol (RTMP) mode allows the C22 server to establish connection
with a remote client for streaming content over a TCP network. This protocol typically would be used
when the C22 is supplying content or programming for wide area transmission over the internet or
broadcasting a stream through a content distribution network (CDN) provider. To make handshaking
with a CDN as simple and convenient as possible, PESA provides a number of pre-configured interface
menus for many of the major CDN providers. Refer to Paragraph 4.4.4.4.
Parameters and options entered through the IP Stream Setup page allow you to configure the C22 IP
output streams.
4-11
PESA XSTREAM C22 USER GUIDE
Publication 81-9059-0731-0, Rev. B
January 2015
Access the IP Stream Setup Page by clicking the Settings button in the IP Stream Settings display box
on the Encoder Setup page. If neither streaming protocol is selected for the IP output, the message
shown in the following example IP Stream Setup page is displayed.
4.4.4.2
RTP/RTSP Configuration
Click in the ENABLE box beneath the RTP/RTSP Configuration header to open the RTSP data entry
menu as shown below.
Each of the IP streams may be password protected such that any RTSP client attempting to establish a
connection with the C22 server channel must have the correct username and password in order for the
connection to be completed.
• Enable Password – Clicking in this box enables password protection for the RTSP channel. A
check in the box indicates password protection is active. Toggle the password function by clicking
again in the box.
• Username and Password – When you have enabled password protection for the RTSP channel,
enter, in their respective data entry cells, the desired Username and Password you will require a
client device to send in order to connect with the C22 output stream. If you enable password
protection, you must enter both a username and password in the fields.
4-12
PESA XSTREAM C22 USER GUIDE
Publication 81-9059-0731-0, Rev. B
January 2015
• Channel Name – You may enter a name for the output stream that is used within the RTSP
connection request message from a remote client. Channel names may use any of the following
valid characters:
- Alpha characters A-Z or a-z
- Numerals 0 – 9
- Period ( . ), Underscore ( _ ) or Dash ( - )
- Spaces are not allowed
You may assign the stream a name that, for example, identifies the stream or describes its contents.
• Channel Mode – C22 allows you to set the mode of the encoder output stream from the pull-down
menu options shown here.
- Single Unicast - allows one and only one remote client to connect to the output stream. This
mode is used when private, point-to-point streaming is desired.
- Multiple Unicast - allows multiple point-to-point connections to the output stream.
- Multicast - provides a one-to-many connection scheme to allow distribution to a higher
number of clients with proper network infrastructure.
• Authentication Mode – When password protection is selected for an output stream, any RTSP
connection request received from a remote client is authenticated before a connection is allowed.
C22 allows you to choose the mode of authentication from the pull-down menu options shown
here. When the Password mode is selected, the user name and password entered for the output
streaming channel must be included in the syntax of the RTSP connection request message from
the client. In HTTP mode, the user name/password is included in an HTTP request.
• Use Random Multicast Address – By networking constraints, all source-specific multicast (SSM)
streams must be assigned a network address in the range of 232.0.1.0 – 232.255.255.255. C22 will
either randomly assign an SSM address to each stream, or allow you to specify an address for an
output stream, within the range of permissible addresses. When the default option Yes is selected
from the pull-down menu, a random SSM address is assigned. Selecting No allows you to
manually enter any desired, valid SSM address for the output stream.
4-13
PESA XSTREAM C22 USER GUIDE
Publication 81-9059-0731-0, Rev. B
January 2015
PESA recommends that you use the random multicast address
option unless your installation or application has a specific need
to specify a stream address.
- Multicast Address – This cell allows you to enter the manual SSM address for the output stream
when random addressing is disabled. Refer to the previous paragraph.
- Multicast TTL – The multicast Time to Live (TTL) setting determines the number of router
“hops” through which the multicast packets are allowed to pass before being eliminated from the
stream. You may enter any number between 1 and 255 for the time to live value. A value of 1 is
typically used to limit stream access to local or campus area networks.
Anytime a new entry or change to an existing entry is made to any cell on the stream settings page, the
SAVE and CANCEL buttons are displayed below the data entry cells. Click SAVE to accept and
implement the changes or CANCEL to cancel the changes.
Once you have completed all set-up parameters for the RTSP stream, click the Return button to go back
to the Encoder Setup page.
4.4.4.3
RTSP Client Configuration for Connection with the C22 Encoder
C22 uses the RTSP protocol and RTP transport for connecting and streaming to a remote client within
the LAN. In order to complete a connection, the client must send the proper connection request message
in the correct syntax. You must know the IP address of the C22 module sending the stream you wish to
capture to complete a connection. If the stream is password enabled, you must also know the username
and password use to protect the stream.
The RTSP client device or application must initiate connection with the C22 module server by sending a
character string containing the following parameter data in the following syntax:
rtsp:// <IP Address> : <Access Port> / <Channel Name>
where:
• IP address is the address of the C22 module sending the stream you wish to capture.
• Access Port identifies the port number.
• Channel Name identifies the stream from the processing engine you wish to capture. For C22, the
default channel name is OCH.1 or OCH.2, where the numeral identifies stream 1 or stream 2 from
the processor. However, this name can be changed through the webcenter control page.
To connect with PESA XSTREAM, a connection request message should follow the syntax of the
example shown below. The IP address and port number shown here are for example only and not
necessarily meant to be an actual working parameter.
rtsp://192.168.1.58:544/OCH.1
If password protection is enabled for the C22 output stream, the client connection request must contain
the parameters above, plus the username and password.
Connection request for a stream that is password protected should be in the following syntax:
4-14
PESA XSTREAM C22 USER GUIDE
Publication 81-9059-0731-0, Rev. B
January 2015
rtsp:// <IP Address> : <Access Port> / <Channel Name>?user=<Username>&password=<Password>
where:
• Username and Password are the parameters entered for the C22 encoder from the IP Stream Setup
webcenter page.
4.4.4.4
RTMP Configuration
Click in the ENABLE box beneath the RTMP Configuration header to open the RTMP setup page as
shown below.
RTMP protocol is typically used when the C22 is streaming material for broadcast over the internet
through a content distribution network (CDN) provider. There are many CDN providers, such as
YouTube, UStream, LiveStream, etc. Each provider requires that the C22 provide specific access and
configuration parameters in order to establish connection with the client. In an effort to make the setup
and configuration process as easy as possible for you, C22 is pre-loaded with configuration setup pages
for many of the more common and popular CDN providers.
You must enter the IP address of your DNS server on the C22 Network
Settings page before selecting a pre-configured CDN provider. If your
facility has an in-house DNS server, the proper address may be obtained
from your IT administrator. If you do not have an in-house DNS server,
obtain the correct IP address from your internet service provider. Refer to
Paragraph 4.7 for more information.
4-15
PESA XSTREAM C22 USER GUIDE
Publication 81-9059-0731-0, Rev. B
January 2015
• Connections
In order to use the setup pages, click the Connections data entry
window to open a listing of the available RTMP connection options.
An example list is shown here for reference, however, this list may
not be identical to the list in your C22 as new providers may be
added through system firmware updates.
If you wish to use one of the pre-configured providers, select the
provider name from the listing. A customized set of data entry
windows is displayed in the main display window for the selected
provider.
Required configuration parameters and data entry windows will vary with each selected provider.
With most all providers, you must have an established account or subscription in order to publish
streaming media through their service. With all providers, you must enter the IP address of your
facility DNS server on the C22 Network Setting page before you can establish a connection with
your CDN, refer to Paragraph 4.7. An example configuration page using the YouTube service for
reference only is shown below.
PESA provides tutorial connection information for each of the providers in the listing on our
website at www.pesa.com.
Enter the requested information for your service provider in the displayed data entry windows to
establish a streaming link between the CDN and the C22 server.
Remember, in virtually all applications you must have an established account or subscription with
the CDN in order to complete a valid streaming connection through C22.
• Generic RTMP Configuration
PESA provides an option in the Connections listing to configure a very basic generic RTMP
stream. This option may be used to select the RTMP output protocol for the C22 encoder when
none of the pre-configured CDN providers are used. Generic RTMP may be used for testing
purposes or when establishing connection with an in-house content publishing server.
4-16
PESA XSTREAM C22 USER GUIDE
Publication 81-9059-0731-0, Rev. B
January 2015
• Publish at Startup – Every RTMP connection configuration option gives you the option to have
the C22 immediately publish an output stream to your CDN provider upon system startup by
checking this option box. If this option is not selected, you must manually publish the stream to the
provider using the RTMP Publish button on the main setup page for each processing channel.
Refer to Paragraph 4.3.
Anytime a new entry or change to an existing entry is made to any cell on the stream settings page, the
SAVE and CANCEL buttons are displayed below the data entry cells. Click SAVE to accept and
implement the changes or CANCEL to cancel the changes.
Once you have completed all set-up parameters for the RTMP stream, click the Return button to go back
to the Encoder Setup page.
4.4.4.5
IP Stream Settings Display
For quick reference, IP Stream parameters
entered through the IP Stream Setup page are
shown in a display only box on the Encoder
Setup page as shown below. This display
window also contains the selection button to
open the IP Stream Setup page.
4-17
PESA XSTREAM C22 USER GUIDE
Publication 81-9059-0731-0, Rev. B
January 2015
4.4.4.6
Encoder Setup Page
Data entry cells on the Encoder Setup page allow you to select desired settings for the stream encoder.
An example Encoder Setup page is shown below:
Some settings, if selected or modified, require a reboot of the C22 in order to become effective. Settings
• Encoder Input Source – A display at the top of the page shows you the input source of video and
audio input signals for the streaming encoder. Input source is selected with the Mode Select button
on the main processing channel page.
- Decoder – If displayed, indicates the video and audio signals from the processing channel’s
decoder are selected as inputs for the encoder.
- Local – If displayed, indicates the video and de-embedded audio (if present) signals from the
processing channel’s local video input are selected as inputs for the encoder.
• Output Resolution – This cell contains a pull-down menu where you select the desired output
resolution and frame rate for the streaming output from the available options shown here.
If you are configuring an application where the stream from the
encoder will be used as the input stream for the decoder of
another C22 module, be sure to select the 720p resolution option.
4-18
PESA XSTREAM C22 USER GUIDE
Publication 81-9059-0731-0, Rev. B
January 2015
• I-Frame Interval - Intra coded frame also known as Key frames. I-frames are coded without
reference to any frame except themselves and can be used to create random access points in the
video. This will allow the decoder to start decoding properly at that picture location. Select the Iframe interval from the pull-down menu options.
• IDR Frames - An encoder sends an IDR (Instantaneous Decoder Refresh) coded picture to clear
the contents of the reference picture buffer. On receiving an IDR coded picture, the decoder marks
all pictures in the reference buffer as unused for reference. An IDR frame specifies that no frame
after the IDR frame can reference any frame before it. This makes seeking the H.264 file easier and
more responsive in a player. Select the IDR frame value from the pull-down menu options shown
here.
• Target Bit Rate - The setting chosen from the Target Bit Rate pull-down menu, in conjunction
with Rate Control defines the output streaming rate for the encoder.
• Rate Control - Constant Bit Rate (CBR) encoding and Variable Bit Rate (VBR) encoding are two
techniques for controlling the bit rate of the compressed video stream.
• Profile - The H.264 standard has many sets of capabilities which are referred to as profiles. A
profile defines specific encoding techniques that can be used by decoders to decode the video.
Choose the desired output stream profile from the pull-down menu options.
4-19
PESA XSTREAM C22 USER GUIDE
Publication 81-9059-0731-0, Rev. B
January 2015
• Level - A Level is a specified set of constraints that indicate a degree of required decoder
performance for a profile. The level of support within a profile specifies the maximum picture
resolution, frame rate, and bit rate that a decoder may use.
• Entropy - CABAC (Context-adaptive binary arithmetic coding) More efficient (e.g. better
quality), but harder to decode for use in Main/High profile only. CAVLC (Context-adaptive
variable-length coding) is less efficient but easier to decode. It is best to use CABAC when
encoding with Main/High
Once you have completed selecting or modifying set-up parameters for the Encoder, click the Return button to
go back to the Webcenter page. Reboot the C22 module in order for the changes to become effective.
4.4.5 IP AUDIO SETUP CONTROL PAGE
One of the unique features of the C22 is the ability to create a custom audio mix that is associated with
each encoder channel through a software implementation of a two-channel audio mixer.
An audio mixer is a matrix of input channels and at least one output bus. Fader devices for each input
channel determine the level (volume) of each input signal present in the output bus. The C22
implementation is a 2 input by 1 output dual channel (stereo) audio mixer. Through a webcenter control
page you may custom blend or replace the primary audio source with the auxiliary audio source; where
the primary audio input is always the audio signal associated with the video source selected for the
encoder and the auxiliary audio source is always the local analog audio signal present at the rear panel
input connectors, see paragraph 4.6. In addition to creating a custom blend of the two audio input
signals, you may also pan or swap stereo channels, produce a mono mix of both source signals or mute
the audio signal.
Following the software mixer you may apply master gain and delay adjustments to the audio source
prior to the AAC encoder. The post-mix audio is also available as a source signal for the analog audio
output from the C22.
Click the IP Audio Setup button in the processing channel flow diagram to access the control page, as
by Figure 4-5. All mixing and audio output control functions are done through this page.
4-20
PESA XSTREAM C22 USER GUIDE
Publication 81-9059-0731-0, Rev. B
January 2015
Figure 4-5 Example IP Audio Setup Page
The first two faders, labeled Primary Audio, set the level of the left and right channels of the primary
audio signal. The second set of faders, labeled Auxiliary Audio, set the left and right channel level of
the local analog audio inputs to the C22.
Use your mouse to move the “faders” and set the desired level of each audio input signal in the output
blend. The buttons above each fader, labeled L and R, select in which channel (left and/or right) the
audio signal from that fader is added. Any fader can supply audio to either output channel. You may
choose left only, right only, or both L and R to insert the audio signal into both output channels for a
mono mix.
Following the mixing function in the processing channel, each signal is at the post-mix stage, after
which the following final adjustments can be made to the audio signals prior to encoding.
• Output Volume –The Output Volume setting is a “master” gain adjustment for post-mix audio
downstream of the mixing matrix, and determines the level of the audio signal entering the audio
encoder. Move the “fader” up and down to set gain to the desired signal level.
• Output Delay – Allows you to add a delay to the audio signal prior to the encoding function. This
function is useful for synchronizing audio and video, such as lip-syncing. There are 256 “steps” of
delay with full fader travel, and each step is approx. 10 msec. Use the “fader” to set a delay value
between 0 and approx. 2.6 seconds.
• Mute – Clicking this button mutes the signal to the audio encoder. Button lit indicates the signal is
muted. Toggle the mute function by clicking the button again.
Click Return to go back to the Webcenter page.
4.4.6 NETWORK IP OUTPUT DISPLAY
When the encoder function of the processing channel is active, the Network IP display provides realtime, output stream status information. A Network IP display is shown below using an RTSP output
stream display for the example.
4-21
PESA XSTREAM C22 USER GUIDE
Publication 81-9059-0731-0, Rev. B
January 2015
• Output - Identifies the protocol of the streaming output signal.
If RTSP mode is active, a character string is shown in a window beneath the output display that
provides connection parameters for RTSP channel. Entering displayed connection parameters to
an RTSP client will initiate a connection with C22 server and establish a streaming transport.
You may use a “copy and paste” function to easily transfer the string data to the RTSP client.
If RTMP mode is active, a click button labeled RTMP PUBLISH is placed beneath the output
display. Clicking this button will cause the C22 to attempt establishing a connection with the
remote client or CDN configured through the Encoder Settings setup page.
4.4.7 CONFIGURE LOCAL VIDEO OUTPUT THROUGH FRAME SYNC
Video and audio output signals for local program feeds or monitoring applications are available from
each processing channel of the C22. Through setup configuration, you may select either the output from
the processing channel decoder, or the local input signal as the source for local output. Regardless of
which signal source is selected, the local output video is processed through a frame synchronizer device
where it may be genlocked to an external sync source for broadcast or high-end video applications. The
local output and frame sync are configured through the Frame Sync setup page, Figure 4-6.
Click the Framesync Setup button in the processing channel flow diagram to access the control page.
Figure 4-6 Example Frame Sync Setup Page
• Input Source – A display at the top of the page shows you the input source of video and audio
input signals for local output. Input source is selected with the Mode Select button on the main
processing channel page.
- Decoder – If displayed, indicates the video and audio signals from the processing channel’s
decoder are selected as source signals.
- Local – If displayed, indicates the video and de-embedded audio (if present) signals from the
processing channel’s local video input are selected as source signals.
• Reference Input – This display identifies when a source of external sync is applied to the C22 rear
panel input connector. When a valid sync source is supplied to the frame sync, it will auto-detect
presence of the signal and sync the local video output.
4-22
PESA XSTREAM C22 USER GUIDE
Publication 81-9059-0731-0, Rev. B
January 2015
If the display reads “none” there is no external sync signal source attached to the C22 and the local
video output signal will be passed through the frame sync with no effect on signal timing.
• Vertical Offset – Allows you to add a desired number of vertical offset pixels to the output video.
Use the up and down arrows to increase or decrease the offset pixel count.
• Horizontal Offset – Allows you to add a desired number of horizontal offset pixels to the output
video. Use the up and down arrows to increase or decrease the offset pixel count.
4.4.8 LOCAL AUDIO SETUP CONTROL PAGE
You can create a custom audio mix that is associated with each local video output channel through a
software implementation of a two-channel audio mixer.
An audio mixer is a matrix of input channels and at least one output bus. Fader devices for each input
channel determine the level (volume) of each input signal present in the output bus. The C22
implementation is a 2 input by 1 output dual channel (stereo) audio mixer. Through a webcenter control
page you may custom blend or replace the primary audio source with the auxiliary audio source; where
the primary audio input is always the audio signal associated with the video source selected for local
output and the auxiliary audio source is always the local analog audio signal present at the rear panel
input connectors, see paragraph 4.6. In addition to creating a custom blend of the two audio input
signals, you may also pan or swap stereo channels, produce a mono mix of both source signals or mute
the audio signal.
Following the software mixer you may apply master gain and delay adjustments to the audio source
prior to the SDI audio embedder. The post-mix audio is also available as a source signal for the analog
audio output from the C22.
Click the Local Audio Setup button in the processing channel flow diagram to access the control page,
Figure 4-7. All mixing and audio output control functions are done through this page.
Figure 4-7 Example Local Audio Setup Page
The first two faders, labeled Primary Audio, set the level of the left and right channels of the primary
audio signal. The second set of faders, labeled Auxiliary Audio, set the left and right channel level of
the local analog audio inputs to the C22.
4-23
PESA XSTREAM C22 USER GUIDE
Publication 81-9059-0731-0, Rev. B
January 2015
Use your mouse to move the “faders” and set the desired level of each audio input signal in the output
blend. The buttons above each fader, labeled L and R, select in which channel (left and/or right) the
audio signal from that fader is added. Any fader can supply audio to either output channel. You may
choose left only, right only, or both L and R to insert the audio signal into both output channels for a
mono mix.
Following the mixing function in the processing channel, each signal is at the post-mix stage, after
which the following final adjustments can be made to the audio signals prior to embedding.
• Output Volume –The Output Volume setting is a “master” gain adjustment for post-mix audio
downstream of the mixing matrix, and determines the level of the audio signal entering the audio
encoder. Move the “fader” up and down to set gain to the desired signal level.
• Output Delay – Allows you to add a delay to the audio signal prior to the encoding function. Use
the “fader” to set a delay value between 0 and approx.2.6 seconds.
• Mute – Clicking this button mutes the signal to the audio encoder. Button lit indicates the signal is
muted. Toggle the mute function by clicking the button again.
Left and right audio signals from the mixer are embedded into the SDI video signal as channels 1 and 2,
respectively, of AES audio group 1.
Click Return to go back to the webcenter page.
4.5
HDMI/DVI INPUT AND OUTPUT CONFIGURATION
There are a pair of native HDMI connectors on the rear panel, one of which is an HDMI/DVI input port,
labeled HDMI IN. Native HDMI with embedded audio may be directly connected to this port. By use of
an adapter cable, a DVI video source may be connected through this port as an input source.
The C22 will not accept an HDMI input source with HDCP protection.
The second connector, labeled HDMI OUT, provides a local output port for HDMI or DVI video. Signal
source for the local HDMI output may be selected as the local output from either processing channel 1
or 2.
With most external devices connected to the HDMI output connector, the C22 circuitry can detect
whether it is an HDMI or DVI device and selects the output mode accordingly. If the EDID data from a
DVI destination device is not recognized by C22, you may manually select DVI output.
Audio embedded into the HDMI output is the post-mix audio signals derived from the local output
processing channel selected as the HDMI source signal. There will be no audio output when the HDMI
OUT connector is used for DVI video since the DVI format does not support embedded audio.
You may configure and check status of the HDMI input and output ports through the HDMI page of the
webcenter.
Click the HDMI menu select tab to access the control page, as shown by Figure 4-8. Status display
information for the HDMI Input is displayed on the left side of the page, Configuration and status
display for the HDMI Output is on the right side.
4-24
PESA XSTREAM C22 USER GUIDE
Publication 81-9059-0731-0, Rev. B
January 2015
Figure 4-8 Example HDMI Setup Page
4.5.1 HDMI INPUT STATUS DISPLAY
• HDMI/RX – Displays status of the native HDMI input port.
- Active – Indicates a source of HDMI or DVI video is present at the HDMI IN connector.
- None - Indicates no input source is present.
• Resolution – When an HDMI or DVI source is present, the resolution of the input signal is
displayed.
• Audio – Displays status of audio embedded into the HDMI input signal.
- Active – Indicates audio is present in the HDMI video source.
- None - Indicates no audio is present. This would be the expected display prompt for a DVI
input source.
4.5.2 HDMI OUTPUT CONFIGURATION AND STATUS DISPLAY
• Source Selection - The C22 allows you to select the local video output from either processing
channel 1 or 2 as the source for the HDMI output. Source selection is made through the pull-down
menu as shown here.
• HDMI/TX – Displays the processing channel (1 or 2) selected as the source for the HDMI output.
• Resolution – Displays the resolution of the output signal.
• Audio – Displays status of audio embedded into the HDMI input signal.
- Active – Indicates audio is embedded in the HDMI video output.
- None - Indicates no audio is present. This would be the expected display prompt with a DVI
output.
4-25
PESA XSTREAM C22 USER GUIDE
Publication 81-9059-0731-0, Rev. B
January 2015
• FORCE MODE TO DVI – Allows you to manually select DVI output from the HDMI OUT
connector by clicking the FORCE MODE TO DVI radio button. A check in this box indicates that
DVI output is manually selected. Click the button again to return the C22 to auto-select operation.
4.6
AUXILIARY AUDIO SETUP PAGE
C22 accepts inputs of two local, analog audio signals from either balanced or unbalanced sources. These
inputs may be associated, such as the left and right channel of a stereo pair, or may be unrelated, such as
two microphones in a conference setting.
As a dual channel source called Auxiliary Audio, these two local inputs are the secondary source to
each of the audio mixer implementations in the C22; and through the mixers may be blended with or
substituted for the primary audio signals of the IP encoder source or the selected source for the local
video output function of each processing channel.
A pair of unbalanced analog audio output signals is available for local program output or monitoring.
Post mix audio from any audio mixer or the HDMI audio output may be selected as the source for this
output pair.
Controls and options available through the Auxiliary Audio setup page allow you mix and configure the
auxiliary audio source and the local analog outputs. Click the Auxiliary Audio menu select tab to
access the control page, Figure 4-9.
Figure 4-9 Example Auxiliary Audio Setup Page
4.6.1 ANALOG INPUTS
These controls allow you to configure the analog audio inputs and blend the auxiliary audio source.
• L and R Faders –Two faders, labeled Analog Inputs, set the level of input channel 1 (left) and
input channel 2 (right) in the auxiliary audio source. Use your mouse to move the “faders” up or
down.
• +20 BOOST – Clicking the +20 BOOST button above each fader adds a +20dB boost to its input
signal. The boost is added pre-fader.
4-26
PESA XSTREAM C22 USER GUIDE
Publication 81-9059-0731-0, Rev. B
January 2015
• Input Select Radio Buttons – Two of the radio buttons beneath the faders allow you to select the
audio source type of the analog inputs.
- Unbalanced Inputs – When checked, configures the C22 audio circuitry to accept a pair of
unbalanced audio inputs through the AUDIO IN 1/2 connector.
- Balanced Inputs – When checked, configures the C22 to accept a single balanced audio input
source at each of the AUDIO IN connectors.
• Phantom Power – Clicking this button applies a source of +48 VDC phantom power to each of
the analog AUDIO IN connectors. When this button is not checked, no phantom power source is
connected to either input connector. Phantom power can ONLY be applied when balanced audio
signals are attached to the C22, and the Balanced Inputs button is checked.
The phantom power selection is only available with balanced
analog input sources, and should only be activated when a
condenser type microphone, or other device, that requires such a
power source is connected to the input.
4.6.2 AUDIO OUTPUTS
These controls configure the local, dual channel analog audio output signals that may be used for
monitoring or as audio-only program outputs. Both output signals are available through a stereo 3.5mm
TRS rear panel connector.
• L and R Faders –The two faders, labeled Audio Outputs, set the level of analog audio output
channel 1 (left) and output channel 2 (right) from the rear panel AUDIO OUT connector. Use your
mouse to move the “faders” up or down.
• Input Select List – Above the pair of faders is a pull-down list as shown here that allows you to
select the source for the analog audio outputs from the following options, where “x” indicates
channel 1 or 2 from the list:
• Chan x IP Audio - Selects post-mix audio from the processing channel encoder function as source
signals for the analog audio outputs.
• Chan x Local Audio - Selects post-mix audio from the processing channel local video output
function as source signals for the analog audio outputs.
• HDMI Tx Audio - Selects audio source embedded into the HDMI video output as source signals
for the analog audio outputs.
4.7
SYSTEM SETTINGS CONFIGURATION (ADMIN LEVEL USERS ONLY)
Controls and options available through the System Settings pages allow an administrative user to set
network and other operating parameters, and view hardware status. Click the System menu select tab to
access the System Settings page, as shown by Figure 4-10.
4-27
PESA XSTREAM C22 USER GUIDE
Publication 81-9059-0731-0, Rev. B
January 2015
The Hardware Status display box and Network Settings values on the left side of the page display the
current status of the listed operating parameters. If you need to modify any of the network settings, click
the Settings button to open the Network Settings page. Refer to Paragraph 4.7.2.
Figure 4-10 Example System Settings Page
4.7.1 DEVICE SETTINGS
• Hardware Name – If desired, you may enter a descriptive name for the C22 module for easy
identification if multiple units are used in a system. The name you enter in this field is displayed in
the center banner at the top of the webcenter page, as shown in Paragraph 4.2.
• Browser Timeout – Enter a number between 1 and 240 to set the amount of time in minutes the
webcenter remains active before automatically logging the user out. You may click in the cell and
enter a number directly, or use the up and down arrows to select the time.
• Select File –Upon receipt of a firmware update from PESA, this function allows you to update the
operating firmware loaded in flash memory.
The following procedure outlines the steps for updating firmware:
- Copy the update file provided by PESA to a convenient directory on the host PC hard drive.
- Click Select File on the System Settings page to open the Flash Update dialog box and click
the Choose File box.
- Navigate to the update file you just saved and select it from the listing. Ensure that the
proper file is selected and that the correct filename is shown in the Filename: box and click
Open to continue.
- Click OK in the Flash Update dialog box and follow the prompts to initiate the update.
• System Restart – Click the System Restart button to initiate a hardware reset of the C22 module.
You will be prompted to verify the reboot request before the reboot process is initiated.
4-28
PESA XSTREAM C22 USER GUIDE
Publication 81-9059-0731-0, Rev. B
January 2015
4.7.2 NETWORK SETTINGS
Ethernet network operating parameters are entered through data entry cells on the Network Settings
page, Figure 4-11.
Figure 4-11 Example Network Settings Page
• Network Parameters – Enter IP address, Subnet Mask and Gateway network parameters in the
cells. To change IP address or gateway entries, click in the cell and directly enter the new values.
Use the pull-down list in each cell to change entries for subnet mask values.
• DNS Server ID – In these cells, enter the address of the Primary and, if used, Secondary Domain
Name System (DNS) server used by your facility. This address must be provided in order to use
the CDN configuration capabilities of C22.
You must enter the IP address of your DNS server before selecting a preconfigured CDN provider. If your facility has an in-house DNS server, the
proper address may be obtained from your IT administrator. If you do not
have an in-house DNS server, obtain the correct IP address from your
internet service provider.
• NTP Server – These data entry cells are reserved for future implementation and are currently not
used for C22 configuration. Leave the data parameters as a zero (0) in each cell.
• Default Domain – Enter the domain name of the network on which the C22 is operating.
• Machine Name – Enter a name for identifying the C22 on the facility network.
Anytime a new entry or change to an existing entry is made to any network parameter, two buttons,
SAVE and CANCEL, are displayed below the hardware status display. Once you have made all
required entries or edits, click the Save button to apply the changes and remove the button display.
Click Cancel to clear changes you have entered without saving or applying the changes.
4-29
PESA XSTREAM C22 USER GUIDE
Publication 81-9059-0731-0, Rev. B
January 2015
4.8
USERS SET-UP PAGE FUNCTIONS (ADMIN LEVEL USERS ONLY)
User accounts for access to the C22 webcenter may be assigned or removed, and the password of each
account may be changed, through control functions of the User Administration page.
Click the Users button in the page header area on any webcenter page to access the User Admin page,
Figure 4-12.
Figure 4-12 Example User Administration Page
Authorized user information is displayed as rows of a spreadsheet with each user account identified by
username, email address and access privilege level, as shown by the example page.
To Add a New User Account:
• Click the Add User button to open the Add User dialog box as shown here.
• Enter the Username and Password you want to assign to the new user.
• Enter the password a second time for verification.
• Enter the user’s Email address.
4-30
PESA XSTREAM C22 USER GUIDE
Publication 81-9059-0731-0, Rev. B
January 2015
• If the new user is to have administrative level access privileges, click the “Is Admin” box. A check
mark is displayed in the box when the user is granted Admin access.
• Click OK to create the new user account.
To Send an Existing User an Email Messagee:
• Locate the Username to whom you wish to send an email message in the first column of the user
display.
• Click the link in the Email column for the user to open a messaging window through your email
client and send the message.
To Modify an Existing User Account:
• Locate the Username of the account you wish to modify in the first column of the user display.
• Choose the account modification action from the options listed on the right side of the username
row.
- Edit – Opens the Update User dialog box as shown here.
.
From this box you may change the username or email address, and you may grant or revoke
administrative access privileges by checking or removing the check from the “Is Admin” box. Click
OK to accept your changes or Cancel to close the box with no changes to the user account.
- Delete – Deletes the user account. You will be prompted to verify the action to complete
account deletion.
- Change Password – Opens a dialog box that allows you to change the password of the user.
The existing user password is not displayed. Click OK to accept your changes or Cancel to
close the box with no changes to the user account.
The default username for the permanent administrative account
is admin. You may change the name or email address of this
account and you may change the password. However, this
account can never be deleted and you can not remove
administrative access privileges from this user account.
4-31
PESA XSTREAM C22 USER GUIDE
Publication 81-9059-0731-0, Rev. B
January 2015
4.9
ABOUT (SYSTEM INFORMATION) PAGE
Click the About button above the main display area to access the system information page, as shown by
Figure 4-13.
Figure 4-13 Example ABOUT Page
System information for the C22 module including revision information for firmware modules currently
in use by the device; and Contact information for PESA Customer Service are shown in the display box.
Click Return to return to the Webcenter landing page.
4.10 FRONT PANEL SYSTEM STATUS LEDS AND DISPLAY DEVICE
Four LEDs and an LCD display device on the module front panel provide real-time monitoring of C22
systems operation and status. An illustration of the front panel devices is shown by Figure 4-14.
Figure 4-14 C22 Front Panel Display Devices
4-32
PESA XSTREAM C22 USER GUIDE
Publication 81-9059-0731-0, Rev. B
January 2015
4.10.1 STATUS LEDS
There are two LEDs labeled Encoder and two labeled Decoder on the front panel as shown by the
figure.
• Encoder LED 1 and 2 – When either of the LEDs is lit, it indicates the C22 has an active
communication link with an RTP/RTSP streaming client, and the encoder function of the indicated
processing channel is active in RTSP mode.
The Encoder LEDs do not light when the C22 is streaming in RTMP mode.
• Decoder LED 1 and 2 - When either of the LEDs is lit, it indicates the C22 has an active
communication link with a streaming server, and the decoder function of the indicated processing
channel is active.
4.10.2 LCD DISPLAY DEVICE
The LCD display provides status readout for selectable C22 operational functions. A joystick-type
navigation button allows you to maneuver through the various display and status readouts.
Home Screen
The Home Screen is the default display window. When any other window is selected, the display by
default always returns to the home screen. After any 15 second period of inactivity, the display
backlight is automatically dimmed. An example home screen display window is shown here.
This window displays the channel 1 and 2 BNC I/O port status on the top line and the IP address of the
C22 module on the bottom line.
BNC port status for either processing channel is displayed as IN or OUT, as shown. Input (IN) indicates
the BNC of the indicated channel is configured to the encoder function as an input port; Output (OUT)
indicates the BNC is configured to the decoder function as an output port.
Status Display Screens
The navigation button allows you to select status display screens for various C22 functional areas. A
flow diagram showing the screens and the status data available through each is presented by Figure 415. Use this diagram as a navigational tool for the available display windows.
4-33
PESA XSTREAM C22 USER GUIDE
Publication 81-9059-0731-0, Rev. B
January 2015
OR
Press Right or Left
Navigation key to
move between status
display windows.
Pressing any key of Navigation Button
from
opens
display to channel 1 decoder.
Pressing Left or Right keys
Moves between decoder channel 1 and 2
display screens.
Select status
display item
*Status display for Decoder 1 or 2,
selected by navigation keys, 1 shown
for example.
Press Right Navigation key from Channel
2
display to move to
Channel 1
display.
Pressing Left or Right keys
Moves between encoder channel 1 and 2
display screens.
Press Right Navigation key from Channel
2
display to move to
display.
Press Right Navigation key from
display to move to
display.
Press Right Navigation key from
display to move to
display.
Select status
display item
DECODER – ACTIVE, IDLE
IP MODE – RTSP, RTMP
RES – 1080P, 720P
AUDIO – YES, NONE
SDI OUT - BNC, SFP, BOTH,
NONE
SDI RES – 1080P, 720P,
UNKNOWN
ENCODER – ACTIVE, IDLE
IP MODE – RTSP, RTMP
RES – 1080P, 720P,
UNKNOWN
INPUT – DECODER, BNC, SFP
*Status display for Encoder 1 or 2,
selected by navigation keys, 1 shown
for example.
Select status
display item
Select status
display item
Select status
display item
INPUT – ACTIVE, IDLE
RES – 1080P, 720P, UNKNOWN
AUDIO – YES, NONE
HDCP – YES, NO
OUTPUT – ACTIVE, IDLE
RES – 1080P, 720P, UNKNOWN
AUDIO – YES, NONE
HDCP – YES, NO
FPGA Rev – Current revision
BOARD TEMP – Current temp
INT FAN – OK, BAD
IP – Module IP address
MASK – Current netmask
MAC – Module MAC address
Press Right Navigation key from
display to return to
display.
Figure 4-15 Front Panel Display Screen Navigation Flow
4-34
PESA XSTREAM C22 USER GUIDE
Publication 81-9059-0731-0, Rev. B
January 2015
Chapter 5 Glossary of Terms
5.1
TERMS AND DEFINITIONS
AAC - Advanced Audio Coding is a standardized, compression and encoding scheme for digital audio.
AAC generally achieves better sound quality than MP3 at similar bit rates.
HDMI - High-Definition Multimedia Interface is a compact audio/video interface for transferring
uncompressed video data and compressed/uncompressed digital audio data from an HDMI-compliant
device to a compatible computer monitor, video projector, digital television, or digital audio device.
H.264 – Also known as MPEG-4 AVC (Advanced Video Coding), H.264 is a standard for video
compression, and is often used for recording, compression, and distribution of high definition video.
H.264/MPEG-4 AVC is a block-oriented motion-compensation-based coder/decoder (codec) standard.
RTP – Real-Time Transport Protocol defines a packet format for delivering audio and video over IP
networks. RTP is used in conjunction with the RTP Control Protocol (RTCP). While RTP carries the
media streams (e.g., audio and video), RTCP monitors transmission statistics and quality of service, and
also assists synchronization of multiple streams.
RTCP – Real-Time Control Protocol is the control protocol that works in conjunction with RTP. RTCP
control packets are periodically transmitted by all participants in an RTP session.
RTMP – Real-Time Messaging Protocol is a proprietary protocol for streaming audio, video and data
over the Internet, typically between a Flash player and a server.
RTSP – Real-Time Streaming Protocol is a network protocol for control of streaming media servers,
used to establish and control media sessions between end points.
XLR – XLR defines a style of electrical connector, primarily found on professional audio and video
equipment. They are most commonly associated with balanced audio interconnection.
Proprietary Information of PESA
5-1
PESA XSTREAM C22 USER GUIDE
Publication 81-9059-0731-0, Rev. B
January 2015
Chapter 6 Maintenance and Repair
6.1
PERIODIC MAINTENANCE
No periodic maintenance is required.
6.2
PESA CUSTOMER SERVICE
If you are experiencing any difficulty with a PESA XSTREAM C22 module, please contact PESA’s
Customer Service Department. Skilled technicians are available to assist you 24 hours a day, every day
of the year.
6.3
REPAIR
Before attempting to repair this equipment, please consult your warranty documents and PESA’s
Customer Service Department. Unauthorized repairs may void your warranty.
PC boards in this equipment contain Surface Mount Technology (SMT)
components. Special tools and skills are required to replace these
components without causing damage to adjacent areas.
Failure to consult with Customer Service before attempting to repair these
boards may void your warranty.
6.4
REPLACEMENT PARTS
Only parts of the highest quality are used in the design and manufacture of this equipment. If the
inherent stability and reliability are to be maintained, replacement parts must be of the same high
quality. Please consult our Customer Service Department before installing any parts not purchased from
PESA.
6.5
FACTORY SERVICE
Before returning any equipment to PESA for service or repair, please contact our Customer Service
Department for an RMA number.
Proprietary Information of PESA
6-1