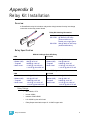
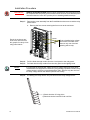
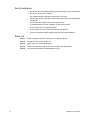
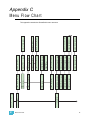
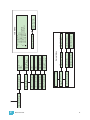
1
Relay Panel User Manual Version 1.0 C o p y r i g h t © E le c tr o n i c T h e a t r e C o n t r o l s , I n c . All Rights reserved. P r o d u c t in f o r m a t i on a n d s p e c i f i c a t i o n s s u bj e c t t o c h a n g e . P a r t N u m b e r : 7023M1200-1.0.0 R e v A Released: 6/2005 ET C ®, S e n s o r ®, S m a r tS w i t c h ™ , S m a r t L in k ™ a n d S m a r t P a c k ® a r e e i t h e r r e g i s t e r e d t r a d e m a r k s o r t r a d e m a r k s o f E l e c t r o n i c T h e a t r e C o n tr o l s , In c . i n t h e U n i t e d S t a t es a n d o t h e r c o u n t r i e s . L o n W o r k s ® i s a r eg i s t e r e d tr a d e m a r k o f t h e E c h e l o n ® C o r p o r a t io n . A l l o t h e r t r a d e m a r k s , b o t h m a r k e d a n d n o t marked, are the property of their respective owners. Table of Contents Introduction . . . . . . . . . . . . . . . . . . . . . . . . . . 1 Congratulations.... . . . . . . . . . . . . . . . . . . . . . . . . . . . . . . . . . . . .1 Using this Manual . . . . . . . . . . . . . . . . . . . . . . . . . . . . . . . . . . . . . . . .2 Chapter 1 Overview . . . . . . . . . . . . . . . . . . . . . . . . . . . . 3 Standard Features . . . . . . . . . . . . . . . . . . . . . . . . . . . . . . . . . . . .3 Product Variants. . . . . . . . . . . . . . . . . . . . . . . . . . . . . . . . . . . . . . . . .4 Specification . . . . . . . . . . . . . . . . . . . . . . . . . . . . . . . . . . . . . . . . . . . .5 Installation Environment . . . . . . . . . . . . . . . . . . . . . . . . . . . . . . .5 Clearance . . . . . . . . . . . . . . . . . . . . . . . . . . . . . . . . . . . . . . . . . .5 Electrical Requirements. . . . . . . . . . . . . . . . . . . . . . . . . . . . . . . .5 Compliance . . . . . . . . . . . . . . . . . . . . . . . . . . . . . . . . . . . . . . . . .5 Relay Specification . . . . . . . . . . . . . . . . . . . . . . . . . . . . . . . . . . . . . . .6 Relay Ratings . . . . . . . . . . . . . . . . . . . . . . . . . . . . . . . . . . . .6 Chapter 2 Menu’s and Configuration . . . . . . . . . . . . . . . 7 User Interface . . . . . . . . . . . . . . . . . . . . . . . . . . . . . . . . . . . . . . . . . .7 Keypad. . . . . . . . . . . . . . . . . . . . . . . . . . . . . . . . . . . . . . . . . . . . .7 LCD Display. . . . . . . . . . . . . . . . . . . . . . . . . . . . . . . . . . . . . . . . .7 Select / Change Text or a Value . . . . . . . . . . . . . . . . . . . . . .7 Relay State Indication on the LCD . . . . . . . . . . . . . . . . . . . . .8 Adjusting the contrast of the LCD Display . . . . . . . . . . . . . . .8 Normal Menu Structure . . . . . . . . . . . . . . . . . . . . . . . . . . . . . . . . . . .8 Set the DMX Start Address: . . . . . . . . . . . . . . . . . . . . . . . . . .8 Test Menu . . . . . . . . . . . . . . . . . . . . . . . . . . . . . . . . . . . . . . . . . .8 Enter the Test menu . . . . . . . . . . . . . . . . . . . . . . . . . . . . . . .8 Advanced Menu Structure . . . . . . . . . . . . . . . . . . . . . . . . . . . . . . . . .9 Enter the Advanced menu from the Normal menu: . . . . . . . .9 DMX. . . . . . . . . . . . . . . . . . . . . . . . . . . . . . . . . . . . . . . . . . . . . . .9 DMX Start Address . . . . . . . . . . . . . . . . . . . . . . . . . . . . . . . .9 DMX Patch . . . . . . . . . . . . . . . . . . . . . . . . . . . . . . . . . . . . . . .9 DMX Loss Behavior . . . . . . . . . . . . . . . . . . . . . . . . . . . . . . .10 DMX Mode . . . . . . . . . . . . . . . . . . . . . . . . . . . . . . . . . . . . . .10 DMX Response . . . . . . . . . . . . . . . . . . . . . . . . . . . . . . . . . .10 Presets. . . . . . . . . . . . . . . . . . . . . . . . . . . . . . . . . . . . . . . . . . . .10 Record a Preset (snapshot) . . . . . . . . . . . . . . . . . . . . . . . . .11 Setup Preset Timing . . . . . . . . . . . . . . . . . . . . . . . . . . . . . .11 Activate a Preset . . . . . . . . . . . . . . . . . . . . . . . . . . . . . . . . .12 Deactivate a Preset . . . . . . . . . . . . . . . . . . . . . . . . . . . . . . .12 Sequencer . . . . . . . . . . . . . . . . . . . . . . . . . . . . . . . . . . . . . . . . .12 Setup a Sequence . . . . . . . . . . . . . . . . . . . . . . . . . . . . . . . .12 Table of Contents i Start / Stop a Sequence . . . . . . . . . . . . . . . . . . . . . . . . . . . .12 Relays . . . . . . . . . . . . . . . . . . . . . . . . . . . . . . . . . . . . . . . . . . . .13 Allow Manual . . . . . . . . . . . . . . . . . . . . . . . . . . . . . . . . . . . .13 Set Relay Turn On . . . . . . . . . . . . . . . . . . . . . . . . . . . . . . . .13 Set Relay Turn Off . . . . . . . . . . . . . . . . . . . . . . . . . . . . . . . .13 Relay Delay . . . . . . . . . . . . . . . . . . . . . . . . . . . . . . . . . . . . .14 Emergency. . . . . . . . . . . . . . . . . . . . . . . . . . . . . . . . . . . . . . . . .14 Assign Relay to Emergency . . . . . . . . . . . . . . . . . . . . . . . . .14 Stations . . . . . . . . . . . . . . . . . . . . . . . . . . . . . . . . . . . . . . . . . . .15 Assign Station Master . . . . . . . . . . . . . . . . . . . . . . . . . . . . .15 Remote Record . . . . . . . . . . . . . . . . . . . . . . . . . . . . . . . . . .16 General Settings . . . . . . . . . . . . . . . . . . . . . . . . . . . . . . . . . . . .17 Chapter 3 SmartLink™ Enabled . . . . . . . . . . . . . . . . . 19 SmartLink Features . . . . . . . . . . . . . . . . . . . . . . . . . . . . . . . . . .19 Definitions . . . . . . . . . . . . . . . . . . . . . . . . . . . . . . . . . . . . . . . . .20 Panel Synchronization . . . . . . . . . . . . . . . . . . . . . . . . . . . . . . . . . . .21 Preset and Sequence Synchronization . . . . . . . . . . . . . . . . . . .21 Preset Synchronization . . . . . . . . . . . . . . . . . . . . . . . . . . . .21 Sequence Synchronization . . . . . . . . . . . . . . . . . . . . . . . . .21 Wall Stations . . . . . . . . . . . . . . . . . . . . . . . . . . . . . . . . . . . . . . . . . .22 Station Options . . . . . . . . . . . . . . . . . . . . . . . . . . . . . . . . . . . . .23 Station Personality Settings . . . . . . . . . . . . . . . . . . . . . . . . .23 Record a Preset from a Wall Station . . . . . . . . . . . . . . . . . . . . . . . .25 Chapter 4 Service and Maintenance . . . . . . . . . . . . . . 27 Service . . . . . . . . . . . . . . . . . . . . . . . . . . . . . . . . . . . . . . . . . . . . . . .27 Contacting ETC about Equipment Problems . . . . . . . . . . . . . . .27 Maintenance. . . . . . . . . . . . . . . . . . . . . . . . . . . . . . . . . . . . . . . . . . .28 Vacuum the Vents . . . . . . . . . . . . . . . . . . . . . . . . . . . . . . . . . . .28 Vacuum the Interior . . . . . . . . . . . . . . . . . . . . . . . . . . . . . . . . . .28 Appendix A LinkPower Supply Kit . . . . . . . . . . . . . . . . . 29 Installation Procedure . . . . . . . . . . . . . . . . . . . . . . . . . . . . . . . .29 Appendix B Relay Kit Installation . . . . . . . . . . . . . . . . . . 31 Overview . . . . . . . . . . . . . . . . . . . . . . . . . . . . . . . . . . . . . . . . . .31 Relay Specification . . . . . . . . . . . . . . . . . . . . . . . . . . . . . . . . . .31 Relay Ratings . . . . . . . . . . . . . . . . . . . . . . . . . . . . . . . . . . .31 Installation Procedure . . . . . . . . . . . . . . . . . . . . . . . . . . . . . . . .32 Verify Installation . . . . . . . . . . . . . . . . . . . . . . . . . . . . . . . . . . . .34 Power Up . . . . . . . . . . . . . . . . . . . . . . . . . . . . . . . . . . . . . . . . . .34 Appendix C ii Menu Flow Chart. . . . . . . . . . . . . . . . . . . . . 35 SmartSwitch User Manual Introduction Congratulations... on your purchase of the ETC SmartSwitch™ relay panel. SmartSwitch continues ETC’s tradition of providing the highest quality product for the entertainment and architectural lighting industry. If you have any questions regarding the operation or installation of your SmartSwitch relay panel, please contact ETC technical services at the office nearest you. Americas U n i te d K i n g d o m ETC International Electronic Theatre Controls, Ltd. Technical Services Department Technical Services Department 3031 Pleasant View Road Unit 26-28 Victoria Industrial Estate Middleton, WI 53562 Victoria Road, 800.775.4382 (USA, toll-free) London W3 6UU, UK +1.608.831.4116 +44 (0) 8896 1000 [email protected] [email protected] Asia Germany ETC Asia, Ltd. Electronic Theatre Controls, GmbH Technical Services Department Technical Services Department Room 605-606 Ohmstrasse 3 Tower III, Enterprise Square 83607, Holzkirchen, Germany 9 Shueng Yuet Road +49 (80 24) 47 00-0 Kowloon Bay, Kowloon, Hong Kong [email protected] +852 2799 1220 [email protected] Introduction 1 Using thi s Manual This manual contains information on using the basic features of the SmartSwitch relay panel with SmartLink™ enabled including basic maintenance and service procedures for long lasting performance. The following symbols are used throughout this manual to alert you to danger or important information. Note: Notes are helpful hints and information that is supplemental to the main text. CAUTION: A Caution statement indicates situations where there may be undefined or unwanted consequences of an action, potential for data loss or an equipment problem. WARNING: A Warning statement indicates situations where damage may occur, people may be harmed, or there are serious or dangerous consequences of an action. WARNING: RISK OF ELECTRIC SHOCK! This warning statement indicates situations where there is a risk of electric shock. Please email comments about this manual to: [email protected] 2 SmartSwitch User Manual Chapter 1 Overview The SmartSwitch relay panel is designed to provide affordable professional quality switching of non-dim loads controlled by DMX512 or used in a stand-alone mode with SmartLink. SmartSwitch is available standard with either twelve or twenty-four 20A HID relays installed and fully pre-wired for low voltage control. As required, custom SmartSwitch relay panels are available including a variable number of relays from 1 - 24. Contact ETC quotations for assistance. Standard Features 1 Overview • Ships standard with either twelve or twenty-four 20A HID relays installed in a rugged steel enclosure. • 20A HID at 300V AC single spaced/single pole relay or 20A HID @ 300V AC single spaced/double pole relay. • Mechanically latching • Capable of switching multiple load types • Full compliance with UL, cUL and FCC regulations • 60,000 operations at full load • Easy to install and field replaceable. • Thirty-two user programmable presets and a built-in sequencer for stand-alone operation. • SmartLink™ enabled for communication with other SmartLink enabled products for preset and sequence synchronization. • Flexible control via DMX512 or stand-alone operation with SmartLink • Convection cooled • Emergency contact input with software support for load-shedding. • Easy to install! The enclosure is designed with the contractor in mind. • Hinged locking door for easy access to low voltage compartment 3 Product Variants Model Part Number Relay Count Voltage Dimensions (inches) SS-121P-LPS 7023A1003 12 120 or 277V SmartSwitch with 12 - 20A single pole AC 50-60 Hz relays and LinkPower supply (S-LPS) 17.14 x 6.3 x 26.24 SS-121P 7023A1001 12 120 or 277V 12 - 20A single pole relays AC 50-60 Hz 17.14 x 6.3 x 26.24 SS-241P-LPS 7023A1004 24 120 or277V SmartSwitch with 24 - 20A single pole AC 50-60 Hz relays and LinkPower supply (S-LPS) 17.14 x 6.3 x 26.24 SS-241P 7023A1002 24 120 or 277V 24 - 20A single pole relays AC 50-60 Hz 17.14 x 6.3 x 26.24 SS-242P 7023A1005 24 120 or 277V 24 - 20A double pole relays AC 50-60 Hz 17.14 x 6.3 x 26.24 SS-242P-LPS 7023A1006 24 120 or 277V AC 50-60Hz 17.14 x 6.3 x 26.24 Description 24 - 20A double pole relays and LinkPower supply (S-LPS) Option kits available for the SmartSwitch relay panel include: Model Part Number Description Notes SS-1PRK 7023K1001 WR6161-81, 20A @ 300V AC single pole, single space relay kit field installed relay kit SS-2PRK 7023K1002 WR6166-81, 20A @ 300V AC double pole, single space relay kit field installed relay kit S-LPS 7021K1010 LinkPower supply kit optional - supplies power for up to four SmartLink wall stations. SS-RMK 7021K1000 19” rack mount kit requires 15 rack units of space SmartSwitch Voltage Barrier Kit optional - for use to separate differing voltages and/or emergency circuits from normal circuits. Use per local code. SS-VB 4 7023K1003 SmartSwitch User Manual Specification For proper operation of your SmartSwitch relay panel ensure the intended installation location conforms to the following environmental and electrical specifications. Installation Environment • Dry room (30-90% humidity, non-condensing) • 0-40°C (32-104°F ambient temperature) • Dust-free • SmartSwitch is intended to be wall mounted (surface only) or installed in an equipment rack utilizing 19” rack mount installation kit (SS-RMK). The installation location must support a fully populated panel not exceeding 22.68 Kg (50 lbs). Clearance • Suggested mounting 1,231mm (48”) height to the bottom of the relay panel. • Clearance on left and right side of the panel should be 38.46mm (1-1/2”). If mounted next to another SmartSwitch or SmartPack Wall Mount dimming pack, zero clearance is required. • Suggested door clearance is 254mm (10”) from the front of the panel. Electrical Requirements • A dedicated circuit from the breaker panel for control electronics power. • 120 or 277V AC • 50-60Hz • 8A maximum current per SmartSwitch relay panel Compliance 1 Overview • UL Listed - UL508 • FCC - This device complies with part 15 of the FCC rules. Operation is subject to the following two conditions: (1) This device may not cause harmful interference, and (2) this device must accept any interference received, including interference that may cause undesired operation. 5 Relay Specification SmartSwitch ships standard with either 12 or 24, 20A HID relays installed and fully prewired for low voltage control. Two relay types are available as standard: 20A single pole/ single space relay (WR6161-81) or 20A double pole/single space relay (WR6166-81). As required, custom SmartSwitch relay panels are available including a variable number of relays from 1 - 24. For customer convenience relay kits are available including a relay and the low voltage control leads for easy field installation. 1 2 SS-2PRK - double pole, single space 20A HID relay kit 1 2 1 6-8 AY 616E REL R W OL 2- P 1 1-8 AY 616E REL R W OL 1- SS-1PRK - single pole, single space 20A HID relay kit P WR6161-81 Single Pole HID Relay CSA UL Listed • General Use 20A @ 347V AC • General Use 20A @ 300V AC • Ballast (HID) 20A @ 347V AC • Ballast (HID) 20A @ 300V AC • Tungsten 2400W @ 120V AC • Tungsten 2400W @ 120V AC • Motor Load 1/2 HP @ 110-125V AC • Motor Load 1/2 HP @ 110-125V AC 1-1/2 HP @ 220-250V AC 1-1/2 HP @ 220-277V AC WR6166-81 Double Pole HID Relay CSA UL Listed • General Use 20A @ 347V AC • General Use 20A @ 300V AC • Ballast (HID) 20A @ 347V AC • Ballast (HID) 20A @ 300V AC • Tungsten 2400W @ 120V AC • Tungsten 2400W @ 120V AC • Motor Load 1/2 HP @ 110-125V AC • Motor Load 1/2 HP @ 110-125V AC 1-1/2 HP @ 220-250V AC 1-1/2 HP @ 220-277V AC Relay Ratings 6 • AIC: 5000A, 277V AC • Inrush: 2000A • Isolation: 5000V RMS • Life: 60,000 cycles at full load • Relay Output terminals accept 12-14 AWG copper wire SmartSwitch User Manual Chapter 2 Menu’s and Configuration User Interface Keypad The SmartSwitch user interface and menu structure provide users an intuitive easy setup. DMX << Symbol < Description << Return to the home menu < Move back one menu item Accept a menu choice or store a value + Increase a value or scroll through the menu - Decrease a value or scroll through the menu Activate the Test menu ~ Power LED - when illuminated control power is ON DMX DMX LED - when flashing NO DMX source is present, when illuminated active DMX source is present. LCD Display The LCD display is a high contrast 20-character by 2-line backlit LCD. The control symbol, indicated in the top right corner of the LCD, indicates the active control source. DMX: 1 > 24 12¼ 1 Control Symbol d = DMX P = Preset S = Sequence T = Test Select / Change Text or a Value When configuring the SmartSwitch: 2 • Text or numerals within [ ] indicates an item can be selected • Text or numerals within > < indicates an item is selected Menu’s and Configuration 7 Relay State Indication on the LCD Relay state is visually indicated on the LCD screen. DMX 1 > 24 1 12 Indicates relay is OFF Indicates relay is ON Initially the LCD displays the state of the first twelve relays. Press to change the display to view the status of relays 13-24. Press < to return the display to relays 1-12. Adjust ing the contrast of the LCD Display Press and hold << and use the + and - buttons to adjust the contrast of the LCD display. Normal Menu Structure The normal menu is used to set the DMX Start Address, view Software Version and change Menu Mode of the SmartSwitch. The DMX Start Address defaults to DMX:[001 - 024]. Set the DMX Start Address: Step 1: Scroll to DMX, press Step 2: Scroll to DMX Start Address, press Step 3: Use + or - to scroll the start address range Step 4: Press to set the start address Test Menu The test menu is a tool for testing relay circuits. In the absence of a DMX control source or the manual lever on the relays, the test menu may be used to specify relay level for snapshot into a preset. Default relay on value is 50%, any value below 50% will turn the relay off. Enter the Test menu From any menu, press Test Relay: Ch: 1 @ Level:_ _ _ % Set Relay Levels via the Test Menu Step 1: Use < or to scroll the selection of relays, choose only one or [ALL] relays. Step 2: Use + or - to set a level, press Step 3: Press . The menu will progress to the next relay. . “Exit Test Mode” displays. • Exit Test Mode and retain all Test levels, scroll down [Keep Test On] and press . • Exit Test menu, clearing all Test levels and return to the previous menu, scroll to [Test: all off], press . • Press < to return to the Test menu. • Press << to exit the Test menu, clearing all Test levels, and return to the main menu. 8 SmartSwitch User Manual Advanced Menu Structure Enter the Advanced menu from the Normal menu: Step 1: Scroll to General Settings, press . Step 2: Scroll to Menu Mode, press Step 3: Scroll to Advanced Menu, press and hold for 5 seconds. The display will return to the main menu when the Advanced Menu has been accessed. . • If the is released prematurely, the menu will remain in Normal Menu mode. DMX DMX Start Address When a DMX Start Address is selected as the active DMX mode, the DMX range will be displayed on the LCD. The first twelve relays will display initially. To see the remaining twelve relays, press . DMX: 1 > 24 DMX: 1 > 24 Å13 12Æ 1 24 DMX Start Address Range The allowable DMX Start Address range is from 1 to 489. Step 1: Scroll to DMX, press . Step 2: Scroll to DMX Start Address, press Step 3: Use + or - to increment or decrement the Start Address range. Press address and return to the previous menu. Step 4: Press < to return to the previous menu or press << to return to the main menu. The specified DMX range will display on the LCD. . to set the DMX Patch DMX Patch allows user-defined relay to DMX channel selection including all relays to the same DMX channel. When DMX Patch is selected as the active DMX Mode, “DMX Patch” will be displayed on the LCD. DMX Patch 12Æ 1 2 Step 1: Scroll to DMX, press Step 2: Scroll to DMX Patch, press Step 3: Use + or - to scroll the list of relays. Press to select the relay number. (Relays are always numbered 1-24 in the panel. The panel is designed with relay #1 as the first relay in the top left side of the panel, #2 is to the right, etc.) Step 4: Relay ## > DMX [###] will display. Press + or - to change the DMX address. Step 5: Press to return to the relay selection. Continue with steps 3 and 4 until all relays are patched to the desired DMX address. Step 6: Press < to return to the previous menu or press << to return to the main menu. Menu’s and Configuration . . “DMX Patch - Relay [1] > DMX 1” will display. 9 DMX Loss Behavior When the DMX control signal is lost, the SmartSwitch relay panel will behave according to the DMX Loss Behavior setting as configured by the user. Options include: • Hold Last Look - holds any active relays at whatever levels they were receiving when the data was lost. The relays will remain in this state until data is restored or the SmartSwitch is reset. • Wait and Fade Out - holds any active relays at whatever level they were receiving when the data was lost for a user-defined length of time then switches the relays off in a user defined fade time. The maximum wait and fade time is 59min:59sec. • Fade to Preset - plays a user-defined preset when data is lost. Step 1: Scroll to DMX, press . Step 2: Scroll to DMX Loss Behavior, press Step 3: Use + or - to select the desired Loss Behavior, press Step 4: Use + or - to set the values as required, press Step 5: Press < to return to the previous menu or press << to return to the main menu. . . . DMX Mode DMX Mode is provided as a shortcut for switching between DMX Start Address and DMX Patch. The LCD will either display the DMX address range or “DMX Patch”, depending on the mode selected. DMX Response DMX Response is a level setting that allows SmartSwitch to manage the number of times a DMX value must be present before acknowledging and reacting to the DMX command. Default setting is “0”, meaning SmartSwitch will react the first time it receives the valid DMX command. Maximum setting is “100”. DMX refreshes approximately 40 times per second. Step 1: Scroll to DMX, press . Step 2: Scroll to DMX Response, press Step 3: Use + or - to select the desired number, press Step 4: Press < to return to the previous menu or press << to return to the main menu. . . Presets SmartSwitch features 32 built-in user defined presets which can be configured and utilized without an external control system. For added control a SmartSwitch with SmartLink enabled and a LinkPower supply (S-LPS) installed facilitates the use of up to four preset stations for remote recall of the built-in presets. See “Stations” on page 15. Note: In addition, these 32 presets are available for use in the built-in sequencer. See “Sequencer” on page 12. For best results presets should be recorded sequentially as they would be recalled in a sequence. When you record a preset, SmartSwitch will snapshot any level whether set in the test menu, by a DMX input, by manually selecting the relay ON/OFF lever, or all of the above. When a new preset is recorded using the same preset number SmartSwitch will record over the previous levels. Unless preset timing is configured otherwise, presets are activated and deactivated in the default fade up and fade down time of 3 seconds. See “Setup Preset Timing” on page 11. 10 SmartSwitch User Manual Record a Preset (snapshot) Step 1: Set relay levels using the Test Menu, a DMX control source, by manually selecting the relay ON/OFF lever from within the low voltage compartment of the relay panel, or all of the above. To manually set relay state: Before manually changing the state of the relays, first change the Relay menu settings to “Allow Manual” control. Scroll the menu to “Relays”, press , [Allow Manual] will display. Press , Allow Manual [NO] will display. Scroll to [YES], press . Open the locking door to gain access to the low voltage area of the relay panel. Using a slotted screwdriver, manually slide the relay ON/OFF lever to the desired state. Repeat this for each relay circuit in the panel ensuring all relays are in the desired state for preset recording. Proceed with Step 2. Step 2: Scroll to the Presets menu, press . Step 3: Scroll to Record Preset, press Step 4: Press + or - to select the desired preset number then press will briefly display. . . “Preset Record” Setup Preset Timing After the preset is recorded set the values for fade up, fade down and hold time. Step 1: Scroll to Presets menu, press . Step 2: Scroll to Setup Timing, press . “Setup timing, Preset/Step: [##]” will display. Step 3: Press + or - to scroll the presets list, press . “Preset/Step ##, Fade Up [min]:sec” will display. Default fade times are 3 seconds and the maximum allowable is 59min:59seconds. Step 4: Press + or - to increase or decrease the Fade Up minutes, press selection will change to the seconds field. Step 5: Press + or - to increase or decrease the Fade Up seconds, press . “Preset/ Step: Fade Down will display with the same values as set for Fade Up. Step 6: Repeat steps 4 and 5 for Fade Down times. press [min]:00” will display. Note: . “Preset/Step: Hold Time If the Fade Up timing is changed after setting the desired Fade Down timing, Fade Down will change to reflect the same timing as Fade Up. You must set Fade Down timing again to the desired timing if changes to Fade Up are made. Step 7: 2 . The Repeat steps 4 and 5 for Hold Time. When activated as a Preset, the preset will hold indefinitely until the preset is deactivated or another event is played. When played as part of a sequence the maximum “Hold Time” is 59min:59seconds. Menu’s and Configuration 11 Activate a Preset Step 1: Scroll to Presets menu, press . Step 2: Scroll to “Activate Preset” and press Step 3: Press + or - to scroll the list of presets. Press Step 4: “Preset Run Instant?” will briefly display. . “Number [##]” will display. to select a preset. a: To run the preset with its programmed Fade Up, Fade Down and Hold Times, ignore this message. The display will return to the previous menu after a few seconds of display. The control symbol will display “P” for preset. b: Press while the message is displayed to complete the preset in the default time of 3 seconds. The display will default to the previous menu when complete. Deactivate a Preset If a preset is active, the control symbol located in the top right corner of the LCD will display the “P” symbol. To deactivate the preset: Step 1: Scroll to the Presets menu, press . Step 2: Scroll to Deactivate Preset and press then return to the previous menu. . “Preset Deactivated” will display briefly Sequencer The built-in sequencer in SmartSwitch plays a series of recorded presets sequentially. The order of execution is based on the first preset (step) and the length is determined by the number of steps configured for the sequence. Fade Up, Fade Down and Hold Times are determined in the Presets menu and may be different for each step. See “Setup Preset Timing” on page 11. The sequence can be set to loop continuously or stop after only one occurrence. Setup a Sequence Step 1: Scroll to Sequencer, press . Step 2: Scroll to Setup Sequence, press Step 3: Use + or - to select the number of steps to be included in the sequence (up to 32). The sequencer will play the steps in series with preset #1 as step #1 always. Press , Loop [NO] will display. Step 4: Scroll to select [Yes] to continuously loop the sequence or [NO] to play the sequence only once and then stop. Press . . Star t / Stop a Sequence Step 1: Scroll to Sequencer, press . a: To start the sequencer, scroll to Start Sequence and press . “Sequence Started” will display briefly and the control symbol on the LCD will display “S”. Note: The sequence will start at Preset 1 and run for a user defined number of steps. If the sequence is not configured to loop, the sequence will stop after only one occurrence and hold the last look played. If the sequence is configured to loop, the sequence will start at preset 1 and continue looping until deactivated. b: To stop the sequencer, scroll to Stop Sequence and press . “Sequence Stopped” will briefly display and the control symbol on the LCD will no longer display “S”. 12 SmartSwitch User Manual Relays Use this menu to specify relay settings including allow manual, relay turn on value, relay turn off value and relay delay timing. Allow Manual Allow manual is a relay setting that when set to [YES] allows users to manually override the relay state as configured in the software. When set to [NO], and a relay state is changed manually, the software will override to correct position of the relay after it finds it incorrect. When set to [YES] users are allowed the freedom to test the relays without fighting for control over the software. Step 1: Scroll to Relays, press . Step 2: Scroll to [Allow Manual], press . a: Selecting [YES] allows users to manually override the relay state as configured in software. b: Selecting [NO] will not allow manual override. If the user manually overrides the relay state, software will immediately correct the relay state back to the configured setting. Set Relay Turn On By default, each relay will turn on after receiving a 50% level from the DMX control source. This setting is adjustable per relay and can range from 50-100%. Step 1: Scroll to Relays, press . Step 2: Scroll to [Set Relay Turn On], press . Relay On Level, Relay [##] will display. Step 3: Use + or - to select the relay, press . Relay On Level, Level [50] will display. Step 4: Use + or - to scroll the allowable levels, press Step 5: Repeat this process for each relay in the panel if required. to set. Set Relay Turn Off By default, each relay will turn off after receiving a 49% level from the DMX control source. This level setting is adjustable per relay and can range from 0-49%. 2 Step 1: Scroll to Relays, press Step 2: Scroll to [Set Relay Turn Off], press . Relay Off Level, Relay [##] displays. Step 3: Use + or - to select the relay, press . Relay Off Level, Level [49] displays. Step 4: Use + or - to scroll the allowable levels, press Step 5: Repeat this process for each relay in the panel if required. Menu’s and Configuration . to set. 13 Relay Delay Relay Delay is the length of time between switching of relays. For example, a preset is selected to turn all relays on. The time between the switching on of each relay can be delayed by a length of time not to exceed 60 seconds. By default, relay delay is set to 00.0 seconds, meaning all relays in the preset will switch at once without delay. Note: When changing the delay time for relays, it is important not to overlap the relay delay times and preset fade up/down times. Example: a preset fade up/down time set to 3 seconds and relay delay set to 4 seconds. A setting of this type will play the preset fade up in 3 seconds as instructed but the relay delay of four seconds will overlap the 3 second fade up time causing the user to believe that the preset never played. Step 1: Scroll to Relays, press . Step 2: Scroll to [Relay Delay], press Step 3: Use + or - to scroll. Press Step 4: Press < to return to the previous menu or << to return to the main menu. . “Relay Delay, [0.0] Seconds” will display. to set. Emergency SmartSwitch is provided with a emergency contact input. When an active emergency contact is received all non-emergency circuits in the SmartSwitch are forced to switch off while all user-selected emergency circuits in the panel are switched on. Note: For customer convenience, ETC offers a Voltage Barrier (SS-VB) for use to separate multiple voltages and/or emergency circuits from normal circuits. This is an accessory option, sold separately, and available for use when local code requires. Contact ETC quotations for assistance. During an emergency state the LCD will display a message advising the “Emergency Input Is Active” and the menu will lock-out all ability to access the system. After normal power is restored, the SmartSwitch will restore to the configured DMX Loss Behavior mode. See “DMX Loss Behavior” on page 10. Assign Relay to Emergency 14 Step 1: Scroll to Emergency, press . Step 2: Scroll to [Assign Relay], press Step 3: Use + or - to scroll the relay list. Press Step 4: Use + or - to scroll In Emergency [Yes] or [No], press Step 5: Press < to return to the previous menu or << to return to the main menu. . “Relay [##], In Emergency No” will display. to select a relay. . SmartSwitch User Manual Stations A SmartSwitch relay panel with SmartLink enabled communicates between SmartSwitch relay panels and/or SmartPack dimmer packs if installed. This feature is called panel to panel synchronization. Panel to panel synchronization include the following configuration settings: • Power Up Behavior • Preset Fade and Hold Times • Number of Steps for Sequencer • Sequence Loop, “Yes” or “No” • DMX Loss Behavior • • Depending on the configured DMX Loss Behavior, the following settings may also be communicated: DMX Wait and Fade Time, DMX Fade to Preset Number Station Support “Enable” or “Disable” Note: The SmartSwitch relay panel with SmartLink enabled continues to function as a stand-alone switching system, meaning no other control system is required for panel to panel synchronization. See “Panel Synchronization” on page 21. A SmartSwitch relay panel with SmartLink enabled and a LinkPower supply (S-LPS) installed facilitates the communication of SmartLink messages between SmartSwitch relay panels and/or SmartPack dimmer packs and up to four SmartLink wall stations. See “Wall Stations” on page 22. SmartSwitch SmartPack SmartPack SmartSwitch Presets, Sequences, Sequence Timing SmartLink LinkPower supply Belden 8471 Note: A SmartLink network is limited to four SmartLink wall stations and up to four SmartSwitch or SmartPack products in a system. Both products install and perform together effortlessly on the SmartLink network without the need of an external control system. One SmartSwitch or SmartPack in the system must have a LinkPower supply installed for station power. Assign Station Master One SmartSwitch or SmartPack, if installed together in a system with wall stations, must be configured as the “Station Master”. The station master tracks and updates button LED states for the connected wall stations when a preset or sequence change occurs. See “SmartLink Features” on page 19. Note: 2 ETC recommends configuring the SmartPack or SmartSwitch product with the LinkPower supply installed and wall stations connected as the “Station Master”. Menu’s and Configuration 15 For systems without wall stations installed, there is no requirement to configure a “Station Master”. Default functionality for panel to panel synchronization is the last SmartSwitch or SmartPack updated in the system acts as the “station master”. Step 1: Scroll to [Stations], press . Step 2: Scroll to [Station Master], press . • If the SmartSwitch you are configuring is to be the station master, scroll to [Enable], press . • If the SmartSwitch you are configuring is not the station master, scroll to [Disable], press . Remot e Record Remote Record enables users the ability to allow or lockout preset recording from SmartLink wall stations. Step 1: Scroll to [Stations], press . Step 2: Scroll to [Remote Record], press Step 3: To record a preset from a SmartLink wall station you must first [Enable] “Remote Record” from within the “Station Master”. Press . . • After enabling “Remote Record” the user has the option to set levels to a desired look (via manual relay switching, the test menu or a DMX control device) and record that look to a specific preset via any installed SmartLink wall station. See “Record a Preset from a Wall Station” on page 25. Step 4: If the ability to record a preset from a wall station is not desired [Disable] “Remote Record”, press . • If disabled, preset recording must be accomplished from the face panel of the “Station Master”. See “Presets” on page 10. 16 SmartSwitch User Manual General Settings The General Settings menu is used to configure standard features of your SmartSwitch relay panel including: LCD Backlight User-selectable LCD backlight performance: • Auto - display dims when not in use for a period of time • On - display backlight is always on • Off - display backlight is always off Menu Mode User selectable Normal Menu or Advanced Menu: • Normal - limited menu options which allow users to change the DMX Start Address from the DMX menu, view the Software Version and change the menu mode only. • • To enter Normal mode from the Advanced Menu, scroll to [Normal] and press The SmartSwitch will request confirmation that you want to exit the Advanced menu, scroll to [YES] and press . . Advanced - all menu access • To enter the Advanced mode from the Normal menu, scroll to [Advanced] press and hold for 5 seconds. The menu will adjust back to the main menu automatically, without further prompt. Reset to Defaults Resets the following attributes to default status: • DMX Mode - resets to >DMX Start Address< • DMX Start Address - resets start address to >1< • DMX Loss Behavior - resets to >Hold Last Look< Deep Clear System Resets the unit as if it were new, out of the box including the following attributes: • Resets the same defaults as described in Reset to Defaults. • Clears all preset and sequence settings and resets timing values to defaults. Software Version Displays the current software version for the SmartSwitch and SmartLink. Power Up Behavior Choose between Normal or Previous State: 2 • Normal - the SmartSwitch powers-up with both presets and the sequencer deactivated. • Previous State - the SmartSwitch powers up with the preset and / or the sequence active that was running during the previous session. This feature allows for unattended operation through power blackouts although it will not restore Test levels. Menu’s and Configuration 17 18 SmartSwitch User Manual Chapter 3 SmartLink™ Enabled SmartLink Features SmartLink is an architectural control system created for enhanced control of the 32 built-in presets and the sequencer as found in the SmartLink enabled SmartSwitch and SmartPack products. SmartLink enables the SmartSwitch and SmartPack products expanded control with wall station integration and panel to panel synchronization. Neither control feature is dependent upon the other for operation but instead rely independently on the SmartLink network and specific host messages. SmartLink enabled I/O panel to chassis ground LinkPower supply (optional) Data to CPU SmartLink & Emergency v v v DMX In DMX-Thru ESD Ground 3 • Synchronization - each SmartSwitch and SmartPack in the system must have the I/O board installed (i.e. SmartLink enabled) and connected on the SmartLink network. A SmartLink enabled SmartSwitch is identified by the logo on the front of the unit. Up to four SmartSwitch and/or SmartPack products may be utilized on the SmartLink network. • Wall Station - In addition to being SmartLink enabled, one SmartSwitch or SmartPack in the system must have a LinkPower supply (S-LPS) installed for wall station integration. The LinkPower supply powers up to four SmartLink wall stations and is FTT-10A topology-free. For ease of troubleshooting, ETC recommends installing the LinkPower supply in the same SmartSwitch or SmartPack product that the station data run terminates and utilize that product as the “Station Master”. SmartLink™ Enabled 19 Definitions 20 • Host Product - any SmartLink enabled SmartSwitch or SmartPack within a system that sends specific host messages to other SmartLink enabled products in the system for preset and sequence synchronization. Default functionality is that the last SmartSwitch or SmartPack product updated in the system acts as the host product and sends its host messages to the other products in the system. If a preset or a sequence is activated from another product in the system, it will then act as the host product and send its host messages to the other products in the system. • Station Master - any SmartLink enabled SmartSwitch or SmartPack product with a LinkPower supply (S-LPS) installed that is configured via the menu to control wall stations. Additionally the station master tracks and updates button LED states for connected wall stations when preset or sequence changes occur, and acts as the “host product” for preset and sequence synchronization. ETC recommends configuring the product with the LinkPower supply (S-LPS) installed and the station data runs terminated as the “Station Master”. • Host Messages - specific configuration settings and events sent from the host product to other SmartLink enabled products for lock-step synchronization of preset and sequence playback. (Lock-step meaning presets will fade up, down and hold in sync across all SmartLink enabled products.) Host messages communicated include: • DMX Loss Behavior - Hold Last Look, Wait and Fade or Fade to Preset. Wait and Fade times or Fade to Preset Number, if applicable. • Sequence - Start, Stop, Loop Yes or No • Preset - Fade Up Time, Fade Down Time and Hold Time • Station Master - Enable or Disable • Power Up Behavior - Normal or Previous State SmartSwitch User Manual Panel Synchronization It is possible to synchronize presets and sequence activation across up to four SmartSwitch or SmartPack products when they are connected on a SmartLink network. SmartLink connected products share various configuration parameters and events known as host messages, as sent from the host product. Reference page 20 for host messages. SmartPack SmartSwitch SmartPack SmartSwitch Belden 8471 Ä Ã - - - - Presets, Sequences, Sequence Timing - - - - Ä Preset and Sequence Synchronization Default functionality is that the last SmartSwitch or SmartPack updated in the system acts as the host product and sends its host messages to the other SmartLink enabled products in the system. Each product retains its programmed preset and sequence configuration but when a host product is selected and the sequence is active, each SmartLink enabled product will activate and play its own sequence with the number of steps, preset timing (fade up, fade down and hold time) as sent by the host product. Note: When SmartPack and/or SmartSwitch products linked together via the SmartLink network and Preset timing is changed in one unit, all products on the SmartLink network record the new Preset timing. Preset Synchronization Selecting a preset on any pack effects the same numbered preset to run on all SmartLink enabled products in the system, simultaneously. If “Preset 1” is activated from the face panel of a SmartSwitch: That SmartSwitch will act as the host product and send its host messages to the other SmartLink enabled products in the system to activate “Preset 1”. The preset will activate with the same fade up time, hold time, and fade down time as sent from the host product. Sequence Synchronization Activating a sequence on any pack causes all connected SmartLink enabled SmartSwitch and SmartPack products to run the same sequence in lock-step synchronization using the host product fade up, fade down and hold time. In addition, sequence loop “Yes” or “No” will be sent from the host product to all SmartLink enabled products to ensure lock-step synchronization. If the sequencer is activated from the face panel of a SmartSwitch: That SmartSwitch will act as the host product and send its host messages to the other SmartLink enabled products in the system. Each SmartLink enabled product in the system will activate the sequence as sent from the host product with steps and timing synchronized. If one product in the system does not have a specific step recorded and the host product sends the message to play that step, the receiving product will simply ignore that message and pick up with the next recorded event. 3 SmartLink™ Enabled 21 Wall Stations Two wall station types, a 5 button preset station and a 10 button preset station, are available for use on the SmartLink network. Wall stations provide remote access to the 32built-in presets and sequencer found in SmartLink enabled SmartSwitch and SmartPack products. A LinkPower supply (S-LPS) must be installed into one SmartSwitch or SmartPack Wall Mount product in the system. This power supply is required to power up to four SmartLink wall stations per system and is available factory installed or as a kit (S-LPS) for field installation. Reference LinkPower Supply Kit, page 29 for field installation instructions. SmartPack SmartSwitch SmartPack SmartSwitch Presets, Sequences, Sequence Timing SmartLink LinkPower supply Belden 8471 CAUTION: A SmartLink network is limited to the following: • Only one LinkPower supply per system. LinkPower supply failure is probable if more than one supply is installed per system. • Up to four SmartLink wall stations per system • Up to four SmartSwitch or SmartPack products per system • A SmartLink data run is limited to 1500 feet 22 SmartSwitch User Manual Station Options Control station electronics mount directly into a flush mount, single gang, industry standard back box. Station faceplates are constructed of ABS plastic and use no visible means of attachment. All stations are available in white, black, ivory, gray or signal white faceplates and buttons. 5 Button 10 Button Preset 1 Preset 1 Preset 6 Preset 2 Preset 2 Preset 7 Preset 3 Preset 3 Preset 8 Preset 4 Preset 4 Preset 9 Sequence Preset 5 Preset 10 A sampling of standard legends available include: 5 Button Station 10 Button Station Presets Only Presets and Sequence Presets Only Presets and Sequence Preset 1-5 Preset 1-4 & Sequence Preset 1-10 Preset 1-9 & Sequence Preset 6-10 Preset 5-8 & Sequence Preset 11-20 Preset 10-18 & Sequence Preset 11-15 Preset 9-12 & Sequence Preset 21-30 Preset 19-27 & Sequence Preset 16-20 Preset 13-16 & Sequence Preset 21-25 Preset 17-20 & Sequence Preset 26-30 Preset 21-24 & Sequence Preset 25-28 & Sequence Preset 29-32 & Sequence Custom options available, contact ETC quotations department for assistance. Station Personality Settings The wall station electronics (back side) include a set of eight dip switches. Each setting activates standard functionality or personalities from within the station including the starting preset number and sequence looping. back side electronics UP 1 OF F 2 3 4 5 6 7 8 set of 8 dip switches DHS-8 1 2 3 4 5 6 7 8 OFF front side electronics 3 SmartLink™ Enabled 23 The table below indicates dip switch settings for both the 5 button and the 10 button preset stations. Determine the functionality required and set the dip switches for station personality Switch Station # 24 2 3 4 5 Button Station 5 Switch 1 On = presets & sequence Switch 1 Off = presets only 10 Button Station Switch 1 On = presets & sequence Switch 1 Off = presets only 1 Off Off Off Off 1-4 1-5 1-9 1-10 2 On Off Off Off 5-8 6-10 10-18 11-20 3 Off On Off Off 9-12 11-15 19-27 21-30 4 On On Off Off 13-16 16-20 28-36 31-40 5 Off Off On Off 17-20 21-25 37-45 41-50 6 On Off On Off 21-24 26-30 46-54 51-60 7 Off On On Off 25-28 31-35 55-63 61-70 8 On On On Off 29-32 36-40 64-72 71-80 SmartSwitch User Manual Record a Preset from a Wall Station It is possible to record a preset from a wall station if “Remote Record” has been enabled in the station master. See “Remote Record” on page 16. All SmartSwitch and SmartPack products on the SmartLink network will record the current output levels and assign the preset to the button. Step 1: Set relay states manually, via the test menu, from a DMX control device or all of the above to the desired preset look. Step 2: Press and Hold the preset button for 5 seconds. • After two seconds, the button LED will start to flash at a 1/2 second interval. If the button is held for the entire 5 seconds, a record action will begin. • If the button is released before the 5 seconds have elapsed, recording action will be canceled and the previous preset will be activated. Step 3: 3 SmartLink™ Enabled Release the preset button. The new recorded preset will activate and the LED will illuminate. 25 26 SmartSwitch User Manual Chapter 4 Service and Maintenance Service Contacting ETC about Equipment Problems If you are having difficulties, your most convenient resources are the references provided in this manual. To search more widely try the ETC web site at www.etcconnect.com. If none of these resources is sufficient, contact ETC technical services directly at one of the offices listed below. Emergency service is available from all ETC offices outside of normal business hours. When calling for assistance, please have the following information handy: • Your location and job name • Model of SmartSwitch relay panel(s) • Type of relays used including model number and quantity. • Other components in your system including SmartPack, LinkPower supply, quantity and type of wall stations, etc. • DMX control source used for system-wide control, if any. • Related system problems or equipment failure. Americas Tel: +1 800 688 4116 (toll-free within the USA) Tel: +1 608 831 4116 (from outside the USA) Email: [email protected] Asia Tel: +852 2799 1220 Email: [email protected] United Kingdom Tel: +44 (0)20 8896 1000 Email: [email protected] Germany Tel: +49 (80 24)47 00-0 Email: techserv-hoki.etcconnect.com 4 Service and Maintenance 27 Maintenance Vacuum the Vents Vacuum the dust from the airflow vents regularly. The interval between cleanings is dependant on the installation environment. Never allow the vents to become completely clogged with dust. Vacuum the Interior WARNING: 28 High Voltage! Remove power from the SmartSwitch unit prior to removing the front cover. Step 1: Remove power from the SmartSwitch unit. Step 2: Remove the front cover of the SmartSwitch unit and detach the ground wire. Step 3: Vacuum the dust from the interior of the unit. Use canned air to blow dust from the circuit boards to avoid possible damage from electrical discharge. Step 4: Reinstall the front cover before applying power to the unit. Be sure that the ground wire is re-attached to the front cover. SmartSwitch User Manual Appendix A LinkPower Supply Kit One LinkPower supply is required to power up to four wall stations over the SmartLink™ network. A SmartLink system is limited to one LinkPower supply, up to four wall stations and up to four SmartLink enabled SmartPack or SmartSwitch products. Due to the similar design for the SmartPack Wall Mount and the SmartSwitch relay panel control terminations, the following instructions may be used for either product. Installation Procedure The LinkPower supply kit includes a LinkPower supply and four screws. Step 1: Remove power from the control electronics. a: For a SmartPack Wall Mount, turn the Standby breaker off. b: For a SmartSwitch relay panel, turn the circuit breaker off at the breaker panel. Step 2: Remove the two screws securing the I/O panel to the chassis. Step 3: Fold the I/O panel down to reveal the control terminations. Step 4 Step 5 LinkPower supply A I/O board Step 4: Angle the LinkPower supply board approximately 10° and insert the four pins as found on the LinkPower supply into the receptacle on the I/O board. Step 5: Align the LinkPower supply with the four screw mounts located on the I/O panel and secure with the four screws provided. Do not over-tighten the screws. Step 6: Close the I/O panel and secure with the two screws. Step 7: Re-apply power to the control electronics. LinkPower Supply Kit 29 30 SmartSwitch User Manual Appendix B Relay Kit Installation Overview A SmartSwitch relay kit includes a relay and a wiring harness for relay low voltage connection to the relay control board. 1 2 Relay Kit Ordering Information 1 2 1 6-8 AY 616 REL WRPOLE 2- Single pole, single space 20A SS-1PRK: @ 300V AC HID relay. (Aromat WR6161-81) 1 1-8 AY 616 REL WRPOLE 1- Double pole, single space SS-2PRK: 20A @ 300V AC HID relay. (Aromat WR6166-81) Relay Specification WR6161-81Single Pole HID Relay CSA UL Listed • General Use • Ballast (HID) • Tungsten • Motor Load 20A @ 347V AC 20A @ 347V AC 2400W @ 120V AC 1/2 HP @ 110-125V AC 1-1/2 HP @ 220-250V AC • General Use • Ballast (HID) • Tungsten • Motor Load 20A @ 300V AC 20A @ 300V AC 2400W @ 120V AC 1/2 HP @ 110-125V AC 1-1/2 HP @ 220-277V AC WR6166-81 Double Pole HID Relay CSA UL Listed • General Use • Ballast (HID) • Tungsten • Motor Load 20A @ 347V AC 20A @ 347V AC 2400W @ 120V AC 1/2 HP @ 110-125V AC 1-1/2 HP @ 220-250V AC • General Use • Ballast (HID) • Tungsten • Motor Load 20A @ 300V AC 20A @ 300V AC 2400W @ 120V AC 1/2 HP @ 110-125V AC 1-1/2 HP @ 220-277V AC Relay Ratings B • AIC: 5000A, 277V • Inrush: 2000A • Isolation: 5000V RMS • Life: 60,000 cycles at full load • Relay Output terminals accept 12-14 AWG copper wire Relay Kit Installation 31 Installation Procedure WARNING: Step 1: RISK OF ELECTRIC SHOCK! All relay panel maintenance and terminations must be completed with the power removed. All line feeds from the circuit breaker panel must be locked out in the OFF position prior to installing additional relays. Remove the cover assembly from the SmartSwitch enclosure to reveal the relay panel interior. a: Remove the four screws securing the front cover to the enclosure. Rough-in enclosure and front cover removed from this graphic for clarity of the relay panel interior. barrier e vabl remolot s Factory installed relay voltage barrier with removable slots. Remove only one slot when replacing with a relay. Step 2: Pull line feeds through conduit from the circuit panel to the relay panel. Step 3: Pull load wires through conduit from the relay panel to the lighting loads. Note: It is important to separate low voltage from high voltage within the relay panel. SmartSwitch units shipped from the factory only partially populated include a relay voltage barrier in all slots not populated with a relay. Remove only the slot from the relay voltage barrier that will be replaced with a relay. Step 4: If installing one relay remove only one slot from the relay voltage barrier. 1) Break the tabs off using pliers. 2) Bend the barrier back and forth until free. 32 SmartSwitch User Manual Step 5: Install the relay into the relay slot. Side view detail relay voltage barrier Low voltage wiring harness provided in the relay kit 1 2 3 1) From the center of the relay panel, direct the relay under the voltage barrier and into the slot. 2) Align the input terminal side with the mounting bracket. 3) Press the output terminal side down into the mounting clip until secure. CAUTION: Careful not to damage the relay control board or connectors during relay installation. Step 6: Install the keyed two pin connector found on the relay wiring harness into the adjacent receptacle on the relay control board. Step 7: If the relay wiring harness was not attached to the relay upon receipt, connect the wire leads from the wiring harness to the low voltage input terminals on the relay. a: Connect the blue wire to the blue screw terminal and secure. b: Connect the red wire to the red screw terminal and secure. Step 8: Connect line and load wires to the output terminals of the relay. a: Strip 1/4” of insulation from the end of the line and load copper wires. b: Insert the bare-end into the relay output screw terminals and secure. e Lin B Relay Kit Installation d Loa 33 Verify Installation • Are all line and load cables landed into the appropriate relay and secured? • Are all load circuits free of shorts? • Are voltage barriers used where required by local code? • Are all cable access openings covered with plugs and all removable plates reinstalled? • Are the relay low voltage (control) wiring harnesses: - a:) seated properly into the receptacle on the control board? - b:) secured to the relay input terminals? • Is the relay panel clean of all metal shavings and debris? • Is the circuit panel schedule updated with the new load information? Power Up 34 Step 1: Switch all relays to the OFF position prior to applying power. Step 2: Re-attach the front cover to the unit. Step 3: Apply power to the control electronics. Step 4: At the circuit breaker panel, switch all line feeds to the ON position. Step 5: Clear all faults that have caused breakers to trip. SmartSwitch User Manual C Menu Flow Chart ETC SmartSwitch [Presets] ETC SmartSwitch [DMX] DMX 123 -> 135 1 12 Preset/Step 32 Fade Up [mm:ss] Preset/Step 32 Hold Time: [mm:ss] Activate Preset Preset Number: [pp] Preset Preset Deactivated Record Preset Preset Number [pp] Setup Timing Preset/Step [32] Preset/Step 32 Fade Down [mm:ss] Presets [Activate Preset] Presets [Deactivate Preset] Presets [Record Preset] Preset [Setup Timing] Preset pp Recorded DMX [000] Packet Delay DMX Mode [DMX Patch] DMX Mode [DMX Start Address] DMX [DMX Response] DMX [DMX Mode] Wait and Fade Out Wait Time:[mm]:ss DMX [Wait and Fade Out] DMX [Hold Last Look] DMX [DMX Loss Behavior] DMX Patch 12 -> DMX [512] Fade to Preset Number: [##] DMX Patch Relay [12] -> DMX 12 DMX [DMX Patch] DMX [Fade to Preset] DMX Start Address DMX: [501-512] DMX [DMX Start Address] Appendix C Menu Flow Chart This appendix contains the SmartSwitch menu structure. 35 36 SmartSwitch User Manual Sequencer Sequence Stopped Setup Sequence Number of Steps [ss] Sequence “Active” Step:ss Fade:mm:ss Sequencer [Stop Sequencer] Sequencer [Setup Sequence] Sequencer [Sequencer Status] Station Master [Enable] Remote Record [Enable] Stations [Station Master] Stations [Remote Record] Relay Delay [0.0]Seconds Relays [Relay Delay] ETC SmartSwitch [Stations] Relay Off Level Relay [xx] Relay [Set Relay Turn Off] Relay [xx] In Emergency [No] Relay On Level Relay [xx] Relays [Set Relay Turn On] Emergency [Assign Relay] Allow Manual Allow Manual [NO] Relays [Allow Manual] Sequence “Inactive” Sequencer Sequence Started Sequencer [Start Sequence] ETC SmartSwitch [Emergency] ETC SmartSwitch [Relays] ETC SmartSwitch [Sequencer] Relay Off Level Level [xx]% Relay On Level Level [xx]% Setup Sequence Loop: [Yes] C Menu Flow Chart 37 ETC SmartSwitch [General Settings] SmartSwitch v#.#.# SmartLink v#.#.# Power Up Behavior [Normal] [Previous State] General Settings [Software Version] General Settings [Power Up Behavior] Menu Mode [Advanced Menu] SmartSwitch v#.#.# SmartLink v#.#.# DMX [DMX Start Address] General Settings [Menu Mode] General Settings [Software Version] ETC SmartSwitch [General Settings] Set Start Address DMX:[001->024] Test Relay Ch:rr @ Level:%%% Exit Test Mode: [Keep Test On] [Test: all off] Button Functions + Increment Level - Decrement Level < Decrement Relay Channel Increment Relay Channel << Exit Test Mode and Cancel Exit Test Mode ETC SmartSwitch [DMX] Normal Menu Are you Sure? [No] General Settings [Deep Clear System] 12 Are you Sure? [No] General Settings [Reset to Defaults] 1 > 24 Menu Mode [Normal Menu] [Advanced Menu] General Settings [Menu Mode] DMX: 1 LCD Backlight [Auto] [On] [Off] General Settings [LCD Backlight] TEST MENU 38 SmartSwitch User Manual Corporate Headquarters 3031 Pleasant View Road, P.O. Box 620979, Middleton, Wisconsin 53562-0979 USA Tel +608 831 4116 Fax +608 836 1736 London, UK Unit 26-28, Victoria Industrial Estate, Victoria Road, London W3 6UU, UK Tel +44 (0)20 8896 1000 Fax +44 (0)20 8896 2000 Rome, IT Via Ennio Quirino Visconti, 11, 00193 Rome, Italy Tel +39 (06) 32 111 683 Fax +39 (06) 32 656 990 Holzkirchen, DE Ohmstrasse 3, 83607 Holzkirchen, Germany Tel +49 (80 24) 47 00-0 Fax +49 (80 24) 47 00-3 00 Hong Kong Room 605-606, Tower III Enterprise Square, 9 Sheung Yuet Road, Kowloon Bay, Kowloon, Hong Kong Tel +852 2799 1220 Fax +852 2799 9325 Service: (Americas) [email protected] (UK) [email protected] (DE) [email protected] (Asia) [email protected] Web: www.etcconnect.com Copyright © 2005 ETC. All Rights Reserved. Product information and specifications subject to change. 7023M1200-1.0.0 Rev A Released 06/05