1
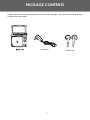
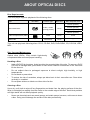
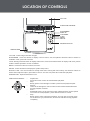
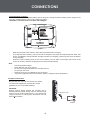
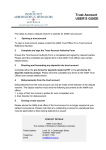
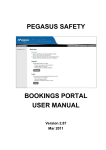
TABLE OF CONTENTS
PRECAUTIONS ...............................................................................................................................1
IMPORTANT SAFETY INSTRUCTIONS ........................................................................................2
PRODUCT GENERAL DESCRIPTION.............................................................................................4
PACKAGE CONTENTS ...................................................................................................................5
ABOUT OPTICAL DISCS ................................................................................................................6
Disc Requirements...................................................................................................................6
Disc Care and Maintenance ....................................................................................................6
Handling a Disc ................................................................................................................6
Cleaning a Disc ................................................................................................................6
LOCATION OF CONTROLS ............................................................................................................7
Front View ................................................................................................................................8
Back View ................................................................................................................................8
Bottom View ............................................................................................................................. 8
Side View ................................................................................................................................. 8
CONNECTIONS ............................................................................................................................. 9
USB/SD Card Connection....................................................................................................... 9
Power Connection ................................................................................................................... 9
Using The Built-in battery.......................................................................................................10
Earphone Connection ............................................................................................................10
BASIC OPERATIONS....................................................................................................................11
Power Supply .........................................................................................................................11
Basic Playback ....................................................................................................................... 11
LCD Mode ..............................................................................................................................11
Power Saving .........................................................................................................................11
Adjusting the Volume .............................................................................................................12
Disc Error Messages .............................................................................................................12
Power Management ...............................................................................................................12
IR Menu ..................................................................................................................................12
SETUP ...........................................................................................................................................13
Language Setup.....................................................................................................................13
Video Setup ...........................................................................................................................14
Audio Setup............................................................................................................................14
Rating .....................................................................................................................................14
Misc ........................................................................................................................................14
4
SPECIFICATIONS .........................................................................................................................15
TROUBLESHOOTING ...................................................................................................................16
Westwell Warranty Statement ..................................................................................................... 17
Olin_Portable_DVD_Player_PD-755_Series_User_Manual_V1
PRECAUTIONS
CAUTION
For Customer Use:
Enter below the serial number that is located on the
bottom of the unit. Retain this information for future
reference.
RISK OF ELECTRIC SHOCK
DO NOT OPEN
CAUTION: TO REDUCE THE RISK OF FIRE AND ELECTRIC SHOCK, DO NOT REMOVE THE COVER (OR BACK)
OF THE UNIT. REFER SERVICING ONLY TO QUALIFIED
SERVICE PERSONNEL.
The lightning flash with arrowhead symbol within an equilateral triangle is intended to alert
the user to the presence of uninsulated “dangerous voltage” within the product’s enclosure
that may be of sufficient magnitude to constitute a risk of electric shock.
The exclamation point within an equilateral triangle is intended to alert the user to the presence of important operation and servicing instructions in the literature accompanying the
appliance.
WARNING:
To prevent fire or shock hazard, do not expose this device to rain or moisture. Dangerous high voltage is present
inside the enclosure. Do not open the cabinet.
Handling the cords on this product will expose you to lead, a chemical known to the State of California to cause
cancer, and birth defects or other reproductive harm . Wash hands after handling.
CAUTION:
This Digital Video Disc player employs a laser system. To prevent direct exposure to the laser beam, do not try to
open the enclosure or defeat the safety interlocks. When open and the interlocks are defeated, visible laser radiation
is present.To prevent electric shock, match wide blade of plug to wide slot of outlet and fully insert.
Use of controls, adjustments, or performance of procedures other than those specified herein may result in
hazardous radiation exposure. DO NOT STARE INTO THE BEAM.
NOTICE:
This product incorporates copyright protection technology that is protected by U.S. patents and other intellectual
property rights. Use of this copyright protection technology must be authorized by Macrovision, and is intended for
home and other limited viewing uses only unless otherwise authorized by Macrovision. Reverse engineering or
disassembly is prohibited.
Do not make any changes or modifications to the equipment unless otherwise specified in
the manual. If such changes or modifications should be made, you could be required to stop
operation of the equipment.
For recycling or disposal information about this product, please
contact your local authorities or the Electronics Industries Alliance:
www.eiae.org.
1
IMPORTANT SAFETY INSTRUCTIONS
1.
Read Instructions: All the safety and operating instructions should be read before the product
is operated.
2.
Retain Instructions: The safety and operating instructions should be retained for future reference.
3.
Heed Warnings: All warnings on the product and in the operating instructions should be
adhered to.
4.
Follow Instructions: All operating and usage instructions should be followed.
5.
Cleaning: Unplug this product from the wall outlet before cleaning. Do not use liquid cleaners
or aerosol cleaners. Use a dry cloth for cleaning.
6.
Attachments: Use only attachments recommended by the manufacturer. Use of other attachments may be hazardous.
7.
Water and Moisture: Do not use this product near water (e.g., near a bath tub, washbowl,
kitchen sink, laundry tub, in wet basements, or near a swimming pool and the like).
8.
Accessories: Do not place this product on an unstable cart, stand, tripod, bracket, or table. Use only with carts, stands, tripods, brackets,
or tables recommended by the manufacturer or sold with the product. Any mounting of the product should follow the manufacturer’s
instructions and should use a mounting accessory recommended
by the manufacturer.
9.
A product and cart combination should be moved with care. Quick
stops, excessive force, and uneven surfaces may cause the product
and cart combination to overturn.
10. Ventilation: Slots and openings in the cabinet are provided for ventilation
to ensure reliable operation of the product and to protect it from overheating. These openings
should never be blocked by placing the product on a bed, sofa, rug, or other similar surface.
This product should not be placed in a built-in installation such as a bookcase or rack unless
proper ventilation is provided or the manufacturer instructions have been adhered to.
11. Power Sources: This product should be operated only from the type of power source indicated on the rating label. If you are not sure of the type of power supply to your home, consult
your product dealer or local power company. For products intended to operate from battery
power or other sources, refer to the operating instructions.
12. Grounding or Polarization: This product may be equipped with a polarized alternating-current
line plug that has one blade wider than the other. This plug will only fit into the power outlet in
one direction. This is a safety feature. If you are unable to insert the plug fully into the outlet,
try reversing the direction of the plug. If the plug should still fail to fit, contact an electrician to
replace the obsolete outlet. Do not defeat the safety purpose of the polarized plug.
13. Power-Cord Protection: Power supply cords should be routed so that they are not likely to
be walked on or pinched by items placed upon or against them, paying particular attention to
cords at plugs, convenience receptacles, and at the point which they exit from the product.
14. Protective Attachment Plug: The product may be equipped with an attachment plug with
overload protection. This is a safety feature. See the operating instructions for replacement
or directions to reset the protective device. If replacement of the plug is required, be sure the
service technician has used a replacement plug that has the same overload protection as the
original plug as specified by the manufacturer.
2
IMPORTANT SAFETY INSTRUCTIONS
15. Lightning: For added protection for this product, unplug it from the wall outlet and disconnect
the antenna or cable system during a lightning storm or when it is left unattended and unused
for long periods of time. This will prevent damage to the product due to lightning or power-line
surges.
16. Overloading: Do not overload wall outlets, extension cords, or integral convenience receptacles as this can result in a risk of fire or electric shock.
17. Object and Liquid Entry: Never push objects of any kind into this product through openings
as they may touch dangerous voltage points or shout-out parts that could result in a fire or
electric shock. Never spill liquid of any kind on the product.
18. Servicing: Do not attempt to service this product yourself as opening or removing covers may
expose you to dangerous voltage or other hazards. Refer all servicing to qualified service
personnel.
19. Damage Requiring Service: Unplug this product from the wall outlet and refer servicing to
qualified service personnel under the following conditions: a) when the power-supply or plug
is damaged; b) if liquid has been spilled or if objects have fallen into the product; c) if the
product has been exposed to rain or water; d) if the product does not operate normally by following the operating instructions. Adjust only those controls that are covered by the operating
instructions as improper adjustment of other controls may result in damage and will often
require extensive work by a qualified technician to restore the product to its normal operation;
e) if the product has been dropped or damaged in any way; f) when the product exhibits a
distinct change in performance—this indicates a need for service.
20. Replacement Parts: When replacement parts are required, be sure that your service technician has used replacement parts specified by the manufacturer or have the same characteristics as the original part. Unauthorized substitutions may result in fire, electric shock, or
other hazards.
21
Safety Check: Upon completion of any service or repairs to this product, ask the service technician to perform safety checks to ensure that the product is in proper operating condition.
22
Wall or Ceiling Mounting: The product should be mounted to a wall or ceiling only as recommended by the manufacturer.
23. Heat: The product should be situated away from heat sources such as radiators, heat registers, stoves, or other products (including amplifiers) that produce heat.
24. If at any time in the future you should need to dispose of this product please note
that Waste electrical products should not be disposed of with household waste.
Please recycle where facilities exist. Check with your Local Authority or retailer for
recycling advice.(Waste Electrical and Electronic Equipment Directive)
3
PRODUCT GENERAL DESCRIPTION
Product Main Features
▪
▪
▪
▪
▪
▪
▪
▪
▪
Swivel-screen Compact Portable Tablet Design
7inch (17.5cm) Widescreen (16:9) Colour TFT Display
DVD,DVD±R/RW,CD,CD-R/RW,JPEG,WMA,AVI compatible
Plays digital audio,video,and photo files directly from USB drive or SD card
Multi-Language Subtitles/Multi-Viewing Angles Support
Video/Audio Output for External Display Devices
Stereo Earphone & Built-in Speakers
Parental lock control & Last memory
Anti-skip circuitry
4
PACKAGE CONTENTS
Please make sure the following items are included in the package. If any items are missing, please
contact your local dealer.
L
AC Adapter
5
R
Earphones
ABOUT OPTICAL DISCS
Disc Requirements
This DVD player supports playback of the following discs.
Type
Disc Mark
Content Type
Disc Size
Max. Playback Time
133 min (SS-SL)
Audio + Video
(moving picture)
DVD-Video Discs
12 cm
242 min (SS-DL)
266 min (DS-SL)
484 min (DS-DL)
Audio
12 cm
74 min
Still Picture
12 cm
--
Audio Compact Discs (CDs)
JPEG CDs
--
This unit can play back following discs: CD-R, CD-RW, DVD, DVD+R/RW, CD, CD-R/W, JPEG,
MP3 .
Disc Care and Maintenance
Optical discs (DVDs, CDs) contain high-density
compressed data and need proper handling.
Handling a Disc
•
Hold a DVD/CD by its edges. Avoid touching the recorded side of the disc. To remove a DVD/
CD from its storage case, press down on the center retention mechanism of the case and
lift the disc out.
•
Do not subject discs to prolonged exposure to direct sunlight, high humidity, or high
temperatures.
•
Do not bend or press discs.
•
To reduce the risk of scratches, always put discs back in their case after use. Store discs
vertically in a cabinet.
•
Do not place stickers or labels on either side of a disc.
Cleaning a Disc
Use a dry, soft cloth to wipe off any fingerprints and dusts from the playing surface of the disc.
Wipe in a straight line radially from the center to the outside edge of the disc. Small dust particles
and light stains will not affect playback quality.
•
Never use chemicals such as record sprays, anti-static sprays, benzene, or thinners to clean
a disc. Doing so will damage the surface of the disc permanently.
6
LOCATION OF CONTROLS
TFT LCD
FUNCTION CONTROL
DVD/USB/SD
DISPLAY
LCD MODE
TITLE
MENU
SETUP
DIRECTION & OK
OPEN/CLOSE
TFT LCD - Present high resolution images.
DVD/USB/SD - Press this button to display a source menu, use the up/down direciton button to select an
available mode, press Ok to access.
TITLE - Briefly press this button to display a title menu. Press and hold this button to display a IR menu, please
read the “Basic Operation” section for details.
MENU - Press this button to locate a root menu.
SETUP - Press this button to display the system setup menu.
Direction & OK - This set of buttons is usually used when working with menu setup, use direction buttons to
select and to adjust an option, press OK to confirm. You also can press OK to start disc playback.
OPEN/CLOSE - Open/close the disc room.
FUNCTION CONTROL - •
•
•
•
•
Play/Pause Press this fuction control to start/hold disc playback.
Skip Briefly push it to the left/right to locate a previous/next playback point.
Search Hold it to the left/right for a short while to search fast backward/forward
through playback contents.
Slow Repeatedly push it up to start slow motion playback with a chosen speed.
To resume a normal playback, press down this function control.
Stop Briefly push it down to stop disc playback. You may get a pre-stop mode
for the first time you push it down, do it the second time to stop playback
completely.
7
LOCATION OF CONTROLS
BACK View
FRONT View
POWER ON INDICATOR
SD SLOT
BATTERY CHARGE INDICATOR
POWER SWITCH
SIDE View
BOTTOM View
DC 5V IN
USB
VIDEO
AUDIO
HEADPHONE
VOLUME
DO NOT CONNECT THE UNIT TO ANY CAR ADAPTOR
Battery can only be recharged when Switch Key on device is set to OFF
VENTILATION SLOTS
RECHARGEABLE BATTERY
FRONT View
POWER ON INDICATOR - Lights green during operation.
BATTERY CHARGE INDICATOR - Lights red druing charge process and will turn green after the battery is fully charged.
POWER SWITCH - Turn the unit on/off.
BACK View
SD SLOT
BOTTOM View
VENTILATION SLOTS
RECHARGEABLE BATTERY
SIDE View
DC5V IN - Connect to the power source.
USB-For use with USB flash drives.
VIDEO - Output video signal to an external monitor.
AUDIO - Output audio signal to an external receiver.
HEADPHONE - Connect to an earphone for a private listening.
VOLUME - Adjust volume level.
8
CONNECTIONS
USB/SD Card Connection
Insert USB/Card into the corresponding slot.
1.
Press the DVD/USB/SD button to Display the source menu.
2.
Use the Up/Down direction buttons to select USB/SD, press OK to enter.
DISC
SD
NOTE:
SD/USB is only displayed when there
is an available device connected to the
corresponding slot.
USB
3.
It takes a short while for the player’s reading data. After USB/Card is recognized by the unit, screen
will display a working menu, use direction buttons to select a desired file, press OK/Play/Pause to
start playback.
4.
To exit USB/SD, unplug it from the port, or use the DVD/USB/SD Button to switch to other modes.
Power Connections
•
Connecting to the wall outlet
To DC 5V in Jack
Caution:
•
Do not connect the power plug to a
power outlet other than that which
is indicated here and on the label
as this may result in the risk of fire
or electric shock.
•
Do not handle the power plug with
wet hands. Doing so may cause
electric shock.
•
Only use AC Adapters of the type
specified here. Failure to do so
may case a fire or damage the
player.
AC Adapter:
This AC Adapter operates on
100-240V~~50/60Hz 0.4A MAX
DC OUT: 5V
DC current: 1.0A MAX
9
CONNECTIONS
Using the Built- in battery
The unit has a built-in rechargeable battery (lithium-polymer). Charge the built-in battery before using it for the
first time. It takes about 4 hours to fully charge the battery.
This battery can work for 2 hours after fully charged
DO NOT CONNECT THE UNIT TO ANY CAR ADAPTOR
Battery can only be recharged when Switch Key on device is set to OFF
•
•
•
Note:
•
•
•
•
•
•
Make sure that the power switch is set to the Off position before charging.
To charge the built-in battery, just connect the AC adapter to the player and a specified wall outlet. See
above. (The Battery Charge indicator will light red while it is charging; it will turn green when the battery
is fully charged.)
When the built-in battery power is low, the low battery icon will flash on the upper right corner of the
screen for a while, and then the player will turn itself off automatically.
Use the specified charger.
Never dispose of in fire or heat up.
Do not use in high temperature or near heat sources.
Do not open the cover.
Refer servicing only to qualified service personnel.
To get the longest service life of the built-in battery, charge at indoor-temperature.
Earphone Connection
Be sure that your unit is at low volume level before
connecting the earphones. Increase the volume
gradually for your comfortable listening.
To Earphone Jack
R
CAUTION:
Hearing experts advise against the constant use of
personal stereos played at high volume. Constant high
volume use can lead to hearing loss. If you experience
ringing in the ears or hearing loss, discontinue use and
seek medical advise.
L
Earphone
10
BASIC OPERATION
. See Power Connections section.
Prepare connections and power supply.
Load a disc.
Press the Open button to open the disc compartment lid. Load a disc with the label-side facing up. Close
the lid manually. If a single-sided disc is loaded upside-down, the player will display “BAD DISC”.
Start playback.
Press Play/Pause/OK to start playback (some discs may start playing automatically).
•
Play/Pause Press this fuction control to start/hold disc playback.
Skip Briefly push it to the left/right to locate a previous/next playback point.
Search Hold it to the left/right for a short while to search fast backward/forward
through playback contents.
Slow Repeatedly push it up to start slow motion playback with a chosen speed.
To resume a normal playback, press down this function control.
Stop Briefly push it down to stop disc playback. You may get a pre-stop mode
for the first time you push it down, do it the second time to stop playback
completely.
•
•
•
•
Function Control is located on
the right lower corner of the
player’s TFT panel.
LCD Mode
Brightness
Contrast
Color
0
0
0
Flip: Up
Mode: 16:9
Reset
Press this button to display the LCD mode menu. Use the up/down direction
button to select an item in the menu, press the left/right direction to adjust
parameter. When Flip/Mode/Reset is selected, press OK to adjust settings.
Power Saving
When the unit is left unused for a while, screen saver is automatically turned on, five minutes later, display will
shut down for power-saving, you can press any button to wake it up.
11
BASIC OPERATIONS
Adjusting the Volume
•
Turn the Volume Control dial to adjust the volume level up or down.
Disc Error Messages
The following messages will be displayed on-screen if there is a problem with the format of the loaded disc.
•
WRONG REGIONAL DISC. The region code of the disc does not match the player’s region code (Region
2).
•
WRONG PASSWORD. The parental rating level of the disc is higher than the parental rating level setting
of the player. The player will not play the disc.
•
BAD DISC. The player is equipped with automatic disc quality detection software. If the player detects
a disc that is damaged or has a format problem, it may play the disc at a lower quality or stop play
completely, depending on how damaged the disc is.
Note:
DVD disc production quality may vary; some discs may deviate from the industry standard.
Some incorrectly-formatted discs may still play, however, the playback and operational quality of the disc may
be substandard.
Power Management
If the player will not be in use for a long period of time, set the Power Switch to the OFF position and unplug
the player.
IR Menu
Press and hold the TITLE button to display the player’s IR menu. Use direction buttons to select an item, press
OK to confirm.
A-B -
Repeat a specified section on a disc.
Select this item, press OK once to set a starting point A, press OK twice to set an ending point B,
the selected contents will be played repeatedly as a loop. Press A-B for the third time to resume a
normal playback.
Sub Select an available subtitle.
Audio Select an alternate tracks.
Zoom Repeatedly press OK to get different zoom effects.
Title Display the available tiltle menu.
Search - Locate a desired section. Select this itme, press OK to display a search menu, use diretion
buttons to enter data, press OK to confirm.
Angle Select an available camera angel.
1/All Repeatedly press OK to set the repeat mode as charter/disc/all/off.
Numbers - These buttons are usually used to input numeric data during menu setup.
The chosen number button functions only when you exit the IR Menu.
12
SETUP
Various features of the player can be adjusted in the SETUP menu.
1. Press SETUP to display the player’s setup menu.
2. Press direction buttons to select and to adjust an opton, press OK to confirm.
3. Press SETUP to exit.
L
English
English
English
English
M
Language Setup
Language
Subtitle
Sets the default subtitle track of loaded DVDs
DVD Menu
13
SETUP
Video
Aspect Ratio
PAL
Auto
Australia.
Channel Output
Rating
Parental Control
Set Password
Sets the maturity rating level of the player.
The player will not play any discs rated higher
than this setting.
This setting is password protected (the initial
password is: 8888).
Levels 1 to 8.
(8: ADULT is
default)
Change the Parental Ctrl password. Enter the old password, and
then the new password.
DO NOT FORGET THE PASSWORD; this password cannot
be reset.
Misc
Use Default
Settings
Resets all settings to their factory default
state. This will not reset the Parental Control
password.
Screen Saver
The screen saver prevents burn-in damage
to the player’s screen.
On
Disc Resume
To set the Disc Resume on/off
On
14
SPECIFICATIONS
1
5W
AUTO/NTSC/PAL
SD Memory Cards
Capacity≤ 8G
USB Host
Capacity≤ 64G, USB 2.0 High-Speed
File System
FAT32
15
TROUBLESHOOTING
There is no power to the device.
•
Ensure that the Power Switch on the main unit is physically set to the ON position.
•
Ensure that the AC adapter cord is securely connected to the player and the proper wall outlet.
The device will not play the disc.
•
Ensure that a supported disc is loaded in the player label-side up.
•
Ensure that the disc’s rating level does not exceed the player’s parental rating level.
•
Ensure that the disc is not damaged or too dirty.
Clean the disc or try another disc.Moisture may have condensed inside the player. Remove the disc and
•
leave the player on for 1-2 hours and then try again.
There is no picture.
•
Ensure that the TV set has been powered on and is set to the correct AV mode.
•
Ensure that the connections between the player and the TV are secure and correct.
•
Check if the connection cables are damaged.
The picture is noisy or distorted.
•
The disc may be damaged or dirty. Clean the disc or try another one.
•
Reset your TV’s color system.
•
Ensure that the player is connected directly to the TV (and not through a VCR, cable box, satellite receiver, etc.)
The picture is not full-screen.
•
Change the aspect ratio setting of your player from the Setup menu.
•
Select a different aspect ratio option from the DVD disc menu.
There is no sound or distorted sound.
•
Ensure that the TV and amplifier have been turned on and properly set up.
•
Ensure that the TV and amplifier connections are secure and correct.
•
Try a different Audio track of the DVD by pressing AUDIO.
•
Ensure that the MUTE function of the TV, Amplifier, or Player is not engaged.
The player has malfunctioned.
•
Unplug the player. After 30 minutes, plug in and power on the player -- the restore function should reset
the player.
16
Westwell Warranty Statement
1. Warranty against defects
Westwell Australia Pty Limited ACN106 648 202 (“Westwell”) warrants the product to be free of any defects in materials
and workmanship for a period of 12 months from the date of purchase (“Warranty”). However, the Warranty does not
apply with respect of products damaged by unreasonable use or by use for which the product is not intended.
The Warranty will not cover defects resulting from alteration, accident, misuse, abuse or neglect and the Warranty is
otherwise subject to the terms, conditions and stipulations recorded below.
2. Warranty is in addition to your rights under the law
The product Westwell supplies come with guarantees that cannot be excluded under the Australian Consumer Law.
You are entitled to a replacement or refund for a major failure and for compensation for any other reasonably
foreseeable loss or damage. You are also entitled to have the products repaired or replaced if the goods fail to be of
acceptable quality and the failure does not amount to a major failure.
The benefits accorded to you under this guarantee are in addition to your other rights and remedies any other law in
relation to goods or services to which the Warranty relates.
3. What you must do for Westwell to be entitled to claim under the warranty
To make a claim under the Warranty you must:
(a) return the product which you claim is defective to the Seller who supplied our products to you (“Seller”).
The product must be unmarked and complete with instruction books and accessories (such as remote controls,
power cords, battery chargers and connectivity cables) supplied at the time of purchase;
(b) complete a claims form that we have supplied to the Seller for that purpose; and
(c) provide a copy of a proof of purchase to the Seller to whom you are returning the products. The best proof of
purchase is a tax invoice or receipt. Please discuss any other acceptable proofs of purchase with the Seller.
4. How Westwell will honour the warranty
If you comply with paragraph 3 above, and Westwell or the Seller determine that the product does not comply with the
Warranty then, the Seller may at its discretion, promptly:
(a) pay to you the cost of repairing or replacing the products or any part of the products; or
(b) replace or repair the product.
(c) Except as to terms, conditions, warranties or guarantees prescribed by law and from which Westwell cannot limit its
liability (“prescribed term”):
(1) the liability of Westwell and any Seller in respect of a breach of a prescribed term or the Warranty relating to the
products or any part of the products is limited to the options set out in this paragraph 4 above;
(2) in these conditions you do not have under any circumstances any cause of action against or right to claim or
recover from the seller for, or in respect of, any loss or damage of any kind whatsoever, caused directly or
indirectly by:
(a) any defect in material or workmanship of, or any other defect whatsoever in, or unsuitability for, any purpose
of the products or any part of the products; or
(b) by default or negligence on the part of Westwell or of any employee, contractor or agent of the seller or of any
person for whom the seller has legal responsibility relating to the supply of, or otherwise concerning products
or any part of the products.
PLEASE note that Westwell will honour all consumer guarantees under the Australian Consumer Law to the extent
it is required to do so by that legislation
5. Expense of making warranty claim
Subject to your rights under the Australian Consumer Law, if Westwell determines that the product you have returned
does not breach the Warranty and Westwell does not have a legal obligation to provide you with a remedy in respect of
the returned product (including for breach of a guarantee under the Australian Consumer Law), then:
(a) Westwell reserves the right to claim all expenses and costs incurred by Westwell in processing the claim and
returning the products; and
(b) Westwell will have the right to make a claim against you for any monies that have been paid to you on account of
your claim of breach of the Warranty, and by returning making the claim for breach of Warranty you agree to this
proviso.
17
Westwell Warranty Statement
Subject to your rights under the Australian Consumer Law, where Westwell determines that your claim under the
Warranty is correct and there has been a breach of the Warranty, then Westwell will determine if it is reasonable to
reimburse your reasonable expenses in making the claim under the Warranty. It will be for Westwell to determine
what is a reasonable expense and you will be required to substantiate that expense by documentation acceptable
to Westwell.
(C) Our goods come with guarantees that cannot be excluded under the Australian Consumer Law.
You are entitled to a replacement or refund for a major failure and for compensation for any other reasonably
foreseeable loss or damage.
You are also entitled to have the goods repaired or replaced if the goods fail to be of acceptable quality and the
failure does not amount to a major failure.
6. Customer Service - Who we are and how you may contact us
The company which gives the Warranty is Westwell Australia Pty Ltd ACN106 648 202.
For any Warranty query you can contact Westwell at:
(a) Customer Helpline: 1800 656 630
(b) Website: www.olinlivenow.com.au
(c) E-mail: [email protected]
Address: Westwell Australia, Suite 1802, Central Square, 323 Castlereagh Street, Sydney NSW 2000
Copyright
This manual contains information protected by copyright law.
No part of this document may be used or reproduced in any form or by any means, or stored in a database/retrieval
system without prior written permission from us.
The information of this manual is based on the current version of the product.
We reserve the right to alter the content without prior notice.
All brand names in this manual are the property of their respective owners.
18