1
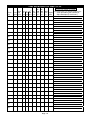
VISTA-40 TWO-PARTITION PROGRAMMING FORM
Use the Two-Partition Programming Form if your system is set up for two partitions.
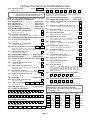
For single partition systems, use the form titled "VISTA-40 Single Programming Form."
IMPORTANT: A 2-Line Alpha keypad is required for programming the VISTA-40.
Make sure that one alpha keypad is connected to the control and is set to device address "00."
1. Enter Programming Mode (enter installer code + [8] + [0] + [0]).
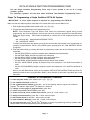
2. Go to field 2✱00 and enter "2" to set the system for two partitions.
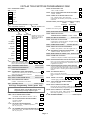
When set for two partitions, there are some data fields that are system-wide (global) and some that are
"partition-specific." The partition-specific fields, shown shaded on the form, can be assigned different
values for each partition, and these fields are automatically skipped when programming system-wide
fields. To program partition-specific fields, see step 4 below.
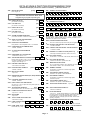
3. Program the system-wide (global) data fields shown on the main portion of the programming form. These
include all fields except those shown shaded and Zone Response Type and Report Code fields, which
require using #93 Menu Mode to program (see step 5 below).
NOTE: zone response Type and Report Code fields will automatically appear during normal
programming, but must be skipped if the zone has not been previously programmed using #93 Menu
Mode (see step 5 below). These fields are bordered by a dotted line on the programming forms and
✱02–✱05 and 1✱01–1✱09 ASSIGN RESPONSE TYPES
include:
✱54–✱78 REPORT CODES
To skip these fields when they appear, press [✱] plus the next data field number to be programmed. For
example, to skip fields ✱02–✱05, press [✱] plus "14." Field ✱14 ZONE 9 FAST/SLOW RESPONSE
appears.
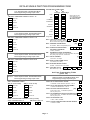
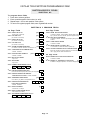
4. Program the partition-specific data fields by pressing ✱91 and entering the partition number you wish to
program. The first partition-specific field (✱09 ENTRY DELAY #1) for that partition automatically appears.
Refer to the Partition-Specific section of this programming form when programming these fields for each
partition.
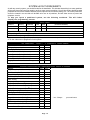
5. Enter #93 Menu Mode by pressing #93 while in programming mode, then do the following in the order
presented:
• Use the DEVICE PROG. prompts to program device addresses and characteristics.
• Use the ZONE PROG. prompts to program zone information.
• Use the RELAY PROG. prompts to program relay output information.
• Use the ALPHA PROG. prompts to program alpha descriptors.
• Use the SERIAL # PROG prompts to program sensor device serial numbers.
• Use RLY VOICE DESCR. prompts to program relay voice descriptors, if the 4285 Phone Module is
used.
• Use the CUSTOM INDEX prompts to program custom word substitutes, if the 4285 Phone Module is
used.
Refer to the #93 Menu Mode section of the separate INSTALLATION INSTRUCTIONS document for
detailed procedures when using #93 Menu Mode. A brief overview of this mode is provided later in this
document.
SUMMARY OF PROGRAMMING COMMANDS
• To enter program mode, enter installer code + [8] + [0] + [0]
• To set standard defaults, press ✱ 9 7
• To set communication defaults, press ✱ 94 + one of the following: ✱ 80=low speed; ✱ 81=Ademco Express;
✱82=Ademco High Speed; ✱83=Ademco's Contact ID
• To change to next page of program fields, press ✱ 9 4
• To return to previous set of fields, press ✱ 9 9
• To erase account & phone number field entries, press [✱ ] + field number + [✱ ]
• To assign zone descriptors, press #93 + follow menu prompts
• To add custom words, press #93 + follow menu prompts
• To enter Installer's Message, press #93 + follow menu prompts
• To exit program mode, press ✱99 OR ✱98: ✱99 allows re-access to programming mode by installer code.
✱98 prevents re-access to programming mode by installer code.
Standard default (✱97) values are shown in brackets [ ], otherwise default = 0.
Page 7