1
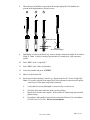
Director Signature___________________________________ Date____________________ Point of Care Testing Clinical Laboratories AVOXimeter 1000E Procedure For Whole Blood Oximetry I. PURPOSE AND PRINCIPLE The ITC AVOXimeter 1000E is a battery operated bedside whole blood oximeter that measures oxyhemoglobin saturation (%HbO2) and total hemoglobin concentration (THb), on freshly drawn or heparin or EDTA anticoagulated whole blood samples. The oxygen content (O2) of the blood sample is automatically calculated from the %HbO2 and THb measurements. Determination of total hemoglobin and oxygen saturation is used to assess oxygen transport status in diagnostic cardiac catherization procedures. Analysis is accomplished by injecting the sample into a disposable cuvette and inserting the cuvette into the instrument. The ITC AVOXimeter 1000E then illuminates the sample with multiple wavelengths, records the optical density of the sample at each of the wavelengths, and computes the results. In less than 10 seconds, the oxyhemoglobin fraction, the total hemoglobin concentration, and the oxygen content, of the sample are shown in appropriate units on the liquid crystal display on the front panel. The ITC AVOXimeter 1000E measures oxygenated hemoglobin (HbO2), deoxyhemoglobin (HHb), methemoglobin (MetHb), and carboxyhemoglobin (COHb) directly, using novel optics and multiple wavelenths. The measured values are used to calculated total hemoglobin (THb) and percent oxyhemoglobin saturation (%HbO2) of the sample, using the fractional method describe below: THb = (HbO2) + (HHb) + (MetHb) + (COHb) %HbO2 = O2 = (HbO2) x 100 (HbO2) + (HHb) + (MetHb) + (COHb) 1.39 x (THb)x(%HbO2) 100 Where 1.39 is the mL of oxygen assumed to be carried by one gram of oxygenated hemoglobin (Hufner’s Number). Rev 3, Ver 1, 6/2013 Page 1 of 10 II. SCOPE This procedure is intended for use in the adult and pediatric cardiac catheterization and EP units. III. PERSONNEL Use of the AVOXimeter is limited to adult and pediatric RNs and MDs in the cardiac catheterization and EP Labs who have gone through training and have demonstrated competency in use of the AVOXimeter 1000E. It is the responsibility of the unit nurse manager to prevent use by non-authorized staff. IV. REAGENTS, EQUIPMENT, MATERIAL STORAGE A. B. Equipment 1. AVOXimeter 1000(E) Analyzer 2. AVOXimeter 1000(E) cuvettes (PMM# 38651) are packaged with a dessicant in the plastic bag. The cuvette pathlength is printed on the label on the plastic bag. The cuvettes are sensitive to humidity. Keep the bag sealed when not in use. a. Store the cuvettes in a closed bag at room temperature (15-30°C/59-86°F). b. Cuvettes are stable as long as the desiccant’s indicator is blue. 3. Optical Filters –each filter is labeled with a serial number that matches the serial number of the instrument. Verify that the serial number on each filter matches the serial number of the instrument when performing optical quality control. Each set of yellow and orange filters can be used only with the ITC Avoximeter 1000E of the same serial number and cannot be shared between different instruments. Note: The optical filters cannot be interchanged with filters from another AVOXimeter 1000E. Reagents 1. 2. RNA Medical Brand CC 527 Co-Oximeter Controls, Level 1, 2, and 3. Ampules are packaged 30 per box (PMM# 38436). a. CC 527 is a buffered aqueous solution containing electrolytes (Na, K, Cl, Ca) and dyes. It has been equilibrated with specific levels of CO2, O2, and N2. This control contains no preservatives and no human or biological materials. b. The controls are good until the printed expiration date on the package if they are stored at refrigerator (2 - 8ºC / 36 - 46ºF) c. The controls may also be stored at room temperature (up to 25ºC) for 12 months, provided the labeled expiration date is not exceeded. RNA Medical Co-Oximeter Calibration Verification Controls (CVC223) Level 1 – 5. Ampules are package in kit containing 4 ampules of each level (PMM # 38432) a. The calibration verification controls are good until the printed expiration date on the package if they are stored at refrigerator (2 - 8ºC / 36 - 46ºF). Rev 3, Ver 1, 6/2013 Page 2 of 10 b. C. V. VI. The calibration verification controls should be analyzed immediately after removal from refrigeration. Materials 1. Gauze (absorbent material) 2. Heparinized Syringes (for patient samples) 3. Syringes (for controls) 4. Gloves SPECIMEN REQUIREMENTS AND INTERFERENCES A. Standard precautions must be followed when collecting and handling blood specimens. B. Collect blood samples in a sodium or lithium heparin plastic syringe. Samples may be obtained from an arterial line, an arterial puncture, or venipuncture. C. When drawing blood samples with a syringe from a saline-filled catheter withdraw the saline first with a separate syringe and make sure that only whole blood is sampled. D. Care should be taken to prevent the introduction of air into the sample when it is drawn. Expel all air bubbles from the syringe and cap or seal the end of the syringe. E. Sample size for the AVOXimeter 1000(E) is 50 µl. F. A freshly collected sample is optimal. Prior to analysis the sample should be free of any air bubbles and mixed by rolling the syringe between the outstretched palms of both hands for 10 seconds. Invert the syringe and repeat mixing. Expel a small amount of blood sample into an absorbent surface and discard. CALIBRATION A. The ITC AVOXimeter 1000E is factory-calibrated and employs highly stable state-of –theart light sources. It is capable of maintaining its calibration for at least 2 years. B. Should recalibration be required, contact the POCT Coordinator (353-1630), who will make arrangements for service. C. Proper calibration also requires entry of the correct cuvette pathlength by the user. D. Analyzing the Optical QC filters will verify the calibration and confirm that the optics are clean. E. Additionally, analyzing liquid QC samples verifies the calibration, checks the cuvette storage conditions, and the function of the cuvettes. Rev 3, Ver 1, 6/2013 Page 3 of 10 VII. QUALITY CONTROL A. B. Optical QC Filters 1. Two levels of the optical QC filters (yellow and orange) should be analyzed each 8 hours of patient testing. The yellow and orange optical filters provide a convenient means of verifying that the optics are not obscured by blood or debris and that the instrument is properly calibrated 2. This device is eligible for Option 2 Equivalent QC: a. 3 levels of liquid QC are run each day for 30 consecutive days b. If all 30 sets of QC are within control ranges the QC can be limited to running 3 levels of liquid QC material once a week. c. Any subsequent QC failure requires that QC revert back to 3 levels each day until 30 consecutive days in control have been achieved and QC can then shift to once per week. Liquid Quality Controls 1. RNA Medical Brand CC 527 Co-Oximeter Controls, Level 1, 2, and 3. Ampules are packaged 30 per box (PMM# 38436). 2. a. CC 527 is a buffered aqueous solution containing electrolytes (Na, K, Cl, Ca) and dyes. It has been equilibrated with specific levels of CO2, O2, and N2. This control contains no preservatives and no human or biological materials. b. The controls are good until the printed expiration date on the package if they are stored at refrigerator (2 - 8ºC / 36 - 46ºF) c. The controls may also be stored at room temperature (up to 25ºC) for 12 months, provided the labeled expiration date is not exceeded. RNA Medical Co-Oximeter Calibration Verification Controls (CVC223) Level 1 – 5. Ampules are package in kit containing 4 ampules of each level (PMM # 38432) a. The calibration verification controls are good until the printed expiration date on the package if they are stored at refrigerator (2 - 8ºC / 36 - 46ºF). b. The calibration verification controls should be analyzed immediately after removal from refrigeration. VIII. QUALITY CONTROL PROCEDURE A. Performing Optical Quality Control 1. Calibration is checked every 8 hours of patient testing with the use of 2 factory calibrated optical filters (yellow and orange). These filters are treated just like a Rev 3, Ver 1, 6/2013 Page 4 of 10 sample cuvette. Each filter is marked with the serial number of the instrument for which it is intended and the range of acceptable values 2. The optical filters cannot be interchanged with filters from another AVOXimeter 1000E. 3. Insert one of the QC filters into the AVOXimeter 1000(E). 4. Enter/Verify Operator ID. 5. Record results and testing initials on the Quality Control Log. 6. At “READY” prompt, repeat steps for second control filter. 7. Verify that results are within established control ranges. 8. Acceptable ranges for filters: Total Hb Yellow QC Filter 7.7 to 8.3 g/dL Orange QC Filter 16.4 to 17.6 g/dL B. %O2Hb 93.5 to 96.5% 37.2 to 40.8% 9. If results are not within range, repeat the test. Most of the time contamination of the optics is responsible for these “out of range” readings. 10. If control is still out of range, notify the Point of Care Coordinator (514-6839) or (353-1630). Point of Care Coordinator will reset Yellow and Orange Filter for trouble shooting. Do not use the instrument if the controls are out of range. Performing Liquid Quality Control 1. Remove Level 1, Level 2 and Level 3 Liquid QC ampules from the refrigerator. Do NOT warm controls before testing. 2. Shake the first control sample approximately ten seconds. 3. Restore liquid to the bottom of the ampule with gentle tapping. If foam or small bubbles are present, allow ampoule to stand until these have come to the surface. 4. With fingers protected, carefully snap open the ampule. 5. Contents should be sampled as soon as the ampule is opened. Using a 1-3 ml unheparinized syringe, slowly draw liquid into the syringe Insert the syringe tip into the cuvette syringe port. Always hold the test cuvette by the black cap. Hold cuvette down at a 45° angle and inject the sample into the cuvette until the sample reaches the vent patch. Leave syringe attached to cuvette. 6. 7. Note: Over injection of QC material will cause the vent patch to bulge outward. If this happens, pull back slightly on the syringe plunger just until the patch flattens. Contamination of the optics usually happens because of over-filling the cuvettes. Rev 3, Ver 1, 6/2013 Page 5 of 10 8. Check that no air bubbles are present in the sample light path. If air bubbles are present in the light pathway, discard cuvette. 1 2 3 Bubble here is O.K. Light path Side View (Do not let patch bulge) 9. Holding the cuvette by the black cap, insert it into the instrument within 30 seconds of filling it. Note: A delay of analysis greater than 30 seconds may yield erroneous results. 10. Press “YES” at the “Liquid QC?” 11. Press “YES’ at the “Enter Lot Number” 12. Select Lot number and press “ENTER” 13. Enter/Verify Operator ID 14. Record result on the Quality Control Log. Repeat steps for all 3 levels of liquid QC. Note: If a result is outside of the range limits, this represents an unsuccessful quality control test. Follow these steps in this situation: a. Verify that the cuvette pathlength is correct for the cuvettes in use. b. c. Check the desiccant's indicator in the cuvette package. Repeat the test with a new ampule. If the results are within range proceed with patient testing. d. If results are still outside of range limits contact the Point of Care Coordinator (514-6839) or (353-1630). Do not use instrument. Rev 3, Ver 1, 6/2013 Page 6 of 10 C. IX. Verification/Entry of Cuvette Pathlength: 1. Each lot of cuvettes has a unique pathlength that MUST be entered into the instrument when using the lot of cuvettes. FAILURE TO ENTER THE CORRECT PATHLENGTH WILL GIVE FALSE PATIENT RESULTS!! 2. Verify that the Cuvette pathlength is correct for the cuvettes in use. The pathlength for the cuvette lot is found on the label of the cuvette packaging. a. Press the Main Menu key. b. Press 1 to select “Calibration”, and press Enter c. Press 3 to select “Cuvette Pathlength”, and press Enter d. Use back arrow ( ) to move cursor and erase displayed pathlength. If verifying path length, press Cancel to return to each previous screen. e. Enter the correct pathlength using the numeric keypad. f. At “OK” prompt, press YES to enter the pathlength into the analyzer's memory. PATIENT TESTING PROCEDURE A. Verify patient ID using 2 forms of patient identifier in the presence of the patient. B. Patient testing can only be done if all quality control has been completed and control results are within acceptable limits. C. Roll the syringe containing the blood sample between hands periodically inverting the syringe to fully mix the sample. The sample must be mixed for a full ten second interval just prior to injection into the cuvette. Note: Poorly mixed samples or those containing clots may cause inaccurate results. D. Expel a small amount of sample from syringe. Always hold the test cuvette by the black cap. Hold cuvette down at a 45° angle and inject the sample into the cuvette. Inject sample into the cuvette until the sample reaches the vent patch. Leave syringe attached to cuvette. Note: Over injection of blood will cause the vent patch to bulge outward. If this happens, pull back slightly on the syringe plunger just until the patch flattens. E. Check that no air bubbles are present in the sample light path. Note: Air bubbles will yield erroneous results. If air bubbles are present in the light pathway, discard cuvette. F. G. Holding the cuvette by the black cap, insert it into the slot of the instrument's front panel. Insert the cuvette within 30 seconds of filling. Note: A delay in analysis of greater than 30 seconds may yield erroneous results. H. Enter/Verify the Operator ID number using the numeric keypad and press “Enter”. Rev 3, Ver 1, 6/2013 Page 7 of 10 X. XI. I. Enter the patient identification number using the numeric keypad (All patient ID numbers must be 9 digits). Verify the number on the screen and press “Enter”. J. If the “Label Site” option is being used, Press “YES” at the “Label Site?” prompt. K. Enter the number on the key pad that corresponds to the Site. Entering a Zero (0) will leave the Site/SubSite unlabeled. Repeat process to label SubSite. L. Record patient results while cuvette in still in the analyzer. Results will print when testing is completed. If the display turns off before the result is recorded, stored patient results may be retrieved by pressing the “Main Menu”. Select “Stored Data”, and “Newest Sample”. LIMITATIONS A. Sodium or lithium heparinate is the anticoagulant of choice. Citrate is known to change the pH of the blood and cause errors in spectrophotometric measurements. Similarly, fluoride/ oxalate should be avoided. B. Excessive volumes of anticoagulant lead to dilution errors. C. The presence of Carboxyhemoglobin, Methemoglobin or significant amounts of deoxyhemoglobin will result in a lower oxygen saturation and oxygen content than expected. If the presence of such non-oxygen carrying hemoglobin(s) is suspected samples should be sent to Neonatal Clinical Physiology Laboratory (NCPL) for a complete coOximetry testing. PROCEDURE NOTES AND INTERFERENCES A. Never re-use a test cuvette once it has been inserted into the analyzer. B. Do not remove the syringe from the cuvettes until testing is completed and the cuvettes have been removed from the analyzer. C. Discard cuvettes with trapped air bubbles and check for blood clots from patient specimen prior to injection. If samples are not analyzed immediately, the sample should be mixed prior to analysis by rolling the syringe between the outstretched palms of both hands for 10 seconds. Invert the syringe and repeat mixing. Invert the sample syringe and allow air bubbles to rise (tap syringe if necessary). Expel a small amount of blood sample into an absorbent surface until all air has been removed. A sample with clots or air bubbles may yield erroneous results. XII. RESULTS AND REPORTING Reportable Range: Total Hemoglobin Oxygen Saturation (%HbO2) 4.0 to 22.5 g/dL 0 to 100% Note: Hemoglobin results less than 4.0 g/dL or greater than 22.5 g/dL should be re-drawn and sent to clinical lab for analysis. Rev 3, Ver 1, 6/2013 Page 8 of 10 Normal Range: Normal Range: 0-7 days: 8-14 days: 2-4 weeks: 1-2 mos. 2-3 mos. 3-6 mos. 6-24 mos. 2-5 years 5-8 years 8-12 yrs. Male 12-15 yrs. Male 15-18 yrs. Male 18+ yrs. Female 12-15 yrs. Female 15+ yrs Total Hemoglobin 14.5-22.5 g/dL 13.5-21.5 g/dL 12.5-20.5 g/dL 10.0-18.0 g/dL 9.0-14.0 g/dL 9.5-13.5 g/dL 11.0-13.5 g/dL 11.2-13.5g/dL 11.4-15.5 g/dL 11.6-15.5 g/dL 12.3-16.0 g/dL 12.6-17.0 g/dL 13.6-17.5 g/dL 11.8-15.5 g/dL 12.0-15.5 g/dL Oxygen saturation (%HbO2) Critical Value: Total Hemoglobin 95-99% < 7.0 g/dL XIII. MAINTENANCE A. Cleaning of the AVOXimeter 1000(E) surface should be performed as needed to remove dust and any blood spills. B. Clean the analyzer’s exterior with isopropyl alcohol. XIV. STAFF EDUCATION AND COMPETENCY Each operator using AVOXimeter 1000E becomes competent through training provided by POCT staff or designated Nursing staff. Competency is re-assessed annually for this non-waived test (for first-time users, competency is re-assessed after 6 months). XV. REFERENCES A. AVOXimeter 1000E Operator’s and Service Manual, 11/07 B. AVOXimeter 1000E Compliance Guide, Rev. 3.98. C. AVOXimeter 1000E Procedures Manual NCCLS format. Downloaded from website www.avoxsystems.com 5/6/09. D. RNA Medical CC527 Co-Oximeter Controls, package insert, Rev. 3/2010. E. RNA Medical CVC 223 Co-Oximeter Calibration Verification Controls, package insert, Rev. 4/2012. Rev 3, Ver 1, 6/2013 Page 9 of 10 PROCEDURE REVIEW HISTORY Procedure Title: AVOXimeter 1000E Procedure for Whole Blood Oximetry Version: 1.0 Author: Kristin Jensen, CLS Date: 5/7/2009 Director: Tim Hamill, MD. Date: 5/7/2009 In Use Date: 5/7/2009 Discontinued Date: ________ ACTION: Reviewed or Revised/Approved Action Approved Signature Tim Hamill, MD. Date 5/7/2009 Action Revised Signature Kristin Jensen Date 8/19/2009 Action Approved Signature Tim Hamill, MD. Date 8/19/2009 Action Approved Signature Tim Hamill, MD. Date 6/30/2010 Action Approved Signature Tim Hamill, MD. Date 5/9/2011 Action Reviewed Signature Cynthia Ishizaki Date 12/3/12 Action Approved Signature Tim Hamill, MD Date 12/06/2012 SEE SIGNATURE MANIFEST Rev 3, Ver 1, 6/2013 Page 10 of 10 Signature Manifest Document Number: SOP-0034 Title: AVOX Procedure Revision: 3 All dates and times are in Pacific Standard Time. Avox Procedure for review SR Sup Review Name/Signature Title Date Meaning/Reason Cynthia Ishizaki (024044224) POC SR SUP 21 Jun 2013, 02:30:31 PM Reviewed Med Dir Apprvl Name/Signature Title Date Meaning/Reason Tim Hamill (023335003) PA CB MED DIRECTOR 26 Jun 2013, 01:33:14 PM Approved Rev 3, Ver 1, 6/2013