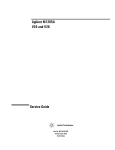
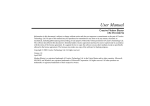
1
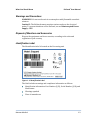
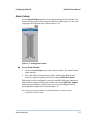
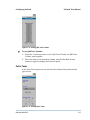
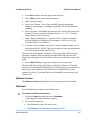
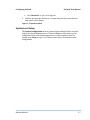
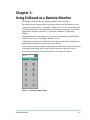
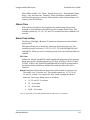
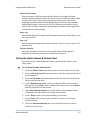
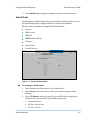
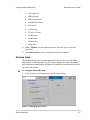
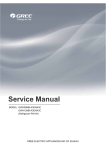
ENGUARD™ USER MANUAL DDM-555-000 REV.C Nov. 2014 Conformity according to the Council Directive 93/42/EEC concerning Medical Devices Manufacturer’s Name : Mennen Medical Ltd. 4 Hayarden Street, Yavne, 81228 P.O. Box 102, Rehovot, 76100, Israel Tel.: +972-8-9323333 Fax: +972-8-9328510 European Representative : Charter-Kontron Limited Unit 18 Avant Business Centre 21 Denbigh Road Milton Keynes MK1 1DT England Tel.: 01908 646070 Fax: 01908 646030 US Representative: Mennen Medical Corp. 290 Andrews Road Feasterville-Trevose, PA 19053-3480 Phone: 215 259-1020 Fax: 215 357-2010. Publication No. DDM-555-000 Ver. 7.0 Revision: Rev. C November 2014 Copyright © Mennen Medical Ltd. 2014. All RIGHTS RESERVED Registered trademarks are the intellectual property of their respective holders.. Mennen Medical 1 Table of Contents TABLE OF CONTENTS......................................................................................II CHAPTER 1: WHAT YOU SHOULD KNOW ................................................... 1-1 System Overview.............................................................................................................. 1-1 Training ........................................................................................................................... 1-2 Prescription Notice ........................................................................................................... 1-2 Compliance ...................................................................................................................... 1-2 Explosion Hazard.............................................................................................................. 1-2 Responsibility of Manufacturer ......................................................................................... 1-2 Warnings and Precautions................................................................................................ 1-3 Disposal of Monitors and Accessories ............................................................................... 1-3 Identification Label .......................................................................................................... 1-3 Labeling ........................................................................................................................... 1-4 Symbols ......................................................................................................................... 1-4 System Specifications ....................................................................................................... 1-4 CHAPTER 2: CONFIGURING ENGUARD ...................................................... 2-1 Alarm Volume .................................................................................................................. 2-3 Pulse Tones ...................................................................................................................... 2-4 Date & Time Setup ........................................................................................................... 2-5 Software Version.............................................................................................................. 2-6 Shutdown ........................................................................................................................ 2-6 System Local Setup ........................................................................................................... 2-7 CHAPTER 3: USING ENGUARD AS A REMOTE MONITOR ....................................................................................... 3-1 Starting Up the System ..................................................................................................... 3-2 Selecting a Patient ........................................................................................................... 3-2 Printing and Recording Data............................................................................................. 3-2 CHAPTER 4: ENGUARD AS SAVED DATA VIEWER ................................................................................................... 4-1 Save & Discharge Data ..................................................................................................... 4-1 Patient Data Viewing ....................................................................................................... 4-1 Mennen Medical ii EnGuard User’s Guide CHAPTER 5: SYSTEM LOCAL SETUP .......................................................... 5-1 Overview ......................................................................................................................... 5-1 Accessing the System Local Setup Menu ............................................................................ 5-1 Alarm Volume & Controls ................................................................................................. 5-3 Silence Time ..................................................................................................................... 5-4 Alarm Tone Setting .......................................................................................................... 5-4 Setting the Alarm Volume & Control Panel ........................................................................ 5-5 Sound Event ..................................................................................................................... 5-6 Network Setup ................................................................................................................. 5-7 Inter Unit Privileges.......................................................................................................... 5-8 Change Password ............................................................................................................. 5-9 Check Disk........................................................................................................................ 5-9 Permission Editor ............................................................................................................. 5-9 Language Setup ............................................................................................................. 5-10 Mennen Medical iii Chapter 1: What You Should Know System Overview The EnGuard has two functions, it can serve as a Remote Monitor, for patients monitored on Envoy / VitaLogik / Menntor X7 monitors, and it can also be used as a "Saved data Viewer" for data of patients that were discharged using the "Save and Discharge mode. The EnGuard , when used as a Remote Monitor, is a single patient monitoring and reviewing device. Any Envoy / VitaLogik / Menntor X7 monitor detected on the network can be selected for display on the EnGuard screen. The EnGuard enables control of any single bedside monitor, as well as review and printing of patient data. These actions can be carried out without interfering with monitoring that is performed simultaneously at the selected bedside. EnGuard can remotely control certain functions of the bedside monitors. It can display vital signs information collected from bedside patient monitoring devices, such as: ECG, Arrhythmia (basic and extended alarms), ST Segment, Respiration, Temperature, Invasive Blood Pressures, Non-Invasive Blood Pressure, Pulse Oximetry, and End Tidal CO2 . EnGuard can be configured under the supervision of the System Manager to reflect the monitoring practices of your hospital. The EnGuard can be configured specifically for each of the applications at the different clinical specialties within the hospital. EnGuard operates similarly to the Envoy ,VitaLogik and Menntor X7 bedside monitors. Monitoring, administrative and configuration procedures are performed in the same way, using the same menus and panels. Therefore to operate the EnGuard you must first be familiar with the Envoy / VitaLogik / Menntor X7. For information on using the bedside monitor, refer to the monitor Operating manual. This manual is concerned with functions unique to the EnGuard. EnGuard provides: Patient Admission and Discharge - you can admit/discharge patients directly from the EnGuard . Real-time visual and audio indications of a patient’s vital signs Alarm functions, including notification, setting alarm limits and alarm suspension Patient data review in the form of trends, charts, and full disclosure waveforms. Initiation of bedside recording and printing. Mennen Medical 1-1 What You Should Know EnGuard® User Manual When used as a "Saved data Viewer", the EnGuard can view and print the Chart, Trend, Event Strips and reports of any patient saved on the monitors on the network. Training Mennen Medical. or it's authorized distributer will provide training for the system user as per the intended use of the device or system. The training may be personal or by training the trainers. The scope of the training is part of the agreement between Mennen Medical. or it's authorized distributer and the end user. It is the responsible of the hospital management that only users that were trained to use the equipment efficiently and safely should operate the equipment. Prescription Notice Federal United States law restricts the sale and use of this instrument to qualified medical personnel only. Compliance The EnGuard remote monitor is designed to comply with the international safety requirements for medical electrical equipment IEC 60601-1, IEC 60601-1-2. European Directive 93/42/EEC classifies the EnGuard remote monitor as a Class IIb device. Explosion Hazard This device is not intended for use in the presence of flammable anesthetic agents. Responsibility of Manufacturer Mennen Medical, Ltd. considers itself responsible for the effects on safety, reliability, and performance of the equipment only if: Repairs are carried out by authorized Mennen Medical personnel only. Electrical installation of the relevant room complies with the appropriate requirements. The equipment is used in accordance with instructions for use. Mennen Medical 1-2 What You Should Know EnGuard® User Manual Warnings and Precautions WARNING!!!: Do not use the unit in an atmosphere with flammable anesthetic mixtures. Caution!!!: The EnGuard remote monitor station works on the electrical mains. To prevent shutdown of the EnGuard, use an Uninterrupted Power Supply – UPS Disposal of Monitors and Accessories Dispose the equipment and its accessories, according to the rules and regulation of your country. Identification Label The Identification label is located on the Processing unit Figure 1-1: Identification Label The label includes warnings and compliance information as follows: Identification information: Part Number (P/N), Serial Number (S/N), and Model name Warnings symbols Place of manufacture Mennen Medical 1-3 EnGuard® User Manual What You Should Know Labeling Symbols Table 1-1 includes a description of the meaning of the various symbols which appear on the EnGuard and its label. Table 1-1: Labels Symbol Description Attention, consult accompanying documents (Service to be performed by qualified technician, consult Service Manual before removing cover Refer to instruction manual Restrict the use and sale of this instrument to qualified medical personnel only Not for use in explosive gas environment Electrical and electronic equipment – dispose according to local regulation Date of manufacture System Specifications See the following page for system specifications. Mennen Medical 1-4 (QJXDUGLVDUHPRWHPRQLWRUIRUFHQWUDO1XUVH6WDWLRQRUGRFWRUV URRPZLWKD´H[WHUQDOGLVSOD\H[WHUQDOGLVSOD\RSWLRQDO &38'HWDLOV x,QWHO;IDPLO\PDLQ&38 x6RXQG%ODVWHU:DXGLRSRZHUȍ x0DVVVWRUDJH*%IL[HGGLVN x2SHUDWLQJ6\VWHP41; x:LQGRZPDQDJHU3KRWRQ 'LPHQVLRQV:HLJKW x+[:['[[PP[[LQFKHV x:HLJKW.JOE 3RZHUUHTXLUHPHQW x9$&$+] x9$&$+] (QYLURQPHQWDO2SHUDWLQJ&RQGLWLRQV Ɣ7HPSHUDWXUH&WR&)WR) x +XPLGLW\WRSHUFHQWQRQFRQGHQVLQJ (QYLURQPHQWDO6WRUDJH&RQGLWLRQV Ɣ7HPSHUDWXUH&2WR&2)WR) Ɣ+XPLGLW\WRSHUFHQWQRQFRQGHQVLQJ 1HWZRUN Ɣ/$13K\VLFDO,((((WKHUQHWLQWHUIDFH%DVH7 Ɣ3URWRFRO7&3,3 'LVSOD\ Ɣ1(&´/&'RU/&'RSWLRQDO 8VHU&RQWUROV Ɣ)L[HGNH\V Ɣ4XLFNQRE Ɣ5HPRWH&RQWURO.H\SDGRSWLRQDO x.H\ERDUGDQGPRXVH x $FFHVVWRPRQLWRU V3DWLHQW'DWDVWRUDJH x )XOOYLHZDQGFRQWURORQHDFKPRQLWRURQWKHQHWZRUN 5HDO7LPH0RGH $FFHVVWRPRQLWRUHG3DWLHQW'DWDVWRUDJH Ɣ&KDUWV1XPHULFDO Ɣ7UHQG*UDSKLF Ɣ)XOO'LVFORVXUH$OOOHDGV(&*ZDYHIRUP Ɣ2YHUYLHZ$OO:DYHIRUPVZLWKWRS(&* Ɣ(YHQW6WULSV)XOO'LVFORVXUHDQG2YHUYLHZ 9LHZ6DYHG3DWLHQW $FFHVVWR'LVFKDUJHGDQG6DYHG3DWLHQW'DWD Ɣ3DWLHQW,QIRUPDWLRQ$'7 x &KDUWV1XPHULFDO Ɣ7UHQG*UDSKLF Ɣ(YHQW6WULSV &XVWRPL]DWLRQ&DSDELOLWLHV x ODQJXDJHVVXSSRUW x /LQNWR(QVHPEOH x /LQNWR(QYR\9LWDORJLNDQG0HQQWRU;SDWLHQWPRQLWRUV x ,QWHU8QLWSULYLOHJHRSWLRQV 5HDG:ULWH5HDGRQO\RU1RDFFHVV /DQJXDJHV (QJOLVK'XWFK)UHQFK,WDOLDQ6SDQLVK(VSDQRO3RUWXJXHVH7XUNLVK 5XVVLDQ3ROLVK 5HJXODWRU\$SSURYDOV Ɣ(1 Ɣ(1 Ɣ(1 Ɣ&(0DUN Ɣ)'$&OHDUHG. '*05HY% 0HQQHQ0HGLFDO/WG$OOULJKWVUHVHUYHG6SHFLILFDWLRQVXEMHFWWREHFKDQJHGZLWKRXWQRWLFH +$5':$5($1'3$5$0(7(56 :HIROORZHYHU\EHDWRI\RXUKHDUW Chapter 2: Configuring EnGuard The Local Setup feature allows you to define local settings for EnGuard . EnGuard is supplied with a basic configuration that enables you to operate the system when it first starts up. The system can be configured at any time to reflect the monitoring practices of your hospital or unit. Local Setup defines those parameters that are independent of similar settings at the bedside monitor. For example, setting the alarm volume at EnGuard does not affect the Envoy / VitaLogik / Menntor X7 bedside monitor and vice versa. The Local Setup menu consists of the following panels: Alarm Volume QRS Tone Volume Pulse Tones Date & Time Setup Software Version Shutdown System Local Setup To access the EnGuard Local Setup menu: 1. Using the QuicKnob or the mouse, click the Device name box. The Zoom View panel appears. Mennen Medical 2-1 Configuring EnGuard EnGuard® User Manual Figure 2-1 The Zoom View panel 2. Click Local Setup. The Local Setup menu is displayed. Figure 2-2: Local Setup menu Mennen Medical 2-2 Configuring EnGuard EnGuard® User Manual Alarm Volume Use the Alarm Volume panel to set the alarm volume at the EnGuard . The Alarm Volume can be set by using the slider bar, which can be set on a scale ranging from Off (Alarm tone is deactivated) to 10. Figure 2-3: Setting Alarm Volume To set Alarm Volume: 1. From the Local Setup menu, select Alarm Volume ; the Alarm Volume panel appears. 2. Move the slider to the preferred volume, and click the Main Screen button to apply the change and close the panel QRS Tone Volume. The monitor can be configured to provide an audible QRS tone whenever a QRS complex is detected. QRS tone volume is set in the QRS Tone Volume panel using the slider bar, which can be set on a scale ranging from Off (meaning that the QRS tone is deactivated) to 10. Note: It is not necessary to activate a visual QRS indicator in order to activate the QRS tone and vice-versa. Mennen Medical 2-3 Configuring EnGuard EnGuard® User Manual Figure 2-4: Setting QRS Tone Volume To set QRS Tone Volume: 1. From the Local Setup menu, select QRS Tone Volume ;the QRS Tone Volume panel appears. 2. Move the slider to the preferred volume, and click the Main Screen button to apply the change and close the panel. Pulse Tones In the Pulse Tones panel you can set the tone volume of the pulse and the type of tone. Figure 2-5: Setting Pulse Tones Mennen Medical 2-4 Configuring EnGuard EnGuard® User Manual To set pulse tones: 1. From the Local Setup menu, select Pulse Tones . The Pulse Tones panel appears. 2. Under Select Module , select the required module. 3. Under Pulse Tone , select Pulse to provide an audible beep for every pulse - or 4. Select Pitch & Pulse to provide an audible beep for every pulse, the frequency of the pulse depending on SpO2. 5. Under Pulse Tones Volume , move the slider to the preferred volume. 6. Click the Main Screen button to apply changes and close the panel. Date & Time Setup This panel enables you to set the date and time and to set time display formats for the EnGuard screen. The panel is divided into 2 major areas: Current Date and Time: The current date and time are set in this area. . Display Format: In the Display Format area, you define how the time and the date appear on the main screen display. Figure 2-6: The Date and Time Setup Panel To set the date and time and date and time display formats: 1. From the Local Setup menu, select Date & Time Setup . The Date & Time Setup panel appears. Mennen Medical 2-5 Configuring EnGuard EnGuard® User Manual 2. In the Date textbox, enter the day, month and year. 3. In the Time textbox, enter the hour/minutes. 4. Under Display Format : 5. Select Dat e Format . A list of four available options is displayed: ddmmyy , ddmmmyyyy , mmddyy or yymmdd . The factory default is mmddyy . 6. Select Separator , and define the character to be used by the system as a separator between elements of a date (such as “.” or “/” or “-”). Only a single character can be selected. 7. Under Display Leading Zeros , select the Date or Time checkbox to activate display of a leading zero (for example, 01/01/98, or 01:30). Clear the checkbox to deactivate. 8. Select the 24 Hour Display checkbox to activate display of time in a 24hour format (00:00 - 24:00). Clear the checkbox to have time displayed in a 12-hour format (12A.M. and 12 P. M. ) . When the 24 Hours Display checkbox is not selected, the Suffix (am/pm) checkbox is enabled. Select to display the suffix AM or PM after the time when time is displayed in 12-hour format. Clear the checkbox to remove the suffix. 9. Select Main Screen to apply the changes and close the panel. The Date and Time setting of the Envoy / VitaLogik / Menntor X7 monitor can be set on each monitor individually, or, if the monitors are connected to a LAN, by one device defined as the Time Server. Only ONE device on the network (e.g. Envoy, VitaLogik, EnGuard, or Ensemble) can function as the Time Server. Software Version The Software Version panel displays the software version of the EnGuard . Shutdown Use the Shutdown procedure to turn off the power. To shutdown the EnGuard station: 1. Select the Setup menu and then select Shutdown. A warning panel called Shutdown appears: 2. Do one of the following: Press Cancel to return to the main screen. Press Restart to reset the monitor without power off. Mennen Medical 2-6 Configuring EnGuard 3. EnGuard® User Manual Press Shutdown: A gray screen appears. Wait for the message: Shutdown - System may now be powered down and switch off the power. Figure 2-7: Shutdown Panel System Local Setup The System Configuration menu is password protected and can be accessed only by the System Administrator or Technical Engineer. The system can be configured to reflect the monitoring practices of your hospital or unit. See System Local Setup on page 5-1, for instructions on how to perform system configuration. Mennen Medical 2-7 Chapter 3: Using EnGuard as a Remote Monitor This chapter describes the operating procedures for the EnGuard . All patient monitoring procedures can be performed via the EnGuard in the same way as in the Envoy / VitaLogik / Menntor X7. For this reason they will not be described here. For information on monitoring vital signs, refer to the appropriate chapter in the Envoy / VitaLogik / Menntor X7 Operating Manual. Any modifications to the display or activation of parameters at the EnGuard will effect the Envoy / VitaLogik / Menntor X7 too. Panels that you open on the EnGuard screen do not open at the bedside unit, and thus do not interfere monitoring of the bedside. You can operate the EnGuard by using one of the fixed keys on the front panel of the main processing unit; or right click the mouse to open the virtual keyboard panel and click on the desired key. See Figure 3-1 below. Figure 3-1 Virtual Keyboard Panel Mennen Medical 3-1 Using EnGuard as a Remote Monitor EnGuard® User Manual Starting Up the System The EnGuard is designed to run continuously. To start up the EnGuard: 1. Turn on the power switch. The EnGuard runs a self-diagnostic program and automatically starts up. The system is immediately ready to monitor patients. Selecting a Patient You can display any patient monitored on the network on the EnGuard screen. To display a patient: 1. Using the mouse or the QuicKnob, click the Device Name box. The Zoom View panel opens. Figure 3-2 The Zoom View panel 2. Select the required unit and bed. The selected bed appears on your screen. Printing and Recording Data From the EnGuard you can print waveforms, trends, charts, full disclosure and overview. To print, press the Print key on the front panel. You can also initiate stripchart recording of waveforms from the EnGuard . To record, press the Record key on the front panel. Mennen Medical 3-2 Chapter 4: EnGuard as Saved Data Viewer This chapter describes the operating procedures for the EnGuard operating as a Saved Patients' Data Viewer. It enables viewing and printing of saved data of all patients discharged from Envoy / VitaLogik / Menntor X7 monitors in "Save and Discharge" mode Save & Discharge Data Data saved by Envoy and VitaLogik monitors after Save & Discharge includes: Patient demographic information Numerical Charts Graphic Trends Event Strips (ECG and Vital signs waveform information) Reports Patient Data Viewing The EnGuard provides the tool to view saved patient data across the network. Note: See the VitaLogik / Envoy User Manual to learn about the available Patient Data options stored with the saved patient. To view saved patient data from any monitor on the network: 1. Using the mouse or the QuicKnob, click the Device Name box. The Zoom View panel opens. Mennen Medical 4-1 EnGuard® User Manual EnGuard as Saved Data Viewer Figure 4-1a Zoom During Monitoring 2. Figure 4-1b Zoom Before Monitoring If a remote patient is monitored click Disconnect. A list of patients that have data stored for transfer on all monitors in the unit is displayed. " L o o k F o r " t e x t b o x e Figure 4-2: Saved Patients ( in sTransfer) Panel 3. Select a patient or use the “Look For” text boxes in order to find the patient. Mennen Medical 4-2 EnGuard as Saved Data Viewer EnGuard® User Manual Note: A patient name auto-completion feature is provided: if you insert one or more letters into the name box, a sub list with all patients with the name beginning with the selected letters will be displayed. The transfer of the selected patient data to the EnGuard, takes time. Wait for the transfer progress bar, at top of the screen to reach 100% before touching any key. At the end of the transfer the EnGuard screen will show the label Saved Patient View, with patient's name and ID in the name box and 4 Quickeys than enables opening : Chart, Trend, Event Strip, and Reports. Figure 4-3: Saved Patient View Panel Note: As opposed to the Transfer function, viewing of saved patient data does not erase the data from the saving monitor. Mennen Medical 4-3 Chapter 5: System Local Setup Overview System Local Setup enables configuration of global controls, such as setting the alarm and volume controls and network setup for the EnGuard . EnGuard is configured at the factory with Mennen Medical default values, which can be changed as needed by your hospital or department. Access to the System Local Setup menu is limited to authorized personnel, such as a System Administrator or Hospital Biomedical Engineer possessing a pre-defined password. Accessing the System Local Setup Menu From the System Local Setup menu, you can access the following panels: Alarm Volume & Controls Use this panel to define general alarm-related parameters, such as alarm volume, silence time, etc. Sound Event Use this panel to assign audio messages to various events. Network Setup Use this panel to configure the EnGuard device and Unit name (e.g. ICU) on the network. Change Password Use this panel to define a new password for entering the System Local Setup menu. Check Disk Check disk is a technical procedure that does not affect user-defined parameters. This panel is for use by authorized service personnel only. Permission Editor Use this panel to define which Envoy / VitaLogik / Menntor X7 menu options are available for the EnGuard Language Setup Use this panel to select the interface language on the display screen. To access the System Local Setup menu: 1. Click the Device name box at the top left corner of the screen. The Zoom View panel appears. Mennen Medical 5-1 Using the Multi-Bed Screen Ensemble User’s Guide Figure 5-1 Zoom View Panel 2. Click the Local Setup button. The Local Setup menu is displayed. On the menu, choose System Local Setup . The System Password panel appears requesting the password. Figure 5-2 System Password Panel 3. Enter the correct password. The System Local Setup menu is displayed. Mennen Medical 5-2 Using the Multi-Bed Screen Ensemble User’s Guide Figure 5-3 System Local Setup Panel Alarm Volume & Controls Use this panel to define general alarm-related parameters, such as silence time. These parameters are defined for each alarm priority level, enabling the alarm response for each alar m priority to be unique. For a more detailed description of Alarms, including alarm priority and notification, refer to “Alarms”, in the Envoy / VitaLogik / Menntor X7 Operating Manuals . Figure 5-4 The Alarm Volume & Controls Panel The panel is divided into two major areas. Parameters common to all alarms are located on the left of the panel. These parameters include: Silence Time and Alarm Tone Setting . On the right side of the panel, parameters specific to each alarm priority are set. Mennen Medical 5-3 Using the Multi-Bed Screen Ensemble User’s Guide These fields include; File Name , Repeat Every (sec) , End and Init Volume , Delay , Step and Increase Intensity . These parameters remain disabled until an alarm priority is selected. A description of each Alarm Volume and Control panel field follows. Silence Time When pressed, the Silence key terminates any audio alarms active at that moment for a predefined period which you can set under Silence Time . The available options are; 30 , 60 , 90 , and 120 seconds. The factory default is 30 seconds. Alarm Tone Setting The Envoy / VitaLogik / Menntor X7 parameter alarms are associated with a priority level. This panel allows you to define the attributes of each priority level. The available priority levels are; C1, C2, C3, C4, T1, T2, Low HR, High HR, SpO2 and SpO2ex . When you select an alarm priority level, the following fields are enabled: File Name Defines the .wav file (sound file) which supplies the alarm tone for the selected alarm prior ity. The available options are; C1.WAV, C2.WAV, C3.WAV, C4.WAV, T1.WAV, T2.WAV and SpO2.WAV and SpO2ex.WAV. Each file corresponds to the alarm priority of that name. Additional sounds are offered for user's selection. Repeat Every (sec). Defines the time period after which an alarm is repeated (every 10 seconds, every 20 seconds, etc.). The available options are; 10, 20, 30, 40, 50 , and 60 seconds. You can press the Play button to sample the selected alarm tone. The factory default values are as follows: C1, C2, and C3 - 0 seconds T1 - 20 seconds T2 - 30 seconds SpO2 - 60 seconds Note: A repeat time of 0 seconds indicates that the alarm tone is continuous. Mennen Medical 5-4 Using the Multi-Bed Screen Ensemble User’s Guide End and Init Volume Sets the volume of the alarm tone when the alarm is first triggered (Initial Volume) and the maximum volume the alarm can reach until responded to (End Volume) . The alarm volume gets progressively louder until it reaches the maximum level then remains at that maximum level until someone responds. End and Init Volume is set on a scale of 0-100. Sliders are provided to set the volume. The left slider controls the end (maximum) volume and the right slider controls the init (initial) volume. Delay (sec) Sets the time delay (in seconds) until the alarm increases in volume. Delay is set on a scale of 10-60. Step (vol) Sets the increase in alarm volume after each delay. Step is set on a scale of 0-20 (in units of 4). Increase Intensity Select this checkbox to enable increase in alarm volume. If this option is disabled, the alarm tone remains at its initial level of volume. Setting the Alarm Volume & Control Panel You can access the Alarm Volume & Controls panel from the System Local Setup menu. To set Alarm Volume and Controls: 1. From the Silence Time drop-down menu, select the alarm silence time. 2. From the Priority Level drop-down menu, select the alarm priority level to be configured. 3. From the File Name drop-down menu, select the alarm tone.WAV file for the selected priority level. 4. Set the Repeat Every (sec) scale by moving the slider to the required time period. Select Play to hear a sample of the alarm tone. Select Stop to end the playback of the alarm tone. 5. Under End and Init Volume, set the left slider to the maximum alarm volume and the right slider to the initial alarm volume. 6. Set the Delay slider to the required delay (in seconds). 7. Set the Step slider to the required number of steps for each alarm volume increase. 8. Check the Increase Intensity box to activate this function. Clear the checkbox to deactivate. Mennen Medical 5-5 Using the Multi-Bed Screen 9. Ensemble User’s Guide Press Main Screen to apply the changes and exit to the main screen. Sound Event Sound events are audio messages that are heard when certain events occur. Use the Sound Event panel to assign sound files to events at the EnGuard . The following sound files are supplied with the EnGuard : Start up NIBP success NIBP fail PCWP Deflate balloon CO inject Alarm watch Zero BP success Figure 5-5: The Sound Event Panel To configure sound events: 1. In the System Local Setup menu, click Sound Event . 2. Under Event , select the event to which you want to assign an audio message. 3. Under File Name , define the .wav file (sound file) which supplies the sound for the selected event. The available options are: Alarm watch.wav BP Zero success.wav C1.wav - C4.wav Mennen Medical 5-6 Using the Multi-Bed Screen CO ready.wav NIBP fail.wav NIBP success.wav PCWP Timeout.wav SPO .wav 2 Startup.wav T1.wav - T2.wav Chime1.wav Chime2.wav Chime3.wav Gling.wav Ensemble User’s Guide 4. Under Volume , set the required volume, and click Play to test the sound file. 5. Click Main Screen to save settings and close the window. Network Setup The Network Setup panel is used to name the EnGuard device and to define which unit it is associated with (e.g. ICU). It also displays the device ID number, and IP address as identified by the system. If a printer is located on the LAN, you can enable the printer. To configure Network Setup: 1. In the System Local Setup menu, click Network Setup. Figure 5-6 Setting up the Network Mennen Medical 5-7 Using the Multi-Bed Screen Ensemble User’s Guide 2. Click in the Device Name text box, and enter the name of the device. 3. Click in the Device Unit/Group text box, and enter the name of the unit or group. 4. Check the Printer box to activate or deactivate the printer. 5. Select Main Screen to apply the changes and close the panel. Inter Unit Privileges The Inter Unit Privileges panel allows the System Administrator to set a “Privilege Table” for all the units on the network. The “Privilege Table” enables the EnGuard to be set to one of the following options: Read only ; Read and Write ; or No Access to the monitors in a given unit. Figure 5-7 The Inter Unit Privileges Panel To activate the required permissions for the EnGuard : 1. Select the unit list - the list will turn green. 2. Select a unit. 3. Select Read only ; Read and Write ; or N/A on the right panel. Read allows you to view all the data from monitor s in a given unit, without changing or controlling any of the setups. It also allows you to perform calculations on data coming from the remote monitor. Read / Write allows you to view and modify any parameter, alarm limits and/or display options. N/A disables any viewing or communication to monitors in a given unit. Mennen Medical 5-8 Using the Multi-Bed Screen Ensemble User’s Guide Change Password The Change Password option allows you to change the password that enables access to the System Local Setup menu. Access to the System Local Setup menu is limited to authorized personnel, such as a System Administrator or Hospital Biomedical Engineer. To change the password: 1. In the System Local Setup menu, click Change Password . Figure 5-8 Changing the Password 2. Enter the new password and click Accept . 3. Type the password again and click Accept . Check Disk When running Check Disk, all patient information on the disk is erased. WARNING! Avoid using this option. To run Check Disk: 1. In the System Local Setup menu, select Check Disk . Permission Editor In the Permission Editor panel you can define which Envoy / VitaLogik / Menntor X7 functions can be accessed at this EnGuard . By default, access to all functions is available at the EnGuard. However, you can configure the station to make certain functions unavailable. For example, you can decide that at the current station recording of vital signs data cannot be performed. The Permission Editor displays the entire Envoy / VitaLogik / Menntor X7 menu, and allows you to define, for each menu option, whether it is available or unavailable for the current EnGuard. The following modes can be set for each menu option: On - Select this option to activate the menu option. The option appears in the appropriate panel and can be accessed. Off - select this option to remove the menu option from the appropriate panel. The option cannot be accessed. Dimmed - select this optionwhen you want the menu option to appear dimmed on the panel. The option cannot be accessed. Mennen Medical 5-9 Using the Multi-Bed Screen Ensemble User’s Guide Figure 5-9 The Permission Editor Panel To define permission for a menu option: 1. From the Local Setup menu, select Permission Editor . The Permission Editor panel appears displaying a menu tree with all Envoy / VitaLogik / Menntor X7 menu options. 2. In the menu tree, click the plus (+) icon that appears to the left of a menu item to access the menu level below that listed on the screen. Any item from any level can be selected when assigning permission. 3. Select the required menu item, and then select the permission status for the item. 4. Repeat steps 3 to 4 until defining permission for all the menu option that you want. 5. Click Main Screen to apply changes and close the panel. Language Setup Enter Language Setup in order to select the interface language on the display screen. Check with Mennen Medical or with your local Mennen agent for the available languages. (Available as from December, 2001 - in English, Dutch, French, Italian, Spanish, Espanol, Portuguese, Polish, Turkish, and Russian). Mennen Medical 5-10 Using the Multi-Bed Screen Ensemble User’s Guide Figure 5-10 The Language Setup Panel Mennen Medical 5-11