1
Operating Instructions
SupplyCare Enterprise SCE30B
Operating program for the coordination of material and
information flow along the supply chain
BA00055S/00/EN/16.14
Software Version: 2.08
71244045
SupplyCare Enterprise SCE30B
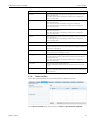
Table of contents
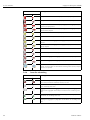
Table of contents
Revision history . . . . . . . . . . . . . . . . . . . . . . . . . . . 7
Registered trademarks . . . . . . . . . . . . . . . . . . . . 7
1
Safety instructions . . . . . . . . . . . . . . . . . . . 8
1.1
1.2
1.3
1.4
1.5
Designated use . . . . . . . . . . . . . . . . . . . . . . . . . . . .
IT Security . . . . . . . . . . . . . . . . . . . . . . . . . . . . . . .
Installation, commissioning and operation . . . . . . . .
Technical improvement . . . . . . . . . . . . . . . . . . . . . .
Conventions used in this manual . . . . . . . . . . . . . . .
1.5.1 Emphasizing text . . . . . . . . . . . . . . . . . . . . .
8
8
8
8
8
9
4.2
4.3
4.4
System description . . . . . . . . . . . . . . . . . . 10
4.5
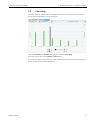
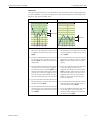
3
User interface . . . . . . . . . . . . . . . . . . . . . . 13
4.6
4.7
3.1
3.2
Starting the program . . . . . . . . . . . . . . . . . . . . . . .
Page structure . . . . . . . . . . . . . . . . . . . . . . . . . . . .
3.2.1 Portal window . . . . . . . . . . . . . . . . . . . . . .
3.2.2 Header . . . . . . . . . . . . . . . . . . . . . . . . . . .
3.2.3 Navigation window . . . . . . . . . . . . . . . . . .
3.2.4 Application window . . . . . . . . . . . . . . . . .
Elements . . . . . . . . . . . . . . . . . . . . . . . . . . . . . . . .
Icons . . . . . . . . . . . . . . . . . . . . . . . . . . . . . . . . . . .
3.4.1 Standard buttons . . . . . . . . . . . . . . . . . . . .
3.4.2 Buttons in tables . . . . . . . . . . . . . . . . . . . .
3.4.3 Symbols for events . . . . . . . . . . . . . . . . . .
3.4.4 Icons for tanks/objects . . . . . . . . . . . . . . .
3.4.5 Icons for tanks/objects ("Map" workplace) .
3.4.6 Icons for scheduling . . . . . . . . . . . . . . . . .
3.4.7 Icons for disposal and delivery status . . . . .
3.4.8 Icons for analysis . . . . . . . . . . . . . . . . . . . .
Descriptions . . . . . . . . . . . . . . . . . . . . . . . . . . . . .
General processing functions . . . . . . . . . . . . . . . . .
3.6.1 Using filter functions in tables (searching) .
3.6.2 Filtering the data records displayed
(picklist) . . . . . . . . . . . . . . . . . . . . . . . . . .
3.6.3 Changing the column display (fields) in
the overview table . . . . . . . . . . . . . . . . . . .
3.6.4 Viewing numerical values (master data) . . .
3.6.5 Changing master data . . . . . . . . . . . . . . . .
3.6.6 Displaying modified master data in full . . . .
3.6.7 Selecting all the rows in a table . . . . . . . . .
3.6.8 Deleting master data . . . . . . . . . . . . . . . . .
3.6.9 Copying and changing a data record . . . . .
Receiving messages (messaging) . . . . . . . . . . . . . . .
2
3.3
3.4
3.5
3.6
3.7
13
14
14
15
15
17
18
18
18
19
19
20
21
22
23
23
24
25
25
26
26
26
27
29
30
30
31
33
4
Monitoring tanks – "Tank"
workplace . . . . . . . . . . . . . . . . . . . . . . . . . . 34
4.1
Viewing tanks and associated information . . . . . . .
4.1.1 "Tank" overview table . . . . . . . . . . . . . . . .
4.1.2 Inventory chart . . . . . . . . . . . . . . . . . . . . .
4.1.3 Tank details . . . . . . . . . . . . . . . . . . . . . . . .
Endress+Hauser
34
35
37
38
4.1.4 Notes and files . . . . . . . . . . . . . . . . . . . . . .
4.1.5 Tank partners . . . . . . . . . . . . . . . . . . . . . .
4.1.6 Location details . . . . . . . . . . . . . . . . . . . . .
4.1.7 Tank service status . . . . . . . . . . . . . . . . . .
4.1.8 Event details . . . . . . . . . . . . . . . . . . . . . . .
4.1.9 Freeze event details . . . . . . . . . . . . . . . . . .
Editing tank service status . . . . . . . . . . . . . . . . . . .
Download history . . . . . . . . . . . . . . . . . . . . . . . . .
Viewing secondaries . . . . . . . . . . . . . . . . . . . . . . .
4.4.1 Viewing secondaries in the overview table
in the "Tank" menu item . . . . . . . . . . . . . .
4.4.2 Viewing secondaries in the inventory chart .
4.4.3 Viewing secondary data via the
"Tank details" tab . . . . . . . . . . . . . . . . . . . .
Viewing historical values and forecast values in
the inventory chart . . . . . . . . . . . . . . . . . . . . . . . .
Zoom functions in the inventory chart . . . . . . . . . .
Planning disposal and delivery via the inventory
chart . . . . . . . . . . . . . . . . . . . . . . . . . . . . . . . . . . .
39
40
40
41
41
41
42
43
45
45
46
47
47
49
50
5
Viewing personalized tank view –
"My tank view" workplace . . . . . . . . . 51
5.1
Viewing secondaries . . . . . . . . . . . . . . . . . . . . . . . 53
6
Editing events – "Event" workplace . 54
6.1
Event management – Status and weighting of
events . . . . . . . . . . . . . . . . . . . . . . . . . . . . . . . . . .
Viewing event messages . . . . . . . . . . . . . . . . . . . . .
6.2.1 Event details . . . . . . . . . . . . . . . . . . . . . . .
6.2.2 Freeze event details . . . . . . . . . . . . . . . . . .
6.2.3 Event history . . . . . . . . . . . . . . . . . . . . . . .
6.2.4 Inventory chart . . . . . . . . . . . . . . . . . . . . .
6.2.5 Tank details . . . . . . . . . . . . . . . . . . . . . . . .
Processing event messages . . . . . . . . . . . . . . . . . . .
Setting the resubmission date . . . . . . . . . . . . . . . . .
6.2
6.3
6.4
54
55
56
56
57
57
57
57
59
7
Planning delivery and disposal –
"Scheduling" workplace . . . . . . . . . . . . 60
7.1
7.2
Status management – delivery and disposal . . . . . .
Status display and notification of planned deliveries
and disposals . . . . . . . . . . . . . . . . . . . . . . . . . . . . .
7.2.1 Processing the status . . . . . . . . . . . . . . . . .
7.2.2 Viewing status history . . . . . . . . . . . . . . . .
Planning delivery and disposal – "Scheduling"
workplace . . . . . . . . . . . . . . . . . . . . . . . . . . . . . . .
7.3.1 Planning a delivery or disposal . . . . . . . . . .
7.3.2 Plausibility check . . . . . . . . . . . . . . . . . . . .
7.3.3 Deleting a delivery or disposal . . . . . . . . . .
Copying a delivery or disposal . . . . . . . . . . . . . . . .
7.4.1 Viewing a planned delivery or disposal
and saving as an Excel spreadsheet . . . . . . .
7.3
7.4
60
60
61
62
63
64
65
66
66
67
3
SupplyCare Enterprise SCE30
8
8.1
8.2
8.3
Table of Contents
Totaling and managing templates "Totaling" workplace . . . . . . . . . . . . . . . 68
Totaling . . . . . . . . . . . . . . . . . . . . . . . . . . . . . . . .
Saving a selection as a template . . . . . . . . . . . . . .
8.2.1 Creating a new template . . . . . . . . . . . . . .
8.2.2 Overwriting an existing template . . . . . . .
Selecting or deleting templates . . . . . . . . . . . . . . .
68
69
70
70
71
9
Viewing analysis data – "Analysis"
workplace . . . . . . . . . . . . . . . . . . . . . . . . . . 72
9.1
9.2
9.3
9.4
9.5
"Analysis" overview table . . . . . . . . . . . . . . . . . . .
KPIs (key performance indicators) . . . . . . . . . . . . .
Outflow/Inflow . . . . . . . . . . . . . . . . . . . . . . . . . .
Chart hourly . . . . . . . . . . . . . . . . . . . . . . . . . . . . .
Chart daily . . . . . . . . . . . . . . . . . . . . . . . . . . . . . .
11.5
73
73
74
76
77
11.6
10
Viewing tank locations on the map –
"Map" workplace . . . . . . . . . . . . . . . . . . . 78
10.1
10.2
10.3
Viewing a map and associated information . . . . . . 79
Tank details . . . . . . . . . . . . . . . . . . . . . . . . . . . . . 80
Planning a disposal or delivery . . . . . . . . . . . . . . . 80
11
Managing master data . . . . . . . . . . . . . . . 81
11.1
Managing companies . . . . . . . . . . . . . . . . . . . . . . 81
11.1.1 Creating a company . . . . . . . . . . . . . . . . . 81
11.1.2 Changing a company . . . . . . . . . . . . . . . . 82
11.1.3 Deleting a company . . . . . . . . . . . . . . . . . 82
11.1.4 Copying a company . . . . . . . . . . . . . . . . . 82
Managing users . . . . . . . . . . . . . . . . . . . . . . . . . . 82
11.2.1 Creating a user . . . . . . . . . . . . . . . . . . . . . 82
11.2.2 Assigning user roles and setting up alarms
via e-mail . . . . . . . . . . . . . . . . . . . . . . . . . 84
11.2.3 Changing a user . . . . . . . . . . . . . . . . . . . . 84
11.2.4 Deleting a user . . . . . . . . . . . . . . . . . . . . . 84
11.2.5 Copying a user . . . . . . . . . . . . . . . . . . . . . 85
11.2.6 Assigning tank groups to a user and setting
up notifications for tank events . . . . . . . . . 85
Managing tanks . . . . . . . . . . . . . . . . . . . . . . . . . . 86
11.3.1 Creating a tank . . . . . . . . . . . . . . . . . . . . . 86
11.3.2 Selecting and deleting a depicted tank
shape . . . . . . . . . . . . . . . . . . . . . . . . . . . . 92
11.3.3 Changing tank – tank group assignment . . 93
11.3.4 Configuring secondaries . . . . . . . . . . . . . . 93
11.3.5 Configuring tank freeze events . . . . . . . . . 94
11.3.6 Adding, opening and deleting files and
other information for a tank . . . . . . . . . . . 97
11.3.7 Changing a tank . . . . . . . . . . . . . . . . . . . . 99
11.3.8 Deleting a tank . . . . . . . . . . . . . . . . . . . . . 99
11.3.9 Copying a tank . . . . . . . . . . . . . . . . . . . . . 99
Managing aggregated tanks . . . . . . . . . . . . . . . . . . 99
11.4.1 Creating an aggregated tank . . . . . . . . . . . 99
11.4.2 Selecting and deleting a depicted tank
shape . . . . . . . . . . . . . . . . . . . . . . . . . . . 102
11.4.3 Adding, opening and deleting files and
other information for an aggregated tank . 103
11.2
11.3
11.4
4
11.7
11.8
11.9
11.4.4 Changing aggregated tank – tank group
assignment . . . . . . . . . . . . . . . . . . . . . . .
11.4.5 Configuring aggregated tank freeze events
11.4.6 Changing an aggregated tank . . . . . . . . .
11.4.7 Deleting an aggregated tank . . . . . . . . . .
11.4.8 Copying an aggregated tank . . . . . . . . . .
Managing locations . . . . . . . . . . . . . . . . . . . . . . .
11.5.1 Creating a location . . . . . . . . . . . . . . . . .
11.5.2 Adding, opening and deleting files and
other information for a location . . . . . . . .
11.5.3 Changing location-tank assignment . . . . .
11.5.4 Computing the location automatically or
entering it manually . . . . . . . . . . . . . . . .
11.5.5 Displaying the location on the map . . . . .
11.5.6 Changing a location . . . . . . . . . . . . . . . .
11.5.7 Deleting a location . . . . . . . . . . . . . . . . .
11.5.8 Copying a location . . . . . . . . . . . . . . . . .
Managing products . . . . . . . . . . . . . . . . . . . . . . .
11.6.1 Creating a product . . . . . . . . . . . . . . . . .
11.6.2 Changing product – tank assignment . . . .
11.6.3 Changing a product . . . . . . . . . . . . . . . .
11.6.4 Deleting a product . . . . . . . . . . . . . . . . .
11.6.5 Copying a product . . . . . . . . . . . . . . . . .
Managing tank groups . . . . . . . . . . . . . . . . . . . . .
11.7.1 Changing tank groups . . . . . . . . . . . . . . .
11.7.2 Assigning users to a tank group and
setting up notifications for tank events . . .
11.7.3 Sending test event e-mail
(user assignment) . . . . . . . . . . . . . . . . . .
11.7.4 Changing tank groups . . . . . . . . . . . . . . .
11.7.5 Deleting tank groups . . . . . . . . . . . . . . . .
11.7.6 Copying tank groups . . . . . . . . . . . . . . . .
Managing units . . . . . . . . . . . . . . . . . . . . . . . . . .
11.8.1 Changing number of places after the
decimal point . . . . . . . . . . . . . . . . . . . . .
11.8.2 Managing customer-specific units . . . . . .
11.8.3 Deleting a customer-specific unit . . . . . . .
Managing a report . . . . . . . . . . . . . . . . . . . . . . . .
11.9.1 Creating a report . . . . . . . . . . . . . . . . . . .
11.9.2 Downloading the report as a PDF file . . .
11.9.3 Creating reports and sending them
immediately . . . . . . . . . . . . . . . . . . . . . .
11.9.4 Changing a report . . . . . . . . . . . . . . . . . .
11.9.5 Deleting a report . . . . . . . . . . . . . . . . . . .
11.9.6 Copying a report . . . . . . . . . . . . . . . . . . .
103
103
103
103
103
104
104
105
105
107
107
107
107
107
108
108
109
110
110
110
110
110
111
112
113
114
114
114
114
115
116
116
117
123
123
123
123
123
12
System administration . . . . . . . . . . . . . 124
12.1
Changing system properties . . . . . . . . . . . . . . . . .
12.1.1 Changing system properties . . . . . . . . . . .
12.1.2 Parameters (keys) and input range table. .
Configuring services (basic jobs) . . . . . . . . . . . . .
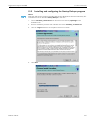
Configuring database backup . . . . . . . . . . . . . . . .
Configuring the splash screen and information
window (UI Customizing) . . . . . . . . . . . . . . . . . .
Modules . . . . . . . . . . . . . . . . . . . . . . . . . . . . . . .
Defining notification . . . . . . . . . . . . . . . . . . . . . .
12.6.1 Defining and editing event notification . .
12.2
12.3
12.4
12.5
12.6
124
124
125
132
133
134
135
135
135
Endress +Hauser
SupplyCare Enterprise SCE30B
12.7
12.8
12.9
12.10
12.11
12.12
12.13
12.14
12.15
12.6.2 Defining and editing freeze event
notification (Freeze event notification) . . .
12.6.3 Defining and editing limit notification . . .
12.6.4 Defining and editing PDL/PDE
notification . . . . . . . . . . . . . . . . . . . . . . .
Set up an e-mail connection . . . . . . . . . . . . . . . .
Creating new gateways, configuring gateways
and replacing gateways – Gateway configuration
menu . . . . . . . . . . . . . . . . . . . . . . . . . . . . . . . . .
12.8.1 Creating new gateways . . . . . . . . . . . . . .
12.8.2 Configure gateways . . . . . . . . . . . . . . . . .
12.8.3 Replacing a gateway . . . . . . . . . . . . . . . .
Assigning a measuring point to a tank . . . . . . . . .
Managing linearization tables . . . . . . . . . . . . . . . .
12.10.1Creating, changing and deleting a
linearization table . . . . . . . . . . . . . . . . . .
12.10.2Displaying a linearization table as a
graph . . . . . . . . . . . . . . . . . . . . . . . . . . .
12.10.3Uploading a linearization table . . . . . . . . .
12.10.4Uploading a linearization table as an
Excel file . . . . . . . . . . . . . . . . . . . . . . . . .
Integrating and managing FIS gateways –
FIS gateway menu . . . . . . . . . . . . . . . . . . . . . . . .
12.11.1Integrating FIS gateways . . . . . . . . . . . . .
12.11.2"FIS gateways" overview table . . . . . . . . .
Displaying and editing system alarms . . . . . . . . . .
12.12.1Table of alarm messages . . . . . . . . . . . . .
E-mail error messages . . . . . . . . . . . . . . . . . . . . .
Faulty measured data . . . . . . . . . . . . . . . . . . . . . .
Creating new gateways –
for communication via e-mail . . . . . . . . . . . . . . .
Endress+Hauser
Table of contents
12.16 Writing and sending messages (messaging) . . . . . . 174
138
140
13
Maintaining a profile . . . . . . . . . . . . . . . 175
13.1
13.2
13.3
Maintaining a user profile . . . . . . . . . . . . . . . . . .
Changing a password . . . . . . . . . . . . . . . . . . . . . .
Selecting and changing user preferences . . . . . . . .
13.3.1 Description of the filters (fields) . . . . . . . .
14
Viewing the gateway report
(Cockpit) . . . . . . . . . . . . . . . . . . . . . . . . . 180
15
OPC Connection . . . . . . . . . . . . . . . . . . 181
159
15.1
15.2
161
162
15.3
Configuring the OPC Bridge (Wrapper) . . . . . . . . 181
Installing and configuring the Startup Delayer
program . . . . . . . . . . . . . . . . . . . . . . . . . . . . . . . . 187
Starting the OPC Configurator Tool . . . . . . . . . . . 190
163
16
Extending the license and searching
for updates . . . . . . . . . . . . . . . . . . . . . . . . 194
16.1
16.2
Extending the license . . . . . . . . . . . . . . . . . . . . . . 194
Searching for updates . . . . . . . . . . . . . . . . . . . . . . 194
17
User roles and authorization . . . . . . . 196
143
145
146
147
148
154
155
158
164
164
166
167
169
172
172
175
176
177
177
172
5
Table of contents
6
SupplyCare Enterprise SCE30B
Endress +Hauser
SupplyCare Enterprise SCE30B
Revision history
Revision history
Version
Operating Instructions
Changes
Remarks
2.08.xx
BA00055S/00/EN/16.14
Implementation of Freeze Events, filters in
Workplace Event; OPC Bridge configuration update,
Google Maps information update
2.06.xx
BA00055S/00/EN/15.13
User roles modified. Implemented:
–
tank setup wizard, optional deactivation of tank
limits, choice between templates "Tank" and
"Object", modules, processing of negative values,
deactivation of forecast, scaling in the inventory
chart, hiding of tabs without information, additional
parameters
2.05.xx
BA00055S/04/en/14.12
Secondary values increased from three to eight.
–
Button renamed to "Start check". Implemented:
Additional tank shapes, display of thousand
separators in the "Workplace" menu, colors showing
the tank status forecast value in the calendar,
"Totaling" menu item, info window containing long
text, check box "Assign", new time zone format,
button "Test event e-mail" in the "Tank group" menu
item, filter "Default home page" in the "User
preferences" menu item, editable event notification,
limit notification and PDL/PDE notification, scaling
table, e-mail error messages, new time zone format
2.03.03
BA00055S/04/en/13.11
The following menus are implemented: Scheduling –
and Analysis. The following tabs are implemented:
Notes and files, Tank notes, Location notes, Secondaries, Customer specific unit UI Customizing and
Event notification. Additional illustration of secondary values implemented in the "Tank" overview table
and the inventory chart. Following user roles implemented: Local system administrator and Analysis
user.
2.02.xx
BA055S/04/en/09.10
Additional functions: alarm hysteresis, recycling
tank, export and download in Excel, managing
number of places after the decimal point per unit
group.
–
2.00.xx
BA055S/04/en/03.10
Revision of program design
–
1.01.xx
BA055S/04/en/12.08
OPC Connection
–
1.00.xx
BA055S/04/en/12.07
Original
–
Registered trademarks
Microsoft® and the Microsoft logo are registered trademarks of the Microsoft Corporation.
Google Maps is a service of Google Incorporated.
iOS is a trademark or registered trademark of Cisco in the U.S. and other countries and is used under
liscense.
Safari®, iPhone® and iPad® are trademarks of Apple® Inc., registered in the U.S. and other countries.
Opera and O logo are trademarks of Opera Software ASA.
All other brand and product names are trademarks or registered trademarks of the companies and
organizations in question.
Endress+Hauser
7
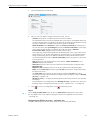
1 Safety instructions
SupplyCare Enterprise SCE30B
1
Safety instructions
1.1
Designated use
SupplyCare Enterprise SCE30B is a web-based operating program for coordinating the flow of
material and information along the supply chain.
SupplyCare Enterprise SCE30B gives you complete transparency over inventory levels in tanks and
silos, anytime, anywhere and even at remote locations.
Based on the measuring and transmission technology installed on site, the current inventories are
recorded and transmitted to SupplyCare. With SupplyCare, you have a constant overview of all the
current inventories. Critical levels are clearly indicated and you can also receive active information
on these levels if required. Calculated prognosis gives additional security for replenishment
planning.
1.2
IT Security
We only provide a warranty if the device is installed and used as described in the Operating Instructions. The device is equipped with security mechanisms to protect it against any inadvertent changes
to the device settings.
IT security measures in line with operator’s security standards and designed to provide additional
protection for the device and device data transfer must be implemented by the operators themselves.
Endress+Hauser can be contacted to provide support in performing this task.
1.3
Installation, commissioning and operation
Notice!
A PC connected to the Internet or Intranet is needed to use SupplyCare Enterprise software.
To install the SupplyCare Enterprise software, insert the CD-ROM into the CD-ROM drive of your
PC.
Follow the setup instructions in manual BA00054S/00/A2/16.14 Getting Started/Schnelleinstieg.
1.4
Technical improvement
Endress+Hauser reserves the right to make technical improvements to the hardware and software
without prior notice. Such improvements are not documented if they do not affect the operating
functions of the software. A new version of the Operating Instructions is always created if the
improvement affects operation. See the change history in this manual.
1.5
Conventions used in this manual
Typographical emphasis and particular symbols have been used to provide a clear structure for this
manual and highlight important information.
8
Endress +Hauser
SupplyCare Enterprise SCE30B
1 Safety instructions
1.5.1
Emphasizing text
The following table provides you with a brief overview of conventions used to highlight and
emphasize text in this manual.
Text emphasis
Meaning
Example
Bold
Keyboard entry, button, tab, menu, instruction,
directory path, commands
Select the Event details tab.
Click the Event menu item.
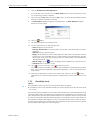
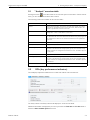
1.6 This document
Notice!
The screen views illustrated in this manual are sample views and can deviate from the views you
see on your screen. The screen views depend on personal settings and on the application.
Endress+Hauser
9
2 System description
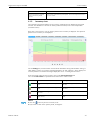
SupplyCare Enterprise SCE30B
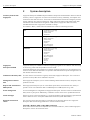
2
Inventory Control with
SupplyCare
System description
SupplyCare Enterprise SCE30B comprises Software-components and information within the field of
Inventory Control. SupplyCare can collect and visualize inventory, availability, consumption and
needs of the tanks and silos online. This allows the rationalization of business and logistic processes
and the reduction of inventory and stockout. From onsite measurement and global remote data
transmission and visualization to integration in ERP systems, SupplyCare offers a universal,
standards-based solution. SupplyCare is modular in design.
The modules "Basic", "Advanced" and "Professional" contain the following functions:
Basic
•
•
•
•
Configurable overview page
History and forecast
CSV download
Notifications
Advanced
•
•
•
•
•
•
•
Configurable overview page
History and forecast
CSV download
Notifications
Graphics
Event Management
Report configurator
Professional
•
•
•
•
•
•
•
•
•
•
•
Configurable overview page
History and forecast
CSV download
Notifications
Graphics
Event Management
Report configurator
scheduling
Totaling
Analysis
Map
SupplyCare
Enterprise SCE30B
SupplyCare Enterprise SCE30B is a web-based operating program for the indication and monitoring
of levels of e.g. tanks and silos spread all over the world.
SupplyCare Enterprise runs by default in an Apache Tomcat-environment on an application server
as service under Microsoft Windows. The operators and administrators operate the application via
web browser from theirs desks.
Indication of inventory data
The tank and silo inventories are regularly collected by SupplyCare Enterprise. The current and
previous inventory data can be indicated at any time.
Management of master
data
With SupplyCare Enterprise you can create and manage master data of locations, companies, tanks,
products and users.
Reports and connection to
ERP-Systems
With SupplyCare Enterprise you can create Excel-reports about the measured value history or
provide current level and master data via CIDX-Report to an ERP-System as e.g. SAP.
Event management
An event management is integrated into SupplyCare Enterprise. It shows events like the fall below
safety stocks or plan points. Additionally, notification e-mails can be sent to predetermined users.
Alarm messages
Whenever there is a technical problem e.g. connection problems, alarm messages are generated and
alarm e-mails are sent to the System administrator and Local system administrator.
Retrieval of measured
values
The inventory of the tanks and silos are retrieved by level measuring devices site. SupplyCare
Enterprise offers the following possibilities to retrieve measured values:
Via HTTP - Modem, GSM or OPC-XML-connection
Point of time and the interval are adjusted via a so-called "Scheduler", which enables SupplyCare
Enterprise to retrieve the measured values.
10
Endress +Hauser
SupplyCare Enterprise SCE30B
2 System description
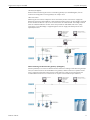
Gateways (Fieldgates):
Endress+Hauser-measuring devices are retrieved by gateways (so-called Fieldgates). For the
creation and configuration of new gateways see Chapter 12.8.
OPC Connection:
Measuring devices of other companies can be retrieved by an OPC Connection. SupplyCare
Enterprise supports the OPC SML DA 1.0 web communication variant. An OPC Bridge is required
for the retrieval of OPC DA 1.0, 2.0 or 3.0 connections via COM/DCOM. This bridge connects
itself via COM/DCOM with the OPC Server and provides an OPC-XML web service (Soap
Technology). This OPC Bridge is supplied together with the SupplyCare Enterprise-CD and
separately licensed.
About incoming e-mails from the gateways (Fieldgates)
Another possibility is to receive the measured values from the incoming e-mails from the gateways.
There, the measured values are embedded in the gateway e-mails and sent to a separate e-mailserver. SupplyCare Enterprise collects these e-mails from the e-mail server and processes the
included measured values. The e-mail-server is not part of the standard scope of delivery.
Endress+Hauser
11
2 System description
SupplyCare Enterprise SCE30B
SupplyCare Enterprise offers and elegant method to create gateways. As soon as a new gateway is
linked to the measurement chain and sends e-mails, this gateway is automatically listed as a "New
Gateway". Via the menu item "New gateways" listed gateways can be taken into the system. Refer
to Chapter 12.15.
12
Endress +Hauser
SupplyCare Enterprise SCE30B
3 User interface
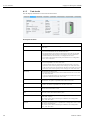
3
User interface
3.1
Starting the program
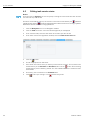
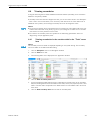
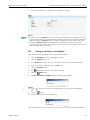
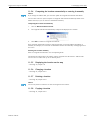
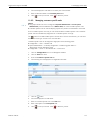
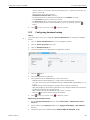
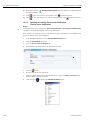
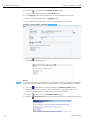
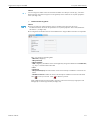
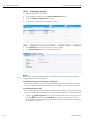
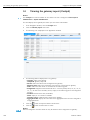
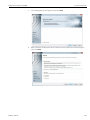
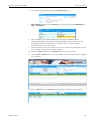
1.
Start your Web browser. Internet Explorer and Firefox are supported.
2.
Specify the URL or IP address for SupplyCare. You can get the URL or IP address from your
network administrator.
3.
The following screen appears:
4.
Enter your Login name (user name) and your Password.
5.
Click Login to confirm your entries.
6.
The first time you log in, you are asked to change your password.
7.
Click
8.
Enter your current password in the Old password field. Enter your new password in the New
password and Repeat fields.
9.
Click
to edit the password.
to save the new password.
Notice!
If the password is not correct, you are asked to enter the password again. Please contact your system
administrator if you have forgotten your password.
Endress+Hauser
13
3 User interface
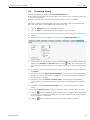
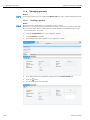
SupplyCare Enterprise SCE30B
3.2
3.2.1
Page structure
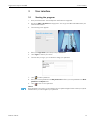
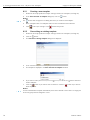
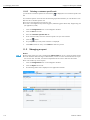
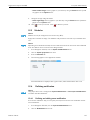
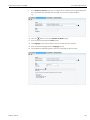
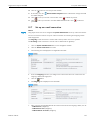
Portal window
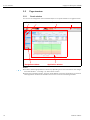
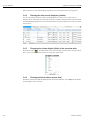
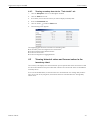
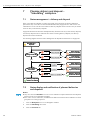
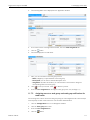
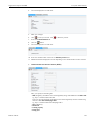
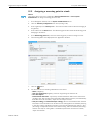
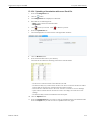
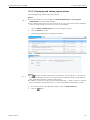
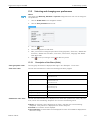
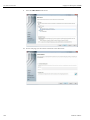
You can see the arrangement of the individual objects in the portal window in the graphic below.
Menus
Menu items
Navigation window
Portal window
Header
Application window
Notice!
• The menu and the appropriate menu items vary depending on the user role and thus also changes
the Portal Window. → See Page 16, "Menu items" section.
• SupplyCare is modular in design. The menu items differ for this reason. Furthermore, the contents
of the application window can also differ as well as the contents of the dialog windows.
14
Endress +Hauser
SupplyCare Enterprise SCE30B
3 User interface
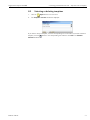
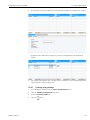
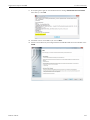
3.2.2
Header
Logging out
You can find the link to log off in the right-hand side of the header.
Clicking Log off takes you back to the Log in screen:
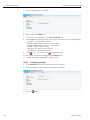
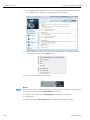
3.2.3
Navigation window
Menus
Depending on the user role, the menus Workplace, Configuration, System Administration and
Profile appear.
Notice!
Multiple user roles can be assigned to a user at the same time. The menu tree is then made up of
the menus for the user roles in question.
Navigation window
Clicking a menu expands or collapses this menu. The active menu is highlighted in blue.
Endress+Hauser
15
3 User interface
SupplyCare Enterprise SCE30B
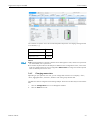
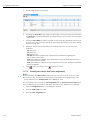
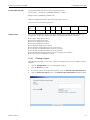
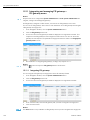
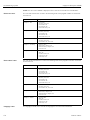
Menu items
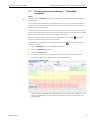
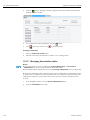
The menu is made up of various menu items depending on the user role in question. The following
table lists the menu items depending on the user role selected:
Notice!
The menu items in the "Workplace", "Configuration" and "Profile" menus differ as a result of
SupplyCare's modular design.
Menus
User Role
Workplace
Configuration
System administration
Cockpit
Profile
Read only
•
•
•
•
•
Tank 1)
My tank view
Event 2)
Totaling
Map
–
–
–
• User profile
• User preferences
Operator
•
•
•
•
•
•
Tank 1)
My tank view
Event 2)
Totaling
Analysis
Map
–
–
–
• User profile
• User preferences
Scheduler
•
•
•
•
•
•
•
Tank 1)
My tank view
Event 2)
Scheduling
Totaling
Analysis
Map
–
–
–
• User profile
• User preferences
Master data
–
•
•
•
•
•
•
•
•
•
–
–
• User Profile
Local
system administrator
–
• User
•
•
•
•
•
•
•
Gateway configuration
Linearization
FIS gateways
Alarm
System properties 3)
Notifications
Messaging
•
•
•
•
•
Logged on users
Logon history
Gateway report
Tank report
Contract report
• User Profile
System administrator
–
• User
•
•
•
•
•
•
•
•
•
Gateway configuration
Linearization
New gateways
FIS gateways
Alarm
System properties
Notifications
E-mail connection
Messaging
•
•
•
•
•
Logged on users
Logon history
Gateway report
Tank report
Contract report
• User Profile
User
Tank
Aggregated tank
Location
Company
Product
Unit 4)
Tank Group
Report
1) Only users with the "Operator" user role can change the tank service status.
2) Only users with the "Scheduler"or "Operator"user role can change the status of an event.
3) In the "System properties" menu item, the "Contract properties", "UI Customizing" and "Modules" tabs are displayed to users whose role is configured as
"Local system administrator".
4) In the "Units" menu item, the "Customer specific unit" tab is shown to users whose role is configured as "System administrator" or "Local system
administrator", with the additional role of "Master data". In the "Units" menu item, the "Details" tab is displayed only to users whose role is configured as
"Master data".
16
Endress +Hauser
SupplyCare Enterprise SCE30B
3 User interface
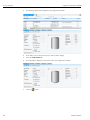
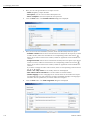
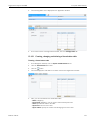
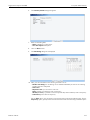
3.2.4
Application window
The content of the Application window varies depending on the menu item selected. The active
menu item is highlighted in blue.
Notice!
As a result of SupplyCare's modular design, the contents of "Overview" and of "Detailed view" can
differ as can the contents of the dialog windows.
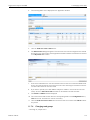
Most of the Application windows contain the following views:
• Overview
• Detailed view
Overview
Detailed view
Overview
The users or data are listed in tabular form in the overview.
Detailed view
Detailed information on the line selected in the table is displayed in the lower section. Left-clicking
another line in the Overview opens up the detailed view of the information. Where necessary, the
information in the detailed view is split even further into tabs.
Tabs
Using the tabs, you can create, change and delete new objects. Forms or tables are displayed in the
tab.
Endress+Hauser
17
3 User interface
SupplyCare Enterprise SCE30B
3.3
Elements
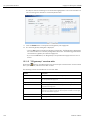
The following elements are available in the individual views:
Button
Function
Input fields
One-line input fields to enter a value (text or digits).
Multiline input fields to enter a long text.
Output fields
One-line output fields to display a value (text or digits).
Multiline output fields to display a long text.
Tables
Multicolumn tables in which individual rows can be selected.
Picklists
These allow the user to select from specified values.
Check boxes
These allow the user activate and deactivate certain functions.
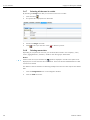
3.4
Icons
3.4.1
Standard buttons
The following standard buttons are used to edit and process individual objects: :
Button
Function
New – creates a new object that can be saved with Save
.
Edit – allows the user change the displayed contents of an object (depends on role).
Delete – deletes the content of an object. A dialog box appears for the user to confirm the deletion.
Save – saves altered contents and newly created objects.
Cancel – undo
Copy – copies the data for the user, tank, aggregated tank, location, company, product, tank group,
report, a disposal or a delivery.
Select tank picture – select a tank picture for tanks and aggregated tanks in the "Tank details" tab.
Update view - updates contents.
Calendar - Button for selecting a period of time (e.g. resubmission date, start and end date for a
history).
Excel-Export button for downloading data such as measured values to an Excel spreadsheet.
PDF export - button for downloading data such as the system settings as a PDF file.
Print – button for printing charts.
Show – shows contents.
Cancel – undo
18
Endress +Hauser
SupplyCare Enterprise SCE30B
3 User interface
3.4.2
Buttons in tables
You can navigate through the table via the following buttons at the bottom of the table.
Button
Function
Goes to the start of the table.
Scrolls back one page.
Moves the table up one line. The element selected remains unchanged.
Moves the table down one line. The element selected remains unchanged.
Scrolls forward one page.
Goes to the end of the table.
3.4.3
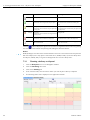
Symbols for events
Status display
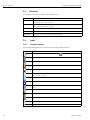
Button
Meaning
Open - the event was triggered.
Acknowledged - the event was acknowledged but no action has yet been taken.
In process - measures have been initiated to replenish material.
Done - recorded by measurement. Replenishment process completed successfully.
Priority (weight)
Button
Meaning
Plan point (GREEN)
Ship point (YELLOW)
Safety stock (RED)
Freeze event (Eye-symbol with tooltip "Check")
Endress+Hauser
19
3 User interface
SupplyCare Enterprise SCE30B
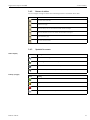
3.4.4
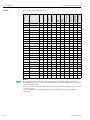
Icons for tanks/objects
SupplyCare allows users to select between the template types "Tank" and "Object". These two
template types have the exact same functionality. However, depending on your selection, the
descriptions in the menu, in "Overview" and in "Detailed view" change as well as the symbols and
tool tips that appear when you move the cursor over a symbol.
Notice!
The symbols for tanks and objects are shown in the following tables. The descriptions that are
different are listed after this in Chapter 3.5 on Page 24. Please note that the template type "Tank"
is used in all remaining sections of these Operating Instructions.
Status display
Button
Tank
Meaning
Object
OK (GREEN)
Standard tank/Standard object: the current (last measured) inventory level of the
tank/object in question is above the plan point/observance limit.
Recycling tank/Recycling object: the current (last measured) inventory level of the
tank/object in question is below the plan point/observance limit.
OK (GREEN)
Aggregated standard tanks/Aggregated standard objects: the current (last measured)
inventory level of the aggregated tank/aggregated object in question is above the plan
point/observance limit.
Aggregated recycling tanks/Aggregated recycling objects: the current (last measured)
inventory level of the aggregated tank/aggregated object in question is below the plan
point/observance limit.
Plan point/Observance limit reached (YELLOW)
Standard tank/Standard object: the current (last measured) inventory level of the
tank/object in question is below the plan point/observance limit.
Recycling tank/Recycling object: the current (last measured) inventory level of the
tank/object in question is above the plan point/observance limit.
Plan point/Observance limit reached (YELLOW)
Aggregated standard tanks/Aggregated standard objects: the current (last measured)
inventory level of the aggregated tank/aggregated object in question is below the plan
point/observance limit.
Aggregated recycling tanks/Aggregated recycling objects: the current (last measured)
inventory level of the aggregated tank/aggregated object in question is above the plan
point/observance limit.
Ship point/Point of action reached (ORANGE)
Standard tank/Standard object: the current (last measured) inventory level of the
tank/object in question is below the ship point/point of action.
Ship point/Point of action reached (ORANGE)
Aggregated standard tanks/Aggregated standard objects: the current (last measured)
inventory level of the aggregated tank/aggregated object in question is below the ship
point/point of action.
Safety stock/Critical limit (RED)
Standard tank/Standard object: the current (last measured) inventory level of the
tank/object in question is below the safety stock/critical limit.
Recycling tank/Recycling object: the current (last measured) inventory level of the
tank/object in question is above the safety stock/critical limit.
Safety stock/Critical limit (RED)
Aggregated standard tanks/Aggregated standard objects: the current (last measured)
inventory level of the aggregated tank/aggregated object in question is below the
safety stock/citical limit.
Aggregated recycling tanks/Aggregated recycling objects: the current (last measured)
inventory level of the aggregated tank/aggregated object in question is above the
safety stock/citical limit.
20
Endress +Hauser
SupplyCare Enterprise SCE30B
3 User interface
Button
Tank
Meaning
Object
Bad measured data - communication error. No measured data are available for the
tank/object in question. The state is also shown for displayed secondary data if the
tank/object is not out of order.
Bad measured data - communication error. No measured data are available for the
aggregated tank/aggregated object in question.
Out of service - the tank/object is not available (e.g. due to overhaul). The time
when the tank/object is out of order is marked in gray in the inventory chart.
Out of service - the aggregated tank/aggregated object is not available (e.g. due to
overhaul). The time when an associated tank/object is out of order is marked in gray
in the inventory chart.
3.4.5
Icons for tanks/objects ("Map" workplace)
Button
Tank
Meaning
Object
OK (GREEN) - no delivery/disposal planned.
OK (GREEN) - planned delivery/disposal.
OK (GREEN) - aggregated tank/aggregated object: no delivery/disposal planned.
OK (GREEN) - aggregated tank/aggregated object: planned delivery/disposal.
OK (GREEN) - several tanks/objects available at the location. All the tanks/objects
have the OK status. The tanks/objects can have different scheduling statuses
(delivery/disposal planned or not planned).
Plan point/Observance limit reached (YELLOW) - no delivery/disposal
planned.
Plan point/Observance limit reached (YELLOW) - planned delivery/disposal.
Plan point/Observance limit reached (YELLOW) - aggregated tank/aggregated
object: no delivery/disposal planned.
Plan point/Observance limit reached (YELLOW) - aggregated tank/aggregated
object: planned delivery/disposal.
Ship point/Point of action reached (ORANGE) - no delivery/disposal planned.
Ship point/Point of action reached (ORANGE) - planned delivery/disposal.
Ship point/Point of action reached (ORANGE) - aggregated tank/aggregated
object: no delivery/disposal planned.
Ship point/Point of action reached (ORANGE) - aggregated tank/aggregated
object: planned delivery/disposal.
Endress+Hauser
21
3 User interface
SupplyCare Enterprise SCE30B
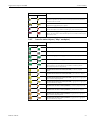
Button
Tank
Meaning
Object
Safety stock/Critical limit reached (RED) - no delivery/disposal planned.
Safety stock/Critical limit reached (RED) - planned delivery/disposal.
Safety stock/Critical limit reached (RED) - aggregated tank/aggregated object:
no delivery/disposal planned.
Safety stock/Critical limit reached (RED) - aggregated tank/aggregated object:
planned delivery/disposal.
Bad measurement data - no delivery/disposal planned.
Bad measurement data - planned delivery/disposal.
Bad measurement data - aggregated tank/aggregated object: no delivery/disposal
planned.
Bad measurement data - aggregated tank/aggregated object: planned
delivery/disposal.
Out of order - no delivery/disposal planned.
Out of order - planned delivery/disposal.
Out of order - aggregated tank/aggregated object: no delivery/disposal planned.
Out of order - aggregated tank/aggregated object: planned delivery/disposal.
Diverse - several tanks/objects with different statuses displayed are available at the
location. The tanks/objects can have different scheduling statuses (delivery/disposal
planned or not planned).
3.4.6
Icons for scheduling
Button
Tank
Meaning
Object
Planned delivery/Planned disposal - a planned delivery or disposal is indicated in
the inventory chart and the calendar by a delivery van icon.
Standard tank/Standard object - how a standard tank/standard object is indicated
in the "Scheduling" menu item.
Aggregated standard tanks/Aggregated standard objects - how aggregated
standard tanks/aggregated standard objects are indicated in the "Scheduling" menu
item.
Recycling tank/Recycling object - how a recycling tank/recycling object is
indicated in the "Scheduling" menu item.
Aggregated recycling tanks/Aggregated recycling objects - how aggregated
recycling tanks/aggregated recycling objects are indicated in the "Scheduling" menu
item.
22
Endress +Hauser
SupplyCare Enterprise SCE30B
3 User interface
3.4.7
Button
Icons for disposal and delivery status
Meaning
Detected - the Detected status is displayed in the following situations:
• The system has detected a delivery or disposal which has been scheduled too early or too late. You
can process this delivery or disposal in the "Details" tab using the Confirm button.
• The system has detected a missing delivery or disposal. You can process this delivery or disposal in
the "Details" tab using the Mark as fulfilled button.
• The system has detected that measured data are missing. You can process this delivery or disposal in
the "Details" tab using the Mark as fulfilled button.
Confirmed - the Confirmed status is displayed in the following situations:
• A delivery or disposal which has been scheduled too early or too late was confirmed when the
delivery/disposal was created.
• A delivery or disposal which has been scheduled too early or too late has been confirmed in the
"Details" tab.
Deleted - a planned delivery or disposal has been deleted.
New - a new delivery or disposal has been planned.
Fulfilled - a new delivery or disposal has been fulfilled. If a delivery and disposal is made, this is flagged
by SupplyCare as Delivery made (detected)/Disposal made (detected).
If the system has detected a missing delivery/disposal or missing measured data, you can process this
delivery/disposal in the "Details" tab using the Mark as fulfilled button. The delivery/disposal is
displayed as Delivery fulfilled (confirmed)/Disposal fulfilled (confirmed).
3.4.8
Icons for analysis
Button
Tank
Meaning
Object
Standard tank/Standard object - how a standard tank/standard object is indicated
in the "Analysis" menu item.
Aggregated standard tanks/Aggregated standard objects - how aggregated
standard tanks/aggregated standard objects are indicated in the ""Analysis" menu
item.
Recycling tank/Recycling object - how a recycling tank/recycling object is
indicated in the ""Analysis" menu item.
Aggregated recycling tanks/Aggregated recycling objects - how aggregated
recycling tanks/aggregated recycling objects are indicated in the ""Analysis" menu
item.
Endress+Hauser
23
3 User interface
SupplyCare Enterprise SCE30B
3.5
Descriptions
Depending on whether "Tank" or "Object" was selected as the template type, the descriptions in the
menu, in "Overview" and in "Detailed view" change as well as the symbols and tool tips that appear
when you move the cursor over a symbol.
The following are the differences in the descriptions that involve more than simply replacing the
word "Tank" with "Object":
24
Standard template type "Tank"
Standard template type "Object"
Tank name
Object
Tank details
Details
Tank partners
Partners
Tank service status
Service status
PP (Plan point)
OL (Observance limit)
SP (Ship point)
POA (Point of action)
SST (Safety stock)
CL (Critical limit)
DSST (Day(s) until reaching saftey stock)
DCL (Day(s) until reaching critical limit)
Capacity
Maximum
Free capacity
Free space
Inventory Chart
Chart
Inventory
Received value
Outflow
Decrease
Inflow
Increase
DO (Daily outflow)
DD (Daily decrease)
ADO (Average daily outflow)
ADD (Average daily decrease)
DI (Daily inflow)
DI (Daily increase)
ADI (Average daily inflow)
ADI (Average daily increase)
Average inventory level
Average level
Endress +Hauser
SupplyCare Enterprise SCE30B
3 User interface
3.6
General processing functions
3.6.1
Using filter functions in tables (searching)
You can use the filter function to reduce the number of data sets displayed for a table. You enter the
filter functions in the top line of the table.
1.
In the top table line, enter a complete designation or just the first few letters in the desired field.
2.
Press ENTER.
3.
Only the matching table entries are now displayed.
In order to display the entire table contents again, delete your entries and then press ENTER.
You can always use the following filter functions for the individual fields:
Description
Group
Function
User entry
Result (data displayed)
Character string
* (wildcard)
Tank0*
All entries that start with "Tank0", e.g. "Tank01",
"Tank02-special" etc.
*Tank0*
All entries that contain "Tank0", e.g.
Frankfurt_Tank0-mp1 etc.
Integer
8
All rows with the value 8
=integer
=8
>integer
>8
All rows with values greater than 8
>=integer
>=8
All rows with values greater than or equal to 8
<integer
<8
All rows with values less than 8
<=integer
<=8
All rows with values less than or equal to 8
Integer-integer
8-100
All rows with values between 8 and 100
<>integer
<>8
All rows with values not equal to 8
!integer
!8
Integer*
8*
All rows with values that start with "8"
>floating point number
>8.0
All rows with values greater than 8
<floating point number
<8.0
All rows with values less than 8
Floating point numberfloating point number
8.0-100.50
All rows with values between 8.0 and 100.50
Floating point number*
(wildcard)
8*
All rows with values that start with "8"
Integers
Floating point
numbers
Endress+Hauser
Example
25
3 User interface
SupplyCare Enterprise SCE30B
Date columns are converted for display purposes so they can be filtered link a string column.
3.6.2
Filtering the data records displayed (picklist)
You can use picklists to filter the data records displayed, such as for "Unit", "Time zone" or
"Product". If you have selected a value from the picklist, the data records that match the filter criteria
are automatically displayed. The content of the picklists is reset to the default values when you leave
the overview.
3.6.3
Changing the column display (fields) in the overview table
Pressing the button
in the table header in the overview opens a context menu. Via this context
menu, you can show and hide columns or change the column order.
3.6.4
Viewing numerical values (master data)
Numerical values above 1000 are displayed with a thousand separator. This is only the case within
the "Workplace" menu, however.
26
Endress +Hauser
SupplyCare Enterprise SCE30B
3 User interface
The character the system uses as the thousand separator depends on the language setting selected
in the browser, e.g.:
German (Germany) de-DE
1.234,78
German (Switzerland) de-CH
1'234.78
English (US) en-US
1,234.78
Notice!
• No thousand separator is used for numerical values that appear in views, histories or reports that
are downloaded, sent or printed out.
• The number of places after the decimal point is defined in the "Configuration" menu, "Unit" menu
item. Only people whose user role is configured as Master Data can change the number of places
after the decimal point for the units.
3.6.5
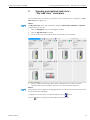
Changing master data
Depending on your particular user role, you can change data records in the "Company", "User",
"Tank", Aggregated tank", "Location", "Product" and "Tank groups" master data.
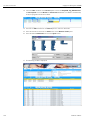
The data for a tank are changed in the following example. Proceed in the same way for other master
data.
Endress+Hauser
1.
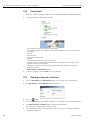
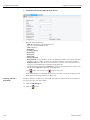
Click the Configuration menu in the Navigation window.
2.
Click the Tank menu item.
27
3 User interface
28
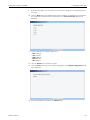
SupplyCare Enterprise SCE30B
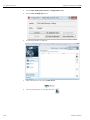
3.
The following detail view is displayed in the Application window:
4.
In the table, click the tank for which you want to make changes.
5.
Select the Tank details tab.
6.
The related tab is displayed in the lower section of the Application window:
7.
Click the
button.
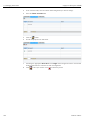
Endress +Hauser
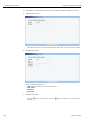
SupplyCare Enterprise SCE30B
3 User interface
8.
The tab is displayed in the edit mode.
9.
Make your changes.
10. Click
to save your changes. Click
to abort the process.
11. If you want to make changes to the Tank groups tab, proceed as described for the Tank
details tab.
3.6.6
Displaying modified master data in full
If a text that has been entered in an input box is too long to be displayed in full in a table column,
it is truncated. However, if you hover the cursor over the text, the text is displayed in full in a separate info box.
Endress+Hauser
29
3 User interface
SupplyCare Enterprise SCE30B
3.6.7
Selecting all the rows in a table
By activating the Assign check box you can select all the rows in a table.
1.
Click the button
2.
The specific tab is displayed in the edit mode:
3.
Activate the Assign check box.
4.
Click
3.6.8
.
to save your selection. Click
to abort the process.
Deleting master data
Depending on your particular user role, you can delete data records in the "Company", "User",
"Tank", Aggregated tank", "Location", "Product" and "Tank groups" master data.
Notice!
A data record can only be deleted if the
symbol is displayed in the tab. If the symbol is not
displayed, the record is linked to other information. These links must be disabled before the data
record can be deleted.
The data for a tank are deleted in the following example. Proceed in the same way for other master
data.
30
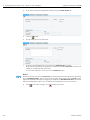
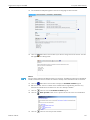
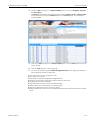
1.
Click the Configuration menu in the Navigation window.
2.
Click the Tank menu item.
Endress +Hauser
SupplyCare Enterprise SCE30B
3 User interface
3.
The following detail view is displayed in the Application window:
4.
In the overview table, click the tank you want to delete.
5.
The related tab is displayed in the lower section of the Application window:
6.
Click
7.
The prompt "Do you really want to delete?" is displayed.
8.
Click OK to delete the tank. Click Cancel to abort the process.
3.6.9
to delete the tank.
Copying and changing a data record
Depending on your user role, you can copy a data record in the following menu items: User, Tank,
Aggregated tank, Location, Company, Product, Tank group and Report.
Data (fields) that belong specifically to the data record are not copied. These fields remain empty in
the copied data record.
If the function is available, the following button
Endress+Hauser
is displayed.
31
3 User interface
SupplyCare Enterprise SCE30B
The data record of a tank is copied in the following example. The same procedure applies if you
want to copy other data records.
32
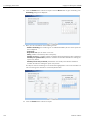
1.
Click the Configuration menu in the Navigation window.
2.
Click the Tank menu item.
3.
In the overview table, click the tank you want to copy.
4.
The following detail view is displayed in the Application window:
5.
Click the
button. The data record is displayed in the editing mode.
Endress +Hauser
SupplyCare Enterprise SCE30B
3 User interface
3.7
Receiving messages (messaging)
Notice!
Everyone can receive a notification message.
A message from the system administrator is displayed the next time the user logs on.
The following options are available:
Button/
field
Meaning
Save message as PDF file.
Endress+Hauser
Previous
message
This button is displayed if several messages are available. Click the Previous message button to view
and process previous messages.
Next message
This button is displayed if several messages are available. Click the Next message button to view and
process subsequent messages.
OK
This button is displayed for the last message. Click OK to exit the dialog.
Mark as read
Mark the message as read using the Mark as read field.
33
3 User interface
SupplyCare Enterprise SCE30B
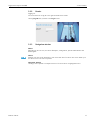
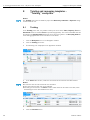
4
Monitoring tanks – "Tank" workplace
4.1
Viewing tanks and associated information
Notice!
• The Tank menu item is available to people with Read only, Scheduler or Operator configured
as their user role.
• The Notes and Files, Tank Partners, Location Details and Event Details tabs are displayed
only if they contain at least one piece of information.
• The time zone configured for the location is used for the "Tank" menu item
(→ See Page 104). "UTC+00:00" is the default value.
• Depending on your configuration, Objects are displayed instead of Tanks. For more information
refer to the appropriate chapter in the Service Manual for System administration.
34
1.
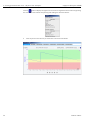
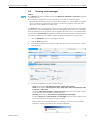
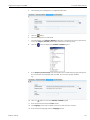
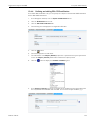
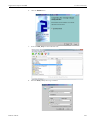
Click the Workplace menu in the Navigation window.
2.
Click the Tank menu item. A list of the tanks assigned to you is displayed.
3.
In the table, click the tank you want to view in greater detail.
4.
The details of the selected tank are displayed in the application window:
5.
If you click on another line, the details of the newly selected tank are displayed.
Click the Hide details button when you want to hide the details again.
Endress +Hauser
SupplyCare Enterprise SCE30B
3 User interface
6.
You can choose the following tabs in the lower part of the application window:
Inventory chart, Tank details, Notes and files, Tank partners, Location details, Tank service
status, Event details and Download history.
Notice!
SupplyCare distinguishes between standard tanks and recycling tanks. From a standard tank, the
product is withdrawn. For a recycling tank, the tank is filled with the product (see Page 90).
In the "Workplace – Tank" view, the current level/available capacity are displayed in graphic form
in the "Level" column. For standard tanks, the colored bar drifts from left to right with increasing
level. The percentage specified corresponds to the current level. For recycling tanks, the colored bar
drifts from right to left with increasing level. The percentage specified corresponds to the currently
available capacity.
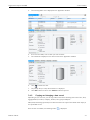
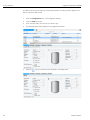
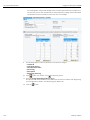
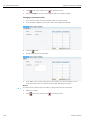
4.1.1
"Tank" overview table
Pressing the button
in the table header in the overview opens a context menu. Via this context
menu, you can show, hide and move table columns.
The following columns are available for the overview table:
Endress+Hauser
Columns
Description
Status
The symbol for the current tank status is shown on the display. See also the "Icons
for tanks" chapter, "Status display" section.
Location
Indicates the tank location. The location is the name of the location. The name is
selected in the "Configuration" menu in menu item "Tank", field "Location". The
location is specified in the "Location" menu item.
Tank name
Indicates the tank name. The field can also be displayed for existing secondary
values.
• Primary value: The tank name for the primary value is entered in the "Tank
name" field. Path: Configuration → Tank → Tank details → Tank name
• Secondary value: The tank names for the secondary values are entered in the
"Configuration" menu, "Tank" menu item, "Secondaries" tab, "Name" field.
Level
The current level is indicated as a symbol and a percentage.
Value
Displays the last valid primary value. The field can also be displayed for existing
secondary values.
• The Value field indicates the last valid measured value.
• For aggregated tanks, the sum of the valid measured values for the associated
tanks is displayed. Tanks with status "Out of service" are not included. If all
associated tanks are "Out of service", "0" is displayed as the value.
• The number of places after the decimal point is defined in the "Configuration"
menu, "Unit" menu item.
Unit
Indicates the unit. The field can also be displayed for existing secondary values.
• The unit for the primary value is selected via the Unit field in the "Tank details"
tab. The units for the other measured values (secondary) are selected in the
"Profile" menu in the "User preferences" tab.
• In the case of mass units, the selection for the field "Unit mass" in the "User
preferences" menu item has priority over the setting in the "Tank" menu item.
• In the case of volume units, the selection for the field "Unit volume" in the "User
preferences" menu item has priority over the setting in the "Tank" menu item.
Free
The free capacity of the tank is calculated.
Product
The product name is selected in the "Configuration" menu in menu item "Tank",
field "Product". The product is specified in the "Product" menu item.
Notes
Indicates whether tank and/or location notes are available.
Optimum
The optimum capacity of the tank is specified in the "Configuration" menu in menu
item "Tank", field "Optimum".
The number of places after the decimal point is defined in the "Configuration"
menu, "Unit" menu item.
35
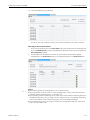
3 User interface
36
SupplyCare Enterprise SCE30B
Columns
Description
Capacity
The capacity of the tank is specified in the "Configuration" menu in menu item
"Tank", field "Capacity".
The number of places after the decimal point is defined in the "Configuration"
menu, "Unit" menu item.
PP (plan point)
Tank plan point. The field can also be displayed for existing secondary values.
The plan point of the tank is specified in the "Configuration" menu in menu item
"Tank", field "Plan point".
The value entered in the "Secondaries" tab is used here for secondary values.
The number of places after the decimal point is defined in the "Configuration"
menu, "Unit" menu item.
SP (ship point)
The ship point of the tank is specified in the "Configuration" menu in menu item
"Tank", field "Ship point".
If the "Recycling" check box is enabled, the ship point is not displayed.
The number of places after the decimal point is defined in the "Configuration"
menu, "Unit" menu item.
SST (safety stock)
Tank safety stock. The field can also be displayed for existing secondary values.
The safety stock of the tank is specified in the "Configuration" menu in menu item
"Tank", field "Safety stock".
The value entered in the "Secondaries" tab is used here for secondary values.
The number of places after the decimal point is defined in the "Configuration"
menu, "Unit" menu item.
Hysteresis
The hysteresis serves to prevent constant event messages, e.g. due to a fluctuating
level. The field can also be displayed for existing secondary values.
The number of places after the decimal point is defined in the "Configuration"
menu, "Unit" menu item.
Out of service
The field is activated if the tank is currently "Out of service".
From date
Indicates the date as of which a tank was, is or will be "Out of service".
To date
Indicates the date until which a tank was, is or will be "Out of service".
Supplier
Indicates the responsible supplier. The supplier is created as a company.
Buyer
Indicates the buyer. The buyer is created as a company.
Buyer ID
Is equivalent to the "ID" field in the "Company details" tab in the "Company" menu
item.
SDT (standard delivery
time/standard disposal time)
Standard tanks: The standard delivery time for the tank is specified in the
"Configuration" menu in menu item "Tank", field "Standard delivery time".
Recycling tank: The standard disposal time for the tank is specified in the
"Configuration" menu in menu item "Tank", field "Standard disposal time".
Time unit
Time unit used for the "SDT" field (standard delivery/disposal time).
Time stamp
Time stamp for the last measured value. The field can also be displayed for existing
secondary values.
• The time stamp of the time zone for the last valid measured value is used. Also
see "Time zone" field.
• In the case of aggregated tanks, the time stamp from the associated tank which
supplied the most recent measured value is used.
Time zone
Time zone of time stamp. The field can also be displayed for existing secondary
values.
The time zone of the location is used.
DSST (days until the safety stock is
reached)
Indicates the estimated number of days remaining until the safety stock is reached.
The value is calculated with the average quantity per day. The calculated average
quantity is based on the "Forecast based on" value.
PD (planned delivery/planned
disposal)
The date and time for the next planned delivery are displayed for standard tanks.
The date and time for the next disposal are displayed for recycling tanks. The field is
empty if no delivery or disposal has been planned.
The time zone of the location is used.
Endress +Hauser
SupplyCare Enterprise SCE30B
3 User interface
Columns
Description
PD amount (amount for planned
delivery/amount for planned
disposal)
Amount for the planned delivery and disposal. The unit corresponds to the unit in
the "Unit" column.
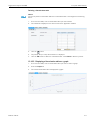
4.1.2
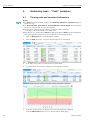
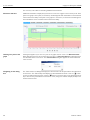
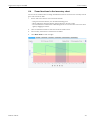
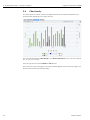
Inventory chart
The historical and expected pattern for the inventory is displayed in the diagram for the period
selected. The distribution is 2/3 for the history (measured values) and 1/3 for extrapolation
(calculated values).
If the tank is out of service, only the historic pattern of the inventory is displayed. The expected
pattern for the inventory is not displayed.
Via the Scaling field, choose between the minimum/maximum scaling and automatic scaling. If
"Min/Max" is chosen, the inventory is displayed between "0" and "Capacity". "Auto" displays the
inventory between the smallest and largest displayable value - including forecast values.
Select the period of time for the inventory chart via the Period selection field.
The current limit values are specified as horizontal lines in various colors:
Color
Standard tanks
Recycling tanks
Range between the Optimum and Plan point limit Range between Empty (value 0) and the Plan point
values
limit value
Range between the Plan point and Ship point limit Range between the Plan point and Safety stock
values
limit values
Range between the Ship point and Safety stock
limit values
not present
Range between the Safety stock limit value and
Empty (value 0)
Range between the Safety stock and Capacity limit
values
Notice!
• Click the
button to print the inventory chart.
• If you want to zoom into a specific period, see Page 49.
Endress+Hauser
37
3 User interface
SupplyCare Enterprise SCE30B
4.1.3
Tank details
The tab displays information on the tank and limit values.
Description of fields
38
Field
Description
Tank name
The tank name is selected in the "Configuration" menu in menu item "Tank", field
"Tank name".
Value
Last primary value
• The Value field indicates the last valid measured value.
• For aggregated tanks, the sum of the valid measured values for the associated
tanks is displayed. Tanks with status "Out of service" are not included. If all
associated tanks are "Out of service", "0" is displayed as the value.
• The number of places after the decimal point is defined in the "Configuration"
menu, "Unit" menu item.
Unit
Last unit of primary value
• The unit is specified in the "Tank" menu item.
• In the case of mass units, the selection for the field "Unit mass" in the "User
preferences" menu item has priority over the setting in the "Tank" menu item.
• In the case of volume units, the selection for the field "Unit volume" in the "User
preferences" menu item has priority over the setting in the "Tank" menu item.
Time stamp
Time stamp of last primary value
• The time stamp of the time zone for the last valid measured value is used. Also
see "Time zone" field.
• In the case of aggregated tanks, the time stamp from the associated tank which
supplied the most recent measured value is used.
Product
The product name is selected in the "Configuration" menu in menu item "Tank",
field "Product". The product is specified in the "Product" menu item.
Location
The location is selected in the "Configuration" menu in menu item "Tank", field
"Location". The location is specified in the "Location" menu item.
Time zone
Time zone of time stamp.
The time zone of the location is used.
Standard delivery time in days or
hours
The standard delivery time for the tank is specified in the "Configuration" menu in
menu item "Tank", field "Standard delivery time".
Capacity
The capacity of the tank is specified in the "Configuration" menu in menu item
"Tank", field "Capacity".
The number of places after the decimal point is defined in the "Configuration"
menu, "Unit" menu item.
Optimum
The optimum capacity of the tank is specified in the "Configuration" menu in menu
item "Tank", field "Optimum".
The number of places after the decimal point is defined in the "Configuration"
menu, "Unit" menu item.
Endress +Hauser
SupplyCare Enterprise SCE30B
3 User interface
Field
Description
Plan point
The plan point of the tank is specified in the "Configuration" menu in menu item
"Tank", field "Plan point".
The number of places after the decimal point is defined in the "Configuration"
menu, "Unit" menu item.
Ship point
The ship point of the tank is specified in the "Configuration" menu in menu item
"Tank", field "Ship point".
If the "Recycling" check box is enabled, the ship point is not displayed.
The number of places after the decimal point is defined in the "Configuration"
menu, "Unit" menu item.
Safety stock
The safety stock of the tank is specified in the "Configuration" menu in menu item
"Tank", field "Safety stock".
The number of places after the decimal point is defined in the "Configuration"
menu, "Unit" menu item.
Hysteresis
The hysteresis serves to prevent constant event messages, e.g. due to a fluctuating
level → See Page 91.
The number of places after the decimal point is defined in the "Configuration"
menu, "Unit" menu item.
Free capacity
The free capacity of the tank is calculated.
Recycling
By activating the "Recycling" check box, you specify that the tank is a "Recycling"type tank. The display of the inventory chart and the event messages are adapted to
this tank type → See Page 90.
Constituent tanks
This field is displayed for aggregated tanks only.
All corresponding tanks are displayed in this list.
Value (aggregated tanks)
This field is displayed for aggregated tanks only.
The "Value" field shows the last valid measured value for the tank selected in the
"Constituent tanks" list.
The number of places after the decimal point is defined in the "Configuration"
menu, "Unit" menu item.
Out of service
This field is displayed for aggregated tanks only.
The field is activated if the tank selected in the "Constituent tanks" list is out of
service.
Bad measurement(s)
This field is displayed for aggregated tanks only.
The field is activated if the tank selected in the "Constituent tanks" list returns bad
measurement data.
4.1.4
Notes and files
Notes, data and files pertaining to the tank and location are displayed in this tab.
Via the Record selection field, choose whether the Notes or Data should be displayed.
Endress+Hauser
39
3 User interface
SupplyCare Enterprise SCE30B
Via the Files table, you can open the files and save them locally as follows:
1.
Click the File name (hyperlink) in the Name column in the table.
2.
A dialog box opens. Here you can choose whether you want to open the file or save it.
3.
Click OK to open or save the file. Click Cancel to abort the process.
4.1.5
Tank partners
Information on the buyer and supplier is displayed in this tab. If no buyer/supplier is currently
assigned to the selected tank, this tab is not visible.
Notice!
The tank partner, buyer and supplier are assigned to the tank via the Configuration menu in the
Tank menu item, Tank details tab (see Page 86).
4.1.6
Location details
Information on the tank location is displayed in this tab.
40
Endress +Hauser
SupplyCare Enterprise SCE30B
3 User interface
4.1.7
Tank service status
Information on the tank service is displayed in this tab.
4.1.8
Event details
The event details for the currently applicable event, e.g. "Safety stock reached", for the selected tank
are shown in this tab. If no event is currently applicable for the selected tank, this tab is not visible.
For a description of the Event details tab, see Page 54.
4.1.9
Freeze event details
The event details for the currently applicable freeze event for the selected tank, are shown in this
tab. If no freeze event is currently applicable for the selected tank, this tab is not visible.
For a description of the Freeze event details tab, refer to Page 56.
Endress+Hauser
41
3 User interface
SupplyCare Enterprise SCE30B
4.2
Editing tank service status
Notice!
Only users with the Operator user role can specify or change the service status of a tank. All other
user roles can only read this tab.
If a tank is out of order for a service, this is shown in the tank overview table by the
symbol for
individual tanks and the
symbol for aggregated tanks. Measured values are no longer updated.
Notifications of tank events are no longer produced.
42
1.
Click the Workplace menu in the Navigation window.
2.
Click the Tank menu item. A list of the tanks assigned to you is displayed.
3.
In the overview table, select the tank whose service status you want to edit.
4.
In the lower section of the application window, select the Tank service status tab.
5.
Click the
6.
The tab is displayed in the edit mode.
7.
Select a time in the future when you want to put the tank out of service. You can either enter
the date directly in the Start date and End date fields or use the
button. When entering
the date directly use the dd.mm.yy format. The "UTC+00:00" time zone is used for the start
and end date.
8.
If necessary, enter a comment in the Comment field.
9.
Click
button.
to save your changes. Click
to abort the process.
Endress +Hauser
SupplyCare Enterprise SCE30B
3 User interface
4.3
Download history
The following options are available via the Download history tab:
• Save measured value history for all tanks shown in the overview or for one tank selected in the
overview in CSV format.
• Display measured value history for one tank selected in the overview in a diagram.
The CSV file contains the following data: Tank name, Time stamp, Value, Unit, Optimum, Plan
point, Ship point, Safety stock and Measuring point (see Page 44).
1.
Click the Workplace menu in the Navigation window.
2.
Click the Tank menu item. A list of the tanks assigned to you is displayed.
3.
In the overview table, select the tank whose history you want to view as a chart or save as a
CSV file.
4.
In the lower section of the application window, select the Download history tab.
5.
Select a time in the past for which you want to download data. You can either enter the date
directly in the Start date and End date fields or use the
button. When entering the date
directly use the dd.mm.yy format. The "UTC+00:00" time zone is used for the start and end
date.
6.
If you want to download the measured value history as a file, MS Excel (CSV) is available as
the Format.
7.
Activate the check box Export selected tank only, if you only want to download the data
from the selected tank. Deactivate the check box if you want to download the data from all of
the tanks shown in the table.
8.
Activate the check box Include secondary values, if you also want to download the
secondary values. This information is only relevant when downloading the data as an Excel
file.
9.
Activate the check box Include scaled values, if you also want to download the scaled
values.
10. Via the field Readings (max.), specify the maximum number of primary values per tank.
11. Click the
buttons to display the measured value history in a diagram. If the selected tank
is out of service, only the historic pattern of the inventory is displayed. The expected pattern
for the inventory is not displayed.
12. Click the
Endress+Hauser
button to download the measured values as an Excel spreadsheet
43
3 User interface
Measuring point
Recycling tank
Safety stock
Recycling tank
Plan point
R
(Recycling tank)
Safety
stock
Ship
point
Plan point
Optimum
Unit
Value
Time stamp
The CSV file has the following structure:
Tank name
CSV file
SupplyCare Enterprise SCE30B
TANK_01 1/13/10 6:40 AM
1.76
l
0
0
0
0
1
7.0
3.0
1
TANK_01 1/13/10 6:49 AM
5
A
0
0
0
0
1
7.0
3.0
2
TANK_01 1/13/10 6:58 AM
1
V
0
0
0
0
1
7.0
3.0
3
TANK_01 1/13/10 7:07 AM
28
°C
0
0
0
0
1
7.0
3.0
4
TANK_01 1/14/10 6:43 AM
1.757
l
0
0
0
0
1
7.0
3.0
1
TANK_01 1/14/10 6:52 AM
6
A
0
0
0
0
1
7.0
3.0
2
TANK_01 1/14/10 7:01 AM
2
V
0
0
0
0
1
7.0
3.0
3
TANK_01 1/14/10 7:10 AM
29
°C
0
0
0
0
1
7.0
3.0
4
TANK_01 1/15/10 6:46 AM
1.754
l
0
0
0
0
1
7.0
3.0
1
TANK_01 1/15/10 6:55 AM
7
A
0
0
0
0
1
7.0
3.0
2
TANK_01 1/15/10 7:04 AM
3
V
0
0
0
0
1
7.0
3.0
3
TANK_01 1/15/10 7:13 AM
30
°C
0
0
0
0
1
7.0
3.0
4
TANK_02 1/13/10 6:40 AM
2.76
l
10.0
8.0
7.0
3.0
0
0
0
1
TANK_02 1/13/10 6:49 AM
2.5
A
10.0
8.0
7.0
3.0
0
0
0
2
TANK_02 1/13/10 6:58 AM
31
V
10.0
8.0
7.0
3.0
0
0
0
3
TANK_02 1/13/10 7:07AM
2.8
°C
10.0
8.0
7.0
3.0
0
0
0
4
TANK_02 1/14/10 6:43 AM
2.757
l
10.0
8.0
7.0
3.0
0
0
0
1
TANK_02 1/14/10 6:52 AM
2.6
A
10.0
7.0
7.0
3.0
0
0
0
2
TANK_02 1/14/10 7:01 AM
32
V
10.0
7.0
7.0
3.0
0
0
0
3
TANK_02 1/14/10 7:10 AM
2.9
°C
10.0
7.0
7.0
3.0
0
0
0
4
TANK_02 1/15/10 6:46 AM
2.754
l
10.0
8.0
7.0
3.0
0
0
0
1
TANK_02 1/15/10 6:55 AM
2.7
A
10.0
8.0
7.0
3.0
0
0
0
2
TANK_02 1/15/10 7:04 AM
33
V
10.0
8.0
7.0
3.0
0
0
0
3
TANK_02 1/15/10 7:13 AM
3.0
°C
10.0
8.0
7.0
3.0
0
0
0
4
Notice!
• The language of the header of the CSV file depends on the language setting in the browser.
• The table is sorted first by tank name, then by time stamp. The "UTC+00:00" time zone is always
used for the time stamp.
• The column "R" provides information about the tank type. "0" stands for standard tank. "1" stands
for recycling tank.
• The date and time are displayed as follows in the standard factory setting: yyyy-MM-dd,
HH:mm:ss
44
Endress +Hauser
SupplyCare Enterprise SCE30B
3 User interface
4.4
Viewing secondaries
A range of measuring devices allows additional measured variables (secondary) to be recorded in
addition to the primary variable.
If secondary values have also been assigned to a tank, you can view these values in the "Workplace
– Tank" view in the overview table, in the "Inventory chart" tab and in the "Tank details" tab. A
maximum of one primary value and eight secondary values can be assigned to a tank.
Notice!
• The unit for the primary value is specified via the "Unit" field in the "Tank details" tab. In the case
of mass units and volume units, priority is given to your settings for the "Mass unit" or "Volume
unit" fields in the "User preferences" menu item.
• The units for the secondary values are specified in the "Measuring point details" tab in the
"Engineering unit (for application)" field.
4.4.1
Viewing secondaries in the overview table in the "Tank" menu
item
Notice!
The secondary values are hidden or displayed depending on the system settings. The secondary
values are hidden in the default standard setting.
Endress+Hauser
1.
Click the Workplace menu in the Navigation window.
2.
Click the Tank menu item.
3.
The following detail view is displayed in the Application window:
4.
Click the Show secondary data button.
5.
All the associated secondary data are shown underneath the specific tanks. Of the secondary
data, the following data are shown if available: Tank name, Value, Unit, Hysteresis, Limit 1 and
Limit 2. The tank name corresponds to the "Name" field in the "Secondaries" tab in the "Tank"
menu item.
6.
Click the Hide secondary data button to hide the secondary data.
45
3 User interface
SupplyCare Enterprise SCE30B
4.4.2
Viewing secondaries in the inventory chart
Notice!
Users with the Master Data user role can specify a name via the "Secondaries" tab in the "Tank"
menu item. This name is used in the overview table for the button and the graph. If no name has
been entered, the secondary values are given the default names Secondary[1], Secondary[2],
Secondary[3], Secondary[4], Secondary[5], Secondary[6], Secondary[7] and Secondary[8].
1.
Click the Workplace menu in the Navigation window.
2.
Click the Tank menu item.
3.
In the table, click the tank whose secondary data you want to display in the "Inventory chart"
tab.
4.
The following detail view is displayed in the Application window:
The inventory chart displays the graph for the primary value.
5.
Click the Show [Name] button beneath the chart.
Depending on the number of secondary values that have been assigned to the tank, the
appropriate number of "Show [Name]" buttons are displayed beneath the inventory chart.
6.
Click the Hide [Name] button to hide the specific graph.
Notice!
• Click the
button to print the inventory chart.
• If you move the cursor over the graph, the specific value and time stamp are displayed for the
individual point in the graph.
46
Endress +Hauser
SupplyCare Enterprise SCE30B
3 User interface
4.4.3
Viewing secondary data via the "Tank details" tab
1.
Click the Workplace menu in the Navigation window.
2.
Click the Tank menu item.
3.
In the table, click the tank for which you want to display secondary data.
4.
Select the Tank details tab.
5.
Click the button
6.
The following screen appears:
beside the Value field.
The magnifying glass cannot be selected in the following cases:
• No secondary values are assigned to the selected tank.
• The tank supplies a faulty measured value.
• The tank is out of order.
• The tank is assigned to an aggregated tank.
4.5
Viewing historical values and forecast values in the
inventory chart
The inventory chart displays the values measured up to the present date with a continuous line and
the values calculated from the present date with a broken line. No forecast values are available for
secondary values.
In the case of standard tanks, the forecast values are calculated from the "Average daily outflow"
value. In the case of recycling tanks, the forecast values are calculated from the "Average daily
inflow" value.
Endress+Hauser
47
3 User interface
SupplyCare Enterprise SCE30B
The inventory chart offers the following additional functionalities:
Mouseover function
Additional information is displayed if you move the cursor over a graph in the inventory chart. If the
point in the graph is in the past, the "Inventory" window appears with information on the measured
value and the time stamp. If the point in the graph is in the future, the "Forecast" window appears
with information on the calculated value and the time stamp.
Clicking on a point in the
graph
A dialog box appears if you click on a point in the graph with the cursor. The Historical value
dialog box appears for the values measured in the past. The Forecast value dialog box appears for
the calculated values in the future. The Current value dialog box appears for the last measured
value received.
Navigating via the dialog
box
The "Value" field in the dialog box displays the measured value for the past and the calculated value
for the future. The "Time stamp" field displays the associated date and time. Click the
button
to view the older measuring points. Click the
button to view the more recent measuring points.
If you want to view points that are further back in time, change the number of displayed days in the
"Period selection" field.
48
Endress +Hauser
SupplyCare Enterprise SCE30B
3 User interface
4.6
Zoom functions in the inventory chart
You can use the zoom function to enlarge a maximum section of 12 hours in the inventory chart to
get a closer look at the data.
1.
Set the start of the zoom-in zone. Proceed as follows:
– Using the left mouse button, click the desired starting point.
– While holding the left mouse button, drag the mouse to the left or right.
– The selected zone is marked with a dark background. You can move the zone to the left or
right by dragging the mouse.
Endress+Hauser
2.
Click the left mouse button to select the end of the zoom-in zone.
3.
The inventory chart with the selected zone is loaded.
4.
Click Reset zoom to zoom out again.
49
3 User interface
SupplyCare Enterprise SCE30B
4.7
Planning disposal and delivery via the inventory chart
Notice!
Only users with the Scheduler user role can plan deliveries for standard tanks and disposals for
recycling tanks.
1.
Click the Workplace menu in the Navigation window.
2.
Click the Tank menu item.
3.
In the overview table, select the tank for which you want to plan a disposal or delivery.
4.
In the lower section of the application window, select the Inventory chart tab.
5.
Click the graph in the inventory chart for the date you are planning a disposal or delivery. The
planned date must be in the future.
6.
The Forecast value dialog box is displayed.
7.
Click the Plan delivery (standard tanks) or Plan disposal (recycling tanks) button.
8.
The Plan delivery dialog box appears for standard tanks. The Plan disposal dialog box
appears for recycling tanks.
9.
Click the
button.
10. The dialog box appears in the editing mode.
11. You can view and enter the following data here:
– Value: Displays the projected level
– Delivery date and time: The day selected in the calendar is used for the date. The time is
predefined.
– Amount: Enter the planned amount.
– Range: This field shows the number of days before the safety stock is reached for the amount
entered. In the case of standard tanks, the number of days is calculated from the "Average
daily outflow" value. In the case of recycling tanks, the number of days is calculated from the
"Average daily inflow" value.
– Refresh range: Via the
button, the "Range field is updated for the amount entered.
– Comment: Enter a comment or note.
12. Click
to save your changes. Click
to abort the process.
13. A delivery van icon
indicates the delivery and disposal in the inventory chart. If you move
the cursor over the delivery van field, information on the planned delivery or disposal is
displayed along with the delivery date and time.
50
Endress +Hauser
SupplyCare Enterprise SCE30B
5 Viewing personalized tank view – "My tank view" workplace
5
Viewing personalized tank view –
"My tank view" workplace
The personalized tank view shows you the tanks that you selected in your user profile in the My
tank view tab (see Page 175).
Notice!
The My tank view menu item is available to people with Read only, Scheduler or Operator
configured as their user role.
1.
Click the Workplace menu in the Navigation window.
2.
Click the My tank view menu item.
3.
You are shown a list of all the tanks which you selected in the user profile.
4.
Where available, the following primary data are displayed for every tank: Tank name,
Company name, Location, Product, Value with unit, Time stamp with time zone.
Notice!
The last primary value is displayed. For aggregated tanks, the sum of all the last measured values for
the associated tanks is displayed.
To update the view and call up new measured data, click the
Click the
Endress+Hauser
button.
button to export the content displayed to an Excel file.
51
5 Viewing personalized tank view – "My tank view" workplace
SupplyCare Enterprise SCE30B
Click the
button to display the legend. You can move the legend to another location by pointing
the cursor at the blue title bar and pressing and holding the left mouse button.
5.
52
Click the picture of the tank if you would like to see more tank details.
Endress +Hauser
SupplyCare Enterprise SCE30B
5 Viewing personalized tank view – "My tank view" workplace
5.1
Viewing secondaries
Notice!
The
button is also displayed if secondary data are available for the tank.
Endress+Hauser
1.
Click the
button to display the secondary data.
2.
A submenu opens. The first menu item displays the tank name of the primary value. This can
be followed by up to eight secondary names.
3.
Select the appropriate secondary name.
4.
The following secondary data are displayed: Tank name, Secondary name, Value with unit,
Time stamp with time zone.
Click the
button again to return to the primary data. Select the tank name of the primary
value in the submenu.
53
5 Viewing personalized tank view – "My tank view" workplace
SupplyCare Enterprise SCE30B
6
Editing events – "Event" workplace
6.1
Event management – Status and weighting of events
An event is triggered if a limit value is undershot (Plan point, Ship point, Safety stock). The status
of the event is then set to Open. The weighting (severity) is derived from the limit value, i.e.
reaching the plan point is categorized as not critical (low) while reaching the safety stock level is
regarded as very critical (high).
Once an event has been generated, the user can change the status to Acknowledged or In
process. To making it easier to track events later, the change is stored with a time stamp and user
name.
If a critical limit is reached, determined by another measurement, the status of the event is set to
Open. If an inventory that is above the plan point is detected for standard tanks, and if an inventory
that is below the plan point is detected for recycling tanks, the event assumes the status Done and
no other activities are required.
A point must be noted with the In process status. If the tank is not refilled by the set resubmission
date, the event status returns to Open.
The following diagram shows the status for an event in SupplyCare Enterprise:
Status diagram for an event
In process
Open
Done
Acknowledge
Status change set by the user
Status change triggered by measurement
Status change triggered by the time
54
Endress +Hauser
SupplyCare Enterprise SCE30B
5 Viewing personalized tank view – "My tank view" workplace
6.2
Viewing event messages
Notice!
• The Event menu item is available to people with Read only, Scheduler or Operator configured
as their user role.
• The time zone configured in the "User preferences" menu item is used for the "Event
details/Freeze event details" and "Event history" tabs (see Page 177). "UTC+00:00" is the default
value. The time zone configured for the location is used for the "Inventory chart" and "Tank
details" tabs. "UTC+00:00" is the default value.
The Event menu item provides effective support in a replenishment process which is controlled by
means of order limits. For standard tanks, the events are triggered if limit values in the individual
tanks are undershot; for recycling tanks, they are triggered if the limit values in the individual tanks
are exceeded. A Freeze Event is triggered if the actual measurement exceeds the configured freeze
event delta. In addition to screen display, people can also be notified of the events by e-mail.
1.
Click the Workplace menu in the Navigation window.
2.
Click the Event menu item.
3.
The following is displayed in the portal window with an overview of all the events, sorted in
order of priority:
4.
To filter the displayed events, select the filter criteria:
– View: Select between All, Only limit events or Only freeze events.
– Status: Select between All (except for done), Only open, Only acknowledged, Only
in process or Only done.
The filters Only acknowledged and Only in process exclusively have an effect on limit
events. Any other filter will effect both types of events.
– Severity: Select between All, Only low, Only medium or Only high.
The filters Only low and Only medium and Only high exclusively have an effect on limit
events. Any other filter will effect both types of events.
If the set filters do not overlap each other, i.e. resulting in no events, the previous filter
settings are restored. The following error message is displayed:
Endress+Hauser
55
5 Viewing personalized tank view – "My tank view" workplace
SupplyCare Enterprise SCE30B
5.
In the overview table, click on an event which you would like to view or for which you require
further information.
6.
You can select the following tabs in the lower area of the application window:
Event details/Freeze Event details, Event history, Inventory chart or Tank details.
6.2.1
Event details
A form with the following fields is shown on this tab:
Message, Comment, Acknowledge and In process.
In addition, the display also shows the Amount, Time stamp, Unit, Time zone and Comments fields
for standard tanks for planned deliveries, and for recycling tanks for planned disposals.
6.2.2
Freeze event details
A form with the following fields is shown on this tab:
Message, Value of the received measurement, Unit of the tank, Time stamp of the measurement
in the respective time zone, Time zone of the measurement.
In addition, the display shows in the lower section information on the Limit:
Value ("Frozen measurement" in respective Unit), Unit of the tank, Time stamp of the frozen
measurement in the respective time zone, Time zone of the frozen measurement, Freeze event
delta, Unit of the tank.
Click the Mark as done button to acknowledge the event. The following message appears:
56
Endress +Hauser
SupplyCare Enterprise SCE30B
5 Viewing personalized tank view – "My tank view" workplace
Click OK.
Notice!
A Freeze event will only be generated once during a check period. The status of the event is Open
until it is marked as done. If a new Freeze event occurs in the next check period, the previously
created event is taken over to the Event history.
6.2.3
Event history
This tab displays the history of an event selected in the overview table. The screen includes Time
stamp, Severity, Weighting, Status, Message, Comment and User.
6.2.4
Inventory chart
The inventory chart of the associated tank is shown here for the event currently selected. For a
description of the Inventory chart tab, see Page 37.
6.2.5
Tank details
The tank details of the associated tank are shown here for the event currently selected.
For a description of the Tank details tab, see Page 38.
6.3
Processing event messages
Notice!
Only users with the Scheduler or Operator user role can comment on events and assign a status.
Endress+Hauser
1.
Click the Workplace menu in the Navigation window.
2.
Click the Event menu item.
3.
In the overview table, select the event that you want to process.
57
5 Viewing personalized tank view – "My tank view" workplace
SupplyCare Enterprise SCE30B
4.
In the lower section of the application window, select the Event details tab.
5.
Click the
6.
The tab is displayed in the edit mode.
7.
If you have acknowledged this event, activate the Acknowledge check box.
If replenishment measures have already been initiated, activate the In process check box and
change the resubmission date if necessary.
You can enter comments on this event in the Comment section.
button.
Notice!
If the status of the event was set to In process, the system monitors whether the tank is replenished
by the resubmission date. If this is not the case, the status of the event is reset to Open and the
appropriate notification messages are triggered. As standard, the Resubmission date is calculated
from the standard delivery time. This can also be set individually for every event however.
8.
58
Click
to save your changes. Click
to abort the process.
Endress +Hauser
SupplyCare Enterprise SCE30B
5 Viewing personalized tank view – "My tank view" workplace
6.4
Setting the resubmission date
Notice!
• Only people whose user role is configured as Scheduler or Operator can set a resubmission date
for events.
• You can only set a resubmission date for the In process option.
1.
Click the Workplace menu in the Navigation window.
2.
Click the Event menu item.
3.
In the overview table, select the event that you want to process.
4.
In the lower section of the application window, select the Event details tab.
5.
Click the
6.
Activate the In process check box.
7.
The tab is displayed in the edit mode.
8.
Either enter the date directly in the Resubmission date field or use the
9.
If necessary, specify a time (in hours and minutes) for the Resubmission time fields.
10. Click
button.
to save your changes. Click
button .
to abort the process.
Notice!
• If a standard tank is refilled and the inventory is again above the plan point, the status of the event
automatically changes to Done. If a recycling tank is drained and the inventory is once again
below the plan point, the status of the event automatically changes to Done.
• The "Standard delivery time" is displayed for standard tanks, and the "Standard disposal time" for
recycling tanks.
Endress+Hauser
59
5 Viewing personalized tank view – "My tank view" workplace
SupplyCare Enterprise SCE30B
7
Planning delivery and disposal –
"Scheduling" workplace
7.1
Status management – delivery and disposal
When a new delivery/disposal is created, the system checks whether the delivery/disposal is
planned too early or too late. The forecast data determined by SupplyCare are used to check the
information. The user can either reschedule the delivery/disposal which is too late/early or confirm
this as an early or late delivery/disposal.
SupplyCare monitors the deliveries and disposals daily. If it detects an early or late delivery/disposal,
this delivery/disposal can be confirmed. If it detects a missing delivery/disposal, this delivery/
disposal can be mark as fulfilled.
The following diagram shows the status management for disposals and deliveries in SupplyCare:
New delivery /
disposal
Early
yes
no
Late
yes
no
Validity-check OK? no
Early delivery /
disposal confirmed
Late delivery /
disposal confirmed
yes
no
yes
Early delivery /
disposal confirmed
Late
yes
Late delivery /
disposal confirmed
Missed
yes
Delivery / disposal
marked as fulfilled
Early
no
Daily validitycheck OK?
no
no
yes
Delivery / disposal
detected as fulfilled
7.2
Status display and notification of planned deliveries
and disposals
Notice!
• Only users with the Scheduler user role receive notification of planned deliveries and disposals
and can process such notification messages.
• For a user to receive notification, the PDL and/or PDE check boxes must be enabled in the Tank
group tab in the Tank group menu.
60
1.
Click the Workplace menu in the Navigation window.
2.
Click the Scheduling menu item.
3.
Click the Overview tab.
Endress +Hauser
SupplyCare Enterprise SCE30B
5 Viewing personalized tank view – "My tank view" workplace
4.
The following is displayed in the portal window with an overview of all the statuses for all the
disposals and deliveries:
5.
In the overview table, click a status to change it or to view the history.
6.
You can select the following tabs in the lower area of the Application window:
Details or History.
7.2.1
Processing the status
The following status information can be displayed:
Button
Meaning
Detected - the Detected status is displayed in the following situations:
• The system has detected a delivery or disposal which has been scheduled too early or too late. You
can process this delivery or disposal in the "Details" tab using the Confirm button.
• The system has detected a missing delivery or disposal. You can process this delivery or disposal in
the "Details" tab using the Mark as fulfilled button.
• The system has detected that measured data are missing. You can process this delivery or disposal in
the "Details" tab using the Mark as fulfilled button.
Confirmed - the Confirmed status is displayed in the following situations:
• A delivery or disposal which has been scheduled too early or too late was confirmed when the
delivery/disposal was created.
• A delivery or disposal which has been scheduled too early or too late has been confirmed in the
"Details" tab.
Deleted - a planned delivery or disposal has been deleted.
New - a new delivery or disposal has been planned.
Fulfilled - a new delivery or disposal has been fulfilled. If a delivery and disposal is made, this is flagged
by SupplyCare as Delivery made (detected)/Disposal made (detected).
If the system has detected a missing delivery/disposal or missing measured data, you can process this
delivery/disposal in the "Details" tab using the Mark as fulfilled button. The delivery/disposal is
displayed as Delivery fulfilled (confirmed)/Disposal fulfilled (confirmed).
Endress+Hauser
61
5 Viewing personalized tank view – "My tank view" workplace
SupplyCare Enterprise SCE30B
1.
Click the Workplace menu in the Navigation window.
2.
Click the Scheduling menu item.
3.
In the overview table, select a status that you want to process.
4.
In the lower section of the Application window, select the Details tab. The following tab
appears:
You can process the following statuses with the Mark as fulfilled button:
– Missed delivery/disposal (detected)
– Missed delivery/disposal (no measurement)
You can process the following statuses with the Confirm button:
– Early delivery/disposal (detected)
– Late delivery/disposal (detected)
7.2.2
62
Viewing status history
1.
Click the Workplace menu in the Navigation window.
2.
Click the Scheduling menu item.
3.
In the overview table, select a status that you want to process.
4.
In the lower section of the Application window, select the History tab. The following tab
appears:
Endress +Hauser
SupplyCare Enterprise SCE30B
5 Viewing personalized tank view – "My tank view" workplace
7.3
Planning delivery and disposal – "Scheduling"
workplace
Notice!
Only users with the Scheduler user role can plan deliveries for standard tanks and disposals for
recycling tanks.
You can plan several deliveries for each standard tank but you can only plan a maximum of one
delivery per day. You can plan several disposals for each recycling tank but you can only plan a
maximum of one disposal per day.
The time zone of the location of the tank is used as the time zone. The unit of the tank is used as
the unit. In the case of mass units and volume units, priority is given to your settings for the "Mass
unit" or "Volume unit" fields in the "User preferences" menu item.
If a tank is out of service, this is indicated in the calendar with a bar and the
deliveries or disposals can be planned for this period.
Planned deliveries and disposals are indicated by a delivery van
"Inventory chart" tab.
symbol. No
in the calendar and in the
1.
Click the Workplace menu in the Navigation window.
2.
Click the Scheduling menu item.
3.
Click on the Planning tab.
4.
In the overview table, click the tank for which you want to plan a disposal or delivery.
5.
The following detail view is displayed in the Application window:
The current date is displayed with a grey background in the calender. Every date in the future
has a color background. The color indicates the forecast value for the tank status for that
particular date.
Endress+Hauser
63
5 Viewing personalized tank view – "My tank view" workplace
Color
SupplyCare Enterprise SCE30B
Standard tanks
Recycling tanks
Grey
Current date
Current date
Green
"Ok":
The forecast value is larger than the plan point
"Ok":
The forecast value is between 0 and the plan
point
Yellow
"Plan point":
"Plan point":
The forecast value is between the plan point and The forecast value is between the plan point and
the ship point
the safety stock
Orange
"Ship point":
Not applicable
The forecast value is between the ship point and
the safety stock
Red
"Safety stock":
The forecast value is below the safety stock
"Safety stock":
The forecast value is above the safety stock
White
The date is in the past or the tank/aggregated
tank is out of service
The date is in the past or the tank/aggregated
tank is out of service
Click the
button to display the legend. You can move the legend to another location by pointing
the cursor at the blue title bar and pressing and holding the left mouse button.
Notice!
00:00 (midnight) is the time that is used to determine the color or the tank status for the particular
date. For example, if the "ship point" is reached at 4 a.m. (04:00) on May 15, and the "safety stock"
at 8:30 p.m. (20:30), May 15 is given the background color "red" for "safety stock".
7.3.1
64
Planning a delivery or disposal
1.
Click the Workplace menu in the Navigation window.
2.
Click the Scheduling menu item.
3.
Click on the Planning tab.
4.
In the overview table, click the tank for which you want to plan a delivery or disposal.
5.
The following detail view is displayed in the Application window:
Endress +Hauser
SupplyCare Enterprise SCE30B
5 Viewing personalized tank view – "My tank view" workplace
6.
Click the Plan delivery/Plan disposal tab.
7.
In the calendar, where necessary use the Next month button to select the month for which
you are planning a delivery or disposal.
8.
Click the preferred day. Before clicking the day, a green "x" beside the day indicates whether
a delivery or disposal is possible on that day.
9.
The Plan delivery dialog box appears for standard tanks. The Plan disposal dialog box
appears for recycling tanks.
10. Click the
button.
11. The dialog box appears in the editing mode.
12. You can view and enter the following data here:
– Value: Displays the projected level
– Delivery date and time: The day selected in the calendar is used for the date. The time is
predefined.
– Amount: Enter the planned amount.
– Range: This field shows the number of days before the safety stock is reached for the amount
entered. In the case of standard tanks, the number of days is calculated from the "Average
daily outflow" value. In the case of recycling tanks, the number of days is calculated from the
"Average daily inflow" value.
– Refresh range: Via the
button, the "Range" field is updated for the amount entered.
– Comment: Enter a comment or note.
13. Click
to save your changes. Click
to abort the process.
The system performs a plausibility check when a planned disposal or planned delivery is saved.
If the values entered are implausible, a dialog box is displayed. → See the "Plausibility check"
section below.
14. Deliveries and disposals are entered in the calendar with a delivery van icon
and the
planned amount. The delivery date and time are displayed when you move the cursor over this
field.
7.3.2
Plausibility check
Notice!
• The plausibility check only checks the latest planned delivery/disposal.
• A plausibility check is only performed if a safety stock (SST) and plan point (PP) have been saved
for the tank.
The system performs a plausibility check on which a planned delivery or a planned disposal is saved.
The planned date and the planned time are checked with the calculated values for the safety stock
(SST) and plan point (PP). If the planned date is before the calculated date when the plan point will
be reached, a dialog box is displayed with the message "In consideration of the forecast value(s) the
planned delivery/disposal date might be too early". If the planned date is after the date on which
the safety stock will be reached, the dialog box "In consideration of the forecast value(s) the planned
delivery/disposal date might be too late" is displayed.
Endress+Hauser
65
5 Viewing personalized tank view – "My tank view" workplace
SupplyCare Enterprise SCE30B
Click the Confirm button to confirm the date entered for the delivery/disposal.
Click the Reschedule button to correct your entries.
– The Plan delivery dialog box appears for standard tanks. The Plan disposal dialog box appears
for recycling tanks.
– Correct your entries.
– Click
to save your changes.
7.3.3
Deleting a delivery or disposal
1.
Click the Workplace menu in the Navigation window.
2.
Click the Scheduling menu item.
3.
Click on the Planning tab.
4.
In the table, click the tank for which you want to delete a delivery or disposal.
5.
Click the Plan delivery/Plan disposal tab.
6.
In the calendar, click the entry that you want to delete.
7.
The Delivery details dialog box appears for standard tanks. The Disposal details dialog box
appears for recycling tanks.
8.
Click the
9.
The prompt "Do you really want to delete?" is displayed.
button to delete the delivery or disposal.
10. Click OK to delete the entry. Click Cancel to abort the process.
7.4
66
Copying a delivery or disposal
1.
Click the Workplace menu in the Navigation window.
2.
Click the Scheduling menu item.
3.
Click on the Planning tab.
4.
In the overview table, click the tank for which you want to copy a delivery or disposal.
5.
Click the Plan delivery/Plan disposal tab.
6.
In the calendar, click the entry that you want to copy.
7.
The Delivery status dialog box appears for standard tanks. The Disposal status dialog box
appears for recycling tanks.
Endress +Hauser
SupplyCare Enterprise SCE30B
5 Viewing personalized tank view – "My tank view" workplace
8.
Click
to copy the entry.
9.
The Copy delivery dialog box appears for standard tanks. The Copy disposal dialog box
appears for recycling tanks.
10. Click the
button.
11. The dialog box appears in the editing mode.
12. Enter the desired amount in the Amount field.
13. For the Delivery date and time field, select a new date and time.
14. Enter a comment or a note for the Comment field.
15. Click
to save your changes. Click
to abort the process.
16. Deliveries and disposals are entered in the calendar with a delivery van icon
and the
planned amount. The delivery date and time are displayed when you move the cursor over this
field.
7.4.1
Endress+Hauser
Viewing a planned delivery or disposal and saving as an Excel
spreadsheet
1.
Click the Workplace menu in the Navigation window.
2.
Click the Scheduling menu item.
3.
Click on the Planning tab.
4.
In the overview table, click the tank for which you want to display the deliveries or disposals.
5.
Click the Planned delivery/Planned disposal tab.
6.
The following detail view is displayed in the Application window:
7.
All the deliveries or disposals for the selected tank are listed in the table, with information on
the date ("PD" column), amount ("PD amount" column) and a comment.
8.
Click the
button to download the table as an Excel spreadsheet.
67
5 Viewing personalized tank view – "My tank view" workplace
8
SupplyCare Enterprise SCE30B
Totaling and managing templates "Totaling" workplace
Notice!
The Totaling menu item is available to people with Read only, Scheduler or Operator configured as their user role.
8.1
Totaling
In the Totaling menu item, it is possible to add up the values of the Value, Capacity, Free and
PD amount fields. The totalized Level is represented graphically. The values of standard tanks can
be totaled in the Standard tanks tab and the values of recycling tanks in the Recycling tanks tab.
Tanks and aggregated tanks can be included in a calculation.
1.
Click the Workplace menu in the Navigation window.
2.
Click the Totaling menu item.
3.
The following view is displayed in the Application window:
4.
In the Select table column, enable the check boxes of the tanks that should be totaled.
Notice!
• At least one tank must be selected for the calculation.
• Only tanks with the same unit can be totalized.
• Activating the check box in the Select column header selects all the tanks in the table, while
deactivating the check box disables all the tanks.
68
5.
Select the unit of the selected tanks in the Unit field.
6.
Click the Calculate button.
Endress +Hauser
SupplyCare Enterprise SCE30B
5 Viewing personalized tank view – "My tank view" workplace
7.
The following detail view is displayed in the Application window:
Notice!
• You must press the Calculate button a second time to incorporate any changes to the selection
which are made after the calculation has been performed. If you do not, the following message is
displayed beside the Calculate button: "You have changed the selection. Please recalculate."
• Clicking the Refresh view button deactivates any activated check boxes and deletes the
calculated values in the detail view. However, anything selected via the picklists of the various
fields in the table header is retained.
8.2
Saving a selection as a template
The choice of tanks or aggregated tanks can be saved as a template.
1.
Click the Workplace menu in the Navigation window.
2.
Click the Totaling menu item.
3.
In the Select table column, select the check boxes of the tanks that should be totaled.
4.
Select the unit of the selected tanks in the Unit field.
5.
Click the Calculate button.
6.
The
7.
Click the
8.
The Save selection as template dialog box appears on the display:
Notice!
The
and
9.
Click the
Save button appears in the header of the table.
Save button.
buttons do not appear in the dialog box when you create the first template.
button.
10. The dialog box appears in the editing mode.
You have two options: you can either create a new template or overwrite an existing template.
Endress+Hauser
69
5 Viewing personalized tank view – "My tank view" workplace
8.2.1
SupplyCare Enterprise SCE30B
Creating a new template
1.
Perform all the steps specified in Chapter "Saving a selection as a template" (see Page 69).
2.
In the Save selection as template dialog box, click the
button.
Notice!
The
button does not appear in the dialog box when you create the first template.
3.
Enter a template name. The template name can have a maximum of 64 characters.
4.
Click
8.2.2
to save your changes. Click
to abort the process.
Overwriting an existing template
1.
Perform all the steps specified in Chapter "Saving a selection as a template" (see Page 69).
2.
Click the
3.
The Overwrite existing template dialog box is displayed:
4.
In the overview table, click the template you wish to overwrite.
5.
The template is displayed in the Save selection as template window.
6.
If you want to undo your selection, click the
another template.
7.
Click the
button if you want to save the selection. Click the
abort the process.
button.
button, then click the
button and select
button if you want to
Notice!
A tank is deleted from a template automatically if the tank is deleted or if the tank is no longer part
of the tank group that was assigned to a user.
70
Endress +Hauser
SupplyCare Enterprise SCE30B
5 Viewing personalized tank view – "My tank view" workplace
8.3
Selecting or deleting templates
1.
Click the
Open button in the overview.
2.
The Template overview window is displayed:
If you want to accept a template, click the corresponding row in the table. If you want to delete a
template, click the
button in the corresponding row and then click OK in the Confirm
deletion window.
Endress+Hauser
71
9 Viewing analysis data – "Analysis" workplace
9
SupplyCare Enterprise SCE30B
Viewing analysis data – "Analysis" workplace
Notice!
The Tank menu item is available to people with Scheduler or Operator configured as their user
role.
This menu item allows you to view important indicators for the inflow and outflow of the individual
tanks as data and charts. You can use these data and charts to analyze past cycle patterns and use
them as the basis for future planning. You can export all the information to an Excel spreadsheet.
In addition, it is also possible to print out the charts.
72
1.
Click the Workplace menu in the Navigation window.
2.
Click the Analysis menu item. A list of the tanks assigned to you is displayed.
3.
In the table, click the tank whose analysis data you want to view.
4.
You can choose the following tabs in the lower part of the application window:
KPIs, Outflow/Inflow, Chart hourly and Chart daily.
Endress +Hauser
SupplyCare Enterprise SCE30B
9 Viewing analysis data – "Analysis" workplace
9.1
"Analysis" overview table
Pressing the button
in the table header in the overview opens a context menu. Via this context
menu, you can show, hide and move table columns.
The following columns are available for the overview table:
Columns
Description
Location
Indicates the tank location. The location is the name of the location. The name is
selected in the "Configuration" menu in menu item "Tank", field "Location". The
location is specified in the "Location" menu item.
Tank name
Indicates the tank name. The tank name is entered in the "Tank name" field (path:
Configuration → Tank → Tank details → Tank name).
Unit
Indicates the unit. The unit for the primary value is specified via the "Unit" field in
the "Tank details" tab. In the case of mass units and volume units, priority is given to
your settings for the "Mass unit" or "Volume unit" fields in the "User preferences"
menu item.
Time zone
Time zone of time stamp. The time zone of the location is used.
DO (daily outflow)
Displays the daily outflow last calculated
ADO (average daily outflow)
Displays the value for "Average daily outflow".
The value is calculated with the average quantity per day. The calculated average
quantity is based on the configured "Forecast based on" value. This field is empty for
recycling tanks.
DI (daily inflow)
Displays the daily inflow last calculated
ADI (average daily inflow)
Displays the value for "Average daily inflow".
The value is calculated with the average quantity per day. The calculated average
quantity is based on the configured "Forecast based on" value. This field is empty for
standard tanks.
Product
Indicates the product in the tank.
9.2
KPIs (key performance indicators)
The tab displays important indicators for the inflow and outflow of the selected tank.
The "Daily outflow" and "Daily inflow" fields display the values last calculated.
Additional information is displayed if you enter a period for the From date and To date fields or
enable the Show available period check box.
Endress+Hauser
73
9 Viewing analysis data – "Analysis" workplace
SupplyCare Enterprise SCE30B
Description of fields
Field
Description
Daily outflow
Displays the calculated daily outflow for the date entered.
Average daily outflow/average daily • Standard tanks: Average daily outflow
inflow
• Recycling tanks: Average daily inflow
The values are calculated with the average quantity per day. The calculated average
quantity is based on the configured "Forecast based on" value.
Daily inflow
Displays the daily inflow for the date entered.
Days until the safety stock is reached Indicates the estimated number of days remaining until the safety stock is reached.
The value is calculated with the average quantity per day.
• If "Safety stock" has been disabled or if the value is "0", the "Days until the safety
stock is reached" field is empty.
Next planned delivery/
Next planned disposal
• Standard tanks: Displays the next planned delivery
• Recycling tanks: Displays the next planned disposal
Total outflow
Displays the total outflow for the period entered.
Total inflow
Displays the total inflow for the period entered.
Number of deliveries/
Number of disposals
• Standard tanks: Displays the number of deliveries made for the period entered.
• Recycling tanks: Displays the number of disposals made for the period entered.
Frequency of deliveries/
Frequency of disposals
• Standard tanks: Average interval between two deliveries for the period entered.
• Recycling tanks: Average interval between two disposals for the period entered.
9.3
Outflow/Inflow
The tab displays important indicators for the inflow and outflow of the selected tank.
Using the From date and To date fields, you can enter a period for which you want to analyze the
values. If you enable the Show available period check box all the saved values will be analyzed.
74
Endress +Hauser
SupplyCare Enterprise SCE30B
9 Viewing analysis data – "Analysis" workplace
Description of fields
Endress+Hauser
Field
Description
Average inventory level
Displays the average amount for the period entered.
Average delivery quantity/
Average disposal quantity
• Standard tanks: Displays the average delivery quantity for the period entered.
• Recycling tanks: Displays the average disposal quantity for the period entered.
To ensure that fluctuating changes in the level do not falsify the result, the value
entered for the "Hysteresis" field is factored into the calculation.
Turnover rate
Displays the turnover rate for the period entered.
• Calculation for standard tanks:
Total outflow/Average inventory level
• Calculation for recycling tanks:
Total inflow/Average inventory level
Average rate of usage
Displays the average rate of usage for the period entered.
• Calculation for standard tanks:
(Average inventory level / Optimum) * 100
If "Optimum" has been disabled or if the value is "0", the system calculates with
the capacity entered.
• Calculation for recycling tanks:
(Average inventory level / Safety stock) * 100
If "Safety stock" has been disabled, the system calculates with the capacity
entered.
Maximum value
Maximum value for the period entered.
Minimum value
Minimum value for the period entered.
Safety stock reached
Number of times the safety stock has been undershot in the case of standard tanks
and exceeded in the case of recycling tanks for the period entered.
• Valuation for standard tanks:
Measured value < value entered for safety stock
• Calculation for recycling tanks:
Measured value > value entered for safety stock
• All measured values within the set hysteresis are not counted (see Page 91).
• If "Safety stock" has been disabled, the "Safety stock reached" field is empty.
• If the value for "Safety stock" is "0", the "Safety stock reached" field is "0".
Average safety stock reached
• Standard tanks: Average value by which the safety stock was undershot for the
period entered.
• Recycling tanks: Average value by which the safety stock was exceeded for the
period entered.
• If "Safety stock" has been disabled, the "Average safety stock reached" field is
empty.
• If the value for "Safety stock" is "0", the "Average safety stock reached" field is "0".
75
9 Viewing analysis data – "Analysis" workplace
9.4
SupplyCare Enterprise SCE30B
Chart hourly
This chart shows the outflow, inflow or the difference between the inflow and outflow for the
period selected, depending on the option selected.
Select the period of time for Chart hourly via the Period selection field. You can select a period
of 1, 2, 3, 4, 5, 6 or 7 days.
Select the type of chart via the Column or Line buttons.
If you move the cursor over a graph in the chart, a window appears with the name of the graph, the
specific measured value and the time stamp.
76
Endress +Hauser
SupplyCare Enterprise SCE30B
9 Viewing analysis data – "Analysis" workplace
9.5
Chart daily
This chart shows the outflow, inflow or the difference between the inflow and outflow for the
period entered, depending on the option selected.
Using the From date and To date fields, specify a period for Chart daily.
Select the type of chart via the Column or Line buttons.
If you move the cursor over a graph in the chart, a window appears with the name of the graph, the
specific measured value and the time stamp.
Endress+Hauser
77
10 Viewing tank locations on the map – "Map" workplace
10
SupplyCare Enterprise SCE30B
Viewing tank locations on the map –
"Map" workplace
Notice!
• The Map menu item is available to people with Read only, Scheduler or Operator configured
as their user role.
• As of version 2.08 onwards, (only) the "Professional" version of SupplyCare Enterprise software
for Endress+Hauser's end customers includes an access to Google Maps service. Endress+Hauser
voluntarily provides this service on the base of a dedicated Google OEM ID licensed to
Endress+Hauser by Google together with the right to allow Endress+Hauser's customers to access
to Google Maps service in conjunction with "SupplyCare Enterprise Professional" version. For
purposes of testing of and familiarizing with Google Maps Endress+Hauser provides its customers
with Endress+Hauser's Google ID upon request.
Today customers may moderately use the Google Maps Service at no extra cost, but Google has
restricted the possible number of sessions to Google Maps service under Endress+Hauser's Google
ID. Topping such maximum number sessions to Google Maps under Endress+Hauser's Google ID
may lead to a sudden shut down of Google Maps service for Endress+Hauser's Google ID users. In
case a customer needs or expects massive usage of Google Maps service it is recommended that it
considers purchasing its own and individual Map-ID from Google. Any questions in this regard may
be addressed to your local Endress+Hauser sales office.
Endress+Hauser reserves the right to extend, restrict or deny further usage of Endress+Hauser's
Google Maps ID depending on an actually occurring mass of usage. Endress+Hauser is by no means
obligated or required to neither extend nor grant any usage of its Google Maps OEM license to any
third party or Customer not having signed the SupplyCare Enterprise license agreement with
Endress+Hauser.
In order to register for using the Google Maps service under Endress+Hauser's Google ID (within
the above terms) follow these steps:
1.
Send an e-mail to [email protected] with the subject: SupplyCare Enterprise
Google Maps registration.
2.
In the e-mail body write down (or copy) the following:
Dear Endress+Hauser IMS Team,
we would like to register our SupplyCare Enterprise (Professional version) for the usage of
the Google Maps option within the Endress+Hauser Google Maps ID according to the Terms
and Conditions in the SupplyCare Enterprise license agreement.
Customer: YOUR COMPANY NAME
Customer email for contact: YOUR_EMAIL@MY_COMPANY.COM
SupplyCare Enterprise Serial No: XXXXXXXXXXX
SupplyCare Enterprise Server/PC URL (domain name)in your network: 192.168.1.1
Thank you
YOUR NAME
78
3.
Please note that the Serial Number for your SupplyCare can be found on the back of your CD
case on a sticker (Ser. no.). Also, the domain name or IP address can be as an example:
http://myintranet and http://192.168.1.1
4.
Our support team will process your request as soon as the information is verified. Please note
that the registration process is a one time action and can take some working days as the process
has to be accepted by Google.
Endress +Hauser
SupplyCare Enterprise SCE30B
10 Viewing tank locations on the map – "Map" workplace
• If you would like to purchase and use your own Google Client ID for a fee, please feel free to
directly contact "Google Enterprise Support". Any questions in regard of how to use the client ID
may be addressed to your local Endress+Hauser sales office.
You can use this menu item to get an overview of the locations of the individual tanks on Google
Maps. The tanks can be filtered by tank group, product, supplier and location. You can call up
detailed information on every tank, such as value, plan delivery or disposal.
10.1
Viewing a map and associated information
Notice!
The following conditions must be met to display a tank or an aggregated tank on the map:
• The tank or aggregated tank must be assigned to a specific location. The user must have the
geographical coordinates (degree latitude and longitude) of the location (see Page 104).
• The tank or aggregated tank must be assigned to a tank group.
1.
Click the Workplace menu in the Navigation window.
2.
Click the Map menu item. A map with an overview of the tank locations is displayed.
– The map view is automatically adapted to the filter criteria so that you see all the tanks for
the locations in question.
– If no tanks are found for the filter criteria, the message "No tanks found!" is displayed. The
filter criteria are reset to the values previously used.
Endress+Hauser
79
10 Viewing tank locations on the map – "Map" workplace
10.2
SupplyCare Enterprise SCE30B
Tank details
1.
If you click a tank on the map, this opens up a window containing more detailed information.
2.
The following data are displayed for the tank:
– Scroll icons if there are several tanks in one location.
– Tank name along with the number and total quantity of tanks if there are several tanks in
one location.
– Location
– Value and unit
– Time stamp and time zone
– Product
– Status of the tank with the symbol for the event.
– Amount and unit, deliverable (for standard tanks) or recyclable (for recycling tanks) if a
disposal or delivery is not planned.
PD amount and unit as well as PD (date and time of delivery/disposal) if a delivery or
disposal is planned.
– Plan delivery or Plan disposal button.
3.
To close the window, click the Close icon on the top right.
10.3
80
Planning a disposal or delivery
1.
Click the Plan delivery or Plan disposal button in the window with the tank details.
2.
The Plan delivery or Plan disposal dialog box appears:
3.
Click the
4.
Select the Date for the planned delivery/disposal in the calendar, or enter the date manually.
5.
The Value, Amount and Range fields are computed automatically.
These fields are recomputed if you change the date.
6.
You can update the range, enter a comment and save or reject the changes for the amount
entered → See Page 64.
button.
Endress +Hauser
SupplyCare Enterprise SCE30B
11 Managing master data
11
Managing master data
11.1
Managing companies
Notice!
Only people whose user role is configured as Master Data can create, change and delete
companies.
11.1.1
Endress+Hauser
Creating a company
1.
Click the Configuration menu in the Navigation window.
2.
Click the Company menu item.
3.
The following detail view is displayed in the Application window:
4.
Click the
5.
The tab is displayed in the edit mode.
button on the Company details tab.
81
11 Managing master data
SupplyCare Enterprise SCE30B
6.
Here, you can enter company data such as:
– Name (obligatory): name of the company
– Contact: select a contact person from the picklist.
The contact person has to have been added beforehand using the User menu item and
assigned to the Company.
– Identifier: company ID to be used in the CIDX reports
– Identifier agency: selection of organization responsible for managing the identifier for the
companies. The selection complies with the CIDX standard. The identifier agency is required
to create CIDX reports.
– Street
– City
– Zipcode
– State
– Country
– Description: you can enter a multiline description here.
7.
Click
11.1.2
to save your entries. Click
to abort the process.
Changing a company
→ See Page 27, Chapter 3.6.5.
11.1.3
Deleting a company
→ See Page 30, Chapter 3.6.8.
Notice!
A company can only be deleted if no more users are assigned to this company. If you still want to
delete the company, you first have to delete the users assigned to this company. The
button is
only displayed for a company which can be deleted.
11.1.4
Copying a company
→ See Page 31, Chapter 3.6.9.
11.2
Managing users
Notice!
• A user always belongs to a company. It is therefore necessary to create the company first (see
Page 81).
• Only people whose user role is configured as Master data can create, change and delete users.
• If the user role of a user is changed, the change only becomes effective after logging out and
logging in again.
11.2.1
82
Creating a user
1.
Click the Configuration menu in the Navigation window.
2.
Click the User menu item.
Endress +Hauser
SupplyCare Enterprise SCE30B
11 Managing master data
3.
The following detailed view appears in the Application window:
4.
In the lower section of the application window, select the User details tab.
5.
Click the
6.
The tab is displayed in the edit mode.
7.
Here, you can enter data on the user such as:
–
–
–
–
–
–
–
–
–
–
–
–
–
Endress+Hauser
button.
Title
Salutation
First name (obligatory)
Surname (obligatory): Surname of user
Login allowed: If the Login allowed check box is activated, the fields "Login Name",
"Password" and "Password confirmed" are displayed.
Once the Login allowed has been deactivated, the fields "Login Name", "Password" and
"Password Confirmed" are no longer displayed.
Users, for whom the Login allowed checkbox has not been activated, have no login
authorization and do not received notification e-mails.
Password: password the user has to enter the first time he/she logs in
Confirm password
Language
E-mail (obligatory)
Phone
Fax
Mobile
Company (obligatory): The company is automatically pre-populated.
83
11 Managing master data
SupplyCare Enterprise SCE30B
–
–
–
–
–
Street
City
Zipcode
State
Country
8.
Click
to save your entries. Click
to abort the process.
9.
Select the User roles tab to assign a role to the user
(see Page 84).
10. Select the Tank groups tab to assign a tank group to the user (see Page 85).
11.2.2
Assigning user roles and setting up alarms via e-mail
One or more user roles can be assigned to a user in the "User roles" tab. The user receives different
authorizations depending on the user role. Refer to Page 16 and Page 196. User with the user role
"System administrator" can also specify whether the user should receive alarms via e-mail.
Notice!
The user roles System administrator, Technical system administrator and Local system
administrator are only visible for users with the user role System administrator.
1.
Click the Configuration menu in the Navigation window.
2.
Click the User menu item.
3.
Select the User roles tab.
4.
Click the
5.
The tab is displayed in the edit mode.
6.
Activate the appropriate check box to assign the user a user role. You can assign multiple user
roles to a user at the same time.
7.
Once the "system administrator", "technical system administrator" or local system
administrator" user role has been activated, the "Alarm by Mail" check box is also displayed. If
this check box is activated, an e-mail is sent to the system administrator or the technical
system administrator if an alarm occurs (see Page 145).
8.
Click
11.2.3
button.
to save your entries. Click
to abort the process.
Changing a user
→ See Page 27, Chapter 3.6.5.
11.2.4
Deleting a user
→ See Page 30, Chapter 3.6.8.
84
Endress +Hauser
SupplyCare Enterprise SCE30B
11 Managing master data
Notice!
A user can only be deleted if he or she is not assigned to any tank group or any company as a contact
person. The user must not be logged in. The tank group assignment can be canceled in the "Tank
groups" tab. The company assignment can be canceled in the "Company" menu item. The
symbol is only displayed for a user who can be deleted.
11.2.5
Copying a user
→ See Page 31, Chapter 3.6.9.
11.2.6
Assigning tank groups to a user and setting up notifications for
tank events
You can assign one or more tank groups to the user using the Tank groups tab. On this tab you
can also specify the tank events which the user should be informed about.
Endress+Hauser
1.
Click the Configuration menu in the Navigation window.
2.
Click the User menu item.
3.
In the table, click the user whose assignment you want to edit.
4.
Select the Tank groups tab.
5.
Click the
6.
The tab is displayed in the edit mode.
7.
Activating the check box in the "Assign" column assigns a tank group to the user. Deactivate
the check box to undo the assignment. The assigned tank groups are listed in the "Workplace
– Tank" view.
8.
Activate the By E-Mail check box if you want the user to also be informed about tank events
by e-mail. The e-mail connection must be set up for SupplyCare before the user can be notified
by mail (see Page 145).
9.
Enable the check boxes corresponding to the events for which the user should receive
notification.
button.
85
11 Managing master data
SupplyCare Enterprise SCE30B
–
–
–
–
PP (plan point)
SP (ship point)
SST (safety stock)
TF/OF (Tank freeze/object freeze): comprises all the information regarding tank
freeze/object freeze events
– PDL (planned delivery/disposal loop): comprises all the new deliveries/disposals which
have been planned or deleted
– PDE (planned delivery/disposal events): comprises all the early, late, missed and completed
deliveries/disposals
10. Activate the PDL (planned delivery/disposal loop) and PDE (planned delivery/disposal
events) check boxes for the deliveries/disposals for which the user should receive notification.
11. Click
11.3
to save your entries. Click
to abort the process.
Managing tanks
Notice!
• Only people whose user role is configured as Technical system administrator or Master Data
can create, change and delete tanks.
• Depending on your configuration, Objects are displayed instead of Tanks. For more information
refer to the appropriate chapter in the Service Manual for System administration.
11.3.1
Creating a tank
There are several ways to create a tank in SupplyCare: you can use the Tank setup wizard or the
tabs in the Configuration menu, Tank menu item.
By using the Tank setup wizard you can easily select the tank settings for a new tank: the basic
settings Tank name, Capacity, Tank type and Tank group and other optional tank settings. The
settings can be changed subsequently via the tabs mentioned above.
Notice!
• A tank always has to be assigned to a tank group since you can only assign tank groups to a user.
• The "Location", "Buyer", "Supplier" and "Product" first have to be created before you can select
elements for these fields. The Buyer and Supplier are created as a Company (see Page 81).
a)
Creating a tank using the Tank setup wizard
1.
Click the Configuration menu in the Navigation window.
2.
Click the Tank menu item.
3.
The detail view is displayed in the Application window.
4.
Click the Tank setup wizard button.
Notice!
The Tank wizard cannot be used to create aggregated tanks.
86
Endress +Hauser
SupplyCare Enterprise SCE30B
11 Managing master data
5.
The dialog window Step 1 out of 2: Basic tank settings is displayed:
6.
Enter the following data:
Tank name (mandatory)
Capacity (mandatory)
Tank type (see Page 90)
7.
By activating the checkbox in the Assign column, assign the tank to a tank group that already
exists or create a new tank group if applicable.
8.
Click the
9.
The Create new tank group dialog window appears:
button to create a new tank group.
10. Enter the following data:
Name (mandatory)
Description
11. Click
to save your entries. Click
to abort the process.
12. Click Next to enter more optional tank settings, click Cancel to cancel the process or click
Finish to finish creating the tank.
Endress+Hauser
87
11 Managing master data
SupplyCare Enterprise SCE30B
13. When you click Next the Step 2 out of 2 : Optional tank settings dialog window appears:
14. Enter the data as described on Page 89.
15. Click the appropriate
button to create a new location, buyer, supplier and product.
16. Select a graphic depicting the appropriate tank shape (see Page 92).
17. Click Back to go back to the Step 1 out of 2: Basic tank settings dialog window, click
Cancel to cancel the process or Finish to finish creating the tank.
88
Endress +Hauser
SupplyCare Enterprise SCE30B
Endress+Hauser
11 Managing master data
b)
Creating a tank using the tabs in the "Configuration" menu, "Tank" menu item
1.
Click the Configuration menu in the Navigation window.
2.
Click the Tank menu item.
3.
The detail view is displayed in the Application window. In the lower section, select the Tank
details tab.
4.
Click the
5.
The tab is displayed in the edit mode.
6.
Here, you can enter data on the tank such as:
– Tank name (obligatory)
– Location: select the location from the picklist.
– Buyer: select a buyer (company) from the picklist.
– Supplier: select a supplier (company) from the picklist.
– SDT (Standard delivery/disposal time)
– Product: select a product from the picklist.
– Use product unit: if this option is activated, the unit of the selected product is automatically
used in the "Unit" field. The values in the fields "Capacity", "Optimum", "Plan point", "Ship
point", "Safety stock" and "Hysteresis" are converted based on the density entered for the
product.
– Tank type: By activating the Standard tank checkbox, you specify that the tank is a
standard type of tank, and by activating the Recycling tank checkbox you specify that the
tank is a recycling tank. The event messages and the way the inventory chart and levels are
displayed are adapted to this tank type (see Page 90).
– ADI/ADO based on: 14 days is the standard value specified here. This period is used for
extrapolating in the inventory chart (see Page 37).
– Include negative values: If this option is enabled, negative measuring values are included
in the ADI/ADO calculations.
– Activate forecast: If this option is enabled, a forecast of the inventory is displayed in the
"Inventory Chart" tab.
The enabled forecast is displayed with a green button; the disabled forecast is displayed with
a red button. This option can be changed in edit mode by clicking the green or red button.
– Capacity (obligatory)
– Optimum (for standard tanks only)
– Plan point
– Ship point(for standard tanks only)
– Safety stock
– Hysteresis: the hysteresis serves to prevent constant event messages, e.g. due to a
fluctuating level (see Page 91).
– Unit
7.
In the case of a standard tank it is possible to deactivate the Optimum, Plan point, Ship point
and Safety stock input fields individually, and the Safety stock and Plan point fields in the
button.
89
11 Managing master data
SupplyCare Enterprise SCE30B
case of a recycling tank. For this purpose, click the button to the right of the specific input field.
This field then becomes gray just like the button. It is no longer possible to enter information.
These input fields can be activated by clicking the gray button in question.
8.
Select a graphic depicting the appropriate tank shape (see Page 92).
9.
Click
to save your entries. Click
to abort the process.
10. Select the Tank groups tab.
11. Click the
button.
12. The tab is displayed in the edit mode.
13. Activating the check box in the Assign column assigns the tank to a tank group.
14. Click
to save your entries. Click
to abort the process.
Standard tank and recycling tank
SupplyCare distinguishes between standard tanks and recycling tanks. From a standard tank, the
product is withdrawn. For a recycling tank, the tank is filled with the product.
Activating the Recycling check box turns the standard tank into a recycling tank. The display logic
in the inventory chart and the notification logic are changed according to the following illustration.
Standard tank
Recycling tank
Capacity
Capacity
Safety stock
Plan point
Ship point
Plan point
Safety stock
90
Endress +Hauser
SupplyCare Enterprise SCE30B
11 Managing master data
Hysteresis
The hysteresis pertains solely to event notifications. The hysteresis prevents multiple triggering of
an event notification, e.g. due to fluctuating levels. The hysteresis applies to the following events:
Plan point, Ship point and Safety stock.
Standard tank
Recycling tank
Capacity
Capacity
Hysteresis
Hysteresis
a
b
c
d
e
b
c
d
e
a) The level falls below the limit value for the
Plan point. The "Plan point reached" event
is triggered. The status of the event is set to
Open.
a) The level climbs above the limit value
for the Plan point. The "Plan point reached"
event is triggered. The status of the event is
set to Open.
b) The level climbs back above the limit value
for the Plan point. The status for event a)
remains Open. The tank status switches to
"OK" (green).
b) The level falls below the limit value for the
Plan point. The status for event a) remains
Open. The tank status switches to "OK"
(green).
c) The level falls back below the limit value for
the Plan point. No new event is triggered.
The status for event a) remains Open. The
tank status switches to "Plan point reached"
(yellow). No new event is triggered, as the
level has not first climbed above the limit
value for the Plan point plus the hysteresis.
c) The level climbs back above the limit value
for the Plan point. No new event is
triggered. The status for event a) remains
Open. The tank status switches to "Plan
point reached" (yellow). No new event is
triggered, as the level has not first fallen
below the limit value for the Plan point
minus the hysteresis.
d) The level rises above the limit value for the
Plan point plus the hysteresis. Event a) now
assumes the status Done.
e) The level falls back below the limit value for
the Plan point. A new "Plan point reached"
event is triggered. The status of the event is
set to Open.
Endress+Hauser
a
d) The level falls below the limit value for the
Plan point minus the hysteresis. Event a)
now assumes the status Done.
e) The level climbs back above the limit value
for the Plan point. A new "Plan point
reached" event is triggered. The status of
the event is set to Open.
91
11 Managing master data
SupplyCare Enterprise SCE30B
11.3.2
Selecting and deleting a depicted tank shape
Selecting a depicted tank shape
In the "Tank details" tab, you can select a graphic depicting the appropriate tank shape for a tank
created. The selected graphic is also displayed in the "Workplace – Tank" view in the "Tank details"
tab.
Notice!
• The "Vertical bar" and "Horizontal bar"
tank pictures can be used if you prefer general
symbols.
• The "Digital display" tank picture
can be used if you prefer the value to be displayed
in digital format.
Please note that the digital display can show a maximum of 17 digits, including commas and
thousand separators. If the value is longer than 17 digits, some or all of the decimal places are not
displayed. If the value can still not be displayed with 17 digits even when the decimal places are
omitted, the following appears on the display: #################
1.
Click the Configuration menu in the Navigation window.
2.
Click the Tank menu item.
3.
Select the Tank details tab.
4.
Click the
5.
The tab is displayed in the edit mode.
6.
Click the
7.
The Select tank picture dialog box is displayed.
8.
Click the picture of the tank shape that applies for the tank you created.
9.
The selected graphic is added to the Tank details tab.
10. Click
button.
button.
to save your selection. Click
to abort the process.
Deleting a depicted tank shape
1.
Click the Configuration menu in the Navigation window.
2.
Click the Tank menu item.
3.
Select the Tank details tab.
4.
Click the
5.
The tab is displayed in the edit mode.
6.
Click the
7.
The prompt "Do you really want to delete?" is displayed.
8.
Click OK to delete the graphic. The "No tank picture selected" graphic is displayed. Click
Cancel to abort the process.
9.
Click
button.
button in the Tank shape graphic.
to save your changes. Click
to abort the process.
Notice!
The picture is only deleted if you save your changes with the
92
button.
Endress +Hauser
SupplyCare Enterprise SCE30B
11 Managing master data
11.3.3
Changing tank – tank group assignment
1.
Click the Configuration menu in the Navigation window.
2.
Click the Tank menu item.
3.
In the table, click the tank whose assignment you want to change.
4.
Select the Tank groups tab.
5.
Click the
6.
The tab is displayed in the edit mode.
7.
Activating the check box in the Assign column assigns the tank to a tank group. Deactivate
the check box to undo the assignment.
8.
Click
11.3.4
button.
to save your entries. Click
to abort the process.
Configuring secondaries
If secondary values have been assigned to the tank via the "Gateway configuration" menu item in
the "Assign measuring point to tank" tab, these secondary values are displayed in the "Secondaries"
tab.
Endress+Hauser
1.
Click the Configuration menu in the Navigation window.
2.
Click the Tank menu item.
3.
In the lower section of the application window, select the Secondaries tab.
4.
Click the
5.
The tab is displayed in the edit mode.
button.
93
11 Managing master data
SupplyCare Enterprise SCE30B
6.
You can enter additional information on the secondary values here, such as:
– Name: The name is displayed in the "Workplace – Tank" view in the "Tank name" column
and in the "Inventory chart" tab.
– Limit 1: See the following section: Display for "Descending limits" and "Ascending limits".
– Limit 2: See the following section: Display for "Descending limits" and "Ascending limits".
– Hysteresis
– Unit (read only)
– Upswing: Switch between descending and ascending limits.
Display for "Descending limits" and "Ascending limits"
Using the Upswing check box, choose between the "Descending limits" and "Ascending limits"
display.
"Upswing"
check box
Description
Column in the "
Workplace – Tank" view
Descending limits:
"Upswing" check box disabled
Limit 1
PP (plan point)
Limit 2
SST (safety stock)
Limit 2
PP (plan point)
Limit 1
SST (safety stock)
Ascending limits:
"Upswing" check box enabled
Limit 1
Limit 1
Limit 2
Limit 2
downswing
11.3.5
upswing
Configuring tank freeze events
Tank freeze events are generated using an internal limit based on the latest measurement received
for the tank within a defined time span, e.g. to recognize material theft, leakage or defects.
94
1.
Click the Configuration menu in the Navigation window.
2.
Click the Tank menu item.
3.
In the lower section of the application window, select the Tank freeze tab.
4.
Click the
button.
Endress +Hauser
SupplyCare Enterprise SCE30B
11 Managing master data
5.
The tab is displayed in the edit mode.
6.
Here you can enter data to configure tank freeze events, such as:
– Activate: If this option is enabled, tank freeze events are enabled.
The enabled tank freeze events are displayed with a green button; the disabled tank freeze
events are displayed with a red button. This option can be changed in edit mode by clicking
the green or red button. The default setting for this option is "disabled".
– Delta calculation: Select absolute to specify the Freeze event delta as a fixed value in
the unit of the tank. Select percentaged to specify the Freeze event delta as a percentage
of the configured tank capacity. The default setting for this option is absolute.
– Freeze event delta: (obligatory) Enter a positive numeric value.
At the beginning of the monitoring time the last measured tank value (e.g. the tank level) is
saved ("frozen"). This "frozen" measurement is compared with the current measurements
during the monitoring time. If the difference between the frozen measurement and the
current measurement exceeds the Freeze event delta (positive or negative), a tank freeze
event is generated.
– Unit: Displays the unit configured for the tank capacity if Delta calculation is set to
absolute. Displays "%" otherwise.
– Time zone: Select the time zone to be used for the monitoring times configured under
Repetition rule.
– Repetition rule: (obligatory) Select a rule for the repetition of the monitoring time.
Daily: Select a From time (start time) and a To time (end time) for the daily monitoring
for tank freeze events.
The From time must represent an earlier time point than the To time. For a daily
monitoring time from a time point before midnight and after midnight, configure a Weekly
on every... repetition rule.
Weekly on every...: Configure monitoring times for tank freeze events for each weekday
individually.
For more details on the configuration of the Weekly on every... repetition rule, refer to the
following chapter "Configuring the Weekly on every... repetition rule". → See Page 95.
7.
Click
to save your configuration. Click
to abort the process.
Notice!
Use the Copy to other tanks button to copy the Tank freeze configuration to other tanks.
For more details, refer to the chapter "Copying the Tank freeze configuration to other tanks".
→ See Page 96.
Configuring the Weekly on every... repetition rule
Configure monitoring times for tank freeze events for each weekday individually.
Endress+Hauser
95
11 Managing master data
SupplyCare Enterprise SCE30B
– Select the weekdays for which to configure the monitoring times.
– Select a From time (start time) and a To time (end time) for the monitoring for tank freeze
events of the selected day. If the To time is smaller than the From time, the monitoring
time extends into the next weekday. E.g. if for a selected Monday a From time of 18:00
and a To time of 6:00 is configured, the monitoring time runs from 18:00 on Monday to
6:00 on Tuesday even if the Tuesday is not selected.
– Select until end of day for a selected weekday to set the end of the monitoring time to
23:59, i.e. substituting To time with 23:59.
If until end of day is selected, To time is disabled and hidden.
– Select all day for a selected weekday to set the monitoring time from 0:00 to 23:59, i.e.
substituting From time with 0:00 and To time with 23:59.
If all day is selected, From time and To time are disabled and hidden.
Copying the Tank freeze configuration to other tanks
96
1.
Click the Copy to other tanks button in the Tank freeze tab.
2.
The dialog window Step 1 out of 2: Copy ’Tank freeze’ configuration to other tanks is
displayed:
3.
The window displays the last saved Tank freeze configuration.
Change the configuration if desired.
Endress +Hauser
SupplyCare Enterprise SCE30B
11 Managing master data
4.
Click Next to proceede to the next step, click Cancel to cancel the process.
5.
When you click Next, the dialog window Step 2 out of 2: Copy ’Tank freeze’
configuration to other tanks is displayed:
6.
Select the tanks to which you want to copy the Tank freeze configuration by activating the
check boxes before the tanks.
You can filter the displayed tanks by Tank group, Location, Product or Supplier.
7.
Click Back to return to the previous step, click Cancel to cancel the process or Finish to copy
the Tank freeze configuration to the selected tanks.
11.3.6
Adding, opening and deleting files and
other information for a tank
Using the Tank notes tab, you can add additional information for a tank and a maximum of five
files. The information entered here and the attached files are also displayed in the "Workplace –
Tank" view, "Notes and files" tab.
The files must meet the following requirements:
• File formats supported: doc, xls, pdf, ppt, jpg, gif, png, bmp or txt.
• Maximum file size: 5 MB
Adding a file
Endress+Hauser
1.
Click the Configuration menu in the Navigation window.
2.
Click the Tank menu item.
3.
In the table, click the tank for which you want to add a file.
4.
Select the Tank notes tab.
97
11 Managing master data
SupplyCare Enterprise SCE30B
5.
Click the
button.
6.
The Tank notes tab is displayed in the edit mode.
7.
Enter a description for the Notes, Data 1, Data 2 and Data 3 fields.
8.
Click the
9.
The Upload new file dialog box is displayed.
button in the table.
10. Click the Search button.
11. Select the File in your directory. The file name is displayed in the "Name" column in the table.
12. Click the Upload new file button.
13. The file is listed in the table with information on the file format, file name, file size and the date
the file was last changed.
Opening or saving a file
1.
Click the Configuration menu in the Navigation window.
2.
Click the Tank menu item.
3.
Select the Tank notes tab.
4.
Click the File name (hyperlink) in the Name column in the table.
5.
A dialog box opens. Here you can choose whether you want to open the file or save it.
6.
Click OK to open or save the file. Click Cancel to abort the process.
Deleting a file
1.
Click the Configuration menu in the Navigation window.
2.
Click the Tank menu item.
3.
Select the Tank notes tab.
4.
Click the
5.
The Tank notes tab is displayed in the edit mode.
6.
In the table, enable the check box for the file that you want to delete.
7.
Click the
8.
The prompt "Do you really want to delete?" is displayed.
9.
Click OK to delete the file. Click Cancel to abort the process.
10. Click
button.
button.
to save your changes. Click
to abort the process.
Notice!
• The file is only deleted if you save your changes by pressing the
button.
• You can change or delete descriptions in the Notes, Data 1, Data 2 and Data 3 fields in the
98
Endress +Hauser
SupplyCare Enterprise SCE30B
11 Managing master data
editing mode. Click
11.3.7
to save the changes.
Changing a tank
→ See Page 27, Chapter 3.6.5.
11.3.8
Deleting a tank
→ See Page 30, Chapter 3.6.8.
11.3.9
Copying a tank
→ See Page 31, Chapter 3.6.9.
11.4
Managing aggregated tanks
Notice!
• Only people whose user role is configured as Master Data can create, change and delete
aggregated tanks.
• Depending on your configuration, Aggregated Objects are displayed instead of Aggregated
Tanks. For more information refer to the appropriate chapter in the Service Manual for System
administration.
11.4.1
Creating an aggregated tank
Notice!
• The "Location", "Buyer", "Supplier" and "Product" first have to be created before you can select
elements for these fields. The Buyer and Supplier are created as a Company (see Page 81).
• If you have assigned a tank to an aggregated tank, this tank is removed from the "Tank
assignment" tabs under the "Tank", "Tank group" and "Report" menu items.
• If you would like to make changes to a tank that is assigned to an aggregated tank, you first have
to remove the tank from the tank list.
• If you want to assign a tank, which is already assigned to a tank group, to an aggregated tank, this
tank must be removed from the tank group.
• An aggregated tank always has to be assigned to a tank group since you can only assign tank
groups to a user.
Endress+Hauser
1.
Click the Configuration menu in the Navigation window.
2.
Click the Aggregated tank menu item.
99
11 Managing master data
100
SupplyCare Enterprise SCE30B
3.
The following detail view is displayed in the Application window:
4.
In the lower section of the application window, select the Tank details tab.
5.
Click the
6.
The tab is displayed in the edit mode.
7.
Here, you can enter data on the aggregated tank such as:
– Tank name (obligatory)
– Location: select the location from the picklist.
– Buyer: select a buyer (company) from the picklist.
– Supplier: select a supplier (company) from the picklist.
– SDT (Standard delivery/disposal time)
– Product: select a product from the picklist.
– Use product unit: if this option is activated, the unit of the selected product is automatically
used in the "Unit" field.
– Tank type: By activating the Standard tank checkbox, you specify that the aggregated tank
is a standard type of tank, and by activating the Recycling tank checkbox you specify that
the tank is a recycling tank. The event messages and the way the inventory chart and levels
are displayed are adapted to this tank type (see Page 90).
– ADI/ADO based on: 14 days is the standard value specified here. This period is used for
extrapolating in the inventory chart (Page 37).
button.
Endress +Hauser
SupplyCare Enterprise SCE30B
11 Managing master data
– Include negative values: If this option is enabled, negative measuring values are included
in the ADI/ADO calculations.
– Activate forecast: If this option is enabled, a forecast of the inventory is displayed in the
"Inventory Chart" tab.
The enabled forecast is displayed with a green button; the disabled forecast is displayed with
a red button. This option can be changed in edit mode by clicking the green or red button.
– Use product unit: if this option is activated, the unit of the selected product is automatically
used in the Unit field.
– Capacity (read only)
– Optimum
– Plan point
– Ship point
– Safety stock
– Hysteresis (Page 91)
– Unit (obligatory)
8.
In the case of a standard tank it is possible to deactivate the Optimum, Plan point, Ship point
and Safety stock input fields individually, and the Safety stock and Plan point fields in the
case of a recycling tank. For this purpose, click the button to the right of the specific input field.
This field then becomes gray just like the button. It is no longer possible to enter information.
These input fields can be activated by clicking the gray button in question.
9.
Select the Tank list tab.
10. Click the
button.
11. The tab is displayed in edit mode in the lower part of the Application window.
12. Activating the appropriate check box in the Assign column assigns the tanks to the aggregated
tank.
Notice!
Only the same type of tanks - i.e. standard tanks or recycling tanks - are displayed in the tank list.
In the "Measuring point details" tab, these tanks must be assigned a measuring point and the same
"Engineering unit (for application)" as has been assigned to the aggregated tank. Only these tanks
can be added to the aggregated tank.
13. Click
to save your entries. Click
to abort the process.
14. Select the Tank groups tab.
15. Click the
Endress+Hauser
button.
101
11 Managing master data
SupplyCare Enterprise SCE30B
16. The tab is displayed in the edit mode.
17. Activating the check box in the Assign column assigns the tank to a tank group.
18. Click
11.4.2
to save your entries. Click
to abort the process.
Selecting and deleting a depicted tank shape
Selecting a depicted tank shape
In the "Tank details" tab, you can select a graphic depicting the appropriate tank shape for a tank
created. The selected graphic is also displayed in the "Workplace – Tank" view in the "Tank details"
tab.
1.
Click the Configuration menu in the Navigation window.
2.
Click the Tank menu item.
3.
Select the Tank details tab.
4.
Click the
5.
The tab is displayed in the edit mode.
6.
Click the
7.
The Select tank picture dialog box is displayed.
8.
Click the picture of the tank shape that applies for the tank you created.
9.
The selected graphic is added to the Tank details tab.
10. Click
button.
button.
to save your selection. Click
to abort the process.
Deleting a depicted tank shape
102
1.
Click the Configuration menu in the Navigation window.
2.
Click the Tank menu item.
3.
Select the Tank details tab.
4.
Click the
5.
The tab is displayed in the edit mode.
6.
Click the
7.
The prompt "Do you really want to delete?" is displayed.
8.
Click OK to delete the graphic. The "No tank picture selected" graphic is displayed. Click
Cancel to abort the process.
9.
Click
button.
button in the Tank shape graphic.
to save your changes. Click
to abort the process.
Endress +Hauser
SupplyCare Enterprise SCE30B
11 Managing master data
Notice!
The picture is only deleted if you save your changes with the
11.4.3
button.
Adding, opening and deleting files and
other information for an aggregated tank
Using the Tank notes tab, you can add additional information for an aggregated tank and a
maximum of five files. The information entered here and the attached files are also displayed in the
"Workplace – Tank" view, "Notes and files" tab.
→ For information on adding, opening, saving or deleting a file, see Page 97.
11.4.4
Changing aggregated tank – tank group assignment
1.
Click the Configuration menu in the Navigation window.
2.
Click the Aggregated tank menu item.
3.
In the overview table, click the aggregated tank whose assignment you want to change.
4.
Select the Tank groups tab.
5.
Click the
6.
The tab is displayed in the edit mode.
7.
Activating the check box in the Assign column assigns the aggregated tank to a tank group.
Deactivate the check box to undo the assignment.
8.
Click
11.4.5
button.
to save your entries. Click
to abort the process.
Configuring aggregated tank freeze events
→ See Page 94, Chapter 11.3.5.
11.4.6
Changing an aggregated tank
→ See Page 27, Chapter 3.6.5.
11.4.7
Deleting an aggregated tank
→ See Page 30, Chapter 3.6.8.
11.4.8
Copying an aggregated tank
→ See Page 31, Chapter 3.6.9.
Endress+Hauser
103
11 Managing master data
SupplyCare Enterprise SCE30B
11.5
Managing locations
Notice!
Only people whose user role is configured as Master Data can create, change and delete locations.
11.5.1
Creating a location
Notice!
A tank must be created before you can assign this tank to a location.
However, you can first create the location and then assign the tanks to a location at a later date.
1.
Click the Configuration menu in the Navigation window.
2.
Click the Location menu item.
3.
The following detail view is displayed in the Application window:
4.
In the lower section of the application window, select the Location details tab.
5.
Click the
6.
The tab is displayed in the edit mode.
7.
Here, you can enter data for the location such as:
button.
– Name (obligatory): unique identifier of the location
– Company: select the company from the picklist.
– Manager
104
Endress +Hauser
SupplyCare Enterprise SCE30B
11 Managing master data
– Time zone: select the time zone for the location from the picklist.
All time data, particularly time stamps for measurements for tanks at this locations are
displayed in this time zone. There is also the preferred time zone for users that is used for
time information for events.
– Street
– City
– Zipcode
– State
– Country
– Longitude and Latitude: you can save the geographical coordinates for this location here
(see Page 105). These coordinates are used to display the location on the overview map
(see Page 78).
– Calculate based on address: the longitude and latitude are calculated automatically
(see Page 107). These coordinates are used to display the location on the overview map
(see Page 78).
Notice!
A prerequisite for the display of the fields "Latitude" and "Longitude" is a valid client ID to use the
workplace "Map" and the activation of the menu item "Map". You can get the client ID for a fee
from the "Google Enterprise Support" (see Page 128). The activation of the menu item "Map" can
be executed by yourself (see Page 128).
8.
Click
to save your changes. Click
9.
Select the Tanks at location tab.
10. Click the
to abort the process.
button.
11. The tab is displayed in the edit mode.
12. Activating the check box in the Assign column assigns the tank to the location.
The table shows the tanks which are already assigned to the location or which are not yet
assigned to a location.
13. Click
11.5.2
to save your changes. Click
to abort the process.
Adding, opening and deleting files and other information for a
location
Using the Location notes tab, you can add additional information for a location and a maximum
of five files. The information entered here and the attached files are also displayed in the "Workplace
– Tank" view, "Notes and files" tab.
→ For information on adding, opening, saving or deleting a file, see Page 97.
11.5.3
Endress+Hauser
Changing location-tank assignment
1.
Click the Configuration menu in the Navigation window.
2.
Click the Location menu item.
105
11 Managing master data
106
SupplyCare Enterprise SCE30B
3.
In the overview table, click the location whose assignment you want to change.
4.
Select the Tanks at location tab.
5.
Click the
6.
The tab is displayed in the edit mode.
7.
Activating the appropriate check box in the Assign column assigns the tanks to the selected
location. Deactivate the check box to undo the assignment.
8.
Click
button.
to save your entries. Click
to abort the process.
Endress +Hauser
SupplyCare Enterprise SCE30B
11 Managing master data
11.5.4
Computing the location automatically or entering it manually
Notice!
If you change the address data, you must also update the longitude and latitude information.
You can either have the system compute the longitude and latitude automatically based on the
address entered, or you can enter this information manually.
Computing the location automatically
1.
Click the Based on address button.
2.
The longitude and latitude automatically computed are displayed in a window.
3.
Click OK to confirm the longitude and latitude.
If the longitude and latitude cannot be computed because not enough address information is
available, for example, the "Unknown or bad address. Please enter manually" message appears on
the screen.
Entering the location manually
Enter the longitude and latitude in the corresponding fields.
The latitude must be between -85 and 85, and the longitude must be between -180 and 180.
You can enter a number with up to 16 decimal places.
11.5.5
Displaying the location on the map
→ See Page 78, Chapter 10.
11.5.6
Changing a location
→ See Page 27, Chapter 3.6.5.
11.5.7
Deleting a location
→ See Page 30, Chapter 3.6.8.
Notice!
You can only delete a location if no tanks are assigned to the location.
11.5.8
Copying a location
→ See Page 31, Chapter 3.6.9.
Endress+Hauser
107
11 Managing master data
SupplyCare Enterprise SCE30B
11.6
Managing products
Notice!
Only people whose user role is configured as Master Data can create, change and delete products.
11.6.1
Creating a product
Notice!
• A tank must be created before you can assign a product to a tank.
• However, you can first create the product and then assign the tanks to a product at a later date.
• The "Product name" and the combination of the fields "Identifier" and "Identifier agency" may
only be used once in the system.
108
1.
Click the Configuration menu in the Navigation window.
2.
Click the Product menu item.
3.
The following detail view is displayed in the Application window:
4.
In the lower section of the application window, select the Product details tab.
5.
Click the
6.
The tab is displayed in the edit mode.
button.
Endress +Hauser
SupplyCare Enterprise SCE30B
11 Managing master data
7.
Here, you can enter data on the product such as:
– Product name (obligatory): unique identifier of a product
– Identifier: unique product ID to be used in the CIDX reports
– Identifier agency (obligatory): selection of organization responsible for managing the
identifier for the companies. The selection complies with the CIDX standard. The identifier
agency is required to create CIDX reports.
– Units (obligatory)
– Consistency
– Density (obligatory): the unit can be selected
– Formula: chemical formula of the product
– Alias: another name for the product, e.g. tradename etc.
– Description: you can enter a multiline description here.
8.
Click
to save your entries. Click
9.
Select the Used in tanks tab.
10. Click the
to abort the process.
button.
11. The tab is displayed in the edit mode.
12. Activating the check box in the Assign column assigns the product to the tank.
The table shows the tanks which are already assigned to the product or which are not yet
assigned to a product.
13. Click
11.6.2
Endress+Hauser
to save your entries. Click
to abort the process.
Changing product – tank assignment
1.
Click the Configuration menu in the Navigation window.
2.
Click the Product menu item.
3.
In the table, click the product for which you want to change the assignment.
4.
Select the Used in tanks tab.
5.
Click the
button.
109
11 Managing master data
SupplyCare Enterprise SCE30B
6.
The tab is displayed in edit mode in the lower section of the Application window:
7.
Activating the check box in the Assign column assigns the selected product to a tank.
Deactivate the check box to undo the assignment.
The table shows the tanks which are already assigned to the product or which are not yet
assigned to a product.
8.
Click
11.6.3
to save your entries. Click
to abort the process.
Changing a product
→ See Page 27, Chapter 3.6.5.
11.6.4
Deleting a product
→ See Page 30, Chapter 3.6.8.
Notice!
You can only delete a product if the product is not assigned to a tank. The
displayed for a product which can be deleted.
11.6.5
symbol is only
Copying a product
→ See Page 31, Chapter 3.6.9.
11.7
Managing tank groups
Notice!
• Only people whose user role is configured as Master Data can create, change and delete tank
groups.
• Depending on your configuration, Object groups are displayed instead of Tank groups. For
more information refer to the appropriate chapter in the Service Manual for System
administration.
Tank groups are used to organize tanks and to assign authorized users to the tanks. In the "Tank
assignment" tab, you create tank groups and assign tanks to the groups. You can assign one or more
users to the tank group using the "User assignment" tab. In the "User assignment" tab, you also
specify the tank events for which the user should receive notification.
11.7.1
110
Changing tank groups
1.
Click the Configuration menu in the Navigation window.
2.
Click the Tank group menu item.
Endress +Hauser
SupplyCare Enterprise SCE30B
11 Managing master data
3.
The following detail view is displayed in the Application window:
4.
In the lower section of the Application window, select the Tank assignment tab.
5.
Click the
6.
The tab is displayed in the edit mode.
7.
Here, you can enter data on the tank group such as:
button.
– Name (obligatory): unique identifier of the tank group
– Description: you can enter a multiline description here.
– Assignment: by means of the table, you can activate the check boxes to assign the
corresponding tanks to this tank group.
8.
Click
9.
Select the User assignment tab to assign the tank groups to a user (see Page 111).
11.7.2
to save your entries. Click
to abort the process.
Assigning users to a tank group and setting up notifications for
tank events
You can assign one or more users to the tank group using the "User assignment" tab. On this tab you
can also specify the tank events which the user should be informed about.
Endress+Hauser
1.
Click the Configuration menu in the Navigation window.
2.
Click the Tank group menu item.
3.
Select the User assignment tab.
4.
Click the
button.
111
11 Managing master data
SupplyCare Enterprise SCE30B
5.
The tab is displayed in the edit mode.
6.
Activating the check box in the "Assign" column assigns a user to the tank group. Deactivate
the check box to undo the assignment. The assigned tank groups are listed in the "Workplace
– Tank" view.
7.
Activate the By E-Mail check box if you want the user to also be informed about tank events
by e-mail. The e-mail connection must be set up for SupplyCare before the user can be notified
by mail (see Page 145).
8.
Enable the check boxes corresponding to the events for which the user should receive
notification.
–
–
–
–
PP (plan point)
SP (ship point)
SST (safety stock)
TF/OF (Tank freeze/object freeze): comprises all the information regarding tank
freeze/object freeze events
– PDL (planned delivery/disposal loop): comprises all the new deliveries/disposals which
have been planned or deleted
– PDE (planned delivery/disposal events): comprises all the early, late, missed and completed
deliveries/disposals
9.
Click
11.7.3
to save your entries. Click
to abort the process.
Sending test event e-mail (user assignment)
Notice!
• Only individuals with Master Data configured as their user role can send test event e-mails.
• A test event e-mail is created in the language that corresponds to the language setting of the
specific addressee in the Configuration menu, User menu item.
You can send test event e-mails in the User assignment tab. The Send test event e-mail button
is only displayed if you are outside the edit mode. The button is not displayed in the edit mode.
112
1.
Click the Configuration menu in the Navigation window.
2.
Click the Tank group menu item.
3.
Select the User assignment tab.
Endress +Hauser
SupplyCare Enterprise SCE30B
11 Managing master data
4.
The following detail view is displayed in the Application window:
5.
Click the Send test event e-mail button.
6.
The Affected user dialog box appears. This lists all the users who are assigned to the selected
tank group in the upper section of the Application window and whose checkboxes are selected
in the By e-mail table column.
7.
Select the checkboxes for the users who should receive the test event e-mail and disable them
for the users who should not receive the test event e-mail. Selecting the checkbox in the first
row of the table selects all the users listed.
8.
If you want to provide your e-mail address and phone number in the text of the test event
e-mail, select the Add contact info checkbox on the bottom left under the table.
9.
The E-mail and Phone fields are displayed.
10. The content of the fields is taken from the corresponding fields in the Configuration menu,
User menu item. Overwrite the content if necessary.
11. Click the Send test event e-mail button to send the test event e-mail.Click Cancel to abort
the process.
11.7.4
Changing tank groups
→ See Page 27, Chapter 3.6.5.
Endress+Hauser
113
11 Managing master data
SupplyCare Enterprise SCE30B
11.7.5
Deleting tank groups
→ See Page 30, Chapter 3.6.8.
11.7.6
Copying tank groups
→ See Page 31, Chapter 3.6.9.
11.8
Managing units
11.8.1
Changing number of places after the decimal point
Notice!
Only people whose user role is configured as Master Data can change the number of places after
the decimal point for the units.
In the "Unit" menu item, you specify the number of places after the decimal point for the various
units.
Notice!
The "Unit" menu item lists all the units along with their description, number of decimal places and
unit type. "Customer-specific" types of units cannot be converted to another unit. Customer-specific
units are for display purposes only.
The
button in the table header opens a context menu. Via this context menu, you can show
and hide the "Unit type" column in the overview table.
1.
Click the Configuration menu in the Navigation window.
2.
Click the Units menu item.
3.
The following detail view appears in the application window:
The table displays all units along with their description and number of places after the decimal
point.
114
4.
Select the unit in the table for which you want to change the number of places after the
decimal point.
5.
Click the
button.
Endress +Hauser
SupplyCare Enterprise SCE30B
11 Managing master data
6.
The tab is displayed in edit mode in the lower part of the window.
7.
Enter the desired number in the Decimal places field.
8.
Click
11.8.2
to save your entries. Click
to abort the process.
Managing customer-specific units
Notice!
• Only people whose user role is configured as System administrator or Local system
administrator, with the additional role of Master data, can create customer specific units.
• Customer specific units are used for display purposes only and are not translated or converted.
In the "Customer specific unit" tab, you can create and delete customer specific units. Customerspecific units are automatically assigned to the "Customer-specific" unit type.
The
button in the table header opens a context menu. Via this context menu, you can show
and hide the "Unit type" column in the overview table.
Customer-specific units can be assigned in SupplyCare at the following points:
• Configuration → Unit → "Details" tab
• System administration → Gateway configuration → Measuring point details →
"Engineering unit (for application)" field
• Configuration → Tank → "Tank details" tab → "Unit" field.
Endress+Hauser
1.
Click the Configuration menu in the Navigation window.
2.
Click the Unit menu item.
3.
Select the Customer specific unit tab.
4.
The following view is displayed in the Application window:
5.
Click the
6.
The tab is displayed in the edit mode.
7.
Enter the customer-specific unit in the Unit field.
8.
Enter a description in the Description field.
9.
Click
button.
to save your entries. Click
to abort the process.
115
11 Managing master data
SupplyCare Enterprise SCE30B
11.8.3
Deleting a customer-specific unit
you can delete a customer-specific unit if the button
tab.
is displayed in the "Customer specific unit"
The customer-specific unit must meet the following requirements before you can delete the unit:
• It must be a customer-specific unit.
• The unit is not assigned to any tank as a unit.
• The unit is not assigned to any measuring point ("Measuring point details" tab, "Engineering unit
(for application)" field).
1.
Click the Configuration menu in the Navigation window.
2.
Click the Unit menu item.
3.
Select the Customer specific unit tab.
4.
In the overview table, select the customer-specific unit you wish to delete.
5.
Click the
6.
The prompt "Do you really want to delete?" is displayed.
7.
Click OK to delete the entry. Click Cancel to abort the process.
11.9
button.
Managing a report
Notice!
• Only people whose user role is configured as Master Data can set up, change or delete reports.
• To use automatic data exchange in CIDX format, a server to receive the files must be set up on
the receiver side. The URL, user name and password of the receiver side must be known.
• You can schedule up to five reports.
116
1.
Click the Configuration menu in the Navigation window.
2.
Click the Report menu item.
3.
The following detail view is displayed in the Application window:
Endress +Hauser
SupplyCare Enterprise SCE30B
Format CIDX and CSV
11 Managing master data
The generated CIDX and CSV files have the following format:
<report.name>_<timestamp "yyyyMMdd_HHmmss">.<suffix>
Example: report1_20100505_1634031.xml
CIDX: The CIDX format used is "InventoryActualUsage, Version 4".
The CSV files have the following structure:
Validate CIDX
Tank
name
Time stamp
Value
Tank 1
12.06.2009 17:20 920.0
Unit
Optimum
Plan point
Ship point
Safety stock
l
1000
100
80
50
Once you have assigned the tanks to the report, validation is performed to check whether the
configuration complies with CIDX specifications. The following checks are performed:
•
•
•
•
•
•
•
•
•
•
Is a supplier assigned to the tank?
Is a buyer assigned to the tank?
Is a location assigned to the tank?
Is a product assigned to the tank?
Is a company assigned to the location?
Is an identifier and identifier agency set for the buyer?
Is an identifier and identifier agency set for the supplier?
Is an identifier and identifier agency set for the product?
Is an identifier and identifier agency set for the company of the location?
Is a measuring point assigned to the tank?
11.9.1
Creating a report
Using the Report Wizard, you can create a report in six simple steps. You can use different report
templates.
Endress+Hauser
1.
Click the Configuration menu in the Navigation window.
2.
Click the Report menu item.
3.
In the lower section of the Application window, select the General report information tab.
4.
Click the Create new report button. The General report information dialog box appears:
117
11 Managing master data
118
SupplyCare Enterprise SCE30B
5.
Here, you can enter general data on the report such as:
– Name (obligatory): unique identifier
– Description: you can enter a multiline description here.
– Select a template: select the template for the report here.
6.
Click the Next button. The Column selection dialog box is displayed:
7.
Here you can select the information (columns) which should be analyzed in the report.
– Available columns: this lists all the columns that can be analyzed in the report. If you want
to add a column, enable the check box for the corresponding column and click the
button. If you want to select all the columns, enable the uppermost check box beside the
columns.
– Assigned columns: this lists all the columns that are analyzed in the report. If you want to
remove a column, enable the check box for the corresponding column and click the
button. If you want to select all the columns, enable the uppermost check box beside the
columns.
If you want to change the order of the columns, select the corresponding column and click
the
or
button.
– Include secondary values: the secondary values are also displayed.
– Add column names as headers: the column names are used as headers.
– Header language: choice of language for the column names in the header of the report.
The language from your user preferences is used as the default language. If no language is
selected in the user preferences, the column names are in English.
8.
Click the Next button. The Tank assignment dialog box is displayed:
Endress +Hauser
SupplyCare Enterprise SCE30B
11 Managing master data
9.
By means of the table, you can activate the check boxes to assign the corresponding tanks to
this report.
10. Click the Next button. For CIDX and CSV reports, validation is performed to check whether
the configuration complies with the specifications. The Format selection dialog box is
displayed:
11. You can select how the report is output here.
– XLS: Excel file
– CSV: CSV file
– XML: XML file
– PDF: PDF file
– TXT: text file
12. Click the Finish button to finish the report.
13. Click the Next button to go to the channel configuration. The Channel configuration dialog
box is displayed:
14. Select the distribution channel for the Channel field.
Endress+Hauser
119
11 Managing master data
SupplyCare Enterprise SCE30B
15. Depending on the distribution channel selected, additional fields are displayed in the tab.
a)
Distributed by Directory
– Enter the path which is accessible for SupplyCare and where you want to save the report.
b)
Distributed by HTTP
Enter the following data here:
– URL (obligatory): website of the selected channel
– User name
– Password
– Use proxy
c)
Distributed by e-mail
– Click the
selected.
120
button to select a user. Click the
button to remove a user who has been
Endress +Hauser
SupplyCare Enterprise SCE30B
11 Managing master data
d)
Distributed by FTP
Enter the following data here:
– URL (obligatory): website of the selected channel
– User name
– Password
– Use proxy
Notice!
You can also use the FTP channel for transmission via secure FTP (FTPS).
Endress+Hauser
121
11 Managing master data
SupplyCare Enterprise SCE30B
16. Click the Finish button to finish the report. Click the Next button to go to scheduling. The
Scheduling dialog box is displayed:
17. Here, you can enter data on the scheduling such as:
– Enable scheduling: the scheduling rule is enabled immediately as soon as the report has
been completed.
– Time zone
– Repetition rule: you can select a rule here.
Daily: possible to schedule by time or frequency.
Weekly on every...: possible to select the specific days and schedule by time or frequency.
Monthly on specified date: possible to schedule the start date and time for creating the
report every month.
Monthly on last day of month: performed on the last day of the month. Possible to
schedule the time for creating the report every month.
The days on which a scheduling rule is executed are highlighted in color in the calendar. You
can scroll through the calendar on a month-by-month basis.
18. Click the Finish button to finish the report.
122
Endress +Hauser
SupplyCare Enterprise SCE30B
11 Managing master data
11.9.2
Downloading the report as a PDF file
You can download a report as a PDF file and save it in your file system.
1.
Click the Configuration menu in the Navigation window.
2.
Click the Report menu.
3.
Select the report in the upper section of the Application window.
4.
In the lower section of the Application window, select the General report information tab.
5.
Click the
6.
As soon as the report is finished, the File download dialog box is displayed.
7.
Click the Open button to view the report immediately. Click the Save button to save the
report in your file system. Click Cancel to abort the process.
11.9.3
button.
Creating reports and sending them immediately
Irrespective of the scheduling rules, you can create a report any time and send the report to the
recipients as defined in the channel configuration. The scheduling rules remain unchanged.
Notice!
Only messages with the status 0 are taken into consideration in CIDX and CSV-type reports.
1.
Click the Configuration menu in the Navigation window.
2.
Click the Report menu.
3.
Select the report in the upper section of the Application window.
4.
In the lower section of the Application window, select the General report tab.
5.
Click the
6.
The report is created in the background and sent to the recipients. You receive a notification
message to this effect.
7.
Click Ok to confirm the notification message.
11.9.4
button.
Changing a report
→ See Page 27, Chapter 3.6.5.
11.9.5
Deleting a report
→ See Page 30, Chapter 3.6.8.
11.9.6
Copying a report
→ See Page 31, Chapter 3.6.9.
Endress+Hauser
123
12 System administration
SupplyCare Enterprise SCE30B
12
System administration
12.1
Changing system properties
Notice!
• People whose user role is configured as System administrator can edit system properties.
• The parameters (keys) may only be changed within the permitted range (see Page 125
"Table: Parameters (keys) and input range").
12.1.1
Changing system properties
1.
In the Navigation window, click on the System administration menu.
2.
Click the System Properties menu item.
3.
Select the System properties tab.
4.
The following view is displayed in the Application window:
5.
In the overview table, select the parameter (key) that you wish to change.
6.
In the lower area, click the
7.
The tab is displayed in the edit mode.
8.
Carry out your changes for the Value field.
9.
Click
button.
to save your entries. Click
to abort the process.
Notice!
Click the
button to export the System properties table as an Excel file. Click the
to export the System properties table as a PDF file.
124
button
Endress +Hauser
SupplyCare Enterprise SCE30B
12 System administration
12.1.2
Parameters (keys) and input range table.
This section describes all the keys displayed in the "System properties" tab.
Key
Description
adiadobasedon.default
This value corresponds to the "ADI/ADO based on" field (Configuration →
Tank → Tank details / Configuration → Aggregated tank → Tank details /
System administration → Gateway configuration → Tank details).
In the case of standard tanks, the value entered here is used to calculate the
"Average daily outflow" value.
In the case of recycling tanks, the value entered here is used to calculate the
"Average daily inflow" value. These average values are used to calculate the
forecast values in the "Inventory chart" tab in the "Tank" and "Event" menu
items and the value in the "DSST (days until the safety stock is reached)"
column in the overview table in the "Tank" menu point.
Selection
• 2 days, 7 days, 14 days, 30 days or 90 days
Factory setting
• 14
analysis.charthourly.period
This value corresponds to the "Period selection" field (Workplace → Analysis
→ chart (hourly). The charts (hourly) are displayed for the period configured
here.
Selection
• 1 day, 2 days, 3 days, 4 days, 5 days, 6 days or 7 days
Factory setting
• 1 day
cm.dailyScanAmount.digit.Codes
For the communication variant "E-mail", you have the option to monitor the
number of incoming e-mails with measured values. The number must be
within a specified range. The count includes only the e-mails that have a valid
three-digit number code in the subject line. This parameter specifies which
codes are included in the count. As standard, the code "005" is specified for
Endress+Hauser gateways (see Page 150).
Factory setting
• 005
cm.dailyScanAmount. interval
This parameter defines the default value for the "Interval [h]" field in the
"Gateway configuration" menu item for the "E-mail" communication variant
when creating a new gateway (see Page 150).
Selection
• - - (no monitoring), 1 h, 6 h, 12 h or 24 h
Factory setting
• empty
cm.dailyScanAmount
This parameter specifies the standard value for the "Number of e-mails per
interval [h]" in the "Gateway configuration" menu item for the "E-mail"
communication version when a gateway is newly created (see Page 150).
Input range
• 0...2147483647
Factory setting
• empty
cm.dailyScanAmount.tolerance
This parameter specifies the standard value for the "Tolerance before warning"
field in the "Gateway configuration" menu item for the "E-mail"
communication version
when a gateway is newly created (see Page 150).
Input range
• 0 to 2147483647 (integer)
Factory setting
• empty
Endress+Hauser
125
12 System administration
SupplyCare Enterprise SCE30B
Key
Description
cm.mail.host
Host address of the e-mail server to retrieve the gateway e-mails from the
server. This parameter corresponds to the "Host name" field in the "Outgoing"
tab in the "E-mail connection" menu item in the "System administration"
menu.
Factory setting
• empty
cm.mail.intervall
Interval in minutes between gateway e-mail retrieval from the server.
This parameter corresponds to the "Interval" field in the "Outgoing" tab in the
"E-mail connection" menu item in the "System administration" menu.
Input range
• 1 to 2147483647 (integer)
Factory setting
• 5
cm.mail.local.mailExtension
This file name extension is assigned to e-mails on the local clipboard.
Factory setting
• msg
cm.mail.local.store
Directory for local temporary storage of e-mails
Factory setting
• {SupplyCareInstallDir}\data\localMailStore
cm.mail.max.size.KB
Maximum size of the gateway e-mail in kilobyte that can be processed by
SupplyCare
Factory setting
• 1000
cm.mail.password
Password for the e-mail account to retrieve the gateway e-mails from the
server.
This parameter corresponds to the "Password" field in the "Outgoing" tab in
the "E-mail connection" menu item in the "System administration" menu.
User entry
• Text e.g. sce
Factory setting
• empty
cm.mail.timeout
Timeout period for establishing connection to POP3 server
Factory setting
• 30 (minutes)
cm.mail.user
User name for the e-mail account to retrieve the gateway e-mails from the
server.
This parameter corresponds to the "User name" field in the "Outgoing" tab in
the "E-mail connection" menu item in the "System administration" menu.
User entry
• Text e.g. sce
cm.newGateway.name
Determines what part and what element is used for the name of a new
gateway.
Possible values are:
• Tag (the name is formed from the tag of the gateway)
• ID (the name is formed from the unique ID of the gateway)
• Combined (the name is a combination
of the tag and unique ID)
User entry
Tag, ID, Combined
Factory setting
• id
126
Endress +Hauser
SupplyCare Enterprise SCE30B
12 System administration
Key
Description
cm.newGateway.store
Directory in which messages from new gateways are stored. The directories
are created where necessary provided sufficient authorization is available to
create directories.
User entry
Any valid path name
Factory setting
• {SupplyCareInstallDir}\data\newGateways
cm.telefon.dipatcherIntervall
Interval in ms in which the system checks whether a telephone connection
has to be worked through.
Input range
• 1 to 9223372036854775807 (whole numbers); useful values: 100 to 1000
Factory setting
• 500
cm.telefon.phoneBook.1
Windows telephone book entry which can be used.
This parameter is needed for the Phone communication version.
User entry
• Text e.g. GW Connection 1
cm.telefon.phoneBook.2
Windows telephone book entry which can be used (needed for connecting by
phone)
User entry
• Text e.g. GW Connection 2
cm.telefon.phoneBook.3
Windows telephone book entry which can be used.
This parameter is needed for the Phone communication version.
User entry
• Text e.g. GW Connection 3
cm.telefon.phoneBook.4
Windows telephone book entry which can be used.
This parameter is needed for the Phone communication version.
User entry
• Text e.g. GW Connection 4
cm.telefon.phoneBook.5
Windows telephone book entry which can be used.
This parameter is needed for the Phone communication version.
User entry
• Text e.g. GW Connection 5
cm.telefon.dispatch.remote.root
Local path on the SupplyCare telephone server to the main sender directory
cm.telefon.dispatch.root
Main directory for all telephone folders
Factory setting
• {SupplyCareInstallDir}\data\telefon
cm.telefon.rasdialExe
Path of the rasdial.exe Windows file.
This parameter is required for the "Telephone" communication version.
User entry
• Text
Factory setting
• C:\WINDOWS\system32\rasdial.exe
cm.telefon.retries
Number of attempts to establish a phone connection if a line is/was busy. If
the value is exceeded, an alarm is triggered. This parameter corresponds to the
"Number of retries" field in the "Gateway configuration" menu item for the
"Telephone" communication version.
Input range
• 0 to 2147483647 (integer)
Factory setting
• 5
Endress+Hauser
127
12 System administration
SupplyCare Enterprise SCE30B
Key
Description
cm.telefon.retry.intervall
Interval in ms between the attempts to establish a telephone connection. This
parameter corresponds to the "Retry interval" field in the "Gateway
configuration" menu item for the "Telephone" communication version.
Input range
• 1 to 2147483647 (integer)
Factory setting
• 30000
instrument.configuration.store
Directory for local storage of OPC configuration file
Factory setting
• {SupplyCareInstallDir}\data\InstrumentConfigurationStore
fis.default.password
User password
fis.default.user
FIS user with which SupplyCare accesses the FIS gateway
forecastbasedon.default
This value corresponds to the "Forecast base on" field (Configuration → Tank
→ Tank details / Configuration → Aggregated tank → Tank details / System
administration → Gateway configuration → Tank details).
In the case of standard tanks, the value entered here is used to calculate the
"Average daily outflow" value.
In the case of recycling tanks, the value entered here is used to calculate the
"Average daily inflow" value. These average values are used to calculate the
forecast values in the "Inventory chart" tab in the "Tank" and "Event" menu
items and the value in the "DSST (days until the safety stock is reached)"
column in the overview table in the "Tank" menu point.
Selection
• 2 days, 7 days, 14 days, 30 days or 90 days
Factory setting
• 14
google.api.clientid
This parameter shall only be used if a customer wants to use their self purchased client ID from the "Google Enterprise Support". A prerequisite to get a
client ID is an application with the "Google Maps API Premier". All client IDs
start with the prefix "gme" which does not have to be entered in SupplyCare
because it is already consigned. If left empty then the Customer can apply for
the use of the Endress+Hauser OEM client ID within the terms described in
Page 78.
Factory setting
empty
google.geocode.proxy.address
Proxy URL for accessing the Geocoding Web Service
google.geocode.proxy.port
Proxy port for accessing the Geocoding Web Service
google.map.activated
Activate "Map" menu item.
Selection
• "true" or "false"
Factory setting
• true
gui.chart.filter.max.measurements
Maximum number of displayed values in the inventory chart.
Input range
• 1 to (integer)
Factory setting
• 1500
gui.chart.scaling
Selection of the kind of scaling used for the display in the Inventory Chart.
Selection
• "Min/Max" or "Auto": "Min/Max" displays the inventory between "0" and
"Capacity". "Auto" displays the inventory between the smallest and largest
displayable value - including forecast values.
Factory setting
• Min/Max
128
Endress +Hauser
SupplyCare Enterprise SCE30B
12 System administration
Key
Description
gui.chart.pdamount
Choose whether the planned quantity of a delivery/disposal is included for the
forecast in the "Inventory Chart" tab.
Selection
• "Exclude" or "Include"
Factory setting
• "Exclude"
gui.chart.period.default
This value corresponds to the "Period selection" field (Workplace → Tank →
Inventory chart / Workplace → Event → Inventory chart). The inventory
charts are displayed for the period configured here.
Selection
• 2 days, 7 days, 14 days, 30 days or 90 days
Factory setting
• 7
gui.template
Selection of template type that is displayed on the user interface. The
functionality of the two possible template types is exactly the same. Depending
on your selection, the descriptions in the menu, in" Overview" and in
"Detailed view" change as well as the symbols and tool tips.
Selction
• "Tank" or "Object"
Factory setting
• Tank
notesAndFiles.recordselection.default
Select whether or not the data or notes entered are to be displayed in the
"Notes and files" tab (Workplace → Tank → Notes and files) as standard.
Selection
• "data" or "notes"
Factory setting
• data
notesAndFiles.tmp
Directory for temporary storage of the files
Factory setting
• {SuppyCareInstallDir}\data\supplycaretemp
product.unit.default
Default product unit
User entry
• Unit
Factory setting
• L
product.unit.default.density.unitmass
Default mass unit
User entry
• Mass unit
Factory setting
• kg
product.unit.default.density.unitvolume
Default volume unit
User entry
• Unit volume
Factory setting
L
product.unit.default.density.value
Default density value
User entry
• 1.40239846E-45f to 3.40282347E+38f
Factory setting
• 1
Endress+Hauser
129
12 System administration
SupplyCare Enterprise SCE30B
Key
Description
report.cidxIncludeNamespace
Indicates whether name spaces are used in the CIDX-XMLs. This key is used
for generation of CIDX reports.
Selection
• "true" or "false"
Factory setting
• true
report.enable.max
Maximal number of reports that can be scheduled.
Factory setting
• 5
reportGroupTempMailPath
Directory for local temporary storage of e-mail reports
Factory setting
• {SupplyCareInstallDir}\data\reports\mail\
reportGroupTempPrintPreviewPath
Directory for local temporary storage of "Print report as PDF" files
Factory setting
• {SupplyCareInstallDir}\data\reports\preview\
schedular.alarm.delete.open
Switch allowing open alarms to also be deleted via the GarbageCollectorJob.
Selection
• "true" or "false"
Factory setting
• false
scheduler.alarm.retention.time
Time in days during which alarms which are not open are retained in the
database.
User entry
• 1 to 2147483647 (integer)
Factory setting
• 10
scheduler.default.retries
Indicates how often a failed job is restarted if no other value is set for the job
User entry
• 1 to 2147483647 (integer)
Factory setting
• 150
scheduler.default.retryIntervall
Indicates the interval after which a failed job is restarted if no other value is set
for the job
User entry
• 1 to 2147483647 (integer)
Factory setting
• 600000 (ms)
schedular.job.ReportGenerator
ConnectionTimeoutMillis
Connection timeout period for sending of HTTP reports
scheduler.measurement.retention.time
Time in days during which old measured values are retained in the database.
Older measured values and also older dates for disposals and deliveries are
deleted.
Factory setting
• 5000 (ms)
User entry
• 1 to 2147483647 (integer)
Factory setting
• 90
scheduler.scan.tolerance
Time specified in ms. A scheduled gateway query may be delayed for this
period of time. If the time limit is exceeded, an alarm is triggered.
User entry
• 1 to 9223372036854775807 (integer)
Factory setting
• 300000
130
Endress +Hauser
SupplyCare Enterprise SCE30B
12 System administration
Key
Description
server.adminEmail
E-mail address of the administrator. All the system e-mails, such as alarms,
new e-mail gateways found etc. are sent to this address. This parameter
corresponds to the "Admin E-mail" field in the "Incoming" tab in the "E-mail
connection" menu item.
User entry
• Every valid e-mail address.
server.smtpHost
Host address of the e-mail server that sends e-mails when events occur, for
example. This parameter corresponds to the "Host name" field in the
"Incoming" tab in the "E-mail connection" menu item.
User entry
• Text e.g. localhost
Factory setting
• localhost
server.smtpPassword
Password for the e-mail account for sending e-mails, e.g. when events occur.
This parameter corresponds to the "Password" field in the "Incoming" tab in
the "E-mail connection" menu item.
User entry
• Text e.g. myPassword
server.smtpPort
Port of the e-mail server for sending e-mails, e.g. when events occur.
This parameter corresponds to the "E-mail server port" field in the "Incoming"
tab in the "E-mail connection" menu item.
Input range
• 0...65535
Factory setting
• 25
server.smtpUser
User name for the e-mail account for sending e-mails, e.g. when events occur.
This parameter corresponds to the "User name" field in the "Incoming" tab in
the "E-mail connection" menu item.
User entry
• A text, e.g. myUserName
server.throttleEmailToAdmin
To avoid multiple mail dispatch to the administrator, the e-mails are grouped
and then sent to the administrator. This value indicates the interval, in ms, in
which the e-mails are sent.
Input range
• 1 to 9223372036854775807 (integer)
Factory setting
• 300000 (ms)
system.proxy.address
Standard value for the "Proxy address" field in the "Gateway configuration"
menu item for the "HTTP" communication version.
User entry
• A text, e.g. proxy.mycompany.com
system.proxy.password
Standard value for the "Proxy password" field in the "Gateway configuration"
menu item for the "HTTP" communication version.
User entry
• A text, e.g. proxyUserPassword
system.proxy.port
Standard value for the "Proxy port" field in the "Gateway configuration" menu
item for the "HTTP" communication version.
Input range
• 0...65535
Factory setting
• empty
system.proxy.used
Standard value for the "Is using a proxy" field in the "Gateway configuration"
menu item for the "HTTP" communication version.
User entry
• TRUE/FALSE (not case-sensitive)
Factory setting
• FALSE
Endress+Hauser
131
12 System administration
SupplyCare Enterprise SCE30B
Key
Description
system.proxy.user
Standard value for the "Proxy user" field in the "Gateway configuration" menu
item for the "HTTP" communication version.
User entry
• A text e.g. proxyUserName
workplace.secondary.default
Select whether or not the secondary values for "Workplace – Tank" are to be
shown in addition to the primary value, as standard.
Selection
• "hide" or "show"
Factory setting
• hide
12.2
Configuring services (basic jobs)
Notice!
Only people with System administrator configured as their user role can configure services
running in the background (basic jobs).
132
1.
In the Navigation window, click the System administration menu.
2.
Click the System Properties menu item.
3.
Click the Basic Jobs tab.
4.
The following view is displayed in the Application window:
5.
Click the
6.
The tab is displayed in the edit mode.
7.
The time interval for the following services can be changed here:
– Check if all HTTP connections have been performed: interval after which the system
checks whether the gateway scans have been performed.
Factory setting: 86400 (seconds); input range: 1800 to 86400 (seconds)
– Check all events for resubmission: interval after which the system checks whether the
resubmission date for an event has been reached.
Factory setting: 300 (seconds); input range: 300 to 86400 (seconds)
– Check all measurements for errors: interval after which the system checks whether a
gateway, a measuring device or a measuring point has an error status.
Factory setting: 600 (seconds); input range: 600 to 86400 (seconds)
– Run garbage collector job: interval after which a garbage collector job is performed.
Factory setting: daily
– Check number of incoming measure values: interval after which the number of
incoming gateway e-mails is checked. This test checks the function of the gateways.
In this case, a check is carried out to establish how many e-mails have arrived. The number
has to be within the given tolerance. If the number is off the given tolerance, the status is et
to "no measured data" and the appropriate icon is shown in the tank overview (workplace
button.
Endress +Hauser
SupplyCare Enterprise SCE30B
12 System administration
–
–
–
–
–
8.
"Tank"). If there is no tolerance with the following test job i.e. normally the other day, the
status is reset to OK .
Factory setting: hourly (see Page 150)
Calculation of forecast data (read only)
The appropriate service is activated or deactivated by the Enabled check box.
In the Interval field, enter the interval in seconds.
The Start time fields are used to specify when the service is started for the first time.
The corresponding service is started immediately, e.g. for test purposes, with the
button.
Click
12.3
to save your entries. Click
to abort the process.
Configuring database backup
Notice!
Only people whose user role is configured as System administrator can configure the database
backup.
1.
Click the System administration menu in the Navigation window.
2.
Click the System properties menu item.
3.
Click the Database backup tab.
4.
The following detail view is displayed in the Application window:
5.
Click the
6.
The tab is displayed in the edit mode.
7.
The specifications of the database backup can be entered here:
– Database backup location(obligatory) : storage location for data backup
The name of the zip file with the database backup is SUPPLYCARE_DB_BACKUP_n (n: 0,
1, etc.)
– Database backup interval (obligatory): storage interval in days for the backup
– Start date (obligatory): day and time of first backup. Any subsequent backups are saved at the
specified time following the specified interval.
– State: indicates whether the database backup is active or inactive.
– With the
button the backup is started immediately.
8.
Click
button.
to save your entries. Click
to abort the process.
Reimporting the database backup
Endress+Hauser
1.
End the SupplyCareEnterprise service under Control Panel - Administrative Tools Services.
2.
Delete or back up the supplycare folder in the {SupplyCareInstallDir} \data\database
directory.
3.
Unpack the zip file of the database backup SUPPLYCARE_DB_BACKUP_n. zip.
133
12 System administration
SupplyCare Enterprise SCE30B
4.
Copy the supplycare folder from the database backup to the
{SupplyCareInstallDir}\data\database directory.
5.
Start the SupplyCareEnterprise service.
6.
Start the SupplyCare Enterprise SCE30B application.
7.
The login window appears.
8.
Enter your Login Name (user name) and your password.
12.4
Configuring the splash screen and information window
(UI Customizing)
Notice!
• Only people whose role is configured as System administrator or Local system administrator
can configure splash screen, information window (navigation window), header image and login
image.
• The graphic formats jpg, png, gif and bmp are supported.
• You can enter a maximum of 50 characters per text box.
134
1.
In the Navigation window, click the System administration menu.
2.
Click the System Properties menu item.
3.
Select the UI Customizing tab.
4.
The following view is displayed in the Application window:
5.
Click the
6.
Configure the splash screen as follows:
– Select splash screen image: Select a graphic in your directory using the Search button.
Upload the graphic via the Upload button.
– Splash screen headline: Enter text. If a graphic was uploaded, the text "Welcome to
SupplyCare" is displayed by default.
7.
Configure the information window as follows:
– Select navigation image: Select a graphic in your directory using the Search button.
Upload the graphic using the Upload button.
– Company name: Enter the company name, for example. The text is displayed in bold.
– Additional text 1 to 5: Enter additional information.
8.
Configure the header image as follows:
button.
Endress +Hauser
SupplyCare Enterprise SCE30B
12 System administration
– Select header image: Select a graphic in your directory using the Search button. Upload
the graphic via the Upload button.
9.
Configure the login image as follows:
– Select login image: Select a graphic in your directory using the Search button. Upload the
graphic via the Upload button.
10. Click
12.5
to save your entries. Click
to abort the process.
Modules
Notice!
Modules can only be configured via the licensce key (KEY).
SupplyCare is modular in design. The "Modules" tab provides an overview of your available modules.
Notice!
Depending on the modules activated, the menu items and contents of "Overview" and of "Detailed
view" can differ as can the contents of the dialog windows.
1.
In the Navigation window, click the System administration menu.
2.
Click the System properties menu item.
3.
Select the Modules tab.
4.
The following appears in the Application window:
Activated modules are displayed with a green button, deactivated modules with a red.
12.6
Defining notification
Notice!
Only people whose role is configured as System administrator or Local system administrator
can define and edit notifications.
12.6.1
Defining and editing event notification
In the "Event notification" tab, you can specify the subject line and the event notification text for
event notifications.
Endress+Hauser
1.
In the Navigation Window, click the System administration menu.
2.
Click the Notifications menu item.
135
12 System administration
SupplyCare Enterprise SCE30B
3.
The following view is displayed in the Application window:
4.
Click the
5.
The tab is displayed in the edit mode.
6.
Click the relevant button for the desired subject line or select the Subject (Custom) radio
button to define the subject yourself.
7.
Click the button
8.
In the Subject (Custom) field, enter the number of the variable from the legend along with
the curly brackets and individual text if needed. You can enter multiple variables, e.g.:
9.
Click the
button.
to display the Available variables legend:
button to close the Available variables legend.
10. Select the desired event from the Event picklist.
11. The Language picklist can be edited as soon as the event has been selected.
12. Select the desired language from the Language picklist.
136
Endress +Hauser
SupplyCare Enterprise SCE30B
12 System administration
13. The standard text template appears as soon as the language has been selected:
14. Click the
button above the text box if you want to change the text in the box. The text
box appears in the editing mode:
Notice!
You can enter a maximum of 500 characters in the text box. The difference between the maximum
number of characters and the number of characters already used is indicated under the text box.
15. Click the
button above the text box to display the Available variables legend.
16. Edit the text box: enter the number of the variable from the legend along with the curly
brackets and individual text if needed. You can enter multiple variables.
Endress+Hauser
17. Click the
button to close the Available variables legend.
18. Click the
Show preview button to see a preview of the text of the event notification:
19. Click the
button to close the preview window.
137
12 System administration
SupplyCare Enterprise SCE30B
20. If necessary, click the
the default template.
Reload default template button to discard the changes and load
21. Click
to save your entries in the text box. Click
22. Click
to save your entries in the "Event notification" tab. Click
12.6.2
to abort the process.
to abort the process.
Defining and editing freeze event notification
(Freeze event notification)
Notice!
Only people whose role is configured as System administrator or Local system administrator
can define and edit contract-specific freeze event notifications.
In the "Freeze event notification" tab, you can specify the subject line and the event notification text
for the contract for which you are logged in.
138
1.
In the Navigation Window, click the System administration menu.
2.
Click the Notifications menu item.
3.
Click the Freeze event notification tab.
4.
The following view is displayed in the Application window:
5.
Click the
6.
The tab is displayed in the edit mode.
7.
Click the relevant button for the desired subject line or select the Subject (Custom) radio
button to define the subject yourself.
8.
Click the button
button.
to display the Available variables legend:
Endress +Hauser
SupplyCare Enterprise SCE30B
12 System administration
9.
In the Subject (Custom) field, enter the number of the variable from the legend along with
the curly brackets and individual text if needed. You can enter multiple variables.
e.g.:
10. Click the
button to close the Available variables legend.
11. Select the desired limit from the Limit picklist.
12. The Language picklist can be edited as soon as the limit has been selected.
13. Select the desired language from the Language picklist.
14. The standard text template appears as soon as the language has been selected:
Endress+Hauser
139
12 System administration
SupplyCare Enterprise SCE30B
15. Click the
button above the text box if you want to change the text in the box. The text
box appears in the editing mode:
Notice!
You can enter a maximum of 500 characters in the text box. The difference between the maximum
number of characters and the number of characters already used is indicated under the text box.
16. Click the
button above the text box to display the Available variables legend.
17. Edit the text box: enter the number of the variable from the legend along with the curly
brackets and individual text if needed. You can enter multiple variables.
18. Click the
button to close the Available variables legend.
19. Click the
Show preview button to see a preview of the text of the event notification:
20. Click the
button to close the preview window.
21. If necessary, click the
the default template.
Reload default template button to discard the changes and load
22. Click
to save your entries in the text box. Click
23. Click
process.
to save your entries in the Freeze event notification tab. Click
12.6.3
to abort the process.
to abort the
Defining and editing limit notification
In the "Limit notification" tab, you can specify the subject line and the limit notification text for limit
notifications.
140
1.
In the Navigation window, click the System administration menu.
2.
Click the Notifications menu item.
3.
Click the Limit notification tab.
Endress +Hauser
SupplyCare Enterprise SCE30B
12 System administration
4.
The following view is displayed in the Application Window:
5.
Click the
6.
The tab is displayed in the edit mode.
7.
The radio button of the Subject (Default) subject line is preselected. Accept the preselection
or click the Subject (Custom) radio button to define the subject yourself.
8.
Click the
9.
In the Subject (Custom) field, enter the number of the variable from the legend along with
the curly brackets and individual text if needed. You can enter multiple variables.
e.g.:
10. Click the
button.
button to display the Available variables legend:
button to close the Available variables legend.
11. Select the desired limit from the Limit picklist.
12. The Language picklist can be edited as soon as the limit has been selected.
13. Select the desired language from the Language picklist.
Endress+Hauser
141
12 System administration
SupplyCare Enterprise SCE30B
14. The standard text template appears as soon as the language has been selected:
15. Click the
button above the text box if you want to change the text in the box. The text
box appears in the editing mode:
Notice!
You can enter a maximum of 500 characters in the text box. The difference between the maximum
number of characters and the number of characters already used is indicated under the text box.
16. Click the
button above the text box to display the Available variables legend.
17. Edit the text box: enter the number of the variable from the legend along with the curly
brackets and individual text if needed. You can enter multiple variables.
18. Click the
button to close the Available variables legend.
19. Click the
Show preview button to see a preview of the text of the limit notification:
20. Click the
button to close the preview window.
21. If necessary, click the
the default template.
142
Reload default template button to discard the changes and load
22. Click
to save your entries in the text box. Click
23. Click
to save your entries in the "Limit notification" tab. Click
to abort the process.
to abort the process.
Endress +Hauser
SupplyCare Enterprise SCE30B
12 System administration
12.6.4
Defining and editing PDL/PDE notification
In the "PDL/PDE notification" tab, you can specify the subject line and the PDL/PDE notification
text for PDL/PDE notifications.
Endress+Hauser
1.
In the Navigation window, click the System administration menu.
2.
Click the Notifications menu item.
3.
Click the PDL/PDE notification tab.
4.
The following view is displayed in the Application Window:
5.
Click the
6.
The tab is displayed in the edit mode.
7.
The radio button of the Subject (Default) subject line is preselected. Accept the preselection
or click the Subject (Custom) radio button to define the subject yourself.
8.
Click the
9.
In the Subject (Custom) field, enter the number of the variable from the legend along with
the curly brackets and individual text if needed. You can enter multiple variables, e.g.:
button.
button to display the Available variables legend:
143
12 System administration
SupplyCare Enterprise SCE30B
10. Click the
button to close the Available variables legend.
11. Select the desired PDL/PDE from the PDL/PDE picklist.
12. The Language picklist can be edited as soon as the PDL/PDE has been selected.
13. Select the desired language from the Language picklist.
14. The standard text template appears as soon as the language has been selected:
15. Click the
button above the text box if you want to change the text in the box. The text
box appears in the editing mode:
Notice!
You can enter a maximum of 500 characters in the text box. The difference between the maximum
number of characters and the number of characters already used is indicated under the text box.
16. Click the
button above the text box to display the Available variables legend.
17. Edit the text box: enter the number of the variable from the legend along with the curly
brackets and individual text if needed. You can enter multiple variables.
144
18. Click the
button to close the Available variables legend.
19. Click the
Show preview button to see a preview of the text of the PDL/PDE notification:
Endress +Hauser
SupplyCare Enterprise SCE30B
12 System administration
20. Click the
button to close the preview window.
21. If necessary, click the
the default template.
Reload default template button to discard the changes and load
22. Click
to save your entries in the text box. Click
23. Click
process.
to save your entries in the "PDL/PDE notification" tab. Click
12.7
to abort the process.
to abort the
Set up an e-mail connection
Notice!
Only people whose user role is configured as System administrator can set up e-mail connections.
You can use this menu item to set up the e-mail connection for incoming and outgoing e-mails
under SupplyCare.
The Outgoing e-mail connection is used to send events by mail to the user in question.
The Incoming e-mail connection is used to collect e-mails from the gateways.
Endress+Hauser
1.
Click the System administration menu in the Navigation window.
2.
Click the E-mail connection menu item.
3.
The following view is displayed in the Application window:
4.
Select the Outgoing tab. Here you configure the e-mail connection to an e-mail server for
outgoing e-mails from SupplyCare.
5.
Click the
6.
The Outgoing tab is displayed in the edit mode.
7.
Here, enter the corresponding data for the e-mail connection for the outgoing e-mails, such as:
– E-Mail Server (obligatory)
– E-Mail Server Port (obligatory)
– E-Mail address of sender (obligatory)
button.
145
12 System administration
SupplyCare Enterprise SCE30B
– User Name
– Password
– Admin E-Mail (obligatory): Alarm messages are sent to this e-mail address. Refer also to
Page 167.
8.
Click
to save your entries. Click
9.
Select the Incoming tab. Here you configure the e-mail connection to an e-mail server from
which the gateway e-mails are collected.
10. Click the
to abort the process.
button.
11. The Incoming tab is displayed in the edit mode.
12. The relevant data for the e-mail connection for incoming e-mails
are entered here:
– E-Mail Server (obligatory)
– User Name (obligatory)
– Password (obligatory)
– Interval (in minutes) (obligatory)
13. Activate the Enabled check box.
14. Click
to save your entries. Click
to abort the process.
15. Click Test.
16. If the e-mail connection has been set up correctly, the message "The connection test was
successful" is displayed.
17. The e-mail server is queried at regular intervals (in minutes).
12.8
Creating new gateways, configuring gateways and
replacing gateways – Gateway configuration menu
Notice!
Only people whose role is configured as System administrator or Local system administrator
can create, configure and replace gateways.
If the measured values get into the application via the communication version "e-mail", these
gateways are automatically listed by SupplyCare. Via the New Gateways menu item the gateways
are linked with SupplyCare (see Page 172).
146
1.
In the Navigation window, click the System administration menu.
2.
Click the Gateway configuration menu item.
Endress +Hauser
SupplyCare Enterprise SCE30B
12 System administration
3.
If no gateways have been created yet, the following view appears in the application window:
If gateways have already been created, the previously created gateways are displayed as
follows:
4.
For creating new gateways refer to Chapter 12.8.1 (see Page 147). For configuring gateways
refer to Chapter 12.8.2 (see Page 148).
12.8.1
Endress+Hauser
Creating new gateways
1.
In the Navigation window, click the System administration menu.
2.
Click the Gateway configuration menu item.
3.
Select the Gateway details tab.
4.
Click the
button.
147
12 System administration
SupplyCare Enterprise SCE30B
5.
The tab is displayed in the edit mode.
6.
Enter a name in the Name field.
7.
If necessary, enter a description in the User Description field.
8.
Via the Type field, select the gateway used. You can choose between the following gateways:
– Ecograph T – Endress+Hauser : Internet
– FXA320 – Endress+Hauser: Internet, e-mail or phone
– FXA520 – Endress+Hauser: Internet, e-mail or phone
– FXA720 – Endress+Hauser: Internet
– Memograph M – Endress+Hauser: Internet
– OPC XML DA – opcfondation: Internet.
9.
Click
to save your entries. Click
to abort the process.
10. After saving , the gateway is displayed in the Gateways table.
11. Configure the gateway as described in Chapter 12.8.2.
12.8.2
148
Configure gateways
1.
In the Gateways table, select the gateway you wish to configure.
2.
The following detail view is displayed in the Application window:
3.
Click the
button.
Endress +Hauser
SupplyCare Enterprise SCE30B
12 System administration
4.
The tab is displayed in the edit mode.
5.
Make your changes.
6.
Click
7.
Select the Communication tab.
8.
Click the
9.
The tab is displayed in the edit mode.
to save your entries. Click
to abort the process.
button.
10. Select the communication version for the Gateway access field.
11. Additional fields are displayed on the tab depending on the communication version selected.
a)
Communication via Internet/Intranet (HTTP)
Here, you specify the following data:
– URL (obligatory): IP address of the selected gateway along with additional text index.xml
e.g. http://123.456.789.0/index.xml
If you are using an FXA720, the IP address of the selected gateway must be entered along
with the suffix /bin/index?page=2011
e.g. http://123.456.789.0/bin/index?page=2011
– User (obligatory)
– Password
– Is using a proxy
– Proxy host
– Proxy port
Endress+Hauser
149
12 System administration
SupplyCare Enterprise SCE30B
– Proxy user
– Proxy password
– Retry interval (ms): Interval between retries if the attempt to establish a connection has
failed.
– Number of retries: number of retries if the attempt to establish a connection has failed.
– Timeout (sec)
Click
to save your entries. Click
to abort the process.
With communication via Internet (HTTP), retrieval is carried out actively by SupplyCare and
managed by the Scanning schedule (see Page 152).
b)
Communication by e-mail
For the communication variant "E-mail", the measured values reach the SupplyCare system via
incoming e-mails. The number of these incoming e-mails can be monitored and must lie within
a certain range. The count includes only the e-mails with a subject line that has a valid
three-digit code. Refer also the parameter "cm.dailyScanAmount.digitCodes", Page 125.
Here, you specify the following data:
– Serial number (obligatory): Serial number of the gateway
– Number of e-mails per interval [h]: E-mails expected for the specified interval ("Interval"
field). If the field remains empty or you enter the value "0", the number of incoming e-mails
is not monitored.
Refer also the parameter "cm.dailyScanAmount", Page 125.
– Tolerance before warning: The tolerance defines the tolerance range for the number of
incoming e-mails. If the number of incoming e-mails is outside this range, an alarm message
is generated.
Refer also the parameter "cm.dailyScanAmount.tolerance", Page 125.
– Interval [h]: Interval in which the number of incoming e-mails must lie within the specified
tolerance. If you enter the characters "- -" for the field, the number of incoming e-mails is
not monitored.
Refer also the parameter "cm.dailyScanAmount.interval", Page 125.
Example
– Daily number of e-mails: 5
– Tolerance before warning: 4
– Interval [h]: 24
If the number of incoming e-mails within 24 hours for this gateway (Fieldgates) is less than 1
or greater than 9, the status for this measured value is set to "No measured data" and the
corresponding icon is set for the tank overview ("Tank" workplace).
Click
150
to save your entries. Click
to abort the process.
Endress +Hauser
SupplyCare Enterprise SCE30B
12 System administration
Notice!
You can assign the default values for the fields "Number of e-mails per interval [h]", "Tolerance
before warning" and "Interval [h]" for all new gateways to be created in the "System properties"
menu (see Page 152).
c)
Communication by phone
Notice!
• For the "Telephone" communication version, the RAS connection must be set up.
The RAS connection must also be specified in the "System properties" menu item (Parameter
cm.telefon.*, see Page 125).
• The integration of a modem into the Virtual Machine for using the RAS connection is not possible.
Here, you specify the following data:
– RAS user (obligatory)
– RAS password
– Phone number
– URL (obligatory): IP address of the selected gateway along with additional text index.xml,
e.g. http://123.456.789.0/index.xml
– User
– Password
– Retry interval (ms): Interval between retries if the attempt to establish a connection has
failed.
– Number of retries: number of retries if the attempt to establish a connection has failed.
Click
to save your entries. Click
to abort the process.
With communication via phone (RAS), retrieval is carried out actively by SupplyCare and
managed by the Scanning schedule (see Page 152).
Endress+Hauser
151
12 System administration
SupplyCare Enterprise SCE30B
d)
Communication via OPC XML DA (OPC Server)
Enter the following data here:
– URL: IP address of the OPC XML DA server,
e.g. http://localhost:8090/opc/da
– User (obligatory)
– Password
– Is using a proxy
– Proxy host
– Proxy port
– Proxy user
– Proxy password
– Retry interval: interval between retries if the attempt to establish a connection has failed.
– Number of retries: number of retries if the attempt to establish a connection has failed.
– Timeout (sec): time, after which the connection to the server is canceled, if it does not
supply all required data from the uploaded configuration file.
– Configuration file: Use the button Browse to choose the configuration file in the directory.
Use the button Upload to upload the configuration file.
Click
to save your entries. Click
to abort the process.
With communication via OPC XML DA, retrieval is carried out actively by SupplyCare and
managed by the Scanning schedule (see Page 152).
Scanning schedule –
Scheduling
If "Internet (HTTP)", "Telephone" or "OPC XML DA", has been selected for the communication,
you have to specify a scanning schedule.
12. Click the Scheduling tab.
13. Click the
152
button.
Endress +Hauser
SupplyCare Enterprise SCE30B
12 System administration
14. The tab is displayed in the edit mode.
15. Here, you can enter data on the scanning schedule such as:
– Enable scheduling: the scheduling rule is enabled immediately as soon as the scanning
schedule has been completed.
– Time zone
– Repetition rule: you can select a rule here.
Daily: possible to schedule by time or frequency.
Weekly on every...: possible to select the specific days and schedule by time or frequency.
– Schedule by: select time or frequency.
You can specify up to 12 scan times for the Time option. For the Frequency option, specify
an interval in hours and minutes and a start and end time for the scan.
The days on which a scan is executed are highlighted in color in the calendar. You can scroll
through the calendar on a month-by-month basis.
16. Click the Check connection button.
Notice!
If you choose communication by phone, the Start check button appears instead of the Check
connection button. After clicking the Start check button, the message "Connection check in
progress" appears. Please note that the connection check can take several minutes.
17. If the connection is fine, the message "Successfully tested" appears.
18. Click OK.
19. Tick the Activate check box.
20. The message "Enabled" appears.
21. Click OK.
22. Click
to save your entries. Click
to abort the process.
23. The measuring points that are connected to the configured gateway are read into SupplyCare
depending on the scheduling.
Endress+Hauser
153
12 System administration
SupplyCare Enterprise SCE30B
12.8.3
Replacing a gateway
1.
Replace the gateway in your system.
2.
In the Navigation window, click the System administration menu.
3.
Click the Gateway configuration menu item.
4.
The following is displayed in the Application window:
5.
In the Gateways table, select the gateway you wish to replace.
6.
The Gateway details tab opens in the application window.
Notice!
You must take the mode of communication into consideration to be able to replace an already
configured gateway with a new gateway.
• Communication by Internet (HTTP) or Telephone:
When replacing gateways where the mode of communication is Internet (HTTP) or Telephone,
you must configure the appropriate settings for the new gateway on the "Communication" tab.
• Communication by E-mail:
When replacing gateways where the mode of communication is E-mail, you must enter the serial
number (unique ID) of the new gateway in the "Serial number" field on the "Communication" tab.
7.
154
Click the
Replace gateway button. Using the HTTP communication a connection to the
new gateway is established and the Unique ID in the system is replaced by the new one.
The new gateway is now implemented in SupplyCare Enterprise and assumes the existing tasks
of the gateway it replaced.
Endress +Hauser
SupplyCare Enterprise SCE30B
12 System administration
12.9
Assigning a measuring point to a tank
Notice!
Only people whose user role is configured as System administrator or Local system
administrator can assign a measuring point to a tank.
Endress+Hauser
1.
In the Navigation window, click the System administration menu.
2.
Click the Gateway configuration menu item (see Page 146).
3.
Select a gateway in the Gateways table. The "Devices" table shows the devices belonging to
the gateway.
4.
Select a device in the Devices table. The "Measuring points" table shows the measuring points
belonging to the device.
5.
In the Measuring points table, select the measuring point you wish to assign to a tank.
6.
The following detail view is displayed in the Application window:
7.
Click the
8.
You can now enter the following information on the device:
– Name (obligatory)
– Unit (for application) (obligatory): Select an engineering unit from the list.
– User description
– Linearization table name: A previously created linearization table can be selected here
(see Page 158). After the name of the linearization table has been selected, it is automatically
filled with values for the "Index", "Input level" and "Input volume".
– Unit (for scaling) and Linearization (for scaling): After the "Linearization table" has been
activated, a second linearization can be selected. The "Scaling table" is activated by selecting
a "Unit (for scaling)" and making a selection in the field "Linearization (for scaling)". "Unit
(for scaling)" corresponds to the unit to be used for scaling. After "Linearization (for scaling)"
has been selected, the "Scaling table" is automatically filled with values for the "Index",
"Input" and "Scaled".
button.
155
12 System administration
SupplyCare Enterprise SCE30B
The "Scaling table" is required for example when a measuring device delivers a number only.
The inventory level is then derived from the "Linearization (for scaling)" and the associated
volume from a further linearization of the level value. For example:
9.
The following data are read in by the device and cannot be changed:
– Unique ID
– Unit (from device)
– Last Measured Value
– Device Tag
– Description
– Measuring Point Tag
10. Click
to save your entries. Click
to abort the process.
11. Select the Assign measuring points to tag tab.
The tab cannot be selected until you have entered the values for the "Name" and "Engineering
unit (for application)" fields in the "Measuring point details" tab.
12. Click the
156
button.
Endress +Hauser
SupplyCare Enterprise SCE30B
12 System administration
13. The tab is displayed in the edit mode.
In this tab, you have the ability to either select a tank created earlier or create a new tank.
Selecting a tank created earlier
1.
Select a tank created earlier in the Tank name field. If the selected tank is a standard type of
tank, the Standard tank checkbox is automatically enabled. If the tank is a recycling tank, the
Recycling tank is enabled.
2.
If a description has already been stored for the selected tank, the description appears
automatically in the Tank notes field. You can add a description in the Tank notes field.
Notice!
• Each measuring point can be assigned only once at most to a tank.
• If no unit has been set for the tank, the "Unit (for application)" is taken as the tank unit when
assigning a primary measuring point. → See Page 155.
• You can assign a primary measuring point to a tank only if the tank and the measuring point have
compatible engineering units (e.g. length, volume, weight units etc.). If compatible engineering
units are not used for the tank and measuring point, an error message is displayed.
• The secondary values which you assign to the tank here are displayed under the "Tank" menu
item in the "Secondaries" tab.
Endress+Hauser
157
12 System administration
SupplyCare Enterprise SCE30B
3.
Click the
button, to assign the measuring point to the tank as a main measuring value
(primary) or as a secondary.
4.
You can delete the existing assignment using the
5.
Click
to save your entries. Click
button.
to abort the process.
Creating a new tank
1.
Click the Tank setup wizard button.
2.
Follow the instructions as described in Chapter 11.3.1"Creating a tank".
12.10 Managing linearization tables
Notice!
• Only people whose user role is configured as System administrator or Local system
administrator can create, change and delete linearization tables.
• A linearization table is assigned to a device in the Gateway configuration menu (see Page 146).
By means of a linearization table a measured value (X-value) is assigned the corresponding Y-value
(a volume value, for example). A linearization table must have a minimum of 2 points and can have
a maximum of 64 points. A point consists of an index, input level (X-value) and input volume
(Y-value).
158
1.
In the Navigation window, click the System administration menu.
2.
Click the Linearization menu item.
Endress +Hauser
SupplyCare Enterprise SCE30B
12 System administration
3.
The following detail view is displayed in the Application window:
4.
In the lower section of the Application window, select the Configuration tab.
12.10.1 Creating, changing and deleting a linearization table
Creating a linearization table
Endress+Hauser
1.
In the Navigation window, click the System administration menu.
2.
Click the Linearization menu item.
3.
Click the
4.
The tab is displayed in edit mode in the lower section of the Application window:
5.
Here, you can enter data for the linearization table:
– Name (obligatory)
– Description (obligatory): you can enter a multiline description here.
– Index: specifies the index in the table.
– Input level: enter the level value.
– Input volume: specify the volume value belonging to the level value.
button.
159
12 System administration
SupplyCare Enterprise SCE30B
6.
Click
to save your entries. Click
to abort the process.
7.
Select the Graph tab to view the linearization table you entered as a graph.
Changing a linearization table
1.
In the overview table, click the linearization table you wish to change.
2.
The related tab is displayed in the lower section of the Application window:
3.
Click the
4.
The tab is displayed in the edit mode.
5.
In the table, click the value (input level or input volume) you want to change. You can
overwrite several values in succession or fill the table with more value pairs.
button.
Notice!
You cannot enter or delete lines in the table, or change the order of the value pairs.
160
6.
Make your changes.
7.
Click
to save your entries. Click
to abort the process.
Endress +Hauser
SupplyCare Enterprise SCE30B
12 System administration
Deleting a linearization table
Notice!
You can only delete a linearization table if the linearization table is not assigned to a measuring
device.
1.
In the overview table, click the linearization table you wish to delete.
2.
The related tab is displayed in the lower section of the Application window:
3.
Click the
4.
The prompt "Do you really want to delete?" is displayed.
5.
Click the OK button to delete the linearization table. Click Cancel to abort the process.
button.
12.10.2 Displaying a linearization table as a graph
Endress+Hauser
1.
In the overview table, click the linearization table you wish to view as a graph.
2.
Select the Graph tab.
3.
The selected linearization table is displayed as a graph:
161
12 System administration
SupplyCare Enterprise SCE30B
12.10.3 Uploading a linearization table
1.
Select the Configuration tab.
2.
Click the
3.
The Configuration tab is displayed in edit mode.
4.
Enter data for the following fields:
– Name: unique name of linearization table
– Designation.
5.
Click
6.
Select the Upload tab.
7.
Click the
8.
The tab is displayed in the edit mode.
9.
Copy a data structure into the text input area.
button.
to save your entries. Click
to abort the process.
button.
10. Specify the Decimal sign and the Data separator.
11. Click
to save your entries. Click
to abort the process.
12. If you save your entries, the message "Linearization data was saved successfully" appears.
13. Select the Configuration tab if you wish to view the uploaded values as a linearization table.
Select the Graph tab if you wish to view the uploaded values as a graph.
162
Endress +Hauser
SupplyCare Enterprise SCE30B
12 System administration
12.10.4 Uploading a linearization table as an Excel file
1.
Select the Configuration tab.
2.
Click the
3.
The Configuration tab is displayed in edit mode.
4.
Enter data for the following fields:
– Name: unique name of linearization table
– Designation.
5.
Click
6.
Select the Upload File tab.
7.
The tab is displayed in the lower section of the application window:
8.
Click the Browse button.
9.
Select the desired Excel file in your directory.
The Excel file must meet the following criteria and is read as follows:
button.
to save your entries. Click
to abort the process.
– The first line is used as a header. These data are not read.
– The Excel file may only consist of two columns. The values in the first column are read as
X-values and the values in the second column are read as Y-values.
– There must be a numerical value in each cell. Text in a cell results in an error message.
– A pair of values consists of an X-value and a Y-value. An empty cell results in an error
message.
– The Excel file may consist of a maximum of 64 value pairs.
10. Click the Upload button.
11. Select the Configuration tab if you wish to view the uploaded values as a linearization table.
Select the Graph tab if you wish to view the uploaded values as a graph.
Endress+Hauser
163
12 System administration
SupplyCare Enterprise SCE30B
12.11 Integrating and managing FIS gateways –
FIS gateway menu
Notice!
People whose role is configured as System administrator or Local system administrator can
integrate, configure and manage FIS gateways.
If a FIS gateway is assigned to a FIS contract, it is listed in the "FIS gateways" menu item.
You can use the "FIS gateways" menu item to view information on the FIS gateways and integrate
a FIS gateway into SupplyCare.
1.
In the Navigation window, click the System administration menu.
2.
Click the FIS gateways menu item.
3.
An overview of all the FIS gateways available is displayed in the Application window. This
comprises all the FIS gateways that are assigned to a FIS contract. You can see which FIS
gateways have already been incorporated into SupplyCare from the names in the SupplyCare
gateway name column.
4.
For information on integrating FIS gateways, see Page 164, Chapter 12.11.1.
Notice!
Click the
button to export the FIS gateways table as an Excel file.
12.11.1 Integrating FIS gateways
You can integrate a FIS gateway into SupplyCare via the FIS Gateway Wizard.
1.
In the Navigation window, click the System administration menu.
2.
Click the FIS gateways menu item.
3.
An overview of all the FIS gateways available is displayed in the Application window:
4.
In the overview table, select the FIS gateway that you want to integrate into SupplyCare.
5.
Click the Insert button.
Notice!
The Insert button is only enabled if the FIS gateway has not yet been integrated into SupplyCare.
164
Endress +Hauser
SupplyCare Enterprise SCE30B
12 System administration
6.
The Gateway details dialog box appears:
7.
Enter the following data:
– Name (obligatory): unique name
– User description: description
8.
Click the Next button.
9.
The Scheduling dialog box is displayed:
10. Here, you can enter data on the scanning schedule such as:
– Enable scheduling: the scheduling rule is enabled immediately as soon as the scanning
schedule has been completed.
– Time zone
– Repetition rule: you can select a rule here.
Daily: possible to schedule by time or frequency.
Weekly on every...: possible to select the specific days and schedule by time or frequency.
– Schedule by: select time or frequency.
For the Time option, you can specify up to 12 times when scanning should take place. For the
Frequency option, specify a time interval and a time frame when scanning should take place.
Endress+Hauser
165
12 System administration
SupplyCare Enterprise SCE30B
The days on which a scheduling rule is executed are highlighted in color in the calendar. You
can scroll through the calendar on a month-by-month basis.
11. Click the Finish button to incorporate the FIS gateway into SupplyCare.
12. The "Activate gateway" dialog box is displayed.
– Click the Yes button to activate the gateway in SupplyCare. The FIS gateway is displayed in
the overview table in the "Gateway configuration" menu item. The measuring points that are
connected to the gateway are read into SupplyCare.
– If you click the No button, the FIS gateway is incorporated into SupplyCare but is out of
service.
12.11.2 "FIS gateways" overview table
Pressing the
button in the table header in the overview opens a context menu. Via this context
menu, you can show, hide and move table columns.
The following columns are available for the overview table:
166
Columns
Description
Action
Button via which you can incorporate a FIS gateway.
SupplyCare gateway name
Gateway name in SupplyCare. The name is only displayed if the FIS gateway has
been incorporated into SupplyCare.
FIS gateway name
Name of the FIS gateway. The name is assigned when the FIS gateway is created.
FIS ID
ID of the FIS gateway. The FIS ID is only displayed if the FIS gateway has not been
incorporated into SupplyCare.
Unique ID
Unique ID of the gateway. Once the FIS gateway has been incorporated into
SupplyCare, it is assigned a unique ID. This unique ID is retained even if the gateway is later deleted from SupplyCare.
Order code
Order code of the gateway
Channel
Gateway type
Endress +Hauser
SupplyCare Enterprise SCE30B
12 System administration
12.12 Displaying and editing system alarms
Alarm messages are generated at technical problems.
Notice!
• Only people whose user role is configured as System administrator or Local system
administrator can process alarm messages.
• If the "Alarm by mail" field in the "User roles" tab in the "User" menu item has been enabled for
a user, the alarm message is also sent to this user's e-mail address.
1.
Click the System administration menu in the Navigation window.
2.
Click the Alarm menu item.
3.
The following is displayed in the Application window:
Notice!
• The
button in the table header opens a context menu. This context menu is used to show
and hide the following columns in the overview: Status, Created date & time, Updated date &
time, Items Affected, Priority, Comment and Category.
• The digits in the "Priority" column have the following meanings: 1 – Major / Critical, 2 – Warning
and 3 – Information. Alarms with priority "1" can be automatically confirmed by the system.
Endress+Hauser
4.
In the lower section of the application window, select the Alarm Details tab.
5.
Click the
button.
167
12 System administration
SupplyCare Enterprise SCE30B
6.
The tab is displayed in the edit mode.
7.
You can now carry out the following:
– Acknowledged Status: Acknowledge the alarm.
– Done Status: set the alarm to the Done status.
– Comment: add a comment.
168
8.
Click
to save your entries. Click
to abort the process.
9.
You can view the history for an alarm by means of the Alarm history tab. The time stamp,
status, message, comment and the user who edited the alarm are displayed here.
Endress +Hauser
SupplyCare Enterprise SCE30B
12 System administration
12.12.1 Table of alarm messages
Message
number
Alarm
Description
Measures
11101
Folder Scanner failed. <+ErrorMessage>
Unexpected error while executing the "FolderScanner"
service.
For further information, see
<ErrorMessage> information.
11102
Folder Scanner failed. Gateway not found: Error while executing the "FolderScanner" service.
<+Message>
During a gateway query, the gateway data were not
loaded correctly from the database.
11103
Folder Scanner failed. Folder not found:
<+Message>
Error while executing the "FolderScanner" service. The Check the settings of the parameters (keys)
"New gateway" directory could not be found during the "cm.newGateway.name" and
procedure.
"cm.newGateway.store" in the "System
Properties" menu.
11151
Folder Scanner failed. Gateway changed.
Error while executing the "FolderScanner" service. The
gateway has been replaced. The gateway type or the
gateway unique ID have changed e.g. due to a device
change.
11152
Folder Scanner failed. Gateway Id is
missing.
Error while executing the "FolderScanner" service. The
gateway unique ID was not transmitted with the
measured value.
11153
Folder Scanner failed. Gateway tag is
missing.
Error while executing the "FolderScanner" service. The
gateway day was not transmitted with the measured
value.
11154
Folder Scanner failed. Invalid Source or
XML.
Error while executing the "FolderScanner" service. The
transmitted XML measured data are invalid or not
correct.
11156
Folder Scanner failed. Invalid date format. Error while executing the "FolderScanner" service. An
invalid date format was transmitted with the measured
value.
11157
Folder Scanner failed. Device Id is missing. Error while executing the "FolderScanner" service.
Gateway ID is missing / the gateway unique ID was not
transmitted with the measured value.
11201
ScanEmails failed. <+ErrorMessage>
Unexpected error while executing the "ScanEMails"
service.
For further information, see
<ErrorMessage> information.
11202
E-Mail Server not available
E-mail server is not available.
In the "E-mail connection (incoming)"
menu, check if the e-mail server is set up
correctly. Check the settings with an
external e-mail client such as
Outlook/Express or Thunderbird.
11301
ScanGateway failed. <+ErrorMessage>
Unexpected error while executing the "ScanGateway"
service.
For further information, see
<ErrorMessage> information.
11301
ErrorMessages OPC are not classified with
other reason codes in the moment
11301
Configuration file contains an invalid OPC At least one OPC item found in the OPC configuration
item
file that is not existing on the OPC server
Modify the OPC connection configuration
file
11301
OPC Endpoint…returned an invalid
response
The OPC XML DA Server has sent an invalid SOAP
message.
Check the OPC XML DA server.
11301
OPC Endpoint…returned OPC Errors
OPC server has returned an error.
Ignoring OPC errors can be set in the OPC
configuration file
(<propertykey="ignoreOPCErrors">
false</property>). Remove this entry if
you want to ignore OPC errors or fix the
OPC problem.
Endress+Hauser
Check whether the gateway exists in the
application.
Replace gateway.
Reset gateway unique ID via GUI.
169
12 System administration
SupplyCare Enterprise SCE30B
Message
number
Alarm
Description
Measures
11351
ScanGateway failed. Gateway changed.
Error while executing the "ScanGateway" service. The
gateway has been replaced. The gateway type or the
gateway unique ID have changed e.g. due to a device
change.
Replace gateway.
Reset gateway unique ID via GUI.
11352
ScanGateway failed. Gateway Id is
missing.
Error while executing the "ScanGateway" service. The
gateway unique ID was not transmitted with the
measured value.
11353
ScanGateway failed. Gateway tag is
missing.
Error while executing the "ScanGateway" service. The
gateway day was not transmitted with the measured
value.
11354
ScanGateway failed. Invalid Source or
XML.
Error while executing the "ScanGateway" service. The
transmitted XML measured data are invalid or not
correct.
11355
ScanGateway failed. No valid OPC
configuration file for the current gateway
found.
Error while executing the "ScanGateway" service. No
valid OPC configuration file for the current Gateway
found.
11356
ScanGateway failed. Invalid date format.
Error while executing the "ScanGateway" service. An
invalid date format was transmitted with the measured
value.
11357
ScanGateway failed. Device Id is missing.
Error while executing the "ScanGateway" service.
Gateway ID is missing, or the gateway unique ID was
not transmitted with the measured value.
11358
Contract
ScanGateway failed. FIS fis.url system property not set.
The system property "fis.url" was not set
correctly.
11359
Contract
ScanGateway failed. FIS-ID
missing in gateway configuration.
The FIS-ID has not been enabled in the
gateway configuration/communication.
11360
Contract
ScanGateway failed. FIS-Error 400: Request was not
valid.
Invalid request format. FIS could not run a
request.
11361
Contract
ScanGateway failed. FIS-Error 401: User not authenticated.
The user could not be authenticated for
the following reasons: the user has not
been
created, incorrect user name or password.
11362
Contract
ScanGateway failed. FIS-Error 403: User not authorized. The specified user does not have
authorization for a request.
11363
Contract
ScanGateway failed. FIS-Error 404: Gateway not found
in FIS.
The gateway was not found in FIS.
11364
Contract
ScanGateway failed. FIS-Error 204: No (new) measurements found.
No (new) measured values were found for
the gateway.
11365
Contract
ScanGateway failed. FIS fis.default.user system property The "fis.default.user" system property was
not set.
not specified correctly.
11366
Contract
ScanGateway failed. FIS fis.default.password system
property not set.
11401
ModemJob failed. <+ErrorMessage>
Unexpected error while executing the "Modem" service. For further information, see
<ErrorMessage> information.
11451
ModemJob failed. Could not connect to
modem.
Connection could not be made with modem.
Check modem/gateway connection.
11501
QueueHandler failed. <+ErrorMessage>
Unexpected error while executing the "QueueHandler"
service.
For further information, see the
<ErrorMessage> information.
11601
AccountingReport failed.
<+ErrorMessage>
Unexpected error while executing the
"AccountingReport" service.
For further information,
see <ErrorMessage> information.
170
Check the settings in the gateway
configuration.
The "fis.default.password" system property
was not specified correctly.
Endress +Hauser
SupplyCare Enterprise SCE30B
12 System administration
Message
number
Alarm
Description
11701
Check number of e-mails failed.
<+ErrorMessage>
Unexpected error while executing the "Check number of For further information, see
e-mails" service.
<ErrorMessage> information.
11702
Too few measurements.
While executing the "Check number of e-mails" service, For further information, see the comment
the following missing gateway scans were identified.
in the alarm message.
11703
Too many measurements.
While executing the "Check number of e-mails" service, For further information, see the comment
too many gateway scans were identified.
in the alarm message.
11801
Check expected gateway scan failed.
<+ErrorMessage>
Unexpected error while executing the
"CheckExpectedGatewayScan" service.
For further information, see
<ErrorMessage> information.
11802
Gateway scan missing.
While executing the "heckExpectedGatewayScan"
service, missing gateway retrievals were identified.
Check Log-File.
11901
Check Gateway, Device, Measurepoint
state failed. <+ErrorMessage>
Unexpected error while executing the
"GatewayDeviceMPState" service.
For further information, see
<ErrorMessage> information.
11902
Gateway <status (error|warning)>
While executing the
"CheckGatewayDeviceMeasurepointState" service, a
gateway with the status "nicht in Ordnung" was found.
Eliminate gateway error.
11903
Device <status (error|warning)
While executing the
"CheckGatewayDeviceMeasurepointState" service, a
device with the status "nicht in Ordnung" was found.
Eliminate device error.
11904
Measurepoint <status (error|warning)>
While executing the
Eliminate measuring point error.
"CheckGatewayDeviceMeasurepointState" service, a
measuring point with the status "nicht in Ordnung" was
found.
12001
Check Tanks failed. <+ErrorMessage>
Unexpected error while executing the "CheckTanks"
service.
12201
GarbageCollector failed. <+ErrorMessage> Unexpected error while executing the
"GarbageCollector" service.
For further information, see
<ErrorMessage> information.
12301
ReportGenerator failed. <+ErrorMessage> Unexpected error while executing the
"ReportGenerator" service.
For further information, see
<ErrorMessage> information.
12401
Resubmission Job failed. <+ErrorMessage> Unexpected error while executing the "Resubmission"
service.
For further information, see
<ErrorMessage> information.
12501
Forecast calculation Job failed.
<+ErrorMessage>
Unexpected error while executing the "Forecast
calculation" service.
For further information, see
<ErrorMessage> information.
12601
Replenishment event Job failed.
<+ErrorMessage>
Unexpected error while executing the "Replenishment
event" service.
For further information, see
<ErrorMessage> information.
20101
Unable to send an E-Mail.
E-mails are not being sent correctly.
In the "E-mail connection (outgoing)"
menu, check if the e-mail server is set up
correctly. Check the settings with an
external e-mail client such as
Outlook/Express. For further information,
see the "sce-mail.log" logfile.
Endress+Hauser
Measures
For further information, see
<ErrorMessage> information.
171
12 System administration
SupplyCare Enterprise SCE30B
12.13 E-mail error messages
In specific cases, e-mail error messages are sent to the administration e-mail address that has been
entered in the Admin e-mail field ("System administration" menu, "E-mail connection" menu item,
"Outgoing" tab).
Content of error message
Description
Wrong gateway type
The gateway type that has been specified in the menu "System
administration", menu item "Gateway configuration", tab "Gateway
details", field "Type" does not correspond to the gateway type specified in
the gateway e-mail.
Unique ID in e-mail is missing
The e-mail does not contain a unique gateway ID.
Mail too large
The e-mail exceeds the size in kilobytes specified in the menu "System
administration", menu item "System properties", tab "System properties",
key "cm.mail.max.size.KB", field "Value".
Invalid mail structure
The e-mail structure cannot be interpreted by SupplyCare.
12.14 Faulty measured data
In the "Workplace – Tank" menu, the status of the tanks and the aggregated tanks is displayed. In
addition to the statuses "OK" (green), "Plan point reached" (yellow)", "Ship point reached" (orange),
"Safety stock reached" (red), "Out of service", there is also the status "Bad measurements" (see
Page 20).
The following events result in the "Bad measurements" status:
• No main measuring value (primary value) is assigned to the measuring point.
• The time stamp of the measured value is older than the last retrieval by the "Gateway
scheduler" service.
• Too many e-mails have arrived.
• Too few e-mails have arrived.
• The XML tag "vstslvl" shows the error levels 1 (warning) or 2 (error).
XML is the abbreviation for "Extensible Markup Language". XML is a markup language used to
display hierarchically structured data in the form of text data. XML is used among other things for
the platform- and implementation-independent exchange of data between computer systems.
12.15 Creating new gateways –
for communication via e-mail
In the "New gateways" table, all gateways are listed that have sent an e-mail to SupplyCare and
whose "Unique ID" is not yet known to SupplyCare. This list enables you to transfer the listed
gateways to the system. As soon as you have accepted a gateway, it is deleted from the "New
gateways" table. You configure the gateway via the "Gateway configuration" menu item.
Notice!
• Only people whose user role is configured as System administrator can view the New
gateways menu item and include gateways.
• This menu item is not available to users whose user role is configured as Local system
administrator. However, local system administrators can create, configure and replace gateways
via the "Gateway configuration" menu item (see Page 146).
• For e-mail server querying to take place, the "Enabled" check box must be enabled under the
"E-mail connection, incoming" menu item. The e-mail server is queried at regular intervals (in
minutes).
172
Endress +Hauser
SupplyCare Enterprise SCE30B
12 System administration
1.
In the Navigation window, click the System administration menu.
2.
Click the New gateways menu item.
3.
The following is displayed in the Application window:
4.
A table with the following columns is displayed in the upper section of the Application
window:
– Name: is assigned automatically in the application.
– Unique ID: e.g. serial number of the gateway.
– Tag: is assigned automatically in the application.
– Description: e.g. location.
– Type: type of gateway.
Notice!
• The name can be either a "Unique ID", a "tag" or a combination of both. People whose user role
is configured as "System administrator" can make the settings for this in the "System settings"
menu item, "System properties" tab (cm.newGateway.name parameter, see Page 125).
• Open the context menu in the table header via the
button. This context menu allows you to
display and hide the following additional columns in the Application window and generally
change the order of the columns:
Number: Indicates the number of e-mails which have been sent by a gateway to SupplyCare
since the first e-mail was received.
Time stamp (received): Contains the time stamp of the last e-mail received by SupplyCare, with
the time converted to the time zone which was selected in the "Profile" menu, "User preferences"
menu item, "Time zone" field.
Time stamp (XML): Contains the time stamp that was included in the XML of the last e-mail
received by SupplyCare, with the time converted to the time zone which was selected in the
"Profile" menu, "User preferences" menu item, "Time zone" field.
5.
In the Selection column, enable the check box
in the Gateway configuration menu item.
for the gateway that you wish to include
6.
Click the button Include all selected gateways, to include these in the Gateway
configuration menu item.
Notice!
Using the Delete selected gateways button, you can delete from the list the gateways selected in
the Selection column.
Endress+Hauser
173
12 System administration
SupplyCare Enterprise SCE30B
12.16 Writing and sending messages (messaging)
Notice!
Only people whose user role is configured as Technical system administrator or Local system
administrator can write and send notification messages.
Users with the "Technical system administrator" or "Local system administrator" user role can send
to all SupplyCare users a message. A message from the system administrator is displayed the next
time the user logs on.
1.
Click the System administration menu in the Navigation window.
2.
Click the Messages menu item.
3.
The following view is displayed in the Application window:
4.
Click the
5.
The tab is displayed in the edit mode.
6.
Fill in the following fields:
button.
– Subject (obligatory)
– Message.
7.
174
Click
to send the e-mail. Click
to abort the process.
Endress +Hauser
SupplyCare Enterprise SCE30B
13 Maintaining a profile
13
Maintaining a profile
13.1
Maintaining a user profile
Notice!
Each person has the possibility to change his/her user profile.
1.
Click the Profile menu in the Navigation window.
2.
Click the User profile menu item.
3.
Select the User profile tab.
4.
The following is an example of what is displayed in the Application window:
5.
Click the
6.
The tab is displayed in the edit mode.
7.
Make your changes. You can change the fields with a white background, e.g. "Name" and
"E-mail address".
8.
Click
9.
The Tank group assignment tab shows you what tank groups you are assigned to.
button.
to save your changes. Click
to abort the process.
Notice!
The tank group assignment can only be changed by people with Master data user role in the "Tank
groups" menu item.
Endress+Hauser
175
13 Maintaining a profile
SupplyCare Enterprise SCE30B
10. The My tank view tab shows all the tanks and aggregated tanks which you can access via the
assigned tank groups.
11. Click the
button.
12. The tab is displayed in the edit mode.
13. Enable the check boxes of the tanks that should be shown in the My tank view workplace.
14. Click
13.2
176
to save your changes. Click
to abort the process.
Changing a password
1.
Click the Profile menu in the Navigation window.
2.
Click the User profile menu item.
3.
Select the User profile tab.
4.
Click the Change password field.
5.
The following is displayed:
6.
Click the
7.
The Change password form appears in the edit mode:
8.
Enter your existing password and your new password. Reconfirm your new password.
9.
Click
button.
to save your changes. Click
to abort the process.
Endress +Hauser
SupplyCare Enterprise SCE30B
13 Maintaining a profile
13.3
Selecting and changing user preferences
Notice!
Only people with Read only, Scheduler or Operator configured as their user role can change the
user preferences.
1.
Click the Profile menu in the Navigation window.
2.
Click the User preferences menu item.
3.
Click the
4.
The tab is displayed in the edit mode.
5.
Here, you can select or change an option for the "Tank group filter", "Time zone", "Default time
zone filter", "Default time zone filter", "Unit mass", "Unit volume", "Language" and "Default
home page" fields.
6.
Click
13.3.1
button.
to save your changes. Click
to abort the process.
Description of the filters (fields)
"Tank group filter" filter
The tank group selected here is displayed after login in the "Workplace – Tank" menu.
"Time zone" filter
The time zone selected here is used in the following areas of the program:
"Default time zone" filter
Menu
Description
Workplace – Tank
• "Notes and files" tab
• "Event details" tab
Workplace – My tank view
• My tank view
• "Notes and files" tab
• "Event details" tab
Workplace – Event
• "Event" table
• "Event details" tab
• "Event history" tab
Configuration – Tank
• "Tank notes" tab
Configuration – Aggregate tank
• "Tank notes" tab
Configuration – Location
• "Location notes" tab
The time zone filter selected here is displayed in the "Time zone" picklist in the "Tank", "My tank
view", "Event" and "Scheduling" workplaces. You can select the following values:
• Empty: the "Location" value is displayed in the "Tank", "My tank view" and "Scheduling"
workplaces. "User preference" is displayed in the "Event" workplace.
• Location: the "Location" value is displayed.
• User preference: the selected time zone is displayed. The value "UTC+00:00" is displayed if the
time zone is empty.
Endress+Hauser
177
13 Maintaining a profile
SupplyCare Enterprise SCE30B
• UTC: the value "UTC+00:00" is displayed. UTC is short for "Universal Time Coordinated".
"Unit mass" filter
"Unit volume" filter
"Language" filter
178
The unit mass selected here is used in the following areas of the program if "Mass" is selected for
the tank unit.
Menu
Description
Workplace – Tank
•
•
•
•
•
"Tank" table
"Inventory chart" tab
"Tank details" tab
"Event details" tab
"Download history" tab
Workplace – My tank view
•
•
•
•
•
"My tank view" table
"Inventory chart" tab
"Tank details" tab
"Event details" tab
"Download history" tab
Workplace – Event
• "Event details" tab
• "Inventory chart" tab
• "Tank details" tab, "Unit" field.
Workplace – Scheduling
•
•
•
•
"Planning" table
"Plan delivery/disposal" tab
"Planned delivery/disposal" tab
"Overview" tab
Workplace – Analysis
•
•
•
•
•
"Analysis" table
"KPIs" tab
"Outflow/Inflow" tab
"Chart hourly" tab
"Chart daily" tab
The unit volume selected here is used in the following areas of the program if "Volume" is selected
for the tank unit.
Menu
Description
Workplace – Tank
•
•
•
•
•
"Tank" table
"Inventory chart" tab
"Tank details" tab
"Event details" tab
"Download history" tab
Workplace – My tank view
•
•
•
•
•
"My tank view" table
"Inventory chart" tab
"Tank details" tab
"Event details" tab
"Download history" tab
Workplace – Event
• "Event details" tab
• "Inventory chart" tab
• "Tank details" tab, "Unit" field
Workplace – Scheduling
•
•
•
•
"Planning" table
"Plan delivery/disposal" tab
"Planned delivery/disposal" tab
"Overview" tab
Workplace – Analysis
•
•
•
•
•
"Analysis" table
"KPIs" tab
"Outflow/Inflow" tab
"Chart hourly" tab
"Chart daily" tab
The language selected here is used as the language for event and limit notifications.
Endress +Hauser
SupplyCare Enterprise SCE30B
"Default home page" filter
Endress+Hauser
13 Maintaining a profile
The default home page selected here is displayed in the application window following successful
login. If a splash screen image is used in the application window, the default home page is displayed
once the user clicks "Next".
179
14 Viewing the gateway report (Cockpit)
14
SupplyCare Enterprise SCE30B
Viewing the gateway report (Cockpit)
Notice!
The Cockpit menu item is available to users whose user role is configured as Local system
administrator or System administrator.
This item displays all the gateways for which you have access authorization.
1.
In the Navigation window, click the Cockpit menu.
2.
Click the Gateway report menu item.
3.
The following view is displayed in the Application window:
4.
The following data are displayed for every gateway:
– Gateway: name of the gateway
– Unique ID: gateway unique ID
– Device: name of the device that is assigned to the gateway
– Measure point: name of the measuring point which is connected to the gateway
– Tank: name of the tank which is connected to the measuring point.
– Assignment: assignment of the measured value. "1" for the primary value; "2", "3", "4", "5",
"6", "7", "8" and "9" for secondary values; "empty" if the measuring point is not assigned to
any tank.
– Location: location of the tank (if available)
– Notes: empty or "x" if notes are available
– Gateway access: communication version of the gateway.
– Aggregated tank: displays the tank name of the aggregated tank if the tank is assigned to
an aggregated tank.
5.
Click the
button to export the table as an Excel file.
6.
Click the
button to make notes on a tank.
Notice!
Notes are assigned to the tank. Notes can only be made if a tank is assigned to the gateway.
180
Endress +Hauser
SupplyCare Enterprise SCE30B
15 OPC Connection
15
OPC Connection
The OPC Bridge (Wrapper) connects SupplyCare Enterprise SCE30B via OPC DA 1.0, 2.0 or 3.0
with the OPC Server.
The installation of the OPC bridge is described in the "Getting Started" BA00054S.
Notice!
Please note that the OPC Bridge requires a license. The trial version is fully functional with a limited
time period. For continuous use beyond that period, a license is required and shall be ordered from
Endress+Hauser. Please contact your Endress+Hauser local Sales office in order to purchase the
OPC option. You will then receive an electronic Key.
Please follow the next steps in order to configure the OPC Bridge.
SupplyCare Enterprise
Application Server
SupplyCare Enterprise
(Running in Web Browser)
Scheduler -> read OPC items via XML Web service
Firewall
Intranet / LAN
Location 2
Intranet
Create XMLConfiguration File
OPC Configurator Tool
(scOpcConfigurator.exe)
Upload XMLConfiguration File
SupplyCare Enterprise
(Running in Web Browser)
OPC Server
XML DA 1.0
OPC Client
DA 1.0, 2.0, 3.0
ControlCare or 3rd party
OPC-Server 1..m (e.g. m=5)
OPC Bridge Wrapper
(Softing)
DCOM
Location 1
Firewall
Intranet / LAN
Controller SF
WAGO I/O
etc.
Fieldbus Devices
The OPC Configurator Tool generates an XML Configuration File which can be uploaded via
the Gateway configuration menu in the SupplyCare Enterprise software. SupplyCare
Enterprise SCE30B is a web operating program and need not to be installed again.
The XML Configuration File includes amongst other items the list of the used OPC connections
strings. After uploading the XML Configuration File, SupplyCare Enterprise can access to the
measure points (tank level measured values) provided by the OPC Server through the OPC Bridge
(Wrapper). The measuring points are provided by the OPC server.
15.1
1.
Endress+Hauser
Configuring the OPC Bridge (Wrapper)
Click the Softing OPC Easy Connect icon in the taskbar using the right mouse button.
181
15 OPC Connection
182
SupplyCare Enterprise SCE30B
2.
Choose Open Softing Easy Connect - Configuration1 Tray.
3.
Push the Start Configurator Button.
4.
The following Window is displayed:
5.
Add a new data source by selecting OPC Server.
6.
Select the following icon on the right hand side:
Endress +Hauser
SupplyCare Enterprise SCE30B
Endress+Hauser
15 OPC Connection
7.
The wizard guides you through the setup. Click Next.
8.
Enter a name for the data source. Be sure that the correct options are selected (see figure).
Then click Next.
183
15 OPC Connection
SupplyCare Enterprise SCE30B
9.
Select the OPC Server from the list.
10. On the next page you can test the connection to the OPC Server.
184
Endress +Hauser
SupplyCare Enterprise SCE30B
15 OPC Connection
11. If everything went right the next window with the message Connection test successful!
shall come up. Click OK.
12. A forward client is not needed so just click on Next.
13. A filter is not needed. Only the configured items of the Modbus OPC Server are available. Click
Finish.
Endress+Hauser
185
15 OPC Connection
SupplyCare Enterprise SCE30B
14. The settings for the OPC XML-DA connection are displayed at Data Destination-OPC Client.
These settings will be needed for the configuration in SupplyCare later:
15. Close the Configurator and save the project when promted to do so. Then right mouse click
on the system tray icon and hit the Start option.
16. The icon in the tray shall be now in green:
Notice!
With some OPC Servers it may be reasonable that the OPC Bridge must start with a time delay. We
recommend to use the Freeware Startup Delayer in this case.
17. Install and set up the program Startup Delayer, if applicable (see Page 187).
18. Restart the PC.
19. Make sure that the OPC Connection is running after the application is started.
186
Endress +Hauser
SupplyCare Enterprise SCE30B
15 OPC Connection
15.2
Installing and configuring the Startup Delayer program
Notice!
With some OPC Servers it may be reasonable that the OPC Bridge must start with a time delay. We
recommend to use the Freeware Startup Delayer in this case.
Endress+Hauser
1.
The file startdelay_v2.3b134.exe can be found in the directory opcBridge on the
Installation-CD.
2.
Start the installation procedure with a double click on file startdelay_v2.3b134.exe.
3.
Click the I Agree button for the acceptance of the licence terms.
4.
Click Next.
187
15 OPC Connection
SupplyCare Enterprise SCE30B
5.
188
Click the Install button.
Endress +Hauser
SupplyCare Enterprise SCE30B
Endress+Hauser
15 OPC Connection
6.
Click the Finish button.
7.
Select the OSF_Tray row with a double click.
8.
Enter for Delay a delay value e.g. 5 minutes.
189
15 OPC Connection
SupplyCare Enterprise SCE30B
9.
Click the Save button.
10. Click the Save button.
11. Close the Startup Delayer program.
15.3
190
Starting the OPC Configurator Tool
1.
Copy the directory scOpcConfigurator from the SupplyCare Enterprise Installations-CD onto
your PC.
2.
Start the OPC Configurator Tool with a double click on file scOpcConfigurator.exe.
3.
Click the Connect button to connect SupplyCare Enterprise with the OPC Server.
4.
The following screen appears:
5.
Select the OPC Server and click the OK button.
Endress +Hauser
SupplyCare Enterprise SCE30B
15 OPC Connection
6.
The OPC Server status will be shown in the OPC Server panel.
7.
Check the Edit checkbox on the Gateway panel to enter the UniqueID, Manufacturer,
Tag, and Description.
8.
Leave the Model, requestedSamplingRate [ms], subscriptionPolledRefreshRetries,
subscriptionPolledRefreshInterval [ms], subscriptionPingRate [ms], ignoreOPCErrors and
ignoreItemValueQuality fields blank to use the default values. The factory setting is
automatically applied to the empty fields.
9.
The OPC prefix is the name of the data source you have entered in the Softing Easy Connect
Suite (see Page 183 "MY_DATA_SOURCE_NAME").
10. Uncheck the Edit checkbox on the Gateway panel to leave the edit mode.
11. Click the Save or Save As button to save the settings. The chosen filename will be displayed
in the top panel.
12. Click the Add button on the Devices panel to generate the desired number of devices.
Endress+Hauser
191
15 OPC Connection
SupplyCare Enterprise SCE30B
13. Check the Edit checkbox on the Devices panel to enter the UniqueID, Tag, Manufacturer
and Description. Leave the Model and Connection fields blank. The Name is automatically
set by the program and cannot be edited.
14. Uncheck the Edit checkbox on the Devices panel to leave the edit mode.
15. Select the first device and click the Add button on the Measure Points panel.
16. Select the desired OPC Items and click the Open button.
17. The following window is displayed:
192
Endress +Hauser
SupplyCare Enterprise SCE30B
15 OPC Connection
18. Check the Edit checkbox on the Measure Points panel to enter the UniqueID, Tag, Unit
and Description.
The Name is automatically generated and cannot be edited. Values, Units and Time stamps
will be refreshed by click on the Refresh button on the Devices panel. This information
cannot be edited.
19. Uncheck the Edit checkbox on the Measure Points panel. Click the Save button to save the
current settings.
20. Click the Close button to close the program.
21. You can now upload the generated XML Configuration File within SupplyCare Enterprise
into the gateway settings (see Page 145).
Further functions in the OPC Configurator Tool:
• New: Starts a new project.
• Load: Loads an already existing XML Configuration File.
• Disconnect: Disconnects SupplyCare Enterprise from the OPC Server.
• Language: Selects another language.
• Help: Information about the version and documentation
• Remove: Removes the selected device or measure point.
• Remove all: Removes all devices or measure points.
• Refresh: Updates the current Value, Time stamp and Quality of the measure points of the selected
device.
Endress+Hauser
193
16 Extending the license and searching for updates
SupplyCare Enterprise SCE30B
16
Extending the license and searching for updates
16.1
Extending the license
A SupplyCare Enterprise license is issued for a max. number of tanks. Exceeding this number the
following message is shown on creation of this tank:
You can not insert more tanks. Your license agreement is limited to [Number of] tanks.
For more tanks the license can be extended. Therefore, contact your Endress+Hauser sales office.
Notice!
After extending the license enter the new license key into SupplyCare Enterprise. The System
administrator only can enter the new license key
1.
Click the About link in the header.
2.
The following screen appears:
3.
Click on To License Page.
4.
The following screen appears:
5.
Enter the Login name, Serial number (S/N) and the new License key (KEY).
6.
Click the Save button.
7.
Now further tanks can be created.
16.2
Searching for updates
SupplyCare offers the possibility to check whether there are any updates. If this is the case and you
want to update your version of SupplyCare Enterprise, please contact your Endress+Hauser sales
office.
194
1.
Click the About link in the header.
2.
The following screen appears:
Endress +Hauser
SupplyCare Enterprise SCE30B
Endress+Hauser
16 Extending the license and searching for updates
3.
Click on Check for updates.
4.
A connection to the Endress+Hauser server is established and a web browser window opens.
Therein a message appears stating if there are any updates available.
195
17 User roles and authorization
SupplyCare Enterprise SCE30B
17
User roles and authorization
Notice!
Several user roles can be assigned to one person at the same time.
Master data
Person with "Master data" configured as their user role are authorized to perform the following:
• Create, change and delete a user
• Assign a user role to users
• Assign a tank group to a user
• Assign notifications to a user
• Change their own user profile
• Create, change and delete a tank
• Assign a tank to a tank group
• Create, change and delete an aggregated tank
• Assign an aggregated tank to a tank group
• Create, change and delete a location
• Assign a tank to a location
• Create, change and delete a company
• Create, change and delete a product
• Create, change and delete a tank group
• Assign a product to a tank
• Create, change and delete reports
• Change the number of decimal places for a unit type
System Administrator
The system administrator is authorized to perform the following:
• Create, change and delete a user
• Assign a user role to users
• Assign a user to a tank group
• Process alarm messages
• Change system properties
• Create and change a tank
• Assign a tank to a tank group
• Create new gateways
• Configure gateways
• Assign a measuring device to a tank
• Upload an existing linearization table
• Create, change and delete a linearization table
• View logged on users, login reports, gateway, tank and contract reports
• Configure contract-specific splash screen and information window
• Determine contract-specific subject line for event messages
• Set up e-mail connection
• Write messages
• Change their own user profile
Local system administrator
The local system administrator has the following authorizations:
• Configure gateways
• Assign a measuring device to a tank
• Create, change and delete a linearization table
• Upload an existing linearization table
• Process alarm messages
• Change contract settings
• Configure contract-specific splash screen and information window
• Determine contract-specific subject line for event messages
• Change their own user profile
• View logged on users, login reports, gateway, tank and contract reports
196
Endress +Hauser
SupplyCare Enterprise SCE30B
17 User roles and authorization
Read only
Person with "Read only" configured as their user role are authorized to perform the following:
• View tanks (measured values)
• View personalized tank view
• View tanks on a map (Google Maps)
• View and save measured value history
• View tank details
• View location details
• View tank service status
• View events
• Perform totaling
• Change their own user profile
• Make user preferences
Operator
The "Operator" is authorized to perform the following:
• View tanks (measured values)
• View personalized tank view
• View tanks on a map (Google Maps)
• View and save measured value history
• Analyze the history of existing measured values
• View tank details
• View location details
• Change tank service status
• View and edit events
• View event history
• Perform totaling
• Change their own user profile
• Make user preferences
Scheduler
The "Scheduler" is authorized to perform the following:
• View tanks (measured values)
• View personalized tank view
• View tanks on a map (Google Maps)
• View and save measured value history
• View notifications and status displays on planned disposals and deliveries
• View tank details
• View location details
• View tank service status
• View and edit events
• Set the resubmission date
• View event history
• Plan deliveries and disposals
• Perform totaling
• Change their own user profile
• Make user preferences
Endress+Hauser
197
17 User roles and authorization
198
SupplyCare Enterprise SCE30B
Endress +Hauser
SupplyCare Enterprise SCE30B
Index
Index
A
D
ADI. . . . . . . . . . . . . . . . . . . . . . . . . . . . . . . . . . . . . . . . . . 73
ADO . . . . . . . . . . . . . . . . . . . . . . . . . . . . . . . . . . . . . . . . . 73
Alarm . . . . . . . . . . . . . . . . . . . . . . . . . . . . . . . . . . . . . . . 167
Alarm history . . . . . . . . . . . . . . . . . . . . . . . . . . . . . . . . . 168
Alarm messages. . . . . . . . . . . . . . . . . . . . . . . . . . . . . . . . 167
Amount for planned delivery . . . . . . . . . . . . . . . . . . . . . . . 37
Amount for planned disposal . . . . . . . . . . . . . . . . . . . . . . . 37
Analysis . . . . . . . . . . . . . . . . . . . . . . . . . . . . . . . . . . . . . . 72
Application window . . . . . . . . . . . . . . . . . . . . . . . . . . . . . 17
Assign Measuring Points to Tank . . . . . . . . . . . . . . . . . . . 156
Assigning a measuring point . . . . . . . . . . . . . . . . . . . . . . 155
Average daily inflow . . . . . . . . . . . . . . . . . . . . . . . . . . 73–74
Average daily outflow . . . . . . . . . . . . . . . . . . . . . . . . . 73–74
Average delivery quantity . . . . . . . . . . . . . . . . . . . . . . . . . 75
Average disposal quantity . . . . . . . . . . . . . . . . . . . . . . . . . 75
Average inventory level . . . . . . . . . . . . . . . . . . . . . . . . . . . 75
Average rate of usage . . . . . . . . . . . . . . . . . . . . . . . . . . . . 75
Average safety stock reached . . . . . . . . . . . . . . . . . . . . . . . 75
Daily basis . . . . . . . . . . . . . . . . . . . . . . . . . . . . . . . . . . . . . 77
Daily inflow. . . . . . . . . . . . . . . . . . . . . . . . . . . . . . . . . 73–74
Daily outflow. . . . . . . . . . . . . . . . . . . . . . . . . . . . . . . . 73–74
Days until the safety stock is reached . . . . . . . . . . . . . . 36, 74
Default time zone . . . . . . . . . . . . . . . . . . . . . . . . . . . . . . 177
Deleting . . . . . . . . . . . . . . . . . . . . . . . . . . . . . . . . . . . . . . 30
Deleting a user . . . . . . . . . . . . . . . . . . . . . . . . . . . . . . . . . 99
Deleting master data . . . . . . . . . . . . . . . . . . . . . . . . . . . . . 30
Delivery details . . . . . . . . . . . . . . . . . . . . . . . . . . . . . . . . . 66
Delivery, Status management. . . . . . . . . . . . . . . . . . . . . . . 60
Designated use . . . . . . . . . . . . . . . . . . . . . . . . . . . . . . . . . . 8
DI . . . . . . . . . . . . . . . . . . . . . . . . . . . . . . . . . . . . . . . . . . . 73
Disposal details . . . . . . . . . . . . . . . . . . . . . . . . . . . . . . . . . 66
Disposal, Status management . . . . . . . . . . . . . . . . . . . . . . . 60
DO . . . . . . . . . . . . . . . . . . . . . . . . . . . . . . . . . . . . . . . . . . 73
Download history . . . . . . . . . . . . . . . . . . . . . . . . . . . . . . . 43
DSST. . . . . . . . . . . . . . . . . . . . . . . . . . . . . . . . . . . . . . . . . 36
B
E-mail error message . . . . . . . . . . . . . . . . . . . . . . . . . . . . 172
Event . . . . . . . . . . . . . . . . . . . . . . . . . . . . . . . . . . 55, 57, 60
Event details . . . . . . . . . . . . . . . . . . . . . . . . . . . . . 41, 56, 58
Event history . . . . . . . . . . . . . . . . . . . . . . . . . . . . . . . . . . . 57
Event notification . . . . . . . . . . . . . . . . . . . . . . . . . . . . . . 135
Events . . . . . . . . . . . . . . . . . . . . . . . . . . . . . . . . . . . . . . . . 54
Extending the license. . . . . . . . . . . . . . . . . . . . . . . . . . . . 194
Bad measurement(s) . . . . . . . . . . . . . . . . . . . . . . . . . . . . . 39
Basic jobs . . . . . . . . . . . . . . . . . . . . . . . . . . . . . . . . . . . . 132
Buyer . . . . . . . . . . . . . . . . . . . . . . . . . . . . . . . . . . . . . . . . 36
Buyer ID . . . . . . . . . . . . . . . . . . . . . . . . . . . . . . . . . . . . . . 36
C
Capacity . . . . . . . . . . . . . . . . . . . . . . . . . . . . . . . . . . . 36, 38
Changing . . . . . . . . . . . . . . . . . . . . . . . . . . . . . . . . . . . . . 27
Changing a password . . . . . . . . . . . . . . . . . . . . . . . . . . . 176
Changing aggregated tank-tank group assignment . . . . . . 103
Changing location-tank assignment . . . . . . . . . . . . . . . . . 105
Changing master data . . . . . . . . . . . . . . . . . . . . . . . . . . . . 27
Changing product-tank assignment . . . . . . . . . . . . . . . . . 109
Changing tank-tank group assignment . . . . . . . . . . . . . . . . 93
Changing user-tank group assignment . . . . . . . . . . . . . . . . 85
Commissioning . . . . . . . . . . . . . . . . . . . . . . . . . . . . . . . . . . 8
Communication . . . . . . . . . . . . . . . . . . . . . . . . . . . . . . . 149
E-mail . . . . . . . . . . . . . . . . . . . . . . . . . . . . . . . . . . . . 150
Internet (HTTP) . . . . . . . . . . . . . . . . . . . . . . . . . . . . . 149
OPC Server . . . . . . . . . . . . . . . . . . . . . . . . . . . . . . . . 152
Phone . . . . . . . . . . . . . . . . . . . . . . . . . . . . . . . . . . . . 151
Company . . . . . . . . . . . . . . . . . . . . . . . . . . . . . . . . . . . . . 81
Company details . . . . . . . . . . . . . . . . . . . . . . . . . . . . . . . . 81
Configuration . . . . . . . . . . . . . . . . . . . . . . . . . . . . . . . . . 159
Configuring aggregated tank freeze events . . . . . . . . . . . . 103
Configuring freeze events . . . . . . . . . . . . . . . . . . . . . . . . . 94
Configuring secondaries . . . . . . . . . . . . . . . . . . . . . . . . . . 93
Configuring services . . . . . . . . . . . . . . . . . . . . . . . . . . . . 132
Constituent tanks . . . . . . . . . . . . . . . . . . . . . . . . . . . . . . . 39
Copy delivery . . . . . . . . . . . . . . . . . . . . . . . . . . . . . . . . . . 67
Copy disposal . . . . . . . . . . . . . . . . . . . . . . . . . . . . . . . . . . 67
Creating new gateways . . . . . . . . . . . . . . . . . . . . . . . . . . 172
Creating/setting up a report group. . . . . . . . . . . . . . . . . . 117
CSV reports. . . . . . . . . . . . . . . . . . . . . . . . . . . . . . . . . . . 116
Customer-specific unit. . . . . . . . . . . . . . . . . . . . . . . . . . . 115
Endress+Hauser
E
F
Fieldgates . . . . . . . . . . . . . . . . . . . . . . . . . . . . . . . . . . . . . 11
Filter functions . . . . . . . . . . . . . . . . . . . . . . . . . . . . . . . . . 25
FIS gateway . . . . . . . . . . . . . . . . . . . . . . . . . . . . . . . . . . . 164
Forecast values . . . . . . . . . . . . . . . . . . . . . . . . . . . . . . . . . 47
Free. . . . . . . . . . . . . . . . . . . . . . . . . . . . . . . . . . . . . . . . . . 35
Free capacity . . . . . . . . . . . . . . . . . . . . . . . . . . . . . . . . . . . 39
Freeze event details . . . . . . . . . . . . . . . . . . . . . . . . . . . 41, 56
Freeze event notification . . . . . . . . . . . . . . . . . . . . . . . . . 138
Frequency of deliveries . . . . . . . . . . . . . . . . . . . . . . . . . . . 74
Frequency of disposals . . . . . . . . . . . . . . . . . . . . . . . . . . . . 74
From date . . . . . . . . . . . . . . . . . . . . . . . . . . . . . . . . . . . . . 36
G
Gateway Configuration . . . . . . . . . . . . . . . . . . . . . . 146, 154
Gateway details . . . . . . . . . . . . . . . . . . . . . . . . . . . . 147, 154
Gateway report . . . . . . . . . . . . . . . . . . . . . . . . . . . . . . . . 180
Gateways . . . . . . . . . . . . . . . . . . . . . . . . . . . . . 11, 146, 154
H
Historical values . . . . . . . . . . . . . . . . . . . . . . . . . . . . . . . . 47
Hourly basis. . . . . . . . . . . . . . . . . . . . . . . . . . . . . . . . . . . . 76
Hysteresis . . . . . . . . . . . . . . . . . . . . . . . . . . . . . . . . . . 36, 39
I
Icons . . . . . . . . . . . . . . . . . . . . . . . . . . . . . . . . . . . . . . . . . 18
Incoming. . . . . . . . . . . . . . . . . . . . . . . . . . . . . . . . . . . . . 146
Inflow . . . . . . . . . . . . . . . . . . . . . . . . . . . . . . . . . . . . . . . . 74
Installation . . . . . . . . . . . . . . . . . . . . . . . . . . . . . . . . . . . . . 8
199
Index
Inventory chart . . . . . . . . . . . . . . . . . . . . . . . . . . . . . 37, 57
K
Key . . . . . . . . . . . . . . . . . . . . . . . . . . . . . . . . . . . . . . . . 125
Key performance indicators . . . . . . . . . . . . . . . . . . . . . . . 73
KPIs . . . . . . . . . . . . . . . . . . . . . . . . . . . . . . . . . . . . . . . . . 73
L
Language . . . . . . . . . . . . . . . . . . . . . . . . . . . . . . . . . . . . 178
Level . . . . . . . . . . . . . . . . . . . . . . . . . . . . . . . . . . . . . . . . 35
Limit notification . . . . . . . . . . . . . . . . . . . . . . . . . . . . . . 140
Linearization . . . . . . . . . . . . . . . . . . . . . . . . . . . . . . . . . 158
Linearization table . . . . . . . . . . . . . . . . . . . . . . . . . . . . . 158
Changing . . . . . . . . . . . . . . . . . . . . . . . . . . . . . . . . . 160
Creating . . . . . . . . . . . . . . . . . . . . . . . . . . . . . . . . . . 159
Deleting . . . . . . . . . . . . . . . . . . . . . . . . . . . . . . . . . . 161
Uploading . . . . . . . . . . . . . . . . . . . . . . . . . . . . . 162–163
Linearization. . . . . . . . . . . . . . . . . . . . . . . . . . . . . . . . . . 159
Local system administrator . . . . . . . . . . . . . . . . . . . . 16, 196
Location. . . . . . . . . . . . . . . . . . . . . . . . . . . . 35, 38, 73, 104
Location details . . . . . . . . . . . . . . . . . . . . . . . . . . . . 40, 104
Logging out . . . . . . . . . . . . . . . . . . . . . . . . . . . . . . . . . . . 15
M
Master data . . . . . . . . . . . . . . . . . . . . . . . . . . . . . . . 16, 196
Maximum value . . . . . . . . . . . . . . . . . . . . . . . . . . . . . . . . 75
Measuring points . . . . . . . . . . . . . . . . . . . . . . . . . . . . . . 155
Menu
Configuration . . . . . . . . . . . . . . . . . . . . . . . . . . . . . . . 16
FIS gateway . . . . . . . . . . . . . . . . . . . . . . . . . . . . . . . 164
Profile. . . . . . . . . . . . . . . . . . . . . . . . . . . . . . . . . . . . . 16
System administration . . . . . . . . . . . . . . . . . . . . . . . . . 16
Workplace . . . . . . . . . . . . . . . . . . . . . . . . . . . . . . . . . 16
Menu items . . . . . . . . . . . . . . . . . . . . . . . . . . . . . . . . . . . 16
Menus . . . . . . . . . . . . . . . . . . . . . . . . . . . . . . . . . . . . . . . 15
Messaging . . . . . . . . . . . . . . . . . . . . . . . . . . . . . . . . . . . . 33
Minimum value . . . . . . . . . . . . . . . . . . . . . . . . . . . . . . . . 75
Monitoring tanks . . . . . . . . . . . . . . . . . . . . . . . . . . . . . . . 34
N
Navigation window . . . . . . . . . . . . . . . . . . . . . . . . . . . . . 15
New Gateways. . . . . . . . . . . . . . . . . . . . . . . . . . . . . . . . 173
New gateways . . . . . . . . . . . . . . . . . . . . . . . . . . . . . . . . 164
Next planned delivery . . . . . . . . . . . . . . . . . . . . . . . . . . . 74
Next planned disposal . . . . . . . . . . . . . . . . . . . . . . . . . . . 74
Notes . . . . . . . . . . . . . . . . . . . . . . . . . . . . . . . . . . . . . . . . 35
Notes and files . . . . . . . . . . . . . . . . . . . . . . . . . . . . . . . . . 39
Notification . . . . . . . . . . . . . . . . . . . . . . . . . . . . . . . 33, 135
Number of deliveries . . . . . . . . . . . . . . . . . . . . . . . . . . . . 74
Number of disposals . . . . . . . . . . . . . . . . . . . . . . . . . . . . . 74
O
OPC Bridge . . . . . . . . . . . . . . . . . . . . . . . . . . . . . . . . . . 181
OPC Configurator Tool
Starting. . . . . . . . . . . . . . . . . . . . . . . . . . . . . . . . . . . 190
OPC Connection . . . . . . . . . . . . . . . . . . . . . . . . . . . . . . 181
OPC Server . . . . . . . . . . . . . . . . . . . . . . . . . . . . . . . . . . 181
Operation. . . . . . . . . . . . . . . . . . . . . . . . . . . . . . . . . . . . . . 8
Operator . . . . . . . . . . . . . . . . . . . . . . . . . . . . . . . . . 16, 197
Optimum . . . . . . . . . . . . . . . . . . . . . . . . . . . . . . . . . . 35, 38
200
SupplyCare Enterprise SCE30B
Out of service . . . . . . . . . . . . . . . . . . . . . . . . . . . . . . . 36, 39
Outflow . . . . . . . . . . . . . . . . . . . . . . . . . . . . . . . . . . . . . . 74
Outgoing . . . . . . . . . . . . . . . . . . . . . . . . . . . . . . . . . . . . 145
P
Parameter. . . . . . . . . . . . . . . . . . . . . . . . . . . . . . . . . . . . 125
PD . . . . . . . . . . . . . . . . . . . . . . . . . . . . . . . . . . . . . . . . . . 36
PD amount. . . . . . . . . . . . . . . . . . . . . . . . . . . . . . . . . . . . 37
PDL/PDE notification . . . . . . . . . . . . . . . . . . . . . . . . . . . 143
Picklist . . . . . . . . . . . . . . . . . . . . . . . . . . . . . . . . . . . . . . . 26
Plan delivery. . . . . . . . . . . . . . . . . . . . . . . . . . 50, 60, 63, 65
Plan disposal. . . . . . . . . . . . . . . . . . . . . . . . . . 50, 60, 63, 65
Plan point. . . . . . . . . . . . . . . . . . . . . . . . . . . . . . . . . . . . . 39
Planned delivery . . . . . . . . . . . . . . . . . . . . . . . . . . . . . . . . 36
Planned disposal . . . . . . . . . . . . . . . . . . . . . . . . . . . . . . . . 36
Portal window . . . . . . . . . . . . . . . . . . . . . . . . . . . . . . . . . 14
PP (plan point) . . . . . . . . . . . . . . . . . . . . . . . . . . . . . . . . . 36
Product . . . . . . . . . . . . . . . . . . . . . . . . . . . . 35, 38, 73, 108
Product details . . . . . . . . . . . . . . . . . . . . . . . . . . . . . . . . 108
Products . . . . . . . . . . . . . . . . . . . . . . . . . . . . . . . . . . . . . 108
Profile . . . . . . . . . . . . . . . . . . . . . . . . . . . . . . . . . . . . . . 175
R
Read only . . . . . . . . . . . . . . . . . . . . . . . . . . . . . . . . . 16, 197
Recycling . . . . . . . . . . . . . . . . . . . . . . . . . . . . . . . . . . . . . 39
Recycling tanks. . . . . . . . . . . . . . . . . . . . . . . . . . . . . . . . . 37
Recycling-Tanks . . . . . . . . . . . . . . . . . . . . . . . . . . . . . . . . 64
Refresh range . . . . . . . . . . . . . . . . . . . . . . . . . . . . . . . 50, 65
Report group . . . . . . . . . . . . . . . . . . . . . . . . . . . . . . . . . 116
Reports. . . . . . . . . . . . . . . . . . . . . . . . . . . . . . . . . . . . . . 112
S
Safety stock . . . . . . . . . . . . . . . . . . . . . . . . . . . . . . . . . . . 39
Safety stock reached . . . . . . . . . . . . . . . . . . . . . . . . . . . . . 75
Scheduler . . . . . . . . . . . . . . . . . . . . . . . . . . . . . . . . . 16, 197
Scheduling . . . . . . . . . . . . . . . . . . . . . . . . . . . . . 63–64, 152
SDT . . . . . . . . . . . . . . . . . . . . . . . . . . . . . . . . . . . . . . . . . 36
Searching . . . . . . . . . . . . . . . . . . . . . . . . . . . . . . . . . . . . . 25
Searching for updates . . . . . . . . . . . . . . . . . . . . . . . . . . . 194
Secondaries . . . . . . . . . . . . . . . . . . . . . . . . . . . . . 45, 53, 93
Select tank picture . . . . . . . . . . . . . . . . . . . . . . . . . . . . . 102
Selecting/changing a user setting . . . . . . . . . . . . . . . . . . 177
Setting the resubmission date . . . . . . . . . . . . . . . . . . . . . . 59
Setting up e-mail notification . . . . . . . . . . . . . . . . . . . . . 111
Ship point. . . . . . . . . . . . . . . . . . . . . . . . . . . . . . . . . . . . . 39
SP (ship point) . . . . . . . . . . . . . . . . . . . . . . . . . . . . . . . . . 36
SST (safety stock) . . . . . . . . . . . . . . . . . . . . . . . . . . . . . . . 36
Standard delivery time . . . . . . . . . . . . . . . . . . . . . . . . . . . 36
Standard delivery time in days or hours . . . . . . . . . . . . . . . 38
Standard disposal time . . . . . . . . . . . . . . . . . . . . . . . . . . . 36
Standard tanks . . . . . . . . . . . . . . . . . . . . . . . . . . . . . . . . . 37
Standard-Tanks. . . . . . . . . . . . . . . . . . . . . . . . . . . . . . . . . 64
Starting the program . . . . . . . . . . . . . . . . . . . . . . . . . . . . . 13
Startup Delayer
Installing and configuring . . . . . . . . . . . . . . . . . . . . . 187
Status . . . . . . . . . . . . . . . . . . . . . . . . . . . . . . . . . . . . . . . . 35
Supplier . . . . . . . . . . . . . . . . . . . . . . . . . . . . . . . . . . . . . . 36
System Administrator . . . . . . . . . . . . . . . . . . . . . . . . 16, 196
System description . . . . . . . . . . . . . . . . . . . . . . . . . . . . . . 10
System properties . . . . . . . . . . . . . . . . . . . . . . . . . . . . . . 124
Endress +Hauser
SupplyCare Enterprise SCE30B
Index
T
U
Tank . . . . . . . . . . . . . . . . . . . . . . . . . . . . . . . . . . . . . . . . . 86
Tank assignment . . . . . . . . . . . . . . . . . . . . . . . . . . . . . . . 111
Tank details . . . . . . . . . . . . . . . . . . . . . . . . 38, 89, 100, 102
Tank freeze . . . . . . . . . . . . . . . . . . . . . . . . . . . . . . . . . . . . 94
Tank group . . . . . . . . . . . . . . . . . . . . . . . . . . . . . . . . . . . 110
Tank group assignment . . . . . . . . . . . . . . . . . . . . . . . . . . 175
Tank group filter . . . . . . . . . . . . . . . . . . . . . . . . . . . . . . . 177
Tank groups . . . . . . . . . . . . . . . . . 84, 90, 93, 101, 103, 110
Tank list . . . . . . . . . . . . . . . . . . . . . . . . . . . . . . . . . . . . . 101
Tank name . . . . . . . . . . . . . . . . . . . . . . . . . . . . . . 35, 38, 73
Tank notes . . . . . . . . . . . . . . . . . . . . . . . . . . . . . . . . 97, 103
Tank partners . . . . . . . . . . . . . . . . . . . . . . . . . . . . . . . . . . 40
Tank service status . . . . . . . . . . . . . . . . . . . . . . . . . . . 41–42
Tank setup wizard. . . . . . . . . . . . . . . . . . . . . . . . . . . . . . . 86
Tank shape . . . . . . . . . . . . . . . . . . . . . . . . . . . . . . . . . . . 102
Tanks at Location . . . . . . . . . . . . . . . . . . . . . . . . . . . . . . 106
Technical improvement. . . . . . . . . . . . . . . . . . . . . . . . . . . . 8
Test event e-mail. . . . . . . . . . . . . . . . . . . . . . . . . . . . . . . 112
Time stamp . . . . . . . . . . . . . . . . . . . . . . . . . . . . . . . . . 36, 38
Time unit . . . . . . . . . . . . . . . . . . . . . . . . . . . . . . . . . . . . . 36
Time zone. . . . . . . . . . . . . . . . . . . . . . . . . . . 36, 38, 73, 177
To date . . . . . . . . . . . . . . . . . . . . . . . . . . . . . . . . . . . . . . . 36
Total inflow . . . . . . . . . . . . . . . . . . . . . . . . . . . . . . . . . . . 74
Total outflow . . . . . . . . . . . . . . . . . . . . . . . . . . . . . . . . . . 74
Turnover rate . . . . . . . . . . . . . . . . . . . . . . . . . . . . . . . . . . 75
UI Customizing . . . . . . . . . . . . . . . . . . . . . . . . . . . . . . . . 134
Unit . . . . . . . . . . . . . . . . . . . . . . . . . . . . . . . . . . . 35, 38, 73
Unit mass . . . . . . . . . . . . . . . . . . . . . . . . . . . . . . . . . . . . 178
Units . . . . . . . . . . . . . . . . . . . . . . . . . . . . . . . . . . . . . . . . 114
Update . . . . . . . . . . . . . . . . . . . . . . . . . . . . . . . . . . . . . . 194
Used in Tanks . . . . . . . . . . . . . . . . . . . . . . . . . . . . . . . . . 109
User . . . . . . . . . . . . . . . . . . . . . . . . . . . . . . . . . . . . . . . . . 82
User assignment . . . . . . . . . . . . . . . . . . . . . . . . . . . . . . . 111
User details . . . . . . . . . . . . . . . . . . . . . . . . . . . . . . . . . . . . 83
User profile . . . . . . . . . . . . . . . . . . . . . . . . . . . . . . . . . . . 175
User roles . . . . . . . . . . . . . . . . . . . . . . . . . . . . . . . . . . . . . 84
User roles and authorization . . . . . . . . . . . . . . . . . . . . . . 196
Endress+Hauser
V
Value. . . . . . . . . . . . . . . . . . . . . . . . . . . . . . . . . . . 35, 38–39
Volume unit . . . . . . . . . . . . . . . . . . . . . . . . . . . . . . . . . . 178
W
Workplace
Analysis . . . . . . . . . . . . . . . . . . . . . . . . . . . . . . . . . . . . 72
Events . . . . . . . . . . . . . . . . . . . . . . . . . . . . . . . . . . . . . 54
Map. . . . . . . . . . . . . . . . . . . . . . . . . . . . . . . . . . . . . . . 78
My tank view. . . . . . . . . . . . . . . . . . . . . . . . . . . . . . . . 51
Scheduling . . . . . . . . . . . . . . . . . . . . . . . . . . . . . . . 60, 63
Tank . . . . . . . . . . . . . . . . . . . . . . . . . . . . . . . . . . . . . . 34
Totaling . . . . . . . . . . . . . . . . . . . . . . . . . . . . . . . . . . . . 68
201
www.endress.com/worldwide