1
INSTALLATION
INSTRUCTIONS
Accessory
Application
ENGINE BLOCK HEATER
P/N 08T44-SNA-101
2015 FIT
Publications No.
AII 51184
Issue Date
APR 2014
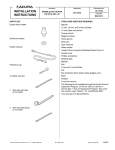
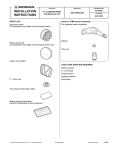
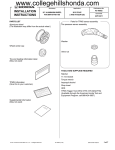
PARTS LIST
TOOLS AND SUPPLIES REQUIRED
Engine block heater
Phillips screwdriver
Ratchet
10 mm, 19 mm, and 24 mm Sockets
10 mm Open end wrench
Torque wrench
Aluminum washer
Diagonal cutters
Heavy gloves
Heater harness
Drain pan
Tape measure
White marker
Coolant (Honda All Season Antifreeze/Coolant Type 2)
Blanket
Fender cover
Tape
Protective cap
12 Black wire ties
(1 Not used)
Shop towel
The following tool is available through the Honda Tool and
Equipment Program. On the iN, click on: Service >
Service Bay > Tool and Equipment Program, then enter
the number under “Search”. Or, call 888-424-6857.
• Trim Tool Set (T/N SOJATP2014)
Illustration of the Engine Block Heater Installed on the
Vehicle
ENGINE BLOCK HEATER
7 Wire ties with clip
(6 Not used)
5 Natural wire ties
(4 Not used)
HEATER HARNESS
© 2014 American Honda Motor Co., Inc. – All Rights Reserved.
AII 51184 (1404)
QC71316AH
08T44-T5A-1000-90
1 of 10
INSTALLATION
Customer Information: The information in this
installation instruction is intended for use only by skilled
technicians who have the proper tools, equipment, and
training to correctly and safely add equipment to your
vehicle. These procedures should not be attempted by
“do-it-yourselfers.”
3.
Place the vehicle on a hoist and raise the vehicle off
the ground.
4.
Place a clean drain pan under the radiator drain plug,
then remove the drain plug from the bottom of the
radiator to drain the coolant. Remove the radiator
cap to increase the flow.
NOTICE: Radiator coolant will damage the paint.
Quickly rinse any spilled coolant from the paint.
NOTE:
• Always use Honda All Season Antifreeze/Coolant
Type 2. Using a non-Honda coolant can result in
corrosion, causing the cooling system to malfunction or
fail.
RADIATOR CAP
• To avoid burning out the element, do not operate the
engine block heater until it is installed in the vehicle with
coolant.
1.
Disconnect the negative cable from the battery.
2.
Allow the engine and all cooling system components
to cool down.
FRONT
RADIATOR
DRAIN PLUG
2 of 10
AII 51184 (1404)
QC71315AH
© 2014 American Honda Motor Co., Inc. – All Rights Reserved.
5.
Drain the coolant completely, then reinstall the
radiator cap.
6.
Remove the front bumper:
•
•
Remove the intake air guide.
4 CLIPS
Attach tape to the areas shown on each side.
INTAKE
AIR GUIDE
FRONT BUMPER
FRONT
FENDER
•
QC71103AH
Remove six self-tapping screws and eight clips.
TAPE
2 SELFTAPPING
SCREWS
FRONT BUMPER
QC71101AH
•
Remove the grille cover.
3 CLIPS
2 SELFTAPPING
SCREWS
(flat head)
GRILLE COVER
FRONT BUMPER
© 2014 American Honda Motor Co., Inc. – All Rights Reserved.
8 CLIPS
QC71104BH
2 SELF-TAPPING
SCREWS
(flat head)
QC71102AH
AII 51184 (1404)
3 of 10
•
Release four retaining tabs on each side.
•
FRONT BUMPER
Remove the front bumper, and unplug the
vehicle connectors. Place the front bumper on
the blanket to prevent damage.
4 RETAINING TABS
4 RETAINING
TABS
FRONT
BUMPER
2 VEHICLE
CONNECTORS
(if equipped)
QC71105AH
•
With the help of an assistant, release one
retaining tab on each side.
FRONT
BUMPER
7.
QC71107AH
Remove the engine under cover.
RETAINING TAB
ENGINE UNDER COVER
FRONT
BUMPER
2 CLIPS
6 SELF-TAPPING
SCREWS
QC71108AH
QC71106AH
4 of 10
AII 51184 (1404)
© 2014 American Honda Motor Co., Inc. – All Rights Reserved.
8.
Using a tape measure, mark the heater harness at
the measurements A, B, C, and D.
250 mm
(9.8 in.)
195 mm
(7.7 in.)
WHITE
MARKER
10. Locate and remove the drain bolt and washer.
Coolant remaining in the engine jackets flows out of
the hole when the drain bolt is removed. Retain the
drain bolt; it will be used if the engine block heater is
removed.
NOTE: Use a new washer if the drain bolt is
reinstalled.
100 mm
(3.9 in.)
A
B
C
D
320 mm
(12.6 in.)
HEATER
HARNESS
QC71109AH
9.
Install one wire tie with clip on the heater harness at
the white mark (point C).
DRAIN BOLT
(Retain.)
(Use a 19 mm
socket.)
WIRE TIE
WITH CLIP
(Point C)
FRONT
WASHER
(Discard.)
BOTTOM VIEW
QC71111AH
HEATER
HARNESS
QC71110AH
© 2014 American Honda Motor Co., Inc. – All Rights Reserved.
AII 51184 (1404)
5 of 10
11. Install the engine block heater with the aluminum
washer into the bolt hole using a 24 mm socket.
Torque the engine block heater to 80 N·m
(8.2 kgf·m, 59 lbf·ft).
13. Route the heater harness in the direction shown.
Align the white mark (point A) with the vehicle
connector, and secure the heater harness to the
vehicle holder with one natural wire tie.
ENGINE BLOCK HEATER
80 N·m (8.2 kgf·m, 59 lbf·ft)
(Use a 24 mm socket.)
HEATER HARNESS
NATURAL WIRE TIE
ALUMINUM WASHER
VEHICLE HOLDER
VEHICLE CONNECTOR
Point A
(Align with the
vehicle connector.)
FRONT
QC71301AH
12. Plug the heater harness connector into the engine
block heater. Make sure the heater harness
connector is fully seated.
FRONT
QC71303AH
HEATER
HARNESS
HEATER HARNESS
FRONT
CONNECTOR
6 of 10
ENGINE BLOCK
HEATER
QC71302AH
AII 51184 (1404)
© 2014 American Honda Motor Co., Inc. – All Rights Reserved.
14. Align the white mark (Point B) with the vehicle clip.
Secure the heater harness to the vehicle harness
with one black wire tie.
VEHICLE
HARNESS
BLACK
WIRE TIE
Point B
15. Secure the heater harness to the vehicle frame hole
with one wire tie with clip installed in step 9.
WIRE TIE WITH CLIP
(Installed in step 9.)
HEATER
HARNESS
HEATER
HARNESS
SECTION
VIEW
VEHICLE
FRAME
HEATER
HARNESS
VEHICLE
CLIP
WASHER
TUBE
BLACK
WIRE TIE
QC71305AH
16. Route the heater harness as shown.
QC71304BH
HEATER HARNESS
© 2014 American Honda Motor Co., Inc. – All Rights Reserved.
AII 51184 (1404)
QC71306AH
7 of 10
17. Secure the heater harness to the vehicle harness
with two black wire ties.
BLACK
WIRE TIE
19. Route the heater harness as shown.
VEHICLE
HARNESS
SECTION
VIEW
WASHER
TUBE
HEATER
HARNESS
HEATER
HARNESS
AIR GUIDE
(Peel.)
QC71309AH
20. Align the white mark (Point D) with the vehicle clip.
Secure the heater harness to the vehicle harness
with one black wire tie.
QC71307AH
18. Route the heater harness as shown. Then secure
the heater harness to the vehicle harness with three
black wire ties.
HEATER
HARNESS
BLACK
WIRE TIE
Point D
(Align with the
vehicle clip.)
VEHICLE
HARNESS
3 BLACK
WIRE TIES
8 of 10
HEATER
HARNESS
VEHICLE CLIP
QC71310AH
QC71308AH
AII 51184 (1404)
© 2014 American Honda Motor Co., Inc. – All Rights Reserved.
21. Secure the heater harness to the vehicle harness
with three black wire ties.
23. Attach the protective cap to the front bumper, and
plug the heater harness connector into the protective
cap.
BLACK WIRE TIE
VEHICLE
HARNESS
VEHICLE
HARNESS
HEATER
HARNESS
FRONT
BUMPER
2 BLACK
WIRE TIES
HEATER
HARNESS
HEATER HARNESS
CONNECTOR
QC71311AH
22. Route the heater harness through the front bumper
as shown, with the help of an assistant install the
front bumper.
PROTECTIVE
CAP
QC71313BH
24. Secure the heater harness to the front bumper with
one black wire tie.
FRONT BUMPER
FRONT
BUMPER
BLACK
WIRE TIE
HEATER
HARNESS
HEATER
HARNESS
CONNECTOR
QC71314BH
FRONT
QC71312AH
© 2014 American Honda Motor Co., Inc. – All Rights Reserved.
AII 51184 (1404)
9 of 10
25. Reinstall all removed parts.
26. Reinstall the radiator drain plug.
27. Remove the radiator cap and fill the system with the
recommended coolant. Follow the instructions in the
Service Manual to fill the cooling system and check
for leaks. Check that there is no leak around the
engine block heater.
28. Make sure that the heater harness is routed properly
and all connectors are plugged in.
29. Reinstall the radiator cap.
30. Put the drain bolt (removed in step 10) in the glove
box.
31. Reconnect the negative cable to the battery.
32. Press and hold the radio power button for two
seconds to restore radio and navi (if equipped)
system functions.
33. Reset the clock.
34. Restore the systems back to normal operation as
described in the Service Manual if necessary.
10 of 10
AII 51184 (1404)
© 2014 American Honda Motor Co., Inc. – All Rights Reserved.