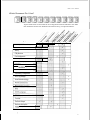
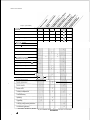
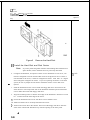
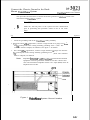
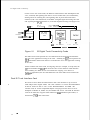
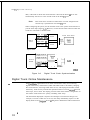
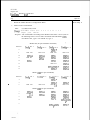
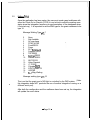
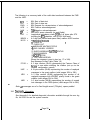
1
Issue 1 Release 2.0 January 1996
Voice
Processing
Solutions
Installation
and Service
Manual
TM,
-Trademark of
Copyright 1996,
All rights reserved.
Printed in Canada.
Corporation
Corporation
Table of Contents
About This Manual
Who Should Read This Manual ...................................................................... vii
How to Use This Manual ............................................................................... vii
Task List......................................................................................................
Procedures ..................................................................................................
Menu Maps and Other Navigation Aids.. ...................................................
Which Document Do I
.........................................................................
vii
...
viii
ix
What If Information Is Missing? ..................................................................
xi
How Do I Obtain the Documents I Need?....................................................
xi
Reader Advisories ............................................................................................ xii
...
Before You Start .............................................................................................
...
Console Tips and Techniques ....................................................................
Viewing Menus.. ................................................................................
Accepting Defaults .............................................................................
Avoiding Automatic Exit ....................................................................
xiii
...
...
Quitting an Entry Session ...................................................................
Shortcut Commands ...........................................................................
Preparing for Hardware Installation.. .............................................................. xv
Protecting Your Equipment From Damage .................................................... xvi
1 Product Description
Introduction ................................................................................................. 1- 1
. .....................................................
1
Capacities a n d Expansions ............................................................................
l-3
Model 70 Overview ................................
Model 70.. ..................................................................................................
I-3
Model 70 General Server Specifications ........................................................ l-4
Safety Compliance.. ....................................................................................
l-4
FCC Regulatory Compliance ....................................................................
Physical Specifications
................................................................................
I-4
Server Environment.. .................................................................................
Major Hardware Components ......................................................................
l-5
Cabinet ......................................................................................................
l-5
Hard Disk ..................................................................................................
l-9
...
111
Table of Contents
Limits Class of Service (LCOS) ...............................................................
Group Class of Service (GCOS) ...............................................................
Network Class of Service (NCOS) ...........................................................
17
Restriction Class of Service (RCOS) .........................................................
17
Tenant Class of Service (TCOS). ..............................................................
l-17
Special Application Mailboxes.. ...................................................................
18
Administrator ...........................................................................................
l-18
Attendant.. ...............................................................................................
l-l 8
Broadcast.. ................................................................................................
l-18
Chain .......................................................................................................
Greeting Only ..........................................................................................
18
Guest........................................................................................................
Rotational ................................................................................................
l-19
Tree.. ........................................................................................................
l-19
19
Optional Special Application Mailboxes.. .................................................
Guaranteed
Fax.. ..............................................................................
l-19
Fax Publishing .................................................................................
19
Fax Store and Forward.. ...................................................................
l-19
MESA Forms ...................................................................................
l-19
2 Installing New Systems
How To Use This Chapter ...........................................................................
2-l
Using the Task List.. ..................................................................................
Site Selection a n d Preparation.. .....................................................................
2-2
Before You Start.. ..........................................................................................
2-3
Installing the Model 70.. ...............................................................................
2-5
Customer
2-6
Turnover ......................................................................................
Task List and Procedures
3 Upgrading and Updating Systems
How T o Use This Chapter . . . . . . . . . . . . . . . . . . . . . . . . . . . . . . . . . . . . . . . . . . . . . . . . . . . . . . . . . . . . . . . . . . . . . . . . . . .
3-l
Using the Task List . . . . . . . . . . . . . . . . . . . . . . . . . . . . . . . . . . . . . . . . . . . . . . . . . . . . . . . . . . . . . . . . . . . . . . . . . . . . . . . . . . . . .
Task List and Procedures
4 Replacing
How To Use This Chapter ...........................................................................
Using the Task List.. ..................................................................................
Service Strategy.. ...........................................................................................
4-2
Table of Contents
Support Plans.. .............................................................................................. 4-3
Self-Sufficient.. ..........................................................................................
.4-3
Centigram Service Partner.. .......................................................................
.4-3
Before You Start.. .......................................................................................... 4-4
Servicing and Expanding the Model 70.. ....................................................... 4-4
Troubleshooting
Overview.. .......................................................................... 4-5
General Troubleshooting Procedure ............................................................. 4-5
Specific Troubleshooting Procedures ............................................................ 4-7
Task List and Procedures
5 System Administration
How To Use This Chapter . . . . . . . . . . . .
Using the Task List . . . . . . . . . . . . . . . . . . . . .
5-l
.
. . . . . . . . . . . . . . . . . . ...5-1
System Administration . . . . . . . . . . . . . . . . . . . . . .
5-2
Administration by Phone . . . . . . . . . . . .
Administrative
5-3
Hardware . . . . . . . . . . . .
5-4
Worksheets . . . . . . . . . . . . . . . . . . . . . . . . . . . . . . . . . . . . . .
5-4
Task List and Procedures
Appendix- Public Telecommunications Network Connection
Model 70 Connections ................................................................................ .A- 1
Shielded Cables .........................................................................................
A- 1
Jack Types .................................................................................................
A-2
Connectors and Loads.. .............................................................................
A-2
Responsibilities of the Equipment Owner ..................................................... A-3
Incidence of Harm ....................................................................................
A-3
Rights of the Telephone Company ............................................................
A-3
Coin Service or Party Line Use.. .........
A-3
list of Centigram Procedures
Index
Menu Maps
vi
.............................................
About This Manual
This manual describes how to install and service the Series 6 Communications
Server, Model 70.
Who Should Read This Manual
This manual is intended for Centigram Certified Technicians
for installing and servicing the Model
voice mail server.
responsible
Technicians must have experience with voice mail servers, PC hardware component
installation, and an understanding of basic telecommunications
They
must have completed the
Phase I and Phase II Installation and
Maintenance courses and the Model 70 update training.
If you do not meet these criteria, do not attempt to install or service the Model 70.
Please contact your regional office or the Centigram Regional Operations Manager.
How to Use This Manual
This manual contains reference information, task lists, a collection of procedures for
performing those tasks, and reader aids such as menu maps.
Task list
Use the task list, starting with a principal task, to install a new server or service an
existing server. Each task is described in more detail in a procedure. For example, if
you are installing a new server, look on the task list in the “Installing New Systems”
section. The lists are alphabetized rather than sequenced, to help technicians find the
desired task (and procedure) quickly. The following example shows how a task list is
organized:
vii
About This Manual
Release
and later
Allow Mailbox Owners t o Control Message Delivery . . . . . . . . . . . . . . . . . . . . . . . . . . . . CP
Procedures
Procedures follow the Task List of each reference chapter. Follow the steps in
Centigram Procedures
to accomplish the desired tasks. The procedures are
structured so that technicians can use the
as a simple checklist if desired, or as
step-by-step instructions.
refer you to
information such as additional
When necessary,
procedures, other manuals, tables, and menu maps. These references are found in
the procedures’ reference columns.
is numbered for document identification and referencing. Numbering does
Each
not indicate a sequence of performance.
Menu Maps and Other Navigation Aids
Most of the documents in the new Centigram document library have menu maps or
a “road map” procedure. You can refer to these document navigation aids at any
point to help you reach a menu or show you which task to perform next. The List of
Centigram Procedures at the back of the manual lists all of the procedures in the
manual and tells you where to find them. It also tells you how they are related to
each other. And don’t overlook the index; it is the fastest way to find all references to
a specific topic.
About
This
Manual
Which Document Do I Use?
Topics listed below are described in the Centigram documents indicated. This table
lists documents for the base hardware and software only, not optional features.
Activating an inactive configuration
Administration by Phone
Card
replacement
Defining a line group
Diagnostics
application
DID
Disk
replacement
Distribution
lists
Installation
procedures
ix
About This Manual
Topics (continued)
and limits
Mailboxes
Message
delivery
Message waiting lights
Paging
mailbox
Password
console
Phoneline exceptions
Power information
Prompts
Release Notes
Repairing a Centigram Series
server
Replacing a Centigram Series 6 server
Reports
Resource Manager
Service
procedures
Site preparation
System administration
*Includes: Model 70, Model 1 20, and Model 640
X
and Service Manuals.
About This Manual
What If Information Is Missing?
If the information you need is not yet available in the documents listed above, go to
these documents:
Release Notes for
Release
OA
Other existing documents, as applicable
How Do I Obtain the Documents I Need?
To obtain other Centigram documents, contact your local Centigram distributor.
Conventions Used in This Manual
The procedures in this manual use the following conventions to
how you
enter configuration information and how information is displayed on the Series 6
server console:
Press Enter
Press the Enter key. For example, “Press Enter if the current
number is correct.” On some keyboards, this key is labeled
“Return” or has a return arrow (J) on it.
Enter
Type the text shown, then press the Enter key. For example, “Enter
the line number (l-24)” means type a number from 1 through 24,
and then press the Enter key.
bold
Words or characters in bold type indicate either a value to be
entered by you exactly as shown or, when used to indicate a variable
entry, describe the type of value to be supplied by you. See example
above.
What you select from
a displayed menu
A displayed prompt
for information
(G) Current Group
Prompt: Enter a group number =
Response: Number of the line group (l-24) to be used for the application.
\
What you enter in
response to the prompt
Note:
Unless otherwise stated, press Enter after each response you enter.
xi
About This Manual
Reader Advisories
Reader advisories used in this manual are shown below.
Note:
Information especially useful in relation to this procedure.
CAUTION!
Information that helps you prevent equipment or software
damage.
CAUTION!
Information that helps
avoid electrostatic discharge
(ESD) damage to the equipment.
WARNING!
Information that helps you prevent an interruption to
telecommunications traffic.
I0
WARNING!
A hazard that can cause you personal injury.
DANGER!
Warns of a condition that could severely injure or kill you.
xii
About This Manual
Before You Start
This manual assumes that you are familiar with using a console and keyboard. This
section describes how to use the Centigram Series 6 server effectively.
Console lips and Techniques
The tips and techniques offered in the following paragraphs can make configuration
entry sessions at the Centigram Series 6 server maintenance console more productive.
Viewing Menus
l
When you finish entering a value for a parameter, the server displays an
abbreviated form of the current menu, called the “short menu.” To view
the complete current menu when a short menu is displayed, just press
Enter.
l
To return to the Main Menu from any
application
configuration menu, press X (Exit), until the Main Menu appears.
Accepting
Defaults
l
To accept a default displayed in a
just press Enter.
l
To accept a default displayed in a menu, no action is necessary.
Avoiding Automatic Exit
CAUTION!
The Centigram Series 6 server “times out” after 15 minutes.
This means that if you do not enter anything at the console for
15 minutes, the server automatically exits from the current
program. When this happens, all work that has not been saved
on the disk is lost.
To avoid being timed out and losing your work, follow these steps:
1. When you need time to think, write down the name of the current menu.
2.
Exit to the (server) Main Menu.
3. When you want to continue your work, enter the appropriate menu
options to regain your place.
. .
About This Manual
If you find that the Centigram Series 6
has timed out, follow the steps below.
If your screen is blank, press any key to reactivate the screen and then continue with
these steps.
1.
P r e s s any key to start the
2.
Enter your user ID and password (if requested).
3.
Starting from the Main Menu, enter menu options to proceed to the menu
from which the server timed out.
4.
Reenter data as needed to regain lost work.
sequence.
Quitting an Entry Session
At any point during entry of offline or online parameters, you can quit. Quitting
application
discards all parameter entries you have made and leaves the
c o n f i g u r a t i o n the way it was before you starred entering parameters.
To quit from the
Select:
Configuration Offline or Online menu:
Quit -- Forget Changes
Quit
and
forget
changes?
Response: Y to return to the
(y/n)
=
Configuration Main Menu.
Shortcut Commands
You can use the Ctrl (Control) key or the (slash) key while simultaneously pressing
another key to execute shortcut commands at an Centigram Series 6 server
maintenance console.
Type...
To do this...
Activate a timed-out console.
From the offline or online menus, or FCOS, LCOS,
GCOS menus, return to the
Configuration Menu and save any entries.
From the offline or online menus, or
LCOS,
GCOS menus, return to the
Configuration Menu without saving any entries.
Stop scrolling a displayed report.
Resume scrolling a displayed report.
Return to the
prompt is displayed.
xiv
application when a
or $
exit
About This Manual
Preparing for Hardware Installation
Before you begin to install any Model
hardware, read the following warnings.
WARNING!
An equipment grounding conductor that is not smaller in size
than the ungrounded branch-circuit supply conductors must
be installed as part of the circuit that supplies the product or
system. Bare, covered or insulated grounding conductors are
acceptable.
Individually covered or insulated equipment
grounding conductors must have a continuous outer finish
that is either green, or green with one or more yellow strips.
The equipment grounding conductor is to be
to
ground at the service equipment.
I0
WARNING!
The attachment plug receptacles in the vicinity of the product
or system must be of a grounding type and the equipment
grounding conductor serving these receptacles must be
connected to earth ground at the service equipment.
DANGER!
Never install telephone wiring during a lighting storm.
Never install telephone jacks in wet locations unless the jack is
specifically designed for wet locations.
Never touch uninsulated telephone wires or terminals unless
the telephone lines has been disconnected at the network
interface.
Use caution when installing or modifying telephone lines.
About This Manual
Protecting Your Equipment From Damage
CAUTION!
Many of the Model
components are easily damaged by
electrostatic discharge (ESD) or rough handling: line cards,
CPU cards, and hard disks are particularly susceptible to
damage. Unless instructed otherwise, observe the precautions
listed below and in individual sections during the handling of all
components.
a
If you follow these simple instructions, you
reduce the risk of equipment
trouble, down-time, and customer dissatisfaction:
..
l
Wear a grounded wrist strap
handling components. Doing so
protects the components from electrostatic discharges (ESD).
l
Do an orderly shutdown of
server before turning its power off. Refer
to Cl? 6268, “Shut Down a System,” for instructions.
Removing or installing a component
the server power is on can
severely damage both the component and its associated circuitry.
Always:
Wait 60 seconds after
turn the server power off. The hard disk
should stop spinning and be quiet.
If you need to set switches or jumpers on a circuit card, first place
the card on an anti-static mat. If such mat is not readily available,
use the card’s anti-static bag as a temporary mat. If neither a mat
nor a bag is available, do not work on the component until you
have obtained one.
Store circuit cards and other components in anti-static bags and
their original shipping boxes.
1 Product Description
Introduction
This chapter provides a high level description of the Centigram Series 6
Communications Server Model
hardware and software functions, features, and
components. It also provides general server specifications.
Expanded discussions of some of the topics in this chapter are found in other
chapters of this manual. Additional information is also located in the
Reference and
Manual and the Centigram Series Technical Reference
Manual.
Model 70 Overview
The Model 70 is based on a standard desktop PC cabinet featuring seven available
ISA slots, a 200-watt AC power supply, a 486-66 MHz CPU, an IDE hard disk, a
floppy disk drive, a special Multi-Vendor Integration Protocol (MVIP)
bus, and a modular design for quick and easy component maintenance. This server
can accommodate up to seven analog or digital adapter cards with a maximum of 30
ports (24 ports analog/30 ports digital) and up to two 500 MB IDE drives for a
maximum redundant speech storage capacity of 55 hours. (Figure l-l shows the
Model 70 block diagram.)
NC
Figure l-1
Model 70 Block Diagram
Product Description
As the block diagram shows, the Model
is a PC-like server containing a CPU,
serial port, floppy disk, mass storage, and ISA expansion slots. Three types of ISA
adapter cards can be inserted into the expansion slots: telephony interface cards
(analog and digital interface cards), telephony service cards (Fax), and computer
interface cards (Serial, Ethernet). The telephony interface cards and the telephony
service cards can also be linked to the
bus, which is a special ribbon cable
linking the adapter cards together and allowing them to share resources.
There are two general categories of mailboxes that are available in the servers at
installation: standard (user/owner) mailboxes and special applications mailboxes. All
mailboxes can be
protected.
Classes of service are assigned to each mailbox. The Features Class of Service
(FCOS), Limits Class of Service (LCOS), and Group Class of Service (GCOS)
determine what a mailbox owner’s options are and how the
function in
relation to one another and the server. The Network Class of Service (NCOS),
Restriction Class of Service (RCOS), and Tenant Class of Service (TCOS) are
related to optional features.
Standard Model 70 features include voice messaging, audible tone message waiting
signals, and notification services. The user interface consists of mnemonic (using
letters instead of numbers for commands; for example,
to play a message) and
single-digit prompts, and an online user tutorial.
The following optional features are also available with the Model 70:
Cut-Through Paging,
MESA Forms, Receptionist II, Auto
Wakeup, Integrations, MESA-Net, and
Analog. Additionally, specialty cards
can also be installed in the Model 70, such as a Fax card, Smartcard, Ethernet Card,
Serial
card, and others.
You can perform system administration and maintenance tasks either on-site or
remotely via telephone. A VT1 00 compatible terminal is required to perform
installation and maintenance, and an outboard modem with cables is required for
remote administration. (The
00 does not support full screen mode.) In
addition to adds and changes, maintenance and restore functions and system reports
are available to the system administrator.
Centigram’s
Release 6.0 is installed. To provide features, the Model 70
uses QNX , a real-time, multi-tasking operating system to control server resources.
The Model 70 supports the Audio Messaging Interchange Specification
standard and can be configured to deliver to mailboxes on other vendors’ systems.
l-2
Product Description
Capacities and Expansions
Model 70
Maximum configuration for the Model 70 includes:
7 available line/specialty card slots
l
ports (24 analog/30 digital)
l
l
MI55 IDE hard disk 2,730 mailboxes; 55 hours of message storage
or 40 hours
24 Kbps
l
Multiple, redundant hard disks (2 IDE disks
l
User/system prompts in four languages
l
Specialty cards: Fax card,
Serial
card, and Ethernet card
Product Description
Model 70 General Server Specifications
Safety Compliance
This equipment meets or exceeds requirements for safety in the US (UL 1950 1st
Edition), Canada (CSA
and Europe (TW to EN60950, IEC 950).
FCC Regulatory Compliance
This equipment meets or exceeds requirements for EM1 and telephone
interconnectability standards in the US.
Physical Specifications
Height (with feet installed)
6.25 inches (15.92 cm)
Width
16.35 inches (41.65 cm)
Depth
16.50 inches (42.67 cm)
Weight
pounds (9.5 kg)
Server Environment
Temperature
Operating: 50 95
(10 35 “C)
Nonoperating: 40 158
(8 70 “C)
Humidity
(35 “C)
Operating: 85% at 95
Nonoperating: 95% at 95
(35 “C)
Altitude
Operating: to 10,000 ft (3,000 m)
Nonoperating: to 50,000 ft (15,240 m)
1700
Noise at operator position
1-4
maximum with peripherals
ESD
15 kilovolts
AC power
100 120 volts AC, 50
Watt
200 240 volts AC, 50
Watt
60 Hz. 200
60 Hz, 200
Product Description
Major Hardware Components
The Model 70 consists of a standard desktop PC cabinet featuring seven available
ISA slots, two peripheral bays, a 200-watt power supply, a 486-66 MHz CPU, an
IDE hard disk, a
floppy disk drive, and a modular design for quick and easy
component maintenance. It also features a special Multi-Vendor Integration
Protocol (MVIP) ribb on cable bus that connects all line cards, allowing them to
switch to any shared resource within the module level. The server backplane can
accommodate up to seven analog or digital adapter cards that total between 4 and 30
ports (24 ports analog130 ports digital). Both analog and digital cards can be mixed
in the same server. The server also accommodates up to two IDE hard disks for a
maximum redundant speech storage capacity of
hours. See Figures l-2 through
l-4 for details.
All major hardware components are replaceable and are referred to as field
The Model
standard configuration upon shipment
replaceable units
includes the following major hardware components:
l
Cabinet
l
Hard Disk
l
Floppy Disk Drive
Line Cards
l
00 compatible terminal (administrative console) is required for system
A
administration and installation. For remote administration, an external modem is
also required.
Cabinet
The Model 70 is housed in a standard PC cabinet. The housing and its major parts,
listed below, are considered one component.
l
An ISA-compatible motherboard with a passive backplane, which supports
up to seven 16-bit ISA/AT compatible cards (line cards, fax cards,
Smartcard, Serial
card, or an Ethernet card).
l
A 200-watt switchable power supply, which provides power for outboard
resources, add-in boards, hard disk, and floppy disk drive. The power
supply can operate at 1 2 0 volts AC or 240 volts AC.
Figure l-2 shows the details of the rear panel. The rear panel includes the following
connectors:
l
Console Port (Serial Port 1)
provides connection to console
l-5
Product Description
Serial Port 2
(RS-232C connector) provides connection to the remote
administration/maintenance modem and optional printer
l
1
l
Parallel
not supported
l
AC Output Power Connector
l
Adapter Card Expansion Slots (7) p rovide external connection to seven
adapter cards . Although there are eight slot openings at the rear panel, the
slop opening closest to the power supply has no corresponding connector
to the motherboard.
l
Keyboard Connector
l
Voltage Switch
l
AC Input Power Connector provides connection to a
supply provided by user
l
Power Supply Fan
provides connection to a peripheral
not supported
selects operating voltage:
volt’. (default) or
provides cooling for the cabinet
2 4 0 volt
power
Product Description
Connector
1)
AC Output Power
Switch
AC Input Power
Connector
Figure
l-2
Keyboard Connector
(Not Supported)
Model 70 Rear Panel Connectors
The front panel, shown in Figure
includes the following controls and indicators:
HDD LED (Red) indicates the state of the hard disk and lights when the
hard disk is accessed
l
Power LED (G reen) indicates the power status and lights when the
server power is on
l
l
Bay for
Hard Disk covered with filter panel and EM1 shield
l
Floppy Disk Drive used an interface to install, reconfigure,
backup, and update the server software
Floppy Disk Drive Eject Button
l
ejects
diskettes
l
Floppy Disk Drive LED (Green) indicates the state of the
floppy disk drive and lights when the floppy drive is accessed
l
Power Button- turns the server on and off
l
Reset Button initiates a warm boot, which resets the server without
turning off the power supply
l
Keyboard Lock
not supported
l-7
Product
Description
3.5inch Floppy
Disk Drive
HDD LED Power LED
Bay for 3.5-inch
Hard Disk
Reset
Button
Keyboard Lock
(Not Supported)
Figure
Model
Floppy disk Drive
Eject Button
Power
Button
Floppy
Disk
Drive LED
Front Panel Controls and Indicators
The internal layout of the cabinet is shown in Figure
It includes the following:
Expansion Slots Slots are numbered 0 6. Slot 6 is closest to the
battery.
Battery
for CMOS
Power Supply
Bay Not used
Front Bezel Assembly
Contains reset button, power on/off button, drive
activity lights, power on light and speaker (between bezel and metal
chassis)
Bay and Carrier Disks
disk drive
Auxiliary Front Fan
Motherboard
l-8
Carrier contains hard disk and
and motherboard guides
floppy
Product Description
Expansion Slots
Battery
Front Fan and
Motherboard Guides
Motherboard
Figure l-4
Power Supply
Front Bezel
Assembly
(Not Supported)
Bay and Carrier for
Hard Disk and Floppy
Disk Drive
Model 70 Internal Components
Hard Disk
The Model 70 features a
IDE hard disk (M155) that stores the operating
system, speech, names, greetings, prompts, messages, and applications. (For specific
hard disk specifications, see the Centigram Series
Technical Reference
This
server can accommodate up to two disks for a maximum of 55 storage hours, with
redundancy, at
Floppy Disk Drive
The Model 70 features a
1.44 MB floppy disk drive that uses
double sided, double density diskettes. The floppy disk drive is used to install,
reconfigure, and update the server
backup mailbox and account data files,
and increase the memory storage capacity of the hard disk.
1-9
Product Description
Line Cards
Line cards are the primary interface between the Model 70 and the telephone
network. These cards control all incoming calls, including fax messages. All line
cards support the Multi-Vendor Integration Protocol (MVIP), which enables the
Series 6 server to interface with a wide range of third-party telephony cards.
Line cards are available in four or eight ports configurations, and are full-size AT
cards that plug into empty slots on the Model 70 cabinet’s backplane. There are two
general types of line cards offered: analog and digital. The analog line cards include
ports) Loop Start, Ground Start Trunk, Direct Inward Dialing Trunk, and
E
M Trunk. The digital cards offered are
(24 ports) Loop Start, Ground Start
Trunk, Direct Inward Dialing Trunk, and E
M Trunk and El (30 ports) An
external -48 volt power supply is also required when using DID, E
M, or Ground
Start line cards. For detailed line card information, see the
Series
Technical Reference Manual.
The line cards have the following features:
l
Speech digitization (analog-to-digital and digital-to-analog) and
compression
l
Line signaling and supervision
l
DTMF, progress tone detection, and synthesis
l
Control and speech buffer memory for each of two channels, and program
memory
l
Multi-Vendor Integration Protocol
support
Specialty Cards
The Model 70 can also accommodate specialty cards that support computer, fax, and
LAN services (such as, Fax cards, Smartcards, Ethernet cards, and Serial
cards).
Product Description
Fax Card
Fax cards handle incoming fax messages and support other telephone interfaces.
When the incoming fax tone is emitted, the fax card performs a “handshake” with
the fax machine that is sending the tone and processes the incoming fax. The Fax
card sends the fax to the hard disk where it is stored for later retrieval or distribution
by the user. For detailed Fax card information, see the Centigram
Technical
Reference Manual and the
Manual.
Smartcard
Smartcards provide multiple, simultaneous serial connections required for
applications such as PBX integration, host computer communication, and
Net networking. This card is compatible with EIA RS 232-C,
V.24, and
V.28 asynchronous communications standards.
Smartcards feature two, four, or eight ports and are full-size AT cards that plug into
empty slots on the Model 70 cabinet’s backplane. For detailed Smartcard
information, see the Centigram Series
Technical Reference Manual and the
Smartcard Manual.
Serial
Card
Serial
cards are replacement cards for Smartcards that provide faster
throughput, such as sixteen channels through an external adapter box. For detailed
Serial
card information, see the Centigram Series
Technical Reference Manual.
Ethernet Cards
Ethernet cards provide special local area networking capabilities. For detailed
Ethernet card information, see the Centigram Series
Technical Reference Manual.
1-11
Product Description
Major
Components
This section provides an overview of available user and server features and special
applications. Depending on your specific server configuration, the Model 70 you are
working with will include some or all of the features discussed in this section.
Software, including support for some optional features, is loaded in the Model 70
when shipped. Additional hardware is required to implement some optional
features.
For more detailed information, refer to the
Reference and
Manual.
Series 6 Communication Server
The Model 70 is one of the Series 6 Communication servers.
is a modular, open,
standards-based communication server that allows users, to make, send, receive, and
answer voice and fax messages from a single mailbox 24 hours a day, using a
pushbutton phone. The Model
is compatible with virtually every PBX and
Central Office Switch.
Software Release 6.0. The Series 6 server
The server is shipped with
uses the
operating system from QNX Software.
Mailbox User Features
Voice Mail/Messaging
The basic function of the Model
is message taking and retrieval. The mailbox
user can receive, review, save, delete, and reply to or send messages.
Several delivery options are available to users:
l
Marking a message as urgent
Making a message confidential (so that it cannot be passed on to another
user)
l
Specifying message delivery dates (future delivery)
Requesting a return receipt (verification that the message was listened to)
Customization
Users can customize mailboxes. This customization includes greetings, distribution
lists, fax delivery, and reminder calls.
1-12
Product Description
Distribution lists
A distribution list allows a mailbox user to send the same message to several other
users simultaneously. Mailbox user distribution lists are established over the
telephone. Each list is assigned an individual distribution list number.
Two types of lists are available: mailbox user distribution lists, which are accessible
only by the mailbox owner; and master, or system distribution lists, which are
established by the system administrator and accessible by all users of a line group.
The ability to create, access, or be part of a distribution is determined through class
of service assignments.
A distribution list can contain up to
members. The server allows a maximum
of 200 personal distribution lists per mailbox and
master
Distribution lists
can be nested, enabling one list to contain other lists.
Message Waiting
This feature provides a “stutter” dial tone or flashing light indication at the user’s
phone to signal that a new message has arrived. This audio indication is only
available on the telephone number associated with the user mailbox.
Notification
There are two types of
Notification: Paging and Message Delivery.
Paging notification uses a radio pager to let the mailbox user know in real-time that
there is a message waiting. If the pager is a voice pager, the server delivers the first 30
seconds of the voice message. (Message length is dependent on the pager company.)
It can also send customized alphanumeric messages.
The user can customize this feature so that the server calls up to two primary and two
alternative pager numbers. Notification can be given at specified intervals for all
messages or set to notify only when urgent messages are received.
Message Delivery provides notification to a telephone number not associated with a
pager. The Model 70 calls the designated telephone number at specified intervals,
announce the number of messages waiting for review, and ask the user to log into
their mailbox.
Optional Features
adds call processing capabilities to your Model 70 while working in
conjunction with your
software. It allows you to create automated
attendant and call processing applications, letting you control the time, destination
and method of each call processing event.
gives you the option of
1-13
Product Description
arranging the presentation of what callers hear and where callers go within the server.
It can be programmed or changed over the telephone using simple menu-driven
pushbutton commands.
Auto
Wakeup
The server allows the mailbox user to schedule wakeup or reminder calls. These calls
can be scheduled for and made from the server any time, any day and anywhere.
Each call can be directed to a specific telephone number and can occur multiple
times at specified intervals.
Cut-Through
Paging
Cut-Through paging sends the actual call-back number rather than the mailbox
number to the mailbox user’s pager.
The
application includes Fax Mail, Fax Broadcast, Guaranteed Fax, Fax
Publishing, and
Fax.. These applications allow users to send, receive,
answer, voice annotate, and distribute fax messages. It also provides automatic
and/or scheduled delivery via facsimile (download to any fax machine). The
is supplied with the Model
The
card must be
purchased separately for the feature to work.
Special Pager Terminal Protocol Paging
Special pager terminal protocol paging customizes
notification to interact
with pager systems (TNPP protocol) used by hospitals and other organizations with
private, or highly specialized, pager networks.
Receptionist
With this feature, the server answers incoming phone calls and asks callers to enter
the extension number or name of the party they wish to call. Once the information
has been entered, the server transfers
the desired extension.
Outside Caller Features
All outside caller features can be enabled/disabled from the server console. Callers who
leave messages can:
Replay and rerecord their messages
1-14
l
Make their messages urgent, placing them in front of the normal message
queue
l
Leave messages in additional mailboxes on the server
Product Description
Be transferred to the operaror or any other extension on the switch
l
System Features
Distribution lists (also see Mailbox User Features)
A distribution list allows a mailbox user to send the same message to several other
users simultaneously. Mailbox user distribution lists are established over the
telephone. Each list is assigned an individual distribution list number.
integrations
Integrations establish the connection between the telephone switch and the Model
70. They provide call information for direct and forwarded calls and message
waiting signals for the user. Integrations are transparent to
and callers.
In-band DTMF integration is standard and allows the switching system and Model
70 to communicate by exchanging tones in the voice frequency band.
Optional System Features
Analog
Analog is a system networking application that enables the Model 70 to
communicate with other vendors’ voice processing systems.
is a multimedia desktop messaging program that works with the
Centigram
and
applications. It allows you to send and
receive fax messages on your PC, and to exchange messages using your current
mail application by launching it from within
It also allows you to view all
your voice and fax messages at a glance, prioritize them, and send and receive
messages that combine voice mail and faxes.
Functional System Partition Administration (FPSA)
This feature adds a much higher level of security to Series 6 server administration for
both Customer Premise Equipment (CPE) customers and service providers. FPSA is
particularly useful to telephone companies, service providers, and large CPE
customers who want to limit access to operations, administration, and maintenance
(OA
M) functions on a departmental or individual basis. In addition, FPSA
offloads or resells certain administrative functions to restricted groups within your
organizations or within your customer base. FPSA adds security in five ways. First,
it can be activated only by a special diskette, which will be shipped upon request.
Second, FPSA controls access to all parts of the server (administration menus or
QNX) by passwords and user
Third, you can control who has access to batch
commands. Fourth, superusers can force system administrators to change their
Product Description
passcodes every number of days. Fifth, FPSA provides an audit trail (if the audit trail
is turned on) every time an administrator enters the server.
Automated or Video Dispatch
This feature enables you to establish mailboxes with specialized distribution lists for
dispatchers and field service representatives. Dispatched message activity can be
displayed on a terminal. This application is used by customers with dispatch
operations units to increase productivity and reduce dispatch costs.
Call Detail Recorder (CDR)
CDR tracks server activity for billing purposes. It records call information, such as
number of messages received, faxes delivered, and
notifications, on a mailbox
or system level. CDR enables you to bill mailbox users, cost centers, or specific
accounts directly.
Configurable Data link and Electronic Set Emulation
Integrations
Direct Data Link enables the Model 70 to use a separate data communications
circuit to receive call processing information from the PBX or CO. With Electronic
Set Emulation, the Model 70 acts as an electronic telephone set to the PBX. Both
are optional integration features.
Foreign language Prompts
The Model 70 plays all prompts in a maximum of four languages. Some of the
available languages are English, French, French hotel, Spanish, German, Portuguese,
Japanese, and Korean.
MESA-Net
MESA-Net is a digital networking application that enables up to 1500 remotely
located Series 6 servers to communicate with each other over 16 simultaneously
operating digital links. (Some of the 1500 remote Series 6 servers must be shared if
Administered
is also being used.)
Classes of Service
Classes of service define the features and capabilities of mailboxes. Six distinct
classes of service categories can be programmed and assigned independently of one
another. Classes of service can be used in combination to build multiple tiers of
service offerings or privileges. More information about classes of service can be
found in the
Reference and
Manual.
Product
Description
Feature Class of Service (FCOS)
FCOS determines what voice mail capabilities a mailbox user has and how each
call is processed. Each feature is called a feature bit. Over 200 features bits are
available. The server allows a maximum of 640
or combinations of features.
Each mailbox must be assigned an FCOS.
limits Class of Service (LCOS)
The LCOS defines all of the time and storage parameters of a mailbox by restricting
message, greeting, and outdialing digit lengths. This class of service is used to
control server resources. Up to 640
can be programmed to quantify
different categories of parameters. Each mailbox must be assigned an LCOS.
Group Class of Service (GCOS)
The GCOS defines the number of users any particular user can exchange messages
with. This class of service provides software partitioning at the mailbox level,
without requiring partitioning at the line group level.
Two types of groups can be configured: flexible, or bitmapped, GCOS, which
allows multiple groups to exchange messages; and closed, or
GCOS, which
restricts message exchange to within the defined group of users.
Up to 64 bitmapped
and 3 2 , 0 0 0 affinity
Model 70. Each mailbox must be assigned a GCOS.
can be assigned in the
Network Class of Service (NCOS)
The NCOS works in conjunction with the MESA-Net digital networking feature. It
is used to assign a user’s access and priority on a network that is set up to connect
multiple Series 6 servers.
Restriction Class of Service (RCOS)
The RCOS is a parameter assigned to mailboxes that limits what telephone number
can be outdialed. Limits are placed on the area codes or exchanges a mailbox can
Tenant Class of Service (TCOS)
The TCOS is a mailbox option used with the SMDI integration. This feature
governs mailbox interaction between user communities.
1-17
Description
Special Application Mailboxes
You can configure special application mailboxes in the Model 70. Two special
application mailboxes are already preconfigured in the software, the administrator
and attendant mailboxes. You can create combinations of special application
mailboxes for special purposes. You can find more information about special
mailboxes in the
Reference and
Manual.
Administrator
The Administrator’s mailbox is included in the preconfigured
installation.
It belongs to the system administrator and has unique special privileges. These
privileges allow you to perform mailbox adds, changes, and deletes by telephone;
create master or system distribution lists; and record the company or system greeting.
Attendant
The Attendant mailbox is also included in the preconfigured software installation.
This mailbox contains the “message of the day” greeting and a customized user
tutorial. It is also the mailbox that receives all unaddressed messages (where neither
an extension number nor a user name is entered by the caller).
Broadcast
Broadcast mailboxes allow both users and outside callers to record and send a single
message to multiple mailboxes. Voice and fax messages can be sent via the Broadcast
mailbox. Distribution lists are configured by either the system administrator or the
user. Each broadcast mailbox can send messages to up to 65,535 members.
Chain
Chain mailboxes allow callers to enter either the desired extension number, or the
name of the mailbox owner or mailbox number. Once the information has been
entered, callers are transferred to the appropriate mailbox or extension.
Greeting Only
Greeting Only mailboxes are used to provide information to callers, but do not allow
callers to leave a message. There are three types of greeting only mailboxes: voice
greeting, fax greeting, or voice and fax greeting.
Guest
A Guest mailbox is assigned on a temporary basis. It does not require an owner
name or
for access. This mailbox cannot save messages.
1-18
Product Description
Rotational
Rotational mailboxes allow constantly changing greetings, either by time and day
(period rotation) or with every call (index rotation).
Tree
Tree mailboxes route calls to preselected mailboxes when callers enter a single digit.
Callers hear a greeting which gives instructions on which single digit to enter to reach
the desired destination. Tree mailboxes can be configured to process callers with
rotary dialers.
Shared Extensions is a type of Tree mailbox which allows more than one individual
or telephone number to access the same mailbox. Discrete passcodes are assigned to
each partition within the mailbox to provide privacy for the
users.
Optional Special Application Mailboxes
Guaranteed Fax
A Guaranteed Fax mailbox is associated with the
optional feature and
creates a “never busy” fax machine. If the fax machine is busy, the call can be
forwarded to the Guaranteed Fax mailbox, which will receive the fax. Once received,
the mailbox attempts delivery to the fax machine until it gets through. The
operation is transparent to the fax sender.
Fax Publishing
With fax publishing, mailboxes can be configured to supplement prerecorded
outgoing messages with related hardcopy documents, such as product or company
information. This feature provides a convenient way to disseminate frequently
requested information to employees, customers, and outside callers.
Fax Store and Forward
This feature enables users to store and forward fax messages the same basic way they
store and forward voice messages. Fax Store and Forward provides an efficient way
to store important faxes and relay them to other related parties.
MESA Forms
MESA Forms is a template, or voice forms, application. It allows callers to leave
messages in a way that simulates written information on paper forms, such as
questionnaires, requests for information, or schedules.
l-19
2 Installing New Systems
How To Use This Chapter
This chapter provides step-by-step procedures for installing a new Model 70.
Additional information is also located in the
Reference and
Manual, Centigram Series Technical Reference Manual, and the System
Implementation Guide.
A task list and Centigram Procedures
describing new server installations are
located at the end of this chapter. The task list identifies two procedural levels of
a high-level CP and a low-level Cl?. A high-level CP provides instructions on
how to do overall tasks, such as installing a server. A low-level CP provides
instructions on more specific tasks, such as how to install a line card.
as a checklist if desired,
Readers familiar with Centigram servers can use the
while readers new to Centigram servers can use
for step-by-step instructions.
After gaining experience with this documentation, you can find your own innovative
way of using the task list. One possible approach on how to use the task list is
provided below:
Using the Task list
Select from the task list the title of the task that you want to perform and note its
high-level CP number. Flip through the
in this chapter until you find the
correct CP number. Follow the instructions given in the CP.
A reference column in each CP contains pointers, when necessary, to supplemental
information such as another procedure, a technical reference in the Centigram Series
Technical Reference
another manual, or menu maps. Use the tabs
included with this binder to find referenced supplemental information that is located
within this manual.
If you need to interrupt a CP and seek reference information, first mark the CP with
your bookmark or otherwise note down where you are in the CP. After you are
finished with the reference information, return to the CP and continue to execute the
steps where you left off.
Installing New Systems
Site Selection and Preparation
The Model
is designed to work in a typical commercial environment. Physical
space requirements are nominal. The following information describes general site
selection and preparation details. For detailed information, refer to the
Implementation Guide.
Choose a site that is:
Located near a grounded, three-pronged power outlet (for the United
States and Canada, this means a
outlet for 100 120 volt
AC or a NEMA 6
outlet for 200 240 volt AC; for any other
regions, please refer to the electrical codes of that region). Noise and surge
protection is required.
Clean and dust free
Well ventilated and away from heat sources, including direct sunlight
At least three feet from strong electromagnetic fields produced by electrical
devices (such as air conditioners, large fans, electric motors, radio and TV
transmitters, and high-frequency security devices)
Installing New Systems
Before You Start
1.
Set up an equipment log to record server model and serial numbers, the
server configuration and options found on the worksheets provided to you
by your system design engineer, and other information about the server
you might find helpful.
2.
Check the power supply setting. The 200-watt power supply is integrated
into the server to provide power for all resources, drives, cards, and
peripherals. A switch on the back panel is used to set the power supply to
operate at 115 volts AC (in the range of
volts AC; 6 amps
maximum current) or 230 volts AC (in the range of 200-240 volts AC; 4
amps maximum current). The switch is set at the factory for 115 volt AC
operation. To verify that your server has the correct setting, check the
input power selection switch on the rear chassis. See Figure 2-l for
details.
Figure 2-1
3.
Power Supply Setting
Check the power cord. In some cases, the power cord supplied with the
Model 70 might not be compatible with the type of AC wall outlet in
your region. If your power cord is incompatible, you must obtain a
suitable power cord that meets the following criteria:
2-3
Installing New Systems
The cord must be rated for use at the AC voltage available, with a
current rating that is at least 125 percent of the current product
rating.
The connector at the end of the cord that plugs into the AC
outlet must be a grounding-type male plug and must show
certification by an agency acceptable in your region.
The connector at the product end must be an IEC type CEE-22
female connector.
The cord must be less than 14.8 feet (4.5 meters) long.
nI
WARNING!
Do not attempt to modify or use the supplied AC
power cord if it is not the exact type required.
WARNING!
Do not attempt to install or remove any components
or peripherals while the Model 70 cover is removed
when the server is turned on. Hazardous voltage,
current, and energy levels are present in this product.
4.
You need a Phillips screwdriver
bit) and a medium flat-bladed
screwdriver. You should use an anti-static wrist strap and a conductive
foam pad when working on the server.
CAUTION!
Electrostatic discharge (ESD) can damage hard disks,
boards and other components. Wearing an antistatic wrist strap attached to a metal part of the server
chassis will reduce risk significantly.
5.
Be sure to do each procedure in the correct order
Installing New Systems
Installing the
70
Each Model
is shipped
per specific customer order (all hardware
and software loaded). Regardless of configuration, the base server is shipped with the
components listed below. (Additional components might be needed, depending on
specific country requirements.)
l
Model 70
l
Modem
l
Modem Cable
l
Power Cable
Figure 2-2 illustrates the server components and basic installation procedure. To
install the Model 70, follow the steps shown in the Centigram Procedures (Cl’s)
listed in the Task List at the end of this section.
Ethernet or
Switch
Telephone
Network
interface
In
I
Figure 2-2
n
Model 70 Components
2-5
Installing New Systems
Customer Turnover
After you have completed the post installation audit checklist as described in the
System Implementation Guide, turn the account over to the group responsible for
ongoing maintenance and support.
Provide the customer with appropriate telephone numbers and escalation procedures.
Discuss outstanding items to be completed, review special applications, and
communicate areas of concern.
2-6
Installation Task list
Release
Page 1 of 1
and later
Procedure
Installing New Systems
Model 70 Installation ..........................................................................
Check Installation Quality ........................................................................
Connect the Telephone Lines ...................................................................
Cl? 6258
626 1
Install Console.. ........................................................................................
CP 62 16
Install Modem ..........................................................................................
CP 6270
Install Printer ...........................................................................................
CP 6215
Install Redundant Hard Disk ...................................................................
CP 6284
Run a System Information Report ............................................................
1340
Run Verify With System Online ..............................................................
7001
Test Basic Telephony Functions.. .............................................................
CP 6201
Note:
Procedures for building the customer database are in the
Reference and
Manual.
For additional information, refer to the Centigram Series
Technical Reference Manual, and the System Implementation
Guide. For detailed information about optional features, refer to
the respective optional feature manual.
Updates to procedures and the Model
are issued to the field in
Centigram’s Notices to Installers. You should add them to this
guide, as appropriate.
Run a System Information Report
Release
Page 1 of 2
and later
This procedure describes how to run a System Information Report. The System
Information report shows all the levels of software previously loaded in the server; the
type of floppy disk d rive installed; the hard disk serial number(s); and the number of
system hours, ports, and links in the server. To run additional reports, refer to the
Reference and
Manual.
FOR THE MODEL 120 AND MODEL 70
Some system prompts in this
procedure may contain generic references to other multiple-module Centigram Series 6
products. In such cases, shaded areas indicate a difference in operations for the Model
120 and Model 70. The Model
and Model
models are equivalent to “one
module” servers. When asked for the number of the host or module, always enter “1” or
“a”.
This procedure applies to servers using either SCSI or IDE hard disks.
Reference
1. Reach the Reports Menu.
2.
Map 9
Run the System Information report.
Select:
Prompt:
(I) System Information
REPORT OUTPUT ROUTING
Console (screen)
Console with pause
Printer A
File...
(A) Append to file...
Exit (no report)
(P)
(1)
If
you
need
help
later,
type
?.
COMMAND
(C/P/l/F/A/X):
Response: C to send the report to the console without pausing
to send the report to the console, pausing as the screen fills,
1 to send the report to printer A*,
F to send the report to a file on the Series 6 server,
A to append the report to an existing file on the Series 6 server, or
X to exit report output options (no report).
* You can have one or more serial ports on your server with different
devices, depending on the configuration of your server.
The server displays the report to the output device you select. If you are sending it
to the console, use the following commands to control scrolling:
To stop scrolling:
To restart scrolling:
Press
Press
A
1340
Page 2 o f 2
Release
and later
Reference
Step
l
The following is a sample System Information Report.
SYSTEM INFORMATION
Fri Apr 28
1995
SERVICE Release 6.00 Rev A17.01 Tue Apr 25
Table
1 3 - - - - - - 1 3 - - - - - - -
Serial number for hard disk is 1234
Serial number for hard disk is 1234
System hours : 240
Hour Lock : 0
Port Lock : 0
Link Lock : 8
UI Lock : 0
Floppy Type :
session licenses: 100
client licenses: 300
Figure1
Sample
System
Information
Report
1995
620 1
Page 1 of 5
Test Basic Telephony Functions
Release
This procedure explains how to test basic telephony functions in a newly installed
Model 70.
Step
Test Telephone lines
1.
Set up your equipment as shown in Figure 1.
2.
Use the telephone test set to verify the following parameters:
l
Ringing voltage or proper E
M Signalling
l
End-to-end transmission of voice
l
End-to-end transmission of DTMF
l
Sound quality of lines (no noise or static)
l
Hunting capability of hunt lines
Telephone
Test Set
Private Branch
Test Station “A”
Operator Station
Figure 1
Post-Installation Test-Equipment Setup
Test Answering Capabilities
3.
Plug a working telephone (Test Set
into an Model 70 port.
4.
Call on Test Telephone “A,” and ensure that the Model 70 answers with the
appropriate greeting. If a port does not answer, see Table 1 for frequent problems
and where to go for more details.
Repeat the above steps for each additional port.
and later
Cl? 6201
Page 2 of 5
Release
and later
Reference
Step
Note:
This test cannot be done on installations with full PBX integration where
each port is linked to the telephone extension through software. In such
installations, plug in all telephone lines, then call each individually. See the
test plan provided with the integration
package for full details.
Table 1
Frequent Problems and Reference Documents
Possible Problem
Line card jumpers: Loop/E
settings
M
Technical Specification in the
“Replacing
chapter
Line card jumpers: addressing
Technical Specification in the
“Replacing
chapter
Line card: not seating properly
CP 6220 in Chapter 4
Line group programming
RN. A
Reference Document
Reference and
Manual
Release
6201
Page 3 of 5
and later
Reference
Check Accuracy of Voice Prompts
6.
Create two mailboxes on the system console, using Unlimited Feature Class of
Service, and the default Limits Class of Service.
and
Manual
7.
Disable the tutorial on the second mailbox.
8.
Call the first mailbox from the test telephone and go through the tutorial. Then:
a.
Press
for User Options and listen for the User Options Menu.
b. Make a message for the second mailbox.
c.
9.
Press
twice, in quick succession, to exit the mailbox and return to the
Company greeting.
Enter the number of the second mailbox. Then:
a.
Listen for “You have an unplayed message...” Do not respond. After time-out,
the Model 70 should play the entire menu: “Press to Play the current
message...”
b.
Play the message. Listen for the prompts to keep, discard, answer, etc.
to answer the message. Listen for the prompt to record additional
c. Press
comments.
d.
Press
to exit the mailbox.
10. If while doing the above steps, a prompt is missing, do a Prompts Update using the
Service Diskette. When asked if you want to clear the prompts, do so by typing
“Clear.” Then, insert the prompts diskette and reload the prompts.
6262, Ch. 5
Verify Mailbox Dialing Plan
11. Set up a dialing plan for the server.
Reference and
Configuration
Manual
Set up one test mailbox for each leading digit of the dialing plan that you are using.
13. Call the server and enter the number of the first mailbox. Repeat for additional
mailboxes. If the server refuses to accept a valid number, check your mailbox
dialing plan programming for the port group.
RN. A
6201
Page 4 of 5
Release
and later
Reference
Step
Attempt to enter an invalid mailbox number for each dialing plan position. The
server should respond: “That is not a valid mailbox number. Please enter another
mailbox number.” If a prompt is missing, do an Update using the Service diskette.
When asked if you want to clear the prompts, do so by typing “Clear.” Then, insert
the prompts diskette and reload the prompts.
Test Call Attendant Operation
15. Attach a telephone test set to Line B (Figure 1).
16. Call Line B from Test Station A. You should hear ringing on the test set.
Test each of the four attendant access routes that apply to your server. When the
dial string to reach the attendant is invoked, listen to the call progress on the test set.
Stay on the line at Station A until you are transferred to the attendant.
If while doing the above steps the call fails, do the following:
a.
Check the programming of the Call Attendant string (take two 2500 sets and
transfer one to the operator). The programming sequence should be identical to
the manual transfer operation.
b.
Check the switch hook flash timing of your server’s phoneline exceptions: long
times cause an immediate disconnect when the server issues a switch hook flash;
too short, the caller is not placed on hold.
c.
Repeat the test, this time inserting a plus
-many
after the dialed telephone number
do not transfer properly if the hangup occurs too fast.
Test Message Indicators
Create a mailbox and assign it the correct FCOS to enable the Caller’s Menu.
Reference and
Call the mailbox and leave a message. Your message should complete under each of
the following conditions:
a.
You stop speaking and the server hears three seconds of dial tone
b. You enter a valid DTMF tone
c.
The server “hears” five seconds of dial tone
d.
You reach the maximum message length allowed by the mailbox LCOS
Note:
2
The message waiting indicator should activate.
Log into the mailbox and retrieve the message. Log out. The message waiting
indicator should go out.
RN. A
Manual
Release
Cl? 6201
Page 5 of 5
and later
Reference
Test Feature Classes of Service (FCOS)
22. Create mailboxes with different FCOS.
Reference and
Manual
23. Test all features assigned to each FCOS. Be sure that appropriate prompts are
played and all server responses are correct.
24. If while doing e a b ove steps you find a problem, check the FCOS programming.
Pay particular attention to possible feature conflicts.
Test limit Classes of Service (LCOS)
Create several mailboxes and assign each a different LCOS.
Reference and
Configuration
Manual
26. Test mailboxes to ensure parameters are correct.
Test Group Classes of Service (GCOS)
Create several mailboxes with different GCOS.
Reference and
Manual
28. Make messages among mailboxes.
29. Verify that you can deliver only messages allowed by each mailbox GCOS.
RN. A
Release
Install Printer
a e
and later
The Model 70 supports one DCE serial printer using X-On/X-Off data transmission
protocols. This procedure explains how to attach this printer to the Model 70 and
refer to the
provides configuration guidelines. For detailed printer
Centigram Series
Technical Reference Manual.
Step
Verify Electronic Specifications
1.
Verify that the customer’s printer meets the specifications given in Table 1 below.
Table 1 Printer Specifications
Requirement
Parameter
Baud Rate
9600 baud
Auto Line Feed
Disabled
Line Mode
Full Duplex
Parity
None
Data Bits
8
Stop Bits
1
Data Protocol
X-On/X-Off
Verify Cabling Specifications
2.
Obtain the correct RS-232 cable for your printer. Table 2 lists all signals present at
the serial port connectors.
Note:
The Model
is shipped with a 9-pin D-type
female console cable which connects to the serial
port. The other end of this console cable is a
D-type female connector. To connect to a terminal,
personal computer, modem, or printer, you need an
RS-232 cable with a
D-type male connector
at one end of the console cable. The other end of
the RS-232 cable will vary depending on the make
and manufacturer of the device you are connecting
to.
A
6215
Page 2 of 2
Release
and later
Reference
Step
Table 2 Printer Pin Assignments
Printer
Model 70
Signal Name
Pin 1
Pin 4, Pin 5
Carrier Detect
Pin 2
Pin 20
Data Set Ready
Pin 3
Pin 2
Receive Data
Pin 4
Pin 8
Request to Send
Pin 5’
Pin 3
Transmit Data
Pin 6
Pin 8
Clear to Send
Pin 7
Pin 6
Data Terminal Ready
Pin 8
No connection
Ring Indicate
Pin 9
Pin 7
Signal Ground
..
Connect Printer
3.
Connect the 9-pin cable connector to Serial port 2 (designated “S2” in Model 70
software).
4.
Connect the
cable connector to the printer.
5. Test printer as recommended by the manufacturer’s documentation.
A
Install Console
Release
Page 1 of 5
and later
This procedure tells you how to connect the console to the Model 70. It also provides
switch settings for the most popular terminals that are compatible with the Model 70.
For detailed console specifications, refer to the Centigram Series 6 Technical Reference
Manual.
The Model 70 can support a console equipped with a keyboard and a CRT or printer
display. You need a terminal to perform administrative and service operations.
Note:
You can find
referenced in this procedure in the Centigram Series 6
Technical Reference Manual.
Reference
Verify Electronic Specifications
I.
Verify that the customer’s terminal meets the specifications given in Table 1 below.
Table 1 Terminal Specifications
Parameter
Requirement
Baud Rate
9600 baud (default)
Auto Scroll
Enable
Auto Line Feed
Disabled
Line Mode
Full Duplex
Parity
None
Data Bits
Stop Bits
1
Data Protocol
X-On/X-Off
6216
Page 2 of 5
Release
and later
Reference
Step
Verify Cabling Specifications
2.
Obtain the correct RS-232 cable for your terminal. Table 2 lists all signals present
at the serial port connectors.
Note:
The Model 70 is shipped with a 9-pin D-type
female console cable which connects to the serial
port. The other end of this console cable is a
D-type female connector. To connect to a terminal,
personal computer, modem, or printer, you need an
RS-232 cable with a
D-type male connector
at one end of the console cable. The other end of
the RS-232 cable will vary depending on the make
and manufacturer of the device you are connecting
to.
Table 2 Terminal Pin Assignments
Model
Terminal
Signal Name
Pin 1
Pin 4, Pin 5
Carrier Detect
Pin 2
Pin 20
Data Set Ready
Pin 3
Pin 2
Receive Data
Pin 4
Pin 8
Request to Send
Pin 5
Pin 3
Transmit Data
Pin 6
Pin 8
Clear to Send
Pin 7
Pin
Data Terminal Ready
Pin 8
No connection
Ring Indicate
Pin 9
Pin 7
Signal Ground
Release
CP 6216
Page 3 of 5
and later
Verify Terminal Compatibility
3.
Make sure that the customer’s terminal is one of the
00-compatible terminals
listed in Tables 3 through 7, and set switches appropriately.
If the terminal is not listed in one of the following tables and it is VT1
compatible, consult the terminal’s documentation or TR 1928 in the Centigram
Series
Technical Reference Manual to determine switch settings.
Table 3 Zenith Z-19
Note: Switches are located inside the cover.
Table 4 ADDS Viewpoint
Parameter
Parameter
Note: Switches are located at the left side of keyboard.
Bit 8 = 0
Keyboard = Lower
Parity = 0
= On
Stop Bits = 1
Interface = RS-232C
Data Bits = 7
Echo = FDX
Parity = Odd or Even
Speed = 300 baud
Note: Switches are located inside the unit.
=
Power = 60 Hz
Case = Lower
Lines/Screen = 24
Keyboard Lock = Disable
Cursor Control = Enable
Clear Screen = Disable
Local = On
Protocols 103,202 = Off
Code = Off
Ext = Off
EOT = Off
A
6216
Page 4 of 5
Release
and
Reference
Table
5
Silent 703
Note: Switches are located inside the cover latch.
Left (Open)
Note: Switches are located on the upper right corner.
Upper Case
OFF
Local copy
OFF
Table 6
Switch
Note.
IV
Setting
are located inside the top cover.
Note: Set front panel switch to 300 baud.
Release
Cl? 6216
Page 5 of 5
and later
Reference
Table 7
Parameter
Bit 8 = 0
ADM-3A
Parameter
Keyboard = Lower
Parity = Off
On
Stop Bits = 1
Interface = RS-232C
Data Bits = 8
Echo = FDX
Parity = Odd or Even
Speed = 300 baud
Note: Switches are located inside the unit.
=
Power = 60 Hz
Case = Upper or Lower
Lines/Screen = 24
Keyboard Lock = Disable
Cursor Control = Enable
Clear Screen
Local = On
Protocols 103, 202 = Off
Code = Off
Ext = Off
EOT = Off
Connect the Console
4.
Connect the
cable connector to Serial port 1 (designated “S
software).
in the
5.
Connect the 25-pin cable connector to the terminal.
6.
Connect keyboard according to manufacturer’s documentation.
7.
Test printer as recommended by the manufacturer’s documentation.
A
Check Installation Quality
Release
Page 1 of 1
and later
By following the steps below, you will be able to catch and correct all mistakes made
during the installation of the hardware. Most checks are visual and require only a few
minutes to complete.
Reference
Inspect Installation Quality
1.
Check all internal cables and connectors to make sure that they are tight.
2.
Check all peripheral cable connections to make sure they are properly labeled and
easily identifiable.
3. Check grounding.
4.
Begin building customer data base.
Reference and
Manual
Dac.
A
6261
Connect the Telephone Lines
Release
Page 1 of 2
and later
This procedure provides guidelines on how to connect Model 120 or Model 70 ports to
the buildings main distribution frame (MDF). Consult Appendix A of your
Implementation Guide before using this procedure.
WARNING!
Work closely with your project manager to prevent accidental
interruption to your telephone services.
Reference
Step
Use Correct Jacks
1.
The ports on the Model 120 or Model 70 line cards have RJ-45 modular jacks for
telephone line connections. Install the telephone lines that go to the Model 120 or
Model 70 ports in the RJ-45 jacks.
2.
To connect the telephone lines to the corresponding Model
or Model 70 ports,
use non-inverting (four-wire) telephone cables, with RJ-45 modular connectors on
each end. Observe Installation Restrictions.
The jacks should be within ten feet of the Model
or Model
Protect Your Equipment
4.
Protect the ports of the Model 120 or Model 70 line cards from power surges (for
example, those caused by lightning or power lines falling on aerial cables). Install
carbon-type or gas-type protectors on unprotected lines coming in from the central
office or an unprotected PBX. Install protectors as close as possible to where the
phone lines enter the building.
6261
Page 2 of 2
Release
and later
Reference
Connect Telephone Lines
5.
Ask you project manager where the MDF is situated. The MDF is usually situated
in a closet or storage room of the building.
6.
Have the worksheets available that show the Model 120 or Model 70 line groups
you plan to configure. Make a list of the telephone numbers and their
corresponding Model 120 or Model 70 ports.
7.
Mount the necessary number of RJ-45 modular connector blocks near the Model
or Model 70.
8.
Install standard 24-gauge twisted pair telephone wire between the
punchdown blocks and the RJ-45 modular connector blocks. If E
M signaling
leads are used, a second pair is needed for each modular connector block.
9.
Connect each pair to the terminals on the MDF punchdown block. If you want to
maintain Tip
Ring integrity, connect the Tip above the Ring connection on the
punchdown block.
10. Connect each twisted pair to the RJ-45 modular block.
11. Label the modular blocks to identify which telephone lines are connected to which
block. Also indicate in your labeling which Model
accesses.
or Model 70 port each line
Install telephone cables from the modular blocks to the corresponding Model 120
or Model 70 ports.
6270
Install Modem
Release
Page 1 of 2
and later
This procedure explains how to connect a modem to the Model 120 or Model 70.
Step
Verify Cabling Specifications
1.
Obtain the correct RS-232 cable for your modem. Table 2 lists all signals present at
the serial port connectors.
Note:
The Model
is shipped with a 9-pin D-type female console cable
which connects to serial port 2. The other end of this console cable is
a
D-type female connector. To connect to a terminal, personal
computer, modem, or printer, you need an RS-232 cable with a
pin D-type male connector at one end of the console cable. The other
end of the RS-232 cable varies depending on the make and
manufacturer of the device you are connecting to.
Table 2
Model 120 Side
Modem Pin Assignments
Modem Side
Signal Name
Pin 1
Pin 4, Pin 5
Carrier Detect
Pin 2
Pin 2
Receive Data
Pin 3
Pin 3
Transmit Data
Pin 4
Pin 6
Data Terminal Ready
Pin 5
Pin 7
Signal Ground
Pin 6
Pin 20
Data Set Ready
Pin 7
Pin 8
Request To Send
Pin 8
Pin 8
Clear To Send
Pin 9
No Connection
Ring Indicate
A
Cl? 6270
Page 2 of 2
Release
and later
Reference
Connect Modem
2.
Connect the 9-pin cable connector to Serial port 2 (designated
software).
3.
Connect the
cable connector to the modem. Configure the modem software
in the Console/Serial Port Setup option in the System Maintenance Additional
Options Menu.
4.
Test modem as recommended by the manufacturer’s documentation.
A
in the
Install Redundant Hard Disk
Release
Page 1 of 3
and later
This procedure describes how to install a redundant hard disk in the Centigram Series 6
Model 70.
DANGER!
Disconnect the system from its power source before connecting
cables, components, or both.
CAUTION!
Protect your system from ESD damage during handling of all
components.
Note:
You can find
referenced in this procedure in the Centigram Series 6
Technical Reference Manual.
Step
Reference
Observe Precautions
1.
Put on a grounded wrist strap and attach the other end to the cabinet. Doing so
protects the component from electrostatic discharge.
2.
Shut down the system and turn off the power, if you have not already done so.
CAUTION!
Removing a component while the power is on can severely damage
the component you are working on and other peripherals.
3.
Wait one minute after you turn off the power before you remove any components.
The hard disk should stop spinning and be quiet.
4. When removing a component, place it on a nonconductive surface, such as an antistatic bag. Make sure you have the anti-static bags before you begin.
5.
Put identification tags on all cables and disconnect cables from
system.
A
Cl? 6284
Page 2 of 3
Release
and later
Step
Reference
Remove the Disk Carrier
WARNING!
When the disk carrier is removed from the system, the power
switch terminals are accessible. These terminals can have
hazardous voltages present even when the power switch is turned
off. Unplug the system before performing the procedure. Failure
to do so can result in personal injury and/or equipment damage.
6. ‘Remove cabinet cover.
6224
7.
Disconnect the data and power cables from both the hard disk and the floppy disk
drive.
8.
Remove the four screws that secure the carrier to the chassis (6-32 hex head Phillips
screws). See Figure 1 for details.
7.
Slide the carrier toward the back of the system, freeing the left front tab from the
slot on the side of the adjacent drive bay. Make sure all the cabling is clear, and lift
the carrier up and out of the system. See Figure 1 for details.
Alignment
Drive Carrier
A
Cl? 6284
Release
Page 3 of 3
and later
Reference
Step
Install the Redundant Hard Disk
1 0 . Remove the plastic faceplate cover from the top slot in the front of the empty hard
disk cage located next to the floppy disk drive.
Remove the aluminum faceplate cover from the top slot of the empty hard disk cage
Jumper the redundant hard disk as a slave (redundant) drive. If there are two hard
disks in one server, one must be configured as master and the other must be
configured as slave. Hard disks are shipped from Centigram configured as
1923
13. Slide the redundant hard disk into the top slot of the hard disk cage. Use the screws
that were holding the aluminum faceplate cover to secure the disk in position.
Ensure that the hard disk faceplate is flush with the front of the Model 70 cover.
Connect the spare data and power cables to the redundant hard disk.
Install the Disk Carrier
Position the carrier above the cabinet. The front of the floppy disk drive faces the
front of the cabinet and should line up with the opening in the front panel.
16. Lower the carrier into the cabinet, lining up the front tab on the carrier with the slot
that projects from the side of the 5.25inch bay.
Slide the carrier toward the front until the left front tab and the screw holes line up.
18. Secure the carrier into the cabinet using four mounting screws (6-32 hex head
Phillips screws).
Note:
If the floppy disk drive needs to be properly aligned with the front
bezel, loosen the mounting screws holding it to the carrier by at most
one-quarter turn. Adjust the position as needed. Once the floppy
disk drive is aligned, tighten the two screws again.
19. Reconnect the data and power cables to the hard disk and floppy disk drive.
20. Reinstall the cabinet cover.
Cl? 6224
A
Page 1 of 2
Model
Installation
Release
and later
from the factory and ready to use. This procedure
The Model 70 is
provides guidelines on how to install the server. When using Centigram Procedures
referenced in this or any other procedures, disregard all instructions that apply to
other Series 6 server models.
WARNING!
Observe all equipment safety and ESD precautions detailed in this
manual.
DANGER!
To prevent injury either to yourself or others, follow QSHA safety
recommendations when lifting equipment.
Note:
You can find
referenced in this procedure in the
Technical
Reference Manual.
Reference
1.
Make sure the site is ready (as specified in the “Installing New Systems section of
this manual).
2.
Place the Model 70 near an unused 20-amp AC outlet and away from sources of
heat and magnetism. Make sure that the installation area is properly ventilated.
WARNING!
I
3.
Make sure the Model 70 power is off.
Connect the module to a dedicated
AC wall plug (U.S). For international
installation, a 220 volt power supply is required.
Note:
When connecting to a
volt power supply, be sure the rear panel
voltage switch is set to 220 volts prior to connection.
4. Ground the cabinet of the module according to Centigram recommendations and
the standards set by your organization.
TR 1900
5.
If installing a printer, connect it to Serial port 2 and test it as recommended by the
manufacturer’s user manual.
CP 6215
6.
Connect the console to the Console port, or Serial port
terminal and keyboard) and leave its power switch off.
CP 6216
7.
If you do not have worksheets with you, contact your project manager to determine
how the customer wants the Model
lines configured.
8.
Connect the telephone lines.
00 compatible
CP 626 1
Turn on the console.
A
Page 2 of 2
Release
and later
Reference
10. Turn on the system and wait for initialization.
1 1 . Run the Online System Verify of all records, and all speech and prompts.
12. Restart the server and wait for initialization.
13.
Test basic telephony functions.
14. If needed, connect an external modem to Serial port 2. (This connection requires a
null modem cable.)
X6270
15. Run a System Information Report and send it to the printer, if installed.
16. Examine the System Information Report and confirm that all features ordered
included.
Check the quality of your hardware installation.
Reference and
Manual
6258
18. Complete your post-implementation documentation.
19. Configure system
Voicememo
Reference and
Manual
20. Configure any optional features.
2
Configure mailboxes.
Reference and
Manual
22. Arrange a meeting with your project manager for customer turnover and to discuss
further plans, including a test plan.
A
System
Implementation
Guide
7001
Run Verify With System Online
Release
Page 1 of 4
and later
This procedure describes how to run an online system verify. An offline verify combines
verification of both account records and speech; in the online verify, it is possible to test
each category separately. To do a complete verify, all speech and all records must be
tested.
It is optional to log the results of the verify for use at a later time. Since the server
responds differently based on whether the results are logged, this procedure includes
steps to run the verify with and without logging the results.
If any errors are recorded, contact the Technical Assistance Center.
Reference
1.
Reach the System Maintenance Menu, then go to the System Verify Menu. Then
go to the task you want to perform.
Menu Map
Verify Records and log Results
2. Access the Record Verification Menu and specify that the results are to be logged for
future use.
Select:
(R) Verify Records
Log results ?
Response:
Y
Results of previous verify will be lost...
Please confirm by entering
Response: Y
Logging results to disk
Record Verification Menu
3.
Select the type(s) of records to verify. For standard maintenance of the server, use
“Verify All Records.” If there is a specific problem with the server, select the
appropriate record type to be verified. Note that you must look at the results from
the module where you ran the report.
Dac.
A
12
7001
P a g e 2 of 4
Release
and later
Reference
Select:
(A) Verify All Records
(B) Verify Sibling Lists
(C) Verify Copy Lists
(D) Verify Distribution Lists
(M) Verify Mailboxes
(N) Verify
Lists
(I’) Verify Phoneline Exceptions
or
(S) Verify Statistics Data
Response: The server displays dots while performing the verify, then returns to the
Record Verification Menu when done.
Verify Records Without logging Results
2. Access the Record Verification Menu and specify no logging of results.
Select:
(R) Verify Records
Log results ?
Response:
Results
Record
A
will NOT be logged
Verification
Menu
to
disk
Release
Reference
Step
3.
7001
Page 3 of 4
and later
Select the type(s) of records to verify. For standard maintenance of the server use
“Verify All Records.” If there is a specific problem with the server, select the
appropriate record type to be verified.
Select:
(A) Verify
Records
(B) Verify Sibling Lists
(C) Verify Copy Lists
(D) Verify Distribution Lists
(M) Verify Mailboxes
(N) Verify
Lists
(I?) Verify Phoneline Exceptions
or
(S) Verify Statistics Data
Response: The server displays the test results as each test is completed, then returns
to the Record Verification Menu.
Verify Speech and log Results
2. Access the Speech Verification Menu and specify that the results are to be logged for
future use.
Select:
(S) Verify Speech
results ?
Log
Response:
Prompt:
R e s u l t s o f previous v e r i f y w i l l
Please confirm by entering
Response:
L o g g i n g r e s u l t s t o disk
Speech Verification Menu
be
lost...
7001
Page 4 of 4
Release
and later
Reference
3.
Select the type(s) of speech to verify. For standard maintenance of the server, use
“Verify All Speech and Prompts.” If there is a specific problem with the server,
select either speech or prompts to be verified.
Select:
(A) Verify All Speech and Prompts
(P) Verify Prompts
or
(S) Verify Speech
Response: The server displays dots while performing the verify, then returns to
Speech Verification Menu when done.
Verify Speech Without logging Results
2. Access the Speech Verification Menu and specify no logging of results.
Select:
(S) Verify Speech
results ?
L o g
Response:
Prompt: R e s u l t s
Speech
3.
will
NOT
be
Verification
logged
to
disk
Menu
Select the type(s) of speech to verify. For standard maintenance of the server, use
‘Verify All Speech and Prompts.” If there is a specific problem with the server,
select either speech or prompts to be verified.
Select:
(A) Verify All Speech and Prompts
(P) Verify Prompts
or
(S) Verify Speech
Response: The server displays the test results as each test is completed, then returns
to the Speech Verification Menu.
A
3 Upgrading and Updating Systems
How To Use This Chapter
This chapter provides step-by-step procedures for upgrading and updating a Series 6
Model
Additional information is also located in the
Reference and
Manual and the Centigram Series
Technical Reference Manual.
A task list and Centigram Procedures
describing upgrading and updating
procedures are located at the end of this chapter. The task list identifies two
procedural levels of
a high-level CP and a low-level CP. A high-level CP
provides instructions on how to do overall tasks, such as installing a server. A
level CP provides instructions on more specific tasks, such as how to install a line
card.
Readers familiar with Centigram servers can use the
as a checklist if desired,
while readers new to Centigram servers can use
for step-by-step instructions.
After gaining experience with this documentation, you can find your own innovative
way of using the task list. One possible approach on how to use the task list is
provided below:
Using the Task list
Select from the task list the title of the task that you want to perform and note its
high-level CP number. Flip through the
in this chapter until you find the
correct CP number. Follow the instructions given in the CP.
A reference column in each CP contains pointers, when necessary, to supplemental
information such as another procedure, a technical reference in the Centigram
Series
Technical Reference
another manual, or menu maps. Use the tabs
included with this binder to find referenced supplemental information that is located
within this manual.
If you need to interrupt a CP and seek reference information, first mark the CP with
your bookmark or otherwise note down where you are in the CP. After you are
finished with the reference information, return to the CP and continue to execute the
steps where you left off.
Upgrade and Update Task list
Release
Page 1 of 1
and later
Procedure
Task
Upgrading and Updating Systems
Cl? 6483
System Software Update . . . . . . . . . . . . . . . . . . . . . . . . . . . . . . . . . . . . . . . . . . . . . . . . . . . . . . . . . . .
5402
Install Optional Feature With System Online.. .........................................
Perform an Offline Prompts Update ........................................................
Cl? 6262
Perform an Offline Software Update.. ......................................................
CP 6263
Perform an Online Increase System Hours ...............................................
CP 702 1
Note:
Procedures for building the customer database are in the
Reference and
Manual.
For additional information, refer to the Centigram Series
Technical Reference Manual and the System Implementation
Guide. For detailed information about optional features, refer to
the respective optional feature manual.
Updates to procedures and the Model 70 are issued to the field in
Centigram’s Notices to Installers. You should add them to this
guide, as appropriate.
For questions, contact TAC before starting any of these
procedures. Be sure the following tasks have been completed
before attempting any of these procedures.
l
System is stable and free of errors and corruption
l
All system backups have been performed
5402
Page
Install Optional Feature With System Online
Release
1 of 2
and later
The procedure describes how to install an optional feature with the system online. Be
sure the Optional Feature Diskette(s) and the Module Enable Diskette contain the serial
number(s) for all disk(s) in the system.
Note:
The serial number on the
Optional Feature diskette must match the
serial number of the hard disk on which
is being installed. If you
receive an error message about an incorrect serial number, contact your
support organization.
CAUTION!
If you are loading a revision support disk (RSD), do it after
completion of this procedure. Loading the RSD first,
create an
incorrect configuration.
Reference
Step
1.
Reach the System Maintenance Menu, then go to the System Maintenance
Additional Options Menu.
2.
Select the Add Optional Feature(s) program.
Select:
(A) Add Optional Feature(s)
Enter
Response:
3.
Install
Map
to add optional features,
to stop:
for Yes.
the optional feature.
Insert
Feature floppy disk in the floppy
drive.
Enter any key when ready:
Response: Insert the Optional Feature diskette, then press Enter.
4. After you have installed the Optional Feature software, the system asks if you want
to install another optional feature.
Do you want to install another optional feature?
Response: Y to install another optional feature and continue from step
N if you are done installing optional features.
The system automatically edits and saves the configuration files, then
Additional Options Menu.
Exit the
r e t u r n s t o the
Configuration Offline Menu. You see the following prompt:
W a i t f o r message w a i t i n g q u e u e s t o b e e m p t y ?
Response: N to continue.
A
12
Cl? 5402
Page 2 of 2
Release
and later
Reference
Step
6.
The following prompt appears:
Wait for paging queues to be empty?
Response: N to continue.
7.
Exit to the
Configuration
8.
Duplicate the active configuration.
Select
9.
Exit to the
Configuration
Offline Menu.
Main Menu, then go to the
(B) Duplicate Active Configuration
Configuration
(A) Activate Configuration
Main Menu and activate the
Map 2
Perform an Offline Prompts Update
Release
Page 1 of 3
and later
This procedure describes the offline process of updating the prompts on the Model 120
or Model 70.
FOR THE MODEL 120 AND MODEL
ONLY: Some system prompts in this
procedure may contain generic references to other multiple-module Centigram Series 6
products. In such cases, shaded areas indicate a difference in operations for the Model
120 and Model 70. The Model 120 and Model 70 are equivalent to “one module”
servers. When asked for the number of the host or module, always enter “1” or “a”.
This procedure applies to servers using either SCSI or IDE hard disks.
WARNING!
This procedure requires that you shut down the server,
in an
interruption to call processing.
Centigram recommends that you
nerform this
durine
of low call traffic.
Step
1.
Reach the System Maintenance Menu.
2.
Execute a system shutdown.
Select:
Map
(S) System Shutdown
Prompt: WARNING! !
This will terminate call
processing.
"shutdown"
if you really
want to do this
R e s p o n s e : shutdown
3.
Specify all modules are to be shut down.
modules to shutdown
Response: Enter the a for all modules.
l
4.
The server displays the status of each line of the specified modules as “idle,”
“active” or “stopped,” and updates the status every minute until all lines are
stopped. The server stops any calls still in progress after five minutes.
If you are executing a system shutdown, wait for the message- waiting queue to clear.
If you are executing a module shutdown on a multi-module system, do not wait for
the message waiting queue to clear.
Wait for message waiting queues to be empty?
Response: Y to wait for the queue to clear,
N to continue immediately with the shutdown.
Dac. RN. A
6262
Page 2 of 3
Release
and later
Reference
Decide if you want to wait for paging queues to clear.
Wait for paging queues to be empty?
Response: Y to wait for the queue to clear,
N to continue immediately with the shutdown.
The following messages are then displayed:
6.
Message Indicator Request Queue Lengths
active:0
untried:0
retrying:0
calls
expected:0
Paging Request Queue Lengths
active:0
untried:0
retrying:0
calls
expected:0
Specify if changes to the status of each module are to be made.
Enable
or
Disable
Modules?
Response: Y
A chart with the status of each module is displayed and then the Module
Maintenance Menu is displayed:
*** Module Status ***
I3
DIS
I4
I
Module is Enabled
Module is Disabled
Module is not configured
MODULE MAINTENANCE MENU
----------------------(D) DISABLE a module
(E) ENABLE a module
Exit
8.
Change the status of all modules to disabled, changing the status of the module the
console is attached to last.
Select:
(D) DISABLE a module
Which Module?
Response: a
"disable"
Response: disable
A
to
confirm
your
request:
Release
Reference
Step
9.
Page 3 of 3
and later
The server automatically boots to the Maintenance From Hard Disk Menu. Select
the prompts.add program.
Enter
one
of
the
names:
Response: prompts-add
10.
Load the prompts diskettes.
1st diskette containing the
return
Response: Insert Prompts Disk 1 then press Enter to continue.
Prompt:
Insert the
and press
Wait
disc
Response:
until drive light is out,
hit CR when ready.
insert
prompts
language
Press Enter again to continue.
The prompts are copied to multiple hard disks, as applicable. The process can take
many minutes, depending on the number of hard disks. The server then requests
the remaining diskettes.
Working...
Wait until drive light goes out, insert language
hit CR when ready.
disc
Response: Insert the specified diskette then press Enter to continue.
12. The server reads from the floppy disk drive and prompts for each of the remaining
diskettes. Insert the remaining diskettes and press Enter when prompted.
13. When the prompts diskettes are complete, the
displays the number of speech
blocks that have been used for the system prompts.
For this prompt partition (vid 1):
directory entries allocated out of
pointer sectors allocated out of
xxxx speech blocks allocated out of
available
available
available
Starting up processes, please wait...
Enable all modules.
Prompt: E n t e r
Response:
Select:
one
of
the
names:
(E) ENABLE a module
Which
Module?
Response: a
The server automatically resets and returns to normal operation.
Rev. A
Perform an Offline
Update
Page 1 of 5
Release
and later
This procedure describes how to update the software on a Model 120 or Model 70. It
applies only to Release 6.0 and above. To update software, the server must be shut
down and disabled using the procedure described in Cl? 6268.
FOR THE MODEL 120 AND MODEL 70 ONLY: Some system prompts in this
procedure may contain generic references to other multiple-module Centigram Series 6
products. In such cases, shaded areas indicate a difference in operations for the Model
120 and Model 70. The Model
and Model 70 are equivalent to “one module”
servers. When asked for the number of the host or module, always enter
or “a".
This procedure applies to servers using either SCSI or IDE hard disks.
Reference
Step
1.
Insert the Floppy Boot Diskette. Press the Reset button or turn on the
to the
system. The system boots from the floppy drive. The server displays the self test
results.
2.
The server reads from the floppy disk, then requests the service diskette.
Insert floppy "SERVICE 6.00" and hit return
Response: I n s e r t the diskette, then press Enter.
3.
The server reads from the floppy disk, and asks which process you want to execute.
Enter one of the names:
Response: update
CP 6263
Page 2 of 5
Release
and later
step
4.
Reference
The server reads from the floppy disk and issues a warning about the pending
process.
WARNING! !
UPDATE program ONLY updates the
system
software
files. Data such as accounts,
and speech will remain unchanged (prompts
cleared later on UPDATE program only
if told so). Any billing data files
command may
constructed via the
be incompatible with the new release. To be,
sure you will not lose billing
information,
run a billing report before doing
this update.
The SYSTEM
and CDR
information will be lost. To save
this
information,
obtain
hard
outputs BEFORE this update
In
as
order to do
a minimum:
a
complete
SOFTWARE
DISKETTES
PROMPTS
DISKETTES
* Only if you clear
process
copy
UPDATE
you
must
prompts
during
have
update
------- WARNING FOR 6.00 USERS --------YOU MUST DISABLE ALL THE HOSTS EXCEPT THIS ONE
TO BE ABLE TO USE THIS
OPTION, IF YOU HAVE NOT DONE SO, REBOOT THIS
HOST AND DO IT NOW !!!
IF YOU DO NOT WANT TO CONTINUE, THEN RE-BOOT
THE SYSTEM!! . ..OTHERWISE
. . . ENTER A CARRIAGE RETURN
Response: Press Enter.
The “Warning for 6.00 users” is for a server currently running Release 6.00, since
most servers running Release 6.00 can run the Update program online. If you do
the procedure from the Floppy Boot Diskette, you must disable all modules.
5.
If the server displays the following warning message:
Prompt C P :
write
error
or
disk
full
P l e a s e continue with the update procedure. This is not a fatal problem. However,
n o t i f y the Technical Assistance Center at (408) 428-3558 of the situation.
A
CP 6263
Release
Step
6.
Reference
If an old format of billing data is found on the server, the following message is
displayed:
Old format of billing report data found.
This data
must be deleted before proceeding with the software
update. To run any billing reports from the last
gather, reboot the system now.
Proceeding from here
will NOT result in any lost billing data provided
you have already run all needed reports from the
last gather. Note:
Future updates will not require
report files to be deleted. To proceed with the
update, enter
to delete report data:
To proceed, please enter a 'Y', OR TO
SYSTEM.
Response:
The server continues, then requests the first software diskette.
The first two lines of the following prompt are seen only if the server located billing
information.
Deleting
Deleting
When drive light goes out insert disk 1 and
press return
Response: Insert the specified diskette, then press Enter.
8.
The server requests the remaining diskettes. Each diskette takes approximately 5
minutes.
Prompt: W h e n
drive light goes out insert disk 2 and
press return
Response: Insert the specified diskette, then press Enter.
9.
Page 3 of 5
and later
After all software disks have been loaded, load the prompts.
WARNING! !
ALL prompts will be cleared from
partition(s).
If you want to clear the
prompts, type "clear"
If you want to do nothing and
continue hit
Response: clear, if new prompts are to be loaded.
Press Enter to skip this process and continue at step
.
10. The server clears all prompts on the server, then requests the first diskette.
Prompt: C l e a r i n g
all prompts..
prompt speech cleared
Insert Prompt Diskette 1 in the floppy drive.
'Y' when ready, or 'N' to quit:
Response: Insert Prompts Diskette Number 1 then Y to continue.
CP 6263
Page 4 of 5
Release
and later
Reference
Step
1 1 . The prompts are copied to multiple hard disks, as applicable. The process can take
many minutes, depending on the number of disks. The server then requests the
remaining diskettes.
Verifying diskette...
Insert Prompt Diskette 2
Enter
when ready, or
in floppy drive.
'N' to quit:
Response: Insert the specified diskette and Y to continue.
1 2 . When the prompts are complete, the server displays the number of speech blocks
that have been used for the server prompts.
speech blocks allocated out of 4000 available
to continue...
Press
Response: P r e s s Enter.
1 3 . The server has an option for additional prompts to be loaded.
Do
you
want
to
add
prompts
to
the
system?
Response: Y to add additional prompts to the existing set; follow the instructions
supplied, similar to Steps 1 0 t o 1 2 a b o v e .
Otherwise, press Enter.
1 4 . The server has an option for adding and RSD or patch:
Prompt: D o y o u w a n t t o i n s t a l l a n R S D o r P a t c h ?
Response: Enter Y to add an RSD or patch.
Otherwise, press Enter.
15. To complete the update process, you must load the Module Enable diskette and all
the optional features.
Prompt: D o e s t h e s y s t e m h a v e
Features?
Response: Y
16. Load the Module Enable diskette or the optional feature.
Prompt: I n s e r t
drive
Enter
Feature Setup diskette in the floppy
when ready :
Response: Insert the diskette, then press Enter.
A
Release
Page 5 of 5
and later
Reference
Step
1 7 . The server loads the feature and asks if there are more.
XXX Optional Feature is now installed...
Is there another Optional Feature in the
system?
Response: “XXX” represents the name of the optional feature.
Enter
if there are more. Repeat steps 1 6 and 1 7 until the Module
Enable diskette and all optional features have been loaded.
Enter N, to end adding optional features and continue with the process.
18. If the server is a multi-module server, or contains a QNET card in Module the.
following message is displayed. If the server is a single module, go to step 1 9 .
Do NOT reset this module.
Press the reset button on all other modules, then
carriage return.
Response: Reset the specified modules and press Enter.
The server waits for the other modules to boot before it continues.
Waiting for the other modules to boot up...
Updating configuration...Please wait....
Messages are displayed to the screen showing conversion of records, if any.
Exit and reboot to complete the update.
A
Offline System
Update
Page 1 of 1
Release
and later
This procedure describes how to update the system software on your Centigram Series 6
server to a new release while the server is offline.
Reference
1.
Review the System History File for any software modifications made to the server.
5304, Ch. 5
2.
Run a System Information report and verify that the serial number(s) of the server
hard disks are listed on the Service Diskette and all Optional Feature Diskettes.
1340, Ch. 2
3.
If you use billing reports, perform a “gather” of all billing information.
Reference and
Manual
4.
If you use billing reports, print out the billing reports.
5.
Print out the
for future reference.
Reference and
Manual
6.
Print out any CDR
you need for future reference.
7.
Run a System Verify. Use either the online or offline verify program.
CP 5701, Ch. 5
8.
Perform a floppy backup. A backup is done before and after the update procedure.
7001, Ch. 2
CP 5703, Ch. 5
9.
Shut down the system.
CP 6268, Ch. 5
10. Update the software, prompts, Module Enable diskette,
diskette,
Receptionist II diskette, and currently installed optional features. If any new
optional features are to be added to the server, they are loaded in step 11 of this
process. Allow the system to reboot at the end of the software update.
CP 6263
11. Load any new optional features. Features previously loaded on the system were
updated in step 10; this step is to load only new optional features. If the server did
not ask for the Module Enable diskette, install it now. If there are no new optional
features to be added, go to step
CP 5402
12. Perform a second floppy backup using a new set of diskettes.
5703,
A
5
7021
Page 1 of 2
Perform an Online Increase System Hours
Release
and later
This procedure describes the online process of increasing the system hours on an
Centigram Series 6 server. The service diskette with the hard disk(s) serial number(s) is
required to complete this process.
FOR THE MODEL 120 AND MODEL 70
Some system prompts in this
procedure may contain generic references to other multiple-module Centigram Series 6
products. In such cases, shaded areas indicate a difference in operations for the Model
120 and Model 70. The Model
and Model 70 models are equivalent to “one
module” servers.
asked for the number of the host or module, always enter “1” or
a .
This procedure applies to servers using either SCSI or IDE hard disks.
Step
Reference
1.
Reach the System Configuration Menu, then to go the
Main Menu.
2.
Increase the system hours.
Select:
Prompt:
(C) Increase System Hours
Please insert t h e
service
diskette in
when ready.
Response: Insert the service diskette and press Enter.
drive
and
enter
any
Configuration
Menu Map 1
floppy
key
The system reads from the floppy disk and returns to the command line when done.
3.
Reach the Reports Menu.
Menu Map 9
4. Verify that the hours have been changed by running a System Information Report.
A
Cl? 7021
Page 2 of 2
Release
Select:
Prompt:
and later
(I) System Information
REPORT OUTPUT ROUTING
Console (screen)
Console with pause
(1) Printer A
(F) File...
(A) Append to file...
(X) Exit (no report)
If you need help later, type
COMMAND
(C/P/l/F/A/X):
Response: C to send the report to the console without pausing
to send the report to the console, pausing as the screen fills,
1 to send the report to printer A*,
F to send the report to a file on the Series 6 server,
A to append the report to an existing file on the Series 6 server, or
X to exit report output options (no report).
* You can have one or more serial ports on your server with different
devices, depending on the configuration of your server.
The system displays the report to the output device you select. If you are sending it
to the console, use the following commands to control scrolling:
To stop scrolling:
To restart scrolling:
Press Ctrl-S
Press Ctrl-Q
Verify that the system hours entry reflects the new hours for the system.
Dac.
A
4 Replacing
How To Use This Chapter
This chapter provides troubleshooting instructions and step-by-step procedures for
replacing
in a Series 6 Model 70. Additional information is also located in the
Reference and Configuration Manualand the Centigram Series Technical
Reference Manual.
A task list and Centigram Procedures
d
FRU replacement procedures
are located at the end of this chapter. The task list identifies two procedural levels of
a high-level Cl? and a low-level CP. A high-level Cl? provides instructions on
how to do overall tasks, such as installing a server. A low-level Cl? provides
instructions on more specific tasks, such as how to install a line card.
as a checklist if desired,
Readers familiar with Centigram servers can use the
while readers new to Centigram servers can use
for step-by-step instructions.
After gaining experience with this documentation, you can find your own innovative
way of using the task list. One possible approach on how to use the task list is
provided below:
Using the Task list
Select from the task list the title of the task that you want to perform and note its
high-level CP number. Flip through the
in this chapter until you find the
correct CP number. Follow the instructions given in the CP.
A reference column in each CP contains pointers, when necessary, to supplemental
information such as another procedure, a technical reference in the Centigram Series
6 Technical Reference
another manual, or menu maps. Use the tabs
included with this binder to find referenced supplemental information that is located
within this manual.
If you need to interrupt a CP and seek reference information, first mark the CP with
your bookmark or otherwise note down where you are in the CP. After you are
finished with the reference information, return to the CP and continue to execute the
steps where you left off.
4-l
Replacing
Service Strategy
The Model
is designed to make installation, system expansions, and service and
repair an easy process. Maintenance and administration, either on-site or remote,
should be performed on a regular basis.
Field repairs are simplified by replacing components within the Model 70. The
eight major components (cabinet, hard disk(s), floppy disk drive, and line cards) are
all field replaceable units
A typical service call to repair a failed Model 70 consists of the following steps:
4-2
1.
If possible, run the
and usage reports to isolate the fault.
2.
Check all major cable and component connections.
3.
Refer to the troubleshooting section of this chapter and follow the
recommended procedures.
4.
Remove and replace each major FRU, and try to turn on power to the
server.
5.
If the server boots after a specific FRU has been replaced, return the
defective FRU for repair.
Replacing
Support Plans
The distributor must choose one of two support options:
l
l
Self-sufficient
Centigram Service Partner
Self-Sufficient
Distributors who elect the self-sufficient option will handle installation and service
issues with their own Centigram Certified Technician (CCT). These distributors
must have a technical support group to field questions from their technicians.
Centigram Service Partner
Distributors who elect the Centigram Service Partner option will choose a third party
that has
who have completed the Model 70 installation and service training to
handle all of their installation and service activities. The Centigram Service Partner
should have a technical support group for its technicians.
If the distributor selects this option, distributor technicians should not work with the
Model 70.
Please check with your regional office to determine which plan has been selected and
your individual responsibilities for installation and service.
4-3
Replacing
Before You Start
I0
WARNING!
When the server is turned on or while the Model 70 cover is
removed, do not attempt to remove or replace any components
or peripherals. Hazardous voltage, current, and energy levels
are present in this product.
CAUTION!
Electrostatic discharge (ESD) can damage disks, boards and
other components. Wearing an anti-static wrist strap attached
to a metal part of the server chassis will reduce risk significantly.
DANGER!
Before removing or replacing hardware on your server, make
sure the power is off.
Note:
Be sure to do each procedure in the correct order.
Servicing and Expanding the Model 70
Follow the steps shown in the Centigram Procedures
of the Task List at the
end of this chapter to service, repair, and expand the capabilities of the Model 70.
Replacing
Troubleshooting Overview
This section addresses general hardware troubleshooting, or “corrective
maintenance.” Detailed hardware and software troubleshooting information is
located in the Centigram Series
Diagnostics Manual.
This section assumes the Model
has been in service and has subsequently failed.
If you experience problems during installation, double check your work to ensure it
was done properly and try to restart the server. If the server still fails, call your
technical support group for additional instructions.
The troubleshooting process is actually a series of linked processes that include
problem recognition, diagnosis, problem or fault isolation, repair, and repair
verification.
General Troubleshooting Procedure
Troubleshooting methods depend on a technician’s experience and therefore can vary
widely. Centigram recommends a systematic approach that you can adapt to most
methods. This approach consists of four phases looped as one continuous process:
l
Verify the Problem: Ask what has gone wrong? Have any changes been
made to the server?
.
Isolate the Faulty Unit: Use a process of elimination.
l
Repair the Problem: Make sure you determine how and when to make the
repair.
l
Verify the Repair: Use diagnostic tools to confirm.
In other words, first you need to find out exactly what the problem is. Then you must
consider the cause(s) of the problem. Finally, you have to repair the server and check your
work. To determine possible causes, you might pose the following questions:
4-5
Replacing
Significance
Q uestion
Did the server fail during hours
of high-peak traffic?
If yes, you could suspect software or
application problems, or PBX problems.
Was the server working and then If yes, you could exclude server software
suddenly failed during low traffic problems.
hours?
Did the server fail after a
hardware expansion or upgrade?
If yes, suspect defective new hardware, a
hardware configuration problem, a
hardware incompatibility problem, or an
installation problem.
Are the problems intermittent?
If yes, there could be a loose cable or other
random component failures.
Has the company hired new
employees?
If yes, the server might be exceeding
original capacities.
Have users been properly
trained?
If no, problems may be caused by misuse
of the server.
Has the server been maintained
regularly?
If no, problems may arise. Run System
Verify monthly.
Refine your isolation process:
1.
Run a
Report to see if there have been an unusual number of
system errors or resets. Do not delete the
2.
Examine the
for errors. See if you can find patterns that indicate a
single trouble source.
3.
Refer to the specific troubleshooting procedure.
4.
Run the Diagnose a Disk With System Online program
program should detect most problems with the hard disk.
5.
If the Diagnose a Disk With System Online program passes, run the Run
Verify With System Online program (CP
Check all records, and all
speech and prompts.
7029). This
If the Online System Verify program passes, inform users that you are
going to shut down the server. Give users a reasonable amount of time to
log out of the server.
7.
4-6
Shut down the system (CP 6268).
Replacing
Specific Troubleshooting Procedures
The following troubleshooting procedures are groups by topic.
What Happens
What to Do
Application Software 1.
Problems
2.
Power Supply
Problems
Make sure all cables are installed correctly.
Verify that server hardware configuration is set correctly.
3.
Refer to the
Series Diagnostics Manual for assistance.
Verify server software is properly configured for the server. Try to
reload the software. If this fails, contact your technical support
group for additional instructions.
1.
Measure voltage
10%.
2.
Make sure the server is plugged in.
3.
Make sure all cables are installed correctly.
4.
Check for short-circuits or defective peripherals by unhooking
each peripheral one at a time and turning on power to the server.
When the server starts, you have isolated the problem.
1.
Call all stations. The problem could be associated with a bad
station port rather than with the Model 70.
2.
Check for loose connections.
3.
Remove line cord from line card. Plug into a single line loop
phone and call the station. Does the phone ring? Do you get dial
tone of line? If not, then bad PBX port or bad line cord. Replace.
with voltmeter. Voltage should be +/-
Communications
Failure
Server not answering
calls
Call is answered, but
followed by silence
4-7
Replacing
What to Do
What Happens
Console/Terminal
Problems
Characters on-screen
are distorted or
incorrect
Characters do not
Make sure the terminal is plugged in and turned on.
2.
Check the terminal cable connectors at both ends.
3.
Check the brightness and contrast controls.
4.
Check the console speed, baud rate, and setup.
5.
Enter
to clear the
Reset the console.
7. Restart the server.
8.
1.
Console function is
missing a prompt or
2.
does not react to entry
3.
Server resets
terminal’s baud rate
on restart
4-8
1.
Check that Green LED on backplane is lit. If not lit, replace
backplane fuse.
Check console terminal settings.
Reset, then try again.
If still malfunctioning, do a floppy disk backup first. Then
perform an update or reinstall server software using a different set
of diskettes.
Disable auto baud detection on the terminal.
Replacing
What Happens
What to Do
Floppy Disk
Drive Problems
light does not
on when drive is in
boot from
Floppy disk drive.
Make sure floppy disk drive cables are properly installed.
Make sure you are using the correct floppy book diskette
2.
Make sure the floppy book diskette is in the floppy disk drive.
3. Make sure the floppy disk drive light goes on when you turn on
the server.
4.
Use On-Site Diagnostics from the
disk menu.
from the hard
5. Turn power off, remove the floppy disk drive and install the spare
floppy disk drive (CP 6222). Turn the power on and try again.
6.
If the server can be started from the spare floppy disk drive, return
the original floppy disk drive for repair.
Cannot backup to
diskette
1.
Diskette might be defective or it might be full. Try another
diskette.
Update, install, or
increase hours fails
1.
Is service diskette write-protected? If so, disable write-protection.
If it still fails, call your technical support protection for a new
diskette.
2.
Is the service diskette properly serialized?
3.
Check the floppy disk drive for failure.
4-v
Replacing
What Happens
to Do
Hard Disk
Problems
Light does not go on
when hard disk is in
use.
1.
Measure voltage
10%.
with voltmeter. Voltage should be +/-
2.
Make sure power and signal cables for the hard disk are properly
installed.
3.
Check to ensure the hard disk is properly configured (see the
Communications Server Technical Reference Manual).
You are receiving:
1. Run Diagnose (Cl? 7029).
“Doubly allocated
speech blocks” or
“Out of range
message number” or
“Invalid Reference
Count”
2.
If Diagnose passes, run System Verify (CP 5701).
3.
If System Verify passes and you are still receiving the messages, call
your technical support group.
You are receiving:
1. Check cable connections.
“Self Test 78” error
2.
Replace the hard disk (CP 6221).
1.
Bring up the Configuration Report (Centigram Series Diagnostics
Manual). Check that the correct PBX lines terminate in the
corresponding Model 70 ports. Check that correct line group for is
chosen.
2.
If a data link is installed, check it or run the event line monitor
(see
Troubleshooting Guide).
3.
Compare PBX dial strings of working extensions with nonworking extensions.
4.
Check extension forwarding targets in PBX.
5.
Compare Message Waiting indicator types.
6.
Check that the mailbox is properly configured
Integration
Problems
Some extensions call
forward properly with
greeting, but some do
not.
4-10
Replacing
to Do
What Happens
Card Problems
voice quality on
calls
and/or
of words
1.
Use another telephone line and make test
improves, it is probably not the line cards.
If quality
2.
Check line current between the telephone switch and the line card.
DB level should be -6 to -12.
3.
Check for noise on CO trunks.
1.
Test the telephone lines’ signal-to-noise ratio.
2.
Check for nearby sources of hum or noise (R-F, FM, motors, etc.).
Connect the appropriate line filter to the line card. Using a
Digigrabber, check
level of DTMF digit. If
to
then
need 600 ohm load.
3.
Check levels on telephone lines to ensure they are normal.
4. Make sure user’s phone is working.
All other line card
problems
5.
With an oscilloscope, check line noise.
6.
Check power supply voltages.
7.
Replace line card
1.
Ensure that switch S-l is in the Ready position.
2.
Exchange the phone line (not applicable for Integrations).
3.
Read and interpret
4.
Use either a 2500 set or a hand set to test ringing, DTMF, and
speech path.
6220).
Report.
5. With power off, reset line card and retry. Check backplane fuse.
6. With power off, reseat line card (Cl? 6220).
7. With power off, replace the line card with a new one reconfigured
for the application
6220).
4-11
Replacing
What Happens
What to Do
System and
Miscellaneous
Problems
when prompt
be heard
Server resets without
apparent reason
Company greeting
sounds distorted
1. Check line card.
2.
Check to see if the problem is common to all line groups.
3.
Check to see if user interface (offline menu) is set to standard.
4.
Reload the prompts diskettes (Cl? 6262).
1.
Measure server voltage
with voltmeter. Voltage should
be
0%. Make sure fans are running and check ground.
2.
Make sure power connections are properly isolated from other
devices.
3.
Check the telephone lines and related equipment for irregular
activity.
4.
If Tellabs equipment is present, check the shelf voltage/ground.
5.
Check
6.
Check
1.
Run Diagnose to check for media problems (CP 7029).
2.
Run System Verify of all records and all speech prompts
for errors. If errors are found, check configuration.
power on the last line card on the server.
7001).
3. Use a regular telephone, re-record the company greeting. Do not
use the Attendant console.
4-12
FRU Replacement Task list
Release
Task
Page 1 of 1
and later
Procedure
Replacing
Remove/Install
Remove/Install
Remove/Install
Remove/Install
Note:
Cabinet Cover . . . . . . . . . . . . . . . . . . . . . . . . . . . . . . . . . . . . . . . . . . . . . . . . . . . . . . . . . . . . .
Floppy Disk Drive . . . . . . . . . . . . . . . . . . . . . . . . . . . . . . . . . . . . . . . . . . . . . . . . . . . . . .
Hard Disk. . . . . . . . . . . . . . . . . . . . . . . . . . . . . . . . . . . . . . . . . . . . . . . . . . . . . . . . . . . . . . . . . . . . . . . . .
Line Card . . . . . . . . . . . . . . . . . . . . . . . . . . . . . . . . . . . . . . . . . . . . . . . . . . . . . . . . . . . . . . . . . . . . . . . . . .
CP 6224
6222
CP 6221
6220
Procedures for building the customer database are in the
Reference and
Manual.*’
For additional information, refer to the Centigram Series
Technical Reference Manual, and the System Implementation
Guide. For detailed information about optional features, refer to
the respective optional feature manual.
Updates to procedures and the Model
are issued to the field in
Centigram’s Notices to Installers. You should add them to this
guide, as appropriate.
6220
Remove/Install a Line Card
Release
Page 1 of 4
and later
This procedure describes first how to remove and then how to install a line card in a
Centigram Series 6 Model 7 0 .
WARNING!
This procedure requires that you shut down the system, which results
Centigram
in an interruption to call processing on the server.
recommends that you perform these steps during periods of low
DANGER!
Disconnect the server from its power source before connecting either
cables or comnonents.
CAUTION!
Protect your server from ESD damage
comnonents.
Note:
handling of
You can find
referenced in this procedure in the Centigram
Technical Reference Manual.
6
Reference
Step
Observe Precautions
1.
Put on a grounded wrist strap and attach the other end to the cabinet. Doing so
protects the component from electrostatic discharge.
2.
Shut down the system and turn off the power, if you have not already done so.
CAUTION!
Removing a component while the power is on can severely damage
the component you are working on and other peripherals.
3.
Wait one minute after you turn off the power before you remove any components.
The hard disk should stop spinning and be quiet.
4. When removing a component, place it on a nonconductive surface, such as an antistatic bag. Make sure you have the anti-static bags before you begin.
5.
Put identification tags on all cables and disconnect cables from the server.
A
Cl? 6220
Page 2 of4
Release
and later
Reference
Remove the line Card
6. Remove the cover to the server.
Identify the line card you want to remove. Disconnect all cables from the board
you are going to remove.
8.
Looking at the line cards from the front of the cabinet, locate the screws that secure
the cards in the mother board along the back panel. Remove the screw that holds
the line card retaining bracket to the cabinet, as shown in Figure 1.
9.
Holding the card at each end, carefully pull the card straight out until the edge
connectors are free. Be careful not to scrape the card against other components.
CAUTION!
If removing a line card and not replacing it, install a slot cover
over the vacant guide slot in the server back panel.
a.
Place the lower end of the cover so that the metal tab fits
outside, hooking over the cabinet edge. Let the cover lean
inward; do not push in or down yet.
b.
Pull the slot cover up far enough to hook the prong over
the guide and bring it flush with the cabinet wall. Push
down to secure the slot cover in place. The slot opening
must be covered to maintain the electromagnetic
emissions characteristics of the server and ensure proper
cooling inside. See Figure 2 for details.
If you are not replacing the removed line card, also remove the
cables associated with it.
10. Place the line card in an anti-static protective wrapper and prepare it for return and
repair.
A
6224
Release
Step
6220
Page 3 of 4
and later
Reference
Figure 1
Remove the
Card
Figure 2 Slot Cover
A
CP 6220
Page 4 of 4
Release
and later
Reference
Install the line Card
6. Verify that you have the correct kind of line card for this server.
I-R 1920
If you are expanding the server and installing a line card into a previously unused
slot, remove the slot cover.
a.
Insert the tip of a small flat-bladed screwdriver in the slot at the lower inside end
of the slot cover.
b.
Slightly twist the screwdriver, popping up the slot cover. From inside the
cabinet, lift the slot up and out.
CAUTION!
Be careful not to damage other components when removing the
slot cover. You might want to remove cards on either side of the
empty slot before you begin to remove the slot cover.
8.
Remove the line card from its wrapper, and place it on a grounded, static-free
surface, component side up.
9.
Record the card’s serial number in your equipment log.
10. Set the line cards ID jumpers, configuration jumpers and channel switch settings.
For detailed line card configuration procedures, see the
Series Technical
Reference
I. Hold the card by the top edge or upper corners and firmly press into the connector
on the motherboard. (Line cards can be installed in slots O-5. The server can only
support a maximum of 6 line cards.)
Align. the rounded notch in the retaining bracket with the hole in the slot frame.
13. Insert a 6-32 hex head Phillips screw, but push the notch against the screw before
tightening. Otherwise, the bracket might interfere with the bracket of an adjacent
slot or with another line card.
14. Connect cables to the installed line card.
15. Check the quality of your work and to see that no tools or loose parts are inside the
server.
16. Install the server cabinet.
17. Reconnect all cables to the server. Remove the identification tags from the cables.
CP 6224
This procedure first describes how to remove and then how to install the hard disk in the
Centigram Series Model
It also describes how to remove and reinstall the disk
carrier. The drive carrier houses both the hard disk and the floppy disk drive.
DANGER!
Disconnect the system from its power source before connecting
cables, components, or both.
CAUTION!
Protect your system from ESD damage during handling of all
components.
Note: You can find
referenced in this procedure in the Centigram
Technical Reference Manual.
Reference
Step
Observe Precautions
1.
Put on a grounded wrist strap and attach the other end to the cabinet. Doing so
protects the component from electrostatic discharge.
2.
Shut down the system and turn off the power, if you have not already done so.
CAUTION!
Removing a component while the power is on can severely damage
the component you are working on and other peripherals.
3. Wait one minute after you turn off the power before you remove any components.
The hard disk should stop spinning and be quiet.
4.
When removing a component, place it on a nonconductive surface, such as an antistatic bag. Make sure you have the anti-static bags before you begin.
5.
Put identification tags on all cables and disconnect cables from the system.
A
6221
Page 2 of 5
Release
and later
Reference
Remove the Disk Carrier
WARNING!
When the disk carrier is removed from the system, the power
switch terminals are accessible. These terminals can have
hazardous voltages present even when the power switch is turned
off. Unplug the system before performing the procedure. Failure
to do so can result in personal injury and/or equipment damage.
6. Remove cabinet cover.
7 . Disconnect the data and power cables from both the hard disk and the floppy disk
drive.
8.
Remove the four screws that secure the carrier to the chassis (6-32 hex head Phillips
screws). See Figure 1 for details.
9.
Slide the carrier toward the back of the system, freeing the left front tab from the
slot on the side of the adjacent drive bay. Make sure all the cabling is clear, and lift
the carrier up and out of the system. See Figure 1 for details.
A
6224
Release
6221
Page 3 of 5
and later
Reference
Step
Drive Carrier
Figure 1
Remove the Hard Disk
Remove the Hard Disk
10. Remove all screws securing the hard disk to the carrier (there are usually three or
four). Do not remove the EM1 shield and the filter panel at the front of the bay.
11. Remove the hard disk from the carrier. See Figure 2 for details.
12. If required, transfer data from the old disk to the new disk.
Cl’ 6592, Ch. 5
Place the hard disk on an anti-static wrapper.
Note:
If you are performing fault isolation, install the hard disk into the
spare cabinet for testing. If you are replacing the hard disk, prepare it
for return and repair.
A
Release
and later
Reference
Figure 2
Remove the Hard Disk
Install the Hard Disk and Disk Carrier
Note:
6.
If you are performing fault isolation and installing the hard disk into a
spare cabinet, remove the disk carrier as previously described.
Configure the hard disk, if required. If there are two hard disks in one server, one
must be configured as master and the other must be configured as slave. If there is
one hard disk in the server, it must be configured as master. Hard disks are shipped
from Centigram configured as master. If you are replacing one disk in a two-disk
system, be sure to jumper the new disk to match the master or slave disk to be
replaced.
Slide the hard disk into the carrier beside the floppy disk drive and orient in the
same direction. The component side of the hard disk should be placed toward the
carrier rather than toward the floppy disk drive.
8.
Align the mounting holes so that the front edge of the hard disk is between 0.5 inch
to 1 .O inches from the front edge of the carrier.
9.
Secure the hard disk to the carrier with three or four suitable screws.
10. Make sure the drives are securely fastened in the carrier.
11. Position the carrier above the cabinet. The from of the floppy disk drive faces the
front of the cabinet and should line up with the opening in the front panel.
1923
Release
CP 6221
Page 5 of 5
and later
Reference
Lower the carrier into the cabinet, lining up the front tab on the carrier with the slot
that projects from the side of the
bay.
Slide the carrier toward the front until the left front tab and the screw holes line up.
14. Secure the carrier into the cabinet using four mounting screws (6-32 hex head
Phillips screws).
Note:
15.
If the floppy disk drive needs to be properly aligned with the front
bezel, loosen the mounting screws holding it to the carrier by at most
one-quarter turn. Adjust the position as needed. Once the floppy
disk drive is aligned, tighten the two screws again,
Connect the data cables.
A
6221
Page 4 of 5
Release
and later
Reference
Step
Figure 2
Remove the Hard Disk
Install the Hard Disk and Disk Carrier
Note:
If you are performing fault isolation and installing the hard disk into a
spare cabinet, remove the disk carrier as previously described.
6.
Configure the hard disk, if required. If there are two hard disks in one server, one
must be configured as master and the other must be configured as slave. If there is
one hard disk in the server, it must be configured as master. Hard disks are shipped
from Centigram configured as master. If you are replacing one disk in a two-disk
system, be sure to jumper the new disk to match the master or slave disk to be
replaced.
7.
Slide the hard disk into the carrier beside the floppy disk drive and orient in the
same direction. The component side of the hard disk should be placed toward the
carrier rather than toward the floppy disk drive.
8. Align the mounting holes so that the front edge of the hard disk is between 0.5 inch
to 1 .O inches from the front edge of the carrier.
Secure the hard disk to the carrier with three or four suitable screws.
10. Make sure the drives are securely fastened in the carrier.
1. Position the carrier above the cabinet. The front of the floppy disk drive faces the
front of the cabinet and should line up with the opening in the front panel.
A
1923
6221
Release
Page 5 of 5
and later
Reference
Lower the carrier into the cabinet, lining up the front tab on the carrier with the slot
that projects from the side of the
bay.
13. Slide the carrier toward the front until the
front tab and the screw holes line up.
14. Secure the carrier into the cabinet using four mounting screws (6-32 hex head
Phillips
screws).
Note:
15.
If the floppy disk drive needs to be properly aligned with the front
bezel, loosen the mounting screws holding it to the carrier by at most
one-quarter turn. Adjust the position as needed. Once the
disk drive is aligned, tighten the two screws again.
Connect the data cables.
A
Remove/Install Floppy Disk Drive
Release
Page 1 of 5
and later
This procedure first describes how to remove and then how to install the floppy disk in
the Centigram Series 6 Model 70. It also describes how to remove and reinstall the drive
carrier. The drive carrier houses both the floppy disk drive and the hard disk. For
detailed floppy disk drive
see TR 192 1 in the Centigram Series Technical
Reference Manual.
DANGER!
Disconnect the server from its power source before connecting cables,
components, or both.
CAUTION!
Protect your server from ESD damage during handling of all
Reference
Step
Observe Precautions
1. Put on a grounded wrist strap and attach the other end to the cabinet. Doing so
protects the component from electrostatic discharge.
2.
Shut down the system and turn off the power, if you have not already done so.
CAUTION!
Removing a component while the power is on can severely
damage the component you are working on and other peripherals.
3. Wait one minute after you turn off the power before you remove any components.
The hard disk should stop spinning and be quiet.
.
4. When removing a component, place it on a nonconductive surface, such as an antistatic bag. Make sure you have the anti-static bags before you begin.
5. Put identification tags on all cables and disconnect cables from the server.
A
6222
Page 2 of 5
Release
and later
Step
Reference
Remove the Drive Carrier
WARNING!
When the drive carrier is removed from the server, the power
switch terminals are accessible.
These terminals can have
hazardous voltages present even when the power switch is turned
off. Unplug the server before performing the procedure. Failure
to do so can result in personal injury and/or equipment damage.
6.
Remove the cabinet cover.
7. Disconnect the data and power cables from both the floppy disk drive and the hard
disk.
8.
Remove the four screws that secure the carrier to the cabinet (6-32 hex head Phillips
screws).
9.
Slide the carrier toward the back of the server, freeing the left front tab from the slot
on the side of the adjacent drive bay. Make sure all the cabling is clear, and lift the
carrier up and out of the server. See Figure 1 for details.
CAUTION!
Support the carrier as you remove it from the cabinet. Be careful
not to damage components on the motherboard.
A
CP 6224
Release
Step
6222
Page 3 of
and later
Reference
Drive Carrier
Figure 1
Remove the Drive Carrier
Remove the Floppy Disk Drive
10. Remove the three screws that secure the floppy disk drive to the carrier
hex
head Phillips screws; these screws differ from the ones that secure the drive carrier to
the cabinet).
1 I. Remove the floppy disk drive from the carrier. See Figure
for details.
Place the floppy disk drive on an anti-static wrapper.
Note:
If you are performing fault isolation, install the floppy disk drive into
the spare cabinet for testing. If you are replacing the floppy disk drive,
prepare it for return and repair.
RN. A
6222
Page 4 of 5
Release
and later
Step
Figure 2
Remove the Floppy Disk Drive
Install the Floppy Disk Drive and Drive Carrier
Note:
If you are performing fault isolation and installing the floppy-disk
drive into a spare cabinet, remove the drive carrier as previously
described.
Orient to the front of the cabinet and slide the floppy disk drive into the drive
carrier beside the hard disk.
8. Align the mounting holes with the carrier holes.
9.
Install three screws
and one at the bottom.
hex head Phillips screws), two at the top of the carrier
10. Make sure the drives are securely fastened in the carrier.
11. Position the carrier above the cabinet. The front of the floppy disk drive faces the
front of the cabinet and should line up with the opening in the front panel.
12. Lower the carrier into the cabinet, lining up the front tab on the carrier with the slot
that projects from the side of the
bay.
13. Slide the carrier toward the front until the left front tab and the screw holes line up.
Dac.
A
6222
Release
Page 5 of 5
and later
Reference
Step
14. Secure the carrier into the cabinet using four mounting screws (6-32 hex head
Phillips screws).
l
If the floppy disk drive needs to be properly aligned with the front bezel,
loosen the mounting screws holding it to the carrier by at most one-quarter
turn. Adjust the position as needed. Once the floppy disk drive is aligned,
tighten the two screws again.
5. Connect the data cables to the drives.
l
Connect floppy disk drive to J 13.
l
Connect hard disk to
16. Connect power cables to the drives.
Check the quality of your work and to see that no tools or loose parts are inside the
server.
18. Install the cabinet cover.
6224
19. Reconnect external cables to the server. Remove the identification tags from the
cables.
20. Turn server power on.
A
Remove/Install Cabinet Cover
Release
Page 1 of 2
and later
This procedure describes how to remove and replace the system cabinet in the
Centigram Series 6 Model 70.
DANGER!
Shut down the system and turn the power off before you begin any
procedures in this section. Failure to do so will result in severe
electrical shock or burns.
CAUTION!
Removing a component while the power is on can severely damage
the component you are working on and other peripherals.
CAUTION!
Protect your server from ESD damage during handling of
all components.
Reference
Step
Observe Precautions
1.
Put on a grounded wrist strap and attach the other end to the cabinet. Doing so
protects the component from electrostatic discharge.
2.
Shut down the system, turn off the power, and unplug the unit. Detach the power
cord from the power input assembly.
3.
Wait one minute after you turn off the power before you remove any components.
The hard disk should stop spinning and be quiet.
Remove the Server Cabinet
4.
Label and remove external cables from the server.
5.
Remove the five retaining screws from the cover (6-32 hex head Phillips screws) at
back of the cabinet. See Figure 1 for the locations of the screws.
6.
Standing behind the server, hold both sides of the cover at the back and press
against the back panel with your thumbs. This pops the cover loose. Slide it toward
the back one inch. Then lift the cover up. See Figure for details.
A
6224
Page 2 of2
Release
and later
Step
Reference
Remove
Retaining
Screws
Figure 1
Remove the Cabinet Cover
Install the Server Cabinet
4.
Check the quality of your work and make sure no tools or loose parts are inside the
system.
Lower cover with front edge about one inch from bezel. Slide the lip on the front edge
forward under the bezel. Make sure the side panels are outside the metal rails and sides
of the cabinet
6.
Reinstall the five retaining screws in the back panel.
Reconnect external cables to the server. Remove any identification tags you placed
on the cables.
8. Turn power on.
Dac.
A
How To Use This Chapter
This chapter provides step-by-step procedures for system administration functions
on a Centigram Series 6 Model 70. Additional information is also located in the
Reference and
Manual and the Centigram Series Technical
Reference Manual.
A task list and Centigram Procedures
describing system administration
procedures are located at the end of this chapter. The task list identifies two
procedural levels of
a high-level CP and a low-level CP. A high-level Cl?
provides instructions on how to do overall tasks, such as installing a server. A
level Cl? provides instructions on more specific tasks, such as how to install a line
card.
Readers familiar with Centigram servers can use the
as a checklist if desired,
while readers new to Centigram servers can use
for step-by-step instructions.
After gaining experience with this documentation, you can find your own innovative
way of using the task list. One possible approach on how to use the task list is
provided below:
Using the Task List
Select from the task list the title of the task that you want to perform and note its
high-level CP number. Flip through the
in this chapter until you find the
correct CP number. Follow the instructions given in the CP.
A reference column in each CP contains pointers, when necessary, to supplemental
information such as another procedure, a technical reference in the Centigram Series
Technical Reference Manual: another manual, or menu maps. Use the tabs
included with this binder to find referenced supplemental information that is located
within this manual.
If you need to interrupt a CP and seek reference information, first mark the CP with
your bookmark or otherwise note down where you are in the CP. After you are
finished with the reference information, return to the CP and continue to execute the
steps where you left off.
System Administration
System Administrtition
The system administrator is responsible for creating and maintaining all mailboxes
and their functionality on the server. The Model 70 allows the administrator to
perform the following tasks:
l
Configure and customize the server
Create and modify, delete and/or reassign mailboxes
Build classes of service (FCOS, LCOS, GCOS, NCOS, RCOS, and
TCOS)
Change the server time and date, when
Set up system-wide distribution lists and broadcast mailboxes
Create the “message of the day”
Create phoneline exceptions
that is, any telephony parameter (for
example, the interface between the Model 70 and the PBX or
that does not use the Model 70 default values (North
American Signaling Standards)
Add optional features and expand capacities
Create system and client reports
Statistics: five reports covering how server resources are used (for
example, usage of line ports, speech storage, trunks and messages)
System information: ten reports which give specific information
about how the server is configured and programmed (see the
Reference and
Manual)
Billing: four reports which give breakdowns of charges for individual
users by statistic and which calculate the total amounts due for
departmental or account
(see the
Reference and
Manual)
Perform maintenance, backup, and troubleshooting
Routine maintenance of software files
System backups and restore
System Administration
System diagnostics and fault isolation
The Model 70 application comes pre-installed with default values that can easily be
changed through the console, The server issues prompts to guide the administrator.
You can enter a question mark
in response to any prompt to receive online help.
Administration security features include console
protection so that
unauthorized users can not access the Model 70 from a terminal.
Administration by Phone
Limited system administration can be performed over the telephone, through the
administrator’s mailbox. These functions include:
l
Creating, deleting, and modifying mailboxes
l
Changing
l
Changing the system clock
l
Getting usage statistics
l
Backing up server to diskette, if the back up fits on one diskette
mailbox
passcodes
In addition to
protection, the timing parameters built into the server are
used to prevent unauthorized access to and from an administrator’s mailbox. The
timing parameters function as follows:
l
The Model 70 allows three to five seconds of response time for each
prompt before announcing “no change” and returning to the
Administration Menu.
l
If more time is needed, the administrator can press “1” in response to a
prompt to restart the timer. The server issues an error message and repeats
the prompt.
Centigram recommends against assigning a name or individual greeting to the
administrator’s mailbox. Unauthorized users should not know that they have
accessed a special purpose mailbox.
Instructions for Administration by Phone are located in the
Manual.
Reference and
s-3
System Administration
Administrative
Hardware
Note:
The customer must provide all administrative equipment.
You must have a standard
compatible terminal for system administration.
An outboard modem is also required for remote administration. If you plan to
both on-site and remotely, an
box (console or modem
administer the Model
active) is also required.
Worksheets
Worksheets facilitate installation and help you establish a paper trail backup for all
work done on the server.
Worksheets establish system and individual mailbox parameters, groups and classes
of service, special application mailboxes,
notification operations, message
waiting indication, and integration parameters. These worksheets are found in the
Reference and
Manual. If you do not have the necessary
worksheets, contact your sales organization.
System Administration Task list
Release
Page 1 of 1
and later
Task
Procedure
System Administration
Activate New Software ......................................................................
Add or Cancel a Phoneline Exception ...............................................
Back Up a Class of Service ................................................................
Change Module Status From Hard Disk.. .........................................
Diagnose a Disk With System Online ...............................................
Disk Addition (add.disk) ...................................................................
Do a Floppy Backup .........................................................................
..................................................
Do a System Reload
Do a System Restore (system.restore) ................................................
Enable a Hard Disk...........................................................................
Enable a Module ...............................................................................
Name the Configurations ..................................................................
Offline Disk Replacement (Non-Redundant/Redundant Systems). .
Online Disk Replacement (Redundant Systems) ...............................
.......................................................
Recover a Lost Console
Redundant Disk Addition (make,redundant) ....................................
Restore a Class of Service ..................................................................
Run Diagnose From Diskette ............................................................
Run Diagnose From Hard Disk ........................................................
Run Verify With System Offline .......................................................
Set the Site Name, Banner, and Code ...............................................
Set the System Time and Date ..........................................................
Shut Down a Hard Disk.. .................................................................
Shut Down a System .........................................................................
Update Disk Redundancy .................................................................
View Hard Disk Operational Parameters ..........................................
View or Edit History File ..................................................................
View the Configuration Names.. ......................................................
Cl? 7025
7022
Cl? 5412
Cl’ 5314
7029
6282
5703
CP 6267
CP 5704
cl? 7019
7014
7004
6592
CP 6283
5303
CP 628 1
5413
703 1
7030
5701
5415
CP 5414
CP 7017
CP 6268
7015
5313
5304
7005
Note: Procedures for building the customer database are in the
Reference and
Manual.
For additional information, refer to the
Series 6
Technical Reference Manual, and the
Implementation
Guide. For detailed information about optional features, refer to
the respective optional feature manual.
Updates to procedures and the Model 70 are issued to the field in
Centigram’s Notices
You should add them to this
guide, as appropriate.
Recover a Lost Console
Release
Page 1 of 1
and later
This procedure describes how to access the console after the Root or Super-user console
has been lost.
It is assumed the module attached to the console has been shut down following the
procedure listed in CP 6268.
WARNING!
This procedure requires the server to be removed from normal operation.
Centigram recommends that you run this process during periods of low
call
Step
1.
Reference
Start the Series 6 server and bypass the normal
and password.
:
Response: bypass
Password:
Response: bypass
2.
When prompted, insert the Service diskette..
Insert the SERVICE diskette, then
continue.
Response: Insert the Service diskette and press Enter.
3.
Enter the new password.
Enter
new
password:
Response: The new Root or Superuser password, up to 253 alphanumeric
characters.
Prompt:
Re-enter
new
password:
Response: Repeat the new root or Superuser
password.
The following message appears:
Password
changed.
4. The server then automatically starts the console.
to
View or Edit History File
Release
Page 1 of 1
and later
The History File is a record of modifications made to the server. Entries are made to the
record by the system administrator, your distributor, or Centigram technical personnel.
You must review this record prior to updating software on the server to verify that no
custom changes have been made to the server that are over-written with the new
software.
This procedure describes how to view or edit the History File.
Reference
Reach the System Maintenance Menu, then from the Additional Options Menu go
to the Utility Menu, then to the History Menu.
Show the History File
2.
Review the History File.
(S) Show file
Enter record number or 'a' for all non-empty
records:
Response: Number of a specific record to review,
or A for all non-empty records.
The server displays the file to the console. Use the following commands to control
scrolling:
To stop scrolling:
To restart scrolling:
Press Ctrl-S
Press
Update the History File
3.
Enter information to the History File.
Select:
Update file
Contact
person
name:
Response: Name of the person who made changes to the server, up to
characters.
Reported
problem:
Response: Description of the problem you encountered, up to
Fixed
characters.
problem:
Response: Description of changes you made to the server to correct the reported
problem, up to 159 characters.
Other
comments:
Response: Any other necessary information, up to 79 characters;
press Enter to leave blank.
Map 12
Page 1 of 2
View Hard Disk Operational Parameters
Release
and later
This procedure describes how to determine the hard disk size and manufacturer.
Step
Reference
Reach the System Maintenance Menu, then go to the Hard Disk Utilities Menu.
2.
Map 8
Review the hard disk information.
Select:
(0) Display the Operation Parameters for a disk
Enter
the
hard disk as
pair:
Response: The bus and SCSI ID numbers, separated by a colon, of the disk t o be
reviewed.
The following is a sample Operational Parameters Report.
..
Operational Parameters for Hard
Vendor: FUJITSU
Model:
Rev:
2026
Page 1
Error Recovery Parameters
AWRE: TRUE
ARRE: TRUE
TB
: FALSE
RC
: FALSE
EER : FALSE
PER : TRUE
DTE : FALSE
DCR : FALSE
Read retry count:
4
Correction
span:
22
Head offset count:
0
Data strobe offset count: 0
Write retry count:
0
Recovery time limit:
0
Changeable
page
1
data:
hd=O, ds=O,
Page 2
Disconnect/Reconnect Parameters
Buffer full ratio:
0
Buffer empty ratio:
0
Bus inactivity limit:
50
Disconnect time limit:
12800
Connect time limit:
0
Maximum burst size :
0
Data transfer disconnect control: 0
Changeable
page
2
data:
A
5313
Page 2 of 2
Release
and later
Reference
Step
Page 3
Format Parameters
Tracks per zone:
6
Alternate sectors per zone:
3
Alternate tracks per zone:
0
Alternate tracks per logical unit: 6
Sectors per track:
-74
Data bytes per sector:
512
Interleave
factor:
1
Track skew factor:
23
Cylinder skew factor:
29
Flags:
0x40
Changeable
page
3
data:
Page 4
Drive Geometry Parameters
Number of cylinders:
2380
Number of heads:
6
Write precomp cylinder:
0
write current cylinder: 0
Step rate:
0
Landing zone:
0
RPL:
0
Rotational
offset:
0
Rotational
offset:
0
Disk capacity:
1039328
Press any key to continue....
Press any key to return to the Hard Disk Utilities Menu.
5314
P a g e 1 of2
Change Module Status From Hard Disk
Release
and later
This procedure describes how to change the status of a module using the Maintenance
From Hard Disk Menu. When changing the status of multiple modules, always change
the one the console is attached to last.
FOR THE MODEL 120 AND MODEL 70 ONLY:
Some system prompts in this
procedure may contain generic references to other multiple-module Centigram Series 6
products. In such cases, shaded areas indicate a difference in operations for the Model
120 and Model 70. The Model 120 and Model 70 models are equivalent to “one
module” servers. When asked for the number of the host or module, always enter
or
“a”.
This procedure applies to servers using either SCSI or IDE hard disks. All SCSI
references in this procedure are for SCSI servers only.
step .
1.
Reference
Boot the system to the Maintenance From Hard Disk Menu. If the module is
currently disabled, it will boot to the Maintenance From Hard Disk Menu by
default.
Run MAINTENANCE from Hard Drive?
Response: y
2.
Specify the program you want to execute.
Enter one of the names:
Response:
3.
Go to the task you want to perform.
Enable The Module
4. Enable the module.
Select:
Prompt:
(E) ENABLE a module
Input a host id in the following range:
n n n n
Which module?
Response: Enter the number of the module you want to enable.
Note:
(Enter 1
o r a for
When changing the status of multiple modules, change the
module attached to the console last.
The module you specify automatically resets itself and returns to normal operation.
5.
Repeat step 4 to enable multiple modules. (Not
for Model 120 or Model 70.)
A
5314
Page 2 of 2
Release
and later
Disable The Module
6.
Shut down the module.
Select:
(D) DISABLE a module
Input a module
n
n
Which
module?
id
in
the
following
range:
Response: Enter the number of the module you want to shut down. (Enter
for
Note:
When changing the status of multiple modules, change the
module attached to the console last.
"disable"
Response:
1 or a
to
confirm
your
request:
disable
The module you specify automatically resets itself and boots in the Maintenance
from Hard Disk Menu.
7.
Repeat step 6 to enable multiple modules. (Not vaild for Model
A
or Model 70.)
Page 1 of 1
Back Up a Class of Service
Release
and later
This procedure describes how to back up the defined Classes Of Service (COS) for the
system. This program should be run in addition to the floppy backup program. This
program is not a replacement for the floppy backup program.
Reference
Step
1.
From the System Maintenance Menu, go to the System Configuration Menu.
Menu Map
2. Start the backup.
Select:
(B) Backup COS
Selective Backup
Insert Backup Diskette 1 in floppy drive
Enter 'Y' when ready, 'N' to quit
Response: Insert the floppy diskette and press Y to continue,
N to quit.
3.
If the diskette has not been formatted in QNX, format the diskette.
Prompt:
Invalid
Enter
backup diskette...need
for formatting, or
formatting
to quit:
Response: Y to format the diskette,
N to abort the backup process.
The system formats the diskette, if required, then proceeds with the backup.
4.
Insert more diskettes as specified by the server.
5.
Store the diskettes in a safe location.
A
cl?5413
Page 1 of 1
Restore a Class of Service
Release 6.0 and later
This procedure describes how to restore the defined Classes Of Service (COS) for the
server. This program is not the same as the restore program found on the Maintenance
From Hard Disk Menu.
Reference
Step
1.
From the System Maintenance Menu, go to the System Configuration Menu.
Map 1
2. Start the restore.
Select:
(A) Restore COS
System Configuration, F C O S
Restore P r o g r a m
Insert
Enter
Backup Diskette
'Y' when ready,
1
in
and L C O S
floppy
drive
to
quit
Response: Insert the floppy diskette and press Y to continue,
N to quit.
The server verifies the diskette.
Specify the types of Classes of Service to be restored.
Do
you
want
to
restore
the
Response: Y to restore,
N or Enter to not restore.
Do
you
want
to
restore
the
Response: Y to restore,
N or Enter to not restore.
Prompt: D o y o u w a n t t o r e s t o r e
Response: Y to restore,
N or Enter to not restore.
the
The server restores the specified Classes of Service and returns to the System
Configuration Menu.
A
Page 1 of 1
Set the System Time and Date
Release
and later
This procedure describes how to set the system time and date.
Reference
Step
1.
Reach the System Maintenance Menu, then go to the System Maintenance
Additional Options Menu.
2.
Change the time and date as necessary.
Select:
Map 12
(T) Time and Date
System
time/date:
[current
Enter new value or press
Enter date (mm-dd-yy)
settings]
to leave unchanged.
Response: The correct date in the format of mm-dd-yy,
or press Enter to keep the current information.
Enter
time
Response: The correct time in the format of hh:mm and the am or pm
designation,
or press Enter to keep the current information.
The server responds with the entered time and date, then returns to the System
Maintenance Additional Options Menu. Note that all modules are set to the same
time.
A
Page
Set the Site Name, Banner, and Code
Release
1 of 1
and later
This procedure describes how to set the site name, site banner, and the site code.
Reference
Step
1.
Map I
Reach the System Maintenance Menu.
Change the site name.
Select:
(N) System Name. Code, and Banner
Enter
to c h a n g e t h e s i t e n a
c u r r e n t s i t e name:
Response: Y to change the name,
N to keep the current name.
3.
me,
to keep the
If you answered yes to step 2, then enter the new site name, otherwise continue at
step 4.
Enter new site name (return for none):
Response: Enter a descriptive name, up to
4.
characters.
Change the site code.
'Y' to change the site code,
current site code:
to keep the
Response: Y to change the site code,
N to keep the current site code.
5.
If you answered yes to step 4, then enter the new site code, otherwise continue at
step 6.
Prompt:
Enter new site code (return for none):
1 0 characters.
Response: Enter a code, up to
6.
Change the site banner.
Enter 'Y' to change the site banner, 'N' to keep
the current site banner:
Response: Y to change the site banner, then enter the new site banner,
N to keep the current site banner.
7.
If you answered yes to step 6, then enter the new site code, otherwise continue at
step 8.
Prompt:
Enter new site banner (return for none):
Response: Enter a banner, up to 240 characters. To acknowledge the end of the
text enter a period on a new line and press Enter.
8. The system returns to the System Maintenance Menu.
Run Verify With System Offline
Page
Release
1 of 3
and later
This procedure describes how to execute an offline system verify. The verify can be run
only if all modules are shut down. For information regarding online system verification,
see CP 700 1.
FOR THE MODEL 120 AND MODEL 70 ONLY: Some system prompts in this
procedure may contain generic references to other multiple-module Centigram Series 6
products. In such cases, shaded areas indicate a difference in operations for the Model
120 and Model 70. The Model 1 2 0 and Model 70 models are equivalent to “one
module” servers. When asked for the number of the host or module, always enter “1” or
“a”.
This procedure applies to servers using either SCSI or IDE hard disks. All SCSI
references in this procedure are for SCSI servers only.
WARNING!
This procedure requires that you shut down the server resulting in an
interruption to call processing.
Centigram recommends that
perform this procedure during periods of low call traffic.
Step
Reference
1.
Reach the System Maintenance Menu.
2.
Execute a system shutdown.
Select:
(S) System Shutdown
This
Prompt: WARNING ! !
will terminate call processing.
"shutdown" if you really want to do this
Response:
3.
shutdown
The server asks which modules are to be shut down.
hosts to shutdown?
Response: a for all.
Wait for Message Waiting?
Response: Y to wait for message waiting queue to clear.
4. When the Series 6 server has taken all lines of the server off-hook, it continues by
asking if a verify is to be executed.
Perform Offline System Verification?
Response: Y to execute the verify.
5 . The server asks if the results of the verify are to be recorded. The default is yes.
Prompt: L o g
results?
Response: Y or press Enter.
3
Map 1
cl? 5701
Page 2 of 3
Release
and later
Step
6.
When the verify is complete, the system continues with the shutdown, asking if the
server should wait while the message waiting indicators are updated. If any errors
were encountered during the verify, contact the Technical Assistance Center.
7.
Change the status of the modules if desired.
Prompt: E n a b l e o r D i s a b l e M o d u l e s ?
Response: Y to change the status of modules,
N to keep the module status the same and continue at step 11.
8.
answered yes in step 7,
Module Maintenance Menu is displayed.
9. To enable a module:
Select:
(E) ENABLE a module
Which Module?
Response: Enter the number of the module to be enabled. If enabling multiple
modules, enable the module attached to the console last. (Enter 1 or a
for Model 120 or Model 70.)
10.
To disable a module:
Select:
(D) DISABLE a module
Which Module?
Response: The number of the module. If disabling multiple modules, disable the
module attached to the console last. (Enter 1 or a for Model 120 or
Model 70.)
"disable"
to confirm your request:
Response: disable
If enabling or disabling multiple modules, repeat step 9 or step 10 as appropriate.
If the status of the module attached to the console was changed, the balance of this
procedure is not be seen due to the module resetting.
11. When done configuring the module, exit the menu. The system completes the
shutdown.
***SHUTDOWN COMPLETE***
The System Maintenance Menu is displayed, even though the server is not
operational.
Reach the Reports Menu.
A
Menu Map 9
5701
Release
Step
Page 3 of 3
and later
Reference
13. Review the Verify Report.
Select:
Verify
Report
destination:
Response: c
If any errors were recorded in the report, contact the Technical Assistance Center.
14. Exit to the Main Menu.
1 5 . Turn off the system power or press the reset button(s) to reboot.
A
Do a Floppy Backup
Release
Page 1 of 1
and later
This procedure describes how to perform a floppy backup of the Series 6 server.
Reference
step
1.
Menu Map 1
Reach the System Maintenance Menu.
2. Initiate the floppy backup.
Select:
(F) Floppy Backup
Insert Backup Diskette 1 in floppy drive
when ready, or
to quit:
Enter
Response: Insert the diskette and enter Y to continue,
N to abort the backup process.
3.
If the diskette has not been formatted in
format the diskette.
Invalid backup
for formatting,
Enter
Response: Y to format the diskette,
N to abort the backup process.
or
formatting
to quit:
The system formats the diskette, if required, then proceeds with the backup.
4. Insert more diskettes as specified by the server.
The server produces a report to the console when the backup is complete, then
returns to the System Maintenance Menu.
A
Page 1 of 3
Perform a System Restore (system.restore)
Release
and later
This procedure describes how to perform a system restore.
It is assumed the Series 6 server has been shut down and all modules disabled using the
process described in CP 6268.
WARNING!
During this procedure, the server cannot process calls. Centigram
recommends that you run this process during periods of low call traffic.
Step
Reference
1.
Boot the system. (All modules boot to the Maintenance From Hard Disk
since they are disabled.)
2.
Initiate the floppy backup.
Enter one o f
the
names:
Response:
3.
The server starts the process. Enter the number of backup diskettes to be restored.
How
many
backup
floppies
do
you
have?
Response: Number of diskettes from the last floppy backup.
4.
Insert diskette(s) when directed.
Insert
Enter
Backup Diskette 1 in floppy drive
'Y' when ready, or 'N' to quit:
Response: Insert the diskette and enter Y to continue,
N to abort the backup process.
Specify what information to restore.
Do you
mailbox
want to turn on
restored
(Y/N)?
the
tutorial
for
each
Response: Y to restore the mailboxes with the tutorial activated,
N to restore the mailboxes with the tutorial turned off.
Do you want
security
and
to restore the configuration,
billing
information
(Y/N)?
Response: Y to restore the information,
N to not restore the information.
A
5704
Page 2 of 3
Release
and later
Reference
Step
6. If you answered yes to restoring the configuration and billing information, specify
the information to be restored; otherwise continue at step 8.
Enter
file:
if you want to restore Billing rates
Response: Y to restore the information,
N to not restore the information.
if you want to restore System name
Prompt:
file:
Response: Y to restore the information,
N to not restore the information.
Enter
file:
if you want to restore System code
Response: Y to restore the information,
N to not restore the information.
Enter
if you want to restore Banner file:
Response: Y to restore the information,
N to not restore the information.
Enter
Revision
if you want to restore System
History:
Response: Y to restore the information,
N to not restore the information.
Enter
console
if you want to restore Remote
history file:
Response: Y to restore the information,
N to not restore the information.
Prompt:
if you want to restore Remove
console task commands file:
Response: Y to restore the information,
N to not restore the information.
Enter
billing
if you want to restore Current
data file:
Response: Y to restore the information,
N to not restore the information.
Prompt:
if you want to restore
configuration
file:
Response: Y to restore the information,
N to not restore the information.
A
Release
Step
5704
Page 3 of 3
and later
Reference
If you answered yes to restoring the
configuration file, specify which
configuration is to be restored; otherwise continue at step 8.
if you want to restore
configuration file 0:
Response: Y to restore configuration file 0,
N to not restore configuration file 0.
if you want to restore
configuration file 1:
Response: Y to restore configuration file 1 ,
N to not restore configuration file 1 .
E n t e r
8.
Insert more diskettes as specified by the server.
The server produces a report to the console when the restore is complete, then
returns to the Maintenance From Hard Disk Menu.
A
Reload a System
Release
Page 1 of 5
and later
This procedure describes how to install the software on an Model
or Model 70
using the System Reload program. This program should be used only on a
redundant server that has experienced a disk failure, and only when you are instructed
to use it. Performing this procedure deletes the existing database of all speech, accounts,
and configuration. To update the server software and preserve the existing database of
all speech, accounts, and configuration, use the Perform an Offline Software Update
procedure (CP 6263).
Note:
Make sure the Service Diskette, all Optional Feature Diskettes, and the Module
Enable Diskette contain the serial numbers for the disk in the server and the
disk to be added.
The Model 1201 and Model 70 contain an IDE hard disk, while the Model
a SCSI hard disk. SCSI disk references have been replaced in the software
where feasible.
The System Reload program erases all information currently on the hard
disk. Run this program only if your technical support group instructs you
to do so.
WARNING!
Be sure to shut down and disable the server using the process described in
CP 6268.
Step
1.
Reference
Insert the Floppy Boot Diskette. Press the reset button or turn on the system
power. The system boots off the floppy drive. The server
the self test
results:
2. The server reads from the floppy disk, then requests the service diskette.
Insert f l o p p y "SERVICE 6.00"
Response: Insert the diskette, then press Enter.
and
hit
return
3. The server reads from the floppy disk, and asks which process you want to execute.
Enter
one
of
the
names:
Response:
A
6267
Page 2 of 5
Release
and later
Reference
4.
The server reads from the floppy disk, and issues a warning about the pending
process.
WARNING! !
INSTALL program should be executed only when a
system
complete
installation
is desired (from scratch).
This means that
all
information
on the
system
(accounts,
speech,
programs, etc.)
will
be
lost.
If you have a current
account
backup
diskette,
the
account
data
(but not speech) can be reloaded
system r e s t o r e
menu.
via
the
If
the
this is
and
execute the
not
desired,
then
reboot
system
UPDATE
program.
In
order to do a complete INSTALL
have as
a minimum t h e f o l l o w i n g s e t o f
diskettes:
must
SOFTWARE
PROMPTS
THEN
DISKETTES
DISKETTES
IF YOU DO NOT WANT TO
CONTINUE,
RE-BOOT THE
SYSTEM! !!
. . ..OTHERWISE
. ENTER A CARRIAGE RETURN
Response: Press Enter.
5.
Enter the number of modules in the server.
How
many
HOSTS
are
in
this
Response: Enter the number of modules in the server.
A
configuration?
you
CP 6267
P a g e 3 of5
Release
Step
6.
and later
Reference
The system displayed the installed disks and the current configuration. If the
is correct, continue with the reload.
Prompt: * * *
I N S T A L L E D
D I S K S
Disk 0
BUS 0
***
MB
C O N F I G U R A. T I O N
Drive 1
Active
(C)
CONTINUE
configuration is correct
(S)
SCAN all disks
installed disks
EXIT disk configuration
configuration
Enter desired option (C/S/X/?
search
. . .
for
abort disk
Response: C to continue.
The server displays the following messages:
Configuring disk
Initializing virtual drives...
System hours increased
7. Confirm the configuration.
Prompt:
System Configuration
Number of Hosts
Hosts present
Number of disks
Active disk
Redundant disk
Enter Y to confirm the change:
Response: Review the information for accuracy.
Y if the information is correct,
N to reenter the information.
8.
The server continues, then requests the first software diskette.
When drive light goes out insert disk
return
Response: I n s e r t the specified diskette, then press Enter.
and press
A
r
Cl? 6267
Page 4 of 5
Release
and later
Reference
Step
9.
The server then requests the remaining diskettes. Insert the diskettes when
prompted.
When drive light goes out insert disk 2 and press
return
Response: Insert the specified diskette then press Enter to continue.
10. After all the software diskettes have been loaded, load the prompts.
Do you want to install prompts to the system Y/N:
Response:
11. Load the prompts diskettes.
Prompt:
Insert the
and press
1st diskette
return
containing
the
prompts
Response: Insert Prompts Disk then press Enter to continue.
Wait
disc
Response:
until drive light is out,
hit CR when ready.
insert
language
Press Enter again to continue.
12. The prompts are copied to multiple hard disks, as applicable. The process can take
many minutes, depending on the number of hard disks. The server then requests
the remaining diskettes.
Working...
Wait until drive light goes out, insert language
hit CR when ready.
disc
Response: Insert the specified diskette t h e n p r e s s Enter to continue.
1 3 . When the prompts are complete, the server displays the number of directory entries,
pointer sectors, and speech blocks used for the server prompts.
Prompt:
For this prompt partition (vid 1):
directory entries allocated out of xxxx available
pointer sectors allocated out of
speech blocks allocated out of
Starting
up
processes,
please
14. The server has an option for adding and
wait...
or patch:.
Prompt: D o y o u w a n t t o i n s t a l l a n R S D o r P a t c h ?
Response: Enter Y to add an RSD or patch.
Otherwise, press Enter.
A
available
available
Release
Cl’ 6267
Page 5 of 5
and later
Reference
Step
15. To complete the update process, you must load the Module Enable diskette and all
the optional features.
Prompt:
Response:
Does the system have Optional Features?
16. Load the Module Enable diskette or the optional feature.
Insert Optional Feature Setup diskette in the
floppy drive
when ready :
Response: Insert the diskette, then press Enter.
17. The server loads the feature and asks if there are more.
XXX Optional Feature is now installed...
Is there another Optional Feature in the
system?
Response:
represents the name of the optional feature.
Enter
if there are more. Repeat steps 16 and 17 until the Module
Enable diskette and all optional features have been loaded.
Enter N, to end adding optional features and continue with the process.
18. If the server is a multi-module s e r v e r , or contains a QNET card in Module
the
following message is displayed. If the server is a single module, go to step 19.
WARNING: Do NOT reset this module.
Press the reset button on all other modules, then
carriage return.
Response: Reset the specified modules and press Enter.
The server waits for the other modules to boot before it continues.
Waiting for the other modules to boot up...
Updating
wait....
Messages are displayed to the screen showing conversion of records, if any, and
configuration information.
19. Press Enter to reboot and complete the update.
Dac.
A
Page 1 of 2
Shut Down a System
Release
and later
This procedure describes how to shut down a module running Release 6.0. You should
use this procedure before turning off the power to a Series 6 server module, as the
shutdown command halts call processing in a clean and orderly fashion.
FOR THE MODEL 120 AND MODEL 70 ONLY: Some system prompts in this
procedure may contain generic references to other multiple-module Centigram Series 6
products. In such cases, shaded areas indicate a difference in operations for the Model
120 and Model 70. The Model 120 and Model 70 models are equivalent to “one
module” servers. When asked for the number of the host or module, always enter “1” or
“a”.
This procedure applies to servers using either SCSI or IDE hard disks. All SCSI
references in this procedure are for SCSI servers only.
WARNING!
You should follow the policies of the site to warn users prior to the
system shutdown. This process removes the server from call processing.
Centigram recommends that you perform this procedure only during
periods of low call traffic.
Step
1.
Reach the System Maintenance Menu.
2.
Execute a shutdown command.
Select:
l
(S) System Shutdown
The server displays the status of each line and the lengths of the message
indicator request queues.
WARNING! !
This
"shutdown"
Response: shutdown
3.
Map 1
will terminate call processing.
if you really want to do this.
Specify which modules to shut down.
modules
Response: a
to
shutdown:
The server displays the status of each line of the specified modules as “idle,”
“active” or “stopped,” and updates the status every minute until all lines are
stopped. The server stops any calls still in progress after five minutes.
4.
If you are executing a system shutdown, wait for the message waiting queue to clear.
If you are executing a module shutdown on a multi-module system, do not wait for
the message waiting queue to clear.
Wait
for
message
waiting
queues
to
be
empty?
Rev. A
CP 6268
Page 2 of 2
Release
and later
Reference
Response: Y to wait for the queue to clear,
N to continue immediately with the shutdown.
When the Series 6 server has taken all lines of the specified modules off-hook, it
continues by asking if a verify is to be executed.
Prompt: P e r f o r m O f f l i n e S y s t e m V e r i f i c a t i o
Response: Y to execute the verify,
N to skip verify and continue with the shut down.
6.
n? (Y/N):
Specify if changes to the status of each module are to be made.
Enable or Disable Modules?
Response: Y to change rhe status of modules,
N to keep the module status the same and continue at step 11.
If you answered yes in step 6, a chart with the status of each module is displayed and then the
Module Maintenance Menu is displayed.
8. To Enable a module:
Select:
(E) ENABLE a module
Which Module?
Response: The number of the module. (Enter 1 or a for Model 1 20
o r Model 70.)
9. To Disable a module:
Select:
(D) DISABLE a module
Which Module?
Response: The number of the module. (Enter 1 or a for Model
"disable"
Response:
1 20 o r Model 70.)
to confirm your request:
disable
If you disable this module you will not see the balance of this procedure because the
module will reset. The console then resets to the Maintenance From Hard Disk
Menu.
10. When you finish configuring the modules, exit the menu.
11. The server completes the shutdown.
****SHUTDOWN COMPLETE****
The System Maintenance Menu is displayed. You can now either reboot the
module or remove power to the module.
A
628 1
Page 1 of 5
Redundant Disk Addition (make.redundant)
Release
and later
This procedure describes how to add storage redundancy by adding another disk to a
non-redundant Centigram Series 6 server. The new disk is called the redundant disk
and stores a mirror image of all data on the primary (original) disk. This procedure can
be performed while the server is online. For instructions describing how to increase the
storage capacity to a server by adding another primary disk, see CP 6282, Disk Addition
(add.disk).
FOR THE MODEL 70 ONLY: Some system prompts in this procedure may contain
generic references to other multiple-module Centigram Series 6 servers. In such cases,
shaded areas indicate a difference in operations for the Model 70. The Model 70 is
equivalent to a “one module” server. When asked for the number of the host or module,
always enter “1” or “a”.
All SCSI references in this procedure are for SCSI servers only.
Note:
You can find
referenced in this procedure in the
Technical Reference Manual.
Reference
Introduction
Primary drives in the Series 6 server store configuration data and voice message
information.
data can be preserved by doing frequent backups. However,
voice message information is so transitory that it is not possible to backup the disks with
enough frequency to maintain their integrity. To preserve the integrity of voice messages, a
different method must be used.
The Series 6 server allows the customer to install mirror drives to provide redundancy of
primary drives. The program to add a redundant disk is called “Make Redundant.” There
are two methods for accessing the Make Redundant program:
1.
From the Hardware Configuration Menu
2.
From the Floppy Boot and Service Diskettes
This procedure describes both methods. Centigram recommends running the Make
Redundant program from the Hardware Configuration Menu. Both procedures prevent
the system from processing calls during the upgrade. Before you implement the upgrade,
please follow these guidelines:
l
Check that the serial numbers imprinted on the labels of the Service Diskette and
the Optional Feature Diskette coincide with the serial numbers of the primary disk
and the disk that you are adding.
Note:
Centigram recommends that you check all other system diskettes
to ensure that their serial numbers match.
A
r
Cl? 6281
Page 2 of 5
Release
and later
Reference
Prepare the New Disk
1.
Determine how to jumper the new hard disk as an IDE “slave” disk.
2. Jumper the new hard disk. If th ere are two hard disks in one server, one must be
configured as master and the other must be configured as slave. If there is one hard
disk in the server, it must be configured as master. IDE hard disks are shipped from
Centigram configured as master.
1923
1923
Prepare the System
3.
Reach the Hard Disk Utilities Menu, then go to the SCSI Status Menu.
4.
Verify that all disks are in sync.
Menu Map 8
Select:
(D) Display Status of all SCSI Buses and disks.
Response: Server displays a report showing the status of the disk(s). Verify that the
disk(s) show the status as
Press Enter to exit.
If any disk is out of sync with its redundant mate, update the redundancy.
6.
Execute a system shutdown. Change the status of the modules based on which
program you are using:
l
7015
Cl? 6268
If running from the Hardware Configuration Menu, leave all modules enabled.
Install the Disk
7.
Turn off the system power and remove the server cabinet.
8.
Change the hardware, adding the new disk.
9.
If you are running the Add A Redundant Disk program from the Hardware
Configuration Menu, go to step 10. If you are running the Add A Redundant Disk
program from the Floppy Boot and Service Diskettes, go to step 14.
A
6224, Ch. 4
CP 6221, Ch. 4
Release
Step
Cl? 6281
Page 3 of 5
and later
Reference
Run the Make Redundant Program From the Hardware
Configuration Menu
10. Turn on the power to the system, and boot from the hard disk.
11. Reach the
Configuration Menu.
Hardware Configuration Menu, then to go the Disk
Map 12
1 2 . Add the redundant disk.
Select:
(M) Make a Disk Redundant
Please
drive,
insert
service
diskette3
hit <RETURN> when ready
into
floppy
Response: Insert the Service Diskette, and press Enter.
Active Disk:
Specify one of
n:n
n:n
Which disk?
the
following
bus:diskId
pairs:
Response: Where “n” represents the valid disk
Enter the
ID of the primary disk that the new redundant disk is
attached to.
Redundant Disk:
Specify one of
n:n
n:n
Which disk?
the
following
bus:diskId
pairs
Response: Where “n” represents the valid disk
Enter the disk ID of the redundant (mirror-image) disk.
13. Update redundancy of all out of sync disks.
l
7015
This completes the Add A Redundant Disk program from the Hardware
Configuration Menu.
Run the Make Redundant Program From the Floppy Boot
and Service Diskettes
14. Insert the Floppy Boot Diskette. Turn on the system power and boot from the
diskette. The server displays the self test results.
15. The server reads from the diskette, then requests the service diskette.
Insert
floppy
"SERVICE
Response: Insert the diskette, and press Enter.
6.00"
and
hit
return
6281
Page 4 of 5
Release
and later
Reference
Step
16. The server reads from the diskette, and asks which process you want to execute.
Enter
one
of
the
names:
Response:
The server reads from the diskette, and issues a warning about the pending process.
*****WARNING: REDUNDANT PROGRAM*******
REDUNDANT program is used to make a primary
disk have a mirror-image secondary disk. Any
d a t a o n t h e p r i m a r y d i s k will a l s o b e r e c o r d e d
on the secondary disk.
You must have the
Redundancy Extra Cost Option installed to use
this
feature.
____
WARNING---YOU MUST DISABLE ALL THE OTHER HOSTS TO USE
THIS OPTION. IF YOU HAVE NOT DONE SO, REBOOT
THIS HOST AND DO IT NOW !!!
IF YOU DO NOT WANT TO CONTINUE, THEN RE-BOOT
THE SYSTEM!! .
. . . ENTER A CARRIAGE RETURN.
Response: Press Enter.
The “Warning is for a server currently running Release 6.00, since most servers
running these versions can run the Make Redundant program online. If you do the
procedure from the Floppy Boot Diskette, you must disable all modules.
18. Identify the disks to be made a redundant pair.
Please specify the PRIMARY
disk id (path:target),
help:
disk: Enter
to stop, or
the
? for
Response: Enter the disk ID of the primary disk that the new redundant disk is
attached to.
Prompt: N o w
id
specify
the
REDUNDANT disk: Enter the disk
to stop, or ? for help:
Response: The disk ID of the redundant (mirror-image) disk.
The server configures the disk and repeats the prompt asking for another primary
disk ID. Continue entering the ID numbers until all the new disk pairs have been
configured, then press Enter to exit.
Release
Cl? 6281
Page 5 of 5
and later
Reference
Step
19. Acknowledge the end of the process.
Prompt
BUILD REDUNDANT DISK DONE. ENTER
RETURN TO REBOOT THE SYSTEM
A
CARRIAGE
Response: Press Enter.
20. Reach the System Maintenance Menu, then go to the Module Maintenance Menu.
2 1. Update the redundancy of the new disk and all other disks that were affected by the
shutdown.
Menu Map 12
7015
Disk Addition (add.disk)
Page 1 of 5
Release
and later
This procedure describes how to increase the storage capacity by adding a primary disk
to a Centigram Series 6 server. This procedure can be performed while the server is
online. For instructions describing how to add storage redundancy to a server by adding
a single redundant disk, see CP 628 1 Redundant Disk Addition (make.redundant).
FOR THE MODEL
ONLY: Some system prompts in this procedure may contain
generic references to other multiple-module Centigram Series 6 servers. In such cases,
shaded areas indicate a difference in operations for the Model 70. The Model 70 is
equivalent to a “one module” server. When asked for the number of the host or module,
always enter “1” or “a”.
All SCSI references in this procedure are for SCSI servers only.
Note:
You can find
referenced in this procedure in the
Reference Manual.
6 Technical
Reference
Step
Introduction
The Series 6 server allows the customer to expand the number of message storage hours to
meet the expanding needs of users. This is done by either adding disk capacity or adding
disk drives (“disks”) to the server. The program to add a disk is called “Add Disk.” There
are two methods for accessing the Add Disk program:
From the Hardware Configuration Menu
2.
From the Floppy Boot and Service Diskettes
This procedure describes both methods. Centigram recommends running the Add Disk
program from the Hardware Configuration Menu. Both procedures prevent the server
from processing calls during the upgrade. Before you implement the upgrade, please follow
these guidelines:
l
Check that the serial numbers imprinted on the labels of the Service Diskette
and the Optional Feature Diskette coincide with the serial numbers of the
primary disk and the redundant disk that you are adding.
Note:
Centigram recommends that you check all other system diskettes
to ensure that their serial numbers match.
RN. A
CP 6282
Page 2 of 5
Release
and later
Reference
Prepare the New Disk
1.
1923
Determine how to jumper the new hard disk as an IDE “slave” disk.
2. Jumper the new hard disk. If there are two hard disks in one server, one must be
configured as master and the other must be configured as slave. If there is one hard
disk in the server, it must be configured as master. IDE hard disks are shipped from
Centigram configured as master.
I-R 1923
..
Prepare the System
3.
Reach the Hard Disk Utilities Menu, then go to the SCSI Status Menu.
Menu Map
4. Verify that all disks are in sync.
Select:
(D) Display Status of all SCSI Buses and disks.
Response: Server displays a report showing the status of all disks. Verify that all
disks show the status as
Press Enter to exit.
5.
If any disk is out of sync with its redundant mate, update the redundancy.
6.
Execute a system shutdown. Change the status of the modules based on which
program you are using:
7015
CP 6268
If running from the Hardware Configuration Menu, leave all modules enabled.
Install the Disk
7. Turn off the system power and remove the server cabinet.
CP 6224, Ch. 4
8.
Change the hardware, adding the new disk.
CP 6221, Ch. 4
9.
If you are running the Add Disk program from the Hardware Configuration Menu,
go to step 10. If you are running the Add Disk program from the Floppy Boot and
Service Diskettes, go to step 15.
Release
Cl? 6282
Page 3 of 5
and later
Reference
Step
Run the Add Disk Program From the Hardware
Configuration Menu
Turn on the power to the system, and boot from the hard disk.
1 1 . Reach the
Map 12
Hardware Configuration Menu, then to go the Disk
Configuration Menu.
12. Add the disk.
Select:
(A) Add a single disk
Please insert service diskette
drive, hit <RETURN> when ready
into floppy
Response: Insert the Service Diskette, and press Enter.
Specify one of the following bus:diskId pairs:
n:n n:n
Which disk?
Response: Where
represents the valid disk
Enter the two-digit disk ID.
Prompt:
Software
Configuration
Configuration
1:
2:
Yes
No
Prompts
Yes
No
Speech
(Messages)
XX
XX
Hours
Hours
Accounts
(Mailboxes
XXXX
XXXX
etc.)
Account
Account
Records
Records
Please select the desired CONFIGURATION TYPE
for disk n:n (1 or 2):
Response: Enter the desired configuration type.
13. Add the redundant disks, if the server is to contain any.
8281
14. Increase the system hours.
7021, Ch. 3
l
This completes the Add Disk program from the Hardware Configuration Menu.
Run the Add Disk Program From the Floppy Boot and
Service
Insert the Floppy Boot Diskette. Turn on the system power and boot from the
diskette. The server displays the self test results.
The server only allows 4 seconds for the
to be entered. If the server did not
accept the
press the reset button on only the module you are working on, and
try again. When the server accepts the
select the service option.
Enter one of the names:
Response:
service
A
r
CP 6282
Page 4 of 5
Release
and later
Step
Reference
The server reads from the diskette, then requests the service diskette.
Insert
floppy
"SERVICE
6.00"
and
hit
return
Response: Insert the diskette, and press Enter.
18. The server reads from the diskette, and asks which process you want to execute.
Enter
one
of
the
names:
Response:
19. The server reads from the diskette, and issues a warning about the pending process.
Prompt:
* * * * * W A R N I N G : ADD-DISK
PROGRAM*******
ADD.DISK program should be run only
increasing the amount of disk storage by
adding a new disk.
Any data on the added disk
will be destroyed in the process.
The disk
being added WILL NOT be used for speech
storage until you upgrade the service hours.
---YOU MUST DISABLE ALL THE
THIS OPTION. IF YOU HAVE
THIS HOST AND DO IT NOW
--OTHER HOSTS TO USE
NOT DONE SO, REBOOT
!!!
IF YOU DO NOT WANT TO CONTINUE, THEN REBOOT
THE SYSTEM. .
. . . ENTER A CARRIAGE RETURN.
Response: Press
Enter.
The “Warning” is for a server currently running Release 6.00, since most servers
running these versions can run the add disk program online. If you perform the
procedure from the Floppy Boot Diskette, you must disable all modules.
Release
6282
Page 5 of 5
and later
20. Add the active (or primary) disk.
Prompt:
Which disk do you want to add?
Enter the disk id (path:target),
or ? for help:
Configuration
Configuration
Software
-- -- -- -- -- -- -- -1:
Yes
2:
No
Please select
for disk n:n
to
Accounts
(Mailboxes
Speech
(Messages)
Prompts
-- -- -- -- -- -- -Yes
XX
XX
NO
the desired
(1 or 2):
stop,
Hours
Hours
etc.)
Account
Account
CONFIGURATION
Records
Records
TYPE
Response: Enter the desired configuration type.
21. Add the redundant disks, if any.
Do
disk?
want t h i s
disk
to
have
a
redundant
(Y/N)
Response: Y if the disk is to have a redundant disk,
N to skip the redundant disk process and continue at step 24.
22. If adding redundant disk(s), identify the redundant disk ID.
Now specify the
Enter the disk
or ? for help:
REDUNDANT disk:
id (path:target),
to
stop,
Response: The two-digit disk ID of redundant disk to added.
23. The server configures the disk and repeats the prompt asking for another disk ID.
Continue entering the disk ID numbers until all the redundant disks have been
added, then press Enter to exit.
24. Acknowledge the end of the process.
ADD-DISK DONE. ENTER
REBOOT THE SYSTEM.
A
CARRIAGE
RETURN
TO
Response: Press Enter.
The server resets all modules to the Maintenance from Hard Disk Menu.
25. Reach the System Maintenance Menu, then go to the Module Maintenance Menu.
26. Update the redundancy of all disks that were affected by the shutdown.
Menu Map 1 2
7015
A
Online Disk Replacement (Redundant
Systems)
Page 1 of 2
Release
and later
This procedure describes how to replace a hard disk for a single or multi-module server
disk redundancy. This procedure can be performed while the server is online.
with
FOR THE MODEL 70 ONLY: Some system prompts in this procedure may contain
generic references to other multiple-module Centigram Series 6 products. In such cases,
shaded areas indicate a difference in operations for the Model 70. The Model 70 is
equivalent to a “one module” server. When asked for the number of the host or module,
always enter “1” or “a”.
All SCSI references in this procedure are for SCSI servers only.
Note:
Be sure that the Service Diskette, all Optional Feature Diskette(s), and the
Module Enable Diskette contain the serial numbers for
disk(s) in the
server and the disk(s) to be added.
CAUTION!
If your server is a multi-module server without redundant disks that
has experienced a total hard disk failure, contact the Technical
Assistance Center for instructions on how to set up the hardware.
WARNING!
During this procedure, the server cannot process calls. Centigram
recommends that you perform this procedure during periods of low
call traffic.
Note:
You can find
referenced in this procedure in the
Technical Reference Manual.
Series
Reference
Step
Prepare the New Disk
1.
Jumper the new disk to match the master or slave disk to be replaced.
2.
Call the Technical Assistance Center to add the serial number of the new disk to the
Service Diskette, the Module Enable Diskette, and all Optional Feature Diskette(s),
if the server contains any. This can be done while the server is processing calls.
1923
Prepare the System
3.
Reach the Hard Disk Utilities Menu, then go to the SCSI Status Menu.
Menu Map 8
A
CP 6283
Page 2 of 2
Release
and later
Reference
4.
Verify that all disks are in sync.
Select:
Response:
(D) Display Status of all SCSI buses and disks.
Server displays a report showing the status of all disks. Verify that all
disks show the status as
Press Enter to exit.
If any d i s k , o t h e r than the disk to be replaced, is out of sync with its redundant
mate, update the redundancy. Do not update the redundancy of the disk to be
replaced.
7015
Cl? 6268
6.
Shut down the system. Leave the status of all modules enabled.
7.
Turn off the system power.
8.
Change the hardware, removing the disk to be replaced.
CP 6221, Ch. 4
Install the new hard disk and replace the cabinet cover.
CP 6224, Ch. 4
1 0 . Turn on the system power.
1 1 . Reach the
Hardware Configuration Menu, then go to the Disk
Menu Map 12
Configuration Menu.
Replace the disk.
Select:
(S) Replace a disk of redundant pairs
Please insert s e r v i c e
diske
drive, hit
tte into
when ready.
floppy
Response: Insert the diskette and press Enter.
Prompt:
Specify one of the following bus:Id pairs:
n:n n:n
Which Disk?
of the disks installed in the server
Response: n:n represents the two digit disk
available to be replaced.
Enter the two
disk ID of the disk to be replaced.
The server configures the disk. When the process is complete, the server prompts
with the serial number of the new disk.
Serial number is xxxx.
13. Update the redundancy of the new disk.
A
7015
Offline Disk Replacement
(Non-Redundant/Redundant Systems)
Release
Page 1 of 4
and later
This procedure describes how to replace a defective or malfunctioning hard disk with a
new hard disk in a non-redundant or redundant Centigram Series 6 server. This
procedure must be performed while the server is offline. (Although this procedure can be
used for redundant systems, Centigram recommends CP 6283, Online Disk
Replacement (Redundant Systems) for redundant disk replacement.)
This procedure requires that all data be transferred from the existing disk to the new
replacement disk. To accomplish this, you must reconfigure the existing hard disk as the
disk and configure the new disk as the master disk. This conversion transfers all
information from the existing hard disk to the new hard disk and maintains a one-to-one
correspondence between the slave and master.
Be sure the Service Diskette, all Optional Feature Diskettes, and the Module Enable
Diskette contain the serial numbers for the disk in the server and the disk to be added.
Note:
The Model
is equivalent to a one-module server. System prompts for the
Model 70 can contain generic software references to hosts or modules.
WARNING!
During this procedure, the server cannot process calls. Centigram
recommends that you perform this procedure during periods of
traffic.
Note:
You can find
referenced in this procedure in the Centigram Series
Technical Reference Manual.
Reference
Inventory the Conversion Parts
1.
The items listed below are required to complete the conversion process. Do not
begin the conversion unless you have all of the items.
Release
or later, already installed on the existing hard disk in your server
l
A Floppy Boot Diskette
l
A new hard disk. This hard disk must be formatted by Centigram.
l
A new Service Diskette serialized for the new hard disk.
Prepare the System
2.
Call your technical support group for assistance in adding the serial number of the
new hard disk to the Service Diskette, the Module Enable Diskette, and all
Optional Feature Diskette(s), if the server contains any. You can do this while the
server is processing calls.
A
Page 2 of 4
Release
and later
Reference
Step
3.
Run an Online System Verify.
4.
Perform a floppy backup.
Shut down the system.
Turn off the system power.
Set Up the Hardware
7. Remove cabinet cover.
8.
Disconnect the disk cable from the existing hard disk and remove it from the
cabinet.
Cl'6221
9.
Rejumper the existing (defective or malfunctioning) hard disk from master to slave.
TR 1923
10. Reconnect the disk cable to slave hard disk. Do not reinstall the hard disk.
11. Jumper the new hard disk to master, if required. IDE hard disks are shipped from
Centigram configured as master.
12. Attach the second connector on the disk cable to the new master hard disk. (If a
second primary hard disk is already connected to this cable connector, temporarily
remove it until the master/slave data transfer process is complete. Do not connect
the new master hard disk to a third connector.)
Run the Disk Replacement Program
Note:
In general, you should never operate the Model 70 with the cover
removed. This is an exception. Proceed with caution.
Insert the Floppy Boot Diskette. Turn on the system power and boot from the
diskette.
14. When prompted, select the option to change the CMOS configuration.
15. Once in the CMOS set up , go to the entry for Hard Disk 1 and set the parameters
to correspond to the new hard disk which you are installing as the new master hard
disk.
16. Go to the entry for Hard Disk 2 and set the parameters to correspond to the
existing hard disk. You have just reconfigured the existing hard disk. It was the
master hard disk, now it is the slave hard disk.
17. Save these changes by pressing the
key and then the F 4 key.
18. The server boots from the floppy disk drive , displaying the Copyright and the
or
Revision history. It prompts you to select from two options: " f l o p p y
service."
option. The server then asks for the Service Diskette 6.0.
Dac.
A
TR 1923
Release
Step
CP 6592
Page 3 of 4
and later
Reference
20. Insert the Service Diskette and press Enter. From the menu of options, select
2
1.
The server displays a warning message. This is your prompt to verify that both hard
disks are correctly connected and that you did a floppy backup before you started
this procedure. If you failed to complete these requirements, stop the procedure at
this point and complete them.
WARNING!
REPLACE PROGRAM*******
REPLACE program s h o u l d b e
run only when
you want to replace a SCSI disk
with a new SCSI
disk.
You must
TEMPORARILY
set
the
SCSI id of the
destination disk
to be an id not.used by
any other SCSI device. If all
ids
are being used then please power
down
the
system,
TEMPORARILY
substitute for the new disk any
existing
disk which is not the disk to be
replaced or its mirror disk, and then start
this process again.
YOU MUST DISABLE ALL THE OTHER HOSTS TO BE
ABLE TO USE THIS OPTION.
IF YOU HAVE NOT DONE
SO, REBOOT THIS HOST AND DO IT NOW.
IF YOU DO NOT WANT TO CONTINUE, THEN RE-BOOT
THE SYSTEM!!
. . . ENTER A CARRIAGE RETURN
Response: Press Enter.
22. Identify the replacement disks.
Which disk do you want to replace?
Enter the disk id
for help.
to stop, or ?
Which disk is the new disk?
the disk id
for help.
to stop, or ?
Response:
Response:
the SCSI ID of the new disk
23. If the hard disks have not been prepared properly, the following error message is
displayed:
MOUNT: Unable to find partition
If this happens, check the cables to the hard disks, and try the disk conversion again.
If there is still a problem, contact your Distributor.
A
CP 6572
Page 4 of 4
Release
and later
Reference
24. The server takes approximately 45 minutes complete the process. The server
displays the following message when the replace disk is done:
Set hard disk parameters by selecting option
from the HARD DISK UTILITIES MENU after system
* reboot.
*
Please shutdown system and adjust disk
to disk
then reboot. If needed, update *
redundancy by updating disk
from its mirror *
* image disk by selecting option K from the HARD *
*
DISK UTILITIES
Specified
disk
replaced.
System
Configuration
-------------------Number of Hosts
Hosts
present
Number of disks
Active disk
Redundant disk
Configuration
has
been
changed!
Response: Turn off the power to the system.
Remove the Old Disk
25. Detach the connectors from both hard disks,
26. Install the new hard disk. Prepare the old hard disk for return and/or repair. (If
required, reconnect the second primary hard disk to the second disk cable connector
and resinstall.)
6221
Return the System To Normal Operation
27. Turn on the system power.
28. Run an Online System Verify.
cl? 7001
29. Reinstall cabinet cover.
Cl? 6224
30. Complete your post-implementation documentation.
A
Name the Configurations
Page 1 of
Release
1
and later
This procedures describes how to name the two system configurations. Use descriptive
names to help you remember the differences between the two configurations.
Step
1.
2.
Reach the
Configuration Main Menu, then go to the
Active Configuration Menu.
Map
Name the configuration.
Select:
(N) Name Configurations
Enter the configuration number to name (CR for
no change) :
Response: Number (0 or 1) of the configuration to create or modify name
Enter a name for this configuration, or
for default or existing name.
The name can be
up to 24 characters long.
Name :
Response: Enter a name that describes the configuration.
3.
Repeat step 2 to create or modify the name for the other configuration.
A
12
cl?
Page 1 of 1
View the Configuration Names
Release
and later
This procedures describes how to view the names of the two system configurations.
Step
1.
Reference
Reach the
Configuration Main Menu, then go to the
Active Configuration Menu.
Map 1 2
2. View the report.
Select:
View Configurations
Configuration last modified
CONFIGURATION is n.
by
OFFLINE
Where is the number of the configuration.
The system displays the report and returns to the command line.
A
7014
Enable a Module
Release
Page 1 of 1
and later
This procedure describes how to enable a module to return it to normal call processing
operation. When changing the status of multiple modules, always change the one the
console is attached to last.
FOR THE MODEL 120 AND MODEL 70 ONLY: Some system prompts in this
procedure may contain generic references to other multiple-module Centigram Series 6
products. In such cases, shaded areas indicate a difference in operations for the Model
120 and Model 70. The Model 120 and Model 70 models are equivalent to “one
module” servers. When asked for the number of the host or module, always enter “1” or
a.
This procedure applies to servers using either SCSI or IDE hard disks.
Reference
1.
Reach the System Maintenance Menu, then go to the Module Maintenance Menu.
2. Enable the module.
(E) ENABLE a module
Input a module id in the following range:
n
n
n
n
Which
Module?
Response: Enter the number of the module to be enabled. (Enter 1 or a for Model
Select:
120 or Model 70.)
The specified module automatically resets itself and returns to normal operation.
Menu Map 12
Page 1 of 1
Update Disk
Release
and later
This procedure describes how to update the disk redundancy. Each hard disk is
partitioned into multiple logical drives. To make sure all drive partitions are updated,
use the “Update all out of synchronization hard disks” option.
Note:
The server allows you to watch the number of the
but this display slows the verification process.
sector
number being updated,
Use the following table to determine which types of drives should be updated.
Drives to be updated:
Drives are not out of synchronization.
Software; speech and accounts
OUTDAT
Speech and accounts
OUTSFW
Software
Reference
Step
1.
Reach the Hard Disk Utilities Menu, then go to the Redundancy Update Menu.
Menu Map 8
2. Update the redundancy.
l
If multiple drives are out of synchronization, update the redundancy of all drives
using the “Update all out of synchronization hard disks” option.
Select:
(A) Update all out of synchronization hard disks
Type
"update"
to confirm your request:
Response: update
Note:
l
is not updated.
To update a specific disk use:
Select:
or
3.
Any drive listed as
Update system
drives
Select:
ate p eec an account drives on a hard disk.
Reach the Hard Disk Utilities Menu, then go to the SCSI Status Menu.
Menu Map 8
4. Verify that all disks are in sync.
Select:
(D) Display Status of all SCSI Buses and disks.
Response: Server displays a report showing the status of all disks. Verify that all
disks show the status as
Press Enter
exit. A note and
timestamp are recorded in the
as each disk is placed back in
service.
A
Page 1 of 1
Shut Down a Hard Disk
Release
and later
This procedure describes how to shut down a hard disk, removing it from service. This
process requires the server to contain redundant disks.
Reference
1.
Reach the Hard Disk Utilities Menu, then go to the SCSI Status Menu.
2.
Shut down the disk.
Select:
Map 8
(S) Shutdown SCSI BUS or disk
SCSI
Shutdown
Menu
Select:
(D) Shutdown a SCSI disk
Prompt:
Input a disk
nn
nn
nn
Which
Disk?
in
the
following
range:
Response: Enter the two-digit SCSI ID of the disk to be shut down.
"disable"
to
confirm
your
request:
Response: disable
3.
Verify the desired disk has been shut down.
Prompt: S C S I
Response:
Shutdown
Menu
Select:
(D) Display Status of all SCSI Buses and disks
Response: Server displays a report showing status of all disks. Verify the disk is
listed as DIS (disabled). ress Enter to exit the report and X to exit the
menu.
A
Enable a Hard Disk
Release
Page 1 of 1
and later
T h e procedure describes how to enable a disk. This process requires the server to
contain redundant disks.
The Update Redundancy procedure described in CP 70 15 must be run before the disk is
available for the server to use.
FOR THE MODEL 120 AND MODEL 70 ONLY: Some system prompts in this
procedure may contain generic references to other multiple-module Centigram Series 6
products. In such cases, shaded areas indicate a difference in operations for the Model
120 and Model 70. The Model 120 and Model 70 models are equivalent to or “one
module” servers. When asked for the number of the host or module, always enter “ 1 " o r
“a”.
This procedure applies to servers using either SCSI or IDE hard disks.
1.
Reach the Hard Disk Utilities Menu, then go to the SCSI Status Menu.
2. Enable the disk.
Select:
(E) Enable SCSI BUS or disk
SCSI
Select:
Enable
Menu
(D) Enable a SCSI disk
Select
one
Which
Disk
of
the
following
disks:
Response: Enter the two-digit SCSI ID of the disk to be enabled.
3.
Verify the desired disk has been enabled.
Prompt: SCSI Enable Menu
Response: X
Se
(D) Display Status of all SCSI Buses and disks
Response: Server displays a report showing status of all disks. Verify the disk is
listed as
OUTSYN, OUTDAT or OUTSFW.
Menu Map 8
7022
Page 1 of 2
Add or Cancel a Phoneline Exception
Relase
and later
This procedure contains instructions for setting any phoneline exception. Phoneline
exception changes take effect on the next new call after saving the settings. A table for
converting port numbers to line numbers follows the procedure.
Reference
Step
Add a Phoneline Exception
1.
Reach the Phoneline Exceptions Menu.
2.
Select line to change.
Select:
(A) Add exception
Keep entering t r i
plets, then
line by itself.
line triplets to change:
Map 10
enter
on
a
..
Response: The line triplets to change (module number:line card number:port
number). P r e s s Enter when ou are finished entering triplets.
3.
Select the exception number to set.
command
Prompt:
Response: The
4.
=
exception number.
Enter the new value for the exception.
value =
Prompt:
Response: The desired new value.
5.
Repeat steps 3 and 4 until all the phoneline exceptions for the selected line are set.
When you are finished, press Enter.
6.
Select a new line to change or press Enter to finish.
Cancel a Phoneline Exception
1.
To return a phoneline exception to the default value, reach the Phoneline
Exceptions Menu.
2.
Select a line to change.
Map 10
(C) Cancel exception.
Keep entering triplets, then enter
line by itself.
line triplets to change:
on a
Response: The line triplets to change (module number:line card number:port
number). Press Enter when ou are finished entering triplets.
A
Cl? 7022
Page 2 of 2
and later
Step
3.
Select the phoneline exception to reset.
Prompt: c o m m a n d t o c a n c e l =
Response: The number of the phoneline exception to reset
4.
Repeat steps 8 and 9 for each phoneline exception you want to change. When you
are finished, press Enter.
5.
Enter the next line to be changed, or press Enter to exit.
7025
Page 1 of 1
Activate New
Release
and later
This procedure describes how to activate new software loaded via the Online
Update program.
WARNING!
This procedure resets the server, causing loss of call processing
capabilities. Centigram recommends that this process be completed
during periods of low call traffic.
Step
1.
Reference
Reach the System Maintenance Menu, go to the System Maintenance Additional
Options Menu, then select S to go to the Online Software Update Menu.
Map 12
2. Activate the software.
Select:
(A) Activate New Software
Activating software will cause t h e s y s t e m t o
shutdown and reboot automatically.
If you wish to
activate the new software and reboot the s y s t e m
“activate”.
Response: activate
Disk 1 has new software Release
T h i s s o f t w a r e was u p d a t e d o n . . .
Do you want to continue.
to stop:
to continue, 'N'
Response: Y to continue the process,
N to abort the process
Perform
shutdown?
Response: Y to warn the users of the impending shutdown,
N to skip the warning.
Wait
for
Message
Waiting?
Response: Y to wait for the message waiting queue to clear.
The server automatically shuts down and resets the entire system. Phase II of the
software update is run, and the server resets a second time, returning to the
Configuration Main Menu.
A
7029
Page 1 of 1
Diagnose a Disk With System Online
Release
and later
This procedure describes how to run the diagnose program to check the hard disk while
the system is online processing calls.
Reference
Step
1.
Reach the System Maintenance Menu, then go to the Hard Disk Utilities Menu.
2.
Specify the disk(s) to be tested.
Select:
Prompt:
Map 8
(D) Diagnose a disk
Enter
A for
the hard disk id[bus:scsiId]
all, or Q to quit:
to
test,
or
Response: Enter a if you want to test all the disks in the system, otherwise enter the
bus and two-digit SCSI ID number of the disk to be tested.
3.
Identify which tests are to be executed.
All options default to 'Y':
Perform Controller Test? [Y/N]
Response: Y or press Enter to perform the test,
N to skip the test.
Perform
Sequential
Test?
R e s p o n s e : Y or press Enter to perform the test,
Prompt
[Y/N]
N to skip the test.
Perform
Random
Seek
Test?
[Y/N]
Response: Y or press Enter to perform the test,
N to skip the test.
Perform
Spiral
Seek
Test?
[Y/N]
Response: Y or press Enter to perform the test,
N to skip the test.
.
4.
If any test does not pass, contact your Centigram Distributor or Centigram TAC.
A
Page 1 of 2
Run Diagnose From Hard Disk
Release
and later
This procedure describes how to run the hard disk diagnose program from the
Maintenance From Hard Disk Menu.
It is assumed the module running the test has been shut down and disabled using the
process described in Cl? 6268.
WARNING!
This version of the diagnose program requires one module to be removed
from normal operation. Centigram recommends that this process be run
during periods of low call
If possible, the online version of this
program should be run from the Hard Disk Utilities Menu so there is
not a loss of call processing capabilities. See CP 7029 for the online
instructions.
Step
1.
Reference
Boot the module to the Maintenance From Hard Drive Menu.
Run
MAINTENANCE
from
Hard
Drive?
Response: y
2.
Start the Diagnose program and identify the disk(s) to be tested.
Select:
diagnose
Enter the hard disk
A for all, or Q to quit:
to
test,
or
Response: a if you want to test all the disks in the system, otherwise enter the bus
and two-digit SCSI ID numbers, separated by a colon, of the disk to be
tested.
cl? 7030
Page 2 of 2
Release
and later
Reference
Step
3.
Identify which tests are to be executed.
All options default to 'Y':
Perform Controller Test? [Y/N]
Response: Y or press Enter to perform the test,
N to skip the test.
Perform Sequential Test?
Response: Y or press Enter to perform the test,
N to skip the test.
Perform Random Seek Test?
‘Response: Y o r p r e s s Enter to perform the test,
N to skip the test.
Perform Spiral Seek Test?
Response: Y o r p r e s s Enter to perform the test,
N to skip the test.
4.
If any test does not pass, contact your Centigram Distributor or Centigram TAC.
If all tests pass, enable the module being tested.
Select:
host.status
Module Status Menu
Select:
(E) ENABLE a module
Input a module id in the following range:
n n n n
Which Module?
Response: Enter the number(s) of the module(s) to enable.
The module(s) automatically resets and returns to normal operation.
Run Diagnose From Diskette
12
Page 1 of
Release
and later
This procedure describes how to run the hard disk diagnose program from the
Diagnostic Diskette.
It is assumed the system has been shut down and all modules disabled using the process
described in CP 6268.
WARNING!
This version of the diagnose program requires the system to be
removed from normal operation. Centigram recommends that this
process be run during periods of low
traffic. If possible, you
should run the online version of this program from the Hard Disk
Utilities Menu, so you do not lose processing
See
CP 7029 for the online instructions.
Step
Reference
1.
Insert the Diagnostic Diskette in the floppy drive and reset the server.
2.
Start the
from the hard disk, then run commands from the floppy diskette.
Boot system from (Hard disk, Floppy)
Response: Press Enter.
Run commands from floppy?
Response:
3.
The server reads from the floppy disk and asks which process is to be executed.
Enter one of the names:
Response:
4.
diagnose
Identify the disk(s) to be tested.
Enter the hard disk
to test, or
A for all, or Q to quit:
Response: a if y o u w a n t to t e s t all the disks in the system, otherwise enter the bus
and two-digit SCSI ID numbers, separated by a colon, of the disk to be
tested.
A
7031
Page 2 of 2
Release
and later
step
Reference
Identify which tests are to be executed.
Prompt:
A l l o p t i o n s d e f a u l t t o ‘Y’:
P e r f o r m C o n t r o l l e r T e s t ? [Y/N]
Response: Y or press Enter to perform the test,
N to skip the test.
Perform Sequential Test? [Y/N]
Response: Y o r p r e s s Enter to perform the test,
Prompt:
N to skip the test.
6.
Prompt: P e r f o r m R a n d o m S e e k T e s t ?
Response: Y or press Enter to perform the test,
N to skip the test.
[Y/N]
Prompt: P e r f o r m S p i r a l S e e k T e s t ?
Response: Y or press Enter to perform the test,
N to skip the test.
[Y/N]
If any test does not pass, contact your Centigram Distributor or Centigram TAC.
If all tests pass, enable the modules.
Select:
Module Status Menu
Select:
Prompt:
(E) ENABLE a module
Input a module id in the following range:
n n n n
Which Module?
Response: Enter the number(s) of the module(s) to enable.
The module(s) automatically resets and returns to normal operation.
A
Appendix- Public Telecommunications
Network Connection
This appendix describes supplemental product information that you can use to
ensure that your Series 6 Model 70 is correctly installed and complies with various
requirements and standards. Refer to the regulatory compliance statements at the
front of this manual for other requirements.
Model 70 Connections
The following paragraphs describe the requirements for connecting-the Model 70 to
the Public Telecommunications Network
Shielded Cables
You must supply and use shielded cables when making connections to any of the
following ports:
l
Console ports
l
Serial ports
l
Text-to-Speech (TTS) card ports
l
MESA-Net ports
l
Disk drive ports
A-l
Public Telecommunications Network Connection
Jack Types
Use standard modular telephone jack types when connecting to the telephone
network. Use RJ- 11 C or RJ-2 1X for 1’me cards in a two-wire loop start or DID
configuration. Use RJ-2EX or
jacks for E
M operation. Use an RJ-11 C
jack for the modem port. Refer to the following table for facility interface codes,
port identifications, service order codes,
and network jacks, by port type.
Registration
Status
Facility
Interface Code
Port
Designation
2-wire loop
start
E line card or AT
line card, ports O-31
2-wire loop
start
Modem
E&M
or
Service
Order
Code
E line card or AT
line card, ports O-31
For fax cards, the REN is O.OB and the network jack is RJ-1
REN
Network
Jacks
or
RJ-21X
O.OB
RJ-2EX or
or RJ-21X.
Connectors and Loads
The Model 70 is connected to the telecommunications network via telephone line
cords that terminate in CA1
connectors for loop circuits, or
connectors
for E
M circuits.
The Load Number (LN), assigned to each terminal device, denotes the percentage
of the total load to be connected to a telephone loop used by the device and prevents
overloading. The termination on a loop may consist of any combination of devices,
but the total of the Load Numbers of all the devices cannot exceed 100.
The LN for a Model 70 is 100. No other terminal devices can share the same
telephone line while the Model 70 is connected.
A-2
Public Telecommunications Network Connection
Responsibilities of the Equipment Owner
The following paragraphs describe the responsibilities of the equipment owner,
subject to the rights of the telephone company and government regulations.
Incidence of Harm
If your equipment harms the telephone network, the telephone company can
discontinue your service temporarily. If possible, the company will notify you in
advance. If this is not practical, you will be notified as soon as possible. You will be
informed of your right to file a complaint with the FCC.
Rights of the Telephone Company
The telephone company may make changes in its facilities,
operations,
or procedures, which could affect the proper functioning of your equipment. If this
occurs, you will be notified in advance so you can maintain uninterrupted telephone
service.
Coin Service or Party line Use
This equipment may not be used on coin service provided by the telephone
company. Connection to party lines is subject to state tariffs.
A-3
List of Centigram Procedures
Page 1 of 3
Procedure
Number
Chapter
Number
Title
Called
Called By
1340
2
Run a System Information Report
CP 6590,
Cl? 6483
5303
5
Recover a Lost Console
5304
5
View or Edit History File
5313
5
View Hard Disk Operational Parameters
5314
5
Change Module Status From Hard Disk
CP 6281
CP 6282
Cl? 5402
3
Install Optional Feature With System
Online
CP 6483
CP 5412
5
Back Up a Class of Service
cl? 5413
5
Restore a Class of Service
5414
5
Set the System Time and Date
5415
5
Set the Site Name, Banner, and Code
5701
5
Run
5703
5
Do a Floppy Backup
5704
5
Do a System Restore
CP 6201
2
Test Basic Telephony Functions
CP 6215
2
Install Printer
CP 6590
CP 6216
2
Install Console
CP 6590
Cl? 6220
4
Remove/Install Line Card
Cl? 6224
CP 6221
4
Remove/Install Hard Disk
Cl? 6224
CP 6592
CP 6222
4
Remove/Install Floppy Disk Drive
CP 6224
CP 6224
4
Remove/Install Cabinet Cover
CP
CP
CP
CP
CP
CP
CP
CP 6258
2
Check Installation Quality
CP 6590
CP 6483
With System Offline
CP 6483
CP 6592
CP 6483
CP 6220
CP 6262
CP 6590
CP 628 1
CP 6282
CP 6592
6220
6221
6222
6281
6282
6284
6592
List of Centigram Procedures
Page 2 of 3
Procedure
Number
Chapter
Number
CP 6261
2
Connect the Telephone Lines
Cl? 6201
Cl? 6590
CP 6262
3
Perform an Offline Prompts Update
CP 6201
CP 6263
3
Perform an Offline Software Update
CP 6267
5
Do a System Reload
CP 6268
5
Shut Down a System
5303
5704
CP 6263
CP 628 1
CP 6282
CP 6483
CP 6270
2
Install Modem
CP 6590
CP 6281
5
Redundant Disk Addition
(make.redundant)
CP 6221
CP 6224
CP 6268
CP 6282
7015
CP 6282
5
Disk Addition (add.disk)
CP 6221
CP 6224
CP 6268
CP 628 1
7015
CP 702 1
CP 6283
5
Online Disk Replacement (Redundant
Systems)
CP 6221
CP 6224
CP 6268
7015
CP 6284
2
Install Redundant Hard Disk
CP 6224
CP 6483
3
Offline System Software Update
1340,
5304,
CP 5402,
5701,
5703,
CP 6263,
CP 6268,
700 1
Title
Called
CP 6268
Called By
CP 6483
CP 6282
List of Centigram Procedures
Page 3 of 3
Procedure
Number
Chapter
Number
CP 6590
2
Title
Model
Installation
Called
Called By
1340
CP 6201
CP 6215
CP 6216
CP 6261
CP 6268
7001
CP 6592
5
Offline Disk Replacement
Redundant
Systems/Redundant
Systems)
7001
2
Run Verify With System Online
7004
5
Name the Configurations
7005
5
View the Configuration Names
7014
5
Enable a Module
7015
5
Update Disk Redundancy
cl? 7017
5
Shut Down a Hard Disk
7019
5
Enable a Hard Disk
CP 7021
3
Perform an Online Increase System
Hours
CP 7022
5
Add or Cancel a Phoneline Exception
CP 7025
5
Activate New Software
CP 7029
5
Diagnose a Disk With System Online
7030
5
Run Diagnose From Hard Disk
703 1
5
Run Diagnose From Diskette
5703
CP 6221
CP 6224
CP 6298
7001
CP 6590
CP 6592
CP 6483
CP 6281
CP 6282
CP 6283
7019
7015
CP 6281
CP 6282
7000
Index
A
GCOS, 1-17
1-17
activating new software, Cl?
add.disk program,
Cl?
6282
adding
hard disks, CP 6282
phoneline exception, CP 7022
redundant hard disks, CP 628
Administrator’s mailbox, l-l 8
Analog, 1-15
Attendant mailbox,
18
Auto Wakeup, 1 14
Automated Dispatch,
16
automatic exit, avoiding, xiv
NCOS, 1-17
B
backup
classes of service, CP 5412
floppy,
5703
Broadcast mailboxes,
18
cabinet
description, l-5
installing, CP 6224
removing, CP 6224
Detail Recorder (CDR), 1 6
1 13
canceling phoneline exception, CP 7022
cards
Ethernet, l-l 1
Fax, l-11
line, l-10
1-11
Serial
Smartcards, l-l 1
specialty, 1- 10
Centigram Service Partners, 4-3
Chain mailboxes, 1- 18
classes of service
backing up, CP 5412
defined, 1-16
FCOS, 1-17
RCOS, 1-17
restoring, Cl? 5413
TCOS, 1-17
Configurable Data Link, 16
configuration
naming, CP 7004
viewing names, CP
connectors, A-2
console passcode, recovering, CP 5303
console, installing, CP 62 16
console, tips, xiii
customer turnover, 2-6
customization, 1 12
Cut-Through paging, 14
defaults, accepting, xiii
diagnose program, CP 7031, CP 7030, CP 7029
Direct Data Link, l-l 6
disk. See hard disk
disks
running diagnose, CP 7031, CP 7030, CP
7029
shutting down, CP 7017
viewing operational parameters, CP 53 13
distribution lists, 1-13, 1-15
distributors, 4-3
E
editing history file, CP 5304
Electronic Set Emulation, l-l 6
enabling, hard disks, CP 7019
equipment log, 2-3
equipment, protecting, xvi
Ethernet cards, l-l 1
F
Fax cards,
l-l
1
fax publishing mailboxes,
19
Index-l
Index
Fax Store and Forward, I-19
l-14
FCC regulatory compliance, l-4
Feature Class of Service (FCOS), 1 -17
field repairs, 4-2
floppy disk drive
backing up, CP 5703
description, l-9
installing, CP 6222
removing, CP 6222
running diagnose from, CP 703 1
Foreign Language Prompts, l-l 6
Functional System Partition Administration
(FPSA), l-l 5
hard disk, CP 6221
line card, CP 6220
Model 70, CP 6590
modem, CP 6270
optional feature, CP 5402
preparing for, xv
printer, CP 62 15
quality check, CP 6258
redundant hard disk, CP 6284
integrations, 1- 15
J
jack types, A-2
G
Greeting Only mailboxe, 18
Group Class of Service (GCOS), l-17
Guaranteed Fax mailboxes, l-l 9
Guest mailboxes, 1-l 8
H
hard disk
adding, CP 6282
adding redundant, CP 628 1
changing module status, CP 53 14
description, l-9
enabling, CP 70 19
installing, CP 6221
offline replacement, CP 6592
removing, CP 6221
replacing redundant, CP 6283
updating redundancy, CP
15
hardware
cabinet, 1-5
floppy disk drive, l-9
hard disk, l-9
line cards, 1- 10
overview,
specialty cards, 1 10
history file, viewing and editing, CP
I
increase system hours, CP 7021
installation
cabinet, CP 6224
console, CP 6216
floppy disk drive, CP 6222
Index-2
Limits Class of Service
line cards
description, 1-l 0
installing, CP 6220
removing, CP 6220
loads, A-2
1-17
M
mailbox
Administrator’s,
18
Attendant, 1-l 8
Broadcast, l-18
Chain, 1-18
fax publishing, 1 19
Greeting Only, 18
Guaranteed Fax,
19
Guest,
optional special application, l-l 9
Rotational,
19
18
special application,
Tree, 1-19
mailbox user features
Auto Wakeup, 1-14
1 13
customization, 1 12
Cut-Through paging, 1 14
distribution lists, 1- 13
Message Waiting,
3
Notification, 1-l 3
Receptionist II, 1- 14
pager terminal protocol paging, 1- 14
voice mail/messaging, 1- 12
Index
program, CP 628 1
maximum system capacities, l-3
menus
returning to main, xiii
viewing complete, xiii
MESA Forms, l-l 9
MESA-Net, 1-16
Message Waiting,
3
messaging, 1- 12
Model 70
capacities, l-3
connectors, A-2
expanding, 4-4
field repairs, 4-2
hardware overview, l-5
installing, 2-5, Cl? 6590
loads, A-2
server specifications, 1-4
service strategy, 4-2
servicing, 4-4
software overview, 1-l 2
support plans, 4-3
system connections, Atroubleshooting, 4-5
modem, installing, Cl? 6270
module, changing status,
53 14
Multi Vendor Independent Protocol (MVIP),
N
naming configuration, CP 7004
Network Class of Service (NCOS),
17
0
offline
running diagnose, CP 7030
CP 6263
updating
offline replace disk, CP 6592
offline software update, Cl? 6483
1 15
online, running diagnose, CP 7029
optional special application mailboxes
Fax Publishing, 1
9
Fax Store and Forward,
9
Guaranteed Fax,
19
MESA Forms, 1-19
optional system features. See also mailbox user
features
Analog,
Automated Dispatch,
16
Call Detail Recorder (CDR), l-l 6
Direct Data Link, 1-16
Electronic Set Emulation, 1-16
Foreign Language Prompts, l-l 6
Functional System Partition Administration
(FSPA),
installing, CP 5402
MESA-Net, 1 16
1 15
Video Dispatch, 1 16
Notification, 13
outside caller features, 1-14
P
parameters, disk, CP 53 13
passcode, console, CP
phoneline exceptions, setting, CP 7022
physical specifications, l-4
power cord, 2-3
power supply setting, 2-3
printer, installing, CP 6215
procedures, documentation conventions for, xi
programs
add.disk, Cl? 6282
diagnose, CP 7031, CP 7030, CP 7029
CP 628 1
CP 6267
system.restore, CP 5704
prompts, updating, CP 6262
Public Telecommunications Network Connection,
A-l
Q
quality check, CP 6258
R
Receptionist II,
redundant hard disk
installing, CP 6284
replacing, CP 6283
reloading system, CP 6267
report, System Information, CP 1340
restore classes of service, CP 5413
Restriction Class of Service (RCOS), l-17
Rotational mailboxes, 1- 19
running, online verify, CP 7001
Index-3
system
increasing hours, CP 7021
naming configuration, CP 7004
reloading, CP 6267
setting time and date, Cl? 5414
shutdown,
6268
verify online, Cl? 7001
viewing configuration, CP 7005
system administration
hardware, 5-4
phone, 5-3
system administrator, 5-2
system components. See hardware overview
system features
distribution lists,
15
integrations,
5
optional, 1-15
System Information Report, CP 1340
program, CP 6267
system.restore program, CP 5704
T
telephone
connecting lines, CP 626 1
testing basic functions, CP 620 1
Tenant Class of Service (TCOS), l-17
time and date, setting, CP 5414
timeouts, avoiding, xiv
tools required, 2-4
Tree mailboxes, 1 19
troubleshooting
application software problems, 4-7
failure, 4-7
console/terminal problems, 4-8
floppy disk drive problems, 4-9
hard disk problems,
10
10
integration problems,
line card problems, 4-l 1
overview, 4-5
power supply problems, 4-7
system and
problems, 4-12
U
updating
hard disk redundancy, CP 70 15
prompts, CP 6262
software, CP 6263
user distribution lists, l-13,
Index
V
W
Video Dispatch, I
viewing
history file, CP 5304
system configuration, CP 7005
voice mail,
warnings, documentation conventions for, xii
worksheets, 5-4
Index-5
issue 1 Release 2.0 January 1 9 9 6
Voice Processing Solutions
Prompt
Installation
Instructions
TM,
Trademark of M itel Corporation
Copyright 1996,
Corporation
All rights reserved.
Printed in Canada.
1996 Centigram Communications Corporation. All rights reserved.
This publication is protected by federal copyright law. No part of this
publication may be copied or distributed, stored in a retrieval system, or
translated into any human or computer language in any form or by any means
electronic, mechanical, magnetic, manual or otherwise, or disclosed to third
parties without the express written permission of Centigram Communications
Corporation, 91 East Tasman Drive, San Jose, CA 95134.
REPRODUCTION
Licensed users and authorized distributors of Centigram products may
this document for use with Centigram products provided that the copyright
notice above is included in all reproductions.
PROPRIETARY TERMS
The following are trademarks or registered trademarks of Centigram
Communications Corporation:
Centigram, PROSE, Speaklt,
AIP,
SPEECH+,
VGS,
PROSE 2000 Version 1 01992 Centigram Communications Corporation.
All other brand and product names are claimed or registered marks of their
respective companies.
NOTICE
The information contained in this document is believed to be accurate in all
Corporation
The information
respects but is not warranted by
is subject to change without notice and should not be construed in any way
or any of its affiliates or subsidiaries.
and its
as a commitment by
affiliates and subsidiaries assume no responsibility for any errors or omissions
in this document. Revisions of this document or new editions of it may be
issued to incorporate such changes.
Page 2
Table of Contents
1. INTRODUCTION ...................................................................................................................................................
3
1.1. SCOPE .....................................................................................................................................................................
1.2. I NTENDED AUDIENCE ...............................................................................................................................................
1.3.
.............................................................................................................................................
I
Obsolete Documents........................................................................................................................................
3
3
3
3
2. NEW FUNCTIONALITY .......................................................................................................................................
3
.......................................................................................................................................
3
2.
3
3. INSTALLING NEW PROMPTS ............................................................................................................................
3.1.
........................................................................................................................
..................................................................................................................................
............4
4
4. UPDATING PROMPTS ..........................................................................................................................................
6
..............................................................................................................................................
............................................................................................................................................
7
7
5. RELATED ISSUES .................................................................................................................................................
7
..........................................................................................................................................
7
7
7
8
4.1.
4.2.
5.1 Overlay Set .....................................................................................................................................................
5.2. ONLINE E NABLE ......................................................................................................................................................
5.3. LANGUAGES PER
..........................................................................................................................................
Page 3
1.
Introduction
This document describes how to install and update prompts diskettes on a Centigram Series 6
server. This information is currently not available in Series 6 documentation.
1.1.
Scope
This document covers installation and updating instructions only. It is for use with all prompt
sets for software release 6.0, except hotel, for all languages.
1.2.
Intended
Audience
This document is intended for anyone who needs to install or update
on a Series 6
server. This includes customers, field engineers, customer support engineers, and customer
education personnel.
1.3.
Related Documents
For reference information on how prompts work with
software, refer to the
Reference and
Manual. For information about specifying drive
types, such as prompts drives, refer to the appropriate Series 6 Installation and Service
Series
Manual for your server. For information on ordering prompts, see Product Note
6 System Prompts.
1.3.1. Obsolete Documents
Procedures CP 6262, CP 7008, and CP 7009, which were included in
drafts of 6.0 manuals, are superseded by this document.
2.
manuals and in
New functionality
There are changes in prompt installation between
2.1.
software and 6.0 software.
No Online Installation
For software release 6.0, online prompts installation is no longer an option. In previous
releases, prompts could be installed while the server was processing calls
3.
Installing New Prompts
This section covers installing new prompts on a Series 6 server. Refer to Section 4 for
updating prompts.
Page 4
3.1.
Summary of Installation
To install language prompts, you must do two things: load the prompts onto the server, and
enable the prompts. Loading the prompts is the process of copying the prompts data to a
prompts drive. The user does not have to specify which drive to load the data as the server
handles this automatically. Enabling the prompts is the process of verifying the serialized
diskette (prompts setup diskette) that permits the new prompts to run on the server. This is
done by running the add.extracost program.
3.2.
Installation Instructions
FOR THE MODEL 120 AND MODEL 70 ONLY: Some server prompts in this
procedure may contain generic references to other multiple-module Centigram Series 6
products. The Model
and Model 70 are
module” servers. When asked for the
or “a” (all.).
number of the module, always enter
WARNING!
This procedure requires that you shut down the system resulting in
an interruption to call processing. Centigram recommends that you
perform this procedure during periods of low call traffic.
Step 1.
Reach the System Maintenance Menu, and execute a system shutdown (menu
choice S, System, Shutdown). You are prompted:
WARNING!!
This will terminate call processing.
"shutdown" if you really want to do this
Enter shutdown.
Step 2
Specify the modules to shut down. When you are prompted m o d u l e s
s h u t d o w n , enter a for all modules.
Step 3
You arepromptedwait f o r m e s s a g e waiting queues to b e
empty?
: Press Enter to wait for the message waiting queues to clear.
Step 4
You arepromptedwait for paging q u e u e s t o
Press Enter to wait for the paging queues to clear.
Step 5
Wait until all lines are off-hook. When prompted Perform O f f
be
to
empty?
line
System
Step 6
Reach the Module Maintenance Menu, as follows, and disable all modules.
Disable the module connected to the server console last. The prompts are:
Enable o r d i s a b l e m o d u l e s ?
Page 5
Enter
This takes you to the Module Maintenance Menu.
Select (D) Disable a module:
Which module?
Enter the number of the module to disable. Repeat this choice until finally
specifying the module connecting to the server console. When you do so, you are
prompted:
Warning: Disabling module 1 will result in system reboot!
Do not confirm disable if you do not want this to happen.
Type "disable" to confirm your request.
Enter disable to disable the module.
Step 7
The server resets. Wait for the maintenance mode prompt.
Step 8
Run the prompts.add program. When you see the prompt E n t e r o n e o f t h e
names: thenrespond
Step 9
Load the first prompts diskette into the server. (Do not load the prompts setup
diskette!) When prompted:
Insert the 1st diskette containing the prompts and press
return
Press Enter. When prompted:
Wait until drive light is out, insert language disk
hit CR when ready.
Press Enter. (Do not change disks.) When prompted for each additional diskette,
remove the previous one and insert the next one in sequence. Press Enter when
the correct diskette is inserted.
Step 10
When the last diskette has been loaded, the server displays the number of directory
entries, pointer sectors, and speech blocks used by the prompt partition. You are
then returned to the Off-Line Maintenance Menu.
Step 11
The only prompts that do not need to be enabled are the full and hotel sets of
American English prompts, mnemonic version (non-numeric). All other prompts
must be enabled as described in the next two steps. (However, you can also enable
prompts online as described in section 5.2, Online Enable.)
Skip to step 13 if installing American English mnemonic full set, otherwise,
continue.
Page 6
Enable the prompts. When prompted E n t e r o n e o f t h e n a m e s : enter
add.extracost. The prompts are:
Enter
t o add e x t r a c o s t f e a t u r e s ,
to stop:
Enter Y to enable the prompts. When prompted:
Insert Extra Cost SETUP disk in the floppy drive
Enter <carriage-return> when ready :
Insert the Prompts setup disk and press Enter.
Step 12
Exit the extra-cost menu. When prompted:
Do you want to install another extra cost feature?
:
Press Enter. You see a number of warning messages. You can ignore the ones
about activating the configuration and rebooting the system.
Step 13
When prompted E n t e r o n e o f t h e n a m e s : enter
modules, enabling the module connected to the server console last.
Enable all
Select (E) Enable a module:
Which module?
Enter the number of the module to enable. Repeat this choice until finally
specifying the module connected to the server console. When you do so, you are
prompted:
Rebooting module X.
Step 14
The server resets and resumes normal operation.
There are two ways to use the prompts once installed and enabled. You can
specify the prompts language as the default language for a line group. Or, create
or modify an LCOS for the new prompt language, then specify the LCOS for each
mailbox using the language. Complete information on how to perform these tasks
are in the
Reference and Configuration Manual, in the Mailboxes and
the Other Classes of Service chapters.
4.
Updating Prompts
This section covers updating prompts on a Series 6 server. Refer to Section 3 for information
on installing new prompts.
Page 7
4.1.
Summary of Update
To update prompts, you must load the new prompt diskette set o n t o t h e s e r v e r . T h e u p d a t e
procedure differs from the installation procedure in that prompts do not need to be enabled.
4.2.
Update
Instructions
To update prompts, follow steps 1 through 10 in section 3.2, Installation Instructions. Then
skip to step 13, and follow the rest of the procedure from that point.
5.
Related Issues
This section covers related issues with prompts installation and update.
5.1.
Numeric Prompts Sets
There are two kinds of numeric prompts sets for American English: full set and overlay. The
numeric full set, when installed, does not replace an existing full mnemonic set. The numeric
overlay set does replace the mnemonic full set, and cannot be used unless the mnemonic full
set was already installed. Numeric overlay sets consist of two diskettes instead of six.
5.1.1, Overlay Set
Overlay sets do not need to be enabled.
It is a known problem that if the overlay set is installed, the configuration report shows
“Numeric prompts enabled, prompts not loaded.”
5.2.
Online Enable
The enabling portion of prompts (Steps 11 and 12) can be performed with the server online.
The procedure is identical to loading an optional feature. From the System Maintenance
Menu, choose the Additional Options Menu, and then select (A) Add Optional Feature(s).
When prompted
Enter
to add an Optional Feature,
to stop:
respond with Y. When prompted, insert the Prompts Setup diskette, and press Enter. When
asked whether to install another Optional Feature, enter N.
If you enable the prompt set online, you must duplicate the active configuration and then
activate the inactive configuration. Both these actions are available under the Offline Menu,
under System maintenance/Reconfiguration/Reconfigure System.
Page 8
5.3.
Languages per Server
The maximum number of languages available on each type of Series 6 server is listed below.
Server Type
I
Max. Number of Languages
70
4
1201
4
120s
8
12
1
Issue 1 Release 2.0 January 1996
Processing Solutions
Enhanced In-band
Integration
Manual
Trademark of M itel Corporation
Copyright 1996,
Corporation
All rights reserved.
Printed in Canada.
TM,
1996 Centigram Communications Corporation. All rights reserved.
This publication is protected by federal copyright law. No part of this
publication may be copied or distributed, stored in a retrieval system, or
translated into any human or computer language in any form or by any means
electronic, mechanical, magnetic, manual or otherwise, or disclosed to third
parties without the express written permission of Centigram Communications
Corporation, 91 East Tasman Drive, San Jose, CA 95134.
REPRODUCTION
Licensed users and authorized distributors of Centigram products may copy
this document for use with Centigram products provided that the copyright
notice above is included in all reproductions.
PROPRIETARY TERMS
The following are trademarks or registered trademarks of Centigram
Communications Corporation:
AIP,
Centigram, PROSE, Speaklt,
SPEECH+,
VGS,
PROSE 2000 Version 1 01992 Centigram Communications Corporation.
All other brand and product names are claimed or registered marks of their
respective companies.
NOTICE
The information contained in this document is believed to be accurate in all
Corporation
The information
respects but is not warranted by
is subject to change without notice and should not be construed in any way
as a commitment by
or any of its affiliates or subsidiaries.
and its
affiliates and subsidiaries assume no responsibility for any errors or omissions
in this document. Revisions of this document or new editions of it may be
issued to incorporate such changes.
Table of Contents
1 Enhanced In-band Integration
Overview .......................................................................................................
l-l
How the Integration Works .......................................................................... 1-2
Template Structure ....................................................................................... 1-4
Data ...........................................................................................................
l-4
Action ........................................................................................................
l-5
Error Action ...............................................................................................
l-5
Time-out ....................................................................................................
l-5
l-5
Next Templates ..........................................................................................
Comment ...................................................................................................
1-6
Example Templates ...................................................................................
Template Execution ...................................................................................... l-7
Template Rules ................................................................................ . ............
l-9
Deriving Mailbox Numbers ........................................................................ l-10
Digit Absorption ......................................................................................
1-11
Digit Offset ..............................................................................................
l-l 1
Conditional Greetings ................................................................................. l-l 1
Administrative Interface ..............................................................................
Loading a Template Set ............................................................................
1-12
Modifying a Template ..............................................................................
1-12
Creating a Template.. ...............................................................................
1-12
Feature Interactions and Limitations ........................................................... 1-12
2 Menu Parameters
How to Use This Chapter ............................................................................. 2-l
Action ...........................................................................................................
2-2
Application Description.. .............................................................................. 2-3
Application Name ......................................................................................... 2-3
Backup Application ....................................................................................... 2-3
Called Extension Absorbed Digits ................................................................. 2-4
Extension Signed Offset.. ................................................................... 2-4
Calling Extension Absorbed Digits ............................................................... 2-5
Calling Extension Signed Offset ................................................................... 2-5
Comment . . . . . . . . . . . . . . . . . . . . . . . . . . . . . . . . . . . . . . . . . . . . . . . . . . . . . . . . . . . . . . . . . . . . . . . . . . . . . . . . . . . . . . . . . . . . . . . . . . . 2-6
Current
Template . . . . . . . . . . . . . . . . . . . . . . . . . . . . . . . . . . . . . . . . . . . . . . . . . . . . . . . . . . . . . . . . . . . . . . . . . . . . . . . . . . . . . . . . .2-6
Data . . . . . . . . . . . . . . . . . . . . . . . . . . . . . . . . . . . . . . . . . . . . . . . . . . . . . . . . . . . . . . . . . . . . . . . . . . . . . . . . . . . . . . . . . . . . . . . . . . .. .. . . . . . . . . 2-6
Error Action . . . . . . . . . . . . . . . . . . . . . . . . . . . . . . . . . . . . . . . . . . . . . . . . . . . . .
2-7
Host Number . . . . . . . . . . . . . . . . . . . . . . . . . . . . . . . . . . . . . . . . . . . . . . . . . . . . . . . . . . . . . . . . . . . . . . . . . . . . . . . . . . . . . . . . .
2-8
Install Application . . . . . . . . . . . . . . . . . . . . . . . . . . . . . . . . . . . . . . . . . . . . . . . . . . . . . . . . . . . . . . . . . . . . . . . . . . . . . . . . . . . . . . . . .2-9
List Applications . . . . . . . . . . . . . . . . . . . . . . . . . . . . . . . . . . . . . . . . . . . . . . . . . . . . . . . . . . . . . . . . . . . . . . . . . . . . . . . . . . . . . . . . . . .2-9
MF Enable . . . . . . . . . . . . . . . . . . . . . . . . . . . . . . . . . . . . . . . . . . . . . . . . . . . . . . . . . . . . . . . . . . . . . . . . . . . . . . . . . . . . . . . . . . . . . . . . . 2
. -10
10
Number of In-band Tasks on This Host . . . . . . . . . . . . . . . . . . . . . . . . . . . . . . . . . . . . . . . . . . . . . . . . . . . . . 2-10
2-11
Save Application . . . .
2-11
Show Application . .
Next Templates. . . . . . . . . . . . . . . . . . . . . . . . . . . . . . . . . . . . . . . . . . . . . . . . . . . . . . . . . . . . . . . . . . . . . . . . . . . . . . . . . . . . . . . . . . .
Show Number of In-band Tasks on Each Host . . . . . . . . . . . . . . . . . . . . . . . . . . . . . . . . . . . . . . . . . . . 2-12
Time-out . . . . . . . . . . . . . . . . . . . . . . . . . . . . . . . . . . . . . . . . . . . . . . . . . . . . . . . . . . . . . . . . . . . . . . . . . . . . . . . . . . . . . . . . . . . . . . . . . . . 2-12
Procedures
Task List
List of General Procedures
General Procedures
List of Detailed Procedures
Detailed Procedures
Appendix A= Fujitsu
Enhanced In-band Integration
Features and Functions .................................................................................
A-l
Hardware and Software Requirements ..........................................................
A-2
Feature Interactions and Limitations .............................................................
A-3
Use of Receptionist II ...................................................................................
A-3
Template Specifications ............................................................
A-4
Appendix B: Omni Enhanced In-band Integration
Features and Functions .................................................................................
B-l
Requirements ..........................................................
B-2
Feature Interactions and Limitations .............................................................
B-3
Use of Receptionist II ...................................................................................
B-3
Hardware and
Template Specifications ............................................................
B-4
Appendix C: System 25 Enhanced In-band Integration
Features and Functions . . . . . . . . . . . . . . . . . . . . . . . . . . . . . . . . . . . . . . . . . . . . . . . . . . . . . . . . . . . . . . . . . . . . . . . . . . . . . . . . . C-l
Hardware and Software Requirements .......................................................... c - 2
Use of Receptionist II ................................................................................... C-3
Template Specifications.. .......................................................... C-3
Appendix D:
Enhanced In-band Integration
Features and Functions . . . . . . . . . . . . . . . . . . . . . . . . . . . . . . . . . . . . . . . . . . . . . . . . . . . . . . . . . . . . . . . . . . . . . . . . . . . . . . . .
Hardware and
D-l
Requirements . . . . . . . . . . . . . . . . . . . . . . . . . . . . . . . . . . . . . . . . . . . . . . . . . . . . . . . . . D-2
Feature Interactions a n d Limitations . . . . . . . . . . . . . . . . . . . . . . . . . . . . . . . . . . . . . . . . . . . . . . . . . . . . . . . . . . . .
D-3
Use of Receptionist II . . . . . . . . . . . . . . . . . . . . . . . . . . . . . . . . . . . . . . . . . . . . . . . . . . . . . . . . . . . . . . . . . . . . . . . . . . . . . . . . . .D-3
Template Specifications . . . . . . . . . . . . . . . . . . . . . . . . . . . . . . . . . . . . . . . . . . . . . . . . . . . . . . . . . . .
Appendix E: Worksheet
Index
Menu Map
D-4
1 Enhanced In-band Integration
The Enhanced In-band Integration (EIB) optional feature allows an AIP
system to accept complex call information as DTMF or MF digits
during call setup. In-band signaling refers to sending tones in the voice frequency
baud over the same circuit on which the conversation later takes place.
The EIB optional feature comes ready to integrate with the following switches:
AT&T System 25, AT&T Legend, Omni, Fujitsu
Northern Telecom
Northern Telecom MTX, and IUSACELL Cellular switches. The installer
can also program the
system to integrate with other switches that use
band signaling.
This manual describes the structure of Enhanced In-band Integration and provides
procedures for configuring a
system and several switches. Information
on specific switches is contained in the appendixes.
Overview
While standard
software can recognize a mailbox number dialed to it,
the EIB software can recognize several additional pieces of information provided by
the switch. By using pattern matching, the EIB software can recognize the call type
(no answer forward, busy forward, direct call) and the origination and destination
extension numbers. Based on this information, the
system can play an
appropriate mailbox greeting. The
system can also set message waiting
indicators (usually a light on the telephone or a broken dial tone) using either the
DTMF-to-PBX or RS-232 Message Waiting feature. Figure 1-l shows
information exchanged between the two systems.
Switch
Call information
System
Message Waiting Information
Figure
l-l
Integration
Communications
Enhanced In-band Integration supports the following user features:
l-1
Enhanced In-band Integration
l
Mailbox owners can forward their calls to the
callers hear mailbox owners’ personal greetings.
l
Mailbox owners can use conditional greetings to let callers know why they
have reached the
system (on the phone, away from desk, and
so on).
l
Mailbox owners do not need to enter their own mailbox numbers when
they call from their own extensions. They only need to enter their
passcodes to access the system.
l
Callers can choose to transfer to the operator or to some other defined
answering point, or they may dial another
extension.
l
The optional Receptionist II feature can answer outside calls that reach the
system directly.
..
Note:
system so that
Some of these features are not supported by all switches. See the
appendixes for information about specific switches.
Release 5.04 allows Enhanced In-band integrations to run on more than
one line group. This can be used for:
Different in-band switches connected to a single
system.
A single switch with different protocols connected to a single
system. For example, an Omni switch with two tenant groups where one
has a three-digit dial plan and the other has a four-digit dial plan.
A single switch with only one protocol but different
applications. For example, calls to different 8 0 0 numbers could reach
different line groups and hear different greetings.
How the Integration Works
The Enhanced In-band Integration software uses pattern matching to recognize the
call information sent from the switch. It compares the DTMF or MF tones with
templates of patterns that define the various call types. Each template defines the
following:
l
The data expected from the switch
The action to be performed after receiving the data
The maximum time
digits
The action to be performed if an error is encountered
Enhanced In-band Integration
The templates provide the flexibility needed to integrate with different kinds of PBX
and CO switches. Generally, each switch integration contains one template for each
call type and one to answer the incoming call. If a specific switch has three call types
(Ring No Answer, Busy, Direct Call), the integration has a total of four templates.
When the switch routes a call to the
system, it constructs an
information packet made of DTMF or MF tones to describe the call. The switch
makes a telephone connection to the
system and plays the tones into the
line card. The EIB software decodes the information packet and
compares it to the templates, and then plays the appropriate greeting to the caller.
For example, if a caller at extension 123 calls extension 456 and the extension is not
answered, the PBX creates an information packet and sends it to the
system, as shown in Figure I-2.
PBX
AIP System
Information
Packet
Extension 123
Extension 456
Figure 1 - 2
Sample Call Handling
This switch uses the DTMF tones *Cl to indicate that the call was not answered.
The resulting information packet is shown in Figure l-3.
Enhanced In-band Integration
Call-type identifier
Calling Extension
I
Separators
Figure l-3 Sample Information Packet
The EIB
compares the information packet to the expected patterns set in
the templates and identifies the call type and the associated mailboxes. The
system then plays the “no answer” greeting for mailbox 456 and records
a message. When the mailbox owner calls in, the
system says that the
message is from mailbox 123.
The EIB software comes with preprogrammed template sets for many telephone
systems, so the installer does not need to create the templates. Using the
administrative interface, it is easy to modify existing templates in the field, or create
new template sets for additional switches, if necessary.
Template Structure
Enhanced In-band Integration usually consists of several templates. Each
template consists of six fields: Data, Action, Error Action, Time-out, Next
Templates, and Comment. All of the fields are explained below, followed by a
sample template set.
Data
This field specifies the data expected from the switch. Table l-l lists the valid data
items.
l-4
Enhanced In-band Integration
Table 1 1
Valid Data Field Entries
Data
Description
o-9,
DTMF/MF digits
A-D
DTMF A through D (column four digits)
MF digits
and ST, respectively
R
Ring or seizure
T
Dial Tone
H
sn
Fixed-length source extension containing
dn
Fixed-length destination extension containing
sxn
Variable-length source extension (11 max.) terminated by
character
dxn
Variable-length destination extension (11 max.) terminated by
character
xn
Ignore
digits (11 max.)
(11 max.)
digits
Ignore all digits until the DTMF/MF digit
Action
This field tells the
system what action(s) to take if the data received
completely matches the template specification. You can specify more than one
action. Table
lists the valid actions.
Enhanced In-band Integration
Table
Valid Action Field Entries
Action
Description
Dnn
Dial DTMF digits nn (O-V, A-D)
H
Hang-up
T
Go off-hook
Wn
Wink
wn
Wait n/l
vo
Play
prompt with
Play
prompt,
of a second
of a second
required
optional *
v2
Play Forward All greeting
v3
Play Ring No Answer greeting
v4
Play Busy Forward greeting
Play General greeting (Receptionist II or
Message Center greeting)
The system will not require callers to enter a
if FCOS bit 2
is enabled.
Error Action
This field tells the
system what action to perform if it receives
unexpected data or if a time out occurs. Valid entries for the error action are the
same as for the Action field.
Time-out
This field defines the maximum time, in tenths of a second, to wait for the next digit
before performing the error action.
Next Templates
This is a list of the application templates to compare with the next set of incoming
digits. The
system simultaneously compares all of the templates listed
in this field against each digit and executes the first template to completely match. If
the
system executes an error action it terminates the call and does not
use the remaining templates.
Comment
This field is optional and can contain a one-line comment for reference. You can
put a short description of the template here.
Enhanced In-band Integration
Example Templates
The first two templates for the AT&T System 25 integration tell the
system how to recognize and handle a direct internal call. The
programming for template 1 is:
Field
Meaning
Value
Data:
R
Wait for ring
Action:
T
Go off hook
Time-out:
none
Wait indefinitely for ring
Error Action:
none
Next Templates:
23456
Comment:
Wait for ring and then go off-hook
After ring, compare data with templates
5, and 6 simultaneously
The system displays the programming as shown in Figure 1-4. The system always
shows the first four fields separated by a comma, even if some of the fields are blank.
Data
Time-out
, Next Templates
R, T,
Next:
Comment:
Wait
for
ring
and
go
off-hook
Comment
3003EiB
Figure
Template Programming Display
The second template contains the pattern of DTMF/MF tones that indicate a direct
internal call. Note that the EIB software compares incoming data with this template
and with templates
5, and 6 simultaneously to find the first match.
l-7
Enhanced In-band Integration
The programming for template 2 is:
r
Field
Meaning
Value
Data:
Expect
followed by a
length source extension number,
followed by
Action:
Play a
mailbox
prompt for the source
Time-out:
10
Wait a maximum of 1 s e c o n d b e t w e e n
digits
Error Action:
H
Hang up if an error occurs
Next Templates:
none
No “next templates;’ required because
the action field plays a prompt
Comment:
Direct internal call; play
prompt
L
The system displays the programming like this:
T2:
10, H
Next:
Comment: Direct internal call; play
prompt
Template Execution
The Enhanced In-band Integration application goes through the templates matching
incoming DTMF/MF data and performing actions. The process always begins with
the first template listed in the application (Template 1 ) .
The
system waits to receive data from the switch, and then compares
that data with the first template’s Data field to determine if a match exists. If a
match exists, it compares the next data item to the next entry in the field. This
process continues until the
system receives either all the data required
by the template, unexpected data, or a lapse in data (a time out). When the data
completely matches the Data field of a template, the system carries out the action
defined in the Action field.
If the template does not play a prompt as its action, the
system
compares the remaining incoming data with the template(s) listed in the Next
Templates field. The system compares all templates listed in the Next Templates
field in parallel. It drops templates from the matching process as it receives
matching data, and it performs the action in the first completely matching template.
l-8
Enhanced In-band Integration
If none of the templates match, the
the last surviving template.
system performs the error action of
If the
system receives unexpected data or a lapse in data (time out), it
carries out the action specified in the Error Action field. Template execution is
complete when the system performs an error action or plays a prompt, or all
templates have been executed.
Figure l-5 uses the AT&T System 25 integration to show how the EIB
matches the incoming data with the templates.
Switch sends:
0
0
#
123
#
Next: 2 3 4
T2:
T3:
T4:
T5:
Figure
l-5
Template Pattern Matching
The ring from the switch matches the Data Field in Template 1 completely, and the
system takes the line off-hook. The switch then sends the data packet
shown by the digits in the figure. The EIB software compares those digits with
templates 2,
4, and 5 in parallel. Templates 3, 4, and 5 drop from the matching
process when the first non-matching digit (0) is received. Template 2 matches all the
way to the end, and the
system performs the action for that template:
play the mailbox
prompt.
Figure l-6 is a flowchart that shows the process of template execution.
1-9
Enhanced In-band Integration
Start
I
Yes
Execute Action
Figure
I
Template Execution
Note:
Templates only describe the protocol during call setup. Template
execution is complete once the
system starts to play a
greeting or perform an error action, and the response to any
additional digits is determined by standard
software.
Template Rules
The following rules apply when creating or modifying a template:
1.
l-10
Both Data and Action fields must not be blank. Only one of the
fields
can be blank. Templates always have comma separators, even if fields are
blank.
Enhanced In-band Integration
2.
If more than one template in a group of Next Templates matches the received
data, the system carries out the action of the first matching template (in order
of template number). Therefore, you should specify templates in the order of
priority for their actions.
3.
If all the templates in a group of next templates fail, the system performs
the error action of the last surviving template.
4.
If a time out occurs while receiving digits, the system performs the error
action for the template with the longest time out value. If all the templates
in the group have the same value, the system performs the first template’s
error action.
5.
If the system recognizes invalid entries in the Data field at any time during
template execution, it drops the template and writes
entry in the error
log. It does not perform an action or error action for that template.
6.
If the Time-out field is left blank, the system uses a value of 0 for the
digit time out. The time out value does not apply while waiting for a
ringing event in template 1.
7.
The maximum length for the Time-out field is 4 characters. The
maximum length of all other fields is 80 characters.
8.
All actions that begin with Vn, where n is a prompt number, must be the
last action in the template.
9.
Except for rule
you can leave any fields blank.
10. All template fields are case sensitive.
11. You cannot leave any spaces between the variable length string (source or
destination number) and the termination digit.
12. Except for rule
1, you can use spaces to enhance the readability of the
template. Spaces are sometimes required. For example, an eleven-digit
source extension followed by the digits
must be entered as
12” to
distinguish it from
112.”
13. When a different application (template set) is activated, the changes take
affect on the next call placed to the system; no reboot is necessary.
1-11
Enhanced In-band Integration
Deriving Mailbox Numbers
The source and destination digits sent from the switch do not always match exactly
with
mailbox numbers. You can use two features with the Enhanced
In-band option to translate the incoming digits to an arbitrary
mailbox
number.
Digit Absorption
Digit absorption shortens the incoming extension numbers to a fixed number of
digits. For example, if your switching system sends seven-digit extension numbers
and you want to use four-digit mailbox numbers, you can set the Calling and Called
Extension Absorbed Digits fields to 3 to absorb the leading three digits.
Digit Offset
Digit offset transforms the incoming strings into a different mailbox number by
adding or subtracting a given number. If the switching system sends a 1234 and the
Called Extension Signed Offset is
the
system changes the
extension number to mailbox 1434.
Conditional Greetings
Mailbox owners can use conditional greetings to let callers know why they reached
the
system-no answer, busy, or call forward. If the dialed extension
was busy, the caller hears the Busy greeting. If the called party did not answer, the
caller hears the Ring No Answer greeting. Mailbox owners can use the prerecorded
conditional greetings or they can record their own greetings.
The conditional greetings are enabled in a user’s FCOS, however users must activate
the feature from within their own mailboxes.
Note:
Not all switches can provide the call information required to
support conditional greetings.
Administrative Interface
You use both offline and online menus to configure an Enhanced In-band
Integration on a
system. You use the offline menus to define a new line
group, assign the line group to the Enhanced In-band Integration, and configure
application parameters. You use the online menus to install the integration template
set or configure an existing template set.
The final step required to fully configure an Enhanced In-band Integration is to set
the mailbox message waiting types.
1-12
Enhanced In-band Integration
The Enhanced In-band Integration option works with incoming calls; it does not
provide a means to activate message waiting indicators. Either the DTMF-to-PBX
or the RS-232 Message Waiting application can perform this function. Both
message waiting methods are included with the base software; see the
Reference and
Manual for details.
Loading a Template Set
All application template sets are copied onto the hard disk when you load the
Enhanced In-band Integration optional feature diskette. You then must select and
install a specific application template set to activate the integration.
Modifying a Template
You can modify an existing EIB integration application by editing the templates.
You can save a modified application with its original name or a new name. Using
the original name to save the file overwrites the original template.
You cannot overwrite applications that are provided by Centigram; you must save
any changes under a different application name. If you do not save your changes,
and then later make additional changes or install a different template set, you cannot
go back to the unsaved version.
Creating a Template
If there is no template set for your switch, you can create a set using the
administrative menus. You create an integration template (or set of templates) by
editing templates in the online menu-the same procedure as modifying a template.
There is a worksheet at the end of this manual to help you design templates for your
switch.
Feature Interactions and limitations
l
Releases 5.02 and
allow only one Enhanced In-band
Integration line group per system. Unpredictable system behavior is likely
if you use more than one integration. Release 5.04 supports multiple line
groups of EIB integration.
l
Not all switches support all of the features and call
available with
Enhanced In-band Integration. Refer to your switch documentation for
more information on the features available with your particular switch.
1-13
2 Menu Parameters
This chapter lists menu choices available in a
system. You can use this
information when planning and installation or when filling in the
worksheets. At an AIP maintenance console, most menu choices require input from
you, such as numbering a line group or answering yes to a yes/no question. These
choices change the configuration of the system, depending on what you enter. Many
other menu choices change the system’s status, such as starting a program or printing
a report. Still other menu choices are navigational only they go to a submenu or
return you to a starting point. Navigational choices are excluded from this chapter,
since they have no effect on the system.
How to Use This Chapter
Refer to this chapter when you need more information about a menu item and what
kind of input is needed, what ranges are acceptable, and what units are used for any
numerical entries.
The following sections are included, when appropriate, for each menu item:
Location in Menus The name of the menu the selection appears in. For
example, the Reports menu choice is on the main menu, so that entry would
read Main Menu.
What to Enter What the system expects you to type.
options are included
here. In most cases, you can enter a question mark
for on-line help.
Default What the system assigns to this choice if you do not alter it, or if you
reset the system back to its defaults.
How It Works An explanation of what happens when you select this choice.
Other Requirements What you must do in other menus or have in terms of
hardware or software to implement this choice.
Tips
Techniques Suggestions and examples for using this menu choice,
Interactions
Limitations How this parameter could affect others in
another part of the
application.
See Also Other menu parameters or reference material that you may find
useful.
2-l
Enhanced In-band Integration Menu Parameters
Action
Location in Menus In-band Edit Template Menu
What to Enter The action to be performed when the received data matches.
Table 2-l contains a list of all valid entries for the Action field.
Table
1
Valid Action Field Entries
Description
A c t i o n
Dial DTMF digits
H
Hang-up
T
Go off-hook
(O-9, A-D) max 23
Wn
Wink
of a second
wn
Wait
of a second
vo
Play
prompt with
Play
prompt,
..
required
optional *
v2
Play Forward
v3
Play Ring No Answer greeting
v4
Play Busy Forward greeting
greeting
Play General greeting (Auto Receptionist or
Message Center greeting)
..
.
The systemwill not require callers to enter a
bit 218 is
enabled.
How It Works
matches the templates to the incoming data.
After a match has been reached, the template performs the action.
Tips
Techniques The Action Field entries are case sensitive
different from
is
Interactions
Limitations Line cards will wink automatically when line
exception 24 is enabled. Turn it off to control winks from the in-band
templates. Note that you can control the time before a wink (wn), the
duration of a wink
and the wait after a wink (wn).
See
2-2
Error Action
Enhanced In-band Integration Menu Parameters
Application Description
Location in Menus Enhanced In-band Menu
What to Enter A one-line description of the application.
Default On integrations provided by Centigram, this value is filled in
automatically. If you are creating a new set of application templates, use this
entry to describe the new application.
How It Works The application description provides more information than
the application name allows.
Interactions
Tip
Limitations This field entry is limited to one line.
Techniques This field is for the user’s record keeping.
Application Name
Location
Menus Enhanced In-band Menu
What to Enter A short descriptive name for the application.
Default The default value is determined by the optional feature integration
that is installed. For example, with the AT&T System 25 integration installed,
this value defaults to
How It Works Enter the name of the application template set to use or the
name of the new application template set.
Interactions
Limitations There must not be any spaces in the application
name. The application name must not contain any reserved words from the
template language. The application name must be less than or equal to 1 0
characters.
Tips
Techniques This is the name of the file that stores the application
templates on the disk, for example,
Backup Application
Location in Menus Enhanced In-band Menu (Release 5.03 only)
What to Enter No entry required.
2-3
Enhanced In-band Integration Menu Parameters
How It’ Works When you select to backup an application, the system will save
a copy of the current template set on the hard disk. You can later reload this
application to put it into service or make more changes.
Tips
Techniques Use an application name that is easy to remember.
Interactions
Limitations If there is already an application with the same
name on the hard disk, the system will ask you if you want to overwrite the
existing application. You cannot overwrite any of the applications provided by
Centigram.
See
Save Application
Called Extension Absorbed Digits
Location in Menus In-band Integration Menu
What to Enter The number of leading input digits to absorb from the called
extension. The acceptable range is from 0 to 12 digits.
Default 0 digits
How It Works Some switches and
send digits (O-9,
before the
extension; this feature allows those digits to be removed. After the digits have
been absorbed, the remaining digits are passed to the application templates.
Interactions
Limitations Do not set this parameter to absorb the digits
that identify different call types.
See Also Calling Extension Absorbed Digits
Called Extension Signed Offset
Location in Menus In-band Integration Menu
What to Enter The numerical constant to be added to the called extension
received.
Default 0 digits
How It Works This adds or subtracts offset to the called extension. Offsets
are added to or subtracted from the extension digits on a digit-by-digit basis.
This allows for
mailbox numbers that are different from the
switching system dialing plan.
Enhanced In-band Integration Menu Parameters
Interactions
Limitations This adds or subtracts without producing any
addition carry or subtraction borrow. It is normally used to make a three-digit
extension into a four-digit mailbox number, or vice-versa. For example, if an
extension is 234 and the signed offset is
the result is 1234.
Calling Extension Absorbed Digits
Location in Menus In-band Integration Menu
What to Enter The number of leading input digits to absorb from the calling
extension. The acceptable range is from 0 to 12 digits.
Default 0 digits
How It Works This absorbs a programmable number
from the
beginning of the calling extension number. Some switches and
send
digits (O-9,
before the extension; this feature allows those digits to be
removed. After the digits have been absorbed, the remaining digits are passed
to the application templates.
Interactions
Limitations Do not set this parameter to absorb the digits
that identify different call types.
See Also Called Extension Absorbed Digits
Calling Extension Signed Off set
Location in Menus In-band Integration Menu
What to Enter The numerical constant to be added to the extension received.
Default 0 digits
How It Works This feature adds or subtracts a specified offset to the
incoming extension number. Offsets are added to or subtracted from the
mailbox
extension digits on a digit-by-digit basis. This allows for
numbers that are different from the switch dialing plan.
Interactions
Limitations This adds or subtracts without producing any
addition carry or subtraction borrow. It is normally used to make a three-digit
extension into a four-digit mailbox number, or vice-versa. For example, if an
extension is 234 and the signed offset is + 1000, the result is 1234.
See Also Called Extension Signed Offset
2-5
Enhanced In-band Integration Menu Parameters
Comment
Location in Menus In-band Edit Template Menu
What to Enter Comments to help the user’s understanding of the application
template. Comments can be a maximum of 128 characters long.
Default Blank
Current Template
Location in Menus In-band Edit Template Menu
What to Enter The number of the template that you wish to modify or
create.
Default Template 1
How It Works This selects the template to edit in the integration application
(for example, template 3 of 21). Each integration application can contain
multiple templates.
Other Requirements The template format and definitions for actions and
data must be known before this menu is used.
Interactions
Limitations The
system only checks the syntax
of the integration template (for example, the existence of comma separators),
not the content. It is the user’s responsibility to ensure the template integrity.
The Enhanced In-band Integration application functions according to the
template; if the template is incorrect, the template language has no way to
detect that a problem exists.
Data
Location in Menus In-band Edit Template Menu
What to Enter Valid in-band events. These are the
and other
events expected from the switch (for example, ring, dial tone, etc. Table 2-2
contains a list of all valid entries for the Data field.
Enhanced In-band Integration Menu Parameters
Table 2-2
Data
Valid Data Field Entries
Description
digits
o-9,
A-D
DTMF A through D (column four digits)
MF digits
and ST, respectively
R
Ring or seizure
T
Dial tone
H
Fixed-length source extension containing
digits (11 max.)
dn
Fixed-length destination extension
containing digits (11 max.)
sxn
11 max.)
Variable-length source
terminated by DTMF/MF character
dxn
Variable-length destination extension (11
max.) terminated by DTMF/MF character
Ignore
digits
Ignore all digits until the DTMF/MF digit
Default This field defaults to empty (no events expected).
How It Works When an incoming DTMF/MF signal is detected, it is
converted to its numerical form and compared to the data listed in this field.
Error Action
Location in Menus In-band Edit Template Menu
What to Enter The action code to take if a time out or incorrect data is
received. Table 2-3 contains a list of all valid entries for the Error Action field.
2-7
Enhanced In-band Integration Menu Parameters
Table 2-3
Error Action
Valid Error Action Field Entries
Description
Dial DTMF digits
H
Hang-up
T
Go off-hook
(O-9, A-D) max 23
Wn
Wink
wn
Wait n/l
of a second
vo
Play
prompt
Play
prompt,
of a second
required
optional *
v2
Play Forward All greeting
v3
Play Ring No Answer greeting
v4
Play Busy Forward greeting
Play General greeting (Auto Receptionist or
Message Center greeting)
* The systemw
enabled.
not require callers to enter a
if FCOS bit
Tips
Techniques The Error Action Field entries are case sensitive
different from “W.”
18 is
is
Interactions and Limitations If several templates experience a time out or
receive unexpected data, the template that is the last to match performs its error
action.
Line cards wink automatically when line exception 24 is enabled. Turn it off
to control winks from the in-band templates. Note that you can control the
time before a wink (wn), the duration of a wink
and the wait after a
wink (wn).
Host Number
Location in Menus In-band Integration Menu
What to Enter Module number (1-4).
Default
How It Works This parameter works with the “Number of
Tasks on
This Host” parameter to set the amount of system CPU resources assigned to
an Enhanced In-band Integration. Use this parameter to select a module
Enhanced In-band Integration Menu Parameters
(host), and then use the “Number...” parameter to set the number of tasks for
the module. Repeat the procedure for each module that has phone ports
assigned to an Enhanced In-band line group.
Interactions
Limitations This parameter is only required for
Releases 5.02 and 5.03 software. Release 5.04 configures the number of tasks
per module automatically.
See Also Number of
Tasks on This Host
Install Application
Location in Menus Enhanced In-band Menu
What to Enter The name of the application that you
to install. Note
that the name is case-sensitive, i.e.,
is not the same as
Default No default.
How It Works The named application is loaded so that you can make
changes or put it into service. You should backup the application if you make
any changes. When you want to put an application into service, you must exit
from the Enhanced In-band Menu to the Online Menu, and then choose to
exit and save changes. The new application starts service on the next call into
each phone port.
Tips
Techniques If you are not sure of the application name or its spelling,
use the List Applications option before attempting to install an application.
See Also Application Name, List Application
list Applications
Location in Menus Enhanced In-band Menu
What to Enter No entry required.
How It Works This menu choice displays a list of all enhanced in-band
applications on the system.
Tips
Techniques Select this option before choosing Install Application if
you are not sure of an application name or its spelling.
See Also Application Name, Install Application
Enhanced In-band Integration Menu Parameters
MF Enable
Location in Menus In-band Integration Menu
What to Enter Yes to enable MF signaling or No to disable.
Default No (MF signaling disabled)
How It Works When enabled, this parameter tells
to expect MF
signaling from the switching system. Some switches and
use
frequency (MF) signaling, others use Dual Tone Multi-Frequency (DTMF)
signaling. The
system only looks for one type of signaling during
call setup, therefore you must set the integration to work with the signaling
provided by the switching system.
Interactions
Limitations This parameter only affects signaling during the
in-band call setup. Normal user interaction with the
system is always via
DTMF.
Next
Location in Menus In-band Edit Template Menu
What to Enter The number of the next template or templates, separated by
spaces, to compare further data against.
Default Blank
How It Works When incoming data completely matches a template
specification and the template action does not play a greeting or hang up, the
system looks at the templates listed here to continue comparing against
incoming data. If more than one template is listed, the system compares all of
them simultaneously.
Number of In-band Tasks on This Host
Location in Menus In-band Integration Menu
What to Enter The number of system tasks to service the in-band ports on a
given module. The valid range is l-32.
Default 2
2-10
Enhanced In-band Integration Menu Parameters
How It Works This parameter works with the Host Number parameter to set
the amount of system CPU resources assigned to an Enhanced In-band
Integration. First select a module (host), and then use this parameter to set the
number of tasks for the module. Repeat the procedure for each module that
has phone ports assigned to an Enhanced In-band line group.
Techniques A good rule of thumb for determining the correct
number of in-band tasks for each module is to begin with a value of 20% of
the number of ports assigned to the Enhanced In-band line group. If more
than two rings occur before a greeting is played, increase the number of tasks.
An exception is for integrations that use line exception 24 to provide
immediate wink on E&M trunks; in these cases the number of tasks should
equal the number of in-band ports.
Tips
Limitations Each task uses more system memory; to preserve
system performance, do not configure more tasks than necessary.
Interactions
This parameter is only required for
Release 5.02 and 5.03
software. Release 5.04 configures the number of tasks per module
automatically.
See Also Host Number
Save Application
Location in Menus Enhanced In-band Menu (Release 5.04 only)
What to Enter No entry required.
How It Works When you select to save an application, the system will save a
copy of the current template set on the hard disk. You can later reload this
application to put it into service or make more changes.
Tips
Techniques Use an application name that is easy to remember.
Interactions
Limitations If there is already an application with the same
name on the hard disk, the system will ask you if you want to overwrite the
existing application. You cannot overwrite any of the applications provided by
Centigram.
See Also Backup Application
2-11
Enhanced In-band Integration Menu Parameters
Show Application
Location in Menus Enhanced In-band Menu
What to Enter No entry required.
Other Requirements This option shows all information about the current
application, including the application name and description, its installation
date and last modification date, and all of its templates.
Tips
Use this option to see all of an application’s templates at
once, especially before editing the application.
Show Number of In-band Tasks on Each Host
Location in Menus In-band Integration Menu
How It Works This displays the details for each in-band task on each module.
This feamre allows you to check your previous work.
Interactions
Liiitations This option is only available in Release 5.03.
Time-out
Location in Menus In-band Edit Template Menu.
What to Enter The time, in tenths of seconds, between received digits to wait
before an error condition occurs.
Default This field defaults to 0 tenths of a second.
How It Works The value of the timeout is set in the template. If there is too
much delay between digits coming from the switch, the time out timer expires.
When the timeout has expired, the system carries out the error action for the
template.
2-12
List of Detailed Procedures
Page 1 of 1
Procedure
Number
Release
Number
Title
5.03
DP 3021
Connect the Chassis Ground to the
Mount
System
DP 5402
Perform an Online Optional Feature
Installation
DP 6028
Define a Line Group for Applications
5.03
DP 6034
Add or Delete Receptionist II Extensions
5.03
DP 7006
Assign the Enhanced In-band Integration
Application to a Line Group
5.03
DP 7007
Configure In-band Digit Absorption and
Signed Offset
DP 7010
Install an Enhanced In-band Integration
Template Set
5.03
DP 7011
Modify an Enhanced In-band Integration
Application
5.03
DP 7016
Set In-band Module Numbers and Number
of Tasks
5.03
DP 7022
Add or Cancel a Phoneline Exception
5.03
DP 7023
Enable Conditional Greetings
5.03
DP 7501
Create a New Enhanced In-band Integration
5.03
..
5.03
list of General Procedures
Page 1 of 1
Procedure
Number
GP502
Release
Number
Title
Configure an Enhanced In-band Integration
5.03
Configure Omni Integration
5.03
Configure Fujitsu
Integration
5.03
Configure AT&T System 25 Integration
5.03
GP507
Configure Northern Telecom
Integration
5.03
GP 508
Configure AT&T Legend Integration
5.03
GP509
Configure Northern Telecom MTX
Integration
5.03
Task List
Release 5.03 and
Page 1 of 1
and later
Procedure
Tusk
Enhanced In-band Integration
Configure an Enhanced In-baud Integration ......................................
Configure AT&T Legend Integration .................................................
Configure AT&T System 25 Integration .............................................
Gl?
Configure Fujitsu Omni Integration ...................................................
Configure Fujitsu
Integration .................................................
Configure Northern Telecom MTX Integration ................
Configure Northern Telecom
..................
Integration ..............................
Add or Cancel a Phoneline Exception ......................................................
DP 7022
Add or Delete Receptionist II Extensions .................................................
DP 6034
Assign the Enhanced In-band Integration Application to a Line Group .... DP 7006
Configure In-band Digit Absorption and Signed Offset.. .........................
Connect the Chassis Ground to the Rack-Mount
DP 7007
System .... DP 3021
Create a New Enhanced In-band Integration ............................................
DP 7501
Define a Line Group for Applications ......................................................
DP 6028
Enable Conditional Greetings ..................................................................
DP 7023
Install an Enhanced In-band Integration Template Set .............................
DP 7010
Modify an Enhanced In-band Integration Application .............................
DP 70 11
Perform a n Online Optional Feature Installation .....................................
DP 5402
Set In-band Module Numbers and Number of Tasks ...............................
DP 7016
A
Page 1 of 1
Configure an Enhanced In-band Integration
Release 5.03 and later
system
This procedure describes the steps required to configure your AIP
with Enhanced In-band Integration. These steps include a Detailed Procedure that is a
sample for reference when creating in-band templates for use with your particular switch.
Use this procedure if there is no default template set available for your switch.
Reference
Step
1.
Install the Enhanced In-band Integration optional feature diskette.
5402
2.
Define a line group for the integration.
6028
3 . Assign the Enhanced In-Band Integration application to the line group.
7006
4. If your AIP system has Release 5.03 software, set the number of in-band tasks ‘per
7016
module to 20% of the number of in-band ports in each module. If your system has
Release 5.04 software, the system automatically configures the required-number of
tasks.
5.
Create a set of Enhanced In-band Integration templates to work with your switch
capabilities. The worksheet in the back of this manual can help you plan the
templates.
6.
Refer to the Task List in your
Reference and
Manual to
find procedures to configure any of the options below for the integration line
group. You can reach these options by selecting Other Features from the online
Enhanced In-band Menu.
l
Schedule Company Greetings
l
Enable Call Placement Message Delivery
l
Configure for Transfer to System Attendant
l
Define an Administrator’s Mailbox
l
Define an Attendant’s Mailbox
l
Configure
l
7501
Map 13
Parameters
Enable Dial-by-Name
l
Set a default language for the line group
l
Enable multiple messages for outside callers
7.
Exit and save your changes.
8.
Configure message waiting for the
system, either RS-232 Message
Waiting or DTMF-to-PBX Message Waiting. If your switch does not support any
type of message waiting indication, you can configure paging or message delivery to
let users know when new messages arrive. See your
Reference and
Manual for details.
A
GP
Page 1 of 8
Configure Omni Integration
Release 5.03 and later
This procedure summarizes the steps required to install and configure the Enhanced
band Integration to work with the Omni PBX. Refer to the appendixes for reference
information about this integration.
There are two sections to installing this integration: installing and configuring the
software on the
system, and configuring the Omni PBX. Refer to your
Omni documentation for help when configuring the PBX, if necessary.
Reference
Configure the
1.
System
Identify the line cards that will be used to integrate with the Omni PBX. Shut down
the
system and strap the line cards for Type 1 E
M signaling. See
the
Installation and Service Manual for details.
If you plan to use DTMF-to-PBX message waiting, identify at least one additional
port and strap it for Type 1 E
M signaling.
2.
Restore power to the
system and allow it to initialize.
3.
Install the Enhanced In-band Integration optional feature diskette.
5402
4.
Define a line group for the integration.
6028
5.
Assign the Enhanced In-Band Integration application to the line group.
7006
6.
Select the Omni integration application that matches your dialing plan (three or
four digit extensions).
7010
7. Use the Edit Parameters Menu to enter the dummy extension for message retrieval
calls (see step 8 of the Omni instructions, below).
8. Refer to the Task List in your
Reference and
Manual to
find procedures to configure any of the options below for the integration line group.
You can reach these options by selecting Other Features from the online Enhanced
In-band Menu.
l
Schedule Company Greetings
l
Enable Call Placement Message Delivery
l
Configure for Transfer to System Attendant
l
Define an Administrator’s Mailbox
l
Define an Attendant’s Mailbox
l
Configure
l
Enable
Map 13
Parameters
Dial-by-Name
l
Set a default language for the line group
l
Enable multiple messages for outside callers
A
GP 504
Page 2 of 8
Release 5.03 and later
Reference
If your
system has Release 5.03 software, set the number of in-band
tasks per module to 20% of the number of in-band ports in each module. If your
system has Release 5.04 software, the system automatically configures the required
number of tasks.
10. Set the following phone
08
24
32
35
10
Y
20
0
Note:
7016
7022
exceptions for each line in the line group:
Value
Dead Line Time-out
Enable Wink Start signaling
Received DTMF
Sleep After Hangup, seconds
If messages are clipped at the beginning, increase the
line
exception 142 to 75 (Inhibit Play Time, defaults to 0.01 seconds
11. If desired, add feature bits 161 and 162 to users’
their conditional greetings.
and have users activate
7023
12. Configure either the DTMF-to-PBX or RS-232 message waiting application. See
the
Reference and Configuration Manual for details.
13. If your
system has the Receptionist II application installed,
configure it for supervised transfer to allow callers to return to the
system after reaching a busy extension. See the Receptionist II Manual for details.
Configure Omni Hardware
1.
Strap the two-wire E
2. Cross-connect the E
follows:
E M T R 3.
RN. A
M signaling.
M lines from the Omni PBX to the
system as
E
M
T
R
Connect the Omni and
4. Configure the E
M cards for type 1 E
systems to same ground point.
M trunks on the Omni PBX to be type 1 E
M.
DP 3021
GJ? 504
Page 3 of 8
Release 5.03 and later
Reference
5.
Use the following RC transactions to add the hardware to the system data base.
Select double-height slots to accommodate the EMT cards.
RC 221
Add a Card
CARD
TYPE
- - - -
CARD
FB NUMBER
- - - - - - - - -
EMT
FB-17201
Add a Trunk
RC 153
Trunks
Message Wait
Trunk
E&M
E&M
Supervisory Incoming
Wink
Supervisory Outgoing
Wink
ID
--
Physical Trunk Type
Configure Trunks for the Enhanced In-band line Group
6.
Use the following RC transactions to add the Enhanced In-band trunk group. (You
configure the message wait trunk and the analog lines in later steps.)
RC 161
Add/Change Trunk Group Characteristics 1
TRUNK SIGNALLING
N
RTN
DIAL
GRP TRUNK
DSP DSP TRK
DIAL SGNL TONE
APPL.
NO.
COS COS DIR TYPE TONE TYPE RTND
--- -------- --- ------ ____ ______ ____
XXX
TIE
YY
ZZ
TW
TC
--
TC
N
PAD
ALT
TRK
AGENT
GRP WAY WAY GROUP
--- --- --- -----03
4
DO YOU WANT DTMF SIGNALS BLOCKED? Y/N
Where
RC 169
XXX is the trunk group number
YY is the displayable COS
ZZ is the non-displayable COS
Add/Change Trunk Group Characteristics 2
VMS
TRUNK
----Y
A
GP 504
Page 4 of 8
Release 5.03 and later
Reference
Change/Show Non-Displayable Class of Service 1
RC 212
H
O F
K A
s s
W H
---
R
E
CD
EI
ID
---
AP
DH
MO
I N
N E
---
Y
N
Y
RC211
S
T A
A C
T C
I E
0 s
N S
--Y
Change/Show Displayable Class of Service 1
A
T C
OC
LE
LS
s
---
0
N
M
E
R
s
---
Y
Y
M
EN
RE
ST
---
Use RC 218 to assign a directory number for the Enhanced In-band trunk group.
This DN is the destination for all forwarded calls. If your system has the
Receptionist II application, it is also the termination point for incoming trunk calls.
DIR NUM
TYPE
IDENTIFIER
VMS
Where
Note:
A
is the directory number
is number of mailbox digits
is the
Enhanced In-band Trunk Group number
You do not need to program a hunt group for calls to reach the
system. The number of the
trunk group in
the IDENTIFIER associates this DN with trunks that you marked as
VMS trunks in step 6.
GP 504
Page 5 of 8
Release 5.03 and later
Reference
Step
8.
Use RC 113 to create a “dummy” extension, and then forward that extension to the
DN for the Enhanced In-band trunk group with RC
This extension is the
number that users must dial to retrieve their messages. You should select an
remember number for this extension.
DIR
D
YY
Where
DIV
DIV
DST
DA
VM
N
zz
DIV
ID
XXX is the DN for message retrieval from step 7
is the Basic Class of Service
Configure Message Waiting Trunk
9.
Use the following RC transactions to add the message waiting trunk group. The
trunk group probably only contains one trunk.
RC 161
Add/Change Trunk Group Characteristics
TRUNK SIGNALLING
----OUT---PAD
N
RTN
DIAL ALT
GRP T R U N K D S P D S P T R K S G N L D I A L S G N L T O N E T R K 2 3- AGENT
NO.
APPL.
COS COS DIR TYPE TONE TYPE RTND GRP WAY WAY GROUP
--- ------- --- --- --- ---- ---- ------ ---- --- --- --- -----XXX
TIE
ZZ
IN
TC
DT
-N
03
4
DO YOU WANT DTMF SIGNALS BLOCKED? Y/N
Where
RC 169
XXX is the trunk group number
YY is the displayable COS
ZZ is the non-displayable COS
Add/Change Trunk Group Characteristics
VMS
TRUNK
----Y
A
504
Page 6 of 8
Release 5.03 and later
Reference
Step
RC 212
Change/Show Non-Displayable Class of Service 1
H
OF
OL
KA
ss
WH
---
R
E
CD
EI
ID
v
E
---
AP
DH
MO
IN
N E
---
---
N
N
Y
Y
RC 211
00
RN
IL
GY
Change/Show Displayable Class of Service 1
S
T A
AC
TC
IE
OS
N S
---
A
TC
OC
LE
LS
S
---
N
N
0
N
M
E
R
S
--N
M
EN
RE
ST
--N
10. Set the following values for the E
through RC transactions.
M trunk groups. These fields are not accessible
T5841
Trunk Group outpulsing delay value = 0
T575 1
Trunk Group AIOD Channel/Rev BAT Check bit for trunk call queuing
allowed = Yes
Trunk Group momentary open OUTGOING field = 300 ms
than)
hook flash time
(greater
Trunk Transfer Allow
T5661
Trunk Group Restriction Table
T5641
Trunk group direction/disconnect
IN/-- for Message Wait ports trunk
T6341
Trunk Group miscellaneous flags bit for Attendant recall on No Answer =
RN. A
for
trunks,
GP 504
Page 7 of 8
Release 5.03 and later
Reference
Configure User Stations
11.
user stations to forward to the
system and receive message
waiting indication with the following RC transactions.
Change/Show Non-Displayable Class of Service 1
RC 212
C V
A A
L R
L I
F A
W B
DL
M
A
I
L
V B
M O
SX
---
Y
Y
RC 214
Change/Show Non-Displayable Class of Service 2
MESSAGE
WAITING
LAMP
Y
12. Change all user
group.
with RC 211 to
access to the Enhanced In-band trunk
13. Use the following RC transactions to assign Message Retrieval to
RC 117
Change/Assign Non-Displayable Class of Service (Line Location)
RC 113
Add/Change/Delete/Show/Show Where Line Features 1
RC 211
Change/Show Displayable Class of Service 1
RC 212
Change/Show Non-Displayable Class of Service 1
Make Miscellaneous Changes
Set the following values. These fields are not accessible through RC transactions.
T6241
Digit Analysis/First Digit Access Code marked as first digit of a two-digit
access code.
T625 1
Digit Analysis/Second Digit Access Code identifies the digit string to be
dialed by the
system for message wait on and o f f requests.
The values can be either 84 and 85, or 4A and 4B.
Time-out Option Table
Index in this table to
sets the duration for message waiting stutter dial tone.
byte one which
GP 504
Page 8 of 8
Release 5.03 and later
Reference
Step
15. Forward POTS telephones to the
directory number with RC 141.
l
Select the condition for forwarding, most likely “Divert if Busy or No Answer.”
l
Select “VMS” as the Destination Type.
16. Tell users with
to forward their phones to the
DN.
17. Force the E
M trunks out of service and put them back into service using
Maintenance mode.
18. Instruct users to dial the “dummy” extension and enter their mailbox number when
they wish to retrieve their messages. Users should not dial the
number.
A
Configure Fujitsu
Integration
Page 1 of 3
Release 5.03 and later
This procedure summarizes the steps required to install and configure the Enhanced
band Integration feature to work with the Fujitsu
PBX. Refer to the appendixes
for reference information about this integration.
There are two sections to installing this integration: installing and configuring the
software, and configuring the Fujitsu
PBX. Refer to your
documentation for help when configuring the PBX, if necessary.
Reference
Configure the
1.
Install the Enhanced In-band Integration optional feature diskette.
5402
2.
Define a line group for the integration.
6028
3. Assign the Enhanced In-Band Integration application to the line group.
7006
4.
Select the
7010
5.
If your
system has Release 5.03 software, set the number of in-band
tasks per module to 20% of the number of in-band ports in each module. If your
system has Release 5.04 software, the system automatically configures the required
number of tasks.
6.
Refer to the Task List in your
Reference and
Manual to
find procedures to configure any of the options below for the integration line group.
You can reach these options by selecting Other Features from the online Enhanced
In-band Menu.
integration application for the line group.
l
Schedule Company Greetings
l
Enable Call Placement Message Delivery
l
Configure for Transfer to System Attendant
l
Define an Administrator’s Mailbox
l
Define an Attendant’s Mailbox
l
Configure
l
Enable
Parameters
Dial-by-Name
l
Set a default language for the line group
l
Enable multiple messages for outside callers
7016
GP 505
Page 2 of 3
Release 5.03 and later
Reference
Step
7.
Set the following phone line exceptions for each line in the line group:
Exception Value
3 2 Dial Tone Detect Time
9 20 Ringing Timeout
25 Y Enable DTMF Column 3
14040 Loop Break Detect Time
14490 In-ring Off Time
148 3 In-ring On Time Low
152 1500 In-ring Minimum Power
1648 DTMF Output Duration
1762 DTMF Output Level
Note:
If the
system has the Receptionist II optional feature, the
than the
Ringing Timeout (line exception 9) must be 3 seconds
switch’s Ring No Answer timer.
8.
If desired, add feature bit 017 to users’
to reduce the amount of time that
the
system waits before clearing a port after an undetected caller
hangup.
9.
If desired, add feature bits 161 and 162 to users’
their conditional greetings.
and have users activate
10. If your
system has the Receptionist II optional feature installed,
enable it from the online menus, then define the extension numbers for the
Receptionist II ports. Set the Receptionist Dial String to +#++.
DP7023
DP6034
11. Create a second line group and configure it for DTMF-to-PBX message waiting, or
configure a serial port for RS-232 message waiting. See the
and
details.
Set the following line exceptions for DTMF-to-PBX message waiting:
Exception
6
164
176
Value
Off
8
2
DTMF Detect Enable
DTMF Output Duration
DTMF Output Level
Configure the Fujitsu
1.
Cross-connect phone lines from
phone ports.
2.
Connect the
A
and
PBX
PBX 8SLC cards to the
systems to same ground point.
system
DP 3021
GP 505
Page 3 of 3
Release 5.03 and later
Reference
Step
3.
CMC 102: Set the following system parameter flags to the indicated values:
Value
FLGN
1
OPS ring pattern = station ringing
on, 3s off)
2
1
Enable message waiting for all
sets
15
10
Send filler digit (0) to
when required
49
1
Enable called party auto-disconnect on hangup
109
1
Enable stutter dial tone if no message waiting lamp
110
0
Set voice mail integration pattern zero (0)
111
3 or4
Set to extension length on PBX; if mixed length, set to 4
112
1
Set standard busy tone
136
4.
CMC 104: Define a class of service for the
trunk group access. Include feature number 87.
5.
CMC 104: Include feature number
users.
6.
CMC 200: Assign a phantom station for use as a
an easy-to-remember number for this station.
7.
CMC 201: Set each message waiting port as an originate-only port (I’2
8.
CMC 204: Set
for each
9. CMC 204: Set
for each
ports. Allow any required
in the classes of service for all
pilot number. Use
port to disable distinctive ringing.
set with a message waiting lamp.
10. CMC 206: Set P4
for the
lines that are used for message waiting.
Include the ACD pilot if you have placed the
ports in an ACD.
11. CMC 251: Set the trunk directory numbers to all zeros
on all trunks
that can reach
12. CMC 254: Lengthen the duration of DTMF sending to 128 milliseconds as
follows:
=o
10
=2
13. CMC 301: Create a circular hunt group that contains all of the phone lines
connected to the
system. You must include the message waiting line(s)
to allow the message waiting return call to reach the hunt group.
14. CMC 308: Build an ACD group consisting of the phantom pilot and only those
lines assigned to the Enhanced In-band Integration. Do not include the message
waiting ports.
15. Forward
user telephones to the phantom extension.
A
Page 1 of 1
Configure AT&T System
Integration
Release 5.03 and later
This procedure summarizes the steps required to install and configure the Enhanced
band Integration optional feature to work with the AT&T System 25 PBX. Refer to the
appendixes for reference information about this integration.
After completing the steps below, you will need to program your switch to pass in-band
call information to the
system. Refer to your
manual for
additional information.
Reference
1.
Install the Enhanced In-band Integration optional feature diskette.
5402
2.
Define a line group for the integration.
6028
3.
Assign the Enhanced In-Band Integration application to the line group.
7006
4.
Select the AT&T System 25 application for the line group.
7010
5.
If your
system has Release 5.03 software, set the number of in-band
tasks per module to 20% of the number of in-band ports in each module. If your
system has Release 5.04 software, the system automatically configures the required
number of tasks.
7016
6.
Refer to the Task List in your
Reference and Configuration Manual to
find procedures to configure any of the options below for the integration line group.
You can reach these options by selecting Other Features from the online Enhanced
In-band Menu.
l
Schedule Company Greetings
l
Enable Call Placement Message Delivery
l
Configure for Transfer to System Attendant
l
Define an Administrator’s Mailbox
Map 13
Define an Attendant’s Mailbox
Parameters
l
Enable
l
Dial-by-Name
Set a default language for the line group
Enable multiple messages for outside callers
7.
Exit and save your changes.
8.
Configure either RS-232 Message Waiting or DTMF-to-PBX Message Waiting.
See your
and
Manual for details.
9.
Cross-connect phone lines from the System
10. Connect the System 25 and
to the
phone ports.
system to same ground point.
DP 3021
A
Configure Northern Telecom
Integration
Page 1 of 4
Release 5.03 and later
This procedure summarizes the steps required to install and configure the Enhanced
band Integration feature to work with the Northern Telecom
KSU. Refer to the
appendixes for reference information about this integration.
There are two sections to installing this integration: installing and configuring the
software, and configuring the
Refer to your
documentation for help when configuring the switch, if necessary.
Step
Reference
Configure the
2.
System
Install the Enhanced In-band Integration optional feature.
DP 5402
Define a line group for the integration.
DP 6028
3. Assign the Enhanced In-Band Integration application to the line group.
DP 7006
4.
If your
system has Release 5.03 software, set the number of in-band
tasks per module to 20% of the number of in-band ports in each module. If your
system has Release 5.04
the system automatically configures the required
number of tasks.
DP 7016
5.
Select the
Dl? 7010
template set.
6. Use the Edit Templates option to modify the Data field in templates 2 and 3. The
Data field for template 2 must contain the prefix digit used by your switch (if any)
and the pilot number of the hunt group of VMI lines. The Data field for template 3
must contain the
digit (if any) and
which means to expect a
extension of three digits.
DP 7011
Alternatively, you can use Xl in place of the
digit in the Data field. This
causes the
system to ignore one digit. The system still expects a digit
(the
digit) from the
but it will accept any digit.
A
GP 507
Page 2 of 4
Release 5.03 and
Reference
7.
Refer to the Task List in your
Reference and
Manual to
find procedures to configure any of the options below for the integration line group.
You can reach these options by selecting Other Features from the online Enhanced
In-band Menu.
l
Schedule Company Greetings
l
Enable Call Placement Message Delivery
l
Configure for Transfer to System Attendant
l
Define an Administrator’s Mailbox
l
Define an Attendant’s Mailbox
l
Configure
Enable
Map 13
Parameters
Dial-by-Name
l
Set a default language for the line group
l
Enable multiple messages for outside callers
7022
8.
Set the following phone line exceptions for each line in the line group:
Exception
Value
Description
Flash-hook Time
23
60
32
24
DTMF Receive
Time
166
70
Interdigit Delay Time
9.
If your
system has the Receptionist II optional feature, set the Pre-DN
dial string to
for blind transfers. The Compact and Modular
do not
support supervised transfers over the VMI lines.
If you have a
or DR4 and want to use supervised transfer, set the
DN dial string to
set the Connect Dial String to
and set the Dial Suing
for Return on Called Party Busy or RNA to
See your Receptionist II
for details.
10. Exit and save your changes.
11. If the systems are near each other, connect the switch and
the
ground point.
systems to
12. Configure a line group for DTMF-to-PBX Message Waiting with the following
values:
Pre-DN On Dial String =
Pre-DN Off Dial String =
See your
Reference and
configuring DTMF-to-PBX Message Waiting.
A
procedures on
3021
GP 507
Page 3 of 4
Release 5.03 and later
Reference
Step
Configure the Northern Telecom
Install VMI modules for all integration lines as instructed in the
Voice Mail
Installation
Connect lines from the Line Jacks on the
to
available telephone ports on the KSU. Connect lines from the Terminal Jacks on
the
to line card ports on the
system. Plug in the power supplies
for the
Mount the
on the wall after connecting them to both the KSU
and the
system.
2.
Install
or additional
for all
any used for DTMF-to-PBX message waiting.
3.
Use an M7310 or M7324 telephone to determine the feature codes assigned to each
VMI. (The KSU automatically assigns feature codes to each VMI and assigns
intercom numbers
to each VMI line.)
4.
Use the VMI feature codes to determine the intercom numbers assigned to each
VMI line.
5.
For Compact
and Modular DR2 systems, ensure that each VMI DN is
configured as follows:
Under Permissions:
Held Line Reminder =
YES
Full Handsfree =
NO
Handsfree Answerback =
NO
Pick Up Group =
NO
Paging Zone =
NO
Under Line Access:
Intercom line is assigned as the prime line.
system
ports, including
GP 507
Page 4 of 4
Release 5.03 and later
Reference
6.
For Modular DR3 and DR4 systems, ensure that each VMI DN is configured as
follows:
Under
Permissions/Capabilities:
Set Lock =
NONE
Full Handsfree =
NO
Handsfree Answerback
NO
Pick Up Group =
NO
Page Zone =
NO
Auxiliary Ringer =
NO
Hotline
NO
Priority Call =
NO
Under Line Access:
Answer DN =
NO
Line Pool Access =
N O (If a line will be used for outdialing, set to YES.)
Two intercom lines are assigned, with one assigned as the prime line.
7.
Program the first VMI DN to call forward for both busy and no answer conditions
to the second VMI DN. Program the second VMI DN to call forward to the third
VMI DN, and so on. Program the last VMI DN to call forward to the first VMI
DN. This will ensure an efficient use of ports for both systems.
8.
Program any
used for message waiting indication to call forward all calls to the
first VMI DN in the Enhanced In-band line group. This will allow users to press
the message key on their phones and be connected to the Enhanced In-band line
group.
9.
Program the following translation codes (L = link or flash):
Set message waiting =
Cancel Message Waiting =
Call Transfer =
Forward
6
Disconnect Code
(clear this field)
Note:
The default Disconnect Code is a dial tone, which means that the
will return dial tone to the
port when a caller
hangs up. You may want to set this code to 9 for integration ports
without Receptionist II software, or ## for ports with Receptionist II.
Both of these codes tell the
system to end a call session.
10. Program all user phones to call forward on both busy and no answer conditions to
the first VMI DN.
A
GP
Page 1 of 1
Configure AT&T Legend Integration
Release 5.03 and later
This procedure summarizes the steps required to install and configure the Enhanced
band Integration optional feature to work with the AT&T Legend PBX.
After completing the steps below, you will need to program your switch to pass in-band
call information to the
system. Refer to your PBX manual for
additional information.
Reference
1.
Install the Enhanced In-band Integration optional feature diskette.
5402
2.
Define a line group for the integration.
6028
3. Assign the Enhanced In-Band Integration application to the line group.
7006
4.
Select the AT&T Legend application for the line group.
7010
5.
If your
system has Release 5.03 software, set the number of in-band
tasks per module to 20% of the number of in-band ports in each module. If your
system has Release 5.04 software, the system automatically configures the required
number of tasks.
7016
6.
Refer to the Task List in your
Reference and
Manual to
find procedures to configure any of the options below for the integration line group.
You can reach these options by selecting Other Features from the online Enhanced
In-band Menu.
l
Schedule Company Greetings
l
Enable Call Placement Message Delivery
l
Configure for Transfer to System Attendant
l
Define an Administrator’s Mailbox
l
Define an Attendant’s Mailbox
l
Configure
l
Map 13
Parameters
Enable Dial-by-Name
l
Set a default language for the line group
l
Enable multiple messages for outside callers
7.
Exit and save your changes.
8.
Configure either RS-232 Message Waiting or DTMF-to-PBX Message Waiting.
See your
Reference and
for details.
Cross-connect phone lines from the Legend to the
10. Connect the Legend and
phone ports.
system to same ground point.
DP 3021
A
Page 1 of 1
Configure Northern Telecom MTX Integration
Release 5.03 and later
This procedure summarizes the steps required to install and configure the Enhanced
band Integration optional feature to work with the Northern Telecom MTX switch.
After completing the steps below, you will need to program your switch to pass in-band
call information to the AIP
system. Refer to your PBX manual for
additional information.
1.
Install the Enhanced In-band Integration optional feature diskette.
5402
2.
Define a line group for the integration.
6028
3. Assign the Enhanced In-Band Integration application to the line group.
7006
4.
Select the Northern Telecom MTX application for the line group.
7010
5.
If your
system has Release 5.03 software, set the number ‘of in-band
tasks per module to 20% of the number of in-band ports in each module. If your
system has Release 5.04 software, the system automatically configures the required
number of tasks.
7016
6.
Refer to the Task List in your
Reference and
Manual to
find procedures to configure any of the options below for the integration line group.
You can reach these options by selecting Other Features from the online Enhanced
In-band Menu.
l
Schedule Company Greetings
l
Enable Call Placement Message Delivery
.
Configure for Transfer to System Attendant
l
Define an Administrator’s Mailbox
l
Define an Attendant’s Mailbox
l
Configure
l
Enable
Map 13
Parameters
Dial-by-Name
Set a default language for the line group
l
Enable multiple messages for outside callers
7.
Exit and save your changes.
8.
Configure either RS-232 Message Waiting or DTMF-to-PBX Message Waiting.
See your
Reference and
for details.
9.
Cross-connect phone lines from the MTX to the
10. Connect the MTX and
phone ports.
system to same ground point.
DP 3021
A
Connect the Chassis Ground to the RackMount
System
This procedure describes how to connect the chassis ground of a
rack-mount AIP
system.
Page 1 of 1
Release 5.03 and later
switch to the
DANGER!
Make sure that all power to the system has been disconnected
prior to performing this procedure. Failure to do so can cause
injury!
A
Step
1.
2.
Reference
Locate the grounding stud on the
non-central
cooling assembly.
applications, connect a single strand of 12 gauge wire
the
ground point to the cooling assembly grounding screw. (Note: The
connector must be crimped, not soldered.) See figure 1 for details.
3.
For Central
applications, connect a single strand of
gauge wire from the
ground point to the cooling assembly grounding screw. (Note: The connector
must be crimped, not soldered.
Note:
Impedance
the
system and the attached
equipment or master ground bar should be less than 1 ohm at zero
volts. The maximum acceptable current is 0.1 amps (RMS) when all
telephone lines are idle.
Figure 1
System Ground location
A
5402
Page 1 of 2
Install Optional Feature With System Online
Release
and later
The
e d
how to install an optional feature with the system online. Be
sure the Optional Feature Diskette(s) and the Module Enable Diskette contain the serial
number(s) for all disk(s) in the system.
CAUTION!
If you are loading a revision support disk (RSD), do it after
completion of this procedure. Loading the RSD first, could create
an incorrect configuration.
WARNING!
This process causes the system to automatically reboot,
an interruption to call processing. Centigram recommends
you perform this procedure during periods of low call
in
at
Reference
Step
1.
Reach the System Maintenance Menu, then go to the System Maintenance
Additional Options Menu.
2.
Select the add optional feature program.
Map 12
Select:
(A) Add Extra Cost Feature(s)
Adding ex
Prompt:
tra cost features here will
result in a complete system shutdown followed
by a system restart.
'Y' to add extra cost features, 'N' to stop:
Response:
3.
Install the optional feature.
Prompt:
Insert extra cost floppy disk in the floppy drive
Enter any key when ready:
Response: Insert diskette, press Enter.
4.
Following the installation the system prompts for another optional feature to be
installed.
D o y o u w a n t t o i n s t a l l a n o t h e r extra cost feature?
Response: Y to install another feature and continue from step
N to exit.
The system automatically shuts down and resets the entire system. The system
automatically edits and saves the configuration files, then returns to the
Configuration Offline Menu.
5.
Make the necessary system configuration changes, if necessary, per the instructions
provided with the optional feature documentation.
A
DP 5402
Page 2 of 2
Release
and later
Reference
Step
6.
Exit the
system shutdown.
Wait
Configuration Offline Menu. The system will perform a
for
message
waiting
queues
to
be
empty?
Response: Y to wait for the queue to clear,
N to continue immediately with the shutdown.
The system then completes the shutdown and activates the
the System Maintenance Additional Options Menu.
A
returning to
Perform an Online Optional Feature
Installation
DP
Page 1 of 2
Release
and later
The
e d
how to install an optional feature with the system online. Be
sure the Optional Feature Diskette(s) and the Module Enable Diskette contain the serial
number(s) for all disk(s) in the system.
WARNING!
This process causes the system to automatically reboot, resulting in
an interruption to call processing. Centigram recommends that
you perform this procedure during periods of low call traffic.
Step
Reference
1.
Reach the System Maintenance Menu, then go to the System Maintenance
Additional Options Menu.
2.
Select the add optional feature program.
Menu Map 1 2
(A) Add Extra Cost Feature(s)
Adding extra
Prompt: WARNING.
cost features here will
system s h u t d o w n
followed
result
in
a
complete
by a system restart.
to add extra cost features,
to stop:
Response:
3.
Install the optional feature.
Insert extra cost floppy disk in the floppy drive
Enter any key when ready:
Response: Insert diskette, press Enter.
Prompt:
4.
Following the installation the system prompts for another optional feature to be
installed.
Do you want to install another extra cost feature?
Response: Y to install another feature and continue from step 3,
N to exit.
The system automatically shuts down and resets the entire system. The system
automatically edits and saves the configuration files, then returns to the
Configuration Offline Menu.
5.
Make the necessary system configuration changes, if necessary, per the instructions
provided with the optional feature documentation.
A
DP 5402
Page 2 of 2
Release
and later
Reference
6.
Exit the
system shutdown.
Configuration Offline Menu. The system will perform a
Wait for message waiting queues to be empty?
Response: Y to wait for the queue to clear,
N to continue immediately with the shutdown.
The system then completes the shutdown and activates the
the System Maintenance Additional Options Menu.
returning to
DP
Page 1 of 2
Define a Line Group for Applications
Release 5.03 and later
This procedure describes how to define a line group for an application.
Reference
Step
1.
Reach the
Configuration Offline Menu.
1 Menu Map 2
CAUTION!
You may want to copy the active configuration to ensure that the
inactive configuration reflects the configuration that is currently
operating.
A
2.
If desired, duplicating the configuration.
Select:
(B) Duplicate Active Configuration
Response: The system copies the current (active) configuration. When copying is
completed, the short form of the Offline Menu appears.
All subsequent steps in this procedure along with any other
configuration entries affect just the copy, and take effect only after you
activate the configuration.
3.
Go to the Line Groups Menu. Enter the requested information, as described in the
following steps, from your completed worksheet.
4.
Specify the line group number.
Select:
(G) Current Group
Enter
a
group
number
=
Response: Number of the line group (l-24) to be used for the application.
5.
Name the line group.
Select:
(N) Name of current group
g r o u p name =
Response: Descriptive name of the application line group.
Enter
Menu Map 2
DP 6028
Page 2 of 2
Release 5.03 and later
Step
Reference
6. Add the desired lines.
Select:
(A) Add Lines to Current Group
Enter
lines
to
add
=
Response: In a single-module system, the line card number (O-l 5) and port
designator (A or B) to add to the line group. Any of the formats shown
in the following examples are valid:
Example
All lines
All lines
Lines OA, OB,
Lines
Lines
and 4A
Lines 2A and 2B
o-15
o-2
2
and 2B
and 4B
In a multi-module system,
module number
card number
(O-l
and port designator (A or B) to add to the line group. A n y of
the formats shown in the following examples are valid:
Example
All lines in module 2
Lines OA, OB,
and 2B in module 2
Lines
and 4B in module 2
All lines in modules 1 and 2
Drop any lines that should not be part of the line group.
(D) Drop Lines From Current Group
Enter
Response:
8.
Exit to the
A
lines
to
drop
=
to remove from the line group; values and formats are the same
as described above for adding lines.
Configuration Offline Menu.
Assign the Enhanced In-band Integration
Application to a Line Group
DP
Page 1 of 1
Release 5.03 and later
This procedure describes how to assign the Enhanced In-band Integration application to
a line group. You must have first defined a line group (DP 6028).
Reference
Step
1.
Reach the
2.
From the Offline Menu, go to the
3.
Assign the Enhanced In-band Integration application to the line group.
Select:
Configuration Offline Menu.
Map 13
(G) Group Selected
Enter
Response:
Only Applications Menu.
Map 13
a
group
number
=
If the current line group number is the one you want, press Enter;
otherwise, enter the
group number for the application you
assigning.
Prompt:
Response: E for Enhanced In-baud Integration.
4.
Exit and save your changes.
Select:
Exit
Prompt:
Response: Exit and save.
A
Modify an Enhanced In-band Integration
Application
Page 1 of 3
Release 5.03 and later
This procedure explains how to modify all of the components of an Enhanced In-band
Integration application. Besides instructions for modifying the individual components
of a template, it includes instructions for changing the inter-digit timeout and the error
action without using the edit templates menu. You can change any or all of the values
for an application or template. The changes will take effect after you exit from the
online menu.
You should always save your application after making any changes. The instructions to
save your application begin at step 20.
Reference
Step
Reach the
Configuration Offline Menu.
2.
Select the Enhanced In-band Integration line group.
3.
Reach the second Enhanced In-band Menu (Configure Application).
.
Map 13
Map
Set Name and Description
4.
If desired, enter a new name for the integration application.
Select:
(A) Application Name
Enter
application
name:
=
Response: Up to 1 0 characters as a name for the application. The application will
be stored on the disk using this name.
Note:
5.
If you are modifying one of the default applications, you
must change the name in order to save your changes. You
cannot overwrite a default application using the same name.
Enter a new description for the application.
Select:
(B) Application Description
Enter
Response: Up to
application
description
characters as a description of the application.
Modify Default Parameters
Map 1 3
6. Reach the Edit Parameters Menu.
Change the default maximum wait between digits.
Select:
(A) Maximum wait for a digit (1
Timeout
seconds)
=
Response: The number
of a second) that the system should wait between
incoming digits before determining that an error has
A
DP 7011
Page 2 of 3
Release 5.03 and later
Reference
Step
8.
Change the default error action.
Select:
(B) Error Action if digits missing
Error Action =
Response: 1 t o cause the system to hang up,
2 to play a general greeting.
9.
Exit to the Enhanced In-band Menu
Select:
Exit
Modify Templates
Reach the In-band Edit Template Menu.
11. Select a template to edit.
Select:
(A) Current Template
Current Template =
Response: The number of the template to edit.
Enter the switch data to match.
(B) Data
Data =
Response: Characters that describe the in-band signaling that this template is to
match. Table 1 at the end of this procedure lists all valid characters.
Select:
13. Enter the action to perform when the data is received.
Select:
(C) Action
Action =
Response: Characters that describe the action to perform when this template
matches the data entirely. Table 2 at the end of this procedure lists all
valid action characters.
14. Enter the next templates, if any, to compare against incoming data.
Select:
(F) Next Templates
Next Templates =
Response: The numbers of the template to match against further incoming data.
15. Enter the time out value.
Select:
(D) Timeout
Timeout =
Response: The number (1 Oths of a second) that the system should wait between
incoming digits before determining that an error has occurred.
A
Map
DP 7 0 1 1
Page 3 of 3
Release 5.03 and later
Reference
Step
Enter the error action to perform if a timeout
completely match any templates.
Select:
o c c u r s or if the data does not
(E) Error Action
Error Action =
Response: Characters that describe the error action to perform. Table 2 at the end
of this procedure lists all valid action characters.
17. Enter a description for the template.
Select:
(C) Comment
Comment =
Response: Characters that describe the function of the template.
18. Repeat any of steps 1
1 through 17 for each template that you need to modify.
Exit to the Enhanced In-band Menu
Select:
Exit
Check Your Work and Save the Application
2 0 . Compare your templates with your worksheet to verify your work.
Select:
(0) Show Application
Response: The system scrolls all of the templates in the application onto the
console screen. If any of the information does not match your
worksheet, select the template and make the necessary changes.
21.
Backup (save) the application.
Select:
(H) Backup Application (Release 5.03 systems) or
(S) Save Application (Release 5.04 systems)
Do you want to overwrite existing copy?
Response:
Application backed up
22. Press X to return to the Online configuration menu.
23. Press X again to save your changes and exit.
A
Set In-band Module Numbers and Number of
Tasks
P a g e 1 of 1
Release 5.03
This procedure describes how to set the number of in-band tasks for each module that
has in-band integration ports.
Note:
You do not need to perform this procedure on a Release 5.04 system.
Reference
Step
Menu Map 13
1.
Reach the Linegroup Only Applications menu.
2.
Select the line group that you defined for your Enhanced In-band application.
3.
Select Enhanced
4.
Select a module for the in-band integration ports.
Select:
to reach the
Integration Menu.
(F) Host number
Host number for
=
Response: Enter a module number (l-4).
5.
Set the number of in-band tasks to run on that module.
Select:
(G) Number of
Number of
Tasks on this host
Tasks on this host (l-16) =
Response: Enter the number of tasks
6.
16) to run on the specified module.
Repeat steps 4 and 5 for all modules with in-band integration ports.
A
DP
7022
1
Page
Add or Cancel a Phoneline Exception
Release 5.03 and l
This procedure describes how to set any phoneline exception. Phoneline exception
changes
effect on the next new call after saving the settings. A table for c o n v e r t i n
port numbers to line numbers follows the procedure.
of 2
ater
g
Reference
Step
Add a Phoneline Exception
Reach the Phoneline Exceptions Menu.
Map
10
Map
10
Select line to change.
Select:
(A) Add exception
line to change =
Response: The
3.
e number to change. The valid entries are
1- 112.
Select the exception number to set.
command =
Response: The exception number.
4.
Enter the new value for the exception.
value =
Response: The desired new value.
5.
Repeat steps 3 and 4 until all the phoneline exceptions for the selected line are set.
When you are finished, press Enter.
6.
Select a new line to change or press Enter to finish.
Cancel a Phoneline Exception
1.
To return a phoneline exception to the default value, reach the Phoneline
Exceptions Menu.
Select a line to change.
(C) Cancel exception.
line to change =
Response: The line number to change.
3.
Select the phoneline exception to reset.
command to cancel =
Prompt:
Response: The number of the phoneline exception to reset
4.
Repeat steps 8 and 9 for each phoneline exception you want to change. When you
are finished, press Enter.
5.
Enter the next line to be changed, or press Enter to exit.
A
DP 7022
Page 2 of 2
Release 5.03 and later
Reference
Step
Port Number to Line Number Conversion
Port
Number
OA
OB
2A
2B
3A
3B
4A
4B
7A
7B
8B
9A
9B
12B
13B
14B
A
Module 1
Line
Number
Module 2
Line
Number
Module 3
Line
Number
0
1
2
3
4
5
32
33
34
35
36
37
38
39
40
41
42
43
44
45
46
47
48
49
64
65
66
67
68
69
70
71
72
73
74
75
76
77
78
79
80
81
82
83
7
8
9
10
11
12
13
14
15
16
17
18
19
20
21
22
23
24
25
26
27
28
29
30
31
51
52
53
54
55
56
57
58
59
60
61
62
63
85
86
87
88
89
90
91
92
93
94
95
Module 4
Line
Number
96
97
98
99
100
1 0 1
102
103
104
105
106
107
108
109
110
111
112
113
114
115
116
117
118
119
120
121
122
123
124
125
126
127
DP
7023
Page 1 of 1
Enable Conditional Greetings
Release 5.03 and later
This procedure details the process for enabling conditional greetings. Conditional
greetings are used to identify, to the caller, why they have reached the
system ( busy, no answer, etc Mailbox owners perform this procedure from their own
telephone sets. Users can either keep the prerecorded greetings or record custom
greetings in their own voice.
Note:
FCOS bit 161 must be enabled before mailbox owners can record or use
conditional greetings.
1.
Call the
system extension.
2.
Enter your password to log into the system.
3.
Press U for user options.
4.
Press G for greeting modification
5.
Press E to enable conditional greetings.
6.
Press C to change (record) conditional greetings.
,
7. After making any desired changes to conditional greetings, press X to exit the
system.
A
Create a New Enhanced In-band Integration
Page 1 of 6
Release 5.03 and later
This procedure is a short tutorial in creating your own Enhanced In-band application It
leads you through the steps to create all of the templates required to integrate with an
AT&T System 25 switch.
By following the basic steps of this procedure, you can create a set of templates for
integration with any switch that can pass in-band signaling. There is a worksheet in the
back of this manual to help you plan your templates. You need to know the format of
the in-band information packets sent by your switch. After you have created all of the
templates, you must program the switch to pass in-band information to the AIP
system.
The System 25 recognizes four call types: direct, direct trunk, internal forwarded and
external forwarded. Each call type needs a template to interpret the incoming data. Call
type identifiers are prepended to the digit stream and sent to the
system
along with the caller and calling party identification.
Reference
1.
Reach the
2.
Select the line group that you defined for your Enhanced In-band application.
3.
Select to modify the application to reach the Enhanced In-band Menu.
4.
Choose to configure the application to reach the second Enhanced In-band Menu.
Configuration Online Menu.
Map 13
List the available applications.
Select:
(L) List Applications
Response: The system presents a list of all Enhanced In-band Integration
applications that are loaded on the system.
6.
Choose an application to install that only has a few templates, such as the
integration application.
Select:
(I) Install Application
Application
name
to
install
Response:
Define a New Application
7.
Enter a name for the integration application.
Select:
(A) Application Name
Enter application
Response: AT&T25
8.
name:
=
Enter a description for the application.
A
DP 7501
Page 2 of 6
Release 5.03 and
Reference
Select:
(B) Application Description
Enter application
Response: AT&T System 25 Test Application
Define the “Incoming Call” Template
Go to the Edit templates menu.
Select:
(C) Edit Templates Menu
10. Set the current template to 1
Select:
.
(A) Current Template
Current Template =
Response:
11. Define the data that Template 1 is to respond to. For Template 1, the data is a
ringing signal on a line.
Select:
(B) Data
=
Response: R, detect ringing.
Enter the action to perform when the data is received.
Select:
(C) Action
Action =
T go off-hook
13. Enter the next templates to compare against incoming data.
(F) Next Templates
Next Templates =
Response: 2 3 4 5
There is no time out value and no error action associated with this template.
Define the “Direct Inward Call” Template
14. Select the next template to edit.
Select:
(A) C u r r e n t Template
Current Template =
Response: 2
A
DP 7501
Page 3 of 6
Release 5.03 and later
Reference
Step
Enter the data to match. Template 2 handles the direct inward call-type. It is
The call type identifier is followed by a variable-length
identified by a
calling extension and two
symbols.
Select:
(B) Data
=
Response: # 00#
16. Enter the action to perform when the data is received. The response for this call
type is the
prompt, or
greeting.
Select:
(C) Action
Action =
Response: Vl
17. Enter the time out value. For this template the time out is one second.
Select:
(D) Timeout
Timeout =
Response: 10 (tenths of a second)
18. Enter the error action. This template hangs up if there are any errors.
(E) Error Action
Select:
Error Action =
Response:
Define the “Direct Trunk Call” Template
19. Enter the next template to match data against.
Select:
(A) Current Template
Current
template
=
Response: 3
20. Enter the data to match. This template handles the direct trunk call. The call type
identifier is
Select:
(B) Data
Prompt: Data =
Response: #
A
DP 7501
Page 4 of 6
Release 5.03 and later
Reference
2 1. Enter the action to be performed when the data is received. The general greeting,
greeting is appropriate.
or
Select:
(C) Action
Action =
Response:
22. Enter the time out value. The time out value for this template is
Select:
second.
(D) Timeout
Timeout =
Response: 10 (tenths of a second)
23. Enter the error action to perform. The error action for this template is to hang up.
Select:
(E) Error Action
Error Action =
Response: H
Define the “Internal Forward Call” Template
24. Enter the next template to edit.
(A) Current Template
Select:
Current Template =
Response: 4
25. Enter the data field to match. This template handles internal forwarded calls. The
call type identifier is
followed by the variable-length calling extension
and the variable-length called extension (dx), each terminated with a
symbol.
Select:
(B) Data
Response:
dx#
26. Enter the action to be performed when the data is matched. The Forward All
greeting is appropriate for forwarded calls in which the reason (busy, no answer) is
not identified.
Select:
(C) Action
Action =
Response: V2
2 7 . E n t e r the time out value for the template. The value for this template is 1 second.
Select:
(D) Timeout
Timeout =
Response: 10 (tenths of a second)
A
DP 7501
Page 5 of 6
Release 5.03 and later
Reference
28. Enter the error action to perform. The error action for this template is to hang up.
Select:
(E) Error Action
Error
Action
=
Response:
Define the “External Forward Call” Template
29. Select the next template to edit.
Select:
(A) Current Template
Current
template
=
Response: 5
..
Enter the data to match. This template handles external forwarded calls. The call
type identifier is
followed by the variable-length destination extension
and a
symbol.
Select:
(B) Data
Prompt: Data =
Response:
3 1 . Enter the action to perform when the data is matched. The V2 prompt is
appropriate in this situation.
Select:
(C) Action
Action
Response: V2
=
32. Enter the time out value. For this template the time out value is 1 second.
(D) Timeout
Timeout =
Response: 10 (tenths of a second)
33. Enter the error action to perform if the template fails. As in the templates above,
the only error action is to hang up.
Sekct:
(E) Error Action
Error
Response: H
Action
=
Check Your Work and Save the Application
34. Exit the Edit Template Menu.
Select:
Exit
A
DP 7 5 0 1
Page 6 of 6
Release 5.03 and l a t e r
Reference
35. Compare your templates with your worksheet to verify your work.
(0) Show Application
Response: The system scrolls all of the templates in the application onto the
console screen. If any of the information does not match your
worksheet, select the template and make the necessary changes.
Select:
36. Backup (save) the application.
Select:
(H) Backup Application (Release 5.03 systems) or
(S) Save Application (Release 5.04 systems)
Prompt:
Response:
Do you want to overwrite existing copy?
Application
backed
up
37. Press X to return to the Online configuration menu.
38. Press X again to save your changes and exit.
A
Appendix A:
Fujitsu
Enhanced In-band Integration
This appendix contains supplemental information about integrating an
system with a Fujitsu
See the Task List for procedures to
configure the integration.
Features and Functions
The
PBX uses a hunt group to route internal and external calls to the
system. When the switch sets up a call to the
system, it
directs the call to the hunt group pilot. The pilot is a “phantom extension,” and is
always busy. This forces the call to hunt past the pilot‘to one of the
ports.
The
extension that controls message wait requests is also part of the
hunt group, but it is an originate-only extension. Because it is part of the hunt
group, users can place message waiting return calls, which hunts past the message
waiting port to the
ports.
Figure A- 1 shows the strategy for
to
integration.
The PBX uses integration pattern 0 to convey calling party identification to the
system. It can identify many different call types in the information
packet, and the
Enhanced In-band integration has over 20 templates to
recognize all of the different call types. See the template specifications later in this
appendix for more details on the different call types.
The AII?
can use with the
system has three types of message waiting notification that you
PBX:
RS-232 Message Waiting (Type
also called Modem Message
Waiting, uses an
serial port and an external 1200 baud
modem to pass DTMF message waiting requests to the PBX. This does
not use a
line port, and is usually the most economical type
of message waiting. The limitation with this type of message waiting is
that the confirmation tones from the PBX are not passed from the
modem back to the
system.
A-l
Fujitsu
DTMF-to-PBX Message Waiting (Type 3) uses
to pass DTMF message waiting requests to the PBX.
l
line ports
Pager and Message Delivery Message Waiting (Type 5) uses one or
more
line ports to
to external paging systems or
telephone numbers.
AIP
PBX
Integration Ports
Incoming
Trunks
I
System
Enhanced In-band
and Receptionist II
Applications
\
Station
Forwarding
MODEM
RS-232
Message Waiting
Message
Retrieval
or
Message Waiting
Circular
Hunt Group
Ports
- - - - - - - - -
DTMF to PBX
Message Waiting
Outdials:
Paging, Fax,
Call Placement
t
Figure A- 1
to
System Integration Structure
Hardware and Software Requirements
The AIP
l
l
Release 5.02 or later
Enhanced In-band Integration optional feature
system hardware requirements are:
The
A-2
system software requirements are:
l
One line card port for every incoming phone line
l
One serial port for RS-232 message wait control, or one line card port
for DTMF-to-PBX message wait control
l
Additional line card ports to place any outgoing calls (paging, fax, etc.)
Fujitsu
The Fujitsu
software requirements are:
Feature Package
The
or higher
hardware requirements are:
One (1)
l
One (1)
port per VoiceMemo/Receptionist port
port for message wait control
Feature Interactions and limitations
In
systems with three- and four-digit extension numbers, the PBX will
insert a lead digit 0 to fill three-digit numbers out to four digits. The EIB
software has templates set to accommodate sites with thre&-digit, four-digit, and
mixed dialing plans.
l
The PBX identifies direct
calls by a number which is defined by
programming (CMC 251, parameter 3). The
system expects that
number to be 0000, and expects the leading digit of three-digit trunk numbers to
be 0.
During a conference call,
electronic telephone sets do not generate the
DTMF tones needed to control the
application.
l
l
The
timeout is quite short
about 5 or 6 seconds. All calls
from the
system must start dialing quickly. Avoid using any pauses
in the early parts of a dial string.
It is possible to connect two
switches to a single
Call Fujitsu and Centigram for assistance.
system.
Use of Receptionist II
If the
system has the Receptionist II optional feature installed, it can
extend a call to an extension which is No Answer Forwarded back to the
ports. The Receptionist II port waits for that call forward to occur, recognizes by an
answer tone that it has connected to a
port, and disconnects.
For this forwarding and call recognition to work correctly, you must:
Program the
system to recognize the extension numbers of
the ports running the Receptionist II application (DP 6034).
A-3
Fujitsu
Program the
ports to dial a DTMF # when the system
identifies a call forwarded from one of its own ports.
Set line exception for ringing timeout to be greater than the Starlog’s
Forward No Answer timer.
See the Receptionist
Receptionist II.
Manual for more information about programming for
Template Specifications
The
templates have a default inter-digit timeout of 2 seconds and are set to
hangup on an error condition. Without actually editing the templates, you can
change the inter-digit timeout and the error action by using the
Edit
Parameters Menu.
The default templates for
integration are:
NAME:
Next:
Comment:
R, T, ,
2 3 4 5 6 7 8 9 10
21 22 23
Wait for ring
T2: C,
Next: 3 4 5 6 7 8 9 10
22 23
Comment: I n c a s e w e l o s e
T3:
Next:
Comment:
T4: 1
Next:
Comment: Direct
2
Next:
Comment:
Direct
call:
Stuffed
0
call:
No
A-4
16
16
17
17
18
18
19
H
internal
20, H
internal
stuffed
digit
20, H
external
call
T6: 3
dx#, V4, 20, H
Next:
Comment: Busy forwarded call: Stuffed
destination
T7: 3
Next:
Comment: Busy
14 15
15
12
13
13
14
11
20,
Direct
11 12
0
in
source
0
in
source
V4, 20, H
forwarded
call:
Stuffed
and
19 20
20 21
Fujitsu
T8:
Next:
Comment:
3
Busy
dx#, V4, 20, H
forwarded
Busy
forwarded
4
Next:
Comment:
0
RNA
call:
call:
forwarded
call:
4
T13:
Next:
Comment:
4
dx#, V3, 20, H
RNA
forwarded
T14:
Next:
Comment:
5
5 Cl
T16:
Next:
Comment:
5
T18:
Next:
Comment:
digits
Stuffed 0 in source and
0
Stuffed 0 in 'source
V3, 20, H
forwarded
0
call:
call:
..
Stuffed 0 in destination
No
stuffed
digits
V2, 20, H
Forward All forwarded call: Stuffed 0 in source
and
destination
T15:
Next:
Comment:
T17:
Next:
Comment:
stuffed
dx#, V3, 20, H
T12:
Next:
Comment:
RNA
No
V3, 20, H
RNA forwarded
destination
4
Next:
Comment:
Stuffed 0 in destination
V4, 20, H
3
Next:
Comment:
call:
V2, 20, H
Forward All forwarded call: Stuffed 0 in source
dx#, V2, 20, H
Forward All forwarded call: Stuffed 0 in
destination
5
dx#, V2, 20, H
Forward All forwarded call: No stuffed digits
8
0 dx#, V4, 20, H
Busy forwarded external call: Stuffed 0 in
destination
8
dx#, V4, 20, H
Next:
A-5
Fujitsu
Comment:
T20:
Next:
Comment:
Busy forwarded external call: No stuffed digit in
destination
0 dx#, V3, 20, H
forwarded external call: Stuffed 0 in
destination
T21:
dx#, V3, 20, H
Next:
Comment: RNA forwarded external call: No stuffed digit in
destination
T22: 0 Xx# 0 dx#, V2, 20, H
Next:
Comment: F o r w a r d A L L f o r w a r d e d e x t e r n a l c a l l : S t u f f e d 0 i n
destination
T23: 0
dx#, V2, 20, H
Next:
Comment: Forward ALL forwarded external
digit in destination
A-G
stuffed
Appendix B:
Omni Enhanced In-band Integration
This appendix contains supplemental information about integrating an
system with an Omni PBX. See the Task List for procedures to
configure the integration.
Features and Functions
The Omni integration operates over standard two-wire E
M trunk circuits. The
switch routes direct and forwarded calls to the
over one
group of trunks. Th e V
system sends message waiting requests to the
switch over a separate trunk (or group of trunks). The Receptionist II application (if
installed) operates on the same line group as the
application.
The PBX uses a hunt group to route station and trunk calls to the
system. All of the trunks in the hunt group are identified as VMS (Voice Mail
System) trunks in the switch database. Because they are VMS trunks, the switch
sends in-band call information when it routes a call over these trunks.
Direct (message retrieval) calls go through a POTS DN that is permanently
forwarded to the
system. The
system recognizes the DN
of this “dummy extension” and treats the call as a direct call from the originating
DN.
Figure B-l shows the strategy for Omni to
integration.
The Omni integration does allow call transfers from the
system, such as
The
switch’s
ability
to
recognize
a
return to operator or to another extension.
switch-hook flash on tie trunks makes this possible.
The EIB integration software includes two Omni template sets: one for three-digit
dialing plans and one for four-digit dialing plans. The Omni integration does not
support mixed dialing plans.
The PBX sends different call information messages to the
system for the
different types of call forwarding. This allows mailbox owners to use conditional
greetings. The forwarded call types are: forward busy, forward no answer, and
forward all.
B-l
Omni
SI,
System
Integration Ports
Incoming
Trunks
Enhanced In-band
and Receptionist II
Applications
Station
Forwarding
Message
Retrieval
AIP
PBX
E&M Tie Trunks
Dummy
Circular
Hunt Group
Message Waiting
Ports
Figure B-l Omni to
DTMF to PBX
Message Waiting
Outdials:
Paging, Fax,
Call Placement
System Integration Structure
The
system has two types of message waiting notification that you
can use with the Omni
l
DTMF-to-PBX Message Waiting (Type 3)
uses
to pass DTMF message waiting requests to the PBX.
l
Pager and Message Delivery Message Waiting (Type 5) uses one or
more
line ports to
to external paging systems or
telephone numbers.
Hardware and Software Requirements
The AIP
l
l
system software requirements are:
Release 5.02 or later
Enhanced In-band Integration optional feature
The AIP system hardware requirements are:
l
B-2’
One line card port for every incoming phone line
line ports
Omni
One line card port for DTMF to PBX message wait control
Additional line card ports to place any outgoing calls (paging, fax, etc.)
The Omni software requirements are:
l
Release 52.40 or later (SI)
l
Release 82.40 or 85.10 or later (SIII)
The Omni hardware requirements are:
l
One (1) 2-wire E
One (1) 2-wire E
M trunk per VoiceMemo/Receptionist port
M trunk for message wait control
Feature Interactions and limitations
l
l
l
Omni
use the Message Leave-feature for message waiting
indication. If the Message Leave feature is not programmed, the Omni
PBX provides stuttered dial tone. The
system cannot
extinguish the message waiting indicator automatically for
because the switch ignores requests to turn off the indicator. To extinguish
the Message Leave button, the user must push the button until “IVMS”
shows in the display, then hold the pound
key until the phone beeps.
Standard (POTS) phones receive a stuttered dial tone
a light as a
message waiting indicator. The
system can turn these
indicators on and off through the switch.
It is possible to connect two Omni switches to a single
Call and Centigram for assistance.
system.
use of
The Omni PBX allows the optional Receptionist II application to perform
supervised transfers. The switch can recognize a switch-hook flash on the tie trunks
and return dial tone. The AIP
system then dials the desired DN and
monitors the call. The Receptionist II application can also perform blind
(unsupervised) transfers.
If the Receptionist II application is operating in supervised mode and extends a call
that is forwarded back to the
system, the switch prevents the
and will return busy to the Receptionist II port.
B-3
Omni
See the Receptionist
Receptionist II.
manual for more information about programming for
Template Specifications
The Omni templates have a default inter-digit timeout of four seconds and are set to
hangup on an error condition. Without actually editing the templates, you can
change the inter-digit timeout and the error action by using the Omni Edit
Parameters Menu.
The Enhanced In-band Integration optional feature includes
template sets for
Omni integration, one for a three-digit dialing plan and one for a four-digit dialing
plan. The default templates for Omni integration with a three-digit dialing plan are:
NAME: OMN13
DESCRIPTION:
Next:
Comment:
T2:
Next:
Comment:
T3:
Next:
Comment:
OMNI-3
R, , ,
2 3 4 5
6 7
T
8 9 10
call
with
Centigram
11
no
Id
Busy forward
T5:
Next:
Comment:
05
T6:
Next:
Comment:
05
T7:
Next:
Comment:
06
T
H
T Vl, 40, H
prompt:
extension)
000
is
the
access point (dummy
0# d3 0#, T V2, 40, H
Forward
Message
07
B-4
by
0# d3 0#, T V4, 40, H
T4: 04
0# d3
Next :
Comment: R N A f o r w a r d
Next:
Comment:
Application
40, H
direct
03
digit
Message
all
d3 0#, T V2, 40, H
desk
Attendent
forward
d3 0#, T V2, 40, H
desk
forward
,
Omni
08
Next:
Comment:
Next:
Comment:
d3 0#, T V4, 40, H
Trunk
call
09
d3 0#, T V3, 40, H
Trunk call
d3
Next:
Comment:
Busy
forward
forward
T V3, 40, H
Command code
will have the same greeting
B-5
Appendix C:
System 25 Enhanced In-band Integration
This appendix contains supplemental information about integrating an AIP
system with an AT&T System 25. See the Task List for procedures to
configure the integration.
Features and Functions
The System 25 integration operates over standard two-wire circuits from Tip and
Ring cards. The switch routes direct and forwarded calls to the
application over one group of lines. The
system sends message waiting
requests to the switch over a separate line (or group of lines). The Receptionist II
application (if installed) operates on the same line group as the
application.
The System 25 integration allows call transfers from the
system, such as
return to operator or to another extension. The switch also correctly passes the
original called extension number to the
system when a double forward
occurs. Although the switch allows all types of call forward (busy, ring no answer, all
calls), it only sends one type of call forward message to the
system.
Because there is no distinction, mailbox owners cannot use conditional personal
greetings.
Figure C-l shows the strategy for System 25 to
integration.
system has three types of message waiting notification that you
The
can use with the System 25:
RS-232 Message Waiting (Type 7)
also called Modem Message
Waiting, uses an
serial port and an external 1200 baud
modem to pass DTMF message waiting requests to the PBX. This does
not use a
line port, and is usually the most economical type
of message waiting. The limitation with this type of message waiting is
that any confirmation tones from the PBX are not passed from the
modem back to the
system.
l
DTMF-to-PBX Message Waiting (Type 3) uses
to pass DTMF message waiting requests to the PBX.
line ports
System 25
Pager and Message Delivery Message Waiting (Type 5) uses one or
more
line ports to
to external paging systems or
telephone numbers.
AIP
System 25
Integration Ports
Incoming
Trunks
System
Enhanced in-band
and Receptionist II
Applications
\
Station
Forwarding
/ .
Queue-
MODEM
Message Waiting
or
Message Waiting
Circular
Hunt Group
Ports
DTMF-to-PBX
Message Waiting
Outdials:
Paging, Fax,
Call Placement
t
Figure C-l
System 25 Integration Structure
Hardware and Software Requirements
The AIP
l
,
system software requirements are:
Release 5.02 or later
Enhanced In-band Integration optional feature
system hardware requirements are:
The
One line card port for every VoiceMemo/Receptionist II line
One line card port for DTMF to PBX message wait control,
or
c-2
l
One serial port for RS-232 message wait control
l
Additional line card ports to place any outgoing calls (paging, fax, etc.)
System 25
The AT&T System 25 software requirements are:
(Release 2, Version 1)
(recommended)
The System 25 hardware requirements are:
l
One (1) ZTN-78 port per VoiceMemo/Receptionist II port
One (1) ZTN-78 port for message wait control
Use of Receptionist II
The System 25 integration allows the optional Receptionist II application to perform
supervised transfers. The switch can recognize a switch-hook
on the line and
return dial tone. The Receptionist II port then dials the desired DN and monitors
the call. The Receptionist II application can also perform blind (unsupervised)
transfers.
See the Receptionist
Receptionist II.
manual for more information about programming for
Template Specifications
The default templates for System 25 integration are:
NAME: SYS25
DESCRIPTION: AT&T System 25 Application by Centigram
R, T, ,
Next: 2 3 4 5 6
Comment:
T2: # 00#
Next:
Comment: d i r e c t
call
T3: #
Next:
Comment:
Trunk
T4: #
Next:
Comment:
T5: #
Next:
50, H
V5, 50, H
direct
call
V2, 50, H
Internal
Forwarded
call
dx#, V2, 50, H
c-3
System 25
Comment:
T6:
Next:
Comment:
External
Forwarded
call
H, 50, H
"Port bad"
call from the switch
Appendix D:
Enhanced In-band lntearation
This appendix contains supplemental information about integrating an AIP
system with a Northern Telecom
KSU. See the Task List for
procedures to configure the integration.
Features and Functions
The
integration operates over a group of digital lines that is equipped with
VMI (Voice Mail Interface) modules. The switch routes direct
forwarded calls
to the
system over one group of VMI lines. The
system
sends message waiting requests to the switch over a separate line (or group of lines)
equipped with a VMI or
(Analog Terminal Adapter). The Receptionist II
application (if installed) operates on the same line group as the
application.
The VMI units convert the
digital telephone interface to standard loop start
circuits for the
system. They also serve as translators, passing along the
in-band codes needed for the integration and message waiting.
Figure D-l shows the strategy for
to
integration.
integration templates are set to expect a prefix digit of 6, and a VMI
The
hunt group pilot extension of 239. Since these are probably not correct for your
switch, you must modify the templates during installation.
The KSU does not distinguish between different types of forwarded calls. It sends
the same call information message to the
system, regardless of whether
the call was forwarded due to a busy, no answer, or forward all condition. This
means that mailbox owners cannot use conditional greetings. The switch does send
the number of the originally dialed extension for multi-step forwarding, SO callers do
hear the correct mailbox greeting.
The
can use with the
l
system has two types of message waiting notification that you
DTMF-to-PBX Message Waiting (Type 3)
uses
to pass DTMF message waiting requests to the KSU.
line ports
D-l
Pager and Message Delivery Message Waiting (Type 5) uses one or
more
line ports to
to external paging systems or
telephone numbers.
AIP
System
integration Ports
Enhanced In-band
a n d Receptionist II
VMI
* A VMI can also be used for
the Message Waiting interface
Figure D- 1
Integration Structure
Hardware and Software Requirements
The AIP
system software requirements are:
Release 5.02 or later
Enhanced In-band Integration optional feature
system hardware requirements are:
The
One line card port for every incoming phone line
One line card port for DTMF-to-PBX message wait control
Additional line card ports to place any outgoing calls (paging, fax, etc.)
software requirements are:
The
l
The
D-2
hardware requirements are:
l
One (1) two-port VMI unit for each two VoiceMemo/Receptionist ports
l
One (1) line through a VMI or
for message wait control
Feature Interactions and limitations
The following
and limitations may affect the integration of a
system and a
KSU.
The DR2 does not support Call Forward Busy.
The Compact DR2 has no Call Forward No Answer.
The DR3 and DR4 support Call Forward Busy if the station is in use on
any line.
Call Forward Busy is a system-level option.
Call Forward No Answer means that the ICM rings several times and
then the call goes to a VMI.
A
can support up to ten
The Compact and Modular
only allows blind call transfers from
the
sysrem, such as return to operator or to another
extension. The
and DR4 both allow supervised transfers through
the VMI modules.
Each VMI connects up to two ports and emulates to
The
emulation behaves like a 7100 phone (one button with flash, conference,
and transfer).
User telephones do not generate DTMF tones during a conference call.
Use of Receptionist II
Only the DR3 and DR4 allow supervised transfers through the
For a
Compact or Modular
the switch recognizes a switch-hook flash on the VMI
line, and the Receptionist II port dials the desired DN and goes on hook.
or DR4 KSU, a Receptionist II port can extend a
With supervised transfer on a
call to an extension which is No Answer Forwarded back to the
ports.
The Receptionist II port waits for that call forward to occur, recognizes by an answer
tone that it has connected to a
port, and disconnects.
For this forwarding and call recognition to work correctly, you must:
D-3
l
Program the
system to recognize the extension numbers of
the ports running the Receptionist II application (DP 6034).
l
Program the
ports to dial a DTMF # when the system
identifies a call forwarded from one of its own ports.
Set line exception for ringing timeout to be greater than the Norstar’s
Forward No Answer timer.
l
See the Receptionist
Receptionist II.
for more information about programming for
Template Specifications
The template sets for
integration must be modified to have the correct
forward
digit and hunt group pilot number. The
templates for
integration are:
NAME:
DESCRIPTION:
R, T, ,
Next: 2 3
Comment: W a i t
Northern
for
Telecom
ring,
go
off
hook
T2: 6 239,
Next:
Comment: D i r e c t c a l l t h a t f o r w a r d s p a s t f i r s t
T3: 6 d3,
10,
Next:
Comment: Forwarded
D-4
call
from
a
station
port
Appendix E:
Worksheet for Enhanced In-band Intearation
This appendix contains the worksheet used for configuring the Enhanced In-Band
Integration.
E-l
Application Name
Application
(10
I
Description
chars max.)
Template Menu
Template #
Valid Data Field Entries
I
Data
Action
I
Timeout
I
I Next Templates
I
I Comment
I
I Template #
I
I Data
I
Timeout
I Next
Error Action
Data
O-9, *
Description
DTMF/MF digits
A-D
DTMF A through D (column four digits)
R
T
Ring or seizure
H
Hang
MF digits
Dial tone
Fixed-length source extension containing
digits (11 max.)
Action
Error Action
and ST, respectively
dn
Fixed-length destination extension
digits (11 max.)
containing
Variable-length source
11 max.)
terminated by DTMF/MF character
Templates
I Comment
I
dxn
Variable-length destination
terminated by DTMF/MF character
Ignore
Template #
Data
Action
Timeout
Error Action
11
digits
Ignore all digits until the
digit
Valid Action and Error Action Field Entries
Next
Templates
Comment
Action
Description
Dn
Dial DTMF digits
(O-9, A-D)
H
Template #
T
Data
Action
Timeout
Error Action ___
Templates
Comment
Template #
Data
Action
Timeout
Error Action
I Next Templates
I
Comment
5.04
n/l
of a second
of a second
wn
vo
Next
Go off-hook
Wn
max.)
Play
prompt,
Play
prompt,
v2
Play Forward All greeting
v3
Play Ring No Answer greeting
v4
Play
required
Forward greeting
Play General greeting (Receptionist II
or Message Center greeting)
23
Index
A
D
action field
description,
2-2
use during template execution, 1-7
valid entries,
adding a phoneline exception, DP 7022
administrative interface, l-l 1
application
backup, 2-3, DP 7501
creating, DP 7501
description, 2-3, DP 750 1
install, 2-9
list, 2-9
name, 2-3, DP 7501
save, 2-l 1, DP 7501
show, 2-l 1
AT&T System 25
Enhanced In-band integration, C-I
integration requirements, C-3
template specifications, C-3
with Receptionist II, C-3
data field
description,
2-6
use during template execution, l-7
valid entries, l-4,2-7
defining a line group, DP 6028
deriving mailbox numbers, l-10, DP 7007
digit absorption, l-l
DP 7007
digit offset, l-l 1, 2-4, 2-5, DP 7007
B
backup application, 2-3
c
call forwarding, l-2
caller recognition, l-2
canceling a phoneline exception, DP 7022
chassis ground
connecting, DP 3021
comment field
description, l-6, 2-6
conditional greetings,
1 1
enabling, DP 7023
current template field
description, 2-6
E
Enhanced In-band Integration
assigning to a line group, DP 7006
configure from scratch, GP 502
creating an application, DP 7501
description,
1
features, l-2
Fujitsu
GP 505
how it works, I-2
Omni, GP 504
error action field
description,
2-7
use during template execution, l-8
valid entries, 2-8
extension numbers
converting to mailbox numbers,
10,
DP 7007
extra cost features, see
F
figures
AT&T System 25 to
System
integration, C-2
integration communications, 1- 1
Northern Telecom
to
System integration, D-2
Omni to
System integration, B-2
sample call handling, l-3
Index-l
Index
sample information packet, l-3
to
System integration,
A-2
template execution, 1-Y
template pattern matching, 1-8
template programming display, l-6
Fujitsu
Enhanced In-band integration, AGP 505
feature interactions, A-3
integration limitations, A-3
integration requirements, A-3
template specifications, A-4
with Receptionist II, A-3
G
grounding, DP 302 1
I
in-band signaling
definition, 1 1
information packet, l-3
sample, l-3
install
optional features, DP 5402
templates, 1 12
inter-digit time-out,
time-out
groups
assigning Enhanced In-band application,
DP 7006
defining, DP 6028
M
mailbox numbers
matching to extensions, l-10, DP 7007
menu options
action, 2-2, DP 7501
add exception, DP 7022
add extra cost feature(s), DP 5402
add lines to current group, DP 6028
application description, 2-3, DP 7501
application name, 2-3, DP 7501
Index-2
backup application, 2-3
called extension absorbed digits, 2-4, DP 7007
called extension signed offset, 2-4, DP 7007
calling extension absorbed digits, 2-5,
DP 7007
calling extension signed offset, 2-5, DP
cancel exception, DP 7022
comment, 2-6
current template, 2-6, DP 7501
data, 2-6, DP 7501
drop lines from current group, DP 6028
duplicate active configuration, DP 6028
error action, 2-7
host number, 2-8, DP
install application,
DP 70 10
list applications,
DP 70 10
MF enable, 2-10
next templates, 2-10, DP 7501
number of in-band tasks on this host,
DP 7016
save application,
11
show application, 2-l 1
show number of in-band tasks on each host,
2-12
time-out, 2-12, DP 7501
message waiting
with AT&T System 25, C-l
with Fujitsu
A-l
with Northern Telecom
D- 1
with Omni, B-2
message waiting indicators, l-l
MF signaling
enable, 2-l 0
N
next templates field
description, l-5, 2-10
use during template execution, l-7
Northern Telecom
Enhanced In-band integration, D-l
feature interactions, D-3
integration limitations, D-3
integration requirements, D-2
template specifications, D-4
with Receptionist II, D-3
Index
0
S
offline menus, 1
Omni
Enhanced In-band integration, B-l, GP
feature interactions, B-3
integration limitations, B-3
integration requirements, B-3
template specifications, B-4
with Receptionist II, B-3
online menus, l-l 1
optional features
install with system online, DP 5402
spaces
use in templates,
see Fujitsu
P
exceptions
adding, DP 7022
canceling, DP 7022
setting, DP 7022
port number to line number conversion,
Dl? 7022
R
Receptionist II
adding extensions, DP 6034
deleting extensions, Dl? 6034
string, DP 6034
with AT&T System 25, C-3
with Fujitsu Star-log, A-3
Northern Telecom
with Omni, B-3
revert,
D-3
10
T
tables
port number to line number conversion,
DP 7022
valid action field entries,
valid data field entries, 1-4, 2-7
valid error action field entries, 2-8
templates
creating, 1-12, DP 7501
description, l-2
execution,
1-9
execution completion, l-8
installing, 1 12
loading, l-12
matching to data, l-7
modifying, 1-12
non-matching data, l-7
pattern matching, l-8
programming display, 1-6
rules, 1-9
sample, l-6
saving, 1 12
structure, l-4
time-out field
description,
transfer, l-2
Index-3
Enhanced In-band
lnband Integration Menu
Enhanced in-band Menu (2)
Edit Parameters Menu
In-band Edit Template Menu
Menu
l
-
-
-
-
w
Menu
Dialing Plan Menu
(and Star Prefix Dplan)
Dial Strin and
Mailbox enu
Dial-by-Name Menu
Menu
(or FPSA Menu)
I
Allow
Receptionist Menu
Analog Networking
Configuration Menu
(data entry parameters)
I
Issue 1 Release 2.0 January 1996
Voice
Solutions
E 1 Digital
Trunk Connectivity
Trademark of
Copyright 1996,
All rights reserved.
Printed in Canada.
TM,
Corporation
Corporation
1
Table of Contents
About This Manual
Should Read This Manual ........................................................................
How to Use This Manual .................................................................................
vii
vii
Reference Chapters .........................................................................................
vii
Task Lists .......................................................................................................
vii
...
Procedures ....................................................................................................
Menu Maps and Other Navigation Aids ........................................................
Worksheets.. ......................................................................
...
ix
............................
ix
Conventions Used in This Manual ....................................................................
Reader Advisories ................................................................................................
X
Before You Start ................................................................................................. xi
Console Tips and Techniques .........................................................................
1 El
xi
Viewing Menus .......................................................................................
xi
Accepting Defaults ..................................................................................
xi
Avoiding Automatic Exit .........................................................................
xi
Quitting an Entry Session ......................................................................
xii
Shortcut Commands ..............................................................................
xii
Digital Trunk Connectivity
El
Trunking Overview ...........................................................................
l-l
Dual E 1 Digital Trunk Multiplexing.. ..........................................................
1
Common Channel Signaling (CCS) .............................................................
1-2
and El-Applications ..............................................................
l-2
E 1 Connectivity Features ..............................................................................
l-3
El Connectivity Functional Operation ............................................................
1-3
Dual El Trunk Interface Card .....................................................................
l-4
Integration With Analog Trunk Interfaces.. ..................................................
Clock Synchronization .................................................................................
l-5
E l Digital Carrier Events .............................................................................
1-6
Configuration .......................
...........................................................................
Slot Assignment............................................................................................
l-7
1-7
Module Number ..........................................................................................
Input/Output
Address ..................................................................................
Signaling ......................................................................................................
1-9
Table of Contents
Trunk Configuration ....................................................................................
l-7
Trunk Sequence Number .....................................................................
l-7
Framing Format...................................................................................
1-7
Coding Format ....................................................................................
l-7
Clock Synchronization .................................................................................
1-7
Digital Trunk Online Maintenance ...............................................................
l-10
2 Dual Tl Digital Trunk Connectivity
Tl
Trunking Overview ..........................................................................
2-1
Digital Trunk Multiplexing ....................................................................
Channel Associated Signaling (CAS) ............................................................
2-l
Line Coding .................................................................................................
2-4
.....................................................................................................
2-5
with
2-6
.....................................................................................
....................................................................................................
2-4
2-6
The Series 6 Server and Tl-Applications ..................................................
T 1 Connectivity Features .............................................................................
2-7
Connectivity Functional Operation ............................................................
2-7
T 1 Trunk Interface Card .....................................................................
2-8
Integration With Analog Trunk Interfaces ....................................................
2-7
Clock Synchronization .................................................................................
2-7
Digital Carrier Events ...........................................................................
2-10
Alarm Handling and Reporting ..................................................................
2-10
Out-Of-Frame (OOF) Alarm .............................................................
2-11
Yellow Alarm .....................................................................................
2-11
Blue Alarm .........................................................................................
2-11
Red Alarm ..........................................................................................
2-12
Carrier Group Alarm (CGA) ..............................................................
2-12
Digital Trunk Status ..........................................................................
2-12
Configuration ...............................................................................................
.2-13
Slot Assignment..........................................................................................
2-13
Module Number ........................................................................................
2-14
Input/Output
Address ................................................................................
2-14
Signaling ....................................................................................................
2-15
Trunk Configuration ..................................................................................
2-15
Trunk Sequence Number ...................................................................
2-15
Framing Format .................................................................................
2-15
Coding Format ..................................................................................
2-16
Table of Contents
Clock Synchronization . . . . . . . . . . . . . . . . . . . . . . . . . . . . . . . . . . . . . . . . . . . . . . . . . . . . . . . . . . . . . . . . . . . . . . . . . . . . . . . 2-16
Digital Trunk Online Maintenance . . . . . . . . . . . . . . . . . . . . . . . . . . . . . . . . . . . . . . . . . . . . . . . . . . . . . . . . . . . . . . . 2-17
Configuration
Task List and Procedures
Index
list of Figures
Table 2-l SF arid ESF Signaling Bits . . . . . . . . . . . . . . . . . . . . . . . . . . . . . . . . . . . . . . . . . . . . . . . . . . . . . . . . . . . . . . . . . . . . 2-2
List of Tables
Figure l-l
D4 Frame Map ..............................................................................
l-3
Figure l-2 DC Voltage Shift in Digital Signal Transmission.. ...............................
Figure l-3 AM1 Line Coding ................................................................................
l-5
Figure l-4
1-6
Figure l-5
Line Coding...............................................................................
Digital Trunk Interface Connectivity .............................................
Figure l-6 Digital Trunk Clock Synchronization.. ..............................................
l-8
l-l 7
Figure 2-l El Frame Organization ........................................................................
2-2
Figure 2-2 El Digital Trunk Connectivity Cards ..................................................
2-4
Figure 2-3 Digital Trunk Clock Synchronization.. ..............................................
2-l
V
About This Manual
This manual describes how to configure El or
Communications Servers:
in any of the Centigram Series 6
Model 640
Model 120
Model
Who Should Read This Manual
This manual is intended for technicians and administrators
configuring El or
on the Centigram Series 6 server.
are responsible for
How to Use This Manual
This manual contains detailed reference information, a list of tasks that you can
perform, a collection of procedures for performing the tasks, and reader aids such as
menu maps.
Reference Chapters
Use the material in Chapters 1 and 2 for detailed inquiry into the configuration of
El or
in a Centigram Series 6 Communications Server. These chapters discuss
how components are related, elaborates on concepts, gives operational details, and
contains all necessary tables and figures about configuration. Use the Centigram
Series
and Service Manual appropriate for your platform for an actual
installation and the
Reference and
Manual for
software configuration.
Task lists
The task list is located in the Configuration section. Use the task list, starting with a
principal task (shown in boldface), to configure El or
Each task listed is
described in more detail in a procedure. The task list is alphabetized, which helps
most readers find the desired task (and procedure) quickly. No particular sequence
of tasks is implied. The following example shows how a task list is organized:
vii
About This Manual
Release
Message
Delivery
Configuration ..........................................................
and later
CP
Allow Mailbox Owners to Control Message Delivery ............................ CP 333
Allow Receipt of Urgent Pages or Urgent Message Delivery
P 33
Procedures
Procedures follow the task list in the Configuration section. Follow the steps in
Centigram Procedures
to accomplish the desired tasks. Readers familiar with a
Centigram Series 6 server can use the
as a checklist if desired, while readers new
to a Centigram Series 6 server can use
for step-by-step instructions.
A reference column in each
contains pointers, when necessary, to supplemental
information such as another procedure, another manual, a technical reference, or a
menu map.
Each Cl’ is numbered for document identification and referencing; numbering does
not indicate a sequence of performance. A numerical list of all
in this manual is
also provided. It gives each
title, Chapter number, and which other procedures
either call it or are called by it.
Menu Maps and Other Navigation Aids
Most of the documents in the new Centigram Series 6 document library have menu
maps. You can refer to
document navigation aids at any point to help you
reach a menu. And don’t overlook the index; it is the fastest way to find all
references to a specific topic.
About
This
Manual
Worksheets
You will
blank worksheets in the back of this manual. Instructions for
completing the worksheets are in the Reference chapters. Many of the
assume
you have completed the appropriate worksheet.
Conventions Used in This Manual
The procedures in this manual use the following conventions to describe how you
enter El or
configuration information and how information is displayed on the
Centigram Series 6 server console:
Press Enter
Press the Enter key. For example, “Press Enter if the current
number is correct.” On some keyboards, this key is labeled
on it.
“Return” or has a return arrow
Enter
Type the text shown, then press the Enter key. For example, “Enter
the line number (l-24)” means type a number from through 24,
and then press the Enter key.
bold
Words or characters in bold type indicate either a value to be
entered by you exactly as shown or, when used to indicate a variable
entry, describe the type of value to be supplied by you. See example
above.
What you select from
a displayed menu
A displayed prompt
for information
Select: (G) Current Group .
Enter a group number =
Response:
Number of the line group (l-24) to be used for the application.
\
What you enter in
response to the prompt
Note:
Unless otherwise stated, press Enter after each response you enter.
ix
About This Manual
Reader Advisories
Reader advisories used in this manual are shown below.
Note:
Information especially useful in relation to this procedure.
CAUTION!
Information that helps you prevent equipment or software
damage.
CAUTION!
..
Information that helps you avoid electrostatic discharge
(ESD) damage to the equipment.
WARNING!
Information that helps you prevent an interruption to
telecommunications traffic.
WARNING!
A hazard that can cause you personal injury.
DANGER!
Warns of a condition that could severely injure or kill you.
About This Manual
Before You Start
This manual assumes that you are familiar with using a console and keyboard. This
section describes how to use the Centigram Series 6 server effectively.
Console Tips and Techniques
The tips and techniques offered in the following paragraphs can make configuration
entry sessions at the Centigram Series 6 server maintenance console more productive.
Viewing Menus
l
When you finish entering a value for a parameter, the server displays an
abbreviated form of the current menu, called the “short menu.” To view
the complete current menu when a short menu is displayed, just press
Enter.
l
To return to the Main Menu from any
application
configuration menu, press X (Exit), until the Main Menu appears.
Accepting
Defaults
To accept a default displayed in a prompt, just press Enter.
To accept a default displayed in a menu, no action is necessary.
l
Avoiding Automatic Exit
CAUTION!
The Centigram Series 6 server “times out” after 15 minutes.
This means that if you do not enter anything at the console for
15 minutes, the server automatically exits from the current
program. When this happens, all work that has not been saved
on the disk is lost.
To avoid being timed out and losing your work, follow these steps:
1.
When you need time to think, write down the name of the current menu.
2.
Exit to the (server) Main Menu.
3. When you want to continue your work, enter the appropriate menu
options to regain your place.
xi
About This Manual
If you find that the Centigram Series 6 server has timed out, follow the steps below.
If your screen is blank, press any key to reactivate the screen and then continue with
these steps.
1.
Press any key to start the
2.
Enter your user ID and password (if requested).
3.
Starting from the Main Menu, enter menu options to proceed to the menu
from which the server timed out.
4.
Reenter data as needed to regain lost work.
sequence.
Quitting an Entry Session
At any point during entry of offline or online parameters, you
quit. Quitting
discards all parameter entries you have made and leaves the
application
configuration the way it was before you started entering parameters.
To quit from the
Select:
Configuration Offline or Online Menu:
Quit -- Forget Changes
Quit and forget changes?
Response: Y to return to the
(y/n)
=
Configuration Main Menu.
Shortcut Commands
You can use the
(Control) key or the (slash) key while simultaneously pressing
another key to execute shortcut commands at an Centigram Series 6 server
maintenance console.
Type...
To do this...
Activate a timed-out console.
From the offline or online menus, or FCOS, LCOS,
GCOS menus, return to the
Configuration Menu and save any entries.
From the offline or online menus, or FCOS, LCOS,
GCOS menus, return to the
Configuration Menu without saving any entries.
Stop scrolling a displayed report.
Resume scrolling a displayed report.
Return to the
prompt is displayed.
xii
application when a
or $
Ctrl-D
type exit
1 El Digital Trunk Connectivity
This chapter has a description and brief technical overview of the El digital trunk
connectivity available for Centigram Series Communications Server.
El PCM Trunking Overview
The Series Communications Server includes El digital trunk connectivity as a
standard feature. This feature facilitates Series 6 server integration with switches
which predominantly use digital trunks for connection to the telephone network and
to special service equipment such as the Series 6 server.
The Model 70 and Model 1201 both support only one
trunk, the Model
and the Model 640 each support up to 3 El trunks (up to the maximum 60-port
system capacity).
If you need an introduction to the El Digital Trunk Connectivity feature of the
Series 6 server for overall applications information, this section is written for you. If
you need an introduction to the El Digital Trunk Connectivity Feature as a general
review before configuring it or troubleshooting it, this section is also for you.
This section briefly reviews the structure of an El frame and time slot assignment for
common channel signaling. It
discusses Series 6 server/El applications, El
features, functional operation, alarms, and specifications. This section is not
intended to be a comprehensive discussion of digital trunking. For more
information on digital encoding of voice signals and digital transmission, refer to the
many external resources on the subject. Also, contact Customer Training for the use
of digital transmission in Centigram equipment.
Dual E l Digital Trunk Multiplexing
The standard El frame (Figure l-l) contains 256 bits divided into 32 time slots of 8
bits each. At 8,000 frames per second, the El bit rate is 2.048 Mbps. Time slot 0 in
each frame is used for framing bits and for error-checking bits. Time slots 1 through
15 carry PCM channel circuits 1 through 15, and time slots 17 through 31 carry
circuits carry data- that
PCM channel circuits 16 through 30. (The PCMc h
is, digitized voice signals.) Time slot 16 in the El trunk
frame is reserved for
line supervision and signaling.
El Digital Trunk Connectivity
Time Slot
1
0
2
3
15
Voice Channel
16
15
ss7
Common
Channel
Signaling
Bits 1
8
Framing
Error Checking
17
30
31
16
29
30
Bits
249
256
Bits
Figure 1-1
E 1 Frame Organization
Common Channel Signaling (CCS)
“Common channel signaling” refers to signaling information for a set of
channels. In the case of a digital trunk, CCS carries signaling information for
multiple PCM channels in one or more trunks. The signaling data uses time slot 16.
Currently, the Series 6 servers use one type of CCS: Signaling System 7 (also known
as CCITT C7). Typically, Series 6 servers equipped with El trunks as a standard
feature will also be equipped with the SS7 Optional Feature (refer to the SS7
Integration optional feature documentation for your system for further information).
Note:
The Series 6 Server supports SS7 as the only CCS optional feature.
Channel associated signaling will be available in a future release.
and E 1 -Applications
Digital trunk connectivity in a Series 6 server is available as a standard feature where
the system connects to the local switch through El digital trunks. A Series 6 server
module with digital connectivity has one or more Dual El digital trunk interface
cards with one or more voice service cards (DSP30 cards,
cards, and so
forth).
Digital and analog trunks can coexist in the same Series 6 server. Though not
typical, such a mix could be implemented in an application where analog trunks exist
and a digital trunk is added.
1-2
El Digital Trunk Connectivity
E 1 Connectivity Features
Model
and Model 640 Series 6 servers can support a total capacity of 60 PCM
voice-application channels per module. Model 70 and Model 1201 Series 6 servers
can support a total capacity of 30
voice application channels per module.
Note:
“Port” as used elsewhere in Series 6 Communications Server
documentation, when used in the context of digital trunk
connectivity, equates directly to
channel,” “channel,” and
“circuit.”
Model
and Model 640 Series 6 server modules can support up to two Dual El
Digital Trunk Interface cards with two trunks per card for Series 6 server-to-network
connections (for example, for incoming-to-help line connections). Some of the
PCM circuits can be allocated for network-to-network connections (for example, for
incoming to help line connections).
The user can enable or disable CRC error checking on the trunks and set line coding
for the CCITT-standard HDB3 (high density bipolar 3) The system clock can be
slaved to the incoming PCM signal or can be set to synchronize with an internal
running reference.
Tip:
To optimize fault tolerance on your system, configure your trunks
with the voice application circuits evenly divided between each
trunk. Then, for example, in a host with four trunks, a single
trunk going out of service results in the loss of only one-fourth of
your total available circuits.
E 1 Connectivity Functional Operation
From the standpoint of implementation, the El trunk is expected to be the primary
trunk interface to the local switch. Setup through the
Physical Resource
Configuration Manager, the Series 6 server expects the Dual El trunk interface card
to connect to an SS7 Protocol Conversion Card. The Dual El trunk interface card
handles El frame multiplexing and demultiplexing, clock extraction, and so forth.
However, because it extracts and interprets the signaling data important to call setup,
tear down and routing, the SS7 Signal Processor card must be present before call
processing can occur.
El Digital Trunk Connectivity
On the receive side of the trunk, the Dual El trunk interface card demultiplexes the
voice, overhead, and signaling time slots to recover traffic data (voice information),
framing and error checking bits, and signaling data. It passes the PCM bearer
channels (with voice information) to the DSP 30 Digital Signal Processing line card
and signaling data
channel 16) to the SS7 Signal Processing card (Figure l-2).
Bus
r
Dual El Trunk
interface Card
El Trunks
link
voice
traffic)
Channels
Traffic
Chan 16
SS7 Data
I
I
SS7 Signal
Processing
Card
Voice
Channels
F a x
D a t a ,
El
Figure l-2
El Digital Trunk Connectivity Cards
The DSP 30 line card separates the voice data from the PCM frame and hands the
data off to the application running in the CPU. Similarly, the
card separates the
information from PCM channel 16 and hands it off to the application running
in the CPU.
On the transmit side of the trunk, for outgoing calls (for example, to a help line) the
card assembles the
data from the CPU for the Dual El Trunk Interface
card. Similarly, the DSP 30 line card formats the outgoing voice data. For
applications, the fax card fulfills the role of the DSP 30 line card but for
facsimiles.
Dual El Trunk Interface Card
The Series 6 Server Dual El trunk interface card is the interface for up to two El
2.048 Mbps CEPT digital trunks. The card conforms to CCITT Recommendation
G.704 for PCM 30 and to I.431 CCITT Recommendation: for ISDN. The
interface card, an AT bus-compatible adapter card, plugs into the Series 6 server
backplane in Model 70, Model 120, and Model 640 servers. The Dual El interface
card can be ordered to support either balanced (1
standard 8-pin RJ-48C) or
unbalanced
l-4
trunk connections.
El Digital Trunk Connectivity
Integration With Analog ‘Trunk Interfaces
The El Digital Trunk Connectivity feature may coexist with analog trunks in the
same Series 6 server module. In such configurations, the voice channel cards are mix
of DSP30 line cards (used in conjunction with the El trunks), and LC8 line cards
(used in conjunction with the analog trunks). The Dual El digital trunk interface
and the
line cards interconnect through the MVIP bus. Configuration and
line group assignments for both are handled through the Configuration Manager
(refer to TR
in the Technical Reference for configuration information).
Clock Synchronization
The El clock can be synchronized to either to a clock recovered from the network
receive data
signal of one of the incoming trunks or an internal clock
reference (free-running master clock source on the Dual El card). Both El carrier
interfaces on the Dual El card recover a 2.048
clock
8
frame clock
from their respective far end carriers. These recovered frame signals go to the
card clock source for use to control the synchronization of the MVIP clock and
frame clock to the El
from the network.
master clock is the actual source of the clock signals used by all cards
An
common to the MVIP bus. Only one master for each MVIP bus is allowed and only
one active 8
frame reference. The El clock default source is the
master
on digital trunk interface card number 1, derived from the trunk 0 El
signal.
(that is, the only digital trunk interface card present in Model 70 and Model 1201
servers). (Trunk numbering is 0 through 3, starting with “0” on the first trunk card.)
Through the configuration manager, the reference source to the master clock is
selected offline. Sources include a free-running oscillator on the digital trunk
signals (that is, from trunk 0 and trunk 1).
interface card and the network
Clock reference switching switchover is “hitless,” that is, the clock reference can be
manually or automatically switched over to a second source without affecting traffic.
For digital trunk connectivity implementations where both trunks terminate in a
single Dual El Trunk Interface card, the Series 6 server provides automatic clock
source switchover in the event of trunk failure. On detecting a failure of the trunk
from which the clock source is derived, the Dual Trunk Interface card automatically
switches over to the second digital trunk (if the trunk in operation) on the card.
Because clock references are independent for each Series 6 server module, the Series 6
server can connect to different
a
combination, or different
These different connections, however, must go to different Series 6 server modules
and must be the primary clock reference within their respective modules.
l-5
El Digital Trunk Connectivity
El Digital Carrier Events
The Dual El digital trunk interface card detects failures on the trunk receive data
When failures persists for more than
milliseconds, the carrier alarm
function automatically generates a remote alarm to the far end in accordance with
Recommendations G.732 and G.733. For such failures, the carrier alarm
function informs the signaling function that circuits on a failed digital trunk are
unavailable and in-process calls are terminated. Only after a trunk is restored for 400
milliseconds are the circuits again made available. The system maintains for these
carrier events for each trunk:
Loss of frame (LOS)
0
0
Frame slips
Bit errors
0
0
Remote Alarms
0
Local carrier alarm
0
Remote carrier alarm
seconds
All one’s signal
0
Failed seconds
When the server is online, service personnel can monitor several digital trunk
conditions and control several functions. These include:
Displaying event counters, current trunk state, current clock source, and
trunk configuration for a single trunk or all trunks in a module.
Setting the module clock reference.
0
Connecting or disconnect a digital
toward the facility.
Placing a digital trunk out-of-service. This action returns an
switch.
Restoring a digital trunk to service.
to the
El Digital Trunk Connectivity
Configuration
Digital trunk connectivity configuration is done offline through the Physical
Resource Configuration Manager. Configuration for a Dual El card and for a
digital trunk connection consists of the following:
l
Selecting the physical slot assignment for the card.
Setting the module number in which the card is installed.
l
Configuring the I/O port address of the card
l
Setting the signaling in use by the trunk.
l
Setting the sequence number of the trunk.
Configuring the framing format
l
l
Configuring the coding format for the PCM bit stream.
Procedure CP 3 15 1 lists the steps for configuring a Dual El card.
l
Slot Assignment
The Dual El Digital Trunk Interface card(s) are assigned (and factory-installed in)
specific physical slots in the Series 6 server backplane. The system software requires
these slot assignments to identify the hardware resources present in the backplane.
The configuration process for installing the digital trunk interface cards includes the
following:
1.
Configure the cards (refer to TR 1906 in this volume).
In the Physical Configuration Menu, configure the slots assigned to the
cards.
3.
In the Offline Menus, continue the configuration needed by the
applications.
The factory installs the digital trunk interface card in these slots in the Series 6
Model 70, Model 120, and Model 640 servers:
2.
Card
0
1
Model 70
Slot Number
3
Model 1201
Slot Number
Model
Slot Number
Model 640
Slot Number
6
6
9
8
11
1-7
El Digital Trunk Connectivity
The Model
and Model
servers each support only one digital trunk for a
maximum system capacity of
PCM voice channels. The Model
server and
Model 640 server each supports up to
PCM voice channels (ports) between two
digital trunk interface cards.
You assign the slot at the Physical Resource Configuration Menu for the card you are
configuring.
Module Number
The module number is the Series 6 server module in which the digital trunk interface
card is installed. A four-module Series 6 Model 640 server can support a total
capacity of 240
voice channels over 16 trunks. (In such a configuration the
line groups would be configured to use only part of the total number of PCM
channels available in each trunk. Refer to “El Connectivity Features” on page 3.)
You assign the slot for the card you are configuring at the Physical Resource
Configuration Menu.
Input/Output Address
The digital trunk interface card can occupy one of two possible AT bus addresses:
and
where address
is the default address occupied by card 0
is assigned to Card 1. These addresses can also be assigned to a
and
Smartcard in Model
and 1201 servers. Before selecting the
address, check the
addresses occupied by these cards if they are present in the affected Series 6 server
module. If these cards are and either of their addresses are set to the same to which
the digital trunk interface card, an address conflict exists and bus contention will
occur. Ensure that each card is set to a unique address. The address selected in the
Select IO Address Menu must match the address for which the card is physically
jumpered.
Note:
The digital trunk interface card has jumper positions for setting
interrupt request levels. However, the
application
polls the hardware to detect status and service the cards and does
not use hardware interrupt requests.
You set the card
AT slot x.
1-8
address in the Configuration Menu for Board [DUAL El] in
El Digital Trunk Connectivity
Signaling
The Series 6 server supports only CCS for CCITT recommendations and ANSI
specifications for digital trunk connectivity. And, currently only SS7 (CCITT C7) is
Integration
supported as the signaling optional feature integration. Refer to the
Manualfor complete information.
You set El trunk signaling in the Select Trunk Type Menu. The menu has options
for both analog and digital trunks. However, when you are configuring a digital
trunk interface card, the configuration manager accepts only the digital trunk
common channel signaling (CCS) option for El trunks.
Trunk Configuration
Trunk configuration includes the trunk number, framing forma:, and coding format.
Trunk Sequence Number
The trunk number is the logical number of the trunk, beginning with trunk number
0. You set the trunk number at the Configuration menu for
Carrier trunk x
Menu.
Framing Format
The
application supports CEPT framing and CRC framing. YOU select
the framing format the trunk uses at the Configure Frame Format for Board [DUAL
El] in AT slot x Trunk y Menu. The configuration manager accepts only the CEPT
and CRC framing formats.
Coding Format
The
application supports
(high density bipolar three) coding
formats for El trunks AM1 (alternate mark inversion) and. You select coding for the
trunk at the Configure Frame Coding for Board [DUAL El] in AT slot x Trunk y
Menu. The configuration manager accepts only CCITT-standard HDB3 or
(alternate mark inversion) for El trunks.
though available as an option, is a
less robust line coding technique than
and is not recommended.)
Clock Synchronization
The system master clock can be synchronized either to the network (that is, a selected
El
signal) or to a free-running oscillator on the Dual El card. The digital
clock reference can be set to one of the following:
Internal reference
Network reference
Default reference
1-9
El Digital Trunk Connectivity
The network reference is a selected El trunk. In the case of a Series 6 Model 70 or
Model 1201, the selected trunk will be trunk 0. In the case of Model
or Model
640, the selected trunk can be either 0, 2 or 3 (only one trunk can be selected).
The default reference is trunk 0.
The Series 6 server features automatic switchover to a backup clock source if the
primary fails. However, this feature functions only when both trunks of a Dual El
card are used and the clock is synchronized to the
signal of one of them..
Then, if the trunk to which the clock reference is derived, the Series 6 server will
automatically switch over to the second trunk on the Dual El card.
Note:
This clock source switchover feature does not work if digital trunk
connectivity is split
two Dual
cards.
When configuring the system, use the network clock as the system clock reference to
prevent frame slips (Figure l-3). clock as the system clock reference
Series 6
Server
El Digital Trunk
El Digital Trunk
Switch
Sync to Trunk
Figure l-3
Digital Trunk Clock Synchronization
Digital Trunk Online Maintenance
The
software features an online maintenance utility for monitoring
digital trunk activity and statistics (either individual trunks or all trunks), changing
the clock reference, removing trunks from service, and looping back trunks toward
the facility. Trunk activity includes the operational state of a trunk,
seconds,
frame slips, and so forth. The display presents trunk status and the configuration of
the trunk-a useful feature for quickly validating trunk setup.
The information displayed is dynamic and changes as trunk status changes. For
example, if a trunk is taken out of service, the utility immediately reports it to the
display. Refer to the Centigram Series Server Systems
Manual for more
information.
l-10
2 Dual
Digital Trunk Connectivity
This chapter has a description and brief technical overview of the
digital trunk
connectivity available for Centigram Series 6 servers. It is provided both as an
introduction to the digital trunk connectivity feature and to provide planning and
installation guidance for retrofitting a Series 6 server with the feature.
PCM Trunking Overview
The Centigram Series 6 Communications Server includes
digital trunk
connectivity as a standard feature. This feature facilitates serverjntegration with
switches which predominantly use digital trunks for connection to the telephone
network and to special service equipment such as the Series 6 server. All Series 6
server products can be equipped with digital trunks.
The Model 70 and Model
both support only one
trunk, the Model
and each Model 640 module support up to four
trunks, configured to use all
trunk channels or fractional
(up to the maximum 60-port system capacity).
If you need an introduction to the
Digital Trunk Connectivity Feature of the
Series server for overall applications information, this section is written for you. If
you need an introduction to the
Digital Trunk Connectivity Feature as a general
review before configuring it or troubleshooting it, this section is also for you.
frame and the bit assignments for
This section briefly reviews the structure of a
channel associated signaling (CAS). It also discusses Series 6
applications,
features, functional operation, alarms, and specifications. This section is not
intended to be a comprehensive discussion of digital trunking. For more
information on digital encoding of voice signals and digital transmission, refer to the
many external tutorials on the subject. Also, contact Customer Training for the use
of digital transmission by Centigram equipment.
Digital Trunk Multiplexing
When an analog voice signal is digitally encoded, it is periodically sampled to
produce an 8-bit representation (a “byte” or
of the sampled moment. This
sampling occurs at an 8
rate (which equals 64
After digital encoding,
each byte is added into a string of bytes encoded from other voice signals for
transmission over a common path. This “byte stringing” is done in an orderly
manner which repeats the insertion of a series of digitally-encoded voice signals, each
assigned to its own time-slot (“channel”) to produce frames. This voice data framing
is done in stages to assemble ever larger frames, beginning with a
frame. A
2-l
Dual
Digital Trunk Connectivity
frame has 24
channels with 8 data bits in each time slot (channel) and,
including an extra bit as a start-of-frame marker
bits makes up a complete frame.
Various framing formats have been developed for channel banks. All formats have a
bit position. A unique bit pattern in the frame bit
framing bit in every
position repeats every 12 frames to define a complete superframe (Figure 2-l). The
bit precedes each frame (at
composite data rate of a frame is 1.536 Mbps. A f
the same 8
rate as the voice channels), increasing the frame rate to 1.544 Mbps.
milliseconds.
Release
A D4 superframe has a frame interval of
supports the extended superframe (ESF) format of 24 frames each. ESF differs
from SF by the number of frames it contains (that is,
the doubling of framing
(F) bits from a
pattern to 24-bit pattern, and the addition of signaling bits C
and used by channel associated signaling, known as “robbed bit” signaling” (refer
to Table 2-l and the following paragraphs). (I n networks whtre ESF is not fully
implemented, the SF signaling bits are repeated.)
and ESF are two of the formats for digital trunk connectivity feature that
Release
supports. The standard D4 superframe format is known
by domestic
as the
format.
Table 2-I
SF
ESF
Frame 6
A
A
Frame 12
B
B
Frame 18
A
C
Frame 24
B
D
Frame 30
A
A
Frame 36
B
B
Frame 42
A
C
Frame 48
B
D
Frame
2-2
SF and ESF Signaling Bits
Dual
Digital Trunk Connectivity
D4 Super Frame
1.5 ms
Frame Frame Frame Frame Frame Frame Frame Frame Frame Frame Frame Frame Frame Frame
i
nsb
msb
msb
Terminal Framing 1
FT Bit (Odd Frames)
0
1
0
1
Signalling Framing
FS Bit (Even Frames)
0
0
1
1
FS Bit I.D.
A
B
A
B
Figure 2-1
0
1
0
D4 Frame Map
2-3
Dual
Digital Trunk Connectivity
Channel Associated Signaling (CAS)
Release 6.0 digital trunk connectivity for
supports only channel-associated
signaling for ground start, loop start E
M, and DID trunks. Neither facility data
link (sometimes used with ESF) nor remote
requests are supported.
Note:
Release
does not support common channel
signaling (CCS)
trunk connectivity. CCS is a method
where signaling for all channels is handled using a link that is
common to all channels (for example, SS7).
Signaling is channel associated (CAS) w h ere the signaling is handled individually
inside each channel. Signaling information is carried in every sixth frame in a SF;
the ‘A’ and ‘B’ bits alternating every twelfth frame by borrowing (“robbing”) the least
bit from each channel. The “A” and “B” signaling bits each appear in
alternating superframes (that is, every twelfth frame). ESF signaling uses four
signaling bits, A, B, C, and D. These bits each repeat every twenty-fourth frame.
(In networks where ESF is not fully implemented, the C and D bits are not used and
the A and B are simply repeated.) Through the use of these two bits, four signaling
states can be transmitted (loop start, ground start, E
M, and DID).
Line Coding
When transmitted, digital signals shift
two voltages, typically some negative
voltage for one logic condition (-Vdc for “0” for example) and typically some
positive voltage for the other logical condition (+Vdc for “1” for example,). This
shift, known as a “bipolar shift.” where the signal shift does not linger at the zero
volts baseline is known as non-return to zero or
Transmission for long
distances over wire-based media of bipolar signals has a problem where the
transmission cable, which appears as a resonant circuit, integrates the DC voltage
(Figure 2-2) of the signal. This is especially true if the voltage remains at positive or
negative level for any length of time (as would be the case for a digital signal with a
series of
or “0” conditions in it). This charging of the transmission cable causes a
progressively smaller and smaller differential between logic 0 and 1 voltage
conditions. This then results in the inability of a receiving circuit to distinguish
between the logic conditions-a distinction that is imperative for recovering the
network clock.
To counteract this problem, several coding techniques have been developed to
balance plus
and minus
voltages (that is, prevent long strings of “l’s” or
“O’s”). The Series 6 server digital trunk interface can be configured to use one of
three of the more common coding techniques: alternate mark inversion
with zero code suppression (ZCS), and binary with 8 zeros suppression (BSZS).
2-4
Dud
Bit Stream Waveform
Figure 2-2
Digital Trunk Connectivity
of l’s
of O’s
DC Voltage Shift in Digital Signal Transmission
AM1 (alternate mark inversion) is a simple technique which
a unipolar
signal into a bipolar signal. It also inverts the second (and the fourth, sixth, and so
forth) of a long string of 1 (Figure 2-3).
1
0
1
0
1
0
0
1
1
0
0
0
1
1
1
0
0
1
a. Bit Stream Code
Logic 1
Logic 0
b. Binary Signal (Unipolar)
Logic 1
Logic 0
c. Polar (NRZ)
d. Bipolar
Figure 2-3
Mark Inversion)
Line Coding
2-5
Dual
Digital Trunk Connectivity
with ZCS
with zero code suppression is coding technique is similar to basic
except
that the eighth 0 bit in a string of O’s is converted to a bit. This technique
interferes with the data when all zeros are transmitted. However, this is not a
significant problem when the data represents a voice signal and an occasional reversal
of a bit is not apparent in the overall voice signal quality. Of course, AM1 with ZCS
a problem when transmitting data that requires a high degree of fidelity (for
example, video), but which is not a concern with voice messaging equipment.
(bipolar with 8 zeros suppression) introduces a code, recognizable to a data
receiver, that a bit has been changed from a 0 to a 1. This technique deliberately
introduces a known bipolar violation
into a data stream. (A bipolar violation
occurs where a pulse is of the same polarity as the previous
deliberately
reverses the
and the seventh 0 in a series of eight 0 bits. The receiver recognizes
this known bipolar violation and substitutes the proper-data in its place. Because of
the predictable nature of
encoding, this encoding technique does not interfere
with the transmitted data. In the example shown in Figure 2-4,
is used to code
1 O’S are represented by a return to the baseline (that is, 0 volts).
Data
Sent
,
10
0
0
0
0
0
BPV
0
0
0
BPV
Line
Signal
Substituted Byte
Figure 2-4
line Coding
The Series 6 Server and
Digital trunk connectivity in a Series 6 server is available as a standard feature where
the system connects to the local switch through
digital trunks. A Series 6 server
module with digital connectivity has one or more
digital trunk interface cards
with one or more voice service cards (DSP24 cards,
cards, and so forth).
Digital and analog trunks can coexist in the same Series 6 server. Such a mix could
configuration where the maximum
be implemented in a Model
number of digital circuits allowed is 24 (that is, one
trunk) and the balance of
ports are analog trunks.
Dual
Digital Trunk Connectivity
Connectivity Features
Series 6 servers Model
and Model 640 can support a total capacity of 60
voice-application channels per module.
Note:
“Port” as used elsewhere in Centigram Series 6 documentation,
when used in the context of digital trunk connectivity, equates
directly to “PCM channel,” “channel,” and “circuit.”
Series 6 server Model 640 and Model
modules can support up to two Dual Tl
Digital Trunk Interface cards with two trunks per module for Series 6
network connections (for example, for incoming-to-help line connections). A Model
1201 and a Model 70 can each support a single trunk. For redundancy, incoming
ports can be divided between two trunk interface cards, so long as the total port
capacity is not exceeded.
Tip:
To optimize fault tolerance on your system, configure your trunks
with the voice application circuits evenly divided between each
trunk. Thus, in a module with four trunks, a single trunk going
out of service results in the loss of only one-fourth of your total
available circuits.
For example, for a Model 640 equipped with four digital trunks (that is, two
Dual
Digital Trunk Interface cards), configure lines groups to
use only 15 ports (PCM channels) on each trunk.
The user can set line coding for AM1 (alternate mark inversion),
with ZCS
(zero code suppression), or
(binary eighth 0 suppression). The trunk can be
disabled using the standard all-ones (AK) signal. By default, the clock is slaved to
the incoming PCM signal from the network on trunk 0.
Connectivity Functional Operation
From the standpoint of implementation, the
trunk is expected to be the primary
trunk interface to the local switch. The
Trunk Interface Card handles
frame
multiplexing and demultiplexing, clock extraction, and so forth. The
digital
trunk connectivity feature supports from one to four
trunks (with up to 60 ports)
per module to a single PBX or to a single CO.
On the receive side of the trunk (relative to the Series 6 server, the
Trunk
Interface Card demultiplexes the voice, overhead, and signaling time slots to recover
traffic data (voice information), framing bits, and signaling data.
For connectionsto differing
or a mix of
trunks should be connected to different modules.
and
with Tls, the
2-7
Dual
Dual
Digital Trunk Connectivity
Trunk Interface Card
The Series 6 server uses a Model MB89 110 Dual
Trunk Interface Card. This
card is the interface for up to two (per card)
digital trunks. The interface card, an
AT bus-compatible adapter card, plugs into the server backplane in Series 6 Model
70, Model 1201 and Model
and Model 640. The interface card supports
balanced (standard
RJ-48C) trunk connections.
The
Digital Trunk Interface and the DSP24 line cards interconnect through the
MVIP bus (Figure 2-5). Configuration and line group assignments for both are
handled through the Configuration Manager (refer to TR 1903 in the Technical
Reference Manual for configuration information).
On the receive side of the trunk, the Dual
trunk interface card demultiplexes the
voice, overhead, and signaling time slots to recover traffic
information),
framing and error checking bits, and signaling data. It passes the PCM bearer
channels with voice information and signaling (CAS) data to the Digital Signal
Processing line card. The line card connected to the Dual
trunk interface card by
way of the
bus separates the voice data and CAS information from the PCM
data. The line card then forwards them to the
application running on
the CPU.
A DSP24 has 24
The Digital Signal Processing line card can be DSP24 or a
channels available to process the voice signal information from a full
trunk. The
DSP 8 cards, with 8 channels available to process the voice signal information, are
used to support fractional
configurations. Refer to
for DSP8 line card
information and to TR1903 for DSP24 line card information in the
Series
Technical Reference Manual.
On the transmit side of the trunk, for outgoing calls the DSP 24 line card formats
the outgoing voice data voice and signaling data from the CPU for the Dual
Trunk Interface card.
Bus
PCM Channels
Tl Trunks
Fax Card
Interface Card
Voice
Figure 2-5
2-8
Channels
Fax Data
Digital Trunk Interface Connectivity
Dual
Digital Trunk Connectivity
Integration With Analog Trunk Interfaces
The
Digital Trunk Connectivity feature can coexist with analog trunks in the
same Series 6 server module. In such configurations, the voice channel cards will be
a mix of DSP24 or DSP8 line cards used in conjunction with a Dual
Trunk
Interface card), and LC8 line cards used in conjunction with the analog trunks.
Clock Synchronization
The
clock can be synchronized either to a clock recovered from the network
signal of one of the incoming trunks or to an internal clock reference (free-running
master clock source on the Dual
card). Both
carrier interfaces on the Dual
card recover a 1.544
clock and 8
frame clock from the network
received signal (Rx). These recovered frame signals go to the on-card clock source
for use to synchronize the
clock and frame clock to the
from the
An MVIP master clock is the actual source of the clock signals used by all cards
common to the MVIP bus. Only one master for each
bus and only one active
8
frame reference are allowed. The
clock default source is the MVIP master
on digital trunk interface card number 0, derived from the trunk 0
Rx signal
(that is, the only digital trunk interface card present in the Model 70 and Model
1201). (Trunk numbering is 0 through starting with “0” on the first trunk card.)
Through the configuration manager, the reference source to the master clock is
selected offline. Sources include a free-running oscillator on the digital trunk
interface card and the network Rx signals (that is, from trunk 0 and trunk 1).
connected either to a PBX or to a CO, the network clock is always the clock
reference.
Clock reference switching switchover is “hitless,” that is, the clock reference can be
manually or automatically switched over to a second source without affecting
For digital trunk connectivity implementations where both trunks terminate in a
single Dual
Trunk Interface card, the Series 6 server provides automatic clock
source switchover in the event of trunk failure. On detecting a failure of the trunk
from which the clock source is derived, the Dual Trunk Interface card automatically
switches over to the second digital trunk (if the trunk in operation) on the card.
When connecting to channel banks, the Series 6 server module is the clock reference.
In this case, all
links to a particular channel bank come from the same Series 6
server module.
Because clock references are independent for each Series 6 server module, the server
connect to different
a
combination, or different
These
different connections, however, must go to different Series 6 server modules and
must be the primary clock reference within their respective modules.
2-9
Dual
Digital Trunk Connectivity
Digital Carrier Events
.
When the Dual
digital trunk interface card detects failures on the trunk receive
data
When f ‘1ures persists for more than 2.5 seconds, the
carrier alarm function automatically generates a remote alarm to the far end. For
such failures, the carrier alarm functionality informs the signaling function that ports
on a failed digital trunk are unavailable and terminates in-process calls. Only after a
trunk is restored for 10 seconds are the trunk ports again made available to the
application. The server maintains these carrier events for each trunk:
l
Loss of frame (LOS)
l
Frame slips
Bit errors
l
Remote Alarms
l
All one’s signal
l
Local carrier alarm
Remote carrier alarm
seconds
l
Failed seconds
When the equipment is online, service personnel can monitor several digital trunk
conditions and control several functions. These include:
l
l
Displaying event counters, current trunk state, current clock source, and
trunk configuration for a single trunk or all trunks in a module.
Setting the module clock reference.
l
Connecting or disconnect a digital
toward the facility.
Placing a digital trunk out-of-service. This action returns an
switch.
l
to the
Restoring a digital trunk to service.
Alarm Handling and Reporting
The
digital trunk function in the Series 6 server recognizes and responds to outof-frame (OOF) a1 arms, yellow alarms (D4 and ESF) red alarms, and blue alarms.
These alarm conditions are all recorded in the system event log. A
maintenance utility presents a Digital Carrier Status screen that shows event counters
where trunk error activity can be reviewed.
-
2-10
Dual
Digital Trunk Connectivity
Out-Of-Frame (OOF) Alarm
the Dual
trunk interface card detects a loss of frame synchronizationit
immediately attempts to reframe. A loss of frame is determined to have occurred
when the received data framing bits are in error two bits out of four. When the loss
of frame occurs, the digital trunk interface driver (the interface control software)
tracks the length of time the framing is lost and notifies all affected applications of
the OOF condition.
Note:
A Blue Alarm (an
condition.
from the far end results in an OOF
Yellow Alarm
The Yellow Alarm signal indicates that a
connection has lost frame
synchronization.
When the Dual
Digital Trunk Interface
an incoming
Yellow Alarm, the affected
carrier goes into a Carrier Group Alarm state. The
Series 6 server module sends the alarm when the OOF condition has been detected
for a set minimum time threshold. The form of the yellow Alarm depends on the
framing format in use. For D4 framing, a Yellow Alarm consists of setting bit 2 in
every channel to zero. An ESF Yellow Alarm consists of the repeating 16-bit pattern:
0000 0000 1111 1111. The Dual
digital trunk interface card generates this
pattern on the command of the driver software.
These are the timing conventions associated with a Yellow Alarm signal:
1.
2.
3.
4.
The Dual
digital trunk interface detects an incoming out-of-frame
within 335 to 1000 milliseconds.
The out-of-frame persists for 2.5 seconds, after which a Yellow Alarm is
asserted.
The Yellow Alarm is not cleared until the
signal has been reframed for
seconds.
The minimum time interval between the end of one Yellow Alarm and the
start of another is 1 second.
Blue Alarm
The Blue Alarm is an alarm indication signal
and consists of a continuous
string of unframed one’s (hence the derivative: “all l’s” or
This signal is
typically used to indicate to the far end that some kind alarm condition exists. This
condition could be nothing more than the circuit removed from service for testing or
it could mean an equipment failure on the network. The transmission of all ones
permits the
clock to continue to be recovered from the network Rx signal in the
absence of traffic while still communicating the alarm condition.
driver is advised of the
by the hardware, the affected
carrier
When the
goes into an OOF condition. The
digital trunk connectivity software
treats the condition like any other OOF except for setting the user-accessible status
bits and an entry in the system error log that the alarm is a Remote Blue Alarm.
2-11
Dual
Digital Trunk Connectivity
Red Alarm
A Red Alarm is asserted and the affected
carrier goes to a Carrier Group Alarm
interface detects that an OOF has persisted for more than
state when the
seconds. A Yellow Alarm is also asserted as long as the
remains in a Red Alarm
condition.
Carrier Group Alarm (CGA)
The CGA consists of the local node either being in a Red Alarm state or of receiving
a Yellow Alarm from the far end. (The Yellow Alarm from the far end indicates that
the far end cannot frame on the near end signal.) The CGA is canceled when the
Red Alarm condition is removed or when the Remote Yellow Alarm is removed for
100 to 1000 milliseconds.
digital trunk interface software logs
When then CGA state has been entered, the
an error message in the system error
to indicating the CGA. It also sends
notice of the CGA to all applications affected by the T-l carrier.
Digital Trunk Status
The
digital trunk status maintenance utility presents a display of
summary counters that shows the occurrences of the following events:
seconds where any event with at least one code violation within one
second.
Out
where
or more framing bit errors out of 16 or fewer
consecutive framing “F” bits are detected within a
period.
Frame slips where the digital trunk interface looses frame synchronization.
Also where the transmission facility or switch drops or repeats a frame
without loosing frame synchronization.
Alarm indication signals
the transmission facility or switch sends to
indicate that a trunk has been put out-of-service from the network end.
seconds where an
impairment.
second is any second with at least one
Failed second where an impairment lasted for an entire second.
Bit
where the count represents the number of bits incorrectly
interpreted by the
line receiver in the digital trunk interface.
Local alarms is the count of the local alarms that have occurred during the
count period.
Remote alarms is the count of the remote alarms that have received during
the count period.
Configuration
Digital trunk connectivity configuration is done off-line through the Physical
Resource Configuration Manager. After you have planned the system and the
2-12
Dual
Digital Trunk Connectivity
module and physically installed the telephony card, configuration for adding a’ Dual
card and for a digital trunk connection consists of the following:
l
Selecting the physical slot assignment for the card.
l
Setting the number of the module in which the card is installed.
l
l
Configuring the I/O port address of the card
Setting the signaling used by the trunk.
l
Setting the sequence number of the trunk.
l
Configuring the framing format (D4 or ESF).
Configuring the coding format for the
bit stream
ZCS, or BSZS).
l
Note:
with
Its architecture being based on an AT bus, the server does sense in
which slot a card is installed. The
application
therefore must be “told” where the cards are in terms of a (logical)
slot assignment. Their slot assignments can be any unused slot
number (within the range of total possible physical slots). By
convention however, these
assignments map directly to
the
into which the cards reside.
In addition to this configuration, the trunk channels are assigned as ports in line
groups in the
manner as for a server equipped with analog trunks.
Procedure
card.
3150 lists the steps for configuring a Dual
digital trunk interface
Slot Assignment
The Dual
Digital Trunk Interface card(s) are assigned (and factory-installed in)
specific physical slots in the Series 6 server backplane. The system software requires
these slot assignments to identify the hardware resources present in the backplane.
The configuration process for installing the digital trunk interface cards includes the
following:
1.
Configure the cards (refer to TR 1905 in this volume).
In the Physical Configuration Menu, configure the slots assigned to the
cards.
3.
In the Offline Menus, continue the configuration needed by the
applications.
The factory installs the digital trunk interface card in these slots in Model 70, Model
2.
120, and Model 640:
Card
Model 70
Model
Model
Model 640
Number Slot Number Slot Number Slot Number Slot Number
0
3
6
6
9
Dual
Digital Trunk Connectivity
1
8
11
Model 70 and Model
supports only one digital trunk for a maximum system
capacity of 24
voice channels. The Model
and the Model 640 module
each supports up to 60 PCM voice channels between two digital trunk interface
cards.
You assign the slot at the Physical Resource Configuration Menu for the card you are
configuring.
Module Number
The module number is the Series 6 server module in which the digital trunk interface
card is installed. A four-module Series 6 Model 640 server can support a total
capacity of 240 PCM voice channels over 16 trunks. (In such configuration the
line groups would be configured to use only part of the total number of PCM
channels
that is fractional
available in each trunk. Refer to
Connectivity Features” on page 7.) You assign the slot at the Physical Resource
Configuration Menu for the card you are configuring.
Input/Output Address
The digital trunk interface card can occupy one of two possible AT bus addresses:
and
where address
is the default address occupied by card 0
and
is assigned to card 1. These addresses can also be assigned to a
Smartcard in Model 70 and
servers. Before selecting the I/O address, check the
addresses occupied by these cards if they are present in the affected Series 6 server
module. If these cards are and either of their addresses are set to the same to which
the digital trunk interface card, an address conflict exists and bus contention will
occur. Ensure that each card is set to a unique address. The address selected in the
Select IO Address Menu must match the address for which the card is physically
jumpered.
Note:
The digital trunk interface card has jumper positions for setting
interrupt request levels. However, the
application
polls the hardware to detect status and service the cards and does
not use hardware interrupt requests.
You set the card
AT slot x.
address in the Configuration Menu for Board [DUAL
in
Signaling
Each channel in the digital trunk interface can be set for one of these four types of
channel associated signaling according to the requirements of
channel banks,
or other related equipment to which the Series 6 server is connected:
Dual
l
Loop start
l
Ground start
Digital Trunk Connectivity
Direct Inward Dial (DID)
. E & M
You set the trunk signaling in the Select Trunk Type Menu. The menu has options
for both analog and digital trunks. However, when you are configuring a digital
trunk interface card, the configuration manager accepts only the digital trunk
options.
l
Trunk Configuration
Trunk configuration includes the trunk number, framing format, and coding format.
Trunk Sequence Number
The trunk number is the logical number of the trunk,
trunk number
0 on trunk card 1. You set the trunk number at the Configuration menu for
Carrier at trunk x Menu.
Framing Format
The Series server supports D4
frames and extended superframe (ESF)
24 channel frames. You select the framing format the trunk uses at the Configure
Frame Format for Board [DUAL
in AT slot x Trunk y Menu.
Coding Format
The Series 6 server supports
(alternate mark inversion) and
with
ZCS (zero code suppression) coding formats for
trunks. You select coding for
the trunk at the Configure Frame Coding for Board [DUAL
in AT slot x Trunk
y Menu.
Clock Synchronization
The system master clock must be synchronized to the
(that is, a selected
signal). The digital clock reference can be set to one of the following:
Network
l
Default
Internal (reserved for connections to channel banks)
The network clock referenceis the
signal of a selected
trunk. In the case of
Model 70 and Model 1201, the selected trunk is trunk 0. For Model
selected
trunk can be 0 or 1. For Model 640, the selected trunk can be 0, 1, 2, or 3 (only one
trunk can be selected). The default reference is trunk 0.
The Series 6 server features automatic switchover to a backup clock source if the
primary fails. However, this feature functions only when both trunks of a Dual
card are used and the clock is synchronized to the
signal of one of them..
2-15
Dual
Digital Trunk Connectivity
Then, if the trunk to which the clock reference is derived, the Series
automatically switch over to the second trunk on the Dual
card.
Note:
server will
This clock source switchover feature does not work if digital trunk
connectivity is split between two Dual
cards.
When configuring the system, use the network clock as the system clock reference to
prevent frame slips (Figure
However, use the internal clock reference when the
trunks are connected to channel banks.
Digital Trunk
Series 6
Server
Known Clock Source
Switch
Digital Trunk
Digital Trunk
Switch
Digital Trunk
Sync to Trunk
Series 6
Server
Digital Trunk
L
i
n
e
s
Sync internal
Figure 2-6
Digital Trunk Clock Synchronization
Digital Trunk Online Maintenance
The
application has an online maintenance utility for monitoring
digital trunk activity and statistics (either individual trunks or all trunks), changing
the clock reference, removing trunks from service, and looping back trunks toward
the facility. Trunk activity includes the operational state of a trunk,
seconds,
frame slips, and so forth. The display presents trunk status and the configuration of
the trunk-a useful feature for quickly validating trunk setup.
The information displayed is dynamic and changes as trunk status changes. For
example, if a trunk is taken out of service, this utility immediately reports it to the
display. Refer to the
Series Diagnostics Manual for further information.
Configuration Task list
Page 1 of 1
Release
and later
Procedure
E1
Configuration
Change the Digital Trunk Connectivity Clock Reference ...........................
CP 3 152
Dual El Offline Configuration ...................................................................
cl? 3151
Dual T 1 Offline Configuration ..................................................................
3150
Monitor Digital Trunk Statistics ................................................................
3153
Place a Digital Trunk Into Service ..............................................................
3155
Put Digital Trunk Out of Service ...............................................................
3154
3150
Dual
Page
Offline Configuration
Release
of 6
and later
Though typically a factory-installed standard feature, the Dual
digital trunk
connectivity feature can be retrofitted to a Series 6 server in the field. Use this procedure
if you are adding a Dual
Digital Trunk Interface card to a Series 6 server that you
already have. This procedure presumes that you have already set the card jumpers and
switches and installed it in the Series 6 server.
This procedure gives you the instructions for configuring the feature software to support
a
digital trunk.
trunk configuration is done offline using the Resource Manager.
In this procedure you will set:
l
Module number in which the Dual
l
port address of the card
Signaling used on the trunk channels
l
l
Trunk number (0 through
with ZCS)
card resides
framing format
or ESF), and coding (AM1 or AM1
A
cl? 3150
Page 2 of 6
Release
and later
Step
Reference
1.
Reach the offline Resource Configuration Menu.
2.
Add a resource card number.
Select:
Menu Map 13
(A) Add resource card
Available slots are: x x x 9 x 11 x x x
Input your choice:
Response: The card number according to the Model of the Series 6 server (refer to
the following Series 6 server matrix for Model 640 and Model
For Model 1201, type 6. For Model 70, type 3.
Model 640 (60 ports/module maximum)
No. 1
Slot No.
No. 2
No. 3
No. 4
8
9
Dual Tl-0
Dual Tl-0
Dual Tl-1
1
Dual Tl-0
Dual Tl-0
10
11
12
Dual Tl-1
13
14
15
Model
Slot No.
No. 1
(60 port maximum)
No. 2
No. 3
No. 4
4
5
6
Dual Tl-0
Dual Tl-0
Model
Dual
Dual Tl-0
(60 port maximum)
7
8
Dual
9
10
11
Dual Tl
1
Release
3150
Page 3 of 6
and later
Step
modules installed only if
not present. Cards can e a mix of
and
so long as total ports per module does not exceed G O . Only count number of
channels
enabled (Fractional
Fax ports are not included n the total port count. The confirmation
message B o a r d [ D U A L
is added to slot
istheslot
number you added in Step 1 above.
3.
At the Add Board to Database Menu, add the digital trunk interface card. Exit back
to the Resource Configuration Menu when done.
Select:
(A) DUAL
Input your choice,
(A/B/C/D/E/F/X/?):
?
for
help
Response: The card number according to the Model of the Series 6 server (refer to
the matrix above for Series 6 for Model 640 and Model
For
Model 1201, type 6. For Model 70, type 3.
4.
At the Resource Configuration Menu, identify the logical number of the module.
For Model 640, this number can be either
3, or 4. For Model 120 and Model
70, this number is 1.
Select:
(M) set Module number
Prompt: I n p u t M o d u l e
Response:
3, or 4.
5. At the Resource Configuration Menu, configure the Dual
Interface card.
Select:
Digital Trunk
(C) Configure resource card
Occupied slots are:
Slot
Card
-- -- -- -xx
DUAL
Input your choice:
Response: The card number according to the Model of the Series 6 server (refer to
the Series 6 server matrix that follows Step 2 for Model 640 and Model
For Model 1201, type 6. For Model 70, type 3.
6.
From the Configuration Menu for Board [DUAL
in AT slot x (where x is the
slot number entered in Step
reach Change IO Port Address Menu to configure
the IO port address for the card.
7.
At the Select IO Port Address Menu, select the input/output address for which the
c a r d is physically configured. The addresses are
(the default address for card
0) and
for card 1. Exit back to the Configuration Menu for Board [DUAL
in AT slot x Menu when you are done.
8.
From the Configuration Menu for Board [DUAL
in AT slot x (where x is the
number entered in Step
reach the Configuration Menu for
Carrier at
trunk 0 to configure the digital trunk.
Menu Map 13
2005
Menu Map 13
A
3150
Page 4 of 6
Release
and
Reference
Step
9. At the Configuration Menu for
/El Carrier at trunk 0, set the logical number of
the trunk. Trunk configuration consists of setting the trunk number, framing, and
coding.
Select:
(T) set Trunk number
Input your choice,
(T/F/C/D/?):
?
for
help
Response: 0 or 1
10. From the Configuration Menu for
Frame Format for Board [DUAL
Carrier at trunk 0, reach the Configure
in AT slot x Trunk 0 Menu.
11. At the Configure Frame Format for [DUAL
in AT slot x Trunk y (where “y” is
the trunk number you entered in Step
select the framing format you want for the
trunk. You can frame the trunk as either a
trunk (with
or as an ESF trunk (24 PCM channels). The CEPT and CRC framing options are
not available for
trunks.
Because you have not yet set the trunk coding format, the default AM1 (alternate
mark inversion) coding appears in the confirmation. Also, because CAS is the only
signaling type available for Series 6
trunk connectivity, CAS appears in the
confirmation message as the selected signaling type.
12. Exit to the Configuration Menu for
Carrier at trunk 0 when you are done.
13. From the Configure Menu for
Carrier at trunk 0, reach the Configure Frame
Coding for Board [DUAL
in AT slot x Trunk y Menu.
14. At the Configure Frame Coding for Board [DUAL
in AT slot x Trunk y Menu,
select the trunk coding format you want. The coding type can be either AM1 or
AM1 with ZCS (zero code suppression).
From the Configuration Menu for Board [DUAL
in AT slot x (where x is the
slot
entered in Step
select the PCM channels you want to configure for a
type of signaling.
Select
channels as a range (for example, O-4) or as a series (for example,
C h annel numbers begin at 00 and end at 47 where
channels 00 through 23 are carried by trunk 0 and PCM channels 24 through 47 are
carried by trunk 1 .
Select:
(T) set Trunk signaling type
Input a
forth):
range
channels
(O-4
or
and
Response: The numbers of the PCM channels whose signaling you want to
configure.
Pressing Enter takes you to the Select Trunk Type Menu.
A
so
Map 13
cl? 3150
Release
Page 5 of 6
and later
Reference
Step
16. At the Select Trunk Type Menu, select the signaling associated with the PCM
channels you selected in Step 15. You can select only the options for digital trunks.
If you select signaling for analog signaling, you get the error message “Can not set
Analog trunk
to Digital Trunk.”
Select:
Map 13
(4) Digital-E&M, (5) Digital-Loopstart, (6) Digital-DID, or (7)
Digital-Groundstart
Input
your
choice,
?
for
help
Response: 4, 5, 6, or 7, as appropriate.
After you select the signaling type, you get this confirmation message: The following
confirmation message:
The following
Trunk: y
Channels:
channels
are
set
to:
where
is the signaling type you selected in Step 8 above,
is the number of
the trunk (0 or I), and
are the numbers of the
channels you selected
in Step 15 above. LS = loop start, GS = ground start, DID = direct inward dial, and
E&M = E&M.
17. Repeat Steps 15 and 16 until you have selected the trunk signaling the for each of
the available PCM channels associated with the Dual
that you are configuring.
18. Exit back to the Configuration Menu for Board [DUAL
are done.
digital trunk interface card
in AT slot x when you
19. At the Configuration Menu for Board [DUAL
in AT slot x, display the current
trunk configuration to review the signaling that you have configured for each PCM
channel. Figure 1 shows a typical trunk configuration list.
To correct any signaling configuration errors, repeat Steps 15 and 16 as required.
20 Exit back to the Resource Configuration Menu when you are satisfied with your
trunk signaling configuration.
A
3150
Page 6 of 6
Release
and later
Reference
Card: DUAL
IO Port Address: OX300
Resources: (48) Net-Dat;
(48)
Net-Sig;
configuration:
Configuration
Configuration
---------Trunk Type for each channel:
Chnl: 00
01
02
03
04 05 06
07
Type:E&M E&M E&M E&M
E&M LS LS LS
Trunk:
Trunk:
Carrier
0
1
:
:
CAS
ZCS, CAS
08
LS
09
LS
10
LS
11
LS
12
LS
13
14
15
16
17
18
19
20
21
22
23
Chnl: 24
Type: LS
25
26
27
28
29
30
31
32
33
34
35
Chnl:
Type:
37
38
39
40
41
42
43
44
45
46
47
Chnl:
Type:
36
Figure 1
Typical Trunk Configuration List
2 1. From the Resource Configuration Menu, reach the Digital Clock Reference
Configuration Menu.
22. From the Digital Clock Reference Configuration Menu, select the clock reference
for the digital trunks. Your options include a reference derived from the network
signal, and the default clock reference (trunk 0).
Note:
the internal clock reference is provided for those applications where the
server is connected to channel banks and no network clock reference is
available.
23. Exit back to the
Configuration
Main Menu when you are done.
24. If you have completed your digital trunk connectivity feature configuration, activate
the configuration. If you have not completed configuring digital trunk connectivity,
go to the appropriate procedure.
A
Map 13
Page 1 of 4
Dual El Offline Configuration
Release
and later
Though typically a factory-installed standard feature, the El digital trunk connectivity
feature may be retrofitted to a system in the field. Use this procedure if you are adding a
Dual El Digital Trunk Interface card to a Series 6 server that you already have.
This procedure gives you the instructions for configuring the feature software to support
a El digital trunk. El trunk configuration is done offline using the Resource Manager.
In this procedure you set the:
l
Module number in which the El card resides.
port address of the card.
l
Trunk number (0 and
l
Note:
framing format (CEPT4 or CRC), and coding (HDB3 or
Though you find digital signaling options for E
M, loop starts DID, and ground
start trunks, the
application allows only CCS (that is, SS7) for El
trunk connectivity. Please refer to the
Integration Manual for more
information.
Reference
Step
1.
Menu Map 13
Reach the offline Resource Configuration Menu
2. Add a resource card.
Select:
(A) Add resource card
Available slots are: x x x 9 x 11 x x x
Input your choice:
Response: The card number according to the Model of the Series 6 server. Model
640 server cards occupy slots 9 and 11. Model
server cards occupy
slots 6 and 8. Model 1201 server cards occupy slot 6. Model 70 server
cards occupy slot type 3.
3.
At the Add Board to Database Menu, add the digital trunk interface card.
Select:
(B) DUAL El
Prompt:
Input your choice,
(A/B/C/D/E/F/X/?):
?
for
help
Response: The card number according to the Model of the Series 6 server. Model
640 server cards occupy slots 9 and 11. Model
server cards occupy
slots 6 and 8. Model 1201 server cards occupy slot 6. Model 70 server
cards occupy slot type 3.
The confirmation
[DUAL El] is
where
is the slot number you added in step above.
added
to
slot
x,
3151
Page 2 of 4
Release
and later
Reference
Step
4.
Exit back to the Resource Configuration Menu when done.
5 . At the Resource Configuration Menu, identify the logical number of the module.
This number is either 2, 3 or 4.
Select:
(M) set Module number
Input Module #:
Response: 1, 2, 3, or 4.
6 . At the Resource Configuration Menu, configure the Dual El Digital Trunk
Interface card.
Select:
(C) Card Configuration
Occupied slots are:
Slot
Card
---- ---xx
DUAL El
Input your choice:
..
Response: The card number according to the Model of the Series 6 server. Model
640 server cards occupy slots 9 and 11. Model
server cards occupy
slots 6 and 8. Model 1201 server cards occupy slot 6. Model 70 server
cards occupy slot type 3.
7. From the Configuration Menu for Board [DUAL El] in AT slot x (where x is the
slot number entered in step
reach Change IO Port Address Menu to configure
the IO port address for the card.
Menu Map 1
8 . At the Change IO Port Address Menu, select the input/output address for which the
card is configured. The possible allowable addresses are
(the default address
for card 0) and
for card
TR 2005
9 . Exit to the Configuration Menu for Board [DUAL El] in AT slot x Menu when you
are done.
Menu Map 1
10. From the Configuration Menu for Board [DUAL El] in AT slot x (where x is the
slot number entered in step
reach the Configuration Menu for El/El Carrier at
trunk 0 to configure the digital trunk.
11. At the Configuration Menu for El/El Carrier at trunk 0, set the logical number of
the trunk. Trunk configuration consists of setting the trunk number, framing, and
coding.
Select:
Menu Map 13
(T) set Trunk number
Input your choice, ? for help
(T/F/C/D/?):
Response: 0 or 1
12. From the Configuration Menu for
Carrier at trunk 0, reach the Configure
Frame Format for Board [DUAL El] in AT slot x Trunk 0 Menu.
A
Menu Map
Release
Step
cl? 3151
Page 3 of 4
and later
Reference
13. At the Configure Frame Format for [DUAL El] in AT slot x Trunk y (where “y” is
the trunk number you entered in step 1 I), select the framing format you want for
the trunk. You can set the trunk for CEPT framing or for CRC framing.
Map 1 3
Because you have not yet set the trunk coding format, the default HDB3 coding
appears in the confirmation. Also, because CCS is the only signaling
available
for El trunk connectivity, CCS appears in the confirmation as the selected signaling
Exit back to the Configuration Menu for El /El Carrier at trunk 0 when you are
done.
Map 13
15. From the Configuration Menu for El/El Carrier at trunk 0, reach the Configure
Frame Coding for Board [DUAL El] in AT slot x Trunk y Menu.
At the Configure Frame Coding for Board [DUAL El] in AT slot x Trunk y Menu,
select the trunk coding format you want. The coding
can be either HDB3
(recommended) or
vlenu Map 13
17. From the Configuration Menu for Board [DUAL El] in AT slot x (where x is the
slot number entered in step
reach the Select Trunk Type Menu.
vlenu Map 13
18. At the Select Trunk Type Menu, set the type of signaling for ‘Common Channel
Signaling.”
vlenu Map 13
19. When you are done, exit to the Configuration Menu for Board [DUAL El] in AT
slot x.
vlenu Map 13
Note:
To be operational, the El Digital Trunk Connectivity feature requires
the installation of the SS7 Integration.
You can only select the CCS option for digital trunks. If you select any other
option, you see the error message “Can not set xxxx trunk type to Digital Trunk.”
Select:
(4) Common Channel Signaling
Input your choice, ? for
(0/1/2/3/4/5/6/7/8/X/?):
help
Response: 4
After you select the signaling type, the configuration display shown in Figure 1.
20. At the Configuration Menu for Board [DUAL El] in AT slot x, display the current
trunk configuration to review the signaling that you have configured for each
channel. Figure 1 shows a typical trunk configuration list.
Map 13
2 I. Exit back to the Resource Configuration Menu when you are satisfied with your
trunk signaling
A
cl? 3151
Page 4 of 4
Release
and later
Step
Reference
Carrier configuration:
Trunk: 0
Configuration: CEPT CRC, HDB3, CCS
Trunk: 1
Configuration: CEPT CRC, HDB3, CCS
---------Trunk Type for each channel:
Chnl: 00
01
02
03
04
05 06 07
08
09
10
11
12
13
14
Type: CCS CCS CCS CCS CCS CCS CCS CCS CCS CCS CCS CCS CCS CCS CCS
Chnl: 15
16
17
18
19
20 21 22
23
24
25
26
27
28
29
Type: CCS CCS CCS CCS CCS CCS CCS CCS CCS CCS CCS CCS CCS CCS CCS
Chnl: 30
31
32
33
34
35 36 37
38
39
40
41
42
43
44
Type: CCS CCS CCS CCS CCS CCS CCS CCS CCS CCS CCS CCS CCS CCS CCS
Chnl: 45
46
47
48
49
50 51 52
53
54
55
56
57
58
59
Type: CCS CCS CCS CCS CCS CCS CCS CCS CCS CCS CCS CCS CCS CCS CCS
Figure 1
Typical Trunk Configuration list
22. From the Resource Configuration Menu, reach the Digital Clock Reference
Configuration Menu.
Menu Map 13
23. From the Digital Clock Reference Configuration Menu, select the clock reference
for the digital trunks. Your options include a reference derived from the network
signal, and the default clock reference (trunk 0).
Menu Map 13
24. Exit when you are done.
If you have completed your digital trunk connectivity feature configuration, activate
the configuration. If you have not completed configuring digital trunk connectivity,
go to the appropriate procedure.
3152
Change the Digital Trunk Connectivity Clock
Reference
Page 1 of 1
Release
and later
In addition to the clock reference selection in the offline digital trunk configuration, the
clock reference can be changed through the Digital Connectivity Maintenance Menu.
Step
Reference
1.
Reach the Digital Connectivity Status/Maintenance Menu.
2.
Change the module clock reference.
Select:
Menu Map 13
(C) Change module clock reference
Module Holding digital board(s):
Response: The number of the module in which the affected digital trunk interface
card is installed.
Module clock reference: (I,O-3)
Response: I for internal or the number 0 ,
or 3 which corresponds to the trunk
..
to which you want the clock reference derived.
3.
Monitor all trunks to verify that the clock reference has changed to the reference
you selected in step 2.
Select:
(A) Monitor all trunks
Module holding digital board(s):
Response: The number of the module.
The system presents the following statistics display:
DIGITAL
CARRIER
CUR
TRUNK
Error
Counters
STATUS
DISPLAY:
STATE:IN-SYNC
Error
Fail
Sec.:
Sec.:
Tue
Aug
1
CONFIG:CEPT,
0000
0000
1995
HDB3,
CCS
CLK
0004 Slip:
OOF:
Bit Err:0000 Lcl.
REF:
TRUNK0
0000
0000
Rem
4.
Check the CLK REF to ensure that it is the clock reference you chose. If it is not,
repeat Step 2 to reselect the clock reference. If the trunk reference does not change,
Manual for troubleshooting information.
refer to the Centigram Series
5.
After you have selected the system clock reference you want, exit to the Main Menu.
Page 1 of 2
Monitor Digital Trunk Statistics
Release
and later
The ability to monitor digital trunks gives statistical data on trunk operation as it affects
voice messaging. This data is valuable for network management and for Series 6 server
maintenance.
The trunk monitor display gives performance statistics totals for the period current the
most recent second as indicated by the time and date stamp on the display. The display
is dynamic, updated every second by the server. As required for your data collection
task, you can reset the counters before you begin monitoring trunk statistics. This
feature can be useful for verifying trunk operation after reconfiguring a trunk or
replacing a digital trunk interface card.
The trunk information presented and the statistics collected include:
l
Current state of the trunk (in-sync, out-of-sync, and so forth)
l
Trunk configuration (framing, line code, and signaling)
l
S o u r c e of the system clock reference
seconds (ES)
l
l
l
Out-of-frame conditions (OOF)
Frame slips
l
l
Failed seconds (FS)
l
l
Bit errors
Local alarm totals
l
Remote alarm totals
Reference
Step
1.
Reach the Digital Connectivity Status/Maintenance Menu.
2.
Monitor a selected digital trunk.
Select:
Menu Map 13
(B) Monitor a single trunk
Host holding digital board(s) :
Response: The number of the module.
Reset counters (Y/N):
Response: As required, Y
Trunk number:
Response: The number of the trunk of interest.
The system presents the following statistics display:
DIGITAL
CARRIER
TRUNK
Error
CUR
Counters
STATUS
DISPLAY:
Tue
1995
STATE:IN-SYNC
Error
Fail
Sec.:
Sec.:
HDB3,
0000
0000
:
Bit
0004
Err:0000
CCS
CLK
Slip:
Lcl.
TRUNK0
0000
0000
Rem
A
3153
Page 2 of 2
Release
and later
Step
3.
Reference
Press Q to return to the Digital Connectivity Status/ Maintenance Menu.
4. Monitor all digital trunks.
Select:
(A) Monitor all trunks.
Host
Response:
holding
digital
board(s):
The number of the module.
Reset
counters
(Y/N):
Response: As required, Y
The system presents the information shown in Step 2.
5. When done monitoring the trunks, exit to the Main Menu.
3154
Put Digital Trunk Out of Service
Release
Page 1 of 1
and later
for maintenance purposes.
Digital trunks can be placed into and out-of-service
When a trunk is placed OOS, the digital trunk interface card automatically sends an
to the far end to indicate the
state of the trunk.
Reference
1.
Reach the Digital Connectivity Status/Maintenance Menu.
2.
Place a trunk out-of-service.
Select:
Map 13
(D) Place trunk out-of-service
Module
Response:
holding
digital
board(s)
:
The number of the module.
Trunk
number:
.
Response: The number of the trunk of interest.
3.
Monitor a selected digital trunk to verify that the trunk is
(B) Monitor a single trunk
Module
holding
digital
:
Response: The number of the module.
Reset
counters
(Y/N):
Response: type N
Trunk
number:
Response: The number of the trunk selected in step 2.
The system presents the following statistics display:
DIGITAL
CARRIER
TRUNK
Error
4.
CUR
Counters
STATUS
DISPLAY:
Tue
STATE:OOS
Error
Fail
Sec.:
Sec.:
Aug
1
1995
HDB3,
0000
0000
:
Bit
CCS
0004
Err:0000
CLK
Slip:
REP:
0000
0000
Rem
Check the CUR STATE of the trunk to ensure that it is out-of-service. If it is not,
repeat Step 2 to set it out-of-service. If the trunk status does not change, refer to the
Centigram Series Server Diagnostics Manual for troubleshooting information.
After you have changed the status of the selected trunk to out-of-service, exit to the
Main Menu.
A
Page 1 of 1
Place a Digital Trunk Into Service
Release
and later
for maintenance purposes.
Digital trunks can be placed into and out-of-service
When a trunk is placed OOS, the
trunk interface card automatically turns off the
to the far end to indicate the
state of the trunk and restores traffic.
Reference
Step
1.
Reach the Digital Connectivity Status/Maintenance Menu.
2.
Place a trunk into service.
Select:
Map 13
(E) Place trunk out-of-service
Host
holding
digital
board(s):
Response: The number of the module.
Trunk number:
Prompt:
Response: The number of the trunk of interest.
3.
Monitor a selected digital trunk to verify that the trunk is in service.
Select:
.
(B) Monitor a single trunk
Host
holding
digital
board(s):
Response: The number of the module.
Reset
counters
(Y/N)
:
Response: type
Trunk
number:
Response: The number of the trunk selected in step 2.
The system presents the following statistics display:
DIGITAL
CARRIER
TRUNK
Error
CUR
Counters
STATUS
DISPLAY:
Tue
Aug
1
STATE:IN-SYNC
Error
Fail
Sec.:
Sec.:
1995
HDB3,
0000
0000
OOF:
Bit
0004
CCS
Slip:
Err:0000 Lcl.
TRUNK0
0000
0000
Rem
4.
Check the CUR STATE of the trunk to ensure that it is in service. If it is not, repeat
Step 2 to set it in service. If the trunk status does not change, refer to the Centigram
Series
Communications Server Diagnostics Manual for troubleshooting information.
5.
After you have changed the status of the selected trunk to out-of-service, exit to the
Main Menu.
A
13
Physical Resource Configuration Menu
(A)
Add resource card
Add Board to Database Menu
(A) Dual
AG
AG 8
CGRM 2
DUAL El
(G) MTP Processing
Analog FAX
(I) M-VIP FAX
Card configuration
Configuration Menu for Board [
in AT slot xx
(A) IO Port Address change
Select IO Port Address Menu
(A) 0x300
0x2300
set Trunk signalling type
Select Trunk Type Menu
(0)
(1)
(2)
(3)
(4)
(5)
(6)
(7)
(8)
(9)
Configure
Type
Analog-DID
Digital-E&M
Digital-Loopstart
Digital-DID
Digital-Groundstart
Digital-CommonChannel
None (digital support)
carrier
Configuration menu for
Carrier at trunk x
set Trunk number
configure Framing format
Configure Frame Format for Board [ in AT
slot xx Trunk x Menu
(A)
framing
(B) ESF framing
CEPT framing
CRC framing
Configure Coding format
Configure Frame Coding for Board [ in AT
slot xx Trunk x
(A) AM1 coding
with ZCS coding
coding
coding
Display current configuration
reset to
Show board configuration
default configuration
digital card
reference
Digital Clock Reference Configuration Menu
set to Internal clock reference
set to Network clock reference
set to Default clock reference
Show current clock reference
show
clock reference
Index
CEPT framing, l-9
CGA, 2-12
A
CGA alarm, yellow alarm, 2-11
channel 16, El, l-4
El, 1-6
2-10
channel banks, network clock, 2-9
clock
alarm
failure timing,
El network, l-5
11
network, 2-9
clock reference, CP 3 152
reporting, 2-10
alarms, carrier group alarm,
1
configuration, offline
El, CP 3151
alternate mark inversion, 2-5
2-16. CP 3151
AM1 with ZCS, 2-16
connections, different
console, tips, xi
analog applications, mixing digital and analog, 2-6
analog trunks
mixed with digital, 1-2
or a mix, 2-7
CRC error checking, l-3
CRC framing, l-9
with El digital trunks, l-5
automatic exit, avoiding, xii
D
B
D4
framing format,
2-l 6
backup clock source, automatic switchover, 1
bearer channels, l-4
bipolar violations, 2-6
bit errors
El, 1-6
2-10
bus clock, MVIP bus, l-5, 2-9
bus master, MVIP bus,
16
superframe,
15
2-2
defaults, accepting, xi
DID, 2-15
digital multiplexing, PCM, 1digital trunk
putting into service, CP 3 155
putting out of service, CP 3 154
digital trunk activity, monitoring utility, l-10,2-17
digital trunk support
El, l-l
2-l
C
c7, l-2
capacity
El digital trunks, l-3
digital trunks, 2-7
CAS, 2-4
Recommendation
l-4
1.431, l-4
ccs, 1-2, 1-9
Direct Inward Dial, 2-15
DSP 30, l-4
E
E
2-15
seconds
El, 1-6
2-10
ESF
Index
extended superframe, 2-2
framing format,
15
viewing complete, xi
monitoring, trunk conditions and events
El, l-6
F
2-10
MVIP bus master,
failed seconds
El, 1-6
2-9
N
2-10
frame slips, 1-6
El, l-6
network clock
backup,
changing, CP 3 152
2-10
framing format
channel banks, 2-9
CP 3151
El, 1-5
extraction, l-3
reference, 1
CRC, CP 3151
G
16
system reference,
Ground start,
16
2-9
15
NRZ, 2-4
0
HDB3, 1-3, l-9. CP 3151
I
out-of-frame, 2-l 2
P
addresses,
15
port address, CP 3151. CP 3150
line cards
DSP 24 and DSP
line coding, HDB3, 1-3
line supervision and signaling, l-2
local alarms, 2-13
extended superframe, 2-2
frames, l-l, 2-2
superframe, 2-2
performance statistics, CP 3 153
port capacity,
14
ports, maximum El channels, l-3
procedures, documentation conventions for, ix
R
local carrier
El, 1-6
.
remote alarms
2-10
Loop start, 2-l 5
El, l-6
loss of frame, l-6, 2-10
loss of frame synchronization
11
out-of-frame alarm,
yellow alarm,
PCM
2-10
remote carrier alarm
El, 1-6
2-10
11
S
master clock, l-9,
16
menus
returning to main, xi
Index-2
shortcut commands, xii
signaling
CAS, 2-4
Index
El and SS7, 1-9
T
on trunk channels, CP 3 150
robbed-bit, 2-4
slot assignments
timeouts, avoiding, xii
trunk configuration
El, l-7
Model 120,
Model 640, 1-8, 2-14
2-13
trunk
failures, alarms, l-6,
10
trunk monitor display, CP 3 153
trunk number, CP 3 150
Model 70,
ss7
connection, l-3
l-4
statistics, digital trunk statistics, CP 3 153
system clock
W
warnings, documentation conventions for, x
El, 1-3
network clock reference,
reference,
16
10,
16
Z
ZCS, 2-6
zero code suppression, 2-6
Index-3
Issue 1 Release 2.0 January 1996
Voice
Processing
Solutions
PMS Integration
Manual
TM,
Trademark of
Copyright 1996,
All rights reserved.
Printed in Canada.
Corporation
Corporation
Table of Contents
Subject
Page
Overview . . . . . . . . . . . .
1
Installation, All Integrations
2
Configuration of EECO and HIS Integrations . . . . . . . . . . . . . . . . . . . . . . . . . . .
5
EECO Trouble Shooting Guide . . . . . . . . . . . . . . . . . . . . . . . . . . . . . . . . . . . . .
1.0
Implementation . . . . . . . . . . . . . . . . . . . . . . . . . . . . . . . . . . . . . .
2.0
Protocol . . . . . . . . . . . . . . . . . . . . . . . . . . . . . . . . . . . . . . . . . . .
3.0
Physical Characteristics . . . . . . . . . . . . . . . . . . . . . . . . . . . . . . . .
4.0
Diagnostic Information . . . . . . . . . . . . . . . . . . . . . . . . . . . . . . . . .
9
9
9
10
10
HIS Trouble
1.0
2.0
3.0
4.0
5.0
6.0
7.0
Shooting Guide . . . . . . . . . . . . . . . . . . . . . . . . . . . . . . . . . . . . . . .
Introduction . . . . . . . . . . . . . . . . . . . . . . . . . . . . . . . . . . . . . . . . .
Physical Layer . . . . . . . . . . . . . . . . . . . . . . . . . . . . . . . . . . . . . . .
Link Layer . . . . . . . . . . . . . . . . . . . . . . . . . . . . . . . . . . . . . . . . . .
Message Layer . . . . . . . . . . . . . . . . . . . . . . . . . . . . . . . . . . . . . .
Mailbox Re-synchronization . . . . . . . . . . . . . . . . . . . . . . . . . . . . . .
Message Waiting . . . . . . . . . . . . . . . . . . . . . . . . . . . . . . . . . . . . .
Diagnostic Information . . . . . . . . . . . . . . . . . . . . . . . . . . . . . . . . .
11
11
11
11
11
12
12
12
Hyatt Encore Configuration and Trouble Shooting . . . . . . . . . . . . . . . . . . . . . . .
1.0
Introduction . . . . . . . . . . . . . . . .
.......................
2.0
Configuration . . . . . . . . . . . . . . . . . . . . . . . . . . . . . . . . . . . . . . . .
3.0
Mailbox Setup . . . . . . . . . . . . . . . . . . . . . . . . . . . . . . . . . . . . . . .
4.0
Text MWI . . . . . . . . . . . . . . . . . . . . . . . . . . . . . . . . . . . . . . . . . .
5.0
Installation . . . . . . . . . . . . . . . . . . . . . . . . . . . . . . . . . . . . . . . . . . .
6.0
Console Administration . . . . . . . . . . . . . . . . . . . . . . . . . . . . . . . . .
7.0
Batch Mode. . . . . . . . . . . . . . . . . . .
....................
8.0
Communication Description . . . . . . . . . . . . . . . . . . . . . . . . . . . . .
9.0
Message Formats . . . . . . . . . . . . . . . . . . . . . . . . . . . . . . . . . . . .
10.0 Diagnostic Information . . . . . . . . . . . . . . . . . . . . . . . . . . . . . . . . .
13
13
14
15
16
16
17
18
19
19
VoiceMemo/Encore PMS Message Format . . . . . . . . . . . . . . . . . . . . . . . . . . . .
21
HIS and Encore Diagnostic Specification . . . . . . . . . . . . . . . . . . . . . . . . Appendix A
(Page 22 through 36)
Overview
Chapter 1
Overview of PMS lntearations
This document describes how to install, configure and trouble shoot three of Centigram’s
PMS integrations. This information is an expanded version of the Appendix G of the
Installation and Maintenance manual.
There are three PMS Integrations discussed in this document:
1.
2.
3.
The EECO PMS Integration
The HIS PMS Integration
The Encore PMS Integration
All the integrations provide the same basic features on room check-in and check-out.
The EECO and HIS integrations use the same configuration menus to set up these
options, the Encore Integration uses additional menus.
All the integrations communicate with the PMS over an RS232 link to determine which
rooms have been checked-in or checked-out. The integrations then change the
mailboxes of these rooms according to a user defined configuration.
There are three basic steps to the installation.
1.
Install the PMS Integration extra cost feature on the
This is discussed in the next chapter. Note that the
have to be rebooted.
2.
Hook up an RS232 link between the
and the PMS. The RS232
connection should be a 9 pin to 25 pin cable with the following straight thru
pin outs: 2 to 2; 3 to 3; and 7 to 7. If the distance from the
to
the PMS is over 50 feet and the data packets discussed in the following
chapters have parity or bit errors, install limited distance line drivers. If a
modem is needed to reach a PMS system at another location, a pair of 202
Modems may be appropriate. Contact Centigram’s Technical Assistance
for further guidance.
Center at
3.
Configure the integration to meet the needs of the specific site. The
configuration changes are done on-line and the changes take effect within
one minute. This makes the integrations very flexible. See the appropriate
following chapters for the type of integration to be used.
Page 1
system.
will then
Installation, All Integrations
Chapter 2
The PMS lntearation installation
INSTRUCTIONS: (For all three Integrations (EECO, HIS, Encore)
1.
Insert the
serialized PMS Integration diskette in the floppy drive.
2.
Shutdown under the System Maintenance console program,
Execute a
to insure no calls in progress are cut-off. Push the reset button located on the
unit.
back of the
3.
After console has displayed “BOOT FROM FLOPPY?” DO NOT INPUT ANY
RESPONSE! The next command will read, “Run commands from floppy disk? Y/N
Input
followed by a carriage return to proceed with the installation.
Please note if users do not input
within 6 seconds, the system will proceed with
its normal operation.
4.
The floppy drive light and hard drive light will go on and off for a few minutes.
Users will see a list of
Revision files. Then the message “Enabling
extra cost feature. . .
system if needed.”
5.
The reconfiguration program is automatically invoked. The user will read:
VOICEMEMO CONFIGURATION
MAIN MENU
(N) Online Menu
Offline Menu
Exit
If you need help later, type
COMMAND (N/F/X).
Input an
to enter the Offline Menu. Users will view the following:
Page 2
VOICEMEMO CONFIGURATION Offline Menu
- - w - e Linegroup Only Applications
(A)
Linegroup and RS232 Only Applications
RS232 Only Applications
DTMF to PBX Message tights
Pre-Extension Dial String
Define tine Groups
Network Menu
Auto-Gather System Billing
System 75 Menu
System 85 Menu
SL-1 /MERIDIAN Menu
Report Current Configuration
Quit -- Forget Changes
Exit Save Changes
Input an
for RS232 Only Applications Menu. The next menu will be as follows:
RS232 Only Application
--m-----------I--Serial Port selected =
[serial port
or
AC Message Waiting Lights (BSR)
BBL Pager
Centigram standard interface
Encore PMS integration
PMS integration [EECO PMS INTEGRATION]
HIS PMS Integration
Hitachi DX
Programmable
SL-1 background terminal facility
SL-1 multiple message waiting set ports
Tip-Ring Message Waiting Lamps
Video dispatch
Citywide
No serial port
Exit
Input
for the serial port number, choose a serial port and input
integration,
for HIS PMS Integration, or
for Encore
Page 3
for EECO PMS
User will then read the following (for example):
PMS integration selected on serial port
(Connect cable to
“Serial Port 1” connector). Exit completely out of the Offline Menu.
WARNING: REBOOT to enable reconfiguration changes!
Exit completely out of the
Menu. Please exit out of the Main Menu as follows:
MAIN MENU
(M) Mailbox maintenance
(R) Report generation
(S) System maintenance
Exit
COMMAND (M/R/S/X): X
Users will view the following:
Z to reactivate. Extra cost feature is now
Console shutdown. Hit
installed. . . REBOOT TO START OPERATION....
system will automatically REBOOT. The PMS Integration is
At this point the
now installed and must be and configured completely (see appropriate following chapter).
Page 4
Configuration of EECO and HIS Integrations
Chapter 3
The EECO and HIS PMS lntearation Set-Up
ACCESS:
The PMS menu is accessed off of the
System Maintenance Menu. The menus are
menu that is accesses from the
MAIN MENU
(M) Mailbox maintenance
Report generation
(S) System maintenance
Enter letter in ( ) to execute command.
When you need help later type
COMMAND (M/R/S/X) : S
SYSTEM MAINTENANCE
(B)
(D)
(E)
(G)
(H)
(M)
(N)
Automatic Wakeup
Automated Receptionist Extensions
Display modem
Enable modem/serial port
Floppy backup
Re-synchronize HIS PMS room status
Hard Disk Utilities
tights test
Manual message purge
System name
(S) System shutdown
and date
(U) Utility menu
Call Detail Recorder
Network menu
Exit
Page 5
Enter letter in ( to execute command.
When you need help later type ?.
COMMAND
(A/B/D/E/F/G/H/L/M/N/P/R/S/T/U/V/W/X):
R
SYSTEM CONFIGURATION
Configure PMS integration
Feature COS
(G) Group COS
Limits COS
(N) Network COS
Phoneline exceptions
Reconfigure system
Configure Video Dispatch
Configure Citywide
Configure Smartcard Table
Enter letter in ( to execute command.
When you need help later type ?.
COMMAND (E/F/G/L/N/P/R/V/W/X): E
Users will then view the following:
Answer the following questions to configure the PMS
on Check-out =
Clear
Clear messages on Check-out =
Clear name on Check-out =
Clear greeting on Check-out =
On Check-in set the mailbox FCOS = [0]
On Check-out set the mailbox FCOS =
COMMAND (E/F/G/L/P/R/V/W/X): E
Here is a list of the PMS configuration questions and some help text on them:
on Check-out =
Clear
To have the mailbox
cleared on Check-out
enter
otherwise, enter
Page 6
Clear messages on Check-out =
To have the mailbox messages cleared on Check-out
enter
otherwise, enter
Clear name on Check-out =
To have the name messages cleared on Check-out
enter
otherwise, enter
Clear greeting on Check-out =
To have the mailbox greeting cleared on Check-out
enter
otherwise, enter
On Check-in set the mailbox FCOS = [0]
Enter the Feature Class of Service number between 1
or enter 0 to prevent the number from being changed.
64
On Check-out set the mailbox FCOS =
Enter the feature Class of Service number between 1 and 64
or enter 0 to prevent the number from being changed
Mailbox Set Up EECO Only:
Once the application has been set up, the user must create guest mailboxes with either
the Check-out or the Check-in FCOS (it is important to match the existing room status
since the integration does not handle a re-synchronization of the databases in
and the Property Management System when it first starts up).
Mailbox Set Up HIS Only:
Once the application has been set up, the user must create guest mailboxes with either
the Check-out or the Check-in FCOS. (It is not critical to match the existing room status
since the integration offers a System Maintenance menu choice to provide a
synchronization of the databases when PMS first starts up). It is important to set the MWI
type for the guest mailboxes to be type 16:
Message Waiting Type
0:
1:
2:
3:
?
None
Not Available
AC msg lamp
DTMF to PBX
Page 7
4:
5:
6:
7:
8:
9:
10:
11:
12:
13:
14:
15:
16:
17:
Fixed RS232
Pager
SL-1
Program RS232
T/R RS232
RS232
lntecom RS232
NEC RS232
Video Dispatch
RS232
Citywide
AT&T System 75
HIS PMS
SL-1 Msg Waiting
Message waiting type #1 : 16
This is so that the guest room’s MW light is controlled by the PMS system. (Note: this
integration does NOT preclude the use of another integration running on a different serial
After both the configuration and the mailboxes have been set up, the integration will
update the room status.
Page 8
EECO Trouble Shooting Guide
Chapter 4
The EECO PMS Integration
Trouble Shootina Guide
1.0
lmolementation
polls the Property Management
The EECO PMS integration within
System once a minute in order to find out which rooms have been
checked-in/checked-out since the last poll. This information is used to perform
user configurable check-in/check-out procedures to mailboxes on the
system. For more information on the
Check-in/Check-out procedures,
contact Centigram’s Marketing Department. In the following description the
system
be referred to as
2.0
Protocol
After 60 seconds of no activity
an
($03).
The PMS replies with the character
sends an ASCII
followed by
within two seconds.
If no reply is received within the two second window up to two additional
attempts will be made by
If there is still no response from the
PMS
will return to sleep for 60 seconds and start over at 1.
Once the PMS replies it then has 6 seconds to start sending room info
packets to
for processing. These packets are as follows:
Stan of record character *
Room status character: A = newly checked-in; V = newly
Room number followed by the delimiter character semicolon
Room numbers are in ASCII readable. Only numeric room numbers
are supported at this time. Note, at this time the Room number is
assumed to be the mailbox number and as such needs to conform
to the dial plan. Eventually the ability to translate alphanumeric room
numbers to mailbox numbers will be added.
End of record character % ($25).
Page 9
These packets can be no longer than 80 characters including the start and
end of record characters. When there is no more data to send to
the interface sends the single ASCII character
($40).
will then process the
Upon receiving the packet from the PMS
information. If the packet is good, all check-in/check-out procedures are
carried out and
requests the next packet (ii any) by sending an
“M” followed by an
($03). If the packet is bad
re-requests
it by sending an
followed by an
($03). If the PMS sent the empty
reply
will go back to sleep for sixty seconds without
responding to the PMS.
Note: The PMS must first echo the
information to
or “M” before sending any other
When the PMS receives either the
or
requests from
it has six seconds to respond.
will try either of
these requests up to three times before giving up and sleeping for sixty
seconds before starting at 1) again.
3.0
Characteristics
RS-232 compatible signal.
1200 baud.
start bit, 1 stop bit, 8 bit data, and no parity.
is configured to be a DCE device.
No flow control is supported.
Data signals required are transmit data, receive data, logic ground (pin
data terminal ready (should always be high).
No control signals are used.
4.0
information
See Appendix A for detailed diagnostic information available through the error log
the CDR file and the system console.
Page 10
Chapter 5
HIS Trouble Shooting Guide
The HIS PMS Integration
Trouble Shootina Guide
1.0
Introduction
In order to integrate reliably between the HIS PMS system and the Centigram
voice messaging system, the following protocol has been developed.
The protocol contains three layers; physical, link, and message. This protocol
conforms to the “HIS Standard Communications Protocol for Full Duplex
Operations” fully with the following stipulations:
2.0 .
3.0
Laver
Electrical Interface:
EIA
Type D electrical standard
compatibility. Connection is via a
pin male connector.
Signal Form:
EIARS404.
Interface Distance:
Maximum 50 feet. Interface unit to
interface Processing Unit direct connection.
Distances exceeding 50 feet require a line
driver.
Operation Mode:
Full duplex.
Link Laver
Appearance:
Data Rate: 2400 Baud Asynchronous
Byte Framing:
bits, (1 start, 7 data, 1 parity, 1 stop), even parity.
4.0
Messaae Laver
There are six messages defined for the protocol as follows:
Message number 1 is RESYNC.
Message number 2 is ROOM OCC
Message number 3 is ROOM
Message number 4 is MESSAGE WAITING STATUS.
Message number 5 is BAD MAILBOX ADDRESS.
Message number 6 is SEND MESSAGE WAITING STATUS.
5.0
Mailbox Re-synchronization
With the HIS PMS integration an additional menu choice (G) has been added to
the System Maintenance Menu to allow the system administrator to re-synchronize
the state of all the mailboxes being supported by the PMS.
6.0
Messaae Waitinq
The HIS PMS integration supports message waiting notification through the PMS
system. A message waiting type has been added to the system called “HIS
See Chapter 6, section 3 for an example of this.
7.0
information
See Appendix A for detailed diagnostic information available through the error log
file, the CDR file and the system console.
-Page12
Hyatt Encore Configuration and Trouble Shooting
Chapter 6
Encore Configuration
and Trouble Shootinq
Introduction
The Hyatt Encore PMS is an extra cost feature enhancement that allows integration
between
and the Encore Property Management System.
Under this integration it is possible to not only automatically assign vacant and
occupied mailboxes to guests (checked in or out), but it also allows for room
reassignment and text message waiting indication.
The
to Hyatt Encore PMS Integration is designed to
the Hotels
a reliable and simple way of relaying communication between the voice messaging
system
and the property management system (PMS).
It is designed to work with
Release 5.00 and later releases of software.
This integration provides:
1.1
Check In Automatic check in of a guest mailbox upon arrival (PMS to VMS
message)
1.2
Text Message Notification VMS notification of number of text messages in
the PMS.
1.3
Message
Indication
(controlled by the PMS)
1.4
Played Message indication Automatic signaling from the VMS to the PMS
when a message is played.
1.5
Multiple Classes of Service Allows the automatic check in of guests with
different classes of service which may include different language prompts.
1.6
Check Out Automatic check out of a mailbox, by disposing of any
recorded messages, recorded name (ii any), or recorded mailbox greeting
(if any).
Automatic voice message waiting indication
Page 13
1.7
Mailbox Modify The Hotel should be able to modify the mailbox number
of a particular guest without losing any of the recorded information in that
mailbox.
2.0
See Chapter 2 for initial configuration information.
Once the application has been setup it is also necessary to access the following
Menus:
SYSTEM CONFIGURATION
Configure PMS integration
Feature COS
Group COS
Limits COS
Network COS
Phoneline exceptions
Reconfigure system
Configure Video Dispatch
Configure Citywide
Configure
Table
Exit
Enter letter in ( to execute command.
When you need help later type
COMMAND (E/F/G/L/N/P/R/V/W/X): E
Users will then view the following:
Answer the following questions to configure the PMS
on Check-out =
Clear
Clear messages on Check-out =
Clear name on Check-out = [N]
greeting on Check-out = [N]
On Check-in set the mailbox FCOS =
2
On Check-out set the mailbox FCOS = [0] 64
Page 14
3.0
Mailbox
Once the application has been setup, the user must create guest mailboxes with
either the Check-Out or Check-In FCOS (it is not critical to match the existing room
status since the integration handles a re-synchronization of the databases when
it first starts up). It is important to set the MWI type for the guest mailboxes to be
type 16:
Message Waiting Type
0:
1:
2:
3:
4:
5:
6:
7:
8:
9:
10:
11:
12:
13:
14:
15:
16:
17:
?
None
Not Available
AC msg lamp
DTMF to PBX
Fixed RS232
Pager
SL-1
Program RS232
T/R RS232
RS232
lntecom RS232
NEC RS232
Video Dispatch
I-T-T RS232
Citywide
AT&T System 75
HIS PMS
Msg Waiting
Message waiting type
16
This is so that the guest room’s MW light is controlled by the PMS system. (Note:
this integration does NOT preclude the use of another integration running on a
different serial port).
After both the configuration and the mailboxes have been set up, the integration
will update the room status.
Page 15
4.0
Text MWI
As a new PMS feature, it is possible for a guest to find how many (if any) text
messages are waiting at the front desk (in the PMS system). This is done both
upon
and
of the mailbox:
“Hello <name you have N unplayed messages, 2 messages total.
X text messages at the front desk. Press P to play the first
message...’
“You have 3 messages remaining.” (No prompting done when there
are NO text messages.)
This announcement of text messages
154:
is controlled
with a
FCOS Feature Bit
“Announce text (E-Mail) message count.”
5.0
Installation
Use the extra cost feature diskette for both the enabling of the feature and with the
Hard Disk Maintenance Menu choice of
to add the following
additional prompts:
Prompt 2131:
“text message”
the front desk>.
Prompt 2182:
“text messages”
the front desk
Prompt 2183:
text messages
“at the front desk.”
**Note: This
can be replaced with an optional: “in your E-Mail System.”
**Note: Only English prompts support this prompt.
6.0
Console Administration
Presently only the Hyatt Encore PMS has control over the Text message count
field in the user’s mailbox. This count can be monitored via the Mailbox Dump
utility. The new field now shows immediately following the network statistics/billing
fields:
Sent
= 0
0
= 0
Net sent node =
=0
= 0
=
0
Clr connect
=0
sent mlen = 0
mien = 0
= 3
Pages
Sent-to-node
Net-send nurg
Net rcvd mlen
0
0
0
0
0
0
0
0
0
0
0
0
0
0
0
0
0
0
Net-send-rep
User connect
Disk
Net-node-urg
Message Queues:
Count Total Head Tail
Free
Played
Receipts
Future delivery
73
0
0
0
-a-----
0
-1
-1
-1
72
-1
-1
-1
Count Total Head Tail
Unplayed
Urgent
Undelivered
Call placmt
0
0
0
0
--
-1
-1
-1
-1
-1
-1
-1
If this field is other than 0, it will be displayed every time a full mailbox report is run
(either when deleting, modifying, searching, etc), under a new field called
MW” (text messages waiting):
MAILBOX: 100
MSGS: 0
LCOS: Default
GCOS: Defautt
BAD LOGS: 0
PASSWD: N
NAME:
EXTEN: 100
DN:
ACCESS: None
UNPLAYED:
:
1 :
LAST LOG:
TUTOR:
0
1
1
N
Page 17
RECEIPT: 0
URGENT: 0
FCOS: Unlimited
: 1
NCOS: Default
: 1
MINS: 0.0
pm
DAY: M
NIGHT: M
CODE:
INDEX: 0
TEXTMW:
INDEX: 0
7.0
Batch Mode
A new batch mode program
new field via the console.
now exists in order to change/query this
The following is a set of examples that demonstrate its usage:
?
use:
$
ml =
Set text count for mailbox: ?
Enter a number in the range, 1 to 99999999999
or a range of mailboxes separated by a hyphen
Set text count for mailbox: 100
New text count (O-255)
?
Text count is used to announce user of an existing electronic
message waiting at either the hotel/motel front desk or at the user’s
E-mail system.
User must have the correct FCOS to allow
announcement.
New text count (O-255)
:
Set text count for mailbox:
Set text count for mailbox: 100
New text count (O-255)
:2
Set text count for mailbox:
$
ml
Mailbox 102: Text count set to 1
$
Set text count for mailbox: 103-l 05
New text count (O-255): 5
Set text count for mailbox:
ml=103
Mailbox 103: Text count set to 3
Mailbox 104: Text count set to 3
Mailbox 105: Text count set to 3
3 Mailboxes affected
Note that when an individual mailbox is modified, the actual text count is shown.
8.0
Communication
This integration is based on communication between the PMS and VMS via an
RS232 Full Duplex link. The connection should be a DB25 pin male connector.
8.1
link Setup
Baud = 1200 Asynchronous, Bits = IO, (Start = 1, Data = 7, Parity = 1,
stop = 1) Panty = Even.
Note:
Modem adapter may be needed with an Encore PMS
Test the RS232 link without one, and if the data packets are not
received correctly, install a Null Modem Adapter.
9.0
A
Messaae Formats
Each fixed length record will contain:
messages start with an STX, followed by the message text. All message text
must be followed by
and the last byte LRC, to guarantee integrity.
ACK and NAK are sent by the receiver to the sender to indicate positive or
negative acknowledgement to the transmitted message. A NAK should be used
by the message sender as a request to retransmit the last message sent. ENQ
is a sender request for a repeat of the acknowledgement (ACK or
as a reply
to the last transmitted message.
Page 19
The following is a summary table of the valid data transferred between the PMS
and the VMS:
El-x
ENQ
ACK
NAK
LRC
=
=
=
=
=
=
=
MBOX =
MSG =
FCOS =
Note:
10.0
UNP
=
URG
=
UNR
=
02H
03H
05H
06H
Start of data text
End of data text
Request for retransmission of acknowledgement
Positive acknowledgement
Negative acknowledgement
20H ASCII space character (to padd fields)
of all bytes after STX
Longitudinal redundancy check
including the
character, with a OOH Null seed)
A 6 digit (left justified and space filled) mailbox ASCII number
CHECK IN
“3” CHECK OUT
MESSAGE WAITING STATUS
BAD MAILBOX ADDRESS
“6” QUERY MESSAGE
STATUS
“7” MOVE MAILBOX
“8”
FCOS
“9” TEXT MESSAGE MW
Where the message is sent in hex (ex: “4” is 34H).
See Message Format Table (Table 1.0)
A 2 byte number (00-64) representing the Feature Class of
to use when modifying the mailbox (set up via the
console configuration menus)
A 2 byte number (00-99) representing the number of unplayed
messages in the guest mailbox (valid ranges 30H to 39H)
A 2 byte number (00-99) representing the number of all
unplayed messages with URGENT priority found in the guest
mailbox (valid ranges 30H to 39H)
A 2 byte number (00-99) representing the number of unread
text messages in the PMS system (valid ranges 30H to 39H)
messages are of a fixed length record (76 bytes), space padded.
Information
See Appendix A for detailed diagnostic information available through the error log
file, the CDR file and the system console.
Page 20
PMS
Message Format
Table 1.0 Message Format Table
Page 21
Appendix A
HIS and Encore Diagnostic Specification
Page 22
CENTIGRAM COMMUNICATIONS CORPORATION
Diagnostic Specification
Part Number
Rev A
June 24, 1991
Prepared by Walter Croft
HIS/Encore PMS Integration
References:
Centigram Document Part No.
PMS Integration ENGINEERING
Definitions:
CDR:
ENQ:
hisinit:
hismwi:
hissnd:
OAA:
PMS:
An ascii control character used in the
serial
for positive
message packet.
acknowledgement of a single character or
A group of routines, data and files that allow the
system to do
detailed
recording of selected information for diagnostics.
routine that runs only when the system administrator requests to inspect
A
or modify the CDR log
and/or configuration.
An OAA record that stores the configured data set up by eecomenu.
control character used in the
serial protocol. It is used to
An
retransmission of the Iast character or full message packet.
routine that
only when the system administrator requests to inspect
A
record for the HIS/Encore PMS integration.
or modify the EECO
routine that is started by hissnd to read though all mailboxes on the
A
message waiting for any with message waiting type 16.
system and
routine that receives message waiting update requests from the mwla,
A
reformats the data and requests hissnd to transmit the message across the serial link to
the PMS system. Upon completion it reports the status back to the
A
routine that receives the serial link data from the PMS system.
routine that is started by hisrcv if it receives a
message
the
A
PMS system. It sends a message to hissnd to start hisinit and then dies.
A
routine that sends data across the serial link to the PMS system.
A
routine that oversees message waiting updates for all the message
waiting integrations.
An
control character used in the
serial protocol for negative
message packet.
acknowledgement of a single character or
Open Account Administrator. The method to store
mailbox and
configuration data in
records.
Property Management System.
Tela-typewriter.
The
of this document is to explain the available diagnostic information for the HIS/Encore PMS
in three areas: the log tile, the CDR file and the system console.
Integration. The information is
Any messages that are displayed on the system console are from the
tasks hissnd,
hismwi
or
showing that they aborted and why.
File:
is running there are two possibilities: the link is up or the link is down. When
is booted, the PMS system integration software starts with
assumption the link is up. If
system sends any data over
Iii to the
PMS system and it is not
Within
the
is
for a
acknowledgement, the
system considers the
down and logs it. At any
time if the
PMS system sends valid data to the
system, it is
and the link is
considered up and it is logged.
is running, if a message waiting notification sent to the
At any time while
system fails due to an internal error, the mailbox number and message waiting state lost is logged.
PMS
If the
system is
to do a move message command (swap) and for any
the
it is logged with both the source and destination mailbox numbers. It is also possible during a
event
swap that the source mailbox is deleted and can not be
If this event occurs, it is logged
the
number that is
To check the log file for information including
From the console
menu enter
enter
Log
then enter (S) Show
PMS integration, complete the following.
Report generation
To display the contents of the log file, possibly including information for the HIS/Encore PMS
integration.
Log File Entries:
“HIS
is up”
“HIS PMS Lii is down”
“Unable to update
(ON/off) for mailbox
“Failed to swap mailbox
with
“Deleted mailbox (x), unable to
CDR Fife:
While the
system is
provides
interface to cause
information to
be
to a CDR log file. For the HIS/Encore PMS system interface, one new CDR level has been
added to allow diagnostic monitoring. The additional
is
PMS. It is
Disk
to have this level active for short periods of time for full diagnostic monitoring of the integration.
space on drive 4 is required to allow logging into the CDR file. If drive 4 becomes 100% full, the
log file and the log file
loose additional information king written to these files. Listed below are
methods to operate CDR and monitor drive 4 dish space.
The data logged is from one of three active tasks and two short lived spanned tasks that make up the
PMS system interface. The names of
tasks are
running programs of the
hisinit and
where
and
are the short
spanned tasks. Each of these
tasks when enabled with CDR level 22 logs data to the CDR file for specific events. Data logged by
in the CDR file. Data logged by
starts with
in
hissnd starts with
file. Data
by
starts with
in the CDR file. Data logged by
To
in the CDR file. Data logged by
starts with
starts with
in the CDR file.
diagnostics for HIS/Encore PMS integration with the Call Detail Recorder, complete the
From the console main
then enter
then enter
System Maintenance
Recorder
For Host lines, make sure line zero is configured. For
referenced. For message
enable 22
the CDR log data tile.
then enter
Host lines, the selected data is not
Enable CDR and select name for
Run CDR
Do testing of the HIS/Encore PMS integration.
then enter (S) Show CDR log file
View the CDR log file and confirm consistent results with system integration testing.
then enter
Delete CDR log file
To remove accumulated data. repeat these last two steps as required.
then enter
Terminate CDR
Turn off the logging of diagnostic information to the CDR log file.
To monitor drive 4 disk
complete the following.
From the console main menu enter (S) System Maintenance
then enter
Utility Menu
Task
then enter
then enter (query 4)
One line displays the number of bytes free, number of bytes used, percentage
number of blocks free,
number of blocks
and the
of
on drive 4. To free up additional space, the
log file and/or the log
may be deleted. It is recommended to
the contents of the files before
deleting either one.
As an
type 16 for
to sending messages and deleting messages from
mailhox to activate message waiting
PMS integration, complete the following.
From the console main menu enter (S) System Maintenance
then enter
Lights test
Enter the mailbox number and message waiting setting to be sent out. This testing tool causes the
to the PMS system without the need to send
message waiting notification to be sent across the
messages too or delete messages from a
Level 22,
PMS:
Messages logged at this level are logged for link and program level diagnostics. This level of diagnostics
an unmonitored system. The
data logged is of a large quantity and may cause
should not run
problems with disk utilization.
Some of
error messages logged
followed by
aborts.
messages are identified
by
additional comment
bracketed with asterisks. Any of the tasks below may abort, either during a
system boot or while the system is in full operation. Only the tasks
hisrcv and hismwi
be
It
he
the
immediately aborts again for the same or another error condition. After
five aborts of a task, the system will auto reboot
try and
the problem by
reason for the
abort is reported to the console and if CDR logging is enabled also to the CDR log
file.
hissnd:
Lii is up”
(Link failure recovery)
“hissnd: Link is
(Link failure)
data is logged at the same time and for the same reason as it is defined in the log file section above.
“hissnd: Lii down condition, timeout”
(Link failure)
This
is logged if after sending any form of message across the link, the PMS system
is logged as down.
even after four attempts. At this point the
not reply
Configuration change”
(Normal operation)
data is logged after a message from
reports that the system administrator has changed the
information is passed on to hisrcv so it will
check-in or check-out mailbox configuration data.
reread the information from the disk file. It is this communication that allows changes to check-in and
check-out handling without a system reboot.
“hissnd: Got send
message”
operation)
This data is logged when hissnd is redirected a message from
message out on the
serial link to the PMS system.
via hisrcv.
sends
a
“hissnd: Got send
(Normal operation)
is redirected a message from hismwi via hisrcv to update
mailboxes
This data is logged when
sends a MW status message with the requested mailbox number, number
message waiting.
serial link to the PMS system.
of urgent and number of unplayed messages out on the
“hissnd: Got send bad mailbox”
(Mailbox undefined in database)
This data is logged when hissnd is
bad
message out on the
by hisrcv
“hissnd: Store MWI command”
report the bad mailbox number.
link to the PMS system.
sends
a
operation)
data is logged when
is actively sending or
is actively receiving a message from the
PMS system when got send
command is delivered.
message can not be directly sent out over
the link and is saved until the link
idle.
idle,
status command is sent
and the
one
update
be held at any one time.
entry is removed from the saved message state. At
This is because the mwla is not replied to
status message is sent out, weather it was
temporarily held on active
state or not.
“hissnd: Add to bad mailbox queue”
(Normal operation)
This data is logged when
actively sending or hisrcv is actively receiving a message
the
PMS system when a got send bad
message can not be directly
over
the link and is saved until the link becomes idle. Once idle, the
status co
is sent out and the
entry is removed from the saved message state.
entries are queued up and sent out in order as the
idle
permits. if the queue is
any new bad mailbox messages are lost.
“hissnd: Send
operation)
This data is logged immediately after one character is transmitted over the
serial link. The
Send
operation)
This data is logged immediately after one character is transmitted over the
character sent is a
, hex
serial link. The
“hissnd: Send
(Normal operation)
This data is logged immediately after one character is transmitted over the
, hex 05.
character sent is an
link.
The
“hissnd: Send
error, report condition)
This data is logged immediately
character sent is in error and
one character is
in hex is shown.
over the
serial link. The
(Normal
This data is logged immediately after one data packet is transmitted over the
message <
= 1.
packet sent should be of the form:
serial
Received a bad
(Internal error, report condition)
This data is logged when hissnd receives an unknown request from another task on the
system.
task
tries to get that task to be reset in an attempt to keep the condition from
“hissnd: Use
Sport
(Internal error, report condition)
*Error condition causes abort,
on console and task restart*
The
This data is logged when hissnd is started w i t h o u t
port first parameter.
setting that tells the software to interface to an Encore PMS system at 1200 baud.
to interface to HIS PMS system at 2400 baud.
the software
is the optional
Without the setting,
Bad RS232 port name”
(Internal error, report condition)
abort, error displayed on console and task restart*
*Error condition
This data is logged when hissnd is started with an undefined port
“hissnd: Unable to attach
error or configuration error, check configuration and report condition)
*Error condition causes abort, error displayed on console and task restart*
can not be attached by this task.
This data is logged when hissnd is started with a port number
Check the configuration of all CPU serial ports of the system for conflicts. If the configuration is
to repair the problem, reboot the system and monitor for
“hissnd: Unable to attach name”
error, report condition)
*Error condition causes abort, error displayed on console and task
This data is logged when hissnd is started and is not able to attach a task name for its use.
“hissnd: Unable to open serial
(Internal error or serial port error, check serial port and report condition)
and task restart*
*Error condition causes abort, error displayed on
is started and it is not able to open the serial port that it just attached to
This data is logged when
this task.
“hissnd: Unable to get
on RS232 port”
(Internal error or serial port error, check serial port and report condition)
condition causes abort, error displayed oa console and task restart*
This data is logged when hissnd is started and it is not able to get the current
options
of
the serial
“hissnd: Unable to SET stty on RS232 port”
(Internal error or serial port error, check serial port and report condition)
displayed on console and task
*Error condition causes abort,
This data is logged when
is started and it is not able to
the desired
port. This includes baud rate, parity, data and stop bit settings.
options of the
“hissnd: Unable to SET device attributes for RS232 port”
(Internal error or
port error, check serial port and report condition)
*Error condition causes abort, error displayed on console and task restart*
device attributes for the
This data is logged when hissnd is started and it is not able to set the
serial port. This includes
break,
and other features.
hisrcv:
“HISRCV: Checked in mailbox
operation)
This data is logged when the PMS system sends valid data to change the configuration of mailbox (x).
The changes to the mailbox are configured for FCOS. The changes to the mailbox are
“HISRCV: Checked out mailbox
(Normal
This data is l o g g e d when the PMS system sends valid data to change the configuration of
(x).
FCOS, password, name recording, greeting
and messages. The
The changes to the mailbox
changes to the mailbox are complete.
Swapped mailbox
(Normal operation)
with
data is logged when the
system sends valid move mailbox data to move source mailbox (x) to
destination
Destination mailbox
is also swapped to source
The fields that
password, text message count, all four mailbox greetings, name recording and
messages and message data.
NOTE:
message data i s swapped, if messages in the mailbox are from other mailbox users (as
to outside callers), the source of
message may play as the wrong user
This
happen if mailbox 100 sends a user message to mailbox 200 and then swaps to 101. At this time, the
name recording for room 101 is now in
and so if user 200 listens to the source of the message it
say the name now associated with
(the old
the wrong name recording. This is not
problem
or with integrations that do not supply the
number.
when a message is left by an outside
“HISRCV:
FCOS
MBOX
(Normal operation)
PMS system sends valid modify FCOS data packet. The FCOS number of
This data is logged when
the mailbox is updated to the requested value.
“HISRCV: Text update COUNT (c), MBOX
(Normal operation)
‘This data is logged when the PMS system sends valid text message data packet. The text message count
of the mailbox is updated to the requested value.
“HISRCV: Received a BAD MAILBOX
(Mailbox
in database)
This data is logged if the PMS system sends any message packet that includes an undefined source
the mailbox passed could not be found in the
mailbox number. It is invalid
database. This message is discarded. No change to the mailbox database is made. The
system
by sending a bad mailbox packet to the PMS system
“HISRCV: Received a BAD NEW MAILBOX
(Mailbox undefined in database)
data is
if the PMS system sends a move mailbox message packet that includes an
destination mailbox number. It is
because the mailbox passed could not be found in the
database. This message is discarded. No change to the mailbox database is made. The
system responds by sending a bad
packet to the PMS system.
“HISRCV: Received a BAD NEW MAILBOX (same number)”
(Error in PMS system)
This data is logged if the PMS system sends a move mailbox message packet that includes the same
message is discarded. No change to the m a i l b o x database
source and destination mailbox number.
system
by sending a bad mailbox packet to the PMS system.
is made. The
“HISRCV: No check in FCOS configured”
(Check
system configuration, Configure PMS integration)
This data is logged if
reads
or invalid data configured for the PMS
in the EECO
“HISRCV: No check out or bad configuration”
system configuration, Configure PMS integration)
reads
or invalid data configured for the PMS
This data is logged if
integration in the EECO OAA record.
(Check
Unable to lock source mailbox
(Internal error, report condition)
This data is logged when hisrcv is unable to lock the source mailbox record as part of the move mailbox
message
by the PMS system.
“HISRCV: Unable to open source mailbox
(Internal error, report condition)
data is
when
is unable to open the source mailbox record as part of the move
message sent by the PMS system.
“HISRCV: Unable to delete source mailbox
(Internal error,
condition)
This data is logged when hisrcv is unable to delete the source mailbox record as part of the move mailbox
message sent by the PMS system.
“HISRCV: Unable to lock destination mailbox
(Internal error, report condition)
This data is logged when hisrcv is unable to
mailbox message sent by the PMS system.
the destination mailbox record as part of the move
“HISRCV: Unable to open destination mailbox
error, report condition)
This data is logged when hisrcv is unable to open the destination mailbox record
mailbox message sent by the PMS system.
part of the move
“HISRCV: Unable to close destination mailbox
(Internal en-or, report condition)
This data is logged when hisrcv is unable to close the destination mailbox record as part of the move
mailbox message sent by the PMS system.
Unable to
swapped source mailbox
(Internal en-or, report condition)
This data is logged when hisrcv is unable to
by the PMS system.
move mailbox message
“HISRCV: Unable to
error, report condition)
is unable to
This data is logged when
mailbox message sent by the PMS system.
“HISRCV: Failed to swap mailbox
the swapped source mailbox record as part of the
source mailbox
original source mailbox record as
with mailbox
of the move
(Internal
report condition)
This data is logged when hisrcv is unable to
and
mailbox records during a
move mailbox.
message follows the specific reason listed above listing the level of the failure in the
swap.
“HISRCV: Invalid FCOS request
system error)
This data is logged when hisrcv receives an invalid FCOS value in a modify FCOS message
PMS system.
“HISRCV: Received an
by the
= send
(Link failure,
link protocol using data scope)
data is logged
reads a
character
the
serial port and it is
ENQ . This choice to send out a C NAK > is made if
has already sent a message four
to reply with
rather than
positive
times and the PMS system
information is sent by hisrcv to
ACK .
“HISRCV: Received an
ENQ
= send last
(Link failure, test link protocol using data scope)
a
character
the
This data is logged when hisrcv
. This choice
send out the last message is made if
ENQ
four times with the PMS system continuing to reply with an
result ACK . The information is sent by hisrcv to
“HISRCV: Received an
serial port and it is an
has not sent this message
rather than the expected positive
ACK
(Normal operation)
This data is logged when hisrcv reads a first character from the
ACK . The information is sent by hisrcv to hissnd.
serial port and it is an
“HISRCV: Received a
(Link failure, test link protocol using data scope. If error is not consistent, suspect PMS system overload
or stressed
data connection)
This data is logged when hisrcv
a first character from the
serial port and it is a
The information is sent by
to hissnd.
“HISRCV: (data packet)”
(Normal operation)
This data is logged when hisrcv reads in any packet that begins with an
displayed if it is a good or bad
The packet is shown in the
. This message
“HISRCV: BAD LRC”
(Link
test link protocol using data scope)
serial port and the LRC passed in the
This data is logged when hisrcv reads a packet from the
packet does not match
calculated LRC. LRC is
as longitudinal redundancy check
of
bytes after
including the
character, with a
seed).
“HISRCV: Received a
(Normal operation)
This data is logged when
reads a good
packet from the
“HISRCV: Received a Check-in or Check-out”
serial port.
(Normal operation)
This data is logged when
hisrcv
reads a good cheek-in or check-out
from the
serial port.
Received a Message Waiting
operation)
This data is logged when
reads a good message waiting status packet
the
serial port.
“HISRCV: Received a Move Mailbox”
(Normal operation)
This data is logged when hisrcv reads a
move mailbox packet from the
serial port.
“HISRCV: Received a Modify FCOS”
operation)
This data is logged when hisrcv reads a good modify FCOS packet from the
serial port.
“HISRCV: Received a Text Message
(Normal operation)
data is logged when hisrcv reads a good text message MW packet from the
serial port.
“HISRCV: Received a bad packet”
failure, test link protocol using
scope)
serial port. The information is sent
This data is logged when hisrcv reads a bad packet from the
to hissnd. The partial packet is displayed in a preceding message showing what data has been
by
received, complete or incomplete.
“HISRCV: Received
STX
and then a timeout”
(Link failure, test link protocol using data scope. If error is not consistent, suspect PMS system overload
data connection)
or stressed
This data is logged when hisrcv gets a two second timeout while trying to read the full packet length
serial port.
data is thrown away and hisrcv resets to look for a first character.
from the
Received a good mailbox”
(Normal operation)
This data is logged when hisrcv reads a good mailbox number in a check-in or check-out packet.
the open account database.
mailbox was able to be found
The
Check in packet
operation)
This data is logged when hisrcv reads a good check-in packet. The extension number (x) in the packet is
to read in
mailbox and change the state of the mailbox depending on the
If hissnd has sent hisrcv a configuration change message, the data stored on disk by
is reread
before the changes to the mailbox are made. This allows the system manager to change how check-in and
check-out effect mailboxes without a
system reboot.
“HISRCV: Check out packet
(Normal operation)
data is logged when
a good check-out packet. The extension number (x) in the packet
is used to read in the mailbox and change the state of the mailbox depending on the
configuration. If hissnd has sent hisrcv a configuration change message, the data stored on disk by
is reread before the changes to the mailbox are made. This allows the system manager to change
system reboot.
how check-in and check-out effect mailboxes without a
“HTSRCV: Request MW for mailbox
operation)
valid check-out packet with an extension number that lead to good mailbox was
This data is logged if
for the check-out packet is configured to delete
received. And if the current configuration in
messages in the mailbox. A message is sent
the
eventually
to
turn off this
station numbers message waiting.
“HISRCV: Ignored bad start character, HEX
(Link failure, test
protocol using data scope)
for start character and the character
This data is logged if hisrcv is
received unknown start character is displayed in hex and the packet is
in from the
and
The
bad.
“HISRCV: Incomplete packet”
(Link failure, test link protocol using data scope)
is logged when the first characters of the packet
) has been
successfully, but
This
the two second packet timer expires before the full number of characters for a packet are read. The
partial packet is displayed in a
showing what data has been
packet is labeled bad.
received, complete or incomplete.
“HISRCV: Unable to locate hissnd”
(Internal error, may locate next transmission, else report condition)
This data is logged when hisrcv needs hissnd to send data allowing the link to stay active but ‘the task
hissnd can not be found by name. Each time data is received over the data link
the PMS system,
hisrcv retries to locate hissnd. If it is again unsuccessful,
message is again logged. At this point, the
PMS system sees the link as down. When hissnd successfully restarts and attaches it’s name, hisrcv and
hisrnwi
locate it and link communication will proceed as expected
“HISRCV: Unable to locate
data
(Internal error, message lost, report condition)
This data is logged when hisrcv needs hissnd to send data allowing the link to stay active but the task
data is lost and
continues to run looking for further link
hissnd can not be found by name.
hissnd and
it will consider the link
data. The PMS system is probably not getting any
and attaches it’s name, hisrcv and
can locate it and
down. When hissnd successfully
communication will proceed as expected.
“HISRCV: Unable to send to hissnd, data lost”
error, message lost,
condition)
This data is logged when hisrcv needs hissnd to send data
the link to stay active but the task
continues to run looking for further link
hissnd can not be found by name. The data is lost and
PMS system is probably not getting any data
hissnd and so it will consider the link
data.
down. When hissnd
and attaches it’s name, hisrcv and
locate it and link
communication will proceed as expected.
“HISRCV: Unable to
to hid, data lost”
(Internal error, message lost, report condition)
This data is logged when hisrcv needs hissnd to send data allowing the link to stay active but the task
hissnd can not be found by name. It tries to send once to hissnd and fails, then it is temporarily able to
attach by name to hissnd again, tries to send a second time and tails. The data is lost and hisrcv
data.
PMS system is probably not getting any data
continues to run looking for further
hissnd and so it will consider the link down. When hissnd successfully
and attaches it’s name,
hisrcv and hismwi can locate it and link communication will proceed as expected.
“HISRCV: Unable to read
OAA record”
(Internal error, report condition)
*Error condition
abort, error displayed on console and task
This data is logged when hisrcv is started and it is not able to
from disk the
data set by
“HISRCV: Use hissnd
error, report condition)
*Error condition causes abort, error displayed on console and task restart*
is the optional
This data is logged when hisrcv is started without a Port first parameter. The
to interface to an
PMS system at
baud. Without the setting,
setting that tells the
the software assumes to interface to a
PMS system at 2400 baud.
“HISRCV: Bad
port name”
error, report condition)
condition causes abort, error displayed on console and task restart*
This data is logged when hisrcv is started with an undefined port parameter.
“HISRCV: Unable to open serial port”
(Internal error or
port error, check serial port and report condition)
*Error condition causes abort, error displayed on console and task restart*
This data is logged when hisrcv is started and it is not able to open the serial port that it just attached to
this task.
“HISRCV: Unable to get stty on
port”
(Internal error or serial port error, check serial port and report condition)
condition causes abort,
displayed on console and task restart*
This data is logged when hisrcv is started and it is not able to get the current TTY options of the serial
“HISRCV: Unable to SET stty on
port”
error or
port error, check serial port and report condition)
on
and task restart*
*Error condition causes abort, error
This data is logged when hisrcv is started and it is not able to set the desired
port. This
baud rate, Parity, data and stop bit settings.
“HISRCV: Unable to SET device attributes for
options of the serial
port”
(Internal
or serial port error, check serial Port and report condition)
condition causes abort, error displayed on console and task restart*
This data is logged when hisrcv is started and it is not able to set the desired device attributes for the
serial port. This includes disabling break,
escape and other
hismwi:
MWI ON for station number
(Normal operation)
requests hismwi to
This data is logged after the following task communication completes. The task
task
hismwi
in
turn
requests
hissnd to send
The
send a message waiting request for station number (x).
out the specific message waiting packet. The task hissnd completes the packet transfer and replies to
CDR message is logged and hismwi replies to mwla.
bismwi. At this time
“HISMWI:
(Normal operation)
off for station number (x)”
This data is logged after the following task
The task
request.3 hismwi to
The task hismwi in
hissnd to send
send a message waiting request for station number
task hissnd completes the packet transfer and replies
out the specific message waiting packet.
hismwi. At this
CDR message is logged and hismwi replies to
Unable to locate
error, may locate next transmission, else report condition)
This data is logged when hismwi needs hissnd to send data allowing the link to stay active but the task
from the PMS system,
hissnd can not be found by name. Each time data is received over the data
hismwi retries to locate hissnd. If it is
is again logged. When hissnd
successfully restarts and attaches it’s name, hisrcv and hismwi can locate it and link communication will
proceed as expected.
Unable to send to hissnd, data lost at level
Unable to turn
(ON/off) for mailbox
(Internal. error, message lost, report condition)
This data is logged when hismwi needs hissnd to send data allowing the link to stay active but the task
hissnd can not be found by name. The data is lost and hismwi continues to run looking for further link
data. The PMS system is probably not getting any data from hissnd and so it will consider the
down. When hissnd successfully restarts and attaches it’s name, hisrcv and hismwi can locate it and link
communication will proceed as expected. The level number is for engineering use to determine which
second half of the
informs what mailbox
one of three levels of sending the failure occurred.
was involved and if message waiting failed for an on or off attempt.
Unable to locate
error, report condition)
*Error condition causes abort, error displayed on console and task restart*
to locate the mwla task and fails.
This data is logged when hismwi starts and it
Unable
in loop”
(Internal error, report condition)
*Error condition causes abort, error displayed on console and task
This data is logged when hismwi tries to send a
to the
at any time and
hisresync:
Resync message sent”
(Normal operation)
This data is logged when
sends a resync message to the PMS system.
Resync message failed”
(Internal error, report condition)
This data is logged when
fails to send a
Unable to locate
(Internal error, report condition)
message to the PMS system.
This data is logged when
returns to
hissnd to send
without completing
command.
Unable to send to
message to the PMS system. The task
data
(Internal error, message lost,
condition)
data is logged when
needs hissnd to
the link to stay active but the task
the
hissnd can not be found by name. The data is lost and hisresync returns to hisrcv without
command.
Unable to
to hid, data lost”
(Internal error, message lost, report
This data is logged when
needs
to send data
the link to stay active but the task
hissnd can not be found by name. It tries to send once to hissnd and fails, then it is temporarily able to
time and fails. The data is lost and
attach by name to hissnd again, tries to send a
returns to hisrcv without completing the command.
hisinit:
Mailbox
update”
(Normal operation)
This data is logged for each mailbox in the system that has a message waiting type
is the result of a
command sent from the PMS system.
Exit mailbox
operation)
This data is logged after
message waiting type
(HIS PMS). This
loop”
the mailboxes in the system have been scanned for the ones that have a
(HIS PMS).
“hisinit: Unable to attach to
(Internal error, report condition)
*Error condition causes abort, error displayed on console and task restart*
This data is logged when hisinit is started with a port number that can not be attached by this
to locate
(Internal error,
condition)
condition causes
error displayed on console and task restart*
response to tbe
at any time and
This data is logged when hisinit tries to
“hisinit: Unable to locate
(Internal error, report condition)
*Error condition causes abort, error displayed on console and task restart*
tries to send response to the oaa at any time and fails.
This data is logged when
task.
Issue 1 Release 2.0 January 1996
Voice
Solutions
TNPPInstallation
and Configuration
Trademark of
Copyright 1996,
All rights reserved.
Printed Canada.
Corporation
Corporation
1
1996 Centigram Communications Corporation. All rights reserved.
This publication is protected by federal copyright law. No part of this
publication may be copied or distributed, stored in a retrieval system, or
translated into any human or computer language in any form or by any means
electronic, mechanical, magnetic, manual or otherwise, or disclosed to third
parties without the express written permission of Centigram Communications
Corporation, 91 East Tasman Drive, San Jose, CA 95134.
REPRODUCTION
Licensed users and authorized distributors of Centigram products may copy
this document for use with Centigram products provided that the copyright
notice above is included in all reproductions.
PROPRIETARY TERMS
The following are trademarks or registered trademarks of Centigram
Communications Corporation:
AIP,
Centigram, PROSE, Speaklt,
SPEECH+,
VGS,
PROSE 2000 Version
01992 Centigram Communications Corporation.
All other brand and product names are claimed or registered marks of their
respective companies.
NOTICE
The information contained in this document is believed to be accurate in all
Corporation
The information
respects but is not warranted by
is subject to change without notice and should not be construed in any way
as a commitment by
or any of its affiliates or subsidiaries.
and its
affiliates and subsidiaries assume no responsibility for any errors or omissions
in this document. Revisions of this document or new editions of it may be
issued to incorporate such changes.
Tefocator Network Paging Protocol
installation and Configuration
INTRODUCTION
TNPP is a standard data communications protocol that is used for communications
between paging terminals or other types of equipment required to implement a paging
system network. The implementation of support for this protocol on
allows message waiting notification for mailboxes to be done by sending a TNPP page
packet over a serial link to a Paging Terminal. The Paging Terminal delivers the page
via the
network. Mailboxes contain information about the individual pagers
which is used in making the
packet.
Software
Reauirements
To support the
Paging feature the following software must be installed:
Release 5.03 or later
Extra-cost Feature diskette: Telocator Network Paging Protocol Release
5.03
l
l
Hardware
l
.
At least one serial port on
per
optional).
An RS232 Cable connecting each link between
Terminal.
If built-in serial ports are used
configured on host
l
.
A maximum of ten
link (Smartcard ports are
,
links may be configured.
and a Paging
the application must be
SOFTWARE
CONFIGURATION
that need configuration information for
There are two areas of
operate. These areas are the Offline menu and Mailbox configuration.
to
The Offline Menu
To configure the Offline portion of
choose the RS232 or Smartcard Integrations
selection from the Offline Menu. From the RS232 or Smartcard menu, choose the
Paging option. This is the main configuration menu for
The
selection that must be made is to choose the host that the
application will run on.
application must run on Host 1.
If built in serial ports are used, the
Offline Configuration Steps:
Choose the
host that the TNPP application will
on
Access the Pager Systems Menu and configure one or more pager systems
for TNPP.
Access the RS232 Link Menu and configure the serial link attributes
Access the
System Information Menu and configure the
Network Information
OPTIONAL: Access the TNPP Timing Parameters Menu to change any of
the default timing parameters used by the TNPP protocol.
Select the Verify TNPP Pager System
option to check for any
missing configuration information.
Select the Display TNPP Pager System
option to show the completed
configuration information for active links.
Exit the
configuration, RS232 and Smartcard Integrations, and
Offline menus. The data will not be save-d until the Offline Menu has been
exited.
l
l
l
l
l
l
l
Offline Configuration Menu Parameters:
Host for
Enter the number of the host that the
Pager
application will run on
Menu
Current Pager System
Select the number of the pager system
be configured or
modified for
Pager Name
Enter a name that will identify this pager system. This field is
optional.
Show Pagers
This option will show
the pager systems that have been
configured in the
system.
RS232 Link Menu
TNPP Link Number
Enter the TNPP link number to be configured
Active
Enter Y or N. TNPP tasks will only be started for
that are
active. Enter Y to make this an active
link.
Select Current Serial Port
serial port that will be used for
Enter the name of a
this TNPP link.
Pager systems this link supports
Enter the pager system(s) that this TNPP link will support. The
only support
pager system
Baud rate
Enter the appropriate baud rate for the serial link. between
and the Paging Terminal.
built in
serial ports can be up to 1200 baud. Smartcard ports can be up
to 9600 baud.
Number of data bits
This item has a default of data bits which is standard for
Number of stop bits
This item has a default of 1 stop bit which is standard for
Parity
This item has a default of NONE which is standard for
Display TNPP Serial Ports
Select this option to display the
serial port information that
is configured for each
link.
Dispiay System Wide Serial Ports
Select this option to display the serial ports that are available on
the
system and the applications that are using them.
TNPP System Information Menu
Link Number
Enter the
link number to be configured
Source Address
Enter the
network source address to be used by
Paging type
Enter either CAP or ID depending on which type of
page
packets will be sent to the Paging Terminal.
Inertia
Enter the inertia value for this
serial link. This number
represents the number of nodes that a packet may pass through
before it is removed from the TNPP network.
System Message
Enter a system message. (Example: Call
This
message will appear on alpha-numeric pagers under certain
circumstances.
If a page is not a cut-through page and the
mailbox does not have post-pager digits configured, the system
message will be sent.
Display TNPP System Information
Select this option to display the TNPP System information that
has been configured for each link.
Timing Parameters Menu
NOTE: The following parameter values represent the defaults recommended in
the TNPP specification. No changes are necessary for a standard configuration.
Link Number
Enter the TNPP link number to be configured
Inter-char time within packet
This parameter represents the amount of time that
will wait between characters in a packet before generating a
timeout. The name of the timeout event is
This applies
packets that are being received by
Currently, the
only packet that is received by
is a zero packet from
the Paging Terminal.
Timeout on response with idle receiver
This parameter represents the amount of time that
will wait for a response from the Paging Terminal when the
side of the link is idle. If the time expires, a
timeout will be generated. This timer is set after a packet is sent.
Timeout on response with busy receiver (tnrb)
This parameter represents the amount of time that
will wait for a response from the Paging Terminal when the
side of the link is busy. If the time expires, a
timeout will be generated. This timer is set after a packet is sent.
Timeout on response to ENQ
This parameter represents the amount of time that
will wait for a response from the Paging Terminal after
has sent an ENQ to the Paging Terminal. If the
time expires, a tnre timeout will be generated.
RS flag hold off time (thold)
This parameter represents the amount of time that
will wait before re-sending a packet if an RS was received from
Paging Terminal after the packet was sent. When the timer
expires, the packet will be sent again.
Timeout on idle link for keep alive ENQ (tidle)
This parameter represents the amount of time that a TNPP link
will send an ENQ.
can be idle before
Number of retries by sending station per packet (Cretry)
will
This parameter represents how many times
make on a packet that has been
Re-transmits in response to RS holdbacks (Chold)
This parameter represents the number of times that
will re-send a packet that an RS has been received on.
Number of ENQ retries before error logging
parameter represents the number ENQ retries that
will make before it logs an error message. An ENQ
retry occurs when
sends an ENQ and does not
link goes
receive an EOT from the Paging Terminal. If
down, an error message will be logged every 6 minutes.
Display
Link Timing Parameters
Select this option to display the timing information that has been
configured for each link.
Display TNPP Pager System Configuration
Select this option to display the TNPP configuration information for
active links.
Verify
Pager System Configuration
Select this option to check a TNPP link configuration for missing
information.
After this option is selected, enter the TNPP link number
to be verified.
Mailbox
Mailbox configuration information for
is entered after the message waiting type
of Pager is selected and a pager access code index (the TNPP Pager system) is assigned
to
mailbox. If the
system has the TNPP extra-cost feature enabled
there is a prompt after the Pager system is assigned.
Mailbox Configuration Steps:
. Create a new mailbox or modify an existing one
At the “Message waiting type?” prompt, enter 5 for Pager. Note that
Message waiting type 1 or 2 may be used for TNPP Paging. Message
waiting type 3 may NOT be used.
At the “Pager access code index?” prompt, enter the TNPP pager system
that was configured in the Offline
configuration.
. For creating a mailbox or adding TNPP to an existing mailbox:
At the “Configure TNPP fields?” prompt, enter y.
l
l
l
l
l
For modifying a mailbox already configured for TNPP:
At the “Modify TNPP fields?” prompt enter y.
For deleting existing TNPP configuration information:
At the “Delete
fields?” prompt enter y.
At the
CAP or ID paging:” prompt, enter either CAP or ID
depending on what type of paging will be done for this mailbox.
Mailbox Parameters:
Message Waiting type
(or
Enter message waiting type 5 for Pager.
Pager Access Code Index
Enter the TNPP Pager system index number that was configured in the
Pager system configuration menu: This is how the
Offline
mailbox’s page packet are directed to the correct TNPP serial link.
Configure TNPP fields?
This prompt is displayed if the mailbox does not have any TNPP
information configured. Answer Y to this prompt to configure the
required
information for this mailbox.
Delete TNPP fields?
This prompt is displayed if the mailbox has TNPP information
configured.
Enter Y to clear the TNPP information and continue
configuring a standard pager. Enter N or a carriage return to continue.
Modify
fields?
This prompt is displayed if the mailbox has TNPP information
configured and the “Delete
fields” prompt was not answered with
Y. Enter Y to modify the existing TNPP information. Enter N or a
carriage return to leave the TNPP information unchanged for this
mailbox.
TNPP CAP or ID paging?
Enter the type of paging packets that will be created for this mailbox. If
the mailbox is CAP, the Pager system index for this mailbox (see above)
must refer to the correct TNPP link that is doing CAP paging. The
same holds true for ID paging. If the mailbox has ID paging, the pager
system index must be supported by a TNPP link doing ID paging.
TNPP Destination Address
Enter the four hexadecimal digit value that represents the address
assigned to the message destination.
TNPP CAP code
This prompt is displayed if CAP paging was selected for this mailbox
(see above). Enter the 8 characters that represent the CAP code of the
mailbox owner’s pager.
TNPP ID code
prompt is displayed if ID paging was selected for this mailbox (see
above). Enter
10 characters that represent the customer ID to be
TNPP Page type
This prompt is displayed if CAP paging was selected for this mailbox
(see above). Enter the value that represents the signaling code scheme of
the mailbox owner’s pager. The help text for this item contains a list of
supported values.
TNPP Page class
prompt is displayed if CAP paging was selected for this mailbox
(see above). Enter the value that represents the message encoding class
of the mailbox owner’s pager. The help text for this item contains a list
of valid values.
RF Channel
prompt is displayed if CAP paging was selected for this mailbox
(see above). Enter the Radio Frequency channel designator for the
mailbox owner’s pager.
TNPP RF Zone
prompt is displayed if CAP paging was selected for this mailbox
(see above). Enter the Radio Frequency zone designator for the mailbox
owner’s pager.
TNPP Function Code
Enter the function code for the mailbox owner’s pager.
Post-Pager number
number entered here will be sent to the pager display if the page is
not a Cut-Through page. If
are no Post-pager digits in the
mailbox, the
System message will be sent to the pager.
TESTING
Testing of TNPP Paging can be done after
Offline TNPP configuration has been
completed and the configuration has been activated. Configure one or more test
mailboxes for TNPP.
NOTE: If a TNPP page in is queue or in process for a mailbox, subsequent
ON
requests for that mailbox will be ignored. If the frequency has not been exhausted or
the message in the mailbox has not been deleted, the page will still be in queue. An
MWI OFF must be sent to terminate the page that is in progress or in the queue. This
can be done using the Lights Test utility or by deleting
message from the mailbox.
Use the lights test from
System Maintenance Menu, Additional Options
selection. Send an “On” to the mailbox.
Result: The mailbox’s pager should receive a page and continue
receiving pages at the configured interval until the configured page
frequency has been exhausted or an “Off’ has been sent. The pager will
display the Post-pager digits (if they were configured) or the System
Message (if it was configured).
Leave messages for the mailbox
Result: The mailbox’s pager
receive a page and continue
receiving pages at the configured interval until the
page
frequency has been exhausted or the message has been played or deleted.
The pager should display the Post-pager digits (if they were configured)
or the System Message (if it was configured).
Leave a Cut-through page
this Extra-cost feature is installed on the system)
Result: The mailbox’s pager should receive a page and continue
receiving pages at the configured interval until
configured page
frequency has been exhausted or page notification has been played or
deleted.
pager should display the Cut-Through page digitsLeave a message in a mailbox with post-pager digits configured
Result: The mailbox’s pager should receive a page and continue
receiving pages at the configured interval until the configured page
frequency has been exhausted, or the message has been played or
deleted. The pager should display the Post-pager digits that were
configured in the mailbox.
Leave a message in a mailbox with no post-pager digits
Result: The mailbox’s pager should receive a page and continue
receiving pages at the configured interval until
configured page
frequency has been exhausted, or the message has been played or
deleted.
The pager should display the System Message that was
configured in the TNPP System Information Menu in the Offline portion
of the configuration.
TROUBLESHOOTING
There are several things to check if TNPP pages are not being delivered:
l
Check both the Offline configuration data for TNPP and
configuration for accuracy.
mailbox’s
l
l
l
l
Make sure the RS232 connection between
is correct and that the link communication attributes
(baud rate, etc.)
and the Paging Terminal
correct on each device.
Check the
for any messages that could indicate the problem. For
example, if a mailbox’s pager system index refers to a
link configured
for CAP paging and the mailbox is configured for ID paging, an error message
will be logged.
Make sure that the pager information configured in the mailbox is consistent
with the actual target pager.
Check for any error messages on the Paging Terminal that mighf indicate what
the problem is.
There are utilities available to aid in troubleshooting
problems. The utility menu
is accessed through the System maintenance menu by choosing Additional Options
selection . From the Additional options menu choose the Utility Menu and then choose
the
Paging Utilities selection. These utilities are mainly intended for use by
technicians or Centigram TAC for run-time troubleshooting. It is not necessary to
access any of these menus if
application is working correctly. Each menu
selection will prompt the user to enter a TNPP link number.
Link Utility Menu
Display link parameters
option will display the link number, host, port name, etc.
that was configured for the link selected
Display link status
option will display the enabled status, link alive timer, etc.
for
link selected.
Disable links
option will disable
TNPP link selected. The link will
not process
packets. The link will NOT remain disabled if
the system reboots.
Enable links
option will re-enable a TNPP link that has been disabled
with the Disable Links option.
Test links
This utility can be used to send a Zero packet, ENQ, EOT, ACK,
etc. on a TNPP link.
Configuration Adjustment Menu
NOTE: Configuration changes made here are run-time and will NOT be
retained if the system reboots. Any permanent changes
be made in the
Offline TNPP configuration menus.
Modify
Link Menu
In
menu there are several RS232 Link attributes that can be
changed during run-time. The items that can be modified are:
Pager Systems Supported
Number of data bits
Number of stop bits
Parity
After the item(s) to be changed have been
the Send
changes to TNPPADMIN option must be selected to have the
changes take effect.
Modify
System Information Menu
In this menu the following items can be changed during run-time:
Source Address
Paging type (CAP or ID)
Inertia
System message
After the item(s) to be changed have been selected, the Send
changes to TNPPADMIN option must be selected to have the
changes take effect.
Modify
Timing Parameters Menu
In this menu the following items can be changed during run-time:
packet
Inter-char time
Timeout on response with idle rcvr
Timeout on response with busy rcvr (tnrb)
Timeout on response to ENQ
RS flag hold off time
Timeout idle link for keep alive ENQ (tidle)
Number of retries by sending station per pkt (Cretry)
Re-transmits in response to RS holdbacks (Chold)
Number of ENQ retries before error logging
After the item(s) to be changed have been selected, the Send
changes to TNPPADMIN option must be selected to have the
changes take effect.
Issue 1 Release 2.0 January 1996
Processing
Solutions
Integration
DIGITAL
S X - 2 0 0 LIGHT
.
.
TM,
-Trademark of
Copyright 1996,
All rights reserved.
Printed in Canada.
Corporation
Corporation
::
:
Contents
1. OVERVIEW . . . . . . . . . . . . . . . . . . . . . . . . . . . . . . . . . . . . . . . . . . . . . . . . . . . . . . . . . . . . . . . . . . . . . . . . . . . . . . . . . . . . . . . . . . . . . . . . . . . . . . . . . . . . . . . . . 3
2 . GENERAL . . . . . . . . . . . . . . . . .
3
3 . REQUIREMENTS/LIMITATIONS . . . . . . . . . . . . . . . . . . . . . . . . . . . . . . . . . . . . . . . . . . . . . . . . . . . . . . . . . . . . . . . . . . . . . . . . . . . . . . . . 3
4. HARDWARE INTERFACE . . . . . . . . . . . . . . . . . . . . . . . . . . . . . . . . . . . . . . . . . . . . . . . . . . . . . . . . . . . . . . . . . . . . . . . . . . . . . . . . . . . . . . . . . . 4
5 . SX-200
PROGRAMMING ................................................................
5 . 1 . System Configuration Form 1 ......................................................................................................
5.2. Feature Access Codes Form 2.. ......................................................................
5
.........................
5.3. Class of Service (COS) Form 3 ...................................................................................................
Voice Mail Port COS ............................................................................................................
5
5
5.3.2. Message Waiting Port COS.. ...............................................................................................
5
5.3.3. User Extensions
5
COS.. ........................................................................................................
5.4. System Options Form 4.. ............................................................................................................
5.5. Station Programming Form 9.. .....................................................................................................
6
5.6. Non Dial-in Trunks Form 14.. .......................................................................................................
6
5.7. Hunt Groups Form 17 ..................................................................................................................
6
5.8. System
Abbreviated Dial Form 31 ..............................................................................................
5.8.1. Message Forwarding Abbreviated Dial Number.. .................................................................
8
5.8.2. Message Retrieve Abbreviated Dial Number.. .....................................................................
9
5.9. Message Retrieval.. .....................................................................................................................
9
5.9.1 . Message Retrieval Using a SUPERSET.. ...........................................................................
5.9.2. Message Retrieval Using Feature Code.. ................ . ..........................................................
5.9.3.
Message Retrieval by Outside Caller.. ...............................................................................
6. MITEL MAIL PROGRAMMING ..................................................................................
6 . 1 . Step
Define Line Group in Offline Menu ...............................................................................
10
10
11
11
6.2. Step 2
Configure the Enhanced In-Band Application.. ..............................................................
16
6.3. Step 3
Install the Enhanced In-Band Application.. ....................................................................
23
6.4. Step 4
Set Additional In-Band Features (Receptionist II) ........................................................
6.5. Test the Application ...................................................................................................................
7 . CONSOLE AND REMOTE ACCESS TO
31
MAIL . . . . . . . . . . . . . . . . . . . . . . . . . . . . . . . . . . . . . . . . . . . . . . 32
7.1 Console Setup . . . . . . . . . . .
......
7.2. Remote Maintenance Access . . . . . . . . . . . . . . . . . . . . . . . . .
2
32
32
MITEL
Enhanced In-Band Integration
(Software Rev.
on
DIGITAL and SX-200 LIGHT Systems
1.
OVERVIEW
This document is intended to show the necessary hardware connectivity to the MITEL
DIGITAL PABX and the SX-200 LIGHT PABX, as well as to define the Customer Data Entry
(CDE) requirements to integrate the MITEL
Enhanced In-band application with the PBX.
2.
GENERAL
Full integration between the
system and the SX-200 is achieved through the use of
the “Enhanced In-band” signaling application on M/TEL MA/L, and the Abbreviated Dialing and
ONS Voice Mail features on SX-200 DIGITAL and SX-200 LIGHT systems.
Conditional Greetings can be enabled to provide Busy and No-Answer responses to callers
forwarded to subscribers’ mailboxes.
can be interfaced to the SX-200 without using the Enhanced In-band application,
but is not discussed in this document.
recommends the integration discussed in this
document for ease of implementation, usability and increased functionality.
3.
REQUIREMENTS/LIMITATIONS
includes “Receptionist II” and “Enhanced In-band” as part of the basic package.
Minimum software load of
is required to support the Enhanced In-band integration
Message key to retrieve messages.
and use of
Illegal number is not supported. Callers are routed to the administrator’s mailbox greeting
(main greeting).
ONS disconnect is not supported. Once the caller reaches the Receptionist II greeting, the
call lasts for the entire greeting time.
Message Waiting light must be turned off only via M/TEL MAIL, not by the PABX console
operator, or the Cancel
on the telephone.
Callers hear
while the digits are pulsed to the voice mail system. Audio is not cut
through until after the last pause is executed.
3
4.
HARDWARE INTERFACE
(Refer to Figure 1)
l
l
l
l
The
system interfaces to the
family of
via ONS lines.
Receptionist II ports use shared ONS lines which are programmed in the same Hunt Group
on the PABX.
Message Waiting port(s) require a dedicated ONS line that is a member of a hunt group. This
hunt group is NOT the same as
ONS lines hunt group.
Pager Notification and
also have separate line port(s).
ONS Voice Mail Hunt Group 4
SX-200
MAIL
Access Code 2000
MSG Waiting Port
Line Card
DTMF to
RS232 Modem
Access C o d e 2 0 0 1
Figure 1
SX-200 DIGITAL/LIGHT Interface with MITEL MAIL
NOTE: Message Waiting can be either a line card port or serial port; both options are
shown in Figure 1.
5.
SX-200 DIGITAL/LIGHT PROGRAMMING
A total of eight CDE forms must be accessed in order to program
on the SX-200:
l
l
l
l
l
l
l
l
Form
Form
Form
Form
Form
Form
Form
Form
01:
02:
03:
04:
09:
14:
17:
31:
System Configuration
Feature Access Codes
Class of Service
System Options
Station Programming
Non Dial-In Trunks
Hunt Groups
System Abbreviated Dial
4
access
5.1.
System Configuration Form 1
l
5.2.
Feature Access Codes Form 2
l
l
l
.
5.3.
Program the ONS line cards in this form
Program
Program
Program
Program
Program
(Feature
a Feature
a Feature
a Feature
a Feature
a Feature
42)
Access
Access
Access
Access
Access
code
code
code
code
code
for
for
for
for
for
Call Forwarding
Internal Only (Feature 4)
Call Forwarding
External Only (Feature 5)
Abbreviated Dial Access (Feature 24)
Send Message (Feature 41)
Call Message sender of Oldest Message
Class of Service (COS) Form 3
l
Voice mail lines and message sending line(s) should each be assigned a unique COS
number. The following COS options should be enabled for each:
53.1. Voice Mail Port COS
.
.
.
l
5.3.2.
COS
COS
COS
COS
COS
Option
Option
Option
Option
Option
212 (Can Flash if Talking to an Incoming Trunk)
213 (Can Flash if Talking to an Outgoing Trunk)
216 (Data Security)
238 (Override Security)
261 (ONS Voice Mail Port)
Message Waiting Port COS
COS
COS
COS
l
COS
. COS
l
COS
. COS
l
l
Option
Option
Option
Option
Option
Option
Option
216 (Data Security)
220 (Do Not Disturb)
235 (Originate Only)
238 (Override Security)
259 (Message Sending)
261 (ONS Voice Mail Port)
265 (Voice Mail System Speed Dial Index O-255)
NOTE: COS Option 265 must be set to the index number programmed in CDE
form 31 for message retrieval (refer to Section 5.8.2
Message Retrieve Abbreviated Dial Number, on page 9).
5.3.3. User Extensions COS
.
.
l
.
COS Option 206 (Call Forwarding
Busy)
COS Option 207 (Call Forwarding
Don’t Answer)
COS Option 208 (Call Forwarding
External)
COS Option 231 (Message Waiting Setup Bell) or COS Option 232
Waiting Setup Lamp) in the COS of the mailbox holder’s extension
COS Option 245 (Abbreviated Dial Access)
5
(Message
5.4.
System Options Form 4
Enable System Option 21 (Incoming to Outgoing Call Forwarding)
l
5.5.
Station Programming Form 9
Program the ONS lines and give the appropriate COS
Voice mail ports must be in a separate COS from the message waiting ports
l
l
5.6.
Non Dial-h Trunks Form 14
If required, enter the Voice Mail Port Hunt Group Access Code in form 14 for DAY,
and/or N2 for trunks to go to Receptionist
l
5.7.
Hunt Groups Form 17
l
l
Program all
ONS lines in a hunt group and give them a Hunt Group
Access code.
Program the Message Waiting line(s) in a hunt group and give them a Hunt Group
Access code.
NOTE:
5.8.
Message Waiting Hunt Group is not the same as
Hunt Group.
ONS
System Abbreviated Dial Form 31
Integration is based upon the use of system abbreviated dial numbers. This eliminates
several dialing steps involved in sending and retrieving voice mail messages.
Special codes entered in the System Abbreviated Dial Form (CDE form 31) allow the
caller to customize the PABX operation to suit the operation of the particular voice mail
system.
Enhanced In-band application, described in this document, is set up to
The
expect three pieces of information, delimited by a # character. These digits are sent as
DTMF tones by the PBX, after the voice mail port answers a call sent to it. The three
fields expected are:
1) Reason call is forwarded to voice mail (i.e., Busy or No-Answer)
2) Called party’s mailbox number
3) Calling party’s mailbox number (if a system user)
6
All fields are provided by the insertion of special codes in the abbreviated dial
used to access
MAIL.
The special codes include:
CODE
l
**
o-9
3xx
DESCRIPTION
5-second pause
Insert manual dialed digits (XX represents digits expected)
Send call forward condition to voice mail
Tone out caller extension number
Send digits of calling party to voice mail
1 -second pause
DTMF digit
DTMF digits 0 9
7
String
58.1.
Message Forwarding Abbreviated Dial Number
Refer to Figure 2
Call Forward and Message Retrieve Process. Users forward
their sets to the index number. This must be set up as follows:
Index Number
Diait Strinq
Voice Mail Hunt Group Access +
+
+
+
+
+
Example: 100 =
Users’ telephones are set up to forward calls, on Busy or No-Answer conditions,
to this abbreviated dial number. If a call to a set is not answered, or encounters a
busy condition, the PBX follows the forwarding that has been set, and dials the
hunt group access code (2000 in this case).
When the
remaining digits
system answers the forwarded call, the PBX sends the
The
is converted into the call forward Busy, or call forward No-Answer access
code, defined in Form 4. This code is matched to a template in the Enhanced
band programming so the appropriate greeting will play.
is converted into the calling party’s extension number (i.e., the extension
The
MA/L system, which is also the user’s
number of the telephone calling the
mailbox number).
The l
8 is converted into the originator’s extension number (i.e., the number of
the extension that called the user’s telephone), provided they are calling from
another extension on the PBX. (NOTE: If the originator is an outside caller, the
code will not tone out any digits).
The # characters are toned out to mark the end of each field and are interpreted
as de-limiting characters.
by
VM HG Access 2000
FWD to: 88100 to send callers to
voice mail
Retrieve Msg dial 88200
OR Dial Call Sender of Oldest
Message feature code
OR Press message key (Supersets only)
2202
2204
,
I
I
DIGITAL/LIGHT
X 1805
MSG Waiting HG
Abbreviated Access code: 88
Voice Mail Hunt Group Access Code: 2000
Call FWD Index 100:
Msg. Retrieve Index 200:
Figure 2
Call Forward and Message Retrieve Process
8
MAIL
5.8.2.
Message Retrieve Abbreviated Dial Number
The index number for users to retrieve messages is set up as
Index Number
Diait String
Voice Mail Hunt Group Access + # + # +
+
Example: 200
NOTE: This number is programmed as the index number for COS option 265 in
the message waiting ports COS (refer to Section 5.3.2
and is used by the
Message Waiting Port COS on Page
Message key and Call Message Sender of Oldest Message PBX
features.
The PBX dials the hunt group access code (2000 in this case).
When
MA/L answers the call, the PBX tones out the remainder of the
abbreviated dial string
The
MA/L system matches the ####to one of its programmed Enhanced
band application templates, and the l
6 is converted into the calling party’s
extension number (i.e., the user’s extension number, which is also the user’s
mailbox number).
MA/L system plays the appropriate user
The
is prompted to enter a password.
5.9.
greeting and the user
Message Retrieval
Messages can be retrieved from the
MA/L system by one of the following
methods. Both methods assume that users are calling from their own extension
telephones. The
MA/L system prompts for users’ passcodes before playing any
saved messages.
5.9.1.
Message Retrieval Using a
and
l
1. Press the Message
2. Press Read
3. Press Call
.
1. Press the Message key
2. Press Call
l
41
1. Press the Message key
l
1. Go off-hook
2. Press the Message key
9
5.9.2.
Message Retrieval Using Feature Code
Go off-hook and dial the Call Sender of Oldest Message feature access code.
This code is programed in Form 2 (Feature Access Codes), and is feature
number 42.
5.9.3.
Message Retrieval by Outside Caller
Although this section is not relevant to the PBX setup, it is included here for
information purposes.
“Outside callers” refers to callers calling from outside the PBX, via trunk access.
These callers are routed to the
MA/L Receptionist II application, where
they hear the “company greeting”. Users who want to access their mailboxes
from an extension other than their own, can do so by dialing the hunt group
access code of the ONS voice mail ports. At this point they are treated in the
same way as outside callers.
Outside callers who want to call into the M/TEL MA/L system to retrieve their
messages, must press the * key (star) during the M/TEL
company greeting.
This puts them into the message centre application, where they are prompted for
mailbox numbers. After entering mailbox numbers, they again press the * key
(star) and are prompted for their passcodes. Once users successfully enter
passcodes, they can retrieve their messages.
10
6.
MAIL PROGRAMMING
The
MA/L system must be programmed to integrate to the
for proper
handling. The following programming details assist you to set up Enhanced In-band. Other
basic programming, such as Message Waiting, is discussed in
Reference and Configuration.
6.1.
Step 1 Define Line Group in Offline Menu
Log into the M/TEL MA/L system to access the OFFLINE Menu.
The system displays the Main Menu:
MAIN MENU
(M) Mailbox maintenance
(C)
maintenance
(R) Report generation
S y s t e m maintenance
Exit
If you need help later, type
COMMAND
Enter S to select System Maintenance. The system displays the System Maintenance
menu:
SYSTEM MAINTENANCE
(A) Automatic Wakeup
(B)
Automated Receptionist Extensions
(F) Floppy backup
(G)
HIS PMS room status
(H)
Hard Disk Utilities
(M) Manual Message Purge
(N)
Site Name, Code, Banner
(0) Additional Options
Passwords/Security
Reconfiguration
System shutdown
(T) Module Status
System Verify
(V) Event Recorder
(W) Network menu
(X) Exit
If you need help later, type
COMMAND
Enter
to select Reconfiguration. The system displays the System Configuration menu:
SYSTEM CONFIGURATION
(A) Restore COS
(B) Backup COS
Configure MWI suppression
(F) Feature COS
Group COS
(L) Limits COS
(M) Restriction COS
Network COS
(T) Tenant COS
(P) Phoneline exceptions
Reconfigure system
(0)
Administration
Exit
If you need help later, type
COMMAND
11
Enter
to select Reconfigure System. The system displays the
Configuration
Main Menu:
VOICEMEMO CONFIGURATION
MAIN MENU
Activate Configuration
Hardware Configuration
Increase System Hours
Define Floating Modules
Modify Active Configuration
Modify Inactive Configuration
Menu
Configure Unified Integration
Exit
If you need help later, type
COMMAND
Enter
to select Offline Menu. The system displays the Offline Menu:
OFFLINE MENU: configuration 0.
Currently active configuration is: 1.
Reading configuration records...
Checking consistency between hardware configuration and OAA...
Configuration
Offline Menu
Linegroup Only Applications
Linegroup and RS232 Applications
RS232 Only Applications
RS232 or Smartcard Integrations
Linegroup and Smartcard Integrations
to PBX Message Lights
Pre-Extension Dial Suing
SL-I Phone Emulator Menu
Serial Redirect Float Menu
Define Line Groups and Fax Groups
MESA-Net
and
Menu
CSOIO Integration Menu
Auto Gather System Billing
Unified
Menu
Configure Smartcard Table
Report Current Configuration
Duplicate Active
Quit -- Forget Changes
Exit -- Save Changes
OFFLINE MENU:
2. Enter B to select Duplicate Active Configuration.
The system copies the active configuration into the inactive work area, then redisplays the Offline Menu in the abbreviated single line form:
Reading configuration records...
Checking consistency between hardware configuration and OAA
MKCONF:
I copied to
0
OFFLINEMENU
NOTE: To re-display any menu in its expanded form, press Enter
return) at the abbreviated menu prompt.
12
(carriage
3. Enter G to select Define Line Groups and Fax Groups.
The system displays the Line Groups menu:
Line Groups
Current Group
Name of current group
Show ALL groups
Show THIS group
Show Unassigned lines
Add lines to current group
Drop lines from current group
Define Fax groups
Fax group connections for current line group
Exit
Enter G to select Current Group. The system prompts for a line group number.
indicates group 1 is selected by default.
The
Enter the number for the line group you want to configure. (This example uses 3.)
Enter a Group number
3
The system responds as follows:
Group
has no lines assigned.
GROUP
Enter N to select Enter group name. Enter the name you choose for this group.
(This example uses Enhanced in-band):
Enhanced /n-band
Enter group name
GROUP
Enter A to add lines to this group. Lines are added by entering their triplet identifiers
(Module:Slot:Circuit). Enter a ? at the prompt for detailed command help.
Enterlinestoadd-
Enter
to Show This group. Confirm the lines you added appear:
Group
“Enhanced In-band”
Module 1: Lines
3:
Fax Conn: <none>
GROUP
Enter X to exit the Line Groups menu and return to the Offline Menu.
4. Enter A to select the Linegroup Only Applications menu:
Group
lines
[VOICEMEMO]
Linegroup Only Applications
Group selected
User Interface
DID
Enhanced
Pager
Receptionist
Special VMVG Application
Disable
Exit
13
5. Enter E to select the Enhanced In-band application for this line group:
Group
lines
[ENHANCED IN-BAND]
Integration
(A)
(B)
(C)
(D)
Calling Extension Absorbed Digits (O-12)
Calling Extension Signed Offset
Called Extension Absorbed Digits (O-12)
Called Extension Signed Offset (+/-N)
MF Enable? (Y/N) [N]
Exit
No changes are required to this application.
Enter X to return to the Linegroup Only Applications menu:
Group
APPL
lines
[ENHANCED IN-BAND]
Enter X to return to the Offline Menu.
6. Enter X to Exit and Save Changes. The system writes the changes to the offline
Configuration
Main Menu:
configuration and returns to the
Writing new configuration report to
Writing new configuration commands to
TCPIP: writing
....
TCPIP: writing
....
WARNING: ACTIVATE CONFIGURATION to enable changes!
COMMAND
7. Enter A to select
Active Configuration Menu:
VOICEMEMO ACTIVE CONFIGURATION MENU
(A)
Activate Configuration
Name Configurations
View Configurations
Exit
If you need help later, type ?.
COMMAND (A/NIV/X):
Enter A to activate the inactive configuration:
Configuration last edited by OFFLINE CONFIGURATION is 0.
NAME
ACTIVE
NUMBER
NO
00 CONFIGURATION # 0
YES
CONFIGURATION
DATE
ACTIVATION DATE
15:
04118196
Activate inactive configuration,
O’? [Y/N]:
Y
Enter Y to activate:
Line states (A-active, I-idle, S-stopped) for module I
3:o I
I
I
Message Indicator Request Queue Lengths
active:0 untried:0 retrying:0 calls expected:0
Request Queue Lengths
calls expected.0
Wait for message waiting queues to be empty? [Y]:
14
(Press Enter key here)
Wait for paging queues to be empty? [Y]:
Line states (A-active, I-idle, S-stopped) for module 1
3:2-I
(Press Enter key here)
Message Indicator Request Queue Lengths
active:0
retrying:0 calls expected:0
Paging Request Queue Lengths
active:0
calls expected:0
SHUTDOWN COMPLETE
cp: Copying
to
cp: Copying
to
cp: Copying
to
cp: Copying
to
Master configuration record updated, restarting tasks
.
....
.....
system restart messages not shown .
Wait for the system to restart and display Program Initialization
..
Program Initialization Complete
(Press Enter key here, to
Active Configuration Menu)
VOICEMEMO ACTIVE CONFIGURATION MENU
(A)
Activate Configuration
Name Configurations
View Configurations
Exit
If you need help later, type
COMMAND (A/N/V/X):
Enter X to return to the
Configuration
Main Menu:
(remember, press Enter to expand any menu)
COMMAND
VOICEMEMO CONFIGURATION MAIN MENU
Activate Configuration
Hardware Configuration
Increase System Hours
Define Floating Modules
Modify Active Configuration
Modify Inactive Configuration
Offline Menu
Configure Unified Integration
Exit
If you need help later, type
COMMAND
15
6.2.
Step 2
Configure the Enhanced In-Band Application
After the line group is set to run the Enhanced in-band application, configuration is
required for the application to work correctly.
The previous steps left the system at the
(Enter S
from the Main Menu.)
VOICEMEMO CONFIGURATION
Configuration
Main Menu prompt.
MAIN MENU
Activate Configuration
Hardware Configuration
Increase System Hours
Define Floating Modules
Modify Active Configuration
Modify Inactive Configuration
Offline Menu
Configure Unified Integration
Exit
If you need help iater. type ?.
COMMAND
Enter E to select Modify Active Configuration. The system displays:
ONLINE MENU: operating on configuration number 0.
Currently active configuration number is: 0.
Configuration last edited by OFFLINE MENU is 0.
confignum is 0,
string:
Enter
at any time for help.
Group
lines
[VOICEMEMO]
Configuration Online Menu
(C)
(Q)
(X)
Group
Modify
Report
Quit -Exit --
selected
Application
Current Configuration
Forget Changes
Save Changes
ONLINE MENU:
Enter
to select the group number to configure.
Enter a Group number
[I]
Enter the number of the Enhanced In-band line group (3 in this example).
Enter M to Select the Modify Group menu option:
ENHANCED IN-BAND
(A) Configure Application
(B) Other Features
Exit
16
2. Enter A to select Configure Application. The system displays the Enhanced In-band
menu:
ENHANCED IN-BAND
Application Name
Application Description
Edit Templates Menu
Edit Parameters Menu
Show Application
Install Application
List Applications
Save Application
Exit
Enter N to select Application Name. This name will be used to install the application
later in this procedure (refer to page 23).
Application Name
Enter an Application Name
(EIB-200D in this example).
Enter D to select Application Description:
ENHANCED INTEGRATION
Enter an application description
(MITEL ENHANCED INTEGRATION
in this example)
3. Enter T to select the Edit Template Menu:
IN-BAND EDIT TEMPLATE Menu
Modify Template
Data =
Action
Timeout
Error Action
Next Templates
Comment =
Exit
EDIT TEMPLATE MENU:
Current Template
(Template
Is selected by default)
Templates are used to match codes sent by the PBX. Seven templates are required
for this application. Enter the following information for Template 1:
D
EDIT TEMPLATE MENU
DataEDIT TEMPLATE MENU
Action
T
EDIT TEMPLATE MENU
Next Templates
N
6 7
EDIT TEMPLATE MENU
Comment
Answer call
EDIT TEMPLATE MENU
and run templates
17
and 7
Press Enter to re-display Template 1, and check that the information you entered
correct:
IN-BAND EDIT TEMPLATE Menu
Modify Template
Data
(A)
Action [T]
Timeout
Error Action
Next Templates
3 4 5 6
Comment [Answer call and
Exit
templates
and
EDIT TEMPLATE MENU
Current Template [I]
Enter M to select Modify Template option.
Enter 2 to select template 2:
(Press Enter key to expand
EDIT TEMPLATE MENU
Press Enter to display Template 2 in its expanded form.
IN-BAND EDIT TEMPLATE Menu
Template
(M)
(A)
Action
Timeout
Error Action
Next Templates
Comment
Exit
4. Enter the following information for Template 2:
EDIT TEMPLATE MENU:
D
Data
A
EDIT TEMPLATE MENU
Action
T
EDIT TEMPLATE MENU
Timeout
EDIT TEMPLATE MENU
Error Action
EDIT TEMPLATE MENU
Comment
Call Forward
EDIT TEMPLATE MENU
Busy (External)
Press Enter to re-display Template 2 and check that the information you entered
correct:
IN-BAND EDIT TEMPLATE Menu
Modify Template
Data
(A)
Action
Timeout
Error Action
Next Templates
Comment
Exit
Forward Busy (External)]
EDIT TEMPLATE MENU
Current Template
18
Enter M to select Modify Template option.
Enter 3 to select template 3:
(Press Enter key to expand menu)
EDIT TEMPLATE MENU
Press Enter to display Template 3 in its expanded form:
IN-BAND EDIT TEMPLATE Menu
Template
Data
Action
(T)
Timeout
Error Action
(N)
Next Templates
(C)
Comment
(X) Exit
(D)
(A)
5. Enter the following information for Template 3:
EDIT TEMPLATE MENU:
D
Data
A
EDIT TEMPLATE MENU
Action
T
EDIT TEMPLATE MENU
Timeout
E
EDIT TEMPLATE MENU
Error Action
EDIT TEMPLATE MENU
Comment
Call Forward
EDIT TEMPLATE! MENU
Busy (Internal)
Press Enter to re-display Template 3 and check that the information
correct:
entered is
IN-BAND EDIT TEMPLATE Menu
Modify Template
Data
Action
Timeout
Error Action
[H]
Next Templates
Comment [Call Forward Busy (Internal)]
Exit
EDIT TEMPLATE MENU
Current Template
Enter M to select Modify Template option.
Enter 4 to select template 4:
(Press Enter key to expand menu)
EDITTEMPLATE MENU
Press Enter to display Template 4 in its expanded form:
IN-BAND EDIT TEMPLATE Menu
Template
Data
Action
Timeout
Error Action
Next Templates
Comment
19
6. Enter the following information for Template 4:
TEMPLATE MENU:
D
Data
EDIT TEMPLATE MENU
Action
EDIT TEMPLATE MENU
Timeout-
E
EDITTEMPLATE MENU
Error Action-
H
EDIT TEMPLATE MENU
Comment
Call Forward
EDIT TEMPLATE MENU
No-Answer (External)
Press Enter to re-display Template 4 and check that the information you entered is
correct:
IN-BAND EDITTEMPLATE Menu
(M)
(D)
(A)
(X)
Modify Template
Data
Action
Timeout
Action [H]
Next Templates
Comment
Forward No-Answer (External)]
Exit
EDIT TEMPLATE MENU
Current Template
Enter M to select Modify Template option.
Enter 5 to select template 5:
(Press Enter key to expand
EDIT TEMPLATE MENU
Press Enter to display Template 5 in its expanded form.
IN-BAND EDIT TEMPLATE Menu
Modify Template
Data(A)
Action
Timeout
Error
Next Templates
Comment
(X) Exit
(M)
7. Enter the following information for Template 5:
EDIT TEMPLATE MENU:
D
Data-
A
EDIT TEMPLATE MENU
Action
T
EDIT TEMPLATE MENU
Timeout-
E
EDIT TEMPLATE MENU
Error
EDIT
Comment
EDIT
H
MENU
Call Forward No-Answer (Internal)
MENU
20
Press Enter to re-display Template 5 and check that the information you entered is
correct:
IN-BAND EDIT TEMPLATE Menu
(M)
(D)
(A)
(C)
(X)
Modify Template
Data
Action
Timeout
Error Action [H]
Next Templates
Comment
[Call Forward No-Answer (External)]
Exit
EDIT TEMPLATE MENU
Current Template
[I]
Enter M to select Modify Template option.
Enter 6 to select template 6:
(Press Enter key
EDIT TEMPLATE MENU
expand
Press Enter to display Template 6 in its expanded form:
IN-BAND EDIT TEMPLATE Menu
Modify Template
Data
(A)
Action
(T) Timeout
(E)
Error Action
(N)
Next Templates
(C) Comment
(X) Exit
8. Enter the following information for Template 6:
TEMPLATE MENU:
D
Data
A
TEMPLATE MENU
Action
T
EDIT TEMPLATE MENU
Timeout
TEMPLATE MENU
Error Action
H
EDIT TEMPLATE MENU
Comment
Local
TEMPLATE MENU
Press Enter to re-display Template 6 and check that the information you entered is
correct:
IN-BAND EDIT TEMPLATE Menu
(M)
(D)
(A)
(T)
Modify Template
Data
Action [VI]
Timeout
Error Action [H]
Next
(C) Comment(X) Exit
EDIT TEMPLATE MENU
Current Template [
21
Enter M to select Modify Template option.
Enter 7 to select template 7:
(Press Enter key to expand menu)
EDIT TEMPLATE MENU
Press Enter to display Template 7 in its expanded form:
IN-BAND EDIT TEMPLATE Menu
Modify Template
Data
(A)
Action
Timeout
(E)
Error Action
Next Templates
Comment
Exit
9. Enter the following information for Template 7:
EDIT TEMPLATE MENU:
Data
EDIT TEMPLATE MENU
A
ActionEDIT TEMPLATE MENU
Timeout
E
EDIT TEMPLATE MENU
Error Action
EDIT TEMPLATE MENU
Comment
A
A
EDIT TEMPLATE MENU
(Receptionist
Press Enter to re-display Template 7 and check that the information you entered is
correct:
IN-BAND EDIT TEMPLATE Menu
(M)
(A)
Modify Template
Data
Action
Timeout
Error Action
Next Templates
Comment
Exit
[Auto Attendant (Receptionist
EDIT TEMPLATE MENU:
Enter X to Exit from templates menu.
Press Enter to display Enhanced In-band menu in its expanded form:
ENHANCED IN-BAND
Date Installed: Mon Feb 5
Date Modified : Wed Apr 24
Application Name
Application Description
Edit Templates Menu
Edit Parameters Menu
Show Application
Install Application
List Applications
Save Application
Exit
12 1996
1996
ENHANCED INTEGRATION]
22
10.
Enter 0 to Show Application. Ensure that all Templates are set up correctly:
NAME:
DESCRIPTION:
ENHANCED INTEGRATION
Installation Date: Mon Feb 5
12 1996
Last Modify Date: Wed Apr 24
Tl: R,
,
Next: 2 3 4 5 6
Comment: Answer call and
1996
templates 2.3.4.5.6 and 7
V4, 10, H
Next:
Comment: Call Forward Busy (External)
T3:
10. H
Next:
Comment: Call Forward Busy (Internal)
T4:
V3.
H
Next:
Comment: Call Forward No-Answer (External)
T5:
10. H
Next:
Comment: Call Forward No Answer (Internal)
T6:
VI, IO, H
Next:
Comment: Local
T7:
v5
Next:
Comment: Auto Attendant (Receptionist 11)
IN-BAND MENU
Step 3 install the Enhanced In-Band Application
After the templates are defined and entered, the application must be installed.
Press Enter to display Enhanced In-band menu in its expanded form:
ENHANCED IN-BAND
Date Installed: Mon Feb 5
Date Modified : Wed Apr 24
Application Name
Application Description
Edit Templates Menu
Edit Parameters Menu
Show Application
Install Application
List Applications
Save Application
Exit
12 1996
1996
[MITEL ENHANCED INTEGRATION]
IN-BAND MENU:
23
1. Enter I to select Install Application:
Application name to install
Enter the Application Name.
The name is case sensitive and must be entered exactly as it appears in the
application name field.
(refer to page 17).
In this example, the name is
2 . Enter S to save application. The system prompts for the following:
Do you want to overwrite existing copy? (YIN):
Enter Y to confirm the overwrite:
Application saved.
IN-BAND MENU
3. Enter X to Exit and return to the In-band menu.
6.4.
Step 4
Set Additional In-Band Features (Receptionist II)
The previous steps installed the Enhanced In-band application. Additional features
the application must now be set up.
(Press Enter key
IN-BAND MENU
expand
ENHANCED IN-BAND
(A) Configure Application
Other Features
(X) Exit
Enter B to select Other Features from the Enhanced In-Band menu:
Group
lines
[ENHANCED IN-BAND]
Application
Enable Receptionist (y/n) =
Day/Night
Dialing
Menu
Dial String and Mailbox Menu
KEY-O for attendant transfer during greeting
= [NJ
Prompts “Enter mailbox # or wait” (y/n)
Allow multiple messages for outside caller
[Y]
Default prompt language [English]
Delay Before Answer
increments) [SO]
Dial-by-Name Menu
Menu
Menu
(A)
Allow Dial an Extension Menu
Speech Quality Menu
Receptionist Menu
Analog Networking Configuration Menu
Mailbox On Demand Menu
Exit
2. Enter I to select Enable
from the In-band Menu:
Receptionist Enabled?
Enter Y to enable to enable Receptionist.
24
3. Enter N to select Day/Night Menu:
Day/Night Menu
Start time of the workday
(E)
End time of the workday
(W) Weekend Days (Monday
Exit
[am/pm])
Sunday) [DN]
AM]
PM]
[DDDDDNN]
Make any required changes from the default settings. Enter X to Exit back to the
In-band Application menu.
4. Enter D to select Dialing Plan Menu:
Dialing Plan
(D) Dialing plan
(E) Optional Star Prefix
(X) Exit
Make any required changes from the default settings. Enter
In-band Application menu.
5. Enter
to Exit back to the
to select Dial String and Mailbox Menu:
Dial String and Mailbox Menu
(A)
(H)
(M)
(X)
System Attendant’s extension [0]
Attendant’s transfer string
Administrator’s mailbox #
Attendant’s mailbox #
E-mail transfer string
General Greeting mailbox
Disconnect String
Pre-company name dial string
he-mailbox greeting dial string
Exit
Make any required changes from the default settings. Enter X to Exit back to the
In-band Application menu.
6. Enter K to select KEY-O for attendant transfer during greeting (y/n) prompt:
KEY-O for attendant transfer during greeting (y/n)
[N]
Enter Y to allow Key 0 attendant transfer.
7. Enter F to select the Dial By Name menu:
Dial By Name
___________________
Last Name First flag [Y]
(L)
(N)
Number of names threshold
Exact Match Break [Y]
Single Digit Access [N]
(M) Suppress Mailbox Number [N]
Exit
Make any required changes from the default settings. Enter X to Exit back to the
In-band Application menu.
25
8.
Enter P to select the
Menu:
Menu
__________
..
(M) Minimum
Length
(N)
Maximum
Length
(C)
Trip Count
(P)
Trip Period
Exit
Make any required changes from the default settings. Enter X to Exit back to the in-band
Application m e n u .
9.
Enter
to select the Receptionist menu:
Receptionist
Dialing
Options
Flow Options
PBX Dial String Definitions
(T)
Trunk /Extension Treatment Types
(X) Exit
10.
Enter D to select the Dialing Plan Options:
Dialing Plan Options
(D)
(T)
(Y)
(Z)
(X)
Dialing Plan
Delete Digits
Offset Table
Timeout for Receipt of First Digit 1 seconds)
PBX Console Attendant Day Access Code [OH]
PBX Console Attendant Night Access Code [OH]
Exit
Make any required changes from the default settings. Enter X to Exit back to the Receptionist
menu.
11. Enter P to select the PBX Dial String Definitions menu:
PBX Dial String Definitions
(B)
(E)
( G
(H)
(K)
Default Options Menu
Rolm CBX
Northern Telecom SL-I
AT&T Dimension
SX
AT&T System
NEC 2400
)
Fujitsu Focus
Hitachi DX
Telexicom 1001
Siemens Saturn
Exit
26
12.
Enter
to select the Default Options Menu:
Default PBX Options Menu
Post Directory number dial string [+]
Pre Directory number dial string Attendant xfer string
Connect Dial string on Called Party Accept
Dial string for Return on Called Party Refused
Dial string for Return on Called Party Busy
Special actions on Reorder Tone Encountered [OH]
(H)
Dial string for Return on Called Party RNA
Exit
(B)
(C)
(E)
(F)
13.
Enter A to select the Post Directory number dial string option. Set to +H:
+H
Post Directory number dial string
NOTE: The Post DN must be set to +H or left blank. If it is set to +H (the
preferred
are ignored. If this
setting), M/TEL MA/L performs a blind transfer and options C, E, F,
setting is left blank, M/TEL MA/L performs a screened transfer. To leave blank, enter .
(a period) and press Enter.
(Press Enter key to expand menu to check changes)
DEFAULT
Default PBX Options Menu
(A) Post Directory number dial string
(B) Pre Directory number dial string Attendant xfer string
(C) Connect Dial string on Called Party Accept
(E) Dial string for Return on Called Party Refused
(F) Dial string for Return on Called Party Busy
Special actions on Reorder Tone Encountered [OH]
(H) Dial sting for Return on Called Party RNA
Exit
Enter X to return to the PBX menu.
Enter X to return to the Receptionist menu.
Enter X to return to the In-band Application menu,
Enter X to return to the In-Band Menu:
IN-BAND MENU
ENHANCED IN-BAND
(A)
Configure Application
Other Features
Exit
Enter X to return to the
Configuration
Configuration -Online Menu
(Q)
Group selected
Modify Application
Report
Configuration
Quit -- Forget Changes
Exit -- Save Changes
27
Online Menu:
14.
Enter X to save changes and return to the
Configuration
Main Menu:
Writing new configuration report to
performing ‘cp
15. Enter X three additional times to exit back to the Main Menu.
COMMAND (M/C/R/S/X):
(c) All Software Copyright
<System Status>
HOST:
I
STATUS:
OS VSN :
MEMORY :
16000
LOG DATA: Y
(Press Enter key to expand
1995 Centigram Comm. Corp. All Rights Reserved.
Disk0 Disk 1 Disk 2 Disk
MAIN MENU
(M) Mailbox maintenance
(C)
maintenance
(R) Report generation
(S) System maintenance
Exit
16.
Enter
to select report generation, and check the setup:
REPORTS
(B)
Billing
Configuration
(D) Pre-extension dial strings
LCOS
FCOS
GCOS
(H) NCOS
System information
Report
Log tile
(M) Mailbox data
(P) Phoneline exceptions
(R)
Pager access codes
(S) Statistics
(T) Receptionist treatments
Offline Verify
Exit
Enter C to select the Configuration Report:
REPORT OUTPUT ROUTING
(A)
(X)
Console (screen)
Console with pause
Serial Port
Serial Port 2
File...
Append to file...
Exit (no report)
Enter C to select Console for output (or 2 if a printer is attached to serial port 2).
28
Enter the number of the group to display (3 in this example):
Enter Group Number to Display (i-24) or
for all:
SYSTEM CONFIGURATION
Apr 26
1996
Group
“Enhanced In-Band
Lines 3:0 3: 1
Application
[ENHANCED IN-BAND]
Dial plan
Administrator mbox #
General Greeting mbox #
Attendant mbox
Wait Prompt = [Y]
Caller multiple messages enabled [Y]
KEY-O for attendant transfer during greeting
[N]
Disconnect string
Pre-company name string
Pre-mailbox greeting string
Length Min
Max
Language [English]
AM], End of day
PM], Days of Week
Start of day
trip count
trip period
Dial-by-name: Last First
Match Threshold
Exact
Suppress Number
Single Digit Access [N]
Delay Before Answer
E-mail Transfer String
Allow Dial an Extension for callers [N], users
Analog Networking:
Setup timeout
International Access Code
Country code
code
dialing
Area/City code is dialed with Local Telephone Number =
Telephone number
Loop-back Test Mailbox
Name Greet Quality
Message Quality
Receptionist Enabled =
or attendant xfer string [S+]
Attendant’s extension
NAME: EIB-2COD
DESCRIPTION: MITEL ENHANCED INTEGRATION
Installation Date: Fri Apr 26 I
1996
Last Modify Date: Fri Apr 26
1996
Calling Extension Absorbed Digits:
Calling Extension Signed Offset:
Called Extension Absorbed Digits:
Called Extension Signed Offset:
MF Detection Enabled N
Pager Systems:
Pager System [0],
Access code
Pager System
Access code
Pager System
Access code
Pager Name “internal”
Hold time
Pager Name “billed”
Hold time
Pager Name
Hold time
Port
RS-232 Serial Port application [Programmable]
Programmed values for Port
Initialization string
Reply string
Pre-DN ON string
Pre-DN OFF string
Post-DN ON string
Post-DN OFF string
Dept Code as DN
Unplayed msg count sent
Delay between message waiting requests
Delay between Post-DN and Trailer string
Trailer string
Suppress message light updates [y]
[Basic Network
info]
Local Network Node
[I]
Links installed
Network
mode)
29
System Wide Host Configuration
Domain name: software
H C M S
s r d o e
t d e t t
1
IP Address
Host Name
P 1 3 134.199.54.147
Card
Gateway Address
Port Irq Vendor
0280
ALTA
Mask Broadcast Address
134.199.54.25 I 255.255.255.0
SMARTCARD TABLE
host card port-name cpu
owner
addr
The following optional features are enabled:
Analog Networking
Receptionist
Networking
Enhanced In-band
Call Agent
Disk Redundancy
Prompt Language Configuration:
English
END
Press any key to continue....
17. Enter X two times to return to the Main Menu.
Check the report to ensure that the line group is programmed correctly.
This completes the Enhanced In-Band programming. Mailboxes for all users must now be
created on the
system. If conditional greetings are to be used, ensure that
FCOS
given to mailboxes include feature bit number 161 (Conditional Greetings).
30
6.5.
Test the Application
1. Set up a telephone to call forward on Busy, or No-Answer, to the abbreviated number
chosen to send callers to voice mail.
Message Forwarding Abbreviated Dial Number, on page 8).
(Refer to Section
2. Call the telephone and let it ring No-Answer.
Check that the call goes to voice mail and the correct No-Answer greeting plays.
3. Take the telephone off-hook to put it in Busy condition, and call it again
Check that the call goes to voice mail and the Busy greeting plays.
4. Test the message retrieve functionality by dialing the abbreviated dial number chosen
to retrieve messages (refer to Section 5.9 Message Retrieval on page 9).
NOTE:
Message waiting lamp setup is not described in this document; it is a separate
application. The message lamp indicator must be lit on the set to
Message key or Call Sender of Oldest Message
allow use of the
Features (described in Section 59.1 Message Retrieval Using a
SUPERSET,
and Section 5.9.2 Message Retrieval Using Feature Code).
31
7.
CONSOLE AND REMOTE ACCESS TO
MAIL
This procedure shows how to connect the console and the modem to the
7.1.
system.
Console Setup
The console uses a 9 to 25 pin NULL MODEM RS-232 cable, included with the system.
NOTE:
Connect the
cable connector to
system software).
l
7.2.
You MUST use a NULL modem cable, or a straight-through cable with a NULL
modem adapter, for console connection (see Figure 3 on page 33).
(designated console in
l
Connect the
cable connector to the terminal.
l
Set console to 9600 baud rate with 8 data bits, 1 stop bit, and no parity.
Remote Maintenance Access
To connect to the system via a Modem, use a straight-through 9 to 25 pin RS-232 cable
between the
MA/L
port and the modem.
recommends using an
external US Robotics Sportster 14,400 Fax Modem.
NOTE:
l
You MUST use a straight-through cable for modem connection. DO NOT use a
NULL modem adapter. This cable differs from the one mentioned above, for
the console (Figure 3).
Connect the
cable connector to
system software).
(designated console in
l
Connect the
cable connector to the modem port.
l
For console and remote maintenance, A/B switch box can be used
Remote terminal MUST be set to 1200 baud rate with 8 data bits, 1 stop bit, and no
parity.
l
Modem DIP switch setting for US Robotics Sportster 14,400 Fax Modem (external) is
shown in Table 1.
Table 1. DIP Switch Setting on US Robotics Modem
1
OFF
ON
2
3
x
x
4
X
X
32
5
6
x
x
7
8
X
X
P one Line
Phone
Ft.9232 Straight through cable
Line
!
I
Modem
Remote
RS232 Straight through cable
Workstation
NULL Modem
cable
RS232 Straight through cable
MAIL
Figure
Console and Remote Maintenance Connection to
33
MAIL
Issue 1 Release 2.0 January 1996
Voice Processina Solutions
1
Integration
::. . . :
TM,
-Trademark of
Copyright 1996,
All rights reserved.
Printed in Canada.
Corporation
Corporation
.:
:
1996 Centigram Communications Corporation. All rights reserved.
This publication is protected by federal copyright law. No part of this
publication may be copied or distributed, stored in a retrieval system, or
translated into any human or computer language in any form or by any means
electronic, mechanical, magnetic, manual or otherwise, or disclosed to third
parties without the express written permission of Centigram Communications
Corporation, 91 East Tasman Drive, San Jose, CA 95134.
REPRODUCTION
Licensed users and authorized distributors of Centigram products may copy
this document for use with Centigram products provided that the copyright
notice above is included in all reproductions.
PROPRIETARY TERMS
The following are trademarks or registered trademarks of Centigram
Communications Corporation:
Centigram, PROSE, Speaklt,
AIP,
SPEECH+,
VGS,
PROSE 2000 Version
01992 Centigram Communications Corporation.
All other brand and product names are claimed or registered marks of their
respective companies.
NOTICE
The information contained in this document is believed to be accurate in all
respects but is not warranted by
Corporation
The information
is subject to change without notice and should not be construed in any way
or any of its affiliates or subsidiaries.
and its
as a commitment by
affiliates and subsidiaries assume no responsibility for any errors or omissions
in this document. Revisions of this document or new editions of it may be
issued to incorporate such changes.
MITEL
on the
PABX
Contents
OVERVIEW . . . . . . . . . . . . . .
4
GENERAL . . . . . . .
4
REQUIREMENTS . . . . . . . . . . . . . . . . . . . . . . . . . . . . . . . . . . . . . . . . . . . . . . . . . . . . . . . . . . . . . . . . . . . . . . . . . . . . . . . . . . . . . . . . . . . . . . . . . . . . . . . . . . . . . . . . . . . . . . . .
5
HARDWARE INTERFACE . . . . . . . . . . . . . . . . . . . . . . . . . . . . . . . . . . . . . . . . . . . . . . . . . . . . . . . . . . . . . . . . . . . . . . . . . . . . . . . . . . . . . . . . . . . . . . . . . . . . . . . . . . . . . . . . . . . . . .
6
SX-2000 ICS PROGRAMMING . . . . . . . . . . . . . . . . . . . . . . . . . . . . . . . . . . . . . . . . . . . . . . . . . . . . . . . . . . . . . . . . . . . . . . . . . . . . . . . . . . . . . . . . . . . . . . . . . . . . . . . . . . . . . . . 7
MITEL MAIL HARDWARE . . . . . . . . . . . . . . . . . . . . .
11
MITEL MAIL PROGRAMMING .............................................................................................................
11
Define Line Group in Offline Menu.. .......................................................................................................
Configure the Enhanced In-Band Application .........................................................................................
Install the Enhanced In-Band Application. ..............................................................................................
11
12
MESSAGE WAITING CONSIDERATIONS ...........................................................................................
18
3
14
OVERVIEW
This document is intended to show the necessary hardware connectivity to the
PABX, as well as to define the Customer Data Entry (CDE) requirements to integrate the
system with the PBX.
GENERAL
Full integration between the
MA/L system and the
is achieved through the use of
MAIL, and Advanced Analog Networking
the “Enhanced In-band” signaling application on
on the
system. Enhancements are as follows:
Conditional Greetings can be enabled to provide Busy, No-Answer and
responses to callers forwarded to subscribers’ mailboxes.
Available
During message playback, subscribers can answer messages left by other internal users.
This only applies to internally forwarded calls.
A single ARS access code can be used for direct subscriber
rerouting.
call forwarding and call
can be interfaced to the SX-2000 without using the Enhanced In-band signaling
application, but is not discussed in this document.
recommends the integration discussed in
this document for ease in implementation, usability and increased functionality, using MS2007
or greater. In older software loads, Enhanced In-band signaling can be used but
MR2
is limited in functionality and complicated to implement.
REQUIREMENTS
l
l
l
M/TEL MA/L includes “Receptionist
package.
and “Enhanced In-band” signaling as part of the basic
PBX software MS2007 MR3
is required for the Digital E&M
E&M) interface.
Minimum software load of MS2007 MR2
is required to support full functionality. The
following feature packages must be purchased on the PBX, as required:
Advanced Analog Networking
Required on the Voice Mail PBX for Enhanced In-band signaling or Direct Subscriber
NOTE:
1. Software load
1.4.0 (MR2) provides
for ease in integrating to
enhancements to
for Enhanced In-band Signaling.
M/TEL
2.
can only be used for message retrieval (not
Forwarding) in software versions older than
Answer Plus
MCD
Required to make use of the System Reroute
in station COS. The System Option
timer is used otherwise. This timer is used only for 2nd alternative rerouting.
Flexible Dimensioning
If callback messages are applied from voice mail, the maximum number of
Callback Messages should not exceed the limit controlled by the purchased dimension
in a Network.
level (MFRD). This should be considered separately on remote
Consider the maximum number of multiline sets in each PBX and set to set
messaging. The following multiline sets must be considered in this count:
and all
series sets.
NOTE:
SUPER-SET Callback Messages can be flexed in PBX software level MS2007
only.
All Network
require the following features for full use of Network voice mail
functionality from a voice mail hunt group and public network access:
Public Network Access via DPNSS
Voice I
Voice Ill
Voice V
NOTE:
(if necessary)
Callback Messages from a voice mail hunt group is only available in MS2007.
Callback
HARDWARE INTERFACE
The
MAIL system interfaces to the SX-2000 family of
via Type I E&M trunks
(analog or digital) for call processing, and QNS port(s) for message activation/deactivation.
See Notes below.
Receptionist II and
through the use of
functionality is performed on the same E&M trunk ports
and Enhanced in-band signaling.
Pager Notification and
require additional dedicated ONS port(s). E&M ports can
be used, but this is not practical from a hardware real estate perspective.
SX-2000 PABX
Digital E&M
or
Analog E&M Trunk
Ports (Type I)
MAIL
Line Cards strapped
for E&M Interface
Auto Attendant
Voice Mail Ports
ONS Ports:
Message Waiting
Pager Notification
NOTES:
Line Card(s) strapped
for
ONS Interface
or use
Smart Card Interface
(See Note)
Please refer to
MA/L Volume
Reference and Configuration for
message waiting configuration.
Pager Notification and
cannot use the Smart Card Interface.
Using the Smart Card for message waiting simply involves a data connection
from a data port on the Smart Card (RS232) to a modem connected to an ONS
port on the SX-2000. This port accesses the modem, goes off-hook and dials the
message activate or deactivate access code on the PBX.
Digital E&M Trunks
E&M) may be used with MS2007 MR3
when
flash on Digital E&M is supported on the PBX software.
SX-2000 ICS PROGRAMMING
1.
Feature Access Code Assignment
Call Hold
Retrieve
Call Forwarding
Busy (External)
Call Forwarding
Busy (Internal)
Call Forwarding
Follow Me
Call Forwarding
No-Answer (External)
Call Forwarding
No-Answer (Internal)
Message Waiting
Activate
Message Waiting
Deactivate
NOTE: These
2.
are programmable and are referenced when programming the
database (see page 13).
Class of Service
Call Forwarding (External Destination)
Call Forward No-Answer Timer (O-l 25
Yes
10
Multiline Set Callback Message Erasure
No
Voice Mail Port
Public Network Access via DPNSS
Yes
Yes
Public Network to Public Network Connection Allowed
Yes
No-Answer Recall Timer (O-45 s)
30
(15 is default must be less
than System Reroute and
Answer Recall timers)
(optional applies to the
Voice Mail PBX only)
(required on the Voice Mail PBX
in a Network or Pager
Notification through a Remote
PBX)
(required on the Voice Mail PBX
if trunk to trunk connections are
to be permitted)
must be greater
(17 is default
than call forward and system
reroute timers)
ONS
Voice Mail Port
Message Waiting
Permanent Do Not Disturb
Yes
Yes
Yes
(optional
MS2007 only)
All Other
No Answer Recall Timer (O-45 s)
30
7
(17 is default must be greater
than call forward and system
reroute timers)
System Options Assignment
Call Rerouting Timer
4.
s)
22
Ringing Cadence for Tie Line Calls (Internal/External)
Internal
Disable End of Dial Character (#) (Yes/No)
No
(default must be greater than
Call Forward No-Answer, and
less than No-Answer Recall
timers)
(required if
performs screened transfers)
Circuit Descriptor Assignment
Default values can be assigned for the ONS voice mail ports which will be used for
Single line sets on the PBX, subscribing to
Messaging, Pager Notification or
voice mail and equipped with a message lamp, must include the following option:
Message Waiting Lamp (Yes/No)
5.
Yes
Single Line Set Assignment
Assign directory numbers to the ONS voice mail ports and apply the proper Circuit
Descriptor Number.
6.
Station Service Assignment
Apply the proper Class of service (COS) number to the ONS voice mail ports. Toll fraud
should be a consideration when assigning a COR to the voice mail ports. External dialing
may be required for Pager Notification or Message Forwarding.
7.
Hunt Group Assignment
(MS2007 Only)
Assign the ONS Messaging port(s) to a voice mail hunt group type with a Pilot Number
that does not conflict with any other dial string in the PBX. Make the Hunt Mode
“Circular” or “Terminal”.
NOTE: Do NOT use single digit hunt group access codes.
8.
Telephone Directory
Assign a name to the voice mail hunt group number so users can easily identify a
callback message from M/TEL MA/L.
8
9.
E&M Trunk Circuit Descriptor Assignment
Address Signaling
Incoming Start Type
Disconnect Timer
DTMF
IMM
300
ms)
Minimum Flash Timer
Maximum Flash Timer (200-250 ms)
Outgoing Start Type
Fake Answer Supervision After Outpulsing
Ignore Answer Supervision
Release Supervision Expected
Audio Inhibit Until Answer Supervision
Transmission Facility (2 Wire/4 Wire)
100
250
IMM
Yes
Yes
Yes
No
2 Wire
NOTE: The E&M trunks on the PBX must be strapped for
10.
(must be greater than the
“Maximum Flash Timer”)
Type I.
Trunk Service Assignment
Assign the E&M trunks the proper COS, COR and simply Absorb
may be entered.
A Trunk Label such as
Non-Dial-In Trunks
Answer Points
Night 1
Night 2
as shown.
Dial-In-Trunks
Incoming Digit
Modification
Absorb
Insert
0
NOTE: Toll fraud must be considered when assigning a COR to the voice mail ports.
External dialing may be required for Pager Notification or Message Forwarding.
11.
Program the E&M trunks in the Trunk Assignment and apply the proper Trunk Service
Number and Circuit Descriptor. The trunks are then entered in the Trunk Group
Assignment, using Circular or Terminal hunting.
12.
Program the following in the Automatic Route Selection Forms:
Digit Modification Assignment
Number of Digits to Absorb
2
Digits to be Inserted
(Require
MS2007
on the PBX and
Enhanced In-band signaling on
MAIL)
NOTE:
A Tone Plan may have to be implemented at the beginning of the “Digits to
MAIL.
be Inserted” field, to pause before digits are outpulsed to
Do NOT use a tone plan when using Enhanced In-band signaling.
is the Call Forward Reason, as programmed in the
is the Call Forwarding party.
is the source party.
is simply a delimiter used in the Enhanced In-band Templates.
The digits outpulsed to M/TEL
must match specific templates for
Enhanced In-band Signaling to work.
9
Program the Route Assignment, referencing the proper Trunk Group and Digit
Modification Number. Digits Before Outpulsing can be set to eliminate overlap outpulsing,
but should not be required.
Automatic Route Selection Assignment
Leading Digits: 81
Second Dial Tone: No
Digits Dialed
COR Group Number:
Digits to Follow
0
NOTE: All access to
13.
Route
Number
01
will follow this single ARS entry.
System Speed Call Assignment
Program a system speed call number which contains the ARS access to the
E&M ports.
14.
MAIL
Call Rerouting
Assign the associated speed call number for
as required:
l
l
M/TEL MA/L access in the following forms,
Call Rerouting Always Alternative Assignment
Call Rerouting First Alternative Assignment
Call Rerouting Second Alternative Assignment
Extensions can be rerouted to M/TEL MA/L in the Call Rerouting Assignment. All
extensions may reference a single Call Rerouting Alternative Assignment. Alternatively,
users may program call forwarding to the ARS access to M/TEL MAIL.
The voice mail hunt group for messaging must be Call Rerouted Always to the E&M
ports.
10
MAIL HARDWARE
Strap the line card ports for E&M and ONS as required. The Smart Card may alternatively be
used for Message Waiting.
MAIL PROGRAMMING
The
system must be programmed to integrate to the SX-2000 for proper call
Templates for the
handling. The following programming details are to assist you in setting up
Enhanced In-band signaling application. For other basic programming, such as Message
Reference and Configuration.
Waiting, refer to M/TEL MA/L Volume
Define Line Group in Offline Menu
1.
Enter G to select the Offline Menu, from the
Configuration
Enter B to Duplicate Active Configuration.
The system copies the active configuration into the inactive work area.
2.
Enter G to Define Line Groups and Fax Groups.
3.
Enter G to select Current Group.
Enter the number for the line group to configure.
4.
Enter N to enter the Name for this group:
5.
Enter A to Add lines to this group.
Enter triplet identifiers
6.
Enter T to show this group and confirm the lines you added.
7.
Enter X to Exit this menu and return to the Offline Menu.
8.
Enter A to select the Line Group Only Applications menu.
9.
Enter E to select the Enhanced In-band application for this line group.
The system displays the following:
Enhanced in-band.
Integration
(A) Calling Extension Absorbed Digits (O-12) =
(B) Calling Extension Signed Offset (+/-n) =
(C) Called Extension Absorbed Digits (O-12) =
Called Extension Signed Offset
=
(E) MF Enable? (Y/N) =
(X) Exit
Do NOT change any of these parameters,
10. Enter X to Exit and save changes.
The system writes the changes to the offline configuration and returns to the
Configuration
Main Menu.
Remember to Activate Configuration to enable changes.
Main Menu.
Configure the Enhanced In-Band Application
Access the Online Menu (enter G from the
to modify the inactive configuration.
The system displays the following:
Group
L i n e s = [Name]
Voicememo Configuration
Configuration
Main Menu)
Online Menu
Group Selected =
(M) Modify Application
(C) Report Current Configuration
(Q) Quit
Forget Changes
(X) Exit
Save Changes
2.
Enter G to select your group.
Enter the number of the Enhanced In-band line group.
3.
Enter M to Modify Application. The system displays:
Enhanced
In-Band
(A) Configure Application
(B) Other Features
(X) Exit
4.
Enter A to select Configure Application. The system displays the
Enhanced In-band menu:
Enhanced
In-Band
Date Installed: XXXXXXXX
Dated Modified: XXXXXXXX
(N) Application Name =
(D) Application Description =
(T) Edit Template Menu
(P) Edit Parameters Menu
(0) Show Applications
(I) Install Application
(L) List Applications
(S) Other Features
(X) Exit
5.
Enter N to name the application. The Application Name is used to install the integration; it
is case sensitive.
Enter Mitel.
6.
Enter D to select Application Description.
Enter
Enhanced Integration.
Templates are used to match codes sent by the PBX.
12
7.
Enter T to access the Edit Template Menu.
The system displays the following:
IN-BAND
Edit
Template
Menu
(M)
(D)
(A)
(T)
(E)
(N)
Modify Template =
Data =
Action =
Timeout =
Error Action =
Next Template =
Comment =
(X) Exit
Enter M and enter the Template Number to modify.
Enter the template information as shown in the following example. Template Data will vary
from site to site, depending on Feature Access Codes used in the SX-2000.
Press Enter to expand the template menu for each template. Press Enter to re-display
each template and verify your entries.
Enter Template information, as in the following Example:
Template 1
Data =
Action T
Timeout
Error Action
Next Templates = 2 3 4 5 6 7 8 9
Comment = Incoming Seizure
Template 2
Data =
Action V4
Timeout 10
H
Error Action
Next Templates
Comments CFB External
Template 3
Data = l 63#dx#sx#
Action V4
Timeout = 10
H
Error Action
Next Templates
Comments = CFB Internal
Template 4
Data =
Action V3
Timeout = 10
H
Error Action
Next Templates
Comments = CFNA External
programmed FAC for Call Forward Busy External)
programmed FAC for Call Forward Busy Internal)
programmed FAC for Call Forward No Answer External)
13
Template 5
Data =
Action = V3
Timeout = 10
Error Action = H
Next Templates =
Comments = CFNA Internal
Template 6
Data =
Action =
Timeout 10
Error Action
H
Next Templates = 8
Comments = Callback
programmed FAC for Call Forward No Answer Internal)
(2150
programmed FAC for Call Forward Always)
Voice Mail Hunt Group for Messaging)
Template 7
Data =
Action =
Timeout =
Error Action = H
Next Templates =
Comments = Local
Template 8
Data =
Action = V2
Timeout = 10
Error Action = H
Next Templates =
Comments = CFA
Template 9
Data =
Action = V5
Timeout =
Error Action = H
Next Templates =
Auto Att
Comments
Programmed FAC for Call Forward Always)
VM
9.
After defining the templates, enter X to Exit and return to the Enhanced In-band menu.
10.
Enter 0 to Show Application. Ensure that all Templates are set up correctly.
Install the Enhanced In-Band Application
1.
Enter I to Install Application, from the Enhanced In-band menu.
Enter the Application Name. This name is case sensitive and must be entered exactly
as it appears in the Application Name field (refer to page 12).
2.
Enter S to save the application.
3.
Enter X to Exit and save changes.
14
4.
Make any other necessary program changes.
5.
Activate the inactive configuration.
6.
Run a Configuration Report to confirm programming.
NOTE:
This will result in service outage.
The following reports provide example configurations for Enhanced
/n-band Signaling and
ONS Message W a i t i n g . Key areas that should also be programmed for initial setup, in the Online
Menu, are highlighted in bold text.
SYSTEM CONFIGURATION
am
November, 1995
Group
Enhanced Integration”
B]
[lines
Application = [ENHANCED IN-BAND]
Dial plan =
Administrator mbox #
General Greeting mbox # =
Attendant mbox # =
Wait Prompt =
Caller multiple messages enabled =
KEY-O for attendant transfer during greeting = [y]
Disconnect string =
Pre-company name string =
Pre-mailbox greeting string =
Length Min =
Max =
Language = [E]
AM], End of day
PM], Days of Week =
Start of day
trip count
trip period =
Dial-by-name: Last First
Match Threshold
Exact =
Suppress Number = [N], Single Digit Access =
(For Screened calls only)
Delay Before Answer =
E-mail Transfer String =
Allow Dial an Extension for callers = [y], users = [y]
Analog Networking: Call Setup timeout =
.
International Access Code
Country code =
Area/City code =
1 plus dialing =
Area/City code is dialed with Local Telephone Number = [N]
Loop-back Test Mailbox =
Telephone number
Receptionist Enabled q [Y]
Pre-DN
Post-DN
Connect
Serial
Return
[S+*ll], Return call reject
Reorder Action
[S+*ll]
PBX dial plan =
4 4 4 4 4 4 0 a]
Offsets =
Deleted digits =
Time-out for receipt of first DTMF digit (.l seconds) = [0]
Greet/Name = [G], PBX console operation = [N]
Day operator = [OH], Night operator
Attendant extension
Attendant’s extension
15
lind Transfer)
Hold
Retrieve)
NAME:
DESCRIPTION:
Enhanced Integration
Installation Date:
Last Modify Date: 21-Sep-95
T, ,
Next:23456789
Comment: Incoming Seizure
pm
pm
T2: l
62#dx#sx#, V4, 10, H
Next:
Comment: CFB External
T3:
Next:
Comment:
V4, 10, H
Internal
T4:
V3,
H
Next:
Comment: CFNA External
V3, 10, H
Next:
Comment: CFNA internal
T6:
Next: 8
Comment: Callback
, 10, H
T7:
10, H
Next:
Comment: Local
T8: l
64#dx#sx#, V2, 10, H
Next:
Comment: CFA
V5, 10, H
Next:
Comment: Auto Att
Group
VM
“ONS MESS WAIT”
[lines
Application = [DTMF TO PBX DIALER]
Detect
[Y]
lnitiai
Dial tone confirmation =
Access dial string =
for Message
Pre-DN ON dial string
Pre-DN OFF dial string
Post-DN ON dial string
Post-DN OFF dial string
[#](Enable End of Dial # in System
Wait for dial tone
[N] Options)
Suppress message light updates
Alternate Code =
16
Phone Line Exceptions
Flash Hook Timer change required:
Exception Number 23: Set to 20 for all Enhanced In-Band Lines, as shown below:
Line 1 configuration:
Host
23 Flash hook time
20 .Ol
Host
Line 2 configuration:
23 Flash hook time
2 0
Host
Line 3 configuration:
23 Flash hook time
2 0
Host
Line 4 configuration:
23 Flash hook time
20 .Ol
FCOS
Conditional greetings can be used by enabling FCOS 161: Conditional Greetings. When this
FCOS is set; mailboxes must be initialized before these conditional greetings can be recorded.
17
MESSAGE WAITING
1.
Message waiting indications activated from an ONS voice mail port with Class of service
Voice Mail Port” ENABLED, and in a voice mail hunt group type,
option
can ONLY be deactivated from a port (with this COS option ENABLED) within the same
me back” (callback) messages, which are readable
voice mail hunt group. These are
from a display set.
NOTE: This applies to PBX software level MS2007 only.
2.
The maximum number of call me back messages permitted on any one PBX is controlled
by the purchased dimension (MFRD) level.
3.
Message waiting indications activated from an ONS voice mail port with Class of service
Voice Mail Port” DISABLED, can be deactivated from any port
option
with this COS option DISABLED. These are “Dialed Message Waiting” messages, which
are only lamp indicators on all sets.
4.
“Call me back” and “Dialed Message Waiting” indications are retained after a main
control activity switch (reload or restart) occurs. This is true-for software loads MS2005
(L08.1) and above. Prior to this, these messages were not retained, making it necessary
for the voice mail system to reactivate messages.
5.
Class of service option “Message Deactivate on-off hook” does not apply to Callback
Messages activated by the ONS voice mail port(s).
NOTE: This applies to
and above only.
6.
Attendant consoles are unable to receive a Message Waiting indication. This includes the
7DN
SUPERCONSOLE
7.
Analog
Telephones and Single Line Telephones without Message
Waiting lamps require “Message Waiting Audible Tone Notification” Class of service
option enabled.
8.
Subscribers with several voice messages in their mailboxes will have only one “call me
back” or “Dialed Message Waiting” applied to their sets.
9.
Advisory messages displayed on Analog
Message Waiting count displayed on the sets.
10.
Messages can be activated from E&M (analog or digital) ports. However, these will only
recommends the use of ONS
be “Dialed Message Waiting” indications (lamp only).
ports for call me back functionality.
18
4 telephones take priority over the
1
Mailboxes
Configuration Main Menu
Main Menu
Mailbox
Maintenance
List Maintenance
(Create New Mailboxes; Modify Mailboxes;
other data entry parameters)
Application
r
Configuration
Application
Configuration
Configuration
Main Menu
Configuration
Menu
G
Q
Line Groups Menu
-
l
Duplicate Active Configuration
Menu
Monthly Gather Menu
(data entry parameters)
Mailbox on Demand
(data entry parameters)
Pager Application
Hard
Utilities
Line Groups Menu
Hard Disk Utilities Menu
Menu
SCSI Enable Menu
Only for
Massage
Delivery
(Pager systems supported)
a Billing
M-232 Message Lights Application
Configuration
AC Massage
Report
Lights
System Information Report
(data entry parameters)
Menu
Message lights Application
1
System
I
reports)
Line Grows Menu
Exceptions
Main Menu
Menu
11
12
and
.
System Maintenance
Main Menu
Main Menu
System Maintenance
Menu
System
System
Maintenance
Menu
Configuration
Menu-
(A
Automatic Wakeup Menu
Feature Class of
Service Menu
Auto. Receptionist
Extensions Menu
Class of
Service Menu
Floppy Backup
System Shutdown
L
Module Maintenance Menu
More Limits Parameters
Menu
System
Even More Limits
Parameters Menu
I
I
Event Recorder Menu
Call Placement
Menu
I
Menu
.
Network Menu
Limits
I
Menu
Additional Options
Menu
Message
Limit Menu
Terminal Type Menu
I
I
Digital Connectivity
Status Maintenance Menu
Set Console Type Menu
RCOS System Wide
Parameters
Console Serial Port Setup
Menu
RCOS Selected Menu
Digit Absorption Menu
Alarms Maintenance Menu
Exact Match Menu
Online Software
Update Menu
Menu
I
and Date Menu
Network Class of
Menu
Menu
Tenant Class of
Service
Menu
Zone
Configuration Menu
r
System Configuration
Menu
Ii
Hardware
Configuration
Resource
I
Configuration
Menu
Offline Menu
I