1
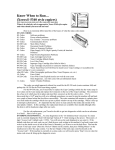
Fixing the Fusers…Xerox DC220 style,
DC332 style & N24 style
(Document Centre) DC220, DC230, DC420,
DC426… also DC332, DC340, DC425, DC432,
DC440, Docuuprint N24, N32, N40, N3225, N4025
& N4525
If you’ve been following recent ENX articles, you’ve seen we’ve repeatedly turned the
floodlight of our attention to the fuser modules and how to fix them. Here is a series of
machines which is definitely plentiful enough to be worth learning about. The Xerox
Document Centre 220/230/420/426 and also the DC 332/340/425/432/440 are copiers which
are basically Printers with a separate scanning section suspended above the printer engine.
The straight printers in this series include the N24/32/40, N3225/4025 and the N4525. These
machines are plentiful and the fusers are moving rather well out there. They are not terribly
difficult to disassemble and just about all of the parts are available… so unless you are super
busy and don’t have time to do this sort of work, it pays to take home the used fuser and fix it
in the comfort of your own workbench for the next customer who calls needing one.
First we’ll do a quick rundown of the 3 basic versions of the Fusers in this group
including the part numbers which apply to them. Then we will dissect one of these things and
see how they come apart. Afterward we’ll look at how to reset the Fuser Overheat Status
Codes and the Maintenance Cycle.
The fusers are offered in the OEM Parts Lists as Fuser Modules and they are also
offered for some of the machines as part of the OEM “Maintenance Kits”. The OEM kits
include an OEM reworked Fuser Module, 12 Feed Rolls (enough to do 4 trays) and a Bias
Transfer Roller (BTR) Assembly. Here are some of the part numbers which pertain to the
fusers which are covered in this article:
DC220/230/420/426 Fuser Module: 126K6050
DC332/340/425/432/440 Fuser Module: 600K73193
N24/32/40, N3225/4025 Fuser Module: 126K10011, Maintenance Kit: 109R486
N4525: Maintenance Kit: 109R48
The 4 types of fusers above are different in some ways from one another although the
procedure for disassembling them remains virtually the same for all of them. The easiest way
to tell these apart is to look at the main AC Connector which interfaces with the one in the
machine. The DC220 version is substantially different from all of the other versions. It has a
white connector with 8 female contacts. The N24 version has a very different AC Connector
(black with places for 8 pins) The N24 version is proving to be interchangeable with the
DC332 machines. The newer N4525 model has a different AC Connector which is black and
has places for 12 pins. Take a look at the photos below which show all 3 versions.
DC220 version
DC332 / N24 versions
Each of these fusers have two Fuser Lamps… a Hi-Watt
(Main) Heat Lamp and a Low-Watt (Sub) Heat Lamp.
They are different for each of the 3 versions shown
above (differences in wattages and also, the DC220
version has a different shape to the metal contact at one
end (see photo of the ends of the two lamp types). Most
of the parts for the N4525 appear to be identical to the
N24 / DC332 version although obviously the AC
Connector differences make it impossible to
interchange the entire fuser module. Another difference
is that the newer N4525 has an extra wire which goes to
a static eliminator brush on the heat roll. The DC220
version of the fuser does not share common parts with
the other fusers in spite of the design being very similar.
The Heat and Pressure Rollers of the DC220 fuser are
considerably smaller in diameter compared to the
others. Even the Heat Roll Stripper Fingers will not
interchange (the DC220 has a taller profile so it won’t
fit into the holder bracket of the other versions).
N4525 version
Lamp differences
Roller differences
(left = DC332 / N24…right = DC220)
First lets get oriented (see the Orientation
photo). I’ll be referring to the “Rear” and “Front”
ends. The Heat Roll Drive Gear is at the rear end.
Then there is the “top” and “Bottom” as the fuser
would sit in the machine. The “Outer-face” is the
part which is visible when you open the left door of
the machine to access the fuser. We will use the
DC332 / N24 version as the Guinea Pig and model
for the disassembly part of this article. Where
appropriate I’ll include a note about how the DC220
or N4525 procedure might differ.
Orientation
Procedure:
1.) Remove the Pressure Roll Cover Assembly. It is relatively fragile, so removing it early in
the process is a good idea. It is held on by 3 screws (self tapping).
2.) Remove the Front Outer-Facing Cover which has the green
jam removal gear attached to it. (2 screws, 6mm machine
thread). You can now lift out the front yellow plastic finger-pull
(not present on the DC220 version).
3.) Release the two front Heat Lamp Contacts (they are screwed
to the Front End Cover). Once the lamp contacts are freed up, it
is safe to remove the Front End Cover (2 screws from the front,
10mm machine thread). Be gentle with the lamp-return contact
which is now exposed and vulnerable. You can see how trying
to yank the Front End Cover off before you release the lamps
would be a mistake which would result in broken glass.
Front End – Exposing
the two Lamp Contacts.
4.) Now for the rear end. Start with the Rear Outer-Facing
Cover with its front yellow plastic finger-pull (2
screws from the outer-face, short machine thread).
This reveals a sphagetti of wires (see Photo). Then
you can release the Rear End Cover and pivot it out
of your way (2 screws from the rear end, 10mm
machine thread)
5.) You’ll need to release the two wire leads for the
fuser lamps in order to then slide them out through
the opposite front end. I found it most convenient to
put the lamp terminal screws right back in place resecuring the red and blue wires which go on to the
AC Connector.
Rear End - With the Outer-Facing Cover
removed…
6.) Next remove the bar which is adjacent to the Pressure Roll (it has static eliminator
brushes attached to it). Take note of how the 3-tined fork-like contact at the front end is
seated against the bar. The bar can be released by simply backing out the screws a tiny bit
(one from either end of the bar). Don’t take those screws off all of the way because the white
plastic bushings which are on either end will fall off easily into several pieces. (This step
doesn’t apply to the DC220 version which is missing this bar).
7.) Remove the Heat Roll Stripper Assembly (2 screws… 10mm self tapping). Clean off the
magnets which are opposite of each finger (these serve to catch any toner flakes which the
fingers scrape off of the heat roller). There are no such magnets on the DC220 version. To
get the individual 5 fingers off of the assembly / bracket you must first remove a tiny screw at
one end to take a metal plate off of the assembly.
8.) Check the height of the pressure screws at both front and rear and write down the
measurements so that you can return the screws to the same height. There is a Fuser Nip
Adjustment available for the DC220 which we’ll look at later on. Back out both of the Fuser
Pressure Screws and place the screws, springs, and collets or washers aside in a safe place
where they won’t disappear on you.
9.) Now if you lift the pressure arms, the Pressure Roll with its bearings can be removed. It
is a sleeved roller. The Heat Roll is now also available to lift out of the assembly. You’ll
want to release the green ground strap from the rear
pressure arm to give you more room to open that rear
arm wide.
10.) With the Heat Roll Assembly out, you can access
the Thermistor and the two Thermostats. Note that the
DC220 version has only one Thermostat. The N4525
has as second Thermistor located close to the front end
of the fuser.
11.) Reassemble… Folks often ask which way the
Thermistor and Thermostats
flanges on the heat rolls are supposed to be positioned.
The bearing flanges need to be positioned towards the end of the roller and must sit outside of
the metal frame on both ends when you go to place it back in the fuser.
The newer versions of the fusers have a rather clever
way of releasing the tension on the pressure roller
during storage and shipping. This is important
because it doesn’t take terribly long for the pressure
roll to develop a flat spot which will cause all kinds
of clunking noises before it rounds out and recovers.
They come with a metal cap which is twisted down
over the Pressure screw to cam up the pressure arm.
When someone goes to install the new fuser, it comes
with instructions to turn each of these caps ½ turn
counterclockwise to remove them, before using the
Pressure Relief Cap for storage…
fuser (if you were to forget and leave the caps in
(Removed during installation of fuser)
place, the fuser would have no pressure and the
copies would come out unfused). Keep any of these
caps you run across for future use. They are handy indeed.
When you respond to a Fuser Related call, you’ll want to bring a new fuser (or one you rebuilt
earlier), and little bit of information. First thing to do is to check out the fuser’s fuser lamp
circuits and the thermistor circuit as well. It’ll be handy to know which pins are which on the
fuser module so that you can diagnose the problem without needing to take the fuser apart.
You’ll notice that the pin numbering is not consistent. This is because the pin-out in the
Service Manual is not consistent. The DC220 numbers the pins top to bottom and the others
number the pins from right to left. Lets “pin” these things out one “style” at a time…
DC220 style Fuser Connector (PJ12) Pin-out:
Pin 1: Thermistor (thin black wire)
Pin 2: - Blank Pin 3: Hi-Watt Heat Lamp (red wire)
Pin 4: Lo-Watt Heat Lamp (blue wire)
Pin 5: Thermistor (thin black wire)
Pin 6: Ground (green wire)
Pin 7: - Blank Pin 8: Return from Heat Lamp & Thermostat Circuit (white wire)
Testing the DC220 style Circuits:
• Hi-Watt Lamp & Thermostat Circuit:
Pins 3 & 8... should be between 4 & 12 Ohms (Ω).
• Lo-Watt Lamp & Thermostat Circuit:
Pins 4 & 8… should be between 4 & 12 Ohms (Ω).
• Thermistor Circuit: Pins 1 & 5… should measure around 300K Ohms (Ω) when the fuser
is cold and resistance should drop if the thermistor’s face is warmed up… drops to around
1.5K Ohms when at operating temperature.
DC332 style & N24 style Fuser Connector (PJ12) Pin-out:
Pin 1: Thermistor (yellow wire)
Pin 2: Thermistor (yellow wire)
Pin 3: - Blank Pin 4: Bias / Static Eliminator Brushes (brown wire)
Pin 5: Lo-Watt Heat Lamp (blue wire)
Pin 6: Hi-Watt Heat Lamp (red wire)
Pin 7: Return from Heat Lamp & Thermostat Circuit (white wire)
Pin 8: Ground (green wire)
Testing the DC332 & N24 style Circuits:
• Hi-Watt Lamp & Thermostats Circuit:
Pins 6 & 7... should be between 4 & 12 Ohms (Ω).
• Lo-Watt Lamp & Thermostats Circuit:
Pins 5 & 7… should be between 4 & 12 Ohms (Ω).
• Thermistor Circuit: Pins 1 & 2… should measure around 300K Ohms (Ω) when the fuser
is cold and resistance should drop if the thermistor’s face is warmed up… drops to around
1.5K Ohms (Ω) when at operating temperature.
N4525 Fuser Connector (PJ12) Pin-out:
Pin 1: Rear Thermistor (yellow wire)
Pin 2: Rear Thermistor (yellow wire)
Pin 3: Return from Heat Lamp & Thermostat Circuit (white wire)
Pin 4: Front Thermistor (black wire)
Pin 5: Front Thermistor (black wire)
Pin 6: - Blank Pin 7: Lo-Watt Heat Lamp (blue wire)
Pin 8: - Blank Pin 9: Hi-Watt Heat Lamp (red wire)
Pin 10: Ground (green wire)
Pin 11: - Blank Pin 12: Bias / Static Eliminator Brushes (brown wire)
Testing the N4525 Circuits:
• Hi-Watt Lamp & Thermostats Circuit:
Pins 9 & 3 ... should be between 4 and 12 Ohms (Ω).
• Lo-Watt Lamp & Thermostats Circuit:
Pins 7 & 3… should be between 4 and 12 Ohms (Ω).
• Front Thermistor Circuit: Pins 4 & 5…
• Rear Thermistor Circuit: Pins 1 & 2…
Both Thermistor circuits should measure a high (but not infinite) resistance on the 1000
Ohms (Ω) scale and should drop as the face of the thermistor is warmed up.
You’ll also want a quick run-down of how to approach each possible fuser related Status
Code. Sometimes these machines are reluctant to display a Status Code at all. Pressing the
“Machine Status” button (DC220 and DC332 styles only) will usually give you an
opportunity to view the “Fault History”… the top code is the most current Status Code. Some
of the codes need to be reset from the diagnostics before the machine will attempt to warm up
again.
U4-1 Status Code means “Fuser Under-temperature” (you’ll be looking for a bad heat lamp
or blown thermostat). The U4-1 does not require a reset from diagnostics.
U4-2 Status Code means “Fuser Over-temperature”. This code you’ll want to approach with
extra caution. You need to figure out why the fuser got too hot, otherwise you’ll pop a new
fuser in and have it ruined by the same initial problem which caused the overheat. It could be
that the Fuser Cooling Fan is not doing its job properly (make sure it turns freely in operation
and that any filter which may be present isn’t clogged… also make sure the machine has
adequate space around it to breathe). Its also possible that a short in the wiring or on the
Driver Board is causing one or both heat lamps to stay on continuously… so, once you reset
the U4-2 code from diagnostics, you’ll want to watch the fuser to see if the lamps come on,
and more importantly you’ll want to make sure that once they’ve reached the ready state, they
cycle on and off like they’re supposed to. Once you’re ready to watch the lamps carefully and
you’ve repaired the problem which caused the U4-2 code, you can reset it from the
Diagnostics as follows: Enter Diagnostic Mode (press “Access” on the panel, then enter the
default password ‘#’, ’1’, ’1’ followed by ‘Enter’). Then touch “dC Routines” and then
“dC131”. Scroll through the list to “50-20 Fuser Over temp Reset”. Press ‘Read’ and then
change the value from ‘1’ to ‘0’ and press ‘confirm’ to lock in your selection. When you turn
the power off and back on, the machine will attempt to warm up again… watch those lamps to
make sure they cycle out when the fuser is fully heated.
U4-3 Status Code means “Fuser Thermistor Failure”. This code comes up if the machine
detects an Open Circuit across the Thermistor Circuit. Make sure the fuser is fully seated and
that the fuser connector is making good contact with the connector in the machine. Check the
thermistor circuit using the 1000 Ohms scale as detailed earlier. This code does not require
resetting from diagnostics.
Maintenance Light (N24 style and N4525 only): The N24 style and the N4525 will call for
a “Maintenance Kit” after 300K prints. You will need to reset the Maintenance
Counter from the Diagnostics before the machine will operate again.
Resetting the Maintenance Kit Counter:
Hold down the [2]<Item Up> And the [5]<Item Down> buttons at the same time while
turning on the Printer. Continue holding those two keys until the message “IOT?” shows up.
Then, within 5 seconds after the “IOT?” message appears, hold down the [0]<On Line> and
[5]<Menu Down> keys at the same time until it says “Reset Complete Please Reboot”. Then
turn the power off and back on.
That should give you all you need to approach these fusers with confidence. Nothing like a
little bit of familiarity with a fuser before you begin ey? Happy Repairs!
Britt works for The Parts Drop, a company whose primary business is providing parts,
supplies and information for Xerox brand copiers, printers and fax machines. You can find
more information on their website www.partsdrop.com. There’s a complete listing of past
articles under contributing writers on the ENX website (www.ENXMAG.com) if you’d like to
read more about Xerox brand office equipment.