1
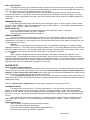
Rpm warning setup
When “WARN” is displayed press and release the switch.
The current warning point will be displayed.
Press and release the switch until the desired setting is displayed.
Press and hold the switch until “DONE” is displayed.
Display update setup
When “UPDATE” is displayed press and release the switch.
The update setting will be displayed. (1=slow, 2=mid, 3=fast)
Press and release the switch until the desired setting is displayed.
Press and hold the switch until “DONE” is displayed.
Tach signal setup
When “SIGNAL” is displayed press and release the switch.
The setting will be displayed. (NORMAL or LO VOLT)
Press and release the switch until the desired setting is displayed.
Press and hold the switch until “DONE” is displayed.
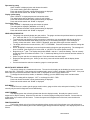
GEAR INDICATOR SETUP
• This gauge can optionally display the gear position. The gauge can learn the positions based on speed and
rpm. It will work with 3, 4, 5, or 6 speed transmissions.
• To program the gear positions, begin at a section of road where you can gradually shift through all of the
gears. Press and hold the switch while turning the key on and starting the engine. Once the engine is
running, release the switch. When “GEAR” is displayed, press the switch again and then release it.
• The display will show the current selection, “OFF” or “PROGRM”. Press and release the switch to change the
selection.
• When “PROGRM” is displayed, press and hold the switch to begin the gear programming. The message will
show “LO RPM” if the engine rpm is below 1500, or “LO SPD” if the vehicle speed is below 5.
st
• Begin driving in 1 gear. The display should show GEAR 1 and the “1” should be flashing. Drive at a steady
speed then press and release the switch. The “1” should stop flashing for a few seconds and then switch to a
flashing “2”.
nd
• Shift to 2 gear and drive at a steady speed. Press and release the switch again.
• Repeat this through each gear. When you are done, press and hold the switch until the display shows
“DONE”.
• Press and release the switch to restart the gauge in normal operation.
MILES TO NEXT SERVICE SETUP
The service mileage is a countdown mile meter. The service mile display can be disabled or can be set to count
down from 500 – 7500 miles. If the service mile is enabled and it gets to 0 miles it will display “SERVIC DUE”. If the push
button switch is pressed and held while “SERVIC DUE” is displayed, the service miles will be reset.
To change the service miles, enable, or disable the reading, go to the SPEED setup menu and then select
“SERVIC”.
The current setting will be displayed. “OFF” or a mileage from 500 – 7500.
Press and release the switch until the desired setting is displayed.
Press and hold the switch until “DONE” is displayed.
INFO MENU
The INFO menu is used to get the gauge model number, gauge revision code, and speed cal setting. This will
normally only be used for diagnostic and troubleshooting.
NIGHT DIMMING
Your display system has a dimming feature that dims the display intensity. Normally the system is at full
brightness for daytime viewing. When the blue wire has 12 volts the display intensity will be reduced. Connect this to a
toggle switch if you wish to use this feature. To have the system at full brightness all of the time, leave the blue wire
disconnected.
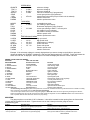
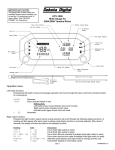
FUNCTION SWITCH
The function switch on the front of the speedometer allows access to all of the mileage, rpm, and performance
information. Pressing and releasing the function switch toggles through the different displays. The display sequence is as
follows:
MAN# 650088B