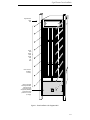
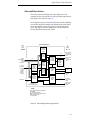
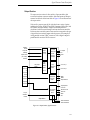
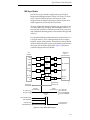
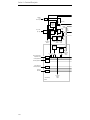
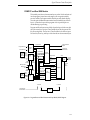
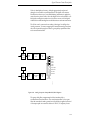
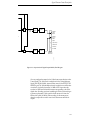
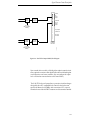
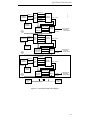
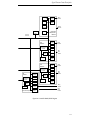
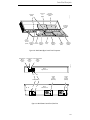
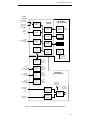
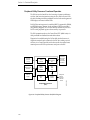
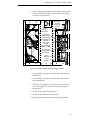
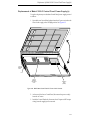
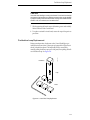
1
Installation and Service
Grass Valley Model 3000
Video Production Switcher
Software Release 5.3
071-0160-00
First Printing: December 1996
Revised Printing: February, 1998
Customer Support
Telephone Numbers
North America
(800) 547-8949
Fax: (530) 478-3181
Tektronix Grass Valley Products is committed to providing the most
responsive and professional product support available. We have a fully
staffed, highly trained support team ready to respond to anything from a
simple question to an emergency repair. Support is available via telephone
or email. For new and updated customer support documents, as well as
new product information, check the Tektronix web site and Grass Valley’s
web page.
Elsewhere
Distributor or sales office from
which equipment was purchased.
Web Addresses
Grass Valley Email Support
[email protected]
Grass Valley Web Page
http://www.tek.com/Grass_Valley
Tektronix Web Site
http://www.tek.com
Postal Addresses
Mail
Tektronix Grass Valley Products
P.O. Box 1114
Grass Valley, CA 95945
Shipping
Tektronix Grass Valley Products
400 Providence Mine Rd.,
Nevada City, CA 95959
Copyright © Tektronix, Inc. All rights reserved. Printed in U.S.A.
Tektronix products are covered by U.S. and foreign patents, issued and pending. Information in this publication supersedes that in all previously published material. Specifications
and price change privileges reserved. TEKTRONIX, TEK, Grass Valley Group, Borderline,
E-MEM, TEN-X, Wavelink, and
are registered trademarks, and Air Link, Auto Match,
Doubletake, E-Disk, Eagle V, Emphasys, EZ-Link, 409, Grass Valley, Horizon, Jogger, Kadenza, Kaleidoscope, K-Mask, Key-Layer, Key-Link, Krystal, MASTER System, Master 21,
MAX, Omni-Key, Performer, Programmed Motion, Silhouette, Softset, SqueezeBack,
Streamline, Super Edit, TEN-20, 20-TEN, Trace, TrailBlazer, VideoDesktop, Flex-Time, and
XEDL are trademarks of Tektronix, Inc. P.O. Box 1000 Wilsonville, OR 97070-1000 U.S.A.
The information in this manual is furnished for informational use only, is subject to change
without notice, and should not be construed as a commitment by Tektronix, Inc. Tektronix
assumes no responsibility or liability for any errors or inaccuracies that may appear in this
publication.
Tektronix, Inc., Video and Networking Division, P.O. Box 1114 Grass Valley, California
95945 U.S.A.
Contents
Important Safety Notices
Symbols and Their Meaning in This Manual ....................................................................
Danger .....................................................................................................................................
Warnings .................................................................................................................................
Cautions ..................................................................................................................................
Power Cord Notices ..............................................................................................................
North American Power Supply Cords ........................................................................
International Power Supply Cord ................................................................................
EMC Regulatory Notices ......................................................................................................
ix
x
x
xi
xi
xi
xi
xii
Section 1 — System Overview
Introduction ............................................................................................................................
System Description ................................................................................................................
Available Options ..................................................................................................................
Input Modules ................................................................................................................
Output Modules .............................................................................................................
Crosspoint Name Displays ...........................................................................................
Frame Store .....................................................................................................................
Effects Send Matrix ........................................................................................................
Dual Chroma Keyer .......................................................................................................
Chroma Key Auto Setup ...............................................................................................
Borderline Key Edge Generation .................................................................................
Secondary Wipe Generator ...........................................................................................
Safe Title/Action Area Generator ................................................................................
Remote Auxiliary Bus Control Panels .........................................................................
Tally Expansion Chassis ................................................................................................
Power Supplies ...............................................................................................................
Control Panel Power Supplies ..............................................................................
Frame Power Supplies ............................................................................................
Extender Modules ..........................................................................................................
Physical Description ..............................................................................................................
Control Panel ..................................................................................................................
Signal Frame ....................................................................................................................
System Specifications ............................................................................................................
1-1
1-1
1-3
1-3
1-4
1-4
1-5
1-5
1-6
1-6
1-7
1-7
1-8
1-8
1-8
1-9
1-9
1-9
1-9
1-10
1-10
1-10
1-12
iii
Contents
Section 2 — Installation
Introduction ............................................................................................................................
Unpacking ..............................................................................................................................
Pre-installation Procedures ..................................................................................................
Items Required but not Supplied .................................................................................
Physical Specifications and Installation Requirements ............................................
Power Requirements ..............................................................................................
Environmental Characteristics ..............................................................................
Safety Requirements ...............................................................................................
Installation ..............................................................................................................................
Model 3000-2 Control Panel Installation .....................................................................
Model 3000-2 Control Panel Console Dimensions .............................................
Inserting the Model 3000-2 Panel .........................................................................
Model 3000-3 Control Panel Installation .....................................................................
Model 3000-3 Control Panel Console Dimensions .............................................
Inserting the Model 3000-3 Panels ........................................................................
Signal Processor Frame Installation ............................................................................
Signal Processor Frame Power Supply Installation ..................................................
Redundant Power Supply Installation ........................................................................
Review .............................................................................................................................
Module Locations ...........................................................................................................
Input Modules ................................................................................................................
Output Modules .............................................................................................................
Interconnect Adapters ...................................................................................................
RF/EMI Strips on Input/Output Modules .........................................................
Cable Connections .................................................................................................................
Model 3000-2 Control Panel Control Connections ....................................................
Model 3000-3 Control Panel Connections ..................................................................
Input Signal Connections (Video and Key) ................................................................
Analog Video Connections ....................................................................................
Digital Video Connections .....................................................................................
Serial Digital Connections ..............................................................................
Parallel Digital Connections ...........................................................................
Reference Input Connections ........................................................................................
Output Signal Connections ...........................................................................................
Frame Communications Connections .........................................................................
GPI Connections ......................................................................................................
GPI Inputs .........................................................................................................
GPI Outputs ......................................................................................................
Configuring GPI Inputs and Outputs ...........................................................
Video Production Editor Connections .................................................................
Connecting to Kaleidoscope ..................................................................................
Connecting to a Krystal Digital Picture Manipulator ........................................
Connecting to a DPM-700 ......................................................................................
DPM Logical Channel Tally ...........................................................................
DPM Logical Channel Tally Example 1 ........................................................
DPM Logical Channel Tally Example 2 ........................................................
DPM Logical Channel Tally Menu Setup .....................................................
Power Connections ...............................................................................................................
Connecting the Control Panel to the AC Power Source ...........................................
Connecting the Frame Power Supply to the AC Power Source ..............................
For 220-Volt Operation ...........................................................................................
For 110-Volt Operation ...........................................................................................
iv
2-1
2-2
2-3
2-3
2-3
2-4
2-4
2-4
2-6
2-6
2-6
2-8
2-9
2-11
2-14
2-15
2-18
2-21
2-23
2-24
2-24
2-26
2-26
2-29
2-30
2-31
2-32
2-34
2-34
2-34
2-34
2-35
2-36
2-36
2-37
2-38
2-38
2-39
2-39
2-39
2-40
2-41
2-42
2-43
2-44
2-45
2-46
2-47
2-47
2-47
2-47
2-48
Contents
Powering Up ..........................................................................................................................
Preliminary Checks ........................................................................................................
Power-On ........................................................................................................................
Redundant Power Supply Voltage Adjustments ..............................................................
System Setup ..........................................................................................................................
Setting Vertical Blanking Range ...................................................................................
Setting Preview Blanking Switch .................................................................................
Checking Auto-timed Analog Inputs ..........................................................................
What is Autotiming? ...............................................................................................
Installation of Options ..........................................................................................................
Crosspoint Name Displays (Model 3000-3 only) .......................................................
Input Display Option Kit Contents ......................................................................
Input Display Option Board Installation .............................................................
Tally Output Option ......................................................................................................
Tally Output Module Switch Settings ..................................................................
Tally Output Connector Pinouts ...........................................................................
Tally Expansion Option .................................................................................................
Installation of Tally Expansion Option ................................................................
Chassis Installation .................................................................................................
Control Cable Installation ......................................................................................
Tally Output Cable Installation ............................................................................
Installing Modules ..................................................................................................
Setting Tally Module Switches ..............................................................................
Turning On the Tally Expansion Option .............................................................
Optional Remote Aux Control Panels .........................................................................
Minimum Requirements ........................................................................................
Disabled Buttons .....................................................................................................
High Tally ................................................................................................................
Joystick Override .....................................................................................................
Chop ..........................................................................................................................
Remote Aux Panel Installation ..............................................................................
Cable Installation ....................................................................................................
Switcher Interconnect Cable ..................................................................................
Joystick Override Cable Installation ....................................................................
Joystick Override Programming ...........................................................................
Changing the Joystick Override Programming ...........................................
Setting Rear Panel Switches ...................................................................................
Address Switches .............................................................................................
Chop Enable Switch ........................................................................................
Bus to be Controlled (Bus Enable) Switches ................................................
Delegate Lock Switch ......................................................................................
Force High Tally Switch ..................................................................................
Test Mode Switches .........................................................................................
Remote Aux Panel Power Supply Installation ...................................................
Remote Aux Panel Installation ..............................................................................
Remote Aux Panel Lens Chip Installation ..........................................................
Mask Draw Tablet Installation ..............................................................................
Hardware Requirements ................................................................................
Installation for UD and KT Series ..................................................................
Installation for SD Series .................................................................................
Configuring Your System Software ....................................................................................
Troubleshooting .....................................................................................................................
2-52
2-52
2-52
2-54
2-56
2-56
2-56
2-58
2-58
2-59
2-59
2-59
2-59
2-60
2-61
2-64
2-65
2-65
2-66
2-67
2-68
2-68
2-69
2-69
2-70
2-71
2-71
2-71
2-72
2-72
2-72
2-72
2-73
2-74
2-74
2-74
2-75
2-75
2-75
2-75
2-77
2-77
2-77
2-77
2-77
2-78
2-80
2-80
2-80
2-81
2-82
2-83
v
Contents
Section 3 — Functional Description
Introduction ............................................................................................................................
System Configuration ...........................................................................................................
System Overview ...................................................................................................................
Signal Formats ................................................................................................................
Analog Video ...........................................................................................................
Timing .......................................................................................................................
SMPTE Composite Parallel Digital .......................................................................
SMPTE Composite Serial Digital ..........................................................................
Input Clock (SYS1 CLK) ..................................................................................
Clock (SYS2 CLK) ............................................................................................
Input Fast Clock (IFCLK) ................................................................................
Output Fast Clock (OFCLK) ...........................................................................
Input and Output Signals .....................................................................................................
Input Modules ................................................................................................................
Analog 10-bit Auto-timing Input Module ..........................................................
Composite Digital D2 Bit-parallel Input Module ..............................................
Composite Digital D2 Bit-serial Input Module ..................................................
RGB Input Module ..................................................................................................
Output Modules .............................................................................................................
GPI ....................................................................................................................................
Editor Port .......................................................................................................................
Tally Relay Option .........................................................................................................
Communication Inputs and Outputs ..........................................................................
DPM Ports ................................................................................................................
Peripheral Bus II ......................................................................................................
Signal Processor Frame Description ...................................................................................
Signal Processor Overview ...........................................................................................
Input Section ............................................................................................................
Video and Effects Section .......................................................................................
Control Section ........................................................................................................
Output Section .........................................................................................................
Input Section ...................................................................................................................
Video and Effects Section ..............................................................................................
Chroma Keyers ........................................................................................................
Keyers, PGM/PST and Borderline .......................................................................
Luminance Keys ......................................................................................................
Key Source ...............................................................................................................
Borderline .................................................................................................................
Key Mask ..................................................................................................................
Matte Generation on the Keyers and PGM/PST Modules ..............................
Matte Modulation on the Keyers and PGM/PST Modules ..............................
Mixer and Wipe Generator Modules ...................................................................
Preset Wipes .............................................................................................................
Clean Feed ................................................................................................................
Frame Store Option .................................................................................................
Frame stores provide the following features: .....................................................
Effects Send Module Option .................................................................................
Output Section ................................................................................................................
Control Section ...............................................................................................................
Peripheral Utility Processors (PuPs) ....................................................................
Control Panel CPU Module ...................................................................................
Data Transfer to the Frame ....................................................................................
Control Processing by the Signal Processor Frame ............................................
Status Terminal ........................................................................................................
vi
3-1
3-2
3-3
3-6
3-6
3-6
3-6
3-7
3-8
3-8
3-8
3-8
3-10
3-10
3-10
3-10
3-10
3-10
3-11
3-11
3-12
3-12
3-13
3-13
3-13
3-15
3-15
3-15
3-15
3-15
3-15
3-17
3-19
3-20
3-20
3-21
3-21
3-22
3-22
3-23
3-23
3-24
3-25
3-25
3-25
3-26
3-26
3-27
3-29
3-29
3-29
3-32
3-32
3-33
Contents
Mix Effects Modules ......................................................................................................
Sync Generator and Preview Module ..................................................................
Sync Generator Section ..........................................................................................
Black and Test Generators Section .......................................................................
Preview Section .......................................................................................................
Input Modules .........................................................................................................
Analog Composite Input 10-bit ............................................................................
Composite Serial Digital Input .............................................................................
Composite Parallel Digital Input ..........................................................................
Crosspoint Modules ................................................................................................
M/E Keyer Module ........................................................................................................
Keyer Module (Continued) ...........................................................................................
Effects Send Module Option .................................................................................
M/E Mixer and Primary Wipe Module ......................................................................
PGM/PST and Dual DSK Module ...............................................................................
Output Modules .............................................................................................................
Analog NTSC Composite Output .........................................................................
Composite Serial Output .......................................................................................
Composite Parallel Digital Output .......................................................................
Secondary Wipe Option Module .................................................................................
Dual Component RGB Input Option Module ............................................................
Dual Chroma Keyer Option Module ...........................................................................
Controller Module ..........................................................................................................
Control Panel Description ....................................................................................................
Control Panel Components ...........................................................................................
Model 3000-2 ............................................................................................................
Model 3000-3 ............................................................................................................
Control Panel Functional Operation ...........................................................................
Model 3000-2 ............................................................................................................
Model 3000-3 ............................................................................................................
Peripheral Utility Processor Functional Operation ...................................................
Power Supply Description ...................................................................................................
Control Panel ...........................................................................................................
Signal Processing Frame ........................................................................................
Signal Processor Frame Assembly ...............................................................................
3-34
3-34
3-36
3-36
3-37
3-38
3-38
3-40
3-41
3-42
3-43
3-48
3-51
3-52
3-55
3-58
3-58
3-60
3-62
3-64
3-66
3-67
3-70
3-75
3-75
3-75
3-78
3-82
3-82
3-84
3-86
3-87
3-87
3-87
3-88
Section 4 — Maintenance
Introduction ............................................................................................................................
Servicing Precautions ............................................................................................................
Powering Down ..............................................................................................................
Removing Circuit Modules ...........................................................................................
Repairing Circuit Modules ...........................................................................................
Servicing Procedures ............................................................................................................
Repairing Power Supplies ....................................................................................................
Power Supply Configurations ...............................................................................
Frame Power Supply Replacement .............................................................................
Replacement of Individual Power Supply Assemblies ............................................
Configurations .........................................................................................................
Procedures ................................................................................................................
Replacement of Multi-Output Power Supply Assembly .........................................
Removal of Pioneer Multi-Output Supply ..........................................................
Installation of Todd Multi-Output Supply ..........................................................
Mount Terminal Block ....................................................................................
Install Assembly in Frame ..............................................................................
Wiring Diagram ......................................................................................................
4-1
4-1
4-1
4-2
4-3
4-3
4-3
4-4
4-4
4-7
4-7
4-7
4-8
4-8
4-10
4-10
4-11
4-12
vii
Contents
Replacement of +5 Volt Power Supply Assembly .....................................................
Removal of Pioneer +5 Volt Supply .....................................................................
Installation of Todd +5 Volt Supply .....................................................................
Wiring Diagram ......................................................................................................
Redundant Power Supply Voltage Adjustments ..............................................................
Replacement of Model 3000-2 Control Panel Power Supply(s) ...............................
Replacement of Model 3000-3 Control Panel Power Supply(s) ...............................
Control Panel Servicing .................................................................................................
Model 3000-2 ............................................................................................................
Model 3000-3 ............................................................................................................
Control Panel Circuit Board Replacement ..........................................................
Pushbutton Lamp Replacement ...................................................................................
Air Filter Cleaning ..........................................................................................................
Frame Air Filter Cleaning ......................................................................................
Frame Power Supply Air Filter Cleaning ............................................................
Signal Processor Frame Circuit Module Replacement .............................................
4-12
4-12
4-14
4-18
4-18
4-21
4-23
4-24
4-24
4-26
4-27
4-29
4-30
4-30
4-32
4-33
Section 5 — Diagnostics
Introduction ............................................................................................................................
Repairing Circuit Modules ...........................................................................................
Static Charges .................................................................................................................
Recommended Test Equipment ...................................................................................
Required Reference Signals ..........................................................................................
System 3000 Service Philosophy ..................................................................................
Power Up Diagnostics ............................................................................................
Fault-Isolation Diagnostics ....................................................................................
Video Path Diagnostics ..........................................................................................
The Software Driven Video Path Diagnostics .............................................
Manual Video Path Testing ............................................................................
Remote Diagnostics ................................................................................................
Manual Fault Isolation Procedures ..............................................................................
Cabling and New Equipment Installation ...........................................................
Software Updates ....................................................................................................
Reference Signals and Sources ..............................................................................
CPU Run and Error LEDs ......................................................................................
Power Supplies ........................................................................................................
Isolating Software Operating Faults ............................................................................
Isolating Control Panel Faults ......................................................................................
Isolating Signal Processing Frame Faults ...................................................................
Isolating Remote Aux Faults ........................................................................................
Draining the Control Processor RAM ................................................................................
Index
viii
5-1
5-2
5-2
5-2
5-2
5-3
5-3
5-3
5-4
5-4
5-4
5-4
5-5
5-5
5-6
5-6
5-6
5-6
5-7
5-7
5-7
5-8
5-9
Important Safeguards and Notices
Important Safeguards and Notices
Information on the following pages provides important safety guidelines
for both Operator and Service Personnel. Specific warnings and cautions
will be found throughout the manual where they apply, but may not
appear here. Please read and follow the important safety information,
noting especially those instructions related to risk of fire, electric shock or
injury to persons.
WARNING
Any instructions in this manual that require opening the equipment cover
or enclosure are for use by qualified service personnel only. To reduce the
risk of electric shock, do not perform any servicing other than that
contained in the operating instructions unless you are qualified to do so.
Symbols and Their Meaning in This Manual
The lightning flash with arrowhead symbol, within an equilateral triangle,
alerts the user to the presence of “dangerous voltage” within the
equipment’s enclosure that may be of sufficient magnitude to constitute a
risk of electric shock to persons.
The exclamation point within an equilateral triangle alerts the user to the
presence of important operating and maintenance (servicing) instructions
in the literature accompanying the equipment.
A V
The fuse symbol indicates that the fuse referenced in text must be replaced
with one having the ratings indicated.
This symbol represents a protective grounding terminal. Such a terminal
must be connected to earth ground prior to making any other connections
to the equipment.
ix
Important Safeguards and Notices
Danger
■
Electrical potential is still applied to some internal components
even when the power switch/breaker is in the off position. To
prevent electrical shock when working on this equipment,
disconnect the AC line cord from the AC source before working on
any internal components.
■
A residual voltage may be present immediately after unplugging
the system due to slow discharge of large power supply capacitors.
Wait 30 seconds to allow capacitors to discharge before working on
the system.
■
To reduce the risk of electrical shock, plug each power supply cord
into separate branch circuits employing separate service grounds.
■
Turn the power switches off on both the main and redundant power
supplies before attempting repair to the Control Panel.
■
Heed all warnings on the unit and in the operating instructions.
■
Do not use this equipment in or near water.
■
Verify that all power supply lights are off before removing power
supply or servicing equipment.
■
Disconnect ac power before installing any options.
■
The attachment plug receptacles in the vicinity of the equipment are
all to be of a grounding type, and the equipment grounding
conductors serving these are to be connected to earth ground at the
service equipment.
■
This equipment is grounded through the grounding conductor of
the power cord. To avoid electrical shock, plug the power cord into
a properly wired receptacle before connecting the equipment
inputs or outputs.
■
Route power cords and other cables so that they are not likely to be
damaged.
■
Disconnect power before cleaning. Do not use liquid or aerosol
cleaners; use only a damp cloth.
■
Dangerous voltages exist at several points in this equipment. To
avoid personal injury, do not touch exposed connections and
components while power is on.
■
Do not wear hand jewelry or watches when troubleshooting high
current circuits, such as the power supplies.
■
To prevent damage to equipment when replacing fuses, locate and
correct the trouble that caused the fuse to blow before applying
power.
■
During installation, do not use the door handles or front panels to
lift the equipment as they may open abruptly and injure you.
Warnings
x
Important Safeguards and Notices
■
To avoid fire hazard, use only components of the the specified type,
voltage, and current rating as referenced in the appropriate parts
list for this equipment. Always refer fuse replacement to qualified
service personnel.
■
To avoid explosion, do not operate this equipment in an explosive
atmosphere unless it has been specifically certified for such
operation.
■
Have qualified personnel perform safety checks after any
completed service.
■
Use only specified replacement parts.
■
Follow static precautions at all times when handling this
equipment.
■
Leave the back of the frame clear for air exhaust cooling and to
allow room for cabling. Slots and openings in the cabinet are
provided for ventilation. Do not block them.
■
The front door is part of the fire enclosure and should be kept closed
during normal operation.
■
This equipment should be powered only as described in the
manual. To prevent equipment damage select the proper line
voltage at the ac input connector as described in the Installation
documentation.
Cautions
Power Cord Notices
North American Power Supply Cords
The Control Panel is supplied with a molded grounding plug (NEMA 515P) at one end and a molded grounding receptacle (IEC 320-C13) at the
other end. Conductors are color coded white (neutral), black (line) and
green or green/yellow (ground).
Operation of this equipment at voltages exceeding 130 VAC will require
power supply cords which comply with NEMA configurations.
International Power Supply Cord
This equipment is supplied with a molded grounding receptacle (IEC 320C13) at one end and stripped conductors (50/5 mm) at the other end.
Conductors are CEE color coded, light blue (neutral), brown (line) and
green/yellow (ground). Other IEC 320 C-13 type power supply cords can
be used if they comply with the safety regulations of the country in which
they are installed.
xi
Important Safeguards and Notices
EMC Regulatory Notices
Federal Communications Commission (FCC) Part 15
Information
This device complies with Part 15 of the FCC Rules. Operation is subject
to the following two conditions:
(1) This device may not cause harmful interference.
(2) This device must accept any interference received including
interference that may cause undesireable operations.
89/336/EEC EMC Directive
EN500081-1
EN55022
WARNING
This is a Class A product. In a domestic environment this product may
cause radio interference, in which case the user may be required to take
adequate measures.
xii
1
System Overview
Introduction
This section presents a general description of the Grass Valley Group
Model 3000 Switching Systems, their basic architecture, and a list of their
video specifications.
System Description
The Model 3000 is a multi-format digital switcher that can manipulate a
variety of composite digital and analog video and key signals through the
use of 10-bit digital processing. Digital inputs can be either bit-serial or bitparallel, or analog, depending on the options and configuration chosen.
Outputs are equally flexible, changing with your future needs.
0347-01-01
The Model 3000-2 switcher, Figure 1-1, provides 2 mix/effects systems, a
Program/Preset mixer with Dual Downstream keyer, and up to 32 video
inputs and 32 key inputs at a time from the control panel.
Figure 1-1. Model 3000-2 Control Panel.
1-1
Section 1 – System Overview
0702-26
TP0702-27
The Model 3000-3 switcher, Figure 1-2, provides 3 mix/effects systems, a
Program/Preset mixer with Dual Downstream keyer, and up to 48 video
inputs and 48 key inputs at a time from the control panel.
Figure 1-2. Model 3000-3 Control Panel
The Control Panel has a user-friendly layout and shallow menu structure
that allows quick and easy control of operating characteristics and signal
manipulations.
Modularity extends throughout the switching system, providing simple
configuration and expansion to meet your present and future needs. The
basic system consists of a Signal Processor Frame, Signal Processor Power
Supply, and a Control Panel (as shown in Figure 1-3).
The Signal Processor frame houses the system Controller, Mix/Effect
Logic, Input/Output, and Expansion modules.
Power supplies for either Control Panel and Signal Processor Frame can be
made fault tolerant by the purchase of optional redundant supplies. Refer
to Section 2, Installation, for further information.
1-2
TP0347-01-02
Available Options
INPUTS
AND
CROSSPOINTS
Video/Key
Signals In
MIX/EFFECTS
PROCESSORS
OUTPUT
AND
EXPANSION
Video/Key
Signals Out
Status
Terminal
MIX/EFFECTS
LOGIC
CONTROL
PANEL
Frame
to
Panel
Link
CONTROLLER/
MAIN
PROCESSOR
Signal
Processor
Frame
CONTROL PANEL
POWER SUPPLY
Signal Processor
Power Supply
Control Panel
Figure 1-3. Simplified Block Diagram of the Model 3000 System.
Available Options
This section provides brief descriptions of options currently available or
soon to be available for the Model 3000 Switcher.
Input Modules
Different types of input modules can be mixed to suit your particular
interconnection needs. Each type of module supports four inputs. Input
modules are installed in the lower bay of the Signal Processor frame. The
following module types are available:
■
Analog 10-bit (Auto-timed) Composite Input
■
Parallel Digital Input
■
Serial Digital Input
■
Chroma Keyer Input (see “Dual Chroma Keyer” later in this section
for a description of the Chroma Keyer input modules)
1-3
Section 1 – System Overview
Output Modules
Output module types can also be inter-mixed to suit your needs. Each
module type supports four channels, with up to three outputs per channel,
depending on the format. The following module types are available:
■
Analog Composite Output (4 signals; 3 outputs per signal)
■
Parallel Digital Output (4 signals; 1 output per signal)
■
Serial Digital Output (4 signals; 3 outputs per signal)
Output modules are placed in the top bay of the Signal Processing Frame.
Standard outputs include:
■
DSK Program Video
■
DSK Program Key
■
Mask bus
■
Switched Preview Video
Optional outputs include:
■
DSK Preview
■
DSK Preview Video
■
M/E 1 Preview Video
■
M/E 1 Program Video/Key
■
M/E 2 Preview Video
■
M/E 2 Program Video/Key
■
M/E 3 Preview Video
■
M/E 3 Program Video/Key
■
AUX Buses 1A-4B
■
Clean Feed Video
■
AUX Buses 5A-7B
■
Frame Store 1 & 2 Video
Crosspoint Name Displays
With this option installed, the Model 3000-3 can display crosspoint names
on the Upper Control Panel. The displayed crosspoint names are defined
using the Configuration/Inputs /Map Inputs/Name Crosspoint Button
Menu. While you may define up to nine characters for a button name, the
Control Panel LED displays only the first four characters. The Upper
Control Panel LEDs normally display the names of unshifted crosspoints.
While any [SHIFT] button is held down, the Upper Control Panel LEDs
display the names of shifted crosspoints.
1-4
Available Options
Frame Store
The Frame Store option allows storage and retrieval of images at a 10-bit
resolution. A maximum of one four-field video and one four-field key can
be frozen in Frame Store. Video and Key inputs may be frozen together or
independently. The images can later be read with either one- or two-field
mode. Either replication or interpolation may be used if one field readout
is selected.
You can assemble complex graphics by layering multiple picture elements
into a final composite image. Adding dropshadows is made easier by the
provision of a Frame Store real-time dropshadow mode. Using this feature,
variable-density full-resolution shadows can be created from the key signal
and positioned anywhere within the raster.
Masks can be extracted from any video source. The mask created can be
frozen as a two-field Mask Store within the Frame Store. All masks have 10bit resolution and can have soft or hard edges as desired.
The Frame Store module is installed in the middle Signal Processor bay.
Effects Send Matrix
The Effects Send Matrix option provides a method of integrating digital
effects devices into the Switcher mix/effects system. Up to four send
channels can be used to route the video and key from an M/E to and from
an external digital effects system.
Video and keys can also be received from external sources. For example,
Effects Send can receive video and keys from the Frame Store option, paint
systems, or disk recorders.
This option comes in the form of an Effects Send Matrix module installed
in the middle Signal Processor frame bay.
1-5
Section 1 – System Overview
Dual Chroma Keyer
Each Dual Chroma Keyer module can chroma key two analog component
or composite inputs. One Dual Chroma Keyer module is used with each
M/E.
The following component formats are supported:
■
RGB
■
YUV
■
Betacam ® 1
Dual Chroma Keyer modules are installed in the middle bay of the Signal
Processor frame. Dual RGB Input modules are mapped via software
selections to any of the three Dual Chroma Keyer modules installed,
independent of slot position. Input interconnects at the rear of the frame
connect source cables to the Dual RGB Input Modules residing in the same
slot orientation at the front of the frame.
Chroma Key Auto Setup
The Chroma Key Auto Setup option provides automatic setup of chroma
keys when the user identifies the background color by positioning a
crosshair over the desired color and pressing a selection button. Other
options required to make this option functional include the Dual Chroma
Keyer module and the Frame Store module.
1. Betacam is the registered trademark of Sony Corporation.
1-6
Available Options
Borderline Key Edge Generation
Borderline Key Edge Generators are optional for each keyer in the
switcher. The Borderline option is added by plugging a small submodule
onto the Keyer module of an M/E. One module can be installed for each of
the two keyers in each M/E and one in each of the two keyers of the
Downstream Keyer (DSK) module. As an example, a two M/E Switcher
could have up to six modules installed, two for the keyers on each M/E
module and two for the Downstream Keyer module.
Each Borderline Key Edge Generator supports 1, 2, or 3 line wide borders
or outlines around the key. Shadow and extrude modes create 1 to 6 line
wide edges, positioned below left or below right. Separate mattes are
provided by the generators for edge and fill. Key Edge opacity may be
adjusted.
Secondary Wipe Generator
An optional Secondary Wipe Generator module provides a second wipe
pattern for each of the M/E systems. Only one module is required for
enhancing both Mix/Effect systems.
Output from the Secondary Wipe Generator can be mixed or nonadditively mixed with the output from the primary wipe generator to
create novel wipe patterns. This option also allows the Preset wipe pattern
to differ from the transition wipe pattern.
The Secondary Wipe Generator module is installed in the middle bay of the
Signal Processor frame.
1-7
Section 1 – System Overview
Safe Title/Action Area Generator
The Safe Title/Action Area Generator option provides up to four different
patterns that can be superimposed on the switched preview output of the
switcher. It may be used to define a safe title area, safe action area, or for
screen centering and horizontal/vertical alignment of picture elements.
Safe Title/Action Area Generator option hardware is installed as a small
submodule plugged onto the Sync Generator module.
Remote Auxiliary Bus Control Panels
The optional Remote Auxiliary Bus Control Panels allow you to control the
switcher aux buses from a remote location. There are three models: one
rack unit (RU), two rack units, and three rack units. The one RU panel is
designed for areas with very restricted space, and has small crosspoint
buttons containing LED tally lamps. The two RU and three RU panels have
large crosspoint buttons with internal tally lamps. Each panel must be set
up to control a specific aux bus, and must be changed to control another
bus. All three panels have a joystick override and chop capability.
Tally Expansion Chassis
The Tally Expansion Option provides tally output “on/off” signals for
indicating switcher crosspoint selections at source locations or monitoring
stations. An unlimited number of Tally Expansion frames, each with up to
three tally modules, can be added to a switcher. The Tally Expansion
Option consists of a two rack unit (RU) chassis which has two (redundant)
power supplies mounted on a single sled and three slots for up to three
Tally Output modules. A single control cable (16 meters long) connects the
tally chassis to the 3000 Signal Processor Frame.
1-8
Available Options
Power Supplies
The Model 3000 is powered by two power supply assemblies. One
assembly located inside the control panel tub supplies the Control Panel,
and a larger 19” rack-mounted power supply powers the Signal Processor
frame.
Optional redundant power supply assemblies are available for both the
Control Panel and the Signal Processing frame.
Cont rol Panel Power Supplies
Power is provided to the Control Panel by a power supply assembly
mounted inside the Control Panel tub on the Model 3000/2 and inside the
lower Control Panel tub on the Model 3000/3.
A redundant power supply, when installed, is mounted alongside the
standard power supply inside either Model’s Control Panel tub.
Frame Power Supplies
Power for the Signal Processor frame is provided by a single, 19” rackmounted assembly containing two individual power supplies. The
assembly is rack-mounted directly below and wired directly to the Signal
Processor frame. When the optional redundant supply is installed, it is
rack-mounted below the standard supply and interconnected by a wiring
harness.
The frame power supply assembly is air cooled by an integral fan in the
assembly.
Extender Modules
Two module extenders are supplied for servicing Signal Processor frame
modules—one for the 8- inch input and output modules in bays A (top)
and C (bottom), and one for the 15.5-inch Controller modules in bay B
(center).
These extenders allow you to extend a circuit module beyond the 18-inch
depth of the signal frame, so that components are readily accessible.
1-9
Section 1 – System Overview
Physical Description
Model 3000 electronic circuitry is contained on circuit modules and boards
in the Signal Processor Frame and Control Panel.
Control circuitry is located in the Control Panel and in the middle bay of
the Signal Processor frame. For reference, hereinafter the bays are referred
to as “A”, “B” and “C”, corresponding to the top, middle and bottom bays.
For example, output modules are installed in bay A (top bay in the frame).
In this manual and in other related documents, the circuit modules will be
referred to by the specific names printed on them.
Control Panel
The Control Panel is the operator interface for the Model 3000 system and
provides all operator controls for the Mix/Effect systems.
Through the Control Panel, the operator performs all actions via
mechanical buttons and controls, or through software controlled menus
and soft button adjustments. The Control Panel provides the data link to
the Signal Frame.
Signal Frame
The Signal Processor Frame is a large rack-mounted unit, see Figure 1-4,
that houses all of the signal processing modules along with some control
processor modules.
The Head Of State (HOS) processor submodule, all M/E processor
submodules, and the Serial Communications submodule reside on a
Controller module in Bay B (center bay) of the frame. The Controller
communicates with the Mix/Effect systems, Video processing circuits, and
I/O modules over buses on the backplane at the rear of the Signal
Processor Frame.
The Control Panel communicates with the Signal Processor Frame over RS422 data links, one per M/E plus a flip/flop mix data link. All of the links
are contained within a single cable that may be up to 1000 feet in length.
1-10
0347-01-03
Physical Description
Impeller Fan —
Air flows up through the frame
Air
Outlets
(Both sides & Rear)
Front Door
Output Modules and Options
(Bay A)
Control and Signal
Processing Modules
(Bay B)
Input Modules and Options
(Bay C)
Air Inlets
are on both sides
Air Filter
Power Supply Assembly
Slide is Mounted directly
under the Signal Processor
Frame in the Equipment Rack
1
Air Inlets are Located on the
Top of the Supply
0
Figure 1-4. Signal Processor Frame and Power Supply.
1-11
Section 1 – System Overview
System Specifications
Specifications for the NTSC version of the Model 3000 Systems are listed on
the following pages. Refer to Section 2, Installation and Configuration, for
information on the mechanical characteristics of the system.
Specifications1 are provided in the following areas:
■
Power Specifications
■
Analog Input Characteristics
■
Parallel Digital Input Characteristics
■
Serial Digital Input Characteristics
■
Analog Output Characteristics
■
Parallel Digital Output Characteristics
■
Serial Digital Output Characteristics
■
Video System Characteristics (Analog In To Analog Out)
■
Video System Characteristics (Analog and Digital)
■
Environmental Characteristics
1. All specifications subject to change without notice.
1-12
System Specifications
Table 1-1. Analog Input Video Specifications
Characteristic
Requirement
Video Amplitude For Primary Inputs
(composite)
1 Volt p-p Nominal
Maximum Video Excursion
Relative To Blanking
(before clipping)
+138 IRE peak positive
- 42 IRE peak negative
Video Amplitude For Color
Difference Chroma Key Inputs
(SMPTE/EBU)
Luminance: 1 V p-p Without Setup
Color Difference: ± 350 mV p/p bipolar for
100% saturated bars
Video Amplitude For Color
Difference Chroma Key Inputs (beta)
Luminance: 1 V P-p With Setup
Color Difference: ± 350 mV p-p bipolar for
75% Saturated Bars
Video Amplitude For Primary Color
Chroma Key Inputs (RGB)
0.7 V Nominal (sync optional) Color Chroma
Key Inputs (RGB)
Linear Key Amplitude
0.714 mV pk with setup or 0.700 mV pk
without setup (Selectable) Composite or
Non-Composite.
Sync Amplitude For Autophasing
0.15 V To 0.5 V
Burst Amplitude For Autophasing
0.15 V To 0.5 V
SC/H Phase For Autophasing
± 170 Degrees relative to Output Reference.
DC Offset Of Blanking Level
± 5 Volts
Sync Timing Relative To Reference
± 17 µS (NTSC)
Common Mode Hum
< 4 V p-p Max
Differential Mode Hum
< 0.5 V p-p Max
Random Noise
< -30 dB RMS rel to 1 V p-p
Analog Reference
Color Black
Reference SC/H Phase
± 70 Degrees for correct Color Field ID.
Impedance
75Ω Bridging
Return Loss
> 40 dB to 5 MHz
Autophasing Range
± 17 µS (NTSC))
Autophasing Accuracy
< 0.5 nS
Manual Timing Steps
35 nS (NTSC)
Subcarrier Lock Jitter
< 0.5 Degrees
Monochrome Sync Lock Jitter
< 5 nS
Differential Mode Hum Attenuation
> 46 dB
Common Mode Hum Attenuation
> 46 dB
1-13
Section 1 – System Overview
Table 1-2. Digital Input Video Specifications
Input Type
Specification
Parallel
Complies with ANSI T14.22/082A and
ANSI T14.22/081B
Serial
Complies with ANSI T14.22x2131D
Table 1-3. Parallel Digital Input Characteristics
Characteristics
Specification
Connector
25 Pin Female D Type with Screw Locks.
Input Impedance
110 Ω ± 10 Ω.
Minimum Input Signal
185 mV
Maximum Input Signal
2.00 V p-p
Maximum Common Mode Noise
DC to 15 KHz
± 1.5 V Rel to -1.3 V
Auto-timing Range
±17µS (NTSC)
Maximum Cable Length Without External
Equalization
100 Meters
Number of Bits
10 or 8 (Selectable)
Table 1-4. Serial Digital Input Characteristics
Characteristic
1-14
Specifications
Aux Data
Auxiliary Data is Blanked
Connector
75 Ω BNC
Input Impedance
75 Ω
Return Loss
> 15dB 5 MHz to 270 MHz
Common Mode Noise
4 V p-p DC to 1 KHz
Auto-timing Range
±17µS (NTSC)
Number of Bits
10
System Specifications
Table 1-5. Analog Output Characteristics
Characteristic
Specifications
Output Amplitude
1.0 Volt p-p nominal
DC On Output Blanking Level
< 50 mV
Output Return Loss
> 40 dB to 5 MHz
Output Isolation
> 40 dB to 5 MHz
Output SC/H Phase
< ± 10 Degrees
Number Of Bits
10 bits
Number Of Outputs
3
Table 1-6. Parallel Digital Output Characteristics
Characteristic
Specifications
Output Format
Complies with ANSI T14.22/082A and
ANSI T14.22/081B
Connector
25 Pin Female D Type with Screw Locks.
Output Impedance
110 Ω ± 10 Ω
Output Amplitude
1.8 V± 10%
Output SC/H Phase
0
Number Of Bits
8 or 10 bits (Selectable)
Number Of Outputs
1
1-15
Section 1 – System Overview
Table 1-7. Serial Digital Output Characteristics
Characteristic
Specifications
Output Format
Complies with ANSI T14.22/082A and
ANSI T14.22/081B
Aux Data
TRS and Line ID only
Connector
75 Ω BNC
Output Impedance
75 Ω
Return Loss
> 15 dB 5MHz to 270 MHz
Output Amplitude
1.8 V± 10%
DC Level on Output
< 50 mV
Output SC/H Phase
0
Number Of Bits
8 or 10 bits (Selectable)
Number Of Outputs
3
Table 1-8. Video System Characteristics (Analog In to Analog Out)
Characteristic
1-16
Specifications
Frequency Response (NTSC)
± 0.1 dB to 5MHz
-38 dB at 7.16 MHz
Frequency Response (PAL)
± 0.1 dB to 6MHz
-0.1 to -0.25 dB at 6.8MHz
-38 dB at 8.86 MHz
Chrominance/luminance Gain Inequality
< 1%
Chrominance/luminance Delay Inequality
< 10 nS
Field Rate Tilt
< 0.25 %
K Factor (2t Pulse)
< 0.25 %
K Factor (Bar)
< 0.25 %
K Factor (Pulse to Bar)
< 0.25 %
S/N Ratio (unweighted, 5 Mhz Bandwidth)
< 60 dB
Differential Phase
< 1.0 Degree
Differential Gain
< 1.5%
Line Time Non Linearity
< 1.0%
Gain Deviation
< 1%
Path Length Deviation
< 1.0 Degree
Crosstalk
< 50 dB
Section 1 – System Overview
Table 1-9. Video System Characteristics (Analog and Digital)
Characteristic
Specifications
Blanking Width
Adjustable 9.9 µS to 11.0 µS
Number Of Quantization Bits
10 Minimum
Mix Tracking Error
0
Linearity During Mix
Linearity Is Not Affected By Mix
Frequency Response During Mix
Response Is Not Affected By Mix
Path Length
77 µS
Rounding Method
Adaptive Bit Reduction™ (Patent Pending)
Table 1-10. Environmental Characteristics
Characteristic
1-17
Specifications
Operating Ambient Temperature Range
0° – 40° C (32° – 104° F)
Ambient Temperature for Specifications
30° –40° C (86° –104° F)
Relative Humidity (Operating)
95% Maximum (Non-Condensing)
Section 1 – System Overview
1-18
2
Installation
Introduction
This section describes the physical installation of a Model 3000 Digital
Switcher. The process of installing the Model 3000 is discussed in the
following major areas:
■
Unpacking
■
Installing the Control Panel
■
Installing the Signal Processor Frame in the rack
■
Installing the Power Supply for the Signal Processor Frame
■
Cabling the equipment
■
Connecting power
■
Powering up the System
■
Adjusting Redundant Power Supply voltages
■
Installing options
NOTE: Following physical installation, the system software must be configured as
described in the Startup section of the User Guide.
2-1
Section 2 – Installation
Unpacking
The Model 3000 is packaged in several boxes — one each for the following:
■
One containing the Signal Processor Frame
■
One containing the Model 3000-2 Control Panel, panel cable, power
cord, spare fuse kit, lens chips, and diagnostic probe.
Or two boxes containing the Model 3000-3 Control Panels; one with the
Lower Control Panel, panel cable, power cord, spare fuse kit, lens
chips, and diagnostic probe, and one containing the Upper Control
Panel
■
One containing the Signal Processor Frame Power Supply, Instruction
Manuals, and cables. (An additional box is supplied if 100 meter cable
is ordered.)
■
If ordered, the Redundant Power Supply for the Signal Processor
Frame is packed in a separate box
Carefully check the contents of each box against the packing slip to ensure
that everything shipped to you was received. If any items are missing or
damaged, contact the shipping company or your supplier or sales
representative immediately.
2-2
Items Required but not Supplied
Pre-installation Procedures
Before you physically install the Model 3000, familiarize yourself with this
section covering required tools, physical specifications, and power
requirements.
Items Required but not Supplied
These items are required for installation but not supplied by Grass Valley.
■
Medium flat-bladed screwdriver
■
Medium Phillips-head screwdriver
■
#10, #15, and #20 Torx screwdrivers
■
9/16” Socket Wrench
Physical Specifications and Installation Requirements
Physical dimensions of the Model 3000, detailed in Table 2-1, are provided
to assist you in the installation. Power requirements are listed in Table 2-2
and environmental characteristics are listed in Table 2-3.
Table 2-1. Model 3000 Equipment Size Summary
Component
Depth
Width
# of Rack
Units
Height
Signal Processor Frame
22 inches
(55.9 cm)
Std (19 inches)
(48.3 cm)
42 inches
(106.7 cm)
24
Power Supply
22 inches
(55.9 cm)
Std (19 inches)
(48.3 cm)
12.25 inches
(31.1 cm)
7
Model 3000-2 Control Panel
25.41 inches
(64.5 cm)
42.81 inches
(108.7 cm)
13.53 inches
(34.4 cm)
n/a
Model 3000-3 Control Panel
(Upper)
10.2 inches
(25.9 cm)
54.0 inches
(137.0 cm)
6.50 inches
(16.5 cm)
n/a
Model 3000-3 Control Panel
(Lower)
21.5 inches
(54.5 cm)
54.0 inches
(137.0 cm)
8.63 inches
(21.9 cm)
n/a
2-3
Section 2 – Installation
Power Requirement s
Power requirements for the Model 3000 Control Panel and Signal
Processor Frame are listed in Table 2-2.
Table 2-2. Model 3000 Power Specifications
Component
Power
Voltage
Frequency
Model 3000-2 Control Panel
240 Watts Max
(340 V-A)
90–130/180–240 Vac
Autoranging
47–63 Hz
Model 3000-3 Control Panel
350 Watts Max
(450 V-A)
90–130/180–240 Vac
Autoranging
47–63 Hz
Frame Power Supply
2900 Watts Max
(16amps @ 180Vac)
90–130/180–240 Vac
Autoranging
47–63 Hz
Environment al Charact erist ics
The Model 3000 has been designed to operate efficiently in environments
outlined below in Table 2-3.
Table 2-3. Environmental Characteristics
Characteristic
Requirement
Operating ambient temperature
0–40 ° C (32–104 ° F)
Ambient temperature for
specifications
20–30 ° C (68–86 ° F)
Relative humidity
95% max (non-condensing)
Saf et y Requirement s
The following precautions are provided to ensure that safety
considerations for both equipment and personnel are presented before any
installation procedures are begun. To prevent injury or equipment
damage, read and follow all installation safety precautions.
WARNING
The fully configured Model 3000 Signal Processor frame weighs about 300
lbs (136 Kg). Use appropriate equipment to support it during installation.
Do not lift the Control Panel by the lid. The lid could open causing the unit to
fall, creating a hazard to personnel and/or damage to the equipment.
2-4
Physical Specifications and Installation Requirements
WARNING
The Signal Processor frame power supply assembly exhibits high leakage
(fault) currents due to the EMI suppression filter system. This power supply
chassis must be connected to earth ground via the ground wire provided in
the AC input cord. An additional ground lug is provided on the rear of the
Power Supply chassis for supplementary grounding purposes.
WARNING
Electrical potential is still applied to some internal components even when
the power switch/breaker is in the off position. To prevent electrical shock
when working on this equipment, disconnect the AC line cord from the AC
source before working on any internal components.
A residual voltage may be present immediately after unplugging the system
due to slow discharge of large power supply capacitors. Wait 30 seconds to
allow capacitors to discharge before working on the system.
CAUTION
To reduce the risk of electric shock, plug each power supply cord into a separate
branch circuit employing a separate service ground.
CAUTION
To avoid static damage to sensitive electronic devices, protect the Model 3000
Digital Switcher from static discharge. Touch the Signal Processor Frame before
you remove any modules. This helps dissipate any potential difference between
your body and the frame. Avoid handling switcher modules in a high static
environment. If you handle the modules or make any repairs to them, use a
grounding strap and grounded equipment.
2-5
Section 2 – Installation
Installation
The following procedures contain the instructions for installing the
Control Panel, Signal Processor Frame, and Frame Power Supply.
Procedures are included for circuit modules and cable installation. Before
proceeding, read all precautions and notes.
Model 3000-2 Control Panel Installation
This installation does not require countersunk or beveled edges. The Panel
enclosure (tub) slips into the cutout from the top and is secured by six
screws inserted through overhanging flanges at the front and rear of the
tub.
NOTE: The Control Panel should be installed on as flat a surface as possible. It is
not recommended to have more than a 10 degree tilt, as this would add excessive
weight on the gas shocks supporting the Control Panel top.
Be sure to leave a minimum of 6.0” (15 cm) of clear space inside the console behind
the Control Panel for control, signal, and power cables and connectors
Also, be sure to leave a minimum of 5.3” (13.5 cm) of clear space behind the
Control Panel so the lid can be fully opened, as shown in Figure 2-2.
M odel 3000- 2 Cont rol Panel Console D im en sio n s
1. Using the dimensions shown in Figure 2-1, make a cutout in the console
to accommodate the Model 3000-2 Control Panel.
2. Carefully place the Control Panel into the cutout and mark pilot hole
locations for the six anchor screws. Note that ends of the panel tub
have been designed so that you can grasp them for removal.
WARNING
Do not lift the Control Panel by the lid or the transition lever arms. Be careful
when opening or closing the panel lid. The gas shock supports may cause
the lid to open or close abruptly, causing possible injury or damage to the
equipment. Always lift the Control Panel by holding on to the tub.
3. Remove the Control Panel and use a 1/8” (3 mm) bit to drill six pilot
holes for the screws that will secure the Control Panel to the console.
2-6
Model 3000-2 Control Panel Installation
2.68"
(6.81 cm)
Redundant
Power Supply
Cable Area
Interconnect
Cable Area
4.82"
(12.25 cm)
8.26"
(21.0 cm)
13.54"
(34.4 cm)
0349-022
Primary
Power Supply
Cable Area
Rear
24.00"
(60.96 cm)
Model 3000-2 Control Panel
Limits of
Cutout
Area
Front
41.25"
(104.8 cm)
Figure 2-1. Model 3000-2 Control Panel Console Cutout Dimensions
2-7
0349-006
Section 2 – Installation
25.1"
(63.8 cm)
6.15"
(15.6 cm)
1.125"
(2.9 cm)
5.3"
(13.5 cm)
7.38"
(18.8 cm)
13.53"
(34.4 cm)
25.41"
(64.5 cm)
Figure 2-2. Model 3000-2 Control Panel Profile
Insert ing t he M odel 3000- 2 Panel
1. Carefully place the Control Panel into the cutout in the console.
2. Secure the Control Panel to the console with six #6 (M4) screws (not
included) into the pilot holes drilled in the console.
3. Do not connect power to the Control Panel until all cable connections
have been completed and verified.
2-8
Model 3000-3 Control Panel Installation
Model 3000-3 Control Panel Installation
A full flush-mount installation requires countersunk edges. The Panel
enclosures (upper and lower tubs) slip into the cutout from the top, are
fitted into the routed openings, and secured by 27 screws inserted through
overhanging flanges at the front, rear, and sides of the tubs.
NOTE: The lower Control Panel tub should be installed on as flat a surface as
possible. It is not recommended to have more than a 10° tilt, as this would add
excessive weight on the gas shocks supporting the lower panel lid.
0347-02-23
To guarantee adequate cable clearances leave a minimum of 11.5” (29.0 cm) of
clear space inside the console behind the upper Control Panel, and 3.25” (8.3 cm)
of clear space inside the console behind the lower Control Panel for control, signal,
and power cables and connectors. See Figure 2-3 and Figure 2-4. If you elect to
reduce these minimums, we suggest the Control Panels be on site before you
prepare the console.
5.469"
(13.9 cm)
5.0"
(12.7 cm)
11.5"
(29.2 cm)
3.25"
(8.3 cm)
5.00"
(12.7 cm)
Figure 2-3. Model 3000-3 Control Panel Cable Clearance
2-9
Section 2 – Installation
0347-02-22
0.375"
(1.0 cm)
0.50"
(1.25 cm)
9.50"
(24.1 cm)
10.2 "
(25.9 cm)
0.375"
(1.0 cm)
0.2"
(0.5 cm)
4.157"
(10.6 cm)
0.375"
(1.0 cm)
6.50"
(16.5 cm)
3.625"
(9.2 cm)
0.22"
(0.5 cm)
17°
8.625"
(21.9 cm)
0.50"
0.375"
(1.25 cm) (1.0 cm)
45°
20.94"
(53.2 cm)
21.7"
(55.1 cm)
Figure 2-4. Model 3000-3 Control Panel Side Dimensions (Flush Mount Installation)
2-10
Model 3000-3 Control Panel Installation
M odel 3000- 3 Cont rol Panel Console D im en sio n s
These instructions allow you to install your Control Panel in a full flushmount installation. For a semi flush-mount installation, simply cut the
console to the dimensions indicated in Figure 2-5, set both Control Panel
tubs in the console, and complete Steps 1, 4, 9, and 10 on both tubs. For a
full flush mount installation, it is recommended that the Control Panel be
on site before cutting the holes and fabricating the routed flanges.
WARNING
Clearance required between the hinge edge of both Control Panel tubs and
the finished edge of the console increases as the panel lid is opened (full
flush installation). Before marking the pilot holes, carefully open the lid on
both panels and observe that sufficient clearance is allowed.
1. Using the dimensions shown in Figure 2-5, make a cutout in the console
to accommodate the Model 3000-3 upper Control Panel unit.
2. Route a 1/2” (12 mm) by 3/8” (9 mm) lip around the right, left, and top
edge of the cutout. For clarification the routed edges of the cutout are
illustrated in Figure 2-6.
Note that in all four corners, clearance must be provided for round screw
heads located on the front and rear of the Control Panel tubs. See notches
illustrated in Figure 2-5.
2-11
Section 2 – Installation
0347-02-26
53.125"
(134.8 cm)
.5" by .375" Notch
(1.25 by 1.0 cm)
.5" by .375" Notch
(1.25 by 1.0 cm)
Rear
0.375"
(1.0 cm)
0.375"
(1.0 cm)
Upper Control Panel
9.625"
(23.5 cm)
Limits of
Cutout
Area
0.188"
(0.5 cm)
Front
0.188"
(0.5 cm)
.4" by .2" Notch
(1.0 by .5 cm)
.4" by .2" Notch
(1.0 by .5 cm)
3.875" by .4" Notch
(9.9 by 1.0 cm)
3.875" by .4" Notch
(9.9 by 1.0 cm)
Rear
0.188"
(0.5 cm)
0.188"
(0.5 cm)
Lower Control Panel
21.06"
(53.5 cm)
Limits of
Cutout
Area
0.375"
(1.0 cm)
0.375"
(1.0 cm)
Front
.5" by .375" Notch
(1.25 by 1.0 cm)
.5" by .375" Notch
(1.25 by 1.0 cm)
53.25"
(135.3 cm)
Figure 2-5. Model 3000-3 Control Panel Console Cutout Dimensions
2-12
Model 3000-3 Control Panel Installation
2.5"
(6.4 cm)
Optional
Interconnect
Cable Area
Interconnect
Cable Area
8.125"
(20.6 cm)
7.125"
(18.1 cm)
0.5"
(1.27 cm)
2.0"
(5.1 cm)
0347-227
3. Route a 3/8” (9 mm) by 3/16” (4.5 mm) lip on the lower edge of the
cutout as illustrated in Figure 2-6.
0.5"
(1.27 cm)
Rear
0.5"
(1.27 cm)
Cutout
Area
Upper Control Panel
0.188"
(0.5 cm)
Routing
Edge
Front
Redundant
Power Supply
Cable Area
20.32"
(49.4 cm)
0.875"
(2.2 cm)
0.5"
(1.27 cm)
8.125"
(20.6 cm)
8.125"
(20.6 cm)
Interconnect
Cable Area
7.13"
(18.1 cm)
Primary
Power Supply
Cable Area
6.44"
(16.3 cm)
0.5"
(1.27 cm)
Rear
0.188"
(0.5 cm)
Cutout
Area
Lower Control Panel
Routing
Edge
0.5"
(1.27 cm)
Front
Figure 2-6. Model 3000-3 Routing and Cable Clearance
2-13
Section 2 – Installation
4. Carefully place the Upper Control Panel into the cutout and mark pilot
hole locations for the 12 anchor screws.
WARNING
Do not lift the Control Panel by the handles or the transition lever arms.
Always lift the Control Panel by holding onto the tub.
5. Remove the upper Control Panel and use a 1/8” (3 mm) bit to drill 12
pilot holes for the screws that will secure the upper Control Panel to
the console.
6. Using the dimensions shown in Figure 2-5, make a cutout in the
console to accommodate the Model 3000-3 lower Control Panel unit.
WARNING
Do not lift the Control Panel by the handles or the transition lever arms. Take
care when opening or closing the lower panel lid. The gas shock supports
may cause the lid to open or close abruptly, causing possible injury or
damage to the equipment. Always lift the Control Panels by holding onto the
tub.
7. Route a 1/2” (12 mm) by 3/8” (9 mm) lip around the right, left, and
lower edges of the cutout.
8. Route a 3/16” (4.5 mm) by 7/16” (10.5 mm) lip on the upper edge of
the cutout.
9. Carefully place the lower Control Panel into the cutout and mark pilot
hole locations for the 15 anchor screws.
10. Remove the lower Control Panel and use a 1/8” (3 mm) bit to drill 15
pilot holes for the screws that will secure the lower Control Panel to
the console.
Insert ing t he M odel 3000- 3 Panels
1. Carefully place the upper and lower Control Panels into the cutouts in
the console.
2. Secure the Control Panels to the console with 27 #6 (M4) screws (not
included) into the pilot holes drilled in the console.
3. Do not connect power to the Control Panels until all cable connections
have been completed and verified.
2-14
Signal Processor Frame Installation
Signal Processor Frame Installation
NOTE: The Signal Processor Frame must be installed before either of the power
supplies. When planning your installation, ensure that the frame will be installed
high enough in the equipment rack to allow room (7 rack units) for the installation
of the Frame Power Supply below it (plus another 7 rack units if an optional
Redundant Power Supply is to be installed).
To allow the use of extender modules and access for other maintenance, sufficient
room should be allowed in front of the equipment rack (≥41 inches, 105 cm).
Sufficient room should also be allowed in the rear of the rack for access to cables and
the exhausting of cooling air.
The Signal Processor Frame mounts in a standard 19-inch (48.3 cm) wide
equipment rack. It is installed in the rack from the front and secured at the
front edges of the frame with standard rack screws (not provided by Grass
Valley). Its Power Supply mounts below it in the rack on slide rails. The
procedure for installing the Power Supply follows the frame installation
procedure.
To install the frame in the equipment rack, read the following precautions,
then refer to Figure 2-7 and complete the following steps:
WARNING
The Model 3000 Digital Signal Processor Frame weighs approximately 300
lbs (136 Kg) when fully configured. Provide appropriate equipment to
support the frame during installation.
When the Signal Processor Frame and Power Supply are installed, the
equipment rack is top heavy and could topple. Ensure that the equipment
rack is attached solidly to the floor/building to prevent tipping when the
Frame and Power Supply are installed.
When lifting the frame into place in the equipment rack, it is recommended
that a mechanical lifting device be used.
Ensure that the bottom plate of the frame is protected from damage while the
frame is being lifted into the equipment rack.
2-15
Section 2 – Installation
1. Ensure that all packing foam, strapping, and tape is removed from the
frame before installing the frame in the rack.
NOTE: The frame is shipped with a protective metal pan on the bottom. Leave the
pan in place to protect the power cables until the frame is mounted in the rack.
2. Carefully, with the aid of a mechanical lifting device, lift the frame and
place it in position in the equipment rack.
3. Align the frame so that its screw holes match up with those in the rack
and secure the screws required by the rack manufacturer.
4. Install all screws and tighten to the rack manufacturer’s specs.
5. Remove the protective plate from the bottom of the Processor Frame.
2-16
0347-02-01
Signal Processor Frame Installation
Signal Processor
Frame
Front
Secure
Bolts
through
Frame
(8 each
side)
into
Rack
Note: Front Door
Not Shown
For Clarity
Leave enough space
below Signal Processor
Frame for mounting
Frame Power Supply
and (optional) Redundant
Frame Power Supply
(7 RU/12.25 in./311 mm
per supply).
1
0
Figure 2-7. Frame Installation in the Equipment Rack.
2-17
Section 2 – Installation
Signal Processor Frame Power Supply Installation
The Primary Power Supply must be mounted immediately below the
Signal Processor Frame in the rack. If you are installing an optional
Redundant Power Supply, it must be located immediately below the
Primary Power Supply. Verify that you have allowed enough rack space
(7 rack units per supply) before proceeding.
CAUTION
No AC power connections should be made until the system is fully installed and all
covers which were removed in the process are back in place.
0347-02-02
To install the Signal Processor Frame Power Supply in the equipment rack,
refer to Figure 2-8 and proceed as follows:
I
O
Figure 2-8. Power Supply Installation (front view)
1. Locate the installation kit containing the power supply assembly slide
mounts and hardware.
2. Measure the location of the slide sections mounted on the power
supply chassis to determine the height at which the stationary sections
of the slides are to be mounted in the rack.
3. Verify that the screws holding the chassis sections of the slides to the
power supply chassis are securely tightened.
4. Mount the rack sections of the slides in the rack and secure them in
place with the appropriate screws. It may be necessary to adjust the
length of the rear brackets, depending upon the depth of the rack
assembly.
2-18
Signal Processor Frame Power Supply Installation
NOTE: In the following descriptions, the terms “right” and “left” refer to the
locations of components as viewed from the rear of the power supply.
5. Remove the right and left covers from the rear of the Power Supply
assembly to expose the wiring connections.
6. Extend the intermediate sections of the slides and insert the chassis
sections (mounted on the power supply chassis) into the intermediate
sections.
7. Slide the power supply assembly into the rack, making sure that the
power cables from the Signal Processor Frame pass through the slot in
the top rear of the Power Supply.
8. Secure the front of the Power Supply assembly to the rails by installing
the appropriate 1/4” (6.4 mm) length rack screws.
Fasten Captive
Screws into
Chassis Mounting
Holes (8 Places)
at Bottom of
Signal Processor
Frame
0347-02-03
9. At the rear of the unit, install the 8 “captive” screws (see Figure 2-9)
through the top of the power supply chassis into the bottom of the
Signal Processor Frame. Tighten the 8 screws securely.
Power Supply
Chassis
Figure 2-9. Captive Screw Locations, Frame Power Supply (rear view)
10. Remove the nuts and lockwashers from the two large electrical posts in
the right compartment of the power supply. Do not discard.
2-19
Section 2 – Installation
NOTE: If you will be installing a Redundant Power Supply at this time, skip Steps
11 through 13 and perform with Step 14. Also skip Step 15 for now.
11. Connect the two large black cables running down from the right rear of
the Signal Processor Frame to the right post (see Figure 2-10) and
secure with the nut and lockwasher removed previously.
12. Connect the two large red cables running down from the right rear of
the frame to the left post and secure with the nut and lockwasher
removed previously.
13. Ensure that the power cables are properly positioned in the slot cut out
of the Power Supply and reinstall the right rear cover.
14. At the left rear of the Power Supply, thread the two connectors
through the rectangular cutouts in the power supply and connect them
to the jacks that are installed in the bottom rear channel of the frame.
15. Ensure that the cables are properly positioned and reinstall the left rear
cover of the Power Supply.
Connectors located
inside Signal Processor
Frame, directly above
Power Supply.
Red Cables from
Signal Processor
Frame.
Black Cables from
Signal Processor
Frame.
Figure 2-10. Frame Power Supply Connections
2-20
Redundant Power Supply Installation
Redundant Power Supply Installation
The Redundant Power Supply Option consists of the following
components:
■
Power Supply Chassis (identical to the Frame Power Supply)
■
Pair of Red cables
■
Pair of Black cables
■
2 studs
■
2 lock washers
WARNING
To reduce the risk of electric shock, do not perform any servicing other than
that contained in the operating instructions unless you are qualified to do so.
Perform the following procedure to install the Redundant Power Supply.
1. Ensure that the Primary and Redundant Power Supplies are
disconnected from all power sources.
2. Remove the rear panel access covers (right and left sides) of the
Redundant and (if necessary) the Primary Power Supply.
3. Remove the hex nuts and lock washers that secure the red and black
power cables on the Primary Power Supply. (Leave the cables
positioned over their respective studs.)
4. Install the new lock washers and studs over the threaded ends of the
existing studs. Torque the studs to 80 inch pounds.
5. Remove the connector and cable slot covers from the bottom of the
Primary Power Supply (see Figure 2-11).
6. Mount the Redundant Power Supply chassis underneath the Primary
Power supply in the same manner as the Primary Power Supply was
installed.
7. Tighten the 8 captive screws that secure the Redundant chassis to the
Primary chassis.
2-21
Signal
Processor
Red Cables
from Processor
Hex Lock
Nuts Washers
Black Cables
from Processor
If Present,
Remove
Connector
Cover Plate
From Primary
Power Supply
Primary
Power Supply
Lock Washers
Studs
If Present,
Remove Slot
Cover Plate
From Primary
Power Supply
Route Cables
Down Through
Slot in Top of
Lower Chassis
Tighten Captive
Screws to Upper
Chassis
(8 Places)
Red Cables
from Primary
Power Supply
Connector Cover Plate
Should Remain on Bottom of
Redundant Power Supply
NOTE:
Always Insert Black Cables
In Slots Before Red Cables
Black Cables
from Primary
Power Supply
Redundant
Power Supply
Lock Washers
Hex Nuts
Slot Cover Plate Should Remain on
Bottom of Redundant Power Supply
Figure 2-11. Redundant Power Supply Installation
2-22
0347-0204
Section 2 – Installation
Review
8. Place the pair of new black cables over the proper studs in the Primary
and Redundant Power Supplies, routing the cables through the slot in
the bottom of the Primary Supply and the top of the Redundant
Supply. (The colors must match those of the existing cables.)
NOTE: The black cables must go in the slot before the red cables; the black cables
are shorter than the red.
9. Secure the cables by placing a lockwasher and hex nut (removed
earlier) over the end of the cable pair.
10. Similarly, place the pair of new red cables over the proper studs in the
Primary and Redundant Power Supplies and secure the cables with
lockwashers and hex nuts.
11. Torque all four hex nuts to 80 inch pounds.
12. Route the loose cable harness connectors on the left side of the chassis
up through the two holes at the top, and securely insert them into the
connector sockets in the bottom of the primary power supply chassis.
(The connectors are keyed for proper alignment.)
13. Check your work to ensure that all connections are secure and safe.
14. Replace the rear panel access covers (left and right) on both the
Primary and Redundant Power Supplies.
Review
By now you should have the Control Panel installed in the console, the
Signal Processor frame installed in the rack, and the Power Supply (and
redundant Power Supply, if any) mounted below the Processor in the rack.
The following section describes the installation of processor modules at the
front of the frame and the installation of interconnect adapters at the rear
of the frame.
Normally, the switcher is shipped with all standard and optional modules
and adapters in place, but you should check to make sure that the
processor modules are securely seated and latched, and that the screws
holding the interconnect adapters are tightened securely.
If you are not installing any modules at this time, proceed to the section on
Cable Connections.
2-23
Section 2 – Installation
Module Locations
The following information on input, processor, and output modules and
their associated Interconnect Adapters is not critical for installation of a
Model 3000 that has been shipped with modules already installed. It is
provided here for reference.
The modules that slide into the frame from the front plug into connectors
inside the frame. The correct locations of these modules in the frame
(Figure 2-12) are indicated on a location strip at the front of the frame
above the slots.
CAUTION
Insert the modules into the frame carefully to prevent damage to components.
Input Modules
Four types of input modules may be installed in the Signal Processor
Frame to suit the needs of your installation. Input modules, except the
Chroma Key Input module, are installed in the lower bay (C) of the frame.
Each input module, except the Chroma Key Input modules, supports four
inputs. The following choices are available:
■
Analog 10-bit Auto-timed Composite Inputs
■
Parallel Digital Inputs
■
Serial Digital Inputs
■
RGB/YUV Dual Chroma Key Inputs
Each of these can be treated by the switcher as either a video or a key input.
NOTE: Even though most of the Input modules are located in the lower bay (C),
the RGB/YUV Dual Chroma Key Input modules are located in slots 1 through 3
of the top bay (A).
2-24
Bottom
Card
Cage
(Inputs)
Bay C
80 X 48 Video Xpt Matrix Lo Nibble
7
8
9
Options
10
11
12
13
14
15
16
17
Quad Input Module
Options
0349-011a
Program Video
Program Key
Mask Bus
Switched Pvw Video
80 X 48 Video Xpt Matrix Hi Nibble
6
Control Processor
Sync Generator/Pvw
5
Tally Relay Module
Program Video
Program Key
Mask Bus
Switched Pvw Video
M/E 3 Quad Keyer
4
Flip/Flop Mixer & Downstream Keyer
17
Quad Input Module
DSK Pvw Video
Clean Feed Video
M/E 3 Pgm Video
M/E 3 Pgm Key
16
Secondary Wipe Generator
15
Quad Input Module
DSK Pvw Video
Clean Feed Video
M/E 3 Pgm Video
M/E 3 Pgm Key
14
M/E 1 Mixer & Primary Wipe Generator
M/E 2 Pgm Video
M/E 2 Pgm Key
M/E 1 Pgm Video
M/E 1 Pgm Key
13
Quad Input Module
M/E 2 Pgm Video
M/E 2 Pgm Key
M/E 1 Pgm Video
M/E 1 Pgm Key
12
M/E 2 Mixer & Primary Wipe Generator
Aux Video Bus 4A
Aux Video/Key Bus 4B
Aux Video Bus 3A
Aux Video/Key Bus 3B
11
Quad Input Module
Aux Video Bus 4A
Aux Video/Key Bus 4B
Aux Video Bus 3A
Aux Video/Key Bus 3B
10
M/E 3 Mixer & Primary Wipe Generator
Aux Video Bus 2A
Aux Video/Key Bus 2B
Aux Video Bus 1A
Aux Video/Key Bus 1B
9
Quad Input Module
Aux Video Bus 2A
Aux Video/Key Bus 2B
Aux Video Bus 1A
Aux Video/Key Bus 1B
8
Effects Loop Crosspoints (Option)
Framestore Video
Framestore Key
Aux Video Bus 7A
Aux Video/Key Bus 7B
7
Quad Input Module
Aux Video Bus 6A
Aux Video/Key Bus 6B
Aux Video Bus 5A
Aux Video/Key Bus 5B
6
Framestores (Option)
Quad Input Module
Quad Input Module
Quad Input Module
Quad Input Module
M/E 3 Pvw Video
DSK Pvw
M/E 1 Pvw Video
M/E 2 Pvw Video
5
M/E 2 Quad Keyer
3
Quad Input Module
2
M/E 3 Pvw Video
DSK Pvw
M/E 3 Dual Chroma Keyer (Option)
1
4
M/E 1 Quad Keyer
Chroma Key Inputs 5&6
3
M/E 1 Pvw Video
M/E 2 Pvw Video
2
Quad Input Module
Quad Input Module
Cell #
Chroma Key Inputs 3&4
Bay B
1
M/E 2 Dual Chroma Keyer (Option)
Middle
Card
Cage
Quad Input Module
Cell #
Chroma Key Inputs 1&2
Bay A
M/E 1 Dual Chroma Keyer (Option)
Top
Card
Cage
(Outputs)
Quad Input Module
Input Modules
Figure 2-12. Signal Processor Frame Module Locations (front view)
2-25
Section 2 – Installation
Output Modules
Three types of output modules can be intermixed to suit your needs. Each
of the modules supports four channels, with up to three outputs per
channel, depending upon the format. The following types of output
modules are available:
■
Analog Composite Output (4 channels: 3 outputs per channel)
■
Parallel Digital Output (4 channels: 1 output per channel)
■
Serial Digital Output (4 channels; 3 outputs per channel)
Output Modules are placed in card bay A (top) of the Signal Processor
Frame.
Standard outputs include an analog output of:
■
DSK Program Video and Key
■
Mask Bus Video
■
Switched Preview Video
To install an Output Module, refer to Figure 2-12 for the correct module
location.
In addition, an optional Tally Output module may be installed in cell 17 of
card bay C (bottom).
Interconnect Adapters
Each input and output module comes with an Interconnect Adapter which
provides the external cable/wiring connections for the module. Each type
of module has the specific type of Interconnect Adapter that it requires
shipped with it. Each Interconnect Adapter must be installed in the rear
panel of the Signal Processor Frame in the position corresponding to its
correct module type.
For a card bay slot that does not have an input or output module installed,
a blank plate must be installed to maintain correct cooling air flow and
EMI integrity.
Figure 2-13 illustrates the types of Input Interconnect Adapters and
Figure 2-14 illustrates the types of Output Interconnect Adapters available.
2-26
Input Interconnect Boards
R/R-Y
Out
J1
J2
In
Serial Digital
uses 75-ohm
BNC Connectors
and 75-ohm
Cables
J1
J1
G/Y
J2
J4
In
J3
J2
B/B-Y
Analog Inputs
use 50-ohm
BNC Connectors
and 75-ohm Cables
Out
J3
R/R-Y
G/Y
J4
B/B-Y
Out
J5
In
TP0347-215a
Interconnect Adapters
J6
J5
J3
J6
Mounts in
Top (Output) Section
of Processor Frame
Out
J7
J8
In
Serial Input
J7
J4
Parallel Input
Cell
17
J8
Analog Input
Cell
1
Tally Output
Module
Bottom (Input) Section
of Processor Frame
(rear view)
Component Analog
Chroma Key Input
(Dual RGB Input)
NOTE: Combination of Interconnect Adapters
must match the I/O Modules. For example,
an Analog Input Interconnect Adapter is
used with an Analog Input Module.
All unused Interconnect Adapter slots must
have blank panels installed to comply with
RF/EMI regulations.
Figure 2-13. Module Input Interconnect Adapters (rear view)
2-27
Section 2 – Installation
J1
J1
J2
J2
J3
J3
J4
J4
J5
J5
J6
J6
J7
J7
J8
J8
J9
J9
J10
J10
J11
J11
J12
J12
TP0347-216a
Uses 75-ohm
BNC and
75-ohm
Cable
Uses 50-ohm
BNC and
75-ohm
Cable
NOTE: The Tally Output
Interconnect Adapter is
installed in the Input section
of the Frame Card Cage.
J1
J2
J1
J3
J2
J4
Analog Composite
Output Module
Serial Digital
Output Module
Parallel Digital
Output Module
Cell
17
Cells
2 1
Top (Output) Section
of Processor Frame
(rear view)
NOTE: Combination of Interconnect Adapters
must match the I/O Modules. For example,
an Analog Output Interconnect Adapter is
used with an Analog Output Module.
All unused Interconnect Adapter slots must
have blank panels installed to comply with
RF/EMI regulations.
Figure 2-14. Module Output Interconnect Adapters (rear view)
2-28
Tally Output
Module
Interconnect Adapters
RF/EM I St rips on Input /Out put M odules
RF/EMI strips on each adapter, see Figure 2-15, are designed to control
RF/EMI emissions. As each adapter is installed in the frame, these strips
make contact with the next adapter to the right.
Because of the design of these RF/EMI “fingers”, if an Interconnect
Adapter is removed, all adapters to the left of it, up to the first blank plate
or the edge of the bay, must also be removed.
Adapters are then reinstalled in the frame from right to left, as viewed
from the rear of the frame.
CAUTION
Interconnect Adapter
0347-02-05
The above method of Interconnect Adaptor installation and removal must be
followed to ensure that the RF/EMI strips mate properly between adapters and that
RF/EMI integrity of the switcher is maintained.
RF/EMI
Finger Strips
Figure 2-15. Interconnect Adapter RF/EMI Strips (Typical).
2-29
Section 2 – Installation
Cable Connections
This section details the cabling of the Model 3000 system components.
While it is not necessary to follow the steps in the specific sequence
presented, the procedures given provide a reference for ensuring that all
connections are properly made.
Cabling will be described in the following sequence:
■
Connection of the control cable from the Control Panel to the Frame
■
Connection of Video and Key signals to the inputs. (Connection of
analog and digital signals will be discussed separately.)
■
Connection of a Reference signal to the Frame
■
Connection of the Video and Key output signals
■
Connection of communication signals to the Frame
■
Connection of source power to the Control Panel and Frame
NOTE: Except for Serial Input/Output Modules, any Interconnect Adapters on
which there are pairs of connectors are “loop-through” connections. This means
that an input signal can be applied to one connector on the Interconnect Adapters
and the associated connector can be used as a convenient point to connect cabling
for the same signal and route it on to other inputs or to other equipment.
CAUTION
If you do not use the second connector, it must be terminated with a 75Ω
terminator. Failing to terminate an unused looping connector will cause the
associated input signal to have twice its normal amplitude.
2-30
Model 3000-2 Control Panel Control Connections
Model 3000-2 Control Panel Control Connections
1. Connect the interconnect control cable to the connector marked J1 on
the rear of the Control Panel as shown in Figure 2-16.
0347-02-06
2. Connect the other end of the interconnect control cable to J3 on the
Communications Panel at the rear of the frame. See Figure 2-16. The
standard length of this cable is 15 meters. This may be extended to a
maximum of 300 meters.
Rear of
Control Panel Tub
Frame
DB-25
Connector
(J1)
Bitpad/Mouse
DB-25
Connector
(J2)
Status Terminal
DB-25
Connector
(J3)
Exhaust
Fan
AC Input
AC Input
Power
Power
Connector Connector
(Redundant) (Standard)
Communication Link
between Control Panel
and Signal Processor
Frame.
CONTROL PANEL
J3
J1
EDITOR
J6
MODEM
GPI OUTPUTS
TALLY EXP
TB1
REFERENCE INPUT
TB2
J7
J4
GPI INPUTS
J2
MAINTENANCE
AUX BUS CTL
TB3
J5
TB4
J8
Rear of
Signal Processor Frame
Figure 2-16. Model 3000-2 Control Panel Connections
2-31
Section 2 – Installation
Model 3000-3 Control Panel Connections
1. Connect the interconnect control cable (Frame Communication) to the
connector marked J105 on the rear of the upper Control Panel as shown
in Figure 2-16.
2. Connect the Frame Communication cable from the rear of the upper
Control Panel (J105) to J3 on the Communications Panel at the rear of
the Signal Frame. See Figure 2-16. The standard length of this cable is
15 meters. This may be extended to a maximum of 300 meters.
3. Connect the 50-pin DC Power Cable from the rear of the upper Control
Panel (J101) to the rear of the lower Control Panel marked TO
ACCESSORY PANEL (J1).
4. Connect the 37-pin Communication Cable from the rear of the upper
Control Panel (J102) to the rear of the lower Control Panel marked TO
ACCESSORY PANEL (J2).
2-32
Model 3000-3 Control Panel Connections
Pointing Device
DB-25
Connector
(J104)
Frame Communication
DB-25
Connector
(J105)
0347-02-28
Status Terminal
DB-25
Connector
(J103)
Rear of
Upper Panel Tub
J101
J102
INTERCONNECT
J1
J2
Rear of
Lower Panel Tub
J1
J2
CONTROL PANEL
J3
J1
EDITOR
J6
MODEM
GPI OUTPUTS
TALLY EXP
TB1
REFERENCE INPUT
AC Input
Power
Connector
(Standard)
AC Input
Power
Connector
(Redundant)
Communication Link
between Control Panel
and Signal Processor
Frame.
TB2
J7
J4
GPI INPUTS
J2
MAINTENANCE
AUX BUS CTL
TB3
J5
TB4
J8
Rear of
Signal Processor Frame
Figure 2-17. Model 3000-3 Control Panel Connections
2-33
Section 2 – Installation
Input Signal Connections (Video and Key)
The Model 3000 allows up to 64 video/key inputs at a time to be
connected. These inputs are connected to the Input Modules through the
Interconnect Adapters installed at the rear of the frame.
Each Input Module supports four analog composite or digital video
inputs.
Component analog RGB inputs are connected via Dual RGB Input
Modules. These modules are located in cells 1, 2 and 3 of the upper bay (A).
Analog Video Connect ions
Composite signals connect to cells 1 through 16 of the Input section of the
card cage.
NOTE: Grass Valley Group does not supply analog (BNC) signal cables or 75Ω
terminators for the loop-through BNC connections. These must be obtained from
other suppliers.
1. Connect analog video/key sources to the Input Interconnect Adapter
connectors as desired. These are bridging (loop-through) inputs —
terminate as necessary.
2. Connect Chroma Key Inputs (RGB) to the Chroma Key Input
connectors located in cells 1, 2 and 3 of the upper bay (A).
Digit al Video Connect ions
There are two kinds of digital signal cables used in the Model 3000 system,
serial and parallel. The following paragraphs provide the information
necessary to install both types of cables.
Serial Digit al Connect ions
The serial digital cables use 75Ω coaxial cables and 75Ω BNC
connectors. The maximum length of serial digital cables should not
exceed 300 meters (984.25 feet). Fiber optic distribution and
transmission is recommended for runs longer than 300 meters.
Connect serial digital video sources to the Input Interconnect Adapter
connectors as required for your facility.
NOTE: The inputs are internally terminated but an active loop-through is
provided on the inputs.
The use of 50Ω connectors and coaxial cables can create errors in the serial data
stream.
2-34
Input Signal Connections (Video and Key)
Parallel Digit al Connect ions
The parallel digital input cables consist of 12 twisted pairs, a common
drain wire, a braided or foil shield in contact with the drain wire, and two
male 25-pin D-Type connectors. The design of the cable is shown in
Figure 2-18. This diagram may be used as an aid in ordering or
constructing cables for interfacing the Model 3000 to external devices.
NOTE: This cable design is the same as that used between the Control Panel and
the Signal Processor Frame.
M30-005-08
Length as
Specified
CF1595
Connector
Hood
(2)
CF1597
Connector
Ferrule
(2)
CF1593
25-Pin
Male
Connector
(2)
CA4113-01
Cable
14
15
15
2
14
2
16
17
17
4
16
4
Twisted
Pairs
3
3
18
19
20
20
7
19
7
6
18
6
8
8
21
21
9
10
24
25
13
13
25
12
12
24
11
11
23
23
10
056774-XX
22
22
9
All connections
have a 1:1
correspondence
(pin 1 connects
to pin 1; pin 14
to pin 14; etc.)
5
5
Male
AMP 207464-2
Wiring Side
1
1
BLUE-BLACK
BLACK-BLUE
YELLOW-BLACK
BLACK-YELLOW
RED-BROWN
BROWN-RED
BROWN-BLACK
BLACK-BROWN
ORANGE-BLACK
BLACK-ORANGE
WHITE-BLACK
BLACK-WHITE
WHITE-RED
RED-WHITE
GREEN-BLACK
BLACK-GREEN
BLUE-RED
RED-BLUE
RED-BLACK
BLACK-RED
GREEN-RED
RED-GREEN
RED-YELLOW
YELLOW-RED
DRAIN WIRE
NOTE: Wire gauge is 28 AWG for lengths
up to 15 meters; use 26 AWG for lengths
greater than 15 meters.
Male
AMP 207464-2
Wiring Side
Figure 2-18. Digital Video Cable Design
NOTE: Parallel digital signal cables are supplied in the lengths specified on the
purchase order.
Connect parallel digital video sources to the Input Interconnect Adapter
connectors as required for your facility.
2-35
Section 2 – Installation
Reference Input Connections
1. Provide analog Black Burst (Color Black) to one of the REFERENCE
INPUT connectors (J1 and J2) on the Communications Panel.
2. Terminate the loop-through reference signal connections as necessary.
Output Signal Connections
Analog Video and Key output signals from the Model 3000 may be
connected directly to external devices. Each Output Module supports four
channels, with up to three outputs per channel.
The function of each output is hardwired according to the cell number as
shown in Figure 2-19. All outputs are optional except for one quad analog
output, usually installed in cell 17 (Mask Bus, Switched Preview Video,
and Program Video/Key signals).
7
9
10
11
M/E 2 Pgm Video
M/E 2 Pgm Key
M/E 2 Pgm Video
M/E 2 Pgm Key
DSK Pvw Video
Clean Feed Video
DSK Pvw Video
Clean Feed Video
Program Video
Program Key
Program Video
Program Key
M/E 1 Pgm Video
M/E 1 Pgm Key
M/E 1 Pgm Video
M/E 1 Pgm Key
M/E 3 Pgm Video
M/E 3 Pgm Key
M/E 3 Pgm Video
M/E 3 Pgm Key
Mask Bus
Switched Pvw Video
Mask Bus
Switched Pvw Video
Aux Video Bus 4A
Aux Video/Key Bus 3B Aux Video/Key Bus 4B
Aux Video Bus 3A
Aux Video Bus 4A
Aux Video/Key Bus 3B Aux Video/Key Bus 4B
Aux Video Bus 3A
Aux Video Bus 2A
Aux Video/Key Bus 1B Aux Video/Key Bus 2B
Aux Video Bus 1A
Aux Video Bus 2A
8
Aux Video/Key Bus 1B Aux Video/Key Bus 2B
Aux Video Bus 1A
Framestore Video
Aux Video Bus 6A
6
Aux Video/Key Bus 7B Framestore Key
DSK Pvw
Aux Video Bus 5A
5
Aux Video Bus 7A
M/E 3 Pvw Video
M/E 2 Pvw Video
4
Aux Video/Key Bus 5B Aux Video/Key Bus 6B
DSK Pvw
M/E 1 Pvw Video
3
M/E 3 Pvw Video
Chroma Key Inputs 5&6
2
M/E 2 Pvw Video
Chroma Key Inputs 3&4
1
M/E 1 Pvw Video
Chroma Key Inputs 1&2
Options
12
13
14
15
16
17
Figure 2-19. Output Signal Modules (front view)
On the rear panel of the frame, connect the composite or component
outputs and the key output from each Interconnect Adapter to the desired
external device (digital VTRs, etc.).
2-36
Frame Communications Connections
Frame Communications Connections
The Model 3000 includes provisions for GPI triggers and for connecting to
Kaleidoscope, Krystal, the DPM-700, other Digital Effects devices, Video
Production Editors, and a Tally Expansion chassis. Communication to
these devices is provided via connectors located at the rear of the Model
3000 frame as shown in Figure 2-20.
NOTE: Ports other than those mentioned above are located on the rear of the frame
for future enhancements, but are not functional at this time.
RS-422 port for connecting
an Editor. Full Switcher Control
Protocols are Available
From This Port.
For Tally Options.
Input Black for Reference.
Terminate with 75 Ohms
or Loop-Through.
For Remote Auxiliary
Bus Control Panels.
CONTROL PANEL
EDITOR
J3
J1
J6
MODEM
GPI OUTPUTS
TALLY EXP
TB1
REFERENCE INPUT
TB2
J7
J4
GPI INPUTS
J2
MAINTENANCE
AUX BUS CTL
TB4
TB3
J8
J5
PORT A1
PORT A2
J16
J14
PORT B1
Serial RS-232 Port for
Running Signal Processor
Frame Diagnostics.
J15
PORT B2
J17
Ports for Connection
of External Digital
Effects Devices.
8 GPI Outputs;
8 GPI Inputs.
Allows Remote Control
of Auto Trans, DSK Mix,
Fade-to-Black Transitions
and/or Selected Functions.
PORT A3
J18
J12
J13
TP0347-210
Serial Link between
Control Panel and
Signal Processor
Frame.
PORT B3
Communications
Section.
J19
Port for connecting up to
24 Peripheral Bus II (PB II)
Slave Devices.
Figure 2-20. Signal Processor Frame Rear Connections (Control Section)
2-37
Section 2 – Installation
GPI Connect ions
The four GPI connectors on the rear panel of the Signal Processor Frame
provide eight input and eight output GPI connections (see Figure 2-21).
These connections provide a variety of user-assignable GPI applications
such as remote control of Auto Transitions, DSK mix, Fade-to-Black
Transitions and other selected functions.
GPI Input s
GPI inputs are opto-isolators. These pairs of input connectors are
numbered 1 through 8 with a chassis ground connection on the right end
and 5V connection on the left end of each connector module.
To trigger the GPI input, a DC voltage must be applied across the pair of
terminals for that input. Voltage must be between 4V and 24V, either
polarity. When the device used to trigger this input has a pair of relay
contacts available, the following wiring connection is recommended
(Input 6 shown in the following example).
G
1
2
3
4
G
G
5
6
7
8
G
GPI OUTPUTS
TB2
+5
1
2
3
4
G
+5
5
6
7
8
G
GPI INPUTS
TB4
Twisted Pair from remote
switch or relay contacts
Insert stripped end of wire in connector slot
and tighten screw to ensure good connection
Figure 2-21. GPI Connections
2-38
0347-02-07
Connect the appropriate GPI DC input signals to GPI INPUTS connectors
TB3 and TB4. Refer to the Startup section of the User Guide.
Frame Communications Connections
GPI Out put s
Each GPI output consists of a pair of connections on the rear of the frame,
which are connected to an isolated pair of relay contacts (SPST; normally
open). These pairs of output connectors are numbered 1 through 8 with a
chassis ground connection on both ends of each connector module. These
relay connections are rated at 500mA (peak) for voltages not to exceed 30
volts peak (AC or DC) with respect to chassis ground.
Connect the appropriate GPI output connections to GPI OUTPUTS
connectors TB1 and TB2. Record these output connections for use by the
operator when attaching the triggers to E-MEM recalls.
Conf iguring GPI Input s and Out pu t s
The functions performed by the GPI inputs and outputs are configured in
the Configuration/External I/F menus. Please refer to the Startup section
of the User Guide for details about setting up the GPI menus.
Video Product ion Edit or Connect ion s
The Model 3000 may be connected to video editors such as Grass Valley’s
VPE-series of editors. Refer to Figure 2-20 when making this connection.
Attach the signal cable from the editor to the EDITOR port (J6) of the
Model 3000, located on the Communications Panel.
2-39
Section 2 – Installation
Connect ing t o Kaleidoscope
The Kaleidoscope Controller connects to the Model 3000 through an
adapter cable (151022-00) and the Model 3000 RS-422 control cable
(054602-16). See Figure 2-22.
The Model 3000’s Aux Bus video and key outputs are connected to the
Kaleidoscope Channel video and key inputs. Note that the Model 3000’s
physical Aux Bus outputs must be cabled to Kaleidoscope’s physical
Channels in sequential order.
The Kaleidoscope Channel outputs can be connected to any of the Model
3000 physical inputs (1 to 64), in any order. It is important to note which
physical inputs are connected from which Kaleidoscope Channel outputs,
for both video and key because this information must be entered later into
a setup menu in the Model 3000 (DPM Map Inputs Menu under the
External Interfaces Menu).
Kaleidoscope
Controller
Comm.
Panel
0347-214C
Model 3000 Signal
Processor Frame
(Port A1) J14
Adapter
Control Cable
RS-422
Cable
(054602-16)
(151022-00)
J17 (IPL)
Parallel I/O
Module
(068604)
Channel A
Channel B
Aux Bus
Outputs
Any Analog Video &
Key Inputs In Any Order
1
VIDEO
2
VIDEO
3
VIDEO
4
VIDEO
KEY
Channel C
KEY
Channel D
KEY
Channel E
KEY
Channel F
VIDEO
KEY
VIDEO
KEY
VIDEO
KEY
VIDEO
KEY
Figure 2-22. Example of Model 3000 to Kaleidoscope Cabling
2-40
Frame Communications Connections
When Kaleidoscope’s outputs are sent to an Output Router, the Primary
Video and Key and Secondary Video and Key outputs may be connected to
any four analog inputs on the Model 3000. The Model 3000’s inputs are
assigned via menus to any crosspoints (Map Inputs Menu under the
Inputs Menu). This assignment is described in the Startup section of the
User Guide.
NOTE: Standard length of the RS-422 cable is 16 meters (The cable length is
indicated by the dash number on the end of the part number.) The maximum
combined length of the adapter and RS-422 cables should not exceed 300 meters.
The adapter cable connects between J17 at the rear of the Kaleidoscope
Controller chassis and the 9-pin D-type connector on the end of the RS-422
control cable. The control cable connects to J14 (Port A1) on the
Communications Panel at the rear of the Model 3000 Signal Processor
Frame. See Figure 2-22.
NOTE: This interface requires that the Serial Communications mezzanine
board (068918) be installed on the Model 3000 Control Processor Module
(068906). The Control Processor Module is located in slot B17 in the
Model 3000 Signal Processor Frame.
Additional Kaleidoscope requirements are as follows: The Parallel I/O module in
the Kaleidoscope Controller must be a 068604 module (not a 068537), and the
software version installed in Kaleidoscope must be 6.1 or later.
Connect ing t o a Kryst al Digit al Pictu r e M an ip u lat o r
Refer to the preceding Kaleidoscope instructions for Krystal connections,
except that no adapter cable is required. Connect the 054602-16 RS-422
cable from 3000 frame Port A1 (J14) directly to connector J4 (Switcher) on
the Krystal Video Processor Frame for 1-channel systems or to J4
(Switcher) on the Krystal Controller Frame for 2-channel systems.
2-41
Section 2 – Installation
Connect ing t o a DPM - 700
The Model 3000 can initiate E-MEM Effects Memory Learn and Recall
operations in a Grass Valley DPM-700 using Peripheral Bus II protocol. In
addition, the Model 3000 can trigger specific functions in the DPM.
Communication is from the Model 3000 to the DPM; the DPM will not
control or communicate with the Model 3000. (Direct DPM control of the
Model 3000 aux buses is not provided.)
Control and video/key connections between the Model 3000 and the DPM
are shown in Figure 2-23.
The control cable is connected between J5 (Peripheral Port) at the rear of
the DPM frame and J18 (Port A3) on the Communications Panel at the rear
of the Model 3000 Signal Processor Frame. See Figure 2-23.
The Model 3000’s Aux Bus video and key outputs are connected to the
DPM’s video and key inputs. The DPM’s outputs can be connected to any
of the Model 3000 physical inputs (1 to 64). The inputs are then assigned
via menus to any crosspoints, as described in the Startup section of the
User Guide (Map Inputs Menu under the Inputs Menu).
Model 3000 Signal
Processor Frame
Comm.
Panel
DPM-700
Control Cable
RS-422
(054602-16)
Port A3
J18
A
Any
Aux Bus
Outputs
VIDEO 1
B
A
KEY 1
B
Peripheral
Port
J5
VIDEO 2
Channel 1
KEY 2
Channel 2
Any Video &
Key Inputs
VIDEO
KEY
Figure 2-23. Model 3000 to DPM-700 Cabling
2-42
Frame Communications Connections
Chassis Ground
Tx Common
Rx A (–)
Rx B (+)
Tx B (+)
Tx A (–)
Rx Common
Chassis Ground
Male
Male
(Wiring
Side)
(Wiring
Side)
1
1
6
6
2
2
7
3
8
7
(Twisted Pairs)
4
3
8
4
9
5
9
0347-02-18A
The standard length of the control cable between the Model 3000 and the
DPM-700 is 16 meters (P/N 054602-16). Alternatively, you may make your
own cable as illustrated in Figure 2-24. Maximum length of the control
cable is 300 meters.
Chassis Ground
Tx Common
Tx A (–)
Tx B (+)
Rx B (+)
Rx A (–)
Rx Common
Chassis Ground
5
Connects to
PORT A3
on 3000/4000
Connects to
J5 on
DPM-700
Figure 2-24. Peripheral Bus II Cable Design
DPM Logical Channel Tally
This feature allows you to return a high tally from a DPM-700 when
configured with the Model 3000. Due to its complexity, two examples will
be used to describe this feature. Note the following parameters for the
examples described below:
■
DPM 1 Logical Channel 1 will be used as the logical Aux Bus.
■
The return (output from the DPM-700) will be connected to BNC
connectors numbered 11 (video) and 12 (key) on the switcher Signal
Processor Frame.
■
Aux Bus Logical Channel 1 will control the tally via GPI Input
connector pins numbered 1 and 2.
2-43
Section 2 – Installation
DPM Logical Channel Tally Exam p le 1
This example demonstrates an appropriate tally for a “near/far switching”
configuration. The following diagram illustrates the video wiring required
for this example.
Switcher Signal
Processor Frame
DPM-700
Aux Bus 1A
VIDEO 1
Aux Bus 1B
Aux Bus 2A
KEY 1
Channel 2
KEY 2
Aux Bus 2B
Input 11
Channel 1
VIDEO 2
Input 12
VIDEO
KEY
Figure 2-25. Switcher-to-DPM-700—Example 1
The following diagram illustrates the GPI wiring required for this
example.
Pin 1
Ch. 1B Tally
Pin 21
TB 3
+5
Ch. 1A Tally
1
2
3
4
Pin 9
Pin 23
Switcher
Pin 25
DPM-700
DB-25 Connector
Figure 2-26. GPI Wiring—Example 1
2-44
GPI INPUTS
G
Frame Communications Connections
DPM Logical Channel Tally Exam p le 2
This example demonstrates an appropriate tally for a “double-box”
configuration, where the two DPM-700 channels are combined and are
returned to the switcher. The following diagram illustrates the video
wiring required for this example.
Switcher Signal
Processor Frame
DPM-700
Aux Bus 1A
VIDEO 1
Channel 1
Aux Bus 1B
KEY 1
Aux Bus 2A
VIDEO 2
Aux Bus 2B
Input 11
Channel 2
KEY 2
Input 12
VIDEO
KEY
Figure 2-27. Switcher-to-DPM-700—Example 2
The following diagram illustrates the GPI wiring required for this
example.
Pin 1
Ch. 2A Tally
Pin 8
TB 3
+5
Ch. 1A Tally
1
2
3
4
G
Pin 9
Pin 23
Pin 25
Switcher
GPI INPUTS
DPM-700
DB-25 Connector
Figure 2-28. GPI Wiring—Example 2
2-45
Section 2 – Installation
DPM Logical Channel Tally M enu Set u p
After connecting the DPM as shown previously in example 1 or example 2,
make the following selections in the 3000 menus.
1. From the Map Inputs Menu:
a. Select LOG CHANNEL with the [LOG/PHYS ASSIGN ] button.
b. Select DPM 1 LOG CHAN 1 with the (VIDEO INPUT) soft knob.
c. Select DPM 1 LOG CHAN 1 with the (KEY INPUT) soft knob.
d. Select NONE with the (CHROMA KEY INPUT) soft knob.
2. From the DPM Setup Menu:
NOTE: Refer to “DPM Configurations” in Chapter 2 of the Operator’s Guide for
more information.
a. Choose DPM 1 with the [DEVICE SELECT] button.
b. Choose OTHER FIXED with the [DPM TYPE] button.
3. From the DPM Map Aux Buses Menu:
a. Select DPM 1.
b. Select 2 with the (NUMBER OF CHANNELS) soft knob.
c. Select AUX 1 with the (CHANNEL 1) soft knob.
4. From the DPM Map Inputs Menu
a. Choose DPM 1 with the [DEVICE SELECT] button.
b. Select CHAN 1 - PRI with the [CHANNEL SELECT] button.
c. Select 11 with the (VIDEO INPUT) soft knob.
d. Select 12 with the (KEY INPUT) soft knob.
e. Select CHAN 2 - PRI with the [CHANNEL SELECT] button.
f.
Select 11 with the (VIDEO INPUT) soft knob.
g. Select 12 with the (KEY INPUT) soft knob.
2-46
Connecting the Control Panel to the AC Power Source
Power Connections
Connecting the Control Panel to the AC Power Source
The present Control Panel Power Supply is capable of operating on either
110 Vac or 220 Vac nominal (see Table 2-2 for specifications.) This supply is
auto-ranging; that is, it will automatically select the correct voltage range.
The power cord shipped with the control panel is equipped with a North
American 110-volt style plug. For use on 220 volts, or for use anywhere
other than North America, you may need to cut off the plug on the source
end of the cord and install an appropriate (customer-supplied) plug that
meets local standards.
1. Open the Control Panel lid and check that the power switch is in the
OFF position. If an optional Redundant Power Supply is present, be
sure that that switch is also set to OFF.
2. Connect the power cord (or cord) from the back of the Control Panel to
the appropriate AC power source. If a Redundant Power Supply is
installed, connect each supply to a separate power source (branch
circuit).
Do NOT turn on the Control Panel power at this time.
Connecting the Frame Power Supply to the AC Power Source
The present Signal Processor Frame Power Supply (power unit
manufactured by Todd) is also capable of operating on either 110 Vac or
220 Vac nominal. This supply is also auto-ranging.
For 220- Volt Operat ion
Each switcher Frame Power Supply is shipped with a captive power cord
intended for use on 200 to 240 Vac at 50/60 Hz.
For operation on 220 Vac nominal, connect the cord from the power supply
frame to a dedicated circuit fused for 20A overload protection. See
Table 2-2 for specifications.
The power cord on each Frame Power Supply sold for use in North
America is equipped with a 250V 20A NEMA Type L6-20 twist-lock plug.
The power cord on a Frame Power Supply sold for use elsewhere is
shipped without a plug, and must be fitted with a customer-supplied plug
that meets local standards.
2-47
Section 2 – Installation
CAUTION
To reduce the risk of electrical shock, ensure that a valid ground is present. For
redundant supply systems, connect the power supplies to separate branch circuits
employing separate service grounds.
1. Ensure that the power switch located on the front of the Frame Power
Supply is in the Off (0) position. If an optional Redundant Power
Supply is present, be sure that its switch is also set to Off.
2. Connect the power cord from the rear of the Frame Power Supply to an
appropriate source of 220 Vac power. If a Redundant Power Supply is
installed, connect it to a separate 220 Vac power circuit.
CAUTION
Do NOT turn on the Frame Power Supply(ies) at this time.
For 110- Volt Operat ion
If it is desired to operate the Signal Processor frame on a 100 to 120 Vac
circuit, first check the rear plate on the Frame Power Supply to see that it
indicates this capability.
For 110 Vac nominal operation, the supplied 10 AWG power cord must be
replaced with 6 AWG wiring. It is recommended that this 6 AWG wiring be
connected into the power supply frame directly from a junction box. This
should be a dedicated circuit fused for 40A overload protection. (See
Table 2-2 for specifications.)
To rewire the Frame Power Supply for nominal 110 Vac operation, proceed
as follows:
1. Make sure that all power is disconnected (from both supplies in a
redundant system).
2. Remove the left and right rear covers, and then the center rear cover
plate from the power supply frame.
2-48
Connecting the Frame Power Supply to the AC Power Source
Remove
Nut and
Jumper
Wire
L1
Brown
L2
0347-0232
3. In the center section, disconnect the incoming AC power wires from
the left and right sides of the terminal block (see Figure 2-29).
Remove 10 AWG
Power Cord
(3 wires) and
Hardware
Blue
Green/Yellow
Figure 2-29. For 110 Vac Operation – Remove 220 Vac Wiring
4. Remove the hardware fastening the incoming AC power cable ground
wire to the chassis ground stud and disconnect that wire. Also remove
the jumper wire which ties the stud to the terminal block.
5. Unscrew the knurled cord retainer and remove the 10 AWG power
cord.
6. Remove the power cord retention block from the supply chassis.
2-49
Section 2 – Installation
Install 3-Wire
6 AWG Cable
"Line"
"Safety Ground"
"Neutral"
L1
L2
Install Cable or
Flexible Conduit
With 6 AWG Wire
Directly From
Circuit Breaker
Install 3/4 In.
Conduit Fitting
in Cable Hole
Brown
Blue
Green/Yellow
Figure 2-30. For 110 Vac Operation – Install 110 Vac Wiring
8. Connect the incoming “safety ground” wire to the center terminal of
the terminal block.
9. Connect the “neutral” side of the incoming AC power to the side of the
terminal block associated with the blue wire
10. Connect the “line” side of the incoming AC power to the side of the
terminal block associated with the brown wire.
2-50
0347 0233
7. The 6 AWG wiring may now be installed (see Figure 2-30). It is
suggested that a 3/4-inch (19 cm) electrical conduit fitting be installed
in the hole from which the power cord retention block was removed
and the wiring be routed in through flexible conduit from a junction
box. In the United States, field wiring must be in compliance with the
National Electrical Code and any applicable local codes.
Connecting the Frame Power Supply to the AC Power Source
11. Inspect your work to make sure that all connections are correct, tight,
and safe.
12. Reinstall the center cover plate, putting in the four screws at the top
and the three screws at the bottom.
13. Install the left and right rear covers which overlap and share mounting
holes with the center plate.
The Frame Power Supply is auto-ranging; therefore, no switches or straps
need to be moved when changing between 220- and 110 Volt power
sources.
2-51
Section 2 – Installation
Powering Up
The following pages provide you with the information necessary to turn
on and begin operating the Model 3000 Production Switcher.
Preliminary Checks
Before bringing the system on-line, the following preliminary checks need
to be made:
CAUTION
You should observe normal precautions when working around high current, low
voltage power supplies. Always remove rings, wrist watches, etc. before working
inside any of the system’s components.
1. Verify that all cabling is clear of cooling fans and that there are no loose
tools or other metal objects near power supply buses or connections.
2. Check that all Modules and Interconnect Adapters are seated firmly in
the frame.
3. Verify that the Control Panel and Signal Processor Frame AC power
cables are properly connected.
Power-On
Raise the Control Panel and set the power supply switch to ON. If you
have redundant power supplies, turn on both supplies.
Verify that the green RUN LED on the CPU Board (located in the middle of
the control panel tub on the Model 3000-2 tub, or at the back of the upper
panel tub in the Model 3000-3) is lit.
Set the power switch on the Signal Processor Frame Power Supply to the
ON position. If you have redundant power supplies, turn on both
supplies.
Verify that the power supply voltage LEDs on the front of the Frame Power
Supply(s) are lit and that the fan in the Processor is on.
If any of these conditions is not present, turn the system off and refer to
Section 5, Diagnostics and Troubleshooting.
A successful power-on is indicated by:
2-52
■
All green Frame Power Supply LEDs are on.
■
The green RUN LED on the Control Panel CPU Board is on.
Power-On
■
The Control Panel Menu Display is on and displaying the Grass Valley
sign-on message.
■
Some pushbuttons are lit on each area of the Control Panel.
NOTE: To meet RF/EMI specifications and to ensure proper cooling, the door on
the front of the Signal Processor must be closed.
Maintenance personnel should be familiar with the Control Panel and its usage.
For information and reference, see the Model 3000 Operation Reference manual
and User Guide.
When the system is turned on, information stored in User-Defined Default
memory is loaded into the Current Working Buffer memory, which sets the
initial state of the switcher.
The data contained in the Current Working Buffer is used for all normal
operations.
The first time the switcher is turned on, the switcher status values will
probably be whatever was stored in the User-Defined Default memory at
the time the system was tested at the factory. These can be changed at any
time through the Configuration/User Prefs/Define Defaults menu, as
described in the Model 3000 User Guide.
2-53
Section 2 – Installation
Redundant Power Supply Voltage Adjustments
If you ordered a redundant Frame Power Supply with the Model 3000, it
was tested and adjusted with the system before leaving the factory. In this
case, it is not necessary to perform the following procedure.
If a redundant Frame Power Supply is ordered after the Model 3000, the
following procedure should be performed to ensure that the Primary and
Redundant supplies are working properly together.
NOTE: This procedure describes the adjustment of output voltages in power
supplies using power units manufactured by Todd Products Corporation (the
present supplier). For information on older power supplies manufactured by
Pioneer Magnetics, refer to the Maintenance section of this manual.
WARNING
Dangerous voltages are present inside the Signal Processor Frame Power
Supply. Do not perform any servicing of this equipment unless you are
qualified to do so. Remove all rings, wrist watches, etc., before working
inside the equipment.
1. Remove the rear access panels of both power supplies if they have not
already been removed.
2. With power to the Redundant Frame Power Supply turned off, turn on
the power switch on the front of the Primary Frame Power Supply.
3. Record the following measurements on paper. Measure the MultiOutput supply voltages (–5.2, +13, –13, and +48 Vdc, referenced to the
COM test point) at the test points inside the left rear compartment of
the power supply frame. See Figure 2-31. Measure the +5 Vdc supply
voltage between the power lugs in the right rear compartment.
2-54
Power-On
Test Points
+5V
–5V
+13V
–13V
+48V
COM
Measure +5V
Between
These Lugs
+48V +5.2V –13V +13V
ADJ ADJ ADJ ADJ
High Current
+5V ADJ
Figure 2-31. Voltage Test Points and Adjustments on Todd Power Supplies
4. Turn off the Primary Power Supply, then turn on the Redundant
Supply and measure its voltages. Compare these measured values to
those recorded in step 3
5. With an insulated screwdriver-type adjustment tool, adjust the
Redundant Supply voltages to within 20mV of the Primary Supply
voltages. Adjustment locations are shown in Figure 2-31.
6. Turn off both power supplies and install the access panels on the rear
of the supplies.
7. Turn on both supplies for redundant operation.
2-55
Section 2 – Installation
System Setup
Setting Vertical Blanking Range
Table 2-4 details the possible end positions of the vertical blanking interval
(see Figure 2-32 on the next page). To select any endpoint, simply turn the
16-position rotary switch (S6) located at the front of the Sync Generator
module to the switch setting that corresponds to the desired value.
Table 2-4. Vertical Blanking Range Set by S6
Switch Setting
Field #1 Video
Field #2 Video
0
Line #15
Line #14.5
F
Line #16
Line #15.5
E
Line #17
Line #16.5
D
Line #18
Line #17.5
C
Line #19
Line #18.5
B
Line #20
Line #19.5
A (nominal RS-170 standard)
Line #21
Line #20.5
9
Line #22
Line #21.5
8
Line #23
Line #22.5
7
Line #24
Line #23.5
6
Line #25
Line #24.5
5
Line #26
Line #25.5
4
Line #27
Line #26.5
3
Line #28
Line #27.5
2
Line #29
Line #28.5
1
Line #30
Line #29.5
Setting Preview Blanking Switch
The Preview Blanking switch (S2) located at the front of the Sync
Generator module (see Figure 2-32) must be in the ON position for normal
switcher operation. When switch S2 is in the OFF position, blanking reinsertion for the PGM Video, PGM Key, Mask, and Switched Preview
buses is turned off, and blanking control via the Blanking menu is
inhibited.
2-56
Setting Preview Blanking Switch
4321
Vernier
0F ED
Fine
98
76
0F ED
5
CBA
4321
98
76
5
CBA
4321
98
76
5
Medium
CBA
4321
CBA
4321
5
76
0F ED
76
98
0F ED
5
CBA
4321
76
98
Coarse
98
0F ED
5
CBA
S6
V Blanking
End
0F ED
Switcher
Timing
0349-226
Sync Generator Module
(front of module facing front door)
Middle of Cardcage, Cell B7
End (set by S6)
Start
Vertical Blanking Interval
Must be set
down (OFF)
for Normal
Operation
V Sync
0FEDCBA987654321
ON OFF ON OFF
S1
Diagnostic
Mode
Line 15............to.........30 Field #1 Video
Line 14.5.........to.........29.5 Field #2 Video
S2
Preview
Blanking
Must be
set up (ON)
for Normal
Operation
Figure 2-32. Sync Generator, V Blanking Range Adjustment & Preview Blanking Switch
2-57
Section 2 – Installation
Checking Auto-timed Analog Inputs
Analog input modules with autotiming have four sets of front mounted
LEDs. Each set of three LEDs reflects the current state of an input channel
arriving at the module. LEDs are marked as follows:
NO BURST
Subcarrier
NO SYNC
OUT OF RANGE
Autotime ON/OFF
Figure 2-33. Auto-time Input LEDs
Proper autotiming of an input is indicated by all LEDs being off. If the top
two LEDs are both on, it indicates either that no signal is applied to the
input or that the signal does not have sync and burst (for example, a key
signal).
When the top two LEDs are off and the bottom LED is on, it indicates that
a signal is applied, but that its timing is not within the specified autotiming
window (see below).
W hat is Aut ot iming?
The Model 3000 autotimed Analog input module accepts input video
within ± 17 µs of the Input Reference. Video outside of this range is not
auto-timed. The autotimed module also corrects input SC/H (subcarrierto-horizontal) phase errors within the range of ±170 degrees. It corrects
SC/H error by repositioning the video with respect to sync. For example,
an input SC/H error of 170 degrees will result in a 132 ns horizontal shift;
a 10 degree error will result in an 8 ns shift (approximately 1/8 pixel).
Because SC/H errors are corrected by repositioning video, a potential
problem can occur when “match frame” editing. In order to “match” into
previously recorded material, SC/H errors of the playback and record
machines must be controlled to provide consistent SC/H phase. This
action is necessary because SC/H errors shift the picture. To ensure an
accurate match, all sources must remain consistent.
NOTE: Any SC/H error in the Input Reference to the switcher will skew the input
SC/H acceptance window and alter the sampling phase of the manual timing mode
of the autotimed module.
2-58
Crosspoint Name Displays (Model 3000-3 only)
Installation of Options
The following pages describe installation of several options. If you are not
installing any of these options at this time, turn now to “Configuring Your
System Software” at the end of this section.
Crosspoint Name Displays (Model 3000-3 only)
The Input Display Board Option is installed in the Upper Control Panel of
the 3000-3 switcher . With this option installed, the Model 3000-3 can
display a four-character source name above each crosspoint. The LEDs
normally display the names of unshifted crosspoints. While a [SHIFT]] button
is held down, the LEDs display the names of shifted crosspoints.
Input Display Opt ion Kit Cont ent s
The option kit (Part No. 088919-00) includes the following parts:
■
Display Boards with metal mounting brackets (quantity 3)
■
Ribbon cable assemblies (quantity 3) with 3 lengths:
156020-00 (short), 156020-01 (medium), 156020-02 (long)
■
1/4 “ Pan Head screws (quantity 6)
Input Display Opt ion Board Inst allat io n
1. Turn off power to the Control Panel.
2. Open the Upper Control Panel lid. Locate the Input Readout Display
windows above to the row of PVW/AUX Bus buttons.
3. Install the left (facing switcher) Display Board first. Position the
Display Board behind the display window in the panel. Align the
board so that two of the screw holes in the mounting bracket match up
with the two threaded holes in the panel above the display window.
(There are eight holes in the Display Board mounting bracket, but only
two will be used—the hole that is second from the left and the one that
is third from the right).
4. Insert two of the supplied screws through the holes in the Display
Board mounting bracket and gently tighten the screws to secure the
Display Board in position.
CAUTION
Do not use screws longer than 1/4-inch long. Screws longer than 1/4” will break
through and damage the exterior surface of the Upper Control Panel.
2-59
Section 2 – Installation
5. Next, install the middle Display Board, followed by the right Display
Board (similar to steps 3 and 4).
6. Take the “long length” ribbon cable and attach one connector to the left
Display Board socket (the connector and socket are keyed). Connect
the second ribbon cable connector to socket J2 of the Control Panel
CPU Board (068985).
7. Install the “medium length” ribbon cable to the middle Display Board
similar to Step 6. Connect the second ribbon cable connector to socket
J3 of the Control Panel CPU Board.
8. Install the “short length” ribbon cable to the right Display Board
similar to Step 6. Connect the second ribbon cable connector to socket
J4 of the Control Panel CPU Board.
9. Dress the ribbon cables in order to avoid getting them pinched in the
Upper Control Panel hinge.
Tally Output Option
The Tally Output Option consists of a Tally Output module (068932) and a
Tally Output Interconnect board (068941). The option provides tally output
relay closures which produce “on/off” signals indicating switcher
crosspoint selections at source locations or monitoring stations.
A typical remote tally example is the red light indicator on the front of a
camera. When the camera source crosspoint is selected on the switcher,
and the camera source is put on-air, a tally relay closes to turn on the
camera’s red light, indicating that the camera output is on-air.
2-60
Tally Output Option
Tally Out put M odule Swit ch Set t ings
The 068932 Tally Output module mounts in slot 17 of Bay C in the switcher
frame. Seven banks of eight DIP switches on the module determine how
the module will act on the data sent to it. See Figure 2-34.
CAUTION
To avoid static damage to sensitive electronic devices, protect the Model 3000
Digital Switcher from static discharge. Avoid handling switcher modules in a high
static environment. Touch the Signal Processor Frame before you remove any
modules. This helps ensure that any potential difference between your body and
the frame is dissipated. If you handle the modules or make any repairs to them, use
a grounding strap and grounded equipment.
The first bank of 8 switches, labeled on the module as MODE (S1), selects
one of several specialized tally functions (Table 2-5).
ON AIR Tally is the normal, most commonly-used tally system (all DIP
switches OFF). When Mode 0 is selected, any input whose signal reaches
the DSK Program Video or DSK Program Key output is tallied.
When Mode 1, 2, or 3 (Iso Tally) is selected, the switcher tallies (only) the
inputs that contribute to the output of the corresponding M/E.
Table 2-5. Tally MODE Switch (S1) Settings
M/E 3
Iso
Tally†
Mode 3
Individual
Bus
Iso Tally††
Mode 4
Preset
(LookAhead)
Tally
Mode 5
OFF
ON
OFF
ON
OFF
ON
ON
OFF
OFF
OFF
OFF
OFF
OFF
ON
ON
4
OFF
OFF
OFF
OFF
OFF
OFF
5
OFF
OFF
OFF
OFF
OFF
OFF
6
OFF
OFF
OFF
OFF
OFF
OFF
7
OFF
OFF
OFF
OFF
OFF
OFF
8
OFF
OFF
OFF
OFF
OFF
OFF
DIP
Switch
Segment
ON AIR
Tally
Mode 0
M/E 1
M/E 2
Iso Tally Iso Tally
Mode 1 Mode 2
1
OFF
ON
2
OFF
3
† 3 M/E switchers only.
†† Iso tally for every bus having its associated DIP switch closed. Select the individual buses
as listed in Table 2-6.
2-61
RESET
RUN
INCOMING
DATA
OFF
ON
NORMAL ON-AIR TALLY=
ALL SWITCHES OFF.
REFER TO MANUAL FOR
OTHER MODES.
INDIVIDUAL BUS ENABLES
1
2
3
4
5
6
7
8
OFF
S2
1
2
3
4
5
6
7
8
S3
1
2
3
4
5
6
7
8
S4
1
2
3
4
5
6
7
8
0347-225
Section 2 – Installation
ON
F1
F2
S5
1
2
3
4
5
6
7
8
S6
1
2
3
4
5
6
7
8
S7
1
2
3
4
5
6
7
8
F3
REMOVE JUMPER TO
ISOLATE TALLY COMMON A
AND TALLY COMMON B
Figure 2-34. Tally Output Module Switch and Jumper Location
When Mode 4 (Individual Bus Iso Tally) is selected, the remaining six
banks of switches on the board (INDIVIDUAL BUS ENABLES 1-48) select
the switcher’s internal buses to be used as tally sources (see Table 2-6). For
example, with the Bus Enable switches set for buses 35 and 36 ON, if an
input were selected on bus 35 or 36, its corresponding relay would close.
The same input chosen on other buses would cause no relay closures. It is
possible to tally as many buses as desired simultaneously.
When Mode 5 (Look-Ahead Tally) is selected, the switcher tallies the
source(s) that will be on air after one of the following transitions:
2-62
■
Flip-Flop Mix/DSK Cut
■
Flip-Flop Mix/DSK Auto Transition
■
Flip-Flop Mix/DSK Lever Arm Transition
Tally Output Option
Table 2-6. Tally Bus Enables Switch Settings
DIP
#
S2
S4
S6
DIP
Segme
nt #
ON
Module
Function
Label
DIP
#
S5
DIP
Segme
nt #
ON
Module
Label
1
25
M/E 3 Key 1 Video Bus†
Function
1
1
PGM Video Bus
2
2
PGM Key Bus
2
26
M/E 3 Key 1 Key Bus†
3
3
PST Video Bus
3
27
M/E 3 Key 2 Video Bus†
4
4
PST Key Bus
4
28
M/E 3 Key 2 Key Bus†
5
5
DSK 1 Video Bus
5
29
M/E 3 BKGD A Video Bus†
6
6
DSK 1 Key Bus
6
30
M/E 3 BKGD A Key Bus†
7
7
DSK 2 Video Bus
7
31
M/E 3 BKGD B Video Bus†
8
8
DSK 2 Key Bus
8
32
M/E 3 BKGD B Key Bus†
1
9
M/E 1 Key 1 Video Bus
1
33
PVW Video Bus
2
10
M/E 1 Key 1 Key Bus
2
34
Mask Bus
3
11
M/E 1 Key 2 Video Bus
3
35
Aux 1 Video Bus
4
12
M/E 1 Key 2 Key Bus
4
36
Aux 1 Key Bus
5
13
M/E 1 BKGD A Video Bus
5
37
Aux 2 Video Bus
6
14
M/E 1 BKGD A Key Bus
6
38
Aux 2 Key Bus
7
15
M/E 1 BKGD B Video Bus
7
39
Aux 3 Video Bus
8
16
M/E 1 BKGD B Key Bus
8
40
Aux 3 Key Bus
1
17
M/E 2 Key 1 Video Bus
1
41
Aux 4 Video Bus
2
18
M/E 2 Key 1 Key Bus
2
42
Aux 4 Key Bus
3
19
M/E 2 Key 2 Video Bus
3
43
Aux 5 Video Bus
4
20
M/E 2 Key 2 Key Bus
4
44
Aux 5 Key Bus
5
21
M/E 2 BKGD A Video Bus
5
45
Aux 6 Video Bus
6
22
M/E 2 BKGD A Key Bus
6
46
Aux 6 Key Bus
7
23
M/E 2 BKGD B Video Bus
7
47
Aux 7 Video Bus
8
24
M/E 2 BKGD B Key Bus
8
48
Aux 7 Key Bus
5
49
Aux 8 Video Bus
6
50
Aux 8 Key Bus
7
51
Aux 9 Video Bus
8
52
Aux 9 Key Bus
S6
S7
S1
† Model 3000-3M/E Switcher only
2-63
Section 2 – Installation
Tally Out put Connect or Pinout s
Input 1 Tally
1
Input 2 Tally
2
Input 3 Tally
Input 4 Tally
Input 5 Tally
Pins 1 through 35
are Relay Closures
to Tally Common A
(Pin 36)
Input 6 Tally
Input 7 Tally
Input 14 Tally
Input 15 Tally
Input 16 Tally
Input 17 Tally
Input 18 Tally
Input 19 Tally
22
Input 22 Tally
23
Input 23 Tally
24
Input 24 Tally
25
Input 25 Tally
26
Input 26 Tally
27
Input 27 Tally
28
Input 28 Tally
29
Input 29 Tally
30
Input 30 Tally
31
Input 31 Tally
32
Input 32 Tally
33
M/E 1 Tally
34
M/E 2 Tally
6
7
9
Input 13 Tally
Input 21 Tally
5
8
Input 12 Tally
21
4
Input 9 Tally
Input 11 Tally
Input 20 Tally
3
Input 8 Tally
Input 10 Tally
20
10
11
12
13
14
15
16
35
(M/E 3 Tally) *
36
Tally Common A
37
Chassis Ground
17
18
19
Input 33 Tally
1
Input 34 Tally
2
Input 35 Tally
3
Input 36 Tally
4
Input 37 Tally
Input 38 Tally
Input 39 Tally
9
Input 45 Tally
Input 46 Tally
Input 57 Tally
26
Input 58 Tally
27
Input 59 Tally
28
Input 60 Tally
29
Input 62 Tally
30
Input 62 Tally
31
Input 63 Tally
32
Input 64 Tally
33
M/E 1 ON AIR
34
M/E 2 ON AIR
35
(M/E 3 ON AIR) *
36
Tally Common B
37
Chassis Ground
12
13
14
15
Input 48 Tally
Input 51 Tally
Input 56 Tally
25
11
16
Input 50 Tally
Input 55 Tally
24
10
Input 47 Tally
Input 49 Tally
Input 54 Tally
23
7
8
Input 44 Tally
Input 53 Tally
22
6
Input 41 Tally
Input 43 Tally
Input 52 Tally
21
5
Input 40 Tally
Input 42 Tally
20
17
18
19
J1
J2
* 3 M/E Switcher Only
NOTE: Tally Common A is tied to Tally Common B on the module.
Either A or B or both can be connected. Maximum Relay
Current is 1 Amp at 32 Volts
Figure 2-35. Tally Output Connector Pinouts
2-64
0347-231
The two tally output connectors on the 068941 board are female 37-pin D
connectors labeled J1 and J2. Pinouts for the two connectors are shown in
Figure 2-35.
Pins 1 through 32
are Relay Closures
to Tally Common B
(Pin 36)
Tally Expansion Option
Tally Expansion Option
The Tally Expansion Option provides expansion of the tally output
function provided by the Tally Output Option described previously.
The Tally Expansion Option consists of a 2 Rack Unit (2 RU) chassis which
has two (redundant) power supplies mounted on a single sled and three
slots for Tally Output modules (068932), and a 16 meter control cable.
NOTE: The optional Tally Output module in the Model 3000 switcher frame may
be moved into one of the three slots in the Tally Expansion frame.
Any number of Tally Expansion frames, each with up to three Tally Output
modules, can be added to a switcher. All Tally Output modules are ordered
separately.
Inst allat ion of Tally Expansion Opt i o n
There are four steps to the Tally Expansion option installation:
■
Chassis installation
■
Control cable installation
■
Tally output cable installation
■
Powering up the system
WARNING
Tighten door latches before moving chassis.
Do not lift chassis by the door or door handles. Door may open unexpectedly
causing damage or injury.
2-65
Section 2 – Installation
Chassis Inst allat ion
Refer to Figure 2-36.
1. Install the rear supports on the chassis.
2. Install the rear support brackets into the rack.
3. Mount the chassis in the rack.
4. Attach a ground wire between the ground stud on rear of the chassis
and station ground.
Do not connect or apply power to the Tally Expansion Chassis at this time.
0703-01
Repeat the above instructions for each chassis.
17.00 in.
(432 mm)
20.13 in.
(512 mm)
3.50 in.
(89 mm)
pansion
Tally Ex
Grass
Valley
Group
Tighten Latches Before
Moving Frame.
Do Not Lift Chassis by
Door or Door Handles.
Rear Supports Must Be Used.
19.00 in.
(483 mm)
Figure 2-36. Tally Expansion Chassis Installation
2-66
Tally Expansion Option
Cont rol Cable Inst allat ion
Male
Male
Cable Shield and
Chassis Ground
1
6
2
7
3
8
1
6
Rx A
Rx B
Tx A
Tx B
2
7
3
8
4
4
Ground
9
5
Connects to
J7 on 3000 Frame
J2 on 2200/4000 Frame
0703-02
Each Tally Expansion chassis comes with a 16 meter (50 foot) cable. This
cable has a 9 pin D connector on each end. The cables are standard RS422
and can be replaced with a custom-built cable if desired. See Figure 2-37.
9
5
(Twisted Pairs)
Wiring
Side
Wiring
Side
Connects to
J3 on
Tally Expansion
Frame
Figure 2-37. Control Cable Wiring
NOTE: Maximum total length of the tally expansion cables is 300 meters
(1000 feet)
1. Locate J7 on the rear of the Model 3000 Switcher frame. Tie the cable so
the connector on the cable will reach the connector on the switcher.
CAUTION
Do not plug the cable into the switcher at this time. Doing so may damage the line
drivers in the switcher.
2. Lay the cable from the switcher frame to the first Tally Expansion
option.
3. Plug this cable into J3 on the rear of the Tally Expansion unit.
2-67
Section 2 – Installation
If there is more than one Tally Expansion chassis, do the following steps:
1. Connect the second cable to J4 on the rear of the first chassis.
2. Run that cable to the next Tally Expansion chassis.
3. Connect the cable to J3 on the rear of the second chassis.
Repeat the above three instructions for each additional chassis. No
terminations are required for this cable.
Tally Out put Cable Inst allat ion
There are six 37-pin D tally output connectors on the rear of each Tally
Expansion chassis. These connectors have the following assignments:
■
1A and 2A: upper Tally Module (Slot A).
■
1B and 2B: center Tally Module (Slot B).
■
1C and 2C: lower Tally Module (Slot C).
Each pair of tally output connectors is active only if its associated tally
module is installed. Pinouts for the two connectors of each pair are the
same as those for the Tally Output option, shown in Figure 2-35.
Inst alling M odules
Each Tally Expansion chassis can hold up to three modules (see
Figure 2-38). To install a module:
1. Remove the chassis door.
2. Slide the module, component side up, into slot A, B, or C until the
module is seated.
3. Close the card ejector to secure the module.Replace the chassis door.
4. Replace the chassis door.
A, B, & C
Slots
CAUTION:
POWER SUPPLY #1
POWER SUPPLY #2
CAUTION:
HIGH VOLTAGE PRESENT
WHEN AC POWER
IS CONNECTED. CONSULT
MANUAL BEFORE SERVICING.
A
MODULES
DISCONNECT TWO AC POWER CORDS AND
LOOSEN CAPTIVE SCREW AT REAR OF
CHASSIS BEFORE REMOVING THIS
POWER SUPPLY DRAWER
Reset
Switch
B
C
RISK OF FIRE
REPLACE FUSES WITH
2A (T) FUSE
Tally Expansion Module
Figure 2-38. Tally Expansion Module Installation
2-68
Card
Ejector
Tally Expansion Option
Set t ing Tally M odule Swit ches
Seven banks of eight DIP switches on each of the Tally Modules determine
how that module will act on the data sent to it. The settings of these
switches are described under “Tally Output Option,” earlier in this section
(see Figure 2-34 and Table 2-5).
Turning On t he Tally Expansion Opt io n
When all the Tally Expansion Chassis are installed and set up:
1. At the rear of each Tally Expansion chassis plug both power cords into
the chassis and a source of power (90 to 132 Vac or 180 to 264 Vac). The
power supplies automatically select either 115 or 230 volt sources,
depending on the input. For improved protection against ac failure, use
two separate branch circuits.
2. Turn the power off to the switcher frame and plug the control cable
into its connector on the back of the switcher frame (J7 on the Model
3000).
3. Turn the switcher power back on.
4. At the front of each Tally Expansion chassis, remove the front cover,
turn on both power switches, and verify that both power supply lamps
are lit.
5. Replace the front cover.
2-69
Section 2 – Installation
Optional Remote Aux Control Panels
Optional Remote Aux Control Panels allow you to control the switcher aux
buses from a remote location. Three models of Remote Aux Panels are
available, each identified by the number of rack units (RUs) it occupies in
the equipment rack.
■
One RU panel (Option Part Number 088901-00)
■
Two RU panel (Option Part Number 088902-00)
■
Three RU panel (Option Part Number 088903-00)
The one RU and two RU panels (Figure 2-39) are functionally identical.
The one RU panel is designed for areas with very restricted space, and has
small crosspoint buttons containing LED tally lamps. The two RU panel
has large crosspoint buttons with internal tally lamps. Each of these panels
must be set up to control a specific aux bus and must have the setup
changed to control another bus.
All three panels have a joystick override and chop capability.
1
2
3
4
5
6
7
8
9
10
11
12
13
14
15
16
17
18
19
20
21
22
23
24 SHIFT
M/E M/E M/E
1
2
3 PGM
ON
AIR
Grass Valley
1
2
3
4
5
6
7
8
17 18 19 20 21 22 23 24
9
10 11 12 13 14 15 16
SHIFT
M/E
1
M/E
2
M/E
3
PGM
Grass Valley
Figure 2-39. One RU and Two RU Remote Aux Control Panels
2-70
Optional Remote Aux Control Panels
The three RU panel (Figure 2-40) has large buttons and is designed for
locations where it is desirable to operate more than one bus. This panel
will normally control all aux buses but can be set up to lock out specific
buses.
1
2
3
5
4
6
7
9
10 11 12 13 14 15 16
SHIFT
M/E
1
8
SOURCE
17 18 19 20 21 22 23 24
AUX
1A
AUX
2A
AUX
3A
AUX
4A
AUX
5A
AUX
6A
AUX
7A
AUX
8A
AUX
9A
AUX
1B
AUX
2B
AUX
3B
AUX
4B
AUX
5B
AUX
6B
AUX
7B
AUX
8B
AUX
9B
M/E
2
M/E
3
PGM
DELEGATE
Grass Valley
Figure 2-40. Three RU Remote Aux Control Panel
As many as 32 Remote Aux Panels can be attached to one switcher. These
are connected by a single cable with a total cable length not exceeding 1000
ft. (320 m).
M inimum Requirement s
The Remote Aux Control Panel requires:
■
Model 3000 Switcher with optional aux bus(es) installed
■
Switcher software version 5.0 or later for joystick override and chop
■
Nearby source of power (100 to 120 Vac or 200 to 240 Vac)
Disabled But t ons
The Remote Aux Panels are designed to control 48 inputs (24 unshifted
and 24 shifted). If your switcher is a 32-input model, input buttons 17
through 24 will be disabled (inputs 1 through 16 and shift 1 through shift
16 will be the active crosspoints).
The Remote Aux Panels are designed to control either 2 M/E or 3 M/E
switchers. For a 2 M/E switcher, the M/E 3 button is disabled.
High Tally
Each crosspoint lamp on the two or three RU panel will high tally (bright
lamp) when that input is on air. There is an ON AIR lamp on the one RU
panel which will illuminate to indicate that the selected input is on air. The
on-air tally can be permanently enabled on all panels.
2-71
Section 2 – Installation
Joyst ick Override
Each panel has inputs for up to 8 external user-supplied switch closures to
enable the override. The aux bus switches to a user-defined crosspoint
selection when the switch is closed. When the switch is released, the aux
bus returns to its previous selection.
Chop
Chop mode provides two fields of one source followed by two fields of
another source at frame rate. This function is intended for system
calibration.
Remot e Aux Panel Inst allat ion
The Remote Aux Control Panel consists of three parts:
■
Remote Aux Panel Assembly
■
Power Supply with power cord
■
Communications bus cable and connector
NOTE: Due to limited access at the rear of the Remote Aux Panel after it is
installed in the rack, it is recommended that the communications cable and power
supply cord be connected and the DIP switches on the rear of the panel be set before
the panel assembly is installed in the rack.
Cable Inst allat ion
Each panel comes with a 49 ft (15 m) switcher interconnect cable. This cable
has a D connector on one end and stripped wires on the other end. The D
connector of the cable will later be plugged into the rear of the switcher
frame
CAUTION
Do not plug the D connector in at this time. If power is applied to the switcher, the
cable line drivers in the switcher may be damaged.
The other end of the cable will be plugged into the Communications Bus
connector on the rear of the Remote Aux Panel using the supplied
connector. Any additional panel(s) will be connected to the previous panel.
Keep in mind that the total length of the cable must not exceed 1000 ft (320
m).
For a Model 3000 Switcher, place the D-connector end of the cable so that it
will reach J8 (AUX BUS CTL), near the center of the rear of the switcher
frame.
2-72
Optional Remote Aux Control Panels
Lay the cable from the switcher frame to where the first Remote Aux Panel
will be. Allow enough cable to reach the control panel connector, and
about 3 feet (1 meter) extra, then cut the cable and strip the wires.
Swit cher Int erconnect Cable
The switcher interconnect cable that plugs into the Remote Aux Panel has
screw clamps to hold the wires. Paying attention to polarity (see
Figure 2-41), insert the wires into the appropriate holes and screw down
the clamps. If there is another control panel, the cable to the next panel
must also be inserted into this connector. The D connector on that cable
must be cut off, and the wires for the next panel must be stripped and
inserted into the same holes before the screws are tightened. Make sure the
polarity is correct.
To Pins 3 and 7 of
D Connector (+)
To Pin 9 of
D Connector
(SHIELD)
To Pins 2 and 8 of
D Connector (–)
To Next Panel
(If Any)
From Switcher or
Previous Panel
Figure 2-41. Cable Connections on Rear of Remote Aux Panel
If you are building your own cable, use a shielded twisted pair such as
Belden 8451 and refer to Table 2-7 below.
Table 2-7. Cable Connections
Panel Connector
D Connector
Factory Supplied Cable
Shield
9
Shield
– (Minus)
2 and 8
Black
+ (Plus)
3 and 7
Red
2-73
Section 2 – Installation
Joyst ick Override Cable Inst allat ion
Momentary-Contact Switches
1
1
2
2
3
3
4
4
5
5
6
6
7
7
8
8
9-Pin Subminature D Male
4
5
9
3
8
2
7
1
0699-08
A user-fabricated cable, external switches, and a 9-pin subminature D
connector with 4-40 jackscrews are required to implement the joystick
override. The cable needs to be shielded, with the shield connected to the
metal connector shell (see Figure 2-42).
6
Joystick Override
Connector
(wiring side)
Common
Figure 2-42. Joystick Override Connector Cable Wiring Diagram
Joyst ick Override Programming
The default programming of the external switches to inputs is: pin 1 of the
joystick override connector corresponds to input button #2, pin 2 to input
#3, … pin 8 to input #9. The programming can be changed and saved in a
local non-volatile memory. This mapping is local to the aux bus control
panel, so each panel needs to be programmed and can have different
programming.
Changing t he Joyst ick Override P r o g r am m in g
1. Verify that the external joystick override switches are connected to the
9-pin D connector. Operation of the switches can be checked using the
test mode DIP switches. When the DIP switches are in test mode 7,
closure of external override switches 1 through 8 will cause the
corresponding input buttons to light.
2. Set test mode DIP switches to test mode 12 to enter the joystick
override programming mode.
2-74
Optional Remote Aux Control Panels
Set t ing Rear Panel Swit ches
The rear panel includes a number of switches that control operating
modes, such as address, bus enable, delegate enable, and test mode.
Settings of these switches are explained below.
Address Swit ches
CAUTION
Each panel must have a unique address. Setting the same address for two or more
panels will cause the entire Remote Aux system to malfunction.
Set the address of the Remote Aux Panel (0 through 31) using the switches
marked PANEL ADDRESS on the right rear of the panel (see Figure 2-43).
The seven switches have 128 possible combinations; however, only five of
the switches may be used (1, 2, 4, 8, and 16). Switches 32 and 64 must be in
the OFF position. If there is more than one panel, it may be useful to keep
a record of the addresses.
Chop Enable Swit ch
■
Chop Enable Switch On—Allows Chop mode to be activated using the
front panel buttons
■
Chop Enable Switch Off—Disables Chop mode
Bus t o be Cont rolled ( Bus Enable) Swit ch es
The one and two RU panels have eighteen switches labeled BUS TO BE
CONTROLLED. These set which aux bus is controlled by the panel. Turn
ON only one of these switches.
The three RU panel has eighteen switches labeled BUS ENABLE. These set
which aux buses can be controlled by the panel. Turn the switch ON for
each aux bus to be controlled. From one to all eighteen switches can be
turned ON. The functioning of the buses that have the switches turned
OFF depends on the position of the DEL LOGIC switch (see next heading).
If your switcher has only fourteen aux buses, the last four switches (8A
through 9B) must be set to OFF.
NOTE: Two or more panels can control the same aux bus; however, if the same bus
is selected on more than one panel and simultaneous selections are made, the panel
with the highest address will control the bus.
2-75
Section 2 – Installation
FORCE HIGH TALLY
16
*32
*64
8
4
2
1
2
1
MODE 4
8
TEST
BUS TO BE CONTROLLED
CHOP ENABLE
9B
9A
8B
8A
7B
7A
6B
6A
5B
5A
4B
4A
3B
3A
2B
2A
1B
OFF
1A
ON
PANEL ADDRESSES
* Panel Addresses 32 and
64 Must be Set To Off
DC POWER
COMMUNICATIONS
BUS
+
–
JOYSTICK
OVERRIDE
SHIELD
5
3
4
9
2
7
8
1
6
DC POWER
COMMUNICATIONS
BUS
+
–
JOYSTICK
OVERRIDE
SHIELD
5
3
4
9
2
7
8
1
6
DC POWER
COMMUNICATIONS
BUS
+
–
JOYSTICK
OVERRIDE
SHIELD
5
3
4
9
8
2
7
1
6
FORCE HIGH TALLY
*32
*64
16
8
4
2
1
2
MODE 4
8
TEST
1
CHOP ENABLE
9B
9A
8B
8A
7B
7A
6B
6A
5B
DELEGATE LOCK
BUS ENABLES
5A
4B
4A
3B
3A
2B
2A
1B
OFF
1A
ON
PANEL ADDRESSES
* Panel Addresses 32 and
64 Must be Set To Off
Figure 2-43. Rear View of Remote Aux Panels Showing DIP Switches
2-76
Optional Remote Aux Control Panels
Delegat e Lock Swit ch
On the one and two RU panels, the DEL LOCK switch has no meaning.
On the three RU panel, the DEL LOCK switch controls the functioning of
the aux buses that have BUS ENABLE switches OFF:
DEL LOCK Switch OFF: If a BUS ENABLE switch is OFF, the associated
Delegate button on the panel can be selected and the source button
selected for that bus will light but cannot be changed.
DEL LOCK Switch ON: The Delegate button on the panel cannot be
selected if its BUS ENABLE switch is OFF.
Force High Tally Swit ch
On the one RU panel, the FORCE HIGH TALLY switch forces the ON AIR
lamp on all the time.
On the two and three RU panels, the FORCE HIGH TALLY switch disables
the low tally condition. The lamps will be on bright whether the bus is on
air or not.
Test M ode Swit ches
For normal operation set all four TEST MODE switches to OFF.
Remot e Aux Panel Power Supply Ins t allat io n
The Remote Aux Panel Power Supply (Figure 2-44) should be placed so
that it is not hanging from its cords. Placing it on a horizontal surface
where it will not be disturbed or tying it to a support inside the rack is
recommended. Verify that the power supply cords will reach to the control
panel and to a source of power. The power supply requires 100-120 Vac or
200-240 Vac and automatically switches to select one of these two line
voltages.
Remot e Aux Panel Inst allat ion
The Remote Aux Control Panel assembly mounts in the rack by means of
screws that pass through the front panel and screw into the front rails of
the rack.
1. Turn off power to the switcher.
2. Attach the communications bus cable(s), the joystick override cable (if
used), and the power supply cable to the connectors on the rear of the
Remote Aux Panel.
3. Using standard rack-mounting screws and washers (not supplied),
install the panel in the rack.
2-77
Section 2 – Installation
Figure 2-44. Remote Aux Panel Power Supply
4. After all panels have been connected, plug the D connector of the
communications cable into the AUX BUS CONTROL connector on the
back of the switcher frame.
5. Plug the power supply of each Remote Aux Panel into a source of
power (100 to 120 Vac or 200 to 240 Vac).
6. Turn the switcher power on.
Remot e Aux Panel Lens Chip Inst all at io n
The primary crosspoint pushbuttons on the two and three RU control
panels can be labeled as desired. An envelope containing a set of printed
lens chips is shipped with the control panel. Make sure not to throw away
the lens chips inadvertently.
To change a lens chip, grasp the lens firmly with your fingers and pull it
straight out. The pushbutton may come off with the lens. You can then pull
apart the pushbutton, lens, and lens chip (refer to Figure 2-45). When reinserting the pushbutton and lens into the panel, make sure to align the
keys on the legs of the pushbutton base with the larger key slots on the
base of the switch (not the smaller slots at the top of the switch, near the
lamp). When properly installed, the pushbutton should lock in place and
not rotate around the lamp and switch.
2-78
Optional Remote Aux Control Panels
M30-005-12
Clear Overcap
Lens Designation Chip
Lens
Figure 2-45. Lens Chip Installation
2-79
Section 2 – Installation
M ask Draw Tablet Inst allat ion
The new Mask Draw feature allows you to use a graphics tablet (connected
to the switcher Control Panel), to customize existing masks, or create new
ones.
By using the Forced Mask mode, you can add to a key. By using the Inhibit
Mask mode, you can subtract from a key.
For example, one common Mask Draw usage is with Chroma Keys. With
Force Mask on, you can remove the bleed-through effect of the Chroma
Key. (You would use the mask store black screen with a white pen.)
Hardware Requirement s
The following WACOM graphics tablet models are supported (GVG does
not supply the tablet):
■
KT-0405-R “ART PAD” (PC compatible version)
■
UD—XXXX—R (Any PC-compatible UD-series tablet)
■
UD-608-R “ART Z” (PC compatible version)
■
SD series (this series is now obsolete; however they may be used if a
pressure sensitive pen is used with the tablet)
Inst allat ion f or UD and KT Series
The following connector pin-out information applies to the UD and KT
series tablets.
The KT and UD tablets include a 9-pin male to 25-pin female adaptor. You
will need a 25-pin male-to-male gender adaptor to connect the tablet to the
POINTING DEVICE input port on the back of the switcher Control Panel.
The 9-pin male to 25-pin female adaptor must be wired as follows: (All
other pin wiring is unchanged.)
Figure 2-46. 25-Pin to 9-Pin Adaptor Wiring
25-Pin
9-Pin
Pin 2
Pin 3
Pin 3
Pin 2
1. Plug the graphics tablet into the POINTING DEVICE input port on the
back of the switcher Control Panel.
2. The Control Panel CPU Board RS-232 jumper blocks must be set to the
“DCE” position.
2-80
Optional Remote Aux Control Panels
On a Model 3000-2:
a. Open the Control Panel lid and locate the Control Panel CPU
Board. Locate jumper blocks (2-pins each), labeled J3 and RS-232, at
the top, middle, of the board. Set the blocks to the “= DCE” setting.
On a Model 3000-3:
b. Open the Upper Control Panel lid and locate the Control Panel CPU
Board. Locate jumper blocks (2-pins each), labeled J11 and RS-232,
in the center of the board. Set the blocks to the “= DCE” setting.
Inst allat ion f or SD Series
1. Plug the graphics tablet into the POINTING DEVICE input port on the
back of the switcher Control Panel.
2. The Control Panel CPU Board RS-232 jumper blocks must be set to the
“DTE” position.
On a Model 3000-2:
a. Open the Control Panel lid and locate the Control Panel CPU
Board. Locate jumper blocks (2-pins each), labeled J3 and RS-232, at
the top, middle, of the board. Set the blocks to the “= DTE” setting.
On a Model 3000-3:
b. Open the Upper Control Panel lid and locate the Control Panel CPU
Board. Locate jumper blocks (2-pins each), labeled J11 and RS-232,
in the center of the board. Set the blocks to the “= DTE” setting.
2-81
Section 2 – Installation
Configuring Your System Software
You have now completed the hardware installation and verification of
your Model 3000 Switcher.
The system must now be configured through the Configuration menu for
use with the signal and equipment connections in your facility, and for
your operational preferences.
Configuration of the Model 3000 consists of the following
■
Setting System Parameters
■
Configuring Inputs
■
Configuring Outputs
■
Configuring External Interfaces
■
Configuring Auxiliary Buses
■
Setting User Preferences
Please turn now to “Software Setup” in the Startup section of the User
Guide for detailed instructions on setting these switcher parameters.
2-82
Optional Remote Aux Control Panels
Troubleshooting
The Model 3000 includes some diagnostic and system status indicators
that may be helpful in isolating simple problems during the start-up
process (see Table 2-8). These not intended for detailed servicing, but
rather as a “quick check” of hardware and software problems that might
be encountered during power-on and initial system configuration.
Refer to the Diagnostics and Troubleshooting Section of this manual for
further troubleshooting procedures.
Table 2-8. Troubleshooting Guide
Device
Control Panel
Symptom
1. No button lights or
panel displays
Probable Cause
1. No power to Control
Panel.
What To Do
1. Check that Control Panel
power switch is ON.
2. Check power cabling.
3. Check AC fuse and
individual power voltage
fuses in Control Panel tub.
2. Red “No Sync” LED
on Control Panel CPU
module is lit.
1. No power to Frame.
2. No communications
with Frame.
Signal Processor
Frame
1. Power Supply LEDs
not illuminated.
1. No power to Frame.
1. Ensure that Frame Power is
switched on and available.
2. Check Frame to Panel
cable connections.
1. Check that power switch on
frame power supply is ON.
2. Check power cabling.
Control Panel or
Signal Processor
Frame
1. System locks up.
1. System software not
executing.
1. Press reset on Control
Panel CPU Module.
2. Press reset on Frame
Control Processor Module.
2. Erratic operation
approximately 15
minutes after
application of power
1. Frame overheating
due to inadequate
ventilation.
1. See ventilation
requirements in this
section.
2-83
Section 2 – Installation
2-84
3
Functional Description
Introduction
The Model 3000 Switcher consists of three main areas.
■
Signal Processor Frame
■
Control Panel
■
Frame power supply chassis
Each of these areas is explored in detail in this section. This section will
provide you with enough knowledge of the basic system that you can
confidently perform any needed service and diagnostic procedures.
Descriptions are given for all areas of the Model 3000 system, supported by
block diagrams and illustrations. An overall description is presented first,
breaking the entire switcher into several areas. Next, functional
information is provided on a module-by-module basis. This approach
should help clarify the relationship between circuit modules.
3-1
Section 3 – Functional Description
System Configuration
As described in Section 1, a Model 3000 system consists of a Control Panel,
a Signal Processor Frame and a Power Supply for each unit.
Various options may be added to the basic system to increase functionality.
A typical system may have several options such as Secondary Wipe
Generators, Expanded Communications, and Redundant power supplies.
Most of these options are purchased as modules installed in Bays A, B, and
C of the Signal Processor Frame.
Remote 19" rack mounted panels may be added to the switcher for remote
Auxiliary Bus control. One panel is a delegated panel and the other two are
single bus panels. All panels communicate with the Signal Frame over a
multidrop single twisted pair cable. A maximum of 32 Remote Aux panels
may be in operation per switcher. (There is a maximum of 14 Auxiliary
buses.)
3-2
System Overview
System Overview
This section details the basic functions of a Model 3000 Switcher. Figure 3-1
shows a typical intermediate sized switcher system.
Composite analog input signals are processed and converted to 10-bit
digital values via A/D converters in the input circuitry. (All values are
internally routed and manipulated as 10-bit values after the input stage.)
Composite digital inputs may be serial or parallel. There are no
prohibitions on the mixing of analog and digital input modules, so any
configuration may be supported.
Input video and key signals are received by the switcher from input
modules. There are specialized types of input modules for each input type
(composite analog, digital serial, and digital parallel). These signals are
selected and processed according to operator assignments entered via the
Control Panel. Input selections are controlled by the Crosspoint Matrix
under monitoring by the system Controller. The Controller also handles
communication with the Control Panel, M/E and flip/flop mix processors.
In addition to direct video, Masks and Video from the optional Framestore
are also available for selection from the crosspoint matrix. Flip/Flop Mixer
output, DSK output, and M/E mixer outputs are available as inputs from
the matrix. (Great flexibility is provided to the user through the use of
reentrant processing.)
Two component signals may be applied per Dual RGB input module.
These input are passed to a Dual Chroma Keyer modules.
Keyers in each of Mix/Effects banks output to the Effects Loop crosspoints
for routing to the M/E mixers and wipe generators or for sending outside
the switcher for external processing. Output can also be directed to the
Framestore option for image capture. One Effects Send Crosspoint module
(optional) is used for all M/Es.
Each M/E has two keyers and two background buses (A and B) as inputs.
Each input can be mixed, in layered mode, into a composite video and key.
The video and key can be forwarded to the DSK, another M/E, or output.
The Model 3000 is unique from other switchers in that backgrounds A and
B can be keyed, just as Keyers 1 and 2 (Layered Mode).
Preview capability allows monitoring of sources at many points in the
signal flow. You can preview video from the M/E mixers, Flip/Flop Mix
and DSK mixer, switched preview bus and mask bus.
To understand the circuitry that manipulates video and key signals, it is
helpful to know the basic formats and characteristics of the external and
internal signals used and processed by the Switcher. This section briefly
describes these signals.
3-3
M30-002-08
Section 3 – Functional Description
Dual Chroma
Keyers
Option
Dual RGB
Inputs
Video Signals
In
Input
Modules
80 x 48 Video
Crosspoint
Matrix
Key Signals
In
Clocks,
Black, Background,
and Test Signal
Generators
M/E Keyers
M/E 1, M/E 2
& M/E 3
Sync Generator
Mask Bus and
Framestore Video
Reference
Input
Switched Preview
Bus and Mask Bus
Preview
Mask Store
Input and Output
Program/Preset
and DSK
Video and Key
Control Panel
Tally Relay
Framestore
for Video, Key
and Mask
Storage
Controller
(control buses
not shown for
clarity)
Flip Flop Mixer
and Dual DSK
3-4
From Effects Loop
Crosspoints
System Overview
Secondary
Wipe Option
To Framestore
M/E Mixers
M/E 1, M/E 2
& M/E 3
Effects Loop
Crosspoints
M/E and DSK
Program Video
and Key
Outputs
Preview Video
Mask
Program Video and Key
Switched Preview
DSK Program Video and Key
Mask, M/E and DSK
Preview
Framestore
Video and Key
Output
Modules
M/E Preview (for each M/E)
DSK Preview
(Analog,
Parallel Digital,
and/or
Serial Digital)
Aux Video and Key Buses
M/E Program
Video and Key (for each M/E)
Clean Feed Video
Framestore Video and Key
DSK Video and Key,
Clean Feed Video,
and DSK Preview
Figure 3-1. An Example of a Model 3000 Switching System (Typical).
3-5
Section 3 – Functional Description
Signal Formats
Analog Video
As mentioned previously, the switcher accepts input analog video signals
in NTSC composite (depending on the model you have). It also accepts
Chroma Key signals in composite or RGB component, SMPTE/EBU YUV
component, and Betacam® component formats. Analog video is sampled
by the input circuitry and converted into the internal 10-bit digital format
used throughout video processing.
Formats are chosen by menu-selected personality options. Fine-timing
adjustments can be made for aesthetic or other reasons via software menu
selection. SYNC is not required on any video input format.
Timing
The switcher auto-times composite analog and digital inputs within a
range of ±17usec (NTSC) relative to the switcher reference. Non-composite
inputs (external keys) may be timed manually using the personality setup
and through soft knob adjustments. These inputs must, however, be
synchronous and in time.
SM PTE Composit e Parallel Digit al
Model 3000 switchers support composite parallel digital video and key
inputs and outputs. Parallel is a digital format for encoding video, sampled
at four times the color sub-carrier frequency.
In composite parallel , the analog signal is sampled at a rate of four times
the color subcarrier frequency along the I and Q axis. The phase reference
for the sample clock is the color subcarrier (FSC). Generally, the phase
reference is derived from the burst of the analog signal. Color subcarrier
phase to horizontal sync timing (SC/H) in the digital domain is zero.
Quantization is performed at 10-bits per sample in PCM. Eight bits per
sample is also supported by using the most-significant 8-bits to represent
the value and setting the least significant two bits to zero.
Data is transmitted in parallel as 10 bit words over 10-conductor pairs of
wire. An eleventh pair of wires carries a four-times-subcarrier clock.
Cables for parallel digital should consist of 12 twisted pairs, terminating in
a Sub-miniature D-type connector on each end. Cables should not exceed
50 meters in length. (Equalization is not supported by the switcher.)
For more information, refer to SMPTE specification T14.22/082, which
fully defines a “Bit-parallel Digital Interface”.
3-6
System Overview
SM PTE Composit e Serial Digit al
Composite Serial Digital signals are basically the same as parallel data ,
except data is sent out one bit at a time instead of one word at a time. Data
is shifted out serially in an encoded order. The coding scheme used is
scrambled NRZI, an algorithm that rearranges the 10 bits in every data
word according to a polynomial. Serial transmissions produced using this
encoding scheme are less prone to cause RF emission problems.
The basic characteristics of digital serial data flow are as follows:
■
Peak-to-Peak signal amplitude is 800mv ±10%, as measured across
a 75 ohm resistive load on the output.
■
DC offset at the mid-amplitude point of the signal, is zero volts, ±
0.5 Vdc.
■
The rising edge of the data signal must be within ±0.25nS of the
average timing of rising edges as determined over the period of one
line.
■
The receiver of the serial interface presents an impedance of 75
ohms with a return loss of at least 15 dB over the frequency range
from 5 to 270 MHz.
■
Serial data bit transfer rates are nominally 143 Mb/second (NTSC).
■
Cables and connectors are 75 Ω BNC. The 75 ohm connectors used
with the Model 3000 have characteristics that allow passage of
frequencies up to 850 MHz.
You may find complete information and specifications in the SMPTE
specification T14.224, which fully defines composite serial digital (D2).
Internal Signal Distribution
Within the Model 3000, video and key data are transferred in between
modules over buses on a common backplane. These video buses use fast
TTL logic (FTTL) to drive and register signals. Registering allows precise
control over timing and provides support for compensating delays. Data is
clocked into receiving registers at the latest moment, allowing time for data
to settle. All data is ultimately referenced to the master system clock (14.3
MHz - NTSC) on the Sync Generator/Preview module.
In between circuit modules, video data is transferred in a multiplexed
format at twice the normal clock rate (2 x 14.3 = 28 MHz- NTSC). Only two
groups of data (A and B) are multiplexed. Video buses and all modules
predominantly use the multiplexed format to distribute signals. Wiring
delays caused by traces in the modules and backplane are compensated by
the clock circuitry throughout the switcher.
Within circuit modules, a variety of clocks derived from the master clock
are used for multiplexing and registering data.
3-7
Section 3 – Functional Description
The following clocks are generated on the Sync Generator/Preview
Module (bay B, cell 15) and are used throughout the Signal Processor frame
for timing:
Input Clock ( SYS1 CLK)
A clock used for timing data into the demultiplexor circuits. It runs at
four times the speed of the subcarrier. ICLK and CLK run at the same
speed but are phased differently for their relative applications.
Clock ( SYS2 CLK)
A general purpose clock, used primarily on the input modules and
video processing modules. It runs at four times the speed of the
subcarrier and is phased for the output multiplexor circuits.
Input Fast Clock ( IFCLK)
A clock optimized for use in taking data off of the backplane and into
the demultiplexor on a circuit module. IFCLK runs at eight times the
subcarrier speed.
Out put Fast Clock ( OFCLK)
A clock optimized for data output from the multiplexor circuitry on a
circuit module onto the backplane. OFCLK is delayed 2nS after IFCLK,
but also runs at eight times the subcarrier speed.
Master Clock
56 Mhz
Frequency
÷2
Frequency
÷2
M30-002-15
IFCLK
28 Mhz
ICLK
14 Mhz
Delay
CLK
14 Mhz
Different Phases
Figure 3-2. How System Clock Signals are Generated.
3-8
OFCLK
28 Mhz
System Overview
10-bit A Data
10-bit
Output
to Bus
Register
Multiplexer
10-bit B Data
CLK
M30-002-16
Multiplexer
10-bit Bus
In
OFCLK
Register
10-bit
A Data
Register
10-bit
B Data
Demultiplexer
CLK
IFCLK
Demultiplexer
Figure 3-3. Multiplexer and Demultiplexor Circuits.
M30-002-17
CLK
ICLK
A Data into Mux (CLK)
A1
A2
A3
B Data into Mux (CLK)
B1
B2
B3
IFCLK, OFCLK
Bus (Mux Register Out — OFCLK)
Demux Rx Register Out (IFCLK)
A1
B1
A2
B2
A3
B3
A1
B1
A2
B2
A3
Demux A Register Out (CLK)
A1
A2
Demux B Latch Out (CLK)
B1
B2
Figure 3-4. Model 3000 System Timing Diagram.
3-9
Section 3 – Functional Description
Input and Output Signals
Input Modules
Up to four sets of video signals can be applied to each Input Module, of
which there are three types:
■
Analog 10-bit Auto-timing Input Module
■
Composite Digital Bit-parallel Input Module
■
Composite Digital Bit-serial Input Module
Analog 10- bit Aut o- t iming Input M od u le
Four inputs (video or key) can be input to the module. Noise filtering, antialiasing and auto-timing are made on the input signals prior to 10-bit
Analog-to-Digital conversion. After conversion, however, input data is
multiplexed onto a video bus for routing through the Signal Processor
Frame.
Composit e Digit al D2 Bit - parallel In p u t M o d u le
Four inputs of Parallel (video or key) signals can be input to the module.
Electrical conversion from ECL to TTL prepares the input for auto-timing
and further conversion into a multiplexed video/key signal. This latter
signal is sent onto the video buses in the Signal Processor Frame.
Composit e Digit al D2 Bit - serial Inpu t M o d u le
Four inputs of Serial (video or key) signals can be input to the module. The
same processing used on the Parallel module is employed, except the
signal is also initially filtered and then decoded from serial to parallel.
For information on assigning and setting up ports, refer to the
Configuration topic in Section 2 (Installation and Configuration).
RGB Input M odule
REB Input modules are available with the optional Dual Chroma Keyer.
Each module supports two sets of RGB inputs.
3-10
Input and Output Signals
Output Modules
Regardless of whether input signals are analog or digital, the Signal
Processor Frame processes the signals according to instructions from the
Control Panel, and provides any outputs you have specifically purchased
and installed. Output modules each provide four outputs of a given type
■
Analog Composite Output Module
■
Composite Parallel Digital Output Module
■
Composite Serial Digital Output Module
The digital outputs may be SMPTE composite serial or parallel, and can be
used to provide processed digital video and key signals to a DVTR, or any
other composite digital video equipment. Composite analog outputs are
NTSC.
GPI
Eight GPI inputs are provided (standard). These inputs can be defined (via
a menu located under External Interfaces) as level-sensitive or pulse type.
You can assign each of the GPI inputs via GPI menu to perform a specific
function when triggered. The functions are as follows:
■
Auto Trans M/E 1
■
Cut Trans M/E 1
■
Auto Trans M/E 2
■
Cut Trans M/E 2
■
Auto Trans M/E 3
■
Cut Trans M/E 3
■
Auto Trans PGM/PST
■
Cut Trans PGM/PST
■
DSK 1 Title Trans
■
DSK 2 Title Trans
■
Learn E-MEM Register #
■
Recall E-MEM Register #
■
Preset Black on PGM/PST
■
NEXT KF/Effect Event*
■
PREV KF/Effect Event*
■
Effects run*
■
Effects rewind*
■
Effects pause*
■
Effects stop*
These functions can be learned in Effects Memory (E-MEM) registers as
simple setups, or keyframes* in effects.
* Future release
3-11
Section 3 – Functional Description
Editor Port
The editor interface consists of an asynchronous RS-422, 38.4K baud serial
communications port. This port is managed by a communications
processor, which transmits internal I/O. Protocols are defined in the Model
3000 Protocols document. (If you are familiar with the protocols on other
GVG switchers such as the Model 100, 200, or 300, please note that Model
3000 switchers support similar protocol sets.) The switcher issues reports
communicating control changes from the switcher to the editor. Reports
include information on layer status, effect jogging and transition jogging.
Editor port serial settings can be altered via a menu located under External
Interfaces. Refer to the Protocol document for information on software
functions and protocols observed by the editor port.
Tally Relay Option
Tally control logic and custom tally control logic are implemented in an
optional tally relay module. This module is located in the switcher frame,
in cell 17.
A tally output connector is provided on the frame for future expansion. It
will provide for expansion via an external tally relay module. The port is
RS-422 running at a maximum of 76K baud.
3-12
Input and Output Signals
Communication Inputs and Outputs
Three ports are provided (standard) on the rear of the switcher frame for
communication with external DPMs (Digital Picture Manipulators) and
other peripheral devices. I/O communication is managed by a
communications processor. Installation and software configuration of
these ports is discussed in Section 2.
DPM Port s
Two independent RS-422 ports support CPL (Control Point Language)
protocol for DPMs such as Kaleidoscope that can interact with the Model
3000 to control a pool of DPM channels.
Peripheral Bus II
An asynchronous RS-422 serial communications link (38.4KBaud) supports
Peripheral Bus II protocol for non-pooled DPMs and other external
devices. This protocol allows the switcher to initiate E-MEM learns and
recalls on up to 24 peripheral devices.
3-13
Frame/Panel Link
Dual Component In
M30-002-11A
Section 3 – Functional Description
Serial Digital
Control
Panel
Status Terminal
Parallel Digital
Mouse/Bitpad
Analog Out
Routing Switcher
On Air Tally A
On Air Tally B
Remote Aux Control
115/230 Vac 47-63 Hz
External Ref Out
External Ref In
+5 Vdc
220 Vac
50-60 Hz
Power
Supply
(Primary)
-5 Vdc
+13 Vdc
Signal
Processor
Frame
GPI
Editor
-13 Vdc
+48 Vdc
Status
Serial Port A1
Serial Port A2
Current Sharing
Serial Port A3
Serial Ports
for DPM
Periph
Bus II Devices
+5 Vdc
-5 Vdc
220 Vac
50-60 Hz
Power
Supply
(Redundant)
+13 Vdc
Serial Composite Digital In
-13 Vdc
Parallel Composite Digital In
+48 Vdc
Status
Analog In
Tally Relay Module
Option
Tally Outputs
Figure 3-5. System Interconnection, Input and Output Signals.
3-14
Signal Processor Frame Description
Signal Processor Frame Description
Model 3000 video processing is carried out on circuit modules (commonly
referred to as “modules”) located within the Signal Processor frame. Many
of the modules perform several functions in different areas. For example,
the Sync/Preview module is used for processing switched preview video,
and it also contains the internal clocks, sync generator, black generator, and
background generators.
Signal Processor Overview
For purposes of discussion, the Signal Processor may be divided into four
sections, see Figure 3-6:
Input Sect ion
Modules in this section include input modules, two Video Crosspoint
Matrix modules, and analog component RGB input modules (used with
the Dual Chroma Keyers).
Video and Ef f ect s Sect ion
Modules in this section include PGM/PST Flip/Flop mixer and
Downstream keyer, Preview and Sync Generator, M/E Keyers, M/E
Mixer and Primary Wipe Generators, Dual Chroma Keyers, Secondary
Wipe Generators Option, Effects Send Loop Option, and Framestore
Option.
Cont rol Sect ion
This section contains only one module: the System Controller.
Out put Sect ion
Modules in this section include the Output modules, Tally Relay Option,
and Expanded Communications Option.
Individual modules making up these sections are indicated by their names
in section blocks on the block diagrams presented in this section.
Video and key signals enter the Input Section, where analog signals are
converted to digital format, timed and conditioned. The digitized signals
are then passed to the Video and Effects Section where keying and mixing
take place. This section also provides effects from wipes to keyframing that
can be applied to selected inputs. In the Output Section, digital video and
key signals are converted to analog or digital composite format, before
leaving the Signal Processor.
3-15
Section 3 – Functional Description
M30-002-12
Signal Frame Processor
Video and
Effects
Section
Composite
Analog
Video & Key
Inputs *
PGM/PST,
Flip/Flop mix &
DSK
Module
Input
Section
Quad
Input
Mux
Modules Video/key
Composite
Digital
Inputs *
Analog
Component
RGB for
Chroma Keying
(RGB, YUV,
Betacam®)
Crosspoint
Modules
(2)
Analog
Component
RGB†
M/E Quad
Keyer
Modules
(1 per M/E)
M/E Mixer &
Pri Wipe
Modules**
(1 per M/E)
Dual Chroma
Mux
Keyer
Video/key
Module†
(1 per M/E)
Effects Send
Module††
Secondary
Wipe
Generator
Module††
Sync/Preview
Module
Output
Section
DSK Program
Video
Quad
Output
Modules
DSK Program
Key
Tally
Output
Module††
Switched
Preview
Video
Mask Bus
Expanded
I/O††
Optional
Outputs ††
Framestore
Module††
Clocks
System
Reference
___ Control Data ___
Control
Data From
Control Panel
Control
Section
Controller
Module
Notes:
† Chroma Keyer consists of two separate options.
One optional module provides 2 sets of component
RGB inputs. The other optional module contains 2
composite chroma keyers and 2 component
chroma keyers.
†† Optional
* Cameras, Character Generators, VTRs, etc.
** Look Ahead Preview and Borderline® submodules optional
Figure 3-6. Overview of Signal Processor.
The four major video processing sections are over-viewed separately on
the following pages. After the overview, each of the printed circuit
modules is discussed in detail. First, the Mix Effect modules (Input Section,
Video and Effects Section, and Output Section) are presented, and then a
discussion of the Controller module follows.
3-16
Signal Processor Frame Description
Input Section
The Input Section of the Signal Processor, shown in Figure 3-7, provides
the following video processing functions: analog-to-digital conversion;
input source selection from the Matrix; input sync generation; and
multiplexing signals into the internal format.
Clocks for multiplexing and demultiplexing in the Input Section come
from the Sync/Preview module in the Video and Effects section.
M30-002-13
Control From
M/E and F/F
Mix CPUs
Video or Key
Analog
Composite
Inputs
Video or Key
Composite Digital
Bit Serial Inputs
Video or Key
CompositeDigital
Bit Parallel Inputs
Video or Key
Quad
Input
Modules
MUX
Mux
Video/
Key
80 x 48
Crosspoint Matrix
(2 Modules:
High 5 bits and
Low 5 bits)
DEMUX
MUX
Video
Bus
Phased variants
In Clock
of Master
14.3 Mhz Clock Out Clock
Chroma
Keyer
Input
Analog
Component
Inputs
(RGB, YUV
Betacam®)
Dual Chroma Keyer
Modules
MUX
Dual
Chroma
Keyer
Inputs
Input Section
Figure 3-7. Input Section, Model 3000 Signal Processor.
Input sources enter the switcher via Input modules where signals are
digitized (if analog), conditioned, and multiplexed onto the backplane.
Multiplexed signals are demultiplexed in the crosspoint matrix and
selected under direction from the Controller module. Microprocessors on
the Controller write directly to registers on the Crosspoint module. These
registers are located inside proprietary Crosspoint ASICs (Application
3-17
Section 3 – Functional Description
Specific Integrated Circuits). All data is buffered and decoded by support
circuitry on the Crosspoint modules.
The switcher uses an 80 by 48 crosspoint matrix. The matrix consists of two
5-bit Crosspoint matrix modules (to support 10-bit resolution). The two
crosspoint matrix modules are identical and may be swapped for
troubleshooting purposes.
Chroma Keyer inputs also enter via Input modules if Composite Analog or
Digital. Component analog signals, however, must enter via Dual RGB
Input modules (two signals allowed per module). These later modules are
only used for inputs to the Dual Chroma keyer modules and are offered
only in sets. Dual RGB modules each support two input sets. There can be
0, 1, 2, or 3 input modules installed.
Regardless of input type, Chroma Keyer inputs (video and key) are
multiplexed before routing over the backplane to the Dual Chroma Keyer
modules.
3-18
Signal Processor Frame Description
Video and Effects Section
This section works with the input section, providing reentry to the
crosspoints of wipes, keys and effects, as well as providing outputs of these
same signals to the video bus, Figure 3-8.
Clocks originate on the Sync Generator and Preview module, distributing
out to all other modules at multiples and different phases where needed.
On the same module, preview circuitry allows video from the keyers,
mixers, flip/flop mix, and downstream keyers to be monitored (see
Preview Operation in the Operator's Guide)
M30-002-14
Video and Effects Section
From/To
Input
Section
To
Output
Section
PGM/PST,
Flip/Flop
Mix & DSK
module
Mux
Borderline
Mezzanine
board
Option
Digital
Video and Key
Signals
from
Crosspoints
Chroma
Key Signals
From RGB
Input
Modules
(2 sets of
inputs per
module)
Mux
Key 1/2 & A/B Video/Key
CCM
Mux
M/E Mixer &
Pri Wipe
Modules
(1 per M/E)
Dual Chroma
Keyer
Module
Option
(1 per M/E)
Mux
M/E Quad
Keyer
Modules
(1 per M/E)
Borderline
Daughterboard
Option
Optional
Decoder
Secondary
Wipe
Generator
Module
Option
Effects Send
Module
Option
Crosspoints
FRM, M,
and SW
Program Video
and Key
(to Crosspoints
also)
Digital Effects
System
M/E CPUs &
Controller
CPU
M
Sync
Generator
&Preview
Module
DSK Video/Key,
DSK Preview,
and Clean Feed
Video
P
Mux
Framestore
Module
Option
Mux
Framestore
Video and Key
Output
P and M
Clocks and Sync
(to all Video-related modules)
Mask, M/E and
DSK Preview
Outputs
LEGEND
Mux = Multiplexed Video and Key (digital)
M = Mask Bus
SW = Switched Preview Bus
CCM = Composite and Component Analog
FRM = Framestore Video
P = Preview Video
Figure 3-8. Video and Effects Section, Signal Processor.
3-19
Section 3 – Functional Description
Chroma Keyers
Up to two Dual Chroma keyer Modules may be installed, one pre M/E.
Each Dual Chroma keyer Module requires a corresponding Chroma Keyer
Input Module for Component Analog sources. A Dual Chroma Keyer
module has two composite (encoded) chroma keyers and two component
(YIQ) chroma keyers.
Component inputs can be set to either RGB, YUV or Betacam by making a
selection in a personality menu. Another user menu selection specifies the
timing to be applied to the signal. Fine timing adjustment via menus allows
you to make creative or aesthetic compromises to the settings.
Component inputs provide key hole information and also provide color
suppression on the video being chroma keyed. This reduces or eliminates
color splash from the back ground on the foreground image and reduces
color edge fringing.
Composite inputs to an M/E are decoded into component video, by the
(optional) NTSC Decoder mezzanine boards, and fed into the component
chroma keyer circuitry. Besides offering all the features of the component
chroma keyer, this architecture also allows chroma keying on an M/E of reentered video from another M/E.
Keyers, PGM /PST and Borderline
Key 1, Key 2, and A and B Video/Key data is input to the M/E Keyer
modules (1 per M/E) and the PGM/PST flip flop mix module.
Each M/E has two full function keyers for the KEY1 and KEY2 buses. The
full function keyers feature:
3-20
■
Linear Key
■
Luminance Key
■
Chroma Key
■
Matte Fill
■
Keyer Priority Control
■
Key Invert
■
Force Mask
■
Inhibit Mask
■
Auto Select / Split Key / Self Key
■
Borderline Generator
■
Preset Pattern
■
NAM
Signal Processor Frame Description
When the layered mode is in operation, the A and B buses provide limited
function keying. The limited function keyers feature:
■
Linear Keys
■
Luminance Keys
■
Auto Select / Split Key / Self Key
■
Preset Pattern
Circuitry on the Keyer and PGM/PST flip/flop Mix modules provide the
following functions:
■
Matte generation
■
Rectangle generation (for box masks)
■
Borderline option support (and bypass if not present)
■
Preview support
■
Chroma Filtering
Luminance Keys
Luminance keys have variable clip/gain controls with S-shaping of the key
signal. Linear keys have gain fixed at unity, clip fixed at 50%, and no Sshaping. A chroma trap may be switched into the key path by menu
selection, in both cases.
Key Source
With video key, the hole cutter is derived from the external key input
associated with the fill video source via the personality setup definition. In
the case of a re-entry from another M/E, the hole cutter is the key produced
by that M/E. In the case of a chroma key, the hole cutter is derived from
one of the six analog component inputs or an encoded key is performed.
The key input may also be any other external key associated with a primary
input.
With Auto Select OFF, the hole cutter is derived from a video source. This
source may be the one providing the fill (self key), another primary video,
or re-entry video (split video key). In the case of a chroma key, an encoded
chroma key is performed from the video source.
3-21
Section 3 – Functional Description
Borderline
The Borderline generator option is a small mezzanine board that can be
added to any Keyer module (two per module for each M/E and two for
the PGM/PST/DSK module. (Up to a total of eight may be present in the 3
M/E switcher). Each assembly is mounted on a 40-pin connector in a
Keyer or PGM/PST module. When the mezzanine board is installed on any
module, the system recognizes its presence and makes the following
modes available for use/selection:
■
Border
■
Shadow Down Left and Right
■
Outline
■
Extrude Down Left and Right
Down left and down right shadow and extrude modes are selected by
adjusting the size/position knob on the Keyer panel. The border or outline
width is adjusted with the same size/position knob. The shadow/extrude
width is adjusted for one through six (NTSC) lines. Outline/Border can be
one, two or three lines wide.
Key M ask
Keys may be masked by the wipe generator or Mask Bus in the same M/E
or by an adjustable rectangular box (on the keyers module). The key can
be inhibited by the inhibit mask or forced with the force mask. Both force
and inhibit masks can be applied simultaneously. In the event of a force
and inhibit mask overlap, the inhibit mask prevails. Keys may also be
masked by a video source selected on the mask bus or by a Framestore
output.
3-22
Signal Processor Frame Description
M at t e Generat ion on t he Keyers an d PGM /PST
M odules
Each M/E has six independent matte generators:
■
Key 1 Fill
■
Key 2 Fill
■
Borderline 1 Edge
■
Borderline 2 Edge
■
Primary Wipe Border
■
Secondary Wipe Border
The PGM/PST mixer and downstream keyer has four matte generators:
■
DSK 1 Fill
■
DSK 2 Fill
■
Borderline 1 Edge
■
Borderline 2 Edge
In addition, there are two independent background generators which may
be assigned to primary inputs. The matte generators are controlled from
sub-panels in each M/E, and the PGM/PST bus, using delegated hue,
saturation, and luminance controls.
M at t e M odulat ion on t he Keyers and PGM /PST
M odules
All of the matte or background generators may be modulated to create a
color wash or complex background. Either of the two wipe generators in
the same M/E as the matte generator may be used to modulate the matte
generator in that M/E. Two modulation sources are available for DSK and
BKGDs; A user defined wash (a ramp with offset (position), softness, and
rotation control. This wash can be mixed with a texture. (See Rotation and
Texture in the menus).
3-23
Section 3 – Functional Description
M ixer and W ipe Generat or M odules
One M/E Mixer and Primary Wipe Module is present in each M/E to
handle mixes and wipes. A full function primary wipe pattern generator
is standard on each module, and an additional secondary wipe pattern
generator module can be purchased as an option. The secondary wipe
module provides an extra wipe pattern generator for all M/Es.
Wipe generators provide transitions, preset wipes, keyer masking, and
matte modulation. Matte modulation is available with all mattes. Separate
selection of primary and secondary (optional) wipe pattern generators is
available to all functions that use wipes.
If secondary wipe is selected and the option is not installed, the pattern
used is the same as the primary wipe. The size and edge attributes (such as
softness, border width, etcetera) are independently adjustable using the
secondary controls.
Two types of mixes, in addition to normal mixing, are performed on the
Mix Module: Full Additive Mix (FAM) and Non Additive Mix (NAM).
FAM mode is an extension of the layered mode. FAM changes a Mix/
Effects system into a knob-a-channel mixer. FAM is controlled through the
menu system. Four soft knobs are provided for controlling each layer's
opacity. When FAM is enabled, the four uncalibrated indicators are
illuminated on the source select buses. FAM is independently available on
each M/E. A limiter provided at the output of the switcher clips the added
video to legal levels. (When you perform a FAM in an M/E, the opacity
knob in the keyer menu does not function.)
Non Additive Mix non-additively mixes the output of Keyer 2 into Keyer
1. On/off control for the NAM is provided in a menu for keyer 1. When
NAM is enabled, the two uncalibrated indicators are illuminated for the
Keyer buses. Opacity controls that vary the effect of the NAM are provided
for the 2 keyers.
3-24
Signal Processor Frame Description
Preset W ipes
With the optional secondary wipe pattern generator installed, the preset
wipe pattern can be completely independent from the transition wipe, e.g.,
a preset wipe can be wiped off using a different pattern. In addition, the
effects send and receive crosspoints are between the preset and transition
wipe circuitry. This organization allows source and target wipes to be
configured. For example, a transformed preset wipe (via DVE) could be
wiped on and off with a standard wipe transition. Preset wipes are
available on all layers in Layering mode.
Clean Feed
The Mixer and Primary Wipe Generator module provides a clean feed of
the wipe/mix control signals and the two background bus video signals
without any keys added if an output module of the desired type is
installed. It also provides a Look Ahead Preview option.
Frame St ore Opt ion
The Signal Processors may contain an optional Frame Store module. The
frame store consists of three 10 bit channels: video, key, and mask. It may
be used to freeze any source in the switcher, both internal and external, in
a manner similar to a small still store.
Users control the frame store from a dedicated group of controls on the
upper Control Panel. The Frame store is source oriented in that its inputs
are fed with an AUX/effects send bus and the outputs are available as
primary inputs to the crosspoint matrix. In addition, the mask store is
available to the mask generators for use as a mask source. The frame stores
can be connected in the effects send loops.
3-25
Section 3 – Functional Description
Frame st ores provide t he f ollowing f eat u r es:
■
Freeze video, key, and mask (separately or all)
■
Mosaic, Pseudo-color Bit- map Effects, Blur, Repositioning, Strobe,
and Hue Rotate.
■
Write after read capability allowing layering of stills in a recursive
manner. (i.e., frame store could receive output from an M/E that is
using the frame store as one of its inputs).
■
Ability to read/write stills from a frame store to the floppy disc.
■
Ability to provide a real-time drop shadow on a key that can be
positioned anywhere in the raster. Shadow can be blurred
independent of Video and Key.
■
One two-field or one four-field image may be captured.
■
1, 2, or 4 field read with replicate or interpolation on readout.
Ef f ect s Send M odule Opt ion
Effects send is a system of crosspoints and I/O buses that allows the
integration of external effects devices within an M/E bank. The Effects
Send Module allows you to “fly” keys or any layer within an M/E bank. In
other words, the effects device is spliced using effects send I/O into the
M/E. This splice takes place between the keyer and the compositing
circuits.
3-26
Signal Processor Frame Description
Output Section
The output section consists of video and key Output modules, their
associated rear-frame connector modules, and other Inputs and Outputs
mounted on the back of the frame. Refer to Figure 3-9 for an illustration of
the output section.
Video and key outputs come off the video bus from a variety of points,
including the Keyers, PGM/PST and DSK, Framestore, Effects Send, and
M/E Mixers and Wipe Modules. Outputs are demultiplexed and
conditioned, and then routed through rear frame interconnect modules.
Each interconnect module contains connectors that correspond to the type
of signals that its associated Output module processes. For example, an
Analog module contains 12 BNC connectors, while a digital composite
parallel module contains 4 DB-25 connectors.
Quad
Output
Modules
Composite
Blanking
(14 or less)
Output Clocks
(TTL to ECL)
Connector
Interconnect
Board
(for type
of output)
4 Outputs
Per
Board
M30-002-18A
Blanking
Interval
Video/Key
Peripheral
Processor
On
Controller
Module
Tally Output
Packet
Tally
Relay
Module
Option
Tally
Interconnect
Board
On-air Tally A
On-air Tally B
(cell 17)
Expanded I/O
Connector
Board
Peripheral
Processor
DPM 1
DPM 2
Peripheral Bus II
Peripheral
Processor
Tally Expansion
Connector
Communication
Connector
Board
To Sync
Generator
Module
Loop
Remote Aux Ctrl
Panel Link
Editor
GPI
Back
Output Section
External Reference
External Reference
Figure 3-9. Output Section, Signal Processor.
3-27
Section 3 – Functional Description
Output Modules are purchased according to the needs of a specific
configuration. In the base configuration, the switcher is shipped with a
Analog Out module. Additional Output modules can be added for any
specific equipment mix present at your site.
For each Output Module placed in Bay A (cells 4 through 17), there must
also be an interconnect module installed on the rear of the frame, plugged
into the corresponding position number. Each output module interconnect
mounts directly behind the backplane, in back of the Output module
driving it. A proper Interconnect module is included with the purchase of
any Output or Input Module.
The optional Tally Relay Module in the output section processes data
packets that reflect switcher status. A peripheral processor on the
Controller Module formats the data and sends it to the Tally Relay Module
in Cell 17 (Bay B). An interconnect module provides the relay contacts on
two connectors for On-air Tally A and On-air Tally B. (Refer to Section 2,
Installation, for pin-outs and information on configuring the optional Tally
Relay Module).
Beside the interconnect modules, connectors are also present at the rear of
the Signal Processing Frame on the Communications Panel.
Peripheral Processors on the Controller module drive and manage most of
the connectors on the Communications panel. Exceptions to this are the
Tally Expansion and External Reference connectors.
The external house reference signal can be applied at either of the External
Reference connectors on the Communications panel. The signal loops
through internally to the other connector, for possible routing elsewhere.
The Communication Connector Panel, offers standard I/O support for the
following:
3-28
■
External Analog Reference (loopthrough of color black)
■
Control Panel-to-Signal Frame link
■
Remote Aux Bus Control
■
GPI
■
Three Serial ports (A1, A2, and A3)
Signal Processor Frame Description
Control Section
The Control Panel, video circuitry, and many distributed processing
elements are tied together by a number of control systems using a distributed processing architecture. These systems provide support services
and act as traffic controllers to prevent resource contention problems.
Control functions for Model 3000 system are shown in Figure 3-10.
Discussed first are the Control Panel systems. Although tied to the frame
over a serial link, the Control Panel has several processor systems to handle
its own functions. This allows the Control Panel to communicate with the
frame on a higher level.
Knobs and switches are monitored and controlled by peripheral utility
processor modules that each handle specific areas. These in turn are linked
to the Control Panel CPU and M/E communications CPUs for carrying out
specific tasks. The disk drive and flat panel display are directly controlled
by the Control Panel CPU. These areas are briefly introduced here and
discussed in detail later in this section under the “Control Panel
Description” and “Signal Processor Frame Description.”
Peripheral Ut ilit y Processors ( PuPs )
Operator actions on the knobs, buttons, and lever arms are tracked by
circuit modules called Peripheral Utility Processors (or “PuPs”) located in
the Control Panel. The 2 M/E panel has two PuPs, and the 3 M/E panel has
two PuPs and three M/E processors to handle its control functions.
Cont rol Panel CPU M odule
Control data from the PuPs is routed through the Control Panel CPU
module and sent serially to the Signal Processor frame.
3-29
Section 3 – Functional Description
PuP
Diagnostics/
Status
Terminal
Knobs
Upper
Panel
PuP
Control
Panel
CPU
Board
(68000)
Lamps/
Buttons
Async 38K
RS-422
M/E 1
Communications
Controller
Async 38K
RS-422
M/E 2
Communications
Controller
Status Terminal, RS-232 , Async 9600 baud
Flip/Flop Mix, RS-422, Sync, 600K baud
Lever Arms
Knobs
Lower
Panel
PuP
3.5" Disk
Drive
M30-002-09
Lamps/
Buttons
3-30
Flat Panel
Display
Signal Processor Frame Description
Address and
Data Busses
Head of State (HOS)
Processor
(68030)
Dual Port
RAM
M/E 1
68020 CPU
Dual Port
RAM
M/E 2
68020 CPU
M/E 1
Video
Modules
Debug
Terminal
Clock
Calendar
M/E 2
Video
Modules
Global
RAM
Peripheral
Processor
(68302)
Peripheral
Processor
(68302)
Diagnostics
Terminal
Flip/Flop
Mix Video
Editor
Tally
Remote Aux Bus
GPI
Peripheral
Processor
(68302)
DPM 1
DPM 2
Peripheral Bus II
Expanded
Communications
Daughterboard
Frame
Controller
Module
Figure 3-10. System Control Block Diagram.
3-31
Section 3 – Functional Description
Dat a Transf er t o t he Frame
Data from each of the M/Es is sent asynchronously over 38K baud RS-422
data lines. The data lines from each M/E are all sent together in a single
physical cable to the Signal Processor Frame. Also contained in the cable,
are the 1.2Mbaud flip/flop mix RS-422 synchronous data line, and
connections for the Diagnostics/Status terminal.
Cont rol Processing by t he Signal Pr o cesso r F r am e
Control information from the M/Es is received at the Controller Module in
the Signal Processor Frame, where all M/E control and system operations
take place. This module contains the central Head-of-State CPU (referred
to as the “HOS”) and individual M/E microprocessors.
Asynchronous data from each Control Panel M/E bank is received by a
communications controller dedicated to that M/E. The controllers rapidly
relay this information to corresponding M/E CPUs via dual-port RAM.
The M/E CPUs act on the control information and direct operation of the
appropriate video modules in the frame.
High-speed synchronous data from the flip/flop mix section of the panel
arrives at a peripheral processor, also located on the Controller module.
The peripheral processor sends the data to the HOS processor for direct
control of the flip/flop mix and downstream keyer module.
Other control features provided by the Controller module are:
3-32
■
A Clock/Calendar for time and date stamping of disk files.
■
Global RAM for use by the M/E processors and HOS for rapid
interprocessor communication.
■
Debug Terminal port for diagnostics.
■
Connector for the I/O Expansion Option
Signal Processor Frame Description
St at us Terminal
The Diagnostics/Status terminal can be any VT-100 data terminal
connected externally to the Control Panel (DB-25 connector). You must
configure the terminal for RS-232C, and XON/XOFF protocol. Serial
parameters (baud rate, stop bits, word size, etc.) are set via personality
selections made from the menu and flat panel display.
Internally, the RS-232 data is converted to RS-422 and routed via a switch
to the status port Peripheral Communications processor in the Signal
Processor Frame. To the user, this routing is transparent, it appears as a
locally connected Control Panel terminal. A type-ahead buffer provides
quick operator keyboard response and a command line interpreter
provides both prompted and unprompted input for keyboard inputs.
The status terminal port allows an operator or service person to
interactively access switcher functions and monitor switcher outputs.
Examples of usage include:
■
Naming E-MEM registers
■
Naming files and creating or changing sub-directories in the disk
files system (floppy disk)
■
Personality editing
If your data terminal has a local “print-screen” function, you can print
switcher status displays to an off-line printer attached to the terminal.
(Many VT-100 compatible terminals offer this capability.)
3-33
Section 3 – Functional Description
Mix Effects Modules
All of the modules in the video and key path are discussed individually on
the following pages. Each discussion presents how a module functions and
provides a block-level understanding of its circuitry.
Discussions of the Control Panel and Power Supply are presented later in
this section, after the modules.
Sync Generat or and Preview M odule
The Sync Generator/Preview module is a multipurpose circuit module
consisting of three main areas, see Figure 3-11:
■
The Sync Generator section: provides system clocks, horizontal/
vertical signals, and blanking signals.
■
The Black and Test Generators section provides a variety of test
signal sources and a black generator.
■
The Preview Section allows a variety of internal sources to be
routed for previewing.
The CPU on the Controller module controls the following functions on the
Sync Generator module:
3-34
■
Video/Key Signals placed on the switched preview bus
■
Switched preview source selection
■
Enable and Disable Optional Safe Title Generator module
■
Test signal selection (top half and bottom half of screen)
■
Chroma filtering ON/OFF for framestore video and Mask bus
Signal Processor Frame Description
Clocks
Sync
Sync
Separator
Clock
Generation
and
Division
Multiplex
14.3 Mhz
M30-002-19
Chroma
Band Pass
Filter
Analog
Reference
Input
28.6 Mhz
System
7.16 Mhz
IQ
3.58 Mhz
Subcarrier
Horizontal
Pulse
Generation
Horizontal Pulses
Horizontal
and
Vertical
Blanking
Horizontal Pulse
Vertical
Pulse
Generation
Sync Generator
Section
Interval to Input Modules
Interval to Output Modules
Output Composite Blanking
Switched Output
Composite Blanking
Vertical Pulses
Black and Test
Generators
Section
Black
Generator
Color Black
MUX
Controller CPU
Horizontal Address
Top/Bottom Half
of Field
Test Signal
Test Signal
Generator
Framestore Input
To M/E Keyer
Modules
MUX
Framestore Output
DEMUX
Mask Bus &
Crosspoint Preview
DEMUX
Clip & Gain
and
Chroma Trap
Framestore 1 Video
Clipped Mask Bus
MUX
To Output Modules
Mask Bus
Switched Preview
MUX
(from M/E 1 Mixer & Pri Wipe Module)
M/E 1 Preview
(from M/E 2 Mixer & Pri Wipe Module)
M/E 2 Preview
(from M/E 3 Mixer & Pri Wipe Module)
M/E 3 Preview
DSK Preview
(from Flip/Flop Mixer & DSK Module)
Preview Blanking ON/OFF
DEMUX
DEMUX
M/E 1 Preview
MUX
M/E 2 Preview
M/E 3 Preview
DSK Preview
MUX
DEMUX
Controls Switched Output Composite Blanking
Diagnostic Mode ON/OFF
Diagnostic Probe
Connector
DEMUX
Via CPU
Safe Title
Generator
Clock and
Condition
Switched Preview Bus
Preview
Section
Figure 3-11. Sync Generator/Preview Module, Block Diagram.
3-35
Section 3 – Functional Description
Sync Generat or Sect ion
The Sync Generator circuitry takes an analog reference as an input and uses
it to create four internal clock signals. The reference input runs through a
bandpass filter and sync separator before being locked to the Model 3000
system clock at 14.313 MHz. The four clock signals consist of a Multiplex
clock, System clock, IQ clock and Subcarrier clock.
Sync derived from the reference is also used as the basis for deriving
horizontal and vertical pulses. Other time intervals are also derived for use
in the input and output modules.
Clock outputs and timing signals are placed on the backplane buses for use
throughout the Model 3000 frame.
Black and Test Generat ors Sect ion
Signal generators on the Sync Generator module offer two video sources,
one provides the color black and the other allows selection of a variety of
test signals for alignment, fault diagnosis, and general use.
The test signals provide 9 different patterns (including black). A PROM on
the module is used to store the patterns. The patterns consist of the
following:
■
100% Color Bars
■
75% Color Bars
■
Multiburst
■
Multipulse
■
Pulse and Bar (composite)
■
Chroma Key Test Pattern (rainbow)
■
Horizontal Ramp—all bits (MSB1 and LSB2)
■
Horizontal Ramp (LSB bits only)
Screens produced by the test generator are divided into a top and bottom
half. Each of the screen halves can display a different test signal out of the
8 choices. For example, the top half of the screen could be set to display a
horizontal ramp, while the bottom half of the screen displays 100% color
bars.
1. MSB - Most Significant Bit.
2. LSB - Least Significant Bit.
3-36
Signal Processor Frame Description
The black generator provides a color black signal that can be used by
selecting any of the BLACK source select buttons on the crosspoint buses.
This signal is also used by the PST BLK button on the Transition Subpanels.
When selected in the Matte Menu, Superblack is available for background
1 and/or 2. The Superblack level is adjusted in the Configuration Menus.
Both the test signal generator and black generators are multiplexed on the
module before routing onto the backplane video bus.
Preview Sect ion
Circuitry in the preview section allows a variety of sources to be selected
for previewing under CPU control. Connections for a Safe Title Generator
option are also provided in the Preview section.
Mask Framestore or Mask Bus are routed to the Chroma Trap and clip &
gain to make masks. The output is the Clipped Mask Bus. A non-clipped
mask bus is multiplexed with the switched preview bus (from the
Crosspoint module) and sent to two output modules.
Preview video from each of the M/E Mixer and the DSK modules are
demultiplexed into the preview section and routed to output modules as
well as being available from the switched preview bus.
The Safe Title Generator option is a small module that is inserted into the
switched preview bus path. The module supports superimposition of four
different patterns on the switched preview output of the switcher. This
ability can be used to define a safe title area, safe action area, or to adjust
screen center and horizontally or vertically align picture elements. Output
is clipped to ensure conformance within acceptable composite digital
amplitude range.
Safe Title Generator operation is controlled by the CPU (controller
module). Inputs to the module, beside the switched preview bus input, are
clock, vertical reset, and CPU bus.
Vertical line width is 2 clock cycles and horizontal lines are 2 scan lines per
frame. The position of all patterns is adjustable via menu selection, over a
range of ±1.8uS in clock cycle increments. The latter adjustment allows
compensation for blanking timing.
3-37
Section 3 – Functional Description
Input M odules
Three types of input modules are available for use in the Switcher:
■
Analog Composite Input 10-bit
■
Composite Serial Digital Input
■
Composite Parallel Digital Input
Each of these modules accept four composite inputs, either analog or
digital (depending on the module type), and routes the signals using a
multiplexed format to the 80 by 48 Video Crosspoint matrix. How the
signals are processed, varies depending on the type of module.
LED indicators on the module show the following information:
■
No burst (subcarrier)
■
No Sync
■
Out of range (autotime ON/OFF)
Analog Composit e Input 10- bit
This module takes its input from four groups of two BNC connectors on an
interconnect module. Each pair of BNC connectors constitutes one video or
key input. Each of the four inputs has an identical circuit path, see
Figure 3-12.
For simplification, only one of the circuit paths is described. First the input
is noise-filtered and passed through delay equalization and an anti-alias
filter. The conditioned signal passes into a 10-bit Analog to Digital
converter. Timing for the A-D converter is supplied by a clock derived
from the system clock.
After A-D conversion, the digital signal enters a digital timing ASIC that
derives video, luminance and chrominance data. An accompanying analog
timing ASIC uses the luminance and chrominance data and supplies autotime and horizontal pulse signal back to the digital timing ASIC. The
analog timing ASIC also controls input clamping of the signal.
3-38
Signal Processor Frame Description
Video timing is controlled by both ASICs. The video signal exits the digital
timing ASIC and enters an adjustable delay pipeline controlled by both the
analog and digital timing ASICs. Following directions sent over the MPU
bus from the system controller CPU, timing is adjusted according to userset programming (made by menu entries on the Control Panel). User
programming provides settings for the following items:
■
Manual analog timing mode ON/OFF
■
Manual analog timing delay value (10-bits)
The input module informs the CPU whenever an input signal is out of
auto-timing range or when a signal is over-amplitude.
Timed video output is multiplexed with another channel out to the
backplane.
Noise
Filter
Delay
EQ
Clamp
Anti-alias
Filter
M30-002-21
Analog
Input
Analog Video
Only 1 Input
Path Shown
All 4 Paths
are Identical
Pipeline Control
Composite
Digital
10-bit
In
Digital
Analog
Timing
to Digital
ASIC
Converter
Analog
Interconnect
Variable
Delay
Video
System
H Ref
Input Clock
2x System
Clock
Mux
Analog
Timing
ASIC
Sync In
System
Clock In
Timed
Video
Out
CPU Bus
System
Clamp
Pulse
Sync
Separator
Figure 3-12. 10-bit Analog Composite Input Module, Block Diagram.
3-39
Section 3 – Functional Description
Composit e Serial Digit al Input
This module provides four channels of auto-timed input for video or key
signals. Input signals enter the module via four 75Ω BNC connectors on a
separate interconnect module. Refer to the block diagram shown in
Figure 3-13.
Although four identical video input paths are provided, only one is
described here.
The signal enters a filter block to shape and condition the serial composite
signal. A transformer passes the signal to a decoder that converts the serial
10-bit word to a parallel 10-bit word, and outputs it on a data bus (D0 to
D9). The signal on the bus is further converted from ECL levels to TTL
levels.
Next, the TTL composite signals enter a digital timing ASIC for auto-timing
to the system clock. Video output is passed through a variable delay circuit
controlled by the digital timing ASIC. The resultant timed video out is
multiplexed with another channel out to the backplane.
Auto-timing is affected by directions sent over the CPU bus from the
system controller CPU. User-set menu selections control whether manual
timing delays are used and, if so, how much of a delay is introduced.
CPU Bus
Vertical
Reference
Pipeline Control
Serial
Composite
Digital
Input
Clock
Input
Filter
Only 1 Input
Path Shown
Serial
Decoder
Data
ECL
Reference
ECL to
TTL
Conversion
Composite
Digital In
2x Clock
Digital
Timing
ASIC
Video
Out
Variable
Delay
Timed
Video
Out
Mux
A-D
Clock
System
Clock
System
Horizontal
Reference
In
All 4 Paths
are Identical
M30-002-22
Serial
Composite
Digital
Interconnect
Figure 3-13. Serial Digital Input Module, Block Diagram.
3-40
Signal Processor Frame Description
Composit e Parallel Digit al Input
This module provides four channels of auto-timed parallel composite
input for video or key signals. Input signals enter the module via four DB25 connectors on a separate interconnect module. Functionally, this
module is similar to the serial composite input module, without the input
filtering and serial decoding blocks. Refer to the block diagram shown in
Figure 3-14.
Although four identical video input paths are provided, only one is
described.
Digital composite signals enter the module with ECL signal levels and are
converted into TTL before any further processing. The 10-bit parallel word
is auto-timed to the system clock by a digital timing ASIC (as used on the
serial composite input module). Video output passes through a variable
delay circuit controlled by the digital timing ASIC. The resultant timed
video out is multiplexed with another channel out to the backplane.
In the same manner as the serial module, CPU instructions from the
controller affect auto-timing according to preset user menu selections.
These selections control whether manual timing delays are used and, if so,
how much of a delay is introduced.
CPU Bus
Pipeline Control
Parallel
Composite
Digital
Input
Clock
Data
Only 1 Input
Path Shown
ECL to
TTL
Conversion
Composite
Digital In
Digital
Timing
ASIC
Video
Out
Variable
Delay
2x Clock
Mux
A-D
Clock
All 4 Paths
are Identical
Timed Video
Out
(multiplexed with
another channel)
System
Clock
System
Horizontal
Reference
Vertical
Reference
Clock Sync
M30-002-23
Parallel
Composite
Digital
Interconnect
Figure 3-14. Parallel Digital Input Module, Block Diagram.
3-41
Section 3 – Functional Description
Crosspoint M odules
The input signals from the input modules enter a switching matrix that
allows the operator to selectively choose signals from among those
available. Data handled by the crosspoints consists of 10-bit words, each of
which is divided into two 5-bit components or “nibbles.” The switcher uses
two crosspoint modules because each only holds 5-bits of the 10-bit data
word.
Data into the Crosspoint modules is clocked into registers to ensure proper
timing. Data leaving the crosspoints also enters registers again for proper
timing, before being output to the backplane.
Output Clock
Input Clock
1 through 80
Multiplexed
Inputs
ASICs
De- Configured as
mux 80 x 40 x 5 bit
Matrix
Input
Registers
Control
Data
Buffer
M30-002-24
M/E 1 CPU
M/E 2 CPU
M/E 3 CPU
Control CPU
1 through 40
Multiplexed
Outputs
Decoding
Address
Latch
Crosspoint 5-bit
Matrix Module
Output
Registers
Mux
Control Bus
(from Controller
module)
To Second 5-bit Crosspoint Module
(not shown)
Figure 3-15. Crosspoint Modules (Two Required), Block Diagram.
Control of source selection is carried out by a distributed group of processors (on the controller module) that read and write to control registers
located inside crosspoint ASICs on the crosspoint modules (M/E1 CPU
controls M/E1 crosspoints, and M/E2 CPU controls M/E2 crosspoints).
Data is accessed by the CPUs via a control bus. The CPU can address
registers on crosspoint modules and write data to buffers on the module.
3-42
Signal Processor Frame Description
M/E Keyer Module
Each M/E uses a keyer module to supply the keyers used for the A
background and B background buses, and key 1 and 2 buses. The keyers
for key 1 and 2 are full-function keyers, while the keyers for the
background buses are limited-function keyers. Separate circuitry on the
module supports Preview Dim and Show Key features.
The keyers support linear keying, luminance keying, preset pattern, and
Auto select/Split keying/Self keying. Additional features on the key 1/2
keyers are their connection to a chroma keyer, matte fill, key invert, force
mask, inhibit mask, borderline generator, and non-additive mixing (NAM)
on Keyer 1.
Two optional borderline mezzanine boards are be mounted on Keyer 1 or
2 via 40-pin connectors. The A or B background keyers do not support
borderline, extrude, and drop shadow. Shorted pins on each keyer module
tell the module that the option is present and a readback register indicates
the revision of the borderline option module. Figure 3-16 presents an
overall block diagram of the Keyer Module.
To Effects Loop
and on to
M/E 1 Mixer Pri Wipe
From
Crosspoints
M/E 1
A Video
and Key
DEMUX
A
Keyer
MUX
M/E 1 A Video/Key
M/E 1
B Video
and Key
DEMUX
B
Keyer
MUX
M/E 1 B Video/Key
M/E 1 Key 1
Video and
Key
DEMUX
Key 1
Keyer
MUX
M/E 1 Key 1
Video/Key
M/E 1 Key 2
Video and
Key
DEMUX
Key 2
Keyer
MUX
M/E 1 Key 2
Video/Key
Key 1 Video & Key
Key 2 Video & Key
M30-002-25
Clipped Mask Bus/
Framestore Video
From Sync/Gen
Preview Module
From M/E 1
Dual Chroma Keyer
To M/E 1
Dual Chroma Keyer
To/From All
Keyers
Key 1 Video & Key
Key 2 Video & Key
Key 1 Force/Inhibit Masks
Key 2 Force/Inhibit Masks
Pri/Sec WIpe Matte Control
Pri/Sec WIpe Border
Pri/Sec WIpe Crop
Mask Bus/Mask Store
K1 and K2 only
Preview Dim/Show Key
(to Mix/Wipe Module)
Figure 3-16. Keyer Module, Block Diagram.
3-43
Section 3 – Functional Description
Video/Key
From
Chroma Keyer
DEMUX
Lum
Key
Signal
Processing
ASIC
Matte
Fill
Key 1 Video
Key 1 Key
Fineline
Mixer
Matte Fill
Generator
DEMUX
Chroma Key
Black
Pri PST
Wipe
Chroma
Key
Lum
Key
Sec
PST
Wipe
1
1
Chroma
Filter
To Show Key
Selector
On/Off
No Key
or
PST
Wipe
Dual
Clip&Gain
Normal/
Inverted
S-shape
On/Off
Matte
Generator
Matte
Generator
Pri
Primary and Secondary
Wipe Matte Control
DEMUX
Primary Wipe Border/
Secondary Wipe Border
DEMUX
Primary Wipe Crop/
Secondary Wipe Crop
DEMUX
Mask Bus/
Mask Store
DEMUX
1 per Quad Keyer
Module
3-44
Pri
Sec
Pri
Sec
to
Key 2 Keyer
B Keyer
A Keyer
Sec
to
Key 2 Keyer
B Keyer
A Keyer
Signal Processor Frame Description
MUX
Video/Key
to Chroma Keyer
Key 2 Video
Key 2 Key
Fineline
Mixer
Fineline
Keyer
Borderline
Option
Shaped or
Chroma Key
Unshaped or
Matte Fill
Sec
PST Wipe
Non-additive
Mix (NAM)
Force and
Inhibit Masks
From Key 2
Keyer
Pri PST
Wipe
Force and
Inhibit
Masks
Force
Mask
Inhibit
Mask
Key
Opacity
Fineline
Mixer
Inhibit
Mask
Level
On
Off or
Chroma
Key
On
Key 1 Video
Key 1 Key
to Effects
Send
Pri
Sec
Preview Dim
and
Show Key
to Mixer
Keyer 1 only
Off or
Chroma
Key
1
MUX
Key Invert
Force/Inhibit
Masks to
Chroma Keyer
Key Invert
Rectangle
Generator
Delayed Blank
to Chroma Keyer
M30-002-26
Figure 3-17. Keyer 1 or 2 Detail, Block Diagram.
3-45
Section 3 – Functional Description
Matte
Generator
Matte
Generator
Pri
to
Key 2 Keyer
B Keyer
A Keyer
Sec
Pri
Sec
Primary and Secondary
Wipe Matte Control
DEMUX
Primary Wipe Border/
Secondary Wipe Border
DEMUX
To Keyer 1
Keyer 2
Keyer B
Primary Wipe Crop/
Secondary Wipe Crop
DEMUX
Mask Bus/
Mask Store
DEMUX
1 per Quad Keyer
Module
To Keyer 1
Keyer 2
Keyer B
Coring Level
Black Level
Lum Gain
Lum Limit
Chroma Gain
Composite Limit
Signal
Processing
ASIC
A Bus Video
A Bus Key
(hole cutter)
DEMUX
Chroma
Filter
To Show Key
Selector
3-46
On/Off
Dual
Clip&Gain
Normal/
Inverted
S-shape
On/Off
Signal Processor Frame Description
M30-002-327
Fineline
Mixer
Lum Key (Black)
Fineline
Keyer
Pri PST Wipe
MUX
Sec PST
Wipe
A Video
A Key
To Effects
Send
Shaped
Pri Preset Wipe Border
Unshaped
Pri PST Wipe
Sec Preset Wipe Border
Sec PST Wipe
Keyer
Lum Key
No Key or PST Wipe
Keyer
Pri Preset Wipe Crop
SecPreset Wipe Crop
(No PST Wipe) 1
Opacity
Figure 3-18. Keyer A or B Detail, Block Diagram.
3-47
Section 3 – Functional Description
Keyer Module (Continued)
Multiplexed video and key signals enter the Keyer module and are
demultiplexed prior to entering the keyer circuitry. All four keyers share
circuitry matte/wipe signals. Key 1 and Key 2 share mask circuitry and
NAM circuitry is on Key 1 only. Two Matte Generators in the shared
circuitry provide color mattes for preset wipes (primary and secondary).
These shared areas are identified in blocks on the illustrations.
The four keyers fall into two groups: Key 1 and 2 complex keyers, and
Background A and B limited keyers. Since the keyers in each group are
virtually identical we only show and discuss the Key 1 and A background
keyers.
Key 1 video and key are routed through separate parallel data paths. After
demultiplexing, the key data is sent through a variable delay element to
match delays caused by reentry and routing through the switcher. The key
signal at this point may be chroma filtered or not. For example, the key
signal may be chroma filtered if its derived from a component video signal
and requires removal of chroma to use it as a key signal.
Next in the path is a clip and gain block that adjusts the clip and gain point
of the key signal, and can level shift an external key source to internal key
levels. Following the clip and gain, a mixer applies the force mask. This
mixer forces the key signal to logical “1” (200 hex) when the force mask is
present.
A variable delay compensates for the length of the Chroma keyer.
Following this delay, the key path routes to a three position data selector
that chooses one of the following (not necessarily in order):
■
Chroma keyer key output,
■
Key bus for luminance key, or
■
Force 1 (200) for no preset wipes or when no key is selected.
A sub-pixel delay allows moving the key signal by small amounts. The key
signal passes to a multiplier that cuts a hole in the key signal for inhibit
masks. Next, the key bus passes to the borderline option connectors and the
NAM (Key 1 only) circuit.
The video bus first passes through the variable delay for reentry matching.
Next, the video bus passes through a signal processing block that handles
luminance and chrominance gain, DC offset, and coring.
3-48
Signal Processor Frame Description
The video path is sampled in the signal processing block for use by the
chroma keyer, and a delay that matches the chroma keyer length is applied.
A data selector chooses from one of the following:
■
Chroma keyer output video
■
Video data path (for regular video fill keys)
■
Matte fill from a dedicated matte generator for matte fill
The video data next passes to a mixer that performs the actual keying for
luminance keys or matte fills, and mixes on the border for preset wipes. A
keyer follows the mixer and applies the inhibit mask to the video path, or
in preset wipes, crops the border. After the keyer, video data is routed to
the borderline option connector and to the non-additive mix (NAM)
circuit.
Video and key output from the Fineline mixer/keyer enters a NAM circuit
block. The NAM circuit is present on the key 1 data path only. The NAM
circuit is switchable (on/off). When active, key 1 is NAMed with key 2, and
routed out of the key 1 output bus. In NAM mode, keyers remain fully
enabled, and key 2 output still shows the result of any key 2 operation that
is set up. If NAM is OFF, the key 1 signal is simply passed through. In either
case, the resulting video and key signals pass out of the module enroute to
the effects send module (or bypass module, if the option is not present).
When NAM is enabled, the two uncalibrated indicators on the Control
Panel are illuminated for the Keyer buses.
Matte fill for the Key 1 keyer is provided by a dedicated Matte generator.
Its output is passed through a data selector to the Fineline mixer/keyer that
performs the keying operation. A complex matte (e.g. a modulated matte
of two colors) may be shaded with either the primary or secondary wipe
generator.
The key 1 keyer provides variable clip/gain controls for luminance keys,
with S-shaping of the key signal. Linear keys have gain fixed at unity, clip
fixed at 50%, and no S-shaping. A chroma trap may be switched into the
key path by menu selection, for both types of keys.
3-49
Section 3 – Functional Description
Keys 1 and 2 may be masked by either of the wipe generators in the same
M/E from the Primary Wipe Generator Module (Keys A and B cannot use
masks). Keys may also be masked by an adjustable rectangular box
generated on the Keyer module. Keys can also be masked by a video
source selected on the mask bus or by a Framestore output. Circuitry on the
keyer allows selective inhibit masking to cover desired areas of video from
showing through, and forced masking to select areas that you wish to show
through. Both force and inhibit masks can be applied simultaneously, or
separately. In the event of a force and inhibit mask overlap, the inhibit
mask prevails.
Preset wipes from the primary or secondary wipe generators are provided
on all keyers. Wipe matte control, wipe border and wipe crop signals are
distributed to all the keyers on the Keyer module. Wipe border defines the
inner edge surrounding the video, Wipe Crop, the outer edge of the border,
and Wipe Matte Control, a color modulation between two matte values
within the preset wipe border. Border Opacity defines the degree of
translucence of the border with respect to the video underneath (from fully
opaque to transparent).
All four keyers share an area of circuitry for Show key/Preview dim. The
Showkey features takes the key signal from all four keyers and passes it to
the M/E's associated Mixer and Primary Wipe module, multiplexed
together with the NAMed Force and Inhibit Masks from Key 1 and 2. Refer
to the Primary Mixer/Wipe Module discussion for information on how
these signals are used to generate “show-key” and “preview dim” outputs.
The information presented so far defines the function of the Key 1 and Key
2 keyers. Features provided by the A and B keyers are similar, but more
limited in scope. Refer to Figure 3-18 for a block diagram of the A
background bus keyer.
A and B Keyer operation is almost identical to Keyers 1 and 2 through the
video and key paths, however they do not provide circuitry for the
following:
3-50
■
Force and inhibit masks
■
Chroma keys
■
NAM
■
Matte fill
■
Sub-pixel key delay
■
Borderline option
Signal Processor Frame Description
Ef f ect s Send M odule Opt ion
The Effects Send Module contains a crosspoint matrix and group of I/O
buses positioned in between the Keyers and the Mixer/Primary Wipe
Generator Modules. This location allows video/key signals to be routed
outside of the switcher for further processing by Effects devices and other
peripherals, before mixing and output. Effects send integrates effects
devices by effectively splicing them into the M/E between the keyer and
the compositing circuits. Refer to Figure 3-19 for a block diagram of the
Effects Send Module.
Only one Effects Send Module is required to support all M/Es. If the Effect
Send Module Option is not used, an Effects Send Bypass module must be
inserted in the same frame location (cell 11, Bay B) to pass the signals.
Aux Bus 1 through 4
Video & Key In
M/E 1 (4 Keyers)
Video & Key In
M/E 2 (4 Keyers)
Video & Key In
M/E 3 (4 Keyers)
Video & Key In
Control
Effects Send
Crosspoint
Matrix Module
ASICs
Configured as
32 x 32 x 10 bit
Matrix
Output
Registers
Decoding
Address
Latch
Data
Buffer
16
Multiplexed
Outputs
Aux Bus 1 through 4
Video & Key Out
M/E 1 (4 Keyers)
Video & Key Out
M/E 2 (4 Keyers)
Video & Key Out
M/E 3 (4 Keyers)
Video & Key Out
M30-002-28
M/E 1 CPU
M/E 2 CPU
M/E 3 CPU
Control CPU
Input
Registers
MUX
16
Multiplexed
Inputs
DEMUX
Output Clock
Input Clock
Control Bus
(from Controller
module)
Figure 3-19. Effects Send Option Module, Block Diagram.
3-51
Section 3 – Functional Description
M/E Mixer and Primary Wipe Module
This module contains the mixer system and Primary wipe system for a
single Mix Effects system, or “M/E”, all on one circuit assembly. One of
these modules is required for each M/E bank in the Switcher.
A block diagram of the module is shown in Figure 3-20.
Three major areas exist on the module:
■
Clocks, Sync, and Control
■
Primary Wipe Generator
■
Mixer
An optional mezzanine board can be installed on the module to provide a
look-ahead preview output. Additionally, in the M/E mode, the optional
mezzanine board provides a “Clean Feed” output through the normal key
output. This clean feed signal may be useful for feed distribution to
external sources where video is used for multiple purposes.
Without the mezzanine board option, preview output is a duplication of
the M/E output. The Preview Dim and Show key features affect the
preview output with or without the option mezzanine board.
Clocks and sync enter the module from the Sync Generator and are
distributed to both the Primary Wipe Generator and Mixer areas of the
module. The Primary Wipe Generator and Mixer are controlled by
instructions sent from the Controller module to the on-board
microprocessor.
3-52
Signal Processor Frame Description
Coefficient A1
V Waveform
Waveform
Generators
H Waveform
Coefficient B1
Rotation
Absolute
Value
Function
Generators
Y1 Waveform
X Waveform
Modulation
Waveform
Function 1 Output
Y Waveform
Function 2 Output
Modulation
Generator
Linear/Circle Solid
Square Root
Matrix Texture
Generators
Wipe Solid Primary Solid
Mixers
Matrix Solid
Texture Solid
Secondary Wipe
Solid
Secondary
Solid
Clip and
Gain
Primary Wipe
Generator
Clocks and
Sync
Secondary Wipe Solid Out
Pri/Sec Wipe Crop
Pri/Sec Wipe Border
Pri/Sec Wipe Border Control
Transition Crop, Border,
Border Control
Dual
Port
RAM
Microprocessor
Control
to Both
Sections
To M/E
Control
Processor
Preview and
Show Key
Preview Dim/Show Key
B Video/Key
Input
Demultiplexer
A Video/Key
Video Buses
Preview
Preview Video
Mixers
Key Buses
Keyer 1 Video/Key
Show Key/
PVW Dim
Preview
Output
Preview/Clean Feed &
Show Key Option
Mezzanine Board
Keyer 2 Video/Key
Border Matte
Transition
Wipe
Signals
M30-002-29
Mixer
Transition Control
Border Transition
Border Matte
Signals
Generator
Mix
Sum 1
4
Border
Mixers
Video
Video Compositing
Buses
Video/Key
Mix
Output
Sum 2
Video/Key
Output 2
Layer Keys
(1 - 4)
Key Transition
Signals
Key Transition
Signals
Key
Buses
Output Key
Layer 1 Key
Processing
Video/Key
Output 1
Priority 1,2
Layer 2 Key
Processing
Priority 1,3
Output Key
Output Key
Priority 2,3
Layer 3 Key Priority 3,4
Processing
Layer 4 Key
Processing
Output Key
Priority 2,4
Priority 1,4
Figure 3-20. M.E. Mixer and Primary Wipe Generator.
3-53
Section 3 – Functional Description
The Primary Wipe Generator works by itself or in conjunction with the
optional Secondary Wipe Generator module to provide wipe solids and
border and crop information to a single M/E. Modulation waveform data
is interpolated and supplied to waveform generators. PAL offset is
corrected in the rotation matrix. These waveforms enter a rotation and
absolute value block for conversion to X, Y, and Y1 waveforms, along with
A1 and B1 coefficients.
Function generators use the above buses as inputs to create function (X,Y)
1 and function (X,Y) 2 waveforms. These waveforms are sent to a Matrix
and Square root circuit block where solids are created. The waveforms
enter a square root generator that uses a lookup table to create a circle solid.
Other solids use the Function 1 and 2 waveforms directly (“as is”). Matrix
solids are created in the same circuit block by taking the X and Y
waveforms and creating the solid from predefined matrix information
stored in ROM. The linear/circle, matrix and texture solids enter a Wipe
Solid Mixers circuit block where the primary wipe solid is created. If the
optional Secondary Wipe module is present, a secondary wipe solid also
enters the Wipe Solid Mixer block and is combined.
Clip and gain circuits use the primary and secondary solids to make the
primary and secondary wipe crop, border and border control signals (for
output to the keyer module).
Mixer circuitry on the module is separate from the Primary Wipe
Generator. An input demultiplexor takes video and key inputs and
preview/show key signals from the Keyer Module and demultiplexes
them. Resultant video and key signals are used in the mixer to create the
video and key outputs and are bused to an option mezzanine board for
Clean Feed output and mixed Preview Output.
A border mixer shapes and mixes the border matte video. Transition
signals for the border are sent to the border mixer from the Transition
Control Border Matte Generator. This is the same generator that produces
the matte. Each layer gets its own transition control information. Video
output from the Border Mixer enters a circuit where the video is
composited with video from the other layers. Layers are prioritized, mixed
and output to a Video/Key Output circuit block.
The Output block limits the key and video signals, and outputs them to the
crosspoint modules for reentry and also to the output modules.
3-54
Signal Processor Frame Description
PGM/PST and Dual DSK Module
This module provides two downstream keyers, each of which can be mixed
into the program/preset buses and output to the crosspoint modules,
preview module, and output modules. Both keyers offer border display
when the optional Borderline mezzanine board is installed (one for each
keyer). A clean feed output of the program video is provided prior to
chroma filtering or processing.
Program and Preset buses enter a block where the key and video are split;
the video routed to a Preview/Clean Feed block and the keys passed to a
Key Processing block. The Preview/Clean Feed block also takes as input
Preview dim, show key, and keyer video from the two downstream keyers.
Program Video
Program Bus Input
Switched Preview
Output
Preset Video
Program
Preset
Clean Feed/
DSK Preview
Preset Bus Input
Video
Borderline In/Out
Option
PC Board
Preview Dim 2
Show Key B
DSK 2 Video
Keyer
2
Preview
Clean Feed
Delayed Preset
Video
Show Key A
Matte
Modifier
Border
Modifier
M/E Wipe Solid
DSK 1
Video
Program
Key
Output
Matte
Modifiers
Background
1&2
Matte
Modifier
Video
Borderline In/Out
Option
PC Board
Border
Modifier
Layer 4 Key
Layer 3 Key
Key
Layer 2 Key
Processing
Layer 1 Key
Preset Key
Key Priority
DSK 1 Key
To all areas
Clocks and Timing
To all areas
Video
Timing
Control
M30-002-30
Video Data Bus
& Wait Enables
Compositor
DSK 2 Key
Program Key
Keyer
1
Program
Video &
Key Bus
Unshaped
Limit
Preview Dim 1
DSK 2 Video
DSK 1 Video
Video
Delayed PGM
Video
Figure 3-21. Program/Preset and Dual Downstream Keyer Module, Block Diagram.
3-55
Section 3 – Functional Description
Processing in the Preview/Clean Feed block consists of a simple mixer for
producing clean feed video from the program/preset buses before keyers
are added in. Delayed program and preset video is passed to a Compositor
circuit block for layering/mixing. Look-ahead preview is provided by the
Preview/Clean Feed block by mixing layer preview video and preview
dim signals from the downstream keyers. Preview dim takes the output
from the rectangle generators and compares luminance value with values
stored in a PROM (preview dim only works with rectangle masks and the
only masks available to DSK are rectangles). Switched preview may
include Look-ahead preview, Show-key 1, Show-key 2, and Downstream
Keyer Preview (lookahead-preview is the normal mode).
Two identical downstream keyers are provided on the module (only one
will be discussed below). Each of the two keyers offers support for the
addition of an optional Borderline mezzanine board.
Video enters the Downstream Keyer block where a Fineline™ keyer ASIC
provides hole cutting. Key signals are passed through a disable chroma
filter and adjustable clip and gain circuits. Matte fill video is supplied to the
keyer by a matte generator using signal sources from the Matte Modifiers
circuit block to create aesthetic matte backgrounds. A rectangle generator
provides box mask creation capability.
3-56
Signal Processor Frame Description
The borderline option mezzanine board mounts on the module and is
interconnected via a 40-pin connector. Resistors on the module tell the
system that the option is installed and indicate the revision of the module.
The Matte Modifiers block supplies sources for use by the two background
generators. One ASIC mixes ramps, SIN and COS signals. Rotated solids
are passed to a texture generator. A second ASIC takes the texture, solids
and texture mix coefficient signals for determining new matte values. The
latter ASIC adjusts clip and gain and outputs the resultant signals to the
background A and B background generators. Each of the background
matte generators has a crosspoint.
Program, preset, DSK 1 and DSK 2 keys from the keyer and Program/
Preset circuit blocks enter a Key Processing circuit block for determination
of layers and key priority. This information is used by the compositor block
for summing and creating the combined image. Video from the compositor
is passed to an Unshape Limiter circuit block that limits the video and
unshapes it. The video passes to a signal processing IC that separates Y and
C, and performs a separate limiting process on each before recombining
them. Program video and key data is multiplexed in this same block and
placed on the video buses for the output modules.
3-57
Section 3 – Functional Description
Output Modules
Three types of output modules are available for use in the top bay of the
signal processor frame:
■
Analog Composite Output
■
Composite Serial Digital Output
■
Composite Parallel Digital Output
Each of these modules offers four outputs, either analog or digital
(depending on the module type), and connect to outside cables via a
separate interconnect module mounted on the back of the signal processor
frame. How the signals are conditioned and processed before output,
varies from module to module. Each of the modules are discussed on the
following pages. Figure 3-22 through Figure 3-24 provide block diagrams
of the three modules.
Random
Number
(from Sync
Generator)
Blanking
Interval
Sum
Variable
Delay
Fineline
Mixer
Adaptive
Rounder
8 or 10 Bits
MSB of Composite
Blanking
CPU
Video 1
and
Key1 or Video 2
Superblack
Level From
CPU
Sum
DEMUX
Key
Mixer
Video
Composite
Blanking
Clocks
Variable
Delay
Level
Shift
(key only)
CPU
8 or 10 Bit Key
MUX
Fineline
Mixer
Adaptive
Rounder
8 or 10 Bits
MSB of Composite
Blanking
ECL to TTL
Conversion
Analog NTSC Composit e Out put
This module provides output on four groups of three 50 ohm BNC
connectors on an interconnect module. Each of the three BNC connectors
in a group provides the same video signal. The circuit paths for all four
outputs are similar, so for simplification only one is discussed below.
Figure 3-22 shows two output paths on the module.
3-58
Signal Processor Frame Description
Video is demultiplexed at entry, delayed appropriately and passed
through a circuit which can add superblack. The digital video enters a
Fineline mixer where sync, burst and blanking information is applied to
create the active picture video. Since the digital video can be either 8 or 10
bit digital, an adaptive rounder circuit is used to convert to 8 bit digital
without the vertical banding that would otherwise occur from a truncation.
The 10-bit word is converted to an analog video signal via a Digital-toAnalog converter. To remove stepping and smooth the analog waveform,
the video is passed through two filters: a group delay equalization filter
and a reconstruction filter.
Gain
Adjust
12-bit
Digital
To Analog
Convertor
Group
Delay
EQ
Reconstruction
Filter
Active
Filter
EQ
Analog
Video 1
Output
Analog
Video 2
or Key 1
Output
Gain
Adjust
Only 2 Output
Paths Shown
All 4 Paths
are Similar
12-bit
Digital
To Analog
Convertor
Group
Delay
EQ
Reconstruction
Filter
Active
Filter
EQ
Analog
Output
Interconnect
M30-002-31
Figure 3-22. Analog Composite Output Module, Block Diagram.
The group delay filter compensates for delay introduced by a
reconstruction filter that follows. The reconstruction filter is a low pass
filter that smooths the analog waveform. A final filter is applied at the end
of the output path to counter the effects of “SIN X/X” frequency losses.
3-59
Section 3 – Functional Description
Output TRS
Insert
Output TRS
3FF
Random
Number
(from Sync
Generator)
Blanking
Interval
Sum
Variable
Delay
Fineline
Mixer
Adaptive
Rounder
8 or 10 Bits
MSB of Composite
Blanking
CPU
Video 1
and
Key1 or Video 2
Superblack
Level From
CPU
Sum
DEMUX
Key
Mixer
Video
Composite
Blanking
Clocks
Variable
Delay
Level
Shift
(key only)
CPU
8 or 10 Bit Key
MUX
Fineline
Mixer
Adaptive
Rounder
8 or 10 Bits
MSB of Composite
Blanking
ECL to TTL
Conversion
Composit e Serial Out put
This module provides four separate video outputs via an interconnect
module containing four 75 ohm BNC connectors. The circuit paths for all
four outputs are similar, so for simplification only one is discussed below.
Figure 3-23 shows two output paths on the module.
Video is demultiplexed at entry, delayed appropriately and passed
through a circuit which can add superblack. The digital video enters a
Fineline mixer where sync, burst and blanking information is applied to
create the active picture video. Since external devices can be 8 or 10 bit
digital, an adaptive rounder circuit allows optional conversion to 8 bit
digital without the vertical banding that would otherwise occur from a
truncation.
3-60
Signal Processor Frame Description
MUX
14.3 Mhz
Clock
Serial
Encoder
Output
Driver
Serial D2
Video 1
Output
Serial D2
Key 1 or
Video 1
Output
e
Only 2 Output
Paths Shown
All 4 Paths
are Similar
MUX
14.3 Mhz
Clock
Serial
Encoder
Output
Driver
Serial D2
Input/Output
Interconnect
M30-002-32
Figure 3-23. Composite Serial Digital Output Module, Block Diagram.
(You can configure the output for 8 or 10 bits from a menu selection on the
Control Panel.) The 10-bit word is multiplexed with a Timing Reference
Signal (TRS 3FF,000,000,000), inserted under control of the OUTPUT TRS
INSERT signal. The 10-bit multiplexed word is applied to a serial Encoder
circuit that is clocked by the master 14.3 MHz clock. Output from the
encoder is a NRZI-encoded serial bit stream corresponding to the 10-bit
digital value. Encoding consists of scrambling the 10-bit word according to
a generator polynomial. Clock speed for the bit stream is 10 times the
Master clock speed (143 MHz). After encoding, the bit stream passes
through an output driver and is routed to the interconnect module for
output.
3-61
Section 3 – Functional Description
Random
Number
(from Sync
Generator)
Blanking
Interval
Sum
Variable
Delay
Fineline
Mixer
CPU
Video 1
and
Key1 or Video 2
Superblack
Level From
CPU
Sum
DEMUX
Key
Mixer
Video
Composite
Blanking
Clocks
Variable
Delay
Level
Shift
(key only)
CPU
8 or 10 Bit Key
MUX
Fineline
Mixer
ECL to TTL
Conversion
Composit e Parallel Digit al Out put
This module provides four separate video outputs via an interconnect
module containing four DB-25 connectors. The circuit paths for all four
outputs are similar, so for simplification only one is discussed below.
Figure 3-24 shows two output paths on the module.
Video is demultiplexed from another video output at entry, delayed
appropriately and passed through a circuit that can add superblack. The
digital video enters a Fineline mixer where sync, burst and blanking
information is applied to create the active picture video.
3-62
Signal Processor Frame Description
Parallel
D2
Video 1
Output
Adaptive
Rounder
TTL to ECL
Convertor
Parallel D2
Key 1 or
Video 1
Output
8 or 10 Bits
MSB of Composite
Blanking
Only 2 Output
Paths Shown
All 4 Paths
are Similar
Adaptive
Rounder
Parallel D2
Input/Output
Interconnect
M30-002-33
8 or 10 Bits
MSB of Composite
Blanking
TTL to ECL
Convertor
Figure 3-24. Parallel D2 Output Module, Block Diagram.
Since external devices can be 8 or 10 bit digital, an adaptive rounder circuit
allows optional conversion to 8 bit digital without the vertical banding that
would otherwise occur from a truncation. (You can configure the output
for 8 or 10 bits from a menu selection on the Control Panel.)
The 10-bit TTL-level word is passed into a conversion circuit that changes
the signal levels to ECL-compatible levels. Data is clocked at the same
speed as the Master clock (14 MHz). After conversion to ECL, output is
forwarded to one of the four DB-25 connectors on the interconnect module.
3-63
Section 3 – Functional Description
Secondary Wipe Option Module
This module provides an extra wipe pattern generator for each M/E bank
in the switcher on one circuit assembly. Only one Secondary Wipe module
can be added to the Signal Processor frame. A block diagram of the module
is shown in Figure 3-25.
This module works with the M/E Mixer and Primary Wipe Generator in
an M/E.
Two major areas exist on the module:
■
Clocks, Sync, and Control
■
Secondary Wipe Generators
Clocks and sync enter the module from the Sync Generator and are
distributed to all three wipe generators. The Wipe Generators are
controlled by instructions sent from the on-board microprocessor of the
associated Primary Mix/Wipe module over the microprocessor control
bus.
The switcher does not use the third wipe generator, it is ignored if present.
Each of the secondary wipe generators work in conjunction with the
Primary Wipe Generator module in their designated M/E bank to provide
extra wipe solids.
Modulation waveform data is interpolated and supplied to waveform
generators. The waveform generators use the data with counters to
determine horizontal and vertical waveforms. These waveforms enter a
rotation and absolute value block for conversion to X, Y, and Y1
waveforms, along with A1 and B1 coefficients.
Function generators use the above values as an input to create function
(X,Y) 1 and function (X,Y) 2 waveforms. These waveforms are sent to a
Matrix and Square root circuit block where solids are created. The
waveforms enter a square root generator that uses a lookup table and ASIC
to create a linear/circle solid. Matrix solids are created in the same circuit
block by taking the X and Y waveforms and creating the solid from
predefined matrix information stored in ROM. The linear/circle, matrix
and texture solids enter a Wipe Solid Mixers circuit block where mixing
occurs, creating the secondary wipe solid. The solid is sent on to the
Primary Wipe Generator module for that M/E where it is used with the
primary wipe solid.
If no Secondary Wipe module is present in the Signal Processing frame, the
primary wipe is used as the secondary wipe. When the optional Secondary
Wipe module is present, secondary wipe solids are sent to each of the
Primary Wipe modules where they enter the Wipe Solid Mixer block, prior
to clip and gain adjustments.
3-64
Signal Processor Frame Description
Coefficient A1
H Waveform
Coefficient B1
Rotation
Absolute
Value
Modulation
Waveform
Y1 Waveform
X Waveform
Function
Generators
Function 1 Output
M30-002-334
V Waveform
Waveform
Generators
Y Waveform
Function 2 Output
Modulation
Generator
Linear/Circle Solid
Square Root
Matrix Texture
Generators
M/E1
PRI Wipe
Solid
Wipe Solid
Mixers
Matrix Solid
Texture Solid
Secondary
Wipe Solid
To M/E 1 Mixer and
Primary Wipe
Generator Module
Coefficient A1
V Waveform
Waveform
Generators
H Waveform
Coefficient B1
Rotation
Absolute
Value
Modulation
Waveform
Y1 Waveform
X Waveform
Function
Generators
Function 1 Output
Y Waveform
Function 2 Output
Modulation
Generator
Linear/Circle Solid
Square Root
Matrix Texture
Generators
M/E2
PRI Wipe
Solid
Wipe Solid
Mixers
Matrix Solid
Texture Solid
Secondary
Wipe Solid
To M/E 2 Mixer and
Primary Wipe
Generator Module
Coefficient A1
V Waveform
Waveform
Generators
H Waveform
Modulation
Waveform
Coefficient B1
Rotation
Absolute
Value
Y1 Waveform
X Waveform
Function
Generators
Function 1 Output
Y Waveform
Function 2 Output
Modulation
Generator
Linear/Circle Solid
Square Root
Matrix Texture
Generators
M/E3
PRI Wipe
Solid
Clocks and
Sync
Matrix Solid
Texture Solid
Wipe Solid
Mixers
Secondary
Wipe Solid
To M/E 3 Mixer and
Primary Wipe
Generator Module
Microprocessor
Control
Figure 3-25. Secondary Wipe Module, Block Diagram.
3-65
Section 3 – Functional Description
Dual Component RGB Input Option Module
This module converts component RGB, YUV, Y , R-Y, B-Y or Betacam® into
suitable input for the Dual Chroma Keyer Option module. Input is
converted to digital format and multiplexed onto the video bus. Encoded
composite signals for the Chroma Keyer are input from the input modules
and do not require a special input module. A block diagram of the Dual
component RGB Input Option module is shown in Figure 3-26.
Up to two RGB Input modules may be installed on the Model 3000
switcher. One module should be installed to accompany each M/E Dual
Chroma Keyer module in the Signal Processor frame. They are separate
options but must be installed as a set; one Dual component RGB Input
module and one Dual Chroma Keyer module.
Two inputs may be connected to each Dual RGB Input module, with three
signal paths per input (i.e., red, green and blue inputs for RGB, etc.). These
three signal paths are very similar; so similar that for the sake of simplicity,
only one is discussed here.
Each input is filtered, limited, and passed to an Analog-to-Digital
converter. The A/D converter outputs the signal as an 8-bit word to a
multiplex circuit block. At the end of the path, the signal is sent to the Dual
Chroma Keyer module. Like all input modules, the Dual RGB Input
module also supports the input of diagnostic test words at the beginning of
the signal path.
Analog
Interconnect
RGB
Dual
Analog
Input
8
Differential
Input
Only 1 Input
Path Shown
3 Paths per Input
are provided
Clamp
Delay
EQ
Anti-alias
Filter
Analog Video
8-bit
Analog
to Digital
Convertor
Input Clock
4x System
Clock
MUX
4
Digital
Video
8
Digital
Video
8
MUX
MUX
4
4
Digital
Video
8
MUX
4
To Dual
Chroma
Keyer
Module
Digital
Video
8
MUX
4
Digital
Video
MUX
4
M30-002-36
8
Digital
Video
Figure 3-26. Dual Component RGB Input Option Module, Block DIagram.
The format of the analog component inputs may be RGB, YUV, or Betacam.
Format is set through personality menu. SYNC is not required on any input
format and the inputs are manually timed by the user via personality
programming. Fine timing adjustment for creative or aesthetic reasons, is
provided to the user via menus.
3-66
Signal Processor Frame Description
Dual Chroma Keyer Option Module
Two chroma keyers are provided to an M/E by the addition of a Dual
Chroma Keyer Option module. (Up to two Dual Chroma Keyer Option
modules can be installed in the switcher.) Figure 3-27 shows a block
diagram of the Dual Chroma Keyer.
In addition to providing key hole cutter information, component inputs are
used to provide color suppression on the video being chroma keyed. This
reduces or eliminates the color splash from the background on the
foreground image and reduces color edge fringing.
Other features include:
■
Key hole size and position adjustment
■
Hue selectivity adjustment
■
Shadow opacity adjustment
■
Color tinting effects
Composite chroma keying is also performed in the Dual Chroma Keyer
Option module. The decoder mezzanine board, mounted on the Dual
Chroma keyer module, decodes the video input and feeds it to the Chroma
Keyer. Composite chroma keying supports all the features of component
chroma keying, as well as the added ability to chroma key re-entered video
from another M/E.
Composite encoded video input enters a decoder block where the frame is
analyzed by a motion detector. If not in motion, video passes to a mixer. If,
however, the frame is in motion, then you can select the decoding to occur
line by line (mode A as shown in the block diagram, Figure 3-27) or frame
by frame (mode B). In both cases, chroma is separated by a chroma pass
filter and introduced into a demodulator and then into a hue selector.
Luminance is also separated and used later in the chroma keyer within the
circuitry used to add shadows. Component video from the Dual
Component Input modules enters a demultiplexor on the chroma keyer
module and is routed by a source selector into an RGB to YUV circuit block.
Delay is added to compensate for time zone position within the switcher
(initial, reentry from another M/E, or after the effects loop).
Component (U and V) or Encoded video (I and Q) both enter the same Hue
Selector block for user adjustment of hue from the sub-panel hue knob and
selectivity adjustment. Sub-panel user adjustments of color range
selectivity are input to the Hue Selector circuit block, and can be adjusted
from a narrow to wide band. Output from the hue selector enters a keyer
where the force foreground mask signal from the keyer module is also
applied. The mask is turned on and off under operator control from the
sub-panel. This output is routed to two circuit blocks, one for shaped video
and one for creating the shaped key.
3-67
Section 3 – Functional Description
Y
Motion
Detector
U
Chroma
Mixer
Video
In
Chroma
Pass
Filter
Sum
Frame
Delay
Component
I
Norm/
Invert
Encoded
Demodulator
V Component
Q
Subcarrier
Encoded
S
Mode
A or B
Select
Mode A
Sum
Luminance
Mode B
On/Off
Key
In
Mode A
Delay
Variable
Delay
Mode B
Force
Foreground
Mask
(from Quad
Keyer)
3 Components x 5 bits
3 Components x 5 bits
External
Inputs
RGB to YUV
Converter
3 Components x 10 bits
3 Components x 10 bits
3 Components x 5 bits
3 Components x 10 bits
3 Components x 5 bits
3 Components x 5 bits
Demultiplexer 3 Components x 10 bits
3 Components x 10 bits
3 Components x 5 bits
3 Components x 10 bits
Source
Selector
Video is mixed with a matte generator output, and routed to a signal
processor circuit. At this stage, the video is in the form of the foreground
over a black background, the specified color being keyed out).
Video entering the shaped-key output circuit is un-shaped if encoded, or
passed if component. A clip and gain circuit adjusts the background hole
cutter. After adjustment, output passes to the signal processing circuit
mentioned above, and is also non-additively mixed with a shadow signal,
adjusted for width, reshaped, and then sent out of the module as the
shaped-key output.
3-68
Signal Processor Frame Description
Foreground
DC, Luma Gain,
Chroma Gain
Background
Coring Level
Suppress Chroma
Fineline
Matte
Generator
Y=200h, C=0
H/2
Subcarrier
Selectivity
Hue
Signal
Processing
Normal
Shaped Video Out
Black (background only)
YUV/Beta®/YIQ
Levels
Force Mask
On/Off
Hue
Selector
Chroma/Luma
Subtraction &
Negative Clip
Positive
NAM
Background
Luma Suppress
Luma Lower
Limit (fixed)
Width
Normal
Component
Negative
Clip
Keyer
Clip and
Gain
Positive
NAM
Width
Adjust
Unshaper Encoded
Foreground
Flare
Suppression
Shadow
Shaped
Key Out
Foreground
Only
Keyer
Component
Unshaper
Clip and
Gain
Encoded
Encoded
Component
200h
M30-002-37
Figure 3-27. Dual Chroma Keyer Option Module, Block Diagram.
The shadow signal is derived from the luminance signal, which enters a
clip and gain circuit where it is added to black and non-additively mixed
with a shadow opacity signal. Shadow clip and gain values set by the user
are used by this circuit to adjust shadow appearance.
3-69
Section 3 – Functional Description
Controller Module
The Controller module is a multipurpose assembly that performs the
following functions:
■
Individual processing and control of each M/E and its areas
■
Overall system control through a Head-of-State processor
■
Management of peripheral communications
■
Management of Control Panel-to-frame communications
Each of the above areas are interconnected by a system of distributed
processing. Refer to the block diagram in Figure 3-28, which shows the
internal architecture of the Controller module.
Processing of each Mix Effect bank's parameters and control data is
handled by a separate M/E Processor mezzanine board that contains a
25 MHz 68030 microprocessor, memory and serial communication
circuitry for data transmission in between itself and the related M/E
portion of the Control Panel.
Processor memory on each mezzanine board is provided in the form of
battery-backed SRAM, DRAM, EPROM and flash EPROM. Major
operating software runs out of the flash EPROM, which can be erased as a
whole and reprogrammed for future software versions. This feature allows
delivery of upgrades on floppy disk, without the necessity for physical
removal of PROM ICs. Battery-backed SRAM holds and protects the
current M/E's E-MEM and setup data from loss through power failure.
A multifunction IC (68901) provides interrupt control and arbitration with
the communications processors and the Head of State processor (HOS). It
also supports direct connection of a debugging terminal for diagnosis of
problems on that M/E processor.
Each M/E processor is identical, and they can be interchanged to isolate a
problem. However, since the battery providing backup power to the M/E
and HOS SRAM is located on the controller module itself, removal of a
mezzanine board causes a loss of E-MEM and setup data stored on that
module. All of the M/E processors communicate with the HOS processor
over a system of data and address buses using shared areas of SRAM to
exchange data. Each M/E processor communicates with both the Control
Panel M/E and the M/E video modules setup for that M/E (Keyer, Dual
Chroma Keyer, Mixer and Primary Wipe and crosspoints for that M/E).
The HOS processor is configured similarly to the M/E processors, also on
a mezzanine board, but electronically is different. Having it located on a
mezzanine board allows the possibility of future upgrades without having
to replace an entire controller module.
Contained on the HOS mezzanine board are a 40 MHz 68030 MPU, SRAM
and battery-backed SRAM, DRAM, EPROM and flash EPROM. Whereas
the M/E processors control M/E crosspoint and sub-panel data, the HOS
3-70
Signal Processor Frame Description
controls and remembers the program/preset bus, framestore, preview and
auxiliary bus, input and output module configurations and system status.
HOS also manages menus, floppy disk operations, and all communications
with external devices. Like the M/E processors, HOS communicates with
both the Control Panel and the video modules in the Signal Processor
Frame (Flip/Flop Mixer and Downstream Keyer, Framestore, Preview/
Sync, Effects Loop, and video input and output modules).
An area of SRAM on the controller module called “Global SRAM” provides
both the M/E processors and HOS processor with a reserved memory area
for data used by routines within the operating system.
Fault tolerance throughout the switcher is provided by the Controller
module in several ways. First, separate M/E processors prevent failure of
one from affecting another. Next, watchdog timer circuitry causes any
failing processor to reset itself, as well as notify external modules that the
processor is experiencing problems. If the HOS should fail, the M/E
processors and their associated sub-panels continue to operate separately,
but without the use of any sub-panels that are shared between M/Es
(master E-MEM, Wipe sub-panel, Mask sub-panel, Wipe Positioner,
Chroma Keyer, menus, and Framestore). However, wipe, chroma keyer
and mask settings made earlier for each M/E continue to be used, even
without HOS.
In the case of degraded operation where an M/E processor or HOS is
operating but in a improper manner, other processors can detect the error
state via data validation. Data from the processor in question will be
ignored by the system in such a case, and although automatic reset may fail
to fix the processor, all other processors continue to operate on their own.
LEDs on the controller module indicate the operational status of each
processor. A steady green LED indicates a healthy processor, whereas a
blinking green LED indicates that a processor is failing.
Communications with external devices such as Digital effects or editors,
are managed by three communications processors. These are provided on
the Controller module for managing the Control Panel to frame link, status
terminal communications, diagnostic terminal communications,
Peripheral Bus II port, editor, tally expansion, remote Aux panel
connection, and the GPI interface.
Peripheral connections are summarized in Table 3-1. For detailed
connector information, refer to Section 2: Installation.
The Signal Processor Frame's internal temperature and power supply
status is available on the internal processor bus, and is monitored by one or
more processors on the Controller module. A battery-backed clock/
calendar IC is also available on the bus to the processors.
3-71
Section 3 – Functional Description
Frame Power
Supply Voltages
Status
Terminal
(via Control
Panel)
A/D
Convertor
68HC11
Processor
Auto Switch
EPROM
Diagnostics
Terminal
Control
Panel
Monitor
Processor
Frame
Temperature
Sensor
EEPROM
EPROM
Flash
EEPROM
SRAM
EPROM
Flash
EEPROM
SRAM
EPROM
Flash
EEPROM
SRAM
Clock/
Calendar
Peripheral
Processor
(68302)
Modem
Editor
Tally
Expansion
Remote
Aux
Panels
Peripheral
Processor
(68302)
GPI
DPM 1
DPM 2
Peripheral
Processor
(68302)
Peripheral
Bus II
Expanded
Communications
Mezzanine
M30-002-38
M/E 1 CPU
3-72
M/E 2 CPU
M/E 3 CPU
Signal Processor Frame Description
SRAM
Multi
Function
EPROM
68030
40 MHz
Flash
EEPROM
Global
SRAM
DRAM
Address and
Data Busses
M/E 1
CPU
Mezzanine
68HC11
Communications
Controller
Flip/Flop
Mix Video
Head of State
(HOS) Processor
Mezzanine
Multi
Function
EPROM
M/E 2
CPU
Mezzanine
68HC11
Communications
Controller
M/E 3
CPU
Mezzanine
68HC11
Communications
Controller
Dual Port
RAM
EPROM
Future Development
Flash
EEPROM
Dual Port
RAM
SRAM
DRAM
EPROM
Debug
Terminal
SRAM
DRAM
EPROM
Dual Port
RAM
Debug
Terminal
Flash
EEPROM
M/E 1
Video
Modules
68030
25 MHz
Multi
Function
Debug
Terminal
SRAM
DRAM
EPROM
M/E 2
Video
Modules
Flash
EEPROM
68030
25 MHz
EPROM
Multi
Function
68030
25 MHz
Debug
Terminal
M/E 3
Video
Modules
Figure 3-28. Controller Module, Block Diagram
3-73
Section 3 – Functional Description
Table 3-1. Peripheral Communications Connections.
Port
3-74
Connector Type
Description
Panel
DB-25
The serial link between the Signal Processor and Control
Panel. Contains five separate full duplex serial paths; one for
each M/E one for the status terminal and one for the Control
Panel CPU. It also delivers a beginning-of-field sync signal to
the panel.
Diagnostic Term
DB-25
Serial RS-232 port for running Signal Processor Frame
diagnostics. This port is disabled when the modem port is in
use.
Modem
DB-25
Serial RS-232 port for connection of an external modem. This
modem can be used for running external diagnostics or
allowing remote fault analysis by the Grass Valley Group
Customer Service department. While the attached modem
has a connection established with a remote mode the
diagnostic terminal port is disabled.
Editor
DB-9
Serial RS-422 port for connection of an Editor. Full switcher
status and control protocols are available from this port. See
the Protocols manual for comprehensive information on this
port.
Tally
DB-9
Serial RS-422 port for future Tally expansion. This port is not
currently supported.
Remote Aux Bus
DB-9
Serial RS-422 port for connection of a remote Aux Bus
Control Panel. This panel can control Aux buses 5 through 10
which are video-only buses.
GPI
Terminal Block
Terminal connections for 8 GPI relay outputs and 8 GPI DC
voltage inputs. Refer to Section 2: Installation for details on
GPI wiring.
A1 & A2 (DPM)
DB-9
Serial RS-422 ports for connection of external digital effects
devices.
A3
(Peripheral Bus II)
DB-9
Serial RS-422 port for connecting up to 24 Peripheral Bus II
slave devices.
Aux 2
DB-9
For future expansion.
Control Panel Description
Control Panel Description
The Model 3000 has two Control Panels available. The smaller size of the
Model 3000-2 panel is achieved through greater use of shared subpanels
that are delegated to the M/Es. The Model 3000-3 is more appropriate for
live operation by having independent panel functions, separate Key buses,
and more inputs available.
Control Panel Components
The following figures show the major Control Panel components and rear
panel connections for the Control Panel and a block diagram of the
switcher.
The Control Panels consist of metal tubs with hinged top plates that
contain knobs and switch assemblies. Gas shock absorbers on the lower
tubs limit the speed of opening and closing the tubs; preventing the lid
from closing too fast and slamming against the tub rim. Circuit modules
and other components are located in the Control Panel tubs.
Rear panel connections contain power connections for either 110/220 VAC.
NOTE: Power supplies are discussed later in this section.
M odel 3000- 2
Control Panel components include the following:
■
Control panel CPU module: handles communications with the
frame, floppy disk and flat display, and responds to PuP
communications.
■
One power supply: provides +5Vdc and +14Vdc power to the
Control Panel tub and top plate assemblies. A redundant Power
Supply option is available for the Control Panel. Power supplies are
hidden under a cover inside the tub, which protects the operator
from hazardous voltage. Power ON/OFF and fuse access are
accessible via a cutout in the power supply cover.
■
Standard system has AC source power input with EMI filter,
replaceable fuse and power switch: provides power to the internal
power supplies. Optional redundant power supply has duplicate
AC source power input, filter, fuse, and switch.
■
Rear Panel I/O Connector Assembly: contains the external
connectors for the frame, status terminal and pointing device, and
also an internal ribbon cable interconnect for the CPU module. Two
LEDs show power status (+5Vdc and +14Vdc).
■
Gas Shock: provides lift mechanism for the Control Panel lid.
Top plate components include the following:
3-75
Section 3 – Functional Description
3-76
■
Upper Control Panel PuP (peripheral utility processor) circuit
module: monitors and controls actions on the Upper Right Switch
module, Soft Button Switch module, and Upper Left Switch
module. It also controls the display of all lamps on the upper panel.
■
Lower Control Panel PuP circuit module: monitors and controls
actions on the Lower Right Switch module, Lower Center Switch
module, and Lower Left Switch module. It also controls the display
of all indicator LEDs and lamps on the lower panel.
■
Lower Left Switch Assembly: contains the crosspoint and preview/
Aux Bus pushbutton switches.
■
Lower Right Switch Assembly: contains the pushbutton switches,
shaft encoders and knobs, indicators and lever arm for the Mattes
sub-panel, Chroma Keyers sub-panel, Bus Delegate switches and
Master Effects Memory sub-panel.
■
Lower Center Switch Assembly: contains pushbutton switches,
shaft encoders and knobs, indicators and lever arms for the DSK
sub-panel, Keyers sub-panels, Transition sub-panels, Preview-only
switches and Aux 1-4 Effects Send-only switches.
■
Upper Left Switch Assembly: contains pushbutton switches, shaft
encoders and knobs for the External Interfaces sub-panel,
Framestore sub-panel and Menu buttons area.
■
Soft Button Switch Assembly: contains pushbutton switches for the
nine menu selection buttons located under the flat panel display.
■
Upper Right Switch Assembly: contains pushbutton switches,
shaft encoders and knobs, and indicators for the Masks and Wipe
sub-panels. Also present are four shaft encoders and knobs for the
soft knobs located next to the flat panel display.
■
Positioner Assembly: contains the positioner joystick.
■
3.5" Floppy Disk Drive: contains a 3.5" floppy disk drive mounted
in a metal support bracket. The drive is connected directly to the
Control Panel CPU module.
■
Flat Panel Display: 512 by 256 pixel electroluminescent display
connected directly to the Control Panel CPU module.
Control Panel Description
Lower Left
Switch Board
(068950)
Lower Center
Switch Board
(068951)
Lower Control
Panel PuP
(068954)
Lower Right
Switch Board
(068952)
Positioner
Joystick
(073890)
Upper Left
Switch Board
(068955)
M30-002-39
Soft Button
Switch Board
(068957)
3.5"
Floppy
Disk Drive
(EA2362)
Upper Control
Panel PuP
(068959)
Upper Right
Switch Board
(068958)
Power Supply
(Standard)
Power Supply
(Redundant)
Power
ON/OFF
Switch
Fuse
Control Panel
Power Supply
Cover
Optional
Redundant
Power Switch
& Fuse
Control Panel
CPU Board
(068960)
Figure 3-29. Model 3000-2 Control Panel Components.
002-40
Frame
DB-25
Connector
(J1)
Bitpad/Mouse
DB-25
Connector
(J2)
Status Terminal
DB-25
Connector
(J3)
Exhaust
Fan
AC Input
AC Input
Power
Power
Connector Connector
(Redundant) (Standard)
Figure 3-30. Model 3000-2 Control Panel, Rear View.
3-77
Section 3 – Functional Description
M odel 3000- 3
The Upper Control Panel components include the following items:
3-78
■
Control panel CPU module: handles communications with the
frame, floppy disk drive and flat display, responds to Upper and
Lower PuP communications, and coordinates diagnostic activity
and software loading.
■
Upper Left Switch Assembly: contains pushbutton switches, shaft
encoders and knobs for the External Interfaces sub-panel,
Framestore sub-panel and Menu buttons area.
■
Upper Right Switch Assembly: contains pushbutton switches,
shaft encoders and knobs, and indicators for the Masks and Wipe
sub-panels. Also present are four shaft encoders and knobs for the
soft knobs located next to the flat panel display.
■
3.5" Floppy Disk Drive: contains a 3.5" floppy disk drive mounted
in a metal support bracket. The drive is connected directly to the
Control Panel CPU module.
■
Flat Panel Display: 512 by 256 pixel electroluminescent display
connected directly to the Control Panel CPU module.
■
Soft Button Switch Assembly: contains pushbutton switches for the
nine menu selection buttons located under the flat panel display.
■
Upper Control Panel PuP (peripheral utility processor) circuit
module: monitors and controls actions on the Upper Right Switch
module, Soft Button Switch module, Upper Left Switch module,
and Aux Bus Switch module. It also controls the display of all lamps
on the upper panel.
■
Aux Bus Switch Modules: a total of three (3) modules that contain
pushbuttons associated with the Aux buses.
■
Upper Distribution Module: routes signals from external devices to
various modules in the Upper Panel; also, provides power
distribution and fusing for the Upper Panel.
Control Panel Description
The Lower Control Panel components include the following items:
■
One Power Supply: provides +5V dc and +14V dc power to the
Control Panel tubs. A redundant Power supply option is available
for the Control Panel. Power ON/OFF and fuse access are
accessible on the front of the power supply cover. Power Supplies
(Standard and Redundant) are identical and physically
interchangeable.
■
Mix Effects Modules: each of the three (3) Mix Effects groups
operate independently from each other. Within each group is found
the following:
■
■
Mix Effect Processor Module: coordinates all pushbutton, lamp,
lever arm, and knob activity with its group, and communicates
directly with the Signal Processor Frame.
■
Eight and Sixteen Input Switch Modules.
■
Either Left or Right Lever Arm modules.
Program Preset Modules consist of the following modules:
■
Flip Flop Mix PuP Module: coordinates all pushbutton, lamp,
lever arm, and knob activity with its group, and communicates
with the CPU module located in the Upper Control Panel tub.
■
Eight and Sixteen Input Switch Modules.
■
Either Left or Right Lever Arm modules.
■
E-MEM Switch Module
■
FF Mix/DSK Switch Module
■
Lower Control Panel Distribution Module: Provides power
distribution and fusing to modules in the Lower Control Panel,
routes communications between upper and lower Control Panel,
and provides load sharing between the standard and redundant
Power Supplies.
■
Gas Shock: provides lift mechanism for the lower Control Panel lid.
3-79
Section 3 – Functional Description
Jumper Board
16 Input
Main Panel Swtich Board
(068989)
(068970)
FF Mix
PuP Board
(068977)
Control Panel
M/E Processor
(068976)
FF Mix/DSK
Swtich Board
(068974)
0347-02-21
8 Input
Switch Board
(068971)
Typical
4 places.
E-MEM
Switch
(068975)
M/E3 Right
Lever Swtich
(068972)
M/E2 Left
Lever Swtich
(068973)
M/E1 Right
Lever Switch
(068972)
Positioner
Joystick
(073890)
Power
ON/OFF
Switch
Fuse
Primary
Power Supply
Optional
Redundant
Power Supply
Distribution
Board
(068986)
Figure 3-31. Model 3000-3 Lower Control Panel Components.
3-80
Control Panel Description
Upper Panel
Distribution Board
(068987)
0347-02-24
Control Panel
CPU
(068985)
Jumper Board
(068990)
Aux Delegate
Switch Board
(068984)
8 Input
Bus Switch
Aux Board
(068983)
16 Input Aux
Switch Board
(068982)
Upper Left
Floppy
Disk Drive Switch Board
(068978)
Flat Panel
Display
Soft Button
Switch Board
(068979)
Upper
PuP Board
(068981)
Upper Right
Switch Board
(068980)
Figure 3-32. Model 3000-3 Upper Control Panel Components.
Pointing Device
DB-25
Connector
(J104)
Frame Communication
DB-25
Connector
(J105)
0347-04-
Status Terminal
DB-25
Connector
(J103)
Rear of
Upper Panel Tub
J101
J102
AC Input
Power
Connector
(Redundant)
INTERCONNECT
J1
J2
AC Input
Power
Connector
(Standard)
Rear of
Lower Panel Tub
J1
J2
Figure 3-33. Model 3000-3 Control Panel, RearView.
3-81
Section 3 – Functional Description
Control Panel Functional Operation
The following pages discuss the functions of the circuits in the Model 3000
Control Panels.
M odel 3000- 2
Communication between the frame and the Control Panel is over a single
cable containing five sets of serial lines as follows:
■
M/E 1 data link (serial port) transfers data to and from M/E 1
communications processor in the signal frame. The Control Panel
CPU module reads and writes data to the 38K baud asynchronous
RS-422 port. The Control Panel CPU communicates the status of all
PuPs, switches, knobs and lever arms to the M/E 1 processor on the
Controller module.
■
M/E 2 data link performs exactly the same functions as M/E 1 but
for M/E 2.
■
F/F Mix data link is a serial port that transfers Flip/Flop Mix/DSK
data to and from the frame via a peripheral processor on the
Controller module. The Control Panel CPU module reads and
writes data to this synchronous 1.2M baud RS-422 port. The Control
Panel CPU reads the status of the upper and lower PuP modules to
transfer switch, knob, lever arm status, flat panel display and 3.5"
disk data to a peripheral processor.
■
Status Terminal port is a serial RS-422 port that transfers data
between the frame and a VT-100-compatible status terminal. The
terminal data lines are looped through an internal switch in the tub
and on to the Signal Processor frame.
Processing of operator controls on the Control Panel is handled by two
Peripheral Utility Processors (PuPs). One PuP monitors the upper Control
Panel area and another monitors the lower panel.
The flat panel display is driven by a graphics controller/driver circuit on
the Control Panel CPU module. Both text and bitmap graphic data are
directed by the CPU to the controller for the actual work of pixel
addressing, refresh and manipulation. A PuP is not used with the flat
panel, the controller communicates directly with the CPU.
Another device that communicates directly with the CPU, is the 3.5" floppy
disk controller circuit. Parallel data words are sent to and from the drive
controller, which formats the data and handles all read/write drive control
operations (head stepping, track/sector seek, etcetera).
The 68000 (series) MPU on the Control Panel Central Processor module has
its own EPROM, RAM and support logic. Firmware contained in EPROM
supplies the instruction for event scheduling, real-time operation, file
management (3.5" disk) and device control.
3-82
M30-002-04
Control Panel Description
External
Connections
RS-422
M/E 1 Data Link
To Frame
Async Serial
Interface
RS-422
M/E 2 Data Link
To Frame
Async Serial
Interface
Dual Port
RAM
Upper Control
Panel PuP
Lamps, LEDs,
Sync Serial
Interface
Dual Port
RAM
Lower Control
Panel PUP
Lever Arms,
Buttons,
Lamps, LEDs,
and Displays
Async Serial
Interface
Graphics
Controller
RS-422
F/F Mix Data Link
To Frame
Control Panel
CPU Board
Buttons,
and Displays
Status Terminal
Link To Frame
Status Terminal
Connector on
Control Panel
RS-232
Bitpad or
Mouse
Diagnostic
Switch
Flat Panel Display
Async Serial
Interface
Floppy Disk
Controller
3.5" Floppy Disk
Control
Panel
Processor
AC Line Input
(Standard)
Control Panel
Power Supply
(Standard)
and/or
AC Line Input
(Redundant)
Control Panel
Power Supply
(Redundant)
Power
Distribution
Board
Control Panel
DC power
(+5Vdc/+14Vdc)
Figure 3-34. Model 3000-2 Control Panel Functional Operation, Block Diagram
3-83
Section 3 – Functional Description
M odel 3000- 3
Communication between the frame and the Control Panel is over a single
cable containing five sets of serial lines as follows:
■
M/E 1 data link (serial port) transfers data to and from M/E 1
communications processor in the signal frame. The Control Panel
Mix Effect processor module reads and writes data to the 38K baud
asynchronous RS-422 port. The Control Panel M/E processor
communicates the status of all switches, knobs and lever arms
within its M/E group to the Mix Effect Processor in the Signal
Processor Frame.
■
M/E 2 data link performs exactly the same functions as M/E 1 but
for M/E 2.
■
M/E 3 data link performs exactly the same functions as M/E 1 but
for M/E 3.
■
F/F Mix data link is a serial port that transfers Flip/Flop mix/DSK
data to and from the frame via a peripheral processor on the
Controller module. The Control Panel CPU module reads and
writes data to this synchronous 1.2M baud RS-422 port. The Control
Panel CPU reads the status of the upper and lower PuP modules to
transfer switch, knob, lever arm status, flat panel display and 3.5"
disk data to a peripheral processor.
■
Status Terminal port is a serial RS-422 port that transfers data
between the frame and a VT-100-compatible status terminal. The
terminal data lines are looped through an internal switch on the
CPU module located in the Upper Panel tub, and on to the Signal
Processor frame.
Processing of operator controls, other than the Mix Effects group, on the
Control Panel is handled by two Peripheral Utility Processors (PuPs). One
PuP monitors the upper Control Panel area and another monitors the lower
panel.
The flat panel display is driven by a graphics controller/driver circuit on
the Control Panel CPU module. Both text and bitmap graphic data are
directed by the CPU to the controller for the actual work of pixel
addressing, refresh and manipulation. A PuP is not used with the flat
panel, the controller communicates directly with the CPU.
Another device that communicates directly with the CPU, is the 3.5" floppy
disk controller circuit. Parallel data words are sent to and from the drive
controller, which formats the data and handles all read/write drive control
operations (head stepping, track/sector seek, etcetera).
3-84
Control Panel Description
Status Terminal
Link To Frame
Status Terminal
Connector on
Control Panel
RS-232
Bitpad or
Mouse
Control Panel
CPU Board
Async Serial
Interface
Dual Port
RAM
Model 3000-3
Upper Control Panel
Upper Control
Panel PuP
M30-002-05
External
Connections
Buttons,
Lamps, LEDs,
and Displays
Async Serial
Interface
Graphics
Controller
RS-422
F/F Mix Data Link
To Frame
Flat Panel Display
Sync Serial
Interface
Floppy Disk
Controller
3.5" Floppy Disk
Dual Port
RAM
Control
Panel
Processor
Upper Panel
Distribution
Module
DC Power from
Lower Panel
(+5Vdc/+14Vdc)
FF Mix
PuP
Lever Arms,
Buttons,
Lamps, LEDs,
and Displays
RS-422
M/E 1 Data Link
To Frame
M/E 1
Processor
Lever Arms,
Buttons,
Lamps, LEDs,
and Displays
RS-422
M/E 2 Data Link
To Frame
M/E 2
Processor
RS-422
M/E3 Data Link
To Frame
M/E 3
Processor
AC Line Input
(Standard)
Lever Arms,
Buttons,
Lamps, LEDs,
and Displays
Lever Arms,
Buttons,
Lamps, LEDs,
and Displays
Control Panel
Power Supply
(Standard)
and/or
AC Line Input
(Redundant)
Control Panel
Power Supply
(Redundant)
Model 3000-3
Lower Control Panel
DC Power to
Upper Panel
(+5Vdc/+14Vdc)
Lower Panel
DC power
(+5Vdc/+14Vdc)
Power
Distribution
Board
Figure 3-35. Model 3000-3 Control Panel Functional Operation, Block Diagram
3-85
Section 3 – Functional Description
Peripheral Utility Processor Functional Operation
The PuPs are used to handle low-level scanning of operator pushbutton
switches, shaft encoders (rotation sensing devices), and lever arms. PuPs
also drive the lamps inside the pushbutton switches and control segmented
LED displays and status indicator LEDs.
Each PuP has a microprocessor/controller (68HC11) supported by DRAM,
and EPROM memory. Buttons, knobs and lamps/LEDs are controlled
using memory mapped I/O. Lever arm status is monitored by the lower
PuP via serial peripheral registers that are read by its processor.
The PuP communicates data to the Control Panel CPU (68000 series) via
dual-port RAM over buffered data and address buses.
Diagnostics for troubleshooting the PuP are built into the firmware. A
diagnostics terminal can be connected to the PuP by a making a switch
selection via a Control Panel tub switch that reroutes the external status
terminal port to an RS-232 asynchronous serial port on the PuP.
(Lower Panel
PuP Only)
Buttons, Knobs
and Lamps
LEDs and
Displays
Analog to
Digital
Converter
Buffered
Microprocessor
Bus
Memory
Mapped
Registers
Async
Serial
Port
68HC11
MPU
RS-232
Interface
To Dual Port
RAM on M/E
(or Control
Panel Central
Processor)
To Diagnostic
Switch on
the Control
Panel CPU
Module
Peripheral Microprocessor
(PuP)
Figure 3-36. Peripheral Utility Processor (PuP), Block Diagram.
3-86
M30-002-06
Lever Arm
Power Supply Description
Power Supply Description
Power to the Control Panel and Signal Processing Frame is supplied by
separate power supplies.
Cont rol Panel
In a non-redundant configuration, the Control Panel contains one power
supply that converts 110 VAC or 220 VAC (auto-ranging) to the internal
DC voltages required.
In the optional redundant configuration, an additional power supply is
housed in the Control Panel tub that converts 110 VAC or 220 VAC (autoranging) to the internal DC voltages required.
Signal Processing Frame
The standard Frame power supply is contained in a single 19-inch rackmounted chassis installed below the Signal Processor Frame. It is
configured for 220 VAC.
An optional redundant Frame power supply is also available to supply
backup power in case the primary frame supply should fail. In the
redundant configuration, the two supplies are current-sharing, so no
switch over is required in the event that one should fail.
The standard and optional redundant power supplies are both 19 inch rack
mounted chassis that are 12.5 inches high and 20 inches deep. Each chassis
is slide mounted for ease of installation. Internal fans in the power supply
chassis provide cooling.
Frame power supply status can be checked by viewing LED indicators on
the front of the chassis (a secondary set of LEDs is mounted in the rear of
the chassis behind the left hand perforated cover). Power Supply status is
monitored by a readback latch on the Controller module and can be read
by the operator from a status screen on the flat panel display.
Frame power supply connections are located on the rear of the frame.
To summarize a fully redundant configuration, the switcher has two 19inch power supply chassis instead of one. Additionally, the Control Panel
has two sets of power supplies internally in the tub, instead of one.
3-87
Section 3 – Functional Description
Signal Processor Frame Assembly
The Signal Processor frame is a 19-inch rack unit, housing three bays for the
installation of circuit modules. Connecting the three bays is a single
backplane. Video output circuit modules reside in the top bay; input
modules are installed in the bottom bay. RF shielding is provided on the
input and output module Interconnect Adapters by a series of flexible
metal “fingers” along their edges that isolate each module from the
adjacent one. The middle bay contains control and video processing
modules.
All modules can be accessed via a hinged service door at the front of the
Signal Processing frame. The door has a small circular hole at mid-height
to allow an operator to press the controller reset switch inside. Each of the
three bays in the frame hold up to 17 modules. I/O to external devices is
made via interconnects installed at the rear of the frame. An interconnect
module accompanies each input and output module. Control and
communications cabling enters the frame via groups of connectors on the
Communications Panel at the rear. One connector plate contains the
standard connections, and one optional plate, called the “Expanded
Communications Option”, offers additional expansion capability.
Air cooling to the entire Signal Processor Frame is provided by an integral
blower mounted at the top of the frame. Air is drawn up through air inlets
at the bottom and sides of the frame, cleansed through air filters , and then
pulled up through the bays and exhausted through vents at the top of the
frame.
3-88
4
Maintenance
Introduction
This section provides maintenance and safety information for servicing the
Model 3000 Signal Processor Frame, Control Panel, and Power Supplies.
Refer to the Diagnostics and Troubleshooting section for procedures to be
used to isolate and resolve specific problems.
NOTE: Torx-head screws are used in the manufacture of many mechanical
components on this equipment. You should have a set of Torx-head screwdrivers
(including sizes T-10 through T-30) available before attempting any mechanical
disassembly and reassembly operations.
Servicing Precautions
CAUTION
Do not operate the signal processor frame with its doors open for an extended
period of time. Failure to observe this precaution may result in overheating of
components.
P ower ing D ow n
Most maintenance operations on the Model 3000 switching system
recommend that you to turn equipment power off before making repairs to
or removing circuit modules and assemblies.
4-1
Section 4 – Maintenance
WARNING
Unless specifically directed to do otherwise by a maintenance procedure,
turn power off before removing or repairing any circuit module or assembly
in this system.
Before working on any power supply assembly, turn off the power and
disconnect the power cord from the AC power source.
NOTE: When power to the signal processor frame is turned off, all data stored in
volatile Dynamic Random Access Memory (DRAM) is lost. E-MEM data will be
retained since it is stored in battery-backed Static Random Access Memory
(SRAM), which can retain data for several years without power.
Removing any of the mezzanine boards from the Controller module will result in
complete data loss from the battery-backed SRAM on the mezzanine board
removed. This occurs because the batteries supplying power to the mezzanine
board are located on the main Controller circuit module and not on the mezzanine
board.
R em oving C ir c u i t M o d u l e s
All of the video processing and control processing in the system takes place
on circuit modules in the Signal Processor Frame and Control Panel. The
locations of these modules are illustrated in the appropriate portions of this
section.
CAUTION
When removing circuit modules from the frame place them on a flat static
controlled surface. Failure to follow this precaution can result in component
damage due to electrostatic discharge.
Two circuit module extenders are provided with the system. One is for use
with I/O modules (top or bottom bay). The second is for use with an M/E
module (middle bay). The extender modules allow operation of the system
while providing access to test points and adjustments that would be
inaccessible with the module seated normally.
4-2
Repairing Circuit Modules
CAUTION
If a circuit module in the Signal Processor frame is removed or reinstalled while the
power is on, it is unlikely that permanent damage will occur to the module or
system. Microprocessor messages, however, may become scrambled. This may
result in system errors and improper operation. If these problems occur, the only
sure way to restore proper operation is to turn power to the frame OFF and then
back ON again. The power-up sequence will re-synchronize the microprocessors.
R epair ing C ir c u i t M o d u l e s
Model 3000 circuit modules are not designed to be repaired in the field.
Failed modules should be replaced.
Multi-layer circuit board and surface-mount manufacturing techniques
have been used in many of the circuit modules. Specialized equipment and
training are required to properly repair these modules.
CAUTION
Do not attempt component-level field repair on these circuit modules. Use of
improper tools or equipment to repair multi-layer and surface-mount circuit
modules, could result in potentially expensive damage to your system.
Servicing Procedures
The following servicing procedures provide procedures for removal and
replacement of typical types of components and assemblies in either
model. Detailed procedures are provided only where a component or
module is unique or requires special handling, tools, or test equipment.
Repairing Power Supplies
GVG does not recommend or support field repair of Model 3000 power
supplies. Failed power supplies should be replaced.
4-3
Section 4 – Maintenance
WARNING
Remove all rings and other jewelry when you are working on equipment that
is powered up. Hazardous currents are present in the power supplies, on the
backplane, and on circuit modules. Failure to follow this precaution could
result in severe shock and other injury.
Only qualified service personnel should work on the Control Panel and
Frame power supply assemblies. Failure to observe this precaution could
result in severe shock or potentially expensive damage to your equipment.
Power Supply Conf igurat ions
The standard power supply configuration of the Model 3000 is a single
supply chassis for the Signal Processor Frame and single supply chassis for
the Control Panel. The power supply chassis are separately connected to
AC source power and each chassis supplies independent voltage/current
buses.
The Control Panel and Signal Processing Frame can each, optionally, be
configured with a second (redundant) power supply.
The redundant supply for the Signal Processing Frame is identical to the
standard supply. It is installed in the rack below and in tandem with the
first. The two supplies are configured to share the current load and the
failure of a single supply should not cause a switcher failure.
Fr am e P ower S u p p l y Re p l a c e m e n t
To replace the Frame power supply chassis, proceed as follows:
1. Turn the main power switch on the front of the supply to the OFF (Ø)
position. The five green DC output LEDs on the front panel will
extinguish. See Figure 4-1.
4-4
Frame Air Filter
0347-04-01
Frame Power Supply Replacement
Model 3000
GRASS VALLEY GROUP
Power Supply
STATUS
+5V
I
-5.2V
+13V
-13V
O
Main AC
Power Switch
DC Output
Indicator LEDs
+48V
Front Panel
Captive Screws
Figure 4-1. Frame Power Supply (Front) AC Switch Location.
4-5
Section 4 – Maintenance
2. At the rear of the equipment rack, disconnect the AC power to the
supply by unplugging the cable from the AC source.
3. Refer now to the Installation section of this manual and reverse the
installation procedure for the Primary and/or Redundant Power
Supply Frames.
Please note the following warnings:
WARNING
The power supply chassis weighs approximately 125 lbs. It should be moved
only by two or more persons or with the aid of some type of mechanical lifting
device. Failure to follow this precaution could result in injury or damage to
the equipment or personnel.
4. Place a wheeled cart or some appropriate support in front of the power
supply chassis to support it as it is removed.
WARNING
If the equipment rack is not securely bolted down to the floor, do not extend
it on its mounting rails. The weight of the power supply chassis, when
extended on the mounting rails, is enough to topple the equipment rack.
Failure to follow this precaution could result in injury or damage to the
equipment.
5. While guiding the heavy cables at the right rear through the cut-out in
the chassis, pull the chassis out on its mounting rails until they fully
extended.
6. Release the chassis from the rails by locating and pressing the two
release buttons (one on each rail).
7. Using two persons or an appropriate lifting device, remove the chassis
from the mounting rails.
4-6
Replacement of Individual Power Supply Assemblies
R eplacem ent o f I n d i v i d u a l P o w e r S u p p l y As s e mb lie s
If it is necessary to replace an individual power supply in the Signal
Processor Frame Power Supply, it is important for you to be aware of the
following information:
■
Two types of power supplies are used in the Signal Processor Frame
Power Supply for the Model 3000, 4000, and 2200 Switchers—a MultiOutput supply and a high-current +5 Volt supply.
■
Power supply units from two different manufacturers—Pioneer
Magnetics and Todd Products Corporation—have been used in the
Signal Processor Frame Power Supplies.
The units from the two manufacturers are very different in appearance, but
are electrically compatible, with the following exception:
In a redundant power system, the two +5 Volt supplies must be of the
same “make” and the two Multi-Output supplies must be of the same
make. (The +5 Volt and Multi-Output supplies, however, may be of
different makes.)
This means that if you need to replace one power supply assembly in a
redundant power system, you must either replace that supply with one
of the same make, or replace both supplies that operate in parallel.
Check to see that your replacement is compatible in a redundant system,
and, if necessary, contact Grass Valley Customer Service.
NOTE: In a non-redundant power system, if both power supply units (one MultiOutput and one +5V) in the single power supply frame are Todd supplies, the
frame can be wired to operate on 110 volts, as described in the Installation
information of this Addendum.
Conf igurat ions
Each power supply comes as a complete assembly (“sled”) that must be
replaced as a unit. As viewed from the rear of the frame, the +5 Volt supply
assembly is located in the compartment at the right side of the chassis and
the Multi-Output (+13V/–13V/–5.2V/+48V) supply is located in the
compartment at the left.
Procedures
The following procedures (one for the Multi-Output supply and one for the
+5 Volt supply) describe replacing Pioneer power supply assemblies with
Todd power supply assemblies.
4-7
Section 4 – Maintenance
For any of the other three possible replacements—replacing a Pioneer unit
with a Pioneer, replacing a Todd unit with a Todd, or replacing a Todd unit
with a Pioneer—use the following procedures as guides and perform the
appropriate steps.
R eplacem ent o f M u l t i - O u t p u t P o w e r S u p p l y As s e mb ly
NOTE: In order to replace a Pioneer Multi-Output supply with a Todd Multi-
Output supply, you will need to have the installation kit that is part of Field
Modification Note FM2025.
To replace a Pioneer Multi-Output assembly (078921-XX) with a Todd
Multi-Output assembly (078960-XX), proceed as follows:
1. On the front panel of the main Signal Processor Frame Power Supply,
turn off the main power switch. The indicator LEDs on the front panel
will go out.
If there is a Redundant Signal Processor Frame Power Supply, also turn
off its main power switch.
2. Inside the switcher Control Panel, turn off the main Control Panel
Power Supply switch and (if present) the redundant Control Panel
Power Supply switch.
3. At the rear of the equipment rack, disconnect AC power from the Signal
Processor Frame Power Supply by unplugging the cable from the AC
power source.
If there is a redundant Signal Processor Frame Power Supply, also
disconnect it from the AC power source.
WARNING
If a redundant power supply is installed, power to both supplies must be
disconnected, due to the interconnecting wiring.
Removal of Pioneer M ult i- Out put Sup p ly
1. Remove the left rear cover of the power supply frame, as viewed from
the rear, to expose the wiring connections at the rear of the MultiOutput power unit. See Figure 4-2.
If this is the upper power supply in a redundant power system, also
remove the left rear cover of the lower power supply.
2. Disconnect the two plugs that plug into the jacks at the top of the left
rear compartment.
4-8
Replacement of Multi-Output Power Supply Assembly
If this is the upper power supply in a redundant power system, also
disconnect the corresponding two plugs in the lower power supply
frame.
3. Unplug the small multiwire connector that connects to the top of the
circuit board containing the power supply indicator LEDs.
0347-0417
4. At the upper right of the compartment, on the rear of the power supply
unit, remove the terminal block cover (if present) and disconnect the
blue and brown wires from the terminal block. The green/yellow wire
may be left in place.
Disconnect
2 Connectors
from
Signal Processor
or upper
Power Supply
Disconnect
2 Connectors
from
Circuit Board
Disconnect
Blue and
Brown Wires
Figure 4-2. Removal of Pioneer Multi-Output Power Supply Assembly
5. Open the door at the front of the power supply frame.
6. Remove the two screws at the bottom that secure the Multi-Output
supply to the power supply frame.
7. Carefully slide the supply assembly forward, out of the frame, taking
care that the wiring follows freely.
4-9
Section 4 – Maintenance
Inst allat ion of Todd M ult i- Out put Sup p ly
Installation of the replacement supply is not a simple reversal of the
removal procedure. The reason for this is that the AC power connection on
the Todd supply is at the upper left corner of the unit, whereas the
connection on the Pioneer supply is at the upper right.
M ount Terminal Block
1. Before installing the new power supply unit in the frame, mount the
terminal block (provided in the Field Modification kit) on the rear of the
Todd Multi-Output power assembly, as shown in Figure 4-3. The
terminal block has four terminals, but only two will be used. Remove
and discard the four tab connectors from the terminal block, but keep
two of the screws for the next step.
Using Screws
Provided,
Mount
Terminal Block
(from Kit)
on Rear of
Power Supply
Assembly
Install Blue
Jumper Wire
Install Brown
Jumper Wire
Figure 4-3. Installation of Terminal Block and Jumpers
4-10
2405-01
2. Install the blue and brown jumper wires from the kit as shown i n
Figure 5.
Replacement of Multi-Output Power Supply Assembly
Inst all Assembly in Frame
1. To install the replacement supply in the frame, slide it into place from
the front of the frame, secure it with the two screws previously
removed, and close the front door.
2405-02
2. At the terminal block you just installed on the Todd power unit,
connect the blue and brown AC power wires you previously
disconnected from the Pioneer supply, as shown in Figure 4-3. Connect
the blue wire coming out of the frame to the terminal with the blue
jumper wire; connect the brown wire coming out of the frame to the
terminal with the brown jumper wire.
Connect
2 Connectors
to
Signal Processor
or Upper
Power Supply
Connect
Blue Wire
Connect
Brown Wire
Connect
2 Connectors
to
Circuit Board
Figure 4-4. Installation of Todd Multi-Output Power Supply Assembly
3. At the top of the circuit board containing the indicator LEDs, reconnect
the multiwire connector that you previously disconnected.
4. Reconnect the two plugs to the jacks at the top of the compartment.
If this is the upper power supply in a redundant system, connect the
corresponding plugs in the lower supply to their mates in the bottom
of this supply.
4-11
Section 4 – Maintenance
5. If this is a non-redundant power system, you may now reinstall the cover
on the rear of the frame, reconnect the power source, and apply power.
6. If this is a redundant power system:
a. You must first replace the Multi-Output power assembly in the
second Power Supply frame (if it is not a Todd supply) by repeating
the procedure given above.
b. When you have completed the installation (of both Multi-Output
supplies, if required), reconnect the power source and apply power
to both units.
c. Before you install the rear plates on the Power Supply frames, you
must adjust the output voltages for load-sharing.
NOTE: For adjustment of redundant Todd power supplies, refer to the Installation
section of this manual.
W iring Diagram
Wiring of the Todd Multi-Output Power Supply assembly is shown on
diagram D11-078960-00/10 in the optional Drawings Manual.
R eplacem ent o f + 5 V o l t P o w e r S u p p l y As s e mb l y
The following procedure describes replacing a Pioneer +5 Volt power
supply assembly with a Todd power supply assembly.
For any of the other three possible replacements—replacing a Pioneer unit
with a Pioneer, replacing a Todd unit with a Todd, or replacing a Todd unit
with a Pioneer—use the following procedure as a guide and perform the
appropriate steps.
Removal of Pioneer +5 Volt Supply
To replace a Pioneer +5 Volt assembly (078920-XX) with a Todd MultiOutput assembly (078959-XX), proceed as follows:
1. On the front panel of the main Signal Processor Frame Power Supply,
turn off the main power switch. The indicator LEDs on the front panel
will go out.
If there is a Redundant Signal Processor Frame Power Supply, also turn
off its main power switch.
4-12
Replacement of +5 Volt Power Supply Assembly
2. Inside the switcher Control Panel, turn off the main Control Panel
Power Supply switch and (if present) the redundant Control Panel
Power Supply switch.
3. At the rear of the equipment rack, disconnect AC power from the Signal
Processor Frame Power Supply by unplugging the cable from the AC
power source. If there is a redundant Signal Processor Frame Power
Supply, also disconnect it from the AC power source.
WARNING
If a redundant power supply is installed, power to both supplies must be
disconnected, due to the interconnecting wiring.
4. Remove both the right and left rear covers of the power supply frame,
as viewed from the rear, to access the wiring connections. See
Figure 4-5.
Feed Cable and
Connector through
Hole in Frame
Disconnect
Blue and
Brown Wires
0347-0419
5. Remove the nuts and lockwashers and disconnect the heavy red and
black cables from the studs. If this is the upper supply in a redundant
system, disconnect (but do not remove) both sets of cables.
Red
Disconnect
Connector from
Circuit Board
Black
Remove Nuts
and Wires
from Studs
(For Upper Supply in
Redundant
Power System
also Remove
Intermediate Studs
and Wires)
Black
Red
Figure 4-5. Removal of Pioneer +5 Volt Power Supply Assembly
4-13
Section 4 – Maintenance
6. Disconnect the small multi-wire connector from the top of the circuit
board in the left compartment of the power supply frame and feed it
back through the holes into the +5 Volt supply compartment.
7. At the right side of the compartment, on the rear of the +5 Volt supply,
remove the terminal block cover (if present) and disconnect the blue
and brown AC power wires from the terminal block. The green/yellow
wire may be left in place.
8. Open the door at the front of the power supply frame.
9. Remove the two screws at the bottom that secure the +5 Volt supply
assembly to the power supply frame.
10. Slide the supply assembly forward out of the frame, taking care that the
wiring follows freely.
Inst allat ion of Todd +5 Volt Supply
1. To install the replacement supply, slide it into place and install the front
mounting screws.
2. Feed the small multi-wire cable from the new power supply through
the hole at the top left of the +5V supply compartment (see Figure 4-6),
and on through the frame to the hole into the Multi-Output supply
compartment. If necessary, gain access from the front of the frame.
3. In the Multi-Output supply compartment, connect the connector on the
end of the multiwire cable to the mating connector at the top of the
circuit board.
4-14
Replacement of +5 Volt Power Supply Assembly
Feed Connector
and Cable
Through Hole
in Frame
0347-0420
4. In the +5 Volt supply compartment, ensure that the connector on the
other end of the multiwire cable is securely attached to the mating
connector on the circuit board.
Red
Connect
Connector to
Circuit Board
Black
Install Wires,
Washers, and Nuts
on Studs (see Text)
(For Upper Supply in
Redundant
Power System
also Install
Intermediate Wires,
Washers, and Studs)
Ensure Connector
is Securely Attached
to Circuit Board
Black
Red
Connect
Brown Wire
Connect
Blue Wire
Figure 4-6. Installation of Todd +5 Volt Power Supply Assembly
5. Connect the blue AC power wire to the left screw on the AC power
terminal block.
6. Connect the brown AC power wire to the center screw on the AC
power terminal block.
7. If this is the +5 volt supply in a non-redundant power system or the
lower +5 volt supply in a redundant power system, perform Step 8
through Step 10.
8. Connect the heavy red wire to the left stud.
9. Connect the heavy black wire to the right stud.
10. Replace the lockwashers and nuts and torque to 80 inch pounds.
4-15
Section 4 – Maintenance
WARNING
Insufficient torquing of the nuts may cause overheating of the terminals
which could result in fire. However, excessive torquing of the nuts may cause
permanent damage to the power supply.
11. If this is a non-redundant power system, you may now reinstall the cover
on the rear of the frame, reconnect the power source, and apply power.
NOTE: Refer to Figure 4-7 when performing the following step.
12. If this is the upper +5 volt supply in a redundant system:
a. Place the wiring from the signal processor frame over the power
supply studs (red to the left; black to the right), install the
lockwashers and second set of studs, and torque these studs to 80
inch pounds. See WARNING above.
b. Place the wiring to the lower supply over the second set of studs,
install the lockwashers and nuts, and torque the nuts to 80 inch
pounds.
4-16
Signal
Processor
0347-0204
Replacement of +5 Volt Power Supply Assembly
Red Cables
from Processor
Hex
Nuts
Lock
Washers
Black Cables
from Processor
If Present,
Remove
Connector
Cover Plate
From Primary
Power Supply
Primary
Power Supply
Lock Washers
Studs
If Present,
Remove Slot
Cover Plate
From Primary
Power Supply
Route Cables
Down Through
Slot in Top of
Lower Chassis
Tighten Captive
Screws to Upper
Chassis
(8 Places)
Red Cables
from Primary
Power Supply
Connector Cover Plate
Should Remain on Bottom of
Redundant Power Supply
NOTE:
Always Insert Black Cables
In Slots Before Red Cables
Black Cables
from Primary
Power Supply
Redundant
Power Supply
Lock Washers
Hex Nuts
Slot Cover Plate Should Remain on
Bottom of Redundant Power Supply
Figure 4-7. Todd Redundant Power Supply Installation Diagram
4-17
Section 4 – Maintenance
13. If this is a redundant power system:
a. You must replace the +5 Volt power assembly in the second Power
Supply frame (if it is not a Todd supply) by repeating the above
procedures.
b. When you have completed the installation (of both +5 Volt
supplies, if required), reconnect the power source and apply power
to both units.
c. Before you install the rear plates on the Power Supply frames, you
must check the output voltages for load-sharing, as described in the
Installation section of this manual.
NOTE: For adjustment of redundant Todd power supplies, refer to the Installation
section of this manual.
W iring Diagram
Wiring of the Todd +5 Volt Power Supply assembly is shown on diagram
C11-078959-00/10, which is included in the optional Drawings manual.
Redundant Power Supply Voltage Adjustments
For a switching system that has redundant power supplies, it is important
for you to adjust the output voltages of the two supplies for proper loadsharing after you have replaced one or more of the individual power
supply assemblies.
CAUTION
Power supply units from two manufacturers are currently in use—Pioneer and
Todd. In order to power-share In a redundant power system configuration, the two
+5V supplies must be of the same make, and the two Multi-Output supplies must
be of the same make. Make sure that your power supply units are compatible in a
redundant system. If necessary, contact Grass Valley Customer Service.
WARNING
Dangerous voltages are present inside the Signal Processor Frame Power
Supply. Do not perform any servicing of this equipment unless you are
qualified to do so. Remove all rings, wrist watches, etc., before working
inside the equipment.
4-18
Replacement of +5 Volt Power Supply Assembly
1. Remove the rear access panels of both power supplies if they have not
already been removed.
2. With power to the Redundant Frame Power Supply turned off, turn on
the power switch on the front of the Primary Frame Power Supply.
3. Refer to Figure 4-8 for adjustment locations on Todd power supplies.
Refer to Figure 4-8 for adjustment locations on Pioneer power supplies.
4. Record the following measurements on paper. Measure the MultiOutput supply voltages (–5.2, +13, –13, and +48 Vdc, referenced to the
COM test point) at the test points inside the left rear compartment of
the power supply frame. Measure the +5 Vdc supply voltage between
the power lugs in the right rear compartment.
0347-0234
5. Turn off the Primary Power Supply, then turn on the Redundant
Supply and measure its voltages. Compare these measured values to
those recorded in step 4.
Test Points
+5V
–5V
+13V
–13V
+48V
COM
Measure +5V
Between
These Lugs
+48V -5.2V –13V +13V
ADJ ADJ ADJ ADJ
High Current
+5V ADJ
Figure 4-8. Voltage Test Points and Adjustments on Todd Power Supplies
4-19
Section 4 – Maintenance
6. With an insulated screwdriver-type adjustment tool, adjust the
Redundant Supply voltages to within 20mV of the Primary Supply
voltages.
7. Turn off both power supplies and install the access panels on the rear
of the supplies.
0347-0421
8. Turn on both supplies for redundant operation.
Test Points
+5V
–5V
+13V
–13V
CH1
VADJ
+48V
COM
2
3
4
–5.2V ADJ
+13V ADJ
–13V ADJ
Measure +5V
Between
These Lugs
High Current
+5V ADJ
+48V ADJ
Figure 4-9. Voltage Test Points and Adjustments on Pioneer Power Supplies
4-20
Replacement of Model 3000-2 Control Panel Power Supply(s)
R eplacem ent o f M o d e l 3 0 0 0 - 2 Co n t r o l P a n e l P o w e r Su p p ly ( s )
To replace the primary or redundant Control Panel power supply proceed
as follows:
1. Open the Control Panel and turn the AC power switch(s) on the left
front of the enclosure to the OFF (Ø) position. See Figure 4-10
Power Supply
(Standard)
Power
ON/OFF
Switch
Power Supply
(Redundant)
Fuse
Optional
Redundant
Power Switch
& Fuse
Control Panel
CPU Board
Control Panel
Power Supply
Cover
Figure 4-10. Model 3000-2 Control Panel AC Power Switch Location.
2. At the rear of the Control Panel, disconnect the power cord from the AC
source.
3. Remove the enclosure covering the power supplies by removing the
screws securing it to the Control Panel tub.
4-21
Section 4 – Maintenance
NOTE: Removal of some Control Panel internal ribbon cables may ease the
removal of the power supply enclosure.
0347-04-10
4. Disconnect the AC input and DC output wiring from the supply to be
removed. See Figure 4-11
Power
Supply
Access
Cover
(secured
by 6 screws)
EMI
Filter
Control Panel
I/O Board
(068949)
Standard
Supply
Redundant
Supply
Control Panel
CPU Board
Exhaust
Fan
Power
ON/OFF
Switch
Fuse
Power
ON/OFF
Switch
(Redundant)
Fuse
(Redundant)
Figure 4-11. Model 3000-2 Control Panel Power Standard Supply Removal.
5. Remove the ten screws securing the flat mounting plate supporting the
supply(s).
6. Remove the screws securing the power supply to the flat power supply
mounting plate.
7. To reinstall or replace either of the standard power supplies, reverse
the previous steps.
4-22
Replacement of Model 3000-3 Control Panel Power Supply(s)
R eplacem ent o f M o d e l 3 0 0 0 - 3 Co n t r o l P a n e l P o w e r Su p p ly ( s )
To replace the primary or redundant Control Panel power supply proceed
as follows:
0347-04-13
1. Open the lower Control Panel tub and turn the AC power switch on the
front of each supply to the OFF (Ø) position. See Figure 4-12
Power
ON/OFF
Switch
Fuse
Optional
Redundant
Power Switch
& Fuse
Distribution
Board
(068986)
Figure 4-12. Model 3000-3 Control Panel AC Power Switch Location
2. At the rear of the lower Control Panel, disconnect the power cord(s)
from the AC source.
3. Inside the Control Panel tub, disconnect the AC input and DC output
wiring from the supply(s) to be removed.
4-23
Section 4 – Maintenance
0347-04-15
4. Remove the screws securing the power supply to the Control Panel tub.
See Figure 4-13.
Figure 4-13. Model 3000-3 Control Panel Power Supply Removal
5. To reinstall or replace either of the standard power supplies, reverse
the previous steps.
C ontr ol P ane l S e r v i c i n g
M odel 3000- 2
The Model 3000-2 Control Panel is contained in a single tub and is divided
into two main areas, referred to as the Upper Panel and the Lower Panel.
The location of the components in these two areas are illustrated in
Figure 4-14.
4-24
Control Panel Servicing
Soft Button
Switch Board
(068957)
Lower Left
Switch Board
(068950)
Lower Center
Switch Board
(068951)
Lower Control
Panel PuP
(068954)
Lower Right
Switch Board
(068952)
Positioner
Joystick
(073890)
Upper Left
Switch Board
(068955)
3.5"
Floppy
Disk Drive
(EA2362)
Upper Control
Panel PuP
(068959)
Upper Right
Switch Board
(068958)
Power Supply
(Standard)
Power Supply
(Redundant)
Power
ON/OFF
Switch
Fuse
Optional
Redundant
Power Switch
& Fuse
Control Panel
Power Supply
Cover
Control Panel
CPU Board
(068960)
Figure 4-14. Model 3000-2 Control Panel Parts Locations.
4-25
Section 4 – Maintenance
M odel 3000- 3
The Model 3000-3 Control Panel is housed in two tubs referred to as the
Upper Control Panel and Lower Control Panel. The locations of the
components in these two tubs are illustrated in Figure 4-15 and Figure 4-16.
Control Panel
CPU
(068985)
Upper Panel
Distribution Board
(068987)
0347-02-24
Jumper Board
(068990)
Aux Delegate
Switch Board
(068984)
8 Input
Bus Switch
Aux Board
(068983) 16 Input Aux
Switch Board
(068982)
Upper Left
Floppy
Disk Drive Switch Board
(068978)
Flat Panel
Display
Soft Button
Switch Board
(068979)
Figure 4-15. Model 3000-3 Upper Control Panel
4-26
Upper
PuP Board
(068981)
Upper Right
Switch Board
(068980)
Control Panel Servicing
Jumper Board
16 Input
Main Panel Swtich Board
(068989)
(068970)
FF Mix
PuP Board
(068977)
Control Panel
M/E Processor
(068976)
FF Mix/DSK
Swtich Board
(068974)
0347-02-21
8 Input
Switch Board
(068971)
Typical
4 places.
E-MEM
Switch
(068975)
M/E3 Right
Lever Swtich
(068972)
M/E2 Left
Lever Swtich
(068973)
M/E1 Right
Lever Switch
(068972)
Positioner
Joystick
(073890)
Power
ON/OFF
Switch
Fuse
Primary
Power Supply
Optional
Redundant
Power Supply
Distribution
Board
(068986)
Figure 4-16. Model 3000-3 Lower Control Panel
Cont rol Panel Circuit Board Replacem en t
The locations of Control Panel circuit boards and mezzanine boards are
illustrated in Figures 4-9, 4-10, and 4-11.
To remove a circuit board assembly from the Control Panel, proceed as
follows:
1. Turn off the AC power at the switch located inside power supply
enclosure of the Control Panel.
2. Unplug the AC line cord from the AC source. The AC line cord is
located at the rear of the Control Panel.
4-27
Section 4 – Maintenance
3. On the Model 3000-2 Control Panel remove any control knobs, lever
arm T-handles, etc., that would interfere with removal of the assembly.
NOTE: For the Model 3000-2 if the lower right switch board is to be removed, the
plug from the joystick/positioner must be unplugged from the side of the board
(under the top of the Control Panel at the rear of the positioner) before lowering the
board out of the Control Panel. It is not necessary to remove the positioner to
remove the switch board.
4.
Open the Control Panel and locate the board to be replaced.
5. Disconnect any cables or wiring that may be attached to the board
being removed.
CAUTION
Use care when removing cables or wiring to prevent the bending of connector pins
or damage to cable assemblies. Damage of this type can result in improper
operation or further damage to other circuit boards.
6. If the board to be removed has a mezzanine board mounted on it,
perform the following sub-steps. See Figure 4-17 If not proceed to step
Seven.
a. Disconnect interconnecting wiring, if any, between the main board
and mezzanine board.
b. While supporting the board, unscrew the mezzanine board from
the stand-off.
Mezzanine
Standoff
Figure 4-17. Mezzanine Board Mounting Showing Standoffs.
4-28
0347-04-34
c. Lift the mezzanine board off and place it on a flat non-static surface.
Pushbutton Lamp Replacement
CAUTION
Use caution when handling or removing circuit boards. Due to their size and weight
and because of their multiwire, and multilayer construction they may be damaged
by improper handling. When removed from their mounting circuit boards should be
placed on a flat, non conductive, and non-static surface.
7. While supporting the board, remove all retaining screws and carefully
lift the board out of the Control Panel.
8. To replace or reinstall a circuit board, reverse the steps of the previous
procedure.
P ushbutton L a mp Re p l a c e m e n t
0347-04-07
During normal operation, the buttons on the Control Panel light up to
indicate their activated state. If a lamp in any button fails to light when it
should, it should be replaced. The lamp bulb (#7382) is removed by
carefully pulling the button cap up out of the panel, then pulling the bulb
out of the button cap. See Figure 4-18
Pushbutton
Lamp
Switch
Figure 4-18. Control Panel Lamp Replacement.
4-29
Section 4 – Maintenance
A ir Filter C le a n i n g
Frame Air Filt er Cleaning
0347-04-12
The air filter at the bottom of the Signal Processor frame reduces the
accumulation of dust in the electronic circuitry. See Figure 4-19. The filter
should be checked and cleaned regularly.
Cooling Fan
Exhaust Outlets
101112
5 6 7 8 9
1 2 3 4
13 14 15 16
17
Air Inlets
Filter Insert
Figure 4-19. Frame Cooling System Vent and Filter Locations.
4-30
Air Filter Cleaning
A fan at the top of the frame draws air up through the circuit cards from
inlets at the bottom. Cooling air entering the frame, passes through the
slide-in air filter then out the vents at the top of the frame.
To clean or replace the air filter in the Signal Processor frame and proceed
as follows:
1. Refer to Figure 4-20. Release the quarter turn captive screws on the
front door of the Signal Processor frame and open the door.
2. At the bottom of the bottom of the frame card bay assembly, locate the
square air filter access hole.
0347-04-08
3. Slide the filter out of the frame to the front, by inserting a finger into the
access hole and moving the air filter far enough out to be grasped and
pulled the rest of the way out.
Bottom
of Signal
Processor
Frame
Slide-in
Air
Filter
Air Filter
Access
Hole
Figure 4-20. Signal Processor, Air Filter Removal.
4-31
Section 4 – Maintenance
CAUTION
If the system is under power, do not reinstall the filter until it is thoroughly dry.
Failure to follow this precaution could result in damage to the equipment due to
shorting caused by residual moisture.
4. Clean the filter with a vacuum cleaner and/or wash it in a warm water
and detergent solution. Rinse the filter thoroughly with fresh water,
and air dry thoroughly.
Frame Power Supply Air Filt er Cleanin g
Power Supply Filter Inserts (3)
Frame Air Filter
0347-04-09B
The frame power supply has three small air filters located in the top of the
chassis. See Figure 4-21. These filters should be inspected regularly and
cleaned as necessary. Clogged filters can cause overheating and failure of
the power supplies. To replace the frame power supply air filters proceed
as follows:
Figure 4-21. Frame Power Supply Panel Release Screws.
1. Release the two quarter turn screws on the front panel and open the
panel.
2. Grasp the filters and pull out to the front.
3. Clean the filter with a vacuum cleaner or wash it in a warm water and
detergent solution, rinsing thoroughly with fresh water. Thoroughly
air dry before reinstalling it.
4-32
Signal Processor Frame Circuit Module Replacement
S ignal P r oces s o r F r a me Ci r c u i t M o d u l e Re p l a c e me n t
The locations of the Signal Processor frame bays and circuit modules are
illustrated in Figure 4-22 and Figure 4-22. The circuit modules in the Signal
Processor frame are slide-in units that can be easily removed for servicing
or replacement.
No data is lost when power to a Signal Processor frame is turned off
because it is stored in non-volatile RAM. When the unit is turned back on
it will return to its previous state. It is, however, recommended that power
to the appropriate frame be turned off whenever any modules are to be
removed or reinstalled.
If a Signal Processor module is inadvertently removed and/or reinstalled
while the power is on, no damage occurs to the module or to the system,
but microprocessor messages may get scrambled, resulting in unexpected
operational problems. If this happens, the only sure way to restore proper
operation is to turn the Signal Processor frame off and then back on again.
The power-up sequence will resynchronize the microprocessors.
WARNING
High current capability is present in the Signal Processor frame. Remove all
rings and other jewelry when working on extended circuit modules, and use
caution when using metal tools in the vicinity of power buses.
CAUTION
Many of the circuit modules in the Signal Processor frame are sensitive to static
discharge. Failure to use proper static-control procedures while working on circuit
modules may cause data loss and/or electrical destruction of static-sensitive
devices.
Each type of input or output module (Bays A and C) has a matching type
of cable interconnect module. The interconnect module is mounted on
corresponding slot at the rear of the frame bay. It accepts the specific
interconnect cabling required by the specific type of module installed. If no
module is installed in a slot, a blank plate should be installed to seal the
frame and preserve internal cooling air flow.
If you are permanently removing a circuit module, the corresponding
interconnect module should also be removed and stored with the module
and a blank panel installed in its place to maintain proper cooling air flow.
Refer to Installation (Section 2) in this manual for instructions on removal
and installation of interconnect modules.
4-33
Section 4 – Maintenance
To remove a circuit module from the Signal Processor frame, proceed as
follows:
0347-04-32
1. To open the front door to the Signal Processor frame, release the quarter
turn captive screws by turning them counterclockwise.
Bay A:
Output Modules
& RGB Input Modules
101112
5 6 7 8 9
1 2 3 4
13 14 15 16
17
Bay B:
Control &
Video Modules
Signal
Processor
Frame
Bay C:
Input
Modules
& Tally Module
Figure 4-22. Signal Processing Frame Module Bay Locations.
2. Remove a circuit module by unlocking its top and/or bottom levers.
Pull the module straight out and away from the frame.
4-34
Signal Processor Frame Circuit Module Replacement
To reinstall a module in the Signal Processor frame, perform the following:
1. Place the module in the correct cell. See Figure 4-22. Align the module
in the guides and gently slide it in as far as it will easily travel.
Dual RGB Input
4
5
6
7
8
9
12
13
14
15
16
Flip/Flop Mixer and Downstream Keyer
Control Processor
068905
068906
12
13
14
15
16
17
16
068908
068921 Analog Input 10-bit Auto timing
068924 Digital Serial Input
068923 Digital Parallel Input
17
Tally Relay Module
M/E 2 Mixer and Primary Wipe Generator
15
Secondary Wipe Generators (Option)
068912
11
14
M/E 1 Mixer and Primary Wipe Generator
10
13
068903
9
12
Cells 1 through 16 may be filled with any combination
of the following Modules:
Bay C
17
068903
8
11
068910 or 068909 Effects Loop Crosspoints (Option) or Bypass Module
7
Framestores (Option)
6
068911
5
80 x 48 Video Crosspoint Matrix Hi Nibble
4
80 x 48 Video Crosspoint Matrix Lo Nibble
Preview and Sync/Black/Bkgd/Test Generators
068901
3
068900
M/E 3 Quad Keyer (Standard Panel only)
2
10
068900
M/E 2 Quad Keyer
068904
9
068904
8
M/E1 Quad Keyer
7
068904
6
M/E 3 Dual Chroma Keyer (Option: 3M/E Panel only)
5
068907
4
068907
3
M/E 2 Dual Chroma Keyer (Option)
11
068929 Analog Output
068930 Digital Parallel Output
068931 Digital Serial Output
2
1
10
Cells 4 through 17 may be filled with any combination
of the following Modules:
068907
Dual RGB Input
3
068907
Dual RGB Input
068907
1
M/E 1 Dual Chroma Keyer (Option)
Bay B
2
068907
Bay A
1
0347-04-11
2. Secure the module by moving the locking levers into the locked
position, thereby seating the edge connector.
Figure 4-23. Signal Processing Frame, Module Locations.
4-35
Section 4 – Maintenance
4-36
5
Diagnostics
Introduction
This section of the manual provides information to assist you in isolating
faults that may occur in the Control Panel or Signal Processing Frame. For
safety, service should only be performed by qualified personnel
The information is organized to allow for quick diagnosis and isolation of
system faults to a circuit module level. Later versions of the system
software will include software diagnostic routines to further assist you in
quickly locating and correcting faults.
WARNING
To avoid electrical shock hazard, do not open covers or access doors.
Dangerous voltages are present even with the AC power switch in the Off
position. All Servicing should be performed by qualified service personnel.
only.
CAUTION
Do not operate the Model 3000 system with the Signal Processing Frame doors or
covers open or removed for an extended period, as overheating may occur.
In order to avoid loss of data, be sure to read the Service Precautions and Removing
Circuit Modules precautions at the beginning of the Maintenance section of this
manual before performing any maintenance procedure on this system.
Multi-wire and multi-layer printed circuit manufacturing techniques have been
used in the manufacture of many of these circuit modules. Specialized equipment
and training are required to properly repair these modules. Attempting to repair
circuit modules rather than replacing them, as recommended, can result in
potentially expensive damage. that is not covered under warrantee.
5-1
Section 5 – Diagnostics
Repairing Circuit Modules
Model 3000 circuit modules are not designed to be repaired in the field.
Faulty modules should be replaced.
Multi-wire and multi-layer printed circuit manufacturing techniques have
been used in the manufacture of many of these circuit modules. Specialized
equipment and training are required to properly repair these modules.
Static Charges
Many of the integrated circuits used in this equipment may be damaged by
static discharge. Damage caused by static discharge may not show up
immediately. Instead, it may result in reduced life span of the component
which may result in earlier than expected failure of the module.
CAUTION
To avoid damage to circuitry caused by electro-static discharge, use approved anti–
static techniques (i.e. wrist straps and anti-static mat) whenever handling circuit
modules.
Recommended Test Equipment
The Model 3000 system is designed to be maintained at a circuit module
replacement level, therefore no special test equipment is required.
Required Reference Signals
In addition to the test equipment listed previously, the following signals
should be supplied or available at the Signal Processor Frame:
■
Reference Black, SC/H phased1
■
Full-field Color Bars2
■
Crosshatch
The Color Black reference signal should be supplied to the switcher and
properly phased to all sources. (Refer to NTSC Studio Timing: Principles
and Applications, published by Grass Valley Group, for more information
on phase reference of video signals).
The full-field color bars signal (full screen, top to bottom of video monitor)
is used to isolate problems in the Video Processor.
5-2
Introduction
System 3000 Service Philosophy
The service philosophy presented throughout this manual is aimed at
rapidly isolating and repairing system problems as well as educating the
reader about system level hardware architecture.
Circuit complexity, use of multi-wire and multi-layer boards, ASICs, and
hybrid circuits, further underscores the need for a “black-box” style of
fault-isolation. This is especially true in the Model 3000 system since single
components often perform multiple functions.
When performing fault isolation and repair to the module level, the focus
is on overall function plus restoration of data and signal flow instead of
component level repair information. Isolating problems in the Model 3000
system involves a systematic and logical troubleshooting process. A basic
understanding of the system architecture and operation of key components
will aid you in this process.
Power Up Diagnost ics
Future releases of Model 3000 system software will have built-in power up
diagnostic tests.
System software runs basic system hardware tests automatically when the
Model 3000 is powered up. An status report of power up test results will be
available via the Status terminal if installed. The tests provide a basic
system status check including checks the following items:
■
Flat panel display
■
Control Panel Button Lamps
■
System Control and Module Intercommunications links
Fault - Isolat ion Diagnost ics
Future releases of Model 3000 system software will have built-in fault diagnostic
software routines.
These diagnostics isolate system faults into major groups as follows:
■
Control Panel Faults
■
Control Path Faults
■
Video Path Faults
Specific diagnostic routines will then be available for each equipment
group to further isolate faults to specific modules or groups of modules.
These tests are user directed through function key and menu or via an
attached diagnostics terminal.
5-3
Section 5 – Diagnostics
Video Pat h Diagnost ics
The following tests will be available in future releases of the system software.
The video path diagnostic tests consist of two main parts.
■
Software Driven Video Path Diagnostics.
■
Manual Video Path Testing, using the (Optional) Diagnostic Probe.
The Sof t ware Driven Video Pat h Diag n o st ics
The software video path diagnostics are run by operator selection of a
menu option and selection/entry of test parameters. A menu option
that automatically tests all possible video paths through the system is
available or a specific path through suspect modules may be specified.
M anual Video Pat h Test ing
Manual testing of the video path may be performed using an (optional)
test probe module. The probe is attached between the Sync Generator/
Preview module and sequentially to connectors on various modules
along an operator selectable video path through the signal processing
modules. It samples module test points along the video path and the
video is viewed on an output monitor. This provides an indication of
the status of each module along the video path.
This manual testing along with the information in this manual, will
allow you to effectively isolate and repair video path faults.
This manual method of diagnosis, requires that the technician have a
greater degree of understanding of the system architecture and is more
subjective than the automated software driven diagnostics.
Remot e Diagnost ics
These diagnostic tests will be available in future releases of the system.
Remote diagnostics are those run by GVG from a remote site. The switcher
is connected remotely via a modem for specialized testing by GVG
Customer Service.
Using remote computer-based diagnostics, GVG can interrogate many
areas of the switcher and duplicate the state and events leading up to the
problem.
The first step in any diagnostic process is to note and record the state of the
apparent failure mode (i.e. visual signs, LEDs, error messages, etc.). This is
5-4
Introduction
important to establish a reference from which GVG Customer Service may
assist you if needed.
Always verify that certain conditions required for proper operation of the
system are present. Problems that may appear as system related are often
external to the system, or caused by some recent change in the equipment
configuration.
The following paragraphs provide a partial list of areas to check and
common problems as recorded by GVG Customer Service. Take a minute
to review these items before going further.
Manual Fault Isolation Procedures
When ever a fault is detected in the Model 3000, the use of a systematic
method to isolate the fault is recommended. This will enable you to correct
the problem or locate and replace a failed module as rapidly as possible.
The following areas bear consideration when first attempting to isolate an
unknown fault. Not all of them will apply to every situation however they
suggest several basic areas to investigate.
Checking these basic areas can aid greatly in narrowing the cause of a fault
and in the event you need to contact GVG Customer Service for assistance,
a number of basic items will have already been checked.
The following items should be considered whenever attempting to isolate
unknown faults.
Cabling and New Equipment Inst alla t io n
■
Have any cabling changes, additions, or repairs been made that
could affect proper system operation or performance?
■
Check for any loose or damaged connectors or bent pins on all
signal or communications cables.
■
Have any new pieces of equipment been installed that could
interfere with the operation of the switcher through ground faults,
A/C interference, etc?
5-5
Section 5 – Diagnostics
Sof t ware Updat es
■
When was the last software update performed? If an update was
done recently, verify that correct versions of all software
components (disk and ICs) were correctly installed according to the
installation update instructions.
■
If any ICs where installed as part of an update, verify that they were
installed correctly with no bent pins or incorrectly oriented ICs.
■
Review the Operational Supplement accompanying any recent
updates for operational changes or setup parameters that may
change how the system operates.
Ref erence Signals and Sources
■
Is Black reference stable when viewed on a vectorscope?
■
Does Black reference contain a sufficient level of sync?
■
Are sources properly timed in reference to Black (±20 µsec)?
■
Are sources within SC/H phase tolerance (±74 degrees)?
■
Are signals, where required, properly terminated?
CPU Run and Error LEDs
■
Are all Green CPU “RUN” LEDs on modules in both the Control
Panel and Signal Processing Frame illuminated and not flashing?
■
Are any of the red error LEDs on the input modules of the Signal
Processing Frame illuminated or flashing?
For specifics on CPU “RUN” and Input Module LEDs, refer to the
appropriate paragraphs on later in this section.
Power Supplies
■
Are all LEDs on the front (and behind the perforated cover at the
rear) of the Signal Processing Frame power supply illuminated?
■
Has the breaker/switch on the front of the Signal Processing Frame
power supply tripped?
■
Are all line cords connected correctly?
■
Are there any failed fuses in AC inputs or DC outputs?
For specifics on Power Supply fuses and LEDs, refer to the appropriate
paragraphs later in this section.
5-6
Introduction
Isolating Software Operating Faults
The following aids are provided to assist you in locating Software faults:
1. Check to verify that the inputs being used are really present and at
required levels of video and sync.
What to Check:
Verify that no (red) LEDs are lit on the front edge of the input
modules in the Signal Processing Frame.
2. Verify that the Monitor LED, visible through the cutout in the
Signal Processing Frame front door, is lit.
What to Check:
If the monitor LED, visible through the cutout in the front door of
the Signal Processing Frame, is out or flashing there is some kind of
control system fault. Try pressing the master reset button on the
front edge of the Control Processor module (slot 17 of the middle
bay of the frame).
3. If neither of the above corrects the problem refer to the following
sections on isolating hardware faults in the modules of the Control
Panel or Signal Processing frame.
Isolating Control Panel Faults
Future versions of the system software will contain software driven Control Panel
diagnostics and descriptions of their use will be provided in updates to this manual.
Isolating Signal Processing Frame Faults
Future versions of the system software will contain software driven Signal
Processing Frame diagnostics and descriptions of their use will be provided in
updates to this manual.
5-7
Section 5 – Diagnostics
Isolating Remote Aux Faults
The following aids are provided to assist you in locating Remote Aux
faults:
1. Check the section on Remote Aux installation, Section 2, of this
manual to verify correct usage.
2. Verify that all Remote Aux Control Panels have different addresses
set.
3. For the One Rack Unit (P/N 088901), verify that one and only one
Aux bus is programmed.
4. For the Three Rack Unit (P/N 088903), verify that at least one Aux
bus is programmed.
5. Verify that all TEST MODE switches are set to OFF.
6. Verify that the polarity of the Communications cable is correct.
Table 5-1. Remote Aux Communications Cable Polarity
Panel Connector
D Connector Pin
Factory Supplied Cable
Shield
9
Shield
– (Minus)
2 and 8
Black
+ (Plus)
3 and 7
Red
7. Information may be gathered regarding the operation of the
Remote Aux option by simultaneously pressing the M/E 1, M/E 2,
M/E 3, PGM and one of the following buttons:
Table 5-2. Remote Aux Operation Lamp Test
Button
SHIFT
5-8
Lamp Test
Button Lamp—Press button to light lamp.
20
Display Panel Software version on Source button lamps—
Binary number; LSB on left.
21
Display Panel type on Source Button Lamps—Binary number;
LSB on left. 1= 2 Rack Unit panel; 2= 3 Rack Unit panel;
3= 1 Rack Unit panel.
22
Display Panel Address on Source Button Lamps—
Binary number; LSB on left.
23
Display Bus Enable/Select DIP switch settings.
(3 Rack Unit =Lights enabled delegate button.)
24
Lamp Walk—Each lamp lights in sequence. High & Low Tally
displayed.
Section 5 – Diagnostics
Draining the Control Processor RAM
If your floppy disk drive does not respond, you need to drain the Control
Processor RAM. The Model 3000 has a single Control Processor module
located in Frame Slot A17. Follow the procedure listed below:
1. Remove the Control Processor I module located in the Switcher
Processor Frame Slot A17.
2. Remove the jumper located near the Lithium battery.
3. Wait 15 minutes for the dielectric-capacitors to discharge. Or, to
expedite the discharge process, connect the left jumper-pin to the
nearest ground. This action drains the capacitor’s charge immediately.
4. Replace the Control Processor module into the Processor Frame.
5. Press the restart button on the Control Panel module inside the tub,
and resume normal operation.
5-9
Section 5 – Diagnostics
5-10
Index
A
C
Air Filter Cleaning 4-30
Ambient Temperature 1-17
Analog Composite Input, Funct. Desc. 3-38
Analog Composite Output 1-4
Analog Input Video Specifications 1-13
Analog NTSC Composite Output, Funct. Desc.
3-58
Analog Output Characteristics 1-15
Analog Video
Connections 2-34
Signal Formats 3-6
Auto-timed Inputs 2-58
Auto-timing
Operation 2-58
Range 1-14
Aux Bus
Chop 2-72
Joystick Override 2-72
Aux Panel Installation, Remote 2-72
Auxiliary Bus Panels, Remote 1-8, 2-70
Available Options 1-3
Cable Connections 2-30
Checkout, Preliminary 2-52
Chop, Remote Aux 2-72
Chroma Key Auto Setup Option 1-6
Chroma Keyer
Funct. Desc. 3-20
Option 1-6
Option, Funct. Desc. 3-67
Circuit Module
Location, Frame 4-33
Removal 4-2
Repair 4-3
Replacement 4-26
Clean Feed, Funct. Desc. 3-25
Common Mode Hum 1-13
Composite Parallel Digital
Input, Funct. Desc. 3-41
Output Funct. Desc. 3-62
Composite Serial Digital
Input, Funct. Desc. 3-40
Output, Funct. Desc. 3-60
Configuring System Software 2-82
Connections
3000-2 Panel 2-31
3000-3 Panel 2-32
Analog Video 2-34
Cables 2-30
Digital Video 2-34
DPM-700 2-42
Editor 2-39
Frame Communications 2-37
GPI 2-38
Input Signal 2-34
Input Signals 2-34
Kaleidoscope 2-40
Krystal Digital Picture Manipulator 2-41
Output Signal 2-36
Panel 2-31
Parallel Digital 2-35
B
Black and Test Generators, Funct. Desc. 3-36
Blanking
Preview Switch Setting 2-56
Range, Vertical 2-56
Block Diagram, System 1-3
Board
Location 4-33
Removal 4-2
Repair 4-3
Replacement 4-26, 4-27
Borderline
Funct. Desc. 3-20, 3-22
Key Edge Generation 1-7
Burst Amplitude 1-13
Index-1
Index
Power 2-47
Reference Input 2-36
Serial Digital 2-34
Tally Expansion Control Cable 2-67
Tally Output Cable 2-68
Video Production Editor 2-39
Console Dimensions
Model 3000-2 Control Panel 2-6
Model 3000-3 Control Panel 2-11
Control Cable Installation, Tally Expansion 2-67
Control Panel 1-10
Components
Model 3000-2 3-75
Model 3000-3 3-78
Components, Funct. Desc. 3-75
Connections
Model 3000-2 2-31
Model 3000-3 2-32
CPU, Funct. Desc. 3-29
Faults, Isolating 5-7
Installation
Model 3000-2 2-6
Model 3000-3 2-9
Module Replacement 4-27
Power Supplies 1-9
Power Supply, Funct. Desc. 3-87
Profile 2-8
Servicing 4-24
Control Processing, Funct. Desc. 3-32
Control Section, Funct. Desc. 3-29
Controller Module, Funct. Desc. 3-70
CPU Run and Error LEDs 5-6
Crosspoint Modules, Funct. Desc. 3-42
Crosspoint Name Display Option 1-4
Crosspoint Name Displays (Model 3000-3) 2-59
D
DC Offset 1-13
Diagnostics 5-1
Fault-Isolation 5-3
Power Up 5-3
Remote 5-4
Video Path 5-4
Differential Mode Hum 1-13
Digital Input Video Specifications 1-14
Digital Video Connections 2-34
Down Stream Keyer, Funct. Desc. 3-55
DPM Logical Channel Tally 2-43
DPM-700, Connecting to 2-42
DSK, Funct. Desc. 3-55
Index-2
Dual Chroma Keyer 1-6
Option, Funct. Desc. 3-67
Dual Component RGB Input Option Module,
Funct. Desc. 3-66
Dual DSK, Funct. Desc. 3-55
E
Editor
Connections 2-39
Port, Signals 3-12
Effects and Video, Funct. Desc. 3-19
Effects Send
Funct. Desc. 3-26
Matrix 1-5
Option, Funct. Desc. 3-51
Environmental Characteristics 1-17, 2-4
Error LEDs 5-6
Extender Modules 1-9
F
Fault Isolation
Diagnostics 5-3
Procedures Diagnostics 5-5
FCC Part 68 xii
Filter Cleaning 4-30
Frame Communications Connections 2-37
Frame Faults, Isolating 5-7
Frame Power Supply 1-9
Air Filter Cleaning 4-32
Replacement 4-4
Frame Store 1-5
Funct. Desc. 3-25
Frequency Response
NTSC 1-16
PAL 1-16
G
GPI
Connections 2-38
Inputs 2-38
Outputs 2-39
Signals 3-11
Index
I
Input and Output Signals, Funct. Desc. 3-10
Input Modules 1-3, 2-24
Signals 3-10
Input Name Display Installation 2-59
Input Readout Display Option 1-4
Input RFI/EMI Strips 2-29
Input Signal Connections 2-34
Installation 2-6
Control Panel
Model 3000-2 2-6
Model 3000-3 2-9
Crosspoint Name Displays 2-59
Frame Power Supply 2-18
Mask Draw Tablet 2-80
Remote Aux Panel 2-72
Requirements 2-3
Signal Processor Frame 2-15
Troubleshooting 2-83
Interconnect Adapters 2-26
Internal Signal Distribution, Signal Formats 3-7
J
Joystick Override, Remote Aux 2-72
Matte Generation, Funct. Desc. 3-23
Maximum Video Excursion 1-13
Mix Effects Modules, Funct. Desc. 3-34
Mixer and Wipe Generator, Funct. Desc. 3-24
Model 3000-2 Control Panel, Funct. Desc. 3-82
Model 3000-3 Control Panel, Funct. Desc. 3-84
Module Locations
Control Panel 4-24
Frame 4-33
Module Replacement, Control Panel 4-27
Module Types
Input 2-24
Outputs 2-26
Module, Repair 5-2
Modules
Removing 4-2
Repairing 4-3
O
Operating Ambient Temperature Range 1-17
Output and Input Signals, Funct. Desc. 3-10
Output Modules 1-4, 2-26
Funct. Desc. 3-58
Signals 3-11
Output RFI/EMI Strips 2-29
Output Section, Funct. Desc. 3-27
Output Signal Connections 2-36
K
Kaleidoscope, Connecting to 2-40
Key Mask, Funct. Desc. 3-22
Key Source, Funct. Desc. 3-21
Keyers, Funct. Desc. 3-20
Krystal, Connecting to 2-41
L
Lamp Replacement, Pushbuttons 4-29
Linear Key Amplitude 1-13
Luminance Keys, Funct. Desc. 3-21
M
M/E Mixer, Funct. Desc. 3-52
Manual Fault Isolation Procedures 5-5
Mask Draw Tablet Installation 2-80
Mask Store 1-5
P
Panel Connections
Model 3000-2 2-31
Model 3000-3 2-32
Parallel Digital
Connections 2-35
Input Characteristics 1-14
Output 1-4
Output Characteristics 1-15
Part 68, FCC xii
Peripheral Utility
Processor, Funct. Desc. 3-86
Processors, Funct. Desc. 3-29
Personality, Setting Up 2-82
PGM/PST, Funct. Desc. 3-20, 3-55
Physical
Description 1-10
Specifications 2-3
Power
Connections 2-47
Requirements 2-4
Index-3
Index
Power Supplies 1-9
Fault Indicators 5-6
Repairing 4-3
Power Supply
Filter Cleaning 4-32
Funct. Desc. 3-87
Installation, Frame 2-18
Replacement, Frame 4-4
Replacing Control Panel 4-21
Voltage Adjustment, Redundant 2-54
Power Up Diagnostics 5-3
Powering
Down 4-1
Up 2-52
Pre-installation Procedures 2-3
Preliminary Checks 2-52
Preset Wipes, Funct. Desc. 3-25
Preview
Blanking Switch Setting 2-56
Module, Funct. Desc. 3-34
Section, Funct. Desc. 3-37
Primary Wipe, Funct. Desc. 3-52
PuP, Funct. Desc. 3-86
Pushbutton Lamp Replacement 4-29
R
Recommended Test Equipment 5-2
Redundant Power Supply Voltage Adjustments
2-54, 4-18
Reference Input Connections 2-36
Reference Signals
And Sources 5-6
Required 5-2
Remote Aux
Bus Control Panels 1-8
Chop 2-72
Joystick Override 2-72
Option 2-70
Panel Installation 2-72
Remote Diagnostics 5-4
Removing Circuit Modules 4-2
Repairing Circuit Modules 4-3, 5-2
Repairing Power Supplies 4-3
Replacement Model 3000-2 Control Panel Power
Supply(s) 4-21
Required Reference Signals 5-2
RF/EMI Strips 2-29
RGB Input Option, Funct. Desc. 3-66
Index-4
S
Safe Title/Action Area Generator 1-8
Safety Requirements 2-4
SC/H Phase 1-13
Secondary Wipe
Generator 1-7
Option Module, Funct. Desc. 3-64
Serial Digital
Connections 2-34
Input 1-3
Input Characteristics 1-14
Output 1-4
Output Characteristics 1-16
Service Philosophy 5-3
Servicing
Control Panel 4-24
Precautions 4-1
Setting Vertical Blanking Range 2-56
Setup, System 2-56
Signal Formats, Funct. Desc. 3-6
Signal Frame 1-10
Signal Processor Frame
Assembly, Funct. Desc. 3-88
Faults, Isolating 5-7
Installation 2-15
Power Supply 1-11
Power Supply, Funct. Desc. 3-87
Signal Processor Overview, Funct. Desc. 3-15
SMPTE Composite
Parallel Digital 3-6
Serial Digital 3-7
Software
Operating Faults, Isolating 5-7
Updates 5-6
Sources and Reference Signals 5-6
Status Terminal, Funct. Desc. 3-33
Sync Amplitude 1-13
Sync Generator
Funct. Desc. 3-34, 3-36
Module 2-57
Sync Timing 1-13
System
Block Diagram 1-3
Configuration, Funct. Desc. 3-2
Description 1-1
Overview, Funct. Desc. 3-3
Setup 2-56
Software Setup 2-82
Specifications 1-12
Index
T
V
Tablet Installation, Mask Draw 2-80
Tally Expansion
Chassis 1-8
Control Cable Connection 2-67
Installing Modules 2-68
Option 2-65
Switch Settings 2-69
Tally Output 2-60
Cable Installation 2-68
Connector Pinouts 2-64
Module Switch Settings 2-61
Tally, DPM 2-43
Test Equipment, Recommended 5-2
Test Generators, Funct. Desc. 3-36
Timing
Autotiming Operation 2-58
Signal Formats 3-6
Troubleshooting, Installation 2-83
Vertical Blanking, Setting Range 2-56
Video Amplitude
Color 1-13
Primary Color 1-13
Primary Inputs 1-13
Video and Effects, Funct. Desc. 3-19
Video Path Diagnostics 5-4
Video Production Editor Connections 2-39
Video System Characteristics 1-16
Analog and Digital 1-17
Analog In to Analog Out 1-16
Voltage Adjustments
Redundant Power Supply 2-54, 4-18
W
Wipe Generator and Mixer, Funct. Desc. 3-24
Wipes, Preset, Funct. Desc. 3-25
U
Unpacking 2-2
Index-5
Index
Index-6