1
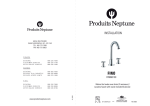
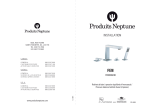
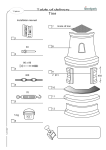
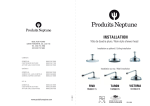
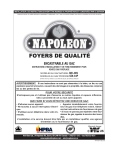
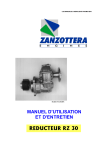
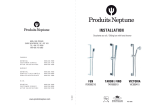
INSTALLATION
6835, RUE PICARD
SAINT-HYACINTHE, QC, J2S 1H3
TEL. 450 773 7058
FAX 450 773 5063
C ANADA
G E NE R AL
C U S TO ME R S E R V ICE
AF T E R S ALE S S E R V ICE
888 226 7099
888 226 7199
888 226 7599
VICTORIA
QUÉBEC
G É NÉ R AL
S E R V IC E À L A C L I E N T È L E
S E R V IC E A P R È S -V E N T E
VIC990460
888 366 7058
888 226 6899
888 223 1899
U .S .A .
888 226 7899
888 226 9099
888 226 9199
www.produitsneptune.com
11 / 2011
G E NE R AL
C U S T O M E R S E R V IC E
A F T E R S A L E S S E R V IC E
Valve thermostatique /
Thermostatic valve
A T 07091 1
***
REV: 0000
OPERATION
PIÈCES / PARTS
liste ci-dessous. Si certaines pièces sont manquantes, contactez votre revendeur
immédiatement.
Follow the t
res below. If any items are missing, contact your dealer at once.
P ièc e / P art
L ’ens emble du c orps princ ipal / Main body g roup
No.
Q té / Q ty
(1)
(2)
(3)
1
1
1
P oignée /
Handle
C orps principal /
Main body
ATTENTION
P laque / Plate
1.
2.
INSTALLATION
3.
2
Ø
" )
1 /4 7 c m
.
(0
/4 " )
6 1 cm
6
(1
3 3/8"
( 8.5 cm)
Ø
Ø 2 1/2"
( 6.5 cm)
1"
(2.4 cm)
1.
1 3/8"
(3.5 cm)
2 3/8"
(6 cm)
5 3/4"
(14.6 cm)
2.
3.
6"
(15.2 cm)
3 1/3"
(8 cm)
La cartouche dans le corps principal a été examinée et ajustée à l’usine.
Ne démontez pas la cartouche!
As s urez-vous de ne oyer le tuyau d’approvis ionnement d‘eau avant l’ins talla on pour
éviter le colmatage.
R accordez l’eau chaude s ur le côté gauche et l‘eau froide s ur le côté droit.
D ébit de pres s ion :
min : 0.05 MP a
max : 1.60 MP a
P res s ion recommandée :
0.1 MP a
à
0.8 MP a
L es traitements extérieurs du produit peuvent changer, et ce s ans préavis du
manufacturier.
T he cartridge in the main body has been tested and adjusted by the factory.
D o not take the cartridge apart!
E ns ure to clean the water s upply pipe before ins talla on to avoid blockage.
C onnect the hot water s upply on the
P res s ure F low:
Min: 0.05MP a
Max: 1.60MP a
R ecommended pres s ure:
0.1MP a
to
0.8MP a
INSTALLATION
L ire complètement et attentivement le manuel d‘ins tallation avant de procéder
afin d’éviter les erreurs .
P leas e read the ins tructions carefully in order to avoid ins tallation errors .
1
R accordement de valve d’arrêt
Water outlet
Jets de corps / Body jets
3
2
1
Sliding bar with hand shower
Tête de douche pluie
Rain-style shower head
Valve déviatrice
Diverter valve
E ntrée d’eau
froide/
C old water
inlet
E ntrée d’eau
chaude/
Hot water
inlet
2
R accordement de valve d’arrêt
ou / or
Valve d’arrêt
valve
4
Bec de bain
Bathtub spout
5
Après avoir ins tallé le corps principal, lire les indications de pos itionnement s ur la
hous s e de protection et confirmer le bon pos itionnement d‘ins tallation. C ontinuer
la finition du mur.
Eau chaude
Hot water
Eau froide
Cold water
Eau mixée
Mixed water
After ins talling the main body, read the pos ition indications on the protective cover
and confirm the correct ins tallation pos ition. C ontinue by finis hing the wall treatment.
*Unused water outlets of the diverter valve have to be blocked with a cap.
ouvrir l’arrivée d’eau et laisser couler le temps que l’eau chaude parvienne bien à la douche
la température de l’eau, tourner dans le sens des aiguilles d’une montre pour une eau plus froide
et dans le sens contraire des aiguilles d’une montre pour
tenir la
L e rayon du 3/4”-14NP T du raccordement ne devrait pas être moins de Ø 3/4” (1.2cm).
T he radius of the 3/4"-14NP T connection pipe s hould not be les s than Ø 3/4‘’ (1.2cm).
L ire les s chémas d‘ins tallation et confirmer le bon pos itionnement d’ins tallation.
R ead the Ins tallation figure and confirm the correct ins tallation pos ition.
O uvrir les s orties d‘eau, fermer la cartouche en céramique et valider qu’il n‘y ait pas de fuite
d’eau. O uvrir la cartouche en céramique et vérifier que le débit d‘eau coule bien. F aire la
finition du mur. E nlevez la hous s e de protection et ins tallez la plaque et la poignée.
temperature, and adjust it by turning clockwise for cooler water and counterclockwise for warmer
O pen the water s upply pipes , clos e the ceramic cartridge and verify for leaks . O pen the cartridge and verify for s mooth water flow. F inis h the wall s urface treatment. R emove the protection cover. Ins tall the plate and the handle.
Vue éclatée / Exploded view
Liste des pièces / Parts list
20 21 22 23 24 25
19
Q té
Q ty
Pièce / Part
Code
01
C orps principal / Main body
P T Y B 0413
02
Manche en plas tique / P T MP 0006
03
J oint d’étanchéité / O -ring
P T R R 0057
04
B ouchon d’éxtrémité / E nd cap
P T T B 0017
05
F iltre / Filter
P T K T 0006
1
2
1
1
2
06
Index rouge / R ed index
P T Q Q 0005
1
07
Tige d’ajus tement / Setting pin
P T B T 0034
08
Valve de s écurité / Security valve
C T Z Q 0006
1
2
2
No.
09
J oint d’étanchéité / O -ring
P T R R 0064
18
10
C ouvert / C over
P T C B 0262
17
16
11
Vis d’ajus tement / P T S B 0071
1
2
12
J oint d’étanchéité / O -ring
P T R R 0005
2
13
Vis / S crew
P T S B 0070
2
14
Cartouche / C artridge
C TAQ 0039
15
J oint d’étanchéité auto-collant / Self adhesive gasket
P T Q G 0001
16
P laque / Plate
P T C B 0063
1
1
1
17
C ouvert / C over
P T C P 0029
1
18
É crou de fixation / F as tening nut
P T NB 0045
1
19
C apuchon décoratif pour poignée / D ecorative handle cover
P T HB 0144
1
31
20
32
P oignée / Handle
Index / Index
P C HB 0009
21
4
1
22
P laque de finition / D ecorative cover
P T C B 0058
23
R es s ort / S pring
P T B T 0020
24
B outon / B utton
P T HB 0222
25
Tige d’ajus tement / S etting pin
26
Vis à tête étoile / P hilip s crew
P T MB 0231
P T S T 0069
27
R es s ort d’ajus tement / S pring s him
P T W T 0004
1
1
1
1
28
R ondelle / Was her
P T W R 1017
1
29
Vis à tête étoile / P hilip s crew
P T S T 0011
30
Hous s e de protection / protective cover
P T C P 0035
31
Index / Index
P Z F F 000300
32
Vis à tête étoile / P hilip s crew
P T S T 0042
1
1
1
2
33
Index bleu / B lue index
P T Q Q 0004
1
34
Adapteur 3/4" à 1/2" / 3/4" to 1/2" Adaptor
P T MB 0523
3
26
15
27
28
14
13
29
12
30
11
10
9
33
8
34
7
6
5
4
3
2
1
P T C P 0009
1
1