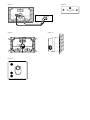
1
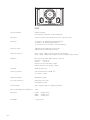
)PNF5IFBUSF
4VSSPVOE4QFBLFST
%4
0XOFST.BOVBM
&IGURE
&IGURE
&IGURE
&IGURE
CM
FT
&IGURE
&IGURE
$3
7
3ERIAL.O
"7'ROUP,TD
-ADEIN%NGLAND&ABRIQUÏEN!NGLETERRE
$3
7
3ERIAL.O
"7'ROUP,TD
-ADEIN%NGLAND&ABRIQUÏEN!NGLETERRE
&IGURE
&IGURE
&IGURE
&IGURE
&IGURE
English
Owner’s manual
Dear customer,
Thank you for choosing Bowers & Wilkins.
We are confident that you will enjoy many years of
listening pleasure from your speakers, but please read
this manual fully before installing them. It will help you
optimise their performance.
B&W maintains a network of dedicated distributors in
over 60 countries who will be able to help you should
you have any problems your dealer cannot resolve.
Environmental Information
All B&W products are designed to
comply with international directives on
the Restriction of Hazardous
Substances (RoHS) in electrical and electronic
equipment and the disposal of Waste Electrical and
Electronic Equipment (WEEE). These symbols indicate
compliance and that the products must be
appropriately recycled or processed in accordance
with these directives. Consult your local waste
disposal authority for guidance.
Unpacking (figure 1)
•
Fold the carton flaps right back and invert the
carton and contents.
•
Lift the carton clear of the contents and remove
the inner packaging from the speakers.
We suggest you retain the packing for future use.
Operation
However, they do have the advantage of making it
easier to balance the system for a larger listening area.
You may well receive conflicting advice from different
sources on the best type of surround speaker to use.
The truth is that there is no one perfect solution for all
situations and the final choice for any given application
will be influenced by several criteria, some of which
may have a degree of conflict. The DS3 has the
advantage of offering a choice of both monopole and
dipole operation via a switch located on the front
baffle, behind the removable grille. You may therefore
choose whichever type of operation best suits the
conditions of the listening room, the size of audience
and the type of programme being played. Indeed, you
may even change the characteristic for different types
of programme and, as the total energy into the room is
the same in both modes, no recalibration of the
installation is necessary when switching between them.
In monopole mode, only the two drive units on the
front face operate. In dipole mode, the front tweeter is
disconnected; the two side firing drivers are brought
into operation and the crossover frequency to the bass
unit is lowered. The side units are connected out of
phase with one another, which creates a wedgeshaped null zone at right angles to the wall. If the
listeners sit within this zone, they become less aware of
the location of the speakers and hear more reflected
sound; hence the diffuse nature of the sound field.
Positioning
Ascertain the optimum position for the speakers
before permanently fixing them in place.
In order to successfully enable both modes of
operation, the speakers should be placed so that the
listeners sit within the null zone of dipole operation.
The DS3 is specifically designed as an on-wall
surround speaker for multi-channel audio and home
theatre installations.
5.1 format (figure 2)
Surround speakers generally fall into two main types –
those that one might describe as 'normal' speakers –
so-called monopoles, where the sound comes from a
set of drive units mounted on the front of the
enclosure – and those that give a more diffuse sound
field, such as dipoles. Each type has its advantages.
6.1 and 7.1 formats (figure 3)
Most multi-channel music is recorded with home
entertainment in mind and is monitored using monopole
surround speakers, whatever the multi-channel recording
format. This enables better location of side and rear
images, although the formation of such images is never
quite as precise as it is between the front speakers.
Place the rear speakers behind the listening area
within the angle limits shown in the diagram.
Most films are originally balanced for cinemas, where a
large number of speakers spread around the
auditorium are used to create the surround sound
field. In that case there are more surround speakers
than there are discrete channels of information and a
less precise image is created that gives an allenveloping effect. Dipoles and similar diffuse speakers
are better at recreating this type of sound field in the
home, but using fewer speakers to do it. Image
positioning with these types of speaker is never as
precise as it can be with monopoles.
2
Place each of the speakers to the side and slightly
behind the centre of the listening area.
We recommend the use of 4 surround speakers, even
when using a 6.1 format.
Place the side speakers in line with the centre of the
listening area.
All formats
The surround speakers will normally be placed
approximately 60cm (2 ft) above ear height. (figure 4)
Higher positions may be used if necessary.
Although the speaker can theoretically be fitted to the
ceiling, it is not recommended unless precautions are
taken to prevent the speaker sliding off its mounting.
B&W cannot accept any responsibility should the
speaker fall from a ceiling mount. If the ceiling has a
cavity construction, the in-wall version CDS3 is a
better solution.
The speakers are handed in terms of which side the
positive and negative dipole lobes are projected.
Indication is via an arrow on the label at the back of
the speaker, which points towards the positive lobe.
(figure 5)
To optimise the smoothness of sounds panning from
the front of the room to the back and vice versa when
speakers are used in dipole mode, we recommend
that the side speakers have their positive lobes
(arrows) pointing towards the front of the room and
the rear speakers have their positive lobes (arrows)
pointing towards the centre of the rear wall. (figure 6)
Stray magnetic fields
The speaker drive units create stray magnetic fields
that extend beyond the boundaries of the cabinet. We
recommend you keep magnetically sensitive articles
(television and computer screens, computer discs,
audio and video tapes, swipe cards and the like) at
least 0.5m (20 in) from the speaker. LCD and plasma
screens are not affected by magnetic fields.
Connections (figure 7)
All connections should be made with the equipment
switched off.
Ensure the positive terminal on the speaker (marked +
and coloured red) is connected to the positive output
terminal of the amplifier and negative (marked – and
coloured black) to negative. Incorrect connection can
result in poor imaging and loss of bass.
The terminals accept 8mm (5/16 in) spades, bared
wire ends or round pins up to 5mm (3/16 in) diameter
and 4mm banana plugs.
Stick 4 of the clear self-adhesive rubber pads to the
rear panel of each speaker, one close to each of the
small bumps in the corners. These stop the speaker
vibrating against the surface and help keep it in
position. (figure 9)
Adjust the protrusion of the screws such that the
rubber pads are a friction slide on the surface when
the wall plates are hooked over the screw heads.
(figure 10)
Always check and ensure that:
• All the screws slide right to the ends of the
slots in the wall plates.
•
Screw protrusion is adjusted so that the
rubber pads provide enough friction to
prevent the speakers sliding out of position.
The cable may be routed in the grooves in the rear
panel.
Shelf mounting is not recommended as the moulded
cabinet has a draft taper and will lean forward.
Mode selection (figure 11)
Use the switch on the front baffle to select between
monopole and dipole modes. In the G position, the
speaker is monopole and in the GG position it is
dipole.
Experiment to find the settings best suited to your
requirements. Typical combinations are:
•
All surround speakers monopole
Important safety notice:
•
Side speakers dipole, rear speakers monopole
In certain countries, notably those in Europe, the use
of 4mm banana plugs is considered a potential safety
hazard, because they may be inserted into the holes
of unshuttered mains supply sockets. In order to
comply with European CENELEC safety regulations,
the 4mm holes in the ends of the terminals are
blocked by plastic pins. Do not remove the pins if you
are using the product where these conditions apply.
•
All surround speakers dipole
Always screw the terminal caps down tightly to
optimise the connection and prevent rattles.
Ask your dealer for advice when choosing cable. Keep
the total impedance below the maximum
recommended in the specification and use a low
inductance cable to avoid attenuation of the highest
frequencies.
Fixing the speaker in place
The speakers may be fixed to a wall using screws in
the range 5mm to 6mm diameter (No.10 to No.12). On
the back of the cabinet are three wall plates. The screw
head should be inserted into the round part of the
aperture and slid fully along one of the slots. (figure 8)
It would be unusual, but not impossible, to set side
speakers to monopole and rear speakers to dipole.
Aftercare
The cabinet surfaces usually only require dusting. If
you wish to use an aerosol or other cleaner, remove
the grille first by gently pulling it away from the
cabinet. Spray aerosols onto the cleaning cloth, not
directly onto the product. Test a small area first, as
some cleaning products may damage some of the
surfaces. Avoid products that are abrasive, or contain
acid, alkali or anti-bacterial agents. Do not use
cleaning agents on the drive units. The grille fabric
may be cleaned with a normal clothes brush whilst the
grille is detached from the cabinet. Avoid touching the
drive units, especially the tweeter, as damage may
result.
Limited Warranty
Ensure, especially when fixing to drywall panels,
that the screw length and wall plug security are
sufficient to hold the weight of the speaker. B&W
can accept no liability for any failure of wall or
ceiling fixings.
This product has been designed and manufactured to
the highest quality standards. However, if something
does go wrong with this product, B&W Group Ltd. and
its national distributors warrant free of charge labour
(exclusion may apply) and replacement parts in any
country served by an official B&W distributor.
Use the template provided to mark the screw
positions. The outside dimensions of the template
correspond to the rear of the cabinet.
This limited warranty is valid for a period of five years
from the date of purchase or two years for electronics
3
including amplified loudspeakers.
Terms and Conditions
1
The warranty is limited to the repair of the
equipment. Neither transportation, nor any other
costs, nor any risk for removal, transportation and
installation of products is covered by this warranty.
2
This warranty is only valid for the original owner. It
is not transferable.
3
This warranty will not be applicable in cases other
than defects in materials and/or workmanship at
the time of purchase and will not be applicable:
a. for damages caused by incorrect installation,
connection or packing,
b. for damages caused by any use other than correct
use described in the user manual, negligence,
modifications, or use of parts that are not made or
authorised by B&W,
c. for damages caused by faulty or unsuitable
ancillary equipment,
d. for damages caused by accidents, lightning, water,
fire heat, war, public disturbances or any other
cause beyond the reasonable control of B&W and
its appointed distributors,
e. for products whose serial number has been
altered, deleted, removed or made illegible,
f.
if repairs or modifications have been executed by
an unauthorised person.
4
This guarantee complements any national/regional
law obligations of dealers or national distributors
and does not affect your statutory rights as a
customer.
How to claim repairs under warranty
Should service be required, please follow the following
procedure:
1
If the equipment is being used in the country of
purchase, you should contact the B&W authorised
dealer from whom the equipment was purchased.
2
If the equipment is being used outside the country
of purchase, you should contact the B&W national
distributor in the country of residence who will
advise where the equipment can be serviced. You
can call B&W in the UK or visit our web site to get
the contact details of your local distributor.
To validate your warranty, you will need to produce the
warranty booklet completed and stamped by your
dealer on the date of purchase. Alternatively, you will
need the original sales invoice or other proof of
ownership and date of purchase.
Français
Manuel d’utilisation
Cher Client,
Nous vous remercions d’avoir choisi Bowers & Wilkins.
Nous sommes convaincus que vous apprécierez
l’écoute de vos enceintes acoustiques pendant de
nombreuses années. Nous vous invitons, cependant, à
lire très attentivement cette notice préalablement à
leur installation. Vous en tirerez les enseignements
nécessaires à l’optimisation de leurs performances.
B&W entretient un réseau de distributeurs officiels
dans plus de 60 pays ; ils sont en mesure de vous
aider au cas où vous rencontreriez des difficultés que
votre revendeur ne pourrait résoudre.
Information sur la protection de
l’environnement
Tous les produits B&W sont conçus en
conformité totale avec les nouvelles
normes internationales concernant
l’interdiction d’utilisation de certaines substances
dangereuses (RoHs, pour Restriction of Hazardous
Substances) dans les équipements électriques et
électroniques, ainsi que la possibilité de recyclage des
matériaux utilisés (WEEE, pour Waste Electrical and
Electronic Equipment). Le symbole du conteneur à
ordures barré par une croix indique la compatibilité
avec ces directives, et le fait que les appareils peuvent
être correctement recyclés ou traités dans le respect
total de ces normes.
Deballage (figure 1)
•
Repliez totalement les rabats du carton puis
retournez l’emballage avec son contenu.
•
Videz le carton de son contenu et sortez l’enceinte
de l’emballage interne.
Nous vous suggérons de conserver l’emballage pour
une utilisation ultérieure.
Fonctionnement
La DS3 est spécifiquement conçue comme enceinte
murale Surround, pour les applications audio
multicanal et les installations Home Cinema.
Les enceintes arrière Surround sont généralement de
deux types : celles que l’on peut qualifier de
“normales”, ou monopôles, dont le son est émis à
partir d’un jeu de haut-parleurs montés sur un baffle
avant traditionnel, et celles conçues pour fournir un
son plus large et plus diffus, telles les enceintes
dipôles. Chaque type a ses avantages.
La plupart de la musique multicanal est enregistrée en
gardant à l’esprit une utilisation grand public, et donc
des enceintes classiques à émission par l’avant, quel
que soit le format d'enregistrement multicanal. Cela
permet une meilleure localisation des images latérale
et arrière, la formation de telles images n'étant jamais
aussi précise que celle présente entre les enceintes
avant.
4
DS3
44
Technical Features
Nautilus™ tweeter
Woven Kevlar® brand fibre cone bass/midrange
Description
2-way closed-box selectable dipole/monopole surround system
Drive units
1x ø25mm (1 in) aluminium dome high-frequency
2x ø80mm (3 in) midrange/high frequency
1x ø130mm (5 in) woven Kevlar® cone bass/midrange
Frequency range
-6dB at 63Hz and 42kHz (monopole mode)
-6dB at 63Hz and 15kHz (dipole mode)
Frequency response
85Hz – 22kHz ±3dB on reference axis (monopole mode)
85Hz – 10kHz ±3dB power averaged over front hemisphere (dipole mode)
Dispersion
Monopole mode: within 2dB of reference response
Horizontal: over 40˚ arc
Vertical:
over 10˚ arc
Dipole mode: horizontal figure of eight
Effective null zone ±20º (250Hz – 15kHz)
Sensitivity
89dB spl (2.83V, 1m)
Harmonic distortion
2nd and 3rd harmonics (90dB, 1m)
<1% 130Hz – 20kHz
Nominal impedance
8Ω (minimum 3.3Ω)
Crossover frequencies
4kHz (monopole mode)
250Hz (dipole mode)
Power handling
25W – 100W into 8Ω on unclipped programme
Max. recommended cable impedance
0.1Ω
Dimensions
Height:
Width:
Depth:
Net Weight
5.2 kg (11.5 lb)
249mm (9.8 in)
380mm (15 in)
153mm (6 in)
***TTVF
#8(SPVQ-UE
%BMF3PBE
8PSUIJOH8FTU4VTTFY
#/#)&OHMBOE
5
'
JOGP!CXHSPVQDPN
XXXCPXFSTXJMLJOTDPN
#8(SPVQ6,4BMFT
5
&VLTBMFT!CXHSPVQDPN
#8(SPVQ/PSUI"NFSJDB
5
&NBSLFUJOH!CXHSPVQVTBDPN
#8(SPVQ"TJB-UE
5
&JOGP!CXHSPVQIL
,FWMBSJTBSFHJTUFSFEUSBEFNBSLPG%V1POU
/BVUJMVTJTBUSBEFNBSLPG#8(SPVQ-UE
$PQZSJHIUª#8(SPVQ-UE&0&
1SJOUFEJO6,