1
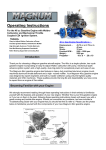
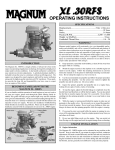
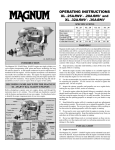
46cc GAS ENGINE SPECIFICATIONS
Displacement: ................
Bore: ...............................
Stroke: ............................
OPERATING
INSTRUCTIONS
Practical RPM: ...............
Weight: ............................
Features:
For the 46cc Gasoline Engine
with Tillotson Carburetor and
Mechanical Throttle Coupled
Ignition System
●
Easy-to-Adjust Tillotson Carburetor w/Pump
●
Includes Ignition Module, Kill Switch & Muffler
●
High-Strength Aluminum Throttle Bellcrank
●
Dual Ball Bearing Supported Crankshaft
●
Roller Bearing Supported Connecting Rod
INTRODUCTION
CAUTION - PLEASE READ!!
Thank you for choosing a Magnum gasoline aircraft engine. The 46cc is a
single cylinder, two-cycle gasoline engine incorporating an easy-to-adjust
Tillotson carburetor with pump, mechanical spark advance ignition system
and a high-quality, dual-ring piston for exceptional power and ease of use.
The Magnum 46cc gasoline engine also features a heavy-duty machined
aluminum engine mount, machined aluminum throttle bellcrank and a highvolume muffler. Your Magnum 46cc gasoline engine was designed by
expert engineers and built by master craftsmen using only the highest
quality materials and CNC machinery. These qualities provide the long life
and dependability you have come to expect from an engine of this caliber.
Magnum two-cycle gasoline model airplane engines will consistently give
you dependable performance and reliability and will be a source of
satisfaction and pleasure if you follow these instructions as to the engine’s
proper and safe use. You alone are responsible for the safe operation of
your engine, so act sensibly and with care at all times. This Magnum model
airplane engine is not a toy. It is a precision built machine whose power is
capable of causing serious injury to yourself and others if abused, misused
or if you fail to observe proper safety precautions while using it.
Keep spectators, especially small children, at least 20 feet away from the
engine while it is running.
●
Mount the engine securely in the airplane or on a suitable engine test
stand to run the engine. Follow the mounting instructions in your kit's
instruction manual or on the plans for individual mounting recommendations.
Do not clamp the engine in a vise to test-run it.
●
BECOMING FAMILIAR WITH YOUR ENGINE
We strongly recommend reading through these operating instructions in
their entirety to familiarize yourself with the features and operation of your
new engine. Whether this is your first gasoline engine or if you've run them
in the past, following these operating instructions closely will reward you
with a great running and trouble-free engine. Should you encounter any
problems, we have included a Troubleshooting Guide with your engine that
you should feel free to refer to.
Please use the photos below to familiarize yourself with the components of
your new Magnum 46cc gasoline engine.
Always use high-quality steel cap screws and washers to mount the
engine to your airplane.
●
Use the recommended size propeller and follow the proper procedure for
mounting the propeller. Use the correct size wrench to tighten the propeller
nut. Do not use pliers. Always balance your propeller before mounting it.
●
Inspect the spinner, propeller and propeller nut on a regular basis, looking
for any signs of nicks, cracks or loosening.
●
To stop the engine, adjust the throttle linkage to completely close the throttle
barrel and therefore cut off the fuel/air supply. You can also use the included
kill switch to stop the engine. Do not throw anything into the spinning propeller
or attempt to use your hands to stop the engine.
●
While the engine is running, stand behind the engine to make any
adjustments to the carburetor. Do not reach over or around the propeller. Do
not lean toward the engine. Do not wear loose clothing or allow anything to
be drawn into the spinning propeller while the engine is running.
●
If you need to carry your model while the engine is running, be conscious
of the spinning propeller. Keep the airplane pointed away from you and
others at all times.
●
Do not use tight-fitting cowls over the engine. They can restrict air from
flowing over the engine which could result in engine damage from overheating.
●
When mixing gasoline with the required amount of two-cycle oil, always
do so in a well-ventilated area.
●
To prevent unwanted RF interference, always keep any part of the radio
control system (servos, receiver, flight battery, antenna, etc) preferrable 12
inches away from the ignition module.
●
●
Always run the engine in a well-ventilated area.
Global Services 18480 Bandilier Circle Fountain Valley, CA 92708 Phone: (714) 963-0329 Fax: (714) 964-6236 Email: [email protected]
1
ENGINE INSTALLATION
Muffler Installation
The muffler is mounted to the
engine using the two steel
socket-cap screws, two split
washers and the gasket provided.
To prevent the muffler screws from
loosening during flight, apply blue
threadlock to the screws before
installing them. Also make sure
to tighten the screws firmly.
Engine Orientation
The 46cc gasoline engine utilizes a high-quality Tillotson carburetor with an
integrated fuel pump so the engine can be orientated in any position on the
firewall without the fuel-draw problems usually associated with non-pumped
engines.
Engine Bolts & Firewall Requirements
The engine utilizes a heavy-duty machined aluminum backplate engine mount
that should be mounted to the plywood firewall in your model. The firewall
in your model should be aircraft grade 5-ply plywood no less than 3/8" thick
and the firewall should be reinforced to meet the torque and weight of the
engine. Use only high-quality steel cap screws and related hardware to
mount the engine.
Should you decide to mount the engine using rubber shock mounts we
strongly suggest using high-quality mounts designed specifically for single
cylinder gasoline engines. Using the wrong type of rubber shock mounts
can lead to an erratic running engine and possible engine damage.
Ignition System Installation
The ignition module should be mounted to your model's firewall, as far away
from your airborne radio equipment as possible, and protected from
excessive heat. We recommend securing it into place using double-sided
tape or silicone glue. The ignition system includes a kill switch which should
be mounted in a convenient location on the outside of the model. For safety,
a second servo-operated kill switch (not included) can be installed so that
you can remotely shut off the ignition system.
With the spark plug installed in your engine, push the rubber boot over the
end of the spark plug until it snaps
down into place. To ground the
ignition system, secure the
grounding wire to the top of the
cylinder head using the socket-cap
screw, as shown. Now plug
together the ignition lead from the
engine and the ignition lead from
the ignition module.
To power the ignition system you will need to use a separate battery pack
that is 6.0V (5 cells) and a capacity of 1100Mah to 3000Mah. NiCD or NiMH
cells can be used. The battery should be wired to the kill switch (making
sure that the polarity is correct) and mounted inside your model, at least 12
inches away from the ignition module. For convenience, a charge jack can
be wired along with the kill switch so that you can charge the battery without
having to remove it from the model.
IMPORTANT The timing ring and the coupled spark advance system comes
preset from the factory to provide a good combination of high power output
and reliable idle. Do not readjust the timing linkages.
Throttle Pushrod Installation
To reduce the chance of RF interference, we don't recommend using a metal
pushrod wire. We suggest using a nylon tube-in-sleeve style pushrod. The
machined aluminum throttle bellcrank on the engine includes three predrilled
pushrod connection locations that are threaded for 4-40 size ball links. For
the best mechanical advantage and smoothest throttle transition, we
recommend installing your pushrod into the outermost hole in the bellcrank.
2
IMPORTANT The muffler can be installed either upright or upside down to
suit your particular installation.
Fuel System
IMPORTANT Because this is a gasoline engine, your fuel system (fuel
tank stopper assembly, fuel lines, filters, fuel valves, etc) much be designed
for use with gasoline. Do not use accessories designed for use with glow
fuel - no silicone-based materials.
The Magnum 46cc gasoline engine uses a Tillotson carburetor with an
integrated fuel pump. For this reason, the location of the fuel tank is not
critical. The pump will draw fuel into the carburetor regardless of the location
of the fuel tank. For best aircraft performance we suggest installing the fuel
tank over the models C/G so that no trim changes will be necessary as the
fuel quantity lowers in the tank.
The engine will burn approximately 1oz. - 2oz. of fuel per minute, so we
recommend using no smaller than a 24oz. fuel tank. This will result in about
15 minutes of flight time.
Optional Smoke System
A 6mm hole has been drilled, threaded and plugged in the left side of the
crankcase to drive an optional smoke system using crankcase pressure.
Propeller Installation
IMPORTANT Before installing the propeller it must be properly balanced.
Running your engine using an
out-of-balance propeller can lead
to excessive vibration, which will
result in excessive stress and
wear on both the engine and the
airframe. Balance the propeller
using the method recommended
by the propeller manufacturer.
Several products are available to
properly balance propellers. Ask
your local retailer for more information about these items.
Using a 3/8" drill bit or a prop reamer, enlarge the hole in the propeller hub to
fit the crankshaft. The diameter of the crankshaft is 3/8". Slide the
propeller onto the crankshaft, up against the flywheel. Slide the propeller
washer up against the propeller and thread the prop nut into place. Adjust
the propeller so that one blade is at the 2 o'clock position when the piston is
just below top dead center. Tighten the prop nut firmly to secure the
propeller in place. When tightening the prop nut, use a large adjustable
wrench. Do not use pliers.
WARNING If you are installing a spinner onto your engine, the cone of
the spinner must not rub against the propeller. Allowing the spinner
cone to rub against the propeller could lead to propeller damage and
eventual propeller failure.
For More Information, Please Visit Our Website at http://globalservices.globalhobby.com
PROPELLER, FUEL & SPARK PLUG
Propeller Recommendation
The diameter and pitch of the propeller needed for the 46cc gasoline engine
will vary greatly depending on the application the engine is used in. The
weight, drag and the type of model and how you intend to fly it are all factors
in determining the correct size propeller to use. Experimentation will be
necessary to find the optimal size propeller for your particular application.
Ideally you want a propeller that the engine will turn in the 6,500 - 7,500 rpm
range on the ground, yet power the airplane sufficiently. Using a propeller
that is too small will cause the engine to run at too high an rpm. Using a
propeller that is too large will cause the engine to run at too low an rpm and
cause it to lug down too much. In both instances this can lead to erratic
engine performance, premature engine wear and eventual failure.
PROPELLER SIZE RECOMMENDATIONS
Fuel Recommendation
The fuel used in your 46cc gasoline engine should be high-octane (89 or 91)
premium unleaded gasoline mixed with a high-quality synthetic two-cycle
engine oil (Honda) at a ratio of 32:1 for the first hour of run-time and a
ratio of 50:1 thereafter. We don't suggest using more oil than recommended since damage to the piston rings and piston could result. We also
don't suggest adding performance-boosting additives to your fuel. Doing
so will void your engine's warranty.
IMPORTANT Always mix your fuel in a clean container and filter it before
filling your fuel tank.
Spark Plug Recommendation
The spark plug included with your engine is designed specifically for your
engine. Factory replacements are available and can be purchased directly
from your Magnum engine dealer using part # xxxxxx. When purchasing a
new spark plug we suggest double-checking the gap using a gap gauge tool
found at auto-parts stores. The spark plug gap should be set to a gap of
.025 - .03 with the spark plug cold. The spark plug should be replaced when
signs of electrode wear are present.
CARBURETOR ADJUSTMENT SCREWS
Idle AdjustmentScrew
Although we suggest using your transmitter's idle trim lever to set the idle
speed of the engine, you can also set the idle speed of the engine using the
idle adjustment screw on the carburetor. Turning the screw clockwise will
increase the idle speed and turning the screw counterclockwise will decrease
the idle speed. The screw is set at the factory and should not require
adjustment.
If your high and low speed needle valves get too far out of adjustment,
use this information to reset them to the factory settings.
High Speed Needle Valve: Turn in until it stops and back out 1-1/2 turns.
Low Speed Needle Valve: Turn in until it stops and back out 1 turn.
STARTING PROCEDURE
The starting procedure for the 46cc gasoline engine is actually quite simple.
For ease of starting we recommend using a high-torque electric starter with
a quality 12V motorcycle battery or a car battery. The engine can be started
by hand, but only using a chicken stick. We strongly discourage it, but if you
must use your hand to start the engine, you MUST wear a heavy-duty
leather glove.
❑ Verify that the ignition kill switch is in the "off" position and fill the fuel tank
with fresh, filtered fuel.
☞ Before filling the fuel tank, gently shake your fuel container to remix the
oil and gas mixture.
❑ Set the throttle to the idle setting. The throttle must be at the idle setting
so that the timing is in the correct position for engine start-up.
❑ Pull the propeller counterclockwise through the compression stroke 4 - 6
times to prime the engine, leaving the propeller just below the top of the
compression stroke the last time you pull it through.
❑ Turn on the kill switch and start the engine using an electric starter or by
hand. If starting by hand, the engine should start within about 5 or 6 flips.
❑ Once the engine starts, maintain a fast idle for no less than 1 minute to
allow the engine to warm up.
IMPORTANT Make sure you never start the engine with the carburetor set
any higher than the idle setting. Trying to start the engine at a higher
throttle setting will result in the engine backfiring. This can quickly lead to
personal injury and/or damage to the engine.
RUNNING THE ENGINE
IMPORTANT Your 46cc gasoline engine does not require it be run on a
High Speed Needle Valve
The high speed needle valve is used to meter the air/fuel mixture at full
throttle. Turn the needle clockwise to lean the mixture or turn the needle
counterclockwise to richen the mixture. The high speed needle valve is
preset from the factory for initial starting. It will need final adjusting to suit
your atmospheric conditions, fuel, temperature, altitude, etc.
Low Speed Needle Valve
The low speed needle valve regulates the air/fuel mixture at idle and during
transition from idle to full throttle. Turn the needle clockwise to lean the mixture
or turn the needle counterclockwise to richen the mixture. The low speed needle
valve is preset from the factory for initial starting. It will need final adjusting to
suit your atmospheric conditions, fuel, temperature, altitude, etc.
test stand and be broken in. It is flight ready. Be aware though that when the
engine is new, it won't produce the rpm and power that an engine that's been
running a while will. Expect rpm's to increase as you run the engine more
and more. The engine will require about 40 - 50 hours of run-time before it
will produce its full power potential.
When you make adjustments to the carburetor, whether it's to the high or low
speed needle valves, you must shut off the engine and turn off the kill switch.
VERY IMPORTANT Be careful never to lean the engine out too much.
Remember that the lubricants for your engine are suspended in the fuel. If
you lean out the fuel mixture too much you will also be lowering the amount
of lubricant entering your engine. Less lubricant means more chance of
your engine overheating and possible engine failure.
Global Services 18480 Bandilier Circle Fountain Valley, CA 92708 Phone: (714) 963-0329 Fax: (714) 964-6236 Email: [email protected]
3
After following the starting procedure, allow the engine to idle for no less
than 1 minute to allow it to adquately warm up. After 1 minute, advance the
throttle to full. Using a tachometer, adjust the high speed needle valve for
full power, then turn the high speed needle valve counterclockwise about
1/16 of a turn to richen the mixture slightly. This is the setting at which you
should fly the airplane.
Bring the throttle back down to idle and allow the engine to idle for 30
seconds. After 30 seconds, advance the throttle to full. The engine should
transition from idle to full power smoothly and quickly. If the engine quits
suddenly, the low speed needle valve is too lean. Shut off the engine and
turn the low speed needle valve counterclockwise 1/16 of a turn to richen the
idle mixture. If the engine sputters and quits, the low speed needle valve is
too rich. Shut off the engine and turn the low speed needle valve 1/16 of a
turn clockwise to lean the mixture. Start the engine and check the transition
again. If it's still not correct, repeat this procedure until you're satisfied with
the transition.
IMPORTANT Once the carburetor settings are made, they will rarely need
to be adjusted again, unless there are major atmospheric changes or you
change fuel or change the spark plug.
WARRANTY SERVICE
All Magnum engines returned for warranty service must be within the
warranty terms as stated on the warranty card provided with your engine.
Do not return the engine to the place of purchase. They are not authorized
or equipped to perform warranty work on Magnum products. When
requesting warranty service, please observe the following guidelines:
Always send the complete engine including the carburetor, muffler and
ignition system. The engine must be removed from the model. DO NOT
send the ignition battery plugged into the ignition system.
●
Include a note detailing the problem or service you are requesting.
Service cannot be provided without this information. Include your daytime
phone number in the event we need more details pertaining to the service
requested.
●
You may request an estimate of services at the time you return your
engine for service. An omission of this request implies permission for the
Global Services to service your engine at our discretion.
●
Include a method of payment for any service charges. If not specified, the
unit will be returned to you C.O.D.
●
MAINTENANCE
Avoid running the engine under dusty conditions or where there are loose
rocks or sand.
●
●
Wipe the outside of the engine dry using a soft cloth.
●
Use a fuel filter between the fuel tank and the carburetor.
Send the engine to us by United Parcel Service, Federal Express or by
Insured Mail. Postage is not refundable. Send to:
●
Global Services
18480 Bandilier Circle ● Fountain
Valley, CA 92708
Phone (714) 963-0329 ● Fax (714) 964-6236 ● Email:
[email protected]
●
Periodically check to make sure all of the engine bolts are tight, including
the engine mounting bolts.
●
Periodically check to make sure that the timing sensor, timing ring and
ignition cables are not chaffed or otherwise damaged.
●
Periodically check the condition and gap of the spark plug, especially when
a noticeable drop in performance is seen. If the spark plug electrode is
damaged or worn, replace the spark plug.
●
Periodically check the condition of the spark plug boot and the grounding
cable. The silcone boot should be soft and pliable, and not show any signs
of cracking or other damage.
●
The timing is preset at the factory to result in the best combination of high
power output and reliable idle. We don't suggest readjusting the timing. If
you do, do so at your own risk. Damage to the enginefrom improper timing
settings will not be covered under warranty.
●
If you're planning on storing the engine for a long period of time (i.e. over
the winter) burn all the excess fuel from inside the engine by running it
without the fuel line hooked up to the carburetor. Once all the fuel is burned
from the engine, remove the spark plug and apply several drops of highquality after-run oil into the engine. Rotate the crankshaft several times to
distribute the oil, then reinstall the spark plug.
●
The Magnum 46cc gasoline engine is distributed
exclusively by Global Hobby Distributors 18480 Bandilier
Circle, Fountain Valley, CA 92708
All contents copyright © 2003, Global Hobby
Distributors Version V1.0 January 2003
4
For More Information, Please Visit Our Website at http://globalservices.globalhobby.com