1
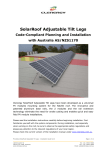
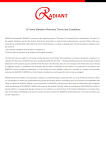
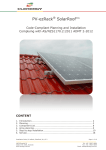
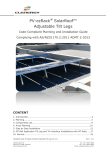
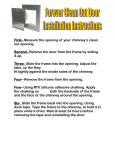
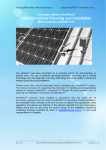
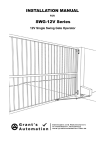
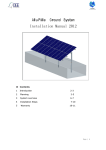
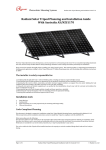
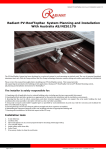
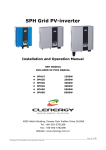
PV-ezRack® SolarTerrace III™ Planning and Installation Guide Complying with AS/NZS1170.2:2011 Contents 1 Introduction 2 2 Installation Tools & Components 3 3 Installation Guide 5 4 Service 11 18/20 Duerdin St Clayton VIC 3168, Australia www.clenergy.com.au Tel: +61 3 9017 6688 Fax: +61 3 9017 6668 Email: [email protected] 1. Introduction Clenergy PV-ezRack® SolarTerrace III™ is a pre-assembled ground mount system suitable for large scale commercial and utility scale installations. PVezRack SolarTerrace III has been developed to fit any PV module. The innovative and patented SolarTerrace III™ T-Rails simplify and improve the accuracy of the installation. Using high quality engineered components SolarTerrace III®™ saves developers and installers, time and money when delivering large scale projects. Please review this manual thoroughly before installing your SolarTerrace III™ system. This manual provides (1) supporting documentation for building permit applications relating to PV-ezRack SolarTerrace III Mounting system, and (2) planning and installation instructions for SolarTerrace III. SolarTerrace III™ parts, when installed in accordance with this guide, will be structurally adequate and will meet the AS/NZS 1170 standards. During the installation and especially when working on the roof inform yourself about the appropriate safety regulations, and please also pay attention to the relevant regulations of your local region. Please check that you are using the current version of the installation manual by contacting Clenergy Australia by email on [email protected], or your local representative. The installer is solely responsible for: Complying with all applicable local or national building codes, including any that may supersede this manual; Ensuring that PV-ezRack and other products are appropriate for the particular installation and the installation environment; Using only PV-ezRack parts and installer-supplied parts as specified by PV-ezRack (substitution of parts may void the warranty and invalidate the letter of certification on page 2); How to recycle: according to the local relative statute. How to disassemble: Reverse installation process. Ensure that there are no less than two professionals working on panel installation. Ensure the installation of relative electrical equipment is performed by professional electrician. Ensuring safe installation of all electrical aspects of the PV array. 18/20 Duerdin St Clayton VIC 3168, Australia www.clenergy.com.au Tel: +61 3 9017 6688 Fax: +61 3 9017 6668 Email: [email protected] 2. Installation Tools & Components 2.1 Installation Tools Allen Key Power Tool Adjustable Spanner String 2.2 Component List Overview of system components End Clamp Splice for T Rail Inter Clamp T-Rail Rail Clamp Assembly Support 2.3 System Components 1) End Clamp 2) Inter Clamp 3) T Rail 4) Rail Clamp 5) BackBase 6) Front Base 7) T Rail Splice 8) Truss support 18/20 Duerdin St Clayton VIC 3168, Australia www.clenergy.com.au Tel: +61 3 9017 6688 Fax: +61 3 9017 6668 Email: [email protected] 2.4 Installation Planning Clenergy PV-ezRack SolarTerrace III is compatible for panels up to 1800mm long. Design for panels 1800mm long Design for panels 1580mm long 18/20 Duerdin St Clayton VIC 3168, Australia www.clenergy.com.au Tel: +61 3 9017 6688 Fax: +61 3 9017 6668 Email: [email protected] Minimum spacing between 2 legs: L STIII Panels Up To 1.80m Wind Zone Region A Region B Region C Region D Wind Speed(m/s) 41 48 56 66 Leg Spacing(m) 3100 2800 2200 1500 Footing design: We recommend using M16 Grade 5.8 Carbon Steel anchor studs with Ramset Chemset REO502 chemical injection anchoring system. Minimum anchor embedment depth of 90mm with concrete strength of 25MPa. For concrete specifications see STIII engineering certificate. 18/20 Duerdin St Clayton VIC 3168, Australia www.clenergy.com.au Tel: +61 3 9017 6688 Fax: +61 3 9017 6668 Email: [email protected] 18/20 Duerdin St Clayton VIC 3168, Australia www.clenergy.com.au Tel: +61 3 9017 6688 Fax: +61 3 9017 6668 Email: [email protected] 3. Installation Process 3.1 Installing the single Truss Support 3.1.1 Unfold the folded Truss support then Bolt the enforcement tube to the bottom of the back leg. Fasten the bolts and nuts pre-assembled to secure the structure. 3.1.2 Connect the front and rear legs to the bolts preinstalled on the ground or screw the legs using anchor screws. 3.1.3 Make sure the other connections on the components are tighten. PV-ezRack Solar Terrace III_Planing and Installation Guide_V1.2 (Rev 1) 18/20 Duerdin St Clayton VIC 3168, Australia www.clenergy.com.au Page 7 of 11 Tel: +61 3 9017 6688 Fax: +61 3 9017 6668 Email: [email protected] 3.1.4 According to the planning, repeat the above operation. Note that the all Tri-Groove Beam must be in the same line. 3.2 Installing the T Rails 3.2.1 Before installing the T Rails, mark the position of the rails on the beam. Note: Clenergy will preassemble the bottom rail clamp when supplying the product for large projects. 3.2.2 Before installing the T Rails to the Tri-groove beam, make sure the rail is long enough, otherwise connect the T rails using T rail splice. It’s recommended to connect the rails before installing them on the Tri-groove Beam。 PV-ezRack Solar Terrace III_Planing and Installation Guide_V1.2 (Rev 1) 18/20 Duerdin St Clayton VIC 3168, Australia www.clenergy.com.au Page 8 of 11 Tel: +61 3 9017 6688 Fax: +61 3 9017 6668 Email: [email protected] 3.2.3 Install the rails according to 3.2.1. 3.2.3 Mark the panel array perimeter and attach T Rail to Trigroove Beam with one T Rail Clamp on each side. 3.2.4 Install the other rails. Note: The end of the rails must line up. PV-ezRack Solar Terrace III_Planing and Installation Guide_V1.2 (Rev 1) 18/20 Duerdin St Clayton VIC 3168, Australia www.clenergy.com.au Page 9 of 11 Tel: +61 3 9017 6688 Fax: +61 3 9017 6668 Email: [email protected] 3.3 Installating PV panels 3.3.1 Install the panels by using patented Clenergy End Clamps and Inter Clamps. Clenergy recommends 750-1000mm rail overhang at the end of the array. It can be maximum 50% of the spacing between the STIII supports. 3.3.2 Install the second row of panels making sure to leave an 18mm gap between the two rows. 3.3.3 Now the installation is completed. PV-ezRack Solar Terrace III_Planing and Installation Guide_V1.2 (Rev 1) 18/20 Duerdin St Clayton VIC 3168, Australia www.clenergy.com.au Page 10 of 11 Tel: +61 3 9017 6688 Fax: +61 3 9017 6668 Email: [email protected] 10 Years Standard Warranty Terms and Conditions 20 Year Designed Service Life Clenergy international co. Ltd warrants to the original purchaser (“Purchaser”) of product(s) that it manufactures (“Product”) at the original installation site that the Product shall be free from defects in material and workmanship for a period of ten (10) years, except for the anodised finish, which finish shall be free from visible peeling, or cracking or chalking under normal atmospheric conditions for a period of five (5) years, from the earlier of 1) the date the installation of the Product is completed, or 2) 30 days after the purchase of the Product by the original Purchaser (“Finish Warranty”). The Finish Warranty does not apply to any foreign residue deposited on the finish. All installations in corrosive atmospheric conditions are excluded. The Finish Warranty is VOID if the practices specified by AAMA 609 & 610-02 – “Cleaning and Maintenance for Architecturally Finished Aluminium” (www.aamanet.org) are not followed by Purchaser. This Warranty does not cover damage to the Product that occurs during its shipment, storage, or installation. This Warranty shall be VOID if installation of the Product is not performed in accordance with Clenergy’s written installation instructions, or if the Product has been modified, repaired, or reworked in a manner not previously authorized by Clenergy IN WRITING, or if the Product is installed in an environment for which it was not designed. Clenergy shall not be liable for consequential, contingent or incidental damages arising out of the use of the Product by Purchaser under any circumstances. If within the specified Warranty periods the Product shall be reasonably proven to be defective, then Clenergy shall repair or replace the defective Product, or any part thereof, in Clenergy’s sole discretion. Such repair or replacement shall completely satisfy and discharge all of Clenergy’s liability with respect to this limited Warranty. Under no circumstances shall Clenergy be liable for special, indirect or consequential damages arising out of or related to use by Purchaser of the Product. Manufacturers of related items, such as PV modules and flashings, may provide written warranties of their own. Clenergy’s limited Warranty covers only its Product, and not any related items. PV-ezRack Solar Terrace III_Planing and Installation Guide_V1.2 (Rev 1) 18/20 Duerdin St Clayton VIC 3168, Australia www.clenergy.com.au Page 11 of 11 Tel: +61 3 9017 6688 Fax: +61 3 9017 6668 Email: [email protected]