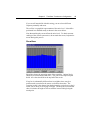
1
TouchWare for Windows User’s Guide The information in this document is subject to change without notice. No part of this document may be reproduced or transmitted in any form or by any means, electronic or mechanical, for any purpose, without the express written permission of MicroTouch Systems, Inc. MicroTouch may have patents or pending patent applications, trademarks, copyrights, or other intellectual property rights covering subject matter in this document. The furnishing of this document does not give you license to these patents, trademarks, copyrights, or other intellectual property except as expressly provided in any written license agreement from MicroTouch. The information provided in this document is intended as a guide only. For the latest detailed engineering specifications, please contact your MicroTouch Systems Application Engineer. MicroTouch Systems is committed to continually improving product designs, as a result, product specifications may be subject to change without notification. © 1997-2001 MicroTouch Systems, Inc. All rights reserved. Printed in the United States of America. Document Title: TouchWare for Windows User’s Guide Document Number: 19-224, Version 2.3 TouchWare, Version 5.6 Windows Touchscreen Driver, Version 5.6 MicroTouch, the MicroTouch logo, ClearTek, Microcal, TouchPad, TouchPen, TouchWare, TouchTek, TruePoint, and ToughTouch are either registered trademarks or trademarks of MicroTouch Systems Incorporated in the United States and/or other countries. Microsoft, MS-DOS, Windows, and Windows NT are registered trademarks of Microsoft Corporation. Contents Introduction About This Manual ........................................................................ 7 MicroTouch Support Services ....................................................... 8 MicroTouch Technical Support ............................................... 8 MicroTouch on the World Wide Web ..................................... 8 MicroTouch Worldwide Offices.................................................... 9 Chapter 1 Installing TouchWare TouchWare Overview .................................................................. 11 Touchscreen Drivers .............................................................. 12 Touchscreen Control Panel .................................................... 12 Online Help............................................................................ 12 MtsCal Calibration Utility ..................................................... 12 TouchWare Uninstall Utility.................................................. 12 Installing TouchWare................................................................... 13 Performing a Silent Install ........................................................... 14 Silent Install From Diskettes.................................................. 14 Silent Install From a CD, Hard Drive, or Network Drive...... 15 Completing the Touchscreen Setup ............................................. 16 Uninstalling TouchWare.............................................................. 16 4 TouchWare for Windows User's Guide Chapter 2 Touchscreen Control Panel Control Panel Overview ...............................................................17 Opening the Touchscreen Control Panel ......................................18 Calibrate Tab ................................................................................18 When to Calibrate the Touchscreen........................................19 Calibrating the Touchscreen ...................................................19 Testing the Calibration ...........................................................20 Touch Settings Tab .......................................................................21 Touch Modes ..........................................................................22 Right-click Tool......................................................................23 Touch Sound...........................................................................23 Double-click Speed and Area .................................................23 Cursor Tab ....................................................................................24 Cursor Visibility .....................................................................25 Cursor Vertical Offset.............................................................25 Edge Adjustment ....................................................................26 Stabilize Cursor ......................................................................26 When to Stabilize the Cursor..................................................26 Testing the Newly Selected Frequency...................................27 Pen Tab .........................................................................................28 Pen/Finger Mode.....................................................................29 Pen Only Mode .......................................................................29 Finger Only Mode...................................................................29 Stabilize Cursor for Finger and TouchPen .............................30 Test TouchPen ........................................................................30 Hardware Tab ...............................................................................30 Controller Information............................................................31 Connection..............................................................................32 About TouchWare ..................................................................33 Restore Defaults......................................................................33 Tools Tab ......................................................................................34 Touchscreen Diagnostics ........................................................34 Video Diagnostics...................................................................35 Touchscreen Linearization......................................................37 Touchscreen Options ..............................................................38 Advanced Touchscreen Settings .............................................42 Contents 5 Chapter 3 ThruGlass Touchscreen Configuration ThruGlass Overview .................................................................... 45 Setting Up a ThruGlass Touchscreen........................................... 46 Screen Type.................................................................................. 47 Sensitivity .................................................................................... 48 Diagnostics................................................................................... 48 Show Noise ............................................................................ 48 Show Base.............................................................................. 49 Show Depth............................................................................ 50 Auto Frequency...................................................................... 50 When to Adjust the Controller Frequency ................................... 51 Calibrating the ThruGlass Touchscreen....................................... 51 Testing the ThruGlass Touchscreen............................................. 51 Adjusting ThruGlass Video Resolution ....................................... 52 ThruGlass Troubleshooting ......................................................... 52 Multiple ThruGlass Touchscreens ............................................... 52 Summary of Firmware Commands .............................................. 53 Additional ThruGlass Specific Commands ........................... 54 ThruGlass Command Line Commands.................................. 54 Chapter 4 Troubleshooting the Touchscreen Troubleshooting Overview .......................................................... 57 Touchscreen Status Lights ........................................................... 58 What to do if... ............................................................................. 59 Cursor does not display on screen after starting Windows .... 59 Cursor does not reach out to edges of screen......................... 59 Cursor is jittery....................................................................... 59 Cursor jumps or bounces suddenly across screen .................. 59 Drawing lines are not straight and smooth............................. 59 Double-click on touchscreen doesn't work ............................ 60 Full screen DOS needed......................................................... 60 Operating two serial devices .................................................. 62 Touch delayed in Windows 2000 or NT 4.0.......................... 62 Touch not working................................................................. 63 Touchscreen not found........................................................... 64 Pen controller not found......................................................... 65 6 TouchWare for Windows User's Guide Error Messages .............................................................................65 Windows 2000 and NT 4.0 Error Messages ...........................65 Appendix A Multiple Serial Touchscreens Multiple Touchscreens Overview.................................................69 Checking System Requirements ...................................................70 Connecting Multiple Monitors and Touchscreens........................70 Configuring Windows for Multiple Monitors ..............................71 Installing TouchWare for Multiple Touchscreens ........................71 Calibrating and Configuring the Touchscreens ............................74 Appendix B Multiple USB Touchscreens Multiple Touchscreens Overview.................................................77 Checking System Requirements ...................................................78 Installing TouchWare ...................................................................78 Connecting Multiple Monitors and Touchscreens........................80 Configuring Windows for Multiple Monitors ..............................81 Configuring TouchWare for Multiple Touchscreens....................82 Mapping Multiple Monitors ...................................................82 Calibrating and Configuring the Touchscreens ......................83 Appendix C Miscellaneous Information Touchscreen Driver Settings.........................................................85 MtsCal Calibration Utility ............................................................86 MousePort Touchscreen Controller Overview .............................87 System Requirements for the MousePort Controller..............87 Connecting a MousePort Touchscreen Controller..................87 Testing the MousePort Controller ..........................................88 Touchscreen Care and Cleaning ...................................................88 Index Introduction The MicroTouch touchscreen is the most intuitive pointing device available for the PC series of computers and monitors. Touchscreens make using computers as simple as touching the screen. Touchscreens are ideal for a variety of applications, including entertainment, training systems, information and self-service kiosks, pointof-sale, factory automation, laboratory and medical instrumentation, interactive selling demonstrations, and educational programs. About This Manual This manual describes how to • Install TouchWare, the software for your touchscreen • Use the Touchscreen control panel to customize your work environment • Troubleshoot the touchscreen • Configure your system to support multiple touchscreens Before installing TouchWare, you must complete the appropriate hardware connections for your type of controller. For instructions, refer to the TouchWare CD booklet or your controller reference guide. 8 TouchWare for Windows User's Guide MicroTouch Support Services MicroTouch is committed to helping you get the most out of your touch product by providing extensive international Technical Support. Whenever you contact Technical Support, please provide the following: • Part number and serial number from the MicroTouch label on your monitor or touchscreen controller • Type of MicroTouch touchscreen • Version number of your MicroTouch TouchWare • Make and model of your personal computer • Name and version number of your operating system • Type of mouse connected to your system • List of other peripherals and application software in use MicroTouch Technical Support MicroTouch Technical Support is available as follows: • 24 hours a day, Monday−Friday (excluding holidays) • 9:00 a.m.−5:00 p.m., EST, Saturday−Sunday (excluding holidays) To contact Technical Support: • Hot Line: 978-659-9200 • Fax: 978-659-9400 • E-Mail: [email protected] • Web site: www.microtouch.com/services Note: MicroTouch worldwide office information is listed on the next page. MicroTouch on the World Wide Web Visit the MicroTouch Web site at www.microtouch.com to download MicroTouch touchscreen software and drivers, obtain regularly updated technical information on MicroTouch products, and learn more about our company. Introduction MicroTouch Worldwide Offices United States MicroTouch Systems, Inc. 300 Griffin Brook Park Drive Methuen, MA 01844 United States Phone: 978-659-9200 Fax: 978-659-9400 E-Mail: [email protected] Web site: www.microtouch.com/services Japan MicroTouch Systems K.K. Bellevue Mizonokuchi Building 3F 3-2-3, Hisamoto, Takatsu-ku Kawasaki-shi, Kanagawa 213, Japan Phone: +81 (44) 811-1191 Fax: +81 (44) 811-1138 E-Mail: [email protected] Web site: www.microtouch.co.jp France MicroTouch Systems SARL Europarc de Créteil 19, rue Le Corbusier 94042 Créteil Cedex France Phone: 08 00 90 61 38; +33 (1) 45 13 90 30 Fax: +33 (1) 45 13 90 34 E-mail: [email protected] Web site: www.microtouch.fr Korea MicroTouch Systems, Inc. #402, Nam-Kyung Building 769-6 Yeoksam-Dong, Kangnam-Gu Seoul, Korea Phone: +822 552 3198 Fax: +822 552-3210 Germany MicroTouch Systems GmbH Schiess-Straße 55 40549 Düsseldorf Germany Phone: +49 (0) 211-599 07-0 Fax: +49 (0) 211-599 06-55 E-mail: [email protected] Web site: www.microtouch.de Hong Kong/China MicroTouch Systems Ltd. Unit 1, 26/F, Westley Square 48 Hoi Yuen Road, Kwun Tong Kowloon, Hong Kong Phone: (852)-2333-6138 Fax: (852)-2333-6861 E-mail: [email protected] Web site: www.microtouch.com.hk Italy MicroTouch Systems Srl C.so Milano, 19 20052 Monza (MI), Italy Phone: +39 039-2302230 Fax: +39 039-2302370 E-mail: [email protected] Web site: www.microtouch.it Singapore MicroTouch Systems Singapore Pte Ltd Blk 3016 Bedok North Avenue 4 #08-23, EASTech Singapore 489947 Phone: +65-3985608 Fax: +65-4428221 E-Mail: [email protected] Web site: www.microtouch.com.au Spain MicroTouch Systems SL Via Augusta 13-15, Oficina 704 08006 Barcelona, Spain Phone: +34 93 415 6285 Fax: +34 93 415 0087 E-mail: [email protected] Web site: www.microtouch.co.uk Taiwan MicroTouch Systems, Inc. Taiwan 5F-1, No. 103, Fun Liao Street Nei Hu District, Taipei City 114 Taiwan, R.O.C. Tel: +886-2-2659-8200 Fax: +886-2-2659-8201 United Kingdom MicroTouch Systems Ltd. 163 Milton Park, Abingdon Oxon OX14 4SD, United Kingdom Phone: +44 (0) 1235-444400 Fax: +44 (0) 1235-861603 E-mail: [email protected] Web site: www.microtouch.co.uk 9 C h a p t e r 1 Installing TouchWare TouchWare for Windows is the software for your MicroTouch touchscreen. It provides full touchscreen functionality for all applications running under Microsoft Windows 2000, Windows NT 4.0, Windows 9X, and Windows Me. Once you install TouchWare, you can select, launch, and drag objects using the touchscreen. To make a selection, you simply touch the screen. It’s that easy and natural — just touch to select. TouchWare Overview Your touch product includes several software tools to help you work with and customize the touchscreen and the TouchPen. Software drivers are available for touch-based applications for use in different environments. Specifically, TouchWare includes the following programs and utilities: • Touchscreen drivers • Touchscreen control panel • Online help • MtsCal calibration utility • TouchWare Uninstall utility 12 TouchWare for Windows User's Guide Touchscreen Drivers TouchWare includes touchscreen drivers the software the system uses to communicate with the touchscreen. TouchWare for Windows includes drivers for Windows 2000, Windows NT 4.0, Windows 9X, and Windows Me. These drivers enable you to use the MicroTouch touchscreen with applications running in Windows environments. You can run Windows programs and use touch (finger or pen) input without any program modifications. Touchscreen Control Panel You can use the Touchscreen control panel to set your preferences for the touchscreen. For example, you can define the following preferences: • Whether the touch action occurs when you touch the screen or when you lift your finger (or pen) off the screen • Whether you hear a sound when you touch the screen • How fast you need to touch to produce a double-click You can also use the Touchscreen control panel to calibrate the touchscreen, stabilize the cursor, define where the cursor appears relative to your touch (an offset), and run diagnostic programs. Online Help TouchWare has online help for setting up and using the touchscreen. These help files use standard Windows Help, complete with hypertext and hypergraphics, to create and display available topics. MtsCal Calibration Utility The MtsCal calibration utility allows you to calibrate the touchscreen directly without opening the Touchscreen control panel. TouchWare Uninstall Utility The Uninstall utility automatically deletes all TouchWare components from your computer and removes all TouchWare entries from the system files. Chapter 1 Installing TouchWare 13 Installing TouchWare When you install TouchWare, you have two installation options: • Express Install • Custom Install The Express option automatically installs the required TouchWare files, creates a MicroTouch TouchWare program group, and places a MicroTouch icon on the Windows desktop and control panel. Additionally, the Custom option allows you to set the calibration style, specify the destination folder, name the program group, and configure multiple touchscreens. Note: If you have a Microsoft Intellipoint or Kensington Mouseworks PS/2 mouse, installing TouchWare will disable the special mouse functionality of these devices. To install TouchWare: 1. Make sure you have completed the appropriate hardware connections as described in the TouchWare CD booklet or your controller reference guide. The connections differ depending on your controller type. Note: If you intend use multiple touchscreens or a MousePort controller, see the appropriate appendix (A, B, or C) before installing TouchWare. 2. Power on your system. Make sure no other applications are open. 3. Insert the TouchWare CD or diskette #1 into your PC. 4. Browse to the Disk1 folder and double-click the Setup.exe file. 5. Follow the onscreen instructions to begin the installation. The system will prompt you to enter diskette #2 and #3 if necessary. 6. When prompted to choose the installation type, select whether to perform an Express Install or Custom Install. If you choose Custom Install, you’ll be prompted to choose the calibration style, enter the number of touchscreens, specify the destination folder, and name the program group. 14 TouchWare for Windows User's Guide 7. Once installation is complete, load the touchscreen driver as follows: • For serial controllers, restart the system. As the system restarts, Windows detects and loads the driver. Note: This step is not necessary for Windows 2000 systems. The driver loads automatically. • For USB controllers, connect the touchscreen cable to the USB port in your computer. After a few seconds, the system beeps to indicate it has detected the touchscreen and loaded the driver. Performing a Silent Install If you have to perform several installations, you may want to take advantage of the TouchWare silent install facility. You can run a silent install from diskettes, a CD, hard drive, or network drive. To begin, you must create a silent install script that contains the recorded install instructions. You create such a script by running the Setup program in record mode. During a silent install, the Setup program receives input from the recorded install script rather than from a user. Once you record an installation script, you can run it on as many systems as you like. Installation from diskettes takes about 2 minutes, while installation from a fast hard drive takes about 20 seconds. Successful installation is indicated by a Result Code entry equal to 0 in the Setup.log file. Note: The silent install facility does not support TouchWare upgrades or multiple monitor configurations. Silent Install From Diskettes To perform a silent install from diskettes: 1. Insert diskette #1 into your computer’s floppy drive. 2. Edit the silent.ini file to reflect the port and baud settings to be used for all silent installations. Chapter 1 Installing TouchWare 3. 15 Click Start → Run and type the following: A:\Setup -r This option enables the system to record your installation choices and create a Setup.iss file in the Windows directory containing the script. 4. Perform the installation for recording. 5. Copy the Setup.iss file to each of the three TouchWare install diskettes and then delete the file from the Windows directory. 6. Reinsert diskette #1, click Start → Run and invoke the silent install facility by typing the following: A:\Setup -s The system prompts you to enter diskette #2 and #3 when required. If necessary, you’ll have to remove diskette #3 before the system restarts. Silent Install From a CD, Hard Drive, or Network Drive To perform a silent install from a CD or other drive: 1. Create a temporary directory on your computer’s hard drive. 2. From the temporary directory, copy each of the three TouchWare directories into its own subdirectory called disk1, disk2, and disk3 respectively. 3. Edit the silent.ini file in the disk1 directory to reflect the port and baud settings to be used for all silent installations. 4. Click Start → Run and type the following: C:\Temp\disk1\Setup -r (where C:\Temp is your temporary directory) This option enables the system to record your installation choices and create a Setup.iss file in the Windows directory that contains the script. 5. Perform the installation for recording. 6. Copy the Setup.iss file into the disk1 directory and then delete the file from the Windows directory. 7. Copy all three disk directories onto the CD, hard drive, or network drive from which you want to perform the install, for example E:\Install. 8. Click Start → Run and invoke the silent install facility by typing the following: E:\Install\disk1\Setup –s (where E:\Install is your install path) 16 TouchWare for Windows User's Guide Completing the Touchscreen Setup Once you’ve installed TouchWare, you can optimize the performance of the touchscreen using the Touchscreen control panel. You can adjust settings for touch mode, touch sounds, double-click speed, double-click area, and other cursor options. You can also use the control panel to set your preferences and calibrate to a specific screen resolution. Uninstalling TouchWare The Uninstall program removes all TouchWare components from your computer. These components include TouchWare files, directories, program folders, and folder items. The Uninstall program also removes all TouchWare entries from the system registry files. To uninstall TouchWare: 1. Make sure the TouchWare and Windows control panels are closed. 2. Click on Start → Programs → MicroTouch TouchWare → Uninstall MicroTouch TouchWare. The path will be different if you performed a custom installation and chose a custom name for the TouchWare program group. 3. Follow the onscreen instructions to remove TouchWare. You may see the following message when the Uninstall is complete: “Some elements could not be removed. You should manually remove items related to the application.” This is perfectly normal, as several files remain in use until you restart the system. Click on Details to see the remaining files. Note: If you have a serial controller, you must restart your system once the Uninstall is complete. The touchscreen driver remains in use until you restart the system. USB controllers do not require a restart, as the driver is uninstalled when you disconnect the last touchscreen. C h a p t e r 2 Touchscreen Control Panel You use the MicroTouch Touchscreen Properties control panel to change the TouchWare settings for your system. You can change the calibration method, touch modes, cursor options, pen settings, hardware, and diagnostic tools to suit your preferences. Control Panel Overview The MicroTouch Touchscreen Properties control panel consists of tabs that allow you to determine the best settings for your touchscreen configuration. • Use the Calibrate tab to calibrate the touchscreen for the current video resolution • Use the Touch Settings tab to define the touch actions that equate to mouse actions and add right-click functionality to the touchscreen • Use the Cursor tab to stabilize the cursor and tune the controller to the best frequency for the current monitor settings • Use the Hardware tab to determine the basic system settings for your touchscreen, verify the touchscreen is communicating properly, select baud rate, and restore system defaults. • Use the Tools tab to run diagnostic tests from the desktop and to enable Advanced Functions for your touchscreen. Note: If you have a ThruGlass controller, a ThruGlass Configuration tab will appear in place of the Pen tab. If you are running a USB multiple monitor setup, you will see an additional tab called Multiple Monitors. 18 TouchWare for Windows User's Guide Opening the Touchscreen Control Panel You can open the Touchscreen control panel several ways: • Double-click the MicroTouch TouchWare icon on the desktop. • Click Start → Settings → Control Panel and double-click the MicroTouch Touchscreen icon. • Click Start → Programs → MicroTouch TouchWare → MicroTouch TouchWare. The path will be different if you performed a custom installation and chose a custom name for the TouchWare program group. Note: If you have multiple touchscreens, you will be asked which touchscreen to configure. See Appendix A or B for additional information. Calibrate Tab The calibration process aligns the touchscreen with the underlying video. Specifically, calibration defines the dimensions of the active area of the touchscreen and locates the center of the touchscreen. If the screen is not Chapter 2 Touchscreen Control Panel 19 calibrated, the active area of the touchscreen may not be aligned properly or may be unnecessarily small in size. Once calibrated, the information is saved by the touchscreen for each video resolution. Therefore, you only need to recalibrate the touchscreen the first time you change to a particular video resolution. Note that the TouchWare installation will automatically set the calibration style to 2-point calibration. Users may change calibration styles using the Tools tab → Options → Advanced Touchscreen Settings dialog. When to Calibrate the Touchscreen You should calibrate the touchscreen in the following cases: • The first time you change to a particular video resolution (for example 640x480 or 800x600) or video mode of your monitor. Your monitor’s video card determines the available resolutions. • Any time you change the size of the video image by adjusting the horizontal and vertical controls on your monitor. • Any time you run the Stabilize Cursor function from the Cursor tab. • Any time the cursor does not follow the movement of your finger, or does not reach the edges of the touchscreen. Calibrating the Touchscreen 1. Select the Calibrate tab. 2. Click the Calibrate button. Calibration targets appear on the screen. A hand guides you through the calibration process pointing, in turn, to the appropriate target. Note: If you press Escape or do not touch the touchscreen within 20 seconds, the system automatically cancels the calibration process with no change to the current settings. 3. Touch the touchscreen and position your fingertip to completely cover the yellow target. The area around the hand will begin to flash. When the calibration completes, the message “Touch Enabled” will appear. 20 TouchWare for Windows User's Guide When touching the calibration target, make sure you • Face the monitor directly. • Perform the calibration in the position (sitting or standing) you expect to use the touchscreen. • Touch the calibration target firmly and precisely with your fingertip. Be careful to keep your other fingers away from the touchscreen as you touch the target. 4. Repeat these instructions for additional calibration target(s). 5. A dialog box prompts you to test the calibration. If you accidentally touched the screen in the wrong place during calibration, you will distort the touchscreen calibration. Test to make sure you are happy with the calibration results. 6. If you are using a TouchPen, repeat the calibration procedure with the pen. Note: Advanced users may disable calibration verification using the Advanced Touchscreen Settings dialog. Testing the Calibration Recalibrate the touchscreen if any of the following tests fail. • Touch random points on the screen. The cursor should be located underneath your finger or pen when you touch the screen. • Drag your finger across the screen and check that the cursor follows your movements. • Touch each corner and along the edges of the screen. Verify that the cursor reaches the full image area of the screen. Be sure you can touch and activate all icons and menus across the entire screen. • If you need to recalibrate the screen, make sure to touch the targets carefully. It is possible that one of your touches did not register properly or you accidentally touched the screen in the wrong place during calibration. For example, if you touch beyond the targets or into the non-image area, you will distort the touchscreen calibration. Chapter 2 Touchscreen Control Panel 21 Touch Settings Tab You can use the Touch Settings tab to customize the response of your touchscreen: • Touch mode – define the touch actions that equate to a mouse click, doubleclick, and drag. • Right-click tool – place the right-click tool on your desktop enabling you to utilize right-click functionality using the touchscreen. • Touch sound – define whether you hear a sound when you touch the screen and when that sound occurs (touchdown or liftoff). • Double-click speed and area – define how fast you need to touch and the space in which you must touch in order to produce a double-click. • Test – enables you to test the double-click speed and area. 22 TouchWare for Windows User's Guide Touch Modes Desktop Mode Desktop mode is most useful for general-purpose desktop applications. In Desktop mode, a touch positions the cursor much like a mouse. Holding the touch steady is equivalent to pressing and holding the mouse button. Lifting off is equivalent to releasing the mouse button. • To click, touch the object. Lift off the screen. • To double-click, touch the object twice quickly at the same location. • To drag, touch the object. Pause. Slide your finger to the new location. Lift your finger off the screen. Note: When using the Draw tool, you must pause for the system to recognize touch before drawing. Drawing Mode Drawing mode is most useful for draw, paint, illustrator, and graphics applications. In Drawing mode, a touch is equivalent to pressing and holding down the mouse button. This is considered the easiest mode to use with immediate reaction to touch. Lifting off is equivalent to releasing the mouse button. • To click, touch the object. Lift off the screen. • To double-click, touch the object twice quickly at the same location. • To drag, touch the object. Slide your finger to the new location. Lift off the screen. Button Mode In Button mode, touching the screen is equivalent to pressing and releasing the mouse button. The action occurs as soon as you touch the screen. This mode is best for button based applications (like a calculator). This mode is not good for drawing or dragging objects. Note: When you choose a Custom Touch mode (Tools → Touchscreen Options), the text on this button face will change from “Button” to “Custom”. You must then select Custom to activate your choice. Chapter 2 Touchscreen Control Panel • To click, touch the object. • To double-click, touch the object twice quickly at the same location. • To drag, touch the object. Pause. Slide your finger to the new location. Lift off the screen. The object is still selected and can be activated with another touch. 23 Right-click Tool Places an icon on the desktop (always on top) that allows you to select which mouse button to activate on touch. Note that this works for the next click action only. Control returns to the left mouse button as soon as you are done. In multiple monitor situations, you will get a separate right click tool for each touchscreen. You can position this icon anywhere on your desktop by selecting it, pausing until the four-pointed arrow appears, and dragging it wherever you want. Left button is typically used for normal select and normal drag. Right button is typically used for applet properties such as context menu and special drag. Touch Sound Select audible beep on touchdown, liftoff, or no beep at all. Click on the Beep button to select the appropriate option for your application. The default setting is no beep on touch (Beep off). Note: For additional customization, refer to the custom touch sound option found on the Tools tab → Options dialog. Double-click Speed and Area The double-click speed defines how quickly you must touch the screen for the system to interpret your actions as a double-click. Set the double-click speed in the slow to medium range for optimum performance with a touchscreen. The black line on the display shows the default setting. The double-click area defines the space in which you must touch the screen for the system to interpret your actions as a double-click. Set the doubleclick area in the medium to high range for optimum performance with a touchscreen. The black line on the display shows the default setting. 24 TouchWare for Windows User's Guide Touch the globe twice to test the double-click speed and area settings. If the MicroTouch Enabled logo begins to circle the globe, the touchscreen recognized your touch as a double-click. Note: Altering the double-click settings for the touchscreen will change the settings for the mouse, and vice versa. Cursor Tab The Cursor tab enables you to customize the response of the cursor to your touch. Using this tab, you can: • Specify whether to display or hide the cursor • Define the vertical distance between your touch and the position of the cursor on the screen • Adjust the cursor movement on the horizontal axis • Stabilize the cursor Chapter 2 Touchscreen Control Panel 25 Cursor Visibility The Cursor Visibility option is for Windows 9X and Windows Me users who do not want to display the cursor when working with a touch application. By default, the touchscreen displays the cursor in your application. Click on the Cursor button to toggle the cursor on or off. While this option is disabled for Windows 2000 and NT 4.0, users can access the Mouse properties page to hide the cursor. To hide the cursor in systems running Windows 2000 and NT 4.0: 1. Click Start → Settings → Control Panel. 2. Double-click the Mouse icon to open the Mouse Properties page 3. Click on the Pointers tab. 4. Select Touchscreen Hidden Cursors scheme and click OK. Note: Some applications can override this setting by loading their own cursors. Cursor Vertical Offset After you calibrate the touchscreen, the cursor should be located directly underneath your finger when you touch the screen. However, you may prefer to offset the cursor slightly above your touch so you can see the cursor and point more easily and precisely to small objects. The Cursor Vertical Offset option lets you define the distance between your fingertip and the position of the cursor on the screen. Offsetting the cursor is helpful when selecting small items, such as single letters in word processing, check boxes, or radio buttons. To set the Cursor Vertical Offset: 1. In the Cursor Vertical Offset box on the Cursor tab, click the Offset button. The function is enabled (“ON”) when the green indicator is illuminated. The Set button then becomes active. 2. Click Set. 3. Touch the screen at the desired distance below the tip of the arrow, within the rectangular space provided. The distance between your liftoff position and the tip of the arrow is the offset distance. Thereafter, the cursor will be positioned above your finger or pen by a distance equal to the offset distance. As your 26 TouchWare for Windows User's Guide finger or pen approaches the bottom edge of the screen, the cursor offset automatically decreases so you can touch items in this area. Edge Adjustment Sometimes the screen image extends beyond the edge of the monitor bezel. In these cases, it may be difficult to touch items at the left and right edges of the screen. If the Edge Adjustment option is on, TouchWare automatically offsets the horizontal position of the cursor near the left and right edges, so you can easily reach the edges of the screen image. TouchWare only makes this adjustment at the left and right edges of the screen. You cannot define the horizontal offset amount. Stabilize Cursor The Stabilize Cursor option adjusts the operating frequency of the touchscreen controller. In general, you will not need to stabilize the cursor for the touchscreen. However, if you are experiencing problems with a jittery cursor, ragged lines, or random touch points, you may want to run the Stabilize Cursor option. Use the Stabilize Cursor option to test the available frequency settings and determine the best frequency. The range of frequency settings and the default setting depends on your touchscreen controller. You can set a new operating frequency, and then check the performance of the touchscreen at that frequency setting. When to Stabilize the Cursor You should stabilize the cursor any time the cursor movement is very erratic or jittery. This is NOT a subtle movement. The cursor will be very jumpy. To test stability, use the Draw program to draw some lines on the screen. Check that they are smooth and thin. If the lines are wide and have ragged edges, the frequency setting is probably not correct for your controller. Run Stabilize Cursor. Note: This test will take several minutes. Do not touch the screen, mouse or keyboard during the test. The test is measuring the amount of noise when there is no touch. Chapter 2 Touchscreen Control Panel 27 Cursor Stabilization Procedure 1. Choose Stabilize Cursor from the Cursor tab. 2. If you are using a TouchPen controller in pen/finger mode, a dialog box appears asking if you want to adjust the frequency for pen or finger. Specify the desired touch method. Note: On a TouchPen system, you must stabilize the cursor twice (once with your finger and once with the pen) if you are using both a pen and your finger as touch devices. 3. The system then does a preliminary check of all the frequency settings. 4. The Analyzing Frequencies dialog box appears. The system tests each frequency setting and determines the optimum setting. 5. Once the test is complete, a dialog box informs you of the best frequency as determined by the test. You can click on Accept to switch to this frequency setting or you may click on the Advanced… button to test and select the frequencies for yourself. 6. The test results are displayed in descending order with the recommended frequency at the top of the list. The current selected frequency is also indicated. 7. Select a different frequency and click Apply. Testing the Newly Selected Frequency Any time you adjust the frequency you should test how the touchscreen is working and verify you are satisfied with the operation of the touchscreen. Test the touchscreen by touching the screen in several places and sliding your finger around the screen. The cursor should hold steady and smooth. If you see erratic or jittery cursor movement, readjust the controller frequency. Adjust the frequency until your touch test produces acceptable results. A good test is to go to the Draw program and hold your finger steady on the screen. If the resulting pattern isn’t fuzzy, you have a good frequency. It is recommended that you recalibrate the touchscreen after using Stabilize Cursor. 28 TouchWare for Windows User's Guide Pen Tab Note: If you have a ThruGlass controller, a ThruGlass Configuration tab will appear in place of the Pen tab. Refer to Chapter 3 for further information on TouchWare for ThruGlass. The Pen tab options are available only if your system has a TouchPen controller. TouchPen Mode defines whether the touchscreen recognizes input from both a pen and a finger, from a pen only, or from a finger only. The default mode is Pen/Finger, which means that you can use either your finger or your pen to select options. The pen works in much the same way as a mouse regardless of the Touch Mode setting. Touching the screen with a pen is equivalent to pressing and holding down the left mouse button. Lifting the pen off the screen is equivalent to releasing the mouse button. Touch Sound is disabled when using the pen (no beep on touch). Certain pens come with a button which can be used to for right-clicks. To right-click, press and hold the button while you touch the screen. After touching the screen, quickly lift the pen and release the button. From the Pen tab, select one of the TouchPen mode buttons using the mouse, a pen, your finger, or the appropriate shortcut key. Chapter 2 Touchscreen Control Panel 29 Note the TouchPen mode is immediately active. For example, if you select Pen Only, the system recognizes only the pen as a touch device. You cannot use your finger to make a selection. You can still use shortcut keys or the mouse to select an option. The system saves the TouchPen mode so that the next time you power up the system, the selected TouchPen mode is active. Pen/Finger Mode The system recognizes both pen and finger touches on the screen. This mode is the default mode for TouchPen controllers. If the system detects both pen and finger touches at the same time, it gives the pen higher priority and acknowledges only the pen touches. This priority prevents accidental touches from your finger or hand being interpreted as input. If you are using the pen and you lift the pen from the screen, the system does not recognize finger (or hand) touch until after a system-defined time delay. If a finger or hand is on the screen when the pen lifts off, the system ignores the finger or hand until you lift off and touch the screen again. For example, if you rest your hand on the screen while you write with the pen, you can lift the pen and put it back again without your hand touch being acknowledged. You must calibrate the touchscreen twice (once with your finger and once with the pen) if you are using Pen/Finger mode. Note: Changing the TouchPen mode setting can optimize the performance of the touchscreen. In Pen/Finger mode, the TouchPen controller checks for input from either a pen or a finger. The controller always gives priority to the pen. Therefore, if you are not currently using the pen for your touch application, use Finger Only mode for optimum system performance. Pen Only Mode The system recognizes only pen touches on the screen. The system ignores finger touches on the screen. Finger Only Mode The system recognizes only finger touches on the screen. The system ignores pen touches on the screen. 30 TouchWare for Windows User's Guide Stabilize Cursor for Finger and TouchPen If you are using pen/finger mode when you select Stabilize Cursor from the Cursor tab, a dialog box appears asking if you want to adjust the frequency for pen or finger. The recommended frequency setting may be different for the pen and the finger; therefore you must adjust each input method independently. You could find that the performance of one touch method is acceptable, while another touch method may need stabilization. Test TouchPen Touch in the designated test area to sample draw mode and to determine if the selected TouchPen mode is working. Hardware Tab Note: For USB controllers, no Connection information is available. Use the Hardware tab to determine the basic system settings for your touchscreen, select the baud rate, and restore system defaults. Chapter 2 Touchscreen Control Panel 31 Controller Information Controller Type The following controllers are supported in this version of TouchWare: • Serial/SMT series of controllers • MT series of controllers • PC Bus controller • TouchPen controller • ThruGlass controller • USB controller • MousePort controller Firmware Version These digits represent the version number and the revision level of the touchscreen controller firmware. Touchscreen Status Touchscreen status refers to whether or not the touchscreen has been found and is operational. Possible messages include: OK – Touchscreen found and operational. Touchscreen Not Found – The system could not detect the touchscreen. Refer to Troubleshooting the Touchscreen for further information on this message. Any other error messages indicate a hardware failure. Refer to Error Messages or contact MicroTouch Technical Support for more information. 32 TouchWare for Windows User's Guide Connection Communication Port Displays the COM port used for the touchscreen hardware connection. If you have two serial devices operating together, such as a touchscreen and a mouse, be sure each device uses a unique COM port and IRQ number. For example, the mouse can use COM1/IRQ4 and the touchscreen can use COM2/IRQ3. Using the same COM port or IRQ creates device conflicts. The touchscreen must have a unique IRQ; it cannot share an IRQ with another device. Use the Microsoft Hardware Conflict Troubleshooter (available in Windows Help) to try and resolve this problem. Find Touchscreen When you select the Find Touchscreen option, TouchWare: • Scans the available communication ports supported by Windows for a touchscreen. Find Touchscreen searches the baud rates used by the touchscreen. Note: TouchWare will only work with COM ports configured, recognized, operational and supported by Windows at the time of install. • Tries to communicate with the touchscreen controller. • Waits for the touchscreen controller to respond. • Requests information about the touchscreen and its controller. If TouchWare does not find the touchscreen, check that the touchscreen is connected properly, and then repeat the search. Refer to Chapter 4 Troubleshooting the Touchscreen for more information on what to do if your touchscreen is not found. Note that this option cannot search any COM ports in use by other applications. Verify that any previously loaded hardware/software (i.e., mouse or modem) that used the same COM port as your touchscreen has been uninstalled. Just because the hardware is disconnected doesn’t mean that the software isn’t claiming the port. Ensure that all components are completely removed from the System files. Chapter 2 Touchscreen Control Panel 33 Select Baud Rate The standard baud rate for MicroTouch controllers is 9600, which is generally acceptable for most applications. You may also select 19200, 4800, 2400 or 1200 baud. Note: The Select Baud Rate setting is not available for ThruGlass. If you change the baud rate, you could render your ThruGlass touchscreen inoperable. About TouchWare Lists the version of TouchWare and its utilities currently installed on your system. This information is particularly helpful if you need to call Technical Support. Restore Defaults This option is useful if you have reconfigured the software and need to get back to the original TouchWare settings. Note: This option does not restore calibration settings, frequency settings, or other controller parameters. Restores original TouchWare settings for: • Touch Mode (Desktop) In Multiple Monitor mode, the default is Click. • Touch Sound (Off) • Double-click Speed and Area (Midrange) • Cursor Visibility (On) • Cursor Vertical Offset (Off) • Edge Adjustment (Off) • TouchPen Mode (Pen/Finger) • Advanced Touchscreen Settings ! Calibration style ! Touch enabled ! Splash screen enabled ! Calibration reminder enabled ! Calibration verification enabled ! Linearization disabled (unless TP4) 34 TouchWare for Windows User's Guide ! Noise filter disabled ! Diagnostic tools disabled ! Multiple monitor touch modes disabled (except for multiple monitors) Tools Tab Use the Tools tab to perform basic touchscreen diagnostic tests to optimize the performance of your touchscreen. This tab is also the gateway to additional options and advanced touchscreen settings. Touchscreen Diagnostics Draw The Draw program lets you test the operation of the touchscreen and pen by checking the accuracy and speed with which the system responds to your touch. To draw, simply touch the screen and drag your finger or pen. When using Desktop Mode, you must pause for the system to recognize touch before drawing. The Draw program includes the following options: • B (blank) -- clears the screen and displays a blank drawing canvas. Chapter 2 Touchscreen Control Panel 35 • G (grid) -- clears the screen and displays a grid that you can use as a drawing guide (default setting). • L (line) -- draws solid lines on the screen (default setting). This option is not available in Multiple Monitor mode. • D (dots) -- draws dotted lines on the screen, where each dot represents a point reported by the touchscreen. • Space Bar -- clears the screen instructions leaving the grid or a blank drawing area. The Draw background reflects your Desktop color scheme. You may experience problems if your desktop includes a light background, as the Draw grid lines are white and may be difficult to see. For best results, change your background color to a dark selection. Click Start → Settings → Control Panel → Display → Appearance. Terminal In Terminal emulation mode, you can send firmware commands directly to the touchscreen controller and view touch position data sent from the controller. Note: Terminal mode is not available for USB controllers. Developers and support personnel can use firmware commands to initialize the controller, select operating or touch modes, specify data formats, and execute diagnostic functions. For a complete description of the available firmware commands, refer to your controller reference guide. Caution: You do not need to use firmware commands in order to use your touch system. If you are not familiar with the use of firmware commands, do not use this option. Executing some commands may alter the performance of your touchscreen or render it inoperable. Video Diagnostics The Color Bars and Color Purity options let you test the monitor video output. These options do not test the touchscreen. Typically, you do not need to use these options unless you are assembling or repairing touchscreen monitors. Advanced users may disable these video diagnostic tools using the Options button → Advanced Touchscreen Settings dialog. 36 TouchWare for Windows User's Guide Color Bars When you select the Color Bars option, TouchWare displays 15 bars that span the color spectrum from black to white. When examining the colors, check the following items: • Look at each color and ensure that it matches its description. • Look at the edges of each color bar and ensure that it does not bleed at the edge or spread into other colors. If you notice problems, try adjusting the contrast and brightness controls on the monitor. If there are still problems with the video, you can continue to troubleshoot the problem by using the Color Purity option. Remember that bad video indicates a hardware problem with the monitor or video card, not the touchscreen. Color Purity Most CRT monitors have three electron guns (or signals) that send the primary colors – red, green, and blue – to the screen. (The exception to this is flat panel displays.) The Color Purity option lets you test each primary color individually. You can also test combinations of these colors to produce some of the same colors shown in the Color Bars option. The advantage of the Color Purity option is that the color fills the screen. You can check a color for consistent appearance and saturation across the screen. Refer to the following Color Table to learn how to produce each color by turning the color guns on or off. For example, turn on red and blue to view magenta, or turn on green and blue to view cyan. When viewing a color with the Color Purity option, look for the color to be uniform across all areas of the screen. Shading, shadows, and distortion in the color indicate there may be problems with the video. Some monitors have a Degauss button. If you notice any problems with the color, try pressing the Degauss button to neutralize the magnetic field that builds up on the CRT. Also, check that other monitor controls are set properly. For more information on these controls, refer to the documentation for your particular monitor. Chapter 2 Touchscreen Control Panel 37 If there are still problems with the video check that you reassembled the monitor properly. Remember that video problems indicate a problem with the monitor or video card, not the touchscreen. Table 1: Color Table Color Red Green Blue Black Blue Cyan Green Magenta Red Yellow White Off Off Off Off On On On On Off Off On On Off Off On On Off On On Off On Off Off On Touchscreen Linearization Note: Touchscreen linearization is typically available for pen systems only. However, advanced users may enable linearization using the Tools → Options → Advanced Touchscreen Settings dialog. To perform a 25-point linearization of the touchscreen surface: 1. Make sure the video image is centered in the screen area using the horizontal and vertical controls. 2. Open the touchscreen control panel and select the Tools tab. 3. Click Linearize. This will bring up 25 linearization targets on the screen. A hand guides you through the linearization process pointing, in turn, to the next appropriate target. Note: If you press Escape or do not touch the touchscreen within 20 seconds, the system automatically cancels the linearization process with no change to the current settings. 4. Touch the touchscreen and position your fingertip to completely cover the yellow target. The area around the hand will begin to flash. When the 38 TouchWare for Windows User's Guide linearization completes, the message “Touch Enabled” will appear. When touching the target, make sure you • Face the monitor directly. • Perform the linearization in the position (sitting or standing) you expect to use the touchscreen. • Touch the target firmly and precisely with your fingertip. Be careful to keep your other fingers away from the touchscreen as you touch the target. 5. Repeat these instructions until all 25 targets have been touched. 6. A dialog will ask if you wish to continue with this process. If so, the 25 targets will now be replaced with a set of 16 targets used to verify the linearization performed in steps 1 through 5. 7. Repeat the previous process for each of these targets. This process automatically returns to the control panel once complete. If you are using a TouchPen, repeat the linearization procedure with the pen. The accuracy numbers should be below 1.5%. To test the accuracy of the linearization process, use the Draw program to draw some lines on the screen. Check that they are smooth and thin. To exit this program at any time during the process, press Escape. Touchscreen Options Chapter 2 Touchscreen Control Panel 39 The Touchscreen Options button enables functions added to the original TouchWare control panel. Using this dialog enables you to further customize TouchWare to suit your setting. Touchscreen Options include: • Single Touchscreen Configuration • Custom Touch Mode • Site Defaults (for NT users) • Custom Touch Sound • Advanced Touchscreen Settings Single Touchscreen Configuration The Single Touchscreen Configuration option is useful for applications requiring 2 monitors with 2 display cards, only one of which is a touchscreen. For example, you may want to have a touch monitor running an interactive program while the non-touch monitor runs a display-only application. Note: This option is only active for single serial touchscreen/multiple monitor configurations. You set up single USB touchscreen/multiple monitor configurations using the Multiple Monitors tab. See “Mapping Multiple Monitors” on page 82 for more information. You can also configure a system to use multiple touchscreens. See to Appendix A or B (depending on your controller type) for more information. This option confines touch to a single screen in a two monitor configuration. This enables you to use a single touchscreen with an image split horizontally (tiled) across 2 screens. You need only select which side is the touchscreen – right or left (primary or secondary in Windows 98 and Me). Select one monitor (default) to place the entire desktop image on one monitor without a split screen. This is the equivalent of standard touchscreen software installed on a single touch monitor. For tiled applications, if your touchscreen is on the left, click Left monitor. If your touchscreen is on the right, click Right monitor. The possible configurations for serial controllers using this option are as follows: 40 TouchWare for Windows User's Guide If you have: Windows NT 4.0 or 95 Windows 2000, 98, or Me 1 Monitor 1 Touchscreen 1 Video Card Supported Supported 2 Monitors 1 Touchscreen 1 Video Card 1 Splitter Supported – Mirrored only Supported – Mirrored only 2 monitors 1 touchscreen 1 video card 2 outputs Supported – Mirrored and tiled Not supported or 2 monitors 1 touchscreen 2 video cards Not supported Supported – Tiled only or Chapter 2 Touchscreen Control Panel 41 Custom Touch Mode Custom Touch Mode provides three additional touch modes to the original Touch Modes found on the Touch Settings tab. In fact, Custom Touch Mode enables you to reconfigure how the third Touch Mode button works. If you choose a Custom Touch Mode (Click, Touchdown or Liftoff), the button name changes from “Button” to “Custom” on the Touch Settings tab. You must then select “Custom” to activate this choice. • Button Mode (default) • Click Mode Touchdown Mode Liftoff Mode • • Refer to the Touch Settings tab for the standard touch mode options. Button Mode (default) This option is exactly the same as Button Mode on the Touch Settings tab. Click Mode This option is exactly the same as Click Mode for Multiple touchscreens. Click mode provides button operation only. The touchscreen sends a button-down, followed by a button-up to the operating system. Drawing or dragging is not supported in this mode. Touchdown Mode Touchdown Mode enables you to create an immediate button action as soon as you touch the screen. In Touchdown Mode, you cause a button down at the cursor location, with a short pause and then a button up. You can leave your finger on the screen but only a single touch is registered until you lift your finger off the screen and touch down again. Touching the screen is equivalent to pressing and releasing the mouse button. The action occurs as soon as you touch the screen. This mode is best for button based applications (like a calculator). Drawing or dragging is not supported in this mode. Liftoff Mode Liftoff Mode enables you to position the cursor where you want before creating a button action. In Liftoff Mode, the cursor will follow your finger for more accurate touch. When you want to select an item, lifting your 42 TouchWare for Windows User's Guide finger off the screen will cause a button down, short pause, and then a button up to occur. Touching the screen is equivalent to moving the mouse position. The button down/button up action occurs when you remove your finger from the screen. This mode is useful for applications requiring greater accuracy because it lets you carefully position the cursor prior to acting on it. Drawing or dragging is not supported in this mode. Site Defaults The Site Defaults option (for Windows 2000 and NT 4.0 administrators only) enables you to restore system defaults to either your Current Settings (site-specific) or the original Factory Settings when you select Restore Defaults from the Hardware tab. This option does not restore calibration or frequency settings. Custom Touch Sound This option enables you to set the exact pitch and duration of the touch sound selected on the Touch Settings tab. Note: If you have selected No Beep on the Touch Settings tab, this option will be disabled. Advanced Touchscreen Settings Chapter 2 Touchscreen Control Panel 43 Caution: Executing the Advanced Touchscreen options may alter the performance of your touchscreen or render it inoperable. You should be aware of expected results before executing any option. If you are not familiar with the outcome of these settings, you should not be using these options. Calibration Style The calibration process aligns the touchscreen with the underlying video. Specifically, calibration defines the dimensions of the active area of the touchscreen and locates the center of the touchscreen. If the screen is improperly calibrated, the active area of the touchscreen may not be aligned or may be unnecessarily small in size. Once you calibrate for each video resolution, the information is saved by the touchscreen. Therefore, you do not need to calibrate the touchscreen each time you start your system. TouchWare provides 2 choices for calibration style: • 2-point calibration is ideal for capacitive touchscreens. • 5-point calibration is recommended for resistive touchscreens. Touch Orientation This is an information-only icon. The Touch Orientation option is included for advanced users who alter the orientation of the touchscreen in custom installations. This orientation (or direction of the sensor mounted in the monitor) is determined the first time calibration is run. Once TouchWare is installed, the calibration program automatically determines the correct sensor positioning. The touchscreen icon illustrates how your sensor is placed in your monitor. The white target indicates the location of the upper left corner of the touchscreen. Standard installation of the touchscreen sensor matches this upper left corner point to the monitor. Disable Touch This option allows you to disable touch functionality. The only way to restore touch is with a keyboard or mouse. This setting will remain in effect until you reboot your system. 44 TouchWare for Windows User's Guide Touch Sensitivity The configuration process sets the default sensitivity that, in most cases, will be appropriate for your touchscreen. However, you can change this setting manually if you are not satisfied with the response of the touchscreen. • If the controller responds or the cursor moves before you actually touch the screen, you should decrease the sensitivity. • If you need to press hard or use more than one finger in order to activate a touch, you should increase the sensitivity. Software Settings These Software Settings are intended for use by advanced users attempting to streamline the installation of TouchWare on many systems at a time. These settings are not intended for use by individual users. • Enable Noise Filter – use to correct grounding problems • Enable Linearization – activates 25-point linearization for use when viewable/touchable area is smaller than full screen • Disable Splash Screen – enabled on startup for advanced users • Disable Calibration Reminder – for advanced users, this option allows users to turn off the automatic calibration reminder message • Disable Calibration Verification – for advanced users, this option allows users to turn off the automatic calibration and linearization verification messages • Enable Video Diagnostic Tools – this option allows users to turn on color testing • Enable Touch Modes – this option allows users to turn on additional touch modes in a multiple monitor setup C h a p t e r 3 ThruGlass Touchscreen Configuration This chapter provides information unique to ThruGlass TouchWare users. Refer to the ThruGlass Touchscreen Hardware Installation Guide for more detailed information on setting up ThruGlass. Refer to earlier chapters of this book for information on installing TouchWare and the overall functionality of the TouchWare control panel. Note: In systems equipped with ThruGlass, the ThruGlass tab appears in place of the Pen tab. ThruGlass Overview The ThruGlass tab enables you to: • Specify the size and type of ThruGlass touchscreen you are using • Adjust the controller sensitivity • Test the operation of the ThruGlass touchscreen • Run ThruGlass diagnostic tests • Adjust the controller frequency After installing the ThruGlass touchscreen and controller, use the ThruGlass tab to configure the touchscreen for the current installation and environment. When you select the ThruGlass Screen Type, you automatically set in motion a configuration process that sets the default sensitivity and determines the best operating frequency for your controller. 46 TouchWare for Windows User's Guide Setting Up a ThruGlass Touchscreen Install the ThruGlass controller using the ThruGlass Touchscreen Hardware Installation Guide for detailed information. Note: You must have a keyboard or mouse attached to your system to initially configure your ThruGlass touchscreen. When you initially install TouchWare, touch is disabled until you specify the Screen Type in the ThruGlass tab. Use the keyboard or mouse to specify the ThruGlass screen type. Before you configure the ThruGlass touchscreen, make sure the video resolution1 is appropriate for your touch application. Your monitor’s video card determines the available resolutions. Configure the ThruGlass touchscreen by specifying the size of ThruGlass touchscreen, such as 17-, 15-, 12- or 10-inch screens. The part number appears on the cable at the lower right corner of the touchscreen. When you select the ThruGlass Screen Type, you automatically set in motion a configuration process that sets the default sensitivity and determines the best frequency for your controller. If you change video resolution or scan rate2, a dialog box will automatically pop up advising you to reselect your screen type in order to optimize ThruGlass performance. If you change only the scan rate on a Windows 95 system, this message will not appear. You must manually reset the screen type by selecting None and then reselect the screen type. After you configure your ThruGlass touchscreen, calibrate the touchscreen using the Calibrate tab. You can then set preferences such as the doubleclick speed or touch mode using the other touchscreen control panel tabs. Refer to Chapter 2 for more information. 1 Video resolution, i.e., 800x600 or 640x480, is also known as Desktop Area on the Settings/Control Panel/Display Properties Page. 2 Scan rate is also known as Refresh rate depending on your video card. Chapter 3 ThruGlass Touchscreen Configuration 47 Screen Type Caution: You must have a keyboard or mouse attached to your system to initially configure your ThruGlass touchscreen. If you are specifying the screen type for the first time, touch is disabled. Use the mouse or keyboard to select the screen type. However, do not touch the screen, keyboard or mouse once the configuration process has begun. After you install the ThruGlass hardware, use Screen Type to specify the type of touchscreen you are using. MicroTouch makes different types of ThruGlass touchscreens, such as 17-, 15-, 12- or 10-inch screens. The part number can be found on the touchscreen cable at the lower right corner of the touchscreen. When you select the ThruGlass Screen Type, you automatically set in motion a configuration process that sets the default sensitivity and determines the best frequency for your controller. 48 TouchWare for Windows User's Guide Sensitivity Using the Sensitivity setting, the touch response can be optimized for the thickness of the non-conductive material (for example, glass or plastic) in front of the ThruGlass touchscreen. The configuration process sets the default sensitivity which, in most cases, will be appropriate for your touchscreen. However, you can change this setting manually if you are not satisfied with the response of the ThruGlass touchscreen. • If the controller responds or the cursor moves before you actually touch the first surface, you should decrease the sensitivity. • If you need to press hard or use more than one finger in order to activate a touch, you should increase the sensitivity. Diagnostics Diagnostics will help to determine whether your ThruGlass touchscreen is working correctly. Before running these tests, make sure the ThruGlass is installed in its operational position, i.e., kiosk doors closed, artwork installed, monitor in final operating location. Show Noise The Noise Level indicates the amount of noise detected by the controller at the current frequency. Ideally, the Noise Level should be less than 30. Choose Auto Frequency to determine the best frequency for your controller. Chapter 3 ThruGlass Touchscreen Configuration 49 If you are still unsatisfied with this setting, you can select a different frequency manually and retest. The red line is a graphical representation of the noise level. It should be positioned low and hold steady as shown in the screen below. Note that touching the screen affects the noise level. To obtain accurate readings of the overall system noise, do not touch the screen, keyboard or mouse during this process. Show Base Show Base shows the operating range of the controller. Optimal levels should be over 400 and less than 1023. The yellow lines represent peak holds. All values should be in the top half of the screen. If any bar is substantially different from its neighbor, there may be a problem such as metal near the sensor or a broken connection. The exception to this is the change from the horizontal to vertical axis at bar 8, where you are likely to see a jump in height. Touching the screen should show a reduction in height of all bars with the lowest reading being the touch point. 50 TouchWare for Windows User's Guide Show Depth Show Depth is a graphical representation of the amount of touch signal that the controller sees when the screen is touched. The best values are above 125. Overall, the higher the values, the better, without topping out the graph. If you sweep your finger slowly from side to side and top to bottom across the screen, you should see that all bars reach a similar maximum height. The yellow lines indicate the maximum reading of any given bar. The leftmost bars represent readings from the horizontal axis. The rightmost eight represent the vertical axis. There may be a slight difference in the average from these two groups. Auto Frequency The Auto Frequency function adjusts the operating frequency of the touchscreen. In general, you will not need to adjust the frequency once you have configured the touchscreen. However, if you are experiencing erratic or jittery cursor movement, ragged lines, or random touch points, you may want to use the Auto Frequency option and rerun the process. You can manually set a new operating frequency, and then check the performance of the touchscreen at that frequency setting. Use the Auto Frequency slide bar to select and test the available frequency settings and determine the best frequency. The range of frequency settings and the default setting depends on your installation. You can adjust the ThruGlass sensitivity after changing the frequency. Chapter 3 ThruGlass Touchscreen Configuration 51 Do not touch the screen, keyboard or mouse during this process. When to Adjust the Controller Frequency You should adjust the controller frequency any time the cursor movement is very erratic or jittery. This is NOT a subtle movement. The cursor will be very jumpy. To test stability, use the Draw program to draw some lines on the screen. Check that they are smooth. If the lines appear ragged, the frequency setting is probably not correct for your controller. To adjust the controller frequency: • Open the ThruGlass tab. • Click on Diagnostics then click on Auto Frequency. • Do not touch the screen until the auto frequency process is complete. Touching the screen influences the results of the frequency adjustment. • The results obtained from changing the frequency are not predictable. If you choose a frequency setting that does not work, keep trying. The next frequency setting (up or down) may be appropriate. Calibrating the ThruGlass Touchscreen You should calibrate the ThruGlass touchscreen after you have set the screen type and adjusted sensitivity and frequency. Use the Calibrate tab to adjust the calibration of the ThruGlass touchscreen. Testing the ThruGlass Touchscreen Use the Test button to check that the ThruGlass touchscreen is correctly responding to your touch. To test the ThruGlass touchscreen: • Open the ThruGlass tab. • Click on Test. A dialog box prompts you to test the touchscreen by touching the screen. A target appears on the screen. • Touch the screen in several places and move your finger around the screen. Touch the corners and edges of the screen. The cursor should be steady and cursor movement should be smooth. If you see erratic or jittery cursor movement or if the controller registers random touch points, readjust the controller frequency. 52 TouchWare for Windows User's Guide Adjusting ThruGlass Video Resolution MicroTouch recommends that you adjust the desired video resolution and scan rate before you configure the touchscreen. Adjusting the video resolution after configuring the touchscreen can cause touch to be erratic. If you change the video resolution or scan rate after configuring the touchscreen, you will see a message advising you to reselect your screen type in order to automatically configure the sensitivity and frequency. If you change only the scan rate on a Windows 95 system, this message will not appear. You must manually reset the screen type by selecting None and then the screen type. Alternatively, you can adjust the controller frequency by selecting the Auto Frequency button from the Diagnostics screen. Values for each video resolution are stored in the system registry so you need only do this once for each video resolution setting. ThruGlass Troubleshooting The ThruGlass touchscreen should be sensitive to your touch and recognize a light touch. If not, you may be experiencing one of the following problems: • If the controller responds or the cursor moves before you actually touch the first surface — decrease sensitivity. • If you need to press hard or use more than one finger to activate a touch — increase sensitivity. • If the cursor is erratic or jittery — adjust the controller frequency. • If the controller is registering random touch points — adjust the controller frequency. • If the cursor does not reach the edges of the video image — recalibrate the touchscreen. • If the cursor is not located underneath your finger — recalibrate the touchscreen. Multiple ThruGlass Touchscreens Depending on your application, you may want to use more than one touchscreen with your system. TouchWare can support up to four ThruGlass touchscreens. Also, you can include a combination of touch monitors and standard (non-touch) monitors with your system. Chapter 3 ThruGlass Touchscreen Configuration 53 To set up multiple ThruGlass touchscreens, you follow the same process as you do to set up multiple serial touchscreens. See Appendix A for instructions. Summary of Firmware Commands ThruGlass controllers use an enhanced set of the commands detailed in the following tables. MicroTouch recommends you use the commands listed in the following table. Caution: If you are not familiar with the use of firmware commands, do not use them. Executing some commands may alter the performance of your touchscreen or render it inoperable. Table 2: Firmware Commands Recommended for Development Command Name ASCII Code Description Calibrate Extended CX Initiates an interactive, two-point calibration. Format Tablet FT Outputs the X, Y touch coordinate data in a five-byte packet. Mode Stream MS Sends a continuous stream of X, Y coordinate data when you touch the screen. Null Command Z Queries the controller and waits for a response. Output Identity OI Identifies the controller type and the firmware version. Reset R Initializes the hardware and the firmware, causes the controller to stop sending data, and recalculates the environmental conditions. Restore Defaults RD Returns the controller to the factory default operating parameters. Unit Type UT Identifies the type of touchscreen controller connected to your system. 54 TouchWare for Windows User's Guide Additional ThruGlass Specific Commands These commands can be used for diagnostics and configuration of ThruGlass controllers. Table 3: ThruGlass Specific Controller Commands Command Name ASCII Code Description Mode Noise Extended Mode Set Creep Set Sensitivity MN MX SC [pressed released] SS [max/min adjacent unused speed fast level release] SF [freq] SP [resln delay] ST [0..3] SCX [xtbl|X0 X1 X2 X3 X4 X5 X6 X7] SCY [ytbl|Y0 Y1 Y2 Y3 Y4 Y5 Y6 Y7] FRA FBA FZA NOA Stream noise data packets Send firmware algorithm data on press Set/show base update rates Set/show touch algorithm parameters Set Frequency Set Phase Set Type Set Correction X Set Correction Y Format Raw ASCII Format Base ASCII Format Depth ASCII Noise ASCII Set/show frequency Set/show phase Set/show controller & screen orientation Set/show X depth correction parameters Set/show Y depth correction parameters Show 16 sensor channel values Show 16 base values Show 16 press depth values Show noise data ThruGlass Command Line Commands Sending ESCAPE,ESCAPE,ESCAPE will place the ThruGlass controller into ‘terminal’ mode. The following commands are then active. Note that some parameter values can render the controller inoperative. FR will return the controller to factory default settings. Note that these commands are for diagnostic use only and are not recommended for normal operation. • Enter either full command or abbreviation followed by <ENTER>. • Angle brackets indicate required parameter. • Square brackets indicate optional parameter(s). • Vertical bar indicates a choice must be made from list. Chapter 3 ThruGlass Touchscreen Configuration 55 Table 4: ThruGlass Terminal Mode Commands Command Abbreviation Description Adcall aa Show 16 sensor channel values Baseall ba Show base values baud [1200|2400|4800|9600] bd Set/show communication rate coldreset cr Perform power-up restart Depthall de Show press depth values eeprom <address> [data] ee Set/show EEPROM values directly Factoryreset fr Reset to factory default settings Go go Start normal operation help [command] he Show list of these commands helpcta hc Show test of CTRL-A commands mode [mode] mo Set/show operation mode noise no Show noise analysis sens [maxmin adjacent unused speed fast level release] ss Set/show touch algorithm parameters scx [xtbl|X0 X1 X2 X3 X4 X5 X6 X7] scx Set/show X depth correction parameters scy [ytbl|Y0 Y1 Y2 Y3 Y4 Y5 Y6 Y7] scy Set/show Y depth correction parameters setcreep [pressed released] sc Set/show base update rates setfreq [freq] sf Set/show frequency setphase [resln delay] sp Set/show phase setlinx [center edge offset] slx Set/show X linearity parameters setliny [center edge offset] sly Set/show Y linearity parameters Tpcal tpc Perform two-point calibration tpval [X1 Y1 X2 Y2] tpy Set/show two-point calibration values tpcreset tpr Reset two-point calibration to default type [0..3] ty Set/show controller & screen orientation version ve Show version information Warmreset wr Restart all processes C h a p t e r 4 Troubleshooting the Touchscreen This chapter provides tips and strategies for problems you may encounter with the touchscreen either during installation or normal use. MicroTouch is committed to helping you get the most out of your touchscreen. If you are unable to resolve your problem using the troubleshooting information contained in this chapter, contact MicroTouch technical support. For information on how to reach technical support in your area, refer to “MicroTouch Support Services” on page 8. Troubleshooting Overview If you are experiencing problems with the touchscreen, check that all cables are connected properly and restart your system. For cursor adjustments, you may need to • Calibrate the touchscreen • Define cursor offset • Stabilize the cursor If your touchscreen or mouse is not working, the communication settings may be incorrect. If both devices are trying to use the same communication port or IRQ, a hardware device conflict will result. The touchscreen cannot share an IRQ with another device. Verify that any previously loaded hardware/software that used the same COM port as your touchscreen has been uninstalled. Just because the hardware is disconnected doesn’t mean that the software isn’t claiming the 58 TouchWare for Windows User's Guide port. Ensure that all components are completely removed from the system files. Refer to manufacturer’s documentation for additional help. To correct the communication settings, use the Windows Hardware Conflict Troubleshooter from Windows Help. Touchscreen Status Lights Some touchscreens have a light-emitting diode (LED) that indicates the status of the touchscreen unit and monitors several diagnostic features in the unit. Note that there is no LED on a TouchPen controller or any internally mounted controller. When you first power up a touchscreen monitor, the LED initially goes bright, then dim. When you touch the screen, the LED should brighten again. If you are experiencing problems with the touchscreen, be sure to check the LED for status information. • If the LED remains bright when you are not touching the screen, there may be a problem with your hardware. • If the LED remains dim when you touch the screen, there may be a problem with your hardware. • If the LED continuously blinks, this is an indication that the power-on self-test failed. A blinking status light usually indicates a problem with the controller hardware, such as a RAM error, ROM error or NOVRAM error. • If the LED is not lit, power is not being supplied to the controller. If this is the case: • Check your power connections. • Check that the monitor is turned on. • Check that the keyboard power tap (optional) is connected. • Check that the power supply unit (optional) is plugged in. Refer to your controller reference guide for more details. Contact Technical Support for additional information. Chapter 4 Troubleshooting the Touchscreen 59 What to do if... Cursor does not display on screen after starting Windows On Windows 9X and Me systems, open the Cursor tab and make sure that Cursor Visibility is enabled. On Windows 2000 and NT 4.0 systems, check the Windows control panel Mouse properties page to make sure that Touchscreen Hidden Cursors is not selected. Refer to page 25 for more information. Cursor does not reach out to edges of screen Try calibrating the touchscreen. When calibrating the screen, be sure you touch the center of each target firmly and precisely. You may also want to turn on the Edge Adjustment in the Cursor tab. Cursor is jittery You need to stabilize the cursor by adjusting the controller frequency setting. Run the Stabilize Cursor option. Any time you adjust the frequency you should test how the touchscreen is working and verify you are satisfied with the operation of the touchscreen. It is a good idea to calibrate the touchscreen again. Cursor jumps or bounces suddenly across screen You are most likely touching the screen in more than one spot at the same time. Be sure to point and touch with one finger only. Keep your other fingers away from the touchscreen. Don’t rest your hand on the monitor or bezel while touching the screen. Drawing lines are not straight and smooth You need to stabilize the cursor by adjusting the controller frequency setting. Run the Stabilize Cursor option. Any time you adjust the frequency you should test how the touchscreen is working and verify you are satisfied with the operation of the touchscreen. It is a good idea to calibrate the touchscreen again. 60 TouchWare for Windows User's Guide Double-click on touchscreen doesn't work Use the Touch Settings tab to adjust the double-click speed and area. The double-click speed defines how quickly you must touch the screen for the system to interpret your actions as a double-click. Set the double-click speed in the slow to medium range for optimum performance with a touchscreen. The tick mark on the bar indicates the default setting. The double-click area defines the space in which you must touch the screen for the system to interpret your actions as a double-click. Set the doubleclick area in the medium to high range for optimum performance with a touchscreen. The tick mark on the bar indicates the default setting. Click on the globe (Test) to test the double-click speed and area settings. If the MicroTouch Enabled logo begins to circle the globe (or stop circling), the touchscreen recognized your touch as a double-click. Note: Changing this setting will affect the double-click setting of the mouse. Full screen DOS needed To run a touch application in a full screen DOS window in Windows 9X and Me, you must run the MicroTouch DOS touchscreen driver DOSTOUCH.EXE before running your application. You can create a batch file that automatically loads the touchscreen driver and then runs your application. Full screen DOS is not supported in Windows 2000 and NT 4.0. Note: To run DOSTOUCH from a batch file, you must include the full path to DOSTOUCH. By default, the MicroTouch Setup program installs the DOS touchscreen driver to the following directory: C:\Program Files\MicroTouch\ TouchWare\DOSTOUCH.EXE. If you changed the directory during installation, make sure you specify the correct DOSTOUCH path. 1. Create a batch file that executes your DOS application. • The first line of the batch file will be c:\progra~1\microt~1\touchw~1\dostouch (or directory you installed the driver in if different). • The second line will be your program name including the path. • The third line will be c:\progra~1\microt~1\touchw~1\dostouch off (or directory you installed the driver in if different). Chapter 4 Troubleshooting the Touchscreen 2. Create a shortcut on the desktop for the batch file. Right click on the shortcut, and go to Properties. 3. Make sure you have a check mark in the "Close on Exit" box. 4. Click on the Screen tab. Under "Usage" make sure “Full Screen” is selected. 61 62 TouchWare for Windows User's Guide 5. Click on Apply and then click OK. Operating two serial devices If you have two serial devices operating together, such as a touchscreen and a mouse, be sure each device uses a unique COM port and IRQ number. For example, the mouse can use COM1/IRQ4 and the touchscreen can use COM2/IRQ3. Using the same COM port address or IRQ creates device conflicts. The touchscreen must have a unique IRQ; it cannot share an IRQ with another device. Verify that any previously loaded hardware/software that used the same COM port as your touchscreen has been uninstalled. Just because the hardware is disconnected doesn’t mean that the software isn’t claiming the port. Ensure that all components are completely removed from the System files. Refer to manufacturer’s documentation for additional help. Use the Microsoft Hardware Conflict Troubleshooter (available in Windows Help) to try and resolve this problem. Touch delayed in Windows 2000 or NT 4.0 In Windows 2000 and NT 4.0 systems, TouchWare becomes active 10 to 15 seconds after the cursor appears when booting up your system. If touch does not become active early enough to suit your application, you can manually adjust the serial device driver startup order. These instructions are intended for use with a standard system. If you have a custom driver for Chapter 4 Troubleshooting the Touchscreen 63 your serial ports and know which device driver controls your touchscreen COM port, you can make changes at your own discretion. Caution: Make an Emergency Repair Disk (ERD) prior to making any changes to your system registry. Refer to Windows NT Help for instructions on using the Repair Disk utility to make an emergency repair disk. To manually adjust the serial device driver startup order: 1. 2. 3. 4. 5. 6. 7. Log in to an account with administrator privileges. Click on the Start button and point to Settings. Click on Control Panel. Double-click on Devices. Scroll down through the list until you get to Serial. Check to ensure that the Status is Started. Select Serial in the list window, then click Startup. Change the Startup type from Automatic to System. Click OK. Restart your system in order for this change to take effect. Touch not working The touchscreen is not communicating with the controller. Check the following items: • Make sure the touchscreen controller is connected to the correct port. • Review the installation procedures and verify all hardware is properly connected. Check the serial port and touchscreen cable connections. Check that the touchscreen and controller cables do not have any kinks and that connector pins are not bent. • If you are using the PC Bus controller, check that the controller is firmly seated in the expansion bus slot in your computer. Check that the jumpers are properly set on the card. • If your controller has an LED and you can see it, touch the screen to determine if the LED brightens to check for power. If the LED is flashing, refer to the touchscreen status lights for a list of possible errors. • Reset the touchscreen and its controller. Turn off both the computer and the monitor, wait a few minutes, and then turn on each device again. • If the touchscreen is still not communicating after checking the hardware, verify that any previously loaded hardware/software that used the same COM port as your touchscreen has been uninstalled. Just because the hardware is disconnected doesn’t mean that the software isn’t claiming the port. Ensure that all components are completely removed from the System files. • If TouchWare has located the appropriate communication port, this field will contain a COM port number. If the touchscreen was not found, this field will be 64 TouchWare for Windows User's Guide grayed out and the Find Touchscreen button will be active. Check to ensure that all cables are correctly fastened and click on Find Touchscreen to locate the COM port in use. Touchscreen not found The touchscreen is not communicating with the controller. If TouchWare does not find the touchscreen, check that the touchscreen is connected properly, and then repeat the search. Note that this option cannot search any COM ports in use by other applications. Note: Verify that any previously loaded hardware/software that used the same COM port as your touchscreen has been uninstalled. Just because the hardware is disconnected doesn’t mean that the software isn’t claiming the port. Ensure that all components are completely removed from the System files. Check the following items: • Make sure the touchscreen controller is connected to the correct port. • Review the installation procedures and verify all hardware is properly connected. Check the serial port and touchscreen cable connections. Check that the touchscreen and controller cables do not have any kinks and that connector pins are not bent. • If you are using the PC Bus controller, check that the controller is firmly seated in the expansion bus slot in your computer. Check that the jumpers are properly set on the card. • If your controller has an LED and you can see it, check the controller’s LED for power on. If the LED is flashing, refer to the controller status lights for a list of possible errors. • Reset the touchscreen and its controller. Turn off both the computer and the monitor, wait a few minutes, and then turn on each device again. • If the touchscreen is still not communicating after checking the hardware, verify the correct COM port and baud rate, and run Find Touchscreen again. • If TouchWare has located the appropriate communication port, this field will contain a COM port number. If the touchscreen was not found, this field will be grayed out and the Find Touchscreen button will be active. Check to ensure that all cables are correctly fastened and click on Find Touchscreen to locate the COM port in use. • If you are trying to use COM 4, be aware that some older video chip sets incorrectly map I/O addresses. TouchWare will only work with COM ports configured, recognized, operational and supported by Windows at the time of install. Chapter 4 Troubleshooting the Touchscreen 65 Pen controller not found You tried to set the pen mode, and either the pen or TouchPen controller is not properly connected, or you do not have a TouchPen controller in your system. Check the following: • If you have a pen, make sure that it is properly plugged into your monitor. • If you have a TouchPen controller, review the installation procedures and verify all hardware is properly connected. Error Messages Some error messages that you might receive when using the touchscreen include the following. Anything other than “OK” or “Touchscreen not found” indicates a hardware failure. Contact MicroTouch Technical Support for more information. • OK — Touchscreen found and operational. • Touchscreen Not Found — Touchscreen not located. • A/D Error — Touchscreen hardware error. (SMT2/TP4) • ASIC Error — Touchscreen hardware error. (SMT2/TP4) • Hardware Error (HWD in USB) — Touchscreen hardware error. (SMT3) • NOVRAM Error (B1 and/or B2 in USB) — Checksum error in NOVRAM, using defaults. • PWM Error — Touchscreen hardware error (SMT3). • RAM Error — Touchscreen hardware error. • ROM Error — Checksum error in ROM. • CBL Error — Cable error in USB Windows 2000 and NT 4.0 Error Messages The following error messages are specific to Windows 2000 and NT 4.0 systems only and will appear in the system error log: • Not enough memory is available for device \Device\PointerPort0 The driver failed to allocate non-paged memory. This is an indication of very low memory resources. What to do: Configure more RAM memory. The driver does not use much memory so it is likely that some other driver is the culprit. 66 TouchWare for Windows User's Guide • Too many PointerPort devices are defined. Could not create device: \DosDevices\MtsTch0. There is a large upper limit (about 64) on the total number of pointing devices (mice, tablet, touchscreens) supported by the MicroTouch driver. What to do: Use fewer pointing devices. • Could not create DeviceMap entry for device \Device\PointerPort0 The driver failed to make an entry in the registry that identifies the driver to the operating system. This may indicate a corrupt registry. What to do: Use your Emergency Recovery Disk to restore the registry. • Could not create symbolic link for device \Device\PointerPort0 The driver failed to make an entry in the registry that identifies the driver to user applications (i.e., the control panel). This may indicate a corrupt registry. What to do: Use your Emergency Recovery Disk to restore the registry. • Touchscreen was not found on communications port \DosDevices\COM1 for device \Device\PointerPort0 The indicated COM port was open correctly, but no touchscreen responded when the driver probed the serial port. This is, by far, the most common error. What to do: Check to make sure the touchscreen is connected and powered correctly. Cycle the power on the touchscreen. Check the controller LEDs to see if they indicate a problem (see page 58 for more information.) Check to make sure the port number is correct. Use the Find Touchscreen button on the Touchscreen control panel. • Touchscreen was found, but failed to initialize properly for device \Device\PointerPort0 A touchscreen responded on the given serial port, but did not pass all the initialization commands at boot time. What to do: Reboot. Cycle touchscreen power. Call technical support with touchscreen model number and TouchWare version number. • An internal error occurred in communications port for device \Device\PointerPort0 An error occurred in configuring COM port. What to do: Check that your serial driver is working correctly. Check that the COM port BIOS is enabled. • Could not set timeouts on communications port \DosDevices\COM1, for touchscreen device \Device\PointerPort0 An error occurred in configuring COM port. What to do: Check that your serial driver is working correctly. Check that the COM port BIOS is enabled. Chapter 4 Troubleshooting the Touchscreen • 67 Could not set baudrate on communications port \DosDevices\COM1, for touchscreen device \Device\PointerPort0 An error occurred in configuring COM port. What to do: Check that your serial driver is working correctly. • Could not set line control on communications port \DosDevices\COM1, for touchscreen device \Device\PointerPort0 An error occurred in configuring COM port. What to do: Check that your serial driver is working correctly. Check that the COM port BIOS is enabled. • Unknown operation was requested for communications port \DosDevices\COM1, for touchscreen device \Device\PointerPort0 A bad command was issued to the COM port driver. What to do: Check that your serial driver is working correctly. Power cycle the system. A p p e n d i x A Multiple Serial Touchscreens This appendix describes how to set up multiple serial touchscreens. Depending on your application, you may want to use more than one touchscreen with your system. TouchWare can support up to four serial touchscreens. Also, you can include a combination of touch monitors and standard (non-touch) monitors with your system. Multiple Touchscreens Overview Setting up multiple touchscreens involves the following steps: • Checking system requirements • Connecting multiple monitors and touchscreens • Configuring Windows for multiple monitors • Installing TouchWare and configuring it for multiple monitor support Note: You must install the hardware and software required to support multiple monitors before installing TouchWare. Also, if you set up and subsequently decide to change your multiple touchscreen configuration, you must uninstall and reinstall TouchWare. 70 TouchWare for Windows User's Guide Checking System Requirements The system requirements for multiple touchscreens are as follows: • Windows 2000, NT 4.0, Windows 9X, or Windows Me • A unique video card or port for each monitor Not all video cards support multiple monitor configurations. MicroTouch has tested and evaluated a large number of video cards. See the ReadMe file for details. If you have to install video cards, consult your system documentation for instructions. • A COM port for each touchscreen PCs typically include two COM ports. You must verify that all previously installed hardware or software that used any COM port you intend to use for a touchscreen has been disconnected and completely uninstalled. If you want to use more than two touchscreens, you must provide additional COM ports. Not all COM port expansion cards support multiple monitors. MicroTouch has tested and evaluated a large number of expansion cards. See the ReadMe file for details. Note: You cannot share COM ports using a “Y” adapter. Connecting Multiple Monitors and Touchscreens To connect multiple monitors and touchscreens to your system: 1. Shut down your system. 2. Install additional video cards, if required. 3. Connect each monitor to a unique video port in your system. The monitor you connect to the primary video card becomes the primary monitor. This monitor displays the desktop and taskbar. 4. Connect each monitor that has a touchscreen to a COM port in ascending order. For example, connect the first touchscreen to the lowest numbered available port, and so on. 5. Apply power to your system and monitors. Windows detects the new video adapters and loads the appropriate drivers. Appendix A Multiple Serial Touchscreens 71 Configuring Windows for Multiple Monitors Next you must configure Windows for multiple monitor support. If necessary, refer to your Windows documentation for more information. To configure multiple monitors in Windows: 1. Open the Windows Control Panel and double-click the Display icon. 2. Select the Settings tab. 3. Activate each monitor by selecting it and then checking Extend my Windows desktop onto this monitor (or by right-clicking the monitor icon and selecting Enable). 4. Display each monitor’s label by clicking Identify (or by right-clicking its icon and selecting Identify). 5. Click and drag the monitor icons to position them according to the physical layout of the monitors. Some examples are shown below. Monitor Layout Options Layout Illustration 1 row x 2 columns 1 row x 4 columns 2 rows x 1 column 2 rows x 2 columns Installing TouchWare for Multiple Touchscreens Next you must install Touchware. You must perform a Custom installation to install Touchware with support for multiple touchscreens. 72 TouchWare for Windows User's Guide Before installing TouchWare, make sure all touchscreen monitors are connected and operational. The install program will search for available COM ports and touchscreens and configure only the number of touch monitors found during installation. Note: If you have previously loaded TouchWare, you must completely uninstall the software and reboot your system prior to reinstalling. To install TouchWare for multiple touchscreen support: 1. Begin installing TouchWare. If necessary, see the instructions in the “Installing TouchWare” section on page 13 and then return to this page. 2. When you see the Select Installation Type screen, select Custom Install for One or More Touchscreens. Click Next. 3. On the Default Calibration Type screen, select the Default Calibration format for your system: either 2-point or 5-point. Click Next. 4. On the Select Number of Touchscreens screen, select Multiple touchscreens. Click Next. The subsequent Multiple Touchscreen Search should produce details on all touchscreens active and connected to your system. If the install program fails to find all your touchscreens, check the connections, reboot your system, uninstall TouchWare, then begin the install again. 5. On the Select Destination Location screen you can choose to install to a different directory. For multiple monitor setup, we recommend you accept the default location. 6. On the Multiple Touchscreen Configuration screen, set how the desktop appears on the multiple monitors. You have the following options: • Mirrored monitors – each monitor displays the same image • Tiled monitors – each monitor displays a portion of the same image Examples of mirrored and tiled monitors are shown below. Appendix A Multiple Serial Touchscreens Mirrored and Tiled Monitor Options Option Illustration Mirrored monitors ------------------------------------------------ ------------------------------------------------ Tiled monitors ------------------------------------------------ ------------------------------------------------ 73 74 TouchWare for Windows User's Guide Calibrating and Configuring the Touchscreens Once you install Touchware, you can calibrate and configure each serial touchscreen connected to your system using the MicroTouch Touchscreen Properties dialog box. In multiple touchscreen configurations, touchscreen properties are applied to the current touchscreen. You set the current touchscreen by selecting the icon of the desired monitor in the Multiple Monitors tab. To calibrate and configure the touchscreens: 1. Open the Windows Control Panel and double-click the MicroTouch Touchscreen icon. 2. Select the touchscreen you want to calibrate or configure. TouchWare includes a tool for re-assigning touchscreen controllers to communication ports in multiple-monitor mode. To switch communication ports: • Double-click on TouchWare icon. A dialog panel showing touchscreen instances and the corresponding com ports will appear. • Select the desired com port. Two touchscreen controllers, previously assigned to com ports, will be automatically switched. To run the control panel, simply click on the desired touchscreen. Appendix A Multiple Serial Touchscreens 3. 75 Use the tabs in the MicroTouch Touchscreen Properties dialog box to calibrate and configure the touchscreen. For more information on the configuration settings, refer to the chapter 2 of this guide or the online help. For the most part, touchscreen properties apply to individual touchscreens. The only exceptions to this are the double-click and cursor visibility settings, which are applied globally. Note: Multiple touchscreens default to a single touch mode called Click. The Touch Mode selection buttons on the MicroTouch Touchscreen Properties dialog box are disabled. Click mode provides button operation only. The touchscreen sends a button-down, followed by a button-up to the operating system. No drawing or dragging is supported in multiple monitor installations. Use the Advanced Touchscreen Settings dialog to enable additional touch modes. 4. Repeat steps 1-3 for each touchscreen connected to your system. A p p e n d i x B Multiple USB Touchscreens This appendix describes how to set up multiple USB touchscreens. Depending on your application, you may want to use more than one touchscreen with your system. TouchWare supports up to four USB touchscreens. Also, you can include any combination of touch monitors and standard (non-touch) monitors with your system. You may not mix serial, USB and MousePort controllers. Multiple Touchscreens Overview Setting up multiple USB touchscreens involves the following steps: • Checking system requirements • Installing TouchWare • Connecting multiple monitors and touchscreens • Configuring Windows for multiple monitors • Configuring TouchWare for multiple touchscreens 78 TouchWare for Windows User's Guide Checking System Requirements Before attempting to set up multiple USB touchscreens, verify the system meets the following requirements: • Windows 2000, Windows Me, or Windows 98 • A unique video card or port for each monitor Not all video cards support multiple monitor configurations. MicroTouch has tested and evaluated a large number of video cards. See the ReadMe file for details. If you have to install additional video cards, consult your system documentation for instructions. • A USB port for each touchscreen PCs typically include two USB ports. If you want to use more than two touchscreens, you must provide additional USB ports via a hub. Each USB port you add must meet the standard USB specifications for low powered devices. The touchscreens will receive power from the USB connection. Installing TouchWare Next you must install Touchware. You must perform a Custom installation to install Touchware with support for multiple touchscreens. Note: If you have previously loaded TouchWare, you must completely uninstall the software and reboot your system prior to reinstalling. To install TouchWare for multiple touchscreens: 1. Begin installing TouchWare. If necessary, see the instructions in the “Installing TouchWare” section on page 13 and then return to this page. 2. When you see the Select Installation Type screen, select Custom Install for One or More Touchscreens. Click Next. 3. On the Default Calibration Type screen, select the Default Calibration format for your system: either 2-point or 5-point. Click Next. 4. On the Select Number of Touchscreens screen, select Multiple touchscreens. Click Next. 5. On the Select Destination Location screen you can choose to install to a different directory. For multiple touchscreen setup, we recommend you accept the default location. 6. On the Multiple Touchscreen Configuration screen, set how the desktop appears on the multiple monitors. Appendix B Multiple USB Touchscreens You have the following options: • Mirrored monitors – each monitor displays the same image • Tiled monitors – each monitor displays a portion of the same image Examples of mirrored and tiled monitors are shown below. Mirrored and Tiled Monitor Options Option Illustration Mirrored monitors ------------------------------------------------ ------------------------------------------------ Tiled monitors ------------------------------------------------ ------------------------------------------------ 79 80 TouchWare for Windows User's Guide Connecting Multiple Monitors and Touchscreens To connect multiple monitors and touchscreens to your system: 1. Shut down your system. 2. Install additional video cards, if required. 3. Connect each monitor to a unique video port in your system. The monitor you connect to the primary video card becomes the primary monitor. This monitor displays the desktop and taskbar. 4. Apply power to your system and monitors. Windows detects the new video adapters and loads the appropriate drivers. 5. Verify that no error messages appear. 6. Connect each monitor that includes a touchscreen to a USB port. The system beeps shortly after you connect each monitor, indicating Windows has detected the touchscreen and loaded the driver. The first touchscreen you connect to a USB port becomes the default touchscreen. Note: On Windows 2000 systems, if you disconnect and reconnect USB devices, the system will not recognize them unless you restart the system. To disconnect USB devices without having to reboot, click the Unplug or Eject Hardware icon on the taskbar, then select the device you want to disconnect. Appendix B Multiple USB Touchscreens 81 Configuring Windows for Multiple Monitors Next you must configure Windows for multiple monitors. If necessary, refer to your Windows documentation for more information. To configure multiple monitors in Windows: 1. Open the Windows Control Panel and double-click the Display icon. 2. Select the Settings tab. 3. Activate each monitor by selecting it and then checking Extend my Windows desktop onto this monitor (or by right-clicking the monitor icon and selecting Enable). 4. Display each monitor’s label by clicking Identify (or by right-clicking its icon and selecting Identify). 5. Click and drag the monitor icons to position them according to the physical layout of the monitors. Some examples are shown below. Monitor Layout Options Layout 1 row x 2 columns 1 row x 4 columns 2 rows x 1 column 2 rows x 2 columns Illustration 82 TouchWare for Windows User's Guide Configuring TouchWare for Multiple Touchscreens Next you must configure TouchWare for multiple touchscreens. Mapping Multiple Monitors Mapping is the process of matching each monitor with its associated touchscreen. Once you have mapped each touchscreen, TouchWare can reference any touchscreen in your system. To map multiple touchscreens: 1. Open the Windows Control Panel and double-click the MicroTouch Touchscreen icon. 2. Click the Multiple Monitors tab. 3. Click Map Touchscreens and follow the onscreen directions to map each touchscreen. Appendix B Multiple USB Touchscreens 83 Calibrating and Configuring the Touchscreens In multiple monitor situations, calibration and configuration changes are applied to the current touchscreen. You set the current touchscreen by selecting the icon of the desired monitor in the Multiple Monitors tab. To calibrate and configure the touchscreens: 1. Double-click the MicroTouch Touchscreen icon in the Windows Control Panel. 2. Click the Multiple Monitors tab. Monitors with touchscreens are indicated by a small green square located at the bottom right of each monitor icon. Monitors without touchscreens display a small orange square. 3. Select the icon corresponding to the touchscreen that you want to calibrate or configure. If the monitor labels do not appear, click Show Monitor IDs to display them. 4. Use the other tabs in the MicroTouch Touchscreen Properties dialog box to calibrate and configure the touchscreen. For more information on the configuration settings, refer to the chapter 2 of this guide or the online help. For the most part, touchscreen properties apply to individual touchscreens. The only exceptions to this are the double-click and cursor visibility settings, which are applied globally. 5. Repeat steps 1-4 for each touchscreen connected to your system. A p p e n d i x C Miscellaneous Information This appendix contains information on: • Touchscreen driver settings • The MtsCal calibration utility • MousePort controller • Touchscreen care and cleaning • TouchWare system files Touchscreen Driver Settings You can define settings for the touchscreen using the Touchscreen control panel. TouchWare stores the touchscreen settings in the Windows registry. Whenever you save your changes to the Touchscreen control panel, TouchWare records the new settings in the System Registry. These changes take effect immediately. 86 TouchWare for Windows User's Guide MtsCal Calibration Utility You can directly access calibration without opening the Touchscreen control panel by running the MtsCal calibration utility. MtsCal offers the following options: • /c – terminates the utility immediately after calibration • /c2 – for 2-point calibration • /c5 – for 5-point calibration • /e – to enable touch • /d – to disable touch • /n=? (1—4) – to determine which touchscreen to calibrate in a multiple touchscreen setup The /c option is particularly useful because it makes only the calibration screen available. The program immediately opens the calibration screen, and terminates when the calibration process is complete. To run MtsCal: 1. Click on Start → Find→ Files or Folders. 2. In the Named box, type MtsCal.exe and press Enter to begin the search. 3. Select MtsCal.exe in the list window. Right click and select Create Shortcut. Then click Yes to place the shortcut on the desktop. 4. Right-click on the shortcut and select Properties. Edit the information in the target box to include any options you would like to use. For example, to disable touch, add the /d option as follows: “C:\Program Files\MicroTouch\TouchWare\MtsCal.exe” /d Appendix C Miscellaneous Information 87 MousePort Touchscreen Controller Overview The MousePort touchscreen controller is a PS/2-compatible controller. The enclosed controller is externally mounted to the back of your monitor. The controller cable has a 6-pin DIN male connector. You plug this cable into the PS/2 mouse connector on the back of your PC. This frees up the serial ports and bus slots for other peripheral devices. System Requirements for the MousePort Controller The hardware and software requirements for using a MousePort touchscreen controller are as follows: • PC with an available PS/2 mouse port connector • Microsoft Windows NT 4.0, Windows 9X or Me Connecting a MousePort Touchscreen Controller Before attempting to install a MousePort controller, be sure of the following: • If a mouse will be used in addition to the touchscreen, the operating system must be functional with a standard serial mouse connected. • MousePort driver installation adds a virtual COM port at COM9. Make sure the system is not currently using COM9. Caution: If you are not familiar with the operation of mouse drivers, do not attempt to install the MousePort controller. Installing a MousePort controller may alter the performance of your touchscreen or render it inoperable. To connect a MousePort controller, plug the controller cable into the PS/2 mouse connector on the back of your PC. 88 TouchWare for Windows User's Guide Testing the MousePort Controller To verify and test that the MousePort controller is operating properly, you can use the MtsCal calibration utility. Note: Remember that a MousePort touchscreen controller does not connect to a serial port. Therefore, you cannot use standard communication programs (for example, ProComm, Telex, or Windows Terminal) to verify that the MousePort controller is operating properly. Touchscreen Care and Cleaning The touchscreen does not require much maintenance. MicroTouch does, however, recommend that you periodically clean the glass touchscreen surface. • Use isopropyl alcohol or a non-abrasive glass cleaner. Avoid using cleaners other than glass cleaners. Do not use any vinegar-based solutions. • Apply the cleaner with a soft cloth. Avoid using gritty cloths. • Always dampen the cloth and then clean the screen. Always handle the touchscreen with care. Do not pull on or stress cables. Index A Auto Frequency 50 B Button Mode 22, 41 C Calibrate 20, 74, 83 Calibrate Tab Calibration overview 18 Testing the calibration 20 When to calibrate 19 Calibrating a touchscreen 18 Calibrating multiple touchscreens Serial 74 USB 83 Calibration 2-point calibration 33, 43 5-point calibration 33, 43 Direct access 86 Calibration Reminder 44 Calibration Verification 44 Cleaning the touchscreen 88 Click Mode 41 Color Bars 36 Color Purity 36 Color table 37 Communication Port 32 Configuring multiple touchscreens Serial 74 USB 82 Connecting multiple touchscreens Serial 70 USB 80 Contacting Technical Support 8 Control panel 18 Control panel version 33 Controller frequency, adjusting 51 Controller type 31 Corporate headquarters 9 Cursor jitter 27 Cursor stabilization procedure 27 Cursor Tab Cursor Vertical Offset 25 Cursor Visibility 25 Edge Adjustment 26 Stabilize Cursor 26 Cursor Vertical Offset 25 Cursor Visibility 25 Custom Install 72, 78 90 TouchWare for Windows User's Guide Custom Touch Mode 39, 41 Custom Touch Sound 39, 42 D Defaults 33 Diagnostics, ThruGlass 48 Direct access to calibration 86 Disable Touch 43 DOS, full screen 60 Double-click Area 23 Double-click Speed 23, 24 Draw 34, 35 Draw and Test 30 Drawing Mode 22 Driver version 33 E Edge Adjustment 26 Edge Button 26 Error Messages 65 F Find Touchscreen 32 Finger Only Mode 29 Firmware commands For a ThruGlass controller 53 For all other controllers 35 Firmware Version 31 Frequency 27, 30 Full screen DOS needed 60 I Installing TouchWare 13 Installing TouchWare for multi-screens Serial 72 USB 78 International Technical Support 9 J Jittery cursor 27 L LEDs 58 Liftoff Mode 41 Linearization 33, 37, 44 M Mapping 82 Mirror Monitors 72, 79 MousePort 87 MousePort installation notes 87 MtsCal utility 86 Multiple monitor icons 83 Multiple touchscreens Serial 69 USB 77 N Noise Filter 44 Noise Level 48 P Pen and Finger Mode 29 Pen Only Mode 29 Pen Tab Draw and Test 30 Finger Only Mode 29 Pen and Finger Mode 29 Pen Only Mode 29 Stabilize Cursor for Finger and Pen 30 Index R Registry 85 Restore Defaults 33 Right-click Tool 23 S Select Baud Rate 33 Sensitivity, ThruGlass 48 Setting up multiple touchscreens Serial 69 USB 77 Setting Vertical Offset 25 Show Base 49 Show Depth 50 Show Monitor IDs 83 Silent install 14 Single Touchscreen Configuration 39 Site Defaults 39, 42 Software Settings 44 Splash Screen 44 Stabilize Cursor 26 Stabilize Cursor for Finger and Pen 30 T Technical Support 8 Terminal mode 35 Testing the calibration 20 Testing the monitor video 35 ThruGlass 28, 33, 45, 46 Calibration 51 Diagnostics 48 Screen Type 45, 46 Sensitivity 48 Troubleshooting 52 Tile Monitors 72, 79 Touch Mode 22 Button Mode 22 Desktop Mode 22 Drawing Mode 22 Touch Modes 22, 41, 44 Touch Orientation 43 Touch Sensitivity 44 Touch Settings Tab Double-click Area 23 Double-click Speed 23 Right-click Tool 23 Touch Sound 23 Touch Sound 23 Touchdown Mode 41 Touchscreen Calibrating 18 Cleaning 88 Touchscreen Linearization 37 Touchscreen Options 38, 39 Touchscreen Status 31 Touchscreen Status Lights Blinking LED 58 Bright LED 58 Dim LED 58 Unlit LED 58 TouchWare Installing 13 Uninstalling 16 TouchWare control panel 18 TouchWare information 33 Troubleshooting 57 U Uninstall utility 12 V Vertical Offset 25 Video Diagnostic Tools 44 Video resolution, adjusting 52 91 92 TouchWare for Windows User's Guide W What to do if... Cursor does not appear after starting Windows 95 59 Cursor does not reach out to edges of screen 59 Cursor is jittery 59 Cursor jumps or bounces suddenly across the screen 59 Double-click doesn't work 60 Drawing lines are not straight 59 Operating two serial devices 62 Touch is not working 63 Touchscreen not found 64 When to calibrate a touchscreen 19 When to stabilize the cursor 26 Worldwide Technical Support 9