1
User
MANUAL
Version 2.0 April 2008
Content
1 Start Working with AutoDNS2................................................................. 4
1.1 About this Documentation .................................................................................... 5
Conventions of Formatting.......................................................................................... 5
The AutoDNS2 Icons .................................................................................................. 5
1.2 Getting Help............................................................................................................ 6
1.3 AutoDNS2 - Login, Login Check and Logout ...................................................... 7
AutoDNS2 Login ......................................................................................................... 7
Login Check and Session Expire ................................................................................ 7
AutoDNS2 Logout ....................................................................................................... 8
1.4 The User Interface.................................................................................................. 9
The Homepage ........................................................................................................... 9
The Main Forms........................................................................................................ 10
The Subforms ........................................................................................................... 11
1.5 The Search Functions of AutoDNS2 .................................................................. 12
The Object Search .................................................................................................... 12
Handle Search .......................................................................................................... 13
The Domain Search .................................................................................................. 16
The Zone Search ...................................................................................................... 17
1.6 Working efficently with Presets.......................................................................... 19
Defining User Presets ............................................................................................... 19
Defining IRTP Presets for a User.............................................................................. 21
2 Domain Management with the AutoDNS2 Domain Robot .................. 22
2.1 Registering and Updating Domains ................................................................... 23
Registering a new Domain........................................................................................ 23
Bulk Registration of Domains.................................................................................... 24
Edit the Data of a Domain......................................................................................... 25
Bulk Change of Domain Data ................................................................................... 27
Changing Domain Status .......................................................................................... 28
2.2 Domain Transfer, Domain Transit and Cancelation.......................................... 29
Transferring a Domain .............................................................................................. 29
Bulk Transfer of Domains ......................................................................................... 30
Ownerchange of a Domain ....................................................................................... 32
Inquiring outgoing Transfers and Answering Requests for Transfer-Out. ................. 33
Giving back the Domain to the Registry.................................................................... 33
Single Domain Cancelation....................................................................................... 34
Bulk Domain Cancelation.......................................................................................... 35
1 of 95
Revoking a delayed Domain Cancelation ................................................................. 35
2.3 Preregistering Domains ...................................................................................... 37
Preregistering Domains ............................................................................................ 37
Bulk Preregistration................................................................................................... 38
Editing Preregistration Data ...................................................................................... 39
Deleting Preregistrations........................................................................................... 40
2.4 Inquiring Domains ............................................................................................... 41
Inquiring Registered Domains................................................................................... 41
Inquiring registered Domains (.csv file)..................................................................... 41
Inquiring preregistered Domains ............................................................................... 41
Inquiring preregistered Domains (.csv file)................................................................ 42
3 Creating and Managing Handles .......................................................... 43
3.1 Creating and Editing Handles ............................................................................. 44
Creating a new Handle ............................................................................................. 44
Editing Handle Data .................................................................................................. 45
Handle Extensions for certain TLDs.......................................................................... 46
3.2 Deleting NIC-References ..................................................................................... 48
Deleting NIC-References .......................................................................................... 48
3.3 Inquiring Handles................................................................................................. 49
Inquiring Handles ...................................................................................................... 49
Inquiring Handles (.csv file)....................................................................................... 49
4 DNS Manager. Creating and Managing Zones .................................... 50
4.1 Creating and Editing Zones ................................................................................ 51
Creating a new Zone................................................................................................. 51
Bulk Zone Create ...................................................................................................... 53
Creating Subdomain Zones ...................................................................................... 54
Editing Zones............................................................................................................ 55
4.2 Cloning, Importing and Deleting Zones ............................................................. 58
Cloning Zones........................................................................................................... 58
Importing Zones ........................................................................................................ 60
Deleting Zones.......................................................................................................... 61
4.3 Inquiring Zones .................................................................................................... 62
Inquiring Zones ......................................................................................................... 62
Inquiring Zones (.csv-file).......................................................................................... 62
5 User Management .................................................................................. 63
5.1 Creating, Editing and Deleting user. .................................................................. 64
2 of 95
Creating a new User ................................................................................................. 64
Editing User Data...................................................................................................... 65
Deleting a User ......................................................................................................... 67
Managing Users with the User Tree-View................................................................. 67
Change the Language .............................................................................................. 68
5.2 Checking and Assigning the Objects of a User ................................................ 69
Inquiring the Objects of a User (Object check) ......................................................... 69
Assigning Objects to another User ........................................................................... 69
5.3 Managing PGP Keys ............................................................................................ 71
Adding PGP-Keys ..................................................................................................... 71
Deleting PGP keys.................................................................................................... 71
6 Redirector. Redirecting Domains and Emails ..................................... 72
6.1 Creating and Editing Domain Redirects ............................................................ 73
Redirecting Domains................................................................................................. 73
Editing Domain Redirects ......................................................................................... 73
Redirecting Domains for Statistics ............................................................................ 74
Deleting a Domain Redirect ...................................................................................... 75
Bulk Deletion of Domains.......................................................................................... 76
6.2 Creating and Editing Email Redirects ................................................................ 77
Redirecting Emails .................................................................................................... 77
7 Get an Overview with the AutoDNS2 Statistics................................... 78
7.1 Statistics: Object Inquire, Common Log and Object History ........................... 79
Object Inquire ........................................................................................................... 79
Requiring the requests for an object (Commen log )................................................. 80
Object History ........................................................................................................... 81
8 Helpful Tools. WHOIS and IDN Converter............................................ 82
8.1 WHOIS Inquiries................................................................................................... 83
Inquiring a single Domain ......................................................................................... 83
Multi Whois: inquiries for several Domains ............................................................... 84
8.2 The IDN Converter ............................................................................................... 89
Converting IDN Domain Names with the IDN Converter........................................... 89
9 Addendum .............................................................................................. 90
9.1 Userstatus ............................................................................................................ 91
9.2 ISO 3166 Country Codes ..................................................................................... 92
9.3 Function Codes.................................................................................................... 95
3 of 95
1 Start Working with
AutoDNS2
1 Start Working with AutoDNS2
1.1 About this Documentation
Conventions of Formatting
Meaning of formatting:
Formatting
Element of the User
Interface
Meaning
Elements of the user interface (e.g. menu items, item lists
or buttons)
1. Action
2. Action
3. Action
The steps of an action
The options of an item list or a listing of items.
item1
litem 2
item 3
NOTE
Text of the note
ATTENTION
Text of the security advice
Marks a note.
Marks a security advice.
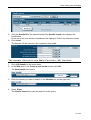
The AutoDNS2 Icons
Meaning of the AutoDNS Icons
Icon
Meaning
Click to get detailed information
Click to delete
Click to get an edit form
Click to view online help
Click to download an .csv file (Excel)
Click to open an email form to get help from our support
5 of 95
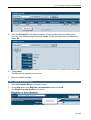
1.2 Getting Help
1.2 Getting Help
There are several possibilities to get help for your work with AutoDNS2:
The online help : click the icon next to the form fields to get help.
If the input in a form field is missing or not valid, you get an error message. If the icon
is displayed, an email form opens to contact our support.
Enter your question in the Comment box and click Next to send it.
6 of 95
1 Start Working with AutoDNS2
1.3 AutoDNS2 - Login, Login Check and
Logout
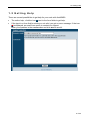
AutoDNS2 Login
1. Start your browser. Enter the URL of your domain system into the address bar.
The Login form opens.
2. Enter your username into the UID box and your password into the Password box.
3. Click Login.
If the login is successful, the Homepage of AutoDNS2 opens. Depending on your
configuration, the content of the start screen is different.
You can start working with AutoDNS2 now.
Login Check and Session Expire
If you did not logout at the end of the last AutoDNS2 session, the check form displays,
after entering UID and password.
7 of 95
1.3 AutoDNS2 - Login, Login Check and Logout
1. Click Yes to terminate the last session and log in. Clicking No you can't login.
2. Click Log on.
AutoDNS2 Logout
1. To terminate your work with AutoDNS2 click the link Logout in the left navigation bar.
The Login form opens, when the Logout is complete.
8 of 95
1 Start Working with AutoDNS2
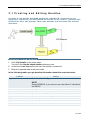
1.4 The User Interface
The Homepage
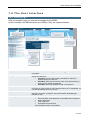
After a successful login you see the homepage of AutoDNS2.
In the screenshot the different areas are marked. They are explained below.
Status bar
Navigation bar
Main menu
Object overview
Left navigation bar
Its an information bar, informing you about the logged in user and the
user status.
The Navigation bar offers you several possibilities for quick access to
objects and functions:
Favorites: list of the the recently used objects. Select the
desired object in the item list.
DirectNav: Enter the the function code of the desired function.
See "Function Codes" on page 95.
QuickNav: Select the desired function in the item list.
Here you find the main functions of AutoDNS2. Clicking the main
functions you have access on each area and each form of AutoDNS2. It is
one favorite starting point of your work.
You get an overview about the number of your objects here.You also can
start your work here, clicking the link Domain Robot, DNS Manager,
Handles or User.
Concerning the configuration different areas are displayed here.
Documentation: Download area of AutoDNS2 documentations
News: News area
FAQ: FAQ area
Download: Download area
Click the desired entry to see details.
9 of 95
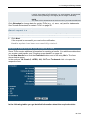
1.4 The User Interface
The Main Forms
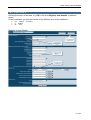
Selecting one of the main functions in the main menu, AutoDNS2 displays the respective
main form. Here you see the Domain Robot main form.
In the screenshot the names of the different area of the forms are added:
the submenu,
an area,
a section
the object search .
10 of 95
1 Start Working with AutoDNS2
The Subforms
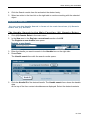
Clicking the button of an area, e.g. OK in the area Register new domain, a subform
opens.
In the screenshot you see the names of the different area of the subforms:
the
search
a
section
an
entry
functions
11 of 95
1.5 The Search Functions of AutoDNS2
1.5 The Search Functions of AutoDNS2
AutoDNS2 offers several search functions.
The Object Search
Domain Search
Handle Search
Zone Search
The Object Search
You can use the Object Search to find desired objects. It is embedded in
forms of the main functions (01) Domain Robot, (2) DNS Manager, (03)
Handles and (05) Redirector.
Using the Alphabetical Search
1. Click the initial letter of the searched object in the Alphabetical Search bar. The
search starts at once.
A new section with the search results is displayed.
2. Click the item list and select the desired entry.
3. Select an action in the item list on the right side to continue working with the selected
object.
U s i n g t h e Search for b o x
1. Enter the term in the Search for box. The wildcard "*" is allowed.
2. In the Sort by item list select the desired grading.
3. Click Search or type Enter.
A new section with the search results is displayed. It shows you the number of found
objects.
12 of 95
1 Start Working with AutoDNS2
4. Click the Search results item list and select the desired entry.
5. Select an action in the item list on the right side to continue working with the selected
object.
Handle Search
You can use the Handle Search in forms of the main functions (01) Domain
Robot and (03) Handles.
The Handle Search in the Main Function (01) Domain Robot.
1. Click (01) Domain Robot in the main menu.
2. In the New area in the Register a new domain section click OK.
The Register a new domain form opens.
3. Enter the Handle you want to search in the Handles box on the right side.
4. Press Enter.
The Handle search form with the search results opens.
5. Click the Handle ID of the desired handle. The Handle search form shows the handle
data.
At the top of the form contact checkboxes are displayed. Select the desired contacts
13 of 95
1.5 The Search Functions of AutoDNS2
The handles will be entered in the respective form fields.
The Handle Search in the forms of Domain Robot
Another Handle Search is included in the forms of the Domain Robot. Use it to search the
handle ID of the desired user and insert it in the Contact info form fields.
1. Click (01) Domain Robot in the main menu.
2. In the New area in the Register a new domain section click OK.
The Register a new domain form opens.
In the Contact info area you find the handle search.
3. Enter the desired data. Select Internal DB to search in the AutoDNS2 Database.
4. Click Next.
The Handle search form with the search results opens.
14 of 95
1 Start Working with AutoDNS2
5. Click the Handle ID of the desired handle.The Handle search form displays the
handle data.
At the top of the form contact checkboxes are displayed. Select the desired contacts
6. Click Insert.
The handles will be entered in the respective form fields.
The Handle Search in the Main Function (02) Handles.
1. Click (03) Handles in the main menu.
2. In the New area in the Create a new handle section click OK.
The New handle form opens.
3. Enter the handle you want to search in the Handles box on the right side.
4. Press Enter.
The Handle search form with the search results opens
15 of 95
1.5 The Search Functions of AutoDNS2
5. Click the Handle ID of the desired handle. A form including all form fields opens .
You can copy desired data for the new handle. Select the respective checkboxes or
select All.
6.
Click insert.
The data will be copied to a new form.
7. Enter the additional data.
The Domain Search
1. Click (01) Domain Robot in the main menu.
2. In the New area in the Register a new domain section click OK.
The Register a new domain form opens.
16 of 95
1 Start Working with AutoDNS2
3. Enter the Domain you want to search in the Domain (intern) box if you want to search
in the internal AutoDNS2 Database.
4. Press Enter.
The Domain search form with the search results opens.
5. Click the Domain name of the desired domain. The Domain search form displays the
domain data.
6. You can copy desired data for the new domain. Select the desired checkboxes or
select All.
7.
Click insert. The data will be copied to a new form. Enter the additional data.
The Zone Search
1. Click (02) DNS Manager in the main menu.
2. In the New area in the Create new zone (Reg) section click OK.
The Create new zone (Reg) form opens.
3. Enter the domain you want to search the zones for in the Zone box.
17 of 95
1.5 The Search Functions of AutoDNS2
4. Press Enter.
The Zone search form with the search results opens.
5. Click the desired Zone.
6. The Zone search form displays the zone data. You can copy desired data for the new
zone. Select the respective checkboxes or select All.
7.
Click insert. The data will be copied to a new form. Enter the additional data.
18 of 95
1 Start Working with AutoDNS2
1.6 Working efficently with Presets
Defining User Presets
Here you can define presets for the form fields in the AutoDNS2 forms. If
you create new objects several fields will already have entries. Of course,
the presets can be overwritten.
1. Click (10) User Profile in the main menu.
You are in the submenu Presets now.
In the following tables you get detailed information about the required entries.
Label
Domain Robot & DNS Manager
Primary
1st secondary to 6th secondary
Main IP
Mode
Help
Enter the presets of the primary nameserver including the TTLs for the
Domain Robot and DNS Manager here .
Enter the presets of the secondary nameservers including the TTLs for
the Domain Robot and DNS Manager here.
Enter the Main IP including the TTL for the Domain Robot and the DNS
Manager here
Select the presets of the nameserver mode here.
Primary only: the zone will be generated only on the primary name
server .
Secondary:The zone will be generated only on the secondary name
server. Zone data will be transferred to primary via AXFR .
Hidden: the zone will be generated on the secondary name server.
Zone data will be transferred to primary via AXFR. Primary name
server is not recorded as name server for the zone .
Complete: the zone will be generated on all nameservers.
ATTENTION
You have to select a mode here. If the mode "none" remains, no zone will
be created on the nameserver.
DNS administration
SOA-Level
Refresh
Retry
Expire
Minimum (TTL)
Enter preset values for the SOA-level within the DNS Manager here. The
SOA level defines the values for refresh, retry, expire and minimum (TTL).
Select "0", if you want to set the values yourself.
Enter a preset refresh value for the zone. The refresh value defines how
often the nameservers should update the SOA data.
Enter a value or keep the values of the predefined SOA level.
recommended median: 39940 (seconds).
Enter a retry value for the zone. If a primary nameserver ist not
accessible, the secondary nameservers try to reach it after a defined span
of time. The retry value defines this span of time.
Enter a value or keep the values of the predefined SOA level.
Recommended median: 7200 (seconds).
Enter a default expire value for the zone. The expire value defines how
long the secondary nameservers should try to reach their inaccesible
primary nameserver, before the zone will be deleted.
Enter a value or keep the values of the predefined SOA level.
Recommended median: 604800 (seconds).
Enter the default value for the Minimum (TTL) in DNS entries here.
19 of 95
1.6 Working efficently with Presets
Show SOA-email
Show AXFR
MX-Host 1 and 2
Number of free Subs
Select the checkbox, if the entry SOA-eMail is to be displayed in the DNS
manager forms.
Select the checkbox, if the entry Transfer limit (AXFR) for the following
networks/ips is to be displayed in the DNS Manager forms.
Enter additional default mailer entries here.
Enter here the initial number of subrecords in the form subs in the DNS
Manager.
Domain Robot
Owner Contact (Owner-C)
Administrative Contact (AdminC)
Technical-Contact (Tech-C)
Zone Administrator (Zone-C)
Enter the default owner contact for your context here.
Enter the default administrative contact here.
Enter the default technical contact here.
Enter the default zone contact here.
General
Answer email
Confirmation email
Confirmation mode (Preview)
Show Contact
Show Handles
Show Nameserver
Show NS Entries
First handle edit
New object user
show toolbar
Session Expire
Bulk-Limit Domains
Bulk Limit DNS
Store searches
Enter a default email address..
Select the checkbox, if the checkbox Confirmation email is to be
displayed.
Select the checkbox, if the checkbox Confirmation Mode (Preview) is to
be displayed.
Select the checkbox to display contact link in sub navigation.
Select the number of handles.
Select the number of nameservers.
Select the checkbox to display NS entries ( .de only).
Select how the first handle should be edited. Using a textfield or a link
(using the search feature).
Select which user should be used as default owner in new forms.
Select the checkbox to display the toolbar at the top.
Enter the time for session expire (seconds).
Enter the maximum number of domains, to be processed in a bulk
request.
Enter the maximum number of zones, to be processed in a bulk request.
Select checkbox if you want your searches to be stored.
Links
Default news open
Default FAQ open
Default Download open
Default timeline open
Select the checkbox, if you want the news to be displayed on the left
navigation bar as default.
Select the checkbox, if you want the FAQ to be displayed on the left
navigation bar as default.
Select the checkbox, if you want the Downloads to be displayed on the
left navigation bar as default.
Select the checkbox, if you want the time line to be displayed on the left
navigation bar as default.
20 of 95
1 Start Working with AutoDNS2
Defining IRTP Presets for a User
Here you can define presets for the FOA emails. According to the ICANN
IRTP policy the FOA1 email has to be sent by the new registrar to the domain
ow ner (Owner-C) or the adminstrative contact or both before the transfer will
be started. The recipient has to agree to the transfer using the confirmation
link in the FOA1 email. Without this acknowledgment a domain transfer is
not possible.
1. Click (10) Userprofile in the main menu.
2. Click IRTP in the submenu.
In the following tables you get detailed information about the required entries.
Meaning of the Foa settings:
Optional = the setting is used for this user but not for the subusers.
Recurse = the setting is used for the subusers too. It can be overwritten.
Fix = the setting ist used for the subusers. It cannot be overwritten.
Label
Help
Foa1 (the email containing the confirmation link)
Information and policy
Confirmation Link
Standard Sender
Send reminder after 1 Week
Support E-Mail Address
Recipient of the FOA1 Request
Mail
Enter the location (URL) for the IRTP policy.
Enter confirmation link.
Enter the senders name of FOA1 email.
Select the checkbox if a reminder is to be sent after 1 week.
Enter a valid support email address.
Select the recipient of FOA1 request email.
Foa2 (mail that is sent by an outgoing transfer)
Senders Name
Senders Address
Recipient
Enter the senders name of FOA2 email.
Enter the senders address of FOA2 email.
Select the recipient of FOA2 email. Choose between Admin-C, Owner-C
or Both.
21 of 95
2 Domain Management
with the AutoDNS2
Domain Robot
2 Domain Management with the AutoDNS2 Domain Robot
2.1 Registering and Updating Domains
Registering a new Domain
1. Click (01) Domain Robot in the main menu.
You are in the submenu Domain administration now.
2. In the New area in the Register new domain section click OK.
The form Register a new domain opens.
3. In the item list as User select the user the domain is created for.
4. Enter the required data in the form fields.
In the following tables you get detailed information about the required entries.
Label
Domain Information
Domain (sld)
Ending (subtld)
Ending (tld)
dont check WHOIS for gTLD
(Status)
Registry Status
Transaction
Help
Enter the second-level-domain.
Example: " test" is the SLD in the domain name "test.de" and "test.co.uk".
Enter the subtld, if there is one.
Example: "co" is the subtld in the domain name "test.co.uk". "Test.de" has
no subtld.
In the Ending (tld) item list select the desired domain.
Select the check box, to start an internal transfer even thought the loosing
reseller did not update the status to "active". Anyway you need an
authcode to start the transfer.
In the list select the desired registry status:
Lock = The domain is protected against updates and transfer
Hold = the domain is registered but not connected (Example: resellers
can set this status e.g. if a client did not pay.)
Hold-Lock = the domain ist registered but not connected; it's also
protected against transfer. (Example: resellers can set this status e.g. if a
client did not pay.)
Active = Domain will be unlocked
Enter a transaction ID for this transaction (optional).
Nameserver
1st Nameserver
2nd Nameserver
3rd Nameserver
MX-entry
IP Adress
Mode
Enter the domain name of your primary nameserver.
Example: my.nameserver1.com
Enter the domain name of your secondary nameserver.
Example: my.nameserver2.com
Enter one or more MX-entries.
(Examples:
mail 180 IN A 1.2.3.4
mail 180 IN MX 10 mail.mydomain.com.)
Enter an IP Address .
Select a nameserver mode:
Primary only: the zone will be generated only on the primary name
server .
Secondary: the zone will be generated only on the secondary name
server. Zone data will be transferred to primary via AXFR .
Hidden: the zone will be generated on the secondary name server.
Zone data will be transferred to primary via AXFR. Primary name
server is not recorded as name server for the zone .
23 of 95
2.1 Registering and Updating Domains
1st nsentry to 5th nsentry
Complete: the zone will be generated on all name servers.
ATTENTION
You have to select a mode here. If the mode "none" remains, no zone will
be created on the nameserver.
Only available for .de: If nameservers are used these fields will be
ignored. You can do the dns entries without a real dns server like this:
my.domain.de IN A 127.0.0.1 these records will be directly published in
DENIC's root nameservers.
Contact info
NOTE
You need a handle to create a new domain. Before creating a new domain create a new handle first. See
page 23. Or you use the button Create in this Contact info section to create one.
Domain Owner (Owner-C)
Organization
Administrative Contact (AdminC)
Technical Contact (Tech-C)
Zone Administrator (Zone-C)
Enter the handle of the future registrant here.
Enter the organization here.
Enter the handle of the future administrative contact here.
Enter the handle of the future technical contact here.
Enter the handle of the future zone administator here.
Send report to
e-mail
Confirmation Mode (Preview)
Confirmation Mail?
Enter a valid email address receiving the reports of your order.
Select the check box to display a preview.
Select the check box to receive a confirmation mail for your request.
5. Click Next.
If the request is successful you get notification:
Domain-registration was successfully started.
Bulk Registration of Domains
1. Click (01) Domain Robot in the main menu.
You are in the submenu Domain administration now.
2. In the area New in the Bulk create section click OK.
3. In the item list as User select the user the domain is created for.
4. Enter the required data in the form fields.
In the following tables you get detailed information about the required entries.
Label
Domain Information
Domains
Help
Enter the domains here.
Click Create new cancelation tasks to cancel domains without current
cancelation request.
Click Replace existing cancelation tasks to update current requests for
domain cancelation.
If you enter mixed lists of domains (with and without current cancelation
request) one part of the domains concerning to the option you selected,
will fail. Subsequently you can make another request for these domains.
24 of 95
2 Domain Management with the AutoDNS2 Domain Robot
Transaction
Enter a transaction ID for this transaction (optional).
Nameserver
1st Nameserver
2nd Nameserver
3rd Nameserver
SOA-check (check zone in
nameserver)
Enter the domain name of your primary nameserver.
Example: my.nameserver1.com
Enter the domain name of your secondary nameserver.
Example: my.nameserver2.com
Select the checkbox to have a SOA-check.This option checks the
nameservers (serial and NS-Records) that you sent in your order. If one
or the other is invalid, the order will not be sent. Other NICs do not let you
update or register a domain if the zone has not been entered correctly on
the nameserver.
Contact Info
SOA-check (check zone in
nameserver)
Domain Owner (Owner-C)
Organization
Administrative Contact (AdminC)
Technical Contact (Tech-C)
Zone Administrator (Zone-C)
Select the checkbox to have a SOA-check.This option checks the
nameservers (serial and NS-Records) that you sent in your order. If one
or the other is invalid, the order will not be sent. Other NICs do not let you
update or register a domain if the zone has not been entered correctly on
the nameserver.
Enter the handle of the future registrant here.
Enter the organization here.
Enter the handle of the future administrative contact here.
Enter the handle of the future technical contact here.
Enter the handle of the future zone administator here.
Send report to
e-mail
Confirmation Mode (Preview)
Confirmation Mail?
Enter a valid email address receiving the reports of your order.
Select the check box to display a preview.
Select the check box to receive a confirmation mail for your request.
5. Click Next.
If the request is successful you receive the notification:
Domain-registrations were successfully started.
For each domain you get a separate notification.
Edit the Data of a Domain
1. Click (01) Domain Robot in the main menu.
You are in the submenu Domain administration now.
2. In the Change/Delete area enter the name of the domain you want to edit in the
Direct box. Select Change in the item list. Click OK.
Or:
Use the search function (see "The AutoDNS2 search functions " on page 12) to find
the domain you want to edit.
Select Change in the item list. Click OK.
3. Enter the required data in the form fields.
25 of 95
2.1 Registering and Updating Domains
In the following tables you get detailed information about the required entries.
Label
Domain Information
Domain (sld)
Ending (subtld)
Ending (tld)
Cancelation
Transaction
Help
Enter the second-level-domain.
Example: " test" is the SLD in the domain name "test.de" and "test.co.uk".
Enter the subtld, if there is one.
Example: "co" is the subtld in the domain name "test.co.uk". "Test.de" has
no subtld.
In the Ending (tld) item list select the desired domain.
Here you can revoke a domain cancelation dated for future execution.
NOTE
Cancelations usually can only be revoked until 12 hours before execution
and will not be displayed here if a revocation is not possible. In this case
the revoke cancelation button is not displayed either. See "How to
cancel a request for domain cancelation" on page 35.
Enter a transaction ID for this transaction (optional).
Nameserver
1st Nameserver
2nd Nameserver
3rd Nameserver
1st nsentry to 5th nsentry
SOA-check (check zone in
nameserver)
Enter the domain name of your primary nameserver.
Example: my.nameserver1.com
Enter the domain name of your secondary nameserver.
Example: my.nameserver2.com
Only available for .de: If nameservers are used these fields will be
ignored. You can do the dns entries without a real dns server like this:
my.domain.de IN A 127.0.0.1 these records will be directly published in
DENIC's root nameservers.
Select the checkbox to have a SOA-check.This option checks the
nameservers (serial and NS-Records) that you sent in your order. If one
or the other is invalid, the order will not be sent. Other NICs do not let you
update or register a domain if the zone has not been entered correctly on
the nameserver.
Contact Info
Domain Owner (Owner-C)
Organization
Administrative Contact (AdminC)
Technical Contact (Tech-C)
Zone Administrator (Zone-C)
Enter the handle of the future registrant here.
Enter the organization here.
Enter the handle of the future administrative contact here.
Enter the handle of the future technical contact here.
Enter the handle of the future zone administator here.
Send report to
e-mail
Confirmation Mode (Preview)
Confirmation Mail?
Enter a valid email address receiving the reports of your order.
Select the check box to display a preview.
Select the check box to receive a confirmation mail for your request.
5. Click Next.
If the request is successful you receive the notification:
Domain-update has been successfully started.
26 of 95
2 Domain Management with the AutoDNS2 Domain Robot
Bulk Change of Domain Data
1. Click (01) Domain Robot in the main menu.
You are in the submenu Domain administration now.
2. In the Change/Delete area in the Bulk change section click OK.
3. Enter the required data in the form fields.
In the following tables you get detailed information about the required entries.
Label
Domains
Domain Owner (Owner-C)
Organization
Administrative Contact (AdminC)
Technical Contact (Tech-C)
Zone Administrator (Zone-C)
Help
Enter the domains here.
Click Create new cancelation tasks to cancel domains without current
cancelation request.
Click Replace existing cancelation tasks to update current requests for
domain cancelation.
If you enter mixed lists of domains (with and without current cancelation
request) one part of the domains concerning to the option you selected,
will fail. Subsequently you can make another request for these domains.
Enter the handle of the future registrant here.
Enter the organization here.
Enter the handle of the future administrative contact here.
Enter the handle of the future technical contact here.
Enter the handle of the future zone administator here.
Nameserver
1st Nameserver
Enter the domain name of your primary nameserver.
Example: my.nameserver1.com
2nd Nameserver
Enter the domain name of your secondary nameserver.
3rd Nameserver
Example: my.nameserver2.com
Alternate nsentry (only possible by DENIC)
1st nsentry to 5th nsentry
Only available for .de: If nameservers are used these fields will be
ignored. You can do the dns entries without a real dns server like this:
my.domain.de IN A 127.0.0.1 these records will be directly published in
DENIC's root nameservers.
Send report to
e-mail
Confirmation Mode (Preview)
Confirmation Mail?
Enter a valid email address receiving the reports of your order.
Select the check box to display a preview.
Select the check box to receive a confirmation mail for your request.
4. Click Next.
If the request is successful you receive the notification:
Domain-update has been successfully started.
27 of 95
2.1 Registering and Updating Domains
Changing Domain Status
1. Click (01) Domain Robot in the main menu.
2. Click Status in the submenu.
The form Change Domain status opens.
3. Enter the required data in the form fields.
In the following tables you get detailed information about the required entries.
Label
Registry Status
Domains
e-mail
Help
In the list select the desired registry status:
Lock = The domain is protected against updates and transfer
Hold = the domain is registered but not connected (Example: resellers
can set this status e.g. if a client did not pay.)
Hold-Lock = the domain ist registered but not connected; it's also
protected against transfer. (Example: resellers can set this status e.g. if a
client did not pay.)
Active = Domain will be unlocked
Enter the domains here.
Click Create new cancelation tasks to cancel domains without current
cancelation request.
Click Replace existing cancelation tasks to update current requests for
domain cancelation.
If you enter mixed lists of domains (with and without current cancelation
request) one part of the domains concerning to the option you selected,
will fail. Subsequently you can make another request for these domains.
Enter a valid email address for the reports.
4. Click Next.
If the request is successful you receive the notification:
The domain status has been successfully set.
28 of 95
2 Domain Management with the AutoDNS2 Domain Robot
2.2 Domain Transfer, Domain Transit and
Cancelation
Transferring a Domain
Transferring a domain means to move the domain from one registrar (= Old
registrar) to another (= new registrar.) For the old registrar this is a transferout, for the new registrar it is a transfer-in. The transfers you start in this
form are transfer-ins.
1. Click (01) Domain Robot in the main menu.
You are in the submenu Domain administration now.
2. In the Transfer area enter the name of the domain you want to transfer in the transfer
Domain box.
3. Select the check box dont check WHOIS for gTLD (Status), to start an internal
transfer even thought the loosing reseller did not update the status to "active". Anyway
you need an authcode to start the transfer.
4. Click OK.
The form Transfer Domain opens.
5. In the item list as User select the user the domain is created for.
6. Enter the required data in the form fields.
In the following tables you get detailed information about the required entries.
Label
Domain Information
Transaction
Help
Enter a transaction ID for this transaction (optional).
Nameserver
1st Nameserver
2nd Nameserver
3rd Nameserver
MX-entry
IP Adress
Mode
Enter the domain name of your primary nameserver.
Example: my.nameserver1.com
Enter the domain name of your secondary nameserver.
Example: my.nameserver2.com
Enter one or more MX-entries.
(Examples:
mail 180 IN A 1.2.3.4
mail 180 IN MX 10 mail.mydomain.com.)
Enter an IP Address .
Select a nameserver mode:
Primary only: the zone will be generated only on the primary name
server .
Secondary: the zone will be generated only on the secondary name
server. Zone data will be transferred to primary via AXFR .
Hidden: the zone will be generated on the secondary name server.
Zone data will be transferred to primary via AXFR. Primary name
server is not recorded as name server for the zone .
Complete: the zone will be generated on all name servers.
ATTENTION
29 of 95
2.2 Domain Transfer, Domain Transit and Cancelation
SOA-check (check zone in
nameserver)
You have to select a mode here. If the mode "none" remains, no zone will
be created on the nameserver.
Select the checkbox to have a SOA-check.This option checks the
nameservers (serial and NS-Records) that you sent in your order. If one
or the other is invalid, the order will not be sent. Other NICs do not let you
update or register a domain if the zone has not been entered correctly on
the nameserver.
Contact info
To create a new Handle click Create to create one. See "Creating a new handle" on page
44.
Click Show recommendation to get the data of the WHOIS as recommendation for a
new handle.
Domain Owner (Owner-C)
Organization
Administrative Contact (AdminC)
Technical Contact (Tech-C)
Zone Administrator (Zone-C)
Enter the handle of the future registrant here.
Enter the organization here.
Enter the handle of the future administrative contact here.
Enter the handle of the future technical contact here.
Enter the handle of the future zone administator here.
Send report to
e-mail
Confirmation Mode (Preview)
Confirmation Mail?
Enter a valid email address receiving the reports of your order.
Select the check box to display a preview.
Select the check box to receive a confirmation mail for your request.
7. Click Next.
If the request is successful you receive the notification:
Domain transfer successfully started.
Bulk Transfer of Domains
1. Click (01) Domain Robot in the main menu.
You are in the submenu Domain administration now.
2. In the Transfer area in the Bulk transfer section click OK.
3. In the item list as User select the user the domain is created for.
4. Enter the required data in the form fields.
In the following tables you get detailed information about the required entries.
Label
Domains
Transaction
Help
Enter the domains here.
Click Create new cancelation tasks to cancel domains without current
cancelation request.
Click Replace existing cancelation tasks to update current requests for
domain cancelation.
If you enter mixed lists of domains (with and without current cancelation
request) one part of the domains concerning to the option you selected,
will fail. Subsequently you can make another request for these domains.
Enter a transaction ID for this transaction (optional).
30 of 95
2 Domain Management with the AutoDNS2 Domain Robot
Nameserver
1st Nameserver
2nd Nameserver
3rd Nameserver
MX-entry
IP Adress
Mode
Enter the domain name of your primary nameserver.
Example: my.nameserver1.com
Enter the domain name of your secondary nameserver.
Example: my.nameserver2.com
Enter one or more MX-entries.
(Examples:
mail 180 IN A 1.2.3.4
mail 180 IN MX 10 mail.mydomain.com.)
Enter an IP Address .
Select a nameserver mode:
SOA-check (check zone in
nameserver)
Primary only: the zone will be generated only on the primary name
server .
Secondary: the zone will be generated only on the secondary name
server. Zone data will be transferred to primary via AXFR .
Hidden: the zone will be generated on the secondary name server.
Zone data will be transferred to primary via AXFR. Primary name
server is not recorded as name server for the zone .
Complete: the zone will be generated on all name servers.
ATTENTION
You have to select a mode here. If the mode "none" remains, no zone will
be created on the nameserver.
Select the checkbox to have a SOA-check.This option checks the
nameservers (serial and NS-Records) that you sent in your order. If one
or the other is invalid, the order will not be sent. Other NICs do not let you
update or register a domain if the zone has not been entered correctly on
the nameserver.
Contact info
AuthInfo
Domain Owner (Owner-C)
Organization
Administrative Contact (AdminC)
Technical Contact (Tech-C)
Zone Administrator (Zone-C)
Here you can enter the authcode from the old provider in order to initiate
a domain transfer.
Enter the handle of the future registrant here.
Enter the organization here.
Enter the handle of the future administrative contact here.
Enter the handle of the future technical contact here.
Enter the handle of the future zone administator here.
Send report to
e-mail
Confirmation Mode (Preview)
Confirmation Mail?
Enter a valid email address receiving the reports of your order.
Select the check box to display a preview.
Select the check box to receive a confirmation mail for your request.
4. Click Next.
If the request is successful you receive the notification:
Domain-Transfers successfully started.
31 of 95
2.2 Domain Transfer, Domain Transit and Cancelation
Ownerchange of a Domain
1. Click (01) Domain Robot in the main menu.
You are in the submenu Domain administration now.
2. In the Change/Delete area enter the name of the domain you want to edit in the
Direct box. Select Change in the item list . Click OK.
Or:
Use the search function (see "The AutoDNS2 search functions " on page 12) to find
the domain you want to make an ownerchange for.
Select Ownerchange in the item list. Click OK.
The form Change domain opens.
3. Enter the required data in the form fields.
In the following tables you get detailed information about the required entries.
Label
Transaction
Help
Enter a transaction ID for this transaction (optional).
Nameserver
1st Nameserver
2nd Nameserver
3rd Nameserver
SOA-check (check zone in
nameserver)
Enter the domain name of your primary nameserver.
Example: my.nameserver1.com
Enter the domain name of your secondary nameserver.
Example: my.nameserver2.com
Select the checkbox to have a SOA-check.This option checks the
nameservers (serial and NS-Records) that you sent in your order. If one
or the other is invalid, the order will not be sent. Other NICs do not let you
update or register a domain if the zone has not been entered correctly on
the nameserver.
Contact info
Domain Owner (Owner-C)
Organization
Administrative Contact (AdminC)
Technical Contact (Tech-C)
Zone Administrator (Zone-C)
Enter the handle of the future registrant here.
Enter the organization here.
Enter the handle of the future administrative contact here.
Enter the handle of the future technical contact here.
Enter the handle of the future zone administator here.
Send report to
e-mail
Confirmation Mode (Preview)
Confirmation Mail?
Enter a valid email address receiving the reports of your order.
Select the check box to display a preview.
Select the check box to receive a confirmation mail for your request.
4. Click Next.
If the request is successful you receive the notification:
Domain-Ownerchange has been successfully started.
32 of 95
2 Domain Management with the AutoDNS2 Domain Robot
Inquiring outgoing Transfers and Answering Requests
for Transfer-Out.
You can inquire outgoing transfers here. You can answer current transfers
with ACK (you accept the transfer), NACK (you refuse the transfer) or
LateACK (you accept now, after you had refused acceptance in the first
instance.)
1.
2.
3.
4.
Click (01) Domain Robot in the main menu.
Click Domain-transfer (Out) in the submenu.
In the item list for User select the user, you want to inquire the transfer-outs for.
Click OK.
You get the success message:
Transfer-out information was aquired successfully.
All current transfer-outs are listed.
Click the link Outgoing transfers for all follow-ups, if you want to inquire the
transfers of the subusers too.
The list shows:
Domain: the domain which will be transferred
User: the User, the domain belongs to
New Provider: the gaining registrar
Status: the current status of the domain, e.g. NACK, if the transfer was refused.
Transfer-Start (KK): the date, when the request for transfer came in.
Transfer-End (KK): the date, when the period of acknowlegement has expired.
Action: you can answer the request for transfer here: ACK = you accept the transfer, NACK = you
refuse acceptance, Lateack = you accept transfer, after you had refused acceptance in the first
instance.
5. Answering a request for transfer-out:
In the column Action select the desired answer for the request:
ACK : you accept the transfer-out
NACK: you refuse acceptance for the transfer-out.
Lateack: for domains, you had refused acceptance in the first instance, you only can select
LateAck.
If the request is successful you receive the notification:
The answering of outgoing domain-transfers has been successfully
started.
Giving back the Domain to the Registry
You use the feature "transit" to give a domain back to the registry.
1. Click (01) Domain Robot in the main menu.
2. Click Cancel a domain in the submenu.
The form Cancel a domain opens.
3. Enter the required data in the form fields.
To give the domain back to the registry select Back (transit) in the Action item list.
33 of 95
2.2 Domain Transfer, Domain Transit and Cancelation
In the following tables you get detailed information about the required entries.
Label
Disconnection
Action
When should these domains be
deleted?
Help
Select the checkbox if you want the domain to be disconnected.
In the list select Delete to delete a domain.
Select Back (Transit) to give a domain back to the registry.
Enter the deletion date. (Format dd-mm-yyyy, hh-mm-ss). Leave blank for
immediate deletion.
4. Click Next
If the request is successful you receive the notification:
Domain cancel task successfully transmitted.
Single Domain Cancelation
1. Click (01) Domain Robot in the main menu.
You are in the submenu Domain administration now.
2. In the Change/Delete area enter the name of the domain you want to delete in the
Direct box. Select Delete in the item list. Click OK.
Or:
Use the search function (see "The search functions of AutoDNS2" on page 12) to find
the domain you want to delete.
Select Delete in the item list. Click OK.
3. Enter the required data in the form fields.
In the following tables you get detailed information about the required entries.
Label
Help
Transaction
Disconnection
When should these domains be
deleted?
e-mail
Enter a transaction ID for this transaction (optional).
Select the checkbox if you want the domain to be disconnected.
Enter the deletion date. (Format dd-mm-yyyy, hh-mm-ss). Leave blank for
immediate deletion.
Enter a valid email address which should recieve the reports of you order.
NOTE
You can revoke a delayed cancelation until 12 hours before deletion time. See "reversing a delayed domain
cancelation" on page 35.
4. Click Next.
If the request is successful you receive the notification:
Domain cancel task successfully transmitted.
34 of 95
2 Domain Management with the AutoDNS2 Domain Robot
Bulk Domain Cancelation
1. Click (01) Domain Robot in the main menu.
2. Click Cancel a domain in the submenu.
The form Cancel a domain opens.
3. Enter the required data in the form fields.
To cancel the domain select Delete in the Action item list.
In the following tables you get detailed information about the required entries.
Label
Domains
Disconnection
Action
When should these domains be
deleted?
Help
Enter the domains here.
Click Create new cancelation tasks to cancel domains without current
cancelation request.
Click Replace existing cancelation tasks to update current requests for
domain cancelation.
If you enter mixed lists of domains (with and without current cancelation
request) one part of the domains concerning to the option you selected,
will fail. Subsequently you can make another request for these domains.
Select the checkbox if you want the domain to be disconnected.
In the list select Delete to delete a domain.
Select Back (Transit) to give a domain back to the registry.
Enter the deletion date. (Format dd-mm-yyyy, hh-mm-ss). Leave blank for
immediate deletion.
4. Click Next.
If the request is successful you receive the notification:
Domain cancel task transmitted.
Revoking a delayed Domain Cancelation
1. Click (01) Domain Robot in the main menu.
You are in the submenu Domain administration now.
2. In the Change/Delete area enter the name in the Direct box. Select Change in the
item list. Click OK.
Or:
Use the search function (see "The search functions of AutoDNS2" on page 12) to find
the domain.
Select Change in the item list. Click OK.
The form Change Domain opens.
3. In the section Domain information you find the entry Cancelation. If there is a
current request for delayed cancelation the Revoke cancelation button is shown.
4. Click Revoke cancelation to revoke the cancelation of the selected domain.
The request for cancelation will be deleted immediately.
35 of 95
2.2 Domain Transfer, Domain Transit and Cancelation
NOTE
Cancelations usually can be revoked until 12 hours before execution and will not be displayed here if a
revocation is not possible. If you want to revoke a cancelation even if no button is shown please contact our
support.
36 of 95
2 Domain Management with the AutoDNS2 Domain Robot
2.3 Preregistering Domains
If new TLDs are to be established, you have the possiblity to preregister
desired domainnames. For preregistration there are several phases,
determined by the respective registry. The purpose of these phases is e.g. to
protect the rights of governments and trademarks. Addionally if a registry
introduces new features for existing TLDs (e.g. the .eu IDN domain names or
numeric domains) preregistration is available.
Preregistrations you order via AutoDND2 will be send to the registry, w hen
the respective phase of registration you selected starts.
Preregistering Domains
1. Click (01) Domain Robot in the main menu.
2. Click Domain Prereg in the submenu.
3. In the area New in the PreRegister new domain section click OK.
The form PreRegister a new domain opens.
4. In the item list as User select the user the domain is preregistered for.
5. Enter the required data in the form fields.
In the following tables you get detailed information about the required entries.
Label
Domain Information
Domain (sld)
Ending (subtld)
Ending (tld)
Help
Enter the second-level-domain.
Example: " test" is the SLD in the domain name "test.de" and "test.co.uk".
Enter the subtld, if there is one.
Example: "co" is the subtld in the domain name "test.co.uk". "Test.de" has
no subtld.
In the Ending (tld) item list select the desired domain.
NOTE
For some Preregistrations we offer an additional button or link for further
information about new domains and the conditions of preregistration.
Please attend to the remarks in the userinterface.
Nameserver
1st Nameserver
2nd Nameserver
3rd Nameserver
Enter the domain name of your primary nameserver.
Example: my.nameserver1.com
Enter the domain name of your secondary nameserver.
Example: my.nameserver2.com
Contact Info
Domain Owner (Owner-C)
Organization
Administrative Contact (AdminC)
Technical Contact (Tech-C)
Zone Administrator (Zone-C)
Enter the handle of the future registrant here.
Enter the organization here.
Enter the handle of the future administrative contact here.
Enter the handle of the future technical contact here.
Enter the handle of the future zone administator here.
Send report to
e-mail
Confirmation Mode (Preview)
Enter a valid email address receiving the reports of your order.
Select the check box to display a preview.
37 of 95
2.3 Preregistering Domains
Confirmation Mail?
Select the check box to receive a confirmation mail for your request.
6. Click Next.
If the request is successful you receive the notification:
Domain successfully preregistered.
Bulk Preregistration
1.
2.
3.
4.
5.
Click (01) Domain Robot in the main menu.
Click Domain Prereg in the submenu.
In the area New in the Bulk Prereg create section click OK.
In the item list as User select the user the domains are to preregistered for.
Enter the required data in the form fields.
In the following tables you get detailed information about the required entries.
Label
Domain Information
Domains
Phase
Help
Enter the domains here.
Click Create new cancelation tasks to cancel domains without current
cancelation request.
Click Replace existing cancelation tasks to update current requests for
domain cancelation.
If you enter mixed lists of domains (with and without current cancelation
request) one part of the domains concerning to the option you selected,
will fail. Subsequently you can make another request for these domains.
Select the phase of registration, in which you want to register the domain.
Nameserver
1st Nameserver
2nd Nameserver
3rd Nameserver
Enter the domain name of your primary nameserver.
Example: my.nameserver1.com
Enter the domain name of your secondary nameserver.
Example: my.nameserver2.com
Contact Info
Domain Owner (Owner-C)
Organization
Administrative Contact (AdminC)
Technical Contact (Tech-C)
Zone Administrator (Zone-C)
Enter the handle of the future registrant here.
Enter the organization here.
Enter the handle of the future administrative contact here.
Enter the handle of the future technical contact here.
Enter the handle of the future zone administator here.
Send report to
e-mail
Confirmation Mode (Preview)
Confirmation Mail?
Enter a valid email address receiving the reports of your order.
Select the check box to display a preview.
Select the check box to receive a confirmation mail for your request.
6. Click Next.
If the request is successful you receive the success message for each preregistered
domain:
Domain successfully preregistered.
38 of 95
2 Domain Management with the AutoDNS2 Domain Robot
Editing Preregistration Data
1. Click (01) Domain Robot in the main menu.
2. Click Domain PreReg in the submenu.
3. In the Change/Delete area enter the name of the domain you want to edit in the
Direct box. Select Change in the item list . Click OK.
Or:
Use the search function (see "The AutoDNS2 search functions " on page 12) to find
the domain you want to edit.
Select Change in the item list. Click OK.
4. Change the data in the form fields.
In the following tables you get detailed information about the required entries.
Meaning of the status
pending
pending_sent
Your request can still be edited or deleted and has not been processed.
Your request has been processed and cannot be edited anymore. The request has been
sent to the registry.
pending_progress The request is currently in process.
invalid_name
The domain name is reserved or invalid.
timeout
We have received information from the registry stating that you exceeded the time limit
for submitting the documentation. Therefore the request was declined.
failed
The request contained an error and could not be processed by the registry for further
validation.
auto_cancel
The registry has informed us that the domain cannot be registered because the domain
is locked, reserved or has already been applied for by another entity or person.
Label
Nameserver
Transaction
1st Nameserver
2nd Nameserver
3rd Nameserver
SOA-check (check zone in
nameserver)
Help
Enter a transaction ID for this transaction (optional).
Enter the domain name of your primary nameserver.
Example: my.nameserver1.com
Enter the domain name of your secondary nameserver.
Example: my.nameserver2.com
Select the checkbox to have a SOA-check.This option checks the
nameservers (serial and NS-Records) that you sent in your order. If one
or the other is invalid, the order will not be sent. Other NICs do not let you
update or register a domain if the zone has not been entered correctly on
the nameserver.
Contact info
Domain Owner (Owner-C)
Organization
Administrative Contact (AdminC)
Technical Contact (Tech-C)
Zone Administrator (Zone-C)
Enter the handle of the future registrant here.
Enter the organization here.
Enter the handle of the future administrative contact here.
Enter the handle of the future technical contact here.
Enter the handle of the future zone administator here.
Send report to
e-mail
Confirmation Mode (Preview)
Confirmation Mail?
Enter a valid email address receiving the reports of your order.
Select the check box to display a preview.
Select the check box to receive a confirmation mail for your request.
39 of 95
2.3 Preregistering Domains
5. Click Next.
If the request is successful you receive the success message:
Preregistration successfully updated.
Deleting Preregistrations
1. Click (01) Domain Robot in the main menu.
2. Click Domain PreReg in the submenu.
3. In the Change/Delete area enter the name of the domain you want to delete in the
Direct box. Select Delete in the item list . Click OK.
Or:
Use the search function (see "The AutoDNS2 search functions " on page 12) to find
the domain you want to delete.
Select Delete in the item list. Click OK.
The form Delete Preregistration opens.
4. Click Next.
If the request is successful you receive the success message:
Preregistration successfully deleted.
40 of 95
2 Domain Management with the AutoDNS2 Domain Robot
2.4 Inquiring Domains
Inquiring Registered Domains
1. Click (01) Domain Robot in the main menu.
2. Click Inventory in the submenu.
The form Inventory opens.
3. In the item list for User select the user you want to view the inventory for.
4. Click OK.
If the request is successful you receive the success message:
Domain-data has been successfully aquired.
AutoDNS2 shows an inventory of the registered domains for the selected user.
5. Click the link Logs for all follow-ups to see the domain inventory of all subusers.
The list shows:
Domain: the name of the domain
Created: date of registration
Due date: billing date
Status: the current status of the domain
User: the User, the domain belongs to
Structure: the user structure
Inquiring registered Domains (.csv file)
1. Click (01) Domain Robot in the main menu.
2. Click Inventory in the submenu.
The form Inventory opens.
3. In the item list for User select the user you want to have an inventory for.
4. Click OK.
If the request is successful you receive the success message:
Domain-data has been successfully aquired.
AutoDNS2 shows an inventory of the registered domains for the selected user.
Click the link Logs for all follow-ups to see the domain inventory of all subusers.
The list shows:
Domain: the name of the domain
Created: date of registration
Due date: billing date
Status: the current status of the domain
User: the User, the domain belongs to
Structure: the user structure
5. Click the link Download as .csv file (can be read with Excel). In the following
window you can store the file or open it with Excel.
Inquiring preregistered Domains
1. Click (01) Domain Robot in the main menu.
41 of 95
2.4 Inquiring Domains
2. Click Inventory in the submenu.
The form Inventory opens.
3. In the item list for User select the user you want to view the inventory for.
4. Select the PreRegs checkbox.
5. Click OK.
If the request is successful you receive the success message:
Preregistration data successfully aquired.
AutoDNS2 shows an inventory of the preregistered domains for the selected user.
Click the link Logs for all follow-ups to see the domain inventory of all subusers.
The list shows:
Domain: the name of the domain
Created: date of registration
Phase: the phase in which the domain was preregistered
Status: the current status of the domain
User: the User, the domain belongs to
Structure: the user structure
Inquiring preregistered Domains (.csv file)
1. Click (01) Domain Robot in the main menu.
2. Click Inventory in the submenu.
The form Inventory opens.
3. In the item list for User select the user you want to view the inventory for.
4. Select the PreRegs checkbox.
5. Click OK.
If the request is successful you receive the success message:
Preregistation data successfully aquired.
AutoDNS2 shows an inventory of the preregistered domains for the selected user.
Click the link Logs for all follow-ups to see the domain inventory of all subusers.
The list shows:
Domain: the name of the domain
Created: date of registration
Phase: the phase in which the domain was preregistered
Status: the current status of the domain
User: the User, the domain belongs to
Structure: the user structure
6. Click the link Download as .csv file (can be read with Excel). In the following
window you can store the file or open it with Excel.
42 of 95
3 Creating and
Managing Handles
3.1 Creating and Editing Handles
3.1 Creating and Editing Handles
Creating a new handle AutoDNS generates a Handle ID. Furthermore the
registry or registries you determined the handle to be used for, generate NIC
handles for their own system. These tw o handles are referenced by the NIC
reference.
Creating a new Handle
1. Click (03) Handles in the main menu.
You are in the Handle administration submenu now.
2. In the item list as User select the user the handle is created for.
3. Enter the required data in the form fields.
In the following tables you get detailed information about the required entries.
Label
Type
Help
Select the Handle Type.
NOTE
Select PERSON, if you want to use it as Admin-C Handle for
the DENIC.
First name
Last name
Title
Organization
Address
Zip-Code
City
Country
State
Telephone
Enter your first name here.
Enter your last name here.
Enter the title here, e.g. "Dr." or "Prof.".
Enter the company name here if available.
Enter postal address including street and house number here.
Enter your postcode here.
Enter the city's name here.
Select the country here. (ISO 3166 Country Codes, see page 92)
Enter the state here.
Enter the phone number here (Format: +49-1234-123456).
44 of 95
3 Creating and Managing Handles
Fax
e-mail
Protection
Enter the fax number here (Format +49-1234-123456).
Enter the contact's email address here.
Select the protection level here. The protection level determins, which
data are displayed in the whois data.
Level A: all data are displayed.
Level B: Some data are not displayed, e.g. email address, phonenumber
and faxnumber (Referring to the registry and its usage of handles) .
NOTE
You have to fill in all text boxes of the form even if you select level B here.
Click Extended to add further data for certain TLDs (e.g. .nl, .aero, .cat) and for
trademarks. See "Handle Extensions for certain TLDs" on page 46.
Remarks
e-mail
Confirmation Mode (Preview)
Confirmation Mail?
Enter additional remarks here.
Enter a valid email address receiving the reports of your order.
Select the check box to display a preview.
Select the check box to receive a confirmation mail for your request.
6. Click Next.
If the request is successful you receive the notification:
Handle-request successfully started.
Editing Handle Data
1. Click (03) Handles in the main menu.
You are in the Handle administration submenu now.
2. In the Change/Delete area enter the handle you want to edit in the Direct box. Select
Change in the item list. Click OK.
Or:
Use the search function (See "The search functions of AutoDNS2 on page 12) to find
the handle you want to edit.
Select Change in the item list. Click OK.
3. In the item list as User select the user the domain is created for.
4. Edit the desired data in the form fields.
In the following tables you get detailed information about the required entries.
Label
Title
Organization
Address
Zip-Code
City
Country
State
Telephone
Fax
e-mail
Protection
Help
Enter the title here, e.g. "Dr." or "Prof.".
Enter the company name here if available.
Enter postal address including street and house number here.
Enter your postcode here.
Enter the city's name here.
Select the country here. (ISO 3166 Country Codes, see page 92)
Enter the state here.
Enter the phone number here (Format: +49-1234-123456).
Enter the fax number here (Format +49-1234-123456).
Enter the contact's email address here.
Select the protection level here. The protection level determins, which
data are displayed in the whois data.
45 of 95
3.1 Creating and Editing Handles
Level A: all data are displayed.
Level B: Some data are not displayed, e.g. email address, phonenumber
and faxnumber (Referring to the registry and its usage of handles) .
NOTE
You have to fill in all text boxes of the form even if you select level B here.
Click Extended to change data for certain TLDs (e.g. .nl, .aero, .cat) and for trademarks.
See "Handle Extensions for certain TLDs" on page 46.
Remarks
Enter additional remarks here.
Send report to
e-mail
Confirmation Mode (Preview)
Confirmation Mail?
Enter a valid email address receiving the reports of your order.
Select the check box to display a preview.
Select the check box to receive a confirmation mail for your request.
5. Click Next.
If the request is successful you receive the notification:
Handle-update has been successfully started.
Handle Extensions for certain TLDs
Some TLDs require additional information for creating a handle. You add these data when
you create a new handle, see "Creating a new handle" on page 44.
In the New Handle form click the Extended button next to the entry Nic's. The form
shown below opens.
In the sections .NL Domicil, .AERO, .AU, .CAT and Trademark click + to open the
respective form.
In the following tables you get detailed information about the required entries.
46 of 95
3 Creating and Managing Handles
Label
Extended
UIN (Travel)
Company Number
ID Number
VAT Number
Birthday
Birthplace
Birthcountry
Help
Enter the travel unique identifying number here.
Enter the company number here.
Enter theiIdentification number of the personal id card here.
Enter the vat number here.
Enter the birthday here.
Enter the birthplace here.
Enter the country of birth here.
.NL Domizil
Street
No.
Zip-Code
City
Enter the name of the street here.
Enter the house number here. Enter the house number extension in the
second box.
Enter the postal code here.
Enter the name of the city here.
.Aero
Please contact our domain support.
.AU
Select the desired entry in the item lists. For further questions please contact our domain
support.
.CAT
ENS Auth ID
Enter the ENS Auth ID here.
ENS Key
Sponsor 1
NOTE
You aditionally need the ENS-Key, to register a .cat Domain. You can
receive ENS Auth ID and ENS Key in promotions.
Enter the ENS Key here.
Enter a sponsor here.
Sponsor 2
Sponsor 3
Reference-URL
Intended use
NOTE
You can register a .cat domain, if you have one to three sponsors, who
have .cat domains themselves. The registry rates the sponsors differently,
thus one, two or three sponsors can be required.
Enter a sponsor here.
Enter a sponsor here.
Enter the URL of your website, you want to register as a .cat website
here.
Enter the intended use of the domain.
Trademark
Trademark Name
Trademark Number
Enter the trademark name here.
Enter the trademark number here.
47 of 95
3.2 Deleting NIC-References
3.2 Deleting NIC-References
Deleting NIC-References
1. Click (03) Handles in the main menu.
You are in the Handle administration submenu now.
2. In the Change/Delete area enter the handle you want to edit in the Direct box. Select
Delete in the item list. Click OK.
Or:
Use the search function (see "The search functions of AutoDNS2" on page 12) to find
the handle.
Select Delete in the item list. Click OK.
The Delete a handle form opens.
In the following tables you get detailed information about the required entries.
Label
Nics
Help
In the Nics section all checkboxes are selected. Unselect the checkbox
for the Nics you do not want to delete.
Send report to
e-mail
Confirmation Mode (Preview)
Confirmation Mail?
Enter a valid email address receiving the reports of your order.
Select the check box to display a preview.
Select the check box to receive a confirmation mail for your request.
3. Click Next.
If the request is successful you receive the notification:
Handle-update has been successfully started.
48 of 95
3 Creating and Managing Handles
3.3 Inquiring Handles
Inquiring Handles
1. Click (03) Handles in the main menu.
2. Click Inventory in the submenu.
The form Inventory opens.
3. In the item list for User select the user you want to have an inventory for.
4. Click OK.
AutoDNS2 displays a handle inventory for the selected user.
Click the link Logs for all follow-ups to see the domain inventory of all subusers.
The list shows:
Handle : the handle ID
User : the user the handle belongs to
Created : date of handle creation
User : the parent user
Structure :the user structure
Inquiring Handles (.csv file)
1. Click (03) Handles in the main menu.
2. Click Inventory in the submenu.
The form Inventory opens.
3. In the item list for User select the user you want to have an inventory for.
4. Click OK.
AutoDNS2 displays a handle inventory for the selected user.
5. Click the link Logs for all follow-ups to see the domain inventory of all subusers.
The list shows:
Handle : the handle ID
User : the user the handle belongs to:
Created : date of handle creation
User :the parent user
Structure : the user structure
6. Click the link Download as .csv file (can be read with Excel). In the following
window you can store the file or open it with Excel.
49 of 95
4 DNS Manager.
Creating and Managing
Zones
4 DNS Manager. Creating and Managing Zones
4.1 Creating and Editing Zones
Creating a new Zone
1. Click (02) DNS Manager in the main menu.
You are in the submenu DNS administration now.
2. In the New area in the Create new zone (REG) section click OK.
The form Create new zone (REG) opens.
3. In the item list as User select the user the zone is created for.
4. Enter the required data in the form fields.
In the following tables you get detailed information about the required entries.
Label
Mode
Help
Select a nameserver mode:
Domain
Main IP
TTL
www Include
SOA_Level
Refresh
Retry
Expire
Primary only: the zone will be generated only on the primary name
server .
Secondary: the zone will be generated only on the secondary name
server. Zone data will be transferred to primary via AXFR .
Hidden: the zone will be generated on the secondary name server.
Zone data will be transferred to primary via AXFR. Primary name
server is not recorded as name server for the zone .
Complete: the zone will be generated on all name servers.
ATTENTION
You have to select a mode here. If the mode "none" remains, no zone will
be created on the nameserver.
Enter the domain, you want to create a new zone for. Format: sld.tld (e.g.
test.de)
Enter the IP address (A record) of the zone.
Enter the TTL for the zone IP address.
Select the checkbox if you want to reach your domain via the "www"
prefix. The system will automatically create the www subdomain in the
system and assign it to the main IP address of the domain.
Leave the checkbox deselected and create the record manually, if you
want to assign a different IP to the www prefix.
Select one of the predefined SOA levels. Each Level sets predefined
values for refresh, retry, expire and minimum (TTL).
Select "0", if you want to set the values yourself.
Enter a refresh value for the zone. The refresh value defines how often
the nameserver should update their SOA data.
Enter a value or keep the values of the predefined SOA level.
recommended median: 39940 (seconds).
Enter a retry value for the zone. If a primary nameserver ist not
accessible, the secondary nameserver tries to reach it again after a
defined span of time. The retry value defines this span of time.
Enter a value or keep the values of the predefined SOA level.
recommended median: 7200 (seconds).
Enter a expire value for the zone. The expire value defines how long the
secondary nameserver should try to reach its inaccesible primary
nameserver, before the zone will be deleted.
Enter a value or keep the values of the predefined SOA level.
51 of 95
4.1 Creating and Editing Zones
Minimum (TTL)
SOA-email
Transfer limit (AXFR) for the
following networks/Ips
Recommended value: 604800
Enter a TTL value for the zone.
Enter the email-address of the zone administrator.
NOTE
If the label is not displayed you can activate it in the presets (Userprofile).
Enter IP adresses or subnets, from which you can start a zone transfer.
Generally only the involved nameserver can start a zone transfer. The
entry has to be BIND conform, that means it has to be semicolon
separated and can have an optional prefix length and should end with
semicolon.
Example:192.168.100.1; 192.168.200.0/24;
It is not necessary to list the IP adresses of the secondary nameserver.
They will be added automatically. Thus it is not possible to interrupt the
nameserver communication accidentally.
NOTE
If the label is not displayed you can activate it in the presets. See
"Defining User presets" on page 19.
Nameserver
Primary
1st secondary to
7th secondary
Additional Entries/ Subdomains
Free Entries (caution)
Enter the primary nameserver. Enter the TTL of the nameserver into the
second box.
Enter at least one or up to seven secondary nameservers. Enter the TTL
of the nameserver into the second box.
Click edit to add additional entries for subdomains. See "Creating
subdomain zones", page 54.
Enter free records for the DNS here.
ATTENTION
Please only use this option if you are knowledgeable about DNS since a
wrong entry can have drastic effects on your domain.
Send report to
e-mail
Confirmation Mode (Preview)
Confirmation Mail?
Enter a valid email address receiving the reports of your order.
Select the check box to display a preview.
Select the check box to receive a confirmation mail for your request.
5. Click Next.
If the request is successful you receive the success message:
Zone successfully stored on nameserver.
52 of 95
4 DNS Manager. Creating and Managing Zones
Bulk Zone Create
1. Click (02) DNS Manager in the main menu.
You are now in the submenu DNS administration.
2. In the area New in the Bulk zone create section click OK.
3. In the item list as User select the user the zones are created for.
4. Enter the required data in the form fields.
In the following tables you get detailed information about the required entries.
Label
Mode
Help
Select a nameserver mode:
Primary only: the zone will be generated only on the primary name
server .
Secondary: the zone will be generated only on the secondary name
server. Zone data will be transferred to primary via AXFR .
Hidden: the zone will be generated on the secondary name server.
Zone data will be transferred to primary via AXFR. Primary name
server is not recorded as name server for the zone .
Complete: the zone will be generated on all name servers.
ATTENTION
You have to select a mode here. If the mode "none" remains, no zone will
be created on the nameserver.
Main IP
TTL
www Include
SOA_Level
Refresh
Retry
Expire
Minimum (TTL)
SOA-email
Enter the IP address (A record) of the zone.
Enter the TTL for the zone IP address.
Select the checkbox if you want to reach your domain via the "www"
prefix. The system will automatically create the www subdomain in the
system and assign it to the main IP address of the domain.
Leave the checkbox deselected and create the record manually, if you
want to assign a different IP to the www prefix.
Select one of the predefined SOA levels. Each Level sets predefined
values for refresh, retry, expire and minimum (TTL).
Select "0", if you want to set the values yourself.
Enter a refresh value for the zone. The refresh value defines how often
the nameserver should update their SOA data.
Enter a value or keep the values of the predefined SOA level.
recommended median: 39940 (seconds).
Enter a retry value for the zone. If a primary nameserver ist not
accessible, the secondary nameserver tries to reach it again after a
defined span of time. The retry value defines this span of time.
Enter a value or keep the values of the predefined SOA level.
recommended median: 7200 (seconds).
Enter a expire value for the zone. The expire value defines how long the
secondary nameserver should try to reach its inaccesible primary
nameserver, before the zone will be deleted.
Enter a value or keep the values of the predefined SOA level.
Recommended value: 604800
Enter a TTL value for the zone.
Enter the email-address of the zone administrator.
53 of 95
4.1 Creating and Editing Zones
Transfer limit (AXFR) for the
following networks/Ips
NOTE
If the label is not displayed you can activate it in the presets (Userprofile).
Enter IP adresses or subnets, from which you can start a zone transfer.
Generally only the involved nameserver can start a zone transfer. The
entry has to be BIND conform, that means it has to be semicolon
separated and can have an optional prefix length and should end with
semicolon.
Example:192.168.100.1; 192.168.200.0/24;
It is not necessary to list the IP adresses of the secondary nameserver.
They will be added automatically. Thus it is not possible to interrupt the
nameserver communication accidentally.
NOTE
If the label is not displayed you can activate it in the presets. See
"Defining User presets" on page 19.
Nameserver
Primary
Free Entries (caution)
Enter the primary nameserver. Enter the TTL of the nameserver into the
second box.
Enter at least one or up to seven secondary nameservers. Enter the TTL
of the nameserver into the second box.
Click edit to add additional entries for subdomains. See "Creating
subdomain zones", page 54.
Enter free records for the DNS here.
e-mail
Confirmation Mode (Preview)
Confirmation Mail?
ATTENTION
Please only use this option if you are knowledgeable about DNS since a
wrong entry can have drastic effects on your domain.
Enter a valid email address receiving the reports of your order.
Select the check box to display a preview.
Select the check box to receive a confirmation mail for your request.
1st secondary to
7th secondary
Additional Entries/ Subdomains
5. Click Next.
If the request is successful you receive the success message:
Zones successfully stored on nameserver.
Creating Subdomain Zones
1. Click (02) DNS Manager in the main menu.
You are now in the submenu DNS administration.
2. In the New area in the Create new zone (REG) section click OK.
The form Create new zone (REG) opens.
3. In the item list as User select the user the zone is created for.
Only the entries for subdomains are explained here. Detailed information about the
other form fields you find here:
"Creating a new zone" on page 51
"Bulk zone create" on page 53
4. Click Edit in the Additional Entries/Subdomains section.
54 of 95
4 DNS Manager. Creating and Managing Zones
The Subs form opens.
In the following tables you get detailed information about the required entries.
Label
Sub
TTL
RR-Type
Pref (Mx)
Value
Take over
Help
Enter the desired subentry here.
Enter a value for TTL TTL
Select the type of RR (ressource record).
Enter preferred value (MX).
Enter a value.
Unselect checkbox, if you do not want to take over this row.
5. Click Next.
6. Following message will be shown in the form:
The information was temporarily saved. It will then be taken over by the system.
7. Click the link Close window. The main form Create new zone is displayed. To
continue see:
"Creating a new zone" on page 51.
or
"Bulk zone create" on page 53.
Editing Zones
1. Click (02) DNS Manager in the main menu.
You are now in the submenu DNS administration.
2. In the Change/Delete area enter the name of the zone you want to edit in the Direct
box. Select Change in the item list. Click OK.
55 of 95
4.1 Creating and Editing Zones
Or:
Use the search function (See "The search functions of AutoDNS2" on page 12) to find the
zone you want to edit.
Select Change in the item list. Click OK.
3. The form Change zone opens.
4. Enter the required data in the form fields.
In the following tables you get detailed information about the required entries.
Label
Mode
Help
Select a nameserver mode:
Main IP
TTL
www Include
SOA_Level
Refresh
Retry
Expire
Minimum (TTL)
Transfer limit (AXFR) for the
following networks/Ips
Primary only: the zone will be generated only on the primary name
server .
Secondary: the zone will be generated only on the secondary name
server. Zone data will be transferred to primary via AXFR .
Hidden: the zone will be generated on the secondary name server.
Zone data will be transferred to primary via AXFR. Primary name
server is not recorded as name server for the zone .
Complete: the zone will be generated on all name servers.
ATTENTION
You have to select a mode here. If the mode "none" remains, no zone will
be created on the nameserver.
Enter the IP address (A record) of the zone.
Enter the TTL for the zone IP address.
Select the checkbox if you want to reach your domain via the "www"
prefix. The system will automatically create the www subdomain in the
system and assign it to the main IP address of the domain.
Leave the checkbox deselected and create the record manually, if you
want to assign a different IP to the www prefix.
Select one of the predefined SOA levels. Each Level sets predefined
values for refresh, retry, expire and minimum (TTL).
Select "0", if you want to set the values yourself.
Enter a refresh value for the zone. The refresh value defines how often
the nameserver should update their SOA data.
Enter a value or keep the values of the predefined SOA level.
recommended median: 39940 (seconds).
Enter a retry value for the zone. If a primary nameserver ist not
accessible, the secondary nameserver tries to reach it again after a
defined span of time. The retry value defines this span of time.
Enter a value or keep the values of the predefined SOA level.
recommended median: 7200 (seconds).
Enter a expire value for the zone. The expire value defines how long the
secondary nameserver should try to reach its inaccesible primary
nameserver, before the zone will be deleted.
Enter a value or keep the values of the predefined SOA level.
Recommended value: 604800
Enter a TTL value for the zone.
Enter IP adresses or subnets, from which you can start a zone transfer.
Generally only the involved nameserver can start a zone transfer. The
entry has to be BIND conform, that means it has to be semicolon
separated and can have an optional prefix length and should end with
semicolon.
Example:192.168.100.1; 192.168.200.0/24;
56 of 95
4 DNS Manager. Creating and Managing Zones
It is not necessary to list the IP adresses of the secondary nameserver.
They will be added automatically. Thus it is not possible to interrupt the
nameserver communication accidentally.
SOA-email
NOTE
If the label is not displayed you can activate it in the presets. See
"Defining User presets" on page 19.
Enter the email-address of the zone administrator.
NOTE
If the label is not displayed you can activate it in the presets (Userprofile).
Nameserver
Primary
1st secondary to
7th secondary
Additional Entries/ Subdomains
Free Entries (caution)
Enter the primary nameserver. Enter the TTL of the nameserver into the
second box.
Enter at least one or up to seven secondary nameservers. Enter the TTL
of the nameserver into the second box.
Click edit to add additional entries for subdomains. See "Creating
subdomain zones", page 54.
Enter free records for the DNS here.
ATTENTION
Please only use this option if you are knowledgeable about DNS since a
wrong entry can have drastic effects on your domain.
Send report to
e-mail
Confirmation Mode (Preview)
Confirmation Mail?
Enter a valid email address receiving the reports of your order.
Select the check box to display a preview.
Select the check box to receive a confirmation mail for your request.
5. Click Next.
If the request is successful you receive the success message:
The zone successfully updated on the name server.
57 of 95
4.2 Cloning, Importing and Deleting Zones
4.2 Cloning, Importing and Deleting Zones
Cloning Zones
With the function cloning zones, you copy the data of a zone, edit them an
use them for a new zone.
1. Click (02) DNS Manager in the main menu.
You are now in the submenu DNS administration.
2. In the Change/Delete area enter the name of the zone you want to clone in the Direct
box. Select Clone in the item list. Click OK.
Or:
Use the search function (See "The AutoDNS2 search functions" on page 12) to find
the zone you want to clone.
Select Clone in the item list. Click OK.
3. The form Create new zone (REG) opens.
4. In the item list as User select the user, the zone is to be cloned for.
5. Enter the required data in the form fields.
In the following tables you get detailed information about the required entries.
Label
Mode
Help
Select a nameserver mode:
Domain
Main IP
TTL
www Include
SOA_Level
Primary only: the zone will be generated only on the primary name
server .
Secondary: the zone will be generated only on the secondary name
server. Zone data will be transferred to primary via AXFR .
Hidden: the zone will be generated on the secondary name server.
Zone data will be transferred to primary via AXFR. Primary name
server is not recorded as name server for the zone .
Complete: the zone will be generated on all name servers.
ATTENTION
You have to select a mode here. If the mode "none" remains, no zone will
be created on the nameserver.
Enter the domain, you want to create a new zone for. Format: sld.tld (e.g.
test.de)
Enter the IP address (A record) of the zone.
Enter the TTL for the zone IP address.
Select the checkbox if you want to reach your domain via the "www"
prefix. The system will automatically create the www subdomain in the
system and assign it to the main IP address of the domain.
Leave the checkbox deselected and create the record manually, if you
want to assign a different IP to the www prefix.
Select one of the predefined SOA levels. Each Level sets predefined
values for refresh, retry, expire and minimum (TTL).
58 of 95
4 DNS Manager. Creating and Managing Zones
Refresh
Retry
Expire
Minimum (TTL)
SOA-email
Transfer limit (AXFR) for the
following networks/Ips
Select "0", if you want to set the values yourself.
Enter a refresh value for the zone. The refresh value defines how often
the nameserver should update their SOA data.
Enter a value or keep the values of the predefined SOA level.
recommended median: 39940 (seconds).
Enter a retry value for the zone. If a primary nameserver ist not
accessible, the secondary nameserver tries to reach it again after a
defined span of time. The retry value defines this span of time.
Enter a value or keep the values of the predefined SOA level.
recommended median: 7200 (seconds).
Enter a expire value for the zone. The expire value defines how long the
secondary nameserver should try to reach its inaccesible primary
nameserver, before the zone will be deleted.
Enter a value or keep the values of the predefined SOA level.
Recommended value: 604800
Enter a TTL value for the zone.
Enter the email-address of the zone administrator.
NOTE
If the label is not displayed you can activate it in the presets (Userprofile).
Enter IP adresses or subnets, from which you can start a zone transfer.
Generally only the involved nameserver can start a zone transfer. The
entry has to be BIND conform, that means it has to be semicolon
separated and can have an optional prefix length and should end with
semicolon.
Example:192.168.100.1; 192.168.200.0/24;
It is not necessary to list the IP adresses of the secondary nameserver.
They will be added automatically. Thus it is not possible to interrupt the
nameserver communication accidentally.
NOTE
If the label is not displayed you can activate it in the presets. See
"Defining User presets" on page 19.
Nameserver
Primary
1st secondary to
7th secondary
Additional Entries/ Subdomains
Free Entries (caution)
Enter the primary nameserver. Enter the TTL of the nameserver into the
second box.
Enter at least one or up to seven secondary nameservers. Enter the TTL
of the nameserver into the second box.
Click edit to add additional entries for subdomains. See "Creating
subdomain zones", page 54.
Enter free records for the DNS here.
ATTENTION
Please only use this option if you are knowledgeable about DNS since a
wrong entry can have drastic effects on your domain.
Send report to
e-mail
Confirmation Mode (Preview)
Confirmation Mail?
Enter a valid email address receiving the reports of your order.
Select the check box to display a preview.
Select the check box to receive a confirmation mail for your request.
5. Click Next.
If the request is successful you receive the success message:
Zone successfully stored on nameserver.
59 of 95
4.2 Cloning, Importing and Deleting Zones
Importing Zones
Importing zones means to transfer the data of one or more zones from a
source nameserver to a target nameserver. This is necessary if the
nameserver has been changed, e.g. when making a domain transfer.
NOTE
The primary nameserver has to support AXFR.
1. Click (02) DNS Manager in the main menu.
2. Click Import zones in the submenu
The form Import zones opens.
3. In the item list as User select the user the zone is to be imported for.
4. Enter the required data in the form fields.
In the following tables you get detailed information about the required entries.
Label
Mode
Help
Select a nameserver mode:
Domain
SOA-email
Primary only: the zone will be generated only on the primary name
server .
Secondary: the zone will be generated only on the secondary name
server. Zone data will be transferred to primary via AXFR .
Hidden: the zone will be generated on the secondary name server.
Zone data will be transferred to primary via AXFR. Primary name
server is not recorded as name server for the zone .
Complete: the zone will be generated on all name servers.
ATTENTION
You have to select a mode here. If the mode "none" remains, no zone will
be created on the nameserver.
Enter the domain, you want to create a new zone for. Format: sld.tld (e.g.
test.de)
Enter the email-address of the zone administrator.
NOTE
If the label is not displayed you can activate it in the presets (Userprofile).
Nameserver (Source)
Primary
Enter the primary nameserver, the zones are copied from.
Nameserver (Target)
Primary
1st secondary to
7th secondary
Enter the primary nameserver. Enter the TTL of the nameserver into the
second box.
Enter at least one or up to seven secondary nameservers. Enter the TTL
of the nameserver into the second box.
5. Click Next.
If the request is successful you receive the success message:
Bulk-Import has been successfully started.
For each zone you get a separate notification.
60 of 95
4 DNS Manager. Creating and Managing Zones
Deleting Zones
1. Click (02) DNS Manager in the main menu.
You are in the submenu DNS administration now.
2. In the Change/Delete area enter the name of the zone you want to edit in the Direct
box. Select Delete in the item list. Click OK.
Or:
Use the search function (See "The search functions of AutoDNS2" on page 12) to find
the zone you want to delete.
Select Delete in the item list. Click OK.
The form Delete zone opens.
3. Click Next.
If the request is successful you receive the success message:
The zone was successfully deleted from the name server.
61 of 95
4.3 Inquiring Zones
4.3 Inquiring Zones
Inquiring Zones
1. Click (02) DNS Manager in the main menu.
2. Click Inventory in the submenu
The form Inventory opens.
3. In the item list as User select the user the zones are to be inquired for.
4. Click OK.
5. Click the link Logs for all follow-ups to see the domain inventory of all subusers.
The list shows:
Zone : the name of the zone and the primary nameserver
Created: creation data of the zone
User: the user, the zone belongs to
Structure: the user structure
Inquiring Zones (.csv-file)
1. Click (02) DNS Manager in the main menu.
2. Click Inventory in the submenu
The form Inventory opens.
3. In the item list as User select the user the zones tto be inquired for.
4. Click OK.
5. Click the link Logs for all follow-ups to see the domain inventory of all subusers.
The list shows:
Zone : the name of the zone and the primary nameserver
Created: creation data of the zone
User: the user, the zone belongs to
Structure: the user structure
6. Click the link Download as .csv file (can be read with Excel). In the following
window you can store the file or open it with Excel.
62 of 95
5 User Management
5.1 Creating, Editing and Deleting user.
5.1 Creating, Editing and Deleting user.
Creating a new User
1. Click (13) Administration in the main menu.
You are now in the submenu User administration.
2. In the New area in the Create new user section click OK.
The form New user opens.
3. Enter the required data in the form fields.
Tip
Another way to create a new user, is to use the tree-view. See "Managing users with the user tree-view" on
page 67.
In the following tables you get detailed information about the required entries.
Label
User
Password
(Password)
Parent
Status
Help
Default mail
Enter the name of the user.
Enter the password of the user.
Enter the password again.
Select the parent user here.
Select the status of the new user here. A subuser has to have a lower
status or a substatus than the parent.
Available status:
Master
Admin
Normal
Available substatus:
clone (a clone ist using the same objects as the user he is cloned
from)
+ = (Substatus 0) Can create clones an users with the same status.
* = (Substatus 1) Can create clones.
" " = (Substatus 2)
For details see "Userstatus" on page 91
Select the language for the new user here. This affects the user interface
and the system messages.
Enter the default email address for the new user here.
Confirmation Mail ?
Select the checkbox, to get a confirmation mail.
Language
4. Click Next.
5. The form New user opens.
In the ACLs (Access Controll Lists) section, the AutoDNS2 functions are listed. You
can edit the rights of the user here to determine which tasks he is allowed to send to
AutoDNS2. Functions with the entry LOCKED cannot be edited.
64 of 95
5 User Management
6. Deselect the checkbox next to the user right, to remove the functionality from the user.
7. Click Next.
If the request is successful you receive the notification:
The user was successfully registered.
Editing User Data
1. Click (13) Administration in the main menu.
You are now in the submenu User administration.
2. In the Change area select the user, you want to edit, in the Edit user item list.
3. Click OK.
The form Edit user opens.
4. Change the data in the form fields.
Tip
Another way to edit a user, is to use the tree-view. See "Managing users with the user tree-view" on page
67.
In the following tables you get detailed information about the required entries.
Label
User
Password
(Password)
Help
Enter the name of the user.
Enter the password of the user.
Enter the password again.
NOTE
To change the password, you have to enter the password twice.
65 of 95
5.1 Creating, Editing and Deleting user.
Parent
Status
Language
Default mail
Confirmation Mail ?
Select the parent user here.
Select the status of the new user here. A subuser has to have a lower
status or a substatus than the parent.
Available status:
Master
Admin
Normal
Available substatus:
clone (a clone ist using the same objects as the user he is cloned
from)
+ = (Substatus 0) Can create clones an users with the same status.
* = (Substatus 1) Can create clones.
" " = (Substatus 2)
For details see "Userstatus" on page 91
Select the language for the new user here. This affects the user interface
and the system messages.
Enter the default email address for the new user here.
Select the checkbox, to get a confirmation mail.
5. Click Next.
6. The form New user opens.
In the ACLs section, the AutoDNS2 functions are listed. You can edit the rights of the
user here to determine which tasks he is allowed to send to AutoDNS2. Functions with
the entry LOCKED cannot be edited.
7. Unselect the checkbox in the Active column next to the user right, to remove the
functionality from the user.
8. Click Follow-up, if you want all subusers to get the respective right. If only certain
subusers should get the right, you have to edit each follow-up.separately.
9. Click Next.
If the request is successful you receive the notification:
The user was successfully edited.
66 of 95
5 User Management
Deleting a User
NOTE
When deleting a user, he may not not have any objects (e.g. domains, zones).
1. Click (13) Administration in the main menu.
You are in the submenu User administration now.
2. In the Delete area select the user you want to delete, in the Delete user item list.
3. Click OK.
The confirmation form Delete user opens.
4. Select the checkbox Confirmation mail to get a confirmation mail..
5. Click Next.
If the request is successful you receive the notification:
The user was edited successfully.
TIP
Another way to delete a user is to use the tree-view. See "Managing users with the user tree-view", page 67.
Managing Users with the User Tree-View
1. Click (13) Administration in the main menu.
You are in the submenu User administration now.
2. In the Change area click the link Show User(s) as tree-view.
A tree-view of all users is displayed.
3. Click + next to the user, to display the subusers.
In the tree-view, you can create new users, edit users and delete them.
Click the link New at the bottom of the list, to create a new user. See "Creating a new
user", page 64.
Click the user name, to edit the name of a user. See "Editing a user", page 65.
Click the link Delete on the right side, to delete the respective user. See deleting a
User" on page 67.
67 of 95
5.1 Creating, Editing and Deleting user.
Change the Language
Changing the language has an effect on the user interface and the system
messages.
1. Click (13) Administration in the main menu.
You are in the submenu User administration now.
2. In the Change area select the user, you want to edit, in the Edit user item list.
3. Click OK.
The form Edit user opens.
4. Enter the required data in the form fields.
In the following tables you get detailed information about the required entries.
Label
Language
Help
Select the language for the new user here. This affects the user interface
and the system messages.
5. Click Next.
If the request is successful you receive the notification:
The user was edited successfully.
68 of 95
5 User Management
5.2 Checking and Assigning the Objects of a
User
Inquiring the Objects of a User (Object check)
With the Object check, you can inquire the objects assigned to a user.
Several objects of the same object type can be checked at once.
1. Click (13) Administration in the main menu.
2. Click Object check in the submenu.
The form Object check opens.
3. Enter the required data in the form fields.
In the following tables you get detailed information about the required entries.
Label
Object
Objects
Help
Click the object type you want to check.
Enter the objects you want to check.
4. Click Next.
If the request is successful you receive a notification, depending on the kind of object,
e.g.
Zone-data has been successfully aquired.
The objects and the respective user are listed below.
Assigning Objects to another User
1. Click (13) Administration in the main menu.
2. Click Object assignment in the submenu.
The form Object assignment opens.
3. Enter the required data in the form fields.
In the following tables you get detailed information about the required entries.
Label
Help
Object
Objects
Click the object type you want to assign to another user.
Enter the objects you want to assign to another user.
New owner
Select the new owner of the objects here.
4. Click Next.
If the request is successful you receive the notification:
The object-user-assignments were successfully
changed.
69 of 95
5.2 Checking and Assigning the Objects of a User
If you want to assign all objects of a user to another one, user the form fields in the
area All objects of a user.
In the following tables you get detailed information about the required entries.
Label
Previous owner
New owner
Help
Select the user, whose objects are to be assigned to a new owner.
Select the new owner of the objects here.
5. Click Next.
If the request is successful you receive the notification:
Moved all objects to other user.
70 of 95
5 User Management
5.3 Managing PGP Keys
Upload here your public PGP key, you want to use for AutoDNS2 requests via the mail
interface. For the requests you send via the user interface PGP keys are irrelevant.
If you upload a PGP-key here, AutoDNS2 verifies the signature of all signed incoming
mails. If the signature is invalid, e.g. due to manipulation of the content or because a
different key was used, the request will be rejected. AutoDNS2 will always accept
unsigned mails.
Adding PGP-Keys
1. Click (13) Administration in the main menu.
2. Click PGP administration in the submenu.
The form PGP administration opens.
3. Click the link New.
The form New PGP key opens.
4. Enter the required data in the form fields.
In the following tables you get detailed information about the required entries.
Label
for User
Fingerprint
Key
Help
Select the user, you want to create a new PGP-key for.
Enter the PGP-Fingerprint of the users PGP key..
Enter the PGP-Key.
5. Click Next.
If the request is successful you receive the notification:
The PGP-key was successfully taken over.
Deleting PGP keys
1. Click (13) Administration in the main menu.
2. Click PGP administration in the submenu.
The form PGP administration opens.
3. Click the link Keys for all follow-ups, if you want to see the keys of the subusers.
4. Click the recycle bin icon
next to to the key you want to delete.
5. Confirm the confirmation request.
If the request is successful you receive the notification:
The PGP-key was sucessfully deleted.
Attention
A deleted key is irrestorable.
71 of 95
6 Redirector.
Redirecting Domains
and Emails
6 Redirector. Redirecting Domains and Emails
6.1 Creating and Editing Domain Redirects
With the Redirector, you can redirect domains, subdomains and email
addresses to existing URLs or email adresses.
Redirecting Domains
1. Click (05) Redirector in the main menu.
2. In the New area in the Create new Redirect section click OK.
The form Redirector opens.
3. Enter the required data in the form fields.
In the following tables you get detailed information about the required entries.
Label
Web preferences
Source(s)
Target
Backup
Mode
Title (frame)
Help
Enter the domain to be redirected (source) . Enter the domain with and
without "www."
Example: "www.test.de" and "test.de"
For bulk processing enter several domains.
Enter the URL of the target domain. Enter the domain without ´"http://"
Enter backup targets here. If the first target is not accessible, the domain
will be redirected to the backup target automatically .
Select the mode frame, if the URL of the source domain is to be
displayed in the browsers adress bar.
Select the mode HTTP, if the URL of the target domain is to be displayed
in the browsers adress bar.
If you have selected frame mode, the target website displays in a frame.
Enter the title, which is to be shown in the title bar of the browser, here.
4. Click Save.
If the request is successful you receive the notification:
The redirect-request has been processed.
Editing Domain Redirects
1. Click (05) Redirector in the main menu.
2. In the Change/Delete area enter the URL of the domain, which redirect you want to
edit in the Direct box. Select Change in the item list and click OK.
Or:
Use the search function (See "The AutoDNS2 search functions" on page 12) to find
the redirect you want to edit. To list all redirects click Show all redirects.
In the Redirects area in the column Source click the URL to edit the redirect.
The form Redirects opens.
3. Edit the desired data in the form fields.
73 of 95
6.1 Creating and Editing Domain Redirects
In the following tables you get detailed information about the required entries.
Label
Web-Einstellungen
Target
Backup
Mode
Title (frame)
Help
Enter the URL of the target domain. Enter the domain without ´"http://"
Enter backup targets here. If the first target is not accessible, the domain
will be redirected to the backup target automatically .
Select the mode frame, if the URL of the source domain is to be
displayed in the browsers adress bar.
Select the mode HTTP, if the URL of the target domain is to be displayed
in the browsers adress bar.
If you have selected frame mode, the target website displays in a frame.
Enter the title, which is to be shown in the title bar of the browser, here.
4. Click Save.
If the request is successful you receive the notification:
The redirect-request has been processed.
Redirect has been updated successfully.
NOTE
Redirects are managed by a dedicated server (IP address 62.116.130.8). In addition to the entry in the
redirector, you have to change the domain and the subdomain entries to point to this IP address.
Redirecting Domains for Statistics
You can redirect domains to a service provider, to get domain access
statistics.
1. Click (05) Redirector in the main menu.
2. In the New area in the Create new Redirect section.
3. Click OK.
The form Redirector opens.
4. Enter the required data in the form fields.
5. To use the placeholder in the form field Target see the following example:
Example
Your source domains are:
domain.com
www.domain.com
domain.org
www.domain.org
The URL of the service provider is:
www.domainparking.de
74 of 95
6 Redirector. Redirecting Domains and Emails
Enter in the Target form field::
www.domainparking.de/{domain}
Now all source domains will be redirected to the target URL.
www.domainparking.de/domain.com
www.domainparking.de/www.domain.com
www.domainparking.de/domain.org
www.domainparking.de/www.domain.org
6. Enter the additional required data in the form fields.
In the following tables you get detailed information about the required entries.
Label
Web-Einstellungen
Source(s)
Target
Backup
Mode
Title (frame)
Help
Enter the domain to be redirected (source) . Enter the domain with and
without "www."
Example: "www.test.de" and "test.de"
For bulk processing enter several domains.
Enter the URL of the target domain. Enter the domain without ´"http://"
Enter backup targets here. If the first target is not accessible, the domain
will be redirected to the backup target automatically .
Select the mode frame, if the URL of the source domain is to be
displayed in the browsers adress bar.
Select the mode HTTP, if the URL of the target domain is to be displayed
in the browsers adress bar.
If you have selected frame mode, the target website displays in a frame.
Enter the title, which is to be shown in the title bar of the browser, here.
7. Click Save.
If the request is successful you receive the notification:
The redirect-request has been processed.
NOTE
Redirects are managed by a dedicated server (IP address 62.116.130.8). In addition to the entry in the
redirector, you have to change the domain and the subdomain entries to point to this IP address.
Deleting a Domain Redirect
1. Click (05) Redirector in the main menu.
2. In the Change/Delete area enter the URL of the domain, which redirect you want to
edit in the Direct box. Select Delete in the item list and click OK.
Or:
Use the search function (See "The search functions of AutoDNS2" on page 12) to find
the redirect you want to edit.
To list all redirects click Show all redirects.
75 of 95
6.1 Creating and Editing Domain Redirects
3. In the Redirects area click the link Delete on the right side of the form.
The form Redirects opens.
4. Click Delete to delete the redirect.
If the request is successful you receive the notification:
The redirect-request has been processed.
Redirect has been deleted successfully.
Bulk Deletion of Domains
Bulk deletion deletes several redirects at once. You can mix domain and
email redirects for bulk deletion.
1. Click (05) Redirector in the main menu.
2. In the Change/Delete area in the Bulk delete section click OK.
The form Redirector Bulk delete opens.
3. Enter the required data in the form fields.
In the following tables you get detailed information about the required entries.
Label
Source(s)
Help
Enter the domain to be redirected (source) . Enter the domain with and
without "www."
Example: "www.test.de" and "test.de"
For bulk processing enter several domains.
4. Click Next.
If the request is successful you receive the notification:
The redirect-request has been processed.
Redirect has been successfully deleted.
76 of 95
6 Redirector. Redirecting Domains and Emails
6.2 Creating and Editing Email Redirects
Redirecting Emails
1. Click (05) Redirector in the main menu.
2. In the New area in the Create new Redirect section click OK.
The form Redirector opens.
3. Enter the required data in the form fields.
Label
Help
E-Mail-Einstellungen
Source 1 to Source 3
for all domains
Enter the email address to be redirected in the source boxes.
Into the Target box enter the URL the email address ist to be redirected
to .
Select the checkbox if all email addresses are to be redirected to source
1-n
Click + to add further sources.
Click - to remove sources.
4. Click Save.
If the request is successful you receive the notification:
The redirect-request has been processed.
NOTE
Redirects are managed by a dedicated server (IP address 62.116.130.8). In addition to the entry in the
redirector, you have to change the domain and the subdomain entries to point to this IP address.
NOTE
If you want to setup an email redirect without web redirect, you have to change the MX of the source. It has
to refer to the IP Adress 62.116.130.8.
77 of 95
7 Get an Overview with
the AutoDNS2
Statistics
7 Get an Overview with the AutoDNS2 Statistics
7.1 Statistics: Object Inquire, Common Log
and Object History
Object Inquire
Here you can inquire the objects of a selected object type (domains,
handles, user, zones) or the tasks in progress.
1. Click (07) Statistics in the main menu.
You are in the form Logs Overview now.
2. In the Display area in the left item list select the item you want to inquire:
Domain Robot: Domains are displayed
DNS administration: Zones are displayed
User: Users are displayed
Handle: Handles are displayed
Spool: The Objects in the spool are displaye
3. Click OK.
Example: the result for Domain Robot.
Date: creation date of the task
Domain: name of the domain
Incident: the task
Status: status of the object
User: the user who has sent the request
4. Click Logs for all follow-ups to receive the results for the subusers too.
5. In the column Date click the date to view details.
79 of 95
7.1 Statistics: Object Inquire, Common Log and Object History
Requiring the requests for an object (Commen log )
With the common log you inquire the successfull AutoDNS2 requests for a
object.
1. Click (07) Statistics in the main menu.
You are in the form Logs Overview now.
2. In the Common log area in the Search box enter the object you want to inquire, e.g.
a domain, a zone or a handle-ID.
3. In the item lists from and until select the span of time you want to get a the log for or
select All to see all requests.
4. Select the Display mode:
Normal: the result is displayed as a table.
Normal (raw): the result is displayed as xml code
Komplett (raw): the result is displayed as xml code (more details)
5. Click OK.
The log is displayed:
Created: creation date of the task
Task: the request
Remote-IP: the IP of the system the request was sent from or the entry "System" for AutoDNS2.
User: the user who has sent the request
Source: the way the request was sent to AutoDNS2 (e.g. https or smtp)
Error: the errorcode, if errors occured
Status. the status of the request
Click the link With inquiries to list the inquiries too.
80 of 95
7 Get an Overview with the AutoDNS2 Statistics
Object History
The Object History shows you the sequence of actions of the selected
domain or handle.
1. Click (07) Statistics in the main menu.
You are in the form Logs Overview now.
2. In the Object History area in the Object box enter the name of the object you want
to inquire. In the following item list select Domain for a domain and Handle, if you
want to inquire a handle.
Selecting "Domain" zone tasks are listed too.
3. In the item lists from and until select the span of time you want to get a the log for or
select All to see all requests.
4. Click OK.
The history is displayed (here the mode "normal").
Example: Domain History
Example: Handle History
Date: creation date of the task
Task: the request
Status. the status of the request
Source: the way the request was sent to AutoDNS2 (e.g. https or smtp)
Remote-IP: the IP of the system the request was sent from or the entry "System" for AutoDNS2.
User: the user who has sent the request
Click the link With inquiries to receive a list of the inquiries too.
81 of 95
8 Helpful Tools. WHOIS
and IDN Converter
8 Helpful Tools. WHOIS and IDN Converter
8.1 WHOIS Inquiries
Inquiring a single Domain
In this form you can start a WHOIS inquiry for a single domain. To make
several inquiries at once use the function Multi Whois. See "Multi WHOIS
inquiries" starting on page 84 .
NOTE
Following TLDs are supported:
ac, aero, af, ag, co.ag, com.ag, net.ag, nom.ag, org.ag, am, as, at, co.at, or.at, com.au, net.au, be, bi, biz,
com.br, bz, ca, cat, cc, cd, ch, cl, cn, com.cn, net.cn, org.cn, com, coop, cx, cz, de, dj, dk, es, com.es,
net.es, org.es, eu, fi, biz.fj, com.fj, info.fj, name.fj, net.fj, org.fj, pro.fj, fr, asso.fr, com.fr, nom.fr, prd.fr,
presse.fr, tm.fr, gg, co.gg, net.gg, org.gg, gs, hk, com.hk, net.hk, org.hk, hm, hn, org.hn, hu, co.hu, ie, il,
co.il, im, in, co.in, net.in, org.in, info, io, it, je, co.je, net.je, org.je, jobs, jp, co.jp, ki, kr, co.kr, kz, la, li, lt, lu, lv,
com.lv, mobi, ms, museum, mx, com.mx, com.my, net.my, org.my, name, net, nl, no, nu, gen.nz, net.nz,
org.nz, org, com.pe, ph, pl, com.pl, net.pl, org.pl, pr, pro, jur.pro, law.pro, med.pro, pt, com.pt, re, ro, com.ro,
nom.ro, www.ro, ru, sc, se, sg, com.sg, sh, si, sk, st, tc, co.th, in.th, tk, tl, tm , to, com.tr, travel, tv, tw,
com.tw, org.tw, ua, com.ua, co.uk, ltd.uk, me.uk, net.uk, org.uk, plc.uk, us, vc, com.vc, net.vc, org.vc, ve, vg,
ws.
1. Click (08) Toolbox in the main menu.
2. Click WHOIS in the submenu.
The WHOIS form opens.
3. In the WHOIS box enter the domain you want to inquire, e.g. "test.de".
4. Select Show DENIC member (for .de domains only) to get the DENIC handle too.
5. Click OK.
The result of the WHOIS inquire is shown.
NOTE
After five consecutive inquiries a code and a respective input field are displayed. You have to enter the
displayed code for all further inquiries. One hour after the last request the code is no longer required.
If you do not enter a code or you enter a wrong one, a WHOIS inquire is not possible.
83 of 95
8.1 WHOIS Inquiries
Multi Whois: inquiries for several Domains
With the Multi Whois tool you can easily inquire several domains. For single
WHOIS inquiries you can use the tool WHOIS too, see "Inquiring a single
domain" on page 83 .
Single Domain Request
Using the Single-Domain inquiry you can inquire one SLD combined with one
or more TLDs (e.g. "test.de" and "test.com").
1. Click (08) Toolbox in the main menu.
You are in the Multi Whois submenu, in the Single-Domain tab.
2. In the textbox enter the sld you want to inquire, e.g. test.
3. Select the Select all checkbox, to inquire all TLDs or select the checkboxes next to
the desired TLDs.
4. Click check.
The result of the WHOIS inquire is shown.
For each domain a button is shown, e.g. to get the whois information or to register.
NOTE
If a domain is still available, you can start registering by clicking Register. See "Registering a new domain"
on page 23
5. Click WHOIS to see the Whois information.
84 of 95
8 Helpful Tools. WHOIS and IDN Converter
6. Confirm the Terms of use first by entering the displayed code .
7. Click OK.
Afterwards the WHOIS information will be displayed.
Multi-Domains Inquiry
Using the Multi-Domains inquiry you can inquire several slds combined with
different TLDs (e.g. test.de, test.com and shop.de, shop.com).
1. Click (08) Toolbox in the main menu.
You are in the Multi Whois submenu.
2. Click the Multi tab.
3. In the textbox enter the slds of the domains you want to inquire, e.g. "test" or "shop".
4. Select the Select all checkbox, to inquire all TLDs or select the checkboxes next to
the desired TLDs.
5. Click check.
The results of the WHOIS inquire are shown.
NOTE
If a domain is still available, you can start registering by clicking Register. See "Registering a new domain"
on page 23
6. Click WHOIS to see the Whois information.
85 of 95
8.1 WHOIS Inquiries
7. Confirm the Terms of use first by entering the displayed code .
8. Click OK.
Afterwards the WHOIS information will be displayed.
Mixed-Domains inquiry
Using the Mixed-Domain inquiry you can enter several items and select
several TLDs. The items will be merged into a new item and will be mixed
with all TLDs. (e.g. inquiries for "shop", "test" and ".de", ".at"; are:
"shoptest.de", "shoptest.at", "testshop.de", "testshop.at").
1. Click (08) Toolbox in the main menu.
2. Click the Mixed tab.
3. Click into the text box. A window opens.
4. In the textbox enter an item, e.g. "test". Click OK.
5. Repeat the steps 3 and 4 for every item you want to add. The entered items will be
merged into a new item and will be mixed with all TLDs. (e.g. inquiries for "shop",
"test" and ".de", ".at"; are: "shoptest.de", "shoptest.at", "testshop.de", "testshop.at").
6. Select the Select all checkbox, to inquire all TLDs or select the checkboxes next to
the desired TLDs.
7. Click check.
The result of the WHOIS inquire is shown.
NOTE
If a domain is still available, you can start registering by clicking Register. See "Registering a new domain"
on page 23
8. Click WHOIS to see the Whois information.
86 of 95
8 Helpful Tools. WHOIS and IDN Converter
9. Confirm the Terms of use first by entering the displayed code.
10. Click OK.
Afterwards the WHOIS information will be displayed.
Domain-Text-Grab
Using the Text-Domain-Grab you can enter text containing domain names.
The search finds domain names. For these domains a WHOIS inquiry w ill be
processed.
1. Click (08) Toolbox in the main menu.
2. Click the Text tab.
3. Enter text including the domain names you want to inquire into the text box.
NOTE
Domain names written with space (here "shop. de") are not recognized as domain names and will not be
listed.
Its not necessary to select the TLD checkboxes in the area below, because the
domain names are already including the TLDs.
4. Click Check.
87 of 95
8.1 WHOIS Inquiries
The result of the WHOIS inquire is shown.
NOTE
If a domain is still available, you can start registering by clicking Register. See "Registering a new domain"
on page 23
5. Click WHOIS to see the Whois information.
6. Confirm the Terms of use first by entering the displayed code.
7. Click OK.
Afterwards the WHOIS information will be displayed.
88 of 95
8 Helpful Tools. WHOIS and IDN Converter
8.2 The IDN Converter
Converting IDN Domain Names with the IDN Converter
The IDN converter transforms IDN domain names into the respective
punycode (ACE) domain name and vice versa.
1. Click (08) Toolbox in the main menu.
2. Click the IDN Converter submenu.
The form IDN Converter for converting IDN <-> Punycode (ACE) opens.
In the text box enter the domain names you want to be converted. You can mix IDN
domain names and such in punycode. They will be converted to the other one. You
can use the character map to enter the characters into the text box. Click the desired
character to insert it. Tlds are not required.
3. Click Go.
4. The results are displayed below the character map.
Original: the item you had entered
Converted: the converted item
Converted back: the reconverted item
String comparison: the result of the string comparison (identical or not identical)
Image: Imagefile with both strings
WHOIS: Link to the Whois Inquire of AutoDNS2.
5. Click Image to get an image of both strings in a separate window. You can save the
file by opening the context menu of the image an selecting the entry Save image as.
89 of 95
9 Addendum
9 Addendum
9.1 Userstatus
+
Master
Admin
Normal
(= superuser)
Master*
Master
Master (clone)
Admin+
Admin*
Admin
Admin (clone)
Normal +
Normal*
Normal
Normal (clone)
Admin*
Admin
Admin (clone)
Normal +
Normal*
Normal
Normal (clone)
Normal*
Normal
Normal (clone)
*
Master (clone)
Admin+
Admin*
Admin
Admin (clone)
Normal +
Normal*
Normal
Normal (clone)
normal
Admin+
Admin*
Admin
Admin (clone)
Normal +
Normal*
Normal
Normal (clone)
Admin (clone)
Normal +
Normal*
Normal
Normal (clone)
Normal +
Normal*
Normal
Normal (clone)
Normal (clone)
No right to create a
new user.
clone
The clone has the
same rights on the
objects as the parent,
but has different
rights on functions.
The clone has the
same rights on the
objects as the parent,
but has different
rights on functions.
The clone has the
same rights on the
objects as the parent,
but has different
rights on functions.
91 of 95
9.2 ISO 3166 Country Codes
9.2 ISO 3166 Country Codes
AD (Andorra)
AE (United Arab Emirates)
AF (Afghanistan)
AG (Antigua and Barbuda)
AI (Anguilla)
AL (Albania)
AM (Armenia)
AN (Netherlands Antilles)
AO (Angola)
AQ (Antarctica)
AR (Argentina)
AS (American Samoa)
AT (Austria)
AU (Australia)
AW (Aruba)
AX (Åland Islands)
AZ (Azerbaijan)
BA (Bosnia and Herzegovina)
BB (Barbados)
BD (Bangladesh)
BE (Belgium)
BF (Burkina Faso)
BG (Bulgaria)
BH (Bahrain)
BI (Burundi)
BJ (Benin)
BL (Saint Barthélemy)
BM (Bermuda)
BN (Brunei Darussalam)
BO (Bolivia)
BR (Brazil)
BS (Bahamas)
BT (Bhutan)
BV (Bouvet Island)
BW (Botswana)
BY (Belarus)
BZ (Belize)
CA (Canada)
CC (Cocos Islands)
CD (Congo, theDemocratic Republic of the)
CF (Central African Republic)
CG (Congo)
CH (Switzerland)
CI (Côte d'Ivoire)
CK (Cook Islands)
CL (Chile)
KY (Cayman Islands)
KZ (Kazakhstan)
LA (Lao People's Democratic
Republic)
LB (Lebanon)
LC (Saint Lucia)
LI (Liechtenstein)
LK (Sri Lanka)
LR (Liberia)
LS (Lesotho)
LT (Lithuania)
LU (Luxembourg)
LV (Latvia)
LY (Libyan Arab Jamahiriya)
MA (Morocco)
MC (Monaco)
MD (Moldova, Republic of)
ME (Montenegro)
MF (Saint Martin (French part))
MG (Madagascar)
MH (Marshall Islands)
MK (Macedonia, the formerYugoslav
Republic of)
ML (Mali)
MM (Myanmar)
MN (Mongolia)
MO (Macao)
MP (Northern Mariana Islands)
MQ (Martinique)
MR (Mauritania)
MS (Montserrat)
MT (Malta)
MU (Mauritius)
MV (Maldives)
MW (Malawi)
MX (Mexico)
MY (Malaysia)
MZ (Mozambique)
NA (Namibia)
NC (New Caledonia)
NE (Niger)
NF (Norfolk Island)
NG (Nigeria)
NI (Nicaragua)
NL (Netherlands)
NO (Norway)
92 of 95
9 Addendum
CM (Cameroon)
CN (China)
CO (Colombia)
CR (Costa Rica)
CU (Cuba)
CV (Cape Verde)
CX (Christmas Island)
CY (Cyprus)
CZ (Czech Republic)
DE (Germany)
DJ (Djibouti)
DK (Denmark)
DM (Dominica)
DO (Dominican Republic)
DZ (Algeria)
EC (Ecuador)
EE (Estonia)
EG (Egypt)
EH (Western Sahara)
ER (Eritrea)
ES (Spain)
ET (Ethiopia)
FI (Finland)
FJ (Fiji)
FK (Falkland Islands)
FM (Micronesia, Federated States of)
FO (Faroe Islands)
FR (France)
GA (Gabon)
GB (United Kingdom)
UK (also exceptionally reserved on request of the
United Kingdom)
GD (Grenada)
GE (Georgia)
GF (French Guiana)
GG (Guernsey)
GH (Ghana)
GI (Gibraltar)
GL (Greenland)
GM (Gambia)
GN (Guinea)
GP (Guadeloupe)
GQ (Equatorial Guinea)
GR (Greece)
GS (South Georgia and the South Sandwich
Islands)
GT (Guatemala)
GU (Guam)
NP (Nepal)
NR (Nauru)
NU (Niue)
NZ (New Zealand)
OM (Oman)
PA (Panama)
PE (Peru)
PF (French Polynesia)
PG (Papua New Guinea)
PH (Philippines)
PK (Pakistan)
PL (Poland)
PM (Saint Pierre and Miquelon)
PN (Pitcairn)
PR (Puerto Rico)
PS (Palestinian Territory, Occupied)
PT (Portugal)
PW (Palau)
PY (Paraguay)
QA (Qatar)
RE (Réunion)
RO (Romania)
RS (Serbia)
RU (Russian Federation)
RW (Rwanda)
SA (Saudi Arabia)
SB (Solomon Islands)
SC (Seychelles)
SD (Sudan)
SE (Sweden)
SG (Singapore)
SH (Saint Helena)
SI (Slovenia)
SJ (Svalbard and Jan Mayen)
SK (Slovakia)
SL (Sierra Leone)
SM (San Marino)
SN (Senegal)
SO (Somalia)
SR (Suriname)
ST (Sao Tome and Principe)
SV (El Salvador)
SY (Syrian Arab Republic)
SZ (Swaziland)
TC (Turks and Caicos Islands)
TD (Chad)
TF (French Southern Territories)
TG (Togo)
93 of 95
9.2 ISO 3166 Country Codes
GW (Guinea-Bissau)
GY (Guyana)
HK (HongKong)
HM (Heard Island and McDonald Islands)
HN (Honduras)
HR (Croatia)
HT (Haiti)
HU (Hungary)
ID (Indonesia)
IE (Ireland)
IL (Israel)
IM (Isle of Man)
IN (India)
IO (British Indian Ocean Territory)
IQ (Iraq)
IR (Iran, Islamic Republic of)
IS (Iceland)
IT (Italy)
JE (Jersey)
JM (Jamaica)
JO (Jordan)
JP (Japan)
KE (Kenya)
KG (Kyrgyzstan)
KH (Cambodia)
KI (Kiribati)
KM (Comoros)
KN (Saint Kitts and Nevis)
KP (Korea, Democratic People's Republic of)
KR (Korea, Republic of)
KW (Kuwait)
TH (Thailand)
TJ (Tajikistan)
TK (Tokelau)
TL (Timor-Leste)
TM (Turkmenistan)
TN (Tunisia)
TO (Tonga)
TR (Turkey)
TT (Trinidad and Tobago)
TV (Tuvalu)
TW (Taiwan, Province of China)
TZ (Tanzania, United Republic of)
UA (Ukraine)
UG (Uganda)
UM (United States Minor Outlying
Islands)
US (United States)
UY (Uruguay)
UZ (Uzbekistan)
VA (Holy See)
VC (Saint Vincent and the Grenadines)
VE (Venezuela)
VG (Virgin Islands, British)
VI (Virgin Islands, U.S.)
VN (VietNam)
VU (Vanuatu)
WF (Wallis and Futuna)
WS (Samoa)
YE (Yemen)
YT (Mayotte)
ZA (South Africa)
ZM (Zambia)
ZW (Zimbabwe)
94 of 95
9 Addendum
9.3 Function Codes
DomainCreate
0101
DomainUpdate
0102
DomainDelete
0103
DomainCancelCreate
0103101
DomainCancelUpdate
0103102
DomainCancelDelete
0103103
DomainCancelInquire
0103104
DomainTransferIn
0104
DomainOwnerchange
0104010
DomainInquire
0105
DomainTransferOut Inquire 0106001
DomainTransferOut
0106002
ZoneCreate
0201
ZoneUpdate
0202
ZoneDelete
0203
ZoneImport
0204
ZoneInquire
0205
HandleCreate
0301
HandleUpdate
0302
HandleDelete
0303
HandleInquire
0304
RedirectCreate
0501
RedirectUpdate
0502
RedirectDelete
0503
RedirectInquire
0504
SpoolInquire
0710
HistoryInquire
0713
95 of 95