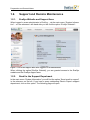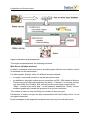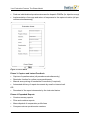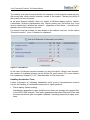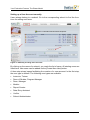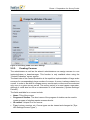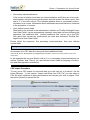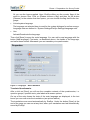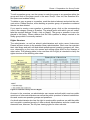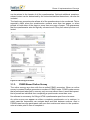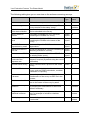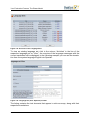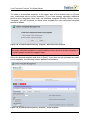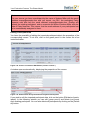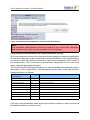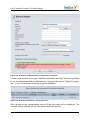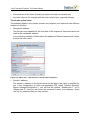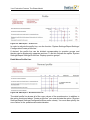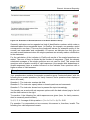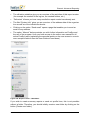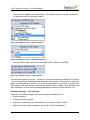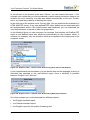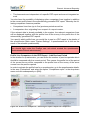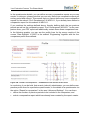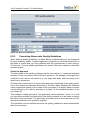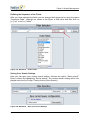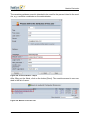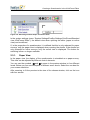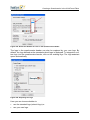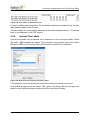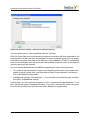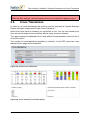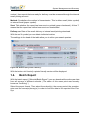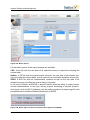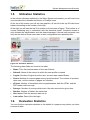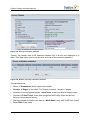
1
2011/05
User Guide
V5.0
Imprint
Electric Paper GmbH
Konrad-Zuse-Allee 13
21337 Lüneburg
Germany
Phone: +49 4131 7360 0
Telefax: +49 4131 7360 60
Email: [email protected]
Chief executive officers:
Lars Riemenschneider
Sven Meyer
USt-IdNr.: DE 179 384 158
Handelsregister: HRB-Nr. 1604, Lüneburg
Edited by Sandra Blomeyer, Dr. Iris Hille, Bernd Röver, Ulrike Schiefelbein
© 2011 Electric Paper GmbH
The manual is protected by copyright.
Subject to change without notice.
Overview
A. PREPARATION AND GENERAL NOTES .................................................................................... 11
1. INTRODUCTION ............................................................................................................................. 11
2. THE BASICS .................................................................................................................................. 17
3. SYSTEM START-UP AND SECURITY ................................................................................................. 26
B. YOUR EVALUATION PROCESS: THE PHASE MODEL ............................................................. 37
1. THE PHASE MODEL – YOUR WORKFLOW IN THE PROCESS OF EVALUATION ................................... 37
2. PHASE 1: PREPARATION OF A SURVEY PERIOD .............................................................................. 39
3. PHASE 2: IMPLEMENTATION OF SURVEYS ....................................................................................... 99
4. PHASE 3: CAPTURE AND INSTANT FEEDBACK ............................................................................... 188
5. PHASE 4: ADVANCED REPORTING ................................................................................................ 236
6. PHASE 5: QUALITY MANAGEMENT ................................................................................................ 314
7. MODULE EVALUATION .................................................................................................................. 342
C. CREATING QUESTIONNAIRES WITH VIVIDFORMS ................................................................ 357
1. ACCESS TO THE VIVIDFORMS EDITOR ......................................................................................... 357
2. CREATING A QUESTIONNAIRE IN THE VIVIDFORMS EDITOR ............................................................ 358
3. REPAIR FORM ............................................................................................................................. 409
4. USE OF THE QUESTION LIBRARY WITH VIVIDFORMS ...................................................................... 409
5. FILTER SETTINGS, VALIDATION, REQUIRED QUESTIONS AND CROSS TABULATIONS ........................ 415
6. DEFINING GENERAL TEMPLATES .................................................................................................. 420
7. EDITING AND PASSING ON QUESTIONNAIRES ................................................................................ 423
8. IMPLEMENTATION OF SPECIFIC DESIGN REQUIREMENTS (VIVIDFORMS PLUS) ................................ 428
D. SYSTEM SETTINGS AND MANAGEMENT ................................................................................ 433
1. SYSTEM MANAGEMENT AND SUMMARY ........................................................................................ 433
2. CONFIGURATION SETTINGS .......................................................................................................... 456
© 2011 Electric Paper GmbH
3
4
© 2011 Electric Paper GmbH
Table of Contents
A. PREPARATION AND GENERAL NOTES ..................................................................................... 11
1. INTRODUCTION .............................................................................................................................. 11
1.1. MANUALS AND DOCUMENTATION ............................................................................................. 12
1.1.1. USER GUIDE ................................................................................................................... 12
1.1.2. FURTHER MANUALS ........................................................................................................ 13
1.1.3. SAMPLE FILES ................................................................................................................ 13
1.2. SUPPORT AND REMOTE MAINTENANCE ................................................................................... 14
1.2.1. EVASYS WEBSITE AND SUPPORT AREA ........................................................................... 14
1.2.2. EMAIL TO THE SUPPORT DEPARTMENT ............................................................................ 14
1.2.3. REMOTE MAINTENANCE: NETVIEWER “AD HOC DESKTOP SHARING” .................................. 16
2. THE BASICS .................................................................................................................................. 17
2.1. STRUCTURE OF THE EVASYS SYSTEM ..................................................................................... 17
2.2. WEB ACCESSIBILITY IN EVASYS .............................................................................................. 20
2.3. CENTRAL EVALUATION AND ACTIVE INSTRUCTOR/TRAINER ACCOUNTS .................................... 22
2.3.1. CENTRAL EVALUATION: A CENTRAL OFFICE CONTROLS THE EVALUATION ......................... 22
2.3.2. ACTIVE INSTRUCTORS/TRAINERS ACCOUNTS .................................................................... 23
2.4. BASIC TERMINOLOGY WITHIN THE EVASYS USER GUIDE .......................................................... 24
3. SYSTEM START-UP AND SECURITY ................................................................................................. 26
3.1. ADJUSTMENT TO YOUR ORGANIZATION .................................................................................... 27
3.1.1. LOGGING INTO EVASYS: ENTRY POINTS .......................................................................... 27
3.1.2. LOGIN SECURITY ............................................................................................................. 28
3.1.3. ADJUSTMENTS IN EVASYS SETTINGS – TEXTS, COLORS, DOCUMENTS .............................. 30
3.1.4. ADJUSTMENTS IN THE TEXT TEMPLATES .......................................................................... 32
3.1.5. ADJUSTMENTS IN THE DOCUMENTS .................................................................................. 32
3.2. DEFINING ACCESS RIGHTS ..................................................................................................... 32
3.3. IMPLEMENTING BACKUPS ........................................................................................................ 34
3.3.1. BACKING UP THE DATABASE ............................................................................................ 34
3.3.2. BACKING UP THE IMAGE FILES OF THE OPEN QUESTIONS ................................................. 35
3.3.3. BACKING UP THE ORIGINAL IMAGE FILES FROM SCANSTATION ......................................... 35
B. YOUR EVALUATION PROCESS: THE PHASE MODEL .............................................................. 37
1. THE PHASE MODEL – YOUR WORKFLOW IN THE PROCESS OF EVALUATION .................................... 37
2. PHASE 1: PREPARATION OF A SURVEY PERIOD .............................................................................. 39
2.1. PRELIMINARY STEPS .............................................................................................................. 39
2.1.1. DEFINE ORGANIZATIONAL DATA ....................................................................................... 39
2.1.2. COURSE TYPES, PERIODS, CUSTOM TITLES .................................................................... 40
2.2. SETTING UP THE ORGANIZATIONAL STRUCTURE ...................................................................... 43
2.2.1. SETTING UP THE SUBUNITS ............................................................................................. 45
2.2.2. GENERATING AND MANAGING USER ACCOUNTS ............................................................... 49
2.2.3. CREATING COURSES ....................................................................................................... 61
2.3. IMPORT INTERFACES ............................................................................................................... 72
2.3.1. CSV-IMPORT WITHIN SUBUNITS ....................................................................................... 72
2.3.2. XML IMPORT (STRUCTURAL DATA, SURVEYS AND SCHEDULED ONLINE SURVEYS) ........... 77
2.3.3. IMPORT OF COURSE PARTICIPANTS’ EMAIL ADDRESSES .................................................. 77
2.4. ADMINISTRATION OF QUESTIONNAIRES .................................................................................... 79
2.4.1. ESSENTIAL INFORMATION ON THE QUESTIONNAIRE ........................................................... 79
© 2011 Electric Paper GmbH
5
2.4.2. MANAGEMENT OF QUESTIONNAIRES AND DETAILED VIEW ................................................. 80
2.4.3. MULTIPLE LANGUAGES .................................................................................................... 92
2.4.4. QUESTION LIBRARY ......................................................................................................... 95
3. PHASE 2: IMPLEMENTATION OF SURVEYS ....................................................................................... 99
3.1. SURVEY PROCEDURES ........................................................................................................... 99
3.1.1. COVER SHEET PROCEDURE .......................................................................................... 100
3.1.2. HARD COPY PROCEDURE .............................................................................................. 100
3.1.3. PSWD BASED ONLINE SURVEY .................................................................................... 101
3.1.4. PASSWORD BASED ONLINE SURVEY .............................................................................. 102
3.2. CENTRAL EVALUATION .......................................................................................................... 103
3.2.1. GENERATING SURVEYS ................................................................................................. 103
3.2.2. DISPLAY SURVEYS ........................................................................................................ 104
3.2.3. SURVEY DETAILS .......................................................................................................... 108
3.2.4. DELETE SURVEY ........................................................................................................... 119
3.2.5. TREE STRUCTURE ......................................................................................................... 120
3.2.6. CONDUCTING A PAPER SURVEY ..................................................................................... 126
3.2.7. EFFECTIVE MANAGEMENT AND CONDUCTION OF ONLINE SURVEYS ................................. 127
3.2.8. ADDING QUESTIONS USING THE INSTRUCTOR/TRAINER’S OPTIONAL QUESTIONS ............. 155
3.2.9. BATCH EVENTS ............................................................................................................ 158
3.2.10. NON-ANONYMOUS SURVEYS ........................................................................................ 166
3.3. ACTIVE INSTRUCTOR/TRAINER ACCOUNTS ............................................................................ 178
3.3.1. CREATING ACTIVE INSTRUCTORS AS (SUBUNIT) ADMINISTRATORS .................................. 178
3.3.2. LOGIN AS ACTIVE INSTRUCTOR/TRAINER ....................................................................... 180
3.3.3. GENERATING AND EDITING QUESTIONNAIRES ................................................................. 181
3.3.4. GENERATING A STUDY FOLDER ..................................................................................... 184
3.3.5. GENERATING SURVEYS ................................................................................................. 185
3.3.6. WORKING WITH THE ACTIVE INSTRUCTOR/TRAINER’S DATA ............................................ 186
4. PHASE 3: CAPTURE AND INSTANT FEEDBACK ............................................................................... 188
4.1. SCANNING THE FORMS ........................................................................................................ 188
4.1.1. SCANNER SETTINGS ...................................................................................................... 189
4.1.2. IMPORTANT RULES FOR SCANNING ................................................................................ 189
4.2. EVALUATION OF SCANNED QUESTIONNAIRES ......................................................................... 191
4.2.1. RECOGNITION OF THE CHECKBOXES VIA BARCODE AND OMR ....................................... 191
4.2.2. PROCESSING IN VIVIDFORMS READER ........................................................................... 192
4.3. CORRECTION OF CHECKBOXES NOT CLEARLY READ: THE VERIFICATION ................................ 192
4.3.1. BATCH VIEW ................................................................................................................. 193
4.3.2. SURVEY VIEW ............................................................................................................... 194
4.3.3. FORM VIEW .................................................................................................................. 195
4.3.4. CARRYING OUT THE VERIFICATION ................................................................................. 196
4.3.5. AUTOMATIC VERIFICATION ............................................................................................. 198
4.3.6. CHECK FILLING DEGREES .............................................................................................. 198
4.3.7. RESPONSES TO OPEN QUESTIONS ............................................................................... 201
4.3.8. KEYBOARD CONTROL IN THE VERIFICATION .................................................................... 201
4.4. MANUAL ENTRY OF HANDWRITTEN COMMENTS ..................................................................... 201
4.5. INSTANT FEEDBACK: THE PDF REPORT ................................................................................ 205
4.5.1. COMPONENTS OF THE PDF REPORT ............................................................................ 206
4.5.2. PDF REPORT DEFINITIONS ............................................................................................ 226
4.5.3. INDIVIDUALLY DESIGNED REPORTS: PDF REPORT PLUGINS ........................................... 230
6
© 2011 Electric Paper GmbH
4.5.4. DESIGNING AN INDIVIDUALLY CONFIGURED LETTER FOR SENDING
REPORTS ...................................................................................................................... 232
4.5.5. DOWNLOAD AND SENDING OF REPORTS ........................................................................ 233
5. PHASE 4: ADVANCED REPORTING ................................................................................................ 236
5.1. INDICATORS ........................................................................................................................ 236
5.1.1. THE PRINCIPLE OF THE INDICATOR ................................................................................ 236
5.1.2. ACTIVATING THE INDICATORS IN THE CONFIGURATION ................................................... 239
5.1.3. CREATING THE INDICATORS FOR A QUESTIONNAIRE ........................................................ 241
5.1.4. INTERNAL CONSISTENCY OF THE QUESTION GROUP: CRONBACH’S ALPHA ...................... 242
5.1.5. FREE INDICATORS ......................................................................................................... 244
5.2. CREATING REPORTS AND COMPARATIVE PROFILE LINES ...................................................... 247
5.2.1. THE USER ROLE OF THE REPORT CREATOR .................................................................. 247
5.2.2. CREATING SUMMARY REPORTS .................................................................................... 257
5.2.3. DISPATCH OF COMPARATIVE PROFILE LINES ................................................................. 288
5.2.4. RESULT REPORTS ......................................................................................................... 299
5.2.5. INTEGRATING PROFILE COMPARISON LINES IN THE PDF REPORT ................................... 302
5.3. DATA EXPORT TO EXCEL/SPSS/SPHINX ............................................................................... 309
5.3.1. POSSIBLE DATA EXPORT FORMATS IN EVASYS .............................................................. 309
5.4. DEFINITION OF THE EXPORT VALUES AND NAMES FOR VARIABLES ......................................... 310
5.5. THE EVASYS REPORT MODULE SPHINX PLUS² ...................................................................... 312
6. PHASE 5: QUALITY MANAGEMENT ................................................................................................ 314
6.1. NORMS ................................................................................................................................ 314
6.1.1. CALCULATION OF NORMS .............................................................................................. 315
6.1.2. DEFINITION OF NORM VALUES FOR QUESTIONNAIRES ..................................................... 316
6.2. QUALITY GUIDELINES ........................................................................................................... 320
6.2.1. SETTING QUALITY GUIDELINES ...................................................................................... 320
6.2.2. CONVERTING INDICATORS INTO QUALITY GUIDELINES ..................................................... 328
6.2.3. CONVERTING NORMS INTO QUALITY GUIDELINES ........................................................... 332
6.2.4. AUTHORIZING ACCESS RIGHTS TO QM VIEWS ............................................................... 336
6.2.5. USE OF QM VIEWS ....................................................................................................... 337
6.2.6. DEFINITION OF SPECIAL SEARCH AND TABLE CONFIGURATIONS ...................................... 339
7. MODULE EVALUATION .................................................................................................................. 342
7.1. SETTING UP A SURVEY WITH MODULE EVALUATION ................................................................ 342
7.2. ACTIVATING MODULE SURVEYS .............................................................................................. 343
7.3. CREATING MODULE QUESTIONNAIRES AND LINKING THEM TO COURSE TYPES ....................... 343
7.4. CHARACTERISTICS OF THE AGGREGATED QUESTIONNAIRE ..................................................... 345
7.5. CREATING A MODULE ACCOUNT ........................................................................................... 346
7.6. CREATING MODULE COURSES ............................................................................................... 348
7.7. GENERATING A MODULE SURVEYS ........................................................................................ 350
7.8. INSTANT FEEDBACK .............................................................................................................. 352
7.9. FURTHER SETTINGS ............................................................................................................. 353
C. CREATING QUESTIONNAIRES WITH VIVIDFORMS ................................................................. 357
1. ACCESS TO THE VIVIDFORMS EDITOR .......................................................................................... 357
2. CREATING A QUESTIONNAIRE IN THE VIVIDFORMS EDITOR ............................................................ 358
2.1. DEFINE FORM INFORMATION ................................................................................................ 358
2.2. THE EDITOR CONTROL ......................................................................................................... 360
2.3. VIEWING OPTIONS ................................................................................................................ 362
© 2011 Electric Paper GmbH
7
3.
4.
5.
6.
7.
8
2.3.1. PAPER VIEW ................................................................................................................. 363
2.3.2. ONLINE VIEW ................................................................................................................ 365
2.3.3. PREVIEW FUNCTIONS .................................................................................................... 367
2.4. EDITING THE QUESTIONNAIRE HEADER .................................................................................. 370
2.5. ADDING AND EDITING QUESTION GROUPS ............................................................................. 374
2.6. ADDING AND EDITING QUESTIONS ......................................................................................... 376
2.6.1. OVERVIEW ON THE QUESTION TYPES ............................................................................ 377
2.6.2. SCALED QUESTION ....................................................................................................... 379
2.6.3. OPEN QUESTION ........................................................................................................... 383
2.6.4. SINGLE CHOICE/MULTIPLE CHOICE QUESTION ............................................................... 389
2.6.5. HORIZONTAL MATRIX QUESTION .................................................................................... 391
2.6.6. VERTICAL MATRIX QUESTION ........................................................................................ 392
2.6.7. GRADE VALUE .............................................................................................................. 394
2.7. ADAPTING THE SIZE OF ANSWER BOXES ............................................................................... 395
2.8. ADDING POLE LABELS .......................................................................................................... 396
2.8.1. HORIZONTAL POLE LABELS ............................................................................................ 396
2.8.2. VERTICAL POLE LABELS ................................................................................................ 397
2.8.3. INCLINED POLE LABELS ................................................................................................. 398
2.9. ADDING GRAPHICAL ELEMENTS ............................................................................................ 400
2.9.1. LINE SPACE .................................................................................................................. 400
2.9.2. SEPARATOR .................................................................................................................. 400
2.9.3. TEXT ............................................................................................................................ 400
2.9.4. PAGE BREAK ................................................................................................................ 401
2.9.5. LINE HEIGHT, FONT SIZE AND FONT TYPE ..................................................................... 401
2.9.6. FILTERING OF HTML-TAGS ........................................................................................... 402
2.10. ADDING PICTURES TO A QUESTIONNAIRE ............................................................................ 403
2.10.1. UPLOAD PICTURES TO THE PICTURE LIBRARY .............................................................. 403
2.10.2. INTEGRATING PICTURES IN A QUESTIONNAIRE .............................................................. 405
2.11. LAYOUT SETTINGS .............................................................................................................. 406
2.12. ADJUSTING COLOR SCHEME ............................................................................................... 407
REPAIR FORM ............................................................................................................................. 409
USE OF THE QUESTION LIBRARY WITH VIVIDFORMS ...................................................................... 409
4.1. ADDING A QUESTION FROM THE LIBRARY .............................................................................. 409
4.2. UNDOING THE CONNECTION BETWEEN A QUESTION AND THE LIBRARY ................................... 412
4.3. ADDING A QUESTION TO THE LIBRARY ................................................................................... 413
4.4. DELETING A QUESTION FROM THE LIBRARY ........................................................................... 414
4.5. ADDING A GROUP TO THE LIBRARY ....................................................................................... 415
4.6. DELETING A GROUP FROM THE LIBRARY ............................................................................... 415
FILTER SETTINGS, VALIDATION, REQUIRED QUESTIONS AND CROSS TABULATIONS ........................ 415
5.1. GENERAL INFORMATION ........................................................................................................ 415
5.2. FILTER SETTINGS ................................................................................................................. 416
5.3. VALIDATION .......................................................................................................................... 417
5.4. REQUIRED QUESTIONS ......................................................................................................... 418
5.5. CROSS TABULATIONS .......................................................................................................... 419
DEFINING GENERAL TEMPLATES .................................................................................................. 420
6.1. DEFINING A TEMPLATE BY THE ADMINISTRATOR ..................................................................... 420
6.2. USE OF TEMPLATES IN INSTRUCTOR/TRAINER ACCOUNTS ...................................................... 421
EDITING AND PASSING ON QUESTIONNAIRES ................................................................................ 423
© 2011 Electric Paper GmbH
7.1. WRITE-PROTECT MODE ........................................................................................................ 423
7.2. AUTOMATIC RECOGNITION SET MANAGEMENT ....................................................................... 424
7.3. IMPORT/EXPORT OF VIVIDFORMS QUESTIONNAIRES .............................................................. 425
8. IMPLEMENTATION OF SPECIFIC DESIGN REQUIREMENTS (VIVIDFORMS PLUS) ................................ 428
8.1. IMPLEMENTATION OF QUESTIONNAIRES WITH VIVIDFORMS PLUS ............................................ 428
8.2. IMPORTING THE VIVIDFORMS PLUS QUESTIONNAIRE .............................................................. 428
8.3. INFORMATION ABOUT A VIVIDFORMS PLUS QUESTIONNAIRE ................................................... 430
8.4. USAGE OF VIVIDFORMS PLUS FORMS ................................................................................... 432
D. SYSTEM SETTINGS AND MANAGEMENT ................................................................................. 433
1. SYSTEM MANAGEMENT AND SUMMARY ......................................................................................... 433
1.1. SEARCH ............................................................................................................................... 433
1.1.1. SEARCHING FOR USERS ................................................................................................ 434
1.1.2. SEARCH FOR COURSES ................................................................................................. 435
1.1.3. SEARCH FOR SURVEYS ................................................................................................. 436
1.1.4. SEARCH FOR DELIVERIES .............................................................................................. 436
1.2. WRITING EMAIL .................................................................................................................... 437
1.3. DELIVERY ............................................................................................................................. 438
1.4. BATCH EXPORT .................................................................................................................... 439
1.5. UTILIZATION STATISTICS ....................................................................................................... 441
1.6. EVALUATION STATISTICS ....................................................................................................... 441
1.7. SYSTEM INFORMATION .......................................................................................................... 443
1.8. LICENSE ADMINISTRATION ..................................................................................................... 444
1.8.1. OVERVIEW ON THE LICENSE ADMINISTRATION ................................................................ 444
1.8.2. ADMINISTRATION OF USER ACCOUNTS ........................................................................... 445
1.8.3. HOW TO USE A VOLUME LICENSE .................................................................................. 447
1.9. PERFORMANCE CONSIDERATIONS ......................................................................................... 449
1.9.1. PERFORMANCE STATISTIC ............................................................................................. 449
1.9.2. LIST OF ALL ACTIVE USERS LOGGED IN ........................................................................ 450
1.9.3. DISPLAY OF ONLINE SURVEYS ....................................................................................... 450
1.9.4. MORE TIPS FOR AVOIDING SYSTEM OVERLOAD ............................................................. 450
1.10. DELETION LOG ................................................................................................................... 451
1.11. SYSTEM CLEANING ............................................................................................................. 452
1.11.1. PSWDS ..................................................................................................................... 452
1.11.2. DELIVERIES ................................................................................................................. 452
1.11.3. ENTRIES IN THE LOG BOOK ......................................................................................... 452
1.11.4. DELETE COMPILATIONS AND SUBGROUP REPORTS ....................................................... 453
1.12. ANALYSIS OF ERRORS ........................................................................................................ 453
1.12.1. LOG BOOK .................................................................................................................. 453
1.12.2. MAIL SERVICE LOG ..................................................................................................... 455
1.12.3. MORE LOG FILES ........................................................................................................ 456
2. CONFIGURATION SETTINGS .......................................................................................................... 456
2.1. TEXT TEMPLATES ................................................................................................................. 456
2.1.1. VIEWING EMAIL TEXTS AND TEXT TEMPLATES ................................................................ 456
2.1.2. TEMPLATES FOR EMAIL MESSAGES ................................................................................ 458
2.1.3. TEMPLATE FOR LETTER IN PDF REPORTS ..................................................................... 461
2.1.4. PLACEHOLDER FOR TEXTS ............................................................................................ 464
2.1.5. HTML FORMAT FOR EMAIL TEXTS ................................................................................. 467
© 2011 Electric Paper GmbH
9
2.1.6. THE PDF REPORT HEADER .......................................................................................... 468
2.2. DOCUMENTS ........................................................................................................................ 470
2.2.1. EMAIL ATTACHMENTS .................................................................................................... 471
2.2.2. PDF TEMPLATES .......................................................................................................... 471
2.3. PROCESS DEFAULTS ............................................................................................................ 474
2.4. WEBSERVICE ....................................................................................................................... 475
2.5. EVASYS SETTINGS: CONFIGURATION .................................................................................... 475
2.5.1. SECTION “GENERAL” ..................................................................................................... 477
2.5.2. SECTION “SURVEY” ....................................................................................................... 479
2.5.3. SECTION “SURVEY ONLINE” ........................................................................................... 481
2.5.4. SECTION “DATA IMPORT AND EXPORT” .......................................................................... 484
2.5.5. SECTION “COURSE USER DATA FIELDS” ........................................................................ 485
2.5.6. SECTION “FUNCTIONS” .................................................................................................. 486
2.5.7. SECTION “CENTRAL EVALUATION” .................................................................................. 489
2.5.8. SECTION “EMAIL FUNCTIONS & ACCOUNTS” ................................................................... 490
2.5.9. SECTION “COLOR SETTINGS” ......................................................................................... 491
2.5.10. SECTION “INSTRUCTOR/TRAINER ACCOUNTS” ............................................................... 492
2.5.11. SECTION “VIVIDFORMS” ............................................................................................... 493
2.5.12. SECTION “NETWORK SETTINGS” .................................................................................. 493
2.5.13. SECTION “SYSTEM SECURITY” ..................................................................................... 496
2.5.14. SECTION “MAINTENANCE” ............................................................................................ 497
2.6. CLIENT OPERATIONS ........................................................................................................... 500
10
© 2011 Electric Paper GmbH
Introduction
A. Preparation and General Notes
This manual is intended to assist you in your day to day operating of the software EvaSys. If you wish to familiarize yourself with particular elements, have a question or, for
example, the software has changed due to an update, you will require fast and convenient access to the relevant information.
Therefore, this chapter deals with the most important introductory questions:
•
Which EvaSys manuals are available and where do you find which information?
•
If these cannot answer all your questions – where do you find more help?
•
What does the structure of the system look like?
•
How do I start to work with EvaSys and how can I save my data while working?
These questions are dealt with in the first chapter of the EvaSys User Guide.
1. Introduction
The course evaluation system EvaSys was developed to offer universities and major
educational institutions an effective tool for comprehensively implementing and processing surveys for quality assurance purposes. EvaSys is suitable for both paper and
online surveys.
This manual introduces the system’s possibilities and abilities with a strong emphasis
on the administrator’s access. It addresses users without any EvaSys experience as
well as experienced users who wish to reference something specific. Hence, it provides an introduction into the utilization of the system as well as offering answers to
questions related to particular topics. Apart from a few exceptions, neither experience
in programming nor technical knowledge is necessary.
For a comprehensive introduction it’s best to work through the manual chapter by
chapter. Should you wish to look up certain steps, the index will lead you to the topic
in question. When working with the manual’s PDF version, the index will also appear
as bookmarks on the left-hand side of the screen, enabling you to navigate to the relevant chapter.
In addition, you will find an index at the back of the manual, where you can look up
important terminology and topics.
The manual’s structure is based on the operating steps of the evaluation. Following
the first three chapters that relate to the basics of the system, the initial operation and
security, specific operations are introduced as and when you need them during the
evaluation. The manual follows a so-called “phase model” that illustrates the workflow,
which you may have already come across during EvaSys training. It will be dealt with
in depth in this manual.
A major part of the evaluation is the creation of questionnaires. EvaSys offers you a
tool for creating questionnaires: the VividForms Editor and the VividForms Designer
(optional). In order to enable fast access to the explanations relating to these two edi-
© 2011 Electric Paper GmbH
11
Preparation and General Notes
tors, you will find one chapter on VividForms after the illustration of the manual’s workflow.
Following that, you will find notes on the system administration and consolidated settings (some of which are mentioned in related chapters in the manual).
Explanations are visualized through illustrations. In more complex windows, red
eclipses/rectangles usually show which elements the comments in the text relate to.
Menu names are set in quotation marks: “menu name”
Buttons are set in angular brackets: [button]
Three symbols alert you to important elements in the manual:
Notes and important information can be recognized by a salmon colored background.
Hints can be recognized by a yellow background color.
Examples which illustrate explanations are marked with a light blue background.
All paths concerning the database are related to an installation with a MySQL database. If you use an MS SQL database, please ask your database administrator for the
appropriate path.
All paths concerning the EvaSys root folder are related to an installation using an
Apache web server. If you use an IIS (Internet Information Server) instead, the standard path is “C:\inetpub\wwwroot\evasys\”.
1.1.
Manuals and Documentation
In the following you receive an overview on the manuals and example files available
for EvaSys and its special components.
1.1.1.
User Guide
You now have the “User Guide” at hand. There are several options of opening/reading
it:
•
As a PDF document you will find it in the administrator‘s access in the main menu
“System Information” on the left side in the area “Documentation/Manuals”. Here a
listing all EvaSys manuals is shown.
•
You will find the manual, again in PDF format, in the index of the Apache folder on
the EvaSys server (index Apache/htdocs/evasys/doc/, there you will find the document “Administrator_Manual_en_E”). However, you cannot usually access it
directly from the file system; rather, you should type the path into the browser (for
example http://localhost/evasys/doc/Administrator_Manual_en_E.pdf). The path
component “localhost” should be replaced by your server name. In relation to clients’ systems please also note that the path component “evasys” is to be supplemented (or replaced, respectively) by the name of the client’s installation. If need
be, please consult your system administrator.
12
© 2011 Electric Paper GmbH
Introduction
1.1.2.
Further Manuals
Apart from the user guide, the following manuals are available:
•
the manual “First Steps with EvaSys” which provides an overview of the most
important features of your work with EvaSys. It is designed as a guide for beginners and helps you off to a quick and easy start;
•
the manual “What’s new in EvaSys”, in which all of the newest innovations in EvaSys are listed, compared to the previous version;
•
the “VividForms Designer Manual”, which is a guide to creating forms using the
VividForms Designer;
•
the “Scanstation Manual” which describes the scan process;
•
the manual “EvaSys Calculations”, which provides an overview of the equations
used in EvaSys for statistical calculations;
•
the “XML Import Manual” which supports you in importing your data into EvaSys.
You will be provided with the XSD for the import via XML (XML schema) and
receive further detailed information.
All manuals listed here can be accessed by administrators and subunit administrators
as PDF files directly in the EvaSys menu “System Information/Manuals”.
In addition, all manuals are, by default, stored in a directory on the server, under
C:\Apache\htdocs\evasys\doc (drive C:\ may need to be replaced with your server
name). Also here, other manuals such as the “Installation Manual” and the “VividForms Reader Manual” can be found. The “Scanstation Guide” is available in the dialog of the Scanstation, the “VividForms Reader Manual” can be found in the dialog of
the VividForms Reader.
In each active users account, the “Manual for Active Users” is available for guidelines,
as well as the manual “Creating Questionnaires with the VividForms Editor”.
Note:
All PDF manuals are provided with linked directories so that you can navigate comfortably. Should the linking not work, please check that the option “View documents
in PDF/A mode” is set to “Never” in the settings of the Adobe Reader (menu “Edit/
Preferences/Documents/PDF/A View Mode”).
1.1.3.
Sample Files
In the menu “System Information/Sample Files” there are a number of example and
sample files that you can use to test different functions in EvaSys, such as the CSV
import of users and course participants, imports into the question library, uploading a
custom cover letter for the PDF report, etc.
© 2011 Electric Paper GmbH
13
Preparation and General Notes
1.2.
Support and Remote Maintenance
1.2.1.
EvaSys Website and Support Area
When logged in as an administrator in EvaSys, – via the main menu “System Information” – on the submenu’s left-hand side you will find the option “EvaSys Website”:
Figure 1: Link to the Support Area when logged in as an Administrator
When clicking the option [EvaSys Website], you are granted access to the EvaSys
website and the EvaSys support area.
1.2.2.
Email to the Support Department
In the main menu “System Information” you will find the option “Send email to support”
in the submenu on the left. If you have a query addressing Electric Paper’s support
department, click on this option. The following page will open:
14
© 2011 Electric Paper GmbH
Introduction
Figure 2: Email to the Support Department
This function enables you to send an email to the EvaSys support department.
Enter your name as well as your email address in the field “Sender”. The selection list
“Request Type” provides you with following options:
•
General question: You have a question regarding EvaSys.
•
Support inquiry: You have a problem with EvaSys and require assistance.
•
Feature request: You have a suggestion for improvement or an idea to develop
EvaSys.
Choose one of these query types and then choose the appropriate category under
“Module”.
In the fields “Subject” and “Your message” you can type your message.
Below the message area you can add up to three attachments: click on [Browse…],
select one file and click on [Add]. The attachment should not be larger than 1 MB.
After another click on [Next] a summary of your message will appear. Some pieces of
information about your EvaSys will be included, such as the version number. Then
click on [Send email] to send the email.
© 2011 Electric Paper GmbH
15
Preparation and General Notes
1.2.3.
Remote Maintenance: Netviewer “Ad hoc Desktop Sharing”
In most cases support queries can be dealt quickly by telephone or email. In more
complicated cases this method can turn out to be lengthy and ineffective. We recommend setting up a remote maintenance connection.
Remote maintenance allows EvaSys developers to be (virtually) with you working on
your EvaSys server, analyzing and solving your problem. This connection can also be
used to install updates. Remote maintenance is done with your permission and
involves remote control for a limited period of time.
The netviewer works without installing software. Just start a 1.5 MB large client application. Netviewer can be started directly via the Electric Paper Website (http://
www.electricpaper.biz). In the menu “Customer Service” click on “Support via Netviewer”. Here click the Netviewer icon to start the download. In the download dialog
select the option “Execute”. The program will then ask you for a session number,
which your EvaSys support consultant will have given to you.
Figure 3: Netviewer – Participant Login
When being asked if you want to transfer your screen, click “Yes”. The support consultant will now be able to see your screen. On your screen a small control window is displayed. The option “Show” is activated, which means that your screen is transferred.
Figure 4: Remote Control
Activate the remote control by clicking the button “on” in the area “Remote control”.
You can end the remote control at any time by pressing the F12 key or closing the
program.
16
© 2011 Electric Paper GmbH
The Basics
By clicking the arrow button the whole control panel opens. In the menu “Application
Selection” you can, if necessary, restrict the selection of transmitted programs by
deselecting the box next to the corresponding program. The options “Transfer newly
opened applications” , “Transfer task bar and system” and “Transfer desktop” should
remain activated.
Figure 5: Application Selection
Now you can watch our developers at work or occupy yourself with something else.
As soon as the maintenance is finished the program will be automatically terminated.
You can find out more about security issues on the netviewer website.
2. The Basics
For orientation purposes and as a glossary, this chapter outlines the most important
terminology and concepts which are used repeatedly throughout the EvaSys Manual.
Initially you can learn how EvaSys is structured and which components you will be
working with. Then, as central evaluation and the de-central evaluation stem from two
fundamentally different concepts, these concepts are also introduced. At the end of
the chapter you will be acquainted with some basic terminology used in EvaSys.
2.1.
Structure of the EvaSys System
EvaSys consists of four resp. five (with the VividForms Designer) components:
•
the web server,
•
the data base,
•
the scanstation (or several scanstations) and
•
the VividForms Reader.
•
optionally the form creation software VividForms Designer
The following graphic gives you an overview of the interaction of the components
mentioned:
© 2011 Electric Paper GmbH
17
Preparation and General Notes
Figure 6: Interaction of the Components
The single components bear the following functions:
Web Server (EvaSys Interface)
EvaSys is controlled via the web server, providing users with the user interface, which
is accessed via the web browser.
For data transfer, EvaSys offers two different access methods:
•
a regular, unsecured connection via the http protocol and
•
an additional, optionally usable secure connection via SSL. SSL stands for Secure
Socket Layer and offers administrators the ability – if desired – to securely encrypt
any data traffic from EvaSys. SSL connections are most easily recognized by
“https” – instead of the usual “http” – in the browser’s address bar. Usually, current
browsers graphically indicate the presence of a secure connection.
The number of users is only limited by the number of user accounts.
Participants of online surveys can also communicate with the EvaSys server via an
encrypted connection.
Email messages to the respective recipients are sent via your local mail server.
18
© 2011 Electric Paper GmbH
The Basics
Data Base
Any data generated through the utilization of EvaSys is stored in a data base. This
means that the entire user structure, the questionnaires and the survey data is stored
in this data base.
For this, a MySQL database or a MS SQL database is utilized.
Note:
Please be sure to save this data base at regular intervals!
Scanstation
Questionnaires are read by means of the Scanstation and the image files generated
are transmitted to EvaSys for further processing. The Scanstation can be utilized
directly via the EvaSys computer. Alternatively, one or more Scanstations may be
linked through de-centralized computers.
Document reading can be carried out through VividForms:
VividForms/VividForms Reader
This is a solution that was developed specifically for EvaSys. With VividForms, questionnaires can be created directly via the web interface and later automatically processed via the scanstation. It also contains a web-based visual correction program
(WebVerifier).
After you have created your questionnaires by means of VividForms, they are processed by the VividForms Reader.
The VividForms Reader receives the images transmitted by the scanstation and reads
the questionnaires’ raw data. This means:
Once you create a survey with a particular questionnaire in EvaSys, a file accurately
describing this form is generated and stored in a folder on the server (form description
file in XML format).
The VividForms Reader has access to this folder and, therefore, is familiar with those
forms’ images that may be produced. When receiving image files of scanned questionnaire batches, the VividForms Reader verifies the form in question. If the form is a
familiar one, the VividForms Reader is informed by the form description file about the
position of the check mark boxes. So it now can check to which degree each check
mark box has been blackened. This is how it receives the survey’s raw data.
This data is then transmitted to the EvaSys data base where it is in turn made available for further processing.
In the case of paper surveys, you scan filled-in batches of questionnaires using the
Scanstation and a scanner. In turn, image files are produced and saved in a folder
that is checked by the VividForms Reader at pre-defined intervals.
By means of the form definitions at hand, the VividForms Reader recognizes the
blackened check mark boxes and transmits this data to the data base.
© 2011 Electric Paper GmbH
19
Preparation and General Notes
(The VividForms Reader cannot process the scanned questionnaires if these are not
based on VividForms forms. Should this be the case, the image files are stored in a
so-called NonForms folder, meaning in a folder for non-recognized image files.
With online surveys, of course no scanning is required. The data will be transferred
directly to the data base.
Once the data has reached the data base, the user can access the data base via the
web server with a web browser and view the results of their survey.
2.2.
Web Accessibility in EvaSys
The HTML content generated by EvaSys is optimized for accessibility. Particularly for
participants of online surveys, special aids are built in to the display output. Such content can be detected by so-called screen readers and voice output can be used for a
better understanding. This allows blind people to take part in online surveys easily and
without complication.
Electric Paper orientates itself on the “Web Content Accessibility Guidelines” (WCAG
1.0, and partly according to WCAG 2.0), which in turn are based on national guidelines (such as BITV or ADA Section 508).
As part of the Electric Paper quality management, the graphical interface of the complete system is tested for Web accessibility using suitable tools such as “WAVE”
(http://wave.webaim.org/).
Figure 7: Testing the EvaSys Interface with “WAVE”
In order to ensure the highest possible accessibility, high contrast color schemes can
be used.
20
© 2011 Electric Paper GmbH
The Basics
Figure 8: High Contrast Online Template
When using special online survey templates, the accessibility can be limited especially when using JavaScript elements. For the best possible accessibility, we recommend using our standard template. If desired, an even higher contrast presentation is
possible using a customized online survey template.
Figure 9: Color Setting of Online Templates
It is also possible to set a high contrast color scheme for the administration interface.
© 2011 Electric Paper GmbH
21
Preparation and General Notes
Figure 10: Color Setting of the EvaSys Interface
For further information, please contact our support team.
2.3.
Central Evaluation and Active Instructor/
Trainer Accounts
Within EvaSys, you have two options for governing responsibilities for surveys.
The option usually used for regular evaluation processes is the so-called “central evaluation” option. Hereby, a central evaluation office takes care of the evaluation’s coordination.
In addition to this central evaluation you may authorize individual instructors/trainers
to create and conduct their own questionnaires and surveys. This is what is called
“active instructor/trainer accounts”.
2.3.1.
Central Evaluation: A Central Office controls the Evaluation
The central evaluation is tailored to a service and competence center, by which the
entire course evaluation is handled.
The instructors/trainers will only have indirect contact with EvaSys insofar as that after
completion of a survey an email will be sent to them, outlining their evaluation results.
Through further feedback options, instructors/trainers can receive comparative reports
(comparing their own course to others in the course of studies and/or the faculty) or –
prior to a survey – they can add their individual questions to the predetermined questionnaires.
At the end of an survey period, summary reports for deans/managers (of studies) can
be submitted and the collected raw data can be transferred for the implementation of
further analyses in statistics programs such as SPSS , Excel or Sphinx.
This means that the system is managed and organized by a central entity, this entity
being the “administrator” in interaction with some other user roles, for example the
22
© 2011 Electric Paper GmbH
The Basics
“report creator”. An EvaSys administrator creates the structure as well as the questionnaires, implements the survey and passes on the questionnaires and reports.
This principle is illustrated in the following graphic:
Figure 11: Central Evaluation Model
The central entity – the EvaSys administrator (top circle colored teal) – is in charge of
the evaluation’s flow and ensures that the survey’s questionnaires are passed on to
the instructors/trainers (bottom row of circles) of various sub-units (middle row).
Of course, several people may share a user role so that, for example, two or three
staff members of quality assurance can share the administrator’s log-in. However, it
still remains ONE log-in so that the staff have to cooperate with one another.
2.3.2.
Active Instructors/Trainers Accounts
In addition to this central control of the evaluation, it is possible to authorize particular
users to carry out their own processing independently.
This means that the administrator – as the central body– can create active users or
use those already in place. These subsequently require their user name and password and can log on to the system through the usual EvaSys registration screen.
Via their user accounts these users can then – depending on their type of authorization – implement all evaluation steps themselves. This applies to
•
creating questionnaires. The administrator assigns the right to create questionnaires per user. Hence some users can create surveys, however, they can only
use those questionnaires that are preset by the administrator. Others can edit
these central questionnaires but cannot create new ones, etc.
•
the implementation of paper and online surveys. With existing questionnaires,
active interviewers can create new surveys as they see fit.
•
the processing of a survey. After evaluating the data, an active instructor/trainer
automatically receives the survey’s result which can be edited, for example by
summarizing it with other reports, establishing subgroups based on specific criteria
(such as age, gender, etc.) and so on.
•
the export as CSV file and into statistics tools such as SPSS and Sphinx. Also
active instructors/trainers can, of course, edit the results of their surveys further in
other programs.
Just like the administrator, active instructors/trainers access EvaSys via a web
browser. This means that they can theoretically access the system from any PC that
© 2011 Electric Paper GmbH
23
Preparation and General Notes
has internet access (unless the administrator applies certain restrictions for security
reasons). As is the case with administrator’s access, security is accorded through a
log-in, only accessible with a password as well as the option to use SSL-encryption.
With paper surveys, the questionnaires are collected via de-centralized Scanstations
which are operated by the instructors/trainers themselves. Carrying out the scanning
process is so simple that no training is required. The active instructor/trainer accounts
are useful in the following types of surveys and for the following users:
•
An instructor/trainer of psychology or sociology wishes to collect data during a
research project using EvaSys. This way you can give the instructor/trainer the
opportunity to generate empirical data.
•
Students/postgraduates often base their work on empirical surveys. The EvaSys
administrator can assign an active account in EvaSys to the respective tutor (professor). In turn, the tutor can grant his students/postgraduates access to his
account.
•
Departments/faculties have a requirement for surveys that are carried out outside
of the centrally managed course evaluation. These may, for example, be surveys
carried out in refectories, canteens and libraries but may also be surveys carried
out among graduates and which can also be managed through active instructor/
trainer accounts.
In the following graphic you see at the bottom level the active instructors/trainers
whose “license to evaluate” is highlighted by blue colored rings:
Figure 12: Active Accounts (in Addition to Central Evaluation)
Of course, active instructors/trainers are not able to access one another’s results.
Only the active instructor/trainer himself and the administrator/subunit administrator
have an insight into the data. (If you have been using EvaSys for some time, it may be
noted that this type of evaluation was formerly known as “de-central evaluation”.)
2.4.
Basic Terminology within the EvaSys User
Guide
Within this manual, you will come across some terms repeatedly. Due to their importance, their meaning is outlined in the following:
Quires
Questionnaires may be several pages long. The complete copy of a questionnaire,
including all its pages, is called quire. As soon as more than one sheet of paper is
24
© 2011 Electric Paper GmbH
The Basics
needed, ONE quire comprises SEVERAL sheets of paper. Quires may also be known
as “booklets” in other applications.
Instructor/Trainer Accounts: Active - Passive
Surveys are always created for particular instructors/trainers and courses. Therefore,
you require the instructor/trainer of the course as an element within the EvaSys structure. These instructors/trainers are managed centrally by the administrator. We talk of
a passive instructor/trainer account when only the administrator can access the
instructors/trainers, for example in order to create surveys centrally for the instructor/
trainer’s course.
If the instructor/trainer himself is additionally authorized to log-on to create questionnaires or surveys, we talk of an active instructor/trainer account (also see chapter A
2.3.2. „Active Instructors/Trainers Accounts“).
Questionnaire
In EvaSys, the term “questionnaire” may have two meanings:
•
Firstly, in EvaSys it refers to the file which serves as a template for a questionnaire
and determines the layout of a questionnaire that is used for numerous surveys.
In this case it is a PDF file that contains the questionnaire and determines which
options for questions and responses appear in what design on the questionnaire.
This template can be used for creating both paper and online surveys (however, in
the case of online surveys with VividForms questionnaires, the design is not
defined through the questionnaire).
Therefore, the footer of a VividForms questionnaire contains for example the word
“SAMPLE” instead of a barcode.
This is what is usually referred to when a “questionnaire” is mentioned in the manual. This also becomes clear in the respective context.
•
Secondly, when creating a survey, you of course receive a particular questionnaire
which you pass on to the respondents.
As soon as you create a paper survey, a copy of the sample questionnaire is created and the variable areas of the questionnaire for this survey are filled (hard copy
procedure).
If you do not wish to receive a new print template for each survey, the questionnaire’s blank version can also be used (cover sheet procedure). In this case, the
personalizable areas of the questionnaire remain blank: only the barcode area
contains information on which questionnaire and which page of questionnaire it
relates to.
However, in this case you must use a cover sheet (which is automatically created
for each cover sheet survey) when you send out surveys. This cover sheet contains all further details of a particular survey (course, instructor/trainer, etc.) and
© 2011 Electric Paper GmbH
25
Preparation and General Notes
has to be scanned in along with the respective questionnaire batch. Because here,
the cover sheet functions as a reference to the relevant survey during processing.
In the case of VividForms questionnaires, online surveys are only possible as
HTML surveys; here you do not need a personalized PDF file. (However, you do of
course require the sample PDF.) When creating an online survey, the HTML questionnaire is automatically created in accordance with the layout of your questionnaire (your PDF template). Of course, you have the option of changing the layout
of the online survey (using online survey templates, for which a separate Manual is
available).
NonForms
A non-form is a scanned page that is not recognized as a form.
This may be the case when you:
•
scan a questionnaire that does not yet exist in EvaSys. Then the VividForms
Reader cannot read this form and will treat it as a non-recognized form.
•
scan an EvaSys form that is faulty in some way. For example, the forms were stapled together and the corner(s) were cut off, or they were scanned in askew, which
too, destroys the corners needed for alignment. The form can not then be identified.
•
scan something completely different, for example, in order to test the scanner.
These image files will also be treated as non-forms.
The VividForms Reader stores the non-forms in a so-called non-forms folder.
Survey/Survey Process
Conducting a survey in EvaSys is a process based on a questionnaire. In order to create a survey, you have to select an existing questionnaire in the system and which
you utilize for the survey.
As a consequence, a personalized copy of the questionnaire template is created and
linked to this particular survey (hard copy procedure), or, respectively, a cover sheet
for the survey is created which supplements the standard questionnaire with survey
details (cover sheet procedure). The related survey is identified through a distinct
mark (in the case of VividForms, for example, a barcode) on the personalized questionnaires or on the cover sheet respectively. This distinct mark is read during processing. Only the correct identification of a survey by means of this number enables
the correct assignment of generated data to a particular survey in EvaSys.
3. System Start-up and Security
The initial operation of your EvaSys server was carried out during installation and test
runs by our technicians. This includes the installation and configuration of the required
software programs, including the connection and testing of collection devices (production-level scanners). Finally the system is integrated into the local network so that the
users have access to the system with their Web browser. Such access by users can, if
26
© 2011 Electric Paper GmbH
System Start-up and Security
required, be severely limited. The final step is configuring the mail server which sends
reports and messages from EvaSys.
For maintenance purposes we recommend having so-called remote maintenance
access, which allows our technicians to have direct access to your local EvaSys system so that they can quickly and systematically analyze and remedy any problem that
might arise. The alternative would be a lengthy diagnosis via telephone.
3.1.
Adjustment to your Organization
EvaSys has login screens, shows colors when working with the software, sends
emails, documents etc. Many of those visible elements contribute to the appearance
of your or institution or organization and thus can be adjusted according to your
needs.
In the following chapters you will get an overview on how change the layout of the system and the relevant documents (or where to find the relevant chapters in the manual).
3.1.1.
Logging into EvaSys: Entry Points
The EvaSys server offers users two entry points to login. Put a link to the relevant
entry point at an appropriate place on your university/company website.
Entry point for Instructors/Trainers and Administrators
<EVASYS-SERVERADRESSE>/INDEXEVA.PHP
Figure 13: Entry Point for Instructors/Trainers and Administrators
Portal for instructors/trainers and administrators. User names and passwords are
required. When access is limited this page can be opened only from computers in the
defined IP address domain for users.
Entry Point for Participants of an Online Survey
<EVASYS-SERVERADRESSE>/INDEXSTUD.PHP
© 2011 Electric Paper GmbH
27
Preparation and General Notes
Figure 14: Entry Point for Participants of an Online Survey
Portal for voting in online surveys. A PSWD is required.
3.1.2.
Login Security
Showing a CAPTCHA Graphic
EvaSys offers you the possibility of blending in a so called CAPTCHA graphic, after a
defined number of failed logins from an IP address. This function protects EvaSys
from automated attacks.
CAPTCHAs are graphics in which figures (numbers or alphabetical characters) are
displayed, so that machines cannot read them. They are employed to detect whether
the counterpart is a human being or a machine. If CAPTCHAs are activated, after multiple failed login attempts the user is prompted to enter a CAPTCHA:
Figure 15: CAPTCHA-Function after several failed Logins
28
© 2011 Electric Paper GmbH
System Start-up and Security
If the CAPTCHA is entered correctly, the user may repeat the login procedure.
You can activate CAPTCHAs under System Settings/EvaSys Settings/System Security. In addition, you can define the number of failed login attempts to trigger a CAPTCHA. The number of failed login attempts always relates to a time frame fixed by you
(again, under System Settings/EvaSys Settings/System Security). Should a user fail
to login correctly within the given time, he will be requested to enter a CAPTCHA. At
the same time, the login screen will be blocked for the IP of the potential assailant for
the defined time (in minutes). This block can be prematurely lifted by entering the
CAPTCHA correctly.
Warning Message when using the Standard Password
As long as the predefined standard login (admin/admin) has not been changed, a
warning message appears when the administrator logs in with a prompt to change the
user name and password. Both can be adapted in the menu “System Settings/My Profile” (see chapter B 2.2.2. „Generating and Managing User Accounts“).
Figure 16: Warning message when using the standard password
The use of the predefined login is a security risk for working systems.
Check for Update Notification
Once the administrator has logged in, automatic checks for updates are carried out at
regular intervals (standard value is 30 days). When checking for updates, data is
transferred from the EvaSys system to the update server via the administrator's web
browser (the EvaSys server itself does not connect to the update server). The following information is included:
•
the customer name,
•
the license key,
•
the current EvaSys version,
•
the default system language,
•
the current configured language,
•
the product derivative,
•
the content of the configuration setting “server root path”,
•
the ID of the supplier,
•
a unique ID for the update check process itself, which is added for reasons of
security.
© 2011 Electric Paper GmbH
29
Preparation and General Notes
This information is SSL encrypted in its entirety and serves solely technical purposes.
No personal data or captured data from the system is ever transmitted.
If you do not agree to the transfer of the above mentioned information, this function
can be deactivated in the system settings (“System Settings/EvaSys Settings/Maintenance/Automatic Update Check”). Independent of this function, you will be informed of
available updates through other channels.
If the administrator uses a secure https connection to the server and if the main server
path in EvaSys is also defined for https (like https://example.com/evasys) and a
secure certificate is not installed on the server, the update check will not function.
Depending on the browser being used, a warning from the browser appears after logging in. Because the use of non-secure certificates causes problems in other areas
and browsers generally recommend not connecting to a server with non-secure certificates, it is strongly recommended to procure a secure certificate.
Certificates are rated as non-secure if the information of the certificate does not match
that of the server, if the lifespan of the certificate has expired or if the issuer of the certificate is not trustworthy. This last point is often the case with self generated certificates.
3.1.3.
Adjustments in EvaSys Settings – Texts, Colors, Documents
You can also adjust EvaSys to your organization in several points. Some text sent
respectively shown by the system can (and partly should) be changed in the EvaSys
Settings. You can find these on the left hand side in the main menu System Settings.
Your changes are only active when you save them. For that purpose click [Save] at
the bottom of the page. With [Undo] you can reconstitute the default settings.
By changing the following settings you can adjust EvaSys to your organization:
•
You can change the header of the login-screen (default is “Faculty Evaluation
Feedback System”) in the EvaSys Settings (main menu “System Settings”). On the
page “General” you will find the option “Title Login Window” to change this title.
•
Define the welcome text for the first login of an active instructor/trainer in the EvaSys Settings on the page “Instructor/trainer Accounts (GHD)”. There you will find
the option “Welcome text for the first login”. As it contains a placeholder for the
name of your organization, at any case change this text to be sure it makes sense.
(Default: Welcome to EvaSys, the course evaluation system of LACE NAME OF
ORGANIZATION HERE]. Please start by changing your password. Click on “My
profile” in the navigation menu on the left. To return to this page, click on “Folders”.)
•
For denied access you can define a redirection address at “EvaSys settings/ network settings”, option “HTTP redirection address”. The default value is “http://
www.evasys.de”.
•
The so-called supportlink can be found at “System Information”/“EvaSys Website”
and provides you a quick access to the webpage of Electric Paper. If you wish to
30
© 2011 Electric Paper GmbH
System Start-up and Security
change the text of this option and/or the link, you can change them at “System Settings”/ “EvaSys Settings” on the page “Network Settings”. There you will find the
options “Display value support link” (default: EvaSys Website) and “HTTP link on
support page” (default: http://www.evasys.de/support).
•
If you want to change the colors of EvaSys, use the page “Color Settings” (“System Settings/EvaSys Settings”). You can choose one of several color schemes or
define your own colors.
The following settings affect documents that are sent/handed out at different occasions:
•
PDF report:
The PDF report you get for your course evaluation can of course be adjusted to
your needs in different respects. The possibilities are described in detail in
chapter B 4.5. „Instant Feedback: The PDF Report“.
•
Letter of the PDF report
You can automatically create a letter for the PDF report of your course evaluation.
There you can see a sender whom you can define in the menu “System Settings/
Report Settings/Configuration”. There you will find the option “Sender part 1” to
“Sender part 3” as well as “Sender above recipient address”.
•
PSWD cards for online surveys
For online surveys you (mostly) need a number of so-called PSWDs (transaction
authorization code). A PSWD is a number-character-combination that serves for
the unique identification and the login of the students/participants.
When generating an online survey a PDF file with the necessary number of PSWD
is created. The PDF contains the PSWDs as cards that can be cut out and distributed to the students/participants. On the cards you will find an explanation text that
can be changed at “System Settings”/ “EvaSys Settings”, page “Survey Online”.
There you will find the option “Instruction text for PSWD cards”. The default text is
“This PSWD allows you to participate in an online survey. Please use a web
browser to open the following web address:”.
PSWD documents can now be generated in four different formats:
- 3x8 PSWDs per page (A4)
- 2x7 PSWDs per page (A4)
- 3x7 PSWDs per page (A4)
- 3x6 PSWDs per page (Letter)
The standard setting is the original format of 3x8 PSWDs (A4).
The format of the PSWD document can be selected in the configuration (“System
Settings/EvaSys Settings/Survey Online/Format PSWD document”).
© 2011 Electric Paper GmbH
31
Preparation and General Notes
•
Cover Sheets:
When conducting paper cover sheet-surveys in addition to the questionnaire a
cover sheet is generated. It serves for the unique identification of the survey in the
scanning process. At “System Settings”/ “EvaSys Settings”, page “VividForms” the
text of the VividForms cover sheet can be modified (default text: empty).
•
Certificate of participation:
A certificate of participation is available only for users of activated accounts after
analysis of the survey. The certificate can be retrieved in the details of the survey
after evaluation.
The footer can be changed at “EvaSys Settings/Instructor/Trainer Accounts
(decentral)”. There you will find the option “Footnote certificate of participation”.
•
Certificate of results:
In contrast to the certificate of participation this document gives the score for each
of the dimensions given in the survey. Its description is identical to the Certificate
of Participation.
3.1.4.
Adjustments in the Text Templates
At any case you should check the text template that serve as templates for letters,
emails and welcome texts at different occasions. Some of them should urgently be
adjusted, some of them may be. For this purpose please read the chapter about the
text templates.
3.1.5.
Adjustments in the Documents
You can add documents to the emails sent by the system.
For example you can send the evaluation regulation of your institution together with
the PDF report.
In addition to this the adjustment of the documents affects the letter that can be added
to the evaluation report. The text of the letter is defined in the text templates, but the
layout is defined by means of a PDF template with variable fields. The layout of the
template can be adjusted freely and can thus e.g. correspond to your corporate
design. (Nevertheless it is – of course – dependent of the content of the letter and the
corresponding fields.)
Please see chapter B 4.5.1. „Components of the PDF Report “ for more information
about the layout of the PDF template.
3.2.
Defining Access Rights
In addition to access rules which can be set up by your local computing center, EvaSys allows you to determine access rights for three groups:
•
Administrators
•
Users (activated instructor/trainer accounts, data entry assistants, report creators,
etc...)
32
© 2011 Electric Paper GmbH
System Start-up and Security
•
Participants in online surveys
You can define valid IP address ranges for each of these user groups under “System
Settings/Evasys Settings/System Security”. For this, the first and last valid address
range is entered respectively:
Figure 17: Defining Access Rights
For each of these user groups you can specify under “EvaSys Settings/Network settings” a valid IP address domain. In each case both the first and the last valid address
are entered.
Example:
Your computing center informs you that instructors/trainers can have IP addresses in
the domain 134.127.0.0 until 134.127.127.255. This gives the address
134.127.23.142 access, but not 134.127.142.34. You need to enter the IP addresses
given both at “Begin IP address domain user” as well as at “End IP address domain
user”. Access security becomes effective as soon as the field “limited access” is set at
“activated”. Confirm with [Save].
When access is denied a message is shown for a few moments and then the individual is redirected to a website given at the “HTTP redirection address”. You can put in
the address of an appropriate website in your intranet.
© 2011 Electric Paper GmbH
33
Preparation and General Notes
3.3.
Implementing Backups
3.3.1.
Backing up the Database
The EvaSys database contains:
•
All of the profile data (organization, department, user)
•
All of the surveys with raw data as well as statistical indicators
•
The contents as well as the evaluation rules governing all questionnaires
•
Operating data (logbooks, survey periods, PSWD lists)
You should regularly backup the database.
In case of a MySQL database, the MySQL service must be stopped first. Therefore
open a command line by “Start/run…”, type “cmd” and press enter. Type “net stop
mysql” and the database server will stop. You can then save the contents of the folder
C:\apache\mysql\data\evasys2
and start the MySQL service again. To start the database server enter the command
line “net start mysql”. Close the command line by entering “exit”.
If you use a MS SQL database, please consult your database administrator.
Additionally, the Apache resp. IIS service should be stopped, because otherwise further components' attempts to access the database might fail. The corresponding command is “net stop apache2” resp. “net stop w3svc”. After the backup the service can
be restarted by the command “net start apache2” resp. “net start w3svc”.
Generally it is advisable to stop all EvaSys services before carrying out the backup.
The further services are:
•
VividForms Reader Service for form reading
•
Cron Service for initiating scheduled tasks and performance checks
•
Memcached Server Service for having in store templates of online surveys on the
server
•
ESCCMailservice for sending emails via scheduled tasks
To stop the services the following commands can be used:
•
net stop vfreader
•
net stop cron
•
net stop memcached
•
net stop esccmailservice
To restart the services after the backup, use the command “net start …”.
34
© 2011 Electric Paper GmbH
System Start-up and Security
3.3.2.
Backing up the Image Files of the Open Questions
The answers to open questions are saved as PNG image files. You can find these in
the folder: C:\Apache\htdocs\evasys\img (Here you will find the images of the open
questions as well as the images which are shown in the verificator).
The folder structure is defined as [survey period\subunit\user\survey]. Before you
backup these files we recommend that you stop the Apache service and then restart
after finishing.
3.3.3.
Backing up the Original Image Files from Scanstation
The EvaSys scanstation software can create a backup copy from every batch. You
can make this backup copy in an archive folder defined in the Scanstation. The exact
path to the archive directory can be found in the Scanstation settings, tab “Scan Destination”. For further information, please consult the Scanstation Manual.
© 2011 Electric Paper GmbH
35
Preparation and General Notes
36
© 2011 Electric Paper GmbH
The Phase Model – Your Workflow in the Process of Evaluation
B. Your Evaluation Process: The Phase Model
Over the course of this chapter you will be acquainted with the actions and settings
which are important for your evaluation work with Eva Sys. This ranges from displaying the structure of your university or organization, to creating questionnaires and
implementing and processing captured data.
Out of our experience a five-step phase model has evolved that follows in chapter B
and so will be introduced to you first. This way you can get your bearings within the
chapter and find relevant paragraphs fast.
1. The Phase Model – Your Workflow in the Process
of Evaluation
This chapter first offers a brief overview of the phase model, before the respective
phases are discussed in detail. The following five stations show the implementation of
survey periods in accordance with the procedure of central evaluation:
•
Phase 1: Preparation
•
Phase 2: Implementation
•
Phase 3: Capture and instant feedback
•
Phase 4: Expanded reports
•
Phase 5: Quality management
The single phases comprise of the following steps:
Phase 1: Preparation
•
Create the organizational structure (subunits, instructors/trainers, courses) OR
•
Create subunits and import instructors/trainers /courses (CSV import) OR
•
Import subunits, instructors/trainers and courses (XML import)
•
Integrate the questionnaires
•
(possible setting of additional report definitions)
•
(possible definition of norms and/or quality guidelines)
•
Generate survey procedures
•
Integrate individual questions (Instructor/Trainer’s Operational Questions) through
feedback loop to the instructor/trainer
Phase 2: Implementation
•
Mass production of individualized questionnaires (for hard copy procedure)
•
Download cover sheets and dispatch envelopes containing pre-produced questionnaires to instructors/trainers (for cover sheet procedure)
•
Generate and dispatch PSWDs (for online surveys)
© 2011 Electric Paper GmbH
37
Your Evaluation Process: The Phase Model
•
Produce individualized questionnaires and/or dispatch PSWDs (for hybrid surveys)
•
Implementation of surveys and return of responses to the capture location (all procedures simultaneously)
Figure 18: Cover Sheet
Phase 3: Capture and Instant Feedback
•
Capture of questionnaires (all procedures simultaneously)
•
Reminder function for online survey participants
•
Manual anonymizing of handwritten comments (if required)
•
Automated delivery of report documents by email or internal mail
OR
•
Download of the report documents by the instructor/trainer
Phase 4: Expanded Reports
•
Create summary reports
•
Filter and combine reports
•
Mass dispatch of comparative profile lines
•
Compare various questionnaire versions
38
© 2011 Electric Paper GmbH
Phase 1: Preparation of a Survey Period
•
Export raw data to Excel, SPSS or Sphinx
•
Archive raw data
Phase 5: Quality Management
•
(possibly definition of norms and/or quality guidelines)
•
Enable QM Screens, giving deans/managers an insight into the evaluation results
of a department
•
Generate new norm values for the following evaluation period
Some steps need to be performed only once – or at least very rarely (for example creating questionnaires); others must be performed for each period (for example the creation and implementation of surveys). Some steps may not (yet) be relevant to you,
for example the creation of norms for which you should already possess evaluation
data. Other steps are necessary in each evaluation (such as, again, the creation and
implementation of surveys)
To give you an overview of how EvaSys can support you in your evaluation, the individual phases are accurately outlined in the following. This way you can best decide
which elements you wish to use and how you design them.
2. Phase 1: Preparation of a Survey Period
The preparation of a survey period includes:
•
The selection of a questionnaire
•
The selection of a survey procedure
•
The setting up of subunits
•
The setting up of user accounts
2.1.
Preliminary Steps
Before creating the organization structure, some basic settings should be defined in
the system. Apart from adapting the organizational data, also the evaluation periods,
course types and forms of addresses (if required) should be defined.
2.1.1.
Define Organizational Data
The profile data of the organization used by EvaSys for the evaluation can be adapted
in the menu “System Settings/Organization”. Please enter all required information and
click [OK] to save the settings.
© 2011 Electric Paper GmbH
39
Your Evaluation Process: The Phase Model
Figure 19: Defining Organizational Data
2.1.2.
Course Types, Periods, Custom Titles
These menu items enable the creation of settings for course types, survey periods
and forms of address. They are located in the left context menu (Configuration) in the
main area System Settings. This basic data is very important and should be permanently defined before beginning operations.
Figure 20: Course Types, Periods, Custom Titles
Course Types
The default course types include lecture, seminar, proseminar, tutorial, lab and working group. You can change this list according to the needs of your organization. If you
want to add a new course type, enter its name in the input box beneath the list and
click on [New]. If you want to remove a course type from the list, click on
40
.
© 2011 Electric Paper GmbH
Phase 1: Preparation of a Survey Period
Note:
You can only delete course types as long as they are not assigned to a course.
Figure 21: Course Types
The numbers at the left represent the index of the table in which the course types are
recorded. Using this key course types are allocated from the CSV import table, i.e. the
index number 2 always corresponds to the second value from the top down..
Note:
Changing these data during operations will create the problem that course data
already existing have a reference to these values. When you make major changes
in this area you must also correct the corresponding references in the course data in
order to ensure that they remain meaningful.
Periods
Survey period is the period of time in which ONE survey per course is carried out. In
most cases the courses are evaluated once per semester and so EvaSys is delivered
with semesters as survey periods.
If for example you would like to evaluate twice per semester you can set up quarters
as survey periods.
Survey periods play an important role in enabling internal allocation to surveys including the image files from open questions. The survey periods must therefore be defined
before beginning productive operations. We strongly discourage making changes in
completed or current survey periods!
In order to set up a new survey period enter the name, enter the start date and the end
date and click on [New].
© 2011 Electric Paper GmbH
41
Your Evaluation Process: The Phase Model
Figure 22: Periods
Please remember the defined date convention MM/DD/YYYY. The date format is
defined in the menu “System Settings/EvaSys Settings/General/Date Format”. Overlaps of existing survey periods are allowed. For example, one period could be defined
as from 1st of Jan. 2009 to 31st of Dec. 2009, name: Year 2009, e.g. add 1st of March
2009 to 31st of August 2009: SS 2009.
Existing periods can be updated by clicking on the green pencil symbol and modifying
the entry fields in the area “Period” at the bottom of the page. A modification of the
period names is not critical.
Custom Titles
All identities in EvaSys have a title. The in-built titles are Mr., Mrs., Ms and neutral.
The menu “Custom Titles” allows the definition of additional titles. To do this enter a
new title and a salutation text. An example title could be “Provost” with the salutation
“Dear”. Save changes by clicking on the [Save] button.
The newly defined title will be used in the active system language. Translations of the
new title may be added if additional languages are present in the system.
You can only edit your entered custom titles. By clicking on
you can alter the salutation text and title in question. Afterwards save your changes by clicking on the butdeletes the form of address in the respective language. The
ton [Save]. A click on
new titles can be linked to the identities in the user profiles.
42
© 2011 Electric Paper GmbH
Phase 1: Preparation of a Survey Period
Figure 23: Custom Titles
The defined titles can be used in the CSV user import. The key word for the title is in
the second column of the CSV file (see chapter B 2.3.1. "CSV-Import within Subunits").
The configured title will be used for all emails or PDF reports which are delivered to
the user.The placeholder [SALUTATION] in the email text templates will be replaced
by the contents in this option area.
2.2.
Setting up the Organizational Structure
The organizational structure in EvaSys consists of three levels which are arranged
hierarchically:
•
First Level: Subunits (e.g. departments, faculties)
•
Second Level: Users (e.g. instructors/trainers, deans/managers, report creators)
•
Third Level: Courses (they are only assigned to instructors/trainers and deans/
managers)
With the help of the course settings further intermediate levels can be inserted such
as, for example, the program of study. These further levels can later be used for filtering purposes.
By dividing the system into subunits a clearly arranged survey administration can be
established and workload can be shared. Each subunit can be administrated by one
or more subunit administrators, so that work within the system can be distributed to
more than one person.
On user level the role of the instructor/trainer is of special importance, as only instructors/trainers can be assigned courses. Without having created an instructor/trainer, no
course can be created nor surveyed.
To conduct a survey, the system always has to be built up to the third level, the course
level. By choosing a questionnaire as well as an evaluation period, the survey for a
course can be created.
© 2011 Electric Paper GmbH
43
Your Evaluation Process: The Phase Model
The following figure shows an example of an organizational structure for a university:
Figure 24: Example of an organizational structure of a university
The functions for creating the organizational structure within EvaSys can be found in
the menu “Subunits”. Here the single levels can be created or imported and their contents can be managed. Furthermore you will also have access to the survey management.
This view is available to the administrator as well as to the subunit administrator. The
subunit administrator can use all the functions described in the following sections
except for setting up subunits.
Figure 25: Menu “Subunits”
44
© 2011 Electric Paper GmbH
Phase 1: Preparation of a Survey Period
2.2.1.
Setting up the Subunits
Choose a reasonable number of subunits. These subunits can either be departments
or other teaching units.
Create new Subunits
Figure 26: Create Subunit
In order to set up a new subunit, click on the button [Create New Subunit] in the window “subunits”.
This is where the name of the subunit as well as a few address data go. The address
data go into the letter for the summary report and appear in the system info (“System
Information”). The Subunit number is automatically incremented. It can be adjusted if
necessary.
If desired, a separate online survey template can be defined for each subunit, which
defines the presentation of an online survey for the subunit. For more information,
please see chapter B 3.2.7. "Effective Management and Conduction of Online Surveys", section “Online Surveys: Customization of the Used Layouts”.
© 2011 Electric Paper GmbH
45
Your Evaluation Process: The Phase Model
The visibility of a subunit can be limited, for example, to hide subunits containing only
old survey data, which should, however, remain in the system. Thereby the clarity of
the system can be increased.
In the area “Subunit visibility” there is a choice of different display options: Hidden,
Unrestricted, (Subunit) Administrator only, Report creator only. As well as this, it can
also be determined, whether the subunit – regardless of the status – should be displayed in the context menu on the left.
If a subunit is set as invisible it is also hidden in the subunit overview. Via the option
“Show all subunits”, it can, if desired, be displayed.
Figure 27: Hide Subunit
In the case of instructor account licenses, by using the option “Assign user licenses”,
the number of available licenses can be limited for each subunit. For more information, please see chapter D 1.8.2. "Administration of User Accounts".
Handling Handwritten Texts
Further information at “Handling handwritten texts” gives a comprehensive subunit
rule for the handling of handwritten responses to open questions:
•
Direct display (default setting):
Handwritten responses to open questions are shown as a image box (graphic file)
in the PDF/HTML analysis. This option guarantees that after collection of the data
the instructor/trainer gets a complete feedback, including responses to open questions.
46
© 2011 Electric Paper GmbH
Phase 1: Preparation of a Survey Period
•
Display after manual collection:
In order to preserve anonymity handwritten responses to open questions are not
displayed. The report recipient can only access the results to the closed questions
(decentral) or will be sent these (Central Evaluation).
With the user type “data entry assistant” (Section 5.2.3) a sequential, manual entry
of the handwritten comments can be accomplished. Multiple selections are
counted, sorted and displayed according to their frequency. The effort put into this
work allows these texts to be transmitted (Central Evaluation) in statistics programs, which then can carry out a lexical analysis. After all image boxes have
been entered, the instructor/trainer receives a message that he can now view the
responses to the open questions.
In order to minimize unnecessary costs, a threshold value can be defined (System
Settings/EvaSys Settings/Surveys). This anonymization threshold sets a minimum
number of returns under which survey responses are anonymized (can be set from
1 to 99).
•
Never display:
When this option is activated, the handprint fields will not appear in either the
HTML or PDF reports. This option is only recommended for blocking access.
Using Logo Files
You can link a graphic file with a subunit. This file appears in the EvaSys interface as
well as in the PDF report of the subunit. You will need a 60x60 pixel size version of the
logo in JPG format.
Note:
The logo in the 60x60 pixel size will only appear with the correct dimensions on the
printed questionnaire when the resolution is 72x72 dpi.
Figure 28: Logo File
Copy this logo file in the directory “C:\Apache\htdocs\evasys\logos” on the EvaSys
server. Give the file a unique name and be careful not to overwrite any of the data
already in this directory.
In the window of the subunit details you can select a logo in a drop-down menu from
the logos available in the system. If the logo you would like is not yet in the system,
then you can add it by clicking on the button [Process].
© 2011 Electric Paper GmbH
47
Your Evaluation Process: The Phase Model
In the window that appears select a logo file with a click on [search] and enter it into
the system with [Upload]. Uploading copies the logo automatically in the logo directory
(C:\apache\htdocs\evasys\data\images\logos\subunit) on the EvaSys server.
Figure 29: Manage Logo Files
In the table in the window you can see all the logos in the system. You can use the
pencil symbol to change the name or the cross symbol to delete the logo from the system. In the first column you can select a logo as default logo, and it will be automatically used whenever a new subunit is set up.
Click on [return] to get back to the subunit details.
The logo graphic will be displayed in the interface as an illustration of the active subunit. Even when the instructor/trainer logs in with an active user account this logo will
appear in the upper right hand corner of the screen. In addition the logo will appear in
the heading of the PDF report document generated by EvaSys.
We recommend using the JPG format even though GIF is better as a rule for depicting
logos. The reason is that for legal reasons relating to licenses some printer drivers
cannot encrypt the compression of the GIF format. In this case, the reports could not
be printed.
Changing Subunit Data
After a mouse click on the symbol
in column “Edit” of the subunit window, you can
work with the address and configuration data of the subunit.
48
© 2011 Electric Paper GmbH
Phase 1: Preparation of a Survey Period
Delete Subunit
Figure 30: Delete subunit
Note:
Take extreme care when using this function. Deleting a whole subunit has far-reaching consequences.
ALL existing profiles of instructors/trainers in this department TOGETHER with their
folder and the surveys contained in them will be irrevocably deleted. Before deletion
we strongly urge you making a copy of such valuable survey data by having the individual instructor/trainer make a copy of the PDF report files or the raw data on their
own hard drive.
2.2.2.
Generating and Managing User Accounts
As a user, you will login to EvaSys with the respective username and password specified by the administrator. You can change both your username and your password in
your user profile.
Should a single person wish to login as multiple EvaSys users, he can open different
browser windows and log himself in at the same time as those users. This means you
can simultaneously be logged in as Instructor/Trainer James Hutton, as Report Creator Maria Report and as the administrator Admin, switching between the open
browser windows (= EvaSys users).
The administrator as well as subunit administrators can take on additional roles in
their user accounts, which means, from their account they can perform other functions
such as report creator, data entry assistant or verifier, without having to log in as a
separate user. The additional roles are assigned by the administrator and can only be
adjusted by him. After logging in, the administrator or subunit administrator can switch
between user roles via a drop-down menu in the upper left corner of the screen.
© 2011 Electric Paper GmbH
49
Your Evaluation Process: The Phase Model
Figure 31: Switching between User Roles
The EvaSys User Types
Administrator
The administrator manages the complete system and sets up user accounts, questionnaires as well as the configuration. In the central evaluation procedure the administrator manages all surveys as well as their reports.
Subunit Administrator
The subunit administrator has a user account that allow the administration of all of the
activities in the subunit.
Within a subunit the subunit administrator can set up user accounts, create questionnaires, start surveys and send reports.
One or more subunit administrators can be created per subunit. Where necessary,
additional subunits can be assigned to their administration, which means they can
administer subunits outside of the subunit in which they were created. With this, the
following is to be observed: Subunit administrators created within a subunit are considered as a group. Therefore they can only administer the same subunits. If, for
example, a subunit is detracted from a subunit administrator, it is automatically
detracted from all other subunit administrators of this group.
Similar to the administrator, the subunit administrator can take on additional roles in
his user account (report creator, data entry assistant and verifier).
The configuration options available to the subunit administrators are defined by the
administrator under “System Settings/EvaSys Settings”. Here, specific setting options
are marked “Make this option available to Subunit Administrators”.
In doing so the subunit administrator is able to change certain configuration options,
by which overwriting his subunit’s settings as defined by the administrator.
50
© 2011 Electric Paper GmbH
Phase 1: Preparation of a Survey Period
Instructors/Trainers
•
Central evaluation mode
When using the central evaluation mode instructor/trainer accounts are set at passive. This shows the organization structure and courses which have surveys registered to them and reports. The email addresses given in the profile receive PDF
reports as well as other emails. As long as the instructor/trainer account is set at
passive it can only be used indirectly by the administrator.
•
Activated instructor /trainer account mode
When the instructor/trainer account is activated then it can be accessed by its
owner with a user name and password. It can now be used for the creation of individual questionnaires and surveys, while at the same time the general course evaluation is carried out by the administrator.
Instructor/Trainer accounts should be activated when internal clients need a tool
for carrying out a number of surveys, e.g. an instructor/trainer, the library or the
administration.
Dean/Manager
•
Decentral system mode
The only difference between the user type Dean/Manager and the user type
Instructor/Trainer is that for the Dean/Manager a complete user statistic for the relevant subunit is created.
•
Central evaluation mode
In Central Evaluation the dean/manager can be labeled as active or passive. An
active dean/manager, similarly to an active instructor/trainer, can create questions,
form questionnaires and, for example, access the activated QM views (stage 5).
A passive dean/manager has access only to his personally activated QM views.
Dean of Studies/Program Manager
This user type is only available for the server version “Central Evaluation”. The user of
this profile can make a selection from a list of evaluated courses and have them summarized in a special report. The dean of studies/program manager does not count as
a user license.
Data Entry Assistant
This user type is important when handwritten responses by respondents are not to
appear in the report document. The data entry assistant can access the responses to
open questions as sorted according to survey and enter them in plain text. After a survey has been processed you will have a completely anonymized analysis available. In
order for this user type to be able to work, you must under the properties of this subunit in “Handling handwritten text” set the option “Show after manual collection”. A
user license is not necessary for the data entry assistant.
© 2011 Electric Paper GmbH
51
Your Evaluation Process: The Phase Model
You can define individual access rights for each data entry assistant:
•
own subunit – data entry assistant has only access to handwritten comments of all
surveys proceeded in own subunit;
•
multiple subunits – data entry assistant has access to handwritten comments of all
surveys proceeded in the selected subunits (Multiple selections of subunits can be
made by pressing and holding down the “Ctrl” key.);
•
system level – data entry assistant has access to handwritten comments of all surveys proceeded in EvaSys.
As an Administrator, you set this value when creating the relevant user account. As
soon as you create a data entry assistant, a particular setting in the user rights (step
three of three) allows you to define the data entry assistant as systemwide (system
level), subunit groups (own subunit and selection of further subunits) or only subunitwide (own subunit):
Figure 32: Creating/Editing the User Rights of a Data Entry Assistant
Verifier
The Verifier can be used as a visual correction for scanned sheets.
The Verifier controls the VividForms sheets processed by the VividForms reader, and
can, where necessary, correct the recognition attributes. The verification can be activated or deactivated for surveys.
This can be necessary, because ambiguously filled out sheets cannot always be correctly machine read.
Report Creator
A user profile is created with report generation rights. This allows the generation of
anonymized summary reports on subunits. Further report forms are available when
52
© 2011 Electric Paper GmbH
Phase 1: Preparation of a Survey Period
using the server version “Central Evaluation”. The user account of a report creator
does need a user license.
The Administrator Account
The administrator account is used to create the system-wide organizational structure,
administrate users and integrate questionnaires, as well as regulating and supervising
processing. In addition to this, surveys can be generated, displayed and evaluated
and raw data exported.
Figure 33: Administrator Account
The data fields of the administrator profile can be edited in “System Settings/My profile”. Here, the personal data of the administrator, such as salutation, title, etc. can be
set. The email address is particularly important because EvaSys users send their
inquiries by email to the administrator. In addition, the administrator can change his
password (login name and password) and, if desired, take on additional user roles.
With the aid of additional roles, the administrator can, from his own user account, take
on tasks such as data entry, verification or creating reports, without having to log into
the system as a new user. Later, the administrator can switch between the different
user roles via a drop-down menu in the top left corner of the screen.
All changes must be confirmed by entering the old password. The entries are applied
by clicking on the [OK] button.
© 2011 Electric Paper GmbH
53
Your Evaluation Process: The Phase Model
Figure 34: Administrator Profile
The administrator can, where necessary, define further secondary administrators e.g.
for representation purposes. As does the administrator, the secondary administrator
has administration rights for the entire system and can access all subunits.
For the creation and management of secondary administrators, go to the menu
“Administrators” in the main menu “System Settings/Profiles”. A click on the menu
item opens the administrator management. A summary table displays all existing secondary administrators. The first column shows the name and, in parentheses, the
additional roles of the secondary administrator. The second column shows the number of reports generated by the report creator role. The administrator can customize
the user settings in the column “Edit”. By use of the red cross in the column “Delete”, a
user can be removed completely.
54
© 2011 Electric Paper GmbH
Phase 1: Preparation of a Survey Period
Figure 35: Management of Secondary Administrators
Note:
Only the main administrator can create and edit secondary administrators. However, secondary administrators can edit their own user data via the menu “System
Settings/My profile”.
To create a secondary administrator, click on the button [Create new secondary
administrator]. A three step wizard opens facilitating the creation of a user. In the first
step, the user type “Secondary Administrator” is already selected. Click on [Next] to
input the user data (the most important being name, email address, login name and
password). In the third step, the user can, where necessary, be assigned additional
roles. After clicking on [Save], the user is created and appears in the list of secondary
administrators.
Figure 36: Creating Secondary Administrators
© 2011 Electric Paper GmbH
55
Your Evaluation Process: The Phase Model
Setting up a User Account manually
Users always belong to a subunit. Go to the corresponding subunit to find the functions for adding new users.
Figure 37: Manually Creating User Accounts
By clicking on the name of a subunit, you reach the list of users. All existing users are
listed here. New users can be added via the [Create New User] button.
A three step wizard opens facilitating the creation of a user account. In the first step,
the user type is defined. The following user types are available:
•
Instructor; Trainer
•
Dean of Studies; Program Manager
•
Dean; Manager
•
Module
•
Report Creator
•
Data Entry Assistant
•
Verifier
•
Subunit Administrator
56
© 2011 Electric Paper GmbH
Phase 1: Preparation of a Survey Period
In the third and fourth step, the user data is deposited as well as the user rights being
defined. The most important details are shown in the table below:
Column
Content
Title 1
Mr., Mrs., Ms or neutral
Title 2
Max 50 characters (optional field)
In the report document the combination
Title2+Surname will appear
First Name
Max 50 characters (optional field)
Surname
Max 50 characters (non-optional field)
Telephone Number
Max 100 characters (optional field)
Address
User defined, three lines recommended (optional field)
* This field is used as the internal email address in the
Central Evaluation server version – Self registering
version and has no function when the standard user
profile (decentral) or the Standard version is used.
Institute Number
Max 6 numerical characters
* This field is used for the subunit classification in the
Central Evaluation server version – self registering
procedure and has no function for the standard user
profiles (decentral) or the Standard procedure.
Email
Max 100 characters (optional field)
EvaSys sends all messages to the user at this email
address, e.g. PDF reports for processed
questionnaires.
Login name
Max 50 characters (non-optional field)
* This field must be unique across the system, i.e. it
may be only used once!
Password
Max 50 characters (non-optional field)
Password (repeat)
Max 50 characters (non-optional field)
QM Views
No QM views | Only own surveys | Only own subunit|
Full authorization
Additional Subunits
Additional subunits can be added to QM views. (QM
views has to be set to “Only own subunit”)
Form Editor
Unrestricted | Templates only| No access
Table 1: Necessary Information for a new User Account
Remember that you will not be able to use again a login name you have already used
in another profile.
The following figure shows exemplarily creating an instuctor account:
© 2011 Electric Paper GmbH
57
Your Evaluation Process: The Phase Model
Figure 38: Creating an Instructor Account (three Steps)
Activating/Deactivating User Profiles
With this function, you can activate or deactivate a user profile. Simply click on the
icon directly next to the user name. Icons with a portrait and a padlock stand for passive user profiles. Icons with a portrait but no padlock, stand for active user profiles.
Figure 39: Active (Belmore) and Passive (Harwood) User Account
If a user account is deactivated then the individual will not be able to login to the EvaSys server. If he does try to log in then he will see a message that his account has
been blocked by the administrator.
An exception is the deactivation of the dean/manager’s account. The dean/manager
can log on to the system if the administrator has allowed him access to the QM-Views.
Furthermore, it is possible to give all deactivated instructors/trainers the right to
access their reports from the central evaluation. In order to do this, the option “EvaSys
Settings/Central Evaluation/Passive Instructors/Trainers: Login for Report Request”
must be activated. The instructor/trainer can now log on with his id and view all the
results of his surveys.
58
© 2011 Electric Paper GmbH
Phase 1: Preparation of a Survey Period
When using the Central Evaluation server type, passive user accounts are as a rule
used to implement all or a large amount of the surveys from the administrator profile.
User accounts can be activated at any time. Two passive accounts are equivalent to
one active user license.
Changing User Data
Click on the name of a subunit. A list of the users in this subunit will appear. By clicking on the user name you will reach his or her user profile. Profile data can be
changed by entering new data and saving it with [OK].
Addresses and institute numbers play a role only in the self-registering procedure. If
an (activated) user has forgotten his password, it can be overwritten by entering the
new password twice. The user can then login again and change their password.
Moving User Accounts
In the list of users in a subunit you will see a check field on the right-hand side. You
can check any combination of these fields. At the bottom of the table you will see the
function “Move selected to [SUBUNITNAME]”. Select the target subunit from the
selection list. A click on the button “move” will start the procedure. Please note that
users with the same name may already be in the target subunit (if a number of instructors/trainers have the same name). In this case you will be notified that you have, for
each of the affected instructors/trainers, the following choice.
•
Overwrite
The surveys and profiles will be consolidated. As a result there is a single user
account.
•
Recreate
The user profile is moved even though the names are identical and there are two
accounts with the same name (which only differ in their login names).
Figure 40: Move User
Delete User
Be extremely careful when using this function. Deleting a profile means that all program files and surveys will also be deleted.
Note:
Make sure that you have the permission of the relevant user, before you carry out
this operation as you CANNOT undelete it.
© 2011 Electric Paper GmbH
59
Your Evaluation Process: The Phase Model
Writing an Email to a User
A mouse click on the letter symbol allows you to send an email to that person. The
EvaSys internal email system will be used.
LDAP Authentification
EvaSys offers an interface to LDAP.
LDAP (Lightweight Directory Access Protocol) is a protocol and offers the possibility to
access the directory server. LDAP is often used to administer the users of a network.
To be able to use the LDAP connection, the function must first be activated in the EvaSys settings (“System Settings/EvaSys Settings/Network Settings/LDAP”). There are
two possibilities: The LDAP connection can be activated individually for each user
(option 1) or it can be activated for all users simultaneously (option 2).
Figure 41: LDAP Activation
If option 1 is selected, then the menu option “LDAP Login” is shown in the user settings dialog. Now, the login via LDAP can be activated or deactivated for each user
separately.
If option 2 is selected in the configuration, the LDAP login is automatically enabled for
all users. Now, when a user logs into EvaSys an authentification takes place in the
LDAP system.
In order to prevent accidental lockout from the system, administrator access is by
default excluded from the LDAP login. If desired, however, the login for this account
can also be enabled in the EvaSys settings under “System Settings/EvaSys Settings/
Network Settings/LDAP Registration also for the Administrator”.
If you activate LDAP in the setting at “EvaSys Settings/ Network Settings /LDAP Host”
anytime a user logs in to EvaSys an authentification will take place. The authentification is made only of users of the type Instructor/trainer. The settings for your LDAP
server are at “EvaSys Settings/Network Settings/LDAP Host” and for your Basis Distinguished Name at “EvaSys Settings/Network Settings/LDAP Base-DN”.
The user account of the instructors/trainers must be in both LDAP as well as in EvaSys. You can use the XML import interface in order to synchronize this user data with
EvaSys. For further information please consult the special XML manual.
If desired, the LDAP connection can be encrypted in the configuration (LDAPS) (“System Settings/EvaSys Settings/Network Settings/LDAP secure connection”).
60
© 2011 Electric Paper GmbH
Phase 1: Preparation of a Survey Period
Figure 42: Activating LDAP in the User Settings
2.2.3.
Creating Courses
The administrator as well as the subunit administrators can assign courses to a an
instructor/trainer or dean/manager. This function is only available when using the
“Central Evaluation” server version.
The basic idea of the Central Evaluation is the repetitive implementation of large-scale
surveys of a correspondingly large number of courses. A survey is always related to a
course. In order to be able to compare survey results each course must be evaluated
only once in a given survey period. The survey period is in most cases a semester,
although it could also be set as a trisemester or a half semester (“System Settings/
Periods”).
The fields available for a course include:
•
Name: Title of the course
•
Program of Studies: The short name of the program of studies can be used to
create program of studies reports across subunits.
•
ID number: Unique ID of the course
•
Type: Lecture, seminar, etc. Course types can be viewed and changed at (“System Settings/Course Types”).
© 2011 Electric Paper GmbH
61
Your Evaluation Process: The Phase Model
•
Evaluation period: Continuous, which means that the course can be surveyed
more than one time, or a specific period, e.g. WS11/12
•
Location: Optional information
•
Number of participants: The number of students/participants in a class can be
used to create the appropriate number of PSWDs for online surveys or questionnaires.
Apart from this, up to five so called user defined course fields are available which can
be defined at will (in the example below: language and location). Furthermore, further
report recipients resp. secondary instructors/trainers can be assigned to each course.
Figure 43: Create Course
62
© 2011 Electric Paper GmbH
Phase 1: Preparation of a Survey Period
Adding, Editing and Deleting Courses Manually
To access the course list of an instructor/trainer, open the user list of a subunit. Click
on the number in square brackets in the column CO next to the name of the desired
instructor/trainer.
Figure 44: User List within a Subunit
The course list of a trainer/instructor opens. Via the button [Create new course] you
can add new courses at any time. The entry mask shown in the picture above opens
and the data for the course can be entered.
Figure 45: Course List
An existing course can be edited with a click on
Courses can be deleted by clicking on
.
.
Note:
When you delete a course, all surveys created for this course together with all their
data are also automatically deleted.
By clicking on the respective column header, the course list can be sorted – ascending and descending.
Definition of Secondary Instructors/Trainers
If a course is held by more than one person but only one evaluation questionnaire is to
be used then secondary instructors/trainers are specified, who will also receive a copy
© 2011 Electric Paper GmbH
63
Your Evaluation Process: The Phase Model
of the PDF reports. Activate the control box “Further report recipients (secondary
instructors/trainers) in this course” in the relevant course and add the individuals from
the list.
Figure 46: Definition of Secondary Instructors
Figure 47: Activating of Secondary Instructors During the Import
Expanding the Course Data with User Specific Fields
You can expand the existing course information by a number of fields in order to
describe them better. These fields can be defined at “EvaSys Settings/Course User
Data Fields”.
Select at “Number of additional fields” how many information fields you would like to
use. You may add from 0 (zero) to 5.
64
© 2011 Electric Paper GmbH
Phase 1: Preparation of a Survey Period
Figure 48: Define Course User Data Fields
Then indicate the headings of these fields at Titles, e.g. “languages” as well as the
possible values of the field at contents, e.g. “English|German|Spanish”.
These additional information fields reappear for selection in the following areas:
•
CSV import of instructor/trainer and course data
•
Adding and editing a course
•
Raw data export through archiving
In the previous figure you see the user defined data fields (Language, location) in the
details of a course. All predefined contents are shown here in a drop-down menu. If
necessary, the content of a field can also be entered here directly.
© 2011 Electric Paper GmbH
65
Your Evaluation Process: The Phase Model
Figure 49: Course User Data Fields in the Details of a Course
Editing Participant Data
In the details of a course, you also have the possibility of editing the participant data of
a course.
In this area you can :
•
manually insert participants into a course,
•
delete single participants of the course,
•
process existing participants,
•
delete all existing participants of the course and
•
import all participant data directly for this course via CSV Import.
The participant data differentiates itself depending on whether you are conducting the
course anonymously or non-anonymously. In anonymous surveys, the participants
data only contains only the participants email address (which you require to send
PSWDs in online surveys). In non-anonymous surveys, you can specify further
details.
66
© 2011 Electric Paper GmbH
Phase 1: Preparation of a Survey Period
The default in EvaSys is that courses are evaluated anonymously. If you wish to conduct non-anonymous surveys, specify this in the details of the course:
Figure 50: Editing Participants’ Data in the Details of a Course
Specifying Participant Data in Non-anonymous Surveys
In non-anonymous surveys, in addition to the email address, you can also deposit
other information such as forename, surname, address, title, and user defined
options. Further information regarding the creation of non-anonymous surveys as well
as inserting and editing participant data in non-anonymous surveys can be found in
the paragraph “Importing participant data” in chapter B 3.2.10. "Non-anonymous Surveys".
Specifying Participant Data in Anonymous Surveys
If you wish to evaluate the course anonymously, and therefore activated the option
“Anonymous survey participants” in the above graphic, you can only insert the email
address of the participants. This makes sense, for example, when you want to send
the participants of an online survey their PSWDs via email.
After you have activated the option “Anonymous Survey Participants” in the details of
a course, click on [Edit data of participants]. In the window which opens automatically,
© 2011 Electric Paper GmbH
67
Your Evaluation Process: The Phase Model
you have the opportunity to either insert the email addresses of your anonymous participants manually or to import them via CSV import:
Figure 51: Adding Anonymous Participants of a Course (Overview)
Further information on CSV-importing of email addresses can be found in chapter B
2.3.3. "Import of Course Participants’ Email Addresses ".
To enter email addresses manually, click on the button [Add] in the field “Participant of
…”. The following window will open.
Figure 52: Adding Anonymous Participants of a Course (Details)
To enter new participants, first enter the email address of the participant in the field
“Search for participants”. Subsequently click on [Search].
In the following “search” or checking of the email address you supplied, EvaSys
checks the following:
68
© 2011 Electric Paper GmbH
Phase 1: Preparation of a Survey Period
•
Is there a participant with this email address already existent in the system? (In
anonymous surveys you see no impact of this, should this already be the case. In
non-anonymous surveys, a data synchronization takes place, and the already
existent information such as forename, last name etc., are automatically adopted.)
•
Is the email valid, meaning valid within the usual rules of an email address? At this
point– as well as in other parts of the system – the structure of an email address is
thoroughly inspected. (This concerns, amongst others, the following rules: there
must be at least one character before the “@” sign, and after it too, this character
must be followed by a dot and at least two characters. Umlauts, as characters, are
not allowed.)
After checking, EvaSys automatically adopts the email address in the area “Details of
the participants”:
Figure 53: Entering the Email Address of Anonymous Participants
All other existing fields here, for example forename and surname, are deactivated,
because this survey is anonymous. (Although you can’t see this in the graphic. If, in a
similar constellation, you try to enter something into EvaSys, you will realize that this
is not possible.
Editing the email address in the area “Details of the participants” is no longer possible.
If you have entered an email address incorrectly, you can klick [Cancel] here and
delete it. (After this you can enter it into the system again, of course.)
If your entry is correct, click on [Save] to insert this email address into the course:
© 2011 Electric Paper GmbH
69
Your Evaluation Process: The Phase Model
Figure 54: Email of a Participant was Added
In the case of erroneous input or a changed email address, you can also delete the
email address here. To do this, click in the relevant column on the red cross.
As already mentioned, you also have the possibility of importing the email addresses
of your anonymous participants via CSV import
In the details of a course, click on [Edit data of participants]. In the following window,
choose the “CSV import of survey participant data”:
Figure 55: CSV Import of Survey Participants’ Data
Click on [Browse] and indicate the location of the CSV file:
Figure 56: Choosing the CSV File
Click on [Open] and then on [Import]. The email addresses of your participants are
now linked with the course:
70
© 2011 Electric Paper GmbH
Phase 1: Preparation of a Survey Period
Figure 57: Import of Email Addresses was Successful
As already mentioned, you can delete single email addresses by clicking on the red
cross next to the relevant email address. In addition, you can delete all email
addresses by clicking on [Delete all].
Displaying Courses
The function “Display courses” in the main menu “Subunits” under “Central evaluation” offers an overview of the courses of an entire subunit. Here, along with the
access to respective properties, the period affiliation of a large number of courses can
be defined here.
After clicking on “Display courses“, select a subunit and an survey period. Then click
on [Display]. A table appears showing the identification data of the identified courses.
By clicking on the respective column headers this table can be sorted as you wish,
whereby the order alternates between ascending and descending.
By clicking on the icon
course.
© 2011 Electric Paper GmbH
a course can be edited. Clicking on this icon
will delete a
71
Your Evaluation Process: The Phase Model
Figure 58: Display of a Subunit’s Courses
At the bottom of the table a function is available which allows you to redefine the
period link of one or more courses:
Figure 59: Redefine the Period link of one or more Courses
Select either an individual course by ticking the check mark box on the left side of the
table, or select all courses by ticking the check mark box “Select all”. Then determine
from the period selection list the respective survey period and click on [Assign].
2.3.
Import Interfaces
The import is intended for data migration from existing systems. Existing data structures can be imported into EvaSys via CSV and XML-import. This is possible not only
via the administrator’s access (for the complete system) but also via the subunit
administrator’s access (for the subunits of the relevant subunit administrator).
2.3.1.
CSV-Import within Subunits
Creating a User with CSV Import
In order to avoid having to enter all the instructors/trainers and courses in a subunit
manually, EvaSys offers a CSV import interface, which allows the import of user pro-
72
© 2011 Electric Paper GmbH
Phase 1: Preparation of a Survey Period
files. CSV stands for “Comma Separated Values” and means that data sets are
changed line by line (or other separators such as in our case semicolons) into data
fields separated by commas in text files.
You can set the separator at “EvaSys Settings/Data Import and Export/Separator CSV
Files”.
Spreadsheet programs, e.g. Microsoft Excel, offer the possibility to save tables as
CSV files. To import this file, click on “Subunits”, then “Browse” and select the file.
Finally click on “import”. All users as well as their courses will be generated, unless
they already exist. Instructors/Trainers already present will not be set up a second
time, so that you can always import the current list in order to keep the system
updated.
Figure 60: Example of a CSV File in Excel
Using these text files, which are independent of software applications and operating
systems and are easy to generate, you can import the relevant data directly into the
EvaSys database system.
The file is created in cooperation with the administration as well as the IT support
team of the subunit concerned.
The following structure is necessary for CSV import files:
Instructor Data
Function
Title 1 Title 2
Course Data
First
Name
Last
Name
Email
Course
Name
Course ID Course Program
Location of Studies
Course
Type
Number
Participants
Math I
10554-v
02.105
Economics 1
34
10564-v
02.123
Economics 2
20
Examples:
Instruc- Mr.
tor
Prof. Dr. Ned
Overend overend@exa
mple.com
Instruc- Mr.
tor
Prof. Dr. Edward Montgomery
montg@ex Math II
ample.com
Instruc- Mrs.
tor
Prof. Dr. Mary
m.chevalier@exam
ple.com
Chevalier
20
Table 2: Structure of the CSV File I
© 2011 Electric Paper GmbH
73
Your Evaluation Process: The Phase Model
A line of the CSV file looks like this:
Instructor,Mr.,Prof. Dr.,Ned,Overend,[email protected],Math II,10574-v,02.104,Economics,1,20
Column
Function
Function
Keyword:
Instructor or Dean, Dean of Studies*, Data Entry Assistant*,Report Creator*
* these user types cannot be given course data
Title 1**
Keyword: Mr. , Mrs., Neutral or custom title
Title 2
Max. 50 characters (optional field)
First Name
Max. 50 characters (optional field)
Surname
Max. 50 characters (non-optional field)
Email
Max. 100 characters (optional field)
Course Name
Max. 200 characters (non-optional field)
Course Code
Max. 150 characters (non-optional field)
Course Location
Max. 100 characters (optional field)
Program of Studies
Max. 50 characters (optional field)
Type***
Index of course type (non-optional field) (according to the number in
the Course Types), e.g.:
1 = Lecture
2 = Seminar
3 = Proseminar etc.
Course Participants
Number, max. 10 digit (optional field)
Table 3: Structure of the CSV File II
** You can define further titles in the main menu “System Settings” in the submenu
“Custom Titles”.
***These are the default values. You can change them in the main menu “System Settings” in the submenu “Course Types”.
The following rules must be followed:
The course code must be unique.
The left side of the table (instructor data) must be repeated for each course an instructor/trainer teaches. Course data “itself” cannot be imported unless assigned to a
instructor/trainer.
The right side of the table (course data) can remain empty except for the course ID.
You just import the instructor/trainer data.
Note:
Without a course ID the import will fail.
In addition to the information depicted above you can add further data fields.
74
© 2011 Electric Paper GmbH
Phase 1: Preparation of a Survey Period
•
Secondary instructors/trainers
If the course is held by more than one instructor/trainer and if they are to be evaluated together using the same questionnaire and will receive the same report, then
add a “1” in the next column. This indicates whether there is a secondary instructor/trainer for a course. Information about additional instructors/trainers is collected
in the properties of courses.
•
User defined course fields
Data fields to be entered in the administrator interface at “EvaSys Settings/Course
User Data Fields” can be automatically imported. Insert data columns following the
sequence “first additional field”, “second additional field” and so on to the CSV
files, which then contain key words which you have also defined at “EvaSys Settings/Course User Data Fields”.
Please follow the sequence: first secondary instructor/trainer, then user defined
course fields.
Example:
An example for a CSV data line along with these additional fields:
Instructor,Mr.,Prof.Dr.,Michael,White,[email protected],Math II,10574-v,02.104,Economics,1,20,0, German,Theory
In this example the line was filled in with a 0 (= no secondary instructors/trainers) as
well as “German” and “Theory” (for user defined course fields for language of instruction and theory/practice orientation).
CSV Import Procedure
To carry out a CSV-import for structural data go to the user list of a subunit. Via the
button [Browse…] in the section “Import instructors from CSV File” you can select a
CSV-file which contains all instructors/trainers and courses you wish to import. Click
the button [Import] to upload the file.
Figure 61: CSV Import of Structural Data
© 2011 Electric Paper GmbH
75
Your Evaluation Process: The Phase Model
After clicking the [Import] button, a synchronisation view will be displayed:
Figure 62: CSV Import – Synchronization Overview
When a new CSV import with updated data is made in a survey period, the user can
decide how to proceed in the case of doubling or changes:
The user account or course is not in the database and is now added (Default).
The user data have changed, for example the email address or title. The changes
are made in the existing user profile. The identity is determined using first and last
name combination, since a personal number code is unknown.
Course names are assigned using an ID number. If there is already a course with the
same ID number then all the data fields of the CSV file are adopted.
The course or the user account is no longer found in the new CSV file. The
orphaned entries in the database are deleted, along with all surveys and their data
related to the course or the user account.
The user account is no longer in the new CSV file but should be kept so that data
related to the surveys is not deleted and remains in the system. The user account is
given the status “archived” and can no longer be reactivated.
The courses contained in the CSV import file must be assigned to an survey period.
Select a corresponding period from the selection list above. Here you are also offered
the option “Continuous” instead of an individual period.
In addition to the general determination of an survey period for all courses contained
in the CSV import files, you can individually assign a deviating period to each course.
However, please bear in mind that by selecting the comprehensive definition of periods, all period settings of individual courses will be overwritten.
76
© 2011 Electric Paper GmbH
Phase 1: Preparation of a Survey Period
At the bottom of the list, click on [Continue] to complete the import procedure.
2.3.2.
XML Import (Structural Data, Surveys and Scheduled Online
Surveys)
Information about the XSDs of the XML import (XML schema definition) and further
details can be found in the additional manual about the XML import (menu “System
Information/Manuals/XML Import Manual“).
2.3.3.
Import of Course Participants’ Email Addresses
In online surveys access codes (PSWD) are usually sent directly to the respondents
by email.
The import interface (menu “Subunits/Data Import”) prevents the user from having to
copy a new list of email addresses into the entry field for every survey before the
PSWDs can be sent. The participants’ addresses for all courses are imported into
EvaSys by the import interface before the survey is compiled.
Once the PSWDs have been imported, the email addresses are available and no longer have to be entered manually. This applies to both manual dispatching and email
by “Scheduled Tasks“.
A CSV file with two columns is created for the import of addresses, with the specification of the course id in the first column and the email address of the participant in the
second column.
If someone participates in several courses then the email address also has to appear
multiple times in the CSV file.
Example for 2 courses:
MA05Wiw2, [email protected]
MA05Wiw2, [email protected]
MA05Wiw2, [email protected]
MA05Con, [email protected]
MA05Con, [email protected]
MA05Con, [email protected]
MA05Con, [email protected]
CSV files are independent of the operating system and can be generated in Windows,
for example with Microsoft Excel. The used separator can be adjusted under “EvaSys
Settings/Data Import and Export/Separators CSV import and export“.
For the allocation of the course participants’ email addresses to the respective course,
it is essential that the course id is unique system wide. If several courses were to be
found in EvaSys with the same id, then the addresses from the CSV file would not be
© 2011 Electric Paper GmbH
77
Your Evaluation Process: The Phase Model
related to any course. However, with the activation of the option “Import courses with
multiple course ID” this allocation can be forced. In this case every course found will
have the same email addresses attached to it.
To perform a CSV import of participant data, open the menu “Subunit/Data Import”.
Figure 63: Menu “Data Import”
The administration of survey participants is in the bottom section of the window. The
number of participant data sets currently in the system is shown in the top line of the
table. With the button [Browse] in the section “Import survey participant data”, an
already prepared CSV file can be selected, and uploaded with the button [Import]. The
participants' data is now automatically assigned to the course that is linked to the
course ID.
A CSV list of all participant data sets in the system can be opened with the button
[Export] in the section “Export existing survey participants as a CSV file”. This can be
useful if the list of the current participants should be revised and then imported again.
Existing data sets for a course are expanded but are not overwritten. If they are to be
overwritten, then the participant data must be deleted from the system beforehand.
All nexuses between courses and email addresses can be deleted from the system
using the [Delete] button. You must then delete the email addresses, particularly if
courses with the same id but different participants are kept over several cycles in EvaSys.
78
© 2011 Electric Paper GmbH
Phase 1: Preparation of a Survey Period
2.4.
Administration of Questionnaires
Another precondition for creating surveys is of course – along with the organizational
structure – the creation of questionnaires. Without questionnaires you can’t interview
anyone, therefore, some fundamentals regarding the questionnaires follow in this
chapter.
You can create questionnaires using a form designer which is integrated in EvaSys:
the VividForms Editor.
To be able to explain the creation of questionnaires with these tool clearly and comprehensively, this manual contains a complete chapter dedicated to VividForms. If you
are reading this manual as an introduction to EvaSys and are not presently using it as
a reference, it would be helpful for you to create a small questionnaire with the aid of
the chapter on VividForms before reading on.
In this chapter you will find out about the questionnaires’ purpose in EvaSys and how
to administrate them, however, it does not supply information on how to create them.
2.4.1.
Essential Information on the Questionnaire
Questionnaires are the basis of every survey. They contain various types of questions
and in turn provide different types of information – such as information on the respondent (such as age) and information on the quality of the object in question (such as the
instructors/trainers’ expertise).
Questionnaires can be created by:
•
The administrator. He uses questionnaires for central evaluations and makes them
available to active instructors/trainers. If a questionnaire is defined as a template it
can additionally be modified by active instructors/trainers.
•
Subunit administrator. He, too, can use them for surveys and make them available
to the instructors/trainers of his own subunit(s). Also the subunit administrator can
create templates (also for the instructors/trainers of his own subunit).
•
Active instructors/trainers. Once they have been granted authorization to access
the VividForms Editor resp. Designer they can create questionnaires (however,
they cannot create templates).
A questionnaire created in EvaSys serves as a template in order to create any survey
with it. If the utilization has not been restricted, it can be used system-wide for as long
as you wish, and for all surveys that you consider necessary. A questionnaire is,
therefore, media-independent. You can create paper as well as online surveys with it.
© 2011 Electric Paper GmbH
79
Your Evaluation Process: The Phase Model
2.4.2.
Management of Questionnaires and Detailed View
Figure 64: Menu “Questionnaires” – List of all Questionnaires
The list of questionnaires is located in the main menu “Questionnaires”, there in the
submenu “Questionnaire List”.
First you will see a list of all questionnaires. The abbreviated name (5 to 10 characters), the description and the status of activation are depicted.
The Administrator can, if required, allow all the questionnaires of the Subunit Administrators to be displayed. For this, the option “Show all questionnaires of the Subunit
Administrators” is activated.
80
© 2011 Electric Paper GmbH
Phase 1: Preparation of a Survey Period
Deactivated questionnaires can be displayed by activating the option “Show deactivated questionnaires at the end of the listing (including module questionnaires)”.
Activated forms are available for creating new surveys, while deactivated ones are
not.
In the column “Engine” you can see an information if the form is a VividForms Editor, a
VividForms Designer, a VividForms Plus or a TeleForm form.
In the column “Action”, a questionnaire can be edited, copied and deleted, depending
on the Engine. If the option “Edit” is selected, the editor opens to revise the questionnaire.
Note:
A questionnaire can only be edited if no surveys have yet been compiled with it. The
questionnaire is automatically protected from changes when surveys are created for
it. This occurs in order to guarantee the processing of forms which are already in circulation. No changes to layout or content can be undertaken on protected forms.
Protected questionnaires which should be changed for future surveys can therefore
be copied. When copying a questionnaire, the user can decide which features of the
questionnaire, beyond the standard features (questions, free texts, formatting, etc.)
should be copied:
Figure 65: Copying a Questionnaire
© 2011 Electric Paper GmbH
81
Your Evaluation Process: The Phase Model
After clicking the button [Copy] the questionnaire list will show a copy of the questionnaire. The description text of this questionnaire is marked by the annotation “[Copy]”,
the abbreviated name is counted up. This copy can then be edited in the VividForms
Editor as it has not yet been used in a survey.
The questionnaire, along with all the collected survey data, can be deleted with the
option “Delete” in the column “Action”. This means that the questionnaire and the survey results will be permanently deleted from the database.
Note:
Please note, that by deleting the questionnaire, all surveys and their results will also
be deleted. For this reason, deactivating a questionnaire instead of deleting it is recommended.
Before the questionnaire is permanently deleted, the delete process must be confirmed by the user again. In this case, EvaSys informs the user how many surveys will
also be deleted. The delete procedure can be cancelled at any time by clicking the
button [Cancel]. By clicking the button [OK], the questionnaires and all related surveys
and their results will be deleted.
Further details about a questionnaire can be opened when the option “Details” is
selected in the column “Action” in the questionnaire table.
This window is subdivided into two sections. In the top part you can, among other
things, open the PDF files.
Figure 66: Details of a Questionnaire
With which Engine the questionnaire was created (VividForms Editor, VividForms
Designer) can be seen on the top left.
A sample questionnaire can be opened with the option “PDF Sample”. Click the option
“Show” for this.
Note:
The PDF sample is for viewing purposes only and cannot be used for surveys!
In the Recognition Set of the VividForms Reader
The VividForms Reader must “know” the forms that you are using, so it knows where
to look for answer box areas. Only with the aid of this information can it evaluate the
graphics of scanned questionnaires. In this way it checks during the evaluation that in
those areas where crosses could lie, areas are actually blackened.
82
© 2011 Electric Paper GmbH
Phase 1: Preparation of a Survey Period
For this reason, the VividForms Reader has at its disposal a file in XML format for
every questionnaire, which defines this form (definition file; XML is a description language). The pool of these definition files is know as “Recognition Set“.
However, EvaSys first makes such a definition file available to the VividForms reader,
when you have created the first survey with a new questionnaire (regardless of
whether a paper or online survey). Only then at this moment is the VividForms Reader
informed of your form and the answer box areas on it. This means precisely, that the
pool of XML files available to the VividForms Reader is only then complemented with
the new XML file. This then defines your new form. (With each new creation of a survey, this XML file is refreshed).
As soon as you create a survey for a VividForms questionnaire, a corresponding form
definition file in XML format is added to the recognition set of the VividForms Reader.
The questionnaires scanned in are evaluated by means of these form definition files.
This means, that the VividForms Reader knows from these form definition files, which
parts of the questionnaire could contain crosses.
In the following graphic you can see a questionnaire, for which a survey has not yet
been created. It is as such, not in the recognition set of the VividForms Reader (red
cross).
Figure 67: Details of a Questionnaire– Recognition Set of the VividForms Reader
Now if you create a survey with this questionnaire or click on [Add], the form definition
file is created and added to the recognition set of the VividForms reader:
Figure 68: Details of a Questionnaire– Questionnaire is in the Recognition Set of the VividForms
Reader
When moving EvaSys, for example to another disc drive or another computer, it can
become necessary to refresh the recognition set of the VividForms Reader. (To be
precise, this becomes a necessity as soon as the directory “forms”, which contains the
recognition set, is moved. By default this directory is in …\Program Files\Electric
© 2011 Electric Paper GmbH
83
Your Evaluation Process: The Phase Model
Paper\VividForms.) The reason for this is that the XML files contain file paths to servers which, after moving, may no longer be correct.
For this reason you have the possibility of reloading the form definition files created,
by clicking on [Refresh] in the survey details under “In the recognition set of the VividForms Reader” (see figure above).
You also have the possibility of refreshing the entire recognition set. To do this, click in
the questionnaire list in the area “VividForms Recognition Set” the [Refresh] button.
By doing so, all existing questionnaires in the recognition set of the VividForms reader
will be refreshed.
Figure 69: Refreshing the Recognition Set of the VividForms Reader in the List of Questionaires
84
© 2011 Electric Paper GmbH
Phase 1: Preparation of a Survey Period
Note:
Should you have any further questions regarding refreshing the recognition set of
the VividForms Reader, please contact our support department, as this function is
above all a feature for technicians in case of moving EvaSys.
The option “Copy and open the questionnaire in the VividForms Designer” offers you
the opportunity to reorganize your existing VividForms Editor questionnaires in the
designer. In order to edit your questionnaires in VividForms Designer, you require a
corresponding license. For further information, please do not hesitate to contact us.
You can open a cover sheet questionnaire with the option “PDF paper survey”. As this
already has a barcode, it can be printed out and used in a corresponding cover sheet
survey. To open the questionnaire, click the option “Show”.
The preview of the questionnaire in an online survey can be opened with the option
“Preview online survey”.
Below the information about the PDF files and the recognition set you can see a dropdown list with several options, moreover two buttons and the [Delete] function.
Figure 70: Advanced Settings in the Questionnaire Details
The options in the section “Advanced Settings” have the following meaning (for all
options you will first have to select the option from the drop-down list and then click
the button [Edit]):
Text Templates
You can define custom email texts or texts for PDF reports in order to incorporate elements specific to a given questionnaire in reports or emails. You can also define email
attachments for the questionnaire.
Norming
This is where the norm data are defined for the questionnaire. In addition sub norms
can be selected for, for example, subunit or course type level as well as displaying
message boxes for interpretation.
© 2011 Electric Paper GmbH
85
Your Evaluation Process: The Phase Model
PDF Reports
Here you can define the default PDF report with which the questionnaire will be evaluated. Furthermore subvariations of the standard report can be created by suppressing
parts of the questionnaire for a given feedback recipient. Additionally subgroup
reports for single choice, multiple choice or matrix questions can be created.
Quality Guidelines
This is where you can set the quality standards for the questionnaire. These standards are found again when using the QM views. QM views can, for example, be
given to deans at the end of a survey period so that they have a clear overview of the
results of their department. The quality guidelines should give an impression of the
quality of a course so that, if necessary, a detailed report can be consulted.
Sphinx Report
Here you can link a report template for Sphinx (in HYP file format) with the questionnaire. This report template will later – during the creation of Sphinx exports – be integrated into the generated ZIP file so that when opening the evaluation in Sphinx, the
report template is automatically used to create the report.
Report for Comparison
Here you can define the number of previous periods and comparative reports of the
report creator which should be compared with the current PDF report.
Data Export Configuration
You can rename the variables and allocate new numerical values for the export of the
questionnaire.
Filter Settings
This is where you define whether certain answers will cause other questions to be
suppressed. In an online survey suppressed questions will not appear or will be inactive. For paper surveys filter settings apply after processing, i.e. retrospectively. In this
way, the filters in the paper surveys have an effect on the report.
Validation
By defining validations you can test entries to open questions and matrix fields in
online surveys with value ranges and regular expressions before a survey participant
can send the questionnaire.
Required questions
Those questions of online surveys for which an answer is compulsory can be defined
here.
Cross Tabulations
The cross tabulations shown here will appear in the PDF report.
86
© 2011 Electric Paper GmbH
Phase 1: Preparation of a Survey Period
Free Indicators
It is possible to define indicators freely so that questions of different question groups
can also serve as a basis for calculating an indicator. In this way, the elements of an
indicator can be freely allocated across the questionnaire. These so-called “free indicators” can be stored separately for each questionnaire and later displayed in the PDF
report instead of the traditional indicators.
Languages
Different languages can be stored for questionnaires in online surveys, so that online
survey participants can select questionnaires in different languages. With paper questionnaires you must create several questionnaires and surveys, whose results you
can combine later in the Report Creator.
In the section “Questionnaire” the following options are available:
Edit form
Opens the questionnaire to edit. The Editor or the Designer can be opened in this
way, depending on the Engine. With VividForms Plus questionnaires, the window to
the questionnaire settings is opened. Here you can change the wording of the questions and formats, as well as making analysis specifications for indicators.
Export
Creates a file from the questionnaire which can be saved and imported into a different
EvaSys system.
Delete form
Deletes the questionnaire and the survey data from the database. Therefore: Take
care with ongoing surveys.
Note:
You will not be able to then create report documents for surveys carried out with this
questionnaire. You will be able to access the raw data though.
In the section “Usage” you can define the use of the questionnaire.
Note:
All changes performed in the section “Usage” must be saved at the end of the page
with the button [Apply].
Form
Activated or deactivated. The latter is the “soft solution”. Existing surveys can still be
analyzed and displayed but you will not be able to create any new surveys.
Survey Type
Either ALL, or Paper Surveys or only Online Surveys.
© 2011 Electric Paper GmbH
87
Your Evaluation Process: The Phase Model
Figure 71: Section “Usage” in the Details of a questionnaire
Procedure
Select either ALL (i.e. Central Evaluation and activated instructor/trainer accounts),
Central Evaluation or activated instructor/trainer accounts (decentral).
Reporting Options
•
Mirrored scale values
The option “mirrored scale values” allows the mirroring of the raw data which is
linked to a survey. This has an effect on the calculation of the average and the
median.
The standard scale in EvaSys goes from 1 to n from left to right. Mirrored values
will have a highest option on the left. All raw data, including averages and medians, will be affected by this.
Note:
The mirrored scale values only affect the raw data, the averages and the medians.
That means that they for example do not affect the calculation of the quality guidelines. Thus you have to define the quality guidelines on the basis of the internal
scale values. Please remember that the standard internal scale in EvaSys goes
from 1 to n from left to right.
•
Allow Summary Reports
Defines whether summary reports (dean of studies/program manager report, dean/
manager report) can be created for this questionnaire.
88
© 2011 Electric Paper GmbH
Phase 1: Preparation of a Survey Period
Evaluation for Participants
For online surveys you can grant the participants access to the results of the survey.
After the survey has been closed, participants can use their PSWD to have a look at
the HTML report.
You can decide if answers to open questions are to be displayed or not.
Online-Design
Here you can decide whether in online surveys, the survey header should be displayed. Should you display it, the survey appears as follows:
Figure 72: Online Survey with an Activated Survey Header
Should you decide to display it not, the dark blue header with the information about
the course disappears and the survey appears as follows:
Figure 73: Online Survey with a Deactivated Survey Header
You can also choose to enable the temporary save and print options.
© 2011 Electric Paper GmbH
89
Your Evaluation Process: The Phase Model
Design
Here, you can define whether the questionnaire is displayed in online surveys as one
page (i.e. to scroll down; option “Complete”), to browse (option “Per Chapter”) or
according to the page display in the VividForms Editor resp. Designer (option “Per
Page”). With the option “Per Chapter” each question group is displayed in online surveys as one page.
Note:
For online surveys, the display mode “per chapter” has been set as default.
Certificate of Participation
If the survey participants need to receive a certificate of participation, this option can
be activated. The options allow the display of a PDF document, the submission of an
email (only available if the PSWDs were sent by email), or both. The certificates will
be generated as soon as a participant has completed a survey.
The text of the email can be edited via the menu “Text Templates”, option “E-Mail:
Certificate of participation for online surveys”. If you want to display a PDF certificate
in the browser directly after the participants have submitted the questionnaire you first
have to take the following steps:
•
Create a PDF template resp. choose the sample template “Certificate for participation in online surveys” from the menu “System Information/Sample files”
•
Upload the PDF template in the menu “Documents”, area “PDF templates”
Attach the PDF template to the text template “PDF: Certificate for participation in
online surveys” in the menu “System Settings/Text Templates” (global) resp. in the
details of a questionnaire, menu “Advanced Settings/Text Templates” (per questionnaire).
In case of using online surveys you have the possibility to permit your participants,
after closing an online survey, to look at the results report with their PSWD (HTMLReport). You can decide if you permit the access to open questions too.
Advanced Configuration
Participants of online surveys, who submit their survey, can be directed to a specific
internet site. Here, an optional password can be conveyed which ensures that the
page to be accessed can only be reached by those people who have actually taken
part in an online survey. In this way, incentives to increase response rates, such as
raffling prizes or the like, can be implemented without the risk of abuse from unauthorized people.
To activate questionnaire specific forwarding, click on the [Edit] button. The window
for questionnaire specific forwarding for online surveys opens automatically. Here you
can:
•
90
deactivate the questionnaire specific forwarding. In this case, the setting in the
menu “System Settings/EvaSys Settings/ Survey Online/Alternative forwarding for
online surveys“ is applicable.
© 2011 Electric Paper GmbH
Phase 1: Preparation of a Survey Period
•
activate the questionnaire controlled specific forwarding and enter a questionnaire
specific address (please observe the format of the URL: http://www.example.com).
As a password, you can either define your own secret word or use a predefined
one, which can be defined in the “System Settings” and which consists of information from the course, e.g. a combination of the user data field and the survey ID
(“System Settings/ EvaSys Settings/Survey Online/Alternative forwarding including
authentication“).
Figure 74: Define Forwarding
Figure 75: Define a Password in the System Settings
© 2011 Electric Paper GmbH
91
Your Evaluation Process: The Phase Model
Subunits
Select a subunit for which the questionnaire should be available.
Course Type
Select one or more different types of course for which the questionnaire is permitted.
Period
Give the periods for which the questionnaire can be used.
2.4.3.
Multiple Languages
For online surveys, you can assign several languages to one form in EvaSys. By this
means EvaSys allows you to create forms, conduct surveys and present results in
reports in a number of languages.
A questionnaire already integrated into EvaSys can be adapted to a new language
any time you like. The language of the first version is automatically defined as the
main language.
To define a language select the option “Languages” from the drop-down list in the
“Details” view of a questionnaire.
Figure 76: Add Languages to a Questionnaire
For the main language and any subsequent language you can make the following
settings:
•
Name of the language
Enter the name of the language.
•
Language picture
Here you can specify the logo of a language set, that can be used for switching the
language in online surveys. You should choose the size of the logo in such a way,
that the display is fitting (i.e. for flags, 40x27 pixels).
Either click on [Upload the file] and then on [Browse] and choose a graphic file.
The file formats JPG, GIF and PNG are supported.
92
© 2011 Electric Paper GmbH
Phase 1: Preparation of a Survey Period
Or you use the logos supplied. Here, EvaSys offers you the country flags of the
world to choose from. Click on [Please choose a flag] and then on the button
[Choose]. In the window that then opens, you can choose the flag that fits the language.
•
Linked system language
The language set selected here is used for the system dialogue for online surveys.
Language sets are defined in “System Settings/EvaSys Settings/Language sets”.
•
Use
Activate/Deactivate the language.
Then click [Save] to save the main language. You can add a new language with the
button [Add language]. First enter, as described above, the details of the language,
and save these entries. Afterwards you can translate your questionnaire.
Figure 77: Languages – Define Attributes
Translate Questionnaire
After a click on [Save] you will see the complete contents of the questionnaire, i.e.
question groups, question texts, pole labels and answer options.
On top of the entry boxes the texts of the main language are displayed; in the text
boxes you can now enter the translations (see picture above).
The translations are saved automatically by EvaSys. Under the button [Save] at the
end of the page you can see at any time, when your translation was last automatically
saved by EvaSys.
© 2011 Electric Paper GmbH
93
Your Evaluation Process: The Phase Model
Figure 78: Languages – DefiningTexts
You can also make changes in language texts and in the language attributes at a later
point in time by selecting a language in the drop-down “Current Language”, editing the
text and then saving the changes.
Language Options in Online Surveys
You can display a questionnaire's translated languages in the HTML online survey.
The questionnaire always appears in the main language after authentification through
the PSWD procedure. Beneath the header data you will see the logos that have been
defined as questionnaire languages. By clicking the logo you change languages.
There is also a drop-down menu with the name of each language.
After clicking the logo or selecting the language in the drop-down menu, the survey is
displayed in the desired language. A further authentication is not necessary.
Figure 79: Languages – Selection in Online Survey
94
© 2011 Electric Paper GmbH
Phase 1: Preparation of a Survey Period
2.4.4.
Question Library
The question library is centrally administered in the menu “Questionnaires/Question
Library”. Different editing functions as well as functions for import and export are available here. Also, a print preview of all question groups and questions can be accessed.
Figure 80: Question Library
Editing View
In the editing view, the current content of the question library is displayed in the form
of a tree structure consisting of three levels:
•
User, which means the “Owner” of the question groups/questions (Administrator,
Subunit Administrator or Active User)
•
Question Groups
•
Questions
By clicking on a user/a question group or on the open/close symbol in front of the
entry, the entry is opened and the elements contained therein are displayed. By clicking on a question group or question, the corresponding properties and available
actions are displayed in the right hand window. In the upper area it is defined whether
the question group or question is a public or non-public one. Public questions and
question groups are available to all users (subunit administrators, active instructors),
non-public only to the relevant owner of the question/group. By activating or deactivating this option, the public status can be changed at any time.
For each question group and question, four actions can be undertaken:
•
Edit: enables the retrospective editing of a question/group
© 2011 Electric Paper GmbH
95
Your Evaluation Process: The Phase Model
•
Delete: deletes the question/group from the library
•
Copy: copies a question/group
•
New Group/Question: creates a new group or question in the library
Figure 81: Question Library – Actions
To edit a question, use the mouse in the editing view to mark the desired question and
then click on the green pencil in the area “Question”. The Question Wizard known
from work with the VividForms Editor opens. Here, the desired changes (e.g. changes
to the question text, the answer options or the pole texts etc.) can be made.
Figure 82: Question Library – Editing Questions
96
© 2011 Electric Paper GmbH
Phase 1: Preparation of a Survey Period
To edit a question group, use the mouse to mark the group or any question within the
group and click on the green pencil in the area “Group”. Here too, the Question Wizard opens and enables editing.
To delete or copy a group or a question, mark the desired element and select the relevant action. Please observe, when deleting a question group, all questions contained
therein are also deleted.
If you want to create a new question or question group, click on the corresponding
icon in the category Group or Question. The wizard opens with which you can undertake the required settings. Finally, click on [Apply]. The group or question is now displayed in the library. Please observe that the new question is always created in the
library group which is currently marked.
Rights Structure
The administrator, as well as subunit administrators and active users (Instructors,
Deans) all have access to the question library administration. Each user can maintain
their own library and add, edit and delete questions and question groups at will. However, depending on the user role access and editing rights differ for the libraries of
other users. The following table (to be read from left to right) is intended to clarify the
rights structure of the differing user roles:
Figure 83: Question Library: Access Rights
As seen in the overview, an administrator can access and edit public and non-public
questions of other administrators as well as the public questions of subunit administrators and create new question groups and questions.
A subunit administrator who has the right to create public questions can edit the public
and non-public question(group)s of other subunit administrators and also create new
elements here, however, he only has viewing rights for other subunits.
© 2011 Electric Paper GmbH
97
Your Evaluation Process: The Phase Model
A subunit administrator who does not have the right to create public questions, cannot
edit the public or non-public questions of other subunit administrators in his subunit,
he only has viewing rights.
The right to input public questions in the library can be given in the user properties of
the subunit administrator. By default, subunit administrators do not have the right to
create public questions.
The active user only has viewing rights and cannot input public questions into the
library. He can however, copy question groups and questions from public libraries into
his own library, and edit them there.
Import and Export
The import into the question library as well as the export from it, is achieved via a CSV
file. An example file for the import is included in the system (“System Information/
Sample files/Question library”).
When importing the question library as a CSV file, the following structure must be
adhered to:
Column 1
Column 2
Question
Question
Group Title type*
Column 3
Column 4
Column 5
Column 6
Column 7
Number of
options**
Question
text
Left pole***
Right
pole****
Abstention*****
Table 4: Structure of the Question Library (CSV File)
* The question types are assigned numbers, the following schema is valid:
0 – Scaled Question
2 – Open Question
4 – Grade Value Question
6 – Single Choice Question with up to 11 answer options (answer options located next
to the question text, all answer options are displayed in the report)
8 – Multiple Choice Question
10 – Single Choice Question with any number of answer options (answer options
located beneath the question text, only selected answer options are displayed in the
report)
14 – Matrix Field Question
Note:
Please note, that for scaled questions neither mirroring nor dual scale functions can
be imported or exported.
** Number of options: In scaled questions, the number of checkboxes is stored here.
In grade value questions and open questions this field remains empty. In single
choice, single choice extended and multiple choice questions, the number of
response options is recorded. In matrix field questions the number of groups in the
PDF report is recorded here.
98
© 2011 Electric Paper GmbH
Phase 2: Implementation of Surveys
*** Left pole: In scaled questions the left pole description is recorded here. In open
questions you can enter the number of lines available to the survey participant for his
response here. In grade value questions this field remains empty. In single choice,
single choice extended and multiple choice questions, the response options are
recorded here. Please note, the different response options must be separated by a
vertical line (Pipe) “|”. In matrix field questions enter the minimum value here.
**** Right pole: In scaled questions the right pole description is recorded here. In
matrix field questions enter the maximum value here. For all other question types, this
field remains empty
***** Abstention: In scaled questions an abstention text can be stored here. For all
other question types, this field remains empty
The following example should clarify the structure of a CSV file for you:
Personal Details
4
Grade of Your last graduation
Personal Details
14 5
Age:
18
Personal Details
6
2
Gender:
Male|Female
Course: Planning
and Presentation
0
4
The course provides a good
Agree
overview of the topic.
Course: Planning
and Presentation
2
Your comment on the
course content:
99
Disagree n.a.
3
Table 5: An Example of the CSV File Structure when Importing and Exporting the Question
Library
This structure is also valid for the export of the question library as a CSV file. To
import a question library, click on [Browse] and select an EvaSys question library file.
To start the import process, click on [Import].
To export click on [Export]. A “Save as...” dialog appears. Select a folder and click on
[Save].
To integrate question groups and questions from the library into your questionnaire,
please open the question library in VividForms Editor (See also chapter C 4. "Use of
the Question Library with VividForms" chapter “).
3. Phase 2: Implementation of Surveys
3.1.
Survey Procedures
EvaSys supports a number of procedures for processing completed paper questionnaires as well as online surveys. The goal of these procedures is to make processing
returns as smooth and anonymous as possible.
© 2011 Electric Paper GmbH
99
Your Evaluation Process: The Phase Model
3.1.1.
Cover Sheet Procedure
With the cover sheet procedure, cost savings can be achieved through the production
of larger quantities of questionnaires in printing shops. When using blank questionnaires it is not possible to determine which course the responses are intended for and
so a cover sheet is necessary. This includes information on the course and in the
lower area the operation number is printed twice.
Figure 84: Cover Sheet Procedure
The alternative would be to allow survey participants to enter in the name of the
course on the questionnaire, but this would involve significant amounts of correction in
later processing. In addition it would at any rate be necessary to collect the returns
simultaneously in order to set an end to collection so as that a report could be generated.
3.1.2.
Hard Copy Procedure
The hard copy procedure involves identifying the questionnaire for every course. The
operation number is printed at the bottom of the page. Additional information fields
100
© 2011 Electric Paper GmbH
Phase 2: Implementation of Surveys
can be printed in the header of all the questionnaires. Optional additional questions,
whose content can be determined by the instructors/trainers themselves, can also be
included.
The hard copy procedure also allows all of the questionnaires to be numbered. This is
especially useful when the questionnaire contains more than two pages, or when
printed on both sides of the page on more than one page of paper. This guarantees
that the questionnaire sets are logically coherent even if they are mixed up when collected.
Figure 85: Hard Copy Procedure
3.1.3.
PSWD Based Online Survey
The online surveys are done with the so-called PSWD procedure. When an online
survey is created EvaSys generates a number of PSWD codes. PSWD codes ensure
that a participant takes part in a survey only once as without them it would be impossible to prevent an individual from completing a questionnaire more than once.
No software is necessarry for filling a HTML questionnaire apart from a browser.
An online survey can appear as either a complete questionnaire or in sections, in
which case the respondent can navigate back and forth between sections. Also in
PSWD-based surveys participants can save their entries and return to the questionnaire at a later point in time to complete it.
© 2011 Electric Paper GmbH
101
Your Evaluation Process: The Phase Model
A print button may be activated in order to print the completed questionnaire. The
questionnaire must be saved temporarily before printing.
Another feature is the filter tool which allows you to define skipping rules in order to
skip irrelevant questions.
Example:
The participant has responded to a question whether a presentation program was
used with “no”. Any following questions about the quality of the presentation program
should not be answered in order to avoid falsifying the data.
If an online survey has an insufficient response rate, a reminder function can batch
email the participants with a reminder to complete the questionnaire. The anonymity
of the participant remains unaffected. Upon submission the system will save a time
stamp which is available through the raw data export for each dataset.
This information can be used to analyze the respondent behavior.
The option “certificate of participation” is available to allow the participants to prove
their completion of the survey. This certificate can either be displayed as a PDF document after submission of the form, or provided through an email with a PDF attachment. The certificate can only be mailed if the PSWDs were sent out by email in the
first place. The option of displaying a PDF certificate in the browser requires the creation, upload and attachment of a PDF template (see B 2.3.2 Management of questionnaires and detailed view).
Online surveys are symbolized with a globe.
You can create so called templates to customize online surveys to individual needs.
3.1.4.
Password Based Online Survey
The password based online survey is an online survey with a pre-established general
password for all participants. As opposed to the PSWD based online survey, not every
participant receives their own password. This method is a comparably unsafe one
because participants cannot be prevented from voting more than once in a survey
with the same password. On the other hand, the password based process allows a
survey to be conducted without precise knowledge of the group of participants, i.e.
without being able to invite participants personally.
The standard method for online surveys in central evaluation is by default the PSWDbased method. In order to perform a password based online survey, this function must
first be activated in the EvaSys settings (menu “System Settings/EvaSys Settings/Survey Online/Allow password based online surveys (Central Evaluation)”). Once activated, standard PSWD based online surveys can be converted in password based
ones. To create a password based online survey, see chapter B 3.2.7. "Effective Management and Conduction of Online Surveys".
102
© 2011 Electric Paper GmbH
Phase 2: Implementation of Surveys
3.2.
Central Evaluation
In the chapter below you will learn about the generation and the handling of surveys in
the central evaluation.
3.2.1.
Generating Surveys
With this function you can generate any number of surveys. You must only make sure
that the questionnaires you need exist, have been tested and are set for use.
For creating questionnaires please consult chapter C C. "Creating Questionnaires
with VividForms".
Figure 86: Generating Surveys
The setting which questionnaire can be used for which course is done at “Questionnaires/Questionnaire List/Details”. You can define here which questionnaire should be
used for which course type and subunit.
After clicking on “generate survey” the screen on the above will appear.
Now you must in succession in each field select one or a number of options. Depending on what you have chosen and the resulting restrictions you will then see only the
valid selection options.
© 2011 Electric Paper GmbH
103
Your Evaluation Process: The Phase Model
Select:
•
a subunit,
•
a survey period,
•
one or more types of courses,
•
a questionnaire,
•
one or more courses,
•
a survey type.
You can select more than one option by pressing down the left mouse button and pulling the mouse down. You can also hold the “Ctrl” button and select any number of
individual courses.
Finally you must select the survey method. You have the choice of:
•
Hard copy procedure
Each questionnaire for each course is downloaded, automatically personalized
and printed.
•
Cover sheet procedure
A cover sheet is printed for each course, while the questionnaires are preproduced. Afterwards the cover letter is scanned together with the completed questionnaires and serves to identify the survey.
•
Online surveys
For each course the appropriate number of PSWDs will be produced. The number
of PSWDs is taken from the data field “number participants” in the course data. If
this information is missing then there is a default setting at “EvaSys Settings/Survey Online/Default value PSWD per survey (central evaluation)”. These PSWDs
are then sent to the survey participants. There are two ways of doing this:
The possibilties of distributing questionnaires and PSWDs are described in chapter B
3.2.9. "Batch Events ".
3.2.2.
Display Surveys
Figure 87: Display Surveys
In order to display a number of surveys, select in the box “Central Evaluation” the
option “Display Surveys”. Then select one or more subunits, survey periods, the
instructors/trainers and the relevant questionnaires and click on [Show].
104
© 2011 Electric Paper GmbH
Phase 2: Implementation of Surveys
Via the additional filter, the selection can, if desired, be refined according to differing
survey status and types. In the drop-down lists, the following status and types are
available:
•
Survey status: ready, data available, data deleted, quantity of data too low, data
capturing, verification, open, closed
•
Survey types: online surveys, hard copy procedure, cover sheet procedure,
merge, report (filtering), report (unweighted), hybrid (online and paper based),
dynamic subgroups
•
Submission status: PSWDs, reminder, questionnaire, evaluation submitted/not
submitted
Figure 88: Additional Filters in the Survey Display
After clicking on [Show], the surveys are displayed in an overview according to the
choices made.
Figure 89: Display the Selected Surveys
© 2011 Electric Paper GmbH
105
Your Evaluation Process: The Phase Model
Alternatively, the survey list of an instructor/trainer can be opened directly via the content view of a subunit. In this overview, a column with the heading “Surveys” is displayed. This includes two numbers for each instructor/trainer, separated by a forward
slash, e.g. [1/3]. This corresponds to: [number of surveys processed/number of surveys created].
Figure 90: Accesing surveys within a Subunit
The display [3/4] means that the user has created four surveys in his user profile, for
three of which returns have been received. With a mouse click on the number in brakkets you can access the survey results.
In the survey window you will see in a table the surveys you selected according to the
filter above: depending on the status of the survey you can now initiate a number of
different operations.
All available actions and information about the survey can be found in the survey
details, which can be reached by clicking on the survey name.
With a click on one of the column headings in blue the window will be sorted according
to this column. You can sort the surveys according to:
•
Type
•
Name
•
Status
•
Form
•
Created (date)
•
Processed (date)
•
Recorded (number of returns)
106
© 2011 Electric Paper GmbH
Phase 2: Implementation of Surveys
Survey Status: In progress
Cover Sheet Procedure:
Figure 91: Survey Status Cover sheet procedure – In Progress
Hard Copy Procedure:
Figure 92: Survey Status Hard copy procedure – In Progress
Online Survey:
Figure 93: Survey Status Online survey – In Progress
Survey Status: Verification
Figure 94: Survey Status Verfication – Web Verifier
© 2011 Electric Paper GmbH
107
Your Evaluation Process: The Phase Model
Survey Status: Data available/Data entry
Figure 95: Survey Status Data available/Data entry
Survey Status: Data Deleted
(only when function “delete in 2 steps” has been activated)
Figure 96: Survey Status Data Deleted
3.2.3.
Survey Details
Display of Survey Details
In order to display more detailed information about the survey you can click on the
survey name. You also have access here too all the functions of this survey.
Some functions can only be accessed using this detail window. Depending on the status of the survey (e.g. ready, data available), the survey type and further attributes
specific to the questionnaire or survey (e.g. language, PSWD status), a variety of survey data and functions will be made available.
At the top of the Detail Window you can see the header data for the survey.
In the lower left-hand corner you can see a number of options relating to the survey
and in the lower right-hand corner you can select the evaluation report and export format.
108
© 2011 Electric Paper GmbH
Phase 2: Implementation of Surveys
Figure 97: Survey Details – Status In Progress
© 2011 Electric Paper GmbH
109
Your Evaluation Process: The Phase Model
The following table gives you an overview on the actions concerning surveys.
Action
Description
Survey Survey
Type
Status
Delete survey
Deletes the survey
All
All
Restore survey
Deletes the response data of a survey. The
survey remains in the status “ready“
All
Data
available
Unlock data collection/ Opens or closes a survey. If closed, no data
Finish data collection
can be submitted to the survey
All
All
Show PSWDs in
browser
Generates and displays a PDF document
containing the PSWDs of a survey
Online
Hybrid
All
Receive PSWDs by
email
Sends an email with the PDF document
containing the PSWDs to the owner of the
survey
Online
Hybrid
All
Send PSWDs to
respondents by email
Batch emailing of the PSWDs to the
respondents
Online
Hybrid
All
Download PSWDs in
CSV file
Allows the download of a text file containing all Online
remaining PSWDs for a survey
Hybrid
All
Generate more PSWDs Allows the generation of additional PSWDs for Online
an existing online survey
Hybrid
All
Number of participants Here the number of participants can be
All
to calculate the
adapted if required (by default using the course
response rate
information)
All
Preview online survey
Opens a window with a preview of the online
survey
Online
All
Scheduled Tasks
Shows the scheduled tasks linked to the
survey, such as PSWD submission, reminder
submission or reporting
Online
All
Show cover sheet/form Opens the personalized cover sheet or the
in browser
questionnaire of the survey as PDF file in the
browser
Paper
All
Email cover sheet/form Sends the personalized cover sheet and/or
form to the owner of the survey by email
Paper
All
Edit answers to open
questions
Shows the open ended question answers in a
list, allowing the administrator to select and
delete if necessary
All
Data
available
Assign survey to a
substitute instructor
Allows a survey to be assigned to a another
user, for example to include a substitute
instructor
All
Data
existent
Edit/display notes
Here, existing notes on surveys can be viewed All
or amended.
Data
existent
110
© 2011 Electric Paper GmbH
Phase 2: Implementation of Surveys
Survey ID
Here, you can change the identification of the
All
survey (= survey -ID). (Attention: Not available in
“Web verifier” mode.)
Data
available
Show recognized form
originals as PDF
Here the recognized answer boxes of the
scanned questionnaires can be displayed.
Data
available
Paper
Table 6: Overview on the Actions Concerning a Survey
In the following graphic, you can see header data, actions and the maintenance of an
email merge survey. There are not yet any data available for the survey. You can only
display the questionnaire here, finish the data collection (close survey), delete the survey, assign the survey to substitute instructor/trainer, edit/show notes and change the
survey ID.
Figure 98: Survey Details – Status In Progress (Ready for data)
In the following graphic you can see the evaluation possibilities of a survey, for which
data is already available. In this case, considerably more options are available to you.
Here you can, for example, display the results in different export formats (i.e. PDF,
CSV, SPSS).
© 2011 Electric Paper GmbH
111
Your Evaluation Process: The Phase Model
Figure 99: Survey Details – Survey Status Data available
If your questionnaire is multilingual then you have the option in this view to display the
form in the various languages.
Figure 100: Select Report Language
After scanning the questionnaires you can display the PDF report in the language of
the questionnaire.
112
© 2011 Electric Paper GmbH
Phase 2: Implementation of Surveys
In the PDF report you will see the text of the letter or the legend in the linked system
language. All of the questionnaire texts are produced in the selected language.
Number of Participants to Calculate the Response Rate
By default, the number of participants deposited in the properties of a course is used
as the number of participants of the survey. This is stated in the details of a survey. It
serves as the basis for calculating the response percentage of a survey, if the mode of
calculation in the central system settings is set on the number of course participants
(“System Settings/EvaSys Settings/Survey/Method of calculating the response rate”).
Should a different number of participants be noted in a new survey period for a course
surveyed several times (i.e. by importing new participant data), this number is adopted
for surveys of the current and future periods. Surveys of this course from past survey
periods show the original number of participants in the survey details, so that the
response rates of past surveys are also calculated correctly.
In some cases, it may be necessary to change the number of participants retrospectively, if, for example, the number of participants needs to be changed for a period that
has expired. To do this, the corrected number of participants can be deposited in the
survey details and with a click on [Accept], saved for the survey. The response rate,
appearing in the survey overview or in the survey details or in the PDF report, is now
based on this corrected number of participants.
Figure 101: Survey Details – Number of Participants to Calculate the Response Rate
Note:
The number of participants noted for the survey only influences the calculation of
the response rate. Functions such as batch printing of questionnaires are not influenced. In the system settings the number of participants must be selected as the
method of calculation for response rates (“System Settings/EvaSys Settings/Survey/Method of calculating the response rate“).
© 2011 Electric Paper GmbH
113
Your Evaluation Process: The Phase Model
Delete Function for Responses to Open Questions
As Administrator you have the option to delete responses to open questions.
This is especially helpful when empty images with only the edges visible have been
saved or when the empty field has been crossed out.
In order to use the delete function, you must activate it in the settings (“EvaSys Settings/Functions/Deletion of Responses to Open Questions”).
With a click on the icon you will open the window with all of the responses to the open
questions of this survey. The responses are either displayed as image or, if they have
already been anonymized, as text field. These have a red background. In order to
delete all of the selected responses, click on the [Delete]-button at the bottom of the
window.
Assign a Survey to a Substitute Instructor/Trainer
If a course is taken over by a substitute instructor/trainer at short notice, an evaluated
survey can be transferred from the original instructor/trainer to the other instructor/
trainer.
To do this, click within the survey details on “Assign survey to substitute instructor”:
Figure 102: Survey Details – Assign this Survey to a Substitute
In the following dialogue you can select the subunit as well as a substitute from the list
of instructors/trainers:
114
© 2011 Electric Paper GmbH
Phase 2: Implementation of Surveys
Figure 103: Select Substitute Instructor
The checkbox “Send PDF report” permits the dispatch of PDF reports to the substitute
instructors/trainers again. To continue, click on [Next].
The survey will then be assigned to a substitute instructor/trainer (and is then no longer existent for the original instructor/trainer). If there is only one survey for the course
that is to be moved, EvaSys will ask whether the associated course is to be moved as
well:
Figure 104: Selection Window – Copy or Move the Course
Click on [Assign] to complete the procedure.
If there are several surveys for one course, the course will always be automatically
copied, since it has to remain with the original instructor/trainer for the assignment to
other surveys.
Editing/Displaying Notes
The notes function supports the communication between the different user roles in
EvaSys. A user can link a memo with a survey. Notes always refer, therefore, to a particular survey and their history is accessible to all users. All notes can be edited or
deleted by the authors at any time.
This function is particularly useful in regard to the QM screens. The instructors/trainers can thus comment on the determined results. Deans/managers or department
heads can then inspect these notes as well as add their own.
To add a note to a survey, call up the survey details through a click on the survey
name. Click on [Edit/Show notes]:
© 2011 Electric Paper GmbH
115
Your Evaluation Process: The Phase Model
Figure 105: Survey Details – Add Note
Then click on [Add note]:
Figure 106: Add Note
An input window appears with which, text can also be formatted:
Figure 107: Editing a Note
116
© 2011 Electric Paper GmbH
Phase 2: Implementation of Surveys
After a click on [Save] the entries are saved. In the survey overview, the symbol
now appears next to the survey name. When the mouse is moved over the symbol,
the most recently entered note appears in a window next to the cursor:
Figure 108: Course with Note
In the case of the QM screens, two types of symbols can appear next to the survey
name:
- symbol Notes exist
- symbol Notes do not yet exist
Editing notes later is only possible for the respective authors.
Additionally, these notes can be displayed in the PDF report. To do this, activate the
option “Show notes in the PDF report” under “System Settings/Report Settings/Configuration”.
Figure 109: All Notes of the Survey in the PDFReport
Show recognized form originals as PDF
The option “Show recognized form originals as PDF” in the survey details allows the
originally scanned forms to be displayed. The forms are displayed as a PDF file and
can be opened as a whole or for each single questionnaire.
© 2011 Electric Paper GmbH
117
Your Evaluation Process: The Phase Model
Figure 110: Survey Details – Show recognized form originals as PDF
After selecting whether you view the entirely or only one questionnaire, simply click on
[Show]. The original scanned forms are displayed. Green boxes show which checkmarks were recognized by the VividForms Reader and therefore provides a quick
overview of the recognition process. This option is available for paper based surveys.
Figure 111: Show recognized form originals as PDF
Maintenance
In the area of maintenance, you can change the survey ID , as long as the changing of
the survey ID in Settings/EvaSys Settings/Maintenance is activated.
This can become necessary, for example, if you have distributed questionnaires in the
self print process with a different/incorrect survey ID. To enable you to assign these
completed questionnaires to your survey anyway, you must replace the ID of the
existing survey with the survey ID of the questionnaires distributed.
Note:
You cannot change the survey ID if the results of the survey are in the “Web verifier”
mode. This means, that the survey ID is protected while the results of your survey
are being processed by the verifier. As soon as the verification is complete, you can
alter the survey ID as accustomed.
Changing the survey ID leads to questionnaires already distributed no longer being
able to be assigned to this survey! For this reason, only change the survey ID after
careful consideration. Should you have any questions, our support team is happy to
help.
118
© 2011 Electric Paper GmbH
Phase 2: Implementation of Surveys
To change the survey ID, enter your chosen ID in the survey ID field, and then click on
[change]. The new survey ID must consist of five characters. The following window
opens automatically:
Figure 112: Confirmation of the Changing of the Survey ID
After confirming this prompt, your survey receives a new survey ID.
Note:
As a rule, you should only change the survey ID after careful consideration. Should
you have any questions, please direct them to our support team.
3.2.4.
Delete Survey
Figure 113: Deleting Surveys
This function allows you to delete large numbers of surveys.
As with all other dialogs you have an “intelligent” option which only displays the valid
options.
© 2011 Electric Paper GmbH
119
Your Evaluation Process: The Phase Model
Select:
1. One or more subunits
2. One or more survey periods
3. One or more course types
4. One or more questionnaires
5. One or more courses
After clicking on [Delete] the data will be deleted from the system.
The deletion process may take between a couple of seconds and a few minutes,
depending on the amount and size of the surveys selected.
Note:
Please keep in mind that the deletion cannot be undone and that the deleted data is
lost forever.
In order to save the raw data before deleting surveys use the archiving function.
3.2.5.
Tree Structure
In the menu “Tree Structure”, it is possible to view the structure of subunits, instructors
and classes built in the system in a hierarchical tree structure. Also hidden layers such
as the program of study or the user defined fields of a course can be made visible and
used for survey administration. Furthermore, the features of display, creation and
deletion of surveys as described in previous sections can be undertaken directly via
the tree structure.
Displaying the organizational structure is enabled in the system by default. If necessary, this display can be switched in the system settings (“System Settings/EvaSys
Settings/Functions/Open Tree Structure”).
The arrangement and number of levels displayed is preset in the menu “System Settings/Define Tree Structure”. As a framework here, the two levels “Subunit” and
“Course” are displayed. If necessary, additional levels such as program of study,
instructor etc. can be inserted.
In the drop-down menu below the structure list, apart from the instructor all levels
which are linked with the course, i.e. program of study, room and the five user-definable data fields (in this example only two are used, namely language and location) are
available.
120
© 2011 Electric Paper GmbH
Phase 2: Implementation of Surveys
Figure 114: Setting up the Tree Structure
To add a level to the tree structure, select the appropriate level from the drop-down list
and determine its position. Afterwards click [Add]. The selected level is now displayed
in the desired location in the list of levels. Continue in the same way with all other
desired levels.
Figure 115: Edit the Tree Structure
The individual levels added can be moved up or down one step at a time retrospectively via the arrows in the area “Action”. With the help of the red cross icon, a level
can be deleted from the list. The framework levels “Subunit” and “Course” can neither
be moved nor deleted.
As soon as the tree structure has been set up in the menu “System Settings”, it can be
displayed in the menu “Subunits”. To do this, click on the entry “Tree Structure” in the
left context menu. The tree structure opens in an overview.
© 2011 Electric Paper GmbH
121
Your Evaluation Process: The Phase Model
Figure 116: Tree Structure in the menu Subunits
In the header of the menu three different actions are available: Display Surveys, Generate Surveys and Delete Surveys.
In the left menu area, the tree structure of the organization is displayed. By clicking on
the name of an element or the button [+], the respective underlying level can be
opened up. Use the selection boxes next to the relevant entries to define which surveys or courses should be displayed in the right window. When an element of a higher
level is selected, all elements on the levels below are automatically selected too.
Figure 117: Tree Structure –Selecting the Levels
By clicking on the level name in the header of the list, all elements of a level can be
displayed or hidden.
Figure 118: Tree Structure – Opening and Closing Levels
122
© 2011 Electric Paper GmbH
Phase 2: Implementation of Surveys
Display Surveys
To display surveys in the tree structure, select the option “Display Surveys” in the
actions panel. On the left side, select the levels to be displayed in the view of the surveys you require, by checking the appropriate boxes. Then select the desired survey
periods and questionnaires on the right. If necessary, these can also be filtered
according to course type, by activating the option “Course Type”. The display can be
refined by different types of surveys and status by using the drop-down menus.
Figure 119: Tree Structure – Select Courses
By clicking on the button [Show], the courses are shown in the list. If required, the
name of the instructor can also be shown by activating the option “Show instructors”.
By using the control button and mouse clicks, any number of courses can now be
selected. After clicking on [Display Surveys] you are redirected to the survey list of the
desired surveys.
© 2011 Electric Paper GmbH
123
Your Evaluation Process: The Phase Model
Figure 120: Tree Structure –Display Surveys
Generating Surveys
In order to use the tree structure to create new surveys, in the panel actions select the
option “Generate Surveys”. On the left, select the levels in which you would like to
generate the surveys by checking the appropriate boxes. Then, on the right, select the
required survey periods and questionnaires. If necessary, you can also filter according
to course type, by activating the option “Course Type”. By clicking on the button
[Show], the courses are displayed in the list. If required, the name of the instructor can
be displayed by selecting “Show instructors”.
124
© 2011 Electric Paper GmbH
Phase 2: Implementation of Surveys
Figure 121: Tree Structure – Generating Surveys
By using the mouse and the control key, any number of courses can be selected for
which a survey is to be generated. At the bottom of the window the various types of
surveys and their additional options (verification, timing) are available. Select a type of
survey and, if necessary, the additional options and click the button [Create Survey].
The survey is created and you will be automatically redirected to the survey list.
Figure 122: Tree Structure – Redirection to the Survey List
© 2011 Electric Paper GmbH
125
Your Evaluation Process: The Phase Model
Deleting Surveys
To delete surveys using the tree structure, select the option “Delete Surveys” in the
actions panel. On the left, select the levels in which you wish to delete surveys. Then,
on the right, select the desired survey periods and the questionnaires. If necessary,
you can also filter according to course type, by activating the option “Course Type”.
By clicking on the button [Show], the courses are displayed in the list. If required, the
name of the instructor can be displayed by selecting “Show instructors”.
Figure 123: Tree Structure – Deleting Surveys
Select the desired course whose surveys are to be deleted and click on [Delete Surveys]. The surveys are now irrevocably deleted from the system.
3.2.6.
Conducting a Paper Survey
Production of Questionnaires
When using the cover sheet procedure, questionnaires are given to a printing company for production and are then used as needed for surveys. The cover sheets can
126
© 2011 Electric Paper GmbH
Phase 2: Implementation of Surveys
be centrally produced and distributed to the instructors/trainers. Alternatively the cover
sheets can be sent to the instructor/trainer by email.
In the hard copy procedure the questionnaires adapted for specific surveys are either
produced centrally or by email delivery to instructors/trainers.
Document Quality
The quality of the paper and the print image is critical for the scanning and processing
stages.
We discourage the use of gray recycled paper due to the gray shadows which can
appear.
Note that when producing questionnaires using private printers or copiers the printer
driver is set up for A4 size paper and the copies should vary, due to tilting or enlargement/reduction, only marginally from the original. The tolerance range for such image
discrepancies is about 10% of an edge length. The general rule is that clearly visible
changes to the original document should be avoided.
3.2.7.
Effective Management and Conduction of Online Surveys
Preview Online Survey
You have the possibility of displaying a preview of your online survey, either in the
details of a survey or in the questionnaire details.
In the details of a survey, as you can see in the following graphic, click in the area
“Actions” on “Preview online survey”.
Figure 124: Preview of an Online Survey in the Survey Details
You can also display a preview of your online survey in the details of a questionnaire
by clicking on “Preview online survey”.
© 2011 Electric Paper GmbH
127
Your Evaluation Process: The Phase Model
Figure 125: Preview of an Online Survey in the Questionnaire Details
In both cases (calling up the preview of your online survey in the survey details or
questionnaire details) you will receive the following warning:
Figure 126: Warning Message of a Preview of the Online Survey
This warning makes you aware that the preview of your online survey is not a real
online survey, but solely offers you a visual preview.
Hint:
In order to test filters, cross tabulations or temporary saving, we recommend that
you create a test survey with your questionnaire. When you have created the test
survey, display the PSWDs in the browser and fill out the survey once. This procedure allows you to fully test your online survey. On successful completion, you can
delete this test survey and create your regular online survey.
Generating and Managing Time Scheduled Online Surveys
EvaSys provides the option to run time-controlled surveys.
The following actions can be controlled:
•
Starting the survey and dispatching the PSWDs by email to the respondents
•
Reminder to respondents per email (with PSWD)
•
Closing the online survey and, if necessary sending an email with evaluation report
to the instructors/trainers.
These actions are managed separately in the so-called “Scheduled Tasks“.
The activation and settings of the time-triggered control system are dependent on
each survey. That means that the process of each online survey can be separately
128
© 2011 Electric Paper GmbH
Phase 2: Implementation of Surveys
controlled. An overview of all planned operations can be found in the menu [Subunits/
Scheduled Tasks].
Hint:
Because you can set the time-triggered control at any time you can send emails at a
time when there is relatively little traffic (usually at night).
•
Activate time-triggered control
To activate the time-triggered control when generating an online survey put a
checkmark in the box. You can always activate the time-triggered control at a later
date by using the menu item in te survey detail view.
Figure 127: Time Trigger
After generating the survey you can define the planned operations for the survey in
the following view.
In the header is the name and number of the survey. By clicking [Next survey] and
[Previous survey] you can navigate between the surveys.
In the view beneath the header there are three actions which can be activated and
controlled separately. Clicking on the button [Edit] will take you to the action you
want.
After generating the survey all actions are deactivated by default. By clicking on
[Activate] you can activate the operation.
The next sections give a detailed description of the individual actions/operations.
•
Operation “PSWD to respondent”
The “PSWD to Respondent” operation starts the online survey. That means that
the participants to the survey receive an email with the login information.
For this email you can define the following details:
- Sender Email (Default: Email address from the system settings)
- Sender Name (Default: Email address from the system settings)
- Subject Line of email (Default: Subject line from the setting “Text Template”)
- Text of email – The email text can have placeholders (Default: Email text from
the setting “Text Template”)
© 2011 Electric Paper GmbH
129
Your Evaluation Process: The Phase Model
- Email Addresses – List of the email addresses of all respondents
The number of email recipients is limited by the number of available transaction
numbers.
The time of the email operation can be defined in the field “Start Date”. A click on
the button with the calender symbol opens the calendar. The use of the calendar is
explained in the last point of this section.
All settings can be saved by clicking on [Save].
Before saving check syntax of the email addresses (e.g. @). Technical limitations
mean that the actual existence of the email addresses cannot be checked. Undelivered email can be found in the EvaSys logbook. The email addresses are saved
in the system for reminder emails.
Figure 128: Define Scheduled Tasks
In general it is possible to assign the date/time and status for all selected surveys
using the [Apply to All] button.
130
© 2011 Electric Paper GmbH
Phase 2: Implementation of Surveys
•
Operation “online survey reminder”
The operation “online survey reminder” is the dispatch of a reminder email to all
respondents who have not yet taken part in the survey.
In the reminder email you can send the login information once again.
Optionally, more than just one reminder email can be sent. In this case, select the
“Multiple reminders every x days“. The system will then keep resending reminders
until the survey is closed.
After activating this operation, the fields sender email, sender name, subject line
and email text can be edited. The recipients are automatically read out of the system, so that all participants who have not responded receive an email.
After defining the start date, you have to save the settings of the operation.
In general it is possible to assign the date/time and status for all selected surveys
using the [Apply to All] button.
•
Operation “close survey”
This operation serves to close the online survey.
When the survey is closed then no more returns are possible. Unused PSWDs are
then invalid and cannot be used anymore. Survey participants are not informed of
this operation.
The evaluation report can be sent directly to the survey owner. When this is the
case then the owner of the survey (i.e. the user allocated to the survey in the system) receives an email of the results of the online survey automatically.
This operation is terminated by a start date and saved with [Save]. In general it is
possible to assign the report delivery date/time, activation status and setting for all
selected surveys using the [Apply to All] button .
•
Use of calendar
The calendar is used for selecting the date and time for a planned operation.
Figure 129: Calendar
© 2011 Electric Paper GmbH
131
Your Evaluation Process: The Phase Model
All changes in the calendar are adopted by the enter templates behind the calendar. The calendar does not need a save button as it can be closed by “x” after
selecting the date and time.
With a click on “?” a help function for the calendar is displayed.
Using the arrow you can change the year and month. Then select a day and in the
line beneath a time. The time is increased by 1 hour/minute with each mouse click.
By pressing Shift and making a click the time is decreased by 1 hour/minute. For a
faster selection, press and hold the mouse button and move the mouse to the left
(decreasing time) or to the right (increasing time).
•
Overview of time-scheduled online surveys
Figure 130: Scheduled Tasks – Overview
The display of subunits, survey periods and questionnaires can be restricted.
For each survey, each of the three tasks are displayed in one line. In the column “Status”, the status of the task is evident.
The following status messages are displayed:
- Open – The task is activated and not yet carried out
- Running – The task is now running, emails are being sent.
132
© 2011 Electric Paper GmbH
Phase 2: Implementation of Surveys
- Deactivated – The task is deactivated
- Executed – The task has been successfully completed
- Executed with error – The task was completed with error
- Executed with warning – The task was completed but with a warning (e.g.
“report could not be created as data was not available”)
- Not completed/with error– The task is not correctly defined and the settings
should be checked
You can use these action icons to control the operations you have planned:
- Modify planned task
- Immediate execution of task
- Deactivate task
- Delete all planned tasks in survey
By clicking on the Edit icon, the data of a time controlled task can be retroactively
adjusted. Here it can be decided whether the changes made should be applied to all
surveys created at the same time, or only to those surveys currently selected.
Figure 131: Scheduled Task –Saving changes for all surveys created at the same time
Actions for all surveys with a definite status can be directly performed by selecting
from the footer. In this way, for example, all surveys with the status “deactivated” can
be edited.
In the drop-down list “Action” you can choose between the actions “Edit”, “Run”, and
“Deactivate”. The tasks on which this action should be performed, and with which status, are set in the second drop-down list box. Different statuses are visible here,
depending on the selection in the box “Action”. To which task the selection applies can
be defined in the last drop-down list “Task”.
In this way, for example, all deactivated tasks in the section “Finish survey” can be
edited immediately. Or all open task can be immediately performed, or deactivated.
© 2011 Electric Paper GmbH
133
Your Evaluation Process: The Phase Model
Online Surveys: Sending PSWDs
In online surveys the EvaSys administrator either sends the PSWDs by batch email to
the survey participants or sends emails with PDF files containing the PSWDs to the
instructors/trainers so that they can distribute the PSWDs to the participants directly.
Instead of sending the PSWD and the server address for the online evaluation you
can use the placeholder [DIRECT_ONLINE_LINK]. This placeholder adds a link to the
online survey that contains the server address as well as the PSWD/password. Simply
clicking the link therefore shows the online questionnaire.
•
Batch emails
•
The PSWDs are sent to the survey participants using an email address list . This
dispatch is carried out by the EvaSys server.
•
Using the reminder function you can send an email at a later time to all PSWD
recipients who have not yet taken part in the survey.
•
PSWD cards
•
The PSWDs are produced as a PDF document. These PSWD cards have an entry
code, the Internet address as well as the name of the survey. These PSWD documents can be either opened by the administrator or sent to the instructor/trainer
per email.
The possibilties of distributing PSWDs are described in chapter B 3.2.9. "Batch
Events ".
Participation Tracking
Participation tracking enables you to create a CSV file where all of the used and nonutilized PSWDs of your online surveys are listed.
In online surveys whose PSWDs have been sent by email to the respondents, the participation tracking allows for easier identification of those participants who haven’t
taken part in a survey. Whilst preserving the anonymity of survey participants who
have already completed their questionnaire, participants who, in spite of their invitation, have not yet used their PSWD, can be identified by their email address. In the
menu “System Settings/EvaSys Settings/Survey Online/Participation tracking (online
surveys): Protection of anonymity” you can define the minimum return. The minimal
return defined here must be reached, in order for specific survey information on participation and non-participation to be released.
To access participation tracking, click in the menu “Subunits” on “Participation Tracking”. A window opens automatically in which you can select any number of subunits,
survey periods, course types, questionnaires and courses. Subsequently, click on
[Request] to trigger the participation tracking. A “Save as…” dialog appears. Select a
folder and click on [Save]. Then, open the saved CSV file to call up the information on
participation and non-participation:
134
© 2011 Electric Paper GmbH
Phase 2: Implementation of Surveys
Figure 132: Example CSV File of Participation Tracking
As soon as you call up the participation tracking for online surveys for which you distributed PSWD cards instead of sending the PSWDs per email, the email column
remains empty.
Online Surveys: Customization of the Language Used
If additional languages for system messages are to be made available to online survey participants, you can integrate them in EvaSys. For online surveys, this refers to
short messages such as [Continue], [Send] and [Save temporarily], but also to longer
texts such as “The red marked multiple choice questions have more options selected
than allowed. Please reduce the number of selected options accordingly.”. (Please
note: here we are talking about elements that do not directly originate from the questionnaire, because you can directly translate all elements of a questionnaire. To do
this, select the option “Languages” in the respective questionnaire’s details).
The internationalization of online surveys is achieved by language sets. Because, for
online surveys, particularly those with an international approach, many more languages need to be translated than is possible with linked system languages, the language sets enable internationalization beyond integrated system languages.
The expedient use of language sets requires two steps:
•
Step 1: General definition of a language set
Via the language sets you can define text elements for online surveys and thus
include them in your EvaSys system.
•
Step 2: Linking a language set with a questionnaire
If you wish to use a particular questionnaire for online surveys and additional languages are relevant, specify the relevant language sets for this particular questionnaire. Of course you can link a language set with any number of questionnaires.
Step 1: General Definition of a Language Set
You will find the language sets in the submenu of the main menu “System Settings”
(on the left-hand side). After clicking on the menu point “Language sets”, a list
appears with the language sets that are already in place. If you haven’t yet added any
language sets, they will correspond with the system languages available:
© 2011 Electric Paper GmbH
135
Your Evaluation Process: The Phase Model
Figure 133: Overview of the Language Sets
To view an existing language set, click in the column “Activities” in the line of the
respective language set on “View”. An overview of the language messages with the
current translation will be displayed. In the following example you can see the translation from the system language English into Spanish:
Figure 134: Language Set (here: Spanish) in Detail
The listing contains the text elements that appear in online surveys, along with their
respective translations.
136
© 2011 Electric Paper GmbH
Phase 2: Implementation of Surveys
Click on the bottom of the screen on [Back] to return to the start menu.
To create a new language set, click on [New] below the list of existing language sets.
Name the language set and then translate all elements:
Figure 135: Defining a Language Set
Note:
The language set can only be saved when all elements have been translated!
Once saved, the language set appears in the list of existing language sets. Unlike language sets linked with system languages, here you have the possibility of editing or
deleting the language set. This option is also recognized by the additional buttons in
the list.
Step 2: Linking a Language Set with a Questionnaire
In order to use a language set for online surveys, you have to link it with the questionnaire with which you conduct the respective online survey. This is possible in a questionnaire’s details. The details of a questionnaire are available in the menu
“Questionnaires/Questionnaire List”. Click on the name of a questionnaire in the list;
you will be directed to the details of the questionnaire. In the drop-down-menu in the
area “Advanced settings” select the option “Languages” and click on [Edit].
If you have not yet defined a language, you first have to define the questionnaire’s
standard language:
© 2011 Electric Paper GmbH
137
Your Evaluation Process: The Phase Model
Figure 136: Defining the Questionnaire’s Main Language
The above figure shows that the language set “English” is linked with the system language “English” (here the main language).
After defining the main language you can add a further language:
Figure 137: Adding a Further Language
As you do with the main language, you define their properties and can link your language set with the questionnaire here. For example, it makes sense to use the language set “Français” for the questionnaire’s French translation:
138
© 2011 Electric Paper GmbH
Phase 2: Implementation of Surveys
Figure 138: Linking the Language Set with the Translated Questionnaire
Note:
The definition of language sets applies to the system messages, not to the questionnaire. You have to translate the questionnaire additionally.
Online Surveys: Customization of the Used Layouts
The layout of online surveys in EvaSys is handled by online survey templates. A template is a sample, that in this case, for example, controls the color, the insertion of
logos or the questionnaire display.
In EvaSys there are four types of online survey templates:
•
Predefined standard templates
The predefined standard templates are firmly integrated in EvaSys and are used
as the default for online surveys.
•
Customized online survey templates
The customized online survey templates can be created in EvaSys without any
previous technical knowledge or knowledge of programming. The colors of these
online survey templates can be adapted to your wishes/your corporate design. In
addition, an individual logo can be integrated too.
© 2011 Electric Paper GmbH
139
Your Evaluation Process: The Phase Model
You can create any number of customized online survey templates and use them
for each subunit individually. Also subunit administrators can define their own customized online survey templates.
•
CSS Editing
Use CSS editing to modify colors, positions and rendering of each element of your
online survey (requires advanced knowledge in CSS edition).
•
Advanced Template Editing
Use the whole set of files to change absolutely anything in the layout of your online
survey (requires advanced object oriented PHP programming and extended knowledge of accessibility requirements).
When using standard templates or a customized online template based upon the standard template, the size of the template is automatically optimized for the screen resolution of the client, that is, as well as PC’s, mobile devices too (cell phones, smart
phones, internet tablets etc.) are supported. The prerequisite for this is, that the corresponding function is activated in the configuration (“System Settings/EvaSys Settings/
Survey Online/Support for mobile devices”). All other templates must be adapted for
display on mobile devices.
All kinds of templates are organized in the menu “System Settings/Online Templates”.
Here you can view and edit existing templates or create and upload new ones.
Figure 139: Menu “Online Survey Templates”
In the properties dialogue of a subunit you can select one of the online survey templates available and thus individually define the layout of this subunit’s online surveys.
Select an option from the list next to “Online survey template”. As well as this, an individual addition to the online survey web server address can be defined for the subunit.
140
© 2011 Electric Paper GmbH
Phase 2: Implementation of Surveys
Figure 140: Linking the Online Survey Template with a Subunit
Creation of a Customized Online Survey Template
To create a so-called customized online survey template, open the menu “Online
Templates” in the main menu “System Settings”. The online template management
opens automatically:
Figure 141: Online Template Management
Predefined templates can be uploaded in the bottom area of the window. In the upper
area of the window, customized templates are created and managed.
© 2011 Electric Paper GmbH
141
Your Evaluation Process: The Phase Model
To create a customized template, in the upper area of the window click on [Create
new customized online survey template]. If you have already uploaded additional
online survey templates other than the standard template (EvaSys Online Survey
Template), you will be asked on which basis template the new customized template
should be based.
Figure 142: Customized Online Survey Template – Select the basic template
Note:
Not every uploaded template is customizable and can serve as a basic template. If
in doubt, please contact our support team.
Select the desired template and click on [Next]. If you have not yet uploaded any additional templates, the following screen appears immediately:
Figure 143: Customized Online Survey Template – Create template
142
© 2011 Electric Paper GmbH
Phase 2: Implementation of Surveys
In the upper half of the window, a preview of the online survey template is displayed.
In the lower half the layout of the template can be edited. All changes made to the layout are immediately shown in the preview.
Numerous functions for customizing the templates are available in four different tabs:
•
General Settings
The name of the template is defined here, your own logo can be uploaded and
aligned, the organization’s logo and the survey header can be shown or hidden
etc.
•
Colors
The color settings for the different areas and elements of the template are set here.
The background as well as the font colors of all areas displayed can be customized.
Figure 144: Customized Online Survey Template – Customize colors
•
Navigation
Different elements, such as the page navigation or the progress bar can be shown
or hidden here.
•
Question Types
Specific settings for different question types can be made here; such as, for example, a remaining characters counter for open questions can be displayed, scale
questions can be displayed as a slider etc.
© 2011 Electric Paper GmbH
143
Your Evaluation Process: The Phase Model
Whilst customizing the template, you can change between the different tabs at any
time. Once you have completed your editing, click on the button [Accept]. The template just created now appears in the overview:
Figure 145: Customized Online Survey Template – Overview
With a click on the pencil icon, the template can be edited at any time, or deleted by
clicking on the red cross-icon. Also, with the aid of the page icon a copy can be made.
The copy now appears in the list as a new template and can be edited further.
Once you have created the template, link it, as described above, with the subunit in
which it is to be used. In the online survey, it is then, for example, presented as such:
Figure 146: Customized Online Survey Template in the Online Survey
CSS Editing
If you wish to modify other elements of design, as, for instance, the way buttons or
dropdown menus are displayed, and if you have some knowledge of CSS styles edition, you can build your own online template.
The easiest way is to copy the file “onlinesurvey.css” you find in:
C:\Apache\htdocs\evasys\application\modules\online\templates\onlinedefault.
144
© 2011 Electric Paper GmbH
Phase 2: Implementation of Surveys
Zip this file, go to the menu “System Settings/Online Templates” and upload the ZIPfile you created. After this, use a CSS editor to modify the file that is now in a folder
named like your template (in this case: “My Template”), in:
C:\Apache\htdocs\evasys\data\templates\My Template.
This file can now be modified using a CSS editor. To display the modifications you
have made in the style sheet, you need to remove the content of the folder
C:\Apache\htdocs\evasys\data\tmp\online and restart the system service “memcached Server”. To do this, select the option “Administrative Tools/Services” in the
Control Panel and search the list for the entry “memcached Server”. If you right-click
on the entry a context menu opens where you can choose the option “Restart” by a
left click. Here is an example of what can be changed by simply editing the styles in
CSS:
Figure 147: Example CSS Editing
Example:
Figure 148: CSS Editing
© 2011 Electric Paper GmbH
145
Your Evaluation Process: The Phase Model
In this example, a button is defined with a light blue background and dark blue border
and text (sample of how it will look like on the right of the example image).
Advanced Template Editing
The way online templates are programmed in EvaSys allows you to modify many
aspects such as colors and location, but also each detail of how the single elements
will be displayed. You can, for example, include flash-interaction into your survey, create a picture-based survey (e.g. displaying pictures as multiple choice options), and
so on. Working at this level of customization requires advanced object oriented PHP
programming and extended knowledge of accessibility requirements.
To access these functionalities, start by copying the whole online default template you
find in folder C:\Apache\htdocs\evasys\application\modules\online\templates\onlinedefault. Here are the objects in this folder (files, and subfolders):
Figure 149: Content of the Folder “onlinedefault”
Each part of your online survey is available for you to modify it (the login screen, the
way pagination is dealt with, the header, the content of the form etc.). Most important,
the CSS style sheet “onlinesurvey.css” allows you to modify almost everything, as
each object of the online survey layout is described by a style.
In the subfolder “element” you find files describing how each question type (single
choice, scaled question, multiple choice question, and so on) will be displayed.
In the subfolder “partial” you will find how errors and warnings (such as “please fill in
this required field”, or “only numbers are allowed in this field”) will be displayed. You
can add further files you would like to integrate into your template.
You can also create several other folders here, like for instance the folder “images”,
where you can save files specifically needed for your template.
Note:
You might just modify some of the files and not all of them. When a file is missing in
your custom template folder, EvaSys is using default instead, so you do not have to
import files you did not edit.
146
© 2011 Electric Paper GmbH
Phase 2: Implementation of Surveys
To have EvaSys load your template, zip the content of your folder. Please note: The
ZIP-file has to contain the content of the folder, and not the folder itself. Go to the
menu “System Settings/Online Templates” and upload the file. You can then modify
the template directly in the folder where it has been created (in C:\Apache\
htdocs\evasys\data\templates\).
Please, if you make modifications to the CSS-file “onlinesurvey.css”, do not forget to
remove the content of C:\Apache\htdocs\evasys\data\tmp\online.
As a general concept, the form is available as an object, the methods of which will provide you with all information you need in order to choose the way you wish to display
each element on the page.
Here are some of the functions that you might regard as useful when starting to work
with EvaSys advanced template editing. You will find examples of other functions,
methods and classes used to get information about items you are editing and willing to
modify, in the files that are available in this folder.
Function
Description
$this->getLabel()
returns the label of the current question
$this->getValue()
returns the value of the current question (very useful if you
wish to create javascript reaction to a value for example)
$this->getMultiOptions()
returns all options of a question (if existing)
$this->getCSSClass()
returns the whole class attribute of the element (multiple
classes get separated by space); it will also give you some
information about where you are in the code (even or odd
item, for example), which you might use to create action
according to this information
$this->addCSSClass($sClass)
adds an additional class to the current element: you might
decide that you won't display a question in the same way if
the label is short or very long ; so you could define a specific
class in your CSS file for long labels and insert this class after
having tested for the length of the label
$this->getTemplatePath()
returns the URL to the template directory of the current template. Useful for routing to images or extra CSS files.
$this->placePartial($sName)
inserts a partial-template at the calling-position. Name should
not contain a path or an extension. This is typically used for
mentioning required questions or validation rules specific to
some questions
$this->getErrors()
returns an array of error-objects for the user, like “this question was required but not filled in”, or “this field should be
completed only with numbers” (rules that are defined through
the VividForms Editor/Designer).
Table 7: Functions for Advanced Template Editing
© 2011 Electric Paper GmbH
147
Your Evaluation Process: The Phase Model
The creation of advanced design templates is also offered as a professional service,
so that all our customers can benefit from the advantages of a fully customized online
survey template. For further information, please contact Electric Paper.
Example of PHTML Editing: scala.phtml
Scaled questions are used a lot in surveys. While you cannot choose how you want
them to be displayed in paper-based surveys, in online surveys you can. By means of
editing the scala.phtml file located in the element folder of a template you can define it
for your own use.
As you can see in the next figure, lots of information, like the label of the question, the
definition of left pole, right pole and abstention or details of options are available
through simple functions of the current object (getLeftPole, getRightPole, and so on).
Code is commented so that you will clearly see what is done at each step. You can
decide to display the radio buttons in a table or in a div element, you can choose to
have them to the right of the label or under the label (this can also be defined in the
CSS file), you can add your code for extended validation rules, put images instead of
poles each time the left pole is defined as “do not agree” and the right pole as “totally
agree”, and other images for other types of poles, for example.
In this example, you also see some code resulting from functions as “getADAOptionText”. These functions are very important. Please bear in mind, that EvaSys has originally been designed to ensure accessibility. Therefore many requirements have been
met, for example to guarantee the accessibility of the content for people of all abilities
and disabilities, mainly blind or poor sight users). Consequently specific functions
were created that would help you to create code that makes your online surveys available for all people.
148
© 2011 Electric Paper GmbH
Phase 2: Implementation of Surveys
Figure 150: PHTML Editing
Access Rights to Online Survey Templates for Subunit Administrators
You as the administrator define within the user properties the of subunit administrators
whether a subunit administrator has the right to create or modify online survey templates. In the drop-down menu next to “Online survey templates” you can choose
between following rights:
© 2011 Electric Paper GmbH
149
Your Evaluation Process: The Phase Model
•
Defined by administrator (No access)
•
Templates only (meaning the subunit administrator cannot create his own templates)
•
Unrestricted
This option of assigning rights can be seen in the following figure:
Figure 151: Creation of Templates by Subunit Administrators – Assignment of Rights
Viewing the Results for Online Survey Participants
In comparison to paper surveys, implementing comprehensive online surveys offers
some organizational advantages. But the often lower number of returns poses a significant disadvantage which can only be partly compensated for through motivational
measures aimed at the survey participants.
Along with the participants’ obligation – possibly entailing queries regarding the regulatory framework or the quality of resulting data – quite often rewarding motivational
procedures are also followed. These, in turn, entail organizational effort.
EvaSys, therefore, offers the alternative of survey participants accessing the survey
results. Of course, access is granted only to those survey participants who have in
fact participated in the survey.
Access to survey results is enabled in the questionnaire details, so access is individually controlled per questionnaire. You will find the area “Evaluation for participants” in
the field “Usage” (details of a questionnaire):.
There you can authorize the viewing of results. As, in this case, only access to results
of closed questions is authorized, the option “Display responses to open questions”
can be additionally selected.
If you authorize the viewing of results, the online survey participants have access to
the HTML report as soon as the survey has been closed. Each participant can use his
150
© 2011 Electric Paper GmbH
Phase 2: Implementation of Surveys
PSWD to again log on to the same page on which the questionnaire was previously
available. Instead of the questionnaire now the HTML report is accessible.
Figure 152: Result for Online Survey Participants– Authorization in the Questionnaire
Important: Only those participants who were logged-in during the survey can now log
in again to download the report. The system verifies that the PSWD has already been
used for this. This ensures that nobody can log-on who has received a PSWD but has
not yet participated in the survey.
The information on the accessibility of results can be communicated to the participants via email once the survey has been closed. It is, however, not a condition for
accessing the results using the PSWD. The email on the report accessibility will be
sent out either manually or by using the time control of online surveys.
If you wish to send out the information manually, click in the details of a survey on
“Send result access information to participants”:
Figure 153: Manually send an Email on the Accessibility of the Report
Upon confirmation of the recipient list the email is sent. Please note that this function
is only available after an online survey has been closed.
The automated dispatch of the access information is accomplished through the time
control. The time control can be reached either through the survey details (provided
that the survey is still running) or via the check mark box “User Time control” straight
after the generation of online surveys:
© 2011 Electric Paper GmbH
151
Your Evaluation Process: The Phase Model
Figure 154: Dispatch Email to Participants via Time-controlled Online Surveys
After activating the procedure “Close survey” the option “Send result access information to participants” appears. This way the dispatch of accessibility details is directly
linked with the automated closure of the particular survey. Upon entering their PSWD,
the authorized survey participants receive access to the HTML report:
Figure 155: The HTML Report
152
© 2011 Electric Paper GmbH
Phase 2: Implementation of Surveys
The text templates (main menu “System Settings”/submenu on the left-hand side
“Text Templates”) contains the text “E-mail: Information about result access to participants”. Here the standard text that is sent to the participants of a survey can be
deposited as soon as the survey has been closed:
Figure 156: Editing the Email Text on Information for Online Survey Participants
Password Based Online Survey
Each PSWD-based online survey can subsequently be converted into a password
based online survey. The precondition for this is that there are no online survey
responses and that the function of the online password based survey is activated in
the EvaSys settings (“System Settings/EvaSys Settings/Survey Online/Allow password based online surveys (Central Evaluation)”).
To convert a PSWD based to a password based online survey, click on the name of
the PSWD based survey to open the details. In the area “Actions”, click on the option
“Convert survey to password based survey”.
© 2011 Electric Paper GmbH
153
Your Evaluation Process: The Phase Model
Figure 157: Convert survey to password based survey
The PSWD based online survey will now be converted into a password based online
survey. You will see a warning message that this operation cannot be undone. Confirm the message with [Yes].
Figure 158: Confirm warning message
By default, the password is the first PSWD of the original PSWD based survey. To
change the password, click on the option “Change password”. This opens a dialog
where you can enter the new password.
Figure 159: Change password
154
© 2011 Electric Paper GmbH
Phase 2: Implementation of Surveys
Now, if desired, and as long as the group of participants is known, the password can
be sent to these. Click on the option “Send password via email to participants”. This
opens an input window. In the field “Recipient” all email addresses that have been
imported for the course are shown. If no addresses were imported, they can also be
deposited manually afterwards. Click on [Submit] to start the sending.
Figure 160: Sending passwords to participants
3.2.8.
Adding Questions Using the Instructor/Trainer’s Optional
Questions
The function “Instructor/Trainer’s Optional Questions” was developed in order to give
instructors/trainers, also in the Central Evaluation, the opportunity to create their own
individual questions for the questionnaires for their courses.
To use the instructor's optional questions, you should activate the template mode in
the VividForms questionnaire, and set the maximum number of pages and possible
elements, whereby every item that can be selected is an element, e.g. question
groups, question, image, and also line spaces or separators. You can also set that an
instructor/trainer is only allowed to add new elements at the end. If these options are
© 2011 Electric Paper GmbH
155
Your Evaluation Process: The Phase Model
not activated, the instructor/trainer can expand the questionnaire of the instructor's
optional questions at any place, with as many elements as desired.
Figure 161: Activate Instructor/Trainer’s Optional Questions
Activate Instructor/Trainer’s Optional Questions (Administrator Account)
After the creation of surveys the administrator can activate the Instructor/Trainer’s
Optional Questions (“System Settings/EvaSys Settings/Survey/Instructor’s/Trainer's
Optional Questions: activation status”), which offers access to a website.
On this webpage instructors/trainers can enter their questions. The EvaSys item
library can be made use of as it offers a collection of valid items (“System Settings/
EvaSys Settings/Survey/Instructor’s/Trainer’s Optional Questions: question library” ->
activated).
Changes to the course data can be either authorized or blocked (“System Settings/
EvaSys Settings/Survey/Instructor’s/Trainer’s Optional Questions: modify course
data” -> Activated).
This procedure offers the opportunity to send instructors/trainers the personalized
PDF questionnaire for printing once they have completed the Instructor/Trainer’s
Optional Questions. Alternatively these emails can be sent to the addresses of those
responsible for the production of the questionnaires (“System Settings/EvaSys Settings/Survey/Instructor’s/Trainer’s Optional Questions: direct delivery of questionnaire/PSWDs” or “System Settings/EvaSys Settings/Email Functions & Accounts/
Instructor’s/Trainer’s Optional Optional Questions: group address”).
156
© 2011 Electric Paper GmbH
Phase 2: Implementation of Surveys
To configure the Instructor’s Optional Questions proceed as follows: Open the menu
“Instructur’s Optional Questions” in the main menu “Subunits”. Select 1. the subunit, 2.
the survey period, 3. the course type, 4. the questionnaire and 5. the course(s). Select
now: activate.
Figure 162: Activate Instructor/Trainer’s Optional Questions
Personalized emails are sent to all instructor/trainer accounts for all selected courses.
These emails contain a link to the webpage of Instructor/Trainer’s Optional Questions.
Example:
Such an email could read as follows:
Dear Mr. Example,
The Instructor's/Trainer’s Optional Questions has been activated for you. You can
enter questions for the survey or course “Time Management” by clicking on the link
given below. Alternatively you can copy the complete link and enter it into the address
line of your Internet browser.
Link:http://localhost/evasys/mask.php?mode=show&tan=C7XES
Your EvaSys Administrator
After clicking on the link the Instructor/Trainer's Optional Questions a new window
appears where the instructor/trainer can change some settings concerning the course.
At the top the instructor/trainer can supplement or if necessary correct information
concerning the course.
Use of a VividForms Questionnaire
When using a VividForms questionnaire the recipient will receive a template with
options to extend the existing questionnaire using the VividForms Editor. The administrator can limit the size of the questionnaire by defining a maximum number of pages
when creating the form template.
•
Remind
The instructor/trainer is reminded of the Instructor/Trainer's Optional Questions.
Again the link is entered in the email.
Optionally, the dispatch of emails can be prevented by activating the option “No
email submission”. In this case the instructor/trainer will not receive information on
activation or deactivation of the instructor/trainer's optional questions.
© 2011 Electric Paper GmbH
157
Your Evaluation Process: The Phase Model
•
Deactivate
The Instructor/Trainer's Optional Questions are deactivated and can no longer be
accessed. Optionally, the dispatch of emails can also here be prevented by activating the option “No email submission”.
Figure 163: No Submission of Emails to the Instructor/Trainer
The text of the relevant emails can be edited in the menu System Settings/Text Templates (“E-MAIL: Instructor/Trainer’s Optional Questions activated”, “EMAIL: Instructor/Trainer’s Optional Questions reminder” and “E-MAIL: Instructor/Trainer’s Optional
Questions deactivated”).
The administrator can edit the surveys where the Instructor/Trainer’s Optional Questions are activated by opening the list of surveys (main menu “Subunits”, there “Display Surveys”).
3.2.9.
Batch Events
Figure 164: Batch Events
158
© 2011 Electric Paper GmbH
Phase 2: Implementation of Surveys
The batch events are located in the menue “Subunits/Batch Events”. They offer various process automation possibilities connected to the distribution of survey forms and
survey reports. Please observe that when selecting subunits, survey periods, course
types and courses, multiple selections can be made by pressing and holding down the
“Ctrl” key. The following processes may be selected in batch mode:
Print Cover Sheets/Forms
For a selection of surveys the personalized cover sheets or questionnaires will be
generated as a single PDF file. It is possible to generate either a master copy or complete sets of questionnaires based on enrolment figures. You can define the maximum
number of pages in a batch event under System Settings/EvaSys Settings/VividForms/Maximum amount of pages that can be printed through batch printing of forms.
The batch printing function enables you to create a large number of personalized
cover sheets or questionnaires as PDF files.
Select 1. the subunit, 2. the survey period, 3. the course type, 4. the questionnaire as
well as 5. a multiple choice of courses (press Ctrl key).
Figure 165: Batch Events –Selecting Courses for Printing Cover Sheets/Forms
© 2011 Electric Paper GmbH
159
Your Evaluation Process: The Phase Model
Then decide, if you want to request one copy of each cover sheet/questionnaire or if
you want to print questionnaires according to enrollment figures, i.e. according to the
number of participants assigned to a course.
By default, the PDF document of a cover sheet survey only contains the cover sheet
and not the questionnaire. If you want the questionnaire to be produced as well, activate the option “Batch printing: form printing when using the cover sheet procedure” in
the menu “System Settings/EvaSys Settings/Functions”. Please be aware, that this
setting is only valid for printing cover sheets and forms and not for sending them.
If you want to print your questionnaires double-sided, you can also activate the option
“Batch printing: Duplex printing” in the menu “System Settings/EvaSys Settings/Functions”. Then the PDF document will contain blank pages which are necessary for double-sided printing (i.e. after a cover sheet or with questionnaires with an odd number
of pages).
Surveys in hard copy procedure have the option to include all the questionnaires
needed in the PDF document and to number them serially. When each questionnaire
has its own number then the consistency of each data set during scanning can be
guaranteed. This is especially important when your form has a number of pages.
Should the pages get mixed up when scanning a batch then the unique number on
each questionnaire will allow them to be correctly sorted.
The number of questionnaires for printing is based on the number of participants. If
this information is missing then a default value can be entered into the entry field.
You can now use the batch print feature without needing the serial number (hard copy
procedure) if you deactivate the option “Add serial number for automatic sorting”.
This is useful in case you are unable to prevent forms being duplicated during the survey process, and you need to collect all data despite having multiple identical serial
number IDs.
Figure 166: Batch Events – Producing Questionnaires with Page Numbering
Click [Request] to begin the procedure. You will now be redirected to a page displaying an overview of the courses you have selected. Each of the columns in the table
show the name of the course, the questionnaire used, the number of questionnaires
already printed, the number of participants of the course and the number of questionnaires still to be printed.
160
© 2011 Electric Paper GmbH
Phase 2: Implementation of Surveys
The number of copies is equal to the number of participants of the course. If, in an
earlier process, questionnaires for a course were created using the batch printing
function, this is considered in the number of copies made. The number of copies can
be altered retrospectively, so that larger or smaller quantities can be printed. In the
footer, the total number of pages to be printed is stated, whereby the page number of
the PDF file can be checked.
Figure 167: Batch Events – Questionnaire Batch Printing
If necessary, each course can also be retrospectively deselected or later reselected,
by activating or deactivating the checkbox in the first column.
To start creating a PDF file, click on the button [Request]. Depending on the number
of questionnaires/cover sheets to be created, the processing of the request can take
up to several minutes. If you have selected more pages than allowed for in the system
settings (cf. “System Settings/EvaSys Settings/VividForms/Maximum amount of
pages that can be printed through batch printing of forms”), a warning appears,
requesting that the number of copies to be printed be reduced.
As soon as the PDF file is completed, a download window appears in your browser.
Now save the file to your hard disk or open it directly.
To print further pages for the same course, click on the button [Refresh]. The list is
refreshed and you can make a new selection.
Send Cover Sheets/Forms
This function emails the personalized cover sheets or questionnaires to the people
who are linked to the respective surveys. Both the text of the email message and that
of the attached documents can be configured in Settings/Text Templates.
After selecting the batch event, type “Send Cover Sheets/Forms.” The option boxes
are completed automatically. Choose a subunit and the corresponding options. In 5. a
list of courses which correspond to the selection will be displayed. Only those courses
which have survey processes without response data linked to them will appear.
© 2011 Electric Paper GmbH
161
Your Evaluation Process: The Phase Model
Figure 168: Batch Events –Send Cover Sheets/Forms
Click on [Request] to start batch emailing. A progress bar shows the status of the
email submission process.
Figure 169: Batch Events –Email Submission
To abort the email submission click on [Cancel].
After the mailing process is complete the system will show a listing of successful and
unsuccessful submissions. All outgoing email will be logged under “Deliveries” in the
menu “System Settings”.
162
© 2011 Electric Paper GmbH
Phase 2: Implementation of Surveys
Archive PDF Reports and CSV Raw Data
Your existing PDF reports and CSV raw data can be archived by sending them to the
email address defined in the configuration (“System Settings/EvaSys Settings/Email
Functions & Accounts/Email address of the archive”). In this way, legacy data can be
exported with a complete audit trail and subsequently deleted from EvaSys, increasing and maintaining clarity of the system. During the export, you can determine
whether just PDF reports or CSV data, or both, are to be archived.
This option is only available if you have activated the archive function of the batch
events in the menu “System Settings/EvaSys Settings/Email Functions & Accounts/
Archive mailing of PDF reports” and entered a valid email address in the menu “System Settings/EvaSys Settings/Email Functions & Accounts/Email address of the
archive”.
Send PSWDs to Instructors/Trainers
For online surveys the PDF files containing the PSWD codes can be sent to the survey owners by email. This option is only available if you have selected the option “2:
PDF lists of PSWDs for printing and distribution are sent to the instructors (respectively trainers)” in the menu “System Settings/EvaSys Settings/Email Functions &
Accounts/Delivery method PSWDs (central evaluation).
Select the courses which require the PSWD lists to be delivered to the survey owners.
The submission will be started by clicking [Request].
Print PDF Reports
For surveys that have already been evaluated, the evaluations of a selection of
courses can be requested. There are two possibilities:
•
The PDF reports of the selected courses are created together in a common PDF
file. This is advantageous for example, when the PDF reports for multiple courses
are to be printed at the same time.
•
The PDF reports requested are summarized as single PDF files in a ZIP file. This
is advantageous for example, when the single PDF files are to be passed on in
electronic format, deposited in a public folder or, when one wants to print them
individually.
Figure 170: Batch Events – Print PDF Report
For each of the PDF reports in the ZIP file it is possible, where necessary, to configure
the naming of individual files in advance. In the central system settings (menu “System Settings/EvaSys Settings/Functions/Batch Events: Naming conventions for PDF
© 2011 Electric Paper GmbH
163
Your Evaluation Process: The Phase Model
Reports in ZIP files”) with the aid of placeholders, a naming convention can be deposited. By default, the following placeholders are used:
[SUBUNIT]-[SURNAME]-[FIRSTNAME]-[SURVEYID]-[SURVEY].
The following placeholders are available:
Placeholder
Meaning
Example
[SURVEY]
Name of Survey
Political Economics 1 A
[SURVEYID]
Survey ID
23456
[QUESTIONARY] Name of Questionnaire
DEMOFORM
[COURSETYPE]
Name of the Type of Course
Seminar
[SUBUNIT]
Name of the Subunit
Economics
[COURSENAME]
Name of the Course
Political Economics1 A
[COURSEID]
Course ID
0112345
[LECTURER]
Name of Instructor
Prof. Dr. Max Mustermann
[SURNAME]
Surname of Instructor
Mustermann
[FIRSTNAME]
Forename of Instructor
Max
[ISO_DATE]
Date in ISO syntax
2011-03-08
[ISO_DATETIME] Date with time in ISO format
2011-03-08T16:19:20
[TIMESTAMP]
Date given according to the date 10.12.2010_091853
and time format configured in
EvaSys
[CURRENTDATE]
Date given according to the date
10.12.2010
format configured in EvaSys
Figure 171: Placeholder
Special characters are filtered out of the filenames and spaces are replaced by underscores. When defining the naming conventions, the following characters and special
characters may be used:
•
All letters and numbers
•
Round brackets (Parenthesis): ( )
•
Square brackets: [ ]
•
Hyphen : -
•
Comma: ,
•
Period or full stop (dot): .
•
Equals sign: =
•
Underscore: _
164
© 2011 Electric Paper GmbH
Phase 2: Implementation of Surveys
Send PDF Reports
You can determine that an instructor/trainer receives all evaluations of his courses
accumulated in one email. To do this, please activate the option “Reports of all
courses of an instructor (or trainer) collected in one email”. Should this not be the
case, the instructor/trainer will receive a separate email for each course. Please
observe the defined maximum number and size for email attachments (“System Settings/EvaSys Settings/Email Functions & Accounts/ Maximum number of attachments” respectively “Maximum size of attachments”).
In the menu “System Settings/Text Templates” the relevant email text can be edited
(“E-MAIL:Results of a survey” and “E-MAIL:Results of a survey (Summary)”).
Send PDF Reports as Instructor/Trainer Profiles
You can send your instructor/trainer profile for surveys that have already been evaluated as a batch email. By activating the option „Include courses with secondary
instructors (or secondary trainers) in instructor profiles (or trainer profiles)”, courses
with additional report recipients are also included.
You can determine whether or not the answers to open questions are to be included in
your instructor/trainer profile. To do this, please activate the option “Include answers
to open questions”.
If the respective instructor/trainer, in addition to his profile, is to receive a detailed
report for each of his courses, simply activate the option “Also send single PDF
reports”.
Furthermore, you can determine whether profiles and PDF reports are sent solely to
the respective instructor/trainer (“Send to instructors (or trainers)”) or only to a specified email address (“Send all to the following email address”).
Figure 172: Batch Events – Dispatch PDF Reports as Instructor/Trainer Profile
The option “hide surveys with dispatched documents” makes sure that no batch event
will be used more than once on the same course.
© 2011 Electric Paper GmbH
165
Your Evaluation Process: The Phase Model
3.2.10. Non-anonymous Surveys
Surveys in EvaSys run by default assuming and protecting the anonymity of the survey participants.
Should the identities of the survey participants be required for example for address
reasons as well as later for the processing of survey results, relevant participant data
can be imported and used.
Please observe the following legal references when using non-anonymous surveys.
Legal References in Non-anonymous Surveys
Please note, that when conducting non-anonymous surveys, you are processing the
personal data of the participants. The processing of personal data is subject to special
stipulations of the data protection act, as well as possible regulations of other laws
(i.e. campus or labor legislation).
As a rule, elements of these regulations state, that when surveying by means of questionnaires (forms), survey participants are informed of the data processing, in particular:
•
of the intended purpose of the data processing,
•
of whether the details are voluntary or an obligation exists, together with the consequences of a refusal, as the case may be.
•
and of the possible recipients of the data.
The extent of the duty to inform as well as the admissibility of the data process itself
depends significantly on the legal requirements under which your particular case is
positioned. This assessment depends on a number of factors which cannot be listed
here. You can normally get support from your data protection officer, and/or the data
protection committee.
EvaSys provides reference texts for anonymous and non-anonymous surveys. You
can find these reference texts under System Settings/Text Templates/”E-MAIL: Footnote for anonymous online surveys” or “Footnote for non-anonymous online surveys”.
These text templates are used automatically when sending the PSWDs to interviewee’s.
Conducting Non-anonymous Surveys
Non-anonymous surveys can only be realized by the (subunit) administrator.
Observe the following steps so that survey participant data can be used in EvaSys:
•
Firstly, import the participant data.
•
Ensure that the questionnaire used contains placeholders for the participant data.
Otherwise the questionnaires used later cannot be assigned to participants in EvaSys.
•
Create a survey for the relevant course.
166
© 2011 Electric Paper GmbH
Phase 2: Implementation of Surveys
Importing Participant Data
You can import the participant data similarly as how you would import the email
addresses for courses: in the menu “Subunits“, in the area “Central evaluation“,
Option “Data import“:
Figure 173: Data Import in the Section “Central Evaluation”
Click the option “Data import”. The following window appears:
Figure 174: Data Import via CSV File
Use this window to import the data on survey participants – either just course ID and
email in the case of anonymous surveys, or further data like name, address and additional information for non-anonymous surveys.
© 2011 Electric Paper GmbH
167
Your Evaluation Process: The Phase Model
Prepare the survey participant data as CSV file. You can use either a semicolon or the
character that you define in “System Settings/EvaSys Settings/Data Import and
Export/Separators CSV import and export” serves as a separator.
Use the following data structure for importing CSV-based survey participant data:
Course
Email address
Surname
Title
ID
Participant 1
DEMO12
[email protected]
Hardy
Participant 2
DEMO12
[email protected]
Smith
Participant n
DEMO12
[email protected]
Harrison
Dr.
First
name
Salutation
Amy
Mrs.
Mary
Mr.
Paul
Mr.
Address
Custom 1
Custom 2
Custom 3
Table 8: Data Structure for Importing CSV-based Participant Data
Here, the text file would appear as follows:
DEMO12,[email protected],Hardy,,Amy,Mrs,,,,
DEMO12,[email protected],Smith,Dr.,Mary,Mr,,,,
DEMO12,[email protected],Harrison,,Paul,Mr,,,,
The field Course ID forms the link to the courses existing in EvaSys. One import file
may contain participant data for any number of courses. If, on a large scale survey,
participant data is to be imported into EvaSys, it makes sense to create and import the
CSV import file for survey participant data and CSV/XML files for subunits, user
accounts and courses simultaneously.
Note:
As soon as you have imported participant data for a course using this method, EvaSys assumes that the course is processed through non-anonymous surveys!
When importing participant data, the number of participants noted in the details of a
course will be ignored, and the number of imported participants automatically
saved.
There is also the possibility for you to import participant data in the details of a course.
To do this, click on the green pencil in the course list:
168
© 2011 Electric Paper GmbH
Phase 2: Implementation of Surveys
Figure 175: Course List with the Edit Button (column “Action”)
A window with the properties of the course opens automatically. Here you can define,
also afterwards, whether this course should be conducted anonymously or non-anonymously. To do this, click in the area “Participants’ data” either on “Anonymous survey
participants” for anonymous surveys or “Non-anonymous survey participant (panel)”
for non-anonymous surveys.
Figure 176: Administrate Anonymous/Non-anonymous Participants
After you have activated the option “Non-anonymous survey participant (panel)”, click
on the button [Edit data of participants]. In the following window, you have the now
familiar option of importing the data of your participants via CSV.
Figure 177: CSV Import of Participant Data
The newly imported participants are added to the already existent participants of the
course.
© 2011 Electric Paper GmbH
169
Your Evaluation Process: The Phase Model
Note:
If in your course you have a participant by the name of Andrew Miller with the email
address [email protected] and you import, via CSV, the participant Patsy
Newman who also has the email address [email protected], EvaSys will
refresh the existing participant, and so overwrite the data of Andrew Miller with the
data of Patsy Newman. This means, that the email address of your participants has
to be unmistakably assigned to them.
Editing Participant Data
You have the possibility of editing the imported participant data in the properties of the
corresponding course. To do this, click on the green pencil in the course list of an
instructor/trainer.
Figure 178: Course List with the Edit Button (column “Action”)
A window opens automatically, displaying the properties of the course.
Figure 179: Administrate Anonymous/Non-anonymous Participants
If you wish to edit the imported participant data, click on the button [Edit data of participants]. In the following window you can edit (green pencil) and delete (red cross)
each existing participant. You can also delete all participants by clicking on the [Delete
all] button.
170
© 2011 Electric Paper GmbH
Phase 2: Implementation of Surveys
Note:
If you delete a participant who was assigned solely to this course, all of his data will
be deleted from the system. As a result, this participant is no longer existent in EvaSys. Should he however also be assigned to another course, his data will remain
existent for that course.
Figure 180: List of the Non-anonymous Participants
Additionally, you can add further participants. To do this, click on the button [Add]. The
following window will open:
Figure 181: Add Non-anonymous Participants
© 2011 Electric Paper GmbH
171
Your Evaluation Process: The Phase Model
To add a new participant, you must first enter the email address of the participant in
the area [Search for Participants]. Then click on [Search]. EvaSys searches all existent participant data for this email address.
If the participant is already in the system, for example for another non-anonymous
course, EvaSys adopts all existing data in the area “Details of the participants”. With
exception of the email address, you can change these details as and when required.
If the given email address is not yet in the system, EvaSys adopts this email address
in the area “Details of the participants”, and you can add all other information such as
name, address etc. You can add further information on the participant such as course
of study, type of degree etc. using the three custom fields. You can later on use these
criteria to filter the CSV raw data.
Figure 182: Details of a Non-anonymous Participant
Close the window by clicking on [Save]. The participant has now been created.
Click on the button [Back] at the bottom of the page to return to the course details.
Close the window of the course details by clicking on the button [OK]. This course is
now saved as non-anonymous. In the list of the course, in the column Participants, it
is marked as non-anonymous by the index card symbol:
Figure 183: Anonymous and Non-anonymous Courses
172
© 2011 Electric Paper GmbH
Phase 2: Implementation of Surveys
If you create a survey for a non-anonymous course (here: “Web Design/XHTML”), it
will be indicated as such in the survey details, that this survey is taking place with nonanonymous participants.
Figure 184: Reference of Non-anonymous Participants
With non-anonymous online surveys you also have the possibility of indicating the status of anonymity in the footnote of the email. For this, you can use existing standard
texts from “System Settings/Text Templates”.
Figure 185: Reference for Anonymous or Non-anonymous Online Surveys (Text Templates)
In addition to this, you can always render a non-anonymous survey anonymous, by
removing the participants’ data from the survey details. You must confirm this action
by clicking on [OK]. In doing so, all information on the participants in the raw data
exports for SPSS and Sphinx, as well as in the CSV-export, are deleted.
After clicking on [OK], a message window indicates the removal of the information to
you. At this point, you still have the option of aborting the process:
© 2011 Electric Paper GmbH
173
Your Evaluation Process: The Phase Model
Figure 186: Subsequent Anonymization of a Non-anonymous Survey
Note:
This retroactive anonymization cannot be undone! If you remove the participant
data from the survey, they are irrecoverably lost for this survey!
Customizing the Questionnaire for a Non-anonymous Survey
With non-anonymous surveys the questionnaires are assigned to specific participants.
So that these allocations can be adhered to during distribution of the questionnaires,
you have to insert the relevant information of the survey participants in the header of
the questionnaire. This is achieved by placeholders (recognized by the continuous
upper case and the angular brackets).
The VividForms Editor/Designer allows you to use placeholders for participant data in
the header of the questionnaire. The placeholder names refer to the data structure
introduced above, as follows:
VividForms Editor
and text templates
CSV import file
Description
[PARTICIPANT_EMAIL]
Email address
Email address of survey participant
[PARTICIPANT_LASTNAME]
Surname
Surname of of survey participant
[PARTICIPANT_TITLE]
Title
Title of survey participant
[PARTICIPANT_FIRSTNAME]
First name
First name of survey participant
[PARTICIPANT_SALUTATION]
Salutation
Salutation of survey participant
[PARTICIPANT_ADDRESS]
Address
Address of survey participant
[PARTICIPANT_CUSTOM1]
Blank1
First user-defined field of resp. survey participant
[PARTICIPANT_CUSTOM2]
Blank2
Second user-defined field of resp. survey participant
[PARTICIPANT_CUSTOM3]
Blank3
Third user-defined field of resp. survey participant
Table 9: VividForms Placeholders
Click one of the placeholder fields in the questionnaire’s header in order to select the
placeholders which you wish to insert.
174
© 2011 Electric Paper GmbH
Phase 2: Implementation of Surveys
The following figure shows an example questionnaire header. In the left-hand side the
text “Participant:” has been inserted as well as variables for the first name and surname.
Figure 187: Customization of a Questionnaire (Here through the Name in the Header)
In the case of a survey, data of specific participants is inserted here, so that during
implementation it is clearly visible which questionnaire was distributed to whom.
Implementing a Non-anonymous Paper Survey
When you create a survey with a customized questionnaire for a course for which participant data was imported, EvaSys assumes that it is a non-anonymous survey.
Therefore, for paper surveys, each questionnaire has to be personalized (for example
the participant’s name has to appear in header). This is why the cover sheet procedure is not suitable for non-anonymous surveys.
However, you can also use the function “Print Cover sheets/Forms” in batch procedures so as to produce personalized PDF questionnaires for all survey participants.
To do this, select in the configuration of the batch procedures the option “Create complete sets of questionnaires according to enrollment figures”.
After a click on “Download” the respective PDF file is produced and displayed. Please
note that the number of generated questionnaires is determined by the number of
occupancies defined in the courses, and not by the number of imported participant
data for the respective course.
Example:
In the following, you will find two examples for personalized questionnaires. The text
below with placeholders was inserted into the header:
Example 1: The Personalized Questionnaire for Janet Gabriel
Figure 188: Questionnaire for Janet Gabriel (example)
© 2011 Electric Paper GmbH
175
Your Evaluation Process: The Phase Model
Example 2: The Personalized Questionnaire for Michael Brown
Figure 189: Questionnaire for Michael Brown (example)
Now the survey can be implemented, whereby attention has to be paid to the fact that
the person specified on the questionnaire is actually the person who fills it in.
The subsequently generated PDF report of the survey does not contain any information on the survey participants. If these are to be processed, this can be effected
through the batch export in which you find information in the following two paragraphs
(paragraph on non-anonymous surveys).
Implementing a Non-anonymous Online Survey
For online surveys it is possible to use information taken from the survey participant
data for the personalization of the emails that are generated for the dispatch of participation codes.
The placeholders shown in the previous paragraph can also be used for the text templates. It is advisable to use customized text templates for individual questionnaires
and not to modify the standard template for the PSWD dispatch.
Example:
In this example, the recipients of the PSWD emails are addressed personally by using
the placeholders for first names and surnames of the survey participants:
Figure 190: Personalized Questionnaire-specific Email Text
The resulting email text in its personalized form looks like this:
176
© 2011 Electric Paper GmbH
Phase 2: Implementation of Surveys
Figure 191: Email for Amy Hardy (example)
As an alternative you can also use the placeholder [PARTICIPANT_SALUTATION2]
to address the participants. With this placeholder, the complete address including a
salutation (“Dear Mrs.”/“Dear Mr.”) will be generated.
Processing Survey Participant Data
The batch export function is available to create statistical reports on survey participants. The data fields for the survey participants are added on the right-hand margin
to the raw data table relating to the respective surveys:
Figure 192: CSV Files of a Non-anonymous Survey
Note:
So that all participant data fields are exported, the option “System Settings/EvaSys
Settings/Data Import and Export/Raw data export contains only the ID of non-anonymous participants” has to be deactivated. Otherwise, only the email address of the
participants as the sole identification feature will be exported.
Use the Participant Data for Participation Certificates
All above mentioned placeholders ([PARTICIPANT_LASTNAME], [PARTICIPANT_
FIRSTNAME] etc.) can also be used for the participant certificates for online surveys.
© 2011 Electric Paper GmbH
177
Your Evaluation Process: The Phase Model
3.3.
Active Instructor/Trainer Accounts
Instructors/Trainers can also implement surveys, if they are granted authorization.
The difference compared to central evaluation is that active instructors/trainers’ surveys are linked neither to particular courses nor to survey periods.
The following provides you (as the administrator or subunit administrator) with a short
overview of the options available to an active instructor/trainer. As an introduction for
active instructors/trainers a brief manual is available in PDF format, called “Active
User Manual”.
3.3.1.
Creating Active Instructors as (Subunit) Administrators
To grant an instructor/trainer authorization to implement his own surveys, you as the
(subunit) administrator have to ensure three things:
•
The instructor/trainer (with sensible log-in data) must exist in the structure which
you as the administrator have created.
By creating instructors/trainers, you decide on the rights which an active instructor/
trainer is granted. Of course, you can change these rights again at any time:
- Is an active instructor/trainer authorized to create new questionnaires, edit the
administrator’s templates or can he only use central templates with which to create his surveys?
For this purpose, you set the respective rights in the mask for Creation/Modify
user data, option “VividForms Editor”. You have the options of: Unrestricted
access/ Extension of templates only/No access:
Figure 193: A User’s Access to the VividForms Editor
The names are relevant and describe the above-mentioned rights.
- Is an active instructor/trainer upon completion of processing, authorized to view
to which degree his surveys meet the quality guidelines – or even those of his
subunit (possibly those of additional subunits) or even those of the entire system?
You also grant these rights in the mask that serves to create and change user
data. The following options can be chosen from: No QM views/Only own surveys/Only own subunit/Unrestricted access.
If you wish to authorize access to one’s own subunit or extend one or more
accesses, first select the option “Own subunit only”. Then you can define further
subunits by selecting “Additional subunits” in the gray area.
178
© 2011 Electric Paper GmbH
Phase 2: Implementation of Surveys
Figure 194: A User’s Access to QM Views
Once you have assigned these rights, please remember to create an appropriate log-in name and a password.
•
The instructor/trainer must be activated. From the user overview you as the (subunit) administrator can see whether an instructor/trainer is activated. A icon with a
padlock in front of an username means this is a passive user (Jasmine Sadhi), no
padlock added to the icon signals an active user (Prof. Sunny Narrow). To switch
simply click on the icon.
Figure 195: Passive (with Padlock) and Active (without Padlock) Instructors/Trainers
You can switch the instructor/trainer between active and passive at any time, for
example denying access after an activated period.
•
You have to pass on the access data to the instructor/trainer: log-in name, password and the link to the EvaSys homepage. Otherwise he cannot log on even if
you have created and activated him.
•
You as the administrator need to check that you have adapted the greeting in your
system that appears automatically when an active instructor/trainer logs on. You
will find the text in the main menu “System Settings”, in the submenu on the lefthand side under “Text templates”. It is titled “EvaSys: Welcome text for the first
login of instructor/trainer“:
Figure 196: Editing the Welcome Greeting for Active Instructors/Trainers
© 2011 Electric Paper GmbH
179
Your Evaluation Process: The Phase Model
Modify the text as you see fit and then click on [Save].
A subunit administrator has no access to these texts, therefore, he cannot check
this setting. Please consult your EvaSys administrator on this.
As soon as you have secured these details the instructor/trainer can log on with the
details that you have supplied him with.
3.3.2.
Login as Active Instructor/Trainer
In order to log in, the active instructor/trainer calls up the EvaSys Log-in window and
enters his access data here. Subsequently, a window appears with the greeting text:
Figure 197: Greeting Screen for Mrs. Jasmine Sadhi (Detail)
It is important that the instructor/trainer changes his access data in the left menu
under “Own profile”.
Depending on the rights granted to the active instructor/trainer, he can now create
new questionnaires, amend existing templates or create surveys only with existing
questionnaires. Accordingly, he sees in the left menu either “Questionnaires”/“Create
Questionnaire” and “Templates” or only “Questionnaires” and “Templates”, or none of
these options:
Figure 198 a-c: Access Options to the Questionnaire Editor, to Templates or No Access
180
© 2011 Electric Paper GmbH
Phase 2: Implementation of Surveys
3.3.3.
Generating and Editing Questionnaires
If an instructor/trainer wants to create questionnaires, he works with the VividForms
Editor resp. – if licensed – with the VividForms Designer, just as the administrator
does. For this purpose he clicks “Create Questionnaire” in the left context menu and
selects the option “VividForms Editor” or “VividForms Designer”. To become
acquainted with the VividForms Editor, the corresponding manual “Creating Questionnaires with the VividForms Editor” is available in the active user's account, area “Information”. The VividForms Designer Manual can be accessed via the interface of the
VividForms Designer.
If the active instructor/trainer wants to add questions to an existing template he has to
copy this questionnaire in his own form management. For this purpose click “Templates” in the left menu. A new page opens listing all the existing templates of the
administrator and the corresponding subunit administrator. Click the icon in the column “Template” and the questionnaire automatically is copied in the form management of the active instructor/trainer:
Figure 199: Copying a Template in the Own Form Management
An active instructor/trainer can find the form management in the left-hand menu when
clicking “Questionnaires”. When clicking this option the list of own questionnaires
opens:
Figure 200: Copied Template in the Own Form Management
The questionnaire that has been copied from the list of templates is contained as a
template here. You can recognize the copy by the modified Abbreviation (it is counted
up: Sampl1 instead of Sample).
Besides the Abbreviation and the Title you can see the number of pages here, you
can see if the questionnaire is already contained in the recognition set of the VividForms Reader and when the questionnaire was copied.
© 2011 Electric Paper GmbH
181
Your Evaluation Process: The Phase Model
Furthermore the active instructor/trainer has the possibility to carry out the following
actions:
•
Add filters, required questions, validation and cross tabulations and define the display mode of the online survey (complete, per page, per chapter). Please read the
relevant chapters of this manual for this purpose.
•
Copy the questionnaire. Clicking the icon in the column “Copy” inserts a duplicate
of the questionnaire in the list and counts up the abbreviation.
•
Delete the questionnaire. Clicking the icon in the column “Delete” deletes the
questionnaire – after an additional request if the questionnaire should really be
deleted. If the questionnaire is based on the central template the template will not
be deleted in this case, of course.
•
Edit the questionnaire. Template can only be edited within the allowed limits.
•
Preview a PDF-template of the questionnaire.
•
Export the questionnaire. By clicking on the icon in the column “Export” active
users can save the questionnaire as a .vfd-file in their file system and hand it on
e.g. to their colleagues. Those can read the file after importing it into EvaSys
again.
Figure 201: Possible Actions in the Form Management of an Active Instructor/Trainer
If the active instructor/trainer copied a template in his form management, he can edit it
here. This is only allowed within the limits the (subunit) administrator has set. If e.g.
the administrator created a template with three pages and 45 questions, and the
questionnaire already has two pages and 40 questions, the instructor/trainer can only
add one page and at the most five questions.
To add them to the template the active instructor/trainer clicks the paper and pencilicon in the column “Edit”. The known VividForms Editor opens, but due to the limitations of the template (also indicated by the word “Template” in and above the header)
the active instructor/trainer must not change the existing elements. All the question
groups, questions and further elements show the annex [T], i.e. they are unchangeable. But the instructor/trainer may add additional elements (as long as the maximum
number of pages and questions is not exceeded).
182
© 2011 Electric Paper GmbH
Phase 2: Implementation of Surveys
Figure 202: Template Questionnaire
The new elements must be added to a new question group (a sort of chapter of the
questionnaire, as is usual when working with the VividForms Editor). That entails that
an active instructors/trainers must first of all decide where to add a new question
group. He may add the question group in an arbitrary position, not only at the end.
(However, it is not possible to interleave question groups, i.e. you cannot put a question group in another one.)
You can add any elements within a question group, e.g. questions, text boxes, line
spaces etc.
The following graphics shows you a questionnaire that has been copied in the form
management and can thus be modified. One question group (“New question group”)
and one question (“New question”) was added, the remaining question groups and
questions are the ones from the template (indicated by the [T]):
Figure 203: Integrated Question Group and Question in a Template
© 2011 Electric Paper GmbH
183
Your Evaluation Process: The Phase Model
How many elements still can be added the active instructor/trainer can see when looking at the “Form Properties” at the bottom of the VividForms Editor menu:
Figure 204: Form Properties of a Questionnaire
The upper information tells the user that you have a template where two pages are
allowed (left information) and one page is already created (information on the right
hand side).
The line below informs the active instructor/trainer about the actual number of questions (12-on the left) and the allowed number of questions (12-on the right).
3.3.4.
Generating a Study Folder
After having changed the login date and possibly created some questionnaires the
active instructor/trainer must create a study folder to be able to work reasonably. The
study folders structure the surveys of an active instructor/trainer and shall therefore be
created according to the use of the user account.
In the following there are named some possibilities for structuring a user account:
•
Survey periods (e.g. semester, if the surveys of the active instructors/trainers are
repeated regularly): e.g. Surveys SS07 – Surveys WS07/08 – Surveys SS08 etc.
•
Survey types (if the surveys are not repeated regularly but can be assigned to specific survey types): Survey research project XY – Survey empirical studies YZ etc.
•
Student/Participant projects if you allow that access: Surveys Diploma John Doe –
Surveys Master Thesis Jane Doe – Surveys PHD Thesis John Sample
•
Etc.
Of course you can combine several of those examples if suitable. But please notice:
You cannot generate tree structures (i.e. a folder within a folder is not possible).
To generate a new folder click the button [Create new Folder]:
184
© 2011 Electric Paper GmbH
Phase 2: Implementation of Surveys
Figure 205: Create New Folder
In the following dialogue the active instructor/trainer is asked for the name of the
folder:
Figure 206: Name New Folder
After entering the name and clicking [OK] the folder appears in the list:
Figure 207: New Folder in the Listing of Folders
3.3.5.
Generating Surveys
After a folder has been created surveys can be set up in it. The user will be guided by
an assistant who will ask the following questions:
•
Selection of the questionnaire for use
•
Selection of template for optional questions
•
Entry of optional questions, self-formulated or from item library
•
Entry of survey name
•
Selection of procedure
© 2011 Electric Paper GmbH
185
Your Evaluation Process: The Phase Model
•
Hard copy procedure
•
Cover sheet procedure
•
Online survey and number of PSWDs
•
Open online surveys with semi-public password
The survey is then “ready”. The questionnaire and the PSWD document can be downloaded and printed or distributed. The batch mailing of emails to online survey participants is also possible.
3.3.6.
Working with the Active Instructor/Trainer’s Data
If data already exists for a survey of an active instructor/trainer, he – just like the report
creator does with his reports – can create the survey subgroup reports. This means
that single reports (for example one report each on male and female students) are
created for the individual options single choice, multiple choice or scaled questions.
(These types of single reports are also known as filtering.)
The survey does not have to be closed when the subgroup reports are created, meaning that more data can yet be captured. In this case, the subgroup reports of an active
instructor/trainer can be updated automatically – unlike those of the report creator. An
active instructor/trainer can decide whether he wants to create a dynamic subgroup.
Dynamic subgroup reports are updated automatically upon receipt of new data. This
way, repeating the creation of subgroups is prevented. This function is particularly
interesting when long-term surveys are running and if, over the course of the survey
one wishes to follow up on reports filtered according to subgroups. (Because you can
save the reports as PDF files at any time and thus keep them available even after an
update.)
The dynamic subgroup reports are only available through active instructor/trainer
accounts, meaning that report creators cannot use this function.
Open the details of a survey and in the area survey data click on “Evaluate subgroup”:
Figure 208: Creating a Dynamic Subgroup
(Should this option not appear, please download the HTML or PDF analysis first and
then click on [Update]).
Below the name of the subgroup, the automated update can be specified by means of
the check mark box “Automatically recalculate subgroup report”.
Dynamic subgroups are marked with the symbol
bol
186
, normal subgroups with the sym-
:
© 2011 Electric Paper GmbH
Phase 2: Implementation of Surveys
Figure 209: Dynamic and Normal Subgroups in the Survey List
When new data is collected during the main survey (the example showing
“TestSurvey1”) the subgroups are automatically updated when the study folder is
downloaded again:
Figure 210: Updating Subgroups
When recalculations are completed the updated reports are available immediately.
When a survey is to be deleted for which dynamic subgroups exist, an inquiry appears
as to what should happen to the subgroups. The options are to either delete these
reports, or alternatively to retain these reports under lack of their dynamic characteristics:
Figure 211: Deleting a Survey for which Dynamic Subgroups exist
© 2011 Electric Paper GmbH
187
Your Evaluation Process: The Phase Model
4. Phase 3: Capture and Instant Feedback
When the first questionnaires have been returned, the capture operations begin.
Make sure that the personnel who will be capturing the questionnaires are well trained
in every aspect of the capture operation. The scanning procedure is a critical moment
in the processing of the questionnaire. If the paper has been put in improperly or if the
settings of the scanner have been unintentionally changed then further processing of
the survey may be impossible.
EvaSys is set for maximum automation. A number of manual checking and correction
steps which are crucial for the processing of complex questionnaires like invoices
have been automated for the processing of questionnaires used in teaching evaluation surveys, which are relatively simple to read.
Before beginning a capture session we recommend testing that the operation is correct by scanning test questionnaires. If everything is ok, then, provided that the paper
and print image quality remain the same, you can proceed to large scale capture of
forms.
4.1.
Scanning the Forms
Figure 212: Scanstation
188
© 2011 Electric Paper GmbH
Phase 3: Capture and Instant Feedback
The capturing of forms is performed with the help of the software “EvaSys Scanstation”. The communication with the scanner uses the TWAIN protocol.
To capture questionnaires, put the forms into the feeder of the scanning device and
open the Scanstation. The scanning process is initialized by clicking the button [Scan].
The further processing is fully automated.
Via the button [Settings] the Scanstation can be configured, if required. Via the button
[Manual] a detailed documentation can be opened.
For further information on the scanning process as well as on the settings of the
scanstation please see the “Scanstation Manual”, which can be opened via the
Scanstation interface or via the EvaSys menu “System Information/Manuals”.
4.1.1.
Scanner Settings
To allow for a successful processing of forms with EvaSys, the scanner has to be configured in a specific way. The following standard settings apply to all models:
•
Image Mode: Black and white
•
Paper Size: A4 (210 x 297 mm)
•
Resolution: 200 DPI
•
Brightness: The threshold value should be slightly darker than average.
•
Skew Correction: Deactivated
•
Scan Type: Duplex (simultaneous scanning of both sides of the sheet)
Scanner configuration can differ in detail depending on the model and manufacturer.
For more information, please consult the documentation supplied with your document
scanner.
4.1.2.
Important Rules for Scanning
Before beginning the scanning operation make sure that the following conditions have
been fulfilled:
Make sure that only those questionnaires from a given survey are to be scanned in a
scanning operation. The returns from one survey are called a batch.
If there are more forms than can fit in the feeder then after scanning the first partial
batch the next batch is inserted and the scanning operation is continued.
Insert the paper as shown in the illustration.
© 2011 Electric Paper GmbH
189
Your Evaluation Process: The Phase Model
Figure 213: Correct insertion of questionnaires
Figure 214: Correct insertion of a questionnaire
The survey ID (the double, seven-digit number on the cover sheet or on the first page
of the questionnaire) must be on the first page of the batch.
In the cover sheet procedure the cover sheet must be scanned first.
If the questionnaires have more than one page, the questionnaire sets should be, if
possible, scanned in a sorted sequence.
If multiple page questionnaires are mixed up then processing is still possible and the
final results will be accurate but an analysis of subgroups cannot deliver accurate
results unless a serial number has been added during batch print.
Now start the scanning operation. As a rule documents are scanned on both sides of
the page (duplex), which is counted as one page each. If you scan 12 pages of paper
printed on one side then the message box in duplex operation will show 24 pages
scanned. Afterwards empty pages will be automatically eliminated so that there will be
no interference with the data capture.
Figure 215: Release/Cancel Batch
190
© 2011 Electric Paper GmbH
Phase 3: Capture and Instant Feedback
Now select [Scan more], if you want to capture a further batch from the SAME survey.
Select [Cancel batch] when the scanning is completed. The scanned forms will be
transmitted to the EvaSys server and further processing is automatic. In order to scan
another survey click in the main window [Scan].
If the scanning operation was not successful then click on [Release batch] in order to
destroy the data scanned from the current scanning operation and to repeat as a new
scanning operation.
4.2.
Evaluation of Scanned Questionnaires
The processing of scanned batches is done with VividForms. In order for processing
to continue the VividForms Reader must be in operation.
4.2.1.
Recognition of the Checkboxes via Barcode and OMR
In the following graphic you see two form pages, one of which is a cover sheet and the
other a page from the questionnaire. The relevant capture zones have been marked in
red.
Figure 216: Barcode and OMR Recognition
Barcode Recognition
On the cover sheet as well as the pages of the questionnaire there is a process number in the form of a 2D barcode. The barcode also contains information about the type
of form being used.
© 2011 Electric Paper GmbH
191
Your Evaluation Process: The Phase Model
OMR Recognition
Answer box fields as well as open questions are processed using so-called OMR Recognition (OMR = Optical Markup Recognition). In a defined capture zone the mark is
scanned. Using a predefined threshold the system decides whether a check mark is
valid or not or whether a completely filled in box is to be considered a correction or
not. Open question fields are also searched for a significant marking and then saved
as an image file. These image files are later integrated into the PDF reports.
Interpretation Rules for Automation
In the interest of maximizing automation there are decision rules to handle exceptional
cases which would normally require user interaction via VividForms WebVerifier.
These are:
If more than one check has been made, where only one is permitted then the check
will be interpreted as “not marked”.
If a check was detected but is under the threshold, (e.g. because the box was unintentionally marked) then it is considered as “not marked”.
Even if you were to view questionnaires by sight it would not always be possible to
determine in every case where two checkmarks were made which was intended as
the correct response by the respondent.
4.2.2.
Processing in VividForms Reader
Processing with VividForms Reader is explained in the manual “VividForms Reader”.
4.3.
Correction of Checkboxes not Clearly Read:
The Verification
The verification is used in order to correct checkboxes that have not been clearly read.
In order to use the WebVerifier, as an administrator or subunit administrator, change
to the role of “Verifier”. Alternatively, a separate user role of the user type “Verifier”
can be created. This has the advantage of allowing the task to be delegated to other
persons.
After login, three different views are available, which can be changed with a click on
the symbol: Batch View, Survey View and Form View.
Figure 217: Verifier View Options
192
© 2011 Electric Paper GmbH
Phase 3: Capture and Instant Feedback
4.3.1.
Batch View
All batches needing to be verified are shown in a table.
The table is made up of the following columns:
•
Batch ID:
Serial number of the batch
•
Time:
Scan time of the batch
•
Duration:
Processing time of the VividForms Reader in seconds
•
NonForms:
Number of unidentified pages in a batch
•
Scanstation:
Name of the scanstation
•
OMR errors:
Number of checkboxes not found
•
Sheets:
Number of all pages
•
In progress:
Shows whether other users are already processing the batch
•
Status:
Corrections already processed/Total corrections
•
Cover Sheet:
Display cover sheets
•
NonForms:
Delete all NonForms
Display NonForms
•
Filling Degrees: Display filling degrees in original PDF
Export filling degrees as CSV file (only when activated in the
EvaSys Settings)
•
Verification
Process batch
Verify automatically
Delete batch
© 2011 Electric Paper GmbH
193
Your Evaluation Process: The Phase Model
Figure 218: Verification – Batch View
4.3.2.
Survey View
In this view you will see all of the surveys that still need to be verified. Because surveys can be scanned in a number of batches and a VividForms batch can have a
number of surveys in it the number of surveys is rarely identical with the number of
batches.
The table is made up out of the following columns:
•
Survey:
Name of the survey
•
Form:
Short name of form
•
Sheets:
Number of recognized forms
•
In progress:
shows whether other users are already processing the batch
•
To verify:
Number of corrections
•
Cover Sheet:
Display cover sheets
•
NonForms:
Delete all NonForms
Display NonForms
•
Verification
Process batch
Verify automatically
Delete batch
194
© 2011 Electric Paper GmbH
Phase 3: Capture and Instant Feedback
Figure 219: Verification – Survey View
4.3.3.
Form View
The form view gives you an overview of the questions that remain to be corrected at
the form level. A form is normally made up of a number of surveys, which are
scanned in a number of batches.
The table has the following columns:
•
Form:
Short name of the form
•
Description:
Title of the form
•
Pages:
Number of pages of the form
•
Sheets:
Number of recognized forms
•
In progress:
shows whether other users are already processing the batch
•
To verify:
Number of corrections
•
Cover Sheet:
Display cover sheets
•
Verification
Process batch
Verify automatically
Delete batch
© 2011 Electric Paper GmbH
195
Your Evaluation Process: The Phase Model
Figure 220: Verification – Form View
4.3.4.
Carrying out the Verification
As soon as you click on the “Process” symbol (green pencil) in a view you will be automatically taken to the correction view. In the correction view there is always a question
to be verified. You work through the questions one by one until you are finished verifying all the questions in the batch (or in the survey or in the form).
Figure 221: Verification – Processing Status and Messages
The current processing status is shown in a bar in the upper left corner of the screen.
The green area symbolizes the questions that have already been corrected, while the
red area shows the number still to be corrected. The number of questions is also
shown.
Left of the bar graph you can see the status messages from VividForms Reader .
The three most common alarm signals are:
•
The fill value of the response field is borderline.
•
More than one checkbox has been checked for this question.
•
The fill value of the checkbox field exceeds the upper fill value (cancel checkmark)
Below the header you can see the original image box and below that the correction
view. In the correction view you can see the solution VividForms Reader suggests. A
click on the image box enlarges it in a separate window.
196
© 2011 Electric Paper GmbH
Phase 3: Capture and Instant Feedback
Figure 222: Verification – Correction of a Scaled Question
In the figure above you can see a scaled question with a fill value that is not above the
threshold for positively identified checkmarks. The checkmark was then displayed for
verification. As no other box was recognized as having a significant fill value the VividForms verifier recommended to accept the left box as checked. You can now correct
this recommendation by selecting a different box or marking the answer to this question as “invalid”.
By clicking on [Next] at the bottom of the view the correction is adopted and you are
taken automatically to the next question.
By clicking on [Back] you can move backwards within a verification batch, so as to
edit a verified question again.
In addition, the following buttons are available:
[Sheet] – Displays the complete sheet in a new window. The question being processed is circled in red. This view can be helpful for seeing the whole context.
[Cancel] – The correction is cancelled. Please note that all corrections made since
the last save will be lost.
[Save] – The current corrections including the open view are saved. Then you will be
automatically taken back to the view you were in before going to the correction view.
The verification can be continued immediately or at a later date.
Saving the verification is necessary, for example, when you interrupt your work. When
you have finished verifying a batch the results are automatically saved and the overview is displayed.
Figure 223: Verification – Navigation
The verification is however completed when the NonForms in a batch have been
deleted. You can do this by using the NonForms view or the button [Delete Non-
© 2011 Electric Paper GmbH
197
Your Evaluation Process: The Phase Model
Forms]. When the NonForms are deleted after completing the manual verification then
the verification must be completed by clicking on the button [Process batch]. Now all
the results of the batch are submitted to the database and the evaluation can be
downloaded from EvaSys.
4.3.5.
Automatic Verification
To accelerate the process of verification, a number of cases can be verified automatically in the WebVerifier. The prerequisite for automatic verification is that the relevant
option in the systems settings is activated (“System Settings/EvaSys Settings/Functions/Automatic Verification”).
In all three display modes (batch, survey and form view) a column with the icon
(Verify automatically) is displayed. Beneath the column there is a checkbox to select
which event is to be verified automatically.
Figure 224: Verification – Selection of Options for Automatic Verification
The following options are available:
•
No valid checkbox found (invalid): All cases, in which no valid checkbox is found
for a question, are determined invalid.
•
One checkmark and correction(s) found: All cases, in which a checkmark and one
or more corrections is found are automatically determined valid with the corresponding checkmark.
With one or both of the options selected, the verification is initiated by clicking on the
icon
4.3.6.
, the relevant cases are then filtered out of the list of elements to be verified.
Check Filling Degrees
In the batch view, the section “Filling Degrees” appears in the table. Using the PDF
icon here, a PDF file can be opened which contains the scanned pages with all of the
degrees of shading measured for the check boxes and open questions. If the ICR rec-
198
© 2011 Electric Paper GmbH
Phase 3: Capture and Instant Feedback
ognition (handwriting recognition) is in use, the characters read can also be viewed in
this file.
Figure 225: Verification – Check Filling Degrees
Note:
The PDF can only be opened, when the display of the entire questionnaire page is
allowed for verification (Menu “System Settings/EvaSys Settings/Functions/Data
entry assistant/Verifier: View entire original questionnaire page”).
The presentation provides a good overview of the values measured and allows for
consideration of adjustments to the OMR threshold. As in this PDF file only data
above the minimum degree of shading (standard 15%) is shown, the minimal degree
of shading can be experimentally lowered to 1%, so as to get a clearer insight into the
degree of shading of empty, unchecked check boxes. For expedient OMR thresholds
it is important to keep a sufficient gap between the degree of shading of empty check
boxes as well as that of “real”, only lightly checked check boxes. Please make sure
that, after such an experimental scan test, the OMR threshold settings, where applicable, are returned to their original values.
Figure 226: Verification – Filling Degrees in PDF-View
For an empirical analysis of the degrees of shading measured, the values can also be
recalled from a CSV export. This feature is by default disabled, and can only be activated by the administrator via the configuration option “Maintenance/CSV export of
filling degrees in the Verifier”.
The CSV file is structured in the following way:
SHEET | FORM | PAGE | QUESTION | TYPE | ROWINDEX | F1 | F2 | F3 | …
© 2011 Electric Paper GmbH
199
Your Evaluation Process: The Phase Model
Figure 227: Verification – CSV-Export of Blackening Degrees
Each line in the CSV file equals one line of the questionnaire. The table contains the
following information (from left to right):
SHEET: Number of scanned page in the page
FORM: Internal form-ID
PAGE: Page number of a questionnaire
QUESTION: Internal question-ID
TYPE: Question type (e.g. Single Choice, Matrix Field, Scaled Question)
ROWINDEX: Indicates the line of a question; normally the rowindex = 0, each further
question will be numerated in ascending order (1, 2, …). Open questions always have
a rowindex = 0, even if they have more than one line.
F1, F2, F3, …: Indicates the blackening degree within checkboxes in a line from left to
right; checkboxes without blackening show the value 0, for boxes with a blackening
the percentaged blackening degree is shown.
Consequently, the figure above can be interpreted as follows: The first single choice
question (3590) is a question with two answer options. The second box has been
checked and shows a blackening degree of 38%. The second single choice question
is a question whose answer options spread over two lines. In the first line the first box
was checked with a blackening degree of 42%, the second with a degree of 72%. The
following figure shows the corresponding section in the PDF file:
Figure 228: Verification – Filling degrees in the PDF file
Note:
Please note, that the flexible layout of VividForms Designer questionnaires can lead
to displacements in the CSV file.
For further information concerning the control and adjustment of OMR thresholds
please refer to the Scanstation Manual.
200
© 2011 Electric Paper GmbH
Phase 3: Capture and Instant Feedback
4.3.7.
Responses to Open Questions
Responses to open questions are only displayed in the WebVerifier when the option
„Handwriting recognition“ was activated on creating the open question (for information
on handwriting recognition in open questions see chapter C 2.6.3. "Open Question").
In this case, the results of the ICR analysis can be controlled and, if necessary, corrected with the help of the WebVerifier.
Open questions without handwriting recognition are directly transferred to the database in form of an image and, if desired, can be further processed by the anonymizer.
4.3.8.
Keyboard Control in the Verification
There are a number of keyboard shortcuts that allow you to use the verification without a mouse. The shortcuts function in most current web browsers. The actions are
done by pressing the ALT key and a further key. Please note that some keyboard
shortcuts may be missing from some views.
Shortcut
Action
ALT+B
Batch View
ALT+Y
Survey View
ALT+R
Form View
ALT+N
Search New Batch
ALT+Q
Enlarge Image Box
ALT+U
Mark Question as Invalid
ALT+P
Display Sheet
ALT+C
Cancel
ALT+S
Save
ALT+F
Next
Table 10: Keyboard Shortcuts in WebVerifier
4.4.
Manual Entry of Handwritten Comments
If handwritten responses to open questions should be anonymized then for each subunit concerned the option “display after manual collection” in the section “handling of
handwritten texts” must be activated. You can change this in subunit details. For subunit details click on the subunit overview in column “Edit” on the icon.
The option “Display after manual collection” will hold back the answers of open questions until the captured images of the open questions have been anonymized. Until
then, the PDF report only contains the answers to closed questions.
© 2011 Electric Paper GmbH
201
Your Evaluation Process: The Phase Model
Figure 229: Activation of Manual Entry of Handwritten Comments
Create a user account of the type “Data Entry Assistant” and log in with the login data,
or, as an administrator/Subunit Administrator, change to the role of “Data Entry Assistant”. A list of all surveys containing images is displayed:
Figure 230: Data Entry Assistant – Survey Overview
After clicking on the corresponding survey-ID the first image will be displayed. The
contents can be entered into the text window below the picture.
202
© 2011 Electric Paper GmbH
Phase 3: Capture and Instant Feedback
Figure 231: Data Entry Assistant – Detail View
After each text has been entered, the next image will appear and a table of comments
will be built up. Next to each comment there is the response frequency.
If a comment is essentially repeated, then instead of entering it again it can be highlighted, which will increase the response frequency.
If a text has been entered with a typing error then each line can be corrected by clicking on green pencil.
With the help of the option “Display the entire questionnaire page” in the upper right
corner of the screen, the data entry assistant can, if necessary, display the entire
questionnaire page containing the image. In this way, texts can be fully acquired, even
if the participant has written outside of the box. If necessary, one can even zoom in,
making hard to read text more legible.
Figure 232: Data Entry Assistant – Display the original scanned page
If you do not want the data entry assistant be able to see the entire page of the form,
this option can be deactivated in the EvaSys Settings (“System Settings/EvaSys Settings/Functions/Data entry assistant/Verifier: View entire original questionnaire
page”).
To significantly speed up the data entry process, shortcuts are available. The following shortcuts can be used: Alt+S (to save), Alt+C (to cancel) and Alt+R (to replace).
If the data entry assistant has already entered answers to open questions, the system
will only display those answers again that are relevant to the question currently being
displayed. For this reason, not all of the answers already entered are displayed.
© 2011 Electric Paper GmbH
203
Your Evaluation Process: The Phase Model
To avoid having to type often recurring words such as for example course or lab
course, you can create a list of placeholders and extend it as needed. A placeholder
may not be contained completely by the replacement text, or represent an entire word.
Example: Course may not be abbreviated to C, but may be abbreviated to CS. We
recommend using special characters as a prefix for placeholders, for example *CS.
Figure 233: Data Entry Assistant – Placeholder
If a statement that has already been classified is entered along with a new statement,
then the existing statement can be marked with a checkmark and only the new statement need be entered. Both statements will be registered and counted.
After the last image has been entered, a corresponding note appears and, by clicking
[Survey list], the data entry assistant can now change to the tracking information on
the surveys that still need to be processed.
Figure 234: Data Entry Assistant – Close a Survey
If desired, the data entry assistant can send the PDF report to the owner of the survey
(usually the instructor/trainer) after the completion of the data entry with the button
[Send PDF report]. For this, the corresponding function must be activated in the configuration (“System Settings/EvaSys Settings/Functions/Data Entry Assistant: Sending a report to the instructor”).
Any single survey, whose answers to open questions have already been entered by a
data entry assistant is protected, and cannot be simultaneously edited by others. In
this way, disruptions caused by the unseen concurrent editing of data are avoided.
204
© 2011 Electric Paper GmbH
Phase 3: Capture and Instant Feedback
4.5.
Instant Feedback: The PDF Report
After scanning the questionnaires (during which you may have verified unclear fields
and entered open questions) you can immediately view the evaluation results.
As soon as there is data available from at least one questionnaire there are two types
of reports available: the HTML and the PDF report. If you wish to get an impression of
a specific type of report, (for example whilst creating particular types of reports) it suffices to create an online survey, fill in a questionnaire and send it. With this data alone,
reports can be created.
EvaSys supports the PDF/A-1b Standard. This standard ensures that your PDF
reports are suitable for long term digital preservation and are clearly able to be reproduced.
Note:
When using your own PDF templates your PDF reports are no longer PDF/A-1b
compatible. This applies to reports whose cover letter was modified by your own
templates (under System Settings/Documents” as well as “System Settings/Text
Templates”). PDF report definitions are only then affected when for this questionnaire or in general your own PDF templates are used. Should you want to use PDF
report plugins, please discuss the question of PDF/A-1b compatibility when creating
the PDF plugins.
It is important to remember that reports are never stored in the system. As soon as
you click on the respective buttons, EvaSys creates the report based on the current
available raw data. This means that you can scan new data in at any time and the
reports are modified accordingly. If you wish to avoid the scanning of further data and
so modifying the PDF report, its best to simply close the survey.
The reports give you an overview of your survey’s results by means of different elements. For feedback on the evaluation results, a PDF report is usually sent by email to
the relevant people. In EvaSys you can also automate this dispatch. You can of
course, as with any PDF file, save the report in your file system and send it yourself
through your email account. (Saving the PDF report in your system, however, this
entails that upon scanning of further data the PDF report in EvaSys and your saved
version will differ. Because only the report in EvaSys will be automatically updated.)
Since the PDF report is clearly utilized much more often than the HTML report, you
are offered various configuration options with which to customize the report according
to your needs. There are the following ways to configure:
•
the menu “Report Settings” in the main menu “System Settings”
•
the questionnaire-specific settings in the edit mode of the VividForms questionnaire (such as diagram type of scaled questions, indicators, cross tabulations)
•
the questionnaire-specific settings in the questionnaire’s detailed view (such as
norms, quality guidelines)
© 2011 Electric Paper GmbH
205
Your Evaluation Process: The Phase Model
The configuration’s respective elements and effects are described in the following. For
further information, please read the relevant chapters in this manual.
4.5.1.
Components of the PDF Report
So as to give you an overview of the elements that you can integrate into this report
we will describe them here, in the order in which they (can) appear in the report. The
report can contain the following components:
•
the letter to the instructor/trainer
•
bar diagrams on the indicators of the questionnaire, these, if desired, with an overall indicator and/or Cronbach’s Alpha
•
a legend for the analysis of scaled questions
•
the individual analysis of the questions appearing on the questionnaire (with or
without open questions, depending on the settings)
•
maxi-histograms on scaled questions
•
cross tabulations
•
a profile line (that also can be displayed as a normed profile line – provided that a
norm has been defined)
•
a presentation template containing the indicators
•
responses to open questions (handwritten or typed – the latter if it is an online survey or if the data entry assistant was used)
•
notes of a survey (You can display the added notes of the different user types in
the PDF report. See here chapter B 3.2.3. "Survey Details" –editing/displaying
notes).
Since the report is crucial to your evaluation, here you will find a detailed description
of how to (de)activate the components.
The Letter
The letter is a regular type of letter and serves as courteous piece of information for
the instructor/trainer on the subsequent results of the PDF report.
If you wish to add a letter to the evaluation results, please activate it in the settings of
the corresponding PDF report (in the main menu “System Settings/Report Settings”).
Please click on the configuration icon in the column “Configuration”. The PDF report
configuration opens automatically. The option “Generate letter” activates/deactivates
the letter.
Please note, that you have to activate/deactivate the letter for each PDF report separately.”
206
© 2011 Electric Paper GmbH
Phase 3: Capture and Instant Feedback
Figure 235: PDF Report Configuration
The following figure shows a sample letter:
Figure 236: PDF Letter – Sample
The letter consists of various components:
•
the header with the address details of the sender and of the recipient
© 2011 Electric Paper GmbH
207
Your Evaluation Process: The Phase Model
•
the actual text of the letter (including a subject line and con-tinuous text)
•
the letter’s layout (for example with the letter head of your corporate design)
The Header of the Letter
The address details in the header (sender and recipient) are defined at two different
locations in EvaSys:
•
Recipient’s address:
The first two lines specified in the user data of the respective instructor/trainer are
used as the recipient’s address.
In the following example, EvaSys takes the address of Donna Harwood and inserts
it below the user name:
Figure 237: PDF Letter – Specification of the Recipient’s Address
•
Sender’s address:
The sender’s address (in the figure shown at the letter’s top right) is specified by
you in the configuration of each corresponding PDF report (“System Settings/
Report Settings/Configuration”). You will find the options “Sender part 1” up to
“Sender part 3”. Here you can insert the university’s name, your company, street
and city (or whatever else you may require):
208
© 2011 Electric Paper GmbH
Phase 3: Capture and Instant Feedback
Figure 238: PDF Letter – Sender’s Address on the Letter
The sender’s details – to be found above the address field – are specified by you right
below it (“Sender above recipient address”).
The Text in the Letter
You can edit the text in the letter under the option “Text templates” (in the main menu
“System Settings“). When changing to this page a window appears offering numerous
text templates for you to choose from. These can be customized according to your
needs. One of those is the one used in the letter (“Letter: Results for instructors/trainers”):
Figure 239: PDF Letter – Text Template “Letter PDF Report: Evaluation to Instructor“
© 2011 Electric Paper GmbH
209
Your Evaluation Process: The Phase Model
When comparing the sample PDF letter with the text template in the figure above, you
will notice that the texts are identical, apart from those areas written in capitals and set
in angular brackets. This text template is automatically used as the text in the letter.
The words that are written in capitals and marked through angular brackets serve as
placeholders and will in the case of an actual letter be replaced by the respective values. [SALUTATION] is replaced by “Dear Ms”, “Dear Mr.” (or similar), “TITLE” is
replaced by “Prof. Dr.”, “Dr.” (if existent), [SURNAME] e.g. by “Harwood”. A list of all
available placeholders can be found in chapter D "".
The Layout of the Letter
You design the letter using a PDF template which you can upload in “Documents” (in
the main menu “System Settings”):
Figure 240: PDF Letter – Uploading Letter Template (for Designing the Layout)
You choose the template via the button [Browse]. In the field “Description” you can
enter an appropriate name that will be displayed whilst you work in EvaSys with this
letter.
These PDF templates have to adhere to particular design settings that you will find in
chapter D 2.2.2. "PDF Templates".
Here for instance, you can, deposit your company’s letter head as a PDF template.
After doing this, please remember to link this template with the text of the letter. To do
this you return to the field “Text templates” where the text of the letter is defined.
There you add your PDF template by selecting the respective letter on the right-hand
side and then clicking on [OK]:
210
© 2011 Electric Paper GmbH
Phase 3: Capture and Instant Feedback
Figure 241: PDF Letter – Selecting the PDF Template in the Field “Text templates“
The selected PDF template is then assigned to the letter text:
Figure 242: PDF Letter – A letter Linked with a Text Template
This results in the defined text elements (continuous text, address) being placed over
your desired layout. Instead of the standard letter you get a letter which contains the
corresponding elements – text and layout.
As an example, you can see here the PDF letter to Ms Dr. Silvia Tomas with the EvaSys sample template as layout:
© 2011 Electric Paper GmbH
211
Your Evaluation Process: The Phase Model
Figure 243: PDF Letter – Sample with a new Layout
If you do not wish to use this layout system-wide but only for surveys that are conducted with a certain questionnaire, you can also upload documents for a particular
questionnaire.
To do this, you go to the details of the relevant questionnaire (via the menu “System
Settings”, on the left-hand side of the menu “Questionnaires”. In the list that appears,
you select a questionnaire and navigate by clicking on the name of the details of the
questionnaire).
In the area “Advanced Settings” you see a drop-down list with several options to
choose from:
212
© 2011 Electric Paper GmbH
Phase 3: Capture and Instant Feedback
Figure 244: PDF Letter – Modify Text Templates for a Specific Questionnaire (Questionnaire
Details)
When the top option “Text Templates” is marked and you click on [Edit] the window for
the “Text Templates” whose screen resembles the one for global text templates will
open:
Figure 245: PDF Letter – Modifying Text Templates for a Specific Questionnaire (Template View)
However, all templates that you upload here and all texts that you change here are
only used for the reports that are associated with this questionnaire's survey. This way
you can design the letter according to your particular requirements.
If you do not need an accompanying letter, you can switch it off. For this purpose just
deactivate the option “Generate Letter” in the configuration of the corresponding PDF
report (in the menu “System Settings/Report Settings/Configuration”).
PDF Report Header
The evaluation report is introduced by the header of the PDF report. The head contains some identification data on the current survey.
© 2011 Electric Paper GmbH
213
Your Evaluation Process: The Phase Model
The contents of the PDF report header can be adapted individually under “System
Settings/Text Templates/PDF-Report: Header”.
Figure 246: PDF Report – Report Header
Indicators
The indicators are an average made up out of the averages of scaled questions
belonging to the indicator. As an aggregate value an overall indicator for all indicators
is supplied.
Figure 247: PDF Report – Indicators
The calculation of the indicators is activated or deactivated at “System Settings/
Report Settings/Configuration/Calculate indicators”.In addition these indicators must
be defined in the questionnaire editor for the relevant questionnaire.
If “Display Cronbach’s Alpha” has been activated, then the calculated value of Cronbach’s Alpha will be displayed behind the indicator names (“System Settings/Report
Settings/Configuration/Display Cronbach’s Alpha”).
This value is a measure of reliability and shows the internal consistence of the question group. The value range of Cronbach’s Alpha spans from minus infinitely to 1 (it is
only sensible to interpret positive values). EvaSys uses the regular, non-standardized
Cronbach’s Alpha, which is calculated from the variances and covariances of the
questions within a question group.
Norm Profile Lines
As an alternative to averaged indicators, you can show norm profile lines. In addition
to the setting discussed above “calculate indicators” you must activate the option
(“System Settings/Report Settings/Configuration/Show norm values”). You must also
specify the norm values in the questionnaire administration.
If the alignment of the poles is different for different questions (i.e. positive answers
are not always on the same side, negative not always on the other), you can despite
this enforce a standardized display of the norm profile line. For this purpose activate
the option “Pole reversal of scales when taking norms”. You can find this option in the
214
© 2011 Electric Paper GmbH
Phase 3: Capture and Instant Feedback
system settings of the PDF report. If you activate it, the scales of those dimensions/
items where smaller values are considered as positive and bigger values as negative
are reversed.
Figure 248: PDF Letter – Norm Profile Lines
Thus if smaller values (i.e. values left of the norm) are positive, the values are
reversed. All amplitudes of the normed profile line on the right side of the norm can be
interpreted as positive evaluation results. Accordingly the values left of the center are
negative. Please note: The reversed values are also taken for the calculation of the
mean values.
Detailed Report
Includes an analysis of all closed questions:
•
Scaled questions with 2 to 11 options
•
1 of n – questions with any number of options
•
m of n – questions with any number of options
with
•
graphic display of histogram, arithmetic or trimmed mean (am/tm) and standard
deviation
•
numeric value of absolute or relative response frequency, arithmetic or trimmed
mean (am/tm) and/or median with 10% or 25% quintile levels, s, n total
•
If the quality guidelines have been defined and the traffic light symbol has been
activated then next to the evaluation graphic you will see to the right a traffic light
symbol.
The following figure shows you a detailed report with scaled questions.
Figure 249: PDF Report – Detailed Report of the Scaled Questions
© 2011 Electric Paper GmbH
215
Your Evaluation Process: The Phase Model
This is the main part of the PDF report which can be deactivated in the menu “System
Settings/Report Settings/Configuration/Analysis of single questions”. It is possible to
remove single questions from the report using the PDF report definitions. For scaled
questions the following graphical representation styles can be selected in the VividForms Editor:
Standard Histogram:
Figure 250: Standard Histogram
Bar Diagram:
Figure 251: Bar diagram
Line Diagram:
Figure 252: Line Diagram
Ring Diagram:
Figure 253: Ring Diagram
Pie Diagram:
Figure 254: Pie Diagram
216
© 2011 Electric Paper GmbH
Phase 3: Capture and Instant Feedback
Maxi-histograms
Maxi-histograms do not contain, except for their size, any differences in comparison
with the description of the standard histograms. You can activate the creation of this
part of the analysis at “System Settings/Report Settings/Configuration/Create maxihistogram”.
Figure 255: PDF Report – Maxi-histograms
Cross Tabulations
Scaled as well as single choice (1 of n) questions can be correlated and put into cross
tabulations. The creation of cross tabulations can be activated in the Editor Control of
a questionnaire under “Form Properties” “Filters, Validation, Cross Tabulations, Required Questions”.
In order to activate the creation of cross tabulations use the function “System Settings/
Report Settings/Configuration/Create cross tabulation”.
Figure 256: PDF Report – Cross Tabulations
Profile Line
The profile line is a dashed line along the averages of scaled questions. The average
will also be displayed as a numerical value.
At the end of a survey period two further lines can be drawn for comparative purposes, e.g. the average of the program of study and of the department.
© 2011 Electric Paper GmbH
217
Your Evaluation Process: The Phase Model
Figure 257: PDF Report – Profile Line
In order to activate the profile line, use the function “System Settings/Report Settings/
Configuration/Create profile line“.
If desired, the profile line can be divided corresponding to question groups and
thereby can be displayed in separate sections. To do this, activate the option “System
Settings/Report Settings/Profile line: Display question groups”.
Detail Norm Profile Line
Figure 258: PDF Report – Normed Profile Line
The detail profile line shows all of the norm values of the questionnaire. In addition to
the option mentioned above “Create profile line” you must activate the option (“System
Settings/Report Settings/Configuration/Show norm values). You must also specify the
norm values in the questionnaire administration.
218
© 2011 Electric Paper GmbH
Phase 3: Capture and Instant Feedback
Presentation Template
Figure 259: PDF Report – Presentation Template
This part serves to facilitate a discussion with the students/participants about the
results of the survey. All indicators can be shown with an explanatory text.
This explanatory text has to be activated first. In order to activate the presentation
template use the function “System Settings/Report Settings/Configuration/Create
presentation template”.
The explanatory texts are defined directly in the questionnaire when creating or editing a question group. In the question group wizard a textbox with the tiltle “Presentation Slide Text” is shown where the desired text can be entered. Each time you
change the text length check to make sure that it fits in the field. You can do this by
opening a PDF report from a survey with the corresponding questionnaire.
Responses to Open Questions
The responses to open questions are shown as image box sorted according to question. If an online survey was carried out, then the answers will be displayed in machine
print.
If there are high return rates then this part of the report can be extensive, depending
on the amount of space given in the questionnaire.
© 2011 Electric Paper GmbH
219
Your Evaluation Process: The Phase Model
You can separate the output of the responses to open questions from the part of the
report with closed questions by activating the function “System Settings/Report Settings/Configuration/Separate close/open questions“. This is especially recommended
when there are high return rates in order to, for example, print out only the part of the
report with closed questions. The part with open questions can take up a great number of pages.
Figure 260: PDF Report – Responses to Open Questions
Notes of a Survey
You can display the notes of a survey in the PDF report, by activating the option
“Show notes in the PDF report” under “System Settings/Report Settings/Configuration”. This option is deactivated by default.
Figure 261: PDF Report – Display Notes of the Survey
Additional information on adding, editing and displaying notes can be found in
chapter B 3.2.3. "Survey Details" – Editing/displaying notes”.
220
© 2011 Electric Paper GmbH
Phase 3: Capture and Instant Feedback
General Configuration
The PDF report settings in the menu “System Settings/Report Settings” have to be
configured for each PDF report. In the details of the questionnaires you can define a
default PDF report for each questionnaire. Thus you can configure an individual PDF
report for each questionnaire.
•
Generate letter
Creates a letter for the PDF report. The letter contains the senders address
(defined in the section “sender part 1”) as well as the logo of the system (taken
from the setting in the organization profile), and a predefined text which is personalized using placeholders. This text is deposited in “Text Templates”.
•
Calculate indicators
If the questionnaire supports the calculation of indicators these can be displayed at
the beginning of the report. There is a general average value, which summarizes
the general values again to an indicator (the latter can be activated at “hide overall
indicator”. This function should only be used with questionnaires which have been
developed for the averaging of individual questions in a category.
•
Show norm values
If there are norm values then both indicators and the profile line in the PDF report
will be normed.
•
Analysis of single questions
Activates the detailed analysis of single questions (main part of the PDF report).
•
Create maxi-histogram
After the detailed analysis part of a PDF report, large histograms of scaled questions can be created using this function. The bar for the response distribution, the
question text, the pole identifiers, the average, the standard deviation and the total
response percentages will appear as well.
•
Create profile line
Activates the display of the profile line in the PDF report.
•
Show normed profile line
When normed data exists for the questionnaire a normed profile line will be shown
in the PDF report.
•
Create Profile Line for indicators
Activates the display of the profile line for indicators in the PDF report.
•
Create Cross Tabulation
Activates the display of cross tabulations in the PDF report. The cross tabulations
are defined in the details of a questionnaire (“Advanced Settings/Cross Tabulations”).
© 2011 Electric Paper GmbH
221
Your Evaluation Process: The Phase Model
•
Create presentation template
Once the indicators for a questionnaire have been defined they can be displayed
together with a short descriptive text at the end of a PDF report as a presentation
template. The presentation slide can serve as a discussion aid to discuss the
results with the course participants.
•
Show notes in the PDF Report
This option activates the display of survey notes in the PDF report. For example,
the notes of a survey of the Instructor, the dean or the administrator are displayed
in the PDF report.
•
Left/ Right/ Top/ Bottom margin
Left/ Right/ Top/ Bottom margin for all pages on the PDF report
•
Font size question texts
Font size of texts in the PDF reports.
•
Font size pole texts
Font size of pole texts in PDF reports.
•
Font size for numerical data
Font size for average (av), standard deviation (s) and frequency (n) in the PDF
report.
•
Font size for presentation slides
Font size of texts in PDF reports/presentation slides
•
Show internal question number
Shows the internal question numbers.
•
Relative values
The PDF reports show the distribution of the responses to closed questions with
relative (activated) or absolute (deactivated) values.
•
Minimum percentage for display (%)
Defines the minimum percentage response frequency to a question in relation to
the total number of returns needed in order to display the question in the HTML/
PDF report. For example: with 50 returns the value is set at 20%. As a result only
analyses of questions that have been answered by at least 10 persons will be
shown. If the value is set to “0”, all questions of the reports will be displayed.
Please also consider the setting “Show notice for suppressed report”.
•
Minimum response frequency for display (absolute)
Defines the minimum absolute response frequency to a question required in order
to display the question in the PDF report. Please also consider the setting “Show
notice for suppressed report”.
222
© 2011 Electric Paper GmbH
Phase 3: Capture and Instant Feedback
•
Procedure to calculate the mean value
The procedures to compute the mean value for the PDF report are defined here.
1 - standard procedure
2 - trimmed mean
•
Decimal point precision average/standard deviation
Number of digits after the decimal point for averages and standard deviation.
•
Sender part 1, 2 and 3
Organization name (part1), mail address (part2) and footer (part3, below the mail
address)
•
Sender above recipient address
Sender name on cover letter in PDF report
•
Background color report heading
Color setting in order to adjust logo background color
•
Color progression in the report header
If this function is activated, then the background color in the header of the report
starts at the set background color and lightens gradually towards the top of the
page. If this function is deactivated, then the background color remains consistent.
•
Alignment of subunit logo
Defines whether the subunit logo will be at the left or right in the PDF report.
•
Hide overall indicator
If this option is activated the overall indicator will not be displayed.
•
Left pole for indicators
Text for the left pole of the indicators. Default value of the left pole is “-“. The pole is
also displayed in the presentation template.
•
Right pole for indicators
Text for the right pole of the indicators. Default value of the right pole is “+“. The
pole is also displayed in the presentation template.
•
Display Cronbach’s Alpha
Activates/deactivates the computation of Cronbach's Alpha (internal consistency)
for indicators. Please note that “Calculate indicators” must be activated!
•
Show legend
Display legend in PDF report.
•
Values legend
Values given in the legend. The number of values must match the scale divisions.
© 2011 Electric Paper GmbH
223
Your Evaluation Process: The Phase Model
•
Divisions legend
Scale divisions of the legend
•
Show bar diagram with histogram
Advanced results bar for scaled questions. When bar diagram is activated, the
mini-histogram should be deactivated.
•
Separate closed/open questions
When activated the results for open and closed questions in the PDF reports are
displayed separately. This results in better readability particularly of those reports
created with a mix of open and closed questions.
•
Show text boxes
If activated the text fields of VividForms forms will be shown in the PDF-Report.
•
Show quality indices (traffic light view)
When activated, the quality indices of the items will be shown as a traffic light symbol in the PDF report. Please note that indices will only be shown for items used in
quality guidelines.
•
Show standard deviation as number
Activates the display of the standard deviation.
•
Show average/median
You can display the following values in the PDF report:
1 Average value
2 Median
3 Average value and median
•
Show quantile
You can display the following quintiles in the PDF report:
1 No quantile
2 10% quantile levels (Decile)
3 25% quantile levels (Quartile)
•
Show standard deviation in graph
Show the standard deviation in the graph of scalar questions.
•
Show scale divisions for bar diagrams
Activates the display of the export values for response options as scale under the
graphic report bar.
•
Show notice for suppressed report
Activates the display of a notice instead of the question summary when the minimum response is not reached. The content of the text can be changed in the text
224
© 2011 Electric Paper GmbH
Phase 3: Capture and Instant Feedback
templates (Action “PDF Report: Text for too little response”). If deactivated; the
respective question does not appear in the report.
•
Bar Mean Value
Line thickness for mean value.
•
Bar standard deviation (Bar Std.-Dev.)
Line thickness for standard deviation.
•
Show recommendation text
When activated, a link for generating a recommendation document will be placed
after the detailed norm profile line.
•
Mode of calculation for norming
1 - Mean value of the dimension = Mean values of all datasets
2 - Mean value of the dimension = Mean value of the mean values of the data
sets.
Please note: In this case in each dataset the number of answers for each item
must be at least as high as a defined minimum value (see also Configuration of
Norming).
You can choose between two ways of calculating the mean value here.
When choosing the first one, the raw data of all given answers to the questions is
taken into account for calculating the mean value.
When choosing the second one, the mean value is calculated from the already
computed mean values for the questions (those in turn have been calculated from
all the answers of the interviewees).
•
Minimum percentage of given answers to enable norming
Percentage of answers, which must have been given for the norming. If less
answers than this percentage have been given, the norming for the dimension cannot be conducted.
Attention: The setting is only taken into consideration when the “Mode of calculation for norming” is set to (1).
•
Pole reversal of scales when taking norms
If activated, the poles of those dimensions/items are reversed, in which small values are judged as positive and large values as negative.
This option is decisive if you use different alignments of scales in your questionnaires. That means that positive evaluation results are on the left side of the scale
for some questions (i.e. smaller values are positive), but for some questions you
can find positive results on the right side of the scale (i.e. bigger values are positive). If you do not activate the option “Pole reversal of scales when taking norms”
© 2011 Electric Paper GmbH
225
Your Evaluation Process: The Phase Model
you have to take those differences into account when interpreting the norm profile
line.
When activating the option the norm profile line is standardized and thus can be
interpreted more easily. If smaller values are positive (i.e. left of the norm), those
values are reversed. Furthermore the reversed values are used for the calculation
of the mean values. Thus all the amplitudes on the right hand of the norm can be
interpreted to be positive. Accordingly, values on the left side are negative.
Those questions where the center is the best value, are an exception to the
explained rules (e.g. with the question “Was the number of presentations adequate?” and the answers “too few – just perfect – too many”).
•
Permit listing of open questions
Listing and counting of individual comments in the report. If this option is activated,
repeated entries to open comments, which have been marked as such during data
entry, are displayed in a summarized form, e.g. “The course was well organized (2
Counts)”.
•
Dual scale profile line
When activated critical values of dual scale questions are highlighted by means of
a color gradient.
0 = deactivated
1 = critical values on the left side of the scale
2 = critical values on the right side of the scale
•
Profile line: Display question groups
If this function is activated the question groups are displayed in the profile line.
•
Page Break before Responses to each Open Question
If activated, and, at the same time, open questions appear at the end of the report
(option: separate closed/open questions), a page break is inserted into the report
before the answers to each open question. In this way, clarity is enhanced, particularly when there are many answers to open questions.
4.5.2.
PDF Report Definitions
The evaluation reports in EvaSys can be influenced in two places.
The configuration of each PDF report can be edited under „System Settings/Report
Settings”. Please click on the configuration icon in the column “Configuration”. The
PDF report configuration of the corresponding questionnaire opens automatically.
Further more you can edit, copy and delete the existing PDF reports in the menu “System Settings/Report Settings”. Please note, with regard to the standard default PDF
report (“EvaSys PDF Report”) present in the system, you are only able to change the
configuration. This PDF report can neither be edited nor deleted. You can copy this
PDF report so as to create a new PDF report.
226
© 2011 Electric Paper GmbH
Phase 3: Capture and Instant Feedback
Figure 262: Report Settings
To copy a PDF report, click in the column “Copy” on the copy icon. A new PDF report
is created. You can recognize the copy of the PDF report by the name extension
[Copy]. To edit a PDF report, click in the column “Edit” on the edit icon. A window
automatically opens, in which, in the area “Description”, you can enter a new name for
the PDF report. In the area “Questionnaires”, you can allocate for which questionnaires the PDF report is to be valid. A multiple selection can be made by pressing the
[Ctrl] button. In the details of each questionnaire you define the PDF report with which
the corresponding questionnaire will be displayed later (also see the following paragraphs).
Save your changes by clicking the [OK] button. Clicking the [Cancel] button closes the
window without saving any changes. You can delete the respective PDF report by
clicking on the red cross in the “delete” column.
The second way is by restricting the content of the PDF report as well as defining the
subreports and special report recipients.
If you have a questionnaire built up out of modules you can use report definitions to
automatically create PDF reports for each module. These partial reports can also then
be sent automatically to one or more recipients by email.
PDF report definitions are always defined for each questionnaire and then are valid for
every survey created with this questionnaire.
Define Report Definitions
Just choose the option “PDF Reports” in the drop-down list in the details of the corresponding questionnaire (area “Advanced Settings”). Subsequently click on [Edit]. The
following window opens automatically:
© 2011 Electric Paper GmbH
227
Your Evaluation Process: The Phase Model
Figure 263: Report Settings for a Specific Questionnaire
In the area “Standard PDF Report” you can define the PDF report with which the corresponding questionnaire will be displayed by default. Select the corresponding PDF
report in the drop-down list and save your changes by clicking on [Save]. Please note,
that the “EvaSys PDF Report” is selected by default.
To create a new custom PDF definition click on [New PDF Report Definition]. If
required you can create more than one report definition for one questionnaire.
In the window now open you have the following settings:
•
name of the report
•
selection of the basic report (The configuration settings are adopted from the basic
report.)
•
description of the report
•
recipient list for automatic email delivery
•
activate recalculation of indicators (only available if you have defined indicators for
the corresponding questionnaire).
Note:
If a special report has been defined then this will always have priority over the
default report when sending the results via the process defaults or the scheduled
online surveys. In the survey list and the batch events the default report will always
be sent. In the details of the survey the user can define which report has to be sent.
You can now enter further recipients in this report definition. Further recipients could
include, for example, the dean of studies/program manager or a head of technical services, if a section of the questionnaire deals with the technical infrastructure of the university/company.
The recalculation of the indicators causes the average values of the indicators to be
recalculated independently of the questions used.
A click on [Save] saves the settings.
228
© 2011 Electric Paper GmbH
Phase 3: Capture and Instant Feedback
Select/Eliminate Questions
Figure 264: PDF Report Definitions – Exclude Questions
After saving the basic settings you now have the option to define the contents of the
report. Select from a list all the questions that should not appear in the report. By
pressing the CTRL key you can select a number of questions simultaneously.
By pressing the button [Save] at the bottom of the list your selection of questions to be
eliminated will be saved. You can see this by the blue background behind a selected
question.
Automatic Subgroups
Figure 265: PDF Report Definitions – Build Automatic Subgroups
In the section “subgroup questions” you can define a question for which automatic
subgroups are built for each option in the report. The question has to be single choice,
multiple choice or a matrix question. Subgroups allow you to take advantage of , for
example, automatic filters according to the program of study.
For each response option to this single choice or matrix question the answers are
filtered and the subgroup report is attached to the standard report. Please bear in
mind, that the standard PDF report is only attached to the subgroup reports if you
have activated the option “Show overall report before subgroup reports”. This is of
course done only for options that have been check marked or that exceed the
© 2011 Electric Paper GmbH
229
Your Evaluation Process: The Phase Model
minimum number of returns (“System Settings/EvaSys Settings/Survey/Minimum
number of returns for reports“).
With the option “Show divider for subgroups with information about subgroup in
report” you activate the use of a separator between the subgroups. The following
information is shown on the separator:
•
The question to be filtered
•
The option the subgroup was constructed for
•
The number of returns for this subgroup
Figure 266: PDF Report Definitions – Divider for Subgroups
With the last configuration option “Include open questions in subgroup reports” you
can define the use of open questions in the subgroups.
4.5.3.
Individually Designed Reports: PDF Report Plugins
EvaSys generates survey evaluations in the form of standardized PDF reports. You
can adjust these reports in different ways according to your needs.
If you require a completely adjusted PDF report, you can also include a so-called PDF
Report Plugin into EvaSys. A plugin is normally a small program which is inserted into
a larger program and provides additional functionality.
230
© 2011 Electric Paper GmbH
Phase 3: Capture and Instant Feedback
In this case it is not a software, but special report types that you can import into the
EvaSys system. These report types can define the reports for one, several or all questionnaires available in the system. Also an imported PDF report plugin can replace the
“EvaSys PDF Report” that is firmly integrated in EvaSys.
In order to integrate a PDF report plugin into the EvaSys system, you click in the main
menu “System Settings” on “Report Settings”.
Figure 267: PDF Report Plugin – Upload Plugin
Via [Browse] you can choose the PDF report plugin file. In the following example, this
file is called CTextualReport.php. Then enter a description text and click on [Save].
In this way several PDF report plugins can be integrated into the EvaSys system:
In order to change the setting of a PDF report plugin, click on the symbol for editing
(Paper and Pencil-Icon).
In the following dialogue the description text can be changed:
Figure 268: PDF Report Plugin – Dialogue for Editing a Plugin
© 2011 Electric Paper GmbH
231
Your Evaluation Process: The Phase Model
From the selective list next to “Questionnaires” you can now select the questionnaires
for which the PDF report plugin should be available.
Note:
A PDF report plugin may not support all question types and may thus only be useful
to certain types of questionnaires.
With a click on [OK] the changes are saved.
If you go back to the main menu “Subunits” and access surveys, a drop down-menu
appears in the column “Report” of the survey overview. Through these you can
access the available PDF report types and have the respective survey evaluated
through the chosen report type:
Figure 269: PDF Report Plugin – Selecting the Adapted Report from the List of Surveys
4.5.4.
Designing an Individually Configured Letter for Sending
Reports
You can add a letter to the automatically generated report – either a standard letter or
a customized one, e.g. a letter according to your corporate design.
To change the design you will need a PDF file with the appropriate letter head. Then
three text fields are applied with Acrobat:
•
address
For the name and address of the recipient. You can use placeholders from the
email texts (“System Settings/Text Templates”).
•
subject
For the subject line. The content of this line is defined in “System Settings/Text
Templates”.
•
text
For the body text of the letter. The content of this text as well as the placeholders
used in it are defined in “System Settings/Text Templates”.
232
© 2011 Electric Paper GmbH
Phase 3: Capture and Instant Feedback
Figure 270: Designing an Individually Configured Letter for Sending Reports
This special letter can either be used for all reports or defined only for special questionnaires. You can limit it to a single questionnaire if you click on “Text Templates” in
questionnaire details (“Questionnaires/Questionnaire List/Details”).
4.5.5.
Download and Sending of Reports
Manual Download of Evaluation Reports
When the reports are not to be sent to the instructors/trainers by email (“EvaSys Settings/Email Functions & Accounts/Attach PDF Report”) you can configure EvaSys so
that instructors/trainers can login to the system and then manually download their
PDF reports from the Central Evaluation.
•
Passive instructors/trainers
Passive instructors/trainers automatically see their surveys from the Central Evaluation. In order to do this simply activate access in “System Settings/EvaSys Settings/Central Evaluation/Passive Instructor/Trainer: Access to Download Reports”.
After authentification of the instructor/trainer he can select the survey period and
all the surveys from this period are displayed with type, name, questionnaire, creation date, and number of returns.
© 2011 Electric Paper GmbH
233
Your Evaluation Process: The Phase Model
For each survey the instructor/trainer can now download the PDF report, if the
questionnaire is multilingual then in a number of languages.
The passive instructor/trainer can change his access data by clicking on the menu
point “My profile”.
Figure 271: Downloading Reports by Passive Instructors
•
Active instructors/trainers
Active instructors/trainers have in their menu view a link to the reports of the Central Evaluation. To set this up simply activate the link in “System Settings/EvaSys
Settings/Central Evaluation/Active Instructor/Trainer: Download Reports from the
Central Evaluation”.
After authentification of the instructor/trainer, he can click on the link “Central Evaluation Report” and then receive the same view as the passive instructor/trainer.
After selecting the period he can download the reports from the survey.
Figure 272: Download of Reports by Active Instructors
234
© 2011 Electric Paper GmbH
Phase 3: Capture and Instant Feedback
In order for the instructor/trainer to receive a message that he can download new
reports, the automatic dispatch of emails should be activated after scanning.
At the same time the dispatch of the PDF reports or CSV data must be deactivated at
“System Settings/EvaSys Settings/Email Functions & Accounts”. The email text “EMAIL: Report for Survey” can be modified and, for example, describe how the instructor/trainer should login to the system.
The settings for email delivery do not only affect the automatic email dispatch but also
the manual delivery of reports by the administrator using the survey view.
Mass Production and Sending of Reports
You can use the batch events for the mass production and sending of reports. For further information please consult the chapter B 3.2.9. "Batch Events ".
Types of report dispatch
The following table gives an overview on different possibilities of report dispatch in
EvaSys together with notes on types of reports and report recipients.
Type of Dispatch
Notes
Process Defaults
(only paper based
surveys)
The PDF report definitions are sent to the defined recipient(s). The
recipients are defined when creating or editing a PDF report definition.
If no PDF report definition exists, the defined standard report will be
sent instead. The standard report can be defined in the details of a
questionnaire.
Scheduled Online
Survey
The PDF report definitions are sent to the defined recipient(s). The
recipients are defined when creating or editing a PDF report definition.
If no PDF report definition exists, the defined standard report will be
sent instead. The standard report can be defined in the details of a
questionnaire.
Survey List (Envelope Icon)
The defined standard PDF report is sent to the defined recipient(s).
The standard report can be defined in the details of a questionnaire.
The report recipients are the instructor as well as selected “Further
Report Recipients” (Secondary Instructors).
Batch Events
The defined standard PDF report is sent to the defined recipient(s).
The standard report can be defined in the details of a questionnaire.
The report recipients are the instructor as well as selected “Further
Report Recipients” (Secondary Instructors).
Details of the Survey
The user can define which report is to be sent to the defined recipient(s).
Table 11: Types of Dispatch
© 2011 Electric Paper GmbH
235
Your Evaluation Process: The Phase Model
5. Phase 4: Advanced Reporting
As soon as you have implemented surveys and scanned data, you receive the automatically generated reports. If you wish to process this data further, for example to
summarize and/or compare it, there are extensive and flexible options in EvaSys
available to you, as well as the export facilities into other programs. In the phase
model this is the fourth of the five phases.
In this chapter, you initially learn what indicators are and how you can create them in
EvaSys – since they form the basis for a certain type of summary reports.
You will then receive a comprehensive introduction to the options in producing summary reports. The creation of reports does not occur via the administrator access, but
rather you must be logged in as a report creator. Often this role, however, is carried
out jointly with that of the EvaSys administrator.
For expanded evaluations you can export the captured data from EvaSys. For this
purpose, the CSV format as well as a specific format for import into the statistics program SPSS are available to you. The explanations of these export options bring us to
the end of the chapter.
5.1.
Indicators
5.1.1.
The Principle of the Indicator
In the automatically generated PDF reports you receive an average value for all your
scaled questions as an expression of how the respondents replied to this scaled question. In this example you see a question referring to the quality of the instructor:
Figure 273: Evaluation of a Scaled Question with Specification of the Average (Diagram Type:
Histogram)
With regard to the thematic direction and your own requirements, you will have
divided the questions on your questionnaire into question groups. For example, one
could assign all questions regarding the quality of the course to the question group
“About the instructor”. You will then receive an average value for each of the scaled
questions.
If you (or for example deans/managers, department heads, etc.) wish to obtain a quick
overview of the results of the survey, often not every single question may be of interest. One rather needs summary statements. If, therefore, you do not wish to view all
questions separately, it is possible to calculate an average for the scaled questions of
an entire question group, the so-called indicator. The indicator in EvaSys thus forms a
question group average.
236
© 2011 Electric Paper GmbH
Phase 4: Advanced Reporting
Figure 274: Evaluation of Scaled Questions of an Entire Question Group
Generally indicators can be regarded as kind of identification numbers which make a
statement about the summarized items. (In EvaSys, for example, one question would
correspond to one item.) This way the questioned values (for example quality of the
course) are measurable and comparable. Of course, an indicator can only give an
accurate overall statement when the single questions can actually make a contribution
to the statement.
For the calculation of the indicator in EvaSys all results of the scaled questions are
added. The sum of them is divided by the number of responses. (Thus, the already
calculated averages of the single questions are not used for this!) This means that
questions with a smaller number of valid responses (for example with abstentions or
invalid responses) have a smaller influence on the indicator than questions with a
higher number of valid answers.
Example:
Your questionnaire contains for example a question group “Instructor/trainer” with the
following three scaled questions (for clarity reasons, fewer questions than displayed
above are used):
Question 1: The instructor masters his field.
Question 2: The instructor openly takes on board questions and comments.
Question 3: The instructor knows how to present the topic interestingly.
You hereby use a scale with six response options with the bad values lying to the left
and the best values to the right.
To question 1 the following five valid responses are given (here, for clarity reasons,
also an unusually small number):
3, 4, 2, 5, 4 - Average of this question = (3 + 4 + 2 + 5 + 4) / 5 = 3.60
For question 2 a respondent put two crosses, this answer is, therefore, invalid. The
following four valid responses remain:
© 2011 Electric Paper GmbH
237
Your Evaluation Process: The Phase Model
1, 4, 2, 4 - Average of this question = (1 + 4 + 2 + 4) / 4 = 2.75
Question 3 was ticked only three times, the other two respondents did not give a
response. These three answers are valid and read
5, 6, 5 - Average of this question = (5 + 6 + 5) / 3 = 5.33
Now an indicator is calculated for this question group. EvaSys needs the responses to
the corresponding scaled questions for that, adds them and divides them by the total
number:
Indicator = (3 + 4 + 2 + 5 + 4 + 1 + 4 + 2 + 4 + 5 + 6 + 5) / 12 = 3.75
If one adds the three averages and divides them by the number of averages – which
does not correspond to the calculation of the indicator! - one receives another value:
(3.60 + 2.75 + 5.33) / 3 = 3.89
Note:
One recognizes clearly that the calculation of the indicator which is weighted
according to the number of answers given, produces a very different result than the
calculation through the averages that are available (which does not take into
account the number of the responses, but which rather counts the questions each
as “1”).
Only through taking into account several indicators you receive an overview of the
entire survey. The summary of several indicators produces an index. In EvaSys all
indicators of the questionnaire (meaning this index for the total questionnaire) are calculated into the so-called overall indicator that thus forms a type of “grade” for the total
survey.
The overall indicator is not formed – unlike the individual indicators – from the individual results. The overall indicator is calculated by adding the individual indicators and
dividing them by the number of indicators.
Example:
On your questionnaire there are three question groups which contain scaled questions:
Question group “Instructor”
Question group “Course”
Question group “General assessment”.
The answers show for the first question group an indicator of 3.75, for the second
question group one of 3.7, for the third group one of 2.9. (The scale consists – as
mentioned – of six response options with the positive values on the right.)
The overall indicator for this questionnaire is made up from the addition of the three
indicators mentioned as well as from the division by three (number of indicators):
238
© 2011 Electric Paper GmbH
Phase 4: Advanced Reporting
(3.75 + 3.7 + 2.9) / 3 = 3.45
The overall indicator is therefore 3.45.
It is a reference to the survey's overall result. On the basis of your scale – a scale with
six options – and the assessment (positives on the right) you can now recognize, for
example, that the result sits to the right from the middle, therefore, it is relatively good.
Note:
You can recognize from this example how important the division and alignment of
the scale is for the interpretation of the results. Since the values on which the scale
is based form the basis for the calculation of the indicator, you must be sure to use
absolute standardized scales on the questionnaire. Within a question group only the
questions of a defined scale can be used for the calculation; a comprehensive
change in the question group scale (for example from a 5er-scale to a 6er-scale)
would make an overall indicator hard to interpret.
In order to really be able to interpret the indicators produced, one must know how
other surveys turned out. For this you can fall back on norming.
5.1.2.
Activating the Indicators in the Configuration
If you wish to utilize the calculation of indicators, you must first activate them in the
configuration of each PDF report.
For this purpose, you call up the option “Configuration” in the menu “System Settings/
Report Settings”. Please bear in mind, that you have to define the configuration for
each of your PDF reports.
There you find the setting “Calculate indicators” which you can activate and deactivate.
If you activate the calculation of the indicators here, the indicator and standard deviation are displayed at the beginning of the PDF report as a bar diagram. On the margin
you can also see both of them as numerical data:
Figure 275: Indicators – Display in the PDF Report (Without Overall Indicator)
© 2011 Electric Paper GmbH
239
Your Evaluation Process: The Phase Model
The option “Calculate indicators” from the configuration refers only to this calculation
of the indicators at the beginning of the questionnaire. The other display options which
are presented in the following are not affected by it!
Here in the EvaSys Settings you can also find some further settings which influence
the display of the indicators in the PDF report.
•
The setting “Create profile Line for indicators” (some lines above “Calculate indicators”) subsequently adds to the usual profile line for individual questions a profile
line for the indicators defined in the questionnaire:
Figure 276: Indicators – Profile Line in the PDF Report
Here you see the profile line for the four indicators “evaluation of the course”, “evaluation of the professor”, “overall rating” and “evaluation of the handouts”.
•
In addition to the display of the indicators that you chose, you can add the overall
indicator of the survey. Deactivate the setting “Hide overall indicator” in the configuration of the PDF report. In addition to the other indicators the overall indicator is
displayed at the beginning of the report:
Figure 277: Indicators – Display in the PDF Report (With Overall Indicator)
•
The options “Left pole for indicators” and “Right pole for indicators” define the texts
that label the scales' left and right margins in the report and in the presentation
template:
Figure 278: Indicators – Left/Right Pole
240
© 2011 Electric Paper GmbH
Phase 4: Advanced Reporting
Please note:
These pole texts in the configuration of the PDF report have no influence on the calculation of the indicators or the actual alignment of the scales! You only define the
texts which serve the users orientation.
5.1.3.
Creating the Indicators for a Questionnaire
Since the indicators form the averages of particular question groups, they are also
activated for particular question groups in the relevant questionnaire.
Hint:
As you know, you can no longer change a questionnaire once you have created a
survey with it. You can, however, create the indicators at any time, even after the
creation of surveys!
To do this, navigate as usual to your questionnaire and open the editing screen (in the
main menu “System Settings”, select “Questionnaires” in the left submenu, select in
the drop down-menu below “Action” the option “Edit”).
Open the editing window of a question group (by double-clicking on the question
group or by clicking on the question group and selecting the option “Edit Question
group” in the menu “Edit”). As described above, for the indicator only scaled questions
are used, meaning that the definition and calculation of an indicator only makes sense
for group questions that indeed contain scaled questions.
You see the following window:
Figure 279: Indicators – Editing Window in the Question Group
The first specification of the window refers to the heading of the question group, this,
however, is possibly grayed in, since you can no longer change it once the surveys
have been created.
© 2011 Electric Paper GmbH
241
Your Evaluation Process: The Phase Model
Below it (and possibly the presentation slide text) you find information on the indicator.
If no indicator has been created so far, it reads “No indicator”. When you open the
drop-down menu, you see that you can also select an indicator for all kinds of scales.
Make your desired selection here – according to the scale of your scaled questions –
and close the window by clicking on [Apply].
5.1.4.
Internal Consistency of the Question Group: Cronbach’s
Alpha
In EvaSys, Cronbach’s Alpha describes the internal consistency of a question group.
This value indicates whether the items of a question group are meaningfully related to
each other and can thus be seen as capturing the concept the question group is
meant to measure.
Note:
Please note that Cronbach’s Alpha cannot be calculated for the free indicators,
which can be defined in the details of a questionnaire.
Note:
Please note that the calculation of Cronbach’s Alpha only includes observations
where a response has been given to all questions of a question group.
Please also note that a respondent needs to have answered all questions of a question group in order for his or her response values to be considered in the calculation
of Cronbach’s Alpha.
Cronbach’s Alpha can range between minus infinity and 1; however only positive values have a meaningful interpretation. A value of 0 means that the items (i.e. questions) are not associated which each other at all. A value of 1 would be the strongest
relationship between questions that is possible. In general, with a value of 0.7 or
above the scale (i.e. question group) can be considered as reliable.
The table below gives a guide how different values of Cronbach’s Alpha can be interpreted:
Cronbach's Alpha Value
Interpretation
> 0.9
Excellent
> 0.8
Good
> 0.7
Satisfactory
> 0.6
Questionable
> 0.5
Poor
< 0.5
Unacceptable
Figure 280: Interpretation of Cronbach’s Alpha
242
© 2011 Electric Paper GmbH
Phase 4: Advanced Reporting
Note:
Please note that the value of Cronbach's Alpha increases automatically when
•
question wording differs only superficially from each other
•
a question group has a large number of questions; in this case the statistic has
to be interpreted with care
When activated in the PDF report settings, Cronbach's Alpha is given in the PDF
report for each indicator (menu “System Settings/Report Settings/Configuration/Cronbach’s Alpha”). Cronbach’s Alpha can only be displayed if the indicators of the corresponding questionnaire have been defined previously.
Figure 281: Display of Cronbach’s Alpha in the PDF Report
Note:
Please note that in EvaSys the regular, non-standardized Cronbach's Alpha is used,
which is calculated from the variances and co-variances of the questions within a
question group.
EvaSys calculates Cronbach's Alpha with the following formula:
Figure 282: Formula Used to Calculate Cronbach's Alpha; where N = number of items (i.e., questions in question group) and r ? = ratio of covariance : variance (average correlation between
items)
In order to determine
, the covariance for all possible combinations of questions is
calculated, as well as the variance for all questions of the question group. The resulting values are averaged and the ratio between them is determined in order to calculate the average correlation between the questions in the question group.
In order to calculate the covariance for each question of the question group, the difference of the given responses to the respective arithmetic mean is calculated. These
values are multiplied for all possible combinations of questions and their sum divided
by n - 1 (n = number of responses).
Figure 283: Formula for the Calculation of the Covariance
© 2011 Electric Paper GmbH
243
Your Evaluation Process: The Phase Model
The variance corresponds to the sum of the squared differences of the response values to their respective arithmetic mean value, divided by n - 1 (n = number of
responses).
Figure 284: Formula for the Calculation of the Variance
5.1.5.
Free Indicators
In general, the question groups containing the questions on the questionnaire form the
basis for the calculation of the indicators, this means, that question group and indicator are consistent with regard to the questions included. It is also possible to freely
define indicators, so that questions of different question groups can serve as the basis
for the calculation of an indicator. The elements of an indicator are, as such, freely distributable throughout the questionnaire. These so-called “Free Indicators” can be
stored separately for each questionnaire and displayed later in the PDF report in place
of the conventional indicators.
The “Free Indicators” can be defined in the questionnaire details (drop-down list in the
area “Advanced Settings”, option „Free Indicators“).
Figure 285: Free Indicators – Access in the Questionnaire Details
After clicking on the button [Edit], the window for setting the indicators opens automatically. Now question groups can either be converted to indicators and be subsequently
processed, or the indicators can be defined freely.
244
© 2011 Electric Paper GmbH
Phase 4: Advanced Reporting
Figure 286: Free Indicators – Setting
By clicking on the button [Generate indicators from question groups], the indicators
are established based on the question groups on the questionnaire and the scaled
questions contained therein. This compilation can be subsequently edited by using
the green pencil icon, so that the questions of an indicator can be freely distributed
throughout the questionnaire.
By using the green arrows, the indicators can be moved up or down. The indicators
can be deleted at any time by clicking on the red cross.
Figure 287: Free Indicators – Generate from Question Groups
To edit an indicator, click on the pencil icon. An overview of the questionnaire is now
shown.
Initially, the indicator name is displayed and can be changed as desired. If the questionnaire exists in different languages, the indicator name must also be deposited for
each respective language (in this case, German and English). In order to achieve
greater clarity, it is possible to hide all questions that are not of the scaled question
type. Via the selection box in the left column, the questions relevant to the indicators
can now be selected or deselected. Please save your changes by clicking on [Save] at
the bottom of the page.
© 2011 Electric Paper GmbH
245
Your Evaluation Process: The Phase Model
Figure 288: Free Indicators – Editing
Using the button [Set new indicators] the indicators can be set up manually. After
clicking on the button, the questionnaire is shown in the overview. Again, a name for
the indicator must first be given, and then the individual questions can be selected by
activating the checkbox. By clicking on [Save], the new indicator is added to the list of
indicators.
Free indicators are displayed in the PDF report, if the calculation of indicators is activated in the configuration of the PDF report:
Figure 289: Free Indicators – Display in the PDF Report
Note:
Free indicators can only be used for display in the PDF report. They cannot be used
as a basis for quality guidelines or norming nor in overall reports in the report creator. Here, in general, only the indicators of the question groups are used. Also,
Cronbach's Alpha cannot be calculated for free indicators.
246
© 2011 Electric Paper GmbH
Phase 4: Advanced Reporting
5.2.
Creating Reports and Comparative Profile
Lines
As soon as you have scanned data into EvaSys for a survey and/or received data during online surveys, a PDF report is generated automatically with this data. The more
data you scan, the more important it is to be able to compare and summarize this
data. For these purposes there are several aids available in EvaSys. One of these are
the functionality’s of the so-called report creator which are presented in the following.
5.2.1.
The User Role of the Report Creator
The report creator is a user created by the EvaSys administrator in order to produce
summary reports for the captured data and to send comparative profile lines. In practice, the person in charge of the system's administration often also takes on the function of the report creator, too. Administrator and subunit administrators can therefore
also take on the role of Report Creator in their user profile. In order to be able to separate the functions, there is a separate user role for the report creator in EvaSys. Of
course, multiple report creators can be created in the system.
Note:
The reports which the report creator produces are based on the data already captured. That means that first you must implement and evaluate surveys before you
can use the report creator.
Fundamental Considerations and Settings
First of all it is important that you carefully consider what insight the report creator
should be permitted to have or must have:
•
Is the report creator supposed to summarize the data of the entire system? In this
case, please note that he can then also view this data. If you decide on this option,
you need a system-wide report creator.
•
Or, he should only view data subunit-wide? That also means, however, that he
cannot produce subunit-comprehensive summary reports, or comparisons,
respectively. In this case you should define subunit-wide report creators.
•
If your report creator may access several subunits please choose the option “own
subunit” in the area „Data access“. Subsequently mark all necessary subunits in
the area „Assign additional subunits“. Thus your report creator accesses several
subunits. Multiple selections of subunits can be made by pressing and holding
down the “Ctrl” key.
As an Administrator, you set this value when creating the relevant user account. As
soon as you create a report creator, a particular setting in the user rights (step three of
three) allows you to define the report creator as system-wide (system level), subunit
groups (own subunit and selection of further subunits) or only subunit-wide (own subunit):
© 2011 Electric Paper GmbH
247
Your Evaluation Process: The Phase Model
It is crucial to consider what exactly the report creator should be able and allowed to
do, in order to subsequently know where and how the report creator be created or
whether several are required.
When an administrator or subunit administrator directly adopts the additional role of
report creator in his user profile, he also automatically receives the same data access
rights as the administrator/subunit administrator himself.
Creating a Report Creator
Just like any other user, a report creator is a user that is created in a subunit.
If your report creator is supposed to work only subunit-wide, you create him in the
subunit for which he is to produce summaries. If the report creator works globally, you
can create him in any subunit at all since he has insight into all data anyway. For
example you can create a subunit “System users” where you put all users, such as the
report creator, the data entry assistant, the verifier etc. so as to find them again fast.
Go to the respective subunit and click on [Create New User].
The input window which opens should be familiar to you from creating instructors/
trainers and other users. In the way you are accustomed, enter the data for the person
who will act as report creator. It is crucial that you choose the user type “report creator” (instead of “instructor/trainer” and the like):
Figure 290: Creating a Report Creator – Step 1
248
© 2011 Electric Paper GmbH
Phase 4: Advanced Reporting
Figure 291: Creating a Report Creator – Step 2
In the third step you define the data access of your report creator. By default the report
creator only has access subunit-wide. To change the standard setting, choose, at this
point, “system level”:
Figure 292: Creating a Report Creator – Step 3
© 2011 Electric Paper GmbH
249
Your Evaluation Process: The Phase Model
Note:
As a subunit administrator, you can only assign subunit-wide access to your Report
Creator.
As soon as you confirm your input by clicking on [Save], the report creator appears in
the user list.
Figure 293: Report Creator in the List of all Users
Give the login name and password to the person acting as the report creator. They
can then log in. Of course, you can also use this account for yourself.
Login and First Steps
In order to be able to log on as report creator, open the usual EvaSys start page. It
looks just like the one shown in the following:
Figure 294: EvaSys Login Window
As soon as you have logged on here, the start screen of the report creator appears,
offering you on the left-hand side a menu with various options:
•
The option “Reports” allows you to download reports on indicators which give the
university management and/or the management of your company an overview of
the assessment the courses.
•
By the option “My profile” you can change the user data of this report creator
access (for example password, language, etc.).
250
© 2011 Electric Paper GmbH
Phase 4: Advanced Reporting
•
The utilization statistics give you an overview of the activities of this report creator
(for example the number of the log-ins, the created folders, etc.).
•
“Deliveries” informs you how many emails the report creator has already sent.
•
The field “System Info” gives you an overview of the address data of the organization as well as of the individual subunits.
•
Clicking on the option “Send email” opens a page that enables you to send an
email to any address.
•
The option “Manual” below provides you with further information on EvaSys and
the use of the program. Here you have access to the online user manual for all
active EvaSys users (explaining the essential points on the user access in a much
more compact fashion than the User Guide at hand does.)
Figure 295: Report Creator – Main Menu
If you wish to create summary reports or send out profile lines, this is not possible
without a folder. Therefore, you should initially create a new folder by clicking on the
button [Create new folder]:
© 2011 Electric Paper GmbH
251
Your Evaluation Process: The Phase Model
Figure 296: Report Creator – Creating a Folder
After clicking on the button, a window appears in which you can name your folder:
Figure 297: Report Creator – Naming the Folder
Here a neutral name was chosen (“General Summaries 2011”). However, according
to the type of your summaries planned, you should choose a suitable structure for
your folders. You could, for example, arrange the reports according to years and
choose names such as “Surveys 2011”, etc.:
Figure 298: Report Creator – Folders structured According to Years
The university’s or company’s structure also makes for a possible organizational criterion for your folders. It suggests names such as “Reports Business Studies” or something similar:
252
© 2011 Electric Paper GmbH
Phase 4: Advanced Reporting
Figure 299: Report Creator – Folders Structured Example According to Subunits
Only in a study folder can you use the possibilities of the report creator, for example to
summarize reports.
The report creator can always move existing reports from one folder to another. To
move a report, click on the folder containing the report to be moved. Then, click on the
name of the report to be moved. You are automatically switched to the details of your
report. Here, click on “Move Compilation”. Now the report can
•
either be moved to an existing study folder, by selecting the relevant folder in the
drop-down list in the area “Folders”
•
or you create a new folder. Enter the name of the folder in the area “Create in a
new folder”.
In both cases, confirm moving the report by clicking on the [OK] button.
Options during Report Creation – General
The options during report creation are presented to you as soon as you wish to create
a report. You can see them in the figure below the report name (which here reads
“Show_Options”):
Figure 300: Report Creator – Options During Report Creation
© 2011 Electric Paper GmbH
253
Your Evaluation Process: The Phase Model
The following options are offered to you:
•
Question mapping of different questionnaires: Summary of surveys that were carried out with different questionnaires
- Options: Automatically with text comparison and manual assignment
- Condition: the questionnaires are similar and therefore comparable.
•
Include answers to open questions
- Should all responses to open questions be displayed in the summary?
- The responses to open questions are not always of interest in more extensive
summaries since they do not serve the quick overview, but rather they provide
details. Furthermore, they may possibly lead to very long reports.
•
Selection between weighted and unweighted compilation
- By default, the reports are summarized weighted, meaning that the calculation
is effected according to the number of returns.
- This means for example: If you summarize a survey with 100 return questionnaires and one with 10, the survey with 100 questionnaires counts for more than
the one with 10.
- Mathematically expressed: All individual results are each summed up for each
question (each single value that was ticked off) and divided by the total number
of results (in this example: 110).
-
You explicitly have to decide on an unweighted compilation whilst creating a
report. It is to be noted that this type of calculation removes the possibility to
adequately undertake further processing in statistics programs.
- Because with weighted compilations, each survey counts as 1, regardless of
how many questionnaires have been processed for it.
- Mathematically expressed: You add the respective averages of the questions
and divide these by the number of the surveys/reports that you are summarizing
(in the example above, therefore, by 2).
Since the questionnaire comparison represents a very important option, whose possibilities can facilitate your work, this is outlined more precisely in the following.
Options during Report Creation – Questionnaire Comparison
There are often cases in which it becomes necessary to modify an existing questionnaire.
Example:
You have been evaluating with one questionnaire for three years. The computer center would like to use the general evaluation and to integrate a question to your questionnaire regarding the equipment of the computer rooms.
254
© 2011 Electric Paper GmbH
Phase 4: Advanced Reporting
Or you have been evaluating with one questionnaire for three years and now the corporate identity of your university/company changes vastly. This also affects names
such as “Technical University of Sample City” which is renamed in “University of
Applied Sciences Sample City”. Furthermore, the subunits and graduation titles now
carry other names (for example “Department Electrical Engineering” instead of “Faculty Electrical Engineering”, “Master” instead of “Diploma” and so on).
These linguistic changes affect of course the questionnaire which must be clearly
adjusted.
A questionnaire which has been evaluated can no longer be changed. In these cases
you have to copy an existing questionnaire and work on the copy. For information on
copying questionnaires see chapter B 2.4.2. "Management of Questionnaires and
Detailed View".
After the evaluation with the new questionnaire consideration has to be given as to
how one can compare the results with the old reports and/or compile the results of the
different reports. The solution is the questionnaire comparison via the option “Question mapping of different questionnaires” in the report creator:
Figure 301: Report Creator – Question Mapping of Different Questionnaires
Whenever you compile reports that are based on different questionnaires, here you
must select whether to have the questionnaires compared automatically or want to
assign them manually. In either case it is important that the questionnaires are comparable, meaning that they are similar:
•
The automatic assignment is advisable when the questionnaires are nearly identical – for example when only one question was added (such as in the first example).
- The questionnaires are compared with each other by pure string comparison.
(In computer science, a “string” is a sequence of letters and special characters,
i.e. a character string.) EvaSys thus lays the character strings over one another
and checks them for identity.
- Decisive is, therefore, the number of different characters in the questions and
the level of marking.
- When you choose “Automatic with text comparison” a page opens where you
can view the result of the text comparison. The left questionnaire is the “basis
questionnaire”, the wording of which is carried over into the report:
© 2011 Electric Paper GmbH
255
Your Evaluation Process: The Phase Model
Figure 302: Report Creator – Automatic Questionnaire Comparison (Overview)
- On the bottom of the page you can change the basis questionnaire.
- Furthermore, you can specify by how many characters the questions and/or the
modality text (texts describing the check mark boxes) can vary:
Figure 303: Report Creator – Define Base Questionnaire/Number of Different Characters
- Please note: Additional questions are of course not included in the total report
because they cannot be compared to questions from the comparative questionnaire.
•
256
You should opt for manual assignment when the questionnaires differ greatly, so
that a string comparison cannot turn out any similarities (as in the second example).
© 2011 Electric Paper GmbH
Phase 4: Advanced Reporting
- If you choose this option, the questions on the manual assignment are presented to you in the following screen. The drop-down menu of each question
presents you with the possible questions which you could select as an appropriate counterpart:
Figure 304: Report Creator – Manual Questionnaire Comparison
- Here you can also define a base questionnaire at the end of the page.
5.2.2.
Creating Summary Reports
The report creator has several options to process data. One of them is the creation of
summary reports. This report creation is extremely flexible, you can create reports
according to all imaginable criteria, summarizing these afterwards again and also taking the created reports apart again according to criteria defined by yourself. You will
see that in this way the report creator answers many questions and accommodates
numerous requirements.
It is important to know that the reports of the report creator have the same properties
as the reports which you are familiar with from the automatically generated PDF
reports:
•
The analyses on the single questions of your questionnaire look the same, for
example a bar diagram for the single choice and multiple choice questions,
(depending on the setting) a histogram for the scaled questions, the handwritten
and/or typed comments on the open questions and so forth.
•
The elements which the administrator has set in the menu “System Settings/
Report Settings/Configuration” also appear in these reports. The exception is the
letter which the report creator does not produce.
•
If for relevant questionnaires extended PDF report definitions or multilingual questionnaires exist, these settings also apply to the summary reports (that are pro-
© 2011 Electric Paper GmbH
257
Your Evaluation Process: The Phase Model
duced for the respective questionnaire). This means that you can also download
an adjusted and/or multilingual report.
Figure 305: Report Creator – Report Selection
Figure 306: Report Creator – Multilingual Reports
•
Also the usual export options are available (CSV, Sphinx and SPSS).
Figure 307: Report Creator – Export Options
The summary reports give you – unlike the usual automatically produced PDF reports
– an overview of your evaluated data. Because depending on your choice, a summary
report is generated for a subunit, for an instructor/trainer, for a course of studies etc.
This report looks just like the automatically produced PDF report, yet it provides you
with information on the corresponding assessment results of entire subunits, etc.
Summary Reports – An Overview
There are four different types of summary reports available to you:
•
Subunit reports
•
Program of study reports
•
Reports for particular instructors/trainers (“Instructor/Trainer Profile”)
•
Reports that you can put together as you like (“Any Compilation”)
258
© 2011 Electric Paper GmbH
Phase 4: Advanced Reporting
You see these options as soon as you click on the folder (and thus open it):
Figure 308: Report Creator – Create Reports
The upper drop-down menu provides a list of all different types of summary reports.
The lower drop-down menu allows to access the batch profile lines, which can be
used to compare different reports and surveys with each other. The batch profile line
dispatch is dealt with in the chapter on summary reports. It is not a type of report.
For the creation of the different reports you must make a selection in several fields.
This affects report-specific fields, also for all of them the type of course and the questionnaire must be selected (multiple selection is possible).
Please note:
For reasons of search comfort, only the values for which surveys exist in the system
are displayed. For example, the subunit “Business Studies” is only then offered for
selection if you have already created a survey in this subunit and have scanned
data.
Subunit Report
A subunit report is the summary of the survey results for a specific subunit and a specific semester:
Figure 309: Report Creator – Create Subunit Report
Choose the option “Subunit” from the drop-down list. If you click the button [Next].
Now four fields are presented to you in which you can select a subunit, a survey
period, a course type (or even several types) and a questionnaire (or several questionnaires):
In the figure below, the subunit report is created based on one questionnaire. If several questionnaires are displayed for the selection in the list, you can mark these;
then, however, you must decide to either go with the automatic text comparison or
with the manual assignment, in order to combine the reports.
Give the report a relevant name so that later you are able to relate to what was summarized and make a selection regarding the open questions and the weighting of the
surveys that you compile.
© 2011 Electric Paper GmbH
259
Your Evaluation Process: The Phase Model
Figure 310: Report Creator – Subunit Report: Selection of Elements and Properties
As soon as you click on [Verify], EvaSys calculates how many surveys suit your selection. In another window you are again informed of the details of the summary before
you actually produce the report:
Figure 311: Report Creator – Subunit Report: Final Overview
260
© 2011 Electric Paper GmbH
Phase 4: Advanced Reporting
Here you can check once again which subunit you selected, what the report will be
called, and based on which questionnaire it will be created. Furthermore, the selected
survey period appears here again with the precise data defined by the administrator.
You can see how many surveys meet your selected criteria and to how many return
responses it applies (meaning completed questionnaires).
If you would like to test the report creator and have only very few surveys running in
your system, a warning message may appear here and you do not have the possibility
to produce a summary report:
Figure 312: Report Creator – Number of Surveys below the Minimum Number
In this case, please inform your EvaSys administrator. For testing purposes, he can
change in the EvaSys Settings under “System Settings/EvaSys Settings/Functions”
the option “Minimum survey number report creator” (by setting it to 0):
Figure 313: Administrator Login: System Settings/EvaSys Settings/Functions – “Minimal survey
number report creator”
This way the message no longer appears and you can create the test reports.
Amongst the general information on the summary report you will find a listing of the
questions of the related questionnaire. Here you can deactivate selection boxes as
required and thus exclude questions from the summary report.
When all properties are selected correctly, you click on the button [Create] and the
report is produced. Please note that depending on the data quantity the processing
may take up to several minutes.
After the creation of the subunit report the folder view appears again, the list of the
reports is however now complemented with the subunit report:
Figure 314: Report Creator – Subunit Report in the Study Folder
Program of Study Report
In the same way you can produce a summary for a program of study, a particular
semester and selected course types and questionnaires.
© 2011 Electric Paper GmbH
261
Your Evaluation Process: The Phase Model
Just a little reminder: A program of study differs from the usual structure of the subunits and interviewer and/or instructors/trainers. Because it is positioned perpendicular to the subunits and allows you to assign courses, that are created in a subunit,
additionally to a program of study. So you could for example assign courses of the
departments of chemistry and physics (additional) to the program of study “nuclear
physics”.
To create a program of study report, choose the option “Program of Study” from the
drop-down list and click the button [Next].
Figure 315: Report Creator – Creating a Program of Study Report
Choose the program of study, the period, the course type as well as the questionnaire
in the window that appears. Also the usual options – questionnaire comparison, display of open questions, creation of an unweighted report – are available to you.
Figure 316: Report Creator – Program of Study Report: Selection of Elements
Except for the selection of the program of study this window largely corresponds to
what is presented to you during the creation of a subunit report.
262
© 2011 Electric Paper GmbH
Phase 4: Advanced Reporting
In the same way the information windows resemble one another prior to the actual
generation of the report. Here you once again receive detailed information on the
report that you create, you can again exclude single questions from the report and
create the report via [Create].
Figure 317: Report Creator – Program of Study Report: Overview of the Selection made and the
Questionnaire
Then the report is added to the report list:
Figure 318: Report Creator – Program of Study Report in the List of Reports
Instructor/Trainer Profile
The option “Instructor/Trainer Profile” allows all surveys of an instructor/trainer to be
periodically summarized into reports. To create an instructor/trainer profile, choose
the option “Instructor/Trainer Profile” from the drop-down list and click the button
[Next].
© 2011 Electric Paper GmbH
263
Your Evaluation Process: The Phase Model
Figure 319: Report Creator – Creating an Instructor Profile
From the instructor/trainer list sorted according to subunits, select an instructor/trainer
and a survey period as well as the required course types and questionnaires. Then
you should enter a relevant name (in the example “Prof. Sunny Narrow SS07”), activate the usual options as per your wishes and click on [Verify]:
Figure 320: Report Creator – Instructor Profile: Selection of Elements
264
© 2011 Electric Paper GmbH
Phase 4: Advanced Reporting
The window known from other report types opens for the overview of the report that
you create:
Figure 321: Report Creator – Instructor Profile: Overview of the Selection made and the Questionnaire
Here you deactivate the questions that you do not need in the instructor/trainer report
and click on [Create]. In turn, this report also appears in the list:
Figure 322: Report Creator – Instructor/Trainer Profile in the Report List
Any Compilation
The option “Any Compilation” is completely flexible, you can freely select which elements you wish to combine. Unlike the other report types it is therefore possible to
make a multiple choice in the individual selection fields such as subunit, period, etc.
© 2011 Electric Paper GmbH
265
Your Evaluation Process: The Phase Model
Example:
You could, for example, summarize the reports for two courses that are held by two
different instructors/trainers, for example for Donna Harwood the lecture on Web
Design, and for Carlos Hernandez on the New Economy. Of course the courses can
also belong to completely different subunits.
Or you summarize everything that you have ever evaluated in order to receive an
overview of the assessment of your university or your company.
Or you summarize the reports of all courses assigned to the course type “Excursion”
in order to receive an overview of the assessment of the study excursions.
These are only a few possibilities – as previously mentioned, in the central evaluation
you can freely combine options. For technical reasons, surveys of active users cannot
be summarized by means of “Any Compilation”.
To create a report which combines freely definable elements, choose the option “Any
Compilation” from the drop-down list and click the button [Next].
Figure 323: Report Creator – Create Any Compilation
The window which then opens offers you the usual selection. Here you can mark several elements by simultaneously pressing with the mouse and the [Ctrl]-key. In the following example a “ReportOfAll/Engineering” is produced, which is a summary of all
surveys that have been conducted so far. The questionnaires “Demo2” and “Demo2A”
do not differ considerably from one another and are, therefore, suitable for such a
compilation:
266
© 2011 Electric Paper GmbH
Phase 4: Advanced Reporting
Figure 324: Report Creator – Any Compilation: Selection of Elements
If you wish to additionally filter the courses according to programs of study activate the
option “Select program of study”. In addition to the existing selection fields (subunit,
survey period, course type, questionnaire and course(s), the field “Program of study”
appears in third place. In this field you can select one or several programs of study:
Figure 325: Report Creator – Any Compilation: Selecting the Program of Study
When you click on [Verify] after selecting the elements, a small overview of the questionnaire is provided – or, if there are several questionnaires as in this case, an overview with a questionnaire comparison is provided:
© 2011 Electric Paper GmbH
267
Your Evaluation Process: The Phase Model
Figure 326: Report Creator – Any Compilation: Overview over the Selection made and the Questionnaire
Click on [Create] (or first assign the questions correctly). Also this report then appears
in the list:
Figure 327: Report Creator – “Any Compilation” in the Report List
In addition to the selection criteria described so far, you have the possibility in “Any
Compilation” to filter according to the courses' properties.
Meaning, you could, for example, have displayed all courses with less than 15 participants and draw your selection from that. Or you filter according to the room. Or
according to the Course ID...
And – something especially useful – you can also filter according to criteria defined by
you. This is possible if you have created user-defined course fields.
A small reminder: If the set fields (name, Course ID, room etc.) do not suffice for the
description of your course, the EvaSys administrator can create additional fields.
For this purpose he or she defines a number of additional fields in the configuration on
the side “course user data fields”, their names and contents.
268
© 2011 Electric Paper GmbH
Phase 4: Advanced Reporting
As soon as the administrator inserts these fields in the configuration, they are displayed in all courses and in addition to the standard information (selection of the set
contents from a drop-down list) further details can be entered. For further information
on course user data fields see chapter B 2.2.3. "Creating Courses", section “Expanding the Course Data with User Specific Fields”.
These data fields complement a course's standard data and can in the same way
serve as a filter criterion for “Any compilation” reports.
If you select the “Any compilation” as a report type, you can activate the option “Show
extended filter options”:
Figure 328: Report Creator – Extended Filter Options
If you activate the filter options here, you can further limit your selection and choose
all properties of a course (multiple selections possible).
The following filtering criteria with the following values are possible:
Criteria
Search type
Name
Simple text search
Identification
Simple text search
Room
Simple text search
Participant
Smaller, equal or larger of particular number
Secondary instructor
Selection: Available/Not available
Additional course user data fields (if
defined up to 5 items)
Selection dependent on defined values
Table 12: Filter criteria for “Any compilations”
Entries in several search fields are linked with an AND-conjunction, meaning that only
those courses are displayed that meet all criteria.
© 2011 Electric Paper GmbH
269
Your Evaluation Process: The Phase Model
The contents of the course user data fields (in this case “Language” and “Location”)
can be selected from drop-down lists. If required they can also be typed in directly.
When you have defined all necessary restrictions, click on the button [Update]. Only
then will the courses that meet your criteria be displayed to you:
Figure 329: Report Creator – Extended Filter Options: Update Course List
With [Back] all entries are being deleted from the search mask and the course view is
updated likewise.
Any Compilation: Tree Structure
When creating an ‘Any Compilation’ report, surveys can also be selected with the help
of a tree structure. By this, the hierarchical order of the different organizational levels
(e.g. subunit, location, program of study, instructor etc.) is better visualized and the
desired surveys can be selected more easily.
Choose the option “Any Compilation (Tree Structure)” from the drop-down list and
click the button [Next].
Figure 330: Report Creator – Create Any Compilation (Tree Structure)
In the left section of the next window the tree is displayed. The single levels of the tree
can be opened or closed by clicking the + / - symbols or clicking on the name of the
level. All levels the administrator has selected for the organizational structure are
shown in the predefined order. By marking the boxes single levels can be selected.
For further information on working with the tree structure please see chapter B 3.2.5.
"Tree Structure".
270
© 2011 Electric Paper GmbH
Phase 4: Advanced Reporting
Figure 331: Report Creator – Any Compilation (Tree Structure): Select Surveys
Choose the desired elements from the tree and use the additional filters to select the
evaluation periods, course types and questionnaires. Then click the button [Show].
Now in the survey list below the surveys will be displayed which correspond to the filter settings. Choose the desired surveys from the list.
Then enter a name for the report and, if necessary, do some further settings (such as
text comparison etc.). Click the button [Verify]. The questionnaire will be displayed in
an overview. Click on [Create] to finally create the report.
© 2011 Electric Paper GmbH
271
Your Evaluation Process: The Phase Model
Figure 332: Report Creator – Any Compilation (Tree Structure): Questionnaire Overview
The report will be created and is shown, as all other reports, in the list within the study
folder.
Figure 333: Report Creator – Any Compilation (Tree Structure): Report in the List of Reports
Combinations and Subgroups
The previous chapters show that the report creator allows the generation of reports
according to very flexible criteria. So far, however, only the compilation of data
according to specific criteria was explained. How to summarize these compiled
reports again or evaluate the reports according to different criteria is the topic of the
following chapter.
For these two needs mentioned – the combining as well as the taking apart of existing
reports – there are two options in the details of a report. Just a small reminder: You
will find the details of a report by clicking on the name of this report in the report list.
Combining Reports
First of all, the combinations are dealt with here. This option enables you to summarize several created reports. If you go to the details of a created report you see at the
bottom right the second to last point “Merge evaluations":
272
© 2011 Electric Paper GmbH
Phase 4: Advanced Reporting
Figure 334: Report Creator – Report Details: Merge Evaluations
If you wish to summarize several reports click on this option. A new window appears
in which you can mark all reports that you wish to combine with the current report. In
this figure two instructor/trainer profiles are united in one report – Prof. Belmore and
Prof. Hernandez from winter term 2010/11:
Figure 335: Report Creator – Merge Evaluations: Selection of Reports
© 2011 Electric Paper GmbH
273
Your Evaluation Process: The Phase Model
Since these are combinations, too, the usual options are available to you (questionnaire comparison, inclusion of responses to open questions as well as the unweighted
combination). Choose the options that you wish here and click on [Merge]. Then a
new report is added to your report list, the combination of reports you chose:
Figure 336: Report Creator – Merged Instructor Profiles “Belmore” and “Hernandez” of 2010/11
The properties of these merged reports correspond exactly to those of the other, existing ones. Here you also obtain the information through the details in the list or through
a click on the name. There you have the option to merge further reports.
Forming Subgroups
Not only can you merge existing reports with others, but you can also form subgroups
from all reports created, meaning the reports can be evaluated according to certain
criteria (age, gender, subject etc.).
These criteria are specific groups of returns (meaning completed questionnaires) and
these you determine yourself – through the creation of your questionnaire. You can
form these groups according to your
•
single choice questions,
•
multiple choice questions and
•
scaled questions.
Example:
Your questionnaire contains a single choice question regarding the gender with the
answers “female” and “male”. You can then create for all summarized reports each a
subgroup report “Female” and “Male” based on this questionnaire. These reports
could give you information on whether women and men answered differently.
Your questionnaire contains a single choice question regarding the age – e.g. you ask
for the groups of those aged 18 to 29, for the students aged 30 to 39, those aged 40 to
49 etc. If you evaluate reports – which are based on this questionnaire – according to
subgroups, this age question is presented to you as a criterion. Then you could, for
example, create a subgroup report for all mentioned age brackets and compare the
results. Following this, it would also be possible to combine the reports for the first
three groups and for the last three groups and thus compare the age group of 18 to 49
with the age group 50 and over.
Your questionnaire contains a multiple choice question (or a single choice question)
on the subject with the responses “Geology”, “Chemistry”, “Physics”, “History” and so
forth. Then you can create corresponding subgroup reports for all summarized reports
based on this questionnaire: subgroup report “Geology”, subgroup report “Chemistry”
and so forth. This way, you can structure courses that are attended by students of various disciplines according to subjects and make the results (meaning the subgroup
274
© 2011 Electric Paper GmbH
Phase 4: Advanced Reporting
reports) available to those in charge of each discipline. It could, for example, be that
the dean of “Chemistry” is not interested how the course “Nuclear Physics” was generally assessed as it belongs to the field of “Physics”. How the Chemistry students
assess the course could, however, be of great interest to him.
If your questionnaire contains a single choice question regarding the grade level, you
can then evaluate subgroups regarding the grade level.
Figure 337: Report Creator – Single Choice Question Regarding a Respondent’s Age
In order to produce a subgroup report, click in the details of a report on “Evaluate subgroup” (the last option on the bottom-right):
Figure 338: Report Creator – Report Details: Evaluate Subgroup
In turn, another window opens that presents you with all possible types of questions
on which you can evaluate subgroups:
Figure 339: Report Creator – Evaluate Subgroup: Selection of a Criterion
© 2011 Electric Paper GmbH
275
Your Evaluation Process: The Phase Model
In order to create a subgroup report, here you choose a criterion (that is a question),
for example the gender, and a value for the criterion (meaning the corresponding
response option to the question), here for example “Male”. Then you assign a relevant
name, decide for or against the inclusion of the open questions in the subgroup report
and click on the button [Create]. The subgroup report now appears in the list of
reports:
Figure 340: Report Creator – Subgroup Report in the Report List
Please note: Subgroup reports are identified by a logo different from that of the other
reports, the remaining options are, however, identical.
So you could again create, for example, subgroups from this report (for example
grade level) and/or merge this report with further evaluations.
Combining Multiple Criteria
In order to summarize the results of different criteria, such as “Gender”, “Registered
Major Subject” and “Target Degree”, in a subgroup report, you can use criteria combinations. These offer you the possibility of creating a subgroup report with several criteria (i.e. with multiple questions).
To create a subgroup report with several criteria, click, as you are accustomed, in the
details of a report on “Evaluate subgroup” (the last option on the bottom right). Subsequently a Window opens, offering you all possible questions with which you can evaluate a subgroup. In this window, you can click on the link “Choose several criteria for
subgroup reports“. This allows you to select multiple criteria for your subgroup report.
Figure 341: Report Creator – Selection of Several Criteria for Subgroup Reports
276
© 2011 Electric Paper GmbH
Phase 4: Advanced Reporting
The following window opens:
Figure 342: Report Creator – Selection of Several Criteria (Questions) for Subgroup Reports
In this window, for example, you can select all male interviewees as the first criteria.
To do this, click in the area “Available questions” on the criteria “Gender”. Choose, on
the right hand side the value of the criterion, i.e. the desired answer for this question.
In this example, you would choose “male”.
Figure 343: Report Creator – Selecting the First Criterion “female” for the Subgroup Report
© 2011 Electric Paper GmbH
277
Your Evaluation Process: The Phase Model
Finally, click on the button [Add criterion]. The criterion then appears in your “Default
criteria combination“.
In this case, the criterion “Gender” with the value “male” was added. The condition
being, that exactly this value must be fulfilled (indicated by the “=” character in the
“Operator” column):
Figure 344: Report Creator – Criterion “Female” was Successfully Selected
Depending on which question type the selected question is related to, you can select
a “=” operator, or other operators. With regard to scaled questions and matrix questions, as well as the “=” operator, the “<”, “>”, “≤” and “≥” and “<>“ (unequal) are available.
In open questions, you can filter by strings contained or not contained, as long as the
data of the open question is not an image. This function then applies to online surveys
or paper surveys with data collection and ICR.
Figure 345: Report Creator – Filteroptions for open questions
You can change the value of a criterion at any time here. This means, you can choose
for example all female interviewees instead of all male ones. To do this, click on the
arrow of the drop-down menu for the value of your chosen question.
Figure 346: Report Creator – Changing Criteria from “female” to “male“
Furthermore, you can delete a selected criterion at any time, by clicking under
“Options” on the red cross.
You can also create a subgroup report for all male interviewees via a simple subgroup, you do not need a criteria combination to do this. You can however combine
this criteria with others, for example with the grade level. In this way, you can create a
subgroup report for all male interviewees who have the grade level “freshman”.
As described above, first select the criterion “Gender” with the value “male”. In a second step, select the criterion “Main Subject” with the value “Business Studies”. Your
“Default criteria combination” now contains two criteria:
278
© 2011 Electric Paper GmbH
Phase 4: Advanced Reporting
Figure 347: Report Creator – Criteria Combination of all Male Interviewees with main subject
“Business Studies”
In this example, you wanted to consolidate all male students with the main subject
“Business Studies” in your subgroup report. This means, that both conditions must be
met at the same time (i.e. the student is male AND he studies Business). For this reason, both of the selected criteria are connected with the logical operator “And” (for
computer scientists amongst you, you can select the Booleschen operators here).
On the other hand, if you want to create a subgroup report containing the results of all
interviewees, who are either male OR studying Business, select here the “Or” operator. Your subgroup report would then contain the results of all male students – as well
as the results of all other students who have the main subject “Business Studies”. This
means, that this subgroup report also contains the results of female students who
study Business.
Figure 348: Report Creator – Two Criteria with the Operator “Or”
Finally, as you are accustomed, allocate a descriptive name, decide for or against
including open questions in the subgroup report and click on the [Create] button. The
subgroup report now appears in the list of reports:
Figure 349: Report Creator – New Subgroup Report in the Report List
You also have the possibility of creating several criteria combinations. If, for example,
you wish to summarize the results of all female students who have the main subject
“Business Studies” or the results of all students between 18 and 29 who have the
main subject “Business Studies”, proceed as follows.
In the default criteria combination, as you are accustomed, set the criteria to “female”
and “Business Studies”. Then click on the button [Add new criteria combination] so as
to create a second group.
© 2011 Electric Paper GmbH
279
Your Evaluation Process: The Phase Model
Figure 350: Report Creator – Add new Criteria Combination
This second group automatically receives the name“Criteria combination 1”. Add the
criteria “What is your age” (with the value “18-29”) and “Main Subject” (with the value
“Business Studies”) to this criteria combination.
Figure 351: Report Creator – Two Criteria Combinations
Imagine you only want to see in your report the results of those interviewees who fulfill
the following conditions: the interviewee is either female OR between 18-29 and in
both cases has the main subject “Business Studies”. For this reason, link both criteria
combinations with the “Or” operator.
Finally, as you are now familiar, allocate a descriptive name, decide for or against
including open questions in the subgroup report and click on the [Create] button. The
subgroup report now appears in the list of reports.
When you have created several criteria combinations, using the drop-down menu, you
can select the criteria combination to which the criteria combination of the chosen
question is to be added.
In the following graphic, you can see the results of the criteria “I learned a lot in this
course”, which is rated with a “1” (applies in full) and linked with criteria combination 3.
In the drop-down menu of the criteria combinations, select the criteria combination 3
and click subsequently on [Add criterion]:
280
© 2011 Electric Paper GmbH
Phase 4: Advanced Reporting
Figure 352: Report Creator – Selection of the Criteria Combination for the new Criterion
Subsequently, this criteria (= this question with the selected answer) is added to the
selected criteria combination.
Information on a Report – Report List
The list of the reports of a folder provides you with an overview of the properties of the
reports:
Figure 353: Report Creator – Subunit Report as Overview
This view provides you with following information:
•
Type of the weighting:
- If it is a weighted, summarized report, the symbol as here at the top of the column, shows two sheets with green arrows.
- For unweighted reports a symbol with paper and a warning triangle appears
here. For an unweighted report, choose the respective option whilst creating a
report:
© 2011 Electric Paper GmbH
281
Your Evaluation Process: The Phase Model
Figure 354: Report Creator – Create Unweighted Report
- The report that is then created shows a symbol with paper and a warning triangle:
Figure 355: Report Creator – Unweighted Report
- Hint: Here the date was added automatically to the name of the report because,
within this report creator access, a report with exactly the same name already
exists. (This is determined not by the folder level, but rather by the report creator
as a whole!)
•
Name: The name of the report corresponds to the name which you assigned during creation.
•
Status: The status here always says “Data available” since in the report creator
you can only summarize surveys for which data already exist, and therefore only
produce surveys (meaning report) with the status “Data available”.
•
Form: In the column “Form” you can call up the questionnaire sample and thus
gain information as to which questionnaire this compilation is based on.
•
Created: Here you can see when this report was produced.
•
Processed: This column informs you of the number of returns (= filled-in questionnaires), in this case 131.
•
Del/Red cross: By clicking on the trash can you can delete the report.
Please observe the following details:
- EvaSys does not hold any completed reports in memory. The automatically
generated PDF reports for single surveys are also produced “on the fly”, when
you click on [PDF] in the column “Report”.
- The report creator combines this data according to your reports and keeps it
282
© 2011 Electric Paper GmbH
Phase 4: Advanced Reporting
ready. When you click on [PDF], EvaSys produces the summarized report and
displays it.
- This means that here you only delete the compiled data, however, you can
reproduce the compilation again from your surveys at any time.
In the following figure you can see the confirmation if you like to delete a report.
Figure 356: Report Creator – Delete Report
•
Report: Here you can download the HTML and the PDF report. Either you only
see the lettering “PDF” for the download of the PDF report or – as in the screenshot – a drop-down list. The latter is the case, if several PDF report definitions
exist:
Figure 357: Report Creator – Download Reports
- The PDF report looks just as you are familiar with it from the automatically generated reports for single surveys (except for the letter and the PDF report
header).
- In the following, the first page of the subunit produced report gives you an overview of the appearance of the PDF reports of the report creator:
© 2011 Electric Paper GmbH
283
Your Evaluation Process: The Phase Model
Figure 358: Report Creator – Example of a PDF Report (Page 1)
- As usual, the report header shows the title of the report. In addition, it displays
the number of responses (46).
- According to the setting defined by the administrator, the details of the report
are then displayed to you, here for example an overview over the indicators of
the questionnaire. Following you will see the legend for the scaled questions as
well as five diagrams for the first five questions of the questionnaire.
•
284
Export: Here you can create export files for the subsequent processing in statistics programs:
© 2011 Electric Paper GmbH
Phase 4: Advanced Reporting
Figure 359: Report Creator – Export Options
- You always have the option of the CSV and SPSS export.
- For representation reasons you see here only two of the options, the SPSS
export is, however, displayed in the details of the report.
Information on a Report – Detailed View
If you click on the name of a report, the detailed view is displayed to you:
Figure 360: Report Creator – Detailed View of a Report
Here you receive information on the name, the folder (= “Study”) and the type of the
report created and, just like in the overview, you can call up the questionnaire template. The status, the creation date and the number of returns are also indicated here.
© 2011 Electric Paper GmbH
285
Your Evaluation Process: The Phase Model
In the left part of the window in the area “Actions” you can rename the report – if for
example you realize that you have produced a report bearing the same name as an
existent one and, therefore, the date was added automatically at the end. Furthermore, you have the possibility of deleting the report.
In the right part of the window under “Survey data” you can download the evaluation in
HTML and PDF format. If any user-defined PDF report definitions are associated with
this questionnaire and/or if the questionnaire was translated, you can download the
user-defined report or reports in other languages here.
In the following figure you can recognize, for example, that besides the EvaSys PDF
report a user-defined report was produced automatically for the computer center. It
contains, for example, only the questions which are important to the employees of the
computer center:
Figure 361: Report Creator – Detailed View: Downloading User-defined PDF Reports
If your questionnaire was translated, you can decide here on the language in which to
download the standard or the user-defined report. Here a selection is possible
between “English” and “German”:
Figure 362: Report Creator – Detailed View: Downloading Multilingual Reports
So in this example you could download four different reports:
•
the English standard report,
•
the German standard report,
•
the English report for the quality of teaching and
286
© 2011 Electric Paper GmbH
Phase 4: Advanced Reporting
•
the German report for the quality of teaching.
Below these options you have the possibility to export the raw data into the formats of
SPHINX, SPSS and CSV:
Figure 363: Report Creator – Detailed View: Export Raw Data
The option “Profile line” allows you to have the profile lines of this report displayed
separately:
Figure 364: Report Creator – Detailed View: Profile Line of the Report
Furthermore, EvaSys can add a further profile line which you can select in the dropdown menu:
© 2011 Electric Paper GmbH
287
Your Evaluation Process: The Phase Model
Figure 365: Report Creator – Detailed View: Selection of a Comparative Profile Line
Via the option “Merge evaluations” the report can be combined with further reports,
and via the option “Evaluate subgroup” it can be filtered according to a specific
aspect. You can obtain further information on this topic in the chapter on combinations and subgroups.
Note:
The options “Merge evaluations” and “Evaluate subgroup” as well as the raw data
exports are not available for reports with unweighted averages.
Further possibilities of comparison are described in the following chapter.
5.2.3.
Dispatch of Comparative Profile Lines
You are already familiar with profile lines from the automatically generated PDF
reports. They give a graphic overview on the results of your evaluation.
You can download these profile lines in the report creator for all surveys and all
reports produced by the report creator and lay them over one another. This way the
report creator compares completed surveys with one another and/or with the created
reports. Since this comparison provides at a glance a comfortable and expressive
overview of surveys, it is conducted often. A popular application is the comparison of a
survey with the subunit report as well as the total evaluation.
Before you can create comparison lines, the necessary surveys and reports must of
course be available.
Creating and Downloading Comparative Profile Lines
When you have created these, select the option “Batch Profile Lines” from the second
drop-down list in the study folder and click the button [Next]:
288
© 2011 Electric Paper GmbH
Phase 4: Advanced Reporting
Figure 366: Report Creator– Create Profile Line Emails
Then the usual choices are presented to you in a new window. Select the desired subunits, the survey periods (here no multiple selection is possible), the course types and
the relevant ones (comparable!) questionnaires here. As usual, the list of courses that
meet all criteria is displayed:
Figure 367: Report Creator – Profile Line Emails: Selection of Criteria
You can mark several courses/reports in the list of courses.
Additionally, you have the option to select the profile lines that every event should be
compared with, under “First Comparison Line” and (as required) “Second Comparison
Line”.
Instead of a report, the option “Survey of same course in period XY” can also be
selected. This selection adds the line of an earlier survey to the profile line of a
selected course, if available.
If you make such a selection and then download the profile lines, a profile line is created for each selected course/report (except for those of the two comparative lines). In
addition, the first profile line and, if selected, the second profile line are laid over each
other. You thus receive a document which bears at least as many pages as selected
courses.
© 2011 Electric Paper GmbH
289
Your Evaluation Process: The Phase Model
Figure 368: Report Creator – Profile Line Emails: Selection of a Comparative Profile Line
After the selection you can scroll to the end of the page and choose one of the following download methods:
•
Dispatch of the profile lines to the instructors/trainers of the marked courses. This
option ensures that each instructor/trainer is only sent the profile line of his or her
course (if selected, with the first and second comparative lines that are inserted
into the graphic). If you mark the option “Additional recipient”, you are presented in
a further field with the possibility to enter further email addresses (separated by a
semicolon):
Figure 369: Report Creator – Profile Line Emails: Send a Comparative Profile Line
•
Dispatch of the profile lines to defined recipients. As described above, enter the
email addresses of the desired recipients. In this case, however, the instructors/
trainers of the selected courses do not receive your email:
Figure 370: Report Creator – Profile Line Emails: Additional recipients
•
Download of the profile lines. If you choose this option, you can subsequently open
and view the profile line directly or save it.
•
Download of the profile lines (zipped). Corresponds to the version just described
with the difference that here you can download a zipped file.
290
© 2011 Electric Paper GmbH
Phase 4: Advanced Reporting
Thus you download – except for the first option – a document containing the profile
lines of all selected courses.
Example 1:
Compare the course “Organization and Management” with the subunit report “Prof.
Development WS10/11”.
Here the course “Organization and Management” (instructor: Carlos Hernandez) is
selected from the list of courses, and as the first comparison line “Prof. Development
WS10/11” (the name of the subunit report):
Figure 371: Report Creator – Selection of Profile Line and Comparison Line
When you download with this selection the batch the following profile line appears:
Figure 372: Report Creator – Comparative Profile Line
© 2011 Electric Paper GmbH
291
Your Evaluation Process: The Phase Model
In the header you first see all of the information on the selected courses and/or
reports, followed by the list of questions on the left which are complemented on the
right by the two overlaid profile lines as well as averages.
As usual with the profile lines, only questions regarding the standard value and scaled
questions are displayed here.
Example 2:
In addition to the course “Organization and Management” by Carlos Hernandez you
also mark the course “Management Strategies” of Prof. Dr. Philipp Belmore, and
again choose as comparative profile line “Prof. Development WS10/11”. You leave all
other options at their default value:
Figure 373: Report Creator – Select two Courses + Comparison Line
In this case in the PDF you will see the profile line comparison shown above on the
second page. On the first page the profile line of the course of Prof. Dr. Belmore is
compared to the first comparative line (Prof. Development WS10/11). (Exception: you
send out these comparative lines, then Prof. Sunny Narrow and Prof. Dr. Michel White
each receive their profile line compared with the subunit report.)
Comparison Options during the Batch Profile Line Dispatch
Below the selection of the comparative lines you have the option to modify the presentation of the profile line comparison through a number of options, or to integrate additional comparative lines:
Figure 374: Report Creator – Profile Line Emails: Options
292
© 2011 Electric Paper GmbH
Phase 4: Advanced Reporting
Comparison of the Selected Courses/of Reports to Each Other
Activate this option if you wish to compare the selected courses/reports not only with
the respective comparative lines, but also with one another.
Though in this case a profile line comparison is created for each course/report, the
profile lines of ALL selected courses/reports are contained in each graphic.
Example 2, continuation:
In the upper example 2 this would mean that in the graphic for Philipp Belmore (Management Strategies) additionally the profile for Carlos Hernandez (Organization and
Management) is included and the other way round as you can see in the figure below.
Figure 375: Report Creator – Profile Line Emails: Compare Selected Courses with Each Other
Please note:
You can compare a maximum of eight courses/reports.
If you do not activate the option “Comparison of the selected courses/of reports to
each other”, the number of eligible courses is unlimited. (But then the profile lines will
not be shown in one and the same diagram.)
© 2011 Electric Paper GmbH
293
Your Evaluation Process: The Phase Model
Minimum/Maximum Values
The worst or the best value within a comparison group determines the margin of the
presentation area. If the option “Minimum/Maximum Values” is activated, the space
between these worst or best values and the scale edges is grayed in:
Figure 376: Report Creator – Profile Line Emails: Options: Minimum/Maximum Values
Overall Average
In addition to the profile lines of the courses/reports you selected you can have their
overall average displayed (as a thick black line). For this, activate the option “Overall
Average” in the comparison options. Here you see an example:
Figure 377: Report Creator – Profile Line Emails: Options: “Overall average”
294
© 2011 Electric Paper GmbH
Phase 4: Advanced Reporting
Comparative Lines
This option is activated as default. Because it ensures that all comparative lines are
displayed.
If you deactivate the “Comparison lines”, the graphic only contains the profile line of
the selected course/report, all others are not displayed.
So that you can use this function meaningfully in its deactivated form, you should bear
in mind the following two points:
•
If this option is deactivated, you must select either “Minimum/Maximum Values” or
“Overall Average” instead (or, of course, both). Since through the deactivated
function you do not display anything but the current course, a comparison is otherwise not possible.
•
Do not activate any first or second comparative line, as then you would restrict
yourself to “5. Courses/Reports”, in order to select profile lines.
If you activate the “Minimum/Maximum Values” and/or the “Overall Average” but
deactivate the “Comparison lines”, only the respective current profile line will be displayed to you; the values of further courses/reports, however, flow into the calculation
of the minimum/maximum values and that of the total average.
Example:
In practice, this looks, for example, as follows:
Under “5. Courses/Reports” you select “Management Strategies” and “Organization
and Management” as well as the report “Prof. Development WS10/11”. The first and
second comparative line remain deactivated.
Now tick “Comparison of selected courses/of reports with each other” (no necessity,
but is advisable).
In the comparison options the “Minimum/Maximum Values” are activated, and “Comparison lines” and the two other options are deactivated.
Everything else remains the same. The graphic contains only one course each in this
example, but the values of the others are taken into account, clearly proven by the
grayed zones.
© 2011 Electric Paper GmbH
295
Your Evaluation Process: The Phase Model
Figure 378: Report Creator – Profile Line Emails: Options: ”Comparative line” (deactivated) with
Minimum and Maximum Values
Here you only see one profile line (in this case for the first selected course). The gray
zones show, however, that the calculation of the minimum and maximum values
includes further values.
If you activate the overall average profile line instead of the minimum and maximum
values, this profile line appears in addition to the profile line of the current
course:
Figure 379: Report Creator – Profile Line Emails: Options: “Comparative line” (deactivated) with
the Overall Average
296
© 2011 Electric Paper GmbH
Phase 4: Advanced Reporting
Anonymizing Comparative Line
With the comparison of several events/reports to each other it is possible, for data protection reasons, to anonymize the names of all comparative lines. So the instructor/
trainer to whose course it relates, only sees the name of his course, the rest is anonymized (“Comparative line [Course1]”/“Comparative line[Report 1]”).
Figure 380: Report Creator – Create Profile Line Emails: Options: “Anonymize comparative
lines”
Of course these options can also be combined. You could, for example, have a profile
line comparison displayed to you in which you mark the minimum and maximum values with gray, add the total average to the graphic and anonymize the comparative
lines.
Hint on Falling Short “Short Number of Minimum Responses”
If you wish to display the profile lines only for the surveys that achieved a certain level
of participation you can freely define this through “Check if the number of completed
forms exceeds the minimum level (defined in parameters)”. If this option is activated,
the limitation applies which the administrator has set in the menu “System Settings/
EvaSys Settings/Survey/Minimum number of returns for reporting”. If the number of
returns to a survey lies below this value, instead of a profile line a corresponding message is displayed:
© 2011 Electric Paper GmbH
297
Your Evaluation Process: The Phase Model
Figure 381: Create Profile Line Emails – Options: “Check if the number of completed forms
exceeds the minimum level (defined in parameters)”
Excluding Questions from the Presentation
When you activate the option “Remove certain questions from profile line(s)” and click
on [Request], the questions of the questionnaire are displayed prior to the dispatch or
download, so that you can exclude individual questions from the presentation of the
profile line.
Of course, only those questions that can also appear in the profile line are presented,
meaning only questions regarding the standard value and scaled questions:
Figure 382: Report Creator – Profile Line Emails: Option “Remove certain questions from profile
line(s)”
Adding Trend Graphic
If you have defined indicators for the relevant questionnaire, you can display a trend
graphic in addition to the profile line. For this purpose, mark the option “Add trend
graphic for indicators to the profile line (as far as corresponding data is available over
several survey periods)”.
The trend graphic shows you a course of time of the averages for indicators determined over several survey periods:
298
© 2011 Electric Paper GmbH
Phase 4: Advanced Reporting
Figure 383: Report Creator – Profile Line Emails: Trend Graph
Prerequisite for this is the availability of indicators on the selected questionnaire as
well as captured data from several survey periods. The trend graphics each show
groups of up to five indicators with a maximum of five survey periods in one graphic. If
data is available from more than five survey periods, the graphics are divided up correspondingly.
Assignment of the Questions in the Case of Different Questionnaires
As you are familiar from the report creation, with profile line comparison you have the
option to compare surveys that are based on different (but comparable) questionnaires. To do so, there both options are available: the automatic and the manual questionnaire comparison. Please activate one of the two options here if you use surveys
with several questionnaires.
With these options you have diverse possibilities to use the batch profile lines for comparison purposes. In conjunction with the summary reports, this is a powerful tool for
processing your data at hand.
5.2.4.
Result Reports
With the report creator you can download further reports that provide an overview of
survey results to the management of your institution or your company. You can find
these reports in the menu “Reports” on the left hand side.
Using this function you can create summary reports for the president for studies, the
deans of studies/program managers as well as the deans/managers, which give them
an overview of the results of the course evaluations. These functionalities are for
questionnaires that were set up for the creation of summary reports.
© 2011 Electric Paper GmbH
299
Your Evaluation Process: The Phase Model
Figure 384: Additional Reports
There are three report forms for summary reports:
•
Report for the president
Contains an overall indicator for all surveys in the past semester sorted according
to subunits.
•
Report for the dean/manager
Contains an overall indicator as well as individual indicators for all surveys in the
past semester in his or her own subunit.
•
Report for the dean of studies/program manager
The dean of studies/program manager selects from a general list of all surveys in
all subunits those which should be compiled in his report. The report has the same
degree of detail as for the dean/manager.
General Settings
First you must select a general setting. Choose a subunit, a survey period and a questionnaire and then click on [Continue >>].
Figure 385: Additional Reports – Basic Settings
300
© 2011 Electric Paper GmbH
Phase 4: Advanced Reporting
Figure 386: Additional Reports – Generating aggregated Reports
The general setting can always be selected again at the bottom of the screen “generating reports” and applied with [Next].
Report for the President
Figure 387: Additional Reports – Report for the President
Click on [Download] to create the PDF document. You will then be able to download it
shortly.
Report for the Dean/Manager
Figure 388: Additional Reports – Report for the Dean
Select the subunit. For the letter accompanying the report the address in the subunit
details will be used. The dean/manager will be addressed in neutral terms as he or
she is not in the system as user. Click on [Download] in order to create the document.
© 2011 Electric Paper GmbH
301
Your Evaluation Process: The Phase Model
Report for the Dean of Studies/Program Manager
Figure 389: Additional Reports – Selection of Courses for the Dean of Studies/Program Manager
For the report type dean of studies/program manager it is essential that the user profile of the type dean of studies/program manager has been set up.
The deans of studies/program managers can then login with user name and password
and from a list of all evaluated courses select those that they would like to have in
their report. The user type dean of studies/program manager cannot however create
this report himself. This is done on the report creator interface
Figure 390: Additional Reports – Report for the Dean of Studies
Select the name of the dean of studies/program manager whose report should be created. Click on [Download] to create the document.
5.2.5.
Integrating Profile Comparison Lines in the PDF Report
Comparative Profile Lines in the PDF Report – Fundamental Possibilities
The automatically generated PDF report of a survey shows you (if activated in the
configuration of the corresponding PDF report) a profile line at the end. With regard to
scaled and matrix questions, it gives you an idea of how the interviewees voted.
As report creator, you can compare the profile lines of the evaluated surveys with
each other or with the profile lines of other reports available. The profile line comparison gives you one or more PDF documents in which several profile lines are placed
next to each other. The following conditions are necessary in order to create these
documents:
•
You have already collected data.
•
As a Report Creator, you can manually recall or send documents for the existing
data
302
© 2011 Electric Paper GmbH
Phase 4: Advanced Reporting
•
The documents are independent of a specific PDF report and are not integrated as
such.
You also have the possibility of displaying other comparison lines together in addition
to the current profile lines in the automatically generated PDF report. Whereby the following comparison lines are possible:
•
Comparison lines from (up to five) previous periods as well as
•
A comparison line, originating from a report of a report creator.
If the relevant data is already available in the system, the relevant comparison lines
will be displayed together with the profile lines of the survey in the profile line of the
automatically generated PDF reports.
You specify which profile lines you would like to see in a PDF report in the details of
the questionnaire (Main menu “System Settings” Æ questionnaire list Æ click on the
name of the relevant questionnaire).
Note:
You should login under the EvaSys user role which created the questionnaire
(Administrator/Subunit administrator).
Profile Line Comparison in the PDF Report – Add Previous Period
In the details of a questionnaire, you can define the number of previous periods which
should be compared with the current period. This means: the profile line of the period
of the current survey will be compared to the profile lines of the survey of the same
course from the previous period.
In order to activate the profile lines for a questionnaire, go to the questionnaire details,
in the area “Evaluations” and select the option “Comparison report” in the drop-down
menu and click subsequently on [Edit]:
Figure 391: Profile Line Comparison – Selecting the option “Report for Comparison”
© 2011 Electric Paper GmbH
303
Your Evaluation Process: The Phase Model
The following window opens automatically, in which you can define the number of previous periods for the comparison lines:
Figure 392: Profile Line Comparison – Defining Previous Periods and Comparison Reports
In the first part, you define how many previous periods are to be considered in the profile line. Here you can choose between none and five previous periods. If, for example
you wish to include three previous periods for comparison, enter the number three
here.
In every PDF report for surveys, which were created using this questionnaire (here:
train_en), as well as the current profile line of the survey, you also can see the comparison profile lines of the previous three periods. This is however only valid under the
premise that data for these three periods is available in EvaSys. Then this is valid not
only for standard report but also the user defined PDF report.
In the following graphic, the course “Management Strategies” of Prof. Philip Belmore,
from summer term 2011 was compared with the results of the two previous periods
(WS10/11, SS10).
304
© 2011 Electric Paper GmbH
Phase 4: Advanced Reporting
Figure 393: Profile Line Comparison – Example of a Profile Line Comparison with two Previous
Periods
Please note, that you define these settings per questionnaire as an administrator as
well as a subunit administrator.
Profile Line Comparison in the PDF Report – Add Report for Comparison
As well as defining previous periods for the profile line comparison, you can also
define comparative reports. Again, in the questionnaire details, select in the area
“Advanced Settings” the option “Report for comparison” and click on [Edit]. In the following window, under “Define report for comparison”, you can define which report
should be used for the comparison.
Figure 394: Profile Line Comparison – Define Report for Comparison in the Details of a Questionnaire (Administrator)
Under “Available reports” you will find all reports which are based on the current questionnaire, and which you have already created in the Report Creator window.
In order to display the profile lines of a comparative report in the standard PDF report,
you must have previously created reports for this questionnaire in the Report Creator.
© 2011 Electric Paper GmbH
305
Your Evaluation Process: The Phase Model
Let us assume, for example, you have created period reports of your individual subunits as report creator, for example, “Prof. Development WS10/11“. In addition, you
have perhaps created instructor/trainer reports, like “Belmore WS10/11” or “Hernandez WS10/11“. These reports created in the report creator can be defined here as
comparative reports for special periods and subunits.
In the following example the comparative report “Prof. Development WS10/11” was
selected. This subunit report, which was created by a report creator, contains all survey results of the winter term 2010-11 for the subunit Engineering.
Once you have selected the comparative report, define in the area “Survey Period”,
which period it should be used for. You can only mark one single period!
If, for example, you define here the period WS10/11, in all PDF reports of the surveys
which were created with this questionnaire in WS10/11, the profile line will be supplemented: they contain additionally the profile line of the subunit report “Prof. Development WS10/11“.
Additionally, you define for which subunits the comparative report should be used for.
As opposed to the survey period, whereby only one period can be selected, in the
area of “Subunits” you can define several subunits. To do this, press and hold down
the [Crtl] button and click on the desired subunits. Please note, that a subunit administrator only has access to his subunit. You can allocate subunits to a subunit administrator in his user profile.
In the following screenshot you can see that the comparative report “Prof. Development WS10/11” was selected. This comparative report is to be used for all surveys in
WS10/11 for the subunit “Prof. Development”, both of which were created with the
train_en questionnaire.
Figure 395: Profile Line Comparison – Definition of the Report for Comparison, the Survey
Period and the Subunit
Save your input by clicking the [Add] button. As you can see in the following graphic,
your settings are automatically added.
306
© 2011 Electric Paper GmbH
Phase 4: Advanced Reporting
Figure 396: Profile Line Comparison – Report for Comparison was created successfully
If you now access the PDF report for surveys of the subunit “Prof. Development” created in the period WS10/11 with the questionnaire “train_en”, as well as the profile line
of this survey you will also receive the comparison profile line of the subunit report
“Prof. Development WS10/11”.
In the following graphic, the profile line of the survey results of the course “Organization and Management” from Prof. Carlos Hernandez in the subunit “Prof. Development” in WS10/11 is displayed with the profile lines of the comparative report (Prof.
Development WS10/11) defined above.
Figure 397: Profile Line Comparison – PDF Report with the Profile Line of the Report for Comparison
© 2011 Electric Paper GmbH
307
Your Evaluation Process: The Phase Model
In the questionnaire details, you can define as many comparative reports as you may
require. In doing so, please note that you can only define one comparative report per
survey period and subunit. This means, that you cannot define any more comparative
reports for the subunit “Prof. Development” in WS10/11, if you already have defined a
comparative report for this subunit in WS10/11.
If you combine the settings defined above, thereby defining both the two previous
periods as well as the comparative report “Prof. Development WS10/11” for the comparison lines, your PDF reports will additionally contain these three comparison lines.
In the following graphic, you can see the profile lines for the survey results of the
course “Data Analysis” in SS07 in the subunit “Engineering” together with the four
comparison profile lines defined:
Figure 398: Profile Line Comparison – Combination of the Various Profile Lines
In conclusion, it can be held, that as an/a (subunit) administrator, you can define comparative profile lines for a particular questionnaire, in the details of a questionnaire via
the option “Report for comparison” in the area “Advanced Settings”. You can there
•
define the number of previous periods to be included in the comparison, and
•
select a comparative report which has already been created by the report creator.
308
© 2011 Electric Paper GmbH
Phase 4: Advanced Reporting
5.3.
Data Export to Excel/SPSS/Sphinx
5.3.1.
Possible Data Export Formats in EvaSys
For further reports and evaluation you can export the collected data to three different
formats. The export function can be used for all of the surveys and reports. In the following you can see a description of the different formats:
CSV Format
CSV stands for “Comma Separated Values” and provides a free text format that is
able to be read by all statistical tools as exchange format. One line of a CSV file is
equivalent to the content of one questionnaire. The values are separated by a separator. You can define this separator at “settings/data import and export“; the default setting is a comma. A line of data contains:
[instructor name],[course name],{course additional fields},[set-ID],[variable 1],... ,[variable n]
Data from surveys whose questionnaires were created in batch printing with serial
numbering additionally receive the batch print ID.
SPSS Format
SPSS is a common tool for statistical analysis and solutions.
Exporting from EvaSys creates a SAV file, which contains the format of the sheet and
all the raw data of the survey/report.
Sphinx Format
Sphinx is a professional statistics solution from France, for which EvaSys has an interface. After the download you will receive a ZIP file which contains a directory as well
as three single files:
[SURVEYNAME].QUE
(Sphinx questionnaire)
[SURVEYNAME].OUV
(responses to open questions)
[SURVEYNAME].REP
(responses to closed questions)
[SURVEYNAME].HYP
(Report template, if available)
[SURVEYNAME].BAT
if report template is available)
(Link to direct display of the Sphinx evaluation report,
In order to use these files you will need to install Sphinx Survey V4.5 or higher on your
PC. Double-click on [SURVEYNAME].OUV file in order to start the operation. You can
learn more about using Sphinx with EvaSys in the relevant chapter.
Export of Online Surveys
For online surveys the export data includes a time stamp showing the completion time
of every record.
© 2011 Electric Paper GmbH
309
Your Evaluation Process: The Phase Model
5.4.
Definition of the Export Values and Names for
Variables
In export, EvaSys assigns the names of the variables (=questions) automatically. In
CSV-export this is unproblematic, because the question text is adopted. With export to
Sphinx or SPSS however, no meaningful variable name appears, but an alpha/numerical combination, for example V2_A for the first variable(as question) in the second
question group.
You can specify new names for all variables. These are then displayed in the CSV file
(thus in Excel), as well as in Sphinx and SPSS, instead of the automatically assigned
names
This function is intended to support you in the evaluation with statistic tools.
To rename the variables, go to the details of a questionnaire and in the area
“Advanced Settings” select the option “Data export configuration”. Click on [Edit]:
Figure 399: Data Export Configuration in the Details of a Questionnaire
Note:
The allocation of names for variables must be carried out for each questionnaire.
In the window which opens afterwards you have the possibility of defining the names
of the different variables:
310
© 2011 Electric Paper GmbH
Phase 4: Advanced Reporting
Figure 400: Define Data Export Configuration
The first column shows you the types of questions and the question text, the second
displays the internal description of the variable. In the third column, you can rename
the variable. Please observe the following rules when renaming:
The name
•
must begin with a letter (reason: variables in SPSS must begin with a letter).
•
may only consist of letters, numbers and the underscore. This means, that other
(special) characters also the space bar, are not allowed. Capital and small letters
are, however, not important.
•
may be a maximum of 32 characters long (Please note: In SPSS the variable
names will be truncated to 8 characters).
•
must contain at least one character. The field therefore, cannot be empty!
In the fourth column the export values are displayed, to which you can allocate new
numerical values. Please note, that you can only use numerical values for the export
value, no alphabetical characters.
After completing your changes, click at the end of the dialogue on [Save]. EvaSys
informs you whether the saving of your changes was successful:
Figure 401: Data Export Configuration successfully saved
© 2011 Electric Paper GmbH
311
Your Evaluation Process: The Phase Model
(Should the variables not comply with the above mentioned rules, an error message
will appear).
After your changes have been successfully adopted, click at the end of the window on
[Close] to exit the export configuration.
The example questionnaire just processed (Sampl1) shows, for example, in the raw
data export via CSV, the following result (SPSS and Sphinx are also possible).
Figure 402: CSV Export of the Raw Data with Changed Names of Variables and Export Values
The variables changed by you and the export values are displayed. In the third column, for example, instead of the usual variable description “V2_B“, the newly defined
variable name “Age” is displayed. Also, the newly defined export values “0-1” in the
area “V2_A” are displayed here instead of the usual export values “1-2”.
5.5.
The EvaSys Report Module Sphinx Plus²
The statistics solution Sphinx Plus2 is available as an expansion for EvaSys. When
this export interface is enabled (you can see this in the license administration) you can
create all surveys, summaries, filtering and archiving.
Figure 403: Export to Sphinx
Just click on the text “SPHINX” in the drop-down menu in the column “Export”. In a
few moments a download window will appear. Save the ZIP file to a folder on your
local hard drive. The data are transmitted as ZIP file because three separate files
have to be transmitted.
Extract the ZIP file. You will get a sub-folder in which there are the three files.
Figure 404: Files of the Sphinx Export
312
© 2011 Electric Paper GmbH
Phase 4: Advanced Reporting
Open the QUE files with a double-click. Sphinx Plus2 will start automatically and open
this survey.
Since in addition to the raw data the contents of the whole questionnaire are transferred, you can immediately begin analyzing the results.
The following figure shows you the welcome page of Sphinx.
Figure 405: Sphinx
The functionality of this statistics solution allows you to conduct a thorough statistical
analysis within a short period of time. The graphic report creation makes use of the
drag and drop principle.
Figure 406: Diagrams in Sphinx
© 2011 Electric Paper GmbH
313
Your Evaluation Process: The Phase Model
6. Phase 5: Quality Management
6.1.
Norms
In EvaSys, you can add norm values for questionnaires. Thus, you can more easily
compare and interpret results from surveys which are based on this questionnaire.
If norms have been defined for the corresponding questionnaire and if they have been
activated in the PDF report settings (menu “System Settings/Report Settings/Configuration/Show norm values”), an overview over the values of the indicators with the corresponding norm values and a normed profile line is displayed in the section “Overall
indicators” at the beginning of the report.
Interpretation is made easier with colored icons that signal if a result is to be interpreted as good or bad:
Positive result
Neutral result
Slightly critical result
Critical result
Figure 407: Normed Profile Line for Indicators
In addition, a detailed profile line can be activated in the PDF report which shows the
norm values for all questions of the questionnaire (“System Settings/Report Settings/
Configuration/Show normed profile line”). This is displayed in the PDF report after the
analysis of the individual questions.
As norm basis you can use averaged data from surveys you conducted in the past
with the same questionnaire. You can add these norm data (mean values and standard deviations) for the individual questions of the questionnaire manually or you can
have them converted automatically from a summary report that was created by a
report creator. This can be e.g. a summary report for a subunit, or similar.
314
© 2011 Electric Paper GmbH
Phase 5: Quality Management
Figure 408: Normed Profile Line for each Scaled Question of a Questionnaire
In addition to norming survey results, individual message texts for below average,
average and above average results can be added to the results. These texts can be
accessed by instructors/trainers via a link in the PDF report. Text building blocks are
used to create individual message texts based on the results achieved in a given evaluation.
The norm profile lines and message text functionality were developed in collaboration
with Dr. Heiner Rindermann from the University of Magdeburg.
6.1.1.
Calculation of Norms
The norming in EvaSys was developed in cooperation with Dr. Heiner Rindermann
from Magdeburg University and consists of a modified form of the Z-transformation.
The formula for cases where large (above average) values are better is:
Figure 409: Formula for Norming when Higher Values Are Better
When lower (below average) values are better the formula is as follows:
Figure 410: Formula for Norming when Lower Values Are Better
© 2011 Electric Paper GmbH
315
Your Evaluation Process: The Phase Model
Example Calculation when Higher Values Are Better:
Suppose the indicator – i.e. the overall mean – of a question group in a questionnaire
is 5.9 and the corresponding value of the indicator for the norm basis is 5.388. Further, suppose the standard deviation of the norm basis is 0.9344. The norm value is
then given by the following calculation:
Figure 411: Example Calculation
Note:
If the setting “Mode of calculation for norming” is set on “2” in the configuration of the
PDF report, the indicator calculated for the norming can differ marginally from the
standard indicator. In this case, the mean value is calculated by averaging the mean
values that have been computed for the individual questions. For this procedure it is
necessary that a minimum number of items/questions were answered in the dataset.
The norm values can be interpreted according to the following table. For example, a
value of 105.5 can be considered as “slightly above average” (compare line 6):
Norm value (Z)
Percent rank
Distribution
Description
<70
0-0,12
ca. 0,1%
far below average
70-84,9
0,13-6,67
ca. 6,6%
below average
85-94,9
6,68-30,84
ca. 24,2%
slightly below average
95-105
30,85-69,15
ca. 38,3%
average
Therin: 100
50
average value
average value
105,1-115
69,16-93,32
ca. 24,2%
slightly above average
115,1-130
93,33-99,87
ca. 6,6%
above average
130<
99,88-100
ca. 0,1%
far above average
Figure 412: Classification of Norms (Mean = 100, Standard Deviation = 10)
6.1.2.
Definition of Norm Values for Questionnaires
In order to use the functionality of norm profile lines, the option (System Settings/
Report Settings/Configuration/Show norm values) must be activated.
In the following figure you see the settings for norming a questionnaire.
316
© 2011 Electric Paper GmbH
Phase 5: Quality Management
The option “System Settings/Report Settings/Configuration/Show recommendation
text” gives instructors/trainers the possibility to generate a recommendation document
through a link in the PDF report.
In the details of a questionnaire you can choose in the drop-down-menu in the area
“Advanced Settings” the option “Norming”. After marking the option “Norming” click on
the button [Edit].
A sub window appears in which the norm value can be entered. If there is not yet a
norming for the questionnaire then a message will display with the button [Add Norming].
Figure 413: Activate Norming
Figure 414: Norming – Details
© 2011 Electric Paper GmbH
317
Your Evaluation Process: The Phase Model
In the table displayed you can now set for all the dimensions (indicators) as well as
items (only scaled items are permissible) norm values and analysis rules.
Figure 415: Norming – Edit
Whether results are to be seen as positive must be set for each dimension, e.g. for
methodology and structure, above average; for redundancy, average; for anomie (lack
of discipline) below average.
At the right-hand side of the screen you will see the average as well as the standard
deviation of the comparative group. This is repeated for the complete contents of the
questionnaire.
In the column “recommendation text” three text building blocks can be placed, which
should be displayed depending on whether the results are above average, average or
below average.
At the left using checkboxes you determine whether in addition to the dimensions
there should also be text building blocks for individual items.
Example: Atmosphere Dimension
Above average score:
Congratulation! Your course is considered by your students/participants to have an
above average positive atmosphere (friendly manner with students/participants, cooperative, instructor/trainer is open). Particularly in courses with interactive teaching is
this an important aspect.
Average score:
Average score results in teaching are not bad, since most courses have been give
evaluated as good. (on a raw value scale between 1 and 7 at 5). So this is at least a
satisfactory score! How could you continue to improve the atmosphere as judged by
students/participants (friendly manner with students/participants, cooperative and
instructor/trainer is open)? Particularly in courses with interactive teaching is this an
important aspect […]
Below average score:
Comparative norms always place 49.99% of the values under the average and
49.99% above. But for norm values below 85 you should definitely take action. It is
important not to be discouraged or to make those circumstances you can’t change
318
© 2011 Electric Paper GmbH
Phase 5: Quality Management
responsible. The best attitude would be to use this score as an impulse to continue to
improve your teaching!
How can you continue to improve the atmosphere as judged by students/participants
(friendly manner with students/participants, cooperativeness and instructor/trainer is
open)? Particularly in courses with interactive teaching is this an important aspect […]
As an alternative to manual entry of norm values you can also make use of existing
evaluations that you have already created with the user type report creator.
In the section “Edit norming types” click on the button [Edit].
Figure 416: Norming – Edit Norming Types
In the upper part of the screen you will see a list of the available norm types, which
cannot be deleted. This total norm is generally valid unless you create a special subnorm.
You can now give the total norm a norm value basis by selecting one of the reports
shown in the list in the area “Assignment of the norm type total norm”. It is not possible
to limit the total norm to courses or subunits.
In order to create sub-norms, enter the name of the sub-norm in the list “norm types”
and click on [New]. The assignment area for the new sub-norm now appears. You can
now select all of the course types and subunits as well as the corresponding norm
value basis valid for this sub-norm.
© 2011 Electric Paper GmbH
319
Your Evaluation Process: The Phase Model
6.2.
Quality Guidelines
With quality guidelines you can define minimum standards for questions in a questionnaire that have to be reached by survey responses.
Note:
Please note that quality guidelines are only available for scaled questions.
By using such an overview, executives within an organization, such as a dean or a
manager, are able to put together and assess a number of evaluated courses and
access detailed reports if desired.
The (subunit) administrator sets quality guidelines for a questionnaire by allocating a
weight and a threshold value to each question or question group that will subsequently be used in the calculation of a quality index. For an evaluated topic or course
this quality index can be between 0% and 100%.
6.2.1.
Setting Quality Guidelines
Quality guidelines are set in the questionnaire details. Choose the option “Quality
Guidelines” in the drop-down menu “Advanced Settings” and click on [Edit].
Any quality guidelines (or their question groups, respectively) that have been already
defined appear in the list. These are one or more questions that have individual
weights attached as well as a group weighting for the quality guideline. Existing quality
guidelines can be edited or deleted. One way to set up new quality guidelines is to set
them up manually via the button [New].
Note:
Please bear in mind that the mirroring of scale values (in the questionnaire details)
does not affect the calculation of the quality guidelines. Therefore, they always need
to be calculated on the basis of the internal scale values (from 1 to n, from left to
right).
Figure 417: Button “New” to Set Up New Quality Guidelines Manually
320
© 2011 Electric Paper GmbH
Phase 5: Quality Management
In the view that opens, a name and description have to be entered and a weight has to
be assigned in relation to the overall quality index. The weight defines the maximal
possible deduction in percent that this guideline can have on the overall quality index.
Figure 418: Edit Quality Guidelines
The quality guideline is saved with [Save] and subsequently, questions can be added
to it. Usually, questions on one topic area are combined in a quality guideline.
Figure 419: Definition of the Quality Guideline – Adding Questions
You can set up quality guidelines based on averages or based on frequency. Both
types of guidelines can even be combined within one quality guideline and for the
same question. In this case the worst result determines the traffic light color in the
PDF report.
© 2011 Electric Paper GmbH
321
Your Evaluation Process: The Phase Model
In addition to this, quality guidelines can be set up without defining them manually, by
directly converting them from indicators or from existing norm values of the questionnaire. The following subsections explain these options in more detail.
Note:
Both the threshold values and the weighting in percent of the individual questions
for a quality guideline can be changed anytime after setting it up. In order to do this,
enter the new values and click on [Save changes].
Average-Based Quality Guidelines
In the above example the question “The course perfectly prepares me for my professional life” was assigned a weight of 25%, a lower threshold value of 3 and an upper
threshold of 4. It was also determined that higher values are positive. In this example
we are dealing with a scaled question with response values ranging from 1 (strongly
disagree) to 5 (strongly agree).
The targeted value in terms of quality is reached when the mean value is 4 or higher.
If the mean for this question is below 4, a deduction will apply, starting with 0% and increasing linearly depending on the extent the value falls short of the target. The full
25% are deducted when the mean is equal to 3 or smaller. As soon as the question
“The course perfectly prepares me for my professional life” reaches a mean value of
only 3, the full 25% are deducted.
If other questions that belong to the guideline get a total weight of 75%, it is possible
to reach a maximum deduction of 100%. This would mean that the deduction from the
overall quality index set for this guideline would come to full effect. The extent of this
deduction is determined when the quality guideline is created.
Example Calculation, when Higher Values Are Better:
In the following example, a scaled question with a 5-point scale “The instructor handles the technical equipment (video projector etc.) without any problems” was
assigned a lower threshold value of 3.2 and an upper threshold of 4.2. It was also
determined that higher values are better.
Figure 420: Definition of a Quality Guideline
When the question “The instructor handles the technical equipment (video projector
etc.) without any problems” reaches a mean of 4.8 in a survey, a green traffic light
symbol indicates that the target value (>4.2) has been reached.
322
© 2011 Electric Paper GmbH
Phase 5: Quality Management
Figure 421: Traffic Light in a PDF Report
Lower Threshold Value Upper Threshold Value Weighting
Question 1
3
4
25%
Question 2
2.8
3.7
75%
QG 1
25%
Question 3
3
4
50%
Question 4
2.8
3.7
50%
QG 2
75%
Result A)
Mean
Quality (absolute)
Quality (%)
Question 1
3.8
0.80
80%
Question 2
3.1
0.33
33%
Q-Index 1
45%
Result B)
Mean
Quality (absolute)
Quality (%)
Question 3
4
1.00
100%
Question 4
3
0.22
22%
Q-Index 2
61%
Q-overall
57%
Table 13: Example Calculation of Quality Guidelines, when Higher Values Are Better
The values in the top half (shaded yellow) are the values from the quality guideline
that you set individually when creating the guideline. For each quality guideline, you
set the weighting in relation to the overall quality index (QG 1 = 25%).
You can then assign any number of scaled questions to each quality guideline (QG 1
= two questions). For these questions, you also define a lower and upper threshold
value, as well as how much this question contributes to the quality guideline in percent
(Question 1: lower threshold value = 3; upper threshold value = 4; a proportion of 25%
of quality guideline 1).
© 2011 Electric Paper GmbH
323
Your Evaluation Process: The Phase Model
In the lower half of the table (shaded green) you see the results of your questions. The
question 1 for example reached a mean of 3.8.
The absolute quality is calculated according to the following formula:
(observed mean - lower threshold value)/(upper threshold value - lower threshold value)
In this example for question 1: (3.8-3)/(4-3)= 0.8
For the quality in % the following applies: If the quality is > 1, then 100% is reached.
If the absolute quality is <0, then 0% is reached. For all values between 0 and 1, the
quality in % = absolute quality * 100.
In this example for question 1: 0.8 * 100 = 80%
The quality index of the whole quality guideline is calculated with the following formula:
∑ (observed quality per question in % * weight per question) / 100
In the example this is for quality guideline 1: ((80%+25%)+(33%*75%))/ 100=44.75%
This value is rounded to 45%.
The following formula is used to calculate the overall quality of this survey:
∑ (quality index of whole quality guideline * weighting of whole quality guideline in
relation to the overall quality index) / 100
In the example this gives the following calculation:
((45%*25%)+(61%*75%))/100=57%
Hence, the survey has reached an overall quality of 57%.
324
© 2011 Electric Paper GmbH
Phase 5: Quality Management
Example Calculation of Quality Guidelines when Lower Values Are Better:
Lower Threshold Value Upper Threshold Value Weighting
Question 1
3
4
25%
Question 2
2.8
3.7
75%
QG 1
25%
Question 3
3
4
50%
Question 4
2.8
3.7
50%
QG 2
75%
Result A)
Mean
Quality (absolute)
Quality (%)
Question 1
1.5
2.5
100%
Question 2
4.5
-0.89
0%
Q-Index 1
25%
Result B)
Mean
Quality (absolute)
Quality (%)
Question 3
3.5
0.5
50%
Question 4
2
1.89
100%
Q-Index 2
75%
Q-overall
62.5%
Table 14: Example Calculation of Quality Guidelines when Lower Values are Better
The values in the top half of the table (shaded yellow) are the values of the quality
guideline that you set individually when creating the guideline. For each quality guideline you define the weighting in relation to the overall quality index (QG 1 = 25%). Any
number of scaled questions can then be assigned to this quality guideline (QG 1 = 2
questions). For each of these questions you define a lower and upper threshold as
well as the percentage it counts towards the quality guideline (question 1: lower
threshold value = 3, upper threshold value = 4; proportion of quality guideline 1 of this
question: 25%).
In the bottom half of the table (shaded green) you can see the results of your questions. Question 1 for example has a mean value of 1.5.
The absolute quality is calculated according to the following formula:
© 2011 Electric Paper GmbH
325
Your Evaluation Process: The Phase Model
(upper threshold value - observed mean)/(upper threshold value - lower threshold value)
In this example for question 1: (4-1.5)/(4-3)= 2.5
For the quality in % the following applies: If the absolute quality is > 1, then 100% is
reached. If the absolute quality is < 0, this corresponds to 0%. For all values between
0 and 1 the quality in % = absolute quality *100.
In this example for question 1: 2.5 > 1 = 100%In order to calculate the quality index for
the whole quality guideline, use the following formula:
∑ (observed quality per question in % * weighting per question) / 100
In this example for quality guideline 1: ((100%*25%)+(0%*75%))/100 = 25%
The overall quality of the survey is calculated using the following formula:
∑ (quality index of whole quality guideline * weighting of whole quality guideline in
relation to the overall quality index)/100
In the example the calculation is thus:
((25%*25%)+(75%*75%))/100 = 62.5%
The survey thus reached an overall quality of 62.5%.
Hint:
If in the questionnaire you have defined questions where the best/worst evaluation result can be found exactly in the middle (= “level questions”), you can choose them
twice when defining a quality guideline.
A possible level question is “Do you think the number of presentations was adequate?”. In answer to this, the interviewees can select one of seven possible options
connected with the ratings “too few” – “just perfect” – “too many”. The positive judgments lie in the middle (when the interviewees choose “just perfect”, respectively the
value of 4). To integrate these questions into the quality guideline in a meaningful
way, first choose a question and define the first side of the scale to be negative (“left
of the middle”). For evaluation results below a certain threshold (e.g. 2.5), you have to
make a quality deduction. As normal, you have to define a range of tolerance here
(e.g. 2.0 to 2.5).
For the other side of the scale (“right of the middle”) you have to choose the question
once again. Now you can say that results bigger than the upper threshold will also
cause a deduction of quality (e.g. the upper threshold may be 6 – again with a chosen
range of tolerance). In this way you ensure the level questions are interpreted in a
meaningful way in regard to the quality guideline.
326
© 2011 Electric Paper GmbH
Phase 5: Quality Management
If you integrate level questions into the quality guidelines, the total quality percentage
of all scaled questions can exceed 100% because each of the level questions needs
to be included twice.
Note:
Please note: After choosing a question once it will be marked by an asterisk (*) in
the list. Thus you will be informed that it is already in use in the quality guideline.
Frequency-Based Quality Guidelines
As an alternative to the averaged-based quality guidelines discussed above you can
set so-called frequency-based quality guidelines. In this case, the decisive criterion is
not a mean value which is equally influenced by all respondents, but a specified frequency of responses within a particular range of response values.
Setting Frequency-Based Quality Guidelines
Figure 422: Frequency-Based Quality Guideline
In this example there is a scaled question with 6 response options (higher values are
better in this case). The aim of the guideline is to apply a deduction of 25% if 20% or
more of the responses are for the negative response options 1 or 2.
This means in turn that in order to meet the defined requirements more than 80% of
the responses need to be for the remaining options 3, 4, 5 and 6. Therefore the condition is defined that more than 80% of the respondents need to have chosen an option
higher than 2 for the quality guideline to be met.
Advantages and Drawbacks of Frequency-Based Quality Guidelines
The advantage of frequency-based quality guidelines is that a certain critical mass (in
this case 20%) can have the effect that a quality guideline is not met, independent of
the opinion of the remaining respondents.
As a drawback it has to be noted that, contrary to average-based quality guidelines,
there is no tolerance region and therefore when the targeted value is not reached, the
full deduction comes to effect immediately.
Example calculation, when higher values are better:
In the following example for the scaled question “The instructor is always well prepared” with 6 response options it was defined that at least 36% of respondents must
have chosen response options 5 or 6. At the same time it was set that high values are
better.
© 2011 Electric Paper GmbH
327
Your Evaluation Process: The Phase Model
Figure 423: Define Frequency-Based Quality Guideline
In the following figure 55.5% (33.3% + 22.2%) have ticked the values 5 or 6 in
response to the question “The instructor is always well prepared”. Therefore, a green
traffic light symbol in the PDF report indicates that the target value was met.
Figure 424: Frequency-Based Quality Guideline - Traffic Light
Note:
Only whole numbers can be entered as percent figures. Decimal numbers are not
supported. For example, if you fill in the percentage value of 38.5% EvaSys automatically rounds this to 39%. A value of 38.2% would be automatically rounded
down to 38%.
6.2.2.
Converting Indicators into Quality Guidelines
If you have defined indicators for your questionnaire already you can use these in
order to save work when defining quality guidelines. EvaSys can convert question
groups for which you have set indicators automatically into quality guidelines; it allocates the questions corresponding to the question group to the respective quality
guideline. Like this, the structure of a questionnaire with its question groups and questions belonging to them can be directly adopted for the quality guidelines.
In order to convert guidelines, choose the option “Quality Guidelines” in the drop-down
menu “Advanced Settings” and click on [Edit]. You are now offered a dialogue where
you can define quality guidelines.
Now click on [Convert quality guidelines from indicators]:
Figure 425: Button “Convert quality guidelines from indicators”
328
© 2011 Electric Paper GmbH
Phase 5: Quality Management
Note:
As only one set of quality guidelines can be defined for a questionnaire, the button
[Convert quality guidelines from indicators] is only available if no other guidelines
had been defined before. If needed, you can delete existing guidelines via the link
“Delete all” (top right). Please note that the deletion of quality guidelines cannot be
undone.
The button is also unavailable if there have not been defined any indicators for the
questionnaire so far. In this case please check whether you have already defined
indicators for the questionnaire.
How you can set up indicators in EvaSys is explained in chapter B 5.1.3. "Creating
the Indicators for a Questionnaire".
After clicking on the button [Convert quality guidelines from indicators], the following
window appears, listing the content of the questionnaire with its question groups and
questions:
Figure 426: Converting a Quality Guideline from Indicators (Dialog for Conversion)
On the top left the relevant lower and upper threshold values for the quality guidelines
are set for all scaled questions in terms of percentage values. In addition you can
declare a global default setting regarding the orientation of the scales (whether higher
values are better or lower values are better).
Underneath you find the question groups with all scaled questions that belong to
them. On the right-hand side you find for each scaled question a drop-down menu as
well as the lower and upper threshold values.
The orientation of the scales is particularly important: Here, this can be defined individually, so that you can change poles for individual questions if necessary. The threshold values for the range of tolerance depend on the length of your scale (2 to 11
options); exact target values can be defined later. In order to refresh the view after
editing values click on [Reload].
© 2011 Electric Paper GmbH
329
Your Evaluation Process: The Phase Model
The following examples illustrate some threshold values for different scales:
Lower
Type of Scale Threshold
40%
Upper
Threshold
60%
Poling
Resulting Quality
Guideline
4-point scale
2.2
2.8
Higher values are better
> (2.2 - 2.8)
5-point scale
2.6
3.4
Higher values are better
> (2.6 - 3.4)
6-point scale
3
4
Higher values are better
> (3 - 4)
7-point scale
3.4
4.6
Higher values are better
> (3.4 - 4.6)
4-point scale
2.2
2.8
Lower values are better
< (2.2 - 2.8)
5-point scale
2.6
3.4
Lower values are better
< (2.6 - 3.4)
6-point scale
3
4
Lower values are better
< (3 - 4)
7-point scale
3.4
4.6
Lower values are better
< (3.4 - 4.6)
Table 15: Threshold Values
Example:
Calculation of a tolerance range for: lower threshold = 40%; upper threshold = 60%.
•
e. g. 4-point scale: Distance of three whole units between 1 and 4
Lower threshold:
•
40% (=0.4) of the three units: 3 * 0.4 = 1.2
•
Add the value of 1.2 to the starting value of the scale ( = 1, as there has to be
ticked at least the value “1”): equals 2.2
Upper threshold:
•
60% (=0.6) of the three units: 3 * 0.6 = 1.8
•
Add the value of 1.8 to the starting value of the scale (=1): equals 2.8
Figure 427: Quality Guideslines – Three whole Units, Beginning at “1"
Type of Scale
Lower Threshold 40%
Upper
Threshold
60%
Poling
Resulting Quality
Guideline
4-point scale
2.2
2.8
Higher values are better
> (2.2 - 2.8)
Table 16: Threshold Values - Example of a 4-Point Scale
330
© 2011 Electric Paper GmbH
Phase 5: Quality Management
After you have chosen all settings, click on [Convert these indicators], in order to create the quality guidelines. Afterwards quality indices for all surveys that were conducted with this questionnaire are computed automatically. As usual, a green circle
symbolizes a quality guideline that has been fully met and a red circle one that has not
been met (with several stages in between). White crosses on red background denote
that there are no results available for this survey yet:
Figure 428: Quality Guideslines – Re-Calculation of Quality Indices
In the overview of the quality guidelines you can now see the question groups of the
questionnaire as quality guidelines:
Figure 429: Quality Guidelines – Overview of Quality Guidelines
You find this list in the area “Advanced Settings” in the questionnaire details; choose
the option “Quality guidelines”, then click on [Edit]. The dialog pictured above appears.
Each quality guideline can now be edited as usual. For example, individual questions
can be weighted differently if necessary or different threshold values can be defined:
© 2011 Electric Paper GmbH
331
Your Evaluation Process: The Phase Model
Figure 430: Edit Quality Guideline
6.2.3.
Converting Norms into Quality Guidelines
When defining quality guidelines it is often difficult to decide where to set thresholds
for good and poor quality. A natural approach is therefore to set these thresholds on
the basis of results that you have collected with this questionnaire in past surveys.
The function “Convert quality guidelines from norms” has been created to make this
process simpler.
Statistical Approach
The direct basis of the quality guidelines are the norm values (i.e. mean and standard
deviation of the norm base) of the individual questions. The strength of this approach
is that the norm values are based on a very large data basis and the poling of the
questions is already set.
The idea of the conversion is to tie the lower and upper thresholds of the quality guideline to the means and standard deviations of the norm base. Whether the threshold
value corresponds exactly to the mean of the norm base or is slightly better or worse
can be defined by the user by choosing a “multiple” of the standard deviation of the
norm base (S).
This multiple is called granularity. The granularity can be between +3 and -3, so that
you can define whether the threshold of the quality guideline is to be below or above
the mean of the norm base. The granularity is chosen once for the lower and once for
the upper threshold for all questions together.
The calculation of the threshold values for the quality guidelines is done automatically
after the conversion.
332
© 2011 Electric Paper GmbH
Phase 5: Quality Management
Conversion
In order to access the conversion view choose “Quality guidelines” in the questionnaire details in the drop-down menu under “Advanced Settings”, then click on [Edit]. In
the window that opens, click on the button [Convert quality guidelines from norms].
Figure 431: Button “Convert quality guidelines from norms”
Note:
As only one set of quality guidelines can be defined for a questionnaire, the button
[Convert quality guidelines from norms] is only available if no other guidelines have
been defined. If needed, you can delete existing guidelines via the link “Delete all”
(top right). Please note that the deletion of quality guidelines cannot be undone.
The button is also unavailable if there have not been any norms defined for the
questionnaire so far. In this case please check whether you have already defined
norms for the questionnaire.
Details on how to create norm values can be found in chapter B 6.1.2. "Definition of
Norm Values for Questionnaires".
After you have clicked on the button [Convert quality guidelines from norms] a new
window opens showing your questionnaire with all question groups and the scaled
questions that were assigned to them, as well as the mean and standard deviation of
the norm base. The conversion of the dimensions (= question groups) of the norm
base into quality guidelines is conducted as the conversion view is accessed.
Initially, all questions within a question group are weighted equally within the quality
guideline.
Select a norm set as basis under “Base norm” in the header area. This norm set
needs to be already there for the norms of this questionnaire.
The guidelines are listed with the respective questions belonging to them underneath.
On the right, the norm base mean (= avg.), the norm base standard deviation (= dev.)
as well as the lower and upper threshold are shown for each question. Initially, the
default settings of the threshold values correspond to the norm base mean (=avg.).
Now the factor for the positive and negative threshold can be selected in the dropdown list in the header area.
© 2011 Electric Paper GmbH
333
Your Evaluation Process: The Phase Model
Figure 432: Quality Guidelines – Setting of Threshold Values
Threshold values can be changed with the drop-down list in the header area by setting
the granularity. It should be noted that the granularity of the negative threshold needs
to be equal to or larger than that of the positive threshold.
Pressing the button [Convert this norm] generates the quality guidelines and the quality indices of the relevant surveys are recalculated automatically.
Of course, once the quality guidelines have been generated automatically, they can
be further edited and adapted.
Example Calculation, when Higher Values Are Better:
For a questionnaire where higher values are better, the granularity set for the negative
threshold affects the calculation of the lower threshold value (= negative threshold value).
Note:
In a question where higher values are better, the negative thresholds are always the
lower thresholds.
Accordingly, the granularity of the positive threshold influences the upper threshold
value.
The following formula is used for this:
Lower threshold value = norm base mean value (avg.) - granularity of the negative
threshold * norm base standard deviation
Hence, for the example pictured below the calculation is as follows:
1. lower threshold value = 3.49 - 1 * 1.72 = 1.77
2. lower threshold value = 3.57 - 1 * 1.7 = 1.87
334
© 2011 Electric Paper GmbH
Phase 5: Quality Management
Figure 433: Quality Guidelines – Example Calculation, when Higher Values Are Better
Example calculation, when Lower Values Are Better:
For a questionnaire where lower values are better, the granularity set for the negative
threshold (= negative threshold value) affects the calculation of the upper threshold
value (= negative threshold value).
Note:
In a question where lower values are better, the negative thresholds are always the
upper thresholds.
Accordingly, the granularity of the positive threshold influences the lower threshold
value.
The following formula is used for this:
Upper threshold value = norm base mean value (avg.) + granularity of the negative
threshold * norm base standard deviation
Hence, for the example below the calculation is as follows:
1. upper threshold value = 3.49 + 1 * 1.72 = 5.21
2. upper threshold value = 3.57 + 1 * 1.7 = 5.27
Figure 434: Quality Guidelines – Example Calculation, when Lower Values Are Better
© 2011 Electric Paper GmbH
335
Your Evaluation Process: The Phase Model
6.2.4.
Authorizing Access Rights to QM Views
In order to grant, for example, a dean/manager access to QM views, a user account
must be set up in the relevant subunit. If the dean/manager is already a user, because
his own courses are evaluated, then the existing user account can be activated for
QM views.
Figure 435: QM Views – Editing User Data
To acquire access to QM views, the user must be an active one. Activation can be
effected by clicking on the symbol
next to the user. The symbol
appears, indicating that access has been granted. The user type “Dean/Manager” is the exception to
the rule, because he also has access to the QM views as a passive user. Open the
profile data of the user by clicking on his name.
In the lower area next to the field “QM views” you can define access in four different
authorization levels:
Figure 436: QM Views – Authorizing Access Rights
No QM Views
The user has no access to QM views.
Only Own Surveys
The user has only access to his own surveys. These are surveys that have been registered by the administrator to the user’s own user profile.
336
© 2011 Electric Paper GmbH
Phase 5: Quality Management
Only Own Subunit
This option gives the user access rights to all surveys within his own subunit.
It is possible to access multiple subunits by selecting from the “additional subunits”
list. This can be done after the access level “only own subunit” has been selected.
Unrestricted Access
This option grants authorization to access all existing surveys in the system.
6.2.5.
Use of QM Views
Displaying Course Lists
Individuals with access rights are informed through login details (user name, password, web address). To increase security you can restrict the permissible IP address
domain. Consult the relevant section in the “Initial Operations”.
After logging in with the user name and password, the user arrives at his or her activated user account.
This user account is equivalent to an activated instructor/trainer account, that is it can
also be used to implement “private” surveys.
With a click on the menu item “QM view” the quality overview is opened.
Figure 437: QM Views – Open View
A new window with a list of evaluated courses appears.
© 2011 Electric Paper GmbH
337
Your Evaluation Process: The Phase Model
Figure 438: QM Views – Overview
In the example the results are for instance shown for the survey of the course “Leadership Development” with a quality calculated at 68.0 %.
The green-red circles each represent a quality guideline, in this example teaching
structure/practical application/interest/interaction. The more red area, the more questions in this quality guideline are below the targeted value. In order to receive a more
precise view, click on [Details].
You will then see a detailed list of all the quality guidelines of the questionnaire as well
as those questions which did not reach the target value.
Figure 439: QM Views – Quality Details
If a value is marked in red, the quality guideline has not been met at all; if the color is
yellow, the value is within the range of tolerance. Other colors are not applied.
In order to open the complete report of the survey, click on [To the List] and in the line
of the survey you are interested in on to open the PDF report.
338
© 2011 Electric Paper GmbH
Phase 5: Quality Management
If an information icon appears in the first column beside the green and red circles,
then this means that data is available for this survey that has not yet been incorporated into the quality guidelines calculation. This can be the case, if, for example, the
online survey data has been entered, but the PDF report has not yet been opened.
Click the icon to calculate the quality guidelines for this survey. The quality guidelines
are now newly calculated for this survey.
Figure 440: QM Views – New Calculation for Single Surveys
6.2.6.
Definition of Special Search and Table Configurations
In order to build a table according to your own specifications you can define searches
yourself and save them. One of these self-defined searches can then be saved as the
new default search. When you next login at EvaSys, this self-defined default search
will automatically be used.
To define a search use the menu “Options” to arrive at all the necessary functions.
These are:
Figure 441: QM Views – Special Search Configuration
•
Search:
This is the search mode in which you will use the table view.
•
Field selection:
Here you can select those database fields you would like to use in your search.
•
Sequence fields:
This allows you to determine or change the sequence of columns selected in “field
selection”.
•
Save search:
This function allows you to save the current search settings under a name you
enter or to replace an existing search.
© 2011 Electric Paper GmbH
339
Your Evaluation Process: The Phase Model
•
Delete search:
This function lets you remove self-defined search settings.
Defining the Display and Search Fields
Using “Field selection” in the option field will display the database fields defined for the
current search. In this example the fields are from the pre-set default search.
The fields appear twice. In the upper area the fields needed for the table view are
marked. In the lower area those fields appear which are to be searched using the
“Search” field. The selection of the search fields should include only those fields to be
displayed.
Figure 442: QM Views – Field Selection
Please note that it may not be possible to completely display more than 10 fields in the
screen horizontally, i.e. you will then have to scroll. Also a large number of search
fields will mean greater use of the database and a noticeably longer processing time.
By clicking on “Select all fields of the search display” or “Select all search fields” at the
bottom of this view you can save time if you want to activate all of the above fields.
Figure 443: QM Views – Select all Query Result Fields
340
© 2011 Electric Paper GmbH
Phase 5: Quality Management
Defining the Sequence of the Fields
After you have selected the fields you can change their sequence by using the option
“Sequence fields”. Highlight, as shown in the figure, a field name and then click on
[<<] “up” or on [>>] “down”.
Figure 444: QM Views – Order Fields
Saving Your Search Settings
Now you can save your current search setting. Activate the option “Save search”.
Enter a name. By highlighting “Set as default”, the current search setting will be displayed every time you login. Finally click on [Save Search].
Figure 445: QM Views – Save your Search Settings
© 2011 Electric Paper GmbH
341
Your Evaluation Process: The Phase Model
Deleting Your Search Settings
Using the option “Delete search” brings you to a selection list in which you can select
the search settings to be deleted. Then click on [Delete].
You can only delete settings you have defined yourself.
Figure 446: QM Views – Delete your Search Settings
7. Module Evaluation
The functionality “Module Evaluation” was developed to allow multiple separate surveys to be combined into a single questionnaire.
EvaSys generates a module questionnaire which contains multiple areas belonging to
the individual courses in a module. After processing the module survey EvaSys generates a report for the module but also separate results for each module element. This
allows separate reporting based on each part of the module survey.
Figure 447: Build up a Module Questionnaire
7.1.
Setting up a survey with Module Evaluation
To set up a survey with module evaluation, several steps have to be taken:
•
By default, the possibility to conduct module surveys is already activated in the
system; if the standard settings have been changed, activate the general possibility to conduct module surveys in the EvaSys Settings (Menu “System Settings/
EvaSys Settings/Central Evaluation/Module”)
•
Create questionnaires you want to use to evaluate your single module courses
342
© 2011 Electric Paper GmbH
Module Evaluation
•
Link the module questionnaires to course types (Menu “System Settings/ Course
Types”); in case of module surveys, the course type has the function to assign
questionnaires to courses
•
Create users (user type “Module”)
•
Create courses for the modules
- Select the course type the module questionnaire is linked to
- Enter a course-ID (which defines the order of the courses to be surveyed on the
overall questionnaire)
- Define a further report recipient (who equals the instructor/trainer of the course
and will receive the report)
•
Generate survey (switch to module evaluation)
•
After conducting the survey open the general PDF-Report to initiate the creation of
the PDF-Reports for the single module courses.
In the following chapters, the conduction of the single steps will be discussed in detail.
7.2.
Activating module surveys
The module evaluation is activated by default. You can change the activation of the
module evaluation by logging in as administrator and opening the menu “System Settings/EvaSys Settings”. Now select the area “Central Evaluation” and scroll down. You
will find the option “Module Evaluation”. Activate or deactivate the “Module Evaluation”
and save the changes by clicking [Save] at the bottom of the page.
Figure 448: Activate Module Evaluation
7.3.
Creating Module Questionnaires and Linking
Them to Course Types
Module questionnaires consist of multiple components which are used to display general questions about the module itself or special questions related to single courses or
course elements in the module.
For each of the building bricks of a module survey individual questionnaires need to
be created using the VividForms Editor, e.g. one for general questions, one for lectures, one for seminars etc. (for further information on creating a questionnaire with
the VividForms Editor see chapter C of this manual).
Remember to give the forms short relevant names so that they can later be separated.
© 2011 Electric Paper GmbH
343
Your Evaluation Process: The Phase Model
Figure 449: Create Module Questionnaires
Now the single questionnaires have to be linked to course types. In the context of
module surveys, the course type has the function to define, which of your questionnaires EvaSys will use for the evaluation of a course. If, for example, a questionnaire
is linked to the course type “lecture”, this questionnaire will be used for the evaluation
of all courses of the type “lecture” on the combined module questionnaire.
Thus, in the context of module surveys the category “course type” does not have to
equal the ‘classic’ course type in common evaluation. In some cases it can be advisable, to create own course types for the evaluation of your modules. If, for example,
you want to use a ‘general questionnaire’ for the evaluation of the module in total and
a ‘trainer questionnaire’ to evaluate the single courses of your module, you can create
corresponding coursetypes such as ‘module general’ and ‘module trainer’.
Figure 450: Form link for modular surveys
344
© 2011 Electric Paper GmbH
Module Evaluation
To link questionnaires to course types, open the dialog “System Settings/Course
Types”. To create new course types, for example a course type “Module General” for
the evaluation of the module in total, enter a new name in the area “Course Type” and
select the corresponding questionnaire from the drop-down list underneath (“Form
Link for Modular Surveys”). Click on [New] to add the new course type to the list.
To link a questionnaire to an existing course type, click on the green pencil icon. You
will find the selected course type in the area “Course Type” at the bottom of the list.
Select the corresponding module questionnaire for the selected course type and click
on [Save] to apply the selection.
7.4.
Characteristics of the Aggregated Questionnaire
When generating a survey, the questionnaires for the different module parts are automatically merged to a complete module questionnaire.
The complete questionnaire adheres to the following rules:
•
The single parts are put together in ascending order with reference to the courseID
•
If a module part has no course-ID, it will be the first part of the module questionnaire
•
If more than one module parts have no course-ID, the creation dates of the module
parts define their order on the module questionnaire
The first questionnaire used for the module questionnaire defines:
•
Font type
•
Default font size
•
Line height; Exception: If the font size of a question group of one of the questionnaire parts is bigger than the the line height of the first questionnaire, the line
height will be accordingly adapted for the whole questionnaire.
•
Layout (traditional or optimized)
•
Position of the answer options of single choice questions
•
Color scheme
•
Display of question numbering
Placeholders:
•
Entries for the placeholder AUTHOR and COURSE are deleted
•
The standard placeholders are reactivated
If the following characterstics apply to all questionnaire parts, they also apply to the
questionnaire in total:
•
Enable temporary save
© 2011 Electric Paper GmbH
345
Your Evaluation Process: The Phase Model
•
Evaluation for participants
- Allow result access
- Display answers to open questions
•
Show print option
•
Show certificate of participation
Further elements which are included in the complete module questionnaire:
•
All PDF reports allowed for all questionnaires involved
•
All languages defined for all questionnaires
•
Filter questions are taken over from all questionnaires
•
Cross tabulations, Required questions and PDF report plugins are taken over
•
Online Design: If the display mode is set to “per chapter” for one of the questionnaires, then this view is taken over for the whole survey
•
Vallidation (plausibility checks) is taken over
•
Norms and Quality Guidelines are taken over from the corresponding questionnaire
7.5.
Creating a Module Account
You create module accounts as you do a regular user account. Open a subunit and
select [Create new user]. Select “Module” as the user type:
Figure 451: Create a Module – Step 1
Subsequently, click on the [Next> >] button. A second window opens, in which an
additional input field for the module name appears. Enter the name of the module
here.
346
© 2011 Electric Paper GmbH
Module Evaluation
The remaining address record is intended to be used for the person linked to the module, e.g. a module coordinator or the administrator.
Figure 452: Create a Module – Step 2
After filling out the fields, click on the button [Save]. The module account is now created in the list of users.
Figure 453: Module in the User List
© 2011 Electric Paper GmbH
347
Your Evaluation Process: The Phase Model
7.6.
Creating module courses
After the module account has been created, courses can be added to the module. To
access the course list, click on the number in angular brackets in the column “CO”
(Course). By clicking the button [Create new course] you can add a new course to
your module.
Apart from entering the name of the course, at least three further entries have to be
made which are essential for a successful conduction of a module survey:
•
Enter an ID for the course in the field “Course-ID”. This ID defines, in which order
the questions for the single courses will be displayed on the module questionnaire. The course with the lowest ID (for example “01”) will be evaluated first, then
the other courses will follow in ascending order ("02”, “03” etc.).
Please note:
Should you forget to enter course-IDs, the questions for the single courses will be
displayed in the order in which the single courses have been created. If you, for
example, forget to enter the ID for only one course, this course will be evaluated first
on the overall questionnaire.
•
Select the course type which is linked to the questionnaire you want to use for surveying the course.
Please note:
If, by accident, you forget to select a course type which is linked to a module questionnaire, the whole module survey cannot be conducted!
•
With module courses, the field “Further report recipients” serves to define the
instructor/trainer who has held the course. The person you add in this field will
receive the report for this single course.
Please note:
As further report recipients you can only select persons, who already have a regular
instructor/dean account in the system. If the intended report recipient does not exist
as a user in EvaSys, you will have to create an instructor account for him so as to be
able to choose him from the list.
348
© 2011 Electric Paper GmbH
Module Evaluation
Figure 454: Module Evaluation – Entering Course Data
In the following example you can see the course list of a sample module “EvaSys
Basics”. In this case, a “dummy” course called “General questions” for means of surveying general aspects concerning the whole module has been created as well as
three regular courses. The “general course” is surveyed with a general questionnaire
(course type “Module - general”), the single courses are surveyed with a trainer questionnaire (course type “Module - trainer”). A secondary instructor/trainer is assigned
to each course, who will later on receive the report on his part of the survey.
Figure 455: Module courses in the course list
© 2011 Electric Paper GmbH
349
Your Evaluation Process: The Phase Model
Please note:
The creation of a “dummy” course for questions concerning the whole module or
general information on the participants allows you to survey these aspects only
once on the questionnaire and not for every single course separately, which is one
of the great benefits of module evaluation. But please be aware, that the possibility
to create a subgroup analysis based on information of the general part of the questionnaire is only available for the whole questionnaire/survey. If you want to create a
subgroup analysis for the single courses separately, you will have to create a subgroup analysis for the whole questionnaire and exclude questions concerning all
courses except the one you want to create the analysis for.
7.7.
Generating a Module Surveys
The generation of module surveys is done using the function “Subunits/Generate Surveys“. Select the checkbox “Switch to Module Surveys” to show selections for modules. You may generate either paper or online surveys.
Please note:
In contrast to common evaluation, you do not select the single courses you want to
evaluate, but the module in total. EvaSys will automatically create a survey which
comprises all courses of your module.
Figure 456: Generate Module Survey
The example shows an online survey. When the survey was generated, EvaSys combined all the sections of the module into a single questionnaire. The name of the questionnaire is random alphanumeric and eight characters long, in this example
Z1ALSCN9.
350
© 2011 Electric Paper GmbH
Module Evaluation
Figure 457: Module Survey in the List of Surveys
If you have generated a paperbased survey, please check the questionnaire by opening the PDF version before printing it. If the layout does not live up to your expectations, as, for example, the pagebreaks are located badly, delete the survey and edit
the single questionnaires in the editor. After that, generate a new survey and check
the results.
The newly generated module questionnaire can now also be displayed in the list of
questionnaires in the menu “System Settings” when enabling the option “Show deactivated questionnaires at the end of the listing (including module questionnaires)”.
Figure 458: Display Module Questionnaires in the List of Questionnaires
By clicking on the name of the questionnaire you can access its details and define further settings for your survey (for example, change the online design, edit the text templates etc.).
After all settings have been done, the survey can be conducted just like any other
paper or online survey in EvaSys (i.e. print or email questionnaires or PSWDs, scan
forms etc.).
© 2011 Electric Paper GmbH
351
Your Evaluation Process: The Phase Model
7.8.
Instant feedback
As soon as the questionnaires have been scanned and analysed by the VividForms
Reader resp. the online survey participants have taken part in the survey, EvaSys will
automatically generate reports on both the module survey in whole and all its single
components (= courses, which have been surveyed).
In the following figure you can see the report on a module survey and all of its components. The report for the whole module has the name of the module (in this case “EvaSys Basics”). It can also be recognized by the name of the module questionnaire in
the column “Form” (in this case “XL279XWT”).
Figure 459: Reports on the Module Survey and all of its Components
Please note:
When you have conducted an online survey, the list will at first only show the report
for the whole module survey. Only after opening the PDF report for the whole survey
or closing (and, if necessary, re-opening) the survey, the reports for the single parts
of the survey will be created.
If the automatic report submission is activated, all recipients will receive a report by
email. The person linked to the module account will receive the whole report, while
those people linked as secondary instructors/trainers to single courses will receive
their parts of the report only.
If there is a course which has no report recipient assigned to it, then the report will
only be sent to the module coordinator when using the “Batch Events” or sendig the
report directly from the survey list. When sending reports via “Process Defaults” oder
via “Scheduled Tasks” there are to possibilities to deal with such courses:
•
the report for this part of the module is only sent to the module coordinator
•
the report for this part of the module is sent to the module coordinnator and to all
report recipients defined for the different parts of the module.
The latter option can, for example, be useful when the course without a defined report
recipient corresponds to a general survey part concerning the module in total and
when the results are to be communicated to all persons involved.
352
© 2011 Electric Paper GmbH
Module Evaluation
The type of dispatch can be defined in the EvaSys Settings, menu “System Settings/
EvaSys Settings/Surveys/Module evaluation: Delivery of module sections with no
instructor”. By default the option is activated, i.e. the report is sent to all recipients
automatically.
Figure 460: Module Evaluation – Delivery of Module Sections without Instructor
7.9.
Further Settings
By default, on a module questionnaire the names of the module courses will be displayed below the title of the first question group of the corresponding questionnaire
part, so as your survey participants know which course has to be evaluated. If you
want the name of the corresponding instructor/trainer to be displayed as well, there
are two possibilities:
•
You can integrate the name of the instructor/trainer in the course name, for example “EvaSys Basic Training – Donna Harwood”. Thus the name of the instructor/
trainer will be displeayed on the questionnaire as well as in the course list and survey list and on the PDF report. Please, remember to add the instructor/trainer to
the list of “Further report recipients” as well, because otherwise the instructor/
trainer will not receive his/her report when you choose to send them by email.
Figure 461: Module Evaluation – Enter the Name of the Instructor/Trainer in the Field for the
Course Name
In the following figure you can see the display of the name of instructors/trainers in
an online survey as well as on a paperbased questionnaire:
© 2011 Electric Paper GmbH
353
Your Evaluation Process: The Phase Model
Figure 462: Module Evaluation – Display the Instructor/Trainer Name in an Online Survey
Figure 463: Module Evaluation – Display the Instructor/Trainer Name in a Paperbased Survey
•
You can activate the display of the instructor/trainer name on the questionnaire in
the EvaSys Settings. To activate this option, open the menu “System Settings/
EvaSys Settings” and choose the option “Survey” from the drop-down list. Scroll
down to the option “Module Evaluation: Display of name of the (secondary) instructor/trainer in the heading of the question group” and activate it. Then save your settings by clicking the button [Save] at the bottom of the list. Thus the names will be
displayed on the questionnaire as well as in the PDF report.
Figure 464: Activation of the Display of the Names of Instructors/Trainers in the EvaSys Settings
The following figure shows the display of the instructor/trainer name in an online
and in a paperbased survey with the option activated in the System Settings:
Figure 465: Display of the Instructor/Trainer Name in an Online Survey
354
© 2011 Electric Paper GmbH
Module Evaluation
Figure 466: Display of the Instructor/Trainer Name in a Paperbased Survey
Please note:
If your questionnaire contains as first element an empty question group, i.e. a question group without a question group text (but only a space character), the name of
the course as well as of the instructor/trainer will be inserted into this question
group. This can improve the layout of your survey, but please be aware of the following: If this question group does not contain questions but only a line space or has
no contents at all, it will not be displayed in the PDF report. In the PDF report you
will then not be able to distinguish the different courses! To avoid this, you will at
least have to add an image or a text box to this question group. In case of using a
text box enable the display of text boxes in the PDF report (menu “Report Settings/
Configuration/Option: Show text boxes”).
ß
Figure 467: Display of the Course and Instructor/Trainer Name in an “Empty” Question Group
© 2011 Electric Paper GmbH
355
Your Evaluation Process: The Phase Model
356
© 2011 Electric Paper GmbH
Access to the VividForms Editor
C. Creating Questionnaires with VividForms
With the VividForms Editor Electric Paper has introduced a form creation tool that is
easy and quick to use allows you to extend or redesign existing questionnaires or
design new questionnaires as desired directly over the web interface. The content in
VividForms questionnaires can be modified as desired. Keep in mind that for questionnaires which already have surveys registered to them there is a edit lock. As well
as this, the administrator can define his questionnaires as templates and make them
available to active users (instructors/trainers) for further processing.
1. Access to the VividForms Editor
Using the VividForms Editor is possible not only for the administrator/subunit administrator but also for active users (active instructors/trainers). Whereas administrator/
subunit administrators always have full access to the editor, access rights for active
users can be defined in the user properties. The administrator can make the following
settings for each user of an active account:
Figure 468: Access Rights for the VividForms Editor
•
Unrestricted access: The user can create his own questionnaires or work with
existing templates.
•
Extension of templates only: The user can extend templates with his own questions, but cannot create his own questionnaires.
•
No access: The user is not authorized to user the Web editor to modify or create
questionnaires.
In the administrator’s and subunit administrator’s account, you can access to the VividForms Editor in the menu “Questionnaires”. To create a new questionnaire, click on
the option “Create Questionnaire” in the left context menu. In the main window, two
© 2011 Electric Paper GmbH
357
Creating Questionnaires with VividForms
tools now appear for creating questionnaires: the VividForms Editor (left) and the VividForms Designer (right).
Figure 469: Access to the VividForms Editor
The VividForms Designer is a questionnaire designer with extended layout versatility,
which is available as an add-on to EvaSys. To use this, a separate license must be
acquired. In systems without this license, the Designer is deactivated and cannot be
started. For further information on the VividForms Designer, please consult the VividForms Designer manual. If interested in acquiring a license, please contact your customer service agent.
To start the VividForms Editor, click with the left mouse button on the questionnaire
graphic under the heading VividForms Editor. The Editor opens directly in the browser
window and you can begin creating a questionnaire.
2. Creating a Questionnaire in the VividForms Editor
2.1.
Define Form Information
After starting the Editor a form creation wizard opens. Some fundamental information
regarding the questionnaire must be deposited here:
•
Short Name
A five to ten digit short name, which may only exist once in the system. It must not
contain any spaces.
358
© 2011 Electric Paper GmbH
Creating a Questionnaire in the VividForms Editor
•
Heading
A longer text describing the questionnaire. This appears in the header of the questionnaire.
•
Paper
Choose between the paper formats A4, letter and legal.
Figure 470: Define Form Information
Click on [Apply]. Now the questionnaire is created. It contains a header and the editing
bar can be used.
The preview mode, which can be activated in the lower part of the window, should
only be switched on if the questionnaire is to be made available to active users
(instructors/trainers) as a template or for the purpose of instructor’s optional questions. As a rule, it should first be activated after completing the sheets.
•
Template
Once you place a tick in the area “Activate/deactivate template mode”, you have
defined your questionnaire as a template.
With a questionnaire that is defined as a template, you can decide whether the
new items should only be added at the end of the questionnaire. By doing so, you
can ensure that the existing structure of your questionnaire cannot be changed. To
do this, activate the option “New items may only be added at the end”.
•
Max Pages
Defines the maximum number of pages this form can have when being used as a
template by other users. If the property “Template” is inactive, the number of pages
will be limited internally to 99 pages.
© 2011 Electric Paper GmbH
359
Creating Questionnaires with VividForms
•
Max Items
Defines the maximum number of questions allowed on the questionnaire. This
enables control over the number of questions which may be added when decentral
users take this template to add personal questions. This limitation is inactive when
the form is not a template.
2.2.
The Editor Control
You can access all functions pertaining to questionnaire creation in the menu panel on
the left. The following table gives you an overview of each individual menu and its
functions. By clicking on a menu name, it can be opened and closed. By clicking on
the padlock icon, the anchoring of the editor control panel to the top of the page is
released, so that, if required, it can scroll down with the questionnaire.
Add
Question group: Opens the dialog to create a new question group
Question: Opens the dialog to create a new question
Pole Labels: Adds the pole labels defined under form properties
Extended Pole Labels: Opens the dialog to add vertical pole labels
Line Space: Adds an empty line
Separator: Adds a horizontal separator
Text Box: Opens the dialog to create a text box
Picture: Opens the dialog to add a picture from the library
Page Break: Adds a page break
Edit
Edit Question Group: Opens the properties dialog of the seleted question group
Edit Question: Opens the properties dialog of the selected question
Edit Pole Labels: Opens the properties dialog of the pole labels
Extended Pole Labels: Opens the properties dialog of the vertical pole labels
Edit Text Box: Opens the properties dialog of the selected text box
Picture: Opens the properties dialog of the marked picture
Clipboard
Undo (Ctrl + Z): Undoes the last action (up to 20 in a row)
Cut (Ctrl + X): Cuts the selected object and adds it to the clipboard
Copy (Ctrl + C): Copies the selected object and adds it to the clipboard
Paste (Ctrl + V): Adds the contents of the clipboard below the marked object
Delete (Del): Deletes the marked object
Move
Up: Moves the marked object one step up
Down: Moves the marked object one step down
360
© 2011 Electric Paper GmbH
Creating a Questionnaire in the VividForms Editor
Form Properties - Paper View
Form properties: Opens the properties of the questionnaire
Layout settings: Opens the layout settings for the form
Repair form: Recreates the questionnaire
Enable numbering: Toggles the numbering of questions and question groups
Edit Pole Template: Opens the dialog for the definition of pole labels
Filter settings, Validation, Required questions, Cross tabulations: Opens the
dialog for the definition of filters, validation, required questions, cross tabulations
Change color scheme: Opens the dialog for adapting the form’s color scheme
Picture Library: Opens the dialog for adding and removing pictures to/from the
picture library
Line Height, Font Size, Size of the answer boxes, Font: Selection of line
height, size of answer boxes, font size and type for the complete questionnaire
Form Properties - Online View
Form properties: Opens the properties of the questionnaire
Repair form: Recreates the questionnaire
Enable numbering: Toggles the numbering of questions and question groups
Edit Pole Template: Opens the dialog for the definition of pole labels
Filter settings, Validation, Required questions, Cross tabulations: Opens the
dialog for the definition of filters, validation, required questions, cross tabulations
Picture Library: Opens the dialog for adding and removing pictures to/from the
picture library
Online survey template: Selection of the template used for the online view in the
VividForms Editor
Display: Selection of the display mode for the online view in the VividForms Editor
Question Library
Choose a question from the library: Opens the dialog to add questions or
question groups to the library
Add selected question to library: Opens the dialog to add a selected question
to the library
Delete selected question from library: Deletes the question from the library
Detach library question: Detaches the selected question from the library
Add selected question group to library: Adds the selected question group to
the library
Delete selected question group from library: Deletes the selected question
group form the library
Detach library group: Detaches the selected question group from the library
Save form and exit editor: Saves changes and exites the VividForms Editor
Delete form and exit editor: Deletes the questionnaire and exits the VividForms
Editor
Table 17: Editor Control
© 2011 Electric Paper GmbH
361
Creating Questionnaires with VividForms
At the foot of the editor control panel, the field meta-information provides an overview
of the current state of the questionnaire:
Figure 471: Editor Control – Meta-information
Individual lines are read from left to right as follows:
•
Line 1:
- Template mode activated/deactivated
- Maximum number of pages
- Current page number
- Edit mode
•
Line 2:
- Paper format
- Numbering on/off
- Information on the active object
•
Line 3:
- Current number of questions on the sheet
- Maximum number of questions on the sheet
- PDF version of the form
- Editor version of the form
2.3.
Viewing Options
Two different display options for displaying the questionnaire in the VividForms Editor
are available: the paper view and the online view. With the help of an icon (PDF and
globe with green arrow) in the viewing bar above the questionnaire, you can switch
back and forth between views, as long as the system is licensed for both types of surveys. If the system is only licensed for paper or online surveys, only the licensed type
of view is displayed.
362
© 2011 Electric Paper GmbH
Creating a Questionnaire in the VividForms Editor
Figure 472: Switching between Paper and Online View
In the system settings (menu “System Settings/EvaSys Settings/VividForms/Standard
view VividForms Editor”), the default view when opening the editor (paper or online
view) can be defined.
If, in the properties of a questionnaire, it is defined that this is only released for paper
surveys, only the paper view is displayed when opening the sheets. If the sheets are
only released for online surveys, only the online view is displayed. The button for
switching is then no longer available.
2.3.1.
Paper View
In the paper view, the display of the questionnaire is simulated as a paper survey.
This view can be adjusted by different control elements.
You can use the symbols
and
to zoom in the preview window to four different
levels. Below you can see examples of different zoom levels. Select the one best for
your screen resolution:
After zooming, to fit the preview to the size of the chosen window, click on the icon
with four arrows.
© 2011 Electric Paper GmbH
363
Creating Questionnaires with VividForms
Figure 473: a and b: Different Zoomed-in Views of a Questionnaire
If the questionnaire you have created consists of more than one page, you can
change to the different pages using the arrows, as well as the drop-down list in the
upper right hand corner of the screen.
364
© 2011 Electric Paper GmbH
Creating a Questionnaire in the VividForms Editor
2.3.2.
Online View
In the online view, the display of the questionnaire is simulated as an online survey.
This view can be adjusted in different ways:
In the menu on the left hand side, under “Form Properties”, the type of display for the
online questionnaire can be adjusted. All three display modes (complete, per chapter
and per page) can be selected, which are also available for the real online survey. If,
for example, the display mode “per page” was selected, tabs are then shown by which
one can skip between the individual pages of an online questionnaire.
Figure 474: Display Modes for Online Questionnaires
If customized online survey templates were created on the basis of the EvaSys standard template (cf. here chapter B 3.2.7. "Effective Management and Conduction of
Online Surveys"), the online questionnaire can also be presented in the design of the
customized template. To do this, select the desired template under “Online survey
templates” in the form properties.
© 2011 Electric Paper GmbH
365
Creating Questionnaires with VividForms
Figure 475: Select Online Survey Template
Via the drop-down list in the viewing bar above the questionnaire, you can, where
required, simulate the display of the online questionnaire for mobile devices. As well
as the standard view, which is intended for screen viewing on PC’s, the view for small,
medium and large mobile devices can also be selected. The following screenshot
shows the resolution for mobile devices of a medium size:
Figure 476: Online View for Mobile Devices
366
© 2011 Electric Paper GmbH
Creating a Questionnaire in the VividForms Editor
Note:
The viewing options that can be set here only apply to presentation in the VividForms Editor. They are intended to facilitate the work with the editor, by displaying a
true image of the online survey. For the real online survey, the representation (per
chapter, per page etc.) is defined in the details of the questionnaire. The online template is defined in the subunit properties. The presentation of the online survey is
automatically adapted to the resolution of mobile devices, when the support of
mobile devices is enabled in the configuration (“System Settings/EvaSys Settings/
Survey Online/ Support for mobile devices”). By default it is enabled.
2.3.3.
Preview Functions
Independent of the view in which you find yourself (paper view or online view), preview options are always available by which the paper forms as well as the online survey can be displayed in a separate browser window. Both preview possibilities can be
found in the viewing bar above the questionnaire.
Figure 477: Preview Possibilities
In order to display a preview of the future PDF questionnaire, click on the PDF symbol
.
A new window opens with a PDF example of your questionnaire. This PDF document
is generated in real time on the server. Check to make sure you like your layout. Close
the window in order to continue editing the questionnaire.
© 2011 Electric Paper GmbH
367
Creating Questionnaires with VividForms
Figure 478: PDF Preview of Questionnaire
Please note that this preview is not suitable for implementing a survey. In order to create a survey on the basis of a new questionnaire you must first create a folder and
then create a survey.
In order to display a preview of the future online survey, click on the online symbol
368
.
© 2011 Electric Paper GmbH
Creating a Questionnaire in the VividForms Editor
Figure 479: Preview of Online Survey
A new window opens with a preview of the online survey. Check to make sure you like
your layout. Close the window in order to continue editing the questionnaire.
To finish editing the questionnaire, click “Save form and exit editor” (or the symbol with
the open door). After that you will reach the details of a questionnaire.
Hint:
Your changes of a questionnaire will always be saved automatically. Hence, you do
not need to save the questionnaire specially. Whenever you need you can e.g. click
further options in EvaSys, e.g. “EvaSys Settings”, without leaving the editor “officially” by clicking “Save form and exit editor”. Your questionnaire in spite will be
saved with all your changes and can be accessed as usual.
© 2011 Electric Paper GmbH
369
Creating Questionnaires with VividForms
2.4.
Editing the Questionnaire Header
The header area of a questionnaire contains a number of placeholders, which are
dynamically filled with the information of the corresponding survey process in the later
use of the questionnaire for paper and online surveys. You can recognize the placeholders by their continuous capital letters as well as the angular brackets. With online
surveys, you can define whether the survey header should be displayed, (see here
chapter B 2.4.2. "Management of Questionnaires and Detailed View" – online surveys. These include, for example, the name of the subunit, the name of the course to
be evaluated or the name of the instructor/trainer.
The placeholders which are automatically indicated during editing of a questionnaire
usually suffice. If required, however, these can be individually adjusted. In the following figure you can see the placeholders that the header area contains by default:
Figure 480: Placeholders in a Questionnaire
Click on a placeholder to edit its content.
Figure 481: Editing the Placeholder
A placeholder wizard will appear as shown here. You can insert different placeholders
in the text fields provided. To do this, click on the buttons which symbolize the relevant
content with small graphics.
370
© 2011 Electric Paper GmbH
Creating a Questionnaire in the VividForms Editor
Following placeholders are available in the icon list:
[SUBUNIT]
Name of subunit
[ORGANIZATION]
Name of organization
[AUTHOR]
Name of instructor/trainer
[SURVEY]
Name of course or survey
[PERIOD]
Name of survey period
[COURSEID]
Course ID
In addition to these placeholders, two text elements can be used to fill the box containing hints on completion:
[MARK]
Filling instructions part 1
[CORRECTION]
Filling instructions part 2
Apart from the placeholders that are available as buttons, almost all further placeholders for use in text templates can be used, e.g., [CUSTOMFIELD_X] for the userdefined course fields, [PROGRAMOFSTUDY] for the program of study/course, etc. A
comprehensive list of all placeholders can be found in chapter D "". Only the following
are excluded from use in questionnaire headers:
•
all placeholders that apply to further report recipients/secondary trainers, e.g.,
[SEC_SURNAME_X] “”
•
questionnaires that are used for paper surveys: all placeholders that apply to
online surveys, e.g., [TAN], [SERVER], etc.
The placeholders can be manually placed in the entry field of a placeholder assistant.
Instead of the placeholders you can enter text directly. It then becomes a static text
which is not adapted to the respective surveys.
As you know, using the cover sheet procedure the header of the questionnaire
remains empty because it cannot be adapted to a single particular survey. If you only
want use a questionnaire in the cover sheet procedure, you can avoid this issue by
inserting static texts into the header instead of the placeholders.
If the questionnaire is to be used for non-anonymous surveys personalized to individual participants, other placeholders can be added. For this simply select a placeholder
from the shortlist in the lower area of the dialogue and click on the button marked [+].
The following placeholders are available for non-anonymous surveys:
[PARTICIPANT_FIRSTNAME] Survey participant’s first name
[PARTICIPANT_LASTNAME]
Survey participant’s last name
[PARTICIPANT_IDENTIFIER] Survey participant’s ID
[PARTICIPANT_SALUTATION] Survey participant’s salutation
[PARTICIPANT_TITLE]
Survey participant’s title
[PARTICIPANT_ADDRESS]
Survey participant’s address
© 2011 Electric Paper GmbH
371
Creating Questionnaires with VividForms
[PARTICIPANT_EMAIL]
Survey participant’s email address
[PARTICIPANT_CUSTOM1]
Survey participant’s first user-defined field
[PARTICIPANT_CUSTOM2]
Survey participant’s second user-defined field
[PARTICIPANT_CUSTOM3]
Survey participant’s third user-defined field
Note:
The fields for survey participants can only then be used in a survey when participant
data for the respective course identification was imported into the EvaSys system
via the relevant CSV import .
If a placeholder is to extend across two columns, click on the corresponding placeholder and activate the option “Placeholder across both columns”. Please observe,
that EvaSys will automatically delete the placeholder in the other column and, where
applicable, you will need to insert it in another area of the questionnaire header.
Figure 482: Extend Placeholder across two Columns
In order to expand or contract the size of the questionnaire header, the number of
lines made available can be adjusted in the placeholder wizard. You can choose
between 1 and a maximum of 10 lines. The more lines included in the form header
equates to more room being available for the logo.
372
© 2011 Electric Paper GmbH
Creating a Questionnaire in the VividForms Editor
Figure 483: Define the Number of Lines in the Questionnaire Header
The logo in the questionnaire header can also be replaced by your own logo. By
default, the logo defined as the standard subunit logo is displayed. To integrate a custom logo into the questionnaire header, click on the existing logo. The logo assistant
opens automatically.
Figure 484: Adjusting the Logo
Here you can choose whether to
•
use the standard logo (subunit logo) or
•
use your own logo.
© 2011 Electric Paper GmbH
373
Creating Questionnaires with VividForms
Under “Use own logo” you will find the logos and pictures which you have already
uploaded into the “Picture Library” in the menu “Form Properties” in the Editor Control.
If you have not yet integrated any pictures (e.g. logos) into the “Picture Library”, you
cannot select your own logo. To upload images to the library please see Section C
3.8.1. “Uploading images to the image library”.
In the area “Position in questionnaire header” it can be determined whether the
selected logo should be displayed on the left or right side of the questionnaire header.
Furthermore, in the “Vertical Alignment”, the orientation of the logo in the questionnaire header (top, middle, bottom) can be defined. In the area “Scale of the box width
in%”, the size of the logo can be adjusted. At a size of 100%, the logo can occupy the
entire outer third of the questionnaire header. If the percentage is decreased, the logo
is scaled down accordingly.
The following illustrations give an example of a questionnaire header expanded to
three lines with adjusted placeholders and custom logo in the editor view as well as in
a PDF:
Figure 485: Adjusted Form Header (Editor View)
Figure 486: Adjusted Form Header (PDF)
2.5.
Adding and Editing Question Groups
Question groups unite questions that are thematically similar under a general heading, so that, for example, indicators can be calculated.
Text entries have the following meaning:
Title
Title of the question group
You can highlight the title of the question group (as you can with numerous other elements) with bold or italic fonts or by underlining. To do this, mark the desired element
and click the buttons [B], [I] and/or [U] in the bar next to the lettering “Headline.
Above the [Arrow back] and [Arrow forward] buttons you can undo editing steps.
374
© 2011 Electric Paper GmbH
Creating a Questionnaire in the VividForms Editor
Figure 487: Create a Question Group
Presentation slide text
This text appears on the presentation slide in the PDF report in order to explain an
indicator.
Please note: This option is only available when the creation of a presentation template is activated in the PDF report settings (“System Settings/Report Settings/Configuration”).
Indicator
Select a scale for the questions that are to be combined to an average.
Figure 488: Indicator Selection of a Question Group
The possibility of highlighting the question groups is activated in the menu “Form
Properties” in the VividForms Editor:
© 2011 Electric Paper GmbH
375
Creating Questionnaires with VividForms
Font Size
Select the font size for the heading text from 7pt up to 20pt (default: resulting from the
chosen default font size in the menu “System Settings/EvaSys Settings/VividForms/
Default Font Size”)).
Note:
The maximum font size of the question group depends on the size of the line height
defined for the questionnaire. Thus, to set a bigger font size for the question group it
can be necessary to first enlarge the line height in the menu “Form Properties”.
Text Element
If you check this box then the question group will be changed into a text element. (This
is only possible when adding a new question group).
Please Note: When changed into a text element, the question group loses its original
function and becomes mere text. You can no longer add items such as questions or
design elements to this redefined group.
Having made your settings and clicking on “Apply”, the chapter title will appear in the
preview. You can open the properties of the question group again with a double click
in the preview window or by using the symbol in the Editor Control menu “Edit” and
the menu “Edit Question Group”.
Attention! Clicking on the symbol
or on the text “Delete (Del)” in the menu “Clipboard” will delete the entire highlighted chapter as well as all of the questions in it,
without any warning or confirmation.
Using the arrow symbols
“Up” and
“Down” in the menu “Move”, you can move
entire chapters up or down. To move a chapter one page forwards or backwards, use
the “Copy (Ctrl+C)”
2.6.
and “Paste (Ctrl+V)”
function in the menu “Clipboard”.
Adding and Editing Questions
Should you wish to add a question to your questionnaire, choose the option “Add
question” in the Editor Control. Please note: You cannot add questions without first
having created a question group!
In a question group, single questions can be moved up or down by using either the
arrow symbols
and
in the menu “Move”, or by ‘drag and drop’, i.e. by right clicking on the question and dragging it to the desired position. To move a question to
another question group, you may either use ‘drag and drop’ or the cut
and paste
function in the menu “Move”.
376
© 2011 Electric Paper GmbH
Creating a Questionnaire in the VividForms Editor
2.6.1.
Overview on the Question Types
Scaled Questions
Linear scales have up to 11 options. In addition to the question text there are two texts
at the scale poles. Scaled questions can be grouped and averaged to indicators.
Scaled questions are also available for generating cross tabulations. When needed a
no opinion field can be added.
Figure 489: Analysis of Scaled Questions
Open Questions
Responses to open questions are automatically recognized as answered during processing and are integrated in the report document as image files. If the responses
have been manually anonymized or are part of an online survey then the responses
are in machine print and can be exported together with the raw data.
Figure 490 (a): Illustration of a Result of an Open Question as Image File as well as (b) in
Machine Print Form
Grade Values
Survey participants check a value (paper survey), or give directly a grade value
(online survey).
Figure 491: Illustration of a Question with Grade Value
Single Choice (1 of n)
A single choice question has multiple answer options of which only one can be
selected (e.g. age, gender, etc.).
Generally you can define as many answer options as necessary, as long as there is
enough room left on the page. Nevertheless, there are differences within this question
type resulting from the number of answer options provided:
© 2011 Electric Paper GmbH
377
Creating Questionnaires with VividForms
For single choice questions with up to 11 answer options, the position of the options
(next to/beneath the question text) can be freely defined. In the report all answer
options will be displayed, regardless wether they have been marked on the questionnaires or not.
When a single choice question has more than 11 answer options, the options are
always displayed beneath the question text. In the report only those options are displayed, which have at least been selected once by the participants.
Figure 492: Illustration of a Single Choice Question
Multiple Choice (m of n)
A multiple choice question can have unlimited options (unlimited means “as many
options as fit on one page”). The options are considered yes/no questions, i.e. not
marking an option is interpreted as a “no”. The number of selections per response
option is for this reason the same as the number of returns.
Figure 493: Illustration of a Multiple Choice Question
Matrix Field
The matrix field allows the capturing and evaluation of five digit numbers (horizontal
matrix question) or 10 digit numbers (vertical matrix question).
Analysis of matrix fields can portray numbers in any dimension.
Figure 494: Illustration of a Matrix Field Question
378
© 2011 Electric Paper GmbH
Creating a Questionnaire in the VividForms Editor
2.6.2.
Scaled Question
Figure 495: Scaled Question
Select the question type scaled question and click on [Next]. In the next step enter the
question text and click on [Next].
Figure 496: Scaled Question – Individualize Pole Labels
The last step involves entering the text of the two poles and selecting the number of
check fields. You have the choice between two and eleven fields.
The pole labels and the optional abstention text can be defined individually after
enabling the checkbox “individualize pole labels“. Otherwise these labels remain
empty or will be defined by the horizontal or vertical pole labels which can be generated separately.
© 2011 Electric Paper GmbH
379
Creating Questionnaires with VividForms
A choice of diagram types to be used in the report is available at the bottom.
Note: Experts may edit the appearance of the report graphics by editing the file
lib.jpgraph.php in the EvaSys email folder. Contact your support representative to
receive the necessary unencrypted file.
Information on further options when creating a scaled question can be found in the following sections.
Click on [Apply].
The scaled question will now appear in the preview and will be automatically highlighted.
Figure 497: Scaled Question in the Editor Preview
Use these settings as default for scaled questions
If you would like to apply the settings of the created scaled question (abstention,
check boxes, pole texts, chart type, etc.) for all further scaled questions, activate the
option, “Use these settings as default for scaled questions”. All scaled questions that
you add afterwards, receive these settings per default.
Mirroring of Individual Scaled Questions
The VividForms Editor allows you to mirror individual scaled questions. Using this
method, control questions can appear inverted in the survey but at the same time flow
correctly into the calculation of the indicators.
On your questionnaire, you can establish mirrored scaled questions in two different
ways:
1. by composing a question text in a negative way with the pole labels being consistent throughout the questionnaire, e.g. “The technical equipment is poor”
with the pole labels “strongly agree” (left) and “strongly disagree” (right).
2. by inverting the pole labels for a question while the phrasing of the question
remains positive, e.g. “The technical equipment is excellent” with the pole
labels “strongly disagree” (left) and “strongly agree” (right). This method is only
apt for scaled questions with individual pole labels.
To create a mirrored scaled question, click on the option “Set this scaled question as a
mirrored question” whilst you are creating the scaled question. In the VividForms Editor preview, the scaled question is marked with a red arrow „ “.
Dual Scale
The combination of quality and importance (dual scale) is a frequently encountered
question type. The purpose of the combination is to separate the important cases from
the unimportant ones. Bad and unimportant as well as good and unimportant cases
should be disregarded as negligible. The dual scale is helpful, in that it separates the
380
© 2011 Electric Paper GmbH
Creating a Questionnaire in the VividForms Editor
relevant and irrelevant areas of a survey, therefore aiding target-oriented decision
making. It is also a useful function for testing new items.
Note:
To use the dual scale, insert your scaled questions with individual pole labels as you
are used to in the VividForms Editor. Please note the following:
•
Scaled questions which are to be later linked to each other, need to have an
identical scale (for example, both questions have a 6 point scale).
•
The scale has to comprise 4-6 checkboxes (no longer/shorter scales possible).
•
The quality rating of the poles must also be consistent with each other. This
means that in quality questions, if the left pole is the positive one (very good/
agree), then in importance questions, the left pole has to be the positive one too
(very important).
•
The dual scale is only expedient if you have stored individual pole labels for each
scaled question.
In the following example, a scaled question was first inserted on the quality of the
technical equipment. Then, a second scaled question was inserted on the importance
of the technical equipment. By activating the option “Combine to dual scale with previous question”, both of these scaled questions are linked to each other.
Figure 498: Combining Scaled Questions with each other (Dual Scale)
In the VividForms Editor, the activation of the dual scale, that is, the linking of a quality
to an importance scaled question, is marked by a yellow bracket:
Figure 499: The marking of Scaled Questions in the VividForms Editor (Dual Scale)
© 2011 Electric Paper GmbH
381
Creating Questionnaires with VividForms
Please note, moving, cutting out or deleting the scaled questions cancels the link.
Display in the PDF Report
In the menu “System Settings/Report Settings” you can change the configuration settings for every PDF report by clicking on the icon in the column “Configuration”. With
the configuration setting “Dual scale profile line” you can activate the display of the
dual scale in the PDF report. By selecting “0” the display of the dual scale is deactivated. By selecting “1” you define that the critical values appear on the left side of the
scale, with “2”, the critical values appear on the right side of the scale.
The critical values are calculated by subtracting the result of the quality question (a)
from the result of the importance question (b). On a 6 point scale, the values range
between -5 and +5. Values of +1 to +5 are considered critical as soon as the positive
pole (agree/very important) in the questionnaire, appears on the left side. Values from
–1 to –5 are considered critical as soon as the positive pole (agree/very important) in
the questionnaire appears, on the right side.
Figure 500: Explanation of the Dual Scale Calculation
Figure 501: Dual Scale Profile Line of the linked Scaled Questions in the PDF Report
Apply settings to all other scaled questions
You can, if required, apply the settings for a scaled question to all the scaled questions already available on the questionnaire.
382
© 2011 Electric Paper GmbH
Creating a Questionnaire in the VividForms Editor
For this, activate the option “Apply settings to all other scaled questions” and click on
the button [Define settings]. A window will then open, where you can determine which
settings should be applied, and define if the selected settings should be applied for the
complete questionnaire, or just for the current question group.
Figure 502: Scaled Question – Apply Settings to all other Scaled Questions
To apply the settings, close each of the opened windows with the button [Apply].
2.6.3.
Open Question
Select the question type open question and click on [Next]. You can now enter the text
of the open question.
Figure 503: Open Question – Enter the Question Text
Now click on [Next] and choose the size of the comment box depending on the number of lines needed. For paper-based surveys any number of lines up to the whole
remaining page area may be selected (“Box Size”). The maximum number of characters allowed for the answer can also be defined for online surveys (“Maximum number
© 2011 Electric Paper GmbH
383
Creating Questionnaires with VividForms
of characters”). If you enter the value “0”, the participants in online surveys can enter
text of any length.
Note:
The option “Handwriting recognition” is only available when this feature is licensed.
For further information on licenses consult the License Management (menu “System
Information/License”). For further information on ICR see the following paragraph
“Handwriting Recognition in EvaSys”.
Figure 504: Open Question – Define the Required Space
After having defined all options click on [Apply]. The open question will now appear in
the preview and will be automatically highlighted.
Figure 505: Open Question in the Editor Preview
Handwriting Recognition in EvaSys
EvaSys supports handwriting recognition via ICR. This feature is only available when
licensed. For further information please contact your vendor.
384
© 2011 Electric Paper GmbH
Creating a Questionnaire in the VividForms Editor
By means of handwriting recognition short handwritten texts can be read and processed automatically. For this, activate the option “Handwriting recognition” when creating an open question.
Figure 506: Open Question – Activate Handwriting Recognition
After activating this option, the box size is automatically set to “2”, as EvaSys can only
read single-line handwritten texts (one handwritten line matches two VividForms
lines).
In the first drop-down menu you can define the kind of characters to be read. You can
choose between the following four options:
•
Alphabetical = letters only
•
Alphanumeric = letters and numbers
•
Numeric = numbers only
•
Numeric+ = numbers and special characters: $ / * + , - . < > = ~ @ € £ ¥ ¢ '
Figure 507: Open Question – Choice of Character Types
© 2011 Electric Paper GmbH
385
Creating Questionnaires with VividForms
Possible fields of applications could be the following:
•
Alphabetical: names of persons or places
•
Alphanumeric: license numbers
•
Numeric: measurements
•
Numeric+: prices, dates
In the second selection box, you can define the language for which the handwriting
recognition is to be conducted. The German language is set as default.
Figure 508: Open Question – Selecting the Language
Figure 509: Open Question – Setting Segmentations
Optional segmented fields can be formatted and displayed for handwriting recognition.
By segmenting, handwritten entries appear more orderly and provide for considerably
improved automatic reading. Preset formats for date specification (e.g. NNNN"-"NN""NN) can be selected and stored as well as your own new formats, such as for customer numbers and the like.
The following options are available for own formats
•
N for numerical entries
•
L for alphabetical entries
•
A for alphanumerical entries as well as special characters.
To define your own format, activate the option “New format”. Click the buttons [N] [L]
[A] to add the character types or type the text directly into the input field. Please
observe, when creating your own templates the separator must be in inverted commas (e.g.: “/”), otherwise they cannot be recognized by EvaSys.
Lastly, different styles for the segmentation can be selected: The fields can be displayed closed at the top, open at the top or half open.
386
© 2011 Electric Paper GmbH
Creating a Questionnaire in the VividForms Editor
Figure 510: Open Question – Setting the Segmentation Style
The segmentation is not only displayed in paper questionnaires, but in online surveys
too.
The display of an ICR question can be set in the report, additional to segmentation.
Note:
Please note that the option “Display in report” is only available for segmented ICR
questions.
The following options are available here:
•
Like an open question: In this case, the results are displayed individually one
below the other, analogous to the results of an open question. Identical entries are
concentrated and have “mentions” added to the corresponding number (for example: 21337 (2 mentions).
Figure 511: ICR Question: Display like an open question
•
Bar for every mention: The results are analyzed using bar charts, with each
answer option receiving its own bar. Identical entries are concentrated. This option
is recommended for double-digit numbers at maximum.
Figure 512: ICR Question: Display with bars for every mention
•
Bar for mentions across 10 groups: The results are analyzed in a bar chart. The
group number relates to the number of bars (here 10) that should be displayed
later in the PDF report as the analysis of this question. In this way, numerical que-
© 2011 Electric Paper GmbH
387
Creating Questionnaires with VividForms
ries in the value range 0-999 (format: “NNN”) are divided into the following 10
groups: 0-99; 100-199; 200-299; ... ; 900-999.
Note:
Please note that the options “bar for every mention” and “bar for mentions across 10
groups” are only available for segmented numerical ICR questions.
It can be individually determined for each segmented ICR question when it should be
displayed in the verification.
Note:
Please note that the option “Verification display” is only available for segmented ICR
questions.
In EvaSys the following settings are available:
•
Always: The question is always displayed in the verification, regardless of the
Reader's reading reliability. This option should be used when the unread characters should be captured exactly.
•
From low to high reading reliability: The question is very likely to appear in the verification. Only when all entries of the ICR question have been recognized with
absolute certainty does it not appear in the verification.
•
From low to middle reading reliability: Only ICR questions that the Reader has recognized with low to medium reading reliability are displayed in the verification.
•
Only when reading reliability is low: Only ICR questions that the Reader has recognized with low reading reliability are displayed in the verification. All other questions (medium to high reading reliability) are not displayed in the verification. This
option is suitable when the verification requirements should be as low as possible,
and when, under certain circumstances, incorrectly read values can be accepted.
Hint:
If only numbers can be recorded by the ICR recording, then the verification can certainly only be performed with low or medium reading reliability as numbers can usually be recognized better than numerical or alpha-numerical entries.
Note:
Please note that the settings for verification only apply if the verification is activated
when the survey is created.
The characters that have been securely read in the verification are highlighted in
white, while those that have been insecurely read are highlighted in yellow, speeding
up verification.
Figure 513: Open question: ICR fields in the verification
388
© 2011 Electric Paper GmbH
Creating a Questionnaire in the VividForms Editor
By clicking the button [Apply] the open question is inserted into the questionnaire.
Figure 514: Open Question – Segmented Fields in the Editor Preview
Note:
Only clear and neat entries written in block letters can be read automatically. As the
available length of entries is limited, handwriting recognition is not apt for capturing
elaborate comments. It is designed as a means to capture data in form of single
words.
If you create a survey with a questionnaire which contains open questions with handwriting recognition, the “verification” is automatically activated. This can be deactivated if desired.
To ensure a high reliability of results we also strongly recommend the use of verification when working with open questions and ICR (for the use of verification see
chapter B 4.3. "Correction of Checkboxes not Clearly Read: The Verification").
Taking into account the additional expenditure of work and time caused by the process of verification, you should always check if the data cannot be collected by means
of closed question types (such as single choice or matrix questions).
2.6.4.
Single Choice/Multiple Choice Question
Select the single choice question type and click on [Next]. You can now enter the text
of the question and then click on [Next].
(This example functions identically for single choice and multiple choice questions.)
Figure 515: Single Choice Question – Enter the Question Text
© 2011 Electric Paper GmbH
389
Creating Questionnaires with VividForms
Figure 516: Single Choice Question – Enter the Answer Options
Next to “Option” enter the text for the first option and click on [Add option]. The option
will now appear in the option list. Repeat this procedure until you have entered all the
options.
You can highlight each option, edit or change their sequence by clicking on the symbols
,
and
.
Settings for the display in online surveys can be made for both single choice question
types. You can choose between the drop-down list and checkbox list.
For paper based surveys the alignment of answer options of single choice questions
can either be set to “next to the question text” or “beneath the question text”. For questions with more than 11 answer options, only the option “beneath the question text”
can be selected. The option “Default Questionnaire Layout“ refers to the settings
defined in the menu “Form Properties/Layout settings“. Further information can be
found in chapter C 2.11. "Layout Settings".
After all the options have been entered, click on [Apply].
The single choice question will now appear in the preview and will be automatically
highlighted.
Figure 517: Single Choice Question in the Editor Preview
The ability to limit the number of possible answers is a specific feature of multiple
choice questions. The value “Max:” is predefined with zero which allows all options to
be selected. Enter a number here to limit the available options.
390
© 2011 Electric Paper GmbH
Creating a Questionnaire in the VividForms Editor
Figure 518: Multiple Choice Question – Enter the Answer Possibilities
In the Editor preview, multiple choice questions are marked with a red “MC”. This is, of
course, not visible in the PDF.
Figure 519: Multiple Choice Question in the Editor Preview
2.6.5.
Horizontal Matrix Question
The horizontal matrix question enables you to display five digit numbers.
Select the matrix field question type and click on [Next]. You can now enter the text of
the question. Then click on [Next].
In the next window, select the matrix question type (horizontal or vertical), the minimum and maximum value, the number of groups in the PDF report, and the method of
capturing the matrix value.
In this example the minimum value is set at 1, the maximum value at 99.
The group number refers to the number of bars that will represent the analysis of this
question in the PDF report. A group number of 10 corresponds to the value areas of 19, 10-19, 20-29 […] 90-99, that is ten groups. If the number of groups is left at the
default value of 0, then each value will be displayed individually in the bar chart of the
PDF report.
Furthermore the entry in the matrix field can be read as a natural number or text, i.e.
to be read as a string of characters. When capturing matrix values as text, it is possible that a series of numbers with leading zeros, i.e. as can occur in postal codes, can
be captured correctly.
© 2011 Electric Paper GmbH
391
Creating Questionnaires with VividForms
Figure 520: Create a Horizontal Matrix Question
On the questionnaire, the question regarding age is shown as a two row matrix.
Respondents can mark the 10's in the top row, and the 1's in the lower row.
The advantage of this method is that the high accuracy of checkboxes makes it
unnecessary to use ICR for handprint recognition, which would mean a considerable
amount of review and correction.
Figure 521: Horizontal Matrix Question in the PDF-Preview
2.6.6.
Vertical Matrix Question
With the vertical matrix question up to ten digit numbers can be entered, i.e. student
number, zip codes, etc.
Select the question type matrix field and click [Next]. You can now enter the text of the
question. Then click [Next].
In this example, a vertical matrix question was selected with a minimum value of
00001 and a maximum value of 99999. In the report, the results are presented in 10
categories. In order to also register leading zeros, the matrix value is captured as text.
392
© 2011 Electric Paper GmbH
Creating a Questionnaire in the VividForms Editor
Figure 522: Create Vertical Matrix Question
The PDF preview of this vertical matrix question looks as follows:
Figure 523: Vertical Matrix Question in the PDF Preview
When filled out, such a matrix question could, for example, look like this:
Figure 524: Completed Vertical Matrix Question
© 2011 Electric Paper GmbH
393
Creating Questionnaires with VividForms
Note:
The handwritten numbers only serve for clarity (so the student/participant or if necessary the verifier, can check the entry). They will not be read in!
2.6.7.
Grade Value
Select the grade value question type and click on [Next]. You can now enter the question text and then click on [Apply].
Figure 525: Grade Value in the PDF Preview
The survey participant can now give a grade by checking a place before and after the
decimal point.
The advantage of this method is that the high accuracy of checkboxes makes it
unnecessary to use ICR for handprint recognition, which would mean a considerable
amount of review and correction. Please note that only values between 1.0 and 5.0
will be considered.
394
© 2011 Electric Paper GmbH
Creating a Questionnaire in the VividForms Editor
2.7.
Adapting the Size of Answer Boxes
You can change the size of your answer boxes in the VividForms Editor under “Form
properties”. You have five sizes (8pt, 9pt, 10pt, 11pt and 12pt) to choose from:
Figure 526: Adapting the Size of Answer Boxes
Note:
Line spacing must be at least 2pt greater than the answer box size.
If, for example, you have defined a line spacing of 11pt and then set your answer box
size up to 11pt, the system automatically increases the line spacing to 13pt.
If you reduce the line spacing, EvaSys automatically reduces the size of your answer
boxes so that, as a basic principle, a minimal difference in size of 2pt is ensured.
Hint:
In order to achieve an appealing layout for your questionnaires, we recommend
selecting a minimal difference in size of at least 3pt in relation to the size of your
answer boxes.
Attention:
The larger the answer boxes, the fewer can be displayed.
With a scaled question with 11 response possibilities, your answer box size will be
8pt. Now if you increase your answer box size to 9pt, for reasons of available space,
only 10 answer boxes will be displayed. With a answer box size of 10pt, you can only
display 9 answer boxes. With a answer box size of 11pt or 12pt, only 8 or 7 answer
© 2011 Electric Paper GmbH
395
Creating Questionnaires with VividForms
boxes are displayed, and so on. (Before applying the change, you will get a warning
message. If you then click on [Cancel], your changes will not be applied).
Decreasing the number of answer boxes follows automatically in the system when
increasing the answer box size. If you decrease the size of the answer boxes afterwards, the number of answer boxes displayed, will not, however, be automatically
increased by the system. This means, that when decreasing the size of the answer
boxes, you have to increase manually the number of answer boxes. To do this, double
click on the corresponding scaled question and select in the area of “Define options”,
as in creating a scaled question, the number of desired answer boxes.
With all other question types, an increase in the size of the answer boxes has no
effect on the question.
These changes (decrease in the number of answer boxes) only occur with scaled
questions, other question types are not affected.
2.8.
Adding Pole Labels
2.8.1.
Horizontal Pole Labels
This function allows pole label headers for groups of scaled questions to be defined.
Firstly it requires the section “Form Properties” in the VividForms Editor control to be
opened. Select the option “
Edit pole template“.
Figure 527: Edit Pole Template
Enter the text elements which should be used for the labels and click [Apply].
Next create a new question group. Now the option “
“Add” can be selected. Click on “
396
Pole Labels” in the section
Pole Labels” to add them to the questionnaire.
© 2011 Electric Paper GmbH
Creating a Questionnaire in the VividForms Editor
Figure 528: Pole Labels in the PDF Preview
Continue adding scaled questions. Do not define individual pole labels since the pole
label headers perform this function.
The pole labels are automatically assigned to all scaled questions below. This allows
them to be displayed in the PDF reports.
2.8.2.
Vertical Pole Labels
Vertical pole labels can be defined as an alternative to the horizontal labels. Chose
the option “ Extended Pole Labels” after creating a new question group. Now enter
the option texts into the dialog. Each text element is limited to 25 characters.
Figure 529: Enter and Edit of the Vertical Pole Labels
Click [Apply] to close the dialog and create the vertical pole labels on the form.
Now scaled questions can be added. The system will assign the left and right pole
labels to each defined scaled question below the vertical pole labels.
© 2011 Electric Paper GmbH
397
Creating Questionnaires with VividForms
Figure 530: Vertical Pole Labels in the Editor Preview
Please note that those labels between the two poles are not linked to the scaled question and will not be visible in the PDF report or exports.
2.8.3.
Inclined Pole Labels
In addition to horizontal and vertical pole labels, you can also use inclined pole texts
for paper surveys. You can define the degree of inclination, under “Extended Pole
labels”:
Figure 531: Inclined Pole Labels – Degree of Inclination
As you can see in the above graphic, you have eleven different degrees of inclination
to choose from.
Note:
In the preview of the VividForms Editor, the pole labels are always in a vertical position. To get a preview of the inclination, please call up the PDF preview.
398
© 2011 Electric Paper GmbH
Creating a Questionnaire in the VividForms Editor
The following graphic shows you the preview in the VividForms Editor, which is identical for all levels of inclination:
Figure 532: Inclined Pole Labels in the Preview of the VividForms Editor (Independent of the
Degree of Inclination)
In the following graphics, you can see examples of possible inclinations in the PDF
preview.
Figure 533: Inclined Pole Labels (45°) in the PDF Preview
Figure 534: Inclined Pole Labels (65°) in the PDF Preview
Figure 535: Inclined Pole Labels (-90°) in the PDF Preview
© 2011 Electric Paper GmbH
399
Creating Questionnaires with VividForms
2.9.
Adding Graphical Elements
2.9.1.
Line Space
Using the line space gives extra room between single objects.
Open the menu “Add” and select “
the active object.
Line Space“. An empty line will be added below
Figure 536: Line Space in the Editor Preview
The line space can be selected, moved and modified using the clipboard functions
“
Cut”, “
2.9.2.
Copy” and “
Paste”.
Separator
The separator allows the optical separation of questionnaire content and can be
added freely inside question groups.
Open the menu “Add” in the Editor control and select “
will be added below the active object.
Separator“. A horizontal line
Figure 537: Separator in the Editor Preview
The separator can be selected, moved and modified using the clipboard functions
Cut,
2.9.3.
Copy and
Paste.
Text
To add a text area open the menu “Add” and select “
Text Box“. A dialog box
appears which contains a text box. Type in the desired text or paste content from
another text editing tool into this edit box.
Alignment options are available to align the text box content to the left, right, center or
as justified text.
Click on [Apply] to create the text area.
400
© 2011 Electric Paper GmbH
Creating a Questionnaire in the VividForms Editor
Figure 538: Text Area in the Editor Preview
As with other objects, the text area on the questionnaire can be moved around. The
text also appears in online surveys and, if desired, in the PDF report too. To activate
this, select the option “Show text boxes” in the menu “System Settings/Report Settings/Configuration”.
2.9.4.
Page Break
If a page becomes full VividForms Editor will automatically apply a page break to continue adding objects on the following page.
Page breaks can also be added manually at each phase of the questionnaire. First
mark an object by clicking on it with the left mouse button. Now open the menu “Add”
and select the option “
Page Break“.
Figure 539: Page Break in the Editor Preview
The page break will be symbolized by a selectable row containing the text // … Page
Break. The next object added to the form will appear on the following page.
If the page break is deleted later, the objects throughout the rest of the questionnaire
will realign.
2.9.5.
Line Height, Font Size and Font Type
With the line height you can change the vertical space needed for a line. This could be
necessary if, for example, a questionnaire does not quite fit on two pages. Decrease
the line height and you will be able to make do with two pages.
© 2011 Electric Paper GmbH
401
Creating Questionnaires with VividForms
Figure 540: Accommodate Line Height, Font Size and Font
On the other hand a questionnaire that is not quite filled can be made to look better by
increasing the line height.
The font size affects all question objects with the exception of chapter headings.
These should not be made too large.
The following font types are available:
•
Arial
•
Georgia
•
Tahoma
•
Times New Roman
•
Verdana
Please examine the PDF sample issue after changing the font type using the PDF
preview to make sure that all texts appear correctly. If not you may have to reduce the
font size.
2.9.6.
Filtering of HTML-Tags
Note:
This feature should only be used by users with technical knowledge.
You should be aware of the implications of your changes and always check them.
Only then you can ensure that your online surveys appear with the desired layout and
functions.
With online surveys, in addition to highlighting you have other formatting options with
bold and italic fonts and underlining. You can use HTML tags for the formatting (for
online surveys only).
402
© 2011 Electric Paper GmbH
Creating a Questionnaire in the VividForms Editor
For this purpose, activate in the EvaSys Settings in the “VividForms” part the option
“Allow editing HTML source code in VividForms Editor”. The button “Source code”
appears in the dialogue for text entry and formatting in the VividForms Editor. This
affects, for example, the assistant for the creation of question groups as well as questions:
Figure 541: Show the Source Code in the VividForms Editor
Click on the button “Source code” to view and change the text's HTML formatting. This
way you can insert line breaks (with the aid of the tag <br/>), list formatting or table
formatting.
All HTML elements inserted here are then available for online surveys.
Note:
The utilization of JavaScript here is explicitly advised against. JavaScript can entail
unpredictable and unwanted implications, if, for example, used variables have by
chance the same name as a variable already used in EvaSys.
Only the font formatting fat <strong>, Italic <em> and underline <u> are supported
for paper surveys. Other formatting is extracted.
2.10. Adding Pictures to a Questionnaire
2.10.1. Upload Pictures to the Picture Library
To add pictures to a questionnaire you have to first upload them.
Please note: You can integrate pictures in the image formats JPEG and PNG in the
VividForms Editor. The JPEG-format is especially suitable for photographs. Because
of losses resulting from compression it is not recommended for text and graphics.
© 2011 Electric Paper GmbH
403
Creating Questionnaires with VividForms
The advantage of the PNG-format is the compressed storage without losses which
cannot be guaranteed with the JPEG-format. Thus the PNG-format is suitable for photographs as well as text and graphics. However, files in the PNG-format are considerably bigger than the according JPEG-files.
To upload pictures click on the button [Picture Library] in the menu “Form Properties”
in the VividForms Editor. A new window called “Picture Library” opens:
Figure 542: Option “Picture Library” in the Menu “Form Properties”
The new window “picture library” appears:
Figure 543: Picture Library
If you click on [Browse], you can search for the picture in your file system. Clicking on
[Upload pictures] integrates it in the picture library. Here you can see a picture that
404
© 2011 Electric Paper GmbH
Creating a Questionnaire in the VividForms Editor
was uploaded and integrated in the picture library. On the left hand side you can see
the name of the added picture, on the right hand side the preview.
Clicking on [Delete picture] removes the marked picture from the list.
Please note: The system does not ask you to confirm the deletion. When you click on
the button, the picture will irrevocably be removed from the list.
2.10.2. Integrating Pictures in a Questionnaire
As soon as you have uploaded pictures into the picture library, you can integrate them
into the questionnaire.
You can find the option [Picture] in the menu “Add“. As with the other items you can
only add a picture to a question group. As long as you do not define a question group
you cannot select the option [Picture].
When you have created a question group you can integrate pictures – the option can
be selected.
Figure 544: Option “Picture” in the Menu “Add” – Activated (left) and Deactivated (right)
When clicking on [Picture] the picture assistant opens in a new window:
Figure 545: Picture Assistant
© 2011 Electric Paper GmbH
405
Creating Questionnaires with VividForms
You can select a picture from a list there. You will see the selected picture in the preview.
Additionally you can define the position of the picture on the questionnaire – leftaligned, centered or right-aligned.
If you choose to scale the picture, the basis for this is the width of the page (width of
page = 100%).
In this case the alignment is “centered” and the scaling is 25%.
When you click on [Apply] you add the picture to the last place in the questionnaire
where the focus was (i.e. where you last clicked on the questionnaire).
Via clicking on the picture and using the key [Delete] you can remove the picture from
the questionnaire again. (Alternatively you can set the focus on the picture and
choose [Delete] in the menu “Clipboard”.)
The position and selection of pictures can be changed after insertion (as long as the
questionnaire is not in use). Just double-click on the picture and the picture assistant
will open. (Alternatively choose [Picture] in the menu “Edit”.)
If you look at the PDF preview (you can view this via the PDF symbol above the upper
left corner of the form), you will get a preview of the actual appearance of the questionnaire. Here you can see an example:
Figure 546: Picture in the PDF Preview
2.11. Layout Settings
Figure 547: Menu “Layout Settings”
Via the menu item “Layout Settings” in the menu “Form Properties”, you can choose
between two layout variations, the “Traditional Layout” and the “Optimized Layout”.
New questionnaires are generally produced with an optimized layout, which has an
improved alignment of the checkboxes. Existing forms that were created with earlier
406
© 2011 Electric Paper GmbH
Creating a Questionnaire in the VividForms Editor
versions of EvaSys, retain the traditional layout. If these are copied for further processing, the optimized layout can be assigned to them later.
Figure 548: Adjusting Layout Settings
The default setting for the position of the response options of single choice questions
is anchored in the layout settings at the bottom. The settings selected here (next to
the question text/beneath the question text) apply to all single choice questions that
are newly inserted. In the properties of each question, the position can be adjusted
manually, if necessary.
2.12. Adjusting Color Scheme
Under a new menu item in the “Form properties” (“Change color scheme”) different
color shadings for question groups and questions can be defined. This improves the
readability and increases the optical quality of the questionnaire.
To change the color of your question or question group, click on the “green pencil”
icon next to the corresponding option.
You can change the following areas:
•
Font color of the question groups,
•
Background of the question groups,
•
Background of odd questions (e.g.: 1.1. and 1.3., etc.),
•
Background of even questions (e.g.: 1.2. and 1.4., etc.)
© 2011 Electric Paper GmbH
407
Creating Questionnaires with VividForms
Figure 549: Adjusting Color Scheme
After clicking on the pencil icon, the color selection dialog opens. Here, at the top of
the window, you can select a color directly, set as an RGB value or as an hexadecimal
number.
Figure 550: Color Selection Dialog
At the bottom of the dialog, the brightness of the color is set. Whilst the font and the
background for question groups may have any color depth, the color value for the
background of the questions should not be too dark, so as to ensure high readability
when scanning. EvaSys immediately checks the brightness of the selected color. If
too dark a color was selected, the message “A brighter color is required” appears.
With the slider in the area “Brightness”, the brightness can be increased. Once the
allowed minimum brightness is reached, the warning disappears. The new color can
be adopted by clicking on [OK].
408
© 2011 Electric Paper GmbH
Repair Form
The following figure shows an example of a questionnaire with an adjusted color
scheme:
Figure 551: Questionnaire with Adjusted Color Scheme
3. Repair Form
When editing large questionnaires it may occur in rare cases that the order of the
objects gets confused. In such a case click on “Repair Form” in the “Form Properties”
menu of the Editor control. The questionnaire will be rebuilt.
4. Use of the Question Library with VividForms
You can integrate both question groups and questions from not yet implemented
questionnaires, as well as protected questionnaires into the question library. In the following, the procedure for adding the question groups and questions is described in
detail.
4.1.
Adding a Question from the Library
Click on the symbol
tion library.
in order to adopt a question-group combination from the ques-
A dialog will open and you should now select a group. With the check field you can
select whether the group will be transferred to the questionnaire (the marked checkbox in the screenshot). In the next selection the elements of this group will appear.
© 2011 Electric Paper GmbH
409
Creating Questionnaires with VividForms
Figure 552: Question Library – Selection of a Question Group
You can select one or more questions (with the Ctrl key).
With the check field you can determine whether the question will be transferred to the
questionnaire. In this case they are assigned to a new question group (you can recognize that by the green tick mark in the window). If the checkbox “Create” in the window
before is not activated, you will see a red cross instead of the tick mark. In this case no
question group will be created.
You can choose between two possibilities regarding the order of the elements:
•
The order of the elements as it was on the original questionnaire, from whence the
question group comes from (and from that to which it was inserted in the library).
This is the default sorting order.
•
Alphabetical sorting of the elements. – if you decide on this sorting order, activate
the option “Alphabetical sorting“.
Furthermore, you can sort the questions on the “questionnaire alphabetically. To do
this, activate the option “Alphabetic Sorting”. If you don’t activate this option, the questions on the questionnaire will be sorted in the displayed, original order.
410
© 2011 Electric Paper GmbH
Use of the Question Library with VividForms
Figure 553: Question Library – Selecting Questions
By clicking on the magnifying glass symbol you can see a scaled down preview of the
selected questions.
Figure 554: Question Library – Preview of the Selected Questions
Please note that elements that are taken from the library are marked with an [L] (=
Library).
© 2011 Electric Paper GmbH
411
Creating Questionnaires with VividForms
Figure 555: Question Library – Inserted Question Group and Questions in the Editor Preview
4.2.
Undoing the Connection between a Question
and the Library
You cannot modify questions or chapters from the library. You will see this by the gray
shading of the selection options in the properties dialog as well as by the symbol
.
If you would like to edit a question from the library you must first undo the connection
to the library by using the symbol . The question can then be edited again.
Figure 556: Question Library – Library Symbol
You can detach the library question by selecting the question on the questionnaire
and choosing the option “Detach library question”.
412
© 2011 Electric Paper GmbH
Use of the Question Library with VividForms
Figure 557: Question Library – Detach Library Question/Library Group
Use the option “Detach library group” to undo the connection between a protected
question group and the library.
4.3.
Adding a Question to the Library
If you would like to add a question you have highlighted, click on
tion library on the edit bar.
in the area ques-
The dialog shown to the right will appear. You have three options:
Figure 558: Question Library – Add a Question to the Library
Include in an existing Question Group
Select a group from the list and click on [Apply].
Create a new Group
Select the second option and enter the name for the new group. Click on [Apply].
© 2011 Electric Paper GmbH
413
Creating Questionnaires with VividForms
Add the current (highlighted) Group
Select the third option. The current group will be added as a new group in the library
and the highlighted question will be added to this group.
Note:
Only the (subunit) administrator can create groups, which are visible to all users, by
activating the answer box “Question visible to all users”. Groups and questions created by Instructors/trainers are only visible to themselves.
The administrator also has the possibility of denying subunit administrators this right.
To do this, he activates the option “Public items disabled” in the user profile of the subunit administrator. The subunit administrator can then no longer add public questions
to the library. All groups and questions are then, as with the instructors/trainers, only
visible to him.
Figure 559: Question Library – Definition of the User Rights for Public Items in the User Profile
of a Subunit Administrator
4.4.
Deleting a Question from the Library
With a click on
414
you can delete the highlighted question from the library.
© 2011 Electric Paper GmbH
Filter Settings, Validation, Required Questions and Cross Tabulations
4.5.
Adding a Group to the Library
With a click on the symbol
the group you have highlighted will be entered as a new
group to the library. The elements of this group will not be entered.
4.6.
Deleting a Group from the Library
With the symbol
library.
in the editor control bar you can delete the current group from the
5. Filter Settings, Validation, Required Questions
and Cross Tabulations
5.1.
General Information
If you open the menu “Form Properties” (on the left hand in the VividForms Editor),
you will find the option “Filters, Validation, Cross Tabulations, Required Questions”.
Click on this option and the dialog for editing these elements will open up. These
options are also available in the details of a questionnaire in the area “Advanced Settings”. In “Questionnaires/Questionnaire List” please click on the name of the questionnaire you like to activate the filter settings, validation, required questions or cross
tabulations for. The details of this questionnaire open automatically. Open the dropdown list in the area “Advanced Settings” and choose the desired option. Thus click
on [Edit] to edit the option.
Filter Settings
This is where you define whether certain answers will cause other questions to be
suppressed. In an online survey suppressed questions will not appear or will be inactive. For paper surveys filter settings apply after processing, i.e. retrospectively.
Validation
By defining validations you can test entries to open questions and matrix fields in
online surveys with value ranges and regular expressions before a survey participant
can send the questionnaire.
Required Questions
Those questions for which an answer is compulsory can be defined here.
Cross Tabulations
The cross tabulations shown here will appear in the PDF report.
To save the form and close the Web editor, click on the diskette symbol . You will
return to the questionnaire administration. In order to completely delete the questionnaire, click on the trash .
© 2011 Electric Paper GmbH
415
Creating Questionnaires with VividForms
5.2.
Filter Settings
Filter settings allow you to suppress questions which may in certain circumstances be
irrelevant. This is especially interesting for online surveys, where this prevents invalid
questions from being responded to.
Figure 560: Filter Settings
However the filter settings defined here are also used for data from paper surveys.
When analyzing each completed questionnaire a check is carried out whether the filter
settings should be applied.
Example:
A question asks about the use of presentation programs in a course. If this question is
answered with a “No” then questions about the quality of such presentations will not
be asked (online surveys) or not analyzed (paper survey).
Figure 561: Filter Settings– Selecting Items to be Skipped
In order to create a filter setting, select from the list a single choice question and click
on [Add].
Now select a response value for which the filter setting should be applied. In the lower
area you will see a list of all the questions following the filter question. You can now
highlight all of the questions that should not be displayed or should not be analyzed.
When you are finished, click on [Save]. Repeat this procedure for each additional filter
setting.
416
© 2011 Electric Paper GmbH
Filter Settings, Validation, Required Questions and Cross Tabulations
In the settings (“System Settings/EvaSys Settings/Survey Online/Display of filtered
questions in online survey”) you can determine, whether deactivated questions in
online surveys are to be greyed out or completely hidden. Hereby it is now possible to
hide questions in all three display modes for online surveys (“per chapter”, “per page”
and “complete”).
Figure 562: Settings for Filtered Questions
5.3.
Validation
By defining validations you can test entries to open questions and matrix fields in
online surveys with value ranges and regular expressions before a survey participant
can send the questionnaire.
Figure 563: Validation
To create validations select a matrix field or an open question from the list and click on
[Add].
Now select which values can be accepted:
•
Numbers only – Here you can delimit the value range by storing a minimum and
maximum value.
•
Letters only – i.e. no blanks
•
Letters or numbers only.
•
Date.
•
Pattern (simplified syntax) – By default, the following templates are available:
- three-digit number,
- word(underscore)number,
- serial number.
All three examples are based on the following legend:
•
L = Letter
•
W = Word
© 2011 Electric Paper GmbH
417
Creating Questionnaires with VividForms
•
D = Digit
•
N = Number
•
A = Alphanumeric (= digit or letter)
In addition, there is the possibility of using square brackets to label a placeholder as
optional. In this way, the following pattern: D[D][D]-W means that only input consisting
of a number of one to three digits, a hyphen and a word (in this order), will be
accepted.
As well as the common syntax for patterns, there is also the possibility of using regular
expressions (on the basis of Perl syntax) to formulate patterns. Regular expressions
are often used to recognize patterns and offer a high level of flexibility.
•
Pattern (regular expression) – The following template choices are available:
- three-digit number,
- word(underscore)number,
- serial number (simple),
- serial number (complex),
- email address.
Please note:
A question text should contain instructions for the correct completion of a validation
question, so that the survey participant knows which input is admissible.
5.4.
Required Questions
Questions for which an answer is compulsory can be configured as required questions.
When submitting a questionnaire in an online survey the system checks if all required
questions have been answered. If this is not the case, the survey cannot be submitted
unless answers to the required questions have been given.
To define the required questions select one or multiple questions and click on [Save].
The selected questions will be displayed with a blue background.
Figure 564: Configuration of Required Questions
418
© 2011 Electric Paper GmbH
Filter Settings, Validation, Required Questions and Cross Tabulations
Note:
Unlike the filter settings, required questions are not recognized in paper surveys.
5.5.
Cross Tabulations
In order to use cross tabulations this function must be activated at “System Settings/
Report Settings/Configuration/Create Cross Tabulation”.
Select from both lists the variables you would like to use. You can use scaled questions as well as single choice questions with as many as eleven choices.
The upper question is displayed in the X axis while the lower question is found in the Y
axis of the matrix.
The number of cross tabulations possible is unlimited. In the PDF report two cross
tabulations per page will be displayed.
Figure 565: Create Cross Tabulations
Figure 566: Cross Tabulation in the PDF Report
© 2011 Electric Paper GmbH
419
Creating Questionnaires with VividForms
6. Defining General Templates
6.1.
Defining a Template by the Administrator
The administrator can create templates whose contents cannot be modified by users
with instructor/trainer accounts.
By activating the box “Template” the form is made available to the active instructor/
trainer. The instructor/trainer can only supplement the questions set up by the administrator.
Figure 567: Activating the Option “Template”
By activating the answer box “Activate/deactivate template mode”, the form is put at
the active instructors/trainers disposal. The administrator can also determine, that the
new items which can be added by the active instructor/trainer, may only be added at
the end of the questionnaire. This means, that the structure of the questionnaire provided by the administrator cannot be changed, as the instructor/trainer may only add
his questions at the end. To select this option, activate the answer box “New items
may only be added at the end”.
As soon as an active user has added a copy of this questionnaire to his questionnaire
administration, a green ball with a white arrow appears in the questionnaire list:
Figure 568: Template Questionnaire Complemented by an Active User
By clicking on the name or description of a questionnaire in the form list you can open
a detail view of the questionnaire. You can even choose under “action” the command
“details”. In the detail view you can define how the questionnaire will be used:
420
© 2011 Electric Paper GmbH
Defining General Templates
Figure 569: Details for a Questionnaire
The VividForms recognition set organizes itself automatically. As soon as the first survey has been created on the basis of the questionnaire it is activated (= deployed) and
can no longer be modified with the editor. If you want to create a new version of the
questionnaire then you must copy the questionnaire.
You cannot delete the questionnaire as long as surveys based on the questionnaire
are in the system. This is to protect your data.
6.2.
Use of Templates in Instructor/Trainer
Accounts
In the menu of the instructor/trainer account in the “template” area, you will see a list
of questionnaires from the administrator.
© 2011 Electric Paper GmbH
421
Creating Questionnaires with VividForms
Figure 570: Template in an Instructor/Trainer Account
By clicking on the symbol
you can create a copy of the template for editing.
Figure 571: Copy of the Template for Editing
Next you will see the user’s own questionnaire administration with a new entry “(Name
of questionnaire) [Template]”. The notice [Template] is automatically added to the
heading and shows that the questionnaire is from a template.
Figure 572: Editing a Template
If the administrator has given the authorization, a click on the symbol
allows the
user to begin editing the questionnaire. Questions from the administrator’s template
appear in the Web editor with a [T] (= Template) and cannot be deleted or edited.
422
© 2011 Electric Paper GmbH
Editing and Passing on Questionnaires
The user can add as many question groups and questions as needed, as long as he
does not exceed the maximum number of pages or the maximum number of questions defined by the administrator (see form properties of the questionnaire). Before
adding a question to the questionnaire, the user first has to create a new question
group. Questions cannot be added to groups already created by the administrator.
When setting the form properties, the administrator can define that new elements
added by users (such as question groups, questions or design elements) may only be
inserted at the end of the questionnaire.
Figure 573: Added Question by the Instructor/Trainer
7. Editing and Passing on Questionnaires
To show the content of a questionnaire click “Editing” in the Drop Down-Menu on the
right hand in the list of questionnaires.
Please note: You can edit a questionnaire only as long as you have not activated
them. When surveys are created for a questionnaire the questionnaire is automatically
protected against modifications. This is done in order to guarantee processing of a
form being used. No changes of any sort to the layout or contents can be made to protected forms.
7.1.
Write-protect Mode
As soon as you generate a survey with a certain questionnaire it is automatically protected against further changes.
Write-protected forms in the VividForms Editor have a yellow lock in the area “form
information” (see figure).
Figure 574: Write-protect Mode
© 2011 Electric Paper GmbH
423
Creating Questionnaires with VividForms
The following points have no effect on the display of the questionnaire and can so be
modified in the write-protect mode:
•
Building indicators for question groups
•
Display of single choice questions in the HTML survey (Options available include
“Checkbox List” and “Drop-Down List”)
•
For matrix fields, number of groups in the evaluation report
•
Limiting the maximum responses for multiple choice questions
•
Selection of the diagram type for scaled questions in the PDF report
•
Definition of filter rules, required questions and cross tabulations
In particularly exceptional cases (for example for typos), the write-protect mode can
be circumnavigated. You can alter the write-protected mode in the form creation information of a questionnaire, as shown in the following graphic.
Figure 575: Write-protect Mode in the Form Information
Note:
By editing the form, the questions’ answer boxes can change their position, whereby
surveys in circulation can become impossible to evaluate.
This warning is to be strictly observed! It is generally not recommended to make
changes to forms with surveys. We recommend that before activating the editing
mode, you make contact with our support team.
7.2.
Automatic Recognition Set Management
As soon as a survey has been created using a VividForms questionnaire, VividForms
expands its recognition set to assure recognition.
In order to ensure that all returning questionnaires can be correctly processed, it is
only possible to delete a questionnaire when simultaneously deleting all surveys
based on that questionnaire. This is done automatically when the delete function in
424
© 2011 Electric Paper GmbH
Editing and Passing on Questionnaires
the questionnaire administration is activated and confirmed. Use this function therefore with extreme care.
The user of an activated user account must be extremely careful when deleting a
questionnaire he has created himself, because there may be surveys which depend
upon the questionnaire to be processed. The delete function can only be activated by
opening the lock symbol . When a questionnaire is deleted, ALL surveys based on
that questionnaire will be automatically deleted as well.
Figure 576: Form Management of an Active Instructor/Trainer
7.3.
Import/Export of VividForms Questionnaires
VividForms forms can be exported as files. These files have the ending “vfd”.
As a (subunit) Administrator, the export function is available in the details of a questionnaire (“Settings/Questionnaire/Details”), by clicking on the [Export] button.
Figure 577: Exporting a Questionnaire
A new dialog containing the settings for the export of forms opens. As well as the standard properties (questions, open text, images, formats etc.), here you can select
which additional properties of the form are to be exported:
© 2011 Electric Paper GmbH
425
Creating Questionnaires with VividForms
Figure 578: Settings for the Export of Forms
The following items can be additionally exported:
•
Quality Guidelines
•
Data export configuration
•
Norming
•
PDF Reports
•
Text Templates
•
Report for comparison
•
Sphinx-Report
•
Languages
•
Filter settings
•
Validation
•
Required questions
•
Cross Tabulations
Note:
Attention: It is sometimes possible that information which is linked to other data in
the system cannot be imported into another system. If, for example, a comparison
report was created for a questionnaire (i.e. to a subunit report or similar), the import
of this report is only available to its own system, not to an external system.
426
© 2011 Electric Paper GmbH
Editing and Passing on Questionnaires
You can get to the export function in the questionnaire detail dialog (Questionnaires/
Questionnaire List/Details).
The import of VividForms questionnaires is done in the questionnaire administration
(Settings/Questionnaire). Activate the checkbox “VividForms”. Then select an vfd file
using “search…” and upload it.
Figure 579: Questionnaire Import
You can also import and export VividForms questionnaires using active instructor/
trainer accounts. The active instructor/trainer will find a form import function in the
questionnaire administration area. Imported forms are subsequently only available to
the instructor/trainer account owner. In the list of personal questionnaires you will see
an export function , which can create a .vfd file.
Figure 580: Import and Export of Questionnaires for Active Users
Active users have limited access to the import and export of secondary data. Only the
following form attributes can be imported or exported with the questionnaire:
•
Filter settings
•
Validation
•
Required questions
•
Cross Tabulations
If the administrator exports a questionnaire with secondary data, such as languages,
text templates, norms etc., these are automatically filtered out when the questionnaire
is imported into an active user account.
© 2011 Electric Paper GmbH
427
Creating Questionnaires with VividForms
8. Implementation of Specific Design Requirements
(VividForms Plus)
8.1.
Implementation of Questionnaires with VividForms Plus
The layout of the VividForms Editor allows the user to create questionnaires very
quickly and easily. To guarantee easy handling and to avoid overloading the editor,
specific design requirements are realized outside of the VividForms Editor.
Thus Electric Paper offers a service providing the implementation of any questionnaire, which corresponds exactly to your ideas, and at the same time is as simple to
use as possible. You tell Electric Paper your wishes, or provide an existing questionnaire, Electric Paper implements the questionnaire and delivers the so called fbd2-file
and the corresponding PDF file of the questionnaire to you. The fbd2-file contains the
information about the content and the layout of the questionnaire. It can be imported
and used in EvaSys and then later read in with the VividForms Reader.
You therefore do not need any experience in programming. Thus a VividForms Plus
questionnaire combines the advantage of easy handling and scanning (as you know
from VividForms) with comprehensive design features.
Please note:
You cannot subsequently change a VividForms Plus questionnaire in EvaSys. However, you can always look at the PDF preview, as with VividForms questionnaires.
8.2.
Importing the VividForms Plus Questionnaire
Before you can import a VividForm Plus-questionnaire in EvaSys, you have to be sure
that the system can find the following two files:
The FBD2-file: The FBD2-file is a supplemented version of a FBD-file. In addition to
the content of the questionnaire it contains information about its layout.
The FBD2-file can be put in any directory.
The PDF file: This PDF file is the master for all the other PDF files later created for the
surveys. As a sample it has an empty barcode.
Normally the file has a five digit name, followed by the character sequence _vfp (=
VividForms Plus), e.g. HEsaC_vfp.pdf.
The PDF file must be found in the directory EvaSys/forms. The name of the whole
path in your file system is probably C:\Apache\htdocs\evasys\data\forms. If there are
any ambiguities, please consult your system administrator.
To import the questionnaire log in to EvaSys as an administrator. If you open the list of
questionnaires (in the menu “System Settings“/ “Questionnaires“), you can import new
questionnaires. Because you want to import a VividForms Plus form and this ques-
428
© 2011 Electric Paper GmbH
Implementation of Specific Design Requirements (VividForms Plus)
tionnaire has not been created with the VividForms Editor, you have to deactivate the
option “VividForms“:
Figure 581: Import Form
Choose the FBD2-file of the questionnaire and confirm by clicking on [OK].
Figure 582: Imported VividForms Plus Questionnaire
Now the VividForms Plus questionnaire has been imported and added to the list of
questionnaires. There you can see the information as you are used to:
•
The ID, the description and the name of the form.
•
The questionnaire was created with VividForms Plus. For that reason you can see
the relevant information in the field “Engine“.
•
You cannot copy the questionnaire.
•
When choosing “Action”/ “Edit” in the drop down-list on the right you can see a window with detailed information about the form. (You will see the same window when
clicking on [Edit Form] in the detailed view.)
•
By choosing “Action”/ “Details” in the drop down-list on the right you can see the
“Details for questionnaire…” as you are used to.
© 2011 Electric Paper GmbH
429
Creating Questionnaires with VividForms
Figure 583: Details for a VividForms Plus Questionnaire
Click on [Edit Form] and you can see further information about the questionnaire.
8.3.
Information about a VividForms Plus Questionnaire
When you click on [Edit] in the list of the questionnaires or on [Edit Form] in the window “Details for questionnaire…” you get to a window with further information about
the VividForms Plus questionnaire.
The metadata will provide you with general information about the form: the name, the
description etc.
The filter settings define specific rules for filling in the form (see chapter “Filter Settings”).
The required questions only affect the online surveys. You can define all those questions as required questions which must have been filled in by the interviewees.
In the crosstabs (“Cross Tabulations“) you can see coherences between questions. If
you have defined some you can see them in the evaluation reports.
Below the crosstabs you gain an overview of the questions on the form.
Please note:
You can change the question texts here, though this does not influence the PDF file
of the questionnaire you have already put into the directory “forms”. Thus each
change in this window is taken into consideration only for the online-questionnaires
and the evaluation reports.
For this reason we do not recommend changing the form here. The dependency
between the form used for a paper survey and the one used for an online-survey, as
well as the correlation of the surveys to the evaluation report, would be blurred or
possibly completely obscured by changing the questions here.
430
© 2011 Electric Paper GmbH
Implementation of Specific Design Requirements (VividForms Plus)
Figure 584: Further Information on the Questionnaire
© 2011 Electric Paper GmbH
431
Creating Questionnaires with VividForms
8.4.
Usage of VividForms Plus Forms
You can use VividForms Plus forms just like other forms. As usual, you can create
paper as well as online surveys. But please note that you cannot use a PDF form
when creating online surveys with VividForms Plus forms. Instead you can apply an
HTML-form.
Figure 585: VividForms Plus Questionnaire (HEsaC – Dr. Edith Braun)
432
© 2011 Electric Paper GmbH
System Management and Summary
D. System Settings and Management
1. System Management and Summary
1.1.
Search
With the search function you can search for users, courses, surveys as well as deliveries either individually or in combination.
The search function can be found on all menu pages in the upper right hand corner.
Enter your search term and click on [Search]. All four categories are searched and
you are directed straight to the search result pages.
Figure 586: Search Function
You can find the same results by opening the EvaSys searchmask at “System Information/Search” and making no restrictions in “Search In”.
Figure 587: Searchmask
For the search text you may use the following operators:
Without operator: “day”
Entering “day” as a search term leads you to day, Monday, Daytona, daylight. Wildcard characters are automatically placed before and after the search term.
© 2011 Electric Paper GmbH
433
System Settings and Management
The same as the search term: “=day” or “+day”
The search term “=day” will just return day. Alternatively you can use “+day”. In contrast to “=day”, “+day” can be expanded by an asterisk, that is “+day*”, which also
returns the term Daytona.
Exclude a term:“day –Monday“
Returns day, Tuesday, Daytona, etc.. but not Monday.
Greater than:“>10”
Returns number entries that are greater than 10.
Smaller than:“>10”
Returns number entries that are smaller than 10.
You can combine more than one search term, e.g. “day + Henry –Maria” searches for
text passages in which the terms “day” and “Henry” but not “Maria” are found.
1.1.1.
Searching for Users
Searches for users are conducted in the profile fields, title, first name, last name, user
name and email.
Example:
You are searching for users who have the word “William” in their profile data.
Enter “William” as a search term and highlight “user” as search goal. Then click on
[Search].
Figure 588: Searching for Users
You will then see under the search template the area for search results. In “hits” you
see that two users were found.
Click on [Details] to display the search returns.
434
© 2011 Electric Paper GmbH
System Management and Summary
Figure 589: Search Result Details
The results can be sorted in ascending or descending order by clicking on the column
name. The data fields are themselves the references:
•
Last name: Refers to the user profile
•
Subunit: Refers to the subunit window
•
Email: Initiates an email to the relevant user
•
Surveys: Opens the surveys of the user
1.1.2.
Search for Courses
With this search you can find details about existing courses.
Figure 590: Search for courses
In the example a search has been made for the term “mathematics*”.
The columns of the results table can also be sorted in ascending or descending order.
By clicking on a course you will be taken directly to the course details.
Searches are carried out in the databases program of study, course name, location,
type and ID.
The following data fields are displayed
•
Name: Name of the course, at the same time a reference to the course data
•
Program of study
© 2011 Electric Paper GmbH
435
System Settings and Management
•
ID
•
Type
1.1.3.
Search for Surveys
This search allows you to find surveys. The search takes place in the survey data
fields creation data, processing date, survey name, survey ID and number of returns.
Figure 591: Search for surveys
Displayed are:
•
Survey name: at the same time a reference to the survey folder
•
SurveyID: this number is identical to the operation number on the questionnaire
without the check digit
•
Status: ready, data existing, validation or deleted
•
Type: Paper or online survey
•
Form: short name of the questionnaire
•
Creation: date the survey was created
•
Processed: date of the (last) time this survey was carried out
•
Number returns (form count): number of scanned questionnaires (empty questionnaires are counted)
1.1.4.
Search for Deliveries
The content of the search table for deliveries is identical to the delivery table in the
menu“System Information/Deliveries” (see Section 5.6.7). The search is conducted in
the fields survey ID, target address, date as well as first and last name of the recipient.
The table contains the following information:
•
436
Batch: Batch ID of jobs which contains the questionnaires processed for this survey.
© 2011 Electric Paper GmbH
System Management and Summary
•
Survey: Name of the survey, the questionnaire module (i.e. of the questionnaire)
as well as the course type.
•
Recipient: The recipient is also the owner of the instructor/trainer account.
•
Target address: Target email addresses or internal email addresses the reports
have been sent to.
•
Method: Delivery method either email (letter symbol) or internal email (paper symbol)
•
Sent: Tells whether the report has been sent or printed
•
Delivery date: Date of the email delivery or the internal email print download.
1.2.
Writing Email
This function gives you the possibility to send a message to all EvaSys users.
By selecting all users (press the left-hand button on the mouse and pull to the bottom
of the list) you can send an email to all users. As soon as two or more recipients are
selected, EvaSys sends the email via the BCC field (blind copy) so that the addresses
of the recipients cannot be seen. Please remember that creating hundreds of emails
could take, depending on the email server load, several minutes.
Enter a subject line as well as a message and then click on “OK” to send the email.
You can see if this action was successful in the display line at the top of the browser
window.
Figure 592: Writing an email to users
The sender address and the sender name are taken from data in the user profile of
the administrator.
© 2011 Electric Paper GmbH
437
System Settings and Management
Other email types, some of which are created automatically, receive sender data from
“EvaSys Settings/Email Functions & Accounts/Sender Name for all System Emails”.
1.3.
Delivery
Here you will find a table with a list of all report emails that have been sent.
Figure 593: Delivery details
You will find the following information in the table:
Bat: Batch ID of jobs which contain the questionnaires processed for this survey.
Survey: The name of the survey, the questionnaire module (i.e. the questionnaire) as
well as the course type. The survey name is also a link which provides access to the
surveys of the relevant instructor/trainer account.
Type: Enter the content of the delivery, e.g. “default report”, “activate template” or
“cover sheet”.
Recipient: The recipient is also the owner of a instructor/trainer account. In addition
the name of the subunit is given in which the instructor/trainer account is located. The
instructor/trainer name is also a link which provides access to his or her user profile.
Address: The target email address or the internal email address to which the report
will be sent. When the internal email address is used (only in the self registering pro-
438
© 2011 Electric Paper GmbH
System Management and Summary
cedure), then reports that are ready for delivery must be accessed through the internal
email printing account.
Method: Symbolizes the method of transmission. This is either email (letter symbol)
or internal email (paper symbol).
Sent: Tells whether the report has been sent or printed.(green checkmark). A blue “I”
means that the report has neither been sent nor downloaded.
Delivery on: Date of the email delivery or internal email printing download.
With the red X symbol you can delete individual entries.
The settings in the head of the table allow you to refine your search queries.
Figure 594: Search Query under “Delivery”
With the button rint Version] a printer friendly version will be displayed.
1.4.
Batch Export
With the batch export (“Subunits/Batch Export”) you can download the entire raw data
from all surveys of different subunits. (The name of this menu point was formerly
known as “Archiving”.)
Select the export format. Then select the subunit(s), the survey period, the questionnaire and the course(s)/survey(s) in order to limit the data to be exported from EvaSys.
© 2011 Electric Paper GmbH
439
System Settings and Management
Figure 595: Batch Export
For the batch export, three export formats are available:
CSV: A text file with the raw data of all selected surveys is exported (including the
course data).
Sphinx: A ZIP file with the questionnaire contents, the raw data of all selected surveys (including the course data) as well (optional) an evaluation template is exported.
SPSS: A SAV file with the questionnaire contents as well as the raw data of all
selected surveys (including the course data) is exported.
In the case of Sphinx and SPSS, a special feature offers the ability to export across
several questionnaires. In this way, survey projects consisting of several questionnaire types, such as 360°-Feedbacks, can be easily exported in a single large file and
processed with the Sphinx-Statistic-Workbench or SPSS.
Figure 596: Batch Export of Several Questionnaires (Sphinx and SPSS)
440
© 2011 Electric Paper GmbH
System Management and Summary
1.5.
Utilization Statistics
In the section utilization statistics (in the Menu System Information) you will receive an
overview about the utilization behaviour of EvaSys users.
At the top of the screen you will see two graphics. At the left is the top 20 instructors/
trainers according to the number of surveys.
At the right you will see the top 20 in relation to the number of logins. This number is of
course interesting only in connection with the decentral model. Complete access is
only allowed the administrator and the deans/managers. Normal user accounts can
only see the data of those users who in their configuration have permitted this.
Figure 597: Utilization Statistics
The following data fields are found in the table:
•
Name: Title, first and last name of the user Subunit
•
Subunit: Name of the subunit in which the user profile is located
•
Logins: Number of logins since the user account was created Scans
•
Scans: Number of scanned paper survey questionnaires. The number of questionnaire sets, not the number of pages, are counted
•
eForms: Number of completed online questionnaires, both the HTML and the
PDF based online surveys
•
Surveys: Number of surveys which are in the user account at a given time.
•
Studies: Number of folders the owner has
•
User since: Date the account was set up
•
Last online: Date of the last login
1.6.
Evaluation Statistics
You can find the evaluation statistics in the details of a paper survey where you have
scanned in data:
© 2011 Electric Paper GmbH
441
System Settings and Management
Figure 598: Survey evaluation statistics
Therein, the header data of all scanned batches from a survey are displayed in a
table. This data allows you to see the time and size of the scanning operation.
Figure 599: Details of survey evaluation statistics
The specifications:
•
Name of Scanstation which captured the batch.
•
Number of Pages of the batch. For Duplex scanners 1 sheet = 2 pages
•
Number of non-recognized pages = NonForms, these can also be empty pages
•
Number of False Forms, forms that recognized as EvaSys forms but did not
belong to the scanned survey.
•
Marking whether the batch was part of a Multi-batch (only with VividForms forms)
•
Scan Date of the batch
442
© 2011 Electric Paper GmbH
System Management and Summary
1.7.
System Information
This is where you will receive an overview of the number of surveys in the system as
well as in the all subunits. Click “System Information/System Summary”.
Figure 600: System Information
At first a summary list of surveys with the following states will display:
•
Ready: Active surveys, for which no results data have yet been registered.
•
Analyzed: Active surveys, for which returns have already been registered.
•
Data Entry: Active surveys, for which returns have been registered, however for
which the anonymization of handwritten comments has not yet been carried out.
This is only an option when the anonymization in the subunit properties has been
activated.
You can now choose (multiple selection) course type, survey period and form. Click
on [Apply].
Figure 601: Filter for System Information
Then tables display for each of the individual subunits, which show a list of all the surveys and form return numbers for the selected parameters.
© 2011 Electric Paper GmbH
443
System Settings and Management
1.8.
License Administration
1.8.1.
Overview on the License Administration
The license administration gives you an overview of the properties of your EvaSys
license. Here you can see information about the product version, the database and
about the activation of the paper and online surveys. In case you have licensed the
handwriting recognition, open questions of VividForms questionnaires can be processed automatically.
In addition you can see the number of available scanstation and user licenses and, if
you have the corresponding licenses, the administration of VividForms Designer
licenses.
In the license management the license key, which has been entered during installation, is saved. In case of a system extension by users or software add-ons or in case
of a change of name you will receive a new license key which contains the old as well
as the new scope of services. In this case please overwrite the existing license key
and/or copy the new one, to avoid typing errors, and click the button [Save].
Should you have entered an invalid key, the old key will not be lost. Only a new valid
license key will overwrite an existing key.
Please note: The server, on which EvaSys is installed, has to use a dongle (hardware
key). It must be plugged in a USB-port of the server where you want to install EvaSys.
Otherwise you cannot use the software. If you are interested in further copy protection
methods just contact us for additional information.
Beneath the section “License Key” you will find the administration of VividForms
Designer licenses. It will only be displayed if you have purchased the corresponding
licenses. With the help of the drop-down list a license can be assigned to an EvaSys
user (e.g. subunit administrator or instructor/trainer). Select the desired user from the
list and click the button [License allocation]. The user will then be shown in the overview of VividForms Designer licenses. If necessary, a license can be revoked by clicking the icon with the yellow brush.
In the bottom section of the license management a list of all licensed scanstations
(depending on the license and activation, one or more scanstations are listed). As an
administrator, you can activate the option “Automatically assign a license to next
requesting Scanstation.”. By doing so, the next scanstation to log on to the EvaSys
server is automatically issued a license. Needless to say, automatic activation can
only take place as long as a license is available. Once the scanstation is activated, the
option is automatically deactivated. This means that as an administrator, you can
control the point in time at which a scanstation can automatically activate itself. As a
default, this option is deactivated.
444
© 2011 Electric Paper GmbH
System Management and Summary
Figure 602: License Management
1.8.2.
Administration of User Accounts
The number of available user accounts for each subunit can be freely determined by
the administrator and as such be limited. This possibility exists for limited as well as
unlimited number of users.
Via a new button [Assign to subunits] in the license administration, the administrator
can display an overview of the existing subunits and limit the number of user accounts
per subunit.
© 2011 Electric Paper GmbH
445
System Settings and Management
Figure 603: Administrating User Licenses
By default, the number of user licenses for each subunit is not restricted, this means,
that any number of users can be created in each subunit, until the quota of user
licenses has been exhausted.
To make restrictions per subunit, remove the tick from the checkbox next to the option
„unlimited“ for each subunit. In the column user licenses in the input field, you can now
specify the maximum number of licenses allowed per subunit. For each subunit you
are shown how many user licenses are currently in use. At the end, click on [Save] to
apply the settings.
Figure 604: Limiting User Licenses
446
© 2011 Electric Paper GmbH
System Management and Summary
Alternatively, restricting the number of licenses available can be undertaken directly in
the details of a subunit. In the area “Assign user licenses”, the administrator can
adjust the number of licenses retrospectively or define this directly when creating the
subunit.
Figure 605: Restricting User Licenses in the Details of a Subunit
The subunit administrator cannot make any of his own settings here. He can, however, see in the subunit details how many licenses are available to him and how many
have already been used.
Once a subunit has reached the established limit of user licenses, no new accounts
can be created. The same is true when moving users into subunits whose contingency is already exhausted. When creating a new subunit, a warning is shown if all
accounts have already been distributed elsewhere.
1.8.3.
How to Use a Volume License
The license model “Volume license” allows you to create as many users as desired.
Instead there is a limitation in the amount of forms you can capture, i.e. in a determined period of time (generally one year) you can only capture a specific number of
datasets in paper or online form.
Also in case of a volume license the license key has already been entered during
installation and the volume file has been uploaded to the system. In case of a change
in your license data you will receive a new license key, which you can add in the menu
© 2011 Electric Paper GmbH
447
System Settings and Management
“System Information/License”. If only the volume changes, you will receive a new volume file, which contains the following information:
•
The volume for each period of time: This data tells the system how many datasets you can use (i.e. how many paper or online-questionnaires you may read in).
•
Period of validity, i.e. when does the cycle start resp. end.
•
Number of cycles: Normally a volume license has an indefinite number of cycles
with a duration of one year each. As soon as one cycle has expired, the license is
renewed automatically and a new cycle starts.
If you click on the button [Details] to the right of the line “Volume license” (in the window “License Management“) you can see a new window with detailed information
about the volume licenses. To upload a new volume file you first have to delete the old
one. Then you can select the volume file, which you have received by Electric Paper
and stored on you computer, with the help of the button [Browse].
Figure 606: Selecting the Second License Key
A click on the button [Upload license] activates the volume license and displays a
message about the successful activation as well as the details of the license:
Figure 607: Volume License Added Successfully
When you click on the button [Back] you can see the window [License Management ]
again. Now the license is activated:
Figure 608: Activated Volume License in the License Administration
448
© 2011 Electric Paper GmbH
System Management and Summary
In case of questions or obscurities please ask your system administrator or the support department of Electric Paper.
1.9.
Performance Considerations
The following paragraphs offer several references with regard to optimizing system
performance.
1.9.1.
Performance Statistic
In the menu “System Information/System status”, you will find details to the current
system utilization. The performance statistic shows the time needed to execute an
internal function, which is called-up every minute. Thus, it represents an indicator for
the workload of the system at the respective time of measurement. When a series of
measurements are located in the red zone for a longer period of time, this indicates a
state of overload which can impair system performance for users or participants in
online surveys. From these statistics, (subunit) administrators can make decisions
regarding optimization of peak access times.
Access peaks can be optimized by the following points. For example, the access time
for online surveys can be optimized by starting the surveys on different days. Apart
from that, the participants of online surveys can receive information on off-peak times,
with the instruction that participation should take place at these times. In addition,
(subunit) administrators can move heavy tasks such as verification, creating questionnaires and reports, to off-peak periods.
Figure 609: Overview of System Utilization
This option can be activated or deactivated in the configuration under “System Settings/EvaSys Settings/Maintenance/Measuring of performance values”. Also, this is
© 2011 Electric Paper GmbH
449
System Settings and Management
where the limiting values (“Yellow limiting value for performance diagram” and “Red
limiting value for performance diagram”) for the performance statistic are stored.
1.9.2.
List of all Active Users Logged In
As a (subunit) administrator, you will find a list of all logged in EvaSys users and
online survey participants at the bottom left of every EvaSys page. In this way, you
can see how many people are currently online and avoid an overload due to a high
number of people being logged in at the same time.
Figure 610: List of Active Users
By clicking on “Users logged in” or “Online surveys” you will automatically reach the
menu “System Information” in the area “System status”. There you will find a detailed
listing of all users currently logged into the system:
Figure 611: Detailed Information of all Active Users
You can sort the active users according to name, user type and last action, by clicking
on the relevant column head.
1.9.3.
Display of Online Surveys
To optimize system performance it is recommended that the display of online surveys
especially for questionnaires with several chapters (question groups) is set to “Complete”. In this way, for a questionnaire of 35 chapters with regard to page views in
online surveys, the system load can be reduced in the range of 97%.
This option is set as default for all questionnaires. To change the display of online surveys, in the menu “Questionnaires/Questionnaire List”, select “Details” in the dropdown menu. As these settings are stored in the details of a questionnaire, it is possible to set an individual display setting for every questionnaire.
1.9.4.
More Tips for Avoiding System Overload
Dispatching email: If you send your email invitations to online surveys spread over a
few days instead of all at once, the feedback phase is also spread over a wider period.
This distribution in the feedback phase leads to continuous system utilization and
450
© 2011 Electric Paper GmbH
System Management and Summary
helps to reduce one-off access peaks. In this way, even at peak access times, system
performance is optimally utilized.
Archiving: Your existing PDF reports and CSV raw data can be archived by sending
them to the email address defined in the configuration. In this way, legacy data can be
exported with a complete audit trail and subsequently deleted from EvaSys, increasing and maintaining clarity and performance of the system Please note, that EvaSys is
a productive system and should not be used as an archiving system. (see also
chapter B 3.2.9. "Batch Events ").
System cleaning: Please delete all reports, compilations, subgroup reports, PSWDs,
deliveries and log book entries that you do no longer need via the system cleaning
(menu “System Information”). Thus the clarity and performance of the system
increases (see also chapter D 1.11. "System Cleaning").
1.10. Deletion Log
The deletion log tracks all data deletion events in the system. It is not possible to
delete from the deletion log.
The following deletion processes are logged in this protocol:
•
Subunits
•
Users
•
Courses
•
Surveys
•
PSWDs
•
Questionnaires
•
Study Folders (Active Accounts)
Each deletion log record will contain the following information:
•
User: Who has deleted the data?
•
Object Type and Description: What was deleted?
•
Date: When was the data deleted?
•
ID of triggering activity: Which deletion event chain has caused the deletion of this
element?
The top section allows the selection of object types to be displayed (multi selection
using the CTRL key). It is also possible to define the number of records per page.
© 2011 Electric Paper GmbH
451
System Settings and Management
Figure 612: Deletion Log
1.11. System Cleaning
You can delete the files that you do no longer need via the system cleaning. For this
purpose you have to define a period to erase dispensable data. You can delete the
following elements:
1.11.1. PSWDs
When you choose a period and click on the button [Delete PSWDs] you delete all the
PSWDs of the chosen period which have not been used by that time.
Please note: You cannot delete PSWDs of open surveys here. The deletion will only
concern surveys that have already been closed.
Figure 613: System Cleaning
1.11.2. Deliveries
As regards the deletion of PSWDs you can delete all deliveries for a chosen period.
(The deliveries can be found in the menu “System Information” on the left hand in the
menu.)
1.11.3. Entries in the Log Book
The log book records messages, warnings and failures of the system (for detailed
information see below). When choosing a period you can also delete those elements
here.
452
© 2011 Electric Paper GmbH
System Management and Summary
1.11.4. Delete Compilations and Subgroup Reports
You can delete the compilations and subgroup reports of the chosen periods here (i.e.
the data the system uses to create the reports of the report creator).
When clicking on the button [Show reports] a new window opens. There you can
define the reports you do not want to delete.
You cannot delete the data you have created in your surveys, it is only possible to
delete that of the report creator.
When the report creator compiles some reports, when he creates profile lines etc., the
system always duplicates the raw data to obtain the data for the new reports. The
PDF reports are based upon this data. Thus no PDF report is available as a file in the
system; every report is created on the fly using the raw data or the copies of the data
when the user calls up the report.
In a sense the deletion of the data copies also implies the deletion of the report of the
report creator. But, in fact, when clicking on the button [Delete reports], you only
delete the duplicated data which overloads your system.
1.12. Analysis of Errors
1.12.1. Log Book
The log book reflects all the operations that occur in connection with the automatic
capture of paper questionnaires.
There are three types of symbol: message (symbolized with a blue “i”), error (red X)
and warning (yellow warning triangle).
Figure 614: Log Book
© 2011 Electric Paper GmbH
453
System Settings and Management
The following messages can occur:
Error messages
•
Error when updating the survey table
The status of the survey could not be updated
Check the status of the survey (ready/processed/etc.) as well as possible error
messages in the VividForms Reader.
If the status of the survey is shown as “processed” open the report. If this is empty
then reset the survey and scan this questionnaire again.
If this error reoccurs then your database may be damaged. Contact EvaSys Support.
•
Interactive cover sheet: general DB problem
Access to the database could not be provided
•
Interactive cover sheet: invalid form type identified
•
Interactive cover sheet: general problem
An operation number could not be generated
The survey could not be set up
Data could not be written in the cover sheet table
•
ProcessID invalid!
VividForms was not able to find an operation number on the first page of the
scanned batch. The data could not be assigned to a survey and were discarded.
Click on the leaf symbol next to this message in order to display the first page of
the batch as a graphic file. Check the image. It may be that a wrong page was
scanned as the first page or that the operation number cannot be identified due to
dirt or manipulation. Repeat the scan operation and reproduce if necessary the
defective cover sheet.
•
The procedure with the ID [SURVEY-ID] is not open (any more)!
The survey for which the data were collected is closed. The data were discarded.
Check whether
- the batch has already been scanned and the new capture was an error;
- an incomplete scanning operation has already taken place. In this case the survey must be reset (broom symbol);
- a further batch in the survey was scanned and the automatic closure of the survey operation was unintentional. In this case set the option “close survey after
the first scan operation” at “settings/process defaults” to “no”;
- the settings of the scanner driver may have been changed. Open the scanstation software, click on [Settings] and select “test scan”. Compare the settings of
the driver with the EvaSys standards (Duplex, 200 DPI, black/white image);
454
© 2011 Electric Paper GmbH
System Management and Summary
Warning
•
Document ([FORMABBREV]) doesn’t match survey
Questionnaires in the batch which do not match the form type specified in the survey were identified and processed.
The cover sheet procedure may have been used and a wrong questionnaire form
was used. In this case a new survey with the questionnaire type that was actually
used must be created. Scan the batch with the new cover sheet.
Some questionnaires of the wrong type have gotten into the batch that was
scanned.
•
[SURVEYNAME] processed: X forms (+ X invalid)
A batch was processed that contains some invalid questionnaire types. The data of
the invalid questionnaire types were discarded while the valid questionnaire types
were processed.
Messages
•
[SURVEYNAME] ([FORMABBREV]) processed: X forms
The survey was correctly processed.
1.12.2. Mail Service Log
Emails from scheduled tasks are sent in the background by the service “Mail Service”.
This service can provide detailed information in case of problems. All errors are documented in the menu “System Information/Mail Service Log”.
After each administrator's log in, EvaSys checks if any errors have occurred. If new
errors have been noted, a message appears in the menu “Subunits” with a reference
to the mail service log, where the error message can be confirmed.
Figure 615: Mail Service Log
© 2011 Electric Paper GmbH
455
System Settings and Management
If the EvaSys server is temporarily switched off, after the new login a message
appears reporting that the mail service does not seem to be functioning. When the
mail service notifies EvaSys that it is active again, the message no longer appears
upon login.
“Mail Service” requires at least Version 2.0 of the .Net-Framework on the server.
Setup checks at installation and reports if preconditions are not fulfilled. In the service
administration of Windows, the service appears as “ESCCMailService”.
1.12.3. More Log Files
VividForms Log File
The VividForms Reader protocols all processed questionnaires in this text file. You
can find it in the program group in the VividForms Reader. If the debug mode in the
VividForms Reader has been activated then the protocol will receive very detailed
data about the form processing operation.
2. Configuration Settings
2.1.
Text Templates
Provided they have the setting in their configuration, EvaSys sends emails to users for
a number of reasons. The texts for these emails can be edited here. Alongside the
texts for emails you can also define texts for cover letters which are used in PDF
reports. By using a placeholder you can personalize these automatically created messages for your recipients. If desired, emails can be sent in HTML format and be edited
with the help of HTML tags.
You can continue to define attachments for emails and templates for PDF letters.
These documents must be first uploaded into the system.
Please note that some option settings can also be defined specifically for individual
questionnaires. Settings at questionnaire level have priority over general settings.
2.1.1.
Viewing Email Texts and Text Templates
The key elements for these settings are the selected actions and the language. Headings, text and attachment or PDF template can be defined for this combination.
The window for processing the text template is made up of five different areas.
Action:
In the action box on the left you can select an email type or a letter text.
Language:
Below the box “Action” you can select the language for the text. The default language
is the system language.
456
© 2011 Electric Paper GmbH
Configuration Settings
Figure 616: Editing of Text Templates
PDF template or email attachment:
If you selected in the “Action” box a PDF letter then you will see “PDF Template“, that
is you can assign a PDF template for the layout to a given letter. If you selected in the
“Action” box an email text then you can add here one or more attachments. Email
attachments and PDF templates are saved by clicking on the button [OK].
Heading or subject:
Depending on what was selected in the “Action” box you can define the heading text
in the PDF or in the email subject line.
Text:
Depending on the option selected in the “Action” box you can define the text of the
PDF letter or the email. Within the text you can make use of placeholders. Changes to
the text can be saved by clicking on [save].
© 2011 Electric Paper GmbH
457
System Settings and Management
2.1.2.
Templates for Email Messages
First you will see a description of all message types and then you will find details to
the various placeholders available.
Report for the Dean/Manager
Trigger:
Provided that the function “EvaSys settings/central evaluation/dean/manager’s copy
report” has been activated, all users of the type “dean/manager” will receive a copy of
all PDF reports, that have been created in a given subunit.
Content:
Personalized text for the processed survey. PDF reports are sent as a rule. In addition
or as an alternative raw data as Excel readable CSV files can be attached (see “System Settings/EvaSys Settings/Email Functions & Accounts”).
Cover Sheet to Instructor/Trainer
Trigger:
The instructor/trainer has used an activated user account to create a survey according
to the cover sheet procedure (decentral) or the administrator is sending the instructor/
trainer a cover sheet (CE).
Content:
Personalized text with an attached cover sheet for a paper survey in the cover sheet
procedure a PDF file.
Batch Printed Form for Instructors/Trainers (Hybrid Surveys)
Trigger:
The administrator sends an email with personalized questionnaire to the instructors/
trainers (Central Evaluation) for a hybrid survey. The setting “EvaSys Settings/Email
Functions & Accounts/Delivery Method PSWDs (Central Evaluation) must be at “Lecturer”.
Content:
Personalized texts with attached PDF document containing personalized forms. The
PSWD makes each form unique.
Form to Instructor/Trainer
Trigger:
The instructor/trainer has used an activated user account to create a survey according
to the hard copy procedure (decentral) or the administrator has sent the instructor/
trainer a questionnaire (CE).
458
© 2011 Electric Paper GmbH
Configuration Settings
Content:
Personalized text with attached form for a paper survey in hard copy procedure as
PDF file (or FDF file).
PSWDs for Online Surveys to Instructor/Trainer
Trigger:
The instructor/trainer has used an activated user account to create an online survey
(decentral) or the administrator is sending the instructor/trainer the PSWDs for an
online survey (CE).
Content:
Personalized text with attached PSWD document for an online survey as PDF file.
The document contains all PSWDs and can therefore be very large.
Information about a New User Account
This message can be used to inform new users directly about their new user account.
Activate the checkbox “Inform user about profile creation via email?”
Report on the Survey to the Instructor/Trainer
Trigger:
EvaSys has just processed a scanned survey and sends a message (decentral/CE) or
the administrator sends the instructor/trainer a report (CE).
Content:
Personalized text processed survey. Normally the PDF report is sent with the text. In
addition or as an alternative the raw data can be sent as an Excel readable CSV file
(see “System Settings/EvaSys Settings/Email Functions & Accounts”).
PSWD to Online Survey Respondents
This text is an exception. It is an email to participants in an online survey sending the
PSWDs and the server address for voting. The placeholders [TAC] and [SERVER]
must NOT be removed. The other placeholders cannot be used for this email.
Reminder to Online Survey Participants
The PSWDs and server addresses for response returns are entered here (similar to
the initial delivery of PSWDs).
Information Concerning Validation for the Instructor/Trainer
Trigger:
A survey has been validated, i.e. the manual data entry of the handwritten comments
has been completed (decentral/CE). The administrator sends the instructor/trainer the
reports from the survey (CE).
© 2011 Electric Paper GmbH
459
System Settings and Management
Content:
Personalized text accompanying the processed survey. The PDF report is normally
sent with this text. In addition or as an alternative the raw data can be sent as a Excel
readable CSV file (see “EvaSys settings/email functions”).
The message of a paper survey after the handwritten comments to open questions
have been manually entered by a data entry assistant. This is the case for those subunits working with manual data entry.
Information Concerning Deactivating the Instructor/Trainer’s Optional Questions
Trigger:
The administrator has again deactivated the instructor/trainer’s optional questions for
the relevant survey.
Content:
Personalized text with the name of the instructor/trainer as well as the course name.
Form/PSWDs to Instructor/Trainer (Instructor/Trainer’s Optional Questions)
Trigger:
The instructor/trainer’s optional questions for a survey has been completed by the
instructor/trainer. Now he/she (or the group address) receives an email with the
required cover sheet and the questionnaire.
The function “EvaSys Settings/Survey/Instructor/Trainer’s Optional Questions activation status” must be activated.
Content:
Personalized text and attached PDF documents.
Information Concerning Activating the Instructor/Trainer’s Optional Questions
Trigger:
The administrator has activated the instructor/trainer’s optional questions for a survey.
Content:
Personalized text as well as a link to the instructor/trainer’s optional questions. In most
email programs clicking the link will lead directly to the instructor/trainer’s optional
questions.
Reminder for the InstructorTtrainer’s Optional Questions
Trigger:
The administrator has initiated a reminder for an activated instructor/trainer’s optional
questions.
460
© 2011 Electric Paper GmbH
Configuration Settings
Content:
Personalized text as well as a link to the instructor/trainer’s optional questions. In most
email programs clicking the link will lead directly to the instructor/trainer’s optional
questions.
Regulatory Information
Trigger:
The message to the instructor/trainer about which deans of studies/program managers received a summarized form of the results has been activated (self registering procedure).
Content:
Personalized text with a list of the deans of studies/program managers who have
been given access to the summarized results of the survey.
Certificate of Participation for Online Surveys
Trigger:
Certificate of participation has been activated for a questionnaire (Option “email“). The
PSWD has been sent to the respondents by email. The respondent has submitted the
online survey and received this email.
Content:
Personalized certificate of participation.
2.1.3.
Template for Letter in PDF Reports
The letter text for PDF reports can be defined in same list like email texts. Letter texts
starts with “LETTER”.
For using a letter, you must have activated the function “System Settings/Report Settings/Configuration/Generate letter”.
A one-page default letter can be used or a PDF template attachment for a one or more
page letter.
A letter can contain a maximum of one page of text. The contents can be personalized
with a series of placeholders, which are described at the end of this section.
Reports not created and not sent to instructors/trainers
The minimum number (as defined at “System Settings/EvaSys Settings/Survey/Minimum number of returns for reporting”) of completed questionnaires was not reached
and so a report is not created and sent.
Summary report for dean/manager
The dean/manager receives a summary report with the indicators for all evaluated
courses selected from a combination of subunit + survey period + questionnaire.
© 2011 Electric Paper GmbH
461
System Settings and Management
Figure 617: Standard Letter
Summary report for dean of studies/program manager
The dean of studies/program manager receives a summary report with the indicators
for all evaluated courses. The selection is made by the deans/managers themselves
in their login account. The function “EvaSys Settings/Central evaluation/dean of studies/program manager” must be activated. A corresponding user account must be set
up and used.
462
© 2011 Electric Paper GmbH
Configuration Settings
Figure 618: PDF Template Letter
Report to the instructors/trainers
Informs about the survey report.
Example:
[SALUTATION] [TITLE] [SURNAME],
You are receiving the results of the automatic evaluation of the course [SURVEY].
Questionnaire type [QUESTIONARY]:
© 2011 Electric Paper GmbH
463
System Settings and Management
The overall indicator given first is made up of the following scales in the questionnaire:
[DIMENSIONS]
Then you will see the individual averages of the scales given above.
In the second part of the report you will find all the averages of each individual question.
The value 1 represents from the students’ viewpoint minimum score for the course
while the value 7 is a maximum score.
Certificate of participation for online surveys
Confirms the participation in an online survey with date and PSWD.
Note:
To enable the creation of this PDF document, a PDF template has to be created,
uploaded and attached to the template “Certificate of Participation for Online Surveys” (see B 2.3.2).
2.1.4.
Placeholder for Texts
Example:
Dear Mr. Example,
You will receive as attachment to this email the report to the survey “Introduction to
Sample Science”.
Your EvaSys Administrator
This is a message of the type “Survey Report to Instructors/Trainers”. Using placeholders defines this message type as follows:
[SALUTATION] [TITLE] [SURNAME],
You will receive as attachment to this email the report to the survey [SURVEY].
Your EvaSys Administrator
464
© 2011 Electric Paper GmbH
Configuration Settings
Here is a list of all permitted placeholders for email texts as well as PDF letters:
[SALUTATION]
Form of Address (e.g. “Dear Mr.” or “Dear Ms.”)
[TITLE]
Title (e.g. “Prof.“)
[GENDER]
Gender (male or female)
[FIRSTNAME]
First name
[SURNAME]
Surname
[SURVEY]
Name of survey
[SURVEY_LIST]
List of all surveys (important when sending the PDF
reports collected in one email - batch events)
[FORMCOUNT]
Number of returns for survey
[PERIOD_NAME]
Name of the Survey Period
[QUESTIONARY]
Name of the questionnaire
[DIMENSIONS]
Name of the dimensions/question groups
[SUBUNIT]
Name of subunit
[ADDRESS]
User’s address
[COURSENAME]
Course name
[COURSEID]
Course identification
[PROGRAMOFSTUDY]
Course’s program of studies
[COURSEROOM]
Course’s room/location
[COURSEENROLLMENT]
Number of course participants
[COURSETYPE]
Course type
[CUSTOMFIELD_X]
Course’s user-defined fields (X=1 bis 5)
[CURRENTDATE]
Current date
[SURVEYCREATIONDATE]
Date of survey creation
© 2011 Electric Paper GmbH
465
System Settings and Management
[LASTCAPTUREDATE]
Last capture date paper = Scan date, Online = last
return)
[SEC_TITLE_X],
[SEC_FIRSTNAME_X],
Title, first and surname of secondary instructor (X
must be an integer)
[SEC_SURNAME_X]
[ENROLLMENT_RESPONSE_ percental response on the basis of the study course
RATE]
participants
[SURVEY_QUALITYINDEX]
Overall quality of a survey as stated in the QM-Views
(e.g. 77%)
Special placeholders for online surveys:
[SERVER_DIR]
User entry point( e.g. http://evasys.demo-university.com)
[DIRECT_ONLINE_LINK]
Adds a link to the online survey that contains the
server address as well as the PSWD/password. Simply clicking the link shows the online questionnaire.
[SURVEY]
Name of survey (e.g. “Introduction to Example Science”)
[PSWD]
A PSWD for online survey participants (e.g. X5FU3)
[SERVER]
URL for online survey participants( e.g. http://evasys.example.com/evasys/online/)
[TIMESTAMP]
Time of submission of an online survey (e.g.
22:15:34 15.03.2011)
[PARTICIPANT_EMAIL]
Email address of an online survey Participant (e.g.
[email protected])
[PSWD_COUNT]
Number of all PSWDs
[DISTRIBUTED_PSWD_
COUNT]
Number of PSWDs dispatched
466
© 2011 Electric Paper GmbH
Configuration Settings
[DISTRIBUTED_RESPONSE_ percental response rate on the basis of the disRATE]
patched PSWDs
[OVERALL_RESPONSE_
RATE]
percental response rate on the basis of the total
existing PSWDs
Hint:
If more than one placeholder is used in a row, they should be enclosed in additional
square brackets (i.e. [[SALUTATION] [TITLE] [SURNAME]]).
In this way, it can be avoided that a superfluous space is displayed in case a placeholder cannot be filled.
2.1.5.
HTML Format for Email Texts
Emails are sent as pure text messages per default. If desired, they can be sent in
HTML format. For this, the option, “Emails in HTML Format” in the “Email Functions &
Accounts” section of the system configuration, must be activated.
Formatting with the help of HTML tags can now be done in the text templates; links
can also be added. The following HTML tags are available:
Type
Tag
Example
Bold
<b>
<b>Bold</b>
Italics
<i>
<i>Italics</i>
Underlined
<u>
<u>Underlined</u>
Centered
<center>
<center>Center</center>
Font
<font>
<font size=14>Size 14</font>
Links
<a>
<a href="http://www.example.com/">http:/
/www.example.com </a>
Line breaks
<br>
<br>Break</br>
The HTML command <br> for the line break does not necessarily have to be used. All
normal line breaks in the text templates are automatically converted into HTML line
breaks before sending.
© 2011 Electric Paper GmbH
467
System Settings and Management
2.1.6.
The PDF Report Header
The contents of the PDF report header can also be defined in the text templates:
Figure 619: Text Template for the PDF Report Header
In the text field, the header content is defined by HTML formatting and placeholders.
The example shown here produces the following PDF report header:
Figure 620: Sample PDF Report Header
Example:
You could, for example, insert a line containing the static text “Result of student survey” (in the example in font size 8):
468
© 2011 Electric Paper GmbH
Configuration Settings
Figure 621: Modifying the Text Template by Inserting a Line
After a click on [Save] you will see upon re-opening of the report that the PDF report
header has changed as follows:
Figure 622: Result after Modifying the Text Template by Inserting a Line
Of course, other placeholders can also be used.
In the following you will find a listing of the available formatting:
Type
Tag
Example
Layout
Bold
<b>
<b>Bold</b>
Bold
Italic
<i>
<i>Italic</i>
Italic
Underlined
<u>
<u>Underlined</u>
Underlined
Centered
<center>
<center>Centered</
center>
<font size=xx>
<font size=14>Font
size 14</font size>
Font size
Please note:
Centered
Font size 12
Maximum 50,
Minimum 1; No
single or double
quotes
Figure 623: List of available formatting
The header of the PDF report generated by the report creator has its own text template “PDF-REPORT: Report Header (report creator)”. This makes it possible to display the instructors name in the standard PDF report, but, at the same time, not
having to display the name of the report creator in the PDF Report of the report creator.
© 2011 Electric Paper GmbH
469
System Settings and Management
2.2.
Documents
Documents can be saved in EvaSys for a number of purposes. As documents for
attachments to emails created in EvaSys or as documents for PDF letters.
The administration of documents and files is done centrally in the menu item “documents“. The following functions are available:
•
Uploading files to the EvaSys server
•
Displaying documents
•
Updating documents
•
Deleting documents from the EvaSys server
Figure 624: Document Administration
The secure storage of documents in the EvaSys database means that they will be
there when you need them, e.g. email delivery.
Uploading documents
Please enter the following information in order to upload documents:
Description– Description of the document
File name – path to the document on your local system
With a click on [Save] you can upload the document to the server.
In the table you can now see more information about the document (columns 3+4):
Size – Size of the uploaded document in bytes
Type – File type of the document (mime type)
470
© 2011 Electric Paper GmbH
Configuration Settings
Updating documents
Changes to documents must be first be done locally (on a workplace computer). Then
upload the modified document again to the server .
Displaying documents
Display documents by clicking on the icon in the next to last column. You will need to
have the appropriate application software (e.g. Microsoft Office for DOC files).
Deleting documents
Delete documents from the system by clicking on the icon in the next to last column.
All links to email types or to PDF report types are also deleted.
The size of the document is limited to 1 megabyte. You can change the maximum size
in the EvaSys settings (“EvaSys Settings/General/Maximum Size of Document”).
2.2.1.
Email Attachments
Every email type in EvaSys (e.g. Send PSWD to respondent” or “Send report to
instructor/trainer”) can be provided with its own email attachment. For example, an
instructor/trainer could receive along with his PDF report a document with the evaluation requirements.
Under the heading “Documents for Email Attachments” you can find all related files.
Email attachments can be created in any file type, so please remember that recipients
may have trouble opening uncommon file formats.
More about assigning documents to specific email types can be found in the section
“Text Templates”.
2.2.2.
PDF Templates
Customized letter templates (PDF templates) can be entered for the various PDF
report types (e.g. “Report to Instructor/Trainer” or “Summary Report to Dean/Manager”).
The template layouts can be designed so that they meet any corporate identity
requirements. As the name says, the templates must be in PDF format or converted
into this format.
The templates in EvaSys are filled with data from the EvaSys system when the reports
are generated. In order to do this certain fields are necessary on the PDF. A full version of Adobe Acrobat (V5.0 and higher) is necessary to create the fields in PDF.
© 2011 Electric Paper GmbH
471
System Settings and Management
Figure 625: PDF Template – Acrobat Professional View
Schematic layout of template:
A letter template is made up of a static part (logo, sender, other text) an a dynamic
part, which is filled out by EvaSys depending on the report. For the dynamic part there
are three different fields available:
address
This field is filled with data about the instructor/trainer (e.g. name, address, etc.). A
placeholder determines which data appears. The types of placeholders are described
472
© 2011 Electric Paper GmbH
Configuration Settings
in Section 2.1.3 Template for letter in PDF reports. In Adobe Acrobat placeholders are
defined in the text field at [Options/Default Value].
For example:
To:
[GENDER]
[TITLE] [FIRSTNAME] [SURNAME]
confidential
Figure 626: Example of PDF Template
© 2011 Electric Paper GmbH
473
System Settings and Management
subject
This field is filled with a heading or the subject line of the letter. The subject line can be
defined in the EvaSys menu item [Text Template] (see Section 6.7).
text
This field contains the personalized text of the letter for the PDF report. The text can
be defined in the EvaSys menu item [Text Template] (see Section???).
In Adobe Acrobat the templates must be saved by [Save As] so that the internal PDF
structure is clean.
2.3.
Process Defaults
In the menu “System Settings”/ “Process Defaults” you can set the defaults for the
configuration of user accounts. The configuration of EvaSys user accounts allows you
to customize the surveys to your requirements. The following points are available:
When creating surveys automatically send emails with cover sheet/questionnaire/PSWDs (only activated instructor/trainer accounts)?
This option sends the cover sheet or personalized form for your new survey immediately after creation of the survey to the email addresses given in your profile.
Make own utilization statistics available for other instructors/trainers (only activated instructor/trainer accounts)?
The information contained in the utilization statistics concerning, for example, the
number of scanned questionnaires and number of surveys can be viewed by your colleagues if you permit it. Otherwise only the administrator can view the utilization statistics.
After the scanning operation automatically generate email with message or
report (only paper survey)?
You can automatically send emails (also with reports) after the forms have been
scanned. The email will be sent to the email address given in your profile. If the email
does not have a report file then it is a matter of system configuration. A message text
or in addition a PDF report and/or CSV raw data can be sent. This setting is made by
the administrator.
End the survey after the scanning operation?
Surveys can be highlighted as either “ended” or “not yet ended”. This function allows
you to collect data in a number of scanning operations in different periods of time (e.g.
when returns come in “waves”). If you are sure that you will not need further scanning
operations after the first scanning operation then you can answer this question with
“yes”.
474
© 2011 Electric Paper GmbH
Configuration Settings
Keep survey data after analysis in the system (only paper survey, only activated
instructor/trainer accounts)?
The survey data is stored in the EvaSys database after it has been captured. No one
other than you has access to this data. The survey data can be deleted manually at
any time. If however you would like to delete the survey data before it enters the database you must activate the option “After the scanning operation automatically generate email with message or report”.
2.4.
Webservice
The configuration area “Web Service Settings” in the main menu “System Settings”
allows the administration of external web servers that communicate with the EvaSys
server via the web services EvaSys SOAP-API.
(Please note: You will see the area “Web Service Settings” in the menu only after activating “Activation of EvaSys Web Service (XML based SOAP interface” in the EvaSys
Settings, page “Functions”.)
By the so-called web services, web servers can communicate with one another and
download the other system's functionalities. This way, it is possible to integrate EvaSys into existing web software systems. Typical applications are, for example, the
automated update of the user accounts and survey procedures, the download of evaluation reports or questionnaire supplies.
Connections with EvaSys via web services can be implemented by the manufacturer
and/or your vendor.
2.5.
EvaSys Settings: Configuration
At the menu “System Settings/EvaSys Settings” in the administrator interface you
have access to the configuration of the EvaSys server.
Figure 627: EvaSys Settings
© 2011 Electric Paper GmbH
475
System Settings and Management
Below the button “EvaSys Settings” you can select a major heading for the EvaSys
settings. The following categories:
•
General
•
Survey
•
Survey Online
•
Data Import and Export
•
Course User Data Fields
•
Functions
•
Central Evaluation
•
Email Functions & Accounts
•
Color Settings
•
Instructor/Trainer accounts
•
VividForms
•
Network Settings
•
System Security
•
Maintenance
Select an item from this list in order to display its settings. Click in the field “Settings”
on “Advanced...” in order to reach the save option.
Figure 628: Advanced Settings
You can save the current EvaSys setting here under a name. This allows you, if
required, to recover an earlier EvaSys setting. You can do this by using the function
“replace the present configuration by … “.
And finally you can delete a configuration you have saved at “delete an earlier configuration…”. Many of the available configuration options are characterized and marked
476
© 2011 Electric Paper GmbH
Configuration Settings
by gray text “Make this option subunit available to subunit administrators”, meaning
that they can be activated for the use by subunit administrators:
Figure 629: Option Activated for Subunit Administrator
With this function activated, the subunit administrators are able to implement settings
which deviate from central settings.
Note:
Changes made by the subunit administrator overwrite the changes made by the
administrator in the relevant subunits.
If any particular released configuration options are to be removed from control by subunit administrators, the marking can be removed.
Figure 630: Warning when Deactivating the Subunit Administrator Release
Note:
Please bear in mind that the settings created by the subunit administrators will be
lost.
2.5.1.
Section “General”
Title login window
Text of the title line on the start page.
System language
Sets the default language of the EvaSys interface as well as all generated report documents. Users (instructors/trainers, report creators, etc...) can change the language in
their settings.
Options:
German (Higher Education)
© 2011 Electric Paper GmbH
477
System Settings and Management
German (Seminar Providers)
English (Higher Education)
English (Seminar Providers)
Date Format
Here you can define the date format. The following characters are recognized (notice
upper and lower case):
d - Day of the month, 2 digits with leading zeros
m - Numeric representation of a month, with leading zeros
M - A short textual representation of a month, three letters
Y - A full numeric representation of a year, 4 digits
y - A two digit representation of a year
Time Format
Here you can define the format for time.
h: Hour: 12-hour format, beginning with zero
H: Hour: 24-hour format, beginning with zero
i: Minutes, beginning with zero
s: Seconds beginning with zero
a: Lower case: ante meridian and post Meriden
A: Upper case: ante meridian and post meridian
Display of menu images
By default, this option is active, which means that menu images are displayed in the
upper left corner throughout the entire system. If this option is deactivated, menu
images are hidden, throughout the entire system.
Number of images for menu
The number of images that can be displayed alternatively in the screen. Please note
that the images must be named and in the subfolder “Bilder” The image name begins
with “customer” and ends with a number. The file ending must be “jpg”. The first image
is named “customer0.jpg” and the last image “customerxx.jpg” with “xx” being the
number given in this setting.
Questionnaire list: Display questionnaire status
The status column in the questionnaire list can be hidden or displayed. With a larger
number of questionnaires, it is recommended to hide the status column so as to
achieve a faster page loading.
478
© 2011 Electric Paper GmbH
Configuration Settings
PDF format
Selection of the format for the creation of PDF documents.
DIN A4: 210 x 297 mm
Letter: 216 x 279 mm
Legal: 216 x 356 mm
2.5.2.
Section “Survey”
Minimum number of returns for reporting
If the number of returns is under the value “n” there will be no display of the results (no
PDF report, no HTML report, no raw data). Instead there will be a note in the letter
(the function “generate letter” must be ACTIVATED). The note can be edited at “System Settings/Text Templates”.
Warning threshold in % for PDF report dispatch by email
Defines the threshold (percentage of pages not recognized) for the automatic dispatch
of the PDF report. Explicit confirmation is necessary for manual dispatch of the report.
(Default: 70)
Warning threshold (in percent) for recognition problems during the processing
of paper forms
If this error occurs, a serious problem was found in the quality of scanned forms. The
problem must urgently be analyzed and corrected before scanning the next forms. If
the threshold defined here is exceeded for a survey, this survey will be marked red.
The PDF report will not be dispatched automatically if this option is activated. Furthermore the EvaSys administrator gets a warning notice via email.
(Default: 0.2)
Instructor/Trainer’s optional questions: activation status
Here you can activate or deactivate the Instructor/Trainer’s Optional Questions
Instructor/Trainer’s optional questions: modify course data
Permits or prevents instructors/trainers from modifying the course data in the Instructor/Trainer’s Optional Questions.
Instructor/Trainer’s optional questions: question library
Defines whether the instructor/trainer can use the question library in the Instructor/
Trainer’s Optional Questions.
(Default: deactivated)
© 2011 Electric Paper GmbH
479
System Settings and Management
Instructor/Trainer’s optional questions: direct delivery of questionnaire/PSWDs
If this function is activated, then once the instructor’s optional questions is complete
the email with the questionnaire and the PSWDs is sent directly to the instructors. If
this function is deactivated, then all emails are sent to the group address given in the
email category.
Instructor/Trainer's optional questions: email for deactivation contains PSWD
list
Deactivating the Instructor/Trainer's Optional Questions a PDF with the PSWDs can
be added.
Instructor/Trainer's optional questions: Status change
If activated, the status of Instructor’s Optional Questions in the survey overview
changes to “completed” as soon as the VividForms Editor is opened. If deactivated,
the status changes when the save and exit button in the Instructor’s Optional Questions is clicked.
Instructor/Trainer’s optional questions: reasons for not conducting a survey
The reasons for when a survey cannot be held or should not be held can be selected
in the Instructor/Trainer’s Optional Questions.
Instructor/Trainer’s optional questions: Email to the administrator when survey
canceled
Send an email to the administrator when the setting in the Instructor/Trainer’s Optional
Questions has been activated that the survey has been cancelled.
Default value course participants
The default value for the course participants is used for batch printing when no information on the number of questionnaires is given. This value can also be changed
when batch printing.
Anonymization threshold
The value set defines the limit to the number of questionnaires before the anonymized
text of open questions will be shown. If the number of questionnaires is above this
value the images of the open questions will be used. Please note that a value of 0
deactivates this functionality, i.e. all of the questionnaires will be shown for anonymization when the anonymization has been activated for this subunit.
Module Evaluation: Display of name of the (secondary) instructor/trainer in the
heading of the question group
If activated, the names of the (secondary) instructors/trainers are displayed on the
aggregated questionnaire. In this case in each first question group heading of a partial
questionnaire, the name of the relevant instructor/trainer is displayed. This setting
480
© 2011 Electric Paper GmbH
Configuration Settings
helps you to relate the questions to the instructors/trainers. It only affects new surveys, existing surveys are not concerned.
Module evaluation: Delivery of module sections with no instructor
If this function is activated, reports from module sections (courses) which are not
assigned to an instructor, are sent to all instructors for that module. These module
sections are, in this case, viewed as general polls about the module. If this function is
deactivated, each instructor for a module section receives only their own report. This
option only affects the automatic delivery of reports directly after scanning and the
delivery of reports using scheduled tasks.
Email dispatch of questionnaires for the coversheet procedure
If activated with each email dispatch of a coversheet the corresponding questionnaire
will be sent, too.
Delete in two steps
If this function is activated then when you delete a survey you will only be deleting the
data. The survey operation itself will be recorded in the system as proof. Another deletion will then result in the complete removal of the survey. If this function is deactivated then all survey data will be deleted immediately at the first deletion.
Method of calculating the response rate
Here, the method of calculating return rates can be set. Methods available are calculation based on the generated PSWDs (0), PSWDs sent (1) and the number of participants of the course (2). To show return rates of paper-based surveys, the option “2 =
percentage of responses based on the course participants” must be selected.
2.5.3.
Section “Survey Online”
Highest permitted number of PSWDs per survey (in instructor/trainer account)
Defines the maximum number of participants in an online survey. This value is theoretically unlimited, but should be limited to an acceptable size for the organization.
Default value is 1000.
Default value PSWD number per survey (in instructor/trainer account)
This number is recommended in instructor/trainer accounts as the number of participants for a survey.
Server address for online evaluations
This address is used on the PSWD cards and in the PSWD emails.
Instruction text for PSWD cards
Defines the instruction text on the PSWD cards for online surveys.
© 2011 Electric Paper GmbH
481
System Settings and Management
Default value PSWD per survey (central evaluation)
Online surveys created in central evaluation use as the number of participants the
number of students that can be admitted to a particular course. If this number is missing then the value defined in this constant is used.
Format PSWD document
Different formats are available for the PSWD document:
1 = 3x8 PSWDs per page (A4)
2 = 2x7 PSWDs per page (A4)
3 = 3x7 PSWDs per page (A4)
4 = 3x6 PSWDs per page (Letter)
Design template for online surveys
File with design templates for online surveys.
Default file is “simple_html_template.inc”. The images and colors of the online survey
are defined in the file .
Alternative forwarding for online surveys
This option activates the forwarding of participants to online surveys. After dispatch,
the participants are forwarded according to the settings under “System Settings/EvaSys Settings/Survey online/Alternative forwarding address for online surveys“.
Alternative web address for forwarding the participants of online surveys
The participants of online surveys are, after dispatch of the results, forwarded to the
Email address given here. The address must be given, complete with protocol (i.e.
http://).
Language selection using images
If activated you can select the language for multiple-language online questionnaires
by language icons. The icons must be defined for the languages and the files must
exist. EvaSys automatically stores the images you have uploaded in the following
folder: C:\Apache\htdocs\evasys\data\ images\flags. As an alternative you can also
use predefined flags included in the system. These are stored in the folder
C:\Apache\htdocs\evasys\images\flags. If this option is deactivated, languages can be
selected using a dropdown box.
Participation tracking (online surveys): Protection of anonymity
With participation tracking available as a CSV export, the participation anonymity for
online surveys is abrogated whereby the survey anonymity should be preserved. The
minimal return value defined here must be attained so that the information on participation or non-participation of a specific survey can be released. Please observe that
under certain circumstances a value of 3 or less can compromise survey anonymity.
482
© 2011 Electric Paper GmbH
Configuration Settings
Allow password based online surveys (Central evaluation)
If this option is activated, a PSWD based survey, for which PSWDs have not yet been
sent and for which there are as yet no responses, can retroactively be converted to a
password based survey. This option is only valid in central evaluations; therefore,
active user accounts are not affected by this setting.
Display of filtered questions in online surveys
0 = Filtered questions are deactivated (=displayed grayed out)
1 = Filtered questions are hidden (=invisible; as such, no longer visible for the participant ).
Alternative forwarding including authentication
Participants of online surveys can be directed to a different internet site once their survey is submitted. The forwarding occurs based upon the forwarding address which is
defined in the details of the corresponding questionnaire. Each questionnaire can be
given an individual forwarding address.
The following option determines whether the authentication for forwarding requires a
value chosen from the properties of a course.
Use the following field to determine the “secret word”:
0 = no course user data fields (If no “questionnaire specific spare secret password”
has been defined in the details of the questionnaire, no “secret password” will be
requested for the authentication.)
1 = Course user data field 1
2 = Course user data field 1 + Survey-ID
3 = Course user data field 2
4 = Course user data field 2 + Survey-ID
5 = Course user data field 3
6 = Course user data field 3 + Survey-ID
7 = Course user data field 4
8 = Course user data field 4 + Survey-ID
9 = Course user data field 5
10 = Course user data field 5 + Survey-ID
Please note: If no questionnaire specific forwarding address was defined in the details
of the questionnaire, the forwarding occurs based upon the system-wide defined forwarding address - Menu “System Settings/EvaSys Settings/Survey Online/Alternative
forwarding for online surveys” - no “secret word” will be used.
© 2011 Electric Paper GmbH
483
System Settings and Management
Support for mobile devices
If activated, when recognizing a mobile device (Cell phone, Smartphone, Internet Tablet PC or similar), the display of the online survey will be optimized to the screen size
of the corresponding device as far as possible.
2.5.4.
Section “Data Import and Export”
Permit data export for open questions
When activated, the CSV raw data files also receive the responses collected to open
questions.
Placeholder image files
Output text for textbox not yet validated.
Separators CSV import and export
Defines the separators for CSV import and export. Accepted: semicolon, comma, tabulator (/t) and the vertical line (|).
Synchronization URL for the XML import
XML export interface of the external system, with which EvaSys is to be synchronized.
Method password creation faculty import
Rules for setting up new users through CSV/XML import.
0: User name/password put on email address
1: User name/password are generated randomly
Activation status faculty import
Rules for setting up new users through CSV/XML import.
0: Instructor/Trainer account is deactivated after import (Central Evaluation)
1: Instructor/Trainer account is activated after import (De-central Evaluation)
SPSS Missing Values
This option defines whether the abstentions in the SPSS export
are defined as “Missing Values"
1 = Abstentions are defined and exported as “Missing Values"
0 = Abstentions are exported as ordinary values
If abstentions are exported as ordinary values, they obtain the value 0. When calculating a mean value of all the results in SPSS, the abstentions contribute to the mean
value and thus distort the result.
For that reason you can define the abstentions as “Missing Values” when being
exported to SPSS. If you activate this option (setting “1”), then for every questionnaire
484
© 2011 Electric Paper GmbH
Configuration Settings
where you have defined the possibility of abstentions, each abstention is exported as
a Missing Value with value o to SPSS. SPSS ignores the “Missing Value” when computing the mean value.
Sphinx path
If the path of the local Sphinx application is defined, a batch file will be generated during the Sphinx export. Running the batch file allows Sphinx to display the report immediately.
Raw data export contains only the ID of non-anonymous participants
If activated, the raw data export contains only the ID (email address) of the participant.
This option is only available for non-anonymous surveys where the participants are
known with names in the system. If this option is deactivated all available participant
data will be exported.
Char encoding for CSV-Export
Defines the char encoding for the CSV export. Use the option Unicode if non-Latin
characters are used.
Options:
ISO 8859-1
ISO 8859-2
Unicode
ISO 8859-1 is a norm which defines the display of the western European font.
ISO 8859-2 is a norm defining the east European character set. Through ISO 8859-2
a CSV file with east European characters can be directly and correctly opened in
Excel.
Unicode is a comprehensive standard for the presentation of characters through a
computer which makes numerous characters presentable worldwide – for example
Chinese fonts. The EvaSys server displays its web pages in the unicode font UTF-8.
2.5.5.
Section “Course User Data Fields”
Number additional fields
Sets the number of user definable courses. Zero corresponds to “no additional fields“.
Title of 1st, 2nd, 3rd, 4th and 5th additional field
The title of the corresponding additional field.
Content of the1st, 2nd, 3rd, 4th and 5th additional field
Designation of permitted values for the additional fields. The values must be separated by “|” (CTRL+ALT+>).
© 2011 Electric Paper GmbH
485
System Settings and Management
2.5.6.
Section “Functions”
Period display
Displays the current period
Permit Kiviat diagram
Kiviat diagram are visible for faculty
Minimal survey number report creator
Minimum number of surveys with which a report creator can create a subunit report
(De-central Evaluation).
Permits immediate deletion of data
Defines whether the data of processed surveys can be immediately deleted after the
reports have been sent by email (activated). The setting “deactivated” suppresses the
corresponding configuration setting.
Permit certificate of participation
Activates the option to download a certificate of participation.
Permit certificate of results
Activates the option to download a certificate of results document after participation in
the evaluation.
Anonymous saving of deleted surveys
Deleted surveys are kept anonymously in a wastebasket so that the report creator can
generate an accumulated subunit report.
Hide bar diagram shadow
Hides the bar shadow in PDF reports.
Hide end of document text
Hides text “end of document”.
Hide page number end of document
Hides page number on last page.
Batch printing: Duplex printing
The PDF document contains empty pages for duplex printing, e.g. after the cover
sheet.
486
© 2011 Electric Paper GmbH
Configuration Settings
Batch printing: form printing when using the cover sheet procedure
When using the cover sheet procedure, the cover sheet and the form will be included
in the PDF, either in a given number or as a master copy, depending on whether this
button is activated.
Batch events: Naming conventions for PDF reports in ZIP files
If PDF reports are opened in the batch events as individual reports merged in a ZIP
file, then the file name for the PDF reports is created using the naming conventions
defined here. A variety of place holders, listed in the manual, can be used for the file
names (see chapter B 3.2.9. "Batch Events ").
Delete answers to open questions
Activates/Deactivates the option to delete responses to open questions.
Serial dispatch of the profile lines for active user accounts
If activated, serial dispatch of the profile lines (of the report creator) can also be used
for active user accounts.
If this option is deactivated, the report creator can only choose courses of inactivated
user accounts when creating profile line emails.
If this option is activated the report creator can additionally see and choose the
courses of active user accounts.
Blocking time for pages of forms in the Web Verifier
Time in minutes, for which a page of the form is blocked by a user. During this time no
other user can access the form.
Consider the minimum response for unweighted merged reports
If activated, those questions which reached an insufficient number of responses are
ignored.
When deactivated every question will be included into the unweighted merged report.
Force settings of the administrator
If activated, after the processing of paper surveys the settings of the administrator are
used instead of the responsible subunit administrator.
Automatic verification
The automatic verification allows certain cases of a batch to be verified automatically.
Scan resolution
Resolution in DPI. This setting influences the scaling of images with handwritten
answers in PDF reports. The default resolution is 200 DPI.
© 2011 Electric Paper GmbH
487
System Settings and Management
HTML report: Relative values
The HTML reports show the distribution of the responses to closed questions with relative (activated) or absolute (deactivated) values.
HTML report: Minimum percentage for display (%)
Defines the minimum percentage of response frequency to a question in relation to
the total number of returns needed in order to display the respective question in the
HTML report. If the value is set to “0”, all questions of the reports will be displayed.
HTML report: Minimum percentage for display (absolute)
Defines the minimum absolute response frequency to a question required in order to
display the question in the HTML report.
Please also consider the setting “Show notice for suppressed report”.
HTML report: Separate closed/open questions
When activated the results for open and closed questions in the HTML reports are displayed separately. This results in better readability particularly of those reports created with a mix of open and closed questions.
HTML report: Listing of open questions
Listing and counting of comments in the report.
Create distribution for the report for the dean (of studies)/(program) manager
This function shows the distribution of results from all reports and is only available for
reports to the dean/manager, the dean of studies/program manager and the president. There is a distribution graph for each active indicator of a questionnaire.
Open tree structure
If this option is activated, the open tree structure, configured parallel to the standard
structure, will be activated.
Subunit administrator: View the original recognized forms
If this option is activated, then subunit administrators can view recognized forms as
PDF files.
Subunit administrator: View survey results
If this function is deactivated, then subunit administrators have no authorization to
view or export survey results.
Data entry assistant/Verifier: View entire original questionnaire page
If this function is activated, the data entry assistant and the verifier can view the entire
questionnaire.
488
© 2011 Electric Paper GmbH
Configuration Settings
Data entry assistant: Sending a report to the instructor
If this function is activated, the data entry assistant can use a button to send a PDF
report to the instructor once all survey comments have been processed.
2.5.7.
Section “Central Evaluation”
Depending on the system version, some of these settings are preset and cannot be
changed.
Creation of summary reports
Permits the creation of summary reports, e.g. for the dean/manager’s report, dean of
study/program manager’s report as well as the president’s report.
Report president
Report function for the president.
Report dean/manager
Report function for the dean/manager.
Report dean of studies/program manager
Report function for the dean of studies/program manager.
Program of study reports
Report creator can download reports on programs of study.
Instructor/Trainer profile reports
Report creator can download reports on instructor/trainer profiles.
Dean of Studies/Program Manager
Toggles existence of the Vice-Dean
Quality Management
Activate/deactivate the availability of quality assurance and QM views.
Passive instructor/trainer: Login for report request
Passive instructors/trainers can log in to EvaSys and request existing reports for their
courses.
Active instructors/trainers: Access to reports from central evaluation
In the menu of the active instructor/trainer account there is a link which allows access
to the course reports from the central evaluation.
Module Evaluation
Activates the possibility to evaluate modules.
© 2011 Electric Paper GmbH
489
System Settings and Management
Visibility of active instructor/trainer surveys in the QM views
Here you can choose, whether you want to see the surveys of active instructors/trainers in addition to the surveys of the central evaluation in the QM Views. By default this
option is deactivated.
Display of course-ID in the list of surveys
Display of the course-ID behind the name of the course. Here you can choose if you
want to display the course-ID in the list of the surveys and in the header of the PDF
report. If activated, the name of the survey consists not only of the name of the
course, but also of the course-ID (following the name in brackets). Additionally the
course-ID is displayed in the header of the PDF report (again after the course name).
2.5.8.
Section “Email Functions & Accounts”
Attach PDF report
Attach PDF report to the report email.
Attach CSV file
Attach CSV export to the report email.
Limit for file names in email attachments
The amount of maximum characters for the file names in email attachments. The
value 0 deactivates the cutting of characters.
Subject: Replace special characters
If activated, in the subject of every email special characters will be replaced to anticipate problems with some email clients.
Delivery method PSWDs (central evaluation)
1: PSWDs sent as batch mail by administrator
2: PDF lists of PSWDs is sent for printing and distribution to instructors/trainers
Conditional email report dispatch
Send email report after scanning depending on the settings of the:
•
admin: settings of the administrator at Process Defaults
•
dep.admin: settings of the subunit administrator at Process Defaults
•
user: configuration of the respective user
•
survey: according to the information on the cover sheet
Instructor/Trainer’s optional questions: group address
Group address to which the questionnaires personalized with the Instructor/Trainer’s
Optional Questions are to be sent.
490
© 2011 Electric Paper GmbH
Configuration Settings
Sender name for all system emails
Sender name that is used for all emails sent by EvaSys.
Sender email address for all system emails
Sender address that is used for all emails sent by EvaSys.
Email address of the support department
This address will be used when sending emails to the support department.
Dean/manager's copy evaluation
When sending the PDF reports via the “Process Defaults”, deans/managers of the
discipline/subunit receive a copy of the instant report.
Dean/manager's copy open ended questions
The dean’s/manager’s copy of the instant report contains responses to open ended
questions.
Archive mailing of evaluation reports
If activated a copy of each email concerning reports will be send to the configured
archive address (compare configuration “Email address of the archive”). This applies
to the reports of the central and decentral evaluation as well as to the profile lines sent
by the report creator.
Email address of the archive
Defines the recipient address of the email archive function.
Maximum number of attachments
The maximum number of email attachments.
Maximum size of attachments
The maximum size of attachments in MB concerning the mailing of PDF reports.
Emails in HTML Format
If this function is activated, emails are sent in HTML format. You can then use HTML
tags in the text templates for formatting and linking.
2.5.9.
Section “Color Settings”
Preset color scheme
All colors will be replaced by a preset color scheme.
Background color contents
This setting determines the background color of the content area.
© 2011 Electric Paper GmbH
491
System Settings and Management
Background color external
This setting determines the background color of the external area.
Table line 1
This setting determines the background color of the first line of each table.
Table line 2
This setting determines the background color of the second line of each table.
Table head
This setting determines the background color of the table heads.
Active Area
This setting determines the background color of the selected menu item.
Processed surveys
This setting determines the background color of the table lines for processed surveys.
New surveys
This setting determines the background color of the table lines for newly created surveys.
Deleted surveys
This setting determines the background color of the table lines for deleted surveys.
2.5.10. Section “Instructor/Trainer Accounts”
Footnote certificate of participation
Footnote of the certificate of participation document.
Standard text: This is the footnote of the certificate for evaluation
Footer certificate of results
Footer of the certificate of results document.
Standard text: The majority of statements and items in the questionnaire on teaching
evaluation are summarized as indicators.
Display question numbers
Question numbers are displayed when processing the optional additional questions.
Activate link to PDF preview
When activated, users can click on a questionnaire name in the list of surveys in order
to see a sample of the questionnaire.
492
© 2011 Electric Paper GmbH
Configuration Settings
2.5.11. Section “VividForms”
Recognition Set Folder
Recognition set folder for VividForms Forms.
Image directory for open questions
Path to a directory in which the VividForms Reader will store the images of an open
question.
Default form editor access for users
You can set the following access modes:
0. Unrestricted access
1. Only templates
2. No access
Cover sheet text
Instruction text on the cover sheet.
Default Font size
Default font size for VividForms questionnaires.
Allow editing of HTML code in the VividForms Editor
If activated users are allowed to edit HTML code in the VividForms Editor.
Maximum amount of pages that can be printed through batch printing of forms
Maximum amount of pages in one batch printing charge (the maximum number is
30.000 pages)
Display of recognized form data
If activated, the checkboxes, whose values were transmitted to EvaSys, will be
marked green in the PDF overview of the processed forms (accessible in the details of
a survey).
Standard view VividForms Editor
This option defines the standard view of a questionnaire in the VividForms Editor. The
user can switch between the paper and online view at any time if the license allows.
2.5.12. Section “Network Settings”
Display value support link
Display text of the web link shown in the interface (default: EvaSys website).
© 2011 Electric Paper GmbH
493
System Settings and Management
HTTP link on support page
Target address of the web link shown in the interface (default: http://www.evasys.de/
support)
HTTP redicrection address
Redirection address for rejected access attempts.
IP address mail server
IP address or domain name of the mail server EvaSys should use for messaging functions.
If you want to use a secure mailservice, you have to add the string ssl:// to the IPaddress (ssl://<IP-address>). Additionally the port of the mail server has to be
changed to the 465.
You cannot use the TSL-protocol here.
Port mail server
Port of the target mail server (Default: 25).
HELO to mail server
Greeting for the mail server, in this case the name of the mail server to be addressed.
Ignored, impolitely, by most mail servers.
Authentication
Activates the authentication on the mail server. In most cases not necessary.
User name
User name with which EvaSys should log in to the mail server (if authentication
needed).
Password
Password with which EvaSys should log in to the mail server (if authentication is
needed).
Server root path
This setting defines the root path of the EvaSys web server.
LDAP
LDAP deactivated/can be defined individually for each user in the user settings/activated for all users. If this option is activated, the user name and password are compared at the login with LDAP.
494
© 2011 Electric Paper GmbH
Configuration Settings
LDAP Registration also for the Administrator
Deactivated/activated. If activated, a login for the administrator is also conducted on
the LDAP system. Please make sure that the login name of the Administrator is a valid
LDAP login, otherwise a lock out from the System can occur. This setting does not
apply to secondary administrators.
LDAP host
Address of the LDAP server.
LDAP secure connection
Deactivated/activated. When activated, the LDAP connections are encrypted. The
LDAP server must support encryption.
LDAP BASE DN
Defines the base DN for LDAP or Active Directory.
LDAP search filter
Search filter for searching for users. The standard value for the filter is
“(|(uid=[USER])(sAMAccountName=[USER]))”. The placeholder [USER] is replaced
with the username entered.
LDAP login
If it's not allowed to search anonymous in the LDAP or Active Directory server you
have to enter the login of the search account here.
LDAP password
If it's not allowed to search anonymously in the LDAP or Active Directory server you
have to enter the password of the search account here.
Maximum document size
Maximum size (in bytes) of an attachment or PDF template document. Please note
that changing this value requires resetting the database configuration
max_allowed_packet.
Storing the IP address in the session
If enabled, the IP address of an EvaSys user is saved in the session at each login.
With each subsequent action initiated by the user in EvaSys, the stored IP address is
compared with the transmitted new one. If they do not match, the session is terminated and the login screen appears. The security check prevents a valid session ID
being guessed and hinders the associated access to EvaSys by third parties. However, guessing a valid and usable session ID, even with the function deactivated, is
quite unlikely.
© 2011 Electric Paper GmbH
495
System Settings and Management
If users with the same IP address are accessing EvaSys (network-related), and the
storage of the IP address is activated, only a limited check can be undertaken.
If EvaSys is accessed from a network communicating with changing IP addresses, the
storing of the IP address must be switched off. Otherwise, the login screen with the
error message will appear continuously whilst working with EvaSys, because EvaSys
cannot determine whether the session is still with the same user, but the IP address
has changed or an unauthorized user is attempting to continue working in the session.
2.5.13. Section “System Security”
Use CAPTCHAs
This function protects EvaSys against automated attacks. CAPTCHAs are pictures
where characters (numbers or letters) are displayed in a way only recognisable by
humans. They are used to distinguish betweeen humans and machines. If CAPTCHAs are activated the user will be prompted to type in a CAPTCHA after several
failed logins.
Number of failed logins before a CAPTCHA will be shown
Number of failed logins a user can have befora a CAPTCHA will be shown to be typed
in.
Observed period of time and blocking time
If a user has several failed logins during the period of time defined here he/she will be
prompted to type in a CAPTCHA. At the same time the login screen will be blocked for
the network address of the potential attacker for the period (in minutes) defined here.
The blocking can be unlocked ahead of time by typing in the CAPTCHA correctly.
Restricted access
Activates/deactivates the restriction of access. When activated the EvaSys server
checks the IP address of each inquiring computer for the following IP address
domains.
Begin IP address domain participant online survey
First permitted IP address for participants in an online survey.
End IP address domain participant online survey
Last permitted IP address for participants in an online survey.
Begin IP address domain user
First permitted IP address for users.
End IP address domain user
Last permitted IP address for users.
496
© 2011 Electric Paper GmbH
Configuration Settings
Begin IP address domain for administrator
First permitted IP address for the administrator.
End IP address domain for administrator
Last permitted IP address for the administrator.
2.5.14. Section “Maintenance”
Debug mode
Activate/deactivate debug. This setting allows you to find defective data and other
problems. If necessary you will be asked by support to activate this.
Because an activated debug mode can slow your system down, the administrator,
after login, is informed of all possible scenario regarding this.
Figure 631: Warning Message Debug Mode
If you click on lease click here to deactivate the debug mode], the debug mode in the
configuration is automatically deactivated. EvaSys informs you of the deactivation of
the debug mode
Figure 632: Debug mode Deactivated Successfully
Changing the survey ID
If activated this option allows changing the survey ID. You can then change the survey
ID in the details of a survey as long as the survey does not have any results (questionnaire returns). This option is available only for the hard copy procedure, for coversheet and hybrid surveys.
Logging of system sessions
The logging of system sessions provides an overview of the users and participants of
online surveys currently logged into the system. This function gives an insight into the
current level of utilization of the system.
© 2011 Electric Paper GmbH
497
System Settings and Management
Display information of system sessions in the menu
Display of the information concerning active system sessions in the menu of the (Subunit) Administrator. This setting is only relevant when logging of system sessions is
activated.
Measuring of performance values
As a means of measuring performance values a graphic illustration of the system
workload of the EvaSys server can be displayed at different times. The diagram can
also be adjusted for different periods.
Yellow limiting value for performance diagram
Defines the lower limiting value in seconds for the yellow zone of the performance diagram. The area beneath is displayed in green.
Red limiting value for performance diagram
Defines the lower limiting value in seconds for the red zone of the performance diagram. The area beneath is displayed in yellow.
Maintenance mode
The maintenance mode allows technical operations (such as updates) to be carried
out by the administrator without hindering any current operations. When activated, no
further users can log into the system. Participation in online surveys is also suspended.
Once activated, a warning message informs the administrator that the maintenance
mode is activated and that users already logged into the system can continue operating.
Figure 633: Maintenance Mode – Activated Warning Message for the Administrator
Users who are already logged into the system receive a warning message too, and
are requested to finish their work and log off the system as soon as possible so that
maintenance operations may be carried out.
498
© 2011 Electric Paper GmbH
Configuration Settings
Figure 634: Maintenance Mode – Activated Warning Message for Active Users
Participants of online surveys who are already logged in may finish their questionnaire. New participants cannot log in. They also receive a warning message.
Figure 635: Maintenance Mode – Activated Warning Message for Online Survey Participants
With the aid of the user statistics (“Users logged in/Online surveys”) the administrator
can oversee which and how many users are still logged into the system. As soon as
the last user has logged off, maintenance operations can be started. On completion,
the maintenance mode may be deactivated.
Note:
By activating the maintenance mode, the VividForms Reader is not automatically
stopped. Before installing an update, please ensure that no forms are being processed, and, if necessary, terminate the VividForms Reader.
Automatic update check
This option determines the interval at which the system searches for automatic
updates after the administrator has logged in.
When checking for updates, data is transferred from the EvaSys system to the update
server. The following information is included: the customer name, the license key, the
current EvaSys version, the default system language, the current configured language, the product derivative, the content of the configuration setting “server root
path”, the ID of the supplier as well as a unique ID for the update check process itself,
which is added for reasons of security. All this information is SSL encrypted and used
solely for technical purposes. No personal data or captured data from your system is
transmitted. If you do not agree to the transfer of the above mentioned information,
simply deactivate this function. Independent of this function, you will be informed of
available updates through other channels.
0 = deactivated
1 = every 30 days
© 2011 Electric Paper GmbH
499
System Settings and Management
2 = every 7 days
3 = after each login
CSV export for blackening degrees in the verifier
If this function is activated, the verifier can export the blackening degrees of all recognized fields within a batch as a CSV file in the batch view.
2.6.
Client Operations
An EvaSys system is made up of VividForms, the web server and a database server.
Together the EvaSys database and the server software make up a single system.
This single system can be configured and divided up into separate areas. There are
certain situations in which it makes sense to completely separate single systems, e.g.:
•
The departments of a university/company would like to use their own subsystems
with their own settings and user space and prevent other departments from
accessing their data.
•
A small college or university is considering sharing an existing EvaSys installation
at a large neighboring university.
Both situations can be solved by using client operations. Clients are subsystems that
are completely separate from each other and yet use the same VividForms and computer environment. In principle this means a number of EvaSys installations in ONE
system.
Electric Paper offers as a service the setting up of clients. Since for each client it is
only necessary to have the necessary number of user licenses, especially small colleges and universities will find it affordable to participate in teaching evaluations.
500
© 2011 Electric Paper GmbH
Index:
A
Access right
Authorizing access rights to QM views . . . . . . . 336
Access rights . . . . . . . . . . . . . . . . . . . . . . . . . . . 32
Accessibility . . . . . . . . . . . . . . . . . . . . . . . . . . . 20
Account
Active instructor account . . . . . . . . . . . 22, 23, 178
Use of templates in instructor accounts . . . . . . . 421
User account . . . . . . . . . . . . . . . . . . . . . . . . . . 49
Activating indicators
Activating the indicators in the configuration . . . 239
Active instructor . . . . . . . . . . . . . . . . . . . . 178, 180
Working with the active instructor’s data . . . . . . 186
Active instructor account . . . . . . . . . . . . . . . . 22, 23
Ad hoc Desktop Sharing . . . . . . . . . . . . . . . . . . . 16
Adding
Adding a group to the library . . . . . . . . . . . . . . 415
Adding a question to the library . . . . . . . . . . . . 413
Adding a question
Adding a question from the library . . . . . . . . . . 409
Adding pictures to a questionnaire . . . . . . . . . . . 403
Administrator
Account . . . . . . . . . . . . . . . . . . . . . . . . . . . . . . 53
Defining a template by the administrator . . . . . . 420
My Profile . . . . . . . . . . . . . . . . . . . . . . . . . . . . 53
Secondary Administrator . . . . . . . . . . . . . . . . . . 54
Adress form . . . . . . . . . . . . . . . . . . . . . . . . . . . . 40
Advanced Reporting
Aggregated Reports . . . . . . . . . . . . . . . . . . . . 257
Advanced reporting . . . . . . . . . . . . . . . . . . . . . 236
Analysis of errors . . . . . . . . . . . . . . . . . . . . . . . 453
Any compilation (Tree structure) . . . . . . . . . . . . 270
Attachment
Email attachments . . . . . . . . . . . . . . . . . . . . . 471
Automatic recognition set management . . . . . . . 424
B
Backup . . . . . . . . . . . . . . . . . . . . . . . . . . . . . . . 34
Backing up the database . . . . . . . . . . . . . . . . . . 34
Backing up the original image files from scan station
35
Image files of open questions .
Barcode . . . . . . . . . . . . . . . . .
Basic terminology . . . . . . . . . .
Batch export . . . . . . . . . . . . . .
Batch view . . . . . . . . . . . . . . .
C
. . . . . . . . . . . . . 35
. . . . . . . . . . . . 191
. . . . . . . . . . . . . 24
. . . . . . . . . . . . 439
. . . . . . . . . . . . 193
Central evaluation . . . . . . . . . . . . . . . . . . . 22,
Checkboxes
Correction of checkboxes not clearly read . . . . .
Recognition of the checked boxes . . . . . . . . . .
Client operations . . . . . . . . . . . . . . . . . . . . . . .
Color scheme . . . . . . . . . . . . . . . . . . . . . . . . .
Combining multiple criteria . . . . . . . . . . . . . . . .
Comment
Handwritten comments . . . . . . . . . . . . . . . . . .
Comparative profile lines
Dispatch of comparative profile lines . . . . . . . . .
© 2011 Electric Paper GmbH
103
192
191
500
407
276
201
288
Comparison of profile lines . . . . . . . . . . . . . . . . 302
Compilation
Delete compilations . . . . . . . . . . . . . . . . . . . . 453
Components of the PDF report . . . . . . . . . . . . . 206
Configuration . . . . . . . . . . . . . . . . . . . . . . . . . . 475
Activating the indicators in the configuration . . . 239
Color . . . . . . . . . . . . . . . . . . . . . . . . . . . . . . . . 30
Cronbach’s Alpha . . . . . . . . . . . . . . . . . . . . . . 242
Definition of special search configurations . . . . . 339
Definition of special table configurations . . . . . . 339
Document . . . . . . . . . . . . . . . . . . . . . . . . . . . . 30
Text . . . . . . . . . . . . . . . . . . . . . . . . . . . . . . . . 30
Configuration settings . . . . . . . . . . . . . . . . . . . . 456
Connection
Connection between question and library . . . . . 412
Correction view . . . . . . . . . . . . . . . . . . . . . . . . 196
Course
Creating courses . . . . . . . . . . . . . . . . . . . . . . . 61
Editing courses . . . . . . . . . . . . . . . . . . . . . . . . 61
Search for courses . . . . . . . . . . . . . . . . . . . . . 435
Course types . . . . . . . . . . . . . . . . . . . . . . . . . . . 40
Cover sheet procedure . . . . . . . . . . . . . . . . . . . 100
Creating courses . . . . . . . . . . . . . . . . . . . . . . . . 61
Creating indicator
Creating the indicators for a questionnaire . . . . 241
Cronbachs Alpha . . . . . . . . . . . . . . . . . . . . . . . 242
CSV-Import
CSV-Import within subunits . . . . . . . . . . . . . . . . 72
D
Data
Working with the active instructor’s data . . . . . . 186
Data entry
Manual entry of handwritten comments . . . . . . . 201
Data export . . . . . . . . . . . . . . . . . . . . . . . . . . . 484
Data export to Excel . . . . . . . . . . . . . . . . . . . . 309
Data export to Sphinx . . . . . . . . . . . . . . . . . . . 309
Data export to SPSS . . . . . . . . . . . . . . . . . . . 309
Data import . . . . . . . . . . . . . . . . . . . . . . . . . . . 484
Database
Backing up the database . . . . . . . . . . . . . . . . . . 34
Dean
Report for the dean . . . . . . . . . . . . . . . . . . . . 299
Dean of studies
Report for the dean of studies . . . . . . . . . . . . . 299
Decentral evaluation
Instructor accounts . . . . . . . . . . . . . . . . . . . . . 492
Defining
Defining a template by the administrator . . . . . . 420
Defining general templates . . . . . . . . . . . . . . . 420
Delete
Delete compilations and subgroup reports . . . . 453
Delete survey . . . . . . . . . . . . . . . . . . . . . . . . . 119
Deleting
Deleting a group from the library . . . . . . . . . . . 415
Deleting a question from the library . . . . . . . . . 414
Deletion log . . . . . . . . . . . . . . . . . . . . . . . . . . . 451
Delivery . . . . . . . . . . . . . . . . . . . . . . . . . 438, 452
Search for deliveries . . . . . . . . . . . . . . . . . . . . 436
501
Design
Designing an individually configured letter for sending
reports . . . . . . . . . . . . . . . . . . . . . . . . . . . . . 232
Individually designed reports . . . . . . . . . . . . . . 230
Design requirement
Implementation of specific design requirements (VividForms Plus) . . . . . . . . . . . . . . . . . . . . . . . . . . 428
Desktop Sharing . . . . . . . . . . . . . . . . . . . . . . . . 16
Details of survey . . . . . . . . . . . . . . . . . . . . . . . 108
Dispatch of comparative profile lines . . . . . . . . . 288
Display survey . . . . . . . . . . . . . . . . . . . . . . . . . 104
Document . . . . . . . . . . . . . . . . . . . . . . . . . . . . . 32
Documentation . . . . . . . . . . . . . . . . . . . . . . . . . 12
Documents . . . . . . . . . . . . . . . . . . . . . . . . . . . 470
Download of reports . . . . . . . . . . . . . . . . . . . . . 233
Dual scale . . . . . . . . . . . . . . . . . . . . . . . . . . . . 380
E
Editing
Editing on questionnaires . . . . . . . . . . . . . . . . 423
Editing Participant Data . . . . . . . . . . . . . . . . . . . 66
Editing participant data . . . . . . . . . . . . . . . . . . . 170
Editor
Editor Control . . . . . . . . . . . . . . . . . . . . . . . . . 360
Editor Control . . . . . . . . . . . . . . . . . . . . . . . . . 360
Element
Adding graphical elements . . . . . . . . . . . . . . . 400
Email
HTML format . . . . . . . . . . . . . . . . . . . . . . . . . 467
Writing email . . . . . . . . . . . . . . . . . . . . . . . . . 437
email addresses
Import of course participants‘ email addresses . . 77
Email attachments . . . . . . . . . . . . . . . . . . . . . . 471
Email messages . . . . . . . . . . . . . . . . . . . . . . . 458
Email text . . . . . . . . . . . . . . . . . . . . . . . . . . . . 456
Entries in the log book . . . . . . . . . . . . . . . . . . . 452
Entry
Manual entry of handwritten comments . . . . . . . 201
Error
Analysis of errors . . . . . . . . . . . . . . . . . . . . . . 453
Evaluation
Central evaluation . . . . . . . . . . . . . . . . . . 22, 103
Evaluation control . . . . . . . . . . . . . . . . . . . . . . . 22
Evaluation of scanned questionnaires . . . . . . . . 191
Evaluation workflow . . . . . . . . . . . . . . . . . . . . . 37
Linking of questionnaires to course types . . . . . 343
Module evaluation . . . . . . . . . . . . . . . . . . . . . 342
Process of evaluation . . . . . . . . . . . . . . . . . . . . 37
The phase model . . . . . . . . . . . . . . . . . . . . . . . 37
Evaluation periods . . . . . . . . . . . . . . . . . . . . . . . 40
Evaluation process . . . . . . . . . . . . . . . . . . . . . . . 37
Evaluation statistics . . . . . . . . . . . . . . . . . . . . . 441
EvaSys
Administrator Manual . . . . . . . . . . . . . . . . . . . . 24
Basic terminology . . . . . . . . . . . . . . . . . . . . . . . 24
Configuration . . . . . . . . . . . . . . . . . . . . . . . . . . 30
EvaSys Website . . . . . . . . . . . . . . . . . . . . . . . . 14
Structure of the EvaSys system . . . . . . . . . . . . . 17
The EvaSys user types . . . . . . . . . . . . . . . . . . . 50
EvaSys settings
Configuration . . . . . . . . . . . . . . . . . . . . . . . . . 475
502
Export
Batch export . . . . . . . . . . . . . . . . . . . . . . . . .
Data export . . . . . . . . . . . . . . . . . . . . . . . . . .
Data Export to Excel . . . . . . . . . . . . . . . . . . . .
Export of VividForms questionnaires . . . . . . . .
439
484
309
425
F
Feedback
Capture feedback . . . . . . . . . . . . . . . . . . . . . . 188
Instant feedback . . . . . . . . . . . . . . . . . . . . . . . 188
The PDF report . . . . . . . . . . . . . . . . . . . . . . 205
Filling degrees
Check . . . . . . . . . . . . . . . . . . . . . . . . . . . . . . 198
Filter settings . . . . . . . . . . . . . . . . . . . . . . 415, 416
Folder
Generating a study folder . . . . . . . . . . . . . . . . 184
Form of Address . . . . . . . . . . . . . . . . . . . . . . . . 40
Form view . . . . . . . . . . . . . . . . . . . . . . . . . . . . 195
Free Indicator . . . . . . . . . . . . . . . . . . . . . . . . . . 87
Free indicator . . . . . . . . . . . . . . . . . . . . . . . . . 244
G
Generating surveys . . . . . . . . . . . . . . . . . . . . . 103
Graphical element
Adding graphical elements . . . . . . . . . . . . . . . 400
Group
Question group . . . . . . . . . . . . . . . . . . . . . . . 374
H
Handwritten comments . . . . . . . . . . . . . . . . . . .
Hard copy procedure . . . . . . . . . . . . . . . . . . . .
Header
PDF report header . . . . . . . . . . . . . . . . . 213,
Questionnaire header . . . . . . . . . . . . . . . . . . .
Horizontal matrix question . . . . . . . . . . . . 378,
HTML-Tags . . . . . . . . . . . . . . . . . . . . . . . . . . .
Filtering of HTML-Tags . . . . . . . . . . . . . . . . . .
201
100
468
370
391
402
402
I
ID einer Umfrage ändern . . . . . . . . . . . . . . . . . 118
Implementation of surveys . . . . . . . . . . . . . . . . . 99
Implementing backups . . . . . . . . . . . . . . . . . . . . 34
Import
Data import . . . . . . . . . . . . . . . . . . . . . . . . . . 484
Import of VividForms questionnaires . . . . . . . . . 425
XML-Import . . . . . . . . . . . . . . . . . . . . . . . . . . . 77
Import interface . . . . . . . . . . . . . . . . . . . . . . . . . 72
Import of course participants‘ email addresses . . . 77
Importing participant data . . . . . . . . . . . . . . . . . 167
Importing participants‘ data . . . . . . . . . . . . . . . . . 70
CSV-Import . . . . . . . . . . . . . . . . . . . . . . . . . . . 70
Importing questionnaire
Importing VividForms Plus questionnaires . . . . . 428
Inclined pole labels . . . . . . . . . . . . . . . . . . . . . 398
Indicator . . . . . . . . . . . . . . . . . . . . . . . . . . . . . 236
Activating the indicators in the configuration . . . 239
Creating the indicators for a questionnaire . . . . 241
Cronbachs Alpha . . . . . . . . . . . . . . . . . . . . . . 242
Free . . . . . . . . . . . . . . . . . . . . . . . . . . . . 87, 244
The principle of the indicator . . . . . . . . . . . . . . 236
Indicators . . . . . . . . . . . . . . . . . . . . . . . . . . . . 214
Individuality
Designing an individually configured letter for sending
© 2011 Electric Paper GmbH
reports . . . . . . . . . . . . . . . . . . . . . . . . . . . . . 232
Individually designed reports . . . . . . . . . . . . . . 230
Information on the questionnaire . . . . . . . . . . . . . 79
Instant feedback . . . . . . . . . . . . . . . . . . . . . . . 205
Instructor
Active instructor . . . . . . . . . . . . . . . . . . . . . . . 180
Active instructor account . . . . . . . . . . . . . . . . . 178
Creating active instructor . . . . . . . . . . . . . . . . . 178
Log-in as active instructor . . . . . . . . . . . . . . . . 180
Working with the active instructor’s data . . . . . . 186
Instructor account . . . . . . . . . . . . . . . . 22, 23, 492
Use of templates in instructor accounts . . . . . . . 421
Instructor?s optional question . . . . . . . . . . . . . . 155
K
Keyboard control . . . . . . . . . . . . . . . . . . . . . . . 201
L
Language
Multiple languages . . . . . . . . . . . . . . . . . . . . . . 92
Language picture . . . . . . . . . . . . . . . . . . . . . . . . 92
Layout settings . . . . . . . . . . . . . . . . . . . . . . . . 406
Legal references in non-anonymous surveys . . . 166
Letter
Designing an individually configured letter for sending
reports . . . . . . . . . . . . . . . . . . . . . . . . . . . . . 232
Template for letter in PDF reports . . . . . . . . . . 461
Library
Adding a group to the library . . . . . . . . . . . . . . 415
Adding a question from the library . . . . . . . . . . 409
Adding a question to the library . . . . . . . . . . . . 413
Deleting a group from the library . . . . . . . . . . . 415
Deleting a question from the library . . . . . . . . . 414
Question library . . . . . . . . . . . . . . . . . . . . . . . . 95
Undoing the connection between a question and the library . . . . . . . . . . . . . . . . . . . . . . . . . . . . . . . 412
License
User licenses . . . . . . . . . . . . . . . . . . . . . . . . . 445
License administration . . . . . . . . . . . . . . . . . . . 444
License management . . . . . . . . . . . . . . . . . . . . 444
Line
Dispatch of comparative profile lines . . . . . . . . . 288
Log book . . . . . . . . . . . . . . . . . . . . . . . . . . . . . 453
Entries in the log book . . . . . . . . . . . . . . . . . . 452
Log File . . . . . . . . . . . . . . . . . . . . . . . . . . . . . 456
Log on the system . . . . . . . . . . . . . . . . . . . . . . . 27
Log-in as active instructor . . . . . . . . . . . . . . . . . 180
Logo . . . . . . . . . . . . . . . . . . . . . . . . . . . . . . . . . 92
Logo file . . . . . . . . . . . . . . . . . . . . . . . . . . . . . . 47
Logs
Mailservice Log . . . . . . . . . . . . . . . . . . . . . . . 455
M
Mailservice Log . . . . . . . . . . . . . . . . .
Manual . . . . . . . . . . . . . . . . . . . . . . .
Manual entry of handwritten comments
Matrices . . . . . . . . . . . . . . . . . . . . . .
Matrix field . . . . . . . . . . . . . . . . . . . .
Message
Templates for email messages . . . . .
Mirrored scaled questions . . . . . . . . . .
© 2011 Electric Paper GmbH
. . . . . . . 455
. . . . . 12, 13
. . . . . . . 201
. . . 415, 419
. . . . . . . 378
. . . . . . . 458
. . . . . . . 380
Module
Creation of module courses . . . . . . . . . . . . . . .
Module evaluation . . . . . . . . . . . . . . . . . . . . . .
Assign module questionnaires . . . . . . . . . . . . .
Create courses . . . . . . . . . . . . . . . . . . . . . . .
Create module account . . . . . . . . . . . . . . . . . .
Create module questionnaires . . . . . . . . . . . . .
Further settings . . . . . . . . . . . . . . . . . . . . . . .
Generate module surveys . . . . . . . . . . . . . . . .
Instant feedback . . . . . . . . . . . . . . . . . . . . . . .
Setup . . . . . . . . . . . . . . . . . . . . . . . . . . . . . .
Module questionnaire
Characteristics . . . . . . . . . . . . . . . . . . . . . . . .
Multiple languages . . . . . . . . . . . . . . . . . . . . . .
N
Netviewer . . . . . . . . . . . . . . . . . . . . .
Non-anonymous surveys . . . . . . . . . .
Legal references . . . . . . . . . . . . . . .
Norm
Norm values for questionnaires . . . . .
Norm profile lines . . . . . . . . . . . . . . . .
Norming . . . . . . . . . . . . . . . . . . . . . .
Norms . . . . . . . . . . . . . . . . . . . . . . .
Calculation . . . . . . . . . . . . . . . . . . .
Notes of a survey . . . . . . . . . . . . . . . .
346
342
343
348
346
343
353
350
352
342
345
. 92
. . . . . . . . 16
. . . . 67, 166
. . . . . . . 166
. . . . . . . 316
. . . . . . . 214
. . . . . . . 314
. . . . . . . 314
. . . . . . . 315
. . . 206, 220
O
OMR . . . . . . . . . . . . . . . . . . . . . . . . . . . . . . . 191
Online survey
Accessibility . . . . . . . . . . . . . . . . . . . . . . . . . . . 20
Advanced Configuration . . . . . . . . . . . . . . . . . . 90
Certificate of Participation . . . . . . . . . . . . . . . . . 90
Conduction of online surveys . . . . . . . . . . . . . . 127
Design . . . . . . . . . . . . . . . . . . . . . . . . . . . . . . 89
Forwarding . . . . . . . . . . . . . . . . . . . . . . . . . . . 90
Management of online surveys . . . . . . . . . . . . 127
Mobile devices . . . . . . . . . . . . . . . . . . . . . . . . 140
Password based . . . . . . . . . . . . . . . . . . 102, 153
Preview . . . . . . . . . . . . . . . . . . . . . . . . . . . . . 127
PSWD procedure . . . . . . . . . . . . . . . . . . . . . . 101
Online survey template
Access rights . . . . . . . . . . . . . . . . . . . . . . . . . 149
Create . . . . . . . . . . . . . . . . . . . . . . . . . . . . . . 141
Online-Design . . . . . . . . . . . . . . . . . . . . . . . . . . 89
Open question
Backing up image files of open questions . . . . . . 35
Handwrting recognition . . . . . . . . . . . . . . . . . . 384
Responses to open questions . . . . . . . . . . . . . 201
Segmentation . . . . . . . . . . . . . . . . . . . . . . . . 386
Optional question . . . . . . . . . . . . . . . . . . . . . . . 155
Organization structure
Tree . . . . . . . . . . . . . . . . . . . . . . . . . . . . . . . 120
P
Paper survey . . . . . . . . . . . . . . . . . . . . . . . . . .
Participant data
Edit . . . . . . . . . . . . . . . . . . . . . . . . . . . . . . . .
Editing participant data . . . . . . . . . . . . . . . . . .
Participant Number
Response Rate . . . . . . . . . . . . . . . . . . . . . . .
126
. 66
170
113
503
Participants‘ email addresses
Import of course participants‘ email addresses . . 77
Passing
Editing on questionnaires . . . . . . . . . . . . . . . . 423
Password based online survey . . . . . . . . . 102, 153
PDF
PDF report header . . . . . . . . . . . . . . . . . . . . . 468
Template for letter in PDF reports . . . . . . . . . . 461
PDF report . . . . . . . . . . . . . . . . . . . . . . . . . . . 205
Components of the PDF report . . . . . . . . . . . . 206
Cronbach’s Alpha . . . . . . . . . . . . . . . . . . . . . . 242
Designing an individually configured letter for sending
reports . . . . . . . . . . . . . . . . . . . . . . . . . . . . . 232
Individually designed reports . . . . . . . . . . . . . . 230
PDF report definitions . . . . . . . . . . . . . . . . . . . 226
PDF report header . . . . . . . . . . . . . . . . . . . . . 213
Sending of reports . . . . . . . . . . . . . . . . . . . . . 233
PDF templates . . . . . . . . . . . . . . . . . . . . . . . . . 471
PDF/A-1b . . . . . . . . . . . . . . . . . . . . . . . . . . . . 205
Performance considerations . . . . . . . . . . . . . . . 449
Performance statistic . . . . . . . . . . . . . . . . . . . . 449
Period of evaluation . . . . . . . . . . . . . . . . . . . . . . 40
Phase 3
Capture and instant feedback . . . . . . . . . . . . . 188
Phase Model
Phase 1-Preparation of a survey period . . . . . . . 39
Phase 2
Implementation of surveys . . . . . . . . . . . . . . . . 99
Phase model . . . . . . . . . . . . . . . . . . . . . . . . . . . 37
Phase 3
Capture and instant feedback . . . . . . . . . . . . . 188
Phase 4
Advanced reporting . . . . . . . . . . . . . . . . . . . . 236
Phase 5
Quality Management . . . . . . . . . . . . . . . . . . . 314
Picture
Adding pictures to a questionnaire . . . . . . . . . . 403
Place holder
Editing the place holders on the questionnaire header
370
Pole labels
inclined . . . . . . . . . . . . . . . . . . . . . . . . . . . . .
Preparation of a survey period . . . . . . . . . . . . . .
President
Report for the president . . . . . . . . . . . . . . . . .
Preview of online surveys . . . . . . . . . . . . . . . . .
Process Defaults . . . . . . . . . . . . . . . . . . . . . . .
Profile comparison . . . . . . . . . . . . . . . . . . . . . .
Profile line
Creating comparative profile lines . . . . . . . . . .
Dispatch of comparative profile lines . . . . . . . . .
Protect mode . . . . . . . . . . . . . . . . . . . . . . . . . .
PSWD . . . . . . . . . . . . . . . . . . . . . . . . . . . . . .
PSWD procedure . . . . . . . . . . . . . . . . . . . . . . .
Q
398
. 39
299
127
474
302
247
288
423
452
101
QM view . . . . . . . . . . . . . . . . . . . . . . . . . . . . . 337
Authorizing access rights to QM views . . . . . . . 336
Use of QM views . . . . . . . . . . . . . . . . . . . . . . 337
504
Quality guideline . . . . . . . . . . . . . . . . . . . . . . . 320
Average-based . . . . . . . . . . . . . . . . . . . . . . . 322
Convert from indicators . . . . . . . . . . . . . . . . . . 328
Convert from norms . . . . . . . . . . . . . . . . . . . . 332
Define . . . . . . . . . . . . . . . . . . . . . . . . . . . . . . 320
Frequency-based . . . . . . . . . . . . . . . . . . . . . . 327
Setting quality guidelines . . . . . . . . . . . . . . . . . 320
Quality Management . . . . . . . . . . . . . . . . . . . . 314
Question
Adding a question from the library . . . . . . . . . . 409
Adding a question to the library . . . . . . . . . . . . 413
Adding Question . . . . . . . . . . . . . . . . . . . . . . 155
Adding questions . . . . . . . . . . . . . . . . . . . . . . 376
Deleting a question from the library . . . . . . . . . 414
Editing questions . . . . . . . . . . . . . . . . . . . . . . 376
Instructor?s optional question . . . . . . . . . . . . . 155
Optional question . . . . . . . . . . . . . . . . . . . . . . 155
Responses to open questions . . . . . . . . . . . . . 201
Undoing the connection between a question and the library . . . . . . . . . . . . . . . . . . . . . . . . . . . . . . . 412
Question group . . . . . . . . . . . . . . . . . . . . . . . . 374
Adding a group to the library . . . . . . . . . . . . . . 415
Adding question groups . . . . . . . . . . . . . . . . . 374
Deleting a group from the library . . . . . . . . . . . 415
Editing question groups . . . . . . . . . . . . . . . . . 374
Question library . . . . . . . . . . . . . . . . . . . . . 95, 409
Edit . . . . . . . . . . . . . . . . . . . . . . . . . . . . . . . . . 95
Export . . . . . . . . . . . . . . . . . . . . . . . . . . . . . . . 98
Import . . . . . . . . . . . . . . . . . . . . . . . . . . . . . . . 98
Rights . . . . . . . . . . . . . . . . . . . . . . . . . . . . . . . 97
Use of the question library with VividForms . . . . 409
Questionnaire . . . . . . . . . . . . . . . . . . . . . . . 25, 79
Adding pictures to a questionnaire . . . . . . . . . . 403
Administration of questionnaires . . . . . . . . . . . . 79
Color Scheme . . . . . . . . . . . . . . . . . . . . . . . . 407
Copy . . . . . . . . . . . . . . . . . . . . . . . . . . . . . . . . 81
Creating questionnaires for module evaluation . 343
Creating the indicators for a questionnaire . . . . 241
Creation of questionnaires . . . . . . . . . . . . . . . . . 79
Delete . . . . . . . . . . . . . . . . . . . . . . . . . . . . . . . 82
Detailed view . . . . . . . . . . . . . . . . . . . . . . 80, 102
Edit header . . . . . . . . . . . . . . . . . . . . . . . . . . 370
Editing on questionnaires . . . . . . . . . . . . . . . . 423
Editing questionnaires . . . . . . . . . . . . . . . . . . 181
Editor control . . . . . . . . . . . . . . . . . . . . . . . . . 360
Essential information on the questionnaire . . . . . 79
Evaluation of scanned questionnaiure . . . . . . . 191
Form information . . . . . . . . . . . . . . . . . . . . . . 358
Generating questionnaires . . . . . . . . . . . . . . . 181
Import/Export of VividForms questionnaires . . . 425
Importing VividForms Plus questionnaires . . . . . 428
Languages . . . . . . . . . . . . . . . . . . . . . . . . . . . 87
Layout settings . . . . . . . . . . . . . . . . . . . . . . . . 406
Linking of questionnaires to course types . . . . . 343
Logo . . . . . . . . . . . . . . . . . . . . . . . . . . . . . . . 370
Management of questionnaires . . . . . . . . . 80, 102
Norm values for questionnaires . . . . . . . . . . . . 316
Placeholders . . . . . . . . . . . . . . . . . . . . . . . . . 370
© 2011 Electric Paper GmbH
Preview functions . . . . . . . . . . . . . . . . .
Questionnaire header . . . . . . . . . . . . . .
Viewing options
Online view . . . . . . . . . . . . . . . . . . . .
Papier view . . . . . . . . . . . . . . . . . . . .
VividForms Plus . . . . . . . . . . . . . . . . . .
VividForms Plus questionnaire . . . . . . . .
. . . . . 367
. . . . . 370
.....
.....
.....
.....
365
363
428
430
R
Recognition
Automatic recognition set management . . . . . . 424
Barcode . . . . . . . . . . . . . . . . . . . . . . . . . . . . 191
OMR . . . . . . . . . . . . . . . . . . . . . . . . . . . . . . . 191
Recognition of the checked boxes . . . . . . . . . . 191
Recognition Set of the VividForms Reader . . . . . . 82
Remote
Remote maintenance . . . . . . . . . . . . . . . . . 14, 16
Repair form . . . . . . . . . . . . . . . . . . . . . . . . . . . 409
Report
Advanced reporting . . . . . . . . . . . . . . . . . . . . 236
Components of the PDF report . . . . . . . . . . . . 206
Creating comparative profile lines . . . . . . . . . . 247
Creating reports . . . . . . . . . . . . . . . . . . . . . . . 247
Cronbach’s Alpha . . . . . . . . . . . . . . . . . . . . . . 242
Designing an individually configured letter for sending
reports . . . . . . . . . . . . . . . . . . . . . . . . . . . . . 232
Download of reports . . . . . . . . . . . . . . . . . . . . 233
Generating aggregated Reports . . . . . . . . . . . . 257
Individually designed reports . . . . . . . . . . . . . . 230
PDF report . . . . . . . . . . . . . . . . . . . . . . . . . . . 205
PDF report definitions . . . . . . . . . . . . . . . . . . . 226
PDF report header . . . . . . . . . . . . . . . . . 213, 468
Report Creator . . . . . . . . . . . . . . . . . . . . . . . . 247
Report for the dean . . . . . . . . . . . . . . . . . . . . . 299
Report for the dean of studies . . . . . . . . . . . . . 299
Report for the president . . . . . . . . . . . . . . . . . 299
Sending of reports . . . . . . . . . . . . . . . . . . . . . 233
Summary reports . . . . . . . . . . . . . . . . . . . . . . 257
Template for letter in PDF reports . . . . . . . . . . 461
The EvaSys report module Sphinx Plus² . . . . . . 312
The user role of the report creator . . . . . . . . . . 247
Report creator . . . . . . . . . . . . . . . . . . . . . . . . . 247
Any compilation (Tree structure) . . . . . . . . . . . 270
Creating a report creator . . . . . . . . . . . . . . . . . 248
Required questions . . . . . . . . . . . . . . . . . 415, 418
Requirement
Implementation of specific design requirements (VividForms Plus) . . . . . . . . . . . . . . . . . . . . . . . . . . 428
Response Rate . . . . . . . . . . . . . . . . . . . . . . . . 113
Rules for scanning . . . . . . . . . . . . . . . . . . . . . . 189
S
Sample Files . . . . . . . . . . . . . . . . . . . . . . . . . . . 13
Scaled question
Apply to all . . . . . . . . . . . . . . . . . . . . . . . . . . . 382
Dual scale . . . . . . . . . . . . . . . . . . . . . . . . . . . 380
Mirroring . . . . . . . . . . . . . . . . . . . . . . . . . . . . 380
Scan station . . . . . . . . . . . . . . . . . . . . . . . . . . 188
Backing up the original image files from scan station
Scanning
Important rules for scanning . . . . . . . . . . . . . . 189
Scanning the forms . . . . . . . . . . . . . . . . . . . . . 188
Search . . . . . . . . . . . . . . . . . . . . . . . . . . . . . . 433
Search for courses . . . . . . . . . . . . . . . . . . . . . 435
Search for deliveries . . . . . . . . . . . . . . . . . . . . 436
Search for surveys . . . . . . . . . . . . . . . . . . . . . 436
Search function . . . . . . . . . . . . . . . . . . . . . . . 433
Searching for users . . . . . . . . . . . . . . . . . . . . 434
Searchmask . . . . . . . . . . . . . . . . . . . . . . . . . 433
Search configuration . . . . . . . . . . . . . . . . . . . . 339
Secondary Administrator . . . . . . . . . . . . . . . . . . 54
Section "Central Evaluation" . . . . . . . . . . . . . . . 489
Section "Color Settings" . . . . . . . . . . . . . . . . . . 491
Section "Course User Data Fields" . . . . . . . . . . 485
Section "Email Functions & Accounts" . . . . . . . . 490
Section "Functions" . . . . . . . . . . . . . . . . . . . . . 486
Section "General" . . . . . . . . . . . . . . . . . . . . . . 477
Section "Instructor Accounts (Decentral Eval.)" . . 492
Section "Maintenance" . . . . . . . . . . . . . . . . . . . 497
Section "Network Settings" . . . . . . . . . . . . . . . . 493
Section "Survey Online" . . . . . . . . . . . . . . 481, 484
Section "Survey" . . . . . . . . . . . . . . . . . . . . . . . 479
Section "VividForms" . . . . . . . . . . . . . . . . . . . . 493
Security . . . . . . . . . . . . . . . . . . . . . . . . . . . . . . 26
Selection of several criteria . . . . . . . . . . . . . . . . 276
Sending of reports . . . . . . . . . . . . . . . . . . . . . . 233
Setting
Configuration settings . . . . . . . . . . . . . . . . . . . 456
Setting up the Subunit . . . . . . . . . . . . . . . . . . . . 45
Settings
Configuration . . . . . . . . . . . . . . . . . . . . . . . . . 475
Several criteria . . . . . . . . . . . . . . . . . . . . . . . . 276
Sphinx
The EvaSys report module Sphinx Plus² . . . . . . 312
Start-up . . . . . . . . . . . . . . . . . . . . . . . . . . . . . . 26
Statistic
Evaluation statistics . . . . . . . . . . . . . . . . . . . . 441
Utilization statistics . . . . . . . . . . . . . . . . . . . . . 441
Structure of the EvaSys system . . . . . . . . . . . . . . 17
Study folder
Generating a study folder . . . . . . . . . . . . . . . . 184
Subgroup
Delete subgroup reports . . . . . . . . . . . . . . . . . 453
Subgroups
Combining multiple criteria . . . . . . . . . . . . . . . 276
Subunit . . . . . . . . . . . . . . . . . . . . . . . . . . . . 43, 45
Create new subunit . . . . . . . . . . . . . . . . . . . . . 45
Visibility . . . . . . . . . . . . . . . . . . . . . . . . . . . . . . 46
Summary report . . . . . . . . . . . . . . . . . . . . . . . . 257
Support
E-mail to the support department . . . . . . . . . . . . 14
Support Area . . . . . . . . . . . . . . . . . . . . . . . . . . 14
Support department . . . . . . . . . . . . . . . . . . . . . 14
Support maintenance . . . . . . . . . . . . . . . . . . . . 13
35
Scan station software . . . . . . . . . . . . . . . . . . . 188
© 2011 Electric Paper GmbH
505
Survey
Conduction of online surveys . . . . . . . . . . . . . . 127
Delete (Tree) . . . . . . . . . . . . . . . . . . . . . . . . . 126
Delete survey . . . . . . . . . . . . . . . . . . . . . . . . . 119
Display (Tree) . . . . . . . . . . . . . . . . . . . . . . . . 123
Display survey . . . . . . . . . . . . . . . . . . . . . . . . 104
Generate (Tree) . . . . . . . . . . . . . . . . . . . . . . . 124
Generating surveys . . . . . . . . . . . . . . . . 103, 185
Generation of module surveys . . . . . . . . . . . . . 350
Implementation of surveys . . . . . . . . . . . . . . . . . 99
Management of online surveys . . . . . . . . . . . . 127
non-anonymous . . . . . . . . . . . . . . . . . . . . . . . 173
Non-anonymous survey . . . . . . . . . . . . . . . . . 166
Online survey . . . . . . . . . . . . . . . . . . . . . . . . . 127
Paper survey . . . . . . . . . . . . . . . . . . . . . . . . . 126
Search for surveys . . . . . . . . . . . . . . . . . . . . . 436
Survey details . . . . . . . . . . . . . . . . . . . . . . . . 108
Survey period . . . . . . . . . . . . . . . . . . . . . . . . . . 39
Survey procedures . . . . . . . . . . . . . . . . . . . . . . 99
Survey details . . . . . . . . . . . . . . . . . . . . . . . . . 108
Survey ID . . . . . . . . . . . . . . . . . . . . . . . . . . . . 118
Survey view . . . . . . . . . . . . . . . . . . . . . . . . . . . 194
Surveys
Non-anonymous surveys . . . . . . . . . . . . . . . . . . 67
System
Security . . . . . . . . . . . . . . . . . . . . . . . . . . . . . . 28
Password . . . . . . . . . . . . . . . . . . . . . . . . . . . . 29
System cleaning . . . . . . . . . . . . . . . . . . . . . . . 452
System cleaning . . . . . . . . . . . . . . . . . . . . . . . 452
System information . . . . . . . . . . . . . . . . . . . . . 443
System management . . . . . . . . . . . . . . . . . . . . 433
System Security
CAPTCHA . . . . . . . . . . . . . . . . . . . . . . . . . . . . 29
System security . . . . . . . . . . . . . . . . . . . . . . . . . 26
System settings . . . . . . . . . . . . . . . . . . . . . . . . 433
System start-up . . . . . . . . . . . . . . . . . . . . . . . . . 26
System summary . . . . . . . . . . . . . . . . . . . . . . . 433
T
Table configuration . . . . . . . . . . . . . . . . . . . . .
Template
Defining a template by the administrator . . . . . .
Defining general templates . . . . . . . . . . . . . . .
Document . . . . . . . . . . . . . . . . . . . . . . . . . . .
PDF templates . . . . . . . . . . . . . . . . . . . . . . . .
Template for letter in PDF reports . . . . . . . . . .
Templates for email messages . . . . . . . . . . . .
Text . . . . . . . . . . . . . . . . . . . . . . . . . . . . . . .
Text templates . . . . . . . . . . . . . . . . . . . . . . . .
Use of templates in instructor accounts . . . . . . .
Text template . . . . . . . . . . . . . . . . . . . . . . . . .
Text templates . . . . . . . . . . . . . . . . . . . . . . . . .
Tree structure . . . . . . . . . . . . . . . . . . . . . . . . .
Define . . . . . . . . . . . . . . . . . . . . . . . . . . . . . .
Delete surveys . . . . . . . . . . . . . . . . . . . . . . . .
Display surveys . . . . . . . . . . . . . . . . . . . . . . .
Generate surveys . . . . . . . . . . . . . . . . . . . . . .
Type of course . . . . . . . . . . . . . . . . . . . . . . . . .
339
420
420
. 32
471
461
458
. 32
456
421
456
. 32
120
120
126
123
124
. 40
User
Searching for users . . . . . . . . . . . . . . . . . . . . 434
User account . . . . . . . . . . . . . . . . . . . . . . . . . . . 49
Generating user accounts . . . . . . . . . . . . . . . . . 49
Managing user accounts . . . . . . . . . . . . . . . . . . 49
User Guide . . . . . . . . . . . . . . . . . . . . . . . . . 12, 24
Basic teminology . . . . . . . . . . . . . . . . . . . . . . . 24
User role
The user role of the report creator . . . . . . . . . . 247
User Type
Verifier . . . . . . . . . . . . . . . . . . . . . . . . . . . . . . 52
Utilization statistics . . . . . . . . . . . . . . . . . . . . . . 441
V
Validation . . . . . . . . . . . . . . . . . . . . . . . . 415, 417
Value
Norm values for questionnaires . . . . . . . . . . . . 316
Verification . . . . . . . . . . . . . . . . . . . . . . . . . . . 192
Batch View . . . . . . . . . . . . . . . . . . . . . . . . . . 193
Check Filling Degrees . . . . . . . . . . . . . . . . . . . 198
Correction view . . . . . . . . . . . . . . . . . . . . . . . 196
Form view . . . . . . . . . . . . . . . . . . . . . . . . . . . 195
Survey view . . . . . . . . . . . . . . . . . . . . . . . . . . 194
Verifier . . . . . . . . . . . . . . . . . . . . . . . . . . . 52, 192
Vertical matrix question . . . . . . . . . . . . . . 378, 392
VividForms
Import/Export of VividForms questionnaires . . . 425
Overview on the three VividForms-Components 357
Use of the question library with VividForms . . . . 409
VividForms Reader . . . . . . . . . . . . . . . . . . . . . 192
VividForms WebVerifier . . . . . . . . . . . . . . . . . 192
VividForms Editor
Adding Pictures . . . . . . . . . . . . . . . . . . . . . . . 403
Integrating pictures in a questionnaire . . . . . . . 405
VividForms Plus . . . . . . . . . . . . . . . . . . . . . . . 428
Implementation of questionnaires . . . . . . . . . . . 428
Importing questionnaire . . . . . . . . . . . . . . . . . 428
Information about a questionnaire . . . . . . . . . . 430
Usage of VividForms Plus forms . . . . . . . . . . . 432
VividForms Reader
Recognition Set . . . . . . . . . . . . . . . . . . . . . . . . 82
Volume License
General information . . . . . . . . . . . . . . . . . . . . 447
W
Webservice . . . . . . . . . . . . . . . . . . . . . . . . . . .
WebVerifier . . . . . . . . . . . . . . . . . . . . . . . 192,
Keyboard control in WebVerifier . . . . . . . . . . . .
Write-protect mode . . . . . . . . . . . . . . . . . . . . .
475
201
201
423
X
XML import . . . . . . . . . . . . . . . . . . . . . . . . . . . . 77
Import of the whole organizational structure . . . . 77
U
Update Notification . . . . . . . . . . . . . . . . . . . . . . . 29
506
© 2011 Electric Paper GmbH
© 2011 Electric Paper GmbH
507
508
© 2011 Electric Paper GmbH