1
Vision 3
ePharmacy User Guide
(Scotland)
Copyright © INPS Ltd 2014
The Bread Factory, 1A Broughton Street, Battersea, London, SW8 3QJ
T: +44 (0) 207 501700 F:+44 (0) 207 5017100 W: www.inps.co.uk
Copyright Notice
© 2014 INPS
All Rights Reserved.
No part of this document may be photocopied, reproduced, stored in a retrieval system or
transmitted in any form or by any means, whether electronic, mechanical, or otherwise,
without the prior written permission of INPS.
No warranty of accuracy is given concerning the contents of the information contained in
this publication. To the extent permitted by law, no liability (including liability to any person
by reason of negligence) will be accepted by INPS, its subsidiaries or employees for any
direct or indirect loss or damage caused by omissions from or inaccuracies in this
document.
INPS reserves the right to change without notice the contents of this publication and the
software to which it relates.
Product and company names herein may be the trademarks of their respective owners.
INPS Ltd.
The Bread Factory
1a Broughton Street
London
SW8 3QJ
Website: www.inps.co.uk
Contents
EPHARMACY
5
Introduction to ePharmacy
5
GP Prescribers for ePharmacy
GP Locums and ePharmacy
Why can't our locum GP print prescriptions?
6
6
6
Advanced Printing for ePharmacy and Printer Profiles
Printer Profiles
6
7
ePharmacy Prescription Notes
8
eAMS
Activating eAMS
Patient Consent for eAMS
Adding an Acute eAMS Prescription
Prescription Notes - AMS
Instalment Dispensing
Qualifying Items for eAMS
Non-AMS Items
Changing between ePharmacy and Paper
Prescription Printing of eAMS Items
Reprinting Restrictions
Cancelling an eAMS Item
Editing AMS Items
eAMS messages in Mail Manager
9
9
9
11
12
12
14
14
15
16
17
19
20
21
eCMS
Workflow Overview
GP Perspective
Patient Perspective
Pharmacy Perspective
Activating eCMS
Adding Pharmacy Codes
Flagging Suitable eCMS Patients
Group Populating Patients Suitable for eCMS
Flagging Individual Patients as Suitable for eCMS
Changing Patient Suitability in Patient Details, Consultation Manager
Changing Patient Suitability from the Therapy tab, Consultation Manager
Changing Patient Suitability from Therapy - Add
eCMS Registration and Patient Status
Eligible/Not Eligible
Patient Suitability
CMS Registration Status
Viewing CMS Registration Status and Suitability
CMS Prescribing
22
22
22
23
24
24
25
26
26
29
31
32
32
33
34
34
34
35
36
iii
Therapy - CMS Filter
Dispensing Information in Consultation Manager
Adding a CMS Prescription
Duplicate CMS Items
Printing the CMS GP10
Printing Contraceptive Endorsements
Reprinting CMS GP10
Reprinting Restrictions
Reorder Forms
Printing Newly Added CMS Items At Another Time
Dispensing Events
Reauthorising CMS Items
Important Information about Deleting, Amending or Cancelling CMS Items
Editing CMS Items
Editing Unprinted CMS Items
Editing CMS Items that have been printed and sent
Cancelling CMS Items
Display Inactive/Cancelled CMS Items
Deleting CMS Items
Deleting Unprinted CMS items
Deleting Printed CMS items
Deleting CMS Dispensing Events
CMS Overdue Dispensing Alert
Adding an alert after the CMS item has been entered
Overdue Dispensing Alert - Alerts Pane
Overdue Dispensing Report
eCMS Exclusions
eCMS Therapy Options
CMS - Therapy Initial List
eCMS Message Management
eCMS Message Collector
Manual Collection
CMS Message Collector Audit
eCMS Regular Tasks
GPs
Admin staff
Mail Gateway
eCMS Reporting
INDEX
37
37
38
41
41
42
43
44
46
46
47
47
48
48
48
48
48
50
51
51
51
52
52
53
53
53
54
54
55
55
55
55
57
59
59
59
59
60
61
iv
ePharmacy
Introduction to ePharmacy
Scottish ePharmacy is intended to improve patient care and reduce GPs’ workload by
making better use of pharmacists’ skills and expertise, especially for patients
requiring long-term medication for chronic conditions.
eAMS and eCMS are names of the ePharmacy solutions supporting the electronic
Acute Medication Service and Chronic Medication Service. After pilots in Ayrshire &
Arran, it was decided to extend the community pharmacy services, now known as
ePharmacy.
Acute Medication Service (AMS) describes the pharmaceutical service provided by
community pharmacists and GPs to acute patients by adding electronic support and
automated payment for acute prescription items.
The patient attends for an appointment. During the consultation, a
decision is taken to create an acute prescription. The patient consent
is reviewed and the prescriptions are printed. Once authorised, the
prescriptions are given to the patient who has responsibility for taking
them to a community pharmacy.
Acutes and repeat issues are handled as AMS prescriptions. These are printed on a
GP10 prescription with a barcode. An XML message is transmitted (via AMS) through
the NHSnet to the ePharmacy store to await call down by the pharmacist when the
patient first presents at the pharmacy. The pharmacy will access the patient
registration details through the central patient registration system.
The pharmacist is then able to scan the bar code to retrieve the corresponding
message. If an item is deleted or edited after the initial message has been sent, then
further update or cancellation messages are sent.
Note - Neither nurses nor supplementary prescribers in Scotland are
authorised to print bar-coded AMS prescriptions.
The Electronic Chronic Medication Service(eCMS) is part of the wider Tranche 4
requirements for NHS Scotland. This scheme allows CMS items to be sent
electronically from Vision to the Community Pharmacy (CP), where all subsequent
dispensing events can be managed. eCMS is similar to eAMS (electronic Acute
Medication Service), but eCMS involves printing a single eCMS GP10 for multiple
dispensing events. See Activating eCMS (page 24)
5
GP Prescribers for ePharmacy
All GP prescribers should have a prescriber number and GMC code entered in the
Control Panel Staff file. If your practice is using eAMS, then in order to print
prescribed items, a GMC code is essential and without it, the prescription will be not
printed.
An exception is made for locums, registrars and GP retainers (see below).
GP Locums and ePharmacy
From DLM 280 onwards, a user, if a Locum or GP Registrar, will pick up the
Responsible Partner’s GMC code if their own is not recorded in Control Panel, in the
same way that they currently pick up the Responsible Partner’s prescriber number.
We recommend if GP locums are doing sessions at your practice that each and every
locum name is entered as a record under Staff (role = Salaried partner) * in Control
Panel - File Maintenance.
Check that the locum's GMC code is entered in Control Panel - File Maintenance Edit user [locum name] - Identifiers tab. All locums and GP Registrars share a
prescriber code* (GMP/PPA) with their responsible partner, but they should have their
own personal GMC code. If the GMC code is not entered for locums, registrars and
GP retainers, then Vision will pick up their Responsible Partner's GMC code.
You can inactivate or activate locum staff very quickly from the Control Panel - File
Maintenance - Staff record to control their display in staff lists.
What is not recommended is the practice of entering just one locum in the Staff file,
called, for example, Dr Locum, and not entering a GMC code on this record. No
prescriptions will be printed from a GP prescriber without a GMC code. From an audit
point of view, the correct name of the GP locum and the correct GMC code is important
against each issued prescription.
* Note - Currently choosing Locum as a role in Staff does not allow
entry of the doctor's own prescribing number and the system forces
you to use that of the Responsible partner. Choosing Salaried partner,
however, does allow a unique prescribing number.
Why can't our locum GP print prescriptions?
If a locum GP is having trouble printing prescriptions, there may be an error message
along the lines of "Transform failed: … @gmc_code….".
Check that the locum's GMC code is entered in Control Panel - File Maintenance Edit user [locum name] - Identifiers tab. All locums and GP Registrars share a
prescriber code (GMP/PPA) with their responsible partner, but they should have their
own personal GMC code.
Advanced Printing for ePharmacy and Printer
Profiles
Advanced Printing MUST be switched on for ePharmacy. Prescription can be printed
on the new stationery in Scotland GP10(SS)(4) or on the older version (3).
6
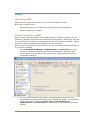
Printer Profiles
The Printer profiles screen can be reached from the following:
The Vision front menu - Options - Setup- Printers.
Printer Profile.
Then Add or Edit a
Consultation Manager - Therapy (Current or Scripts) Manager - Setup - Print Profile.
Consultation Manager - Consultation - Options - Prescription Setup - Print
Profile.
- Prescription
If you are using Printer Profiles for the first time
In Scotland in Printer Profiles, you need to set up both the GP prescription stationery
and the Nurse/SP prescriptions. Although it is optional, this does allow you to specify
the different "bins" on the printer from which the GP and nurse/SP prescriptions can
be loaded.
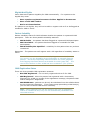
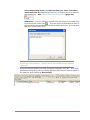
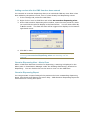
1. From the Vision front menu, go to Vision - Options - Setup, then on the
Printers tab.
2. Select Prescriptions and click on Add.
3. Select the Available Printer from which the GP prescription stationery will
load.
4. In Stationery, select (GP10(SS)(4)) if you are using version (4). If not select
version (3).
5. Print a Test Page and make any adjustments to the left and top margins by trial
and error.
6. Click on Advanced and select the Paper Source, if required, to specify the
bin/tray for loading.
7. Click on Save then Close
If you are already using Printer Profiles and want to change the prescription
stationery
Currently most Scottish GP prescribers are using version 3 of the prescription forms GP10(SS)(3). There is a new version of this prescription soon to be available in
Scotland called GP10(SS)(4).
The Stationery is a user setting, so all prescribers must update this
setting individually.
1. When a GP wants to change over to printing on the new prescriptions:
2. Go to Vision - Options - Setup, then on the Printers tab.
3. Make sure Prescriptions is selected, then click on Edit.
4. In Stationery, select (GP10(SS)(4)) .
5. Click on Save then Close to the front Printer Profiles screen.
Note - Each individual GP must make this stationery change.
7
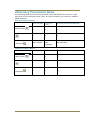
ePharmacy Prescription Notes
The following table shows which prescription notes are printed on the left or right
hand side of the prescription and if they are also included in the electronic eAMS or
eCMS message:
AMS Prescription Notes
Prints on RHS
Patient Note
Prints on
LHS
Included in Electronic Message
P
x
x
x
P
x
Not available
Not
available
Not available
Dispensing Note
CMS Note
CMS Prescription Notes
Prints on RHS
Patient Note
Prints on LHS
Included in Electronic Message
P
x
x
x
P
x
x
x
P
Dispensing Note
CMS Note
8
eAMS
Activating eAMS
AMS needs to be switched on and you will be advised how to do this.
Note that for AMS to work:
The patient must have a valid CHI number recorded in Registration;
Advanced printing is enabled.
Patient Consent for eAMS
Patient consent for participation in the AMS scheme is assumed, though it can be
withdrawn (patient consent for future CMS will not be assumed). GPs are not required
to record consent in Vision as all patients will be set to consenting by default. Only if
patient consent is withdrawn does this dissent need recording.
Once consent is withdrawn, the prescription will not print with a barcode and there is
no electronic message.
1. From Consultation Manager - Patient Details – Preferences, you can
record or change the patient's consent to the sending of electronic AMS
prescriptions. You can also access the patient's consent form from within
Prescription Manager.
2. You may optionally select the patient's preferred pharmacy where their
prescriptions are dispensed but this is not essential for eAMS. The pharmacy
name must first be added in Control Panel - File Maintenance Organisations under Pharmacy for it to appear in the Preferred Pharmacy
picklist.
9
3. When you go into Preferences, you should see the AMS consent listed under
Preferred Pharmacy, with the words Patient consents to - The sending of AMS
prescriptions electronically.
4. If instead you see the message "This patient is not eligible for this feature",
then it is most likely that that patient has no CHI number recorded in
Registration.
5. The consent form is also accessible from Registration which may be more
convenient for admin staff to record consent, rather than starting a
consultation in Consultation Manager. Note that you should not have the
same patient open in Consultation Manager and Registration at the same time
if you are recording consent.
6. The Consent dialog allows the recording of consent or dissent. Assent to
sending AMS prescriptions is assumed. If the patient withdraws consent, this
too needs to be recorded.
10
7. To change consent status, click on the Change button to display the
ePharmacy Consent form.
8. On the ePharmacy Consent screen, the box Send eAMS prescriptions is
ticked if the patient consents to electronic prescriptions. If the patient
withdraws consent or wants to opt out, remove the tick from Send eAMS
prescriptions and click on Save. If a patient opts out of AMS, then no
barcode is printed on the prescription form and no electronic message
transmitted to EPMS.
Adding an Acute eAMS Prescription
An eAMS item is created in the same way as for a normal acute with Therapy Add from
the Current tab.
1. Use Therapy Add from the Current tab in Consultation Manager in the
usual way to add the acute medication.
2. Double click in Drug Name to access the Drug Select screen. You can check
that the medication will be part of AMS by looking at the Product Information in
the bottom pane (use the down scroll arrow to reach this). If it has a DM+D
mapping, then it can be included in AMS, with certain exceptions - see
Qualifying items for eAMS (page 13).
3. Click OK to complete Therapy Add.
4. Press F9 or click on
.
5. On the Prescription Manager screen, any acute medications added today will be
selected by default.
6. Click on
or press F9.
7. The barcoded prescription (token) will be printed, and the AMS message sent
off, if the item is eligible for AMS.
11
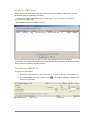
8. The XML message can be tracked through Mail Manager and you should visit
this regularly to check for rejected AMS messages.
Prescription Notes - AMS
The following table demonstrates which prescription notes are printed on the left, or
right hand side of the prescription for AMS prescriptions. None of the notes are sent in
the electronic message:
Patient Note
Prints on
RHS
Prints on LHS
Included in Electronic Message
P
x
x
x
P
x
Not
available
Not available
Not available
Dispensing Note
CMS Note
Instalment Dispensing
Note that there is a new icon on Therapy Add
. When clicked, a free text box is
displayed for you to add a note for the pharmacist if you intend for the item to be
12
dispensed in instalments, eg Dispense weekly.
Type in free text then click OK.
icon will now have a red tick to show a note has been added
The
.
The text of your message appears under Dosage for that item on a Therapy list.
It will also be printed on the prescription in the endorsement area with <I> to indicate
instalment dispensing.
13
Qualifying Items for eAMS
When an unprinted acute or repeat issue is viewed within Prescription Manager, it is
displayed as an AMS item provided that the following conditions are met:
AMS is enabled
The person to sign is a GP.
excluded from AMS.
The patient has not withdrawn consent to participate in the AMS program.
The drug is not a prescription which normally prints on the right-hand side
The item is not PA (personally/practice administered). Note that in Scotland,
PA items are not printed. if you tick the P/Admin box on Therapy Add because
the item is practice administered, the Print Script checkbox is automatically
unchecked. If you want the prescription to be printed, recheck the Print
Script box again.
The item is not Private (right-hand side)
The source of drug is "In Practice"
Nurses and Supplementary Prescribers are
Any item that falls within the scope of eAMS is printed with a barcode on the
prescription form, with up to 3 items per form.
Non-AMS Items
Any items selected from printing which fall outside eAMS scope are printed on
prescriptions without barcodes, with up to 3 items per form, and no electronic is
generated. For example, if 6 items are selected, 4 in eAMS scope and 2 outside,
there will be 2 eAMS bar-coded prescription with electronic messages, and 1
non-bar-coded prescription without an electronic message.
14
Changing between ePharmacy and Paper
On the Prescription Manager screen, the prescription type can be changed between
Paper/ePharmacy via the right click context menu. Paper prints the prescription and
no message is sent. ePharmacy prints the prescription and sends an electronic
message.
Note - in some cases or error, the system will not send an electronic
prescription and will need to swap to a paper prescription. For
example, this could happen if:
If a repeat master, added in the past, has a blank Preparation field (eg
glucagon) (probably first prescribed a year or so ago). eAMS demands an entry
in the Preparation field so a blank Preparation field will give an error message
and the prescription will be paper only.
it has not yet reached its maximum number of issues so is therefore still active
and you try to print an issue.
15
Prescription Printing of eAMS Items
Print eAMS items in the usual way (F9, F9). The first F9 or Print icon reaches the On
the Prescription Manager screen from where you can select which items to print.
When you finalise (ie click on the Print button
the following takes place:
) on Prescription Manager,
1. Translation of the message(s). This is to detect any translation problems early.
2. Printing of the script(s). This will provide definitive paging information and item
order.
3. Sending the message(s) using the paging and item order information obtained
during the printing stage.
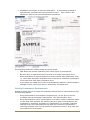
On the printed prescription, the following are printed:
the patient's CHI number
The DM+D code (18 digits)
Any endorsement. <S> sls, <C> contraceptive, <I> instalment dispensing
with text of message
Unused space on prescription is filled with asterisks
The bar code for eAMS items has a UPN (unique prescription number) which is
repeated and can be used to identify the prescription on the Mail Manager
message
The last 5 digits of the GP's PPA number
the GMC code (beneath the practice telephone number)
The following fields are in Courier 11 Black to make them scannable: CHI Number,
DM+D Code, Script Date, Endorsements, Prescriber Code. Other fields have varying
point sizes to fit them on the prescription.
16
Reprinting Restrictions
When reprinting an ePharmacy AMS or CMS prescription, you cannot reprint the
prescription if the selected prescriber in Prescription Manager differs from the original
signer of the prescription or is no longer valid in Vision. Where this happens, the
following is displayed:
"The selected signatory does not match that of the original prescription(s).
Please select the original signing clinician in the list of signatory and reprint the
prescription(s).
ePharmacy (AMS/CMS) prescription containing n item signed on nn/nn/nnnn
by "prescriber name""
AMS Reprinting where original prescriber is still valid
You should change the authoriser in Prescription Manager and continue to reprint.
Where the original prescriber is no longer available/valid, you are now asked to
manually cancel the prescription and re-prescribe:
"The selected signatory does not match that of the original prescription(s). The
original signing clinician is no longer a valid signatory. If you need to reprint the
prescription(s), you are advised to:
1. Cancel the original prescription(s) - AMS/CMS only.
2.Re-prescribe all necessary items.
3.Contact the patient and/or dispenser(s).
17
ePharmacy (AMS/CMS) prescription containing n item signed on nn/nn/nnnn
by "prescriber name""
AMS Reprinting where you want to change original prescriber
When reprinting a prescription, if the number of pages used differs from the original
prescription, the prescription will not be reprinted and the following message is
displayed:
"The selected prescription(s) cannot be reprinted because the associated items
do not fit on the same number of pages. If you need to reprint the
prescription(s), you are advised to:
1. Cancel the original prescription(s) - AMS/CMS only.
2.Re-prescribe all necessary items.
3.Contact the patient and/or dispenser(s).
18
ePharmacy (AMS/CMS) prescription containing n item signed on nn/nn/nnnn
by "prescriber name""
Note - When reprinting a prescription with cancelled items,the
current functionality remains the same i.e. Vision will not reprint the
prescription if the cancelled items are selected, the prescription will be
allowed to be reprinted if the cancelled items are deselected.
Cancelling an eAMS Item
1. From Vision – Consultation Manager – Therapy select the item requiring
cancellation.
2. Select Delete, Inactivate or Edit, you are prompted "The item has already
been sent electronically. A cancellation message will now be sent and you are
advised to update the script accordingly"
3. Click OK to proceed.
4. The Cancel Prescription Reason window is opened. Select a reason from the
list, the options are:
Prescribing error
Clinical contra-indication
Change to medication treatment regime
Clinical grounds
At the patient’s request
At the pharmacist’s request
19
Additional text can be added in the available free text box (max 350
char).
5. Click OK to save and close.
Editing AMS Items
When acute medication items have been sent via AMS, it is possible to amend some
of the medication fields. An amendment reason is recorded and a prescription
amendment message is sent. This process has been updated and a picklist is now
presented for selection.
1. From Vision – Consultation Manager, Therapy select the item to edit.The
following details can be edited:
Quantity
Prescriber Endorsements
Dosage (instructions for use)
Preparation (prescribed units)
2. Make the required changes, click OK to save and close.
3. The Prescription Amendment Reason window is displayed, select a reason
from the list:
Previous error correction
Prescriber change
Prescriber addition
Pharmacist request
Patient request
Other
Additional text can be added in the available free text box (max 350
char).
Note – Additional text is Mandatory if Other is selected.
4. Click OK to save and close.
20
eAMS messages in Mail Manager
Practices should be regularly checking for rejected AMS
messages in Mail Manager and reporting rejections to the INPS
helpline at a regular interval (say weekly or fortnightly
depending upon how many you are getting) so these can be
investigated for the root cause.
The AMS messages to the ePharmacy store pass through Mail Manager with a
message type of AMS Prescription.
Mail Manager has filters to hide successful AMS messages from view so that only
rejected messages are shown. In Mail Manager, go to Tools - Options - Message Show Sent Electronic Prescriptions. If you are AMS enabled, we recommend that
you leave this option unticked so that only unsuccessful/error messages are
displayed, as this will improve performance and declutter your screen. If this option
is ticked, all messages including sent and complete AMS messages are displayed.
There are three successful status of AMS Prescription messages in Mail Manager
Outgoing Mail :
1. Awaiting Transmission
2. Sent Awaiting Acknowledgement
3. Complete
In Incoming mail, you will see a Ready for Action message on a message type AMS
Acknowledgement. There is no action you need take - this message automatically
updates the outgoing one from Awaiting Acknowledgement to Complete.
eAMS messages contain full practice and patient details, including telephone numbers
21
eCMS
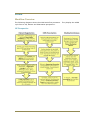
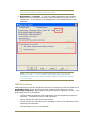
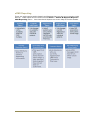
Workflow Overview
The following diagrams show the eCMS workflow processes.
cycle from a GP, Patient and Pharmacist perspective.
GP Perspective
22
They display the eCMS
Patient Perspective
23
Pharmacy Perspective
Activating eCMS
eCMS needs to be switched on and you will be advised how to do this. You must also
have advanced printing enabled. If you are using eAMS you should already have
advanced printing enabled. The following steps are required:
24
Before going live with eCMS prescribing, it is recommended that you generate
a test prescription message. See Mail Manager on screen help for further
details.
When a registration message is received, Vision checks to see if the pharmacy
code contained in the message matches an existing pharmacy code in Vision.
If a matching pharmacy is not found, or you have a pharmacy organisation
listed without the pharmacy code, Vision creates a new Pharmacy. This
means that you could have duplicate pharmacies created in Control Panel. It
is therefore advisable that you add pharmacy codes to all existing pharmacies
in Vision before CMS is enabled. See Adding Pharmacy Codes (page 24) for
further details.
Adding Pharmacy Codes
When a registration message is received, Vision checks to see if the pharmacy code
contained in the message matches an existing pharmacy code in Vision. If a
matching pharmacy is not found, or you have a pharmacy organisation listed
without the pharmacy code, Vision creates a new Pharmacy. This means that you
could have duplicate pharmacies created in Control Panel. It is therefore advisable
that you add pharmacy codes to all existing pharmacies in Vision before CMS is
enabled.
1. In Control Panel, go to File Maintenance.
2. Click on the Organisations tab.
3. In the Pharmacy folder, right click on an existing pharmacy and select Edit
Organisation.
4. In the Identifiers tab, click on Add.
5. From the Identifier Type drop down list, select CP Contractor Code.
6. In the Identifier Value field, enter the 4-digit pharmacy code.
7. Press OK and OK again to save.
Note - You cannot delete a pharmacy contractor code for a pharmacy
which has CMS registered patients.
25
Flagging Suitable eCMS Patients
As some of your clinical and administrative workload will be lightened if patients are
registered for the eCMS scheme, you might like to flag patients who are potentially
suitable for CMS (although this is not a mandatory process). This should act as a
prompt for you during the consultation to review the patient for eCMS participation.
There are two ways of flagging patients as potentially suitable for eCMS:
Using the Populate CMS Suitability tool.
Marking individual patients as suitable for CMS.
Other points to note:
Suitable patients can be flagged before eCMS is enabled on your system.
You must be part of the Clinical Managers security group to flag a patient as
suitable for CMS.
You can generate a report which lists all the patients suitable for CMS. See
Search and Reports on screen help for further details.
Group Populating Patients Suitable for eCMS
The Populate CMS Suitability function allows you to mark patients as suitable within a
specific patient group. You might like to review your chronic disease registers for
patients potentially suitable for CMS. You can use the QoF audit groups to identify
chronic disease patients and merge the groups together to create a definitive list of all
chronic patients. You might also like to add a reminder to the flagged patients. The
best way to do this would be to create the CMS Suitability report (see Search and
Reports on screen help) and save the results to a group so that you can bulk add
reminders from patient groups.
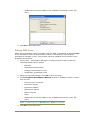
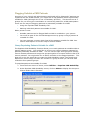
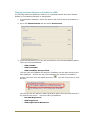
To populate patients as suitable for eCMS:
1. From the front screen of Vision, select Utilities – Populate CMS Suitability.
2. At the Populate CMS Suitability screen, click on Select to display the Groups or
Clinical Audit Search Browser.
26
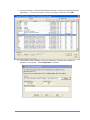
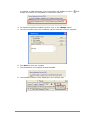
3. From the Groups or Clinical Audit Search Browser, select the required group for
population. You can also enter a free text reason if desired. Click OK.
4. The details of the selected group are displayed, including the number of
patients in the group. Press Populate to continue.
27
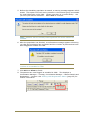
5. Before the Suitability population is started, a warning message appears which
states: "This option will mark active patients in the selected group as suitable
for serial dispensing under CMS. Please note there is no undo facility. Are
you sure you wish to continue?" Select Yes to continue.
Note - Patients who are already CMS registered will not be marked as
suitable.
6. After the population has finished, a confirmation message appears informing
you that the population has completed and the number of patients that have
been flagged as suitable for CMS.
Note - Patients must be Applied or Permanent and have a valid CHI
number to be suitable for CMS.
7. Click OK then Close to finish.
8. The patients are now flagged as suitable for CMS. This displays in
Consultation Manager – Therapy, Consultation Manager – Patient Details and
Registration – Consent. See Viewing CMS Registration Status (page 35) for
further information.
28
Flagging Individual Patients as Suitable for eCMS
You can flag patients suitable for eCMS on an individual patient basis from Patient
Details in Consultation Manager or Registration.
1. In Consultation Manager, select the patient and ensure that a consultation is
open.
2. Go to the Patient Details tab and select Preferences.
3. From the CMS section, you can see the patient’s current CMS suitability status.
There are three possibilities:
CMS Suitable
CMS Unsuitable
CMS Suitability Not Specified
The user who last updated the patient’s suitability and the date and time are
also displayed. If there are any notes detailing the reason for suitability
change, the notes icon will display as active
the text.
.
You can click on this to view
You can also see the patient’s CMS registration status from the CMS section in
the preferences screen. There are three possibilities:
Not CMS Registered
CMS Registered
CMS Registration Withdrawn
29
If a patient is CMS withdrawn, the notes button will display as active
contain the reason for withdrawal if it has been entered.
and
4. To change the patient suitability status, click on the change button
5. You can now select from the suitability options and add a note if required:
6. Click Save to save the changes
7. The CMS Status now displays as CMS Suitable:
8. The suitability status is also displayed in the Therapy tab:
30
Changing Patient Suitability in Patient Details, Consultation Manager
You can change the suitability status of individual patients at any time:
1. In Consultation Manager, select the patient and ensure that a consultation is
open.
2. Go to the Patient Details tab and select Preferences.
3. From the CMS section, you can see the patient’s current CMS Suitability status.
Click on Change.
4. Make your selection and optionally enter a free text Reason for Change.
5. Click Save and the new suitability status is displayed.
Note – You cannot change the suitability status for more than one
patient at a time.
31
Changing Patient Suitability from the Therapy tab, Consultation Manager
1. In Consultation Manager, select a patient and ensure that the consultation is
open.
2. Choose the Therapy tab.
3. To change the suitability, click on CMS Suitable. From here, there is a direct
link to the Patient Details, Preference tab.
4. From the CMS section, you can see the patient’s current CMS Suitability status.
Click on Change.
5. Make your selection and optionally enter a free text Reason for Change.
6. Click Save.
7. The new suitability displays on the Patient details screen and will show on the
Therapy tab.
8. To view the changes on Therapy, select the Therapy tab and move your mouse
over the CMS Suitable box. You can see when the change was made and by
whom.
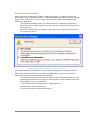
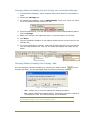
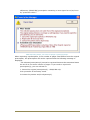
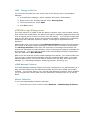
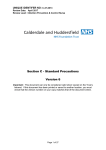
Changing Patient Suitability from Therapy - Add
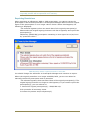
You can change a patients suitability by selecting the CMS Tick Box
on the
Therapy Add form. You are prompted with the following warning message:
Figure 1: CMS Warning Message
Yes - allows you to continue adding the eCMS prescription.
No - shows a warning message stating: This patient has been marked as
unsuitable for CMS. The CMS checkbox will be disabled.
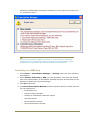
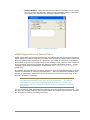
Note - Selecting Yes or No is saved for the remainder of the
consultation and you are not prompted again.
32
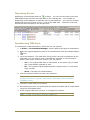
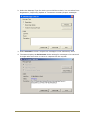
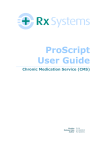
Review Status - opens the ePharmacy Patient Suitability screen, where
you can change the patient's status. If the suitability status is still CMS
Unsuitable, the CMS warning message appears again.
Figure 2: CMS Review Status
eCMS Registration and Patient Status
eCMS registration is an agreement between the patient and the Community Pharmacy
within which the patient is agreeing to share clinical data to support their healthcare.
Once the patient has registered at a pharmacy for eCMS, an electronic registration
notification is sent from the Pharmacy to the message store, which is then retrieved
by the practice and used to update the patient’s eCMS registration status . Vision
retrieves registration messages on a daily basis (see eCMS Message Management
(page 55)).
If a patient decides that they no longer wish to be part of the eCMS scheme, they are
entitled to withdraw by notifying the pharmacy. Once the pharmacy updates their
system, a withdrawal message is sent and retrieved in much the same way as the
original registration message.
Note Patients can register at another pharmacy as soon as they have
deregistered/withdrawn from their previous pharmacy. If a patient
withdraws and still has outstanding CMS prescriptions, neither the
previous nor the new community pharmacist is authorised to dispense
such items.
For you to issue a CMS prescription the patient must be eligible and registered. You
are also able to flag potential patients as suitable for CMS to help with your records,
but this has no bearing on CMS prescribing.
33
Eligible/Not Eligible
Vision determines patient eligibility for CMS automatically.
eligible they must:
For a patient to be
Have a patient registration status of either Applied or Permanent.
Have a valid CHI number.
Not be a Private Patient.
If a patient is not eligible, they will not be able to register with a CP or be flagged as
suitable for CMS in Vision.
Patient Suitability
Patient suitability status for CMS indicates whether the patient is a potential CMS
participant. There are three possible suitability statuses:
CMS Suitable – the patient has been flagged as a potential CMS participant.
CMS Unsuitable – the patient has been flagged as unsuitable for CMS
participation.
CMS Suitability Not Specified – suitability for this patient has not yet been
considered.
Remember - The patient can still register with a CP regardless of suitability status in
Vision.
Note – Patients will not be automatically flagged as suitable for CMS.
You need to run the Suitability Group Population or manually flag the
patient. See Group Populating Patients Suitable for eCMS (page 26)
and Flagging Individual Patients as Suitable for eCMS (page 28). This
can be done before or after eCMS has been enabled on your system.
CMS Registration Status
There are three possible CMS registration statuses:
Not CMS Registered – not currently registered with a CP for CMS.
CMS Registered - when the patient has registered with a Community
Pharmacy for eCMS, on receipt of the registration message, the patient CMS
status changes to "Registered".
CMS Withdrawn - patients can be only be withdrawn from the eCMS scheme
by the Community Pharmacy. If you want to stop prescribing a CMS item(s),
you are able to cancel CMS items if necessary.
Note – When patients have left the practice and have a registration
status of Transferred Out, they are not automatically withdrawn from
the eCMS scheme.
34
Viewing CMS Registration Status and Suitability
The eCMS patient registration status and suitability are displayed in the following
three places within Vision:
1. Consultation Manager - Therapy Tab Registration and suitability status
displays in the Therapy tab in Consultation Manager as follows:
2. Patient Details - Preferences You can also view eCMS registration and
suitability status from Patient Details – Preferences in Consultation Manager.
If the patient is eCMS Registered, the CMS Pharmacy is also displayed.
35
Note – You can click on CMS Registered on the Therapy tab to go
directly to the Patient Details, Preference tab.
3. Registration – Consent. To view the eCMS Registration and Suitability
Status from the Registration module, select the patient and click on the
Consent tab. If the patient is eCMS Registered, the CMS Pharmacy is also
displayed.
Note - You can also create a CMS Registration report and a CMS
Suitability report. To list suitability and registration statuses See
Registrations Report and CMS Suitability Report in search and reports
on screen help.
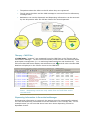
CMS Prescribing
CMS prescribing has all the attributes expected of a repeat item with the addition of a
medication term, which specifies the total duration of the CMS item, and a
Dispensing Frequency, which defines the period between dispensing events. The
prescribing process is as follows:
36
The GP creates a CMS item with medication term and dispensing frequency
specified. The patient must be CMS registered.
The GP selects the CMS items to be printed.
The GP prints the prescription and a message is sent to the ePharmacy store
detailing the CMS items.
The CMS GP10 is given to the patient.
The patient takes the GP10 to the CP where they are registered.
The CP scans the GP10 and the CMS message is retrieved from the ePharmacy
message store.
Medication can now be dispensed and Dispensing information can be retrieved
by the GP practice after the CP has claimed for items dispensed.
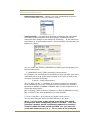
Therapy - CMS Filter
All CMS items ("masters") are managed from the CMS filter in the Therapy tab in
Consultation Manager. All the usual functionality exists as with conventional repeat
prescription management (i.e. re-authorise/inactivate/select and deselect All). You
will notice that CMS items display with a different icon
, and all other relevant CMS
details are displayed in the column views in the CMS filter.
Note - CMS items can be viewed from the Current, Scripts and CMS
filters. Dispensing events are only visible from the CMS filter within
the CMS item.
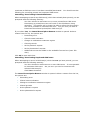
Dispensing Information in Consultation Manager
As dispensing information is retrieved, the patient record is automatically updated.
You can see dispensing information from the CMS filter in the Therapy tab. In the
example below you can see that there have been three dispensing events for
Diprobase Cream.
37
Adding a CMS Prescription
CMS items can be added from the CMS or Scripts Filter in Consultation Manager –
Therapy.
1. In Consultation Manager, select a patient and ensure that a Consultation is
open.
2. Click on the Therapy tab and select the CMS filter.
3. Select the Therapy – Add form in the usual way (i.e. press F4/F8, start to type
etc). You can also choose CMS – New or Ctrl + M.
4. Find the drug as usual.
5. You must tick the CMS box
on the Therapy – Add form. If you do not
tick this box, the Medication Term, Dispensing Frequency and Alert boxes will
not be visible.
Note – The CMS box is disabled if any of the CMS exclusions apply. See
eCMS Exclusions (page 53) for further information.
6. The CMS Item Add form has the following additional fields which you should
check/complete:
38
Date Prescribed – The date prescribed is always today’s date.
not permitted to add a CMS item for any other date.
You are
Medication Term - is the total duration of the CMS care term.
Currently, you can select from 24 or 48 weeks only. The current default
is set at 24 weeks. To change the default, see Therapy options.
Note – items with different medication terms will be printed on
different prescription forms.
Dispensing Frequency – Allows you to set a dispensing frequency.
You can select from 1,2,3,4,6,8 and 12 weeks.
Total Quantity – The total drug quantity is automatically calculated
according to the medication term and dosage (obtained from the
maximum daily dosage in the Gemscript dictionary). If this cannot be
calculated e.g. if the dosage instructs "use as needed", the Quantity box
displays in yellow:
You can make the following calculation by typing into the Quantity box
then pressing enter:
7* [Medication term] *[daily quantity]=total quantity
For example, the calculation of a paracetamol caps 500 CMS item with a
medication term of 24 weeks and a dosage of two caps 4 times a day
would be calculated as follows:
7*24*8 = 1344 total quantity.
You can also use the "/" character as a divisor operand, for example
when calculating how many inhalers to prescribe when the Dosage is
specified as INHALE 2 DOSES 4 TIMES A DAY and the Preparation is a
single 200 dose inhaler:
[No. of doses]*[Daily frequency]*[Days in a week]*[Medication term] /
[No. of doses in the item preparation] = total quantity
i.e. 2*4*7*24/200 = 6.72 (which you would round up to 7)
You can also manually enter the total quantity if you wish.
Alert – You can enter a time period in the Alert field which
prompts you when a dispensing event is overdue. This will
generate a patient alert if a dispensing update has not been
received within the time period specified. You can enter the
usual date shortcuts of d, m, y. If you want to be prompted
39
about dispensing alerts, it is advised that you enter a duration
which matches the dispensing frequency, or slightly more to allow for
late dispensing. See CMS Overdue Dispensing Alert (page 52)
CMS Notes – You can add any optional free text notes to the CMS item
by selecting the notes icon
. This text will be transmitted as part of
the CMS Prescription Message and will be visible to the CP. This text does
not print on the GP10 form.
Note – You can set user defaults for Medication Term and Dispensing
Frequency in Consultation – Options Set up. See eCMS Therapy Options
(page 54).
7. Once the relevant fields have been checked/completed, click OK. The usual
prescribing safety drug /allergy checks will take place and the item is added to
the CMS list with a status of Not Printed.
40
Duplicate CMS Items
When printing a drug that is already listed as an active AMS or CMS item, you are
prompted with the following message:
There are existing AMS/CMS items for this drug.
prescribe this CMS item?
Are you sure you wish to
Select Yes to continue or No to cancel.
If any previous items are non-dm+d, they are excluded from the duplicate
verification. The details are presented on the ePharmacy Duplicate medication screen
along with any matched duplicate items.
Printing the CMS GP10
To print the CMS GP10:
1. Select the CMS item(s) in the usual way (i.e. click on them or use select all).
2. Then press F9 or select the printer icon
items to be printed.
. Prescription Manager displays the
41
3. Press F9 or print again to print the CMS GP10. A prescribing message is
automatically generated for each prescription form. This is sent to the
ePharmacy store at the next scheduled transmission.
The following details for eCMS printing should be noted:
CMS Items are printed separately from other types of prescriptions.
No more than 3 CMS Items can be printed on a single prescription form.
All the CMS Items on a prescription form must have the same Medication Term,
i.e. items with 24 weeks medication term will print on a different prescription
from items with a 48 week medication term.
If you add a new eCMS item it will not automatically appear in the Prescription
Manager screen unless you select it specifically and press print.
Printing Contraceptive Endorsements
As part of eCMS, there is no longer an automatic endorsement of contraceptive drugs.
The following applies:
42
Drugs prescribed for contraceptive purposes only, do not print or send a
message with the following endorsement: <For Contraceptive Use>.
Drugs prescribed for either contraception or for other uses are endorsed based
on the drug class selected. By selecting the drug class ‘Contraceptives’ the
medication is endorsed, otherwise it is suppressed. For example, selecting
Dianette from the Contraceptive drug class will endorse the prescription.
Choosing Dianette from the ‘Hormones for treatment of acne’ drug class will
not endorse the prescription.
Drugs eligible for endorsement will print on a separate GP10.
Reprinting CMS GP10
You are able to reprint the CMS GP10 when the aim is to provide the patient with an
identical copy of a CMS prescription form, e.g. if the previous copy was jammed in the
printer.
Please note the following:
When reprinting a prescription, you cannot reprint the prescription if the
selected prescriber in Prescription Manager differs from the original
signer of the prescription.
When reprinting a prescription, if the number of pages used differs from
the original, the prescription will not be reprinted.
To reprint an item:
1. From the CMS filter in the Therapy tab, select the CMS item.
2. Click on the Show Prescriptions icon.
3. Select the item in Prescription Manager.
4. Click on the Reprint button.
5. Select a Prescription Reprint Reason.
6. Click OK.
7. A copy of the CMS GP10 is printed. No further CMS message is sent.
43
Note - If a single item needs reprinting, the GP10 on which it was
originally printed will be reprinted in its entirety.
Reprinting Restrictions
When reprinting an ePharmacy AMS or CMS prescription, you cannot reprint the
prescription if the selected prescriber in Prescription Manager differs from the original
signer of the prescription or is no longer valid in Vision. Where this happens, the
following is displayed:
"The selected signatory does not match that of the original prescription(s).
Please select the original signing clinician in the list of signatory and reprint the
prescription(s).
ePharmacy (AMS/CMS) prescription containing n item signed on nn/nn/nnnn
by "prescriber name""
AMS Reprinting where original prescriber is still valid
You should change the authoriser in Prescription Manager and continue to reprint.
Where the original prescriber is no longer available/valid, you are now asked to
manually cancel the prescription and re-prescribe:
"The selected signatory does not match that of the original prescription(s). The
original signing clinician is no longer a valid signatory. If you need to reprint the
prescription(s), you are advised to:
1. Cancel the original prescription(s) - AMS/CMS only.
2.Re-prescribe all necessary items.
3.Contact the patient and/or dispenser(s).
44
ePharmacy (AMS/CMS) prescription containing n item signed on nn/nn/nnnn
by "prescriber name""
AMS Reprinting where you want to change original prescriber
When reprinting a prescription, if the number of pages used differs from the original
prescription, the prescription will not be reprinted and the following message is
displayed:
"The selected prescription(s) cannot be reprinted because the associated items
do not fit on the same number of pages. If you need to reprint the
prescription(s), you are advised to:
1. Cancel the original prescription(s) - AMS/CMS only.
2.Re-prescribe all necessary items.
3.Contact the patient and/or dispenser(s).
45
ePharmacy (AMS/CMS) prescription containing n item signed on nn/nn/nnnn
by "prescriber name""
Note - When reprinting a prescription with cancelled items,the
current functionality remains the same i.e. Vision will not reprint the
prescription if the cancelled items are selected, the prescription will be
allowed to be reprinted if the cancelled items are deselected.
Reorder Forms
eCMS items are printed on the therapy reorder form with [CMS] next to the drug
name along with the due for renewal date. CMS and Preferred pharmacy are printed
on the forms.
Printing Newly Added CMS Items At Another Time
If you are adding CMS items in advance of printing (e.g. transferring their repeats to
CMS in anticipation of future printing of CMS items), Vision will prompt you that there
are unprinted items. This message will appear for 48 hours after the script has been
added, so care needs to be taken if you do not want to print them on that date. Click
"continue WITHOUT printing". When you wish to print at a later date, go back into the
patient, to the CMS tab, press the printer icon / F9 and click on the ALL tab which
appears in prescription manager at the bottom of the screen. Select the items to be
printed and press F9 / print and the scripts will be printed with the updated date –
which also updates in the scripts screen / and journal.
46
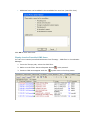
Dispensing Events
Dispensing events display with the
symbol. You can view the date of the last
CMS dispensing event from the CMS filter in the Therapy tab. The number of
dispensing events appears in brackets next to the CMS Item. You can look at each
dispensing event by clicking on the + next to the CMS item. These are read only
entries and do not display in the Scripts filter.
Reauthorising CMS Items
To reauthorise a CMS prescription, which has not yet expired:
1. In Vision – Consultation Manager, select a patient and open a consultation.
2. Select the repeat dispensing item to be reauthorised. Click the reauthorisation
icon.
3. You are prompted: "The CMS Item (drug name) can still be dispensed at the
pharmacy. Do you wish to send a cancellation message to prevent further
issues? This action cannot be undone. Yes, No, Abort".
Yes – The original CMS item is inactivated, a new active copy is made
and a cancellation message is sent.
No – The original repeat dispensing item remains active, a new active
copy is made.
Abort – Cancels the reauthorisation
4. Click the relevant button to make your selection.
Note – If the CMS item is not cancellable (eg it has not been sent, is
already cancelled or expired) the process is unchanged. No cancellation
message is sent
5. The item is now ready to be issued.
6. On finalising the item, the prescribed and repeat until date will be recalculated
using the consultation date.
7. If the original CMS item is active, it is changed to inactive.
Note – A CMS cancellation message is not sent.
47
Important Information about Deleting, Amending or Cancelling
CMS Items
Occasionally a drug is cancelled or amended some time after the item is dispensed. In
this scenario the pharmacy has already requested and retrieved the prescription
message from the message store. They are unable to receive any amendments or
cancellations made at a later stage as this type of information is delivered to a
pharmacy when the original message was requested and downloaded. It is therefore
extremely important that the practice inform the pharmacy e.g. over the phone, of
any amendments or cancellations and issue a new prescription for the patient.
Editing CMS Items
You might want to edit a CMS item, for instance, when the strength of a drug needs to
be increased:
Editing Unprinted CMS Items
You are able to edit a CMS drug item that has not yet been printed without restriction
by right clicking on the item and selecting edit.
Editing CMS Items that have been printed and sent
Editing printed CMS items is not permitted as such. However, if you right click and
select edit on a printed item, you will be given the opportunity to cancel and create a
new CMS item:
1. Right click on the CMS item.
2. Select Edit.
3. When the following message appears;
You have elected to edit a printed/sent CMS item. Editing a printed/sent
item will result in the original medication being inactivated, the original
prescription being cancelled and a new amended medication being
created. The patient will no longer be able to collect the original drug.
Are you sure you wish to edit the selected printed/sent CMS item?
Select Yes to proceed. If you select No, then you are returned to the edit
dialog.
4. You must fill in a cancellation reason.
5. Click OK.
A cancellation message will be sent for the original item
6. The add item form appears and you can add the new CMS item.
7. A new CMS prescription message will be sent when the prescription is printed.
Note – It is not possible to edit dispensing events.
displayed as read only entries in the CMS filter.
These are
Cancelling CMS Items
You are able to cancel CMS items by selecting them and clicking on the inactivate
button as with conventional repeat masters. For instance, you might want to cancel
a CMS item for which the patient is having adverse side effects. You are not able to
48
reactivate a CMS item once it has been cancelled/inactivated.
following for cancelling printed and unprinted CMS items:
You should note the
Cancelling/Inactivating Printed CMS Items
When attempting to cancel any CMS item(s) which have already been printed, you are
prompted with the following warning:
You have elected to inactivate one or more printed/sent CMS items.
Inactivating a printed/sent item will result in the medication being
cancelled. The patient will no longer be able to collect this drug and it
will not be possible to reactivate this item. Are you sure you wish to
inactivate the selected printed/sent CMS item(s)?
If you select Yes, the Cancel Prescription Reason window is opened. Select a
reason from the list, the options are:
Prescribing error
Clinical contra-indication
Change to medication treatment regime
Clinical grounds
At the patient’s request
At the pharmacist’s request
Additional text can be added in the available free text box (max 350
char).
Click OK to save and close.
Cancelling/Inactivating Unprinted CMS items
When attempting to cancel a CMS item(s) which has not yet been printed, you are
prompted with the following warning:
You have elected to inactivate one or more CMS items. It is not possible
to reactivate CMS items. Are you sure you wish to inactivate the
selected CMS item(s)?
Click Yes to Continue.
The Cancel Prescription Reason window is opened. Select a reason from the list,
the options are:
Prescribing error
Clinical contra-indication
Change to medication treatment regime
Clinical grounds
At the patient’s request
At the pharmacist’s request
49
Additional text can be added in the available free text box (max 350 char).
Click OK to save and close.
Display Inactive/Cancelled CMS Items
You can view inactive/cancelled CMS items from Therapy – CMS filter in Consultation
Manager:
1. From the Therapy tab, select the CMS filter.
2. Make sure the Filter Inactive Repeats button
3. Inactive CMS items appear with the
50
is de-pressed.
symbol next to the Drug name.
Note - It is still possible to receive dispensing information for cancelled
CMS items i.e. if the dispensing event took place before the CMS item
was cancelled but the claim from the CP was not submitted until after
cancellation.
Deleting CMS Items
You are able to delete CMS items, but this should only be done if you have made a
genuine mistake and you are certain that the medication has never been dispensed.
All deleted information is recorded against the Vision audit trail.
Deleting Unprinted CMS items
You can elect to delete a CMS item that has not yet been printed without restriction by
right clicking on the item and selecting Delete. You are required to enter a reason for
deletion. (N.B. This is a generic audit requirement, as with conventional prescribing,
and not specific to CMS.)
Deleting Printed CMS items
You are able to delete a CMS drug item after it has been printed by right clicking on
the item and selecting delete. You are then prompted with the following warning:
You have elected to delete a printed/sent CMS item. Deleting a
printed/sent item will result in the original medication being cancelled.
The patient will no longer be able to collect this drug. Are you sure you
wish to delete the selected printed/sent CMS item?
If you select No, you are returned to the item; otherwise, after selecting Yes, the
Cancel Prescription Reason window is opened. Select a reason from the list, the
options are:
Prescribing error
Clinical contra-indication
Change to medication treatment regime
Clinical grounds
At the patient’s request
At the pharmacist’s request
Additional text can be added in the available free text box (max 350
char).
51
Click OK to save and close.
Note - the reason for inactivation will be used as the reason for
cancellation included in the cancellation message
The associated item is still visible from Prescription Manager but is greyed out and
marked as deleted:
Deleting CMS Dispensing Events
Dispensing Events will only be deleted as a result of the associated CMS Item being
deleted i.e. when you delete a CMS item, all associated Dispensing Events are deleted
as a result.
CMS Overdue Dispensing Alert
The overdue dispensing alert notifies you when dispensing information has not been
received since the last dispensing event (or date printed if first issue) plus the
duration entered in the alert criteria. This does not have to be set for every patient
but might be useful for monitoring specific patients.
In the example above, the last issue date was 06.01.09, and the alert will appear if no
dispensing update is received by 06.02.09.
If you re-authorise a standard repeat that has an alert attached and make it into a
CMS repeat, the overdue date is calculated from the date dispensed on the new CMS
item.
52
Adding an alert after the CMS item has been entered
You can add an overdue dispensing alert to an individual CMS any time after it has
been added to the patient record, even if it has already had dispensing events.
1. In the Therapy tab, select the CMS filter.
2. Right click on item in CMS filter and select Set overdue dispensing alert.
3. At the CMS overdue dispensing alert window, enter the time period for which
you would like the alert to display in the Interval box. You can enter d for day
or m for month. The date the alert will be triggered on displays in the bottom
right hand corner.
4. Click OK to save.
Note - The overdue dispensing alert can be removed at any time by
selecting Set overdue dispensing alert and blanking out the
interval.
Overdue Dispensing Alert - Alerts Pane
When a CMS item becomes overdue for dispensing, a warning is displayed in the
Alerts pane in Consultation Manager under the heading CMS Item(s) Overdue for
Dispensing. You can double click on the item to view it in the CMS filter.
Overdue Dispensing Report
You can generate a report listing all the patients who have outstanding dispensing
alerts. See Search and Reports on screen help - CMS Overdue Dispensing Report for
instructions on running this report.
53
eCMS Exclusions
The following items are outside the scope of eCMS:
Medication
Medication excluded from eCMS
includes:
Types of Prescribing
The following prescribing types cannot
be executed as part of eCMS:
Non-FP10 drugs
Bulk prescribing
Discontinued drugs
Prescription forms other than GP10
Oxygen
Private Prescriptions
Handwritten drugs
NHS24 Prescribing
Schedule 1, 2, 3 and 4 Controlled
drugs
Out of Hours Prescribing
Cytotoxics
Dispensing by dispensing doctors
(however, dispensing doctors will
require the ability to prescribe
using CMS functionality).
Patients
See eCMS Registration and Patient
Status (page 33)
Prescribers
The following prescribers are not able to
produce an eCMS prescription:
Other exclusions
Other prescribing exclusions include:
Private prescription
Personally administered
Dispensed
Source of drug is other than In
Practice
Nurse Prescribers
Supplementary Prescribers
Dentists
Hospital Consultants
Opticians
Prescribing date is in the past
Optometrists
The print box is unchecked.
eCMS Therapy Options
There are user configurable options for CMS in Consultation Manager. These are per
user preferences. Please make sure you are only logged into Vision on the current
machine or else the changes will not be saved.
1. In Consultation Manager, go to Consultation – Options – Setup.
2. Select the Therapy tab.
Default Medication Term – you can currently pick from 24 or 48
weeks.
Default Dispensing Frequency – select from 1, 2, 3, 4, 6, 8, 12 weeks
3. Press OK to save.
54
In the CMS section you can select:
CMS - Therapy Initial List
You can make the CMS view the initial view in the Therapy tab in Consultation
Manager.
1. In Consultation Manager, select a patient and open a Consultation.
2. Right click on the Therapy tab and select View Options
3. From the Initial List, select CMS.
4. Click OK to save.
eCMS Message Management
The main objective of eCMS is that the patient registers with a CP and after having
been issued with a CMS GP10, the patient’s drugs are repeatedly dispensed by the CP
over an agreed period of time (currently 24 or 48 weeks). It is therefore imperative
that you are able to send, receive and process information pertaining to registration,
dispensing and treatment summary reports, including any replacements and
deletions.
Mail Manager and a new function called Message Collector manage the transmission
and receipt of all eCMS-related messages, and should be checked on a daily basis.
The Message Collector looks after the mechanics of message transmission and
imports the messages into Mail Manager, where incoming and outgoing messages can
be monitored. You can view the details of the last Message Collector transmission
from the CMS tab in Mail Gateway.
Before you can send and receive eCMS messages successfully, you need to make sure
that you have configured the Message Collector scheduled task option on the GPC
machine/EDI account. You should also be familiar with the daily workings of Mail
Manager (i.e. allocating messages, assigning patients, actioning, etc).
eCMS Message Collector
The eCMS Message Collector should have been configured to run automatically as a
daily scheduled task from the GPC Machine/EDI Account when eCMS was initially
enabled. You are also able to run a manual CMS Message Collection which enables
you to request and receive data from the ePharmacy message store on an ad hoc
basis.
Manual Collection
To run the CMS Message Collector manually:
1. From the front screen of Vision select Modules – CMS Message Collector.
55
2. Select the Message Type for which you would like to check. You can select from
Registration, Dispensing Update or Treatment Summary Report messages.
3. Select Process to send a request for messages to the ePharmacy store.
4. The status displays as In Process whilst waiting for messages to be returned.
It might take some time to return a response for the request.
56
5. The Audit status and description displays as Complete once the message
collection process has finished.
If there are no messages to collect a prompt appears detailing that no
update messages exist for the selected message type.
6. The messages can now be checked in Mail Manager.
CMS Message Collector Audit
From the CMS Message Collector, you can view an audit trail of previous message
collection processes for each message type. This functionality is particularly useful
when trying to determine why an error has occurred and will most probably be used
by the helpdesk.
1. From the main CMS Message Collector window, select the message type you
would like to view the audit for.
2. You can then elect to:
View Audit which allows you to view an audit of the last run message
collection.
57
Select Audit which allows you to select from a list of previously run
message collections.
3. Once you have selected which audit log you would like to display, the following
screen appears. The collection process is broken down into the sequence of
events. This may help you identify where an error originates.
58
eCMS Regular Tasks
The following lists show the recommended housekeeping tasks for eCMS.
GPs
Consultation Manager
Review patients for CMS suitability at relevant patient encounters.
Mail Manager
Regularly check Mail Manager outgoing folder for unsuccessful messages for
clinical staff. These will either have failed to be transmitted in the first place, or
have ‘timed out’ because an acknowledgement has not been received
successfully, and in both cases will display with a status of ‘Transmission
error’.
On a daily basis check for incoming Treatment Summary Reports in Mail
Manager. These need to be viewed so that the relevant GP can take any
action required (e.g. issue a repeat CMS prescription), before they can be
Marked as Read and manually filed.
CMS Populate
You might also like to create the Suitability Report once a month to check for
new suitable CMS patients. This could be allocated as an admin task.
Admin staff
GP Communicator
Check that the Mail Gateway is running properly – eCMS tab.
Mail Manager
Check for unmatched and unallocated messages in Mail Manager.
Check for messages in error.
Search and Reports
Run the Dispensing Report on a daily basis in Search and Reports. This allows
you to monitor the patients that are not collecting their medication.
Run the Batch Messaging Errors Report on a daily basis.
gives details of any messaging errors.
Run the Suitability Report once a month to check for new suitable CMS
patients. This could be a clinician’s task.
This highlights and
Mail Gateway
There is a new eCMS tab within the Mail Gateway screen, which displays the status of
the last eCMS message collector process. You should check the status of this on a
daily basis. See GPC on screen help for Mail Gateway details
59
eCMS Reporting
There are eight reports within Search and Reports that you can use to monitor CMS
activity. Each report can be found from the Vision – Search & Reports-Reports –
CMS Reporting menu. See Search and Reports on screen help for further details.
60
Index
A
Activating eAMS • 9
Activating eCMS • 5, 24
Adding a CMS Prescription • 38
Adding an Acute eAMS Prescription • 11
Adding an alert after the CMS item has been entered •
53
Adding Pharmacy Codes • 24, 25
Admin staff • 59
Advanced Printing for ePharmacy and Printer Profiles • 6
C
Cancelling an eAMS Item • 19
Cancelling CMS Items • 48
Changing between ePharmacy and Paper • 15
Changing Patient Suitability from the Therapy tab,
Consultation Manager • 32
Changing Patient Suitability from Therapy - Add • 32
Changing Patient Suitability in Patient Details,
Consultation Manager • 31
CMS - Therapy Initial List • 55
CMS Message Collector Audit • 57
CMS Overdue Dispensing Alert • 40, 52
CMS Prescribing • 36
CMS Registration Status • 34
Copyright Notice • ii
D
Deleting CMS Dispensing Events • 52
Deleting CMS Items • 51
Deleting Printed CMS items • 51
Deleting Unprinted CMS items • 51
Dispensing Events • 47
Dispensing Information in Consultation Manager • 37
Display Inactive/Cancelled CMS Items • 50
Duplicate CMS Items • 41
eCMS Message Collector • 55
eCMS Message Management • 33, 55
eCMS Registration and Patient Status • 33, 54
eCMS Regular Tasks • 59
eCMS Reporting • 60
eCMS Therapy Options • 40, 54
Editing AMS Items • 20
Editing CMS Items • 48
Editing CMS Items that have been printed and sent • 48
Editing Unprinted CMS Items • 48
Eligible/Not Eligible • 34
ePharmacy • 5
ePharmacy Prescription Notes • 8
F
Flagging Individual Patients as Suitable for eCMS • 29, 34
Flagging Suitable eCMS Patients • 26
G
GP Locums and ePharmacy • 6
GP Perspective • 22
GP Prescribers for ePharmacy • 6
GPs • 59
Group Populating Patients Suitable for eCMS • 26, 34
I
Important Information about Deleting, Amending or
Cancelling CMS Items • 48
Instalment Dispensing • 12
Introduction to ePharmacy • 5
M
Mail Gateway • 59
Manual Collection • 55
N
Non-AMS Items • 14
O
Overdue Dispensing Alert - Alerts Pane • 53
Overdue Dispensing Report • 53
E
P
eAMS • 9
eAMS messages in Mail Manager • 21
eCMS • 22
eCMS Exclusions • 38, 54
Patient Consent for eAMS • 9
Patient Perspective • 23
Patient Suitability • 34
Pharmacy Perspective • 24
61
Prescription Notes - AMS • 12
Prescription Printing of eAMS Items • 16
Printer Profiles • 7
Printing Contraceptive Endorsements • 42
Printing Newly Added CMS Items At Another Time • 46
Printing the CMS GP10 • 41
Q
Qualifying Items for eAMS • 11, 14
R
Reauthorising CMS Items • 47
Reorder Forms • 46
Reprinting CMS GP10 • 43
Reprinting Restrictions • 17, 44
T
Therapy - CMS Filter • 37
V
Viewing CMS Registration Status and Suitability • 28, 35
W
Why can't our locum GP print prescriptions? • 6
Workflow Overview • 22
62