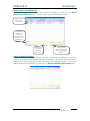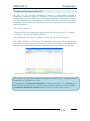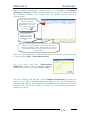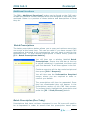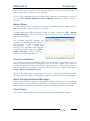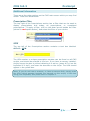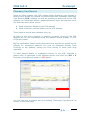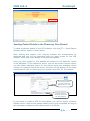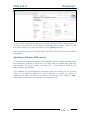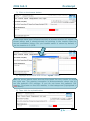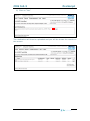
1
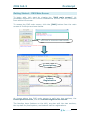
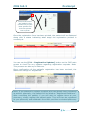
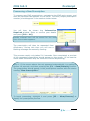
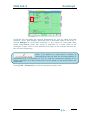
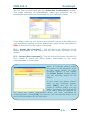
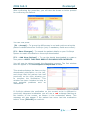
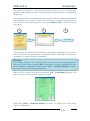
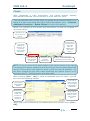
ProScript
User Guide
_________________________________________________________________________
Chronic Medication Service (CMS)
Version
Release Date
Author
5.0.4
21/10/2010
Rx Systems
CMS 5.0.3
ProScript
Table of Contents
Objectives ............................................................................ 3
Introduction ......................................................................... 4
Getting Started – CMS Main Screen ...................................... 5
Registering a New Patient .................................................... 6
Withdrawing a patient .......................................................... 8
Manually updating a Patient Registration Status ........................ 9
Processing a New Prescription ........................................... 10
Owings ............................................................................... 15
Claims ................................................................................ 16
Prescription Details ............................................................ 17
Treatment Summary Reports ............................................. 20
Viewing previously sent Reports ............................................ 23
Pending Reports .................................................................. 23
Resubmitting expired pending messages ................................ 24
Additional functions ........................................................... 25
Batch Prescriptions .............................................................. 25
Batch Prescription (Due Today) ............................................. 25
Batch Claims ....................................................................... 26
Claim Cancellations .............................................................. 26
Batch Pending/ReSubmit Messages ........................................ 26
Clear Scripts ....................................................................... 26
Additional Information ....................................................... 27
Prescription Filter................................................................. 27
UPN ................................................................................... 27
Patient Filter ....................................................................... 28
Patient Registration Reports .................................................. 29
Pharmacy Care Record ....................................................... 30
Sending Patient Details to the Pharmacy Care Record .............. 31
Updating a Patients PCR record ............................................. 32
Sending Medication Details to the PCR database ...................... 33
Function Keys Summary ....................................................... 37
2
© 2010
CMS 5.0.3
ProScript
Objectives
After reading this user manual you should be able to perform the following:
Register new patients on the CMS
Withdraw patients from the CMS
Process New CMS Prescriptions
Send CMS claims
Send Claim cancellations
Create and Send Treatment Summary Reports
Send Patient Details to the PCR web database
Send Medication history to the PCR web database
3
© 2010
CMS 5.0.3
ProScript
Introduction
The Chronic Medication Service (CMS) allows patients with long-term
conditions to register with a community pharmacy of their choice for the
provision of pharmaceutical care as part of a shared agreement between
the patient, community pharmacist and General Practitioner (GP). It
introduces a more systematic way of working and formalises the role of
community pharmacists in the management of individual patients with
long term conditions in order to assist in improving the patient’s
understanding of their medicines and optimising the clinical benefits from
their therapy.
There are three stages to CMS:
Stage 1 involves the registration of patients for CMS. A patient with a
long term condition/s registers with a community pharmacy of their choice
to receive CMS. He/she can only register with one pharmacy at any one
time for the service. Registration is voluntary and includes an explicit
informed patient consent process. This consent is given to the registering
pharmacist.
Stage 2 introduces a generic pharmaceutical care planning framework
which is based on the systematic approach to the practice of
pharmaceutical care as described in the Clinical Resource and Audit Group
(CRAG) Framework document, Clinical Pharmacy Practice in Primary Care.
Initially the pharmacist assesses registered patients to identify and
prioritise individuals or patient groups with unmet pharmaceutical care
needs in order to target patients most in need of their support. The
pharmacist then undertakes to identify and record the patient’s
pharmaceutical care needs, care issues, any desired outcomes and the
actions required to deliver those outcomes. These are documented in a
pharmaceutical care plan.
Stage 3 establishes the shared care element which allows a patient’s GP
to produce a 24 or 48 week serial prescription for a patient which is
dispensed at appropriate time intervals determined by the GP. Information
detailing the date of a dispensing event for a CMS serial prescription item
is automatically sent back to the GP practice electronically after each
serial dispensing episode. This stage is supported by CMS disease specific
protocols in order to determine any specific reporting or referral criteria
for a number of pertinent disease conditions. A GP can cancel an item/s
on a serial prescription electronically. Once cancelled, the pharmacist can
no longer dispense any quantities that remain outstanding for that item. If
there is a change of medication or dosage, then the GP can generate a
new serial prescription if appropriate. Once the last instalment from the
serial prescription has been dispensed the pharmacist electronically sends
an end of care treatment summary, which includes a serial prescription
renewal request to the GP practice. The renewal request acts as trigger to
request a new serial prescription/s for the patient. The end of care
treatment summary details any relevant data such as compliance
reporting and any recommended action/s for the GP.
Source: http://www.communitypharmacy.scot.nhs.uk/
4
© 2010
CMS 5.0.3
ProScript
Getting Started – CMS Main Screen
To begin with, let’s start by viewing the “CMS main screen”. All
processes required in the Chronic Medications Service can be performed
from within this screen.
To access the CMS main screen, click the [CMS] button from the main
screen of ProScript as shown below.
Click here to access the CMS module.
Prescriptions
Patient
Registration
As shown above the CMS main screen is split into two sections, the
Prescriptions section, and the Patient Registration section.
The function keys (buttons on the left), are also split into two sections,
the top half for prescriptions, and bottom half for registrations.
5
© 2010
CMS 5.0.3
ProScript
Registering a New Patient
The first stage required as part of the Chronic Medication Service involves
the registration of patients.
From the CMS main screen, press the [F10 – Register New Patient]
function key (or left click on it with the mouse).
You will then be shown the Select Patient window. Type in the name of
the patient you wish to register, and select the patient from the list.
Note: After selecting the correct patient, ProScript will check the patient’s
details to ensure all mandatory patient details exist in order to send a
registration request (address, CHI number, exemption etc). If any of the
required fields are missing or invalid, you will see a message similar to the
one shown below.
As registration will not be possible without
correcting these fields, you will need to select
“Yes” in order to proceed.
You will then be shown the patient’s details screen. Simply enter or
correct the fields mentioned in the message above and press [F10 - Save]
to continue.
Next, you will be required to enter your details and confirm that you seen
evidence that the exemption is correct.
Enter all the details as applicable, and tick the
exemption evidence seen checkbox at the bottom of
the window confirming the exemption is correct. Press
[F10 – OK] to proceed.
Note: Fields marked with a * are mandatory.
After pressing [F10 – OK], you will then be required to print a CP3
registration form. A preview will be shown on the screen as shown below.
6
© 2010
CMS 5.0.3
ProScript
Ensure the forms
are loaded in the
correct tray of your
laser printer and
click this printer
icon to print.
Once the registration form has been printed, the patient will be displayed
along with a status indicating what stage the registration process is
currently at.
You can use the [F11 – Registration Updates] button on the CMS main
screen to check for any updates regarding registration requests. Note:
This process can take up to 24hours.
Once confirmation of the patient’s registration has been received, the
status will change to “Registered”.
Note: If you attempt to register a patient who has already been registered
at another pharmacy, the patient will be listed as “Registered Elsewhere”.
After consulting the patient, if you still wish to register them at your
pharmacy, simply register the patient again. They will then be registered
at your pharmacy and withdrawn from their previous nominated pharmacy.
7
© 2010
CMS 5.0.3
ProScript
Withdrawing a patient
To withdraw a patient from the service, simply highlight the patient in the
patient registration section, and press [F9 – Withdraw Patient].
You will then see a window, confirming you wish
to withdraw the current patient. Click “Yes” to
continue.
Next you will be shown the information required
window which is the same as the window seen
whilst registering a patient, enter or confirm the
pharmacists details and press [F10 – OK] to
continue.
Lastly you will be shown
containing all the required
registration withdrawal on
Ensure the forms are loaded
printer and click the printer
print.
report preview
information for
the CP3 form.
correctly in your
icon (in red) to
The status change can up to 24hours. If you wish to manually check the
status of the registration change you can use the [F11 Registration
Updates] to check for updates.
8
© 2010
CMS 5.0.3
ProScript
Manually updating a Patient Registration Status
If after 24 hours you still have not received a confirmation of registration
or withdrawal, you may need to call EPMS and manually to check the
status and then if necessary update the patient’s registration status
manually. This can be done by highlighting the patient and using the
[ALT+R Manually Update Registration Status] button shown in red
below.
You will then see the following screen which allows you to manually
update the registration status.
Use the drop down
arrow to display a
list of registration
statuses.
When you have selected the relevant status, press [F10 – OK] to
complete.
9
© 2010
CMS 5.0.3
ProScript
Processing a New Prescription
To process new CMS prescriptions, navigate to the CMS main screen, and
scan the barcode that appears on the script. The UPN (unique prescription
number) should appear in the section shown below.
You will then be shown the Information
Required window. Enter or confirm your details
and press [F10 – OK].
Details entered here will be saved for the next
time this window appears.
The prescription will then be requested from
ePharmacy. During this time you will see a
flashing message momentarily reading:
This process usually only takes 5-10 seconds. Once completed, a preview
of the requested prescription should appear on the screen, (if not see the
notes below otherwise skip the notes to continue dispensing).
Note 1: If the screen above has not appeared automatically, try waiting a
further 10 seconds, and then pressing the [F1 – Send/Receive] button.
The prescription should appear in the prescriptions section with the status
reading “New Prescription.”
To begin processing, highlight it and press [F2 – View/Process] to
display the prescription preview.
10
© 2010
CMS 5.0.3
ProScript
Note 2: If you attempt to process a prescription for a patient and
ProScript is unable to match the downloaded patient’s details with a
registered patient currently on your system, you will be shown the select
patient screen at this point.
Select the correct patient to continue dispensing. If the patient does not
exist on your system, see note 3.
Note 3: If the patient does not exist on your system (as shown in note 2),
press Esc on the select patient screen and you will be shown the patients
details screen, with the downloaded patient’s details already filled in for
you where applicable.
Enter any additional information you have available and press F10 to save
the new patient.
11
© 2010
CMS 5.0.3
ProScript
ProScript will calculate the current dispensing for you by using the total
quantity, term, and dosage. Although this is accurate most of the time, it
should always be confirmed manually in the event of inaccurate data
being downloaded when the script is scanned. If it does need to be
changed, simply click on the quantity and type in the correct amount for
the current dispensing.
Note: This button is used when a batch of
prescriptions has not had all its prescriptions in
dispensed (e.g. is currently on 5 of 6), but the remaining quantity is no
longer required. It is also used when not all items on the prescription are
dispensed.
Press [F10 – Process] to continue dispensing the script.
12
© 2010
CMS 5.0.3
ProScript
You will then be presented with the Prescriber Confirmation window.
This stage attempts to automatically match the prescriber on the
downloaded prescription to one already on you ProScript system.
If the doctor exists on your system and is found, but has a few differences
such as different spelling of name, address etc, these will be highlighted in
RED. At this point you the option of pressing:
[F1 – Accept (No changes)] – This will ignore the differences in the
details downloaded on the script and use the doctor currently on the
system.
[F2 – Accept (Save changes)]– This will amend the doctor currently on
your system to match the doctor details downloaded on the script
(recommended in most cases).
Note: If ProScript cannot match
the doctor on the electronic script
to the same doctor on your
ProScript system, it will display
the Select Doctor window where
you can manually search for the
doctor.
In the event the doctor doesn’t
exist on the ProScript system,
press [ESC], and you will be
shown a window where you can
add a new doctor. ProScript will fill
in as many fields as possible for
you using the details downloaded. When you have completed all
remaining fields, press [F10], to continue. This will add the doctor on to
your ProScript system for the next time.
13
© 2010
CMS 5.0.3
ProScript
After confirming the prescriber, you will then be shown a similar process
for confirming the Patient.
You can now press:
[F1 – Accept] – To ignore the differences in red and continue using the
patient’s details stored on ProScript (only if mandatory fields are correct).
[F2 – Save Changes] - To amend the patient details on your ProScript
system to match the details on the script downloaded.
[F3 – Add New Patient] – To use the details downloaded to create a
new patient. NOTE: THIS MAY RESULT IN DUPLICATE PATIENTS.
You will now be taken through the dispensing process. The first window
that will appear is the Prescription Comparison window.
This window displays the items on the
downloaded prescription on the left,
and drugs that the patient has had
previously on the right, allowing you
to compare the medication. This
window has been included to help to
spot potential problems such as
interactions.
If ProScript detects the medication on the current script is different to
previously dispensed medication you will see a red message flashing at
the bottom of the screen, as shown in the screenshot above. This
message will also appear if the patient has never had the medication
before. Press [F10-OK] to continue.
14
© 2010
CMS 5.0.3
ProScript
The next few stages in the process simply require you to confirm the
quantity and dosage for each item. Follow the steps below to complete the
dispensing.
The steps below are following the assumption that the details downloaded
electronically are correct. If they are not correct, simply change them as
you would a normal prescription, and press Enter/F10 to proceed to the
next step.
2
1
Enter
3
F10
Next item
This process will continue until all items have been dispensed. The process
will then remain on the patients medication screen, allowing you to amend
mistakes, or create owings if necessary.
Owings
If an owing needs to be created for one or more item it can be created at
this point (just before pressing F8 for last item). Simply highlight the item
in the patients medication list and press [F2 – Create Owing] and enter
the quantity currently being dispensed.
When you are ready to endorse press the [F8 – Last Item] button. You
will then see the prescription preview screen.
Now press [F10 – Endorse Script] to finish, or select one of the other
options if applicable.
15
© 2010
CMS 5.0.3
ProScript
Claims
After dispensing a CMS prescription, the claims window
automatically allowing you to send one or more items for claim.
appears
You can send the claim at this point, or escape the screen and send it in a
batch at a later time along with other CMS prescriptions (See – Contents
Additional Functions – Batch Claims for more information).
Below is a preview of the screen and instructions on how to complete it
and send claims.
Click here to
tick or un-tick
items.
Click here to
Esc and send
the claim
later as
explained in
the note
above.
Use these
buttons to
select or deselect all
items in the
list above.
Click here to
search items
in the list.
Click here to
view the
PMR Screen.
Click here to send the
selected items for claim.
NOTE: If one or more of the items listed in the claims section is an owing,
a message will appear explaining that the full qty has not been dispensed,
and you will be given the option to send a claim for the full quantity. You
can then redeem the qty from either accessing the patient record, or by
accessing the F2 - Owings screen at a later date.
After pressing [F10 – OK] to send the selected items for claim, you will
then see the following window.
Tick one of
these options
to select who
collected the
medication.
Confirm the
pharmacist’s
details.
Confirm the
exemption
letter. Or
use the F2
button to
change it.
If you select
representative
above, enter
their details
here.
When you have confirmed all the details above are correct, press [F10 –
OK].
16
© 2010
CMS 5.0.3
ProScript
Prescription Details
The Prescription details window allows you to perform additional tasks
such as viewing a previously dispensed script’s details, send a claim for
items on a dispensed script, sending a cancellation for items that have
already been claimed, or viewing/re-sending existing claims.
To access it, highlight the script that you wish to perform one of the above,
and press [F2- View/Process].
(If there are instalments still due you will see the following message)
Click “No” and you will see the Claims Main screen.
Below is a description of all the tabs (in red above) at the top of the
Prescription Details window.
Dispensed Script Details
This screen simply displays details of the patients existing or completed
script such as the current episode.
Send Claims
The Send Claims tab is the same as the send claims screen that appears
automatically at an end of a dispensing. If you didn’t send the claims at
that point, you can return to this tab and send it from here. (See
Contents – Claims for more information)
17
© 2010
CMS 5.0.3
ProScript
Send Claim Cancellations
If you have sent a claim but then wish to cancel it, click on the Send
Claim Cancellations tab. You will then see the following screen.
Click here to
tick or untick items.
Use these
buttons to
select or
de-select all
items in the
list above.
Click here
to search
items in
the list.
Click here to
cancel the claim
for the selected
items.
Show Pending Claims
If a claim cannot be sent due to network problems for example, it will be
held in a window called Show Pending Messages. ProScript will attempt to
resend the claims here at regular intervals for at least one day. To view all
claims that are still pending, click on the Show Pending Messages tab.
18
© 2010
CMS 5.0.3
ProScript
Resubmitting expired pending Claims
When a pending claim (as explained above) expires i.e. has been
exceeded the maximum amount of auto-retries in a day, Epharmacy as a
requirement requests that all these claims re-submitted. This shouldn’t
happen very often, but in the event it does, ProScript will automatically
move them to the Re-Submit messages window as shown below.
1) By default each line
will be selected,
indicated by the
in the red square. To
de-select it, click on the
X and it will turn into
an.
2) Use these
buttons to either
Select all or Deselect the entire
list.
When you have selected the claim/s that you wish to re-submit, press
[F10 – Re-Submit]. If the re-submit is successful, the reports will
disappear from the ReSubmit tab.
19
© 2010
CMS 5.0.3
ProScript
Treatment Summary Reports
As part of the Chronic Medication service a pharmacist creates a
treatment summary report for a patient. This report should be created 20
weeks after the first CMS item has been dispensed. Subsequent reports
will be automatically prompted at 24 weekly intervals after the previously
produced report was sent electronically (as an ad-hoc report may have
been produced.).
This report can be:
- Sent to EPMS for subsequent retrieval by a GP from their GP IT system
- Viewed or printed for patient/GP use
The pharmacist chooses to perform one or the other as necessary.
The CMS module in ProScript automatically searches the prescriptions
currently on your system each time the CMS main screen is accessed, and
displays the Treatment Summary Window if any due reports are found.
Preview of a due treatment summary report appearing as a “pop-up” after CMS button is pressed.
The report can also be created manually as required (for example when
requested by the patient or GP).
To access the Treatment Summary window manually (as opposed to it
automatically popping up on a due date as shown above), press the [F3 –
Treatment Summary Report] button from the CMS main screen.
20
© 2010
CMS 5.0.3
ProScript
When a treatment summary report is due, or if the [F3 – Treatment
Summary Report] button has been pressed, you will be presented with
the following window. This screen lists all patients whose report is
currently due.
1) By default all reports
will be de-selected,
indicated by the X in the
red square. To select it,
click on the X and it will
turn into a
2) Use these
buttons to either
Select all or Deselect the entire
list.
If the report is being created manually at a GP’s or
Patient’s request, you will need to tick this box to
display the patients. Note: Patients will only appear
if medication has been dispensed for them in the
last 24 weeks.
Once you have selected all the patients whose summary report you wish
to send, press [F10 – Send Request(s)].
You will then see the “Information
Required” screen, fill in the Pharmacist’s
details (if required) and press [F10 – OK].
The next window you will see is the Treatment Summary window. An
option in the CMS Treatment Summary Report is for the Pharmacist to
indicate that item(s) are suitable for consideration for renewal by the GP
practice. On the screen below, all items for the selected patient are
displayed in a list.
21
© 2010
CMS 5.0.3
ProScript
1) By default they will
be de-selected,
indicated by the X in the
red square. To select it,
click on the X and it will
turn into a
.
2) Use these
buttons to either
Select all or Deselect the entire
list.
When you have made your recommendations, Press [F10 – Represcribe
Request]. A preview of the report will now be displayed on the screen.
Although the report is sent electronically to Epharmacy and then to the
corresponding practice, this screen allows you to print the report for your
own records, or a copy for the patient should it be required. To print it, or
escape this screen, click on the relevant icon a shown below.
Click this icon if a
print out is not
required.
Click this icon if a
print out is
required.
You will then see a confirmation window as shown below.
Click “Yes” to continue. ProScript will then attempt to send the report.
After creating and sending a summary report, you can check the status of
it by following the steps below.
From the main CMS screen, press the [F3 – Treatment Summary
Reports] button.
22
© 2010
CMS 5.0.3
ProScript
Viewing previously sent Reports
All treatment summary reports that have successfully been sent to the
corresponding GP will be listed under a tab called View Report (Send to
GP).
<You can view and print off a
previously sent report by highlighting
it, and pressing [F10 – View PDF
Report].
This will then display a preview of the
report and an option to print it at the
bottom of the page.
Pending Reports
If the report cannot be sent due to network problems for example, it will
be held in a window called Pending Messages. ProScript will attempt to
resend the report at regular intervals. To view all summary reports that
are pending, follow the steps below.
Now click on the Pending Messages Tab at the top of the screen. You will
then see the following window.
As shown above, this screen lists all
reports that are yet to be sent to
Epharmacy, these messages will
attempt an auto re-send at regular
intervals.
23
© 2010
CMS 5.0.3
ProScript
Resubmitting expired pending messages
As with claims, when a pending message (treatment report in this case)
has expired (i.e. has exceeded the maximum amount of auto retries)
Epharmacy, as a requirement requests that all these messages are
removed from the Pending messages tab, and re-submitted. This
shouldn’t happen very often, but in the event it does, follow the steps
below to re-submit a Treatment Summary Report.
Click on the ReSubmit Messages Tab, at the top of the screen. You will
then see the following window containing all reports that have expired and
need to be resubmitted.
1) By default each line
will be selected,
indicated by the
in the red square. To
de-select it, click on the
X and it will turn into
an.
2) Use these
buttons to either
Select all or Deselect the entire
list.
When you have selected the reports that you wish to re-submit, press
[F10 – Re-Submit]. If the re-submit is successful, the reports will
disappear from the ReSubmit tab.
24
© 2010
CMS 5.0.3
ProScript
Additional functions
The [F4 - Additional Functions] button can be found on the CMS main
screen and contains several features which are designed to help ease your
workload. Below is a preview of those buttons and descriptions of what
they do.
Batch Prescriptions
The batch prescriptions button allows you to scan and retrieve more than
one script at the same time. This can be useful if you have several CMS
prescriptions that need to be processed as you only have to wait for the
download once. To scan several prescriptions in batch mode, press the
[F1 – Batch Prescriptions button].
You will then see a window labelled Batch
Prescriptions. Ensure the UPN bar at the top
is yellow indicating it is selected, and then scan
your first barcode. It will then appear in the list.
Continue scanning all the bar-coded scripts and
then press [F10 – Request].
You will then see the Information Required
screen, where you are required to enter or
confirm your details.
The prescriptions will then be requested. Once
they are downloaded they will appear in the
Prescriptions section of the CMS main screen.
To process simply highlight the prescription and
press the [F2 – View/Process] button.
Batch Prescription (Due Today)
Prescriptions that have not been requested in over 24 hours will need to
be re-requested in order to ensure that the prescription hasn’t been
25
© 2010
CMS 5.0.3
ProScript
amended by the GP since it was last requested. For one prescription this is
done simply by re-scanning the barcode.
If you have several of these scripts that require re-requesting, you can
use the [F2 - Batch Request (Due Today)] instead to request them in
one go.
Batch Claims
As mentioned earlier, claims can be sent immediately after dispensing or
stored till a later time and sent in a batch.
To view and send claims that are ready for claim, press the [F3 – Batch
Claims button]. The Send Claims tab at the top of the screen will be
selected by default.
The window that will appear and
process of sending these claims is
very similar to the process used
immediately
after
dispensing.
Simply “tick” all items that you wish
to send for claim, and press [F10 –
Send Claims]. (See contents –
Claims for more information)
Claim Cancellations
If you wish to cancel a batch of claims for more than one patient, you can
also use the Send Claim Cancellation Tab to do this. Again this screen is
similar to sending a claim cancellation (see contents – Prescription Details,
claim cancellations). Simply tick the claims you wish to cancel and press
[F10 – Send Cancellation(s)].
Note: If the claim you are looking for is over 1 month old, please increase
the No of Months filter in the bottom right to a higher number accordingly.
Batch Pending/ReSubmit Messages
These two tabs are used for viewing pending claims and resubmitting
expired claims (as explained in Content - Prescription Details) but with the
added ability to send for all patients within a certain amount of months.
Clear Scripts
This option allows you to clear all completed and abandoned scripts.
26
© 2010
CMS 5.0.3
ProScript
Additional Information
There are a few other options on the CMS main screen which you may find
useful. These are listed below.
Prescription Filter
The top right of the Prescriptions section has a filter that can be used to
display prescriptions due today, all prescriptions, or completed
prescriptions. To apply a filter, click on the down arrow beside the filter
(shown in red square below), and select the filter of your choice.
UPN
The top left of the Prescriptions section contains a text box labelled:
ALT+U – UPN.
The UPN number or unique prescription number can be found on all CMS
scripts, and should be entered in this box. If you have a scanner installed,
simply ensure the box is yellow indicating it is active, (press ALT+U on the
keyboard if it isn’t), and scan the barcode on the script. The UPN should
appear in the yellow box.
Note: If you do not have a scanner, or have a scanner fault, simply enter
the UPN (which appears beneath the barcode on the script) in this box
using your keyboard, and press enter to request it.
27
© 2010
CMS 5.0.3
ProScript
Patient Filter
The Patient Registration section is where all CMS patients and details
of their registration are displayed.
As shown above, details such as Registration, Start Date, Status, CHI
Number etc can be seen for each patient above. To view more details use
the horizontal scroll bar at the bottom of the page to scroll right/left.
This list can be filtered to show specific patients by using the filter in the
top right (shown in red square above). Simply select the down arrow
beside the filter (in red below), and select from the choices that appear as
shown below.
28
© 2010
CMS 5.0.3
ProScript
Patient Registration Reports
<This button (in blue square above) allows you to create a report on
patients based on your filter (see above). After selecting this button you
will see a preview of the report, and an option to print it, as shown below.
Note: the reports button will only be active if patients exist under the
chosen filter.
The [Alt+H – History] button (shown in red below) is located at the top
of the patient registration section and can be used to display the
registration history for the selected patient.
29
© 2010
CMS 5.0.3
ProScript
Pharmacy Care Record
Since its initial release, the CMS module within ProScript now includes a
facility which allows the module to interact with NHS Scotland’s Pharmacy
Care Record (PCR) website. As well as providing a direct link to the PCR
website via a dedicated button (explained below) there are also two more
key features which allow you to:
Send a Patient’s details to the PCR website.
Send a Patient’s medical history to the PCR website.
These options should save valuable time, as:
a) Many of the forms required in creating a patient record on the PCR
website will be pre populated using the patient record already in your
ProScript system.
b) The medication history which pharmacist are required to update on the
website for registered patient’s can now be uploaded directly from
ProScript to the website, saving you from having to enter each drug
manually.
To send patient details or medication history to the PCR, highlight a
patient who is registered in the Patients section and click the [Alt + P
Pharmacy Care Record] shown in RED below
You will then see a window with the heading “Pharmacy Care Record” as
shown on the next page.
30
© 2010
CMS 5.0.3
ProScript
Sending Patient Details to the Pharmacy Care Record
To send a patients details to the PCR website, click the [F3 – Send Patient
Details] button, shown in Blue above.
After clicking this button, your internet browser will automatically be
launched and you will be presented with the login screen for the PCR
website. Enter your login details to access the website.
Once you have logged in, the website will search for the patient’s record
on its database. If one cannot be found, you will be shown a screen where
you can either manually search for the patient using the available search
criteria. If a patient cannot be found, an option at the bottom of the page
is available to click on allowing you to create a new PCR for the patient.
Use these options
to search for the
patient if you wish
Or click here to
create a new PCR
for the patient
If you chose to create a PCR for the patient, you will be shown a Patient
Details screen. Most of the patient details will be pre-populated as long as
the mandatory details for the patient exist in ProScript.
31
© 2010
CMS 5.0.3
ProScript
If any of the mandatory fields are missing (marked with a red asterisk *),
fill them in as you will not be able to proceed without them. Then fill in all
the other fields if you wish and click on the [Save] button.
You will then be shown the Pharmacy Care Record with the patient details
populated.
Updating a Patients PCR record
If any part of a patient’s details has changed and you have already made
the necessary change in ProScript, you may wish to update the PCR with
this change. To do so, simply click the [F3 – Send Patient Details] and
login to the PCR website.
The website will automatically recognise that the details on its system
differ to the Patients details on your ProScript, and offer an option of
updating the PCR record from the PMR on ProScript. Click “Yes” or “No”,
depending on whether the change is accurate or not.
32
© 2010
CMS 5.0.3
ProScript
Sending Medication Details to the PCR database
Once a patient’s PCR record has been found/created, you can then upload
the PMR to the websites secure online database.
To do this, click on the [Alt + P – Pharmacy Care Record] button on the
CMS main screen.
You will then be required to select the medications you wish to upload. As
shown all items are ticked by default. To de-select or Select all items, use
the F1, and F2 keys at the bottom of the page, or alternatively click the
beside the item to deselect it and vice versa.
Once you have selected the medication you wish to send, click the [F4 –
Send Medication History] button which can be found at the bottom of
the “Pharmacy Care Record” screen. If successful, you will see a
confirmation as shown below.
33
© 2010
CMS 5.0.3
ProScript
At this point the medication history is converted into a secure text file and
stored in the location shown. The next step is to import this file on the
PCR website.
A quick way of doing this is to
1) Highlight the patient’s record in the Patients section of the CMS
screen.
2) Click the Pharmacy Care Record button
3) Select the [F3 – Send Patient Details] button.
4) Login to the PCR website.
As the record already exists, you will be directed to the patient’s PCR
summary screen.
Once you have the Patients Pharmacy Care Record summary screen
displayed, scroll to the medication section and follow the steps below
1) Select the “Review” option shown in RED square below.
2) Click on the Import Medication option shown in RED square below.
34
© 2010
CMS 5.0.3
ProScript
3) Click on the browse button.
If the steps have been followed correctly a browse window will appear as
shown below, and it should already be pointing in the location that the
secure medication history file you created earlier is stored by default, if
not the location is C:\PCR.
4) Highlight the file and click on the “Open” button.
TIP: As shown above there are two files listed. Be very careful to select
the right one. The naming convention is MHxxxxxxxxxxx where the X’s
are the patient’s CHI number. If you do not know the patient’s CHI
number, it’s shown on the PCR website, in the background (highlighted in
RED above).
5) Then click the upload button
35
© 2010
CMS 5.0.3
ProScript
6) Click on “Yes”
The medication will then be uploaded and you will be shown the results on
the screen.
36
© 2010
CMS 5.0.3
ProScript
Function Keys Summary
The Function Keys which run all the way down the left of the CMS Main
screen perform tasks related to the CMS. Many of them have been
explained thorough this manual. Below is a chart containing all the keys
available and a short description of what they do in relation to CMS.
The top half of these function keys are related to Prescriptions and the
bottom half are all related to Patient registration.
This button is used to manually send or receive
prescriptions/claims that you are waiting for.
This button allows you to either process a script that
you have scanned (see contents Processing a New
Prescription), or view a prescription that has already
been processed.
This button is used to generate the electronic
treatment summary report. See contents - Treatment
Summary Report.
This button is used when you request a prescription
but it has failed before it has been sent to
ePharmacy. These scripts will be listed as New
Prescription - (PENDING)
This button allows you to use CMS features in batch
mode. See contents – Additional functions for more
information.
F5 - Abandon allows you to cancel a NEW
prescription which you no longer require.
F6 – Search allows you to search through the list of
prescriptions using a keyword.
This button allows you to clear completed and
abandoned scripts. This button will only be active if
one of these scripts is selected.
This button is used by the RxSystems support team
as a basic test to check connectivity when
experiencing problems registering new patients.
This button is used when you attempt to register a
patient but it has failed before it has been sent to
ePharmacy. These scripts will be listed as Pending
Confirmation (Register) – ReSubmit.
Press F7 if you wish to reprint the details of a selected
patient on a CP3 form. Press F8 to search through the
patients in the registration list using a keyword.
Click this button if you wish to withdraw a patient
from the CMS service. See contents – Withdrawing a
patient for more information.
Click here to register new patients. See Contents –
Registering a new patient for more information.
Click here to check the registration status of a
patient.
Click here to check for any updates to patient
registration requests you may have made.
This option is for technical support purposes only.
37
© 2010