1
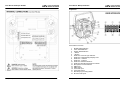
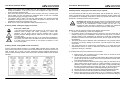
User Manual: Multispot GII-HP5 7) 8) 9) 10) 11) 12) 13) 14) 15) User Manual: Multispot GII-HP5 lens panel versus the LED panel can damage the LEDs. Use both hands and the provided finger grip points and lift off the lens panel. Remove the 5 standoffs that define the lens panel distance to the PCB by unscrewing them with left-turns. Keep these 5 standoffs stored together with the removed lens panel as every specific lens panel has its matching standoff length. Insert the 5 standoffs that have been delivered with the new lens panel into the relative thread holes and fix them properly with right-turns. Put the new lens panel into place by perpendicularly lowering it down on the LED panel. Make sure the LED panel is lowered in the right position, as lowering it in the wrong position may lead to collision between the lenses and the LEDs, which may damage the LEDs. Put the 5 lens panel screws back into place which hold the lens panel and tighten them with 0.50-0.55Nm torque. Check whether the front glass seal smoothly surrounds the front glass in proper position and put the front glass back into place, properly centering it on the mounting edge around the Lens/LED panel. Check whether the main seal is properly aligned and smoothly adapts to the groove around the lens/LED panel. Carefully lower the front frame down on the main unit in the right position with aligned screw holes, avoiding any position change of the front glass with seal and the main seal during this procedure. Provide clamping of the main unit and the front frame by means of holding them together with both hands, and turn the unit around. Put the 8 screws back into place which connect the main unit with the front frame and tighten them with 3.0-3.3Nm torque. ■ Getting started: choosing a location Risk of fire: The MULTISPOT-GII-HP5 LED has been designed for environmental temperatures of up to 40 degrees Celsius. For proper operation, the unit must be operated with unobstructed air convection to its outside metal case. Do not: Operate the MULTISPOT-GII-HP5 LED in environments with more than 40 degrees environmental temperature Operate the MULTISPOT-GII-HP5 LED in any closed environment smaller than 10cbm, unless forced air convection is provided. ■ Getting started: secure mounting The MULTISPOT-GII-HP5 LED can be mounted in various ways: Floor standing operation Turn the bracket to the lower side of the unit and fold out the second, inlaying bracket. Place the unit in a secure position where it can neither be touched by anyone or could possibly become an objective for anyone to stumble. Make sure to comply with cooling requirements of the used power supply if any. Hanging/Rigging, ceiling-mounted operation Risk of injury: Overhead mounting requires extensive experience, like calculating working load limits, knowledge installation materials, and periodic safety inspection of all installation material and the unit. If you lack such qualifications, do not attempt the installation yourself. Improper installation can result in body injury. Be sure to complete all rigging and installation procedures before applying power to the unit. V1.00 (08-2011) 12 Leave the inner and outer bracket folded. The unit should be installed out of reach of people and outside areas where persons may walk by or be seated. Make sure that the installation area can hold a minimum point load of 10 times the device’s weight. In fixed installations, fix the unit with self-locking screws/nuts to the mounting point. When mounting the unit to truss be sure to secure an appropriately rated clamp to the hanging yoke using a M10 screw fitted through the center hole of the hanging yoke. Where required, secure the installation with an appropriate safety cable. Always use a certified safety cable according to DIN56927 that can hold 12 times the V1.00 (08-2011) 13