1
M3 x 4
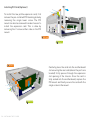
Replacing the HDD/ODD Cage
With all the drives now fitted to the cage,
carefully lower it into the chassis. Note that the
front mounting points are under the screw
holes and the back are above.
Replace the 4 screws to secure the cage in
place, and make sure that all drives cables are
accessible and easy to connect.
M3 x 5
Adjust the position of the optical drive so that
the drive eject button makes light contact
with the chassis eject button bar.
Test that the button operates correctly by
listening for the eject button ‘clicking’ sound
when pressing the chassis eject button.
Once the correct position has been found,
tighten the 4 screws to secure the optical
drive in place.
If the drive requires a larger amount of travel
then is allowed by the mounting holes, you
can fully remove the screw marked with the
red arrow.
M2 x 3
REPLACING THE HDD/ODD CAGE - P13