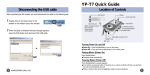
1
Part No. Z1-004-532, IB019012 Dec. 2009 User’s Manual General Description 1 Installation and Preparation 2 Basic Operation 3 External Control 4 Remote Control 5 Specifications 6 FC Impedance Meter KFM2005 App. Thank you for purchasing the KFM2005 FC Impedance Meter. How to read this manual About Operation Manual This manual is designed to be read from beginning to end. We recommend that you read it thoroughly before using this product for the first time. The operation manual for the KFM2005 is consisting of the “User’s Manual” (this manual) and the “Communication Interface Manual”. In addition, the “User’s Manual” for the FCTester for KFM2005 (accompanying application software) is available. This manual is intended for users of the product or persons teaching other users on how to operate the product. The manual assumes that the reader has knowledge about electronic measuring instrument. • KFM2005 User’s Manual (this manual) This manual is intended for first-time users of the KFM2005. It gives an overview of the KFM2005, connecting procedures, safety precautions, etc. Read through and understand this manual before using the product. • KFM2005 Communication Interface Manual (HTML, PDF) The interface manual explains the remote control by using SCPI commands. It is provided on the accompanying CDROM. The interface manual is written for readers with sufficient basic knowledge of how to control instruments using a personal computer. The HTML manual can be viewed using the following browsers. Operating environment: Windows 98 or later Browser: Microsoft Internet Explorer 5.5 or later Waste Electrical and Electronic Equipment (WEEE) Disposing of used Kikusui products in the EU Under a law adopted by member nations of the European Union (EU), used electric and electronic products carrying the symbol below must be disposed of separately from general household waste. This includes the power cords and other accessories bundled with the products. When disposing of a product subject to these regulations, please follow the guidance of your local authority, or inquire with your Kikusui distributor/agent where you purchased the product. The symbol applies only to EU member nations. Disposal outside the EU When disposing of an electric or electronic product in a country that is not an EU member, please contact your local authority and ask for the correct method of disposal. Trademarks • FCTester for KFM2005 User’s Manual (HTML Help, PDF) This user’s manual explains the remote control by using the FCTester for KFM2005 application software. It is provided on the accompanying CD-ROM. Microsoft, Windows and Visual Basic are registered trademarks of Microsoft Corporation in the United States and/ or other countries. You can view the PDF manual using Adobe Reader 6.0 or later. Other company names and product names used in this manual are generally trademarks or registered trademarks of the respective companies. Operation manual has been prepared with the utmost care; however, if you have any questions, or note any errors or omissions, please contact Kikusui distributor/agent. If the operation manual gets lost or soiled, a new copy can be provided for a fee. In either case, please contact Kikusui distributor/agent, and provide the “Kikusui Part No.” given on the cover page. After reading, always keep the manual nearby so that you may refer to it as needed. Copyrights The contents of this manual may not be reproduced, in whole or in part, without the prior consent of the copyright holder. The specifications of this product and the contents of this manual are subject to change without prior notice. © 2009 Kikusui Electronics Corporation The newest version of the operation manual can be downloaded from Download service of Kikusui website (http:// www.kikusui.co.jp/en/ download/). Product firmware versions This manual applies to products with firmware versions 1.0X. When contacting us about the product, please provide us with: The model (marked in the top section of the front panel) The firmware version (see page 20.) The serial number (marked in the bottom section of the rear panel) 2 KFM2005 Safety Symbols For the safe use and safe maintenance of this product, the following symbols are used throughout this manual and on the product. Note the meaning of each of the symbols to ensure safe use of the product. (Not all symbols may be used.) Notations Used in This Manual • The KFM2005 FC Impedance Meter is also referred to as the KFM2005. • Device under test is also referred to as the DUT in this manual. • The following markings are used in this manual. or Indicates that a high voltage (over 1 000 V) is used here. Touching the part causes a possibly fatal electric shock. If physical contact is required by your work, start work only after you make sure that no voltage is output here. DANGER Indicates an imminently hazardous situation which, if ignored, will result in death or serious injury. WARNING Indicates a potentially hazardous situation which, if ignored, could result in death or serious injury. CAUTION Indicates a potentially hazardous situation which, if ignored, may result in damage to the product or other property. WARNING Indicates a potentially hazardous situation which, if ignored, could result in death or serious injury. CAUTION Indicates a potentially hazardous situation which, if ignored, may result in damage to the product and other property. Indicates a prohibited act. Indicates information that you should know. DESCRIPTION Explanation of terminology or operation principle. See Indicates reference to detailed information. SHIFT+key name (marked in blue) Indicates a warning, caution, or danger. When this symbol is marked on the product, see the relevant section in this manual. Indicates an operation that requires you to press a key indicated in blue letters while holding down the SHIFT key. Protective conductor terminal Chassis (frame) terminal On (supply) Off (supply) In position of a bi-stable push control Out position of a bi-stable push control KFM2005 3 G N L Safety Precautions The following safety precautions must be observed to avoid fire hazards, electric shock, accidents, and device failures. Keep them in mind and make sure to observe them. Using the product in a manner that is not specified in the operation manual may impair the protection functions provided by the product. Grounding • This product is IEC Safety Class I equipment (equipment with a protective conductor terminal). To prevent electric shock, be sure to connect the protective conductor terminal of the product to electrical ground (safety ground). Che ck? ration Ope al Manu Users • This product must be used only by qualified personnel who understand the contents of this operation manual. • If an unqualified personnel is to use the product, be sure the product is handled under the supervision of qualified personnel (those who have electrical knowledge). This is to prevent the possibility of personal injury. Purpose of use • Never use the product for purposes other than the product’s intended use. • This product is not designed or manufactured for general home or consumer use. Line Voltage Operation • If you notice a malfunction or abnormality in the product, stop using it immediately, and remove the power cord plug from the outlet. Make sure the product is not used until it is completely repaired. • Do not disassemble or modify the product. If you need to modify the product, contact your Kikusui distributor or agent. Maintenance and inspection • To prevent electric shock, be sure to unplug the product before carrying out maintenance or inspection. Do not remove the external cover. • Check periodically that there are no tears or breaks in the power cord. • If the panel needs cleaning, gently wipe it using a soft cloth with water-diluted neutral detergent. Do not use volatile chemicals such as benzene or thinner. Input power • Use the product within the rated input line voltage range. • For applying power, use the power cord provided. For details, see the respective page in this operation manual. • To maintain the performance and safety of the product, we recommend periodic maintenance, inspection, cleaning, and calibration. • This product is an equipment of IEC Overvoltage Category II (energy-consuming equipment supplied from the fixed installation). Service Fuse • Kikusui service engineers will perform internal service of the product. If the product needs adjustment or repairs, contact your Kikusui distributor or agent. • The fuse can be replaced on this product. When replacing the fuse, use a fuse of shape, rating, and characteristics that conform to the product. For details, see the respective page in the operation manual. Cover • Some parts inside the product are hazardous. Do not remove the external cover. 4 KFM2005 Precautions Concerning Installation Location Precautions for Moving the Product Be sure to observe the following precautions when installing the product. Note the following points when moving or transporting the product to the installation location. • Do not use the product in a flammable atmosphere. To prevent explosion or fire, do not use the product near alcohol, thinner or other combustible materials, or in an atmosphere containing such vapors. • Turn off the POWER switch. Moving the product with the power is turned on may cause electric shock or damage to it. • Avoid locations where the product is exposed to high temperature or direct sunlight. Do not install the product near a heater or in areas subject to drastic temperature changes. Operating temperature range: 0 °C to +40 °C (+32 °F to +104 °F) Storage temperature range: -10 °C to +60 °C (14 °F to +140 °F) • Avoid humid environments. Do not install the product in high-humidity locations near a boiler, humidifier, or water supply. Operating humidity range: 20 %rh to 80 %rh (no condensation) Storage humidity range: 0 to 90 %rh (no condensation) Condensation may occur even within the operating humidity range. If this happens, do not use the product until the condensation dries up completely. • Disconnect all wiring. Moving the product with the cables connected may cause wires to break or injuries due to the product falling over. • Put away the stand. The stand may break if the product is moved with the stand pulled out. • When transporting the product, be sure to use the original packing materials. Otherwise, damage may result from vibrations or from the product falling during transportation. • Be sure to include the operation manual. • Be sure to use the product indoors. This product is designed for safe indoor use. • Do not install the product in a corrosive atmosphere. Do not install the product in a corrosive atmosphere or in environments containing sulfuric acid mist, etc. This may cause corrosion of various conductors and bad contacts of connectors inside the product leading to malfunction and failure, or in the worst case, a fire. • Do not install the product in a dusty location. Accumulation of dust may lead to electric shock or fire. • Do not use the product where ventilation is poor. This product employs a forced air cooling system. Air is taken in from intake ports located on the front panel and exhausted from the ports on the rear panel. Install the product so that the vent ports are at least 20 cm from the wall to prevent the possibility of fire caused by accumulation of heat. In addition, do not place objects within 20 cm. • Do not place objects on the product. Placing heavy objects on top of the product may cause failures. • Do not install the product on an inclined surface or location subject to vibrations. The product may fall or tip over causing damages and injuries. • Do not use the product in a location where strong magnetic or electric fields are nearby or a location where large amount of distortion and noise is present on the input power supply waveform. The product may malfunction. • Do not use the product near highly sensitive measuring instruments or transceivers. The noise generated by the product may affect them. KFM2005 5 Contents Safety Symbols ....................................................................................................... 3 Notations Used in This Manual ............................................................................... 3 Safety Precautions .................................................................................................. 4 Precautions Concerning Installation Location ......................................................... 5 Precautions for Moving the Product ........................................................................ 5 Front Panel (Controls and Terminals) .................................................................................... 8 Front Panel (LCD)............................................................................................................... 10 Rear Panel ........................................................................................................................... 12 6 1 2 General Description 3 Basic Operation Product Overview................................................................................................................. Features.............................................................................................................. KFM2005 Configuration ...................................................................................... Rack Mounting Option.......................................................................................................... 14 14 15 16 Installation and Preparation Checking the Package Contents.......................................................................................... Using the Stand.................................................................................................................... Connecting the Power Cord ................................................................................................. Turning the Power On .......................................................................................................... Turning the POWER Switch On .......................................................................... Turning the POWER Switch Off .......................................................................... Connecting to the Fuel Cell.................................................................................................. Using the Internal Load Device ............................................................................................ Setting the Load Current ..................................................................................... Turning the Load On/Off ..................................................................................... Measuring the Impedance.................................................................................................... Setting the Measurement Range and Measurement Frequency ........................ Setting the superimposed Current ...................................................................... Setting the Average Count ................................................................................................... Setting the Integral Average ............................................................................... Setting the Moving Average................................................................................ Protection Function .............................................................................................................. Overvoltage Protection (OVP)............................................................................. Undervoltage Protection (UVP)........................................................................... Overheat Protection (OHP) ................................................................................. Overload Protection (OPP) ................................................................................. Overcurrent Protection (OCP)............................................................................. Disconnection detection (OPEN) ........................................................................ Resetting Alarms.................................................................................................................. Adjusting the LCD contrast .................................................................................................. Using the Memory Function ................................................................................................. Storing the Panel Settings to the Memory........................................................... Recalling the Panel Settings from the Memory ................................................... Changing the item to be displayed on the LCD.................................................................... 18 18 19 20 20 20 22 24 24 25 26 26 27 30 30 30 32 32 32 33 34 34 34 35 35 36 36 37 38 KFM2005 4 External Control 5 Remote Control 6 Specifications Appen dix Using the CONTROL TERMINAL ........................................................................................ Connecting the Wire to the CONTROL TERMINAL ............................................ Controlling the load current using an external voltage ......................................................... Turning the Load Current On/Off.......................................................................................... Switching the Internal Load Device Range .......................................................................... Voltage Monitoring ............................................................................................................... Current Monitoring................................................................................................................ Using the Alarm Output ........................................................................................................ Using the LOAD ON/OFF Status Output.............................................................................. Selecting the Communication Interface................................................................................ Operating the KFM2005 with SCPI commands.................................................................... Using the Accompanying Application Software.................................................................... Product Overview ................................................................................................ System Requirements ......................................................................................... VISA Driver.......................................................................................................... Notes on use ....................................................................................................... Opening the Menu Program Window .................................................................. Installing the KI-VISA .......................................................................................... Installing the FCTester for KFM2005 .................................................................. Starting FCTester for KFM2005 .......................................................................... Viewing the FCTester for KFM2005 User’s Manual ............................................ Impedance Measurement Section....................................................................... DC Voltage and Current Measurement Section .................................................. Electronic Load Section....................................................................................... Protection Function ............................................................................................. Communication Interface .................................................................................... General................................................................................................................ Outline Drawing................................................................................................... A B C D 40 41 42 43 44 45 45 46 46 48 51 52 52 52 53 54 54 55 56 56 57 60 61 61 62 62 63 64 Overview of the Fuel Cell ........................................................... 66 Impedance Measurement Method of the KFM2005................... 67 Concerning the GUARD Terminal .............................................. 68 Maintenance .............................................................................. 69 Replacing the Fuse ............................................................................................. 69 Replacing the Backup Battery ............................................................................. 69 Calibration ........................................................................................................... 69 E Troubleshooting ......................................................................... 70 Index ........................................................... 73 KFM2005 7 Front Panel (Controls and Terminals) Sensing terminals Display Vent holes Controls SENSING LOW OHP OVER LOAD LOAD ON HIGH 20V f:10kHz R X GUARD DC:0.00000A 432.2mΩ -87.4mΩ Averaging... 1/128 Z MEASURE 11.3mA Range 50mA Variable AUTO CURR-DC Current-AC Coarse 441.0mΩ -11.44deg F1 F3 IMPD AVERAGE F2 F4 AC VIEW MEMORY LOAD STORE/ RECALL ON OFF PROTECT CURRENT LOCAL SYSTEM RMT SHIFT 60W 20V 30A LOW KFM2005 HIGH LOAD Stand Load input terminals 1 2 4 3 SENSING LOW HIGH 20V OHP OVER LOAD LOAD ON 13 12 14 60W 20V 5A LOW HIGH LOAD MEMORY MEASURE GUARD F1 F3 IMPD AVERAGE F2 F4 AC VIEW STORE/ RECALL LOAD ON OFF 5 PROTECT CURRENT 6 11 SYSTEM LOCAL RMT SHIFT 7 10 8 9 8 KFM2005 No. Name Function See 1 OHP LED If the internal temperature rises abnormally, the load is turned off. Then, the OHP LED lights to warn the user. p. 33 2 OVER LOAD LED If the power consumption at the load exceeds 63 W, the OVER LOAD (Overload Protection) lights to warn the user. p. 34 Stores or recalls panel settings. Three sets of memories are available: A, B, and C. p. 36 LOAD ON LED Lights when the load is turned on. p. 25 LOAD A group of keys used to configure the internal load device. MEMORY 3 4 STORE/RECALL key 5 ON key Press this key to turn the load on. The specified load current flows through the KFM2005. p. 25 OFF key Press this key to turn the load off and cut off the current flowing through the KFM2005. This key also clears the alarm when an alarm is activated. p. 25 PROTECT key Sets the detection voltage for protecting the fuel cell from abnormal voltage. p. 32 CURRENT key Sets the current of the internal load device. p. 24 6 SYSTEM key Selects the communication interface for remote control. p. 48 7 POWER switch Turns on ( )/off ( p. 20 Rotary knob Changes values and settings. You can press the rotary knob to switch between coarse adjustment and fine adjustment. Turn the rotary knob while holding down the SHIFT key to adjust the LCD contrast. - MEASURE A group of keys used to configure the impedance measurement. - 8 IMPD key 9 Sets the measurement frequency or range. p. 26 AVERAGE key Sets the average count. p. 30 AC key Sets the superimposed current. p. 27 VIEW key Sets the items displayed on the LCD. p. 38 Remote mode is enabled while this key is lit. Press this key in remote mode to switch to local mode. - SHIFT key Calls up the functions marked in blue characters. - FUNCTION Function keys - F1 / F3 key Press this key to perform the function of F1. Pressing this key with the SHIFT key held down performs the function of F3. - F2 / F4 key Press this key to perform the function of F2. Pressing this key with the SHIFT key held down performs the function of F4. - HIGH terminal LOW terminal Sensing terminals for impedance measurement and voltage readout. p. 22 GUARD terminal It is the circuit common for the measuring related circuits. p. 68 HIGH terminal LOW terminal Load input terminal. Connect between the same polarities of the LOAD terminals and fuel cell. p. 22 10 LOCAL ( 11 12 13 14 ) the power. SENSING LOAD KFM2005 RMT) key 9 Front Panel (LCD) 16 Measured value display area 15 Preset value display area 11.3mA f:10kHz DC:0.00000A R X 432.2mΩ -87.4mΩ Z 441.0 -11.44 Averaging... 1/128 17 Message display area No. Name Range 50mA mΩ Variable deg AUTO CURR-DC Current-AC Coarse 18 Function key display area Function See Displays the preset frequency value, the preset load current value, and the superimposed current value. Indicates the level of the measurement range. Indicates the superimposed current. Displays when "FIX" of the variable mode (varying the superimposed current) is selected. 15 Preset value display area Displays when "AUTO" of the variable mode (varying the superimposed current) is selected. Indicates the variation ratio (10 % to 100 %) of the superimposed current value by the position of Icon. The variation level of icon bar can be referred to compare with the displays for the height level of stick bar placed horizontally on the vertical axis when the "Manual" mode is selected. - Displays when "AUTO" of the variable mode (varying the superimposed current) is selected. Displays when the terminal voltage of the DUT is measured more than 5 mVpp even when the value of superimposed current is varied down to 10 %. Displays when "AUTO" of the variable mode (varying the superimposed current) is selected. Displays when the terminal voltage of the DUT is measured less than 5 mVpp even when the value of superimposed current is varied up to 100 %. Displays when "Manual" of the variable mode (varying the superimposed current) is selected. The height level of stick bar placed horizontally on the vertical axis varies depends on the specified value (10 % to 100 %). 10 KFM2005 No. Name Function See Displays measured values. 16 Measured value display area V Sensing voltage I Load current R Real resistance R of the impedance X Reactance Z Absolute value of the impedance θ Impedance phase angle p. 38 Displays the status such as an alarm occurrence, a measurement value, and a transaction progress. By turning the rotary knob, the setting value or the condition of the item displayed on the right side of the icon can be changed. By pressing the rotary knob, the item displayed on the right side of the icon can be changed. 17 Message display area By pressing the rotary knob repeatedly, the setting value or the condition of the item displayed on the left side of the icon can be changed. Over Range Displayed when the measured value exceeds the measurement range. Averaging Displayed while processing the moving average. ALM Displayed when an alarm occurs. ALM:OVP (overvoltage protection) ALM:UVP (undervoltage protection) ALM:OHP (overheat protection) ALM:OCP (overcurrent protection) ALM:OPEN (disconnection detection) ALM:OPP (overload protection) 18 Function key display area - The item shown in this area can be set using the F1 (F3) and F2 (F4) keys. Press the CURRENT, IMPD, AVERAGE, or VIEW key to switch this area. p. 30 p. 32 - By pressing the function key repeatedly located on the right side of the icon, the setting value or the condition can be changed. KFM2005 11 Rear Panel 19 27 28 26 23 25 29 24 No. Name Function 19 USB connector A connector for the USB cable. - 20 GPIB connector A 24-pin connector for the GPIB cable. Conforms to the IEEE-488-1978 GPIB Standard. - 21 RS232C connector A connector for the RS232C cable. p. 49 22 CONTROL TERMINAL The terminal for controlling the built-in electronic load by the external signal, and for monitoring the operation status of the KFM2005. p. 40 23 Vent holes Air is taken in from intake ports located on the front panel and exhausted from the ports on the rear panel. - 24 Cord holder A holder for winding the power cord for storage. - 25 EXT CONT 12 22 21 20 OFS adjuster A variable resistor for fine tuning the offset current when controlling the internal load device externally. FSC adjuster A variable resistor for fine tuning the full scale current when controlling the internal load device externally. See p. 42 26 OPTION terminal A reserved terminal for future expansion. Do not connect anything to this terminal. 27 AC LINE connector A connector for the power cord. p. 19 28 FUSE Fuse holder for the input power supply. p. 69 29 Stand The stand is used to tilt the front panel for easier viewing of the screen and improving the operability of the keys. p. 18 KFM2005 1 General Description This chapter gives an overview and describes the options. Product Overview The KFM2005 FC impedance meter has been developed to easily test the impedance characteristics of the fuel cell under loaded conditions using the AC impedance method. The electronic load with the maximum input power of 60 W is built-in in the KFM2005, so it has capability of testing the fuel cell with the DC load current flowing in 2 ranges 0.5 A or 5 A at the maximum voltage of 20 V. Features ● DC load function The KFM2005 is equipped with a constant current (CC) mode load device with two load current ranges. The load device can be switched between two ranges: 5 A maximum and 0.5 A maximum. ● AC impedance measurement function AC impedance from 10 mHz to 10 kHz can be measured on the fuel cell under test under loaded conditions. Four elements of the Impedance, the real resistance element "R", the reactance element "X", the absolute value of impedance "|Z|", and the phase angle "θ" of impedance can be displayed at a time. ● DC voltage measurement function Measures the DC voltage at the sensing terminal. Two full scale ranges are available: 2 V and 20 V. ● The variable function of the superimposed current The superimposed current*1 can be selected from 2 modes either in "50 mApp" or "16.5 mApp". To suppress the effect to the fuel cell, the superimposed current can be varied between the range from 10 % to 100 % for each range (5 mApp to 50 mApp, or 1.65 mApp to 16.5 mApp) respectively. Even when the impedance of the fuel cell changes, the function is installed that the superimposed current varies automatically to keep the terminal voltage of the DUT at 5 mVpp. ● Load current read back function The current flowing through the load device can be read back. ● External control of the load current The load device current can be controlled using an external voltage. 1. 14 To superimpose the current on the load current by the AC current for the impedance measurement, it is called as "Superimposed Current" in this operation manual. KFM2005 Product Overview ● Remote control function The KFM2005 can be controlled by the PC using SCPI commands through by the port on the rear panel. By using the application software "FC Tester for KFM2005" included as a standard accessory, it can be remotely operated from the PC and conduct the test for the I-V characteristic test, the Cole-Cole plot, and the constant current test, and the test result can be saved as a text file. KFM2005 Configuration 1 General Description The interface, RS232C, USB, GPIB, are equipped as standard. As shown in Fig. 1-1, the KFM2005 is equipped with the necessary functions for testing fuel cells on a single unit. It consists of an electric load device, voltmeter, ammeter, and impedance meter. In addition, it is equipped with useful functions such as external load current control and communication interface that facilitate the synchronization with the fuel cell control system. LOAD HIGH SENSING HIGH Impedance meter / Voltmeter Fuel cell Constant current AC circuit (Superimposed current) Load device / Ammeter SENSING LOW LOAD LOW KFM2005 Fig. 1-1 See p. 67 KFM2005 KFM2005 configuration The KFM2005 incorporates a high performance constant current AC circuit that enables a given AC current (superimposed current) to be supplied to the fuel cell. By connecting sensing wires to the output terminals of the fuel cell, the KFM2005 samples the AC voltage to calculate the impedance. Therefore, highly accurate measurements can be made even when resistance or inductance components in the wires or contact resistance exist. The power that the fuel cell generates is absorbed by allowing DC current to flow through the load device from the LOAD terminal. A superimposed current is supplied by the constant current AC circuit through the LOAD terminal to the fuel cell. The superimposed current does not flow through the load device in the process. The impedance is calculated using the AC voltage that is measured by the SENSING terminal and the superimposed current. 15 Rack Mounting Option The following options are available for the KFM2005. For details on the options, contact your Kikusui agent or distributor. Item Model Notes Rack mount bracket KRB2-TOS Inch rack EIA standard KRB100-TOS Milli rack JIS standard KRB2-TOS 6 (0.24) 76 (3.00) 88 (3.47) 465 (1 479 (18.31) 8.86) 24.5 460 479 50 99 KRB100-TOS Unit: mm (inch) 16 KFM2005 2 Installation and Preparation This chapter describes the procedures of unpacking and preparation of the KFM2005 before use. Checking the Package Contents When you receive the product, check that all accessories are included and that the accessories have not been damaged during transportation. If any of the accessories are damaged or missing, contact your Kikusui agent or distributor. We recommend that you keep all packing materials, in case the product needs to be transported at a later date. or Rating: 125 V, 10 A Plug: NEMA5-15 [85-AA-0003] The power cord that is provided varies depending on the destination for the product at the factory-shipment. or Rating: 250 V, 10 A Plug: CEE7/7 [85-AA-0005] Rating: 250 V, 10 A Plug: GB1002 [85-10-0790] Power cord (1 pc.) Contained in the AC LINE connector. AWG24 2-core shielded wire 1.5 m 6.3 A (T) 250 VAC Sensing wire (1 pc.) [91-80-9910] Spare fuse (1 pc.) [99-02-0019] KFM2005 User’s manual (This manual, 1 pc.) [Z1-004-532] Fig. 2-1 AWG18 Red and white twisted pair 1.5 m Load wire (1 pair) [91-80-5842] CD-ROM [SA-6032] Accessories Using the Stand The stand is used to tilt the front panel for easier viewing of the screen and improving the operability of the keys. Pull and flip over the stand underneath at the front until it clicks in place. Fig. 2-2 CAUTION 18 Using the stand When using the stand, do not place objects on top of the product or apply downward force from the top of the product. To do so may cause the stand to break. KFM2005 Connecting the Power Cord WARNING • This product is an IEC Safety Class I equipment (equipment with a protective • Use the supplied power cord to connect to the AC line. If the supplied power cord cannot be used due to the rated voltage or the plug shape, have the cord replaced with an appropriate power cord of length 3 m or less by a qualified engineer. If obtaining a power cord is difficult, consult your Kikusui agent or distributor. • In an emergency, the power cord with a plug may be used to disconnect the product from the AC line in an emergency. Connect the plug to an easily accessible power outlet so that the plug can be removed from the outlet at any time. Be sure to allow enough space around the power outlet. • Do not use the supplied power cord on other instruments. 2 Installation and Preparation conductor terminal). To prevent electric shock, be sure to ground (earth) the unit. • This product is grounded through the ground wire of the power cord. Be sure to connect the power plug to an outlet with an appropriate earth ground. This product is an equipment of IEC Overvoltage Category II (energy-consuming equipment supplied from the fixed installation). 1 2 Turn the POWER switch off. Check that the AC power line complies with the input rating of the KFM2005. The voltage that can be applied is any of the nominal power supply voltages in the range of 90 Vac to 132 Vac or 180 Vac to 250 Vac. The frequency is in the range of 45 Hz to 65 Hz. 3 Connect the power cord to the AC inlet (AC LINE) on the rear panel, and connect the power cord plug to an outlet with proper grounding. To a three-prong outlet with proper grounding Fig. 2-3 KFM2005 Plug connection 19 Turning the Power On Turning the POWER Switch On 1 2 Press the POWER switch to turn the power on ( ). Check the firmware version (Ver x.xx) that appears on the screen. KFM2005 Fuel Cell Impedance Meter Version: 1.02 KIKUSUI ELECTRONICS CORP. Self Check... When you turn the POWER switch on for the first time, the following screen will appear after the firmware version (factory default setting). f : 10kHz R X DC:0.00000A 226.7mΩ 66.4mΩ Z 50.0mA 235.8mΩ 16.44deg FREQ Range Auto Impedance Because the KFM2005 stores the conditions immediately before the POWER switch is turned off, the KFM2005 starts up using the conditions that existed when the POWER switch was turned off the last time. Turning the POWER Switch Off CAUTION It may cause the damage to the KFM2005. When turning off the POWER switch of the KFM2005, be sure that the load current is in the state of LOAD OFF. To turn on the POWER switch again, make sure that the built-in cooling fan is completely stopped before turning on. Press the POWER switch to turn the power off ( ). The KFM2005 stores the panel settings immediately before the POWER switch is turned off. 20 KFM2005 3 Basic Operation This chapter describes the procedure to connect the fuel cell and the panel operations. Connecting to the Fuel Cell CAUTION To prevent damage to the KFM2005 and the fuel cell, • Pay attention to the polarities of the fuel cell. If the polarity is reversed, overcurrent may flow. • The maximum input voltage of the LOAD terminal is 20 V. Do not apply the voltage exceeding 20V. To prevent damage to the load wire and the sensing wire, • Be sure to use a wire with a diameter that can handle at least the maximum load current (5 A) and strong sheath that is frame resistant. • The rated temperature of the sensing wire provided is 80°C. Therefore, the fuel cell with the activation temperature exceeding 80°C can not be used. • Even for fuel cells that run at relatively low temperatures such as a PEFC, the cable cannot be connected to a location where the collecting electrode or ambient temperature is 75°C or higher. Connect the sensing wire to the point where you wish to measure the impedance or voltage on the fuel cell. If wish to eliminate the effects of the electrode plate, you must connect the sensing terminal directly to the separator. If you wish to measure the performance at the electrode terminal, you must connect it to the electrode terminal. 1 2 Check that the POWER switch is turned off. Connect the electrode plate of the fuel cell to the LOAD terminal using the load cable provided as shown in Fig. 3-1. Connect the positive and negative polarities of the fuel cell to the HIGH and LOW terminals of the LOAD, respectively. It is recommended that the cables be stranded to eliminate the effects of magnetic flux. 3 Connect the desired sensing point of the fuel cell to the SENSING terminal of the KFM2005 using the sensing wires provided. Connect the shield to the GUARD terminal. Connect the positive and negative polarities of the fuel cell to the HIGH and LOW terminals of the SENSING, respectively. ■ Further information for the GUARD terminal See 22 See Appendix C "Concerning the GUARD Terminal". p. 68 KFM2005 Connecting to the Fuel Cell Sensing wire Connect the shield to the GUARD terminal. - + SENSING LOW HIGH 20V GUARD 3 60W 20V 5A LOW HIGH Basic Operation LOAD KFM2005 Twist Load cable Fuel cell Fig. 3-1 Connecting to the fuel cell Table 3-1 Nominal crosssectional area [mm2] AWG (Reference crosssectional area) [mm2] Allowable current*1 [A] (Ta = 30 °C) Current recommended by Kikusui [A] 2 14 (2.08) 27 10 3.5 12 (3.31) 37 - 5.5 10 (5.26) 49 20 8 8 (8.37) 61 30 14 5 (13.3) 88 50 22 3 (21.15) 115 80 30 2 (33.62) 139 - 38 1 (42.41) 162 100 50 1/0 (53.49) 190 - 60 2/0 (67.43) 217 - 80 3/0 (85.01) 257 200 100 4/0 (107.2) 298 - 125 - - 344 - 150 - - 395 300 200 - - 469 - *1. KFM2005 Nominal cross-sectional area of cables and allowable currents Excerpts from Japanese laws related to electrical equipment. 23 Using the Internal Load Device To use the built-in electronic load, set the load current first, then turn the load on. Setting the Load Current 1 Press the CURRENT key. "Current" is displayed on the function key display area. OHP 50.0mA f:10kHz DC:0.00000A R X 226.7mΩ 65.9mΩ Z 236.5mΩ 16.42deg CURR-DC Coarse OVER LOAD MEASURE Range 0.5A Source INT Current F1 F3 IMPD AVERAGE F2 F4 AC VIEW See MEMORY STORE/ RECALL LOAD ON SYSTEM RMT Press the F2 key to select the INT (KFM2005 control) for the Source (load current setting control). The setting (INT/EXT) changes each time the F2 key is pressed. When "EXT" (external control) is selected, the value of load current can not be set by the front panel. p. 42 INT Ext OHP 50.0mA f:10kHz DC:0.00000A R X 226.7mΩ 65.9mΩ Z 236.5mΩ 16.42deg CURR-DC Coarse OVER LOAD MEASURE Range 0.5A Source INT Current F1 F3 IMPD AVERAGE F2 F4 AC VIEW LOAD ON MEMORY STORE/ RECALL LOAD ON 3 SYSTEM RMT Press the F1 key to select the Range. The setting (0.5 A/5 A) changes each time the F1 key is pressed. If the range is switched, the load is turned off to prevent unintended current from flowing through the circuit. 0.5 A 5A OHP 50.0mA f:10kHz DC:0.29999A R X 226.7mΩ 65.9mΩ Z 236.5mΩ 16.42deg CURR-DC Coarse OVER LOAD MEASURE Range 0.5A Source INT Current F1 F3 IMPD AVERAGE F2 F4 AC VIEW LOCAL SHIFT 4 OFF PROTECT CURRENT LOCAL SHIFT 24 OFF PROTECT CURRENT LOCAL SHIFT 2 LOAD ON LOAD ON MEMORY STORE/ RECALL LOAD ON OFF PROTECT CURRENT SYSTEM RMT Turn the rotary knob to set the load current. Press the rotary knob to switch the setting resolution (Coarse / Fine). If the fine adjustment is required, select the "Fine". KFM2005 Using the Internal Load Device Load current range: 0.5 A 5A Fine setting resolution: 0.00001 A 0.0001 A Coarse setting resolution: 0.00100 A 0.0100 A OHP 226.7mΩ 65.9mΩ 236.5mΩ 16.42deg Z CURR-DC Coarse Range 0.5A Source INT Current F1 F3 IMPD AVERAGE F2 F4 AC VIEW STORE/ RECALL LOAD ON OFF PROTECT CURRENT LOCAL SYSTEM RMT SHIFT Coarse LOAD ON MEMORY 3 Fine Turning the Load On/Off "Turning the load on" refers to the operation of enabling the current to flow. "Turning the load off" refers to the operation of cutting off the current. Basic Operation 50.0mA f:10kHz DC:0.29999A R X OVER LOAD MEASURE Press the ON key to turn the load on; press the OFF key to turn the load off. Lights OHP f :10kHz DC :0.29999A R X 226.7mΩ 65.9mΩ Z 50.0mA 236.5mΩ 16.42deg FREQ OVER LOAD MEASURE Range Auto F1 F3 IMPD AVERAGE F2 F4 AC VIEW LOCAL p. 43 MEMORY STORE/ RECALL LOAD ON OFF PROTECT CURRENT Impedance SHIFT See LOAD ON SYSTEM RMT When the external signal for the load off is applied, the load on/off can not be controlled by the front panel. • Be sure that the setup such as the current setting, the connection to the fuel cell, and the polarity are correct before turning the load on. • If the cell voltage fluctuates during the measurement and the KFM2005 cannot distinguish the superimposed current from the fluctuating voltage, the measurement may become unstable or the measurement may not be possible. When measuring the impedance, be sure that the cell voltage is stable and free from the effects of external noise. • The fuel cell noise and the voltage fluctuation tend to increase in proportion to the load current. If the load current is large, a more stable result can be obtained using a superimposed current of 50 mA rather than 16.5 mA in the same measurement range. DESCRIPTION Difference between 0 A setting with the load turned on and the load turned off With 0 A setting with the load turned on, the KFM2005 tries to set the load current to 0 A, but the actual current is not 0 A. This current is called an offset. The offset in the specifications of the KFM2005 is 2.5 mA or less (5 A range) or 0.5 mA or less (0.5 A range). On the contrary, the load current is electronically cut off when the load is turned off. If you wish to set the current exactly to 0 A, turn the load off. KFM2005 25 Measuring the Impedance The impedance is always measured. (except when the superimposed current is OFF.) The setting items required for the impedance measurement are "measurement range", "measurement frequency", and "superimposed current". Setting the Measurement Range and Measurement Frequency 1 Press the IMPD key. "Impedance" is displayed on the function key display area. OHP f :10kHz DC :0.29999A R X 226.7mΩ 65.9mΩ Z 50.0mA 236.5mΩ 16.42deg FREQ OVER LOAD MEASURE Range Auto F1 F3 IMPD AVERAGE F2 F4 AC VIEW LOAD ON MEMORY STORE/ RECALL LOAD ON OFF PROTECT CURRENT Impedance SYSTEM LOCAL RMT SHIFT 2 Turn the rotary knob to select the measurement frequency (10 mHz to 10 kHz). 10 mHz to 10 kHz OHP 50.0mA f :10kHz DC :0.29999A R X 226.7mΩ 65.9mΩ Z 236.5mΩ 16.42deg FREQ OVER LOAD MEASURE Range Auto F1 F3 IMPD AVERAGE F2 F4 AC VIEW LOAD ON MEMORY STORE/ RECALL LOAD ON Impedance LOCAL SYSTEM RMT SHIFT 3 Press the F1 key to select the measurement range. The setting changes each time the F1 key is pressed. The measurement range can be selected from 100 mΩ, 300 mΩ, 1 Ω, 3 Ω, and Auto. The selectable measurement range is varied depends on the setting of the superimpose current. It can not be selected when the superimposed current set to "OFF". For example, set the superimposed current for 50 mA with measurement range of 1 Ω, and the superimposed current for 16.5 mA with measurement range of 300 mΩ. When the superimposed current is changed from 50 mA to 16.5 mA, the measurement range is also changed from 1 Ω to 300 mΩ. Superimposed :16.5 mA range current :50mA range 300mΩ 100mΩ 1Ω 300mΩ 3Ω 1Ω Auto Auto OHP f :10kHz DC :0.29999A R X 226.7mΩ 65.9mΩ Z 50.0mA 236.5mΩ 16.42deg FREQ OVER LOAD MEASURE Range Auto F1 F3 IMPD AVERAGE F2 F4 AC VIEW LOAD ON MEMORY STORE/ RECALL LOAD ON OFF PROTECT CURRENT Impedance LOCAL SHIFT 26 OFF PROTECT CURRENT SYSTEM RMT KFM2005 Measuring the Impedance Setting the superimposed Current To suppress the effect to the tested fuel cell, the KFM2005 equips the variable mode that the superimposed current can be varied. The following three modes are available for the variable mode. Sets to fix the value of the superimposed current, the same value of current always flows not depends on the frequency. • AUTO To keep the terminal voltage of the DUT at 5 mVpp, the superimposed current varies automatically between the range from 10 % to 100 % in the value of the setting superimposed current. • Manual You can specify the ratio between 10.0 % to 100.0 % to the value of superimposed current. 1 Press the AC key. "Current-AC" is displayed on the function key display area. OHP f :10kHz DC :0.00000A R X 226.7mΩ 65.9mΩ Z 50.0mA 236.5mΩ 16.42deg OVER LOAD MEASURE Range 50mA Variable FIX Current-AC F1 F3 IMPD AVERAGE F2 F4 AC VIEW LOAD ON MEMORY STORE/ RECALL LOAD ON SYSTEM RMT Press the F1 key to select the Range of superimposed current. The setting (50 mA/16.5 mA/OFF) changes each time the F1 key is pressed. 50mA 16.5mA OFF OHP f :10kHz DC :0.00000A R X 226.7mΩ 65.9mΩ Z 50.0mA 236.5mΩ 16.42deg OVER LOAD MEASURE Range 50mA Variable FIX Current-AC F1 F3 IMPD AVERAGE F2 F4 AC VIEW LOAD ON MEMORY STORE/ RECALL LOCAL SHIFT 3 OFF PROTECT CURRENT LOCAL SHIFT 2 3 Basic Operation • FIX LOAD ON OFF PROTECT CURRENT SYSTEM RMT Press the F2 key to select the Variable mode of superimposed current. The setting (FIX/AUTO/Manual) changes each time the F2 key is pressed. When the "Manual" is selected, the value of present setting ratio is displayed. It can not be selected when the superimposed current set to "OFF". KFM2005 27 Measuring the Impedance Setting the superimposed Current (Cont’d) OHP FIX f :10kHz DC :0.00000A R X 226.7mΩ Z 65.9mΩ OVER LOAD Range 50mA 236.5mΩ Variable 16.42deg FIX Current-AC F1 F3 IMPD AVERAGE F2 F4 AC VIEW f :10kHz DC :0.00000A R X 331.4mΩ -352.9mΩ Z 10.3mA 485.0mΩ -46.63deg Range 50mA Variable AUTO Current-AC STORE/ RECALL LOAD ON OFF PROTECT CURRENT SYSTEM LOCAL SHIFT AUTO MEMORY MEASURE 50.0mA LOAD ON RMT When the "Manual" is selected, you can specify the ratio between 10.0 % to 100.0 % to the value of superimposed current. The setting resolution can be switched for Coarse (1.0 % step) or Fine (0.1 % step) by pushing the rotary knob. Manual f :10kHz DC :0.00000A R X 387.7mΩ -332.9mΩ Z 12.0mA Range 50mA 512.5mΩ Variable -40.58deg 24.0% Manual % Current-AC Coarse Fine/Coarse indicator Displays when "FIX" is selected. Displays when "AUTO" is selected. Indicates the variation ratio (10 % to 100 %) of the superimposed current value by the position of Icon. The variation level of icon bar can be referred to compare with the displays for the height level of stick bar placed horizontally on the vertical axis when the "Manual" mode is selected. Displays when "AUTO" is selected. Displays when the terminal voltage of the DUT is measured more than 5 mVpp even when the value of superimposed current is varied down to 10 %. Displays when "AUTO" is selected. Displays when the terminal voltage of the DUT is measured less than 5 mVpp even when the value of superimposed current is varied up to 100 %. Displays when "Manual" is selected. The height level of stick bar placed horizontally on the vertical axis varies depends on the specified value (10 % to 100 %). 28 KFM2005 Measuring the Impedance DESCRIPTION superimposed current and minimum load current The superimposed current of 16.5 mA and 50 mA are in terms of peak-to-peak values. In other words, a current of 16.5 mA corresponds to an AC current with +8.25 mApeak and -8.25 mApeak (+25 mApeak and -25 mApeak for 50 mA). The current that is supplied from the fuel cell to the load device is a DC current. The actual current that flows through the fuel cell is as follows depending on the load current setting. Basic Operation 3 Peak-to-Peak C A B • For case A, the load current is small and a section of the superimposed current does not flow. In this case, the impedance cannot be measured (over range is indicated). • For case B, the load current is at the minimum level that allows the impedance to be measured (8.25 mA for the 16.5 mA range and 25 mA for the 50 mA range). • For case C, the load current is sufficiently greater than the minimum load current, and the impedance can be measured. In this way, the impedance cannot be measured depending on the load current setting. In case of the over range are frequently displayed, draw the load current greater than the minimum load current or minimize the superimposed current as shown either case B or C. However, if you reduce the superimposed current, the effect by noise may become large and the measurement value may become unstable. KFM2005 29 Setting the Average Count The averaging functions below can be used to stabilize the measured result such as when the signal source contains high level of noise or when the measured value fluctuates. Setting the Integral Average 1 Press the AVERAGE key, and then press the F1 key to select the Integration. The "Average" is displayed in the function key display area, and circle check box displayed below "Integration" is changed to " " from " ". When the circle check box is displayed as " ", it means that the Integration is selected. OHP R X 226.7mΩ 65.9mΩ Z MEASURE Integration 1 mΩ Moving deg 1 Averages Average 50.0mA f :10kHz DC :0.00000A OVER LOAD 236.5 16.42 F1 F3 IMPD AVERAGE F2 F4 AC VIEW LOAD ON MEMORY STORE/ RECALL LOAD ON LOCAL SYSTEM RMT SHIFT 2 OFF PROTECT CURRENT Turn the rotary knob to set the integral average count. 1 226.7mΩ Z 65.9mΩ 4 8 16 32 OHP OVER LOAD MEASURE Integration 1 mΩ Moving deg 1 Averages Average 50.0mA f :10kHz DC :0.00000A R X 2 236.5 16.42 F1 F3 IMPD AVERAGE F2 F4 AC VIEW LOAD ON MEMORY STORE/ RECALL LOAD ON OFF PROTECT CURRENT LOCAL SYSTEM RMT SHIFT Setting the Moving Average 1 Press the AVERAGE key, and then press the F2 key to select the Moving. The "Average" is displayed in the function key display area, and circle check box displayed below "Moving" is changed to " " from " ". When the circle check box is displayed as " ", it means that the Moving is selected. OHP f :10kHz DC :0.00000A R X 226.7mΩ 65.9mΩ Z OVER LOAD MEASURE Integration 1 Moving 1 Averages Average 50.0mA 236.5mΩ 16.42deg F1 F3 IMPD AVERAGE F2 F4 AC VIEW LOAD ON MEMORY STORE/ RECALL LOCAL SHIFT 2 30 LOAD ON OFF PROTECT CURRENT SYSTEM RMT Turn the rotary knob to set the moving average count. KFM2005 Setting the Average Count If moving average is set to a value greater than or equal to 2, the message display area displays the progress of the moving average as in "Averaging... 2/128." This indicates that the count is set to 128, and the second moving average is being performed. The display disappears when the specified count is completed. 1 2 226.7mΩ Z 65.9mΩ 8 16 32 64 128 256 Integration 1 mΩ Moving deg 256 Averages Average 236.5 16.42 Averaging... 116/256 OHP OVER LOAD LOAD ON MEMORY MEASURE 50.0mA f :10kHz DC :0.00000A R X 4 F1 F3 IMPD AVERAGE F2 F4 AC VIEW LOAD STORE/ RECALL ON OFF PROTECT CURRENT LOCAL 3 SYSTEM RMT SHIFT DESCRIPTION Difference between integral average (Integration) and moving average (Moving) The KFM2005 determines the impedance by supplying a superimposed current and measuring the AC voltage that results. Therefore, the influence from the electromotive force (DC voltage) of the fuel cell itself must be removed. Basic Operation In progress The KFM2005 is equipped with an offset adjustment function for correcting the DC voltage of the fuel cell. In the impedance measurement, the offset adjustment is performed first. Then, the AC voltage is measured. The number of times the AC voltage is to be measured is referred to as the cycle count. In integral average, the cycle count can be specified, and impedance is determined from the averaged AC voltage. In moving average, the impedance is determined from a single measurement of the AC voltage. The count specified for moving average is the number of times the impedance is averaged. The idea of averaging the measured values to obtain a stable measured result is the same for integral average and moving average. However, the time when offset adjustment is carried out differs between the two. In integral average (Integration), offset adjustment is carried out before starting the measurement, and readjustment is not made until the specified number of cycles elapses. In moving average (Moving), however, offset adjustment is carried out every measurement cycle. It is recommended that Integration be used when you wish to cut down the time needed to make the offset adjustment and shorten the total measurement time. Moving should be used when you wish to obtain a more stable result even if the measurement takes longer. Integration is highly effective when measuring at high frequencies. However, if the electromotive force of the fuel cell is fluctuating gradually (this is called a drift), the drift affects the measurement if Integration is used. This is due to the long interval between offset adjustments. In such case, Moving must be used. Integral average and moving average can be used in combination. When the variable mode of the superimposed current is set to "AUTO", the superimposed current will be stable if an integral average (Integration) is used. Signal voltage Integration Count = 4 Offset adj. cycle1 cycle2 cycle3 cycle4 Impedance measurement Offset adj. cycle1 cycle2 cycle3 cycle4 Impedance measurement Display results Moving Count = 4 Offset adj. Impd. meas. Offset adj. Impd. meas. Offset adj. Impd. meas. Offset adj. Impd. meas. Offset adj. Display the 1st result Integration Moving Count = 2 KFM2005 Display results cycle1 Offset adj. cycle2 Impd. meas. Display the 1st and 2nd result cycle1 Offset adj. cycle2 Impd. meas. Display the 1st result Display the 1st to 3rd result Display the 1st to 4th result cycle1 Offset adj. Display the 2nd to 5th result cycle2 Impd. meas. Display the 1st and 2nd result Display the 2nd and 3rd result 31 Protection Function The protection function automatically turns the load off or places a limit to protect the fuel cell. When a protection function trips, an alarm is activated. When an alarm occurs, the load is turned off (or is limited), and the ALARM pin (pin 9) of CONTROL TERMINAL OUT on the rear panel is set to a high TTL level signal. There are two types of protection functions: those that allow you to set the trip point and those with a fixed trip point. Overvoltage Protection (OVP) An overvoltage is detected when a voltage greater than or equal to 21 V is applied. If this happens, "ALM:OVP" is displayed on the message display area. If a voltage greater than or equal to 21 V is applied for more than 4 seconds or if a voltage greater than or equal to 24 V is applied, the load is automatically turned off for safety reasons. Undervoltage Protection (UVP) An undervoltage is detected when the voltage falls to or below the specified voltage. If this happens, "ALM:UVP" is displayed on the message display area. You can set a time (delay) until the undervoltage protection (UVP) is activated. If the condition lasts for a time longer than the specified UVP Mask Time, the load turns off. The detected voltage value of the under voltage protection (UVP) is set at -2.000V as factory default setting. Set the desired value for the operation. Setting the detection voltage of undervoltage protection (UVP) 1 Press the PROTECT key, and then press the F1 key to select the UVP. The "Protect" is displayed in the function key display area, and circle check box displayed below "UVP" is changed to " " from " ". When the circle check box is displayed as " ", it means that the UVP is selected. OHP 50.0mA f:10kHz DC :0.00000A R X 226.7mΩ 65.9mΩ Z 236.5mΩ 16.42deg UVP Coarse OVER LOAD MEASURE UVP -2.000V Mask Time 4s Protect F1 F3 IMPD AVERAGE F2 F4 AC VIEW 2 32 MEMORY STORE/ RECALL LOAD ON OFF PROTECT CURRENT SYSTEM LOCAL SHIFT LOAD ON RMT Turn the rotary knob to set the detection voltage (-2.000 V to 20.000 V.) KFM2005 Protection Function -2.000 V to 20.000 V 226.7mΩ 65.9mΩ Z 236.5mΩ 16.42deg UVP Coarse OVER LOAD MEMORY MEASURE UVP -2.000V Mask Time 4s Protect LOAD ON F1 F3 IMPD AVERAGE F2 F4 AC VIEW LOAD ON STORE/ RECALL OFF PROTECT CURRENT SYSTEM LOCAL RMT SHIFT 3 Setting the UVP Mask Time 1 Press the PROTECT key, and then press the F2 key to select the UVP Mask Time. The "Protect" is displayed in the function key display area, and circle check box displayed below "Mask Time" is changed to " " from " ". When the circle check box is displayed as " ", it means that the UVP Mask Time is selected. OHP 50.0mA f:10kHz DC :0.00000A R X 226.7mΩ 65.9mΩ Z 236.5mΩ 16.42deg UVP Coarse OVER LOAD UVP -2.000V Mask Time 4s Protect LOAD ON MEMORY MEASURE F1 F3 IMPD AVERAGE F2 F4 AC VIEW LOAD ON STORE/ RECALL OFF PROTECT CURRENT LOCAL SYSTEM RMT SHIFT 2 Basic Operation 50.0mA f:10kHz DC :0.00000A R X OHP Turn the rotary knob to set the UVP Mask Time (0 s to 10 s). OHP 50.0mA f:10kHz DC :0.00000A R X 226.7mΩ 65.9mΩ Z OVER LOAD UVP -2.000V Mask Time 4s Mask Time Protect 236.5mΩ 16.42deg LOAD ON MEMORY MEASURE F1 F3 IMPD AVERAGE F2 F4 AC VIEW LOAD ON STORE/ RECALL PROTECT CURRENT SYSTEM LOCAL 0 s to 10 s OFF RMT SHIFT Overheat Protection (OHP) An overheat is detected when the temperature of the internal power unit exceeds 95°C. If this happens, the OHP alarm LED lights. In addition, "ALM:OHP" is displayed on the message display area, and the load is turned off. Turn the power off, and turn it back on after the KFM2005 has cooled down. Lights OHP 226.7mΩ 65.9mΩ Z ALM:OHP OVER LOAD MEASURE 50.0mA f:10kHz DC :0.00000A R X UVP -2.000V Mask Time 4s Mask Time Protect 236.5mΩ 16.42deg F1 F3 IMPD AVERAGE F2 F4 AC VIEW LOCAL SHIFT Lights out LOAD ON MEMORY STORE/ RECALL LOAD ON OFF PROTECT CURRENT SYSTEM RMT Alarm display KFM2005 33 Protection Function Overload Protection (OPP) The overload protection is activated at two stages. If the power consumption at the load exceeds 63 W, the OVER LOAD LED lights. In addition, "ALM:OPP" is displayed on the message display area. If the power consumption increases further and exceeds 65 W, the current setting is automatically changed to suppress the power down to approximately 65 W. Lights OHP 50.0mA f:10kHz DC :0.00000A R X 226.7mΩ 65.9mΩ Z ALM:OPP OVER LOAD MEASURE UVP -2.000V Mask Time 4s Mask Time Protect 236.5mΩ 16.42deg F1 F3 IMPD AVERAGE F2 F4 AC VIEW LOAD ON MEMORY STORE/ RECALL LOAD ON OFF PROTECT CURRENT SYSTEM LOCAL RMT SHIFT Alarm display Overcurrent Protection (OCP) If a load current greater than or equal to 5.25 A flows, "ALM:OCP" is displayed on the message display area, and the load is turned off. Lights out OHP 226.7mΩ 65.9mΩ MEASURE 50.0mA f:10kHz DC :0.00000A R X Z ALM:OCP OVER LOAD UVP -2.000V Mask Time 4s Mask Time Protect 236.5mΩ 16.42deg F1 F3 IMPD AVERAGE F2 F4 AC VIEW LOAD ON MEMORY STORE/ RECALL LOAD ON OFF PROTECT CURRENT LOCAL SYSTEM RMT SHIFT Alarm display Disconnection detection (OPEN) If the load current does not flow such as when the load cable is not wired or is loose, "ALM:OPEN" is displayed on the message display area, and the load is turned off. If OPEN is detected even when the cable is connected properly, the protection fuse in the load device is blown. If this happens, repair/inspection is necessary. If the KFM2005 needs repair/inspection, contact your Kikusui distributor or agent. Lights out OHP 50.0mA f:10kHz DC :0.00000A R X 226.7mΩ 65.9mΩ Z ALM:OPEN OVER LOAD MEASURE UVP -2.000V Mask Time 4s Mask Time Protect 236.5mΩ 16.42deg F1 F3 IMPD AVERAGE F2 F4 AC VIEW STORE/ RECALL LOAD ON OFF PROTECT CURRENT SYSTEM LOCAL SHIFT LOAD ON MEMORY RMT Alarm display 34 KFM2005 Resetting Alarms You can press the OFF key when an alarm is activated to reset the alarm. However, the alarm will be activated again, if the cause of the alarm is not corrected. Lights out f:10kHz DC :0.00000A R X 226.7mΩ Z 65.9mΩ OVER LOAD MEASURE 50.0mA UVP -2.000V mΩ Mask Time deg 4s Mask Time Protect 236.5 16.42 F1 F3 IMPD AVERAGE F2 F4 AC VIEW LOAD ON MEMORY STORE/ RECALL LOAD ON OFF PROTECT CURRENT SYSTEM LOCAL RMT SHIFT Alarm display disappears. 3 Basic Operation OHP Adjusting the LCD contrast Turn the rotary knob while holding down the SHIFT key to adjust the LCD contrast. Turning the rotary knob clockwise makes brighten, and turning it counterclockwise makes darken. OHP f :10kHz DC :0.00000A R X 226.7mΩ 65.9mΩ Z 50.0mA 236.5mΩ 16.42deg OVER LOAD MEASURE Item 3 Z Item 4 F1 F3 IMPD AVERAGE F2 F4 AC VIEW LOAD ON MEMORY STORE/ RECALL LOAD ON OFF PROTECT CURRENT View Item LOCAL SHIFT SYSTEM RMT Turn the rotary knob while holding down the SHIFT key. KFM2005 35 Using the Memory Function The current panel settings can be stored to internal memories A, B, and C. or recalled from the memories. Storing the Panel Settings to the Memory 1 Press the STORE/RECALL key, and then press the F2 key to select the Store. The "STR/RCL" is displayed in the function key display area, and circle check box displayed below "Store" is changed to " " from " ". When the circle check box is displayed as " ", it means that the Store is selected. OHP 50.0mA f:10kHz DC :0.00000A R X 226.7mΩ 65.9mΩ Z 236.5mΩ 16.42deg Address Store OVER LOAD MEASURE Recall default Store A STR/RCL F1 F3 IMPD AVERAGE F2 F4 AC VIEW LOAD ON MEMORY STORE/ RECALL LOAD ON SYSTEM LOCAL RMT SHIFT 2 Turn the rotary knob to select the memory address (A, B, or C) for storing the settings. OHP 50.0mA f:10kHz DC :0.00000A R X 226.7mΩ 65.9mΩ Z 236.5mΩ 16.42deg Address Store OVER LOAD MEASURE Recall default Store A STR/RCL F1 F3 IMPD AVERAGE F2 F4 AC VIEW A 36 B LOAD ON MEMORY STORE/ RECALL LOAD ON OFF PROTECT CURRENT SYSTEM LOCAL SHIFT 3 OFF PROTECT CURRENT RMT C Press the rotary knob to execute. KFM2005 Using the Memory Function Recalling the Panel Settings from the Memory Press the STORE/RECALL key, and then press the F1 key to select the Recall. The "STR/RCL" is displayed in the function key display area, and circle check box displayed below "Recall" is changed to " " from " ". When the circle check box is displayed as " ", it means that the Recall is selected. OHP 50.0mA f:10kHz DC :0.00000A R X 226.7mΩ 65.9mΩ Z 236.5mΩ 16.42deg Address Recall OVER LOAD MEASURE Recall default Store A STR/RCL F1 F3 IMPD AVERAGE F2 F4 AC VIEW LOAD ON MEMORY LOAD ON STORE/ RECALL SYSTEM LOCAL RMT SHIFT 2 OFF PROTECT CURRENT 3 Basic Operation 1 Turn the rotary knob to select the memory address (A, B, C, or default) for recalling the settings. If default is selected, the KFM2005 is reset to factory default settings. A 50.0mA f:10kHz DC :0.00000A R X 226.7mΩ 65.9mΩ Z 236.5mΩ 16.42deg Address Recall B default C OHP OVER LOAD MEASURE Recall default Store A STR/RCL F1 F3 IMPD AVERAGE F2 F4 AC VIEW LOAD ON MEMORY STORE/ RECALL LOAD ON LOCAL SHIFT 3 Factory default settings*1 Item Setting Load current Load current setting DC: 0.00000 A Current setting control INT: KFM2005 control Range 0.5 A Load Off Measurement frequency superimposed current 10 kHz 50 mA Range Auto Variable mode FIX Moving average 1 Integration cycle 1 LCD display Upper left R: Real resistance of the impedance Lower left X: Reactance Upper right Z: Absolute Value of the impedance Lower right θ: Phase angle of the impedance Under voltage Voltage value protection (UVP) Mask time KFM2005 SYSTEM RMT Press the rotary knob to execute. Table 3-2 *1 OFF PROTECT CURRENT -2.000 V 4.0 s The item has not been listed above are not subject to set as factory default settings. 37 Changing the item to be displayed on the LCD The measurement items displayed on the measured value display area can be changed with the VIEW key. 1 Press the VIEW key. "View item" is displayed on the function key display area. OHP 50.0mA f :10kHz DC :0.00000A R X 226.7mΩ 65.9mΩ 236.5mΩ 16.42deg Z OVER LOAD MEASURE Item 1 R Item 2 X View Item F1 F3 IMPD AVERAGE F2 F4 AC VIEW LOAD ON MEMORY STORE/ RECALL LOAD ON LOCAL 2 Sensing voltage I Load current R Real resistance of the impedance X Reactance Z Absolute value of the impedance θ Impedance phase angle SYSTEM RMT SHIFT V OFF PROTECT CURRENT Press the F1 key to change the item description (Item 1) located in the upper left of the measured value display area. F1 key: Item 1 R X Z V I OHP 50.0mA f :10kHz DC :0.00000A R X 226.7mΩ 65.9mΩ Z 236.5mΩ 16.42deg OVER LOAD MEASURE Item 1 R Item 2 X View Item F1 F3 IMPD AVERAGE F2 F4 AC VIEW LOAD ON MEMORY STORE/ RECALL LOAD ON LOCAL Item 2 X Z SYSTEM RMT SHIFT F2 key: OFF PROTECT CURRENT V I R 3 Press the F2 key to change the item description (Item 2) located in the lower left of the measured value display area. 4 Press the F3 (SHIFT+F1) key to change the item description (Item 3) located in the upper right of the measured value display area. F3 key: Item 3 Z V I R X OHP f :10kHz DC :0.00000A R X 226.7mΩ Z 65.9mΩ 50.0mA 236.5mΩ 16.42deg OVER LOAD MEASURE Item 1 R Item 2 X View Item F1 F3 IMPD AVERAGE F2 F4 AC VIEW LOAD ON MEMORY STORE/ RECALL LOCAL SHIFT F4 key: Item 4 V I LOAD ON OFF PROTECT CURRENT SYSTEM RMT R X Z Press the F3 or F4 key while pressing the SHIFT key. 5 38 Press the F4 (SHIFT+F2) key to change the item description (Item 4) located in the lower right of the measured value display area. KFM2005 外部コントロ┃ル 4 External Control This chapter describes the procedures of controlling the built-in electronic load by the external signal, and of monitoring the operation status. Using the CONTROL TERMINAL The KFM2005 allows the internal load device to be controlled not only from the panel or through the communication interface but also using external signals. The settings in each operation mode normally use the internal reference signal. In external control, this reference signal is supplied externally. The external signal is applied using a voltage (voltage control). External control allows the range to be controlled between 0 % and 100 %. This section describes the procedures to connect, adjust, and use the external control function. Table 4-1 CONTROL TERMINAL arrangement Terminal #*1 Signal name Description 1 EXT V CC CONT An input terminal for controlling the current supplied to the internal load device using an external voltage. (Vext<11 V) 2 LOAD ON/OFF An input terminal for controlling the on/off of the internal load device using an external signal. (0 V: OFF,5 V: ON) 3 RANGE An input terminal for setting the load device range when the load current setting control (Source) is set to external control (Ext). (0 V: 0.5 A range, 5 V: 5 A range) 4 AUX IN1 5 AUX IN2 Reserved input terminals for future expansion. Do not connect anything to these terminals. 6 AUX IN3 7 V MONITOR A monitor terminal for the DC voltage applied to the SENSING terminal. Outputs half of the SENSING terminal voltage. 8 I MONITOR Monitor output for the load current. Outputs 10 V when the load current is 5 A. 9 ALARM A high level is output if an abnormal condition occurs in the internal load device such as OHP, OVER LOAD, OCP. 10 LOAD ON/OFF STATUS Outputs the on/off status of the internal load device. Set to high level when the load is on; set to low level when the load is off. 11 AUX OUT 1 12 AUX OUT 2 Reserved input terminals for future expansion. Do not connect anything to these terminals. *1. The terminal marked "IN" is the input terminal, "OUT" is the output terminal, and "COM" is the common terminal. (Refer to the Fig. 4-1.) The terminal indicated by the number corresponds to the same number of each signal. 40 KFM2005 Using the CONTROL TERMINAL Connecting the Wire to the CONTROL TERMINAL WARNING • Never connect wires to the CONTROL TERMINAL while the POWER switch is turned on. Doing so can cause electric shock or damage to the internal circuitry. CAUTION • Do not apply the terminals exceeding the rated voltage. It may cause the damage to the KFM2005. 1 2 3 4 Check that the POWER switch is turned off. Use a wire stripper to remove the covering from the wires. Insert the wires in the CONTROL TERMINAL as shown in Fig. 4-1. 4 External Control Remove 9 mm to 10 mm (10 mm recommended) of the covering. You can perform the work accurately by using the strip gauge indicated on the KFM2005 rear panel. Pull on the wires gently to check that they do not come loose. CONTROL TERMINAL IN OUT 1 6 7 12 1 6 7 12 Insert the wire while pressing this section. Insert the wire with 10 mm of the covering removed here. Wires that can be used Single wire: φ0.32 to φ0.65 (AWG28 to AWG22) Stranded wire: 0.08 mm2 to 0.32 mm2 (AWG28 to AWG22) COM Fig. 4-1 KFM2005 CONTROL TERMINAL for external control 41 Controlling the load current using an external voltage See p. 24 An external voltage is used to control the current supplied to the internal load device. If the load current setting control (Source) is set to external control (Ext), the load current is controlled by the voltage applied across pin IN1 and pin COM1. 1 Connect the voltage source to pin 1 of the CONTROL TERMINAL. CONTROL TERMINAL IN Twist 0 V to 10 V OUT 1 6 7 12 1 6 7 12 COM IN 1 • Input impedance: 10 kΩ • COM is at the same potential as chassis. Fig. 4-2 2 COM 1 Controlling the load current using an external voltage Press the CURRENT key, and then the F2 key to set the load current setting control (Source) to external control (Ext). The F2 key allows selection between the KFM2005 control (INT) and the external control (Ext). INT Ext OHP 50.0mA f:10kHz DC:0.00000A R X 226.7mΩ 65.9mΩ Z 236.5mΩ 16.42deg CURR-DC Coarse OVER LOAD MEASURE Range 0.5A Source Ext Current F1 F3 IMPD AVERAGE F2 F4 AC VIEW LOCAL SHIFT LOAD ON MEMORY STORE/ RECALL LOAD ON OFF PROTECT CURRENT SYSTEM RMT Use a stable voltage source with small ripple noise. If the voltage contains high level of ripple noise, the ripple noise also appears in the load current. If this occurs, the impedance measurement may be unstable or may not be possible. Adjusting the offset and full scale The KFM2005 allows the offset and full scale to be adjusted so that the load current control using an external voltage is as accurate as possible. 42 1 Adjust the offset with the EXT CONT OFS variable resistor on the rear panel so that 0 A is obtained when 0 V is applied. 2 Adjust the full scale with the EXT CONT FSC variable resistor so that the full scale value of the specified range (0.5 A or 5 A) is obtained when 10 V is applied. KFM2005 Turning the Load Current On/Off The internal load device can be turned on/off using an external signal. The load current is turned on when the terminal is opened or is set to 5 V and turned off when the terminal is shorted or is set to 0 V. However, for this function to work, the load must be turned on on the panel or through remote control. The relationship of load on/off between the LOAD key, remote, and external control is shown in Table 4-2. Load on/off status by external control External signal Instruction through the LOAD key or remote control Load ON ON On OFF ON Off ON OFF Off OFF OFF Off 1 4 Connect to the contact or signal source to pin 2 of the CONTROL TERMINAL. External Control Table 4-2 CONTROL TERMINAL IN Twist OPEN: Load on SHORT: Load off OUT 1 6 7 12 1 6 7 12 COM +5 V 10 kΩ IN 2 • Pulled up to +5 V with 10 kΩ. • Logic input • COM is at the same potential as chassis. COM 2 Fig. 4-3 Turning the load current on/off by external control • When the load current can not be turned on or off by the external control, the setting of the LOAD key or the instruction from the remote were set to "OFF" as indicated in the Table 42. After the external signal is turned OFF, press the LOAD ON key on the front panel, or send the command "INP ON" from the remote. • When the load current is turned off by the protection function, eliminate the cause of problem and reset the alarm, then turn on the load current again either from the front panel or the remote. KFM2005 43 Switching the Internal Load Device Range See p. 24 If the load current setting control (Source) is set to external control (Ext), the load device range can be controlled through pin IN3. The range is set to 5 A when the terminal is opened or is set to 5 V and 0.5 A when the terminal is shorted or is set to 0 V. 1 Connect to the contact or signal source to pin 3 of the CONTROL TERMINAL. CONTROL TERMINAL IN Twist OUT 1 6 7 12 1 6 7 12 OPEN: 5 A range SHORT: 0.5 Arange COM +5 V 10 kΩ IN 3 • Pulled up to +5 V with 10 kΩ. • Logic input • COM is at the same potential as chassis. Fig. 4-4 2 COM 3 Switching the current range by external control Press the CURRENT key, and then the F2 key to set the load current setting control (Source) to external control (Ext). The F2 key allows selection between the KFM2005 control (INT) and the external control (Ext). INT Ext OHP 50.0mA f:10kHz DC:0.00000A R X 226.7mΩ 65.9mΩ Z 236.5mΩ 16.42deg CURR-DC Coarse OVER LOAD MEASURE Range 0.5A Source Ext Current F1 F3 IMPD AVERAGE F2 F4 AC VIEW LOCAL SHIFT LOAD ON MEMORY STORE/ RECALL LOAD ON OFF PROTECT CURRENT SYSTEM RMT • The load device range cannot be switched while the load is turned on. Turn the load off before switching the range. • If the range is switched, the Internal load device status is turned off. Therefore, you must press the LOAD key on the panel or send the INP ON command through remote control before you can turn the load on/off using external control again. 44 KFM2005 Voltage Monitoring A monitor terminal for the DC voltage applied to the SENSING terminal. This terminal outputs half of the SENSING terminal voltage. 1 Connect a voltmeter to pin 7 of the CONTROL TERMINAL. CONTROL TERMINAL OUT 1 6 1 6 7 12 7 + Twist V 12 - 0 V to 10 V Monitors one-half of the sensing input voltage. COM 100 Ω OUT 7 • Output impedance: 100 Ω • COM is at the same potential as chassis. 4 External Control IN COM 7 Fig. 4-5 Voltage monitor output Current Monitoring A monitor terminal for the load current. The terminal outputs 10 V at 5 A regardless of the preset current range. 1 Connect a voltmeter to pin 8 of the CONTROL TERMINAL. CONTROL TERMINAL IN 1 1 OUT 6 6 7 7 + Twist 12 V 12 - 0 V to 10 V Outputs 0 V to 10 V with respect to 0 A to 5 A. COM 100 Ω OUT COM 8 Fig. 4-6 KFM2005 • Output impedance: 100 Ω • COM is at the same potential as chassis. Current monitor output 45 Using the Alarm Output You can acquire the alarm signal from pin 9 of the CONTROL TERMINAL. If an abnormal condition exists in the internal load device such as OHP, OVER LOAD, or OCP, the terminal outputs 5 V (high level). Otherwise, the terminal outputs 0 V (low level). CONTROL TERMINAL IN OUT ALARM OUT 1 6 7 12 1 6 7 12 Twist COM COM 220 Ω OUT 9 COM 9 Fig. 4-7 • Logic output • Current: 5 mA • COM is at the same potential as chassis. Alarm output Using the LOAD ON/OFF Status Output You can acquire the status signal from pin 10 of the CONTROL TERMINAL. This terminal outputs the on/off status of the internal load device. The load is on when the terminal is 5 V (high level) and off when the terminal is 0 V (low level). CONTROL TERMINAL IN OUT LOAD ON/OFF STATUS 1 6 7 12 1 6 7 12 Twist COM COM 220 Ω OUT COM 10 Fig. 4-8 46 • Logic output • Current: 5 mA • COM is at the same potential as chassis. Load on/off status output KFM2005 リモ┃トコントロ┃ル 5 Remote Control This chapter describes the selection of interfaces and the installation of the application software included as a standard accessory. Selecting the Communication Interface The operation besides front panel key operation, the KFM2005 can be remotely operated from the PC with SCPI commands through the communication interface or by using the application software included as a standard accessory. • RS232C interface • GPIB interface • USB interface The factory default remote control interface setting is RS232C. USB, GPIB, and RS232C cannot be used simultaneously. The KFM2005 conforms to the following standards. • IEEE Std 488.2-1992 IEEE Standard Codes, Formats, Protocols, and Common Commands For Use With IEEE Std 488-1987 • IEEE Std 488.1-1987 IEEE Standard Digital Interface for Programmable Instrumentation • Standard Commands for Programmable Instruments (SCPI) version 1999.0 • Universal Serial Bus Specification Rev 2.0 • Universal Serial Bus Test and Measurement Class Specification (USBTMC) Rev 1.0 • Universal Serial Bus Test and Measurement Class, Subclass USB488 Specification (USBTMC-USB488) Rev 1.0 To operate the KFM2005 remotely, it is necessary to select the communication interface to be used. The interface is selected from the front panel of the KFM2005. 1 Press the SYSTEM key. "System" is displayed on the function key display area. OHP 50.0mA f:10kHz DC:0.00000A R X - - - - mΩ - - - - mΩ V I 0.0000 V 0.0000 A OVER LOAD MEASURE Interface Menu F1 F3 IMPD AVERAGE F2 F4 AC VIEW LOAD ON MEMORY STORE/ RECALL LOAD ON OFF PROTECT CURRENT System LOCAL SYSTEM RMT SHIFT 2 Select the communication interface to be used. The setting (GPIB/USB/RS232C) changes each time the F1 key is pressed. GPIB Address : USB RS232C OHP Interface GPIB 1 Select OVER LOAD MEASURE F1 F3 IMPD AVERAGE F2 F4 AC VIEW LOAD ON MEMORY STORE/ RECALL LOAD ON OFF PROTECT CURRENT Interface SYSTEM LOCAL SHIFT RMT The following describes the settings of each interface. The selected interface becomes valid by turning on the POWER switch again. 48 KFM2005 Selecting the Communication Interface When RS232C interface is selected. To set the protocol, press the rotary knob repeatedly, the mark " " moves in the circle check box " " displayed on the front of item description, it is selected when the circle check box is shown as " ". Set each item by turning the rotary knob. 2400 bps / 4800 bps / 9600 bps / 19200 bps Baudrate : 2400bps Databits :8 7/8 Acknowledge : OFF Parity : NONE Stopbits: 2 Select Next ON / OFF OVER LOAD Interface RS232C F1 F3 IMPD AVERAGE F2 F4 AC VIEW STORE/ RECALL LOAD ON OFF PROTECT CURRENT Interface LOCAL SYSTEM RMT SHIFT Protocol setting Item Choices Baudrate (Bit rate) 2400 bps, 4800 bps, 9600 bps, or 19200 bps*1 Databits 7 bit or 8 bit*1 Acknowledge ON or OFF*1 Parity Fixed to NONE Stopbits Fixed to 2 *1 LOAD ON MEMORY MEASURE 5 When the application software "FC Tester for KFM2005" as included as a standard accessory is used through by RS232C interface, select "19200 bps", "8 bits", and "OFF". Remote Control Table 5-1 OHP The RS232C port on the KFM2005 is a standard D-sub 9-pin male connector. Check that the POWER switches of the KFM2005 and the PC are off, and connect the KFM2005 to the PC using a standard cross cable (null modem cable). Use a D-sub 9-pin female-to-female AT type for the cross cable. Fig. 5-1 shows the connector pin assignments. The KFM2005 does not use hardware handshaking. The cable shown in the "Cross cable example 2" can be also used. 1: CD (carrier detect) 2: RXD (receive data) 3: TXD (transmit data) 4: DTR (data terminal ready) 5: GND (signal ground) #4-40UNC inch screw #4-40UNC inch screw 9: RI (ring indicator) 8: CTS (clear to send) 7: RTS (request to send) 6: DSR (data set ready) Facing the KFM2005 rear panel 1 1 1 2 2 2 2 3 3 3 3 4 4 4 4 5 5 5 5 6 6 6 6 7 7 7 7 8 8 8 8 9 9 9 D-sub 9 pin female D-sub 9 pin female Cross cable example 1 Fig. 5-1 KFM2005 1 9 D-sub 9 pin female D-sub 9 pin female Cross cable example 2 9-pin AT type connector 49 Selecting the Communication Interface Selecting the Communication Interface (Cont’d) When GPIB interface is selected. Turn the rotary knob to set the GPIB address (1 to 30). 1 to 30 Address : OHP MEASURE Interface GPIB 1 Select OVER LOAD F1 F3 IMPD AVERAGE F2 F4 AC VIEW LOAD ON MEMORY STORE/ RECALL LOAD ON OFF PROTECT CURRENT Interface LOCAL SYSTEM RMT SHIFT When USB interface is selected. "Vendor ID (0x0B3E)", "Product ID (0x1018)", and "Serial/No." are displayed on the LCD. Data rate is 12 Mbps maximum (full speed). OHP Vendor ID : 0x0B3E Product ID : 0x1018 Serial/No : ADXXXXXX OVER LOAD MEASURE Interface USB F1 F3 IMPD AVERAGE F2 F4 AC VIEW LOAD ON MEMORY STORE/ RECALL LOAD ON OFF PROTECT CURRENT Interface LOCAL SHIFT 3 50 SYSTEM RMT Power cycle the KFM2005. The settings are updated. KFM2005 Operating the KFM2005 with SCPI commands The required SCPI commands are specified in the "Communication Interface Manual" (CDROM) as included as a standard accessory. The communication interface manual is in HTML format. The HTML manual can be viewed using the following browsers. Operating environment: Windows 98 or later Browser: Microsoft Internet Explorer 5.5 or later The list of messages of interface manual is provided in a PDF file. Adobe Reader 6.0 or later is required to view the file. KFM2005 5 Remote Control A device driver supporting USB T&M Class (USBTMC) is required to control the KFM2005 through the USB interface. The USBTMC driver is automatically installed by one of the VISA drivers below. • KI-VISA 2.2.x or later (included with the software CD-ROM, or downloadable from KIKUSUI Website) • NI-VISA 3.0 or later (downloadable from National Instruments Website) • Agilent VISA (Agilent I / O Libraries) M01.00 or later (downloadable from Agilent Website) 51 Using the Accompanying Application Software Product Overview The accompanying application software "FCTester for KFM2005" for measuring the impedance of fuel cell under loaded conditions can be used to control the KFM2005 from a PC and perform tests on fuel cells, etc. The application software achieves the following functions. ● I-V characteristics test It acquires the I-V (Load current - Cell voltage) characteristics by varying the load current in steps. At the same time, it measures the impedance of the cell at the specific frequency. ● Cole-Cole plot It measures the impedance and creates the Cole-Cole plot by varying the frequency of the superimposed current while the specific load current is drawn by the fuel cell. ● Constant current test The data logging for the cell voltage and impedance while the specific load current is drawn by the fuel cell. ● Saving the test result The test result can be saved as a text file. The saved file can be used by other application software. System Requirements Below are the hardware and software requirements for using the FCTester for KFM2005. • • • • • • • PC running Windows 2000, Windows XP, or Windows Vista At least 256 MB of memory 1024 x 768 dots or higher resolution 100 MB or more free hard disk space CD-ROM drive Mouse or other pointing device VISA library NI-VISA 3.0 or later; Agilent IO Libraries Suite M01.00 or later; or KI-VISA 2.2.x or later • USB cable (when using USB) • IEEE488 cable (when using GPIB) • Cross serial cable (when using RS232C) 52 KFM2005 Using the Accompanying Application Software VISA Driver CAUTION Do not install multiple different VISA drivers, because they may not operate properly. VISA (Virtual Instrument Software Architecture) is a standard developed by the VXIplug&play Systems Alliance that defines software specifications for communicating with instruments from a PC. A VISA-compliant driver software is the VISA driver. The KI-VISA is Kikusui original VISA driver compatible with VXIplug&play VISA 3.0. You must install a VISA driver to use the FCTester for KFM2005. The VISA driver that is required varies depending on the I/O interface that you will be using. See below to select the appropriate VISA driver. VISA driver that is required and how to obtain the driver I/O interface VISA driver that is required RS232C*1, *2 KI-VISA Ver2.2.x or later NI-VISA Ver3.0 or later Agilent IO Libraries M01.00 or later USB*1 GPIB*3 Interface Corporation*4 KI-VISA Ver2.2.x or later CONTEC CO., LTD.*4 NI-VISA Ver3.0 or later Agilent Agilent IO Libraries M01.00 or later VISA driver How to obtain the driver KI-VISA From the software CD-ROM or from the KIKUSUI Website*5 NI-VISA From the CD-ROM provided with the GPIB card or from the National Instruments Website Agilent IO Libraries From the CD-ROM provided with the GPIB card or from the Agilent Technologies Website *1 *2 *3 *4 *5 KFM2005 National Instruments 5 Remote Control Table 5-2 If you are using RS232C or USB, any VISA driver can be used. However, for details on licensing, refer to the license terms of the respective VISA driver. RS232C supports standard communications ports on a personal computer and virtual serial communication ports through a USB-RS232C converter or other similar converters. However, virtual communication ports may not work properly depending on the device driver that is provided. If you are using GPIB, you must use the appropriate VISA driver; otherwise, it will not work. KI-VISA supports the following GPIB models. CONTEC CO., LTD. GP-IB(PCI)L, GP-IB(PM), GP-IB(PCI)F, GP-IB(CB)F. API-GPIB driver VER4.01 or later recommended. When using GPIB cards by Contec Co., Ltd, use the ordinary APIGPIB driver, not the API-GPLV driver (LabVIEW compatible and NI-488.2M API compatible). Interface Corporation PCI-4301 LabVIEW compatible version (GPC-4301N driver version 1.21 or later recommended) When using GPIB cards by Interface Corporation, use the GPC4301N driver (LabVIEW compatible and NI-488.2M API compatible), not the ordinary GPC-4301 driver. It can be downloaded by "DOWNLOAD" site ( http://www.kikusui.co.jp/en/download/ index.html ) at KIKUSUI Website. To install the KI-VISA Ver.4.2.2 or later, the Windows 2000 SP4 or later version is required. 53 Using the Accompanying Application Software Notes on use The FCTester for KFM2005 is used to retrieve KFM2005 test data to your PC. To ensure that test data is retrieved, disable the following features on your PC during testing. • Windows power save mode • Screen saver • Memory-resident programs Do not run other software applications during testing. Opening the Menu Program Window Insert the program CD-ROM in the drive. After a short time, the menu program window opens. If the menu program window does not open, browse the CD-ROM with Windows Explorer, and double-click index.htm. The menu program will start. 54 KFM2005 Using the Accompanying Application Software Installing the KI-VISA CAUTION Do not install multiple different VISA drivers, because they may not operate properly. To use "FCTester for KFM2005", it requires to install the VISA driver, however, it is not necessarily to install the KI-VISA. p. 56 1 On the menu program window, click Installing the KI-VISA. 2 Double-click Kivisa_3_x_x.exe. 3 When the KI-VISA driver installation is complete, the following dialog box opens. Click Finish. The Kivisa_3_x_x.exe file on the CD-ROM appears in the window. 5 Remote Control See To use an NI-VISA or Agilent Technologies VISA driver, refer to the manual of the respective product. If you are not installing KI-VISA, proceed to "Installing the FCTester for KFM2005". Then, follow the instructions on the screen. The IVI Shared Components will be installed prior to the installation of KI-VISA. To back the menu program window, click Back in the browser window. KFM2005 55 Using the Accompanying Application Software Installing the FCTester for KFM2005 1 On the menu program window, click Installing the Software application FCTester for KFM2005. Then, follow the instructions on the screen. 2 When the installation is complete, the following window appears. Click Close. Starting FCTester for KFM2005 See p. 48 1 2 3 Setting the communication interface of the KFM2005. Connect the KFM2005 to the PC with the interface cable. Click Start on the task bar, point to Programs > Kikusui KFM2005, and then click FCTester for KFM2005. FCTester for KFM2005 starts. 56 KFM2005 Using the Accompanying Application Software Viewing the FCTester for KFM2005 User’s Manual 5 Remote Control To use FCTester for KFM2005, it should be recognized that the FCTester for KFM2005 is connected with the KFM2005. For details, see "Connecting the KFM2005" on the FCTester for KFM2005 user’s manual. The FCTester for KFM2005 user’s manual details the instructions on how to use the application software. ■ HTML help On FCTester for KFM2005, choose Application manual from the Help menu. ■ PDF operation guide The PDF version is the user’s manual for printing help contents. On the menu program window, choose FCTester for KFM2005 user’s manual. KFM2005 57 Using the Accompanying Application Software 58 KFM2005 6 Specifications This chapter gives the specifications and external dimensions. Unless specified otherwise, the specifications are for the following settings and conditions. • The warm-up time is 30 minutes (with current flowing). Impedance Measurement Section Measurement frequency 10 mHz to 10 kHz Frequency resolution 1.00, 1.26, 1.58, 2.00, 2.51, 3.00, 3.16, 4.00, 5.00, 6.00, 6.30, 7.00, 8.00, 9.00 sequence with a resolution of 14 points/decade Impedance measurement range*1 16.5 mA range 300 mΩ, 1 Ω, 3 Ω, or AUTO 50 mA range 100 mΩ, 300 mΩ, 1 Ω, or AUTO superimposed current Current range Variable mode 16.5 mA range 6 mArms ±10 % *2 50 mA range 18 mArms ±10 % *2 OFF Mechanically opens the AC current source FIX Sets the selected range of the superimposed current. AUTO To keep the terminal voltage of the DUT at 5 mVpp, it varies automatically between the range from 10% to 100% of the value in selected range of the superimposed current. MANUAL Specify the value by 0.1 % step from 10 % to 100 % of the value in selected range of the superimposed current. Measured value display and resolution*1 R, X, Z θ 100 mΩ range 0.0 mΩ to 999.9 mΩ , 1.000 Ω to approx. 4.000 Ω The unit changes automatically. 300 mΩ range 0.0 mΩ to 999.9 mΩ , 1.000 Ω to approx. 12.000 Ω The unit changes automatically. 1 Ω range 0.0 mΩ to 999.9 mΩ, 1.000 Ω to approx. 16.000 Ω The unit changes automatically. 3 Ω range 0.000 Ω to approx. 16.000 Ω The unit is fixed at "Ω". All ranges -180.00 deg to 180.00 deg Select and display 4 items among R, X, |Z|, θ, voltage, and current Measured value display Measurement accuracy *1. *2. *3. *4. 60 *2, *3 R and X from 10 mHz to 900 Hz ± (2 % of |Z| rdng + 0.5 % of range + 1 mΩ/Variable ratio)*4 R and X from 1 kHz to 4 kHz ± (3 % of |Z| rdng + 0.5 % of range + 1.5 mΩ/Variable ratio)*4 R and X from 5 kHz to 10 kHz ± (4 % of |Z| rdng + 0.5 % of range + 2 mΩ/Variable ratio) *4 Can measure up to approximately 4 times the range. When varying the superimposed current, it extends the range of measuring value depends on the variable ratio. If you vary the superimposed current down to 10 %, it enables to extend approximately 10 times of the range for the measuring value (maximum up to approximately 40 times). The maximum display for the range of each impedance measurement value display will be changed depending on the variable ratio of the superimposed current. However, under the environment when the drift or the ripple of the fuel cell were large or the considerable noise were generated, it may become over range by the value smaller than the specified value. Maximum capable measurement value is approximately 16 Ω At 15 °C to 35 °C After 32 counts of the moving average count range: Measurement range Variable ratio: 1 to 0.1 of the super imposed current |Z| rdng: |Z| reading KFM2005 DC Voltage and Current Measurement Section Voltage range Auto switching between 2 V and 20 V Voltage measurement resolution 2 V range 100 µV 20 V range 1 mV Voltage measurement accuracy *1 2 V range ±(0.2 % of rdng*2 + 6 digit) 20 V range ±(0.7 % of rdng*2 + 8 digit) Current measurement resolution 100 µA Current measurement accuracy *1 ±1 % with respect to 5 A Monitor output Voltage monitor Outputs 10 V with respect to a sensing input voltage of 20 V Voltage monitor accuracy ±0.05 V Current monitor Outputs 10 V with respect to a load current of 5 A Current monitor accuracy ±0.2 V 6 At 15 °C to 35 °C rdng: Input voltage reading Specifications *1. *2. Electronic Load Section Operation mode Constant current Range 0.5 A or 5 A Maximum load current 5A Input voltage range 0 V to 20 V Maximum input power 60 W Current setting resolution 5 A range 0.1 mA 0.5 A range 0.01 mA Current setting accuracy *1 5 A range ±(0.5 % of set*2 +2.5 mA) 0.5 A range ±(0.5 % of set*2 +0.5 mA) 0.5 A range 0 A to 0.5 A with respect to 0 V to 10 V 5 A range 0 A to 5 A with respect to 0 V to 10 V External control*3 *1. *2. *3. KFM2005 At 15 °C to 35 °C set: Input current setting The full scale of the setting can be fine tuned. 61 Protection Function Overvoltage protection (OVP) Cuts off the load when a voltage greater than or equal to 21 V is applied to the sensing terminal Undervoltage protection (UVP) Cuts off the load if the sensing terminal falls below the preset voltage Setting range -2 V to 20 V Mask Time: 0 s to 10 s (in 1 second) Overheat protection (OHP) Cuts off the load when the load device reaches an abnormal temperature. OHP LED lights. Overload protection (OPP) CP (constant power) trips and OVER LOAD LED lights with a power greater than or equal to 63 W Overcurrent protection (OCP) Cuts off the load when a load current greater than or equal to 5.25 A flows. Disconnection detection (OPEN) Cuts off the load when the load cable is not wired or is loose. Communication Interface RS232C Connector 9-pin D-sub terminal on the rear panel Bit rate 2400 bps/ 4800 bps/ 9600 bps/ 19200 bps Data length 7 bit or 8 bit Stop bits Fixed to 2 bit Parity Fixed to none Acknowledge ON or OFF GPIB Complies with IEEE Std.488-1978 Subset SH1, AH1, T6, L4, SR1, RL1, PP0, DC1, DT1, C0, and E1 Device address Set in the range of 1 to 30 USB Common Specifications 62 USB specification 2.0, Self-powered Device class USB Test and Measurement Class (USMTMC Specification 1.0 and USMTMC-USB488 Specification 1.0) Data rate 12 Mbps maximum (full speed) Messaging protocol IEEE488.2 std 1992 Command language SCPI Specification 1999.0 KFM2005 General 240 × 64 dot LCD, with CCFL backlight, contrast adjustable Installation location 2000 m or less Storage temperature and humidity range Temperature: -10 °C to 60 °C (14 °F to 140 °F) Humidity: 90 % rh or less (no condensation) Operating temperature and humidity range Temperature: 0 °C to 40 °C (32 °F to 104 °F) Humidity: 20 % to 85 % rh or less (no condensation) Line voltage range 90 VAC to 132 VAC, 180 VAC to 250 VAC Line frequency range 45 Hz to 65 Hz Maximum power consumption 600 VA Safety*1 Complies with the requirements of the following directives and standards. Low Voltage Directive 2006/95/EC EN 61010-1 Class I Pollution degree 2 Electromagnetic Compatibility (EMC)*1, *2 Complies with the requirements of the following directives and standards. EMC Directive 2004/108/EC EN 61326-1, EN 61000-3-2, EN 61000-3-3 Applicable condition All of the wires and wires connected to the KFM2005 are less than 3 m in length. Using the accessory sensing wire and load cables. Dimensions See outline drawing. Weight 9.5 kg (20.9 lb) Battery life Approx. 3 years Battery backup Backs up setup information Accessories *1. *2. *3. KFM2005 Power cord 1 Spare fuse 1*3 (250 VAC, 6.3 A) Sensing wire 1 (AWG24, 2-core shielded wire 1.8 m) Load wire 1 pair (AWG18 red and white twisted pair 1.5 m) CD-ROM 1 User’s manual 1 6 Specifications Display Not applicable to custom order models. Applies only to models that have CE marking on the panel. Contained in the AC LINE connector. 63 MAX10 (0.39) 430 (16.93) MAX455 (17.91) 88 (3.46) MAX30 (1.18) MAX105 (4.13) 380 (14.96) MAX450 (17.71) Outline Drawing Unit: mm(inch) 64 KFM2005 Appendix A Overview of the Fuel Cell B Impedance Measurement Method of the KFM2005 C Concerning the GUARD Terminal D Maintenance E Troubleshooting A Overview of the Fuel Cell A fuel cell is a generating device that produces power by a chemical reaction between the fuel (hydrogen or methanol) and oxygen. There are various types of fuel cells such as phosphoric acid fuel cell (PAFC), molten carbonate fuel cell (MCFC), solid oxide fuel cell (SOFC), and polymer electrolyte fuel cell*1 (PEFC). The principle structure of a PEFC is shown in Fig. A-1. A membrane electrode assembly (MEA), which comprises a proton-exchange membrane and electrodes sandwiching the membrane, is placed between separators. Hydrogen and oxygen are supplied to the separator to generate power. This one block is corresponds to a cell. A cell generates an electromotive force of slightly less than 1 V. If high electromotive force is required, multiple cells are stacked together as shown in Fig. A-1. This is called a stack. The current is drawn from the collecting electrode plates. In addition to the fuel cell unit, a system that supplies fuel smoothly through the stack is required for the fuel cell to actually work. Various instruments are needed to test the electric performance of fuel cells such as a load device for absorbing the generated power, ammeter, voltmeter, and impedance meter. Stack Hydrogen Air (oxygen) + Collecting electrodes - MEAs - + MEA (membrane electrode assembly) Separators Cell Separators Fig. A-1 1. 66 PEFC fuel cell structure Or proton exchange membrane fuel cell (PEMFC) KFM2005 B Impedance Measurement Method of the KFM2005 Impedance refers to electrical resistance in an AC circuit. It is generally denoted as Z and defined by the following equation. ( E ⋅ sin ( ωt + θ ) ) Z = -----------------------------------------( I ⋅ sin ( ωt ) ) E : Voltage amplitude I: Current amplitude θ: Phase angle (phase difference between the voltage and current) ω : Angular frequency t: Time When the relation of the voltage, the current, and impedance are expressed by the vector on the complex plane, it becomes following Ohm's laws. E Z = --- I When the "R" is a component of real number, and "X" is a component of imaginary number of the impedance Z , the relation of impedance magnitude of Z " Z " and the phase angle "θ" can be referred by the following formula. Z = ( R2 + X2 ) θ = tan– 1 ( X ⁄ R ) App. R : Resistance X : Reactance The KFM2005 measures the impedance using a configuration generally called galvanostat in the chemical field. The KFM2005 supplies a prescribed AC current I to the fuel cell and measures the AC voltage E that appears. From this result, the KFM 2005 determines R, X, |Z|, and θ of the fuel cell according to the relationships described above. KFM2005 67 C Concerning the GUARD Terminal The GUARD terminal is connected to the chassis and it is the circuit common for the measuring related circuits. This terminal is not used for the input terminal of measurement application. When the noise that is called a common mode has been generated from the equipment such as gas supply system other than the fuel cell, it may cause the effect for the measurement. In such cases, wire the equipment which generates the noise to connect to the GUARD terminal, the effect for the measurement will be reduced. If the chassis is not grounded, it will not effect for the noise reduction. Be sure to ground the ground wire of the power cord. If the different potential of the chassis is connected to the KFM2005, note that the trouble may occur to the entire test system of the fuel cell. Do not connect the output terminal of the fuel cell directly with the GUARD terminal. The KFM2005 may not operate normally. The input terminal of the KFM2005 are configured as shown in Fig. A-2. When the terminal voltage of fuel cell is 20 V, it operates as applying 10 V for each HIGH and LOW of the GUARD terminal and the SENSING terminal. The KFM2005 will not work when greater than 10 V is applied to the GUARD terminal and the SENSING terminal. LOAD HIGH SENSING HIGH Fuel cell GUARD Impedance meter Load device SENSING LOW LOAD LOW KFM2005 Chassis Fig. A-2 68 KFM2005 configuration KFM2005 D Maintenance Replacing the Fuse To prevent the possibility of electric shock WARNING • Make sure to unplug the power cord before replacing the fuse. • Use a fuse of shape, rating, and characteristics that conform to the KFM2005. Using a fuse of a different rating or shorting the fuse holder is dangerous. 1 2 3 Turn the POWER switch and remove the power cord plug. Remove the power cord from the AC LINE connector on the rear panel. Remove the fuse holder using a tool such as a flat-blade screwdriver. Fuse rating: 250 VAC, 6.3 A (T) App. Fuse Spare fuse Fig. A-3 Removing the fuse holder Replacing the Backup Battery The KFM2005 backs up panel settings and other information with the internal battery even when the power is turned off. If the panel settings are different at the time the power is turned off and at the time the power is turned on again, the battery is already dead. The battery life depends on the operating conditions. Three years after purchase is a good estimation. To replace the battery, contact Kikusui distributor/agent. Calibration The KFM2005 is calibrated at the factory before shipment. However, periodic calibration is necessary due to changes that occur after extended use. To have your KFM2005 calibrated, contact Kikusui distributor/agent. KFM2005 69 E Troubleshooting This section introduces troubleshooting measures. Typical symptoms are listed. Check whether any of the symptoms below apply to your case. In some cases, the problem can be solved quite easily If the remedy does not solve the problem, contact your Kikusui agent or distributor. Nothing appears on the display when the POWER switch is turned on. Check Item Location and status of the object Is rated voltage applied for the input power supply (AC)? Possible cause Check result No Broken power cord or bad connection at the AC LINE connector on the rear panel Yes Malfunction Remedy Check that the power cord is not broken and that the connection at the power cord connector is secure. Remove the power cord plug from the outlet. Immediately stop the use of the instrument and request repairs. The display is dark. Check Item Location and status of the object Is rated voltage applied for the input power supply (AC)? Possible cause Check result No Remedy Low supply voltage Use the KFM2005 in the input supply voltage range. Bad contrast adjustment Adjust the contrast. Yes See p. 35 Keys do not work. Check Item Location and status of the object Check result Is the RMT LED lit? 70 Possible cause Yes The KFM2005 is being remotely controlled via the external interface. No Malfunction Remedy Press the RMT/LOCAL key. Immediately stop the use of the instrument and request repairs. KFM2005 Input current is unstable or oscillates. Check Item Location and status of the object Is rated voltage applied for the input power supply (AC)? No Yes Is the alarm LED lit or ALM: displayed on the LCD? Is there a large loop in the load wire? Possible cause Check result Yes Remedy Low supply voltage Use the KFM2005 in the input supply voltage range. Malfunction Immediately stop the use of the instrument and request repairs. An internal or external error occurred on the KFM2005. Check the alarm type and carry out the appropriate remedy. Effect of magnetic flux Twist the wires. Yes See See p. 32 p. 22 An alarm occurs. Check Item Location and status of the object Is the fan stopped? Are the bent holes obstructed? Check result Yes Yes Is the overcurrent protection (OCP) tripping while using external control? Is OCP tripped? Yes Yes Possible cause Remedy Overheat protection tripped. Immediately stop the use of the instrument and request repairs. Overheat protection tripped. Allow at least 20 cm between the vent holes and the wall. In addition, do not place objects within 20 cm. External input voltage greater than or equal to 10 V was applied, or full scale adjustment have not been made. Set the external input voltage to 10 V or less. Adjust the full scale. Malfunction Immediately stop the use of the instrument and request repairs. App. The load cannot be turned on. Check Item Location and status of the object Check result Is ALM: displayed on the LCD? Yes Is the load being turned on using external control? Yes Possible cause Remedy An alarm was activated. Press the OFF key once and then the ON key. The load is turned OFF from the panel. Turn the load on from the panel. See p. 43 The impedance measurement is unstable. Check Item Location and status of the object Check result Is there a large loop in the sensing wire? Yes Is the voltage measurement stable? No KFM2005 Possible cause Remedy Effect of magnetic flux Shorten the wires. The fuel cell output is not stable. Stabilize the fuel cell output. 71 Voltage display is unstable, or incorrect. Check Item Location and status of the object 72 Check result Is the superimposed current set to "OFF"? Yes Is the ground wire of the power cord grounded? No Possible cause Effect of the common mode noise. Effect of the common mode noise. Remedy Use the GUARD terminal. See p. 68 Ground the ground wire. See p. 19 KFM2005 Index Numeric 0 A setting ................................................................ 25 A AC key ..................................................................... 27 Accessories ............................................................. 18 AUTO ....................................................................... 27 AVERAGE key ......................................................... 30 B backup battery, replacement of ............................... 69 C calibration ................................................................ 69 Coarse ..................................................................... 24 CONTROL TERMINAL ............................................ 40 CURRENT key ......................................................... 24 D default ...................................................................... 37 F Factory default settings ............................................ 37 FCTester for KFM2005 ............................................ 52 Fine .......................................................................... 24 firmware version ..................................................2, 20 FIX ........................................................................... 27 full scale, adjusting .................................................. 42 Fuse, replacing ........................................................ 69 G GPIB ........................................................................ 50 GUARD terminal ...................................................... 68 I I (Load current) ........................................................ 38 IMPD key ................................................................. 26 Impedance ............................................................... 67 integral average ....................................................... 31 Integration ..........................................................30, 31 K KI-VISA .................................................................... 53 L load current setting .................................................. 24 load off ..................................................................... 25 load on ..................................................................... 25 LOAD terminal ......................................................... 22 KFM2005 M Manual ..................................................................... 27 Mask Time ............................................................... 33 measurement frequency .......................................... 26 measurement items ................................................. 38 measurement range ................................................ 26 memories A, B, and C ............................................. 36 minimum load current .............................................. 29 Moving ...............................................................30, 31 moving average ....................................................... 31 O OCP ......................................................................... 34 offset, adjusting ....................................................... 42 OPEN ...................................................................... 34 OPP ......................................................................... 34 options ..................................................................... 16 OVER LOAD ............................................................ 34 OVP ......................................................................... 32 P polymer electrolyte fuel cell (PEFC) ........................ 66 Power Cord .............................................................. 19 PROTECT key ...................................................32, 33 proton exchange membrane fuel cell (PEMFC) ...... 66 R R (Real resistance of the impedance) ..................... 38 Rack mount bracket ................................................. 16 RECALL key ......................................................36, 37 Resetting Alarms ..................................................... 35 RS232C ................................................................... 49 S SCPI commands ...................................................... 51 SENSING terminal ................................................... 22 separator ................................................................. 66 stand ........................................................................ 18 STORE key ........................................................36, 37 Superimposed current ................................ 14, 27, 29 SYSTEM key ........................................................... 48 T θ (Impedance phase angle) ................................... 38 troubleshooting ........................................................ 70 U USB ......................................................................... 50 USBTMC driver ....................................................... 51 UVP ......................................................................... 32 73 UVP Mask Time .......................................................33 V V (Sensing voltage) ..................................................38 version ........................................................................2 VIEW key ..................................................................38 VISA driver ........................................................ 51, 53 X X (Reactance) ..........................................................38 Z IZI (Absolute value of the impedance) ......................38 74 KFM2005