1
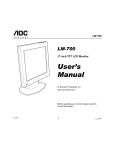
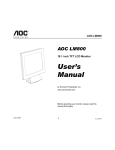
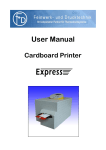
User Manual Color Card Printer TOP State: July 2003 3076.02.098.90.06 TOP User Manual 3 of 22 Table of Contents 1. 2. 3. 4. 5. 6. 7. 8. Introduction.................................................................................................................................. 4 Getting Started ............................................................................................................................ 5 2.1 Preparation of the place of installation ................................................................................... 5 2.2 Unpacking............................................................................................................................... 5 2.3 Connecting the power............................................................................................................. 5 2.4 Loading the ribbon, cards and cleaning rolls.......................................................................... 7 2.5 Running the self test............................................................................................................... 7 2.6 Connecting the Printer to your PC.......................................................................................... 8 2.7 Printing a card from your PC .................................................................................................. 8 2.8 Serial Interface ....................................................................................................................... 8 Operation..................................................................................................................................... 9 3.1 PRN - Key............................................................................................................................... 9 3.2 ON .......................................................................................................................................... 9 3.3 RESET.................................................................................................................................... 9 Service ........................................................................................................................................ 11 4.1 Changing the ribbon ............................................................................................................... 11 4.2 Change of ribbon type ............................................................................................................ 12 4.3 Changing the thermal head .................................................................................................... 12 4.4 Changing the cleaning rolls .................................................................................................... 13 4.5 Cleaning the thermal head ..................................................................................................... 13 4.6 Update of the Printer Software ............................................................................................... 13 4.7 Cleaning the transport rolls..................................................................................................... 14 Modifications ............................................................................................................................... 15 5.1 Magnetic Stripe Encoder ........................................................................................................ 15 5.2 Flip-Over Station..................................................................................................................... 15 5.3 Output Hopper ........................................................................................................................ 15 5.4 SCSI-Interface ........................................................................................................................ 16 5.5 Laminator................................................................................................................................ 16 5.6 Chip-Module ........................................................................................................................... 16 Troubleshooting .......................................................................................................................... 17 6.1 General Troubleshooting ........................................................................................................ 17 6.2 Improvement of the print Quality ............................................................................................ 18 6.3 Printing Time .......................................................................................................................... 19 Accessories ................................................................................................................................. 19 Technical Specifications.............................................................................................................. 20 F+D Feinwerk- und Drucktechnik GmbH Kirchenstrasse 38, D - 69239 Neckarsteinach, Germany Phone: +49 6229 7000, Fax: +49 6229 70067 E-mail: [email protected], Internet: http://www.fuddruck.de TOP User Manual 4 of 22 1. Introduction The TOP is a high speed, reliable, compact, full color edge to edge printer for plastic cards for industrial applications As features the TOP has - Magnetic Stripe Encoder - Chip-Modul - SCSI-Bus - Automatic Output Hopper - Flip-Over Module - Laminator Unit. The TOP can also works with any other personalising system by using Win 3.11, Win 95, Win 98 or NT 4.0 driver. The TOP includes the features: - Ultra fast 25 seconds full color, edge to edge printing - Ribbon Saving Possibility - Ease for operation - Internal diagnostic software - Ease access card cleaning - Fitting to a variety of ribbon types from monochrome to color - High precision mechanical assembly “Please take your time to read this manual” F+D Feinwerk- und Drucktechnik GmbH Kirchenstrasse 38, D - 69239 Neckarsteinach, Germany Phone: +49 6229 7000, Fax: +49 6229 70067 E-mail: [email protected], Internet: http://www.fuddruck.de TOP User Manual 5 of 22 2. Getting Started 2.1 Preparation of the place of installation The installation area must be even and stable. Make sure that there is enough space: - to be able to connect the cables, - that air may circulate through the ventilation slits. The printer must be applied according to application conditions concepted for it. The case or even the internal parts of the printer may never get in contact with any liquid. 2.2 Unpacking After removing the packing material from the printer check the contents of the carton: - Printer TOP - Power Cable (DIN-standard) - Centronics Cable - Sublimation Ribbon (YMCKO for 250 cards) with an empty spool - Card Support Weight - 2 cleaning rolls - Card Output Plate - Spherical Typehead Screwdriver - Operating Instructions - Diskette with the printer software and the print head parameters (only for archiving) - Printer Driver (diskette) with installation manual 2.3 Connecting the power On the backside of the TOP are the connectors and the power switch. 1. Switch Off the power switch (“O“ must be seen on the switch). 2. Connect the power cable (pay attention to a tight fitting) and only use a grounded wall outlet socket. Note: The voltage of your electricity must be same then in the TOP. Otherwise change it in the TOP. See the next illustrations. 3. Switch On the TOP (“1“ must be seen on the switch). F+D Feinwerk- und Drucktechnik GmbH Kirchenstrasse 38, D - 69239 Neckarsteinach, Germany Phone: +49 6229 7000, Fax: +49 6229 70067 E-mail: [email protected], Internet: http://www.fuddruck.de TOP User Manual 6 of 22 The change of the power to 110 V is demonstrated by Ill. After opening the cover the corresponding voltage may be set by turning it. At the same time the power fuse is accessible and has to be exchanged. The cover then has to be closed again. F+D Feinwerk- und Drucktechnik GmbH Kirchenstrasse 38, D - 69239 Neckarsteinach, Germany Phone: +49 6229 7000, Fax: +49 6229 70067 E-mail: [email protected], Internet: http://www.fuddruck.de TOP User Manual 7 of 22 2.4 Loading the ribbon, cards and cleaning rolls In order to make the printer operable you must insert the sublimation ribbon (s.4.1). Put the blank cards into the card feeder, which is at the right side. In order to guarantee an optimal color print you should only use color ribbons and card material recommended by the manufacturer. Put the plastic cards that are to be printed into the card feeder. On top of the card stack put the card support weight (grey plastic part). At the left side hang on the card output plate. The gate of the card feeder is set for 0,76 mm thick cards. Put in the two cleaning rolls (see Ill.). Note: The quality of the printed cards depends on the quality of the blanks cards and how to handle the cards (Never touch the cards with your fingers). To guaranty the best quality order the ribbon and the cards from F+D (see 7.). 2.5 Running the self test In order to print a test card out from the printer the following tasks are necessary: 1.Press the ON key so that the printer is in off-line mode (ON-LED off) 2. Press the ON-key again until the LED is blinking. 3. Press the PRN -key briefly. After about 3 sec. the card illustrated in Ill. is being printed. Should this not be the case repeat the initial operation completely in the instructed sequence. On the card there are, among others, the Software applied in the printer (V 3.54C1Lo), the cards printed before with the printer (copy count), and the parameter (HC,CC,BH,CB), with which this card was printed. F+D Feinwerk- und Drucktechnik GmbH Kirchenstrasse 38, D - 69239 Neckarsteinach, Germany Phone: +49 6229 7000, Fax: +49 6229 70067 E-mail: [email protected], Internet: http://www.fuddruck.de TOP User Manual 8 of 22 2.6 Connecting the Printer to your PC When connecting the cables please pay attention, that all interface- and/or power cables are grounded properly and that they are in accordance with the electronically regulations. The interface connections are located on the back side of the printer. In order to connect the Centronics cable align the wide side of the plug to the wide side of the printer socket. Afterwards tighten the plug with the two screws in order to establish the electrical contact in a stable way. Then connect the cable to the computer (corresponding parallel interface). 2.7 Printing a card from your PC The target is to print a card from your PC. For this you must prepare the PC, that means install the software. Before printing install the TOP printer-driver. (diskette).Start your windowsapplication to create a cardlayout (as a sample you can use WORD from Microsoft). Make the following: Install the windowsdriver regarding to the installation manual. 1. Start the windows-application 2. Switch On the TOP and wait for the initialisation (the OnLED must be lighting) 3. Print from the application (before set the TOP printer in the printer Setup) 4. Check the printed card. 2.8 Serial Interface This serial interface is used for remote control. Here it is possible to control and supervise the complete print technical process by using a terminal (i.e. Win 3.11, accessories, terminal, 9600 b/s or Win 95 with the hyperterminal). The main functions are password secured. F+D Feinwerk- und Drucktechnik GmbH Kirchenstrasse 38, D - 69239 Neckarsteinach, Germany Phone: +49 6229 7000, Fax: +49 6229 70067 E-mail: [email protected], Internet: http://www.fuddruck.de TOP User Manual 9 of 22 3. Operation The three keys arranged on the front side of the printer are used for operation of the printer. 3.1 PRN - Key Pressing this key effects a print function. Application: 1. Print Printing of the contents of the printer storage. To do so the printer must be set on off-line. This may be achieved by briefly pressing the ON-key (ON - LED off). Afterwards you must briefly press the PRN-key. This way, the data contained in the printer storage will be printed. 2. Test Print Serves for the off-line test of the printer. This way, all functions are being tested. See 2.5. 3. Card Output To do so, you must press both keys ON and PRN simultaneously for about 2 sec. 3.2 ON Serves for indication of the operation readiness of the printer. If the LED shines the printer is in on-line mode. This always occurs automatically after switching on the printer. By pressing the ON-key the printer goes into the off-line mode (LED off). Pressing this key again puts the printer back into the on-line mode. In order to print from the PC this LED must always be on. 3.3 RESET Application: In case an error occurs during operation (RESET LED off) this key has to be pressed for debugging. Pressing the key longer (more than 2 sec.) results in a software reset of the printer. In case the LED is blinking a debugging (i.e. no more card in the feeder) is possible without starting the printer all over again. By briefly pressing the key the error message is cleared and the program proceeds at the same spot. Before you must clear the error (i.e. insert new cards). F+D Feinwerk- und Drucktechnik GmbH Kirchenstrasse 38, D - 69239 Neckarsteinach, Germany Phone: +49 6229 7000, Fax: +49 6229 70067 E-mail: [email protected], Internet: http://www.fuddruck.de TOP User Manual 10 of 22 Functions of the Display Elements: Key LED ON PRN RESET On Off Blinks On Blinks On Blinks F+D Feinwerk- und Drucktechnik GmbH Kirchenstrasse 38, D - 69239 Neckarsteinach, Germany Phone: +49 6229 7000, Fax: +49 6229 70067 E-mail: [email protected], Internet: http://www.fuddruck.de Description Printer switched on, On-line Printer Off-line Test image generating Printing process running Data transmission running Error message (HardwareReset necessary) Error message (Errordebuggable) TOP User Manual 11 of 22 4. Service 4.1 Changing the ribbon 1. Disconnect the printer from the power. 2. Unlock the thermal head. To do so, move the release lever to the left and push the thermal head up. 3. Fasten the thermal head in the upper position (Ill.) The release lever must be moved back to the right. 4. Remove the wind- and unwind spools Pull the wind- and unwind spools off to the front. 5. Insert the empty wind up spool (you may use the old unwind spool for this, Ill.). 6. Insert a new color ribbon spool serving as unwind spool. 7. Mount the color ribbon according to the drawing (Ill.). Note: Doing this, pay attention that the two color ribbon spools both are pushed back until to be fixed to the buffer. 8. By three complete rotations you achieve a fixation of the color ribbon on the wind up spool. 9. Unlock the thermal head. To do so, move the release lever to the left and push the thermal head slightly down. 10. Fasten the thermal head in the lower position. The release lever must be moved back to the right (Ill.). 11. Switch the printer back on by using the power switch. 12. Print a test card and check the print quality. Note: Pay attention that ribbon is fixed according to the drawing in the printer). F+D Feinwerk- und Drucktechnik GmbH Kirchenstrasse 38, D - 69239 Neckarsteinach, Germany Phone: +49 6229 7000, Fax: +49 6229 70067 E-mail: [email protected], Internet: http://www.fuddruck.de TOP User Manual 12 of 22 4.2 Change of ribbon type To change the type of ribbon, please observe the following points: 1. Switch off the pritner 2. Remove the old ribbon and load the new one. 3. Push the green button of the printer and switch on the printer (the green button must be pushed until all LEDs of the printer do not blink). 4. Let go the green button and, if necessary, push it again so that the green LED is lightened (ON). 5. In the printer data dialog (File ê Printer Setup ê Options), Ribbon Type, define the loaded ribbon. YMCKO for 5 segments ribbon YMC for 3 segments ribbon X for monochrome ribbon KO for Sublimation black/Overlayribbon 6. End the dialog with OK and print a card from your application. Before printing the card, the printer initializes itself according to the new ribbon type. 7. The new settings are also maintained after switching on/off the printer. 4.3 Changing the thermal head 1. Follow the steps 1. to 4. of changing the color ribbon. 2. Release the cable connection to the thermal head (pull up and off). 3. Remove the two screws on the mounting of the thermal head (Ill. 3.5). 4. Pull the thermal head with heat sink off to the front. 5. Insert the new thermal head very carefully. 6. Tightened the two fastening screws (Ill. 3.5). 7. Re-establish the cable connection to the thermal head, doing so, you must assure of a stable connection. 8. Follow the steps 5 to 11 of changing the color ribbon. 9. Connect the Centronics cable. Switch on the TOP and wait for initialisation. 10. Insert the diskette to the floppy drive of the PC. 11. Start the program setuppre.exe under MS-DOS. Check the head number and the port (Normal LPT1). It takes around 1min time. 12. Switch off the TOP. 13. Switch on the TOP. 14. Print a testcard. Note: On the testcard must be the new headnumber. F+D Feinwerk- und Drucktechnik GmbH Kirchenstrasse 38, D - 69239 Neckarsteinach, Germany Phone: +49 6229 7000, Fax: +49 6229 70067 E-mail: [email protected], Internet: http://www.fuddruck.de TOP User Manual 13 of 22 4.4 Changing the cleaning rolls 1. Switch the printer off. 2. Pull the two cleaning rolls up and off (Ill.). 3. Insert new, i.e. cleaned and dry rolls. To do so, insert the rolls from the TOP and push them down. 4. Switch the printer on again. The cleaning rolls may be cleaned again with tab water and put them dry back. Cleaning should take place according to contamination. 4.5 Cleaning the thermal head 1. Take the thermal print head out (s.4.2) 2. Clean the head with a cleaning pen or spirit. 3. Put the head back (s. 4.2) Note: The thermal print head is a very sensitive electronic and mechanical part. 4.6 Update of the Printer Software For the updating of the printer software you need the printer connected to the PC and the new firmware on the diskette. Before switching the TOP On press PRN button and hold it until the green LED is blinking. Load the new firmware by the commando string. copy /b Filename lpt1 (copy/b top384c1.prn lpt1) After the loading the TOP is automatically initialised and then is ready for further operations. Wait this time. Note: This takes around 1 minute time. Only work in the DOSmode F+D Feinwerk- und Drucktechnik GmbH Kirchenstrasse 38, D - 69239 Neckarsteinach, Germany Phone: +49 6229 7000, Fax: +49 6229 70067 E-mail: [email protected], Internet: http://www.fuddruck.de TOP User Manual 14 of 22 4.7 Cleaning the transport rolls Regularly clean the grey transport rolls (at least after 500 cards). Push down the Reset-button and switch the power on. Only hold the Reset-button down until the transport rolls are moving. Now you can clean the transport rolls. With the help of a moisture cloth (spirit or Isopropanol) touch it very strong to the moving rolls. Clean all 4 rolls. After that push down the Resetbutton down again. The moving of the transport rolls stops. F+D Feinwerk- und Drucktechnik GmbH Kirchenstrasse 38, D - 69239 Neckarsteinach, Germany Phone: +49 6229 7000, Fax: +49 6229 70067 E-mail: [email protected], Internet: http://www.fuddruck.de TOP User Manual 15 of 22 5. Modifications 5.1 Magnetic Stripe Encoder This is a option for the TOP. You have the possibility to encode LoCo or HiCo –cards . After writing the magnetic stripe is a verify. If the verify is Ok, than the card will be printed. If there is an error, than the printer takes the next cards out of the feeder and make the same procedure again. After three cards with an error the printer send an error message and stops. Note: Use only HiCo or LoCo cards according to the printer settings. Set to HiCo- use only HiCo – cards. Set to LoCo – use only LoCo cards. 5.2 Flip-Over Station Factory setting is for cards with 0,76 mm thickness. The Flip-Over Station is generic with Flip-over. 5.3 Output Hopper The automatic card hopper additionally offers the function of sorting out in case the magnetic stripe could not be properly written (this way the card is not printed). The printed cards are being dispensed in the hopper (first in - first top). F+D Feinwerk- und Drucktechnik GmbH Kirchenstrasse 38, D - 69239 Neckarsteinach, Germany Phone: +49 6229 7000, Fax: +49 6229 70067 E-mail: [email protected], Internet: http://www.fuddruck.de TOP User Manual 16 of 22 5.4 SCSI-Interface This communication system facilitates a fast, standardised, and bi-directional data transmission between PC and TOP. The corresponding cable and the terminator are being delivered along. Please obtain the installation instructions from the description of the Windows-Driver. Supported will the SCSI-1 standard. 5.5 Laminator The operation of the laminator unit is described in a special manual. 5.6 Chip-Module The terminals of the chipcontacts are led out via 9-pin-port at the back of the printer. The chip-module is driven by <esc>commands and by external programming electronics. Pinning of DB9-socket Pin Contact 1 2 3 4 5 6 7 8 9 5 7 1 3 n.c. 6 8 2 4 F+D Feinwerk- und Drucktechnik GmbH Kirchenstrasse 38, D - 69239 Neckarsteinach, Germany Phone: +49 6229 7000, Fax: +49 6229 70067 E-mail: [email protected], Internet: http://www.fuddruck.de Chip TOP User Manual 17 of 22 6. Troubleshooting 6.1 General Troubleshooting Error Description Incorrect print, transmission error No print Possible Error Cause Cable defect or not contact, wrong cable Solution Check the cable and connection Cover not closed Printer not switched On Fuse defect Power or Centronics cable are not connected Thermal Print Head not connected Printer Off-line End of the ribbon Ribbon torn Close the cover Switch the printer On Change fuse Check the cables and connections Connect the print head Set the printer ON-line Insert a new ribbon Rewind the ribbon, check the parameters in the driver and the card material Clean the transport rolls Insert the ribbon according to the drawing Change the ribbon or change the settings in the firmware Insert new cards Change the card feeder gate Clean the transport rolls OEM support set flip-over, if it repeats contact the printer manufacturer repeat trying to insert new card with corresponding chip Insert magstripe cards Insert in the correct position Insert HiCo or LoCo cards No ribbon synchronisation Ribbon inserted incorrectly Ribbon stops during the initialisation Card feeding error Insert not the right ribbon type Card isn’t move correctly Card isn‘t print parallel Card is not being flipped over Chip reader read/write error Magnetic Stripe encoding error No card in the feeder Card feeder gate to small or to large Transport rolls dirty Card feeder isn’t parallel to the print head check software installation read/write error on chip or bad contacts No magstripe on the card Wrong position of the magstripe Wrong magstripe card F+D Feinwerk- und Drucktechnik GmbH Kirchenstrasse 38, D - 69239 Neckarsteinach, Germany Phone: +49 6229 7000, Fax: +49 6229 70067 E-mail: [email protected], Internet: http://www.fuddruck.de TOP User Manual 18 of 22 6.2 Improvement of the print Quality 1. Print too light or rich in contrast In order to guarantee a constant quality in printing only sublimation ribbon recommended by the manufacturer should be used. The corresponding parameter may be set in the printer driver. Read the operation manual for the printer driver 2. Individual Small Areas of not Printed or Printed Incorrectly in Color This deals with dirt particles which were not removed from the cleaning rolls or the card material is uneven. The cleaning rolls have to be cleaned immediately. 3. The Card Edges are not being Printed Evenly There is a “Ridge“ on the card edges. You should insert different cards or not print all the way to the edge. Note: The „Ridge“ normally is only on one side. Change the front- and backside) 4. Change in Print Quality after Change the Sublimation Ribbon After insertion of a new color ribbon (according to the specification of the manufacturer) the contrast decreases while printing. -The ribbon is outdated -The print parameter must be changed. 5. Horizontal Lines White or black lines straight through appear, individual dots are not printed. Should the error re-appear after cleaning the thermal head , thus the thermal head is defect and must be exchanged. 6. After Changing the Card Material the Print Quality Changes. The printer parameter must be installed according to the card material. Only use card material recommended by F+ D. 7. Printer Offset When printing the test card an offset of the color lines is observed (Y,M,C). Please clean the transport rolls by spirit. F+D Feinwerk- und Drucktechnik GmbH Kirchenstrasse 38, D - 69239 Neckarsteinach, Germany Phone: +49 6229 7000, Fax: +49 6229 70067 E-mail: [email protected], Internet: http://www.fuddruck.de TOP User Manual 19 of 22 6.3 Printing Time The TOP is an ultra high speed color printer. To be use this speed you need a fast data transfer from the PC to the TOP. During the printing the TOP doesn’t wait for the data’s. 1. Works only with Win 95 2. Set in the BIOS of PCs the ECP-Mode with a DMA-Channel (before read the PC manual) 3. Check all settings under Win 95 Settings Control Panel System Device Manager Ports (COM and LPT) Printer Ports ECP (LPT1) Resources – here must be a DMA-channel 7. Accessories Color Ribbon: YMCKO Order-No.: 100 136 YMC Order-No.: 100 138 KO Order-No.: 100 170 Monochrome Ribbon:Black Order-No.: 100 102 Plastic Cards: White Order-No.: 100 533 White with Magstripe (LoCo) Order-No.: 100 134 White with Magstripe (HiCo) Order-No.: 100 222 Thermal Print Head: Order-No.: 100 167 F+D Feinwerk- und Drucktechnik GmbH Kirchenstrasse 38, D - 69239 Neckarsteinach, Germany Phone: +49 6229 7000, Fax: +49 6229 70067 E-mail: [email protected], Internet: http://www.fuddruck.de TOP User Manual 20 of 22 8. Technical Specifications Printing Method: Dye-sublimation (YMCKO, YMCO, YMC, KO) and Resin/Wax thermal transfer (monochrome) Printing Time: max 27 sec (YMCKO, edge to edge, without data transmission) Print Resolution: 300 dpi Color Resolution: 8 bit per color (corresponds to 16,7 Mill. colors) Operation: 3 Buttons and 3 LEDs Interface: Centronics for PC Serial for service purposes Controller: 32 bit RISC Basic Storage: 4 Mbytes Power Supply: 230 V / 115 V 1,7 / 3,4 A 50 / 60 Hz stand by 25 W Fuse T 4 / 5 A Dimensions: H x B x T 195 mm x 390 mm x 365 mm Weight: 18,5 kg Card Feeder: max. 120 cards (0,76 mm thickness) Card Material: PVC, ABS, PE and PET Card Dimensions: 54 mm x 85,6 mm (ISO 7810 ) Card Thickness: 0,5 mm up to 1,2 mm Cleaning Rolls: Cleaning plastic cards before print Operating temperature:+10° C up to +35° C Humidity: 20 - 80 % (no condensing) Service: Connection possibility Modem (T2), by protocolling the total print procedure a distance control is possible. Temperature Stability: Fan, Software Software: - WinEpicc- Card-layout-Software (optional) - Driver for Win 3.11/95/98 or Win NT 4.0 - ESC-sequences of the printer Basic Model: - Magnetic Stripe Encoder: ISO 7811, HiCo or LoCo - Flip-Over Station Options: - Chip-Modul - SCSI-Interface - Output Hopper - Laminator F+D Feinwerk- und Drucktechnik GmbH Kirchenstrasse 38, D - 69239 Neckarsteinach, Germany Phone: +49 6229 7000, Fax: +49 6229 70067 E-mail: [email protected], Internet: http://www.fuddruck.de TOP User Manual 21 of 22 F+D Feinwerk- und Drucktechnik GmbH Kirchenstrasse 38, D - 69239 Neckarsteinach, Germany Phone: +49 6229 7000, Fax: +49 6229 70067 E-mail: [email protected], Internet: http://www.fuddruck.de F+D Feinwerk- und Drucktechnik GmbH Kirchenstr. 38 D-69239 Neckarsteinach Tel. Fax. Mail: Web: +49(0)6229 / 700-0 +49(0)6229 / 700-67 [email protected] www.FuDdruck.de Copyright by F+D 3076.02.098.90.06 Spezifications subject to change without prior notice