1
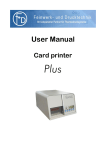
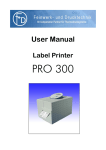
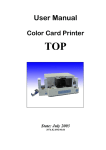
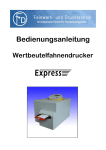
User Manual
Printer driver
PRO 300 / ECO 200 / Express
Plus / Pegasus
State: April 2003
3073.01.991.90.08
Installation instructions driver PRO300 / ECO200 / Express / Plus / Pegasus
3
Contents
1. Introduction
2. System requirements
2.1
2.2
4
4
WindowsTM 95 / 98
WindowsTM NT / 2000 / XP
4
4
3. Driver installation using WindowsTM as operating system
3.1
Installation Windows
TM
95 / 98
5
3.1.1 Installation as local printer from disk or CD
3.1.2 Installation as local printer using a downloaded file
3.2
Installation WindowsTM NT / 2000 / XP
4. Settings ECO 200
8
8
9
Settings WindowsTM NT / 2000 / XP
4.2.1
4.2.2
4.2.3
4.2.4
4.2.5
4.2.6
10
Properties, Device Settings
Properties, Info
Printing Preferences, Layout
Printing Preferences, Paper / Quality
Printing Preferences, Options
Printing Preferences, Advanced Document Settings
5. Settings PRO 300
5.1
5.2
Settings Windows 95 / 98
Settings WindowsTM NT / 2000 / XP
15
15
15
TM
6. Settings PRO 300 2CP Windows
NT / 2000 / XP
Properties, Device Settings
TM
NT / 2000 / XP
Properties, Device Settings
16
16
8. Settings Pegasus WindowsTM NT / 2000 / XP
8.1
15
15
7. Settings Express and Plus Windows
7.1
10
12
12
13
13
14
15
TM
5.2.1 Properties, Device Settings
6.1
6
7
8
Settings WindowsTM 95 / 98
4.1.1 Properties, page setup
4.1.2 Properties, Info
4.2
5
5
6
3.2.1 Installation as local printer from disk or CD without Plug and Play
3.2.2 Installation as local printer using a downloaded file
4.1
5
17
Properties, Device Settings
17
9. Definition of a new label format
18
New label format using WindowsTM 95 / 98
New label format using WindowsTM NT / 2000 / XP
18
18
10. Uninstall driver using WindowsTM as operating system
19
9.1
9.2
TM
10.1 Uninstall driver using Windows 95 / 98
10.2 Uninstall driver using WindowsTM NT
10.3 Uninstall driver using WindowsTM 2000 / XP
11. Special features
11.1 Use of internal objects
11.2 Writing data to the transponder
12. Index
19
19
19
20
20
21
22
F+D Feinwerk- und Drucktechnik GmbH
Kirchenstraße 38, 69239 Neckarsteinach, Germany
Phone: +49 (0) 6229 7000, fax: +49 (0) 6229 70067
E-Mail: [email protected], internet: http://www.fuddruck.de
4
Installation instructions driver PRO300 / ECO200 / Express / Plus / Pegasus
Introduction
1.
Introduction
The printer can be driven by windows TM applications.
The printer driver is a software which transfers the necessary commands for the print process to the printer.
This manual includes the description regarding the installation and the settings of the corresponding printer driver.
The current driver version can be downloaded from the F+D homepage: www.fuddruck.de. Click on the Englisch flag,
support button and download the corresponding driver.
Following drivers are available:
ECO 200:
Windows TM 95, 98, NT 4.0, 2000 and XP
PRO 300:
Windows TM 95, 98, NT 4.0, 2000 and XP
PRO 300 2CP:
WindowsTM NT 4.0, 2000 and XP
Express:
WindowsTM NT 4.0, 2000 and XP
Pegasus:
WindowsTM NT 4.0, 2000 and XP
Plus:
WindowsTM NT 4.0, 2000 and XP
2.
System requirements
2.1 WindowsTM 95 / 98
The printer drivers can be used on following conditions:
- WindowsTM 95/98
- Pentium, min. 32 MB RAMhhhhhhh
2.2 WindowsTM NT / 2000 / XP
The printer drivers can be used on following conditions:
- WindowsTM NT 4.0 SP6, Windows TM 2000 or Windows TM XP
- Pentium, min. 32 MB RAM
F+D Feinwerk- und Drucktechnik GmbH
Kirchenstraße 38, 69239 Neckarsteinach, Germany
Phone: +49 (0) 6229 7000, fax: +49 (0) 6229 70067
E-Mail: [email protected], internet: http://www.fuddruck.de
Installation instructions driver PRO300 / ECO200 / Express / Plus / Pegasus
3.
5
Driver installation using WindowsTM as operating system
3.1 Installation WindowsTM 95 / 98
3.1.1 Installation as local printer from disk or CD
1.
2.
3.
4.
5.
6.
7.
8.
Picture 1
(Displayed using WindowsTM 98, second
version)
9.
10.
11.
12.
13.
14.
Picture 2
When the operating system has started up, insert the printer driver
CD into your CD drive.
Click on Start button and select Settings.
Click on Printers. Printers window is displayed (see picture 1).
Double click on Add Pinter.
Click on Next button.
Local printer is already selected. Click on Next button.
A list of printers is now displayed on the screen. Click on Have
Disk... button.
Enter the name of the disk or CD drive (e. g.: A:\WIN98) or click
on the browse button and go to the right folder. Click on OK
button, and again on the OK button if you browsed.
Select the right printer driver in the displayed list (see picture 2)
and click on it. It is now marked in blue. Click on Next button.
Select the corresponding printer port from the list (e. g. LPT1)
and click on it. It is now marked in blue. Click on Next button.
Select yes or no to choose the printer as a DEFAULT PRINTER
or not. In case of No, click on the left field of No. Click on Next
button. In case of installation of the first printer on your PC, it
will automatically be defined as default printer.
Select Test Page No and click on the corresponding field at the
left. Click on Finish button.
The corresponding files for the printer driver are copied in the
printer folder and the corresponding icon appears in the Printers
windows (e. g. F+D Eco200 W2K English).
The installation is successfully finished in case of no error
messages.
3.1.2 Installation as local printer using a downloaded file
1.
2.
3.
4.
5.
When the operating system has started up, extract, if necessary,
the downloaded file in a folder on your hard disk.
Do the same as for the CD: step 2 to 8
Enter the name and path of your folder or click on Browse button
to enter it using the displayed paths. When the right folder is
selected and the right file appears on the screen, click on open
button.
Click on OK button.
Do the same as for the CD: step 10 to 15.
Notice: In case of an error message after step 11, click on next button, please check that you have the right driver for
WindowsTM 95 / 98.
F+D Feinwerk- und Drucktechnik GmbH
Kirchenstraße 38, 69239 Neckarsteinach, Germany
Phone: +49 (0) 6229 7000, fax: +49 (0) 6229 70067
E-Mail: [email protected], internet: http://www.fuddruck.de
6
Installation instructions driver PRO300 / ECO200 / Express / Plus / Pegasus
Driver installation using WindowsTM as operating system
3.2 Installation WindowsTM NT / 2000 / XP
3.2.1 Installation as local printer from disk or CD without Plug and Play
1.
2.
3.
4.
5.
6.
Picture 3
(Displayed using WindowsTM Professional)
7.
8.
9.
10.
11.
12.
Picture 4
13.
14.
15.
Picture 5
16.
When the operating system has started up, insert the printer driver
CD into your CD drive.
Click on Start button and select Settings
Click on Printers. Printers window is displayed (see picture 3)
Double click on Add Pinter.
Click on Next button.
Local printer is already selected. Unselect automatic detect and
install... clicking on the left field. Click on Next button.
Select the corresponding printer port from the list (e. g. LPT1)
and click on it. It is now marked in blue. Click on Next button.
A list of printers is now displayed on the screen. Click on Have
Disk... button.
Enter the name of the disk or CD drive (e. g.: A:\WIN98) or click
on the browse button and go to the right folder. Click on OK
button, and again on the OK button if you browsed.
Select the right printer driver in the displayed list (see picture 4)
and click on it. It is now marked in blue. Click on Next button.
Select Yes or No to choose the printer as a DEFAULT PRINTER
or not. In case of No, click on the corresponding field at the left.
Click on Next button. In case of installation of the first printer on
your PC, it will automatically be defined as default printer.
Select Do not share or Share as. In case of Share as, click on the
corresponding field at the left. Enter a new name for the printer if
wanted. Click on Next button
Only in case of Share as: Enter the Location and Comment if
wanted. Click on Next button.
Select Test Page No and click on the corresponding field at the
left. Click on Next button.
Click on Finish button.
In case a notice regarding the digital signature appears, please
continue the installation clicking on the Yes button.
The corresponding files for the printer driver are copied in the
printer folder and the corresponding icon appears in the Printers
windows (e. g. F+D Eco200 W2K English) (see picture 5).
The installation is successfully finished in case of no error
messages.
F+D Feinwerk- und Drucktechnik GmbH
Kirchenstraße 38, 69239 Neckarsteinach, Germany
Phone: +49 (0) 6229 7000, fax: +49 (0) 6229 70067
E-Mail: [email protected], internet: http://www.fuddruck.de
Installation instructions driver PRO300 / ECO200 / Express / Plus / Pegasus
7
3.2.2 Installation as local printer using a downloaded file
1.
2.
3.
4.
5.
When the operating system has started up, extract, if necessary,
the downloaded file in a folder on your hard disk.
Do the same as for the CD: step 2 to 9
Enter the name and path of your folder or click on Browse button
to enter it using the displayed paths. When the right folder is
selected and the right file appears on the screen, click on open
button.
Click on OK button.
Do the same as for the CD: step 11 to 17.
Notice: In case of an error message after step 11, click on next button, please check that you have the right driver for
WindowsTM NT / 2000 / XP.
F+D Feinwerk- und Drucktechnik GmbH
Kirchenstraße 38, 69239 Neckarsteinach, Germany
Phone: +49 (0) 6229 7000, fax: +49 (0) 6229 70067
E-Mail: [email protected], internet: http://www.fuddruck.de
8
Installation instructions driver PRO300 / ECO200 / Express / Plus / Pegasus
Settings ECO 200
4.
Settings ECO 200
4.1 Settings WindowsTM 95 / 98
4.1.1 Properties, page setup
To go to the properties, click on Start, Settings, Printers and open
the Properties windows of the corresponding printer (e. g. click on
the printer icon with the right mouse button, click on properties).
Click on options, to open the corresponding window (see picture 6).
Page setup
Page
Click on the field at the right of “paper” and choose one of the predefined label formats or user defined for an other format.
Scale
The label format can be displayed in point, mm or inch. Click on unit
to define the wanted unit in the right field. Default value: point.
Picture 6
Rotate 180°
To rotate the picture by 180°. Click on the left field and select it or
not. Default value: selected.
Width
Label width. Value can only be changed in case of an user defined
format.
Length
Label length. Value can only be changed in case of an user defined
format.
Dispensin pos.
To obtain a label dispense, label-taken must be selected.
Enter the wanted position in the right field. Default value: 0 point.
Cut pos.
To use this setting, cutter must be selected.
Enter the wanted position in the right field. Default value: 154 points.
copies
Enter the number of copies you want. Default value: 1.
Notice: Please note that in some applications the number of copies can
already be defined.
Orientation
Choose the format in the left field: Portrait or Landscape. Default
value: portrait.
Notice: Please note that in some applications the format can already
be defined.
F+D Feinwerk- und Drucktechnik GmbH
Kirchenstraße 38, 69239 Neckarsteinach, Germany
Phone: +49 (0) 6229 7000, fax: +49 (0) 6229 70067
E-Mail: [email protected], internet: http://www.fuddruck.de
Installation instructions driver PRO300 / ECO200 / Express / Plus / Pegasus
9
hardware and handling
Cutter
Corresponding to your application and printer, select it or not in the
left field. Default value: unselected.
Label-Taken
Corresponding to your application and printer, select it or not in the
left field. In case of selected and appropriate printer, labels are
dispensed each by each. Default value: unselected.
without parameters
Select it or not in the left field. Default value: unselected.
Following parameters are transfered or not to the printer:
Dispensin pos., cut. pos., cutter, label-taken, heating time, print on
printkey, sync labels, cutting options and print speed.
heating time
To define the blackening decree of the printed label in steps of 5 %.
Define the wanted value in the right field. Default value: 0 %.
Notice: An increase of the heating time results in an increase of the
blackening decree (optical density).
print on printkey
Each label is only print after pushing the print key on the printer.
Select it or not in the left field. Default value: unselected.
sync labels
Corresponding to your application and printer, select it or not in the
left field. Selected for labels, not selected for endless application.
Default value: selected.
Cutting options
To define this setting, cutter must be selected.
Select in the right field between:
- no cutting
- cut every label
- cut after job.
Default value: no cutting.
print speed
To define the printing speed.
4.1.2 Properties, Info
Click on info in the properties window to see the printer driver version
and F+D address, phone, fax ... (see picture 7).
Picture 7
F+D Feinwerk- und Drucktechnik GmbH
Kirchenstraße 38, 69239 Neckarsteinach, Germany
Phone: +49 (0) 6229 7000, fax: +49 (0) 6229 70067
E-Mail: [email protected], internet: http://www.fuddruck.de
10
Installation instructions driver PRO300 / ECO200 / Express / Plus / Pegasus
Settings ECO 200
4.2 Settings WindowsTM NT / 2000 / XP
4.2.1 Properties, Device Settings
To go to the Device Settings, click on Start, Settings, Printers and
open the Properties windows of the corresponding printer (e. g. click
on the printer icon with the right mouse button, click on Properties).
Click on Device Settings, to open the corresponding window (see
picture 8).
Form To Tray Assignment
Has no function for the driver. Do not make any change.
Font Substitution Table
Has no function for the driver. Do not make any change.
Installable Options
Picture 8
labeltaken
Corresponding to your application and printer, select no or yes in the
right field. In case of yes and appropriate printer, labels are dispensed
each by each. Default value: no.
cutter
Corresponding to your application and printer, select yes or no in the
right field. Default value: yes.
sync labels
Corresponding to your application and printer, select yes or no in the
right field. , Yes for labels, no for endless application. Default value:
yes.
Cutting Position
To use this setting, cutter must be selected yes.
Enter the wanted position in the right field. Default value: 240 points.
Dispense Position
To obtain a label dispense, labeltaken must be selected yes.
Enter the wanted position in the right field. Default value: 0 point.
Unit
The label format can be displayed in point, centimeter or inch. Define
the wanted unit in the right field. Default value: point.
F+D Feinwerk- und Drucktechnik GmbH
Kirchenstraße 38, 69239 Neckarsteinach, Germany
Phone: +49 (0) 6229 7000, fax: +49 (0) 6229 70067
E-Mail: [email protected], internet: http://www.fuddruck.de
Installation instructions driver PRO300 / ECO200 / Express / Plus / Pegasus
11
Heating Time
To define the blackening decree of the printed label in steps of 5 %.
Define the wanted value in the right field. Default value: 0 %.
Notice: An increase of the heating time results in an increase of the
blackening decree (optical density).
Flip Label
To rotate the picture by 180°. Select No or Yes in the right field.
Default value: No.
Printing Speed
To define the printing speed. Select the wanted speed in the right field.
Cutting Options
To define this setting, cutter must be selected yes.
Select in the right field between:
- no cutting
- after print job
- after each label.
Default value: no cutting.
Print on Key
Each label is only print after pushing the print key on the printer.
Select No or Yes in the right field. Default value: No.
print with parameters
Select Yes or No in the right field. Default value: Yes.
Following parameters are transfered or not to the printer:
Dispense pos., cutting pos., cutter, labeltaken, heating time, print on
key, sync labels, cutting options and printing speed.
Color Region Color 1
Picture 9
A RGB colour area is defined which prescribes which colour area is
allocated to the printable colour.
These settings are only active when Color mode is selected in the
Advanced Document Settings (see chapter 4.2.6, page 14).
Normally, the default values must not be changed for the ECO 200.
Default values for Red, Green and Blue Part: Upper Range: 100,
Lower Range: 0.
(see picture 9)
F+D Feinwerk- und Drucktechnik GmbH
Kirchenstraße 38, 69239 Neckarsteinach, Germany
Phone: +49 (0) 6229 7000, fax: +49 (0) 6229 70067
E-Mail: [email protected], internet: http://www.fuddruck.de
12
Installation instructions driver PRO300 / ECO200 / Express / Plus / Pegasus
Settings ECO 200
4.2.2 Properties, Info
Click on Info in the properties window to see the printer driver
version and F+D address, phone, fax ... (see picture 10).
Picture 10
4.2.3 Printing Preferences, Layout
To go to the layout window, open the Printing Preferences from your
application or click on Start, Settings, Printers and open the
Printing Preferences window of the corresponding printer (e. g. click
on the printer icon with the right mouse button, click on Printing
Preferences) (see picture 11).
Orientation
Choose the format in the left field: Portrait or Landscape. Default
value: Portrait.
Notice: Please note that in some applications the format can already
be defined.
Picture 11
Page Order
Select the printing sequence in the left field. Select Front to Back or
Back to Front. Default value: Front to Back.
Pages Per Sheet
To define how many pages of your application will be printed on one
paper sheet. Default value: 1. Normally, you will not have to change
it.
Advanced...
Click on Advanced... button to go to the Advanced Document
Settings (see chapter 4.2.6, page 14).
F+D Feinwerk- und Drucktechnik GmbH
Kirchenstraße 38, 69239 Neckarsteinach, Germany
Phone: +49 (0) 6229 7000, fax: +49 (0) 6229 70067
E-Mail: [email protected], internet: http://www.fuddruck.de
Installation instructions driver PRO300 / ECO200 / Express / Plus / Pegasus
13
4.2.4 Printing Preferences, Paper / Quality
Click on Paper / Quality in the Printing Preferences window (see
picture 12).
Tray Selection Paper Source
Default value is: Automatically Select. Do not make any change.
Color
Select Black & White or Colour in the left field. Default value is:
Black & White.
When you change this value the value of color mode (see chapter
4.2.6, page 14) is also automatically changed. Same function for both.
Picture 12
Advanced...
Click on Advanced... button to go to the Advanced Document
Settings (see chapter 4.2.6, page 14).
4.2.5 Printing Preferences, Options
Click on Options in the Printing Preferences window (see picture 13).
See Device Settings (see chapter 4.2.1, page 10)
Picture 13
F+D Feinwerk- und Drucktechnik GmbH
Kirchenstraße 38, 69239 Neckarsteinach, Germany
Phone: +49 (0) 6229 7000, fax: +49 (0) 6229 70067
E-Mail: [email protected], internet: http://www.fuddruck.de
14
Installation instructions driver PRO300 / ECO200 / Express / Plus / Pegasus
Settings ECO 200
4.2.6 Printing Preferences, Advanced Document Settings
To go to the Advanced Document Settings, click on Advanced...
button when you are in the Printing Preferences, Layout or Paper /
Quality window (see chapter 4.2.3, page 12, or chapter 4.2.4, page
13). Following features can be defined (see picture 14, 15 and 16).
Paper / Output
Paper Size
Select the wanted size in the right field. Default value: A4.
Copy Count
Picture 14
Enter the number of copies you want. Click on the left field of collated
to select wether you want that the copies are collated or not. Default
value: 1.
Notice: Please note that in some applications the number of copies can
already be defined.
Graphic
Has no function for the driver. Do not make any change.
Documents Options
See Device Settings (chapter 4.2.1, page 10) for the features not
described below.
Advanced Printing Features
Has no function for the driver. Do not make any change.
Color mode
Picture 15
Select the wanted value in the right field. Default value: Monochrome.
With Monochrome, the graphic will be dithered.
With color, the settings of the RGB colour area are used, and thus
only the colours within the defined range printed (chapter 4.2.1, page
10).
When you change this value the value of color (chapter 4.2.4, page
13) is also automatically changed. Same function for both.
Halftoning
To define the dither decree of the graphic. Default value: Automatic.
Normally no changes are necessary. Otherwise, Select the wanted
value in the right field.
Picture 16
F+D Feinwerk- und Drucktechnik GmbH
Kirchenstraße 38, 69239 Neckarsteinach, Germany
Phone: +49 (0) 6229 7000, fax: +49 (0) 6229 70067
E-Mail: [email protected], internet: http://www.fuddruck.de
Installation instructions driver PRO300 / ECO200 / Express / Plus / Pegasus
5.
15
Settings PRO 300
5.1 Settings WindowsTM 95 / 98
All settings are the same as for the ECO 200 printer (see chapter 4.1, page 8). Some default values can be different.
5.2 Settings WindowsTM NT / 2000 / XP
All settings not described below are the same as for the ECO 200 printer (see chapter 4.2, page 10). Some default values
can be different.
5.2.1 Properties, Device Settings
The PRO 300 can be used with a RFID unit for which following
setting must be Yes in case you want to use it.
transmit transponder data
Corresponding to your application and printer, Select Yes or No in the
right field. Default value: Yes.
The transponder data can be read from a file and transfered to the
printer / transponder (see chapter 11.2, page 21).
See picture 17.
Picture 17
6.
Settings PRO 300 2CP WindowsTM NT / 2000 / XP
All settings not described below are the same as for the ECO 200 printer (see chapter 4.2, page 10). Some default values
can be different.
6.1 Properties, Device Settings
As the PRO 300 2CP allows two-coloured printouts, the heating time
and the color region color of each colour must be defined (see chapter
4.2.1, page 10) (see picture 18).
Color 1 is the colour which needs the higher temperature (e. g. black).
Color 2 is the colour which needs the lower temperature. (e. g. red).
Which colour needs the higher or lower temperature depends on the
used label material and should be indicated in the material
specifications. In case of one-coloured printouts the whole 4 values
must also be adapted to the label material.
Heating Time Color 1
Heating Time Color 2
Color Region Color 1
Picture 18
Color Region Color 2
F+D Feinwerk- und Drucktechnik GmbH
Kirchenstraße 38, 69239 Neckarsteinach, Germany
Phone: +49 (0) 6229 7000, fax: +49 (0) 6229 70067
E-Mail: [email protected], internet: http://www.fuddruck.de
16
Installation instructions driver PRO300 / ECO200 / Express / Plus / Pegasus
Settings Express and Plus WindowsTM NT / 2000 / XP
7.
Settings Express and Plus WindowsTM NT / 2000 / XP
All settings not described below are the same as for the ECO 200 printer (see chapter 4.2, page 10). Some default values
can be different.
7.1 Properties, Device Settings
As for the PRO 300, the Express and the Plus can also be used with a
RFID unit, transmit transponder data (see chapter 11.2, page 21).
Some settings of the ECO 200 printer are not available, and thus not
displayed on the screen.
Following settings are not available for the Express and Plus.
Installable Options
Cutting Position
Dispense Position
Cutting Options
Picture 19
(Express: picture 19 / Plus: picture 20)
Picture 20
F+D Feinwerk- und Drucktechnik GmbH
Kirchenstraße 38, 69239 Neckarsteinach, Germany
Phone: +49 (0) 6229 7000, fax: +49 (0) 6229 70067
E-Mail: [email protected], internet: http://www.fuddruck.de
Installation instructions driver PRO300 / ECO200 / Express / Plus / Pegasus
8.
17
Settings Pegasus WindowsTM NT / 2000 / XP
All settings not described below are the same as for the ECO 200 printer (see chapter 4.2, page 10). Some default values
can be different.
8.1 Properties, Device Settings
As the Pegasus allows two-coloured printouts like the PRO 300 2CP,
the heating time and the color region color of each colour must be
defined (see chapter 6.1, page 4) (see picture 21).
Heating Time Color 1
Heating Time Color 2
Color Region Color 1
Color Region Color 2
Picture 21
F+D Feinwerk- und Drucktechnik GmbH
Kirchenstraße 38, 69239 Neckarsteinach, Germany
Phone: +49 (0) 6229 7000, fax: +49 (0) 6229 70067
E-Mail: [email protected], internet: http://www.fuddruck.de
18
Installation instructions driver PRO300 / ECO200 / Express / Plus / Pegasus
Definition of a new label format
9.
Definition of a new label format
9.1 New label format using Windows TM 95 / 98
A new label format can be defined in the driver properties window (see chapter 4.1, page 8).
9.2 New label format using Windows TM NT / 2000 / XP
To define a new user defined label format, it must first be defined in
WindowsTM.
1.
2.
3.
Picture 22
4.
5.
Click on Start, Settings, Printers to open the corresponding
window.
Click on File, Server Properties (see picture 22).
To create a new format select the field left from “Create a New
Form” and enter a new name in the field right from “Form
Description for:” (see picture 23).
Select the unit (Metric or English) you want, clicking on the
corresponding field and define the width, height and the margins
in the corresponding fields. Click on Save Form button.
The new format is now available for the drivers. Click on Close
button to end the definition of label formats.
Notice: Each printer can only work with formats for which it is
designated. In case the format does not fit, the printer driver will
ignore it.
Picture 23
F+D Feinwerk- und Drucktechnik GmbH
Kirchenstraße 38, 69239 Neckarsteinach, Germany
Phone: +49 (0) 6229 7000, fax: +49 (0) 6229 70067
E-Mail: [email protected], internet: http://www.fuddruck.de
Installation instructions driver PRO300 / ECO200 / Express / Plus / Pegasus
19
10. Uninstall driver using WindowsTM as operating system
Before installation of a new driver, the old one should be deleted or uninstalled.
10.1 Uninstall driver using Windows TM 95 / 98
•
Click on Start, Settings, Printers.
•
Mark the corresponding printer icon and delete it (e. g. with menu File, Delete).
10.2 Uninstall driver using Windows TM NT
•
Click on Start, Settings, Printers.
•
•
Mark the corresponding printer icon and delete it (e. g. with menu File, Delete).
Additionally, the old driver files must be deleted in the following folders:
- \WinNT\System32\Spool\Drivers\W32x86
- \WinNT\System32\Spool\Drivers\W32x86\1
- \WinNT\System32\Spool\Drivers\W32x86\2
E. g. in case of the ECO 200 printer, delete all ECO200*.* files in the 3 above mentioned folders.
•
In some cases, the corresponding format must also be deleted (e. g. Express or PLUS printer) in the Server
Properties window (see chapter 9.2, page 18) in order to took over the new format settings from the GPD file.
Click on the corresponding format in the list below Forms on:, to select it. Click on the delete button, to delete it.
For the Express printer delete if necessary the format: Express.
For the PLUS printer delete if necessary the format: Plus Card.
10.3 Uninstall driver using Windows TM 2000 / XP
•
Click on Start, Settings, Printers.
•
•
•
•
•
Mark the corresponding printer icon and delete it (e. g. with menu File, Delete).
Click on File, Server Properties (see chapter 9.2, page 18).
Click on Drivers.
Mark the corresponding driver and delete it clicking on Remove button.
In some cases, the corresponding format must also be deleted (e. g. Express or PLUS printer) in the Server
Properties window (see chapter 9.2, page 18) in order to took over the new format settings from the GPD file.
Click on the corresponding format in the list below Forms on:, to select it. Click on the delete button, to delete it.
For the Express printer delete if necessary the format: Express.
For the PLUS printer delete if necessary the format: Plus Card.
F+D Feinwerk- und Drucktechnik GmbH
Kirchenstraße 38, 69239 Neckarsteinach, Germany
Phone: +49 (0) 6229 7000, fax: +49 (0) 6229 70067
E-Mail: [email protected], internet: http://www.fuddruck.de
Installation instructions driver PRO300 / ECO200 / Express / Plus / Pegasus
20
Special features
11. Special features
11.1 Use of internal objects
Printer specific characteristics can be used with this special feature as e. g. the stepping function for text- and barcodeobjects. Text, barcodes, boxes, logos and transponder are e. g. internal objects.
With ESC sequences (printer commands), internal objects can be used to directly control the printer.
The positioning of ESC sequences as text can be made freely within the layout. Each single control sequence is simply
placed between the start and stop character.
You will find a detailed description regarding internal objects and ESC sequences in the corresponding chapters of the
software manual.
Syntax
Stop character
Start character
~~<Printer command>~
Examples
Text:
~~G100~
~~I100~
~~R090~
~~TARIAL12F;Hallo~
(x - coordinate)
(y - coordinate)
(Rotation)
(Text object)
Barcode:
~~G100~
~~I100~
~~BC_128;Sb>123456~
Logo:
~~G100~
~~I100~
~~MFDLogo;~
Box:
~~X100;100;800;400;4~
Transponder:
~~U0;4;Test~
F+D Feinwerk- und Drucktechnik GmbH
Kirchenstraße 38, 69239 Neckarsteinach, Germany
Phone: +49 (0) 6229 7000, fax: +49 (0) 6229 70067
E-Mail: [email protected], internet: http://www.fuddruck.de
Installation instructions driver PRO300 / ECO200 / Express / Plus / Pegasus
21
11.2 Writing data to the transponder
Writing data to the transponder is only possible using Windows TM 2000 or XP.
With the printer driver, transponder data can be transferred to the printer out of any application. These transponder data
are stored in a folder on the hard disc. The files must have the RF*.DAT format, i. e. the first two characters of the
name are “RF” and the extension is “DAT” (e. g. RF001.DAT). Each file includes a data record for the transponder.
Each data record is only written one time. A file with the same name and the extension “LOG” is created. For the next
print job the next file for which no LOG file exists will be used.
The definition is as follows:
~~~U#<Path to the folder>~
The input of "~~~" defines that now not normal text but a special command is following. The swung dash signals the
end of this command.
Additionally, an offset for the transponder data can be defined. In this case, a certain part at the beginning of
the transponder storage location will be skipped. The offset is defined in blocks. A special command is
written for the offset.
The definition is as follows:
~~~O#<Offset>~
You will find a detailed description regarding writing data to the transponder in the corresponding chapters of the
software manual.
F+D Feinwerk- und Drucktechnik GmbH
Kirchenstraße 38, 69239 Neckarsteinach, Germany
Phone: +49 (0) 6229 7000, fax: +49 (0) 6229 70067
E-Mail: [email protected], internet: http://www.fuddruck.de
22
Installation instructions driver PRO300 / ECO200 / Express / Plus / Pegasus
Index
12. Index
Advanced Document Settings 14
Advanced Printing Features 14
Advanced... 12, 13
Color 13
Color mode 14
Color Region Color 1 11, 15, 17
Color Region Color 2 15, 17
Copies 8
Copy Count 14
Cut pos. 8
Cutter 9, 10
Cutting options 9, 11, 16
Cutting Position 10, 16
Device Settings 10, 15, 16, 17
Dispense Position 10, 16
Dispensin pos. 8
Documents Options 14
Flip Label 11
Font Substitution Table 10
Form To Tray Assignment 10
Graphic 14
Halftoning 14
Heating time 9, 11
Heating Time Color 1 15, 17
Heating Time Color 2 15, 17
Info 9, 12
Installable Options 10, 16
Installation 5
Installation WindowsTM 95 / 98 5
Installation WindowsTM NT / 2000 / XP 6
Introduction 4
Labeltaken 10
Label-Taken 9
Layout 12
Length 8
New label format 18
Options 13
Orientation 8, 12
Page 8
Page Order 12
Page setup 8
Pages Per Sheet 12
Paper / Output 14
Paper / Quality 13
Paper Size 14
Print on Key 11
Print on printkey 9
Print speed 9
Print with parameters 11
Printing Speed 11
Rotate 180° 8
Scale 8
Settings ECO 200 8
Settings Express and Plus 16
Settings Pegasus 17
Settings PRO 300 15
Settings PRO 300 2CP 15
Special features 20
Sync labels 9, 10
System requirements 4
Transmit transponder data 15
Transponder 21
Tray Selection Paper Source 13
Uninstall 19
Unit 10, 16
Use of internal objects 20
Width 8
Without parameters 9
F+D Feinwerk- und Drucktechnik GmbH
Kirchenstraße 38, 69239 Neckarsteinach, Germany
Phone: +49 (0) 6229 7000, fax: +49 (0) 6229 70067
E-Mail: [email protected], internet: http://www.fuddruck.de
Installation instructions driver PRO300 / ECO200 / Express / Plus / Pegasus
F+D Feinwerk- und Drucktechnik GmbH
Kirchenstr. 38
69239 Neckarsteinach, Germany
Phone:
Fax:
Mail:
Web:
+049 (0) 06229 / 700-0
+049 (0) 06229 / 700-67
[email protected]
www.FuDdruck.de
Content of this publication may be changed without notice and shall not be regarded as a warranty.
All product and brand names are trademarks of their respective companies. All rights reserved.
13.11.2003