1
Test procedures
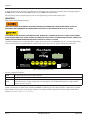
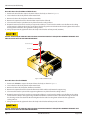
Tee Test
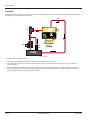
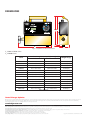
Install tee between the pump and control valve. Connect the tee to the IN port of the PFM tester. The OUT port of the tester is
connected to the tank. Pumps and relief valves can be isolated from the system and checked with the Tee Test.
OUT
OUT
CONTROL
VALVE
IN
TEE
DO NOT STAND IN FRONT OF
PRESSURE RELIEF DISK VENT.
by HEDLAND
RACINE, WI. USA
INDICATES DISPLAY
OVER RANGE.
OPEN LOAD VALVE BEFORE
STARTING MACHINERY.
PUMP
RELIEF
VALVE
OFF
Flo-check
PFM
FLOW
TEMP
Flo-check
PFM
TANK
Figure 7: Tee test
INCREASE PRESSURE SLOWLY. THE RELIEF VALVE MAY NOW BE ISOLATED FROM THE HYDRAULIC CIRCUIT, AND SYSTEM
PRESSURES HIGHER THAN THE RELIEF VALVE SETTING CAN RESULT IN INJURY TO PERSONNEL AND/OR DAMAGE TO
THE EQUIPMENT.
1. Pump Test
a. Plug the line to the control valve.
b. Open the tester loading valve fully to read maximum pump flow at zero pressure.
c. Close the loading valve to increase pressure from zero pressure to rated or maximum pump pressure to determine
pump condition.
d. Check the pump flow at rated pressure against the pump manufacturer’s specifications. A decrease in flow from
zero pressure to maximum pressure indicates the pump condition. A pump that delivers a constant low flow at zero
pressure and at maximum pressure suggests suction problems.
2. Relief Valve Test (for relief valve in separate housing, see “Relief Valve in Separate Housing” on page 12.)
a. Put a control valve into a power output mode with the output flow blocked, such as a cylinder at the end of its stroke.
b. Close the tester loading valve while viewing the pressure. Pressure will increase until the relief valve opens. Record the
pressure at this point. Repeat to check the relief valve adjustment.
August 2014
TUR-UM-00730-EN-02
Page 11