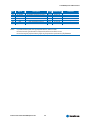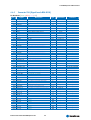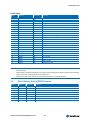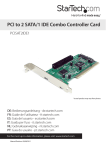
1
® Kontron User's Guide ® microETXexpress™-PM Document Revision 1.11 This page intentionally left blank Table of Contents Table of Contents 1 User Information........................................................................................................ 7 1.1 1.2 1.3 1.4 1.5 1.6 2 Introduction .............................................................................................................. 9 2.1 2.2 2.3 3 microETXexpress™-PM........................................................................................9 ETXexpress® Documentation ...............................................................................9 ETXexpress® Benefits.........................................................................................9 Specifications ...........................................................................................................11 3.1 3.1.1 3.2 3.2.1 3.3 3.3.1 3.3.2 3.3.3 3.3.4 3.4 3.4.1 3.4.2 3.5 4 About This Manual .............................................................................................7 Copyright Notice ...............................................................................................7 Trademarks ......................................................................................................7 Standards ........................................................................................................7 Warranty .........................................................................................................7 Technical Support..............................................................................................8 Functional Specifications.................................................................................. 11 Block diagram ................................................................................................ 13 Mechanical Specifications ................................................................................. 14 Dimensions .................................................................................................... 14 Electrical Specifications.................................................................................... 14 Supply Voltage................................................................................................ 14 Supply Current (typical, DOS prompt) .................................................................. 14 Supply Current (Windows XP SP2) ....................................................................... 14 CMOS Battery Power Consumption ...................................................................... 15 Environmental Specifications ............................................................................ 15 Temperature................................................................................................... 15 Humidity ....................................................................................................... 16 MTBF............................................................................................................. 16 microETXexpress™-PM Connectors ...............................................................................17 4.1 4.2 4.3 4.3.1 4.3.2 4.4 4.4.1 4.4.2 4.5 4.5.1 4.5.2 Connector Locations ........................................................................................ 17 General Signal Description ................................................................................ 18 Connector X1A ................................................................................................ 19 Connector X1A (Signal Levels A1-A55)................................................................. 19 Connector X1A (Signal Levels A56-A110) ............................................................. 21 Connector X1A (Signal Levels B1-B55)................................................................. 23 Connector X1A (Signal Levels B56-B110) ............................................................. 25 Connector X1A Subsystems................................................................................ 26 Connector X1B ................................................................................................ 30 Connector X1B (Signal Levels C1-C55) .................................................................30 Connector X1B (Signal Levels C56-C110).............................................................. 32 Kontron User's Guide microETXexpress™-PM iii Table of Contents 4.5.3 4.5.4 4.5.5 5 Special Features ........................................................................................................38 5.1 6 Thermal Management....................................................................................... 41 Heat spreader Dimensions................................................................................. 42 microETXexpress™-PM Heatspreader ................................................................... 42 Important Technology Information ..............................................................................43 8.1 8.2 8.2.1 8.2.2 8.2.3 8.3 8.3.1 8.3.2 8.4 8.4.1 8.5 8.5.1 8.6 8.7 8.8 9 Max CPU Frequency setting................................................................................ 39 Max CPU Frequency default settings .................................................................... 39 Limitations .................................................................................................... 39 microETXexpress™-PM Celeron 800 MHz and 1000 MHz ........................................... 40 Cooling Solutions ............................................................................................ 40 Design Considerations................................................................................................41 7.1 7.2 7.2.1 8 Watchdog Timer .............................................................................................. 38 Important Information...............................................................................................39 6.1 6.2 6.3 6.3.1 6.4 7 Connector X1B (Signal Levels D1-D55) ................................................................34 Connector X1B (Signal Levels D56-D110) ............................................................. 36 Connector X1B Subsystems................................................................................ 37 ACPI ............................................................................................................. 43 I/O APIC vs 8259 PIC Interrupt mode ................................................................... 43 Method of interrupts transmission ...................................................................... 43 Interrupt priority ............................................................................................ 43 More interrupts............................................................................................... 43 Native vs. compatible IDE mode ......................................................................... 44 Compatible Mode ............................................................................................ 44 Native Mode ................................................................................................... 44 Thermal Monitor and Catastrophic Thermal Protection ............................................ 44 Summary ....................................................................................................... 45 Processor Performance Control .......................................................................... 45 Cooling Policies .............................................................................................. 46 Processor Clock Throttling................................................................................. 46 ACPI Suspend Modes and Resume Events.............................................................. 47 USB 2.0 (EHCI) Host Controller Support ............................................................... 47 System Resources ......................................................................................................48 9.1 9.2 9.3 9.4 9.5 Interrupt Request (IRQ) Lines ............................................................................ 48 Direct Memory Access (DMA) Channels................................................................. 49 Memory Area .................................................................................................. 50 I/O Address Map ............................................................................................. 50 Peripheral Component Interconnect (PCI) Devices ................................................. 50 Kontron User's Guide microETXexpress™-PM iv Table of Contents 9.6 9.7 9.8 10 BIOS Operation .........................................................................................................52 10.1 10.2 10.2.1 10.3 10.3.1 10.4 10.4.1 10.4.2 10.4.3 10.4.4 10.4.5 10.4.6 10.4.7 10.4.8 10.4.9 10.5 10.6 10.6.1 10.7 10.7.1 10.7.2 10.7.3 10.8 10.9 10.10 11 Inter-IC (I2C) Bus............................................................................................ 50 System Management (SM) Bus ........................................................................... 50 JILI-I2C Bus ................................................................................................... 51 Determining the BIOS Version............................................................................ 52 Setup Guide ................................................................................................... 52 Start Phoenix BIOS Setup Utility......................................................................... 53 Main Menu ..................................................................................................... 54 Master or Slave Submenus................................................................................. 54 Advanced Menu............................................................................................... 55 Advanced Chipset Control Submenu .................................................................... 55 PCI/PNP Configuration Submenu ........................................................................ 56 Memory Cache Submenu ................................................................................... 57 I/O Device Configuration Submenu ..................................................................... 57 Keyboard Features Submenu..............................................................................58 Hardware Monitor Submenu .............................................................................. 59 Watchdog Settings Submenu ............................................................................. 59 Display Control Submenu .................................................................................. 59 Miscellaneous Submenu ................................................................................... 60 Security Menu................................................................................................. 60 Power Menu ................................................................................................... 61 ACPI Control sub menu ..................................................................................... 62 Boot Menu ..................................................................................................... 64 MultiBoot ...................................................................................................... 64 The Setup Boot Menu ....................................................................................... 64 Boot First Menu ..............................................................................................65 Exit Menu ......................................................................................................65 Updating or Restoring BIOS............................................................................... 66 Preventing Problems When Updating or Restoring BIOS .......................................... 67 Appendix A: JIDA Standard .........................................................................................68 11.1 JIDA Information ............................................................................................ 68 12 Appendix B: Supported operating systems ....................................................................69 13 Appendix C: PC Architecture Information ......................................................................70 13.1 13.1.1 13.1.2 13.2 13.3 13.3.1 Buses............................................................................................................ 70 ISA, Standard PS/2 – Connectors........................................................................ 70 PCI/104......................................................................................................... 70 General PC Architecture .................................................................................... 70 Ports............................................................................................................. 71 RS-232 Serial ................................................................................................. 71 Kontron User's Guide microETXexpress™-PM v Table of Contents 13.3.2 Serial ATA ...................................................................................................... 71 13.3.3 USB .............................................................................................................. 71 13.4 Programming ................................................................................................. 71 14 Appendix D: Limitations and Restrictions .....................................................................73 15 Appendix C: Document-Revision History .......................................................................74 Kontron User's Guide microETXexpress™-PM vi 1 User Information 1 User Information 1.1 About This Manual This document provides information about products from Kontron Embedded Modules GmbH and/or its subsidiaries. No warranty of suitability, purpose, or fitness is implied. While every attempt has been made to ensure that the information in this document is accurate, the information contained within is supplied “as-is” and is subject to change without notice. For the circuits, descriptions and tables indicated, Kontron assumes no responsibility as far as patents or other rights of third parties are concerned. 1.2 Copyright Notice Copyright © 2003-2007 Kontron Embedded Modules GmbH All rights reserved. No part of this document may be reproduced, transmitted, transcribed, stored in a retrieval system, or translated into any language or computer language, in any form or by any means (electronic, mechanical, photocopying, recording, or otherwise), without the express written permission of Kontron Embedded Modules GmbH. DIMM-PC®, PISA®, ETX®, ETXexpress®, microETXexpress™, X-board®, DIMM-IO® and DIMM-BUS® are trademarks or registered trademarks of Kontron Embedded Modules GmbH. Kontron is trademark or registered trademark of Kontron AG. 1.3 Trademarks The following lists the trademarks of components used in this board. 1.4 ® IBM, XT, AT, PS/2 and Personal System/2 are trademarks of International Business Machines Corp. ® Microsoft is a registered trademark of Microsoft Corp. ® Intel is a registered trademark of Intel Corp. ® All other products and trademarks mentioned in this manual are trademarks of their respective owners. Standards Kontron Embedded Modules GmbH is certified to ISO 9000 standards. 1.5 Warranty This Kontron Embedded Modules GmbH product is warranted against defects in material and workmanship for the warranty period from the date of shipment. During the warranty period, Kontron Embedded Modules GmbH will at its discretion decide to repair or replace defective products. Within the warranty period, the repair of products is free of charge as long as warranty conditions are observed. Kontron User's Guide microETXexpress™-PM 7 1 User Information The warranty does not apply to defects resulting from improper or inadequate maintenance or handling by the buyer, unauthorized modification or misuse, operation outside of the product’s environmental specifications or improper installation or maintenance. Kontron Embedded Modules GmbH will not be responsible for any defects or damages to other products not supplied by Kontron Embedded Modules GmbH that are caused by a faulty Kontron Embedded Modules GmbH product. 1.6 Technical Support Technicians and engineers from Kontron Embedded Modules GmbH and/or its subsidiaries are available for technical support. We are committed to making our product easy to use and will help you use our products in your systems. Before contacting Kontron Embedded Modules GmbH technical support, please consult our Web site at http://www.kontron-emea.com/emd for the latest product documentation, utilities, and drivers. If the information does not help solve the problem, contact us by telephone or email. Asia Europe North/South America Kontron Asia Inc. 4F, No.415, Ti-Ding Blvd., NeiHu District, Taipei 114, Taiwan Tel: +886 2 2799 2789 Fax: + 886 2 2799 7399 mailto:[email protected] Kontron Embedded Modules GmbH Kontron America Brunnwiesenstr. 16 94469 Deggendorf – Germany 14118 Stowe Drive Poway, CA 92064-7147 Tel: +49 (0) 991-37024-0 Fax: +49 (0) 991-37024-333 mailto:[email protected] Tel: +1 (888) 294 4558 Fax: +1 (858) 677 0898 mailto:[email protected] Kontron User's Guide microETXexpress™-PM 8 2 Introduction 2 Introduction 2.1 microETXexpress™-PM The microETXexpress™-PM component SBC modules hosts Intel® Pentium® M Processor in combination with an Intel® 855GM/GME or Intel® 852GM chipset with an integrated graphics memory controller hub with Intel® Extreme Graphics 2 technology. Celeron M versions of this board are possible, too. A DDRSODIMM socket can hold either PC1600 ,PC2100 or PC2700 DDR memory modules up to 1GB. Furthermore six USB 2.0 ports and one 10/100 MBit Ethernet interface completes the interfaces. 2.2 ETXexpress® Documentation This product manual serves as one of three principal references for an ETXexpress® design. It documents the specifications and features of microETXexpress™-PM. The other two references, which are available from the Kontron Embedded Modules Web site, include: Note: 2.3 ® The ETXexpress® Component SBC™ and COMexpress Specification defines the ETXexpress® module form factor, pinout, and signals. ® The ETXexpress® Component SBC™ Design Guide serves as a general guide for baseboard design, with a focus on maximum flexibility to accommodate a range of ETXexpress® modules. Some of the information contained within this product manual applies only to certain product revisions (Prev: xxx). If certain information applies to specific product revisions (Prev: xxx) it will be stated. Please check the product revision of your module to see if this information is applicable. ETXexpress® Benefits Micro Embedded technology extended express (microETXexpress™) modules are very compact (95 x 95 mm, 12mm thick), highly integrated computers. All microETXexpress™ modules feature a standardized form factor and a standardized connector layout that carry a specified set of signals. Each ETXexpress® module is based on connector type 2 of the COMexpress specification. This standardization allows designers to create a single-system baseboard that can accept present and future ETXexpress® modules. ETXexpress® modules include common personal computer (PC) peripheral functions such as: ® Graphics ® Parallel, Serial, and USB ports ® Keyboard/mouse ® Ethernet ® Sound ® IDE (and SATA) The baseboard designer can optimize exactly how each of these functions implements physically. Designers can place connectors precisely where needed for the application on a baseboard designed to optimally fit a system’s packaging. Kontron User's Guide microETXexpress™-PM 9 2 Introduction A peripheral PCI bus can be implemented directly on the baseboard rather than on mechanically unwieldy expansion cards. The ability to build a system on a single baseboard using the computer as one plug-in component simplifies packaging, eliminates cabling, and significantly reduces system-level cost. A single baseboard design can use a range of ETXexpress® modules. This flexibility can differentiate products at various price/performance points, or to design future proof systems that have a built-in upgrade path. The modularity of an ETXexpress® solution also ensures against obsolescence as computer technology evolves. A properly designed ETXexpress® baseboard can work with several successive generations of ETXexpress® modules. An ETXexpress® baseboard design has many advantages of a custom, computer-board design but delivers better obsolescence protection, greatly reduced engineering effort, and faster time to market. Kontron User's Guide microETXexpress™-PM 10 3 Specifications 3 Specifications 3.1 Functional Specifications Processor: Mobile Intel® Pentium® M ® Intel® Pentium® M Processor 738 1,4 GHz (see section Important Information) ® Intel Celeron® M Processor 373 0.6 GHz - 1.0 GHz (see section Important Information) ® Cache: On-die Second level 2 MB(1.4 GHz) 512 kB (Celeron M 0.8 GHz, 1.0 GHz), 0 kB (600 MHz and 800 MHz cacheless) ® Supports Intel® Architecture with Dynamic Execution ® High performance, low-power core ® On-die, primary 32-kbyte instruction cache and 32-kbyte write-back data cache ® On-die, up to 2-Mbyte second level cache with Advanced Transfer Cache Architecture ® Advanced Branch Prediction and Data Prefetch Logic ® Streaming SIMD Extensions 2 (SSE2) ® 400-MHz, Source-Synchronous processor system bus ® Advanced Power Management features including Enhanced Intel SpeedStep® technology Chipset: Intel® 852GM/855GME ® 200/266/333 MHz memory bus on modules with Intel® 855GME ® 200/266 MHz memory bus on modules with Intel® 852GM ® Memory: One 200-pin DDR-SO-DIMM ® 2.5V PC-1600/2100/2700 unbuffered DDR-SDRAM, up to 1GB ® Onboard video graphics array (VGA): Integrated in Intel® 855GME (200MHz) / 852GM (133MHz) ® Graphics memory controller hub with Intel® Extreme Graphics 2 technology ® Up to 64 MB Video RAM (UMA) ® Cathode ray tube (CRT) and low voltage differential signalling (LVDS) liquid-crystal display (LCD) interfaces Chipset: Intel® 82801 DB (ICH4) ® Enhanced Intelligent Drive Electronics (EIDE): One Peripheral Component Interconnect (PCI) Bus Master IDE ports (up to two devices) support: ® Ultra 100/66/33 Direct Memory Access (DMA) mode ® Programmed Input/Output (PIO) modes up to Mode 4 timing ® Multiword DMA Mode with independent timing Kontron User's Guide microETXexpress™-PM 11 3 Specifications ® Universal Serial Bus (USB) ® Six USB 1.1/2.0 ports (UHCI and EHCI) ® USB legacy keyboard support ® USB floppy, CD-ROM, Hard drive, and memory stick boot support ® Integrated Ethernet: Intel 82562 10/100 Mbps Fast Ethernet controller ® Integrated, WfM 2.0 and IEEE 802.3 compliant; 10BASE-T and 100BASE-TX compatible PHY ® Audio: Integrated in Intel 82801DB southbridge ® AC97, Windows Sound System™ compatible ® NV-EEPROM for CMOS-setup retention without battery ® Real-time clock (requires external battery) VIA VT6421 SATA Controller ® 2 Channels Serial ATA ® SATA Spec. Rev. 1.0 up to 150 MB/s per channel ® Support for additional super I/O devices (COM1, COM2, LPT, and Floppy). ® BIOS: Phoenix, 1MB Flash-BIOS in Firmware Hub Flash Memory BIOS Power Management ® APM 1.2 support ® ACPI 2.0 support ® Power on Suspend (S1) and Suspend to RAM (S3) support MARS Support ® Further details about MARS (Mobile Application platform for Rechargeable Systems) are available at Embedded Modules Division - Kontron. Kontron User's Guide microETXexpress™-PM 12 3 Specifications Block diagram Kontron User's Guide microETXexpress™-PM Connector CD Connector AB 3.1.1 13 3 Specifications 3.2 Mechanical Specifications 3.2.1 Dimensions ® 95.0 mm x 95.0 mm (3.75” x 3.75”) ® Height approx. 12 mm (0.4”) 3.3 Electrical Specifications 3.3.1 Supply Voltage ® 3.3.2 8,5 V min. - 18 V max. (ripple frequency < 10 kHz) Supply Current (typical, DOS prompt) Power-consumption tests were executed during the DOS prompt. The tested boards were mounted on a Kontron Evaluation Board (Article number: 38100-0000-00-0), a USB-mouse and a USB-keyboard were connected. The measurements were done on the baseboard that only the corresponding current to the microETXxpress™ modul was recorded. The power consumption from devices on the Kontron Evaluation Board or connected to the Kontron Evaluation Board (for example USB-sticks, Hard drives) are not included in the measurements. All boards were equipped with 512MB DDR SDRAM. Modules were tested using maximum CPU frequency. CPU 1400 MHz 1000 MHz 800 MHz n.c. 3.3.3 Prompt [A]12V [A]5VSB [W] DOS Standby [A]12V [A]5VSB [W] Suspend [A]12V [A]5VSB [W] 1,15 0,22 14,90 0,72 0,22 9,74 0,72 0,22 9,74 1,03 0,22 13,51 0,65 0,22 8,97 0,66 0,22 8,99 0,89 0,26 11,98 0,62 0,26 8,73 0,62 0,26 8,74 Supply Current (Windows XP SP2) The tested boards were mounted on a Kontron Evaluation Board (Article number: 38100-0000-00-0), a USB-mouse and a USB-keyboard were connected. The measurements were done on the baseboard that only the corresponding current to the microETXxpress™ modul was recorded. The power consumption from devices on the Kontron Evaluation Board or connected to the Kontron Evaluation Board (for example USB-sticks, Hard drives) are not included in the measurements. The Power-consumption tests were executed during Windows XP SP2 by using a tool to stress the CPU (100 % load). The power measurements values were acquired after 15 min full load and a stable CPU die temperature. To ensure a stable die temperature a corresponding heat sink was used to hold the temperature under the critical trip point. Kontron User's Guide microETXexpress™-PM 14 3 Specifications All boards were equipped with 512MB DDR SDRAM. The Modules were tested using maximum CPU frequency. CPU Standby S1 [A]12V [A]5VSB 1400 MHz 1000 MHz 800 MHz n.c. Windows XP Standby S3 cold Standby S3 hot ACPI S5 [W] [A]12V [A]5VSB [W] [A]12V [A]5VSB [W] [A]5VSB [W] 0,49 0,13 6,53 0,00 0,70 3,52 0,02 0,65 3,46 0,22 1,10 0,49 0,14 6,57 0,00 0,69 3,46 0,02 0,65 3,42 0,22 1,10 0,49 0,13 6,55 0,00 0,70 3,52 0,01 0,66 3,45 0,25 1,25 Windows XP CPU Full Load [A]12V [A]5VSB 1400 MHz 1000 MHz 800 MHz n.c. Note: 3.3.4 [W] [A]12V Idle [A]5VSB 1,62 0,22 20,54 0,78 0,22 10,46 1,07 0,22 13,94 0,68 0,22 9,26 0,99 0,23 13,03 0,68 0,23 9,32 [W] It is difficult to test for all possible applications on the market. There may be an application that draws more power from the CPU than the measured values in the table above. This should be taken into consideration if you are on the board of the thermal specification. If this is the case improvements to your thermal solution are recommended. CMOS Battery Power Consumption RTC Voltage Range Quiescent Current Integrated in the southbridge 2.0 V – 3.6 V 3.52 µA @ 3.14 V CMOS battery power consumption was measured with a microETXexpress™-PM module on a standard Kontron ETXexpress® evaluation board. The system was turned off and the battery was removed from the evaluation board. The 2.5 V or 3.0 V of power was supplied from a DC power supply. Do not use these values to calculate the CMOS battery lifetime. 3.4 Environmental Specifications 3.4.1 Temperature Operating: (with Kontron Embedded Modules GmbH heat-spreader plate assembly): ® Ambient temperature: 0 to +60 °C (*) without SATA controller ® Maximum heat spreader-plate temperature: 0 to +60 °C (*) (**) without SATA controller ® Non-operating: -30 to +85 °C Kontron User's Guide microETXexpress™-PM 15 3 Specifications See the Thermal Management chapter for additional information. Notes: *For microETXexpress™-PM modules with SATA-controller (standard) the max. temperature is reduced to 50 °C! If the SATA controller is not used and disabled in the BIOS Setup the max. temperature is 60 °C! **The maximum operating temperature with the heat spreader plate is the maximum measurable temperature on any spot on the heat spreader's surface. You must maintain the temperature according to the above specification. Operating (without Kontron Embedded Modules GmbH heat-spreader plate assembly): ® Maximum operating temperature: 0 to + 60 °C (*) (**) without SATA controller ® Maximum operating temperature: 0 to +60 °C (*) (**) without SATA controller ® Non operating: -30 to +85 °C See the Thermal Management chapter for additional information. Note 3.4.2 3.5 *For microETXexpress™-PM modules with SATA-controller (standard) the max. temperature is reduced to 50 °C! If the SATA controller is not used and disabled in the BIOS Setup the max. temperature is 60 °C! **The maximum operating temperature is the maximum measurable temperature on any spot on a module’s surface. You must maintain the temperature according to the above specification. Humidity ® Operating: 10% to 90% (non condensing) ® Non operating: 5% to 95% (non condensing) MTBF The following MTBF (Mean Time Between Failure) values were calculated using a combination of manufacturer’s test data, if the data was available, and a Bellcore calculation for the remaining parts. The Bellcore calculation used is “Method 1 Case 1”. In that particular method the components are assumed to be operating at a 50 % stress level in a 40° C ambient environment and the system is assumed to have not been burned in. Manufacturer’s data has been used wherever possible. The manufacturer’s data, when used, is specified at 50° C, so in that sense the following results are slightly conservative. The MTBF values shown below are for a 40° C in an office or telecommunications environment. Higher temperatures and other environmental stresses (extreme altitude, vibration, salt water exposure, etc.) lower MTBF values. ® Notes: System MTBF (hours) : 181284 Fans usually shipped with Kontron Embedded Modules GmbH products have 50,000-hour typical operating life. The above estimates assume no fan, but a passive heat sinking arrangement. Estimated RTC battery life (as opposed to battery failures) is not accounted for in the above figures and need to be considered for separately. Battery life depends on both temperature and operating conditions. When the Kontron unit has external power, the only battery drain is from leakage paths. Kontron User's Guide microETXexpress™-PM 16 4 microETXexpress™-PM Connectors 4 microETXexpress™-PM Connectors The pinouts for ETXexpress® Interface Connectors X1A and X1B are documented for convenient reference. Please see the ETXexpress® Specification and ETXexpress® Design Guide for detailed, designlevel information. 4.1 Connector Locations Kontron User's Guide microETXexpress™-PM 17 4 microETXexpress™-PM Connectors 4.2 General Signal Description Term Description I O DP OA IO-3,3 IO-5 I-2,5 I-3,3 I-5 O-3,3 O-5 PU PD PWR Nc Differential Pair Input Differential Pair Output Differential Pair Input/Output Output Analog Bi-directional 3,3 V IO-Signal Bi-directional 5 V IO-Signal 2,5 V Output 3,3 V Input 5 V Input 3,3 V Output 5 V Output Pull-Up Resistor Pull-Down Resistor Power Connection Not Connected / Reserved Kontron User's Guide microETXexpress™-PM 18 4 microETXexpress™-PM Connectors 4.3 Connector X1A 4.3.1 Connector X1A (Signal Levels A1-A55) Pin A1-A55: [ LAN | Power | USB | SATA | AUDIO ] Pin Signal Description Type Termination Comment A1 A2 A3 A4 A5 A6 A7 A8 A9 A10 A11 A12 A13 A14 A15 A16 A17 A18 A19 A20 A21 A22 A23 A24 A25 A26 A27 A28 A29 A30 A31 A32 A33 A34 A35 A36 A37 A38 A39 A40 A41 A42 A43 A44 A45 A46 A47 A48 GND GBE0_MDI3GBE0_MDI3+ GBE0_LINK100# GBE0_LINK1000# GBE0_MDI2GBE0_MDI2+ GBE0_LINK# GBE0_MDI1GBE0_MDI1+ GND GBE0_MDI0GBE0_MDI0+ GBE0_CTREF SUS_S3# SATA0_TX+ SATA0_TXSUS_S4# SATA0_RX+ SATA0_RXGND SATA2_TX+ SATA2_TXSUS_S5# SATA2_RX+ SATA2_RXBATLOW# ATA_ACT# AC_SYNC AC_RST# GND AC_BITCLK AC_SDOUT BIOS_DISABLE# THRMTRIP# USB6USB6+ USB_6_7_OC# USB4USB4+ GND USB2USB2+ USB_2_3_OC# USB0USB0+ VCC_RTC EXCD0_PERST# Power Ground n.c. n.c. LAN_SPDLED# | Ethernet Speed LED n.c. n.c. n.c. LAN_LILED# | LAN Link LED LAN_RXD- | Ethernet Receive Data LAN_RXD+ | Ethernet Receive Data + Power Ground LAN_TXD- | Ethernet Transmit Data LAN_TXD+ | Ethernet Transmit Data + ETH_CTREF PM_SLP_S#3_CPLD SATA0_TX+ | SATA 0 Transmit Data + SATA0_TX- | SATA 0 Transmit Data PM_SLP_S#4_CPLD SATA0_RX+ | SATA 0 Receive Data + SATA0_RX- | SATA 0 Receive Data Power Ground n.c. n.c. PM_SLP_S#5_CPLD n.c. n.c. PM_BATLOW# | Battery Low ATA_ACT# | SATA LED AC_SYNC | AC'97 Sync AC_RST# | AC'97 Reset Power Ground AC_BITCLK | AC'97 Clock AC_SDATAOUT | AC'97 Data BIOS_DISABLE# PM_THRMTRIP#_CON n.c. n.c. n.c. USB_PN4 | USB Data- Port4 USB_PP4 | USB Data+ Port4 Power Ground USB_PN2 | USB Data- Port2 USB_PP2 | USB Data+ Port2 USB_OC#_2_3 | USB OverCurrent Port 2/3 USB_PN0 | USB Data- Port0 USB_PP0 | USB Data+ Port0 +V_BAT n.c. PWR nc nc O-3,3 nc nc nc O-3,3 I I PWR O O O-3,3 O-3,3 O O O-3,3 I I PWR nc nc O-5 nc nc I-3,3 O-3,3 O-3.3 O-3,3 PWR I-3,3 O-3,3 I-3,3 O-3.3 nc nc nc DP DP PWR DP DP I-3,3 DP DP PWR nc PU 10k 5VSB PU 10k 3,3V PU 10k 3,3V PU 10k 3,3V - on at 100Mb/s 121R between RXD+/121R between RXD+/100R/C10p between TXD+/100R/C10p between TXD+/int. PD 20k in ICH4 int. PD 20k in ICH4 int. PD 20k in ICH4 int. PD 20k in ICH4 56R2 Ohm Resistors int. PD 15k in ICH4 int. PD 15k in ICH4 int. PD 15k in ICH4 int. PD 15k in ICH4 int. PD 15k in ICH4 int. PD 15k in ICH4 - Kontron User's Guide microETXexpress™-PM 19 4 microETXexpress™-PM Connectors Pin A49 A50 A51 A52 A53 A54 A55 Notes: Signal EXCD0_CPPE# LPC_SERIRQ GND PCIE_TX5+ PCIE_TX5GPI0 PCIE_TX4+ Description n.c. INT_SERIRQ | Serial Interrupt Request Power Ground n.c. n.c. GPI0 | General Purpose Input 0 n.c. Type Termination Comment nc IO-3.3 PWR nc nc I-3.3 nc PU 8k2 3,3V PU 10k 3,3V - - * To protect external power lines of peripheral devices, make sure that: - the wires have the right diameter to withstand the maximum available current - the enclosure of the peripheral device fulfils the fire-protection requirements of IEC/EN60950 Kontron User's Guide microETXexpress™-PM 20 4 microETXexpress™-PM Connectors 4.3.2 Connector X1A (Signal Levels A56-A110) Pin A56-A110: [ Power | LVDS ] Pin A56 A57 A58 A59 A60 A61 A62 A63 A64 A65 A66 A67 A68 A69 A70 A71 A72 A73 A74 A75 A76 A77 A78 A79 A80 A81 A82 A83 A84 A85 A86 A87 A88 A89 A90 A91 A92 A93 A94 A95 A96 A97 A98 A99 A100 A101 A102 A103 A104 A105 A106 Signal PCIE_TX4GND PCIE_TX3+ PCIE_TX3GND PCIE_TX2+ PCIE_TX2GPI1 PCIE_TX1+ PCIE_TX1GND GPI2 PCIE_TX0+ PCIE_TX0GND LVDS_A0+ LVDS_A0LVDS_A1+ LVDS_A1LVDS_A2+ LVDS_A2LVDS_VDD_EN LVDS_A3+ LVDS_A3GND LVDS_A_CK+ LVDS_A_CKLVDS_I2C_CK LVDS_I2C_DAT GPI3 KBD_RST# KBD_A20GATE PCIE0_CK_REF+ PCIE0_CK_REFGND RSVD RSVD GPO0 RSVD RSVD GND VCC_12V VCC_12V VCC_12V GND VCC_12V VCC_12V VCC_12V VCC_12V VCC_12V VCC_12V Description n.c. Power Ground n.c. n.c. Power Ground n.c. n.c. GPI1 | General Purpose Input 1 n.c. n.c. Power Ground GPI2 | General Purpose Input 2 n.c. n.c. Power Ground LVDS_YAP0 | LVDS Channel A Data0+ LVDS_YAM0 | LVDS Channel A Data0LVDS_YAP1 | LVDS Channel A Data1+ LVDS_YAM1 | LVDS Channel A Data1LVDS_YAP2 | LVDS Channel A Data2+ LVDS_YAM2 | LVDS Channel A Data2 LVDS_VDDEN | LVDS Panel Power Control LVDS_YAP3 | LVDS Channel A Data3+ LVDS_YAM3 | LVDS Channel A Data3Power Ground LVDS_CLKAP | LVDS Channel A Clock+ LVDS_CLKAM | LVDS Channel A ClockLVDS_DDCPCLK | JILI I2C Clock LVDS_DDCPDATA | JILI I2C Data GPI3 | General Purpose Input 3 H_RCIN# | Keyboard Reset H_A20GATE n.c. n.c. Power Ground n.c. n.c. GPO0 | General Purpose Output 0 n.c. n.c. Power Ground 12V VCC 12V VCC 12V VCC Power Ground 12V VCC 12V VCC 12V VCC 12V VCC 12V VCC 12V VCC Kontron User's Guide microETXexpress™-PM 21 Type Termination Comment nc PWR nc nc PWR nc nc I-3,3 nc nc PWR I-3,3 nc nc PWR O O O O O O O-2,5 O O PWR O O IO-3.3 IO-3.3 I-3,3 I-3,3 I-3,3 PWR nc nc O-3,3 nc nc PWR PWR PWR PWR PWR PWR PWR PWR PWR PWR PWR PU 10k 3,3V PU 10k 3,3V PU 4k7 3,3V PU 4k7 3,3V PU 10k 3,3V PU 10k 3,3V PD 10k - int. PD 100k in 855GME - 4 microETXexpress™-PM Connectors Pin A107 A108 A109 A110 Note: Signal VCC_12V VCC_12V VCC_12V GND Description 12V VCC 12V VCC 12V VCC Power Ground Type Termination Comment PWR PWR PWR PWR - - The termination resistors in this table are already mounted on the microETXexpress™ board. Please refer to the ETXexpress® design guide for information about additional termination resistors. Kontron User's Guide microETXexpress™-PM 22 4 microETXexpress™-PM Connectors 4.4 Connector X1A (Signal Levels B1-B55) Pin B1-B55: [ LAN | Power | USB | SATA | AUDIO | LPC] Pin Signal Description B1 B2 B3 B4 B5 B6 B7 B8 B9 B10 B11 B12 B13 B14 B15 B16 B17 B18 B19 B20 B21 B22 B23 B24 B25 B26 B27 B28 B29 B30 B31 B32 B33 B34 B35 B36 B37 B38 B39 B40 B41 B42 B43 B44 B45 B46 B47 B48 B49 B50 B51 B52 GND GBE0_ACT LPC_FRAME# LPC_AD0 LPC_AD1 LPC_AD2 LPC_AD3 LPC_DRQ0# LPC_DRQ1# LPC_CLK GND PWRBTN# SMB_CK SMB_DAT SMB_ALERT# SATA1_TX+ SATA1_TXSUS_STAT# SATA1_RX+ SATA1_RXGND SATA3_TX+ SATA3_TXPWR_OK SATA3_RX+ SATA3_RXWDT AC_SDIN2 AC_SDIN1 AC_SDIN0 GND SPKR I2C_CK I2C_DAT THRM# USB7USB7+ USB_4_5_OC# USB5USB5+ GND USB3USB3+ USB_0_1_OC# USB1USB1+ EXCD1_PERST# EXCD1_CPPE# SYS_RESET# CB_RESET# GND PCIE_RX5+ Power Ground LAN_ACTLED# | Ethernet Activity LED LPC_FRAME# | LPC Frame Indicator LPC_AD0 | LPC Adress & DATA Bus LPC_AD1 | LPC Adress & DATA Bus LPC_AD2 | LPC Adress & DATA Bus LPC_AD3 | LPC Adress & DATA Bus SIO_DRQ#0 | LPC Request 0 SIO_DRQ#1 | LPC Request 1 CLK_SIOEXTPCI Power Ground Power Button SMB_CLK | SMBUS Clock SMB_DATA | SMBUS Data SMB_ALERT# SATA1_TX+ SATA1_TXPM_SUS_ STAT# SATA1_RX+ SATA1_RXPower Ground n.c. n.c. 17V_8.5V_PWR_OK | Power Good n.c. n.c. WDTO_CPLD | Watch Dog Trigger AC_SDATAIN2 | AC'97 Serial Input Data 2 AC_SDATAIN1 | AC'97 Serial Input Data 1 AC_SDATAIN0 | AC'97 Serial Input Data 0 Power Ground AC_SPKR | Speaker I2CLK I2DAT PM THRM# CON | Over Temperature n.c. n.c. USB_OC#_4_5 | USB OverCurrent Port 4/5 USB_PN5 | USB Data- Port5 USB_PP5 | USB Data+ Port5 Power Ground USB_PN3 | USB Data- Port3 USB_PP3 | USB Data+ Port3 USB_OC#_0_1 | USB OverCurrent Port 0/1 USB_PN1 | USB Data- Port1 USB_PP1 | USB Data+ Port1 n.c. n.c. RESIN# | Reset Input CB RESET# | PCI Bus Reset Power Ground n.c. Kontron User's Guide microETXexpress™-PM 23 Type Termination Comment PWR O-3,3 I-3,3 IO-3,3 IO-3,3 IO-3,3 IO-3,3 I-3,3 I-3,3 O-3,3 PWR I-5 IO-3,3 IO-3,3 IO-3,3 O O O-3,3 I I PWR nc nc I-5 nc nc O-3,3 I-3,3 I-3,3 I-3,3 PWR O-3,3 O-5 IO-5 I-3,3 nc nc I-3.3 DP DP PWR DP DP I-3.3 DP DP nc nc I-3,3 O-3,3 PWR nc PU 2k2 3,3V PU 2k2 3,3V PU 10k 3,3V PU 2k2 5V PU 2k2 5V PU 8k2 3,3V PU 10k 3,3V PU 10k 3,3V - int. PU 20k 3,3V in ICH4 int. PU 20k 3,3V in ICH4 33R2 in Series int. PD 20k in ICH4 int. PD 20k in ICH4 int. PD 20k in ICH4 int. PD 20k in ICH4 int. PD 15k in ICH4 int. PD 15k in ICH4 int. PD 15k in ICH4 int. PD 15k in ICH4 int. PD 15k in ICH4 int. PD 15k in ICH4 - 4 microETXexpress™-PM Connectors Pin B53 B54 B55 Note: Signal PCIE_RX5GPO1 PCIE_RX4+ Description n.c. GPO1 | General Purpose Output 1 n.c. Type Termination Comment nc O-3,3 nc PD 10k - - The termination resistors in this table are already mounted on the microETXexpress™ board. Please refer to the ETXexpress® design guide for information about additional termination resistors. Kontron User's Guide microETXexpress™-PM 24 4 microETXexpress™-PM Connectors 4.4.1 Connector X1A (Signal Levels B56-B110) Pin B56-B110: [ Power | PCIe | LVDS | CRT] Pin Signal Description B56 B57 B58 B59 B60 B61 B62 B63 B64 B65 B66 B67 B68 B69 B70 B71 B72 B73 B74 B75 B76 B77 B78 B79 B80 B81 B82 B83 B84 B85 B86 B87 B88 B89 B90 B91 B92 B93 B94 B95 B96 B97 B98 B99 B100 B101 B102 B103 B104 B105 B106 B107 PCIE_RX4GPO2 PCIE_RX3+ PCIE_RX3GND PCIE_RX2+ PCIE_RX2GPO3 PCIE_RX1+ PCIE_RX1WAKE0# WAKE1# PCIE_RX0+ PCIE_RX0GND LVDS_B0+ LVDS_B0LVDS_B1+ LVDS_B1LVDS_B2+ LVDS_B2LVDS_B3+ LVDS_B3LVDS_BKLT_EN GND LVDS_B_CK+ LVDS_B_CKLVDS_BKLT_CTRL VCC_5V_SBY VCC_5V_SBY VCC_5V_SBY VCC_5V_SBY RSVD VGA_RED GND VGA_GRN VGA_BLU VGA_HSYNC VGA_VSYNC VGA_I2C_CK VGA_I2C_DAT TV_DAC_A TV_DAC_B TV_DAC_C GND VCC_12V VCC_12V VCC_12V VCC_12V VCC_12V VCC_12V VCC_12V n.c. GPO2 | General Purpose Output 2 n.c. n.c. Power Ground n.c. n.c. GPO3 | General Purpose Output 3 n.c. n.c. EXTSMI# PM_RI# n.c. n.c. Power Ground LVDS_YBP0 | LVDS Channel B Data0+ LVDS_YBM0 | LVDS Channel B Data0LVDS_YBP1 | LVDS Channel B Data1+ LVDS_YBM1 | LVDS Channel B Data1LVDS_YBP2 | LVDS Channel B Data2+ LVDS_YBM2 | LVDS Channel B Data2 LVDS_YBP2 | LVDS Channel B Data3+ LVDS_YBM2 | LVDS Channel B Data3 BLON# | Panel Backlight ON Power Ground LVDS_CLKBP | LVDS Channel B Clock+ LVDS_CLKBM | LVDS Channel B ClockLVDS BKLTCTL | Backlight Brightness Contr. +V_STBY_ETX | 5V Standby +V_STBY_ETX | 5V Standby +V_STBY_ETX | 5V Standby +V_STBY_ETX | 5V Standby n.c. DAC_RED | Analog Video RGB-RED Power Ground DAC_GREEN | Analog Video RGB-GREEN DAC_BLUE | Analog Video RGB-BLUE DAC_HSYNC | Analog Video H-Sync DAC_VSYNC | Analog Video V-Sync DAC_DDCACLK | Display Data Channel Clock DAC_DDCADATA | Display Data Channel Data n.c. n.c. n.c. Power Ground 12V VCC 12V VCC 12V VCC 12V VCC 12V VCC 12V VCC 12V VCC Kontron User's Guide microETXexpress™-PM 25 Type Termination Comment nc O-3,3 nc nc PWR nc nc O-3,3 nc nc I-3,3 I-3,3 nc nc PWR O O O O O O O O O-3,3 PWR O O O PWR PWR PWR PWR nc O PWR O O O-3,3 O-3,3 IO-5 IO-5 nc nc nc PWR PWR PWR PWR PWR PWR PWR PWR PD 10k PD 10k PU 10k 3,3V PU 10k 3,3V PU 4k7 5V PU 4k7 5V - int. PD 100k in 855GME - 4 microETXexpress™-PM Connectors Pin Signal B108 B109 B110 VCC_12V VCC_12V GND 4.4.2 Description 12V VCC 12V VCC Power Ground Type Termination Comment PWR PWR PWR - - Connector X1A Subsystems Ethernet The Ethernet interface is based on the Intel® 82562 Fast Ethernet PCI controller. This 32-bit PCI controller is a fully integrated 10/100BASE-TX LAN solution. The Ethernet interface requires an external transformer. See the ETXexpress® Design Guide for suggestions on transformer selection. Configuration The Ethernet interface is a PCI device. The BIOS setup automatically configures it during configuration of the PCI device. Note: Implementation and limitation information is provided in the ETXexpress® Design Guide. Refer to the documentation for additional information. Serial IRQ The serial IRQ pin offers a standardized interface to link interrupt request lines to a single wire. Configuration The serial IRQ machine is in “Quiet Mode”, the frame size is 21 frames and the frame pulse width is 4 clocks. USB Three USB host controllers (two 1.1 UHCI and one EHCI high-speed 2.0 controller) are on the Intel® 82801DB south bridge device. The USB controllers comply with both versions 1.1 and 2.0 of the USB standard and are backward compatible. The three controllers implement a root hub, which have two USB ports each. Configuration The USB controllers are PCI bus devices. The BIOS allocates required system resources during configuration of the PCI bus. SATA The VIA VT6421 SATA Controller offers the possibility to connect 2 SATA Hard disks according SATA Specification 1.0 with 150 MB/s per channel. Configuration The SATA controller is a PCI bus device. The BIOS allocates required system resources during configuration of the PCI bus. Kontron User's Guide microETXexpress™-PM 26 4 microETXexpress™-PM Connectors Audio The microETXexpress™-PM PCI audio controller is integrated in the Intel® 82801DB Southbridge. Configuration The audio controller is a PCI bus device. The BIOS allocates required system resources during configuration of the PCI device. VGA Output The microETXexpress™-PM graphics subsystem is integrated in the Intel® 852GM/855GME northbridge. It has the following features: Note: ® Display image rotation ® Display core frequency at 133 MHz (852GM); 200 MHz or 250 MHz (855GME) ® Render core frequency at 133 MHz (852GM); 100 MHz, 133 MHz, 166 MHz, 200 MHz, 250 MHz (855GME) ® 2D graphics engine ® Improved hardware motion compensation for MPEG2 ® Software DVD at 60 Fields/second and 30 frames/second full screen ® Support for standard definition DVD (i.e. NTSC pixel resolution of 720x480, etc.) quality encoding at low CPU utilization ® Single- or dual-channel LVDS panel support up to UXGA panel resolution with frequency range from 25 MHz to 112 MHz (single channel/dual channel) ® 3D graphics engine ® 3D setup and render engine ® Zone rendering ® High quality performance texture engine ® Viewpoint transform and perspective divide ® It can drive cathode ray tube (CRT) monitors and flat-panel displays, using the JUMPtec Intelligent LVDS Interface (JILI). You can program the graphics controller to use up the 32MB of unified memory architecture (UMA) memory as its video memory. ® Max. resolution CRT: 2048x1536 at 75 Hz (855GME), 1920x1440 at 60 Hz (852GM) ® Max. resolution LCD: UXGA 1600x1200 (4G colors); Bits/Pixels supported 1x18 bit, 2x18 bit, 1x24 bit*, 2x24 bit* *The 852GM/855GME does not support 24 bit LVDS but emulates the missing 2 bits per color and most of the panels can be used with this limitation. Configuration The graphics controller requires the following resources: ® An IRQ ® Several I/O addresses Kontron User's Guide microETXexpress™-PM 27 4 microETXexpress™-PM Connectors ® Memory-address blocks in high memory The BIOS allocates the resources during AGP configuration. Many resources are set for compatibility with industry-standard settings. LVDS Flat Panel Interface (JILI) The user interface for flat panels is the JUMPtec Intelligent LVDS Interface (JILI). The implementation of this subsystem complies with the ETXexpress® Specification. Implementation information is provided in the ETXexpress® Design Guide. Refer to the documentation for additional information. Digital Flat Panel Interface (JIDI) The microETXexpress™-PM does not support the JUMPtec Intelligent Digital Interface (JIDI). Power Control Power Good / Reset Input The microETXexpress™-PM provides an external input for a power-good signal or a manual- reset pushbutton. The implementation of this subsystem complies with the ETXexpress® Specification. Implementation information is provided in the ETXexpress® Design Guide. Refer to the documentation for additional information. Power Management ATX PS Control The microETXexpress™-PM can control the main power output of an ATX-style power supply. The implementation of this subsystem complies with the ETXexpress® Specification. Implementation information is provided in the ETXexpress® Design Guide. Refer to the documentation for additional information. External SMI Interrupt Contact Kontron Embedded Modules technical support for information on this feature. Speaker The implementation of the speaker output complies with the ETXexpress® Specification. Implementation information is provided in the ETXexpress® Design Guide. Refer to the documentation for additional information. Battery The implementation of the battery input complies with the ETXexpress® Specification. Implementation information is provided in the ETXexpress® Design Guide. Refer to the documentation for additional information. In compliance with EN60950, there are at least two current-limiting devices (resistor and diode) between the battery and the consuming component. Kontron User's Guide microETXexpress™-PM 28 4 microETXexpress™-PM Connectors I2C Bus The I2C Bus is implemented by using general purpose I/O. You also can access the I2C Bus via JUMPtec’s Intelligent Device Architecture (JIDA) BIOS functions. For additional information, refer to the ETXexpress® Design Guide, I2C application notes and JIDA specifications which are available at the Kontron Web site. SM Bus System Management (SM) bus signals are connected to the SM bus controller, which is located in the Southbridge (Intel 82801DB) device. For more information about the SM bus, please see the System Management (SM) Bus section in the System Resources chapter. LPC Bus The Low Pin Count Interface signals are connected to the LPC Bus controller, which is located in the Winbond Super I/O Controller. The LPC low speed interface can be used for peripheral circuits such as an external Super I/O Controller, which typically combine legacy-device support into a single IC. The implementation of this subsystem complies with the ETXexpress® Specification. Implementation information is provided in the ETXexpress® Design Guide. Refer to the documentation for additional information. Kontron User's Guide microETXexpress™-PM 29 4 microETXexpress™-PM Connectors 4.5 Connector X1B 4.5.1 Connector X1B (Signal Levels C1-C55) Pin C1-C55: [ IDE | Power | PCI | | PEG ] Pin Signal Description C1 C2 C3 C4 C5 C6 C7 C8 C9 C10 C11 C12 C13 C14 C15 C16 C17 C18 C19 C20 C21 C22 C23 C24 C25 C26 C27 C28 C29 C30 C31 C32 GND IDE_D7 IDE_D6 IDE_D3 IDE_D15 IDE_D8 IDE_D9 IDE_D2 IDE_D13 IDE_D1 GND IDE_D14 IDE_IORDY IDE_IOR# PCI_PME# PCI_GNT2# PCI_REQ2# PCI_GNT1# PCI_REQ1# PCI_GNT0# GND PCI_REQ0# PCI_RESET# PCI_AD0 PCI_AD2 PCI_AD4 PCI_AD6 PCI_AD8 PCI_AD10 PCI_AD12 GND PCI_AD14 C33 PCI_C/BE1# C34 C35 C36 C37 PCI_PERR# PCI_LOCK# PCI_DEVSEL# PCI_IRDY# C38 PCI_C/BE2# C39 C40 C41 C42 C43 PCI_AD17 PCI_AD19 GND PCI_AD21 PCI_AD23 C44 PCI_C/BE3# C45 C46 C47 PCI_AD25 PCI_AD27 PCI_AD29 Power Ground IDE Data Bus IDE Data Bus IDE Data Bus IDE Data Bus IDE Data Bus IDE Data Bus IDE Data Bus IDE Data Bus IDE Data Bus Power Ground IDE Data Bus IDE Ready IDE IO Read PCI Power Management Event PCI Bus Grant 2 PCI Bus Request 2 PCI Bus Grant 1 PCI Bus Request 1 PCI Bus Grant 0 Power Ground PCI Bus Reqest 0 PCI Bus Reset PCI Adress & Data Bus line PCI Adress & Data Bus line PCI Adress & Data Bus line PCI Adress & Data Bus line PCI Adress & Data Bus line PCI Adress & Data Bus line PCI Adress & Data Bus line Power Ground PCI Adress & Data Bus line PCI Bus Command and Byte enables 1 PCI Bus Grant Error PCI Bus Lock PCI Bus Device Select PCI Bus Bus Initiator Ready PCI Bus Command and Byte enables 2 PCI Adress & Data Bus line PCI Adress & Data Bus line Power Ground PCI Adress & Data Bus line PCI Adress & Data Bus line PCI Bus Command and Byte enables 3 PCI Adress & Data Bus line PCI Adress & Data Bus line PCI Adress & Data Bus line Kontron User's Guide microETXexpress™-PM 30 Type Termination Comment PWR IO IO IO IO IO IO IO IO IO PWR IO I-3,3 O-3,3 IO-3,3 O-3,3 I-3,3 O-3,3 I-3,3 O-3,3 PWR I-3,3 O-3,3 IO-3,3 IO-3,3 IO-3,3 IO-3,3 IO-3,3 IO-3,3 IO-3,3 PWR IO-3,3 PU 1k1 3,3V PU 8k2 3,3V PU 8k2 3,3V - - IO-3,3 - - IO-3,3 IO-3,3 IO-3,3 IO-3,3 PU 8k2 3,3V PU 8k2 3,3V PU 8k2 3,3V PU 8k2 3,3V - IO-3,3 - - IO-3,3 IO-3,3 PWR IO-3,3 IO-3,3 - - IO-3,3 - - IO-3,3 IO-3,3 IO-3,3 - - PU 8k2 3,3V 4 microETXexpress™-PM Connectors Pin C48 C49 C50 C51 C52 C53 C54 C55 Note: Signal PCI_AD31 PCI_IRQA# PCI_IRQB# GND PEG_RX0+ PEG_RX0TYPE0# PEG_RX1+ Description PCI Adress & Data Bus line PCI Bus Interrupt Request A PCI Bus Interrupt Request B Power Ground n.c. n.c. n.c. n.c. Type Termination Comment IO-3,3 I-3,3 I-3,3 PWR I I nc I PU 8k2 3,3V PU 8k2 3,3V - - The termination resistors in this table are already mounted on the microETXexpress™ board. Please refer to the ETXexpress® design guide for information about additional termination resistors. Kontron User's Guide microETXexpress™-PM 31 4 microETXexpress™-PM Connectors 4.5.2 Connector X1B (Signal Levels C56-C110) Pin C56-C110: [ Power | PCIe ] Pin Signal C56 C57 C58 C59 C60 C61 C62 C63 C64 C65 C66 C67 C68 C69 C70 C71 C72 C73 C74 C75 C76 C77 C78 C79 C80 C81 C82 C83 C84 C85 C86 C87 C88 C89 C90 C91 C92 C93 C94 C95 C96 C97 C98 C99 C100 C101 C102 C103 C104 C105 C106 C107 PEG_RX1TYPE1# PEG_RX2+ PEG_RX2GND PEG_RX3+ PEG_RX3RSVD RSVD PEG_RX4+ PEG_RX4RSVD PEG_RX5+ PEG_RX5GND PEG_RX6+ PEG_RX6SDVO_DATA PEG_RX7+ PEG_RX7GND RSVD PEG_RX8+ PEG_RX8GND PEG_RX9+ PEG_RX9RSVD GND PEG_RX10+ PEG_RX10GND PEG_RX11+ PEG_RX11GND PEG_RX12+ PEG_RX12GND PEG_RX13+ PEG_RX13GND RSVD PEG_RX14+ PEG_RX14GND PEG_RX15+ PEG_RX15GND VCC_12V VCC_12V VCC_12V VCC_12V Description n.c. n.c. n.c. n.c. Power Ground n.c. n.c. n.c. n.c. EXT_COM_EN# n.c. n.c. Power Ground n.c. n.c. n.c. n.c. n.c. Power Ground n.c. n.c. n.c. Power Ground n.c. n.c. n.c. Power Ground n.c. n.c. Power Ground n.c. n.c. Power Ground n.c. n.c. Power Ground n.c. n.c. Power Ground n.c. n.c. n.c. Power Ground n.c. n.c. Power Ground 12V VCC 12V VCC 12V VCC 12V VCC Kontron User's Guide microETXexpress™-PM 32 Type Termination Comment nc nc nc nc PWR nc nc nc nc nc nc nc nc nc PWR nc nc nc nc nc PWR nc nc nc PWR nc nc nc PWR nc nc PWR nc nc PWR nc nc PWR nc nc PWR nc nc nc PWR nc nc PWR PWR PWR PWR PWR - - 4 microETXexpress™-PM Connectors Pin C108 C109 C110 Signal VCC_12V VCC_12V GND Description 12V VCC 12V VCC Power Ground Kontron User's Guide microETXexpress™-PM 33 Type Termination Comment PWR PWR PWR - - 4 microETXexpress™-PM Connectors 4.5.3 Connector X1B (Signal Levels D1-D55) Pin D1-D55: [ IDE | Power | PCI PEG ] Pin Signal Description D1 D2 D3 D4 D5 D6 D7 D8 D9 D10 D11 D12 D13 D14 D15 D16 D17 D18 D19 D20 D21 D22 D23 D24 D25 D26 D27 D28 D29 D30 D31 D32 D33 D34 D35 D36 D37 D38 D39 D40 D41 D42 D43 D44 D45 D46 D47 D48 D49 D50 D51 D52 GND IDE_D5 IDE_D10 IDE_D11 IDE_D12 IDE_D4 IDE_D0 IDE_REQ IDE_IOW# IDE_ACK# GND IDE_IRQ IDE_A0 IDE_A1 IDE_A2 IDE_CS1# IDE_CS3# IDE_RESET# PCI_GNT3# PCI_REQ3# GND PCI_AD1 PCI_AD3 PCI_AD5 PCI_AD7 PCI_C/BE0# PCI_AD9 PCI_AD11 PCI_AD13 PCI_AD15 GND PCI_PAR PCI_SERR# PCI_STOP# PCI_TRDY# PCI_FRAME# PCI_AD16 PCI_AD18 PCI_AD20 PCI_AD22 GND PCI_AD24 PCI_AD26 PCI_AD28 PCI_AD30 PCI_IRQC# PCI_IRQD# PCI_CLKRUN# PCI_M66EN PCI_CLK GND PEG_TX0+ Power Ground IDE Data Bus IDE Data Bus IDE Data Bus IDE Data Bus IDE Data Bus IDE Data Bus IDE Data Bus IDE IO Write IDE DMA Acknowledge Power Ground IDE Interrupt Request IDE Adress Bus IDE Adress Bus IDE Adress Bus IDE Chip Select Channel 0 IDE Chip Select Channel 1 IDE Hard Drive Reset PCI Bus Grant 3 PCI Bus Reqest 0 Power Ground PCI Adress & Data Bus line PCI Adress & Data Bus line PCI Adress & Data Bus line PCI Adress & Data Bus line PCI Bus Command and Byte enables 0 PCI Adress & Data Bus line PCI Adress & Data Bus line PCI Adress & Data Bus line PCI Adress & Data Bus line Power Ground PCI Bus Parity PCI Bus System Error PCI Bus Stop PCI Bus Target Ready PCI Bus Cycle Frame PCI Adress & Data Bus line PCI Adress & Data Bus line PCI Adress & Data Bus line PCI Adress & Data Bus line Power Ground PCI Adress & Data Bus line PCI Adress & Data Bus line PCI Adress & Data Bus line PCI Adress & Data Bus line PCI Bus Interrupt Request C PCI Bus Interrupt Request D PCI Clock Run n.c. PCI Clock Power Ground n.c. Kontron User's Guide microETXexpress™-PM 34 Type Termination Comment PWR IO IO IO IO IO IO IO O-3,3 O-3,3 PWR I-3,3 O-3,3 O-3,3 O-3,3 O-3,3 O-3,3 O-3,3 O-3,3 I-3,3 PWR IO-3,3 IO-3,3 IO-3,3 IO-3,3 IO-3,3 IO-3,3 IO-3,3 IO-3,3 IO-3,3 PWR IO-3,3 IO-3,3 IO-3,3 IO-3,3 IO-3,3 IO-3,3 IO-3,3 IO-3,3 IO-3,3 PWR IO-3,3 IO-3,3 IO-3,3 IO-3,3 I-3,3 I-3,3 I-3,3 nc O-3,3 PWR nc PU 8k2 3,3V PU 8k2 3,3V PU 8k2 3,3V PU 8k2 3,3V PU 8k2 3,3V PU 8k2 3,3V PU 8k2 3,3V PU 8k2 3,3V PU 10k 3,3V - - 4 microETXexpress™-PM Connectors Pin D53 D54 D55 Note: Signal PEG_TX0PEG_LANE_RV# PEG_TX1+ Description n.c. n.c. n.c. Type Termination Comment nc nc nc - - The termination resistors in this table are already mounted on the microETXexpress™ board. Please refer to the ETXexpress® design guide for information about additional termination resistors. Kontron User's Guide microETXexpress™-PM 35 4 microETXexpress™-PM Connectors 4.5.4 Connector X1B (Signal Levels D56-D110) Pin Signal D56 D57 D58 D59 D60 D61 D62 D63 D64 D65 D66 D67 D68 D69 D70 D71 D72 D73 D74 D75 D76 D77 D78 D79 D80 D81 D82 D83 D84 D85 D86 D87 D88 D89 D90 D91 D92 D93 D94 D95 D96 D97 D98 D99 D100 D101 D102 D103 D104 D105 D106 D107 D108 PEG_TX1TYPE2# PEG_TX2+ PEG_TX2GND PEG_TX3+ PEG_TX3RSVD RSVD PEG_TX4+ PEG_TX4GND PEG_TX5+ PEG_TX5GND PEG_TX6+ PEG_TX6SDVO_CLK PEG_TX7+ PEG_TX7GND IDE_CBLID PEG_TX8+ PEG_TX8GND PEG_TX9+ PEG_TX9RSVD GND PEG_TX10+ PEG_TX10GND PEG_TX11+ PEG_TX11GND PEG_TX12+ PEG_TX12GND PEG_TX13+ PEG_TX13GND PEG_ENABLE# PEG_TX14+ PEG_TX14GND PEG_TX15+ PEG_TX15GND VCC_12V VCC_12V VCC_12V VCC_12V VCC_12V Description n.c. n.c. n.c. n.c. Power Ground n.c. n.c. n.c. n.c. Power Ground n.c. n.c. Power Ground n.c. n.c. n.c. n.c. n.c. Power Ground IDE Primary ATA Detect n.c. n.c. Power Ground n.c. n.c. n.c. Power Ground n.c. n.c. Power Ground n.c. n.c. Power Ground n.c. n.c. Power Ground n.c. n.c. Power Ground n.c. n.c. n.c. Power Ground n.c. n.c. Power Ground 12V VCC 12V VCC 12V VCC 12V VCC 12V VCC Kontron User's Guide microETXexpress™-PM 36 Type Termination Comment nc nc nc nc PWR nc nc nc nc nc nc PWR nc nc PWR nc nc nc nc nc PWR I-3,3 nc nc PWR nc nc nc PWR nc nc PWR nc nc PWR nc nc PWR nc nc PWR nc nc nc PWR nc nc PWR PWR PWR PWR PWR PWR PD 10k - - - 4 microETXexpress™-PM Connectors Pin D109 D110 Signal VCC_12V GND Description 12V VCC Power Ground Type Termination Comment PWR PWR - - Note: The termination resistors in this table are already mounted on the ETXexpress® board. Please refer to the design guide for information about additional termination resistors. Notes: *To protect external power lines of peripheral devices, make sure that: - the wires have the right diameter to withstand the maximum available current - the enclosure of the peripheral device fulfils the fire-protection requirements of IEC/EN60950. **This signal is not supported on the microETXexpress™-PM. Note: Connector X3 Signal Description 4.5.5 Connector X1B Subsystems PCI Bus The implementation of this subsystem complies with the ETXexpress® / COMexpress Specification. Implementation information is provided in the ETXexpress® Design Guide. Refer to the documentation for additional information. IDE Port The IDE host adapter is capable of DMA-33*/66*/100* operation. The implementation of this subsystem complies with the ETXexpress® Specification. Implementation information is provided in the ETXexpress® Design Guide. Refer to those documents for additional information. Note: *For UDMA-100/66 operation please follow the System Guidelines for ULTRA DMA of the ATA-Specification. The ETX®-concept in combination with peripheral devices (cable, connectors, base board layout…) can worse the transmission quality so that it is necessarily to decrease the UDMA-Mode to values below 3. Configuration The IDE host adapter is a PCI bus device. It is configured by the BIOS during PCI device configuration. You can disable it in setup. Resources used by the IDE host adapter are compatible with the PC/AT. Note: PHOENIX BIOS will not recognize a Slave device on the IDE port if there is no Master device connected. Kontron User's Guide microETXexpress™-PM 37 5 Special Features 5 Special Features 5.1 Watchdog Timer You can configure the Watchdog Timer (WDT) in BIOS setup to start after a set amount of time after power-on boot. The WDT can also be controlled by the JIDA32 Library API (Refer to Appendix A: JIDA Standard). The application software should strobe the WDT to prevent its timeout. Upon timeout, the WDT resets and restarts the system. This provides a way to recover from program crashes or lockups. Configuration You can program the timeout period for the watchdog timer in two ranges: ® 1-second increments from 1 to 255 seconds ® 1-minute increments from 1 to 255 minutes Contact Kontron Embedded Modules technical support for information on programming and operating the WDT. Kontron User's Guide microETXexpress™-PM 38 6 Important Information 6 Important Information Kontron Embedded Modules GmbH currently offers different variants of the microETXexpress™-PM. They are the 1400 MHz PentiumM and the 800 MHz and 1000MHz CeleronM versions. These variants utilize a smart BIOS that is capable of identifying the CPU that the module is equipped with. Another feature of the BIOS is its ability to offer the user the option to set the maximum CPU frequency when using modules equipped with the 1400 MHz PentiumM. The Celerons 800 MHz and 1000MHz does not support this option. 6.1 Max CPU Frequency setting The 1400MHz variant offers the option to set the maximum CPU frequency using a setting in the BIOS setup located in the Power Menu page. The different Max CPU frequency settings available are as follows: 1400 MHz 1300 MHz 1200 MHz 1100 MHz 1000 MHz 900 MHz 800 MHz 600 MHz 6.2 Max CPU Frequency default settings Each microETXexpress™-PM module that supports the Max CPU Frequency setting option has a predefined default frequency setting. ® 6.3 On the 1400MHz version this default setting is 1400MHz. Limitations With the introduction of higher frequency CPUs new problems arise when considering cooling solutions. Although these higher frequency CPUs offer greater performance they also produce more heat, which must be efficiently dissipated from the application. As mentioned in the previous section each microETXexpress™-PM module that supports the Max CPU Frequency setting option has a predefined default frequency setting. This is done to ensure that the module can operate using the standard microETXexpress™-PM heatspreader without reaching the “Critical Trip Point” when used at room temperature (typical 24°C). The “Critical Trip Point” is designed to ensure that the module is shut down before any thermal damage can occur to the CPU. This feature is available on all microETXexpress™-PM modules. If the cooling Kontron User's Guide microETXexpress™-PM 39 6 Important Information solution is unable to maintain a temperature below the “Critical Trip Point” then the module is automatically shut down. The “Critical Trip Point” feature only works in conjunction with an ATX power supply or power supplies that utilize the PS_ON signal. Warning: 6.3.1 AT power supplies do not support the “Critical Trip Point” feature. microETXexpress™-PM Celeron 800 MHz and 1000 MHz Kontron Embedded Modules GmbH also offers an microETXexpress™-PM Celeron 800 MHz and 1000 MHz. This module does not support the “Max CPU Frequency” setting option mentioned earlier in this section but does support the “Critical Trip Point” feature. Due to the fact that this particular CPU does not support the “Max CPU Frequency” setting option it always operates at maximum frequency and generates extreme heat. This means that this module is unable to operate using the standard microETXexpress™PM heatspreader as its only means of thermal interface and therefore requires a special cooling solution for use. You must ensure that you design a cooling solution that will allow the excess heat to be dissipated from the application so that the “Critical Trip Point” is not reached causing the module to shut down. Additionally the microETXexpress™-PM Celeron 800 MHz and 1000 MHz does not support INTEL speed step. As a result of this the default value for the “Automatic Thermal Monitor Control Circuit” in the BIOS setup is TM1 instead of TM2. The microETXexpress™-PM Celeron 800 MHz and 1000 MHz does not support TM2. See sections Thermal Monitor and Catastrophic Thermal Protection and Power Menu of this document for more information about TM1 and TM2. Warning: 6.4 AT power supplies do not support the “Critical Trip Point” feature. Cooling Solutions With introduction of higher frequency CPUs into the embedded market the need to design more efficient cooling solutions is now a necessity. These higher frequency CPUs generate much more heat, which must be removed from the application. One solution that has become more common in the embedded market is the use of heat pipes when designing a cooling solution. Kontron Embedded Modules GmbH has designed some cooling solutions that utilize heat pipes in order to perform some tests. Although Kontron Embedded Modules GmbH designed these cooling solutions strictly for test purposes, and not as a standard ETXexpress® cooling solution, the knowledge gained from these tests is being made available to customers in the form of an application note called PM_Thermal_Guidelines_E1xx.pdf. This application note should be used as a guideline to help evaluate potential thermal designs. It can be found on Kontron’s web site at http://www.kontron-emea.com/emd on the ETXexpress® product page and in the Tech Support section. Kontron User's Guide microETXexpress™-PM 40 7 Design Considerations 7 Design Considerations 7.1 Thermal Management A heat-spreader plate assembly is available from Kontron Embedded Modules GmbH for the microETXexpress™-PM. The heat-spreader plate on top of this assembly is NOT a heat sink. It works as an ETXexpress®-standard thermal interface to use with a heat sink or other cooling device. External cooling must be provided to maintain the heat-spreader plate at proper operating temperatures. Under worst-case conditions, the cooling mechanism must maintain an ambient air and heat-spreader plate temperature of 60° C or less. The aluminum slugs and thermal pads on the underside of the heat-spreader assembly implement thermal interfaces between the heat spreader plate and the major heat-generating components on the microETXexpress™-PM. About 80 percent of the power dissipated within the module is conducted to the heat-spreader plate and can be removed by the cooling solution. For 1400 MHz modules, the heat dissipated into the plate ranges from 18 to 20 watts. Design a cooling solution to dissipate the heat load on a heat-spreader plate at a minimum of 20 watts to accommodate all microETXexpress™-PM modules. You can use many thermal-management solutions with the heat-spreader plates, including active and passive approaches. The optimum cooling solution varies, depending on the ETXexpress® application and environmental conditions. Please see the ETXexpress® Design Guide for further information on thermal management. Kontron User's Guide microETXexpress™-PM 41 7 Design Considerations 7.2 Heat spreader Dimensions 7.2.1 microETXexpress™-PM Heatspreader This is the backside view of the heatspreader plate with pads marked for the heat generating components for microETXexpress™-PM Modules. Article numbers: 36001-0000-99-0 HSP-PM threaded stand off 36001-0000-99-1 HSP-PM through hole stand off Kontron User's Guide microETXexpress™-PM 42 8 Important Technology Information 8 Important Technology Information The following technological information is designed to give the reader a better understanding of some of features of the microETXexpress™-PM. This information can be referenced when reading the System Resources and BIOS Operation sections that follow. There are also references to additionall documentation that will help to develop a better understanding of the technical information described herein. 8.1 ACPI The microETXexpress™ supports ACPI. Non ACPI (APM support) is not intended. 8.2 I/O APIC vs 8259 PIC Interrupt mode The I/O APIC (Advanced Programmable Interrupt Controller) handles interrupts differently then the 8259 PIC. The following information explains these differences. 8.2.1 Method of interrupts transmission The I/O APIC transmits interrupts through the system bus and interrupts are handled without the needs for the processor to run an interrupt acknowledge cycle. 8.2.2 Interrupt priority The priority of interrupts in the I/O APIC is independent of the interrupt number. 8.2.3 More interrupts The I/O APIC in the chipset of the microETXexpress™-PM supports a total of 24 interrupts. The APIC is not supported by all operating systems. Windows XP, Vista and Linux does support APIC. The APIC mode must be enabled in the BIOS setup before the OS installation. APIC only works in ACPI mode. For more information see chapter 8 of the IA-32 Intel Architecture Software Developer’s Manual, Volume 3. Note: Enable the APIC mode if your OS supports it. Kontron User's Guide microETXexpress™-PM 43 8 Important Technology Information 8.3 Native vs. compatible IDE mode Windows XP SP1 and Windows Server 2003 will switch a native-mode-capable ATA controller from compatible to native mode if the BIOS indicates that the controller can be switched, the controller supports native mode and the appropriate registry entry is set. You must add a DWORD VALUE called EnableNativeModeATA under: HKEY_LOCAL_MACHINE/System/CurrentControlSet/Control/PnP/Pci/ and set 1 as the value. 8.3.1 Compatible Mode The ATA controller emulates a legacy IDE controller, which is a non-standard extension of the ISA-based IDE controller. In compatible mode, the controller requires two ISA IRQs (14 and 15) that cannot be shared with other devices. 8.3.2 Native Mode The ATA controller acts as a true PCI device that does not require dedicated legacy resources and can be configured anywhere in the system. ATA controllers running in native mode use their PCI interrupt for both channels and can share this interrupt pin with other devices in the system, like any other PCI device. By requiring only one shareable interrupt instead of two non-shareable ones, native-mode controllers significantly decrease the likelihood that a user will install a device that cannot work because no interrupts are available. Enable Native IDE mode if your OS supports it. http://www.microsoft.com/whdc/device/storage/NativemodeATA.mspx Note: 8.4 For more information see: http://www.microsoft.com/whdc/device/storage/Native-modeATA.mspx Thermal Monitor and Catastrophic Thermal Protection The Thermal Monitor within the Pentium M processor helps to control the processor temperature by activating the TCC (Thermal Control Circuit) when the processor silicon reaches its maximum operating temperature. The temperature at which the Intel Thermal Monitor activates the TCC is not userconfigurable and is not software visible. The Thermal Monitor controls the processor temperature by modulating (starting and stopping) the CPU core clocks at a 50% duty cycle (TM1) or by initiating an Enhanced Intel Speedster technology transition (TM2) when the processor silicon reaches its maximum operating temperature (selectable in setup). Note: TM2 is the recommended mode for the Intel Pentium M processor. Not supported on the microETXexpress™-PM Celeron 0.8 GHz and 1.0 GHz. Kontron User's Guide microETXexpress™-PM 44 8 Important Technology Information Thermal Monitor supports two modes to activate the TCC: Automatic and On-Demand mode. The Intel Thermal Monitor Automatic Mode must be enabled via BIOS for the processor to be operating within specification. Automatic mode does not require any additional hardware, software drivers, or interrupt handling routines. Note: With a properly designed thermal solution, the TCC is only active for very short periods, hence processor performance impact is expected to be so minor that it would not be detectable. For more details see chapter 5.1.2 of the Intel Pentium M Processor Datasheet. The Intel Pentium M processor supports the THERMTRIP# signal for catastrophic thermal protection. In the event of a catastrophic cooling failure, the processor will automatically shut down when the silicon has reached a temperature of approximately 125°C. At this point the system BUS signal THERMTRIP# will go active. THERMTRIP# activation is independent of processor activity and does not generate any bus cycles. 8.4.1 Summary Thermal Control Circuit reduces performance when the processor reaches its max. operating temperature (100°C). THERMTRIP# shuts down the system in case of catastrophic cooling failure. 8.5 Processor Performance Control The Pentium M processor can run in different performance states (multiple frequency/voltage operating points). The CPU performance can be altered while the computer is functioning. This allows the processor to run at different core frequencies and voltages depending on CPU thermal state and OS policy. Windows XP includes built-in processor performance control to operate the processor more efficiently when it is not fully utilized. Win2k, WinME and Win9x do not support processor performance control. Special software is required for Oses not capable of processor performance control. In Windows, the processor performance control policy is linked to the Power Scheme setting in the control panel power option applet. Note: Windows always runs at the highest performance state when the “Home/Office” or “Always On” power scheme is selected. For a more detailed information about processor performance control, see: Chapter 8 of the ACPI Specification Revision 2.0c available at www.acpi.info ACPI allows the OS to play a role in the thermal management of the system. With the OS in control of the operating environment, cooling decisions can be made based on the application load on the CPU and the thermal heuristics of the system. Note: Linux also includes processor performance control built-in for efficient use of the System and also supports ACPI working mode. Kontron User's Guide microETXexpress™-PM 45 8 Important Technology Information 8.5.1 Cooling Policies The ACPI thermal solution on microETXexpress™-PM supports two cooling policies: Passive Cooling The OS reduces the power consumption of the processor by throttling the processor clock to reduce the temperature of the thermal zone. Passive cooling devices (processor) produce no noise. The passive cooling trip point declares the temperature threshold where the OS will start or stop passive cooling. Critical Trip Point The OS performs an orderly, but critical, shutdown of the system when the temperature reaches the critical trip point. Note: 8.6 Customers can design there own fan cooling methode (on the Backplane) which is not SW controlled. Processor Clock Throttling The ACPI OS assesses the optimum CPU performance change necessary to lower the temperature using the following equation: ΔP[%] = TC1(Tn-Tn-1) + TC2(Tn-Tt) ΔP is the performance delta, Tt is the target temperature = passive cooling trip point. The two coefficients TC1 and TC2 and the sampling period TSP are hardware dependent constants the end user must supply (setup options section ACPI Control Submenu). It’s up to the end user to set the cooling preference of the system by setting the appropriate trip points in the BIOS setup. Note: See chapter 12 of the ACPI specification (www.acpi.info) for more details. Kontron User's Guide microETXexpress™-PM 46 8 Important Technology Information 8.7 ACPI Suspend Modes and Resume Events The microETXexpress™-PM supports the S1 (POS=Power On Suspend) state. S3 (=Save to Ram) is supported. S4 (=Save to Disk) is not supported by the BIOS (S4_BIOS) but it is supported by the following operating systems: ® WinME ® Win2k ® WinXP (S4_OS=Hibernate) The following events resume the system from S1: ® Power Button ® PS/2 Keyboard and Mouse IRQs (1 & 12) ® USB Wake Events ® PCI Bus signal PME# The following events resume the system from S3: 8.8 ® Power Button ® LAN activities (tested wiht magic packet) USB 2.0 (EHCI) Host Controller Support The EHCI host controller shares the 6 USB ports with the 3 UHCI host controllers. Integrated into the EHC functionality is a port-routing logic, which performs the mixing between the UHCI and EHCI host controllers. If a device is connected that is not capable of USB2.0’s high-speed signaling protocol, or if the EHCI software drivers are not present, than the UHCI controller owns the ports. Routing Diagram: Note: USB2.0 high speed boot is supported by the BIOS. Kontron User's Guide microETXexpress™-PM 47 9 System Resources 9 System Resources 9.1 Interrupt Request (IRQ) Lines In 8259 PIC mode IRQ # 0 1 2 3 4 5 6 7 8 9 10 11 12 13 14 15 Note: Used For Available Timer0 No Yes No No No Yes Yes Yes No No Yes Yes Yes No No Yes Slave 8259 COM2 COM1 RTC SCI FPU IDE0 Comment Note (2) Note (2) Note (3) Note (1) 1 If the “Used For” device is disabled in setup, the corresponding interrupt is available for other devices. 2 Unavailable if baseboard is equipped with an LPC-I/O controllerWinbond W83627HF, and the device is enabled in setup. 3 Unavailable in Advanced Configuration and Power Interface (ACPI) mode. Used as System Control Interrupt (SCI) in ACPI mode. Kontron User's Guide microETXexpress™-PM 48 9 System Resources In APIC mode: IRQ # Used For Available 0 1 2 3 4 5 6 7 8 9 10 11 12 13 14 15 16 17 18 19 20 21 22 23 Timer0 No Yes No No No Yes Yes Yes No No Yes Yes Yes No No Yes For PCI For PCI For PCI For PCI No No No No Note: 9.2 DMA # 0 1 2 3 4 5 6 7 Slave 8259 COM2 COM1 RTC SCI FPU IDE0 PIRQ[A] PIRQ[B] PIRQ[C] PIRQ[D] PIRQ[E] PIRQ[F] PIRQ[G] PIRQ[H] Comment Note (1) Note (1) System Control Interrupt (2) Note (3) PCI IRQ line 1 + USB UCHI controller #1 + Graphics controller PCI IRQ line 2 + AC97 Audio controller PCI IRQ line 3 + USB UCHI controller #3 + Native IDE PCI IRQ line 4 + USB UCHI controller #2 Lan Controller SATA controller USB EHCI controller 1 Unavailable if baseboard is equipped with an LPC I/O controllerWinbond W83627HF, and the device is enabled in setup. 2 Unavailable in Advanced Configuration and Power Interface (ACPI) mode. Used as System Control Interrupt (SCI) in ACPI mode. Currently not free in Non-ACPI mode. 3 IRQs are available if IDE controller is either disabled in setup or if in Native IDE mode. Direct Memory Access (DMA) Channels Used for Cascade Available Comment Yes Yes Yes Yes No Yes Yes Yes Kontron User's Guide microETXexpress™-PM 49 9 System Resources 9.3 Memory Area Upper Memory Used for Available Comment C0000h – CFFFFh D0000h – DFFFFh E0000h – FFFFFh VGA BIOS No Yes No Shadow RAM 9.4 System BIOS I/O Address Map The I/O-port addresses of the microETXexpress™-PM are functionally identical with a standard PC/AT. The following I/O ports are used: I/O Address Used for Available Comment 3F8-3FFh 2F8-2FFh COM1 COM2 No No 1000h > PCI No Available if external I/O controller not used. Available if external I/O controller not used. I/O ports 1000h and above might be allocated by PCI devices or onboard hardware. 9.5 Peripheral Component Interconnect (PCI) Devices PCI Device Busmaster Audio, USB and Ethernet PCI Interrupt Comment See IRQ resource tables above See IRQ resource tables above SATA Integrated in the Intel chipset. No REQx/GNTx pair needed. Serial ATA Controller. REQ4/GNT4 used for it. You can use REQ0/GNT0, REQ1/GNT1, REQ2/GNT2, and REQ3/GNT3 pairs for external PCI devices. 9.6 Inter-IC (I2C) Bus I2C Address Used For Available Comment JIDA-Bus-Nr. A0h A2h B0h JIDA-EEPROM JIDA-EEPROM WD-PIC No No No EEPROM for CMOS data. 0 0 0 9.7 Reserved for internal use. System Management (SM) Bus Following SM bus addresses are reserved. SM Bus Address SM Device Comment JIDA-Bus-Nr. 10h 12h 14h 16h A0h D2h SMB Host SMART_CHARGER SMART_SELECTOR SMART_BATTERY SPD Clock generator Do not use under any circumstances. Not to be used with any SM bus device except a charger Not to be used with any SM bus device except a selector Not to be used with any SM bus device except a battery SDRAM EEPROM Do not use under any circumstances. 1 1 1 1 1 1 The standard microETXexpress™-PM Power management BIOS does support MARS (Mobile Application platform for Rechargeable Systems). Further details about MARS are available at Embedded Modules Division - Kontron. Kontron User's Guide microETXexpress™-PM 50 9 System Resources 9.8 JILI-I2C Bus I2C Address Used For Available Comment JIDA-Bus-Nr. A0h JILI-EEPROM No EEPROM for JILI-Data 2 Kontron User's Guide microETXexpress™-PM 51 10 BIOS Operation 10 BIOS Operation The module is equiped with a Phoenix legacy Reduced Bios. This implicates that the Module works only in ACPI-Mode. The Bios is located in an onboard Flash EEPROM. The device has 8-bit access. Faster access (16 bit) is provided by the shadow RAM feature. You can update the BIOS using a Flash utility. The Legacy Reduced Bios has been developed on demand of many OEM in order to lower system and support cost. Removal of obsolete, slow, complicated, and often poorly understood interfaces provides obvious benefits toward this goal: simpler, more robust machines, and a lower cost of goods. As a result of these initiatives, the operating system (OS), devices, and end users cannot detect the presence of the following: 10.1 ® ISA bus, slots or devices; ® legacy floppy disk; ® controller (FDC); ® PS/2 and game ports. Determining the BIOS Version To determine the PhoenixBIOS version, immediately press the Pause key on your keyboard as soon as you see the following text display in the upper left corner of your screen: PhoenixBIOS 4.0 Release 6.1.X.XX Copyright 1985-2006 Phoenix Technology Ltd All Rights Reserved Kontron® BIOS Version <EEB1R110> © Copyright 2002-2007 Kontron Embedded Modules GmbH 10.2 Setup Guide The PhoenixBIOS Setup Utility changes system behavior by modifying the BIOS configuration. The setup program uses a number of menus to make changes and turn features on or off. The BIOS setup menus documented in this section represent those found in most models of the microETXexpress™-PM. The BIOS Setup for specific models can differ slightly. Note: Selecting incorrect values may cause system boot failure. Load setup default values to recover by pressing <F9>. It might also be necessary to use the “reset configuration data” option in the BIOS setup and set it to “yes”. In certain circumstances this may also help to recover from system boot failure or a resource conflict. Kontron User's Guide microETXexpress™-PM 52 10 BIOS Operation 10.2.1 Start Phoenix BIOS Setup Utility To start the PhoenixBIOS setup utility, press <F2> when the following string appears during bootup. Press <F2> to enter Setup The Info Menu then appears. The Setup Screen is composed of several sections: Setup Screen Location Function Menu Bar Legend Bar Item Specific Help Window Menu Window General Help Window Top Bottom Right Left Center Overlay (center) Lists and selects all top level menus. Lists setup navigation keys. Help for selected item. Selection fields for current menu. Help for selected menu. Menu Bar The menu bar at the top of the window lists different menus. Use the left/right arrow keys to make a selection. Legend Bar Use the keys listed in the legend bar on the bottom to make your selections or exit the current menu. The table below describes the legend keys and their alternates. Key Function <F1> or <Alt-H> <Esc> ← or → Arrow key General Help window. Exit menu. Select a menu. ↑ or ↓ Arrow key <Tab> or <Shift-Tab> <Home> or <End> <PgUp> or <PgDn> <F5> or <-> <F6> or <+> or <Space> <F9> <F10> <Enter> <Alt-R> Select fields in current menu. Cycle cursor up and down. Move cursor to top or bottom of current window. Move cursor to next or previous page. Select previous value for the current field. Select next value for the current field. Load the default configuration values for this menu. Save and exit. Execute command or select submenu. Refresh screen. Selecting an Item Use the ↑ or ↓ key to move the cursor to the field you want. Then use the + and – keys to select a value for that field. The Save Value commands in the Exit menu save the values displayed in all the menus. Displaying Submenus Use the ← or → key to move the cursor to the submenu you want. Then press <Enter>. A pointer () marks all submenus. Kontron User's Guide microETXexpress™-PM 53 10 BIOS Operation Item Specific Help Window The Help window on the right side of each menu displays the Help text for the selected item. It updates as you move the cursor to each field. General Help Window Pressing <F1> or <Alt-F1> on a menu brings up the General Help window that describes the legend keys and their alternates. Press <Esc> to exit the General Help window. 10.3 Main Menu Feature Option Description System Time System Date 8Primary Master HH:MM:SS MM/DD/YYYY Autodetected drive Set system time. Use <Enter to move to MM or SS. Set system date. Use <Enter to move to DD or YYYY. Displays result of PM autotyping. 8Primary Slave Autodetected drive Smart Device Monitoring Disabled Enabled System Memory Extended Memory BIOS Date LAN1 MAC address N/A N/A MM/DD/YY XX:XX:XX:XX:XX Displays result of PS autotyping. IDE Failure Prediction.Turns on Self-Monitoring Analysis-Reporting Technology, which monitors the condition of the hard drive and reports when a catastrophic IDE failure is about to happen. Displays amount of conventional memory detected during bootup. Displays amount of extended memory detected during bootup. Build Date of the BIOS Physical address of the onboard LAN controller Note: In the Option column, bold shows default settings. 10.3.1 Master or Slave Submenus Feature Type Cylinders Heads Sectors Maximum Capacity Total Sectors Maximum Capacity Multi-Sector Transfer LBA Mode Control 32-Bit I/O Option Description None IDE Removable ATAPI Removable CD-ROM Other ATAPI User Auto 1 to 65,536 1 to 256 1 to 63 N/A N/A N/A Disabled 2 sectors 4 sectors 8 sectors 16 sectors Disabled Enabled None = Autotyping is not able to supply the drive type or end user has selected None, disabling any drive that may be installed. User = You enter parameters of hard-disk drive installed at this connection. Auto = Autotypes hard-disk drive installed here. CD-ROM = A CD-ROM drive is installed here. ATAPI Removable = Removable disk drive is installed here. Number of cylinders. Number of read/write heads. Number of sectors per track. Displays the calculated size of the drive in CHS Number of total sectors in LBA mode Displays the calculated size of the drive in LBA Disabled Enables 32-bit communication between CPU and IDE card. Requires PCI or Kontron User's Guide microETXexpress™-PM Any selection except Disabled determines the number of sectors transferred per block. Standard is 1 sector per block. Enabling LBA causes Logical Block Addressing to be used in place of CHS. 54 10 BIOS Operation Feature Transfer Mode Ultra DMA Mode SMART Device Monitoring 10.4 Option Description Enabled Standard Fast PIO 1 Fast PIO 2 Fast PIO 3 Fast PIO 4 FPIO 3/ DMA 1 FPIO 4/ DMA 2 Disabled Mode 0 Mode 1 Mode 2 Mode 3 Mode 4 Mode 5 Disabled Enabled Local Bus. Selects the method for transferring the data between the hard disk and system memory. Selects the UDMA mode used for moving data to/from the drive. Autotype the drive to select the optimum transfer mode. Shows if SMART Device monitoring is supported by the drive. Advanced Menu Feature Option Description 8Advanced Chipset Control sub menu Opens Advanced Chipset Control sub menu. 8PCI/PNP Configuration sub menu Opens PCI/PNP Config sub menu. 8Memory Cache sub menu Opens Cache Control sub menu. 8I/O Device Configuration sub menu Opens Peripheral Config sub menu. 8Keyboard Features sub menu Opens Keyboard Features sub menu. 8Hardware Monitor sub menu Shows hardware monitor current state. 8Watchdog Settings sub menu Opens Watchdog Config sub menu. 8Display Control sub menu Opens Display Control sub menu 8Miscellaneous sub menu Opens sub menu with miscellaneous options. Note: Setting items on this menu to incorrect values may cause your system to malfunction. 10.4.1 Advanced Chipset Control Submenu Feature Option Graphics Engine 1 Graphics Engine 2 Graphics Memory Assign IRQ to VGA Note: Disabled Enabled Disabled Enabled 1MB, 8MB, 16MB, 32MB UMA Disabled Enabled Description Enable/Disable Internal Graphics Device. Enabled/Disabled Function 1 of the Internal Graphics Device Select the amount of main memory that the Internal Graphics Device will use. Determines whether the VGA Device gets an IRQ assigned. In the Option column, bold shows default settings. Kontron User's Guide microETXexpress™-PM 55 10 BIOS Operation 10.4.2 PCI/PNP Configuration Submenu Feature Option Plug & Play OS No Yes Reset Configuration Data* No Yes Select the operating system installed on your system which you will use most commonly. If your system has a PnP OS (e.g. Win9x) select Yes to let the OS configure PnP devices not required for booting. No allows the BIOS to configure them. Note: An incorrect setting can cause some operating systems to display unexpected behaviour. Yes erases all configuration data in ESCD, which stores the configuration settings for plug-in devices. Select Yes when required to restore the manufacturer’s defaults. Yes prevents a Plug and Play OS from changing system settings. Yes No sub menu Secured Setup Configuration 8PCI Device, Slot #x PCI IRQ line 1 PCI IRQ line 2 PCI IRQ line 3 PCI IRQ line 4 Onboard LAN IRQ line Onboard EHCI IRQ line Opens sub menu to configure slot x PCI device Disabled Auto IRQ3, 4, 5, 7, 9, 10, 11, 12, 14,15 Default Primary Video Adapter AGP PCI Assign IRQ to SMB Disabled Enabled Note: Description PCI devices can use hardware interrupts called IRQ´s. A PCI device cannot use IRQ´s already in use by ISA or EISA devices. Use “Auto” only if no ISA or EISA legacy cards are installed. Select “PCI” to have a PCI video card, if installed, used for the boot display device. Select “AGP” to have a AGP video card, if installed, used for the boot display device. Determines whether the onchip SMBus host controller gets an IRQ assigned. In the Option column, bold shows default settings. *Setting this option to “yes”, under certain circumstances, may help to recover from system boot failure or a resource conflict. PCI Device, Slot # x Submenu Feature Option Description Option ROM Scan Disabled Enabled Initialize device expansion ROM. Enable Master Latency Timer Note: Disabled Enabled Default, 20h, 40h, 60h, 80h, A0h, C0h, E0h Enables device in slot as a PCI bus master, not every device can function as a master. Check device documentation. Minimum guaranteed time slice allocated for bus master in units of PCI bus clocks. A high-priority, high-throughput device may benefit from a greater value. In the Option column, bold shows default settings. Kontron User's Guide microETXexpress™-PM 56 10 BIOS Operation 10.4.3 Memory Cache Submenu Feature Option Memory Cache Cache System BIOS area Cache Video BIOS area Cache Base 0 – 512k Cache Base 512 – 640k Cache Extended Base / Extended Memory area: D000 – D3FF D400 – D7FF D800 – DBFF DC00 – DFFF Note: Description Disabled Enabled uncached Write Protect uncached Write Protect Uncached Write Through Write Protect Write Back Uncached Write Through Write Protect Write Back uncached Write Through Write Protected Write Back Enables or Disables the L2 cache. Controls caching of System BIOS area. Controls caching of Video BIOS area. Controls caching of 512k base memory. Controls caching of 512k – 640k base memory. Controls caching of system memory below 640k / above 1MB. Disabled: block is not cached. Write Through: Writes are cached and sent to main memory at once. Write Protect: Writes are ignored. Write Back: Writes are cached, but not sent to main memory until necessary. Disabled Write Through Write Protected Write Back In the Option column, bold shows default settings. 10.4.4 I/O Device Configuration Submenu Feature Primary IDE UDMA66/100 SATA controller 8USB Options AC97 Audio Controller Option Description Enabled Disabled Enabled Disabled sub menu Disabled Enabled Disabled limits max. transfer mode to UDMA33. Enabled allows UDMA66 and above. Onboard LAN controller Enabled Disabled Onboard LAN PXE ROM Disabled Enabled *Serial port A: *Serial port B: Disabled Enabled Auto Base I/O address IRQ (port A and B) 3F8h, 2F8h, 3E8h, 2E8h IRQ 3, IRQ 4 Kontron User's Guide microETXexpress™-PM Enable/Disable the onboard SATA controller Opens USB sub menu. Enable the AC97 Audio device. This Setup Item will have no effect if an AC97 Audio MDC is not present. Enable/Disable the ICH4 internal LAN controller. Setting item to "Disable" will remove the LAN from PCI Config Space. Enables the remote boot BIOS extension for the onboard LAN controller. Configure serial port: Disabled: No configuration Enabled: User Configuration Auto: BIOS or OS chooses configuration Select I/O base of port. Select IRQ of port A and B 57 10 BIOS Operation Parallel port: Disabled Enabled Auto Configure parallel port using options: Disabled: No configuration Enabled: User Configuration Auto: BIOS or OS chooses configuration Mode: Output only Bi-directional EPP ECP Set the mode for the parallel port Base I/O address Interrupt DMA channel Notes: 378 278 3BC IRQ 5 IRQ 7 DMA 1 DMA 3 Set the base I/O address for the parallel port. Set the interrupt for the parallel port. Set the DMA channel for the parallel port. In the Option column, bold shows default settings. *Available if an external Super I/O (Winbond W83627HF) is on the base board.! USB Sub menu Feature Option USB UHCI Host Controller 1 USB UHCI Host Controller 2 USB UHCI Host Controller 3 USB EHCI Host Controller * Notes: Description Enabled Disabled Enabled Disabled Enabled Disabled Enable/ Disable UHCI 1 HC = USB ports 0 and 1. Enable/ Disable UHCI 2 HC = USB ports 2 and 3. Enable/ Disable UHCI 3 HC = USB ports 4 and 5. Control USB 2.0 functionality through this Setup Item. If enabled, Ports 0 - 5 are multiplexed between UHCI and EHCI. Ports are routed to EHCI if an USB2.0 high speed device is connected and an EHCI driver is loaded. Enabled Disabled In the Option column, bold shows default settings. *The USB ports are multiplexed between UHCI and EHCI. Ports are routed to EHCI if an USB 2.0 high-speed device is connected and an EHCI driver is loaded. 10.4.5 Keyboard Features Submenu Feature Numlock Key Click Keyboard auto-repeat rate Keyboard auto-repeat delay Option Auto On Off Disabled Enabled 30/sec,26.7/sec, 21.8/sec, 13.3/sec, 10/sec, 6/sec, 2/sec ¼ sec, ½ sec, ¾ sec, 1 sec Kontron User's Guide microETXexpress™-PM Description On or Off turns NumLock on or off at bootup. Auto turns NumLock on if it finds a numeric key pad. Turns audible key click on. Sets number of times to repeat a keystroke per second if you hold the key down. Sets delay time after the key is held down before it begins to repeat the keystroke. 58 10 BIOS Operation Note: In the Option column, bold shows default settings. 10.4.6 Hardware Monitor Submenu This submenu shows the current voltages and temperatures of the system. Vcc (3.3) CPU core Voltage 5Vsb Voltage Battery Voltage 3.3V power plane Core voltage (depends on CPU) 5 V stand by Backup Battery Voltage CPU Temperature Temperature of CPU die 10.4.7 Watchdog Settings Submenu Feature Option Disabled Reset NMI 1s, 5s, 10s, 30s, 1min, 5.5min,10.5min, 30.5min 1s, 5s, 10s, 30s, 1min, 5.5min, 10.5min, 30.5min Mode Delay Timeout Note: Description Select watchdog operation mode. The time until the watchdog counter starts counting. Useful to handle longer boot times. Maximum trigger period. In the Option column, bold shows default settings. 10.4.8 Display Control Submenu Feature Display Mode JDA Revision Flat Panel Type *PAID/FPID1 Flat Panel Scaling **Flat Panel Backlight ***Flat Panel Contrast Option CRT only LFP only CRT+LFP 1.5 VGA 1x18 SVGA 1x18 XGA 1x18 XGA 1x24 XGA 2x18 SXGA 2x24 UXGA 2x18 Enter PAID Enter FPID Auto 0 – FFFF, default 0 Centered Stretched 0 – 255, default 128 0 – 63, default 32 Kontron User's Guide microETXexpress™-PM Description Select the display mode. Displays the revision of the JILI data area image. Select Auto to let the BIOS automatically detect the panel type or use one of the predefined fixed panel types. Choose Enter PAID or Enter FPID to manually set JILI3 ID values. Enter the JILI3 ID. Stretched expands a low resolution video mode to full screen on a higher flat panel resolution. Enter a value to adjust backlight of the LCD. Enter a value to adjust contrast of the LCD. 59 10 BIOS Operation Notes: *Only available if Flat Panel Type (Enter PAID) or (Enter FPID) are selected. **Only available if the DAC (MAX5362) is on the OEM backplane or the panel adapter. ***Only available if the digitally controlled potentiometer (Xicor X9429) is on the OEM backplane or the panel adapter. 10.4.9 Miscellaneous Submenu Feature Option Floppy Check Summary Screen QuickBoot Mode Extended Memory Testing Dark Boot Halt On Errors Disabled Enabled Disabled Enabled Disabled Enabled Normal Just zero it None Disabled Enabled Yes No Large Disk Access Mode DOS Other Additional Boot Delay Not allow Other 10.5 Description Enabled verifies floppy type on boot; disabled speeds boot. If enabled, a summary screen is displayed just before booting the OS to let the end user see the system configuration. Allows the system to skip certain tests while booting. This will decrease the time needed to boot the system. Determines which type of tests will be performed on memory above 1MB. The option Normal is not visible if QuickBoot is enabled. If enabled, system comes up with a blank screen instead of the diagnostic screen during bootup. Determines if post errors cause the system to halt. Select DOS if you have DOS. Select Other if you have another OS such as UNIX. A large disk is one that has more than 1024 cylinders, more than 16 heads or more than 63 sectors per track. Add 3sec Delay to Start of POST. This is useful for some Devices to be Autotyped by System Bios, especially some USB HDDs. Security Menu Feature Supervisor Password Is: User Password Is: Option Description Clear Set Clear Set Set Supervisor Password Up to seven alphanumeric characters Set User Password Up to seven alphanumeric characters *Diskette access User Supervisor Fixed disk boot sector Normal Write protected Virus check reminder System backup reminder Disabled Daily Kontron User's Guide microETXexpress™-PM If a password is choosen "Set" will appear in this field. If a password is choosen "Set" will appear in this field. Pressing <Enter> displays the dialog box for entering the user password. In related systems, this password gives full access to setup. Pressing <Enter> displays the dialog box for entering the user password. In related systems, this password gives restricted access to setup. Enabled requires supervisor password to access floppy disk. Write protect the boot sector on the hard disk for virus protection. Requires a password to format or Fdisk the hard disk. Displays a message during bootup asking (Y/N) if you backed up the system or scanned for viruses. 60 10 BIOS Operation Weekly Monthly **Password on boot Disabled Enabled **Password on bootmenu Disabled Enabled Notes: 10.6 Message returns on each boot until you respond with „Y“. Daily displays the message on the first boot of the day, Weekly on the first boot after Sunday, and Monthly on the first boot of the month. Enabled requires a password on boot. Requires prior setting of the supervisor password. If supervisor password is set and this option is disabled, BIOS assumes user is booting. Enables password entry on bootmenu. In the Option column, bold shows default settings. Enabling Supervisor Password requires a password for entering Setup. Passwords are not case sensitive. User and Supervisor passwords are related. *Appears when User/Supervisor password is choosen and Password on boot is enabled. **Available only when a User/Supervisor password is choosen. Power Menu A power management system reduces the amount of energy used after specified periods of inactivity. The setup menu supports: ® Full On state ® Standby state with partial power reduction ® Suspend state with full power reduction Use the Advanced Options menu to specify whether an activity can terminate a Standby or Suspend state and restore Full On. Feature Option *ACPI Control sub menu *Automatic Thermal Control Circuit Disabled TM1 TM2 **Max CPU frequency Resume on Modem Ring Resume on Time 1400 MHz 1300 MHz 1200 MHz 1100 MHz 1000 MHz 900 MHz 800 MHz 600 MHz Off On Off On Kontron User's Guide microETXexpress™-PM Description These items will control selective functionality when an ACPI OS is loaded. Enables the thermal control circuit (TCC) of the thermal monitor feature of the Pentium-M CPU. TM1 = 50% duty cycle TM2 = Geyserville III Automatic TTC must be enabled to ensure that the processor operates within specification. Warning! Selecting frequencies higher then the default may cause the system to reach “critical trip point” and shutdown if a proper cooling solution is not used. Always ensure that you use proper cooling when selecting higher frequency settings. Enabled wakes the system on incoming calls detected by modem (RI). Enabled wakes the system at a specific time. 61 10 BIOS Operation Resume Time Power Supply Power Button Function Power Loss Control Enable PME for WOL Notes: 00:00:00 ATX AT Power Off Sleep Stay Off Power On Last State OS control Enabled Disabled Specify the time when the system is to wake up. <Tab>, <Shift-Tab> or <Enter> selects field. Choose the connected power supply, ATX or AT. Determines if the system enters suspend or soft off when the power button is pressed. Determines how the system behaves after a power failure. This only works in conjunction with a CMOS backup battery. This item controls the activation of the PME line which can be used to wake the system via LAN. OS control: BIOS won´t interfere with the settings made in an ACPI OS. In the Option column, bold indicates default setting. * See Important Technology Information of this user’s guide for more details about ACPI. **The CPU frequency values shown in this example are taken from the microETXexpress™-PM 1.4GHz. Please note that other microETXexpress™-PM variants capable of CPU frequency switching may have different possible values listed as well as different defaults 10.6.1 ACPI Control sub menu Feature *Deepest sleep state for standby Passive Cooling Trip Point Option Description None S1 S3 Disabled 40 C – 100 C *S3 saves more power than S1 and choosing "None" will disable standby in the OS. Please be sure your board support the appropriate Sleep state when making this choice. Passive TC1 Value 1, 2, 3, …15, 16 Passive TC2 Value 1, 2, 3, 4, 5, …15, 16 Passive TSP Value 2, 4, 6, 8, 10, … 28, 30 Critical Trip Point 40 C – 110 C APIC – IO APIC Mode Disabled Enabled Native IDE Support Disabled Enabled Kontron User's Guide microETXexpress™-PM Determines the temperature of the ACPI Passive Trip Point, the point at which the OS will turn on/off CPU clock throttling. Determines the TC1 (temperature coefficient 1) value for the ACPI passive cooling formula. See section 8.6 Processor Clock Throttling. Determines the TC2 (temperature coefficient 2) value for the ACPI passive cooling formula. See section 8.6 Processor Clock Throttling. Determines the Tsp (sampling period) value for the ACPI passive cooling formula. See chapter 8.6 Processor Clock Throttling. This value controls the temperature of the ACPI Critical Trip Point- the point at which the OS will shut the system off. This item is valid only for Windows XP. Also, a fresh install of the OS must occur when APIC Mode is desired Test the IO APIC by setting an item to Enabled. The APIC Table will then be pointed to by the RSDT, the Local APIC will be initialized, and the proper enable bits will be set in IHC4M. See section 8.1ACPI The microETXexpress™ supports ACPI. Non ACPI (APM support) is not intended. I/O APIC vs 8259 PIC Interrupt mode Enable Native IDE support for WINXP by setting this item. The NATA Package will be created if this item is set to Enabled. Changing this item will have no effect in WIN98, WINME, or 62 10 BIOS Operation Disabled Enabled IGD - S3 Popup WIN2K. See section 8.3 Native vs. compatible IDE mode for more details. If the IGD is the primary display device and this option is set to enabled, a Popup Icon will be displayed for 5 seconds during ACPI S3 resume. ACPI Resume Events microETXexpress™-PM supports S1 state , S3 (S2R) and S4 (S2D). The following events resume the system from S1: ® Power button ® PME# ® USB keyboard and mouse activity ® USB resume event The following event resume the system from S3: Notes ® Power button ® LAN activities (tested wiht magic packet) In the Option column, bold indicates default setting. *Available when ACPI is switched off. Automatic TTC must be enabled to ensure that the processor operates within specificaion. ** The microETXexpress™-PM Celeron M default setting for this value is TM1 because the microETXexpress™PM Celeron M does not support TM2. Kontron User's Guide microETXexpress™-PM 63 10 BIOS Operation 10.7 Boot Menu 10.7.1 MultiBoot Multiboot allows you to select the following boot devices: ® Hard disk ® Floppy disk ® CD-ROM ® Network card You can make the selections from Setup, or by selecting the boot device in the BootFirst Menu. Note: The microETXexpress™-PM also supports booting from USB floppy and Mass Storage Device (MSD). MultiBoot consists of the 2 menus: ® Setup Boot Menu ® Boot First Menu 10.7.2 The Setup Boot Menu This menu allows selecting the order of the devices from which the BIOS attempts to boot the OS. During POST, if BIOS is unsuccessful at booting from one device, it will try the next one on the list. The Boot Menu shows two lists, the boot priority list and the exclude from boot order list. The sample below shows the default configuration. Item Specific Help Boot Priority order: 1. IDE0: <primary master device> 2. IDE1: <primary slave device> 3. IDE CD: <IDE CD-ROM> 4. PCI SCSI: <PCI SCSI device>* 5. USB Key: <USB stick> 6. USB CDROM: <USB CD-ROM device> 7. 8. Keys used to view or configure devices: Up and Down arrows select a device. <+> and <-> moves the device up or down. <f> and <r> specifies the device fixed or removable. <x> exclude or include the device to boot. <Shift + 1> enables or disables a device. <1 – 4> Loads default boot sequence. Exclude from boot order: USB FDC: <USB Floppy drive> USB HDD: <USB Hard Drive device> USB ZIP: <USB ZIP drive> USB LS-120: <USB CDROM device> PCI BEV: <PCI LAN device> Bootable Add-in Cards Notes: The BIOS only tries to boot from the devices (max 8) in the Boot Priority Order list. *SATA devices. Kontron User's Guide microETXexpress™-PM 64 10 BIOS Operation 10.7.3 Boot First Menu Display the Boot First Menu by pressing <Esc> during POST. In response, the BIOS displays the message Entering Boot Menu and then displays the Boot Menu at the end of POST. Use the menu to select one of the following options: 10.8 ® Override the existing boot sequence (for this boot only) by selecting another boot device. If the specified device does not load the OS, the BIOS reverts to the previous boot sequence. ® Enter Setup. ® Press <Esc> to continue with the existing boot sequence. Exit Menu The following sections describe the five options in Exit Menu. Pressing <Esc> does not exit this menu. You must select an item from the menu to exit. Exit Saving Changes Saves all selections and exits setup. Upon reboot, the BIOS configures the system according to the Setup selection stored in CMOS. Exit Discarding Changes Use this option to exit Setup without storing new selections in CMOS. Previous selections remain in effect. Load Setup Defaults Select to display the default values for all Setup menus. Discard Changes Discards changes made during a Setup session and revert to values previously saved in CMOS. Save Changes Saves all selections without exiting Setup. Kontron User's Guide microETXexpress™-PM 65 10 BIOS Operation 10.9 Updating or Restoring BIOS Phoenix Phlash16 allows you to update or restore the BIOS with a newer version or restore a corrupt BIOS by using a floppy disk without having to install a new ROM chip. ® Get the Phoenix Phlash16 compressed file, CRDxMODB.ZIP, from the Kontron Embedded Modules GmbH. It contains the following files: File Purpose MAKEBOOT.EXE CRISBOOT.BIN MINIDOS.SYS PHLASH16.EXE WINCRISIS.EXE WINCRISIS.HLP BIOS.WHP Creates the custom boot sector on the Crisis Recovery Diskette. Serves as the Crisis Recovery boot sector code. Allows the system to boot in Crisis Recovery Mode. Programs the Flash ROM. Creates the Crisis Recovery Diskette from Windows. Serves as the help file of WINCRISES.EXE. Serves as the actual BIOS image to be programmed into Flash ROM. Note: ® BIOS.WPH is a file that contains the 1MB BIOS binary and flash interface code required by Phlash16.EXE. ® To install Phoenix Phlash16 on a hard disk, unzip the content of CRDxMODB.ZIP into a local directory such as C:\PHLASH. Crisis Recovery requires an USB floppy drive. ® To create a Crisis Recovery Diskette, insert a blank diskette into Drive A: or B: and execute WINCRISIS.EXE. This copies three files onto the Crisis Recovery Diskette. File Purpose MINIDOS.SYS PHLASH16.EXE BIOS.WPH Allows the system to boot in Crisis Recovery Mode. Programs the Flash ROM. Serves as the BIOS image to be programmed into Flash ROM. ® If the BIOS image (BIOS.WPH) changes because of an update or bug fix, copy the new BIOS.WPH image onto the diskette. ® Phoenix Phlash16 runs in one of two modes: Command Line or Crisis Recovery. Use the Command Line mode to update or replace a BIOS. To execute Phlash16 in this mode, move to the Crisis Recovery Disk and type PHLASH16. Phoenix Phlash16 will update the BIOS. Phlash16 can fail if the system uses memory managers. If this occurs, the utility displays the following message: Cannot flash when memory managers are present. ® If you see this message after you execute Phlash16, disable the memory manager or use parameter /x for Phlash16.exe. Kontron User's Guide microETXexpress™-PM 66 10 BIOS Operation 10.10 Preventing Problems When Updating or Restoring BIOS Updating the BIOS represents a potential hazard. Power failures or fluctuations that may occur during updating the Flash ROM can damage the BIOS code, making the system unbootable. To prevent this potential hazard, many systems come with a boot-block Flash ROM. The boot-block region contains a fail-safe recovery routine. If the boot-block code finds a corrupted BIOS (checksum fails), it boots into the crisis recovery mode and loads a BIOS image from a crisis diskette (see above). Kontron User's Guide microETXexpress™-PM 67 11 Appendix A: JIDA Standard 11 Appendix A: JIDA Standard Every board with an on-board BIOS extension supports the following function calls, which supply information about the board. Jumptec Intelligent Device Architecture (JIDA) functions are called via Interrupt 15h. Functions include: ® AH=Eah ® AL=function number ® DX=4648h (security word) ® CL=board number (starting with 1) The interrupt returns a CL≠0 if a board with the number specified in CL does not exist. CL will equal 0 if the board number exists. In this case, the content of DX determines if the operation was successful. DX=6B6Fh indicates success; other values indicate an error. 11.1 JIDA Information To obtain information about boards that follow the JIDA standard, use the following procedure. Note: ® Call Get BIOS ID with CL=1. The name of the first device installed will be returned. If you see the result Board exists (CL=0), increment CL, and call Get BIOS ID again. ® Repeat until you see Board not present (CL≠0). You now know the names of all boards within your system that follow the JIDA standard. ® You can find out more information about a specific board by calling the appropriate inquiry function with the board’s number in CL. Association between board and board number may change because of configuration changes. Do not rely on any association between board and board number. Always use the procedure described above to determine the association between board and board number. Refer to the JIDA manual in the jidai1xx.zip folder, which is available from the Kontron Embedded Modules GmbH Web site, for further information on implementing and using JIDA calls with C sample code. Kontron User's Guide microETXexpress™-PM 68 12 Appendix B: Supported operating systems 12 Appendix B: Supported operating systems The microETXexpress™-PM only works in ACPI Mode and therefore should support all Oparation Systems with ACPI capabilities. Kontron User's Guide microETXexpress™-PM 69 13 Appendix C: PC Architecture Information 13 Appendix C: PC Architecture Information The following sources of information can help you better understand PC architecture. 13.1 Buses 13.1.1 ISA, Standard PS/2 – Connectors ® AT Bus Design: Eight and Sixteen-Bit ISA, E-ISA and EISA Design, Edward Solari, Annabooks, 1990, ISBN 0-929392-08-6 ® AT IBM Technical Reference Vol 1&2, 1985 ® ISA & EISA Theory and Operation, Edward Solari, Annabooks, 1992, ISBN 0929392159 ® ISA Bus Specifications and Application Notes, Jan. 30, 1990, Intel ® ISA System Architecture, Third Edition, Tom Shanley and Don Anderson, AddisonWesley Publishing Company, 1995, ISBN 0-201-40996-8 ® Personal Computer Bus Standard P996, Draft D2.00, Jan. 18, 1990, IEEE Inc ® Technical Reference Guide, Extended Industry Standard Architecture Expansion Bus, Compaq 1989 13.1.2 PCI/104 13.2 ® Embedded PC 104 Consortium ® The consortium provides information about PC/104 and PC/104-Plus technology. You can search for information about the consortium on the Web. ® PCI SIG ® The PCI-SIG provides a forum for its ~900 member companies, who develop PCI products based on the specifications that are created by the PCI-SIG. You can search for information about the SIG on the Web. ® PCI & PCI-X Hardware and Software Architecture & Design, Fifth Edition, Edward Solari and George Willse, Annabooks, 2001, ISBN 0-929392-63-9. ® PCI System Architecture, Tom Shanley and Don Anderson, Addison-Wesley, 2000, ISBN 0-201-30974-2. General PC Architecture ® Embedded PCs, Markt&Technik GmbH, ISBN 3-8272-5314-4 (German) ® Hardware Bible, Winn L. Rosch, SAMS, 1997, 0-672-30954-8 ® Interfacing to the IBM Personal Computer, Second Edition, Lewis C. Eggebrecht, SAMS, 1990, ISBN 0-672-22722-3 ® The Indispensable PC Hardware Book, Hans-Peter Messmer, Addison-Wesley, 1994, ISBN 0-201-62424-9 Kontron User's Guide microETXexpress™-PM 70 13 Appendix C: PC Architecture Information ® 13.3 The PC Handbook: For Engineers, Programmers, and Other Serious PC Users, Sixth Edition, John P. Choisser and John O. Foster, Annabooks, 1997, ISBN 0-929392-36-1 Ports 13.3.1 RS-232 Serial ® EIA232E standard ® The EIA-232-E standard specifies the interface between (for example) a modem and a computer so that they can exchange data. The computer can then send data to the modem, which then sends the data over a telephone line. The data that the modem receives from the telephone line can then be sent to the computer. You can search for information about the standard on the Web. ® RS-232 Made Easy: Connecting Computers, Printers, Terminals, and Modems, Martin D. Seyer, Prentice Hall, 1991, ISBN 0-13-749854-3 ® National Semiconductor The Interface Data Book includes application notes. Type “232” as search criteria to obtain a list of application notes. You can search for information about the data book on National Semiconductor’s Web site. 13.3.2 Serial ATA ® Serial AT Attachment (ATA) Working Group. This X3T10 standard defines an integrated bus interface between disk drives and host processors. It provides a common point of attachment for systems manufacturers and the system. You can search for information about the working group on the Web. We recommend you also search the Web for information on 4.2 I/O cable, if you use hard disks in a DMA3 or PIO4 mode. 13.3.3 USB 13.4 ® USB Specification. ® USB Implementers Forum, Inc. is a non-profit corporation founded by the group of companies that developed the Universal Serial Bus specification. The USB-IF was formed to provide a support organization and forum for the advancement and adoption of Universal Serial Bus technology. You can search for information about the standard on the Web. Programming ® C Programmer’s Guide to Serial Communications, Second Edition, Joe Campbell, SAMS, 1987, ISBN 0-672-22584-0 ® Programmer’s Guide to the EGA, VGA, and Super VGA Cards, Third Edition, Richard Ferraro, Addison-Wesley, 1990, ISBN 0-201-57025-4 Kontron User's Guide microETXexpress™-PM 71 13 Appendix C: PC Architecture Information ® The Programmer’s PC Sourcebook, Second Edition, Thom Hogan, Microsoft Press, 1991, ISBN 1-55615-321-X ® Undocumented PC, A Programmer’s Guide to I/O, CPUs, and Fixed Memory Areas, Frank van Gilluwe, Second Edition, Addison-Wesley, 1997, ISBN 0-201-47950-8 Kontron User's Guide microETXexpress™-PM 72 14 Appendix D: Limitations and Restrictions 14 Appendix D: Limitations and Restrictions ® Working with a VGA PCI Card require Graphic engine 1 to be disabled ® Maximum operating temperature 0 to + 50 °C due to SATA controller Kontron User's Guide microETXexpress™-PM 73 15 Appendix C: Document-Revision History 15 Appendix C: Document-Revision History Rev. Date Author Changes 1.0 16.05.07 10.08.07 GUL PRO GUL 17.01.08 GUL Initial Release Updated HS Picture Changed Pin A35 from IO to O, B13 from O to IO, B35 from O to I, B66 from IO to I Changed BIOS section Changed WDT B27 signal from Input to Output Added chipset 852 GM; Added MTBF; Updated Block Diagram 1.1 Kontron User's Guide microETXexpress™-PM 74