1
DOMAIN System User’s Guide
Order No. 005488
Revision 02
Apollo Computer Inc.
330 Billerica Road
Chelmsford, MA 01824
Copyright © 1987 Apollo Computer Inc.
All rights reserved. Printed in U.S.A.
First Printing: July, 1985
Latest Printing:
January, 1987
This document was produced using the Interleaf Workstation Publishing Software
(WPS). Interleaf and WPS are trademarks of Interleaf, Inc.
APOLLO and DOMAIN are registered trademarks of Apollo Computer Inc.
AEGIS, DGR, DOMAIN/BRIDGE, DOMAIN/DFL-100, DOMAIN/DQC-100, DOMAIN/
Dialogue, DOMAIN/IX, DOMAIN/Laser-26, DOMAIN/PCI, DOMAIN/SNA, D3M,
DPSS, OSEE, GMR, and GPR are trademarks of Apollo Computer Inc.
Apollo Computer Inc. reserves the right to make changes In specifications and
other Information contained In this publication without prior notice, and the reader
should In all cases consult Apollo Computer Inc. to determine whether any such
changes have been made.
THE TERMS AND CONDITIONS GOVERNING THE SALE OF APOLLO COMPUTER
INC. HARDWARE PRODUCTS AND THE LICENSING OF APOLLO COMPUTER
INC. SOFTWARE CONSIST SOLELY OF THOSE SET FORTH IN THE WRITTEN
CONTRACTS BETWEEN APOLLO COMPUTER INC. AND ITS CUSTOMERS. NO
REPRESENTATION OR OTHER AFFIRMATION OF FACT CONTAINED IN THIS
PUBLICATION, INCLUDING BUT NOT LIMITED TO STATEMENTS REGARDING
CAPACITY , RESPONSE-TIME PERFORMANCE, SUITABILITY FOR USE OR
PERFORMANCE OF PRODUCTS DESCRIBED HEREIN SHALL BE DEEMED TO BE
A WARRANTY BY APOLLO COMPUTER INC. FOR ANY PURPOSE, OR GIVE RISE
TO ANY LIABILITY BY APOLLO COMPUTER INC. WHATSOEVER.
IN NO EVENT SHALL APOLLO COMPUTER INC. BE LIABLE FOR ANY INCIDENTAL,
INDIRECT, SPECIAL OR CONSEQUENTIAL DAMAGES WHATSOEVER (INCLUDING
BUT NOT LIMITED TO LOST PROFITS) ARISING OUT OF OR RELATING TO THIS
PUBLICATION OR THE INFORMATION CONTAINED IN IT, EVEN IF APOLLO
COMPUTER INC. HAS BEEN ADVISED, KNEW OR SHOULD HAVE KNOWN OF
THE POSSIBILITY OF SUCH DAMAGES.
THE SOFTWARE PROGRAMS DESCRIBED IN THIS DOCUMENT ARE CONFIDENTIAL INFORMATION AND PROPRIETARY PRODUCTS OF APOLLO COMPUTER INC. OR ITS LICENSORS.
PREFACE
The DOMAIN ® System User’s Guide is the second volume in the twovolume introduction to the DOMAIN ® (Distributed On-line MultiAccess Interactive Network) Computing System. The first volume,
Getting Started With Your DOMAIN System, introduces you to
the basic concepts you’ll need to use the DOMAIN system on your
node. The DOMAIN System User’s Guide follows with more detailed
information about the system and describes how to use the system to
perform various computing tasks.
The Organization of this Manual
We’ve divided this manual into three separate parts, each part describing
a set of related topics. Part I describes the DOMAIN system. Part
II and Part III describe how to perform various tasks using system
commands and utilities. We’ve separated each part with a tabbed
divider for easy access.
Part I -- The DOMAIN System
Chapter 1
Provides an overview of the DOMAIN system
and its distributed operating environment. It
describes how the system organizes objects
in the system naming tree, and how to use
pathnames to identify these objects.
Chapter 2
Describes how the system functions at startup
and log-in, and describes how to create, modify,
and organize the various scripts that set up your
node’s particular operating environment. The
chapter also describes procedures for changing
your password and log-in home directory when
you log in.
iii
Preface
Part II -- The Display Environment
Chapter 3
Explains the functions of the Display Manager
(DM), describes how to use DM commands,
and shows how to define keys to perform DM
functions.
Chapter 4
Describes how to use the DM to control your
node’s display. Each section describes a set of
related display management tasks and the DM
commands you use to perform them.
Chapter 5
Describes how to use the DM to control the
characteristics of edit pads and how to edit
text. Each section in this chapter describes a
set of editing tasks and the DM commands you
use to perform them.
Part III -- The Command Shell
Chapter 6
Describes the command Shell environment
that processes Shell commands. The chapter
includes information on: Shell commands,
controlling command input and output, the
command line parser, and using pathname
wildcards.
Chapter 7
Describes how to use Shell commands to
manage files, directories, and links on the
system.
Chapter 8
Describes Access Control Lists (ACLs) and
how to use them to control access to files and
directories.
Chapter 9
Describes how to write Shell scripts using
Shell commands, operators, and expressions.
Preface
iv
Documentation Conventions
Unless otherwise noted in the text, this manual uses the following
symbolic conventions.
UPPERCASE
Bold, uppercase words or characters in
formats and command descriptions represent
commands or keywords that you must use
literally.
lowercase
Bold, lowercase words or characters in formats
and command descriptions represent values
that you must supply.
example
Color words in command examples represent
literal user keyboard input.
output
System output in command examples appears
in this font.
Bolded term or key
When new terms or keys are introduced, they
appear in boldface.
[
]
Square brackets enclose optional items in
formats and command descriptions. In sample
Pascal statements, square brackets assume
their Pascal meanings.
{
}
Braces enclose a list from which you must
choose an item in formats and command
descriptions. In sample Pascal statements,
braces assume their Pascal meanings.
A vertical bar separates items in a list of
choices.
|
<
>
Angle brackets enclose the name of a key on
the keyboard.
v
Preface
CTRL/
The notation CTRL/ followed by the name of
a key indicates a control character sequence.
You should hold down <CTRL> while typing
the character.
. . .
Horizontal ellipsis points indicate that the
preceding item can be repeated one or more
times.
.
.
.
Vertical ellipsis points mean that irrelevant
parts of a figure or example have been
omitted.
Related Manuals
If you are using the DOMAIN system for the first time, you should read
Getting Started With Your DOMAIN System (order number 002348)
first. Getting Started With Your DOMAIN System teaches you the
basics of using the DOMAIN system.
The DOMAIN System Command Reference (order number 002547)
contains detailed descriptions of all DOMAIN system commands. The
command descriptions are arranged alphabetically for quick and easy
access.
For information on how to create the network environment, protect
the network software, create servers, and maintain and troubleshoot
the network, see Administering Your DOMAIN System (Order number
001746).
Problems, Questions, and Suggestions
We appreciate comments from the people who use our system. In order
to make it easy for you to communicate with us, we provide the User
Change Request (UCR) system for software-related comments, and the
Reader’s Response form for documentation comments. By using these
formal channels you make it easy for us to respond to your comments.
You can get more information about how to submit a UCR by consulting the DOMAIN System Command Reference. Refer to the
Preface
vi
CRUCR (Create User Change Request) Shell command description.
You can view the same description on-line by typing:
$ HELP CRUCR <RETURN>
For your documentation comments, we’ve included a Reader’s Response
form at the back of each manual.
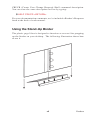
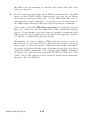
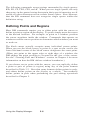
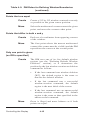
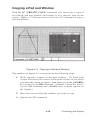
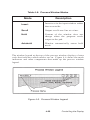
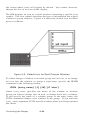
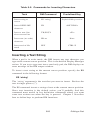
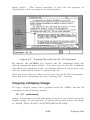
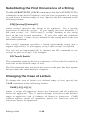
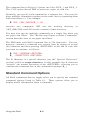
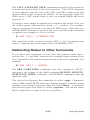
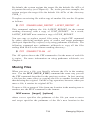
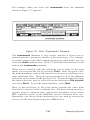
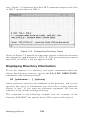
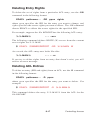
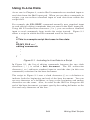
Using the Stand-Up Binder
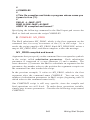
The plastic page lifter is designed to function as an easel for propping
up the binder on your desktop. The following illustration shows how
to use it.
vii
Preface
CONTENTS
Chapter 1
The DOMAIN System
Overview ................................................................................... 1-2
The Naming Tree ...................................................................... 1-4
Using Pathnames ......................................................................
The Working Directory .....................................................
The Naming Directory ......................................................
The Parent Directory .........................................................
Pathname Summary ...........................................................
Chapter 2
1-6
1-9
1-11
1-12
1-13
Start-Up and Log-In
Understanding the System at Start-Up .................................... 2-2
Disked Node Start-Up ....................................................... 2-2
Diskless Node Start-Up ..................................................... 2-8
Understanding the System at Log-In ....................................... 2-13
Logging In ................................................................................
Logging In as User ............................................................
Changing Your Password ..................................................
Changing Your Home Directory .......................................
Logging Into a DOMAIN Server Processor (DSP) ..........
Chapter 3
2-20
2-20
2-20
2-21
2-22
Using The Display Manager
Using DM Commands .............................................................. 3-2
DM Command Conventions .............................................. 3-4
Defining Points and Regions ............................................ 3-6
Using Keys to Perform DM Functions ....................................
Keyboard Types and Key Definitions ...............................
Key Naming Conventions ..................................................
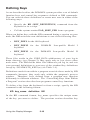
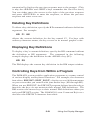
Defining Keys ....................................................................
Deleting Key Definitions ..................................................
Displaying Key Definitions ..............................................
Contents
viii
3-10
3-12
3-15
3-18
3-21
3-21
Controlling Keys from Within a Program ........................ 3-21
Using DM Command Scripts ................................................... 3-22
Chapter 4
Controlling the Display
Controlling Cursor Movement ................................................. 4-2
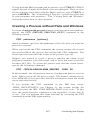
Creating Processes ...................................................................
Creating a Process with Pads and Windows ....................
Creating a Process without Pads and Windows ...............
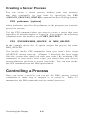
Creating a Server Process .................................................
4-4
4-5
4-7
4-8
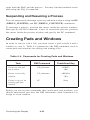
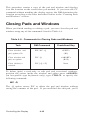
Creating Pads and Windows ....................................................
Creating an Edit Pad and Window ...................................
Creating a Read-Only Pad and Window ...........................
Copying a Pad and Window ..............................................
4-10
4-13
4-14
4-15
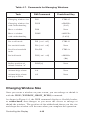
Managing Windows .................................................................
Changing Window Size .....................................................
Moving a Window .............................................................
Pushing and Popping Windows ........................................
Changing Process Window Modes ...................................
Defining Default Window Positions .................................
Responding to DM Alarms ...............................................
4-17
4-18
4-20
4-21
4-22
4-25
4-26
Controlling a Process .............................................................. 4-8
Stopping a Program or Process ........................................ 4-9
Suspending and Resuming a Process ............................... 4-10
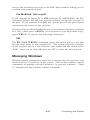
Closing Pads and Windows .....................................................
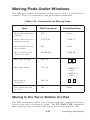
Moving Pads Under Windows .................................................
Moving to the Top or Bottom of a Pad .............................
Scrolling a Pad Vertically .................................................
Scrolling a Pad Horizontally ............................................
Saving a Transcript Pad in a File .....................................
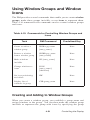
Using Window Groups and Window Icons .......................
Creating and Adding to Window Groups .........................
Removing Entries from Window Groups .........................
Making Windows Invisible ...............................................
Using Icons ........................................................................
Setting Icon Default Position and Offset .........................
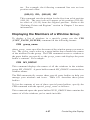
Displaying the Members of a Window Group ..................
ix
4-16
4-27
4-27
4-28
4-30
4-30
4-31
4-31
4-32
4-33
4-33
4-36
4-37
Contents
Chapter 5
Editing a Pad
Setting Edit Pad Modes ........................................................... 5-2
Setting Read/Write Mode .................................................. 5-3
Setting Insert/Overstrike Mode ........................................ 5-4
Inserting Characters .................................................................
Inserting a Text String ......................................................
Inserting a NEWLINE Character .....................................
Inserting a New Line .........................................................
Inserting an End-of-File Mark ..........................................
5-4
5-5
5-5
5-6
5-6
Deleting Text ............................................................................
Deleting Characters ...........................................................
Deleting Words ..................................................................
Deleting Lines ...................................................................
5-6
5-7
5-7
5-8
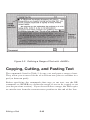
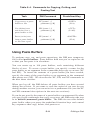
Copying, Cutting, and Pasting Text ........................................
Using Paste Buffers............................................................
Copying Text ......................................................................
Copying a Display Image ..................................................
Cutting Text .......................................................................
Pasting Text .......................................................................
5-10
5 -11
5-12
5-13
5-14
5-15
Searching for Text ....................................................................
Repeating a Search Operation ..........................................
Cancelling a Search Operation .........................................
Setting Case Comparison ..................................................
5-23
5-25
5-25
5-25
Undoing Previous Commands .................................................
5-29
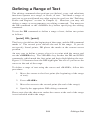
Defining a Range of Text ......................................................... 5-9
Using Regular Expressions ...................................................... 5-16
Substituting Text ......................................................................
Substituting All Occurrences of a String .........................
Substituting the First Occurrence of a String ..................
Changing the Case of Letters ...........................................
5-26
5-27
5-28
5-28
Updating an Edit File ............................................................... 5-29
Chapter 6
Using the Shell
Shell Commands ....................................................................... 6-2
Command Line Format .....................................................
6-3
Standard Command Options ............................................. 6-4
Contents
x
Command Search Rules .................................................... 6-5
Special Characters ............................................................. 6-7
Creating and Invoking Shells .................................................. 6-7
Setting Up the Initial Shell Environment ........................ 6-8
Controlling Input and Output ..................................................
Reading Input from a File .................................................
Writing Output to a File ....................................................
Appending Output to a File ..............................................
Redirecting Output to Other Commands .........................
The Command Line Parser ......................................................
Using Query Options .........................................................
Reading Data from Standard Input ...................................
Reading Pathnames from Standard Input ........................
Using Pathname Wildcards ...............................................
Running Programs in a Background Process ...................
Chapter 7
6-9
6-11
6-12
6-12
6-13
6-14
6-15
6-16
6-17
6-18
6-22
Managing Files, Directories, and Links
Moving Around the Naming Tree ........................................... 7-2
Setting the Working Directory ......................................... 7-3
Setting the Naming Directory .......................................... 7-3
Managing Files .........................................................................
Creating Files ....................................................................
Renaming Files ..................................................................
Copying Files .....................................................................
Moving Files ......................................................................
Appending Files ................................................................
Printing Files .....................................................................
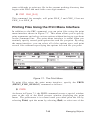
Printing Files Using the Print Menu Interface ................
Displaying File Attributes ................................................
Deleting Files ....................................................................
Copying the Display to a File ...........................................
Comparing ASCII Files ....................................................
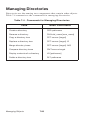
Managing Directories ..............................................................
Creating Directories ..........................................................
Renaming Directories .......................................................
Copying Directory Trees ...................................................
Replacing Directory Trees ................................................
Merging Directory Trees ..................................................
Comparing Directory Trees ..............................................
xi
7-5
7-5
7-7
7-8
7-9
7-10
7-11
7-13
7-16
7-18
7-18
7-19
7-20
7-21
7-21
7-22
7-25
7-26
7-27
Contents
Displaying Directory Information .................................... 7-28
Deleting Directory Trees .................................................. 7-30
Managing Links .......................................................................
Creating Links ...................................................................
Displaying Link Resolution Names ..................................
Redefining Links ...............................................................
Renaming Links ................................................................
Copying Links ...................................................................
Deleting Links ...................................................................
Chapter 8
7-31
7-32
7-33
7-33
7-34
7-35
7-36
Controlling Access to Files and Directories
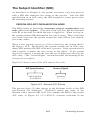
ACL Structure ..........................................................................
The Subject Identifier (SID) .............................................
Access Rights ....................................................................
Understanding SEARCH and EXPUNGE Rights ............
Managing ACLs .................................................................
8-2
8-3
8-4
8-7
8-7
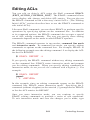
Editing ACLs ............................................................................
Rules to Specify ACL Entries ...........................................
Adding ACL Entries ..........................................................
Changing Entry Rights ......................................................
Adding Entry Rights .........................................................
Deleting Entry Rights .......................................................
Deleting ACL Entries ........................................................
8-9
8-11
8-15
8-15
8-16
8-17
8-17
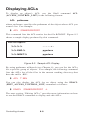
Displaying ACLs ...................................................................... 8-8
Copying ACLs .......................................................................... 8-18
Initial ACLs .............................................................................. 8-18
Editing Initial ACLs .......................................................... 8-20
Copying Initial ACLs ........................................................ 8-21
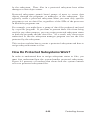
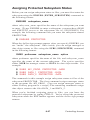
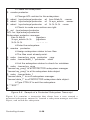
Protected Subsystems ...............................................................
How Do Protected Subsystems Work? ..............................
Creating a Protected Subsystem .......................................
Assigning Protected Subsystem Status .............................
Contents
xii
8-22
8-23
8-26
8-27
Chapter 9
Writing Shell Scripts
Creating Your Own Commands ...............................................
Creating Scripts .................................................................
Passing Arguments to Scripts ...........................................
Using Quoted Strings ........................................................
Using In-Line Data ............................................................
Executing DM Commands from Shell Scripts .................
Debugging Shell Scripts ...................................................
9-2
9-2
9-4
9-8
9-9
9-10
9-10
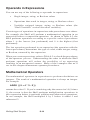
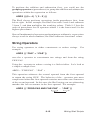
Using Expressions ....................................................................
Operands in Expressions ...................................................
Mathematical Operators ....................................................
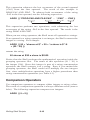
String Operators ................................................................
Comparison Operators ......................................................
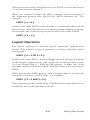
Logical Operators ..............................................................
9-12
9-14
9-14
9-15
9-16
9-17
Controlling Script Execution ...................................................
Using the IF Statement ......................................................
Using the WHILE Statement ............................................
Using the FOR Statement ..................................................
Using the SELECT Statement ...........................................
9-25
9-28
9-29
9-31
9-34
Shell Variables .........................................................................
Defining Variables ............................................................
Using Shell Variables ........................................................
Variable Commands ..........................................................
Defining Variables Interactively ......................................
Using Active Functions .....................................................
Appendix A
Initial Directory and File Structure
Appendix B
Summary of Predefined Key Definitions
9-18
9-18
9-19
9-21
9-22
9-24
Index
xiii
Contents
Illustrations
Figure
1-1
1-2
Page
A Simple DOMAIN Network .................................. 1-2
A Sample Naming Tree ........................................... 1-4
1-3
A Sample Path Through the Naming Tree ............. 1-7
1-5
A Sample Path Beginning at the Current
Working Directory ..................................................
1-4
1-6
1-7
2-1
2-2
A Sample Path Beginning at the Node Entry
Directory .................................................................. 1-8
1-10
A Sample Path Beginning at the Current
Naming Directory .................................................... 1-12
A Sample Path Beginning at the Parent
Directory .................................................................. 1-13
The Start-Up Sequence for Disked Nodes .............. 2-3
A Sample Boot Script (STARTUP.19L) .................. 2-6
2-3
The Start-Up Sequence for a Diskless Node .......... 2-9
2-5
The Log-In Sequence ..............................................
2-4
2-6
2-7
3-1
3-2
3-3
The Boot Script Search Sequence ..........................
2-13
2-14
A Sample Log-In Start-Up Script
(STARTUP_LOGIN.19L) ........................................ 2-17
A Sample DM Start-Up Script
(STARTUP_DM.19L) .............................................. 2-19
Invoking a DM Command Interactively ................. 3-3
Defining a Display Region ...................................... 3-9
Key Names for the Low-Profile Type
Keyboards ................................................................ 3-13
4-1
A Process Running the Shell .................................. 4-6
4-3
Copying a Pad and Window .................................... 4-15
4-2
4-4
4-5
Contents
Creating an Edit Pad and Window .......................... 4-13
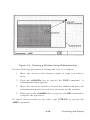
Growing a Window Using Rubberbanding ............. 4-19
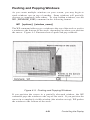
Pushing and Popping Windows ............................... 4-21
xiv
4-6
Process Window Legend ............................................
4-23
4-7
Location of Pad Scroll Keys ......................................
5-1
The Edit Pad Window Legend .................................... 5-3
4-8
5-2
5-3
6-1
6-2
6-3
4-29
Default Icon for Shell Process Windows ................... 4-34
Defining a Range of Text with <MARK> ................. 5-10
Copying Text with the XC -R Command ................... 5-13
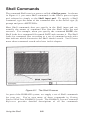
The Shell Process .......................................................
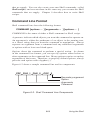
6-2
Shell Command Line Components ............................. 6-3
Sample Shell Start-Up Script ..................................... 6-9
7 -1
The Print Menu ........................................................... 7-13
7-3
Sample Display Showing File Attributes ................... 7-17
7-2
7-4
7-5
7-6
7-7
Print “Commands” Submenu ...................................... 7-15
Comparing Two ASCII Files ...................................... 7-19
Sample Directory Tree ............................................... 7-23
Copying a Directory Tree ........................................... 7-24
Replacing a Directory Tree ........................................ 7-25
7-8
Comparing Directory Trees .......................................
7-10
Deleting a Directory Tree .......................................... 7-30
8-1
Structure of an ACL Entry ......................................... 8-2
8-3
Sample ACL Display .................................................. 8-8
7-9
7-11
8-2
7-28
Sample Directory Display .......................................... 7-29
Sample Display of Link Resolution Names ............... 7-33
Sample ACL Entries ................................................... 8-3
8-4
Initial ACLs for Files and Directories ....................... 8-19
8-6
Sample of a Protected Subsystem Transcript ............ 8-28
8-5
Controlling Access to Protected Subsystem Files .... 8-24
9-1
Including In-Line Data in a Script ............................. 9-9
9-3
Flow of Execution in a Simple Script ........................ 9-26
9-2
A Sample Script Using the READ Command ........... 9-23
9-4
Flow of Execution with a Conditional Statement .....
A-2
The System Software Directory ................................. A-3
A-1
9-27
The Node Entry Directory (/) and Subdirectories .... A-2
xv
Contents
A-3
A-4
B-1
Contents
The Display Manager Directory (/SYS/DM) ................ A-4
The Network Management Directory (/SYS/NET) ...... A-5
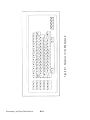
Keynames for the 880 Keyboard ................................... B-2
xvi
Tables
Table
1-1
2-1
2-2
3-1
Page
Pathname Symbols ..................................................... 1-9
Node Boot Script Files .............................................. 2-5
Node Log-In Start-Up Script Files ............................ 2-16
Rules for Using DM Special Characters ................... 3-5
3-2
Formats for Specifying Points on the Display .........
3-4
Key Definition File Names ........................................ 3-14
3-3
3-5
4-1
3-7
Default Mouse Key Functions ................................... 3-11
Key Naming Conventions .......................................... 3-16
Cursor Control Commands ........................................ 4-2
4-2
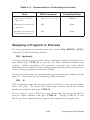
Commands for Creating Processes ........................... 4-5
4-4
Commands for Creating Pads and Windows ............
4-3
Commands for Controlling a Process ....................... 4-9
4-10
4-5
DM Rules for Defining Window Boundaries ........... 4-11
4-7
Commands for Managing Windows .......................... 4-18
4-6
Commands for Closing Pads and Windows .............. 4-16
4-8
Process Window Modes ............................................. 4-23
4-10
Commands for Controlling Window Groups and
Icons ........................................................................... 4-31
4-9
4-11
5-1
Commands for Moving Pads ..................................... 4-27
Window Paste Buffers ............................................... 4-38
Commands for Setting Edit Modes ........................... 5-2
5-2
Commands for Inserting Characters ......................... 5-5
5-4
Commands for Copying, Cutting, and Pasting
Text ............................................................................. 5-11
5-3
5-5
Commands for Deleting Text ....................................
5-7
Characters Used in Regular Expressions .................. 5-17
5-6
Commands for Searching for Text ............................ 5-23
6-1
Standard Shell Command Options ............................ 6-5
5-7
Commands for Substituting Text ............................... 5-26
xvii
Contents
6-2
6-3
I/O Control Characters ................................................ 6-11
Command Line Parser Options ................................... 6-15
6-4
Command Query Responses ........................................ 6-16
7-1
Commands for Setting the Working and Naming
Directory ...................................................................... 7-2
6-5
7-2
7-3
7-4
7-5
Summary of Pathname Wildcards ............................... 6-19
Commands for Managing Files ................................... 7-5
Print “Commands” Submenu Items ............................
7-16
Commands for Managing Directories ......................... 7-20
Commands for Managing Links .................................. 7-31
8-1
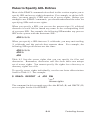
Access Rights for Files and Directories ..................... 8-6
8-3
Valid Rights for Files and Directories ........................ 8-12
8-5
Summary of Commands for Editing and Copying
Initial ACLs .................................................................
8-2
8-4
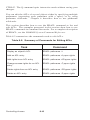
Summary of Commands for Editing ACLs ................. 8-10
Class Names for Commonly Assigned Rights ............ 8-14
8-20
8-6
Options for Copying Initial ACLs ..............................
9-2
Script Verification Options ......................................... 9-11
9-4
Rules for Assigning Variable Types ............................ 9-19
9-1
9-3
9-5
8-22
Shell Parsing Operators ............................................... 9-3
Summary of Expression Operators ............................. 9-13
Variable Commands ..................................................... 9-21
Contents
xviii
CHAPTER
1
The DOMAIN System
The DOMAIN system is a high-speed communications network
connecting two or more of our computers, called nodes. Each node
loads programs into its own memory, and uses the computing functions
of its own central processing unit (CPU). Because the DOMAIN
system enables nodes to share information, you can log into any node
and access information stored anywhere in the network.
Many of the operations you’ll perform on the system involve the use
of objects (files, directories, and links) that store information such as
programs, data, or text. Before you can work with these objects, you
must understand how the system organizes and identifies them.
This chapter describes the DOMAIN system, how it organizes objects
in the system naming tree, and how to use pathnames to identify these
objects.
1-1
The DOMAIN System
Overview
The DOMAIN system uses a physical network, in which member nodes
can load data from the network into memory just as they would load
data from their own disk.
The DOMAIN System Site Planning and Preparation Guide describes
the DOMAIN network in much more detail. For our purposes, we’re
interested in the network to see how nodes use the system to share
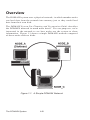
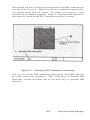
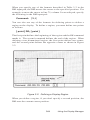
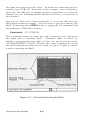
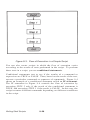
information. Figure 1-1 shows a simple DOMAIN network composed
of three nodes and two disks.
Figure 1-1. A Simple DOMAIN Network
The DOMAIN System
1-2
The DOMAIN system makes the information on all disks available
to any node in the DOMAIN network. For example, in Figure 1-1,
NODE_ C can access information stored on its own disk, as well as
information stored on the disk connected to NODE_ B. Although
NODE_ A doesn’t have its own disk, it can, via the network, access
information stored on the disks connected to NODE_ B or NODE_ C.
Each node in the network requires the use of at least one disk, called
a boot volume, that contains the operating system and other system
software it needs to run. Some nodes, called disked nodes, are
physically connected to the disk that they use as the boot volume.
Other nodes, called diskless nodes, share the boot volume of some
other disked node in the network, called a network partner. In Figure
1-1, NODE_ B and NODE_ C are disked nodes. Because NODE_ A is a
diskless node, it must use either NODE_ B or NODE_ C as its partner.
To run in the network, a diskless node must have a network partner.
The network partner’s disk provides all of the necessary operating
system and support software for the diskless node. Because a diskless
node relies on its partner for system software, it can operate only when
the partner node is operating. If the partner node is removed from
the network while the diskless node is running, the diskless node will
crash.
The operating system interface on each node, whether disked or
diskless, is made up of two main programs: the Display Manager
(DM) and the Shell.
The DM is the system program that controls your node’s display and
enables you to create processes. The DM listens for DM commands
that you specify in the DM command input pad of your display. Part II
of this manual describes your node’s display environment and how to
use the DM to control this environment.
The Shell is the program that you use to perform more traditional
computing operations such as managing files, and compiling programs.
The Shell listens for commands that you specify in the Shell process’s
command input pad. Each command invokes a different utility
program that performs a specific computing operation. Part III of this
manual describes the Shell program and the Shell commands you use
to perform standard computing operations.
1-3
The DOMAIN System
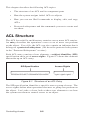
The Naming Tree
To make information available to all the nodes in the network, the
DOMAIN system organizes objects in a hierarchical structure called a
naming tree. The naming tree serves as a type of map that the system
uses to keep track of where objects reside in the network. To access an
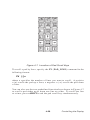
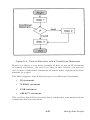
object, you refer to its location in the naming tree. Figure 1-2 shows a
sample naming tree.
Figure 1-2. A Sample Naming Tree
The double slashes (//) in Figure 1-2 represent the top level of the
naming tree, the network root directory. Each node maintains its
own copy of the network root directory, which contains the name of
each node entry directory the node can access. Figure 1-2 shows a
The DOMAIN System
1-4
network root directory containing the names of two node entry
directories: NODE_ B and NODE_ C.
Each disked node in the network has a node entry directory name
associated with it. This name refers to the branch of the naming tree
that resides on its disk. (Since diskless nodes don’t have disks, they
use the node entry directory of their partner.) In Figure 1-2, all of
the objects under the node entry directory, NODE_ B, reside on the
disk NODE_ B, while all of the objects under the node entry directory
NODE_ C reside on the disk NODE_ C. In other words, each disk in the
network represents an entry directory in the system naming tree.
Entry directories contain one or more upper-level directories. An
upper-level directory is one level below the entry directory and
normally serves as the main directory for a branch of logically related
objects. For example, the /SYS directory that we supply is an upperlevel directory that contains many of the system objects that make
up the operating system. (Appendix A contains a set of figures that
illustrate how the system organizes the software we supply with your
node.) An upper-level directory can also serve as a user’s main directory
for storing files.
In Figure 1-2, the directories OWNER and USER_ 1 are upper-level
directories, one level below the entry directory NODE_ B. The
directory OWNER serves as the main directory for all objects that
belong to the owner of the node. The upper-level directory USER_ 1
is the main directory for the user of a diskless node (NODE_ A) that
uses NODE_ B as its entry directory. The directory USER serves as the
main directory for the user on NODE_ C.
In summary, the network root directory contains the names of node
entry directories in the network. The system uses your node’s network
root directory to determine which node entry directories in the network
it can access. Each node entry directory contains one or more upperlevel directories. An upper-level directory serves as the main directory
for logically related objects.
Your node can access only the node entry directories whose
names appear in the local copy of the network root directory. To
keep your local copy of the network root directory up to date,
you should catalog new disked nodes as they are added to the
network. To catalog new nodes, use the Shell command CTNODE
1-5
The DOMAIN System
(CATALOG_NODE) described in the DOMAIN System Command
Reference.
Some network sites use the NS_HELPER (Naming Server Helper)
to maintain an up-to-date network root directory. If your site uses
NS_HELPER, you don’t need to use CTNODE to catalog nodes; NS_
HELPER does it for you. To find out if your network site uses the
NS_HELPER, ask your system administrator. Administering Your
DOMAIN System describes NS_HELPER and explains how to catalog
nodes to update the network root directory.
Using Pathnames
The system identifies each object in the naming tree by its unique
location. Whenever you specify a command to create or access an
object, you also specify a pathname that points to the object’s location
in the naming tree. The pathname tells the system what path to follow
when searching for an object.
The commands you use to create and manage objects require you
to specify a pathname as a command argument. When you invoke
a command, the command specifies the operation, and the pathname
tells the system where in the naming tree to perform it.
For example, the following Shell command deletes the file MEMO in
the naming tree shown in Figure 1-3:
$ DLF //NODE_B/USER_1/MEMO
command
pathname
The Shell command DLF (DELETE_FILE) tells the system to delete
the file at the location specified by the pathname. Figure 1-3 shows the
path the system follows to the file.
The DOMAIN System
1-6
The pathname directs the system to:
1.
Start at the network root directory (//).
2. Follow the path through the entry directory, NODE_ B, and the
subdirectory, USER_ 1.
3.
Stop at the file, MEMO.
Figure 1-3. A Sample Path Through the Naming Tree
When the system searches for a location in the naming tree, it begins its
search at some point in the tree and follows a path to the location. The
pathname in the previous examples explicitly specified the network
root directory as the starting point for the system’s search through the
naming tree. (The double slashes (//) at the beginning of the pathname
specify the network root directory.) This type of pathname, called an
absolute pathname, tells the system the full path, from the network
root directory to the final location.
1-7
The DOMAIN System
You don’t have to begin pathnames with the network root directory
specification. For example, the single slash (/) symbol directs the
system to begin its search at your node’s entry directory. Here is an
example using the single slash to start a search at your node’s entry
directory:
$ DLF /USER_1/MEMO
Figure 1-4. A Sample Path Beginning at the Node Entry
Directory
For this example, let’s assume that your node’s entry directory is
NODE_ B. As shown in Figure 1-4, the pathname directs the system
to:
1.
Start at your node’s entry directory, NODE_ B.
2. Follow the path through the upper-level directory, USER_ 1.
3.
Stop at the file, MEMO.
The DOMAIN System
1-8
You can specify other starting points in the naming tree by beginning
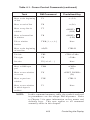
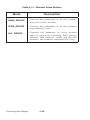
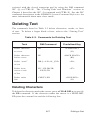
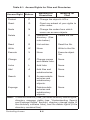
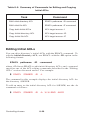
a pathname with any of the symbols in Table 1-1.
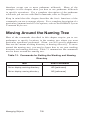
Table 1-1. Pathname Symbols
Symbol
System starts search at:
//
Network root directory
/
Node entry directory
No symbol or .
Working directory
~
Naming directory
\
Parent directory
The Working Directory
If you specify a pathname without a symbol preceding it (or if you
precede the pathname with a period) the system starts its search at
a default location in the naming tree called the working directory.
Think of the working directory as the directory location in which you
are currently working. Each process that you create uses one of the
directories in the naming tree as its working directory.
When you log into a node, the system creates a process running the
Shell program and sets that process’s working directory to the home
directory name designated in your user account. (Chapter 2 describes
your home directory and how to change it at log-in.) The system
uses this directory as your working directory unless you change it to
another directory. (Chapter 7 describes how to change your working
directory.)
1-9
The DOMAIN System
The following command deletes the file MEMO in the current working
directory:
$ DLF MEMO
In this example, let’s assume that the current working directory is the
directory REPORTS. As shown in Figure 1-5, the system begins its
search at REPORTS and deletes the file MEMO.
Figure 1-5. A Sample Path Beginning at the Current Working
Directory
You’ll notice in Figure 1-5 that another file named MEMO exists at
another location in the naming tree (in the directory USER_ 1). If
the current working directory was USER_ 1 instead of REPORTS, the
command in our example would delete this file instead. So you see,
a pathname that starts at the working directory functions differently
depending on the directory currently being used as the working
directory.
The DOMAIN System
1-10
The Naming Directory
If you precede a pathname with the tilde ( ~ ) symbol, the system starts
its search at a location in the naming tree called the naming directory.
Like the working directory, each process has a naming directory that
points to some directory in the naming tree.
When you log into a node, the system creates a process running the
Shell program and sets that process’s naming directory to the home
directory name designated in your user account. The system uses this
directory as your naming directory unless you change it to another
directory. (Chapter 7 describes how to change your naming directory.
)
The following command deletes the file MEMO in the current naming
directory:
$ DLF ~REPORTS/MEMO
In this example, let’s assume that the current naming directory is the
upper-level directory OWNER. As shown in Figure 1-6, the pathname
directs the system to:
1.
Start at your node’s naming directory, OWNER.
2. Follow the path through the directory, REPORTS.
3.
Stop at the file, MEMO.
Like pathnames that use the current working directory, pathnames
starting at the naming directory work differently depending on the
directory currently being used as the naming directory.
1-11
The DOMAIN System
Figure 1-6. A Sample Path Beginning at the Current Naming
Directory
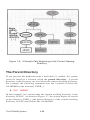
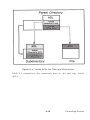
The Parent Directory
If you precede the pathname with a backslash (\) symbol, the system
starts its search at a location called the parent directory. A parent
directory is the directory one level above the current working directory.
For example, the following command uses the \ symbol to delete the
file MEMO in the directory USER_1:
$ DLF \MEMO
In this example, let’s assume that the current working directory is the
directory PLANS. As shown in Figure 1-7, the system begins its search
at the directory USER_ 1 (the parent directory of the current working
directory PLANS) and deletes the file MEMO.
The DOMAIN System
1-12
Figure 1-7. A Sample Path Beginning at the Parent Directory
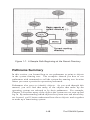
Pathname Summary
In this section, you learned how to use pathnames to point to objects
in the system naming tree. The examples showed you how to use
pathnames with commands to tell the system the naming tree location
where you want a particular operation performed.
Pathnames also serve to identify objects. As you read through this
manual, you will find that many of the objects that make up the
operating system are referred to by their pathnames. For example,
Chapter 2 describes many of the objects the system uses at start-up and
log-in. By understanding which objects the system uses and where they
are located, you’ll better understand how these objects work together
to make up a functioning system.
1-13
The DOMAIN System
Appendix A contains a set of figures that illustrate how the system
organizes the system software that we supply with your node. These
figures also refer to system objects by their pathnames.
The DOMAIN System
1-14
CHAPTER
2
Start-Up and Log-In
Each time you start up a node and log in to it, the DOMAIN system
executes various programs that start the operating system, and scripts
that set up the node’s operating environment. You can tailor the
operating environment on your node by modifying the scripts the
system uses at start-up and log-in. For example, you may want to start
specific server processes when you start up your node. Or, you may
want your own specific key definitions, default window positions, and
tabs defined each time you log in.
This chapter describes how the system functions at start-up and
log-in, and describes the steps you can take to tailor your operating
environment. The chapter also describes procedures for changing your
password and log-in home directory when you log in.
2-1
Start-Up and Log-In
Understanding the System
at Start-Up
The Owner’s Guide for your node describes the proper procedure for
starting it up. When you initiate the node’s start-up by turning on the
power, the node performs a series of operations to boot the operating
system (load the operating system from disk into memory) and begin
executing it. The operating system then executes a series of start-up
files to set up the operating environment on your node.
This section explains the sequence of events occurring at start-up for
both disked and diskless nodes.
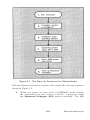
Disked Node Start-Up
If your node is a disked node, it reads the programs it needs for startup from its own disk. The flowchart in Figure 2-1 shows the start-up
sequence on a disked node.
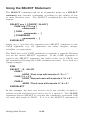
Start-Up and Log-In
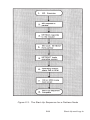
2-2
Figure 2-1. The Start-Up Sequence for Disked Nodes
The descriptions that follow explain each step in the start-up sequence
shown in Figure 2-1.
1.
When you power on your node in NORMAL mode (follow
the instructions in your Owner’s Guide), a program called
the Mnemonic Debugger (MD) begins executing. The MD
2-3
Start-Up and Log-In
resides in the node’s boot PROM (Programmable Read- Only
Memory).
2. The MD reads a program called SYSBOOT from your node’s
disk and loads it into the CPU’s memory. The MD then transfers
control to SYSBOOT. SYSBOOT, as its name indicates, is the
program responsible for booting the operating system.
3. The SYSBOOT program loads the operating system into the
CPU’s memory. Once loaded, the operating system begins
executing and takes control.
4. The operating system starts either:
•
The Display Manager (DM) on nodes with displays.
•
The Server Process Manager (SPM) on DOMAIN Server
Processors (DSPs). The SPM is the server program that
allows you to create a process on a DSP from a remote
node in the network. (For more information about the
SPM, see Administering Your DOMAIN System.)
5. The DM or the SPM executes a start-up file, called a boot
script, that sets up the initial operating environment on your
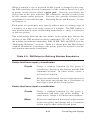
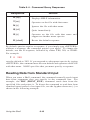
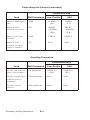
node. Table 2-1 lists the different boot script files used at
start-up. As shown in Table 2-1, the system chooses which
boot script file to execute according to the type of node.
All of the boot script files listed in Table 2-1 reside in the
directory ‘NODE_ DATA. The grave accent (‘) that precedes
the directory name is a special symbol that returns a value for
NODE_ DATA. For example, on disked nodes, ‘NODE_ DATA
points to the directory /SYS/NODE_ DATA on the node’s disk.
On diskless nodes, ‘NODE_ DATA points to the directory /
SYS/NODE_ DATA.node_ id on the partner node’s disk. The
node_ id suffix refers to the diskless node’s hexadecimal node
ID. (Refer to the “Diskless Node Start-Up” section for more
information on diskless node start-up.)
Start-Up and Log-In
2-4
Table 2-1. Node Boot Script Files
Node Type
Boot Script Filename
800x1024 (Portrait)
STARTUP
DN400
1024x800 (Landscape)
STARTUP.19L
DN420, DN460, DN3xx,
DN550, DN560, DN570,
DN3000 (color)
1280x1024
(Color Landscape)
STARTUP.1280COLOR
DN580
1280x1024
(Black & White Landscape)
STARTUP.1280BW
DN3000 (Black & White)
1024x1024 (Color)
STARTUP.COLOR
DN600
Displayless
STARTUP.SPM
DOMAIN Server Processor
(DSPs)
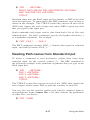
Figure 2-2 shows a sample boot script similar to the one we
provide with DN3xx nodes. The boot scripts for other nodes
are similar.
2-5
Start-Up and Log-In
#
#
#
#
‘NODE_DATA/STARTUP, default system startup
command file for 19L, 4/21/83
Default is black characters on white (or green)
background.
INV -ON
(608,744)dr; (1023,799)cv /sys/dm/output
(556,744)dr; (608,799)cv /sys/dm/output;pb
(0,744)dr; (556,799)cv /sys/dm/input
# To enable the diskless node boot server,
# uncomment the following CPS command.
#
# cps /sys/net/netman
# To startup default printer
#
# cps /com/sh -c ‘/com/prsvr’ -n print_server
# To enable the summagraphic bit pad support,
# uncomment the following CPS command.
#
# cps /sys/dm/sbp1 /dev/sio2 L
# To startup mbx (IPC) helper
#
# cps /sys/mbx/mbx_helper
# To Properly define the keys for the 880 keyboard,
# uncomment the following command.
#
# kbd
#
#
#
#
#
To properly define the keys for the low-profile
keyboard (KBD2), uncomment the following
command.
#
#
#
#
#
To properly define the keys for the low-profile
keyboard with the numeric keypad, uncomment the
following command.
kbd 2
kbd 3
•
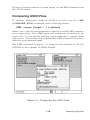
•
•
Figure 2-2. A Sample Boot Script (STARTUP.19L)
Start-Up and Log-In
2-6
The boot script contains commands that start various server
programs. These server programs run regardless of log-in and
log-out activity and provide various system services to the node.
For example, the NETMAN program makes the node available
as a host for diskless partners, and the print server program
(PRSVR) runs peripheral printers. For a description of these
and all of the DOMAIN server programs, see Administering
Your DOMAIN System.
If you want your node to automatically start any of these server
programs, edit your node’s boot script and remove the pound
sign (#) from the command line that invokes the server. Note,
however, that the system will not start any of these servers
until the next time you shut down and restart your node. (See
your node’s Owner’s Guide for node startup and shutdown
procedures.)
The boot scripts that run on nodes that have displays contain
a set of commands that instruct the Display Manager to draw
the initial display windows on the screen. One of the windows
contains the “Please log in:” prompt.
These boot scripts also contain commands that specify which
type of keyboard the node is using. If your node uses the
DOMAIN Low-profile Model I keyboard, remove the # from the
KBD2 command. If your node uses the low-profile keyboard
with the numeric keypad (DOMAIN Low-profile Model II
keyboard), remove the # from the KBD3 command. See the
“Using Keys to Perform DM Functions” section in Chapter 3
for a description of keyboard types.
Note:
On DN3000 nodes, use of the KBD 3 command is
optional; KBD 3 is assumed by default.
The STARTUP.SPM script used by DSPs is similar to the other
start-up scripts. However, since DSPs don’t have displays,
STARTUP.SPM doesn’t contain commands for creating
windows.
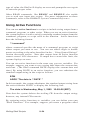
6. Once the boot script finishes executing, the node start-up
completes, and the system prompts you to log in.
2-7
Start-Up and Log-In
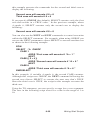
Diskless Node Start-Up
The start-up sequence for diskless nodes is somewhat different than the
start-up sequence for disked nodes. A diskless node does not have its
own disk to store the operating system and other software files it needs
to run. Therefore, each time it starts up, the diskless node must load
parts of the operating system across the network from its partner node.
The diskless node also relies on its partner for any utility programs and
libraries it needs. Figure 2-3 presents a flowchart showing the start-up
sequence for a diskless node.
From your perspective as a user, starting up a diskless node is the
same as starting up a disked node; you turn the power on in NORMAL
mode and wait for the log-in prompt to appear. However, the startup sequence that goes on internally is somewhat different. The
descriptions that follow explain each step in the diskless node start-up
sequence shown in Figure 2-3. Once you’ve read the descriptions, go
back and compare each step with the disked node start-up sequence
described in the “Disked Node Start-Up” section.
Start-Up and Log-In
2-8
Figure 2-3. The Start-Up Sequence for a Diskless Node
2-9
Start-Up and Log-In
1.
When you power on your node in NORMAL mode (by
following the instructions in your Owner’s Guide), a program
called the Mnemonic Debugger (MD) begins executing. The
MD resides in the node’s boot PROM (Programmable ReadOnly Memory).
2. Because a diskless node does not have a disk, the MD cannot
load SYSBOOT and transfer control to it. Instead, the MD
must boot the system from another disked node in the network.
The MD then broadcasts a message across the network asking
for a partner node to volunteer the use of its boot volume.
3. All nodes running the NETMAN program receive these request
messages (NETMAN’s purpose is to respond to them). In
response to the diskless node’s request, NETMAN on a disked
node checks the file /SYS/NET/DISKLESS_ LIST. This file on
the disked node contains a list of hexadecimal node IDs for all
nodes the disked node may offer partnership.
If the diskless list contains the ID of the diskless node
requesting partnership, NETMAN volunteers the node as
a partner. The first disked node to volunteer becomes the
partner of the diskless node. (It remains the diskless node’s
partner until the next time the diskless node boots.) At this
point, the diskless node displays the partner node’s node ID for
your information.
You can take a look at a sample diskless list by reading the
file /SYS/NET/SAMPLE_ DISKLESS_ LIST. For a complete
description of how to create a diskless list and set up partners
for diskless nodes, see Administering Your DOMAIN System.
4. Once the diskless node finds a partner, the MD copies the
NETBOOT program from the file, /SYS/NET/NETBOOT
on the partner node into the diskless node’s memory. The
NETBOOT program is a special version of SYSBOOT that
diskless nodes use to boot the operating system across the
Start-Up and Log-In
2-10
network. The MD, when finished loading NETBOOT, transfers
control to it.
5. The NETBOOT program, running on the diskless node, loads
the operating system from the partner node’s boot volume into
memory.
6. The operating system starts either:
7.
•
The Display Manager (DM) on nodes with displays.
•
The Server Process Manager (SPM) on DOMAIN Server
Processors (DSPs). The SPM is the server program that
allows you to create a process on a DSP from a remote node
in the network. (Refer to Administering Your DOMAIN
System for more information about the SPM.)
The DM or the SPM executes a start-up file, called a boot
script, that sets up the initial operating environment on your
node. Table 2-1 lists the different boot script files used at
start-up. As shown in Table 2-1, the system chooses which
boot script file to execute according to the type of node.
Since diskless nodes don’t have files of their own, the DM or
SPM must look to the partner node to find its boot script file.
Just as on a disked node, the DM or SPM on a diskless node
searches for the boot script file in the directory ‘NODE_ DATA.
(The grave accent (‘) that precedes the directory name is a
special symbol that returns a value for NODE_ DATA.) Unlike
a disked node, however, ‘NODE_ DATA for the diskless node
points to the directory /SYS/NODE_ DATA.node-id on the
partner’s disk. (The node-id suffix is the hexadecimal node In
of your diskless node.)
Once the DM or SPM finds the diskless node’s boot script,
the boot script executes. Figure 2-2 shows a sample boot
script similar to the one we provide with DN3xx nodes. For
information about this script refer to the “Understanding the
System at Log-In” section.
A single disked node can serve as the partner for several
diskless nodes. Each diskless node may need to use a
2-11
Start-Up and Log-In
“node-specific” boot script to set up its own unique operating
environment. Therefore, the system uses the node-id suffix
to denote a unique boot script location for each diskless node
assigned to the partner.
At start-up, if the partner does not have a NODE_ DATA
directory set up for the diskless node, NETMAN creates one,
copying it from a template stored in the partner’s ‘NODE_ DATA
directory. The NETMAN program then copies the partner
node’s boot script file into the diskless node’s ‘NODE_ DATA
directory. If you want the newly created boot script to perform
different operations at startup than its partner, edit the boot
script.
8. Once the boot script finishes executing, the node start-up
completes, and the system prompts you to log in.
A major difference between the disked node and diskless node startup
sequence is the step where the DM or SPM searches for the node’s boot
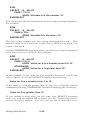
script (Step 7 for diskless nodes and Step 5 for disked nodes). Figure
2-4 presents a flowchart that summarizes this search.
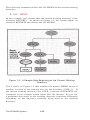
Start-Up and Log-In
2-12
Figure 2-4. The Boot Script Search Sequence
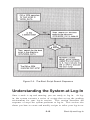
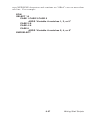
Understanding the System at Log-In
Once a node is up and running, you are ready to log in. At login, the system executes a series of scripts that set up the working
environment for your log-in session. This section describes the
sequence of steps the system performs at log-in. This section also
shows you how to create and modify scripts to tailor your log-in en2-13
Start-Up and Log-In
vironment. The flowchart in Figure 2-5 shows the log-in sequence for
a node.
Figure 2-5. The Log-In Sequence
Start-Up and Log-In
2-14
The descriptions that follow explain each step in the log-in sequence
shown in Figure 2-5.
1.
After you enter your username and password, the operating
system verifies your account. (Chapter 1 in Getting Started
With Your DOMAIN System describes how to log in.)
The system verifies your account by checking the file ACCOUNT
in the site registry directory. If the username and password
match a valid account in the ACCOUNT file, the system
executes the next step. If the system cannot verify the account,
the log-in attempt fails, and the system displays a log-in error
message in the DM output window. For more information about
user accounts and registries, see Administering Your DOMAIN
System.
2. The system sets your initial working directory and naming
directory to the log-in home directory designated in your user
account. You can change your log-in home directory anytime
you log in. (See the “Changing Your Home Directory” section
later in this chapter.)
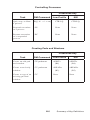
3. The DM (on nodes with displays) executes the node’s log-in
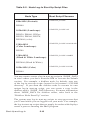
start-up script, which resides in one of the files listed in Table
2-2. As shown in Table 2-2, the system chooses which log-in
start-up file to execute according to the type of node you are
using. Note that on DSPs, the SPM does not execute a log-in
start-up file.
The DM looks for log-in start-up scripts in two different
locations. First, it looks in ‘NODE_ DATA, which refers to the
node’s specific /SYS/NODE_ DATA directory. (By default, no
log-in start-up script exists in ‘NODE_ DATA; you must put
one there.) If the DM doesn’t find the log-in start-up script in
‘NODE_ DATA, it executes one of the default log-in start-up
scripts that we supply in the directory /SYS/DM.
2-15
Start-Up and Log-In
Table 2-2. Node Log-In Start-Up Script Files
Node Type
Boot Script Filename
800x1024 (Portrait)
STARTUP_LOGIN
DN400
1024x800 (Landscape)
STARTUP_LOGIN.19L
DN420, DN460, DN3xx,
DN550, DN560, DN570,
DN3000 (color)
1280x1024
(Color Landscape)
STARTUP_LOGIN.1280COLOR
DN580
1280x1024
(Black & White Landscape)
STARTUP_LOGIN.1280BW
DN3000 (Black & White)
1024x1024 (Color)
STARTUP_LOGIN.COLOR
DN600
You may want to create a log-in start-up script in ‘NODE_ DATA
in cases where you don’t want the DM to execute the default
version. For example, a diskless node, by default, uses one
of the log-in start-up scripts located in its partner’s /SYS/DM
directory. If you want the diskless node to execute its own
unique log-in start-up script, you can create a copy in the
diskless node’s ‘NODE_ DATA directory. For more information
about ‘NODE_ DATA for diskless nodes, refer back to the
“Diskless Node Start-Up” section.
The system uses log-in start-up scripts to start processes that
you’ll need while you are logged in to your node. For example,
the log-in start-up scripts that we supply for nodes with displays
create a process running the Shell program.
Start-Up and Log-In
2-16
When you log out, the DM stops the Shell process and deletes
its pads and windows from the display. Figure 2-6 shows a
sample log-in start-up script that we supply for DN300 nodes.
# STARTUP LOGIN (the per_login startup file in
# ‘node_data or /sys/dm)
# main shell whose shape is generally agreeable to
# users of this node
(0,300)dr; (700,700)cp /com/sh
## and the user’s private dm command file from his
# home directory’s user_data sub-directory. Personal
# key_defs file is also kept in user_data by DM.
# cmdf user_data/startup_dm.19L
Figure 2-6. A Sample Log-In Start-Up Script
(STARTUP_LOGIN.19L)
As shown in Figure 2-6, the command that creates the initial
Shell process is the only command not commented out in the
script. You may leave it in, comment it out by adding the
pound sign character (#), or change it to draw the process’s
windows in a different location. You can also add commands
that will start certain processes that you want to run each time
you log in.
You’ll notice that the last line in the sample script
shown in Figure 2-6 contains the DM command CMDF
(COMMAND_FILE).
This command invokes another
script, STARTUP_ DM.19L. If you remove the # character
from the command line, the DM attempts to execute this
additional script as part of the log-in sequence. Otherwise, the
system performs Step 5. (Note that when you remove the #,
2-17
Start-Up and Log-In
the DM will not attempt to execute the script until the next
time you log in.)
4. If no # character precedes the CMDF command line, the DM
looks in the USER_ DATA subdirectory of your log-in home
directory for the specified file. If the DM finds the file, it
executes the script; otherwise, it displays an error message in
the DM output window when the log-in sequence completes.
This script, called the DM start-up script, is an optional script
that you create to execute additional DM commands during
log-in. For example, you may want to include commands that
make specific key definitions or run specific programs. Figure
2-7 shows a sample DM start-up script.
Remember, we don’t supply a DM start-up script as part of
the system; if you want to use a DM start-up script, you must
create one. If you do create a DM start-up script, remember
to create a file that has the same filename as the file specified
with the CMDF command. For example, the CMDF command
in Figure 2-6, specifies the filename STARTUP_ DM.19L. The
suffix 19L is the suffix for files used by nodes with landscape
displays, like the DN300.
Start-Up and Log-In
2-18
#
#
#
#
#
#
USER_DATA/STARTUP_DM (in login home directory)
Some personal preference keys:
Define < F4 > and < F5 > for easy PASCAL
indenting and undenting:
KD F4 T1 ;S/%
KD F5 T1 ;S/%/
// KE
/ KE
#
# Define CTRL/J to repeat previous substitution:
#
KD ^J S KE
#
# Set tab every 5 spaces:
#
TS 5 - R
#
# Build a Shell window and execute a personal Shell
# program
#
(0,500)dr; (799,955) cp /com/sh -f -c ‘user_data/sh’
(0,770)dr;(600,110) wdf1
Figure 2-7. A Sample DM Start-Up Script
(STARTUP_DM.19L)
5. The DM reads the file KEY_ DEFS3 (for nodes with DOMAIN
Low-profile Model II keyboards), KEY_ DEFS2 (for DOMAIN
Low-profile Model I keyboards) or KEY_ DEFS (for nodes
with 880 keyboards). These files, located in the USER_ DATA
directory of your log-in home directory. contain a record of
any key definitions that you made the last time you were logged
in. By reading these files, the DM carries over key definitions
to the new log-in session. These files are non-ASCII files;
therefore, you cannot edit them. The “Defining Keys” section
in Chapter 3 describes the key definition files in more detail.
6. At this point, the log-in sequence is complete.
2-19
Start-Up and Log-In
Logging In
Chapter 1 in Getting Started With Your DOMAIN System describes the
basic procedure for logging in to your node. This section describes the
various log-in procedures you can use to log in as USER, change your
password and log-in home directory, and log in to a DOMAIN Server
Processor (DSP).
Logging In as User
The registry file ACCOUNT, described earlier in the “Understanding
the System at Log-In” section, contains a default account named
USER.NONE.NONE, or simply USER. This default account allows
any user anywhere in the network to log into the DOMAIN system.
To use the default account, log in with the username USER as follows:
Please log in: USER <RETURN>
When the system prompts you for a password, simply press
<RETURN>.
Changing Your Password
You can change your password anytime you log in by typing -p after
your username as follows:
Please log in: L USERNAME -p <RETURN>
After you specify your current password at the” Password: “ prompt,
the system displays the following prompt if the log-in is successful:
Enter new password:
Specify the new password next to the prompt, and press <RETURN>.
Next the system prompts you to verify your new password (to ensure
that you entered it correctly). At the prompt, type the new password
again and press <RETURN>. Use the new password the next time you
log in.
Start-Up and Log-In
2-20
If you want to maintain a secure account, avoid using obvious passwords
such as your username or your initials. If security is not a high priority,
you can use a blank password. (Note, however, that blank passwords
violate system security.) To change your password to a blank, specify a
space in quotation marks. For example:
Enter new password: “ ” <RETURN>
To enter a blank password when you log in, just press <RETURN>.
Changing Your Home Directory
Each system account has a directory associated with it, called the home
directory. Anytime you log in, the system sets your initial working
and naming directories to your home directory. When you log in, you
can change your home directory to another directory in the naming
tree by specifying the -h option after your username as follows:
Please log in: L USERNAME -h
Specify your current password at the “Password: “prompt. If the log-in
is successful, the system displays the following prompt along with the
pathname of your current home directory:
Change home directory: pathname
To change your home directory, change the pathname to the pathname
of the new home directory you want to use and press <RETURN>.
When you enter the pathname of your new home directory, the system
attempts to update the file ACCOUNT in your site registry directory.
This file contains information about your account, such as your
username, password, and home directory. By updating the ACCOUNT
file, the system stores your new home directory for logging in later.
See Administering Your DOMAIN System for more information about
the ACCOUNT file and system registries.
If the system succeeds in updating the ACCOUNT file, it displays a
message in the DM output window verifying the update. If the system
cannot update the ACCOUNT file, it displays a message in the DM
output window. In the latter case, although the system could not
2-21
Start-Up and Log-In
update the file, it still uses the new home directory during the current
log-in session.
Logging Into a DOMAIN Server Processor
(DSP)
Unlike user nodes, a DOMAIN Server Processor (DSP) doesn’t have a
keyboard or display. Therefore, you must log into it from a user node
in the network.
As described earlier in the “Disked Node Start-Up” section, when you
start up a DSP, the system starts a program called the Server Process
Manager (SPM). The SPM makes it possible for you to create a process
on the DSP, log into the process, and execute programs and commands,
all while you sit at a user node in the network.
For a complete description of the procedure for logging into a DSP, see
the Owner’s Guide for your particular processor.
Start-Up and Log-In
2-22
CHAPTER
3
Using the Display
Manager
The Display Manager (DM) is the operating system program that
controls your node’s display. Using DM commands, you can instruct
the DM to perform specific display management operations, such
as: moving the cursor around the display, creating and controlling
processes, creating and manipulating pads and windows, and modifying
display characteristics.
This chapter explains the functions of the DM and describes how to
specify DM commands. It also describes how to define keys to perform
DM operations. Chapter 4 describes how to use the DM to perform
specific display-management tasks.
3-1
Using the Display Manager
Using DM Commands
DM commands enable you to control your node’s display by instructing
the DM to perform specific display management operations. To use a
DM command, you normally perform two basic steps:
1.
Point to the spot on the display where you want the DM
operation performed.
2. Specify a DM command to execute the operation.
You point to a spot on the display either by moving the cursor to
the desired spot, or by explicitly defining a point on the screen as a
command argument. If you don’t perform a pointing operation using
either method, the DM executes the command at the current cursor
position.
Some DM commands require you to define an area, or region, on
the screen instead of a single point. You define the size of a region
by defining two points on the screen. The region is simply the area
between the two points. The “Defining Points and Regions” section
describes how to define points and regions.
To specify a DM command interactively:
1.
Press <CMD> to move the cursor next to the Command:
prompt in the DM input pad. (The DM remembers where the
cursor came from so it can apply the next command to that
point.)
2. Type the command along with any arguments or options.
3.
Press <RETURN> to invoke the command.
Use this procedure to specify commands interactively from your
keyboard. You can also specify commands in special DM programs,
called scripts. When you invoke a DM script, the DM reads and
executes DM commands in the order you specify them. The “Using
DM Command Scripts” section describes how to use DM scripts.
Using the Display Manager
3-2
The method you use to define a point depends on the DM command you
use, and how you use it. When you specify a command interactively,
you usually point with the cursor. In scripts, you specify a point
explicitly as a command argument. Figure 3-1 illustrates the interactive
procedure for invoking the WC command to delete a window.
Figure 3-1. Invoking a DM Command Interactively
You can also invoke DM commands interactively using DM function
keys and control key sequences. The “Using Keys to Perform DM
Functions” section describes how to use these keys to perform DM
functions.
3-3
Using the Display Manager
DM Command Conventions
DM commands have the following general format:
[region] COMMAND [arguments ...] [options ...]
Separate the components of a command with the proper command line
delimiters, as follows:
•
Separate an argument from a command and any additional
arguments or options with at least one blank space.
•
Precede each option with a hyphen (-). Separate each option
from commands, arguments, or any additional options with at
least one blank space.
•
If you precede the command with a region, make sure you use
the correct syntax to define each point (see Table 3-2). You
can place multiple blanks before and after the region, although
they are not required.
•
You can string multiple commands together on the same line
by separating each command with a semicolon (;) as shown
below:
PT;TT;TL
This command sequence executes three separate commands to
move the cursor to the first character in a pad.
When you use commands in scripts and key definitions, you can use
several special characters that control how the DM interprets commands.
Table 3-1 lists the rules for using these special characters.
Using the Display Manager
3-4
Table 3-1. Rules for Using DM Special Characters
@ The escape character (@) always nullifies the meaning of any
special character (such as the input request character) it precedes.
When the DM reads a command line containing the escape
character, it strips off the @ character, and any special meaning of
the character following its.
If you can’t remember whether a character has some special
meaning, it is safe to escape the character. If the character is not
special, the DM still removes the @, so the character appears as
it should. Character escaping is generally confined to search and
substitute operations (see Chapter 5), commands requiring quoted
strings, and key definitions.
#
When the DM reads the pound sign (#) in a DM script, it ignores
the information on the remainder of the line. Use this character to
add comments to your DM script.
;
Use the semicolon (;) to separate commands that you specify on
the same line.
& The input request character (&) enables you to supply keyboard
input from the DM input pad to a command in a key definition
or script. When the DM reads the &, it stops reading commands
and moves the cursor to the DM input pad. When you enter input
(usually a command argument), the DM replaces the & character
with the specified input and continues reading commands. You
can also specify a prompt in the form
& “prompt”
to display a prompt in the DM input pad that requests the proper
input.
3-5
Using the Display Manager
The following commands accept strings surrounded by single quotes:
KD, ES, CP, CPO, CPS, and &. When you use single quotes, the only
characters in the quoted string that retain their special meaning are @
and &; all other characters revert to their literal values. Note, however,
that the KD command does not recognize single quotes within the
definition string.
Defining Points and Regions
Most DM commands require you to either point with the cursor or
define a point or region on the display. To point, simply move the cursor
to the desired location. For example, to point to a window, position
the cursor anywhere inside the window. Commands that operate on
windows read the cursor position to determine which window you want
to work on.
The block cursor actually occupies many individual screen points.
When you use the block cursor to point to a spot on the screen, the
lower left-hand corner of the block cursor designates the exact point.
(When you point to the upper edge or right edge of a window, the
DM adjusts the point position to account for the size of the cursor.
See the “Creating Pads and Windows” section in Chapter 4 for more
information on how the DM defines window boundaries.)
If you choose not to point with the cursor, you can explicitly define
a point or pair of points (a region) using any of the point formats
described in Table 3-2. Note that some formats define points in pads,
and others define points on the display as a whole. You normally
define points in pads when performing the pad editing operations
described in Chapter 5.
Using the Display Manager
3-6
Table 3-2. Formats for Specifying Points on the Display
line-number
Specifies a line location in a pad. Line numbers begin at 1 and
range upward to the last line in the pad. To refer to the last line
in a pad, you may specify the dollar sign ($) symbol. The edit
pad window legend displays the line number of the top line in a
window. You can also display the line number (plus the column
number, and x- and y- coordinates) of the current cursor position
by using the DM command =.
+/- n
Specifies a line location in a pad that is n lines before (-) or after
(+) the current cursor position.
[ [ line-number ][ ,column-number ] ]
Specifies a point in a pad by line and column number. The DM
assumes the current line if you omit line-number; it assumes
column 1 if you omit column-number. Line numbers range from 1
to the last line in the pad. Column numbers range from 1 to 256.
Some examples are:
[ 127,14 ]
Line 127, column 14.
[ 53 ]
Line 53, column 1.
[ ,12 ]
Column 12 of the current line.
Note that you must use the outer set of square brackets; however,
when you specify line-number only, the brackets are optional.
When using this format, you cannot use the dollar sign ($) to
specify the last line in a pad; you must specify the number of the
last line.
/regular-expression/ or \regular-expression\
Specifies a string in a pad that begins or ends a specific region.
Chapter 5 describes regular expressions.
3-7
Using the Display Manager
Table 3-2. Formats for Specifying Points on the Display
(continued)
( [x-coordinate] [ ,y-coordinate] )
Specifies a point on the display by screen coordinates. Screen
coordinates indicate bit positions on the display. The origin
(0,0) is at the extreme upper-left corner of the screen. Values for
coordinates have the following ranges:
Display Type
x-coordinate
y-coordinate
1024x800
1280x1024
(Landscape)
0 to 1023
0 to 1023
0 to 799
0 to 1279
800x1024
(Portrait)
0 to 799
0 to 1023
1024x1024
(Square)
0 to 1023
0 to 1023
If you omit either coordinate from the specification, the DM uses
the coordinates of the cursor. Note that you must enclose the
coordinates in parentheses. Some examples are:
(200,450)
Bit position with an x-coordinate of 200 and a ycoordinate of 450.
(135)
Bit position with an x-coordinate of 135 and the
same y-coordinate as the current cursor position.
(,730)
Bit position with the same x-coordinate as the
current cursor position, and a y-coordinate of
730.
Using the Display Manager
3-8
When you specify any of the formats described in Table 3-2 in the
DM input pad, the DM moves the cursor to the specified position. For
example, to move the cursor to line 75, column 5 in an edit pad, specify
the following in the DM input pad:
Command: [75,5]
You can also use any of the formats for defining points to define a
region on the display. To define a region, you must define two points
as follows:
[ point ] DR; [ point ]
The first point defines the beginning of the region and the DR command
marks it. The second command defines the end of the region. When
defining a two-dimensional region, the first point defines one corner,
and the second point defines the opposite corner as shown in Figure
3-2.
Figure 3-2. Defining a Display Region
When you define a region, if you don’t specify a second position, the
DM uses the current cursor position.
3-9
Using the Display Manager
Like defining a single point, an easy way to define a region is to
point with the cursor. For convenience, we defined the function key
<MARK> to invoke the DR command, which marks the first point. To
define a region using the cursor:
1.
Move the cursor to the first point.
2. Press the <MARK> key.
3.
Move the cursor to the second point.
4.
Specify the DM command.
For a complete description of the DM commands used to control marks,
see the DOMAIN System Command Reference.
For commands that require a region in which to operate, you have
the option of specifying the region as part of the command. The CV
(CREATE_VIEW) command, shown below, creates a read-only pad
and window. It uses a region to define the size and location of the
window it creates.
Command: (350,200) DR; (700,600) CV MY_FILE
region
command
Using Keys to Perform DM Functions
You can also perform display management operations using keys,
called function keys, that we’ve defined as specific DM commands.
When you press a function key, it invokes its assigned DM command
or command sequence.
By default, many keys perform DM operations when pressed
simultaneously with the <CTRL> key. Like function keys, these
key combinations, called control key sequences, provide you with a
“shorthand” method of specifying commands.
The DOMAIN system’s set of predefined function keys and control
key sequences enable you to execute commonly performed opera-
Using the Display Manager
3-10
tions. For example, the directional keys described in Chapter 1 in
Getting Started With Your DOMAIN System are predefined keys that
you’ll use routinely to move the cursor.
We’ve also defined the mouse’s function keys to perform three useful
DM operations. Table 3-3 describes the default mouse key functions.
Table 3-3. Default Mouse Key Functions
Mouse Key
Function
Left Key
(M1)
This key performs a GROW/MARK operation
to change the size of windows. The section,
“Changing Window Size” in Chapter 4
describes how to use the left mouse key to
change the size of a window.
Center Key
(M2)
This key works just like the <POP> key. To
use it, move the cursor inside the window
you want to pop, then press the key. See the
section, “Pushing and Popping Windows” in
Chapter 4 for more information.
Right Key
(M3)
This key makes it easy for you to read files in
your current working directory. It executes
the CV (CREATE_VIEW) command with
the name of the file you point to with the
cursor. To use this key, specify the LD Shell
command to list the contents of your current
directory. Then, position the cursor over the
name of the file you want to read and press
the right mouse key.
3-11
Using the Display Manager
Keyboard Types and Key Definitions
The DOMAIN System supports two basic types of keyboards:
•
DOMAIN low-profile keyboards
•
The 880 keyboard
DOMAIN low-profile type keyboards (shown in Figure 3-3) include
the DOMAIN Low-profile Model I keyboard and the DOMAIN Lowprofile Model II keyboard. Notice that the key layout for both of these
keyboards is the same except that the Model II keyboard has a numeric
keypad and two additional function keys, F0 and F9.
Note:
The 880 keyboard is an older style keyboard that we no
longer ship with new nodes. Appendix B describes the 880
keyboard and its predefined key functions. The command
summary tables in this manual list the predefined function
keys for the low-profile type keyboards only.
The system stores the definitions for its predefined keys in a keyboardspecific definition file. Table 3-4 lists the names of the definition file
for each keyboard.
When you boot your node, the system loads the key definition file
according to which KBD (KEYBOARD) commands are specified in
your node’s boot script (STARTUP) file. (See the “Understanding
the System at Startup” section in Chapter 2 for a description of boot
scripts.)
Using the Display Manager
3-12
3-13
Using the Display Manager
Figure 3-3. Key Names for the DOMAIN Low-Profile Keyboards
Table 3-4. Key Definition File Names
Keyboard
Key Definition File
880
/SYS/DM/STD_KEYS
Low-profile Model I
/SYS/DM/STD_KEYS2
Low-profile Model II
/SYS/DM/STD_KEYS3
To direct the DM to execute the STD_ KEYS2 file and establish key
definitions for the low-profile Model I keyboard, remove the comment
character (#) from the KBD 2 command. To use a node with the lowprofile Model II keyboard, remove the comment character from the
KBD 3 command. To use a node with an 880 keyboard, uncomment
the command KBD.
After you log in, if you find that the predefined keys do not work as
described in this manual, you can execute the appropriate STD_ KEYS (n)
file to set up the proper default key definitions for your keyboard.
For example, to set up the predefined key definitions for the Model I
keyboard, specify the following in the DM input pad:
Command: CMDF /SYS/DM/STD_KEYS2
You can also define your own function keys and control key sequences
by assigning commands to specific key names. But, before you can
define keys, you must understand how they are named. The next two
sections describe key naming conventions and describe how to define
keys.
Using the Display Manager
3-14
Key Naming Conventions
The DM identifies each key on your keyboard (and mouse) by a unique
name. The names of the ordinary character keys (letters and numbers)
have the same name as the characters they represent. For example,
the A key has the name “A”. Other keys, like the DM function keys,
have special names that are different than the names written on them.
The <READ> key, for example, has the name R2. Figure 3-3 shows
the names and locations of the keys on both the low-profile type
keyboards.
For example, the <CUT> / <COPY> function key (L1A) performs a
different function when you use it with the <SHIFT> key. The name
(L1A) identifies the key’s normal function (when you press the key
down). The name (L1AS), referred to as the key’s shifted name,
identifies the key’s function when pressed simultaneously with the
<SHIFT> key. The key’s up-transition name (L1AU) identifies the
function the key performs when released. Table 3-5 describes the key
naming conventions you should use when defining keys.
When defining a key as a command or sequence of commands, you use
the same name that the DM uses to identify the key. Some keys, like
the DM and program function keys, function differently depending on
how you use them. Therefore, each of these keys has a set of additional
names that identify the manner in which the key is used.
3-15
Using the Display Manager
Table 3-5. Key Naming Conventions
Key Type
Description
Ordinary
Characters
These keys have the same name as the
characters (numbers and letters) they represent.
You can assign functions to lowercase letters
and numbers, as well as to capital letters and
special characters. When you specify ordinary
characters, enclose the character in single
quotes (‘ ‘).
ASCII Control
These are the standard line control keys. Their
names are:
CR
BS
TAB
TABS
^TAB
ESC
DEL
Carriage Return
Back Space
Tab
Shifted Tab
Control Shifted Tab
Escape (low-profile
only).
Same as ‘^[‘ (hex
1B)
Delete (low-profile
only) Same as ‘^|’
(hex 7F)
Control
Key
These are ordinary character or program
function keys used with the <CTRL> key.
Specify a control key name as ^x (where x is
an ordinary character or program function key
name.). For example, use ^Y for CTRL/Y or
^F4 for CTRL/F4.
Program
Function
These keys are reserved for user program
control. They appear at the top of the keyboard
and are named F1 through F8 as labeled. (For
DOMAIN Low-profile Model II keyboards,
these keys are named F0 through F9). Their
up-transition names are F0U through F9U;
their shifted names are F0S through F9S; and
their control key names are ^F0 through ^F9.
Using the Display Manager
3-16
Table 3-5. Key Naming Conventions (continued)
Key Type
Description
DM Function
These keys are predefined to perform special
display management functions. The function
keys on the left side of the keyboard are named
L 1 through LF. The function keys on the right
are named R1 through R5. Specify a key’s uptransition name by adding the suffix U to the
key name. To specify a function key’s shifted
name (only on low-profile type keyboards), add
the suffix S. For example, the up-transition
name for R3 is R3U; the shifted name is R3S.
Numeric
Keypad
These keys are only available on the DOMAIN
Low-profile Model II keyboard. The keypad’s
numeric keys are named NP0 through NP9.
The keypad symbols are named NP+, NP-, and
NP, respectively. The “Enter” key is named
NPE. Keys 0 through 9, plus (+), and minus (-)
can have shifted names (for example, NP+S).
Mouse
These are located on the optional mouse and
are named M1, M2, M3. Their up-transition
names are M1U, M2U, M3U. These keys do
not have shifted or control key names.
3-17
Using the Display Manager
Defining Keys
As we described earlier, the DOMAIN system provides a set of default
function keys and control key sequences defined as DM commands.
You can override these definitions or create new ones in either of the
following ways:
•
Specify the KD (KEY_DEFINITION) command from the
keyboard or in a script.
•
Call the system routine PAD_ $DEF_PFK from a program.
When you define keys with the KD command during a session on your
node, the DM writes the new definitions to one of the following files:
•
KEY_DEFS for the 880 keyboard
•
KEY_DEFS2
keyboard
•
KEY_DEFS3 for the DOMAIN Low-profile Model II
keyboard
for
the
DOMAIN
Low-profile
Model
I
These files reside in the USER_ DATA subdirectory of your log-in
home directory (see Chapter 2); they apply only to you, not to other
node users. The DM checks these files whenever you log in, and sets
your personal definitions to reset any of the standard key definitions
set up by /SYS/DM/STD_ KEYS (n) (see Table 3-4).
Definitions made from within a program override those made by KD
commands; however, they work only within the program’s process
window. Therefore, keys defined from a program may function
differently in different windows. The “Controlling Keys from Within
a Program” section describes how programs control key functions.
To define a key from the keyboard or from a script, specify the KD
command in the following format:
KD key_name definition KE
In the KD command format, key_name specifies the unique name
of the key you want to define. The previous section describes key
Using the Display Manager
3-18
naming conventions, and Figure 3-3 shows the location and names
of keys. Remember, always enclose ordinary character and special
character names in single quotes. For example, to define the Z key,
specify ‘Z’.
The definition argument specifies either a single DM command
or a sequence of DM commands that the desired key will perform.
(The DOMAIN System Command Reference describes all of the
DM commands you can use in key definitions.) When you specify a
sequence of commands, either specify each command on a new line (in
scripts) or separate each command with a semicolon (;). Always follow
the definition argument with the KE argument, which signals the end
of the KD command.
The command in the following example defines the program function
key, F1, to move the cursor to the end of the previous line in a
window:
KD F1 AU;TR KE
command
key_name
definition
The definition argument in the example above specifies a command
sequence composed of two commands: AU, which moves the cursor up
to the previous line, and TR, which moves the cursor to the end of the
line. You can specify any number of commands, but you cannot exceed
256 characters in the entire KD command.
You can embed key definitions inside other key definitions, and thereby
define keys that define other keys. The embedded key definition
follows the same rules as any other key definition; however, you must
precede the semicolon (;) with an escape character (@) to separate
the embedded KD command from the next command. The following
example shows an embedded key definition:
KD F3 KD ^X ES ‘THIS IS A TEST’ KE@ ; PV KE
embedded key definition
3-19
Using the Display Manager
This command defines the F3 key to perform the following operations
when pressed:
•
Define CTRL/X to print out the string, “This is a test.” (The
embedded key definition specifies this function.)
•
Invoke the PV command to scroll the current pad one line.
(Chapter 4 describes the PV command.)
Note that the DM scans embedded key definitions three times when:
1.
It makes the outer key definition.
2. It executes the outer key definition and makes the inner key
definition.
3.
It executes the inner key definition.
To define a key that prompts you for input, specify as part of the
definition argument, the input request character (&) in the following
format:
&”prompt”
where prompt specifies the prompt string. The input request character
and prompt cause the DM to prompt for part of the definition argument
you specified in the key definition. For example, the <READ> key
(R3) has the following default key definition:
KD R3 CV &’Read File: ‘ KE
Whenever you press the <READ> key, the DM displays the prompt,
Read File: in the DM input pad and moves the cursor next to it. When
you respond to the prompt by typing the name of a file and pressing
<RETURN>, the DM replaces &’Read File: from the key definition
with your response. In this way, the CV command opens the file you
specify. (Chapter 4 describes the CV command.)
NOTE:
When you define keys in scripts, you must precede the input
request character (&) with the escape character (@).
When you enter a response to a prompt, the DM remembers the
response you typed. So, the next time you press the key, the DM
Using the Display Manager
3-20
automatically displays the previous response next to the prompt. (This
is why the <READ> and <EDIT> keys remember the last files used.)
You can either move the cursor to the right of the previous response
and press <RETURN> to enter the response, or delete the previous
response and enter a new one.
Deleting Key Definitions
To delete a key definition, specify the KD command without a definition
argument. For example:
KD F1 KE
deletes the current definition for the key named F1. For keys with
ordinary character names, the key reverts to its normal graphic value.
Displaying Key Definitions
To display a key’s current definition, specify the KD command without
the definition or KE arguments. The command in the following
example displays the definition for the <READ> key (R3):
KD R3
The DM displays the current key definition in the DM output window.
Controlling Keys from Within a Program
The DOMAIN system enables application programs to assume control
of various display and keyboard functions. For example, the character
font editor, EDFONT (EDIT_FONT), displays several different menus
on your screen that you control with your mouse keys (M1 through M3).
When you use EDFONT, the EDFONT program defines how these keys
function; the keys do not maintain their normal DM definitions. The
DM restores the mouse keys to their normal DM definitions when you
end your EDFONT session. The DOMAIN System Command Reference
describes the EDFONT character font editor.
3-21
Using the Display Manager
For your own applications, you can control key definitions through
program calls to the PAD_ $DEF_PFK and PAD_ $DM_CMD
routines. For more information on these system routines, refer to the
PAD routines section of the DOMAIN System Call Reference.
You may find the normal functions of the DM keys useful even when
using an application program that has redefined them, With the
<HOLD> key, you can temporarily override the application program’s
key definitions and use the normal DM definitions.
To override an application program’s key definitions, press the <HOLD>
key. By pressing the <HOLD> key again, you restore the application
program’s key definitions. Note that this function of the <HOLD> key
is different than the normal DM function of switching a window in and
out of hold mode (see Chapter 4).
Using DM Command Scripts
A DM script is a file that contains one or several DM commands. You
can use DM scripts to perform any of the DM operations described in
this manual, such as creating and controlling processes, manipulating
pads and windows, editing files, and defining keys.
You execute scripts by specifying the pathname of the script file with
the DM command CMDF (COMMAND_FILE) as follows:
CMDF pathname
The start-up scripts discussed in Chapter 2 are examples of DM
command scripts that the system uses to set up your node’s operating
environment. In fact, your node’s log-in start-up script uses the CMDF
(COMMAND_FILE) command to invoke the DM start-up script that
you create. Figure 2-2 in Chapter 2 shows a sample DM start-up script,
STARTUP.19L, for a DN300 node.
Using the Display Manager
3-22
CHAPTER
4
Controlling the
Display
This chapter describes how to use the DM to control your node’s
display. Each section describes a set of related screen-management
tasks and the DM commands you use to perform them.
You can execute a DM command either from a DM script or interactively
by specifying the command in the DM input window. In some cases,
you can also execute a DM command by typing a function key or
control key sequence.
The command summary tables, at the beginning of each section, list the
DM commands, and related function keys and control key sequences,
used to perform a specific set of tasks. Note that the predefined keys
listed in these tables apply only to low-profile type keyboards. For
a description of the predefined keys for the 880 keyboard, refer to
Appendix B.
4-1
Controlling the Display
Chapter 3 explains how to specify DM commands from the keyboard and
from scripts, and how to use function keys and control key sequences.
For a complete description of all the DM commands described in this
chapter, refer to the DOMAIN System Command Reference.
Controlling Cursor Movement
Moving the cursor is the most basic of all display management
operations; it’s also the one you’ll perform most frequently. You use
the cursor to move to a location on the display where you want to
perform a specific operation. For example, you can move the cursor
to point to the location where you want a DM command to operate, or
you can move the cursor into the DM input window to type the name
of a command.
In Chapter 1 of Getting Started With Your DOMAIN System you learned
how to use the touchpad, mouse, and directional keys to move the cursor
around the display. This section summarizes the DM commands and
control key sequences used to control cursor movement. Table 4-1 lists
the commands used to control the cursor. It also shows the predefined
directional keys on low-profile type keyboards. Predefined keys for
the 880 keyboard are described in Appendix B.
Table 4-1. Cursor Control Commands
Task
DM Command
Predefined Key
Move left one char.
AL
← (LA)
Move right one char.
AR
→ (LC)
Move up one line
AU
↑ (L8)
Move down one line
AD
↓ (LE)
Set arrow key scale
factors
AS x y
None
Controlling the Display
4-2
Table 4-1. Cursor Control Commands (continued)
Task
DM Command
Predefined Key
Move to the beginning
of line
TL
⇤ (L4)
Move to end of line
TR
⇥ (L6)
Move to top line in
window
TT
<SHIFT> ↑
(LDS)
Move to bottom line
in window
TB
<SHIFT> ↓
(LFS)
Tab to window
borders
TWB [ 1, r, t, b ]
Move to the beginning
of next line
AD;TL
Tab left
THL
Tab right
TH
Set tabs
TS [ n1 n2 ... ]
Move to DM input
pad
TDM
Move to next window
on screen
TN
Move to previous
window
TLW
Move to next window
in which input is
enabled
TI
NOTE:
None
CTRL/K
CTRL/<TAB>
<TAB>
None
<CMD>
(L5)
<NEXT_WNDW>
(L8)
CTRL/L
None
In this command summary table, the symbols enclosed
in parentheses are the unique DM keynames. Refer
to Chapter 3 for more information on key names and
defining keys. This note applies to all command
summary tables in this chapter.
4-3
Controlling the Display
Creating Processes
When you execute a program on a DOMAIN node, you run it in a
computing environment called a process. Each process that you create
is unique, providing a separate computing environment. Since the
DOMAIN system enables you to create multiple processes on your
node, you can run several programs simultaneously. You can create
and run up to 24 simultaneous processes.
The system associates each process that you create with a subject
identifier (SID). The SID identifies the owner of a process and consists
of the user’s name, project, organization, and node ID. SIDs enable
the system to control user access to processes and other objects on the
system. Chapter 8 describes how the system uses SIDs and Access
Control Lists (ACLs) to control access to system objects. By default,
the system assigns the same SID to each process that you create.
You can create processes that have pads and windows that let you enter
data and view program output. Or, you can create processes that run
without the use of the display. The type of process you create depends
on the program and its application.
To run an interactive program, for example, you create a process with
pads and windows. The Shell program that we supply with your system
is an interactive program. It prompts you for input (Shell commands)
and displays output.
We also supply a set of special programs called server programs that
provide you, or a program, with access to some service, such as the
use of a peripheral device. Server programs run in processes called
servers that you can create using any of the process creation commands
described in this chapter. Many of these servers run as background
processes without pads or windows.
Table 4-2 summarizes the commands used to create processes.
Controlling the Display
4-4
Table 4-2. Commands for Creating Processes
Task
DM Command
Predefined Key
Create new process,
pads, and windows
CP pathname
<SHELL>
(L5S)
Create new process
without pads or
windows
CPO pathname
None
Create a server
process
CPS pathname
None
Creating a Process with Pads and Windows
To create a process with input and output pads and windows to view
these pads, use the CP (CREATE_PROCESS) command in the
following format:
[region] CP pathname [options]
where region specifies the coordinates of the process window and
pathname specifies the pathname of the program you want the process
to execute. The process pads and windows that the CP command creates
enable you to supply input to programs and view program output.
The command in the following example creates a process that executes
an interactive program called COUNTER.BIN. The program prompts
for program input and displays its output to the process’s transcript
pad.
CP /HORACE/PROGS/COUNTER.BIN -N COUNTER
The -N option assigns the process the name COUNTER. When
COUNTER.BIN completes (or if you stop the program or process),
4-5
Controlling the Display
the input and transcript pads close. To delete the remaining process
window, type CTRL/N. Note that in this example, since no region is
specified, the DM uses its default window coordinates to create the
window (see the “Defining Default Window Positions” section later in
this chapter.)
One process that you’ll create frequently is a process that runs the
Shell program that we supply. You can create a process running “the
Shell” by pressing the < SHELL> key or typing the CP command with
the pathname /COM/SH as follows:
Command: CP /COM/SH
This command creates an input pad and a transcript pad, and opens
the input pad as standard input. (Standard input is where, by
default, a program gets user input.) In fact, the log-in start-up script,
/SYS/DM/STARTUP_ LOGIN executes this same command to set up
the initial Shell process that you see when you log in. Figure 4-1 shows
a process running the Shell.
Figure 4-1. A Process Running the Shell
Controlling the Display
4-6
To stop both the Shell program and its process, type CTRL/Z (CTRL/Z
signals the end of input) in the Shell’s process input pad. Then, to close
all the windows associated with the Shell’s process, type CTRL/N or
press <ABORT>. The “Controlling A Process” section describes how
to stop programs and processes. The “Closing Pads and Windows”
section describes how to close windows.
Creating a Process without Pads and Windows
To create a background process without associated pads and windows,
specify the CPO (CREATE_PROCESS_ONLY) command in the
following format:
CPO pathname [options]
where pathname specifies the pathname of the file that you want the
process to execute.
When you invoke the CPO command, the system assigns the created
process the SID of the process that invoked the CPO command. The
created process runs until the owner of the process logs out.
Suppose you wanted to create a process running the alarm server
program to monitor your disk usage, and to warn you when your disk
becomes 90% full. To create the process and start the alarm server,
specify the following command:
CPO /SYS/ALARM/ALARM_SERVER -DISK 90
In this example, the alarm server runs as a background process on your
node. When you log off, the process stops. The manual, Administering
Your DOMAIN System provides detailed information about the alarm
server and other servers.
If you include the CPO command in the DM boot script,
‘NODE_ DATA/STARTUP (see Chapter 2), the system assigns the
created process the SID, USER.SERVER.NONE.local_ node. In this
case, the created process continues to run regardless of who logs in
or out. You can perform this same function by executing the CPS
command from the DM input window.
4-7
Controlling the Display
Creating a Server Process
You can create a server process without pads and windows
that runs continually on your node by specifying the CPS
(CREATE_PROCESS_ SERVER) command in the following format:
CPS pathname [options]
where pathname specifies the pathname of the program you want the
process to execute.
Use the CPS command when you want to create a server that runs
regardless of whether anyone is logged in. For example, the following
command starts the mailbox server MBX_HELPER:
CPS /SYS/MBX/MBX_HELPER -N MBX_HELPER
In the example above, the -N option assigns the process the name
MBX_ HELPER.
You usually invoke CPS commands from your node’s boot script
(STARTUP) during start-up. (Chapter 2 describes the boot script
files the system uses when you start your node.) By including CPS
commands in your node’s boot script, you ensure that your servers
restart whenever you have to restart your node. You can also invoke
the CPS command from the DM input window.
Controlling a Process
Once you create a process, you can use the DM’s process control
commands to either stop it, suspend it, or restart it. Table 4-3
summarizes the DM commands used to control processes.
Controlling the Display
4-8
Table 4-3. Commands for Controlling a Process
Task
DM Command
Predefined Key
Quit, stop, or blast
a process
DQ [-b | -s | -c nn]
CTRL/Q
Suspend execution of
a process
DS
None
Resume execution of
a suspended process
DC
None
Stopping a Program or Process
To stop a program or an entire process, use the DQ (DEBUG_QUIT)
command in the following format:
DQ [options]
To stop a program, position the cursor inside the window of the process
and either type CTRL/Q or specify the DQ command without any
options. Either operation will generate a normal quit fault, which
interrupts the execution of the current program and returns the process
to the calling program (usually the Shell).
To stop an entire process, position the cursor inside the window of the
process. Then, specify the following DM command:
DQ -S
This command stops the current process and closes any open streams,
files, and pads. To delete the remaining window, move the cursor
inside the window and type CTRL/N.
If you want to stop a Shell process, move the cursor to the Shell’s
process input window and type CTRL/Z. Typing CTRL/Z in the
Shell’s process input window signals the completion of input and
4-9
Controlling the Display
stops both the Shell and the process. You may find this method easier
than using the DQ -S command.
Suspending and Resuming a Process
You can temporarily interrupt a process and then restart it using the DS
(DEBUG_ SUSPEND) and DC (DEBUG_CONTINUE) commands.
To interrupt a process, position the cursor inside the process window;
then specify the DS command. Later, to restart the process, position
the cursor inside the process window and specify the DC command.
Creating Pads and Windows
In order to read or edit a file, you must create a pad to hold it and a
window to view it. Table 4-4 summarizes the DM commands used to
create pads and windows for editing and reading files.
Table 4-4. Commands for Creating Pads and Windows
Task
DM Command
Predefined Key
Create an edit pad
and window
CE pathname
<EDIT>
(R4)
Create a read-only
window
CV pathname
<READ>
(R3)
Create a copy of an
existing pad and
window
CC
None
Before you can use the commands that create pads and windows, you
should understand just how the DM determines what boundaries to
assign to a new window.
Controlling the Display
4-10
When a window’s size or position on the screen is changed in any way,
the DM calculates the new boundaries of the window based on a pair
of points on the screen called a point pair. (Usually, you define the
first point in the pair with the DR command, and the second point
by the current cursor position. You may also provide absolute point
coordinates as described in the .. Defining Points and Regions” section
in Chapter 3.)
Each point in a point pair may specify either a new or existing edge of
a window, or a new or existing corner of a window. The DM creates a
new window based on the relationship between the x- and y-coordinates
of the two points.
The relationship between the two points in the point pair affects the
actions of the DM window-creation commands, CP, CE, CV, CC, and
the window-movement commands, WM, WME, WG, and WGE (see the
“Managing Windows” section). Table 4-5 shows how the DM defines
window boundaries according to the points given for window-creation
and window-movement commands.
Table 4-5. DM Rules for Defining Window Boundaries
Points that have equal y-coordinates
Create
Create a window bounded by the given xcoordinates, the top of the display, and the DM
command window. In other words, create a
full vertical window.
Move
Select the unobscured vertical edge nearest to
the first point and change the x-coordinate of
that edge to that of the second point.
Points that have equal x-coordinates
Create
Create a window bounded by the given ycoordinates and each side of the display. In
other words, create a full horizontal window.
Move
Select the unobscured horizontal edge nearest
to the first point, and change the y-coordinate
of that edge to that of the second point.
4-11
Controlling the Display
Table 4-5. DM Rules for Defining Window Boundaries
(continued)
Points that are equal
Create
Create a 512 by 512 window centered as nearly
as possible to the given cursor position.
Move
Select the unobscured corner nearest the given
point, and move the corner to that point.
Points that differ in both x and y
Create
Each set of coordinates form opposing corners
of the window.
Move
The first point selects the nearest unobscured
corner (this corner must be visible) and the DM
repositions the corner at the second point.
Only one point is given
(no DR is specified)
Create
Move
Controlling the Display
The DM uses one of its five default window
regions (see the “Defining Default Window
Positions” section), or it determines the
position by the last window creation or deletion
command as follows:
•
If the last command was window deletion
(WC), the default region is the same as
that for the deleted window.
•
If the last command was a successful
window-creation command, the default
region is the next third of the screen
•
If the last command was an unsuccessful
window-creation command, the default
region is the same as that specified in the
unsuccessful command.
Grow is illegal and move behaves as if both
points are equal.
4-12
Creating an Edit Pad and Window
To create an edit pad and window, specify the CE (CREATE_EDIT)
command in the following format:
[region] CE pathname
where pathname specifies the pathname of the file you want to edit. If
the file you specify exists, the CE command opens the file for editing.
If the file does not exist, the CE command creates a new file, assigns it
the pathname you specified, and opens it for editing. Note that the CE
command does not create a process; it opens a file for editing within
the current DM process.
Once you create an edit pad, you can use the DM edit commands to
manipulate the text that appears on the pad. Chapter 5 describes how
to use the DM edit commands to edit pads.
As described in Getting Started With Your DOMAIN System, you can
also create an edit pad and window using the <EDIT> key. When
you press <EDIT>, an “Edit File: “ prompt appears in the DM input
window, and the DM moves the cursor next to the prompt. To edit a
specific file, type the file’s pathname next to the prompt, and press
<RETURN> as shown in Figure 4-2.
Figure 4-2. Creating an Edit Pad and Window
4-13
Controlling the Display
Creating a Read-Only Pad and Window
A read-only pad and window is identical to an edit pad and window
with one exception: you cannot make changes to a read-only pad; you
can only read it. (Note, however, that you can copy text from a readonly pad.)
To create a read-only pad and window, specify the CV (CREATE_VIEW)
command in the following format:
[region] CV path name
where pathname specifies the pathname of the file you want to read.
If the file you specify exists. The CV command opens the file and
displays its contents. If the file does not exist, the DM displays the
following error message:
(CV) filename - Name not found
Note that the CV command does not create a process; it opens a file for
reading within the current DM process.
If the file you want to read is currently active in another window,
you can create another new pad and window to read it. You cannot,
however, edit a file while anyone else on the network has it open for
editing.
On occasion, you may create a read-only pad and window and decide
that you would like to make changes to the file. Instead of creating
a new edit pad and window for the file, you can either type CTRL/M
or specify the DM command, RO (set read/write mode), to change the
read-only pad to an edit pad. Chapter 5 describes how to use the RO
command to set a pad’s read/write mode.
You can also create a read-only pad and window using the <READ>
key. For a description of how to use the <READ> key, see Getting
Started With Your DOMAIN System.
Controlling the Display
4-14
Copying a Pad and Window
With the CC (CREATE_COPY) command, you can create a copy of
an existing pad and window and display it at a specific area on the
screen. Figure 4-3 illustrates how to use the CC command to copy a
pad and window.
Figure 4-3. Copying a Pad and Window
The numbers in Figure 4-3 correspond to the following steps:
1.
Mark opposite corners of the new window. To mark each
corner: first move the cursor to the point on the screen where
you want the corner to appear, then either press the <MARK>
key or specify the DR command. (Chapter 3 describes how to
use the DR command and <MARK> key to mark regions on
the display.)
2. Move the cursor inside the window you want to copy.
3. Specify the CC command.
4-15
Controlling the Display
This procedure creates a copy of the pad and window and displays
it at the location on the screen that you marked. If you issue the CC
command without marking the display region, the DM determines the
location according to the rules described earlier in the “Creating Pads
and Windows” section.
Closing Pads and Windows
When you finish reading or editing a pad, you can close the pad and
window using any of the commands listed in Table 4-6.
Table 4-6. Commands for Closing Pads and Windows
Task
DM Command
Close window and
pad; update file
PW; WC -Q
Close window and
pad; no update
WC -Q
Close (delete) a
window
WC [-Q | -F]
Predefined Key
<EXIT>
(R5)
<ABORT>
(R5S)
None
To delete (quit) a read-only or edit pad and associated windows,
position the cursor inside the window and either press <ABORT>
(on low-profile type keyboards only), type CTRL/N, or specify the
following command:
WC -Q
The -Q option causes WC to delete the pad and window without
saving the contents of the pad. If you modified the edit pad, you’ll
Controlling the Display
4-16
receive the following message in the DM input window asking you to
confirm your request to quit:
File Modified. OK to quit?
If you respond by typing Y or YES followed by <RETURN>, the WC
command deletes the pad and window without saving the contents of
the pad. If you respond N or NO, the system ignores the quit request
and returns the cursor to the edit pad.
If you modify an edit pad and want to save its contents (write its contents
to a file), either press <EXIT> (for low-profile type keyboards only),
type CTRL/Y, or specify the following command:
PW
The PW (PAD_WRITE) command copies the edited pad to a file that
has the same name as the original file. The system saves the contents
of the original pad in a file with the same name and the added suffix
.BAK. Once you’ve saved the pad, use WC to close the edit window.
Managing Windows
Window control commands enable you to change the size, position, and
characteristics of windows on the screen. You can use window control
commands to manage edit pad windows, or process windows. Table
4-7 summarizes the window control commands.
4-17
Controlling the Display
Table 4-7. Commands for Managing Windows
Task
DM Command
Predefined Key
Changing window size
WG
CTRL/G
Changing window size
with rubberbanding
WGE
<GROW>
(LA3)
Move a window
WM
None
Move a window
with rubberbanding
WME
Set scroll mode
WS [-on | -off]
CTRL/S
Set autohold mode
WA [-on | -off]
None
Scroll and autohold
mode
WA;WS
CTRL/A
Set hold mode
WH [-on | -off]
<HOLD>
(R6)
Define position of
default window “n”
WDF [n]
None
Acknowledge alarm
AA
None
Acknowledge alarm
and pop window
AP
None
<MOVE>
(LA3S)
Changing Window Size
Once you create a window on your screen, you can enlarge or shrink it
with the WGE (WINDOW_GROW_ECHO) command.
As shown in Figure 4-4, the WGE command displays a flexible border,
or rubberband, that changes as you move the cursor to enlarge or
shrink the window. The position of the rubberband shows you the size
and shape the window will become when you complete the operation.
Controlling the Display
4-18
Figure 4-4. Growing a Window Using Rubberbanding
Use the following procedure to change the size of a window:
1.
Move the cursor to the window corner or edge you want to
move.
2. Press the <GROW> key or specify the WGE command. A
rubberband border appears.
3.
Move the cursor to stretch or shrink the rubberband until the
rubberband matches the new size you want for the window.
4.
Either press the <MARK> key or specify the DR command to
complete the operation.
To cancel the procedure at any time, type CTRL/X or specify the
ABRT command.
4-19
Controlling the Display
If you have a mouse, you can change the size of a window by using
the left mouse key. To use the mouse to change the size of a window,
perform the following procedure:
1.
Move the cursor to the window corner or edge you want to
move.
2. Press and hold the left mouse key.
appears.
A rubberband border
3.
Holding the left key down, move the cursor to grow or shrink
the window.
4.
When the rubberband matches the new size you want for the
window, release the left mouse key.
Moving a Window
To move a window to another location on the display, use the WME
(WINDOW_MOVE_ECHO) command. The WME command, like
the WGE command, uses a rubberband border to show you the exact
position the new window will occupy.
1.
Use the following procedure to move a window:
2. Move the cursor to any corner of the window you want to
move.
3.
Press the <MOVE > key or specify the WME command. A
rubberband border appears.
4.
Move the cursor until the rubberband is at the new window
position.
Either press the <MARK> key or specify the DR;ECHO command
sequence to complete the operation,
To cancel the procedure at any time, type CTRL/X or specify the
ABRT command.
Controlling the Display
4-20
Pushing and Popping Windows
As you create multiple windows on your screen, you may begin to
stack windows one on top of another. Some windows will partially
obscure or completely hide others. To view hidden windows, use the
WP (WINDOW_POP) command in the following format:
WP [options] [window_name]
The WP command either pops a window to the top of the stack or pushes
a window to the bottom of the stack, depending on where you position
the cursor. Figure 4-5 illustrates how to push and pop windows.
Figure 4-5. Pushing and Popping Windows
If you position the cursor in a partially obscured window, the WP
command pops the window to the top of the stack. If you position the
cursor in a completely visible window (the window on top), WP pushes
the window to the bottom of the stack.
4-21
Controlling the Display
Use the following procedure to push or pop windows:
1.
Position the cursor inside the window you want to push or
pop.
2. Pop or push the window by either pressing the <POP> key
(on low-profile type keyboards only), typing CTRL/P, or
specifying the WP command.
You can also refer to a window you want to push or pop by specifying
the name of the window. To specify a window name, either enter it as an
argument to the WP command, or point to window name as follows:
1.
Use the cursor to point to a text string that contains the name
of the window you want to push or pop,
2. Press <MARK>, or specify DR to mark the window name.
3.
Specify the WP command.
This second method is useful when you’re displaying a list of all
windows that you currently have open (see the description of the CPB
command in the “Displaying the Members of a Window Group” section
later in this chapter).
Changing Process Window Modes
The DM provides several modes that control how the DM inserts text
into process input windows, and how process transcript windows
display program output. Table 4-8 describes these modes.
You control window modes by positioning the cursor inside the
process window and specifying window mode control commands. If
you specify a command without any options, the command toggles the
mode setting (turns it on or off depending on its current state).
Controlling the Display
4-22
Table 4-8. Process Window Modes
Mode
Description
Insert
Insert text in the input window rather
than overstrike.
Scroll
Output scrolls one line at a time.
Content of the window does not
change when the program sends
output to the pad.
Hold
Autohold
Window automatically enters hold
mode.
The window legend at the top of the process window displays a letter
code that indicates which modes are on. Figure 4-6 shows the mode
indicators and other components that make up the process window
legend.
Figure 4-6. Process Window Legend
4-23
Controlling the Display
By default, the window legend displays the letter I indicating that the
process input window is in insert mode. In insert mode, the DM inserts
characters you type at the current cursor position. The remainder of
the line moves to the right to make room for new characters.
With insert mode turned off, the process input window is in overstrike
mode, in which characters you type replace those under the cursor.
To turn insert mode on or off, specify the EI command in the following
format:
EI [-ON | -OFF]
If you do not specify an option, EI toggles the current mode.
To turn scroll mode on or off, specify the WS (WINDOW_ SCROLL)
command in the following format:
WS [-ON | -OFF]
With scroll mode turned on, the window displays output one line at
a time as the transcript pad moves beneath the window. With scroll
mode ·turned off, output does not appear a line at a time. Instead,
when the program finishes sending output to the transcript pad, the
window automatically displays the end of the pad and any new output.
Initially, all transcript pad windows have scroll mode turned on. The
window legend at the top of the window displays the letter S when
scroll mode is on. You can also toggle scroll mode on or off by typing
CTRL/S.
To turn hold mode on or off, specify the WH (WINDOW_HOLD)
command in the following format:
WH [-ON | -OFF]
When you turn hold mode on, the DM freezes the position of the
transcript pad beneath the window. The window will not display new
program output until you release the pad by turning hold mode off.
When you turn hold mode off again, the window automatically displays
the end of the transcript pad and any new program output.
Controlling the Display
4-24
Initially, all transcript pad windows have hold mode turned off. With
hold mode turned off, the window automatically displays new output
as the pad moves beneath it. The window legend displays the letter
H when hold mode is on. You can also turn hold mode on or off by
pressing the <HOLD> key.
To turn autohold mode on or off, specify the
(WINDOW_AUTOHOLD) command in the following format:
WA
WA [-ON | -OFF]
With autohold mode turned on, the window automatically turns hold
mode on under either of the following conditions:
•
A full window of output is available and none of it has been
displayed.
•
A form feed or create frame operation is output to the pad. In
this case, the window displays the output preceding the form
feed. When the window exits from hold mode, the output
following the form feed or create frame operation starts at the
top of the window.
To continue displaying output, turn hold mode off.
Initially, all transcript pad windows have auto hold mode turned off.
The window legend contains an A when autohold mode is on. You can
also turn autohold mode on or off by typing CTRL/A (which invokes
the commands WA;WS).
Defining Default Window Positions
The DM uses default window positions to determine where to display
the first five windows you create. To define any of the DM’s five
default window positions, specify the WDF (WINDOW_DEFAULT)
command in the following format:
[region] WDF [n]
where region specifies the position that the window will occupy on
the screen (see Table 4-5), and n specifies the identification number
of the default window you are defining. If you omit n, the WDF com-
4-25
Controlling the Display
mand causes the DM to discard any current window information and
begin creating windows using its default window boundaries.
The command in the following example defines the window position
for default window four. Note the format of the region definition.
(0,770) DR; (600,110) WDF 4
region
If you want to use your own default positions for each log-in session,
include WDF commands in your DM start-up script (STARTUP_ DM ).
Once you’ve defined your default window positions, you should add
the command WDF;CMS. This command instructs the DM to use the
first WDF command to set up the default position for the first window
you create. Otherwise, the DM uses the last WDF command in you
script to determine the default position of the first window you create.
For more information on DM start-up scripts, see “Understanding the
System at Log-In” section in Chapter 2.
Responding to DM Alarms
Whenever the DM writes output to a partially obscured or hidden
window, it sounds an alarm and displays a small pair of bells in the
alarm window. (See Chapter 2 in Getting Started With Your DOMAIN
System for a description of the DM alarm window.) To respond to an
alarm, specify either the AA or AP commands.
The AA command acknowledges the DM alarm by turning off the
current alarm and enabling further alarms (which may already be
waiting) .
The AP command acknowledges the DM alarm and pops to the top of
the stack, the window to which the alarm pertains. This command is
particularly useful when the window is completely hidden, and you
can’t point to it.
Controlling the Display
4-26
Moving Pads Under Windows
The DM pad control commands enable you to move a pad under a
window. Table 4-9 summarizes the pad control commands.
Table 4-9. Commands for Moving Pads
Task
DM Command
Predefined Key
Move top of pad into
window
PT
None
Move cursor to first
character in pad
PT;TT;TL
CTRL/T
Move bottom of pad
into window
PB
None
Move cursor to last
character in pad
PB;TB;TR
CTRL/B
Move pad n pages
PP [-]n
↑
↓
(LD, LF)
Move pad n lines
PV [-]n
<SHIFT> ↑
(L8S)
<SHIFT> ↓
(LES)
Move pad n
characters
PH [-]n
←
→
( L7, L9)
Save transcript pad
in a file
PN
None
Moving to the Top or Bottom of a Pad
Two DM commands enable you to move from the current position in
a pad to the top or bottom of a pad. The PT (PAD_TOP) command
moves the top line of a pad to the top of the current window. The
4-27
Controlling the Display
PB (PAD_BOTTOM) command moves the bottom line of a pad to the
bottom of the current window. Neither command accepts arguments
or options.
We also provide two predefined control key sequences that perform the
same functions as the PT and PB commands; they also move the cursor
to either the first or last character in the pad. To move the cursor to
the first character in the pad, type CTRL/T (defined as the command
sequence PT;TT;TL). To move the cursor to the last character in the
pad, type CTRL/B (defined as the command sequence, PB;TB;TR).
Scrolling a Pad Vertically
You can scroll a pad up or down by a specified number of lines or pages
using the vertical scroll commands or associated function keys. To
scroll a pad by pages, specify the PP (PAD_PAGE) command in the
following format:
PP [-]n
where n specifies the number (or fraction) of pages you want to scroll.
A positive n (n) scrolls the pad up n pages; a negative n (-n) scrolls
the pad down n pages. The DM considers a page the smaller of the
following values:
•
The number of lines that fit in a window.
•
The number of lines between the bottom of the window and the
next form feed or frame.
The command in the following example scrolls the pad down one and
one-half pages:
PP -1.5
We also provide two predefined keys that scroll a pad either up or down
one-half page at a time. Figure 4-7 shows the location of these keys.
Controlling the Display
4-28
Figure 4-7. Location of Pad Scroll Keys
To scroll a pad by lines, specify the PV (PAD_LINE) command in the
following format:
PV [-]n
where n specifies the number of lines you want to scroll. A positive
n (n) scrolls the pad up n lines; a negative n (-n) scrolls the pad down
n lines.
You can also use the two predefined function keys shown in Figure 4-7
to scroll a pad either up or down one line at a time. To scroll one line
at a time, press < SHIFT> and the pad scroll key simultaneously.
4-29
Controlling the Display
Scrolling a Pad Horizontally
To scroll a pad horizontally by a specified number of characters, use
the PH (PAD_HORIZONTAL) command or its associated function
keys. The PH command has the following format:
PH [-]n
where n specifies the number of characters you want to scroll. A
positive n (n) scrolls the pad to the left n characters; a negative n (-n)
scrolls the pad to the right n characters.
You can also use two predefined function keys to scroll a pad either
right or left 10 characters. Figure 4-7 shows the location of these
keys.
Saving a Transcript Pad in a File
Normally, the DM deletes a transcript pad when you stop the pad’s
process and delete all windows. To keep a log of the current transcript
pad and save the log in a file, specify the PN (PAD_NAME) command
in the following format:
PN pathname
where pathname specifies the pathname of the file where the DM saves
the contents of the pad. You must specify a pathname cataloged on
your node; you can not use a pathname cataloged on another node.
The PN command stores the current transcript pad in a file that remains
opened and locked until you stop the process and delete all windows.
Once you specify the PN command, the DM saves all current and
subsequent output written to the pad.
Controlling the Display
4-30
Using Window Groups and Window
Icons
The DM provides several commands that enable you to create window
groups, make these groups invisible, or use icons to represent them.
Table 4-10 summarizes the commands used to control window groups
and icons.
Table 4-10. Commands for Controlling Window Groups and
Icons
Task
DM Command
Predefined Key
Create or add to a
window group
WGRA grp-name
[entry_name]
None
Remove a window
from a window group
WGRR grp_name
[entry-name]
None
Make windows
invisible
WI [entry_name]
None
Change windows to
icons
ICON
[entry_name]
[character]
None
Set icon positioning
and offset
IDF
None
Display list of
windows in group
CPB group_name
None
Creating and Adding to Window Groups
When you create a window group, you establish a group name and
assign windows to the group. You can then make the window group
invisible or represent the group with icons by specifying the group
4-31
Controlling the Display
name. Groups can contain individual windows, as well as other groups
of windows.
To create a window group or add a window to an existing group, specify
the WGRA (WINDOW_GROUP_ADD) command in the following
format:
WGRA group_name [entry_name]
where group_ name specifies the name of the group you want to
create or add to, and entry_ name specifies the name of the window
or window group you want to add. For process windows, entry_ name
specifies the process name that appears in the window legend; for edit
pad windows, entry_ name specifies the pathname that appears in the
window legend.
You must specify the group_ name argument when you use this
command. If you omit the entry_ name argument, WGRA uses the
name of the window where you last positioned the cursor.
The commands in the following example create a window group:
WGRA SHELL_WINDOWS PROCESS_1
WGRA SHELL_WINDOWS PROCESS_2
WGRA SHELL_WINDOWS PROCESS_3
The first command creates a window group named SHELL _WINDOWS
and adds the window named PROCESS_ 1 to the group. The remaining
commands add additional windows (PROCESS_ 2 and PROCESS_ 3) to
the SHELL _WINDOWS group.
Removing Entries from Window Groups
To remove an entry (window or window group) from a window group,
specify the WGRR (WINDOW_GROUP_REMOVE) command in the
following format:
WGRR group_name [entry_name]
where group_ name specifies the name of the group that contains
the entry you want to remove, and entry_ name specifies the window
name or window group name you want to remove. You must specify
the group_ name argument when you use this command. If you omit
Controlling the Display
4-32
the entry_ name argument, WGRR uses the pathname of the window
where you last positioned the cursor.
The command in the following example removes a window named
PROCESS_ 1 from the group named SHELL _WINDOWS:
WGRR SHELL_WINDOWS PROCESS_1
Making Windows Invisible
To control whether a window or window group is visible or invisible,
specify the WI (WINDOW_INVISIBLE) command in the following
format:
WI [entry_name] [-W] [-I]
where entry_ name specifies the name of the window or window group
you want to make visible or invisible. If you omit the entry_ name
argument, WI uses the pathname of the window where you last
positioned the cursor.
The -W option forces the window or group to appear as a window;
the -I option forces the window or group to become invisible. If you
specify the WI command without either of these options, WI toggles
the setting (makes the window or group visible or invisible, whichever
is the opposite of its current state).
The command in the following example makes the window group
SHELL _WINDOWS invisible:
WI SHELL_WINDOWS -I
Using Icons
You use icons to represent a window or group of windows on your
display. Because icons are small, they enable you to keep windows
and window groups easily accessible without having them open on the
display.
Icons are very similar to the windows they represent. For example,
you can move icons with the WME command (see the “Moving a
Window” section discussed earlier), or you can set the position on
4-33
Controlling the Display
the screen where icons will appear by default. You cannot, however,
change the size of an icon on the display.
The DM displays an icon as a small window containing a specific icon
symbol. The icon symbol describes the type of information the related
window or group contains. Figure 4-8 shows the default icon for Shell
process windows.
Figure 4-8. Default Icon for Shell Process Windows
To either change a window or window group into an icon, or to change
an icon into the window or group it represents, specify the ICON
command in the following format:
ICON [entry_name] [-I] [-W] [-C ‘char’]
where entry_ name specifies the name of the window or window
group you want to change into an icon, or change back into a window.
If you specify the name of a window group as the entry name, the
ICON command changes each window in the group. If you omit the
entry_ name argument, ICON uses the window where you last positioned
the cursor.
Controlling the Display
4-34
The -W option forces the specified window or window group to appear
as a window; the -I option forces the specified window or group to
change to an icon. If you specify the ICON command without either of
these options, ICON toggles the setting (changes the window or group to
the opposite of its current state). The easiest way to change individual
windows and icons is to position the cursor inside the window or icon
and specify the ICON command.
The ICON command also accepts the -C option that allows you to
specify which icon you want to use. Before we look at an example,
let’s look at how the system uses icons, and where it stores them.
The system uses certain default icons that we supply to represent
specific types of windows. For example, whenever you change a Shell
process window into an icon, the system, by default, uses the icon
shown in Figure 4-8. Similarly, the system uses a special EDIT icon
to represent read/edit windows. Many application programs that we
supply also represent their specific process windows with their own
specific default icons.
The system stores the default icons in a font file named
/SYS/DM/FONTS/ICONS. (Note that this file is not an ASCII file;
you cannot read it.) You can examine this file by using the EDFONT
(EDIT_FONT) program described in the DOMAIN System Command
Reference. You can also use ED FONT to create your own icons or
change those the system uses by default.
Each icon in the font file ICONS is associated with a specific keyboard
character. For example, the default Shell icon is associated with the
lowercase “s” character. When you create an icon, you first choose a
character, and then use EDFONT to transform the character into an icon
symbol. (This is how we created the default icons that the system and
various application programs use.) To use your own icon once you’ve
created it, specify its associated character name with the -C option.
The -C option allows you to specify the character associated with the
icon you want to use. For example, suppose you used EDFONT to
create your own icon associated with the uppercase “F ” character in
the ICONS file. To use this icon to represent the read/edit window
JUNE_ REPORT, use the following command:
ICON JUNE_REPORT -I -C F
4-35
Controlling the Display
In this example, the ICON command directs the DM to change the read/
edit window JUNE_ REPORT into an icon. Normally, the DM uses the
default icon for read/edit windows. The -C option directs the DM to use
the icon associated with the character F in /SYS/DM/FONTS/ICONS
instead of the default read/edit icon.
Setting Icon Default Position and Offset
The DM allows you to set the position of an icon on your screen and
specify an offset that the DM uses to determine the positions of the
next icons you create. The offset value specifies the position of new
windows relative to the position of the previous icon.
By default, the DM displays icons in a horizontal line across the
top of portrait displays, and in a vertical line along the right side of
landscape displays. The default offset is the width of one icon (60 bits);
horizontally for portrait displays, vertically for landscape displays.
With the IDF (ICON_DEFAULT) command, you can change the
default positioning and offset of an icon, or to establish the position of
an icon you create in a script. You can use the IDF command in any
of the following ways:
•
Move the cursor to the desired default icon position. Press
the <MARK> key or specify the DR command to mark the
position. Specify the IDF command to set the new position.
Since you did not specify an offset value, the DM places any
new icons that you create at this one position.
•
Move the cursor to the desired default icon position. Press
the <MARK> key or specify the DR command to mark the
position. Move the cursor to indicate the offset vector for the
next icon. Specify the IDF command to set the new position
and offset.
•
Specify the icon position and offset explicitly in the following
command line format:
(position) DR; (offset) IDF
where position specifies the x- and y-coordinates of the icon
position and offset specifies the coordinates of the offset vec-
Controlling the Display
4-36
tor. For example, the following command line sets an icon
position and offset:
(800,10) DR; (850,60) IDF
This command sets the position for the first icon at bit position
(800,10). The next icon will appear at bit position (850,60),
an offset of (50,50) from the original position. Refer to the
“Defining Points and Regions” section in Chapter 3 for more
information.
Displaying the Members of a Window Group
To display a list of windows in a specific group, use the CPB
(COPY_PASTE_BUFFER) command in the following format:
CPB group_name
where group_ name specifies the name of the window group you want to
list. The group_ name refers to a paste buffer that contains the names
of the windows in the group. The CPB command creates a window to
the paste buffer you specify as the group_ name and displays the paste
buffer’s contents. For example:
CPB MY_GROUP
This command displays the names of all the windows in the window
group MY_ GROUP. A paste buffer named MY_ GROUP contains these
window names.
The DM automatically creates three special paste buffers to help you
manage your windows and icons. Table 4-11 describes these paste
buffers.
To list the contents of one of these special paste buffers, specify the
CPB command with the special group_ name as follows:
This command opens the paste buffer INVIS_ GROUP that contains the
names of all the windows you’ve made invisible.
4-37
Controlling the Display
Table 4-11. Window Paste Buffers
Mode
Description
INVIS_GROUP
Contains the pathnames of all the windows
that you’ve made invisible.
ICON_GROUP
Contains the pathnames of all the windows
represented by icons.
ALL_GROUP
Controlling the Display
Contains the pathname of every window
open on your node, including: Shell process
windows, DM windows, visible and invisible
windows, and windows represented by icons.
4-38
CHAPTER
5
Editing a Pad
Chapter 4 describes how to create pads and windows to read and
edit files. This chapter describes how to use the DM to control the
characteristics of edit pads, and how to edit text.
Each section in this chapter describes a set of editing tasks and the DM
commands you use to perform them. You can execute a DM command
either from a DM script or interactively by specifying the command in
the DM input window. In many cases, you can execute a DM editing
command by typing a function key or control key sequence.
The command summary tables at the beginning of each section list the
DM commands, related function keys, and control key sequences used
to perform a specific set of editing tasks. Note that the predefined
keys listed in these tables apply only to low-profile type
5-1
Editing a Pad
keyboards. For a description of the predefined keys for the 880
keyboard, refer to Appendix B.
Chapter 3 explains how to specify DM commands from the keyboard and
from scripts, and how to use function keys and control key sequences.
For a complete description of all the DM editing commands described
in this chapter, refer to the DOMAIN System Command Reference.
Setting Edit Pad Modes
All edit pads are controlled by a very important feature of the DM:
the modes in which the DM currently operates. The modes determine
whether you can make changes to the material in the pad, and whether
the DM either inserts characters that you type or overstrikes them.
Table 5-1 summarizes the DM commands used to change edit pad
modes.
Table 5-1. Commands for Setting Edit Modes
Task
DM Command
Predefined Key
Set read/write
mode
RO [-ON | -OFF]
CTRL/M
Set insert/overstrike
mode
EI [-ON | -OFF]
<INS>
(L1S)
Figure 5-1 shows the window legend for edit pads. The edit pad
window legend provides information about a window’s characteristics,
such as the pathname of the file and current window modes. The edit
pad window legend also displays the line number of the line at the top
of the window and the horizontal offset, which indicates the number
of columns the window has been scrolled sideways over the pad. The
horizontal offset number appears only when you scroll the window
sideways over the pad.
Editing a Pad
5-2
Figure 5-1. The Edit Pad Window Legend
Setting Read/Write Mode
Edit pads can be in read-only mode or write mode. In read-only mode,
you cannot write to or make changes to the text in a pad. However, you
can copy, search for, and scroll the text. In write mode, you can write
to a pad and change text using all of the editing commands described
in this chapter.
When a pad is in read-only mode, the letter R appears in the window
legend as shown in Figure 5-1. The R disappears in write mode.
To turn read-only mode either on or off, specify the RO command in
the following format:
RO [-ON | -OFF]
The -ON option instructs RO to set the pad to read-only mode. The
-OFF option causes RO to set the pad to write mode (i.e., it turns readonly mode off). If you do not specify an option, the RO command
toggles the current mode setting.
You can also toggle the current setting by typing CTRL/M.
CTRL/M sequence invokes the RO command without options.
The
If you’ve modified the text in a pad, you cannot change the pad to
read-only mode without first writing the changes to a disk file (saving
5-3
Editing a Pad
the file). The PW command, described in the “Updating an Edit File”
section, allows you to write your changes to a disk file without closing
the pad and window.
Setting Insert/Overstrike Mode
The DM has two modes to control how text is added to a pad: insert
mode or overstrike mode. In insert mode, the DM inserts characters
you type at the current cursor position. The remainder of the line
moves right to make room for the new characters.
In overstrike mode, characters you type replace, or “overstrike,” those
under the cursor. Overstrike mode is useful when you want to enter
text into a pre formatted file without disrupting the file’s format.
When a pad is in insert mode, the letter I appears in the window legend
as shown in Figure 5-1. The I disappears in overstrike mode. All pads
are initially in insert mode, although this is irrelevant if the pad is also
read-only.
To turn insert mode either on or off, specify the EI command in the
following format:
EI [-ON | -OFF]
The -ON option instructs EI to set the current pad to insert mode. The
-OFF option causes EI to set the pad to overstrike mode (i.e., it turns
insert mode off). If you do not specify an option, the EI command
toggles the current mode.
You can also toggle the current mode by pressing <INS>. This key
invokes the EI command without options.
Inserting Characters
Any pad that is in write mode automatically accepts anything that you
type at the keyboard as input to that pad. The commands listed in
Table 5-2 perform special insertion functions.
Editing a Pad
5-4
Table 5-2. Commands for Inserting Characters
Task
DM Command
Predefined Key
Insert string at
cursor
ES ‘string’
Insert NEWLINE
character
EN
Insert a new line
after current line
TR;EN;TL
<F1>
Insert raw (no echo)
character
ER nn
None
Insert end-of-file
mark
EEF
Default DM operation
<RETURN>
CTRL/Z
Inserting a Text String
When a pad is in write mode, the DM inserts any text character you
type at the current cursor position. This is the default Display Manager
action. If you try to type text into a read-only pad, the DM displays an
error message in the DM output window.
To insert a text string at the current cursor position, specify the ES
command in the following format:
ES ‘string’
The ‘string’ argument is the text that you want to insert. Enclose the
text in single quotes (‘’).
The ES command inserts a string of text at the current cursor position.
Since text insertion is the default action, you’ll probably find this
command most useful in key definition commands where you want
some text written out when the key is pressed. Chapter 3 describes
how to define keys to perform DM functions.
5-5
Editing a Pad
Inserting a NEWLINE Character
The NEWLINE character marks the end of the line.
To insert a NEWLINE character at the current cursor position, either
press <RETURN> or specify the EN command. When you insert a
NEWLINE character, the cursor moves to the beginning of the next
line.
Inserting a New Line
To insert a new, blank line following the current line, specify the
following command sequence:
TR;EN;TL
The TR command moves the cursor to the end of the line, EN inserts
(or overstrikes) a NEWLINE character, and TL moves the cursor to the
beginning of the next line.
By default, the <F1> key invokes the TR;EN;TL command sequence.
Inserting an End-of-File Mark
To insert an end-of-file mark (EOF) in a pad, type CTRL/Z or specify
the EEF command. If the line containing the cursor is empty, the DM
inserts the end-of-file mark on that line. Otherwise, the DM inserts
the end-of-file mark following the current line.
It is a common (although not universal) convention for programs to
terminate execution and return to the process that called them when
they receive an end-of-file mark on their standard input stream.
The Shell is such a program. When the top-level program in a process
(usually /COM/SH) returns, the process stops and all of its streams are
closed. The DM then closes and deletes the Shell’s process input pad
and window, and closes the transcript pad.
Whether or not the DM also deletes the transcript window depends
on the setting of its auto-close mode. If auto-close mode is disabled
(the default setting), then you must manually delete any windows as-
Editing a Pad
5-6
sociated with the closed transcript pad by using the DM command
WC -Q, or CTRL/N. The “Closing Pads and Windows” section in
Chapter 4 describes the WC -Q command and CTRL/N. See the WC
command description in the DOMAIN System Command Reference for
more information about auto-close mode.
Deleting Text
The commands listed in Table 5-3 delete characters, words, or lines
of text. To delete a larger block of text, refer to the “Cutting Text”
section.
Table 5-3. Commands for Deleting Text
Task
DM Command
Predefined Key
Delete character
at cursor
ED
<CHAR DEL>
(L3)
Delete character
before cursor
EE
<BACK SPACE>
(BS)
Delete “word”
of text
DR;/[~A-Z0-9$_]/XD
<F6>
Delete from
cursor to end
of line
ES ‘‘;EE;DR;TR;
XD;TL;TR
<F7>
Delete entire
line
CMS;TL;XD
<LINE DEL>
(L2)
Deleting Characters
To delete the character under the cursor, press <CHAR DEL> or specify
the ED command. If the character under the cursor is a NEWLINE,
ED joins the current line and the following line.
5-7
Editing a Pad
To delete the character to the left of the cursor, press <BACK SPACE >
or specify the EE command. If the pad is in overstrike mode, the EE
command replaces the character with a blank.
Both <CHAR DEL> and <BACK SPACE> are repeat keys. You can
repeat the operation by holding down the key.
Deleting Words
To delete a word of text at the current cursor position, press the
predefined function key <F6>. In this case, a “word” consists of a
string of characters that may include a tilde (~) in the first position
of the word, upper or lowercase letters, numbers, dollar signs ($), or
underscores (_). The deletion stops at the next space, punctuation
mark, or special character (other than a dollar sign or underscore).
Here are some examples of character strings that <F6> will delete:
$FILE, my_ file3, ~REPORT.
The <F6> function
DR;/[~A-Z0-9$_]/XD.
key
invokes
the
command
sequence
The DM writes the deleted word to its default paste buffer (a temporary
file). You can reinsert the word elsewhere by moving the cursor to
the desired location and either pressing <PASTE> or specifying’ the
XP command. For more information about paste buffers and the XP
command, see the “Copying, Cutting, and Pasting Text” section.
Deleting Lines
To delete text from the current cursor position to the end of the line
(excluding the NEWLINE character), press the predefined function
key <F7>. The <F7> key invokes the following command sequence:
ES ‘ ’;EE;DR;TR;XD;TL;TR
The DM writes the deleted line to its default paste buffer. You can
reinsert the line elsewhere by either pressing <PASTE> or specifying
the XP command. For more information about paste buffers and the
XP command, see the “Copying, Cutting, and Pasting Text” section.
Editing a Pad
5-8
Defining a Range of Text
The editing commands that perform cut (delete), copy, and substitute
functions operate on a range, or block, of text. You mark a range of
text just as you would mark any other region in a pad (see the “Defining
Points and Regions” section in Chapter 4). However, you may not
declare a range as an argument to an editing command. You must use
the DR command or the <MARK> key before specifying the editing
command.
To use the DR command to define a range of text, define two points
as follows:
[point] DR; [point]
The first point defines the beginning of the range, and the DR command
marks it. The second point defines the end of the range. If you do
not specify literal points, DR places the marks at the current cursor
position.
An easy way to define a range of text is to point with the cursor and
use the <MARK> key. The <MARK> key invokes the DR and ECHO
commands, which mark the first point and begin highlighting the text.
Figure 5-2 illustrates how the DM highlights the text as you move the
cursor to the end of the range.
To define a range of text using the cursor and <MARK>, follow this
procedure:
1.
Move the cursor to the first point (the beginning of the range
of text).
2. Press <MARK>.
3.
Move the cursor to the second point (the end of the range).
4.
Specify the appropriate DM editing command.
Please note that the character under the cursor at the end of the range
is not included within the range.
5-9
Editing a Pad
Figure 5-2. Defining a Range of Text with <MARK>
Copying, Cutting, and Pasting Text
The commands listed in Table 5-4 copy, cut, and paste a range of text.
They allow you to move blocks of text from one place to another in a
pad (or between pads).
Before specifying the commands that copy or cut text, use the DR
command or <MARK> to define the range of text to be copied or cut
(see the previous section). If you do not define a range, the DM copies
or cuts the text from the current cursor position to the end of the line.
Editing a Pad
5-10
Table 5-4. Commands for Copying, Cutting, and
Pasting Text
Task
DM Command
Predefined Key
Copy text to a paste
buffer or file
XC [name | -f
pathname] [-R]
<COPY>
(L1A)
Cut (delete) text
and write it to a
paste buffer or file
XD [name | -f
pathname] [-R]
<CUT>
(L1AS)
Paste (write) text
from a paste buffer
or file into a pad
XP [name | -f
pathname] [-R]
<PASTE>
(L2A)
Using Paste Buffers
To perform copy, cut, and paste operations, the DM uses temporary
files called paste buffers. Paste buffers hold text you’ve copied or cut
so that you can paste it in elsewhere.
You can create up to 100 paste buffers, each containing different
blocks of text. To create a paste buffer, you specify a name for the
paste buffer as an argument to the commands that copy or cut text (XC
and XD). To insert the contents of a paste buffer you have created,
specify the name of the paste buffer as an argument to the command
that pastes text (XP). We describe the XC, XD, and XP commands in
the next three sections.
When you log off, the DM deletes all paste buffers you have created
during the session. If you want to save the copied or cut text for use
during another session, you can write it to a permanent file (see the XC
and XD command descriptions in the next two sections).
If you do not specify the name of a paste buffer or permanent file when
you specify the commands that copy or cut text, the DM writes the text
to its default (unnamed) paste buffer. The DM also uses this default
paste buffer when you press the predefined function keys and control
key sequences that copy, delete, and paste text.
5-11
Editing a Pad
NOTE:
In a paste buffer, the DM saves only the text copied or
deleted during the last DM operation. Therefore, do not
write anything else to the paste buffer until you have
reinserted its contents. Otherwise, you will lose the text
you’re attempting to move.
Copying Text
To copy a defined range of text from any pad into a paste buffer or file,
specify the XC command in the following format:
XC [name | -f path name] [-R]
where name specifies the name of a paste buffer that the DM creates to
hold the copied text. The -f pathname option specifies the name of a
permanent file for the text. For example:
XC copy_text
copies a defined range of text into a paste buffer named copy_ text.
Here is another example:
XC -f copy_text
copies a defined range of text into a permanent file named copy_ text.
If you supply the name of an existing paste buffer or file, XC overwrites
its contents with the newly copied text. If you omit the name of a
paste buffer or permanent file, XC writes the copied text to the default
(unnamed) paste buffer.
The -R option instructs XC to copy a rectangular block of text that you
have defined by marking the upper left and lower right corners of a text
region. To define the region, use the cursor and the DR command or
<MARK> to specify the left corner, then move the cursor to specify
the right corner. If you specify a column (the left and right corners in
the same column), XC copies all characters to the right of the column.
Figure 5-3 shows the two cursor positions used to mark the column.
The dotted rectangle shows the block of text that the XC -R com-
Editing a Pad
5-12
mand copies. (The dotted rectangle is only for the purpose of
illustration; it does not appear on your display.)
Figure 5-3. Copying Text with the XC -R Command
By default, the <COPY> key invokes the XC command using the
default (unnamed) paste buffer. You must specify the XC command
with the name argument or the -f pathname option if you want to copy
text to a named paste buffer or permanent file.
Once you have copied a range of text, you can use the XP command to
paste the text in elsewhere (see the “Pasting Text” section).
Copying a Display Image
To copy a display image into a graphics map file (GMF), use the XI
command in the following format:
XI [-F pathname]
where -F pathname specifies the name of the file you want to store the
display image. If you omit the -F option, the system writes the image
to ‘NODE_ DATA/PASTE_ BUFFERS/DEFAULT.GMF.
5-13
Editing a Pad
Once you copy the image to a file, you can print the file using the PRF
command with the -PLOT option as follows:
PRF MY_FILE.GMF -PLOT
To use the XI command, mark the range of the display you want to
copy. If you do not specify a range, XI copies the entire window in
which the cursor is positioned. Note that if you want to copy the whole
screen, use the Shell command CPSCR (COPY_ SCREEN). Chapter
7 describes the CPSCR command.
Cutting Text
When you cut text from a pad, the DM copies the text into a paste
buffer or file and then deletes it from the pad. To cut a defined range
of text, specify the XD command in the following format:
XD [name | -f pathname] [-R]
where name specifies the name of a paste buffer that the DM creates
to hold the deleted text. The -f pathname option specifies the name of
a permanent file for the text. You can use this command only in pads
created with <EDIT> or the CE command.
If you supply the name of an existing paste buffer or file, XD overwrites
its contents with the newly deleted text. If you omit the name of a
paste buffer or permanent file, XD writes the deleted text to the default
(unnamed) paste buffer.
The -R option instructs XD to delete a rectangular block of text that
you have defined by marking the upper left and lower right corners of a
text region. To define the region, use the cursor and the DR command
or <MARK> to specify the left corner, then move the cursor to specify
the right corner. If you specify a column (the left and right corners
in the same column), XD deletes all characters to the right of the
column.
By default, the <CUT> key invokes the XD command using the default
(unnamed) paste buffer. You must specify the XD command with the
name argument or the -f pathname option to write deleted text to a
named paste buffer or permanent file, respectively.
Editing a Pad
5-14
Once you have cut a range of text, you can use the XP command
(described in the next section) to paste the text in elsewhere.
Pasting Text
To insert the contents of a paste buffer or file into a pad at the current
cursor position, specify the XP command in the following format:
XP [name | -f pathname] [-R]
where name specifies the name of an existing paste buffer that contains
the text you want to insert. The -f pathname option specifies the name
of an existing file that contains the text you want to insert. If you do
not specify the name of a paste buffer or permanent file, XP inserts the
contents of the default (unnamed) paste buffer.
You can use this command only in pads created with <EDIT> or the
CE command.
The -R option instructs XP to insert a rectangular block of text that
you have copied or deleted using the XC or XD command and the -R
option. XP uses the current cursor position as the origin (upper left
corner) of the block.
By default, the <PASTE > key invokes the XP command using the
contents of the default (unnamed) paste buffer. You must specify the XP
command with the name argument or the -f pathname option to insert
the contents of a named paste buffer or permanent file, respectively.
5-15
Editing a Pad
Using Regular Expressions
The DM search and substitute operations (described in the next
several sections) allow you to use special notation, called regular
expressions, to specify patterns for search and substitute text strings.
You can also use regular expressions with the Shell commands ED
(EDIT), EDSTR (EDIT_STREAM), FPAT (FIND_PATTERN), FPATB
(FIND_PATTERN_BLOCK), and CHPAT (CHANGE_PATTERN).
See the DOMAIN System Command Reference for descriptions of these
Shell commands.
Regular expressions permit you to concisely describe text patterns
without necessarily knowing their exact contents or format. You can
create expressions to describe patterns in particular positions on a
line, patterns that always contain certain characters and at times may
include others, or patterns that match text of indefinite length.
Table 5-5 provides a list of the characters used to construct regular
expressions and a brief description of their functions.
CAUTION:
Editing a Pad
The special characters described in Table 5-5 apply
only to regular expression operations.
Some of
these characters also have meanings (often radically
different) in Shell commands and other software
products. If you want to use a regular expression as a
part of one of those Shell commands or products, be
sure to enclose the expression in quotation marks so
that it will not be misinterpreted.
5-16
Table 5-5. Characters Used in Regular Expressions
ASCII Character
Any standard ASCII character (except those listed in this table)
matches one and only one occurrence of that character. By
default, the case of the characters is insignificant. Use the SC
(SET_CASE) command to control case significance (see the
“Setting Case Comparison” section). The following examples
are all valid expressions:
SAM
fred12
Joe(a&b)
Percent Sign (%)
A percent sign (%) at the beginning of a regular expression
matches the empty string at the beginning of a line. If a %
is not the first character in the expression, it simply matches
the percent character. Use this special feature to mark the
beginning of a line in a regular expression. For example:
%Print matches the string in line a but not line b because
in line b, Print is not at the beginning of the line.
(a) Print this file
(b) This Print file
Dollar Sign ($)
A dollar sign ($) at the end of a regular expression matches the
end-of-line character (null) at the end of a line. If $ is not the
last character in the expression, it simply matches the dollar
sign character. Use this special feature to mark the end of a
line in a regular expression. For example:
file$ matches the string in line a, but not line b, because in
line b, file is not followed by an end-of-line marker.
(a) Print this file
(b) This file is permanent
5-17
Editing a Pad
Table 5-5. Characters Used in Regular Expressions
(continued)
Question Mark (?)
A question mark (?) matches any single character except a
NEWLINE character. The only exception to this is when the ?
appears inside a character class (see the” [string]” description
in this table), in which case it represents the question mark
character itself. For example:
?OLD??? matches the strings in lines a and b, but not line c,
because in line c the letters “OLD” are alone on the line:
(a) HOLDING
(b) FOLDERS
(c) OLD
Asterisk (*)
An asterisk (*) following a regular expression matches zero or
more occurrences of that expression. The only exception to this
is when the * appears inside a character class (see the “ [string]
“ description in this table) , in which case it represents the
asterisk character itself. Matching zero or more occurrences
of some pattern is called a closure. An expression used in
a closure will never match a NEWLINE character. Here are
some examples:
a*b matches the strings b, ab, aab, etc.
%a?*b matches any string that begins with a and ends with b,
and that is also the first string in the line. Any number of other
characters can come between a and b.
[A-Z] [A-Z] [A-Z] * matches any string containing at least two
(and possibly more) uppercase characters (see the “ [string]”
description in this table). Strings like Mary would not match,
since Mary does not begin with two uppercase characters.
Editing a Pad
5-18
Table 5-5. Characters Used in Regular Expressions
(continued)
[string]
A string of characters enclosed in square brackets [string]
is called a character class. This pattern matches anyone
character in the string but no others. Note that the other regular
expression characters % $ ? * lose their special meaning
inside square brackets, and simply represent themselves. For
example:
[sam] matches the single character s, a, or m. (If you want
to match the word sam, omit the square brackets.)
[~string]
A string enclosed in square brackets whose first character is
a tilde [~string] matches any single character that does not
appear in the string. If a tilde (~) is not the first character
in the string, it simply matches the tilde character itself. For
example:
[~sam] matches any single character except s, a, or m.
[letter-letter] or [digit-digit]
Within a character class, you can specify anyone of a range
of letters or digits by indicating the beginning and ending
characters separated by a hyphen (-). F or example:
[A-Z] matches any single uppercase letter in the range A
through Z.
[a-z] matches any single lowercase letter in the range a
through z.
[0-9] matches any single digit in the range 0 through 9.
5-19
Editing a Pad
Table 5-5. Characters Used in Regular Expressions
(continued)
Remember, though, that the actual search ignores case unless
you have used the SC command to specify a case-sensitive
search (see the “Setting Case Comparison” section). The
range can be a subset of the letters or digits. However, the
first and last characters in the range must be of the same type:
uppercase letter, lowercase letter, or digit. For example, [a-n]
and [3-8] are valid expressions. [A-9] is invalid.
Note that a hyphen (-) has a special meaning inside square
brackets. If you want to include the literal hyphen character
in the class, it must be either the first or last character in the
class (so that it does not appear to separate two range-marking
characters), or you can precede the hyphen with the escape
character @ (see the @ description in this table).
The right bracket ( ] ) also has special meaning inside a
character class; it closes the class descriptor list. If you want
to include the right bracket in the class, precede it with the
escape character @ (see the @ description in this table). For
example:
[a-d] matches any single occurrence of a, b, c, or d.
%[A-Z] matches any uppercase letter that is also the first
character on the line.
5-[1-9][0-9]* matches any of the page numbers in this
chapter.
[0A-Z] matches any string containing a zero or an
uppercase letter.
[~a-z0-9] matches any uppercase letter or punctuation
mark (i.e., no lowercase letter or digit).
Editing a Pad
5-20
Table 5-5. Characters Used in Regular Expressions
(continued)
At Sign (@)
The at sign (@) is an escape character. Characters preceded by
the @ character have special meaning in regular expressions,
as indicated in the following list:
@n matches a NEWLINE character.
@t matches a tab character. Note, however, that the
<TAB> key does not insert a tab character. It simply
moves the cursor to the display’s next tab stop. In a regular
expression, @t matches only tab characters that have been
inserted with @t.
@f matches a form feed character.
In addition, you can use the escape character inside a character
class to specify literal occurrences of a hyphen (-) or a right
bracket (D. You may also use the @ character to specify a
literal occurrence of the other special characters used in
regular expressions: % $ ? * @. For example:
[A-Z@-@]] matches any uppercase letter, a hyphen, or a
right bracket.
@?@* matches a question mark followed by an asterisk,
rather than zero or more occurrences of any character
(?*).
{expr}
You can “tag” parts of a regular expression to help rearrange
pieces of a matched string. The DM remembers a text pattern
surrounded by braces {expr} so that you can refer to it with @n,
where n is a single digit referring to the string remembered by
the nth pair of braces. For example:
5-21
Editing a Pad
Table 5-5. Characters Used in Regular Expressions
(continued)
S/{???} {?*}/@2@1/
S is the DM command for substituting strings of text (see the
“Substituting All Occurrences of a String” section). This
example of the S command moves a three-character sequence
from the beginning of a line to the end of the line. ??? matches
the first three characters of the line, and ?* matches the rest of
the line. The @2 expression refers to the string ?* inside the
second pair of braces, and @l refers to the string ??? inside the
first pair of braces. For example:
SO/{?} {?}/@2@1/
SO is also a DM command for substituting strings of text, but
it only substitutes the first occurrence of the first pattern on
a line (see the “Substituting the First Occurrence of a String”
section). This example of the SO command transposes two
characters beginning with the one under the cursor. This can
be a handy key definition if you often type ie for ei, etc.
Editing a Pad
5-22
Searching for Text
The search operations shown in Table 5-6 locate strings of characters
in a pad. You describe the string pattern using regular expressions (see
the previous section).
Table 5-6. Commands for Searching for Text
Task
DM Command
Predefined Key
Search forward for
string
/string/
None
Search backward for
string
\string\
None
Repeat last forward
search
//
CTRL/R
Repeat last backward
search
\\
CTRL/U
Cancel search or any
action involving the
ECHO command
ABRT
CTRL/X
Set case comparison
for search
SC [-ON] [-OFF]
None
To search forward from the current cursor position, enclose the regular
expression in slashes as follows:
/string/
To search backward from the current cursor position, enclose the
regular expression in backslashes as follows:
\string\
A search operation moves the cursor to the first character in the pattern
specified by string. If necessary, the pad moves under the window to
display the matching string. If the search fails, the cursor
5-23
Editing a Pad
position does not change, and the DM displays the message “No match”
in its output window.
Searches do not wrap around the end or beginning of the file. Therefore,
to search an entire pad, position the cursor at the beginning of the
pad.
By default, searches are not case-sensitive. This means, for example,
that /mary/ will locate mary, MARY, and even maRy. To perform a
case-sensitive search, use the SC command (see the “Setting Case
Comparison” section).
Actually, a search is not syntactically a command. It is a pointing
operation. Note (as described in the “Defining Points and Regions”
section in Chapter 3) that one way to specify a point in a pad is by
matching a regular expression. This means that the search operation
is really a pointing action followed by a null command. Consequently,
you should not think of search operations as operating on a text range,
but rather searching from the initial cursor position to the end (or
beginning) of the file in order to properly position the cursor.
If the DM scans more than 100 lines in a search operation, it displays
a “Searching for /string/ ... “ message in its output window. Then
it polls for keystrokes every 10 lines it processes. At this point, you
may:
•
Wait for the DM to complete the operation.
•
Cancel the search by typing CTRL/X, or by pressing a key that
has been defined to invoke the ABRT or SQ command (see the
“Cancelling a Search Operation” section).
•
Use the keyboard; it works as it normally does. You can type
into any pad except the one being searched. You can specify any
DM command except another search or substitute command.
The DM executes these commands when it completes the
search. You can type input to another Shell or program (if it
was previously waiting for input). The process executes these
commands when the DM finishes the search.
Editing a Pad
5-24
Repeating a Search Operation
To repeat the last search forward, specify the // command or type the
CTRL/R sequence.
To repeat the last search backward, specify the \ \ command or type the
CTRL/U sequence.
The DM saves the most recent search instruction, so you may repeat
it even if you have specified other (non-searching) commands since
then.
Cancelling a Search Operation
To cancel the current search operation, type CTRL/X. The CTRL/X
sequence invokes the ABRT command. Since you cannot type DM
commands for the pad being searched, you must use CTRL/X or define
a key to invoke the ABRT command (see the “Defining Keys” section
in Chapter 4).
The DM command SQ also cancels a search operation. As with the
ABRT command, you must define a key to invoke SQ during a search.
When you type CTRL/X or press a key defined to invoke ABRT or SQ,
the DM displays the message” Search aborted” in its output window.
Setting Case Comparison
As we said earlier, a search operation is not case sensitive by default.
In a case-insensitive search, upper- and lowercase letters are equivalent.
In a case-sensitive search, the characters must match in case (i.e.,
/mary/ will not locate /MARY/).
To set case comparison for a search, specify the SC (SET_CASE)
command in the following format:
SC [-ON | -OFF]
5-25
Editing a Pad
The -ON option specifies a case-sensitive search, and the -OFF option
specifies a case-insensitive search. The SC command without options
toggles the current case comparison setting.
Substituting Text
The commands shown in Table 5-7 allow you to search a pad or part of a
pad for a text string, and to replace the string with a new string. Before
specifying a substitute command, use the DR command or <MARK>
to define the range of text in which you want the substitution to occur
(see the “Defining a Range of Text” section earlier in this chapter).
If you do not define a range, the substitution occurs from the current
cursor position to the end of the line.
Unlike searches, which ignore case unless told otherwise, all
substitutions are case-sensitive. You cannot make a substitution caseinsensitive.
Table 5-7. Commands for Substituting Text
Task
DM Command
Predefined Key
Substitute string2 for
all occurrences of
string1 in a defined
range
S/string1/string2
None
Substitute string2 for
the first occurrence of
string1 in each line
of a defined range
SO/string1/string2/
None
Change case of each
letter in a defined
range
CASE [-S] [-U]
[-L]
None
If the DM scans more than 100 lines while processing a substitute
command, it displays a “Substitute in progress ... “ message in its
output window. Then it polls for keystrokes every 10 lines it processes.
At this point, you may:
Editing a Pad
5-26
•
Wait for the DM to complete the substitute operation.
•
Use the keyboard; it works as it normally does. You can type
into any pad except the one where the substitution is occurring.
You can specify any DM command except another search or
substitute command. The DM executes these commands when
it completes the substitution. You can type input to another
Shell or program (if it was previously waiting for input). The
process executes these commands when the DM finishes the
substitution.
Substituting All Occurrences of a String
To replace all occurrences of a text string with a new text string, specify
the S (SUBSTITUTE) command in the following format:
S[[/[ string1]]/string2/]
where string1 specifies the string to be replaced. Use a regular
expression to describe string1. If you supply the first delimiter (/) but
omit string1 (i.e., S//string2/ ), string1 defaults to the string used in the
last search operation. If you also omit the delimiter (i.e., S/string2/ ),
then string1 defaults to the string used in the last substitute operation.
The string2 argument specifies a literal replacement string (not a
regular expression). If you supply string1, then string2 is required.
You can use an ampersand (&) to instruct the S command to use string1
as part of string2. For example:
S/Tom/& Smith/
This command replaces all occurrences of Tom with Tom Smith over
the defined range of text.
The S command does not move the cursor or the pad, but does update
the pad when the substitution is complete.
5-27
Editing a Pad
Substituting the First Occurrence of a String
The SO (SUBSTITUTE_ONCE) command is like the S (SUBSTITUTE)
command except that SO replaces only the first occurrence of a string
in each line of a defined range of text. Specify the SO command in the
following format:
SO[[/[string1]]/string2/]
where string1 specifies the string to be replaced. Use a regular
expression to describe string1. If you supply the first delimiter (/)
but omit string1 (i.e., SO//string2/), string1 defaults to the string
used in the last search operation. If you also omit the delimiter
(i.e., SO/string2/ ), then string1 defaults to the string used in the last
substitute operation.
The string2 argument specifies a literal replacement string (not a
regular expression). If you supply string1, then string2 is required.
You can use an ampersand (&) to instruct the SO command to use
string1 as part of string2. For example:
SO/Tom/& Smith/
This command replaces the first occurrence of Tom with Tom Smith in
each line of the defined range of text.
The SO command does not move the cursor or the pad, but does update
the pad when the substitution is complete.
Changing the Case of Letters
To change the case of letters in a defined range of text, specify the
CASE command in the following format:
CASE [-S] [-U] [-L]
where -S swaps all uppercase letters for lowercase and all lowercase
letters for uppercase. The -U option changes all letters in the defined
range to uppercase, and -L changes all letters to lowercase. CASE
without options swaps all uppercase letters for lowercase and all
lowercase letters for uppercase.
Editing a Pad
5-28
Undoing Previous Commands
To undo the most recent DM command you entered, specify the UNDO
command. You can also undo the previous command by pressing the
<UNDO> key.
NOTE: The UNDO command only applies to DM operations. You
cannot undo Shell commands.
The UNDO command works by compiling a history of DM operations
in input and edit pads in reverse chronological order. UNDO reverses
the effect of the most recent DM command you specified. Successive
UNDOs reverse DM commands further back in history.
To compile its history of activities, the DM uses undo buffers (one
per edit pad and one per input pad). The undo buffers are circular
lists that, when full, eliminate the oldest entries to make room for new
ones.
The DM groups entries together in sets.
For example, an S
(SUBSTITUTE) command may change five lines. While the DM
considers this to be five entries, the five entries are grouped into a
single set so that one UNDO will change all five lines back to their
original state. When a buffer becomes full, the DM erases the oldest
set of entries. This means that UNDO will never partially undo an
operation; it will either completely undo the operation or do nothing.
An undo buffer for an edit pad can hold up to 1024 entries. An undo
buffer for an input pad can hold up to 128 entries.
Updating an Edit File
To update a file that you are currently editing, specify the PW
(PAD_WRITE) command. PW is valid for edit pads only. It requires
no arguments or options.
The first time you specify PW during an editing session, the DM
writes the contents of the edit pad to the file that is being edited,
without closing the edit pad. The DM writes the previous contents
of the file to a file with the same name and the added suffix .BAK.
Subsequent PW or WC (WINDOW_CLOSE) commands rewrite the
new file and leave the .BAK version unchanged. (For more informa5-29
Editing a Pad
tion about the WC command, refer to the “Closing Pads and Windows”
section in Chapter 4)
PW is similar to WC with two exceptions:
1.
PW leaves the edit pad open so that you can continue editing
the file.
2. PW writes the new version of the file even if other windows are
viewing the edit pad.
PW is useful if, for example, you want to try compiling a program you
are editing. If you decide to make additional changes to the program,
you can just go back to the edit pad and continue .editing, since updates
made by PW leave the edit pad open and active.
You can also update an edit file by pressing the < SAVE > key or the
CTRL/Y sequence (see the “Closing Pads and Windows” section in
Chapter 4).
Editing a Pad
5-30
CHAPTER
6
Using the Shell
Chapter 3 describes the Display Manager (DM), the operating system
program that you use to create processes and control your node’s display.
We supply another operating system program, called the command
Shell, that lets you perform more traditional computing operations.
The Shell lets you enter commands to perform such operations as
copying files and directories, compiling and running programs, and
monitoring system activity.
This chapter describes the command Shell environment that processes
Shell commands. The chapter includes information on:
Shell commands, controlling command input and output, the command
line parser, and using pathname wildcards.
6-1
Using the Shell
Shell Commands
The command Shell runs in a process called a Shell process. As shown
in Figure 6-1, you enter Shell commands in the Shell’s process input
pad, referred to simply as the Shell input pad. To specify a Shell
command, type the name of the command next to the dollar sign ($)
prompt and press <RETURN>.
Most Shell commands that you specify in the Shell input pad are
actually the names of command files that the Shell looks for and
executes. For example, when you specify the command DATE, the
Shell looks for a command file named DATE and executes it. The Shell
looks for command files according to a set of command search rules
that indicate which directories the Shell should search. You’ll learn
more about command search rules later in this chapter.
Figure 6-1. The Shell Process
As part of the DOMAIN system, we supply a set of Shell commands
for your use. You’ve seen many of these commands in Getting
Started With Your DOMAIN System. The DOMAIN System Command
Reference provides detailed descriptions of all the commands
Using the Shell
6-2
that we supply. You can also create your own Shell commands, called
Shell scripts, and execute them in the same way you execute the Shell
commands that we supply. Chapter 9 describes how to write Shell
scripts.
Command Line Format
Shell command lines have the following format:
COMMAND [options ... ] [arguments ... ] [options ... ]
COMMAND is the name of either a Shell command or Shell script.
Arguments indicate which objects you want the command to operate on.
An argument is either the pathname of an object in the naming tree,
or a literal string that you want the command to manipulate. Always
separate an argument from a command and any additional arguments
or options with at least one blank space.
Options direct the command to perform a special action. As shown
in the command line format, you can specify options either before or
after arguments on the command line. Many options require secondary
arguments of their own. Therefore, to properly delimit options, always
precede each option with a hyphen (-).
Figure 6-2 shows a sample command line and its components.
PRF FILE_1 FILE_2 -COP 2
Secondary argument
Option
Arguments
Command
Figure 6-2. Shell Command Line Components
6-3
Using the Shell
The command line in Figure 6-2 prints two files: FILE_ 1 and FILE_ 2.
The -COP option directs PRF to print two copies of each file.
Normally, you specify each command as a separate line. You can also
place multiple commands together on the same line by separating them
with semicolons (;). For example:
$ WD //MY_DIR/SUB_1; LD
executes two commands: WD sets the working directory to
//MY_ DIR/SUB, and LD lists the contents of that directory.
You may also specify multiple commands on a single line when you
use pipes and filters. The “Redirecting Ouput to Other Commands”
section describes how to use pipes and filters.
The DM limits each Shell command line to 256 characters. You can,
however, continue a command over several lines by typing an at sign
(@) character and then pressing <RETURN> at the end of each line
you want to continue, as follows:
$ WD //NODE@ <RETURN>
$_ /DIRECTORY <RETURN>
The @ character is a special character (see the” Special Characters”
section) called an escape character. In this example, the @ character
“escapes” the normal execution of the <RETURN>, allowing you to
continue the command line at the continuation prompt ($_).
Standard Command Options
All Shell commands that we supply allow you to specify the standard
command options listed in Table 6-1. These options allow you to
display useful information about a command.
Using the Shell
6-4
Table 6-1. Standard Shell Command Options
Option
Description
-HELP
Displays detailed information on how
to use the command.
-USAGE
Displays a brief summary on how to
use the command.
-VERSION
Displays the command’s software
version number.
Command Search Rules
As mentioned earlier, most commands are the names of files. Since
you usually specify command names, rather than the full pathnames
of the files they represent, the Shell searches different locations in the
system naming tree for the file that matches the command name you
specify. When you specify a command, the Shell determines which
directories to search according to a set of command search rules.
Some commands, such as INLIB (INITIALIZE_LIBRARY) are not
files. They invoke internal Shell functions and do not follow command
search rules. The DOMAIN System Command Reference identifies
which commands are internal Shell commands.
The default command search rules direct the Shell to search the
following directories in the order shown:
•
Your current working directory ( . )
•
Your personal command directory ( ~ COM )
•
The system command directory ( /COM )
6-5
Using the Shell
When you specify a command, the Shell searches the directories in
the order specified by the command search rules. As soon as the Shell
finds a file with the name that matches the command you specified, it
attempts to execute the file.
For example, when you specify the Shell command:
$ LD
the Shell first looks for a file named LD in your current working
directory. If the Shell does not find the file in the current working
directory, it checks the directory ~ COM, which is a subdirectory
of your naming directory. The ~ COM directory is your personal
command directory where you store your own frequently used Shell
scripts. (Please note that you don’t have to create a personal command
directory; if the Shell doesn’t find one, it continues its search and no
error occurs.)
The final directory that the Shell searches is the node’s main command
directory /COM, which contains all of the standard commands that we
supply. Since LD is a system command, the Shell finds it in /COM and
executes it, sorting MY_ FILE and displaying output.
This example assumes that you have not created an executable file or
Shell script named LD in your working directory or personal command
directory. Had you done so, the Shell would have executed your version
of LD before the system’s version.
You can set or show a Shell’s command search rules using the CSR
(COMMAND_ SEARCH_RULES) command. For example, the CSR
command in the following example displays the Shell’s command
search rules:
$ CSR
. ~com /com
You can use the -A option with the CSR command to append additional
directories to the current list. For example, the following example adds
two additional directories (~PROG and /PROG) to the current set:
Using the Shell
6-6
$ CSR -A ~PROG /PROG
$ CSR
. ~com /com ~prog /prog
To completely change a set of command search rules, specify the CSR
command along with a new set of rules. For example:
$ CSR /COM ~COM
$ CSR
/com ~com
If you change a Shell’s command search rules, any subordinate Shell
(created with the SH (SHELL) command), or Shell script that you
invoke, inherits the new command search rules. If you create a new
process running the Shell (see Chapter 4), the new Shell uses the
original default command search rules, not the new rules.
Special Characters
The Shell recognizes a variety of special characters that allow you to
direct the action of commands. These characters are divided into three
basic categories:
•
input and output (I/O) control characters
•
pathname wildcards
•
parsing operators
The following sections explain how to use I/O control characters
and pathname wildcards. Since you will use Shell command parsing
operators most frequently in Shell scripts, we describe parsing operators
in detail in Chapter 9, “Writing Shell Scripts.”
Creating and Invoking Shells
The Shell is a command line interpreter that reads command lines
that you type and interprets them as requests to execute other
programs. When you press the < SHELL> key, you create a process
6-7
Using the Shell
running the Shell program. Each new Shell process that you create
provides a separate environment in which the Shell runs.
You can invoke additional Shells from within a Shell process using the
Shell command SH (SHELL). When you specify SH, you generate a
separate subordinate Shell, in which you can carryon separate operations
and execute programs and scripts. Note that the SH command does not
create a new process, only a subordinate Shell running in the current
process. Each subordinate Shell inherits environment characteristics,
such as variables and command search rules, from its parent Shell.
Setting Up the Initial Shell Environment
Whenever you create a new process to run the Shell (see Chapter
4), the system looks for a file called STARTUP in the directory
~USER_ DATA/SH. If the file exists, the system executes it to set up
the initial environment for the Shell.
Since no default Shell start-up file exists, you must create one if you
want to use one. The Shell start-up script is useful when you want
to define a standard set of variables for each Shell process, or set up
certain Shell characteristics, such as variable evaluation (EON), or
new command search rules. Figure 6-3 shows a sample Shell startup
script.
Note:
Shell start-up files do not execute from siologin or
For more
CRP (CREATE_REMOTE_PROCESS).
information about the CRP command, see the DOMAIN
System Command Reference.
Using the Shell
6-8
# Sample Shell start-up script -USER_DATA/SH/STARTUP
#
# Set up standard variables
#
A := 3
B := 4
# Turn on variable evaluation
#
EON
#
# Add additional directory to command search rules
#
CSR -A -PROGS
#
Figure 6-3. Sample Shell Start-Up Script
Controlling Input and Output
Processes pass data to and from programs, such as the Shell, through
open system channels called streams. Every process that you create
has the following streams open for program input and output:
•
standard input
•
standard output
•
error input
•
error output
Standard input and standard output are the streams that channel
normal input and output between a program and a process. By default,
standard input passes program input that you type in the
6-9
Using the Shell
process input pad; standard output passes program output to the process
transcript pad.
Error input and error output are two streams used for additional
program input and output. Like the standard streams, they use the
process input pad and process transcript pad by default.
The error input stream has nothing to do with errors; it is simply
another input stream for passing data to a program. For example, when
a command queries you to verify wildcard names, error input passes
your response to the command. (The “Using Query Options” section
describes how commands query you to verify wildcard names.) Error
output is the stream that passes program error messages to the process
transcript pad.
Shell commands use input and output streams when processing
command line data. When you specify a command in the Shell
input pad, standard input passes data from the command line to the
command program. Standard output passes data from the program to
the transcript pad.
In certain instances, you may want the Shell to read input from and
write output to locations other than the input and transcript pads.
For example, you may want to save the output from a command in a
file. Using I/O control characters, you can redirect input and output
streams to pass data to and from other locations, usually files.
Table 6-2 lists the I/O control characters and a brief summary of their
functions.
The following sections show how to use I/O control characters. Chapter
9 describes the characters used to redirect standard input to read inline data from scripts.
Using the Shell
6-10
Table 6-2. I/O Control Characters
Character
Function
<
Redirect standard input
<?
Redirect error input
>
Redirect standard output
>?
Redirect error output
>>
Append standard output
>>?
Append error output
|
Pipe standard output
()
Group commands for I/O redirection
<<
Redirect standard input to read in-line data
from scripts. (See Chapter 9 for a complete
description.)
<< ?
Redirect error input to read in-line data
from scripts. (See Chapter 9 for a complete
description.)
Reading Input from a File
To redirect standard input to read data from a file rather than the
input pad, use the less-than symbol ( < ). For example, the following
command reads data from a file named FILE_ 1:
$ TLC a-z A-Z < FILE_1
6-11
Using the Shell
The TLC (TRANSLITERATE_CHARACTERS) command normally
substitutes or deletes characters from text that you type in the Shell
input pad. The TLC command in this example redirects standard
input to read data from a file (FILE_ 1) instead of the input pad. The
command changes all lowercase characters in FILE_ 1 to uppercase
characters, and writes the converted text to the transcript pad.
Writing Output to a File
To redirect standard output to write output to a file rather than to the
transcript pad, use the greater-than ( > ) symbol. For example, the
following command writes output to a file named FILE_ 1.FMT:
$ FMT FILE_1 > FILE_1.FMT
The FMT (FORMAT_TEXT) command formats FILE_ 1 and writes
the output (the formatted file) to FILE_ 1.FMT instead of to the
transcript pad.
Shell commands use the error output stream to report any errors found
in the input file. By default, error output writes output to the transcript
pad. To redirect error output to write output to a file instead of the
transcript pad, use the greater-than/question mark symbol ( >? ). For
example, the following command redirects both standard output and
error output:
$ FMT FILE_1 > FILE_1.FMT >? FILE_1.ERR
The FMT command writes the formatted file to FILE_ 1.FMT, and if it
discovers any errors, writes error messages to the file FILE_ 1.ERR.
Appending Output to a File
To redirect standard output to append output to the end of a file, use
the double greater-than symbol ( >> ). For example, the following
command appends output to a file named BOOK:
$ CATF CH4 CH5 CH6 >>BOOK
Using the Shell
6-12
The CATF (CATENATE_FILE) command normally reads input files
in order and writes them to the transcript pad. The CATF command
in this example reads the files CH4, CH5, and CH6 in that order and
appends them to the existing file BOOK. If the specified output file
didn’t exist, CATF would create a new file named BOOK and write
output to it.
To redirect error output to append error output to the end of a file, use
the double greater-than/question mark ( »? ) symbol. For example,
suppose you wanted to keep a record of all FMT errors. Each time you
used the FMT command to format a file, you could direct the command
to append error output to a file as follows:
$ FMT FILE_1 >>?ERROR_LOG
The command in this example formats FILE_ 1. If it encounters any
errors, it appends any error output to the file ERROR_ LOG.
Redirecting Output to Other Commands
If you place two commands on one line, and separate them with a
vertical bar ( | ), the Shell connects the standard output stream of the
first command to the standard input stream of the next command. For
example:
$ SRF FILE_1 | DLDUPL
The SRF (SORT_FILE) command sorts the contents of FILE_ 1
and passes the output to the Shell command DLDUPL (DELETE_
DUPLICATE_LINES) command. The DLDUPL command strips out
duplicate lines.
The vertical bar between the commands is called a pipe. Commands
such as SRF and DLDUPL that copy standard input to standard output
(making some changes along the way) are called filters. A command
line that uses pipes and filters is called a pipeline. You can use either
Shell commands or scripts as filters in pipelines.
6-13
Using the Shell
To use a group of commands as a filter, enclose them in parentheses
using the following format:
(COMMAND_1; COMMAND_2) | COMMAND_3
The Shell passes output from the commands enclosed in parentheses
(COMMAND_ 1 and COMMAND_ 2) to the command to the right of the
vertical bar COMMAND_ 3. For example:
$ (LD MY_DIR1 -C -NHD; LD MY_DIR2 -C -NHD) | SRF >@
$_ LIST
This example concatenates the output of the two LD (LIST_DIRECTORY)
commands and then sorts the reported file names, placing the output in
the file called LIST.
The Command Line Parser
Many of the Shell commands that we supply share a standard command
line parsing procedure. This procedure, called the command line
parser, determines how each command processes command line
information. The Shell command descriptions in the DOMAIN System
Command Reference and the on-line HELP files identify which
commands use the command line parser.
Commands that use the command line parser allow you to:
•
Specify multiple pathnames as pathname arguments.
•
Use pathname wildcards to specify existing pathnames and
to derive pathnames from other pathnames on the command
line.
Commands that use the command line parser also accept the command
parser options listed in Table 6-3. These options allow you to:
•
Control how a command queries you to verify wildcard
matches.
•
Direct a command to use standard input to read command line
input.
Using the Shell
6-14
Table 6-3. Command Line Parser Options
Option
-AE
Description
Causes the command to abort if it cannot find
a name in a pathname. By default, processing
continues to the next name.
-NQ
Do not issue a query to verify wildcard names.
This is the default.
-QW
Issue a query to verify wildcard names.
-QA
Issue a query to verify all names.
-
Read additional data from standard input.
* [pathname]
Read the specified file for additional pathname
arguments. If the pathname is omitted, read
the additional pathname arguments from
standard input.
Using Query Options
Commands that delete or modify objects query you to verify names
that you specify using wildcards. You can control how a command
queries by using any of the query options listed in Table 6-4.
By default, commands use error output to query you by writing selected
names to the transcript pad with a question mark (?), prompting you
for a response. The command uses the error input stream to read your
response from the Shell input pad.
To respond, type one of the responses listed in Table 6-4 and press
<RETURN>.
6-15
Using the Shell
Table 6-4. Command Query Responses
Response
Action
H [elp]
Displays HELP information.
Y [es]
Operates on the file with that name.
N [o]
Ignores the file with that name.
Q [uit]
Quits immediately.
G [o]
Operates on the file with that name and
suppresses further name queries.
D [efault]
Resets the default response.
By default, queries require a response; if you simply type <RETURN>
without a response, the command queries you again. To change the
default, use the D response, followed by either YES, NO, or NONE.
For example:
? D YES
sets the default to YES. If you respond to subsequent queries by typing
<RETURN>, the command uses the new default and operates on the file
with that name. NONE specifies that you must specify a response.
Reading Data from Standard Input
When you enter a Shell command, the command normally reads input
data from arguments that you specify in the command line. For
example, the PRF (PRINT_FILE) command reads data from the
specified files and prints it. To direct the command to read data from
standard input instead of an input file, use the hyphen character (-) as
shown in the following example:
Using the Shell
6-16
$ PRF - <RETURN>
PRINT THIS LINE ON THE LINE PRINTER <RETURN>
AND THIS ONE TOO <RETURN>
CTRL/Z
Standard input uses the Shell input pad by default, so PRF reads data
from the input pad. To input data to the PRF command, type in data as
shown in the example. The CTRL/Z control.key inserts an end-of-file
(EOF) that signals the end of input and causes PRF to print any data
that you typed in the input pad.
Some commands and scripts receive data from both a list of files and
standard input. For these commands, specify the hyphen character (-)
as a pathname argument. For example:
$ FMT FILE_1 - FILE_2
The FMT command: formats FILE_ 1, formats data typed in standard
input, and finally formats FILE_ 2.
Reading Path names from Standard Input
To direct a command to read pathnames (rather than data) from
standard input, use the asterisk symbol (*). The PRF command in
the following example reads pathname arguments that you type in the
Shell input pad:
$ PRF - <RETURN>
FILE_1 <RETURN>
FILE_2 <RETURN>
FILE_3 <RETURN>
CTRL/Z
The CTRL/Z control key inserts an end-of-file (EOF) that signals the
end of input, which causes PRF to print the contents of each file.
You can also use the asterisk symbol and redirect standard input to
read pathnames from a names file, a file that contains the pathnames
of other files, as follows:
$ PRF *JOBS
6-17
Using the Shell
In this example, PRF prints the contents of each file listed in the names
file JOBS.
Using Pathname Wildcards
Most Shell commands accept pathnames as arguments. The commands
that use the command line parser also accept wildcards as part of
their pathname arguments. Wildcards are characters or text strings
that you can use in pathnames to represent one or more text strings in
a pathname. For example, the wildcards in the following command
line match every file that ends with .FTN in the current working
directory:
$ LD ?*.FTN
wildcards
The question mark wildcard (?) matches any single character except
<RETURN>. The asterisk wildcard (*) matches zero or more
occurrences of the character preceding it. As a result, this wildcard
combination matches zero or more occurrences of any character.
Table 6-5 provides a list of pathname wildcards along with a brief
description of how they work. Chapter 7 describes how to use
Shell commands to manage files, directories, and links. Many of
the examples in Chapter 7 provide specific examples of how to use
pathname wildcards.
Using the Shell
6-18
Table 6-5. Summary of Path name Wildcards
Character
?
Description
Matches any single character
<RETURN>. For example:
except
Z? matches any two-character name that
begins with the letter Z (ZA and Z1).
%
Matches zero or more characters up to, but
not including, a period. For example:
%.BAK matches any name that ends in
.BAK (SALES.BAK and INV.BAK, but not
SALES.BAK.BAK )
DEMO.% matches any name that begins
with DEMO, up to and including the period
(DEMO.BAK and DEMO.PAS)
DEMO.%.% matches DEMO.PAS.BAK
*
Matches zero or more occurrences of
the character that precedes it. When *
follows the ? character, it matches zero or
more occurrences of any character except
<RETURN>. For example:
FILE9* matches
FILE999.
DE?* matches
DEPARTMENT.
FILE,
FILE9,
and
DEMO,
DESK,
and
DEMO.*% matches any name that
DEMO. % matches (see the % example
above), but also matches the period
(DEMO.FMT and DEMO).
6-19
Using the Shell
Table 6-5. Summary of Pathname Wildcards (continued)
Character
Description
[ string ]
Matches any single character listed in a
string. For example:
FILE[0-9] matches any five-character name
that begins with FILE and ends in a single
digit (FILE4 and FILE8)
FILE[A-D] matches FILEA and FILEB but
not FILEM
FILE[AXY] matches FILEA, FILEX, and
FILEY
[ ~string ]
Matches any single character that does not
appear in a string. For example:
FILE.[~A-Z] matches FILE and FILE.9 but
not FILE.A or FILE.P
...
Matches zero or more directories subordinate
to the starting point. For example:
//MY_NODE/... matches all the directories
in MY_ NODE
/OWNER/.../DEMO matches any object
named DEMO in a subdirectory of OWNER
.../JAN?* matches any object starting with
JAN in all subdirectories of the current
working directory
Using the Shell
6-20
Table 6-5. Summary of Pathname Wildcards (continued)
Character
=
Description
Shell commands that let you copy, compare,
or rename files sometimes require two
pathnames as arguments. Many of these
commands derive the second name from
the first name. In this case, we refer to the
second name as the derived name. The
Shell replaces the equal sign wildcard (=) in
the second name with the first name. For
example:
CPF MY_FILE=.OLD copies the
MY_ FILE to the file MY_ FILE.OLD
file
CPF MEMO MY=.BAK copies the file
MEMO to MYMEMO.BAK
( names )
derived-name
Enclose the first names in parentheses
to create several derived names with one
command line.
For example:
CPF (A B C) =.FMT copies the files A, B,
and C to A.FMT, B.FMT, and C.FMT
{ expr }
Use braces to tag an expression (expr) for
use in a derived name. Refer to tagged
expressions in arguments as @1 (first
expression tagged), @2 (second expression
tagged), etc. For example:
CPF
{PROG.FTN}.BAK
@1
PROG.FTN.BAK to PROG.FTN
copies
CPF {FIL}E_{A} @1.@2 copies FILE_ A to a
file named FIL.A
6-21
Using the Shell
Running Programs in a Background Process
The command Shell has another set of special characters, called
parsing operators, that control how a command parses (interprets and
categorizes) the individual components on a command line. We’ve
already seen how to use some of these parsing operators: the semicolon
(;) to separate multiple commands on a command line, the escape
character (@) to continue commands on more than one line, and blank
spaces to separate command arguments and options.
Another parsing operator is the ampersand character (&). It instructs
the Shell to run a program in a background process (a process that
runs without pads and windows). To run a command or program in a
background process, enter the command line or program name in the
Shell input pad, followed by the & character. For example:
$ BIND FILE_1.BIN -MAP > PROG.MAP &
This command line runs the binder as a background process to bind the
file FILE_ 1.BIN and writes a complete map to the file PROG.MAP.
By default, the Shell directs output to the file /DEV/NULL. You can
display output from the background process by specifying the Shell
command BON. The BON command directs the Shell where the
background process was invoked to display output in its transcript pad.
To turn output off (direct output to /DEV/NULL), specify the BOFF
command.
The remainder of the Shell parsing operators are used most frequently
in scripts. Chapter 9 contains a complete list of parsing operators and
describes how to use them in writing Shell scripts.
Using the Shell
6-22
CHAPTER
7
Managing Files,
Directories, and
Links
In Chapter 1, we looked at how the system organizes objects (files,
directories, and links) in a structure called a naming tree. This chapter
describes how to use Shell commands to manage these objects on your
system. Shell commands let you move around the system naming tree
and create, rename, copy, move, print, delete, and compare objects.
Since all of the commands described in this chapter require you to
specify pathnames, you should understand the rules for pathnames
described in Chapter 1. Commands that use the Shell command line
parser also allow you to perform operations on groups of objects, and
7-1
Managing Objects
therefore accept one or more pathname wildcards. Many of the
examples in this chapter show you how to use pathname wildcards
in specific operations. For a complete description of the pathname
wildcards you can use with Shell commands, refer to Chapter 6.
Keep in mind that this chapter describes the basic functions of the
commands you use to manage objects. For a complete description of a
particular command and all of its options, refer to the DOMAIN System
Command Reference.
Moving Around the Naming Tree
Most of the commands described in this chapter require you to use
pathnames to specify locations in the naming tree where you want
particular operations performed. Often, you will specify pathnames
that use the current working directory or naming directory. To move
around the naming tree, you need to know how to set your working
directory and naming directory. Table 7-1 summarizes the commands
used to move around the naming tree.
Table 7-1. Commands for Setting the Working and Naming
Directory
Task
Shell Command
Set or display working directory
WD [pathname]
Set or display naming directory
ND [pathname]
Managing Objects
7-2
Setting the Working Directory
The working directory is where the system begins its search for objects
when you omit the object’s full pathname. At log-in, the system sets
your initial working directory to the home directory designated in your
user account (see Chapter 2). Each subsequent process that you create
uses the working directory of the previous process as its working
directory.
To display the name of a process’s current working directory, specify the
WD (WORKING_DIRECTORY) command without any arguments
or options as follows:
$ WD
To change a process’s working directory to another directory, specify
the WD command in the following format:
WD [pathname]
where pathname specifies the pathname of the directory you want to
use as the working directory. For example:
$ WD //MY_NODE/OWNER/FORMS
sets the working directory for the current process to FORMS. Once
set, anytime you omit the full pathname of an object, the system starts
its search at the directory FORMS by default.
Setting the Naming Directory
The system searches the naming directory’s COM directory (~ COM ) as
part of the default command search rules (see Chapter 6). As described
in Chapter 1, the naming directory is also where the system begins its
search for an object when you precede an object’s pathname with the
tilde (~) symbol.
7-3
Managing Objects
At log-in, the system sets the naming directory to the home directory
designated in your user account (see Chapter 2). Each subsequent
process that you create uses the naming directory of the previous
process as its naming directory.
To display the name of a process’s current working directory, specify
the ND (NAMING_DIRECTORY) command without any arguments
or options as follows:
$ ND
To change a process’s naming directory to another directory, specify
the ND command in the following format:
ND [pathname]
where pathname specifies the pathname of the directory you want to
use as the naming directory. For example:
$ ND /USER_1/REPORTS
sets the naming directory to the directory REPORTS. Once set, you
can use a tilde (~) in place of /USER_ 1/REPORTS at the beginning
of any pathname. Thus, ~ CAL _ 85 would be the same as /USER_ 1
/REPORTS/CAL _ 85.
Managing Objects
7-4
Managing Files
Table 7-2 summarizes the commands for managing files.
Table 7-2. Commands for Managing Files
Task
Shell Command
Create a file
CE pathname (DM command)
Rename a file
CHN old_name [new_name]
Copy a file
CPF source [target]
Move a file
MVF source [target]
Append a file to another file
CATF source >>target
Print a file
PRF [pathname]
Display file attributes
LD [pathname]
Delete a file
DLF [pathname]
Copy display Image to a file
CPSCR pathname
Compare ASCII flies
CMF source [target]
Compare sorted flies
CMSRF [options] source [target]
Creating Files
To create normal text files, specify the DM command CE
(CREATE_EDIT) along with the pathname of the file you want to
create. By default, the <EDIT> key invokes the CE command. The
CE command directs the DM to create the file and open an edit pad and
window for the file on the display. Using the DM editor, you can edit
the file then save its contents by typing CTRL/Y. When you save the
file, the system stores it at the location in the naming tree
7-5
Managing Objects
specified by the file’s pathname. Refer to the “Creating Pads and
Windows” section in Chapter 4 for a description of how to use the CE
command to create and edit files.
The following example creates a file named MEMO in the directory
/USER, and opens the file for editing:
Command: CE //NODE/USER/MEMO
The previous example uses an absolute pathname to specify the name
of the new file. When you use a pathname that assumes the current
working directory or naming directory, the system uses the working or
naming directory of the current process. (The last process to perform
an operation before you specified the CE command is the current
process.)
The following example creates a file named MEMO in the current
working directory:
Command: CE MEMO
The command in this example specifies the filename MEMO. Since
the pathname does not specify an explicit directory location, the
system uses the current process’s working directory to determine
where to create the new file. If the current process’s working directory
is //NODE/USER, then the system will create the new file with the
pathname //NODE/USER/MEMO.
When you run multiple Shell processes, you typically move between
processes, often changing the current working directory. As a result,
you may find it difficult to keep track of the current working directory.
In situations where you run multiple processes, you may want to specify
absolute pathnames to avoid creating files at an unintended location.
Whenever you create a file, the system assigns the file a set of initial
ACLs from the file’s parent directory. After you create a file you can
change its ACLs with the EDACL command. Chapter 8 explains ACLs
and describes how to use the EDACL command.
Managing Objects
7-6
Renaming Files
To change the name of a file, use the CHN (CHANGE_NAME)
command in the following format:
CHN old_name [new_name] [options]
where old_ name specifies the current pathname of the file you want
to rename, and new_ name specifies the new name of the file. For
example:
$ CHN /OWNER/JOHN PAUL
changes the name of the file JOHN to PAUL. Notice that the new_ name
argument applies to the rightmost component (JOHN ) of the old_ name
argument.
To append a naming suffix to the new filename, specify any of the
following naming options:
Option
Description
-D
Appends the current month and day to the new
name (new_name.mm.dd.).
-Y
Appends the current year, month, and date to
the new name (new_name.yy.mm.dd).
-U
Forces the system to create a unique new name
by appending a sequence of number(s) to the
end of the name.
If you omit the new_ name argument, you must specify one of the
options in the previous list; the system creates a new name by copying
the old_ name and appending the proper suffix as shown below.
$ CHN /OWNER/JOHN -D
This command changes the name of the file JOHN to JOHN.06.16.
7-7
Managing Objects
Copying Files
When you copy a file, you create a copy of the file at another location
in the naming tree. To copy a file or group of files, use the CPF
(COPY_FILE) command in the following format:
CPF source [target] [options]
where source specifies the pathname of the file you want to copy, and
target specifies the pathname of the naming tree location where you
want the copy created. The rules for pathnames described in Chapter
6 apply to both command arguments.
The CPF command always creates a copy of the source file at the
location specified by the target. For example:
$ CPF MEMO /USER_1/NEW_MEMO
creates a copy of the source file MEMO in the directory USER_ 1. In
this example, since the target specifies the pathname of a file, CPF
assigns the copy the name specified by the target, which in this example
is NEW_ MEMO.
If the target specifies the pathname of a directory, CPF creates a copy
of the source file in the target directory (the current working directory
if you omit the target) and assigns the copy the filename of the source
file. For example:
$ CPF MEMO /USER_1
copies the file MEMO from the current working directory to the target
directory USER_ 1. Because CPF assigns the copy the name of the
source file, the new file has the pathname /USER_ 1/MEMO.
If you omit the target pathname entirely, CPF creates a copy of the
source in the current working directory, unless the source file also
resides there. In the previous example, since the source file MEMO is
in the current working directory, CPF can’t create another file named
MEMO in the same directory. In this case, CPF displays the error
message, “... can’t copy a file or tree to itself” and does not make a
copy.
Managing Objects
7-8
By default, the system assigns the target file the default file ACLs of
its parent directory (see Chapter 8). So, in the previous example, the
system assigns the target file the default file ACLs of the directory
USER_ 1.
To replace an existing file with a copy of another file, use the -R option
as follows:
$ CPF /OWNER/JUNE_REPORT LATEST_REPORT -R
This command replaces the file LATEST_ REPORT (in the current
working directory) with a copy of JUNE_ REPORT. As a result,
LATEST_ REPORT now contains a copy of JUNE_ REPORT.
You can copy or replace several files using a single CPF command
by either specifying multiple pairs of source and target pathnames
(each pair separated by a space) or by using pathname wildcards. The
following command uses pathname wildcards to copy all the files
ending with PLAN to the current working directory:
$ CPF /OWNER/?*PLAN -LF
The -LF option directs the CPF command to list the name of each file
it copies. For more information on using pathname wildcards, see
Chapter 6.
Moving Files
When you move a file, you literally relocate the file in the naming
tree. Use the MVF (MOVE_FILE) command the same way you use
the CPF command described in the previous section. In fact, moving
a file has the same effect as copying the file to another location and
then deleting the original. Unlike a copy operation, however, when you
move a file, it retains its original ACLs.
To move a file or group of files from one location in the naming tree to
another, use the MVF command in the format:
MVF source [target] [options]
where source specifies the pathname of the file you want to move
and target specifies the pathname of the file’s new location in the
7-9
Managing Objects
naming tree. The rules for pathnames described in Chapter 1 apply to
both arguments.
The following command moves the file FLOORPLAN:
$ MVF /DESIGNER/FLOORPLAN /BUILDER/PLANS/CAPE
In this example, the target specifies the pathname for a nonexistent
file named CAPE. The MVF command moves the file FLOORPLAN
from the directory DESIGNER to the directory BUILDER/PLANS and
names the file CAPE.
If the target pathname specifies a directory, MVF moves the source
file into the target directory (or current working directory if you omit
the target pathname). For example, the following command moves the
file FLOORPLAN into the current working directory:
$ MVF /DESIGNER/FLOORPLAN
In this example, since no target filename was specified, the file retains
the name of the source file (FLOORPLAN ) .
You can move a file to replace an existing file in another directory by
using the MVF command with the -R option, as follows:
$ MVF /OWNER/REPORT LATEST_REPORT -R
This command replaces the contents of the file LATEST_ REPORT (in
the current working directory) with the contents of the file REPORT
(in the directory /OWNER).
To move several files in one operation, you can specify multiple pairs
of source and target pathnames or use pathname wildcards. Chapter 6
describes how to use pathname wildcards.
Appending Files
To append the contents of one or more files to the end of another
file, use the CATF (CATENATE_FILE) command in the following
format:
CATF [source ... ] >>target
Managing Objects
7-10
where source specifies the pathname of the file whose contents you
want to append, and target specifies the pathname of the file to which
you want to append. When you specify more than one source file,
separate each file with a space. The system concatenates the source
files and appends them to the target file.
The CATF command reads source files in order and normally writes
them to standard output, which is, by default, the Shell’s process
transcript pad. The double right-angle brackets (>>) , however, redirect
output from standard output and append the output to the target file.
For example:
$ CATF MEMO_1 MEMO_ 4 >> PLAN_MEMOS
reads the files MEMO_ 1 and MEMO_ 4 in that order, and appends them
to the file PLAN_ MEMOS.
Chapter 6 provides more information on how to use I/O control
characters.
Printing Files
To print one or more files, use the PRF (PRINT_FILE) command in
the following format:
PRF [pathname ... ] [options]
where pathname specifies the name of the file you want to print. If
you specify more than one file, separate each pathname with a space.
The following example prints the file MY_ PLAN on the printer named
SPIN:
$ PRF MY_PLAN -PR SPIN
The PRF command itself doesn’t actually print files; a server process,
called PRINT_ SERVER (PRSVR) does. (The PRSVR process runs
on the node that is physically connected to the printer.) The PRF
command queues a file for printing by copying the file to a directory,
where it waits for PRSVR to get it and print it. By default, PRF queues
files to the directory /SYS/PRINT/QUEUE.
7-11
Managing Objects
To see which files are queued for printing in the default queue
directory (/SYS/PRINT/QUEUE), use the PRF command with the
-INTER[ACTIVE] option. This option causes PRF to enter interactive
mode, in which you can specify PRF commands and options interactively.
For example, the following example lists all of the files queued to the
printer named SPIN:
$ PRF -INTER
PRF> -PR SPIN
PRF> READ
For more information about the PRF command and its commands and
options, see the DOMAIN System Command Reference.
If you normally use a printer connected to your node, /SYS/PRINT/QUEUE
is the name of the queue directory on your node. If a remote node
controls the printers that you use by default, then /SYS/PRINT is a link
that your System Administrator creates to point to the /SYS/PRINT
directory on the remote node. This link causes PRF to queue files
to the /SYS/PRINT/QUEUE directory on the remote node by default.
(The “Managing Links” section describes links in more detail.)
You can queue a file to the /SYS/PRINT/QUEUE directory on another
node by specifying the -S option along with the name of the node’s
entry directory. For example:
$ PRF MY_PLAN -S //BOSTON
queues MY_ PLAN to the /SYS/PRINT/QUEUE directory on the remote
node BOSTON.
Another option that you’ll find useful is the -COP[IES] option. This
option lets you print multiple copies of a file, as shown in the following
example:
$ PRF MY_PLAN -COP 16
This command prints 16 copies of the file MY_ PLAN.
You can print multiple files using a single PRF command by either
specifying multiple pathnames (each pathname separated by a space)
or by using pathname wildcards. The following command uses path-
Managing Objects
7-12
name wildcards to print any file in the current working directory that
begins with FILE and ends with a one-digit number:
$ PRF FILE_[0-9]
This command, for example, will print FILE_ 2 and FILE_ 8 but not
FILE_ A or FILE_ B.
Printing Files Using the Print Menu Interface
In addition to the PRF command, you can print files using the print
menu interface shown in Figure 7-1. This menu allows you to specify
print arguments and select various options without having to type them
on the command line. The print menu interface is useful when you
routinely specify several print options for each file you print. By using
the menu interface, you can select all of the options once, and print
several files without respecifying the options for each file you print.
Figure 7-1. The Print Menu
To print files using the print menu interface, specify the PRFD
(PRINT_FILE_DIALOG) command as follows:
$ PRFD
As shown in Figure 7-1, the PRFD command creates a special window
pane at the top of the Shell process window displaying the print
menu. The print menu is in control until you either print the file by
selecting Print, quit the menu by selecting Quit, or select one of the
7-13
Managing Objects
commands submenu items (we’ll learn more about the commands
submenu later in this section.)
To use the print menu, move the arrow cursor to the menu item you
want to select; the system highlights the item name in reverse video.
To select the item, press either the <F1> key, the space bar, or if you
are using a mouse, the left mouse button (M1). (Hereafter, we use the
term select key to refer to any of these keys.) You can also display
help information about an item by moving the cursor over the item and
pressing <HELP>.
To specify any of the File type: items (text, bitmap, or transparent),
move the cursor over the item name. Once the item is highlighted,
use the select key to select it, and a checkmark will appear as shown
below:
For items that require you to type in specific information, such as File
to print:, printer:, and #copies:, a small, triangular cursor appears
in the item field. For example, to specify the pathname of the file you
want to type, move the cursor to the line next to File to print: and
press the select key. When the triangular cursor appears, type in the
pathname as follows:
When you finish typing in the file’s pathname, press <RETURN> and
move to another item.
The items along the top row of the menu, and the profile and
commands items on the bottom row, display submenus when you
select them. These submenus allow you to select or specify additional
print information. Use the submenu in the same way you use the main
menu: either select an item, or type in the requested information. When
you finish with a submenu, move the arrow cursor out of the submenu
box, and it will close.
Managing Objects
7-14
For example, when you select the commands item, the submenu
shown in Figure 7-2 appears.
Figure 7-2. Print “Commands” Submenu
The commands submenu is very useful, because it allows you to
perform specific operations outside of the print menu. For example,
to return control to the Shell without quitting the print menu, you can
select the shell submenu item. Table 7-3 describes the function of each
item in the commands submenu.
When you’re satisfied with the selections you’ve made in the print
menu, you can print the file by selecting Print. After you print a file,
the menu maintains control and remains on the screen, enabling you to
print additional files. The print menu remembers all of the submenu
selections you’ve made for the previous file. To print another file using
the same selections, specify a new file on the line next to File to print:
and select Print. To exit the menu interface, select Quit.
Most of the selections in the print menu perform the same print
functions as options on the command line. For more information on a
specific menu or submenu item, refer to the description of its related
PRF command option in the DOMAIN System Command Reference.
Remember, you can get help information for any item by moving the
cursor over the item and pressing the <HELP> key.
7-15
Managing Objects
Table 7-3. Print “Commands” Submenu Items
Item
shell
wdir
read
cancel
Description
Returns control to the Shell. When you select
shell, the dollar sign prompt appears in the Shell
input window. To return control to the print menu
again, type CTRL/Z.
Changes the current working directory to the
specified directory. When you select wdir,
a prompt appears in the Shell input window
requesting a directory pathname. If you type
<RETURN> without specifying a pathname, the
system displays the current working directory.
Reads the queue directory and list the entries
with the printer name specified by the printer
item. If no printer name is specified, the system
lists all the entries in the queue
Deletes the specified file from the queue. When
you select cancel, a prompt appears in the Shell
input window requesting the name of the file.
If you type <RETURN> without specifying
a filename, the system deletes the last file you
queued.
Displaying File Attributes
To display a file’s attributes, such as its size, creation date, and access
rights, to name a few, use the LD (LIST_DIRECTORY) command in
the following format:
LD pathname...
Managing Objects
[-options]
7-16
where pathname specifies the pathname of the file, and options
specifies which attributes you want displayed.
The LD command in the following example displays attribute
information for the file MEMO, as shown in Figure 7-3. The command
specifies two attribute options: -R, which displays the file’s access
rights, and -DTC, which displays the file’s creation date and time.
$ LD //NODE/USER/MEMO -R -DTC
rights
date/time
created
name
pgndcalr
85/01/04.09:16
//node/user/memo
1 entries, 2 blocks used.
Figure 7-3. Sample Display Showing File Attributes
To display an entire set of attributes for a file, use the -A option as
follows:
$ LD //NODE/USER/MEMO -A
You can display the attributes of several files by either specifying
multiple file pathnames, (each pathname separated by a space) or by
using pathname wildcards. The command in the following example uses
the question mark (?) and asterisk (*) pathname wildcards to display
attribute information for all files in the current working directory that
have the suffix, _ PLAN:
$ LD ?*_PLAN -R -DTC
You can also display the attributes of all the files in a particular
directory by specifying the name of the directory as the pathname
argument. The “Displaying Directory Information” section describes
how to use LD to list the contents of a directory and display attribute
information about its contents.
7-17
Managing Objects
Deleting Files
To delete one or more files, use the DLF (DELETE_FILE) command
in the following format:
DLF [pathname ... ] [options]
where pathname specifies the pathname of the file you want to delete.
If you specify multiple pathnames to delete multiple files, separate
each pathname with a space.
The following command deletes the files MY_ PLAN and REPORT
from the current working directory:
$ DLF MY_PLAN REPORT
You can also use pathname wildcards to delete related groups of files.
For example:
$ DLF %.BAK -L
The percent sign (%) wildcard character causes DLF to delete all of the
files in the current working directory that end in .BAK. The -L option
lists each file as DLF deletes it.
DLF is an example of a command that queries you to verify names that
you specify with pathname wildcards. In the previous example, the
DLF command asks you to verify the deletion of each file that matches
the pathname %.BAK.
Copying the Display to a File
You can copy the image of your current display to a file using the
CPSCR (COPY_ SCREEN) command in the following format:
CPSCR path name [-INV]
where pathname specifies the pathname of the file to which you want
to copy the display image. The -INV option directs CPSCR to store
the file in reverse video (black on white or white on black depending
on the current display setting).
Managing Objects
7-18
To print a file that contains a screen image, use the PRF command with
the -PLOT option.
Comparing ASCII Files
To identify differences between ASCII text files, use the CMF
(COMPARE_FILE) command in the following format:
CMF source [target ... ] [-options]
where source specifies the pathname of the file to which CMF compares
one or more target files; CMF reports all differences in relation to the
source file. If you specify multiple target pathnames, separate them
with spaces. If you omit a target pathname, CMF compares the source
with text from standard input.
The CMF command in Figure 7-4 compares the contents of the file
SPEECH to the contents of SPEECH.BAK.
Figure 7-4. Comparing Two ASCII Files
7-19
Managing Objects
Managing Directories
Directories are the naming tree components that contain other objects.
Table 7-4 summarizes the commands for managing directories.
Table 7-4. Commands for Managing Directories
Task
Shell Command
Create a directory
CRD pathname
Rename a directory
CHN old_name [new_name]
Copy a directory tree
CPT source [target]
Replace a directory tree
CPT source [target] -R
Merge directory trees
CPT source [target] -MS
Compare directory trees
CMT source target
Display contents of a directory
LD [pathname]
Delete a directory tree
DLT pathname
Managing Objects
7-20
Creating Directories
Each directory that you create is actually a subdirectory of its parent
directory (the directory above it in the naming tree). To create a
directory, specify the CRD (CREATE_DIRECTORY) command in
the following format:
CRD pathname ...
where pathname specifies the pathname of the directory you want to
create. If you specify multiple pathnames to create multiple directories,
separate each pathname with a space. The following command creates
a directory named REPORTS:
$ CRD /OWNER/REPORTS
The CRD command creates the directory REPORTS as a subdirectory
of the parent directory /OWNER. The new directory, (REPORTS) also
receives an initial set of ACLs from the initial directory ACLs of the
parent directory (/OWNER). You can change the initial ACLs with the
EDACL command. Chapter 8 explains ACLs and describes how to use
the EDACL command.
Renaming Directories
To change the name of a directory, use the CHN (CHANGE_NAME)
command in the following format:
CHN old_name [new_name] [options]
where old_ name specifies the pathname of the directory you want to
rename, and new_ name specifies the new name of the directory. For
example:
$ CHN /OWNER/REPORTS PROGRESS
changes the name of the directory REPORTS to PROGRESS. Notice
that the new_ name argument applies to the rightmost component
(REPORTS) of the old_ name argument. You cannot use CHN to
change the name of a directory embedded in a pathname.
7-21
Managing Objects
To append a naming suffix to the new directory name, specify any of
the following naming options:
Option
Description
-D
Appends the current month and day to the new
name (new_name.mm.dd.).
-Y
Appends the current year, month, and date to
the new name (new_name.yy.mm.dd).
-U
Forces the system to create a unique new name
by appending a sequence of number(s) to the
end of the name.
If you omit the new_ name argument, you must specify one of the
options in the previous list; the system creates a new name by copying
the old_ name and appending the proper suffix as shown here:
$ CHN /OWNER/REPORTS -D
This command changes the name of the directory REPORTS to
REPORTS.06.16.
Copying Directory Trees
A directory and all of the objects it contains is called a directory tree.
A directory tree represents the part of a naming tree that extends from
a specific directory through all its files, subdirectories, and links as
shown in Figure 7-5.
Managing Objects
7-22
Figure 7-5. Sample Directory Tree
To copy a directory tree to another location, use the CPT (COPY_TREE)
command in the following format:
CPT source target
where source specifies the pathname of the directory you want to copy
and target specifies the pathname of the naming tree location where
you want the copy created. The rules for pathnames described in
Chapter 1 apply to both command arguments.
Figure 7-6 illustrates how the CPT command in the following example
copies a directory tree.
7-23
Managing Objects
$ CPT REPORTS //BOSTON/USER_1/PROG -L
Figure 7-6. Copying a Directory Tree
The CPT command creates a copy of the directory tree REPORTS and
names the copy PROG. CPT creates the copy in the directory USER_ 1.
The -L option lists the name of each object as it is copied.
Managing Objects
7-24
Replacing Directory Trees
To replace one directory tree with another directory tree, specify the
-R option with the CPT (COPY_TREE) command described in the
previous section. The -R option directs CPT to delete the directory
tree specified by the target pathname and to create a copy of the source
tree in its place. Figure 7-7 illustrates how the following command
replaces a directory tree.
$
CPT
REPORTS //BOSTON/USER_1 -R
Figure 7-7. Replacing a Directory Tree
7-25
Managing Objects
The CPT command in Figure 7-7 does the following:
1.
Deletes the target
//BOSTON/USER_ 1.
tree
starting
at
the
pathname
2. Replaces the target tree with a copy of the entire REPORTS
directory tree.
Merging Directory Trees
You can merge directory trees using either the -MS or -MD option
with the CPT (COPY_TREE) command described in the “Copying
Directory Trees” section discussed earlier. When merging directory
trees, CPT first compares the source and target directories object by
object. It then merges the directories according to the option you
specified.
When you specify the -MS option, CPT uses the following process to
merge the source directory with the target directory:
•
Objects that exist in the source but not in the target are created
in the target.
•
Objects that exist in the target but not in the source remain
unchanged.
•
Files and links with the same name in both the source and
target are deleted from the target and replaced by the source
version.
•
Directories with the same name in both source and target are
merged.
The CPT command continues this process until it reaches the end of
the source tree.
The following command merges the source directory PROGRESS with
the target directory REPORTS.
$ CPT //BOSTON/USER_1 /PROGRESS REPORTS @
$_ -MD -L
Managing Objects
7-26
The -L option directs CPT to list all objects that it creates in the target
directory.
If you specify the -MD option, the merging process is similar to that
of -MS; however, files and links with the same name in the source and
target are left unchanged in the target.
Comparing Directory Trees
To compare the contents of one directory tree to another, use the CMT
(COMPARE_TREE) command in the following format:
CMT source target [options]
CMT compares all of the objects in the source directory tree against all
the objects in the target directory tree. CMT reports the following:
•
Any objects that appear in both the source and target but whose
contents are different.
•
Any objects that appear in the source but not in the target. If
the target contains objects that do not appear in the source,
CMT ignores the differences.
For example, let’s assume that directories DIR_ 1 and DIR_ 2 contain
the following files:
DIR_1
DIR_2
FILE_A
FILE_B
FILE_A
Contain
different text
FILE_C
FILE_B
FILE_C
FILE_D
Let’s also assume that the contents of all the files in DIR_ 1 and
DIR_ 2 are identical, except for FILE_ B which contains different
7-27
Managing Objects
text. Figure 7-8 illustrates how the CMT command compares the files
in DIR_ 1 against those in DIR_ 2.
Figure 7-8. Comparing Directory Trees
Notice in Figure 7-8 that the first message reports a difference between
the contents of each directory’s FILE_ B. The second message reports
that FILE_ D in DIR_ 1 did not appear in DIR_ 2.
Displaying Directory Information
To list the contents of a directory and report information about the
objects the directory contains, specify the LD (LIST_DIRECTORY)
command in the following format:
LD [pathname ... ] [options]
where pathname specifies the pathname of the directory, and options
specifies the types of information you want LD to report about the
objects it lists. If you omit the pathname argument, LD lists the
contents of the current working directory.
The command in the following example lists the contents of the
directory REPORTS; the options direct LD to report each object’s
Managing Objects
7-28
creation date and time, system object type, and rights (ACLs). Figure
7-9 shows a sample display produced by the following LD command:
$ LD /OWNER/REPORTS -DTC -ST -R
Directory ”/owner/reports”:
sys
type
dir
dir
dir
dir
file
link
file
file
rights
date/time
created
pgndcalr
pgndcalr
pgndcalr
pgndcalr
pgndwrx
85/01/04.09:16
85/01/04.09:16
85/01/04.09:16
85/01/04.09:16
85/01/04.09:18
pgndwrx
pgndwrx
85/01/04.09:16
85/01/04.09:18
name
april
july
june
may
procedure
progress
sample
template
8 entries, 7 blocks used.
Figure 7-9. Sample Directory Display
To list the contents of an entire directory tree, specify the ellipsis
wildcard (...) as part of the pathname argument. For example:
$
LD /OWNER/...
This command lists the contents of the directory OWNER, as well as
the contents of all its subdirectories.
You can also use LD to report information about specific files by
specifying the pathname of the file as an argument. The “Displaying
File Attributes” section discussed earlier describes how to use LD to
report file information.
7-29
Managing Objects
Deleting Directory Trees
To delete a directory tree, use the DLT (DELETE_TREE) command
in the following format:
DLT pathname ...
where pathname specifies the pathname of the directory you want to
delete.
NOTE: The pathname you specify does not have to be a directory. If
you specify the pathname of a file or link, DL T will delete
the object with no warning message. To delete files, use
the DLF (DELETE_FILE) command; to delete links, use
the DLL (DELETE_LINK) command.
The DLT command deletes the specified directory and all of the objects
it contains. For example, the following command deletes the directory
tree shown in Figure 7-10:
$ DLT REPORTS -L
Figure 7-10. Deleting a Directory Tree
Managing Objects
7-30
The command in the previous example deletes the directory tree
starting at the directory REPORTS in the current working directory.
The -L option directs DLT to list each object it deletes.
Managing Links
As you use the system, you may find that many of the files and
directories that you access frequently have unusually long pathnames.
You can eliminate the inconvenience of typing a lengthy pathname by
creating a shorthand name for the object, called a link.
A link is a special object that contains the name of another object.
When you specify a link as a pathname or part of a pathname, the
system substitutes the pathname that the link contains (the resolution
name) for the name of the link.
This section describes how to manage links on your system. Table 7-5
summarizes the commands used to manage links.
Table 7-5. Commands for Managing Links
Task
Shell Command
Create a link
CRL link_name object_name
Display link resolution names
LD [pathname] -LL -LT
Redefine a link
CRL link_name Object_name -R
Rename a link
CHN old_name [new_name]
Copy a link
CPL source [target]
Delete a link
DLL link_name
7-31
Managing Objects
Creating Links
To create a link, specify the CRL (CREATE_LINK) command in the
following format:
CRL link_name object_name
where link_ name specifies the pathname of the link, and object_ name
specifies the pathname of the object to which the link points. The
rules for pathnames described in Chapter 1 apply to both arguments.
The following command creates a link:
$ CRL REPORTS /OWNER/APRIL/PROGRESS_REPORTS
The command in this example creates a link named REPORTS
in the process’s current working directory.
The link contains
the pathname for the subdirectory PROGRESS_ REPORTS.
As
shown in the following example, when you specify REPORTS as a
pathname or part of a pathname, the system substitutes the pathname
/OWNER/APRIL/PROJECT_ REPORTS.
For example, instead of
specifying
$ DLF /OWNER/APRIL/PROGRESS_REPORTS/MR_JONES
to delete the file MR_ JONES, you could specify
$
DLF REPORTS/MR_JONES
You can also use the CRL command to create more than one link by
specifying link_name/object_name pairs as shown below:
$ CRL BUGS /MAINTENANCE/REPORTS STARTS /SYS/DM
pair
pair
This command creates two links: BUGS and STARTS.
Managing Objects
7-32
Displaying Link Resolution Names
To display the resolution names for all the links listed in a particular
directory, use the LD (LIST_DIRECTORY) command in the following
format:
LD pathname -LT [-LL]
where pathname specifies the pathname of the directory that contains
the link, and -LT directs LD to display the resolution name of each
link. Normally, LD lists all the objects in the directory, including files
and subdirectories. The -LL option directs LD to list only the links.
The command in the following example displays the link resolution
names for all links in the node entry directory, as shown in Figure
7-11:
$ LD / -LT -LL
BUGS
STARTS
NEWS
“/maintenance/reports”
“/sys/dm”
“//my_boss/owner/project/status”
30 entries, 3 listed.
Figure 7-11. Sample Display of Link Resolution Names
Redefining Links
You can redefine an existing link by changing its link resolution name.
To redefine a link, use the -R option with the CRL (CREATE_LINK)
command as follows:
$ CRL REPORTS /OWNER/MAY/PROGRESS_REPORTS -R
This command replaces the object name for the existing link REPORTS
that we created in the “Creating Links” section discussed earlier.
Notice that the new link name points to the subdirectory MAY instead
of APRIL.
7-33
Managing Objects
Renaming Links
To change the name of a link, use the CHN (CHANGE_NAME)
command in the following format:
CHN old_name [new_name] [options]
where old_ name specifies the pathname of the link you want to rename,
and new_ name specifies the new name of the link. For example, the
command:
$ CHN REPORTS PROGRESS
changes the name of the link REPORTS, in the current working
directory, to PROGRESS.
You can specify any of the following naming options with the CHN
command:
Option
Description
-D
Appends the current month and day to the new
name (new_name.mm.dd.).
-Y
Appends the current year, month, and date to
the new name (new_name.yy.mm.dd).
-U
Forces the system to create a unique new name
by appending a sequence of number(s) to the
end of the name.
If you omit the new_ name argument, you must specify one of the
options in the previous list; the system creates a new name by copying
the old_ name and appending the proper suffix as shown here:
$ CHN REPORTS -U
This command changes the name of the link REPORTS to
REPORTS.1.
Managing Objects
7-34
Copying Links
Copying links is basically the same as copying files; when you copy
a link, you create a copy of the link in another location in the naming
tree. To copy a link, use the CPL (COPY_LINK) command in the
following format:
CPL source [target ...] [option]
where source specifies the pathname of the link you want to copy,
and target specifies the naming tree location where you want the copy
created. The rules for pathnames described in Chapter 1 apply to both
command arguments.
The CPL command always creates a copy of the source link at the
location specified by the target. For example:
$ CPL REPORTS /USER_1/STATUS
creates a copy of the source link REPORTS in the directory USER_ 1.
And, since the target specifies the pathname of a link, CPL assigns
the copy the name specified by the target, which in this example is
STATUS.
If the target specifies the pathname of a directory, CPL creates a copy
of the source link in the target directory (the current working directory
if you omit the target) and assigns the copy the name of the source link.
For example:
$ CPL REPORTS /USER_1
copies the link REPORTS from the current directory to the target
directory USER_ 1. Because CPL assigns the copy the name of the
source link, the new link has the pathname /USER_ 1/REPORTS.
To replace an existing link with a copy of another link, use the -R
option as follows:
$ CPL REPORTS /USER_2/PROGRESS -R
This command replaces the link PROGRESS with a copy of the link
REPORTS (from the current working directory).
7-35
Managing Objects
You can copy or replace several links using a single CPL command
by either specifying multiple pairs of source and target pathnames
(each pair separated by a space) or by using pathname wildcards. The
following command copies all of the links in the current working
directory to the directory /USER_ 2.
$ CPL ?* /USER_2/MY=
The wildcards (?) that make up the source pathname direct CPL to
copy all links in the current working directory. The wildcard (=) in
the target pathname directs CPL to derive the name of each new link
from the source link names. For example, the link REPORTS becomes
MYREPORTS in the target directory.
Deleting Links
To delete one or more links, use the DLL (DELETE_LINK) command
in the following format:
DLL [link_name ...] [options]
where link_ name specifies the pathname of the link you want to delete.
If you specify multiple pathnames to delete multiple links, separate
each pathname with a space.
The following command deletes the link REPORTS from the current
working directory:
$ DLL REPORTS
You can also use pathname wildcards to delete related groups of links.
For example:
$ DLL /.../STATUS
The ellipsis wildcard (...) directs the DLL command to delete every
link named STATUS in all directories subordinate to the node entry
directory.
Managing Objects
7-36
CHAPTER
8
Controlling Access to
Files and Directories
You can protect your files and directories from unauthorized use with
a system protection mechanism called an access control list (ACL).
Every file and directory in the system has an access control list that
defines:
•
Who can use the object
•
What operations these users can perform on the object
An ACL for a file, for example, can authorize some users to read the
file, and permit others to edit it.
8-1
Controlling Access
This chapter describes the following ACL topics:
•
The structure of an ACL and its component parts
•
How the system assigns initial ACLs to objects
•
How you can use Shell commands to display, edit, and copy
ACLs
•
Protected subsystems and the commands you use to create and
use them
ACL Structure
The ACL for each file and directory contains one or more ACL entries.
An entry describes the operations a user or set of users can perform
on the object. For a file, the ACL can also contain an indicator that it
belongs to a protected subsystem. (We describe protected subsystems
in the “Protected Subsystems” section.)
Each ACL entry consists of two elements: a subject identifier (SID)
specification and a set of access rights. Figure 8-1 shows the elements
that make up an ACL entry.
SID Specification
Access Rights
PERSON.PROJECT.ORGANIZATION.NODE
right1 right2 right3 ...
Figure 8-1. Structure of an ACL Entry
The SID specification identifies a specific user or group of users. The
access rights define what operations that user or group can perform on
the object. Let’s take a closer look at these two elements to see how
the system uses them to control access to an object.
Controlling Access
8-2
The Subject Identifier (SID)
As described in Chapter 4, the system associates each user process
with a SID that identifies the owner of the process. Like the SID
specification in an ACL entry, the SID assigned to a user process has
the following format:
PERSON.PROJECT.ORGANIZATION.NODE
The SID consists of four fields: username, project, organization, and
node (abbreviated ppon). (The node field specifies the hexadecimal
node ID of the node on which the user is logged in). When you log in,
the system gathers SID information for your account. Then, each time
you create a process, the system assigns the same SID to it to identify
you as the owner.
When a user requests access to a file or directory, the system checks
the object’s ACL. Specifically, the system searches for an ACL entry
whose SID matches the SID of the user’s process. If the system doesn’t
find a match, it denies the user access to the object. If the system
does find a match, it grants the user the set of rights specified by the
ACL entry. (The “Access Rights” section describes the meaning of the
various access rights.)
Figure 8-2 shows a set of two ACL entries for a file.
SID Specification
Access Rights
JOE.%.ENG.%
pgndwrx
%.%.ENG.%
-----r-
Figure 8-2. Sample ACL Entries
The percent signs (%) that appear in the different fields of the SID
specification are wildcards. Wildcards match any name in the
network with a specific SID field. For example, the SID for the second
ACL entry in Figure 8-2 (%.%.ENG.%) contains wildcards in the
8-3
Controlling Access
PERSON, PROJECT, and NODE fields. These wildcards match any
name in the corresponding fields of a user’s process SID. As a result,
the ACL entry for %.%.ENG.% matches any process SID with the
organization name ENG.
When a user process requests access to an object, the system starts its
search for a matching SID at the most specific SID specification and
continues searching toward the most general. As soon as the system
finds a specification that matches the process’s SID, it stops the search
and grants the rights listed in that ACL entry.
For example, the SID specification for the first ACL entry in Figure 82 (JOE.%.ENG.%) is more specific than that of the second entry (JOE
is a specific person in the organization ENG). Suppose a process with
the SID JOE.BRIDGE.ENG.1E07 tries to access the object. In this
case, the SIDs for both ACL entries match the process SID. However,
since the system matched the more specific SID (JOE.%.ENG.%) first,
it grants the process the associated rights (pgndwrx).
Access Rights
Access rights specify what operations, such as read, write, execute,
and delete, a user process can perform on a particular file or directory.
Table 8-1 lists the access rights for files and directories.
For example, the following ACL entry for a file grants the specified set
of access rights to all users:
%.%.%.%
- - - - wrx
In this example, the wrx specification indicates that the file has WRITE
(w), READ (r), and EXECUTE (x) rights. Notice the four hyphens that
precede wrx rights. When you list the ACL entries for an object (see
the “Displaying ACLs” section) the system displays the hyphens to
represent access rights that are not valid (denied) for the entry. In the
previous example, the entry denies p, g, n, and d rights (represented by
hyphens) and grants w, r, and x rights.
Controlling Access
8-4
As you’ll see later in this chapter, you can also deny certain users any
access to an object. For example:
%.BRIDGE.ENG.%
%.%.ENG.%
pgndwrx
-------
This ACL denies every user in the ENG group access to the file, except
those working on the BRIDGE project.
As shown in Table 8-1, the types of access for directories are different
than those for files. While PROTECT (P), GRANT (G), and NODE
(N), have the same meaning for files and directories, DELETE (D)
and READ (R) have different meanings. In addition, WRITE (W)
and EXECUTE (X) access apply only to files; CHANGE (C), LINKS
(L), ADD (A), SEARCH (S), and EXPUNGE (E) rights apply only to
directories.
8-5
Controlling Access
Table 8-1. Access Rights for Files and Directories
Access Right
Abbrev.
Meaning for
Directories
Meaning for
Files
Protect
P
Change the object’s ACLs.
Grant
G
Grant any subset of your rights to
other users.
Node
N
Change the nodes from which
users can access objects.
Delete
D
Delete the
directory. (See
note below.)
Delete the file.
Read
R
List entries.
Read the file.
Write
W
None.
Write to the file.
Execute
X
None.
Execute object
file.
Change
C
Change names
and delete links.
None.
Links
L
Add links
None.
Add
A
Add files and
subdirectories.
None.
Search
S
Access subdirectories and
subdirectory
objects.
None.
Expunge
E
Delete subdirectories and
subdirectory
objects.
None.
Note: To delete a directory tree, you need directory delete rights,
directory expunge rights (see “Understanding Search
and Expunge Rights” section), directory change rights (if
the directory contains links), and file delete rights (if the
directory contains files).
Controlling Access
8-6
Understanding SEARCH and EXPUNGE Rights
To access an object, in addition to appropriate rights to the object, you
must have appropriate rights to the object’s parent directory. To access
an object, its parent must grant you SEARCH (S) rights. To delete an
object, its parent must grant you EXPUNGE (E) rights. Consider the
following example:
$ LD /OWNER/REPORTS
In order to list the contents of REPORTS, you must have S rights to its
parent directory /OWNER, as well as R rights to REPORTS. Similarly,
to delete the subdirectory REPORTS, you need E rights to /OWNER, as
well as D rights to REPORTS.
If REPORTS contains additional objects, you need E rights to REPORTS
to delete them. Therefore, to delete a directory tree, you must have E
rights to the parent directory and all of its subdirectories except the
subdirectories at the very bottom of the tree.
For reasons of compatibility, the system, by default, assigns S and E
rights to all ACL entries for directories. In addition, if the directory
ACL does not contain a %.%.%.% entry, the system adds the following
entry by default whenever the object is accessed:
%.%.%.%
- - - - - - - - SE
Since both DOMAIN software and user-supplied software depend on
these rights, you should always leave S and E rights on. To deny S and
E rights, you must explicitly delete them from the entry.
Managing ACLs
By default, the system assigns an ACL to every file or directory that
you create. (The “Initial ACLs” section describes how the system
assigns ACLs to objects.) You can display, edit, and copy an object’s
ACL using the following Shell commands:
•
ACL displays and copies ACLs.
•
EDACL displays and edits ACLs.
The following sections describe how you use these commands.
8-7
Controlling Access
Displaying ACLs
To display an object’s ACL, use the Shell command
(ACCESS_CONTROL_LIST) in the following format:
ACL
ACL pathname
where pathname specifies the pathname of the object whose ACL you
want to list. For example:
$ ACL /OWNER/REPORT
This command lists the ACL entries for the file REPORT. Figure 8-3
shows a sample display produced by this command.
ACL for report:
%.%.%.%
-----r-
%.%.ENG.%
pgndwrx
%.%.MRKT.%
pgndwrx
Figure 8-3. Sample ACL Display
By using pathname wildcards (see Chapter 6), you can list the ACLs
for a specific group of objects. For example, the following command
lists the ACLs for all the files in the current working directory that
have the suffix .BIN:
$ ACL ?*.BIN
You can also display the ACL for an object using the EDACL
(EDIT_ACCESS_CONTROL_LIST) command as follows:
$ EDACL /OWNER/REPORT -L
The next section, “Editing ACLs,” provides more information on how
to use the EDACL command to display and edit ACLs.
Controlling Access
8-8
Editing ACLs
You can edit an object’s ACL using the Shell command EDACL
(EDIT_ACCESS_CONTROL_LIST). The EDACL command allows
you to display, add, change, and delete ACL entries. You can also use
the EDACL command to edit a directory’s initial ACLs. (The “Editing
Initial ACLs” section describes how to use the EDACL command to
edit initial ACLs).
Like most Shell commands, you can direct EDACL to perform specific
operations by specifying options on the command line. In addition
to its command options, the EDACL command also accepts a special
set of ACL editing commands. The way you specify these editing
commands depends on the mode in which EDACL operates.
The EDACL command operates in two modes: command line mode
and interactive mode. In command line mode, you specify editing
commands as options on the command line. For example, EDACL in
the following example uses the editing command -L to display the ACL
for the file REPORT:
$ EDACL REPORT -L
If you specify the EDACL command without any editing commands
on the command line, EDACL enters interactive mode and prompts
you for editing commands. When you specify editing commands in
interactive mode, do not precede the command with a hyphen (-). For
example:
$ EDACL REPORT
report
* L <RETURN>
In this example, since no editing commands appear on the EDACL
command line, EDACL enters interactive mode. Specifying the L
command (without a hyphen) at the asterisk (*) prompt directs EDACL
to list the ACL entries for REPORT.
Once you enter interactive mode, you can continue to specify
EDACL editing commands to perform a series of edit operations.
To exit interactive mode and save the changes you’ve made, type
8-9
Controlling Access
CTRL/Z. The Q command quits interactive mode without saving your
changes.
You can edit the ACLs of several objects either by specifying multiple
pathnames (separating each pathname with a space) or by using
pathname wildcards. Chapter 6 describes how to use pathname
wildcards.
This section describes how to use the EDACL command to list and
edit ACLs. The examples presented in this section show how to use
EDACL commands in command line mode. For a complete description
of EDACL, see the DOMAIN System Command Reference.
Table 8-2 summarizes the commands used to edit ACLs.
Table 8-2. Summary of Commands for Editing ACLs
Task
Command
Display an object’s ACL
EDACL pathname -L
Add an ACL entry
EDACL pathname -A ppon rights
Add rights to an ACL entry
EDACL pathname -AR ppon rights
Change access rights for an ACL
entry.
EDACL pathname -C ppon rights
Delete rights from an ACL entry
EDACL pathname -DR ppon rights
Delete an ACL entry
EDACL pathname -D ppon rights
Controlling Access
8-10
Rules to Specify ACL Entries
Most of the EDACL commands described in this section require you to
specify SID and access right information. For example, to add an ACL
entry, you must specify a SID and a set of access rights. Before you
attempt to use EDACL commands, you should understand the rules for
specifying SIDs and access rights.
When you specify a SID, you can use the percent sign (%) wildcard
character in each field to match any name in the corresponding field
of a process SID. For example, the following SID matches any process
SID in the system with the username JOE:
JOE.%.%.%
When you specify a SID that uses % wildcards, you may omit trailing
% wildcards and the periods that separate them. For example, the
following SID specifications are the same:
JOE.%.%.%
JOE.%
JOE
Table 8-3 lists the access rights that you can specify for files and
directories. Remember, directories and files have their own unique
set of access rights. You cannot specify file rights for a directory or
directory rights for a file.
To specify access rights individually, use the one-letter abbreviations
listed in Table 8-3. For example:
$ EDACL REPORT -A JOE RW
Access rights
The command in this example specifies the READ (R) and WRITE (W)
access rights for the file REPORT.
8-11
Controlling Access
To deny rights (grant no rights) for an entry, specify a hyphen character
(-) as follows:
$ EDACL REPORT -A JOE No access rights
Table 8-3. Valid Rights for Files and Directories
FILES
DIRECTORIES
P Protect
P Protect
G Grant
G Grant
N Node
N Node
D Delete
C Change
R Read
A Add files and
subdirectories
W Write
L Add links
X Execute
D Delete
R Read
S Search
E Expunge
Controlling Access
8-12
You can also use any of the special class names in Table 8-4 to specify
a set of commonly used rights. For example:
$ EDACL REPORT -A JOE -USER
Class name
The -USER class name in this example specifies a set of rights that
you commonly grant to other users on the system. For both files and
directories, -USER grants all rights to the object except the ability to
change the object’s ACL. Since the object in this example is a file, USER grants DELETE (D), WRITE (W), READ (R), and EXECUTE
(X) access.
NOTE:
EDACL will not allow you to perform an operation that
restricts everyone from changing an ACL. At least one user
must have the right PROTECT (P) to change the ACL.
System users with the project name BACKUP may create back-up copies
of files and directories on magnetic tape. Users with the project name
BACKUP need READ (R) access to files and directories. EDACL issues
a warning when you change an ACL in a way that denies BACKUP
access; however, EDACL does make the change. You should ignore
the warning only if the object(s) does not require back-up copies. If
the object does require back-up copies, edit the ACL again and add an
entry that grants the BACKUP project (%.BACKUP.%.%) READ (R)
access. The next section, “Adding ACL Entries,” describes how to add
an ACL entry.
8-13
Controlling Access
Table 8-4. Class Names for Commonly Assigned Rights
Name
Meaning
Directories
Files
-OWNER
All rights.
PGNDCALRSE
PGNDRWX
-USER
All rights except the
ability to change
ACL.
DCALRSE
DWRX
-READ
File read access.
Not allowed
R
-EXEC
File read access.
Execute access to
object files.
Not allowed
RX
-LDIR
List directory.
Search and expunge
the directory’s
subdirectories.
RSE
Not allowed
-ADIR
List directory and
add entries. Search
and expunge
the directory’s
subdirectories.
ALRSE
Not allowed
-NONE
Grants no rights
except Sand E.
(denies access).
SE
Controlling Access
8-14
None
Adding ACL Entries
To add an entry (SID and rights) to an ACL, use the -A command in
the following format:
EDACL pathname ...
-A ppon rights
where ppon specifies the SID for the new entry and rights specifies
the set of access rights. The -A command directs EDACL to add the
specified SID and access rights to the ACL. For example:
$ EDACL REPORT -A %.%.MAN -OWNER
The command in this example adds a new ACL entry to the ACL for
the file REPORT. The -OWNER rights class name (see Table 8-4)
specifies a full set of rights for the entry. The new entry grants full
access (pgndrwx) to anyone in the organization named MAN. Notice
that the SID specification in this example omits the trailing % wildcard
for the NODE field.
Changing Entry Rights
To change the access rights for an existing ACL entry, use the -C
command in the following format:
EDACL pathname ...
-C ppon rights
where ppon specifies the SID for the entry you want to change, and
rights specifies the new set of access rights. The -C command directs
EDACL to change the access rights for the specified SID.
For example, suppose the file REPORT has the following ACL entry
granting full rights:
%.%.MAN.%
pgndwrx
The following command changes the access rights for %.%.MAN to
READ (R) access:
$ EDACL REPORT -C %.%.MAN R
8-15
Controlling Access
As a result, the new ACL entry now looks like this:
%.%.MAN.%
-----r-
If you try to change the access rights for an entry that doesn’t exist,
you will receive an error message.
Adding Entry Rights
To add access rights to an existing ACL entry, use the -AR command
in the following format:
EDACL pathname ...
-AR ppon rights
where ppon specifies the SID for the entry you want to change, and
rights specifies the new set of access rights. The -AR command
directs EDACL to add rights to the existing list of access rights for the
specified SID.
For example, suppose the file REPORT has the following ACL entry:
%.%.MAN.%
-----r-
The following command adds the rights WRITE (W) and EXECUTE
(X) to the current access rights for %.%.MAN.
$ EDACL /OWNER/REPORT -AR %.%.MAN WX
As a result, the ACL entry now looks like this:
%.%.MAN.%
- - - - wrx
If you try to add rights to an entry that doesn’t exist, you will receive
an error message.
Controlling Access
8-16
Deleting Entry Rights
To delete the set of rights from a particular ACL entry, use the -DR
command in the following format:
EDACL pathname ... -DR ppon rights
where ppon specifies the SID for the entry you want to change, and
rights specifies the access rights you want to delete. The -DR command
directs EDACL to delete the access rights for the specified SID.
For example, suppose the file REPORT has the following ACL entry:
%.%.MAN.%
- - - - wrx
The following command deletes WRITE (W) access from the current
access rights for %.%.MAN:
$ EDACL /OWNER/REPORT -DR %.%.MAN W
As a result, the ACL entry now looks like this:
%.%.MAN.%
- - - - - rx
If you try to delete rights from an entry that doesn’t exist, you will
receive an error message.
Deleting ACL Entries
To delete an entry (SID and rights) from an ACL, use the -D command
in the following format:
EDACL pathname ... -D ppon
where ppon specifies the SID for the entry you want to delete. For
example:
$ EDACL /OWNER/REPORT -D %.%.MAN.%
This command deletes the entry %.%.MAN.% from the ACL for the
file REPORT.
8-17
Controlling Access
Copying ACLs
To copy an ACL from one object to another, use the ACL
(ACCESS_CONTROL_LIST) command in the following format:
ACL target source
where target specifies the pathname of the object to which you want
the ACL copied. The source argument specifies the pathname of the
object whose ACL you want to copy.
The following command copies the ACLs from the directory /OWNER
to the directory /USER_ 1:
$ ACL /USER_1 /OWNER
Initial ACLs
Whenever you create a new file or directory, the system assigns it a
default ACL by copying a special ACL, called an initial ACL, from
the parent directory. Each directory, in addition to its own ACL, has
two initial ACLs: an initial file ACL for new files, and an initial
directory ACL for new directories.
For example, if you create a file named REPORT in the directory
OWNER, the system assigns REPORT the initial file ACL of the
directory OWNER. If you create a subdirectory in OWNER, the system
assigns the new subdirectory OWNER’s initial directory ACL. New
subdirectories also receive a set of initial ACLs that match the parent
directory’s initial ACLs. In this example, the new subdirectory also
receives OWNER’s initial ACLs.
Figure 8-4 shows how the system assigns initial ACLs to files and
directories.
Controlling Access
8-18
Figure 8-4. Initial ACLs for Files and Directories
Table 8-5 summarizes the commands used to edit and copy initial
ACLs.
8-19
Controlling Access
Table 8-5. Summary of Commands for Editing and Copying
Initial ACLs
Task
Command
Edit Initial directory ACL
EDACL pathname -ID command
Edit Initial file ACL
EDACL pathname -IF command
Copy both Initial ACLs
ACL target source -I
Copy Initial directory ACL
ACL target source -ID
Copy Initial file ACL
ACL target source -IF
Editing Initial ACLs
You can edit a directory’s initial ACLs with the EDACL command. To
edit the initial directory ACL, use EDACL with the -ID option in the
following format:
EDACL pathname -ID -command
where -ID directs EDACL to edit initial directory ACLs, and -command
specifies one of the ACL editing commands described in the “Editing
ACLs” section discussed earlier. For example:
$ EDACL /OWNER -ID -L
The command in this example displays the initial directory ACL for
the directory /OWNER.
To add an entry to the initial directory ACL for /OWNER, use the -A
command as follows:
$ EDACL /OWNER -ID -A %.%.ENG ALDR
Controlling Access
8-20
The following example uses the -DR command to take away or delete
DELETE (D) rights from the entry we added in the previous example:
$ EDACL /OWNER -ID -DR %.%.ENG D
To edit the initial file ACL, use the EDACL command with the -IF
option in the following format:
EDACL pathname -IF -command
where -IF directs EDACL to edit initial file ACLs, and -command
specifies one of the ACL editing commands described in the “Editing
ACLs” section discussed earlier. For example:
$ EDACL REPORT -IF -L
The command in this example displays the initial file ACL for the file
REPORT.
Copying Initial ACLs
You can copy a directory’s initial ACLs using the ACL command in
the following format:
ACL target source option
where option specifies one of the options listed in Table 8-6. The
target argument specifies the pathname of the object to which you want
the initial ACL copied. The source argument specifies the pathname
of the object whose initial ACL you want to copy.
8-21
Controlling Access
Table 8-6. Options for Copying Initial ACLs
Option
-I
Description
Copies both the initial file and initial
directory ACLs from the source to the
target.
-ID
Copies the initial directory ACL from the
source to the target.
-IF
Copies the initial file ACL from the source
to the target.
The command in the following example uses the -I option to copy the
initial file and directory ACLs from the directory /OWNER to the
directory /USER_ 1.
$ ACL /USER_1 /OWNER -I
To copy only the initial file ACL, use the -IF option as shown in the
following example:
$ ACL /USER_1 /OWNER -IF
For a complete description of how to use the ACL command to copy
initial ACLs, see the DOMAIN System Command Reference.
Protected Subsystems
Another method of controlling access to files is through a protection
mechanism called a protected subsystem. Protected subsystems allow
you to designate a collection of data (a protected group of files) for use
solely by specific programs.
A protected subsystem is composed of one or more programs and
a set of data files. The programs are called the managers of the
protected subsystem; the data files, called data objects, are owned
Controlling Access
8-22
by the subsystem. Thus, files in a protected subsystem have either
manager or data object status.
Protected subsystems permit broad groups of users to access data
objects through the programs, or managers, of the subsystem. You
typically create a protected subsystem when you want only specific
programs to act on data files, regardless of the SIDs of the processes
in which the programs run.
For example, you might have a group of data files produced and used
by a specific program. If you want to prevent these files from being
used for any other purpose, you can assign protected subsystem status
to both the program and the data files. As a result, only those users
authorized to run the subsystem manager program can use the files
protected by the subsystem.
This section explains how to create a protected subsystem and how to
assign subsystem status to files.
How Do Protected Subsystems Work?
In order to understand how to assign subsystem status to files, you
must first understand how the system handles protected subsystems.
Figure 8-5 presents a flowchart that shows how the system controls
access to protected subsystem files.
8-23
Controlling Access
Figure 8-5. Controlling Access to Protected Subsystem Files
Controlling Access
8-24
The following descriptions explain the sequence of events shown in
Figure 8-5:
1.
When a program in a protected subsystem requests access to
a file, the system first checks whether the file belongs to a
protected subsystem. If the file does not belong to a protected
subsystem, the system uses the file’s ACL information to
control access.
2. If the file does belong to a protected subsystem, the system
determines whether the requesting program owns the file
(whether the program is a manager in that subsystem). If the
program is not a manager in that subsystem, the system treats
it like any other program and uses ACL information to control
access.
3. If the program is a manager in that subsystem, the system
verifies that the program has executed a command or system
call that raises the manager program’s privilege level. If a
manager program hasn’t raised its privilege level, the system
treats it like a non-manager program and uses ACL information
to control access.
The system allows you to raise a program’s privilege level by
using either the Shell command SUBS (SUBSYSTEM) or a set
of programming calls. For more information, see the SUBS
Shell command in the DOMAIN System Command Reference
or the ACLM call descriptions in the DOMAIN System Call
Reference.
4. If the manager program has raised its privilege level, the system allows it to operate on the file.
To use a protected subsystem, you must first create it, and then enter it
to add files. The following sections describe how to create and enter
a protected subsystem.
8-25
Controlling Access
Creating a Protected Subsystem
To
create
a
protected
subsystem,
use
the
CRSUBS
(CREATE_ SUBSYSTEM) command in the following format:
CRSUBS subsystem_name
where subsystem_ name specifies the name you want to assign to the
subsystem. For example, the following command creates a protected
subsystem named PROTECTOR:
$ CRSUBS PROTECTOR
When you create a protected subsystem, the system assigns it
the subsystem name that you specify. The system also assigns the
subsystem name to a subsystem Shell in the node’s /SYS/SUBSYS
directory. The subsystem Shell is actually a copy of the Shell program.
This Shell program is the first manager program in your newly-created
subsystem.
The operating system uses the managers in the /SYS/SUBSYS directory
when it checks for the names of protected subsystems. Internal to the
ACL for each of these managers, and to the ACL for any file, is a field
for protected subsystem status. Only the operating system can see this
field. If the file belongs to a protected subsystem, the field contains
an internal identifier for that subsystem. All files in a particular
subsystem, including the files in /SYS/SUBSYS, have the same internal
identifier.
When you display an object’s ACL (see the “Displaying ACLs” section
discussed earlier), the system looks at the ACLs subsystem field. If
the field contains a subsystem identifier, the system looks in /SYS/
SUBSYS for a file with the same internal identifier. The system then
displays the name of that file as the name of the subsystem.
To use CRSUBS to create a protected subsystem, you must have ADD
rights to the /SYS/SUBSYS directory. The initial file ACL for this
directory must also grant READ and EXECUTE rights to any file
created in /SYS/SUBSYS. You should normally limit these rights to
the creator of the subsystem or to the system administrator.
Controlling Access
8-26
Assigning Protected Subsystem Status
Before you can assign subsystem status to files, you must first enter the
subsystem using the ENSUBS (ENTER_ SUBSYSTEM) command in
the following format:
ENSUBS subsystem_name
where subsystem_ name specifies the name of the subsystem you want
to enter. (To use ENSUBS to enter a subsystem, you must have READ
and EXECUTE access to the subsystem file in /SYS/SUBSYS.) For
example, the following command lets you enter the subsystem named
PROTECTOR:
$ ENSUBS PROTECTOR
When the dollar sign prompt appears after you specify ENSUBS, you
are “inside” the subsystem. Once inside, you can assign manager or
data object status to files using the SUBS (SUBSYSTEM) command
in the following format:
SUBS pathname subsystem_name option
where pathname specifies the name of the file, and subsystem_ name
specifies the name of the current subsystem. The option specifies
either -MGR for manager status or -DATA for data object status. For
example:
$ SUBS MY _PROG PROTECTOR -MGR
$ SUBS DATA_1 PROTECTOR -DATA
$ SUBS DATA_2 PROTECTOR -DATA
The commands in this example assign subsystem status to files of the
subsystem PROTECTOR. The first command assigns manager status
to the program file MY_ PROG. (You can assign manager status to
either a binary program or a script.) The remaining commands assign
data object status to the files DATA_ 1 and DATA_ 2.
When you’re finished assigning status to files, you can leave the
protected subsystem by typing CTRL/Z. You’ve exited the protected
subsystem when the EOF marker appears and the dollar sign prompt
returns.
8-27
Controlling Access
# Create the subsystem.
$ crsubs protector
# Change ACL entries for the subsystem.
$ edacl /sys/subsys/protector -af fran.%Iab.% -owner
$ edacl /sys/subsys/protector -cf %.sys_admin -owner
$ edacl /sys/subsys/protector -cf %.%.%.% -none
# Check to make sure entries are right.
$ acl /sys/subsys/protector
ACL for /sys/subsys/protector
Subsystem protector manager
fran.%.Iab.%
pgndwrx
%.sys_admin.%.%
pgndwrx
%.%.%.%
------# Enter the subsystem.
$ ensubs protector
# Assign subsystem status to two files.
# The files must already exist.
$ subs /owner/my_prog protector -mgr
$ subs /owner/data_1 protector -data
# List the subsystem status to check for mistakes.
$ subs /owner/my_prog
“/owner/my_prog” is a PROTECTOR subsystem manager
“/owner/my_prog” is a file subsystem data object
$ subs /owner/data_1
“/owner/data_1” is a nil subsystem manager
“/owner/data_1” is a PROTECTOR subsystem data object.
# Type CTRL/Z to exit the subsystem.
$ ***EOF***
$
Figure 8-6. Sample of a Protected Subsystem Transcript
Figure 8-6 contains a transcript that shows how a user created a
protected subsystem, entered it, created a subsystem manager and data
object, and exited the subsystem.
Controlling Access
8-28
CHAPTER
9
Writing Shell Scripts
Most of the Shell command examples that you’ve seen so far show you
how to use commands interactively by specifying them in the Shell
input pad. You can also use Shell commands in Shell scripts. Shell
scripts are essentially programs made up of Shell commands and other
valid Shell characters, operators, and expressions. Think of scripts as
programs written in the” Shell language.”
This chapter describes how to write Shell scripts using Shell
commands, operators, and expressions. Although you can use many
of the commands and conventions presented in this chapter when you
use the Shell interactively, they have their most practical applications
in scripts.
9-1
Writing Shell Scripts
Creating Your Own Commands
In its simplest form, a script is a file containing Shell commands that
you create to perform some customized operation. For example, a Shell
script can contain a sequence of commands that you specify frequently,
such as WD to set the working directory, and LD to list the directory’s
contents. Or, it could contain a single command with a long list of
options. By including commands such as these in a script, you can
execute them at any time by specifying a single command name.
For example, when you specify the LD command to list the contents
of a directory, by default it displays only the name of each object.
Suppose, however, that you want to display each objects’ access rights,
creation date, and object type. Normally, each time you specify the
LD command you have to specify the same list of options. Instead,
you can create a Shell script named LIST that contains the following
command line:
LD -R -DTC -ST
Whenever you specify the command name LIST, the Shell lists the
access rights, creation date, and object type of each object in the
current working directory.
Of course, you can write much more complicated scripts that perform
more sophisticated tasks. This section describes some of the basic
components for writing scripts.
Creating Scripts
To create a script, simply create a file and insert Shell command lines.
Command lines in scripts use the same command line format described
in Chapter 6.
Like commands that you enter in the Shell input pad, you can use
parsing operators like the semicolon (;) to separate commands on a
command line, and the escape character (@) to continue a command
on more than one line. Other operators, like the pound sign
character (#), have functions more suited for use in scripts. The #
character allows you to include comments in your scripts, since it
directs the Shell to ignore anything that follows it on the command
Writing Shell Scripts
9-2
line. Table 9-1 lists the Shell parsing operators you’ll use when writing
scripts.
Table 9-1. Shell Parsing Operators
Character
Function
#
Direct the Shell to ignore anything that
follows it on the command line.
;
Separate commands on a line.
&
Run a command or program in the background
without pads and windows (see Chapter 6).
^n
Substitute nth parameter (n is a number).
^*
Substitute all parameters (not including the
command itself).
!n
Substitute parameter for n (n is a number) and
rescan it.
!*
Substitute and rescan all parameters (not
including the command name itself).
‘string’
Quoted string, no parameters inserted.
“string”
Quoted string, parameter may be inserted.
@
Escape character
Space (separates arguments).
An important consideration when creating scripts is where to create
them. Remember, when you specify a command name, the Shell
searches for the corresponding file according to a set of command
search rules. By default, the second directory the Shell searches is
your personal command directory ~ COM. Therefore, you should
9-3
Writing Shell Scripts
normally create your own personal scripts there. In fact, all of the
examples in this chapter assume that the scripts reside in your ~ COM
directory. For more information on command search rules, refer to
Chapter 6.
Passing Arguments to Scripts
Let’s take a look at a slightly more sophisticated script. This script is
in a file called COMPILE and contains the following lines:
# COMPILE
#
# This file compiles and binds PROG
#
PAS PROG -L -MAP -OPT
BIND PROG.BIN -MAP >PROG.MAP
ARGS “PROG compiled and bound.”
When you specify COMPILE in the Shell input pad, the Shell executes
the script. The script compiles and binds the program in file PROG
and produces various output files (listings and maps), all in the current
working directory. When finished, it uses the ARGS (ARGUMENTS)
command to display the message, “PROG compiled and bound.”
The ARGS command uses standard output to write its arguments (one
per line) to the Shell transcript pad. You can use the ARGS command
in scripts to display the results of expressions (see the “Using
Expressions” section) or to display messages and diagnostics (as in the
previous example). In fact, many of the examples in this chapter use
the ARGS command to show how the Shell evaluates various strings
and expressions. You can also use the ARGS command with the
-ERR[OUT] option to write arguments to error output.
The Shell script COMPILE isn’t very useful, since it only operates on
a single file named PROG and performs fixed compilation and binding
operations. A script is more versatile if you can pass arguments to it
when you specify the command to invoke it. Consider the following
script named COMPILE2:
Writing Shell Scripts
9-4
#
# COMPILE2
#
# This file compiles and binds a program whose name you
# pass to it as (^1).
#
PAS A1 -L -MAP -OPT
BIND A1.BIN -MAP >A1.MAP
ARGS “A1 compiled and bound.”
Specifying the following command in the Shell input pad causes the
Shell to find and execute the script COMPILE2:
$ COMPILE2 MY_PROG
The Shell substitutes MY_ PROG, which is the first argument on the
command line, for every occurrence of the (^1) in the script. As a
result, the script compiles MY_ PROG, binds MY_ PROG.BIN, writes a
map to MY_ PROG.MAP, and when complete, writes the message:
MY _PROG compiled and bound.
Arguments that you specify on the command line correspond to symbols
in the script, called substitution parameters. Each substitution
parameter is composed of a caret character (^) and a number. The
caret character (^) instructs the Shell to substitute an argument for the
parameter; the number refers to the position the argument occupies on
the command line that invoked the script.
In the previous example, ^1 refers to MY_ PROG, which is the first
argument after the command name COMPILE. You can use any
number of substitution parameters in Shell scripts (beginning with ^0
which refers to the command name itself).
Our COMPILE2 script is still very specific, since the compile and
bind operations are still fixed. To make those operations variable,
simply pass in more parameters. Consider the following script named
COMPILE3:
9-5
Writing Shell Scripts
#
# COMPILE3
#
# ************ (THIS EXAMPLE IS WRONG)**********
#
# This file compiles and binds a program whose name you
# pass to it as ^1, and whose options you pass to it as ^2.
#
PAS ^1 ^2
BIND ^1.BIN -MAP >^1.MAP
ARGS “^1 compiled and bound.”
How do we pass the multiple parameters if we want COMPILE3 to
behave like COMPILE2? Let’s take a look at what happens if we
specify the following command:
$ COMPILE3 MY _PROG -L -MAP -OPT
1
2
3
4
As shown in this example, the Shell tries to substitute -L for parameter
2, -MAP for 3, and -OPT for 4. This command won’t work, however,
because COMPILE3 doesn’t contain substitution parameters ^3 and ^4.
As a result, the Shell ignores the -MAP and -OPT options.
Normally, we can group the arguments and pass them as a single
argument by enclosing them in single quotation marks as follows:
$ COMPILE3 MY_PROG ‘-L -MAP -OPT’
1
2
The single quotation marks tell the command Shell to treat the
characters inside them as a single string, even if there are intervening
spaces. When you specify the command, the Shell substitutes the
Writing Shell Scripts
9-6
string ‘-L -MAP -OPT’ for substitution parameter 2 in COMPILE3.
However, this still won’t work, because the Shell tries to interpret the
entire string as a single argument, instead of the three separate options
the string represents.
Let’s look at a fourth and final COMPILE script to see how to solve
our problem.
#
# COMPILE4
#
# ********** (THIS EXAMPLE IS CORRECT) *********
#
# This file compiles and binds a program whose name you
# pass to it as ^1, and whose options you pass to it as !2
#
PAS ^1 !2
BIND ^1.BIN -MAP >^1.MAP
ARGS “^1 compiled and bound.”
Now, typing the following command will work:
$ COMPILE4 MY _PROG ‘-L -MAP -OPT’
1
2
Like the caret (^), the exclamation point (!) parsing operator causes
the Shell to substitute the string in quotation marks for the second
parameter. However, the exclamation point directs the Shell to rescan
the command line before executing it. When the Shell scans the line a
second time it breaks apart the three options in the string. As a result,
the Shell interprets the options correctly.
9-7
Writing Shell Scripts
Using Quoted Strings
The proper use of quotation marks can make a big difference in the
way the Shell interprets quoted strings. In order to use quoted strings
correctly in scripts, you must understand the subtle differences in the
Shell’s interpretation of single and double quotation marks.
When you want the Shell to interpret a string literally, you can use
either single or double quotation marks as follows:
ARGS ‘compiled and bound’
or
ARGS “compiled and bound”
Both commands use standard output to write the message, “compiled
and bound” to the Shell’s transcript pad. But suppose you wanted to
substitute arguments inside the quoted string.
To substitute arguments inside a quoted string, you must use double
quotation marks. For example, let’s use a line from the script,
COMPILE4 that we created in the “Passing Arguments to Scripts”
section.
ARGS “^1 compiled and bound”
When you use double quotes, the Shell performs substitutions in the
quoted string. In this example, if the argument passed to the script is
MY_ PROG, the Shell outputs the string:
MY_PROG compiled and bound.
On the other hand, if you enclose the string in single quotation marks:
ARGS ‘^1 compiled and bound.’
the Shell will not perform the substitution. Instead, it displays the
message:
^1 compiled and bound.
Writing Shell Scripts
9-8
Using In-Line Data
As we saw in Chapter 6, certain Shell commands use standard input to
read data from the Shell input pad. When you use these commands in
scripts, you can redirect standard input to read data from within the
script itself.
For example, the ED (EDIT) command normally uses standard input
to read special editing commands that you enter in the Shell input pad.
Using the I/O redirection character ( << ), you can redirect standard
input to read commands from inside the script instead. Figure 9-1
shows a script in which the ED command reads in-line data.
#
# This is a sample script that uses in-line data
#
ED MY_FILE << /
editing commands
.
.
.
/
Figure 9-1. Including In-Line Data in a Script
In Figure 9-1, the list of editing commands between the two slash
characters ( / ) is called a here document. The I/O redirection
character ( << ) redirects standard input to read the data (in this case
commands) contained in the here document.
The script in Figure 9-1 uses a slash character (/) as a delimiter to
indicate both the beginning and end of the here document. You can
use any character as a delimiter, as long as the beginning and ending
characters are the same. Also, in order for the Shell to recognize the
end of the here document, you must specify the ending delimiter as the
first and only character on the line.
9-9
Writing Shell Scripts
Executing DM Commands from Shell Scripts
You can invoke DM commands from the command Shell or
from within a Shell script using the Shell command XDMC
(EXECUTE_DM_COMMAND) in the following format:
XDMC dm_command
where dm_ command specifies the name of the DM command you want
to execute. For example:
XDMC CV NEWS
This command executes the DM command CV (CREATE_VIEW) to
open a read-only pad and window for the file NEWS.
Debugging Shell Scripts
Normally, when a script runs, it doesn’t display commands as it executes
them. As a result, when a script doesn’t work, it is difficult to locate
which command or commands cause the errors.
To debug a Shell script, invoke the script using the SH (SHELL)
command in the following format:
SH option script
where script specifies the name of the script, and option specifies one
of the options in Table 9-2. Each option activates a specific function.
The following command executes the script COMPILE and writes each
command line to standard output immediately before execution:
$ SH -X COMPILE
Writing Shell Scripts
9-10
Table 9-2. Script Verification Options
Option
-x
Function
Writes each command line in
the script to standard output
immediately before execution.
Provides the complete pathname
for each command and evaluates all
expressions.
-v
Writes each command line in the
script to standard output. Each
variable is expanded, but expressions
are not evaluated, and command
pathnames are not expanded.
-n
Interprets commands without
actually executing them.
If you want to turn either of these features on or off without using
the SH command options, you may specify the Shell commands VON,
VOFF, XON, or XOFF and then run your script directly using the
current Shell. For example, the following are equivalent:
$ SH -X COMPILE
or
$ XON
$ COMPILE
$ XOFF
You can also include these commands within the script itself to enable
or disable verification. For example, to debug part of a script, you
can place XON and XOFF commands around the segment of the script
you want to debug. Or, to debug an entire script, include the XON
command as the first line in the script. When the script completes,
control of verification returns to the Shell.
9-11
Writing Shell Scripts
Using Expressions
Like programs written in a high-level programming language such as
FORTRAN or Pascal, scripts allow you to use expressions to perform
mathematical, string, and Boolean operations. Table 9-3 provides a
summary of the operators you can use in expressions.
To evaluate an expression, you must enclose the expression within
expression delimiters (a set of double parentheses) as follows:
ARGS (( 4 + 2 ))
The only exception to this rule is the case where you use the assignment
operator ( := ) to assign an expression to a variable:
TOTAL := 4 + 2
In this example, the Shell evaluates the expression and assigns the
resulting value to the variable TOTAL. While the assignment operator
doesn’t require you to use expression delimiters, you can use them if
you prefer; no error will occur if you do use them. The “Defining
Variables” section describes how to use the assignment operator to
assign values to variables.
Writing Shell Scripts
9-12
Table 9-3. Summary of Expression Operators
Type
Char.
Function
Legal Operands P①
Grouping
Operators
( )
Group
operations
Any value
8
Math
Operators
+
Positive value
Integer
7
**
Mod
*
/
+
Negative value
Op1 to the
Op2
Mod Op1 by
Op2
Multiply
Divide
Add
-
Subtract
String
Operators
+
Concatenate
Math or
String
Comparison
Operators
=
-
<
>
<=
>=
<>
Logical
Operators
or
and
not
Subtract last
occurrence of
Op2
Compare for
equality
Less than
Greater than
Less than or
equal to
Greater than
or equal to
Not equal
Logical or
Logical and
Logical negate
Integer
Integers
7
6
Integers
5
Integers
4
Integers
Integers
4
3
Integers
3
Strings
3
Strings
3
Integer or string
2
Integer or string
2
Integer or string
2
Integer or string
2
Integer or string
2
Integer or string
2
Boolean
Boolean
Boolean
1
1
9
1. Precedence: 1 is the lowest; 9 is the highest
9-13
Writing Shell Scripts
Operands in Expressions
You can use any of the following as operands in expressions:
•
Single integer, string, or Boolean values
•
Operations that result in integer, string, or Boolean values
•
Variables assigned integer, string, or Boolean values (the
“Shell Variables” section describes variables).
Certain types of operations in expressions take precedence over others.
For example, the Shell will perform a mathematical operation in an
expression before a comparison operation. As shown in Table 9-3, the
Shell performs operations according to a specific order of precedence
where 1 is the lowest (last performed) and 9 is the highest (first
performed).
The last operation performed in an expression (the operation with the
lowest precedence) determines the type of value, either integer, string,
or Boolean, returned by the expression.
When you create expressions, refer to Table 9-3 to check the precedence
of the operators you use. Understanding the order in which the Shell
performs operations will reduce the possibility of an expression
resulting in an unexpected answer. Many of the examples that we’ll
see in this chapter demonstrate operator precedence.
Mathematical Operators
Use mathematical operators in expressions to perform calculations on
integers. The result of a mathematical operation is always an integer.
For example:
ARGS (( 5 + 4 * 3 - 2 ))
returns the value 15. If you’re wondering why the answer isn’t 9 (9 times
1), the reason is that the Shell performs multiplication operations in
this expression before it performs addition and subtraction operations.
In our example, the Shell multiplied 4 by 3 before it added 5 and
subtracted 2.
Writing Shell Scripts
9-14
To perform the addition and subtraction first, you could use the
grouping operators (parentheses) to group the addition and subtraction
operations within the expression as follows:
ARGS (( (5 + 4 ) * ( 3 - 2 ) ))
The Shell always performs operations inside parentheses first, from
left to right. In this example, the Shell first adds 5 and 4 and subtracts
2 from 3, and then multiplies the resulting values. Table 9-3 lists the
order of precedence for all operators where 1 is the lowest and 9 is the
highest precedence.
Since all mathematical operators perform integer arithmetic, expressions
always result in whole numbers; the Shell truncates fractional values.
String Operators
Use string operators to either concatenate or reduce strings.
example:
For
ARGS (( “FILE” + “.PAS” ))
uses the + operator to concatenate two strings and form the string
FILE.PAS.
Using the - operator to reduce a string is a little trickier. Let’s look at
a simple example first:
ARGS « “FILE.PAS” - “.PAS” »
This operation subtracts the second operand from the first operand
to return the string FILE. The behavior of the - operator gets more
complicated when the first operand contains more than one occurrence
of the second operand. In this case, the Shell string you are subtracting
matches the last occurrence in the first operand. For example:
ARGS (( “PROG.PAS AND FILE.PAS” - “.PAS” ))
9-15
Writing Shell Scripts
This expression subtracts the last occurrence of the second operand
(.PAS) from the first operand. The result of this example is
PROG.PAS AND FILE. To subtract both occurrences of the string
.PAS in the first operand, use the following expression:
ARGS (( “PROG.PAS AND FILE.PAS” - “.PAS” - .PAS ))
This expression performs two operations, each subtracting the last
occurrence of the string .PAS in the first operand. The result is the
string PROG AND FILE.
When you use string operators, the Shell treats all operands as strings.
If an operand in a string operation is an integer, the Shell converts the
integer to a string. For example:
ARGS (( 50 + “shares at $” + 30 + “a share is $” @
+ (50 * 30) ))
returns the string
50 shares at $30 a share is $1500
Notice that the Shell performs the mathematical operation inside the
grouping operators first. The result of this operation (50 * 30) is
the integer 1500. Since this integer is part of a string concatenation
operation, the Shell converts it to a string. Even if you omitted the
grouping operators, the Shell would still multiply the two integers
first, since multiplication operations have a higher precedence than
string concatenation operations (see Table 9-3).
Comparison Operators
Use comparison operators to compare either integer or string values.
The result of a comparison operation is always a Boolean value (true or
false). The following expression compares two integers:
ARGS (( 5 > 2 ))
Writing Shell Scripts
9-16
This expression results in the Boolean value TRUE, because the integer
5 is greater than the integer 2.
When you compare strings, the Shell compares them according to
the sequential position they hold in the ASCII character set. For
example:
ARGS (( a < b ))
results in the value TRUE because a holds a lower position than b in the
character set. Also, the Shell is case-sensitive when comparing strings.
For example, the following expression results in the value FALSE:
ARGS (( A = a ))
Logical Operators
Use logical operators to perform logical operations with Boolean
values. The result of a logical operation is always a Boolean value.
For example:
ARGS (( 5 > 2 OR 5 > 6 ))
results in the value TRUE. In this example, the first operand (the result
of the integer comparison) is true, while the second operand is false
(5 is not greater than 6). With the OR operator, if either one of the
operands results in the value TRUE, then the result of the operation is
TRUE.
When you use the AND operator, both operands must be true for the
operation to result in a TRUE value. For example:
ARGS (( 5 > 2 AND 5 > 6 ))
This expression results in the value FALSE because both operands are
not TRUE; the second operand is FALSE.
9-17
Writing Shell Scripts
Shell Variables
You use variables in Shell scripts as symbolic names for specific integer,
string, or Boolean values. Once you assign a value to a variable name,
you can refer to that value in the script by its variable name rather than
its actual value.
•
The Shell allows you to use variables in any of the following:
•
Command lines as commands, arguments, or options
•
Here documents
•
Strings enclosed in double quotation marks
•
Expressions
Defining Variables
To define a variable, use the assignment character (:=) in the following
format:
variable name := value
where variable name specifies the name of the variable, and value
specifies the value you want to assign to the variable. Variable names
can contain alphanumeric characters, as well as the underscore ( _ ) and
dollar sign ( $ ), and up to 1024 characters. You MUST, however, begin
all variable names with a letter. (Variables are not case-sensitive.) The
following statement assigns the integer value 30 to the variable name
WORK_ DAYS:
WORK_DAYS := 30
Unlike many programming languages that require you to declare
variable types, the Shell automatically assigns the variable a type based
on the assigned value. In the previous example, since the value 30 is an
integer, the Shell assigns the variable WORK_ DAYS the type integer.
Table 9-4 lists the rules the Shell uses to assign variable types.
When you define a variable at the current Shell level, you define it
for all levels below the current Shell level. For example, suppose you
Writing Shell Scripts
9-18
define the variable D:= 25 in the Shell input pad, and then execute a
Shell script. Since scripts run at a lower Shell level, the value assigned
to variable D remains 25, unless the script redefines the variable by
changing its value. If the script does change the value for variable D,
the value returns to 25 when the script completes execution.
Table 9-4. Rules for Assigning Variable Types
Type
Integer
Assignment Rule
When the assigned value is an integer, constant,
an integer expression, or another integer
variable. For example:
INT := 7
or
INT := 5 + (4-2)
String
When the assigned value is a quoted string, a
string constant, a string expression, or another
string variable. For example:
STR := “APRIL” + ^VAR2
Boolean
When the assigned value is a Boolean constant
(TRUE or FALSE), a Boolean expression, or
another Boolean variable. For example:
BOOL := ^VAR1 = VAR2
Using Shell Variables
To use a Shell variable, precede the variable name with the
substitution character ( ^ ). When the Shell encounters the substitution
character in a command line, it substitutes the value of the variable
9-19
Writing Shell Scripts
for the variable name. Variable names are not case-sensitive. Let’s
look at an example.
Suppose we assign the variable CITIES a string value:
CITIES := “Boston and NY”
To use the variable CITIES, simply precede it with the substitution
character as follows:
ARGS (( “Cities with early flights are” + ^CITIES ))
The ARGS command uses standard output to display the result of the
expression to the transcript pad. In this example, the Shell substitutes
the string value “Boston and NY” for the variable name CITIES. The
expression concatenates the first string and the second string to form
the following string:
Cities with early flights are Boston and NY
The Shell automatically substitutes values for (evaluates) Shell
variables when you use them as operands in expressions (as shown in
the previous example). However, you may want to evaluate a variable
that isn’t part of an expression. Consider the following example:
ARGS “Cities with early flights are ^CITIES”
By default, the Shell won’t evaluate the variable CITIES since the
variable is not used in an expression. In order for the Shell to evaluate
variables outside of expressions, you must turn on evaluation using the
EON command.
You can either specify the EON command before you run a script to
turn on evaluation for the current Shell, or include the EON command
in the script itself. The EON command, when used in a script, turns
on evaluation for the script only, not for the current Shell. To turn
evaluation off, use the EOFF command.
With variable evaluation turned on, the command in the previous
example evaluates the variable CITIES and displays the following
string:
Cities with early flights are Boston and NY
Writing Shell Scripts
9-20
You can also turn evaluation on when you create a Shell by specifying
the -E option with the SH (SHELL) command. By default, when you
create a Shell, evaluation is off.
Variable Commands
The Shell provides three commands that let you verify or delete
variables. Table 9-5 lists these commands.
Table 9-5. Variable Commands
Command
EXISTVAR
LVAR
DLVAR
EXPORT
Description
Verifies whether the variable(s) you specify
as arguments exist. If all of the variables
specified exist, the command returns the value
TRUE. If anyone of the variables does not
exist, the command returns the value FALSE.
Lists the type, name, and assigned value of
the variable(s) you specify as arguments.
If you don’t specify any variables, LVAR
lists information about currently assigned
variables.
Deletes all variables that you specify as
arguments.
Changes all specified variable names into
environment variables. If the specified
variable does not exist, EXPORT creates it.
The EXISTVAR and LVAR commands verify variables defined at the
current level and every level above. For example, when you specify
the LVAR command from within a script, the command lists variables
defined in the script, as well as variables defined at the
9-21
Writing Shell Scripts
Shell level (one level above). When you specify LVAR at the Shell
level, the command lists only variables defined at the Shell level.
The DLVAR command deletes only the variables defined at the current
level. For example, suppose you defined the variable D:= 25 at the
Shell level. If you executed a script that used the DLVAR command
to delete the variable D (assuming that you didn’t redefine D in the
script), you’d receive an error. In this example, if the script redefined
D by assigning it a new value, the command would delete the new
value, and D would return to the value defined at the Shell level.
Use the EXPORT command to create environment variables or
change variables into environment variables. Environment variables
store global state information about the system. We supply a set
of default environment variables that you can list using the LVAR
command.
Defining Variables Interactively
So far, we’ve looked at variables that you either define at the Shell
level or from within scripts. When you define variables in a script, you
assign them initial values. These initial values are used every time you
execute the script, unless you edit the script to change the values prior
to each execution.
Instead of including values for variables directly in scripts, you can
direct the script to read values supplied by the user of the script. To
read user input into variables, use the READ command in the following
format:
READ [option] variable_list
where variable_ list specifies one or more variables that receive the
input values. Figure 9-2 shows a sample script that demonstrates how
to use the READ command to read user input.
Writing Shell Scripts
9-22
# STOCKS
#
# This script calculates the value of stock holdings.
# It reads In both the number of shares held by the
# user, and the current market price per share.
#
# Read In number of shares
#
READ -PROMPT “Number of shares:” SHARES
#
# Read In current market price
#
READ -PROMPT “Current market value:” PRICE
#
# Calculate value of holdings and display value.
#
ARGS (( “ ^SHARES shares at $ ^PRICE per share $ ” + @
( ^SHARES * ^PRICE ) ))
Figure 9-2. A Sample Script Using the READ Command
By default, the Shell uses standard input to read values that the user
of the script types in the Shell input pad. Our sample script in Figure
9-2 uses two READ commands: one reads in the number of shares
and assigns the value to the variable SHARES, the other reads in the
current price of each share and assigns the value to the variable PRICE.
Notice that each READ command uses the -PROMPT option to prompt
the user for the proper input. To see just how this script works, create
your own copy and execute it.
The sample script in Figure 9-2 expects the user to supply integer
values. But what if the user entered a string or Boolean value? The
script would use the value, and as a result, the final calculation
(^SHARES * ^PRICE) would result in an error. To prevent a user from
entering the wrong variable type, use the -TYPE option with the READ
command as follows:
READ -PROMPT “Number of shares: ” -TYPE INTEGER @
SHARES
The -TYPE option in this example directs the READ command to
accept only integer values as input. If the user specifies any other
9-23
Writing Shell Scripts
type of value, the Shell will display an error and prompt the user again
to enter the proper value.
Other READ commands, like READC and READLN also enable
you to read user input into scripts. For more information on these
commands, refer to the DOMAIN System Command Reference.
Using Active Functions
You can use active functions in scripts to include string output from a
command, program, or other script. When you use an active function,
the system replaces it with a string containing standard output from the
command, program, or script used in the function. Active functions
have the following format:
^“command”
where command specifies the name of a command, program, or script
whose output you want to use. You can use either single or double
quotes according to the rules described in the .. Using Quoted Strings”
section discussed earlier. Note that output from an active function
cannot exceed 1024 characters. If output does exceed this limit, the
system displays an error.
You can use active functions in the same way you use variables. For
example, suppose you want to use a string that shows the current date
and time. (The Shell command DATE displays the current date and
time.) By using DATE in an active function, you can substitute the
standard output string in the script as follows:
EON
ARGS “The date is ^‘DATE’ ”
In this example, the system substitutes the standard output string from
the active function ‘DATE’ to display the following line:
The date is Wednesday, May 1, 1985 10:59:28 (EDT)
Note that the system deletes the trailing CR from the output string;
however, any internal CRs remain.
By assigning active functions to variables, you can define your own
“Shell functions.” For example, suppose you wrote a program called
Writing Shell Scripts
9-24
GET_ PROCESS_ NAME that displays the current process name. To
make use of this program in a script, you can refer to the program in
an active function. For example:
EON
#
# Assign active function to variable
#
PROCNAME := ^“GET_PROCESS_NAME”
#
# Execute DM command to make process window
# invisible
#
XDMC “WI -W ^PROCNAME
#
# Go off and do something else
.
.
.
# Make process window visible again
#
XDMC “WI -I ^PROCNAME
The script in this example assigns the active function to the variable
PROCNAME. It uses PROCNAME with the DM command WI
(WINDOW_INVISIBLE) to make the current process window invisible
and then visible again. The system substitutes the output string
generated by the active function for the variable PROCNAME.
Controlling Script Execution
In all of the scripts we’ve seen in this chapter, the Shell executes each
command in sequence, following an unaltered path from the beginning
of the script to the end as shown in Figure 9-3. As a result, these scripts
perform the same basic operations each time you execute them.
9-25
Writing Shell Scripts
Figure 9-3. Flow of Execution in a Simple Script
You can also create scripts in which the flow of execution varies
according to the results of tests performed in the script. To perform
these tests in a script, you use conditional statements.
Conditional statements test to see if the results of a command or
expression are TRUE or FALSE. Then, based on the result of the test,
execute a particular command or sequence of commands. Figure 9-4
shows an example of a conditional statement called an IF statement.
The IF statement in Figure 9-4 controls the flow of execution by
executing STEP 2 only if the result of the conditional statement is
TRUE, and executing STEP 3 if the result is FALSE. In this way, the
script executes different commands depending on different conditions
in the script.
Writing Shell Scripts
9-26
Figure 9-4. Flow of Execution with a Conditional Statement
Figure 9-4 shows a very basic example of how to use an IF statement
to control execution. As you’ll see later in this section, you can use
one or more conditional statements to create more sophisticated flow
patterns in scripts.
The Shell supports four different types of conditional statements:
•
IF statement
•
WHILE statement
•
FOR statement
•
SELECT statement
The sections that follow describe these conditional statements and the
commands that execute them.
9-27
Writing Shell Scripts
Using the IF Statement
The IF command and all its arguments make up an IF statement that
executes one or more commands depending on the result of a Boolean
test. The IF command has the following format:
IF com_1 THEN com_2 ... [ ELSE com_3 ... ] ENDIF
where com_ 1 specifies a command, program, expression, or Boolean
variable you want tested for “truth.” A test of a command or program
is TRUE, if the command or program executes successfully (returns
an abort severity level of zero). A test of an expression or Boolean
variable is TRUE if they result in a TRUE value.
The com_ 2 argument specifies one or more commands or expressions
to execute if the result of the test on com_ 1 is TRUE. The ENDIF
command signifies the end of an IF statement. For example:
EON
IF (( ^A < 100 ))
THEN ARGS “ ^A is less than 100 ”
ENDIF
The IF statement in this example tests whether the value for variable
A is less than 100. If the value for A is 55, then the result of the
test is TRUE (the expression results in a TRUE value), and the ARGS
command executes displaying the message:
55 is less than 100
In this example, if the result of the test is FALSE, the next command in
the script (following ENDIF) executes.
The com_ 3 argument, which is optional, specifies one or more
commands to execute if the test on com_ 1 is FALSE. For example:
EON
IF (( ^A < 100 ))
THEN ARGS “ ^A is less than 100 ”
ELSE ARGS “ ^A is greater than 100 ”
ENDIF
Writing Shell Scripts
9-28
In this example, if the value of A is 900, then the test results in the value
FALSE (900 is not less than 100). As a result, the ARGS command
following the ELSE statement executes displaying the message:
900 is greater than 100
When the IF statement completes, execution of the script continues
sequentially with the next command following ENDIF.
Using the WHILE Statement
The WHILE command and all its arguments make up a WHILE
statement that executes one or more commands as long as the result
of a Boolean test is TRUE. The WHILE command has the following
format:
WHILE com_1 ...
DO com_2... ENDDO
where com_ 1 specifies a command, program, expression, or Boolean
variable you want tested for “truth.” A test of a command or program
is TRUE, if the command or program executes successfully (returns
an abort severity level of zero). A test of an expression or Boolean
variable is TRUE if it results in a TRUE value.
The com_ 2 argument specifies one or more commands or expressions
to execute as long as the result of the test on com_ 1 is TRUE. For
example:
i := 0
WHILE (( ^i < 5 ))
DO
ARGS (( ^i ))
i := ( ^i ) +1
ENDDO
The WHILE statement in this example tests whether the value for
the variable i is less than 5. As long as i is less than 5, the ARGS
command displays the value of i and the next command adds 1 to its
9-29
Writing Shell Scripts
value. Thus, the WHILE statement executes the ARGS command 5
times and produces the following display:
0
1
2
3
4
On the sixth pass, the test results in a FALSE value (5 is not less than
5). As a result, the script leaves the WHILE “loop” and continues
execution at the next command in sequence.
You can also use two special commands with the WHILE statement:
•
NEXT
•
EXIT
The NEXT command returns to the top of the WHILE loop. You
normally use the NEXT command to return prematurely to the top of
the loop before executing additional commands. For example, consider
the following section from a Shell script:
WHILE (( TRUE ))
DO READ -PROMPT “Enter number: ” -TYPE INTEGER A
IF (( ^A < 50 )) THEN NEXT ENDIF
ARGS (( ^A ))
ENDDO
This WHILE loop executes three commands:
•
A READ command to read in an integer value.
•
An IF command to test whether the value is less than 50.
•
An ARGS command to display the value.
If the integer value is greater than 50, the IF statement is FALSE
and the next command (ARGS) executes. If the value is less than
50, however, the IF statement is TRUE and the NEXT command
executes, returning execution to the top of the WHILE loop. As a
Writing Shell Scripts
9-30
result, this section of the script displays any value that is greater than
50.
The EXIT command exits the WHILE loop. You normally use the
EXIT command to exit a WHILE loop prematurely before executing
additional commands. For example:
WHILE (( TRUE ))
DO READ -PROMPT “Enter number: ” -TYPE INTEGER A
IF (( ^A < 50 )) THEN EXIT ENDIF
ARGS (( ^A ))
ENDDO
ARGS “Finished”
The WHILE loop in this example is very similar to the loop in the
previous example, except that the IF statement uses the EXIT
command instead of NEXT. If the integer value is greater than SO,
the IF statement is FALSE, and the command (ARGS) executes. If the
value is less than 50, however, the IF statement is TRUE, and the EXIT
command executes.
The EXIT command causes execution to exit the WHILE loop and skip
to the next command outside the loop (after ENDDO). As a result, this
section of the script displays any value that is greater than SO, but exits
the loop if you enter a value less than SO.
Using the FOR Statement
The FOR command and all its arguments make up a FOR statement
that executes commands as long as the result of a -Boolean test is true.
The FOR command has two formats: one for using integer expressions,
and one for using string expressions.
The FOR command used with integer expressions has the following
format:
FOR variable := exp_1 [ TO exp_2 ] [ BY exp_3 ]
command ...
ENDFOR
9-31
Writing Shell Scripts
where exp_ 1, exp_ 2, and exp_ 3 are all expressions that result in integer
values. The exp_ 1 argument specifies the initial integer value assigned
to variable.
The command argument specifies one or more commands to execute
as long as the test on variable results in a TRUE value. Before each
iteration, the FOR statement tests to see if the current variable value is
less than the value specified by exp_ 2. As long as the variable value
is less than the value for exp_ 2, the result is TRUE.
Like the WHILE statement, you can use the FOR statement to execute
commands repetitively in a loop. The FOR statement is different,
however, because it increments its variable automatically after each
iteration. For example, the WHILE and FOR statements in the following
example perform the same operation:
#Example using WHILE Statement
#
A:= 0
WHILE (( A < = 10 )) DO
ARGS AA
A := ^A + 2
ENDDO
#
#
#Example using the FOR statement
#
FOR A : = 0 TO 10 BY 2
ARGS ^A
ENDFOR
In this example, both the WHILE loop and the FOR loop execute the
ARGS command six times. By default, the FOR statement increments
the value of the variable by one after each iteration. Notice,
however, that this example uses BY 2 to increment the variable by
Writing Shell Scripts
9-32
two after each iteration. Instead of the FOR loop counting from 0 to
10 by 1, it counts to 10 by 2. The result is:
0
2
4
6
8
10
The FOR command used with string expressions has the following
format:
FOR variable IN exp [ BY [ CHAR ] [ WORD ] [ LINE ] ]
command ...
ENDFOR
where exp specifies a string expression. By default, during each
iteration, FOR reads a word from the string and assigns it to variable.
You can also direct FOR to read the string by character or line by
specifying BY with the appropriate option.
The command argument specifies one or more commands to execute
as long as the test on variable results in a TRUE value. Before each
iteration, the FOR statement tests to see if any more characters, words,
or lines exist (depending on the BY argument specified). As long
as a value exists to assign to the variable, the result is TRUE. For
example:
EON
FOR FILE IN “foo bar zap” BY WORD
ARGS “The current file is ^FILE”
ENDFOR
In this example, with each pass through the FOR loop, FOR assigns the
variable FILE a word from, the string. When FOR runs out of words,
it exits. As a result, the FOR statement in this example displays the
following lines then exits:
The current file is foo
The current file is bar
The current file is zap
9-33
Writing Shell Scripts
Using the SELECT Statement
The SELECT command and all its arguments make up a SELECT
statement that executes commands according to the results of one
or more Boolean tests. The SELECT command has the following
format:
SELECT arg_1 [ ONEOF | ALLOF ]
CASE arg [ TO arg ]
commands ...
[ CASE ...
commands ... ]
[ OTHERWISE
commands ... ]
ENDSELECT
where arg_ 1 specifies the argument that SELECT compares to the
CASE argument, arg. All arguments are either integers, strings,
variables, or expressions.
The Shell uses each CASE statement to perform a separate Boolean
test on the initial SELECT argument. If the CASE argument is
equal to the SELECT argument, the result of the test is TRUE, and
the command following the CASE statement executes. Let’s look at a
simple example:
EON
SELECT ^A ALLOF
CASE 1
ARGS “First case will execute if ^A = 1 ”
CASE (( 2 + 4 ))
ARGS “Second case will execute if ^A = 6 ”
CASE 6
ARGS “Third case will execute if ^A = 6 ”
ENDSELECT
In this example, the first case tests to see if the variable A equals 1,
and the second and third cases test to see if A equals 6. The ALLOF
statement directs SELECT to execute the commands associated with
all cases that result in TRUE. If A is 6, the SELECT statement in
Writing Shell Scripts
9-34
this example executes the commands for the second and third case to
display the following:
Second case will execute if 6 = 6
Third case will execute if 6 = 6
If you specify ONEOF (the default), SELECT executes only the first
case that results in a TRUE value. In the previous example, where
A equals 6, SELECT executes only the second case to display the
following:
Second case will execute if 6 = 6
You can also use the NEXT and EXIT commands to control execution
within the SELECT statement. For example, when using ONEOF you
can use the NEXT statement to direct SELECT to execute another case
as shown in the following example:
EON
SELECT ^A ONEOF
CASE 1
ARGS “First case will execute if ^A = 1 ”
NEXT
CASE (( 2 + 4 ))
ARGS “Second case will execute if ^A = 6 ”
NEXT
CASE 6
ARGS “Third case will execute if ^A = 6 ”
ENDSELECT
In this example, if variable A equals 6, the second CASE executes.
Although this script uses ONEOF, the NEXT command following the
second case directs SELECT to execute the next case that’s TRUE.
Since the third case is TRUE, the script in this example executes the
third case.
Using the TO statement, you can specify a range for a case argument.
The case in the following script tests for a value in the range of 1 to
10:
9-35
Writing Shell Scripts
EON
SELECT ^A ALLOF
CASE 1 TO 10
ARGS “Variable A is the number ^A”
ENDSELECT
You can also use the TO statement to test for a range of string characters.
For example:
EON
SELECT ^A ALLOF
CASE a TO z
ARGS “Variable A is the letter ^A”
ENDSELECT
The case in this example tests for a string value between a and z. Note
that this range is case-sensitive, so the case is TRUE for example, if A
equals r but not R.
Use the OTHERWISE statement when you want to perform an operation
if the test on a case is FALSE. For example:
EON
SELECT ^A ALLOF
CASE 0 TO 10
ARGS “Value for A is a number from 0 to 10”
OTHERWISE
ARGS “Value for A is greater than 10”
ENDSELECT
In this example, if the value for A is a number between 1 and 10, the
case is TRUE. As a result, SELECT displays the following:
Value for A is a number from 1 to 10
If the value is a number greater than 10, the case is FALSE, and the
command following OTHERWISE executes displaying the following:
Value for A is greater than 10
If you include several cases on the same line, SELECT separates
each case with an implied OR operator (see the “Logical Operators”
section discussed earlier). You can also use the @ character to es-
Writing Shell Scripts
9-36
cape NEWLINE characters and continue an “ORed” case on more than
one line. For example:
EON
SELECT ^A
CASE 1 CASE 3 CASE 5
ARGS “Variable A matches 1, 3, or 5”
CASE 2 @
CASE 4 @
CASE 6
ARGS “Variable A matches 2, 4, or 6”
ENDSELECT
9-37
Writing Shell Scripts
APPENDIX
A
Initial Directory and
File Structure
The following illustrations show how the system organizes the software
that we supply with your node:
•
Figure A-1 shows the contents of the node entry directory (/)
•
Figure A-2 shows the files and directories in the system
software directory (/SYS)
•
Figure A-3 shows the files and directories in the Display
Manager directory (/SYS/DM )
•
Figure A-4
(/SYS/NET )
shows
the
network
A-1
management
directory
Initial Structures
Figure A-1. The Node Entry Directory ( / ) and Subdirectories
Initial Structures
A-2
Figure A-2. The System Software Directory (/SYS)
A-3
Initial Structures
Figure A-3. The Display Manager Directory (/SYS/DM)
Initial Structures
A-4
Figure A-4. The Network Management Directory (/SYS/NET)
A-5
Initial Structures
APPENDIX
B
Summary of
Predefined Key
Definitions
The tables presented in this appendix describe the predefined key
definitions for both the 880 and low-profile type keyboards. The 880
keyboard is an older style keyboard that we no longer ship with new
nodes. Figure B-1 shows the names and locations of the keys on the
880 keyboard.
B-1
Summary of Key Definitions
Summary of Key Definitions
B-2
Figure B-1. Keynames for the 880 Keyboard
Controlling the Cursor
Predefined Key
Task
DM Command
Low-Profile
880
Move left one char.
AL
← (LA)
← (LA)
Move right one
char.
AR
→ (LC)
→ (LC)
Move up one line
AU
↑ (LB)
↑ (LB)
Move down one line
AD
Set arrow key scale
factors
AS x y
None
None
Move to the
beginning of line
TL
⇤ (L4)
⇤ (L4)
Move to end of line
TR
⇥ (L6)
⇥ (L6)
Move to top line in
window
TT
<SHIFT> ↑
(LDS)
None
Move to bottom line
in window
TB
<SHIFT> ↓
(LFS)
None
Tab to window
borders
↓ (LE)
TWB [ 1, r, t, b ]
↓ (LE)
None
None
CTRL/K
CTRL/K
Move to the
beginning
of next line
AD;TL
Tab left
THL
CTRL/<TAB>
CTRL/<TAB>
Tab right
TH
<TAB>
<TAB>
Set tabs
TS [ n1 n2 ... ]
None
None
B-3
Summary of Key Definitions
Controlling the Cursor (continued)
Predefined Key
Task
DM Command
Low-Profile
880
Move to DM input
pad
TDM
<CMD>
(L5)
<CMD>
(L5)
Move to next
window on screen
TN
<NEXT
WNDW>
(LB)
<NEXT
WNDW>
(LB)
Move to previous
window
TLW
CTRL/L
CTRL/L
Move to next
window in which
input is enabled
TI
None
None
Creating Processes
Predefined Keys
Task
DM Command
Low-Profile
880
Create new process,
pads, and windows
CP pathname
<SHELL>
(L5S)
<SHELL>
(R2)
Create new process
without pads or
windows
CPO pathname
None
None
Create a server
process
CPS pathname
None
None
Summary of Key Definitions
B-4
Controlling Processes
Predefined Key
Task
Quit, stop, or blast
a process
DM Command
Low-Profile
880
DQ [-b | -s | -c nn]
CTRL/Q
CTRL/Q
Suspend execution
of a process
OS
None
None
Resume execution
of a suspended
process
DC
None
None
Creating Pads and Windows
Predefined Key
Task
DM Command
Low-Profile
880
Create an edit pad
and window
CE pathname
<EDIT>
(R4)
<EDIT>
(R4)
Create a read-only
window
CV pathname
<READ>
(R3)
<READ>
(R3)
Create a copy of an
existing pad and
window
CC
None
None
B-5
Summary of Key Definitions
Closing Pads and Windows
Predefined Key
Task
DM Command
Low-Profile
880
Close window and
pad; update file
PW; WC -Q
<EXIT>
(R5)
CTRL/Y
Close window and
pad; no update
WC -Q
<ABORT>
(R5S)
CTRL/N
Close (delete) a
window
WC [ -Q | -F ]
None
None
Managing Windows
Predefined Key
Task
DM Command
Low-Profile
880
Changing window
size
WG
CTRL/G
None
Changing
window size with
rubberbanding
WGE
<GROW>
(LA3)
CTRL/G
Move a window
WM
None
None
Move a
window with
rubberbanding
WME
<MOVE>
(LA3S)
CTRL/W
Set scroll mode
WS [ -on | -off ]
CTRL/S
CTRL/S
Set autohold mode
WA [ -on | -off ]
None
None
Scroll and
autoholdmode
WA;WS
CTRL/A
CTRL/A
Set hold mode
WH [ -on | -off ]
<HOLD>
(R6)
<HOLD/GO>
(R5)
Summary of Key Definitions
B-6
Moving Pads
Predefined Key
Task
DM Command
Low-Profile
880
Move top of pad
into window
PT
None
None
Move cursor to
first character in
pad
PT;TT;TL
CTRL/T
CTRL/T
Move bottom of
pad into window
PB
None
None
Move cursor to
last character in
pad
PB; TB; TR
CTRL/B
CTRL/B
Move pad n pages
PP [-]n
Move pad n lines
↑
PV [-]n
Move pad n
characters
PH [-]n
Save transcript pad
in a file
PN
↑
↓
(LD, LF)
(LD, LF)
<SHIFT> ↑
(L8S)
(F2)
<SHIFT> ↓
(LES)
(F3)
←
B-7
↓
→
←
→
( L7, L9)
(L7, L9)
None
None
Summary of Key Definitions
Controlling Window Groups and Icons
Predefined Key
Task
DM Command
Low-Profile
880
Create or add to a
window group
WGRA grp-name
[entry_name]
None
None
Remove a window
from a window
group
WGRR grp_name
[entry-name]
None
None
Make windows
invisible
WI [entry_name]
None
None
Change windows
to icons
ICON
[entry_name]
[ character]
None
None
Set icon
positioning and
offset
IDF
None
None
Display list of
windows in group
CPS group_name
None
None
Setting Edit Modes
Predefined Key
Task
DM Command
Low-Profile
Set read/write
mode
RO [-ON | -OFF]
CTRL/M
Set insert/
overstrike mode
EI [-ON | -OFF]
<INS>
(L1S)
Summary of Key Definitions
B-8
880
CTRL/M
<INS MODE>
(L1)
Inserting Characters
Predefined Key
Task
DM Command
Insert string at
cursor
ES ‘string’
Insert NEWLINE
character
EN
Insert a new line
after current line
TR;EN;TL
Insert end-of-file
mark
EEF
Low-Profile
880
Default DM operation
<RETURN>
<RETURN>
<F1>
<F1>
CTRL/Z
CTRL/Z
Deleting Text
Predefined Key
Task
DM Command
Low-Profile
880
<CHAR DEL>
(L3)
Delete character
at cursor
ED
<CHAR DEL>
(L3)
Delete character
before cursor
EE
<BACKSPACE> <BACKSPACE>
(BS)
(BS)
Delete “word”
of text
DR;/[~A-Z0-9$_]/XD
Delete from
cursor to end of
line
ES ‘‘;EE;DR;TR;
XD;TL;TR
Delete entire
line
CMS;TL;XD
B-9
<F6>
<F6>
<F7>
(L3A)
<F7>
(L3A)
<LINE DEL>
(L2)
<LINE DEL>
(L2)
Summary of Key Definitions
Copying, Cutting, and Pasting Text
Predefined Key
Task
DM Command
Low-Profile
880
Copy text to a
paste buffer or file
XC [name | -f
pathname] [-R]
<COPY>
(L1A)
CTRL/C
Cut (delete) text
and write it to a
paste buffer or file
XD [name | -f
pathname] [-R]
<CUT>
(L1AS)
CTRL/E
Paste (write) text
from a paste buffer
or file into a pad
XP [name | -f
pathname] [-R]
<PASTE>
(L2A)
CTRL/O
Commands for Searching for Text
Predefined Key
Task
DM Command
Low-Profile
880
Search forward for
string
/string/
None
None
Search backward
for string
\string\
None
None
Repeat last
forward search
//
CTRL/R
CTRL/R
Repeat last
backward search
\\
CTRL/U
CTRL/U
Cancel search
or any action
involving the
ECHO command
ABRT
CTRL/X
CTRL/X
SC [-ON] [-OFF]
None
None
Set case
comparison for
search
Summary of Key Definitions
B-10
Commands for Substituting Text
Predefined Key
Task
Substitute
string2 for all
occurrences
of string1 in a
defined range
Substitute string2
for the first
occurrence of
string1 in each
line of a defined
range
Change case of
each letter in a
defined range
DM Command
Low-Profile
880
S/string1/string2
None
None
SO/string1/string2/
None
None
None
None
CASE [-S] [-U]
[-L]
B-11
Summary of Key Definitions
Index
The letter f means “and the following page”; the letters ff mean “and
the following pages.” Symbols are listed at the beginning of the index.
Task oriented entries appear in color.
<< (double less-than)
redirecting standard input 9-9
// (double slash) 1-4
{ } (braces)
in absolute pathnames 1-7
as pathname wildcard characters
to repeat search forward 5-25
6-21
...
(ellipsis)
in regular expressions 5-21
as pathname wildcard character
(( )) (double parentheses)
6-20
as expression delimiters 9-12
= (equal sign)
( ) (parentheses)
as comparison operator 9-17
as pathname wildcard characters
as pathname wildcard character
6-21
6-21
& (ampersand)
! (exclamation mark)
as input request character 3-5, 3-20
as substitution character 9-7
as Shell parsing operator 6-22
> (greater-than)
* (asterisk)
as comparison operator 9-16
as EDACL prompt 8-9
redirecting standard output 6-12
as multiplication operator 9-14
>?
(greater-than/question
mark)
as pathname wildcard character
redirecting error output 6-12
6-18f
- (hyphen)
in regular expressions 5-18
preceding DM command options
reading pathnames from standard
3-4
input 6-17
preceding Shell command options
@ (at sign)
6-3
escape character
reading data from standard input
In DM commands 3-5
6-17
in Shell commands 6-4
< (less-than)
in regular expressions 5-21
as comparison operator 9-17
\ (backslash)
redirecting standard input 6-11
beginning pathnames 1-12f
%
(percent
sign)
to search backwards for text 5-23
as pathname wildcard character
~ (tilde)
6-18f
beginning pathnames 1-11
as SID wildcard 8-3, 8-11
^ (caret)
In regular expressions 5-17
as substitution character 9-4, 9-19
# (pound sign)
in active functions 9-24
in DM commands 3-5
$ (dollar sign)
in Shell commands 9-2
as Shell command prompt 6-2
?
(question
mark)
in regular expressions 5-17
as pathname wildcard character
\\ (double backslash)
6-18f
to repeat search backwards 5-25
in regular expressions 5-18
>> (double greater-than)
; (semicolon)
appending files 7-10f
separating DM commands 3-5
appending standard output 6-12
separating Shell commands 6-4
>>? (double greater-than/question
/ (slash) 1-4
mark)
beginning pathnames 1-8
appending error output 6-13
to search forward for text 5-23
Index-1
b
Symbols
[ ] (square brackets)
as pathname wildcard character
6-19
in regular expressions 5-19
~ (tilde)
as pathname wildcard character
6-20
in regular expressions 5-19
| (vertical bar)
as pipe 6-13
A
AA (Acknowledge alarm) command
4-26
ABORT key 4-7, 4-16
ABRT (ABORT) command 4-19, 4-20
absolute pathname 1-7, 7-6
Access Control List (see ACL)
access rights 8-12
class names 8-14
denying 8-4, 8-12
EXPUNGE 8-7
for backup files 8-14
in ACL entries 8-2
in ACL entries 8-4
SEARCH 8-7
types for directories 8-6
types for files 8-6
ACCOUNT
components 2-21
default account (USER) 2-20
file 2-15
initial naming directory 2-15
initial working directory 2-15
updating 2-21
verification at login 2-15
ACL (Access Control List) 8-lff
ACL (ACCESS_CONTROL_LIST)
command 8-7
copying initial ACLs 8-21f
copying ACLs 8-18
displaying ACLs 8-8
ACLs
access rights
adding 8-16
changing 8-15
class names 8-14
deleting 8-17
for backup files 8-14
commands for editing and copying
8-9, 8-20
copying 8-21
displaying 8-8
editing 8-9, 8-20
entries 8-2
adding 8-15
deleting 8-17
rights element 8-2
SID element 8-2f
rules for specifying 8-11f
initial 8-18f
managing 8-7f
on new files 7-6
sample display 8-8
structure 8-2
valid access rights 8-12
active functions 9-24f
assigning to variables 9-24
adding
ACL access rights 8-16
ACL entries 8-15
alarm server
running in a process 4-7
alarms
responding to 4-26
ALL_GROUP paste buffer 4-38
ampersand (&)
as input request character 3-5, 3-20
as Shell parsing operator 6-22
AP (Acknowledge alarm and pop) 4-26
appending
directories to command search rules
6-6
error output to files 6-13
files 7-10f
standard output to files 6-12f
ARGS (ARGUMENTS) command 9-4
arguments
in DM commands 3-4
in Shell commands 6-3
passing to Shell scripts 9-4ff
ASCII characters
in regular expressions 5-17
assigning
protected subsystem status to files
8-27
asterisk (*)
as EDACL prompt 8-9
as multiplication operator 9-14
as path name wildcard character
6-18f
in regular expressions 5-18
reading pathnames from standard
input 6-17
at Sign (@)
escape character
in Shell commands 6-4
in regular expressions 5-21
autohold mode 4-23f
Index-2
B
BACK SPACE key 5-8
background processes 6-22
creating 4-7
backslash
to search backwards for text 5-23
backup files 4-17, 5-30
access rights 8-14
BOFF command 6-22
BON command 6-22
Boolean values
comparing 9-17
in expressions 9-14
logical operations 9-17
boot script 2-4, 2-11
creating processes from 4-7
editing 2-7
invoking CPS commands from 4-8
node-specific 2-11
used by DSPs 2-7
boot volume 1-3
sharing by nodes 1-3
booting
operating system on disked nodes
2-4
operating system on diskless nodes
2-10
braces ( { } )
as path name wildcard characters
6-21
in regular expressions 5-21
buffers
for window groups 4-37
paste (see paste buffers)
undo 5-29
C
cancelling
search operations 5-25
window grow operation 4-19
window move operation 4-20
caret (^)
as substitution character 9-4, 9-19
in active functions 9-24
CASE (CHANGE _CASE) command
5-28
case
changing 5-28
case companson
setting 5-25
CASE statement 9-34
cataloging nodes 1-5f
CATF (CATENATE _FILE) command
6-12
CATF (CATENATE _FILES) command
7-10f
CC (CREATE _COPY) command 4-15
CE (CREATE _EDIT) command 4-13,
7-6
changing
ACL access rights 8-15
case of lellers 5-28
command search rules 6-7
naming directory 7-4
process window modes 4-22ff
size of windows 4-18f
working directory 7-3
CHAR DEL key 5-7
character class 5-19
characters
ASCII control 3-16
ASCII
in regular expressions 5-17
control key 3-16
deleting from pads 5-7f
DM function 3-16
end-of-line 5-17
in regular expressions 5-17ff
inserting into pads 5-4ff
I/O control 6-11
matching with regular expressions
5-18
mouse 3-16
ordinary 3-16
program function 3-16
Shell command line limit 6-4
special Shell 6-7
CHN (CHANGE _NAME) command
changing directory names 7-21
changing file names 7-7
changing link names 7-34
class names 8-12
closing
pads and windows 4-7, 4-16
CMD key 3-2
CMDF (COMMAND_FILE) command
2-17, 3-22
CMF (COMPARE _FILE) command
7-19
CMT (COMPARE _TREE) command
7-27
/COM directory 6-5
~COM directory 7-3, 9-3
command line parser 6-14ff
command parser options 6-15
command search rules 6-2, 6-5ff
Index-3
appending directories to 6-6
changing 6-7
default 6-5
displaying 6-6
commands
DM (see DM commands)
for changing Shell variables 9-21
for closing pads and windows 4-16
for controlling edit pad modes 5-2
for controlling window groups 4-31
for controlling window icons 4-31
for copying text 5-11, 5-11
for creating pads and windows 4-10
for creating processes 4-5
for cutting text 5-11, 5-11
for deleting Shell variables 9-21
for deleting text from pads 5-7
for editing ACLs 8-10
for editing and copying initial ACLs
8-20
for inserting characters into pads
5-5
for managing ACLs 8-7
for managing directories 7-20
for managing files 7-5
for managing links 7-31
for managing windows 4-17
for moving cursor 4-2f
for moving pads under windows
4-27
for pasting text 5-11, 5-11
for searching for text 5-23
for setting directories 7-2
for substituting text 5-26
for verifying Shell variables 9-21
Shell (see Shell commands)
undoing 5-29
comments
in DM command scripts 3-5
in Shell scripts 9-2
comparing
ASCII files 7-19
Boolean values 9-17
directory trees 7-27f
comparison operators 9-16f
components
in Shell command line 6-3
concatenating strings 9-15
conditional statements 9-26
types 9-27
continuing
Shell commands 6-4
control characters 6-11
control key sequences
predefined 3-10f
to invoke DM commands 3-3,
3-10ff
controlling
access to protected subsystem files
8-24
command queries 6-15
cursor movement 4-2f
edit pad modes 5-2
icons 4-33ff
Shell command input and output
6-9f
Shell script execution 9-25ff
the display 3-2, 4-1ff
window groups 4-31ff
conventions
for DM commands 3-4
for naming keys 3-15ff
for Shell command lines 6-3f
COPY key 3-15
copying
ACLs 8-18
directory trees 7-22ff
display images to files 5-13
display to files 7-18f
files 7-8
initial ACLs 8-21
links 7-35
pads and windows 4-15
text from pads 5-12
CP (CREATE _PROCESS) command
4-5
CPB (COPY PASTE _BUFFER)
command 4-37
CPF (COPY_FILE) command 7-8
CPL (COPY_LINK) command
copying links 7-35
replacing links 7-35f
CPO (CREATE _PROCESS_ONLY)
command 4-7
CPS (CREATE _SERVER_PROCESS)
command 4-8
CPSCR (COPY_SCREEN) command
7-18
CPT (COPY_TREE) command
copying trees 7-23
merging trees 7-26
replacing trees 7-25
CRO (CREATE _DIRECTORY)
command 7-2f
creating
directories 7-21
edit pads and windows 4-13
files 7-5
icons 4-35
links 7-32
new files 4-13
pads 4-10ff
Index-4
paste buffers 5-11
processes 4-4
processes running the Shell 4-6
processes
with pads and windows 4-5f
processes without pads and windows
4-7
protected subsystems 8-26
server processes 4-8
Shell scripts 9-2f
Shells 6-7f
subordinate Shells 6-8
window groups 4-31f
windows 4-10ff
CRL (CREATE _LINK) command
creating links 7-32
redefining links 7-33
CRSUBS (CREATE _SUBSYSTEM)
command 8-26
CSR (COMMAND_SEARCH_RULES)
command 6-6
CTNODE (CATALOG_NODE)
command 1-5f
CTRL/A key 4-25
CTRL/B key 4-28
CTRL/E key 5-14
CTRL/M key 4-14, 5-3
CTRL/N key 4-7, 4-16
CTRL/P key 4-22
CTRL/Q key 4-9
CTRL/R key 5-25
CTRL/S key 4-24
CTRL/T key 4-28
CTRL/U key 5-25
CTRL/X key 4-19, 5-25
CTRL/Y key 4-17.5-30,7-5
CTRL/Z key 4-7, 5-6, 6-17
saving EDACL changes 8-10
cursor
controlling movement 4-2f
defining display points 3-2, 3-6
CUT key 3-15, 5-14
cutting
text from pads 5-14
CV (CREATE _VIEW) command 3-10
3-11, 4-14
D
DATE command 6-2 9-24
DC (DEBUG_CONTINUE) command
4-10
debugging
Shell scripts 9-10f
default
access rights 8-7
account (USER) 2-20
ACLs 8-18f
command search rules 6-5f
icon position and offset 4-36
icons 4-35
paste buffer 5-11
paste buffers
writing text to 5-8
window positions 4-25
defining
a range of text in pads 5-9f
default window positions 4-25
display points 3-6ff
display regions 3-6ff
keys 3-18ff
at startup 2-7
at startup 2-11
at start-up 3-12ff
from within a program 3-18
from within a program 3-22
to prompt for input 3-20
Shell
environment 6-8f
variables 9-18
variables interactively 9-22f
deleting
ACL
access rights 8-17
entries 8-17
characters from pads 5-7f
directory trees 7-30
edit pads and windows 4-16
entries from window groups 4-32f
files 7-18
key definitions 3-21
lines of text from pads 5-8
links 7-36
NEWLINE characters from pads
5-7
paste buffers 5-11
read-only pads and windows 4-16
text from pads 5-7ff, 5-14
windows 5-7
words from pads 5-8
delimiters
for DM command lines 3-4
derived-name
in path name wildcards 6-21
/DEV/NULL 6-22
directories
appending to command search rules
6-6
/COM 6-5
~COM 6-5, 7-3, 9-3
commands for managing 7-20
Index-5
comparing 7-27f
copying trees 7-22ff
creating 7-21
deleting trees 7-30
displaying information 7-28f
EXPUNGE rights 8-7
for personal commands 9-3
initial ACLs 8-l8f
log-in home 2-l5
managing 7-20ff
merging 7-26f
naming 1-11
changing 7-4
setting 7-3
network root 1-4f
node entry 1-4f
parent 1-12f
protecting 8-1ff
queue 7-12
renaming 7-21f
replacing trees 7-25f
SEARCH rights 8-7
site registry 2-21
/SYS 1-5
upper-level 1-4
valid access rights 8-12
working 1-9f, 7-2
changing 7-3
setting 7-3
directory tree 7-23
disked node 1-3
as network partner 2-9
booting 2-4
‘NODE _DATA 2-11
start-up 2-2ff
diskless list 2-10
diskless node 1-3
‘NODE _DATA 2-4
start-up 2-8ff
display
controlling with DM commands
3-2ff
copying images to files 5-13
defining points 3-2, 3-6ff
defining regions 3-2, 3-6ff
drawing initial windows 2-7
Display Manager (DM) 1-3, 2-4,
2-10, 3-1ff
display
printing images 5-14, 7-18f
displaying
ACLs 8-8
command search rules 6-6
current naming directory 7-3
current working directory 7-3
directory information 7-28f
file attributes 7-16f
key definitions 3-21
link resolution names 7-33
naming directory 7-3
window group members 4-37
DLDUPL
(DELETE DUPLICATE _LINES)
command 6-13f
DLF (DELETE _FILE) command 1-6,
7-18
DLL (DELETE _LINK) command
7-36
DLT (DELETE _TREE) command
7-30
DLVAR (DELETE _VAR) command
9-21f
DM command scripts 3-22f
DM commands
AA (Acknowledge alarm) 4-26
ABRT (ABORT) 4-19, 4-20
AP (Acknowledge alarm and pop)
4-26
CASE (Change case) 5-28
CC (CREATE _COPY) 4-15
CE (CREATE _EDIT) 4-13, 7-6
CMDF (COMMAND_FILE) 3-22
conventions 3-4
CP (CREATE _PROCESS) 4-5
CPB (COPY_PASTE _BUFFER)
4-37
CPO (CREATE _PROCESS_ONLY)
4-7
CPS
(CREATE _SERVER_PROCESS)
4-8
CV (CREATE _VIEW) 3-10, 3-11,
4-14
DC (DEBUG_CONTINUE) 4-10
DQ (DEBUG_QUIT) 4-9
DR 3-9, 4-15
DS (DEBUG_SUSPEND) 4-10
ED (Delete character at cursor) 5-7
EE (Delete character before cursor)
5-8
EEF (Insert end-of-file) 5-6
EI (Set insert/overstrike mode)
4-24, 5-4
EN (Insert NEWLINE) 5-6
ES (Insert string) 5-5
executing from a script 2-18
executing from scripts 3-22f
executing from Shell scripts 9-10
format 3-4
ICON 4-34
IDF (ICON_DEFAULT) 4-36
KD (KEY_DEFINITION) 3-18
PB (PAD_BOTTOM) 4-28
Index-6
DM
PN (PAD_NAME) 4-30
PP (PAD_PAGE) 4-28
prompt 3-2
PT (PAD_TOP) 4-28
PV (PAD_LINE) 4-29
PW (PAD_WRITE) 5-30
RO (READ_ONLY) 5-3
RO (Set read/write mode) 4-14
S (SUBSTITUTE) 5-27
SC (Set case comparison) 5-25
SC (SET_CASE) 5-17
SO (SUBSTITUTE _ONCE) 5-28
special characters 3-5
specifying interactively 3-2
UNDO (Undo previous
command(s)) 5-29
using 3-2ff
WA (WINDOW_AUTOHOLD)
4-25
WC (WINDOW_CLOSE) 4-16
WD (WINDOW_DEFAULT)
4-25f
WGE (WINDOW_GROW_ECHO)
4-18
WGRA (WINDOW_GROUP_ADD)
4-32
WGRR
(WINDOW_GROUP_REMOVE)
4-32
WH (WINDOW_HOLD) 4-24
WI (WINDOW_INVISIBLE) 4-33
WME (WINDOW_MOVE _ECHO)
4-20
WP (WINDOW_POP) 4-21
WS (WINDOW_SCROLL) 4-24
XC (Copy text) 5-12
XD (Cut (delete) text) 5-14
XI (Copy portion of display) 5-13
XP (Paste text) 5-15
defining window boundaries 4-11f
DM scripts
executing 3-2
DM (see Display Manager)
DM start-up script 2-18f
defining default window positions
4-25f
dollar sign ($)
as Shell command prompt 6-2
in regular expressions 5-17
DOMAIN ring network 1-2
DOMAIN Server Processor (see DSP)
DOMAIN System 1-1ff
at log-in 2-13ff
at start-up 2-2ff
DQ (DEBUG_QUIT) command 4-9
DR command 3-9, 4-15
DS (DEBUG_SUSPEND) command
4-10
DSP (DOMAIN Server Processor) 2-4,
2-11
DSP
logging into 2-22
E
ED (Delete character at cursor)
command 5-7
ED (EDIT) command 9-9
EDACL
(EDIT_ACCESS_CONTROL_LIST)
command 8-7, 8-9
adding access rights 8-16
adding ACL entries 8-15
changing access rights 8-15
deleting access rights 8-17
deleting ACL entries 8-17
editing commands 8-9
operation modes 8-9
EDFONT (EDIT_FONT) program
3-21, 4-35
EDIT key 3-21, 4-13, 7-6
edit modes 5-3
edit pads
deleting 4-16
modes 5-2
saving contents of 4-17
window legend 5-3
editing
ACLs 8-9
files 4-13
initial ACLs 8-20
pads 5-1ff
EE (Delete character before cursor)
command 5-8
EEF (Insert end-of-file) command 5-6
EI (Set insert/overstrike mode)
command 4-24, 5-4
ellipsis (...) ,
as pathname wildcard character
6-20
EN (Insert NEWLINE) command 5-6
end-of-file mark
inserting into pads 5-6
end-of-line character
matching 5-17
enlarging windows 4-19
ENSUBS (ENTER_SUBSYSTEM)
command 8-27
entering
protected subsystems 8-27
Shell commands 6-2
Index-7
entry directory 1-4f
beginning pathnames 1-8
environment variables 9-22
EOFF command 9-20
EON command 9-20
equal sign (=)
as comparison operator 9-17
as pathname wildcard character
6-21
error input 6-10
in reading query responses 6-16
error output 6-10, 6-12
appending to files 6-13
displaying query options 6-16
redirecting 6-12
ES (Insert string) command 5-5
escape character (@)
in DM commands 3-5
in Shell commands 6-4
evaluating
expressions 9-12
Shell variables 9-20
exclamation mark (!)
as substitution character 9-7
executing
DM commands
from scripts 3-22f
from Shell scripts 9-10
Shell scripts 6-2
EXISTVAR (EXIST_VARIABLE)
command 9-21
EXIT command 9-30, 9-35
EXIT key 4-17
EXPORT command 9-21f
expressions
delimiters 9-12
evaluating 9-12, 9-20
in Shell scripts 9-12ff
operands 9-14
regular 5-16
characters used in 5-17ff
EXPUNGE access rights 8-7
F
F1 key 5-6
F6 key 5-8
F7 key 5-8
files
appending 7-10f
appending standard output to 6-12f
as standard input 6-11
ASCII
comparing 7-19
assigning protected subsystem status
to 8-27
backup 4-17, 5-30
access rights 8-14
boot script 2-5, 2-11
commands for managing 7-5
comparing 7-19
copying 7-8
copying display to 7-18f
creating 4-13, 7-5
deleting 7-18
displaying attributes 7-16f
edit
updating 5-30
editing 4-13
in protected subsystems 8-22f
initial ACLs 7-6
keyboard definitions 3-12f
managing 7-5ff
moving 7-9
names 6-17
printing 7-11
in interactive mode 7-12
on other nodes 7-12
using print menu interface
7-13ff
protecting 8-1ff
reading pathnames from 6-17
renaming 7-7
replacing 7-9
saving 4-17, 7-5
saving transcript pads In 4-30
Shell command 6-2
startup
DM 2-18f
start-up
Shell 6-8f
operators 9-13
valid access rights 8-12
writing Shell command output to
6-12
writing Shell error output to 6-12
filters 6-13
FMT (FORMAT_TEXT) command
6-12
font editor (EDFONT) (See EDFONT)
FOR command 9-31f
FOR statement 9-31f
formats
for DM commands 3-4
for Shell command lines 6-3
function keys
predefined 3-10f
to invoke DM commands 3-3,
3-10ff
Index-8
G
greater-than (>)
as comparison operator 9-16
redirecting standard output 6-12
greater-than/question mark (>?)
redirecting error output 6-12
GROW key 4-19
H
here document 9-9
HOLD key 3-22
hold mode 4-23f
home directory 2-15
changing at log-in 2-21
hyphen (-)
preceding DM command options
3-4
preceding Shell command options
6-3
reading data from standard input
6-17
I
ICON command 4-34
ICON_GROUP paste buffer 4-38
icons 4-31ff, 4-33ff
changing into windows 4-35
creating 4-35
defaults 4-35
group paste buffer 4-37
setting default position and offset
4-36
IDF (ICON_DEFAULT) command
4-36
IF command 9-28
IF statement 9-26, 9-28f
information
sharing 1-3
initial ACLs 8-18f
commands for editing and copying
8-20
copying 8-21
editing 8-20
initial naming directory
at log-in 2-15
initial working directory
at log-in 2-15
INLIB (INITIALIZE _LIBRARY)
command 6-5
in-line data
in Shell scripts 9-9f
INS key 5-4
INS MODE key 5-4
insert mode 4-23f, 5-4
inserting
blank lines into pads 5-6
characters into pads 5-4ff
end-of-file mark into pads 5-6
NEWLINE characters into pads 5-6
integers
in expressions 9-14
interactive
procedure for specifying DM
commands 3-2
internal Shell commands 6-5
INVIS_GROUP paste buffer 4-38
invoking
DM commands
using control key sequences 3-3
using control key sequences
3-10ff
using function keys 3-3
using function keys 3-10ff
Shells 6-7f
subordinate Shells 6-8
I/O control characters 6-11
K
KD (KEY_DEFINITION) command
3-18
key definitions
deleting 3-21
displaying 3-21
embedding key definitions in 3-19
keyboards
880 3-12
key names 3-16
start-up definitions 3-14
low-profile
key names 3-16
Model I 3-12
Model II 3-12
start-up definitions 2-7, 3-14
types 3-12
keys
ABORT 4-7, 4-16
BACK SPACE 5-8
CHAR DEL 5-7
CMD 3-2
Index-9
controlling from within a program
3-22
COPY 3-15
CTRL/A 4-25
CTRL/B 4-28
CTRL/E 5-14
CTRL/M 4-14, 5-3
CTRL/N 4-7, 4-16
CTRL/P 4-22
CTRL/Q 4-9
CTRL/R 5-25
CTRL/S 4-24
CTRL/T 4-28
CTRL/U 5-25
CTRL/X 4-19, 5-25
CTRL/Y 4-17, 5-30, 7-5
CTRL/Z 4-7, 5-6, 6-17
saving EDACL changes 8-10
CUT 3-15, 5-14
defining 3-18ff
at log-in 2-18
at start-up 2-7
at start-up 2-11
at start-up 3-12ff
from within a program 3-18
from within a program 3-22
to prompt for input 3-20
deleting definitions 3-21
displaying definitions 3-21
EDIT 3-21, 4-13, 7-6
embedded definitions 3-19
EXIT 4-17
F1 5-6
F6 5-8
F7 5-8
for scrolling pads 4-29
GROW 4-19
HOLD 3-22
INS 5-4
INS MODE 5-4
MARK 3-10, 4-15
MOVE 4-20
naming conventions 3-15ff
PASTE 5-15
POP 4-22
READ 3-20, 4-14
RETURN 3-2, 5-6
SAVE 5-30
SHELL 6-7
SHIFT 3-15
with pad scroll keys 4-29
shifted name 3-15
to perform DM functions 3-10ff
UNDO 5-29
up-transition name 3-15
L
LD (LIST DIRECTORY) command
displaying directory information
7-28
displaying file attributes 7-16f
displaying link resolution names
7-33
in Shell script 9-2
less-than (<)
redirecting standard Input 6-11
links
commands for managing 7-31
copying 7-35
creating 7-32
deleting 7-36
managing 7-31ff
redefining 7-33
renaming 7-34
replacing 7-35f
resolution names
displaying 7-33
loading
key definitions 2-7
operating system across network
2-10f
logging in
as USER 2-20
basic procedure 2-20
changing home directory 2-21
changing password 2-20
to a DSP 2-22
logical operators 9-17
log-in
executing DM commands 2-18
failure 2-15
gathering SID Information 8-2
sequence 2-14
log-in home directory 2-15
log-in start-up script 2-15
creating 2-17
creating Shell process 4-6
locations 2-16
LVAR (LIST_VARIABLES) command
9-21
M
mailbox server (see MBX_HELPER)
managing
ACLs 8-7f
directories 7-20ff
Index-10
files 7-5ff
links 7-31ff
windows 4-17ff
MARK key 3-10, 4-15
marking
a range of text in pads 5-9f
mathematical operators 9-14f
MBX_HELPER (mailbox server) 4-8
merging
directory trees 7-26f
messages
error
file not found 4-14
request to quit edit 4-17
searching for text 5-24
substitute in progress 5-26
Mnemonic Debugger (MD) 2-3, 2-10
Model I keyboard 3-12
Model II keyboard 3-12
modes
edit 5-3
for edit pads 5-2
for process windows 4-23
insert 5-4
overstrike 5-4
read-only 5-3
read/write 5-3
mouse
default function keys 3-11
MOVE key 4-20
moving
around the naming tree 7-2
cursor 4-2f
files 7-9
pads under windows 4-27ff
to bottom of pad 4-27f
to first character in pad 4-28
to last character in pad 4-28
to top of pad 4-27f
windows 4-20
MVF (MOVE FILE) command 7-9
N
names file 6-17
naming directory 1-11
at log-in 2-15
changing 7-4
displaying 7-3
setting 7-3
Naming Server Helper (NS_HELPER)
1-6
naming tree 1-4ff
moving around 7-2
search for Shell commands 6-5ff
ND (NAMING DIRECTORY)
command 7-3
NETBOOT 2-10f
NETMAN 2-7
creating ‘NODE _DATA 2-12
during diskless start-up 2-10
network partner
as boot volume 1-3
node 2-10
network
ring 1-2
network root directory 1-4f
in absolute pathnames 1-7
NEWLINE character
deleting from pads 5-7
inserting into pads 5-6
NEXT command 9-30, 9-35
node entry directory 1-4f
beginning pathnames 1-8
‘NODE _DATA
on disked nodes 2-4
on diskless nodes 2-11
‘NODE DATA/PASTE _BUFFERS
/DEFAULT.GMF 5-13
‘NODE _DATA/STARTUP
creating processes from 4-7
nodes
boot script files 2-5, 2-11
cataloging 1-5f
disked 1-3
disked start-up 2-2ff
diskless 1-3
diskless start-up 2-8ff
IDs 2-10
in DOMAIN system 1-1
partner 2-10
powering on 2-3, 2-10
NS_HELPER 1-6
O
N objects 1-1
organization 1-4
protecting 8-1ff
offset
for icon positions 4-36
ONEOF statement 9-35
operands
in expressions 9-14
operating system
booting 2-4
booting on diskless node 2-10
components 1-3
Index-11
loading across the network 2-10f
operators
comparison 9-16f
in expressions 9-13
logical 9-17
mathematical 9-14f
parsing 6-22
precedence 9-13
string 9-15f
options
command parser 6-15
in DM commands 3-4
in Shell commands 6-3
overstrike mode 4-23f, 5-4
P
PAD_ $DEF_PFK call 3-18, 3-22
PAD_ $DM_CMD call 3-22
pads
closing 4-16
copying 4-15
copying text 5-12
creating 4-10ff
defining a range of text in 5-9f
edit
inserting blank lines into 5-6
creating 4-13
cutting text from 5-14
deleting characters from 5-7f
deleting lines of text from 5-8
deleting NEWLINE characters
from 5-7
deleting text from 5-7ff
deleting words from 5-8
inserting characters into 5-4ff
inserting end-of-file mark into
5-6
inserting NEWLINE characters
into 5-6
inserting text string into 5-5
modes 5-2
opening 7-6
pasting text into 5-15
substituting text in 5-26ff
window legend 5-3
editing 5-1ff
moving to bottom of 4-28
moving to first character 4-28
moving to last character 4-28
moving to top of 4-27f
moving under windows 4-27ff
process input 6-10
process output 6-10
read-only 4-14
saving transcript in a file 4-30
scrolling horizontally 4-30
scrolling vertically by lines 4-29
scrolling vertically by pages 4-28
searching for text in 5-22ff
Shell input 6-2
specifying text patterns in 5-16
parent directory 1-12f
parentheses ( )
as pathname wildcard characters
6-21
parser options 6-15
parsing operators 6-22, 9-3
partner node 2-10
passing
arguments to Shell scripts 9-4ff
password
changing at log-in 2-20
entering at login 2-15
paste buffers
copying text into 5-12, 5-14
creating 5-11
default
writing text to 5-7
deleting 5-11
for icon groups 4-37
for window groups 4-37
pasting contents into pads 5-15
PASTE key 5-15
pasting
text into pads 5-15
pathnames
absolute 1-7, 7-6
beginning at naming directory 1-11
beginning at network root directory
1-7
beginning at node entry directory
1-8
beginning at parent directory 1-12f
beginning at working directory 1-9f
reading from files 6-17
reading from standard input 6-17
symbols 1-9
to identify objects 1-6ff
wildcards 6-18ff
PB (PAD_BOTTOM) command 4-28
percent sign (%)
as pathname wildcard character
6-18f
as SID wildcard 8-3, 8-11
regular expressions 5-17
pipelines 6-13
pipes 6-13
PN (PAD_NAME) command 4-30
point pair 4-10
Index-12
points
defining 3-2, 3-4, 3-6ff
preceding DM commands 3-4
POP command 4-22
pound sign character (#)
in DM commands 3-5
in Shell commands 9-2
power on
to start up node 2-3, 2-10
PP (PAD_PAGE) command 4-28
predefined function keys 3-10f
PRF (PRINT_FILE) command 6-17,
7-11
PRFD (PRINT_FILE _DIALOG)
command 7-13
print menu interface 7-13ff
print server (PRSVR) 2-7
printing
display images 5-14, 7-18f
files 7-11
in interactive mode 7-12
on other nodes 7-12
using print menu interface
7-13ff
PRINT_SERVER (see PRSVR) 7-11
process window legend 4-23
processes
background 6-22
closing pads 4-7
closing windows 4-7
creating 4-4
at log-in 2-17
with pads and windows 4-5f
without pads and windows 4-7
interrupting execution of 4-10
nammg directory
changing 7-4
displaying 7-3
passing data 6-9
resuming 4-10
running the Shell 4-6
servers 4-4
Shell 6-2
creating 6-7f
SID 8-3, 8-11
standard streams 6-9f
stopping 4-8f
with CTRL/Z 5-6
suspending 4-10
transcript pads 6-10
window legend 4-23
window modes 4-23
working directory
changing 7-3
displaying 7-3
program
input and output 6-10
Programmable Read-Only Memory (see
PROM)
programs
as protected subsystem managers
8-22f
EDFONT 4-35
running in background processes
6-22
server 4-4
Shell
creating 6-8
PROM (Programmable Read-Only
Memory) 2-4, 2-10
prompt
for changing home directory 2-21
prompts
for DM commands 3-2
Edit file: 4-13
for continuing Shell commands 6-4f
for EDACL 8-9
for Shell commands 6-2
for variable assignment input 9-24
in key definitions 3-20
protected subsystems 8-22f
assigning status to files 8-27
creating 8-26
entering 8-27
protecting
files and directories 8-1ff
PRSVR (PRINT_SERVER) 7-11
PRSVR (see print server) 2-7
PT (PAD_TOP) command 4-28
pushing and popping windows 4-21
PV (PAD_LINE) command 4-29
PW (PAD_WRITE) command 5-30
Q
query options 6-16
question mark (?)
as path name wildcard character
6-18f
question mark
in regular expressions 5-18
queues
print 7-11f
quoted stings 9-8
R
READ command 9-23
READ key 3-20, 4-14
Index-13
READC command 9-24
reading
data from standard input 6-16f
pathnames from files 6-17
pathnames from standard input
6-17
standard input from files 6-11f
READLN command 9-24
read-only mode 5-3
read-only pads 4-14
deleting 4-16
read-only windows 4-14
read/write mode 5-3
redefining
links 7-33
redirecting
error output 6-12
output to Shell commands 6-13
standard input 6-11, 9-9
standard output 6-12
reducing strings 9-16
regions
defining 3-2f, 3-6ff
preceding DM commands 3-4
regular expressions 5-16
characters used in 5-17ff
removing
entries from window groups 4-32f
renaming
directories 7-21f
files 7-7
links 7-34
repeating
search operation 5-25
replacing
all occurrences of a string 5-27
directory trees 7-25f
files 7-9
first occurrence of a string 5-28
links 7-35f
text in pads 5-26ff
responding
to DM alarms 4-26
resuming
processes 4-10
RETURN key 3-2, 5-6
RO (READ_ONLY) command 5-3
RO (Set read/write mode) command
4-14
root directory 1-4f
in absolute pathnames 1-7
rubberband 4-19
rules
for assigning variables 9-19
for Shell command search 6-2
for specifying ACL entries 8-1lf
running
programs in background processes
6-2
S
S (SUBSTITUTE) command 5-27
SAVE key 5-30
saving
contents of an edit-pad 4-17
EDACL changes 8-10
files 7-5
Shell command output 6-10
transcript pads 4-30
SC (Set case comparison) 5-25
SC (SET_CASE) command 5-17
screen coordinates 3-8
scripts
boot 2-4, 2-11
DM
command 3-22f
executing 3-2
including comments 3-5
start-up 2-18f
start-up 3-22
executing at login 2-13ff
log-in start-up 2-15, 4-6
Shell (see Shell scripts)
start-up 6-8f
scroll mode 4-23f
scrolling
keys 4-29
pads horizontally 4-30
pads vertically by lines 4-29
pads vertically by pages 4-28
SEARCH access rights 8-7
searching
cancelling operation 5-25
entire pad 5-24
for Shell commands 6-5
for text in pads 5-22ff
repeating operation 5-25
securing accounts 2-21
SELECT command 9-34f
SELECT statement 9-34f
semicolon (;)
separating command lines 6-4
separating DM commands 3-5
Server Process Manager (see SPM)
server processes
creating 4-8
server programs 4-4
servers
alarm 4-7
Index-14
MBX HELPER 4-8
naming 1-6
NETMAN 2-7, 2-12
process manager 2-4, 2-11
PRSVR 2-7
PRSVR (PRINT_SERVER) 7-11
starting from boot script 2-7
setting
case comparison 5-25
default icon position and offset 4-36
initial Shell environment 6-8
naming directory 7-3
read/write modes 5-3, 5-3
working directory 7-3
SH (SHELL) command 6-8, 9-11
9-20
SH (SHELL) command 6-7
Shell 1-3, 6-1ff
ACL (ACCESS_CONTROL_LIST)
8-7
copying ACLs 8-18
copying initial ACLs 8-21f
displaying ACLs 8-8
ARGS (ARGUMENTS) 9-4
as filters 6-13
BOFF 6-22
BON 6-22
CATF (CATENATE _FILE) 6-12
CATF (CATENATE _FILES) 7-10f
character limit 6-4
CHN (CHANGE _NAME) 7-7,
7-21, 7-34
CMF (COMPARE _FILE) 7-19
CMT (COMPARE _TREE) 7-27
continuing on next line 6-4
controlling input and output 6-9f
controlling queries 6-15
CPF (COPY_FILE) 7-8
CPL (COPY_LINK) 7-35, 7-35f
CPSCR (COPY_SCREEN) 7-18
CPT (COPY_TREE) 7-23, 7-25,
7-26
CRD (CREATE _DIRECTORY)
7-21
CRL (CREATE _LINK) 7-32,
7-33
CRSUBS (CREATE _SUBSYSTEM)
8-26
CSR
(COMMAND_SEARCH_RULES)
6-6
DATE 6-2, 9-24
DLDUPL
(DELETE _DUPLICATE _LINES)
6-13f
DLF (DELETE _FILE) 7-18
DLL (DELETE _LINK) 7-36
DLT (DELETE _TREE) 7-30
DLVAR (DELETE _VAR) 9-21f
ED (EDIT) 9-9
(EDIT_ACCESS_CONTROL_LIST)
8-7, 8-9
ENSUBS (ENTER_SUBSYSTEM)
8-27
entering 6-2
EOFF 9-20
insert/overstrike modes 5-4
EON 9-20
EXISTVAR (EXIST_VARIABLE)
9-21
EXIT 9-30, 9-35
EXPORT 9-21f
FMT (FORMAT_TEXT) 6-12
FOR 9-31f
format 6-3
Shell commands 6-2ff
IF 9-28
in active functions 9-24f
in Shell scripts 9-1ff
INLIB (INITIALIZE _LIBRARY)
6-5
internal 6-5
LD (LIST_DIRECTORY) 7-16f,
7-28, 7-33
LVAR (LIST_VARIABLES) 9-21
MVF (MOVE _FILE) 7-9
ND (NAMING_DIRECTORY) 7-3
NEXT 9-30, 9-35
PRF (PRINT_FILE) 6-17, 7-11
PRFD (PRINT_FILE _DIALOG)
7-13
processing command line
information 6-14ff
READ 9-23
READC 9-24
reading input from files 6-11f
READLN 9-24
saving output 6-10
search rules 6-2
SELECT 9-34f
SH (SHELL) 6-7, 6-8, 9-11, 9-20
SRF (SORT_FILE) 6-13f
standard options 6-4f
SUBS (SUBSYSTEM) 8-27
TLC
(TRANSLITERATE _CHARACTER)
6-12
VOFF 9-11
VON 9-11
WD (WORKING_DIRECTORY)
7-3
WHILE 9-30
writing error output to files 6-12
Index-15
writing output to files 6-12
XOFF 9-11
XDMC
(EXECUTE _DM_COMMAND)
9-10
XON 9-11
Shell
creating 6-7f
creating process 4-6
input pad 6-2
invoking 6-7f
SHELL key 6-7
Shell
parsing operators 9-3
Shell process
creation at log-in 2-17
Shell scripts 9-1ff
controlling execution 9-25ff
creating 9-2f
debugging 9-10f
defining variables interactively 9-22f
executing DM commands 9-10
passing arguments to 9-4ff
quoted strings 9-8
using active functions 9-24f
using conditional statements 9-26ff
using expressions 9-12ff
using variables 9-18ff
Shell
setting up initial environment 6-8
start-up files 6-8
subordinate
creating 6-8
Shell variables 9-18ff
assigning active functions 9-24
assignment rules 9-19
defining 9-18
defining interactively 9-22f
environment 9-22
evaluating 9-20
substituting 9-19f
SHIFT key 3-15
with pad scroll keys 4-29
shifted key name 3-15
shrinking windows 4-19
SID (subject identifier) 4-4
for processes created at start-up 4-7
in ACL entries 8-2f
single quotes (‘ ‘)
in DM commands 3-5
site registry directory 2-21
slash (/)
to search forward for text 5-23
SO (SUBSTITUTE _ONCE) command
5-28
special characters
in DM commands 3-5
in Shell commands 6-7
specifying
ACL entries 8-11f
DM commands 3-2f
Shell commands 6-2
text patterns in pads 5-16
SPM (Server Process Manager) 2-4,
2-11
square brackets ([])
as pathname wildcard character
6-19
in regular expressions 5-19
SRF (SORT_FILE) command 6-13f
standard input 6-10
connecting to standard output 6-13
reading data from 6-16f
reading pathnames from 6-17
redirecting 6-11
redirecting to read in-line data 9-9
standard options
for Shell commands 6-4f
standard output 6-10
appending to files 6-12f
connecting to standard input 6-13
in active functions 9-24f
redirecting 6-12
standard streams 6-9f
start-up
boot scripts 2-5, 2-11
defining keys 2-7
differences between disked and
diskless nodes 2-12
disked nodes 2-2ff
diskless nodes 2-8ff
files
Shell 6-8f
sequence for disked nodes 2-3,
2-9ff
STARTUP_LOGIN 2-17
statements
CASE 9-34
FOR 9-31f
IF 9-26, 9-28f
ONEOF 9-35
Index-16
SELECT 9-34f T
WHILE 9-29
stopping
processes 4-8f
streams 6-9f
closing with CTRL/Z 5-6
string operators 9-15f
strings
changing case of 5-28
concatenating 9-15
deleting from pads 5-8
in expressions 9-14
inserting into pads 5-5
quoted 9-8
reducing 9-16
searching for 5-22ff
substituting all occurrences of 5-28
substituting first occurrence of 5-28
substituting in pads 5-26
structure
of ACLs 8-2
subject identifier (SID) (See SID)
subordinate Shell 6-7
creating 6-8
SUBS (SUBSYSTEM) command 8-27
substituting
all occurrences of a string 5-27
first occurrence of a string 5-28
for variables 9-19f
text in pads 5-26ff
substitution parameters 9-5
suspending
processes 4-10
symbols
for pathnames 1-9
/SYS
as upper-level directory 1-5
SYSBOOT 2-4
in diskless start-up 2-10
/SYS/DM/FONTS/ICONS 4-35
/SYS/DM/STARTUP_LOGIN 4-6
/SYS/DM/STD_KEYS 3-14
/SYS/NET/DISKLESS_LIST 2-10
/SYS/NET/NETBOOT 2-10f
/SYS/NODE _DATA 2-4
/SYS/NODE _DATA/node_id 2-4,
2-11
/SYS/PRINT/QUEUE 7-11f
system calls
PAD_ $DEF_PFK 3-18, 3-22
PAD_ $DM_CMD 3-22
T
text
changing case of 5-28
copying from pads 5-12
cutting from pads 5-14
defining a range of 5-9f
deleting from pads 5-7ff
lines
deleting from pads 5-8
pasting into pads 5-15
searching for 5-22ff
specifying patterns in pads 5-16
substituting in pads 5-25ff
tilde (~)
as pathname wildcard character
6-20
beginning pathnames 1-11
in regular expressions 5-19
TLC
(TRANSLITERATE _CHARACTER)
command 6-12
transcript pad
saving in file 4-30
transcript pads 6-10
U
undo buffers 5-29
UNDO key 5-29
UNDO (Undo previous command(s))
command 5-29
undoing
previous command 5-29
updating
edit files 5-30
upper-level directory 1-4
up-transition
key name 3-15
USER_DATA/KEY_DEFS 2-19
/USER_DATA/KEY_DEFS 3-18
USER_DATA/KEY_DEFS2 2-19
~USER_DATA/SH 6-8
/USER_DATA/STARTUP_DM 2-18f
username
entering at log-in 2-15
in SID 4-4, 8-2
Index-17
V
variables
in Shell (see Shell variables)
verifying
Shell scripts 9-11
viewing
hidden windows 4-21
VOFF command 9-11
VON command 9-11
W
WA (WINDOW_AUTOHOLD)
command 4-25
WC (WINDOW_CLOSE) command
4-16
WD (WINDOW_DEFAULT) command
4-25
WD (WORKING_DIRECTORY)
command 7-3
WGE (WINDOW_GROW_ECHO)
command 4-18
WGRA (WINDOW_GROUP_ADD)
command 4-32
WGRR
(WINDOW_GROUP_REMOVE)
command 4-32
WH (WINDOW_HOLD) command
4-24
WHILE command 9-29
WHILE statement 9-29
WI (WINDOW_INVISIBLE) command
4-33
wildcards 6-18ff
query verification 6-16
verification 6-10
window groups 4-31ff
changing into icons 4-34
creating 4-31f
displaying members 4-37
making invisible 4-33
making visible 4-33
paste buffers 4-37
removmg entries from 4-32f
window icons 4-31ff
windows
alarm 4-26
cancelling move 4-20
cancelling size change 4-19
changing groups into icons 4-34
changing size of 4-18f
closing 4-16
copying 4-15
creating 4-10ff
defining default positions 4-25
deleting 5-7
determining boundaries 4-11f
displaying members of window
groups 4-37
drawing at start-up 2-7
edit
creating 4-13
edit pad window legend 5-3
group paste buffers 4-37
in groups 4-31ff
legend 4-23
making invisible 4-33
making visible 4-33
managing 4-17ff
moving 4-20
moving pads under 4-27ff
process
changing modes 4-22ff
pushing and popping 4-21
read-only 4-14
removing from window groups 4-32f
representing with icons 4-33ff
using icons 4-31ff
WME (WINDOW_MOVE _ECHO)
command 4-20
words
deleting from pads 5-8
inserting into pads 5-5
working directory 1-9f, 7-2
at log-in 2-15
beginning pathnames 1-9f
changing 7-3
setting 7-3
WP (WINDOW_POP) command 4-21
writing
error output to files 6-12
standard output to files 6-12
WS (WINDOW_SCROLL) command
4-24
X
XC (Copy text) command 5-12
XD (Cut (delete) text) command 5-14
XDMC (EXECUTE _DM_COMMAND)
command 9-10
XI (Copy portion of display) command
5-13
XOFF command 9-11
XON command 9-11
XP (Paste text) command 5-15
Index-18