1
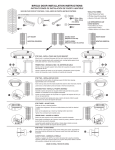
BOL, manual Installation Instructions: Select anchor bolts appropriate for your bollard from the table below: Model BOL-##-2 BOL-##-4.5 BOL-##-5.5 BOL-##-6.5 BOL-##-8.5 *Anchor bolt kit BOL-ABK-3 BOL-ABK-4 BOL-ABK-4 BOL-ABK-4 BOL-ABK-4 Anchor bolt specifications 3 /8in. x 41/4in. /4in. x 41/4in. 3 /4in. x 41/4in. 3 /4in. x 41/4in. 3 /4in. x 41/4in. 3 Diameter of bolt hole required 3 /8in. 3 /4in. 3 /4in. 3 /4in. 3 /4in. Depth of bolt hole 2¼in. 3¼in. 3¼in. 3¼in. 3¼in. *Anchor bolt kits are not included, but must be purchased separately. 1. Place the bollard in the desired installation location. 2. The base plate of each bollard includes 4 bolt holes/slots. Mark the concrete with the location of each bolt hole. 3. Using a hammer drill and either a 3/8in.or 3/4in. masonry bit based on the necessary bolt hole diameter indicated in the table above, drill a hole to the appropriate depth in the concrete (also indicated in table). 4. Set the bollard in place and align the bolt holes in the base plate with the holes drilled into the concrete. 5. Put a flat washer followed by a hex nut onto the threaded end of each wedge anchor bolt; then tap the bolts through the hole in the base plate and into the drilled holes with a hammer. The nut should stick up above the end of the bolt so that the hammer strikes the nut rather than the end of the bolt. 6. Tighten the nuts to expand the anchoring mechanism against the walls of the bolt holes. The bollard should now be solidly anchored to the surface. Inspections & Maintenance: At least once per month: Try to wiggle the bollard to determine the soundness of the connections between the anchor bolts and the surface. If the bollard can wobble determine if any of the bolts are loose and tighten them. If the concrete around the anchors is damaged and the anchor itself is loose, the bollard will have to be installed in another location. Wipe dirt and grime from the surface of the bollard. Copyright 2014 Vestil Manufacturing Co. Page 3 of 4