1
LS- EX
LS- TT
OPERATION MANUAL
80825800
Safety Notices
This printer iscertified w a Class I ImerpmchrctuncfertheU.S.Departmentof Healthand Human Services
(DHHS) Radiation Performance Standard according to the Radiation Control fbr Health and Safety Act
of 1968.This means that the printer does not emit hazardous laser radiation.
Since radiation emitted inside the printer is completely confined within protective housings and external
covers, the laser beam cannot escape from the machine during any phase of user operation.
The Center for Devices and Radiological Health (CDRH) of’the U.S.Food and Drug Administmtirm
implemented regulations km laser products on August 1, 1976,These regulations apply tn laser products
mwketed !nthe United States, The label on tbe printer indicates compliance with the CDRH regulations
and must be attfichedto laser products marketed in the L’nitedSt:ites,
Caution-use of’crrntrolsor adjustments or performance of procedures other than thnse specified herein
may result in hazardous radiation exposure.
Federal Communications Commission
Radio Frequency Interference Statement
Tbisequipment has been tested and found to comply with the limits fora Class B digital device, pursuant
to Part 15 of FCC Rules. These limits are designed to provide reasonable pmtectinn against harmful
interference in a residential installation. This equipment generates, uses and can radiate radio frequency
energy and, if not installed and used in accordance with the instructions, may cause barmf’ulinterference
to radio communications. However. there is no guarantee that interference will not occur in a particular
installation. If tbis equipment does cause harmful interference to radio or television reception. which can
be determined by turning the equipment offandon, the user isencouraged totrytoccsmectthe interference
by one or more of the following measures:
. Reorient or relocate the receiving antenna.
.
●
Increase the separation between tbe equipment and receiver.
Connect the equipment into an outlet on a circuit different from that to wbich the receiver is
connected.
o Consult the dealer or an experienced radio/TV technician for help.
For compliance with the Federal Noise Interference Standard, this equipment requires a shielciedcable.
Th(,Oh(],,(,rtuten,(tlisupp[>0111>
to printers marketed in the U.S.A.
VDE Statement
This device’carries tbe VDE RFI protection mark to certify that it meets tbe radio interference
requirements of the Postal Ordinance No. 243/1991. The additional marking “Vfg. 243/P” expresses in
short form that this is a peripheral device (not operable alone) wbich only individwdly meets the Class
B RFI requirements in accordance with the DIN VDE 0878 part 3/1 1.89and the Postal Ordinance 243/
1991.
If this device is operated in conjunction with other devices within a set-up, in order to take advantage of
a ‘“General(Operating) Authorization” in accordance with the Postal Ordinance 243/1991, the complete
set-up must comply with the Clkss B limits in accordance with the DIN VDE 0878 part 3/1 1.89,as well
as satisfy the preconditions in accordance with $ ‘2and the prerequisites in accordance with $ 3 of the
Postal Ordinance 243/1991.
As a rule, this is only fulfilled when the device is operated in a set-up which has been type-tested and
provided with a VDE RFI protection mark with the additional marking “Vfg 243”.
Macbine Noise Information Ordinance 3. GSGV, January 18, 1991: The sound pressule level It the
operator position is equal m less than 70 dB(A) according to 1S0 7779.
T/7eutx)~>c stuteniei7r
tipp[iesOIIIV10[Irit?tersmarLefed if]GewmrtI>
Statement of
The Canadian Department of Communications
Radio Interference Regulations
This digital apparatus does not exceed the Class B limits for radio noise emissions from digital apparatus
se[ out in the Radio Interference Regulations of the Canadian Department of Communications.
Le present appareil num6riquen’enlenpasde bruits radio~lectriquesdepassant les limites applicablesaux
apparei$ num~riquesde la cla;se B prescribesclansIe Reglement sur Ie brouillage raclio.+lec[riqueddictd
par Ie Mm@re des Commumcatlons du Canada.
The uhmv statement up[)lierorrlj,to printers marketed in Cunudu
Safety Notices for Finland
Tama Kirjoitin LUOKAN 1 LASERLAITE.
VAROITUS! Laitteen kiiyttiiminenmucdkikuin tiissa kayttoohjeessa mainitulla tavalla saattaa altistaa
kiiyttiijiinturvallallisuusluokan I ylittiiviilleniikymiitttimiillelasersiiteilylle.
DENNA SKRIVARE AR EN KLASS I LASERAPPARAT.
VARNING! Om apparaten anviinds pi annat siht an i denna bruksanvisning specificerats, kan
anviindaren utsiittas for osynlig laserstr%lning,som bverskrider griinsen for Iasekkiss 1.
The ubm,e .srutc,rr]enr
applies onlj 10printers marketed in Fiiflaml
Trademark Acknowledgements
LS-5EX, LS-5TT, EP-40XA: Star Micrmrics Co., Ltd.
HP LaserJet IIIjPCL, GI./2: Hewlett Packard Company
LaserWriter NTX, AppleTalk: Apple Computer. Inc.
PostScript: Adobe Systems, hrc.
TrueImage, TrueType: Microsoft Corporation
IntelIiFont: Agfa Corporation
NOTICE
. All rights reserved. Reproduction of any part of this manual in any form whatsoever without
STAR’s express permission is forbidden.
o The contents of this manual are subject to cbange without notice.
. All efforts have been madetoensurethe accumcyofthecontents ofthismanual at thetimeofpress.
However, should any errors be detected, STAR would greatly appreciate being informedof them.
o The above notwithstanding, STAR can assume no responsibility for any errors in this manual.
@Copyright 1992 Star Micronics Co.. Ltd.
TABLE OF CONTENTS
1. How to Use This Manual . . .... ......... . .. . . . ..... ...... . ....... ...... ......... ... 1
1.1Lwer Printing .
.
.
.
.
,2
],? printer c~mp~nents .
. ..........................4
].~ Printer Feiltures .. ........... . .... ........... .. ............. ......................6
2. Setting Up the Star LS-5 Series Printer ... ...... ......... .... . ....... .... ..... 9
2,1 Unpacking
..
.............10
2. 1.1 Unpacking the Printer
.
................10
~ I .-~ checking the Parts
.
.
. ]~
-.
2. 1.3 Optional ltetns ..,..,.,...........,..,.. .
.
....13
2. 1.4 Carrying the Printer .
. 14
2. 1.5 Opening and Closing the Printer ...........,.........,.. ...........15
~,~ Ins(:l]ling[he Toner Cartridge
.
.
.
lx
2.3 Loading Paper
.
..,.,..22
2,3,1 Selection of Paper .
..
.
.
22
~,~,~ Loading paper Into the Front Paper Trav ......,.............. ~~
2.3.3 Loading Paper Into the Paper Cassette . . .... ......... .. .,.29
2.4 Connecting the Power Cord
.
.
.,.......,.,,.,.,...34
2.5 Connecting the Interface Cable .
..
. ..,.,..,.,.....35
3. Initial Operation .......................................................................................37
3,1 Front Panel
.
37
3.1.1 Powering Up
.
.
. . 38
3.1.2 The Buttons .. . . ....... . .... ........... .. . ....... ...... ......... .. 39
3.1.3 Light Indic:itors........,.,..,...,.....
.
.
43
3.2 SeIt’Test
.
.
.
..
,.,.......,....,44
3,2.1 Printing Test Sheets
.
44
~,~.~ s[~[us Sheet Description .
.
......45
3,3 Programming from the Control Panel
.
.
47
4. Quick Start with the Star LS-5 Series: A Tutorial ..........................5 I
4. I Preliminaries ...................:.........................................................5 1
4,2 Control Panel
.
...
..
. 52
4.2.1 Basic Operation .............................................................53
4.3 Connecting the Printer to the Computer
..
. 54
4.3.1 Selecting the Serial Interface
.
.
55
4,3,2 Selecting [he Auto Selection
.
57
4.4 Resolution Enhancement Procedure ....,.,.,..,.........,..,.,.,.....,.,,.,.5 8
4.5 Paper Feed .................................................... ...........................59
4.5,1 Feeder Selection ............................................................59
4.5.2 Paper Size .....................................................................60
4.6 Printing in Landscape Orientation ... ................ . ......... .. ........61
4.7 Print Density .................................................. .... ......... .. ... ....62
4.8 Saving the Setting ................................................ ........ .... ..... 63
4.9 Returning to Factory Settings ...................................................64
4.10 Selecting Display Language .............. . ............ ....................65
5. Font Selection ............................................................................................67
5. I Printing a Font List ...................................................................67
5,2 Selectlng Fonts .,,.,,,.,,,.,.,.,.,,.,,.,.,,,..,........,. ..................... .... ....68
6. Maintaining the Star LS-5 Series Printer .........................................71
6. I Replacing the Toner Cartridge . ............................ . ......... .. . 71
6.2 Precautions for the Toner Cartridge ............ ........... .... ..... .....75
6.3 Cleaning the Exterior of the Printer ......... .................. ......... .76
7. Troubleshooting ........................................................................................ 77
7.1 Error Messages Displayed on the Screen
. .
. . 77
7.2 Service Call Messages ..... . ............ .................. ......................78
7,~,] Efigin~Service Call Messages ............. ......... ...... .......78
7,~,z Controller Service Call Messages ..... ...... ......... .. . .....78
7.3 Operator Call Messages ...........................................................80
7.3.1 Engine Problems ...........................................................80
7.3.2 Font Cartridge Problems ...... .... ......... . .. . ....... . ........8 I
7.3.3 Optional Hardware .. .... ....... . .............. . .. . ................8 I
7.3.4 Change Paper Size .. .. . .............. ......... . . . ....... . ......82
7.3.5 Manual Paper Feed ....................................................... 83
7.4 Operator Information Messages ............. . ....... .... ..................84
7.4. I Host Communication Problem
.
.
. 84
7.4.2 Function or Size incompatibility . . .
.
84
7.4.3 Font Cartridge .................. ........... .. .........
..
85
7.5 Status Messages .........................................
..
.
86
7.6 Paper Jamming ..........................................
.
87
7.7 Streaky Prints ...........................................................................90
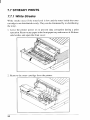
7.7. I White Streaks ................................................................90
7.7.2 Stains on Transparency Films ........... . ....... . .. . ....... . 92
8. Options ..............................................................................................93
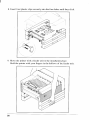
8.1 Feeder Unit and Cassette ............................. ....................,.......93
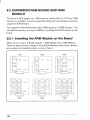
82 Expansion RAM Board and RAM Module .................... ....... 100
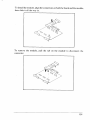
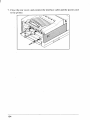
8.2.1 Installing the RAM Module on the Board .................. 100
8.2.2 Installing the RAM Board into the Printer .................. 102
8.3 Font Cartridge ........................................................................ 105
8.4 TrueImage Board .................................................................... 106
9. Reference .................. ....... . .. ......... .... ...................................................109
9. I Specifications . .. . .................................................................. 109
9.2 Reliability ... ........................................................................... 111
9.3 Pin Functions on Interfaces .................................................... 112
9.4 Command Summary .......................... .... .......
. . . . . . 114
9.4.1 Printer Control Language (PCL) Commands ............. 114
9.4.2 GL/2 Commands .
.
.
. . . ......... ... I 18
9.4.3 TrueImage Operators .................................................. 121
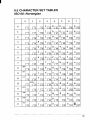
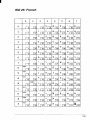
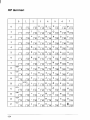
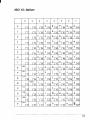
9.5 Character Set Tables ......... .. .................... ............................. 131
9.6 Resident Font Samples ........................................................... 161
9.6. I PCL5 Fonts .................... ............................................ 161
9.6.2 TrueImage Fonts ......................................................... 163
Glossary ........................................................................................................167
Index ........................... ....... . ............ ..........................................................171
How to Use This
Manual
m
‘” “
Congratulations on purchasing a Star LS-5 Series Laser Printer. You will be
delighted with the quality of the printed images and the ease of operation.
With your computer, software and this printer, you can create professionallooking documents.
This Operations Manual explores the entire range of printing possibilities of
the Star LS-5 Series Printer. This manual is for beginners and for those who
plan to concentrate on the basics.
Advanced users and those interested in programming may want to purchase
our optional Applications Manual. For details, please contact your dealer.
Chapter 2 begins with an overview of the manual and of the Star Laser
printer. This chapter explains how to unpack your new printer and prepare
it for initial operation. Chapter 3 explains how to operate the printer’s control
panel and display screen.
Some people like to skip the preliminary explanations and begin using the
printer immediately. Chapter 4 provides the information for a quick start. If
you begin with Chapter 4. you should read the rest of the manual in sequence,
at some later time, for a complete picture of your printer and its operations.
Chapter 5 describes the font and typeface characteristics that will enable you
to give your printed page that professional look.
The Star LS-5EX emulates the operation of the HP LaserJet Ill, and the Star
LS-5TT emulates the operation of the Apple LaserWriter NTX and the HP
LaserJet ~.
With this capability, the star LS-5 Series Printer will operate with a wide
range of software that is available on the market.
Chapters 6 and 7 describe the maintenance and troubleshooting operations
to keep your Star LS-5 Series Printer working in “perfect” condition.
Chapter 8 describes the optional accessories which you can select with the
Star LS-5 Series Laser Printer.
1
1.1 LASER PRINTING
Before you begin learning about your new Star LS-5 Series Laser Printer, you
may find it helpful to know something about laser printing itself.
A laser is actually abeam of light ofjust one wavelength (Laser is an acronym
for Light Amplification by Stimulated Emission of Radiation). This “highly
coherent” beam of light can be focused very sharply. Lasers, generated by
gases, liquids or semiconductors, are widely used in applications ranging
from surgery to the visual arts.
Laser printing is a process that uses a laser beam — in this case, generated
by a semiconductor — to activate portions of an electrically charged surface.
These activated parts represents the words, numbers, or graphics being sent
from the computer for printing. Other parts of the printer transfer this image
to paper, then clean the surface and prepare it to receive more information to
be printed.
In other words, this process is a type of laser-activated temporary engraving.
The Star LS-5 Series Laser Printer consists of two interconnected assemblies
— the toner cartridge and the printer body.
The toner cartridge contains the drum, which is the rotating surface. In the
darkness of the toner cartridge, the drum holds a negative charge placed on
it by the primary corona wire in the printer. Shutters on the bottom of the toner
cartridge assure that no unwanted light penetrates its interior.
When text or graphics are sent by the computer to the printer, a laser beam
is generated by a semiconductor laser diode. This beam is focused by special
scanning mirrors that turn the light beam into a tool that “writes” or “paints”
on the surface of the drum. The area of the drum touched by the laser beam
loses its negative charge and contains a reverse image of the information sent
from the computer. As the drum rotates, it passes a developer unit that is also
rotating, but in the opposite direction. The surface of the developer unit is
covered with toner (“ink”) which has a negative charge. The neutralized
portions of the drum, containing the information to be printed, picks up
negatively charged toner from the developer unit.
At this point, paper fed from the paper cassette moves through the transfer
unit, there it receives a positive charge. As the drum rotates, the negatively
charged particles of toner are attached to the positively charged surface of the
paper.
2
A combination of heat and pressure fuse the image to the paper. The paper
is then ejected from the printer.
Finally, a cleaning mechanism in the toner cartridge removes excess toner
from the drum, and a special light beam neutralizes its entire surface. Then
the entire process can begin again.
3
1.2 PRINTER COMPONENTS
You will learn about all aspects of your Star LS-5 Series Printer as you read
this manual, but a brief introduction is in order. The following figures show
the front. rear and inside views of the printer.
Front View
slot
Paper cassct[c
\
Control panel
4
Rear View
Power
receptacle
Inside View
I
1.3 PRINTER FEATURES
The Star LS-5 Series Laser Printer is a highly compact, fast and highresolution model, equally well-suited to home or office use. Its small
footprint consumes significantly less space than many ofother laser printers,
making it admirably suited for use in places where space is at a premium.
Standar@output resolution is 300 x 300 dots per inch. This can be boosted
to 300 x 600 dots per inch, giving the printer a noticeable edge over the
competition in clearly and sharpness of output.
The printing process used is that of’laser beam scanning, described in the
previous section.
The printer’s engine is rated for five pages per minutes— more than adequate
for home use. and fine for many commercial environments. Actual throughput, however, depends on several other factors as well, most important y the
complexity of documents that are transmitted to the printer for printing.
Paper feeding is from one of two sources, a slide-in cassette that fits
compactly into the deck at the base of the printer chassis. and a front-loading
tray. The cassette holds 250 sheets as standard and there is also an additional
feeder unit and cassette available as an option that will increase cassettefeeding capacity to 500 sheets. The front paper tray can hold 50 sheets. A
range of paper sizes (Letter, A4, Executive. B5, Legal), and envelope sizes
— COM- 10, Monarch, DL and C5 are available. Printing materials include
plain paper, envelopes, labels and transparency films.
The printer is easily setup and controlled by means of the control panel and
LCD display screen.
Connection to host computers is via any one of three ports — parallel,
RS-232C serial or AppleTalk. Two computers connected to dif-ferentports
may freely share the printer. The AppleTalk interface is only available for use
with the LS-5TT or the LS-5EX with its,optional TrueImage Board installed.
Internally the printer processes data using a fast, high-performance RISC
chip — the 16 MHz INTEL 80960SA.
The LS-5EX comes with 1MB of RAM as standard, and the LS-5TT comes
with 2 MB of RAM as standard. This can be expanded to a maximum of 7
MB (LS-5EX) or 8 MB (LS-5TT). which is advisable if complex documents
are to be processed, or if heavy use of fonts and macros is envisaged.
6
There are two emulations provided — Hewlett Packard’s Printer Control
Language (PCL), incorporating the GL/2 graphics language, and TrueImage,
Microsoft’s PostScript-compatible page description language. (The
TrueImage emulation is only available for use with the LS-5TT or the
LS-5EX with its optional TrueImage Board installed.)
In each emulation there area selection of built-in fonts—22 PCL fonts and
35 TrueType (the name for TrueImage’s font format). This offers considerable typographic flexibility without the need to purchase additional fonts.
Additional fonts may be installed on cartridge (HP emulation mode only) or
downloaded from the host computer.
7
8
Setting Up the Star
LS-5 Series Printer
E!i
‘”
“
The fact that you’re now reading this manual shows that you’ve opened the
carton containing your new Star LS-5 Series Printer. This chapter will help
you to unpack the printer, set it up, and get it running.
First, you should make some preparations. You may already have decided on
the printer’s new location. Whether you have or have not, run through this
checklist of requirements:
●
Environmental control
The printer andtonercartridge should never be exposed to strong sunshine
or other direct heat sources. It should also be located away from air
conditioning ducts, dust and fumes. Excessive moisture shouldbe avoided,
such as humidity in excess of 85~oor less than 15%. If it is comfortable
for you, then it will be comfortable for your printer.
●
A large, strong table or stand
The printer weights approx. 26.5 lbs ( 12kg)and must be firmly supported.
Also, the printer will need more room than it takes up in the shipping
carton, because the front paper tray will extend forward from the front; so
plan for some additional space.
●
A three-pronged outlet
The outlet should be no more than 6.5 feet (2.Om)from the printer (the
length of the power cord), preferably one shielded from power fluctuations. No motor-driven appliance should be connected to the same outlet.
This will avoid interface with the printer’s operations.
●
A fresh toner cartridge (product #EP-40XA)
●
Paper
A package of 16-28 lb (60 - 105g/mz)photocopier paper is best to start
with; however, the printer can use thicker paper, as well as special media,
such as envelopes and transparent sheets.
9
2.1 UNPACKING
The printer comes in two boxes. The large box contains the printer and its
accessories, and the smaller one contains the toner cartridge. Follow these
instructions when unpacking.
2.1.1 Unpacking the Printer
Follow the instructions below to unpack the printer,
1. Open the large box, and remove the power cord and the accessories box.
2. Carefully remove the printer from the box.
3. Remove the packing material from around the printer.
1
4. Open the accessories box. Remove the front paper tray and Operations
Manual.
NOTE: Save the packing boxes and materials. If you need to move the
printer (for relocating or service etc.), use these materials to protect
the printer from damage.
11
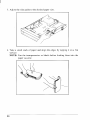
5. Open the small box and remove the packing material from the toner
cartridge.
Do not open the aluminum bag containing the cartridge until you are ready
to install it in the printer.
.t/
w
/
@
,7
..
/
@
12
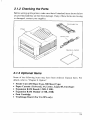
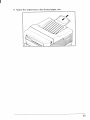
2.1.2 Checking the Parts
Before setting up the printer, make sure that all standard items shown below
are provided and they are free from damage. If any of these items are missing
r damaged, contact your supplier.
Power cord
/’
\
Y
(operations manual
I
2.1.3 Optional Items
Some of the following items may have been ordered. Unpack them. For
details, refer to “Chapter 8. Option”.
●
●
●
●
●
●
Feeder Unit (250 Sheet Type, 500 Sheet Type)
Paper Cassette (Universal, A4, Letter, Legal, B5, Envelope)
Expansion RAM Board (1 MB, 2 MB)
Expansion RAM Module (1 MB, 2MB)
Font Cartridge
TrueImage Board (For LS-5EX only)
13
I
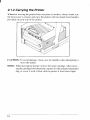
2.1.4 Carrying the Printer
Whenever moving the printer from one place to another, always make sure
the front cover is closed. and carry the printer with two hands from handles
provided on each side of the printer.
CAUTION: To avoid damage, always use the handles when attempting to
move the printer.
NOTE: When moving the printer, remove the toner cartridge. After removing the cartridge from the printer, replace it in the original aluminum
bag, or cover it with a thick cloth to protect it from direct light.
14
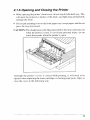
2.1.5 Opening and Closing the Printer
. When opening the printer’s front cover, do not stop it in the half-way. This
will open the protective shutter of the drum, and light may permanently
damage the drum.
. Do not put anything in or on the front paper tray except paper, and do not
press the tray downward.
CAUTION: The shaded area in the illustration below become extremely hot
when the printer is used. To avoid any personal injury, do not
touch these parts when the printer is open.
Although the printer’s cover is closed while printing, it will need to be
oliened when replacing the toner cartridge or clearing paper jams. Open or
close the cover in the following way:
15
Opening the Cover
1. Remove the front paper tray if it is installed. Failure to do so, may cause
damage to the tray.
2.
I
Side latch
The cover opens downward.
Do not stop the cover in the half-way. This will open the protective shutter
of the drum, and light will permanently damage the drum.
16
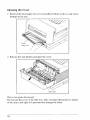
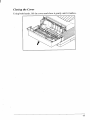
Closing the Cover
Using both hands, lift he cover and close it gently until it latches.
17
2.2 INSTALLING THE TONER CARTRIDGE
Important Notice
●
Install the toner cartridge immediately after opening the aluminum bag.
Permanent damage can be caused by exposing light to the photosensitive
drum. NEVER expose the cartridge to the strong light (more than 15000
Iux) or room lighting (1000 IUX)for more than five minutes.
Do not open the drum’s protective shutter on the toner cartridge.
Keep the cartridge away from CRTs, disk drives, diskettes, etc. Otherwise, CRTs and disk drives can be damaged, and data on diskettes can be
destroyed by the magnetic force inside the cartridge.
●
When handling the cartridge, do not touch the bottom of the toner
cartridge. Print quality will be adversely affected if the protective shutter
is open and the drum is damaged. The drum can also be damaged if it is
exposed to light.
●
Always keep the toner cartridge with the label facing up. Do not turn it
upside down or stand it on end. The toner may become caked, and this
causes print quality to deteriorate.
●
Use the cartridge before the expiration date printed on the carton.
Otherwise print quality may deteriorate.
●
Use only genuine Star toner cartridge, EP-40XA.
●
Dispose of your used toner cartridge as a noninflammable item.
18
Follow the instructions below to install the toner cartridge for the first time,
or when replacing the used one.
1. Open the front cover as described in “2. 1.5 Opening and Closing the
Printer”.
2. If you are installing the toner cartridge for the first time, skip to Step 3. If
you are replacing the old toner cartridge, pull out the used toner cartridge
and dispose it in the proper manner.
NOTE; Keep the toner cartridge horizontally to avoid scattering leftover
toner.
3. Open the aluminum bag containing the toner cartridge and remove it.
\
NOTE: Save the aluminum bag. as you may need it for storing the cartridge
when you move the printer to another place in the future.
19
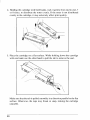
4. Holding the cartridge with both hands, rock it gently from end to end, 7
or 8 times, to distribute the toner evenly. If the toner is not distributed
evenly in the cartridge, it may adversely affect print quality.
5. Place the cartridge on a flat surface. While holding down the cartridge
with one hand, use the other hand to pull the tab to remove the seal.
Make sure that the tab is pulled smoothly in a direction parallel to the flat
surface. Otherwise, the tape may break or snap, making the cartridge
unusable.
20
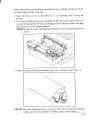
6. Align the guides on the toner cartridge (marked by an orange line) with the
guides inside the printer (marked by an orange arrow) and gently slide the
cartridge into position.
NOTE: Do not touch the rollers and the gears inside the printer.
7, Make sure that the cartridge is securely seated, then close the cover gently.
21
I
2.3 LOADING PAPER
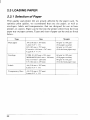
2.3.1 Selection of Paper
Print quality and printer life are greatly affected by the paper used. To
optimize print quality, we recommend that you use paper; as well as
envelopes, labels and transparencies, that are designed for use in laser
printers or copiers. Paper can be fed into the printer either from the front
paper tray or paper cassette. Types and sizes of paper can be used are listed
below.
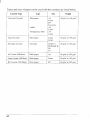
Type
Plainpaper
Size
A4 (210 mm x 297 mm)
Let(er(8.5”x 1I”)
B5 ( 182 mm x 257 mm)
Executive ( 184 mm x 267 trim)
Legal (8 5“ x 13“)
Envelope
Labels
COM-t O(105 mm x 241 mm)
MONARCH (98.5 mm x 199 mm)
DL ( I 10 mm x 220 mm)
C5 ( 162 mm x 229 mm)
A4 (210 mm x 297 mm)
Letter (X.5”x 1I”)
Transparency films
22
A4 (210 mm x 297 mm)
Letter (8.5” x I I”)
Weight
60 g/m2to 105g/m2
(For paper cassette)
60 g/m2to I35 g/m2
(For the front paper tray)
60 g/mJ to 105 ,ghn’
(For paper cassette)
60 glnf to 135 g;trr’
(Forthe frontpapertray)
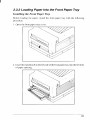
2.3.2 Loading Paper Into the Front Paper Tray
Installing the Front Paper Tray
Before loading the paper, install the front paper tray with the following
procedure.
1, Open the front paper tray cover.
‘7
-.
Insert the metal knob on the left side of the front paper tray into the left hole
of paper opening.
23
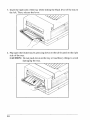
L1lG ‘---r
L1 cIy LU
3. Insert the right side of the tray while sliding the black lever of ‘hthe left. Then. release the lever.
/
4. Flip open the folded tray by pressing down on the tab located on the right
side of the tray.
CAUTION: Do not push down on the tray or load heavy things to avoid
damaging the tray.
24
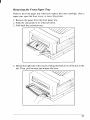
Loading Paper
Now, you are ready to load paper into the front paper tray.
1. Pull out the extension tray for standard length paper.
2. Adjust the side guide to the desired paper size.
25
3. Take a small stack of paper and align the edges by tapping it on a flat
surface.
NOTE: Fan the transparencies or labels before loading them into the
paper tray.
4. Insert paper, with the print surface face-down, as far as it will go.
CAUTION: Do not stack paper higher than the limit mark.
26
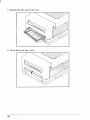
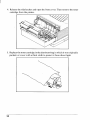
Removing the Front Paper Tray
Remove the front paper tray when you replace the toner cartridge, clear a
paper jam, open the front cover, or move the printer.
1. Remove the paper from the front paper tray.
2. Slide the side guide to its widest position.
3. Fold back the extension tray.
4. Detach the right side of the tray by sliding the black lever of the tray to the
left. Then, pull forward and release the lever.
27
5. Detach the left side of the tray.
6. Close the front tray cover.
28
2.3.3 Loading Paper Into the Paper Cassette
1.Remove the paper cassette from the printer.
2. Pinch the end guide and slide it back as far as it will go.
29
I
.3. Adjust the side guide to the desired paper size.
4. Take a small stack of paper and align the edges by tapping it on a flat
surface:
NOTE: Fan the transparencies or labels before loading them into the
paper cassette.
1’
30
5 Slide the paper edges under the metal retaining clips with the print surface
face-down.
CAUTION: Do not stack the paper higher than the limit mark.
6. Align the edges of the paper.
31
7. Slide the end guide to touch the paper edge.
Make sure the paper edge is under the plastic tab of the end guide.
8. Insert the paper cassette into the printer.
32
9. Adjust: the output tray to the desired paper size.
1
33
2.4 CONNECTING THE POWER CORD
Make sure that the power switch on the printer is set to OFF, then connect the
power cord to the printer and an AC power outlet as shown below:
1. Insert the power cord into the receptacle on the back of the m-inter.
.
2. Insert the power cord into a grounded outlet.
Only use the power cord supplied with the printer. Note that this power cord
is fitted with a ground pin. This grounding is an important safety feature and
should not be ignored. If a suitable grounded socket is not available, contact
a qualified electrician to rectify the situation.
34
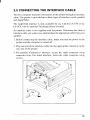
2.5 CONNECTING THE INTERFACE CABLE
The host computer transmits information to the printer through an interface
cable. The printer is provided up to three types of interface (serial, parallel
and AppleTalk).
The AppleTalk interface is only available for use with the LS-5TT or the
LS-5EX with its optional TrueImage Board installed.
An interface cable is not supplied with the printer. Determine the kind of
interface cable you want to use, and purchase the appropriate cable from your
supplier.
1 Before connecting the interface cable, make sure that the power to the
printer and the computer is turned off.
2 Plug one end of the interface cable into the appropriate connector on the
rear side of the printer.
3 For parallel (Centronics) interface, secure the cable connector using
connector clips. For serial interface, fasten the cable connector using
screws.
I
35
4. Connect the other end of the cable to the appropriate interface on the host
computer.
m
NOTE: The printer’s factory setting is for a parallel interface. If the serial
interface is to be used, you need to select the interface on the control
panel. See “4.3. 1 Selecting the Serial Interface” for selecting type
of interface.
36
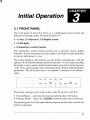
Initial Operation
3.1 FRONT PANEL
The front panel of Star LS-5 Series is a combination control board and
interactive message center. The panel consists of:
. a 2-line, 32 character LCD display screen
. 5 LED lights
●
8 momentary contact buttons
The momentary contact buttons permit you to perfrom various printer
functions. In turn, the printer uses the display screen and the light indicators
to convey information to you.
The screen display is the primary way the printer communicates with the
operator. It informs the operator about the machine’s overall state including:
the printer’s status, alarm conditions that require some action by the operator,
“soft” errors, and messages when selecting current, initial and default printer
parameters. The LEDs provide an “at a glance” summary of the printer’s
status.
cnuNE
.—,
mm
m.
.——)
DA,.
mm
SK,,
,-.—.
*)
<
MArwl
,—. -..
rem”
—.
mm,.
TEST
,
—.
>
PECCRAM ~5EL6cT,,
,—.
:’
,—
Mm,
,——. —..
A
The printer operates in two main modes when the printer is off-line:
. Normal Mode — performs the function labeled above the button.
. Program Mode — press the (-M)
button to enter menu selections.
The meaning and use of the panel buttons depends on the mode in which the
printer is operating.
37
3.1.1 Powering Up
Please note the following points when turning the printer cmor off.
Power on: First turn on the computer, then all other devices, and finally
turn on the printer.
Power off: First turn off the printer, then all other devices, and finally turn
OHthe computer.
CAUTION: Always wait at least three seconds between turning off and
turning cmagain.
Turn cmthe printer by pressing the “I” side of the power switch. The printer
will begin its internal diagnostics and warming up, displaying a series of
messages on the screen as follows.
1, All LEDs are lit and the LCD display turns black.
2, The screen displays “Star
LS - 5EX” (or’’Star
LS - 5TT”) on the first
line.
.3 Then the screen displays “Memory
Test
IMB” (“Memory
Test
ZMB” for the LS-5TT) on the second line.
It’ an optional IMB RAM board has been installed, the message will
2 MB” with the LS-5EX. The actual value
display “Memory Test
depend on the size of the RAM board installed.
4, After a short while, the screen will momentarily display “EEPROM LOAD
DONE”. This means that default parameters have been read from the
EEPROM and the EEPROM CRC has been checked.
5, “PRINTER WARMUP”is displayed, the READY indicator starts blinking
and the ON LINE lights up.
6 When the printer is ready. the screen displays “PRINTER
the READY indicator is now continuously lit.
38
READY” and
3.1.2 The Buttons
This section explains the various meaning and uses of the buttons, including
their light indicators, when applicable. Keep in mind that the buttons’
functions depend on the mode the printer is in: the Normal Mode and
Program Mode.
ON LINE
Pressing this button switches the printer from off-line to on-line or vice versa.
When the printer is on-line (ON LINE LED is lit), the printer is able to receive
information from the computer and print it. All other buttons (except
( ‘ZR,==) button under certain conditions) are inactive when the printer is
on-line.
When the printer is off-line, the printer is unable to receive information and
print, but the other buttons can be used. If the printer is in the Program Mode,
pressing this button will exit the printer from the Program Mode, and enter
it into the Normal Mode.
PRINT
This button is active only when the printer is off-line. Pressing the button will
print and eject any page of data. If there is no data in the printer, the
depression of the button will be ignored. When printing is in operation, the
LED is lit.
ERROR SKZP/<
This button is active only when the printer is off-line. In the Normal Mode,
pressing this button has no effect if no alarm condition exists. However, if an
alarm or warning condition exists, pressing this button causes the printer to
return to the previous state after corrective action has been taken.
When the printer is off-line and in the Program Mode, this button is called
NEXT(<). During programming, pressing this button displays the various
items under a category for the operator to select next in the sequence.
39
TEST/>
Pressing this button when the printer is in Normal Mode will operate in the
following sequence:
1. Pressing this button displays “HOLD FOR TEST” on the bottom line of
the LCD display screen. If the button is released while this message is
displayed, the printer returns to the previous state.
2. If the button is held down for two seconds, the screen will display
“STATUS SHEET” on the top line. If the button is released, the printer
will print a status sheet (see “3.2.1 Printing Test Sheets”).
3. Ifthebutton ispressedfortwo more seconds (except in Hex Dump mode),
the screen will display “FONT LIST” on the top line. If the button is
released, the printer will print a font list.
4. If the button is pressed for two more seconds (inthe TrueImage Emulation
mode), the screen will display “TEST PAGE” on the top line, and the
printer will print a test page.
When the printer is off-line and in the Program Mode, this button is called
PREVIOUS(>). During programming, pressing this button displays the
“previous” items under a category for the operator to select in the sequence.
RESET/V
This button has three functions when the printer is off-line.
. Pressing and holding this button when the printer is in the Normal Mode
the screen will display “HOLD FOR RESET”. If this button is held for
more than two seconds, “REINIT IA LZED” message is displayed on the
screen and the printer is reinitialized to the initial settings of the emulation
currently selected, This will also clear the input buffer, any page in
composition, and all composed pages queued up.
●
When the printeris in the Program Mode, this button iscalled ENTER( V).
Pressing this button “enters” the current category and selects it. This is
indicated by a “@” symbol.
●
Turning the power on while holding down this button causes the printer
to enter the display language selection mode. (See “4.9 Selecting Display
Language”.)
40
P
R
T s
u
t P
p
t b
W
t p
m
M
a d
“
m
f
t C
F
M
y m f
ap
s
t t n
h
l
R
s t p
o
t
p
t b
tr
ro e
f
t P
t “ P
d
r
i
P
sELEcT
T b
t
p
e
d
p
m b o
l t
p
t
s
p
P
t
t
b
(
S
p
T c
f
l
f
(ONLINE)
T
b
s
o
ae p
s t t
s
t a
t r
i t O L
L f ir
w d
’
“
r x
l
.
b
d
t
b
w
s
r
t
c
w c
C
f
t
t
t
(
m
o t b
o
b
i d
l
t
F
s
pi
o
s
S
C
L
F
M
T
C
t
a
N
d
s
w i
t o
a
o
. H
d
t b
f m t
t s
c
t s
t o
d
“
S
e
w
“
O
i t c
i
f
s
I t b
i r
w
t m e i d
t s
w d
t c
f
t
s
o t b
l
F
p
o t b
w c
t
t o
b
u
P
: L
P
: L
P
: A (
s
P
: E
x
P
: B
E
M
E : C -1
E : I
D
E : I
C
T e f
t
m
p
t (
( TEST ). ( RESET), o
(PROGRAM)button.
4
M
W t b
y c
r
T c
a t C
a I
T c
f
o c
r
s
S
u t t
b t
p
c
T
4
m
t
t
( o
p
L
buttcm
p
u
n
u
t a
i t O L
( MODE ) button. The screen w d
“
a t c
s
o t b
l
F
p
w c
t
t o
N C
M
1
M
2
press the (ONLINE)
s
p
c
ow b r
aa s
om
i l
t
S
b o
p
o t t
b
( T
t
l
e
u
> o (R
be
u
r
O
3.1.3 Light Indicators
L
T O
i s o
r
f
t p
o
L
w
r
s
t
d
i p
t
L
(
ap
t p
i r
t r
d ( p
i l T L
i o w
t p
ni n
p
i s o
T L
f e
w
o w
t p
i s
f
o
t rr
f
P
T
p
L
i c
O
t
L
l w
i a
ap
o
i b
to
t
t
r
t
D
T
p
L
p
D
L
i c
l w
d
a f
w
t p
i w
w g o w
a r
d h b
o w
t D
L
i l o
y
h b
r o
a n
f m d
T D
r
p
D n t
t
d w b l
r
R
T
w
R
L
t
p
i l w
i w
t
u
p
i r
f
u
T
L
f
A
T L
w l
u i t
t t
a
(
p
o
t L
l
u
e
T
o a e
w
r
b w s
f 2s
t
o
w
I
3.2 SELF TEST
T S L
t
I s
c
o a
s
T
o s
i
S
t
i
I e
i
t
p
p
as
o t p
c
q
o t
p
I s
t p
t a
oo m
a w
f
a i nn
h
t p
p
w vl
w t c
p
s a p
l
I t ew
t p
i a
n
x
n
3.2.1 Printing Test Sheets
T
B
a
t
H
R
as
t
P
af
. P
4
A
r
t
“
Tv
s
r
( T
>b
t b
w
H
t ( T
L
W
y r
F d
r
T
H
P
T
a
u
. P
●
t
T
p
w
t
s
s
t
d
“
s
S
e
l
r
>b
f
f
t b
t “
at
f
t
u
p
s
t p
5 F
u
w
t
s
p
d
af
l
S
r
o
>b
p
e
eC
e
p
i v
“
at
i t T
f s s
p
s
e
u
m
t
s
d
u
“
r
3.2.2 Status Sheet Description
Y
t
p
t
p
I t
c k
s
t
a
t p
o
b j
l
a
p
p
F
(
o
t p
i o
S
t
br
i p
i t p
o
T i t t a
o t rp
r
w p
a u
p
h
t
t
a w oW
t
a i w
t
i i h
t o
i r
t a l
r
p
i s f l
o
y
p j i p
t wr a r
T s
y
p
s
(
a t a
R
e
T l
u p
p
T
s
i d
b
i
r
o R
b
p
f
t
t
c
s
T
s
v o
t a
o t
f y
u I y
p
s i a l
h
i
a s
a
i m
o t s
t p
f
t
s
Y
f
p
c
p
i
T f
. N
o t
o c
T f
. C
T f
. P
. R
S
E
N
—t
a
s
w
t
s
b
O C
o c
G
G
i f
c
i f
r
u
i s t a l
i
p
u
u
p
p
s h
i
a
M
t b p
i
n
t
o
e
m
b el
S EL
o e
t
r
n e
p
i t p
t p
w
n
S
G
s o t p
w
o p
p
c
a Ps
w
i
t
o P
—t
—t
v
p
i
t
f
G
f
s
v
o p
w
o C
—c
oa t
d
p
r
i c
o d
t
● I
—t s
t
w b r
o u
t
w
m
c
● M
1(
s
t
I i a t s
t
w b r
o
e M
2— a a
s o p
o t E
—t p
s
or i o
R F (
h a o
x
o t
c
p
T f
. ‘
f
t
s
H
h
u
f
A s
p
4
I
T
●
●
●
●
●
f
O
M
a
V
c
E
A
p
af
o t L
—p
s
—l
p
(
l
—V
M
b m
i t v
o l —w
l f
—w
b
a a
f
(
a
T P
. F
● F
F
—w
T
S
T f
. P
G
o P
C
o G
o
T
f
●
R
R
T I
. I
T
I
T
f
P
m
●
T f
. A
p
4
a
t
o V
(
l
e
e
a a
a
u
b t
f
p
t
u
r
b
E
P
a o r
P
e
T
n
u
t
r
e
G
o t
—p
o t P
— s
o t A
f
—h
i a
f
o t
G
o A
s
D
t
o l
e
i
d
i
u
(
n
h
N
a
u
t b p
d
s
e
e
t
n
b
i
p
P
l
o n
i
c
I
s
p
o
a e
i
p
R
a
p
n
G
t
f
—m
d
u
o l
r
r
a t i r
t t a
i n
o l
I
V r
t t s
i
o ya
L
s
i am
a
w
f
i o o o
t
i a a
c
r
l f
(
a t e ao e
e
p
C
— w
B
f
●
i
G
i
t p
w b f f
—t s o p
t b u
i a
i
—w
B
G
F
p
i
w
e
u
f
d
b
e
t
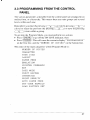
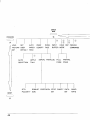
3.3 PROGRAMMING FROM THE CONTROL
PANEL
v
o
l
p
f
w
s
o ah
e
o
T
f
m
t
c
t
a
p
m
a
g
a
a
is
i a
u
R
y
~ ov ] o e ( pe
u ~
al
t s
t p
( p
~
)o n
( p
)
)
i
w
a
g
( <
T g i
t P
M
y m p
t
a
. P
(
t g o t O L
i
t o
. P
I
T w c
t s
t d
“
P M
o t f
l
a t “
O C
“o t b
l
T
o
o t
N
C
P
L
P
E
P
R
P
I
I
P
A
S
L
m
c
C
O
w
P
M
i
)
a
H
S
F
M
C
R
M
B
N
D
P
U
F
F
D
S
4
ERROR
SKIP
(
PROGRAM
LOAD
)
<
SET
‘ACTORY USER
AUTO
PRINT
INTER- INPUT
PAPER DENSITY FACE
PAGE REP PRINTER
BUFFER MODE
COMMANDS
\
‘ET-
/
RESET
v
“F*
AUTO
APPLE
SELECTION
TALK
DTR
+-l
SERIAL PARALLEL FULL
PAGE
PARTIAL
PAGE
ROBUST PROTOCOL STOP PARITY DATA
BIT
BIT
POLARITY XON
BAUD
RATE
N
@
@
@
@
S
i H D
m
H e
m
o
T
m
o
S
w
E
R
B
TEST
1
(
>
f
‘@
PAPER FEED
EMULATION
PAGE SIZE CHARACTER NUMBER
LAYOUT
OF COPIES
FRONT
FEEDER
TRAY SIZE
AUTO
LINEFEED
END OF
LINE
VMI
MANUAL
AUTO SET
MARGIN
ORIENTATION
SOURCE
DEFAULT
NUMBER
MARGIN MARGIN
~
POINT
I
TEXT
TOP
RIGHT
LEFT
LENGTH MARGIN MARGIN MARGIN
7
PITCH
I
I
SYMBOL SET
4
MEMO
Am D
Quick Start with the
Star LS-5 Series:
A Tutorial
S
O
aq
T
b
p
l
r
c
l t r
t p
r
g
i f b
o i c b u
t
d
i
t
t
m
h
A
m
f
u
b
d
o t e
a
e
g
I c
a as
b r
a
i s
w
t
r
o t
t
h
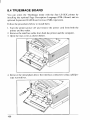
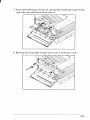
4.1 PRELIMINARIES
Y
S
. t
. t
p
t
W
y
L
S
L
b
p
r
c
a
al
f
o
y
p
b s
t
o a s
m
p
f
f
s
t
u
u w
o E
(
t
i
t
b
y
u y
S L
S
a
t r
t s
“ I
h
a i
t c
t t f
u
t p
I i a
aL
C
p
i t
b
I y a j
s
p
t
t t
I i v
t
y
T
p
c
c
. i s o as
s
. t
i a c
. y r
a t p
I a
p
s
p
P
v
w
t
s
h
t
v
n r
T
c
p
C
C
2
o p
c b f di
t
c
t i p
ar
E
t a B Yv c
u
a a o
u
A
b i
u t
L
C
i l
o t rl
s
r
o t
a
T f
p
o t p
I a
a
y t p
n
T S L
S
t p
i o
N
P
T
p
i
y
i f
L
P
n
w
e
r
m
m
b
h
r
d
f
i e
m
i
N
L
l
(
l
]
o
i
f
C
p
D
e
[
t
D
]
w
s
l
I
[
P
e
P
m
S
D
c
t
i
p
l
D
w
s
l
w
s
l
i
I
]
S
[
u
(
p
b
[
u
P
p
[
s
s
f
B
[
a
t p
y
c
i t
b
m
(
w
E
s
p
d
S
p
S
s
D
c
s
p
e
c
f
p
w
s
f
s
f
c
s
R
aL
~
5
Y
t s
I
e
( p
t p
(
w
aG
(
p
o
(
>
( pe
) o n
(
(
r
p
r
T
a
i
l
O L
(
P
(
D
(
R
(
A
(
o t
—t p
—t p
—i
—t p
—a e
f
p
i r
i p
h b
i r
c
W
l t
m
n
f p
i
r
b n y pn
f p
o f p
e
a t p
i o
g
g
o
4.2.1 Basic Operation
T
a
f
b
o
p
f
. O L
a O L
—T p
c
c
a p
i o
w
i i o
t O L
l
w b l F a o
o
T i a
b p
L
l
w g o
t
c
r
i
t
W
f
t
p
p
f
t
io o
m b
t O
p
t
(ONLINE)
p
fcb
. P
e
—T p
m h
u
i
i i m
T i i
b t l D
i
T e
i f
tn p
(
PRINT
).
W
t
r
t
t p
o
T
p
i
i p
t p
w b e n a t D
l
w
g o
. E
p
p
,
w
S
— I c
o a e
t p
w g
I t e
i m
i i p
t c
p
(‘
) ,t
(
u
t O L
l
m
p
w r
I t e
w m
p
i
o h
t h
i
. R
—T c
u s
p
B
y
t p
S
S
. i c
a e
. a s
s
●
b
o
t
(
p
a
r
T
p
i i ag
p
”
w p
i
t t
( T
h
s
as
t
s
p
) u
s
r
o
a s
r
T d t
i o I t e
s
t p
n
t t
e
RESET].
p
T
m
f
t
r
r
p
r
T d t
t r
d
f r
r
o
o t
o i
p
s
a
— i
p
p
a
n
rx
u
a a
e
4.3 CONNECTING THE PRINTER TO THE
COMPUTER
T
p
T
h
B
s
S
L
L
P
c
e
w as
C
i
a A
i
a a R
n s a i
S L
L
P
c
e
w t s
i
t A
i
i n a
u
t o
oT p
i i
T p
a
s
i
c nb c
t
o
oi c b a
a a o t m
U ap
i
d o f
f
t
as
c
i l
U
t
s
a R
1 f
t
(
w
T
i
p
p
c
w
f
Y
s
~
INPUT
PRINT
AUTO
5
l
a
A rp r
f
t
n
o gna
i
p
i
nt t
f
p
c
t
w
b l
y
i
p
a
a
m
m
o
n
e
t C
a nt I
p
G
r
c
o
L5-5EX
Status
and Setup Report
1.00
2
1024K bytes
OKbytes
640K bytes
—————
~
off
BUFFER
INTERFACE
I y
c
s
c
t t p
c
l
n
S
o
t
c
p
configuration
Firmware rev. :
page count:
RAMsize:
On-board
Expansion
Available
T
w
p
f
t
i
w
y n
t l
u t 5 f
f
y
c
v
l
g
d
star
I
s
b
i
t 1 f
s
a
o t
y
t
p
DENSITY
PAPER
FEED
1X by,,,
IK bytes
IK bytes
,.,8,1,1
,.,.1,.,
,.3,.,1,[
Hedlm
Meal,
m
,ed,m
Off
off
off
Error History
m
a
a
t
I
t
t
g
I y
l
C
w
t u aC
w
t u
p
s
i
i a
I t
s
ep
s
c
i
a R
y
i
d
n
m
y
e
t m
hc
a e
t
n
4.3.1 Selecting the Serial Interface
p
●
o
L
l
i o
●
T
p
(
●
P
(
●
P
p
u
<
] u
P
I
M
(
N
t
d
R
N
t
s
w
r
N
@
Now press (
W t
w s
]. T
<
a
s
w
c
t
N
d
r
S
B
●
P
●
P
p
(
V
T
p
p
t
D
P
S
P
R
D
) n
t
p
(
) T
V
s
d
r
@
u
t d
t o y
(
V
B
9
●
t
R
b
(
P
“
R
B
9
●
O
r
I
S
●
t
p
I
P
●
b
(ONLINE)
) n
as
o o
f
w
a
o t s
3
t 3
K
r
d
R
b
r
@
<
o
d
o t s
B
l
R
o t
P
d
(
<
) d
s
B
B
R
-X
P
O
5
I
T
s
f
t
f
f
t
o
a
e
8d b
N p
1s
b
D
H
W
y w t c
a o t s
p
f
h t s
s
a f s
t b
r
F e
t c
et d eb
a “ er i
”p
(
t
(
u
D
B i d
t f o
a ( < ) r c
o t s
P
( V )w d
w g t r o t
P
(
w
y
c
a
o t
s
F
p
it c
(ONLINE)
t e t P
M
a p
S L
S
P
f p
I y
w
a
p
r
t
. P
r
D
(
“
t
(
t X
s i f
u
p
t
y
h
(
“
hm
s
R
. Pressing (
V
) displays
P
D
P
R
@
(
d
r
F
X
. P
~
P
X
b
r
S
P
●
r
i
R
O
t s
X
T
@
d
s
i
O
R
O
4.3.2 Selecting the Auto Selection
T
u
a
u
“
t
S
f
w
b
d
w
T s
p
t
i
T
L
t
l
i o
T
p
(
P
~
u
P
I
M
(
N
P
p
t
i
t
o
S
t
b
(ONLINE)
u
t
O
p
(
<
t
d
r
R
t
s
w
r
) u
y
a
s
N
s
e
(
T
s
w
r
s
R
t
s
a
t
p
S
“
s
c
w t
p
t a t
N
A
B
F
L
a
ut
w e y
i
T
i s
d
d t n
@
p
S
c
i u
N
I
A
P
i
b p
I
P
N
f t
p
e
i
p
p
t
c
f
t
n
a
o
t e
(ONLINE)
P
t m
f
t
P
M
a
p
it
S
p
r
5
4.4 RESOLUTION ENHANCEMENT PROCEDURE
T
“
R
E
t f
. T
t
●
T
p
●
P
(
P
R
. P
p
s
g
a
o
) u
t
e
t
t
p
q
es o t
e
c
(ONLINE)
b
p
d
o nc
b
r
m
f r
m
s
r
M
~
R
N
t
s
R
o
. P
t
b p
(PROGRAM) t
<
t
w
r
@
<
) t d
R
O
. P
~
t s
i T
R
O
. P
r
d
w
r
@
(ONLINE)
e
w
a
p
t
S
L
S
e
P
n
tr u
t
r
4.5 PAPER FEED
T S L
S
P
c f
p
c
o f
t f
p
t
Y c
d
t s o p
f f
t f
o t ~
b
a
s
e
f
t
f as
a
P
M
g
t p
u
et
t
u
4;5.1 Feeder Selection
T
P
●
f
d
M
P
. P
●
P
p
>u
(
P
P
<
(
P
F
v )3a
<
s
w
t
a
r
d
s
w
n
d
w
d
@
) d
t
a
o t s
o
l
o t d
s
S
e
a
C
T
<
a
) t d
T
(
t s
F
F
I y
t c
t
O
(
F
F
. F
t S
t
(PROGRAM).
R
w
Pressing
. P
s
T c
p
F
(
P
O
a
M
A
C
L
F
M
●
t
i C
o
F
F
C
●
o f
t p
“
T
p
L
g ap
t m
t
S
j
T
T
s
t e t
f p
P
w
d
@
CONLINE)
P
w
p
b
r
r
t “
M
P
J
a ip
f
w
a
I
4.5.2 Paper Size
T
s
o
●
f
o p
a
P
d
o F
o e
p
~
●
P
l
●
B
6
w
r
d
r
(
w
@
) r
s
<
(
d
S
d
:
:
:
:
:
M
: C
I
I
i
S
T
: A
o t
w
l
t
o
c
o t r s
e
i
L
L
A
E
B
x
-1
D
C
w
t
r
p
s
i d
o at
c
F
t S
y
e
r
) d
w
~
P
s
a
R
F
T
P
P
P
P
P
E
E
E
E
●
s
), w
<
F
P
●
t
ad
An g
f
F
(
p
) u
V
P
F
●
t u
p
M
Press ~
P
w
t
F
P
F
●
I y
(PROGRAM):
<
‘P
P
T
i A p
y m f
p
p
L
t
S
s
p
(ONLINE)
P
r
b
r
t
t e t
f p
t
w
P
t
a
a ip
M
p
r
4.6 PRINTING IN LANDSCAPE ORIENTATION
I y
p
w
f
t c
t p
. P
. P
f
p
] u
<
t l
g
o
a
P
L
M
(
w
y
o
a
(
P
R
w
d
f
R
@
r
(
g
r
O
L
●
P
R
a
(
O
L
. F
t S
p
R
O
P
●
y
r
(PROGRAM>:
g
L
O
. P
f
p
s
L
T
s
w
d
r
R
@
c
p
L
t
S
(ONLINE)
P
b
r
t e t
f p
P
M
a ip
a
I
4.7 PRINT DENSITY
T
c
p
d
. T
i
●
t
p
t
p
l
T
w
i s
d
t
f
d
[ y
w
t
e
e
(ONLINE>
b
T
P
f r
O L
t e
t
p
m
T
s
i
M
O C
. F
t S
) u
R
t
(
P
P
<
c
v ).N
P
M
D
P
d
. P
“
r h
n
d
d
r
M
R
D
t
s
w
r
@
(
) d
<
t
o
o t
s
l r o t
i
s
D
S
M
S
L
6
t
PROGRAM b
p
. P
●
a t
p
o
b p
w g o
P
N
●
t “
f
i
D
L
<
s
w
s
p
L
t
S
t
t
(ONLINE)
P
r
a
d
n
b
r
t y
t e t
f p
i d
P
P
o t
D
s
s
M
a ip
A
c
4.8 SAVING THE SETTING
T n
i t
s
●
●
●
●
s
o
w r
Y s
i t p
s
t
s
e P
(PROGRAfd).
●
P
t
p
t
m s
i i E
t p r o
t
s
o n
r
!P
et
e
e
d
(
a
U
1
R
w
t
s
w
d
t s
t
n
m
i s
D
@
P
~
w
y
●
P
b
(
w
t
w
d
s
t M
N
t
2
s
w
d
S
E
F
u
d
e
y
●
●
m
f
M
D
U
S
M
a
a t
p i
t p
E A
f n
t u c c
t
s Oi a E
E
e
a
t p e i t
o
o
t F
S
b
a
e
o t
o a
T M
2s
c b
p
e
w
t u c c
a u a l
a E
t
N
T
a s
i t
o v
R
r
e ~
t P
S
w
a t
s
i t
R E
U
i
b s
c
t
o
a e
e
u
P
S
t
w
a t
w
a
P
R
t
p
s
p
m
T F
S
u
R
m
T P
S
p
m
c
T M
1s
w
w
t p
i t
r
f
t c
T I
S
p
i n t
o
m
T
o
T C
S
m
T
m b
o
s
T m
p
●
i t
u
r
U
D
L
p
(ONLINE).
D
Y
n
s
a
n
s
i
6
I
4.9 RETURNING TO FACTORY SETTINGS
I f
f
●
s
r
y
s
I t
f
P
M
P
L
. P
w
t
t s
f
t
b
w
p
p
(
u
t
s
t
e
o
a
r
r
r
M
R
F
~
L
E
S
T
s
F
w
d
S
L
F
S
@
●
P
(
<
>w
●
P
c
v ).T
L
L
F
F
P
L
F
y
s
s
@
t
w
o
d
o
b
S
O
R
t
T
a
6
f
M
s
R
S
a
n
r
a
y
c
c
g o
f
o
e a
e
4.10 SELECTING DISPLAY LANGUAGE
T L
s
F
G
t p
a
. H
d
.t (
L
a
p
. P
p
●
P
d
o
I t
t p
c
I
d
f
t
i
m
o S
t p
(
b
T
b
a
i h
b
a
T s
b
t
l
o t
o c
TEST )
i e
l
E
t
or
o t p
t s
d
s Aw d
(
s
t
“
R
“
u
t
c
o t s
(
)
l
m
(ONLINE)
w
b
g o
b
T
a
t
l
i p
a
w
t
b
d
e
r
r
t
u
a l
p
d
b
c
(ONLINE)
b
a
b s
d
l
t
t
a
p
t
w
r
r
l
d
s
t
wa g i
e
n
b
a i w
~RESET)
r
6
MEMO
6
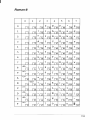
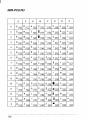
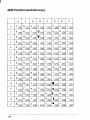
F
T
e
S L
b
T
a
S
T
B
B
S
e
b
S
L
I
L
L
P
S
a
h
f
h
f
i
f
B
f
n
i
a a
S
m
af
b
f
P
c
f
f
e
3 b
P
o r
f
o t
p
d
s
p
p
a
i p
s a
s
a c
w
t p
o a
s
a p
q
I v
3p
t 9
p
i q
s
c c
s n f
l
a
u
b
c
e i
u
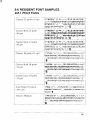
5.1 PRINTING A FONT LIST
T p
af
1 P
a
l
h
F
2 R
l
f
t
(
p
b
r
u
t
d
r
L
t
b
o
T
p
w
p
af
l
r
i b
a
p
a
6
e
5.2 SELECTING FONTS
Y
c
s
a
o t
d
s f
u
o f
t c
p
F
t
1 T
L
t
2 P
3 P
4 I y
d
i
(
M
(
N
C
S
: R
w
r
c
o
s
f
b p
p
u
P
C
a
t s
o
T
i o
(
p
o p
c
r
pw
o
b
p
l
i
y
t
f
t
d
tn c
p
b
u
(
o
t
O
f r
r
R
H
t
s
w
r
H
t s
c
f
o s
f
p
(
u
t
a
i
C
S
H
: C
(
C
C
S
: S
(
S
f
o
5 N
p
H
T
(
S
N
6
w
c
t
: R
: 1
6 P
(
t d
7 P
[
t s
s
f
u
t
s
n
a
o t
s
l
o
i
D
w
o t
s
f
t
f
w
p
f
w
i s
t
s
l
o e
r
P
: 1
P
R
: 1
-
(
s
(
(
f
f
s
s
i s
i
S
e
S
8 W
d
p
aS
p
<
9 P
o t
(
d
1 F
S
f
o p
u
y
p
o t
r
(
s
l
s
o (
o t
s s
u
d
o t
t c
T
s
e
l
i
p
L
i s
i s
(
S
P
t e
f p
f
t
P
M
a
p i
t
6
M
L
T
n
y
r
c
S
S
L
H
p
E!
t S
P
S
L
i i i
i g
c
t t
c
t p
P
‘
●
“a
●
d
n r
m
c
a m
t p
af c
t
t m o
T
c
w e
p
of
h
t t
c
e a p
a a
l
m
r
r
6.1 REPLACING THE TONER CARTRIDGE
R
t t
. I p
q
r
t
s t
● [ t
f
F
1 O
P
2 P
N
t
c
f
i
t
o
c
i s
i t
l
e
a r
f
a
s
p
s
b
f
c
t u
t
K
t t
t
t r
r
f
e
t e
ar e
t
t
t
i “ 1
cn
t
a d
c
c
y
i g
c
h
a
h
d
o b
O
i i t
t a
ae
t t
b
a e f ao
a
r
p
s
o t
C
t
m
l
o
I
3 O
m
t
4 O
t
N
S
w
b
f
c
t
a
b
t
m
n
t
c
c
a
y
5 H
t c
o 8t
t d
e
i t c
b
7
t
c
t
t
b
p
t
w
i m
t
a y m
t a
b
t
h
t
a
r
c
n
t op
a
a
r
i f
p
r
e
a
i g
I t t
a
p
t
i t
i
lo
c
l
f
f
e
i n
q
a
t ea 7 o
d i
a
d
I
6 P
w
t
o
c
h
M
s
u
s
7 A
g
t
o af
t o
u
t
t
t
O
t
s
h
W
h
t p t t
t r
s
m
b
i ad
o s
m
i p
t
d
t
t
p
tt
ca
s
t t
uc
f
w
s
t
t
n
g
i
t
o t
p
t
c
(
(
b a o
b a o
a
a
l
g
7
8 M
7
s
t
c
i s
s
t
c
t
c
g
a
h
6.2 PRECAUTIONS FOR THE TONER
CARTRIDGE
T
p
p
C
T
t
c
S
c
b
t p
i e
s
i i i e
t t ed
d
t
m r
o
t f
r
t
d
o u
a
A
o
i i t
k
p
D n
s
t
t
p
c
d n
A
t
c
w
S
9
t
a at
c
D n s
s
a a
t
c
f
A
t
l
b
i w
a r
ry
a
t
f
f
u
c
a
C
c
c
a
c
q
b e
i s
i t
k
i w
t d
D n t
o b
c
B
i w
t i
a
O
o w
d
f
a
i u
a
t
d
a
s
3
a
a
a
da
o
( a ea
c
g
f
a
m
d a T
a
t
a
c
b
a
e
d
O
a
au
D
W
i a
i t a
o
t b u
w
t c
i o e
t
h
r
S
s
K
m
d
a t a u hf
t tr l
i m b
s
o s
l
i p
p iq
n
d
h
. D n
t
t
t
t t
c
a an
a
p
o
a
t t
f
pa
a
t
. D n o
b a
c
t
t
a
d
b
d
o t
p
c
s
w
h
I i i o
t
c
p
q
m r
f
7
a
6.3 CLEANING THE EXTERIOR OF THE PRINTER
B
U
p
c
c
o
m
w
t
a
w
n
t
m
s
p
i
o
7
e
s
t
p
d
p
d
d
t
r
l
p
p
p
t
d
w
p
c
t r
as
N
O
p
i r
d
m
c
a
l
l
a
s
e
f
or a
l
U
l
a
t
o
o
e
T
r
A i
k
h
b h
o
t
p
y d w
o
k t r
o
o y
S L
m
S
P
t r
w
t
o
S
p
c
t s
b t p
o
O
r
s
T c
w e
w
t d we I w a
t p
j
a o
o
p
i
cn
b a
h r
7.1 ERROR MESSAGES DISPLAYED ON THE
SCREEN
T c
p
s
m d
o o
o t S L
S
d
s
d
p
S
m
p
i
o t c
o t t
c
e
A
i h
p
p
w
o c
e
o s
O
e
o
o t h
c
a o
t
i b
av
P
a
a
o m
d
t
Y a a
pf
w
p
t
t p
s
i t
O
h
t d wo
m
c
w t
p e i
c ne
f
o
o
o
a
i t
s
o t
r
of
f
n
a f
m
t ae o t
h c
t c
p tr
i d
c
p
e
I t p
m
f s
r
w
o t s
r
w a
y s
a m
t t y t c f r
s
S
l s
c
t c h
b t p
m
r
ac
p
w t h
a
t p
o
T
m
a s
ma
te
o
oc
T
m
w a
m s
ce
oI
eb d n
hr p
r
c
e
7.2 SERVICE CALL MESSAGES
7.2.1 Engine Service Call Messages
E
c r
s
f
c
e
m
ac
a
r
t t
f
i
o ah
w e
i t oe
T
r
e e
n
l
M
M
S
f
A
—
p
b
e
p
s
(=
r
)
p
ing s
(=
r
)
e
S
s
m
m
p
b
e
S
i
c
p
b
s
p
r
S
e
e
p
b
r
s
r
e
r
7.2.2 Controller Service Call Messages
C
S
m
m
i
i
a
p
l
e
m
r
f
f
i e o h
o s
c
e
m
o
d
s
to
T m
t t c
i m
b i s a t ad o t e
C
c
c a b d
d
c
e or
o
o ac
a a o
t
a
t c n
ao p
A e
s
t nt s
t u g
o i
a t
s
T c
w a
t r
i p
oI t
i n f
d
i
b r
d
on
m r
t f
i i t h
e
e
e
o
a
i
A
M
e
c
p
h
r
p
h
e
p
h
s
s
p
‘
p
C
r“”
S
e
(
r
o
S
rcWW1’ite test error in
e
E
b
(
c
e
n
IC
e
C
s
i
s
p
a
b
ICITI;
c
c
}
CRC e
S
E
s
i
s
p
b
~
c
I
F
S
iI
read/write
test error in
p
f
s
s
s
s
b
E
c
g
l
s
7.3 OPERATOR CALL MESSAGES
W
t s
d
o
c m
t p
hg
o
l a t a
s
T p
i o t t o
s
b a
t r
A
m
a c
y s
p
[ e
t o
r
t s
I t e
i n d
a
y m c
e
p
s
a
( t e
w o o t E
P
r b t
I t e
m
w o a o
t
y s
p
(
b
c
t p
j
o
i
t
e
7.3.1 Engine Problems
T
p
a
m
p
t
p
t
e
f
eb
r
r
r
M
M
C
c
R
m
c
s
m
R
c
s
L
A
i
p
s
r
p
s
r
p
s
r
p
o
l
c
c
f
p
T
R
?
m
c
s
I m
c
C
f
t
p
c
o
c
s
c
f
p
s
s
i
l
f
c
p
c
s
i
c
s
L
p
f
m
s
C
C
c
P
J
p
c
j
c
f
p
p
P
C
8
t
t
c
i
J
t
c
7.3.2 Font Cartridge Problems
The font cartridge is plugged into the printer. It should not be inserted or
withdrawn while the DATA LED is continuously lit. If’someone does this,
the screen will indicate “CARTRIDGE ERROR”. The printer must be
reinitialized by turning off the power and then on again.
If a font cartridge is removed while the DATA LED is blinking, the screen
will display “REINSERT CART”. in this case, the operator must insert the
If (~)
is pressed, the printer will
font cartridge or press (-).
select the closest font.
Message
Meaning
Action
CARTRIDGEERROR Fontcartridge is removed
while DATA LED is on
Turn the power off then on
again to initialize the printer
REINSERT CART.
insert the cartridge or press
-
Fontcartridge isremoved
while DATA LED is
blinking
7.3.3 Optional Hardware
The following messages will be displayed if necessary optional hardwares
(e.g. RAM expansion board) have been removed.
Message
Meaning
Action
INSUFFICIENTRAM full page mode is selected; no expansion
RAM installed
repower-up with expansion
RAM board, or press
-
INSUFFICIENTRAM full page mode and REP
is selected; 1MB expansion RAM installed
repower-up with 2MB (or
more)expansionRAM board,
or press (-)
NO EMUL. BOARD
repower-up with the emulation board,or press (-)
emulation of the board is
selected; no emulation
board installed
81
7.3.4 Change Paper Size
Certain emulations permit page size to be specified by the host computer.
Also, page size can be selected from the menu. If a change in page size is
required, the screen will display a message to that effect. The alarm will beep
and the printer will go off-line. You may have the printer ignore such a
message by pressing (-).
(In this case, the printer will print the page
size image on the different size paper.) If the current feeder is cassette,
inserting the correct paper cassette causes the printer to start printing
automatically. If the current feeder is the front paper tray, changing the front
paper tray size via panel starts printing automatically.
Message
Meaning
Action
CASS:CHANGE ??? the paper size (indicated
with ???)isrequired; cassette
follow procedure above
LCAS:CHANGE ??’? the paper size (indicated
with ‘???)is required; optional cassette feeder
follow procedure above
TRAY:CHANGE ‘??’.the paper size (indicated
with ?’??) is required;
i front paper tray
follow procedure above
82
I
7.3.5 Manual Paper Feed
Certain emulations permit specifying manual paper feed from the host
computer. Also. you may select manual feed from the menu. The following
message tell you to hand feed paper of a specific size. The alarm beeps and
the printer goes off-line. When you feed the appropriate paper into the front
paper tray and press (-],
the message will be turned off and printing
will continue. The operator has the option oppressing (~~~),
which turns
off the message and causes the printer to continue printing.
If there is no paper in the front paper tray, pressing (=)
turns off the
message and causes the printer to feed paper from cassette and then displays
the message again.
Message
M-FEED ‘???
Meaning
the paper size (indicated
with ???) is required to
be hand fed
Action
follow procedure above
83
7.4 OPERATOR INFORMATION MESSAGES
7.4.1 Host Communication Problem
Certain problems with communication with the host computer may be
detected. Messages listed below provide information, but do not halt the
printing process. The printer uses a default value if necessary. You may
remove the message by pressing (=).
Note that if there are multiple
errors, the last one detected is displayed.
Message
Action
Meaning
LINE ERROR
parity error in host data
follow procedure above
INPUTOVERFLOW
input buffer overflow
follow procedure above
BAD FONT DATA
downloaded font bad
downloaded font ignored
BAD FONT CODE
downloaded font in error
downloaded font ignored
BAD CHAR CODE
loaded character outside
of index
downloaded font ignored
7.4.2 Function or Size Incompatibility
There are problems that occur when the host computer requests a function not
provided or a function that requires more memory than is available.
Message
Meaning
Action
page buffer memory
overtlow
partial page currently composed is printed and ejected;
remaining data for page is
printed on next sheet
OVERRUN ERROR data too complex to print
printable data of the page will
be lost
CANNOT ROTATE
insufficient memory to
rotate font
font rotation aborted; printing continues using closest
available font
CANNOTDOWNLOAD insufficientmemory to
downloadfont
font download is aborted;
printingcontinuesusingclosest availablefont
CHARNOTINFONT received character not in
blank space is printed for that
character
PAGE OVERFLOW
currently selected font
84
I
7.4.3 Font Cartridge
The font cartridge is plugged into the printer. The operator may insert or
withdraw a cartridge only when the DATA LED is off or blinking. The
following message acknowledges the change.
Message
Action
Meaning
‘CART. CHANGED
font cartridge is inserted
or removed when DATA
LED is off or blinking
message will remain for one
second
REINSERT CART.
Fontcartridge isremoved
while DATA LED is
blinking
insert the cartridge or press
E~~,~R
85
7.5 STATUS MESSAGES
Status messages are low priority messages that either indicate normal
conditions or provide warnings that need not be acted upon immediately.
These conditions should not occur when the printer is on-line. If they do,
however, the alarm will beep find the printer will go oi’f-line. For some
conditions however, there is the possibility ofa condi(ion occurring when the
printer is on-line. If it does, the alarm will not sound and the printer will
remain on-line.
Message
Action
Meaning
PRINTERW, ARML:P printer is warming LIp but
service call not necessary
—
ENGINE TEST
test in progress
~ operatot has initiateda
testof the printing
ENGINE RESET
engineis being reset
REINITIALIZE
controller soft ini[ialization
111”SW’tlell ( RESET-) is
OCC
pressedoremul~t[ion
ischmyxi;
may filsooccur whm printeris
m-line if emull~ionis Chtingcci
STATUS SHEET
PRINTING
status sheet pt”intout
OCCUI”S
Mhcn(~>
ij held
t’oratkust2butlessthtin-1winds
FONT LIST
PRINTING
font list printout
is held
whetl~T~
~tleast4 sec(mdsin HPemul:ltionml TI’LIeIIIULgCmock
TEST P~GE
PRINTING
sample pa~e printout
occur~whenC TESTO is held
Jt Ie:istb SWMKIS
in I’rwlmdge
mock
REPRINTLOSTPGS
retransmission of lost
sheets
may occur ai’ter paper janming
—
PRINTER READY
all conditi(msnormaland
pl”operbut printc?t”is not
opertition; no unused
data incontrollet”c)t-pa
ges”
in printing
PRINTER ACTIVE
all conditions mmml and
proper: printer is in operation: unuse~l dwl in
controller or pages in
printing
—
86
OCCLII”S
7.6 PAPER JAMMING
As paper travels from the front paper tray or cassette through the printing area
and is ejected. it can .jiumat the following locations:
.i Paper pick-up area (front paper tray)
,2 Paper pick-up area (cassette paper feeder)
@ Paper pick-up area with optional cassette paper feeder
4; Fixing assembly area
&Print delivery area
➤
-%’~<”--””””””’”~
..,6)
Common causes ofpaperjarns areas follows. Remove them to prevent paper
jams.
●
‘Theprinter is not located on a firm, level surface which is fairly vibrationfree.
●
Paper may not be correct for the printer.
Refer to “2.3.1 Selection of Paper” for the detailed information of paper
specifications.
●
Transparencies and envelopes may not be fanned before using.
●
Paper may not be loaded correctly on a paper cassette or the front paper
tray.
Refer to “2.3.2 Loading Paper into the Front Paper Tray” or “2.3.3
Loading Paper into the Paper Cassette” for detailed information of paper
loading.
87
Follow the procedures below to clear the paper jam.
1. Remove any paper from the front paper tray, and remove the front paper
tray.
2. Pull out the cassette and check the paper pick-up area. If there is a paper
jam here, remove the jammed paper before replacing the cassette.
NOTE: Remove the wrinkled paper in the paper cassette and make sure
that paper is loaded in the paper cassette properly.
88
3. Release the side latches to open the front cover.
4. Remove the jammed paper carefully so as not to tear it.
1
I
CAUTION:
. Do not touch the fusing area as shown above, because it gets hot.
. Do not throw strong light inside to avoid damaging the toner cartridge.
. Do not touch the transfer roller.
. Make sure that paper fragments are not left inside.
5. After checking all the areas described here, close the front cover, replace
the front paper tray (if it is being used) and refill paper. Printing will
restart.
89
7.7 STREAKY
7.7.1 White Streaks
White streaks occur if the toner level is low and the toner inside the toner
cartridge is not distributed evenly. They can be eliminated by re-distributing
the toner.
1. Leave the printer power on to prevent data corruption during a print
operation. Remove any paper in the front paper tray and remove it. Release
side latches and open the front cover.
2. Remove the toner cartridge from the printer.
90
3. Holding the cartridge with both hands, rock it gently from end to end, 7
or 8 times, to distribute the toner evenly.
,
4. Replace the toner cartridge in the printer, then close the front cover.
I
I
If vertical white streaks still appear after the toner inside the cartridge has
been re-distributed, the cartridge needs to be replaced. See “6.1 Replacing
the Toner Cartridge” for replacing the cartridge.
91
I
7.7.2 Stains on Transparency Films
Transparency films may sometimes show stains at either the top or bottom
of the films. These stains may be caused by a dirty paper path or the flaw on
the toner cartridge.
. Clean the fixing assembly. The fixing roller inside the fixing assembly
may have been stained with toner. Print out several sheets of blank paper.
If the stains still appear, use a different type of transparency film.
●
92
Replace the toner cartridge. The photosensitive drum in the cartridge may
have been damaged due to exposure to the bright light. For replacing the
cartridge, see “6. 1 Replacing the Toner Cartridge”.
m
m
Am
Options
●
●
The following optional accessories are available with the Star LS-5 Series.
This chapter describes how to install and use these optional accessories.
●
●
●
●
●
●
Feeder unit
Cassette
Expansion RAM board
RAM module
Font cartridge
TrueImage board for LS-5EX
8.1 FEEDER UNIT AND CASSETTE
The optional feeder unit is used with one of the optional paper cassettes, to
feed paper from the paper cassette into the printer. The feeder unit can be
attached easily to the bottom of the printer.
Model
FU-25XA-UN
IFU-50XA-A4
FU-50XA-LT
Type
250 sheet feeder unit with Universal Cassette
I500sheet feeder unit with A4Cassette
500sheet feeder unit with Letter Cassette
I
Cassettes are available in the following paper sizes: A4, Letter, Legal, B5,
Executive and Envelope. Each cassette can hold up to 250 sheets of plain
paper (paper weight: 80 g/m2), and the envelope cassette holds about a27mm
stack of envelopes or about 30 envelopes. In addition, different type of the
A4, Letter and B5 cassettes can holdup to 500 sheets.
93
I
Types and sizes of paper can be used with the cassettes are listed below.
Cassette Type
Universal Cassette
Type
Plain paper
Labels
Transparency films
Size
Weight
A4
Letter
B5
Executi\’e
A4
Letter
A4
Letter
60 g/m2to 105g/m2
Legal Cassette
Plain paper
Legal
Letter
60 jjm: to 105ghn~
Envelope Cassette
Envelope
COM-1O
MONARCH
60 g/m2to 105g/m~
DL
C5
A4 Cwsette(500 Sheet)
Plain paper
A4
60 g/m’ to 105g/m’
LetterCassette(500Sheet)
Plain paper
Letter
60 g/m2to 105g/m2
B5 Cassette (500 Sheet)
Plain paper
B5
60 g/m2to 105g/m’
94
Setting Up
Attaching an optional feeder unit requires a wide space. Choose a wide and
flat surface near the installed printer. After attaching a feeder unit to the
printer, return the printer to the installation place.
1. Unpack the feeder unit and put it on a wide and flat surface. Remove the
paper cassette if it is installed.
NOTE: Leave enough space to put your fingers inside both the front and
rear of the feeder unit.
CAUTION: Do not touch the control unit. It is easy to be broken.
‘7
e.
Turn the printer power off and remove the power cord from both the
printer and the outlet.
.3. Remove the paper cassette from the printer and the front paper tray if it is
installed.
95
I
4. Release the side latches and open the front cover. Then remove the toner
cartridge from the printer.
5. Replace thetonercartridgein thealuminum bag in which it was originally
packed, or cover with a thick cloth to protect it from direct light.
\
96
6. Put the printer on the feeder unit by holding the hollows of both sides of
the printer. Make sure the corners of the printer are aligned with on those
of the feeder unit exactly.
7. Make sure the four projections fit into the four holes.
If all the projections do not fit into the holes, lift the printer and put it on
the feeder unit again
I
8. Insert four plastic clips securely into the four holes until they click.
/
,.’
,.. --——
‘\\
“\ ‘ -...
.,.
‘.<~
..
.,.>4
...
. ,,,
w’
,.~’
,/’
9. Move the printer with a feeder unit to the installation place.
Hold the printer with your fingers in the hollows of the feeder unit.
98
paper.
I
1
I
Now, you are ready to use the optiona] feeder unit. Connect the power cord
and turn on the printer,
99
8.2 EXPANSION RAM BOARD AND RAM
MODULE
The Star LS-5EX printer has 1 MB memory and the Star LS-5TT has 2 MB
memory as standard. You can expand this memory by installing the optional
expansion RAM board.
The expansion RAM board has either IMB memory or 2MB memory. You
can add the memory size up to 6 MB by installing the RAM module on the
board.
8.2.1 Installing the RAM Module on the Board
There are two types of RAM module: 1 MB Module and 2 MB Module.
There are three positions (banks) for the RAM Module on the board, and they
are assigned an installing order, as shown below.
3MB
2MB
D-n
n
cl
--
~
1
I
L
(
4MB
100
5MB
6MB
To install the module, align the connectors on both the board and the module,
then slide it all the way in.
To remove the module, pull the tab on the module to disconnect the
connector.
101
8.2.2 Installing the RAM Board into the Printer
When you have finished installing the RAM module on the board, follow the
procedures below to fit the RAM board into the printer.
1. Turn the printer power off and remove the power cord from both the
printer and the outlet.
2. Remove the interface cable from both the printer and the computer.
3. Open the rear cover as shown below
4
4. Remove the metal plate above the interface connectors using a philipstype screwdriver.
102
5. Insert the board into the left side, then slide it all the way in.
6. Remount the metal plate in place and secure it with three screws.
103
I
7. Close the rear cover, and connect the interface cable and the power cord
to the printer.
104
I
8.3 FONT CARTRIDGE
Fonts can be added to the printer by installing an optional Font Cartridge. The
Font Cartridge is installed in the slot on the right side or the printer.
Insert the Font Cartridge with the arrow label facing up. If the Font Cartridge
is inserted upside down, the cartridge and/or printer may be damaged.
105
I
8.4 TRUEIMAGE BOARD
You can select the TrueImage mode with the Star LS-5EX printer by
installing the optional Page Description Language (PDL) Board, and an
optional Expansion RAM Board (at least IMB expansion).
Follow the procedures below to install them.
1. Turn’the printer power off and remove the power cord from both the
printer and the outlet.
2. Remove the interface cable from both the printer and the computer.
3. Open the rear cover as shown below.
4. Remove the metal plate above the interface connectors using a philipstype screwdriver.
106
5. Insert the RAM board into the left side and the TrueImage board into the
right side, then slide them all the way in.
6. Remount the metal plate in place and secure it with three screws.
107
7. Close the rear cover, and connect the interface cable and the power cord
W/-”
108
Reference
9.1 SPECIFICATIONS
. Type
Laser beam page printer
●
Engine
Resolution:
Speed:
Warm up:
. Emulation
LS-5EX:
LS-5TT:
●
300 x 300 dots per inch
5 pages per minutes for A4 size
under I minute (at 20”C or 68”F)
Standard: PCL 5 and GL/2 (HP LaserJet HI)
Option: TrueImage (with optional PDL board)
PCL 5 and GL/2 (HP LaserJet 111)
TrueImage (Apple LaserWriter NTX)
RAM
Resident:
Optional:
. Host Interface
Serial:
Parallel:
AppleTalk:
. Default Settings:
1 megabyte (LS-5EX)
2 megabyte (LS-5TT)
Max. 6 megabytes on RAM Expansion Board
RS-232C
Centronics
Standard for LS-5TT
Optional for LS-5EX with PDL Board
Changeable using the control panel
. Fonts
Resident:
Option:
14 bitmap fonts
8 scalable fonts
35 TrueType scalable fonts (LS-5TT only)
Font cartridges
109
!
●
Paper feeding:
●
Paper size
Plain paper:
Envelope:
Labels:
.Transparency films:
Front paper tray
Cassette feed
. Paper weight (plain paper)
Front paper tray:
Cassette feed:
Letter, A4, Executive, B5
COM- 10, Monarch, DL, C5
A4, Letter
A4, Letter
60 g/mz to 135 g/mz
60 g/m’ to 105 g/mz
●
Printing area
Requires a marign of 4mm from each edge of the paper
●
Acoustic noise (in accordance with 1S0 7779)
37 dB or less
Stand by:
Printing:
45 dB or less
. Environment
Operating:
Storage:
5°C to 35°C (41‘F to 95°F)
15 to 85% relative humidity, no condensation
-20°C to 40”C (4°F to 104”F)
5 to 95970relative humidity, no condensation
●
Power source
●
Power consumption: less than 450W (100/115V) or 500W (200/240V)
. Weight:
100/115V(50/60Hz) for North America and Japan
200/240V (50Hz) for Europe, Asia, and Oceania
Approx. 12kg
●
Dimensions:
352 mm x 393.5 mm x 253 mm
●
Options:
Feeder Unit (250 Sheet Type, 500 Sheet Type)
Paper Cassette (Universal, A4, Letter, Legal, B5,
Envelope)
Expansion RAM Board (1 MB, 2 MB)
Expansion RAM Module (1 MB, 2MB)
Font cartridge
TrueImage Board (For LS-5EX)
110
I
9.2 RELIABILITY
●
Suggested monthly print volume
3000 prints
. Definition of failure
Any loss of operation that requires calling a service person.
Operation errors and installation failures are not included.
. Product life
Five years or 150,000 prints, whichever comes first
. MPBF
120,000 pages
. Mean time to repair
30 minutes or less
. Paper feed reliability
. Toner cartridge life
8,000 prints at 2.87c print duty (A4/Letter size)
111
9.3 PIN FUNCTIONS ON INTERFACES
●
Paralle interface
Signal
Name
Pin No.
1
STROBE
IN
2
3
4
5
6
7
8
9
10
DATA1
DATA2
DATA3
DATA4
DATA5
DATA6
DATA7
DATA8
ACK
IN
IN
IN
IN
IN
IN
IN
IN
OUT
11
BUSY
OUT
12
18
19-30
PAPER
OUT
OUT
SELECTED OUT
N/C
SIGNAL
GND
CHASSIS
GND
+5VDC
OUT
GND
31
RESET
IN
32
ERROR
OUT
?? ?L
NT
13
14-15
16
17
112
/fl
Function
Direction
Goes from High to Low (for at
least 0.5 microseconds) when
data are valid.
Eight-bit character data.
DATA8 is the most significant
bit; DATA I is the least
significant bit. High is logic 1
and Low is logic O.
A low pulse acknowledges
receipt of data.
Low when the printer is ready
to accept data.
Goes High if the printer runs
out of paper.
High when the printer is on line
Unused
Signal ground.
Printer’s chassis ground,
isolated from signal ground.
External supply of +5VDC
Twisted pair return signal
ground level.
Low input resets the printer to
its power-on condition.
Goes low to signal that the
printer cannot print due to an
error condition.
1 I—...
-2
●
Serial interface
Pin No.
1
2
3
4
Signal
Name
GND
TXD
Direction
OUT
RXD
IN
RTS
OUT
5-6
7
8-19
20
N/C
GND
NIC
DTR
OUT
~I--25
N/C
Function
Chassis ground.
Carries data from the printer.
Carries data to the printer.
On when the printer is ready to
receive data.
Unused.
Signal ground.
Unused.
On when the printer is ready to
receive data.
Unused.
113
9.4 COMMAND SUMMARY
This section shows the summary of the commands that work with the Star
LS-5 Series Printer. For details of those functions, refer to the optional
Applications Manual.
9.4.1 Printer Control Language (PCL) Commands
Job control commands
Command
<ESC> E
zESC> & /n H
KESC> & /n X
<ESC> [ C n
<ESC> [ E n
Function
Reset
Paper source
Select number of copies
Select feeder
Change emulation
Page dej5nition commands
Command
<ESC> & !n A
KESC> & /n O
EESC> & /n P
<ESC> & tn U
<ESC> & ~n Z
<ESC> [ O n
<ESC> [ S n
Function
Page size
Logical page orientation
Page length
Left offset registration
Top offset registration
Select orientation
Select paper size
Margins and line spacing commands
Command
EESC> & a n L
EESC> & a n M
KESC> & k n H
<ESC> & t’nC
<ESC> & ~}?D
<ESC> & AI E
<ESC> & tn F
<ESC> & tn L
<ESC> 9
114
Function
Set left margin
Set right margin
Horizontal motion index
Vertical motion index
Set line spacing
Top margin
Text length
Perforation skip
Clear horizontal margins
Positioning the cursor
Command
<BS>
<HT>
<LF>
<FF>
<CR>
<SP>
<ESC> & a n C
<ESC> & a n H
<ESC> & a n R
<ESC> & a n V
<ESC> & f ~ZS
<ESC> * p n X
<ESC> * p n Y
<ESC> =
Function
Backspace
Horizontal tab
Line feed
Form feed
Carriage return
Space
Horizontal cursor position (columns)
Horizontal cursor position (decipoints)
Vertical cursor position (rows)
Vertical cursor position (decipoints)
Push/pop cursor position
Horizontal cursor position (dots)
Vertical cursor position (dots)
Half line feed
Miscellaneous output commands
Command
<ESC> & a n P
<ESC>
<ESC>
<ESC>
<ESC>
<ESC>
Function
&knG
& Sn C
Y
Z
Print direction
Line termination
End of line wrap
Display functions on
Display functions off
Z
Self test
Font selection commands
Function
Select secondary font
Select primary font
Turn underlining off
&d@
Turn underlining on
&dnD
& p n X <charater dutu>
Transparent print data
(n
Select primary font symbol set
(nX
Select primary font by ID number
(3@
Set primary font to default values
(Sn B
Select primary font stroke weight
Command
<so>
<S1>
<ESC>
<ESC>
<ESC>
<ESC>
<ESC>
<ESC>
<ESC>
115
<ESC>
<ESC>
<ESC>
<ESC>
(snH
(snP
(Sn S
(Sn T
<ESC> ( S ~~V
<ESC> ) n
<ESC> ) n X
<ESC>
<ESC>
<ESC>
<ESC>
<ESC>
<ESC>
<ESC>
j3@
)snB
)Sn P
) S t? H
) S ?? S
) S /z T
)Sn V
Set primary font pitch
Select primary font spacing type
Select primary font style
Select primary font typeface
Set primary font point size
Select secondary font symbol set
Select secondary font by ID number
Set secondary font to default values
Select secondary font stroke weight
Select secondary font spacing type
Set secondary font pitch
Select secondary font style
Select secondary font typeface
Set secondary font point size
Creating and downloading fonts
Function
Command
Font ID
<ESC> * C 77 D
Send character code
<ESC> * C n E
Font control
<ESC> * C n F
<ESC> ( s n W <descriptorand data>
Send character descriptor and data
<ESC> ) s n W <descriptor>
Send font descriptor
Graphics commands
Function
Command
Set compression mode
<ESC> * b n M
<ESC> * b n W <data>
Transfer raster data
Set raster y-offset
<ESC> * b n Y
Set rectangle width in dots
<ESC> * C n A
Set rectangle height in dots
<ESC> * C n B
Set area fill identity
<ESC> * C n G
Set rectangle width in decipoints
<ESC> * C n H
Draw filled rectangle
<ESC> * C n P
Set rectangle height in decipoints
<ESC> * c n V
End raster transfer
<ESC> * r B
116
I
<ESC>
<ESC>
<ESC>
<ESC>
<ESC>
<ESC>
<ESC>
<ESC>
*rnA
*rnF
*rn S
*rnT
*tnR
*Vn N
*V n O
* Vn T
Start raster transfer
Set raster image orientation
Set raster area width
Set raster area height
Set raster resolution
Set source transparency
Set pattern transparency
Set pattern type
Macro commands
Command
<ESC> & f n X
<ESC> & f n Y
Function
Macro control
Macro ID
117
I
9.4.2 GU2 Commands
Set-up commands
Command
<ESC> 7Ctz A
<ESC> 5%n B
<ESC>’* C OT
<ESC> * C n K
<ESC> * C n L
<ESC> * Cn X
<ESC> * c ~?Y
Function
Enter PCL mode
Enter GL/2 mode
Set picture frame ancher point
Specify horizontal plot size
Specify vertical plot size
Set picture frame horizontal size
Set picture frame vertical size
Con.guration and status group
Command
DF
IN
1P
IR
Iw
PG
RO
RP
Sc
Function
Default values
Initialize
Input scaling points
Input relative scaling points
Input window
Advance full page
Rotate coordinate system
Replot
Scale
Vectorgroup
Command
AA
AR
AT
CI
PA
PD
PE
PR
Pu
RT
118
Function
Draw absolute arc
Draw relative arc
Draw absolute three point arc
Draw circle
Plot absolute
Pen down
Polyline encoded
Plot relative
Pen up
Draw relative three point arc
Polygon group
Command
EA
EP
ER
EW
FP
PM
RA
RR
WG
Function
Edge absolute rectangle
Edge polygon
Edge relative rectangle
Edge wedge
Fill polygon
Polygon mode
Fill absolute rectangle
Fill relative rectangle
Fill wedge
Line andfill attributes group
Command
AC
FT.
LA
LT
Pw
RF
SM
SP
Sv
TR
UL
Wu
Function
Anchor corner
Fill type
Line attributes
Line type
Pen width
Raster fill definition
Symbol mode
Select pen
Screened vectors
Transparency mode
User-defined line type
Select pen width unit
Character group
Command
AD
CF
CP
DI
DR
DT
.,DV
ES
Function
Define alternate font
Character fill mode
Character plot
Absolute direction
Relative direction
Define label terminator
Define variable text path
Extra space
119
I
FI
FN
LB
LO
SA
SB
SD
S1
SL
SR
Ss
TD
120
Select primary font
Select secondary font
Define label
Label origin
Select alternate font
Scalable or bitmap fonts
Define standard font
Set absolute character size
Set character slant
Set relative character size
Select standard font
Transparent data
9.4.3 TrueImage Operators
Stack operators
Operator
clear
cleartomark
copy
count
counttomark
dup
exch
index
mark
pop
roll
Function
Discard all elements
Discard elements down through mark
Duplicate top n elements
Count elements on stack
Count elements down to mark
Duplicate top element
Exchange top two elements
Duplicate arbitrary element
Push mark on stack
Discard top element
Roll n elements up,j times
Maths operators
Operator
abs
add
atan
ceiling
Cos
div
exp
floor
idiv
in
log
mod
mul
neg
rand
round
rrand
sin
sqrt
srand
sub
truncate
Function
Absolute value of numt
num I plus num2
Arctangent of num~lnum~ in degrees
Ceilin,gof m4m I
Cosine of angle (degrees)
numI divided by numz
Raise num to e.xpmlent power
Floor of nL4mI
Integer divide
Natural logarithm (base e)
Logarithm (base 10)
int] mod irzt~
num I times nurm
Negative
of tlLl})l,
Generate pseudo-random integer
Round nwnI to nearest integer
Return random number seed
Sine of dngle (degrees)
Square root of Hun?
Set random number seed
nun7I minus num2
Remove fractional part of HLmZI
121
Logical operators
Operator
and
bitshift
eq
false
ge
gt
le
It
ne
not
or
true
xor
Function
Logical I bitwise and
Bitwise shift to hzh (positive is left)
Test equal
Push boolean valuejtilse
Test greater or equal
Test greater than
Test less or equal
Test less than
Test not equal
Logical Ibitwise not
Logical Ibitwise inclusive or
Push boolean value true
Logical Ibitwise exclusive or
Path construction upcrcuur
‘----4--Operator
arc
arcn
arcto
charpath
clip
clippath
closepath
currentpoint
curveto
eoclip
flattenpath
initclip
lineto
moveto
newpath
pathbbox
pathforall
rcurveto
reversepath
rlineto
rmoveto
strokepath
122
3
Function
Append counterclockwise arc
Append clockwise arc
Append tangent arc
Append character outline to current path
Clip using non-zero winding number rule
Set current path to clipping path
Connect subpath back to its starting point
Return current point coordinate
Append Bezier cubic sction
Clip using even-odd inside rule
Convert curves to sequences of straight lines
Set clipping path to device default
Append straight line to (x, J’)
Set current point to (x, y)
Initialize current path to be empty
Return bounding box of current path
Enumerate current path
Relative curveto
Reverse direction of current path
Relative Iineto
Relative moveto
Compute outline of stroked path
I
Painting operators
Operator
eofill
erasepage
fill
image
imagemask
stroke
Function
Fill using even-odd rule
Paint current page white
Fill current path with current color
Paint monochrome sampled image
Paint current color through mask
Draw line along current path
String operators
Operator
anchorseach
copy
eq
forall
,ge
get
getinterval
gt
le
length
It
ne
put
putinterval
Function
Determine if seek is initial substring of string
Copy elements of strirzgl to initial substringof stringz
Test equal
Execute proc for each element of string
Test greater or equal
Get string element indexed by index
Substring of string at index for count elements
Test greater than
Test less or equal
Number of elements in string
Test less than
Test not equal
Put int into string at index
Replace substring of .stringl starting at index by
string2
search
string
token
Search for seek in string
Create string of length int
Read token from start of string
Array operators
Operator
aload
. array
astore
copy
Function
Start array construction
End array construction
Push all elements of arraj on stack
Create array of length int
Pop elements from stack into arra-v
Copy elements of urra]] to initial subarray of arra?z
123
I
forall
get
getinterval
length
put
putinterval
Execute proc for each element of arraj
Get array element indexed by inde.r
Subarray of arraj starting at inde.t for cvantelements
Number of elements in arr(i)
Put an? into array at ilzde.r
Replacesubarrayofarra~’ startingat inde.[by,subarra]
Packed array operators
Operator
aload
copy
Function
Push all elements of packedat-ra? on stack
Copy elements c)f~)t~(.ke[fc~rrc~]l to initial subarray of
arra}2
currentpacking
forall
get
getinterval
length
packedarray
setpacking
Return array packing mode
Execute proc for each element ofp(lck[~ciclr~-(~?’
Get palkedarra> element indexed by imiex
Subm-rayof packedarra> starting at inde.r for counf
elements
Number of elements in packedarra)’
Create packed array consisting of the specified n
elements
Set array packing mode
Dictionary operators
Operator
begin
copy
countdictstack
currentdict
def
diet
dictstack
end
errordict
forall
get
known
length
load
Function
Push diet on dictionary stack
Copy contents of diet! to dict~
Count elements on dictionary stack
Push current dictionary on orerand stack
Associate ke~! and value in current dictionary
Create dictionary with capacity for i}zt elements
Copy dictionary stack into arra)
Pop dictionary stack
Error handler dictionary
Execute pro( for each element of di(t
Get value associated with kej. in di(t
Test whether ke) is in dicf
Number of key-talue pairs in diet
Search dictionary stack for kc~and return associtited
\’a[14e
124
maxlength
put
store
systemdict
userdict
where
Current capacity of diet
Associate kc}’ with value in dic~
Replace topmost definition of key
System dictionary
Writable dictionary in local VM
Find dictionary in which key is defined
Control operators
Operator
countexecstack
exec
execstack
exit
for
if
ifelse
loop
quit
repeat
start
stop
stopped
Function
Count elements on exec stack
Execute arbitrary object
Copy exec stack into arra}’
Exit innermost active loop
Execute proc with values form start by steps of
increment to finish
Execute proc if bml is true
Execute procl if bool is true, proc~ if bool is false
Execute proc an indefinite number of times
Terminate interpreter
Execute proc int times
Executed at interpreter startup
Terminate stopped context
Establish context for catching stop
Type and attribute operators
Operator
cvi
cvlit
cvn
cvr
Cvs
cvrs
Cvx
executeonly
noaccess
rcheck
readonly
type
wcheck
xcheck
Function
Convert to integer
Make object be literal
Convert to name
Convert to real
Convert to string
Convert to string with radix
Make object be executable
Reduce access to execute-only
Disallow any access
Test read access
Reduce access to read-only
Return name identifying the type of any
Test write access
Test executable attribute
125
I
Font operators
Operator
ashow
awidthshow
currentfont
define
font
findfont
FontDirectory
kshow
makefont
scalefont
setfont
show
StandardEncoding
string
width
widthshow
Function
Add (x. j) to width of each character while showing
,String
Colmbineeffects of ashow and widthshow
Return current font dictionary
Register,/i~ntas a font dictionary
Return font dictionary identified by ke}
Dictionary of font dictionaries
Execute proc between characters shown from srring
T1-ansf-ol-nl,~i~)?ti
by ma[ri.r toproduce new,fij}?r~
Scale,fimtl by scale to produce new, fimt~
Set font dictionary in graphics state
Paint characters of string on page
Standard font encoding vector
Width of strin(q in current font
Add (.Y,]) to width of char while showing .s~rin(y
Font cache operators
Operator
cachestatus
currentcacheparams
setcachedevice
setcachelimit
setcachepararns
setcharwidth
Function
Return font cache status and parameters
Return current font cache parameters
Declare cached character metrics
Set mtiximuln,bytes in cached character
Change font cache parameters
Declare uncached character metrics
File operators
Operator
—
—
——
——
bytesavailable
closefile
currentfile
echh
file
126
Function
Write text representation of all? to standard output
file
Write syntactic representation of fin?)to standard
output file
Number of bytes available to read
Close,file’
Return file currently being executed
Turn on/off echoing
Open file identified by stringl with access .stt-ing~
flush
tlushfile
print
prompt
pstack
read
!-eddhexstring
reudline
readstring
resetfile
run
stack
status
token
write
writchexstring
writestring
Send buffered data to standard output file
Send buffered data or read to EOF
Write string to standard output file
Executed when ready f’orinteractive input
Print stack non-destructively using ==
Read one character fronl,filc
Read hex f’rom,~ileinto string
Read line fromjile into string
Read string fronl,~ile
Discard buffered characters
Execute contents of’named file
Print stack non-destructi~ely using =
Return status of,~ile
Read token from ,file
Write one charucter t(~,file
Write ,strin<qto,fi/e as hex
Write .s~rin<y
to,fi/e
Virtual memory operators
Operator
restore
sale
Vmstatus
Function
Restore VM snapshot
Create VM snapshot
Report VM status
Miscellaneous operators
Operator
bind
currentdash
currenttlat
currentgray
currenthsbcolor
current]inecap
currentlinejoin
cul”rentlinemidth
cLl[.t-e[ltmitcl-linlit
cul-1-ellt]-gbcolc)l.
currentscreen
cul-i-e[lttl-allsfe]cxecutil’c
Function
Replace operator names in pt”()(
by operators
Return current dash pattern
Return currcn[ flatness
Return current color as gray \aluc
Return current color as hue, saturation. brightness
Return current line c~p
Return current line join
Return current ]inc width
Return current mitcl”]imit
Return current color as red, green. blue
Return current gray halftone screen
Return current :ray transfer function
ln~oke inter~cti~e cxccuti~e
127
grestore
grestoreall
gsave
initgraphics
null
setdash
setflat
setgray
sethsbcolor
setlinecap
setlinejoin
setlinewidth
setmiterlimit
setrgbcolor
setscreell
settransfer
usertime
version
Pop graphics state
Pop to bottommost graphics state
Push graphics state
Reset graphics state parameters
Push null on operand stack
Set dash pattern for stroking
Set tlatness tolerance
Set color to specified gray value
Set coior to specified hue, saturation, brightness
Set shape of line ends for stroke
Set shape of corners for stroke
Set line width
Set miter length limit
Set color to specified red, green, blue
Set gray halftone screen
Set gray transfer function
Return execution time in milliseconds
Interpreter version
Coordinate operators
Operator
concat
concatmatrix
currentmatrix
defaultmatrix
dtransforrn
identmatrix
idtransform
Function
Replace CTM by matrix x CTM
Fill nzatri.nwith matrixl x matrixz
Fill mufrix with CTM
Fill matrix with device default matrix
Transform distance (dxi, d}l) by CTM or matrix
Fill matrix with identity transform
Inverse transform distance (dxl, dvl) by CTM or
matrix
initmatrix
invertmatrix
itransform
matrix
rotate
scale
setmatrix
tran}form
translate
128
Set CTM to device default
Fill matrixz with inverse of matrixl
Inverse transform (xl, y]) by CTM or matrix
Create identity matrix
Rotate user space or define rotation by angle degrees
Scale user space or define scaling by x and y
Replace CTM by matrix
Transform (xl, II) by CTM or matrix
Translate user space or define translation by (x, }’)
Device set-up operators
Operator
copypage
frarnedevice
nulldevice
showpage
Function
Transmit current page
Install frame buffer device
Install no-output device
Transmit and reset current page
Star original operators
Operator
a4tray
b5tray
c5envelope
c5envelopetray
corn 1oenvelope
com 1Oenvelopetray
dlenvelope
dlenvelopetray
dojamrecovery
dorep
executivepage
executivetray
findtray
legaltray
lettertray
monarcenvelope
Inonarcenve]opetray
papertray
ppapersize
setdojamrecovery
setdorep
setemulation
setpapertray
settray
traysup
Function
Look for A4 size paper tray
Look for B5 size paper tray
Establish imaging area to C5 size envelope
Look for C5 size envelope tray
Establish imaging area to COM- 10 size envelope
Look for COM- 10 size envelope tray
Establish imaging area to DL size envelope
Look for DL size envelope tray
Indicate whether jam recovery is on or off
Indicate whether REP is on or off
Establish imaging area to executi~e size
Look for Executive size paper tray
Find the specific paper tray
Look for Legal size paper tray
Look for Letter size paper tray
Establish imaging area to Monarch size envelope
Look for Monarch size envelope tray
Return int indicating the current tray
Ask the paper size of the specific paper tray
Turn jam recovery on/off
Turn REP on/offSwitch the emulation
Establish which input tray and set the imaging urea
Set tray which paper will be fed
Check whether the specified paper tray is supplied
129
Errors
Operator
dictfull
dictstackoverflow
dictstackunderflow
execstackoverflow
handleerror
interrupt
invalidaccess
invalidexit
invalidfileaccess
invalidfont
invalidrestore
ioerror
limitcheck
nocurrentpoint
rangechec~
stackoverflow
stackunderflow
syntaxerror
timeout
typecheck
undefined
undefinedfilename
undefinedresult
unmatchedmark
unregistered
VMerror
130
Function
No more room in dictionary
Too many begins
Too many ends
Exec nesting too deep
Called to report error information
External interrupt request
Attempt to violate access attribute
exit not in loop
Unacceptable access string
Invalid font name or dictionary
Improper restore
Input/output error occurred
Implementation limit exceeded
Current point is undefined
Operand out of bounds
Operand stack overflow
Operand stack underflow
Language syntax error
Time limit exceeded
Operand of wrong type
Name not known
File not found
Over/underflow or meaningless result
Expected mark not on stack
Internal error
VM exhausted
9.5 CHARACTER SET TABLES
ISO 60: Norwegian
131
Roman Extension
132
ISO 25: French
133
HP German
I
134
I
I
I
I
I
I
I
I
ISO 15: Italian
.0
1
2
3
4
“5
E
6
7
8
9
I
A
I
E
B
c
D
E
F
13.5
I
JIS ASCII
136
ECMA-94 Latin 1
E
.0
1
2
3
rI
4
5
6
7
8
9
A
B
c
D
I
E
I
F
137
ECMA-94 Latin 1
—
138
ISO 11: Swedish
o
2
1
%
5
3
4
5
6
7
5
<FF>
/
c
E
<J-lo-l
1-1o-1
‘
139
US-ASCII
140
ISO 61: Norwegian
F
.0
1
2
3
4
5
6
7
8
9
A
B
.E
c
D
E
F
141
ISO 4: UK
142
ISO 69: French
143
ISO 21: German
144
,0
1
2
3
4
“5
6
7
8
9
A
B
c
D
E
.r
F
145
1s0 57:
146
ISO 17: Spanish
E
,0
1
2
3
4
-5
6
7
8
9
A
B
c
D
E
F
147
ISO 2: IRV
148
/S0 10: Swedish
,0
1
2
3
4
5
6
7
8
9
A
B
c
D
E
F
149
ISO 16: Portuguese
150
I
84: Portuguese
151
ISO 85: Spanish
152
o
1
2
3
4
5
6
7
.0
1
2
3
4
-5
6
7
8
9
E
B
c
D
E
F
1.53
Roman-8
154
IBM-PC(US)
155
IBM-PC(US)
156
IBM-PC(Denmark7Norway)
157
IBM-PC(Denmark7Norway)
158
PC-850
159
c
160
D
E
F
9.6 RESIDENT FONT SAMPLES
9.6.1 PCL5 Fonts
Courier 12-point (10 cpi)
!M#$%& f()*+,-./0123456789 :
;<=>?C!M3CDEFGHIJKLMNOPQRSI
UVWXYZ [\]‘–‘abcdef ghijklmn
opqrstuvwxyz
Courier Bold 12-point
(10 cpi)
{ I } -*
s CC#$%&
t ( ) *+, -. / 0123456789
:
; <=>?@ABc!DEFGHIJKLMNOPQRS!J!
UVWXYZ [\]‘–‘abcdef ghi jklmn
opqrstuvwxyz { I}+
Courier Italic 12-point
(10 cpi)
!“#$%& ‘()*+,-./012.3456789:
;<=>[email protected]
WWXYZ[ \]‘– ‘abcdef ghi jkl mn
opqrstuvwxyz{l}-~
Courier IO-point (12
cpi)
!“#$%&’ ( )*+,-./Ol23456789
: ;<=>?
@ABcDEFGH1J~~0PQR5TuwXYz I\IA
‘abcdefghi]klmnopqrstuvwxyz{
1}
1%
Courier Bold lo-point
(12 cpi)
!“#$%&’ ()*+,- ./0l23456789: ;<=>?
@-CDEFGH1J=0PQRSmxY2r\l
A
‘abcdefghijklmnopqrstuvwxyz{
1}
3
Courier ttalic 10-point
( I 2 cpi)
!“#$%&’()*+,-. /Ol23456789:;<=>?
FmcDEFGHIJKLMNOPQRSTuwXYZl~
1A
‘abcdefghijklmnopqrstuvwxyz{
~}
3
Line Printer 8.5-point
( 16.6 cpi)
!W$Y!I()*
+J-./O123456789:
LMNOPQRSTUVWXYZ[\lA
;f=>?&IABCDEFGHIJK
–~abcdefghi
jklmopqrstuv
Mxyz{I}-#
Univers Medium
!w#$~o&’()* +,-./o123456789:;
< =>?
@ABCDEFGHIJKLMNOpQRsTuvwxyz
N“-’abcdefghijklmnopqrstuvwxyz{
l}-
@
161
Univers Medium Italic
!“#$ N& ‘()‘ +,../OI2s456789:; < = > ?
@ABCDEFGHlJKLA41V0PQR.S
TUVWXYZ
111’-’abcdefghijklmnopwstuvvvvz{ 1)a
Univers Bold
!“#$0A8L’()*+ ,-./01 23456789:; < = > ?
@ABCDEFGHIJKLMNOPORSTUVWXYZ
[U”-’abcdefghijklmnopqmtuvwxyz{\}B
Univers Bold Italic
!“#$”A&ro* +,..\Ol2sds67a9:;
K = B?
@ABCDEFGHIJKLMNOPQRSTUVWXYZ
NA-’abcdefgh4klmnopqrstumuxyz{ ~)B
CG Times
CG Times Italic
!“#$z&’()*+ ,_./O~23456789:;< = > ?~~
CDEFGHIJKLMNOPQRSTUVWXYZ[\]A-’
abcdefghijklmnopqrstuvwxyz{
I}-~
!“#$%&‘()*+,-./0123456789:;< = > ?~~
TWWXIZ[\]A-’ab
CDEFGHIJKLMNOPQRS
cdefghijklmnopqrstuvwxyz{ IJ -~
CG Times Bold
CG Times Bold Italic
y~za?()*+ ,.. /oI23456789:;K = z ?@AB
z[\]A
CDEFGHIJKLMNOPQRSTUVWXY
-’abcdefghiJdnmopqrstuvwxyz{
I} -~
fII#$WA‘()*+,.. /()12~s6789:; c = > ?@21AB
CDEFGHLIKLMNOPQRSTUVWXYZflr ‘
abcdeJgh~klmnopqrstuvwxyz{~]-~ -
162
9.6.2 TrueImage Fonts
I“#$O~&’()*+,./()l
23456789:;<=>~@AB
Arial
CD EFGHIJKLMNOPQRSTU VWXYZ~]A
-’abcdefghijklmnopqrstuvwxyz{l}Arial
Bold
y’#$YO&’()*+,../CII
23456789:;<=>?
B
CDEFGHIJKLMNOPQRSTUVWXYY @]A
-’abcdefghijklmnopqrstuvwxyz{l}-
ArialBoldOblique
.I’’#$s&’()*+,-./oIZ345678g:;<=> ?@AB
CDEFGHIJKLMNOPQRSTUVWXYZ fl]A
– ‘abcdefgh~k/mnopqrstuwxyz{/}-
ArialOblique
!“#$B&‘()*+,-./o I3456789:;c=>=>?@AB
CDEFGHIJKLMNOPQRS
TUVVVXY.Zfl]”
–’abcdefghijklmnopqrstuvwxyz{/}-
A-rialNarrow
!“#$Oh&’()”+,.,
/01234s6Teg:
;<=>?QABCDEFGHI
JKLMNOPQRSTUVWXYZ(l]”-’abcdefghijklmn
qrstuvwxyz{l}-
Arial Narrow Bold
II~#$yo&I()*+,../o12345678g:;<=>?@A
HIJKLMNOPQRSTUVWXYZ@]
A-’abcdefghijkl
mnopqrstuvwxyz(~-
ArialNarrowBoldOblique
?@ABCOEFG
.I’’#$s&’()*+,-./oI2345678g:;<=>
lilJKLMhlOPQRSTUVWXYZ@]A-’abcdefghijkl
nmopqrsfuvwxyz{/}-
Arial Narrow Oblique
i“#$%&~)*+,-./oI
23#s6T8g:;<=>?@ABCDEFGH/
JKLMIVOPQRSTUVWXYZ@]A-‘abcdefghijklmnop
qrshmvxyz{/}Century Schoolbook Bold
!“#$yo&’()*+,-,
/012345678g:;<
=>?@AB
CDEFGHIJKLMNOPQRSTUVWXY
Z[\ ]A–’abcdefghijldrnnopqrstuvwx
w{ I}-
Century Schoolbook Bold
Italic
!“#$70&’()*+,-./Ol23456789:;< =>?@L4
BCDEFGHIJKLMNOPQRSTUVWX
YZ[ \]”-’abcdefghijklmnopqrstuvw
Xyz{l }-
—
163
I
Century Schoolbook Italic
,l’’#$~>&’()*+,.,J 0123456789:;<=> ?6M
CDEFGHIJKLMNOPQRSTUVWXYZ[
1]”-<abcdefghijklm nopqrstuvwxyz{ I}-
Cen[ury Schoolbook Roman
!“#$%&’()*+,-.
/O123456789: ;<=>?@AB
CDEFGHIJKLMNOPQRSTUVWXYZl
\] ‘-’abcdefghijklmnopqrstuvwxyz{
I}-
Courie;
! “#$%&‘ ( ) *+, -. /0 123456789 : ; <
.> z @McDEFGHIJKLMNOpQRsTUvWXY
‘ abcdef ghi j klmnopqrstuv
z[\]A
Wxyz {T} -
Courier Bold
I ,,#$%&~( ) *+ , -. / 0123456789
: ;<
.>?@~cDEFGHIJK~oPQRs
T~Y
j klmnopqrs tuv
z [\] A ‘ abcdefghi
Wxyz {T) Courier Bold Oblique
f II#$%&T() *+, – , /0123456789:
;<
.>?@BcDEFGHIJ_K~opQRS
T~XY
jklmnopqrs
tuv
z [ \1 ‘– ‘abcdefghi
Wxyz { I } Courier Oblique
.I“#$%&‘ ( ) *+, -. /01 23456789 : ; <
y
.> T@ABCDEFGH1~KLMNOpQRSTUWX
2[\]“ ‘abcdef gh i jklmnopqrs t uv
Wxyz {7]-
ITC A~ant Garde Gothic Book
!I’#$%&‘()*+,-,/01 23456789:; <=>? @AB
CD EFGHIJKLMNOPQRSTUV WO’Z[ \1‘‘a bcdefghijklmnopq
rstuvwxyz{ I}-
ITC Avant Garde Gothic Book
Oblique
/II#$%&‘()*+,-,/0 123456789:,<=> ?GA B
CDEFGHIJKLMNOPQRSTU
V WXYZ[ \ ] ‘‘obcdefghjklmnopqrsfu
vwxYz{/}-
ITC Avant Garde Gothic Demi
!“#$y’&’()*+,../CII 23456789 :;<=>?@AB
CDEFGHIJKLMNOPQRSTUVWXYZ[\] ‘-’
abcdefghijklmnopqrstuvwxyz{
ITC Awmt Garde Gothic Demi
Oblique
164
I}-
!“#$%&‘()*+,-./0123456789:;<=> ?@AB
cDEfGH/J/(LMNOPQR5Tl,)VWXYZ[ \] “- ‘
abcdefghjk/mnopqrstu
vwx yz{/}-
ITC Bookman Demi
!“#$’30&’()*+,-./Ol23456789::
<=>?
@UICDEFGHIJKLMNOPQRSTUVW
XYz[\1A ‘abcdefghijklmnopqrstuv
Wxyz{I}:
ITC Bookman Demi Italic
,,,//$%&,o*+,-,/ol 23456789:;<=> ?
ijM13CDEFGHZJKLMN0pQRSTWW
XYZ[\]A_’ubcdefgh~klmnopqrstuu
IuxlJz(I}-
ITC Bookman Light
!“#$Y!&’()*+,-. /O123456789:: <=>?(K
ABCDEFGHIJKLMNOPQRSTUVWXY
2[ \ ]A–’abcdefghijkhnnopqrstuvwmyz{
l}-
ITC Bookman Light Italic
.f’’#$Yi&’()*+,
-. /0123456789::<=>?@A
BCDEFGHIIJKLMNOPQRSTUVWX1’Z[
\]A-”abcdefghijklmrlopqrstuuwxyz{ I}
ITC Zapf’Chancery Medium
Italic
!“#$@&’(/)”+,-.
/Ol23456789:;c=> ?@A%CD’EY~
fiIJKL>M~OPQ~’WW~Z[’\Jn–
hllopfr.ftuzml~yz{
‘ftbcdef$+i~”~,
l}-
ITC Zapf Dingbats
Symbol
Times New Roman
!“#$O/&&’()*+>../O
1234567W::<=>’?I’@ABC
DEFGHIJKLMNOPQRSTUVWXYZ[\]A-’a
bcdefghijklmnopqrstu~”~}’xy
z{I}-
Times New Roman Bold
TimesNew RomanBold Italic
IIf#$~&
‘() *+,-.
/0123JS67Sg:;<=>?@;AI]C’
DEFGHIJKI.MNOP~R,V
Y-UVWXYZII]Aubcdefgh(jklnlno~)qrstuv+~v.r)lz)~)-
165
TimesNewRomanItalic
(712.$
4.56
?89:;
-~~~;
[email protected]
!“#$%& ‘(j*+,-.,
DE”FGHIJKL,iLV”OPQl(sS1’
1~1‘L1’.IJ”Zl\]~‘ah
ccicj~h~”k[tl)iT(~~>q)-.~ti(~~~lx~:{
)-
Zapf Calligraphic Bold
!“#$~O&’()*+,../olzs4 s67s9:;< =>?@ABC
DEFGHIJKLMNOPQRSTUVWXYZ [\]
‘–’abcdefghijklmnopqrstuvwxyz{ l}-
Zapf Calligraphic Bold Italic
! “#$% c5’()*+,-.I0123456789:;<=> ?(@ABC
DEFGHIJKLA4NOPQRSTuvwxYz[\ ]“
–’abcdefghijklmnopqrstuvru.ryz{
I}-
Zapf’Calligraphic Italic
!“#.$Yo
~+’()*+r-./~lJ45b7~g:;<;<
= >?@Ai~L’
DEE’C;I~l]KLMNC]
IIQl{LS’l’L[
VWXYZ~ \ j ‘‘[zl~cJefsbijklmt7
Zapf Calligraphic Roman
166
cl~7t]7st14ViLJXyZ{
I} -
!“#$%&c’()*+,-.
/01234567W:;< =>?@ABC
DEFGHIJKLMNOPQRSTUVW XYZ[i,]“
–’abcdefghijklmno pqrstuv wxyz{ I}-
Glossary
ASCII (as’ kee) — a standardized and commonly accepted numerical code
that represents letters, numbers, and symbols, as well as command
sets. ASCII stands for American Standard Code for Information
Interchange.
Baud— a measure of the speed at which information is transmitted. The baud
rate, which is set for serial transmissions, is approximately the
number of characters transmitted per second multiplied by 10.
Bitmap fonts— made of tiny dot-by-dot patterns in pre-defined sizes.
Bitmap fonts have a fixed point size, pitch and symbol set attributes.
Byte — a series of 8 bits that represents one character.
Centronics interface — a standard wiring configuration for parallel data
transmission. Centronics is often used as a synonym for the parallel
standard developed by Centronics Inc.
Character Set — the complete set of characters available in a font.
Data Bits — the number of bits in a transmitted byte that actually contains
data.
EEPROM — Electrically Erasable Programmable Read Only Memory. It
has an internal switch to permit a user to erase the contents and write
new contents into it by means of electrical signals.
EP-40XA Cartridge — A disposable type of process cartridge which
contains the photosensitive drum and toner.
Emulation — behaving like something else. The Star LS-5EX can emulate,
or behave like the HP LaserJet 111laser printer, and the Star LS-5TT
can emulate the operation of the Apple LaserWriter NTX, a
PostScript version, and the HP LaserJet 111.
.
Expansion RAM board— An available option that is easily attached to the
Star LS-5 Series Printer to expand its RAM.
167
Fixing assembly — The assembly used to fix the toner on to the paper or
other material using heat and pressure in printing process. It is
located inside the printer and it gets extremely hot during the
operation.
Font — a set of letters, numbers, and symbols of the same typeface design.
Font cartridge — Font cartridges contain fonts which can supplement the
‘available resident fonts of the printer to increase the variety of
typefaces.
Handshaking — in data communication, the automatic acknowledging by
the receiving device of information that has been sent to it, either by
signals and the interface (“hard”) or by software control (“soft”).
Hex dump — conversion by the printer of ASCII symbols into their
hexadecimal (base 16) equivalent. This is useful for programmers or
other users who want to troubleshoot the communications between
the computer and the printer.
HMI (Horizontal Motion Index) — refers to dot spacing in the smallest
increment that can be made in the horizontal or x axis.
Interface — a hardware plug that allows cable connections of two devices.
For instance, a cable from a computer parallel port to a printers
parallel port.
Landscape — printing on paper across its wider dimension, such as a
spreadsheet that is 11 in. wide and 8.5 in. high: landscape pictures
are usually wider than they are tall.
NV RAM — NV(Non-volatile) Random Access Memory is the permanent
storage by the Star LS-5 Series Printer of settings programmed from
the front panel, even when the power is turned off. When the printer
is turned on again, these settings become the current settings.
Parallel — a communications interface that sends or receives 8 bits of
information plus control signals at a time.
Parity — a bit in a serial information that allows a computer and printer to
automatically check for errors in transmission.
Pitch — the width of a typeface measured in characters per inch.
Point — the height of a type font, measured in points, or 1/72 of an inch
168
Portrait — printing on paper across its narrower dimension. such as a letter
on paper that is 8.5 in. wide and 11 in. high: portrait pictures are
usually taller than they are wide.
Proportional type — a typeface in which some letters take up more room
on u printed line than others, such as W taking more space than [. The
spticingof the letters is also intended to enhance the esthetic quality
of the printed page.
RAM — Random Access Memory. or memory that can be used to store
information temporarily, such as text or printing configurations.
RAM-stored information is erased when the power is turned off.
ROM — Read On]y Memory, or memory in which information can be stored
permanently. whether the power is on or off.
RS-232— a wiring configuration for sending and receiving serial transmissions. including data and acknowledgments between sending and
receiving equipment (“handshaking”).
Scalable fonts —created within the printer on a character-by-character basis
ensuring high speed and print quality. In virtually limitless sizes,
fonts can be scaled from 3 points to 999.75 points in quarter-point
increments.
Serial — a communications interface that sends or receives 1 bit of
information at a time tit a specified baud rate.
Stop Bit — 1or 2 bits used by the computer for the timing ofa transmission
of information.
Stroke weight — the intensity of a printed charucter, such as Ii,qht.mediunz.
or bold. Normal printing is medium weight.
Symbol Set — the entire list of’ASCII letters, numbers, and symbols used
with a particular language, such as English or Spanish.
VMI (Vertical Motion Index) — refers to line spacing, the smallest increment that can be made in the vertical or ) axis.
169
170
Index
A’
Air vent, 4
ALARM indicator, 43
AppleTalk interface, 6, 35
Applications manual, I
Auto selection, 57
B ~
BAD CHAR CODE message, 84
BAD FONT CODE message, 84
BAD FONT DATA message, 84
Basic operation. 53
Bitmap font, 109
Buttons, 39-42
c
CANNOTDOWNLOADmessage,84
CANNOTROTATEmessage,84
Carryingthe printer,14
CARTCHANGEDmessage,85
CARTRIDGEBADmessage,79
CARTRIDGEERRORmessage,81
Cartridgeslot,4
CASSCHANGEmessage,82
CASSREFILLmessage,80
CHARNOT IN FONTmessage,84
Checklistof contents,13
CLOSE COVER message, 80
Control panel, 4, 52
Controller service call messages, 78
Current setting, 63
-.D,
DATA indicator, 43
Dimensions, 110
Display language, 65
E ~
Emulation. 7, 109
ENGINE RESET message. 86
Engine service call messages, 78
ENGINE TEST message, 86
Environment, 9
Error messages, 77
ERROR SKIP button, 39
Expansion RAM board. 100
IF
Factory setting, 64
Features, 6
FEEDER SELECT button, 41
Feeder selection, 59
Feeder unit, 93
Fixing assembly, 5
Font cartridge, 105
Font list, 44,67
FONT LIST message, 86
Font selection. 67
Front cover-,4, 15
Front panel, 37
Front paper tray, 6, 23
Front paper tray cover, 4
Front view, 4
171
I
Initial setting, 63
INPUT OVERFLOW message, 84
Inside view, 5
INSUFFICIENT RAM message. 8 I
Interface, 54
Interface cable. 35
Iinterfie signals. 112
L
Landscape orientation. 6 I
Laser printing. 1
LaserJet emulation. 1
LaserWriter emulation, I
LCAS CHANGE message. 82
LCAS REFILL massage. 80
Light indicators. 43
LINE ERROR message. 84
LOAD CASS message. 80
LOAD LCAS message, 80
Loading paper. 22
M
Maintenance. 7 I-76
Manual paper feed message. 83
MODE button, 42
N
NO EMUL. BOARD message, 81
NO FONT PRESENT message, 79
0
ON LINE button, 39
ON LINE indicator, 43
Operator call message. 80
Operator information messages, 84
Optional items, 13, 93
Orientation, 6 I
OLltPLlttl”lLJ’.~
OVERRUN message. X4
172
P ~l
PAGE OVERFLOW message, 84
Paper, 9
Paper cassette, 4.6.29
Paper feed, 59
Papel-iamming. 87
PAPER JAMMING message, 80
Paper size, 60
Parallel interface. 6
Pick-up roller, 5
Portrait orientation, 61
PostScript, 7
Power cord, 34
Power receptacle, 5
Power switch, 5
Powel-up function, 38
Power-up setting. 63
PRINT button. 39
Print density, 62
PRINT indicator. 43
PRINTER ACTIVE message, 86
Printer components, 4
PRINTER READY message. 86
PRINTER W’ARMUPmessage. 86
PROGRAM button. 4 I
Program mode. 47
R
RAM, 6
RAM board, I(V
RAM module. 100
READY indicator. 43
Rear cover. 5
Rear kiew, 5
REINITIALIZE message. 86
REINSERT CART message, 81, 85
Reliability. I I I
REP, 58
REPRINT LOST PCS tnessage. 86
RESET button, 40
Resolution, 109
Resolution enhancetnent procedure. 58
,.
s
Scalable font, 109
Self test, 44
Serial interface, 6, 55
Service call message. 78
SET EP CARTRIDGE message, 80
Side latch, 4
Specifications, 109
Stains, 92
Status messages, 86
Status sheet, 44,45
STATUS SHEET message, 86
Streaky prints, 90
,..— !
~—T–-~
TEST button, 40
TEST page, 44
TEST PAGE message, 86
Toner cartridge, 5, 9, 18, 71
TRAY CHANGE message. 82
TRAY REFILL message, 80
Troubleshooting, 77-92
TrueImage, 7
TrueImage board, 106
TrueType font, 7
u~
Unpacking, IO-17
w’
–.J
White streaks, 90
173
Consumer Response
Star Micronics Co., Ltd. invites your suggestions and comments on your
printer and this manual. Please address your correspondence to:
Worldwide Headquarters:
STAR MICRONICS CO.. LTD.
20-10 Nakayoshida
Shizuoka, JAPAN 422-91
Attn: Product Manager
American Market:
STAR MICRONICS AMERICA, INC.
420 Lexington Avenue, Suite 2702-25
New York, NY 10170
Attn: Product Manager
European Market:
STAR-MICRONICS DEUTSCHLAND GMBH
Westerbachstra13e59
P.O. Box 940330
D-6000 Frankfurt/Main 90
F.R. of Germany
Attn: Product Manager
U.K. Market:
STAR MICRONICS U.K., LTD.
Star House
Peregrine Business Park
Gomm Road, High Wycombe
Bucks. HP13 7DL, U.K.
Attn: Product Manager
French Market:
STAR MICRONICS FRANCE S.A.R.L.
25, rue Michael Faraday
78180 Montigny-le-Bretonneux
Attn: Product Manager
Asian Market:
STAR MICRONICS ASIA LTD.
181FTower 2.Enterprise Square
9 Sheung Yuet Road. Kowloon Bay, HONG KONG
Attn: Product Manager
PRINTED IN JAPAN