1
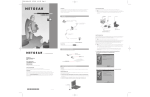
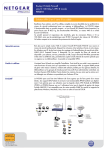
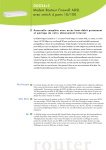
SB104.QCard.R2
9/7/00
4:53 PM
NETGEAR
Page 1
™
START HERE
© 2000 by NETGEAR, Inc. All rights reserved.
INSTALL A NETWORK CARD IN EACH PC
This kit includes everything you need to network two Pentium PCs running Windows® 95 or Windows 98,
and to share Internet access, files, printers, CDs, and applications. The kit is expandable for additional
users, and can be upgraded to 100 megabits per second (Mbps). The same network cards, desktop software, and cables are used when upgrading to 100 Mbps; only the hub has to be changed.
Network Starter Kit
These five easy steps...
Installation Guide
1. Verify Package Contents
2. Install the Hub
3. Install a Network Card in Each PC
4. Connect the Network Cables
Trademarks
NETGEAR is a trademarks of NETGEAR, Inc.
Note: Touch a grounded metal object to free yourself of static electricity before you handle the
network card.
Microsoft, Windows, and Windows NT are registered trademarks of Microsoft Corporation.
1. Turn the power off and unplug the power cord from your computer.
All other trademarks and registered trademarks are the property of their respective owners.
2. Remove the PC cover.
Statement of Conditions
3. Choose an available PCI slot (PCI slots are the shorter slots) and remove the corresponding back
plate from the PC chassis.
In the interest of improving internal design, operational function, and/or reliability, NETGEAR reserves
the right to make changes to the products described in this document without notice.
4. Insert the network card into the PCI expansion slot.
NETGEAR does not assume any liability that may occur due to the use or application of the product(s)
or circuit layout(s) described herein.
Caution: To avoid damaging any components on the network card, handle it by the edges,
using your thumbs to push it securely into the PCI slot. Make sure the network card is fully
inserted into the slot to prevent the PC operating system from freezing at startup.
5. Install the Windows Network Driver
Certificate of the Manufacturer/Importer
5. Fasten the network card to the rear of the computer chassis by tightening the screw that is on the PC.
Model EN104TP
Ethernet Hub
It is hereby certified that the Model FA311 PCI Adapter and the Model EN104TP Ethernet Hub have
been suppressed in accordance with the conditions set out in the BMPT-AmtsblVfg 243/1991 and Vfg
46/1992. The operation of some equipment (for example, test transmitters) in accordance with the regulations may, however, be subject to certain restrictions. Please refer to the notes in
the operating instructions.
Network card
Federal Office for Telecommunications Approvals has been notified of the placing of this equipment on
the market and has been granted the right to test the series for compliance with the regulations.
Model FA311
Network Cards (2)
Voluntary Control Council for Interference (VCCI) Statement (for the Model EN104TP Ethernet Hub)
This equipment is in the first category (information equipment to be used in commercial and/or industrial
areas) and conforms to the standards set by the Voluntary Control Council for Interference by Data
Processing Equipment and Electronic Office Machines that are aimed at preventing radio interference
in commercial and/or industrial areas.
Back plate
removed
Category 5
10/100 Mbps
UTP cables (2)
Consequently, when this equipment is used in a residential area or in an adjacent area thereto, radio
interference may be caused to equipment such as radios and TV receivers.
Installation
hardware
Drivers and
Diagnostics Disk
7983FB
Federal Communications Commission (FCC) Compliance Notice:
6. Replace the PC cover and reconnect the power cord to the PC.
Radio Frequency Notice (for the Model EN104TP Ethernet Hub)
Resource CD
CONNECT THE NETWORK CABLES
Installation
guide, Warranty &
Owner Registration Card
Using the unshielded twisted pair (UTP) cables that are supplied, connect any port on the hub to the
Power adapter
(for hub)
7956FB
PC with network
card installed
Po wer adapter
PC with network
card installed
Printer
(optional)
Note: This equipment has been tested and found to comply with the limits for a Class A digital
device, pursuant to Part 15 of the FCC rules. These limits are designed to provide reasonable
protection against harmful interference when the equipment is operated in a commercial environment.
This equipment generates, uses, and can radiate radio frequency energy. If it is not installed and
used in accordance with the instruction manual, it may cause harmful interference to radio
communications. Operation of this equipment in a residential area is likely to cause harmful
interference, in which case users will be required to take whatever measures may be necessary to
correct the interference at their own expense.
Federal Communications Commission (FCC) Compliance Notice: (for the Model FA311 PCI Adapter)
VERIFY PACKAGE CONTENTS
Verify PC Requirements
The instructions given in this guide are for using the NETGEAR™ Model FA311 Network Card in a PC
that has a Microsoft Windows 95 or Windows 98 operating system. You must have a PC with:
• Windows 95 or Windows 98
• An available PCI expansion slot
Note: Modifications to this device change it from the original state it was in when tested and may
alter the device so that it no longer complies with FCC testing limitations for Class B digital devices.
According to FCC regulations, the user could be prevented from operating this equipment if it
is modified.
This device complies with Part 15 of the FCC Rules. Operation is subject to the following two conditions: (1) This device may not cause harmful interference, (2) This device must accept any interference
received, including interference that may cause undesired operation.
FA311
NETGEAR Model FA311 PCI Adapter
NETGEAR
INSTALL THE HUB
™
Tested to comply
with FCC Standards
Hub
1. Set the hub on a flat surface or mount it on a wall and choose a location that:
FOR HOME OR OFFICE USE
• Is close to an electrical outlet.
RJ-45
connector
• Exposes the front and rear panels to allow connection of the network cables and easy monitoring
of the LEDs.
To install the hub on a wall, measure the distance between the mounting holes at the back of the
hub and mark the wall to match the location of the mounting holes. Drill pilot holes at the two
marked locations on the wall and screw two 5/16-inch diameter flathead screws (provided) into
the wall so that the screws protrude 1/18 inch to 3/16 inch. Slide the hub down onto the screws.
Support Information
2. Turn on power to the hub by connecting the power adapter.
See Support Information Card for phone numbers.
3. Verify that the Pwr (power) LED is on.
Go to http://www.NETGEAR.com for the NETGEAR Web page.
Defective or damaged merchandise can be returned to your point-of-sale representative.
*Use the cables provided or any Categor y 5 UTP cable .
Maximum length = 100 meters (300 feet)
7995FB
port on a network card in each PC.
Note: The Model FA311 PCI Adapter has been tested and found to comply with the limits for a
Class B digital device, pursuant to Part 15 of the FCC Rules. These limits are designed to provide
reasonable protection against harmful interference in a residential installation. This equipment
generates, uses, and can radiate radio frequency energy and, if not installed and used in accordance
with the instructions, may cause harmful interference to radio communications. However, there is
no guarantee that interference will not occur in a particular installation. If this equipment does
cause harmful interference to radio or television reception, which can be determined by turning the
equipment off and on, the user is encouraged to try to correct the interference by one or more of
the following measures:
• Reorient or relocate the receiving antenna.
• Increase the separation between the equipment and receiver.
• Connect the equipment into an outlet on a circuit different from that to which the
receiver is connected.
• Consult the dealer or an experienced radio/TV technician for help.
If the Pwr LED is not on, the hub is defective and should be returned to your
point-of-sale representative.
Internet / World Wide Web
RJ-45
connector
Category 5 10/100 Mbps UTP cables*
• Places the hub and PCs close enough to connect the network cables.
NETGEAR, Inc.
4500 Great America Parkway
Santa Clara, CA 95054 USA
Phone: 1-888-NETGEAR
www.NETGEAR.com
4. Make sure that the Normal/Uplink push button is set to Normal.
The push button is set to Uplink only if the port 4 is connected to another hub for expansion purposes.
IMPORTANT!
Link LED
Please register online. YOU MUST REGISTER TO OBTAIN TECHNICAL SUPPORT. PLEASE
RETAIN PROOF OF PURCHASE and this warranty information. To get product support, or to
obtain product information and NETGEAR product documentation, direct your Web browser to
the http://www.NETGEAR.com Web page.
To register online, direct your Web browser to the http://www.gearguy.com/pub/registration
Web page. If you do not have access to the World Wide Web, you can complete the enclosed
registration card and mail it to NETGEAR customer service.
Rx LED
EN 55 022 Statement (for the Model EN104TP Ethernet Hub)
This is to certify that the Model EN104TP Ethernet Hub is shielded against the generation of radio interference in accordance with the application of Council Directive 89/336/EEC, Article 4a. Conformity is
declared by the application of EN 55 022 Class A (CISPR 22).
Warning: This is a Class A product. In a domestic environment, this product may cause radio interference,
in which case the user may be required to take appropriate measures.
Pwr LED
EN 55 022 Statement (for the Model FA311 PCI Adapter)
Col LED
Normal/Uplink push button
(Normal position when
connected to a PC)
RJ-45 ports
Ground clip
(not used)
Power adapter
receptacle
7979FB
*M1-SB104NA-6*
*
M
1
-
S
B
1
0
4
N
A
-
6
August 2000
*
This is to certify that the Model FA311 PCI Adapter is shielded against the generation of radio interference in accordance with the application of Council Directive 89/336/EEC, Article 4a. Conformity is
declared by the application of EN 55 022 Class B (CISPR 22).
SB104.QCard.R2
9/7/00
4:53 PM
Page 2
8. Type A:\ in the “Copy files from” entry field and click on “OK.”
The system copies the files from the driver diskette.
INSTALL THE WINDOWS 98 DRIVERS
INSTALL THE NETWORK SHARING SOFTWARE
HARDWARE WARRANTY
This guide provides instructions for installing the Windows 98 network driver. Since all versions of
Windows may not respond similarly, your computer screen may display different information, in a different order, than pictured in the following instructions. This procedure works for the FA311.
1. Insert your Resource CD into the CD drive and type the following at the prompt:
2. Follow the steps shown onscreen to complete the installation process.
where “CD” is the CD drive letter.
Note: You must install the network card (instructions on the
other side of this guide) before installing the network driver.
After completing installation, you can now connect to your network.
You need to have the Windows 98 CD-ROM disc and the Model FA311 Drivers and Diagnostics floppy
disk ready to use in the installation process.
Subject to the provisions described below, the components in this NETGEAR product kit are protected
from defects in material and workmanship as follows:
RUN CD:\SETUP.EXE
REPLACEMENT POWER ADAPTER
Note: If the “Insert Disk” window opens and a message prompts you to insert your disk at any
time during the installation process, insert the Windows CD in Drive D (the CD drive) and click
on “OK.” Then follow the next step in the instructions.
If, for any reason, the power adapter for any of the hubs fails, please contact NETGEAR immediately to
order a replacement adapter. Use the following table when ordering a specific power adapter.
1. Turn on the power to the computer and start Windows. The new Hardware is found.
2. In the first “Add New Hardware Wizard” dialog box that indicates a PCI Ethernet Controller is
found, click on “Next.”
9. Make sure the Windows 98 CD-ROM disk is in the system, and click on “OK” when prompted.
3. Select “Search for the best driver…” Click on “Next.”
10. Make sure the designated path to the Windows 98 CD-ROM is displayed in the “copy files from”
prompt line (for example, D:\WIN98).
Order Code
EN104TP
PWR-024-001
PWR-024-002
PWR-024-003
PWR-024-004
PWR-024-005
Power
Power
Power
Power
Power
adapter
adapter
adapter
adapter
adapter
(7.5 V
(7.5 V
(7.5 V
(7.5 V
(7.5 V
DC, 1
DC, 1
DC, 1
DC, 1
DC, 1
Prior to returning any defective product, the end customer or the reseller from whom the end customer
originally purchased the product must obtain a Return Materials Authorization (RMA) number from
NETGEAR. All defective products should be returned to NETGEAR with shipping charges prepaid.
NETGEAR will not accept collect shipments.
TECHNICAL SPECIFICATION
< Back
Next>
Model FA311 Network Card
9179DA
4. Select “Floppy disk drives” and insert the NETGEAR FA311 Fast Ethernet PCI Adapter Drivers and
Diagnostics disk into the floppy drive. Click on “Next.”
11. In the “Update Device Driver Wizard” dialog box, click on “Finish.”
12. Remove the NETGEAR FA311 Drivers and Diagnostics disk and the Windows 98 CD-ROM.
When asked if you want to restart your computer, click on “Yes.”
NetWare tested and approved Microsoft Windows 95, Windows 98,
Windows NT® compatible
Standards
Compatibility
IEEE 802.3u 100BASE-TX Fast
Ethernet, IEEE 802.3i 10BASE-T
Ethernet, Autosensing PCI
Plug-and-Play 2.2 compatible
IEEE 802.3i 10BASE-T Ethernet
Network Interface
RJ-45 for 10BASE-T or
100BASE-TX
5 RJ-45 connectors for 10BASE-T
3W
+5V +/- 5% @ 630 mA maximum
7.5 W
7.5 V @ 1 A maximum
Power
Power consumption
DC operating voltage
Physical Specifications
Dimensions
You must restart your computer to complete the installation of the driver.
Weight
VERIFY INSTALLATION
1. Double-click on “My Computer” on the desktop.
2. Double-click on “Control Panel.”
3. Double-click on “System.”
Model EN104TP Ethernet Hub
Software
Compatibility
Cancel
5.7 by 3.7 in.
14.4 by 9.3 cm
4.6 x 3.1 x 1.2 in.
118 x 78 x 29 mm
0.20 lb (90 g)
1.25 lb (.6 kg)
Environmental
Specifications
Operating temperature 0 to 40˚C
Operating humidity
10 to 90% noncondensing
Agency Compliance
CE Mark, commercial, C-Tick
FCC, Part 15, Class B
EN 55 022 (CISPR 22), Class B
Canada ICES-003, Class B
CE Mark, commercial, C-Tick
FCC, Part 15, Class A
EN 55 022 (CISPR 22), Class A
VCCI Class A
4. Click on “Device Manager.”
Safety Approvals
CE Mark, commercial
CE Mark
UL Listed
cUL Listed
TUV licensed
T-Mark
Warranty Information
Limited lifetime
5 years
5. Double-click on “Network adapters.”
6. If there is a problem with the installation of the driver, an exclamation point appears next to
“NETGEAR FA311 Fast Ethernet PCI Adapter.” If there is an exclamation point, double-click on
“NETGEAR FA311 Fast Ethernet PCI Adapter.” The “Properties” window opens, and a message
regarding the status of the device is displayed in the window. Continue to click on “OK” or click on
the “X” in the right-hand corner to close any open windows and return to the Windows desktop.
5. Click on “Next” in the Update Device Driver Wizard.
6. When the “Network” window opens, enter a name (a different one-word name for each computer)
in the “Computer name” entry field; enter a workgroup name (the name of your entire network)
in the “Workgroup” entry field. Click on “OK.”
7. When asked to insert the NETGEAR FA311 Fast Ethernet PCI Adapter Drivers disk, click on “OK.”
Products that fail after the first year following the original date of purchase will be repaired or replaced
with the same or functionally equivalent, product by NETGEAR, at its discretion, free of charge provided
you (1) have, within 30 days of the original date of purchase, completed and returned the Owner
Registration Cards which accompanied the products when shipped, (2) return the failed product to
NETGEAR designated repair facility with shipping charge prepaid, and (3) provide NETGEAR with
proof of the original date of purchase. Repaired or replacement products will be returned to you with
shipping charges prepaid.
This warranty does not apply if, in the judgement of NETGEAR, the product fails due to damage from
shipment, handling, storage, accident, abuse or misuse, or if it has been used or maintained in a manner
not conforming to product manual instructions, has been modified in any way, or has had any serial
number removed or defaced. Repair by anyone other than NETGEAR or an approved agent will void this
warranty. The maximum liability of NETGEAR under this warranty is limited to the purchase price of
the product covered by the warranty.
What do you want windows to do?
Display a list of all the drivers in a specific
location, so you can select the driver you want.
Should a product fail to perform as described above within the first year following the original date of
purchase, NETGEAR will ship a replacement for the failed product upon return of the defective product.
Replacement products may be refurbished or contain refurbished materials. If NETGEAR, by its sole
determination, is unable to repair or replace the defective product, it will refund the depreciated purchase
price of the product.
A), North America
A), Europe
A), United Kingdom
A), Australia
A), Japan
Add New Hardware Wizard
Search for the best driver for your device
(Recommended).
The network cards and cables are protected by a limited lifetime warranty, the hub or switch is protected
by a 5-year warranty, and the power supply or AC adapter is protected by a 1-year warranty.
EXCEPT AS SPECIFICALLY PROVIDED IN THIS AGREEMENT OR AS REQUIRED BY LAW, THE
WARRANTIES AND REMEDIES STATED ABOVE ARE EXCLUSIVE AND IN LIEU OF ALL OTHERS,
ORAL OR WRITTEN, EXPRESS OR IMPLIED. ANY AND ALL OTHER WARRANTIES, INCLUDING
IMPLIED WARRANTIES OF MERCHANTABILITY, FITNESS FOR A PARTICULAR PURPOSE
AND NONINFRINGEMENT OF THIRD PARTY RIGHTS ARE EXPRESSLY EXCLUDED. NETGEAR
SHALL NOT UNDER ANY CIRCUMSTANCES BE LIABLE TO ANY PERSON FOR ANY SPECIAL,
DAMAGES RESULTING FROM USE OR MALFUNCTION OF THE PRODUCTS, LOSS OF PROFITS
OR REVENUES OR COSTS OF REPLACEMENT GOODS, EVEN IF NETGEAR IS INFORMED IN
ADVANCE OF THE POSSIBILITY OF SUCH DAMAGES.