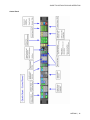
1
DENSITÉ series
JAZZ-800
Universal Signal Processor
Guide to Installation and Operation
M874-9900-100
1 Aug 2007
Miranda
Technologies Inc.
3499 Douglas-B.-Floreani
St-Laurent, Québec, Canada H4S 1Y6
Tel. 514-333-1772
Fax. 514-333-9828
www.miranda.com
© 2007 Miranda Technologies Inc..
GUIDE TO INSTALLATION AND OPERATION
Safety Compliance Information
Safety Compliance
This equipment complies with:
-
CSA C22.2 No. 60950-1-03 / Safety of Information Technology Equipment, Including Electrical Business Equipment.
UL 60950-1 (1st Edition) / Safety of Information Technology Equipment, Including Electrical Business Equipment.
st
IEC 60950-1 (1 Edition) / Safety of Information Technology Equipment, Including Electrical Business Equipment.
CAUTION
These servicing instructions are for use by qualified service personnel only. To reduce the risk of electric shock, do not
perform any servicing other than that contained in the operating instructions unless you are qualified to do so. Refer all
servicing to qualified service personnel. Servicing should be done in a static-free environment.
Electromagnetic Compatibility
-
This equipment has been tested for verification of compliance with FCC Part 15, Subpart B, class A requirements for
Digital Devices.
This equipment complies with the requirements of:
EN 55022 Class A, Electromagnetic Emissions,
EN 61000-3-2 & -3-3, Disturbance in Supply Systems
EN 61000-4-2, -3, -4, -5, -6, -8 & -11 Electromagnetic Immunity
How to contact us:
For technical assistance, please contact the Miranda Technical support centre nearest you:
Americas
Telephone:
+1-800-224-7882
e-mail:
[email protected]
Asia
Telephone:
+81-3-5730-2987
e-mail:
[email protected]
Visit our web site at www.miranda.com
JAZZ-800
Europe, Middle East,
Africa, UK
Telephone:
+44 (0) 1491 820222
e-mail:
[email protected]
France (only)
Telephone:
+33 (0) 1 55 86 87 88
e-mail:
[email protected]
GUIDE TO INSTALLATION AND OPERATION
Table of Contents
1
JAZZ-800 Universal Signal Processor......................................................................................1
1.1
1.2
1.3
1.4
2
Introduction ......................................................................................................................................... 1
Overview ............................................................................................................................................. 2
Applications......................................................................................................................................... 6
Quick Start .......................................................................................................................................... 8
Installation ................................................................................................................................15
Rear Panel (From Left to Right) ................................................................................................................. 15
3
Operations ................................................................................................................................18
Local Control (Full) ..................................................................................................................................... 18
Remote Control (Full)................................................................................................................................. 18
Control Panel Interfaces............................................................................................................................. 19
Control Panel Logic.................................................................................................................................... 20
Input/Output – Section 1 ............................................................................................................................ 21
Video Select – Section 2 ............................................................................................................................ 23
Format / Frame-rate Select – Section 3..................................................................................................... 24
Aspect – Section 4 ..................................................................................................................................... 26
Graphical User Interface (GUI) and Menu Controls – Section 6................................................................ 29
Vid Proc (Video Processing) – Section 7 ................................................................................................... 30
Logo / Presets – Section 8 ......................................................................................................................... 32
Audio Active & System Status – Section 9 ................................................................................................ 33
Panel – Section 10 ..................................................................................................................................... 35
4
MENUTREE ...............................................................................................................................36
Main Menu.................................................................................................................................................. 36
Video Menu ................................................................................................................................................ 37
Proc Amp Menu.......................................................................................................................................... 38
Enhance ..................................................................................................................................................... 42
Sharpness .................................................................................................................................................. 42
Aspect Ratio Menu ..................................................................................................................................... 43
Zoom/Crop ................................................................................................................................................. 46
Test Generator Menu ................................................................................................................................. 47
Audio Menu ................................................................................................................................................ 51
Audio Level Menu....................................................................................................................................... 52
Audio Phase Menu ..................................................................................................................................... 58
Audio Delay Menu ...................................................................................................................................... 64
Audio Test Menu ........................................................................................................................................ 67
Advanced Menu ......................................................................................................................................... 73
Noise Reduction Menu............................................................................................................................... 74
Source Menu .............................................................................................................................................. 77
Aperture Menu............................................................................................................................................ 78
Preset Menu ............................................................................................................................................... 79
5
Configuration ............................................................................................................................81
Set-up Menu – Page 1 ............................................................................................................................... 81
External Reference 1 Menu ....................................................................................................................... 82
JAZZ-800
GUIDE TO INSTALLATION AND OPERATION
External Reference 2 Menu ....................................................................................................................... 87
External Reference 2 Menu ....................................................................................................................... 88
Ancillary Data Menu ................................................................................................................................... 89
Timecode Menu.......................................................................................................................................... 90
Closed Caption Menu................................................................................................................................. 91
Setup Menu – Page 2 ................................................................................................................................ 94
Key (License Key) Menu ............................................................................................................................ 95
Remote IP Address Menu .......................................................................................................................... 96
IP Address Menu........................................................................................................................................ 97
Control Panel IP Address Menu................................................................................................................. 99
6
System Messages ..................................................................................................................101
System Messages – Non-critical Alerts.................................................................................................... 101
System Message – Critical Alerts ............................................................................................................ 102
7
Specifications .........................................................................................................................104
Appendix A – Cable & Pin-outs...................................................................................................107
Analog Audio I/O Break-Out Cable .......................................................................................................... 107
AES Audio I/O Break-Out Cable (Balanced)............................................................................................ 108
AES Audio I/O Cable (Unbalanced) ......................................................................................................... 109
Appendix B – Preset Files ...........................................................................................................110
JAZZ-800
GUIDE TO INSTALLATION AND OPERATION
1 JAZZ-800 Universal Signal Processor
1.1
Introduction
The JAZZ-800 brings legendary Teranex image quality to the Broadcasting world. The JAZZ-800 is packed
with proprietary technology, like PixelMotion™ Deinterlacing and Multi-Directional Diagonal Filtering
(MDDFTM) algorithms, drastically reducing jaggies on diagonal lines. The Per-Pixel Temporal Recursive
Noise Reduction algorithm minimizes HD and SD video noise. Teranex HQV Technology yields unsurpassed
image quality for the demanding Broadcaster.
The Dual REALTA™ architecture includes the industry’s first fully software programmable video array
processor capable of performing over 1 trillion operations per second per chip. In addition it performs end-toend true 10-bit image processing. The powerful Teranex Video Processor (TVP) core, built into the Realta,
ensures flexibility and future proofing by enabling subsequent software improvements without making
hardware obsolete. The Dual-Realta Module supports an I/O data path that is 32-bit and is assignable as 30bit YCrCb or RGB.
This flexible frame synchronizer is able to handle just about any signal at its inputs and outputs in either HD
or SD formats. The JAZZ-800 uses two Silicon Optix Realta image processing engines, reducing overall size
while maximizing image processing capability. The result? The best possible picture from the most flexible,
powerful, and user-friendly frame synchronizer available today, all in a space-saving 1RU design.
Features:
• Unsurpassed image quality within a 1RU Frame
• Two Fully Independent Processing Channels
• Dual Realta Engines Provide Power & Flexibility
• Software Field Updatability and Upgradeability
• Single Channel Unit Upgrades to Dual Channels
• Flexible Video and Audio I/O
• FlexviewTM Aspect Ratio
• Full SD 608 and HD 708 Closed Captioning Capability
• Easy Setup with Intuitive User Interface
• Front Panel LCD Serves as Video I/O Monitor & Menu Display
• Integrated Video & Tone Test Signal Generator
• Gain & Phase Control of all 16 Audio Channels
• Redundant Power Supplies
JAZZ-800 Applications:
• Network Feed Centers
• Mobile Truck Applications
• International Broadcast Exchange SD/HD Linear Standards Conversion
• HD Broadcast Exchange Cross Conversion
• Frame Synchronized SD Video Signal Up Conversion To HD Switchers
• Frame Synchronized HD Video Down Conversion
• Frame Synchronized SD/HD VTR Conversion and Monitoring
• Frame Synchronized SD/HD Video Noise Cleaning
JAZZ-800 | 1
GUIDE TO INSTALLATION AND OPERATION
1.2
Overview
Filters and Algorithms
PixelMotion™ De-interlacing
PixelMotion de-interlacing of video originated material produces perfect progressive frames in
preparation for further processing. The processing aperture is adjusted on a pixel-by-pixel basis, which
preserves all of the detail of the original interlaced image and eliminates jaggies in the output image.
Scene Change Detection
Preserves clean cuts between scenes. Upon detecting a cut, the temporal aperture is reduced from 4fields to 2-fields for the first frame in the new scene. This prevents uncorrelated data from being used in
the interpolation process at scene boundaries.
3:2 Handling
Recognizes and handles the redundant fields inserted by the telecine during 24fps film to 30fps video
conversion. By detecting 3:2 sequences it allows for better performance in the de-interlace process by
maintaining the full vertical resolution.
Aspect Ratio Control
Allows selection from standard aspect ratios, such as common top & bottom, common sides, 14:9 and
Anamorphic. In addition, it allows for Flexview, a non-linear anamorphic aspect ratio, to be used in upconversions.
Detail Enhancement
Is an edge-sharpening filter based on a traditional film compositing technique called "Unsharp Masking."
This filter corrects any blurring introduced during image capture, compression or resampling.
Noise Reduction
Adjustable noise reduction controls offer a greater degree of temporal recursive noise reduction with
fewer artifacts. A bias control allows the aggressiveness to be fine-tuned. For filter performance testing,
a Red Overlay can be applied that will color pixels that are in motion in Red.
Block Diagram
2 | JAZZ-800
GUIDE TO INSTALLATION AND OPERATION
Supported Format Conversions
The JAZZ-800 supports the following format conversions:
Input
Output
Input
Output
480i59.94
480i59.94
576i50
576i50
720p59.94
1080i59.94
1080sf23.98
720p59.94
720p50
1080i59.94
1080i50
480i59.94
720p50
576i50
720p59.94
720p50
1080i59.94
1080i50
480i59.94
1080i50
576i50
720p59.94
720p50
1080i59.94
1080i50
480i59.94
1080i59.94
The JAZZ-800 supports the following additional format conversions when equipped with the SDSC option
(see page 5):
Input
Output
Input
Output
480i59.94
576i50
576i50
480i59.94
720p50
720p59.94
1080i50
1080i59.94
JAZZ-800 | 3
GUIDE TO INSTALLATION AND OPERATION
Packages
The JAZZ-800 is available in the following product configurations:
Single Channel Configurations (1 in Æ 1 out)
JAZZ-810-P
JAZZ-810-AP
JAZZ-810-VAP
Single channel Up/Down/Cross converter & synchronizer.
•
HD/SD-SDI Video
•
16 channel Embedded audio I/O
Single channel Up/Down/Cross converter & synchronizer.
•
HD/SD-SDI Video
•
16 channel Embedded audio I/O / AES/ Analog audio (AAIO option)
Single channel Up/Down/Cross converter & synchronizer.
•
HD/SD-SDI Video and analog video (AVIO option)
•
16 channel Embedded audio I/O / AES/ Analog audio (AAIO option)
1½ Channel Configurations (1 in Æ 2 out)
JAZZ-820-P
JAZZ-820-AP
JAZZ-820-VAP
1½ channel Up/Down/Cross converter & synchronizer.
•
HD/SD-SDI Video
•
16 channel Embedded audio I/O
1½ channel Up/Down/Cross converter & synchronizer.
•
HD/SD-SDI Video
•
16 channel Embedded audio I/O / AES/ Analog audio (AAIO option)
1½ channel Up/Down/Cross converter & synchronizer.
•
HD/SD-SDI Video and analog video (AVIO option)
•
16 channel Embedded audio I/O / AES/ Analog audio (AAIO option)
Dual Channel Configurations (2 in Æ 2 out)
JAZZ-830-P
JAZZ-830-AP
JAZZ-830-VAP
Dual Channel Up/Down/Cross converter & synchronizer.
•
HD/SD-SDI Video
•
16 channel Embedded audio I/O
Dual Channel Up/Down/Cross converter & synchronizer.
•
HD/SD-SDI Video
•
16 channel Embedded audio I/O / AES/ Analog audio (AAIO option)
Dual Channel Up/Down/Cross converter & synchronizer.
•
HD/SD-SDI Video and analog video (AVIO option)
•
16 channel Embedded audio I/O / AES/ Analog audio (AAIO option)
All of these configurations include:
•
Redundant power supply
•
Local control panel
4 | JAZZ-800
GUIDE TO INSTALLATION AND OPERATION
Options
These options are available for the JAZZ-800.:
Options
Channel Configuration Upgrades
JAZZ-810-UG-820
Upgrade from single channel to 1½ Channels.
JAZZ-810-UG-830
Upgrade from single channel to Dual Channels.
JAZZ-820-UG-830
Upgrade from 1½ channel to Dual Channels.
Noise Reduction
JAZZ-8n0-OPT-SDNR
Motion adaptive SD noise reduction
JAZZ-830-OPT-SDNR
Dual channel motion adaptive SD noise reduction for JAZZ-830
JAZZ-8n0-OPT-HDNR
Motion adaptive HD/SD noise reduction
JAZZ-830-OPT-HDNR
Dual channel motion adaptive HD/SD noise reduction for JAZZ-830
Standards conversion
JAZZ-8n0-OPT-SDSC
SD Standards Conversion option (50 Hz <--> 59.94 Hz)
JAZZ-830-OPT-SDSC
Dual channel SD Standards Conversion option (50 Hz <--> 59.94 Hz) for
JAZZ-830
Cables
JAZZ-800-BOC-D75
2 meter AES break out cable on 75 ohm unbalanced BNC (included with
A & AP models)
JAZZ-800-BOC-D110
2 meter AES break out cable on 110 ohm balanced XLR (included with
A & AP models)
JAZZ-800-BOC-A
2 meter analog audio break out cable on balanced XLR (included with A
& AP models)
Certain available options must be factory-installed:
Factory Installed Options
Analog video I/O
JAZZ-8n0-OPT-AVIO
Analog video I/O, Component, composite (included with V & VP models)
•
Factory installed, equipment must return
Audio I/O and embedded
JAZZ-8n0-OPT-AAIO
16 Channel AES/ 8 Channel Analog I/O, Audio synchronizer, and Audio
cable set (included with A & AP models)
•
Factory installed, equipment must return
JAZZ-800 | 5
GUIDE TO INSTALLATION AND OPERATION
1.3
Applications
Up-/Down-conversion
In situations where the highest image quality up- or down-conversion is necessary, Miranda’s JAZZ-800 uses
proprietary PixelMotion™ De-interlacing, 3:2 Detection, and Detail Enhancement combined with a powerful
array processing module, provides the best image solution.
The first step in the conversion process is to identify whether the input material is video or film originated.
The identification process happens in a fully automatic mode and selects either PixelMotion De-interlacing for
video based material or 3:2 Detection for film based material. The goal is to apply the appropriate filter in
order to recover the full vertical resolution of the input material.
PixelMotion de-interlacing produces perfect progressive frames in preparation for further processing. The
processing aperture is adjusted on a pixel-by-pixel basis, which preserves all of the detail of the original
interlaced image. Additionally, the filter eliminates “jaggies” in the output image, providing well-defined edges
on objects and producing the sharpest images possible.
3:2 Detection recognizes the redundant fields inserted by the telecine during the conversion of film to video.
This advanced 3:2 pull-down filter avoids frame rate conversion artifacts and provides the highest vertical
resolution and motion quality.
Since the quality of the video de-interlacing is so high, there will be no difference visible in the vertical
resolution seen with film originated material and that of the de-interlaced video originated material.
Once the image has been de-interlaced and up-converted, Detail Enhancement can be applied to the image
to further sharpen and enhance the output. This filter adds an additional level of image quality by helping to
better define the detail in the up-converted image. This is achieved by detecting the edges of objects and
adjusting the contrast ratio around those objects to help separate them from the background.
Frame-rate Conversion
Moving images exist in three dimensions. Firstly, in the horizontal direction, images are made up of
individual pixels. Secondly, in the vertical direction, they are made up of the lines contained in the field or
frame. The combination is referred to as the spatial domain. Thirdly, the motion image is composed of a
number of fields or frames per second, which is referred to as the temporal domain.
The process of frame-rate, or standards, conversion is a form of sample rate conversion in two or three of the
above dimensions. It consists of expressing moving images sampled on one three-dimensional sampling
lattice to a different three-dimensional lattice.
A process called interpolation is used to convert between these various spaces. Interpolation is defined as
computing the value of a sample, or samples, which lie outside the sampling matrix of the source signal. In
other words, it is the process of computing the values of output samples that lie between the input samples.
Per-pixel processing allows the processing aperture to be adjusted on a pixel-by-pixel basis, which preserves
all of the detail of the original image.
6 | JAZZ-800
GUIDE TO INSTALLATION AND OPERATION
Frame-rate conversions generally involve changing the number of lines and fields (or frames) per second in
an image. Examples of standards conversions include:
480i59.94 to 576i50
720p59.94 to 1080i50
1080i59.94 to 1080i50
If we look at a standards conversion from 480i59.94 to 576i50, we need to change two of the three
parameters of the signal. The first is the number of lines in each field. A 480i signal has 240 lines per field
while the 576i signal has 288 lines, as shown below.
The second parameter, which needs to be changed is the number of fields per second. The 480i signal has
59.94 fields per second while the 576i signal has 50, as shown below.
The third parameter, the number of pixels on each active picture line, does not change significantly between
480i and 576i.
Conversions involving high definition I/O require that all three domains must be changed. Examples include:
480i59.94 to 1080i50
1080i59.94 to 576i50
480i59.94 to 1080p23.98-sf
Frame Synchronizing
Frame Synchronization is the ability to propagate and lock a non-synchronous video signal throughout one’s
existing genlocked video system. The non-synchronous signal will be genlocked (timed or phased) and
“Framed Synch’d” in the vertical and horizontal domains to the house reference signal, usually a Black Burst
or HD Tri-Level sync signal.
JAZZ-800 | 7
GUIDE TO INSTALLATION AND OPERATION
1.4
Quick Start
Installation
Getting assistance with the JAZZ-800
This manual will help in the operation of the Miranda JAZZ-800. It provides an overview of features and
procedures to accomplish all of the tasks this product can perform.
However, if you need further assistance, please contact the Miranda Technical support centre nearest you:
Americas
Telephone:
+1-800-224-7882
e-mail:
[email protected]
Asia
Telephone:
+81-3-5730-2987
e-mail:
[email protected]
Europe, Middle East,
Africa, UK
Telephone:
+44 (0) 1491 820222
e-mail:
[email protected]
France (only)
Telephone:
+33 (0) 1 55 86 87 88
e-mail:
[email protected]
Visit our web site at www.miranda.com
Servicing
Only authorized service personnel should open the unit. Disconnect AC sources to the power supply(ies)
before servicing.
Unpacking the JAZZ-800
1. Open the shipping box, and remove the top foam insert.
8 | JAZZ-800
GUIDE TO INSTALLATION AND OPERATION
2. Remove the Control Panel and place it on a flat, stable surface.
3. Remove the foam insert that held the Control Panel.
4. Remove the JAZZ-800 chassis and place it on a flat, stable surface.
JAZZ-800 | 9
GUIDE TO INSTALLATION AND OPERATION
Attaching the Control Panel
5. On the rear of the Control Panel, locate the multi-pin connector and the three ball-pin connectors.
6. On the front of the JAZZ-800 chassis, locate the multi-pin connector and the three ball-pin mating
connectors.
7. Orient the Control Panel so that the multi-pin connector and the ball-pin connectors of the Control Panel
line up with the respective mates on the front of the JAZZ-800 chassis.
8. Slide the Control Panel towards the chassis until the multi-pin connector and ball-pins begin to mate with
the Chassis.
9. Press firmly on the Control Panel until the multi-pin connector and ball-pins are fully seated.
10 | JAZZ-800
GUIDE TO INSTALLATION AND OPERATION
Control Panel
JAZZ-800 | 11
GUIDE TO INSTALLATION AND OPERATION
Control Panel Logic
Note: Input/Output channel selection drives the state of all other sections of the control panel and the
MENUTREE.
There are two primary states for the control panel button/LED logic.
•
The first is “Active” mode, shown by solid LED’s. This mode shows the current state of the selected
input or output channel.
•
The second is the “Update” mode, shown by flashing LED’s. This mode allows the user to change
the state of the currently selected input or output channel.
Control Panel LED Color Code
Button Color
Red
Orange
Green
Cyan
Blue
Blue
12 | JAZZ-800
State
Flashing
Flashing
Solid
Solid
Solid
Flashing
Mode
Update
Update
All
Active
Active
Update
Comments
Error condition
Warning condition
Function is available, but not selected
Shows association with currently selected input or output
Shows current state of selected input or output (all sections follow)
Shows that selected input or output is in Update mode (all
sections follow)
GUIDE TO INSTALLATION AND OPERATION
Rear Panel
JAZZ-800 | 13
GUIDE TO INSTALLATION AND OPERATION
Setup
Detail Enhance & Sharpness
There is a known issue with the default setting for Detail Enhance & Sharpness that cause the output image
to be soft. To correct this set the Detail Enhance slider to ‘0’ and the Sharpness slider to ‘63’. This will be
corrected in the next software release.
To Adjust, press the Menu button to the Right of the LCD display on the Control Panel
To ensure that these values are reloaded should the JAZZ-800 be turned off or lose power, save them to the
‘Default’ Preset. This Preset is automatically recalled when the JAZZ-800 is powered on.
14 | JAZZ-800
GUIDE TO INSTALLATION AND OPERATION
2 Installation
Rear Panel (From Left to Right)
Standard Connections
1. PS1 – Mains input 1
a. 90-110V @ 60Hz / 200-220V @ 50Hz, Auto Detect
2. PS2 – Mains input 2
a. 90-110V @ 60Hz / 200-220V @ 50Hz, Auto Detect
3. RS232/RS422 – Serial Port
a. 1x 9-pin-D-Male, Selectable RS232 or RS422
b. User adjustable baud rate
4. GPI – General Purpose Interface – Not functional / Future expansion
a. 1x 9-pin-D-Female
5. Linear Time Code (LTC) – Out 2 (video processing channel 2) - Not functional / Future expansion
a. 1x BNC, LTC output
6. Linear Time Code (LTC) – In 2 (video processing channel 2) - Not functional / Future expansion
a. 1x BNC, LTC input
7. Linear Time Code (LTC) – Out 1 (video processing channel 1) - Not functional / Future expansion
a. 1x BNC, LTC output
8. Linear Time Code (LTC) – In 1 (video processing channel 1) - Not functional / Future expansion
a. 1x BNC, LTC input
9. Ethernet Port (10/100 BaseT)
a. RJ-45
JAZZ-800 | 15
GUIDE TO INSTALLATION AND OPERATION
Digital Video Input/Output & Reference Input
1. Reference Input 1
a. 1x BNC, SD analog blackburst, HD tri-level sync (interlaced or progressive)
2. Reference Input 2
a. 1x BNC, SD analog blackburst, HD tri-level sync (interlaced or progressive)
3. SD/HD-SDI Output 2B (video processing channel 2)
a. 1x BNC
4. SD/HD-SDI Output 2A (video processing channel 2)
a. 1x BNC
5. SD/HD-SDI Output 1B (video processing channel 1)
a. 1x BNC
6. SD/HD-SDI Output 1A (video processing channel 1)
a. 1x BNC
7. SD/HD-SDI Input 2 Loop (Active)
a. 1x BNC
8. SD/HD-SDI Input 2 (video processing channel 2)
a. 1x BNC
9. SD/HD-SDI Input 1 Loop (Active)
a. 1x BNC
10. SD/HD-SDI Input 1 (video processing channel 1)
a. 1x BNC
16 | JAZZ-800
GUIDE TO INSTALLATION AND OPERATION
Analog & AES Audio Connection (NOTE: Requires Analog & AES Audio Option Board)
1. Analog Audio Input/Output
a) High Density Molex LFH Connector
2. AES Audio Input/Output
a) High Density Molex LFH Connector
Analog Video Input/Output & DVI Output (NOTE: Requires Analog Video Input/Output Option Board)
1. DVI-I Output
a. 1x DVI Connector
2. Analog Component Y/G Output
a. 1x BNC
3. Analog Component Pb/B/C Output
a. 1x BNC
4. Analog Component Pr/R Output
a. 1x BNC
5. Analog Composite Output
a. 1x BNC
6. No Connection
a. 1x BNC
7. Analog Component Y/G Input
a. 1x BNC
8. Analog Component Pb/B/C Input
a. 1x BNC
9. Analog Component Pr/R Input
b. 1x BNC
10. Analog Composite Input
b. 1x BNC
JAZZ-800 | 17
GUIDE TO INSTALLATION AND OPERATION
3
Operations
This section describes the control panel for the JAZZ-800 Universal Video Processor. The panel can operate
in one of two modes, local or remote.
Local Control (Full)
In the Local Control mode, the panel is physically mounted to the JAZZ-800 frame and controls this one unit.
The panel establishes communication with the frame and is powered via a multi-pin header connector
located between the two units.
Remote Control (Full)
In the Remote Control mode, the panel is mounted apart from the chassis. It is connected to the chassis via
an Ethernet connection and powered by an external power supply. The Remote panel can be assigned to
any JAZZ-800 chassis on the network. Refer to page xx in this manual for details on connecting a Remote
panel to a JAZZ-800 chassis.
Control Panel Layout
The control panel is divided into 10 Sections.
• Section 1 – Input / Output channel selection
• Section 2 – Video source selection
• Section 3 – Format (video line & frame-rate) selection
• Section 4 – Aspect Ratio selection
• Section 5 – Audio source selection
• Section 6 – Display, rotary encoder, USB port
• Section 7 – Proc Amp
• Section 8 – Logo, Channel ID
• Section 9 – Audio and System status LEDS
• Section 10 – Remote, Tally, Power Switch
Function buttons (Qty 48)
• “Soft” buttons associated with panel functions such as input select, video select, etc.
Display buttons (Qty 10)
“Soft” buttons associated with the LCD display.
• 8 buttons for use with display
• 1 button for the Menu ”Home” function
• 1 button for the Menu ”Back” function
Rotary Encoder
• The rotary encoder is a linear encoder with push function.
Power switch
• A power switch is located at the right-hand end of the control panel
• The power switch controls power for the control panel and the JAZZ-800 chassis by inhibiting the
power supplies of the JAZZ-800.
LEDs
The JAZZ-800 Control Panel incorporates the following:
• Tri-Color LED’s (Qty 31)
o The LED’s are red, green, blue tri-color LED’s
o All LED’s in Section 1 to 5 are tri-color
18 | JAZZ-800
GUIDE TO INSTALLATION AND OPERATION
•
Bi-Color LED’s (Qty 49)
o The LED’s are red, green, blue tri-color LED’s, wired as bi-color
o All LED’s in Section 6 to 10 are configured as bi-color
LCD Display
The JAZZ-800 Control Panel supports the following.
• 320 x 240 Color LCD Display
Control Panel Interfaces
The JAZZ-800 Control Panel supports the following:
•
USB 1.1 port
o The port is located on the front of the control panel
o The port will be used to future applications
•
Ethernet port (for remote connections)
o The Ethernet port is located on the rear of the control panel
o The Ethernet port is 10/100 BaseT
o The Ethernet port has a user assignable IP address
o The Ethernet connection supports DHCP
•
Multi-pin header connector
o The Multi-pin header connector is located on the rear of the control panel
o USB 1.1
o High-speed serial
o Video data
o Power
•
Power
o When used in the local configuration, the power connection from the JAZZ-800 chassis to
the control panel, is a multi-pin header connector
o When used in the remote configuration, the control panel utilizes an external 12V DC power
supply
o The power connector is located on the rear of the control panel
JAZZ-800 | 19
GUIDE TO INSTALLATION AND OPERATION
Control Panel Logic
Note: Section 1, Input/Output channel selection drives the state of all other sections of the control panel and
the MENUTREE.
There are two primary states for the control panel button/LED logic.
• The first is “Active” mode, shown by solid LED’s. This mode shows the current state of the selected
input or output channel.
• The second is the “Update” mode, shown by flashing LED’s. This mode allows the user to change
the state of the currently selected input or output channel.
Color Code
Button Color
Red
Orange
Green
Cyan
Blue
Blue
20 | JAZZ-800
State
Flashing
Flashing
Solid
Solid
Solid
Flashing
Mode
Update
Update
All
Active
Active
Update
Comments
Error condition
Warning condition
Function is available, but not selected
Shows association with currently selected input or output
Shows current state of selected input or output (all sections follow)
Shows that selected input or output is in Update mode (all
sections follow)
GUIDE TO INSTALLATION AND OPERATION
Input/Output – Section 1
Input
IN 1 (Button) – Allows the user to configure video processing channel 1 input. The first press will place the
system into the Active mode (solid LED’s); the second press will place the system into the Update mode
(flashing LED’s)
Button Color
Red
Orange
State
Flashing
Flashing
Mode
Update
Update
Green
Cyan
Blue
Blue
Solid
Solid
Solid
Flashing
All
Active
Active
Update
Comments
No input signal present on SDI 1
Currently selected format does not match input signal on SDI 1
(manual input mode)
IN 1 is available, but not selected
Shows association with currently selected output
Shows current state of IN 1 (all sections follow)
Shows that IN 1 is in Update mode (all sections follow)
IN 2 (Button) – Allows the user to configure processing channel 2 input. The first press will place the system
into the Active mode (sold LED’s); the second press will place the system into the Update mode (flashing
LED’s)
Button Color
Red
Orange
State
Flashing
Flashing
Mode
Update
Update
Green
Cyan
Blue
Blue
Off
Solid
Solid
Solid
Flashing
n/a
All
Active
Active
Update
All
Comments
No input signal present on SDI 2
Currently selected format does not match input signal on SDI 2
(manual input mode)
IN 2 is available, but not selected
Shows association with currently selected output
Shows current state of IN 2 (all sections follow)
Shows that IN 2 is in Update mode (all sections follow)
When disabled by keyed package
JAZZ-800 | 21
GUIDE TO INSTALLATION AND OPERATION
Output
OUT 1 (Button) – Allows the user to configure processing channel 1 output. The first press will place the
system into the Active mode (solid LED’s); the second press will place the system into the Update mode
(flashing LED’s)
Button Color
Green
Cyan
Blue
Blue
State
Solid
Solid
Solid
Flashing
Mode
All
Active
Active
Update
Comments
OUT 1 is available, but not selected
Shows association with currently selected Input
Shows current state of OUT 1 (all sections follow)
Shows that OUT 1 is in Update mode (all sections follow)
OUT 2 (Button) – Allows the user to configure processing channel 2 output. The first press will place the
system into the Active mode (solid LED’s); the second press will place the system into the Update mode
(flashing LED’s)
Button Color
Green
Cyan
Blue
Blue
Off
22 | JAZZ-800
State
Solid
Solid
Solid
Flashing
n/a
Mode
All
Active
Active
Update
All
Comments
OUT 2 is available, but not selected
Shows association with currently selected Input
Shows current state of OUT 2 (all sections follow)
Shows that OUT 2 is in Update mode (all sections follow)
When disabled by keyed package
GUIDE TO INSTALLATION AND OPERATION
Video Select – Section 2
SDI 1 (Button) – Assigns the SDI 1 Input to the currently selected input channel or SDI 1 output to the
currently selected output channel. After selecting, press the ROTARY ENCODER to accept.
Button Color
Red
Green
Cyan
Blue
Blue
State
Flashing
Solid
Solid
Solid
Flashing
Mode
Update
Update
Active
All
Update
Comments
No input signal (only when selected)
Available but not selected
Shows association with currently selected input or output
Shows the state of the currently selected input or output
NEW source or destination selected – Press the ROTARY
ENCODER to confirm
Note: SDI IN 1 will always be associated with SDI OUT 1.
SDI IN 1 may also be associated with SDI OUT 2 if used in the 1-in/2-out configuration.
SDI 2 (Button) - Assigns the SDI 2 Input to the currently selected input channel or SDI 2 output to the
currently selected output channel. After selecting, press the ROTARY ENCODER to accept.
Button Color
Red
Green
Cyan
Blue
Blue
State
Flashing
Solid
Solid
Solid
Flashing
Mode
Update
Update
Active
All
Update
Comments
No input signal (only when selected)
Available but not selected
Shows association with currently selected input or output
Shows the state of the currently selected input or output
NEW source or destination selected – Press the ROTARY
ENCODER to confirm
Note: SDI IN 2 will always be associated with SDI OUT 2.
CPST 1 (Button) – Not functional / Future expansion
CPST 2 (Button) – Not functional / Future expansion
COMP (Button) – Not functional / Future expansion
DVI OUT (Button) – Not functional / Future expansion
JAZZ-800 | 23
GUIDE TO INSTALLATION AND OPERATION
Format / Frame-rate Select – Section 3
480/576 (Button) – If an input channel is selected, on first press the system sets the selected input to 480
lines. On second press, the input is set to 576 lines. If one of the output channels is selected, on first press
the selected output is set to 480 lines. On the second press, the output is set to 576 lines. After selecting,
press the ROTARY ENCODER to accept.
Button Color
Green
Cyan
Blue
Blue
State
Solid
Solid
Solid
Flashing
Mode
Update
Active
All
Update
Comments
Available but not selected
Shows association with currently selected input or output
Shows the state of the currently selected input or output
NEW source or destination selected – Press the ROTARY
ENCODER to confirm
720 (Button) – Sets the line rate of the currently selected input or output to 720. After selecting, press the
ROTARY ENCODER to accept.
Button Color
Green
Cyan
Blue
Blue
State
Solid
Solid
Solid
Flashing
Mode
Update
Active
All
Update
Comments
Available but not selected
Shows association with currently selected input or output
Shows the state of the currently selected input or output
NEW source or destination selected – Press the ROTARY
ENCODER to confirm
1080 (Button) - Sets the line rate of the currently selected input or output to 1080. After selecting, press the
ROTARY ENCODER to accept.
Button Color
Green
Cyan
Blue
Blue
State
Solid
Solid
Solid
Flashing
Mode
Update
Active
All
Update
Comments
Available but not selected
Shows association with currently selected input or output
Shows the state of the currently selected input or output
NEW source or destination selected – Press the ROTARY
ENCODER to confirm
59.94 (Button) - Sets the frame rate of the currently selected input or output to 59.94Hz. After selecting,
press the ROTARY ENCODER to accept.
Button Color
Green
Cyan
Blue
Blue
24 | JAZZ-800
State
Solid
Solid
Solid
Flashing
Mode
Update
Active
All
Update
Comments
Available but not selected
Shows association with currently selected input or output
Shows the state of the currently selected input or output
NEW source or destination selected – Press the ROTARY
ENCODER to confirm
GUIDE TO INSTALLATION AND OPERATION
50 (Button) - Sets the frame rate of the currently selected input or output to 50Hz. After selecting, press the
ROTARY ENCODER to accept.
Button Color
Green
Cyan
Blue
Blue
State
Solid
Solid
Solid
Flashing
Mode
Update
Active
All
Update
Comments
Available but not selected
Shows association with currently selected input or output
Shows the state of the currently selected input or output
NEW source or destination selected – Press the ROTARY
ENCODER to confirm
29.97 PSF (Button) - Not functional / Future expansion
23.98 PSF (Button) - Not functional / Future expansion
25 PSF (Button) - Not functional / Future expansion
24 PSF (Button) - Not functional / Future expansion
JAZZ-800 | 25
GUIDE TO INSTALLATION AND OPERATION
Aspect – Section 4
ANA (Button) - Sets the aspect ratio of the selected processing channel to Anamorphic. After selecting,
press the ROTARY ENCODER to accept.
Button Color
Green
Cyan
Blue
Blue
State
Solid
Solid
Solid
Flashing
Mode
Update
Active
All
Update
Comments
Available but not selected
Shows association with currently selected processing channel
Shows the state of the currently selected processing channel
NEW selection – Press the ROTARY ENCODER to confirm
COM TOP (Button) - Sets the aspect ratio of the selected processing channel to Common Top & Bottom.
After selecting, press the ROTARY ENCODER to accept.
Button Color
Green
Cyan
Blue
Blue
State
Solid
Solid
Solid
Flashing
Mode
Update
Active
All
Update
Comments
Available but not selected
Shows association with currently selected processing channel
Shows the state of the currently selected processing channel
NEW selection - Press the ROTARY ENCODER to confirm
COM SIDE (Button) - Sets the aspect ratio of the selected processing channel to Common Sides. After
selecting, press the ROTARY ENCODER to accept.
Button Color
Green
Cyan
Blue
Blue
26 | JAZZ-800
State
Solid
Solid
Solid
Flashing
Mode
Update
Active
All
Update
Comments
Available but not selected
Shows association with currently selected processing channel
Shows the state of the currently selected processing channel
NEW selection - Press the ROTARY ENCODER to confirm
GUIDE TO INSTALLATION AND OPERATION
FLEX (Button) - Sets the aspect ratio of the selected processing channel to Flexview. After selecting, press
the ROTARY ENCODER to accept.
Button Color
Green
Cyan
Blue
Blue
Off
State
Solid
Solid
Solid
Flashing
n/a
Mode
Update
Active
All
Update
All
Comments
Available but not selected
Shows association with currently selected processing channel
Shows the state of the currently selected processing channel
NEW selection - Press the ROTARY ENCODER to confirm
720 or 1080 selected as input line-rate
14X9 (Button) – Sets the aspect ratio of the selected processing channel to 14:9. After selecting, press the
ROTARY ENCODER to accept.
Button Color
Green
Cyan
Blue
Blue
State
Solid
Solid
Solid
Flashing
Mode
Update
Active
All
Update
Comments
Available but not selected
Shows association with currently selected processing channel
Shows the state of the currently selected processing channel
NEW selection - Press the ROTARY ENCODER to confirm
VAR (Button) – Not functional / Future expansion
JAZZ-800 | 27
GUIDE TO INSTALLATION AND OPERATION
Audio Select – Section 5
SDI 1 (Button) – Assigns the embedded audio from the SDI 1 to the currently selected input or output
channel. After selecting, press the ROTARY ENCODER to accept.
Button Color
Red
Green
Cyan
Blue
Blue
State
Flashing
Solid
Solid
Solid
Flashing
Mode
Update
Update
Active
All
Update
Off
n/a
All
Comments
No input signal (only when selected)
Available but not selected
Shows association with currently selected input or output
Shows the state of the currently selected input or output
NEW source or destination selected - Press the ROTARY
ENCODER to confirm
Disabled if SDI 2 is selected as the input video source
SDI 2 (Button) – Assigns the embedded audio from the SDI 2 to the currently selected input or output
channel. After selecting, press the ROTARY ENCODER to accept.
Button Color
Red
Green
Cyan
Blue
Blue
State
Flashing
Solid
Solid
Solid
Flashing
Mode
Update
Update
Active
All
Update
Off
n/a
All
Comments
No input signal (only when selected)
Available but not selected
Shows association with currently selected input or output
Shows the state of the currently selected input or output
NEW source or destination selected - Press the ROTARY
ENCODER to confirm
Disabled if SDI 1 is selected as the input video source
AES (Button) – Not functional / Future expansion
ANA (Button) – Not functional / Future expansion
AUDIO RESET (Button) – Not functional / Future expansion
AUDIO MENU (Button) - Not functional / Future expansion
28 | JAZZ-800
GUIDE TO INSTALLATION AND OPERATION
Graphical User Interface (GUI) and Menu Controls – Section 6
Display Controls (8 Buttons around
display) - Assigned based on current
MENUTREE page
Button Color
Green
Yellow
State
Solid
Solid
Mode
All
All
Comments
Available but not selected
Selected
Rotary Encoder
• Rotation – Used to navigate MENUTREE or adjust sliders
• Push – Used to select front panel button selections
Back (Button) – Takes you to the previous menu
• There is no LED associated with this button
Home (Button) – Takes you to the top of the MENUTREE (Main Menu)
• There is no LED associated with this button
MENU (Button) – Takes you to top level menu (Main Menu) on the MENUTREE. Will also switch between
showing active video, from the currently selected input or output channel, and the MENUTREE on the
Control Panel LCD display.
Button Color
Yellow
State
Solid
Mode
All
Comments
Alternates the display between active video and the MENUTREE
Note: Active video is not available when the unit is in Update mode
SETUP (Button) – Takes you to the Setup Menu on the MENUTREE
Button Color
Yellow
State
Solid
Mode
All
Comments
Takes you to the Setup Menu
PROC BYPAS (Button) – All Proc Amp, Detail Enhance and Sharpness settings are disabled
Button Color
Yellow
State
Solid
Mode
Update
Yellow
Flashing
Update
Comments
Proc Amp settings are applied to the selected processing
channel
Proc Amp settings are disabled on the selected processing
channel
JAZZ-800 | 29
GUIDE TO INSTALLATION AND OPERATION
Vid Proc (Video Processing) – Section 7
VID LEV (Button) – Takes you to the VIDEO LEVEL control on the Proc Amp Menu of the MENUTREE. The
ROTARY ENCODER will then be used to adjust the VIDEO LEVEL.
Button Color
Green
Blue
State
Solid
Flashing
Mode
Update
Update
Comments
Available but not selected
The control is active
BLK LEV (Button) – Takes you to the BLACK LEVEL control on the Proc Amp Menu of the MENUTREE.
The ROTARY ENCODER will then be used to adjust the BLACK LEVEL.
Button Color
Green
Blue
State
Solid
Flashing
Mode
Update
Update
Comments
Available but not selected
The control is active
SAT LEV (Button) – Takes you to the SATURATION LEVEL control on the Proc Amp Menu of the
MENUTREE. The ROTARY ENCODER will then be used to adjust the SATURATION LEVEL.
Button Color
Green
Blue
State
Solid
Flashing
Mode
Update
Update
Comments
Available but not selected
The control is active
HUE (Button) – Takes you to the HUE PHASE control on the Proc Amp Menu of the MENUTREE. The
ROTARY ENCODER will then be used to adjust the HUE PHASE.
Button Color
Green
Blue
30 | JAZZ-800
State
Solid
Flashing
Mode
Update
Update
Comments
Available but not selected
The control is active
GUIDE TO INSTALLATION AND OPERATION
R-Y (Button) – Takes the user to the R-Y
LEVEL control on the Proc Amp Menu of
the MENUTREE. The ROTARY
ENCODER will then be used to adjust the
R-Y LEVEL.
Button Color
Green
Blue
State
Solid
Flashing
Mode
Update
Update
Comments
Available but not selected
The control is active
B-Y (Button) – Takes the user to the B-Y LEVEL control on the Proc Amp Menu of the MENUTREE. The
ROTARY ENCODER will then be used to adjust the B-Y LEVEL.
Button Color
Green
Blue
State
Solid
Flashing
Mode
Update
Update
Comments
Available but not selected
The control is active
JAZZ-800 | 31
GUIDE TO INSTALLATION AND OPERATION
Logo / Presets – Section 8
TSG MENU (Button) – Takes the user to the Video Test Generator Menu of the MENUTREE.
Button Color
Yellow
State
Solid
Mode
Active
Comments
Takes you to the Test Generator Menu in the MENUTREE
ID MENU (Button) – Not functional / Future expansion
LOGO MENU (Button) – Not functional / Future expansion
PRST MENU (Button) – Takes the user to the User Presets Menu of the MENUTREE.
Button Color
Yellow
State
Solid
Mode
Active
Comments
Takes you to the Presets Menu in the MENUTREE
USER 1 (Button) – Not functional / Future expansion
USER 2 (Button) – Not functional / Future expansion
32 | JAZZ-800
GUIDE TO INSTALLATION AND OPERATION
Audio Active & System Status – Section 9
AUDIO STATUS (LED’s 1 – 16) – Shows the status of the audio channels for the currently selected video
processing channel.
LED Color
Green
Yellow
Red
Off
State
Solid
Solid
Solid
n/a
Mode
All
All
All
All
Comments
Active audio is present for selected processing channel
DOLBY-E audio is present for selected processing channel
Audio errors are present for selected processing channel
No audio is present for selected processing channel
Note: Currently, active audio will be determined by group. For example, if group 1 is detected as present,
LED’s 1 – 4 shall be lit. Green = Active audio detected; OFF = no active audio detected
PS1 (LED) – Shows the status of Power Supply 1
LED Color
Green
Red
Off
State
Solid
Flashing
n/a
Mode
All
All
All
Comments
Power Supply 1 is operating properly
Power Supply 1 has an Error condition
Power Supply 1 is not present
PS2 (LED) – Shows the status of Power Supply 2
LED Color
Green
Red
Off
State
Solid
Flashing
n/a
Mode
All
All
All
Comments
Power Supply 2 is operating properly
Power Supply 2 has an Error condition
Power Supply 2 is not present
JAZZ-800 | 33
GUIDE TO INSTALLATION AND OPERATION
REF1 (LED) – Shows the status of the signal on External Reference Input 1
LED Color
Red
Yellow
Green
Off
State
Flashing
Flashing
Solid
n/a
Mode
All
All
All
All
Comments
Reference 1 and the output PLL’s are not locked
Reference 1 is locked but the output PLL’s are not locked
Reference 1 and the output PLL’s are locked
Processing channel 1 is set to Input reference
REF2 (LED) - Shows the status of the signal on External Reference Input 2
LED Color
Red
Yellow
Green
Off
State
Flashing
Flashing
Solid
n/a
Mode
All
All
All
All
Comments
Reference 2 and the output PLL’s are not locked
Reference 2 is locked but the output PLL’s are not locked
Reference 2 and the output PLL’s are locked
Processing channel 2 is set to Input reference
IN1 (LED) – Shows the status of the signal assigned to the input of video processing channel 1
LED Color
Red
Yellow
State
Flashing
Flashing
Mode
All
All
Green
Solid
All
Comments
No input has been detected
Input is detected but does not match the currently selected
input format
Input is valid
IN2 (LED) – Shows the status of the signal assigned to the input of video processing channel 2
LED Color
Red
Yellow
State
Flashing
Flashing
Mode
All
All
Green
Solid
All
Comments
No input has been detected
Input is detected but does not match the currently selected
input format
Input is valid
SYS (LED) – Shows the status of the overall system
LED Color
Red
Yellow
Green
State
Flashing
Flashing
Solid
Mode
All
All
All
Comments
Critical system error
Non-critical system error
System is operating normally
USB (LED) – Not functional / Future expansion
34 | JAZZ-800
GUIDE TO INSTALLATION AND OPERATION
Panel – Section 10
NOTE: REM/TALLY status has GPI interface (GPI pins 7 and 8) for ON-AIR indication
PANL LOCK (Button) – Locks the Local Control Panel. To activate the PANEL LOCK, press and hold the
button for 2 seconds.
Button Color
Orange
Orange
State
Solid
Flashing
Mode
Active
Active
Comments
Control panel operative – press & hold 2 sec. to LOCK PANEL
Control panel locked – press & hold 2 sec. to UNLOCK PANEL
Note: When the panel is locked, it will still update to show current status.
Power Switch – Inhibits both power supplies in the JAZZ-800 chassis (This control is not active when the
panel is used in the remote configuration.)
Color
Blue
Off
State
Solid
n/a
Mode
Active
All
Comments
Power On
Power off
REM – TALLY (Button) - Not functional / Future expansion
JAZZ-800 | 35
GUIDE TO INSTALLATION AND OPERATION
4 MENUTREE
Main Menu
The Main Menu is the top menu in the JAZZ-800 MENUTREE. It provides access to the top level functions in
the MENUTREE.
•
•
•
•
•
•
•
•
VIDEO – Takes the user to the Video Menu
AUDIO – Takes the user to the Audio Menu
ADV – Takes the user to the Advanced Settings Menu
SETUP – Takes the user to the Setup Menu
LOGO – Not functional / Future expansion
CH ID – Not functional / Future expansion
PRESET – Takes the user to the User Preset Menu
HELP – Not functional / Future expansion
The Main Menu can be reached at any time by pressing the HOME button on the control panel.
36 | JAZZ-800
GUIDE TO INSTALLATION AND OPERATION
Video Menu
•
•
•
•
•
•
•
•
INPUT – Not functional / Future expansion
PROC – Takes the user to the Proc Amp Setting Menu
ENH – Allows the user to adjust the Detail Enhance Setting
SHARP – Takes the user to adjust the Sharpness Setting
ASPECT – Takes the user to the Aspect Ratio Menu
Z/C – Enables Zoom/Crop
DVI – Not functional / Future expansion
TEST – Takes the user to the Test Generator Menu
JAZZ-800 | 37
GUIDE TO INSTALLATION AND OPERATION
Proc Amp Menu
PROC – Takes the user to the Video Processing Amplifier Menu
VIDEO – Adjust the VIDEO LEVEL for the selected video processing channel. To adjust, turn the ROTARY
ENCODER on the control panel. Press the DEFAULT soft button to go back to the default value.
• The range of adjustment is -6.0dB to +6.0dB.
• The default setting is 0dB.
Press the BACK button to move to the previous menu
Press the HOME button to go back to the Main Menu
BLACK – Adjust the BLACK LEVEL for the selected video processing channel. To adjust, turn the ROTARY
ENCODER on the control panel. Press the DEFAULT soft button to go back to the default value.
• The range of adjustment is -30mV to +30mV.
• The default setting is 0mV.
Press the BACK button to move to the previous menu
Press the HOME button to go back to the Main Menu
38 | JAZZ-800
GUIDE TO INSTALLATION AND OPERATION
Proc Amp Menu (continued)
HUE – Adjust the HUE PHASE for the selected video processing channel. To adjust, turn the ROTARY
ENCODER on the control panel. Press the DEFAULT soft button to go back to the default value.
• The range of adjustment is -179 degrees to +178 degrees.
• The default setting is 0 degrees.
Press the BACK button to move to the previous menu
Press the HOME button to go back to the Main Menu
SAT – Adjust the SATURATION LEVEL for the selected video processing channel. To adjust, turn the
ROTARY ENCODER on the control panel. Press the DEFAULT soft button to go back to the default value.
• The range of adjustment is -6.0dB to +6.0dB.
• The default setting is 0dB.
Press the BACK button to move to the previous menu
Press the HOME button to go back to the Main Menu
JAZZ-800 | 39
GUIDE TO INSTALLATION AND OPERATION
Proc Amp Menu (continued)
R-Y – Adjust the R-Y LEVEL for the selected video processing channel. To adjust, turn the ROTARY
ENCODER on the control panel. Press the DEFAULT soft button to go back to the default value.
• The range of adjustment is -200mV to +200mV.
• The default setting is 0mV.
Press the BACK button to move to the previous menu
Press the HOME button to go back to the Main Menu
B-Y – Adjust the B-Y LEVEL for the selected video processing channel. To adjust, turn the ROTARY
ENCODER on the control panel. Press the DEFAULT soft button to go back to the default value.
• The range of adjustment is -200mV to +200mV.
• The default setting is 0mV.
Press the BACK button to move to the previous menu
Press the HOME button to go back to the Main Menu
40 | JAZZ-800
GUIDE TO INSTALLATION AND OPERATION
Proc Amp Menu (continued)
RESET – Resets all PROC AMP LEVELS to their default values
• YES – Will reset all proc amp levels (video gain, black level, hue, saturation, R-Y level, and B-Y
level) back to their default values.
• NO – Leaves all proc amp settings at their current values.
Press the BACK button to move to the previous menu
Press the HOME button to go back to the Main Menu
JAZZ-800 | 41
GUIDE TO INSTALLATION AND OPERATION
Enhance
ENH – Adjust the DETAIL ENHANCE setting for the selected video processing channel. To adjust, turn the
ROTARY ENCODER on the control panel. Press the DEFAULT soft button to go back to the default value.
• The range of adjustment is 0 to 100.
• The default setting is 25.
Press the BACK button to move to the previous menu
Press the HOME button to go back to the Main Menu
Sharpness
SHARP – Adjust the SHARPNESS setting for the selected video processing channel. To adjust, turn the
ROTARY ENCODER on the control panel. Press the DEFAULT soft button to go back to the default value.
• The range of adjustment is 0 to 100.
• The default setting is 0.
Press the BACK button to move to the previous menu
Press the HOME button to go back to the Main Menu
42 | JAZZ-800
GUIDE TO INSTALLATION AND OPERATION
Aspect Ratio Menu
ASPECT – Takes the user to the Variable Aspect Ratio Conversion Menu
• H SIZE – Not functional / Future expansion
• V SIZE – Not functional / Future expansion
• H POS – Not functional / Future expansion
• V POS – Not functional / Future expansion
• H TRIM – Adjusts the HORIZONTAL TRIM for the image
• V TRIM – Adjust the VERTICAL TRIM for the image
• LINK – Not functional / Future expansion
• RESET – Resets all variable aspect ratio conversion setting
JAZZ-800 | 43
GUIDE TO INSTALLATION AND OPERATION
Aspect Ratio Menu (continued)
H TRIM – Adjust the HORIZONTAL TRIM of the image for the selected video processing channel. To adjust,
turn the ROTARY ENCODER on the control panel. Press the DEFAULT soft button to go back to the default
value.
• The range of adjustment is 0 to 200 pixels for standard definition formats and 0 to 400 pixels for high
definition formats.
• The default setting is 0 pixels for both SD & HD.
Press the BACK button to move to the previous menu
Press the HOME button to go back to the Main Menu
V TRIM – Adjust the VERTICAL TRIM of the image for the selected video processing channel. To adjust, turn
the ROTARY ENCODER on the control panel. Press the DEFAULT soft button to go back to the default
value.
• The range of adjustment is 0 to 200 lines for standard definition formats and 0 to 400 lines for high
definition formats.
• The default setting is 0 lines for both SD & HD.
Press the BACK button to move to the previous menu
Press the HOME button to go back to the Main Menu
44 | JAZZ-800
GUIDE TO INSTALLATION AND OPERATION
Aspect Ratio Menu (continued)
RESET – Resets all Variable Aspect Ratio settings to their default values
• YES – Will reset all variable aspect ratio conversion settings (H&V Size, H&V Position, and H&V
Trim) back to their default values.
• NO – Leaves all variable aspect ratio conversion settings at their current values.
Press the BACK button to move to the previous menu
Press the HOME button to go back to the Main Menu
JAZZ-800 | 45
GUIDE TO INSTALLATION AND OPERATION
Zoom/Crop
Z/C – Enables ZOOM/CROP. This mode will zoom the image by 3-pixels/3-lines and then crop it by 3pixels/3-lines. It is useful for eliminating edge effect caused by processing the edges of the image.
• ON – Will zoom the image by 3-pixels/3-lines and then crop it by 3-pixels/3-lines.
• OFF – Leaves the image in the original format.
Press the BACK button to move to the previous menu
Press the HOME button to go back to the Main Menu
46 | JAZZ-800
GUIDE TO INSTALLATION AND OPERATION
Test Generator Menu
Test – Takes the user to the Video Test Generator Menu
• CIR – Selects the Circle Test Pattern.
• 75% – Selects the 75% Color Bars Test Pattern.
• GRAY – Selects the Gray Field Test Pattern.
• RES – Selects the Resolution (RES) Test Pattern.
• RGB – Selects the RGB Test Pattern.
• GRID – Selects the Grid Test Pattern.
JAZZ-800 | 47
GUIDE TO INSTALLATION AND OPERATION
Test Generator Menu (continued)
CIR – Selects the Circle Test Pattern.
• ON – Turns ON the Circle Test Pattern on the output of the selected video processing channel.
• OFF – Turns OFF the Circle Test Pattern on the output of the selected video processing channel.
Press the BACK button to move to the previous menu
Press the HOME button to go back to the Main Menu
Note: If a test pattern has been turned on, and you go back to the Video Test Menu, the other test patterns
will not be available (i.e, they will be grayed out). To select a new test pattern, you must first turn off the
current test pattern and the select the new test pattern
75% – Selects the 75% Color Bars Test Pattern.
• ON – Turns ON the 75% Color Bars Test Pattern on the output of the selected video processing
channel.
• OFF – Turns OFF the 75% Color Bars Test Pattern on the output of the selected video processing
channel.
Press the BACK button to move to the previous menu
Press the HOME button to go back to the Main Menu
Note: If a test pattern has been turned on, and you go back to the Video Test Menu, the other test patterns
will not be available (i.e, they will be grayed out). To select a new test pattern, you must first turn off the
current test pattern and the select the new test pattern
48 | JAZZ-800
GUIDE TO INSTALLATION AND OPERATION
Test Generator Menu (continued)
GRAY – Selects the Gray Field Test Pattern.
• ON – Turns ON the Gray Field Test Pattern on the output of the selected video processing channel.
• OFF – Turns OFF the Gray Field Test Pattern on the output of the selected video processing
channel.
Press the BACK button to move to the previous menu
Press the HOME button to go back to the Main Menu
Note: If a test pattern has been turned on, and you go back to the Video Test Menu, the other test patterns
will not be available (i.e, they will be grayed out). To select a new test pattern, you must first turn off the
current test pattern and the select the new test pattern
RES – Selects the Resolution (RES) Test Pattern.
• ON – Turns ON the Resolution (RES) Test Pattern on the output of the selected video processing
channel.
• OFF – Turns OFF the Resolution (RES) Test Pattern on the output of the selected video processing
channel.
Press the BACK button to move to the previous menu
Press the HOME button to go back to the Main Menu
Note: If a test pattern has been turned on, and you go back to the Video Test Menu, the other test patterns
will not be available (i.e, they will be grayed out). To select a new test pattern, you must first turn off the
current test pattern and the select the new test pattern
JAZZ-800 | 49
GUIDE TO INSTALLATION AND OPERATION
Test Generator Menu (continued)
RGB – Selects the RGB Test Pattern.
• ON – Turns ON the RGB Test Pattern on the output of the selected video processing channel.
• OFF – Turns OFF the RGB Test Pattern on the output of the selected video processing channel.
Press the BACK button to move to the previous menu
Press the HOME button to go back to the Main Menu
Note: If a test pattern has been turned on, and you go back to the Video Test Menu, the other test patterns
will not be available (i.e, they will be grayed out). To select a new test pattern, you must first turn off the
current test pattern and the select the new test pattern
GRID – Selects the Grid Test Pattern.
• ON – Turns ON the Grid Test Pattern on the output of the selected video processing channel.
• OFF – Turns OFF the Grid Test Pattern on the output of the selected video processing channel.
Press the BACK button to move to the previous menu
Press the HOME button to go back to the Main Menu
Note: If a test pattern has been turned on, and you go back to the Video Test Menu, the other test patterns
will not be available (i.e, they will be grayed out). To select a new test pattern, you must first turn off the
current test pattern and the select the new test pattern
50 | JAZZ-800
GUIDE TO INSTALLATION AND OPERATION
Audio Menu
AUDIO – Takes the user to the Audio menu
• LEVEL – Takes the user to the Audio Level adjustment menu
• PHASE – Takes the user to the Audio Phase adjustment menu
• DELAY – Takes the user to the Audio Delay adjustment menu
• SWAP – Not functional / Future expansion
• TEST – Takes the user to the Audio Test Tone menu
JAZZ-800 | 51
GUIDE TO INSTALLATION AND OPERATION
Audio Level Menu
LEVEL – Allows the user to adjust the AUDIO LEVEL for each audio channel in the currently selected video
processing channel.
Audio Level Adjustment – All Channels
Audio Level (ALL) – Adjusts the AUDIO LEVEL on all audio channels in the currently selected video
processing channel. To adjust, turn the ROTARY ENCODER on the control panel. Press the DEFAULT soft
button to go back to the default value.
• The range of adjustment is -32dB to +16dB in 1dB steps.
• The default setting is 0dB.
Press the BACK button to move to the previous menu
Press the HOME button to go back to the Main Menu
Note: At present there are 8 audio channels assigned to each video processing channel In a dual-channels
JAZZ-800. A single channel JAZZ-800 has 16-channels of audio.
52 | JAZZ-800
GUIDE TO INSTALLATION AND OPERATION
Audio Level Adjustment – by Audio Groups
•
•
•
•
1 – Adjusts the audio level for the channels in Group 1 (channels 1 – 4)
2 – Adjusts the audio level for the channels in Group 2 (channels 5 – 8)
3 – Adjusts the audio level for the channels in Group 3 (channels 9 – 12)
4 – Adjusts the audio level for the channels in Group 4 (channels 13 – 16)
Audio Level (Groups) – Adjusts the audio level of the channels in the selected audio group. To adjust, turn
the rotary encoder on the control panel. Press the Default soft button to go back to the default value.
• The range of adjustment is -32dB to +16dB in 1dB steps.
• The default setting is 0dB.
Press the Back button to move to the previous menu
Press the Home button to go back to the Main Menu
Note: At present there are 8 audio channels assigned to each video processing channel in a dual-channel
JAZZ-800. A single channel JAZZ-800 has 16-channels of audio.
JAZZ-800 | 53
GUIDE TO INSTALLATION AND OPERATION
Audio Level Adjustment – by Audio Pairs
•
•
•
•
•
•
•
•
1/2 – Adjusts the audio level for the channels in Pair 1/2 (channels 1 & 2)
3/4 – Adjusts the audio level for the channels in Pair 3/4 (channels 3 & 4)
5/6 – Adjusts the audio level for the channels in Pair 5/6 (channels 5 & 6)
7/8 – Adjusts the audio level for the channels in Pair 7/8 (channels 7 & 8)
9/10 – Adjusts the audio level for the channels in Pair 9/10 (channels 9 & 10)
11/12 – Adjusts the audio level for the channels in Pair 11/12 (channels 11 & 12)
13/14 – Adjusts the audio level for the channels in Pair 13/14(channels 13 & 14)
15/16 – Adjusts the audio level for the channels in Pair 15/16 (channels 15 & 16)
Audio Level (Pairs) – Adjusts the audio level of the channels in the selected audio pair. To adjust, turn the
rotary encoder on the control panel. Press the Default soft button to go back to the default value.
• The range of adjustment is -32dB to +16dB in 1dB steps.
• The default setting is 0dB.
Press the Back button to move to the previous menu
Press the Home button to go back to the Main Menu
Note: At present there are 8 audio channels assigned to each video processing channel in a dual-channel
JAZZ-800. A single channel JAZZ-800 has 16-channels of audio.
54 | JAZZ-800
GUIDE TO INSTALLATION AND OPERATION
Audio Level Adjustment – by Audio Channels
•
•
•
•
•
•
•
•
1 – Adjusts the audio level for channel 1
2 – Adjusts the audio level for channel 2
3 – Adjusts the audio level for channel 3
4 – Adjusts the audio level for channel 4
5 – Adjusts the audio level for channel 5
6 – Adjusts the audio level for channel 6
7 – Adjusts the audio level for channel 7
MORE – Takes the user to the next channel selection menu
Audio Level (Channels 1-7) – Adjusts the audio level of the individual channels. To adjust, turn the rotary
encoder on the control panel. Press the Default soft button to go back to the default value.
• The range of adjustment is -32dB to +16dB in 1dB steps.
• The default setting is 0dB.
Press the Back button to move to the previous menu
Press the Home button to go back to the Main Menu
Note: At present there are 8 audio channels assigned to each video processing channel in a dual-channel
JAZZ-800. A single channel JAZZ-800 has 16-channels of audio.
JAZZ-800 | 55
GUIDE TO INSTALLATION AND OPERATION
Audio Level Adjustment – by Audio Channels (continued)
•
•
•
•
•
•
•
•
8 – Adjusts the audio level for channel 8
9 – Adjusts the audio level for channel 9
10 – Adjusts the audio level for channel 10
11 – Adjusts the audio level for channel 11
12 – Adjusts the audio level for channel 12
13 – Adjusts the audio level for channel 13
14 – Adjusts the audio level for channel 14
MORE – Takes the user to the next channel selection menu
Audio Level (Channels 8-14) – Adjusts the audio level of the individual channels. To adjust, turn the rotary
encoder on the control panel. Press the Default soft button to go back to the default value.
• The range of adjustment is -32dB to +16dB in 1dB steps.
• The default setting is 0dB.
Press the Back button to move to the previous menu
Press the Home button to go back to the Main Menu
Note: At present there are 8 audio channels assigned to each video processing channel in a dual-channel
JAZZ-800. A single channel JAZZ-800 has 16-channels of audio.
56 | JAZZ-800
GUIDE TO INSTALLATION AND OPERATION
Audio Level Adjustment – by Audio Channels (continued)
•
•
15 – Adjusts the audio level for channel 15
16 – Adjusts the audio level for channel 16
Audio Level (Channels 15-16) – Adjusts the audio level of the individual channels. To adjust, turn the rotary
encoder on the control panel. Press the Default soft button to go back to the default value.
• The range of adjustment is -32dB to +16dB in 1dB steps.
• The default setting is 0dB.
Press the Back button to move to the previous menu
Press the Home button to go back to the Main Menu
Note: At present there are 8 audio channels assigned to each video processing channel in a dual-channel
JAZZ-800. A single channel JAZZ-800 has 16-channels of audio.
JAZZ-800 | 57
GUIDE TO INSTALLATION AND OPERATION
Audio Phase Menu
PHASE – Allows the user to adjust the audio phase for each audio channel in the currently selected video
processing channel.
Audio Phase Adjustment – All Channels
ALL – Adjusts the audio phase on all audio channels in the currently selected video processing channel.
• 0 DEG – Sets the audio phase to 0 degrees of all audio channels in the currently selected video
processing channel.
• 180 DEG – Sets the audio phase to 180 degrees of all audio channels in the currently selected video
processing channel.
Press the Back button to move to the previous menu
Press the Home button to go back to the Main Menu
Note: At present there are 8 audio channels assigned to each video processing channel in a dual-channel
JAZZ-800. A single channel JAZZ-800 has 16-channels of audio.
58 | JAZZ-800
GUIDE TO INSTALLATION AND OPERATION
Audio Phase Adjustment – by Audio Groups
•
•
•
•
1 – Adjusts the audio phase for the channels in Group 1 (channels 1 – 4)
2 – Adjusts the audio phase for the channels in Group 2 (channels 5 – 8)
3 – Adjusts the audio phase for the channels in Group 3 (channels 9 – 12)
4 – Adjusts the audio phase for the channels in Group 4 (channels 13 – 16)
Audio Phase (Groups) – Adjusts the audio phase of the channels in the selected audio group.
• 0 DEG – Sets the audio phase to 0 degrees of all audio channels in the selected group in the
currently selected video processing channel.
• 180 DEG – Sets the audio phase to 180 degrees of all audio channels in the selected group in the
currently selected video processing channel.
Press the Back button to move to the previous menu
Press the Home button to go back to the Main Menu
Note: At present there are 8 audio channels assigned to each video processing channel in a dual-channel
JAZZ-800. A single channel JAZZ-800 has 16-channels of audio.
JAZZ-800 | 59
GUIDE TO INSTALLATION AND OPERATION
Audio Phase Adjustment – by Audio Pairs
•
•
•
•
•
•
•
•
1/2 – Adjusts the audio phase for the channels in Pair 1/2 (channels 1 & 2)
3/4 – Adjusts the audio phase for the channels in Pair 3/4 (channels 3 & 4)
5/6 – Adjusts the audio phase for the channels in Pair 5/6 (channels 5 & 6)
7/8 – Adjusts the audio phase for the channels in Pair 7/8 (channels 7 & 8)
9/10 – Adjusts the audio phase for the channels in Pair 9/10 (channels 9 & 10)
11/12 – Adjusts the audio phase for the channels in Pair 11/12 (channels 11 & 12)
13/14 – Adjusts the audio phase for the channels in Pair 13/14(channels 13 & 14)
15/16 – Adjusts the audio phase for the channels in Pair 15/16 (channels 15 & 16)
Audio Phase (Pairs) – Adjusts the audio phase of the channels in the selected audio pair.
• 0 DEG – Sets the audio phase to 0 degrees of both audio channels in the selected audio pair in the
currently selected video processing channel.
• 180 DEG – Sets the audio phase to 180 degrees of both audio channels in the selected audio pair in
the currently selected video processing channel.
Press the Back button to move to the previous menu
Press the Home button to go back to the Main Menu
Note: At present there are 8 audio channels assigned to each video processing channel in a dual-channel
JAZZ-800. A single channel JAZZ-800 has 16-channels of audio.
60 | JAZZ-800
GUIDE TO INSTALLATION AND OPERATION
Audio Phase Adjustment – by Audio Channels
•
•
•
•
•
•
•
•
1 – Adjusts the audio phase for channel 1
2 – Adjusts the audio phase for channel 2
3 – Adjusts the audio phase for channel 3
4 – Adjusts the audio phase for channel 4
5 – Adjusts the audio phase for channel 5
6 – Adjusts the audio phase for channel 6
7 – Adjusts the audio phase for channel 7
MORE – Takes the user to the next channel selection menu
Audio Phase (Channels 1-7) – Adjusts the audio phase of the individual channels.
• 0 DEG – Sets the audio phase to 0 degrees of the selected audio channel in the currently selected
video processing channel.
• 180 DEG – Sets the audio phase to 180 degrees of the selected audio channel in the currently
selected video processing channel.
Press the Back button to move to the previous menu
Press the Home button to go back to the Main Menu
Note: At present there are 8 audio channels assigned to each video processing channel in a dual-channel
JAZZ-800. A single channel JAZZ-800 has 16-channels of audio.
JAZZ-800 | 61
GUIDE TO INSTALLATION AND OPERATION
Audio Phase Adjustment – by Audio Channels (continued)
•
•
•
•
•
•
•
•
8 – Adjusts the audio phase for channel 8
9 – Adjusts the audio phase for channel 9
10 – Adjusts the audio phase for channel 10
11 – Adjusts the audio phase for channel 11
12 – Adjusts the audio phase for channel 12
13 – Adjusts the audio phase for channel 13
14 – Adjusts the audio phase for channel 14
MORE – Takes the user to the next channel selection menu
Audio Phase (Channels 8-14) – Adjusts the audio phase of the individual channels.
• 0 DEG – Sets the audio phase to 0 degrees of theselected audio channel in the currently selected
video processing channel.
• 180 DEG – Sets the audio phase to 180 degrees of the selected audio channel in the currently
selected video processing channel.
Press the Back button to move to the previous menu
Press the Home button to go back to the Main Menu
Note: At present there are 8 audio channels assigned to each video processing channel In a dual-channels
JAZZ-800. A single channel JAZZ-800 has 16-channels of audio.
62 | JAZZ-800
GUIDE TO INSTALLATION AND OPERATION
Audio Phase Adjustment – by Audio Channels (continued)
•
•
15 – Adjusts the audio phase for channel 15
16 – Adjusts the audio phase for channel 16
Audio Phase (Channels (15-16)) – Adjusts the audio phase of the individual channels.
• 0 DEG – Sets the audio phase to 0 degrees of the selected audio channel in the currently selected
video processing channel.
• 180 DEG – Sets the audio phase to 180 degrees of the selected audio channel in the currently
selected video processing channel.
Press the Back button to move to the previous menu
Press the Home button to go back to the Main Menu
Note: At present there are 8 audio channels assigned to each video processing channel in a dual-channel
JAZZ-800. A single channel JAZZ-800 has 16-channels of audio.
JAZZ-800 | 63
GUIDE TO INSTALLATION AND OPERATION
Audio Delay Menu
DELAY – Takes the user to audio delay menu.
• AUTO – Selects the Auto delay mode.
• MANUAL – Selects the Manual delay mode.
AUTO – Not functional / Future expansion
64 | JAZZ-800
GUIDE TO INSTALLATION AND OPERATION
Audio Delay Menu (continued)
MANUAL – Allows the audio to be manually adjusted.
• Audio Delay (uS) – Takes the user to the microsecond adjustment slider
• Audio Delay (mS) – Takes the user to the millisecond adjustment slider
• Audio Delay (Sec) – Takes the user to the seconds adjustment slider
Audio Delay (uS) – Adjusts the audio delay in the currently selected video processing channel in
microsecond increments. To adjust, turn the rotary encoder on the control panel. Press the Default soft
button to go back to the default value.
• The range of adjustment is 0 to 49uS
• The default setting is 3uS
Press the Back button to move to the previous menu
Press the Home button to go back to the Main Menu
JAZZ-800 | 65
GUIDE TO INSTALLATION AND OPERATION
Audio Delay Menu (continued)
Audio Delay (mS) – Adjusts the audio delay in the currently selected video processing channel in
millisecond increments. To adjust, turn the rotary encoder on the control panel. Press the Default soft button
to go back to the default value.
• The range of adjustment is 0 to 999mS
• The default setting is 106mS
Press the Back button to move to the previous menu
Press the Home button to go back to the Main Menu
Audio Delay (Sec) – Adjusts the audio delay in the currently selected video processing channel in one
second increments. To adjust, turn the rotary encoder on the control panel. Press the Default soft button to
go back to the default value.
• The range of adjustment is 0 to 4 seconds
• The default setting is 0 seconds
Press the Back button to move to the previous menu
Press the Home button to go back to the Main Menu
66 | JAZZ-800
GUIDE TO INSTALLATION AND OPERATION
Audio Test Menu
750Hz – Enables a 750Hz audio tone for the selected audio channel(s)
1.5KHz - Enables a 1.5KHz audio tone for the selected audio channel(s)
3KHz - Enables a 3KHz audio tone for the selected audio channel(s)
6KHz - Enables a 6KHz audio tone for the selected audio channel(s)
Mute – Mutes the selected audio channel(s)
Audio Test Tone – All Channels
Press the Back button to move to the previous menu
Press the Home button to go back to the Main Menu
Audio Test Tone (ALL) – Enables the selected audio test tone for all audio channels.
• ON – Enables the selected audio test tone
• OFF – Disables the selected audio test tone.
Note: At present there are 8 audio channels assigned to each video processing channel in a dual-channel
JAZZ-800. A single channel JAZZ-800 has 16-channels of audio.
JAZZ-800 | 67
GUIDE TO INSTALLATION AND OPERATION
Audio Test Tone – by Audio Groups
•
•
•
•
1 – Enables the selected audio test tone for the channels in Group 1 (channels 1 – 4)
2 – Enables the selected audio test tone for the channels in Group 2 (channels 5 – 8)
3 – Enables the selected audio test tone for the channels in Group 3 (channels 9 – 12)
4 – Enables the selected audio test tone for the channels in Group 4 (channels 13 – 16)
Audio Test Tone (Groups) – Enables the selected audio test tone for the selected group.
• ON – Enables the selected audio test tone
• OFF – Disables the selected audio test tone.
Press the Back button to move to the previous menu
Press the Home button to go back to the Main Menu
Note: At present there are 8 audio channels assigned to each video processing channel in a dual-channel
JAZZ-800. A single channel JAZZ-800 has 16-channels of audio.
68 | JAZZ-800
GUIDE TO INSTALLATION AND OPERATION
Audio Test Tones – by Audio Pairs
•
•
•
•
•
•
•
•
1/2 – Enables the selected audio test tone for the channels in Pair 1/2 (channels 1 & 2)
3/4 – Enables the selected audio test tone for the channels in Pair 3/4 (channels 3 & 4)
5/6 – Enables the selected audio test tone for the channels in Pair 5/6 (channels 5 & 6)
7/8 – Enables the selected audio test tone for the channels in Pair 7/8 (channels 7 & 8)
9/10 – Enables the selected audio test tone for the channels in Pair 9/10 (channels 9 & 10)
11/12 – Enables the selected audio test tone for the channels in Pair 11/12 (channels 11 & 12)
13/14 – Enables the selected audio test tone for the channels in Pair 13/14 (channels 13 & 14)
15/16 – Enables the selected audio test tone for the channels in Pair 15/16 (channels 15 & 16)
Audio Test Tone (Pairs) – Enables the selected audio test tone for the selected pair.
• ON – Enables the selected audio test tone
• OFF – Disables the selected audio test tone.
Press the Back button to move to the previous menu
Press the Home button to go back to the Main Menu
Note: At present there are 8 audio channels assigned to each video processing channel in a dual-channel
JAZZ-800. A single channel JAZZ-800 has 16-channels of audio.
JAZZ-800 | 69
GUIDE TO INSTALLATION AND OPERATION
Audio Test Tones – by Audio Channels
•
•
•
•
•
•
•
•
1 – Enables the selected audio test tone for channel 1
2 – Enables the selected audio test tone for channel 2
3 – Enables the selected audio test tone for channel 3
4 – Enables the selected audio test tone for channel 4
5 – Enables the selected audio test tone for channel 5
6 – Enables the selected audio test tone for channel 6
7 – Enables the selected audio test tone for channel 7
MORE – Takes the user to the next channel selection menu
Audio Test Tone (Channels 1-7) – Enables the selected audio test tone for the selected channel.
• ON – Enables the selected audio test tone
• OFF – Disables the selected audio test tone.
Press the Back button to move to the previous menu
Press the Home button to go back to the Main Menu
Note: At present there are 8 audio channels assigned to each video processing channel in a dual-channel
JAZZ-800. A single channel JAZZ-800 has 16-channels of audio.
70 | JAZZ-800
GUIDE TO INSTALLATION AND OPERATION
Audio Test Tones – by Audio Channels (continued)
•
•
•
•
•
•
•
•
8 – Enables the selected audio test tone for channel 8
9 – Enables the selected audio test tone for channel 9
10 – Enables the selected audio test tone for channel 10
11 – Enables the selected audio test tone for channel 11
12 – Enables the selected audio test tone for channel 12
13 – Enables the selected audio test tone for channel 13
14 – Enables the selected audio test tone for channel 14
MORE – Takes the user to the next channel selection menu
Audio Test Tone (Channels 8-14) – Enables the selected audio test tone for the selected channel.
• ON – Enables the selected audio test tone
• OFF – Disables the selected audio test tone.
Press the Back button to move to the previous menu
Press the Home button to go back to the Main Menu
Note: At present there are 8 audio channels assigned to each video processing channel in a dual-channel
JAZZ-800. A single channel JAZZ-800 has 16-channels of audio.
JAZZ-800 | 71
GUIDE TO INSTALLATION AND OPERATION
Audio Test Tones – by Audio Channels (continued)
•
•
15 – Enables the selected audio test tone for channel 15
16 – Enables the selected audio test tone for channel 16
Audio Test Tone (Channels 15-16) – Enables the selected audio test tone for the selected channel.
• ON – Enables the selected audio test tone
• OFF – Disables the selected audio test tone.
Press the Back button to move to the previous menu
Press the Home button to go back to the Main Menu
Note: At present there are 8 audio channels assigned to each video processing channel in a dual-channel
JAZZ-800. A single channel JAZZ-800 has 16-channels of audio.
72 | JAZZ-800
GUIDE TO INSTALLATION AND OPERATION
Advanced Menu
ADV – Takes the user to the Advanced menu
• NR – Takes the user to the Noise Reduction menu
• SOURCE – Takes the user to the Source menu
• APER – Adjusts the Aperture filter used in frame-rate conversions
• CLIP – Not functional / Future expansion
JAZZ-800 | 73
GUIDE TO INSTALLATION AND OPERATION
Noise Reduction Menu
NR – Takes the user to the Noise Reduction Menu
The Noise Reducer is a motion adaptive temporal recursive filter that works well in removing random and
Gaussian noise. Each pixel is labeled as motion, no motion, or noise. Each of these classes of pixels is
treated differently in the noise reduction process. For pixels in which there is no motion, low-level Gaussian
noise may be reduced via temporal processing by a weighted averaging over successive frames. For pixels
labeled as random noise, spatial processing replaces these pixels. Pixels labeled as being “in motion” are
retained “as is” to avoid artifacts that may be introduced through temporal processing.
NR – Enables/Disables Noise Reduction
• ON – Enables Noise Reduction
• OFF – Disables Noise Reduction
Press the Back button to move to the previous menu
Press the Home button to go back to the Main Menu
74 | JAZZ-800
GUIDE TO INSTALLATION AND OPERATION
Noise Reduction Menu (continued)
NR Bias – Adjusts the Noise Reduction Bias level. To adjust, turn the rotary encoder on the front panel.
• The range of adjustment is -6dB to +6dB.
• The default setting is 0dB.
Press the Back button to move to the previous menu
Press the Home button to go back to the Main Menu
SPLIT – Enables/Disables the noise reduction Split Screen mode
• ON – Enables the Noise Reduction, Split Screen mode. In this mode the image is divided vertically.
The Left half of the image will not have any noise reduction applied. The Right half of the image will
have noise reduction applied.
• OFF – Disables the Noise Reduction, Split Screen mode
Press the Back button to move to the previous menu
Press the Home button to go back to the Main Menu
JAZZ-800 | 75
GUIDE TO INSTALLATION AND OPERATION
Noise Reduction Menu (continued)
RED – Enables/Disables the noise reduction Red overlay
• ON – Enables the Noise Reduction, Red Overlay. In this mode, pixels that are interpreted as in
motion will be colored red.
• OFF – Disables the Noise Reduction, Red Overlay
Press the Back button to move to the previous menu
Press the Home button to go back to the Main Menu
In the Temporal Recursive Filter, the red overlay will show the pixels in the image that have been determined
to be in motion. These pixels will not have any noise reduction applied to them. This helps to identify which
pixels are being processed by the temporal recursive filter in the image.
76 | JAZZ-800
GUIDE TO INSTALLATION AND OPERATION
Source Menu
SOURCE – Takes the user to the Source Menu
• Auto - Select this mode if the source material is a mixture of film and video. This mode selects a
compromise algorithm that will look for film- and video-based material. For best results when the
source material is known to be exclusively either film or video, select the Film or Video modes
below.
• Film – Select this mode when the source material is film-originated. This mode will optimize the
algorithms for processing film-originated material.
• Video – Select this mode if the source material is interlaced video material. This mode will optimize
the algorithms for processing interlaced material.
Press the Back button to move to the previous menu
Press the Home button to go back to the Main Menu
JAZZ-800 | 77
GUIDE TO INSTALLATION AND OPERATION
Aperture Menu
APER – Takes the user to the Aperture Menu
When performing a frame rate conversion, the interpolation aperture is used to set the characteristics of the
filter used to create the synthetic information in a frame rate conversion. A setting of 0 (drama) will give a
sharper image with more potential for judder in motion areas. A setting of 3 (sport) will give a softer image
with more blur in motion areas.
• The range of adjustment is 0 to 3
• The default setting is 0
Press the Back button to move to the previous menu
Press the Home button to go back to the Main Menu
78 | JAZZ-800
GUIDE TO INSTALLATION AND OPERATION
Preset Menu
PRESET – Allows the user to save and recall system settings to system memory. The PRESETS will capture
all current settings for the system.
• PRESET1
• PRESET2
• PRESET3
• PRESET4
• PRESET5
• PRESET6
• DEFAULT – The DEFAULT PRESET is used as the power-on PRESET. Parameters saved to this
PRESET will be loaded when the system is powered-on.
Note: At present the Presets do not capture all system parameters. See Appendix B for a list of the
parameters that are being captured.
JAZZ-800 | 79
GUIDE TO INSTALLATION AND OPERATION
Preset Menu (continued)
PRESET1 – Saves the current system settings to PRESET1 or Recalls the stored values from PRESET1
RECALL – Recalls the user preset from system memory
• YES – Recalls the stored values from the selected PRESET
• NO – Cancels the Recall
Press the Back button to move to the previous menu
Press the Home button to go back to the Main Menu
SAVE – Saved the current state of the system to the select user preset
• YES – Saves the current system settings to the selected PRESET
• NO – Cancels the Save
Press the Back button to move to the previous menu
Press the Home button to go back to the Main Menu
SAVE USB – Not functional / Future expansion
LOAD USB - Not functional / Future expansion
80 | JAZZ-800
GUIDE TO INSTALLATION AND OPERATION
5 Configuration
Set-up Menu – Page 1
SETUP – Takes the user to the SETUP menu
• REF 1 – Takes the user to the External Reference 1 Menu
• REF 2 – Takes the user to the External Reference 2 Menu
• AUDIO – Not functional / Future expansion
• ANC – Takes the user to the Ancillary Data Menu
• CMPNT – Not functional / Future expansion
• CMPST – Not functional / Future expansion
• GPI – Not functional / Future expansion
• MORE – Takes the user to additional Setup menus
MORE – Takes the user to additional Setup menus
• KEY – Used to enter the System Access Key
• DISPLAY – Not functional / Future expansion
• SECTION – Not functional / Future expansion
• RMT IP – Set the IP of the JAZZ-800 chassis that the Remote Control Panel will communicate with
• IP – Allows the user to set the IP address for the chassis
• PNL IP – Allow the user to set the IP address for the Front Panel
• RS PORT – Not functional / Future expansion
• RESET – Not functional / Future expansion
JAZZ-800 | 81
GUIDE TO INSTALLATION AND OPERATION
External Reference 1 Menu
REF 1 – Takes the user to the External Reference 1 Menu
• INPUT – Selects the current input video source as the reference for video processing channel 1
• BLACK – Sets analog blackburst as the reference for video processing channel 1
• TRI-I – Sets HD tri-level sync (interlaced) as the reference for video processing channel 1
• TRI-P - Sets HD tri-level sync (progressive) as the reference for video processing channel 1
INPUT – Selects the current input video source as the reference for video processing channel 1
Press the Back button to move to the previous menu
Press the Home button to go back to the Main Menu
82 | JAZZ-800
GUIDE TO INSTALLATION AND OPERATION
External Reference 1 Menu (continued)
Black – Sets analog blackburst as the reference for video processing channel 1.
• PIXEL - Adjusts the Pixel timing of the output relative to the analog blackburst reference for video
processing channel 1.
• LINE - Adjusts the Line timing of the output relative to the analog blackburst reference for video
processing channel 1.
PIXEL - Adjusts the Pixel timing of the output relative to the analog blackburst reference for video processing
channel 1. To adjust, turn the rotary encoder on the control panel. Press the DEFAULT soft button to go back
to the default value.
• The range of adjustment is based on the current input/output format selection.
Press the Back button to move to the previous menu
Press the Home button to go back to the Main Menu
JAZZ-800 | 83
GUIDE TO INSTALLATION AND OPERATION
External Reference 1 Menu (continued)
LINE - Adjusts the Line timing of the output relative to the analog blackburst reference for video processing
channel 1. To adjust, turn the rotary encoder on the control panel. Press the DEFAULT soft button to go back
to the default value.
• The range of adjustment is based on the current input/output format selection.
Press the Back button to move to the previous menu
Press the Home button to go back to the Main Menu
84 | JAZZ-800
GUIDE TO INSTALLATION AND OPERATION
External Reference 1 Menu (continued)
TRI-I – Sets HD tri-level sync (interlaced) as the reference for video processing channel 1.
• PIXEL - Adjusts the Pixel timing of the output relative to the HD tri-level sync (interlaced) reference
for video processing channel 1.
• LINE - Adjusts the Line timing of the output relative to the HD tri-level sync (interlaced) reference for
video processing channel 1.
PIXEL - Adjusts the Pixel timing of the output relative to the HD tri-level sync (interlaced) reference for video
processing channel 1. To adjust, turn the rotary encoder on the control panel. Press the DEFAULT soft
button to go back to the default value.
• The range of adjustment is based on the current input/output format selection.
Press the Back button to move to the previous menu
Press the Home button to go back to the Main Menu
JAZZ-800 | 85
GUIDE TO INSTALLATION AND OPERATION
External Reference 1 Menu (continued)
LINE - Adjusts the Line timing of the output relative to the HD tri-level sync (interlaced) reference for video
processing channel 1. To adjust, turn the rotary encoder on the control panel. Press the DEFAULT soft
button to go back to the default value.
• The range of adjustment is based on the current input/output format selection.
Press the Back button to move to the previous menu
Press the Home button to go back to the Main Menu
TRI-P – Sets HD tri-level sync (progressive) as the reference for video processing channel 1.
• PIXEL - Adjusts the Pixel timing of the output relative to the HD tri-level sync (progressive) reference
for video processing channel 1.
• LINE - Adjusts the Line timing of the output relative to the HD tri-level sync (progressive) reference
for video processing channel 1.
Press the Back button to move to the previous menu
Press the Home button to go back to the Main Menu
86 | JAZZ-800
GUIDE TO INSTALLATION AND OPERATION
External Reference 1 Menu (continued)
PIXEL - Adjusts the Pixel timing of the output relative to the HD tri-level sync (progressive) reference for
video processing channel 1. To adjust, turn the rotary encoder on the control panel. Press the DEFAULT soft
button to go back to the default value.
• The range of adjustment is based on the current input/output format selection.
Press the Back button to move to the previous menu
Press the Home button to go back to the Main Menu
LINE - Adjusts the Line timing of the output relative to the HD tri-level sync (progressive) reference for video
processing channel 1. To adjust, turn the rotary encoder on the control panel. Press the DEFAULT soft
button to go back to the default value.
• The range of adjustment is based on the current input/output format selection.
Press the Back button to move to the previous menu
Press the Home button to go back to the Main Menu
JAZZ-800 | 87
GUIDE TO INSTALLATION AND OPERATION
External Reference 2 Menu
REF 2 – Takes the user to the External Reference 2 Menu
Note: Refer to External Reference 1 Menu (page 77) for details.
88 | JAZZ-800
GUIDE TO INSTALLATION AND OPERATION
Ancillary Data Menu
ANC – Takes the user to the Ancillary Data Menu
• TC – Takes the user to the Timecode Menu
• CC – Takes the user to the Closed Caption menu
• INDEX – Not functional / Future expansion
JAZZ-800 | 89
GUIDE TO INSTALLATION AND OPERATION
Timecode Menu
TC – Takes the user to the Timecode Menu
• TC OUT – Selects the line on which timecode will be inserted in an SD output.
• TC GEN – Not functional / Future expansion
TC OUT – Selects the line on which timecode will be inserted in an SD output. To adjust, turn the rotary
encoder on the control panel. Press the DEFAULT soft button to go back to the default value.
• The range of adjustment is Line 9 to Line 19
• The default setting is 14
Press the Back button to move to the previous menu
Press the Home button to go back to the Main Menu
90 | JAZZ-800
GUIDE TO INSTALLATION AND OPERATION
Closed Caption Menu
CC – Takes the user to the Closed Caption menu
• HD IN
• HD OUT
• DET FLD 2
• CC – Enables Closed Caption support
HD IN – Used to select the location of the closed caption information in the incoming HD signal. To adjust,
turn the rotary encoder on the control panel. Press the DEFAULT soft button to go back to the default value.
• The range of adjustment is Line 9 to Line 19
• The default setting is Line 9
Press the Back button to move to the previous menu
Press the Home button to go back to the Main Menu
JAZZ-800 | 91
GUIDE TO INSTALLATION AND OPERATION
Closed Caption Menu (continued)
HD OUT - Used to select the location for inserting the closed caption information in the output HD signal. To
adjust, turn the rotary encoder on the control panel. Press the DEFAULT soft button to go back to the default
value.
• The range of adjustment is Line 9 to Line 19
• The default setting is Line 9
Press the Back button to move to the previous menu
Press the Home button to go back to the Main Menu
DET FLD 2 – Enables the detection of field 2 closed caption information
• ON – Enables Field 2 Detection
• OFF – Disables Field 2 Detection
Press the Back button to move to the previous menu
Press the Home button to go back to the Main Menu
92 | JAZZ-800
GUIDE TO INSTALLATION AND OPERATION
Closed Caption Menu (continued)
CC – Enables Closed Caption processing
• ON – Enables Closed Caption support
• OFF – Disables Closed Caption support
Press the Back button to move to the previous menu
Press the Home button to go back to the Main Menu
JAZZ-800 | 93
GUIDE TO INSTALLATION AND OPERATION
Setup Menu – Page 2
MORE – Takes the user to additional Setup menus
• KEY – Used to enter the System Access Key
• DISPLAY – Not functional / Future expansion
• SECTION – Not functional / Future expansion
• RMT IP – Set the IP of the JAZZ-800 chassis that the Remote Control Panel will communicate with
• IP – Allows the user to set the IP address for the chassis
• PNL IP – Allow the user to set the IP address for the Front Panel
• RS PORT – Not functional / Future expansion
• RESET – Not functional / Future expansion
94 | JAZZ-800
GUIDE TO INSTALLATION AND OPERATION
Key (License Key) Menu
KEY – Used to enter the “Access” or License Key to configure the JAZZ-800 for the purchased features and
options.
• LEFT – Moves the cursor left, one position
• RIGHT - Moves the cursor right, one position
• UP – Scrolls up through the list 0-9, A-Z
• DOWN – Scrolls down through the list 0-9, A-Z
• RESET – Resets or Clears the currently entered Key
• ENTER – Press to accept the Access Key
JAZZ-800 | 95
GUIDE TO INSTALLATION AND OPERATION
Remote IP Address Menu
RMT IP – Used to enter the IP address of the chassis that you wish to connect to with a remote control
panel.
• LEFT – Moves the cursor left, one position
• RIGHT - Moves the cursor right, one position
• UP – Scrolls up through the list 0-9
• DOWN – Scrolls down through the list 0-9
• DSCNCT – Disconnects the Remote Control Panel from the JAZZ-800 chassis
• CNCT – Connects the Remote Control Panel to the Chassis selected by the Remote IP Address
96 | JAZZ-800
GUIDE TO INSTALLATION AND OPERATION
IP Address Menu
IP – Set the IP address for the JAZZ-800 chassis
• DHCP – Assign an IP address to the JAZZ-800 chassis using Dynamic Host Configuration Protocol
(DHCP)
• STATIC IP – Allows the JAZZ-800 chassis IP address to be manually entered
• SUBNET – Not functional / Future expansion
DHCP - assign an IP address to the JAZZ-800 chassis using Dynamic Host Configuration Protocol (DHCP)
• ON – Enabled DHCP IP address assignment
• OFF – Disabled DHCP
JAZZ-800 | 97
GUIDE TO INSTALLATION AND OPERATION
IP Address Menu (continued)
STATIC IP – Allows the IP address of the JAZZ-800 chassis to be manually entered
• LEFT – Moves the cursor left, one position
• RIGHT - Moves the cursor right, one position
• UP – Scrolls up through the list 0-9
• DOWN – Scrolls down through the list 0-9
• ENTER – Press to accept the Access Key
98 | JAZZ-800
GUIDE TO INSTALLATION AND OPERATION
Control Panel IP Address Menu
PNL IP – Set the IP address for the JAZZ-800 Local Control Panel
• DHCP – Assign an IP address to the JAZZ-800 Local Control Panel using Dynamic Host
Configuration Protocol (DHCP)
• STATIC IP – Allows the JAZZ-800 Local Control Panel IP address to be manually entered
• SUBNET – Not functional / Future expansion
DHCP - assign an IP address to the JAZZ-800 Local Control Panel using Dynamic Host Configuration
Protocol (DHCP).
• ON – Enabled DHCP IP address assignment
• OFF – Disabled DHCP
JAZZ-800 | 99
GUIDE TO INSTALLATION AND OPERATION
Control Panel IP Address Menu (continued)
STATIC IP – Allows the IP address of the JAZZ-800 Local Control Panel to be manually entered
• LEFT – Moves the cursor left, one position
• RIGHT - Moves the cursor right, one position
• UP – Scrolls up through the list 0-9
• DOWN – Scrolls down through the list 0-9
• ENTER – Press to accept the Access Key
100 | JAZZ-800
GUIDE TO INSTALLATION AND OPERATION
6
System Messages
System Messages – Non-critical Alerts
A non-critical system fault indicating that there is a problem with one or
more of the internal fans.
A non-critical system fault indicating that there is a temperature problem
in the chassis.
A non-critical system fault indicating that there is a problem with
External Reference 1.
A non-critical system fault indicating that there is a problem with
External Reference 2.
JAZZ-800 | 101
GUIDE TO INSTALLATION AND OPERATION
System Message – Critical Alerts
A critical system fault indicating that there is a problem with the
communication between the Audio option board and the main chassis.
A critical system fault indicating that there is a problem with the
communication between the Local Control Panel and the main chassis.
A critical system fault indicating that there is a problem with the internal
fans.
A critical system fault indicating that there is a problem with the one or
more of the power supply voltages on the chassis motherboard.
102 | JAZZ-800
GUIDE TO INSTALLATION AND OPERATION
A critical system fault indicating that there is a problem with the internal
temperature of the chassis.
A critical system fault indicating that there is a problem with the
communication between the Video option board and the main chassis
.
JAZZ-800 | 103
GUIDE TO INSTALLATION AND OPERATION
7
Specifications
VIDEO INPUT
SD- & HD-SDI Input (2):
• SD/HD-SDI, 10-bit serial digital input at 270Mb/s per SMPTE-259-C or 20-bit serial digital input at
1.485Gb/s per SMPTE 292-1997, SD audio embedding per SMPTE 272M or HD audio embedding per
SMPTE-299
• Formats SD: 480i59.94, 576i50
• Formats HD: SMPTE-274M: 1080i59.94, 1080i50
• Formats HD: SMPTE-296M: 720p59.94, 720p50
• Cable Length SD: 300m (1000ft.) Belden 1694A at 270Mb/s and HD: 110m (350ft.) Belden 1694A at
1.485Gb/s
SD- & HD-SDI Output (4):
• SD/HD-SDI, 10-bit serial digital output at 270Mb/s per SMPTE-259-C or 20-bit serial digital output at
1.485Gb/s per SMPTE 292-1997, SD audio embedding per SMPTE 272M or HD audio embedding per
SMPTE-299
• Formats SD: 480i59.94, 576i50
• Formats HD: SMPTE-274M: 1080i59.94, 1080i50
• Formats HD: SMPTE-296M: 720p59.94, 720p50
• Return Loss: >15dB up to 1.5GHz per SMPTE-292M
• Jitter: <0.2UI as per SMPTE-292M
Reference Input (2)
• SD Blackburst – SMPTE-170M or HD Tri-level Sync – SMPTE 274M / SMPTE296M
AUDIO INPUT/OUTPUT
Embedded audio
• 16-channels of embedded audio
• Sampling: 48KHz
• Quantization: SD: 20-bits, HD: 24-bits
Note: At present there are 8 audio channels assigned to each video processing channel in a dual-channel
JAZZ-800. A single channel JAZZ-800 has 16-channels of audio.
Ancillary Data Input/Output:
Closed Caption
• ITU-608 pass-through for 480i59.94 IO processing
• ITU-608 to ITU-708 translation for 480i59.94 up-conversions to 720p59.94 and 1080i59.94
• ITU-708 pass-through for 720p59.94 to 1080i59.94 and 1080i59.94 to 720p59.94
• Line 21 extraction for 60Hz down-conversions, 720p59.94 and 1080i59.94 to 480i59.94
Vertical Interval Time Code (VITC)
• Supports vertical interval timecode (VITC) delay to automatically match the video processing delay.
104 | JAZZ-800
GUIDE TO INSTALLATION AND OPERATION
PROCESSING FEATURES
Video Proc Amp
• Video gain – adjustable +/- 6dB, default = 0
• Black Level – adjustable +/- 30mV, default = 0
• Hue – adjustable -179 to +178, default = 0
• Saturation – adjustable +/- 6dB, default = 0
• R-Y – adjustable +/- 200mv, default = 0
• B-Y – adjustable +/- 200mV, default = 0
Enhance
• Detail Enhance - adjustable 0 to 100, default = 25
• Sharpness - adjustable 0 to 100, default = 0
Color space conversions
• Operates automatically based on the selected conversion
• There are no user controls for this function
Temporal Recursive Noise Reduction Filter
• Bias - adjustable +/- 6dB, default = 0
• Split screen - On/Off
• Red Overlay - On/Off
Auto, Film, Video
• Allows selection of auto, film, or video processing modes. Default = Auto
Aspect Ratio Conversion
• Fixed Aspect Ratio Conversions
o Common Top & Bottom
o Common Sides
o Anamorphic
o Flexview
o 14:9
• H & V Trim, 0 to 200 pixels SD, 0 to 200 lines SD, 0 to 400 pixels HD, 0 to 400 lines HD
• Zoom/Crop – On/Off (Zoom by 3, Crop by 3)
Frame Sync with Audio Sample-rate Converters
Test Pattern (Video) Generator
• Screen boundary with circle
• 75 % Color Bars
• Gray Bars
• Resolution alignment
• RGB Bars
• Grid
Note: The available test patterns may change in the final release of software
Audio Processing
• Supports audio level adjustment per audio channel
o -32dB to +16dB for embedded audio
• Supports audio phase adjustment per audio channel
o +/- 180 degrees invert
JAZZ-800 | 105
GUIDE TO INSTALLATION AND OPERATION
Delay
• The processing delay for all application is 4 frames.
• The JAZZ-800 has the ability to adjust the audio delay from -100mS to +5 seconds.
OTHER
10/100-BaseT Ethernet (for remote control)
• User assignable IP address
• Supports DHCP
User Presets
• The JAZZ-800 supports 6 User Presets.
• Preset 1 to Preset 4 will store ALL parameters
• Preset 5 is fixed to Remote. It will place the system in remote when triggered
• Preset 6 is fixed to Tally. It will place the system in the On Air mode when triggered
Redundant Power Supply
• The JAZZ-800 supports a redundant power supply.
• The redundant supply has two separate universal AC inputs (90-240 VAC 50/60Hz)
Note: The power supplies are not hot swappable. Two separate mains inputs are provided for facilities that
support independent power grids for redundancy.
106 | JAZZ-800
GUIDE TO INSTALLATION AND OPERATION
Appendix A – Cable & Pin-outs
Analog Audio I/O Break-Out Cable
Connector: Molex LFH
LFH
Pos
Signal Description
XLR
(Female)
LFH
Pos
Signal Description
XLR
(Male)
1
Channel 8 RX+ Signal
2
31
Channel 8 TX+ Signal
2
2
Channel 8 RX Ground
1
32
Channel 8 TX Ground
1
3
Channel 8 RX- Signal
3
33
Channel 8 TX- Signal
3
4
NC
34
NC
5
Channel 7 RX+ Signal
2
35
Channel 7 TX+ Signal
2
6
Channel 7 RX Ground
1
36
Channel 7 TX Ground
1
7
Channel 7 RX- Signal
3
37
Channel 7 TX- Signal
3
8
NC
38
NC
9
Channel 6 RX+ Signal
2
39
Channel 6 TX+ Signal
2
10
Channel 6 RX Ground
1
40
Channel 6 TX Ground
1
11
Channel 6 RX- Signal
3
41
Channel 6 TX- Signal
3
12
NC
42
NC
13
Channel 5 RX+ Signal
2
43
Channel 5 TX+ Signal
2
14
Channel 5 RX Ground
1
44
Channel 5 TX Ground
1
15
Channel 5 RX- Signal
3
45
Channel 5 TX- Signal
3
16
Channel 4 RX+ Signal
2
46
Channel 4 TX+ Signal
2
17
Channel 4 RX Ground
1
47
Channel 4 TX Ground
1
18
Channel 4 RX- Signal
3
48
Channel 4 TX- Signal
3
19
NC
49
NC
20
Channel 3 RX+ Signal
2
50
Channel 3 TX+ Signal
2
21
Channel 3 RX Ground
1
51
Channel 3 TX Ground
1
22
Channel 3 RX- Signal
3
52
Channel 3 TX- Signal
3
23
NC
53
NC
24
Channel 2 RX+ Signal
2
54
Channel 2 TX+ Signal
2
25
Channel 2 RX Ground
1
55
Channel 2 TX Ground
1
26
Channel 2 RX- Signal
3
56
Channel 2 TX- Signal
3
27
NC
57
NC
28
Channel 1 RX+ Signal
2
58
Channel 1 TX+ Signal
2
29
Channel 1 RX Ground
1
59
Channel 1 TX Ground
1
30
Channel 1 RX- Signal
3
60
Channel 1 TX- Signal
3
JAZZ-800 | 107
GUIDE TO INSTALLATION AND OPERATION
AES Audio I/O Break-Out Cable (Balanced)
Connector: Molex LFH
LFH Pos Signal Description
XLR (Female)
LFH Pos Signal Description
XLR (Male)
1
Channel 8 RX+ Signal
2
31
Channel 8 TX+ Signal
2
2
Channel 8 RX Ground
1
32
Channel 8 TX Ground
1
3
Channel 8 RX- Signal
3
3
4
NC
5
Channel 7 RX+ Signal
6
33
Channel 8 TX- Signal
34
NC
2
35
Channel 7 TX+ Signal
2
Channel 7 RX Ground
1
36
Channel 7 TX Ground
1
7
Channel 7 RX- Signal
3
37
Channel 7 TX- Signal
3
8
NC
38
NC
9
Channel 6 RX+ Signal
2
39
Channel 6 TX+ Signal
2
10
Channel 6 RX Ground
1
40
Channel 6 TX Ground
1
11
Channel 6 RX- Signal
3
3
12
NC
13
Channel 5 RX+ Signal
14
41
Channel 6 TX- Signal
42
NC
2
43
Channel 5 TX+ Signal
2
Channel 5 RX Ground
1
44
Channel 5 TX Ground
1
15
Channel 5 RX- Signal
3
45
Channel 5 TX- Signal
3
16
Channel 4 RX+ Signal
2
46
Channel 4 TX+ Signal
2
17
Channel 4 RX Ground
1
47
Channel 4 TX Ground
1
18
Channel 4 RX- Signal
3
48
Channel 4 TX- Signal
3
19
NC
49
NC
20
Channel 3 RX+ Signal
2
50
Channel 3 TX+ Signal
2
21
Channel 3 RX Ground
1
51
Channel 3 TX Ground
1
22
Channel 3 RX- Signal
3
52
Channel 3 TX- Signal
3
23
NC
53
NC
24
Channel 2 RX+ Signal
2
54
Channel 2 TX+ Signal
2
25
Channel 2 RX Ground
1
55
Channel 2 TX Ground
1
26
Channel 2 RX- Signal
3
56
Channel 2 TX- Signal
3
27
NC
57
NC
28
Channel 1 RX+ Signal
2
58
Channel 1 TX+ Signal
2
29
Channel 1 RX Ground
1
59
Channel 1 TX Ground
1
30
Channel 1 RX- Signal
3
60
Channel 1 TX- Signal
3
108 | JAZZ-800
GUIDE TO INSTALLATION AND OPERATION
AES Audio I/O Cable (Unbalanced)
Connector: Molex LFH Mtx 50
LFH
Pos
Signal Description
BNC
Connector
1
Channel 8 RX+ Signal
1 (Pin)
2
NC
3
Channel 8 RX- Signal
4
NC
5
Channel 7 RX+ Signal
6
NC
7
Channel 7 RX- Signal
8
NC
9
Channel 6 RX+ Signal
10
NC
11
Channel 6 RX- Signal
12
NC
13
Channel 5 RX+ Signal
2 (Shield)
1 (Pin)
LFH
Pos
Signal Description
BNC
Connector
31
Channel 8 TX+ Signal
1 (Pin)
32
NC
33
Channel 8 TX- Signal
34
NC
35
Channel 7 TX+ Signal
36
NC
37
Channel 7 TX- Signal
38
NC
39
Channel 6 TX+ Signal
40
NC
41
Channel 6 TX- Signal
42
NC
1 (Pin)
43
Channel 5 TX+ Signal
2 (Shield)
1 (Pin)
2 (Shield)
2 (Shield)
1 (Pin)
2 (Shield)
1 (Pin)
2 (Shield)
1 (Pin)
14
NC
44
NC
15
Channel 5 RX- Signal
2 (Shield)
45
Channel 5 TX- Signal
2 (Shield)
16
Channel 4 RX+ Signal
1 (Pin)
46
Channel 4 TX+ Signal
1 (Pin)
17
NC
47
NC
18
Channel 4 RX- Signal
48
Channel 4 TX- Signal
19
NC
49
NC
20
Channel 3 RX+ Signal
50
Channel 3 TX+ Signal
21
NC
51
NC
22
Channel 3 RX- Signal
52
Channel 3 TX- Signal
23
NC
53
NC
24
Channel 2 RX+ Signal
54
Channel 2 TX+ Signal
25
NC
55
NC
26
Channel 2 RX- Signal
56
Channel 2 TX- Signal
27
NC
57
NC
28
Channel 1 RX+ Signal
58
Channel 1 TX+ Signal
29
NC
59
NC
30
Channel 1 RX- Signal
60
Channel 1 TX- Signal
2 (Shield)
1 (Pin)
2 (Shield)
1 (Pin)
2 (Shield)
1 (Pin)
2 (Shield)
2 (Shield)
1 (Pin)
2 (Shield)
1 (Pin)
2 (Shield)
1 (Pin)
2 (Shield)
JAZZ-800 | 109
GUIDE TO INSTALLATION AND OPERATION
Appendix B – Preset Files
The following table details the parameters that are captured in the user presets.
Function
Command
Comments
Aperture Slider
APERTURE
for frame-rate conversions
Aspect Ratio
ASPECT
select fixed aspect ratios
B-Y Level
B-Y
Black Level
BLACKLEVEL
Closed Caption Detect Field 2 Information
CLOSED CAP DETECT FIELD 2
Closed Caption Detection Line
CLOSED CAP DETECT LINE
Closed Caption on/off
CLOSED CAP ON/OFF
Closed Caption Output Line Number
CLOSED CAP OUTPUT LINE
Detail Enhance
DETAILENHANCE
Edge Trim – Horizontal
EDGETRIM X
Edge Trim – Vertical
EDGETRIM Y
IN1 / IN2 / REF1 / REF2
EXT REFERENCE
select external reference source
INPUT / BLACKBURST / TRI-I / TRI-P
EXT REF TYPE
select external reference type
Hue Phase
HUE
Input / Output Format
IOFRMAR
Input / Output (Video) Source
IOSOURCE
Proc Amp Bypass
PROCAMP BYPASS
R-Y Level
R-Y
Noise Reduction Red Overlay
RED OVERLAY
for HD outputs
Saturation
SATURATION
Auto / Film / Video
SOURCETYPE
Noise Reduction Split Screen
SPLITSCREEN
Video Test Signals
TESTSCREEN
enables video test signals
Timecode Output Line Select
TIME CODE OUTPUT LINE
for SD outputs
Noise Reduction On/Off
TRNR
Noise Reduction Bias Level
TRNRBIAS
Video Gain
VIDEOGAIN
Zoom / Crop
ZOOMCROP
110 | JAZZ-800