1
c
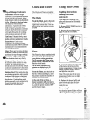
Anti-TipBracket
ApplianceRegistration
Careand Cleaning
ControlPanel
o
3,5
2
15-19
17
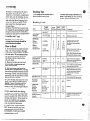
Features
6,7
FlooringUnder Range
5
Leveling
5
Lift-UpCooktop
16
Modeland SerialNumbers
2
Oven
9,10
Air Adjustment
20
Baking,BakingGuide
11,12
BroilerPan and Rack
19
Broiling,BroilingGuide
14
ContinuousCleaningCare 15
10
ControlSettings
DoorRemoval
18
Light;BulbReplacement 10,18
LightingInstructions
9, 10
OvenBottomRemoval
19
Preheating
11,12
Roasting,RoastingGuide
13
10,19
Shelves
ThermostatAdjustment
20
VentDuct
10
ProblemSolver
22
RepairService
23
2-5
SafetyInstructions
SurfaceCooking
8,9
Burner Grates
16
Burners
17
Clockand Timer
9
ControlSettings
8
CookwareTips
.9
Drip Pans ‘
16
FlameSize
8
LightingInstructions
8
Warranty “
BackCover
GEAmwtw Cmtw@
&wa&?2&2#w
,)
;“.~.
[Lr
FOR
YOUR sAFE”rY
you smell gas:
windows.
la open
2sDon’t touch
electrical switches:
3. Extinguish
any
If
If youdon’tunderstandsomething
or needmorehelp,write(include
yourphonenumber):
ConsumerAffairs
GE Appliances
AppliancePark
Louisville.KY40225
write
downthemodel
andserialInl.n-nbers.
You’llfindthemon a labellocated
in the-burnerboxunderthe
cookmp.
Seepage6.
Thesenumbersare also on the
ConsumerProductOwnership
RegistrationCard that camewith
yourrange.Beforesendingin this
card, pleasewritethesenumbers
here:
open
flame.
4.Immediatelycall
your gas supplier,
*Ck3n’~
iwnehxtrksNRches
Cm43P
CM’
betxw$eSparksmay
ignite the C&m,
FOR YOUR
SAETY
Do not store or use
gasoline or’ other
flammablevapom and
liquids in the vicinity
of this or any other
appliance,
ModelNumber
Serial Number
Usethesenumbersin any
correspondenceor servicecaHs
concerningyourrange.
damagedIrm-Rge. ,
●
hnmediatelycontactthe dealer(or
builder)that soldyouthe range.
save
time
and money.
Beforeym.1request
service
e. e
~~eck the problem
businesses to warn customers
OfpOtentialexpOsurcto such
substances.
Gasappliancescan cause
minor exposure tOthree of these
substances,namelybenzene,
formaldehyde
andsoot,caused
primarilybytheincomplete
combustionofnaturalgasor U
fuels.Properlyadjustedranges,
indicatedbya Muishratherthan
a yellowflame,willminimize
incompletecombustion.Exposure
tothesesubstancescanbe
minimizedMther byventing
withan openwindowor using
a ventilationfanor hood.
~ Havetheinstallershowyou
theh!atim d’therangegas
clm=off
vim%?
andimwtoshut
itoffif’m!cessary.
~ Have yourrangeinstilled
andproperlygroundedbya
quaiifiedinsbller,inaccordance
withtheInstallationInstructions.
Anyadjustmentandserviceshould
beperformedonlybyqualified
gas range installers or service
technicians.
F#J&
-==
Hyollreceived
a
TheCaliforniaSafe1.3rinking
WaterandToxicErtforcemeni
ActrequirestheGovernorof
(1.diforniatopublisha listof
substancesknownto thestate
tocausecancerand i-equires
~o]veron
page22. R listscausesof minor
operatingproblemsthat youcan
correctyourself.
2
@~~~~~~~:
~~~~f~ <}~
INTEWT To CRILDMN
mT
SHOULDNOTBE
CABIWB ABOW i-$RANGE
‘m IONTHEBACKSPLASH
OF A MNGGCHILDREN
CLHVH3HNGONTHERANGE
mm~
TOREACHITHvISCOULDBE
SERKKJSLY
INJURED.
w~G–All cantipandranges
~ Be sure 4 packingmaterials
areremwxi fmmtherange
beforeoperatingit, to preventfire
or smokedamageshodd the
packingmaterialignite.
@Locaterangeoutof kitchen
traffkpathandoutof drafty
i!omfions
to preventpilotoutage
(m modelsso equipped)and
or air
cireulahfi~
Besureyourrangeis correctly
adjustedby a qualified
serviceWhich or ihstdk’ for
the
q-p d gas (Naturalor u?) on
whichit is to be used. Your
rangecanbeconvertedforuse
cmeithertypeofgas.See
kMallationInstructions.
~ AfterprolongedUSC d’ a
ralqy+ highfloor temperatures
mayresult and many floor
W’eringsVW notWitbwnd
thiskind of use.Neverinstallthe
nmgeovervinyltileor linoleum
thatcannotwithstandsuchtypeof
use.Neverinstallitdirectlyover
interiorkitchencarpeting.
-wn.g
-YimrRange
e Dm9tkm! childrenakmeor
unattendedwherea range is
M
or h?.G~2Fation.
‘h3y Cdd be
seriouslyburned.
injurycould
resuk To
prevent
wxkkmd
tippingofthe
range,attach
it tothewall
or floorby
installingthe
ANTI-TIPbracketsupplie{(on
modelssoequipped).Tocheckif
thebracketis installedandengaged
properly,carefullytiptherange
forwardtocheckiftheANTI-TIP
bracketis engagedwiththe
levelingleg.
If youpulltherangeoutfrom
thewallforanyreason,make
suretherearlegis returnedto its
positionin thebracketwhenyou
pushtherangeback.
63~t lNUTMTgratu
and other
surfacescoolbeforetouching
themm leavingthemwhere
Chihk!ncanreach‘them.
@Neverwearloosefittingor
hanginggarmen@whileusing
theappliance.Flammable
materialcouldbeignitedif
broughtincontactwithflame
or hotovensurfacesandmay
causesevereburns.
* Neverwe yourappliancefor
warmingorheatingthemm.
Prolongeduseoftherange
withoutadequateventilation
canbe hazardous.
3
.
...
@h
notuse water
on grease
fires.
Neverpickupa flaming
pan.‘I’urnoffburner,then
smotherflamingpanbyccwcring
pancompletelywithwellfitting
lid,cookiesheetor flattray.
Naminggreaseoutsidea pan
canbeputoutbycoveringwiih
bakingsodaor,if available,a
multi-purposedrychemical
or foamfire~xtinguisher.
@Donot storeflammable
materialsinanmm ornear
thecooktop.
e Donot.M cookinggrease
orotherflammablematerials
accmmdateinorneartherange.
@Whencookingpork9follow
thedirectionsexactlyandalways
cookthemeattoaninternal
temperatureofat least170”E
Thisassuresthat,in theremote
possibilitythattrichinamaybe
presentinthemeat,it willbe
killedandmeatwillbe safeto eat.
SW4i!MX3
Cooting
~MwaysusetheMIX position
whenignitingtopburnersand
makesuretheburnershaveignited.
@Neverleavesurfaceburners
unattendedatHIGHflame
settings.Boilovercauses
smokingandgreasyspillovers
thatmaycatchonfire.
* Adjusttopburnerflamesize
so it doesnotextendbeyondthe
edgeofthecookingUBtensiL
Excessiveflameis hazardous.
~lhe onlydry pot hMersmoistor damppotholdersonhot
surfacesmayresukin burnsfrom
steam.Donotletpotholders
comenearopenflameswhen
liftingutensils.Donotusea towel
or otherbulkyclothinplaceofa
potholder.
possibilityd’
hums, ignitionof flammable
materials,andspillage,turn
cookwarehand~estowardtheside
or backoftherang-ewithout
extendingoveradjacentburners.
~Aiw’ays
turn surface!burner to
OI?Fbeforeremovingutensil.
a carefully watchfoodsbeing
fried at HI flmllesetting.
e ly~~~~
~]~~~~~~~~~~(~~~
opetings)of the range. They
providetheair inletandoutlet
whichis necessaryfortherange
tooperateproperlywithcorrect
combustion.
e ~~ n~~~~ea w& ~~~~e
cookingsurfaceif the wokhas 24
roundmetal!ringwhichispkmed
overthe burner grate to support
the wok.Thisringactsasa heat
tmpwhichmaydamagetheburner
grateandburnerhead.Also,it
maycausetheburnerto work
improperly.Thismaycausea
carbonmonoxidelevelabovethat
allowedbycurrentstandards,
resultingin a heakhhazard.
a Foodsfor fryingshouldbe as
dry as possible.Frostonfrozen
foodsor moistureon freshfoods
cancausehotfattobubbleupand
oversidesofpan.
~l.heleast possib~eamount of
fat for effectiveshaibv or deepfat frying.Fillingthepantoofill
offatcancausespilloverswhen
foodis added.
e H’a combinationof oilsor
fatswillbe usedin frying9stir
togetherbeforeheating,or as fats
meltslowly.
@Alwaysheat fat s10wly9
and
watchas it heats.
@Usedeepfat thermometer
V4”heMNUW
possibletoprevent
overheatingfatbeyondthe
smokingpoint.
@~Q]~~nimize the
~Use~~operpan size—Avoid
pansthatareunstableor easily
tipped.Selectutensilshavingilat
bottomslargeenoughtoproperly
containfoodavoidingboilovers
andspillovers,butlargeenough
tocoverburnergrate.ThisWN
bothsavecleaningandprevent
hazardousaccumulationsoffood,
sinceheavyspatteringorspillovers
lefton rangecanignite.Usepans
withhandlesthatcanbeeasily
graspedandremaincool.
~Useonlygbss cookwarethat
is recommended
foruseongas
burners.
~Keep811plasticsawayfrom
topburners.
@Toavoidthepossibilityof a
burn,ahvaysbecertainthatthe
controlsforallburnersareat
OFFpositionandall gratesare
coolbeforeattemptingtoremove
thegrate.
aWhenflamingfoodsunder
the hood,turn the fanoff.The
fan,if operating,mayspread
theflame.
@Mrangeis 10cMAI
neara
window,do notuselongcurtains
whichcouldblowoverthetop
burnersandcreatea firehazard.
@Whena pilotgoesout9(on
modelssoequipped),youwill
detecta faintodorofgasasyour
signalto relightpilot.When
relightingpilot,makesureburner
controlsarein OFFpositionand
followinstructionsdescribedon
followingpagesto relight.
~If yousmellgas9andyouhave
alreadymadesurepilotsarelit,
turnoffthegastotherangeand
calla qualifiedservicetechnician.
Neveruseanopenflametolocate
a leak.
4
&*$
w
BaKI~, Broilingand
Roastifig
=Do notuse oven fora storage
area.
@Standawtiyfromtherange
whenopeningthedoorof a hot
oven.Thehotairorsteamlv}tich
escapescancauseburnsto
hands,facean4Yor
eyes.
~Keepovenfreefromgrease
buildup.
@Placeovenshelvesindesired
positionwhileoveniscool.
@Pullingoutshelftotheshelf
stopis a convenience
inlifting
heavyfoods.Mis alsoa
precautionagainstburnsfrom
touchinghotsurfacesof the
doororovenwalls.
~Don’theatunopenedfood
containersintheoven.Pressure
couklbuildupandthecontai
420uM
burstcausinganinjury.
e ~on9tusea~uminum
foil
anywhereintheovenexceptas
describedinthisbook.Misuse
couldresultina firehazardor
damagetotherange.
*Whenusingcookingor
roastingbagsinoven9followthe
manufacturer’s
direction.
@Useonlyglasscookware
thatis recommended
foruse
in gasovens.
@Alwaysremovebroi!erpan
frombroilercompartmentas
soonasyoufinishbroiling.
Greaseleftinthepancancatch
fireif ovenis used.without
removingthegreasefromthe
broilerpan.
Flooringunder
the Rawe
* when!k2FoiIingy
if’meat
isWI
dose tothe fkme~the fat
may
ignite.
Trimexcessfat
toprevent
excessiveflare-ups.
e RfskeSMlre
broiler planis in
placecorrectlyto reducethe
possibilityofgreasefires.
@Hyous~louidhavea grease
firein the broiler panyturnoff
oven,andkeepdrawerclosedto
con[ainfireuntilit burnsout.
!4.’bur
range, likeso many other
householditems, is heavy and
can settle into Sof’tfloor em’%?r’ings
such as cushionedvinyl. When
movingthe rangeon thistypeof
flooring,use care.
Do not install the range over
unlessyou
kitchen carpeting
placean insulatingpad or sheetof
l/4-inch-thickplywoodbetween
the rangeand carpeting.
W72eFI
thej?oor coveringendsd
thejront of the range, the areathat
cled~
Your m~e
@clean dy partslistedinthis
useandCii’emodi.
e Keeprange dean -andfrw d
the rangewillrest on shouldbe
builtup withplywoodor similar
materialto the samelevelor higher
thanthefloorcovering.Thiswill
allowtherangeto be movedfor
cleaningor servicing.
accumulations
of gm!aseor
Spillovers whichmay ignite.
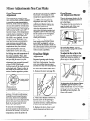
Wveliw the Range
IfYouNeedservice
Levelinglegsare locatedon each
cornerof thebaseofthe range.
Yourrangemustbe levelin orderto
producepropercookingand baking
results.Afterit is initsfinallocation,
placea levelhorizontallyon an
ovenshelfand checkthe levelness
frontto backand sideto side. Level
the rangeby adjustingthe leveling
legsor byplacingshimsunderthe
cornersas needed.
Oneof the rear levelingscrewswill
engagetheANTI-TIPbracket(allow
for somesideto sideadjustment).
Allowa minimumclearanceof 1/8”
betweenthe rangeandthe leveling
screwthatis to be installedinto
the ANTI-TIPbracket.
WidVrhe ProbEemSo$w%’”
page 22 Of’this book.
attempt
torepair
jptu-t
d’ your
~ Dm9t
m’ H@Nemy
rangelmkss it is specifically
recommendedin this book. All
otherservicingshouldbe referred
toa qualifiedtechnician.
5
-
JGEKx6GPJ
with Standing PiJotIgnition
XX!3C16GM
withAutomaticPilotlessIgnition
K%C17GN withBrushedChromeCooktop,Automatic
Pilotless Ignition
JGJ3CMGPJ
Explained
on page
JGBC~~GW
JG~Cl~GEJ
2
@
@
8
4
4
8, 16,17
4
4
4 OvenTemperatureControl
10
e
e
5 ClockandTimer
9
*
e
10
*
e
10,18
*
e
10
e
e
10,19
2
2
10 OvenShelfSupports
10
e
e
H BroilerPanand Rack
19
e
e
12 RemovableOvenDoor
(easilyremovedfor ovencleaning)
18
e
e
13 Lift-UpCooktop
(locksin up positionto simplifycleaningunderneath)
16
@
e
14 RemovableOvenBottom
19
e
e
15 BroilerDrawer
19
e
e
16 Continuous-Cleaning
OvenInterior
15
e
e
3,5
e
Feature Index
1 ModelandSerialNumbers
(in burnerboxundercooktop)
2 SurfaceBurnerControls
3 SurfaceBurners,Gratesand Drip Pans
6 OvenVent
7 OvenInteriorLight
8 OvenLightSwitch
(letsyouturn interiorovenlighton andoff)
9 OvenShelves
(easilyremovedor repositionedon shelfsupports)
[7 Anti-TipBracket
(seeInstallationInstructions)
)
7
i6iEF-—.
—.
—
—
-_~
—.—
e
surface
BurnerControk
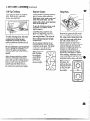
HowtoSelectFlme Size
The flamesizeon a gas burner
shouldmatchthecookwareyou
are using.
L Be suresurfaceburnercontrol
knobsare in theOFF position.
Theknobsthatturn the surface
burnerson andoffare locatedon
the lowercontrolpanelin frontof
the burners.
Thetwoon the leftcontrolthe left
frontandleflrear burners.Thetwo
on therightcontrolthe rightfront
andrightrear burners.
2. Removethegratesand liflthe
cooktopup (seepage 16).
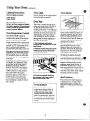
’10 Lighta $urfmeBurner
Lighti~ Itiructiom
Wading
Pilot Model
JGK16GR?
The surfaceburnerson thisrange
havestandingpilotsthat mustbe lit
initially.Tolightthem:
NEVERLET THE FLAME
EXTENDUP THE SIDESOF
THE COOKM?ARE.
Anyflame
largerthanthe bottomof the
cookwareis wastedand onlyserves
to heatthe handles.
3. Locatethe twopilotportsand
lighteachof themwith a match.
4. Lowerthe cooktop.Yoursurface
burnersare nowreadyfor use.
Electric Ignition Models
JG~C~6GEJ
JGK17GEI
Surfaceburnerson theserangesare
lightedby electricignition,ending
theneedfor standingpilotswith
constantlyburningflames.
In case of a power outage, youcan
lightthe pilotlessignitionsurface
burnerson yourrangewitha
match.Hold alighted matchto the
burner,thenturn the knobto the
LITEposition.Use extreme
eautiomwhen lighting burners
in this manner.
Surfaceburnersin use whenan
electricalpowerfailureoccurswill
continueto operatenormally.
Pushthecontrolknobin andturn it
toLITE.Onelectricignitionmodels,
youwillheara littleclickingnoise—
thesoundoftheelectricspark
ignitingtheburner.
When using a!uminum or
aluminum-clad stainless steel
pots and pans, adjustthe flameso
the circleit makesis about 1/2inch
smallerthan thebottomof the
*
cookware.
When boiling, usethis same
flamesize—1/2inch smallerthan
the bottomof thecookware—no
matterwhatthe cookwareis made
of. Foodscookjust as quicklyat a
gentleboilas theydo at a furious,
rollingboil. A highboil creates
steamand cooksawaymoisture,
flavorand nutrition.Avoidit except
for the fewcookingprocesses
whichneed a vigorousboil.
I
Aftertheburnerignites,turnthe
knobto adjusttheflamesize.
Note:
@Do notoperatea burnerfor
extendedperiodsoftimewithout
havingcookwareon thegrate.The
finishon thegratemaychipwithout
cookwareto absorbtheheat.
~ Checkto be surethebufier you
turnedon is theoneyouwantto use.
@Be surethe burnersandgratesare
coolbeforeyouplaceyourhand, a
potholder,cleaningclothsor other
materialson them.
8
When frying or warming foods
in stainlesssteel, cast iron or
enamelware, keepthe flamedown
lower—toabout 1/2the diameter
of thepan.
When frying in glass or ceramic
cookware, lowerthe flameeven
more.
using
Youroven
op-of-Range
cookware
Alurnirmm:Medium-weight
cookwareis recommendedbecause
it heatsquicklyand evenly.Most
foodsbrownevenlyin an aluminum
skillet.Mineralsin foodandwater
willstainbut willnotharm
aluminum.A quickscourwitha
soap-filledsteelwoolpad after
eachusekeepsaluminumcookware
lookingshinynew.Use saucepans
withtight-fittinglids for cooking
withminimumamountsof water.
The Clockand Timerare helpful
devicesthatserveseveralpurposes.
The clock
TOset the C?ock,pushin theknob
andturn the clockhandsto the
rightto thecorrecttime.Thenlet
the knoboutandcontinueturning
to OFF.
LightingMtruetiom
StandingPilot Model
JGBCMGPJ
Thisrangehasa standingoven
pilotportthatmustbe lit initially.
Tolightit:
L BesureOVENTEMPknobis in
theOFF position.
———
—
=Eaa&a”–
EaFg&.
~=
----EREw=
2. Removetheovenbottom(see
page19)andtheovenbaffle.
Cast km: If heatedslowly,most
skilletswillgivesatisfactoryresults.
Enamelware: Undersome
conditions,the enamelof some
cookwaremaymelt.Followcookwm
manufacturer’srecommendations
for cookingmethods.
Glass: Thereare twotypesofglass
cookware—thosefor ovenuse only
andthosefor top-of-rangecooking
saucepans,coffeeand teapots).
lassconductsheatvery slowly.
Heatproof Glass Ceramic: Can
be usedfor eithersurfaceor oven
cooking.It conductsheatvery
slowlyandcoolsveryslowly.Check
cookwaremanufacturer’sdirections
tobesureitcanbeusedongasranges.
StainlessMeekThismetalalonehas
poorheatingproperties,andisusually
combinedwith copper,aluminum
or othermetalsfor improvedlieat
distribution.Combinationmetal
skilletsgenerallyworksatisfactorily
if usedat mediumheatas the
manufacturerrecommends.
Timer
TheTimerhasbeencombinedwith
the rangeclock.Use it to timeall
yourprecisecookingoperations.
You’llrecognizethe Timeras the
pointerwhichis differentin color
thantheclockhands.
On the innergraduateddial,
minutesare markedup to 30.
Hoursare markedup to 4.
Toset the Timer, turn the knobto
the left, withoutpushingin, until
thepointerreachesthe numberof
minutesyouwantto time.
At the end of the set time, a
buzzer sounds to tell you time is
up. Turnthe knob,withoutpushing
in, untilthe pointerreachesOFF
andthebuz;er stops.
9
3. Locatethe pilotporton the side
oftheburnerat thebackofthe
broilercompartment.Usingalong
matchor matchholder,reachin
andlightthe ovenpilot.
Note:The ovenmustbeat room
temperaturebeforeyoucanlight
theovenpilot.
4. Replacethe burnerbaffleand
ovenbottomandclosethedoor.
Yourovenandbroilerare now
readyfor use.
Poweroutage?
An electricalpowerfailurewillnot
affecta lightedstandingovenpilot.
-.
-~—
-=
-_—
-~
—.
-
LightingImtruetioBE
oven Light
Electric Ignition Models
Use the switchon thecontrolpanel
to turn the lighton andoff.
K=$aazl
JGBC17GEJ
The ovenburner and broil
burner on theseranges are lighted
by electric ignition, ‘I’heovenand
broiler cannot be operated in the
eventof a power failure.
oven lkxnperattwe
control
TheOVENTEMP controlis
locatedat the centerof thecontrol
panelon the frontof the range.
Simplyturn the knobto thedesired
cookingtemperatures,whichare
markedin 25°F.incrementson the
dial. It willnormallytake60
secondsbeforethe flamecomescm.
Afterthe ovenreachestheselected
temperature,theovenburnercycles—
offcompletely,thenon witha full
flame-to keeptheoventemperature
controlled.
CAUTION:DO NOTMAKEANY
ATTEMPTTOOPERATETHE
EIJXI’RIC IGNITIONOVEN
DURINGAN ELECTRICAL
POWERFAILURE.Resumption
of electricalpowerwhenOVEN
TEMPcontrolis in anyposition
otherthan OFF will resultin
automaticignitionof the ovenor
broilerburnerand couldcause
severeburns if, at the time,you
wereattemptingto lighttheburner
witha match.
oval shelves
oven vent
Yourovenis ventedthroughducts
at the rear of the range(seepage6).
Do notblocktheseductswhen
cookingin the oven—itis important
thattheflowof hotair fromtheoven
and freshair to the ovenburnerbe
uninterrupted.Avoidtouchingthe
ventopeningsor nearbysurfaces
duringovenor broileroperation—
theymaybecomehot.
~Ventopeningsand nearby
surfaces may becomehot. Do not
touch them.
@Handles of pots and pans on the
cooktopmay becomehot if left
too closeto the vent.
* Do not leaveplastic items on
the cooktop—theymay melt if
left too closeto the vent.
oven Moisture
As yourovenheatsup, the
temperaturechangeof the air
in the ovenmaycausewater
dropletsto form on thedoor
glass. Topreventthis, openthe
ovendoor for the firstminute
of ovenheat-upto let the moist
air out.
The shelvesaredesignedwithstoplocksso whenplacedcorrectlyon
the shelfsupports,theywillstop
beforecomingcompletelyoutof
the ovenand willnottilt whenyou
are removingfoodfromthemor
placingfoodon them.
Whenplacingcookwareon a shelf,
pullthe shelfoutto the “stop”
position.Placethe cookwareon
the shelf, then slidethe shelfback
intotheoven.Thiswilleliminate
reachingintothehotoven.
Toremovethe shelvesfrom the
oven,pullthemtowardyou, tilt
frontend upwardandpullthemout.@
Toreplace,placeshelfon shelf
supportwith stop-locks(curved
extensionundershelf)facingup
andtowardrear of oven.Tdt up
frontandpush shelftowardbackof
ovenuntilit goespast “stop”on
ovenwall.Thenlowerfrontof shelf
and pushit all thewayback.
SMf Positions
The ovenhas fiveshelfsupports—
A (bottom),B, C, D and E (top).
Shelfpositionsforcookingare
suggestedon Bakingand Roasting
pages.
Baking
OW
toSetYourRange
forBaking
1. I%sitiontheshelfor shelvesin
{heoven.
~. Closeovendoor.TurnOVEN
TEMPknobto desiredtemperature.
Preheatovenfor at least 15minutes
if prehe:itingis necessary.
3. Placef(mdin ovenon center
ofshelf. Allowat least2 inches
betweenedgeof bakewareandoven
wailor adjacentcookware.
If cookingon twoshelvesat the
sametime,placeshelvesabout4
inchesapartand staggerfoodon
them.
4. Checkfoodfordonenessat
minimumtimeon recipe.Cook
longerif necessary.Switchoff
heatand removefood.
Preheating
reheatingisveryimportantwhen
usingtemperaturesbelow225°F.
andwhenbakingfoodssuchas
biscuits,cookies,cakesandother
pastries.
Preheatingis notnecessarywhen
roastingor forlong-timecookingGf
wholemeals.
?!hMTtKitions
Mostbakingis doneon the second
shelfposition(B)fromthe bottom.
Whenbakingthreeor fouritems,
usetwoshelvespositionedon the
secondand fourthsetsof supports
(B& D) frombottomof oven.
Bakeangelfoodcakeson first shelf
position(A) frombottomof oven.
BaMngTips
~Followa testedrecipeand
measuretheingredientscarefully.
If youare usinga packagemix,
howlabeldi~ections.-
s If~lloisture
isn[]tiecab~e
on~he
f’ron!
oftheovenor ontheblackglass
doorwhenfirstturningontheoven,
leavetheovendoorajarfora few
minutesor untiitheovenis warm.
~Donotopentheovendoorduring
a bakingoperation—heat
willbelost
andthebakingtimemightneedto
beextended.Thiscouldcausepoor
bakingresuks.Ifyoumustopenthe
door,openitpartially-only 3 or4
inches—andcloseitasquicklyas
possible.
~Donotdisturbtheheatcirculation
intheovenwiththeuseofaluminum
foil.If foilisused,placea small
sheetof it, about10by 12inchesat
themost,on a lowershelfseveral
inchesbelowthefood.Donotplace
foilontheovenbottom.
CommonBakingProblems
andI?ossibkSolutions
Pm
Burning around edges
@Oventoofill; avoidovercrowding.
@Edgesofcrusttoothin.
@Incorrectbakingtemperature.
Bottomcrust soggyand unbaked
. A11ow
crustand/orfillingtocool
sufficientlybeforefillingpieshell.
oFillingmaybetoothinorjuicy.
~Fillingallowedto standinpieshell
beforebaking.(Fillpieshellsand
bakeimmediately.)
~Ingredientsandpropermeasuring
affectthequalityofthecrust. Usea
testedrecipeandgoodtechnique.
Makesuretherearenotinyholesor
tearsina bottomcrust. “Patching”
a piecrust couldcausesoaking.
l% fillingruns over
@Topandbottomcrustnotwell
sealedtogether.
~Edgesofpiecrustnotbuiltup
highenough,
~Toomuchfilling.
@Checksizeofpieplate.
Pastry is tough; crust not flaky
~ TOO muchhandling.
~Fattoosoftor cutintoofine.
Rolldoughlightlyandhandleas
littleaspossible.
11
CAKES
CakerkesM@eron oneside
@Batterspreaduncverdyinpan.
~~veI~~h~~v~s
not]e~el.
~Usingwarpedpans.
~Incorrectpansize.
Cakescracking on top
@Oventemperaturetoohigh.
~Battertoothick,followrecipe
or exactpackagedirections.
@CheckforpropersheIfposition.
@Checkpansizecalledforin recipe.
* Impropermixingofcake.
Cakefalls
* Toomuchshortening,sugaror
E3Ef!sr-.
=..
-
liquid.
~Checkleaveningagent,baking
powderor bakingsodatoassure
freshness.Makea habitto note
expirationdatesofpackaged
ingredients.
e Cakenotbakedlongenoughor
at incorrecttemperature.
oIf addingoilto a cakemix, make
certaintheoilisthetypeand
amountspecified.
Crust is hard
oChecktemperature.
o Checkshelfposition.
Cakehassoggylayerorstreaks
at bottom
@Underminingingredients.
e Shorteningtoosoftforproper
creaming.
~ TOO muchliquid.
Coowm
& Blscmm
Doughycenter; heavycrust on
surface
~Checktemperature.
~Checkshelfposition.
* Followbakinginstructions
carefullyas giveninreliablerecipe
or onconveniencefoodpackage.
~Flatcookiesheetswillgivemore
evenbakingresults.Don’tovercrowd
foodsona bakingsheet.
oConveniencefoodsusedbeyond
theirexpirationdate.
Browningmore noticeableon
oneside
@Ovendoornotclosedproperly,
checkgasketseal.
~Checkshelfposition.
m
-–.
-.
---
BakilBgGuide
1. Preheating isveryhnportant
whenusingtemperaturesbelow
225”F.and when baking foods such
as biscuits, cookies, cakes and
other pastries. Reheattheovenfor
at least15minutes.
Preheatingis notnecessarywhen
roastingor for long-timecookingof
wholemeaLs.
2. Aluminum
pansconduc[hcat
quickly.Formostconventional
baking,
light,shinyfinishesgivebestresults
becausetheyhelppreventoverbrowningin thetimeit takesforheatto
cookthecenterareas.Werecommend
dull(satin-finish)bottomsurfacesof
pansforcakepansandpieplatesto be
surethoseareasbrowncompletely.
3. Darkornon-slliny
fi~~ishes,
t~lso
glassandPyrocmam@
cookware.
gencwill
yabsorbheatwhichmayresult
in dry,crispcrusts.Rcduccovenheat
25*F.if lightercrustsare desired.
Preheatcast ironforbakingsome
foodsforrapidbrowningwhenfoodis
added.
Shelf
Positions
Oven
Temperatures
Ilme,
Minutes
ShinyCookieSheet
B.C
400°-4750
15-20
B,A
350°-4000
~o.3(-)
B
B
400°-4500
350°
20-40
45-55
Preheatcastironpanforcrispcrust.
Muffins
Popovers
ShinyMetalI% with
satin-finishbottom
CastIronor GlassF%
ShinyMetalPanwith
satin-finishbottom
ShinyMetalMuffinPans
DeepGlassor CastIronCups
A, B
B
400°-4250
375”
20-30
45-60
Quickloafbread
Yeastbread(2 loaves)
Metalor GlassLoafPans
Metalor GlassLoafPans
B
A, B
350°-375”
375°-4250
45-60
45-60
Decreaseabout5 minutesformuffinmix.
Or bakeat450”F.for25minutes,thenat
350”F.for 10to 15minutes.
Darkmetalor glassgivesdeepest
browning,
Plainrolls
Sweetrolls
Cakes
[withoutshortening)
Angelfd
\ellyroll
SponSe
Cakes
Bundtcakes
:upeakcs
Fniitcakes
ShinyOblongor MuffinPans
ShinyOblongor MuffinPans
A, B
B, A
375°-4250
350°-3750
10-25
20-30
Forthinrolls,ShelfB maybeused.
Forthinrolls,ShelfB maybeused.
A
B
A
325°-3750
375°-4000
325°-3500
30-55
10-15
45-60
Twopiecepanisconvenient.
Linepanwithwaxedpaper.
Metalor CeramicPan
ShinyMetalMuffinPiins
Metalor GlassLoafor
TubePan
ShinyMetalPanwith
satin-finishbottom
ShinyMetalPanwith
satin-finishbottom
Metalor GlassLoafPans
A, B
B
A. B
325°-3500
350°-3750
275°-3000
45-65
20-25
2-4hrs.
B
350°-375”
20-35
B
350°-3750
25-30
B
350°
40-60
Metalor GlassPans
CookieSheet
B,C
B,C
3~5”-350°
350°-4000
25-35
10-20
CookieSheet
CookieSheet
B, C
B,C
400°-4250
375°-4000
6-12
7-12
6.
Food
Bread
Biscuits(Yz-imthick)
Coffeecake
Cornbreador muffins
Gingerbread
-ayer
.ayer,chocolate
oaf
hokies
3rownies
lrop
refrigerator
lolledor sliced
~ruits,
)therDesserts
lakedapples
hstard
‘uddings,rice
ndcustard
%
‘rozen
leringue
)necrust
‘Wo
crust
astryshell
fisce!laneous
akedpotatoes
callopeddishes
ouffles
cookware
AluminumTubePan
MetalJellyRollPan
Metalor CeramicPan
Glassor MetalPans
GlassCustardCupsor
Casserole(setinpanof hotwater)
GlassCustardCupsor
Casserole
FoilPanonCookieSheet
Spreadtocrustedges
Glassor Satin-finishMstal Pan
Glassor Satin-finishMetalPan
Glassor Satin-finishMetalPan
SetonOvenShelf
Glassor MetalPan
GlassPan
A, B,C
B
350°-4000
300°-3500
30-60
30-60
B
325°
50-90
A
B
400°-4250
325°-3500
45-70
15-25
A, B
B
B
400°-4250
400°-4250
450°
45-60
40-60
13-16
A, B,C
A, B,C
B
325°-4000
325°-3750
300°-3500
60-90
30-60
30-75
12
Comments
Canned,refrigeratedbiscuitstake2 to4
minuteslesstime.
Paperlinersproducemoremoistcrusts.
Use300”F.andShelfB forsmallor
individualcakes.
If bakingfourlayersusc
shelvesBandD.
Barcookiesfrommixuscsametime.
Use ShelfC andincreasetemperature
25 to 50”F.formorebrowning.
Reducetemperatureto 300°Eforlarge
custard.
Cookbreador ricepuddingwithcustard
base 80to90 minutes.
Largepiesuse400”F.andincreasetime.
Toquicklybrownmeringueuse400”F.for
9 to 11minutes.
Custardfillingsrequirelowertemperature,
longertime.
Increasetimefor largeamountor size.
Roasting
oastingis cookingbydry heat.
Tendermeator poultrycan be
roasteduncoveredin youroven.
Roastingtemperatures,which
shouldbe lowand steady,keep
spatteringto a minimum.When
roasting,-itis not necessaryto sear,
baste,cover,or add waterto your
meat. Roastingis easy,just follow
thesesteps:
Step L Positionovenshelfat
secondfrombottomposition(B)
forsmallsizeroast (3 to 5 Ibs.)and
at bottomposition(A) for larger
roasts.
/.
Step 2: Checkweightof roast.
Placemeatfat-side-upor poultry
breast-side-upon roastingrackin a
shallowpan. Themeltingfatwill
bastethemeat. Selecta pan as
closeto thesizeof meatas possible.
(Broilerpan withrack is a good
pan forthis.)
Step3: l!hm OVENTEMPto
desiredtemperature.Checkthe
RoastingGuidefor temperatures
and approximatecookingtimes.
Step 4: Mostmeatscontinueto
cookslightlywhilestandingafter
beingremovedfromthe oven.
Standingtimerecommendedfor
roastsis 10to 20 minutesto allow
roastto firm up andmakeit easier
to carve.Internaltemperaturewill
riseabout5°to 10*F.;to compensate
fortemperaturerise, if desired,
removeroastfromovenat 5° to 10*F.
lessthantemperatureon guide.
IhozenRoasts
Frozenroastsof beef, pork,
lamb,etc., canbe startedwithout
thawing,butallow15to 25 minutes
per poundadditionaltime (15
minutesper poundfor roastsunder
5 pounds,moretimefor larger
roasts).
Thawmostfrozenpoultrybefore
roastingto ensureevendoneness.
Somecommercialfrozenpoultry
canbe cookedsuccessfi.dlywithout
thawing.FO11OW
directionsgiven
on packer’slabel.
.
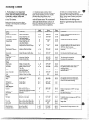
RoastingGlide
Type
Oven
Temperature
Doneness
Meat
Tendercuts; rib, highquality
sirlointip, rumpor topround*
325°
Lamblegor bone-inshoulder*
325°
Vealshoulder,legor loin*
Porkloin,rib or shoulder*
Ham,pre-cooked
325°
325°
325°
Rare:
Medium:
WellDone:
Rare:
Medium:
WellDone:
WellDone:
WellDone:
ToWarm:
Ham,raw
*Forbonelessrolledroastsover6-inches
thick,add5 to 10minutesper lb.to times
givenabove.
325°
WellDone:
Poultry
Chickenor Duck
Chickenpieces
325°
375°
WellDone:
WellDone:
Turkey
325°
WellDone:
13
Approximate
RoastingTime
inMinutesperPbund
3 to5-lbs.
6 to8-lbs.
24-30
18-22
29-33
22-25
35-45
28-33
21-25
20-23
25-30
24-28
30-35
28-33
35-45
30-40
35-45
30-40
18-23minutesper lb. (anyweight)
Under10lbs.
10to 15-lbs.
27-35
24-27
3 to’5-lbs.
35-40
30-35
10to lS-lbs.
16-22
Over5 Ibs.
30-35
OverK Ibs.
13-19
Internal
Temperature‘F
130°-1400
150°-1600
170°-1850
130°-1400
150°-160°
170°-1850
170°-180°
170°-180°
115°-1250
170°
185°-1900
185°-1900
Inthigh:
185°-1900
Broiling
Broiling is cookingfoodbydirect
BroilingTips
heatfromabovethe food. Your
e use tongs to tmw meat oVer* Steaksand chonsshould be a?
mngehasa convenientcompartment
piercedmaatlosesjuices.
least 1 inch thick-forbestbroiling
belowtheovenfor broiling.It also
results.l%wl
broilthinnerones.
hasa speciallydesignedbroilerpan
andrackthatallowdrippingfatto
drainawayfromthe foodsandbe
Broiling Guide
keptawayfromthehighheatof
thegas flame.
Quantity
M Sid
Broil ‘llnm,
andlor
Distancefromthe heatsourcemay
Food
Thickness
l%sitionMimtt
bechangedbypositioningthebroiler
3)4
3
B
Arrangeinsinglelayer.
panand rackon oneof threeshelf
positionsinthebroilercompartment—
!$paccevenly.Up[o8patlics
A @ottomof broilercompartment),
c
9-1o
7-8
takeaboutsametime.
B (middle)andC (top).
BeefSteaks
Both theovenandbroiler
Rare
l-in.~hick
A
7
9
S[eakslessthanl-in.cook
T
I
eornpartrnent
doorsshouldbe
closedduringbroiiing.
How to Broil
L If meathas fator gristlenear the
edge,cut verticalslashesthrough
bothabout2 inchesapart, butdon’t
cut intomeat. Werecommendthat
youtrim fatto preventexcessive
smoting, leavinga layerabout
V8-inchthick.
2. Removebroilerpan and rack
frombroilercompartmentand
placefoodon rack.
3. Pullout drawerand position
broilerpan in compartment.Placing
f~ closertoflameincreasesexterior
browningof food,butalso increases
spatteringand thepossibilityof fats
andmeatjuices igniting.
4. Closebroilerdoorand, for most
foods,turn OVENTEMP knobto
BROIL.Note: Chickenand ham
are broiledat a lowersettingin
orderto cookfoodthroughwithout
over-browningit.
5. Turnmostfoodsonceduring
cooking;(theexceptionis thinfillets
of fish; oil one side,placethatside
downonbroilerrackandcookwithout
turninguntildone). Timefoodsfor
aboutone-halfthe totalcooking
time,turn food, thencontinueto
cookto preferreddoneness.
6. TbrnOVENTEMP knobto
OFE Removebroilerpan from
compartmentand servefood
immediately.Leavepan outside
compartmentto cool.
Medium
WellDone
Rare
Medium
WellDone
Chicken(450°)
(1-l% lbs.)
1%-in.thick
(2-2%Ibs.)
1whole
(2t02%4bs.),
splitlengthwise
BakeryProducts
Bread(Toast)or
2-4slices
ToasterPastries
1pkg.(2)
EnglishMuffins 2-split
Lobstertails
(6to8-oz.each)
2-4
Fish
l-lb.fillets%to
%-in.thick
+
I
A
A
A
A
A
~
13
10
15
25
5-6
8-9
6-7
12-14
16-18
throughbeforebrowning.
Piinfryingisrecommended.
Slashfat.
A
30-35
25-30
Reducetimesabout5to10min.
persideforcut-upchicken.
Brusheachsidewithmelted
butter.Broilwithskinsidedown
firstandbroilwithdoorclosed.
c
2-3
1/+.1
c
3-4
B
13-16
Donot
turn
ever.
5
5
c
I
I
B
8
Porkchops
WellDone
A
A
10
13
2(%in.)
2 (l-in.thick),
about1lb.
Cutthroughbackofshell,spread
open.Brushwithmeltedbutter
beforeandafterhalftime.
Handleandturnverycarefully.
Brushwithlemonbutterbefore
andduringcookingifdesired.
Preheatbroilertoincrease
/ browninz
I
I
Hamslices(4509 l-in.thick
Precooked
Spaceevenly.PlaceEnglish
e
muffinscut~side-up
an~brush
–
withbutterifdesired.
8
Increasetimes5-10min.perside
forll&in.thickorhomecured.
4-5
10-12
Slashfat,
I
Lambchops
Medium
WellDone
Medium
WellDone
2(1inch)
about10-12oz.
2 (1%inch),
about1lb.
Wieners,
i l-lb. pkg.(10)
similarprecooked
sausages,
bratwurst
14
B
B
B
B
8
10
10
17
4-7
10
4-6
12-14
c
6
1-2
Slashfat,
Ifdesired,splitsausagesinhalf
lengthwise;cutinto5 to6-in.
pieces.
Care and Cleaning
kqxr care:mdcleaning are
iin@wtantsoyourrarygc-wi
11give
~OLi
efficientandsatisfactory
service.Followthesedircc{ions
carefullyin caringfor it to help
assuresafeandpropermaintenance.
BESUREELECTRICPOWER
ISOFF BEFORECLEANING
ANYPARTOF YOURRANGE.
‘Me Continuot.is-CIeaningoven
cleans itself whilecooking.The
insideof the oven—top,sides,back
and insideof the door—isfinished
witha specialcoatingwhichcannot
becleanedin theusualmanner
withsoap,detergents,steelwool
pads,commercialovencleaners,
coarseabrasivepadsor coarse
brushes.Use of suchcleaners
and/oruse of ovensprayswill
use permanentdamage.
Thespecialcoatingisaporous
ceramicmaterialwhichis dark in
colorand feelsslightlyroughto the
touch.If magnified,thesurface
wouldappearas peaks,vallcys,and
sub-surface“tunnekl’Thisrough
finishtendsto preventgrease
spattersfromforminglittlebeads
or dropletswhichrun downthe
sidewallsof a hard-suri%ce
oven
linerleavingunsightlystreaksthat
requirehandcleaning.Instead,
whenspatterhitsthe porousfinish,
it is dispersedandis partially
absorbed.This spreadingaction
increasestheexposureof oven
soilto heatedair, andmakesit
somewhatlessnoticeable.
Soilmaynotdisappear
completely
andat sometimeafterextended
usage,stainsmayappearwhich
cannotbe removed.
Thespecialcoatingworksbeston
smallamountsofspatter.It does
notworkweliwithlargerspills,
especiallysugars,eggor dairy
mixtures.
Thespecia~
coatingisnotused
onovenshelves.Shelvesshouldbe
cleanedoutsidethe oven to avoid
damageto the specialcoating
insidetheoven.
lb fckm the Continuom”
ckmirg oven:
L Letrangepartscoo]before
handling.Werecommendrubber
glovesbe wornwhencleaning.
2. Removeshelvesand cookware.
3. Soilvisibilitymaybe reducedby
operatingthe ovenat 400°F.Close
thedoor andturn OVENTEMP
knobto 400°F.Timefor at least4
hours.Repeatedcyclesmaybe
necessarybeforeimprovementin
appearanceis apparent.
REMEMBER:DWNG THE
OPERATIONOF THEOVEN,THE
DOOR,WINDOWAND(YI’HER
RANGESURFACESWILLGETHOT
ENOUGH‘IQCAUSEBURNS.~0 N(YI’
TQUCH.LET THE RANGECOOL
BEFOREREPLACINGOVENSHELVES.
4. If a spilloveror heavysoiling
occurson theporoussurfhce,as
soonas theovenhascooled,remove
as muchofthe soilas possibleusing
a smallamountof wateranda stiff
bristlenylonbrush. Usewater
sparinglyandchangeit frequently,
keepingit as cleanas possible,and
be sureto blotit up withpaper
towels,cloths,or sponges.Donot
rubor scrubwithpapertowels,
clothsor sponges,-sincetheywill
leaveunsightlylinton theoven
finish.If waterleavesa whitering
on the ftish as it dries,applywater
againandblotit witha clean
sponge,startingat theedgeofthe
ringandworkingtowardthecenter.
Donotusesoap,detergent,
steel
woolpads,commercial
ovencleaner,
siliconeovensprays,coarsepads
orcoarsebrushesontheporous
surface.Theseproductswillspot,
clog,andmar the poroussurface
and reduceits abilityto work.
Do notscrapetheporoussurface
witha knifeorspatula—they
damageit.
couldpermanently
Theovenbottomhasa porcelain
enamelfinish.It canbe removed
for cleaningawayfromthe
continuous-cleaningoven.
Lift-upCmktop
BurnerGrates
Cleanthe area underthe cooktop
often.Built-upsoil, especially
*~rease,maycatchfire.
Gratesshouldbe w~shedregularly
and, of course,after spillovcrs.
Washthemin hot, soapywaterand
rinsewithcleanwater.Dry the
grateswitha cloth—don’tputthem
backon the rangewet.
Toget rid of burned-onfood,soak
thegratesin a slightlydiluted
liquidcleanser.
Althoughthey’redurable,the
grateswillgraduallylosetheir
shine,regardlessof thebestcare
youcan givethem. Thisis dueto
theircontinualexposureto high
temperatures.
Do notoperatea burnerfor an
extendedperiodof timewithout
cookwareon the grate.The finish
cmthegratemaychipwithout
cookwareto absorbthe heat.
Whenreplacing
pair of grates,
the irregular
sidesshould
interlockin
the middleas
shownat right.
Tomakecleaningeasier,the entire
cooktopmaybe liftedup arid
supportedby lockingarms that
catchand holdthetop whenit’sall
thewayup.
Besure W burnersareturnedoff
beforeraisingthecooktop.Then
removethe gratesanddrip pans,
graspthe frontsidesof the cooktop
andlift.
Aftercleaningunderthe cooktop
withhot, mild soapywateranda
cleancloth,put thecooktopbackin
place.Lift up a littleto releasethe
lockingarms andpushthemin
whileguidingthe topback down.
Becarefidnotto pinchyourfingers.
Drip Pam
Removethe gratesand lift out the
chromedrip pans.Washthemin
hot, soapywater.Rinsethemwith
clean,hot waterand polishthem
dry witha cloth. Neveruse
abrasivecleaneror steelwool—
they’llscratchthe surface.Instead,
soakthe drip pansfor about20
minutesin slightlydilutedliquid
cleanseror mildsolutionof
ammoniaand water(1/2cup of
ammoniato onegallonof water).
Afier soaking,washthem in hot,
soapywater.Rinsewithcleanwater
andpolishwitha clean, softcloth.
Whenreplacing
drip pans, the
notchon the rear
pan andthe notch
on the frontpan
shouldmeetin
the middle. +
12fsJ
q
tingeTopBurners
The holes in the burners must be
kept cleanat all timesforproper
ignitionand an even,unhampered
flame.
Cleantheburnersroutinelyand
especiallyafterbadspillovers
whichcouldclogtheseholes.
Burnerslift out forcleaning.
Note:No screwsholdeach burner
pairinplacetokeepthemfrom
wobblingaroundduringshipment.
moveand discardthe shipping
rewsandlift theburnersup and
out. Thisdisengagesthemfromthe
mountingbracketundereach
burnerpair.
Toremoveburned-onfood,soak
theburnerin a solutionof a product
usedforcleaningtheinsideof coffi
makers.Soakthe burnerfor 20 to
30minutes.If the fooddoesn’t
rinseoffcompletely,scrubit with
soapand wateror a mildabrasive
cleanserand a dampcloth.
Do riotattemptto cleanburnersin
anautomaticdishwasher.Loosened
foodsoiIcan clogburnerholes,
andthecausticactionof the
dishwasherdetergentcan damage
theburnerheads.
Beforeputtingthe burnerback,dry
it thoroughlyby settingit in a warm
ovenfor 30 minutes.Thenplaceit
backin the range,makingsureit is
properlyseatedon themounting
bracketand is level.
Ckmtrd
I+md$
Oukrbel
It’sa goodideato wipethecontrol
panelscleanaftereachuseof the
oven.Fora morethoroughcleaning,
thecontrolknobscanbepulledofftheknobstemsand,on modelsso
equipped,theglassuppercontrol
panelcanbecleanedon bothsides.
Whentherangeis cool,washthe
enamelfinishwithmildsoapand
wateror a mildabrmivecleanser
appliedwitha dampcloth.Rinse
withcleanwateranddry witha soft
cloth.If youwish,occasionally
applya thincoatof mildcleaning
waxto helpprotectthefinish.
Toavoidmarringthesurfhceof
therangeandtopreventit Ilom
becomingdull,don’tslideheavy
pansacrossit. If youspillfds with
a lotofacidor highsugarcontent,
cleanthemup as soonas possible.If
allowedto remain,thesefti could
causea dullspot.Also,neveruse
harshabrasivecleansers.Theycould
permanentlydamagetheenamel
surface.
~—
Toremovetheglasspanel:
1. Removethescrewon eachendof
thebacksplash.
2. Removethemetalstripson each
endthatholdtheglassin place.
3. Removetheclockknobandnut
securingthelightswitch.
4. Carefidlyremovetheglassand
placeit on a smooth,flatsur%ce.
Cleanit withmildsoapandwater,
rinsewithcleanwateranddrywith
a softcloth.Caution:Do notuse
abrasivecleansem,strongIiquid
cleanersor ovencleanemonglassor
enamelcontrolpanelsurfaces-they
willdamagethefinish.
mh
—.
—.
—
~
—.
—.
—
-—–
~.—
BrushedChmneFinish
ModelJGB3CXKHLJ
Cleanthe brushedchrometop
withwarm, soapywateror an allpurposehouseholdcleanerand
immediatelydry it witha clean,soil
cloth.Takecareto dry thesurface
followingthe “grain.”Tohelp
preventfingermarksaftercleaning,
spreada thin filmof babyoil on the
surface.Wipeawayexcessoilwitha
clean,soil cloth.A goodappliance
waxwillhelpprotectthisfinish.
oven Light Bulb
Replacement
The light bulb is located in the
upper left corner of the oven.
Before replacing the bulb,
disconnect electric power to the
range at the main fuse or circuit
breaker panel or pull the range
power cord plug from the electrical
outlet. I&t the bulb cool completely
before removing it. Do not touch a
hot bulb with a damp cloth as the
bulb wiUbreak.
Replace with a high temperature
appliance bulb of the samewattage.
RemovableOwn Door
Theovendoor is removableto
makethe interiormoreaccessible.
‘h replace the o~endoor, make
surethe hingesare in the “out”
position.Positionthe slotsin the
bottomof thedoorsquarelyovc~
thehinges.Thenlowerthedoor
slowlyandevenlyoverbothhinges
at thesametime. If hingessnap
backagainstthe ovenframe,pull
thembackout. Whenthedoor is
in position,openit fullyand insert
the twoPhil!ipsscrews.
Openthe ovendoorfullyand
removethetwoPhillipsscrewsthat
hokithedoorto the hinges.Then
closethe doorto theautomaticstop
position(at about3 inchesopen),
andliftthe doorstraightup andoff
thehinges.(Dueto thelargeamount
of insulationandtheconstruction
of thedoor, it is heavy.)
Note:Care shouldbe takennotto
placehandsbetweenthe spring
hingeandthe ovendoorframeas
thehingecouldsnapbackand
pinchfingers.
—
18
emokableoven
Bottwn
q
ovenshdves
Mu can i-cmovethe porcelain
enamel oven bottom for cleaning
outside the cwen.
To remove the oven Mtorn:
1, Removethe ovenshelves.
Ovenshelvesmay be cleaned with
a mild abrasive cleanser following
manufacturer’sdirections. After
cleaning, rinse the shelves with
clean water and dry with a clean
cloth. To remove heavy, burned-on
soil, soapy metal pads may be used
followingmanufacturer’s
directions.
Afterscrubbing,washwithsoapy
water,rinseanddry.
BroilerI%& Rack
2. Removethe two knurled holddownscrewsat the rear of theoven.
If theyare too tightto removeby
hand,usea coinor screwdriver.
I
—
—
//11
3. To lift out the ovenbottom,
placeyourfingersin the slotsin the
bottomand lift the rear of theoven
bottomup and backuntiltheoven
bottomis clearofthelipat thefront.
Thenlift the bottomup andou~.
lb replace the ovenbottom,place
it in the ovenwiththeback raised
about6 to 8 inchesor untilyoucan
insertthe frontof the ovenbottom
underthehold-downlipat thefront.
Thenpushthe backof the oven
bottomdownfilly intoplaceon the
metalflangesand inserttheholddownscrews.
DO NOT placea sheetof aluminum
foil onthe bottom of the oven. If
youdo, your foodsmaynot cook
perly.The ovenfinishmaybe
aged.And theremaybean
increaseh heaton the outside
wrfacesof the oven.
Afterbroiling,removethebroiler
rackand carefullypouroff the
grease.Washand rinsethepan
andrack in hot, soapywater.
If foodhas burnedon, sprinklethe
broilerrackwhilehotwithdetergent
andcoverwithwetpapertowelsor
a dish cloth. Burned-onfoodswill
thensoakloosewhilethemealis
beingserved.
Thebroilerpanand rackare
designedto allowdrippingfatto
drainand be keptawayfromthe
highheatof thebroiler.Do not
coverthe rack withaluminumfoil
or usethe pan withoutthe rack
becausethe exposedfatmay
catchfire.
Do not storea soiledbroilerpan
andrackin thebroilercompartment
or oven.
E3m%K.
——
-.–
—
=
—.
—.
~
~—
——
~
—.
—.
-.
_–
ovenThernlosbt
Adjwtment
The temperature control in your
new ovenhas been carefullyadjusted
to provide accurate temperatures.
However, if this oven has replaced
one you haveusedfor severalyears,
youmay notice a difference in the
degree of browning or the length of
time required when using your
favoriterecipes. Oven temperature
controls have a tendency to “drifi”
over a period of years and since
this drift is very gradual, it is not
readily noticed. Therefore, you
may have become accustomed to
your previous oven which may
have provided a higher or lower
temperature than you selected.
Before attempting to have the
temperature of your new oven
changed, be sure you have followed
the baking time and temperature of
the recipe carefully. Then, after
you have usedthe ovena fewtimes
andyoufeelthe ovenis toohot
or too cool, thereis a simple
adjustmentyoucan makeyourself
on the OVENTEMP knob.
Pullthe knoboffthe shaftand look
at the back side.There is a discin
the centerofthe knobskirtwith a
seriesof marksoppositea pointer.
thedirectionof arrowfor LOWER.
Eachmarkwillchangethe oven
temperatureapproximately20°E
Wesuggestthatyoumakethe
adjustmentonemarkfromthe
originalsettingandcheckoven
performancebeforemakingany
additionaladjustments.
Afterthe adjustmentis made,
pressskirtandknobtogetherand
retightenscrewssotheyare snug,
butbe carefulnotto overtighten.
Re-installknobon rangeand
checkperformance.
Note:Afteran adjustmenthas
beenmadeto theOVENTEMP
knob,OFF andBROILwillnot
lineup withthe indicatormarkon
the controlpanelas theypreviously
did. Thisconditionis normaland
willnotcreatea problem.
OV~~ DoorI
Height
Adjustment
Repeatedopeningsandclosings
can causethe ovendoorto work
itselfoutof adjustment.One side
mayclosehigherthanthe other,
and thedoormaynotsealproperly.
OvenBurner
The air adjustment shutter for the
oven burner regulates the flow of
air to the flame.
The shutterforthe ovenburneris
nearthe backwallof theoven
behindthe broilerdrawer.
Toreachthe shutter,remove
theovenbottom(page19)andthe
burnerbaffle.
Toadjustthe flowof air to the
burner,loosenthe Phillipshead
screwand rotatethe shut~erto
allowmoreor lessair intothe
burnertubeas needed.
Toadjustthe heightof the door:
1. Removethe door (seepage 18).
Loosenonlythe
lockingscrews
Todetermineif the burnerflame
is proper,lightthe burner.The
flameshouldhave1/2”to 3/4”blue
coneswithno yellowtipping.When
the baffleis backin place,the
flamewillresettle.
~Note positionof
pointerto marks
beforeadjustment
Noteto which mark the pointer is
pointing. To make an adjustment,
carefully loosen (approximately
one turn), but do not completely
removethe twoscrewsthatholdthe
skirt to theknob.Hold theknob
bladein onehandand the outer
skirt in the otherhand.
Toraise the oventemperature,
movethe pointerin the directionof
the arrowfor RAISE. Tolowerthe
temperature,movethe poiuterin
2. Witha thin-bladedscrewdriver,
turn the screwin theopeningat
the top of eachdoorhinge.Turn
clockwiseto lower,counterclockwise
to raiseeachsideof thedoor.
3. Replacethedoor,closeit, and
checkalignmentanddoor seal.
20
m
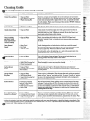
i~>te:Let range/ovenpartscm! beforetouchingor handling.
Wi#v —
PART
NfKI’ERIAW3TO USE
GENERALIMRECTIONS
Broiler l%mand Rack
QSoapandWater
~ Soap-FilledScouringPad
o plasticScouring~dd
Drain fat,coolpanandrackslightly,(Do not let soiled pan and rack stand in
broiler compartment tocool.)Sprinkledetergenton rackandpan. Fillpanwith
warmwaterandspreadclothor papertoweloverrack.Letpanandrackstand
fora fewminutes.Wash;scourif necessary.Rinseanddry.OKNON:Chxmpan
andrackindishwasher.
Control Knobs
e MildSoapandlk%ter
Pulloffknobs.Washgentlybutdo notsoak.Dryandreturncontrolsto range.
Outside Glass Finish
@SoapandWater
Cleanoutsideofcooledblackglassdoorwitha glasscleanerthatdoesnot
containammonia.Washotherglasswithclothdampenedinsoapywater.Rinse
andpolishwitha dry cloth.If knobsare removed,do notallowwaterto run
downinsidesurfaceof glasswhilecleaning.
Metal$including
Side Trims, Trim
Strips and Brushed
Chrome Cooktop
e SoapandWater
Wash,rinseandthenpolishwitha dry cloth.DONOTUSEsteelwool,
abrasives,ammonia,acids,or commercialovencleanerswhichmaydamage
the finish.
Outer Enamel
Finish*
e I%perTowel
* DryCloth
~ SoapandWater
Avoidcleaningpowdersor harshabrasiveswhichmayscratchtheenamel.
If acidsshouldspillontherangewhileit is hot, usea drypapertowelor cloth
to wipeuprightaway.Whenthe surfacehascooled,washandrinse.
Forotherspills,suchas fatsmatterings,etc., washwithsoapandwaterwhen
cooledandthenrinse.Polishwitha dry cloth.
~ SoapandWater
Usea mildsolutionof soapandwater.Donotuse anyharshabrasivesor
cleaningpowderswhichmayscratchor marsurface.
Shelves
* SoapandWater
@Soap-FilledScouringPad
o PlasticScouringPad
Shelvescanbe soakedindishwasheror cleanedbyhandusingsoapandwater.
Rinsethoroughlyto removeanysoapaftercleaning.
Surface Burner
Grates
e SoapandWater
e Soap-FilledScouringPad
(Non-metallic)
Lift outwhencool.Soak5 to 10minutesifdesiredinwarmsolutionof
dishwasherdetergent.Scourwithmaterialsmentionedheretoremoveburnedon foodparticles.
Chrome-Plated
e SoapandWater
~ Stiff-BristledBrush
e Soap-FilledScouringPad
(Non-metallic)
Cleanat sinkor indishwasher.Wipedrippansaflereachcookingso unnoticed
spatterwillnot “bum on” nexttimeyoucook.Toremove“burned-on”spatters,
useanyor all cleaningmaterialsmentioned.Rublightlywithscouringpadto
preventscratchingofthe surface.
Surface Burners
~ Solutionfor Cleaning
Insideof CoffeeMakers
e SoapandWater
e MildAbrasiveCleanser
o DampCloth
Wipeoffburnerheads.If heavyspilloveroccurs,removeburnersfromrange
(seepage 17)andsoakthemfor20 to 30 minutesin solutionofhotwaterand
productforcleaninginsideofcoffeemakers,suchas Dip-Itbrand.If soildoes
not rinseoffcompletely,scrubburnerswithsoapandwateror a mildabrasive
cleanseranda dampcloth.Dryburnersina warmovenfor30minutesbefore
returningthemtothe range.
RemovablePorcelain
e SoapandWater
o CommercialOvenCleaner
e Soap-FilledScouringPad
~ PlasticScouringPad
Removeovenbottompanelfromovenbeforecleaning.Whencool,wipewith
mildsoapandwater,especiallyaflercookingmeat. Forheavysoil, use nonabrasivecleanerandfollowlabelinstructions,usingthinlayerofcleaner.Wipe
or rublightlyonstubbornspots.Useof rubberglovesis recommended.
inted Surfaces
Drip Pans
Enamel Oven Bottom*
*Spillageof marinades, fruit juices,andbastingmaterialscontainingacidsmaycausediscoloration,so shouldbe blottedup immediately.Take
c~ren~ttotouchhotportio~ofoven.Whens~rfaceis cool,cleanand rinse.CAUTION:Lightbulbscangetwarmenoughtobreakif touched
‘i[hmoist cloth. When cleaning, avoid warm lamp.
21
PROBLEM
POSSIBLECAUSENVD/ORWHAT’‘N) DO
TOPBURNERS
DO NOTLIGHT
@Pilotsare not lit. Removeor liftcooktopand holdli@tedmatchnextto pilotopening
betweenfrontand rear burners.On modelswithelectricignition,makesureekxtrical
plugis pluggedintoa livepoweroutlet.
@Burnerholes‘cmsideof burner~may
be clogged.Removeand cleanthem.
@1%.wne~
Maynot be fittedcorrectlyontothe mountingbrackets.Removeand reinstall
themproperly.
OVENDOESN(YI’
COOKPROPERLY
~Makes~e the~osat &@lary bulb (locatedin upperportionof oven)is in correct
position,nottouc~g oven-sidesand notcoatedwith anything.
QAluminumfoil&ing
usedimpro~erlyin”oven.
,.
QQvenvent’blockedon topof rahge.
e Incomct ~o~~~ beingused,ch~~ eachcookingsectionfor cookwaretipsor
reco&nendations.
,)
,>
* Ovenbottomnot securelyseati in position.
on.
* OVENTEMP knob sit in&rrectly or notturned’
o Checkcotion baking,roas&g andbiding problemson pages 11-14.
CLOCKDOES
Nm WORK
Seatedin a live Posver
e R~ge elwtric~plugmustbe‘Se~”~rely
fuseor trippedcircuitbreaker..
,, !.
OVENLIGHTDOES
N~ COMEON
@Bulbmaybe looseor burnedout.
- Electricalplugmustbe pluggediito alive ‘poweroutlet.-
STRONGODOR
@Improperair/gasratioin oven.Adjustovenburner air shutter.
outlet.
Checkfor blown
If you need more help.. call, toUfree:
GEAnswerCenter@
800.626.2000
eons~merinformationservice
e
22
If YouNeedservice
To obtainservice,seeyourwarranty
on thebackpageof thisbook.
We’reproudof our serviceand
wantyouto be pleased.If forsome
reasonyouare nothappywiththe
serviceyoureceive,hereare three
stepsto followfor furtherhelp.
FIRST,contactthepeoplewho
servicedyourappliance.Explain
whyyouare notpleased.In most
cases,thiswillsolvetheproblem.
NEXT,if youare stillnotpleased,
writeall thedetails-including
yourphonenumber—to:
—.
Imi=
Manager, Consumer Relations
GE Appliances
Appliance Park
Louisville, Kentucky 40225
FINALLY,if yourproblemis still
notresolved,write:
MajorAppliance
ConsumerActionPanel
20 NorthWackerDrive
~
Chicago,Illinois60606
=“
—v.
Irsffg-=
!i3=si
__
YOURGENERALELEmRlc RANGE
WARRANTY
Save proof of original purchase date such as your sales slip or cancelled check to establish warranty period.
WHAT
1sCOVERED FULL (XW-YEN? WARRANTY
For one year from date of original
purchase, we will provide, free of
charge, parts and service labor
in your home to repair or replace
anypart of the range that fails
because of a manufacturing defect.
WHAT
IsNOTCOVERED teach
“Servicetrips
‘0
your
‘ome
‘0
you how to use the product.
Read your Use and Care material.
If you then have any questions
about operating the product,
please contact your dealer or our
Consumer Affairs office at the
address below, or call, toll free:
GE Answer CenteF
800.626.2000
consumer information service
This warranty is extended to
the original purchaser and any
succeeding owner for products
purchased for ordinary home use
in the 48 mainland states, Hawaii
and Washington, D.C.h Alaska the
warranty is the same except that it is
LIMITED because you must pay to
ship the product to the service shop
or for the service technician’s travel
costs to your home.
All warranty service will be provided
by our Factory Service Centers or
by our authorized Customer Care”
servicers during normal working
hours.
Look in the White or Yellow Pages
of your telephone directory for
GENERAL ELECTRIC COMPANY,
GENERAL ELECTRIC FACTORY
SERVICE, GENERAL ELECTRICHOTPOINT FACTORYSERVICE or
GENERAL ELECTRIC CUSTOMER
CARE@SERVICE.
o
Replacement of house fuses or
resetting of circuit breakers.
~ Failure of the product if it is used
for other than its intended purpose
or used commercially.
~ Damage to product caused
by accident, fire, floods or acts
of God.
WARRANTORIS NOTRESPONSIBLE
FOR CONSEQUENTIAL DAMAGES.
e Improper installation.
If you have an installation problem,
contact your dealer or installer.
You are responsible for providing
adequate electrical, gas, exhausting
and other connecting facilities.
Some statesdo not allow the exclusion or limitation of incidental or consequential damages, so the above limitation or exclusion
may not apply to you. This warranty gives you specific legal rights, and you may also have other rights which vary from state to state.
To know what your legal rights are in your state, consult your local or state consumer affairs office or your state’s Attorney General.
Warrantor: General Electric Company
If further help is needed concerning this warmty, write:
Manager—Consumer Affairs, GE Appliances, Louisville, KY 40225