1
No two vehicles operate under identical conditions, as a
result, maintenance intervals may vary. Experience is a
valuable guide in determining the best maintenance interval
for air brake system components. At a minimum, the TC-6™
valve should be inspected every 6 months or 1500 operating
hours, whichever comes first, for proper operation. Should
the TC-6™ valve not meet the elements of the operational
tests noted in this document, further investigation and service
of the valve may be required.
If the valve does not function as described, or if the leakage
is excessive, it is recommended that it be returned to the
nearest Bendix authorized distributor for a factory
remanufactured valve under the exchange plan. If this is not
possible, the valve can be repaired with genuine Bendix parts,
in which case the following should be helpful. The
maintenance kit for the TC-6™ valve is part number 289890.
Every 900 hours, 25,000 miles or every 3 months, drop some
lubricant such as BW-650M silicone lubricant (Bendix part
number 291126) (Dow Corning 55-M) through the handle
operating slot, to re-lubricate the cam roller and hinge pin.
Perform operating and leakage tests.
Remove the valve from the panel. Place the lever in a vise
and with a firm pull the rubber handle may be removed.
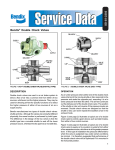
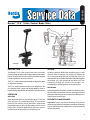
Remove the two slotted head cap screws (14) which hold
the mounting bracket in place as shown in Fig. 2 and remove
the mounting bracket.
REMOVING AND INSTALLING
Secure vehicle with spring brakes or blocks. Drain the
reservoir which supplies the TC-6™ valve. Remove the
fasteners which secure the mounting bracket to the panel.
Disconnect the connecting air lines. Remove valve.
INSTALLING
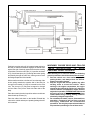
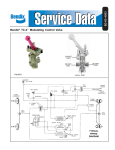
A typical piping arrangement for the TC-6™ valve is shown in
Fig. 3. Check connecting air lines for integrity and foreign
material. Replace lines if necessary. Re-connect air lines.
Replace fasteners securing bracket to panel. Check
operation of valve by charging system and performing the
service check as described in this manual.
SERVICE CHECKS
OPERATING
Connect an accurate test gauge to the trailer service line
hose and leave the trailer emergency or supply hose
connected to the trailer or if a trailer is not available, connect
the trailer supply hose to an unvented dummy coupling or
to a plugged hose fitting. The trailer supply valve should be
in the normal position.
When the operating lever is moved to the fully applied
position, the gauge should register full reservoir pressure.
Intermediate positions should deliver proportional
intermediate pressures. Upon release, the gauge should
immediately register zero.
The location of the atmospheric end of the exhaust line
from the valve should be found, probably in the engine
compartment.
With the TC-6™ valve in the release position, no pressure
should register on the test gauge and leakage at the end of
the exhaust line should not be greater than 100 SCCM
(1" bubble in 5 seconds).
With the valve fully applied, leakage at the exhaust line
should not be greater than 175 SCCM (1" bubble in 3
seconds).
2
DISASSEMBLY
Drive the pivot pin (13) out of the body with a drift punch.
The handle (10), roller cam (11) and torsion spring (8) may
now be removed. Remove the roller cam from the handle.
The cam follower (9), graduating spring (6), plunger (12),
and plunger return spring (4) may now be removed through
the top of the valve. Care should be taken not to lose washer
(15).
Place the body in a soft-jawed vise and remove cap nut (16).
Remove o-ring (1) from cap nut.
Inlet valve spring (3) and inlet valve (2) may now be removed.
CLEANING AND INSPECTION OF PARTS
Clean all metal and plastic parts with mineral spirits or
equivalent. Wipe all o-rings and rubber parts dry. Replace
any which show signs of wear or deterioration. Inspect
valve seats for nicks or burrs and remove any deposits.
Check all springs for distortion, cracks and corrosion.
Replace all parts not considered serviceable after inspection.
ASSEMBLY
Before assembling the valve all bores, cam, pivot pin,
plungers, and o-rings should be lubricated with silicone
lubricant Dow Corning 55-M (Bendix part number 291126).
Place body in a soft-jawed vise with ports pointing up. Place
inlet valve (2) in inlet cavity and install inlet valve spring (3).
Place o-ring (1) on cap nut (16) and assemble cap nut in
body. Torque cap nut to 50-150 inch pounds.
Install o-rings (5) and (7) on plunger (12) and cam follower
(9). Caution: o-ring (7) is slightly larger than (5) and goes on
the cam follower (9).
Reverse position of body in vise and install plunger return
spring (4), plunger (12), washer (15), graduating spring
(6), and cam follower (9). Note: The cam follower must be
positioned so that the projection on the side of the body
matches the corresponding groove in the body.