1
BCM Rls 6.0
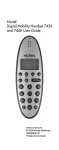
Digital Mobility Handset Users
Guide
Task Based Guide
Digital Mobility Handset Users Guide
Copyright © 2010 Avaya Inc.
All Rights Reserved.
Notices
While reasonable efforts have been made to ensure that the information in this document is complete and accurate
at the time of printing, Avaya assumes no liability for any errors. Avaya reserves the right to make changes and
corrections to the information
in this document without the obligation to notify any person or organization of such changes.
Documentation disclaimer
Avaya shall not be responsible for any modifications, additions, or deletions to the original published version of
this documentation unless such modifications, additions, or deletions were performed by Avaya. End User agree to
indemnify and hold harmless Avaya, Avaya’s agents, servants and employees against all claims, lawsuits, demands
and judgments arising out of, or in connection with, subsequent modifications, additions or deletions to this
documentation, to the extent made by End User.
Link disclaimer
Avaya is not responsible for the contents or reliability of any linked Web sites referenced within this site or
documentation(s) provided by Avaya. Avaya is not responsible for the accuracy of any information, statement or
content provided on these sites and does not necessarily endorse the products, services, or information described or
offered within them. Avaya does not guarantee that these links will work all the time and has no control over the
availability of the linked pages.
Warranty
Avaya provides a limited warranty on this product. Refer to your sales agreement to establish the terms of the
limited warranty. In addition, Avaya’s standard warranty language, as well as information regarding support for
this product, while under warranty, is available to Avaya customers and other parties through the Avaya Support
Web site: http://www.avaya.com/support
Please note that if you acquired the product from an authorized reseller, the warranty is provided to you by said
reseller and not by Avaya.
Licenses
THE SOFTWARE LICENSE TERMS AVAILABLE ON THE AVAYA WEBSITE,
HTTP://SUPPORT.AVAYA.COM/LICENSEINFO/ ARE APPLICABLE TO ANYONE WHO DOWNLOADS,
USES AND/OR INSTALLS AVAYA SOFTWARE, PURCHASED FROM AVAYA INC., ANY AVAYA
AFFILIATE, OR AN AUTHORIZED AVAYA RESELLER (AS APPLICABLE) UNDER A COMMERCIAL
AGREEMENT WITH AVAYA OR AN AUTHORIZED AVAYA RESELLER. UNLESS OTHERWISE
AGREED TO BY AVAYA IN WRITING, AVAYA DOES NOT EXTEND THIS LICENSE IF THE
SOFTWARE WAS OBTAINED FROM ANYONE OTHER THAN AVAYA, AN AVAYA AFFILIATE OR AN
AVAYA AUTHORIZED RESELLER, AND AVAYA RESERVES THE RIGHT TO TAKE LEGAL ACTION
AGAINST YOU AND ANYONE ELSE USING OR SELLING THE SOFTWARE WITHOUT A LICENSE. BY
INSTALLING, DOWNLOADING OR USING THE SOFTWARE, OR AUTHORIZING OTHERS TO DO SO,
YOU, ON BEHALF OF YOURSELF AND THE ENTITY FOR WHOM YOU ARE INSTALLING,
DOWNLOADING OR USING THE SOFTWARE (HEREINAFTER REFERRED TO INTERCHANGEABLY
AS "YOU" AND "END USER"), AGREE TO THESE TERMS AND CONDITIONS AND CREATE A
BINDING CONTRACT BETWEEN YOU AND AVAYA INC. OR THE APPLICABLE AVAYA AFFILIATE
("AVAYA").
Copyright
Except where expressly stated otherwise, no use should be made of the Documentation(s) and Product(s) provided
by Avaya. All content in this documentation(s) and the product(s) provided by Avaya including the selection,
arrangement and design of the content is owned either by Avaya or its licensors and is protected by copyright and
other intellectual property laws including the sui generis rights relating to the protection of databases. You may not
modify, copy, reproduce, republish, upload, post, transmit or distribute in any way any content, in whole or in part,
including any code and software. Unauthorized reproduction, transmission, dissemination, storage, and or use
without the express written consent of Avaya can be a criminal, as well as a civil offense under the applicable law.
Third Party Components
Certain software programs or portions thereof included in the Product may contain software distributed under third
party agreements ("Third Party Components"), which may contain terms that expand or limit rights to use certain
portions of the Product ("Third Party Terms"). Information regarding distributed Linux OS source code (for those
Products that have distributed the Linux OS source code), and identifying the copyright holders of the Third Party
Components and the Third Party Terms that apply to them is available on the Avaya Support Web site:
http://support.avaya.com/Copyright.
Trademarks
The trademarks, logos and service marks ("Marks") displayed in this site, the documentation(s) and product(s)
provided by Avaya are the registered or unregistered Marks of Avaya, its affiliates, or other third parties. Users
are not permitted to use such Marks without prior written consent from Avaya or such third party which may own
the Mark. Nothing contained in this site, the documentation(s) and product(s) should be construed as granting, by
implication, estoppel, or otherwise, any license or right in and to the Marks without the express written permission
of Avaya or the applicable third party. Avaya is a registered trademark of Avaya Inc. All non-Avaya trademarks
are the property of their respective owners.
2
NN40011-037 Issue 1.2 BCM Rls 6.0
Digital Mobility Handset Users Guide
Downloading documents
For the most current versions of documentation, see the Avaya Support. Web site: http://www.avaya.com/support
Contact Avaya Support
Avaya provides a telephone number for you to use to report problems or to ask questions about your product. The
support telephone number is 1-800-242-2121 in the United States. For additional support telephone numbers, see
the Avaya Web site: http://www.avaya.com/support
Copyright © 2010 ITEL, All Rights Reserved
The copyright in the material belongs to ITEL and no part of the material may
be reproduced in any form without the prior written permission of a duly
authorised representative of ITEL.
NN40011-037 Issue 1.2 BCM Rls 6.0
3
Digital Mobility Handset Users Guide
Table of Contents
Digital Mobility Handset Users Guide .............................. 5
Overview .......................................................................................... 5
Digital Mobility Handset Models ....................................................... 6
Required Information / Equipment ................................................... 7
Logging on to CallPilot Manager ........................................................................8
Adding a Subscriber Mailbox ...........................................................................13
Subscriber Mailbox Settings ............................................................................14
Initialising a Mailbox .........................................................................................16
Recording Primary or Alternate Greetings .......................................................17
Twinning ........................................................................................ 17
Digital Mobility Handset Battery ..................................................... 19
Installing the Battery ........................................................................................19
Charging the Battery ........................................................................................20
Checking the Battery Capacity ........................................................................21
Navigating the Digital Mobility Handsets ........................................ 22
Handset Display ............................................................................. 22
Basic Handset Options .................................................................. 23
Answering Calls ...............................................................................................27
Hold a Call .......................................................................................................27
Making or Answering a Second Call ................................................................28
Replying to Messages .....................................................................................29
More Handset Options .....................................................................................29
Using the Phone Book .....................................................................................30
Storing a Number .............................................................................................31
Using Text Messages (MSF) ......................................................... 32
Shortcuts........................................................................................ 34
Accessing BCM Features .............................................................. 35
Configuring the DMC Feature List ...................................................................36
General information ....................................................................... 37
Troubleshooting ...............................................................................................37
Avaya Documentation Links .......................................... 38
4
NN40011-037 Issue 1.2 BCM Rls 6.0
Digital Mobility Handset Users Guide
Digital Mobility Handset Users Guide
Overview
This guide is designed to provide information on the features available on the
Digital Mobility 743X, 744X, 413X 414X, 4135, 4145, & 4145EX handsets.
The following features are available:
Twin to a fixed set to allow remote reception of calls.
Make and receive calls from the handset, within the range of the
system the handset is subscribed to as an independent set.
Transfer and conference calls from and to the handset.
Display an internal caller by name, and an external caller by number or
name, depending on how the external line is set up.
Query the voice mail system using the mail extension or the Message
Waiting button.
Call forward calls, and cancel call forward, to another set, to voice mail,
or to an external number.
Determine when a call gets forwarded: all calls, on busy, or if call is not
answered.
Make a second call while a call is in progress.
Shuttle between two calls.
NN40011-037 Issue 1.2 BCM Rls 6.0
5
Digital Mobility Handset Users Guide
Digital Mobility Handset Models
The 743X, 744X – 413X , 414X models are a low cost handset targeted at
industry, warehouses, hospitals and retail environments.
The 4145Ex handset is an intrinsically safe wireless handset. It has been
designed for use in hazardous environments, such as chemical or oil
industries.
6
NN40011-037 Issue 1.2 BCM Rls 6.0
Digital Mobility Handset Users Guide
Required Information / Equipment
Ensure that the Digital Mobility Controller has been installed and configured
successfully and that the Digital Mobile handsets have been registered and
subscribed to the system. Please refer to the Digital Mobility Configuration
Guide.
Equipment required and already installed should include:
Digital Mobility Controller
Digital Mobility Base Stations
Digital Mobility Repeaters (as required)
Digital Mobile Handsets
Voice Mail Access
Digital Mobile handsets have the ability to access Voice Mail mailboxes
for both internal, stand-alone systems, and external voice mail systems
accessed over a private network (as with MCDN). To facilitate this,
there is a Message Waiting Indicator (MWI) available on the Digital
Mobility 4145, and 4135,4145 EX handsets.
If the Digital Mobile handset is being used as a stand-alone set, then the
CallPilot Manager set up is the same as for any other BCM set.
NN40011-037 Issue 1.2 BCM Rls 6.0
7
Digital Mobility Handset Users Guide
Logging on to CallPilot Manager
The following process describes how to access CallPilot Manager from
Element Manager.
1. To access the Business Element Manager application from the Start
Menu,
navigate
to
Start,
Programs,
Avaya,
Business
Communications Manager, Business Element Manager.
2. Alternatively, double-click on the Business Element Manager desktop
icon.
8
NN40011-037 Issue 1.2 BCM Rls 6.0
Digital Mobility Handset Users Guide
3. You will be presented with the Element Manager interface.
4. Open the Network Elements folder and select the IP Address of the
BCM.
5. Enter the User Name of the BCM in the User Name field, by default this
is nnadmin. Then enter the Password in the Password field, by default
the password is PlsChgMe!. Click the Connect button.
NN40011-037 Issue 1.2 BCM Rls 6.0
9
Digital Mobility Handset Users Guide
6. A warning screen will appear, read the warning and click OK.
7. You will be presented with the Element Manager interface.
10
NN40011-037 Issue 1.2 BCM Rls 6.0
Digital Mobility Handset Users Guide
8. To access CallPilot Manager: Select the Configuration tab, open the
Applications folder, select the Voice Messaging / Contact Center
link, and then click to Launch CallPilot Manager.
9. You will be presented with a Security Alert Screen. Read the alert and
click Continue to this website to continue.
NN40011-037 Issue 1.2 BCM Rls 6.0
11
Digital Mobility Handset Users Guide
10. The Main Menu of CallPilot Manager will be launched.
12
NN40011-037 Issue 1.2 BCM Rls 6.0
Digital Mobility Handset Users Guide
Adding a Subscriber Mailbox
To create a Subscriber Mailbox for the Digital Mobile handset is the same
procedure for all other BCM handsets. It is recommended to make the Mailbox
number the same as the extension number it is being assigned to.
1. Click the Mailbox Administration heading.
2. Click the Add Mailbox link. The Add Mailbox page appears.
3. In the Mailbox box, type the mailbox number. In the field for the
Mailbox Type, select Subscriber. Click the Submit button.
NN40011-037 Issue 1.2 BCM Rls 6.0
13
Digital Mobility Handset Users Guide
4. The Subscriber Mailbox page appears. Configure the Subscriber
Mailbox properties as required. Click Submit when complete. A
description of these properties is provided in the below table.
Subscriber Mailbox Settings
Attribute
Extension
Last Name
First Name
Class Of Service
14
Description
The extension that the mailbox will be assigned to. It is generally good
practice to match the mailbox number to the extensions number.
Last name of the mailbox owner.
First name of the mailbox owner.
Class of Service assigned to the mailbox.
NN40011-037 Issue 1.2 BCM Rls 6.0
Digital Mobility Handset Users Guide
Attribute
Find Me/ Follow
Me
Display in
Directory
Enable Message
Waiting
Enable Auto Login
Outdial Type
Alternate Ext 1,2,
3, 4, 5
Enable Call
Screening
Express
Messaging Line
(Fax Only)
Enable Mailbox
Restrictions
Park & Page
Description
Click Change to add/edit any of the Find Me/ Follow Me schedules or
external number entries.
Clear this if you do not want the mailbox owner’s name to appear in the
Company Directory.
Clear this if you do not want message notification to appear on the
mailbox owner’s telephone display.
Auto-Login speeds up the login process for subscribers. With AutoLogin, subscribers can log on from their primary or alternate telephone
without having to enter their mailbox number or password.
This setting provides an external access resource for certain mailbox
features. Outdial is required for features such as Reply, Off-Premise
Notification, Outbound Transfer etc.
Select None if you do not want to assign outdialing capabilities
Select Line and type the line number. Line numbers must be
between 1 - 999 for BCM450 and 1-332 for BCM50.
Select Pool and type the line pool number or letter.
Select Route if, for example routing is used to access a PRI line
pool.
Allows the designated extension direct access to the mailbox, in
addition to Message Waiting Indication when messages are left in the
mailbox. Maximum of 5 Alternate Extension for a single mailbox.
Select this to assign screened transfers (via the Auto-Attendant) to the
mailbox owner
Any calls to this line will be immediately transferred to the mailbox. Note
that if you enter an Express Messaging Line (e.g. a Target Line), that
line cannot appear/ring at any extension. Also, the Voicemail (F985) DN
should be set as the Prime set for that line (see Telephony Services,
Lines).
If the mailbox will use Express Messaging Line, enabling this option
stops the greeting being played to calls to the Express Messaging Line,
making the fax call quicker.
You can control how a subscriber accesses a mailbox. If you select the
Enable Mailbox Restrictions check box, a subscriber cannot log in to the
mailbox externally. If the subscriber attempts to log in externally, the
prompt "You are not allowed to use this feature. Exiting the system,
goodbye.” is played. The system disconnects the caller.
In addition, an internal subscriber cannot administer a restricted
mailbox. If the subscriber presses 8, the prompt "You are not allowed to
use this feature" plays and the subscriber returns to the main
Menu. Mailbox restrictions are applicable only to subscriber mailboxes.
With Park and Page, external callers can press 6 to page a mailbox
subscriber while they listen to the subscriber’s personal greeting or
record a message. When the caller presses 6, the system parks the call
and pages to paging zone or overhead paging system, or both and the
caller hears “One moment, please.” The caller cannot interrupt this
prompt by pressing DTMF. The page is repeated based on the mailbox
configuration until the parked call is picked up or the park timeout
occurs, at which point the caller is returned to the mailbox and hears the
subscriber’s personal greeting. The call is parked as long as there are
not already 25 calls parked. If the call cannot be parked, the caller hears
“The person you have called is not available” followed by the
subscriber’s mailbox greeting. While a call is parked the caller hears a
hold tone or music on hold, depending on the system configuration. The
call is paged to the appropriate paging zone or overhead speaker
system, or both. If the page is unsuccessful because the paging facility
is busy with another page, the system waits five seconds and retries the
page every five seconds until the paging facility is available or the call
park timeout expires, whichever occurs first. If the call park timeout
NN40011-037 Issue 1.2 BCM Rls 6.0
15
Digital Mobility Handset Users Guide
Attribute
Page Type
Paging Zone
Page Retries
Retry Interval
Find Me/Follow Me
disabled for Hunt
Groups
Description
expires first, the caller hears “The person you have called is not
available” followed by the subscriber’s mailbox greeting. If the page is
unsuccessful for any other reason, the call is un-parked and the caller
hears “The person you have called is not available” followed by the
subscriber’s mailbox greeting. While a call is being paged, the system
plays the mailbox spoken name and park string, for example “John Doe,
101.” The park string is played in the standard voice prompts, or
customized digits, if you recorded them.
Select the required paging type facility. The choices are Internal Zone,
Overhead Paging, Both or None. The default is none.
Select the Paging Zone to which the paging announcement will be
played. The zones available are zone 1, 2, 3, 4, 5, 6 or All. The default
is 1. If the paging type is overhead paging this setting is ignored.
Select the number of page retries to be played to the Page Zone from
the box select 0, 1, 2, 3, 4 or 5. The default is 1.
The retry interval is the number of seconds between paging retries. The
range is 5-300 seconds. The default is 15 seconds.
If a Find Me/Follow Me user is a member of a Hunt Group, enabling this
option will stop Hunt Group calls at the FM/FM user’s extension from
being forwarded to FM/FM destinations.
Initialising a Mailbox
Once the Subscriber mailbox has been created for the Digital Mobile handset,
the mailbox owner must initialise it before it can receive voice messages. This
involves changing the default mailbox Password to a new user Password and
recording the mailbox owners name in the Company Directory. This can be
done from the Digital Mobile Handset in the same way as you would initialise
the mailbox from a BCM digital desk set.
1. On a Digital handset, press F981.
2. On the soft keys, select OTHR then log onto the DECT mailbox by
typing out the Mailbox number and password (the default password is
0000), then press the soft key under OK or press the # key.
3. You will be prompted in the display to change your password “Must
change pswd”.
4. Enter a new password from 4 to 8 digits long that does not start with
“0”, and press OK or #.
5. You will now be required to confirm the new password. Re-enter your
new mailbox password and press OK or #.
6. At the tone, record your name in the Company Directory. It is
recommended to include your mailbox number in the recording, for
example, “Pat Smith, mailbox 5344.”
7. Press OK or # to end the recording.
16
NN40011-037 Issue 1.2 BCM Rls 6.0
Digital Mobility Handset Users Guide
8. Press OK or # to accept the recording or press PLAY or 1 to listen to
the recording or press RETRY or 2 to re-record your name.
9. Press the Release key to end the session.
Recording Primary or Alternate Greetings
Only a Primary mailbox greeting is necessary, but you can record an Alternate
mailbox greeting for times when you are out of the office, such as holidays. If
you do not record any mailbox greetings, your Company Directory name
recording plays to callers who reach your mailbox.
1. On a Digital Mobile Handset, press F981. Follow the voice prompts or
the display button options to open your mailbox.
2. Open the Greeting options menu:
a) If you use the CallPilot interface, press 82
b) If you use the Norstar Voice Mail interface:
i. Press ADMIN or 8
ii. Press GREET or 2
3. Press REC or 1.
4. Press PRIME or 1 to record the Primary greeting or press ALT or 2 to
record the Alternate greeting.
If you are changing a greeting, the current greeting starts to play. If this is
the first time you are recording a greeting, Not recorded appears briefly.
5. Press YES or 1 and record you’re greeting at the tone.
6. Press OK or # to end the recording.
7. Press OK or # to accept the recording or press PLAY or 1 to listen to
the greeting or press RETRY or 2 to re-record the greeting.
8. Press the Release key to end the session.
Twinning
The Digital Mobility handsets have the ability to be twinned to a BCM digital
desk set, so that when a call is sent to the Digital desk set, the DIGITAL
MOBILITY handset also rings. The programming for this is done under
Element Manager.
1. Log into the Element Manager main configuration screen. Then open
the Telephony folder followed by the Sets folder and select the Active
Sets link.
NN40011-037 Issue 1.2 BCM Rls 6.0
17
Digital Mobility Handset Users Guide
2. Select the DECT DN number that you wish to have twinned. Select
the Answer DNs tab and click the Add button.
3. The Add Answer DNs dialogue box will be presented. In here type
the DN number of the Digital Desk set that the DECT handset is to be
twinned with, then click the OK button.
4. Finally, exit the telephony programming and Element Manager. The
Digital Mobility handset will now ring whenever a call is placed to the
Digital desk set.
18
NN40011-037 Issue 1.2 BCM Rls 6.0
Digital Mobility Handset Users Guide
Digital Mobility Handset Battery
Installing the Battery
The battery is connected to the handset when it is shipped from the factory.
1. To change the battery, unscrew the plate on the rear of the handset to
access the battery compartment. Use a normal screw driver.
2. Insert the screwdriver into the small crack behind the blind cover and
break to open the handset.
3. Place the battery plug in the slot in the battery box.
4. Insert battery with the label readable, and replace the back cover.
NN40011-037 Issue 1.2 BCM Rls 6.0
19
Digital Mobility Handset Users Guide
Charging the Battery
When charging the battery for the first time, it is necessary to leave the
handset in the charger for 14-16 hours for the battery to be fully charged.
During normal operation, it takes approximately 3.5 hours to charge the
handset from fully discharged to its full capacity.
Place the handset in the charger. For correct charging, be sure the
room temperature is between 0°C and 25°C. Do not place the handset
in direct sunlight. The battery has a built-in heat sensor which will stop
charging if the battery temperature is too high. If the handset is turned
off when placed in charger, only the LED indicates the charging. When
handset is turned off, the LED flashes at a low frequency while
charging and lights constantly when the charging is finished.
There will be no reaction on incoming calls. If the handset is turned on when
charging, the display shows the charging status. The display goes back to
normal mode when fully charged. It will not vibrate. Auto-answer is inactive.
The handset reacts normally for incoming calls.
20
NN40011-037 Issue 1.2 BCM Rls 6.0
Digital Mobility Handset Users Guide
It is necessary to recharge the battery when the display shows BATTERY
LOW, or if the handset cannot be turned on. When the battery is fully
discharged, up to 10 minutes may pass before charging begins (display lights
up). When the charger begins the charging, status is shown in the display if
the handset is turned on.
Checking the Battery Capacity
In the BATTERY MENU it is possible to see the remaining battery capacity.
For reading the correct capacity, the handset has to be removed from the
charger for at least one hour.
1. Press MENU (
MENU.
) and use the < or > keys to reach the BATTERY
2. Press to enter the BATTERY MENU, and see the current status of
the battery capacity.
3. Press to return to the menu system, or press MENU (
) to quit.
The indication on the display is not necessarily an exact reflection on the
remaining speech time, but only an indication of the voltage on the battery.
NN40011-037 Issue 1.2 BCM Rls 6.0
21
Digital Mobility Handset Users Guide
Navigating the Digital Mobility Handsets
Handset Display
There
are
four
lines
on
your
handset
display.
Standby Text
DECT1
218
Information Text
90800500005
INFO
Feature Options
TRANSFER
Handset Icons
The types of information shown on the display are:
Standby text: When the handset is on hook (idle), your extension name and
number appears on the first line of the display.
22
NN40011-037 Issue 1.2 BCM Rls 6.0
Digital Mobility Handset Users Guide
Information text: Call or feature information appears on the second line of
the display.
Feature options: Feature options appear on the third line of the display.
Feature options vary, depending on the type of call or feature in use.
Handset icons: The following icons appear on the fourth line of the display:
The radio signal icon indicates connection to system. The icon flashes when
the system is busy and you will not be able to make or answer calls.
The envelope icon indicates a new text message
(MSF-MAIL).
Left and right arrow icons appear on the display when you access Handset
option menus.
The telephone icon indicates a call is active. The icon flashes when a call
connection is in progress.
Basic Handset Options
Turning the handset ON/OFF
ON
Press
. When the handset is turned on the radio signal display icon is
shown in the lower left corner of the display, if the handset is subscribed to a
system.
OFF
Press (
) for 3 seconds.
NN40011-037 Issue 1.2 BCM Rls 6.0
23
Digital Mobility Handset Users Guide
Adjusting speaker volume
1. Press
2. Use the two keys placed at the upper right side of the handset for
volume control.
Two buttons
incorporated into
the grip at the
right of the
handset for
increasing and
decreasing
volume
3. Press
again.
Changing Menu Language
There are three predefined languages in the handset: English, French, and
Spanish.
1. Press MENU (
), and then press .
2. Switch to SET PROFILE LANGUAGE using the < > keys, then press
.
3. Use the < > keys to choose between the predefined languages, then
press to select the required language.
4. Press MENU (
) to exit the menu structure.
Customising handset
The handset has one user-defined profile (set up), and a mode where all
sounds are disabled (SILENT).
• Press MENU (
) followed by to show the profile. All settings have to be
defined under the profile. The display shows if the SILENT mode is enabled.
Profile set-up
In the following you will find a description of how to set up the profile.
1. Press MENU (
24
) to enter the PROFILE SET UP MENU.
NN40011-037 Issue 1.2 BCM Rls 6.0
Digital Mobility Handset Users Guide
2. Press . You are now able to switch between the different settings
using < or >.
3. Press when you find the setting you wish to change (or see).
4. Change the setting according to your needs, confirm with and you
automatically go to the next setting.
5. Press MENU (
) to finalise profile setup.
Description of profile functions
RINGERTONE: Scroll through the 9 different ringer tones using < and >.
Confirm with .
RINGER VOL: Turn the volume up and down using < or >. Confirm with .
KEY CLICK: Turn the volume up and down using < and >. Confirm with .
VIBRATOR: Can be turned on/off using < and >. Confirm with . (Works only
on handset 7445).
AUTO-ANSWER: Can be turned on/off using < and >. Confirm with . When
turned on, the telephone automatically goes off hook when ringing.
START VOL: Start volume can be adjusted using < and >. Confirm with .
OUT OF RANGE: The out of range indication can be turned on/off using <
and >. Confirm with . With the out of range indicator turned on, a beep will
appear when the telephone is moving out of range of the base station, and
“OUT OF RANGE” will appear in the display. If on a call (when out of range)
the call will be transferred to the prime set.
AUTO KEYLOCK: The auto keylock function can be turned on/off using < and
>. Confirm with . With auto keylock turned on the handset will automatically
lock the keys after 60 seconds. Press MENU(
), then press to activate
the keys again.
NN40011-037 Issue 1.2 BCM Rls 6.0
25
Digital Mobility Handset Users Guide
Language: Choose between predefined languages using < and >. Confirm
with .
BACKLIGHT: Can be turned on/off using < and >. Confirm with .
Making and answering calls
The handset must be subscribed and registered to make or answer a call.
(Contact your system administrator to have your handset subscribed).
For internal calls, dial the extension number. (Contact your system
administrator for a list of extension numbers).
For external calls, dial the external code (or line pool code) to access an
external line, then dial the external telephone number. (Contact your system
administrator to confirm what external code or line pool code to use).
Dial directly
1. Press
, the display
icon flashes until the call is connected.
2. Dial the number.
3. Press
again to end the call.
On hook dialling (pre-dial)
1. Dial the number. A long press on will make a pause, if necessary.
2. Press
3. Press
.
again to end the call.
Dial from your phone book
1. Press > (
) to enter the telephone book.
2. Search for the number either by using the < > - keys, or by pressing the
first letter in the name by using the digits 2 – 9.
26
3. Press
, the display
icon flashes until the call is connected.
4. Press
again to end the call.
NN40011-037 Issue 1.2 BCM Rls 6.0
Digital Mobility Handset Users Guide
Redial
The handset has maximum 10 redial numbers. Each number is only
represented once.
1. Press < (
) to enter the redial list. You can also reach the REDIAL
MENU in the main menu.
2. Search for the number by using the < > -keys. Redial numbers are
marked with “REDIAL” or name of the person who called, if present in
the phone book.
3. Press
, the display
icon flashes until the call is connected.
4. Press
again to end the call.
Note: Use the Redial list or the Last Number Redial Feature (5) to
automatically redial the last external telephone number that you called.
Answering Calls
Depending on the system hardware/ software configuration, Call Display
information (CLID) for incoming external calls will appear on the display.
To answer a call:
1. Press
to answer a call when your handset rings.
2. If you are using headset, press any key on the handset to answer the
call.
To stop the handset ringing without answering the call:
1. Press
and the ring signal is muted. The display shows: »RINGER
MUTED«
2. Alternatively, press one of the volume control buttons to mute the
ringing signal.
Hold a Call
1. While on a call, press R ( ).
2. To retrieve the held call, press R ( ) again.
NN40011-037 Issue 1.2 BCM Rls 6.0
27
Digital Mobility Handset Users Guide
Making or Answering a Second Call
You can have two calls active at the same time. Use R () to switch between
calls.
To answer a second call while on another call.
Press R () to answer the second call. The first call is automatically
put on hold.
To hold a call and make a second call
1. Press R ( ) to put the first call on hold.
2. Dial the telephone number of the second call.
To return to the first call
Press R ( ) again to return to the first call. The second call is
automatically put on hold.
Mute a call
1. While on a call, press (
).
2. To cancel mute, press (
) again.
Turn on loudspeaker
Only available on Handset 7445.
1. While on a call, press Feature key (long key press) to turn the
loudspeaker on.
2. To turn the loudspeaker off, press Feature key (long key press) again.
28
NN40011-037 Issue 1.2 BCM Rls 6.0
Digital Mobility Handset Users Guide
Replying to Messages
This allows you to read messages from another DN (Directory Number) in the
system or to listen to voice-mail messages. The red LED on your handset
flashes when you receive a message from an internal voice message center
or another telephone on your system. This is the message waiting indication.
To view, reply and listen to your messages:
1. While on hook, press R ( ) (short key press) to access your message
list.
2. Press NEXT to view all messages in the list.
Note: The NEXT soft key only appears on the display when you have more
than one message.
3. Press CALL to reply to a message in the list.
4. Press ERASE to delete a message from the list.
More Handset Options
Moving around in the Menu
Press MENU (
) to enter or exit the menu structure. It has to be used if a
“NO” or “CLEAR” is wanted in the menu structure.
Press to jump to a lower level in the menu. When the lowest menu level is
reached, it will store the setting and jump to a higher level. It has to be used if
a “YES” is wanted.
Note: If the handset is in the menu, and an incoming call arrives, then the
menu will be dropped and the call handled in the normal way.
Menu structure
The main menu consists of the following 8 menus:
MENU PROFILE SET UP
MENU EXT. SERVICE
External services are only applicable to the Master handset.
MENU BATTERY
MENU PHONE BOOK
MENU REDIAL
NN40011-037 Issue 1.2 BCM Rls 6.0
29
Digital Mobility Handset Users Guide
The handset has maximum 10 redial numbers. Each number is only
represented once.
Press MENU ( ), press > four times from standby text to enter the
REDIAL MENU, and then press .
Repeated presses at < turn backward through the dialed numbers
(from newest to the oldest). Right arrow moves in the opposite
direction.
Note: It is also possible to reach the REDIAL MENU using the < (
) key.
Numbers are named “REDIAL” or with the name.
If you want to delete a ”REDIAL” use < or > to scroll to the name/
number, and then press twice. The name/number is now deleted. If
the number is stored, it is moved to the telephone book. It is possible to
add prefixes to the redial numbers.
Find the number you wish to edit and press the digits you want to add
to the number, e.g. prefix = O.
MENU LOGIN
For more information on this menu option, contact your system administrator.
MENU MSF FUNCTION
MSF Functions are special functions, which are based on MSF (Message
Service Function). The functions require special software in the main system.
Note: The PHONE BOOK MENU, REDIAL MENU and MSF MAIL MENU can
be accessed directly. The PHONE BOOK MENU by pressing > (
), the
REDIAL MENU by pressing < ( ) , and the MSF MAIL MENU by pressing R
( ) with a long key press.
Using the Phone Book
You can store telephone numbers and names in your telephone book. The
telephone book can store up to 65 numbers with name. A maximum of 32
digits, including spaces, is allowed for each number. Names are sorted
alphabetically starting with their first character.
30
NN40011-037 Issue 1.2 BCM Rls 6.0
Digital Mobility Handset Users Guide
Storing a Number
1. While on hook, press the number to be stored (max. 32 digits), press >,
and then press .
2. Enter a name, and then press to store the number. After storing, the
telephone will go back to standby mode.
3. If the display shows MEMORY FULL, it is necessary to delete one or
more numbers from the telephone book.
Storing from Redial list
1. While on hook, use the < -key to find the number in the redial list to be
stored in the telephone book.
2. Press , then >, and then press again.
3. Enter a name, and then press to store the redial list number in the
telephone book.
Storing number from last caller
While on hook, press < to store a number from last caller, then , then
press , then to confirm.
Reading BOOK numbers
1. While on hook, press > (
) to enter the telephone book.
2. For quick-search: press the first letter of the name (using 2-9)
3. Press to call the displayed person. It is also possible to reach
the PHONE BOOK MENU from the main menu.
4. Press MENU (
) to exit the telephone book.
Note: Viewing and editing the telephone book can also be done while in
conversation (off hook) by pressing > (
) with a long key press.
Changing numbers
1. While on hook, press > (
) to enter the telephone book.
2. Use the < > -keys to find the number to be edited, press , press >,
then press .
3. Edit the number, and then press to store the number.
NN40011-037 Issue 1.2 BCM Rls 6.0
31
Digital Mobility Handset Users Guide
Note: Viewing and editing the telephone book can also be done while in
conversation (off hook) by pressing > (
) with a long key press.
Changing Redial number
1. While on hook, press < (
), use the < > -keys to find the redial
number to be edited, and press the digits you want to add to the
number, e.g. prefix = O.
2. Press , followed by >, enter a name, and then press again to store
the number.
Deleting numbers
1. While on hook, press > (
) to enter the telephone book.
2. Use the < > - keys to find the number to be deleted, press twice.
Deleting from Redial list
While on hook, press < (
), then use the < > -keys to find the name/
number to be deleted, and press twice. The name/number is now
deleted. If number is stored, it is moved to the telephone book.
Using Text Messages (MSF)
It is possible to send text messages from handset to handset on the same
system. At the reception of a text message the envelope display icon appears.
The envelope display icon is indicating one or more unread messages or
unanswered calls.
32
The text message is shown in the display, and when the message is
read the envelope display icon will disappear.
If the message contains a callback number, this will be displayed on
the bottom line of the display. As long as the callback number is in the
display, it is possible to activate the number by pressing
.
1st letter in the display, in front of the timestamp, shows the message
status: read (R), unread (N) or locked (L).
Mails include a maximum of 96 letters or digits (2 display screens of 48
each). Call back no. is max 32 digits (or letters for E-mail).
14 messages can be ”stored” in the handset. When receiving a new
message, the oldest unlocked will be deleted.
Locked messages will not automatically be overwritten, but can
manually be deleted. Maximum 7 messages can be locked.
NN40011-037 Issue 1.2 BCM Rls 6.0
Digital Mobility Handset Users Guide
Reading a MSF mail
1. While on hook, press R ( ) with a long key press, then press . If
the message includes more than 48 letters or digits, the message will
run over 2 display screens.
2. Use the > - key to scroll.
3. To see the sender of the mail, press .
4. To leave the mail, press MENU (
).
Replying a MSF mail
1. While on hook, press R () to open the mail, then , press again
and use the < > - keys to find the reply feature, press and you are
now able to reply the mail.
2. After writing your reply, press to confirm.
Forwarding a MSF mail
1. While on hook, press R () to open the mail, then , press again
and use the < > - keys to find the forward feature, press twice and
you are now able to dial the number on the receiver.
2. Press to confirm.
Deleting all MSF mails
1. While on hook, press R () to open the mail stack, then , press
again and use the < > - keys to find the delete feature.
2. Press and all mails are deleted.
Deleting a MSF mail
1. While on hook, press R ( ) to open the mail, then , press again
and use the < > - keys to find the delete feature.
2. Press and the mail is deleted.
Locking/unlocking a MSF mail
When locking a message, the message will not automatically be overwritten
when receiving a new message. If unlocked, the oldest message will be
deleted when receiving a new message.
1. While on hook, press R ( ) to open the mail, then , press again
and use the < > -keys to find the lock/unlock feature.
2. Press and the mail is locked/ unlocked.
NN40011-037 Issue 1.2 BCM Rls 6.0
33
Digital Mobility Handset Users Guide
Writing a MSF mail
1. While on hook, press R ( ) with a long key press to write a new mail,
confirm with , and then write your message.
2. To send the mail press , dial the number of the receiver, and then
confirm with .
3. If one or more mails are stored do as followed:
a. Press R (), then >, confirm with , and then write your
message.
b. Press , dial the number of the receiver, and confirm with .
The message is sent.
Note: In case a sent message is not received, the sender will get a message
in the display.
Shortcuts
”SILENT”: Press: MENU (
SILENT)
) followed by #. (No sounds) (Display shows
”KEY LOCKED”: Press: MENU (
LOCKED)
“PHONE BOOK”: Press > (
) followed by . (Display shows KEY
) (in on hook).
Name search in telephone book:
Press the first letter in name.
Store a number: Press > (
“REDIAL”: Press < (
) after the number (in on hook).
) in on hook.
Check messages: Short Press R () in on hook.
“MSF-MAIL”: Long Press R () in on hook.
MUTE temporarily the ringer: Press ( ) when the telephone is ringing.
Alternatively, you can also press one of the volume control buttons to mute
the ringing signal.
MUTE the microphone: Press (
) when the telephone is off hook.
RECALL: Press R ( ). Pause(-): Hold for one second (only for on hook
dialing /pre-dial).
34
NN40011-037 Issue 1.2 BCM Rls 6.0
Digital Mobility Handset Users Guide
Accessing BCM Features
Features available on the BCM are accessed by the Digital Mobility Handsets
in the same manner as accessing such features using a standard BST set.
1. Press the Feature key to access the features menu. The display will
show four lines of display.
DECT1
218
FEATURE:
PAGE
PARK
2. Type the code for the feature that you require, or you can use the
softkeys to navigate the DMC Feature List. This list contains 5 preconfigured features which can easily be accessed by pressing the
feature key.
NN40011-037 Issue 1.2 BCM Rls 6.0
35
Digital Mobility Handset Users Guide
Configuring the DMC Feature List
The DMC Feature list can be altered to suit the customers requirements, so
as to provide easy access to the features most frequently used.
1. In Element Manager programming interface on the BCM, open the
Telephony folder followed by the Global Settings folder.
2. Highlight DMC Feature List and change the 5 positions as required.
36
NN40011-037 Issue 1.2 BCM Rls 6.0
Digital Mobility Handset Users Guide
General information
Troubleshooting
The telephone freezes.
Remove and replace the battery pack. Press to turn on the telephone.
The telephone does not ring.
Check whether the ringer is SILENT or RINGER VOL. is OFF.
Not possible to turn on the telephone.
Check if battery is connected. If yes, charge the battery.
The telephone turn off when receiving a call and going off-hook.
Charge the battery. If still a problem change the battery as it might be
defective.
NN40011-037 Issue 1.2 BCM Rls 6.0
37
Digital Mobility Handset Users Guide
Avaya Documentation Links
38
Digital Mobility Phone 743X/744X User Guide
Digital Mobility Phone 413X and 414X User Guide
Digital Mobility Phone 4145Ex and 4146Ex User Guide
Digital Mobility System Installation and Configuration Guide
NN40011-037 Issue 1.2 BCM Rls 6.0