1
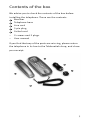
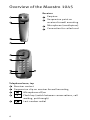
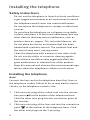
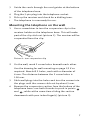
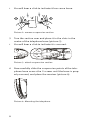
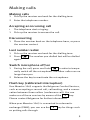
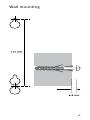
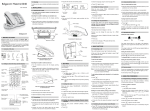
Belgacom Maestro 1045
2_Manuel_Maestro1045.indd 4
TM
User manual
7/30/08 4:27:55 PM
Table of contents
Table of contents . . . . . . . . . . . . . . . . . . . . . . . . . . . . . . . . . . 1
Introduction . . . . . . . . . . . . . . . . . . . . . . . . . . . . . . . . . . . . . . 2
Contents of the box . . . . . . . . . . . . . . . . . . . . . . . . . . . . . . . . 3
Overview of the Maestro 1045 . . . . . . . . . . . . . . . . . . . . . . . 4
Installing the telephone . . . . . . . . . . . . . . . . . . . . . . . . . . . . 6
Safety instructions . . . . . . . . . . . . . . . . . . . . . . . . . . . . . . . . . 6
Installing the telephone . . . . . . . . . . . . . . . . . . . . . . . . . . . . . 6
Mounting the telephone on the wall . . . . . . . . . . . . . . . . . . . 7
Making calls . . . . . . . . . . . . . . . . . . . . . . . . . . . . . . . . . . . . . . 9
Making calls . . . . . . . . . . . . . . . . . . . . . . . . . . . . . . . . . . . . . . 9
Accepting an incoming call . . . . . . . . . . . . . . . . . . . . . . . . . . 9
Disconnecting . . . . . . . . . . . . . . . . . . . . . . . . . . . . . . . . . . . . . 9
Last number redial . . . . . . . . . . . . . . . . . . . . . . . . . . . . . . . . . 9
Switch microphone off/on . . . . . . . . . . . . . . . . . . . . . . . . . . . 9
Flash key (calibrated interruption) . . . . . . . . . . . . . . . . . . . . 9
Personal settings . . . . . . . . . . . . . . . . . . . . . . . . . . . . . . . . . 10
Setting the ring tone . . . . . . . . . . . . . . . . . . . . . . . . . . . . . 10
Setting the volume . . . . . . . . . . . . . . . . . . . . . . . . . . . . . . . 10
Troubleshooting . . . . . . . . . . . . . . . . . . . . . . . . . . . . . . . . . . 11
What to do in the event of malfunctions . . . . . . . . . . . . . . 11
Malfunctions when making a call . . . . . . . . . . . . . . . . . . . 11
Repairs . . . . . . . . . . . . . . . . . . . . . . . . . . . . . . . . . . . . . . . . 12
Recycling . . . . . . . . . . . . . . . . . . . . . . . . . . . . . . . . . . . . . . . 12
Technical details . . . . . . . . . . . . . . . . . . . . . . . . . . . . . . . . . 13
Declaration of conformity . . . . . . . . . . . . . . . . . . . . . . . . . . 14
Guarantee terms . . . . . . . . . . . . . . . . . . . . . . . . . . . . . . . . . 15
Wall mounting . . . . . . . . . . . . . . . . . . . . . . . . . . . . . . . . . . . 19
Introduction
Thank you for choosing the Belgacom Maestro 1045, a
telephone that can be used at home and in the office. This
telephone has been designed for connection to the analogue telephone network of Belgacom.
Contents of the box
We advise you to check the contents of the box before
installing the telephone. These are the contents:
Receiver
Telephone base
Line cord
5-pin plug
Coiled cord
– 2 screws and 2 plugs
– User manual
If you find that any of the parts are missing, please return
the telephone in its box to the Teleboetiek shop, and show
your receipt.
Overview of the Maestro 1045
Receiver
Earpiece
Suspension point on
receiver for wall mounting
Microphone (mouthpiece)
Connection for coiled cord
Telephone base, top
Receiver contact
Suspension clip on receiver for wall mounting
Microphone off/on
R
Flash key (switch between conversations, call
waiting, put through)
Last number redial
Telephone base, side
Sound level switch
Telephone base, underside
Suspension section with suspension points for wall
mounting
Cord guide for line cord
Connection point for line cord
Connection point for coiled cord
Ring tone volume switch: high/low
Cord guide for coiled cord
Installing the telephone
Safety instructions
-
Do not use the telephone in humid or dusty conditions,
a gas-logged environment or an environment in which
the telephone would come into contact with water.
-
Do not expose the telephone to sunrays or other heat
sources.
-
Do not place the telephone on a slippery or unstable
surface, and place it at least one metre away from any
other devices that may cause interference, such as
wireless devices, pagers, TVs, industrial devices, etc.
-
Do not place the device on furniture that has been
treated with synthetic varnish. The synthetic feet and
the varnish may react, causing stains.
-
Clean the telephone with a damp or anti-static cloth.
Do not use dry cloths or corrosive cleaning agents.
-
Each of these conditions may negatively affect the
good performance or intended use of the product.
-
Keep this manual and observe the environmental regulations when the telephone is taken out of service.
Installing the telephone
Note!
Connect the line cord to the telephone base first, then to
the telephone socket. Failure to do so may lead to electric
shocks, as the telephone socket is live.
1 Click one mini plug of the coiled cord into the connection point
at the bottom of the telephone base.
Click the other mini plug into the connection point of
the receiver.
2 Click one mini plug of the line cord into the connection
point
at the bottom of the telephone base. Click
the other mini plug into the 5-pin plug.
3 Guide the cords through the cord guides at the bottom
of the telephone base.
4 Plug the 5-pin plug into the telephone socket.
5 Pick up the receiver and check for a dialling tone.
> The telephone is now ready for use.
Mounting the telephone on the wall
1 Use a screwdriver to turn the suspension clip in the
receiver holder on the telephone base. This will make
part of the clip stick out (picture 1). The receiver will be
suspended from the clip.
Picture 1: turn suspension clip
2 On the wall, mark 2 screw holes beneath each other.
Use the drawing for wall mounting on page 19 if so
required. Now drill 2 holes, each with a diameter of
6 mm. The distance between the 2 screw holes is
100 mm.
3 Stick wall plugs into the holes and turn the screws into
the plugs until the screws stick out by about 5 mm.
4 Remove the suspension section from the bottom of the
telephone base: use both thumbs to push in points
and
, while at the same time sliding the section
downwards with your index finger(s) (picture 2).
>
You will hear a click to indicate it has come loose.
A
B
Picture 2: remove suspension section
5 Turn the section over and place it in the slots in the
centre of the telephone base (picture 3).
>
You will hear a click to indicate it is secured.
Picture 3: attach suspension section
6 Now carefully slide the suspension points of the telephone base across the 2 screws until the base is properly secured, and place the receiver (picture 4).
Picture 4: Mounting the telephone
Making calls
Making calls
1 Pick up the receiver and wait for the dialling tone.
2 Enter the telephone number.
Accepting an incoming call
>
The telephone starts ringing.
1 Pick up the receiver to answer the call.
Disconnecting
1 Place the receiver back on the telephone base, or press
the receiver contact.
Last number redial
1 Pick up the receiver and wait for the dialling tone.
2 Press
. The number you dialled last will be dialled
again.
Switch microphone off/on
1 During the call, press and hold
in order to tempo-
rarily switch off the microphone. The other caller can no
longer hear you.
2 Release the key to reactivate the microphone.
Flash key (calibrated interruption)
Your Maestro 1045 supports the Belgacom Comfort Services,
such as accepting a second call, call waiting, and a conversation between three callers (conference call). You can
make use of these services by means of the
R
key.
Please contact Belgacom for further information.
When your Maestro 1045 is connected to a domestic
exchange (PABX), you can use the
R
key for things such
as putting calls through.
Personal settings
Setting the ring tone
Use the switch
on the bottom of the telephone base
to change the ring tone volume to high or low.
Setting the volume
Use the switch
on the right side of the telephone
base to change the receiver’s sound level during a call (3
settings).
10
Troubleshooting
What to do in the event of malfunctions
If there is no dialling tone or if you are unable to make a
call, follow the instruction given below:
1 Check whether the telephone has been installed correctly (see page 6).
2 Check for damage to the line cord.
3 Disconnect all peripheral equipment, extension leads
and other telephones and test the Maestro 1045
directly on a different telephone line, which you know
to be in working order. If the telephone works, the fault
is probably in your own telephone line.
Malfunctions when making a call
Problem Cause (1) Solution Cause (2) Solution You receive a call, but you cannot hear the ring
tone, or the ring tone volume is too low.
The ring tone volume is set to low.
Use the switch at the bottom of the telephone
base to set the ring tone volume to high.
Too many telephones are connected to the line.
Disconnect one or more telephones.
Problem Cause The sound breaks up.
Multiple telephones are being used simultaneously.
Solution Continue the call with only one telephone.
Problem You are unable to use the flash button or put a
call through.
Cause The Maestro 1045 is connected to a domestic
exchange (PABX) which is set to earth signals.
The telephone base only functions on flash
signals.
Solution Makes sure that the PABX is set to flash signals
(see the manual of your PABX).
11
Repairs
If you are unable to solve the problem, you can take the
entire telephone set to a Teleboetiek shop. Also bring the
completed warranty card and your receipt if the telephone
is still within its warranty period. You can also call Belgacom customer services.
Recycling
Natural resources were tapped and used for the production
process of the telephone you have purchased. This equipment may contain substances that are harmful to your
health and the environment. In order to prevent these
substances from entering the environment and to prevent
the waste of natural resources, we ask you to use the
correct return & collection systems. Those systems will
correctly reuse or recycle most of the materials that constitute your used equipment.
The symbol of the crossed-out wheelie-bin
reminds you to use such systems.
If you need more information about the collection, reuse
and recycling systems, please contact your municipal or
provincial waste-disposal centre. You can also contact us
if you need more information about the effects of our
products on the environment.
12
Technical details
Dimensions 190 x 78 x 85 mm
Ring tone
Adjustable volume
Weight 415 grams
Dialling method Tone dialling
Network The Maestro 1045 functions on
the analogue network (PSTN) of
Belgacom.
Number redial Last dialled number, subject to
a maximum of 32 characters
Sound level of receiver Adjustable
Flash button/putting calls through
Flash signals
13
Declaration of comformity
14
Guarantee terms
The Equipment you have bought has been carefully selected by Belgacom and is covered by a two-year warranty on
spare parts and labor in the event of any material or manufacturing defect, unless otherwise specified. The warranty
shall be valid from the date on which the equipment is
collected or delivered.
If you have any problems with the equipment, you should
take it to a Teleboutique or to one of our authorized agents,
in its entirety and in its original packaging, or in packaging
providing the same degree of protection, together with the
original receipt. The addresses for our Teleboutiques and
authorized agents are given in the Information Section of
the White Pages.
Your equipment will be repaired or replaced free of charge,
on presentation of the receipt, in the event of any material
or manufacturing defect.
Belgacom alone shall determine what repairs and/or
replacements are necessary. The warranty on the repaired
or replaced equipment shall end on the date on which the
original warranty on the purchased equipment expires, but
shall not be less than 3 months.
The warranty shall not cover:
-
damage of any kind that does not predate the sale;
-
any damage, faults or defects attributable to the
Customer or to causes unrelated to the Equipment:
lightning, power surges, humidity, accidental damage,
improper use or poor maintenance, failure to comply
with the instructions in the user manual, and force
majeure;
15
-
the repair or replacement of movable parts (cords,
wires, plugs, aerials, etc.), consumables (cells, batteries, paper, ink, etc.) needing regular replacement and
the supply of cleaning products.
The warranty shall not apply:
-
to any changes or repairs to the terminal Equipment
undertaken by the Customer himself/herself or through
the services of persons not designated by Belgacom;
-
if the Customer removes or tampers with the manufacturer’s serial numbers and/or brand names on the
terminal Equipment.
Belgacom shall not be liable for any indirect or immaterial
loss sustained by the Customer as a result of the malfunctioning of the terminal Equipment, such as any loss of
production, revenue or contracts.
The General Terms and Conditions for the Sale of
Terminal Equipment can be obtained on request from
any Belgacom service available to the public or at
www.belgacom.be
Belgacom SA under public law,
Bd. du Roi Albert II 27, B-1030 Brussels VAT BE
0202.239.951, Brussels Register of Legal Entities
16
Guarantee certificate
Please keep in a safe place
Device:
Serial number:
Date of purchase, replacement or repair (*)
Name and address of the buyer:
Telephone number of the relevant technical
department:
Stamp:
(*) Please delete as appropriate
17
18
Wall mounting
19