1
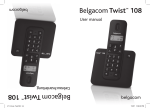
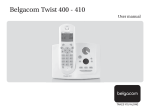
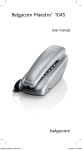
Belgacom Twist 250 User manual BB0DQXHOB7ZLVWB[B:HELQGG Twist 250 Introduction Dear customer: Thank you for purchasing a DECT telephone; we appreciate your trust in us. This product was manufactured with the utmost care, should you encounter any difficulties during its use, we recommend that you refer to this user guide. For your comfort and safety, we ask that you read the following paragraph carefully: Recommendations and safety instructions Your DECT telephone must not be installed in a humid room (wash room, bathroom, laundry room, kitchen, etc.) unless it is 1.50 m away from a water point, or outside. Your telephone must be operated at temperatures ranging from 5°C to 45°C. Only use the supplied power adapter, connect it to the base socket according to the installation instructions provided in this booklet and the indications on the identification label affixed to it (voltage, current, electric network frequency) . As a safety measure, you can use the power adaptors to cut off the 230V current in case of danger. They must be located near to the device, and must be easily accessible. This telephone was designed for use on the public switched telephone network (PSTN). In case of a problem you must first contact your reseller. Only use the supplied telephone cord. To avoid damaging your handset, only use certified rechargeable AAA batteries of the 1.2V 550mAh, never use non rechargeable batteries. Insert the batteries in the handset battery compartment respecting polarity. For your personal safety, never place your handset on the base without the batteries, or without the battery cover, you could get an electric shock. At the end of their useful life, batteries must be disposed of according to the recycling instructions presented in this booklet. Your DECT telephone has an inside radio range of about 50 metres and up to 300 metres in open space. The immediate presence of metal parts (of a television for example), or of any electric appliance may result in range reduction. Some sensitive medical equipment and safety equipment may be affected by the radiofrequency transmissions of your telephone. In all cases, we ask that you respect the safety recommendations. In areas where storms are frequent, we recommend that you protect your telephone line using a surge protection device. This equipment does not function in the case of an electric network shutdown: For the emergency calls, use a self-contained cord telephone. The CE marking certifies that the product meets the essential requirements of Directive 1999/ 5/CE of the European Parliament and of the Council pertaining to microwave radio equipment and telecommunication terminal equipment, for the safety and health of users, for electromagnetic interference. Furthermore, it efficiently uses the frequency spectrum attributed to ground and spatial communication to prevent damaging interference. 1 Twist 250 Recommendations and safety instructions ......................................................................1 1. Before you begin ..............................................................................................................4 1.1. Digital security system.................................................................................................4 1.2. Installing the phone .....................................................................................................4 1.3. Welcome screen..........................................................................................................5 1.4. Handset keys ...............................................................................................................6 1.5. Base Station ................................................................................................................6 1.6. Quick guide to handset display icons..........................................................................7 2. Menu structure ..................................................................................................................7 3. Calls....................................................................................................................................8 3.1. Cordless phone basics ................................................................................................8 3.1.1. Handsfree .........................................................................................................8 3.1.2. Make a call........................................................................................................8 3.1.3. Answering a call ...............................................................................................8 3.1.4. Handset volume................................................................................................8 3.1.5. Caller timer .......................................................................................................8 3.1.6. Auto talk off.......................................................................................................8 3.1.7. Redialling a call ................................................................................................9 3.1.8. Microphone mute function ................................................................................9 3.1.9. Recall / Flash....................................................................................................9 3.1.10. Paging the handset ..........................................................................................9 3.1.11. Voice Mail (According to operator)...................................................................9 3.2. Calling line identification presentation (CLIP) .............................................................9 3.2.1. Caller list ...........................................................................................................9 3.2.2. Display of numbers not available ...................................................................10 3.2.3. Accessing the list of calls ...............................................................................10 3.2.4. Calling back a caller .......................................................................................10 3.2.5. Deleting caller list record ................................................................................10 3.2.6. Storing memory from the caller list.................................................................11 4. Using the Multi-Handset capabilities............................................................................11 4.1. Intercom Call /Intercom .............................................................................................11 4.2. Answering an internal call .........................................................................................11 4.3. Call management ......................................................................................................12 4.3.1. An external and an internal call......................................................................12 4.3.2. Two outside calls ............................................................................................12 5. Phonebook ......................................................................................................................13 5.1. Dialling a memory number ........................................................................................13 5.2. Storing a memory ......................................................................................................13 5.3. Editing a memory.......................................................................................................13 5.4. Deleting a memory / the whole phonebook ..............................................................14 5.5. Assign a shortcut .......................................................................................................14 5.5.1. Calling an abbreviated number ......................................................................14 5.6. Inserting a pause .......................................................................................................14 2 Twist 250 6. Time and alarm setting ..................................................................................................15 6.1. Time and date ...........................................................................................................15 6.2. Date format / Hour format .........................................................................................15 6.2.1. Hour format.....................................................................................................15 6.2.2. Date format.....................................................................................................15 6.3. Alarm clock ................................................................................................................15 6.4. Modifying alarm tone .................................................................................................15 7. Customising the handset ..............................................................................................16 7.1. Tone settings .............................................................................................................16 7.1.1. Handset ringer level .......................................................................................16 7.1.2. Handset ringer melody ...................................................................................16 7.1.3. Key tone On/Off..............................................................................................16 7.2. Handset naming ........................................................................................................16 7.3. Auto Hang up ............................................................................................................17 7.4. Modifying the language .............................................................................................17 7.5. Key lock .....................................................................................................................17 8. Advanced settings..........................................................................................................18 8.1. Association handset & base......................................................................................18 8.2. Disassociation handset .............................................................................................18 8.3. Base master PIN code ..............................................................................................18 8.4. Restoring the Handset / Base Default Settings ........................................................19 8.5. Prefix..........................................................................................................................19 8.6. Setting the "flash" access time..................................................................................19 8.7. First ring.....................................................................................................................19 9. Battery replacement .......................................................................................................20 9.1. Battery safety precautions.........................................................................................20 10. General product care ..........................................................................................20 11. Troubleshooting ..................................................................................................20 11.1. Causes of poor reception .................................................................................20 11.2. Troubleshooting tips .........................................................................................21 11.2.1. Caller id ..........................................................................................................21 11.2.2. Telephone.......................................................................................................21 11.3. Unit beeps.........................................................................................................21 11.4. Memory dialling.................................................................................................21 12. Guarantee terms ..................................................................................................22 13. Environmental information.................................................................................23 3 Twist 250 1. Before you begin Make sure your package includes the items: • Base unit, • Handset, • Plug adaptor with modular jack ( 6P2C ), • One battery compartment cover, • Telephone line cord, • Two rechargeable batteries, • AC power supply, • This user guide. In the case of purchasing a pack duo or trio, you will find in addition for each additional handset: • A handset charger, • One battery compartment cover, • Two rechargeable batteries. 1.1. Digital security system Your cordless phone uses a security system to provide protection against false ringing, unauthorised access and charges to your phone line. When you place the handset in the base, the unit verifies its security code. After a power cut or replacing batteries, you must leave the handset on the base station for about 20 seconds to reset this code. 1.2. Installing the phone Telephone socket Note ! To charge the handset, place it on the base face to up. 4 Power socket Twist 250 1. 2. 3. 4. 5. 6. Insert the batteries one by one and the right way round as indicated by their polarities in the battery compartment shown in the figure. Put the compartment door back on. Plug the power supply cord into AC outlet and the other end into the power jack on the base bottom. Place the handset in the base station to charge for 15 hours prior to first use. if you don’t properly charge the phone, battery performance will be compromised. Plug one end of the telephone line cord into the modular wall phone jack and the other end into the jack on the base (as shown in the illustration). Once the batteries are recharged, press key, you can hear dial tone. Only use the supplied power adapter, connect it to the base socket according to the installation instructions provided in this booklet and the indications on the identification label affixed to it (voltage, current, electric network frequency). As a safety measure, you can use the power adaptors to cut off the 230V current in case of danger. They must be located near to the device, and must be easily accessible. 1.3. Welcome screen You can change the display on the screen saver. For this purpose, press and hold down the key . To return to the previous display, press and hold down the key 5 . Twist 250 1.4. Handset keys Screen Earpiece Mute the microphone / Correction / Cancel Access to dialled number Access to menu / Validadate Talk off / Switch handset on/off Talk on / Handsfree Navigation key up / Access the caller list Navigation key down / Access to the phonebook Activate / Deactivate keypad lock Inserting pause (Long press) Internal call Recall/Flash Microphone 1.5. Base Station Handset location Base button Pressed briefly: - telephone set paging. Held down (4 seconds minimum): - telephone set registration. Tw ist250 6 Twist 250 1.6. Quick guide to handset display icons Signal status icon (blinking when no signal or the signal strength is weak). Call Voicemail icon: indicates that new messages are present in your voicemail box. Handset ringer muted. Received call list (appears when a new call is in the caller list). Memory Battery charge state ( :Full. + blinking : Flat; during charging, level charge is blinking and the message "charge" is displayed on the screen). If the battery charge state displays + blinking, this means that your battery level is low and you can no longer use the handset number keypad. In this case, make sure to place the handset back on its base station to recharge the batteries. 2. Menu structure PHonebook clock & alarm New entry date/ time set format list alarm edit entry alarm tone delete delete all advanced set direct mem. change pin registration personal set handset name unregister handset tone reset language auto prefix auto hang-up recall time first ring 7 Twist 250 3. Calls 3.1. Cordless phone basics 3.1.1. Handsfree While having a conversation with your contact, you can enable the handsfree mode of the handset. 1. Press 2. To activate the handsfree mode, press to activate the handsfree mode of the handset. again. 3.1.2. Make a call Ensure that the handset is switched on. 1. Press the Talk key phone icon 2. 1. , you will hear the dialling tone and the display will show you the . Enter the phone number. The number is dialled. - OR Enter the phone number first and then press key. If you make a mistake, press key to remove the last digit. 2. To end the call, press or place handset on the base station. 3.1.3. Answering a call 1. When the phone rings, press the key to answer the call. - OR 1. If AUTO TALK MODE is ON, pick up the handset from the base station to answer (Refer to paragraph 7.3 page 17). 2. Ending a call press key or place the handset in the base station. 3.1.4. Handset volume You can adjust the volume of what you hear through the handset at any time by pressing or key. You will hear a beep with each key press. You will hear a double beep when you reach the highest or lowest setting. 3.1.5. Caller timer After you press Talk key on the handset, the built-in call timer shows in the display (after 20 seconds) and counts the length of time of the call on minutes and seconds. 3.1.6. Auto talk off Placing the handset in the case cradle while the handset is off the hook (during a call) automatically hangs up the handset. 8 Twist 250 3.1.7. Redialling a call The last five numbers you have dialled can be quickly redialled. Redialling from Standby Mode: 1. Press 2. Press the or key to review redial telephone list. (You can select to redial your last five numbers called). 3. Press key. The phone number that was last dialled appears on the display. key to dial out the number. 3.1.8. Microphone mute function During a call you can switch OFF the microphone. The call is placed on hold. key during - Enable MUTE function : Press the shows "Mute on ". Your correspondent will not be able to hear you. - Disable MUTE function: Press the a call. The display key to continue the call. 3.1.9. Recall / Flash Press the R key to access line transfer offered by PABX or call waiting provided by telephone Company or permit access to the Belgacom comfort services (set 2-way conversation, switch from one contact to the other, set a three party conference). 3.1.10. Paging the handset To locate a misplaced handset, press on the base station, the " message ‘”Paging” appears until you press the Call key " icon flashes and the . 3.1.11. Voice Mail (According to operator) This function allows you to receive calls while you are absent. You can then listen to the messages as network Voice Mails. To indicate that a new message has been received the envelope icon message “VOICEMAIL” are displayed on the Handset screen. 1. While on idle screen, press and hold 2. The envelope icon Note ! and the new event in order to access voice messaging service. disappears when there are no more new messages. Your voicemail number is not set in the factory, you can set the number using the . To proceed, turn to paragraph 5.5 page 9. key 3.2. Calling line identification presentation (CLIP) This CLIP phone stores and displays CLIP information provided by your local telephone company. You must subscribe to CLIP service in order to use this unit. If you have not subscribed to CLIP service or if the caller number is «suppressed», the display shows unknown. Caller ID call waiting is not working in Pulse dialling mode. 3.2.1. Caller list CLIP of incoming Call are stored in the CALLER LIST menu. . When you enter the CALLER LIST menu, the display will show icon The list contains the numbers of the last 10 contacts call lasted and the duration of each call. If the number is not transmitted, only duration can be shown. 9 Twist 250 3.2.2. Display of numbers not available Unavailable: you are not in same area as your contact. withheld: your contact does not want their number to be displayed. 3.2.3. Accessing the list of calls 1. Press or to access the list of calls made or received. The display shows the recent caller phone number (up to 12 digits). 2. Press the or key through the caller List. , the incoming call date and time are displayed. This function If you press the key only works if you have set the date and time on your base station as described in this manual user (refers to paragraph 6.1 page 14). If the list is empty, the screen displays "no number". If the number is too long (more than 12 digits), the screen will show only the 11 first digits. key to go to last number page for CID length. Press If the number is already stored in your phonebook, the name of the person in question is displayed. 3.2.4. Calling back a caller 1. 2. Press the Press the or or key to enter the caller list menu. key to select a call record. 3. Press the key to dial the number. 3.2.5. Deleting caller list record 1. 2. 3. Press the key to enter the caller list menu. Press the or key to select a call record. Press Menu key. To delete the current record : - Select "delete " using the or key. - The selected number is deleted. You will hear a confirmation tone. To delete the entire Caller list : - Select " delete all ” using the or key. A confirmation screen appears : 4. Using the keypad: - 5. If you do not wish to delete the current record, press To delete the current record, press Menu. . The record or the entire Caller list is deleted. You will hear a confirmation tone. 10 Twist 250 3.2.6. Storing memory from the caller list 1. Press or 2. Use 3. Press Menu key, then select "save number". Press Menu. 4. Enter the name of the entry. Press Menu. The number is displayed. 5. Press Menu to confirm the number. The entry is stored in the phonebook. You will hear a confirmation tone. or . The list of calls made or received is displayed. to select the desired caller number. If the number is too long (more than 12 digits), the screen will not show the number in full. key to go to last number page for CID length. Press Note ! 4. Using the Multi-Handset capabilities These functions are used for handset management when two or more handsets are registered on the same base. 4.1. Intercom Call /Intercom 1. 2. Press the key on the handset. - If your installation has two handsets, the second handset is directly called, and "int" followed by the handset number are displayed on the screen. - The display shows the " " icon and the number of all registered handsets. - Enter the desired handset number or press the handsets. The handset(s) ring(s). On the called handset, press the key if you want to call all key to answer. Handset 4 4.2. Answering an internal call 1. The ring melody from an internal call is different from an external call. "HANDSET" and the calling handset number appear on the screen. " " is blinking. 2. Press the 3. Ending an internal call press the key to answer. The " " stop blinking. key. 11 Twist 250 4.3. Call management 4.3.1. An external and an internal call Transfering an external call to another handset registered on same base You can transfer an outside call to another handset registered on the base station. During a call, press . The external user is put on hold. Enter the internal call number. When the user answers, you can announce the call. Press the key to transfer the call. Note! To switch from one call to another, press and hold down the signal is heard. Note! If the called handset does not answer, press key until an aural to take back the call. Making conference calls (3-way conversation) You can connect one external call to two handsets registered at the base station. All users can talk and listen simultaneously: 1. 2. Press key. The external user is put on hold. The internal call number. Wait until the internal user answers. 3. Press and hold down the key 4. Press to start the three-way conference. to return to the 2-way conversation. 4.3.2. Two outside calls Taking a second call while you are already on line During a call, a beep is emitted by your operator to inform you that a second call is on hold. A screen displays the number of this second caller on hold. Press R then the key . Your first contact is put on hold and you can talk with the second caller. Making a second call while you already on line During a conversation, press R then dial the number to be called. The call in process is then put on hold and you can take the second call back. Switching from one call to the other To switch from one call to the other, press R then the key . The call in process is then put on hold and you can take the second call back. 12 Twist 250 Ending one of the two calls To end one call and continue with the other, press R then the key . The call in process is then ended finally and you take the second call back. To set up a 3-way conference (the 2 calls and yourself) During a conversation, press R then the key . You can then talk with the 2 contacts at the same time. To end the 3-way conference, press the red key . 5. Phonebook You can store 50 phonebook entries in your phonebook. Each phonebook entry can contain the name of your contact which can be a maximum of 12 characters long (spaces included), your contact's telephone number up to 24 digits. 5.1. Dialling a memory number 1. Press Menu, “phonebook” appears on the screen. Press Menu. 2. Press the 3. Press or key to view the phonebook locations. key. The display number is dialled. 5.2. Storing a memory 1. 2. 3. 4. Enter the phone number of the entry to be created using handset keys. To delete an incorrectly entered digit. Press . "new entry" appears on the screen, press Menu again. Enter the name of the entry. Press Menu to confirm the name entered. The entry phone number is displayed with the cursor placed at the end of the line. Press Menu to confirm the number displayed. The entry is stored in the phonebook. You will hear a confirmation tone. 5.3. Editing a memory 1. 2. 3. Press Menu, "phonebook " appears on the screen. Press Menu. The list of phonebook entries is displayed in alphabetical order. Select the entry to be changed using or . Press Menu. Using the or key, select "edit entry ". Press Menu. The name entry screen is displayed with the cursor placed at the end of the line: The information is accurate. Press Menu. - 4. You will then enter the number screen and the cursor will be at the end of the number: The information is accurate. Press Menu key. - 5. To correct the name, press key to delete characters. Enter the new name and press Menu. To correct the number, press key to delete the numbers. Enter the new number and press Menu. The entry is then modified and you will hear a confirmation tone. 13 Twist 250 5.4. Deleting a memory / the whole phonebook 1. 3. Press Menu, "phonebook " appears on the screen. Press Menu. The list of phonebook entries is displayed in alphabetical order. Select the entry to be deleted using or . Press Menu. To delete the entry, select "delete " using the or key. To delete the entire phonebook list, select "delete all " using the A confirmation screen appears. 4. Using the keypad: 2. 5. If you do not wish to delete the entry, press To delete the entry, press Menu. or key. . One phonebook entry or the whole phonebook is deleted. You will hear a confirmation tone. 5.5. Assign a shortcut This menu allows you to record two quick dial numbers assigned to the keys 1 and 2 on the keyboard. Note ! 1. 2. 3. 4. 5. 6. Your voice mail number is not factory set and you can assign it to the key . Please Contact your telephony operator in order to obtain the appropriate voicemail number. Press Menu, "phonebook " appears on the screen. Press. Using the or key, select "direct mem.". Press Menu. Using the or key, select the key you want to assign a number (1 or 2) to and press Menu, "no number" is displayed on the screen. Press Menu. "edit" appears on the screen, Press Menu. You will then enter the name input screen. Enter the name of the entry and press Menu to confirm. You will then enter the number screen. Enter the number of the entry. Press Menu to confirm. You will hear a confirmation tone. 5.5.1. Calling an abbreviated number To call the number you have assigned to one of the shortcut keys: 1. 2. Hold down the key on which the number was programmed (1 or 2). The number is displayed on the screen and is automatically dialled. 5.6. Inserting a pause You can insert a pause in the dialling sequence. Press and hold key during edit mode to inset the pause. The display shows an ’’P’’. 14 Twist 250 6. Time and alarm setting 6.1. Time and date 1. 2. 3. 4. 5. Press Menu, select "clock & alarm" using the or key, Press Menu. Using the or key, select "date/time". Press Menu. A screen displays the current date DD/MM format. Enter the new date and press Menu. A screen then displays the current time. Enter the time in HH-MM format. Press Menu to confirm. You will hear a confirmation tone. 6.2. Date format / Hour format 6.2.1. Hour format 1. 2. 3. 4. 5. Press Menu, select "clock & alarm " using the or key, Press Menu. Using the or key, select "set format ". Press Menu. Using the or key, select "time format ". Press Menu. Use or to select format. Press Menu to confirm your selection. You will hear a confirmation tone. 6.2.2. Date format This function allows you to define the date format (JJ/MM ou MM/JJ). or key, Press Menu. 1. Press Menu, select "clock & alarm " using the 2. Using the or key, select "set format ". Press Menu. 3. Using the or key, select "date format ". Press Menu. 4. Use or to select format. 5. Press Menu to confirm your selection. You will hear a confirmation tone. 6.3. Alarm clock The alarm clock function arranges for your handset to ring once or each day (according to your choice) at a time you programmed. When the alarm clock is set of, the selected ring tone rings for 60 seconds through the handset loudspeaker and a warning screen is displayed. To stop the warning, press any key on the handset. 1. 2. 3. 4. Press Menu, select "clock & alarm " using the or key, Press Menu. Using the or key, select "alarm". Press Menu. To activate the alarm once, select "on once ". To repeat the alarm each day at the programmed time, select "on daily ". To deactivate the alarm, select "off ". Select your choice then press Menu: Use the touch tone pad to enter the current alarm time. Enter minutes first (format is HH-MM). Press Menu to confirm your selection. You will hear a confirmation tone. 6.4. Modifying alarm tone 1. 2. 3. 4. Press Menu, select " clock & alarm " using the or key, Press Menu. Using the or key, select "alarm tone". Press Menu. 3 melodies are available: "melody 1", "melody 2" and "melody 3". Select the desired melody. Press Menu to confirm your selection. You will hear a confirmation tone. 15 Twist 250 7. Customising the handset 7.1. Tone settings 7.1.1. Handset ringer level You can choose from four ringer volumes. or key, Press Menu. 1. Press Menu, select "personal set " using the 2. Using the or key, select "handset tone" Press Menu. 3. "ring volume " appears on the screen. Press Menu. 4. Four levels are available: "level 1 ", …, "level 4". To deactivate the phone ringing on receiving calls, choose "off". The icon is displayed on the screen. 5. Select the desired volume level then press Menu. You will hear a confirmation tone. 7.1.2. Handset ringer melody This function allows you to assign a ring tone for incoming calls. 1. Press Menu, select "personal set " using the or key, Press Menu. 2. Using the or key, select "handset tone" Press Menu. 3. Using the or key, select "ring tones" Press Menu. 4. Ten tones are available: "melody 1 ", …, " melody 10". Select a tone then press Menu. You will hear a confirmation tone. 7.1.3. Key tone On/Off This function allows you to activate or deactivate tones being heard when pressing the keypad. 1. Press Menu, select "personal set " using the or key, Press Menu. 2. Using the or key, select "handset tone" Press Menu. 3. Using the or key, select "key beep" Press Menu. 4. Use to select "ON" or "off" setting. 5. Press Menu to confirm your selection. You will hear a confirmation tone. or 7.2. Handset naming This function allows you to change the name of your handset. 1. Press Menu, select "personal set " using the or key, Press Menu. 2. "handset name " appears on the screen. Press Menu. A screen displays the handset current name: Use the keypad to enter the new name (up to 10 characters). 3. Use key to delete wrong input if necessary. Press Menu to confirm. You will hear a confirmation tone. 16 Twist 250 7.3. Auto Hang up When active, the auto hang up feature enables you to automatically hang up as soon as you put the handset on the base. or key, Press Menu. 1. Press Menu, select "personal set " using the 2. Using the or key, select "auto hang-up " Press Menu. 3. Use or to select: "Off " to deactivate the automatic pickup function. "on " to activate the automatic pickup function. 4. Press Menu to confirm your selection. You will hear a confirmation tone. 7.4. Modifying the language 1. 2. 3. 4. Press Menu, select "personal set " using the or key, Press Menu. Using the or key, select "language" Press Menu. A list of languages is available. Choose the desired language from the list of available languages using the keys Press Menu to confirm your selection. You will hear a confirmation tone. or 7.5. Key lock You can lock the keypad to prevent inadvertent activation. 1. key for 1 second, when the keypad lock is switched ON, the display Press and hold will show "keys locked". 2. To recover to normal, press and hold cradle. key 1 sec or replace handset into the base 17 . Twist 250 8. Advanced settings 8.1. Association handset & base This function allows you to register a new handset on your base station. 1. 2. 3. Press Menu. Select "advanced set" using the or key, press Menu. Using the or key, select "registration". Press Menu. Enter the 4 digit base master PIN code (default 0000). Each time a digit is entered the «_» is replaced by a «*». 4. Press and hold key for 5 seconds (after 1 minute if no Handset has started association process the base goes back to standby). Press Menu to confirm. The display shall show "WAITING" to indicate the waiting state. Once the handset is registered, you will hear a confirmation tone. The handset automatically exits the registering mode. When the handset has been successfully registered with the base station, a list of numbers is displayed on your handset screen. Select the registration number. If you do not select a registration number for your handset at this level, this number will be automatically assigned by the base station. The handset automatically exits the registering mode and the handset number is displayed on the screen saver. 5. 6. 8.2. Disassociation handset This function allows you to remove the registration of a handset from your base station. You may need to do this if you have lost a handset or if you have already registered 4 handsets on the base station. or key, press Menu. 1. Press Menu. Select "advanced set" using the 2. Using the or key, select "UNregister". Press Menu. 3. Enter the 4 digit base master PIN code (default 0000). Each time a digit is entered the «_» is replaced by a «*». Press Menu to confirm. 4. The list of handsets registered on the base station is displayed on the screen. Enter the number of the handset to be deleted. A confirmation signal sounds. 5. In standby mode, the handset displays "pls reg h/s”. 8.3. Base master PIN code The base station code (default setting 0000) is required to access certain functions. This code must include 4 digits. or key, press Menu. 1. Press Menu. Select "advanced set" using the 2. "change pin " appears on the screen. Press Menu. The base station code entry screen is displayed. 3. First enter your current PIN number. Each time a digit is entered the «_» is replaced by a «*». Press Menu to confirm. 4. Enter your new PIN number. Each time a digit is entered the «_» is replaced by a «*». 5. Confirm by re-entering the new PIN number. Press Menu to confirm. You will hear a confirmation tone. 18 Twist 250 8.4. Restoring the Handset / Base Default Settings To restore the handset and base station default settings: 1. Press Menu. Select "advanced set" using the or key, press Menu. 2. Using the or key, select "reset ". Press Menu. 3. A confirmation screen appears, Using the handset keyboard: . - to cancel resetting, press the key - to confirm resetting, press Menu. The initial parameters of the handset and base station are restored. 4. You will hear a confirmation tone. 8.5. Prefix If a PABX is used in a private network, you can program the outside call prefix. This function sets: - The PABX prefix number: this number will be added at the beginning of the number you dialled ". The number to be detected: if the number you dialled starts with the recorded sequence, this sequence will be automatically deleted. These two settings are not applied if number you dialled starts with "#" or "*". To restore the handset and base station default settings: 1. Press Menu. Select "advanced set " using the or key, press Menu. 2. Using the or key, select " auto prefix ". Press Menu. 3. Select "detect digit " to define the number giving you access to the outside line. 4. Select "prefix " to specify the «digits before prefix». 5. Press Menu to confirm your selection. You will hear a confirmation tone. 8.6. Setting the "flash" access time If you connect your telephone to a private automatic branch exchange or use it in a foreign country, you may need to modify the flash duration in order to use your telephone correctly with regard to the following functionalities: outgoing 2nd call, incoming 2nd call, conference call. Contact your administrator, who will supply the appropriate time period, and proceed to the new settings. 1. Press Menu. Select "advanced set" using the or key, press Menu. 2. Using the or key, select "recall time". Press Menu. 3. Three choices are available: " short ", " medium " and " long ". 4. Select the appropriate time period. 5. Press Menu to confirm your selection. You will hear a confirmation tone. 8.7. First ring Activating this function is only useful if you do your line does not have the CLIP service. This menu allows you to arrange for your telephone to ring when a call is received even if it is connected on the same line with another device (a fax, a cord telephone, etc.). This function is activated as default. It will be automatically deactivated when a CLIP call is received (the number of which will be displayed on the handset screen). 1. Press Menu. Select "advanced set" using the or key, press Menu. 2. Using the or key, select " first ring ". Press Menu. - select "ON " using the or key, to activate the first ring. - select “OFF” using the or key or to deactivate the first ring. 3. Press Menu to confirm your selection. You will hear a confirmation tone 19 Twist 250 9. Battery replacement Make sure that the handset is OFF before replacing batteries. 1. 2. 3. Remove the battery cover. Remove the old batteries. Insert the new batteries one by one and the right way round as indicated by their polarities in the battery compartment. Refit the battery cover. Place the handset on the base station to charge the batteries. Before they are used for the first time, new batteries must be charged for 15 hours. This ensures the optimum operation of the batteries. 4. 5. To avoid any risk of explosion, make sure the batteries are installed the right way round. Only use rechargeable batteries of the 1.2V 550mAh, or equivalent. Do not throw batteries on a fire. This may cause them to explode. Dispose of batteries in accordance with the regulations in force. 9.1. Battery safety precautions - Do not burn, disassemble, damage or pierce batteries. Like other batteries of this type, toxic materials could be released which can cause injury. - To reduce the risk of fire or personal injury, use the batteries in accordance with the instructions provided in this user manual. - Keep batteries out of children's reach. - remove the batteries from the handset if storing over 30 days. 10. General product care - To keep your telephone working and looking good, follow these guidelines: - Avoid putting the phone near heating appliances and devices that generate electrical noise (for example, motors or fluorescent lamps). - DO NOT expose to direct sunlight or moisture. - Avoid dropping and other rough treatment to the phone. - Clean with a soft cloth. - Never use a strong cleaning agent or abrasive powder because this will damage the finish. - Retain the original packaging in case you need to ship the phone at a later date. 11. Troubleshooting 11.1. Causes of poor reception • • • • • • • • • • Aluminium siding. Foil backing on insulation. Heating ducts and other metal construction can shield radio signals. You are too close to appliances such as microwaves, stoves, computers, etc. Atmospheric conditions, such as strong storms. Base installed in the basement or lower floor of the house. Base is plugged into an AC outlet with other electronic devices. Baby monitor is using the same frequency. Handset batteries discharged. You are out of range of the base. 20 Twist 250 11.2. Troubleshooting tips 11.2.1. Caller id Problem Solution • No display Did you order Caller ID service from your local telephone company? 11.2.2. Telephone Problem Solution • • • No dial tone • • • • • Check installation: - Is the base power cord connected to a working outlet? - Is the telephone line cord connected to the base unit and the wall jack? Disconnect the base from the wall jack and connect another phone to the same jack. If there is no dial tone in the second phone, the problem might be your wiring or local service. Is the handset out of range of the base? Are the batteries correctly charged (15 hours)? Are the batteries correctly installed? Did the IN USE indicator come on? Try to recharge the batteries. Handset does not ring You experience static, noise or fading • • • • • • • • in and out Make sure the RINGER setting on the handset is programmed to ON. You may have too many extension phones on your line. Try unplugging some phones. See solutions for «NO dial tone». Change channels. Is handset out of range? Move closer to the base. Does the base need to be relocated? Recharge the batteries. Make sure base is not plugged into an outlet with another household appliance. 11.3. Unit beeps - Place handset in base for 20 seconds to reset the security code. If that doesn’t work, recharge the batteries for 15 hours. - Clean charging contacts on handset and base with a soft cloth. - See solutions for «No dial tone». - Replace the batteries. 11.4. Memory dialling - Did you program the memory location keys correctly? Did you follow proper dialling sequence? Make sure the tone/pulse setting is correct. Have you re-registered the numbers after a power cut battery replacement? 21 Twist 250 12. Guarantee terms The Equipment you have bought has been carefully selected by Belgacom and is covered by a two-year warranty on spare parts and labor in the event of any material or manufacturing defect, unless otherwise specified. The warranty shall be valid from the date on which the equipment is collected or delivered. If you have any problems with the equipment, you should take it to a Teleboutique or to one of our authorized agents, in its entirety and in its original packaging, or in packaging providing the same degree of protection, together with the original receipt. The addresses for our Teleboutiques and authorized agents are given in the Information Section of the White Pages. Your equipment will be repaired or replaced free of charge, on presentation of the receipt, in the event of any material or manufacturing defect. Belgacom alone shall determine what repairs and/or replacements are necessary. The warranty on the repaired or replaced equipment shall end on the date on which the original warranty on the purchased equipment expires, but shall not be less than 3 months. The warranty shall not apply: - damage of any kind that does not predate the sale; - any damage, faults or defects attributable to the Customer or to causes unrelated to the Equipment: lightning, power surges, humidity, accidental damage, improper use or poor maintenance, failure to comply with the instructions in the user manual, and force majeure; - the repair or replacement of movable parts (cords, wires, plugs, aerials, etc.), consumables (cells, batteries, paper, ink, etc.) needing regular replacement and the supply of cleaning products. The warranty shall not apply: - to any changes or repairs to the terminal Equipment undertaken by the Customer himself/herself or through the services of persons not designated by Belgacom; - if the Customer removes or tampers with the manufacturer's serial numbers and/or brand names on the terminal Equipment. Belgacom shall not be liable for any indirect or immaterial loss sustained by the Customer as a result of the malfunctioning of the terminal Equipment, such as any loss of production, revenue or contracts. The General Terms and Conditions for the Sale of Terminal Equipment can be obtained on request from any Belgacom service available to the public or at www.belgacom.be Belgacom SA under public law, Bd. du Roi Albert II 27, B-1030 Brussels VAT BE 0202.239.951, Brussels Register of Legal Entities 22 Twist 250 13. Environmental information • The equipment that you bought has required the extraction and use of natural resources for its production. It may content hazardous substances for the health and the environment. • In order to avoid the dissemination of those substances in our environment and to diminish the pressure on the natural resources, we encourage you to use the appropriate take-back systems. Those systems will reuse or recycle most of the materials of your end life equipment in a sound way. • The crossed-bin symbol invites you to use those systems. • If you need more information on the collection, reuse and recycling systems, please contact your local or regional waste administration. • You can also contact us for more information on the environmental performances of our products. 23 LU Twist 209 FL - final.fm Page 25 Mardi, 4. mai 2010 4:54 16