1
GUTTER INSTALLATION
Constructing the Gutters
Gutter Brackets
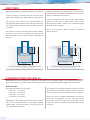
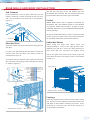
Rivet a left and right hand stop end to each length of
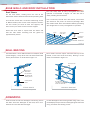
Crest fix the gutter brackets to the wall sheets at
gutter. Seal with silicone.
approximately 1000mm centres with pop rivets (refer to
Figure 7). Allow for a slight fall towards the downpipe
Cut a hole for each downpipe outlet and rivet the outlet
end so the water can flow freely.
into position (refer to Figure 6). Seal with silicone.
Once the gutter brackets have been installed, roll the
gutter bead onto the gutter bracket and clip the back of
the gutter into position.
Cut a hole and
rivet the outlet
into position.
Seal with silicone.
m
00m
y 10
atel
m
i
rox
App
Outlet
Pop rivet and silicone
the stop ends
Stop end
GUTTER INSTALLATION
Crest fix the
brackets with
pop rivets.
GUTTER
BRACKETS
Figure 6
Figure 7
PERSONAL ACCESS DOOR
Gutter Side PA Door
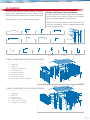
If you are installing a PA door, leave an 835mm gap
between the wall sheets. Fix the wall sheets on either side
of the proposed door location. It may be necessary to
rotate one of the wall sheets so the under-lap is aligned
with the door opening on both sides (refer to Figure
8). To avoid cutting, the sheets may need to be lapped
several times.
Once the wall sheets have been fixed, cut the middle and
bottom wall girts with a hacksaw. Do not cut the top wall girt.
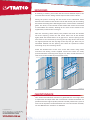
Slide the door mullions into position so they cap the
middle and bottom wall girts. Notch and fix the door
mullions to the top girt with one 10x16mm self drilling
screw and one rivet (Figure 9).
Please Note: Do not use the PA door lintel as a mullion
spacing template. The PA door lintel is supplied longer to
allow for on site tolerance and must be cut to fit between
the door mullions.
Position and fix the door lintel to the door mullions with
two rivets. The door lintel should finish 2250mm from
the bottom of the wall sheets (refer to Figure 9).
Pan fix a wall sheet to the PA door frame with 10x16mm
screws. Fix the PA door side flashing with rivets at
600mm centres.
Determine which way the door will swing. The PA door
frame will be provided with two 100x75mm butt hinges
that are pre-welded in position. Fix the hinges to the door
mullion with 10x16mm wafer head screws.
If PA Door sheets require cutting, the excess sheeting can
be fixed above the PA Door in conjunction with a PA Door
gutter flashing. Alternatively, if a PA Door header flashing
is provided, rivet the PA Door header flashing to the door
mullions to flash the area above the door opening.
Gable End PA Door
For Homesheds greater than 2.4m high, the installation
of the PA Door mullions in the the gable end of the
Homeshed follow the same process as for the gutter
side, with the mullions being fixed to the top girt (under
the rafter).
If the PA Door is being installed in a Homeshed less than
2.4m high the top girt also needs to be cut as the PA Door
mullions are fixed to the rafter.
As gable end sheets are not rotated, two sheets will need
to be trimmed to allow for the PA Door opening (Figure
10). When cutting the second sheet try to cut along the
pan of the sheet to ensure a clean flat edge with no gaps.
A PA Door angle trimmer is supplied to flash the edge of
the second cut sheet (sheet 3 in Figure 10).
A PA Door gable end header flashing will be provided
and may require cutting. This flashing will cap the
bottom of the cut header sheets and act as a gutter
above the door opening.