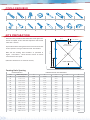
1
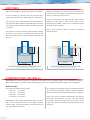
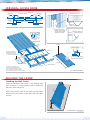
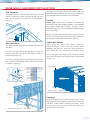
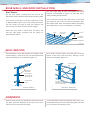
BUILDING THE FRAME
Rafters
The rafters are bolted together on the ground using a
ridge bracket. Lay two rafters out, making sure there is
Rafter
Rafter
M12x30mm
high tensile
bolts
a left and a right rafter. The C-section opening on each
Eaves Bracket
rafter should open on the same side, with the purlin
holes on the flange pointing up.
Bolt the ridge bracket in place by lining up the rafter
and ridge bracket holes. Use an M12x30mm high tensile
flanged purlin bolt in each hole and tighten. To eliminate
any movement in the joint, screw four 12x20mm self
M12x30mm high
tensile bolts
drilling hex head screws through the ridge bracket and
into each rafter as displayed in Figure 13.
Eaves Bracket
Strengthening washer plate
Figure 12
Figure 13
Bolt the eaves bracket to each end of the rafter frames
with four M12x30mm high tensile flanged purlin bolts
(refer to Figure 12).
Roof Truss
Use a person on each end of the rafter frame to lift the
Alternatively the eaves brackets can be fastened to the
ends of the columns first. The ridge bracket and rafter
frame can then be lifted into position and bolted through
the eaves brackets.
frame into position. Bolt the eaves brackets to the column
ends with five M12x30 high tensile flanged purlin bolts
(refer to Figure 14).
Attach all the intermediate trusses first for stability, then
If strengthening washer plates are provided, bolt them
the front and rear trusses as previously described.
between the eaves brackets and the rafter/column joint,
as shown in Figure 13.
Wall frame
Ridge bracket
Lift the truss into place
Bolts
Screws
Figure 14