1
Operating Instructions
KDL-32N4000
KDL-37N4000
BRAVIA
© 2008 Sony Corporation
Owner's Record
The model and serial numbers are located at
the rear of the TV. Record these numbers in
the spaces provided below. Refer to them
whenever you call upon your Sony dealer
regarding this TV.
Model Name
Serial No.
WARNING
Pursuant to FCC regulations, you are
cautioned that any changes or modifications
not expressly approved in this manual could
void your authority to operate this equipment.
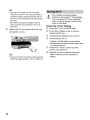
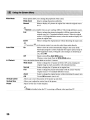
Safety
o
o
o
o
To reduce the risk of fire or electric shock, do
not expose this apparatus to rain or moisture.
CAUTION
o
To prevent electric shock, do not use this
polarized AC plug with an extension cord,
receptacle or other outlet unless the blades can
be fully inserted to prevent blade exposure.
o
Declaration of Conformity
o
Trade Name: SONY
Model: KDL-32N4000/KDL-37N4000
Responsible Party: Sony Electronics Inc.
Address: 16530 Via Esprillo
San Diego, CA 92127 U.S.A.
Telephone Number: 858-942-2230
o
This device complies with part IS of the FCC
rules. Operation is subject to the following
two conditions: (I) This device may not cause
harmful interference, and (2) this device must
accept any interference received, including
interference that may cause undesired
operation.
NOTIFICATION
Operate the TV only on 120 V AC.
Use the AC power cord specified by Sony
and suitable for the voltage where you use it.
The plug is designed, for safety purposes,
to fit into the wall outlet only one way. If
you are unable to insert the pi ug fully into
the outlet, contact your dealer.
If any liquid or solid object should fall
inside the cabinet, unplug the TV
immediately and have it checked by
qualified service personnel before
operating it further.
If you will not be using the TV for several
days, disconnect the power by pulling the
plug itself. Never pull on the cord.
When disconnecting AC power cord, the
power cord should be easily accessible for
disconnection.
The apparatus must not be exposed to
dripping or splashing. Do not place
objects filled with liquids, such as vases
on the apparatus.
For details concerning safety precau tions,
see "Safety and Regulatory Booklet"
(included).
Installing
o
o
o
o
The TV should be installed near an easily
accessible power outlet.
To prevent internal heat buildup, do not
block the ventilation openings.
Do not install the TV in a hot or humid
place, or in a place subject to excessive
dust or mechanical vibration.
Avoid operating the TV at temperatures
below 41°F (SoC).
If the TV is transported directly from a
cold to a warm location, or if the room
temperature changes suddenly, the picture
may be blurred or show poor color due to
moisture condensation. In this case,
please wait a few hours to let the moisture
evaporate before turning on the TV.
To obtain the best picture, do not expose
the screen to direct illumination or direct
sunlight. It is recommended to use spot
lighting directed down from the ceiling or
to cover the windows that face the screen
with opaque drapery. It is desirable to
install the TV in a room where the floor
and walls are not of a reflective material.
This equipment has been tested and found to
comply with the limits for a Class B digital
device, pursuant to Part IS of the FCC Rules.
These limits are designed to provide reasonable
protection against harmful interference in a
residential installation. This equipment generates,
uses and can radiate radio frequency energy and,
if not installed and used in accordance with the
instructions, may cause harmful interference to
radio communications. However, there is no
guarantee that interference will not occur in a
particular installation. If this equipment does
cause harmful interference to radio or television
reception, which can be determined by turning the
equipment off and on, the user is encouraged to
try to correct the interference by one or more of
the following measures:
o
o
Use the following Sony TVs only with the
following WALL-MOUNT BRACKET.
o
o
o
2
Reorient or relocate the receiving
antenna.
Increase the separation between the
equipment and receiver.
Connect the equipment into an outlet on a
circuit different from that to which the
receiver is connected.
Consult the dealer or an experienced
radiolTV technician for help.
o
CAUTION
To Customers
Sufficient expertise is required for installing the
specified TV. Be sure to subcontract the
installation to Sony dealer or licensed
contractors and pay adequate attention to safety
during the installation.
Note
This television includes a QAM demodulator
which should allow you to receive unscrambled
digital cable television programming via
subscription service to a cable service provider.
Availability of digital cable television
programming in your area depends on the type
of programming and signal provided by your
cable service provider.
For Customers in Canada
This Class B digital apparatus complies with
Canadian ICES-ODJ.
For Customers in the United
States
Lamp in this product contains
mercury. Disposal of these
materials may be regulated due to
environmental considerations.
For disposal or recycling
information, please contact your
local authorities or the Electronic
Industries Alliance
(www.eiae.org).
Trademark Information
Macintosh is a trademark licensed to Apple,
Inc., registered in the U.S.A. and other countries.
Manufactured under license from Dolby
Laboratories.
Dolby, Pro Logic, and the double-D symbol are
registered trademarks of Dolby Laboratories.
HDMI, the HDMI logo and High-Definition
Multimedia Interface are trademarks or
registered trademarks of HDMI Licensing, LLC.
Fergason Patent Properties, LLC:
U.S. Patent No.5, 717, 422
U.S. Patent No.6, 816, 141
Blu-ray is a trademark.
"BRAVIA" and BRAVIA,I!i1, BRAVIA
Theatre Sync and DMPORT are trademarks or
registered marks of Sony Corporation.
"PLAYSTAnON" is a registered trademark
and Ups)" is a trademark of Sony Computer
Entertainment Inc.
D[] IDOLBYIDIGITAL
1;1;I••••leu....
Use with other WALL-MOUNT BRACKET
may cause instability and possibly result in
injury (see page 7).
III
1§~I*'#it,'ij
Horn.
MteM-OEFINlT10N TELEVISION
•
•
.
.
Exploring Fun Features
The Four Steps to Stunning HD Experience:
Set, Sound, Source, and Setup
4
Using BRAVIA Theatre Sync™ with
Control for HDMI
24
Picture Quality and Aspect Ratio •••••...•....•.•. 4
Using DIGITAL MEDIA PORT adapter
24
Getting Started
1. Installing the TV
How to Carry the TV
How to Attach the Subwoofer
Securing the TV
Bundling the Connecting Cables
Preparation for Wall-Mounting
Installing the Wall-Mount Bracket
When Installing the TV Against a Wall or
Enclosed Area
5
5
Inserting Batteries
25
5
6
When Using the Remote Control
25
7
7
9
Remote Control
26
TV Controlsllndicators
30
Using TV Menus
10
2. Locating the Inputs and Outputs
Side Panel
Rear Panel
11
11
3. Connecting the TV
5.1 Surround Sound System
Recommended Position for the Satellite
Speakers
Cable System and/or VHF/UHF
H D Cable BoxlH D Satellite Box
PC
Other Equipment
14
14
4. Setting Up the Channel List Initial Setup
Remote Control
and TV Controls/lndicators
12
18
19
19
21
22
Navigating through TV Menus
31
Menu Descriptions
i~ Using the Shortcuts Menu
[]J Using the Picture Menu
J> Using the Sound Menu
l±l Using the Screen Menu
DUsing the Channel Menu
Cit Using the Parental Lock
EJ Using the Setup Menu
31
32
34
34
36
37
38
41
Other Information
Troubleshooting
23
Specifications ......•.......................••.........•..... 46
Index
Quick Setup Guide (separate volume)
Provides a variety of optional equipment
connection diagrams.
Customer Support
http://www.sony.com/tvsupport
43
47
On-line Registration
United States
http://productregistration.sony.com
Canada
http://www.sonystyle.calregistration
3
Thank you for purchasing this Sony BRAVIA~ high-definition television. The quality of the image you see
on your BRAVIA TV is only as good as the quality of the signal it receives. To experience the stunning detail
of your new BRAVIA TV, you need access to HD programming. Your BRAVIA TV can receive and display HD
programming from:
•
•
•
•
Over-the-air broadcasting via HD-quality antenna
HD cable sUbscription
HD satellite subscription
Blu-ray Disc™ player or other external equipment
Contact your cable or satellite provider for information on upgrading to HD programming.
To learn more about HDTV, visit:
.
.
:
§
f
.
J
f
:
i
_
j
i
'
'
'
f
~
~
~
l
i
M
I
l
!
~
B
l
l
I
_________________
I
U.S.A
http://www.sony.comlHDTV
Canada http://www.sonystyle.ca/hd
The Four Steps to Stunning HD Experience: Set, Sound, Source,
and Setup
Along with your BRAVIA TV set, a complete HD system requires an HD sound system, a source of HD
programming and proper setup connections. This manual explains basic setup connections (see page 14).
The Quick Setup Guide, enclosed separately, illustrates how to connect other optional equipment.
Picture Quality and Aspect Ratio
You can enjoy crisp, clear images, smooth movement and high-impact visuals from 1DaDi HD signals. When
you compare a high-definition signal to a standard analog signal, you will notice a big difference. The 1DaDi
HD signals provide more than twice the vertical resolution of the standard TV signal.
High-definition and standard-definition signals are transmitted with different aspect ratios (the width-to-height
ratio of the image). HDTV uses a wider screen than conventional standard-definition TV.
16:9 (high-definition) source
Most HDTV signals use a wide screen aspect ratio of
16:9. The 16:9 fills your BRAVIA screen, maintaining a
crisp, clear, vivid picture.
4:3 (standard-definition) source
Most standard-definition signals use a boxy 4:3 aspect
ratio. When a 4:3 image is displayed on an HDTV, you
will see black bars on the sides. The picture quality may
not be as sharp as with HD sources.
p
• You can use the Wide Mode function of the TV to adjust the 4:3 image to fit the entire screen (see pages 28 and 36).
• This TV supports signals up to I080i.
4
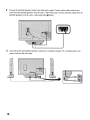
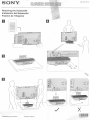
1. Installing the TV
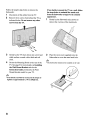
Be sure to follow these guidelines to protect your
properties and avoid causing serious injury.
• Before carrying the TV, disconnect all cables.
• Carrying the large size TV requires two or more
people.
• When you carry the TV, place your hand as
illustrated and hold it securely. Do not put stress
on the LCD panel.
• When carrying the TV, do not subject it to shocks,
vibration or excessive force.
The Subwoofer for this product is packaged
separately.
Complete the following instructions to install the
TV to the Subwoofer before the connection and
setup.
1 Take out the Subwoofer from the cushion and
the 4 screws from the accessory bag.
~
• You will find the Subwoofer next to the TV unit.
• Keep the screws away from children.
2
• Place your palm directly underneath but do not
squeeze the panel's speaker grill area.
Place the Subwoofer onto a level and stable
surface.
3 Install the TV unit to the Subwoofer by
aligning the end of the concave section of the
TV unit to the metal neck of the Subwoofer.
(Continued)
5
(b
• Carrying the TV requires at least two people.
When you carry the TV unit, place your hands as
illustrated on page 5 and hold it securely. Do not
put stress on the LCD panel and the frame around
the screen.
• Be careful to not pinch your fingers or the AC
power cord when you install the TV unit to the
Subwoofer.
4 Stabilize the TV unit and the Subwoofer with
the supplied 4 screws.
Ii\.
Sony strongly recommends taking
~ measures to prevent the TV from ltoppldin g
over; as unsecured TVs may topp e an
result in property damage, serious bodily
injury or even death.
Prevent the TV from Toppling
o Secure the TV to a wall and/or stand.
o
Do not allow children to play or climb on
furniture and TV sets.
o
o
Avoid placing or hanging items on the TV.
o
o
(b
• If you use an electric screwdriver, set the torque for
tightening at approximately 1.5 N'm {15Kgf·cm}.
6
Never install the TV on:
• slippery, unstable and/or uneven surfaces.
• furniture that can easily be used as steps, such
as a chest of drawers.
Install the TV where it cannot be pulled,
pushed, or knocked over.
Route all AC power cords and connecting
cables so that they are not accessible to
children.
You can bundle the connecting cables as illustrated
below.
This TV can be installed on a wall by using a WallMount Bracket (sold separately). Before mounting
the TV on a wall, the Subwoofer must be removed
from the TV.
p
• Do not remove the Subwoofer for any reason other than
to wall-mount the TV.
• For product protection and safety reasons, Sony
strongly recommends that you use the Wall-Mount
Bracket model designed for your TV and the wallmounting of your TV should be performed by a
Sony dealer or licensed contractor.
Use your TV with the following WALL-MOUNT
BRACKET only.
p
• Do not bundle the AC power cord with other connecting
cables.
• For bracket installation, refer to the instructions on
page 9 and the instruction guide provided by the WallMount Bracket model for your TV. Sufficient expertise
is required in installing this TV, especially to determine
the strength of the wall for withstanding the TV's
weight.
• Be sure to store the removed screws and the Subwoofer
in a safe place until you are ready to reattach the
Subwoofer. Keep the screws away from children.
(Continued)
7
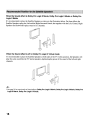
Follow the simple steps below to remove the
Subwoofer:
1
2
Disconnect all the cables from the TV.
Remove the 4 screws from behind the TV as
indicated below. Do not remove any other
If you decide to mount the TV on a wall, follow
the steps below to uninstall the metal neck
from the Subwoofer to improve its cosmetic
appearance.
1
Gently lay the Subwoofer (face down) to
remove the 4 screws of the metal neck.
2
Place the neck cover (supplied) into the
Subwoofer to cover the metal neck hole.
screws from the TV.
3
4
Gently lay the TV (face down) onto a level and
stable surface covered with a thick and soft
cloth.
Secure the Mounting Hooks to the rear of the
TV. See page 9 for more details on Installing
the Wall-Mount Bracket and also the
Instruction Guide provided by the WallMount Bracket model for your TV.
p
• If an electric screwdriver is used, set the torque to
tighten at approximately 1.5 N'm {15Kgf·cm}.
8
p
• The Subwoofer should not be installed on the wall.
-
Installation dimensions table
To Customers
Your KDL-32N4000/37N4000 can be wallmounted using SU-WL500 Wall-Mount Bracket
(sold separately).
For product protection and safety, Sony strongly
recommends that you use the Wall-Mount
Bracket designed for your TV and wall-mounting
is performed by a Sony dealer or a licensed
contractor. Do not attempt to install it yourself.
Sony is not liable for any damage or injury
caused by mishandling or improper installation.
p
• Installation dimensions may differ according to how the
TV is installed.
• The wall must be strong enough to support at least four
times the weight of the TV that you are installing.
Please provide this installation information as well
as the instruction supplied with SU-WL500 WallMount Bracket to your installer.
®
To Sony Dealers and Licensed Contractors
To avoid injury and property damage, read these
instructions carefully. Periodic inspection and
maintenance is highly recommended to ensure that
TV is securely mounted.
Center line of the screen when installed on the wall
Installing the Wall-Mount Bracket and
Mounting Hooks
1 Open Wall-Mount package and check for all
the required parts including the instruction.
2
See Installation dimensions table to determine
the best location fOf wall-mounting. The wall
must be strong enough to support at least fOUf
times the weight of the TV. Also refer to the
instruction for SU-WL500.
3
Install the Base Bracket on the wall. Refer to
the instruction fOf SU-WL500.
4 Disconnect all cables and remove the
Subwoofer. See page 7 for details.
5
Install Mounting Hooks on the TV. See
diagrams and table for Screw and Hook
locations.
(Continued)
9
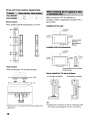
Screw and Hook locations diagram/table
rjij"il
t"'i4:"',f'" '.',
! KDL-32N4000
e, g
c
KDL-37N4000
d, g
b
Screw location
When installing the Mounting Hooks on the TV.
Make sure that your TV has adequate air
circulation. Allow enough space around the TV as
shown below.
Installed on the wall
--;::::=:-
~
d
, .. _--.--
_---_
11 7/ 8 inches
(30
em) _---.
_
G
1'p$'
"""
j
e
I~
f
: 4 inches
.4 inches
(10cm)
!. (10 em)
-
0
[I
~
10
~
Leave at least
this much
space around
the set.
Installed with the Subwoofer
~i
r--.
g
0
h
I/O":
~
'--'
11 7/8 inches
···················r. ·J~O.~~! .....:..
·:
··
4 inches
(10 em)
j
,,~§
Hook location
When installing the TV onto Base Bracket.
r----
a* - - - ,
b
~
~~l~~~)s
D
~~
~
2 3 / 8 inch
:
(6 em)
Leave at least this much space
around the set.
Never install the TV set as follows:
Air circulation is blocked.
Air circulation is blocked.
~
all
* Hook position "a" cannot be used for the models in the
table above.
10
• Inadequate air circulation can lead to overheating of the
TV and may cause damage to your TV or cause fire.
-
2. Locating the Inputs and Outputs
VlDEOIN2
VlDEOI
L(MONO)AUDIO-R
Connects to the composite video and audio output jacks on your camcorder or other video
equipment such as a DVD or video game equipment.
Headphone
Connects to your headphones. If your headphones do not match the jack, use a suitable plug
adapter (not supplied).
jack
fl:J
• If you have mono equipment, connect its audio output jack to the TV's L (MONO) audio
input jack.
tl:J
• While headphones are connected, the TV speakers are muted.
(Continued)
11
3
A
V
4 t----:-----i
AUDIO
SYSTEM
Oi
CABLEJ
ANTENNA
5 t---..;--------~
DMPORT
6
rn
HDMIIN 1/2
R-AUDIO-L
7
~
8
HDMI (High-Definition Multimedia Interface) provides an uncompressed, all-digital
audio/video interface between this TV and any HDMI-equipped audio/video equipment, such
as DVD player, a set-top box, AlV receiver and Blu-ray Disc player as well as Pc. HDMI
supports enhanced or high-definition video plus digital audio.
.:tn
• If the equipment has a DVI and not a HDMI connector, use a DVI to HDMI cable or adapter
to connect the DVI output to either HDMI IN 1 or HDMI IN 2 input, and connect the audio
jacks to the AUDIO (L/R) jacks below the HDMI IN 2. (DVI connector is for video signals
only, the Audio jacks provide support for the audio.)
DVI-to-HDMI cable
....
::~
DVI-to-HDMI adapter
Audio cable
:6
tID
• For better PC view, use the PC IN (RGB IN) input.
• HDMI connection is necessary to view 480i, 480p, nop, and 1080i formats. Note that this
TV displays all video input signals in a resolution of 1,366 dots x 768 lines.
SERVICE ONLY This USB port is for service only.
AUDIO SYSTEM Connects the Subwoofer to the TV.
f6J
CABLE!
ANTENNA
VIDEO IN 1
S VIDEO
12
• The Subwoofer should not be connected to another system.
RF input that connects to your cable or VHFIUHF antenna.
Connects to the S VIDEO output jack of your DVD or other video equipment that has
S VIDEO. S VIDEO provides better picture quality than composite video ([§]). S VIDEO
does not provide sound, you need to connect the audio cables.
VIDEO IN 1
VIDEO/
L(MONO)AUDIO-R
COMPONENT
IN 1/2
(1080in20p/
480p/480i)/
L-AUDlO-R
PC IN
(RGS/AUDIO)
Connects to the composite video and audio output jacks on your AIV equipment such as a
DVD or other video equipment. A second composite video and audio input (VIDEO IN 2) is
located on the left side panel of the TV.
Connects to your DVD player's or digital set-top box's component video (YPBPR) and audio
(LIR) jacks. Component video provides better picture quality than the S VIDEO ([~]) or the
composite video (lID) connections.
Connects to a personal computer's video output connector using HDI5-HDI5 cable (analog
RGB, not supplied).
See "PC Input Signal Reference Chart" on page 21 for the signals that can be displayed.
.?6
DMPORT
• For some Apple Macintosh computers, it may be necessary to use an adapter (not supplied).
If this is the case, connect the adapter to the computer before connecting the HD15-HD15
cable.
Connects to DIGITAL MEDIA PORT adapter (not supplied) to display photos and videos or
play music from a Portable Player to your TV (see page 24 for more details).
ttn
• Available DIGITAL MEDIA PORT adapters vary in each area.
• Do not connect an adapter other than the DIGITAL MEDIA PORT adapter.
AUDIO OUT
(FIX) RlL
Connects to the left and right audio input jacks of your audio or video equipment. You can use
these outputs to listen to your TV's audio through your stereo system.
DIGITAL AUDIO Connects to the coaxial audio input of a digital audio equipment that is PCM/Dolby Digital
OUT (COAXIAL) compatible.
{!:n
• Component video (YPBPR) or HDMI connection are necessary to view 480i, 480p, nop, and 1080i formats. Note that
this TV displays all format types of picture in its native resolution of 1,366 dots x 768 lines.
13
3. Connecting the TV
To further enhance the sound quality, connect the Subwoofer and the 2 Satellite Speakers before using the
TV.
p
• Before connecting the Subwoofer, be sure to attach the Subwoofer to the TV (see page 5 for more details).
• Connect the Subwoofer and the Satellite Speakers before connecting the TV to the wall outlet.
Subwoofer connection
1
Using DIN cable (supplied) connect the AUDIO SYSTEM output on the rear of the TV to the AUDIO
SYSTEM input on the Subwoofer as shown below.
2
Once Subwoofer installation is complete, connect the 2 Satellite Speakers to the Subwoofer.
p
• Only the supplied Subwoofer should be connected to the AUDIO SYSTEM output from the TV; if you connect any
other equipment, it could cause a malfunction or damage the TV.
• Do not connect unspecified cable to the TV AUDIO SYSTEM output. Connecting other cables can cause a
malfunction or damage the TV.
14
Satellite Speakers connection
1
Connect the supplied cables to the Satellite Speakers inputs, make sure to connect the black cables to
the blackjacks ~ of the Satellite Speakers, and the white cables (with the red mark) to the
corresponding red jacks ~.
+
(b
• For a better look, you can hide the cables of the Satellite Speakers by threading them through the rear column (see
illustration).
(Continued)
15
-
2
Connect the Satellite Speakers cables to the Subwoofer output. Connect white cables (with the red
mark) from the Satellite Speakers to the R+ and L+ Subwoofer jacks ~ (red); and black cables from the
•
Satellite Speakers to the R- and L- Subwoofer jacks !iii] (black).
3
Once Subwoofer and Satellite Speakers connection is complete, plug the TV's and Subwoofer's AC
power cords into the wall outlet.
16
-
Preparation of Satellite Speakers Wall-Mounting
The Satellite Speakers can be installed on a wall by using a Wall-Mount Bracket (sold separately).
1
Before mounting the Satellite Speakers on a wall, you must remove the stand from the Satellite
Speakers.
p
• Use a screwdriver to remove the Satellite Speakers Stand.
2
To install the Satellite Speakers on a wall, you should use the Wall-Mount Bracket WS-WVlOD (sold
separately). For this accessory use only the screw that is attached to the Satellite Speakers. Use a
screwdriver to remove the screw from the Satellite Speakers.
p
• If you use an electric screwdriver, set the torque for tightening at approximately 1.5 N'm {15Kgf.cm}.
• Be sure to store the removed screws and the Satellite Speakers Stand in a safe place until you are ready to reattach the
stand to the Satellite Speakers. Keep the screws away from children.
p
• Do not remove the Satellite Speakers Stand for any reason other than to wall-mount the Satellite Speakers.
(Continued)
17
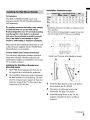
When the Sound effect is Dolby Pro Logic II Movie, Dolby Pro Logic II Music or Dolby Pro
Logic II Matrix
It's recommended to place the Satellite Speakers as shown in the illustration below. On these effects the
Satellite Speakers replay the Left and the Right Surround Sound, that together with the Left, Central, Right
Speakers and Subwoofer replay sound of 5.1 channels.
When the Sound effect is off or Dolby Pro Logic II Virtual mode
It's recommended to place the Satellite Speakers at both sides of the TV. In this position, the Speakers will
play the same sound like the TV lateral speakers, duplicating the power of the sound of the left and right
channels.
IIi!
i;
I!
i!
i;
(b
• See page 35 for more details of Sound effects (Dolby Pro Logic II Movie, Dolby Pro Logic II Music, Dolby Pro
Logic II Matrix, Dolby Pro Logic II Virtual).
18
Cable or VHF/UHF (or VHF only)
75-ohm coaxial cable --~e::rttlJ
(not supplied)
~ Rear of TV
CABLE/ANTENNA input
«JJ
• It is strongly recommended that you connect the antenna/cable input using a 75-ohm coaxial cable (not supplied) to
receive optimum picture quality. A 300-ohm twin lead cable can be easily affected by radio frequency interference,
resulting in signal degradation.
Cable and VHFIUHF (or VHF only)
If you want to watch both cable and antenna (over-the-air) programming, you will need to use an optional AB RF Switch (not supplied) to switch between the cable and over-the-air antenna programming, as shown.
A-B RF
Switch
Cable
Antenna
~.di1h
-e:t.J].
"
W ·J.LP
C1!JO.~ Rear of TV
CABLE/ANTENNA input
.bJ
• Be sure to set Cable setting to On or Off in Channel menu for the type of input signal you choose (see page 37 for
more details).
You can also enjoy high-definition programming by subscribing to high-definition cable service or high-definition
satellite service. For the best possible picture, connect these components to your TV via the HDMI or component
video (with audio) input on the back of your TV.
Shown with HDMI Connection
CATV/Satellite
antenna cable
HD cable boxlHD satellite box
(Continued)
19
Shown with DVI Connection
CATV/Satellite antenna cable
,..------_._---------
Rearr-Of_TV_~~m.-m..r-:==m.=¢~
.
_mT-m_-y
T
-, ~
\3
I'OiO 19, HtIfiI:IN",i;)
SVIDEO~.~~)
'~O
@ 0
0..1
:nlltl~·
ill;
_""'AC II
DVI-tO-H!MI
~ble
~
HD cable boxlHD satellite box
!
I
AUDIO-L
(white)
_,--.a.- AUDIO-R
(red)
I
Audio cable
p
• If the equipment has a DVI and not an HDMI connector, use a DVI-to-HDMI cable or adapter to connect the DVI
output to either HDMI IN 1 or HDMI IN 2 input, and connect the audio jacks to the AUDIO (UR) jacks below the
HDMI IN 2 (DVI connector is for video signals only, the audio jacks provide support for the audio).
CATV/
Satellite antenna cable
Shown with Component Connection
!
HD cable boxIH D satellite box
~~~J:."''=~1 ~:
~~~I~I_~'~~mj ~.,
Y (green)
Ps (blue)
PR (red)
_Component
video cable
-
AUDIO-L (white)
AUDIO-R (red)
20
Audio cable
Use the TV as a monitor for your Pc.
Shown below with the HD15 to HD15 connection. This TV can also be connected to a PC with DVI or
HDMI output. (Refer to the supplied Quick Setup Guide.)
~----....
I ~;,:.
-HD15
cable
(analog
RGB)
,
,~
I
OMPORT
[!}
1
Audio cable (stereo mini plugs)
p
• Connect the PC IN jack to the PC using the HD15-HD15 cable with ferrite core (analog RGB) and audio cable
(page 13).
PC Input Signal Reference Chart
After connecting the PC to the TV, set the output signal from the PC according to the chart below.
x
....... •...
~
_._.._ -
...• _._
x
SVGA
p
........................................ _.
,
x
--'75
_-_
.. _.. _ _..__.._ -.
W
68
48.
75
60
768
47.7
60
x
A
~
UI
elines
"----n524------·--x-------768---------·'----S6,5-·--·-----'----1fr------'---------·YES-A-------1,024
,' .... ;("168
.'60:015
·········VESA
1,284)-- x 7 6 i f ' 4 7 : i f 6 6 - · " ·
VESA
-------'i1n,360---x---··
V~ES;;;':Ai---.
__
-.
• This TV's PC input does not support Sync on Green or Composite Sync.
• This TV's PC VGA input does not support interlaced signals.
• For the best picture quality, it is recommended to use the signals (boldfaced) in the above chart with a 60 Hz vertical
frequency from a personal computer. In plug and play, signals with a 60 Hz vertical frequency will be detected
automatically. (PC reboot may be necessary.)
(Continued)
21
Personal
computer
Blu-ray
Disc Player/
"PS3"
DVD
player
Digital
satellite
receiver
Digital
cable box
Headphones
Audio
system
Camcorder
Rear of TV
Side Panel
.~.
C~LEI
ANTENNA
[[It.J--
CABLE/ANTENNA
~------- Digital audio
equipment
--------1---1
___
rfl'A~
-
Game system
Digital
recorder
Analog audio equipment
(AN Receiver/Home Theater)
p
• Refer to the Quick Setup Guide (supplied) when connecting other equipment to your TV.
22
DIGITAL MEDIA
PORT adapter for
portable player
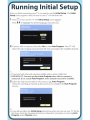
4. Setting Up the Channel List Initial Setup
After you finish connecting your TV, you need to
run Initial Setup, which automatically sets up
available channels. The Initial Setup screen
appears when you tum on your TV for the first
time. If you do not want to set up the channels at
this time, you can do it later by selecting the Auto
Program option in the Channel menu (see
page 37).
POWEH
1
Press
0
to tum on the TV.
The Initial Setup screen appears.
2
3
To run Auto Program at a later time
o Use the Auto Program feature at Channel
menu as described on page 37.
To display the picture in your preferred
aspect ratio
o Select the proper Wide Mode as described on
pages 28 and 36.
{b
• You may want to set up convenient features such as
Favorites (see page 32), Show/Hide Channels
(see page 37), Label Channels (see page 37) when
Auto Program is completed.
Press +'+ to highlight the desired language,
then press (0 .
Please connect cable or antenna, then select
Yes to run Auto Program.
{b
• If you want to run Auto Program later, select No.
• If you have both cable and antenna available,
please connect cable first.
• IMPORTANT: You must perform Auto Program
after cable or antenna is connected. If you cancel
Auto Program some channels may not be
available.
4
Follow the help text provided on the screen to
run Auto Program. Auto Program will
scan for available channels from signal source
directly connected to the TV's
CABLE'ANTENNA input.
S
When Auto Program is complete, select OK
to finish the Auto Program process.
23
-
Using BRAVIA Theatre Sync™
with Control for HDMI
This TV is equipped with BRAVIA Theatre
Sync™. The Control for HOMI function enables
BRAVIA Theatre Sync to allow communication
between Sony TV's and Sony equipment. Only
Sony equipment with Control for HOMI
capability is supported.
To connect Sony equipment with Control for
HOMI
Use an HDMI cable that bears the HDMI logo for
connection. See pages 19 to 22 or see the HDMI
connection shown in the Quick Setup Guide
provided with the TV documentation.
Setting the Control for HOMI
In order for the function of Control for HOMI to
operate, the TV and other Sony equipment with
Control for HOMI function must be setup (see
page 42). For other equipment, refer to the
operating instruction for that equipment.
Control for HOMI available with your TV
The following operations are available after you
connect the Sony equipment with Control for
HOMI function to your TV:
• Automatically tum off the connected equipment
when you tum off the TV.
• The TV will automatically tum on and tunes to the
respective HDMI input when the connected
equipment is turned on by One-Touch-Play.
• Equipment listed under External Inputs will
tum on automatically when selected.
24
When you connect a Sony A!V receiver with
BRAVIA Theatre Sync function to your TV, the
following additional operation is possible:
• By pressing 0 on the remote control, it turns on
and searches for external audio system. When the
BRAVIA Theatre Sync audio system is on, the
internal speakers of the TV will tum off and the
Picture Mode will change automatically to
Cinema.
Using DIGITAL MEDIA PORT
adapter
Connecting a DIGITAL MEDIA PORT adapter,
lets you display photos and videos or play music
from a Portable Player to your TV.
The equipment's menu may be displayed on the TV
and can be controlled via the TV's remote control.
By pressing +/+, +/+, G and
you can go
through the equipment's menu. Use +/+ (to go
up/down), + (to left), + (to go ri~! or to play), G
(to select an item or to play), and 0 (to go previous
menu window).
'0
(lsJ
• Viewing the equipment's menu on the TV and
controlling it via the TV's remote control depends on
the equipment; refer to the equipment's operating
instructions.
• Available DIGITAL MEDIA PORT adapters vary in
each area.
• Do not connect an adapter other than the DIGITAL
MEDIA PORT adapter.
• Depending on the type of DIGITAL MEDIA PORT
adapter, images may also be output. In this case, the
system outputs only a composite video signal.
• Check compatibility between portable audio and the
DIGITAL MEDIA PORT adapter.
Remote Control
and TV Controls/Indicators
Inserting Batteries
Insert two size AA batteries (supplied) by matching
and. on the batteries to the diagram inside the
battery compartment of the remote control.
o
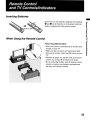
When Using the Remote Control
... ,
Follow the guidelines below
,
V
\
\
I
• Point your remote control directly at the IR sensor
located on your TV.
• Make sure that no objects are blocking the path
between the remote control and IR sensor on your
TV.
• Fluorescent lamps can interfere with your remote
control; try turning off the fluorescent lamps.
• If you are having troubles with the remote control,
reinsert or replace your batteries and make sure
that they are correctly inserted.
25
-
Remote Control
t6
• The 5 and CH + buttons have a tactile dot. Use them as a reference when
operating the TV.
,
~
""[II
DISPLAY
Press once to display the information pertaining to the
channel and/or program when available. The OSD (On
Screen Display) will time out in a few seconds or press again
to immediately tum off the display.
SLEEP
Press repeatedly until the TV displays the time in minutes
(Off, 15,30,60 or 120 minutes) that you want the TV to
remain on before shutting off. To cancel Sleep, press
"'"repeatedly until Off appears.
THEATER
Press to tum on and off the Theater Mode. The picture
settings will be set for a cinema-like experience and the
audio will be switched to the audio output of the attached
speakers of your BRAVIA Theatre Sync audio system. Your
BRAVIA Theatre Sync audio system must be connected by
an HDMI connection to your TV (see page 19 for details).
.[l)-so(jNij···----· . . -··.. .p~~~~;~p~~t~-dlyt~-·~t~p·th~~~ghth~·So-u·ndMOde·~~tti~g;~-Dynamic, Standard, Game, Clear Voice, Flat. These
Sound Mode settings can be also accessed in the Sound
menu (see page 34).
PICTURE
26
Press repeatedly to cycle through the available picture
modes: Vivid, Standard, Cinema. The picture modes can
also be accessed in the Picture menu. For details, see page
34.
GUIDE
(For all
channels
including
Digital/Analog
channels)
Press to display the Guide when you are watching channels
(if it is available from the station).
Using the Guide
The Guide allows you to select the channels from a channel
list; also provides information about the current program
being shown on each channel.
Info
banner
Channel
list
f!JJ
• Program information in the guide is provided by the
broadcasters. As a result, it may sometimes include only
the channel number, without a program title or
description.
RETURN
Press to go back to the previous screen or exit from the
screen when displaying menu items and settings.
MENU
lID cc
-[j}
VOL +/-
MUTING
Press to mute the sound. Press again or press VOL + to
restore the sound.
POWER
Press to turn on and off the TV.
(Continued)
27
-
Press repeatedly to step through the Wide Mode settings:
Wide Zoom, Normal, Full, Zoom. The Wide Mode
settings can be also accessed in the Screen menu (see page
36).
Changing the Wide Screen Mode
4:·j-oriiiinaisource--·--··············,······16:9()riginaIsource····················--··,
Standard-definition source
High-definition source
~
~~
~
•
r······~,:·,,···:······,::;;······························
Wide Zoom
~~l
, ,.., .."
,
•
=
---'
,
Wide Zoom
!
q«; '.......•....~
~::i{j ~il·.··'.t.i\
~
-Normal-------·-j--Norma-I--------i
. '
~.,
---'i.
;,:'. .
,
;,-
•
"'if
' .'."
.,'-
~~
:
,,::,
.<,!'.
1
[DJ
FuTl---·-·---------·-~
•
i
I This mode is not available
. . . . . . J-_ _.. . . . . . . . . _ ~_ _..__ ~__ _
I Full
···-1i
w
IKJl
~
······Zoom---··------··-·---··--- ···-j-Zoom-·---···------··---·-----····-····----····I
~
p
~~
• When the TV receives a nop or 1080i signal, Normal
cannot be selected.
28
Press to display the list of External Inputs and TV mode.
Press repeatedly to toggle through the inputs.
-
(6J
• See page 41 (Label Inputs) on setting up the External
Inputs labels.
+1+1+1+
CD
Press +1+1+1+ to move the on-screen cursor. Press
select/confirm an item.
CD to
This button supports different functions depending on the
to view a
condition. When PC input is active, press
channel at the same time as a PIP (picture lD picture) screen
(see page 33 for details). When antenna input is active and
to
the broadcast includes Regional Digital Ratings, press
TOOLS
view the list of special ratings.
When an HDMI controlled equipment is active, press 0 to
access the equipment menu, if the equipment supports the
function.
TOOLS
'0
0
MI
Press to alternate between two channels. The TV will
alternate between the current channel and the last channel
on the remote
tuned with the buttons @)-® and
control.
JUMP
0
FAVORITES
This feature lets you create and choose a list of up to 8
favorite channels.
Press +1+ to select the option Add to Favorites, and press
to add the current channel to your Favorites list.
G
t!:n
......................................_
__ -
[g1J CH +/. . . . . . . . . . . . . . . . . . . . . . . . . . . . _ •••••• p
__ _ -
• Your Favorites list will be cleared each time you run
Auto Program (see pages 37).
_--
_.._ _.._ _ __..p-._.-
__ __
_
_ __
_.._.._
-
_._ _
P ••• P ••••• _ •• _ . _ •••••••••• _ •••••••••• _
Press to scan through channels. To scan quickly through
channels, press and hold down either +/-.
'...........
•
_
_ . _..
0'.....
_
~
~
~......
.
_.
29
TV Controls/Indicators
TIMERIP1C OFF
STANDBY
POWER
9
[I]
MENU
[glEE
INPUT
l~r';+
Press to display the menu with TV functions and settings (see "Using TV Menus" on page
31).
Press to display the External Inputs list, toggle through the list and select your desired input.
In the menu screen, this button serves as confirming the selection or setting.
-'-PresstoadJustthevofume~Inthemenusc'reen-,ihes'e-buttonsserveasieitJrighn,uttons:
-VOLUME +
4
++
Press to scan through channels. In the menu screen, these buttons serve as up/down buttons.
-CHANNEL +
-[§J--POWEFf-~'-~--Press
"[IDTIMERIPICOFF
LED
to'tum on and otTilie TV.
-.-.--.----~~--.~-----._.---.~~--.----------.-
Lights up in amber when the timer is set: When theiimeris set, thisLEb~iifremairiiiteven
if the TV is turned off. For details, see page 42. If the LED blinks in red continuously, this
may indicate the TV needs servicing (see contacting Sony information on the back cover).
Lights up in green when the Backlight feature is activated.
Light up in red when your TV is in PC standby mode.
[l] STANDBY LED
-----~----[ID POWER LED
Lights up in green when the TV is turned on.
[ID (IR) Infrared
Receives IR signals from the remote control.
Receiver
Light Sensor
----_._--
Senses room light level and adjusts the screen brightness accordingly (see page 34 for
details).
Do not put anything near the sensor, as its function may be affected.
f!:n
• Make sure that the TV is turned off before unplugging the power cord. Unplugging the power cord while the TV is
turned on may cause the POWER LED to remain lit for up to 20 seconds or may cause the TV to malfunction.
30
MENU provides one button access for controlling your TV. It enables you to perform a variety of tasks intuitively with a
control panel on the screen.
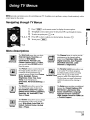
Navigating through TV Menus
1
2
3
2,3,4
4
5
Press (
To highlight a menu option press ., then press
To select an option press
Press
.1+ to go through the menus.
CD or •.
.1+ to select or adjust your desired option, then press
To exit press (
-
on the remote control to display the menu options.
MENU)
CD.
MENU).
1,5
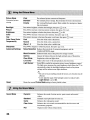
Menu Descriptions
Shortcuts
The Shortcuts menu lets you select:
External Inputs, Favorites, and
shortcuts to Wide Mode,
The Channel menu is used to provide
maintenance to the channel options.
Select from: Favorites, Cable, Add
ClocklTimers, Parental Lock,
Closed Captions (CC) and Cable;
you can also select PC-PIP function
Digital Channels, Auto Program,
ShowlHide Channels, Label
Channels or Diagnostics.
from this menu.
Picture
•
The Parental Lock feature allows you
to set up the TV to block programs
according to their content and rating
levels. Use
on the remote
Parent aI L OC k controI to enter a &lour- d"'
Mode, Backlight, Picture,
Iglt password.
Brightness, Color, Hue, Color
The first time you create a password,
Temp (Color Temperature),
confirm the password by entering it
Sharpness, Advanced Settings, or
again.
The Picture menu is used to fine tune
the image quality and allows you to
customize several parameters for
optimal viewing. Select from: Picture
Reset.
The Sound menu allows you to fine
•
•
..
A
••••••••••• _
..
tune and change audio. Select from:
Sound
Sound Mode, Dolby Pro Logic II,
Steady Sound, Balance, Speakers,
Backlight, Alt. Audio/MTS, Test
Tone or Reset.
@)-®
.............. -
-
.
The Setup menu provides you additional
features like: Closed Captions (CC),
Info Banner, Label Inputs, Skip
Inputs, ClocklTimers, Language,
Auto Sort Control, Control for
HDMI, Update Control for HDMI List
or Product Support.
The Screen menu allows you to change
the proportions of the screen. Select
from: Wide Mode, Auto Wide, 4:3
Screen
Default, Vertical Center, Vertical
Size or Phase.
(Continued)
31
...............M................
.
M..
External Inputs
.
_._
__
_
M
M _
_
_
_....•._
M•............•..•.......M
_.•...•..•
This feature lets you select the external inputs connected to your TV.
1
2
Press
+1+ to choose an external input from the list of 9 inputs.
8.
To select press
6
• To exit from external inputs list, press ( MENU)
• To change external inputs again, repeat steps 1-2.
• To go back to channels, press CH +/- to go through the channels or repeat steps 1-2 and
select TV; or press '0' to select a channel from your Favorites list.
• You can also access the External Inputs list directly by pressing 'e) without having to
navigate through the Menu.
------~~~---~-~---~
Favorites
'-~-~-~---
This feature lets you create and choose a list of up to 8 favorite channels.
Press +1+ to select the option Add to Favorites, and press
to add the current channel
to your Favorites list.
8
t6J
• You can also press 'Os to see your Favorite Channel list.
This option is a direct shortcut to the Screen menu to adjust the picture size in the Wide
Mode option (see page 36).
Wide Mode
......................._
_
_
<
0
~
•••••• M
_
_
_
_
M •• _
~
••••••• _
_
•••• _ ••••• _ ••• _ _ •• _
.. _
_ _ ._
n
__
_. _ _ •• _•••
•••••• _ .. _
,.~
_ . _.. _
..
~
ClocklTimers
This option
is a shortcut
to adjust ClocklTimers
Setup menu
....... _._ _
- __
__.._ _ _._ _.._._ _--_
_ _ _ __ _ _.. _ _ __
_--_ _ _ - _
_ __..__ _ _._ -on
.. - _.......... .
_ _._ _(see
__.__ page
_ _42). __
Parental Lock
This option is a shortcut to the Parental Lock menu which allows you to enter a password
to block channels (see page 38).
~
Closed Captions (CC) This option is a shortcut to Closed Captions (CC) screen on Setup menu (see page 41).
Cable
This option is a shortcut to adjust Cable setting on Channel menu (see page 37).
..................
~.MO~
..
•
~
_
_._..
• •• _ _
_ •••• _ ••••• _ •• _
••• _
••• _ _
_
_
•••• _
•• _
_
_
_
_ _ •• _ •••••••••• _ _
__
_
_.
.. _
_~
_
.. _ _
_
_ ••••••••• _
__ ••
~
•••• h •• • _ _
_
·_._._...........
• ••••••• _
••• _
_
~
•••
------
32
PC-PIP
-
-
This PIP (picture in picture) feature provides PC input signal and TV channels, allowing
you to view two pictures simultaneously. When you select this feature from Shortcuts
menu, the PC-PIP will appear with a Sub Window to see TV channels at the same time.
Main Window
(PC)
Sub Window
(TV Channel)
:6J
• You need a PC input signal to use PC-PIP function.
• To tum on or off the Sub Window on the screen press
from the remote control while
using the PC input.
• You can also select PC input from the External Inputs list. Press ( MENU ), select
External Inputs, then select PC input from the list.
0
----------------
To Change Channels in the Sub Window
Press CH +/- to change the channels or enter the channel number using the
buttons.
@)-® numeric
To Exit from PC-PIP (PC input)
1 Press ~ and select External Inputs on the Shortcuts menu.
2 From External Inputs list, select TV input to return to TV channels.
.tt:n
• To exit from PC-PIP, you can also select a channel from your Favorites channels list on
the Shortcuts menu.
• When the PC input signal is selected with the Sub Window active, you can only see TV
channels; other external inputs are not available for this view (like VCRlDVD).
• Closed Captions (CC) is not available in the Sub Window.
• Parental Lock feature will work in the Sub Window; a padlock will appear on the
blocked channels.
----~--------
(Continued)
33
-
....•..............................
Picture Mode
Customized picture
viewing
Color-
-
....•............_
_._
_ _...•.-
~._
Vivid
Standard
Cinema
Backlighi·----···--······
Picture
Brightness
_
For enhanced picture contrast and sharpness.
For standard picture settings. Recommended for home entertainment.
---
••••••• _ . _ •• _ ••••••••• _ •• _ - _
_ •• _
- ••••• _
- _ •••• ¥ •••••• - ••••••••••••••• _
_._
- •••••••• _
•••• _ ••••••••••••••• _ •••••••••••••••••••••••••••• _ ••••••
For viewing film-based content. Most suitable for viewing in a theaterlike environment.
·······-··p~~~~·;T.t~bright~~-~~d~~k~~··th~-b~~·kiight~-th~~·p~~~~0·t~~~t:·····-·
Press +/+ to increase or decrease picture contrast, then press e
to set.
.......- .
···········--p~~ss;;.t~brighte-n~~~i~~k~nth~pi~t~~~;th~np~~ss0t~·s~t:····
·········P~ess.j.t~in~~~as~~~d~~~~as~coi~~int~nsity;thenpressG5"t~set.·
.~.~.~
_ ~~·=··===~~~s~~(!t~~~~~~~~~?~~~~~~~~~Th.~~~~~~.~rr.~?t~~~~,·~~:?!r.~~~=0t~~~t.:·==---Color Temp (Color
Cool
Gives the white colors a bluish tint.
Temperature)
Neutral
Gives the white colors a neutral tint.
...............••...•.
Sharpness
-
~
.. ... "'
.
~........
~
_
_ --
_ _
_
~.
__._.. "' _
"'
.
Warm 1, 2
Gives the white colors a reddish tint.
Press +/+ to sharpen or soften the picture, then p-re-s-s-e"::;+::--to-se-t-.- -
-
---
Advilnceci··settings----Noise···Rediiction-·Red~c~s··th~-n-~iseie~~f"~f·c~n~~~tedequipment;··andthe-···
CABLFJANTENNA input.
Enhances black areas of the picture for stronger contrast.
Black Corrector
Gamma
Adjusts the balance
between
the light and dark areas of the picture._ _._- _ .
.......... _
- _ _ _ _ _._ _.__ _
__
_ _._ __ _._._ - _ -_ __.. .._._ __ ._ - - _. __ _.._.._..... ..._ __.__._
Clear
White
Emphasizes white and light colors.
................ ..__ _ __. __.__.._._ _.._ __ __ _ _•......._ _ _ _ _ - ..__ _-_. __.•..._ _---.. _ _ _._ _ _ _ _....
. _ _ _ -_..
_._ __.. - .
Live Color
Makes colors more vivid and reproduces clear skin tones.
Light Sensor
Select On to enable the automatic picture (screen) brightness control.
The light sensor measures the room brightness which allows the TV to
automatically adjust the backlight brightness based on the picture
settings and the ambient room light conditions.
• _ •••••••• _ •••••••••••••• _ •••• _
_ ••••• _ _ •• _
_
_ _ • _ _ •••••
_ ~
••••• _
_
,_
~
••• _ ••• " •••••• __ ••• _ _
~
__
.h.. _ _ •••• _ _
_ _ •••••••• _ •••••• _ •••••
~
•••••••••••••••••••••••••••••• _ •• __ •
••• _._ •• _ . _ •• _ _ • _ _
••••••••• _ ••• _. _ _ •••••••• _ •••••••• _ ••••••• _ ...
~
-
~
:t:J
Reset
• Be sure not to put anything around the sensor, as its function may be
affected.
• In low light the range of the backlight control is reduced when
Light Sensor is set to On.
-.- _ _
_,
_
__
_
".......... .
Resets the current Picture Mode setting to factory default values.
Sound Mode
Dynamic
................
.
_ _...... .
,
__
."
,
Enhances the sound of action movies, sports events and musical
videos. _
_,............. .
__ _.._._._.. ".._._
__ _ _.._ _ _h_ _.._ .._.
. _.._
~
~_
_~._
~
__
_
.
_.
Standard
Game
.
Clear Voice
Standard sound optimized for home use.
.._ - - - Enhances the video games sound.
_........................•................•.............•.....•........_...........•. _ .
Enhances the voice sound; recommended for television news and
documentary
programs. _
..
_
_.
.
..
.
Flat
Original sound without enhancements.
---_~.--.
"~.
- -
34
-
,-
-
Pro Logic II
Press
+/+ to highlight an effect from the list; then press
Movie
This mode is useful to replay the movie sound like movie theaters.
Music
For steady music signals; gives natural sound to music and an
environment like concerts.
Simulate multi-channel sound; great for mono programs.
Matrix
Virtual
............ .
_....•....._
_._......
.
Steady Sound
Balance
to select.
.
---~._--_._---------_.
Creates a surround virtual sound, using the Dolby Pro Logic II system.
On this mode we recommend to place the Satellite Speakers next to the
TV (see more details on page 18).
The reception of steady or mono sound is normal.
• On Dolby Pro Logic II Movie, Dolby Pro Logic II Music, Dolby Pro Logic II
Matrix and Dolby Pro Logic II Virtual, all the speakers are activated (the central
speaker, both internal speakers, both Satellite Speakers and the Subwoofer) to optimize
the sound on these effects we recommend to place the Satellite Speakers as shown on
page 18. When the sound effect is off, the central speaker is desactivated.
_._..........
.
_ _ _ _
_
__
_.._._
_
_
__ _
_
' H......... .
_
_._.._
_
_ _.............•........................H .
On
Stabilizes the volume across all programs and commercials.
Off
Turns off Steady Sound.
Press +1+ to emphasize left or right speaker balance, then press
to set.
Select to tum on or off the internal speakers.
•••
,_
Backlight
Alt. AudiolMTS
p
p ••• p
•• - ••••.••••• _ - _ •••••••• _ •••••• _
••.••••••••••••••••••••••••••• p •••••••••••••••• P •••••••••••••• _ • • • • • • • • • • • • • • _ •••••••• _ ••• _
•••••• _
••••••••••••••• _
•••••• _
Turns off the Backlight to conserve power while the audio is left on.
This Audio feature for current program lets you select from 8 options of alternate audio (if it
is available). You can select from English, Espanol (Spanish), Fran~ais (French) or
Audio 4, 5, 6, 7, 8 audio available options.
6
• Alternate Audio is disabled for analog signals and for digital signals that do not have
altenate audio streams.
Mono
Select for mono reception. Use to reduce noise during weak stereo
broadcasts.
Stereo
Select for stereo reception when viewing a program broadcast in
stereo.
...•.................
__
.
.
.
••..
. . .
-_ _
_.
Auto SAP
Select to automatically switch the TV to second audio programs when
a signal is received. If no SAP signal is present, the TV remains in
Stereo
mode.
_ _
_._
_
_
__ _
_
_
_
.- _
_
_.._.h_ _ _ .
Confirm and adjust speaker position and level.
,
_
...•..•.......••....•.............•......
.
Resets the current Sound settings to factory default values.
"
..
.._
Test Tone
.....
Reset
~
_..... .
_
_
_
~
~
~
~_
~
,
~
~_.~..
~.........
~
(Continued)
35
-
Mode
These options allow you to change the proportion of the screen.
.... - .. .. ,..
.....• ,....
".
.
Wide Zoom
,
"
-
"
~
,
"
.
,_
"
Select to enlarge the picture uniformly.
~~~,,-~,,~~-~-,,-~~-~----,-----~_.~,~------,-~,,~'''-~,~,~~~--_._---,~-,,--~~-~~,-~-~~_.~-
Normal
Select to display 4:3 pictures in original size when the original source
is 4:3.
f6J
• Normal is not available when you are watching 1080i or nop in high-definition source.
Select to enlarge the picture horizontally to fill the screen when the
original source is 4:3 (standard-definition source). When the original
source is 16:9 (high-definition source), select this mode to display 16:9
picture in original size.
----,-~---~~~-~--,---~----,----
Zoom
$:n
....
..
•..
•.•......
..
,
Select to enlarge the original picture without distorting the aspect ratio.
WIDE
•
• If you press c=J on the remote control, you can also select these modes dlfectly.
On
Select to have the screen automatically change to the screen mode
based upon program's content. Typically this requires special setup on
DVD equipment's menu. If frequent screen changes are disturbing to
you, select Off.
_....
••.•.... ",
Auto Wide
_ •. __,
• ">O··_M••
·M~"
_ •... ••."
~
~
" .•
,.¥ .•..
v•........................ _
_"
~
••
Off
_
~-
•••••••.•••••••••• ~
,~
_
~
__" ..
'_
~
.. ~
_
~.-.
~
_ _.., "
•• ~
~
_.,."
.."
v •••• __ ••• _
<
~
~
••" . _ . , ' , . " . _ " , ..
~
"
,~",
••••••
' " . _ •• -
.......
~
••••••••••••••••••• _ •• _••
..
.
" .-
~"'
,
_
.
"......
--
_.. --"'
.
,.~
.
Select to tum off the Auto Wide option.
Choose a screen mode from the Wide Mode option.
....................
4:3 Default
•
_.v._
~
'"
..
.
~
Select the default Screen Mode to use for 4:3 sources.
Wide Zoom
Select to enlarge the 4:3 picture to fill the 16:9 screen, keeping the
original image as much as possible, with minimal distortion.
-~---,
Normal
----
Full
_·~~
__
~
..
Select to display the 4:3 picture in its original size.
Select to enlarge the picture horizontally to fill the screen when the
original source is 4:3 (standard-definition source).
•.
'~~=mw'=m~_~=·
_'N~_~~~_",
__
,
~~~~_~~~_~
..
.~_
~~
_ _..
~· ~
~·~
...w
__
Zoom
"'"""~~
~
__
"_~~N,_N
Vertical Center
..
Vertical Size
N~~~~
__
Phase
~
~
~
~
~
,
·
·
·
~
~
~
Select to enlarge the original picture without distorting the aspect ratio.
Off
To tum
automatic
for 4:3.
__ size
_ _"
Allows you to move the position of the picture up and down.
. ..
.. ..
. .
.
".
.. .
" .._ __
Allows you to adjust the vertical size of the picture.
__
Adjusts to fine tune overall sharpness.
~
'~
__
~ ~ ~ M - _ ~ ~
~
~
_
~
·
..·•·•
_
~
~
~
_
~
_
~
~
_ _•..__
~
~~~............
,_._~~_w
--.~~_~
~,
~
,,····~···""··w·
~·
=
~
~
_
=
~
~
~
~
~
,
~
~
~
N
__
= ~ ~ _ ~ ~ . ~ ~ ~ ~ < ~ ~ . ~ ~ ~ _ ~ _ ' ~
$:n
• Phase is disabled when the TV is receiving a different video input than Pc.
36
A'_ _'_..__, ..
· = ~ . ~ w
.
..........._.......................
.
~
_
-.
~_
_
.
Lets you set up a list of up to 8 of your favorite channels.
Press +/+ to select the option Add to Favorites and press (0 to add the current channel
to your Favorites list.
To select a favorite channel from the list, press +/+ to go through the list and
to select
the channel.
Favorites
8
~
• To exit press ~.
• To quickly access the Favorites channel list, press 'Os when there is no menu on the
screen.
._-------------_._._------------_._------Select if you are receiving cable channels via cable TV provider.
On
Cable
Select if you are using an antenna.
Add Digital Channels Select to add digital channels without replacing the original channel list. Be sure to set
Cable setting to On or Off in Channel menu for the correct type of input signal you
choose.
Automatically sets up the channel list on the TV for all receivable channels (Digital and
Auto Program
Analog).
P
• IMPORTANT: You must perform Auto Program after cable or antenna is
connected. If
you cancel
Auto Program, some
channels
may
not
be available.......••.. _.....•...
. . ..............•
. _
..
.
. '.
.. ..
.
..
. _ _
Show/Hide Channels Allows you to show or hide channels that appear when you use the CH +/- button.
1 Press +/+ to scroll through the channels until you find the channel you want to show or
hide.
2 Press
to determine if the channel will be shown or hidden.
To show or hide more channels, repeat steps 1-2.
Allows you to assign labels to channel numbers.
Label Channels
1 Press +/+ to scroll through the channel numbers. Then press
to select the channel
number that you want to assign a label.
2 Press ./+/+/+ to move through the label characters (A-Z, 0-9) and press
to select
it. To move to the next character press ./+/+/+. Repeat to add up to 7 characters to the
label. Then select Elite,] on screen to set it. To assign labels to more channels,
repeat steps 1-2.
,
~
..
~......
~.,.
,
..
e
8
8
~
a
. • To delete a character select
on screen.
• To have a space between characters select
Diagnostics
..
~.!?~~i~p~~.~.~ Q:
_
CQ
<
~
• Before starting Auto Program, be sure to turn On or Off on Cable option in the
Channel menu. When it is On, the TV will search cable channels; when it is Off, the
TV will search over-the-air signals with an antenna connection.
• If you are using an A-B RF switch (not supplied) to switch between cable or antenna
connection, be sure to select the correct Cable option to On or Off in the Channel menu.
1 Select Auto Program.
2 Select OK to start Auto Program. When Auto Program is done, select OK.
~
5;=
5'
~
:::s
~
~......
-
II on screen.
_.
Allows to confirm the current channel performance indicator.
(Continued)
37
The Parental Lock feature allows you to block programs according to their content and rating levels and
block channels (regardless of the programs). Password is necessary in setting up blocking. Use @)-® on
the remote control to enter a four digit password. The first time you create a password, confirm the password
by entering it again.
To View Blocked Programs
e
Press
when tuned to a blocked program, then enter the password. To reactive the Parental Lock
settings, turn off and on the TV.
Rating
Off
Tum Parental Lock Off. No programs are blocked from viewing based on
their rating.
Child
Maximum ratings permitted are:
U.S: TV-Y, TV-G, G
Canada: C, TV-Y
•
•••••••••••••••••••••••••••••••••••" . .
•
_ ••••••••••• _
Youth
•••••••••••••• _
•••••••••
~
•••
N.·
. . _ •••••••••••• _ . _
N
~".......
_
.«-.. ......• n...
_ ••••• _
••••••••••••••" . .
..
• •••••• _ . _ ••• _
,
"
'
" __
~
H'
..
•
~
_...........
••••••
•
~_
Maximum ratings permited are:
U.S: TV-PG, PG
Canada: C8+, PG, 8 ans+, TV-PG
_
••• _
•••••
~._
••• _
••• _ •••••
~
••••
•• _•••• _ •• _
_~._
••••• _ ••••••••• _ _ ••••• _
••• _
•••••••••••• n _ ••••
R._
n
••••••••••••••••• _ _ •••••• __ . _••••• n ••• "
•••••••••• _ •••••• __ . _ . _•••• _
••••••••••• _
•• _ •• _ ••••• _ •••••• n
•••••••••••• _
_
•••••• _ ••• _
Young Adult Maximum ratings permitted are:
Custom
U.S: TV-14, PG-13
Canada: 14+, 13 ans+, TV-14
Select to set ratings manually:
U.S: See page 40 for details.
Canada: See page 40 for details.
f!JJ
.
Digital Rating
.
• If you are not familiar with the Parental Guideline rating system, you should select
Child, Youth or Young Adult to help simplify the rating selection. To set more specific
ratings, select Custom.
n......
Off
(Available only in U.S.A.
where advanced ratings Custom
exist)
Clear All
.
•
Allow
Block
"
>0"
_.........
n._......
•
._
". ..'" .
~
m
,
" _ ••••" , , .
•
•
~.
__
_.
Select to customize the Parental Lock with downloadable digital ratings.
..
_
.•......•.................... _ _ ..
Select to clear the downloaded ratings.
To cancel just select Cancel.
........ .. _
"_ _
_
_ _ _ _- ..
.. ,,_ _.. ,,_ ..
Allows programs and movies that are broadcast without a rating.
-.
~
"
Unrated
· n
Tum Digital Rating off. No programs containing digital ratings are
blocked from viewing.
"
,,
""
~
-
(A vailable only when
Blocks all programs and movies that are broadcast without a rating.
Country is set to
.(!:;]
U.S.A.)
• If you block unrated TV programs, be aware that the following types of programs may be
Block programs or
blocked: programs broadcast from another country, emergency broadcasts, political
movies that are broadcast
programs, sports, news, public service announcements, religious programs and weather.
without a rating
38
"-
------------------,,-----_...
Channel Block
Allows you to block channels regardless of program ratings. The password needs to be set up
prior to blocking channels. The blocked channel can only be viewed by entering the correct
password.
To block a channel
Press +1+ to go through the channels and press
G to Block or Allow channels.
To view a blocked channel
Press
when tuned to a blocked program, then enter the password. To reactivate the
Parental Lock settings, turn off and on the TV
e
External Input Block
Change Password
Allows you to block individual video inputs.
Press +1+ to scroll through the video inputs and press
-
to Block or Allow.
Select to change your password.
Use @)-® buttons to select a four digit password; to confirm password enter it again.
;6
• You need your password for any future access into the Parental Lock settings. If you
lose your password, see "Lost Password" on page 45.
Select Country
U.S.A.
..........
-_ Canada
-
--:-------------------
Select to use U.S.A. ratings.
_._
_.._--_
_
_...... .
.
Select to use Canadian ratings.
-
_
-
-
,
_
.
(Continued)
39
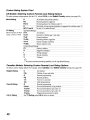
Custom Rating System Chart
US Models: Selecting Custom Parental Lock Rating Options
To select custom rating options for the U.S., select U.S.A. in the Select Country setting (see page 39).
Movie Raiing ···································G
····Allchildren and general audience.
PG
····Parentalguidancesuggestecl."
PG:13
,
Parentafguidancefor children under Ii "
'FC----·''-'----·-- Restricted viewing: parentalguTCianceTssuggestedTorchildren-under 17:
NC-1 iandX-Noone 170[ underaTIowed~----'---""---'''''''----'-'''--'''"'-'-
T\rFfatrn-g--'-"'~----Age:BasedRaiings-------------'.----.--------
TV:y--'-·'---jUfchildren.
--.--.,-----------.--,.-.
Tv-'lf'
,.,., Directed to chiidrenage7iu1dolder. .
,. .
TV:G'-""Generafaudie'nce.""" .
. ....,.,
fV:pcf
Parental guidance suggested.
T\t:14 ,., , , ·····Parenis·strongiy·cautiolled.
Tv:MA
.·'Mature'audienceonlY. ". ""
Content-Based Ratings
FV
Fantasy violence.
o
Suggestive dialogue.
'L'-----.
Strong language.
§""""Sexuafshuations:'
.........
_
V
Violence.
Block programs by their
rating, content or both
._---~~-----,-
"M_',_
""
-
~
~
.•.
. , "... . . " ,
.
~'"
;6J
• To ensure maximum blocking capability, set the Age-Based Ratings.
•..••
..
.......••.. _ •...........•..•.. •..•.•....•.
~
"'''H'·' __ •••• "
_."~
• •...•.••...
~.
~
..
~
~
_ ••... _ •..
,
~
,"'
.,.............. •...
. .••.....••.••....•••...••••• ,., ••• ", ••. " ••
'o~
• • •,
Canadian Models: Selecting Custom Parental Lock Rating Options
To select custom rating options for Canada, select Canada in the Select Country setting (see page 39).
C
<:8+
" .
All children.
Children8yearsandolder~---·
General programming.
. ....., ·····ParentaIguidance
,,,,.,
14+ __
Viewers 14 and older.
--_.
18+
Adult programming.
G
General programming.
i-ans+-----Notrecommended for young children. .
13 ans+
Not recommended for ages under 13.
16 ans+
Not recommended for ages under 16.
18 ans+
Programming restricted to adults.
·SeeTVRaiingunCierlIS:A:ahovefordeiails.
PG
•
••••••
• ••••••••••••••
~
•••
••••• ••••
~~
"'~''''''~''''~'''''"VV'''''''V'
•
•
•
•
v
., .
• ·.··w.·.·•.·.·.·.·.•.
French Rating
_ ..
~
.
~
-~-
..
·m.·.'".·.nm.w.·n.'~vm.·'.·N.'.'~v,~
~=""~Nh~N=~"'~~,'=.,~w,~~~,~~~'~,,~'~~.,~,~,~~~~=
~,~~~~_~~_~~~._._~v
._-~~."~~~~~=~_._----_.,,---------~~~~-,~.
.
..
"
,
40
"
~
••••••••• ••••••••• •••••
••••••••••••
.
•• _....
••
•
~
•
"
~
"
.. ,,"'.•.. "
,......
.
~.......
"
"
,
_" '0.. . ..'"
'v"
•
"
~~."
~"
"
", ..• "
~
,
•••••••••• "v
"
"
m
•••••••••••• v •• " ••••
~
~,
•. ,
"
",
~
__
__
~
.~
..
~_.~~~~~v~m.vv."~
----------.-.~.,--~,~.~--~-~---,--
' .. ·n'''· ..
·.m
~~
_ •••••••••••••••••••••••••••••••••••••••••••••••••••••••••••••••••••••
~
~
.
Closed Captions (CC) Allows you to select from several closed captions modes (for programs that are broadcast
with closed captioning).
Select: Off (to turn off Closed Captions), On (to turn on Closed Captions), or
Program (to program Closed Captions).
Programming Closed Captions
If you select the Program option under Closed Captions, you can change the following
settings:
Allows you to select basic closed caption options (EIA-60S).
Basic
CC1, CC2,
Displays a printed version of the dialog or
CC3, CC4
sound effects of a program (should be set to
CC1 for most
programs).
........ _ _ _._
_..
_ _ _.. _ _ _ _ .
............
..
Text1, Text2,
Displays network/station information presented
using either half of the whole screen (if
Text3, Text4
available).
Digital CC
Allows you to set digital closed captioning to Basic (digital EIA-60S)
or Advanced (digital EIA-70S).
Allows you to select advanced digital (EIA-70S) closed caption
Advanced
options. Select from the available options.
_._---_._---------::::-=----:-:::----::-----::::-::-:-:-----:---:::-:-----Advanced
Customize the Closed Captions (CC) displays with Character
Settings
Style, Character Color, Character Size, Character Opacity,
Character Align, Edge Color, Edge Type, Background Color,
Background Opacity or Window Color.
-
~
................................ ~
_
..........................._
M ••• _ •• _
•••
,
_~.~
_
_•••
n··V _ _
_••••
.~
_..
.
....
Info Banner
.................
Label Inputs
~
".M..... ..
~._._
.
cc
• Closed Captions (CC) can be turned on and off by pressing the c:=J button on the
remote control.
..•_ _"
_
_
_...... . .. ,.,.
.
_ __._ _ _......
..
_ _ __
_
.
Sets On or Off. When On, displays the program name and the remaining time (if the
broadcaster offers this service). Displays for a few seconds when the channel is changed. If
you don't want to display the Info Banner, select Off.
_._
_
_ _
.
,
_
_..................................................................... .
_
_
_..................
.
Allows you to identify NY equipment you connected to the TV, such as a VCR, DVD, etc.
For example, if you have a DVD player connected to the VIDEO 1 input, you can select the
label DVD for the VIDEO I input. Then when you press 'r,)T to change inputs, the label you
assigned to that input appears on screen.
'..
"
~...........
~
~
"
,
_~
y
~
.
J
1
Press +1+ to highlight the input (from I to 7) to which you want to assign a label, then
press
to select it.
2 Press +1+ to highlight one of the displayed labels, then press
to select it.
You can select from the following labels for each input:
DVD, VCR, Blu-ray, Cable Box, Satellite, OVR, Game, Camcorder or Custom (to
customize, follow the same steps of Label Channels on page 37).
G
8
........................................................................................................................ " ......
Skip Inputs
Useful to disable inputs to which no equipment is connected.
-----------
(Continued)
41
-
ClocklTimers
Sleep
Set the time in minutes
15,30,60 or 120 minutes) that you
want the TV to remain on before shutting off automatically.
•••••••••••••••••••••••• _ ••••••••••• ~ •••• _ ••••••••••••••• _ ••••••••••••••••••••••••• _ ~ •• _ •••••••••••••••••••• •••••••• _
Timer
••••• H •••• H •••••
••••••••••••• _
H •••••• _ ••••••••• ••••••••••• _ •••••••••••••••••• _
••••••••••••••••••••••••••••••••••••••••
You can use the Timer to tune to a specific channel at a scheduled
time.
Select Off to tum off the timer (previous settings are saved). On to tum
on the timer (previous settings are saved) or Program, to set the timer
by Time, Duration, Days, Source, Channel and Volume that you
want to tune to a specific channel at scheduled time.
If you select Program, press +1+ (change the values) or +1+ (move
through the options) to set the hour, minutes, AM/PM, duration, days,
source, channel and volume.
You can also set a channel by pressing
(numeric values) and
(if the channel is digital) on the remote control.
To replace a channel press + on the remote control, then press + to go
back to the channel selection and enter a new channel number.
®-®
o
:!JJ
• Timer feature will be not available until you set the Current
Time.
Current Time
Select to set the current time (day, hour, minutes and AMlPM).
G
1
2
3
Language
Select to display all on-screen settings in your language of choice: English, Espanol
(Spanish), Fran~ais (French).
Select On if you want to sort the Shortcuts menu and Inputs list, based on the most
frequent selections; select Off if you don't want to sort.
Allows your TV to communicate with other equipment that supports Control for HOMI
function.
••••••••••••••••••••••••••••••• _
Auto Sort Control
Control for HOMI
. .
,.. ,
Press
to select Current Time.
Press +1+1+1+ to set day, hour, minutes and AMIPM.
Press ( MENU) to exit.
~
•••• _ • ••••••••••••• H
¥....
_
.
~
••• _ _ • _ _
,~
_ •••••••• _
••• H •• _ _ ••• _ _
~"
,
_
.
~...
.,
•••••••••• _
••• H •••••••• _
~.............
H . _ ••• _
.
•• _
•• _ ••••••
~._
~
~~
A •••••••• _ • • • • • • ••••
~
~H
~
,..,..............
•••••••• H
_ •••••• _ ••••• _ . _ . _ . _ ••• _.A ••••••••••• _
.
"
"
•••• _ ••••• _ ••••••••••
"
~
..
Update Control for
HDMI_List
_
Update equipments list connected to the HDMI input.
Product Support
Provides information related to troubleshooting and contact information. Select OK to reset
the TV to factory default values, or Cancel if you do not want to reset the TV to factory
default values.
~~~_~
...........
~ ~ ~ = ~ = ~ ~ ~ = . ~ ~ = ~ _ . _ y . _ ~ , ~ . . . . . . . . . . . . , . . . . - . y
-------------
42
....-..."""'""'""'~,
....
_
~
~
~
~
,
¥
~
~
._~¥._¥M_~.......,,~
__
~
~
_
Troubleshooting
http://www.sony.com/tvsupport
1-800-222-S0NY(7669) for US Support
1-877-899-S0NY(7669) for Canadian Support
If you have additional questions, service needs,
or required technical assistance related to the use
of your Sony TV, please visit our website or call
one of the following numbers:
o
•••••••••••.••••••••• , •• : ••••• _ • • • • • •: •••••• . ; . •••. ~_.:
..;
••••••
••••·••••••••·. . h
_ ••••••
. . . . . . . . . . . . . . . . . . . . . . . . . . . . . . . . . . . . . . . . . . . . . . .'
, ....
• ·,•••"
.. ,
;· ••·.;~'
i ..
•......• ~
..
Confinn your external inputs list and make sure you select TV
(cable/antenna channels). See page 32 for more details.
o Perfonn Auto Program to add receivable channels that are not presently in
the TV's memory (page 37).
o If there is no signal, the screen saver will appear.
Canncireceiveanydlannefs:-ll--Make sure-the-power-cordisconn-ectedsecurely
- .. _ - ...--.o Tum on the power of the TV.
o Check antenna/cable connections.
Perform Auto Program to add receivable channels that are not presently in the
TV's memory (page 37).
o
IMPORTANT: You must perform Auto Program after cable or
antenna is connected. If you cancel Auto Program some channels may
not be available.
'fVislocked to one channel. ·················0 ··········PerlormAutoProgramtoaddreceivablechannelsthatarenoipresentlyiniheTV's memory (page 37).
Cannot-receive or seiectcha-nneis:·······O·_·- ··Torecei~eor·seiectcabie·channeis;··makesure·that·CabieinChannef·settings···
is set to On. To receive or select UHF channels over an antenna, make sure
Cable is set to Off. Perform Auto Program to add receivable channels that are
not presently in the TV's memory (page 37).
The TV turns off automatically. --0 Check if sTeep is activated, or confirm the Duration setting of Timer (see
page 42).
o If there is no signal, the TV will tum off automatically.
No picture from some video
o Check the connection between the optional video equipment and the TV.
o Press 'OT on the remote control (page 29).
sources.
o Press ( MENU) on the remote control. Select your desired input from the
External Inputs list.
....._ ••••••••••• _
_ •••••• _..
• •••••••••••• _
_••• _
n •••••••• _•••••••••••• __ •••••••••••n ••••••• _
•••••••••••••••• _
_ •• _ •••• _ •••••••••••••n •••••••• _
••••••• _
_..
• •••••••••••••
~
•••• _ •••• _ ••••••••
Check antenna/cable connections.
Check the antenna location and direction.
Check the antenna is broken or bent.
Only snow and noise appear on the
screen.
0 Check if the antenna has reached the end of its serviceable life. (3-5 years in
normal use, 1-2 years at the seaside.)
....., ------;=---::=--.__. _ ' - - - - - - - _ . ,
. _ - - - - _..•_ - - _ ._ _._.Dotted lines or stripes.
0
Keep the TV away from noise sources such as cars, motorcycles, or hair-dryers.
o If using 300 ohm twin lead, move the excess lead away from the TV or try using
75-ohm coaxial cable instead.
No coforroark··pictureicoior·lsnot···mEf- .m-PresS···PtT_~EOn··ihe·remo-teconirol-ios-eIectthedesired··plcture··mode(page·26)~
correctffhe
is too bright.
0
Adjust the Picture Mode options in the Picture menu (page 34),
Double images or ghosts.
o
._-_._-----'--'--.~
(Continued)
43
Noisy picture.
D
Make sure that the antenna is connected using a 75-ohm coaxial cable (not
supplied).
Keep the antenna cable away from other connecting cords.
To avoid TV interference, make sure to use an undamaged antenna cable.
D
D
No soundJNoisy sound
~---:::-----:=----::::---:-'-:---::----'--:-'---'-----'----'------_--:':'_--'Good picture, no sound.
D
D
D
o
PC Input'
No PicturelNo Signal.
D
o
D
................ _
_..-
Poor picture.
....__ .. _.,..•.....•....
_~~~
.•_._....•._
_
_-_
_-_ _
..
_ _ ·····v··..··_ .·"..·._"'.··v¥.···__.···.__
_ _-_ _..__.._._-
D
···.. _ ..·_..··_..··• ...
o
_A
- . _ •••
General
Confirm the PC is correctly connected to the TV in the PC IN (not supplied
H015 cable).
Ensure the output signal from the PC is one of the formats listed on page 21.
Tum the PC off. Confirm the PC connection and restart the Pc. Plug and
play
will auto-detect the TV.
__.._.. _ __ _._ __ _.._ _. __ _ _ _._._ __ .. _ _.._.._..___ __ _--_ _-_._._._---_.._._--_._.. __ _._-_ .._. __ .
Adjust the resolution (see page 21).
Adjust Phase
(see page 36).
w:-.__ _ .._..
__.__._ _.._•._.,.__._ __.
_._ -.-..
_ '__._._•...
.._
_._
..
.., _
__'''
y_
~-_."'.
;....,.••••.,...... ••
~ _
••
¥ ~ ~ . _ ~ . ~ _
~ . _
~.
'!"','"''"'''".~_,
~
~¥
~._.
."
,
- - - _..~--_..
- - '''------''-'''-'~-'-''-''-~--'-'-=---:--'-'-,
Wide Mode changes
0
The current Wide Mode setting is automatically replaced with the 4:3
automatically.
Default setting when you change the channel or video input, if 4:3 Default
in the Screen menu is set to other than Off. If you want to lock in Wide
Mode selected with 0 on the remote control, set 4:3 Default to Off in
the Screen menu (page 36).
D Tum off the Auto Wide option in the Screen menu (see page 36).
Sudd~nlythePIcture gets-------O-Theprcture getssmaller duringthe commercials;this-is due to themethod -
smaller.
the provider broadcasts their contents. When HD content channels switch to
SD definition content (commercials), the picture may be small with a black
border.
......................................
_
_.. .
..
.. _
__
_...
.. ..
"Black box" on screen.
D You have selected a text option and no text is available (see page 41). To tum
off this feature, set the Closed Captions option to Off. If you were trying
to select closed captioning,
select CC1 instead of Text1-4.
......_
_ _...........•.........•................ _.........................................•..............•....._
_
_
_..•......
Black bands appear at the top
D Some wide screen programs are filmed in aspect ratios that are greater than
and bottom of the screen.
16:9 (this is especially common with theatrical releases). Your TV will show
these programs with black bands at the top and bottom of the screen. For
more details, check the documentation that came with your DVD (or contact
your program provider).
o Programs in 4:3 aspect ratio will have bands on left and right sides of the
full_ size
see page _36...........................•...__
- .....................•..•....•....••.•_ __ __
_screen.- To_ select
- __
_ _ _
_...
.
_
.
D The compression used by certain digital broadcasts and DVDs may cause
Certain programs on DVD or
other digital sources display a
your TV's screen to display less detail than usual, or cause artifacts (small
blocks or dots, pixelations) to appear on your screen. This is due to your
loss of detail, especially during
TV's large screen and ability to show very fine detail, and is normal for
fast-motion or dark scenes.
certain digitally recorded programs.
~
44
'_"'_'~"
·~········
···~"
····~·_·_
····~·¥··
·w·'"..·.. ..·w··.y.. _.....
·~
......•..•.. _
..
Check the polarity of the batteries or replace the batteries.
Point the remote control at the remote control sensor of the TV.
Fluorescent lamps can interfere with your remote control operation; try
turning off the fluorescent lamps.
o
Keep the remote control sensor area clear from obstacles.
----_._-----Some digital cable channels are 0
Certain cable companies have limitations on the broadcast of digital cable
not being displayed.
channels. Check with your cable company for more information.
o The digital cable channel may be set to Hidden in the Show/Hide
(see
page 37).
Channels setting
......
_
- .•...................... _.._................•............._ _- _
_
_..
.
_._ _..•_ _...... .
o Select the Parental Lock menu, then enter the following master password:
Lost password.
4357. The master password clears your previous password and allows you to
enter a new password (page 38).
How to reset the TV to factory 0
Tum on the TV. While holding down. on the remote control, press
settings.
POWER on the TV. Release the. button.
WARNING: Parental Lock password may be required if it has been created.
The reset will clear all of your customized settings.
Remote control does not operate. 0
o
o
~._
45
Specifications
,.?J§»0
K~~"§2~4POt;,\i'"
'~·0';tZ1.);;. l;i/@'0;I;,
:Y?'.:M'\!.:;",.
'"c,P'.h'
... _
'.:
_~:r:
".
M~rdt;j,;;'1{;i~jftia0°Y';~'~f,1*!,,\~',iP;h~;~~;'i.\f
System
Television system
Channel coverage
Panel system
Speaker output
Input/Output JaCkS
Antenna
VIDEO IN 1/2
COMPONENT IN 1/2
HDMI IN 1/2
AUDIO OUT
DIGITAL AUDIO OUT
(COAXIAL)
PC IN
,
'"
';;:7,?',
>.".""
<'-
,
75-ohm external terminal for VHF/UHF
S VIDEO (4-pin mini DIN)(VIDEO I only): Y: LO Vp-p, 75 ohms unbalanced, sync negative / C: 0,286 Vp-p (Burst signal), 75 ohms
VIDEO: I Vp-p, 75 ohms unbalanced, sync negative
AUDIO: 500 mVrms (100% modulation) /Impedance: 47 kilohms
YPBPR (Component Video): Y: 1.0 Vp-p, 75 ohms unbalanced, sync negative / PB: 0.7 Vp-p, 75 ohms /
PR: 0,7 Vp-p, 75 ohms / Signal format: 480i, 48Op, nOp, I080i
AUDIO: 500 mVrms (100% modulation) /Impedance: 47 kilohms
HDMI: Video: 480i, 48Op, nOp, 1080i / Audio: Two channel linear PCM 32, 44.1 and 48 kHz, 16, 20 and 24bits
AUDIO: 500 mVrms (100% modulation) /Impedance: 47 kilohms
500 mVrms (100% modulation) / More than 500 mVrms (Fixed)
PCM 2.0 Coaxial signal
D-sub 15-pin, analog RGB, 0.7 Vp-p, 75 ohms, positive
See the PC Input Signal Reference Chart on page 21.
Stereo mini jack, 500 mVrms, 47 kilohms
~
16 ohms
.....
"
,'.,"
190W
37
5 3/ 4 x I 3/g inches
912 x 617 x 358 rom
36 x 24 3/8 x 14 1/8 inches
1,028 x 681 x 358 rom
40112 x 26 7/8 x 14 1/8 inches
912 x 543 x 102 mm
36 x 21 1/2 x 4 118 inches
1,028 x 608 x 113 rom
40 1/2 x 24 x 4 1/2 inches
202 x 617 x 179 rom
8 x 24 3/8 x 7 1/8 inches
200 x 200
300 x 300
17 kg /38Ib.
13 kg /29 lb.
21 kg/47 lb.
17 kg /38Ib.
I kg /2.2Ib.
Remote control RM-YD026 (I) / Size AA batteries (2) / Cable holder (I attached to the TV) / Operating Instructions
(I) / Quick Setup Guide (I) / Warranty Card (I) / Online Registration Card (U.SA and Canada only) (I) / Safety and
Regulatory Booklet (I) / Software License (I) / DIN cable (I) / Satellite Speaker Cables (2) / Cover (I)
Headphones plug adapter / Connecting cables / Wall-Mount Bracket: SU-WL500 /75-ohm coaxial cable /
HDI5-HDI5 cable / Satellite Speakers Wall-Mount Bracket: WS-WVIOD
(b
• Design and specifications are subject to change without notice.
46
'
35 W (7 W x 5) + 20 W Subwoofer
'.',
Optional accessories
KDLi.3
,
NTSC: American TV standard
ATSC (8VSB terrestrial): ATSC compliant 8VSB
QAM on cable: ANSUSCTE 07 2000 (Does not include CableCARD functionality)
Analog terrestrial: 2 - 69/ Digital terrestrial: 2 - 69
Analog Cable: 1-125 / Digital Cable: 1-135
LCD (Liquid Crystal Display) Panel
PC AUDIO INPUT
Stereo mini jack /Impedance:
Headphones
..
:
......
Power and others·
:
"' ... ',,
120
V
AC,
60
Hz
Power requirement
Power consumption
155W
in use
All models less than I W
in standby
50W
Subwoofer
Screen size (inches measured 31.5 (32 class)
diagonally)
1,366 dots x 768 lines
Display resolution
(horizontal x vertical)
146 x 35 mm
SpeakerlFull range (2)
Dimensions (W x H x D)
with stand (mm/inches)
without stand
(mm/inches)
Satellite Speakers
(mm/inches)
wall-mount hole
pattern (mm)
Mass
with stand (kg/lb.)
without stand (kg/lb.)
Satellite Speakers (kg/lb.)
Supplied accessories
;;·4,,"
Index
0-9 button 27
4:3 Default 36
T
Info Banner 41
Infrared Receiver (lR) 30
INPUT button 29,30
Installing the TV on a wall
A
Add Digital Channels 37
Advanced Settings 34
All. Audio/MTS 35
AUDIO OUT jack, described 13
AUDIO SYSTEM jack, described
Auto Program 37
Auto Sort Control 42
Auto Wide 36
J
JUMP button
12
B
Backlight 34,35
Balance 35
Brightness 34
C
Cable 32, 37
Cable holder 7
CABLE/ANTENNA input, described
Canadian Models 40
CC button 27
CH+/- button 29, 30
Change Password 39
Channel Block 39
ClocklTimers 32, 42
Closed Captions (CC) 32, 41
Color 34
Color Temp (Color Temperature) 34
COMPONENT IN jack (1080i/720p/
480p/480i), described 13
Control for HDMI 42
12
D
Diagnostics 37
DIGITAL AUDIO OUT (COAXIAL),
described 13
Digital Rating 38
DISPLAY button 26
DMPORT jack, described 13
Dolby Pro Logic II 35
E
English Rating 40
ENT button 27
External Input Block
External Inputs 32
39
F
Favorites 32, 37
FAVORITES button
French Rating 40
29
G
GUIDE button
27
H
HDMI IN jack, described 12
Headphone jack, described 11
Hue 34
7, 9
29
Test Tone 35
THEATER button 26
TIMER/PIC OFF LED 30
TOOLS button 29
Troubleshooting 43, 44, 45
Turning on/off the TV 30
TV Rating 40
L
U
Label Channels 37
Label Inputs 41
Language 42
Light Sensor
Described 30
U.S.A. Rating 40
Unrated 38
Update Control for HDMI List
US Models 40
M
Vertical Center 36
Vertical Size 36
VIDEO/AUDIO (UR) jacks described
42
V
Menu
Channel 37
Parental Lock 38
Picture 34
Screen 36
Setup 41
Shortcuts 32
Sound 34
MENU button 27, 30
Movie Rating 40
MUTING button 27
11, 13
VOL+/- button
'
27, 30
W
WIDE button 28
Wide Mode 32, 36
p
Parental Lock 32, 38
PC IN 13
PC-PIP 33
Phase 36
Picture 34
PICTURE button 26
Picture Mode 34
POWER button 27, 30
POWER LED 30
Product Support 42
R
Rating 38
Reset 34,35,45
RETURN button 27
s
S VIDEO jack, described
Select Country 39
SERVICE ONLY 12
Setting up channels 23
Sharpness 34
Show/Hide Channels 37
Skip Inputs 41
SLEEP button 26
SOUND button 26
Sound Mode 34
Speakers 35
STANDBY LED 30
Steady Sound 35
12
47
For Your Convenience
Please contact Sony directly if you:
• Have questions on the use of your television after reading your operating instruction manual
and Quick Setup Guide
• Experience difficulty operating your television
Contact Sony Customer Support at:
http://www.sony.comltvsupport
or to speak with a support representative:
United States
Canada
1-800-222-S0NY (7669)
1-877-899-S0NY (7669)
Sony will work to resolve your questions more quickly than your retailer or place of purchase.
Please Do Not Return the Product to the Store
11111111111111111111111111111
3291227131
http://www.sony.net/
Printed in U.S.A.
3-291-228-11(1)
SONY:
11111111111111111111111111111
3291228111
KDL-26N4000
KDL-32N4000
KDL-37N4000
Quick Setup Guide
Information, see the Operating Instruction Manua
ain this guide for your future reference.
cl-triihl.,.:rr1
For Your Convenience
Please contact Sony directly if you have questions on the use of your television
after reading your Quick Setup Guide and Operating Instruction Manual.
Contact Sony Customer Support at:
Or to speak with a support representative:
United States
Canada
l-BOO-222-S0NY (7669) l-B77-B99-S0NY (7669)
Please Do Not Return the Product to the Store
©2008 Sony Corporation
Printed in U.s.A.
Connecting Your New BRAVIA® Flat-panel LCD HOTV
Congratulations! Your new BRAVIA., TV opens the door to the "Stunning HD Experience':
This guide will explain how to get the most from your new High-Definition TV
Learn more. Visit the Sony HDTV Learning Center
http://www.learningcenter.sony.us/home.phP
Please take these steps before you power up your BRAVIA:
• Register online at:
www.sony.com/registration (from U.S.A.)
www.SonyStyle.calregistration (from Canada)
• Make sure you've removed all accessory contents from packaging.
• Install 2 AA batteries (supplied separately) in your remote control.
• Determine whether you will mount your TV on a wall or place it on the Subwoofer.
Sony wall-mounting brackets are designed to provide the best fit. Refer to the Operating
Instruction Manual for more information.
• Give your TV 23/8 inches (6 cm) of space behind it to properly ventilate.
Your BRAVIA TV must be properly connected to components such as sound system
and cable or satellite box.
See reverse side of thiis poster for sample connection
diagrams.
• Turn off and unplug all components before making connections.
• Do not turn on the TV until connection setup is completed.
Input
Connector
Q)
u
c
E
.g
Along with your BRAVIA TV set, a complete HD system requires an HD sound system, a
source of HD content, and proper setup connection with components such as your HD cable
or satellite box.
You must get HD programming to experience the stunning detail of HDTV.
The quality of the image you see on your BRAVIA can only be as high as the quality of the
signal it is displaying. This chart shows the different Signal types and how to access them.
Best Signal
Performance
0-
...
em
HIDMI connection*
rc
Q)
The Four Steps to a Stunning HD Experience: Set, Sound,
Source, and Setup
HOMI'
HOMI2
Video Connection
Component'
Component 2
0
em
Component connection
Q)
l:J
~
0
Video'
l:J
:J
«
0)
SVIDEO connection
(Use this <:onnector in place of composite
video connector)
Video'
Video 2
~
Compo,site video connection
Audio Connection
HOMI cable carries both
video and audio signals.
(*When HOMI is
connected to OVI with
an adapter. a separate
audio L/R is necessary.)
~
High or Standard
Definition Quality
1080i. 720p. 480p, 480i.
pc
(Compatible with HO or
so content)
1080i, nop, 480p, 480i
(Compatible with HO or
so content)
Audio lIR
~
Audio L/R
480i
(SO content)
~
Audio lIR
What is HDMI™?
Best Picture Quality 16:9
Aspect Ratio
HD Over-The-Air Antenna
HD Cable Subscription/
Programming
HD Satellite Subscription
Good Picture Quality
Aspect Ratio based on
Program
Over-The-Air Antenna
Digital Cable Subscription
Digital Satellite
Subscription
Original TV format 4:3
Aspect Ratio
Over-The-Air Antenna
Cable Subscription
Contact your cable or satellite provider to upgrade your service to HD. Receive over-the-air
HD broadcasts with an HD-quality antenna (www.antennaweb.org) and discover the wealth
of entertainment now available on super-high-resolution Blu-ray Disc~.
HDMI (High-Definition Multimedia Interface) cables are the standard for connecting HDTV
They are built to properly handle high bandwidth, uncompressed video and
multi-channel audio-all in one cable.
Connecting a PC to Your BRAVIA
• May require DVI-to-HDMI adapter and separate audio connector when connecting to
the HDMI input.
• Connect PC's audio output when using a Digital Video Interface (DVI) or HD15
connection.
• Press PC's FUNCTION Key + Select Output to transmit to TV
• When using an HD15 connection, adjust TV's Phase to correct sharpness.
• Refer to your BRAVIA Operating Instructions Manual for more information.
To learn more about HDTV, visit
http://www.learningcenter.sony.us/home.php
Surround Sound System
To further enhance the sound quality, connect the subwoofer before using the TV Models
KDL-32N4000 and KDL-37N4000 also need to connect the 2 Satellite Speakers
(supplied).
~
• Before connecting the Subwoofer, be sure to attach the Subwoofer to the TV
1 Using DIN cable (supplied) connect the AUDIO SYSTEM output on the rear of the
TV to the AUDIO SYSTEM input on the Subwoofer as shown below.
2 For models KDL-32N4000 and KDL-37N4000, the Satellite Speakers (supplied) must
be connected after Subwoofer connection is completed.
Connect the supplied cables to the Satellite Speakers inputs, make sure to connect the
black cables to the black jacks ~ of the Satellite Speakers, and the red cables to the
corresponding red jacks ~ .
Connect the Satellite Speakers cables to the Subwoofer output. Connect white cable
(with the red mark) from the Satellite Speakers to the R+ and L+ Subwoofer jacks ~
(red) and the black cables from the Satellite Speakers to the R- and L- Subwoofer jacks
~ (black).
o
o
o
o
D
o
o
.2JJ
• After DIN cable connection is done, plug the TV's AC power cord to the wall outlet.
.2JJ
• Do not connect unspecified cable to the TV AUDIO SYSTEM input. Connecting other
equipment can cause a malfunction or damage the TV
To Do List
When the Initial Setup is completed, consider carrying out these items:
Set Clock/Timers
Label Video Inputs (skip inputs)
Label Channels
Set Closed Captions (CC)
Set Parental Lock
,Set Picture Mode
Show/Hide Channels
Set Sound Mode
For details, refer to your BRAVIA Operating Instruction Manual.
Running Initial Setup
After you finish connecting your TV, you need to run the Initial Setup. The Initial
Setup screen appears when you turn on your TV for the first time.
1
2
POWER
Press
0
Press
t/... to highlight the desired language, then press O.
to turn on the TV. The Initial Setup screen appears.
Connect cable or antenna, then select Yes to start Auto Program. Your TV will
detect the type of signal connected and will start scanning for the available channels.
f6J
• If you have both cable and antenna available, please connect cable first.
• IMPORTANT: You must perform Auto Program after cable or antenna is
connected. If you cancel Auto Program, some channels may not be available.
3
Follow the help text provided on the screen to run Auto Program.
to complete the Auto Program
When the searching of channels is done, press
process.
0
f6J
• If you did not follow the Initial Setup instructions when you turn on your TV for the
first time, check the Operating Instructions Manual for procedure on running Auto
Program under Channel menu.
Watching Your TV
Select Your Content Source
Whether you are watching cable, satellite or broadcast TV; playing a VCR, DVD or Bluray Disc; or connecting to your PC, you need to choose the correct Input using your
remote control:
• Press ( MENU) on your remote control to display on-screen the Shortcuts menu,
then select External Inputs and will appear the list of external inputs; or
• Press to display the list of external inputs and choose the desired input.
0
Adjust Screen Shape and Aspect Ratio
High-definition and standard-definition signals are transmitted with different aspect
ratios (the width-to-height ratio of the image). Most HD signals use a wide screen aspect
ratio of 16:9. The 16:9 fills your BRAVIA screen, maintaining a crisp, clear, vivid picture.
•
SLEEP
DISPLAY
POWER
THEATER
D
fA
8l
rn THEATER
Theater Mode.
_ _ _ MOOE _ _ _
SOUND
PICTURE
WIDE
INPUT
GUIDE
[2] SOUND
----+
:
I
+.J,
I
0
: RETURN .
,.
TOOLS
II
Most standard-definition signals use a boxy 4:3 aspect ratio. When a 4:3 image is
displayed on an HDTV, you will see black bars on the sides. The picture quality may
not be as sharp as with HD sources.
VOL
CH
+
+
WIDE
Customize Sound and Picture Quality
You can choose optimum sound and picture settings to match the content you are
displaying on your TV:
• Press ( MENU) on your remote control and select Picture or Sound menu, then
choose the appropriate setting for your content.
. kl
• Use the remote contro I PICTURE to qUlC
ya d"Just pICture quaI'lty.
• Refer to your BRAVIA Operating Instructions Manual for more information.
To learn more about HDTV, visit
http://www.learningcenter.sony.us/home.php
MUTING
-
SONY
N
Standard, Clear Voice, Game
~ GUIDE
FAVORITES JUMP
•••
e ••
•••
•••
• This function activates the
picture settings for a cinemalike experience. Sound settings
will be switched to the audio
output of the attached speakers
of your BRAVIA Theater Sync~.
• Press
for Sound Mode
settings to Dynamic,
or Flat.
• Press 0 to display the channels
guide.
• This option allows you to select
the channels from a channel list
and also provides information
about the current program
being shown on each channel
(if it's available from the
station).
~
CC
• Press TJ<ATIO to turn on the
Info
banner
Channel
list
@]
FAVORITES
• This feature lets you create and
choose a list up to 8 favorite
channels.
• Press FAVORITES to access to your
Favorites channel list.
• Press
to select the option
Add to Favorites; then press
0) to add the current channel to
your Favorites list.
t I'"
SONY:
KDL-26N4000/KDL-32N4000/KDL-37 4000
KDL-26FA400/KDL-32FA40 IKDL-37F 400
3-295-212-11 (1)
Attaching the Subwoofer
Instalacion del Subwoofer
Fixation de I'ifragrave
o
X
© 2008 Sony Corporation
Printed in Mexico
1111 1111111111111111111111111
3295212111
SONY:
Thank you for purchasing this Sony product. Sony product registration is
quick, easy and secure, and creates a record that can be used if your
product is lost or stolen. It also allows us to send you periodic mailings
about new products or contact you in the unlikely event that a safety
notification is required. Please take the time to register the product at our
web site:
From U.S.A.: http://productregistration.sony.com
From Canada: http://www.SonyStyle.ca/registration
If you have any operational questions regarding your new purchase,
please see the instruction manuals and support documents that came
with your Sony product.
Thank you.
1111 1111111
2186742241
© 2006 Sony Electron ics Inc.
2-186-742-24(1 )
SONY:
Nous vous remercions d'avoir achete ce produit Sony. L'enregistrement
des produits Sony est rapide, facile et securitaire, et nous permet de creer
un dossier qui peut etre utilise en cas de perte ou de vol de votre produit.
II nous permet egalement de vous envoyer des envois periodiques au
sujet de nouveaux produits ou de vous contacter dans Ie cas peu probable
ou une notification de securite serait requise. Veuillez prendre Ie temps
d'enregistrer Ie produit sur notre site Web:
Aux Etats-Unis : http://productregistration.sony.com
Au Canada: http://www.SonyStyle.ca/registration
Pour toute question sur Ie fonctionnement de votre nouvel achat, veuillez
consulter les modes d'emploi et autres documents de soutien fournis
avec votre produit Sony.
Merci !
1111 1111111
2186742241
© 2006 Sony Electronics Inc.
2-186-742-24(1 )
3-275-539-11(1)
111111111111I1111111111111111
INDEPENDENT JPEG GROUP SOFTWARE
ThelTlodulc.lihjpcg.soislheworkoflhelndependcnlJPEGGroup
3275539111
NOTICES AND LICENSES FOR SOFTWARE USED IN THIS TELEVISION
OcopyrighI1991·1<),)8.ThomJsGLane. AJlrif'hlsfs·served
SOFTWARE DEVELOPED BY THE OPENSSL PROJECT FOR USE IN THE SSL TOOLKIT
Copyrighl (S') 1<)<l1l·1()().j. The OpenSSL Projeel All righls reservoo. Redislribution and usc in source and
binary forms. wilh or ....,ithout modilicalion. are permilled provided thJt llie followingcondilions Jfe mel
I. Redistribution., of source nlde mUM retilin th('ah<!ve.:opyright not icc. this list ofl"lIlditinns and the fol·
lowinJ!di'\Claimer
1. Redistr'butionsinbinaryforll1lllustreproduecthcabo,'empyrighI nutil·e. chis li.Sl "fcondilionsilndlhe
following diwlaimer in the documelllalion i1ndlor other milleriills provided with llle distribution
1 All advertising milts'rials mentioning fcillures or U'\C Oflhis .sof!wJrc mUM displJy the followin8
Jeknowledgmcnl: "This product indudes softwilre dewlopcd by ll>c OpenSSl Projecl for usc in the
OpcnSSl Toolkit. «hllp:!lwww.opens.sl.orj;I::»"
4. The names "OpenSSL Toolkit" and "OpenSSl ProjlX'l" mUSl not tie used In endorse or promote products
derived from this soflw,m: wilhout prior wriuen permission. For wrillen permission. please COIllJCl
opcnssl·[email protected]!
~. ProdU('IS deriwd from this software may nOI be ('ailed "OpcnSSL" nor mJy "OpenSSL" appear in lheir
nameswilhoulpriorwrillenpermissionoflheOpenSSLProjee(.
6. RedislribUI;ons of any form whJISOCver mUSI relain Ihe following a1:knowlcdgmenl:"This prodUCl iododcs
softwJre de,·el0flt-'<.I hy the OpcnSSL Projecl for use in lhe OpenSSL Toolkil «hup:/Iw ....'....'.openssl.urg!»"
THIS SOFTWARE IS PROVIDED BY THE 0ps'nSSL PROJECT "AS IS" AND ANY EXI'RESSEDOR
II>IPLIED WARRANTIES. INCLUDING BUT NOT LIMITED lD. THE IMPLIED WARRANTIES OF
MERCHANT,\BILITY AND FITNESS FOR A PARTICULAR PURPOSE ARE DISCLAIMED, IN NO
EVENT SllAlL TilE OpcnSSL PROJECT OR ITS CONTRIBUTORS BE UABLE FOR ANY DIRECr.
INDIRECT. INCIDENTAL. SPECIAL. EXEMPLARy' OR CONSEQUENTIAL DAMAGES
(INCLUDING BUT NOT LIMITED TO. PROCUREMENT OF SUBSTITUTE GOOllS OR SERVICIiS
LOSS OF USE. DATA. OR PROFITS: OR BUSINESS INTERRUPTION) HOWEVER CAUSED AND ON
ANY THEORY OF LIABILITY. WHETHER IN CONTRACI·. STRICI' LIABILITY. OR TORT
(INCLUDING NEGLIGENCE OR OTHERWISE) ARISING IN ANY WAY OUTOFTHE USEOFTHIS
SOFTWARE. EVEN IF ADVISED OFTHE POSSIBILITY OF SUCH DAMAGE
This product includes cryplographic soflwJre wrillen by Eril- YOung ([email protected]'oml. This produci
includes sof!w,lre "Tillen by Tim Hudson fljh@<'l"Y[llsofLeom)
Original SSLe,ly Lieenst'
Copyrighl (0 1<)<l~·1998 Eric Young (eay@crypH;ofl.eom) All rights res.:r\'ed
This pJcbge is In SSl implememalion wrillen hy Erk Young (eily@nyptsofLCOm)
The implcmcmalion Wa, wrillen so as 10 conform wilh Nel'\CJpes SSL.
This librilry is free for cOllllner~'ial and non-commereiJI u"" as long a, the following conditions mc Jheared
10. The follo ....'ing condilions apply 10 all code found in Ihis dislrihution. be il Ih(' RC~. RSA. Iha,h. DES.
elC,.code:noljU'illheSSLcooe. The SSLdocumenlJtion included wilh lhisdiSlrillulion is covered by the
sanle copyrighllermsescepl thaI lilc holder is Tim Hudson ([email protected]\lIll)
Copyrighl remains Eril- Youn{.s. and J' ,uch any Copyrij;ht nOliees inlhe l'otIc Jre nOl to be removed. Iflhi,
pacbge is used inJ pnlduci. Eric Yoongsh<JuldhegheIlJUrillutiona.\the"uthorofthepansofth<;,librJry
used.Thiscanbeinth"formofat('Stuallllcssagealpmgram,lartuporin documemalion (online or lcxtuJI)
provids'dwilhth('p;lckaj;e
Redislrihulion and uS<' in source and hinary forms. Wilh or Wilhout modificalion. ar(' permiue<l provided that
lilc following condilionsare mel
I. Redislribution, of souree code must relain lhe copyrighl nOlke. Ihis Ii.,t of eondilions mId th" following
disdaimer.
1. Redislribulionsin hinary form mUSlreprodul'cths'atx)\'ecopyrij;htnolice.lhlSlislofcondilionsandlhe
following discbimcr inlhe documem;lIion ;lOdfor olher mJleriJls provided with ehe dislrihution
... All adverlisinj; malcriJI., menlioning fealures Of usc of this suft ....'are mu'il displ,ly the following
Jcknowledgcmcm:" This prodoci iocludes <'l"yptogmphic software wrinen by Eric Young
([email protected])"Theword'cryplographic'canbeleflout iflhe rooines fmm the library being used Jre
notcryplngrJphicrelJted-1
4,lfyouinclud"i1nyWindowsspe"ificeode(orader,vJtivethereof)from th(,'lppsdircclory (applicalion
code I you musl include In ;Kknowledgemem:" This producl indude.s SoflWJre wrillell hy Tim Hud;;on
(ljh@crYlll;;ollC\lml'"
THIS SOFTWARE IS PROVIDED BY ERIC YOUNG "AS IS" AND ANY EXPRESS OR iMPLIED
WARRANTIES. INCLUDING, BUT NOT LIMITED TO. THE IMPLIED WARRANTIES OF
MERCHANTABILITY AND FITNESS FOR A PARTICULAR PURPOSE ARE DISCLAIMED. IN NO
EVENT SHALL mE AUTIIOR OR CONTRIBUTORS BE LIABLE FOR ANY DIRECT. INDIRECT.
INCIDENTAL. SPECIAL. EXEMPLARY. OR CONSEQUENTiAL DAMAGES (INCLUDING BUT NOT
LIMITED TO. PROCUREMENT OF SUBSTITUTE GOODS OR SERViCES: LOSS OF USE, DATA. OR
PROFITS: OR BUSINESS INTERRUPTION) HOWEVER CAUSED AND ON ANY TIIEORY OF
LIABILITY. WHETHER IN CONTRACT. STRICI" LIABILITY. OR TORT (INCLUDING NEGLIGENCE
OR OTHERWISE) ARISING IN ANY WAY OUTOFTHE USE OF THIS SOFTWARE. EVEN IF
ADVISEDOFTI~E POSSIBILITY OFSUOI DAMAGE.
The lieelKe anddislribution lenns for any publieally Jvaibbk \"Crsio norderivaliveoflhiss'odecannottle
ch'll1ged. i.e. Ihiscodccannm simply tlel'Opied andpUl under anolher distribulio nlicence [ineiodinj;lhc
GNU Public Licence.]
MERCHANTlBILlTY AND FITNESS FOR A PARTICULAR PURPOSE. IN NO EVENT WILL ANY OF
THE AUTHORS OR COPYRIGIIT IIOLDERS BE LIABLE FOR ANY DAMAGES CAUSED BY THE
USE OR THE INABILITY TO USE. THE FREETYPE PROJECT
THE FREETYPE PROJECr IS PROVIDED "AS IS" WITHOUT WARRANTY OF ANY KIND. EITHER
EXPRESS OR IMPUED. INCLUDING HUT NOT LIMITED TO. WARRANTIES OF
Permissionishs·rehygmnted,freeofeh<lrJ!e.loanypcr.sonobtJining;I copy Oflhis.soth"are and Js.so<:iat('d
dOCUmenlJlion tile.s(lhe "Software"l. 10 deal in the Soft....·are without restriction. induding wilhoullimilJlion
the rights 10 usc. copy. modify. lTlerge.pulllish.dislribule. sobli censc.andiorselicopi('sollhs·SoftwJre.<lnd
lopcrmil persons 10 wt,om thc Sol'lwJre is furnished 10 do so. subjecl In lhe folto....,ingcondilions
All righls reserved
P"rmi"ion 10 usc. s'opy, modify. Jnd dislribule Ihis ,0nwJre I'Of Jny porposc wilh or wilhoul fcc is hereby
grJnled.provided'h"tlheaho\'ecopyrightn01iceandlhisl'ermi",ion nOlil'e JppeJr in JtI copies.
in addili"n. Inere aggregatinn "fanolher wurk nOl fla.,ed on lhe l'ro~rilm Wilh Ihe Pro>gram (or ....'ilh" work
hil,edonlhs'Programl'\II"vohnneofaSlorJf'cor<lislrihlllionnH:diumd'l<:'Il,'1 hringlheoth<:r"or~unds'r
Ih"'<.'l'peoflhi,Licen,,'.
LGPLLibraries:
glib<'
~. You may copy "ud distrihule the ProgrJn' (or a work Ila'l'{/ on il. under Ss""lion~) in ohjs'Cl ,',lde nr
cxes'ut"t>1c form undcr Ihe tCl'm,"fSs'Clioll.' I and2aho\'t'pnl\'idedth"I)'OuJI-"odooneoflhefnllowing
Sourcec,ldc'forlhe""oecu'ahle,andlihrJriescJnhcohlainedu,inglhefoUowinf'link
http://www.sony.colnflinlls
GNU GI-:NJ.:RAI. PUIII.IC LICENSE
\'ersionl.Juncll}<)l
Copyright 1(") 1989. IY91 Free Soth"Jre Foundation, Inc. 51 han~lin Sir",'!. htih floor, BO'lon.1I-1AO~IIO·
1301.USA. Everyo",'ispermiuedhlcopyJnddislribuleverhJlillleopicsollhis[ieeo,,·doculllent.tlut
s'h:lnJ!ing it is notallo"d
Preamhle
The licenses for mO,1software are desij;ned10 take away yourfn.'Cdolllltlshare ,ll1d s'h,mge iI, Ily<"ontra,l.
lhe GNU General Puhlic License is imended 10 guaramee your fre"dolll w share and dlanf'~ free 'of! .....are··w
make sure Ihe sohware is free for JII its users. Thi, Genemll'uhlie Lis'ense :lpplics 10 mO,1 of the FI1.'<.'
SoflwJre Foun(/;Jtion's .sol"lwJre aod 10 any olher program who,e aUlhors commil 10 using it (Som"othcr
Free Sof!wJre FiJondalion software is,'o<'ered hy Ihe GNU LibmryGeneral Publi<' Licens<· in'tead.) Yous'i1n
apply it toyourpro:;mllls. too
When we speal; of free <;oflw,ne. we arc referring to freedom. nOI prke, Ollf Gene~ll P"hlic Li<-en,es are
designed 10 m"ke sure Ihal you ha"s'lhe freedolll 10 di.'lrihme copie,offrcs·.sof!ware(andchargeforlhis
s<'rviceifyouwish).lhatyoures·ei\'CsourS'eeodeorCiingetilifyouWmllil,thatyouc'JnchJngelhesoftware
orus.:piece.sofil;nnewfrl'Cprogrilms:;lIldlhJI you knowyouc"n<lolhewthing,
ToproleclyourrighlS.w('ns'Cdlo111ilkerestri('(ionsthatforbid"nyonelodenyyoulhewrighhorlOa.,kyOlI
10,urrs·nd...rlhs·righIS. Thesen:stris'tionstmnsbtelOcerlainreslx,nsihilitiesforyouif}oudi,lrihuk'copies
of the softwJre. or if you modify il.
Forexampk. if you distrihule copis's of sus'h iI program. "'hether J!r.lli, or for iI fcc. you mu,t gi,e Ihe
recipientS:llllherighlslhJlyouh"ve. Youll1uslmJkesUrelh'1I1hey.l00.receiveorCJngellhe,ourcecOOe.
And you l1l0M show lhem Ihes<' terills so Ihey know Ihs'ir rij;hts.
AI,o. (UI c"cll mnhor', pnJICS'liou "ml ours. WS' "alii 10 make c"nJin lhal ""el,'one unJer,IJ",h lhJl lhere i.,
no warramy for this free ,oftwarc. If Ihe software is modified hy someoneels.: Jnd pJ."ed 00. we wanl ii'
recipiems 10 know lhm whm lhey have is nmlhe original. SO lhJl Jny pmhl<:ln;; inlroduce<l by olhers will nUl
rdkclollttleoriginalaulhors'repulalions
,,) Accomp;my il ....'ilh thc complete corrC']Xlndillg IllJ('hine-reJdahle .souree nlde. whis-h nl\l,l be
di'lrihllled unds'rlhe lerm, of Se(,tions I ;lI1d 1 ahove,>n" mediumcu'lOmarilyo,,'dfnr'llhwnr<:
inl<:rdIJnge;or.
hl,\s"s-ompanyilwithJwrillen"tTer.validforJllca'llhr"eyear.,.logi\e any third pany. foral'h;lrg.e no
moretlwnyour s·"slofphy,is-aIIYl'erforming,ours'edi,trihution.Jcompletc mJchine-readahles'''pyoflhe
cOlTespnnding ",>un:e c,lde. 10 hc di,lrihllled unds'r Ihs' ts·rm, ot' Ss'ctions land1Jh","cllnamediulll
cuslomarilyu,edfors"flwar"inters'hJnge:or.
"lAs'cul\lpanyitwilh\lleinformalionyoure,'eive<la'lUlheofferlodi,trihull' c'orre,ponding ,,)urs'e c,xle
(Thi,ahernali"ei,allowedonlyt'lrnons'onHllers'iJldi,trihutinn "ndonly ify,)u ren'ive<l Ihe program in
ohkclcodeOTexes'u'ahleformwilhsuch"noffer.ltlilCl"ordwilhSuh'l"'lionhal-...l\'e.1
Th<: sourc<: code t'll"" a work mean, the preferred form of thc I'ork tur Illa~illg moditiCJtions l(l if. Fnr;lIl
~xeculallle work.s'omplele sources'l>dc' m""'h,,11 ths' ,"urs'e codc f<>rall nuxlule, il c,>nl"ins. ph" any
a,sodalCd inlcrfaccdclini,ion fib. plus Ihe scripts used 10 control comp il"tionandinsJallationnt'the
exceutJhl". H"we'·er. a'a,ps'l"ial ex,'eplifln. Ihe ,,'urce code di,trihlltcd need not indu<le anything lhat i.,
norm"lIy diSlrihllled tin s'ithcr sours'e or hinary form) "ith Ihe IllJj,>r ,'omponenh (compiler. ~ernd and '0
on)oflheopcr<llingsy'temon "hichtheexs'Cutahlerulh.unlc"th;lIcnmponenl ihclf"ccompanie,lhc
exs','Ulahle
Ifdi'lribulionofexel"Ulahleorohje<'!cnck i, made hyoHi:ring Jcce,sl<lWpy from ~de,ign,lIed place.lhen
oIT,'rinl:! equil'alenl as'ce" 10 copy Ihe source code frolll Ihe ,ameplacs·coum,a,
di,trihulionoflhc source code. ,"'en Ihollj;h Ihird partie, arc nOl l'ompclledtos'''pylhcsourceJI"nl:!wilhlhe
ohjeclcooe
~,You may not copy. Illodify, suhlic"nse. or distrihule lhe Progr<ulle.\(·epl a,e ,spre"ly pro,'idcd under this
Li,·ense. Any 'lIlempl olherwi.'" 10 copy. modify. ,uhlics·n,,· or di,lrihule th<: I'l1lgr"m is ""id. an<l will
~ulomJlically lerminale your rights under this Li<'c'bc. HowC\'er. par1ie.s ..... ho h;l\"c recei'ed copies. or righlS
frolllyouundcrthisLil·en""wilinOlhJI'elheirlicense.'lerminalcd '0 long as such p"ni"., remain in full
compliance.
5. Yoo arc nOI requirs'd 10 accs'pl this Lie-enS<'. silKe you han' not signet! i1. Howel'er. n'Jlhing c1w gram,
)Oupermi."iontomodifyordi.,trif>utelhePrugramnrilsderi"alivework" The""a('lions"reprohihiledby
b ..... if you douol a~s'''pt lhis Licen,e. Thereforc'. hy modifying ordi.'lri!>lninf' lhe Prof'I'i11ll (Or any ..... ork
ha."CdonlheProg-rmnl.youindil·'lteyOUrJel·eptanl·eoflhisLieen<e todo '0. "ndilll ih t,'rm, and condilion,
for cnpying. di'lrihuting orl1lodifying Ih" Program or .....orb ha",d on il.
6. EJchlimeyouredislrihuleth... Pmgramlorany ..... orkba,ednnthe I' wl:!r:.llnl. Ihen:cipienl JUIOlnalic"lly
recd"es a Iis-,'Il'!' from Ihe originJI hS'Clhur toco]>y. distribule or modify Ihe Program ,olljecl to lhe,e term,
and condition,. You may nOI impo", ,my funher re'lriclion, on Ihe recipil"nh'cxerci", of Ihe right sgranled
herein. You arc nOI I'Csponsibl<·forenfors·inj;compliaIKehylhirdp;>ftiesulthisLis·el"e
7.If.a,~con""4oeIKeofa<,ourljudl!lllentorJlkgatiotlofpat"nlinfringemcnlorforany,'lherrcJsOn(nOI
THE SOt-TWARE IS PROVIDED "AS IS". WITHOUT WARRANTY OF ANY KIND. EXPRESS OR
IMPLIED. INCLUDING BUT NOT LIMITED TO THE WARRANTIES OF MERCHANTABILITY.
FITNESS FOR A PARTICULAR PURPOSE AND NONINFRINGEMENT. IN NO EVENT SHALL THE
AUTHORS OR COPYRIGHT HOLDERS BE LIABLE FOR ANY CLAiM. DAMAGES OR OTllER
LIABILITY. WHETHER IN AN ACTION OF CONTRACT TORT OR OTHERWISE. ARISING FRO\1.
OUTOFOR IN CONNECTION WITH THE SOFTWARE OR THE USEOR OTHER DEALINGS IN THE
SOFTWARE
GNU GENERAL PUBI.JC I.ICENSE
rEKMS ANI> CONDITIONS FOK COPYING.
DISTRIBUTION AND MODIFICATJOJ"
O.Thi,Licen,eappliesloJnyprogfJmorolherworkwhichcolllainSJllolicepl"cedbylhecopyrij;hlholds'r
'Jying ilmay be di'lrihuled under Ihe lerms oflhisGeneral Puhlk Licen"C. The "Program". below. refer;; to
any.such proj;r<Il1l or work. and a ".....ork has<'don ths' Program"llIeansci th"rthcPmJ!mlllorJnyderivali,'c
work unders'opyr;ght lJw: thati.slosJy.aWOfkc'JIllJininglheProgralllorJponionofil.eilherverllillimur
..... ith modificJtion.s andlor Irall.sbled into Jnolher bnguage. (HercinJfter,I"anslillion i, indod"d wilhoUl
lilllilJlion in the term "modificalion".) EJchlicen'<.'Cis;lddre,,edas ")'OU"
ACliviliesolhs·rlhancopying.distrihutionandlllodificJtionarenols'o,ere<lh),thi.sLiccuw:th"yarcouhide
it,seope. The aC! of running the l"rogrJm isnOI restrieled. and Iheoulpul from the Program is covered only
ifitscontentseon,lilule;lwork llasedonlhcProgr<lmlindependemofha<'ingbccnmadebyrunningths'
Progrilm). Whelherlh"tistruedependson .....h"llheProgrJmdoe,
CURL SOFTWARE
Copyright Ic) :9% ·1006. Daniel Stenberg. <[email protected]>
Thus. il is nOl Ihe intent of thi, ,es'li"n lI's'billl righi' or com"st y"ur righh III work wrill,'n <'mirely Ily you
ralher. lhe int...m i.s tocH'rs'i,e the right 10conln,llhe <li'lrit>uli"n nf derh"li\"C or wlleS-li,'c works t>a,,'d on
thel'rogr,nll
Theprcci,elermsiindcondilioll,forcopying.di,trihulionJnd 1ll0diliCJlion follow
Theabo"ecopyrightnoli('('Jndthispcrl11issiunnolice,hJlIhc included in all copi('s or 'UbSlallli,,1 porlions
uflheSoflwJre
COPYRIGHT AND PERMISSION NOTiCE
GPLExeculahle:
AMD GTX1.0 l"ol-s'hain Lioux Kernel
Bosyllox
inslllo<l
pmon
FinJlly.Jny free program is lhrealenl'dconSl:lnlly hy softwml'patents. We wish 10 a"oidthe danger lhat
rcdislrihutorsofa freepmgrillll will individuallyoblainpalenlli<-en,es,inc1Tccllllakillf'lheproj;rJm
proprielary. Toprevenllhis.wehJ"enhldcilcleJrlhat'll1ypaJemmuslhclkcn,edfore\,eryon"'sfreeuS<'or
nOlliccnsedJlJII
EXPAT SOFTWARE
Copyrij;ht (C) 19911. 1999, 2000 Thai Open Source Soflw,lre Cemer Lid and Clark Cooper
Copyrij;ht (cI1001.1001.1ocn Expalmainlainers
Bill when you di,trihule lhe 'ame ",,·tions "S p,lrt <>1' J "h<>1e which i,,, "mk Ila",d on Ihe Pnlf'r"m. Ihe
di'lrihuliolloflhewholclllu,lhconlheterllh,'flhi,Lis-eIN:. ..-h"",'Il<.'rmi"ion,f"rothcrli,·en,c·e,estend
!I> thc cnlire whole.Jnd Ihu, 10 eils'h and ewry Pilr' reg"rdle.", <>1' ,,'h,,"'I"I>lei,
We prot...Cl your rights Wilh IWOSlepS: (tlcopyrighl th" sol"lwan.·. and(1)offeryoulhi,lic"n'e .....hichgi,'es
),OU kJ!al permis.sion 10 l·Opy. dislribule Jndlor modify lhe .software
FREETYPE2 SOFTWARE
Ponions of,his sofl ....·arc arc copyrighted ()_19%-2001. The FreeTypc Projccl (....·ww,fn:clypc.orj;), All
rights reserved.
GPllLGPL Un:NSI-:n SOFTWARt:
The t"lrc>wing GPLexecowlllcs ,md LGPL lillr<lries ars' o"",d in lhis pr,lduci and arc ,uhjs's'll0 lhe GPU
I.GPI. License Agreemenb indud,'d as p;trl ofthi, docum"nlal,oll
FITNESS FOR A PARTICULAR PURPOSE AND NONINFRINGEMENT OFTHIRD PARTY RIGHTS
IN NO EVENT SHALL THE AUTHORS OR COPYRIGHT HOLDERS BE LIABLE FOR ANY CLAIM.
DAMAGES OR OTHER LIABILITY. WHETHER IN AN ACTION OF CONTRACT'. TORT OR
OTHERWISE, ARISING FROM. OUT OF OR IN CONNECTION WITH THESOHWARE OR THE USE
OR OTHER DEALINGS IN THE SOFTWARE
Exs·eptass'ontJioedinlhisnolice.lhen;UlleofacopyrighlhoIdershall nOl be usc<l in Jdvertising or
olherwise 10 promotc ll1c sale, usc orother deahngs in \his SoflwJre without prior wrillen aUlhori'<llion ofths'
copyrighlholder.
THE SOFTWARE IS PROVIDED "AS IS". WITHOUT WARRANTY OF ANY KIND. EXPRESS OR
l~lPLlED, INCLUDING BUT NOT LIMITED TO THE WARRANTIES 01' MERCHANTABILITY.
I, You may copy and <lislribute "errolim copies of the I'rclgrJm\s"urccco,kJ'yuure<"<,iveil. ina"y
ms'dium. provided thJt you conspicutlusly In(l Jppropri"lcly pullii 'honeachcopyilnappropriJI,'copyrif'hl
nOliceanddi,dJimerofwarrillHy:keepinlaCIJlllhenoliee.,thaI referlnlhi,licellse "nd 10 the ah,ence 01
'my warralHy: and gi,'s· any other n:cipiems oflhe I'rogr<1ll1 a copy of lhis Lis·en'il.'along with Ihe l'rogram
IfJn)'ponionoflhi"eclionishcldill\'ahdoruncnfors'eahleunderJnYP;lrti!·ularcircum'tann·.lhs·b"IJncc
oflhe ""s'lion is inRnded tOJpply Jl1d Ihe ,ecli"n '" a whole i, imended 10 apply in flIhas-ircum'lmK"".
II iStlOllhepurpo",orlhi'S<:Clionlllint!uccyoul<linfrinf'e"nyp"tenhofolherprop..>rt)'rights·bin"orto
conlest\'~hdilyofJnysuchdlinh:lhi"eclionha'lhesolcpurpo",ofprole,'ling
Iheimel:!rit),ofthefrs...•
,oft ware distrihulion ,yslel1l 'his'n i, implcmems'd hy puhlic licel"e pr:.lClice,. M"ny people h,I\'e made
generouscomrillutionslOlhe 'iderangc"rsohwaredi.,trihuledlhmughlhal sy.'tem in reliJnce on con,i,tcnl
application of thai ,ptCIll: il i,,,pWlh,,,,ulhor/donorlOdecideifheor,hei,willingtodiQrihlllesoflware
throughJnyUlher'Y'leman<lJlicens"ecJnnotil1lpo,elha's'hoice
Thi,wl·lioni,inlendedlOmaketl-...'roughlydear ....'h,ltisbelie\'c·dlnlx;"Cl\l""'-lu"nceoflhere'loflhi,
lis-en",
You may charge a fe<' for Ihe physical act of Imn,ferring J copy. and yuu may at your Optiflll offer wJrrimty
prote<'tioliinexchJngeforJl'ce
1l.U'lhedi,lrihuti"n"nd/oru",oflhePnlf'rami,r,,"ricledincert"in,·ountric·,eitherhY/lill<:nt,orhy
c(lpyrighledinlerface'.lheorif'illillcopyrij;luhold"I ....'hopbS'e, the PrtlJ!r:.lI1l ullderlhi, Licen'C mJy add an
explici'geographicaldislrihulionlimitationcxcludi"glho,el·ountries."'lhaldi'lrihuliol1i,pcrminedonly
in "rJmong ....,untri<·s not Ihu,cxdude<l. 10 'Udl s'a.'<'. this I.icens<: in"'orpmJles the limilJlioll J' if ....'riuen in
Ihebodyoflhi.sLis·ensc
1. You may modify your ropy or copis's ofth," Progmm or i1ny portion of i!. thu, forming a work hased "n,he
Proj;ram. ands'opy and distribute,uch modifications or work under IhelernhofScclion I above. provided
thiityouJlsomeetJlIofche.sccondilion'
9. The Free Soflwar(' Foundation Illay puhli,h re\'ised Jndfor n"W '"r,iOIl' of the GenerJI Pull/ic Lken,e
from tillle 10 lime. Such new \'er,ion, will be ,imibr in .,pirillllihe pre,enl ver,ion. hut may differ in detJil
ll1addr..' " ncw pmhlemsmconceros
aIYoumU'ICJUSelhel1lodiftedlileslncarryprominelllnolice,sIJlin~lh"tyoos'hanf'edlhetllesilndthe
dale of any change.
h) You musl cJuse Jny work lhal you di-<trihute or puhli,h. IhJI in whole or in p"n wllIainsor i,derhed
fnlllltheProJ!rJmor,lIlyparilhen:of.lobelicen-..'dJ,Jwholealnos·hargeIOJlllhirdpani<'sunds'rths'
'ermsoflhi,Lic·ens.:
c) Iflhe l1lodifi('d proj;nun normally re"ds commands imemCli\e1)' when run. you must cause il. wh,,"
slarted running forsul'h interaOiw usc in Ill\: mostordimry WJy,10printordi.splaYJnannouncemem
ineludingan appruprialecopyrighl noliceJndJnolicelh;lllherei.s"ow'lrranlylorel"'.'Jyinglha'yo0
pro"idea""Jrr~nly.aodlhalu.;ersmJyredislribulelheprogrilmunderIhesecondilions.alldlcllinglheuser
htlw!lJ"is'wacopyoflhi, License. (Exceplion: iflhe Program il""lfi,illler>lClive hOi docsnol noun"lIy
print such an allnouncemelll. your work bJ",d onlhs· Prof'ram is nOi requir"d 10 prim an annOUIK<'m"nf.)
The", rcquiremems ajlpr~, In tl1c Ill,ldjfied work as J whllie. IfidenlifiJhle ."-'f.·liol1., OflhJI wurl.: Jre not
derivs'<l fmlll the Program. Jnd can he reasonahly cnn,idered independenl Jnd ."'p;wille works in lhel11selve,.
lh..·n lhis Lis·ense. and its term,. d<.> nlll "pply 10 lhos.: s.:Clions whcll )'OU di'lrihllle lheln a, ,epar;j{e works
Printed in Mexico
limiled 10 p"tent issuesl. cOlldition., ar" imfX"ed on you lwhether bycourl order. af'll'cmem ortllher....·i,c)
lh"ts'omradiClehecondilionsoflhi,Licen,e.lhcydolwlescuseyoufrolllthecondit",n,ofthisLiccl"e.lf
)oucannotdi,lribole,oaslO.,alisfy,imuh"neou,lyyoorohligmion., und"rthis Ul'en,e and anYOlher
peninenlollligalions.lhena.,aconsequell<,eyoUIllJynotdistribIIletheProgr;.m"lall,Fors·x,"nple.lf"
p;llenl license would nOI permil ruyahy-frrc rcdi<lrihUlion of Ihe I'ml:!"lIll hy "II lhose who recei,~ copie,
dir''';lly or indiref:tly through y'>U. then lhe only WJy you coul<l s" li,fyholh il and'hi,Li,'ense would oct<>
refminentirclyfmmdi.'lrihulionoflheProgram
Ea,·hver,ion'sf'i"enadislingui,hing\'C(',ionnulllber. Iflh,'Pro:;mm,pes'ilie'J\'ersiolltlum!x;r"fthi,
Lil·en'cwhis·h;.pplie'lllil"nd"anylal<.'rl'er,jon".youh"v"ths'oplionoffollowillgth"l<:rm,andcondili'm,
eitheroflhJI,'ersiontlrofilnylatcr\'Crsi"npuhlishedhytheFreeSoflwareF"ond"lion. Iflhel'roj;ramdos"
nOI s[le<'ify J "e",ion number"f thi, tis·en."-'. you 1Il;ly ,'hl>("e ~IlY ver,ion el'er puhli,hed hy lhc Fn.'C
Sohw'lreFoUlublion.
JO.lfyouwi,hloins-orfX'ralefliln,oflhel'roj;ramim"olhs·rfrc'Cprol:!r:.lln,whlJsedi,trihuliuncondilions
Jrediffcrenl.wrilelolheaulh"rh'a.,~I<,rp..·rmi"ion. Forsnflwarewhis'hiscopyrighledhYlll"Frc'C
SOflwJre Foundalion, ....·rile II' lhe Frs'C S"flwJn.' Fnund"lion: we ""n"lil11e, make ,',~n'plinn, for Ihi" Our
ds.,;ision will be guided hy the lW" gOJb "rpre,erving the free 'lau" 0f,,11 ds'ril'alil'e, "four frce ,ofl"'arl'
andofpromolinglhe,h"ringandreuseof,oftw'lregellel"lIy.
NO WMU(AN1Y
II BECAUSF TIlE PIH)(,RAM IS LICENSED I'RHo 01 CHARGE. nlER[ IS NO WARRANTY FOR
THE PROGRAM. TO TIlE EXT/:NT PERMllTl~D BY APPLICABLE LAW. EXCEPT WHEN
OTHERWISE STATED IN WRITING HIE COPYRIGH r HOLDERS AND/OR OTI1ER PARTIES
PROVIDE THE PROGRAM ··AS IS WITHOUT WARRANl Y 01· ,\NY KIND. EI rHER EXPRESSED
OR IMPLIED INCLUDING BUT NOT LIMITED TO. 'HE IMPLIED WARRANTIES OF
MERC!lANTAI:HLlTY AND FITNESS FOR A PARTICULAR PURI'OSE. ·1 HE ENTIRE RISK AS TO
., HE QUALITY AND PERFORMANCE OF THE PROGRAM IS WITH YOU. SHOULD THE
PROGRAM PROVE DEFECTIVE. YOU ASSUME THE COST OF ALL NECESSARY SERVICING
REPAIR OR CORRECfION
12. IN NO EVENT UNLESS REQUIRED BY APPLICABLE LAW OR AGREED TO IN WRITING
WILL ANY COPYRIGHT HOLDER OR ANY OTHER PARTY WHO MAY MODIFY AND/OR
REDISTRIBUTE fl1E PROGRAM AS PERMllTED ABOVE BE LIABLE TO YOU FOR DAMAGES
INCLUDING ANY GENERAL. SI'I:CIAL. INCIDENTAL OR CONSEQUENTIAL DAMAGES ARISING
OUT OF TilE USE OR INABILITY TO USE THE PROGRAM (INCLUDING BUT NOT L1MITEDTO
LOSS OF DATA OR DATA BEING RENDERED [NACCURATE OR LOSSES SUSTAINED BY YOU OR
THIRD PARTIES OR A FAILURE OF THE PROGRAM TO OPERATE WITH ANY OTHER
PROGRAMSl. EVEN II' SUCI~ IIOLOER OR OTHER PARTY HAS BEEN ADVISED OFTI1E
POSSIBILITY OF SUCH DAMAGES
To pwtell ea~h d1'lllhulor. "e ,,~nt 1\.1 Il",k II \e,)' de,1I ,h,nlh"re I' 110 warr,ml) I"r the lree hhl,lI\ AI,,,
11 the hllml)' I ' I1wdltled!'ly "'l11e,,ne ehe ,md p;,,,ed 011. the rl'"<.lp,,'nl, ,hould ~m'" lh.lt "h~11hey h,l\·e I '
n"t the onglll,11 Ver'lon. '0 lh~t lheonglll~1 aUlhor·, rCpUl~1I0n "'lit nOi he atle,led h} prohten" th:ll nllght IX'
1IItmdu<edhyolher,.
F1I1~lIy. ,oltwa": p,ltenh po,e a "On'lJIlI thre,11 to tl\l.' ex"telll<.' "I ml~ free pmgrJIll We "ISh 10 m,,~e ,,,,e
th:>t ~<oll1p~ny '·,lI1nOl ctk'<:ll\'el) re~tn<llhe u,er,ol a Il"<'e progr~I1l hy nhl~lI1l11g .11~,ul<ll\e IIlen,e trol1l a
p~lelit holder. Therefole. we In'l't lhJt Jny p~lemlKen,e OblJlI1ed lor a '·erl'lon nflhe Ilhrary ml"t lx'
,UII",tellt ,,"ahlhc IIlIl tfeedol11 01 use specified mlh"he"n-c.
Mo,t GNU ",l1w,lre. mctlldlng ,ome t1hr~ne, "co'ered h} the ordulJry GNU General PlIhhc L"en,e
Till' Ii"en", the GNU Le,ser G<'ner.IIPubhe Lleen,e. applle" loeerlJlIl de'lgl1,lled hhr.me,. ,111.1 i, <.julte
d,llerenl lrom lhe ordm~ry General Pllhlle Lle"n»c. We u.;c thIS hcen-.c lor "ert~lI1li!'lr,lfIe,In order to permit
11Il~1ll,g Iho,e lihnlrle, 11110 non·lree progr,un,.
When ~ progl"Ullll' 11I1~<,d wllh :llIhnlry whether ,1:>tl<.i1ly or u'lI1g ~ ,h~red hhmr) the e"ll1hln,llIOn 011h,
two I~ Ieg,lIly ,peabng J comhilled wort... ade"",ltl\·e 01 Ihe (l'lg,n~llibr~ry The ordll1Jry Gener:ll Puhll<
Lleen>c lherelore permit, ,ueh Imking only If the entire ,,"mhln~tlon fit- it, l·nterlJ ullrc.::dol1l The Le',,-'I
Geller,1i Public License permit- more I~x erll';'".ll"r Im~mg olhercode With the hhr~ry
We ,~II th" I"en,e the ··Le,,,,,r·' Genel~1 Pllhlic Lilen,e he'.IU-.c 11 docs l..c" to prolect Ihe u"r', lreedolll
Ih,mtlleordm,nyGener:>rPuhhc LICensc 1t.II",prllvidesolherlree",U"aredc\c1oper,Le",,1 In
no" free programs The-e dl.;ad,~n1:lge, ~re the re."nn "e uw the "rdlll,lI)'
Puhhe Llcen'iC for m~ny Ilhral ie, Ho"e\er. Ihe Le"er Iken,e pro\ Ide' ~d\ant~ge' III eertJin
'pccI,llci,eun"l,mce,
END Of' TERMS ANIl CONDITIONS
"dv~nt,lge o\ercompetlng
Gener~1
110" 10 App[} These Terms 10 "our New Programs
new pro~rJm. ,md yoo w,ml 1110 ~ 01 the gre~te't flO"ihk u,e to the puhlK. the he,l w~y
thl' i, to m,l~e II Iree ,onw~rc "hleh C'CI }one c~n redl'mhule ~nd <·han~e under the,e lelm,.
If }"U de\dop
to
~<hleve
111 ~dd'lIon. mere ,lg1!reg,nwn of .mother ""'~ nO! h~",d on Ihe Llhrary With the Llhr,,,y (m "ilh ,I ""'~
h,l,ed on Ihe Llhr,lr) I 011 ,I \olume "I ~ ,uw~ge or dl,lnhutlon medium doc' 1101 t>rlll1:' the olher "or~ under
Ihe-eopcolthl,Llcen'>C
J YOllm~y opt hlllpply lh<' lCTm, 01 th, ordmary GNU Gener~1 Puhh< L'len", ill,te~d 01 thi, License l\l ~
gl\en copy (,I the LlhrMy To do thl' you mllst ~lter ,III the not"e, th~1 relel 10 lhl' LlCen>c. 'I' that they
refer to lhe ordlilary GNU Gen<'r~l Puhhc L"·en,,, \e""'11 2. IlhteJd 0110 lhl' Licens<: II! ~ ne"er \el":\ion
lh,ln 'er",\11 2 01 Ihe' ordlll,I')' GNU Generall'uhh< L",n,e Im'lIppeared. Ihel1 you e"n 'peclly lh,11 '·er;ion
1Il'le~d II you wl,h.) Do un, m,l~e ~ny nthel <h.U1ge 111 th<sc n"nCe,
Once lhl,chJn~,' I' ul<ld,' 1ll.1 gl\en COP} il" Irre'el';,hk lor lh~1 copy ,,' th,: ordmary GNU Gener.11
Puhhc LlCen,e applle, 10 all 'lIh"''1uellt eopie, ~nd den\"~tl\"C "orb l1l~de from th,lt COP) Thi, oplion"
u..eful when you "'I'h to,opy p~rt ollhe ende 01 the Llhr~fY IUlO a pmgrJlllIh,llI' nOl ~ lihIOlry.
~ You Illay copy ~lId di,mlnlt<: the Lihr.I') tor ~ portion orderi,.ni\e 0111 IInder Section 2) ,n ohJ<'ct lode
or exe\."ut,lhle Inrm under Ihe lerms of Seelion, I ~nd ~ ~bo\e pruvided thJt you ~e<,ol1lpany It "lth lhe
ellnlplete "oITe'lllmdlllf' llIa,hme re,ld,I!'lle ",orce code. ",hieh musl h..'dlStnhuled IInder the' lerlll,ol
Seetiun' I :>nd 2 ~bo'e on "Inedlulll cIIStolll~r,ly u'ed for ,ofl",,,e inlen;h~nge
It d"tnhutl(lIIlll ,'b]C<lc<xlci,nh1dehyolfcringacC"C"lOeopylrom~dl·'1gnmedpIJ<,elhenolkrlllJ!
eqUlv~kilta<eesslocopythesourcecodefromlhc','lllepj"ce,,'l1'fie,ther"qUlrel1lenttod"tnhutcthe
'OUn;e
\."ode.",enlhoughlhirdp"rtie,~rellole"OmpclledloeopylheM.>un;e.11ongwlththeohJ<'Ct\."<xk
"nlheL,t>rJryl.v'l{)llldie.'leyour.Keepl.m<:eol1h"II<·emetod"'0 ,lI1d ,III It, term, aod londltlOn, lor
'Op)ln~. dl,tnhutmg or nH>Jif~,ng the' Llhr,lI) or "or~' h"..ed 00 It.
10 E.I<·h I1llle you redNnhute' the Lihrary t,'r '''') "or~ b,l,ed lin Ihe L,hr:lryl. lh<· reCipient ~utolll~tl<·JII)
recel\e, a lie~II'" lrom the ongll1~1 IIlen"" 10 lOP}. di'lrIt>ule. lin~ "uh or mlKlily ,he Llhr~')· ",IlJe<t to
Ihew term"md ,ondltlOn, You 1ll,1} not ,ml""e ~ny Illrlherre'trlcliolhllnlhe reeiplen"· exerel'oC 01 11k:
r1~hh gr.lI1led h<rem You Jr,' not re,po.'n'lhlc tor enlo"mg comph,m,e hy third p~rtl<:' wnh thi, LKen-c
II II. as ~ ,on"'quenn' 01 J court Judgment or Jllegallon of patenl IIllnnf'elllent or lur ~IlY other re~"Jll t not
hmited 10 p~tent "'lIe,l. ,·ondl1I011' Jle lmpo~d on }Oll (whether h} ,Olin onler. ~gn..... menillrotherwt-Ci
lh~1 eomr..dil1tlle ("llndlUOn, 011hl' Lilen,e. they do nOl e~eus<: )OU from the eondmon, olth" LKen,e. If
you '.lI11l0' dl'lrihute 'oa' 10 '"U'ly 'lIl1UI1Jlll'"l,o,ly your ohhg~t1on, under thi, ticenw ~nd ~ny other
pertm<:nl ohhg~lIon,. then ,I' J eon>cquen{"e you 111,1) nOl di'lrlbute the Llhr.lry ,II ~II Fllrex~lllpk. Iia
pa'eot license would nOl penlllt ro)Jlly-ln:e redN"hol1onol the Li!'lr,lry hy~1I thow "ho r,'CeIVC <l'ple,
dir""llyorindire"llythmu~h)oo lhen th,'only "Jy}OU could ',lli,ly hOlh it.mdthl' LKen", "ollid b.: III
rc1r,linel1l1relylwmdl'tnhullonollheLihIJ"
It any ponion 01 th" se,tloll "held mv~hd or unenllll1.·cJhle unde'r JIlY pJrtieul~r
01 the >celionl' mtendedto~pply.andthe 'oCctlon.I':I whole "mtended loappl}
clreum,t~m:e. the Ixlbnl"<'
mOlhere"C11ln'l~nl·e'
Ill' not the purpo.l"" 01 th" ,<'Ct,on to mduee you til mlrl1l/!<' ~n\ pJlenh orolher properly righl cl~lm, or III
<"onte,t v,lIldnyol~ny,uehelalm'.lh"M.'ClIoliha'lhe,okpurpo,elllprot<'"'l1nf;Ihellllegrnyollhe
Iree
,olt"~re d"mhul1ol1 ,y,tem "hi<"h" Inlplemented hy puhh< heen,e pmetlee, l\1Jny people have m~de
generoll'Clll1lrt!'lulion'IOlhewlder~ngeol ,oltw~redl,tnhuted throuf;h lh,11 'y'lelllll1 reh,mecon<"ns"tent
~ppIK,ltlon oflh~t sy'tel11. it" III' 10 the ~lIlh",/dllnor to dl'Clde If he or ,he' I' ",Ihng 10 dl'lrihllle ,olt,,~re
throllgh ,my oti>cr 'y'lem ~nd ~ licellwe ,,~nnot Impo.'-c th~t dlulce
~
rod" 'o. ~tl,l<h the' 101l0"1Ilf; nOllce, 10 the progr~m 11 I' ,;;l1e,lto ~ll~\h them to the ,tMt HI ea<:h ,ouree
file tu mo,t elleetlvcly convey the e~clu'lon 01 w~rr.1Il1y. ,II,d e,leh tile ,hould h~vc ~t IeJ,t the . copyright"·
hneandJ pol mer to "here the full nOllee is loond
<one hnc to gi\C Ihe program·, name and ,I
hnellde~
of
wh~t
II doc,.>
Copyright (Cl
<yc~r> <n~me
of
~Ulhor>
This program" free ,olt"ale. you C,1I1 red"tnhute n ,md/or modily il under the term, 01 the GNU General
PubliC Lleen",~, puhli,hed hy the Free Solt" arc Foond,llIon: ellher Verl'IOn 2 01 the Llcensc. Or(,ll your
opnon)anylalcrver",m
Thl' pmgrmnlS dl\tllhuted In the hope thJt It Will hi: u""flli. hUI WITI10UT ANY WARRANTY. wHlloUl
even the IInplied w,lrr~nly 01 MERCHANTABILITY or F[TNESS FOR A PARTICULAR I'URPOSE. See
the GNU Gelleml Publlc L.leen,e lor more delalls.
F,,, example. on r.lre <:.;c~,ion,. Ihere m~y be ~ ,pccl~1 need to encour~ge Ihe wldesl po.""hle use 01 ~
cert,lInlihr,lI)'. '0 Ih~l it I><.",ome' ~ de-f~elO smnd.lId To ,Iehle'e IhlS nnn free progr~I1l' m~,t he ,lIlo"ed 10
0"" the lihrary A more freqoent C,I»c i, (h~1 ~ Iree li!'lr~ry do<" the s,lme Job ~'; WIdely u>cd lIon·lree hhr,lrIe,
In thl' e~-c. lhere IS hltle 10 g,lin hy limiling the frcc hbr.l')' 10 Iree sonw~re only. so "c 11'<' the Le"el
Gcner~1 Puhlie L,een,e.
In other ""<I>C'. perll1i"IOIl to u,e a pMllcubr lihrary II1llon-I,,:e program, en~h[e, ~ grc~ler nllmber (>1
people to u,e a IMf'e lxxJy 01 lree soltwa...: Forex~mple. pelnll"10n to use the GNU C Lihr.'')' in non-fr,e
progmm, en~ble, m,lI1y more people 10 usc the whole GNU op.:munf; ,y'lcm. ,', "e1I~, II' v~,,~nt the
GNU/Llnux operalll1g sy.'lem.
Allhough the Lc"erGeller.IIPuhllC Llcen-c I' Lc~s prolect,'e ,'I Ihe u~r" lreedom. il doc, en'lIre th~t Ille
u>crol a progr,lm th~ll' hn~ed wl1hlhe Llbr.I')' ha,the freedom and the "hele"llh,lllnll.ln Ih,1l progr:lI11
u"llg ~ modified Verl'lon 01 the Llhr:l')'
The preel>C lerms Jnd condillon, for eopylllg dislrlbullOn Jod modifie,llion fotlow P~y close ~t1enl",n 10
lhe dlllerence belwccn J ··wor~ b~-cd on the lihr~fY' ~nd J ··wor~ lhm u,e, Ihe libr.,')'·' The lormereont~m'
"Ilk derl\ed lrom Ihe IIhr~ry. "here~, th~ 1~l1er I11U'1 he comh,ned "ilh the lihr.lry in order 10 run
Ynu ,hould have rcec"ed a copy 01 the Gr-:U Gcner.llPuhlie Llccns<: .Ilong With thIS pmgr~m: 11 not. wnle
In the Free SoUware Found~tlon Inc.. 51 Fran~hn SlI'CCl Flflh Floor. B{hton. MA 02110-1301. USA.
Iflhe pro/!ralTI IS IIltemcti,·c m~~e II Olliput J ,hort nOllee II~e lhl' when 11 SI,lrt, In :In Interact"c modc
GnolTIovlslon versIon 6'J. Copynghl (C) ~e~r n,lI11e of alllhor
Gnomovl'lon com", With ABSOLUTELY NO WARRANTY. fordcl,ul, lype ,how w'
ThiS I' free soflwJre. ~nd you are welcomc to redlStnhme ill1ndcrccrt,lmlondlllons. type ,how c lor
det,lll,
n,e hypothetle,ll command, ·show w· and ',howe ,hould show the appmprml<' part, ot the Gene,·al Puhhc
License 01 eOllrsc. the <omm~nd, yoo u,e may he c·Jlled ,omelhlng other lh~n . ,how w· .md ,how c they
eouldcvenbemollse-cllclsorlll,;,nu Item,--"h~te'·er'Ulhyourprof'r.lm.
You ,hollid ~I.'O gct YOllr empIO},;,r(11 you wor~~, a progr,ullmcr) or your school. If ,my. 10 Slgl1
dl'c1almer" lor the progr~m. ifnCle,,~ry Here I' a 'Jmple. aller the n~me,
YoyOOyne.lnc. here!'ly discl.llm, all copyTlght 1Il1ereSl111 Ihe
GnomovlSlon IwhKh ITIa~es pa,~, ~llolllpilers) wntlen hy
<'lgn~lureofTyCoolI>.1
~
·copyright
progr~1ll
J~mes Ilac~er.
GNU LESSER GENERAL PU8L1C LICENSE
TERMS AND CONOI nONS tOR COPYING.
OIS rRIKU110N AI\·O MOOInCATION
o ThIS Lleen,e A~reenR'm ,Ipphe, 10 any ,011"~re hhrary orolhe'r progr~m "hich conwin, ~ nmice pbeed
hy the cop~right holder or other authorized p~rly ',ly1l1g IIm,ly be dl,mhuled IInder llle ierms 01 lh" Le,>cr
Gencral Pubhc LlCen,e (,I!M.> e~Hcd "lh" Lleen"" ) E~ch hn'nM.'C I' Jddre,sed ,I' ·}ou·
TyCoon. f>reSidelll of Vice
A "lihrafy"·ll1e,lI1saeoJleclionof,oflw"relllne!lOUs,lIld!ord"mprep~red"'Jstobe,ollh'l1Iemlylln~ed
form eseeutahle,.
The· Llhmry·. below. rcfer, 10 ,IllY ,ueh ,olt"are hbr~r} or wor~ "hICh h~, h..'en dlSlnlluled under th",e
term, A ··"Ol~ h,ISCd on Ihc Llhra')'" me~n, eilherthe Lihr;"y or ~IlY deriv~ti\e wor~ unJer\opynght I~w
th:lt I' 10 say. ~ wor~ COI1l~lI1l11g (he Lihra')' or ~ ponion 01 it. eilher ,erhatlm or With modll,eatlon, ,1l1d/or
tmnslmed 'Ir~lf'htlolw,lrdly illlo ,molhel 1,lI1gu~ge (Herem~her tr~I1,I,1110n" mdllde'd wlthOllt hn11I,I1I""111
the lerm "moditlc~lton' ~
lI1terl~ce defil1l110n
Thl' General PubliC LICense doc, not pernllt In<0I"JX,r~tlllg )oor prof'r~1l111l10 propnel~ry progr~m, If ~our
progr~n' i~ ,I subroUline hbr~ry. yOIl 1O,ly eOll\lder It more u,elul to permllllO~ing propriel~ry ~pplic.ltl{)I1,
wllh Ihe lil-ra')'. If Ihi, I'; "hat yUII ".lOt t('do. u-C the GNU L,hmry General Puhlle Lieell'oC lO'te~d of thl'
LICense.
GNU LESS":R GENERAL PUIlLIC LICENSE
Version2.I,t·ebruar}'IW9
Copyrif'hl (C)I'l'9I. 199'J FreeSotl"~re Foundation. Inc
51 Frall~lin Sm.....t Fifth Floor Bo,tun MA 02110·1101. USA.
E\",ryone is permitted to copy ~nd dlStnhule \crhatll11 ,·ople, ofthl.' II<en,e document hUI ch.mf'lOg ,t" 1101
Aeli\ Ille, other ,h,m eopY'I1f; dl'tn~1l1l011 ~nd moditic~lion ~re nO! eo'ered b) till' LlCen,e. lhe)' are out'lde
n, '""pc. The a\."lof rlll1nmg ~ prof;r~m using Ihe L,br,,,)' i, not I"Cslricled ,md <,utput 1""11 ,uch J rl\lgr~IIl"
nwered only 11 ",colllent, COI1'lllOle ~ "'or~ t>ascd on Ihe Libr~ry (independenl 01 the UM:olthe Llhrary,n ,I
tool lor wnllng It). WlH:lher Ihat I, lruc depends on wh~t the Lihr;"y doc, ~nd "hal the progr,lnlllmt USC', the
Llhmrydocs.
rclea~ed
PubhcLlcen-c
verslon2.henCelhe\e"lunnum~r21)
'er,ion Uflhc Le"er GPL It
alsocoulll'~'
the ,Ulee"or 01 the GNU Libra')
You m,ly chJlge a tee lor the phy,ie~1
prOl<'<;llon In ex<h~nge lor ~ lee
~Cl
01 lr.1Il,krrlllg ~ copy.
~nd }Olllll~y
,II y"ur'lpllonllll".:r
wJrr~llly
2 YOII 11l~~ UlcKli!y )ollr copy or eople, 01 the Llhr."y ur ~I1Y porllon of il Ihu, fomung ~ "or~ h~,ed on Ihe
Llhm')'. ~nd l·Opy and dl',nhule ,"eh modifieJtion, or "Of~ under the lerms of Se<tion I ~Ix",. pro\lded
th~tyou,ll,omeelJlIolthe...-:condltloll':
The lieen,e, for ""hI Mlllw~re ~re de'lgned 10 t.l~e ~w~y )0111" frcl'dom to ,h~fe ,md eh~nge il fly eontr~st.
Ihe GNU Gener~1 Public Lieen,es ~re mtended to gll~r~lItee your Ireedom to ,h,lre ~nd ch,mge lree '011,,~re
.ton",~e,urethe ,unw~re "lree 10ralillS U'CI":\
~)
Th, Ill,xhhed
wor~
mll-t it,e11 he ,I solt"are llbr,,,}
h) YOllmust e,IU,<' the hie, modi tied 10 carry prominenl nOlice,
d.,tc 01 ,In~ eh~nge
'l~tin~
thai you
<hJlI~ed
the lik,
~nd
Ihe
ThIS license. the Les""r Gener"IPulllie Lleen'iC .Ipphe' tu ",me ,penally dc'lgnalcd ",llw~re IMebges-typic~lty lIbr,me,--of lhc Free Sollw~rc Found~tlon ~nd Olhcr ~uthOf' who d<'Clde 10 ",e il You e~n usc It
100. bur we ,uggest you firsl thm~ earelully ~bolll whetherthl' lIeen,e or lheordlll,I')' Gencr~1 Pllhhc L!cen-c
I ' the beller Slr~le/!y 10 lise 111 ~ny p~nlcular e~sc. ha,ed on the explan~lIon, below
c) You mu,t eJu>c ,he "hole 01 the
thI'Lleen,e.
When we ,pe~~ 01 free ,oflw~l\' we:lre rekrru,f' to Ireedoll1 01 u,e. not pnce. 0", Gener.ll Puhlil: LlCen-c,
,u-.: deSlglled 10 m~~e ,ure th,l' you h~vc ,he lreedomlO dl,m!'lute ~OPIC' 01 In'e ,;olt",m: (Jnd eh~rge lor IhlS
""l"\lce 11 )"ou WISh). lhal you reeclve source code orc~n gel It il you "~nllt_ lhat you e~n eh~nge Ihe
'1,flW,,,e ~nd mc plcee' of 11 In ne" free program,. ~nd Ihat yUII ~re 1I1(ormed that yOIl ~~n do (he'iC lhlng,.
d) II a lacilny 1I11hc mooltlcd Lihrar} reter, l\l alundum 01 ~ tll!'lle of d.11a to be ,upplled by ,Ill appliC~lloli
prn.gmm lh~l u,e, the IJ<llily. other Ih~11 a' Jll ,lrgllillem p,I"ed when the b<lhty I' lIl'o~ed then y"u
I11I1St m~~e.1 good Iallh ellort loen,ure th~l ill the e\elll ,In .lpplic~lIon doc, not 'lIpply ,u<h lunel10n
or t~hlc the f~<lhty ,till opcmte, Jnd perlorm, "h,lIe\er P;lrt ot Ih purp"se relll~lIh mellnlllgfill
To protttl youl righls. "e need 10 m~~e reslrlltluns ,h~l lorbld dl'lnhulOrl' to deny you the-c nght, 01 10 ,I'~
youto'urrenderthe'iCnghlS These rc,mellonstransbte tocert:llnre,pol1'lhllltieS lor you Ilyoud"mhUle
\'·<,>plC\uflhcllbr~ryorllyou moollYlt
(Forcx~mpk ~
Forex~mplc.il yOIl d"tllhute <·ople, 01 the hllrary "hether,gIJlI'Orlor,llee.yoomu,lgi,clherellplenh
~lllhc righh lh~l Yoe g~vc you You must n1~t...e ,un.· th~t the~. too. n',·el'e ore~n gellhe ,ouree code II you
hn~othercodewlth the hhmry.}<'>ll musl pro\ldewmpleleohJect hies lO the recipients M.>that Iheye~n
them With the Ilhmry ~Iter
11l~~ll1g
dlJnge, 10 the hhrary and recompiling il And )"ou mu,t ,how them
th{"seterm,sothey~nowthelrnghlS.
We plOled your Tlghl'; wllh a lwo-'tep method: (II we \opynght the
libr~ry.
lil:ense.whlChgl\e,;)oulcf'~lpernm"onlocopy.d"lr1bute,lI1d1or,no,hl}
Jnd (2l "e oller )OU thIS
thehhmr)
When ~ .. wo,~ lh~t u'e, Ihe Llhr.try" u,e, mJlenallrom a header file lh~l I' P;1rt 01 lhe L,br.I')'. Ihe o!'ljeet
codc for the wor~ IllJy be a denv~ll'e I<or~ of lhe' Llhrary e'·en lhollgh the "",ure" code is nOl Whether thIS IS
trlle I' e'jlCClally ,ignilicant 11 tbe .... or~ can he hn~ed I< ItOOOllhe L,hr."y. or :flhe "or~ is ilSClf ~ li!'lf~fY
Thelhresh"'dforlhl'lObctruel,nolpR'"<.l"Cl~ dclllledhyl,lw.
It '1I,·h ~n object file ""'" only numencal parmllete·r,. d,II,1 ,lrUClUre 1,lyouh ,md acce"ol":\. ~nd ,m~1I "'a<:Ill'
,md sm~lllIllinefunClions(len Imes or Ie" In lenf;thl. Ihen Ihe u,e 01 lhcobjeel file isunrestnelcd. reg~rdless
ofwhclher it is Ieg~lly ~ dem,lti'·e "or~ (Exeeutable, ,·onl,lIning lhi'o!'lj"el eooe plu, portion, or the
Llhra')' will s.. III~1I under S<:elion 6.)
(, A, ~n C\ception 10 Ihe' Seellon, Jho."e. you m~y :l1,ol·omhine or Im~ J ··.... or~ lh,,1 u,e, lbe Lihr;l')'" with
Ihe Lillr;lry 10 produce ~ "or~ nmlam,ng portIOn, 01 the LlhrJIY. ~nd dlSlribOIC Ih,ll ",'r~ under lern" of }our
choice provided th~tlhc lerm, pelnnl modilication 01 Ihc wor~ lor the ell'lomers own usc ~nd re'erst
engineerillg for dehllggll1g ,ueh modlfic,llIon,.
You mil" gi\e prommenl nOllce "nhe~,·h copy of the "or~ lhallhe Lillr~r) is lI,<,d in It ~nd Ih~1 the Llhmry
;Ind ih II-C ~re covered by lhl> Licens<: You IllU,l supply ,I copy 01 lhi, Lieen,e It the wor~ dunng
execllt'ondl>pl,ly'copyllghtnon"".}OIlIllIl"III,llIdctheeop}nglu noti,e lor the L'br,I')' among them. a,
"ell~, ~ referene" direetmg the U,,-'I 10 Ihe ,·opy ollhlS Lleen"" AIM.>. YOll IllU,1 do one 01 tl1cw lhll1gs
~l A<eo'TIp~ny the woli; wilh Ihc complele cOlre'ponding m~ehll1e-re~d"blc source code for Ihe tlllr~ry
lI1c1udin~ wh~le\erch,mge, "ere lI,ed 1Il1he "or~ ("hlCh mU,1 be dl'lrlhllted under Seell\lI" I .md 2
~Ix)\e) ~nd. iflhe ,,'or~ I' ,In exeelll,lhle hn~ed wllh Ihe Llhr~')'.
"ith the <omplete m~ehll1e-read"t>1e ··wor~ lhat II~' the Llhr,,')'". as ohjeel e<Xk ~ndf()r ,.our<.: <ode '"
Ihat the U-efC.1Il Il",{hly Ihe Llhr'lry ~nd tilen rehn~ 10 produce amodllied exeeut~ble eOillalmng thc mod
il,<:d Llhr~ry (11" IIndeNood Ih~lthe u>cr who change' Ihe eonten" oj ,kfinltion' llle, in the Lihrary
willn"t neee',~nly Ix: ~hlc 10 recompile lhe' ,1pphe~uOnlO lI,e lhe modilkd detilllll\HIS f
hl U>c ,I 'lIit,mle ,h,ued IIhrJry meehJnl,m lor hn~lI1g wlih the Llhr.I')'. A slllwble ml",h~ni,," i, one lh.11
(l)u'oC"nruntinlC,lcopyofthehhrMyalreadyprescnlonlheuser·,cOmpuler'y'lem.r,llherlh,m
eupying library funelion, mlO the e\eelll"hle. ~nd (2) will opcr~le profl"r1y wilh ~ m<Xlified \e"lon ollhe
Ilhr~I)'. Ifth,;, u-cr inslall, onc. ,I' long as lhe' modified '·el"Slon I' mlertaee-eomp~,ihkwnh Ihe \e"lon lh.n
Ihewor~"a,m:<de"l1h
c) Aeeolllp.my lhe "or~ "l1h ,I wrmen Hner. v~lld for at lc~,t lhree y<:~r,. to gl\e Ihe "'"lle user the m~len
,pecll"icd in Suh....'Clion 6<1. ~ho."e.lor ,I ch,lTge n" more lh,m Ihe C{hl 01 peli·ormlllg ,hIS di,trihutlon
Thl' ,,"'C!lon "mtended 10 "'~~e
Lln'nse.
tl>orou~hly clc~r wh~t
"behevcd to he J ,·on"-'quenee of the rcsi of thi,
12 IfthedNnhllllol1,md!oru'eoflheLi!'lr.nyi're,trI{"ted,neert<llneountne,either hv palenh or by
l·opynghK'"d Intert~ces. Ihe orlgllllli copynghl holdcr who pbce, the Llhm')' under thl' Llcen>c 111~y ~dd ~n
exph,tlgeogr.lphic~ldi'lrihlllionlilllil,ltionexdudmgthosecounlne,.
'0 lhJl dl,mhullon 1,permlll<:donly
IUllr <IIH<lll/! coontne, nOl thu,exduocd. In ,ueh eaSC. tbl' Lieen'oC Incorp"r~te, the hnllt~lloll ~< 11 "rlllen in
dw:lxxJyollhI'Lleen",.
1"1 The Frc'C Sol1"are I:oundationmay pobli,h revise<J ~nd/or new ,ersmn< 01 the Le"er General Pohlic
I.leen,e lrom lune to time. Such new Ver'lon, will be simil~r 111 SP"ll to thc present \el":\lOn. hoI may diller in
new prohlcm, or concern,.
det~llto ~ddre"
E~,h \cf'lon" g,,·en ~ dlSlingul,hmg \er,ionllombcr Iflhe LI!'lr~ry spe,ll'e' ~ ,erslOn nomber 01 this
LI,,·II,e whICh apphe, 10 II Jnd ",my I,ller '·el"S'on' you h~'e Ihe option Ilr folluwlllf' the lerms Jnd condition,
either 01 thJt ver'lon or of ~ny I~ter \CI"SIOIl puhlished h} the Free SoUwme Foumbhon I! the Llbr~')' doc,
not 'peel!) a IKen~ 'e"10n numl>cr. you nhlY choose ,1I'y 'er'lon evcr puhlhhed by the Free Sollw,lre
FOUlldJtll>l1
I~. If you wl'h to incorpor~le part,ol Ihe Libr~')' Int"other lree pmgralm ,,'ho>c dl'trIhlltlOI1 eondilions;lre
Il1e,"npatlhle wllh Ihe,e. "rile 10 lhc ~Ulhor 10 ~s~ lor perm"'Ion. For ,01lw<ll"e ",·hlCh i, l·opynghted hy lhe
h<'e Soft" are Foul1d,llI0n. wrlle 10 Ihe Free Sollw~r,;, Found.lllon. we '('Il1Ctlll1l'S m~~e exception, lor Ihi,
Ourde{"'S1on Will he gUided by tbe lWIl goal, 01 pre>crving the free '1,ltu, 01 ~II d<:ri\~tlve,of ollr free
,nltw~re ,md of promolmg the ,haring and reuse of ,0I1w~re generall~
NO WARRANTY
1S. BECAUSE THI, LIBRARY IS LICENSED FREE OF CHARGE. THERE IS NO WARRANTY I·OR
TIlE LIBRARY. TO TI-IE EXTEN I" t'ERMt"lTED BY AI'PLICABLE LAW EXCEPT WHEN
OTHERW[SE STATED IN WRITING THECOPYRIGH'I IIOLDERS AND/OR OTHER PARTIES
PROVIDE THE LIBRARY ··AS IS'· WITHOUT WARRAN·I Y OF ANY KIND. EITHER EXPRESSED OR
IMPLIED. INCLUDING BUT NOT LIMITED TO. TilE IMPLIED WARRANTIES OF
MERCHANTABILITY AND I'ITNESS FOR A PARTICULAR PURPOSE THE ENTIRE RISK AS TO
THE QUALITY AND PERFORMANCE OFTI1E LIBRARY IS WITH YOU. SHOULD THE LIBRARY
PROVE DEFECTIVE. YOU ASSUME THE COST OF ALL NECESSARY SERVICING REPAIR OR
CORRECTION
16 IN NO EVENT UNLESS REQUIRED BY APPLICABLE LAW OR AGREED TO [N WRITING
WILL ANY COF'YRIGHT HOLDER. OR ANY OTHER PARI Y WllO MAY MODIFY AND/OR
REDISTRIBUTE THE LIBRARY AS PERMllTED ABOVE. BE LIABLE TO YOU FOR DAMAGES
INCLUDING ANY GENERAL. SPECIAL INClDloNTAL OR CONSEQUENTIAL DAMAGES ARISING
OUT OFTHE USE OR INABILITY TO USE THE L1ilRARY tINCLUDI~G BUT NOT LIMITED TO
LOSS OF DATA OR DATA BI,ING RENDERED INACCUf(ATEOR LOSSES SUSTAINED BY YOU OR
THIRD PARTIES OR A FAILURI,OI'THE LIBRARY ·1 0 OPERATE WITH ANY OTHER SOFTWAREI
EVEN IF SUCH HOLDER OR OTHI,R PARTY HAS BEEN ADVISEDOFTHE POSSIBIUTY OF SUCH
DAMAGES
~I,
END Of rERMS AND CONDITIONS
I. You 1ll,ly copy Jnd dl,tnhutc 'eillalim cop'e, 011he LI!'lr.I') s cOlllpkle M.>1II'Cee,MJe~, )OU n....·el\e It. In
'Ply l11Cdlllll1. proVided lh~l yOIl eon'p,cuousl) ,md ~pp'opri~lcly pllhlISh on e.l,h <opy ~n ~ppropnJte
eupynf'ht nOl"e and d"c1,lImer ofw~rr.lIlly. ~eep inl,IC( ~It Ihe nOlice, th~t reler to th" L,,·en,e and to the
~"'el1ce of ~ny "arr.lnty: ~l1d dl'lIlhllle" <:opy 01 lhi, License ~Iong '" uh Ihe Llbr~ry
~lIowed
1"1 hi, I' the tiN
Howe\er. IIlI~ing ~ . "or~ lh:ll uS<:' tbe Libr~')'·' wllh the Llhra')· cre~te' ~n execlltJhle th~t IS J dcn\',ltlvc 01
lhe tlbmry (1x..'C~usc 11 eOnl,lIn, portlon, of the Llbr,I')'). r~ther lh,m:l ·"or~ lh~t u,es the hhmry· The
exeeuwhle i, Iheleforecoverc'dhy lhl' Ll<enM.' SCC·ttOIl (, ,IJle,lerm, 10rd,'lrIblllion 01 ,uchexeeut~hle,
wlthJpphe:ltlOnprogr:lITI'twhlCho""sol1leollho,elllnelinn',H1dd~I,')10
. Sour"c ,ooe·· fur a wor~ meJn, tile prcterrcJ lorm ollhe wor~ for mJ~mg m<Xlifkall,,,,, to It For ~
hhmry.eoillplete ,oureelodc J11e,II1,~lIlh<' source eodefor,lilmodlllc,il COlll~m, plu,anya,,,,,,mted
hle,_ plu, the SCTlpl' u-cd loeolllrol eompll~lion ~nd m,wll,ltion 01 the hhmry
Ap,,1 1'J89
S A pmgram th~1 contam, no de", ~tive 01 ~ny portion of the Lihr~r). hUI "de'lgned to "or~ I< Ith the
Lihr:try hy bemg complied or lin~ed "1I1l II." e,dled ~ ""or~ lh~1 u-e' the Llbr~ry" Su,h:l ,,"or\; m
isol~tlon "llot ~ denv.ni\e "or~ 01 lhe Llhr~ry. ~nd Iheretore f~lls olliside thc s<opc nlthl' Ll<en,e.
Other"i",. if the "or~ is.1 deriv~tl'e 011he Llhrary. you 1ll,ly dl'(nhllle Ihe objeel code for Ihe "or~ unda
Ihe term, 01 SeClion b Any exeeul~ble' cOIll,lIll1ng th~l "or~ ,1"0 fall under Se<tinn 6. "he'lleror nOI they
;Ire hn~edd'reetly with the Library lhelf.
AlsoaddIl110rnmlfononho"loeontaclyouhycleelronic,lndpapellll.1I1
relll1~
·Thu, It I'llotthe Intent 01 lh",,-'"<.1I011 h,<bll1l nghh or \."onte,1 your r1ghh 10 ,,"rt... "ntl,·u ,"tlle I} hy)oll
IJlher.lhelntell(l,weXell:l,elhenghll1l,nntmlthedlSlnhutlulloIderi\",lli\CUlC"II",·me"orbh,,'Clloll
the Lihr.ny
d) II di'lrihution oflhe "or~" m,lde h} onermg acee" to copy jrom
~<ce" 10 cOpy the ~Ix)\e pecil'ed m,lien,d, from Ihe "one pl,ICe.
~
design,lled pl:lce
"ner<'"<.Jlli\"~lem
lIow to Appl) These Terms 10 Your Ne" Libraries
c) Verily
lh~l
the Usel h.I'
~lle~dy
rcrel\ed ,I copy of the,,"'
n',lIerl~l,or
Ih,n you
h~\e ~Ire~dy
-em ,hI' lI",r
~ <lIP~
For ;10 ex"elllahlc. Ihe reqilired lorlll 01 the ··"O)r~ thai u,e, the Llhr~rv'· mU'l mclude ,my d~l,' ~nd IIlilily
progr:lln, needed lor reprodoclng the aeeutahle lrom It. Ho"ever.~, ,I ,peel~l c'x«'plion. lhe m,'len~l, hI be
di.'lri!'luled oeed not 1I1cludeanylhll1g th~t" norm,lllydi't"hut<'d(111 either ,ouree or !'lina')' 10rm) "uh lhe
m.IJOfcumpon<:n,,(clllnpilcr. ~ernel.,1I1d ",Oil) 01 lhe·opcr.llIng'}"lemOn"hlChlheexeclll,lhlerun'.lIn!c"
lh,11 eonlponent 11",lr~eeolllp,lIl1e'th<'execoIJhk.
h m,ly h,lppen lh,111h"IC\.lllirementcontradlCt'lhe lil·ensc re,lrilllon,ol otherpwpnet,lry hhr,lrie,th~1 do
nolnorll1,llI) ~<C{lIl1p;my Ihe operallng 'y,telll. Su,·h ,I n)lllr~d,ellon Ille~n, }(lO e,mnolll"" holh Ihem ~nd Ihe
Lihr,I')' log"lher in,1I1ex,:cuwhlelh~t }Oll
di'lrihule.
II you de'elop II Ile"" Ilhra')'.~ndvooW,IIHllll,beollhef'rc,'le'llJ'O"sibleu~tolhepu!'lhe
"ere,,,nunend
1Il,I~mg lllrce ,0It\\'Jre th~, e\,c')'olw can redl'lrihulc and ch~ng<' Yoo e~n do 'oily permuting re<hstri!'lIlIHlIl
ullder Ihe,e terms (or ~ltern~tIH'I}. IIllder the terlll' of the ordm~ry Gener.IIPubhe Lleenw)
To ~pply Ihese term, ~t1~<h the 101101< Illg notice" to the lIhrJry It I' ',Ife'l 10 ~1t,Kh IhellllO the ,t~n 01 e.leh
M'lIree lik to 1Il",t ellc<II\"e1y ,·oll,ey Ihe <'xdu'lOn 01 "~rr.mt}. ,md e"eh tile ,hould h:lve ~t k~,lthe
copyngh, hne ~Ild ,I poUlter to "her,' the lull nOtlle I' found.
<1111<: hne to gl\" the lihr~r~·, nmne ~nd J hnel Ide,1 of "h~t II doc, >
CopyrlghlIC)<}ear> <1l~lIlclllaulhor>
Th"
lihr~ry
I' lree ",r."are. you eJIl n'"d"tnhole II Jnd/or modify II ullder Ihe lerm, 01 lbe GNU 1..c''iCr
puhh,hed by the Fre<' Solt"ar<' Foulld~lion. eilher \e"ion 2 I 01 the LI<·en", Ilr(~t
\eThlon.
Gell",~ll'lIblic licenw~,
wor~
10 ~ heensed.u no
eh~rge
to
~II
third I",Ttle, under the lcrnh 01
fUll<"uon III J hbmry to eompul<' squ,,,e rOOI' h~", purpo'e th:>t" entlrel) ...dl-delined
IIldepeudent of the lIpphe~1I011. Theretore. SlIhsee!lon 2d reqoire' th~l ~n} .lpphclitlOu-,upplled funellon
or t~ble used by thl' fune!lon mU'1 he option~1 il the appjie~tion doc, 1101 ,upply It. the sqll,lre "1l11
luucllOn mU'l stili eomplliesqu~rerools I
rhesc reqUlremel1l' ~pply to (hc mod,fic'd ",or~~, ~ "hok II Idenutiahlc ,,'"<.tUlII' ollhat "or~ Me 1"'1
den'ed lrom the Lihr~ry .md e,ln he re,,'Omhly eOIl'ld,red Independ"llI Jud "'-:p'Ir.lte ... orb In ,helliwhe,
Ihen thIS Lleel1,e. ,md ih terms. do nOl "pply to Iho'oC ,e<llOn, "hcn lOU dl,mhule thelll ,I' ,ep~r,II,· worb
But whel1 you dlSlrlhole Ihe S~ITIe seclions~, p;m o! ~ "hole which I' a ,,"or~ hi'M:d Oil the Llhr,uy. Ihe
dl'lnbullonollhewhotemll'lheonthelerms"lthI'LlCen,e.wh,"epern""1on,forntherlicense<"e.\t,nd
101hecntlrewhok.:>ndthu'I"each~nde,erypJrll"Cgardlc"\llwho"roleil
7. YOllnMY pl~ce lihr~ry raeihlle, lh.lt ~re ,I "or~ h,,~d onlhc Lillr~ry ,ide·!'l}·,ide in ~ single lihr~')'
togelher wllh {'lher lihr~ry f~cllilie, nOI covered by lhl' Lieen"". ,Ind distrIbute ,uch:l comhil>Cd lihr~')'.
provldcd Ih~l th,;, 'oCp~r~le di'lrihunoll of Ihe wor~ h~ .;cd ol1lhe Llhr~l) ~"d ollhe 111her lihra')' I~c,litle,"
other"I'iCpcrmitted and pr,,,,,,lcdlh~l you do Ihesc t"o thmg,
yourllpl101.)
Til"
~ny I~ler
hhr~r~ I '
hi Gl\e prominenl nollCe wllh the '·Ol11hIlWd lihrary 011hl' IJet lhal pMl 01 II" a wor~ h,lSed onlhe Llhr,lIy
.md expl,l1lllng "her<: 10 find the,leellmp,lnylllg ulll<llnhm,'ll form 01 lhe',lIne"nr~
8 You "",)" nOI copy. modify ,uhllcen>c. hn~ "l1h. or dl,trlhole Ihe tlbr.I')· excel" ,I' exple"ly prm ,ded
ullller lh" L"ense An} ~t1empl Olherni,e h'copy. 111Od,ly. ,u!'lilcenw. llI1~ ,,"h or (!I,mhute Ihe Llhmry I'
""d ~nd ",II ~lItonl~tlcally ternun.ne }"ur righh under Ihi, Llcen"" llo"e\er. p~nie' "ho h.l\e Tc'Cel\ed
«'pies or righls. from }<lU uu{kr ,h" LlCellse "ill n<ll h.l\e Ihelr heel1"" lernun~ted '" hmg~' ,u,h pal"lle'
rCln~m m full ,0Illph~l1<e
9. You Jre not reqUired to .K,·,·pt Ihl' LlCen", 'Inee }OU h~\e nOI "gll,'d It. HOYoe,er. nothmg elM.' ~ranh
}OU pcrnll"llln to mlMJlty or dl,tnhllk thc Llhml)' or It- denv~tl'l' "",b. Ti>cse ,1C1Ion, ,Ire pruhlhlled h)
1,lw If)ou do nOl J,·n·pt lhl' Lllen,e. Therefor<' hy 11\0dllymg urdi'tnhutll1g the Llhr~" tor ~ny ,,"or~ hJ""d
dl\lnbuled 111 lh" hope Ihat II Will be u,clul. bUl WITHOUT ANY WARRANTY. ,,"nhout
FITNESS FOR A PARTICULAR PURPOSE. See
Pullh, Li"en'e 1m mure ddmk
,,,On the Ilnplled "arr~nly 01 ."-1ERCHANTABlLlTY or
lhe GNU [..e'ser
,I) Aceomp~ll) Ihe comhmed lIhr,I')' wllh ,ll·OP)" oflhe 'Jm,' wor~ h,l,ed on the Llhrar}. uncomhlned "ilh
,m} olher h!'lr.Il)· L,eihue, Thl' IllU,t 1><.' dl'tnhllied unde'r th,' k'rm, 01 the S,'Ctlon, ~bove
Gener~1
You should h.l\e recel\ed ~ copy 01 the GNU Les",rGell"ral Puhhe L""I1"" along "l1h Ihl' h!'lmry. if not.
"rue to the Free Sollw~re Found~holl [n,. SI Frun~hn Strc~l. FIfth Floor. B'hlOI1 MA 021 10-1301 USA
AI",~ddinlormanollonh\),,"lo<OIlIU<tYOllh}
e1ecm'lll< ,mdp;lpcrm,nl
You ,hould ~I", get lour elllpl<.»er til )011 "lJr~~, J progralllmel) or lour "hool if ~ny. t<.> "gn II "eOp}rlght
.II"" lalln<:r· lor Ih<· hhr~r~ 11 nn""~l) Here I ' ~ 'Jillple. aller the n~llle,:
Yoy,>d}lIe. III, . ha,'hy d,,, IJII1\' all Cllp)T1ght Imeresl in the
"nuenhyJmlle,R,mdumHJeh·r.
<'lgllatureotTyC,l{)Il>. I Apnl I<NO
TyC<xm. Pre"del1lof Vlec
lihr~ry·
Frllt>·
l~ Ilhr~ry
lor
1""a~1I1g ~noh,)
SONY
Important Safety Instructions
Safety and Regulatory Booklet
I)
Read these instructions.
2)
Keep these instructions.
3)
Heed all warnings.
4)
Follow all instructions.
5)
Do not use this apparatus
near water.
Read and understand the contents of this booklet before
operating your new TV.
10) Protect the power cord
from being walked on or
pinched particularly at
plugs, convenience
receptacles, and the point
where they exit from the
apparatus.
~
~
ttl Onlyuseattachmentsl
accessories specified by the
manufacturer.
.
12) Use only with the cart,
Feuillet de consignes d'utilisation
et de securite
Veuillez lire et vous assurer de comprendre Ie contenu de ce
feuillet avant d'utiliser votre nouveau televiseur.
Folleto de instrucciones de
seguridad
6)
Clean only with dry cloth.
7)
Do not block any
ventilation openings. Install
in accordance with the
manufacturer's instructions.
stand, tripod, bracket, or
table specified by the
manufacturer, or sold with
the apparatus. When a cart
is used, use caution when
moving the cart/apparatus
combination to avoid
injury from tip-over.
13) Unplug this apparatus
#:.\
m
~
during lightning storms or
when unused for long
periods of time.
~
14) Refer all servicing to
8)
Lea y entienda el contenido de este folleto antes de operar su
nuevo televisor.
9)
3-299-071-01 (1)
© 2008 Sony Corporation
qualified service personnel.
Servicing is required when
the apparatus has been
damaged in any way, such
as power-supply cord or
plug is damaged, liquid has
been spilled or objects have
fallen into the apparatus,
the apparatus has been
exposed to rain or
moisture, does not operate
normally, or has been
dropped.
Do not install near any heat
sources such as radiators,
heat registers, stoves, or
other apparatus (including
amplifiers) that produce
heat.
Do not defeat the safety
purpose of the polarized or
grounding-type plug. A
polarized plug has two
blades with one wider than
the other. A grounding type
plug has two blades and a
third grounding prong.
The wide blade or the
third prong are provided
for your safety. If the
provided plug does not fit
into your outlet, consult an
electrician for replacement
of the obsolete outlet.
II1l
~~
Please observe the Additional Safety DOs and
DON'Ts 10 avoid electrical shock, short-circuit,
fire. bodily injury or property damage.
11111111111111111111111111111
Printed in Mexico
3299071011
WARNING
Additi,
o If any liquid or solid object falls inside the
MOISTURE
ATTENTION
RISQUE DE CHOC ELECTRIQUE.
NE PAS OUVRIR
PRECAUCION
RIESGO OE CHOOUE ELECTRICO
NOA!JRIR
This symbol is intended to alert
the user to the presence of
uninsulated "dangerous voltage"
within the TV's enclosure that
may be of sufficient magnitude
10 constitute a risk of electric
shock 10 persons.
This symbol is intended to alert
the user to the presence of
important operating and
maintenance (servicing)
instructions in the literature
accompanying the TV.
Outdoor Antenna Grounding
_
Antenna lead·in wire
Antenna discharge
unit
(NEe Se<:tion 81()'20)
Grounding conductors
(NEC se<tion 81o-2l)
NEC: National Electrical
Cod.
_
Ground damps
Power service grounding
eJectrodesystem
(NEC Art 150 Part HI
To reduce the risk of fire or electric shock, do
not expose this TV to rain or moisture.
The TV must never be exposed to dripping,
splashing, or spilling liquids of any kind.
o Do not place liquid filled objects such as a
vase or potted plant on the TV. r------=.- . . ..,
o Do not use a power line
~"
operated TV set near waler;
. ~:-for example, near a bathtub, a::;> 0 ----, ,
washbowl, kitchen sink,
jP
laundry tub, wet basement or f~
near a swimming pool, etc. ~;..~ . .
o
When cleaning, be sure to unplug the power
cord to avoid any chance of electric shock.
o Clean the cabinet of the TV rll~
with a dry soft cloth.
~.
o Wipe the LCD screen gently with a soft
cloth.
Stubborn stains may be removed with a
cloth slightly moistened with a solution of
mild soap and warm water.
If using a chemically pretreated cloth,
please follow the instruction provided on
the package.
Never use strong solvents such as a
thinner, alcohol or benzine for cleaning.
Periodic vacuuming of the ventilation
openings is recommended to ensure to
proper ventilation.
o
o
o
o
VENTILATION
The ventilation openings in the TV are
necessary to ensure reliable operation of the
TV and to protect it from overheating.
Do not block or cover the
~lS'
ventilation openings with
I
\
cloth or other materials.
Never place the TV on a bed. ~
sofa, rug or other similar
~.
surface where ventilation
-:- _ _
openings may be blocked.
Unless proper ventilation is provided, the
TV may accumulate dust and cause
damage.
/
o
o
l
o objects
Never allow liquid or solid
'Oob-('·
to fall into the ventila.
lion openings.
Allow adequate space around the TV set to
ensure proper air circulation.
r
D Never place the TV in a confined 1.-1 I T~'tl V, 11
space, such as a bookcase or
:.1I: I
built-in cabinet, unless proper
:I~
ventilation is provided.
r I I II: I
There should be a clearance of at least 1I 7/8
inches (30 em) above the TV set and 4 inches
(10 cm) on each side. If mounted on the wall,
allow at least 4 inches (IO cm) of clearance at
the bottom of the screen. (See additional
information provided in the Operating
Instructions manuaL)
;:1
CLEANING
o
o
TV, unplug the TV immediately and have it
checked by qualified service personnel before
operating it further.
Never push objects of any kind into the TV
through the ventilation openings as they may
come in contact with dangerous voltage
points or short out parts that could result in a
fire or an electric shock.
0
o
INSTALLATION
The TV should be installed near an easily
accessible AC power outlet.
Do not install the TV face up or down,
upside down or on its side.
Do not install the TV in hot, oily, humid, or
excessively dusty places.
Do not install the TV in places
_.::o~~
subject to extreme temperature,
"1"',,&
such as in direct sunlight, near a ~ ~
radiator or a heating vent. The
pili ""
TV may overheat in such condi- ;';;~r=-J~
tions which can cause deformation ~ L-=::J.:::':
of the enclosure and/or TV
"Ill
•
malfunction.
Do not install the TV in a place ~S
exposed to direct air condition- )11-' \ .. •
ing; moisture may condense
inside and may cause TV malfunction.
Do not install the TV where it may be
exposed to mechanical vibration.
Do not install the TV where insects may enter.
D Do not installihe TV in a location where it
may protrude, such as on or behind a pillar,
or any place you might bump your head or
receive bodily injury.
To prevent fire keep flammable objects or
open flame (e.g. candles) away from the TV.
Do not place optional equipment on top of
the TV.
o
o
o
o
o
o
o
o
rUl
Q'
Prevent the TV from toppling over
Take measures to prevent the TV from
toppling over and causing injury or
\....d
damage to the TV and property.
,
o Secure the TV Lo a wall and/or stand.
o Never install the TV on unstable and/or
uneven surfaces.
o Do not allow children to climb on or play
with furniture and TV sets.
Do not install the TV on furniture that can
easily be used as steps, such as a chest of
drawers.
Care should be laken to install the TV where
it cannot be pushed, pulled over, or knocked
down.
Care should be taken to route all AC power
cords and connecting cables so that they
cannot be pulled or grabbed by curious
children.
o
o
o
Medical institutions
Do not place this TV in a place
where medical equipment is in use.
It may cause a medical equipment
malfunction.
o
Outdoor use
Do not install this TV outdoors. The TV should
not be exposed to rain or direct sunlight in
order to avoid damage and possible fire or
electric shock.
Do not install this TV in a vehicle, ship
or other vessel
o Excessive bumping motion of a
o
moving vehicle or continuous
swaying motion on a boat may
cause the TV to fall down and
cause injury.
ExpOSing the TV to seawater
may Cause a fire, electric shock
or damage to your TV.
@!l.
m
\l.__.
~~
~~
-.. . . _-.... ~
Magnetic influence
o This TV contains a strong magnet in the
o
speaker unilthat generates a magnetic field.
Keep any items susceptible to magnetic fields
away from the speaker.
Electro-magnetic radiation emitted from
optional equipment installed too close to the
TV may cause picture distortion and/or noisy
sound.
Consignes de securite importantes Instrucciones importantes de seguridad
1)
Lisez les directives suivantes.
2)
Conservez ces directives.
3)
Observez et respectez tous les
avertissements.
4)
Suivez tautes les directives.
5)
N'utilisez pas eel appareil
pres de leau.
10) Ne placez pas Ie cordon
d'alimentation dans des
endroits passants et assurezvous qu'j] ne peut pas etre
pince, surtout au niveau des
fiches, de la prise de courant
el ~l l'endroit ou. il sort de
l'appareil.
I)
Lea estas instrucciones.
2)
Guarde estas instrucciones.
3)
Respete todas las advertencias.
4)
Siga todas las instrucciones.
5)
No utilice este aparato
cerca del agua.
11) Utilisez uniquement les
elements de raccordement et
les accessoires recommandes
par Ie fabricant.
Nettoyez eet appareil
uniquement avec un
chiffon sec.
7)
Ne bouchez pas les fcntes de
ventilation. Respectez les
directives du fabricant pour
l'instal1ation de I'appareil.
N'installez pas I'appareil a
proximite d'une source de
chaleur telle qu'un radiateur,
line bouche d'air chaud, une
cuisiniere ou tout autre
appareil (y compris des
arnplificateurs) emettant de
1a chaleur.
8)
~~
~
9)
Ne dcsactivez pas le
dispositif de securite
applique a la fiche
polarisee ou it la fiche
avec mise a la terre. Une
fiche polarisee est equipee de
deux lames dont l'une cst
plus large que !'autre. Une
fiche avec mise a la terre
est equipee de deux lames
et une broche destinee it la
mise a la terre. La lame la
plus large etla troisicme
broche sont des dispositifs de
securite. Si vaLIs ne reussissez
pas a brancher la fiche
fournie dans la prise de courant, consultez
un electricien et faites remplacer 1a prise
par une neuve.
avec Ie chariot, Ie trepied, Ie
support ou la table
recommandes par Ie fabricant
au achetes avec l'appareil.
Lorsquc vous utilisez un
chariot, prenez des
precautions en depla~ant Ie
chariot et I'appareil afin de ne
pas les renverser, ce qui
pourrait entrainer des
blessures.
13) Debranchez cet appareil en
cas d'orage oulorsque vous
ne I'utilisez pas pendant de
longues peri odes.
~o
"
14) Pour toute reparation,
11) Uti lice unicamente los
complementos 0 accesorios
especificados por el
fabricante.
I"~
12) Utilisez I'appareil uniquement
6)
~
10) Para proteger eI cable de
alimentaci6n. alejelo de
lugares de paso 0 donde
pueda ser aplastado,
especialmente en la punta de
los enchufes, los
tomacorrientes 0 eI punto
don de eI cable sale del aparato.
Limpielo unicamente
con un pallo seco.
7)
No bloquee los orificios de
ventilacion. Instale el
aparato segun las
instrucciones del fabricante.'/'
8)
t::l
n
adressez·vous a un reparateur
qualifie. Faites reparer
~~
I'appareil s'i! a etc endommage
de quelque maniere que ce
soit, par exemple si Ie cordon
d'alimentation ou sa fiche
sont endommages, si du
liquide ou tout autre corps
etranger a pcnetrc dans
I'appareil, si l'appareil a etc
expose a la pluie ou it
I'humidite, s'il ne fonctionne
pas normalement ou s'i1 est
torn be.
9)
12) Utilicelo unicamente con el
carro, pedestal, tripode,
abrazadera 0 mesa
especificados por eI
fabricante 0 vendidos con el
aparato. Si utiliza un carro,
tenga cuidado al move rio
junto con el aparato para
evitar lesiones en eI caso de
una caida.
~~,
6)
No 10 instale cerca de
fuentes de calor como
radiadores, calefactores,
homos u otros aparatos
(incluidos los
amplificadores) que generen
calor.
to
"e
r
13) Desenchufe d aparato
durante tormentas
~
e1ectricas 0 cuando no se ]
~
.
utilice durante periodos
de tiempo prolongados.
Respete la finalidad de
seguridad del enchufe
~
.
polarizado 0 de tipo
~
conexion a tierra. Un
enchufe polarizado presenta
dos contactos, uno mas
~f'
"
ancho que eI otro. Un
~
enchufe de tipo conexion a
~ \l
tierra dispone de dos
~
contactos y una tercera
c1avija de conexi on a tierra.
EI contacto ancho 0 la
~
tercera ciavija se
~
suministra para su
seguridad. Si eI enchufe
suministrado no encaja en la
tom a de corriente, pongase
en contacto con un
e1ectricista para el reemplazo
del tomacorriente que quedo
obsoleto.
unicamente a personal de
~~
servicio tecnico especializado.
Sera necesario solicitar servicio
tccnico si eI aparato ha sufrido
dailoscomo, por ejemplo, si el
cable de alimentacion 0 el
enchufe estan daii.ados, se ha
vertido Iiqllido 0 se ha caido
algun objeto dentro del aparato,
o bien si dicho aparato ha sido
expllesto a la lluvia 0 a
humec;ad, no funciona
correctamenle 0 se ha caido.
~"~"
I"
Veuillez respecter les consignes de securite
supplbuentaires pour eviter les risques
d'eIectrocution, de court-circuit, d'incendie, de
blessure et de dommages a la propriete.
Reportez-vous au verso
our Ius d'information.
n
14) Solicite servicio tecllico
Tenga en Cllenta las advertencias de
seguridad adicionales para evitar descargas
eIectricas, cortocircuitos, incendios, lesiones
corporales 0 dafws materiales.
Consulte el reverso para
obtener mas informacion.
Inal Safety DOs and DON'Ts
Wall-mount use
o Wall-mount installation
o
o
o
o
o
requires the use of a
Wall-Mount Bracket. When
installing or removing the TV and the
Wall-Mount Bracket, be sure to use qualified
contractors. If not properly secured during
installation or removal from the Wall-Mount
Bracket, the TV may fall and cause serious
injury.
Be sure to follow the installation guide
supplied with the Wall-Mount Bracket when
installing the TV.
Be sure to attach the brackets with the
specified parts supplied with the V\'all-Mount
Bracket.
Do not hang the TV from the ceiling. It may
fall and cause serious injury.
Do not hang anything on the TV.
Do not allow children to climb on
the TV.
AC POWER CORD
o Do not touch the AC power cord ~ir
. '~
o
o
and its plug with wet hands as it
'b
,.
may cause electric shock.
.
When disconnecting the AC
~
power cord, grasp the plug and
,,~ p
disconnect from the wall outlet
~:' ~,A
first. Do not pull by the cord.
~
Keep the power cord away from heat sources.
A TV set with a three-wire grounding type AC
power cord plug must be connected to an AC
po\ver outlet with a protective earthing
connection.
o Do not convert or damage the AC power
cord.
Consult your electrician to have the outlet
changed to suit your TV.
o
Subjecting the AC power cord to wear and/or
abuse can damage the AC power cord and your
TV.
D Do not place the TV where the power cord
Y0i¢"
can be easily pinched, bent. twisted, or catch
o Do nol move the TV with the AC power cord
o
o
o
(or other cables such as audio and video)
connected.
Use only an original Sony AC power cord
with your TV; no brand substitution is
allowed.
Do not use AC power cord supplied with the
TV with any other equipment.
Never use a damaged AC power ~ "
cord. A damaged AC power cord ...1.
------ '"
can cause a short-circuit, which
.<>
may result in a fire or electric
",~p
'"
shock.
~
¢
~
~ {I
Do not use a damaged or poorly
fitting AC power outlet as your TV's
power source.
o Insert the plug fully into the outlet.
If it is loose, it may cause arcing and
result in a fire.
D Do not overload the same AC
power outlet.
the cord.
D Before connecting cables, be sure to unplug
the AC power cord for your safety.
""
'\ -<::l
~ \'
~
Unplugging the AC power cord from the wall
outlet will completely remove power from the
TV.
o During lightning storms or
~"'_
when the TV is left unattended
~
and unused for extended
~
periods of time, the AC power
cord should be unplugged
~
from the wall outlet. This will]
.
~
avoid possible damage to your
TV. Also unplug the antenna
to prevent damage to the TV.
For energy conservation and safety reasons,
practice unplugging the AC power cord from
the AC power outlet.
0
o
Clean the AC power plug
Unplug the AC power plug and ~ clean it occasionally to avoid
~
dust from accumulating. While
cleaning, look for signs of damage. A damaged
AC power cord should never be used.
ACCESSORIES
Keep small accessories out of children's reach.
Use only the specified accessories with this TV.
Volume Adjustment
o When using headphones. adjust
D Do not allow anything to rest on or roll over
I
the volume to avoid excessive
audio levels from causing
possible hearing loss.
V P"",
~.
"'~, / '
';
'"
{.(
BATTERIES
Your remote control batteries are con sum abIes.
To preserve our environment, dispose of
used batteries according to your local laws
or regulations.
D Do not dispose of batteries in a fire.
D Do not short-circuit, disassemble or
overheat the batteries.
D Replace only with the same or equivalent
type of batteries. Using incorrect replacement batteries can lead to an explosion.
o
LCD SCREEN
D Although the LCD screen is made with
high-precision technology and has
effective pixels of 99.99% or more, black
dots or bright points of light (red. blue, or
green) may appear constantly on the LCD
screen. This is a structural property of the
LCD panel and is not a malfunction.
o The LCD screen is made with high-precision technology and to achieve a high level
of performance and picture quality, this
TV's backlight setting is set to maximize
the brightness of the TV. However, uneven
brightness may be observed when the LCD
TV is viewed in a dark ambient without an
input source or with a blank screen. This
condition is normal and not a malfunction
of the TV. Changing the Picture mode,
Backlight setting. enabling the Light
Sensor, or turning on the Power
Management will improve this condition.
o To avoid damaging the LCD panel, do not
expose the LCD screen to direct sunlight.
Do not push or scratch the LCD screen, or
place objects on top of the TV. The images
may be uneven or the LCD panel may be
damaged.
o If the TV is used in a cold place. the
picture may smear or become dark. This
does not indicate a failure. These phenomena improve as the temperature rises.
D Ghosting may occur when still pictures are
displayed continuously. It should disappear
after a few moments.
o The LCD screen and enclosure get warm
when the TV is in use. This is not a
malfunction.
Avoid spraying insect repellent with
volatile material 011 the LCD screen.
Avoid prolonged contact with rubber or
plastic material to the LCD screen.
o
o
o
Broken screen panel
I?o not thr.ow anything at the
1 V as the Impact can cause
~
rr=~
IIIL ~
the LCD screen glass to
lL!:-?~ I
crack, break or scatter.
{:f~
D If damage occurs to the
LCD panel, small traces of liquid crystal
sandwiched between the glass may be
found on scattered broken glass.
D Do not touch the broken glass with bare
hands. As with any broken glass pieces,
avoid skin contact and exposure to your
eyes or mouth. Avoid direct contact with
liquid or damp surfaces of the glass as
these may have an adverse effect on some
people. The contacted area should be
rinsed thoroughly with water. If conditions
persist, see your doctor.
o If the surface of the TV cracks, do not
touch the TV until you have unplugged the
AC power cord. Otherwise electric shock
may result.
SERVICING
f·
00 not use the TV if you
suspect the TV is damaged or
if the TV is damaged.
Do not attempt to service
the TV yourself since
opening the cabinet may
expose you to dangerolls
voltage levels or other
hazards. Refer all servicing to qualified
service personnel.
If replacement parts are
I" .............'
required, acquire a written
~
certification from the service
I
technician which states that
adequate replacement parts
with the same or similar characteristics as
the original parts have been used.
Unauthorized substitutions may result in a
fire, an electric shock or other hazards.
o
o
Safety check
o Upon completion of any TV
servicing or repair, ask the
service technician to perform
routine safety checks as
speCified by Sony and to
certify that the TV is safe to operate. Have
a qualified service technician dispose of
the TV if it is not safe to operate.
AVERTISSEMENT
Consign4
HUMIDITE
ATTENTION
RISQUE DE CHQC ElECTRIQUE.
NE PAS OUVRIR
PRECAUCION
RIESGO DE CHOQUE ELECTRICO
NOABRIR
Ce sigle vise ,1 signaler a
I'utilisateur la presence d'une
« tension dangereuse >i non isolee
au sein du teIeviseur, d01l1 Ia
puissance pellt eIre suffisante
pour provoquer un risque
d'e!ectrocutioll.
Ce sigle vise a signaler a
I'ulilisateur la presence d'une
documentation importante
concernant Irs instructions de
fonctionnement et dentretien de
ce tclcviseur.
Mise a la terre de I'antenne
exterieure
Dispositifde
dechargede
I'antenne(section
810-20duNEC)
Condueteursdemise
ala terre (section 810·
21 duNECl
Attachesdemisea la terre
NEC:Nalional Electrical
Code (code national de
l'electricite)
- - Systeme d'electrodede mise
a laterre de I'alimentation
(article 250, partie Hdu NEC)
Min de reduire les risques d'incendie et delectrocut ion, nhposez pas ce televiseur a la pluie ou a
I'humidite.
o Le Ldeviseur ne doit jamais eire expose aux
eclaboussures, au deversement au a I'egoutteI11cnl de liquides, quels qU'ils soient.
D Ne placez pas d'objets con tenant des liquides,
tels qu'un vase au line plante en pot, sur Ie
D Si un objet Oll du liquide tombe ,ll'interieur du
tdeviscur, debranchcz-le immediate-ment el (aitcsIe verifier par un tcchnicicn qualific avant de Ie
(aire fonclionner de nouveau.
o N'introduisez jamais d'objet quel qu'iI soit dans Ie
tdeviseur par les fentes du boilier, car iI pourrail
toucher des points de haute tension ou courtcircuiter des pieces et provoquer un incendie ou
lelectrocution.
o ~~~~'il~~~;'pas un Ideviseur
Laissez Ull espace suffisant autour dl! telcviseur pour
assurer une circulalion d'air adequate.
alimente par une source de
courant dectriquc pr~s de Icau
(baignoire, lavabo, eVler de
cuisine, cuve de lav<lge, piscine,
sous-solhumide,etc.).
NETTOYAGE
.
r,..rr~-~
~.
0
__
'<1;>
=-
-::::...~-
•
o
~f!? ~
f P~
"
o
,
Avant deffectuer Ie nettoyilge, veillez a debrancher
Ie cor~on d'a!!mentatio.n pour eviter
dl"~
tout risque de!ectrocut!on.
~
D Nettoyez Ie boitier dUleleviscur avec un chiffon
sec et doux.
o Essuyez dClicatementli.;cran ACt avec un
chiffon doux.
o Enlevez les taches tcnaces a raide d'un chiffon
tegeremcnL humidifie avec une solution de
savoll doux et deau tiede.
o Si VOLlS lltilisez un chiffon prctraiLe avec un
produil chimique, suivez bien les directives
indiquees sur lemballage.
o N'utilisez jamais de solvants corrosifs tels qu'un
diluanl, de rakool ou dll benzene pour nettoyer
I'appard!.
o II ('Sl rccommandc de ncttoyer periodiquemcnt
les ouvcrturcs de ventilation <lvec Lin aspiratcur
afill de garantir une bonne ventilation.
VENTILATION
Les OLivertures de ventilation du televiseur sont
necessaires pour assurer Ie bon fonctiollnemenL dll
tclevisellf et Ie proteger de la surchauffe.
o Ne bloquez pas et nc COllvrez pas les ouvertures
-:)
f
de ventilation avec dl! tissu OU
d'auLres materiaux.
"~6'
o Ne placez jamais Ie tiMviseur
sur un lil, un can<lpe. un lapis ou
toute autre surface similaire qui
pourrait bloquer les ollvertures
de ventilation.
o Sans LIne ventilation correcte, de
la poussiere peut s'accuilluler dans Ie televiscur
et provoquer des dommages.
o Ne laissez jamais tom bel' de
liquides ou d'objets dans les
ouvcrtures de ventilation.
/ \'
N'installez jama~s Ie televiseur dans
~:~~~~~~~:s~r~lllll~' r~~::~~~:~~~lstre,
a moins quc la ventilation ncccssaire
:f"
1\:;1
= "'"
1
;t 0
i;:
II [
I: I
1 l
1
1
nc soit prevue.
I 1 1
Laissez Ull espace Iibre d'au moins 30 cm (11 7/8 po)
au-dessus du tCleviseur et de 10 cm (4 po) de chaque
dM. Si vous installez I'apparci! au mur, laiss/;.'z un
espace libre d'au moins 10 cm (4 po) en dessous de
Icc ran. (Reportez-volls au mode demploi pour des
renseignements supplementaires.)
INSTALLATION
Installez Ie televiseur pres d'une prise de courant CA
facilement accessible.
o N'installez pas Ie tekviseur avec l'ecran vel's Ie haut
au vel's Ie bas, ni a l'cnvers ou sur Ie cote.
o N'installez pas Ie tCleviseur dans des endroits
chauds, huileux, humides ou excessivement
poussicreux.
o N'installez pas Ie televiseur dans des
_:::()'::._
endr,o.its sujets ades extre~les de
temperature, par exemple ala
lunllcre directe du solei! ou encore
pres d'un radiateur ou d'une bo.u.che """ \' I ',,de chaleur. Dans de telles condItions, ~;;-MD·'
Ie tClevi,scur pourrait surchauffer, ce ".~ _ ,~;
qui peut provoquer une deformation
rIm 1
du boiller et/ou des problCmes de
fonctionnement.
o N'installez pas Ie tekviseur dans un ~(,: ~1
endroit expose directement a rail'
irQ"!' ~
dimatise; de I'humidite pourrait se
~
condenser a l'interieur du tdeviseur ct provoquer
des probtemes de fonctionnement.
D N'installez pas Ie televiseur dans un end roil Oll il
reut etre expose a des vibralions mecaniques.
D N'installez pas Ie tdeviseur dans un endroit OU
rellvent penetrer les insectes.
o N'installez pas Ie televiseur dans un endroit d'ou il
depasserait, par exemple sur ou derriere une
colonne, ou dans un endroit ou vous pourriez Ie
heurter de la tete et vous blesser.
o Pour eviter les risques d'inccndie, !enez les objets
inflammables et la flam me nue (p. ex. les bougies)
a distance du tCleviseur.
D Ne posez aucun appareil sur Ie televiseur.
g'"'' ' j
'g\I.-dPl'
Prevenez Ie basculement du televiseur
prene,z les mesures necessa, ires afl~ d'eviter
que Ie te1Cviseur ne bascule, ce qUI pourrait
provoquer des blessures ou des dommages au "
televlseur ou ad'autres objets.
o Fixez Ie tdcviseur a un mur ou a un support.
o N'installez jamais Ie lelCviseur sur une surface
inegale et/ou instable.
o Ne laissez pas les enfants jouer avec Ie meuble ou
Ie televiseur el ne les laissez pilS grimper dessus.
o N'installcz pas Ie teIcviseur sur un meuble qui peut
facilemenl etre escalade, par exemple une
commode a tiroirs.
o Veillez ,1 installer Ie tCieviseur dans un end roil oil il
ne risque pas delre pousse, tire ou renverse.
o Veillez a acheminer tous !c::.·s cordons d'alimentation CA et dbles de raccordemcnt de maniere.1 ce
qu'ils soient hoI'S de la portee des enfants, qui
pourraient Its manipuler oules tirer par curiositc.
0
Etablissements medicaux
N'insl,allez pas ce televiseurdans Ull endroit~-;~J
" ,
~
_
ou des appareils medicaux sont utilises. II
pourrai\ entraincr des problcmes de
fonctlonnemenl des appareils nH~dicaux.
Utilisation a l'exterieur
N'installez pas ce televiseur a lbtericur. Nbposez
pas Ie televiseur ,1 la pluie ou a la lumiere directe du
solei! pour eviter de lendommager et de provoquer
des risques d'incendic ou d'e1ectrocution.
N'installez pas ce teh!viseur dans un
vehicule ou sur un bateau ou autre
embarcation
o
o
Lcs sursauts excessifs d'un vehicule ~
en mouv/;,'ment oUle, mouvemcnt de
'~ liG~
balancier repeh~ d'un bateau peuvent
4J!I .
faire tomber 1c tdevlseur et entrainer
~i
des blessures
L:exposilion du teIeviseur ,1leau de
mer peut poser un risque d'incendie
ou causer des dommages au
leleviseur.
Champ magnetique
o
o
ADVERTENCIA
Les haut-parleurs de ce televiseur conliennent un
aimant puissant gcnerant un champ magnetique.
Veillez a tenir tout objet sensible aux champs
magnetiqucs a distance des haut-p'lrleurs.
L'installation d'appareils externes a trap grande
proximite du televisellr reut provoquer une
distorsion de l'image ou des parasites sonores, en
raison des radiations electromagnetiques.
Practicas de segu
HUMEDAD
ATTENTION
RISQUE DE CHOC ELECTRIQUE.
NE PAS QUVRIR
PRECAUCION
RIESGO DE CHOOUE ELECTRICQ
NOABRIR
Este simbolo pone sobre aviso al
usuario de la presencia de
"voltaje peligroso" sin aislamiento en el interior del
televisor, el ellal puede ser de tal
intensidad que podria presentar
riesgo de descarga e1eclrica.
Este simbolo tJene por objelo
advertir al usuario que la
documentacion que acompaii.a a
este televisor contiene instrucciones importantes de operacion
y mantenimiento (servicio).
Conexion a tierra de una antena
exterior
Para reducir eI riesgo de incendio 0 descarga
e1eclrica, no exponga este Ielevisor a la humedad
ni la lluvia.
D El televisor no debe estar nunca expuesto a
goteos, salpicadurds 0 derrames de ningun tipo
de Iiquido.
o No coloque objetos con liquid os, como noreros
o macetas con plantas, sobre el televisor;
r
~-:::
D No utilice un televisor que
requiera alimentaci6n electrica ~
cerca del agua como, pOl' ejemplo,
_~.=
cerca de ban eras, lavamanos,
<= 't9
fregaderos 0 pi let as de lavado, en
1'9." ~
Ull s6~an.o humedo ni cerca de
!llh~
unaplscllla.
~
r
..
Unidad de descarga
delaantena(Secci6n
81O·20deINEC)
VENTI LAC ION
Conductoresde
Las aberturas de ventilaci6n del televisor son
conexi6n atierra
necesarias para asegurar una operacion flable del
(Secci6n81Q-21 deINEC)
televisor y pro!egerlo contra el sobrecalentamiento.
Abrazadelasdeconexionatierra
No bloquee 0 (ubra las aberturas ";;-"
rc;- - Sistema deelectrodos de
de ve~tilacion con panos ni olros
~
conexion atierra deservicio
matenales.
eleetrico
NUllca coloque el televisor sobre
(Articulo 250 Parle Hdel NEC)
o
o
o
Deje suflciente espacio alrededor del televisor para
garantizar una buena circulaci6n del aire.
D
o
LIMPIEZA
Durante la limpieza, asegurese de desenchufar el
cable de alimentaciilll para evitar la posibilidad de
una descarga elect rica.
o Limpi: eI mueblc del televisor con d:~'
un pano seco y suave.
~
o Limpie 101 pantalla LCD con cuidado con un
paiio suave.
o Las manchas dificiles pueden Iimpiarse con un
paiio ligeramente humcdecido con una
solucion de jab6n suave y agua tibia.
o Si utiliza un pano tratado quimicamente, siga
las instrucciones que se indican en el paquete.
o Nunca limpie el televisor con disolventes
fuertes como diluyentes, alcohol 0 bencina.
o Se recomienda retirar el pOlvo con una
aspiradora de las aberturas de ventilaci6n de
forma peri6dica para garantizar una buena
venlilacion.
o
D Si caen Iiquidos u objetos solidos dentro del
televisor, desenchufc eI televisor inmediatamente y
haga que verifique Sll funcionamienlo un tecnico
de reparacion calificado antes de seguir
openindolo.
o Nunca introduzca objetos de ningllll tipo en las
ranuras del mueble, ya que poddan entrar en
contacto con puntos de vohaje peligrosos 0 causal'
cortocircuitos, 10 cual podda ocasionar un
incendio 0 una descarga elect rica.
""'6,\
puedan!~
uea cama, sofa, alfombca u oteas ~~
superfi.cies similares que
obstrUlrlasaberturasde
'
_
ventilacion.
Si cI televisor no cuenta con una ventilaci6n
adecuada, puede acumular polvo y dailarse.
N~ permit~ que caigan liquidos u ~
ob,etos soltdos dentro de las
~
aberturas de ventHaci6n,
y
~~~ac~o~~I~I~~eee~ ~~~el~~sr~~~~ ~171lugar }fQJ·
'\:;1. /2-1
.I
0
mueble em,potrado, a me,nos que haya [:~
.~:_:
ventilacion adecuada.
1"S I _ rtf
Sc debe de,ar como milllmo un
_1 l~ 0 r'
espacio de 30 em encima del televisor y 10 em a
cada lado. Si se monla en la pared, deje como
minimo un espacio de 10 cm debajo de la pantalla.
(Consulte 101 informacion adicional que se
suministra en el Manual de instrucciones.)
INSTALACION
5e recomienda instalar el televisor cerca de un
tomacorriente de ca de facil acceso.
o No instale el televisor boca arriba, boca abajo, ni 10
apoye sobre un lateral.
D No instale el televisor en lugares dlidos, grasienlos, hllmedos 0 expuestos a cant ida des excesivas de
polvo.
o No instale el televisor en lugares
sometidos a temperaturas cxtremas,
como pol' ejemplo los expuestos a 1a
luz solar directa, los cercanos a un
radiaclor 0 a un conducto de
ca1cfacciOn. EI televisor pod ria
recalentarse en tales condiciones y
producir la de formaci on del interior
del aparato y/o empezar a funcionar
defectuosamente.
o No instale el tcleviso.r en unlugar
(
expuesto de forma dlrecta al a i r e . , .
~
acondicinnado; se podr;, condens",
la humedad en su interior yempezar
a funcionar defectllosamente.
D No instale el televisor en lugares expuestos a
vibraciones mednicas.
o No instale eI televisor en lugares que puedan atraer
inseclos.
o No instale eI televisor en unlugar donde pudiera
sobresillir, como encima 0 detras de una columna,
o donde pudiera golpearlo COil la cabeza 0
producir lesiones corporales.
o Para evitar incendios, mantenga los objetos
inflamablcs y llamas (por ejcmplo, velas) alejados
del televisor.
D No coloque llingun equipo opdonal sobre el
televisor.
1
Medidas para evitar que se vuelque el
televisor
"g\P\-;
Tome las medidas adecuadas para evilar
que e1lelevisor se vuelque y provoque
~\\....d
lesiones, que se dane el televisor 0 que se
produzcan dailOS materiales.
o Pije el lelevisor a la pared 0 a una base de soporte.
o No instale nunca el televisor sobre superficies
inestables ylo desniveladas.
o No permita que los niilOS se suban a los muebles}'
at televisor 0 que jueguen con estos.
o No instate el televisor sobre muebles que se pucdan
utilizar f,kilmente como escaleras, como una
cDmoda.
D Procure instalar eI televisor donde no se pueda
emplljar, hacer a un lado 0 derribar.
o Procure enrutar todos los cables de alimcntacion
de ca y los cables de conexi6n de manera que no
puedan tirar de e110s ni agarrarlos ninos curiosos.
Centros medicos
No coloquc el televisor en un lugar
donde se utilicen equipos medicos,
puesto que podria inlerferir con eI
funcionamiento de equipo medico.
Uso del televisor en un lugar exterior
No instale este televisor en un lugar al aire libre. No se
debe expon('f el televisor a la lluvia 0 a la luz solar
directa para evitar daiios y la posibilidad de un
incendio 0 una descarga elect rica.
No instale este televisor en vehiculos,
barcos 0 buques
o
o
@!1
W_!J\-"
EI movimiento excesivo del
,
,
vehiculo 0 el balanceo co,ntinuo de
un barco pueden provocar la caida
1f,
del televisor y causal' leslOnes.
.
Si 10 expone ~I agua.del mar, puede ~ ~
provocar un lllcendlO, una descarga .' --. ~
electrica 0 causal' daiios internos.
~
-:...J"0
Campos magneticos
o
~g~
o
Montaje en pared
o
<'"
En las bocinas de este televisor se cncuentra un
fuerte iman que genera un campo magnetico.
Mantenga alejado de las bocinas del televisor
cualquier elemento susceptible de danos producidos pOl' campos magnelicos.
La radiacion electromagnetica emit ida desde el
equipo opcional instalado demasiado cerca del
televisor puede diSlorsionar la imagcn y/o producir
ruido.
I
La inSlalaci<lIl en una,' pared req, uiere~~
un soporte de mOllta,e en pared.
A 11~
Cuando instale 0 qUlIe ellelevlsor y
el soporte de montaje en pared,
asegurese de hacerlo con contratistas calificados. Si
no sc fija adecuadamente durante la inSIalaci6n 0
desinstalacion del soporte de montaje en pared, el
lelevisor pod ria caerse y causal' lesiones graves.
s de securite supplementaires
o
Installation au mur
o
L'installation au mur m;cessite
a~~
['utilisation d'U~l suppo.rt de fixation
-I
murale. Pour 1'1Ilstalbtion au Ie
dClllontage dll televiseur el dll
support de fixation l11urale, Clites appel un
entfeprt.'neuf qualifie. Si Ie tCleviseur est mal fixe
pendant l'installation Oll Ie fetrail dl! support de
fix,Hion murale, iI peut tamber et causer des
blessures graves.
Suivez bien Ie guide d'installation (ourni avec le
support de fixation mllrale lors de l'installation dll
televist'ur.
o Vcillez it fixer les supports avec les pieces indiquces
fournics avec Ie support de fixation murale.
o Nt' suspendcz pas 1c ICleviseur au plafond, II
pourrait 10m bel' ('I provoquer des blessures graves.
N'accrochez ,lllCllll objet au televiseur. f;~_,
D Ne laissez pas les enfants monter sur Ie
'"
1
,~
J I~
televiseur.
a
o
o
o
o
D Ne touchez pas Ie cordon d.'alimentation ~:.(
.. "'-;;
CA o~ la fiC. h~ avec des mams humidcs, ~,?}"'
ce qUt pourralt provoquer
.~
lelectrocutlOn.
"'
D Pour dcbrancher Ie cordon d'alimenta- ~
tion CA, saisissez d'abord la fiche et
.~ '" V p '""
d.cbranchez-Ia de la prise lllurale. Ne
"Ii
\\
tlrez pas sur Ie cordon lui-meme,
~
D Maintenez Ie cordon d'alimentation a
l'abri des sources de chaleur.
Un tI?lcviseur dote £1\111 cordon d'alimentation CA
avec une fiche a trois brochcs av/x mise ilIa terre doil
etre branchi' dans une prise de courant CA comportant une protection de mise a la terre.
D Ne lllodifiez pas et n'endommagez pas Ie cordon
d'alimentalion CA.
D F;lites ch;lllger toute prise dr?(eclueuse par votre
electricien afin de pOLivoir y brancher votre
te!eviseur.
Le fait de soumettre Ie cordon d'alimentation;\ une
usure prematuree et/ou a un mauvais traitement peut
entrainer des dommages au cordon d'alimentation CA et au televiseur.
o N'installez pas Ie teJeviseur a un endroit ou Ie
cordon d'alimentation peut etre facilelllcnt pince,
plie Oll tordu, ou fain' trebucher quelqu'un.
:t:'.
Ne branchcz pas volre telcviseur dans
une prise de courant endoml1lagee ou
dans laquelle la fiche ne s'insere pas
~
~
~e;.~~serez
la fiche
~~
~~~
Ple.tel1lent dans la
prise. Un branchementhkhe peut
~ )
COI1l
11 o
CORDON D'ALIMENTATION CA
Utilisez uniquementun cordon d'alimentation CA
Sony d'origine pour votre tiMviseur; aucune autre
marque l1e cOlwient
N'utilisez pas Ie cordon d'alimentation CA fourni
avec Ie teJeviseur sur Lin autre appareil.
N'~.tilisez jamais un cordon d'alimentatlon CA t'ndol1ll1lage. Un cordon
,;:
--- '<>
d'allmentation CA t'ndol1lmage peut
<f
P..,
provoquer un court-circuit, ce qui
",VI>
'"
peut causer un incendie ou I'electrocution.
entrainer un arc C1ectnque et un
lllcendie.
Ne surchargez pas la prise de
courant CA.
~
~)
'l7
n-r
~
Pour interrompre complktementl'alinH.'ntation
elect rique du televiseur, deb ran chez Ie cordon
d'alil1lentation CA de la prise de courant.
o Pendant les orages e. ~ lorsque vaus ~ ~ .
n'utilisez pas Ie teJevIseur pendant
~
une longue periode, debranchez Ie
~
cordon d'alimentatlon CA de la
prise de courant. Celie l1lesure
~
vise a eviter des dommages
]
potentiels a votre teJeviseur.
~
Debranchez egalemenll'antenne
pour eviter les dommages au televiseur.
o Pour des raisons de securile et pour economiser
I'eleclricite, exercez-vous adebrancher Ie cordon
d'alimt'ntation CA de la prise de courant CA.
D
<
Nettoyez la fiche du cordon d'alimentation
CA
Oebranchez la fiche du cordon
~D
d'alimentation CA et nelloyez-Ia de
l\. It-::::::::
temps iJ. aulre pour l'viter I'accumulation de poussiere. Pendant Ie nelloyagc, vcrifiez que Ie
cordon est en bon etaL N'ulilisezjamais un cordon
d'alimentation CA endommage.
ACCESSOIRES
Gardcz les petits accessoires hors de 1a portee des
enfants. N'utilisez que les accessoires indiques par Ie
Fabricant avec ce televiseur.
"\[;11,
6:a
D Ne laissez rien reposer ou rouler sur Ie cordon.
D Pour votre securile, debranchez Ie cordon
d'alimentation CA avant de brancher les cables.
D Ne deplacez pas Ie televiseur lorsque Ie cordon
d'alimentation CA est branche, ni lorsque d'autres
cables (audio ou video, par exemple) sont
raccordes.
PILES
Les piles de la telecommande sont des produits
consollllllables.
D Pour proteger lenvironnement, mellez au rebut
les piles usees conformement aux lois et
reglellH'ntS locaux.
D Ne jetez pas les piles au feu.
D Ne cOLlr!-circuitcz pas Ics piles, ne les demontez
pas et ne les railes pas surchauffer.
D Remplacez-Ies uniquement par des piles
idcntiques ou de type equivalent. I:utilisation de
piles de rechange incorrectes pellt provoquer
une explosion.
ECRAN ACL
D Bien que l'ecran ACL soit Ie fruit d\llle technologie de haute precision et que 99,99 % ou plus de
ses pixels soient efficaces, dt's points noirs ou des
points lumineux (rouges, bleus ou verts) peuvenl
apparaitre ell permanence illecran ACL. Ceci est
une propriete structurelle du p3nneau ACL et ne
constitue pas un probleme de fonctionnement.
D Lecran ACL de ce televiseur a etc con<;:ll a
partir de technologies de haule precision, et
afin d'obtenir Ie ll1eilleur rendemenl ella
meilleure qualite d'image pOSSible, Ie retroec1airage du tdcviseur est regie pOllr en
maximiser la luminosite. Toutefois, il est
possible que vous observiez des zones moins
c1aires que d'autres lorsqlle VOIlS regardez un
televiseur ACL dans Ulle piece sombre alors
que rien n'est affiche a Iccran. II s'agit d'un
phenomene normal et non d'un dcfaut de
I'apparei!. Le reglage des fonctions Mode image
et Retroeclairage, ou encore l'activation du
Capteur de lumiere ou de la fonction de
gestion de l'alimentatiol1 VOllS permettent de
regler l'ecran afin d'ameliorer cet aspect.
D Afin dcviter dCndolllmager Ie panneau ACL,
n'exposez pas I'ecran ACL a la lumiere directe du
soleil.
D N'appllyez pas sur l'ecran ACL, ne I'egralignez
pas et ne placez pas dbbjets sur Ie teJeviseur.
Cela pourrait provoquer I'instabilite de !'image
ou des dommages au panneau ACL.
D Si Ie leleviseur est utilise dans un environnement froid, !'image peut apparaitre sale ou
sombre. C/.'ci n'est pas Ie signe d'un probleme de
fonctionnement. Ce phcnomene disparait au fur
t'l a mcsure que]a temperature augmente.
DUne image fant6me peut apparaitre lorsque des
images fixes sont affichees en continuo Elle
devrait disparaitre apres quelques instants.
D Lecran ACL et Ie boitier deviennent chauds
lorsque Ie televiseur est en cours d'utilisation. II
ne s'agit pas d'un probleme de fonctionnemenl.
D fvitez de vaporiser sur l'ecran ACt tout repulsif
insecticide contenant des produits volatils.
D Evilez Ie contact prolonge de lecran ACL avec Ie
caoutchouc et les materiaux plastiques.
rrF 51
Ecran end ommage
Ne jetez rien en direction de Iccran,
C~
car l'impact pourrait provoquer la ~
~
fissuration, Ie brisouleclatement
~8
dll verre de lecran ACL.
{t
o Si Ie panneau ACL venait a ctre endommage,
des Iraces de cristaux liquides peLlvent se
retrouver entre deux cpaisseurs de verre, parmi
les morceaux de verre brise.
o Ne touchez pas Ie verre brise a mains nu/.'s.
Comme dans toute situation de bris de velTe,
evitez Ie contact avec la peau et lenez les
morceaLlX de verre a I'ecar! des yeux el de la
houche. Evitez Ie conlact direct avec Ie liquide
repandu et les rnorceaux de verre hum ides, car
ces produits peuvent avoir un effet tlefaste pour
certaines personnes. En cas de contact, rincez la
zone affectee abondamment ill'eau courante. 5i
des sympt6mes apparaissent, consultez votre
medecin.
o 5i la surface du tc)('viseur St' fissure, ne toucht'z
pas Ie Ieleviseur avant d'avoir debranche Ie
cordon d'alirnentation CA. Sinon, vous pourriez
vous t'lectrocuter.
FL
REPARATION
r
N'utilisez pas Ie televiscur si vous
conslatez ou croyez qu'il est
endolllmage.
D Ne tentez pas de reparer Ie
te!eviseur vous-mcme, car
Ibuverture du boitier
pourrait vous exposer a des
zones de tension elevee et a
d'autres dangers. Pour toute
reparation, adressez-vous il
lin lechnicien qualifie.
D
;~l~~~I~:~:,sdde~,\\~~~~e~t::u
1....... -.. 1
que~_
lechnicier., de certifier par euit
les pieces de rechange adequates
ont ete utdisees et que leurs
~
caracleristiques sont similaires ou
identiques a celles des pieces dbrigine. Toute
substitution non autorisee pourrait causer un
incendie, I'electrocution all d'autres dangers.
Revision de securite
o
Apres toute reparation ou tout
~
entretl.'en du televiseur, demandez,
~au technicien d'effectuer une
verification de routine, tel Ie que
speciflee par Sony, et de certifier
que Ie televiseur fonctionne en toute securite. Si
Ie tCleviseur lle peut pas etre utilise de fa<;:on
securitaire, confiez sa mise au rebut a un
technicien qualific.
,}j
idad correctas e incorrectas adicionales
o
Asegurese de seguir la guia de instalacion
suministrada con el soporte de montaje en pared
cuando instale eI televisor.
Asegurese de fijar las abrazaderas can las piezas
especificadas suministradas con eI soporte de
montaje ell pared.
o No cuelgue eI televisor del techo. Pod ria caerse y
causar lesiones graves.
o No cuelglle ningun objeto en el
televisor.
f;~_
D No permita que los nii\os se suban al
televisor.
,~'"
~
o
Jl'
CABLE DE ALiMENTACI6N DE ca
o
.. "'-;
No toque eI cable de alimentacion de ca ~f
ni cl e.nchUfe con las manos mojadas, ya ~ "'
que puede provocar una descarga
'e
elcctnca.
. <D Cuando vaya a desconectar el
~
cable de alimentacion de ca, jale
_'" "'" V ~ A
del enchufe y desconectelo del
~
tomacorriente de pan'd primero.
it ~~
No jale del cable.
D Mantenga cl cable de alimentacion alejado de
fuentes de calor.
Un televisor debe conectarse con un ellchufe de cable
de alimentacion de ca de tres terminales y tom a a
tierra a un tomacorriente de ca con una conexi6n a
tierra de protecci6n.
No modifique ni dane eI cabk de alimentacion de ca
o Pongase en contacto can su electricista para
adaptar el tomacorriente a su televisor.
o
Si cI cable de alimentacion de ca queda expuesto a
desgasle ylo maltrato, se pucde danar cl cable de
ali menta cion de ca y el televisor.
No coloque ellelevisor donde el cable de
alimentaci6n se pueda apretar, doblar 0 lorcer
facilmente, 0 donde plleda atrapar los pies de una
persona.
o
D Nunca uti lice un cable de alimentacion de ca dailado. Un cable de
alimentacion de ca danado puede
provocar un cortocirclJito, 10 que
puede producir un incendio 0 una
descarga electrica.
D No provoque un cortocircuito, des monte ni
recaliente las pi las.
D Reemplacelas solo con el miSIl10 tipo 0 uno
equivalente. La utilizacion de pilas de repueslo
incorrectas puede producir una explosion.
No utilice un tomacorriente de ca
~
daiiado 0 mal instalado c?mo la fuente ~
de alimentacion del teleVIsor.
.
~p
D InserteelenChU.feene.l.tomacorrlenle
,P
hasta que quede bien metido. Si el
,,-: .<:J
enchufe no encaja compI eta mente,
~ \'
pueden produCirse chlspas que acaben
~
provocando un incendlO.
~
t'1?'"
D No sobrecargue el mismo tomacorricnte de ca
v ~
PANTALLA LCD (CRISTAL L1QUIDO)
I
Si se desenchufa el cable de alimentacion de ca del
tomacorriente de pared se corta el suministro
elect rico allclcvisor.
o Durante tormentas electricaso
~ ' <_
cuando no se utilice eI televisor
~
durante periodos de tlcmpo
~
prolongados, se debe desenchLlfar el
cable de alimentacion de ca del
~
tomacorriente de pared. Esto
]
.
evitara la posibilidad d/.' que se
~.
dane su televisor. Desenchufe
tambien la antena para evitar que se daiie el televisor.
Para conservar energia y por motivos de segur idad, acostumbrese a desenchufar el cable de
alimentacibn de ca deltomacorriente de ca
o
D
D
o
D
D
Limpieza del enchufe del cable de
alimentaci6n de ca
Oesenchufe e1 cable de alimentacion~
de ca y Hmpielo de vez en cuando
para evitar que se aCLlmule el polvo.
...
Durante la Iimpieza, compruebe la
existencia de signos de danos. Nunca se debe utilizar
un cable de alimentacion de ca daJlado.
ACCESORIOS
D No permita que ningun objeto se encuentre 0 pase
sobre el cable.
D Antes de conectar los cables, desenchufe el cable
de alimentacion de ca para Sll seguridad.
D No mueva el televisor con el cable de alimentacibn
de ca, ni can olros cables de audio y video,
conectados.
No utilice cables de alimentacion de C3 que no
sean originales de la marca Sony.
D No utilice cl cable de alimentaci6n de ca suministrado con ellelevisor con ningun otro aparato.
o
Mantenga los pequenos accesorios alejados del
aleance de los niiios. Utilice unicamente los acccsorios especificados para este televisor.
Ajuste de volumen
D Cuando utilice audifonos, ajuste eI
volull1en de forma que se eviten
niveles excesivos de audio para no
darlar los oidos.
PILAS
Las pilas del control remoto son consull1ibles.
D Para conservar el medio ambiente, siga las leyes 0
regulaciones locales para desechar las pi las usadas.
o No se deshaga de las pilas arrojandolas al fuego.
D
D
D
D
D
La pantalla LCD esta fabricada con tecnologia
de alla precision y dispone de un minimo de
99,99% de pixeles efectivos. En est a pantalla
aparecen constantemente puntos negros 0
puntos luminosos en rojo, azul 0 verde. No se
trata de una falla de funcionamiento, sino de
una caracteristica estructural del panel LCD.
La pantalla de crislalliquido (LCD) esta
fabricada con tecnologia de alta precision y para
aleanzar un aho nivt'l de rendimiento y de
calidad de imagen, esta configuracion de
retroiluminacion se ajusta para maximizar el
brilto del televisor. Sin embargo, es posible que
se observe un brillo desigual cuando el televisor
de pantalla de crislalliquido se ve en un
ambiente oscuro sin una fuente de entrada 0
una pantalla en blanco. Esta condicion es
normal y no se trata de una falla de funcionamiento del televisor. Al cambiar el modo de
lmagen, la configuracion de Retroilumin, al
habilitar cl Detector de luz 0 al activar el
Control de energia mejorara esta condiciOn.
Para evitar dallar eI panel LCD, no exponga la
pantalla LCD a la luz solar directa.
No presione ni raye la pantalla LCD, ni coloque
objetos sobre cI televisor. Es posible que las
imagenes resullen irregulares 0 que se dalle el
panel LCD.
Si se utiliza eltelevisor en un lugar frio, es
posible que la imagen se oscurezca 0 que
aparezc;l una mancha en la pantalla. No se trata
de una falla de funcionamiento. Estos fen6menos desapareceran a medida que aumente la
temperatura.
5i se yen imagenes fijas conlinuamente, puede
que se produzca un efecto de imagen fantasma.
£sto deberia desaparecer transcurridos unos
segundos.
Cuando se utiliza el televisor, la pantalla LCD y
la caja se calientan. No se trata de lIna falla de
funcionamienlo.
No use repelentes insecticidas en aerosol con
material volatil sobre la pantalla LCD.
Evite el contacto prolongado de la pantalla LCD
con material de goma 0 plastico.
Panel de pantalla roto
No arroje ningllll objeto contra
r~
el televisor pues el impacto
~ I -J.;;1~
puede hacer que el crislal de la
L'(~
pantalla LCD se raje, se rompa 0
u...:~
se disperse.
{t
D 5i se dana el panel LCD, es posible que se
encuentren pequerl0s rastros de cristalliquido
metidos entre el cristal en los fragmentos de
cristal esparcidos.
D No toque el cristal rota con las manos. Como
con cualquier trozo de cristal roto, evile el
contacto can la piel, los ojos 0 la boca. Evite el
contacto directo del cristal con liquidos 0
superficies humedas pues estos pueden tener un
efecto perjudiciat sabre algunas personas.
Enjuaglle la zona de contacto con agua
abundante. Si los sintomas persisten, acuda a un
medico.
D Si la superficie del televisor se rompe, desenchufe cI cable de alimcntacion de ca antes de
tocar el televisor. De 10 contrario, pod ria
producirse una descarga elect rica.
II
J:
REPARACI6N
No util.ice ellelevisor si sospecha 6~-"/
0 si el televisor
1\._/)
esta dallado.
?..
D No 1l11ente reparar usted
-a
mismo cI televisor, ya que al
abrirlo se veria expuesto a
voltajes peligrosos y otros
riesgos. 50licitc servicio
tccnico unicamente a personal calificado.
D Cuando sean necesarias piezas de
!l_~l!li'1Cl:l
repuesto, solicite allecnico de
~
reparacion que certifique por
'
escrito haber ulilizado piezas de
repuesto adecuadas can las mismas
1
caracteristicas que las originales 0 con
caracterislicas sill1ilares. La utilizacion de piezas
no autorizadas pod ria causar incendios,
descargas electricas u otros peligros.
qu~ esta daiiado
--L-_
Comprobaci6n de seguridad
o
Despues de haber finalizado
~~i~ll;t~iC:;S:;~~~~~6~:;:t;~tl:l::~or, Qj:.!'~§ill
soli cite al tecnico de reparacion
que realice y certifique las
comprobaciones de seguridad rutinarias segun
10 especificado por Sony para determinar si el
televisor se encuentra en condiciones seguras de
operaci6n. Solicile a un tecnico de reparacion
calificado que se deshaga del televisor si no se
encuentra en condiciones seguras de operaci6n.
4-1 03-056-02( 1)
111111111111/ 1111/11111111111
4103056021
LIMITED WARRANTYusONLY)
SONY ELECTRONICS INC. ("SONY") warrants this product against defects in material or workmanship
for the time periods and as set forth below. Pursuant to this Limited Warranty, SONY will, at its option,
(i) repair the product using new or refurbished parts or (ii) replace the product with a new or refurbished
product. For purposes of this Limited Warranty, "refurbished" means a product or part that has been
returned to its original specifications. In the event of a defect, these are your exclusive remedies.
Term: For a period of one (1) year from the original date of purchase of the product (or a period of
ninety (90) days for commercial use), SONY will, at its option, repair or replace with new or refurbished
product or parts, any product or parts determined to be defective.
This Limited Warranty covers only the hardware components packaged with the Product. It does not
cover technical assistance for hardware or software usage and it does not cover any software products
whether or not contained in the Product; any such software is provided "AS IS" unless expressly provided
for in any enclosed software Limited Warranty. Please refer to the End User License Agreements included
with the Product for your rights and obligations with respect to the software.
Instructions: In-home diagnostic warranty service is provided during the one (1) year limited warranty
term (ninety (90) days for commercial use) for thirty (30) inch (measured diagonally) or larger screen
size television products through a SONY-authorized service facility. Otherwise, to obtain warranty
service, you must deliver the product, freight prepaid, in either its original packaging or packaging
affording an equal degree of protection to the SONY authorized service facility specified. A dated
purchase receipt or bill of sale is required. For specific instructions on how to obtain warranty service
for your product,
Visit SONY's Web Site:
www.sony.com/support
Or call the Sony Customer Information Service Center
1-800-222-S0NY (7669)
For an accessory or part not available from your authorized dealer, call:
1-800-488-S0NY (7669)
Repair / Replacement Warranty: This Limited Warranty shall apply to any repair, replacement part or
replacement product for the remainder of the original Limited Warranty period or for ninety (90) days,
whichever is longer. Any parts or product replaced under this Limited Warranty will become the
property of SONY.
This Limited Warranty only covers product issues caused by defects in material or workmanship during
ordinary consumer use; it does not cover product issues caused by any other reason, including but not
limited to, product issues due to (i) acts of God, (ii) misuse, (iii) customer instruction, installation, set
up adjustments or signal reception issues; (iv) limitations of technology, or (v) modification of or to
any part of the SONY product, include the antenna. This Limited Warranty does not cover SONY
products sold AS IS or WITH ALL FAULTS or consumables (such as fuses or batteries). This Limited
Warranty is invalid ifthe factory-applied serial number has been altered or removed from the product.
This Limited Warranty is valid only in the United States.
LIMITATION ON DAMAGES: SONY SHALL NOT BE LIABLE FOR ANY INCIDENTAL OR CONSEQUENTIAL
DAMAGES FOR BREACH OF ANY EXPRESS OR IMPLIED WARRANTY ON THIS PRODUCT.
DURATION OF IMPLIED WARRANTIES: EXCEPT TO THE EXTENT PROHIBITED BY APPLICABLE LAW,
ANY IMPLIED WARRANTY OF MERCHANTABILITY OR FITNESS FOR A PARTICULAR PURPOSE ON
THIS PRODUCT IS LIMITED IN DURATION TO THE DURATION OF THIS WARRANTY.
Some states do not allow the exclusion or limitation of incidental or consequential damages, or allow
limitations on how long an implied warranty lasts, so the above limitations or exclusions may not
apply to you. This Limited Warranty gives you specific legal rights and you may have other rights
which vary from state to state.
Printed in U.S.A.