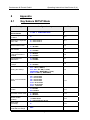
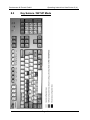
1
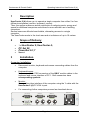
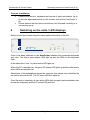
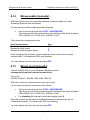
UserCenter2/4
Operating Instructions
Copyright G&D 20/06/2006
M 6.50; S 5.60
Errors and technical changes excepted!
Table of Contents UserCenter
2 (4)
1
Description............................................................................................................. 1
2
Scope of Delivery .................................................................................................. 1
3
Installation.............................................................................................................. 1
4
Switching on the units / LED displays................................................................. 2
5
Operation................................................................................................................ 3
5.1 Switching ............................................................................................................ 3
5.2 Manual Hold function.......................................................................................... 3
5.3 GET function....................................................................................................... 4
5.4 Dark-Switching of the screen whilst manual hold function ................................. 5
5.5 Dark-Switching of the screen whilst GET-function ............................................. 5
6
Setup Mode ............................................................................................................ 6
6.1 Default Settings .................................................................................................. 6
6.2 Establishing the default condition ....................................................................... 7
6.3 Changing the keyboard scan code ..................................................................... 7
6.4 Manual hold function .......................................................................................... 8
6.5 GET function....................................................................................................... 8
6.6 Darkening of a screen if the hold function is enabled......................................... 9
6.7 Transmission of GDFrames................................................................................ 9
6.8 Defining the double hotkey ............................................................................... 10
6.9 Setting the HotKeys.......................................................................................... 10
6.10 Time-out for automatic switch........................................................................... 11
6.11 Automatic mouse-enable (standard mouse driver)........................................... 11
6.12 Automatic mouse-reset..................................................................................... 12
6.13 Support for the serial Logitech mouse.............................................................. 12
6.14 Mouse-enable (manually) ................................................................................. 13
6.15 Mouse-reset (manually).................................................................................... 13
7
Specifications ...................................................................................................... 14
8
Appendix .............................................................................................................. 15
8.1 Key Seizure SETUP Mode ............................................................................... 15
8.2 Key Seizure / SETUP Mode ............................................................................. 16
INFORMATION
Warning
IN ORDER TO AVOID THE RISK OF AN ELECTRIC SHOCK THE DEVICE IS NOT
TO BE OPENED OR THE COVERS NOT TO BE REMOVED.
IN CASE OF AN ERROR PLEASE CONTACT OUR TECHNICIANS.
BEFORE YOU TAKE THIS DEVICE INTO OPERATION PLEASE READ THE OPERATING
INSTRUCTIONS CAREFULLY.
FOLLOW ALL THE WARNINGS OR OPERATING HINTS WHICH ARE ON THE DEVICE OR IN THE
OPERATING INSTRUCTIONS.
KEEP THE OPERATING INSTRUCTIONS IN A SAFE PLACE FOR LATER USE.
POWER SUPPLY : USE THIS DEVICE ONLY WITH THE DELIVERED OR IN THE OPERATING
INSTRUCTIONS DESCRIBED AC-ADAPTOR. CONNECT THIS DEVICE ONLY TO AN EARTHED
VOLTAGE SOURCE.
VOLTAGE-FREENESS: MAKE SURE THAT THIS DEVICE IS VOLTAGE-FREE
INSTALLATION. PULL OFF THE POWER PLUG OR THE POWER SUPPLY.
BEFORE
CABLES: ONLY USE ORIGINAL G&D CABLES. DAMAGES WHICH SOURCE FROM THE USE OF
FOREIGN CABLES ARE NOT INCLUDED IN THE WARRANTY REGULATIONS. AVOID TRUMPLE
TRAPS WHEN LAYING THE CABLES.
VENTING SLOTS: VENTING SLOTS PREVENT AN OVEHREATING OF THIS DEVICE. DO NOT
COVER THEM.
EXCLUSION OF WARRANTY: G&D DOES NOT TAKE OVER ANY WARRANTY FOR DEVICES
WHICH
WERE NOT USED ACCORDINGLY.
WERE REPAIRED OR MODIFIED BY NON AUTHORIZED PERSONS.
SHOW BIG OUTER DAMAGES NOT VISIBLE WHEN DELIVERED.
WERE DAMAGED BY FOREIGN ACCESSORIES.
G&D IS NOT RESPONSIBLE FOR CONSEQUENTIAL DAMAGE OF ANY KIND WHICH
POSSIBLY COULD OCCUR WHEN USING THE PRODUCTS.
RANGE: THIS DEVICE IS CONSTRUCTED FOR THE USE IN THE INTERIOR. AVOID EXTREME
COLDNESS, HEAT OR MOISTURE.
CONFORMITY: THIS DEVICE CORRESPONDS TO THE MAIN PROTECTIVE DEMANDS OF THE
PROVISION FOR ELECTROMAGNETIC COMPATIBILITY (89/336/EWG) AND THE STANDARDS
EN55022 CLASS B (1998), EN50082-1 (1992) AS WELL AS EN60950.
Guntermann & Drunck GmbH
1
Operating Instructions UserCenter 2 (4)
Description
UserCenter 2 (4) allows you to operate a single computer from either 2 or four
different workplaces (monitor, keyboard, mouse).
Thus, the system makes an active contribution to reducing costs, energy and
space for additional computers and allows for more efficient use of existing
computers.
Several users are afforded comfortable, alternating access to a single
computer.
The UserCenter works in the local area and at a distance of up to 10 meters.
2
Scope of Delivery
•
•
•
•
3
1 x UserCenter
2 (UserCenter 4)
PC Set 20
PowerSet 9-1,7
Manual
Installation
Computer installation:
•
Disconnect monitor, keyboard and mouse connecting cables from the
computer.
•
Keyboard/mouse:
Now connect both PS/2 connectors of the KM-Y module cables to the
keyboard and mouse interface of PC 1. Both connectors have
corresponding symbols.
•
Monitor:
Connect the video interface of the computer using the Y cable with the
UserCenter 2 (4) PC VGA In port.
•
For connecting further computers proceed as described above.
PC VGA IN
PC Key./Mouse IN
Monitor 1
Keyb.
1
Monitor 2
Mouse
Keyb.
Page 1
2
Mouse
Main Power
AC 100-240 V, 47-63 Hz
Guntermann & Drunck GmbH
Operating Instructions UserCenter 2 (4)
Console installation:
•
•
4
Connect the monitor, keyboard and mouse of each workstation (up to
4) with the appropriate ports on the reverse side of the UserCenter 2
(4).
Please ensure that the three connections are allocated correctly to a
connecting group.
Switching on the units / LED displays
Switch on the User Center using the rocker switch at the back of the unit.
1
ser
USER
PC
2
Active
enter
Status
Once it has been switched on, the UserCenter initializes the connected keyboards
and mice. The User’s green status LEDs light up and the LEDs on the keyboard
flash.
At the same time, User 1’s yellow active LED lights up.
When the PC is switched on, the green PC status LED lights up and the other user’s
active LEDs are switched on.
Should one of the workstations access the computer, this station only is identified by
the yellow user active LED. The PC active LED also lights up.
Once the entry is complete, all user active LEDs light up again (each workstation can
access the computer) and the PC active LED goes out.
Page 2
Guntermann & Drunck GmbH
5
Operating Instructions UserCenter 2 (4)
Operation
The changeover between the active workstations is automatic. Should a
workstation access the computer using the keyboard or the mouse, the other
workstations are blocked for the duration of this access plus the set time-out
period.
The time-out period, which is set by the manufacturer, lasts approximately 1
second. This period can, however, be extended to 90 seconds.
All of the connected monitors show the image of the connected computer at all
times.
When none of the workstations accesses the computer, the UserCenter is
released so that access can be afforded to every workstation.
5.1
Switching
The UserCenter 2(4) allows the selectable operation of the computer from 2 (4)
consoles.
In default both keyboards and mice are enabled.
As soon as at one of the consoles there is keyboard or mouse action
keyboard and mouse of the other station are disabled.
After a time out of approx 1 second where there is no action the system is
enabled again.
The time out between the switching can be adjusted to your needs (see
chapter 6.10).
Both connected monitors show simultaneously the picture of the computer.
5.2
Manual Hold function
The UserCenter 2(4) makes it possible that one of the 2 (4) consoles has
access to the computer. This prevents that the system enables the other
console after a preset time out of approx 1 second.
By pressing CTRL and PRINT the hold function is enabled.
Page 3
Guntermann & Drunck GmbH
Operating Instructions UserCenter 2 (4)
The enabled hold function is indicated
•
•
by the slowly flashing keyboard LED “Scroll Lock” at the console
where the hold function was enabled.
by the fast flashing keyboard LED “Scroll Lock”, the disabled
ACTIVE LED LOCAL and the enabled ACTIVE LED CPU at the
console which was locked by the hold function.
The hold function will be enabled by pressing CTRL and PRINT again and the
LED SCROLL-LOCK of the keyboard will be switched off. After this the
automatic switch (as described in chapter 5.1) will be enabled again.
Notice: If you have activated the double-hotkey (see chapter 6.8) you have to
press the defined double-hotkey for activating the manual hold function.
In default the manual hold function for both consoles is released. If you
intend to lock the hold function or only release it for one console proceed
as described in chapter 6.4.
5.3
GET function
The GET-Function allows, that either the local or the remote work station can
use the computer exclusivly.
In the initial state of the GET-Function each connecetd consoles are blocked
(no keyboard and mouse action possible). Additionaly, if the dark-switching
mode has been activated (compare chapter 6.6), all monitors are darkswitched
By triggering the keyborad-combination CTRL und PRINT, the releasing station
receives full keyboard and mouse access. Against that, the inactive console
remains blocked. The GET-function is indicated by flashing of the yellow
ACTIVE PC LED at the UserCenter2(4).
Additionally, the GET function will be indicated by:
•
•
Flashing LED SCROLL-Lock on the keyboard, visible at the initating
console
rapidly flashing LED SCROLL-Lock on the keyboard, which has been
blocked by the hold function
The automatic hold function will be deactivated by pushing the CTRL-Key and
PRINT-Key in combination and the SCROLL-LOCK-LED on the keyboard
stop flashing. If the dark-switching mode is also activated, all monitors will be
Page 4
Guntermann & Drunck GmbH
Operating Instructions UserCenter 2 (4)
dark switched again. After this the automatic changeover as described in
chapter 5.1 is enabled again.
Default: The manual hold-function is enabled. If you wish to disable the
manual hold function, proceed as described in chapter 6.5.
5.4
Dark-Switching of the screen whilst manual hold
function
The dark-switching of the screen can only be carried out, if the hold function is
enabled and the dark-switching has been allowed (see chapter 6.6).
The dark-switching will be activiated by pressing the CTRL -Key and the the
PRINT-Key (similar to the hold-function)
The hold function will be deactivated by pushing the CTRL -Key and PRINT Key in combination and the screen of the non-active station will be released.
Default: The dark-switching is disabled. If you wish to enable the dark
switching, proceed as described in chapter 6.6.
5.5
Dark-Switching of the screen whilst GET-function
Another type of the dark switching function is the result of a combination with
the GET-function. Basiclly, the dark switching of the screen whilst GETfunction corresponds to the function as described in chapter 5.4.
In the initial state, all screens are dark switched. The initial state exists, if:
•
•
the GET-function is enabled (see chapter 6.5)
dark switching is enabled (see chapter 6.6)
By just one mouse or keyboard action, the screen of the active console will be
switched on. All other screens remain dark.
The GET-function will be deactivated by pressing the keys CTRL and PRINT
and the screen of all inactive consoles will be switched off again.
Default: The dark-switching is disabled. If you wish to enable the dark
switching, proceed as described in chapter 6.6.
Page 5
Guntermann & Drunck GmbH
6
Operating Instructions UserCenter 2 (4)
Setup Mode
With the setup mode you can adapt UserCenter 2(4) exactly to your individual
needs. The following settings can be done via keyboard:
•
•
•
•
•
•
•
•
•
•
•
•
•
•
Establishing the default condition
Changing the keyboard scan code
Enabling the hold function
GET-function
Darkening of a screen if the hold function is enabled
Transmission of GDFrames
Defining the double hotkey
Setting the hotkey
Time-out for automatic switch (local/remote)
Automatic mouse-enable
Automatic mouse-reset
Support for the serial Logitech mouse
Mouse-enable
Mouse-reset
The settings can be done via keyboard. Mouse action during this
procedure is not possible.
The following chapters describe how these settings are activated.
6.1
Default Settings
In default UserCenter 2(4) has the following settings:
•
•
•
•
•
•
•
•
•
•
•
Keyboard scan code
Hold function
Transmission of GDFrames
Defined hotkey
Double hotkey
Time-out for auto switch
Darkening of the screen
GET function
Automatic mouse-enable
Automatic mouse-reset
Support for serial Logi mouse
2
On
On
CTRL
Off
1 Second
Off
Off
Off
Off
Off
Page 6
Guntermann & Drunck GmbH
6.2
Operating Instructions UserCenter 2 (4)
Establishing the default condition
To establish the default condition proceed as follows:
Call up the setup mode with CTRL + BACKSPACE
The setup mode will be indicated be the flashing of the three keyboard LEDs
(NUM-Lock, CAPS-Lock, SCROLL-Lock).
Press the key D
The default condition is established and the setup mode will be closed
automatically. The keyboard LEDs stop flashing.
You can always stop the entry by pressing ESC.
6.3
Changing the keyboard scan code
A change of this setting should only be done as agreed with the G&D
service.
With this setting the scan code for intializing the keyboard is defined.
To change the keyboard scan code proceed as follows:
•
Call up the setup mode with CTRL + BACKSPACE
The setup mode will be indicated by the flashing of the three keyboard
LEDs (NUM-Lock, CAPS-Lock, SCROLL-Lock).
•
•
For scan code 2 press key 2
For scan code 3 press key 3
After pressing one of the keys for the scan code the setup mode will be closed
automatically. The keyboard LEDs stop flashing.
The changes in setting will first be activated after a restart (voltage free)
of the computer.
You can always stop the entry by pressing ESC.
Page 7
Guntermann & Drunck GmbH
6.4
Operating Instructions UserCenter 2 (4)
Manual hold function
With this setting you define whether the user can start the hold function with
CTRL + PRINT or not.
For enabling the manual hold function you proceed as follows:
•
•
•
Call up the setup mode with CTRL+ BACKSPACE
The setup mode will be indicated by the flashing of the three keyboard
LEDs (NUM-Lock, CAPS-Lock, SCROLL-Lock).
For enabling press X
To disable the manual hold function again press C
After the manual hold function is enabled/disabled the setup mode will be
closed automatically. The keyboard LEDs stop flashing.
You can always stop the entry by pressing ESC.
6.5
GET function
With this setting you define whether the GET function will be activated or not.
For activating the GET function proceed as follows:
•
•
•
Call up the setup mode with CTRL + BACKSPACE
The setup mode will be indicated by the flashing of the three keyboard
LEDs (NUM-Lock, CAPS-Lock, SCROLL-Lock) angezeigt.
For enabling press J
To disable the automatic hold function again press K
After the GET function is enabled/disabled the setup mode will be closed
automatically. The keyboard LEDs stop flashing.
You can always stop the entry by pressing ESC.
Note: When double hotkeys are enabled (see chapter 7.8), the defined double
hotkeys has to be pressed for calling up the setup mode.
Page 8
Guntermann & Drunck GmbH
6.6
Operating Instructions UserCenter 2 (4)
Darkening of a screen if the hold function is
enabled
With this setting you define whether the screen of a console will be darkened if
another console is active.
To enable darkening proceed as follows:
•
•
•
Call up the setup mode with CTRL + BACKSPACE
The setup mode will be indicated by the flashing of the three keyboard
LEDs (NUM-Lock, CAPS-Lock, SCROLL-Lock).
For enabling press V
To disable the darkening againg press B
After the darkening is enabled/disabled the setup mode will be closed
automatically. The keyboard LEDs stop flashing.
This setting has direct influence on the manual and automatic hold
function (see chapters 6.4 and 6.5)
You can always stop the entry by pressing ESC.
6.7
Transmission of GDFrames
A change of this setting should only be done as agreed with the G&D
service.
For transmitting GDFrames proceed as follows:
•
•
•
Call up the setup mode with CTRL + BACKSPACE
For transmission press G
To disable transmission again press H
After the transmission of GDFrames is enabled/disabled the setup mode will be
closed automatically. The keyboard LEDs stop flashing.
You can always stop the entry by pressing ESC.
Page 9
Guntermann & Drunck GmbH
6.8
Operating Instructions UserCenter 2 (4)
Defining the double hotkey
With this setting you define whether one or two hotkeys are necessary for
calling up a function.
For this setting you proceed as follows:
•
•
•
6.9
Call up the setup mode with CTRL + BACKSPACE
To enable double hotkeys press A
To disable hotkeys again press S
Setting the HotKeys
With this setting you define the hotkey for calling up Setup and the hold
function.
To change the hotkeys proceed as follows:
•
•
Call up the setup mode with STRG + BACKSPACE
The setup mode will be indicated by the flashing of the three keyboard
LEDs (NUM-Lock, CAPS-Lock, SCROLL-Lock).
The following keys are available
Hotkey Combination
Ctrl (+ Shift)
Alt (+Shift)
Alt Gr (+ Ctrl)
Windows (+ Ctrl)
Shift (+ Windows)
Will be activated by:
Ctrl
Alt
Alt Gr
Windows
Shift
Note: The terms in brackets are only relevant for the double hotkeys!
After pressing the keys for your individual hotkey the setup mode will be closed
automatically.
The keyboard LEDs stop flashing.
You can always stop the entry by pressing ESC.
Warning: After changing the hotkey you have to call up the setup and the
hold function with the changed hotkey!
Page 10
Guntermann & Drunck GmbH
6.10
Operating Instructions UserCenter 2 (4)
Time-out for automatic switch
With this setting the time-out for the automatic switch between the local and the
remote console is defined.
To change the time-out for the automatic switch proceed as follows:
Call up the setup mode with CTRL + BACKSPACE
You can choose between the following values of time-out:
Time-out
10 sec.
15 sec.
20 sec.
30 sec.
45 sec.
60 sec.
90 sec.
1 sec.
Key
F5
F6
F7
F8
F9
F 10
F 11
F 12
After selecting the time-out value the setup mode will be closed automatically.
The keyboard LEDs stop flashing.
You can always stop the entry by pressing ESC.
6.11
Automatic mouse-enable (standard mouse driver)
With this setting you define whether the mouse emulation sends data to the
computer even if the computer has not given an enable. This only works with a
standard mouse.
For enabling the automatic mouse-enable proceed as follows:
•
Call up the setup mode with CTRL + BACKSPACE
The setup mode will be indicated by the flashing of the three keyboard
(NUM-Lock, CAPS-Lock, SCROLL-Lock).
•
For enabling press Q
•
To disable the mouse-enable again press W
After enabling/disabling the automatic mouse-enable the setup mode will be
closed automatically. The three keyboard LEDs stop flashing.
You can always stop the entry by pressing ESC.
Page 11
Guntermann & Drunck GmbH
6.12
Operating Instructions UserCenter 2 (4)
Automatic mouse-reset
With this setting you define whether UserCenter 2(4) sends a mouse-reset to
the computer during the switch-on or not (does not work with Unix computers).
For enabling the automatic mouse-reset proceed as follows:
•
•
•
Call up the setup mode with CTRL + BACKSPACE
The setup mode will be indicated by the the flashing of the three
keyboard LEDs (NUM-Lock, CAPS-Lock, SCROLL-Lock).
For enabling press T
To disable the automatic mouse-reset againg press Z
After enabling/disabling the automatic mouse-reset the setup mode will be
closed automatically. The keyboard LEDs stop flashing.
You can always stop the entry by pressing ESC.
6.13
Support for the serial Logitech mouse
With this setting you define whether to connect a Logitech or an Intelli mouse to
the serial interface (V.24).
For supporting the serial mouse proceed as follows:
•
•
•
Call up the setup mode with CTRL + BACKSPACE
The setup mode will be indicated by the flashing of the three keyboard
LEDs (NUM-Lock, CAPS-Lock, SCROLL-Lock).
For the support press O
To disable the support again press P
After the mouse support is enabled/disabled the setup will be closed
automatically. The keyboard LEDs stop flashing.
You can always stop the entry by pressing ESC.
Page 12
Guntermann & Drunck GmbH
6.14
Operating Instructions UserCenter 2 (4)
Mouse-enable (manually)
With this function you can manually establish a mouse-enable (on other
Operating Systems than Windows).
For the manual mouse-enable proceed as follows:
•
Call up the setup mode with CTRL + BACKSPACE
The setup mode will be indicated by the flashing of the three keyboard
LEDs (NUM-Lock, CAPS-Lock, SCROLL-Lock).
Then press the corresponding key:
Used mouse driver
Enable for standard mouse driver
Enable for Intelli driver
Enable für Intelli Explorer driver
Key
M
I
E
After having set the manual mouse-enable the setup mode will be closed
automatically. The keyboard LEDs stop flashing.
You can always stop the entry by pressing ESC.
6.15
Mouse-reset (manually)
Choose FUNCTION on your Windows operating system;
Independend from the selected mouse driver.
This is for:
WIN 98, WIN NT, WIN ME, WIN 2000, WIN XP.
With this function a manual mouse-reset can be set.
For the manual mouse-reset proceed as follows:
•
•
Call up the setup mode with CTRL + BACKSPACE
The setup mode will be indicated by the flashing of the three keyboard
LEDs (NUM-Lock, CAPS-Lock, SCROLL-Lock).
For disabling the manual mouse-reset again press R
After the manual mouse-reset is enabled/disabled the setup mode will be
closed automatically. The keyboard LEDs stop flashing.
You can always stop the entry by pressing ESC.
Page 13
Guntermann & Drunck GmbH
7
Operating Instructions UserCenter 2 (4)
Specifications
Interfaces:
Monitor: - input HD 15 pole socket
output HD 15 pole SUB socket
Transmittable signals: analog color graphics signals,
R, G, B, H sync, V sync,
Sync. in green, composite Sync.
Keyboard/
Mouse : -
HD 15 pole socket
output 6 pole mini DIN (PS/2) socket
Resolution:
max. 1600 x 1200 > 85 Hz
Power supply:
100 – 240 V primary; 47 – 63 Hz
Housing:
Desk-top casing 210 x 44 x 211 UserCenter2
(W x H x D):
270 x 44 x 211 UserCenter 4
Transmission length:
Local area (up to approx. 10 m)
Options:
Remote operation over a distance of up to 250 meters in combination with
video, keyboard and mouse extension; VKM system; CATVision system
Combination with miniMUX 2 (4) , CC1/plus, CC4 for alternating operation of up
to 96 PC
Housing dimensions:
(W x H x D in mm)
CATVision CPU 210 x 44 x 210 (19” / 1HU)
CATVision CON 210 x 44 x 210 ( 19” / 1 HU )
Transmission cable: CAT 5 or higher
Temperature range: 0 – 40° C
Page 14
Guntermann & Drunck GmbH
Operating Instructions UserCenter 2 (4)
8
Appendix
8.1
Key Seizure SETUP Mode
Setting
Configuration key
Chapter
CALLING UP THE
SETUP MODE
CTRL + BACKSPACE
6
Establishing the default
condition
D
6.2
Selecting the keyboard
scan code
2 = scan code 2
3 = scan code 3
6.3
Manual hold function
X = Enable
C = Disable
6.4.
Get function
J = Enable
K = Disable
6.5
Darkening of a screen
if the hold function is
enabled
V = Enable
B = Disable
6.6
Transmission of
GDFrames
G = Enable
H = Disable
6.7
Defining the double
hotkeys
A = activate
S = disable
6.8
Setting the hotkeys
Time-out for automatic
switch
Automatic mouseenable
CTRL = CTRL (+ SHIFT)
ALT = ALT (+ SHIFT)
ALT GR = ALT GR (+ CTRL)
WINDOWS = WINDOWS (+ CTRL)
SHIFT = SHIFT (+ WINDOWS)
F5 = 10 seconds
F6 = 15 seconds
F7 = 20 seconds
F8 = 30 seconds
F9 = 45 seconds
F10 = 60 seconds
F11 = 90 seconds
F12 = 1 seconds
6.9
6.10
Q = Enable
W = Disable
6.11
Automatic mouse-reset
T = Enable
Z = Disable
6.12
Mouse enable
(enable)
M = standard driver
I = Intelli driver
E = Intelli-Explorer driver
6.14
Maus reset
(manually)
R
6.15
Closing the setup
mode without change
ESC
Page 15
Guntermann & Drunck GmbH
8.2
Operating Instructions UserCenter 2 (4)
Key Seizure / SETUP Mode
Page 16
Guntermann & Drunck GmbH
Systementwicklung
Dortmunder Str. 4a , 57234 Wilnsdorf
Tel.: 02739/89010 , Fax.: 02739/890120
Email: [email protected]
http://www.GDsys.de
©Sun, MAC, RS 6000, HP 9000, SGI, DEC Alpha Station sind eingetragene Warenzeichen der jeweiligen Hersteller.