1
sat-nms VSAT Local Controller
Installation Manual
Version 1.1 / 2004-10-28
© Copyright
SatService Gesellschaft für Kommunikatiosnsysteme mbH
Hardstrasse 9
D-78256 Steisslingen
www.satnms.com
www.satservciegmbh.de
Tel +49 7738 97003
Fax +49 7738 97005
SatService
Gesellschaft für Kommunikationssysteme mbH
Table Of Contents
Table Of Contents ................................................................................................................................. 1
Introduction .......................................................................................................................................... 3
Before you start .................................................................................................................................... 3
VLC basic configuration ....................................................................................................................... 3
Network configuration ....................................................................................................................... 4
How to connect to the VLC ................................................................................................................ 6
The file '/etc/rc.vlc' ............................................................................................................................ 8
The file '/etc/satnms.rc' ................................................................................................................. 10
Adding serial interfaces ................................................................................................................... 12
4 / 8 Port Cards ............................................................................................................................. 12
Moxa Intellio Cards ...................................................................................................................... 13
Digi Etherlite Terminal Server ...................................................................................................... 13
Port Naming ................................................................................................................................. 13
VLC Serial IO Card Configuration 1 ............................................................................................. 13
VLC Serial IO Card Configuration 2 ............................................................................................. 14
VLC Serial IO Card Configuration 3 ............................................................................................. 14
VLC Serial IO Card Configuration 4 ............................................................................................. 14
VLC Serial IO Card Configuration 5 ............................................................................................. 14
VLC Serial IO Card Configuration 6 ............................................................................................. 14
VLC Serial IO Card Configuration 7 ............................................................................................. 15
VLC Serial IO Card Configuration 8 ............................................................................................. 15
VLC Serial IO Card Configuration 9 ............................................................................................. 15
VLC Serial IO Card Configuration 10 ............................................................................................ 15
VLC Serial IO Card Configuration 11 ............................................................................................ 15
VLC Serial IO Card Configuration 12 ............................................................................................ 16
VLC Serial IO Card Configuration 13 ............................................................................................ 16
VLC Serial IO Card Configuration 14 ............................................................................................ 16
Serial IO Hardware Setting (4-PORT / 1) ...................................................................................... 16
Serial IO Hardware Setting (4-PORT / 2) ...................................................................................... 17
Serial IO Hardware Setting (4-PORT / 3) ...................................................................................... 19
Serial IO Hardware Setting (8-PORT / 1) ...................................................................................... 20
Serial IO Hardware Setting (8-PORT / 2) ...................................................................................... 20
Serial IO Hardware Setting (8-PORT / 3) ...................................................................................... 21
Serial IO Hardware Setting (ROCKET / 1) .................................................................................... 22
Serial IO Hardware Setting (ROCKET / 2) .................................................................................... 22
Serial IO Hardware Setting (ROCKET / 3) .................................................................................... 22
Serial IO Hardware Setting (INTELLIO) ...................................................................................... 22
The setup program ........................................................................................................................... 23
Configuring the VLC for the equipment setup ....................................................................................... 23
Operating the VLC .............................................................................................................................. 24
Appendix ............................................................................................................................................ 24
Device driver / protocol reference list ............................................................................................... 24
Device setup configuration file format .............................................................................................. 26
(C) 2013, SatService GmbH
www.satnms.com
VLC-IM-1307 Page 1/30
SatService
Gesellschaft für Kommunikationssysteme mbH
A short introduction to 'vi' ................................................................................................................. 28
Common commands ...................................................................................................................... 29
'vi' in the MS Windows telnet client ............................................................................................... 30
(C) 2013, SatService GmbH
www.satnms.com
VLC-IM-1307 Page 2/30
SatService
Gesellschaft für Kommunikationssysteme mbH
Introduction
The VLC installation manual describes the steps of the basic configuration for a new VLC which shall be prepared for it's first use.
These steps apply to VLCs which are going to be upgraded or re-used as well.
The chapter 'Before you start' gives some advice which information to collect before you start to configure a VLC.
The chapter 'VLC basic configuration' describes the steps to prepare a VLC coming 'out of the box' for it's on-site usage. This
covers the VLC network setup including topics like the VLC - NMS communication management and IP addresses as well as a
detailed guide how to extend a VLC with additional serial interfaces.
This manual coverts also the new version of the VLC which SatService delivers since March 2003 with serial numbers greater or
equal 1020. Changes in the documentation for the new VLC's are marked with the
label.
The Chapter 'setup program' describes the new setup program for the VLC configuration.
Chapter 'Configuring the VLC for the equipment setup' adds a short discription how to tell the VLC which type of equipment shall
be controlled at which interface port without using the NMS.
Finally, the 'Appendix' provides some reference information, amongst other things a complete list of device drivers comping with
the VLC.
Before you start
To configure a VLC, there are some information about this VLC you need to collect. First of all you have to assign an ID to the
VLC. Each VLC managed by the NMS has it's unique ID. VLC IDs are number s in the range 1 ... 1600. The NMS names the
VLCs 'VLC0001' ... 'VLC1600' according to these numbers. There is no need to number the VLSs in a close sequence.
However, IP routing might be simpler to configure if you limit the VLC IDs to 16 or 32 for a small network.
The next important question to check is how many serial interfaces does the VLC need to control the devices attached to it. You
probably will have clarified this before you purchased the VLC. But if you are going to upgrade or reconfigure a VLC which was
already in use, you have to figure out now which serial interface boards have to be built into the VLC. Chapter 'Adding serial
interfaces' gives you an overview, which kinds of serial boards the VLC may be configured for.
As a last point, you have to decide in which way the VLC shall communicate with the NMS. Does the VLC use a dial-up link via
modem or ISDN terminal adapter? Or does the VLC connect directly via Ethernet to the NMS? Are there special requirements
regarding the IP routing to the VLC? Chapter 'Network configuration' demonstrates the some configuration variants.
VLC basic configuration
To prepare a VLC before it is used the first time (or if it shall be re-configured), the following parameters must be set at the VLC:
You can use the setup program for new VLC's to configure these settings.
VLC number/ID: Within the NMS, each VLC must have a unique ID assigned to it. The NMS software accesses the VLC
through this identifier. The VLC ID is a number in the range 1 .. 1600. The factory default for the VLC ID is 1.
Parameter:
VLC_ID=[1..1600]
SATNMS_HOSTNAME="vlc[0001..1600]"
Working mode Set this option to 'vlc'.
Parameter:
SATNMS_TYPE=vlc
(C) 2013, SatService GmbH
www.satnms.com
VLC-IM-1307 Page 3/30
SatService
Gesellschaft für Kommunikationssysteme mbH
Serial interface setup: VLCs can be used with different serial interface boards built in. The VLC software directly supports a
number of boards in several combinations. The serial interface setup parameter selects a combination of I/O boards from a given
set. The factory default for this parameter selects 2 passive 4-port serial boards. Chapter 'Adding serial interfaces' gives a
complete reference which combinations of serial interface boards are supported, how the boards must be prepared and which
settings are to be made in the main configuration file. For other supported interface boards and the appropriate configuration
parameters refer also to Chapter 'Adding serial interfaces'.
Parameter:
SERIAL=[0..14]
SATNMS_SERIAL=[0..14]
Modem parameters: The VLC will connect to the NMS via a modem or ISDN terminal adapter in most cases. The factory
defaults initialize a modem at the first serial port using 34800 bps. You may want to change the modem parameters for a ISDN
terminal adapter or disable the modem completely if the VLC is connected to the NMS via Ethernet.
Parameters:
USES_MODEM=[yes|no]
SATNMS_MODEM_USE=[yes|no]
Ethernet parameters: The parameters of the VLC's Ethernet port have to be set in order to integrate the VLC into the network it
is part of. Chapter 'Network configuration examples' explains some common network setups for a VLC.
UPS setup: The VLC is prepared to connect to a battery power supply through a special cable connected to the second serial
port. This cable uses the handshake lines to tell the VLC when to give a power fail alert and when to shut down because the
battery is going low. UPS support is disabled by default.
Parameters:
USES_UPS=[yes|no]
SATNMS_UPS_USE=[yes|no]
These basic configuration parameters are set by editing one configuration file at the VLC. This means, you have to login to the
Linux operating system running at the VLC and changes the configuration file. Chapter 'How to connect to the VLC' explains,
which options the VLC provides to do this task. Chapter The file '/etc/rc.vlc' provides a reference of all parameters which can be
set in this configuration file.
Chapter 'setup program' describes the use of the setup program for new VLC's and Chapter 'The file '/etc/satnms.rc'' provides
a reference to all parameters.
Network configuration
For the VLC network configuration, there are five common scenarios how to use the Ethernet port of the VLC. The paragraphs
below describe necessary configuration settings for these frequently used configurations.
1. The VLC does not use the Ethernet at all
It is recommended not to switch off the Ethernet functionality at the VLC. Leave the network settings at their factory defaults, this
enables the Ethernet interface and assigns the IP address 192.168.2.222 to it. You will be able to connect to the VLC for
maintenance tasks at a later point, usually there is no reason to disable this facility.
parameters:
USES_ETHERNET=[yes|no]
The new System does not provide an option to disable the ethernet interface. If you really want to do this you have to edit the
configuration files of the operating system directly.
2. The VLC connects via modem/ISDN-TA to NMS, Ethernet is used for occasional configuration or maintenance jobs
You have to decide in this case if you will leave the default IP address for the VLC or if you have to integrate it in a LAN with a
given address space. Depending on this you will have to configure the VLC's IP settings.
The IP address of the VLC's Ethernet interface is not the address the NMS uses to access the VLC. While s PPP session
between NMS and VLC is running, the NMS accesses the VLC at an address computed from the VLC ID. The Ethernet IP
address may be freely chosen, however the subnet routed to the Ethernet interface and the subnet routed to the NMS must not
(C) 2013, SatService GmbH
www.satnms.com
VLC-IM-1307 Page 4/30
SatService
Gesellschaft für Kommunikationssysteme mbH
overlap. The IP routing happening between VLC and NMS is described more detailed with the next scenario.
Ethernet interface parameters:
ETHER_ADDR
ETHER_SNET
ETHER_MASK
SATNMS_IP_ADDRESS
SATNMS_IP_NETMASK
Modem parameters:
USES_MODEM=[yes|no]
MODEM_INIT="[InitString]"
MODEM_BAUD=[Baudrate]
SATNMS_MODEM_USE=[yes|no]
SATNMS_MODEM_INIT="[InitString]"
SATNMS_MODEM_BAUD=[BaudRate]
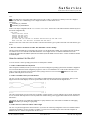
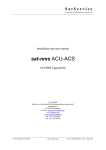
3. The VLC connects via modem/ISDN-TA to NMS. To the VLC Ethernet some devices are connected you want to
access from the NMS
NMS and VLC are able to act as IP routers and to provide an on demand IP link between the LAN the NMS is connected to and
the Ethernet trunk behind the VLC.
For this reason, the NMS uses a unique IP address space for each VLC during an online PPP session to it. VLCs are assigned to
IP addresses in steps of 16, starting at 192.168.100.1. VLC0001 is at 192.168.100.1, VLC0002 at 192.168.100.17 and
so on. Moreover, the NMS routes a subnet masked 255.255.255.224 to each VLC. The subnet 192.168.100.0/28 is routed
to VLC0001, 192.168.100.16/28 is routed to VLC0002 and so on.
The VLC may be configured to use same address valid for the PPP interface for the Ethernet interface, too. With this configuration,
the VLC routes addresses for the 255.255.255.224 subnet assigned to it to it's Ethernet interface.
To activate this configuration, assign empty strings to the 'ETHER_ADDR', 'ETHER_SNET' and 'ETHER_MASK' (
'SATNMS_IP_ADDRESS', 'SATNMS_IP_NETMASK') parameters in the 'rc.vlc' file. Devices or hosts which shall be
accessible from the NMS must configured to an IP address within the subnet the VLC is assigned to. The remote devices / hosts
must have the VLC's IP address set as the gateway for the NMS' address space.
The diagram above shows an example for this configuration. The CLIENT computer at the NMS site can access the DEVICE at
the VLC's site at it's address 192.168.100.20. The gateway settings of the communication partners ensure, that the packets are
routed through the NMS -- VLC link.
4. The VLC connects via Ethernet to NMS. The modem line is not used
This scenario described here is quite simple: The VLC gets one IP address assigned to, this address must be in the NMS LAN
subnet. The VLC does not need a modem to be connected at ttyS0. You absolutely should set the 'USES_MODEM' (
'SATNMS_MODEM_USE') parameter to 'no' in this case or else the VLC will permanently try to initialize a modem which is not
present. The VLC might run into trouble due to such a misconfiguration.
Yet another advantage of this configuration is the fact, that the ttyS0 interface now becomes available for M&C function of the
(C) 2013, SatService GmbH
www.satnms.com
VLC-IM-1307 Page 5/30
SatService
Gesellschaft für Kommunikationssysteme mbH
VLC.
If your NMS Server is not in the same Subnet as the VLC but you have a connection via a WAN you can also configure a
default route of the VLC. Additionally you can configure the Adress of a DNS Name Server.
parameters:
SATNMS_IP_GATEWAY
SATNMS_IP_DNSSERVER
Statics route maybe configured in the file /etc/network/interfaces in the section of the ethernet interface eth0 directly (not in
the satnms configuration file).
auto eth0
iface eth0 inet static
address 192.168.2.222
netmask 255.255.255.0
gateway 192.168.2.254
up route add -net 192.168.1.0 netmask 255.255.255.0 gw 192.168.2.253
down route del -net 192.168.1.0 netmask 255.255.255.0
The last two lines sets a static route to the 192.168.1.0 network if the interface goes up and removes this route if the interface goes
down.
5. The VLC connects via Ethernet to NMS. The modem line is used as backup
The last scenario described here corresponds to the previous one, but the Modem or ISDN-TA is connected but only used in the
case that the VLC is not reacheable via the Ethernet interface. Just configure the VLC for Ethernet and Modem use. Then
configure the NMS with both Addresse (Ethernet-IP and PPP-IP) and the NMS Server tries first to connect via Ethernet and then
via the Dialup link.
How to connect to the VLC
To access the VLC's Linux operating system, there are basically three methods:
1. Connect a CRT monitor and a keyboard
This is the preferred method, because you can not only access the running Linux operating system but also the BIOS configuration
screen and some MS-DOS based configuration programs as well. It is recommended to use a CRT monitor rather than a LCD
panel as some LCD panels have been reported to refuse syncing to the VLC's screen resolution. With the new VLC such
problems with LCD panels are not known.
2. Connect a terminal to the ttyS1 serial interface
The VLC accepts a VT100 type terminal (or a PC running a terminal emulation program) at the serial interface 'ttyS1' (see the
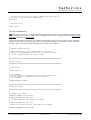
diagram at the end of this chapter). You need a special cable for this case, wired as shown in the diagram below.
The cable, with 9-pin sub-D socket connectors at both sides, connects the pins 2, 3 and 5 with pin 2 and 3 crossed. All other pins
are not connected. This is important to avoid any interference with the battery power supply function which uses the other lines of
this interface.
The terminal / PC must be set to 9600 baud, 8 data bits, no parity. Hardware flow control must be switched off. When typing
at the terminal, you should get a login prompt.
3. Connect the VLC to the LAN and use telnet to login
The VLC accepts telnet logins at the network interface. If you know the actual setup configuration of the VLC's Ethernet interface
(specially it's IP address), you may con figure a computer to see the VLC in it's address space and connect this computer via
Ethernet to the VLC. Telnet is not prefered for the new VLC's.
(C) 2013, SatService GmbH
www.satnms.com
VLC-IM-1307 Page 6/30
SatService
Gesellschaft für Kommunikationssysteme mbH
The VLC by default is configured to the address 192.168.2.222.
4. Connect the VLC to the LAN and use SSH to login
Use the Secure Shell (ssh) to connect to the VLC via LAN. The connection is encrypted and is much more secure as the plaintext
protocol from Telnet.
The VLC by default is configured to the address 192.168.2.222.
Login procedure
Regardless of physical method of connecting to the VLC you chose, you have to login at the Linux operating system before you
can modify the VLC setup configuration. The common login procedure is two step:
First you have to login as user 'vlc' (password 'vlc'). When you are logged on as 'vlc', issue the command 'su' which gives you root
/ administrator privileges on this computer. When the VLC asks for the password, enter 'root'.
The username and password of new VLC's differs from the old version. Use user 'satnms' and password 'satnms' to login. The
root password remains the same ('root').
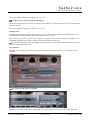
VLC connectors
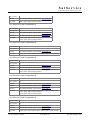
The picture below, showing a part of the VLC's rear panel, denominates the connectors of the VLC core component for your
orientation.
VLC Connectors and Serial Card positions
Remember to connect the security device coming with the VLC to the 25 pin connector. The VLC will not work without this!
(C) 2013, SatService GmbH
www.satnms.com
VLC-IM-1307 Page 7/30
SatService
Gesellschaft für Kommunikationssysteme mbH
The file '/etc/rc.vlc'
See the following chapter for the description of the new configuration file /etc/satnms.rc
Below the file '/etc/rc.vlc' with the factory default settings is listed. Comments in the file describe the meaning and valid range
of each setting at great length. To change some of the settings, connect to the VLC and login as described in the previous chapter
and then open this file in the editor. Change the parameters at your needs and save the file. After rebooting the VLC (command
'reboot') the new settings become effective. Please note, that changing the IP address probably will lock you out after reboot if you
connected via telnet to the VLC.
The parameter 'USES_SCC' is reserved for a future extension of the VLC. Satellite control communication between VLC and
NMS actually is only available in networks planned and configured by SatService GmbH. Therefore, 'USES_SCC' should be kept
'no'.
#
#
#
#
VLC configuration file. After changing this file, the VLC should
be rebooted to execute the changes
########################################################################
#
# VLC Identification
#
########################################################################
# A unique identification number for the VLC in the network. Must
# be in the range 1 .. 1600 decimal.
#
VLC_ID=1
########################################################################
#
# Network Settings (VLC-NMS Communication)
#
########################################################################
# Set this to "yes" if the VLC shall setup it's Ethernet interface on
# startup. If the VLC shall access the NMS through this interface, you
# must assign the interface an address in the NMS' IP address space.
#
# If you leave ETHER_ADDR, ETHER_SNET and ETHER_MASK empty, the VLC
# will assign an address to the interface which is suitable for the
# remote control of LAN controlled devices through a PPP connection
# to the NMS. This address gets derived from the VLC_ID, a unique
# /28 subnet is assigned to each VLC
#
#
USES_ETHERNET=yes
#
#
#
ETHER_ADDR=192.168.2.222
ETHER_SNET=192.168.2.0
ETHER_MASK=255.255.255.0
ETHER_ADDR=""
ETHER_SNET=""
ETHER_MASK=""
# Set this to "yes" if you have a SCC card installed and you want the
# VLC to talk with the NMS via satellite
#
USES_SCC=no
SCC_ADDR=0.0.0.0
SCC_SNET=0.0.0.0
SCC_MASK=255.255.255.255
#
#
#
#
#
Set this to "yes" if you have a modem/terminal-adapter connected
to /dev/ttyS0 and you want to use a PSTN line for the VLC-NMS
communication.
MODEM_INIT
is sent by mgetty to the modem every minute
(C) 2013, SatService GmbH
www.satnms.com
VLC-IM-1307 Page 8/30
SatService
Gesellschaft für Kommunikationssysteme mbH
# MODEM_BAUD
#
USES_MODEM=yes
the tty rate to be used to the modem
MODEM_INIT="AT\\&F OK"
MODEM_BAUD=38400
########################################################################
#
# Serial Interfaces (look at the manual how the cards have to be
# prepared to the I/O and interrupt settings the VLC expects)
#
########################################################################
# Internal serial cards.
#
# Basically three types of cards are supported:
# 4-port
MOXA Smartio/Industrio 4 port card
# 8-port
MOXA Smartio/Industrio 8 port card
# rocketport Comtrol Rocketport (8 port) card
# Select one of the following combinations:
#
#
0
no card installed
#
1
4-port card
#
2
4-port + 4-port card
#
3
8-port card
#
4
8-port + 4-port card
#
5
8-port + 4-port + 4-port card
#
6
8-port + 8-port card
#
7
8-port + 8-port + 4-port card
#
8
8-port + 8-port + 8-port card
#
9
rocketport card
#
10
rocketport + 4-port card
#
11
rocketport + 4-port + 4-port card
#
12
rocketport + rocketport card
#
13
rocketport + rocketport + 4-port card
#
14
rocketport + rocketport + rocketport card
#
SERIAL=2
# MOXA Intellio C320/Turbo cards 8 ... 96 ports
#
# Select the number of ports (multiples of 8) which are accessible
# through C320/Turbo boards. Say 0 if there is no C320 card in the
# VLC.
#
# Either one board (8, 16, 24 or 32 ports), two boards (40, 48,
# 56 or 64 ports) or three boards (72, 80, 88 or 96 ports) may be
# installed. One C320 board may be combined with one or two internal
# boards, Two C320 boards may be combined with one internal serial board.
#
INTELLIO=0
# Digi EtherLite TCP/IP terminal server
#
# If you say yes here, the Digi els driver is launched on system
# startup. You must have a running Ethernet interface for this,
# the file /etc/els.conf must be adapted to the unit's configuration
# you want to access
#
USES_ETHERLITE=no
########################################################################
#
# Other Runtime Parameters
#
########################################################################
# If the VLC is powered by a battery UPS which reports it's state to
# the /dev/ttyS1 port (see the manual regarding the special cable needed
(C) 2013, SatService GmbH
www.satnms.com
VLC-IM-1307 Page 9/30
SatService
Gesellschaft für Kommunikationssysteme mbH
# for this) say "yes" here. This starts a daemon which shuts down the
# VLC safely if the UPS reports "LOW BATTERY"
#
USES_UPS=no
# This must be yes.
#
START_VLC=yes
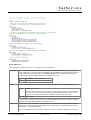
The file '/etc/satnms.rc'
Below the file '/etc/satnms.rc' with the factory default settings is listed. Comments in the file describe the meaning and valid
range of each setting at great length. To change some of the settings, connect to the VLC and login as described in How to connect
to the VLC and then start the setup program.
You can also open this file in an editor (e.g. vi or mcedit) and Change the parameters at your needs and save the file. To apply the
settings to the Linux operation system call 'apply-setup' or set the parameter 'SATNMS_CONF_APPLY' to 'reboot' and reboot
the system. This cause the system to apply all settings from /etc/satnms.rc before shutdown.
#
#
#
#
#
#
#
#
sat-nms configuration file
After changing this file run 'apply-setup' to execute the
changes or set SATNMS_CONF_APPLY="reboot" and reboot the system
For easy configuration use the 'setup' program
########################################################################
#
# Basic settings
#
########################################################################
# working mode
#
SATNMS_TYPE="vlc"
# vlc hostname
# A unique identification number for the VLC in the network. Must
# be in the range 1 .. 1600 decimal with a leading vlc
# e.g. "vlc0002"
#
SATNMS_HOSTNAME="vlc0002"
########################################################################
#
# Network settings
#
########################################################################
# ip-address and netmask
#
SATNMS_IP_ADDRESS="192.168.2.222"
SATNMS_IP_NETMASK="255.255.255.0"
# The default gateway, leave empty if not needed
#
SATNMS_IP_GATEWAY="192.168.2.254"
# Address of the dns name server, leave empty if not needed
#
SATNMS_IP_DNSSERVER="192.168.2.253"
(C) 2013, SatService GmbH
www.satnms.com
VLC-IM-1307 Page 10/30
SatService
Gesellschaft für Kommunikationssysteme mbH
########################################################################
#
# Serial interface settings
#
########################################################################
# Sets up the serial ports (passive cards and Comtrol Rocketport cards)
# in the computer. Replaces the original Debian setserial script.
#
# Basically three types of cards are supported:
# 4-port
MOXA Smartio/Industrio 4 port card
# 8-port
MOXA Smartio/Industrio 8 port card
# rocketport Comtrol Rocketport (8 port) card
#
# The variable SATNMis_SERIAL selects one of 15 combinations of cards. The
# software documentation shows the address/irq settings vor each board in
# each particular configuration
#
#
0:
no cards
#
1:
4-port
#
2:
4-port + 4-port
#
3:
8-port
#
4:
8-port + 4-port
#
5:
8-port + 4-port + 4-port
#
6:
8-port + 8-port
#
7:
8-port + 8-port + 4-port
#
8:
8-port + 8-port + 8-port
#
9:
ROCKET
#
10:
ROCKET + 4-port
#
11:
ROCKET + 4-port + 4-port
#
12:
ROCKET + ROCKET
#
13:
ROCKET + ROCKET + 4-port
#
14:
ROCKET + ROCKET + ROCKET
#
SATNMS_SERIAL=2
# MOXA Intellio C320/Turbo cards 8 ... 96 ports
# Select the number of ports (multiples of 8) which are accessible
# through C320/Turbo boards. Say 0 if there is no C320 card in the
# VLC.
#
# Either one board (8, 16, 24 or 32 ports), two boards (40, 48,
# 56 or 64 ports) or three boards (72, 80, 88 or 96 ports) may be
# installed. One C320 board may be combined with one or two internal
# boards, Two C320 boards may be combined with one internal serial board.
#
SATNMS_INTELLIO=0
# Digi EtherLite TCP/IP terminal server
#
# If you say yes here, the Digi els driver is launched on system
# startup. You must have a running Ethernet interface for this,
# the file /etc/els.conf must be adapted to the unit's configuration
# you want to access
#
SATNMS_ETHERLITE=no
########################################################################
#
# Modem settings
#
########################################################################
# Set this to "yes" if you have a modem/terminal-adapter connected
# to /dev/ttyS0 and you want to use a PSTN line for the VLC-NM
# communication. Default is "no"
#
SATNMS_MODEM_USE="no"
# Baud rate, the tty rate to be used to the modem
#
(C) 2013, SatService GmbH
www.satnms.com
VLC-IM-1307 Page 11/30
SatService
Gesellschaft für Kommunikationssysteme mbH
SATNMS_MODEM_BAUD="38400"
# Init string, is sent by mgetty to the modem every minute to
# initialize the modem
#
SATNMS_MODEM_INIT="AT&F"
########################################################################
#
# Setup program settings
#
########################################################################
# apply new configuration to system files manual or on reboot
#
SATNMS_CONF_APPLY="manual"
Adding serial interfaces
A VLC can contain up to three serial IO cards which add RS232 or RS422/485 interfaces to the unit. While principally the VLC
works with any serial IO card which is compatible to Linux, the units are pre-configured to work with a fixed set of card
configurations. The following types of cards are supported by the VLC:
Moxa
Smartio/Industrio
series
This is a family of 4-port / 8-port passive serial cards which are available with RS232 or RS422/485
interfaces and various types of connectors.
Comtrol
Rocketport
The Rocketport is an active 8-port card providing 8 RJ45 connectors directly on the card's back.
Moxa Intellio
C320 Turbo
The Intellio C320 is an active card which uses it's own processor to manage the data exchange to up to 32
ports for each card. The IO ports are located in rack-mountable modules containing 8 or 16 ports each.
Digi Etherlite
Terminal Server
For large systems an external terminal server may provide a nearly arbitrary number of serial ports. The
terminal server is connected to the VLC via Ethernet.
The serial IO cards are not automatically recognized by the VLC. Each card must be configured to the address/irq settings
expected by the software. Then the software must be told which cards are installed.
The card configuration is defined in the configuration file '/etc/rc.vlc'. The 'SERIAL' variable defines the Smartio/Industrio or
Rocketport boards to be used. The 'INTELLIO' variable defines the number IO ports connected to one or more Intellio boards.
The card configuration is defined in '/etc/satnms.rc' and the variable SATNMS_SERIAL defines the combination of interface
cards. SATNMS_INTELLIO defines the number of IO ports connected to one or more Intellio boards.
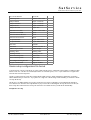
4 / 8 Port Cards
The following table shows the configurations which can be selected with the parameter 'SERIAL'. The table uses the abbreviations
4-PORT, 8-PORT and ROCKET for Moxa Smartio/Industrio series and Rocketport cards respectively.
SERIAL Card 1
Card 2
Card 3
0
-
-
-
1
4-PORT
-
-
2
4-PORT
4-PORT
-
3
8-PORT
-
-
4
8-PORT
4-PORT
-
5
8-PORT
4-PORT
4-PORT
6
8-PORT
8-PORT
-
7
8-PORT
8-PORT
4-PORT
(C) 2013, SatService GmbH
www.satnms.com
VLC-IM-1307 Page 12/30
SatService
Gesellschaft für Kommunikationssysteme mbH
8
8-PORT
8-PORT
8-PORT
9
ROCKET -
-
10
ROCKET 4-PORT
-
11
ROCKET 4-PORT
4-PORT
12
ROCKET ROCKET -
13
ROCKET ROCKET 4-PORT
14
ROCKET ROCKET ROCKET
The ports provided by these cards are named following a fixed scheme, making it easy to link port names to connector names.
Moxa Intellio Cards
Ports at Moxa Intellio boards are defined by means of the 'INTELLIO' Variable. INTELLIO must be set to the total number of
serial ports provided by the modules connected to Intellio boards. The VLC assumes, that the first 32 ports are assigned to board
1, the next 32 ports to to board 2 etc. 'INTELLIO=0' tells the VLC that there is no Intellio board in the system. Intellio boards
may be combined with the 4/8 port boards discussed above, however, the total number of serial IO cards in the VLC must not
exceed 3. Intellio cards are configured by jumpers/DIP switches.
The port names generated for Intellio cards follow a similar scheme as the passive cards do.
The variable name was changed to SATNMS_INTELLIO.
Digi Etherlite Terminal Server
The VLC also supports the Digi Etherlite terminal server series. Set the variable USES_ETHERLITE in the file /etc/rc.vlc to 'yes' if
you have connected one or more terminals servers to the VLC's Ethernet port.
The terminal servers have to be set to fixed IP addresses within the subnet covered by the subnet of the VLC's Ethernet port. To
tell the serial port driver which Etherlite units are connected, you must edit the file /etc/els.conf. For details, refer to the Digi user
manual and the information available at the Digi web site concerning the Etherlite Linux driver.
The variable name was changed to SATNMS_ETHERLITE in the configuration file '/etc/satnms.rc'.
Port Naming
The VLC uses a fixed scheme to name it's serial ports. This scheme makes it easy to match port connections and the
corresponding port names in the software:
4/8 port The port names are built as 'ttySik', where 'i' is the number of the board (1..3) and 'k' is the number of the port in the
cards:
board (1..8). The latter port number matches that one printed on the boards bracket or on the individual connector.
Example: 'ttyS23' designates the third port on the second board.
Intellio
cards:
The port names are built as 'ttyikl', where 'i' is the number of the board (A..C), 'k' is the number of the external IO
module (1..4) and 'l' is the individual port number at this module(1..8).
Please note, that 16 port modules are treated by the driver like 2 8-port modules in one housing. They occupy 2
module addresses where the first contains the ports 1..8, the second one the ports 8..16.
Example: 'ttyA18' designates the 8th port at the first module connected to the first Intellio board.
Etherlite The Etherlite serial port driver automatically assigns names to the ports it manages. The names are 'ttyN???' where
ports:
the question marks are replaced by a number which identifies the individual port. Please refer to the Digi software
documentation for the numbering scheme used.
VLC Serial IO Card Configuration 1
No. of boards: 1
(C) 2013, SatService GmbH
www.satnms.com
VLC-IM-1307 Page 13/30
SatService
Gesellschaft für Kommunikationssysteme mbH
No. of ports:
4
Board 1:
Moxa Smartio/Industrio 4-port board at 0x180 / IRQ 10
tty-names:
ttyS11, ttyS12, ttyS13, ttyS14 (board1)
VLC Serial IO Card Configuration 2
No. of boards: 2
No. of ports:
8
Board 1:
Moxa Smartio/Industrio 4-port board at 0x180 / IRQ 10
Board 2:
Moxa Smartio/Industrio 4-port board at 0x200 / IRQ 5
tty-names:
ttyS11, ttyS12, ttyS13, ttyS14 (board1)
ttyS21, ttyS22, ttyS23, ttyS24 (board2)
VLC Serial IO Card Configuration 3
No. of boards: 1
No. of ports:
8
Board 1:
Moxa Smartio/Industrio 8-port board at 0x180 / IRQ 10
tty-names:
ttyS11, ttyS12, ttyS13, ttyS14, ttyS15, ttyS16, ttyS17, ttyS18 (board1)
VLC Serial IO Card Configuration 4
No. of boards: 2
No. of ports:
12
Board 1:
Moxa Smartio/Industrio 8-port board at 0x180 / IRQ 10
Board 2:
Moxa Smartio/Industrio 4-port board at 0x200 / IRQ 5
tty-names:
ttyS11, ttyS12, ttyS13, ttyS14, ttyS15, ttyS16, ttyS17, ttyS18 (board1)
ttyS21, ttyS22, ttyS23, ttyS24 (board2)
VLC Serial IO Card Configuration 5
No. of boards: 3
No. of ports:
16
Board 1:
Moxa Smartio/Industrio 8-port board at 0x180 / IRQ 10
Board 2:
Moxa Smartio/Industrio 4-port board at 0x200 / IRQ 5
Board 3:
Moxa Smartio/Industrio 4-port board at 0x380 / IRQ 11
tty-names:
ttyS11, ttyS12, ttyS13, ttyS14, ttyS15, ttyS16, ttyS17, ttyS18 (board1)
ttyS21, ttyS22, ttyS23, ttyS24 (board2)
ttyS31, ttyS32, ttyS33, ttyS34 (board3)
VLC Serial IO Card Configuration 6
No. of boards: 2
No. of ports:
16
Board 1:
Moxa Smartio/Industrio 8-port board at 0x180 / IRQ 10
Board 2:
Moxa Smartio/Industrio 8-port board at 0x200 / IRQ 5
tty-names:
ttyS11, ttyS12, ttyS13, ttyS14, ttyS15, ttyS16, ttyS17, ttyS18 (board1)
(C) 2013, SatService GmbH
www.satnms.com
VLC-IM-1307 Page 14/30
SatService
Gesellschaft für Kommunikationssysteme mbH
ttyS21, ttyS22, ttyS23, ttyS24, ttyS25, ttyS26, ttyS27, ttyS28 (board2)
VLC Serial IO Card Configuration 7
No. of boards: 3
No. of ports:
20
Board 1:
Moxa Smartio/Industrio 8-port board at 0x180 / IRQ 10
Board 2:
Moxa Smartio/Industrio 8-port board at 0x200 / IRQ 5
Board 3:
Moxa Smartio/Industrio 4-port board at 0x380 / IRQ 11
tty-names:
ttyS11, ttyS12, ttyS13, ttyS14, ttyS15, ttyS16, ttyS17, ttyS18 (board1)
ttyS21, ttyS22, ttyS23, ttyS24, ttyS25, ttyS26, ttyS27, ttyS28 (board2)
ttyS31, ttyS32, ttyS33, ttyS34 (board3)
VLC Serial IO Card Configuration 8
No. of boards: 3
No. of ports:
24
Board 1:
Moxa Smartio/Industrio 8-port board at 0x180 / IRQ 10
Board 2:
Moxa Smartio/Industrio 8-port board at 0x200 / IRQ 5
Board 3:
Moxa Smartio/Industrio 8-port board at 0x380 / IRQ 11
tty-names:
ttyS11, ttyS12, ttyS13, ttyS14, ttyS15, ttyS16, ttyS17, ttyS18 (board1)
ttyS21, ttyS22, ttyS23, ttyS24, ttyS25, ttyS26, ttyS27, ttyS28 (board2)
ttyS31, ttyS32, ttyS33, ttyS34, ttyS35, ttyS36, ttyS37, ttyS38 (board3)
VLC Serial IO Card Configuration 9
No. of boards: 1
No. of ports:
8
Board 1:
Comtrol Rocketport board at 0x180
tty-names:
ttyS11, ttyS12, ttyS13, ttyS14, ttyS15, ttyS16, ttyS17, ttyS18 (board1)
VLC Serial IO Card Configuration 10
No. of boards: 2
No. of ports:
12
Board 1:
Comtrol Rocketport board at 0x180
Board 2:
Moxa Smartio/Industrio 4-port board at 0x200 / IRQ 5
tty-names:
ttyS11, ttyS12, ttyS13, ttyS14, ttyS15, ttyS16, ttyS17, ttyS18 (board1)
ttyS21, ttyS22, ttyS23, ttyS24 (board2)
VLC Serial IO Card Configuration 11
No. of boards: 3
No. of ports:
16
Board 1:
Comtrol Rocketport board at 0x180
Board 2:
Moxa Smartio/Industrio 4-port board at 0x200 / IRQ 5
Board 3:
Moxa Smartio/Industrio 4-port board at 0x380 / IRQ 11
(C) 2013, SatService GmbH
www.satnms.com
VLC-IM-1307 Page 15/30
SatService
Gesellschaft für Kommunikationssysteme mbH
tty-names:
ttyS11, ttyS12, ttyS13, ttyS14, ttyS15, ttyS16, ttyS17, ttyS18 (board1)
ttyS21, ttyS22, ttyS23, ttyS24 (board2)
ttyS31, ttyS32, ttyS33, ttyS34 (board3)
VLC Serial IO Card Configuration 12
No. of boards: 2
No. of ports:
16
Board 1:
Comtrol Rocketport board at 0x180
Board 2:
Comtrol Rocketport board at 0x200
tty-names:
ttyS11, ttyS12, ttyS13, ttyS14, ttyS15, ttyS16, ttyS17, ttyS18 (board1)
ttyS21, ttyS22, ttyS23, ttyS24, ttyS25, ttyS26, ttyS27, ttyS28 (board2)
VLC Serial IO Card Configuration 13
No. of boards: 3
No. of ports:
20
Board 1:
Comtrol Rocketport board at 0x180
Board 2:
Comtrol Rocketport board at 0x200
Board 3:
Moxa Smartio/Industrio 4-port board at 0x380 / IRQ 11
tty-names:
ttyS11, ttyS12, ttyS13, ttyS14, ttyS15, ttyS16, ttyS17, ttyS18 (board1)
ttyS21, ttyS22, ttyS23, ttyS24, ttyS25, ttyS26, ttyS27, ttyS28 (board2)
ttyS31, ttyS32, ttyS33, ttyS34 (board3)
VLC Serial IO Card Configuration 14
No. of boards: 3
No. of ports:
24
Board 1:
Comtrol Rocketport board at 0x180
Board 2:
Comtrol Rocketport board at 0x200
Board 3:
Comtrol Rocketport board at 0x380
tty-names:
ttyS11, ttyS12, ttyS13, ttyS14, ttyS15, ttyS16, ttyS17, ttyS18 (board1)
ttyS21, ttyS22, ttyS23, ttyS24, ttyS25, ttyS26, ttyS27, ttyS28 (board2)
ttyS31, ttyS32, ttyS33, ttyS34, ttyS35, ttyS36, ttyS37, ttyS38 (board3)
Serial IO Hardware Setting (4-PORT / 1)
The first Moxa Smartio/Industrio 4-port board in a VLC is operated at at 0x180 / IRQ 10, which is the factory default setting for
these boards. So, usually the board can be used out of the box.
If you want to install a board which already has been configured to work as second or third board in a VLC, you have to reset the
IO/IRQ settings of this board. The following steps describe how to install the card into a running VLC.
1.
2.
3.
4.
Shut down the VLC, switch it off.
Open the housing.
Install the board in a free slot.
Install the jumper at the rounded corner of the board (it's the only jumper on this board).
(C) 2013, SatService GmbH
www.satnms.com
VLC-IM-1307 Page 16/30
SatService
Gesellschaft für Kommunikationssysteme mbH
5. Connect a VGA computer monitor and a keyboard to the VLC.
6. Switch on the unit.
7. Press 'F5' when the VLC asks to do so. The VLC only waits for 3 seconds at this point, so keep an eye on the messages
on the screen.
8. At the DOS prompt, enter MOXA
9. The configuration program first asks to select the card type (choose 'Smartio'), then it asks for the board address. Enter
'A700'.
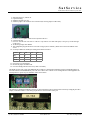
10. Set the port addresses and IRQs according to the table shown below:
IO Port 180
188
190
198
IRQ
10
10
10
10
Speed
Normal Normal Normal Normal
Int.Vec.
11. Press F10 to save the changes.
12. Remove the jumper from the board.
13. Close the housing and reboot the VLC (CTRL+ALT+DEL)
The RS485 version of the 4-port card additionally has 4 jumpers to enable the line termination resistors and eight dip switches to
select the behavior of the RS485/RS422 ports. The VLC software uses a RS422 4-wire cabling with most of the equipment. The
switch positions to operate all ports in RS422 mode is shown below:
The jumpers for enabling the termination resistors are places beside the connector at the board's bracket. By closing the pins with a
jumper, a termination resistor of 120 ohms gets placed across the receive lines of the port.
Serial IO Hardware Setting (4-PORT / 2)
To install a Moxa Smartio/Industrio 4-port board in a VLC as the second serial board, the IO port and IRQ settings of the board
must be changed to 0x200 / IRQ 5 by means of the DOS based configuration utility shipped with the board.
The following steps describe how to install the card into a running VLC.
(C) 2013, SatService GmbH
www.satnms.com
VLC-IM-1307 Page 17/30
SatService
Gesellschaft für Kommunikationssysteme mbH
1.
2.
3.
4.
Shut down the VLC, switch it off.
Open the housing.
Install the board in a free slot.
Install the jumper at the rounded corner of the board (it's the only jumper on this board).
5. Connect a VGA computer monitor and a keyboard to the VLC.
6. Switch on the unit.
7. Press 'F5' when the VLC asks to do so. The VLC only waits for 3 seconds at this point, so keep an eye on the messages
on the screen.
8. At the DOS prompt, enter MOXA
9. The configuration program first asks to select the card type (choose 'Smartio'), then it asks for the board address. Enter
'A700'.
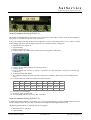
10. Set the port addresses and IRQs according to the table shown below:
IO Port 200
208
210
218
IRQ
5
5
5
5
Speed
Normal Normal Normal Normal
Int.Vec.
11. Press F10 to save the changes.
12. Remove the jumper from the board.
13. Close the housing and reboot the VLC (CTRL+ALT+DEL)
The RS485 version of the 4-port card additionally has 4 jumpers to enable the line termination resistors and eight dip switches to
select the behavior of the RS485/RS422 ports. The VLC software uses a RS422 4-wire cabling with most of the equipment. The
switch positions to operate all ports in RS422 mode is shown below:
The jumpers for enabling the termination resistors are places beside the connector at the board's bracket. By closing the pins with a
jumper, a termination resistor of 120 ohms gets placed across the receive lines of the port.
(C) 2013, SatService GmbH
www.satnms.com
VLC-IM-1307 Page 18/30
SatService
Gesellschaft für Kommunikationssysteme mbH
Serial IO Hardware Setting (4-PORT / 3)
To install a Moxa Smartio/Industrio 4-port board in a VLC as the third serial board, the IO port and IRQ settings of the board
must be changed to 0x380 / IRQ 11 by means of the DOS based configuration utility shipped with the board.
The following steps describe how to install the card into a running VLC.
1.
2.
3.
4.
Shut down the VLC, switch it off.
Open the housing.
Install the board in a free slot.
Install the jumper at the rounded corner of the board (it's the only jumper on this board).
5. Connect a VGA computer monitor and a keyboard to the VLC.
6. Switch on the unit.
7. Press 'F5' when the VLC asks to do so. The VLC only waits for 3 seconds at this point, so keep an eye on the messages
on the screen.
8. At the DOS prompt, enter MOXA
9. The configuration program first asks to select the card type (choose 'Smartio'), then it asks for the board address. Enter
'A700'.
10. Set the port addresses and IRQs according to the table shown below:
IO Port 380
388
390
398
IRQ
11
11
11
11
Speed
Normal Normal Normal Normal
Int.Vec.
11. Press F10 to save the changes.
12. Remove the jumper from the board.
13. Close the housing and reboot the VLC (CTRL+ALT+DEL)
The RS485 version of the 4-port card additionally has 4 jumpers to enable the line termination resistors and eight dip switches to
select the behavior of the RS485/RS422 ports. The VLC software uses a RS422 4-wire cabling with most of the equipment. The
switch positions to operate all ports in RS422 mode is shown below:
The jumpers for enabling the termination resistors are places beside the connector at the board's bracket. By closing the pins with a
jumper, a termination resistor of 120 ohms gets placed across the receive lines of the port.
(C) 2013, SatService GmbH
www.satnms.com
VLC-IM-1307 Page 19/30
SatService
Gesellschaft für Kommunikationssysteme mbH
Serial IO Hardware Setting (8-PORT / 1)
The first Moxa Smartio/Industrio 8-port board in a VLC is operated at at 0x180 / IRQ 10, which is the factory default setting for
these boards. So, usually the board can be used out of the box.
If you want to install a board which already has been configured to work as second or third board in a VLC, you have to reset the
IO/IRQ settings of this board. The following steps describe how to install the card into a running VLC.
1.
2.
3.
4.
Shut down the VLC, switch it off.
Open the housing.
Install the board in a free slot.
Install the jumper at the rounded corner of the board (it's the only jumper on this board).
5. Connect a VGA computer monitor and a keyboard to the VLC.
6. Switch on the unit.
7. Press 'F5' when the VLC asks to do so. The VLC only waits for 3 seconds at this point, so keep an eye on the messages
on the screen.
8. At the DOS prompt, enter MOXA
9. The configuration program first asks to select the card type (choose 'Smartio'), then it asks for the board address. Enter
'A700'.
10. Set the port addresses and IRQs according to the table shown below:
IO Port 180
188
190
198
1A0
1A8
1B0
1B8
IRQ
10
10
10
10
10
10
10
10
Speed
Normal Normal Normal Normal Normal Normal Normal Normal
Int.Vec.
11. Press F10 to save the changes.
12. Remove the jumper from the board.
13. Close the housing and reboot the VLC (CTRL+ALT+DEL)
Serial IO Hardware Setting (8-PORT / 2)
To install a Moxa Smartio/Industrio 8-port board in a VLC as the second serial board, the IO port and IRQ settings of the board
must be changed to 0x200 / IRQ 5 by means of the DOS based configuration utility shipped with the board.
The following steps describe how to install the card into a running VLC.
1. Shut down the VLC, switch it off.
2. Open the housing.
(C) 2013, SatService GmbH
www.satnms.com
VLC-IM-1307 Page 20/30
SatService
Gesellschaft für Kommunikationssysteme mbH
3. Install the board in a free slot.
4. Install the jumper at the rounded corner of the board (it's the only jumper on this board).
5. Connect a VGA computer monitor and a keyboard to the VLC.
6. Switch on the unit.
7. Press 'F5' when the VLC asks to do so. The VLC only waits for 3 seconds at this point, so keep an eye on the messages
on the screen.
8. At the DOS prompt, enter MOXA
9. The configuration program first asks to select the card type (choose 'Smartio'), then it asks for the board address. Enter
'A700'.
10. Set the port addresses and IRQs according to the table shown below:
IO Port 200
208
210
218
220
228
230
238
IRQ
5
5
5
5
5
5
5
5
Speed
Normal Normal Normal Normal Normal Normal Normal Normal
Int.Vec.
11. Press F10 to save the changes.
12. Remove the jumper from the board.
13. Close the housing and reboot the VLC (CTRL+ALT+DEL)
Serial IO Hardware Setting (8-PORT / 3)
To install a Moxa Smartio/Industrio 8-port board in a VLC as the third serial board, the IO port and IRQ settings of the board
must be changed to 0x380 / IRQ 11 by means of the DOS based configuration utility shipped with the board.
The following steps describe how to install the card into a running VLC.
1.
2.
3.
4.
Shut down the VLC, switch it off.
Open the housing.
Install the board in a free slot.
Install the jumper at the rounded corner of the board (it's the only jumper on this board).
5. Connect a VGA computer monitor and a keyboard to the VLC.
6. Switch on the unit.
7. Press 'F5' when the VLC asks to do so. The VLC only waits for 3 seconds at this point, so keep an eye on the messages
on the screen.
8. At the DOS prompt, enter MOXA
9. The configuration program first asks to select the card type (choose 'Smartio'), then it asks for the board address. Enter
'A700'.
10. Set the port addresses and IRQs according to the table shown below:
(C) 2013, SatService GmbH
www.satnms.com
VLC-IM-1307 Page 21/30
SatService
Gesellschaft für Kommunikationssysteme mbH
IO Port 380
388
390
398
3A0
3A8
3B0
3B8
IRQ
11
11
11
11
11
11
11
11
Speed
Normal Normal Normal Normal Normal Normal Normal Normal
Int.Vec.
11. Press F10 to save the changes.
12. Remove the jumper from the board.
13. Close the housing and reboot the VLC (CTRL+ALT+DEL)
Serial IO Hardware Setting (ROCKET / 1)
The first Comtrol Rocketport card in the VLC computer are operated at 0x180, which is the factory default. If you want to install
a board which already has been configured to work as second or third board in a VLC, you have to reset the DIP switch settings
as shown in the picture below:
Serial IO Hardware Setting (ROCKET / 2)
To use a Comtrol Rocketport card as the second serial board, the DIP switches on the board must be set to the configuration
shown below:
Please note, that the use of a Rocketport card as the second board only is permissible if the first board in the VLC also is a
Comtrol Rocketport.
Serial IO Hardware Setting (ROCKET / 3)
To use a Comtrol Rocketport card as the third serial board, the DIP switches on the board must be set to the configuration shown
below:
Please note, that the use of a Rocketport card as the third board only is permissible if both, the first and the second board also are
Comtrol Rocketport cards.
Serial IO Hardware Setting (INTELLIO)
Moxa Intellio boards are configured by setting a jumper on the board to select the IRQ and a DIP switch located at the card's
bracket. The table below shows the settings for this card.
Card 1 at 0xdc000, IRQ 11:
Jumper Setting:
Switch Setting:
Card 2 at 0xd8000, IRQ 5:
(C) 2013, SatService GmbH
www.satnms.com
VLC-IM-1307 Page 22/30
SatService
Gesellschaft für Kommunikationssysteme mbH
Jumper Setting:
Switch Setting:
Card 3 at 0xd4000, IRQ 10:
Jumper Setting:
Switch Setting:
The setup program
The setup program is a tool to configure the VLC. You have to login as root (see How to connect to the VLC) and then start
the program by enter 'setup'
at the command prompt. The dialog based program ask for the parameters, writes them to the
sat-nms configuration file and finally applies the setting to the system and the appropriate configuration files of the Linux operating
system.
See The file '/etc/satnms.rc' for a complete list and the complete description of all parameters.
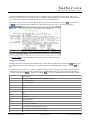
Configuring the VLC for the equipment setup
Telling the VLC which types of devices are connected to which serial interface you preferably will do at the NMS. The NMS
software provides a graphical user interface which easily lets you add or remove interfaces or assign device drivers to interfaces.
This chapter explains how to define the VLC equipment setup without the help of the NMS. You need to do this, if you intend to
use the VLC without a NMS.
To edit the equipment setup definition, first connect to the VLC as described in chapter 'How to connect to the VLC'. You need
not login as root, it is sufficient to be logged on as 'vlc' for this job. Then open the file 'vlc.setup' in /home/vlc ( /home/satnms ) in
the editor, enter the interface, protocol and device definitions as described below:
For each interface at the VLC that is used for equipment control, enter a line looking like
PORT port-name PROTOCOL protocol-name
Following the PORT keyword the name of the serial interface is added. Serial interfaces are named ttyS? with Linux, ? is an
arbitrary number. See chapter 'Port Naming' learn about the port numbering scheme used with the VLC.
The protocol name following the PROTOCOL keyword tells the VLC which communication protocol to use with this interface.
The communication protocol depends on the device type to control. The 'Device driver / protocol reference list' at the end of this
document lets you look up the protocol name to be used with a particular device.
Each PORT .. PROTOCOL line in the 'vlc.setup' file must be followed by a at least one line defining the name and device driver
for a device connected to this interface port.
DEVICE device-name IS driver-name
The name of the device may be freely chosen, however, the following restrictions apply:
The name may consist of letters, digits and the hyphen ('-').
(C) 2013, SatService GmbH
www.satnms.com
VLC-IM-1307 Page 23/30
SatService
Gesellschaft für Kommunikationssysteme mbH
The name must be unique in this VLC.
Names longer then 11 characters will be truncated in the the event log display of the NMS.
Configurations setup by SatService GmbH use device names in capital letters, you may want to follow with internal
standard.
Chapter 'Device setup configuration file format' at the end of this manual gives a complete description of the file format used for the
'vlc.setup' file.
Operating the VLC
The VLC is built to run 24 hours a day without local user interaction. There is no local control of a VLC. Once installed, a VLC
will run under control of the NMS.
Power supply
The VLC is a computer containing a hard disk. Like with any computer, it may be damaging for the VLC to switch off the power
while the VLC is running! It is strongly recommended to use a battery backed up power supply for the VLC.
The new version contains a CompactFlash Card instead of a hard disk, but it may be damaging for the VLC to switch off the
power while the VLC is running as well !
Shut down procedure
To switch off the VLC, use the following procedure:
1. Remove the security device at the rear side of the VLC. This will cause the VLC software to shut down.
2. After a couple of seconds the VLc beeps two times.
3. Now it is safe to switch off the VLC.
Appendix
Device driver / protocol reference list
Device setup configuration file format
A short introduction to 'vi'
Device driver / protocol reference list
The table below list the device types supported by the VLC together with the name of the communication protocol to be used with
this device type. Some device drivers allow the usage of an alternate communication protocol. The detailed device driver
descriptions coming with the NMS user manual give more information about this.
driver name
protocol name
Agilent-Spectrum-Analyzer
Terminal-LF-LF
Anacom-KuBand-Transceiver
Anacom-Packet
Anacom-Protection-Switch
Anacom-Packet
Andrew-APC100
Andrew
Barco-RE4220
Scientific-Atlanta-RCDS
Cisco-Router
Cisco-Terminal
Clarent-SDM9400
SNMP
Codan-Transceiver
Codan-Terminal
Comstream-ABR202
Comstream-ASCII
Comstream-CM601A-SCPC
Comstream-Packet
(C) 2013, SatService GmbH
remarks
www.satnms.com
VLC-IM-1307 Page 24/30
SatService
Gesellschaft für Kommunikationssysteme mbH
Comstream-CM701-MC
Comstream-Packet
Comstream-CM701
Comstream-Packet
Comstream-CX101
Comstream-Packet
Comstream-CX801
Comstream-Packet
Comstream-DAC700-PRE
Comstream-ASCII
Comstream-DAC700
Comstream-Packet
Comstream-Demodulator
Comstream-Packet
Comstream-LoSpeed-Modem-SCPC
Comstream-Packet
Comstream-Modem-Card-SCPC
Comstream-Packet
Comstream-Modulator
Comstream-Packet
Comtech-CDM600
Comtech
CPI-350W-TWTA
Miteq-MOD95
CPI-TWTA
CPI-STX
CPI-VZU-TWTA
CPI-STX-CR
EF-Data-SDM300
EF-Data
Experimental
EF-Data
Generic
Terminal-CR-CRLF-E
Miteq-DVM100
Miteq-MOD95
Miteq-KBand-Upconverter
Miteq-MOD95
Monterey-140
Terminal-CR-CR
NAIS-FP-8Port-Switch
NAIS-FPx
NAIS-FP-AD-Test
NAIS-FPx
NAIS-FP-Alarm-Circuit
NAIS-FPx
NAIS-FP-Inv-Alarm-Circuit
NAIS-FPx
NAIS-FP-Latching-Relay
NAIS-FPx
NAIS-FP-Protection-Switch
NAIS-FPx
NAIS-FP-Pulse-Output
NAIS-FPx
NAIS-FP-Relay
NAIS-FPx
NAIS-FP-Simple-Input
NAIS-FPx
NAIS-FP-Simple-Output
NAIS-FPx
NAIS-FP-Watchdog-Output
NAIS-FPx
NDSatCom-1Axis-ACU
NDSatCom-ACU
NDSatCom-3Axis-ACU
NDSatCom-ACU
NDSatCom-KBand-Upconverter
Miteq-MOD95
NDSatCom-KuBand-Upconverter
Miteq-MOD95
NDSatCom-KuHBand-Upconverter
Miteq-MOD95
NDSatCom-KuLBand-Upconverter
Miteq-MOD95
NDSatCom-SkyWAN
SNMP
NDSatCom-Step-Track
Terminal-CRLF-CRLF
NDSatCom-TWTA
Miteq-MOD95
Newtec-NTC2080
Newtec
(C) 2013, SatService GmbH
www.satnms.com
VLC-IM-1307 Page 25/30
SatService
Gesellschaft für Kommunikationssysteme mbH
Novotronik-Matrix24
Novotronik
ORB-Step-Track
Terminal-CRLF-CRLF
Radyne-DM240
Radyne-Comstream
Radyne-DVB3030
Radyne-Comstream
Radyne-RCS11
Radyne-Comstream
Radyne-SFC1450
Radyne-SFC
SatService-ACU-IDU
Terminal-CRLF-CRLF
SatService-ACU-ODM
HTTP
SatService-Beacon-Receiver
HTTP
SatService-Power-Sensor
HTTP
Scopus-IRD26XX
Scopus-Master-Slave
Scopus-IRD28XX
Scopus-Master-Slave
SSE-ASat
SSE-NPI
SSE-KStar
Terminal-CR-CRLF-E
Tadiran-Scopus-E1000
Tadiran-Scopus
Tandberg-Alteia
Tandberg-Alteia
Tandberg-TT1260
Tandberg-TT1200
Vertex-7134-Step-Track
Vertex-7134
Vertex-7200-Step-Track
Vertex-7200
Vertex-Digital-Tracking-Receiver
Vertex-7200
Wegener-UNITY44XX
Wegener-Terminal
Device setup configuration file format
At startup the VLC software reads the file 'vlc.setup'. This file tells the software, which kind of device shall be controlled at which
interface of the VLC. The file is free formatted (line breaks are treated like spaces). C/C++-style comments are recognized and
removed before the file is interpreted.
Usually you will use the device setup editor coming with the NMS software to define which kind of equipment is connected to
which communication port of the VLC. If you plan to use a single VLC without having a NMS available, you will need to edit the
'vlc.setup' file directly.
The file uses a very limited number of keywords to specify the VLC's device configuration. If you modify this file manually, be
aware that the VLC will behave in an unpredictable way if you start it with an misconfigured 'vlc.setup' file. Please note also, the
device setup editor will reformat the 'vlc.setup' file and remove all comments from it if you edit the file with this utility.
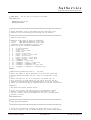
Example file 'vlc.setup'
(C) 2013, SatService GmbH
www.satnms.com
VLC-IM-1307 Page 26/30
SatService
Gesellschaft für Kommunikationssysteme mbH
Keyword Reference
Below the keywords which may appear in a 'vlc.setup' file are shown in tabular form.
COMMENT
The COMMENT keyword defines an identification string which should describe the purpose and the revision
of this configuration file. A message with the string defined with COMMENT is listed in the event log when the
software starts. There should be exactly one COMMENT definition in each 'vlc.setup' configuration file. It
usually appears at the very beginning of the file, however this is not a must.
Syntax:
COMMENT " Arbitrary String "
Example: COMMENT "BDRT4 Setup, 11.May 2001"
PORT
The PORT keyword introduces an interface port, which all definitions following the PORT definition refer to.
Syntax:
PORT Interface-Name
Interface-Name is the name one of the serial ports installed at the computer or the special name
"null". The latter is used in conjunction with the "Logical" communication protocol for so called
"logical devices" which exist in the software without a counterpart in the real world.
Example: PORT ttyS11
For each interface the software uses, there must be one PORT definition. PROTOCOL, DEVICE or IDLE
definitions following the PORT definition automatically refer to it.
PROTOCOL The PROTOCOL keyword defines a communication protocol to be used with the PORT definition it follows.
There must be exactly one PROTOCOL definition for each PORT. A port's communication protocol must be
defined prior to any DEVICE definitions.
The set of communication protocols which are available on a certain VLC/M&C computer may vary. Type 'ls
(C) 2013, SatService GmbH
www.satnms.com
VLC-IM-1307 Page 27/30
SatService
Gesellschaft für Kommunikationssysteme mbH
protocols/'
at the shell prompt in the home directory of the software to get a list of protocols which are
actually available.
Syntax:
PROTOCOL Protocol-Name
Example: PROTOCOL NAIS-FPx
There must be exactly one PROTOCOL specification following each PORT definition. The special protocol
'Logical' must be used, if the PORT is named 'null'.
DEVICE
The DEVICE keyword attaches a device to the port defined above. Usually you will attach one device to a
port. Some protocols allow multiple devices being controlled through a single interface. In such a case you can
attach more than one device to a port.
Syntax:
DEVICE Device-Name IS Driver-Name
Device-Name is a short and pregnant name you choose to uniquely identify the device in the
VLC/M&C. Device names must not be used twice. Device names should not be longer than 11
characters as they are cut to this length in event log messages.
Driver-Name selects the device driver the software shall use for this device.
Example: DEVICE CAM-SW IS NAIS-FP-Simple-Output
IDLE
For each port the software maintains an own 'thread' which polls the device(s) in an endless loop. In order not
to eat up all the computer's CPU time, the thread rests in every loop cycle for a certain time. The default for this
idle time is 1000 msecs.
The IDLE parameter lets you set the idle time for each port individually. Increasing the time unburdens the
CPU, but makes the software recognize state changes of the device with some delay. You may want to set the
idle time for a power meter involved on a power control loop to 200 ms while a "door open" alarm circuit only
needs to be polled every 10 seconds.
Syntax:
IDLE n
n the idle time (msecs)
Example: IDLE 500
A short introduction to 'vi'
vi is the standard text editor used on Unix systems. The M&C system being based on the Linux operating system uses an
enhanced version of vi, called vim (vi improved). The paragraphs below give a short introduction how to use this text editor.
The new version contains also the Midnight Commander with an integrated editor. type mc at the command prompt to start the
file manager and type mcedit filename, where filename is the path to the file which you want to edit, to start the editor. While
running MC you can browse through the directories of the system and manipulate files. Use the function keys F1 .. F10 or select
the functions from the menu.
First of all, why to use vi? vi is known to be difficult to learn as it's concept is different as you might expect. There are other text
editors available for Linux which are easier to handle. The answer is: vi turned out to be the only text editor program which works
in a satisfying way when used in the Microsoft Windows telnet client. If you are going to maintain and configure a sat-nms network
management system, you will find it comfortable even to do configuration jobs from your desk.
The most important difference between text editors like the 'notepad' known from the MS Windows operating system and vi is the
modal behavior of vi. This means, vi treats keystrokes in a different way, depending on it's current mode. The two most important
modes of vi are the COMMAND mode and the INSERT mode
In COMMAND mode, each keystroke tells the editor to do something. Even plain characters are commands rather than they are
inserted into the text. The advantage of this COMMAND mode is that you can operate the editor without any special keys arrows
or function keys.
(C) 2013, SatService GmbH
www.satnms.com
VLC-IM-1307 Page 28/30
SatService
Gesellschaft für Kommunikationssysteme mbH
In contrast, the INSERT mode lets you enter text but no commands. You have to switch between these modes while you are
editing a text. Early versions of vi really didn't provide any commands while in INSERT mode. vim is much more flexible with this,
e.g. you may move around the text using the cursor keys, even if you are in INSERT mode.
The vi editor contains a extensive online help manual which you can view from within the editor. Type the
key, followed by :h
and
. The editor splits the window and shows the online help in the upper part. Type :q to remove the help again.
The following chapter lists the most frequently used commands for the vi editor as a reference.
Common commands
The table below lists some frequently used commands for the vi editor. Pleas note that all the commands except
must be typed
in COMMAND mode. This means if the editor is in another mode than the COMMAND mode, you have to press the
key
first.
Commands starting with a colon are so called 'ex commands' which are entered in the command / status line at the bottom of the
terminal window. As soon as you press the colon character in COMMAND mode, the cursor jumps to the bottom line and lets
you edit the command. Press
to complete the command or
to return to COMMAND mode without changing anything.
Mode changes
Leave the INSERT mode, revert to COMMAND mode.
i
Go to INSERT mode
Cursor movements
k
Up
j
Down
h
Left
l
Right
0
Start of line
$
End of line
gg
First line of the text
G
Last line of the text
Block / range commands
v
Start visual mode, this marks the block start
y
Yank the marked block into the paste buffer.
x
Yank the marked block and delete it from the text.
(C) 2013, SatService GmbH
www.satnms.com
VLC-IM-1307 Page 29/30
SatService
Gesellschaft für Kommunikationssysteme mbH
P
Paste the contents of the buffer before the cursor position. te
File / buffer commands
:qa!
Quit, abandon all changes.
:xa
Exit, save changes.
:e file-name
Edit a file in a separate buffer.
:bn
Step through buffers.
Find / replace commands
/ pattern
Goto the next occurrence of 'pattern'.
N
Repeat the last search.
:%s/pattern/text/gc Replace each occurrence of 'pattern' in the document with 'text'. Ask for confirmation before executing
each replace.
You normally will use the cursor keys at your keyboard for moving in the text rather than typing the commands shown in the table
above. If however the cursor keys do not work for some reason, knowing the command characters may be very helpful.
'vi' in the MS Windows telnet client
To make the MS Windows telnet client work well with the vi editor, you should configure the telnet client as shown below.
it is important to have the following parameters set:
No local echo selected.
The VT100/ANSI emulation chosen.
The buffer size set to 24 lines.
VT100 cursor keys enabled.
With these settings you get most comfortable control about the vi editor in the telnet window. Text scrolling works as you expect
with a buffer size of 24 lines, with the VT100 cursor keys enabled you can move in the text even in INSERT mode.
The keys 'Ins', 'Del', Pos1', 'End', 'Pg Up' and 'Pg Dn' do not work. You should not try to use them as they might insert strange
characters in the text instead of doing the function you expect.
(C) 2013, SatService GmbH
www.satnms.com
VLC-IM-1307 Page 30/30