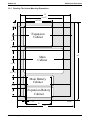
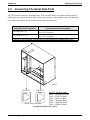
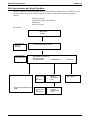
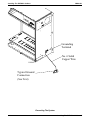
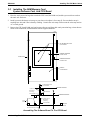
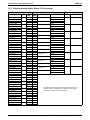
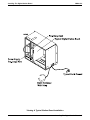
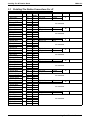
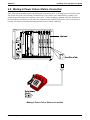
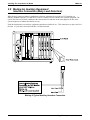
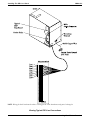
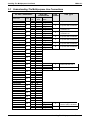
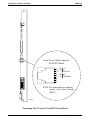
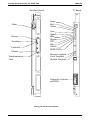
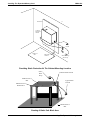
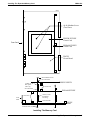
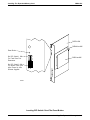
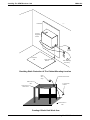
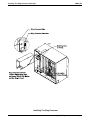
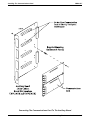
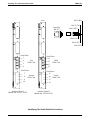
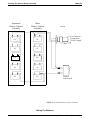
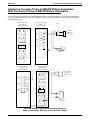
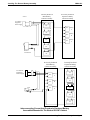
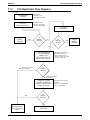
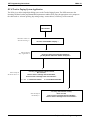
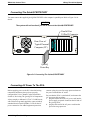
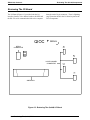
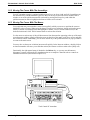
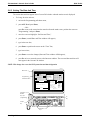
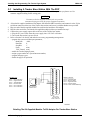
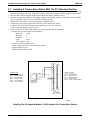
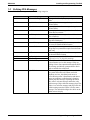
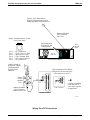
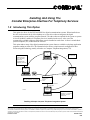
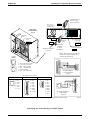
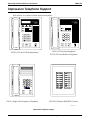
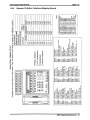
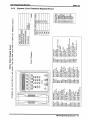
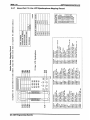
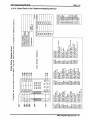
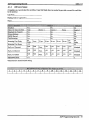
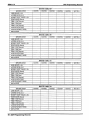
1
DXP
Digital Communications System
General System
Description
This publication reflect
software releases through
R
Printed in U.S.A.
GCA40–112.04
8/96
Accredited by the Dutch Council
for Certification for certification
and registration activities.
Comdial’s Quality Management System Is
Certified To The ISO 9001 Standard.
DXP General Description
GCA40–112
Contents
1. Introducing The DXP ..................................................................... 1
1.1
1.2
Using This Publication.......................................................................................1
Understanding The DXP...................................................................................2
2. Understanding The Telephone Features ........................................3
2.1
2.2
2.3
2.4
2.5
Using the Comdial Telephones ..........................................................................3
Understanding The Telephone Features............................................................4
Using DigiTech Telephones.............................................................................. 6
Using Impact Telephones.................................................................................. 8
Using ExecuTech Telephones..........................................................................10
3. Reviewing The Hardware ..............................................................13
3.1
3.2
3.3
3.4
3.5
3.6
3.7
3.8
3.9
3.10
3.11
3.12
Understanding Printed Wire Boards .............................................................. 13
Defining The Line Boards...............................................................................14
Defining The Station Boards.......................................................................... 15
Defining The Optional Circuit Boards.............................................................15
Locating The Boards...................................................................................... 16
Using The Modem ...........................................................................................18
Using The Ring Generator ..............................................................................19
Understanding Board Configuration ............................................................... 20
Mounting Considerations................................................................................ 21
Using The Power Supply .................................................................................24
Using The Battery Backup ...............................................................................26
Understanding System Grounding Requirements ............................................27
4. Connecting The System..................................................................29
4.1
4.2
4.3
4.4
4.5
4.6
Connecting The Lines .....................................................................................29
Connecting The Stations .................................................................................30
Connecting The Paging Equipment And Music Sources .................................32
Connecting The Power Failure Telephone...................................................... 33
Connecting The Serial Data Ports ....................................................................34
Connecting The Slave Equipment Requiring Dry-Contact Relay Closures....36
5. Knowing The General Specifications............................................37
5.1
Knowing The FCC Rules And Regulations .................................................... 43
6. Understanding The System Features............................................45
Contents – iii
DXP General Description
1
1.1
GCA40–112
Introducing The DXP
Using This Publication
What this
book does
This DXP General Description provides an overview of the system and its
features. The system’s general specifications are detailed in full in Section 5,
Knowing The General Specifications. Section 6, Understanding The Features,
details all of the available features.
Where to find
what you need
The General Description contains six sections. Use the following list as a guide to
finding what you need in this book.
•
Section One, Introducing The DXP, gives you a general overview of the
system and its capabilities.
•
Section Two, Understanding The Telephone Features, lists the telephone
models that function on the DXP. This chapter also lists the major features of
the telephones, and it gives you diagrams and dimensions of each telephone
model.
•
Section Three, Previewing The Hardware, details all of the hardware for the
DXP. Use this chapter to find definitions of the printed-wire-boards. Along
with general definitions, section three gives the product code numbers and the
installation locations for each board.
•
Section Four, Connecting The System, describes some basic installation
instructions. You will find information on line and station connections in
section four.
•
Section Five, Knowing The Specifications, lists all of the product codes and
specifications for the DXP.
•
Section Six, Understanding The Features, defines all of the system’s
features.
Introducing The DXP – 1
GCA40–112
1.2
DXP General Description
Understanding The DXP
Station and line
capacity
The DXP system is a 224–port, two-cabinet, digital communications system
consisting of a main cabinet and an expansion cabinet. With analog, loop-start,
DID, or multipurpose line boards, the maximum configuration is 32 lines and 192
stations, or 120 lines and 16 stations. However, by using the maximum of four
24-channel T1 boards, you can increase the number of stations that the system
will support to 48 without reducing the maximum line capacity of 120 lines. This
is because the T1 boards can provide maximum system line support while
occupying fewer board slots than other line board types thus freeing board slots
for station board use. Then, the system can use these free board slots for
additional station boards, thus increasing the quantity of stations available when
the system is providing maximum line capacity.
How the system
works
The Comdial DXP digital communications system provides cost-effective voice
and data communications using the latest PCM-TDM (pulse code modulated/time
division multiplexing) digital switching technology. The DXP switching
architecture provides a non-blocking switching array that gives all ports
simultaneous access through the system. The digital technology allows
simultaneous voice and data transmission using 2B+D signaling (CCITT
specification for basic access data transfer rate for ISDN on a single twisted pair)
when data terminals become available. The design is a fully modular, ISDN
(integrated services digital communications network) system with 224 usable
time slots and the flexibility for upgrade and expansion as needed. The DXP
digital communications system supports the current Comdial line of DigiTech,
Impact, and ExecuTech telephones.
2 – Introducing The DXP
DXP General Description
2
2.1
GCA40–112
Describing The Telephone
Features
Using The Comdial Telephones
The DXP system supports many of Comdial’s proprietary telephones as well as industry-standard
telephones. The following list details the various telephone models.
•
•
•
DigiTech Telephones
» 7700S
— LCD Speakerphone
»
7701X
— Multiline Telephone
»
7714X
— Multiline Telephone
»
7714S
— Multiline Speakerphone
»
DD32X
— 32-Button DSS/BLF
Impact Telephones
» 8024S
— 24 Line LCD Speakerphone
»
8124S
— 24 Line Speakerphone
»
8012S
— 12 Line LCD Speakerphone
»
8112S
— 12 Line Speakerphone
»
8112N
— Multiline Proprietary Telephone
»
IB64X
— DSS/BLF Console
»
8101N
— Single line Proprietary Telephone
ExecuTech Telephones
» 6620E
— 23-Line Monitor Telephone
6714S
— 14-Line Speakerphone
»
6620T
— 23-Line Speakerphone
6714X
— 14-Line Monitor Telephone
»
6614E
— 22-Line Monitor Telephone
6614T
— 22-Line Speakerphone
»
6600E
— 17-Line LCD Speakerphone
»
6700S
— 12-Line LCD Speakerphone
DB70
— 70-Button DSS/BLF
»
6701X
— Single Line Proprietary Telephone
DB32S
— 32-Button DSS/BLF
»
6706X
— 6-Line Monitor Telephone
EX32X — 32-Button DSS/BLF
Describing The Telephone Features – 3
GCA40–112
2.2
DXP General Description
Understanding The Telephone Features
The DXP supports the following telephone features on both analog and digital proprietary telephones.
Some of these features are system-wide and others are specific to individual stations.
Alphanumeric Display
— Displays time, day and date
— Keeps you apprised of the status of your telephone
— Provides programming prompts
Auxiliary Jack (used only with Impact and DigiTech LCD speakerphone)
— Allows you to use your telephone privately and handsfree with headset
— Allows you to plug in a tape recorder
— Allows you to plug in a loud ringer
— Helps improve operation of high-volume business applications by adding a paging speaker
Button Query
— Allows you to see the function of a programmed button on your LCD screen
Hold Button
— Places a line on hold
— Stores pauses in number sequences while programming
— Allows you to scroll through multiple held calls on display
Interactive Buttons
— Provide quick and easy access to system and call processing features
— Provide straightforward button programming without dialing codes
(the interactive buttons themselves, however, are not programmable)
Intercom Button
— Selects an intercom line
— Initiates many of the features of the telephone
Message Waiting Light
— Tells you that there is a message for you
Mute Button
— Keeps the person on the line or speakerphone from hearing your conversation
Programmable Buttons
— Allow you to program your telephone for automatic dialing functions
— Allow you to program your telephone for Direct Station Selection (DSS)
— Show which lines and intercoms are either in use or on hold
— Allow you to store frequently used feature codes at unused buttons
4 – Describing The Telephone Features
DXP General Description
GCA40–112
Ringer Volume Control
— Lets you vary ringer volume
Shift Button
— Allows you to program and access preprogrammed feature codes or secondary speed dial
numbers (each programmable button can accommodate two feature codes or speed dial numbers)
Speaker Button
— Turns your speaker on or off
— Disconnects a call when your handset is on-hook
— Ends or cancels programming
Status Lights
— Shows status of line when next to line button
— Shows status of station when next to DSS button
— Shows status of feature when next to programmable button
TAP Button
— Recalls dial tone, or activates host system features (must be programmed for either feature)
— Retrieves held calls (last call held is first call retrieved)
Transfer/Conference Button
— Transfers calls
— Sets up conference calls
Volume Control
— Regulates the volume of the speaker and the handset
Describing The Telephone Features – 5
GCA40–112
2.3
DXP General Description
Using DigiTech Telephones
The DXP accepts all of the currently produced DigiTech telephones.
CAJS075
12X14LCD
DIGITECH
COMDIAL
DIGITECH
COMDIAL
TRANS
CONF
TAP
TRANS
CONF
TAP
SPKR
MUTE
SPKR
MUTE
HOLD
ITCM
7700S
7714X, 7714S
ABC
DEF
1
2
3
GHI
JKL
MNO
4
5
6
PRS
TUV
WXY
7
8
OPER
0
HOLD
HOLD
9
#
TAP
7701X
DD32X
Detailing The DigiTech Station Configurations
6 – Describing The Telephone Features
ITCM
DXP General Description
GCA40–112
7.658"
4.983"
4.069"
7714X
7714S
7700S
8.625"
1.112"
4.007"
6.451"
2.887"
8.625"
7701X
CAJS045
1.251"
Illustrating DigiTech Station Outline Dimensions
Describing The Telephone Features – 7
GCA40–112
2.4
DXP General Description
Using Impact Telephones
The DXP accepts all of the currently produced Impact telephones.
QZ
ABC
DEF
QZ
ABC
GHI
JKL
MNO
GHI
JKL
MNO
PRS
TUV
WXY
PRS
TUV
WXY
OPER
#
OPER
TRNS/CNF
DEF
#
TRNS/CNF
HOLD
INTERCOM
TAP
SPEAKER
SHIFT
MUTE
HOLD
8024S
SPEAKER
INTERCOM
TAP
ABC
DEF
QZ
ABC
DEF
GHI
JKL
MNO
GHI
JKL
MNO
PRS
TUV
WXY
PRS
TUV
SHIFT
#
MUTE
8124S
QZ
OPER
SHIFT
WXY
SHIFT
OPER
MUTE
#
MUTE
TRNS/CNF
TRNS/CNF
SPEAKER
HOLD
TAP
SPEAKER
INTERCOM
HOLD
8012S
TAP
INTERCOM
8112S
CAJS076
QZ
ABC
DEF
GHI
JKL
MNO
PRS
TUV
WXY
QZ
ABC
DEF
GHI
JKL
MNO
PRS
TUV
WXY
OPER
OPER
TRNS/CNF
TAP
HOLD
INTERCOM
8112N
IB64X
Detailing The Impact Station Configurations
8 – Describing The Telephone Features
TRNS/CNF
TAP
HOLD
INTERCOM
8101N
DXP General Description
GCA40–112
7.130
10.750
8.900
8024S, 8124S
8101N,
8112N
8.900
CAJS077
4.640
3.731
9.080
8.900
8012S, 8112S
1.034
Illustrating The Impact Station Outline Dimensions
Describing The Telephone Features – 9
GCA40–112
2.5
DXP General Description
Using ExecuTech Telephones
The DXP accepts all of the currently produced ExecuTech telephones.
TAP
TRANS
CONF
TAP
GHI
ABC
DEF
JKL
MNO
MUTE
PRS
TUV
WXY
SPKR
SYS
OPER
RDL
TAP
ABC
DEF
ABC
DEF
GHI
JKL
MNO
GHI
JKL
MNO
MUTE
PRS
TUV
WXY
MUTE
PRS
TUV
WXY
SPKR
SYS
OPER
RDL
SPKR
SYS
OPER
RDL
TRANS
CONF
TRANS
CONF
SHIFT
MW
HOLD
HOLD
ITCM
ITCM
HOLD
6614T
6614E
6620T
6620E
ITCM
6600E
CAJS046A
ABC
2
3
JKL
MNO
4
5
6
PRS
TUV
WXY
7
8
9
OPER
#
0
HOLD
DB70
ABC
DEF
JKL
MNO
PRS
TUV
WXY
GHI
PRS
OPER
TAP
SPKR
HOLD
TAP
DB32X
EB32X
6701X
GHI
SYS
DEF
1
GHI
ABC
DEF
JKL
MNO
TUV
WXY
TAP
TRANS
CONF
MNTR
MUTE
ABC
DEF
GHI
JKL
MNO
PRS
TUV
MUTE
SYS
TRANS
CONF
TAP
ITCM
SPKR
HOLD
6702X
6700S
WXY
PRS
OPER
OPER
RDL
GHI
SYS
RDL
MUTE
ITCM
6706X
Detailing The ExecuTech Station Configurations
10 – Describing The Telephone Features
TUV
WXY
SYS
TAP
HOLD
DEF
MNO
OPER
RDL
TRANS
CONF
ITCM
ABC
JKL
SPKR
RDL
MUTE
HOLD
6714S
TRANS
CONF
ITCM
DXP General Description
GCA40–112
7.658"
4.983"
4.069"
8.625"
1.112"
4.007"
6.451"
2.887"
8.625"
CAJS045
1.251"
Illustrating The ExecuTech Station Outline Dimensions
Describing The Telephone Features – 11
DXP General Description
3
3.1
GCA40–112
Reviewing The Hardware
Understanding The Printed-Wire Boards
The basic system consists of a main cabinet, which accepts 12 printed-wire boards and an expansion
cabinets that accepts eight printed-wire boards.
Auxiliary Board:
— A utility board that provides interface for a maximum of four special-purpose circuit cards.
Actual make-up requirements depend upon system configuration. The DXP system accepts two
auxiliary boards installed in the first two universal board slots.
Central Processing Unit (CPU) Board:
— Provides central processing and control for the system and other miscellaneous functions. The
CPU board has the time switch and conference circuitry and two serial data ports, which have
been dedicated for PC-based programming and a remote maintenance modem. The CPU board
includes four dry-contact relays for external control functions.
Conference Board:
— Provide additional conference capability. Each board provides 5 additional 3-way conferences.
Interface Boards:
— Ties the main cabinet to the expansion cabinet. Both the main and expansion cabinet has an
interface board. Interface boards are included with the expansion cabinet packages.
RAM Card and Software Card:
— Provides the memory storage and operating system control. The cards mount directly onto the
CPU board.
Services Board:
— Provides an interface for music-on-hold and background music inputs; it also provides an output
to an external paging amplifier.
Reviewing The Hardware – 13
GCA40–112
3.2
DXP General Description
Defining The Line Boards
The DXP accepts several different types of lines. In order to use these various lines, you must install the
correct line board. The following list details all of the current DXP line boards.
Direct Inward Dialing Line Board:
— Direct Inward Lines (DID) are incoming only and are employed to reduce the number of channels
between the DXP and the Central Office (CO). DID lines allow incoming CO calls to reach
internal intercom extensions without going through the attendant station. DID operation requires
a group of published directory numbers provided by the CO. The number of DID lines is limited
only by the number of installed DID boards. The DID translation tables have limits that may
affect DID capacities.
Loop-Start Line Board:
— The loop-start line board provides system interface for loop start lines. Loop start lines are the
most common CO line type (loop-start lines do not usually offer disconnect supervision)
Multi–Purpose Line Board:
— The multipurpose line board provides system interface for ground start lines, loop start lines, and
E & M Tie lines; these are typically the three line types that the central office (CO) makes
available for connection. The multipurpose line board is programmable for each line type. You
can have a maximum of two Tie lines on each multipurpose line board.
T1 Line Board:
— The T1 board provides 8, 16, or 24 channels of voice transmissions over a single four wire cable
using multiplexing techniques. The system accepts a maximum of four T1 boards.
14 – Reviewing The Hardware
DXP General Description
3.3
GCA40–112
Defining The Station Boards
The DXP accepts digital, analog, and industry standard telephones. In order to use these different types
of stations, you must install the correct station board. The following list explains each station board.
Analog Station Board
— The analog station board provides support for Comdial’s proprietary analog telephones (such as
the various ExecuTech models). Each board supports either 8 or 16 stations. A precharge port is
provided for board removal or insertion without system power-down.
Digital Station Board
— The digital station board provides support for Comdial’s proprietary digital telephones (such as
the Impact and DigiTech). Each board supports either 8 or 16 stations. A precharge port is
provided for board removal or insertion without system power-down.
Industry Standard Telephone Board
— The industry-standard station board provides support for industry-standard telephones. Each
board supports either 8 or 16 stations. A precharge port is provided for board removal or insertion
without system power-down.
3.4
Defining The Option Circuit Cards
The auxiliary boards accept the installation of smaller circuit cards.
Synchronization Card
— Adjusts the T1 transmit frequency to match the frequency from the CO. The synchronization card
mounts onto the Services board only.
Communications Card:
— The optional communications card provides extra serial ports for the DXP. The communications
card contains four serial communication ports You can install two communications cards onto the
lower two slots of the auxiliary board. The system supports a maximum of 18 serial data ports.
DTMF Tone Card
— The DTMF Tone card expands the system’s industry-standard dialing capability. The system has
two IST DTMF receivers located on the CPU board while each DTMF card provides four
additional DTMF receivers.
Reviewing The Hardware – 15
GCA40–112
3.5
DXP General Description
Locating The Boards
Main Cabinet
The 12-board capacity of the main cabinet breaks down as follows from left to right:
1 – interface board slot
1 – services board slot
1 – CPU board slot
2 – auxiliary/universal slot (for auxiliary boards, station boards, conference boards, or line boards)
3 – universal slots (for station, conference, or line boards)
4 – line board slots
Expansion Cabinet
The 8-board capacity of the upper expansion cabinet breaks down as follows:
1 – interface board slot
7 – universal slots (for station, conference, or line boards)
16 – Reviewing The Hardware
DXP General Description
GCA40–112
Interface Board
(Expansion)
Ribbon Cable For
Interconnecting
Interface Boards
Station or
Line Board
(7 Slots)
DXP031
Interface Board
(Main)
Services Board
CPU Board
Auxiliary Board
Or Line Or Station
Board (2 Slots)
Station Or Line
Board (3 Slots)
Line Board
(4 Slots)
Locating The DXP Circuit Boards
Reviewing The Hardware – 17
GCA40–112
3.6
DXP General Description
Using The Modem
The modem is a general-purpose *HayesTM compatible, 300, 1200, and 2400 automatic baud detect
serial modem. The CPU board defaults serial data port RS232/2 for modem use and also provides a
power port for the modem. If you connect the modem to a serial data port on one of the communications
cards, you will have to program the system for modem operation on that port.
* Hayes is a registered trademark of Hayes Microcomputer Products.
Power
Cord
Sta
PW
tus
R
PLUS013
SE
RIA
Lin
L
e
Serial Port
Cord
Line Cord
Illustrating The Modem
18 – Reviewing The Hardware
DXP General Description
3.7
GCA40–112
Using The Ring Generator
The DXP digital communications system supports the use of industry-standard
telephones (IST). To use ISTs, the system requires a ring generator assembly to supply ringing voltage
and message waiting voltage to the industry-standard telephones.
Regardless of the number of installed industry-standard telephones, you will need to install one ring
generator assembly in each common equipment cabinet that has IST telephones connected.
Installing The Ring Generator
Reviewing The Hardware – 19
GCA40–112
3.8
DXP General Description
Understanding The Board Configuration
Line Port
Location
The line numbers on every board ascend from the bottom line jack (lines 1 and 2)
to the top line jack (lines 7 and 8).
The line ports for both the main and expansion cabinet ascend from the
right-most slot to the left-most slot. This means that in the main cabinet, line ports
1–8 are in the rightmost board slot, line ports 9–17 are in the next slot to the left,
line ports 18–26 are in the next slot and so forth through line ports 65–72 located
in the left-most universal slot. The main cabinet supports a total of 72 lines.
Line ports in the expansion cabinet begin at the right-most board slots with line
ports 73–80 and ascend to the left at eight line ports per slot to end at the
left-most universal slot with line ports 121–128. The expansion cabinet supports a
total of 56 lines.
Station Port
Location
On 16–station boards, station ports 1–8 appear at connector J1and station ports
9–16 appear at connector J2 on every analog station board.
The station ports for both the main and expansion cabinet assend from the
leftmost universal board slot. This means that in the main cabinet, station ports
1–16 are in the leftmost universal board slot, station ports 17–32 are in the next
universal boatd slot to the right, station ports 33–48 are in the next universal
board slot and so forth through station ports 65–80 located in universal board slot
five. The main cabinet supports a totol of 80 stations. Remember, if the system
requires auxiliary boards, you must install them at universal slots one and two
thus eliminating two station board locations.
Station ports in the expansion cabinet begin at the leftmost board slots with
station ports 81–96 and assend to the right at 16 station ports per slot to end at the
rightmost universal slot with station ports 177–192. The expansion cabinet
supports a total of 112 stations.
Analog station ports are paired ODD/EVEN, beginning with the lowest port
number 1/2, 3/4, etc., for data and for overload protection. The odd port is the
positive voltage (+) port and the even port is the negative voltage (-) port.
20 – Reviewing The Hardware
DXP General Description
3.9
GCA40–112
Mounting Considerations
When installing the DXP digital communications system, take note of the following requirements (read
Sections 3.9.1 and 3.9.2 to learn the mounting dimensions):
• Always choose a secure and dry mounting location that has plenty of ventilation. Be sure that the
temperature range of the location is within 32-122 degrees F (0-50 degrees C) and that the
humidity is less than 90 percent, non-condensing.
•
Locate the equipment within four feet of a proper AC electrical outlet dedicated exclusively to
this equipment. The outlet must be a 117 VAC 15 AMP circuit with a third-wire ground
supplied to a standard electrical outlet (NEMA 5-15R)
•
Locate the equipment within 25 feet of the TELCO/PBX jacks—this is an FCC requirement. A
nominal distance of seven feet is ideal.
•
Use a reliable earth ground—a metal cold water pipe ahead of any non-metalic couplings or
junctions, or a metal building frame ground that is verified to be at earth ground potentional by
measurement.
•
Use a backboard of at least 3/4-inch thick plywood to mount the DXP common equipment. It is
a good practice to make this backboard large enough to accommodate the main cabinet, the
expansion cabinet, and a battery backup assembly even though the initial installation may not
require all of this equipment. Always bridge underlying wall studs with the backboard and drive
the attaching hardware through the backboard and through the underlying wall into the wall
studs. Allow space between the top and bottom of the main cabinet for later placement of an
expansion cabinet above the main cabinet.
NOTE: You can mount the cabinet on a standard 23–inch equipment rack if you wish.
Reviewing The Hardware – 21
GCA40–112
DXP General Description
3.9.1 Detailing The Vertical Mounting Dimensions
32"
24-1/2"
18-5/16"
3"
7"
Expansion
Cabinet
8-3/4"
3-31/32"
7"
60"
Main
Cabinet
8-3/4"
4-13/32"
Main Battery
Cabinet
5"
3-3/4"
5"
Expansion Battery
Cabinet
1-7/16"
CAJS051
16"
36"
22 – Reviewing The Hardware
DXP General Description
GCA40–112
3.9.2 Detailing The Horizontal Mounting Dimensions
24-1/2"
34-3/4"
18-5/16"
7"
Expansion
Cabinet
8-3/4"
3-31/32"
7"
48"
5"
Expansion Battery
Cabinet
5"
Main Battery
Cabinet
7"
10-31/32"
Main
Cabinet
CAJS052
16"
32"
64"
72"
Reviewing The Hardware – 23
GCA40–112
DXP General Description
3.10 Using The Power Supply
What the power
supply does
Each cabinet in the DXP system has its own power supply. The power supply
provides + and – 5 VDC operating power for the circuit boards and – 36 VDC for
all of the telephone stations. Each power supply is located in the lower left corner
of the respective cabinet.
Power supply
requirements
For the AC power connection, employ a dedicated 117VAC 15 AMP circuit, with
a third-wire ground, supplied to a standard electrical outlet (NEMA 5-15R).
Remember, this electrical outlet must be located within four feet of the common
equipment cabinet.
To provide protection against surges and spikes that may appear on the AC line,
install a plug-in power line surge protector between the AC power cord of the
installed equipment and the AC outlet.
The common equipment cabinet employs an electronic switching power supply.
During operation, power supplies of this type generate an audible sound from
their switching regulators. This sound is normal and is not an indication that the
power supply is operating improperly.
CAUTION
DO NOT attach or secure the line cord to the surface of the mounting location in any manner.
24 – Reviewing The Hardware
DXP General Description
GCA40–112
Detailing The Power Connections
Reviewing The Hardware – 25
GCA40–112
DXP General Description
3.11 Using The Battery Backup
What the battery
backup does
Should the AC power to the system be interrupted, one external battery assembly
provides 1.0 hour of operation for a fully loaded main cabinet or .5 hours for a
fully loaded main and expansion cabinet. Adding a second battery assembly in
parallel extends the time to a minimum of 2.0 hours for a fully loaded main
cabinet or 1.0 hour for a fully loaded main and expansion cabinet.
During AC operation, the external battery assembly accepts re-charging current to
maintain the voltage potential of its batteries at an operational level. The
measured voltage the battery backup is 34.5 volts when the batteries are fully
charged.
The charging circuit may not provide an adequate charge if an installed battery
assembly has a current rating of greater than 40 ampere-hours.
One external battery assembly requires approximately 12 hours to completely
re-charge to full potential after it has been completely discharged and, in some
cases, when initially installed. Adding another battery assembly extends the
required re-charge time to approximately 24 hours.
Battery backup
components
You can only install two battery backup per system. The battery backup
assembly includes the following items:
•
Five 6–volt, 20 ampere-hour GC Portalac Model PE6V20*
(Comdial product code BT000–131)
•
Metal enclosure with wire harness, includes combination circuit breaker,
on/off switch
*GC Portalac, City Of Industry CA, 91748
How to
calculate
backup time
Calculate the minimum battery backup time provided by one battery backup
assembly to a fully configured DXP system using the following formula:
T = Back-up time in hours
K = Constant:
.6 for fully-loaded main cabinet
.6 for fully-loaded main and expansion cabinet
e = Ampere-hour capacity of battery (BBLDX = 20)
N = total number of stations
T=
Ke
1 + [(0.13) (N)]
Example:
DXP main cabinet with 80 stations and one BBLDX battery assembly
(.6)(20)
12.0
T=
=
= 1.05 Hour
1 + [(0.13) (80)]
11.4
26 – Reviewing The Hardware
DXP General Description
GCA40–112
3.12 Understanding System Grounding Requirements
Transient voltage spikes, if induced onto CO or CENTREX lines, can travel through the cable and into
the common equipment. The telephone company offers basic protection against this condition but it is
usually designed to protect the central office circuits. While it will also provide some protection to the
common equipment, you should not rely upon it for total protection. To help ensure that external
over-voltage surges do not damage the system, installers should install and properly ground primary
protection devices, such as gas discharge tubes or similar devices, on all lines. While the line boards
have internal secondary surge protection on all line ports, in order for this protection to be effective,
installers MUST connect the common equipment cabinet to a reliable, effective earth ground.
Proper DXP grounding is necessary for trouble-free operation and personnel safety. The DXP has the
following three types of grounds:
Service Ground—a neutral power line wire that is connected to the ground bus in the premises’ AC
power panel,
System Ground—a non-current carrying power line wire that is connected to the ground bus in the
premises’ AC power panel,
Frame Ground—a low impedance conductor that places the common equipment cabinet at reference
ground potential. The frame ground provides the greatest safety by limiting electrical potential
between non-current carrying parts of the system. The common equipment cabinet provides a
ground stud on its cabinet for access to its frame ground.
Effective grounding requires that installers connect the frame ground to a good earth ground. A good
earth ground is one such as the ground bus in the premises’ AC power panel or a public metallic cold
water pipe at a point immediately at its entrance to the premises and ahead of any meters, pumps, or
insulating sections that have been added for vibration reduction. Installers must avoid using the
premises’ structural steel frame as it may not be at earth ground potential. Installers must make the
ground connection between the main and expansion cabinets with #10 or #12 or larger size insulated,
solid copper wire. They must make the connection between the main cabinet and the earth ground with
#6 or larger insulated, solid copper grounding wire. They must keep the ground wire separate from the
three-wire AC line cord, not splice it, and keep it as short as possible.
The impedance of the wiring between the DXP and the earth ground must not exceed 0.25 ohms and the
impedance between the earth ground and the power company’s reference standard ground must not
exceed 5 ohms. Installers should use an acceptable low impedance measuring device to measure the
impedance of these paths. The #6 or larger wire size will minimize the wiring impedance; however, if
the impedance between earth ground and the power company’s standard reference ground exceeds 5
ohms, someone must contact the local power company. The ground path must always be of sufficient
current-carrying capacity to prevent a build up of voltages that may result in circuit noise, hazard to
personnel, or equipment damage.
Installers must be sure that all of the ground connections are visible for inspection and maintenance, and
they should tag all of the ground connections with a sign that reads: Do Not Remove Or Disconnect.
Reviewing The Hardware – 27
DXP General Description
4
4.1
GCA40–112
Connecting The System
Connecting The Lines
How to connect
the lines
Line terminations to the line boards vary depending upon the line board type.
Terminations for the loop start board are standard modular jack connections. Each
jack on the loop-start board provides termination for two lines. Terminations for
the loop start and the multipurpose boards are through a 50-pin amphenol-type
connector, and the connection for the T1 board is an eight-pin modular jack. The
demarcation point can be a type 66M-xx connector block or individual 6-position
modular jacks. The wiring that you route between the demarcation-point and the
line board termination should be #24 AWG or larger twisted-pair wiring (see
figure 14 for line board connections).
How to protect
the line
connections
Transient voltage spikes, if induced onto CO or CENTREX lines, can travel
through the cable and into the common equipment. The telephone company offers
basic protection against this condition, but it is usually designed to protect the
central office circuits. While this CO or CENTREX service will also provide
some protection to the common equipment, you should not rely upon it for total
protection. To help ensure that external over-voltage surges do not damage the
system, Comdial engineers recommends that technicians install and properly
ground gas discharge tubes, or similar primary protection devices, on all lines.
Each line board is shipped with a ferrite collar. Bundle the line cables together
and snap the collar around the bundle to provide protection against radio
frequency interference.
Connecting The System – 29
GCA40–112
4.2
DXP General Description
Connecting The Stations
How to connect
the stations
Connections between the telephones and the station boards are typically via type
66M-xx connector blocks that are cable connected to the station boards.
The gauge size of the twisted-pair station wiring determines the maximum
distance allowed from the common equipment to the stations.
Station Type
Digital Telephone
Analog Multiline Telephone
Analog Single-Line Proprietary
Telephone
Industry-Standard Telephone
How to
protect
the station
connections
20 AWG
Wire Gauge
22 AWG
24 AWG
2500 Feet
2500 Feet
2000 Feet
2000 Feet
1500 Feet
1500 Feet
4000 Feet
3500 Feet
3000 Feet
4000 Feet
3500 Feet
3000 Feet
If spare conductors exist in the cables that are run between the station boards and
the 66M-xx connector blocks, it is a good practice to connect them to earth
ground to help prevent them from inducing radio frequency and/or AC
interference into the system.
Each station interface board is shipped with an appropriate supply of ferrite
collars. Snap one of these around each station cable to provide protection against
radio frequency interference.
Installing
a DSS / BLF
console
Install a DSS/BLF Console at any station in the system as a companion to a
telephone. There is no limit to the maximum number of consoles that can be
installed on a system. When you install a console, you must also define the station
as a console with programming.
30 – Connecting The System
DXP General Description
GCA40–112
Viewing Typical Line And Station Connections
Connecting The System – 31
GCA40–112
4.3
DXP General Description
Connecting The Paging Equipment And Music Sources
The services board provides a standard 6-position modular jack for interfacing external paging
equipment and external music sources to the DXP system. This jack supplies audio output from the
DXP for paging purposes and accepts audio input from two separate audio sources.
Services Board
External Paging Port
Pin No. Signal
3&4
Paging
1&6
Background Music
2&5
Music on Hold
DXP CPU Board
Front View Of Jack
1
2
3
4
5
6
DXSRV
Page
Music 1
Music 2
External
Loudspeaker
DXCPU
Status
DXPSM
MAIN CAB. POWER SUPPLY
EXPANSION
UNIT
BATTERY
CONNECTION
BATTERY
BACKUP
CONNECTION
RS-232
1
RS-232
2
INPUT RATING
117V
5A
60MZ
PRECHARGE
PORT
EXPANSION UNIT
POWER CONNECTIONS
POWER
Audio Input To
Paging Amplifier
FUSE
ON 15A 250V
NORMAL
OFF BLOW
dxp072
SPKR Output
External Paging
Amplifier
Enable Input
(If Required)
Common Audible Interface Relays
Relay
Pin
Signal
Jack
No.
J3
J4
1
2
3
4
5
6
1
2
3
4
5
6
No Contact
Relay 1
Relay 2
Relay 2
Relay 1
No Contact
No Contact
Relay 3
Relay 4
Relay 4
Relay 3
No Contact
1
2
3
4
5
6
Relay 2
Front View Of Jacks
1
2
3
4
5
6
Detailing The Paging And Music Source Interface
32 – Connecting The System
Relay 1
Relay 4
Relay 3
DXP General Description
4.4
GCA40–112
Connecting A Power Failure Telephone
Each line board provides one standard 6-position modular jack that interfaces an industry-standard
telephone for power failure operation to line 1 of that board.
Connecting A Power Fail Telephone
Connecting The System – 33
GCA40–112
4.5
DXP General Description
Connecting The Serial Data Ports
The CPU board provides two serial data ports. You can add as many as 16 additional data ports by
adding up to two communications cards at lower two card slots on an auxiliary board. The following
chart shows the locations for all of the non-dedicated serial data ports.
Serial Data Port Designation
Communications Card Locations
Lower two slots on the auxiliary board installed at the
Serial Data Ports 3–10
UNV1/AUX board slot
Lower two slots of one of the auxilary board installed at the
Serial Data Ports 11–18
UNV2/AUX board slot
In order to use all 16 auxiliary serial data ports you must install four communications cards.
DXP017
RS-232 2
6
5
4
3
2
1
RS-232 1
6
5
4
3
2
1
(Front View of Jacks)
RS-232 Modular Jacks
Pin 1 = Request To Send
Pin 2 = Clear To Send
Pin 3 = Receive Data
Pin 4 = Transmit Data
Pin 5 = Signal Ground
Pin 6 = Frame Ground
Locating Serial Data Ports 1 And 2
34 – Connecting The System
DXP General Description
GCA40–112
CAJS067
(Pin 3) RD
(Pin 2) CTS
Data Port
RS-232 1
6
(Pin 1) RTS
2
5
3
4
(Pin 6) PG
(Pin 5) SG
(Pin 4) TD
Serial Ports
3
4
First
COM Card
5
6
14
Serial Ports
Serial Ports
7
8
Serial Ports
11
Third
12 COM
Card
13
Second
COM Card
15
16
9
17
10
18
Auxiliary Board 1
(Board Slot: UNV 1/AUX)
Fourth
COM Card
Auxiliary Board 2
(Board Slot: UNV2/AUX)
Locating Serial Data Ports 3 through 18
Connecting The System – 35
GCA40–112
4.6
DXP General Description
Connecting The Slave Equipment Requiring
Dry-Contact Relay Closure For Actuation
The CPU board provides dry-contact relay closures that are under software control.
Showing The Relay Port Details
36 – Connecting The System
DXP General Description
5
GCA40–112
Knowing The Specifications
• Maximum System Capacities
Attendant Consoles:
Telephone Attendant
Personal Computer Attendant
Unlimited
4
Conferencing: (Simultaneous–without conference circuit board)
1 five-way plus 2 SOHVA, or
1 four-way plus 2 three-way, or
4 three-way plus 1 SOHVA
With optional conference circuit board
5 three-way conferences per board
DSS/BLF Consoles:
Assigned To Each Station
4 (Each console uses a separate station port)
Intercom:
Conversations (Simultaneous)
Non-blocking
Paths
Non-blocking
Stations Assigned To Same Group
Intercom Number
Simultaneous Rings On Same Group Intercom
Lines:
192
192
72 (main cabinet capacity)
56 (expansion cabinet capacity)
Line Groups (With unlimited members):
16
Paging:
External Paging Ports
Internal/External Paging Zones or All Call
Station Capacity Per Zone
1 plus 4 relays
8
192
Park Orbits:
9
Knowing The Specifications – 37
GCA40–112
DXP General Description
• Maximum System Capacities—continued
Power Fail Circuits:
One per line board
Ringing Capacities (Simultaneous):
Proprietary Telephones
Industry- Standard Telephone ring per phase
192
96 (48 with bridged ISTs)
Subdued Off-Hook Voice Announce Groups:
Receive
Transmit
16
16
SMDA Call Storage Capacity:
(with standard memory card installed)
(with required DXRAM-EXP68K
expanded memory card installed)
200 records
Approximately 12200 calls
Speed Dials:
System Speed Dial
Station Speed Dial Numbers Per Set
Station Speed Dial Sets Per Station
Speed Dial Sets Per System
500 maximum
10
3 at default , 1 minimum, 10 maximum
616
Stations:
80 (main cabinet)
Station Class Of Service:
32
Toll Restriction Table Entries:
400
Traffic Capacities:
36 CCS (1 Erlang), non-blocking
38 – Knowing The Specifications
112 (expansion cabinet)
DXP General Description
GCA40–112
• Power Requirements
(Fully Loaded Main Cabinet, Fully Loaded Expansion Cabinet)
Domestic AC Power Supply
90–129 VAC Single phase - all models
5A
432W
530VA
International Power Supply
90–129 VAC at 50/60 Hz, internally switchable,
200–254 VAC at 50 Hz
5A
432W
530VA
(Approved to IEC 950 International Safety Standards)
Battery Back-up Reserve Power
1 Hour minimum for fully loaded system
(System without expansion cabinet and with
BBLDX external battery assembly)
• Dimensions (approximate)
Main Cabinet:
Width (inches)
Height(inches)
Depth (inches)
Weight (approximate pounds)
Expansion Cabinet:
Width (inches)
Height(inches)
Depth (inches)
Weight (approximate pounds)
26.0
19.0
12.0
42 ( with cabinet, board cage, and backplane)
72 (with power supply and circuit boards added)
19.75
19.0
12.0
60 (includes cabinet, board cage, backplane,
power supply, and circuit boards)
Knowing The Specifications – 39
GCA40–112
DXP General Description
• Station Cable Requirements
Cable Type
#24 AWG minimum
2-wire (1-pair) twisted, non-shielded for IST
2-wire (1-pair) twisted, non-shielded for proprietary digital telephones
4-wire (2-pair) twisted, non-shielded for proprietary analog telephones
6-wire (3-pair) twisted, non-shielded for proprietary
analog telephones with SOHVA
Maximum Length
–digital telephone
–analog multiline telephone
–single line proprietary telephone
–IST telephone
With 20 AWG
2500 feet
2500 feet
4000 feet
4000 feet
With 22 AWG With 24 AWG
2000 feet
1500 feet
2000 feet
1500 feet
3500 feet
3000 feet
3500 feet
3000 feet
• Operating Environment
Temperature
32-122 degrees F (0-50 degrees C)
Humidity
90 percent relative, non-condensing
Heat Dissipation (Fully loaded main cabinet)
1474 BTUs per hour
Heat Dissipation (Fully loaded expansion. cabinet)
1474 BTUs per hour
• Terminations
Station:
Line:
Standard 50-pin male connectors
for connection to external distribution field.
Standard, 6-conductor mini-jack (USOC 14C)
• RS-232 (Data) Port
Ports On CPU board
2 at 9600 bps
Ports ON comm. card
4 at 1200 bps
Format
Serial, pseudo RS-232C
Parity
None, Even, Odd (Programmable)
Data Bits
7 or 8 (programmable)
Stop Bits
1 or 2 (programmable)
Baud Rate
Programmable in class of service
Handshaking
X on – X off, Hardware—CTS and RTS, None
Cable Length (CPU board ports)
500 Feet
40 – Knowing The Specifications
DXP General Description
GCA40–112
• Music Interfaces (Background and MOH):
Input Level
Input Impedance
Connector
3 Volts peak-to-peak maximum
Approximately 500 Ohms
Modular jack
• PA Port
Output Level
Output Impedance
Connector
400 Millivolts peak-to-peak (typical speech)
Approximately 500 Ohms
Modular jack
• Central Office Limits
Loop Limits
Cable Insulation Leakage
1900 Ohms maximum loop
15,000 Ohms minimum
• Industry/Regulatory Standards
FCC Certified, Part 15 (Class A)
FCC registered (fully protected)
LISTED by OSHA-accredited, nationally recognized,
test laboratory
EIA RS478
Bell publication 48002 guidance
Hearing aid compatible handset
• Memory Retention After Power Loss
65 hours typical -without battery back up
(memory retained by “super cap” device on RAM card)
• FCC Requirements
Registration Number
Key System
Hybrid System
CVWUSA-65214-KF-E (KS Registration)
CVWUSA-65213-MF-E (MF Registration)
Network Specifications
Service Order Code
Facility Interface Code
Loop Start
9.0F
02LS2
Ground Start*
9.0F
02GS2
DID
9.0F-AS.2
02RV2-T
E&M
9.0F
TL11M
USOC Connectors
RJ21X
RJ21X
RJ21X
RJ2EX
0.4B
n/a
Ringer Equivalence Number 0.4B
0.4B
*State tariffs do not permit ground start lines for key system configurations (KF registration).
Systems must be hybrid configured (MF registration) if they use ground start lines.
Knowing The Specifications – 41
GCA40–112
DXP General Description
• Product Codes
Main Cabinet
Expansion Cabinet
Power Supply (main)
Power Supply (expansion)
Interface Board (main)
Interface Board (expansion)
Services Board
Central Processor Unit Board
Auxiliary Board
Conference Boards
Communications Card
Digital Station Board
DXCBM
DXCBX
DXPSM
DXPSX
DXINM
DXINX
DXSRV
DXCPU-68K
DXAUX
DXCNF
DXOPT–COM
DXDST–8
DXDST–16
Analog Station Board
DXAST– 8
DXAST–16
Industry Standard Station Board DXIST–16
DXIST– 8
Loop Start Line Board
DID Line Board
Multipurpose Line Board
T1 Line Board
DXPCO–LP4
DXPCO–LP8
DXPCO–DD8,–DD4
DXPCO–GD4,– GD8
DXPT1
Random Access Memory Card
Expanded RAM Card
Ring Generator For IST
Software Card–EPROM,
System software program)
DXRAM–STD68K
DXRAM– EXP68K
DXRNG
DXPSW–xxxDLR rev nn
DXPSW–xxxEXE rev nn
DTMF Receiver Card
Modem
DXOPT–TON
DXMDM
Main Cabinet Package
(Includes: Main Cabinet,
Main Power Supply,
Services Board, CPU Board,
Modem.)
DXBKM
Expansion Cabinet Package
DXPKX
(Includes: Expansion Cabinet,
Expansion Power Supply,
Expansion Interface Board—for main cabinet,
Expansion Interface Board—for expansion cabinet .)
• Ringing Cadences
Digital Intercom Ring
Digital Trunk Ring
Digital Recall Ring
Digital Camp–on Recall Ring
Analog Intercom Ring
Analog Trunk Ring
Analog Recall Ring
Analog Camp–on Recall Ring
42 – Knowing The Specifications
150 msec. on, 75 msec. off, 4 sec. between rings
450 msec. on, 75 msec. off, 4 sec. between rings
275 msec.—300msec. on, 4 sec. between rings
150 msec. on, 75 msec. off
300 msec. on, 150 msec. off, 3.5 sec. between rings
900 msec on, 125 msec off, 3.5 sec. between rings
500 msec. on, 3.5 sec. between rings
300 msec. on, 150 msec off
DXP General Description
5.1
GCA40–112
Knowing The FCC Rules And Regulations
This electronic key system complies with Federal Communications Commission (FCC) Rules, Part 68.
The FCC registration label on the DXP Plus contains the FCC registration number, the ringer
equivalence number, the model number, and the serial number or production date of the system.
Notification To Telephone Company
Unless a telephone operating company provides and installs the system, the telephone operating
company which provides the lines must be notified before a connection is made to them. Provide the
telephone company with the lines (telephone numbers) involved, the FCC registration number, the
ringer equivalence number, the Facilities Interface Code (FIC), the Universal Service Ordering Code
(USOC), and the USOC jack required. The FCC registration number and the ringer equivalence number
is provided on the label attached to the common equipment. The FIC and USOC information is provided
in the equipment’s general specifications found in equipment system manual. The user/installer is
required to notify the telephone company when final disconnection of this equipment from the telephone
company line occurs.
Compatibility With Telephone Network
When necessary, the telephone operating company provides information on the maximum number of
telephones or ringers that can be connected to one line, as well as any other applicable technical
information. The telephone operating company can temporarily discontinue service and make changes
which could affect the operation of this equipment. They must, however, provide adequate notice, in
writing, of any future equipment changes that would make the system incompatible.
Installation Requirements
Connection of the electronic key system to the telephone lines must be through a universal service order
code (USOC) outlet jack supplied by the telephone operating company. If the installation site does not
have the proper outlet, ask the telephone company business office to install one. The correct outlet jack
for this system is either a type RJ21X or type RJ14C.
Party Lines And Coin Lines
Local telephone company regulations may not permit connections to party lines and coin lines by
anyone except the telephone operating company.
Troubleshooting
If a service problem occurs, first try to determine if the trouble is in the on-site system or in the
telephone company equipment. Disconnect all equipment not owned by the telephone company.
If this corrects the problem, the faulty equipment must not be reconnected to the telephone line until the
problem has been corrected. Any trouble that causes improper operation of the telephone network may
require the telephone company to discontinue service to the trouble site after they notify the user of the
reason.
Repair Authorization
FCC regulations do not permit repair of customer owned equipment by anyone except the manufacturer,
their authorized agent, or others who might be authorized by the FCC. However, routine repairs can be
Knowing The Specifications – 43
GCA40–112
DXP General Description
made according to the maintenance instructions in this publication, provided that all FCC restrictions are
obeyed.
44 – Knowing The Specifications
DXP General Description
GCA40–112
Radio Frequency Interference
The electronic key system contains incidental radio frequency generating circuitry and, if not installed
and used properly, may cause interference to radio and television reception. This equipment has been
tested and found to comply with the limits for a Class A computing device pursuant to Subpart J of Part
15 of FCC Rules. These limits are designed to provide reasonable protection against such interference
when operated in a commercial environment. Operation of this equipment in a residential area may
cause interference to radio and television reception; in which case the user is encouraged to take
whatever measures may be required to correct the interference. If this equipment does cause
interference to radio or television reception, which can be determined by turning the equipment off and
on, the user is encouraged to try to correct the interference by one or more of the following measures:
Reorient the television or radio’s receiving antenna, and/or relocate the DXP Plus, the individual
telephone stations, and the radio or TV with respect to each other. If necessary, the user should consult
the manufacturer or an experienced radio/television technician for additional suggestions. The user may
find the following booklet prepared by the Federal Communications Commission helpful: “How to
Identify and Resolve Radio-TV Interference Problems.” This booklet is available from the Government
Printing Office, Washington D.C. 20402. Stock No. 004-000-00345-4.
This digital apparatus does not exceed the (Class A) limits for radio noise emissions from digital
apparatus set out in the Radio Interference Regulations of the Canadian Department of Communications.
Le pre’sent appareil nume’rique n’emet pes de bruits radioe’lectriques de’passant les limites applicables
aux appareils nume’riques (de la class A) prescrites dans le Re’glement sur le brouillage radioe’lectrique
e’dicte’ par le ministe’re des Communications du Canada.
Ringer Equivalence Number
The REN of each line is 0.4B. The FCC requires the installer to determine the total REN for each line,
and record it at the equipment.
Knowing The Specifications – 45
DXP General Description
6
GCA40–112
Understanding The Features
6.1 DXP Features List
This list details all of the features available on the DXP. Use it as a pre-installation check list.
Abandoned Hold Release
Call Announce Beeps
Adjunct Feature Module
Access Denied
Call Announce With Handsfree
Answerback
Account Code Button
Call Costing and SMDA Reports
Account Codes With Positive
Verification
Call Forward - All Or Personal
All Call Paging
Call Forward - Busy Or RNA, All Or
Personal
Allow Ringer Off (Ringer Volume Off)
Call Forward- Immediate
Data Base Programming From Main
Station (Limited)
Data Base Programming With Personal
Computer And Visual Man Machine
Interface (VMMI) Software
Day One and Day Two Ringing
Default Busy/RNA Call Forward
Default Functional Programming
Alpha-Numeric Calling Party and Line
Display
Call Park
Delayed Ringing
Call Park Recall
Dial 0 for System Attendant
Alternate Attendant
Call Pick-Up - Directed
Dial Plus Interdigit Time
Answer Button
Call Pick-Up - Group
Digital Voice Announce
Area Paging Interface
Call Pick-Up - System
Attendant Position
Call Transfer - Screened
Dialed Number Identification Service
(DNIS)
Attendant Position, PC
Authorization Code
Call Transfer - Unscreened
With Automatic Camp On
Automatic Dialing
Call Waiting Tone
Direct Inward System Access (DISA)
Automatic Hold - Intercom To
Intercom/Line
Caller ID
Direct Line Access by Station
Caller ID–RNA
Direct Line Group Selection
Automatic Hold - Line To Intercom
Camp-On With Automatic Call Back
Directed Station Hold
Automatic Hold - Line To Line
Camp-On - Call Waiting
Disconnect Supervision
Automatic Pause Insertion
Camp-On - No Answer
Discriminating Ringing
Automatic Privacy
Clear Major Alarm Ring
Do Not Disturb
Automatic Number Identification (ANI)
Central Message Desk
Do Not Disturb Inhibit
Automatic Redial
Do Not Disturb Override
Automatic Reports
Central Processor Switched Data Port
Configuration
Automatic Route Selection
Centrex Compatible
Dynamic Save Button
Automatic Station Relocation
Common Audible Ringer Interface
E&M tie Line support
Auxiliary Equipment Interface
Conference Advisory Tone
End to End DTMF Signalling
Auxiliary Station Ringer Interface
Conferencing - Multiline
End to End Signalling on Intercom
Background Music*
Console Support
End to End Signalling on Lines
Battery Backup (Chassis, Cable, and
Batteries)
Console-Less Operation
Enhanced LCD Display
Communications Card Support
Exclusive Hold
Battery Backup Interface
Consultation Hold
Executive Override
Block Programming
Copy Model
Executive Override Block
Busy Button Inquiry
Data Base Program Storage Via PC
Interface
Executive Override Advisory Tone
Busy On SOHVA
Digital Wireless Telephone Support
Direct Inward Dialing (DID)
DSS Status Button
Extended DTMF Tonest
Button Query
Understanding The Features – 45
GCA40–112
DXP General Description
Existing Comdial Telephone Support
Maximum Call Duration
Ringback On Transfer
ExecuMail Integration
Meet-Me Answer Page
Ring Back Tone
External Paging Interface
Memory Retention Without Batteries
Ring No Answer Call Forward
Feature Inhibit
Message Deposit
Ring On Busy
Feature Renumbering
Message Waiting
Ringing Line Preference
Flexible Ringing Assignment
Mnemonic Programming
Save Button Dial Storage
Flexible Ringing Assignment Of The External
Paging Port
Modem Support
Saved Number Redial
Modify Digits Table
Secure Account Code Display
Flexible Station Numbering Plan
Multiple Attendant Positions
Self Diagnostics
Ground Start Lines
Multipurpose Line Board
Serial Data Port
Group Intercoms
Music Interface*
Service Observing
Handsfree Answer Inhibit
Music On Hold*
Shift Button
Handset Volume Control
Mute
Silent Mode Button
Headset Capability
Names (Stations And Lines)
Single-Line Proprietary Telephone Support
Hold
Night Service Automatic Switching
SMDA Reports
Hold, Exclusive
Night Transfer (Of Ringing)
SOHVA Beeps (SOHVA Tone Bursts)
Hold Queuing
Off-Premise Extension (OPX)
Speakerphone Support
Hold Time Reporting
On-Hook Dialing
Split Button
Hot Transfer
Operator Station
Square/Non-Square Configuration
I Hold and I Use Indications
Originating Denied
Station Hunting
Idle Line Preference
Out Dial Delay Time
Station Class Of Service
Idle Line Priority
Password Protection
Station Message Detail Accounting (SMDA)
Industry Standard Telephone Support
Pause Time
Station Message Detail Recording (SMDR)
IST Offhook Treated As Busy
PBX/Centrex/Central Office Compatible
Station Monitoring with DSS Call Pickup
IST Message Wait Retrieval Access Code
Personal Intercom Number
Station Names
IST Ring Frequency
Paging Access
Station Speed Dial
IST Ring Patterns
Periodic Line Tone
Subdued Off-Hook Voice Announce
Interactive Button Support
Personal Intercom Number Preference
Subdued Off-Hook Voice Announce Groups
Intercom Call Progress Tones
Personalized Ringing Tone
Subdued Ringing
Intercom Hunt List
Pooled Line Access
Synchronized Ringing
Intercom Interdigit Dialing Time-out
Power Failure Transfer
System Clock
Intercom Time-out
Preselection Prime Line
System Speed Dial
Intercom Number
Printer Interface
System Status Reports
Key/Hybrid Configuration
Privacy
T1 Digital Carrier Transmission Option
Last Number Redial
Privacy Release
Tap (Flash)/Recall
Line Access Restriction
Private Lines
Line Answer From Any Station
Program Printout
Telephony Services Application Programming
Interface (TSAPI) Support
Line Appearance, Enhanced
Programmable Button Flexibility
Through Dialing
Line Groups
Programming Port
Tie Lines
Line Group Access
Pulse/Tone Switchable
Time And Date
Line Names
Quick Transfer
Timed And Immediate Recall
Line Out Softkey Option
Remote Programming and Diagnostics
Toll Restriction
Line Queuing
Remote Station Disable
Toll Restriction Pause Entries
Liquid Crystal Display (LCD) Messaging
Release Button
Tone or Voice Signalling on Internal Calls
Liquid Crystal Display (LCD) Support
Reminder Alert
Transfer/Conference Button
Location Code
Restrict ARS Hookflash (Automatic Route
Selection, Hookflash Restriction)
Transfer Ring Cadence
Lock Button
Manual Exclusion
Restricted Dial Error Tone
Voice Announce Blocking
Manual Reset
Response Messaging
Voice Mail Integration Digits
Master Clear
Ringback On Busy
Zone Paging
Unsupervised Conference
* The system is equipped with two inputs for separate customer-supplied music sources.
46 – Understanding The Features
DXP General Description
GCA40–112
6.2 Defining The Features
The following section defines all of the DXP features. Read through all of these definitions before
programming the DXP to ensure that you are programming the desired feature.
A
Abandoned Hold Release
If a distant on-hold party hangs up, it may cause an interruption in the line current. The DXP system then
drops the line from the hold condition and returns it to service. You can program the time interval
between hang-up and line-drop with choices of either 50 milliseconds or 350 milliseconds. The central
office makes the arrangement for the time choice. Also refer to the discussion titled, Disconnect
Supervision.
Access Denied
If you have programmed the system to do so, it can deny access to particular lines and group intercoms at
certain telephones. A user cannot select a line for use if it is access denied at his or her telephone.
Account Code Button
As part of the button mapping, the system installer can assign a special button that the user may use to
apply an account code to a call. Refer to the discussion titled Account Codes With Positive Verification.
Account Codes With Positive Verification
Station users can assign account codes to specific calls. The system uses the account codes to identify
calls by category, or special grouping, for call accounting purposes. All calls with the same account code
are reported together by the station message detail accounting (SMDA) feature. The system attendant can
obtain a separate printout of calls assigned to one account without causing any other calls to print or be
deleted. The programmer can arrange for the system to verify that the user entered an account code and
to sound an error tone if an invalid account code is entered. If the programmer arranges it, attendants can
use account codes as a basis for SMDA print-outs. He or she may program the system to prompt station
users to enter account codes for incoming calls and/or out-going calls if desired. The prompt can be with
or without system verification of the entry. Alternately, account code prompting can be turned off
completely. Depending upon the type of call, different users are associated with the call accounting
record. The following list explains to whom the call record is associated:
• On out-going calls, the user who enters the account code
•
On transferred calls, the transferee
•
On incoming calls, the last user active on a call.
Account codes may be from three to 16 digits in length as set by class of service programming. The
system will verify all digits. Also refer to the discussion titled Account Codes With Positive
Verification—forced.
Understanding The Features – 47
GCA40–112
DXP General Description
Account Codes With Positive Verification—Forced
Station users can assign account codes to specific calls. The system uses the account codes to identify
calls by category, or special grouping, for call accounting purposes. If the programmer programs the
system to have forced account codes, the user must enter the account code before the call can be placed.
If the system does not find a match between a user entered account code and one that the programmer has
set in the system, the call will not be allowed. Remember, verification alone does not deny users’ calls,
only forced verification denies. The programmer can arrange for the system to verify that the user entered
an account code and to sound an error tone if an invalid account code is entered. If the programmer
arranges it, attendants can use account codes as a basis for SMDA print-outs. He or she may program the
system to prompt station users to enter account codes for incoming calls and/or out-going calls if desired.
You can program the system to recognize emergency numbers that do not require account codes.
Account Code Display And Display Time
For LCD speakerphone users, a message appears in the telephone’s display prompting the user to enter an
account code for incoming or outgoing calls. If the user does not require this prompt, the programmer
should turn off the prompting message display.
Adjunct Feature Module Support
When the installer includes a 16-button adjunct feature module with certain model Comdial proprietary
telephones, that module extends the programmable buttons of the telephone by 16 buttons and status
lights. The users can program these buttons for speed dialing and direct station selection (DSS) with busy
lamp field (BLF) status lights.
All-Call Paging
Refer to the discussion titled Zone Paging.
Allow Ringer Off (Ringer Volume Off)
On some proprietary telephones, the user selects the ringer volume level by pressing a rocker-type volume
control repeatedly to select one of four different volume levels. The lowest volume setting is essentially
an off condition as the telephone sounds only one low-volume ring burst when a call rings the station.
Sometimes users would rather not receive even one ring burst. For these cases, installers can program the
system so that it completely silences the ringer at a telephone when its user selects the lowest volume
setting.
Alpha-Numeric Calling Party And Line Display
An LCD speakerphone, when receiving an inside call, displays the caller’s name (up to seven characters),
for example, “John L”. The system uses the remaining nine characters on the display for status messages
(for example, “Fwd from”). The system also displays the logical line number of the current line. Also see
the discussion titled Liquid Crystal Display Support.
Alternate Attendant
Refer to the discussion titled Attendant Position.
Answer Button
When you map a telephone with this button, the user can press it to answer the call that is audibly ringing
at his or her station. It is possible for more than one call to be ringing at the same time; however, only
one of the first ringing calls is answered with the answer button.
Also refer to the discussion titled Programmable Button Flexibility.
48 – Understanding The Features
DXP General Description
GCA40–112
Area Paging Interface
Refer to the discussion titled External Paging Interface.
Attendant Position
The attendant of a telephone system is typically the first person to answer an incoming call and usually
directs incoming calls to the proper person or department within the system. In addition to call control,
the attendant controls system-wide operating features such as night transfer (of ringing) and the system
clock. Additionally the attendant is responsible for programming such items as system speed dial
numbers and LCD messages that are available to many of the system users.
The DXP provides two attendant positions at default (stations 1 and 2, intercom 101 and 102); however,
the programmer can assign any or all stations as attendant stations if they wish. The attendant can also
assign up to four DSS/BLF consoles to each attendant position where needed. In addition to the many
programmer–enabled feature buttons that the system can make available at any station, the DXP provides
the attendant position with several special purpose programmer-enabled feature buttons to enhance call
processing. These special purpose buttons are described below.
Alternate Button
When an attendant presses this button, all calls that are normally routed to his or her telephone now route
to an alternate attendant’s telephone instead.
Both Button
The both button provides a means for attendants to conference between themselves, a current call, and the
last call that they placed on hold.
Overflow Button
When an attendant presses this button, calls that normally ring at his or her telephone also ring at an
overflow attendant’s telephone as well.
Queue Button
When multiple calls are ringing at an attendant station or are on hold there, the system places them in a
queue. The attendant can use this button to determine how many calls are queued and awaiting service.
Serial Call Button
When a caller wishes to speak to more than one person or department, the attendant uses this button to
place the caller in a serial mode of multiple transfers to every desired party. In the serial mode, the
system automatically transfers the caller to another party as soon as a present party hangs up (up to three
stations can be part of a serial transfer). The system places the caller in the serial mode as soon as the
attendant hangs up.
Test/Busy Button
This button provides the attendant a means to test the status of specific lines. Attendants can use this
button to determine whether individual lines are idle, busy, on hold, or out of service.
Also refer to the discussions titled Answer Button, Lock Button, Release Button, Split Button, and Silent
Mode Button and to the discussion titled Programmable Button Flexibility.
Understanding The Features – 49
GCA40–112
DXP General Description
Attendant Position, PC
The Total Control PC attendant position is a computerized attendant operating station that consists of an
IBM-compatible personal computer, a proprietary interface circuit board (factory-installed in one of the
computer’s expansion slots), a customized keyboard that includes a handset cradle, a telephone handset, a
program diskette, and all necessary cables for connecting the equipment to the DXP. The DXP can handle
a maximum of four PC Attendants.
Among the many features that are available to the PC attendant is a feature that allows him or her to
change the class of service of an individual station. This feature allows an attendant to control the calling
parameters of a station (such as how much or little toll restriction to allow) at any time.
The installer can program function keys F1–F12 on the PC attendant keyboard with features that are in
addition to the fixed features that these keys provide. To access the additional features, the attendant must
press and hold the CONTROL key while pressing the desired function key on the keyboard.
Authorization Code
Authorization codes have a “walking class of service” option. Walking class of service provides system
users the mobility to use their class of service (COS) features, prime line assignments, and exception
numbers on any telephone in the system instead of being limited by what is available to the particular
telephone they happen to be using. Authorization codes are associated with personal intercom numbers as
is COS, prime markings, and exception numbers. Therefore, when a user enters his or her authorization
code at any system telephone, the code alerts the system as to what features to make available to the user.
The user can use the telephone for anything allowed by his or her personal intercom number; however, a
user cannot disturb the last number redial stored there by the normal user. Once a user accesses his or her
telephone features, those features remain in effect until any idle time exceeds the authorization code
time-out period. A telephone user activates walking class of service by pressing ITCM and then dialing
#08 followed by an authorization code. Also refer to the discussion titled Lock Button.
Automatic Dialing
Refer to the discussion titled Station Speed Dial.
Automatic Hold—Intercom To Intercom/Line
If a user selects a second intercom number during the time that he or she is already active on the first
intercom number, this feature causes the first intercom number call to be automatically placed on hold.
This feature allows a user to move from intercom call to intercom call without having to press the HOLD
button to place any current calls on hold. The programmer must enable this feature for it to be available.
Automatic Hold—Line To Intercom
If a telephone user selects an intercom number while a line call is active, this feature causes the system to
automatically place the line call on hold . This is a fixed system feature and is always available.
Automatic Hold—Line To Line
If a user selects a second line during the time that he or she is already active on a line, this feature causes
the system to automatically place the first line call on hold. The feature allows a user to move from line
call to line call without pressing the HOLD button. The programmer must enable this feature for it to be
available.
50 – Understanding The Features
DXP General Description
GCA40–112
Automatic Number Identification (ANI)
Automatic Number Identification (ANI) is a T1 service feature for both E&M and DID lines. Long
distance common carriers offer ANI as a feature to dial 800 and dial 900 lines. The ANI feature provides
information to an internal telephone system that identifies the telephone number of the calling party.
Businesses served by a dial 800 or dial 900 service allow any available user to answer the calls and have
their internal telephone system process the ANI information to identify the caller’s telephone number.
The common carrier supplies ANI information as DTMF digits. When the ANI feature is combined with
the Dialed Number Identification Service (DNIS) feature, the common carrier also delimits the DNIS
information from the ANI information with an asterisk (✳) tone so that the DXP can process each portion
properly.
Automatic Pause Insertion
When the system stores a dialed number for later redial, it automatically stores a pause whenever the user
waits between digits for at least two seconds while dialing the number. The system inserts the automatic
pause in the stored number sequence at the point where the manual pause in dialing occurred. The actual
time length of the inserted pause is programmable.
Automatic Privacy
The programmer can make a line private or non-private. In the private mode, a station has exclusive use
of the line during a call. No other station can access that line unless the original user includes it through
the use of the add-on conference feature. In the non-private mode, any stations with that line appearance
can gain access at the same time (sometimes known as common line pickup). Users may add up to five
parties into one conversation. Also see the discussions titled: Conferencing —Multiline and Privacy
Release.
Automatic Redial
With this feature, the system automatically redials a busy or unanswered outside call. Once the user
activates automatic redial, the station selects the line, automatically dials the number, and waits for a
response. (It dials and then waits 30 seconds for an answer.) If the called station does not answer, the
redialing station disconnects, waits one minute, and then repeats the sequence. The station will repeat this
procedure for approximately 10 minutes. The feature cycle is timed and does not have busy and
ring-no-answer detection circuitry. Because of this, if the redialing user is operating handsfree when the
called party answers, he or she must take the handset off-hook to prevent being cut off by the timing
cycle. The station users must program an Auto Redial button at one of the designated programmable
button locations on their telephones before they can use it.
Automatic Reports
This feature makes the system automatically generate selected station message detail accounting and call
costing reports for printing on a daily or weekly basis. The programmer sets the time that the report is to
be printed, sets the type of report to be printed, and dictates whether the call records are to be erased from
the system memory after they have been printed.
Understanding The Features – 51
GCA40–112
DXP General Description
Automatic Route Selection
Automatic Route Selection (ARS) allows the system to automatically select the least costly line group
available to a station to route a call. The system modifies the dialed number, if needed, to match the
selected line group. Additionally, ARS provides the costing information for the dialed call that is
reported by the station message detail accounting feature. ARS makes routing decisions (which lines to
route a call over, if and how to modify a number, and costing information) based entirely upon the
programming of the system.
When the ARS feature is active, the user selects ARS by dialing 9. Because direct line selection by the
user bypasses the ARS route selection feature, the programmer normally does not give stations direct line
appearance when ARS is part of the system operation.
The ARS feature can operate with the toll restriction feature or independently from it; however, both
features use the same entry table for programming. The programmer enables or disables automatic route
selection on a system-wide basis. A defaulted system has ARS disabled.
The programmer must program a number and the proper routing information before the system can
perform ARS on that number when it is dialed. The programmer generally arranges routing from the least
costly routing method to the most costly routing method. The costliness of the route is determined by the
line group over which the call is routed.
If a station does not have access, because of programmed restrictions, to a route that the ARS selects for
it, the system denies the dialing and causes an error tone to sound at the station. If the station does have
access, ARS routes calls from that station based on the routing information. If the call can not be made
on the line group first selected by the routing, ARS will try the next route. Once again the route access is
tested. This process is repeated, up to a maximum of six times. Each route is programmed from least to
most costly. The more costly the route, the higher the access level needed to access it and the greater the
chance that the station will be denied access. If ARS selects a more costly route because the least costly
one is busy, a station user receives a warning tone when a call is attempted. Since this tone indicates that
a more expensive line group was chosen by the system, the station user should hang up and try again later.
This warning tone feature is enabled through programming.
Before automatic route selection can operate efficiently in a cost saving manner, the programmer must
group similar lines together into line groups.
Each route in every route table contains costing information. The costing information includes two
programmable tiers of costing and a programmable surcharge amount. Even if a call is not routed through
ARS, (if the station user selects the line), the system still accesses this costing information to cost the call.
The programmer can arrange the automatic route selection feature so that it modifies the dialed number
by adding or deleting digits until the number better fits the dialing needs of the selected route. Doing this
results in situations such as the following example:
Assume a station user dials 12025551212 (Washington D.C. area), and further assume that the system has
an FX line to the Washington D.C. area and ARS will route the call over it. ARS will delete the 1202
prefix and only dial 5551212 because the FX line does not require the prefix numbers to complete the
call. Field maximum: 20 digits.
You can program the system for any one of three different dial tones that you will hear whenever you
enter the ARS access code. The ARS dial tone choices are:
— Dial Tone 1 - steady intercom dial tone (dual tones of 480 Hz + 620 Hz),
— Dial Tone 2 - same as dial tone 1 only preceded by three short tones (200 ms on, 200 ms off),
— Dial Tone 3 - steady similated central office ring back tone (dual tones of 440 Hz + 480 Hz).
52 – Understanding The Features
DXP General Description
GCA40–112
Restrict ARS Hookflash (Automatic Route Selection, Hookflash Restriction)
This feature enhances ARS response to hookflash action on an outside line when that action is followed
by dialed digits. With the feature enabled, the system delays response to a hookswitch flash until after the
ARS feature verifies as valid all subsequent dialed digits. With the feature disabled, the system sends the
hookflash over the line without waiting for the ARS feature to verify the validity of subsequent dialed
digits. This station class of service feature is applicable only when the ARS feature is active.
Automatic Route Selection For Speed Dials
The programmer can arrange for the system to route the system speed dial and any personal speed dial
numbers that the user has programmed through the system’s automatic route selection feature (ARS).
Automatic Station Relocation
The system will automatically recognize a particular station should someone relocate it to a different
station port. After being installed at a new port location, a relocated station will provide the same class of
service parameters and station features that it provided at its original port location. Also, the relocated
station will respond to the same personal intercom number that it responded to at its original port location.
A relocated station prompts the user to take action to either accept its original programming or accept the
programming at the new port. If the user takes no action, the station assumes the parameters and personal
intercom number that is determined by a system programming procedure. Consider these following points
when you enable station relocation:
• If someone does a station relocation, the programmer must save the database programming to make the
relocation permanent.
• This relocation feature only applies to digital telephones.
• Users must ensure that the vacated port remains unused until they complete a relocation.
• If someone connects a telephone to the vacated port before users complete a relocation, the relocated
telephone will not retain its original programming.
• When the user accept the original programming for the new port, the vacated port assumes the
programming currently assigned to the new port (that is, a parameter exchange takes place between the
vacated port and the new port).
• If a DSS/BLF console was assigned to the telephone at its original location, the console assignment
follows the telephone to the new location even though the console is no longer located physically near
the telephone. If the user relocates the console, the system programmer must reprogram the new port
for console use.
The relocation feature also applies to relocated digital telephone boards, however, the installer must
ensure that the vacated port remains unused until the relocation is complete. All stations connected to the
relocated circuit board show the relocation prompt.
Auxiliary Equipment Interface (Busy Lead Detection)
One line port on every loop start line board will detect current flow on the line ahead of the common
equipment. When an external device, such as a modem or fax, is connected to this line and is activated,
current flow over the line occurs. When the port detects the current flow, the system causes a busy
indication for this line to appear at every system telephone that has its appearance. Normally, the user
cannot interrupt an external device by pressing the line button or by dialing a line group code; however, if
the line is programmed to be non-private, a user can interrupt the device.
Understanding The Features – 53
GCA40–112
DXP General Description
Auxiliary Station Ringer Interface
The central processor unit circuit board includes four dry-contact relay actuations. They may be used for
the following:
• Programmable Station Ringer Interface
• Paging Enable
• Door Relay Lock/Unlock
• Zone Night Answer
The relay contacts for the station ringer interface follows the ring pattern of a ringing line or telephone.
These relay contacts close during ringing and open between rings and may be used to control an external
signaling device. The relay contacts for the paging enable and door relay are closed while the activating
station is off-hook and may be used to provide a path for an enabling signal where needed. Contacts on
relay 1 is normally closed when idle and contacts on relays 2, 3, and 4 are normally open when idle.
Also refer to the discussions titled Common Audible Ringer Interface, External Paging Interface, Flexible
Ringing Assignments, Line Answer From Any Station, and Night Transfer (Of Ringing).
B
Background Music (Two Selections)
If the system includes an external music source, telephone users can turn background music on and off at
their stations. The system uses two dedicated audio ports to interface the music sources, one for
background music through the station speakers and the other for music on hold for both lines and
intercom numbers. Therefore, the background music can be different from the music provided to held
calls if the system installer connects two different sources to the system. When the two different choices
are available, station users can dial a code to choose either source for their background music.
Also refer to the discussions titled Music Interface and Music On Hold.
Battery Back-Up (Chassis, Cable, and Batteries)
Battery back-up assemblies that include chassis, cable, and battery are available as optional kits (through
normal distribution from Comdial). The battery back-up assembly connects directly to the battery
interface connector on the system main power supply.
Battery Backup Interface
Attach a Comdial-provided optional battery backup kit to the DXP digital communications system for full
uninterruptable system power in case of an AC power loss. The switching and trickle charge circuitry are
in the common equipment power supply assembly, but batteries, chassis, and cable are packaged as a
separate option. When the installer plugs the system into an active AC power source, the common
equipment power supply will constantly charge the attached batteries with a trickle current. Built-in
circuitry automatically switches to battery power when AC power is lost. With batteries at full charge, a
fully loaded system (without expansion cabinets) will remain fully functional for a minimum of one hour
without AC power.
If additional time is required, the backup time can be increased by adding additional batteries.
54 – Understanding The Features
DXP General Description
GCA40–112
Block Programming
A programmer can assign the programmed features of a particular line or station, to other lines or stations.
He or she can also assign a particular arrangement of button functions (mapped buttons) of one telephone
to a quantity of other telephones. This feature eliminates the need to individually program every station
class of service, line and/or button function.
Busy Button Inquiry
This feature provides the user with a means to identify both a station that is busy on a line and the line the
station is busy on as well. The system presents the identified line or station information on the user’s
telephone display for 10 seconds after he or she requests that information. If the system installer has not
given the user’s telephone this feature, the system presents busy information to the display without
identifying the line or station involved.
Button Mapping
Refer to the discussion titled, Full Button Programmability Of Features, Programmable Button
Flexibility, and Square / Non Square Configuration.
Button Query
The button query feature allows users to display the function of programmable buttons on LCD
telephones.
C
Call Announce With Handsfree Answerback
The internal speaker at each full–featured multiline telephone provides call-announce capability over the
personal intercom number. Users can call announce between all telephone types except between an
analog monitor telephone and digital telephones. When a user makes a call-announce intercom call to the
personal intercom number of another telephone, the user of that telephone can make a handsfree response
to the call. If the personal intercom number is forwarded or is in a hunt group, the intercom call will
appear as a tone signaled intercom call at the telephone to which the calls are forwarded. A tone burst,
programmable by the installer, precedes the call announce.
Call Announce Beeps (Call Announce Tone Bursts)
Installers can set the number of call announce tone bursts for each station in the system to be a value of
from one to five .
Call Costing And Station Message Detail Accounting Reports
The system provides built-in, estimated costing of all calls. It also provides station message detail
accounting (SMDA) reports of all calls, and it displays call costs on LCD speakerphones. Call costing, in
general, provides a means of establishing costs to be applied to outside calls made from system
telephones. Call costing computes charges for a call after it is completed but does not restrict dialing as
toll restriction does. Call costs are based on a two-tier time rate and include a line surcharge cost. The
programmer can make allowances for call set-up and minimum call duration using the answer time and
dial time parameters. The system determines call costing through the use of the toll restriction and
automatic route selection (ARS) features; however, these features need not be active for costing to work.
Call costing is based on programmed estimates that best fit the particular area of the country the system is
installed in.
Understanding The Features – 55
GCA40–112
DXP General Description
Caller ID
DXP caller ID provides relevant caller information (caller’s name and number, for example) to any called
LCD stations. The installer can program any C.O. line as a caller ID line. The caller ID information is
also reflected in the SMDA printout. The DXP Caller ID feature package requires the use of a CID08
unit—hardware designed to support the Bell 202 Caller ID signal transmitted by the central office. The
CID08 supports up to 8 CO lines (you can install up to 8 CID08 units), for a total of 64 caller ID lines.
Caller ID RNA—Ring–No–Answer
If a station with assigned caller ID lines receives a call but does not answer, the system will
automatically archive the caller ID information. The installer can program any station or group of
stations to receive Caller ID RNA information. Upon reviewing a Caller ID RNA record, the user can
automatically redial that number by pressing the SAVE button. When the caller ID information goes to
more than one telephone, the system will also display the last station user that viewed that record, thus
preventing multiple call backs. Caller ID RNA is a programmable feature.
Call Forward—All Or Personal
Station users can forward the calls that normally ring at their telephones to another telephone for
answering. They can forward just their prime line and intercom calls or forward every call that rings at
their station. If users forward calls while the attendant has enabled the night transfer of ringing mode, the
night mode ringing assignments at their stations are forwarded. There are multiple levels of forwarding.
Station A can forward to station B, then station B can forward to station C, thus making calls to station A
forward all the way to station C. For each internal call received while call forward is enabled, the
forwarding telephone sounds a ring reminder (short tone burst) to remind the users that their calls are
being forwarded.
The programmer can assign a call forward button to individual telephones. If a telephone has a call
forward button available at a programmable button location that includes an associated light, the light
turns on when the user presses the button.
If a telephone has an LCD display, it will show a call forward message along with the extension number
or name of the station receiving the forwarded calls.
Also see the discussions titled Call Forward— Busy Or Ring No-Answer, Call Forward—Manual, and
Default Busy Ring No-Answer Call Forward.
56 – Understanding The Features
DXP General Description
GCA40–112
Call Forward—Busy Or Ring No-Answer, All Or Personal
Station users can forward the calls that normally ring at their telephones to another telephone for
answering. They can forward just their prime line and intercom calls or forward every call that rings at
their telephone. Users can control whether the calls forward immediately or after a preprogrammed
number of rings (this is true of busy calls as well, which ring in a subdued manner) that is set by the
programmer. When the telephone is set to ring several times before forwarding, the user has a chance to
end the current call before the incoming call is forwarded. Certain conditions must exist before this
enhancement will allow the call to a busy station to subdue-ring before forwarding. The called station
must have an idle intercom available and this intercom number must be part of the intercom hunt list that
the programmer arranged for the station, or the call to a busy station will forward automatically. The
number of group intercoms in a station’s intercom hunt list determines the number of calls that can
subdue ring on a busy station. After the system reaches that maximum number, any additional calls
immediately follow the station’s forwarding assignment.
When a busy station receives a call on a line for which it has an appearance, the call will forward
immediately. If the station does not have a line appearance but does have an idle intercom in its hunt list,
the call will subdue–ring at the idle intercom for the programmed number of rings before it forwards.
When a busy station receives an intercom call or a transferred call and it has an idle intercom in its hunt
list, the call will subdue ring at the idle intercom for the programmed number of rings before it forwards.
The programmer must enable the call forwarding enhancement as a separate programming choice in
addition to class of service programming. Once the feature is enabled, it will enhance both the default
call forward scheme and the call forward scheme that the users set up for themselves.
Also see the discussions titled Call Forward - All Or Personal, and Default Busy Ring No-Answer Call
Forward.
Call Forward—Immediate
The installer can map a call forward button on the user’s telephone that will allow the user to forward
calls even if he or she is not busy. After a user determines where to forward a call and activates the call
forward button, the system will immediately forward the call once the line rings.
Call Forward, Recall
If the site includes ExecuMail equipment and the programmer has arranged for the ExecuMail to provide
release transfer, she or he should also arrange for the ExecuMail station to have this call forward, recall
feature. Also see the discussion titled Call Forward–Busy or Ring No-Answer, All Or Personal.
Call Park
The system can hold nine calls in park zones (also referred to as orbits) where they are retrievable by all
users in the system.
Those calls that users can park include intercom calls, outside calls, and conference calls. Users park
calls in predefined zones and then retrieve them by dialing an intercom feature code or by pressing a
preprogrammed call park button. Call park, when used with paging features, allows a user to direct calls
to roving personnel by first parking a call in an orbit and then paging the personal to tell them which orbit
holds the call. When a user retrieve a call from park orbit, the system places the call on the user selected
intercom. If the station has several intercoms arranged in a hunt list, the system always chooses the
intercom that the user selected.
Also see the discussion titled Call Park Recall.
Understanding The Features – 57
GCA40–112
DXP General Description
Call Park Recall
If a call remains unanswered after the park recall time has ended, the system returns the call to the parking
station where it rings. If that telephone includes an LCD display, a message appears on it that shows the
park orbit number of the returning call as well as the line number.
The system programmer sets the call park recall times. Prior to software release 8C, he or she could
choose a minimum time of one minute; however, beginning with software release 8C, the minimum call
park recall time that the programmer can choose is 30 seconds.
Also refer to the paragraph titled Call Park.
Call Pick-Up Directed
A station user can dial a code and the intercom number of a ringing station to answer the call.
Call Pick-Up Group
If a call rings to any station in a preprogrammed pick-up group, and a second user in the group wishes to
answer the call, the second user can dial the group pick up code to answer the call. Up to 16 different
groups can exist with any number of stations in a group. The system provides group overlap by allowing
stations to be in more than one group at the same time thus enabling them to pick up calls for stations in
each group. The programmer places the stations in their logical answering groups.
Call Pick-Up System
If a call rings at any station in the system, certain other station users, such as the attendant station, can
pick up that call. That station user must dial the appropriate pick up code to answer the call, and the
station must be programmed to pick up the call. The programmer places all telephones in the same
pick-up group to enable this feature.
Call Transfer—Screened
Screened call transfer allows users to first announce and then transfer both line and intercom calls from
one station to another station or group in one of two ways. If both stations have access to the line or
intercom number, the user makes a common line pickup transfer. If the other station does not have access
to the incoming line, the user makes a transfer using the system transfer feature. The user uses the
TRANS/CONF button to effect the call transfer. Also refer to the discussion titled Call
Transfer—Unscreened with Automatic Camp-On, and Hot Transfer.
Call Transfer —Unscreened With Automatic Camp-On
Unscreened call transfer allows users to transfer both line and intercom calls from one station to another
station or group without first announcing them. The unscreened transferred call appears at the other
station where it will ring if that station is idle or automatically camp-on and await an answer if that station
is busy. The call automatically rings back to the transferring station after a programmed recall period.
There is no limit as to how many calls that can be camped onto another station. A transferred call will
ring if the called intercom number is idle. If the handset is off-hook, the ringing is subdued.
Call Waiting Tone
A user can send a call waiting tone to signal to a busy station that he or she wishes that station to contact
them. They do this by dialing a special code when they encounter a busy signal. The call waiting tone
sounds at the busy station and reoccurs until the calling party hangs up. The frequency of the call waiting
tone is preprogrammed by the programmer.
58 – Understanding The Features
DXP General Description
GCA40–112
Camp-On With Automatic Call Back
After calling another station and encountering a busy signal or a ring with no answer, a user can camp on
to that station, hang up, and wait to be called back by the system when that station becomes idle or when
the user returns. Likewise, a user can camp-on to a busy line, hang up, and wait to be called back when it
becomes idle.
When the busy station becomes idle, the system rings the originating station and starts a timer. The user
of the originating station must take it off hook as soon as it rings and as soon as he or she does so, the
camped-on telephone rings.
When the user of the ring no-answer station uses it for any call activity, the system detects this activity as
a sign that the user has returned. As soon as that call activity is finished, the system rings the station that
originated the camp-on and starts a timer. The user of the originating station must take it off hook, and as
soon as he or she does so, the camped-on telephone rings.
When the busy line becomes idle, the system rings the originating station and starts a timer. The user of
the originating station must take it off hook before a preprogrammed time out occurs. As soon as he or
she does so, the camped-on line returns dial tone to the originating station. If the originating user does
not take his or her station off– hook before the time-out period elapses, the system cancels the camp-on.
If, for some reason, the system cannot ring the camped-on facility after the user takes the originating
station off hook, he or she hears busy tone and may camp-on again.
Camp–On—Call Waiting
If a user makes a call to a busy telephone, he or she can send a call waiting tone to the busy telephone and
wait on line for an answer. As soon as the called telephone returns to idle, it will ring with the camped on
call.
Also refer to the discussion titled Call Waiting Tone.
Camp–On—No Answer
Refer to the discussion titled Camp–On With Automatic Call Back.
Clear Major Alarm Ring
Major alarm rings occur whenever a number of faults exceed a programmed threshold. You can use a
telephone station to clear a major alarm ring by pressing the INTERCOM button and then dialing a
feature code (default code is #09). However, the telephone station must have a class of service (COS)
assigned to it that has this feature enabled. The installer or programmer enables this feature through COS
programming.
Central Message Desk
The programmer can designate one station as the central message desk and arrange for it to have
exclusive message waiting control. A central message desk user takes messages for other system users,
controls the message waiting light at their telephones, and delivers the messages upon request.
Also refer to the discussion titled Message Waiting.
Understanding The Features – 59
GCA40–112
DXP General Description
Central Processor Switched Data Port Configuration
The CPU board provides a dual in-line pin (DIP) switch that enhances installer convenience in setting up
data communications between the DXP and an external data device. It is possible to mismatch the data
port configurations between the DXP and the external device in a manner that prevents data
communications from occurring. The DIP switches provide a hardware way of setting the data
configuration to a known set of parameters without the need for reprogramming the system. With the
switch set to ON, the DXP provides the following data parameters:
Parameter
RS232 1
RS232 2
Baud Rate In
9600
300
Baud Rate Out
9600
300
Data Bits
8
7
Stop Bits
1
2
Parity Bits
None
None
Flow Control
None
None
Common Audible Ringer Interface
Relay connections that provide dry-contact closure whenever ringing occurs are available on the central
processor unit circuit board. The relay closure tracks the ringing pattern of the applied ring signal and is
typically used to control an external ringer device. The installer can program the particular ringing
assignment that is tracked, and the ringing assignment can be any one of those that are provided by the
flexible ringing assignment feature.
Also refer to the discussions titled Auxiliary Ringer Interface, External Paging Interface, Flexible
Ringing Assignments, Line Answer From Any Station, and Night Transfer (Of Ringing).
Communications Card Support
The communications card provides serial data ports for interfacing such items as open architecture
interface applications, PC attendant positions, and the SMDA data printer.
Install communications cards on the services board, the expansion cabinet interface boards, and the main
cabinet’s auxiliary board. Each of these boards will accept two communications cards in its lower two
slots.
The DXP supports a maximum of 18 serial data ports. Two of these ports are the dedicated ports provided
by the CPU board while communications cards provide the remaining 16 undedicated ports.
60 – Understanding The Features
DXP General Description
GCA40–112
Conferencing - Multiline
This feature allows one station to access other stations or lines at the same time resulting in a conference
arrangement. Users press the TRANS/CONF button to establish conferencing.
A station user can make conference calls that encompass up to five parties, including the originating
station, in any combination of lines and system stations. For example, a user can conference his or her
telephone with three lines and one other station.
After establishing a conference between his or her station and two external parties, the user can drop out
of the conference by dialing a special code. The conference between the two outside parties continues in
an unsupervised condition. During unsupervised conferences, a line-to-line connection exists through the
system.
The programmer can use the line-to-line connect duration feature to set the length of time that the system
allows an unsupervised conference to continue. Prior to software release 8C the maximum time that he or
she can choose is 30 minutes; however, beginning at software release 8C, the programmer can choose
never as a programming option. System planners should be careful when choosing the never recall option
for systems that have loop start line without disconnect supervision. Both distant parties can leave an
unsupervised conference thus leaving the line unused yet still active. This line will remain active until the
person that set the conference rejoins it to disconnect the line.
Conference Advisory Tone
Beginning with software release 9A, the conference advisory tone feature allows programmers to
configure the system to provide an audible tone whenever more than two parties are connected in a
conference call. They may select this tone as either a one time tone or as a periodic reoccurring tone. If
they choose a reoccurring tone, they must select the time interval between the reoccurring tones.
Console Support
The DXP supports the operation of a DSS/BLF console. The system installer must use a station port to
install each DSS/BLF console; however, the programmer can assign up to four DSS/BLF consoles to
support the operation of one system station. When assigned to a station, a DSS/BLF console provides
additional programmable buttons that the user can program as direct station select (DSS) buttons with
associated busy lamp field (BLF) lights and as speed dial buttons (the console, however, does not support
second-level speed dialing). The programmer can also assign both outside lines and intercom numbers to
console buttons when necessary. The station with which the console is assigned to work does not have to
be a paired station port.
Consoleless Operation
The system can operate with or without the use of an attendant console.
Understanding The Features – 61
GCA40–112
DXP General Description
Consultation Hold
When the station user presses the TRANS/CONF button while on a call, the call is placed on consultation
hold and dial tone is returned to the station. The user may then make another intercom or line call. After
speaking with this “consulted” party, the station user may do any of the following: (1) return to the held
call by selecting the line or intercom number for the held party, (2) effect a conference by pressing the
TRANS/CONF button (putting the held call, the consulted party and the station user in conference), (3)
hang up and effect a transfer of the held party to the consulted party. If the user encounters a busy or a
ring no-answer, he or she may press the TAP button to return to the held party.
Transfer considerations:
• The system default denies line-to-line transfers.
• To make an unscreened or blind transfer, press the TRANS/CONF button, dial the desired intercom
number, and hang up.
Copy Model
Refer to the discussion titled Block Programming.
Database Program Storage
The Save/Restore Database feature saves a database externally from the DXP and restores it after the
system programmer turns the DXP off and upgrades the operating system software. This feature employs
a personal computer with an XMODEM communications program to store the database on a magnetic
diskette and reload it from the diskette after software upgrades. The saved and reloaded database includes
all of the following data: system information, station parameters, line parameters, toll restriction and
automatic route selection parameters, and system speed dial numbers but it does not include the
SMDA/SMDR records. The system programmer must make a printout of all stored SMDA/SMDR
records before he or she performs the database storage because this save/restore feature does not record
them and they will be lost. The Software Upgrade feature saves a database internally within the memory
(requires expanded RAM card—DXRAM–Exp 68K) of the DXP equipment and restore that database
after the system programmer has turned the DXP off and upgraded the operating system software. Saving
the database in this manner eliminates the need for a personal computer with an XMODEM
communications program to insure translation of the database between software upgrades.
NOTE: It is a good practice to save the database to a PC as a general back–up of your DXP programming.
Database Programming (From Main Station)
The system administrator can use a system telephone to reprogram certain feature parameters away from
the values set by the installer using the computer-based VMMI. Included among the features that the
system administrator can program are the ability to assign prime line, prime group, or prime intercom to
the stations, and the ability to assign day and night toll restriction exception numbers to the stations.
Database Programming
System programmers employing the visual man machine interface (VMMI) program running on a
DOS-based personal computer can customize the DXP system parameters and change the system data
base. The VMMI program causes the system to down load the existing database to the PC’s memory
where the installer can make additions and changes to database. While the installer is reprograming the
database, the system allows users to continue to use their telephones but prevents them from making
changes that affect the database’s structure. As the installer makes the changes to the database, the VMMI
program sends these changes back to the DXP memory.
62 – Understanding The Features
DXP General Description
GCA40–112
Day One And Day Two Ringing
Refer to the discussion titled Flexible Ringing Assignments.
Day Restriction Level
Refer to the Discussion titled Toll Restrictions.
Default Busy/Ring No-Answer Call Forward
The programmer can arrange for the system to automatically forward any calls that ring at busy
telephones or any calls that ring and are not answered after a preprogrammed number of rings. The
programmer chooses the station to receive those calls forwarded with this feature on a station-by-station
basis; he or she can also program the number of rings (0-6) the system requires until it rolls the call to the
forwarding station. The system defaults to four rings, three rings for voice mail ports. Users do not select
this operating feature since it is fully automatic; however, user-enabled call forwarding overrides this
default busy ring no-answer call forwarding.
Also see the discussions titled Call Forward - All Or Personal; and Call Forward-Busy Ring No-Answer,
All Or Personal.
Default Functional Programming
At initial power up of the system, the system operating features consist of a specific group of conditions
(default conditions). These default conditions provide a completely operational system for normal use. A
system installer can leave the system in a defaulted state or reprogram it as desired. After
reprogramming, a programmer can restore default conditions to the system at any time they are needed as
follows:
• When a master clear is programmed, the entire system is restored to the basic default start-up operating
mode. This action erases all customized program settings.
• When a system default is programmed, all system parameters and timing are reset to the basic start-up
settings. Plus, system-wide customized data such as LCD messages and system speed dial numbers are
erased.
• When line default is programmed, all lines are set to the basic operating parameters. Any lines that are
now programmed for rotary dial are reset as tone dial.
• When station COS default is programmed, the station operating features are set to the basic operating
mode.
• When button mapping default is programmed, each button at every telephone connected to the system
is reset to the basic settings for that particular model of telephone. This means that all unique button
functions are erased.
• When the table defaults are programmed, all customized data that the programmer has entered in any
tables such as SOHVA groups and toll restriction tables are erased. See also—Master Clearing The
System.
Delayed Ringing
Ringing assignments are programmable. A programmer can program a station to provide delayed ringing
on some lines while providing direct ringing on other lines.
Diagnostics (Limited)
The installer can use this feature to perform maintenance routines and diagnose certain system
malfunctions.
Understanding The Features – 63
GCA40–112
DXP General Description
Dial 0 For System Attendant
A user can signal the system attendant station (station 101 at default or any other station set by
programming) by dialing the digit 0 on their personal or group intercom number.
Dial Pulse Interdigit Time
You can set the interdigit time between dial pulses when the system pulse–dials a number over a line.
The DXP defaults this time to 200 milliseconds and provides a range of timing values in 100 millisecond
intervals between 100 milliseconds and one second.
Dial Pulse Rate—Make / Break Ratio
You can set the line make / break ratio for rotary dial signaling in a more flexible manner. You can
program the make and break times independently in one millisecond increments to any time from one to
99 milliseconds.
Dialed Number Identification Service (DNIS)
The DNIS feature allows the DXP to read an inband DTMF digit string sent by a common carrier. It uses
this information to identify the telephone number the caller dialed and appropriately route the call. DNIS
is a service that long distance carriers make available for dial 800 and dial 900 number subscribers on
trunks that use E&M signalling over a T1 network. Also see the discussion titled Automatic Number
Identification (ANI).
Digital Wireless Telephone Support
The DXP supports the operation of the Scout 900MX digital wireless telephone. The Scout 900MX is a
full-featured proprietary multiline telephone consisting of a wireless handset that lets the user roam about
and still make and receive telephone calls.
Direct-in Lines (DIL)
The direct-in lines (DIL) feature provides a line appearance at a dedicated button on one or more
multiline telephones. The programmer can assign a DIL to a proprietary single-line telephone where it
provides one-way (either incoming or outgoing) or two-way operation depending upon further
programming action.
64 – Understanding The Features
DXP General Description
GCA40–112
Direct Inward Dialing (DID)
The DID line board allows incoming CO calls to reach intercom extensions by direct dialing with no
attendant assistance. Since DID lines are incoming only, their direct appearance in limited to attendant
stations where their status indication may be useful. The CO assigns the DID numbers and the system
translates them into intercom numbers for station ringing.
DID Hunting
When a DID call rings at a station that the programmer has disabled though programming action, the
system routes the call through the disabled station’s hunt list until it locates a group intercom for the call
to ring. Should all group intercoms be busy or should no one answer the call in a programmed number of
rings, the system then routes the call along the station’s call forwarding arrangement. With a hunt list
containing up to eight assigned group intercoms and access to each group intercom available to several
system stations, many users have an opportunity to service a DID caller. Coupling this flexibility with the
station’s call forwarding ability, provides many chances for system users to service DID calls. A
programmer could program a hunt list and a call forwarding scheme to an unassigned station and provide
a designated DID termination and routing center. There would be no need to connect a telephone to the
station port to use the feature in this manner. The programmer could arrange several DID termination
centers to service different DID numbers. Each DID number could represent different calling categories,
and ring at different blocks of system stations (see Multipurpose Line Board for more information).
Direct Line Access By Station
Through program assignment, the system gives certain stations direct access to lines. The programmer
must map line buttons for use at these stations. The users then press the line buttons to select lines for use.
Direct Line Group Selection
This feature allows the programmer to put lines into line groups. A line group appears to the station user
as a single button. The system supports a maximum of 16 line groups with a line group containing any
number of lines; however, all lines in a group must be the same type. A multiline telephone can have a
line group button for each line group. A single-line proprietary telephone is either dedicated to a specific
line group, or it’s user may dial a code to access a line group.
When a user presses an idle line group button or dials a line group access code, the system scans the lines
in that group and picks the first available line in a reverse hunt group. The indicator associated with the
line group button on multiline telephones is idle if at least one line in the group is idle.
Understanding The Features – 65
GCA40–112
DXP General Description
Direct Inward System Access (DISA)
DISA allows outside callers to directly call a station or access certain internal system features, including
all line groups and ARS. The system allows up to eight DISA lines to be active at the same time. To
prevent fraudulent access and unauthorized use, the caller must use an authorization code and system
access code to gain access to outside lines as well as many of the advanced telephone features. The
authorization and access codes are from one to six digits (including pauses). You can use any of the digits
zero through nine.
The system denies access, and routes a DISA call to a pre-programmed device such as a station telephone,
or proprietary voice mail, under the conditions listed below:
a caller dialing an invalid authorization code,
a caller dialing restricted or invalid features,
Comdial has taken reasonable steps in the design of all product features, including DISA, which protect
against unauthorized or fraudulent access to, or use of, a system, or which protect against unauthorized,
fraudulent or unaccounted-for access to, or use of, long distance lines. However, no system is entirely
invulnerable or immune from unauthorized or fraudulent access or use, or unaccounted-for access or use,
and therefore Comdial disclaims any and all liability, and makes no warranty, express or implied, relating
to unauthorized or fraudulent access or use, or unaccounted-for access or use.
NOTE: DISA is not recommended for use on loop start lines without disconnect supervision. While DISA will
function, Comdial will not be liable for its performance under any condition where disconnect supervision
is not provided.
NOTE: Callers that use DISA to access a trunk group and place calls (trunk to trunk calling) may experience low
audio levels on their calls due to the normal line resistance of CO lines. A low audio level is usually only
noticeable on long line loops. If signal loss is a problem at a particular site, the installer may need to add a
line amplifier (repeater) in the DISA line.
In regard to the above note, software release 8C adds +3dB of gain to the DISA lines as a default setting,
and provides a means for the programmer to disable this gain if necessary. The software enhancement
also provides a means by which DISA callers can preselect the gain on a DISA line before they select the
line for use. They can dial a code to select either 0dB, +3dB, or +6dB of gain.
It is important to note that uncompensated line–to–line DISA connections often exhibit low audio levels
due to double loop copper losses. While adding gain to these connections will usually improve audio
signal levels, the added gain may also result in circuit instability in some connections. This instability
presents itself as a singing sound that can interfere with dialing or voice communications. If callers
experience dialing problems or hear a singing sound in their calls, they should select a lower gain setting
for use.
Disconnect Supervision
When the programmer enables this feature for a line, the system detects any break in loop current anytime
during a call and disconnects the line. Also refer to the discussion titled, Abandoned Hold Release.
Discriminating Ringing
The system provides two types of ringing to give an audible distinction between internal and external
calls. Internal calls sound two quick bursts every four seconds and external calls sound one long burst
every four seconds, except when synchronized ringing is enabled. When synchronized ringing is enabled,
the central office ringing pattern is tracked on external calls. Incoming calls transferred by an attendant
always ring as an external call.
66 – Understanding The Features
DXP General Description
GCA40–112
Do Not Disturb (DND)
Users can set any multiline telephone to a do not disturb mode (DND) using the designated programmable
button. The associated indicator turns on as an indication of active DND an appropriate message appears
in the display of LCD speakerphones. Under the DND condition, an outside call forwards to another
station or to the attendant according to the call forwarding feature. An intercom number call will not ring
a DND station and the system sends a fast busy signal to the caller to distinguish from a standard busy
line. No paging announcements are received on the DND station. Even though a station is in the DND
mode, the user can make out-going calls and access other features.
You can set any multiline telephone to a do not disturb mode using the designated programmable button.
The associated indicator turns on as an indication of active DND an appropriate message appears in the
display of LCD speakerphones. Under the DND condition, an outside call forwards to another station or
to the attendant according to the call forwarding feature. An intercom number call doesn’t ring a DND
station and the system sends a fast busy signal to the caller to distinguish the DND condition from a
standard busy line. No paging announcements are received on the DND station. Even though a station is
in the DND mode, you can still make outgoing calls and access other features.
You can enable or disable this feature on an industry-standard telephone by dialing the feature code
(default is #01).
Do Not Disturb (DND) Inhibit
The programmer can inhibit DND on a station class of service basis.
Do Not Disturb (DND) Override
The programmer can provide stations with a Do Not Disturb (DND) override capability that will allow
them to call a station that is set in the DND mode. The programmer must also enable the executive
override feature for the DND override feature to function. Refer to the discussions titled: Do Not Disturb
and Executive Override.
DSS/BLF Console Support
The DXP system supports the use of both digital and analog proprietary DSS/BLF consoles. The installer
can place a console at any station port and use database programming to identify it as a console port. The
installer then uses database programming to enable the console to be a companion to a telephone that he
or she has installed at any other station port. The system supports the use of up to four consoles for each
telephone, and there is no limit to the maximum number of consoles that it will support.
The DSS/BLF console provides a one-button direct station selection (DSS) intercom and an associated
busy lamp field (BLF) additional autodial capability to the telephone user.
DSS Status Button
When the programmer assigns the personal intercom number of one telephone to appear at a button on
another telephone, the button and its associated light provide a direct station select (DSS) busy lamp field
(BLF) feature. With this feature, the user can monitor the status of the appearing station. If the
programmer also assigns a DSS status button to the telephone, the user can press it to select between
monitoring all of the telephone status or just its personal intercom status.
Also refer to the discussion titled Intercom Number.
Understanding The Features – 67
GCA40–112
DXP General Description
Digital Voice Announce
The DVA is a line-powered device that provides voice prompts for auto-attendant and transfer, or you can
use it to enhance the operation of DISA and Tracker. However, you must have DISA assigned for DVA
to function. The DVA is designed to interface with a digital station port and is easy to install and
program. You perform all DVA programming through the “Attendant Level” programming, though there
are some DXP programming steps as well. It isn’t necessary to send DTMF or ringing signals to the unit
to activate it because the DISA programming determines the DVA’s actions. When you use DVA in
conjunction with DISA, the DXP Plus automatically answers CO lines and guides callers with voice
prompts.
Connect the DVA to any vacant digital station port. The DVA self-identifies to the CPU in the DXP so
you don’t have any phone-type programming to do.
The DVA accepts and stores up to four recorded messages, with a total maximum recorded time for all
messages of two minutes. The system attendant or installer can divide this two-minute period as
necessary among the four messages or use the entire two minutes for one message. These pre-recorded
messages play during an in-process call. Single digit dialing is allowed during each of the four prompts.
The system attendant or installer can store the customized messages (prompts) into the DVA device by
delivering them from the attendant’s station. The DVA interfaces with the DXP through any of its unused
digital telephone station ports. The maximum number of DVA units you can install is limited only by the
number of DXP station ports. If you install multiple DVAs, the DVA functions as an automatic attendant,
and it enhances the operation of direct inward system access (DISA) by providing automated voice
prompts and dialing instructions to callers. In general, the voice prompts are of the categories listed in the
examples following this description.
You control the day versus night messages by programming the day 1, day 2, and night ringing begin and
end times in the system parameters menu. The system goes into the night mode either manually by the
attendant or automatically each day when the programmed times occur. When the system is in the night
mode, the night menu message plays versus the day menu message; likewise, the night routing message
plays versus the day routing message.
Message types, such as welcome greetings and recall-no-answer messages are indexed within the system
by a two-digit number (example: 10 = Welcome Greeting 1, 11 = Welcome Greeting 2, and so forth).
A single-digit number appended to many of the message-type names (example: Welcome Greeting 1,
Welcome Greeting 2, and so forth) is used for grouping similar types of messages together to prompt
callers. For example, a company sharing the telephone system with several departments may assign all
messages in group 1 to the sales department and all messages in group 3 to the customer service
department. This allows DISA lines coupled with voice prompt 1 to seek welcome group 1, and DISA
lines coupled with voice prompt 2 to seek welcome greeting 2, for departmental applications.
When programming DVA voice menus (example, press 1 for sales, 2 for customer service ...), you can
also enter feature codes as well as intercom numbers in the Voice Digit Translation menu. For example, if
you have installed the Tracker Paging System option, you can program the Tracker Pager access code
(*8) into one of the single-digit translation locations. This allows callers to track the called party by
pressing the appropriate single-digit button on their telephone when prompted by voice message. The
caller then enters his or her call-back number and the # symbol to complete the page.
NOTE: DVA prompts are shared; for example, if you make eight different recordings, with two DVAs, they will be
distributed in both units. If one DVA fails or is removed, then only the remaining messages will play.
DVA continued on next page. . .
68 – Understanding The Features
DXP General Description
GCA40–112
DVA Continued . . .
Lines are associated with DVAs by “Line Pgm,” DVA voice option. For example, in the diagram below,
lines 1, 2, and 3 are programmed for “voice option 1" and will be answered by any DVA unit with index
group 1 prompts recorded. Lines 4, 5, and 6 are programmed with voice option 2 and will be answered by
the DVA with index group 2 recorded.
DVA 1
Index Group 1
L1 line pgm / voice option = 1
L2 line pgm / voice option = 1
L3 line pgm / voice option = 1
DVA 2
Index Group 1
DVA 3
Index Group 1
L4 line pgm / voice option = 2
L5 line pgm / voice option = 2
L6 line pgm / voice option = 2
DVA 4
Index Group 2
The following are examples of DVA voice messages.
Welcome greeting
This greeting identifies your company or business. Example: “Welcome to Acme Company, one of our
agents will be with you as soon as possible.”
Day message
This message represents the main menu prompt used during normal daytime hours.
Example 1: “If you know your party’s extension, dial it now; otherwise, stay on the line—an operator will
be with you shortly.”
Example 2: “To reach engineering, dial 1; to reach customer service, dial 2; to reach sales, dial 3;
otherwise, stay on the line—an operator will be with you shortly.”
Night message
The night message is used after normal business hours have ended. Example: “Our office hours are from
eight to five. Please call back tomorrow.”
Recall no answer messages
Whenever a station is dialed from a DISA line and is not answering, the system plays a recall no answer
message to the caller. Example 1: “The party you have reached is unavailable at this time.” Example 2:
“The party you have reached is unavailable at this time. Dial 1 followed by your call-back number and
pound symbol to track the called party or dial 2 to leave a voice message.”
NOTE: In example 2, the installer must install the Tracker Paging System and proprietary voice mail options.
Recall busy message
Whenever a station is dialed from a DISA line and is busy, the system plays a recall busy message to the
caller. Example: “The party you have reached is unavailable at this time—please dial another extension
or dial zero for the operator.”
Understanding The Features – 69
GCA40–112
DXP General Description
Hold message
This prompt is used during DISA calls and is activated when the called party is being paged with the
Tracker Paging system. Example: “The party you have reached is being paged—please hold.”
DISA authorization code message
This message prompts callers to dial their DISA authorization code. Example: “Please enter your
authorization code at this time.”
Feature access message
Before a caller using a DISA line can access system features, he or she must dial the proper feature code.
Example: “The following features are available. Dial *01 for system speed dial access, *8 for Tracker
Pager, or hold and you will be assisted by an operator.
Drop message
This prompt is used when a DISA call cannot be completed (not enough system resources available,
wrong access code dialed, or feature dialed is busy).
NOTE: The call is not routed to the attendant–the message plays, then reorders.
Example: “Your call cannot be completed at this time. Please try again.”
DVA / DISA
You can enhance the security of DISA by using the DVA. The DXP seizes the incoming call based on the
“DISA assignment” parameters, and the DVA plays the appropriate prompts to enhance the following
items.
DISA access code,
Authorization code,
Feature access code.
For example:
Main Number
xxx-xxxx
Index Prompt 10
“Welcome
Greeting”
“You have reached ABC company. You may
dial an extension at any time, or press 1 for
advanced feature access.—Pause—
1 = Disa Access Code
Index Prompt 31
“Password
Prompt”
“Dial your authorization number.”—Pause—
Index Prompt 33
“Dial Feature”
“Dial the feature access code.” —Pause—
70 – Understanding The Features
DXP General Description
GCA40–112
DVA/ Auto Attendant with Single Digit Menu
The DVA functions as an auto attendant, giving callers single-digit dialing options. The DXP seizes the
incoming call based upon the “DISA assignment” parameters, and the DVA plays the appropriate
prompts.
Welcome Greeting
Day Main Greeting—Menu choices
Recall Busy
Recall No Answer
For example:
Main Number
xxx-xxxx
Index Prompt 10
“Welcome
Greeting”
Index Prompt 14
“Day / Night Menu”
“You have reached ABC company.
“Dial 1 for Service
”Dial 2 for Advanced Features
“Dial 3 for Assistance
1 = (Group ITCM #)
Service Department
Index Prompt
31
“Password”
All phones ring and flash group
ITCM.
Index Prompt
33
“Dial Feature
2 = (DISA Access)
3 =(station#)
Station Number
Dial your
Authorization
Code
Dial your
Feature Access
Code
Understanding The Features – 71
GCA40–112
DXP General Description
DVA / Tracker
The DVA gives caller’s single digit dialing access to the Tracker paging system. The DXP seizes the
incoming call based upon the “DISA assignment” parameters, and the DVA plays the appropriate voice
prompts.
Welcome Greeting
Day Main Greeting—Menu choices
Recall Busy
Recall No Answer
For Example:
Main Number
xxx-xxxx
Index Prompt 10
“Welcome
Greeting”
“You have reached ABC company.
Index Prompt 14
“Day / Night Menu”
Index Prompt
22
“Recall No
Answer”
“If you are calling from a tone-dial telephone, you may dial the extension
number at any time.”
“I’m sorry, that extension doesn’t answer.
Dial 1 to Track;
Dial 2 to leave a message with the attendant;
Dial 3 to leave a message in the voice mail box
1 = ✳8
2 = Extension Number
Index Prompt 26
“Recall Busy”
3 = Voice Mail Port number
“I’m sorry, that extension doesn’t answer.
Dial 1 to Track;
Dial 2 to leave a message with the attendant;
Dial 3 to leave a message in the voice mail box
1 = ✳8
72 – Understanding The Features
2 = Extension Number
3 = Voice Mail Port number
DXP General Description
GCA40–112
Dynamic Save Button
Unprogrammed buttons at multiline telephones are available for the user to dynamically save dialed
numbers. To save a number, the user presses any unprogrammed button before hanging up after he or she
has dialed a number. To dial the saved number, the user presses the same button and the system
automatically dials the saved number. Saving a number over a previously saved number erases the old
one and stores the new one in place of it.
E
E & M Tie Line Support
Extension Hunting
When an E and M tie line call rings at a station that the programmer has disabled though programming
action, the system routes the call through the disabled station’s hunt list until it locates a group intercom
for the call to ring. Should all group intercoms be busy or should no one answer the call in a programmed
number of rings, the system then routes the call along the station’s call forwarding arrangement. With a
hunt list containing up to eight assigned group intercoms and access to each group intercom available to
several system stations, many users have an opportunity to service an E and M tie line caller. Coupling
this flexibility with the station’s call forwarding ability, provides many chances for system users to
service E and M tie line calls. A programmer could program a hunt list and a call forwarding scheme to
an unassigned station and provide a designated E and M tie line termination and routing center. There
would be no need to connect a telephone to the station port to use the feature in this manner. The
programmer could arrange several E and M tie line termination centers to service different extension
numbers. Each extension number could represent different calling categories, and ring at different blocks
of system stations (Also see Multipurpose Line Board Support).
End-to-End DTMF Signaling
The system accepts DTMF tones or digital signals from proprietary telephones and sends them as DTMF
tones through the public telephone network where they are received at a distant end for computer, voice
mail, or other peripheral feature access.
End-to-End Signaling On Intercom
After establishing an intercom call, the system can continue to send and receive dialing signals (DTMF
tones) through the intercom path. This feature can be performed from every station in the system and is
used by peripherals such as a VMI–X or ATI–D–1PT accessory unit for voice mail.
End-to-End Signaling On Lines
After a user has established an outside call, the system can continue to send dialing signals (DTMF tones)
through the public switched network and have them received at the distant end for inward call completion
(bank by telephone, voice mail). Users can perform this conventional, on or off-hook dialing feature from
every station in the system.
Enhanced Line Appearance
Refer to Line Appearance, Enhanced
Exclusive Hold
Refer to Hold, Exclusive
Understanding The Features – 73
GCA40–112
DXP General Description
ExecuMail Integration
The DXP supports the ExecuMail voice mail system through an appropriate interface device. The
ExecuMail system provides voice mail boxes where callers can leave messages to station users when the
users are not available to answer their telephones. The ExecuMail system camps incoming calls that
encounter busy ports so that they can recall when a voice mail part becomes available.
Also refer to the paragraph titled Voice Mail Integration Digits.
Executive Override
This feature allows the user of a station, upon encountering a busy signal at another station, to dial a
special code that will override the busy condition, sound a warning tone, and allow caller access to the
existing conversation.
Conditions for executive override are as follows:
• Calling station has class of service that enables busy override.
• Calling station is switched to override voice path.
• Called party may respond and will be heard by calling station and outside party.
• When the calling party dials the override code, the called party receives several tone bursts.
Also refer to the feature discussion titled Do Not Disturb.
Executive Override Advisory Tone
Beginning with software 9A, the executive advisory tone allows programmers to configure the system to
provide an audible tone whenever a system user activates the executive override feature. Programmers
can select this tone as either a one time tone or as a periodic reoccurring tone. If they choose a reoccurring
tone, they must select the time interval between the reoccurring tones.
Executive Override Block
As a class of service feature, the programmer can block executive override at a station. When a station is
blocked, a caller cannot override a busy condition and break into an on-going conversation at the called
station.
Extended DTMF Tones
The installer can program the length of the DTMF tones associated with automatically or manually dialed
numbers on analog telephones. This feature allows the system to access equipment such as answering
machines, banking computers, voice mail equipment, that requires DTMF tones longer than the defaulted
80 msec. tone. To use the feature, the user programs the digits that require longer DTMF tones into speed
dial locations or waits until the DTMF dialing time threshold exceeds the limit.
Extended DTMF Tones For ExecuMail
The programmer can set different DTMF tones for ExecuMail Stations. The system defaults the length to
80 msec., but the programmer can set other tone lengths as needed.
74 – Understanding The Features
DXP General Description
GCA40–112
External Paging Interface (External Paging Port)
The external paging port, available on the services circuit board, provides an interface for external paging
equipment. When the programmer assigns the external paging port to a paging zone, announcements to
that zone are sent through the external paging equipment installed at the port. When the programmer
assigns one of the relays that are available on the central processor unit circuit board to the paging zone, it
provides a dry-contact actuation for the duration of the page to that zone. Typically, the installer wires
the system so that this actuation enables the external paging equipment while the paging signal is sent
through it.
The programmer can program a line port as an external paging interface for an external paging amplifier.
When this feature is available, station users access the amplifier by selecting that line port. The paging
line port accepts dialed DTMF tones to make a zone selection if the amplifier provides this function.
When the programmer assigns a flexible ringing assignment to the external paging port, the external
paging equipment responds to a ring signal and sounds the ringing over the paging loudspeaker. The
programmer can assign one of the common audible ringer interface relays to track the ring signal that is
supplied to this external paging port. Typically, the installer wires this relay so that its contact actuation
enables the paging equipment.
Also refer to the discussions titled Auxiliary Ringer Interface, Common Audible Ringer Interface, Flexible
Ringing Assignments, Line Answer From Any Station, and Night Transfer (Of Ringing)
F
Feature Inhibit
The programmer can disable a large array of individual features to provide a very basic telephone system
when it is necessary. A basic system might be necessary at a site where a large proportion of the
telephones are accessible to unauthorized users that may use them to tamper with the system, or such a
system may be necessary for locations where users only need a narrow range of features to do their job.
Feature Renumbering
While the dialing codes for personal and group intercoms and for feature access are set by system default,
they are flexible, and the programmer can renumber them when necessary. Feature renumbering may be
necessary if personal or group intercom numbers must be in a certain block or sequence to match some
site requirement (for example, numbering all telephones located on the third floor with 3nn numbers). If
a new number assignment conflicts with a defaulted dialing code, the defaulted code can be reassigned
into a block of unassigned numbers set aside for that purpose.
At default, the blocks of numbers are as follows:
101 - 292 = personal intercom
3101–3292, 4101–4292, 5000–5023 = group intercom
5024 - 5999 = unassigned —used for renumbering an assigned number so that the original number can be
used for something else.
600 - 899 = feature codes
9 = line group 1
The programmer can reassign any number between 101 and 8999 to any intercom or feature code in any
combination of three-or four-digits; however, the assigned numbers must not conflict with one another.
For instance, if 211 is assigned as an intercom number, there cannot be any intercom or feature code
numbered 21, 21n, or 21nn. Similarly, since 9 is defaulted as the code for line group one, there cannot be
any intercom or feature code numbered 9n, 9nn, or 9nnn.
Understanding The Features – 75
GCA40–112
DXP General Description
Flexible Ringing Assignments
The programmer can arrange ringing assignments for every station. He or she can arrange for this ringing
to sound immediately as soon as the call appears on specified lines at a telephone (direct ringing) or after
a system imposed delay (delayed ringing). Further, he or she can arrange for a telephone to ring when
calls appear on specified lines during certain periods of the day or night. To program for flexible ringing,
the programmer assigns lines to the direct and delayed ringing modes. He or she also divides a 24-hour
period into three time blocks designated as day 1, day 2, and night mode and assigns lines to each of these
categories. The programmer then assigns the direct, delayed, day 1, day 2, and night mode ringing
designations to the various stations.
During the day 1 time period, calls on lines assigned to direct, delayed and day 1 categories all ring.
During the day 2 time period, calls on lines assigned to direct, delayed and day 2 categories all ring.
During the night time period, calls on lines assigned to delayed and night both ring.
The system also provides a manual night transfer (of ringing) feature that the attendant activates by
dialing a code or pressing a preprogrammed button. While this feature is active, calls on lines assigned to
delayed and night ringing both ring at the various stations; however, no other ringing occurs.
Also refer to the discussions titled Auxiliary Ringer Interface, Common Audible Ringer Interface,
External Paging Interface, Line Answer From Any Station, and Night Transfer (Of Ringing).
Flexible Ringing Assignment Of The External Paging Interface
Refer to the discussion titled, External Paging Interface.
Flexible Station Numbering Plan
Refer to the discussions titled Feature Renumbering and Intercom Number.
Full Button Programmability Of Features
The programmer, and often the telephone users themselves, can make frequently dialed feature codes
available at programmable buttons by storing the specific access codes necessary for dialing the features.
They can store every feature access code, except those requiring TRANS/CONF button action, in a
continuous string including button actuations and keypad digits up to a maximum of 16 digits per
programmable button.
Also refer to the discussion titled Programmable Button Flexibility.
G
Group Intercoms
Refer to the discussion titled Feature Renumbering and Intercom Number.
Ground Start Line Support
Refer to the discussion titled Multipurpose Line Board Support.
76 – Understanding The Features
DXP General Description
GCA40–112
H
Handsfree Answer Inhibit
The MUTE button on a multiline telephone will block all handsfree answerback response. This
arrangement prevents a station user from monitoring another station site using the monitoring ability of
the voice announce feature. When a user presses the MUTE button at his or her telephone, all handsfree
answerback is disabled thus inhibiting any off-site monitoring. The mute light will remain on to indicate
that this feature is active on digital telephones. On analog telephones, the monitor light will flash. Also
refer to the discussion titled Mute.
Handset Volume Level (On Impact Telephones)
The installer can program the handset volume feature on Impact telephones to offer the station user more
choices when selecting the handset volume level locally from his or her telephone. Normally, users have
up to 8 volume levels that they can select. However, this programmed feature increases the user’s handset
volume choices to 13.
Headset Compatibility
Some proprietary multiline telephones are equipped with a headset jack. The programmer can enable a
station port to allow headset operation with these telephone models. The programmer assigns, or in some
cases the user can program, a programmable button at the telephone that the user can press to
enable/disable headset port operation.
Hold
This feature allows a user to temporarily disconnect from a current call yet retain it so that it can be
retrieved. When users place a call on hold, they are free to use their telephones for other calls or features
and then return to the held call. At a multiline telephone, the user can put a call on hold manually, by
pressing a HOLD button, or automatically (if programmed), by pressing another line button. Further,
when a user presses the TRANS/CONF button to transfer a call, the system places the call on hold. The
user can place a call on hold in either an exclusive or non-exclusive manner. Exclusive hold prevents a
user at another telephone from retrieving a call held on a shared line. Non-exclusive hold allows any
telephone that has line appearance of the held call to pick it up. The transfer hold is an exclusive hold
condition. When a user answer a call on a group intercom and places it on hold, the system keeps this call
on hold on the group intercom. This means that the user who placed the call on hold or any other user
with access to that group intercom can pick up the held call.
The programmer must program each multiline telephone for manual or automatic and exclusive or
non-exclusive hold. When he or she enables automatic hold at a telephone, it does not prevent users from
using manual hold.
Also refer to the various discussions headed Automatic Hold... .
Directed Station Hold
This feature allows station users to pick up the last call a user placed on hold at another station. This
feature does not allow users to pick up exclusive hold calls or calls that are in the process of being
transferred. Also, the feature does not allow users to send a directed call hold to a station where its user is
scanning the currently held calls. In addition, this feature allows users to place a call on hold at another
station and have this call appear to be the one that has been on hold there for the longest time. Features
such as hold recall apply to the station that sent the directed call hold and not to the station that received
the directed call hold.
Understanding The Features – 77
GCA40–112
DXP General Description
Hold, Exclusive
Exclusive hold prohibits a user from retrieving a held call at any station other than the one where it was
placed on hold. The exclusive hold condition also links the held call to the timed hold recall timeout
feature. After timeout, audible and visual signaling occurs and the exclusive hold condition reverts to a
normal hold condition. The programmer enables or disables exclusive hold as a class of service feature.
Hold Queuing
The hold queuing feature allows a station user to put multiple lines on hold. The LCD speakerphone user
can scroll through this queue of held calls by repeatedly pressing the HOLD button. The numbers or
names of the held lines are shown on the LCD display. When the desired line appears on the display, the
user presses TAP to retrieve it.
Hold Time Reporting
A programmer can arrange for the SMDR/SMDA parameters to convey either the cost of calls that the
stations make or the amount of time that lines have been on hold at the stations. This time includes the
actual hold time as well as the time waiting for transfers and conferences to be completed.
Hot Transfer
A hot screened call transfer allows users to first announce and then transfer both line and intercom calls
from one telephone to another in a special manner. Once users have announced that they are transferring
a call to another telephone, they can then take action to make the transferred call appear at the other
station as if that user has already answered it. If the recipient of a hot transferred call is using a
speakerphone, he or she merely begins the conversation with the distant party. If the recipient of the hot
transfer is using a monitor telephone, he or she must lift the handset to reply to the distant party.
Also refer to the discussion titled Call Transfer -Screened.
I
I Hold And I Use Indications
The light associated with a line button provides a visual indication of the status of that line. When a user
has a line in-use or on-hold at his or her telephone, the light indication provided is of a different flash rate
than the indication provided at the other telephones in the system.
Idle Line Preference
With idle line preference, a telephone automatically connects to an assigned outside line that is idle and
arranged for this feature. Connection occurs as soon as the user lifts the telephone handset. He or she
does not have to press a line button.
The programmer assigns idle line preference to a station class of service and then assigns that class of
service to a particular telephone. He or she also assigns the lines that are associated with the feature and
the priority that these lines are to be available. If the programmer enables this feature and the prime line
automatic feature together, the user gets his or her prime line upon going off-hook or an idle line if the
prime line is in use.
Also refer to the discussion titled Idle Line Priority.
Idle Line Priority
When a programmer arranges for a telephone to have idle line preference he or she also specifies the
order in which the idle lines are given to the station. Also refer to the discussion titled Idle Line
Preference.
78 – Understanding The Features
DXP General Description
GCA40–112
Industry Standard Telephone Support
The DXP supports industry standard (IST) telephones.
Distinctive Ringing
An industry–standard telephone can sound one ring cadence for intercom calls and another for for outside
calls. You must select the ringing style in station class of service programming.
DTMF Receiver–Time-out
You can program the amount of time that the system waits to receive a DTMF tone on an
industry–standard telephone. The DTMF receiver–timeout feature applies to the time between a user’s
lifting the handset and pressing a dialpad digit.
Do Not Disturb (DND)
You can dial a feature code (#01 by default) from your industry standard telephone and put the telephone
into a do not disturb (DND) condition. While in this condition, an outside call forwards to another station
or to the attendant according to the call forwarding feature. An intercom call will not ring the DND
station and the system sends a fast busy signal to the caller to distinguish the DND from a standard busy
line.
Flash Time
The flash time is the timed length of the signal delivered when a user presses the hookflash (or TAP)
button. The installer can program both the minimum and maximum times that define the IST flash.
Hold Confirmation
Hold confirmation allows the industry–standard telephone users to have positive tone feedback while on
hold.
Offhook Treated As Busy
When an industry-standard telephone user takes the telephone’s handset off hook, the IST station appears
busy to the system. This feature prevents the system from ringing an IST station while the station is idle
and off hook making it unable to sound audible ringing.
Message Wait Retrieval Access Code
This feature allows IST station users to respond to a message waiting condition without using the central
message desk. They do this by dialing a special intercom feature code that lets them respond directly to a
waiting message.
Ring Frequency
The system programmer can set a ring frequency of 25 Hz for international applications or set a ring
frequency of 21 Hz for domestic applications. He or she must choose a setting that matches the frequency
of the installed ring generator.
Ring Patterns
Installer can program the ringing pattern for either IST ring mode one or IST ring mode two. Mode one
causes a two-second ring phase while mode two causes a shorter one second ring phase. For this feature
to function properly, the industry-standard telephone interface board must contain firmware revision 2C
Ringing on Busy
When an industry–standard telephone is busy on a call and another call comes to that telephone, the
system sounds three quick tone bursts to the telephone’s handset receiver. You must program the ringing
on busy feature.
Industry-Standard Telephone Support continued on next page . . .
Understanding The Features – 79
GCA40–112
DXP General Description
Industry-Standard Telephone Support continued . . .
Ringing Time-out
You can program the number of times that the system sends a ring signal to an industry–standard
telephone on a system wide basis.
Ringing Patterns
The ringing pattern can be changed. Additionally, firmware revision 2C or higher must be installed on the
DXIST (industry-standard interface) board. A ringing pattern (mode 2) with pulse durations half the
normal ones (mode 1) can be programmed. This results in shorter ring phases of one-second duration.
Ringing Per Phase
Installers can bridge two ISTs at a single station port but the telephones share the same intercom number.
When installers do this, it reduces the number of ISTs that can ring simultaneously from 96 per cabinet to
48 per cabinet. Bridged ISTs require programming action to match the systems ringing requirements to
the installation parameters.
Ringing Time-out
You can program the number of times that the system sends a ring signal to an industry-standard
telephone on a system-wide basis.
Subdued Off-Hook Voice Announce (SOHVA)
Users can perform a SOHVA from any telephone to an industry-standard telephone if the installer has
programmed the IST in the SOHVA tables according to the SOHVA feature. Users can SOHVA the IST
whenever it is busy on a line or the intercom. The IST user can not respond to a SOHVA call and his or
her outside party will hear the SOHVA caller’s voice.
Station Lock
This feature allows you to lock any local industry standard telephone (IST) being used with a DXP
system. You enable this feature by dialing the feature code (default is #04) followed by your authorization
code. You disable this feature by dialing only your authorization code after hearing the “enter your
authorization code” fast tone. Your authorization code is programmed into the system by the installer.
Also refer to the discussion titled Authorization Codes.
When this feature is enabled, access to lines and features on your telephone are denied to other users until
you unlock or disable this feature.
Interactive Button Support
The system supports three interactive buttons on LCD speakerphones. These buttons and their associated
expanded display messages provide quick easy access to system features and straight-forward button
programming without the need for dialing codes.
Line Out Softkey Option
Beginning with software release 9A, the programmer can select between two different interactive button
menu options that LCD speakerphones display when connected to outbound lines for outgoing calls.
Specifically, this action substitutes a release (RLSE) button for the automatic redial (ARDL) button. This
feature enhances DXP installations within the international community because some nations have
specifications in place that disallow automatic redialing.
80 – Understanding The Features
DXP General Description
GCA40–112
Intercom Hunt List
You can place personal intercom and group intercom numbers in a hunt list. When a user makes a call to
a busy hunt list number, the system searches the list for an idle number to ring. The system allows you to
place up to eight intercom numbers in a hunt list, either all group intercom numbers or one personal and
seven group numbers. Refer to Intercom Number—Intercom Hunt List.
Intercom Number
The DXP system provides intercom support in several ways as described in the following paragraphs. The
system provides 192 personal intercom slots and 408 group intercom slots for a total of 600 available
intercom slots.
Personal Intercom Number
The system assigns a unique personal intercom number to every station, and the user of that station has
exclusive use of that intercom number for making calls. However, telephone users can answer personal
intercom calls that ring at another telephone or pick up non-exclusive calls that are on hold there. At
default, the personal intercom appears on a telephone at the intercom button, but it can appear at any
button that the programmer maps for that purpose. Personal intercoms can hunt to other personal or to
group intercoms, depending upon programming.
Group Intercom Number
Group intercom numbers are those that are shared for use by several stations. Any time someone calls a
group intercom number, all stations assigned to the number will ring. The programmer, through station
programming methods, enables a station’s ability to answer and originate calls on a group intercom
number. He or she also maps the buttons on a telephone at which the group intercom numbers are to
appear. The lights associated with these buttons show activity status of the group intercom numbers. In
addition to normal intercom activity, a group intercom can show the appearance of a line that normally
does not appear at the telephone (such as one carrying a transferred call). Group intercom numbers can
appear in intercom hunt lists; however, a particular group intercom number can appear in only one hunt
list at a time.
When a user selects a group intercom and dials a line group code to select a line or dials a code to retrieve
a call from a park orbit, the system places the subsequent line appearance on the group intercom that the
user preselected. the line appearance remains at that group intercom until the user finishes his or her call,
parks it, or transfers it to another telephone.
Understanding The Features – 81
GCA40–112
DXP General Description
Station Monitoring
The programmer can make the personal intercom number of one telephone appear at a button on other
telephones in the system. Users at those telephones can use the light associated with this button to
monitor the idle/busy status of that telephone and press the button to make a call to the idle monitored
telephone.
The degree of monitoring that users can do is determined by whether the station monitoring feature that is
assigned to the telephone is on or off. The type of monitoring that they can do is determined by whether
their telephones have a status button that they can use to choose one type of monitoring in place of
another.
When the station monitoring feature is off, the status light shows the state of the monitored telephone. If
the user’s telephone has a status button, he or she can press it to show the busy/idle state of just the
personal intercom number of the monitored telephone.
When the station monitoring feature is on, the status light shows activity status (idle, ringing, busy, and
hold) of the monitored telephone.
The programmer must map a telephone button for each personal intercom that is to appear and, if desired,
map a status button for the user to switch between the types of monitoring. Also, she or he must enable
station monitoring as a class of service feature and assign that class of service to those telephones where
monitoring is required.
Intercom Hunt List
The programmer can group up to eight intercom numbers together at an individual telephone to form an
intercom hunt list. The eight numbers can include one personal intercom number and seven group
intercom numbers or eight group intercom numbers.
When someone calls a telephone and it is busy, the call will go to the first idle number in that telephone’s
hunt list and then ring every telephone that has access to that number. An outside line call to a busy
telephone will always go to the hunt list; however, an intercom call will not. To make an intercom call
route to the hunt list, the programmer must include the personal intercom number of that telephone in the
hunt list. The system will not allow you to assign a group intercom number to more than one hunt list at a
time.
When a user has set his or her telephone to forward just prime line and personal intercom calls, those calls
will forward while any other calls to that telephone will go to the hunt list. When a user has set his or her
telephone to forward all calls, then all calls forward and none go to the hunt list.
Also refer to the discussion titled Feature Renumbering.
Intercom Time-out
Should the user select the intercom for use and then perform no dialing or other action, the intercom will
timeout after 10 seconds (at default) and return the telephone to an idle state.
Intercom Call Progress Tones
Internal call progress is marked by the following special tones: Dial tone sounds steady; ring back tone
sounds one second on and three seconds off; tone signaled internal call sounds a two-tone burst every four
seconds at a called station and returns to the caller as ring back; voice signaled internal call sounds a
single tone burst at a called station and returns to the caller as two tone bursts; busy tone sounds one-half
second on and one-half second off at the calling station, and do not disturb tone sounds a fast busy tone
when the called station is in the do not disturb mode. (The system only supplies OPX ports with the
regular busy tone since fast busy tones could interfere with the operation of some accessories that can be
connected to these ports).
82 – Understanding The Features
DXP General Description
GCA40–112
Intercom Inter-Digit Dialing
A timer begins timing out after the dialing of each number during intercom number dialing. It also begins
a timeout whenever the station user accesses the intercom number path and does not dial any digits.
When the timer times out, the system returns the station to an idle state.
K
Key/Hybrid Configuration
Either key system or hybrid configuration is available with the DXP digital communications system.
Whenever the programmer assigns outside lines into line groups and gives individual stations access to
those line groups, the system automatically places itself into the hybrid configuration mode. The installer
does not have to make any physical adjustment to the equipment to achieve the hybrid configuration
mode. The Federal Communications Commission rules and regulations, Part 68, designate a fully
protected hybrid configuration as an MF equipment type category and a key system configuration as a KF
equipment type category. The installer must report the appropriate category registration number to the
telephone company. Operationally, the hybrid configuration enables a PBX feature that may incur a
higher monthly tariff to the telephone company.
L
Last Number Redial
The system provides each station with a last number redial feature. This feature saves 16 digits of the last
outside number dialed at the station. A newly dialed number always replaces a previously dialed number.
When the user presses the last number redial button, the system will choose a line and redial the saved
number. The system will choose the last line used and redial the number. If the last line used is busy or is
unavailable, the system will choose the prime line. If they both are unavailable, the system will choose
any line assigned to idle line preference. If this is busy or unavailable, no further system action is taken;
you must hang up and retry later when a line is available.
Line Access Restriction
Refer to the discussion titled Access Denied.
Line Answer From Any Station (TAFAS)
The programmer can assign one or more of the four relays, which are located on the central processor
board, to track the ring signal on any or all lines that he or she assigns to them. The programmer can
arrange for the tracked ringing to be during the direct, delayed, day 1, day 2, or night ringing modes.
Typically, the installer wires a relay so that its contact actuation causes an external bell or other device to
sound. Station users can hear an external ringer and dial a code. When they do this, the system allows
their stations to answer any line that the installer has assigned to that external ringer through the relay
programming. Since each site installation can be unique, the installer must explain to the users which
dialing code answers which external ringer.
Also refer to the discussions titled Auxiliary Ringer Interface, Common Audible Ringer Interface,
External Paging Interface, Flexible Ringing Assignments, and Night Transfer (Of Ringing)
Line Appearance, Enhanced
When a telephone user selects a group intercom and dials a line group code to select a line or to retrieve a
call from a park orbit, the system places the subsequent line appearance on the group intercom that the
user preselected. The line appearance remains at that group intercom until the user finishes his or her call,
parks that call, or transfers it to another telephone.
Understanding The Features – 83
GCA40–112
DXP General Description
Line Groups
The programmer can assemble and program outside lines together in up to 16 different line groups. Users
can access each group by dialing a different access code or by pressing a line group button. The
programmer can use this feature to reserve certain lines for certain clusters of stations for a tenant-service
arrangement.
Line Group Access
The programmer can assign certain line groups to certain stations for call origination purposes. Stations
may also be denied access to certain line groups.
Line Queuing
When several telephones share a line and that line is busy, a user can dial a code and hang up to wait for
the line to become idle. When the line becomes idle, the user’s telephone will ring.
Liquid Crystal Display Support
The system supports the use of LCD speakerphones having a liquid crystal display (LCD). The LCD
speakerphone display may shows many useful messages that guide station users through many calling
situations.
Enhanced LCD Display
The installer can program the system to enhance the display of an LCD-equipped telephone so that it
shows both the name of the calling station and its personal intercom number.
Liquid Crystal Display Messaging
A user can set standard and system supplied custom display messages by dialing a specific code at any
telephone. When a user places a call from an LCD speakerphone, the preset LCD message from the called
station will flash on the caller’s LCD. When a user sets a message, the intercom number light at his or her
telephone flashes to indicate that the feature is active. The attendant programs these messages form his or
her position (30 messages are available).
84 – Understanding The Features
DXP General Description
GCA40–112
Location Code
Software release 9A adds the location code feature to enhance system installation in the international
community. When installers set this code for a particular nation where they have installed the DXP, the
DXP system automatically defaults certain system parameters to a setting that meets specifications set
forth by that nation’s technical standards. Also see the discussions titled Conference Advisory Code,
Executive Override Advisory Tone and Line Out Softkey Option.
Location Code 1 (USA)
• Standard system default codes for all system features.
Location Code 2 (South Africa)
• Standard system default codes for all system features except:
— transmission and receive levels set to meet local standards,
—frequency and cadence of call progress tones set to local standards.
Location Code 3 (Brazil)
• Standard system default codes for all system features except:
— transmission and receive levels set to meet locate standards,
—frequency and cadence of call progress tones set to local standards,
—conference advisory tone turned on and set to provide periodic reoccurring tone,
—executive advisory tone turned on and set to provide periodic reoccurring tone,
—Selectable interactive button menu for LCD speakerphone displays set to substitute
a release (RLSE) button for the automatic redial (ARDL) button.
NOTE: Be sure to notify users of this button change as it is different from information
provided in the user’s guides.
Location Code 4 (Argentina and Chile)
Standard system default codes for all system features except:
— transmission and receive levels set to meet local standards,
—frequency and cadence of call progress tones set to local standards.
Lock Button
When the installer maps a telephone with this button, a user can press the button and dial an authorization
code to deny other users access to lines and features at his or her telephone.
Also refer to the discussion titled Authorization Codes.
Understanding The Features – 85
GCA40–112
DXP General Description
M
Manual Exclusion
Refer to the discussion titled Privacy Release.
Manual Reset
The system provides a button on the central processor unit circuit board for manually resetting the
software. When someone presses this button, it causes the system to reset all lights, features, line states
and station states.
Master Clearing The System
When master clearing the system, the installer can set the parameters to one of three settings.
Mode 1—"Key-Like Mode"
At default, assigns line appearances for every multiline telephone but does not assign group intercoms in
any station hunt list.
Mode 2—"PBX-Like Mode"
At default, assigns no line appearances but does default two unique group intercom appearances for every
multiline telephone in the hunt list.
Mode 3—"All-clear"
This option defaults the system with no button mapping, group intercom access, or extension numbers for
stations.
Maximum Call Duration
This feature automatically cuts off calls on certain lines after a preprogrammed time. The system will not
cut off calls made to an emergency number. The system sounds a warning tone at the busy station 10
seconds before it disconnects the call. The warning tone consists of one 800 ms burst followed by eight
100 ms bursts.
Meet—Me Answer Page
Any station user can dial a code in response to an all-call or zone page and be connected to the paging
party in a private conversation.
Memory Retention Without Batteries
The database programming is electronically protected during AC power failures by an internal electronic
component sometimes known as a “supercap”. The stored data will remain in memory for a minimum of
30 hours provided that the system has been powered continuously for approximately 30 minutes prior to
the power failure or disconnection. The system clock will continue to run for at least 30 minutes after an
AC power failure or disconnection.
Message Deposit
This messaging feature allows station users to call an LCD speakerphone and arrange for a message to be
left on its display. The message is for the called party to read if he or she is unable to answer the caller.
86 – Understanding The Features
DXP General Description
GCA40–112
Message Waiting
A special feature access code allows a station user to control the message waiting (MW) light at other
stations in the system. When the message waiting light is turned on at a station, the user can
automatically call the station that turned it on. Stations that include an LCD display show the source of
the message.
The programmer can program one station as the central message desk and arrange it for exclusive
message waiting control. The central message desk user can control message waiting lights and deliver
messages to and from all other stations in the system. The programmer can also provide a programmable
button for placing and retrieving message waiting calls. Single line telephones only utilize central
message desk signaling. A station can have as many 8 message waiting lights stacked at one time.
Mnemonic Programming
Refer to the discussion titled Programmable Button Flexibility.
Modem Support
The system supports the operation of the DXMDM serial data modem. The DXMDM is a
general-purpose, 300, 1200, and 2400 automatic baud detect, serial data modem that receives its operating
power and configuration programming from the DXP system. The CPU board provides a dedicated serial
data port for DXMDM modem use. If your installer connects the modem to a serial data port that is
supplied by a communications card, he or she will need to program the system for modem operation on
this port. Regardless of where the modem is connected, the system arranges for that port to automatically
match the baud rate and serial data parameters of the modem.
The system also suports the operation of a customer-supplied modem connected to a serial data port that
is supplied by a communications card.. This customer-supplied modem must be self-powered and must
provide its own terminal ready and auto answer capability.
Modify Digits Table
Refer to the discussion titled Automatic Route Selection.
Multiple Attendant Positions
The system supports the operation of an attendant position at more than one station port.
Also refer to the discussion titled Attendant Position.
Multipurpose Line Board
The multipurpose line board provides system interface for ground start lines, loop start lines, and E & M
Tie lines; these are typically the three line types that the central office (CO) makes available for
connection. The multipurpose line board is programmable for each line type. You can have a maximum
of two Tie lines on each multipurpose line board.
Music Interface
The services circuit board provides a modular jack where the installer can connect customer-provided
music sources. Two different sources can be used so that the music supplied to parties while they are on
hold is different than that supplied internally for background music. Also refer to the discussions titled
Background Music and Music On Hold.
Understanding The Features – 87
GCA40–112
DXP General Description
Music On Hold (MOH)
When an installer connects a customer-supplied music source to the system and the programmer enables
the feature, music is provided to outside lines and intercom calls while they are on hold. Music on hold
can be turned on or off system-wide by attendant action. Also see discussions titled Music Interface and
Background Music. You can program each line for either music on hold source.
Mute
Each multiline telephone has a MUTE button that, when pressed by the user, will mute the handset
transmitter (or internal microphone on speakerphones) to prevent the user’s voice from being heard by the
distant party. The mute light flashes to indicate a muted condition. Users can respond to a SOHVA by
pressing the MUTE button and speaking to the SOHVA sender and releasing the button when they have
finished their response. The button provides push-on/push-off operation on speakerphones. Also refer to
the discussion titled Handsfree Answer Inhibit and Subdued Off-Hook Voice Announce.
N
Names (Station And Lines)
The programmer can name every station and line connected to the system for identification and
programming purposes. On an LCD speakerphone, the name of called and calling stations appear in the
display. When a user selects a line for use or when it is ringing on a call, the line name appears in the
LCD speakerphone display.
Night Service Automatic Switching
The programmer can arrange the system to automatically enter and exit the night transfer (of ringing)
mode of operation on a timed basis.
Also refer to the discussion titled Night Transfer (Of Ringing).
Night Ringing
The attendant can manually place the system in the night ringing mode by dialing a code or pressing a
preprogrammed button. This mode overrides the direct, day 1, and day 2 automatic ringing modes.
While this feature is active, calls on lines assigned to delayed and night ringing both ring at the various
stations. No other ringing occurs unless the programmer has arranged for a loud ringing bell or other
external ringing device to sound when calls appear on those assigned lines during the night ringing mode.
These calls may be answered at any telephone in the system if the user dials the proper code.
When the attendant station includes a preprogrammed night transfer (of ringing) button, its associated
light conveys the following system ringing status: day 1 ringing = steady on, day 2 ringing = wink with
off time, night ringing = continuous wink, and manual night transfer (of ringing) = flutter.
Also refer to the discussions titled Auxiliary Ringer Interface, Common Audible Ringer Interface,
External Paging Interface, Flexible Ringing Assignments, and Line Answer From Any Station.
Also refer to the discussions titled Flexible Ringing Assignments and Line Answer From Any Station.
88 – Understanding The Features
DXP General Description
GCA40–112
O
Off-Premise Extension (OPX)
Installers can locate any industry-standard telephone away from the main premises served by the system.
To enable this feature, they must use a proprietary interface device between the telephone and the DXP
system and make the necessary programming entries.
On-Hook Dialing
Multiline speakerphones and monitor telephones provide manual and/or automatic dialing while it’s
handset is on-hook. An internal loudspeaker monitors call progress for completion (the user must take the
handset off-hook to provide the voice link on non-speakerphone monitor stations).
Operator Station
The system programmer designate the station that you want to ring when system users dial the operator.
Usually this station is an attendant position station; however, the operator station can be any station in the
system. In other words, the operator station does not have to be an attendant position station if you do not
want it to be one. Plus, the programmer can change the code that users dial to call the operator from a
default of 0 to the dialing code of your choice.
Originating Denied
The programmer can deny users the ability to originate calls on certain lines or intercom numbers at
certain stations. Originating denied does not prevent a user from answering a ringing line, retrieving a
held call or receiving a transferred call.
Out-Dial Delay Time
With speed dialing, it is sometimes necessary for the system to wait a short time after selecting a line and
before dialing the number. This wait period gives the telephone company switching equipment time to
prepare to receive the dialed number. This feature provides a programmable wait time to match various
types of telephone company switching equipment.
Understanding The Features – 89
GCA40–112
DXP General Description
P
Paging Access
This feature allows station users to dial-up customer provided loudspeaker paging equipment and page
over externally placed loudspeakers and determines what paging zones, if any, a station can page over.
Password Protection
No one can enter a programming mode to reprogram the system without first entering a password. The
system provides two different entry levels for programming and allows for a different password for each
entry. While the passwords are the same at default, a programmer can change them as needed to provide
security against unauthorized program entries. The two programming entry levels are the installer level
and the administrator level. Programmers can enter the installer level, using the installer password, to
perform all programming functions including major changes such as master clearing or defaulting ,
feature renumbering, and diagnostics. They can enter the administrator level, using the administrator
password, to perform most programming functions except those major changes just mentioned. When the
system is initially installed and programmed, or at any later time as needed, the installer programmer can
make the two passwords different to limit subsequent access to either programming level to certain
special or authorized people.
The system also provides two entry levels for main station database programming and provides a different
feature code for each entry. These feature codes default to certain values, but a programmer can change
them as needed to provide security against unauthorized program entries. These two different
programming entry levels are the system manager and the attendant levels. On-site system managers use
the system manager feature code to make many program changes in the system, line, station, and station
class of service parameters. Attendants use the attendant feature code to make routine changes in the
day-to-day operating parameters of the system such as revamping LCD messages, adding system speed
dial numbers, and setting the system clock.
The installer programmer can change the passwords and the feature codes from the default values to
custom ones whenever a change is needed. Also, the system manager can change the feature codes at any
time he or she chooses. When they change these passwords and feature codes, they should keep a record
of the new ones since the default words and codes will no longer provide entry to the programming.
Pause Time
During speed dialing, it is sometimes necessary for the system to delay the sending of dialed digits to give
telephone company switching equipment time to prepare to receive them. This feature allows users to
store pauses as part of the stored number at the points in the numbering sequence where delays are
required.
PBX/CENTREX/Central Office Compatible
System features and programmable buttons support the requirements of most PBXs, Central Offices, and
CENTREX systems. Users can make numbers, #, *, programmable pauses, and flash signals a part of
every stored number for access to host system feature codes.
PC Attendant
Refer to Attendant Position, PC.
90 – Understanding The Features
DXP General Description
GCA40–112
Periodic Line Tone
This feature provides periodic warning tones to station users while they are busy on certain lines. The
warning tone consists of one 500 ms burst, a 100 ms off period, and one100 ms burst. The tone reminds
the users to keep their conversations short on these lines. The system programmer can enable this feature
for a class of service of telephones and then specify the applicable lines. Further, he or she can select how
often the tone sounds.
Personal Intercom Number
Refer to the discussion titled Intercom Number.
Personal Intercom Number Preference
When a telephone goes off-hook, the system automatically connects it to the personal intercom number
assigned to the station.
Personalized Ringing Tone
This feature allows a station user with certain model telephones to choose one of several different ring
tones to aid in distinguishing one ringing station from another.
Pooled Line Access
Refer to the discussion titled Line Group Access.
Power Failure Transfer
A power failure line connection is available on each line interface board for connecting industry-standard
telephones such as a Comdial ATC or MaxPlus model. The system automatically connects these
power-fail telephones directly to certain lines whenever there is an AC power failure. During a power
failure, users can originate and receive calls on a power-fail station. The power-fail stations automatically
disconnect as soon as power is restored.
Preselection
This feature provides an override to the automatic line preference. If a station user presses a line button
on his or her telephone before lifting the handset, the station will go off hook on the selected line.
Prime Line
With this feature, a station automatically selects a line, line group, or intercom number for use when the
user takes it off hook. The feature can be over-ridden if the user preselects another line, line group, or
intercom number before lifting the handset. If the prime line is ringing, it is automatically answered when
the user lifts the handset—this feature can be used along with ringing line preference functions. Also see
Ringing Line Preference.
Printer Interface
The system makes a wide variety of printout records available through a serial data port provided by a
communications card. The programmer can direct these printouts to the SMDR/SMDA data printer or to
the screen of the programming PC. Also refer to the discussions titled Communications Card Support and
Serial Data Port.
Privacy
Refer to the discussion titled Automatic Privacy.
Understanding The Features – 91
GCA40–112
DXP General Description
Privacy Release
The programmer can assign a privacy button to a telephone. If a line has privacy release programmed for
it, a user can press the privacy button to change it into a non-private one.
Private Lines
Lines may appear at one station port or at selected station ports for call origination and reception yet may
not appear at other stations.
See the discussion titled Direct In Lines.
Program Printout
The system supports an RS-232 compatible, asynchronous serial data printer to the system. When a data
printer is connected to a serial port, the programmer can command it to provide a printout of all or
selected database data, and the system administrator or attendant can command it to print selected data.
Programmable Button Flexibility
The programmable buttons accommodate any combination of line appearances, features, speed dial
numbers and other intercom numbers. A shift operation permits the station user to program speed dial
numbers on the second level. Through the button mapping programming procedure, the programmer can
assign functions and features to each button on every system station using a list of mnemonics (shorthand
titles for functions and features that the system software understands).
A button may be programmed as one of four things:
1.
2.
3.
4.
Feature button (including line group access)
Line direct appearance button
Intercom number button (DSS/ BLF)
Speed dial button - If shift is used, a second level of autodial storage is available.
Also refer to the discussions titled Square / Nonsquare Configuration, and Full Button Programmability
Of Features.
Programming Port
Refer to the discussion titled Database Programming (From The Main Station).
Pulse/Tone Switchable
If the installation site is in an area that supplies rotary (pulse) dialing lines from the central office instead
of, or in addition to, tone (DTMF) dialing lines, the programmer can match the dialing mode of the line
port to that of the line. If a rotary dial line is matched, further programming action matches the system
with the pulses-per-second rotary dial signaling of the line. The system defaults the line ports to match
tone dialing lines.
On those occasions when a user needs to send DTMF tones after making a call on a rotary line (to
generate banking-by-telephone codes for instance), he or she can dial a # to convert the dialing mode to
tone for the duration of the present call. The system changes it back to pulse when that call is completed.
92 – Understanding The Features
DXP General Description
GCA40–112
Q
Quick Transfer
The quick transfer feature allows users to perform an automatic screened or unscreened transfer of an
incoming line call without pressing their telephone’s TRANS/CNF button. The transfer occurs
automatically as soon as the user who answers the call dials the intercom number or access code for the
transfer location. The system begins the call transfer process as soon as the user dials a digit on his or her
dial pad, and effects the transfer as soon as the user hangs up or presses his or her telephone’s RELEASE
button. When installers activate this feature, it greatly reduces the keystrokes that users must take to
transfer calls over a tie line.
R
Recall
Refer to the discussion titled Timed Recall.
Recall/Flash (TAP)
Refer to the discussion titled TAP (Flash)/Recall.
Relays
Refer to the discussion titled Auxiliary Ringer Interface.
Release Button
When a telephone is mapped with this button and a user presses it, the system discontinues the current
active operation and returns the station to an idle state. When used along with an answer button, the
release button provides rapid call handling.
Also refer to the discussions titled Database Program Storage and Password Protection.
Reminder Alert
A user can set up to two reminder alerts to sound at his or her telephone. The alert sounds at the station as
four short tone bursts, which continue until the user responds to the alert by pressing CLEAR. This
feature only works on digital stations that have interactive buttons.
Remote Programming And Diagnostics
Programmers can program the DXP system from a personal computer (PC) running the visual man
machine interface (VMMI) program. The PC can be connected directly to the CPU board or connected by
modem through the public telephone network. For remote programming to take place, an installer must
connect the DXP modem between the RS232 2 port on the CPU board and an outside telephone line and
connect a customer-supplied modem between the PC and an outside telephone line. In addition to
database programming, installers with the proper password entry can perform maintenance routines and
diagnose system malfunctions to the board level.
Understanding The Features – 93
GCA40–112
DXP General Description
Remote Station Disable
This feature allows users at stations with the proper class of service to dial a code and remotely disable or
enable another station. Normally, the installer should give this capability to the system attendant but could
assign it to any class of service that is appropriate.
Response Messaging
Users can set messages to be received and displayed by calling LCD speakerphones. These messages
give information on the status of the called telephone. The system attendant usually programs customized
messages for use by the other telephone users, although the defaulted system does provide several general
purpose messages for use.
Telephone users can program a response message button on their telephones if they wish. This response
message button lets them make a non-verbal response to subdued off-hook voice announce calls or
intercom calls using the attendant-prepared response messages.
Restricted Dialing Error Tone
When you dial a toll-restricted number from your telephone, you will hear an intercom error tone
frequency with a continuous pattern of 250 ms on and 250 ms off. With earlier software, no audible error
indication is given.
If you have a LCD speakerphone, the message EXT or Code is displayed. The message Dialing Denied
is displayed instead.
Ring No-Answer (RNA) Call Forward
Refer to the discussion titled Default Busy/Ring No-Answer.
Ring Back On Busy
With this feature disabled, when someone calls another telephone and the calling party is busy on an
outside line, the caller hears a ring back tone—not a busy tone. In this case, when the caller is using a
non-display telephone he or she has no means of knowing the busy status of the called party. (LCD
speakerphones can display called party status—for details on this display feature, see the paragraph titled
Allow Busy Display). Installers can take programming action on a individual station basis that allows
callers to hear a busy tone instead of a ring back tone when they call a party who is busy on an outside
line.
Ring Back On Transfer
Beginning with software release 8C, installers have the ability to control what outside parties hear while
the system transfers their calls to an internal extension. Prior to this software release, outside parties hear
whatever the music on hold source provides. With software release 8C, programmers can select ringback
tone in place of music on hold on a per line basis.
94 – Understanding The Features
DXP General Description
GCA40–112
Ring Back Tone
By default, when callers call an intercom party, they receive an intercom ring back tone to tell them that
the called intercom station is ringing. Also, when they call over the CO line, they receive a CO-style ring
back tone to tell them that the distant CO telephone is ringing. Some system users find intercom ring back
tone confusing. When installers encounter this situation, they can take this programming action to assign
CO-style ring back tone to intercom calls on a system-wide basis.
Ring On Busy
If a user is on a speakerphone call (on certain model telephones) and a second call comes in to that
station, a quick subdued tone burst sounds. If the user does not wish to hear this tone burst, the
programmer can eliminate any ringing. For industry standard telephones, the system will send three short
tone bursts through the handset.
Ringing Line Preference
When this feature is active at a station, a ringing line is automatically connected to a station when the user
takes the handset off hook or presses the speaker button. No manual line selection is required.
S
Save Button Dial Storage
A user can dial digits and save them while on a call, which is useful should the distant party tell the user
of a number to call and the user wishes to save that number for later redial.
Saved Number Redial
Refer to the paragraph titled Dynamic Save Button.
Screened Call Transfer
Refer to the feature discussion titled, Call Transfer -Screened.
Secure Account Code Display
Software release 8C enhances the SMDA/SMDR feature. Prior to software release 8C when a caller dials
his or her account code, the LCD speakerphone displays the dialed digits. With software release 8C, the
system programmer can activate the secure account code display that causes the LCD speakerphone to
display a ✳ for each digit instead of the dialed account code digits.
Self Diagnostics
Each station can execute a self test when so enabled. This test verifies processor, indicator, and tone
function.
Understanding The Features – 95
GCA40–112
DXP General Description
Serial Data Port
The system provides two RS-232 serial data ports on the central processor unit circuit board. If necessary
the installer can provide additional serial data ports by installing communications cards on auxiliary
boards. Each communications card provides four ports and each auxiliary board supports two
communications cards. With the system supporting two auxiliary boards, a maximum of 16 auxiliary
serial data ports can be made available for use.
The installer must connect the video display terminal (VDT), used to perform database programming to
either CPU board data port (RS232 1 or RS232 2). When a serial data printer is required, the installer
should connect it to RS232 2. Data interface and handshaking parameters for the data ports are
programmable so that the system can match a range of customer-supplied equipment.
The distance between the data device and the common equipment can be up to 500 feet in a quiet
electrical environment. Long runs may dictate the need for shielded cable at some sites. For longer
distances, the system installer must install a limited distance modem to relay the data communications
between the common equipment and the data device.
Service Observing
Service observing is programmable as a station class of service feature. It allows users to enter an
in-progress call in an unannounced muted mode, to monitor the conversation. No warning tones sound
when users make the call entry. This feature is useful in allowing a supervisor to monitor the
performance of an employee during a phone conversation with a client. In order for a station to use the
service observing feature, that station must have the initiate observe feature allowed and the telephone
being observed must be programmed as observable while service observing is activated. The station that
is being observed can continue to answer or originate multiple calls without disrupting the observing
station.
Shift Button
The programmer can button map a certain station to have a SHIFT button. If a telephone includes a
SHIFT button, the user can press it to reach a second level of speed dial storage.
Also see the paragraph titled Station Speed Dial.
Silent Mode Button
When a telephone is mapped with this button, the user can press it to turn off the ringer at his or her
station for the duration of the current ringing call. Ringer operation is restored when a new call rings at
the station.
Also refer to the discussion titled Programmable Button Flexibility.
Single-Line Proprietary Telephone Support
The system supports a proprietary single-line telephone. The single-line telephone provides basic
intercom service coupled with the ability to access outside lines and system features through special
access codes. The programmer identifies the station port for single-line telephone use.
96 – Understanding The Features
DXP General Description
GCA40–112
SMDA Reports
The system will automatically provide an SMDA report whenever the costed call storage reaches 95
percent of capacity. The programmer can arrange the system to print the reports automatically at a
specific time in the order that they are specified. The attendant can view the number of free records or
delete all stored records. Deleting all stored records insures that the system is storing only the latest
SMDA reports and provides a known starting point for record storage. Also, the installer can use the
programming terminal to view the number of free records and delete all the stored records. Any call
records created between the time the report printout was started and completed will not be printed or
deleted. If the reports are not deleted after they are printed, a later command to delete records will delete
all records at that point and not just the ones that were printed in the previously generated reports. The
programmer can arrange for the system to always delete the records after they have been printed. The
attendant can request particular reports at any time they are required.
If the programmer arranges the system to use account codes, they can be used to identify calls by category
or by any other desired grouping so that costing by that category or grouping can be reported.
There are four different Station Message Detail Accounting reports. They are as follows:
• Detailed report sorted by stations
• Detailed report sorted by account codes
• Line summary report
• A general output of all records
SMDA Reports—Call Costing / Hold Time
The programmer can also choose between call costing reports and hold time display reports. The hold
time display feature reports the accumulated time a line has been on hold; call costing reports the
estimated cost of the call.
Speakerphone Support
The optional speakerphone provides handsfree operation of all features.
Speed Dial Sets
Refer to the discussions titled System Speed Dials and Station Speed Dials.
Understanding The Features – 97
GCA40–112
DXP General Description
Split Button
When a telephone is mapped with this feature, the user can press the button to switch between the last call
(intercom, outside line, or conference) that they placed on hold and their current active call.
Also refer to the discussion titled Programmable Button Flexibility.
Square/Non-Square Configuration (Button Mapping)
Refer to the discussion titled Programmable Button Flexibility, and Full Button Programmability of
Features.
Station By Station Privacy
See the discussion titled Automatic Privacy.
Station Call Transfer
Refer to the discussions titled Call Transfer -Unscreened, Call Transfer - Screened.
Station Camp-On, Callback
Refer to the discussion titled Camp-On With Automatic Callback
Station Class Of Service
The programmer can enable or disable a group of features and parameters to provide a particular class of
service (COS). The system permits the arrangement of up to 32 different classes of service. After
programming the COS features, the programmer then programs individual stations to exhibit one of these
different classes of service. He or she usually chooses certain COS features to match a particular group of
users and then programs the stations assigned to these users to exhibit that COS.
98 – Understanding The Features
DXP General Description
GCA40–112
Station Hunting
Station hunting is a future feature that will be available to systems with a software revision of 10A and
later. Station hunting provides a means of routing both intercom and outside calls through an
installer-determined grouping of stations. This call routing continues to a designated overflow location in
case of no answer or if all stations in the hunt group are busy. Station hunting works equally well with
intercom, standard central office (CO) lines, direct inward dialing (DID/DNIS) lines, direct inward
system access (DISA) lines, and E&M tie lines.
For station hunting purposes, stations are considered busy under the following conditions:
• when they are currently connected with a call (internal or external),
• when they have an incoming call currently ringing,
• when they have a call on hold, in DND, call forwarded, out of service or being intercepted by an OAI
application.
The installer can enable default call forwarding for a hunt group station. This feature allows the system to
forward the non-hunt group routed calls that a station receives. Calls routed to a station by the station
hunting feature ignore the default call forwarding settings. The installer can assign all types and any
number of lines to ring at a hunt group. He or she can assign the lines as direct, delayed, day 1, day 2 or
night ringing lines.
Hunt Group Attributes
Pilot Extension: This is the extension number that callers dial to call or route calls to this hunt group.
The pilot extension number is similar to a personal intercom number, or extension number, and follows
the same numbering plan restrictions. When station hunting is used with DID/DNIS, the pilot extension is
the extension number assigned in the DID/DNIS translation table. When station hunting is used with
DISA, the pilot extension can be the extension number assigned to the singls digit translation for the
digital voice announce (DVA) message associated with the DISA line.
Name: The hunt group’s name is the seven character alphanumeric name of this group that is used for
LCD display and reference.
Full Name: The hunt group’s full name is the 20 alphanumeric character name of the group that is used
by OAI applications. (Future development will support OAI access and control of station hunting.)
Direct Ring Lines: The list of lines that directly ring at this hunt group when the system is not in the
night mode of operation. This list can contain any lines in the system.
Delayed Ring Lines: The list of lines that delay ring on this hunt group. This list can contain any lines in
the system.
Day 1, Day 2, Night Ring Lines: The lists of lines that can ring this hunt group during these programmed
times. These lists can contain any lines in the system.
Member Stations: The list of stations that are members of this hunt group. This list can contain all
stations in the system but is limited to personal intercom numbers only.
Overflow Destination: The overflow destination is a station intercom number, a group intercom number,
a voice mail number, or another hunt group pilot extension where the system routes unserviced hunt
group calls.
Queue Ringing Calls: With the queue ringing calls feature disabled and if all stations in the hunt group
are busy, the sytem immediately routes hunt group calls to the overflow destination. With the queue
ringing calls enabled, in the case of no answer or if all stations in the hunt group are busy, hunt group
calls wait in a queue to be answered until an overflow timer times out then route to the overflow
destination.
Understanding The Features – 99
GCA40–112
DXP General Description
Types Of Hunting
Terminal Hunting: Terminal station hunting always delivers a call to the first idle station programmed in
the hunt group. If the station does not answer within a programmed amount of time (programmed as the
Call Advance Timer), the system delivers the call to the next sequential idle station programmed in the
hunt group. The system makes no attempt to balance the distribution of incoming calls as this is a linear
search through the programmed list. The search starts at the beginning of the list for each incoming call.
Distributed Hunting: Distributed station hunting delivers a call to the next idle station in the hunt group
after the station that received the previous call. If that station does not answer within the programmed
call advance time, the system delivers the call to the next sequential idle station programmed in the hunt
group. This hunting method is a linear search through the programmed list; however, the search starts
wherever it left off after the previous call.
Longest Idle Station Hunting: Longest idle station hunting delivers a call to the station that has been
idle for the longest period of time since completing the last call that was routed to it by the station hunting
feature. In the case of stations with equal idle times (such as at system startup), the system picks the first
of the grouped stations with equal idle times. If that station does not answer within the call advance time,
the system delivers the call to the station with the next longest idle period.
Ring All Station Hunting: Ring all station hunting is not a true hunting method. This method delivers a
call to all idle stations simultaneously. This is a good method to use when the site requires that all calls
be answered as quickly as possible.
None (No Hunting): This selection disables hunting for the group. It allows a hunt group to be
completely programmed yet disabled. Any intercom calls to this group will receive busy and line ringing
ignores any programming within this group.
Station Hunting Timers
Call Advance Timer: This is the time interval that a station within a hunt group rings unanswered before
the system routes the call to the next station in the group. This timer is programmable from 10 seconds
though 5 minutes.
Overflow Timer: This is the maximum time interval that an unanswered call hunts within a group before
the system routes it to the designated overflow station for the group. This timer is programmable from 30
seconds through 15 minutes.
Recall Timer: This is the maximum time interval that an unanswered transferred call hunts within a
group before recalling to the source of the transfer. This timer is programmable from 30 seconds through
15 minutes.
100 – Understanding The Features
DXP General Description
GCA40–112
Station Hunting Operation
When a system station user makes an intercom call to the hunt group pilot extension, the system rings the
first available station within the hunt group (based on the group’s selected hunting method). This ringing
appears on the station’s personal intercom. The system ignores all call announce settings as all intercom
calls into a hunt group are treated as voice announce block calls. If the station does not answer the call
within the programmed call advance time limit, the system rings the next station of the group. If no
station answers within the programmed overflow time, the call rings the designated overflow destination.
When a line rings at a hunt group, it rings at the first available station within the group (based on the
group’s selected hunting method). As the ringing line appears at the station, it follows the DXP
conventions for line appearances. If the station does not answer the call within the programmed call
advance time limit, the system rings the next member station. If no station answers within the
programmed overflow time, the system sends the call to the designated overflow destination.
The DXP supports a maximum of 64 hunt groups. Each hunt group can include the maximum number of
stations that the system can support; however, due to system memory limitations, all hunt groups can not
contain all stations simultaneously. Since the system makes a total of 32 Kbytes of memory available for
station hunt groups, you can use the following formula to determine possible station hunt group capacities.
[32768 Kbytes] – [(Stations per group) x (2) + (220 bytes of memory)] = memory remaining for next hunt
group
Station Message Detail Recording (SMDR)
Station message detail recording provides a record of the incoming and outgoing calls handled by the
system on selected lines. This record provides information for accounting and traffic analysis studies.
When enabled, SMDR is invoked automatically. The SMDR feature generates a call record for printing
as soon as it is collected by the system. The call record is presented as ASCII data in an eighty-column
format to an RS-232 data port located on the central processor unit circuit board. SMDR requires
customer-provided equipment such as a printer or other compatible data recording device.
Also see the discussion titled Call Costing and SMDA Reports.
Station Monitoring With DSS Call Pick Up
Refer to the discussion titled Intercom Number.
Station Name
The installer can assign a display name and a full name to a station. A display name is composed of a
maximum of seven characters and shows in the display of an LCD speakerphone as a identification aid. A
full name is composed of a maximum of 20 characters and shows in some voice mail and open
architecture interface applications. The installer can compose a valid name from any alpha-numeric
character; however, the first character of a display name must be an alphabetic character.
Understanding The Features – 101
GCA40–112
DXP General Description
Station Speed Dial
Station speed dialing is a feature that lets the user dial lengthy numbers using one or two buttons, store
frequently used feature dialing codes, and store intercom extension numbers of frequently called
telephones. The user can store speed dial numbers at any unused programmable button, or if the
programmer assigns a shift button to a telephone, or one exists as a fixed feature button, the user can store
a speed dial number at a second level under any programmable button.
Speed dial buttons can store up to 16 digits, plus, trunk or intercom number selection. Stored digits
include 0-9, ✳ and #. A pause is stored at any point where the HOLD button is pressed, and a hookflash
is stored at any point where the TAP button is pressed. Also refer to the discussion titled Automatic
Pause Insertion.
There are two levels of storage on speed dial buttons. To access the second level, the user must press the
programmed SHIFT button. The shift mode is then active for five seconds after the SHIFT button is
pressed. If a SHIFT button is not available, the user has access to only one level of speed dial storage.
A speed dial set is a group of 10 speed dial locations. The DXP system allocates one speed dial set to
each telephone as a default but can allocate up to 10 sets to a telephone if a programmer makes it so.
When a DSS/BLF Console is operated as a companion to a telephone, the programmer must allocate it’s
speed dial sets at the companion telephone to be shared with the console. The total system speed dial
allocation that is available is 960 sets or 9600 individual speed dial locations.
Station Transfer Recall
Refer to the discussion titled Timed Recall.
Subdued Off-Hook Voice Announce (SOHVA)
With the subdued off-hook voice announce (SOHVA) feature, a subdued announcement can be made
from one station to another station that is off-hook and busy on a call. When a user is operating a
telephone in a handsfree mode, it cannot receive a SOHVA. The telephone must be a model that includes
SOHVA capability. With SOHVA, the announcement is delivered and responded to in a subdued manner
that prevents the distant party from hearing either the announcement or the response. A tone alert
precedes the announcement and is delivered to the handset receiver of the telephone ahead of the
announcement. The installer can program the number of tones that the system delivers. The announcing
callers also receive a tone to alert them that they are making a SOHVA call. Users can response to the
announcement in a verbal or non-verbal manner. They affect a verbal response by pressing and holding
the MUTE button or appropriate interactive button and speaking into the handset. They effect non-verbal
response by pressing a pre-programmed button to send a message to be shown on the display of the
announcing station (if it is an LCD speakerphone). The announcing station is automatically disconnected
after the response message is displayed. Stations that have the voice announce blocking feature turned on
cannot receive a SOHVA call. Also refer to the discussion titled Call Announce with Handsfree
Answerback and Response Messaging.
SOHVA installations for analog telephones requires two paired station ports. In addition to the wiring
connections associated with the installation, the installer must take certain programming actions. He or
she must mark the telephone type for the odd-numbered station port to support the connected telephone,
and mark the telephone type for the even-numbered station port undefined.
102 – Understanding The Features
DXP General Description
GCA40–112
Busy On SOHVA
A default, a system returns a ring back tone to users who make SOHVA calls to busy stations; however,
the system programmer can arrange for telephone users to receive a busy signal instead of the ring back
tone. This feature lets non-LCD telephone users know that a called station is busy.
SOHVA Beeps (SOHVA Tone Bursts)
Installers can choose the number of tone bursts that each telephone user hears preceding a SOHVA
message to be a value of from one to six.
Subdued Off-Hook Voice Announce Groups
The SOHVA calling groups control the pattern that station ports receive and/or originate SOHVA calls to
one another. The programmer first creates SOHVA groups and then assigns individual stations to each
group.
Subdued Ringing
When a station is busy on a call and another call comes to the same station, the ringing of the second call
will automatically be subdued to a lower volume.
Synchronized Ringing
When the programmer enables synchronized ringing, the central office ringing pattern is tracked on
external calls that ring within the DXP system.
Also refer to the discussion titled Discriminating Ringing.
System Clock
The system clock provides time and date information for display on LCD speakerphones and on
SMDR/SMDA printouts. The clock also provides the time for the user–set alert feature.
System Speed Dial
System speed dialing provides system users with a repertory of up to 500 numbers that they can dial from
any telephone in the system. The programmer or the attendant is responsible for storing the system speed
dial numbers. These numbers can be up to 32 digits long and can include line number selection, the dial
pad digits 0-9, ✳, and #, Plus pauses and hookflash signals.
The programmer or attendant can divide the unused or available system speed dial numbers into up to 50
different groups with 10 numbers in each group and then assign different speed dial groups to each station
class of service (total of 500).
The program can choose a line a line group that the system will automatically select for speed dialing.
Alternately, the programmer or attendant can choose the intercom to be automatically selected for speed
dialing. This enhancement allows an intercom selection and feature codes to be stored together as speed
dial numbers for true one-button access to features (for example; store INTERCOM ✳11 and
INTERCOM #1 at two locations for system wide availability to music on and music off). This
enhancement will not accept ✳#0✳ or ✳#746✳ as programming entries and it ignores any entered pauses
or hookflashes.
Understanding The Features – 103
GCA40–112
DXP General Description
System Status And T1 Status Log Viewing
When enabled, this feature permits the system to notify certain designated stations when a system error
condition occurs by lighting the system status button. You can view the status log directly from an LCD
speakerphone. If the T1 option is installed, you can also view the T1 status log from an LCD
speakerphone in the same manner.
Your LCD speakerphone must have a pre-programmed system status button to enter the status log
viewing mode. The status button is programmed using the button mapping procedure in the Programming
Instructions. The LCD status log viewing feature allows you to view the log only. The installer must use
programming to clear the log.
To enter the log viewing mode, you press the system status button (the system status button flashes red if
any log entries exist). The LCD indicates SYSTEM and T1 (if the T1 option is installed). Select the log you
want to view by pressing the related interactive button. If you are using a telephone that is not equipped
with interactive buttons, you can use dial pad buttons 1, 2, and 3 that perform the same functions as the
interactive buttons. See the following chart.
Interactive Button
Location Displayed Function
Left
SYSTEM,
Left
REV
Center
FWD
Right,
T1
Right,
INFO
Equivalent Dial Pad Button
1
1
2
3
3
After selecting the log you want to view, you can view the time and date of the current log entry by
pressing the INFO interactive button (or dial pad button 3 when appropriate). You can scroll through the
selected log to view all of the entries by pressing the REV and FWD interactive buttons (or dial pad
buttons 1 and 2 when appropriate).
The number of entries in the log is displayed whenever you press the # button.
You exit the log viewing mode either by pressing the SPEAKER button, pressing the hookswitch, or
waiting for the 15-second timeout.
104 – Understanding The Features
DXP General Description
GCA40–112
T
T1 Digital Carrier Transmission Option
This feature allows up to 24 channels of voice and/or data transmissions over a single four-wire cable
using multiplexing techniques in superframe (SF) or extended superframe (ESF) format. For convenience,
a customer service unit (CSU) is built into the T1 option board to terminate the T1 channels, provide
protection from transient voltages, and respond to loopback requests from the central office. This
eliminates the need to install a CSU external to the DXP.
Up to four T1 boards can be installed if the expansion cabinet has been added to the main cabinet – two
boards in each cabinet. The DXOPT-SYN card on the DXAUX board must be installed whenever one or
more T1 boards is installed, and the DXP is receiving its timing signals from an external source. In
installations where the local DXP is supplying the clock signal for the far system, no DXOPT-SYN card
is required in the local DXP.
You can assign a system status button to a station and enable the system to report T1 transmission errors
via the T1 status log. Depending on how you program the system, the T1 status log either prints out on an
optional printer or is displayed on an optional video display terminal (VDT). You can also view the T1
status log from an LCD speakerphone by programming a system status button.
Also, you can program the system to alert the system attendant whenever a major alarm alerting condition
occurs by activating an external, customer-supplied audible or visual alarm. The external alarm connects
to one of the relay jacks (J3 or J4) on the front of the DXCPU board. Make sure the alarming device
complies with system voltage and power requirements. You determine when a major alarm alerting
condition should occur by programming threshold values and corresponding time periods for each type of
alarm caused by a transmission error. Whenever the threshold value is reached within the programmed
time period, the selected relay on the DXCPU board is activated by the board’s circuits, which in turn,
activates the external alarm. The system attendant can turn the alarm off from any specified station by
dialing a feature code.
Transmit Or Receive Gain
Line transmit or receive gain adjusts the audio levels for both the transmit and receive circuits in the
individual T1 channels when using the T1 option. The available selections are very low (-6 dB), low (-3
dB), normal (0 dB), high (+3 dB) and very high (+6 dB). The default setting is “Normal (0 dB).”
Adjusting the receive level changes the strength of the incoming signal while adjusting the transmit level
changes the signal strength being received at the far end.
CAUTION
If you use line transmit or receive gain on non-T1 lines, it can severely affect speakerphone
performance.
TAP (Flash)/Recall
When host system custom calling features are available via a hook-flash signal while on line, the TAP
button functions as a hook-flash button and generates a flash signal when the user presses it. When
custom calling signals are not available, the TAP button functions as a positive disconnect and recalls dial
tone when the user presses it. These features are mutually exclusive. The programmer sets the desired
function for the system by programming action. With single–line proprietary telephones, the Tap
function works for internal transferring only. An access code is required to activate custom calling
features
Understanding The Features – 105
GCA40–112
DXP General Description
Telephony Services Application Programming Interface (TSAPI) Support
The DXP provides support for TSAPI applications. These applications are Novell Telephony Services*
applications developed by third-party software vendors. TSAPI applications run independently of the
DXP yet use its digital communications capability. The DXP’ Enterprise open architecture interface
(OAI) data port provides the hardware interface for the personal computer (PC) that runs the TSAPI
software program. Depending upon the TSAPI application and its functions, there may or may not be a
need to reprogram the DXP database feature parameters.
*Novell, Novell Netware, and Novell Telephony Services are registered trademarks of Novell Inc. Orem,
UT
Through Dialing
An installer can connect external telephony equipment to the DXP through a proprietary interface device
or through an IST port. When the programmer enables the through dialing feature, DTMF tones that the
external device generates pass through the interface equipment, the DXP system, and any line connection.
Also see the paragraph titled Off Premise Extension
Time And Date
The time designation will accept either a 12- or 24-hour format. Time and date appear on the LCD
speakerphone and the SMDA/SMDR record printout.
Timed And Immediate Recall
If a telephone user places a call on hold and fails to pick it back up within a preprogrammed time, the call
rings the user’s telephone again. While only the telephone that put the call on hold rings, all other
telephones that share call appearance will flash the light for the held call at a hold recall rate.
Recall to an originating station also occurs from unanswered parked calls, transferred calls, and calls that
are camped-on. Plus, unanswered calls (ring no-answer calls) recall to the attendant or other
preprogrammed designation after exceeding a preprogrammed timeout period.
Any transfer attempt that fails will cause the held call to recall immediately. Examples of failed transfer
attempts are calling any of the following:
–non-existent extension
–partial extension number
–invalid extension number
A calling party continues to hear music on hold (if provided) throughout the recall sequence.
106 – Understanding The Features
DXP General Description
GCA40–112
Toll Restriction
With the toll restriction feature, the system allows or denies outgoing line calls to selected users over
selected lines. Toll restriction meets different dialing needs by allowing users to dial numbers that they
are required to dial yet restrict them from dialing numbers they are not allowed to dial. Toll restriction can
be used together with the automatic route selection and call costing features if desired, or used separately
as a stand alone feature or not used at all.
The programmer assigns toll restriction to stations based on system requirements. Telephones that are not
assigned this feature are free to dial any number their users choose to dial. Plus, a toll restricted station
can dial any telephone number that it is not restricted from dialing. If a station is restricted from dialing a
certain telephone number on a certain line, it can, if programming permits, dial that number on another
line that is not restricted. Further programming action specifies whether or not toll restriction applies to
system speed dial numbers. The programmer can also differentiate between day toll restrictions and toll
restrictions that only take effect in night mode. A defaulted system imposes no toll restriction on any
station.
The toll restriction feature first compares a dialed number to a matching assigned restricted number up to
the last digit in the assigned number. At that point it considers it a match and applies other toll restriction
tests whether the station user keeps dialing or not. If all toll restriction tests are met, the station is not
normally allowed to dial the number. There are 32 exception number test matches assigned to the station.
Exception numbers allow stations to dial numbers that they are not normally allowed to dial by their toll
restriction.
Toll Restriction Pause Entries
When this feature is activated by installers, they can enter a pause at the end of a restricted number’s digit
string to indicate that dialing is complete. They do this by typing a P or p after they type the digit string.
The pause entry distinguishes this restricted number as unique. They can enter the same digits without the
pause but instead followed by additional digits as another unique number. They can assign different
routing and toll restriction parameters to each of these entries. There are several applications for this
feature. One application is in international dialing where different toll restriction parameters apply
depending upon whether the caller dialed 0 or 011. In this case, installers can enter 0 pause to access local
lines and 01 to access international lines. Another application is with tie line calling where a remote
extension is the same digits as an office or area code that installers need to enter in the restriction table.
By entering nnn pause for tie line access and nnn@ for CO line access, the system can route the call over
the proper line. A third application is brought forth with the advent of the new North American
Numbering Plan (NANP). With NANP, an area code may be the same digits as a local office code.
Installers can enter nnn@@@@ pause for local line access and nnn@@@@@@@ for long distance line
access (the @ is a match anything character). In any application, the system resets its pause timer after
receiving each caller dialed digit. If the timer expires before the caller dials another digit, the system
routes the call based on the digits preceding the pause. If, instead, the system detects more digits instead
of a pause, it routes the call based on the entire digit string.
Tone On Hold
This feature gives you an alternative to providing music or no music for callers who are placed on hold.
When you program this feature into the DXP system, both internal and external callers hear a pattern of
short tone bursts while they are on hold. The patterns consist of two 1/10-second tone bursts separated by
1/10-second. These tone patterns repeat every five seconds.
The installer enables this feature and assigns it to particular trunks through line programming or stations
through class of service programming using the PC. The system manager can also select this feature from
the applicable class of service from a programming station for intercom calls placed on hold. The choices
when programming this feature are: music from source one, music from source 2, tone on hold, or nothing.
Understanding The Features – 107
GCA40–112
DXP General Description
Tone Or Voice Signaling On Internal Calls
Intercom number calls can be tone signaled or voice signaled as desired. Programming determines which
signaling method the system uses as the primary method when an intercom number call is made. Users
can choose the alternate method at the station by pressing the intercom key. Intercom number call
progress is marked by special tone signals.
Tracker Paging System
The Tracker Paging System interfaces a DXP system with individual Tracker pagers. The Tracker Paging
System informs users through their Tracker pagers that they have a call waiting for them. The Tracker
base station connects to any of the DXP system’s serial ports or to the PC Attendant position. The DXP
can accept up to four Tracker base stations supporting up to 600 Tracker pagers. Many different types of
Tracker pagers are supported—from those with numeric displays to those that display a pre-programmed
message up to 32 alphanumeric characters long.
Creating Messages From The PC Attendant
Up to eight default messages can be programmed and delivered exclusively from the PC Attendant
position (see the Digital Communications System PC Attendant’s Console User’s Guide, GCA 70-230 for
instructions). The PC attendant can be in either the local or the system mode of operation.
RNA Or Busy Tracking
If the called station fails to answer or is busy, the caller can activate the Tracker Paging System by
pressing the TRACK button on his or her telephone. The TRACK button is one of the telephone’s
interactive buttons. On telephones not equipped with interactive buttons, the caller activates the Tracker
Paging System by dialing the Tracker access code (defaults to * 8). When the call is accepted, the caller
will hear a confirmation tone, or if it is not accepted, a busy tone.
Direct Tracking
The caller can also do direct paging by pressing the TRACK programmed button or by dialing the
Tracker access code (defaults to * 8). The telephone prompts the caller with its display to enter the
assigned extension number for the pager along with the display message “Enter Ext:”
Transfer Tracking
If the system attendant attempts to transfer a call to an extension that does not answer (or is busy) and
then activates the Tracker pager assigned to that extension, the incoming call is placed on a page orbit.
Once the system places the call on a page orbit, the user’s Tracker pager displays the orbit number so that
he or she can retrieve the call by dialing the number of the orbit containing the call. If the user does not
retrieve the call within the pre-programmed timeout, the call returns to the attendant. The Tracker Paging
System on DXP supports up to 100 page orbits.
108 – Understanding The Features
DXP General Description
GCA40–112
Using Voice Mail With Tracking
When a caller reaches an extension with an assigned Tracker pager, and that extension is covered by
proprietary voice mail, the system may prompt the caller to either select the assigned Tracker pager or
leave a message. If the caller selects the Tracker pager, the system places the call in a page orbit, and
displays that page orbit number on the user’s Tracker pager. The user retrieves the call by dialing the
number of the page orbit containing the call. After a pre-programmed timeout, the call is returned to the
proprietary voice mail where the caller can leave a message.
Accessing The Tracker Pager From DISA
The Tracker Paging System is accessible from DISA by using the DVA voice messages.
Programming Options
There are three levels of programming associated with Tracker operation.
One level, the DXP system level, is done by the installer or system programmer using a PC. This installs
Tracker operating parameters and pager-to-intercom assignments that can only be changed at this
programming level. Transfer/Conference Button
Each multiline telephone and proprietary multiline telephone provides a fixed button that gives quick,
easy transferring and conferencing of calls.
Another level is done by the PC attendant, if installed. The PC attendant operates in one of two
modes–local or system. In the local mode, the attendant can assign pagers to intercoms and select pager
types. This programming is transparent to the DXP system and does not alter any Tracker programming
done at the DXP system level. In the system mode of operation, all Tracker operating parameters and
pager-to-intercom assignments, as viewed on the PC screen, are as programmed into the DXP system by
the installer or system programmer.
Finally, the system manager can select a Tracker base station and enable or disable the Tracker Paging
system from a programming station.
Transfer Recall
Refer to the discussion titled Timed Recall.
Transfer Ring Cadence
A telephone user can select the ringing cadence that announces a transferred line call. They have two
choices as follows: one cadence provides a 2 sec. on—4 sec. off tone, the other cadence provides a 0.5 sec
on—5.5 sec. off tone. The programmer can choose either cadence as the default setting.
U
Unscreened Call Transfer
Refer to the discussion titled, Call Transfer - Unscreened With Automatic Camp-On.
Unsupervised Conference
Refer to the discussion titled Conferencing - Multiline.
Understanding The Features – 109
GCA40–112
DXP General Description
V
Voice Mail Integration Digits
Installers can choose the DTMF digits that the DXP sends to a voice mail system. A voice mail system
uses these DTMF digits to determine system and station status so that it can properly process a call.
Installers must be versed in the voice mail’s requirements before they can assign DTMF integration
digits in the DXP. The system defaults the voice mail parameters to match the Comdial voice mail
system. Certain applications in countries with dialing plans different than the United States may require
different integration digits. The default digits are shown in the following list and discussed below:
Follow Extension ID = 2
Busy = 2
Incoming Intercom Answer = 9
Intercom/Answer Confirmation = 1
Do Not Disturb = 3
Disconnect = A
Follow Extension ID – When the voice mail system receives a forwarded call from a ring no-answer
(RNA) or busy station, the DXP sends to the voice mail system the extension number of the forwarded
call followed by this DTMF digit (n). The DXP sends this digit within 500 ms of the time the voice mail
system answers the call. For example, if extension 101 is forwarded to voice mail and voice mail answers
a forward RNA or busy forwarded call, the DXP sends 101n to the voice mail system within 500 ms of
the answer time.
Intercom/Answer Confirmation – The DXP sends this DTMF digit to the voice mail system to confirm
that an intercom path (without dial tone) is available for the voice mail system’s call transfer or dialing
use. The DXP sends this digit within 500 ms of the time it detects the voice mail system’s off-hook or
hookflash condition. The DXP also immediately sends this digit to the voice mail system when a station
answers a voice mail transferred call. This action can alert the voice mail system to disconnect and leave
the parties connected.
Busy – If the voice mail system transfers a call to a station that is busy on a call, the DXP sends this
DTMF digit to the voice system. When the voice mail system receives this digit, it can abandon the
transfer, reconnect to the call, and offer the caller whatever options the the voice mail system has
available in its programming. If the DXP auto attendant transfer on busy feature is active, the DXP will
not send the DTMF digit to the voice mail system thus allowing the system to transfer a second call to the
station.
DND – If the voice mail system transfers a call to a station that is in the do not disturb (DND) mode, the
DXP sends this DTMF digit to the voice system. Receiving this digit allows the voice mail system to
distinguish between a busy and a DND condition and offer the caller the appropriate choices.
Incoming Intercom Answer – The DXP sends this DTMF digit to the voice mail system when a station
user makes an intercom call to the voice mail system. This action allows the voice mail system to
distinguish between internal and external calls and offer the caller appropriate prompts and dialing
options.
Disconnect – When an outside line or intercom party hangs up, the DXP sends this DTMF digit to the
voice mail system to command an immediate disconnect. For outside calls, the central office (CO) must
provide disconnect supervision to the DXP and the installer must program the DXP line for abandon hold
release and disconnect supervision. At default, the DXP sends the DTMF tone for the A character as the
disconnect digit. Since a caller cannot dial an A from a telephone. This feature eliminates callers from
causing an accidental disconnect by dialing this digit on their telephone’s dial pad.
110 – Understanding The Features
DXP General Description
GCA40–112
Voice Announce Blocking
This feature allows the user of multiline telephones to block voice announced intercom calls by dialing a
special code or by pressing a programmed button.
Z
Zone Paging
This feature arranges for stations to transmit and/or receive voice announcements to and from a particular
group of stations or to all stations. This feature also arranges for all-call and zone paging to an external
paging device. The programmer can assign stations to particular paging zones, up to eight zones, to
permit station users to make announcements to one particular site, or he or she can assign all stations to
the same zone to permit users to announce all areas at once.
Understanding The Features – 111
DXP General Description
GCA40–112
Index
A
Abandoned Hold Release
Access Denied
Accessing The Tracker Pager From DISA
Account Code Button
Account Code Display And Display Time
Account Codes With Positive Verification
Account Codes With Positive
Verification—Forced
Adjunct Feature Module Support
All-Call Paging
Allow Ringer Off (Ringer Volume Off)
Alpha-Numeric Calling Party
And Line Display
Alternate Attendant
Alternate Button
Answer Button
Area Paging Interface
Attendant Position
Attendant Position, PC
Authorization Code
Automatic Dialing
Automatic Hold—Intercom To Intercom/Line
Automatic Hold—Line To Intercom
Automatic Hold—Line To Line
Automatic Number Identification (ANI)
Automatic Pause Insertion
Automatic Privacy
Automatic Redial
Automatic Reports
Automatic Route Selection
Automatic Route Selection For Speed Dials
Automatic Station Relocation
Auxiliary Equipment Interface
Auxiliary Station Ringer Interface
47
47
110
47
48
47
48
48
48
48
48
48
49
49
49
49
50
50
50
50
50
50
51
51
51
51
51
52
53
53
53
54
B
Background Music
Battery Back-Up
Battery Backup Interface
Battery Backup, Using The
Block Programming
Board Configuration, Understanding
Board Locations
Both Button
Busy Button Inquiry
Busy Lead Detection
Busy On SOHVA
Button Mapping
Button Query
54
54
54
26
55
20
16
49
55
53
105
55, 100
55
C
Call Announce Beeps
Call Announce Tone Bursts
55
55
Call Announce With Handsfree Answerback
Call Costing And Station Message Detail
Accounting Reports
Call Forward, Call Forward—All Or Personal
Call Forward—Busy Or Ring No-Answer,
All Or Personal
Call Forward-Immediate
Call Forward Outside System
Call Forward, Recall
Call Park
Call Pick-Up Directed
Call Pick-Up Group
Call Pick-Up System
Call Transfer —Unscreened With
Automatic Camp-On
Call Waiting Tone
Caller ID
Caller ID RNA—Ring–No–Answer
Caller ID
Camp-On With Automatic Call Back
Camp–On—Call Waiting
Camp–On—No Answer
Central Message Desk
Central Processor Switched Data
Port Configuration
Clear Major Alarm Ring
Circuit Boards, Defining The Optional
Circuit Boards
Common Audible Ringer Interface
Communications Card Support
Conference Advisory Tone
Conferencing - Multiline
Connecting The Lines
Connecting The Paging Equipment
And Music Sources
Connecting The Power Failure Telephone
Connecting The Serial Data Ports
Connecting The Slave Equipment
Connecting The Stations
Connecting The System
Console Support
Consoleless Operation
Consultation Hold
Copy Model
55
55
56
57
57
58
59
59
59
59
59
58
58
56
56
56
60
60
61
61
61
61
15
12
61
61
62
62
29
32
33
34
36
30
29
62
63
63
63
D
Data Ports
Database Program Storage
Database Programming (From Main Station)
Database Programming
Day One And Day Two Ringing
Day Restriction Level
Default Busy/Ring No-Answer Call Forward
Default Functional Programming
Defining The Features
34
64
64
64
64
64
64
65
47
Index I–1
GCA40–112
Defining The Line Boards
Defining The Optional Circuit Boards
Defining The Station Boards
Delayed Ringing
Diagnostics (Limited)
Dial 0 For System Attendant
Dial Pulse Interdigit Time
Dial Pulse Rate—Make / Break Ratio
Dialed Number Identification Service (DNIS)
DID Hunting
Digital Voice Announce
Digital Wireless Telephone Support
DigiTech Telephones
Direct-in Lines (DIL)
Direct Inward Dialing (DID)
Direct Inward System Access (DISA)
Direct Line Access By Station
Direct Line Group Selection
Direct Tracking
Directed Station Hold
DISA
DISA, Accessing Tracker From
Disconnect Supervision
Discriminating Ringing
Distinctive Ringing
Do Not Disturb (DND) Inhibit
Do Not Disturb (DND) Override
Do Not Disturb (DND)
DSS/BLF Console Support
DSS Status Button
DTMF Receiver–Timeout
DVA/ Auto Attendant with Single Digit Menu
DVA / DISA
DVA / Tracker
DXP Features List
Dynamic Save Button
DXP General Description
13
15
14
65
65
65
65
65
66
66
70
66
6
66
66
66
68
68
110
80
66
111
68
68
82
69
69
68, 82
69
69
82
73
72
74
45
75
E
E1 Digital Carrier Transmission Option
E & M Tie Line Support
End-to-End DTMF Signalling
End-to-End Signaling On Intercom
End-to-End Signaling On Lines
Enhanced LCD Display
Enhanced Line Appearance
Exclusive Hold
ExecuMail Integration
ExecuTech Telephones
Executive Override Block
Exectuive Override Advisory Tone
Executive Override
Extended DTMF Tones For ExecuMail
I–2 Index
75
76
76
76
76
87
76, 86
76, 81
77
10
77
77
77
77
Extended DTMF Tones
Extension Hunting
External Paging Interface
External Paging Port
77
76
78
78
F
FCC Rules And Regulations, Knowing The
Feature Inhibit
Feature Renumbering
Features, Understanding The System
Flash Time
Flexible Ringing Assignment
Of The External Paging Interface
Flexible Ringing Assignments
Flexible Station Numbering Plan
Full Button Programmability Of Features
43
78
78
45
82
79
79
79
79
G
Group Intercom Number
Group Intercoms
Ground Start Line Support
84
79
79
H
Handset Volume Level
Handsfree Answer Inhibit
Hardware, Reviewing The
Headset Compatibility
Hold, Exclusive
Hold Queuing
Hold Time Reporting
Hold
Hold Confirmation
Hookflash Restriction, ARS
Hot Transfer
Hunt Group, Attributes
Hunting, Types Of
80
80
12
80
81
81
81
80
82
53
81
101
102
I
I Hold And I Use Indications
Idle Line Preference
Idle Line Priority
Impact Telephones
Industry Standard Telephone Support
Interactive Button Support
Intercom Call Progress Tones
Intercom Hunt List
Intercom Inter-Digit Dialing
Intercom Number
Intercom Timeout
Introducing The DXP
81
81
81
8
82
83
85
85
85
84
85
1
DXP General Description
GCA40–112
K
Key/Hybrid Configuration
Knowing The FCC Rules And Regulations
Knowing The General Specifications
P
85
43
37
L
Last Number Redial
Line Access Restriction
Line Answer From Any Station (TAFAS)
Line Appearance, Enhanced
Line Boards, Defining The
Line Connections
Line Group Access
Line Groups
Line Out Softkey Option
Line Queuing
Liquid Crystal Display Messaging
Liquid Crystal Display Support
Location Code
Locating The Boards
Lock Button
86
86
86
86
13
28
86
86
86
87
87
87
87
16
88
M
Manual Exclusion
Manual Reset
Mark Problem Line
Master Clearing The System
Maximum Call Duration
Meet—Me Answer Page
Memory Retention Without Batteries
Message Deposit
Message Wait Retrieval Access Code
Message Waiting
Mnemonic Programming
Modem Support
Modem, Using The
Modify Digits Table
Mounting Considerations
Multiple Attendant Positions
Multipurpose Line Board
Music Interface
Music On Hold (MOH)
Music Sources, Connecting
The Paging Equipment And
Mute
Names (Station And Lines)
88
88
88
88
89
89
89
89
82
89
89
89
18
90
22
90
90
90
90
32
90
91
N
Night Ringing
Night Service Automatic Switching
91
91
O
Off-Premise Extension (OPX)
Offhook Treated As Busy
On-Hook Dialing
Operator Station
Operation, Station Hunting
Originating Denied
Out-Dial Delay Time
Overflow Button
91
82
91
91
103
91
91
49
Pad Level–Transmit, Receive
Paging Access
Paging Equipment And Music Sources,
Connecting The
Password Protection
Pause Time
PBX/CENTREX/Central Office Compatible
PC Attendant Position
PC Attendant
PC Attendant, Creating Tracker Messages
Periodic Line Tone
Personal Intercom Number Preference
Personal Intercom Number
Personalized Ringing Tone
Pooled Line Access
Power Failure Telephone, Connecting The
Power Failure Transfer
Power Supply, Using The
Preselection
Prime Line
Printed Wire Boards, Understanding The
Printer Interface
Privacy Release
Privacy
Private Lines
Program Printout
Programmable Button Flexibility
Programming Options, Tracker
Programming Port
Pulse/Tone Switchable
75, 107
92
32
92
92
93
50
93
110
93
93
84, 93
93
93
33
93
24
93
93
12
94
94
94
94
94
94
111
94
95
Q
Queue Button
Quick Transfer
49
95
R
Recall/Flash (TAP)
Recall
Relays
Release Button
Reminder Alert
Remote Programming And Diagnostics
Remote Station Disable
Response Messaging
Restrict ARS Hookflash
Restricted Dialing Error Tone
Reviewing The Hardware
Ring Back On Busy
Ring Back On Transfer
Ring Back Tone
Ring Frequency
Ring Generator, Using The
Ring On Busy
Ring Patterns
Ringer Volume Off (Allow Ringer Off)
Ringing Line Preference
Ringing on Busy
Ringing Patterns
Ringing Per Phase
Ringing Timeout
RNA Or Busy Tracking
95
95
95
95
95
95
96
96
53
96
12
96
96
97
82
19
97
82
48
97
82
82
83
83
110
Index I–3
GCA40–112
DXP General Description
S
Save Button Dial Storage
Saved Number Redial
Screened Call Transfer
Secure Account Code Display
Self Diagnostics
Serial Call Button
Serial Data Port
Serial Data Ports, Connecting The
Service Observing
Shift Button
Silent Mode Button
Single-Line Proprietary Telephone Support
Slave Equipment, Connecting The
SMDA Reports
SMDA Reports—Call Costing / Hold Time
SOHVA Beeps
SOHVA, Busy On
SOHVA Groups
SOHVA Tone Bursts
SOHVA
Speakerphone Support
Specifications
Speed Dial Sets
Speed Dial, Station
Speed Dial, system
Split Button
Square/Non-Square Configuration
Station Boards, Defining The
Station By Station Privacy
Station Call Transfer
Station Camp-On, Callback
Station Class Of Service
Station Connections
System Grounding, Understanding The
Station Hunting
Station Hunting Operation
Station Hunting Timers
Station Lock
Station Message Detail Recording (SMDR)
Station Monitoring With DSS Call Pick Up
Station Monitoring
Station Name
Station Speed Dial
Station Transfer Recall
Subdued Off-Hook Voice Announce
Subdued Off-Hook Voice Announce Groups
Subdued Ringing
Synchronized Ringing
System Clock
System Connection
System Speed Dial
System Status And E1, T1 Status Log Viewing
T
97
97
97
97
97
49
98
34
98
98
98
99
36
99
99
105
105
103
105
105
99
37
99
104
106
100
100
14
100
100
100
100
30
27
100
103
102
81
103
103
84
104
104
104
82, 105
105
105
105
105
29
106
106
T1 Digital Carrier Transmission Option
TAFAS
TAP (Flash)/Recall
Telephone Features, Understanding The
Telephone Features, Using The
Telephones, Using The Comdial
Telephones, Using The DigiTech
Telephones, Using The ExecuTech
Telephones, Using The Impact
Telephony Services Application
Programming Interface Support
Test/Busy Button
Through Dialing
Time And Date
Timed And Immediate Recall
Timers, Station Hunting
Toll Restriction Pause Entries
Toll Restriction
Tone On Hold
Tone Or Voice Signaling On Internal Calls
Tracker Paging System
Transfer/Conference Button
Transfer Recall
Transfer Ring Cadence
Transfer Tracking
Transfer—Screened
Transmit Or Receive Gain, T1
TSAPI
107
86
108
3
4
3
6
10
8
108
48
108
108
108
102
109
109
109
110
110
111
111
111
110
58
107
108
U
Understanding Board Configuration
Understanding Printed Wire Boards
Understanding System Grounding
Understanding The DXP
Understanding The System Features
Understanding The Telephone Features
Understanding The Telephone Features
Unscreened Call Transfer
Unsupervised Conference
Using DigiTech Telephones
Using ExecuTech Telephones
Using Impact Telephones
Using the Comdial Telephones
Using The Battery Backup
Using The Modem
Using The Power Supply
Using The Ring Generator
Using This Publication
20
12
27
2
45
3
4
111
111
6
10
8
3
26
18
24
19
1
V
Voice Announce Blocking
Voice Mail Integration Digits
Voice Mail, Using With Tracking
113
111
111
Z
Zone Paging
I–4 Index
113
R
Installing The
DXP Main Common Equipment Cabinet
1.0 Installing The Common Equipment Cabinet
1.1
•
Considering The Mounting Parameters
Choose a suitable location.
✔ A suitable location is within four feet of a proper electrical outlet. (The main cabinet and two expansion
cabinets requires two dedicated 117VAC 15 AMP circuits, with a third-wire ground, supplied to standard
NEMA 5-15R electrical outlets. Each outlet must be supplied from the opposite phase of the AC power line.
✔ A suitable location provides a distance between the common equipment and the TELCO/PBX jacks of 25
feet or less as per FCC requirements. (Good engineering practices recommend a nominal distance of 7 feet.)
✔ A suitable location allows enough room between the top and bottom of the main cabinet and the ceiling or
floor of the equipment room for placement of one expansion cabinet above and one expansion
cabinet below the main cabinet.
✔ A suitable location is secure and dry and has adequate ventilation. The temperature range of a suitable
location is within 32–122 degrees F (0-50 degrees C), and the relative humidity is less than 90 percent
non-condensing .
1.2
•
•
•
•
•
•
•
•
Inventorying The Tools And Hardware
Round-head wood screws (typically 1/4 x 1–inch for mounting equipment cabinet to backboard)
Round-head wood screws (typically 1/4 x 1 1/2–inch for mounting backboard to wall studs; longer screws are
necessary if fasteners must also pass through a dry-wall covering)
Cross recessed screwdriver (phillips-head type)—to match front panel shipping screws
Flat blade screwdriver—to match front panel retaining screws
Electric drill—if prepared holes are required
Connecting tool—for fastening wires to a type–66 connector block.
Crimping tool—for 623-type modular plugs
Static discharge wrist strap and conductive floor mat
1.3
Complying With Underwriters Laboratories Regulations
Per The Underwriters Laboratories regulation 1459, 2nd edition, be aware of the following precautions when
installing telephone equipment that is to be directly connected to the telephone company network:
•
•
•
Never install telephone wiring during a lightning storm.
•
Use caution when installing or modifying telephone lines.
Never install telephone jacks in wet locations unless the jack is specifically designed for wet locations.
Never touch uninsulated telephone wires or terminals unless the telephone line has been disconnected at the
network interface.
This manual has been developed by Comdial Corporation (the “Company”) and is intended for the use of its customers and service personnel. The information in this manual is subject to change without notice.
While every effort has been made to eliminate errors, the Company disclaims liability for any difficulties arising from the interpretation of the information contained herein.
The information contained herein does not purport to cover all details or variations in equipment nor to provide for every possible contingency to be met in connection with installation, operation, or maintenance.
Should further information be desired, or should particular problems arise which are not covered sufficiently for the purchaser’s purposes, contact Comdial, Inside Sales Department, Charlottesville, Virginia
22906.
Printed in U.S.A.
IMI66–001.03
1/97
IMI66–001
1.4
Installing The DXP Main Cabinet
Mounting The Common Equipment Cabinet
1. Unpack and carefully inspect all equipment for shipping damage. Notify the shipper immediately of any
damages found. Verify that the packages contain all parts and accessories needed for proper installation and
operation.
2. Choose a place at the mounting location where the backboard will bridge underlying wall studs, and securely
attach a suitable backboard to the mounting surface. (Suitable backboards are available commercially or you
can construct one out of 3/4-inch plywood.) You must drive the hardware that secures the backboard to the
mounting surface into the underlying wall studs instead of just into the wall material alone.
3. Refer to the illustration for the locating dimensions required for the mounting screws, and mark their locations
on the backboard. You must attach the main common equipment cabinet vertically to the backboard.
4. Drill holes in the backboard of a proper size to accommodate the hardware being used.
5. Insert the two top screws into the backboard and tighten them to within approximately 1/8-inch of the surface.
6. Hang the cabinet on the top screws using the top mounting holes in the rear mounting flange of the cabinet.
Note that these holes are elongated with an enlargement at one end. This feature allows the cabinet to slide
down on the screws to secure the mounting when the cabinet is hung on them.
7. Use the openings for the middle and lower set of mounting screws as a guide, and mark the location for the
remaining screws.
8. Lift the cabinet from the top screws and set it aside while preparing the holes for the remaining screws.
9. Rehang the cabinet as discussed in step 6.
10. Insert the middle and lower screws into the backboard and tighten them to within approximately 1/8-inch of
the surface.
Shipping screws attach the front panel to the main cabinet. These screws are in addition to the two retaining
screws located at the lower corners of the panel. Remove and store the shipping screws. You will not need them to
re-attach the panel to the cabinet after you have installed the power supply assembly, circuit boards, and wiring;
however, you will need them to secure the panel in place if you should later transport the cabinet to a new
location.
After you remove the screws, pivot the front panel upward until you can unhook the panel hangers from the slots
in the cabinet top. To re-attach the front panel, pivot it upward so that you can hook the panel hangers into the
slots at the top of the cabinet, and then pivot the panel down in place. Install the two retaining screws at the
bottom right-hand and left-hand corners of the panel to secure it to the cabinet.
tel: 800.766.3425
818.773.8888
www.kellatronics.com
2 – Installing The DXP Main Cabinet
fax: 800.720.1172
818.773.8899
[email protected]
Installing The DXP Main Cabinet
IMI66–001
Detailing The Cabinet Dimensions
32.00
24.50
7.00
Mounting Backboard
Inside Holes Match Main Cabinet Assembly
24.00
Outside Holes Match Wall Studs With 16-Inch
On-Center Installation
8.75
DXP035
36.00
Mounting The Common Equipment Cabinet
Installing The DXP Main Cabinet – 3
IMI66–001
1.5
Installing The DXP Main Cabinet
Understanding System Grounding Requirements
Transient voltage spikes, if induced onto CO or CENTREX lines, can travel through the cable and into the
common equipment. The telephone company offers basic protection against this condition but it is usually
designed to protect the central office circuits. While it will also provide some protection to the common
equipment, you should not rely upon it for total protection. To help ensure that external over-voltage surges do not
damage the system, you should install and properly ground primary protection devices, such as gas discharge
tubes or similar devices, on all lines. While the line boards have internal secondary surge protection on all line
ports, in order for this protection to be effective, you MUST connect the common equipment cabinet to a reliable,
effective earth ground.
Proper DXP grounding is necessary for trouble-free operation and personnel safety. The DXP has the following
three types of grounds:
•
Service Ground—a neutral power line wire that is connected to the ground bus in the premises’ AC power
panel,
•
System Ground—a non-current carrying power line wire that is connected to the ground bus in the premises’
AC power panel,
•
Frame Ground—a low impedance conductor that places the common equipment cabinet at reference ground
potential. The frame ground provides the greatest safety by limiting electrical potential between non-current
carrying parts of the system. The common equipment cabinet provides a ground stud on its cabinet for access to
its frame ground.
Effective grounding requires that you connect the frame ground to a good earth ground. A good earth ground is
one such as the ground bus in the premises’ AC power panel or a public metallic cold water pipe at a point
immediately at its entrance to the premises and ahead of any meters, pumps, or insulating sections that have been
added for vibration reduction. Avoid using the premises’ structural steel frame as it may not be at earth ground
potential. Make the ground connection with #6 or larger insulated, solid copper grounding wire. Keep the ground
wire separate from the three-wire AC line cord, do not splice it, and keep it as short as possible.
The impedance of the wiring between the DXP and the earth ground must not exceed 0.25 ohms and the
impedance between the earth ground and the power company’s reference standard ground must not exceed 5
ohms. Use an acceptable low impedance measuring device to measure the impedance of these paths. The #6 or
larger wire size will minimize the wiring impedance; however, if the impedance between earth ground and the
power company’s standard reference ground exceeds 5 ohms, contact the local power company. The ground path
must always be of sufficient current-carrying capacity to prevent a build up of voltages that may result in circuit
noise, hazard to personnel, or equipment damage.
Be sure that all of the ground connections are visible for inspection and maintenance. Tag all of the ground
connections with a sign that reads: Do Not Remove Or Disconnect.
4 – Installing The DXP Main Cabinet
Installing The DXP Main Cabinet
IMI66–001
Grounding
Terminal
No. 6 Solid
Copper Wire
DXP036
Typical Ground
Connection
(See Text)
Grounding The System
Installing The DXP Main Cabinet – 5
IMI66–001
Installing The DXP Main Cabinet
2.0 Installing The Power Supply
NOTE: The common equipment cabinet employs an electronic switching power supply. During operation, power
supplies of this type generate an audible sound from their switching regulators. This sound is normal and
is not an indication that the power supply is operating improperly.
Install the power supply assembly in the common equipment cabinet per the following discussion and illustration.
1. Be sure to ground the common equipment cabinet per the instructions in the previous paragraph before
installing the power supply assembly.
2. Remove the power supply assembly from the carton. Be sure to save the small bag containing the mounting
hardware.
3. Slide the power supply assembly into the opening at the left side of the common equipment main cabinet and
lower the front mounting holes over the threaded studs protruding up from the cabinet frame.
4. Route the power cable from behind the power supply assembly to the connector on the backplane and connect
it there.
5. Remove the two #8-32 hex nuts and lockwashers from the bag and install them on the threaded studs to secure
the power supply assembly in place. Be sure to tighten the screws securely.
6. Remove one #6 machine screw from the bag and thread it through the tab at the rear of the power supply
assembly into to standoff located on the back of the cabinet.
7. Route the AC line cord through the square opening in the side of the cabinet.
CAUTION
DO NOT attach or secure the line cord to the surface of the mounting location in any manner.
8. A ferrite collar is included with the power supply assembly. Snap this collar around the AC power cord to
provide protection against radio frequency interference.
2.1
Making The AC Power Connection
•
For the main cabinet’s AC power connection, employ a dedicated 117 VAC 15 AMP circuit, with a third-wire
ground, supplied to a standard electrical outlet (NEMA 5-15R). Remember, this electrical outlet must be
located within four feet of the common equipment cabinet.
•
To provide protection against surges and spikes that may appear on the AC line, install a plug-in power line
surge protector between the AC power cord of the installed equipment and the AC outlet..
CAUTION
DO NOT attach or secure the line cord to the surface of the mounting location in any manner.
6 – Installing The DXP Main Cabinet
Installing The DXP Main Cabinet
IMI66–001
dxp009b
Power Cable
DXSRV
Captive Lock
Screw (1 Place)
DXCPU
S
Power Connector
For Expansion
Cabinet Power
Supply
DXPSM
MAIN CAB POWER SUPPLY
Battery Back-Up
Connector
EXPANSION
UNIT
BATTERY
CONNECTION
Pre-Charge
Source Jack
and Modem
Power Source
BATTERY
BACKUP
CONNECTION
RS 232
1
RS 232
2
INPUT RATING
117V
5A
0M
S
PRECHARGE
PORT
AC Line Cord
RS232
EXPANSION UNIT
POWER CONNECTIONS
Ferrite Collar
#8-32 Hex Nut and
#8 Lockwasher (2 Places)
PWR
L
POWER
FUSE
15A 250V
NORMAL
OFF BLOW
ON
Installing The Power Supply
Making The AC Power Connections
Installing The DXP Main Cabinet – 7
IMI66–001
2.2
Installing The DXP Main Cabinet
Measuring The Power Supply Voltages
If you need to measure power supply voltages, you can do so at the DC voltage connector. Measure the power
under the following conditions:
•
•
AC line cord connected to the AC outlet,
DC power cable disconnected from power supply’s DC voltage connector,
Measurement details are shown in the illustration.
CAUTION
Once you have measured the power supply voltages, turn off the AC power switch and disconnect the AC
line cord from the AC outlet. Leave the AC power disconnected until you have installed the circuit boards
in the main cabinet.
2.3
Identifying The Fuse
The power supply fuse is a slow-blow type rated at 15 AMPS and 250 VOLTS. A replacement fuse must have the
same rating.
8 – Installing The DXP Main Cabinet
Installing The DXP Main Cabinet
IMI66–001
Flat Side of Pin 1
(1) -36 Volts GND
(2) -36 Volt GND
(3) -36 Volt Supply
(4) -36 Volt Supply
(5) +5 Volt Supply
(6) -5 Volt Supply
DXSRV
(7) Digital and Analog
GND
(8) Power Fail
DXCPU
S
Flat Side of Pin 8
FRONT VIEW OF CONNECTOR
(Orient With Flat Side of Pins 1And
8 To Right Side Of Connector.)
KSPSM
MAIN CAB POWER SUPPLY
EXPANSION
UNIT
BATTERY
CONNECTION
BATTERY
BACKUP
CONNECTION
MEASURE
BETWEEN
Pin 1 and 3
Pin 5 and 7
Pin 6 and 7
Pin 7 and 8
RS 232
1
RS 232
2
INPUT RATING
117V
5A
0M
S
PRECHARGE
PORT
PWR
RS232
EXPANSION UNIT
POWER CONNECTIONS
NOMINAL
VOLTAGE
-36 VDC
+5 VDC
-5 VDC
Under 5 VDC
Modem
Line Cord
L
POWER
FUSE
ON 15A 250V
NORMAL
OFF BLOW
Fuse (15A, 250V, Little Fuse
314-015 or Equivalent)
DXP03
Measuring The Power Supply Voltages
Installing The DXP Main Cabinet – 9
IMI66–001
Installing The DXP Main Cabinet
3.0 Installing Circuit Boards In The Main Cabinet
CAUTION
Circuit boards for the DXP system are susceptible to damage caused by electrostatic discharge, and you
must keep this fact in mind as you handle the circuit boards. Refer to the Comdial publication IMI01-005,
Handling Of Electrostatically Sensitive Components, for general information. Specific handling
precautions are also included in this installation instruction.
Each circuit board is supplied in a static protection bag. Do not open a static protection bag prior to board
installation time.
The board slots are keyed so that only those boards that will operate from a particular slot will plug into that slot.
The main cabinet provides unique slots for the CPU board, the services board, and the interface board for the main
cabinet, universal slots that accept auxiliary boards, line boards, or station boards, and dedicated slots for line
boards alone.
This publication provides installation instructions for the CPU and services boards. Since you will install line and
station boards as well as auxiliary boards and other optional circuit boards on an as needed basis, each of these
boards include its own installation instruction for your reference.
3.1
Creating A Static Safe Work Area
When servicing the common equipment cabinet at the installation location, it is a good practice to place a
conductive mat in front of the cabinet area and ground the mat to a good earth ground. (The third wire ground of
the AC power line is also an acceptable grounding point.) The grounded conductive mat provides a safe static
electric discharge path.
When removing the common equipment cabinet from the installation location for servicing, it is a good practice to
prepare a static-safe work area on which to place the cabinet.
You should supply yourself with a static discharge wrist strap, and wear it every time you handle electronic circuit
boards either at the cabinet mounting location or at your work area.
10 – Installing The DXP Main Cabinet
Installing The DXP Main Cabinet
IMI66–001
Backboard
dxp040
Common
Equipment
Cabinet
Earth
Ground
Conductive
Mat
1 Meg Ohm
Resister
Static Discharge
Wrist Strap
Providing Static Protection At The Cabinet Mounting Location
Static
Wrist
Strap
Common Point Ground
ESD Protective
Mat
Typical Earth
Ground
ESD Protective
Worksurface
Static 2
ESD Protective
Mat
Creating A Static Safe Work Area
Installing The DXP Main Cabinet – 11
IMI66–001
3.2
Installing The DXP Main Cabinet
Installing The RAM Memory Card,
System Software Card, And CPU Board
1. Place the static protection bags that contain the CPU board, the RAM card, and the system software card on
the static safe work area.
2. Install your static discharge wrist strap on your bare wrist; adjust it for a snug fit. Be sure that the strap is
touching bare skin and is not isolated by clothing. Connect the wrist strap cord between the wrist strap and an
AC or earth ground.
3. Remove the CPU board, RAM card, and system software card from their static protection bags, orient them as
shown in the illustration, and attach them with the supplied hardware.
DXP022
#4-40 Machine Screw
(Two Places
DXPSW-XXXXX
Circuit Card
Front Panel
DXRAM-XXXXX
Circuit Card
DXCPU
Circuit Board
#4-40 Machine Screw
#4 Lockwasher
DXPSW-XXXXX
1/4 Hex, #4-40
M-F Spacer,
.625 Long
Connectors
#4 Lockwasher
DXRAM-XXXXX
Connectors
Front
Panel
1/4 Hex, #4-40
M-F Spacer,
.625 Long
#4 Lockwasher
DXCPU
Board
#4-40 Hex Nut (3X)
Assembling The Software Board To The CPU Board
12 – Installing The DXP Main Cabinet
Installing The DXP Main Cabinet
IMI66–001
4. If the common equipment cabinet is not at the static safe work area, place the assembled CPU board and
software card into a static protection bag and transport the board assembly to the cabinet.
5. Be sure that the AC power cord is not connected to an AC outlet and that the cable from the optional battery
back-up assembly is not connected to the main cabinet power supply.
6. Locate the proper board slot. Remember, the CPU board plugs into a unique slot.
7. With your static discharge wrist strap properly grounded, remove the board and card assembly from the static
protection bag. Orient it with the top and bottom guides in the main cabinet board cage, and press it in firmly
until the board edge connector properly mates with the backplane connector.
CAUTION
When pressing the board and card assembly into place, press it only at the extractor lever locations. If
you apply pressure at other locations, you may damage the board assembly.
8. Make a final inspection to ensure that the board and card assembly is in the correct slot, oriented correctly and
mated properly; then install and tighten the supplied screws to secure it to the board cage.
DXCPU
S
Typical extractor lever
(Press boards into place
by pressing at the extractor
lever locations.)
DXPSM
MAIN CAB POWER SUPPLY
EXPANSION
UNIT
BATTERY
CONNECTION
BATTERY
BACKUP
CONNECTION
RS 232
1
CPU Board
RS 232
2
INPUT RATING
117V
5A
0M
PRECHARGE
PORT
EXPANSION UNIT
POWER CONNECTIONS
POWER
FUSE
ON 15A 250V
NORMAL
OFF BLOW
dxp041
DXP041
Installing The Assembled Software And CPU Board
Installing The DXP Main Cabinet – 13
IMI66–001
3.3
Installing The DXP Main Cabinet
Installing The Services Boards In The Equipment Cabinet
1. Be sure that the AC power cord is not connected to an AC outlet and that the cable from the optional battery
back-up assembly is not connected to the main cabinet power supply.
2. Install your static discharge wrist strap on your bare wrist; adjust it for a snug fit. Be sure that the strap is
touching bare skin and is not isolated by clothing. Connect the wrist strap cord between the wrist strap and an
AC or earth ground
NOTE: With the common equipment in the installed position, the ground lug on the side of the cabinet is an
appropriate grounding point since it should have a heavy ground wire connected between it and a good
earth ground.
3. When you are ready to install the circuit board, remove it from its static protection bag.
4. Locate the proper board slot. Remember, the service board plugs into into a unique slot.
5. Orient the circuit board with its top and bottom guides in main cabinet board cage. and press the board firmly
until its board edge connection properly mates with the connector on cabinet’s backplane.
CAUTION
When pressing circuit boards into place, press them only at the extractor lever locations. If you apply
pressure at other locations you may damage the board assembly.
6. Repeat steps 3 and 4 until all circuit boards are installed.
7. Make a final inspection to ensure that all circuit boards are, oriented correctly and mated properly.
8. Install and tighten the supplied screws to secure the circuit boards to the board cage.
14 – Installing The DXP Main Cabinet
Installing The DXP Main Cabinet
DXSRV
IMI66–001
DXCPU
S
Typical extractor lever
(Press boards into place
by pressing at the extractor
lever locations.)
DXPSM
MAIN CAB POWER SUPPLY
EXPANSION
UNIT
BATTERY
CONNECTION
BATTERY
BACKUP
CONNECTION
INPUT RATING
117V
5A
0M
RS 232
1
Services Board
RS 232
2
PRECHARGE
PORT
EXPANSION UNIT
POWER CONNECTIONS
POWER
FUSE
ON 15A 250V
NORMAL
OFF BLOW
dxp042
Viewing The Services Board Installation
Installing The DXP Main Cabinet – 15
IMI66–001
Installing The DXP Main Cabinet
4.0 Connecting Data Devices
The system provides two serial data ports on the CPU board. The system designates these modular jacks as
RS–232 1 and RS–232 2. Use either of these two serial data ports for connecting the video display terminal
(VDT) that you will use to program the data base. Use either of these serial data ports for connecting the remote
servicing and programming modem that you can use to remotely load the programmed data base and troubleshoot
the system.
NOTE: If you connect a modem other than the DXMDM, you must interface that modem through a comunications
card that you have installed on an auxiliary board.
Use the RS–232 2 port for connecting a serial data printer for SMDR, SMDA, and COS printouts or reprogram
the system so that a serial data port on a comunications card that you have installed on an auxiliary board will
accept the printer.
CAUTION
When you are not using a VDT for programming purposes, you should disconnect it from the serial data
port. It is possible for the idle connected VDT to induce electrical interference that may affect system
performance.
The distance between a data device and the common equipment can be up to 500 feet in a quiet electrical
environment; however, you might find that you need to use shielded cable at some sites for long runs. For
distances longer than 500 feet, use limited distance modems to relay the data communications between the
common equipment and the data device.
When preparing a data cable for connection to a data device, refer to the manufacturer’s manual for the equipment
being interfaced, and make the following wiring connections:
•
Wire the common equipment RD (data from device to common equipment) connection to the device TD
(transmit data) connection.
•
Wire the common equipment TD (data to device from common equipment) connection to the device RD
(receive data) connection.
•
•
Wire the common equipment SG (signal ground) connection to the device SG (signal ground) connection.
If required for proper operation, wire the common equipment CTS (clear-to-send status from device to common
equipment) connection to the device RTS (request-to-send) connection.
NOTE: The common equipment requires a positive voltage, with respect to signal ground, in order to send data.
•
If the cable has spare wires, be sure to ground them so that they will not act as antennas and induce interference
into the system. Further, if there is a source of RF power nearby (such as a radio transmitter), use shielded cable
and ground the shield at both ends.
The default data format is shown in the following chart. Configure the data device that you connect to the
maintenance port to match the charted information.
Port Type
RS–232 1
RS–232 2
Baud Rate
9600
300
Data Bit
8
7
Stop Bit
1
2
Parity Bit
0
0
CAUTION
As an added precaution against induced interference, route the data cable as far away from any
fluorescent lighting as you can reach, and make every effort to route the data cable perpendicular to other
wiring.
16 – Installing The DXP Main Cabinet
Installing The DXP Main Cabinet
IMI66–001
DXP017
RS-232 2
6
5
4
3
2
1
RS-232 1
6
5
4
3
2
1
(Front View of Jacks)
RS-232 Modular Jacks
Pin 1 = Request To Send
Pin 2 = Clear To Send
Pin 3 = Receive Data
Pin 4 = Transmit Data
Pin 5 = Signal Ground
Pin 6 = Frame Ground
NOTE 1: The maximum distance between the two serial data ports and the external data equipment is limited to
500 feet. Use shielded cable for long runs. For distances longer than 500 feet, use limited distance
modems to relay the data communications between the common equipment and the data device.
NOTE 2. Some data devices require a CTS signal for proper operation. Route this signal lead as needed.
Detailing Typical Data Device Connections
Installing The DXP Main Cabinet – 17
IMI66–001
Installing The DXP Main Cabinet
5.0 Viewing The Circuit Board Status Indicators
Once you have installed the CPU board and services board in the main cabinet, turn on the AC power and observe
the board’s status lights.
CPU Board
Steady On = Normal Operation
Steady Off = System Malfunction
Services Board
Steady On = Normal Operation
Steady Off = System Malfunction
Flashing = Micoprocessor Malfunction
CPU Board
Status Light
Services Board
Status Light
DXSRV
DXCPU
S
DXPSM
MAIN CAB POWER SUPPLY
EXPANSION
UNIT
BATTERY
CONNECTION
BATTERY
BACKUP
CONNECTION
RS 232
1
RS 232
2
INPUT RATING
117V
5A
0M
PRECHARGE
PORT
EXPANSION UNIT
POWER CONNECTIONS
POWER
FUSE
ON 15A 250V
NORMAL
OFF BLOW
dxp044
Locating The CPU And Services Board Status Lights
Installed Station and Line boards also provide status light indications:
Station Boards
Rapid flash = malfunctioning micro-controller
Off with repeated 5 second blink on = normal operation with all stations idle
On with repeated 5 second blink off = normal operation with at least one station busy
Steady on or steady off = board malfunction
Line Boards
Rapid flash = malfunctioning line board processor
Off with repeated 5 second blink on = normal operation with all lines idle
On with repeated 5 second blink off = normal operation with at least one line busy
18 – Installing The DXP Main Cabinet
Installing The DXP Main Cabinet
IMI66–001
6.0 Configuring The Common Audible Ringing Interface
The CPU board provides relay actuation dry-contact terminals that you can use for controlling external ringing
equipment. These relays are under programming control. You can program them to provide dry-contact
actuations that track the ringing pattern of any of the programmed flexible ringing assignment ringing patterns.
CAUTION
Do not exceed a 1 amp at 24 volts (0.5 amp at 48 volts) load on these control terminals. If the load
requirements exceed this limit, connect the load through an external slave relay. DO NOT CONNECT
THESE CONTROL TERMINALS DIRECTLY TO THE 120VAC LINE.
Detailing Typical Common Audible Interface Wiring
Installing The DXP Main Cabinet – 19
IMI66–001
Installing The DXP Main Cabinet
7.0 Configuring The External Paging Interface
A special transformer-isolated external paging port, located on the services board, provides system interface for
an external paging amplifier. Connect a customer-supplied paging amplifier to the PAGE jack as shown in
illustration.
Remember, the CPU board provides relay actuation dry-contact terminals that you can use for controlling the
external paging amplifier. Of course, you must make the necessary wiring arrangements to match the control that
you want to occur.
Once you have made the necessary wiring connections, you may either:
•
program any of the relays to provide dry-contact actuation that will turn on the paging amplifier for as long as
the paging port is active,
•
or program any of the relays to use their dry-contact actuations to track line ringing signals sent from the paging
port. (This is useful for turning the amplifier on and off to sound these ringing signals.)
CAUTION
Do not exceed a 1 amp at 24 volts (0.5 amp at 48 volts) load on these control terminals. If the load
requirements exceed this limit, connect the load through an external slave relay. DO NOT CONNECT
THESE CONTROL TERMINALS DIRECTLY TO THE 120VAC LINE.
Services Board
External Paging Port
Pin No. Signal
3&4
Paging
1&6
Background Music
2&5
Music on Hold
DXP CPU Board
Front View Of Jack
1
2
3
4
5
6
DXSRV
Page
Music 1
Music 2
External
Loudspeaker
DXCPU
S
DXPSM
MAIN CAB POWER SUPPLY
EXPANSION
UNIT
BATTERY
CONNECTION
BATTERY
BACKUP
CONNECTION
RS 232
1
RS 232
2
INPUT RATING
117V
5A
0M
PRECHARGE
PORT
EXPANSION UNIT
POWER CONNECTIONS
POWER
Audio Input To
Paging Amplifier
FUSE
ON 15A 250V
NORMAL
OFF BLOW
dxp072
SPKR Output
External Paging
Amplifier
Enable Input
(If Required)
Common Audible Interface Relays
Relay
Pin
Signal
Jack
No.
J3
J4
1
2
3
4
5
6
1
2
3
4
5
6
No Contact
Relay 1
Relay 2
Relay 2
Relay 1
No Contact
No Contact
Relay 3
Relay 4
Relay 4
Relay 3
No Contact
1
2
3
4
5
6
Relay 2
Front View Of Jacks
1
2
3
4
5
6
Making A Typical External Paging Connection
20 – Installing The DXP Main Cabinet
Relay 1
Relay 4
Relay 3
Installing The DXP Main Cabinet
IMI66–001
8.0 Installing An External Audio Source
If music or other audio information is to be part of the system, connect a customer-provided audio source to the
common equipment music interface jack provided on the services board. These jacks are labeled MOH and BGM.
You can provide different audio sources, one for outside parties while on hold and another for internal
background music, if desired. The input impedance of the music interface is approximately 500 ohms. Use the
volume control on the audio source(s) to adjust the audio level of the music source(s) as required.
6
5
4
3
2
1
Music Source
For Music
On Hold
Music Source
For
Background Music
DXP047
PIN No.
1&6
2&5
Signal Input
Background Music
Music on Hold
NOTE: Use One Source For Both
Inputs If That Is Acceptable
To Users.
Installing An External Audio Source
Installing The DXP Main Cabinet – 21
IMI66–001
Installing The DXP Main Cabinet
9.0 Understanding FCC Rules And Regulations
This DXP digital communications system complies with Federal Communications Commission (FCC) Rules, Part
68. The FCC registration label on the equipment cabinet contains the FCC registration number, the ringer
equivalence number, the model number, and the serial number or production date of the system.
Notification To Telephone Company
Unless a telephone operating company provides and installs the system, the telephone operating company which
provides the lines must be notified before a connection is made to them. Provide the telephone company with the
lines (telephone numbers) involved, the FCC registration number, the ringer equivalence number, the Facilities
Interface Code (FIC), the Universal Service Ordering Code (USOC), and the USOC jack required. The FCC
registration number and the ringer equivalence number is provided on the label attached to the common
equipment. The FIC and USOC information is provided in the equipment’s general specifications found in
equipment system manual. The user/installer is required to notify the telephone company when final
disconnection of this equipment from the telephone company line occurs.
Compatibility With Telephone Network
When necessary, the telephone operating company provides information on the maximum number of telephones
or ringers that can be connected to one line, as well as any other applicable technical information. The telephone
operating company can temporarily discontinue service and make changes which could affect the operation of this
equipment. They must, however, provide adequate notice, in writing, of any future equipment changes that would
make the system incompatible.
Installation Requirements
Connection of the DXP system to the telephone lines must be through a universal service order code (USOC)
outlet jack supplied by the telephone operating company. If the installation site does not have the proper outlet,
ask the telephone company business office to install one. The correct outlet jack for this system is either a type
RJ21X or type RJ14C.
Party Lines And Coin Lines
Local telephone company regulations may not permit connections to party lines and coin lines by anyone except
the telephone operating company.
Troubleshooting
If a service problem occurs, first try to determine if the trouble is in the on-site system or in the telephone
company equipment. Disconnect all equipment not owned by the telephone company. If this corrects the
problem, the faulty equipment must not be reconnected to the telephone line until the problem has been corrected.
Any trouble that causes improper operation of the telephone network may require the telephone company to
discontinue service to the trouble site after they notify the user of the reason.
Repair Authorization
FCC regulations do not permit repair of customer owned equipment by anyone except the manufacturer, their
authorized agent, or others who might be authorized by the FCC. However, routine repairs can be made
according to the maintenance instructions in this publication, provided that all FCC restrictions are obeyed.
22 – Installing The DXP Main Cabinet
R
Installing The DXP
Expansion Common Equipment Cabinet
1.0 Installing The Expansion Common Equipment Cabinet
1.1
Considering The Mounting Parameters
Locate the expansion cabinet directly above the main cabinet assembly. Allow approximately one inch or less of
clearance between the cabinets.
1.2
•
•
•
•
•
•
•
Inventorying The Tools And Hardware
Round head wood screws (typically 1/4 x 1–inch)—for mounting expansion equipment cabinet to backboard)
Cross recessed screwdriver (phillips-head type)—to match front panel shipping screws
Flat blade screwdriver—to match front panel retaining screws
Electric drill—if prepared holes are required
Connecting tool—for fastening wires to a type-66 connector block.
Crimping tool—for 623-type modular plugs
Static discharge wrist strap and conductive floor mat
1.3
Complying With Underwriters Laboratories Regulations
Per The Underwriters Laboratories regulation 1459, 2nd edition, be aware of the following precautions when
installing telephone equipment that is to be directly connected to the telephone company network:
•
•
•
Never install telephone wiring during a lightning storm.
•
Use caution when installing or modifying telephone lines.
Never install telephone jacks in wet locations unless the jack is specifically designed for wet locations.
Never touch uninsulated telephone wires or terminals unless the telephone line has been disconnected at the
network interface.
tel: 800.766.3425
818.773.8888
www.kellatronics.com
fax: 800.720.1172
818.773.8899
[email protected]
This manual has been developed by Comdial Corporation (the “Company”) and is intended for the use of its customers and service personnel. The information in this manual is subject to change without notice.
While every effort has been made to eliminate errors, the Company disclaims liability for any difficulties arising from the interpretation of the information contained herein.
The information contained herein does not purport to cover all details or variations in equipment nor to provide for every possible contingency to be met in connection with installation, operation, or maintenance.
Should further information be desired, or should particular problems arise which are not covered sufficiently for the purchaser’s purposes, contact Comdial, Inside Sales Department, Charlottesville, Virginia
22906.
Printed in U.S.A.
IMI66–002.03
1/97
IMI66–002
1.4
Installing The DXP Expansion Cabinet
Mounting The Expansion Common Equipment Cabinet
1. Unpack and carefully inspect all equipment for shipping damage. Notify the shipper immediately of any
damages found. Verify that the packages contain all parts and accessories needed for proper installation and
operation.
2. Th expansion cabinet mounts above the main cabinet. After you determine where you will mount the
expansion cabinet, remove the plates covering the appropriate interface cable access holes on the main and
expansion cabinets. As you face the front of the cabinets, these plates are located near the left front of the
cabinet’s top and bottom.
3. The illustration shows the locating dimensions required for the expansion cabinet’s mounting screws. Mark
the hardware locations on the backboard above the main common equipment cabinet. (You must mount the
cabinet vertically on the backboard.)
4. Drill holes in the backboard of a proper size to accommodate the hardware being used.
5. Insert the two top screws into the backboard and tighten them to within approximately 1/8-inch of the surface.
6. Hang the cabinet on the top screws using the top mounting holes in the rear mounting flange of the cabinet.
Note that these holes are elongated with an enlargement at one end. This feature allows the cabinet to slide
down on the screws to secure the mounting when the cabinet is hung on them.
7. Use the openings for the middle and lower set of mounting screws as a guide, and mark the location for the
remaining screws.
8. Lift the cabinet from the top screws and set it aside while preparing the holes for the remaining screws.
9. Rehang the cabinet as discussed in step 6.
10. Insert the middle and lower screws into the
backboard and tighten them to within
approximately 1/8-inch of the surface.
11. Shipping screws attach the front panel to
the main cabinet. These screws are in
addition to the two retaining screws located
at the lower corners of the panel. Remove
and store the shipping screws. You will not
need them to re-attach the panel to the
cabinet after you have installed the power
supply assembly, circuit boards, and
wiring; however, you will need them to
secure the panel in place if you should later
transport the cabinet to a new location.
12. After you remove the shipping and
retaining screws, pivot the front panel
upward until you can unhook the panel
hangers from the slots in the cabinet top. To
re-attach the front panel, pivot it upward so
that you can hook the panel hangers into the
slots at the top of the cabinet, and then
pivot the panel down in place. Install the
two retaining screws at the bottom
right-hand and left-hand corners of the
panel to secure it to the cabinet.
Expansion Cabinet
Assembly
Access
Openings
Access
Plates
DXP049
Main Cabinet
Assembly
Locating The Access Plates
2 – Installing The DXP Expansion Cabinet
Installing The DXP Expansion Cabinet
IMI66–002
Mounting The Cabinets
Installing The DXP Expansion Cabinet – 3
IMI66–002
1.5
Installing The DXP Expansion Cabinet
Understanding System Grounding Requirements
Transient voltage spikes, if induced onto CO or CENTREX lines, can travel through the cable and into the
common equipment. The telephone company offers basic protection against this condition but it is usually
designed to protect the central office circuits. While it will also provide some protection to the common
equipment, you should not rely upon it for total protection. To help ensure that external over-voltage surges do not
damage the system, you should install and properly ground primary protection devices, such as gas discharge
tubes or similar devices, on all lines. While the line boards have internal secondary surge protection on all line
ports, in order for this protection to be effective, you MUST connect the common equipment cabinet to a reliable,
effective earth ground.
Proper DXP grounding is necessary for trouble-free operation and personnel safety. The DXP has the following
three types of grounds:
•
Service Ground—a neutral power line wire that is connected to the ground bus in the premises’ AC power
panel,
•
System Ground—a non-current carrying power line wire that is connected to the ground bus in the premises’
AC power panel,
•
Frame Ground—a low impedance conductor that places the common equipment cabinet at reference ground
potential. The frame ground provides the greatest safety by limiting electrical potential between non-current
carrying parts of the system. The common equipment cabinet provides a ground stud on its cabinet for access to
its frame ground.
Effective grounding requires that you connect the frame ground to a good earth ground. A good earth ground is
one such as the ground bus in the premises’ AC power panel or a public metallic cold water pipe at a point
immediately at its entrance to the premises and ahead of any meters, pumps, or insulating sections that have been
added for vibration reduction. Avoid using the premises’ structural steel frame as it may not be at earth ground
potential. Use #10–12 or larger insulated solid copper grounding wire to connect the frame ground of the
expansion cabinet (available through the ground stud on the expansion cabinet’s side) to the frame ground of the
main common equipment cabinet. Use #6 or larger insulated solid copper grounding wire to make the ground
connection from the main cabinet’s frame ground to earth ground. Keep this ground wire separate from the
three-wire AC line cord, do not splice it, and keep it as short as possible.
The impedance of the wiring between the DXP and the earth ground must not exceed 0.25 ohms and the
impedance between the earth ground and the power company’s reference standard ground must not exceed 5
ohms. Use an acceptable low impedance measuring device to measure the impedance of these paths. The #6 or
larger wire size will minimize the wiring impedance; however, if the impedance between earth ground and the
power company’s standard reference ground exceeds 5 ohms, contact the local power company. The ground path
must always be of sufficient current-carrying capacity to prevent a build up of voltages that may result in circuit
noise, hazard to personnel, or equipment damage.
Be sure that all of the ground connections are visible for inspection and maintenance. Tag all of the ground
connections with a sign that reads: Do Not Remove Or Disconnect.
4 – Installing The DXP Expansion Cabinet
Installing The DXP Expansion Cabinet
IMI66–002
Grounding The Expansion Cabinet
Installing The DXP Expansion Cabinet – 5
IMI66–002
Installing The DXP Expansion Cabinet
2.0 Installing The Power Supply
NOTE: The common equipment cabinet employs an electronic switching power supply. During operation, power
supplies of this type generate an audible sound from their switching regulators. This sound is normal and
is not an indication that the power supply is operating improperly.
Install the power supply assembly in the expansion cabinet per the following discussion and illustration.
1. Be sure to ground the common equipment cabinet per the instructions in the previous paragraph before
installing the power supply assembly.
2. Remove the power supply assembly from the carton. Be sure to save the small bag containing the mounting
hardware.
3. Slide the power supply into the opening at the left side of the expansion cabinet and lower the front mounting
holes over the threaded studs protruding up from the cabinet frame.
4. Remove the two #8-32 hex nuts and #8 lockwashers from the bag and install them on the threaded studs to
secure the power supply in place. Be sure to tighten them securely.
5. Remove the #6-32 hex nuts and #6 lockwasher from the bag and install it through a tab on the rear of the
power supply chassis into the back of the cabinet
6. Route the power cable from the power supply, to the right edge and below the ring generator mounting rails,
up to the connector on the backplane and connect it there.
7. Route the supplied power interface cable between the expansion cabinet power supply and the main cabinet
power supply assembly and connect it to both.
8. Obtain the ferrite collar that is included with the power supply assembly, and snap it on the power interface
cable.
9. Route the AC line cord from the power supply through the front square openings in the bottom of the
expansion cabinet and the top of the main cabinet (exposed by removing the access plates during cabinet
installation) to the front of the main cabinet power supply, and connect it.
10. If battery back-up is part of the installation, route the DC cable from the main cabinet to the expansion cabinet
and connect it to the battery back-up connector on the expansion power supply.
CAUTION
Do not connect the AC power cord until the circuit boards have been installed and the installation has
been checked.
2.1
Making The AC Power Connection
•
For the main cabinet’s AC power connection, employ a dedicated 117 VAC 15 AMP circuit, with a third-wire
ground, supplied to a standard electrical outlet (NEMA 5-15R). Remember, this electrical outlet must be
located within four feet of the common equipment cabinet.
•
To provide protection against surges and spikes that may appear on the AC line, install a plug-in power line
surge protector between the AC power cord of the installed equipment and the AC outlet..
CAUTION
DO NOT attach or secure the line cord to the surface of the mounting location in any manner.
6 – Installing The DXP Expansion Cabinet
Installing The DXP Expansion Cabinet
IMI66–002
Expansion
Cabinet
Power
Cable
Captive Lock
Screw (1 Place)
Power Supply
Power Interface
Cable Between
Expansion and
Main Cabinets
Ferrite Collar
#8-32 Hex Nut and
#8 Lockwasher (2 Places)
AC Line Cord
To Main Cabinet
DXP052
Installing The Power Supply Assembly
Making The AC Power Connections
Installing The DXP Expansion Cabinet – 7
IMI66–002
2.2
Installing The DXP Expansion Cabinet
Measuring The Power Supply Voltages
If you need to measure power supply voltages, you can do so at the voltage connector. Measure the power under
the following conditions:
•
•
•
AC line cord connected to the AC outlet,
DC power cable disconnected from power supply’s DC voltage connector,
AC power switch turned on.
Measurement details are shown in the illustration.
CAUTION
Once you have measured the power supply voltages, turn off the AC power switch and disconnect the AC
line cord from the AC outlet. Leave the AC power disconnected until you have installed the circuit boards
in the main cabinet.
8 – Installing The DXP Expansion Cabinet
Installing The DXP Expansion Cabinet
IMI66–002
Flat Side of Pin 1
(1) -36 Volts GND
(2) -36 Volt GND
(3) -36 Volt Supply
(4) -36 Volt Supply
(5) +5 Volt Supply
(6) -5 Volt Supply
(7) Digital and Analog
GND
(8) Power Fail
Flat Side of Pin 8
FRONT VIEW OF CONNECTOR
(Orient With Flat Side of Pins 1And
8 To Right Side Of Connector.)
MEASURE
BETWEEN
Pin 1 and 3
Pin 5 and 7
Pin 6 and 7
Pin 7 and 8
NOMINAL
VOLTAGE
-36 VDC
+5 VDC
-5 VDC
Under 5 VDC
DXP039A
Measuring The Power Supply Voltages
Installing The DXP Expansion Cabinet – 9
IMI66–002
Installing The DXP Expansion Cabinet
3.0 Installing Circuit Boards In The Expansion Cabinet
CAUTION
Circuit boards for the DXP system are susceptible to damage caused by electrostatic discharge, and you
must keep this fact in mind as you handle the circuit boards. Refer to the Comdial publication IMI01-005,
Handling Of Electrostatically Sensitive Components, for general information. Specific handling
precautions are also included in this installation instruction.
Each circuit board is supplied in a static protection bag. Do not open a static protection bag prior to board
installation time.
The board slots are keyed so that only those boards that will operate from a particular slot will plug into that slot.
The expansion cabinet provides a unique slot for the interface board and universal slots for line boards, or station
boards.
This publication provides installation instructions for the interface board. Since you will install line and station
boards on an as needed basis, each of these boards include its own installation instruction for your reference.
3.1
Creating A Static Safe Work Area
When servicing the main or expansion common equipment cabinets at the installation location, it is a good
practice to place a conductive mat in front of the cabinet area and ground the mat to a good earth ground. (The
third wire ground of the AC power line is also an acceptable grounding point.) The grounded conductive mat
provides a safe static electric discharge path.
When removing a common equipment cabinet from the installation location for servicing, it is a good practice to
prepare a static-safe work area on which to place the cabinet.
You should supply yourself with a static discharge wrist strap, and wear it every time you handle electronic circuit
boards either at the cabinet mounting location or at your work area.
10 – Installing The DXP Expansion Cabinet
Installing The DXP Expansion Cabinet
IMI66–002
Providing Static Protection At The Cabinet Mounting Location
Static
Wrist
Strap
Common Point Ground
ESD Protective
Mat
Typical Earth
Ground
ESD Protective
Worksurface
Static 2
ESD Protective
Mat
Creating A Static Safe Work Area
Installing The DXP Expansion Cabinet – 11
IMI66–002
3.2
Installing The DXP Expansion Cabinet
Installing The Interface Boards
When you add an expansion cabinet to the main common equipment cabinet, you must install interface boards in
both cabinets and route the accompanying cables through the cable access holes in the cabinets. You must install
the main interface board in the main cabinet, the expansion interface board in the expansion cabinet.
1. Install your static discharge wrist strap on your bare wrist; adjust it for a snug fit. Be sure that the strap is
touching bare skin and is not isolated by clothing. Connect the wrist strap cord between the wrist strap and an
AC or earth ground
NOTE: With the common equipment in the installed position, the ground lug on the side of the cabinet is an
appropriate grounding point since it should have a heavy ground wire connected between it and a good
earth ground.
2. When you are ready to install the circuit board, remove it from its static protection bag.
3. You can install the interface board in the main cabinet while the system is operational if you wish. To do so,
connect a standard telephone handset cord between the precharge port on the main cabinet power supply and
the precharge jack on the main interface board. Make this connection before you install the baord.
4. Locate the proper board slot. Remember, the interface boards all plug into unique slots in their respective
cabinets.
5. Orient the circuit board with its top and bottom guides in main cabinet board cage. and press the board firmly
until its board edge connection properly mates with the connector on cabinet’s backplane.
CAUTION
When pressing circuit boards into place, press them only at the extractor lever locations. If you apply
pressure at other locations you may damage the board assembly.
6. Remove the expansion interface board from its static protection bag, ard repeat steps 4 and 5.
7. Route the interface cables between the main and expansion cabinets. Be sure to thread the cables through the
access holes in the cabinets.
8. Make a final inspection to ensure that all circuit boards are, oriented correctly and mated properly.
9. Install and tighten the supplied screws to secure the circuit boards to the board cage.
12 – Installing The DXP Expansion Cabinet
Installing The DXP Expansion Cabinet
IMI66–002
Viewing The Interface Board Installation
Installing The DXP Expansion Cabinet – 13
R
Installing The Analog Station Board
In The DXP Digital Communications System
1.0 Introducing The Analog Station Boards
The analog station board supports the operation of the ExecuTech model 66nnn and 67nnn analog multiline
telephones.
1.1
Inventorying The Analog Station Boards
There are two models of station boards available for use.
•
•
Eight-station model supports eight ExecuTech multiline and single line proprietary analog telephones
16-station model supports 16 ExecuTech multiline and single line proprietary analog telephones
1.2
Complying With Underwriters Laboratories Regulations
Per The Underwriters Laboratories regulation 1459, 2nd edition, be aware of the following precautions when
installing telephone equipment that is to be directly connected to the telephone company network:
•
•
•
Never install telephone wiring during a lightning storm.
•
Use caution when installing or modifying telephone lines.
Never install telephone jacks in wet locations unless the jack is specifically designed for wet locations.
Never touch uninsulated telephone wires or terminals unless the telephone line has been disconnected at the
network interface.
tel: 800.766.3425
818.773.8888
www.kellatronics.com
fax: 800.720.1172
818.773.8899
[email protected]
This manual has been developed by Comdial Corporation (the “Company”) and is intended for the use of its customers and service personnel. The information in this manual is subject to change without notice.
While every effort has been made to eliminate errors, the Company disclaims liability for any difficulties arising from the interpretation of the information contained herein.
The information contained herein does not purport to cover all details or variations in equipment nor to provide for every possible contingency to be met in connection with installation, operation, or maintenance.
Should further information be desired, or should particular problems arise which are not covered sufficiently for the purchaser’s purposes, contact Comdial, Inside Sales Department, Charlottesville, Virginia
22906.
Printed in U.S.A.
IMI89-217.01
11/95
IMI89–217
Installing The Analog Station Board
2.0 Installing Circuit Boards
CAUTION
Circuit boards are susceptible to damage caused by electrostatic discharge, and you must keep this fact in
mind as you handle the circuit boards. Refer to the Comdial publication IMI01-005, Handling Of
Electrostatically Sensitive Components, for general information. Specific handling precautions are also
included in this installation instruction.
2.1
Creating A Static Safe Work Area
When servicing the common equipment cabinet at the installation location, it is a good practice to place a
conductive mat in front of the cabinet area and ground the mat to a good earth ground. (The third wire ground of
the AC power line is also an acceptable grounding point.) The grounded conductive mat provides a safe static
electric discharge path.
When removing the common equipment cabinet from the installation location for servicing, it is a good practice to
prepare a static-safe work area on which to place the cabinet.
You should supply yourself with a static discharge wrist strap, and wear it every time you handle electronic circuit
boards either at the cabinet mounting location or at your work area.
2 – Installing The Analog Station Board
Installing The Analog Station Board
IMI89–217
Backboard
dxp040
Common
Equipment
Cabinet
Earth
Ground
Conductive
Mat
1 Meg Ohm
Resister
Static Discharge
Wrist Strap
Providing Static Protection At The Cabinet Mounting Location
Static
Wrist
Strap
Common Point Ground
ESD Protective
Mat
Typical Earth
Ground
ESD Protective
Worksurface
Static 2
ESD Protective
Mat
Creating A Static Safe Work Area
Installing The Analog Station Board – 3
IMI89–217
2.2
Installing The Analog Station Board
Installing Station Boards In The Equipment Cabinet
1. Normally you should first disconnect the optional battery back-up assembly from the main cabinet power
supply and then disconnect the AC power cord from the AC outlet; however, when necessary, you can install
a station board in an operating system. If you must do this, connect one end of a standard telephone handset
coil cord to the precharge port on the power supply. During step 5, you will connect the other end of this coil
cord to the precharge jack on the station board.
2. Install your static discharge wrist strap on your bare wrist; adjust it for a snug fit. Be sure that the strap is
touching bare skin and is not isolated by clothing. Connect the wrist strap cord between the wrist strap and an
AC or earth ground
NOTE: With the common equipment in the installed position, the ground lug on the side of the cabinet is an
appropriate grounding point since it should have a heavy ground wire connected between it and a good
earth ground.
3. Each station board is supplied in a static protection bag for safe keeping. When you are ready to install the
circuit board, remove it from its static protection bag.
4. Locate the proper board slot.
•
In DXP main cabinets, the station boards connect to universal slots 3 through 5. You can connect station
boards in universal slots 1 and 2; however, if you do this, you will occupy the only slots that are available
for auxiliary boards.
•
In DXP expansion cabinets, the station boards connect to any universal board slot.
5. If you are installing the station board in an operating system, connect the free end of the precharge cord that
you installed in step 1 to the precharge jack on the station board.
6. Orient the station board with its top and bottom guides in main cabinet board cage. and press the board firmly
until its board edge connection properly mates with the connector on cabinet’s backplane. If you connected a
handset cord between the pre-charge port on the power supply and the jack on the circuit board, disconnect
the cord after installing the board.
CAUTION
When pressing circuit boards into place, press them only at the extractor lever locations.
If you apply pressure at other locations you may damage the board assembly.
7. Repeat steps 3 and 4 until all circuit boards are installed.
8. Make a final inspection to ensure that all circuit boards are, oriented correctly and mated properly.
9. Install and tighten the supplied screws to secure the circuit boards to the board cage.
10. Each station board includes a ferrite collar. Snap the ferrite collar around the cable station to provide
protection against radio frequency interference.
4 – Installing The Analog Station Board
Installing The Analog Station Board
IMI89–217
Viewing A Typical Station Board Installation
Installing The Analog Station Board – 5
IMI89–217
Installing The Analog Station Board
3.0 Connecting The Stations
Connections between the telephone stations and the common equipment station boards are typically via type
66M-xx connector blocks that are cable connected to 50-pin male connectors on the station boards.
The American Wire Gauge (AWG) size of the station wiring determines the maximum distance allowed from the
common equipment to the stations. The following chart details this relationship.
Station Types
Analog Multiline Telephone
Analog Single-Line
Proprietary Telephone
20 AWG
Wire Gauge
22 AWG
24 AWG
2500 Feet
2000 Feet
1500 Feet
4000 Feet
3500 Feet
3000 Feet
If spare conductors exist in the cables that you run between the station boards and the 66M-xx connector blocks, it
is a good practice to connect the spare conductors to earth ground. Doing this may help prevent the spare
connectors from inducing radio frequency and/or AC interference into the system.
Remember, you should snap a ferrite collar around each station cable to provide protection against radio
frequency interference.
CAUTION
The polarity between the individual wires in a particular voice or data pair is not critical; however, do not
connect the voice circuits to the data circuits.
3.1
Understanding Station Port Locations
On 16–station boards, station ports 1–8 appear at connector J1and station ports 9–16 appear at connector J2 on
every analog station board.
The station ports for both the main and expansion cabinet assend from the leftmost universal board slot. This
means that in the main cabinet, station ports 1–16 are in the leftmost universal board slot, station ports 17–32 are
in the next universal boatd slot to the right, station ports 33–48 are in the next universal board slot and so forth
through station ports 65–80 located in universal board slot five. The main cabinet supports a totol of 80 stations.
Remember, if the system requires auxiliary boards, you must install them at universal slots one and two thus
eliminating two station board locations.
Station ports in the expansion cabinet begin at the leftmost board slots with station ports 81–96 and assend to the
right at 16 station ports per slot to end at the rightmost universal slot with station ports 177–192. The expansion
cabinet supports a total of 112 stations.
3.2
Understanding Station Pairing
Station ports are paired ODD/EVEN, beginning with the lowest directory number 101/102, 103/104, etc., for data
and for overload protection. The odd port is the positive voltage (+) port and the even port is the negative voltage
(-) port.
6 – Installing The Analog Station Board
Installing The Analog Station Board
IMI89–217
Viewing A Typical Station Connection
Installing The Analog Station Board – 7
IMI89–217
3.3
Installing The Analog Station Board
Detailing The Station Connections
3.3.1 Detailing Analog Station Board J1 Connections
25-Pair Connections For J1
Wire Color
Pair
Pin
No.
White-Blue
1
26
Blue-White
1
White-Orange
2
27
Orange-White
2
White-Green
3
28
Green-White
3
White-Brown
4
29
Brown-White
4
White-Slate
5
30
Slate-White
5
Red-Blue
6
31
Blue-Red
6
Red-Orange
7
32
Orange-Red
7
Red-Green
8
33
Green-Red
8
Red-Brown
9
34
Brown-Red
9
Red-Slate
10
35
Slate-Red
10
Black-Blue
11
36
Blue-Black
11
Black-Orange
12
37
Orange-Black
12
Black-Green
13
38
Green-Black
13
Black-Brown
14
39
Brown-Black
14
Black-Slate
15
40
Slate-Black
15
Yellow-Blue
16
41
Blue-Yellow
16
Yellow-Orange
17
42
Orange-Yellow
17
Yellow-Green
18
43
Green-Yellow
18
Yellow-Brown
19
44
Brown-Yellow
19
Yellow-Slate
20
45
Slate-Yellow
20
Violet-Blue
21
46
Blue-Violet
21
Violet-Orange
22
47
Orange-Violet
22
Violet-Green
23
48
Green-Violet
23
Violet-Brown
24
49
Brown-Violet
24
Violet-Slate
25
50
Slate-Violet
25
Clip
Term.
1
2
3
4
5
6
7
8
9
10
11
12
13
14
15
16
17
18
19
20
21
22
23
24
25
26
27
28
29
30
31
32
33
34
35
36
37
38
39
40
41
42
43
44
45
46
47
48
49
50
8 – Installing The Analog Station Board
Station Connections
Pair
Wire Color
Voice Path
Data Path
Voice Path
Data Path
Voice Path
Data Path
Voice Path
Data Path
Voice Path
Data Path
Voice Path
Data Path
Voice Path
Data Path
Voice Path
Data Path
Green
Red
Yellow
Black
Green
Red
Yellow
Black
Green
Red
Yellow
Black
Green
Red
Yellow
Black
Green
Red
Yellow
Black
Green
Red
Yellow
Black
Green
Red
Yellow
Black
Green
Red
Yellow
Black
Station Identification
Station
Location
1
2
3
4
5
6
7
8
The analog station board does not provide station connections on J1
connector pairs 17–25. Remember, you should connect all unused
conductors in your house cable to earth ground.
Installing The Analog Station Board
IMI89–217
3.3.2 Detailing Analog Station Board J2 Connections
25-Pair Connections For J2
Wire Color
Pair
Pin
No.
White-Blue
1
26
Blue-White
1
White-Orange
2
27
Orange-White
2
White-Green
3
28
Green-White
3
White-Brown
4
29
Brown-White
4
White-Slate
5
30
Slate-White
5
Red-Blue
6
31
Blue-Red
6
Red-Orange
7
32
Orange-Red
7
Red-Green
8
33
Green-Red
8
Red-Brown
9
34
Brown-Red
9
Red-Slate
10
35
Slate-Red
10
Black-Blue
11
36
Blue-Black
11
Black-Orange
12
37
Orange-Black
12
Black-Green
13
38
Green-Black
13
Black-Brown
14
39
Brown-Black
14
Black-Slate
15
40
Slate-Black
15
Yellow-Blue
16
41
Blue-Yellow
16
Yellow-Orange
17
42
Orange-Yellow
17
Yellow-Green
18
43
Green-Yellow
18
Yellow-Brown
19
44
Brown-Yellow
19
Yellow-Slate
20
45
Slate-Yellow
20
Violet-Blue
21
46
Blue-Violet
21
Violet-Orange
22
47
Orange-Violet
22
Violet-Green
23
48
Green-Violet
23
Violet-Brown
24
49
Brown-Violet
24
Violet-Slate
25
50
Slate-Violet
25
Clip
Term.
1
2
3
4
5
6
7
8
9
10
11
12
13
14
15
16
17
18
19
20
21
22
23
24
25
26
27
28
29
30
31
32
33
34
35
36
37
38
39
40
41
42
43
44
45
46
47
48
49
50
Station Connections
Pair
Wire Color
Voice Path
Data Path
Voice Path
Data Path
Voice Path
Data Path
Voice Path
Data Path
Voice Path
Data Path
Voice Path
Data Path
Voice Path
Data Path
Voice Path
Data Path
Green
Red
Yellow
Black
Green
Red
Yellow
Black
Green
Red
Yellow
Black
Green
Red
Yellow
Black
Green
Red
Yellow
Black
Green
Red
Yellow
Black
Green
Red
Yellow
Black
Green
Red
Yellow
Black
Station Identification
Station
Location
9
10
11
12
13
14
15
16
The analog station board does not provide station connections on J2
connector pairs 17–25. Remember, you should connect all unused
conductors in your house cable to earth ground.
Installing The Analog Station Board – 9
IMI89–217
3.4
Installing The Analog Station Board
Installing DSS/BLF Consoles
Install a DSS/BLF Console at any station port in the system as a companion to a system telephone.
•
The DXP systems support a maximum of four consoles for each telephone and there is no limit to the maximum
number of consoles that you can install on a system. Typically, the console capacity is equal to one-half of the
total station capacity of the system.The installed distance limit between the station board and the console is the
same as that allowed for an analog or digital telephone.
•
When you install a DSS/BLF console, you must program define the station port as a console port.
3.5
Detailing Station Call Announce Parameters
The DXP systems place no limits (other that the distance constraints stated previously) on telephone placement
and arrangement within the system; however, when placing telephones that require call announcing capability,
consider the parameters detailed in this call announce matrix table.
10 – Installing The Analog Station Board
Installing The Analog Station Board
IMI89–217
Call Announce Matrix
Receive Call Announcements
Originate Call Announcements
Digital
Speaker
Digital
Monitor
Digital
Single
Line
Analog
Speaker
Analog
Monitor
Analog
Single
Line
PC
Atten.
Scout
900MX
Industry
Standard
Digital
Speaker
YES
YES
NO
YES
NO
NO
NO
NO
NO
Digital
Monitor
YES
YES
NO
YES
NO
NO
NO
NO
NO
Digital
Single
Line
YES
YES
NO
YES
NO
NO
NO
NO
NO
Analog
Speaker
YES
YES
NO
YES
YES
NO
NO
NO
NO
Analog
Monitor
YES
YES
NO
YES
YES
NO
NO
NO
NO
Analog
Single
Line
YES
YES
NO
YES
NO
NO
NO
NO
NO
PC
Atten.
YES
YES
NO
YES
NO
NO
NO
NO
NO
Scout
900MX
YES
YES
NO
YES
NO
NO
NO
NO
NO
Industry
Standar
YES
YES
NO
YES
NO
NO
NO
NO
NO
Installing The Analog Station Board – 11
IMI89–217
Installing The Analog Station Board
4.0 Installing Subdued Off-Hook Voice Announce (SOHVA)
Wiring For Analog Stations
An analog multiline telephone has SOHVA capability built into it. This telephone contains a 6-position, 3-pair
station jack for SOHVA connection.
To enable SOHVA as a system feature for analog stations,
•
you must use 6-wire, twisted-pair house cable to connect two data-paired station ports to a 625A2-6 station
jack,
•
you must connect the SOHVA-capable analog multiline telephone to the 625A2-6 station jack using a
6-wire line cord,
•
you must take programming action to configure the station ports to support SOHVA operation.
Make the installation per the following procedure:
1. Identify two data-paired ports on an analog station connector block (identify an odd-numbered port and its
even-numbered counterpart such as ports 103 and 104).
2. Use 6-wire, twisted-pair house cable and make the following connections:
(a) connect pins 3 and 4 (the inside pair) of a 625A2-6 station jack to the voice pair of the odd-numbered
station port.
(b) connect pins 2 and 5 (the outside pair) of the 625A2-6 station jack to the data pair of the odd-numbered
station port,
(c) connect pins 1 and 6 of the 625A2-6 station jack to the voice pair of the even-numbered stration port,
(d) leave the data pair of the even-numbered station port vacant.
3. Using the Telephone Types programming selection from the stations programming menu, program the
odd-numbered station port to support the type of telephone that you will install there. Program the
even-numbered station port as UNDEFINED.
12 – Installing The Analog Station Board
Installing The Analog Station Board
IMI89–217
Voice Pair
(Paired Station)
To Secure
Off-Hook
Voice Announce
Telephone
Data Pair
Voice Pair
6-Wire
Twisted Pair
Cable
No {
Connection
6-Wire
Line
Cord
654321
1
2
3
4
5
6
PLUS012
FRONT
VIEW
OF JACK
VOICE (PAIRED STATION)
DATA
VOICE
VOICE
DATA
VOICE (PAIRED STATION)
Type 625A2-6 Connector
(Typical)
1
2
3
4
5
6
7
8
9
10
11
12
13
14
15
16
17
18
19
20
21
22
23
24
25
26
27
28
29
30
31
32
33
34
35
36
37
38
39
40
41
42
43
44
45
46
47
48
49
50
Typical
Paired
Station
Ports
50
26
25
1
CLIP TERMINALS
Typical Station
Connector Block
Making Off-Hook Voice Announce Telephone Connections
Installing The Analog Station Board – 13
IMI89–217
Installing The Analog Station Board
5.0 Testing The Analog Station Installation
5.1
Making A Resistance Check
Make the following resistance measurements at the station connector blocks under the following conditions.
•
•
•
•
•
AC power cord disconnected from electrical outlet.
External battery back-up assembly disconnected.
Common equipment connected to station connector blocks.
Stations wired and wiring punched down on blocks.
Bridging clips removed from blocks to isolate stations from common equipment.
1. Measure the resistance of each installed station and wiring from the station side of the connector blocks.
Resistance values will vary with cable length and station type but should be within the limits shown in the
chart below.
2. Measure the resistance of the common equipment and cables from the common equipment side of the station
connector blocks. Resistance values should be within the limits shown in the chart below.
Making Resistance Measurements
Measured Pair
Voice Pair
Data Pair
5.2
Multiline Telephone
40–150
0.3–100
Resistance In Ohms
Single Line Telephone
DSS/BLF Console
40–150
0.3–100
0.3–100
0.3–100
Common Equipment
40–50
1–2
Making A Voltage Check
Make the following voltage measurements at the station connector blocks under the following conditions:
•
•
Bridging clips installed
AC power connected to the common equipment
Measure the voltage across one voice line and one data line and then across the other voice line and the other data
line for each even and odd station. The measured voltage must be within the limits shown in the chart below.
Making Voltage Measurements
Station Under Test
Odd Station
Even Station
66M-xx Block Connection
Voice 1
Data 3
Voice 2
Data 4
Voice 5
Data 7
Voice 6
Data 8
Meter Lead Polarity
+
+
+
+
-
Measured Voltage
+ 34 +/-3 VDC
+ 34 +/- 3 VDC
+ 34 +/- 3 VDC
+ 34 +/- 3 VDC
Varriant readings can indicate a possible wiring error or a station or common equipment problem.
14 – Installing The Analog Station Board
Installing The Analog Station Board
5.3
IMI89–217
Causing An Analog Station To Self Test
You can cause analog multiline stations to self test for proper operation per the following instructions:
1. Disconnect line cord at station base.
NOTE: The adjacent odd or even station will be disabled during the time that the station line cord is being
disconnected or reconnected.
2. Press and hold MUTE and reconnect line cord to station connector. Station will automatically perform self
test routine.
3. Release MUTE as soon as test begins. Sequence of test is as follows:
(a.) Indicators will light in sequence
(b.) Indicators will then turn off at the same time
(c.) Ringer will sound—be sure to set station ringer volume to medium or high setting
4. Replace any station that does not pass the self test.
5.4
Causing A DSS/BLF Console To Self Test
You can cause the DSS/BLF Consoles to self test for proper operation as follows:
1. Disconnect console line cord plug from line.
2. Press and hold console button C10 while reconnecting line cord plug to line.
NOTE: The companion station will be disabled during the time that the console is being disconnected and
reconnected.
3. Release console button C10, and note that BLF indicators will each turn on in sequence beginning with
station 10 indicator. Indicators will then turn off and console will become operational.
5.5
Understanding The Failure Indications
If erratic light indications or ring signals occur at a paired station, an open data pair at either station may be the
fault. A station with an open data line may work properly on a short loop but fail on a long loop.
Stations are paired for overload current protection. If a fault occurs that causes more than 300 milliamps of
current to be drawn, the overload paired stations are disabled by circuit action. Disconnect the disabled stations
and reconnect them one at a time to isolate the faulty one.
The Station board status light conveys the following information:
Rapid flash = malfunctioning micro-controller
Off with repeated 5 second blink on = normal operation with all stations idle
On with repeated 5 second blink off = normal operation with at least one station busy
Steady on or steady off = board malfunction
Installing The Analog Station Board – 15
R
Installing The Digital Station Board
In The DXP Digital Communications System
1.0 Introducing The Digital Station Boards
The digital station board supports the operation of both the DigiTech and Impact digital multiline telephones.
1.1
Inventorying The Digital Station Boards
There are two models of station boards available for use.
•
•
Eight-station model supports eight DigiTech or Impact multiline and single line proprietary digital telephones
16-station model supports 16 DigiTech or Impact multiline and single line proprietary digital telephones
1.2
Complying With Underwriters Laboratories Regulations
Per The Underwriters Laboratories regulation 1459, 2nd edition, be aware of the following precautions when
installing telephone equipment that is to be directly connected to the telephone company network:
•
•
•
Never install telephone wiring during a lightning storm.
•
Use caution when installing or modifying telephone lines.
Never install telephone jacks in wet locations unless the jack is specifically designed for wet locations.
Never touch uninsulated telephone wires or terminals unless the telephone line has been disconnected at the
network interface.
This manual has been developed by Comdial Corporation (the “Company”) and is intended for the use of its customers and service personnel. The information in this manual is subject to change without notice.
While every effort has been made to eliminate errors, the Company disclaims liability for any difficulties arising from the interpretation of the information contained herein.
The information contained herein does not purport to cover all details or variations in equipment nor to provide for every possible contingency to be met in connection with installation, operation, or maintenance.
Should further information be desired, or should particular problems arise which are not covered sufficiently for the purchaser’s purposes, contact Comdial, Inside Sales Department, Charlottesville, Virginia
22906.
Printed in U.S.A.
IMI89-218.01
11/95
IMI89–218
Installing The Digital Station Board
2.0 Installing Circuit Boards
CAUTION
Circuit boards are susceptible to damage caused by electrostatic discharge, and you must keep this fact in
mind as you handle the circuit boards. Refer to the Comdial publication IMI01-005, Handling Of
Electrostatically Sensitive Components, for general information. Specific handling precautions are also
included in this installation instruction.
2.1
Creating A Static Safe Work Area
When servicing the common equipment cabinet at the installation location, it is a good practice to place a
conductive mat in front of the cabinet area and ground the mat to a good earth ground. (The third wire ground of
the AC power line is also an acceptable grounding point.) The grounded conductive mat provides a safe static
electric discharge path.
When removing the common equipment cabinet from the installation location for servicing, it is a good practice to
prepare a static-safe work area on which to place the cabinet.
You should supply yourself with a static discharge wrist strap, and wear it every time you handle electronic circuit
boards either at the cabinet mounting location or at your work area.
2 – Installing The Digital Station Board
Installing The Digital Station Board
IMI89–218
Backboard
dxp040
Common
Equipment
Cabinet
Earth
Ground
Conductive
Mat
1 Meg Ohm
Resister
Static Discharge
Wrist Strap
Providing Static Protection At The Cabinet Mounting Location
Static
Wrist
Strap
Common Point Ground
ESD Protective
Mat
Typical Earth
Ground
ESD Protective
Worksurface
Static 2
ESD Protective
Mat
Creating A Static Safe Work Area
Installing The Digital Station Board – 3
IMI89–218
2.2
Installing The Digital Station Board
Installing Station Boards In The Equipment Cabinet
1. Normally you should disconnect the AC power cord from the AC outlet and disconnect the optional battery
back-up assembly from the main cabinet power supply; however, when necessary, you can install a station
board in an operating system. If you must do this, connect one end of a standard telephone handset coil cord
to the precharge port on the power supply. During step 5, you will connect the other end of this coil cord to
the precharge jack on the station board.
2. Install your static discharge wrist strap on your bare wrist; adjust it for a snug fit. Be sure that the strap is
touching bare skin and is not isolated by clothing. Connect the wrist strap cord between the wrist strap and an
AC or earth ground
NOTE: With the common equipment in the installed position, the ground lug on the side of the cabinet is an
appropriate grounding point since it should have a heavy ground wire connected between it and a good
earth ground.
3. Each station board is supplied in a static protection bag for safe keeping. When you are ready to install the
circuit board, remove it from its static protection bag.
4. Locate the proper board slot.
•
In DXP main cabinets, the station boards connect to universal slots 3 through 5. You can connect station
boards in universal slots 1 and 2; however, you occupy the only slots that are available for auxiliary boards.
•
In DXP expansion cabinets, the station boards connect to any universal board slot.
5. If you are installing the station board in an operating system, connect the free end of the precharge cord that
you installed in step 1 to the precharge jack on the station board.
6. Orient the station board with its top and bottom guides in main cabinet board cage. and press the board firmly
until its board edge connection properly mates with the connector on cabinet’s backplane.
CAUTION
When pressing circuit boards into place, press them only at the extractor lever locations.
If you apply pressure at other locations you may damage the board assembly.
7. Repeat steps 3 and 4 until all circuit boards are installed.
8. Make a final inspection to ensure that all circuit boards are, oriented correctly and mated properly.
9. Install and tighten the supplied screws to secure the circuit boards to the board cage.
10. Each station board includes a ferrite collar. Snap the ferrite collar around the cable station to provide
protection against radio frequency interference.
4 – Installing The Digital Station Board
Installing The Digital Station Board
IMI89–218
Viewing A Typical Station Board Installation
Installing The Digital Station Board – 5
IMI89–218
Installing The Digital Station Board
3.0 Connecting The Stations
Connections between the telephone stations and the common equipment station boards are typically via type
66M-xx connector blocks that are cable connected to 50-pin male connectors on the station boards.
The American Wire Gauge (AWG) size of the station wiring determines the maximum distance allowed from the
common equipment to the stations. The following chart details this relationship.
Station Type
Digital Telephone
Wire Gauge
20 AWG
2500 Feet
22 AWG
2000 Feet
24 AWG
1500 Feet
If spare conductors exist in the cables that you run between the station boards and the 66M-xx connector blocks, it
is a good practice to connect the spare conductors to earth ground. Doing this may help prevent the spare
connectors from inducing radio frequency and/or AC interference into the system.
Remember, you should snap a ferrite collar around each station cable to provide protection against radio
frequency interference.
3.1
Understanding Station Port Locations
On 16–station boards, station ports 1–16 appear at connector J1
The station ports for both the main and expansion cabinet assend from the leftmost universal board slot. This
means that in the main cabinet, station ports 1–16 are in the leftmost universal board slot, station ports 17–32 are
in the next universal boatd slot to the right, station ports 33–48 are in the next universal board slot and so forth
through station ports 65–80 located in universal board slot five. The main cabinet supports a totol of 80 stations.
Remember, if the system requires auxiliary boards, you must install them at universal slots one and two thus
eliminating two station board locations.
Station ports in the expansion cabinet begin at the leftmost board slots with station ports 81–96 and assend to the
right at 16 station ports per slot to end at the rightmost universal slot with station ports 177–192. The expansion
cabinet supports a total of 112 stations.
3.2
Installing DSS/BLF Consoles
Install a DSS/BLF Console at any station port in the system as a companion to a system telephone.
•
The DXP systems support a maximum of four consoles for each telephone and there is no limit to the maximum
number of consoles that you can install on a system. Typically, the console capacity is equal to one-half of the
total station capacity of the system.
•
The installed distance limit between the station board and the console is the same as that allowed for an analog
or digital telephone.
When you install a DSS/BLF console, you must program define the station port as a console port.
6 – Installing The Digital Station Board
Installing The Digital Station Board
IMI89–218
Viewing A Typical Station Connection
Installing The Digital Station Board – 7
IMI89–218
3.3
Installing The Digital Station Board
Detailing The Station Connections
3.3.1 Detailing Digital Station Board Connections
25-Pair Connections
Wire Color
White-Blue
Blue-White
White-Orange
Orange-White
White-Green
Green-White
White-Brown
Brown-White
White-Slate
Slate-White
Red-Blue
Blue-Red
Red-Orange
Orange-Red
Red-Green
Green-Red
Red-Brown
Brown-Red
Red-Slate
Slate-Red
Black-Blue
Blue-Black
Black-Orange
Orange-Black
Black-Green
Green-Black
Black-Brown
Brown-Black
Black-Slate
Slate-Black
Yellow-Blue
Blue-Yellow
Yellow-Orange
Orange-Yellow
Yellow-Green
Green-Yellow
Yellow-Brown
Brown-Yellow
Yellow-Slate
Slate-Yellow
Violet-Blue
Blue-Violet
Violet-Orange
Orange-Violet
Violet-Green
Green-Violet
Violet-Brown
Brown-Violet
Violet-Slate
Slate-Violet
Pair
1
2
3
4
5
6
7
8
9
10
11
12
13
14
15
16
17
18
19
20
21
22
23
24
25
Pin
No.
26
1
27
2
28
3
29
4
30
5
31
6
32
7
33
8
34
9
35
10
36
11
37
12
38
13
39
14
40
15
41
16
42
17
43
18
44
19
45
20
46
21
47
22
48
23
49
24
50
25
Station Pair Connections
Clip
Term.
1
2
3
4
5
6
7
8
9
10
11
12
13
14
15
16
17
18
19
20
21
22
23
24
25
26
27
28
29
30
31
32
33
34
35
36
37
38
39
40
41
42
43
44
45
46
47
48
49
50
8 – Installing The Digital Station Board
Pair Identification
Signal Path
Signal Path
Signal Path
Signal Path
Signal Path
Signal Path
Signal Path
Signal Path
Signal Path
Signal Path
Signal Path
Signal Path
Signal Path
Signal Path
Signal Path
Signal Path
Wire Color
Green
Red
Yellow
Black
Green
Red
Yellow
Black
Green
Red
Yellow
Black
Green
Red
Yellow
Black
Green
Red
Yellow
Black
Green
Red
Yellow
Black
Green
Red
Yellow
Black
Red
Green
Yellow
Black
Station Identification
Station
Location (note the site
position in this column)
1
2
3
4
5
6
7
8
9
10
11
12
13
14
15
16
The digital station board does not provide station connections on
connector pairs 17–25. Remember, you should connect all unused
conductors in your house cable to earth ground.
Installing The Digital Station Board
3.4
IMI89–218
Detailing Station Call Announce Parameters
The DXP systems place no limits (other that the distance constraints stated previously) on telephone placement
and arrangement within the system; however, when placing telephones that require call announcing capability,
consider the parameters detailed in the call announce matrix table.
Call Announce Matrix
Originate Call Announcements
Receive Call Announcements
Digital
Speaker
Digital
Monitor
Digital
Single
Line
Analog
Speaker
Analog
Monitor
Analog
Single
Line
PC
Atten.
Scout
900MX
Industry
Standard
Digital
Speaker
YES
YES
NO
YES
NO
NO
NO
NO
NO
Digital
Monitor
YES
YES
NO
YES
NO
NO
NO
NO
NO
Digital
Single
Line
YES
YES
NO
YES
NO
NO
NO
NO
NO
Analog
Speaker
YES
YES
NO
YES
YES
NO
NO
NO
NO
Analog
Monitor
YES
YES
NO
YES
YES
NO
NO
NO
NO
Analog
Single
Line
YES
YES
NO
YES
NO
NO
NO
NO
NO
PC
Atten.
YES
YES
NO
YES
NO
NO
NO
NO
NO
Scout
900MX
YES
YES
NO
YES
NO
NO
NO
NO
NO
Industry
Standard
YES
YES
NO
YES
NO
NO
NO
NO
NO
Installing The Digital Station Board – 9
IMI89–218
Installing The Digital Station Board
4.0 Testing The Digital Station Installation
During operation, the station board’s status light conveys the following information:
Rapid flash = malfunctioning micro-controller
Off with repeated 5 second blink on = normal operation with all stations idle
On with repeated 5 second blink off = normal operation with at least one station busy
Steady on or steady off = board malfunction
4.1
Making A Resistance Check
Measure the resistance at the station connector blocks under the following conditions.
•
•
•
•
AC power cord disconnected from electrical outlet.
Common equipment connected to station connector blocks.
Stations wired and wiring punched down on blocks.
Bridging clips removed from blocks to isolate stations from common equipment.
Measure the resistance of each installed station and wiring from the station side of the connector blocks.
Resistance values will vary with cable length and station type but should be within the following limits:
✔ Greater than 700 Kohms
Measure the resistance of the common equipment and cables from the common equipment side of the station
connector blocks. The resistance value should be within the following limits.
✔ 40–50 Ohms
4.2
Making A Voltage Check
Make the following voltage measurements at the station connector blocks under the following conditions:
•
•
Bridging clips installed
AC power connected to the common equipment
Measure the voltage across the signal pair. The measured voltage must be within the following limits:
✔ 28–36 VDC
4.3
Causing A Digital Station To Self Test
The multiline stations can be self tested for proper operation per the following instructions:
1. Disconnect line cord at station base.
2. Press and hold MUTE and reconnect line cord to station connector. Station will automatically perform self
test routine.
3. Release MUTE as soon as test begins. Sequence of test is as follows:
• (a.) Indicators will light in sequence
• (b.) Ringer will sound - be sure volume is set to low or high
• (c.) Indicators and ringer will then turn off at the same time
4. Replace any station that does not pass the self test.
Accredited by the Dutch Council
for Certification for certification
and registration activities.
Comdial’s Quality Management System Is
Certified To The ISO 9001 Standard.
R
Charlottesville, Virginia 22901-2829
World Wide Web: http://www.comdial.com/
R
Installing An Industry-Standard Telephone Station Board
In The DXP Digital Communications System
1.0 Understanding Industry-Standard Telephone Support
The DXP digital communications system supports the use of on-premise industry-standard telephones (IST)
through IST station interface boards. IST installations require a ring generator assembly—one required for the
main common equipment cabinet and another one in the expansion common equipment cabinet if you install IST
station boards there. Plus, IST installations may require a dual tone multiple frequency (DTMF) receiver card if
additional DTMF receivers are required beyond the one provided by the CPU board.
1.1
Detailing The Necessary Equipment
Regardless of the number of industry-standard telephones that you plan to install, you will need to install the
following equipment:
•
•
•
at least one IST station interface board,
one ring generator assembly for each equipment cabinet that will contain IST station interface boards,
at least one line interface circuit board
The DXP CPU board provides on-board DTMF receiver circuitry capable of supporting simultaneous dialing of
two industry-standard telephones at a time. This provision is adequate if your site requires only a few
industry-standard telephones; however, if you intend to support a population of industry-standard telephones that
will generate a large volume of outgoing call traffic, you may need to install one or more DTMF receiver cards to
provide additional DTMF receivers for the telephones. Each receiver card allows four ISTs to dial simultaneously.
The number of cards that you need to install in the system depends upon how active the ISTs will be at the site.
See section 1.2 for complete details.
If you do need to add receiver cards, add one or two auxiliary boards to the system and install up to four DTMF
receiver cards on each one.
tel: 800.766.3425
818.773.8888
www.kellatronics.com
fax: 800.720.1172
818.773.8899
[email protected]
This manual has been developed by Comdial Corporation (the “Company”) and is intended for the use of its customers and service personnel. The information in this manual is subject to change
without notice. While every effort has been made to eliminate errors, the Company disclaims liability for any difficulties arising from the interpretation of the information contained herein.
The information contained herein does not purport to cover all details or variations in equipment or to provide for every possible contingency to be met in connection with installation, operation, or
maintenance. Should further information be desired, or should particular problems arise which are not covered sufficiently for the purchaser’s purposes, contact Comdial, Inside Sales Department,
Charlottesville, Virginia 22906.
Printed in U.S.A.
IMI89-219.02
1/97
IMI89–219
1.2
Installing The IST Station Board
Determining The Board Configuration That You Will Need
Use the following specifications to determine the maximum number of station boards and DTMF receiver cards
that you may need.
•
Each eight-station circuit board supports up to eight telephones. (It will actually support 16 telephones—two
telephones at each port sharing a common intercom number.)
•
•
Each 16-station circuit board supports up to 16 telephones. (It will actually support 32 telephones—two
telephones at each port sharing a common intercom number)
•
•
You can bridge up to two industry-standard telephones at one station port as long as you do not exceed a
combined ringer equivalence number, or REN, of 2.0. (Remember, with two telephones at the same port,
they share a common intercom number.)
You can bridge up to two industry-standard telephones at one station port as long as you do not exceed a
combined ringer equivalence number, or REN, of 2.0. (Remember, with two telephones at the same port,
they share a common intercom number.)
Each receiver card allows four industry-standard telephones to dial simultaneously. (The number of cards that
you need to install in the system will depend upon how active the industry-standard telephones will be at the
site.)
•
You can install four receiver cards on a auxiliary board. With four receiver cards installed, an auxiliary
board supports simultaneous dialing of 16 industry-standard telephones (Remember, while you can install
up to two auxiliary boards in the system, each auxiliary board that you use occupies a slot where you could
install a station or line board.)
Based upon the above specifications, a fully-equipped DXP system provides the following industry-standard
telephone support:
•
a maximum of 352 industry-standard telephones (11 IST station boards times 16 telephones per board times
two telephones per station port —sharing the same extension number) with a maximum of 18 telephones
dialing simultaneously (four DTMF receiver cards times one auxiliary board times four DTMF receiver circuits
per card plus the two DTMF receiver circuits that are always provided by the CPU board),
•
a maximum of 320 industry-standard telephones (10 IST station boards times 16 telephones per board times
two telephones per station port —sharing the same extension number) with a maximum of 34 telephones
dialing simultaneously (eight DTMF receiver cards times two auxiliary boards plus the two CPU board
supplied DTMF receiver circuits).
A typical telephone system, experiences the following call traffic percentages. Your system may be similar.
•
•
•
Light Call Traffic = up to 15 percent of the telephones dial simultaneously
Moderate Call Traffic = up to 20 percent of the telephones dial simultaneously
Heavy Call Traffic = up to 30 percent of the telephones dial simultaneously
If you are not sure how many telephones will dial at the same time in your system, you can use these typical
system averages and the following formula to arrive at a usable estimate.
(Percent Of Simultaneous Dialing) x (Installed IST Telephones) = (Simultaneous Dialing Telephones)
An an example the system maximum is as follows: .106 x 320 = 34 telephones
You can use the following formula to determine how many receiver cards that you must install in your system.
(Simultaneous Dialing Telephones) – (2 Telephone Supported By CPU Board)
( 4 Telephones Supported Per Receiver Card)
As an example, the system maximum is as follows: (34 – 2) ÷ 4 = 8 cards
2 – Installing The IST Station Board
= Total Number Of Receiver Cards
Installing The IST Station Board
IMI89–219
The following chart details typical hardware configurations for IST installations:
Call Traffic
Light
Moderate
Heavy
Light
Moderate
Heavy
Light
Moderate
Heavy
Light
Moderate
Heavy
Light
Moderate
Heavy
Light
Moderate
Heavy
Light
Moderate
Heavy
Light
Moderate
Heavy
Light
Moderate
Heavy
Light
Moderate
Heavy
Light
Moderate
Heavy
Telephone
Quantity
16
16
16
32
32
32
48
48
48
64
64
64
80
80
80
96
96
96
112
112
112
128
128
128
144
144
144
160
160
160
176
176
176
IST Board
Quantity
1
1
1
2
2
2
3
3
3
4
4
4
5
5
5
6
6
6
7
7
7
8
8
8
9
9
9
10
10
10
11
11
11
Auxiliary Board
Quantity
0*
0*
1
1
1
1
1
1
1
1
1
1
1
1
2
2
2
2
2
2
2
2
2
2
2
2
2
2
2
2
1
1
1
Receiver Card
Quantity
Simultaneous
Dialing
0*
0*
1
1
1
2
2
2
3
3
3
4
4
4
5
5
5
6
6
7
7
7
7
8
8
8
8
8
8
8
4
4
4
2
2
6
6
6
10
10
10
14
14
14
18
18
18
22
22
22
26
26
26
30
30
30
30
34
34
34
34
34
34
18
18
18
*The CPU board provides DTMF receivers that allow up to two industry-standard telephones to dial
simultaneously.
Installing The IST Station Board – 3
IMI89–219
1.3
Installing The IST Station Board
Complying With Underwriters Laboratories Regulations
Per The Underwriters Laboratories regulation 1459, 2nd edition, be aware of the following precautions when
installing telephone equipment that is to be directly connected to the telephone company network:
•
•
•
Never install telephone wiring during a lightning storm.
•
Use caution when installing or modifying telephone lines.
Never install telephone jacks in wet locations unless the jack is specifically designed for wet locations.
Never touch uninsulated telephone wires or terminals unless the telephone line has been disconnected at the
network interface.
2.0 Installing Circuit Boards
CAUTION
Circuit boards are susceptible to damage caused by electrostatic discharge, and you must keep this fact in
mind as you handle the circuit boards. Refer to the Comdial publication IMI01-005, Handling Of
Electrostatically Sensitive Components, for general information. Specific handling precautions are also
included in this installation instruction.
2.1
Creating A Static Safe Work Area
When servicing the common equipment cabinet at the installation location, it is a good practice to place a
conductive mat in front of the cabinet area and ground the mat to a good earth ground. (The third wire ground of
the AC power line is also an acceptable grounding point.) The grounded conductive mat provides a safe static
electric discharge path.
When removing the common equipment cabinet from the installation location for servicing, it is a good practice to
prepare a static-safe work area on which to place the cabinet.
You should supply yourself with a static discharge wrist strap, and wear it every time you handle electronic circuit
boards either at the cabinet mounting location or at your work area.
4 – Installing The IST Station Board
Installing The IST Station Board
IMI89–219
Backboard
dxp040
Common
Equipment
Cabinet
Earth
Ground
Conductive
Mat
1 Meg Ohm
Resister
Static Discharge
Wrist Strap
Providing Static Protection At The Cabinet Mounting Location
Static
Wrist
Strap
Common Point Ground
ESD Protective
Mat
Typical Earth
Ground
ESD Protective
Worksurface
Static 2
ESD Protective
Mat
Creating A Static Safe Work Area
Installing The IST Station Board – 5
IMI89–219
2.2
Installing The IST Station Board
Installing IST Station Boards In The Equipment Cabinet
1. Normally you should first disconnect the optional battery back-up equipment from the power supply and then
disconnect the AC power cord from the AC outlet; however, when necessary, you can install a station board
in an operating system. If you must do this, connect one end of a standard telephone handset coil cord to the
precharge port on the power supply. During step 5, you will connect the other end of this coil cord to the
precharge jack on the station board.
2. Install your static discharge wrist strap on your bare wrist; adjust it for a snug fit. Be sure that the strap is
touching bare skin and is not isolated by clothing. Connect the wrist strap cord between the wrist strap and an
AC or earth ground
NOTE: With the common equipment in the installed position, the ground lug on the side of the cabinet is an
appropriate grounding point since it should have a heavy ground wire connected between it and a good
earth ground.
3. Loosen the retaining hardware and lift the front panel away from the common equipment cabinet.
4. Each station board is supplied in a static protection bag for safe keeping. When you are ready to install the
circuit board, remove it from its static protection bag.
5. Locate the proper board slot.
•
In DXP main cabinets, the station boards connect to universal slots 3 through 5. You can connect station
boards in universal slots 1 and 2; however, you occupy the only slots that are available for auxiliary boards.
•
In DXP expansion cabinets, the station boards connect to any universal board slot.
6. If you are installing the station board in an operating system, connect the free end of the precharge cord that
you installed in step 1 to the precharge jack on the station board.
7. Orient the station board with its top and bottom guides in main cabinet board cage. and press the board firmly
until its board edge connection properly mates with the connector on cabinet’s backplane. If you connected a
handset cord between the pre-charge port on the power supply and the jack on the circuit board, disconnect
the cord after installing the board.
CAUTION
When pressing circuit boards into place, press them only at the extractor lever locations.
If you apply pressure at other locations you may damage the board assembly.
8. Repeat steps 3 and 4 until all circuit boards are installed.
9. Make a final inspection to ensure that all circuit boards are, oriented correctly and mated properly.
10. Install and tighten the supplied screws to secure the circuit boards to the board cage.
11. Each station board includes a ferrite collar. Snap the ferrite collar around the cable station to provide
protection against radio frequency interference.
12. If your installation requires additional DTMF receivers, add receiver cards by following the instructions
included with the card.
13. If the cabinet where you installed the IST station boards does not now include a ring generator assembly,
install a ring generator assembly by following the instructions included with the assembly.
14. Plug the AC line cord into the AC outlet, reconnect any battery back up equipment, and turn on the switch on
the power supply.
15. Replace the front panel on the common equipment cabinet.
6 – Installing The IST Station Board
Installing The IST Station Board
IMI89–219
Viewing A Typical Station Board Installation
Installing The IST Station Board – 7
IMI89–219
Installing The IST Station Board
3.0 Connecting The Stations
Connections between the telephone stations and the common equipment station boards are typically via type
66M-xx connector blocks that are cable connected to 50-pin male connectors on the station boards.
The maximum distance allowed from the common equipment to the industry-standard telephone varies with the
gauge of wire that you use to make the connection. Refer to the following chart for complete details.
Station Type
Industry-Standard
Telephones
20 AWG
Wire Gauge
22 AWG
24 AWG
4000 Feet
3500 Feet
3000 Feet
The maximum distances stated above are dependent upon the following conditions:
•
•
resistance of industry-standard telephone (per EIA specs) cannot exceed 300 ohms maximum,
DC load resistance of the wiring between the common equipment and the industry-standard telephone Plus the
DC resistance of telephone itself can not exceed 460 ohms maximum.
If spare conductors exist in the cables that you run between the station boards and the 66M-xx connector blocks, it
is a good practice to connect the spare conductors to earth ground. Doing this may help prevent the spare
connectors from inducing radio frequency and/or AC interference into the system.
Remember, you should snap a ferrite collar around each station cable to provide protection against radio
frequency interference.
CAUTION
The polarity between the individual wires in a particular voice pair is not critical.
3.1
Understanding Station Port Locations
On 16–station boards, station ports 1–8 appear at connector J1 and station ports 9–16 appear at connector J2.
The station ports for both the main and expansion cabinet assend from the leftmost universal board slot. This
means that in the main cabinet, station ports 1–16 are in the leftmost universal board slot, station ports 17–32 are
in the next universal board slot to the right, station ports 33–48 are in the next universal board slot and so forth
through station ports 65–80 located in universal board slot five. The main cabinet supports a total of 80 stations.
Remember, if the system requires auxiliary boards, you must install them at universal slots one and two thus
eliminating two station board locations.
Station ports in the expansion cabinet begin at the leftmost board slots with station ports 81–96 and assend to the
right at 16 station ports per slot to end at the rightmost universal slot with station ports 177–192. The expansion
cabinet supports a total of 112 stations.
8 – Installing The IST Station Board
Installing The IST Station Board
IMI89–219
Typical Station
Connector Block
1
2
3
4
5
Typical
Industry-Standard
Telephone
Station Board
7
10
11
12
13
14
15
1
17
1
1
20
21
22
23
24
25
2
27
2
2
30
31
32
33
34
35
3
37
3
3
40
41
42
43
44
45
4
47
4
4
50
J1 (Male 50-pin connector)
50
2
25
1
Ferrite
Collar
J2 (Male 50-pin connector)
CLIP TERMINALS
DXP0 1
Connecting Telephones To The IST Station Board
Installing The IST Station Board – 9
IMI89–219
3.2
Installing The IST Station Board
Detailing The Station Connections For J1
25-Pair Connections
Wire Color
Pair Pin No.
White-Blue
Blue-White
White-Orange
Orange-White
White-Green
Green-White
White-Brown
Brown-White
White-Slate
Slate-White
Red-Blue
Blue-Red
Red-Orange
Orange-Red
Red-Green
Green-Red
Red-Brown
Brown-Red
Red-Slate
Slate-Red
Black-Blue
Blue-Black
Black-Orange
Orange-Black
Black-Green
Green-Black
Black-Brown
Brown-Black
Black-Slate
Slate-Black
Yellow-Blue
Blue-Yellow
Yellow-Orange
Orange-Yellow
Yellow-Green
Green-Yellow
Yellow-Brown
Brown-Yellow
Yellow-Slate
Slate-Yellow
Violet-Blue
Blue-Violet
Violet-Orange
Orange-Violet
Violet-Green
Green-Violet
Violet-Brown
Brown-Violet
Violet-Slate
Slate-Violet
1
2
3
4
5
6
7
8
9
10
11
12
13
14
15
16
17
18
19
20
21
22
23
24
25
26
1
27
2
28
3
29
4
30
5
31
6
32
7
33
8
34
9
35
10
36
11
37
12
38
13
39
14
40
15
41
16
42
17
43
18
44
19
45
20
46
21
47
22
48
23
49
24
50
25
Clip
Term.
1
2
3
4
5
6
7
8
9
10
11
12
13
14
15
16
17
18
19
20
21
22
23
24
25
26
27
28
29
30
31
32
33
34
35
36
37
38
39
40
41
42
43
44
45
46
47
48
49
50
10 – Installing The IST Station Board
Two-Wire Connections
Pair
Wire Color
Tip Lead
Ring Lead
Station Connections
Station
Location
Green
Red
1
No connection
Tip Lead
Ring Lead
Green
Red
2
No connection
Tip Lead
Ring Lead
Green
Red
3
No connection
Tip Lead
Ring Lead
Green
Red
4
No connection
Tip Lead
Ring Lead
Green
Red
5
No connection
Tip Lead
Ring Lead
Green
Red
6
No connection
Tip Lead
Ring Lead
Green
Red
7
No connection
Tip Lead
Ring Lead
Green
Red
No connection
8
Installing The IST Station Board
3.3
IMI89–219
Detailing The Station Connections For J2
25-Pair Connections
Wire Color
Pair Pin No.
White-Blue
Blue-White
White-Orange
Orange-White
White-Green
Green-White
White-Brown
Brown-White
White-Slate
Slate-White
Red-Blue
Blue-Red
Red-Orange
Orange-Red
Red-Green
Green-Red
Red-Brown
Brown-Red
Red-Slate
Slate-Red
Black-Blue
Blue-Black
Black-Orange
Orange-Black
Black-Green
Green-Black
Black-Brown
Brown-Black
Black-Slate
Slate-Black
Yellow-Blue
Blue-Yellow
Yellow-Orange
Orange-Yellow
Yellow-Green
Green-Yellow
Yellow-Brown
Brown-Yellow
Yellow-Slate
Slate-Yellow
Violet-Blue
Blue-Violet
Violet-Orange
Orange-Violet
Violet-Green
Green-Violet
Violet-Brown
Brown-Violet
Violet-Slate
Slate-Violet
1
2
3
4
5
6
7
8
9
10
11
12
13
14
15
16
17
18
19
20
21
22
23
24
25
26
1
27
2
28
3
29
4
30
5
31
6
32
7
33
8
34
9
35
10
36
11
37
12
38
13
39
14
40
15
41
16
42
17
43
18
44
19
45
20
46
21
47
22
48
23
49
24
50
25
Clip
Term.
1
2
3
4
5
6
7
8
9
10
11
12
13
14
15
16
17
18
19
20
21
22
23
24
25
26
27
28
29
30
31
32
33
34
35
36
37
38
39
40
41
42
43
44
45
46
47
48
49
50
Two-Wire Connections
Pair
Wire Color
Tip Lead
Ring Lead
Station Connections
Station
Location
Green
Red
9
No connection
Tip Lead
Ring Lead
Green
Red
10
No connection
Tip Lead
Ring Lead
Green
Red
11
No connection
Tip Lead
Ring Lead
Green
Red
12
No connection
Tip Lead
Ring Lead
Green
Red
13
No connection
Tip Lead
Ring Lead
Green
Red
14
No connection
Tip Lead
Ring Lead
Green
Red
15
No connection
Tip Lead
Ring Lead
Green
Red
16
No connection
Installing The IST Station Board – 11
IMI89–219
Installing The IST Station Board
4.0 Checking Out The Installation And Isolating Failures
During operation, the station board’s status light conveys the following information:
Rapid flash = malfunctioning micro-controller
Off with repeated 5 second blink on = normal operation with all stations idle
On with repeated 5 second blink off = normal operation with at least one station busy
Steady on or steady off = board malfunction
4.1
Voltage Check
Make the following voltage measurements at the station connector blocks under the following conditions:
•
•
•
•
Common equipment connected to station connector blocks.
Stations wired and wiring punched down on blocks.
Bridging clips installed
AC power connected to the common equipment
Measure the DC voltage across the Tip and Ring leads for each installed telephone with a DC voltmeter. Then,
call the industry-standard telephone to stimulate the ring generator assembly and measure the AC ringing voltage
across the Tip and Ring leads for each installed telephone with an AC voltmeter.
The measured voltages must be within the limits shown in the chart below. If your measured readings are
different from these charted values, it could indicate a possible wiring error or a station or common equipment
problem.
66M-xx Connector
Meter Lead Polarity
Measured DC Volts
Measured AC Ring
Voltage
Tip Lead
Ring Lead
+
-
+ 36 ± 3 VDC
70 ± 5 VAC
Accredited by the Dutch Council
for Certification for certification
and registration activities.
Comdial’s Quality Management System Is
Certified To The ISO 9001 Standard.
R
Charlottesville, Virginia 22901-2829
World Wide Web: http://www.comdial.com/
R
Installing The Loop Start Line Board
In The DXP Digital Communications System
1.0 Introducing The Loop Start Line Board
1.1
Defining Loop Start
The line board signals for the host system to complete a line connection by sending a supervisory signal to the
host system. Typically this signal is the hookflash that occurs when a user takes a telephone off hook on the line.
The line board transmits this signal to the host system by placing a resistance across the line’s tip and ring leads to
complete a current loop. When the host system senses this resistance, it sends dial tone over the line thus giving
line service to the system.
1.2
Inventorying The Loop Start Line Boards
There are two versions of the loop start line board. One version interfaces four central office lines and the other
version interfaces eight central office lines.
1.3
Complying With Underwriters Laboratories Regulations
Per The Underwriters Laboratories regulation 1459, 2nd edition, be aware of the following precautions when
installing telephone equipment that is to be directly connected to the telephone company network:
•
•
•
Never install telephone wiring during a lightning storm.
•
Use caution when installing or modifying telephone lines.
Never install telephone jacks in wet locations unless the jack is specifically designed for wet locations.
Never touch un-insulated telephone wires or terminals unless the telephone line has been disconnected at the
network interface.
tel: 800.766.3425
818.773.8888
www.kellatronics.com
fax: 800.720.1172
818.773.8899
[email protected]
This manual has been developed by Comdial Corporation (the “Company”) and is intended for the use of its customers and service personnel. The information in this manual is subject to change without notice.
While every effort has been made to eliminate errors, the Company disclaims liability for any difficulties arising from the interpretation of the information contained herein.
The information contained herein does not purport to cover all details or variations in equipment nor to provide for every possible contingency to be met in connection with installation, operation, or maintenance.
Should further information be desired, or should particular problems arise which are not covered sufficiently for the purchaser’s purposes, contact Comdial, Inside Sales Department, Charlottesville, Virginia
22906.
Printed in U.S.A.
IMI89–211.02
8/96
IMI89–211
Installing The Loop Start Line Board
2.0 Installing Circuit Boards In The Equipment Cabinet
CAUTION
Circuit boards are susceptible to damage caused by electrostatic discharge, and you must keep this fact in
mind as you handle the circuit boards. Refer to the Comdial publication IMI01-005, Handling Of
Electrostatically Sensitive Components, for general information. Specific handling precautions are also
included in this installation instruction.
2.1
Creating A Static Safe Work Area
When servicing the common equipment cabinet at the installation location, it is a good practice to place a
conductive mat in front of the cabinet area and ground the mat to a good earth ground. (The third wire ground of
the AC power line is also an acceptable grounding point.) The grounded conductive mat provides a safe static
electric discharge path.
When removing the common equipment cabinet from the installation location for servicing, it is a good practice to
prepare a static-safe work area on which to place the cabinet.
You should supply yourself with a static discharge wrist strap, and wear it every time you handle electronic circuit
boards either at the cabinet mounting location or at your work area.
2 – Installing The Loop Start Line Board
Installing The Loop Start Line Board
IMI89–211
Backboard
dxp040
Common
Equipment
Cabinet
Earth
Ground
Conductive
Mat
1 Meg Ohm
Resister
Static Discharge
Wrist Strap
Providing Static Protection At The Cabinet Mounting Location
Static
Wrist
Strap
Common Point Ground
ESD Protective
Mat
Typical Earth
Ground
ESD Protective
Worksurface
Static 2
ESD Protective
Mat
Creating A Static Safe Work Area
Installing The Loop Start Line Board – 3
IMI89–211
2.2
Installing The Loop Start Line Board
Installing Loop Start Line Boards
1. Normally you should disconnect the AC power cord from the AC outlet and disconnect the optional battery
back-up assembly from the main cabinet power supply; however, when necessary, you can install a line board
in an operating system. If you must do this, connect one end of a standard telephone handset coil cord to the
precharge port on the power supply. During step 5, you will connect the other end of this coil cord to the
precharge jack on the line board.
2. Install your static discharge wrist strap on your bare wrist; adjust it for a snug fit. Be sure that the strap is
touching bare skin and is not isolated by clothing. Connect the wrist strap cord between the wrist strap and an
AC or earth ground
NOTE: With the common equipment in the installed position, the ground lug on the side of the cabinet is an
appropriate grounding point since it should have a heavy ground wire connected between it and a good
earth ground.
3. Each circuit board is supplied in a static protection bag for safe keeping. When you are ready to install the
circuit board, remove it from its static protection bag.
4. Locate the proper board slot.
•
In DXP main cabinets, the loop start line boards normally connect to line slots 1–4 and universal slots 3–5.
You can connect line boards in universal slots 1 and 2; however, you occupy the only two slots that are
available for auxiliary boards.
•
In DXP expansion cabinets, the loop start line boards connect to any universal board slot.
5. If you are installing the line board in an operating system, connect the free end of the precharge cord that you
installed in step 1 to the precharge jack on the line board.
6. Orient the circuit board with its top and bottom guides in main cabinet board cage. and press the board firmly
until its board edge connection properly mates with the connector on cabinet’s backplane.
CAUTION
When pressing circuit boards into place, press them only at the extractor lever locations.
If you apply pressure at other locations you may damage the board assembly.
7. Repeat steps 3 and 4 until all circuit boards are installed.
8. Make a final inspection to ensure that all circuit boards are, oriented correctly and mated properly.
9. Install and tighten the supplied screws to secure the circuit boards to the board cage.
10. Each line board includes a ferrite collar. Bundle the line cables together and snap the ferrite collar around the
cable bundle to provide protection against radio frequency interference.
Operating line boards provide the following status light indications:
Line Boards
Rapid flash = malfunctioning line board processor
Off with repeated 5 second blink on = normal operation with all lines idle
On with repeated 5 second blink off = normal operation with at least one line busy
4 – Installing The Loop Start Line Board
Installing The Loop Start Line Board
IMI89–211
Viewing A Typical Line Board Installation
Installing The Loop Start Line Board – 5
IMI89–211
Installing The Loop Start Line Board
3.0 Connecting The Telephone Lines
The line terminations on the line board are standard modular plug/jack connections. Each modular jack provides
termination for two lines. The line outside termination can be a type 66M-xx connector block or individual
6-position modular jacks. The wiring that is routed between the outside termination and the common equipment
circuit board termination should be twisted-pair wiring.
Remember, each line board is shipped with a ferrite collar. Bundle the line cables together and snap the collar
around the bundle to provide protection against radio frequency interference.
The line numbers on every board ascend from the bottom line jack (lines 1, 2) to the top line jack (lines 7, 8).
The line ports for both the main and expansion cabinet ascend from the rightmost slot to the leftmost slot. This
means that in the main cabinet, line ports 1–8 are in the rightmost board slot, line ports 9–17 are in the next slot to
the left, line ports 18–26 are in the next slot and so forth through line ports 65–72 located in the leftmost universal
slot. The main cabinet supports a total of 72 lines.
Line ports in the expansion cabinet begin at the rightmost board slots with line ports 73–80 and ascend to the left
at eight line ports per slot to end at the leftmost universal slot with line ports 121–128. The expansion cabinet
supports a total of 56 lines.
Viewing A Typical Line Connection
6 – Installing The Loop Start Line Board
Installing The Loop Start Line Board
IMI89–211
Detailing The Line Board Connections
Line
Jack
1
2
3
4
5
Pin
Number
1
2
3
4
5
6
1
2
3
4
5
6
1
2
3
4
5
6
1
2
3
4
5
6
1
2
3
4
5
6
Connection
Telephone Number
No Connection
Line 8 Tip
Line 7 Tip
Line 7 Ring
Line 8 Ring
No Connection
No Connection
Line 6 Tip
Line 5 Tip
Line 5 Ring
Line 6 Ring
No Connection
No Connection
Line 4 Tip
Line 3 Tip
Line 3 Ring
Line 4 Ring
No Connection
No Connection
Auxiliary (Line 2) Tip
Line 1 Tip
Line 1 Ring
Line 2 Ring
Auxiliary (Line 2) Ring
No Connection
No connection
Power Fail (Line 1) Ring
Power Fail (lIne1 ) Tip
No Connection
No Connection
NOTE: If the system operation includes the direct inward station access (DISA) feature on a particular line,
callers that use DISA to access a trunk group and place calls (trunk to trunk calling) may experience low
audio levels on their calls due to the normal line resistance of CO lines. Low audio level is usually only
noticeable on long line loops. If signal loss is a problem at your site, try adding a line amplifier (repeater)
in the DISA line. Comdial does not recommend DISA for use on loop start lines without disconnect
supervision. While DISA will function, Comdial will not be liable for its performance under any condition
where disconnect supervision is not provided.
Installing The Loop Start Line Board – 7
IMI89–211
Installing The Loop Start Line Board
4.0 Making A Power Failure Station Connection
Every loop start line board provides a tip and ring pair connected to line 1 as an emergency power failure circuit.
This power fail circuit is active during a commercial AC power failure if an external battery assembly is not
installed to provide battery back-up power to the system. Connect an industry standard, single-line telephone to
the power failure jack and use it to provide basic communications capability until the AC power to the system is
restored. The bottom jack on the line board provides the power failure connection.
Making A Power Failure Station Connection
8 – Installing The Loop Start Line Board
Installing The Loop Start Line Board
IMI89–211
5.0 Making An Auxiliary Equipment
Interface Connection (Busy Lead Detection)
When needed, connect an industry standard non-electronic telephone device such as a FAX machine, an
industry-standard telephone, or a data device, such as a modem, on a line ahead of the common equipment. The
system will detect an off-hook condition in the connected device and turn on the status light for the line at the
system telephones to indicate that the line is busy.
Each line board makes one auxiliary equipment connection available for use. This connection is at pins 1 and 6 of
the lines 1,2 jack and is associated with line 2 of that line board.
Making A Typical Auxiliary Interface Connection
Installing The Loop Start Line Board – 9
R
Installing The Direct Inward Dialing (DID) Line Board
In The DXP Digital Communications System
1.0 Understanding The DID Line Board
1.1
Describing Direct Inward Dialing Parameters
Direct inward dial (DID) lines are incoming only and are employed to reduce the number of channels between the
DXP and the Central Office (CO). The number of DID lines that the system accepts is limited only by the number
of installed DID boards that you can install in the system.
Direct inward dialing allows incoming CO calls to reach internal intercom extensions by direct dialing. No
attendant assistance is necessary. Since DID lines are incoming only, their direct appearance is limited to
attendant stations where busy indication may be useful.
DID operation requires a group of published directory numbers (400 maximum) provided by the CO. These
directory numbers are incoming only and the DXP translates them to the appropriate personal or group intercom
number for ringing. The lines will accept outgoing DTMF digits while the call is active to support personal
identification number dialing and similar user purposes.
The DXP handles DID calls in the same manner that it handles regular intercom calls and will forward them via a
hunt list or a call forwarding scheme. An unanswered DID call that receives no answer will either continue to
ring or route to a programmed ring no-answer (RNA) destination. If there is no forwarding or the RNA routing
destination is available, the system provides no routing.
Users can place DID calls on hold; however, if they press TAP, the system will generate an internal hookflash
signal instead of one that the CO will recognize.
The system returns a ring back signal to DID calls made to a station in the do not disturb (DND) mode of
operation.
When a DID line is disabled, the system returns an off-hook indication to the CO. This prevents the CO from
placing calls on a disabled line.
The synchronized ringing feature does not have any affect on DID calls, and the Caller ID feature is not available
on DID lines.
This manual has been developed by Comdial Corporation (the “Company”) and is intended for the use of its customers and service personnel. The information in this manual is subject to change
without notice. While every effort has been made to eliminate errors, the Company disclaims liability for any difficulties arising from the interpretation of the information contained herein.
The information contained herein does not purport to cover all details or variations in equipment or to provide for every possible contingency to be met in connection with installation, operation, or
maintenance. Should further information be desired, or should particular problems arise which are not covered sufficiently for the purchaser’s purposes, contact Comdial, Inside Sales Department,
Charlottesville, Virginia 22906.
Printed in U.S.A.
IMI89–212.02
8/96
IMI89–212
1.2
Installing The DID Line Board
Understanding DID Operation
The DID line is a reverse battery, loop start, two-wire voice circuit. (The term reverse battery means that it is the
DXP and not the CO that provides tip and ring supervisory battery for the loop.) The PBX supervision battery,
tone address, supervisory tones, and voice signals are transmitted across the voice pair. The line interface at the
DXP provides loop current detection, loop pulse digit collection, DTMF receivers, and a polarity reversal circuit.
In the idle state, the loop is open at the CO end, with on-hook battery polarity maintained on the circuit by the
DXP. The CO requests service from the DXP by applying a resistive termination across the line tip and ring
leads. The DXP recognizes current flow in the loop as a CO connection and prepares for the incoming call. The
CO does not send ringing since the DXP generates it internally and sends it to the stations.
After the DXP receives all of the address digits, it will translate the digits based on the appropriate DID block
translation table and attempt to place the call to the desired station. To assure that the caller will always hear ring
back prior to the call being answered (for example, when answered by voice mail), the system delays the station
ringing until it applies ring back tone.
During station ringing, the called station will sound a distinctive ringing based on the ring code in the translation
table. If the translation table has a name for this CO digit string, the LCD of the called stations will display that
name. Otherwise, the DID block name will display followed by a portion of the CO digit string. If there is
neither CO digit string name nor DID block name programmed, the station LCD will display just the CO digit
string.
If an incoming call is addressed to either an unassigned or an uninstalled station, the DXP will route the call to the
DID block alternate extension. If the DID Block alternate extension is unavailable, it routes the call to the Dial 0
attendant. If the Dial 0 attendant is either unprogrammed or uninstalled, the DXP will return reorder tone to the
caller.
2 – Installing The DID Line Board
Installing The DID Line Board
IMI89–212
The system returns several different call progress signals to the CO in the interval after it receives address
signalling and before it answers. It does this within 1.5 seconds after completion of address signalling.
Line Busy Tone: This tone indicates called station is busy or already being alerted by another call.
Reorder Tone: This tone indicates that the call cannot be completed due to:
blocking or lack of equipment,
an incomplete (partial dial) address is received.
Audible Ringing Tone: This tone indicates that the station is being alerted or that a recorded announcement will
follow. The ring back will precede the actual alerting of the station to assure that the caller always hears some
portion of the ring back tone.
When a called station answers, the DXP sends answer supervision to the CO by applying reverse polarity to the
line. This polarity reversal is maintained until either the station goes on-hook or the CO opens the loop. The
DXP establishes a communication path between the line and station when it detects station answer.
The CO signals a line disconnect condition to the DXP by opening the loop. When the DXP detects the CO
disconnect, it returns the line to idle polarity and changes the line from busy to idle.
The DXP signals a line disconnect condition to the CO by returning the supervision battery polarity to the
on-hook state. Wink and delay start lines maintain the busy status until the DXP detects CO release. After
disconnect, the DXP returns to the idle state and is ready to process the next call.
With the Wink Start line, the DXP acknowledges that is ready to receive addressing digits from the CO by
giving a momentary reversal of polarity after it has successfully allocated the resources.
With the Delay Start line, the DXP reverses polarity upon notification from the CO of the pending incoming
call, then acknowledges that is ready to receive addressing digits by returning the polarity back to the idle state
after it has successfully allocated the resources.
With the Immediate Start line, there is no acknowledgment from the DXP that it is ready. It is best to only use
this method if the system is set for pulse (rotary) dialing on the line.
Installing The DID Line Board – 3
IMI89–212
Installing The DID Line Board
2.0 Installing Circuit Boards In The Equipment Cabinet
CAUTION
Circuit boards are susceptible to damage caused by electrostatic discharge, and you must keep this fact in
mind as you handle the circuit boards. Refer to the Comdial publication IMI01-005, Handling Of
Electrostatically Sensitive Components, for general information. Specific handling precautions are also
included in this installation instruction.
2.1
Creating A Static Safe Work Area
When servicing the common equipment cabinet at the installation location, it is a good practice to place a
conductive mat in front of the cabinet area and ground the mat to a good earth ground. (The third wire ground of
the AC power line is also an acceptable grounding point.) The grounded conductive mat provides a safe static
electric discharge path.
When removing the common equipment cabinet from the installation location for servicing, it is a good practice to
prepare a static-safe work area on which to place the cabinet.
You should supply yourself with a static discharge wrist strap, and wear it every time you handle electronic circuit
boards either at the cabinet mounting location or at your work area.
4 – Installing The DID Line Board
Installing The DID Line Board
IMI89–212
Backboard
dxp040
Common
Equipment
Cabinet
Earth
Ground
Conductive
Mat
1 Meg Ohm
Resister
Static Discharge
Wrist Strap
Providing Static Protection At The Cabinet Mounting Location
Static
Wrist
Strap
ESD Protective
Mat
Common Point Ground
Typical Earth
Ground
ESD Protective
Worksurface
Static 2
ESD Protective
Mat
Creating A Static Safe Work Area
Installing The DID Line Board – 5
IMI89–212
2.2
Installing The DID Line Board
Installing DID Line Boards
1. Normally you should first disconnect the optional battery back-up assembly from the main cabinet power
supply and then disconnect the AC power cord from the AC outlet; however, when necessary, you can install
a DID line board in an operating system. If you must do this, connect one end of a standard telephone handset
coil cord to the precharge port on the power supply. During step 6, you will connect the other end of this coil
cord to the precharge jack on the line board.
2. Install your static discharge wrist strap on your bare wrist; adjust it for a snug fit. Be sure that the strap is
touching bare skin and is not isolated by clothing. Connect the wrist strap cord between the wrist strap and an
AC or earth ground
3. Loosen the retaining hardware and lift the front panel away from the common equipment cabinet.
NOTE: With the common equipment in the installed position, the ground lug on the side of the cabinet is an
appropriate grounding point since it should have a heavy ground wire connected between it and a good
earth ground.
4. Each DID line board is supplied in a static protection bag for safe keeping. When you are ready to install the
board, remove it from its static protection bag.
5. Locate the proper board slot.
•
In DXP main cabinets, the loop start line boards normally connect to line slots 1–4 and universal slots 3–5.
You can connect line boards in universal slots 1 and 2; however, you occupy the only two slots that are
available for auxiliary boards.
•
In DXP expansion cabinets, the loop start line boards connect to any universal board slot.
6. If you are installing the line board in an operating system, connect the free end of the precharge cord that you
installed in step 1 to the precharge jack on the line board.
7. Orient the DID line board with its top and bottom guides in main cabinet board cage. and press the board
firmly until its board edge connection properly mates with the connector on cabinet’s backplane. If you
connected handset cord between pre-charge port on DXP power supply and jack on DID line board (as
directed in step 6), disconnect it after installing board.
CAUTION
When pressing circuit boards into place, press them only at the extractor lever locations.
If you apply pressure at other locations you may damage the board assembly.
8. Repeat steps 3 and 4 until all DID line boards are installed.
9. Make a final inspection to ensure that all boards are, oriented correctly and mated properly.
10. Install and tighten the supplied screws to secure the circuit boards to the board cage.
Do not neglect this step! It is important because it helps in providing a protective ground condition for
the board.
6 – Installing The DID Line Board
Installing The DID Line Board
IMI89–212
Installing The DID Line Board
Installing The DID Line Board – 7
IMI89–212
Installing The DID Line Board
3.0 Connecting The DID Lines
The FCC specified jack configuration for DID line connection to the switched network is a universal service order
code (USOC) RJ21X type and the facility interface code for DID is 02RV2-T. This specified connection is
typically a type 66M-nn connector block.
CAUTION
When connecting the lines for DID applications, be sure that you do not reverse the tip and ring leads.
A 50-pin connector on the DID line board provides its line terminations. You can cable connect the DID board to
the CO line termination with a prepared cable that matches the termination requirements. Snap the supplied ferrite
collar around the cable to provide protection against radio frequency interference.
Before you connect the CO-supplied DID lines to the board, program the system for DID operation, and test the
DID line ports per the steps shown below.
1. Replace the front panel on the common equipment cabinet.
2. Plug the AC line cord into the AC outlet, reconnect any battery back up equipment and turn on the switch on
the power supply.
3. Using the data base programming procedure, program the system for DID line operation.
4. Connect a buttset or an industry-standard telephone (IST) to a line port on the DID line board.
5. Take the buttset or ISToff-hook, and listen for relay click on both wink start and delay start lines.
6. Dial a CO digit string to determine if you can make a call. Have someone answer your call to determine if
you have a complete talk path. If you can complete a call, this verifies that you have programmed the system
correctly.
7. Repeat step 6 as desired for other CO digit strings and repeat steps 4 through 7 at all line ports on the DID line
board.
8. Connect the CO-supplied DID lines to the DID board.
9. Note the DID board’s status light, and compare status with the following details:
Rapid Flash = Malfunctioning on-board processor,
Off with repeated 5 second blink on = Normal operation with all idle lines,
On with repeated 5 second blink off = Normal operation with at least one busy line, (lf a line is active but
the LED is showing off with repeated 5 second blink on, check the wiring for poor connections),
Three Rapid Flashes On Followed By 2.5 seconds Off = One or more lines out of service
8 – Installing The DID Line Board
Installing The DID Line Board
IMI89–212
NOTE: Wiring for the 8 line board is shown. Wiring for the 4 line board uses only pairs 1 through 4.
Viewing Typical DID Line Connections
Installing The DID Line Board – 9
IMI89–212
3.1
Installing The DID Line Board
Understanding The DXP Line Port Numbering
The line numbers on every board ascend from the bottom line jack (lines 1and 2) to the top line jack (lines 7 and
8).
The line ports for both the main and expansion cabinet ascend from the rightmost slot to the leftmost slot. This
means that in the main cabinet, line ports 1–8 are in the rightmost board slot, line ports 9–17 are in the next slot to
the left, line ports 18–26 are in the next slot and so forth through line ports 65–72 located in the leftmost universal
slot. The main cabinet supports a total of 72 lines.
Line ports in the expansion cabinet begin at the rightmost board slots with line ports 73–80 and ascend to the left
at eight line ports per slot to end at the leftmost universal slot with line ports 121–128. The expansion cabinet
supports a total of 56 lines.
10 – Installing The DID Line Board
Installing The DID Line Board
3.2
IMI89–212
Understanding The DID Line Connections
25-Pair Connections
Wire Color
White-Blue
Blue-White
White-Orange
Orange-White
White-Green
Green-White
White-Brown
Brown-White
White-Slate
Slate-White
Red-Blue
Blue-Red
Red-Orange
Orange-Red
Red-Green
Green-Red
Red-Brown
Brown-Red
Red-Slate
Slate-Red
Black-Blue
Blue-Black
Black-Orange
Orange-Black
Black-Green
Green-Black
Black-Brown
Brown-Black
Black-Slate
Slate-Black
Yellow-Blue
Blue-Yellow
Yellow-Orange
Orange-Yellow
Yellow-Green
Green-Yellow
Yellow-Brown
Brown-Yellow
Yellow-Slate
Slate-Yellow
Violet-Blue
Blue-Violet
Violet-Orange
Orange-Violet
Violet-Green
Green-Violet
Violet-Brown
Brown-Violet
Violet-Slate
Slate-Violet
Wire-Pair
Connections
Pair
Pin Clip
No. Term.
1
26
1
27
2
28
3
29
4
30
5
31
6
32
7
33
8
34
9
35
10
36
11
37
12
38
13
39
14
40
15
41
16
42
17
43
18
44
19
45
20
46
21
47
22
48
23
49
24
50
25
2
3
4
5
6
7
8
9
10
11
12
13
14
15
16
17
18
19
20
21
22
23
24
25
1
2
3
4
5
6
7
8
9
10
11
12
13
14
15
16
17
18
19
20
21
22
23
24
25
26
27
28
29
30
31
32
33
34
35
36
37
38
39
40
41
42
43
44
45
46
47
48
49
50
Wire Name
Tip
Ring
Tip
Ring
Tip
Ring
Tip
Ring
Tip
Ring
Tip
Ring
Tip
Ring
Tip
Ring
Line Designations
Line Number
CO Line
Number
1
2
3
4
5
6
7
8
NOTE: Wiring for the 8 line board is
shown. Wiring for the 4 line board
uses only pairs 1 through 4.
Installing The DID Line Board – 11
IMI89–212
Installing The DID Line Board
4.0 Understanding The Federal Communications
Requirements Concerning DID Lines
The Federal Communications Commission (FCC) requires that you inform the central office (CO) that the DXP
is configured as an MF (multipurpose) registered device if you connect it to ground start DID lines. Also, FCC
rules, part 68, require customer premise equipment (CPE) to return answer supervision signalling to the CO for
DID calls. Allowing the DXP to be operated in a manner that does not provide answer supervision is a violation
of these rules. In compliance to this ruling, the DXP system returns DID answer supervision no later than 500
milliseconds after the incoming call is serviced. The regulations require that the system return this answer
supervision whenever the following DID call conditions exist:
•
•
•
call answered by the called station,
call answered by the attendant,
call routed to a recorded announcement that can be administered by a system user,
Exceptions to the requirement are when:
•
•
•
a call is not answered,
a busy tone is received,
a reorder tone is received.
4.1
Understanding Installer/User Information
Regarding FCC Rules And Regulations
This DXP digital communications system complies with Federal Communications Commission (FCC) Rules, Part
68. The FCC registration label on the KSU contains the FCC registration number, the ringer equivalence number,
the model number, and the serial number or production date of the system.
Notification To Telephone Company
Unless a telephone operating company provides and installs the system, the telephone operating company which
provides the lines must be notified before a connection is made to them. The lines (telephone numbers) involved,
the FCC registration number, and the ringer equivalence number must be provided to the telephone company.
The FCC registration number and the ringer equivalence number of this equipment are provided on the label
attached to the common equipment. The user/installer is required to notify the telephone company when final
disconnection of this equipment from the telephone company line occurs.
Compatibility With Telephone Network
When necessary, the telephone operating company provides information on the maximum number of telephones
or ringers that can be connected to one line, as well as any other applicable technical information. The telephone
operating company can temporarily discontinue service and make changes which could affect the operation of this
equipment. They must, however, provide adequate notice, in writing, of any future equipment changes that would
make the system incompatible.
Installation Requirements
Connection of the electronic key system to the telephone lines must be through a universal service order code
(USOC) outlet jack supplied by the telephone operating company. If the installation site does not have the proper
outlet, ask the telephone company business office to install one. The correct outlet jack for this is a type RJ21X.
12 – Installing The DID Line Board
Installing The DID Line Board
IMI89–212
Party Lines And Coin Lines
Local telephone company regulations may not permit connections to party lines and coin lines by anyone except
the telephone operating company.
Troubleshooting
If a service problem occurs, first try to determine if the trouble is in the on-site system or in the telephone
company equipment. Disconnect all equipment not owned by the telephone company.
If this corrects the problem, the faulty equipment must not be reconnected to the telephone line until the problem
has been corrected. Any trouble that causes improper operation of the telephone network may require the
telephone company to discontinue service to the trouble site after they notify the user of the reason.
Repair Authorization
FCC regulations do not permit repair of customer owned equipment by anyone except the manufacturer, their
authorized agent, or others who might be authorized by the FCC. However, routine repairs can be made
according to the maintenance instructions in this publication, provided that all FCC restrictions are obeyed.
Radio Frequency Interference
The electronic key system contains incidental radio frequency generating circuitry and, if not installed and used
properly, may cause interference to radio and television reception. This equipment has been tested and found to
comply with the limits for a Class A computing device pursuant to Subpart J of Part 15 of FCC Rules. These
limits are designed to provide reasonable protection against such interference when operated in a commercial
environment. Operation of this equipment in a residential area may cause interference to radio and television
reception; in which case the user is encouraged to take whatever measures may be required to correct the
interference. If this equipment does cause interference to radio or television reception, which can be determined
by turning the equipment off and on, the user is encouraged to try to correct the interference by one or more of the
following measures: Reorient the television or radio’s receiving antenna, and/or relocate the KSU, the individual
telephone stations, and the radio or TV with respect to each other. If necessary, the user should consult the
manufacturer or an experienced radio/television technician for additional suggestions. The user may find the
following booklet prepared by the Federal Communications Commission helpful: “How to Identify and Resolve
Radio-TV Interference Problems.” This booklet is available from the Government Printing Office, Washington
D.C. 20402. Stock No. 004-000-00345-4.
This digital apparatus does not exceed the (Class A) limits for radio noise emissions from digital apparatus set out
in the Radio Interference Regulations of the Canadian Department of Communications.
Le présent appareil numérique n’émet pes de bruits radioélectriques dépassant les limites applicables aux appareils
numériques (de la class A) prescrites dans le Réglement sur le brouillage radioélectrique édicté par le ministére
des Communications du Canada.
Ringer Equivalence Number
The REN of each line is 0.4B. The FCC requires the installer to determine the total REN for each line, and record
it at the equipment.
Installing The DID Line Board – 13
R
Installing The Multipurpose Line Board
In The DXP Digital Communications System
1.0 Understanding The Multipurpose Line Board
The Multipurpose line board for the DXP digital communications system provides system interface for ground
start lines, loop start lines, and E&M (tie) lines. These are typically the three different line types that the central
office (CO) makes available for connection to the public switched network. The multipurpose line board is fully
programmable for each type of line.
1.1
Detailing The Line Types
Loop Start Lines: With this line type, the DXP bridges a resistance across the tip and ring leads to signal the CO
to establish a communications link for an outgoing call. The CO detects the resulting current flow and supplies
dial tone to the DXP . The CO signals an incoming call to the DXP by placing an alternating voltage (ring signal)
on the tip lead for the DXP to sense. The DXP then generates ringing to the DXP station being called. When a
station answers the ringing, the circuit is completed as it was for outgoing calls. Loop start lines can not provide
any sure means of determining when a distant party hangs up his or her telephone. For a system that experiences
moderate incoming and outgoing call volume and does not cost calls, loop start lines provide an economical
choice for connecting the DXP to the central office (CO) equipment. When you use line 1 for the power-fail
mode, you must program that line to be a loop-start line unless the industry-standard telephone that you use as a
power-fail station is a ground-start device.
Ground Start Lines: With this line type, the DXP momentarily grounds the ring lead to signal the CO to establish
a communications link for an outgoing call. When the CO detects this, it acknowledges by momentarily
grounding the tip lead. The DXP responds by removing its ground connection and bridging itself across the tip
and ring leads. The CO then removes its ground connection and returns dial tone to the DXP.
For an incoming call, the CO grounds the tip lead and places an alternating voltage on the ring lead for the DXP
to sense. The DXP detects ring-lead ground and then causes its ring generator to generate ringing to the station
being called. When a station answers the ringing, the circuit is completed as it is for outgoing calls. Because
ground start lines are controlled at both ends, they are capable of release supervision that provides a sure means of
determining when a distant party hangs up his or her telephone. This is very important in applications where calls
are costed. Also, since the signalling protocol indicates which end requested the line, it helps prevent call
collisions and glare and thus is useful in applications where there is a high volume of incoming and outgoing calls
occurring on the same lines. Ground start lines are standard protocol for remote networking and are useful for
connecting the DXP to private branch exchange (PBX) equipment. For ground start lines to be dependable, you
must ensure that you have connected the DXP to a low resistance telephone company ground.
NOTE: The Federal Communications Commission (FCC) requires that you inform the central office that the DXP
is configured as an MF (multipurpose) registered device if you connect it to ground start lines.
E&M Tie Lines: The tie line connections (also known as tie trunk access) are special circuits that allow, on a
dial-up or continuous connection (hot line) basis, the DXP to communicate with remotely located equipment such
as: another DXP, a PBX, or to other common carrier (OCC) equipment for long distance calls. Tie lines can be a
part of a private or leased network and can be metallic, carrier current, T1, or microwave.
This manual has been developed by Comdial Corporation (the “Company”) and is intended for the use of its customers and service personnel. The information in this manual is subject to change
without notice. While every effort has been made to eliminate errors, the Company disclaims liability for any difficulties arising from the interpretation of the information contained herein.
The information contained herein does not purport to cover all details or variations in equipment or to provide for every possible contingency to be met in connection with installation, operation, or
maintenance. Should further information be desired, or should particular problems arise which are not covered sufficiently for the purchaser’s purposes, contact Comdial, Inside Sales Department,
Charlottesville, Virginia 22906.
Printed in U.S.A.
IMI89–213.02
8/96
IMI89–213
1.2
Installing The Multipurpose Line Board
Detailing E&M Signalling Methods
The multipurpose line board provides two wires for a tip and ring voice circuit and two wires (the E and M line)
to provide control signalling between the systems. When a local DXP puts a request for service from the remote
equipment on the M lead, the remote equipment detects this request on its E lead. As an option it can also respond
by putting an alerting signal on its M lead.
NOTE: Intercom feature codes of one DXP are not available to callers from the other DXP nor can those callers
access a line through the distant DXP using line group access codes.
The DXP supports two different types of E and M lines. The E and M Direct type is for direct connection
between two telephone systems and is also known as a metallic connection. The E and M Carrier type is for tie
lines that run through a central office (CO) interface; however, some COs also provide a metallic connection
interface.
If you plan to use tone dial configured E and M lines with the multipurpose line board, you may need to install
one or more DTMF receiver cards to the DXP. Typically, you will need one DTMF receiver for every six lines. In
high traffic situations, you may need additional DTMF receivers. For information on DTMF receiver card
installation, see IMI89–186, Installing A DTMF Receiver In The DXP Digital Communications System.
NOTE: The DTMF receiver cards that you add for this purpose are in addition to any you may add to the system
to support industry-standard telephone station boards
You can program the system to respond to three different standard-protocol types of E and M signalling. They are
known as: immediate signalling, wink signalling, and delayed signalling and are defined in the following
paragraphs.
Immediate Signalling: With this signalling method, the called DXP answers as soon as the calling DXP initiates
the call. There is no delay between calling and answering. This signalling method is usually used if the line is
programmed for hot line operation or is programmed for pulse dialing.
Wink Signalling: With this signalling method, the called DXP places a momentary signal reversal (wink) on its
M lead to alert the calling DXPsystem that it is ready to receive information. The calling DXP controls the status
of the M lead and watches for a return signal from the called DXP on the E lead. A wink occurs when the called
DXP is ready to receive dialed digits from the calling DXP. Dialing can begin only after the wink is complete.
After the wink occurs, the called DXP (if it is programmed for dialing) returns dial tone to the calling DXP as an
indication it is ready to receive digits. This signalling method is the preferred protocol for use between two DXP
systems.
Delayed Signalling: With delay dial signalling, the called DXP immediately responds to the calling DXP by
sending an off-hook signal on its M lead. It holds this off-hook condition until it is ready to receive digits and
then returns its M lead to on-hook. After the signal exchange occurs, the called DXP (if it is programmed for
dialing) returns dial tone to the calling DXP as an indication it is ready to receive digits. This signalling method is
an alternate to wink start signalling that also provides equipment readiness signals. This method is most useful if
the DXP is connected to another manufacturer’s PBX with incompatible wink timing parameters.
In addition to the standard-protocol signalling, you can program the system to respond to two types of
non-standard tie line signalling protocols. They are known as: hot line and intercom dialing and are defined in the
following paragraphs.
Hot Line: You can program the system for hot-line operation so that as soon as a user accesses the tie line, the
station or stations at the distant system that have access to the personal or group intercom assigned to the hot line
will ring.
Intercom Dialing: Alternately, you can program the system for intercom dialing mode so that as soon as users
access the tie line they will hear dial tone. Upon hearing dial tone, they can dial either a personal or group
intercom number at the distant system.
2 – Installing The Multipurpose Line Board
Installing The Multipurpose Line Board
IMI89–213
2.0 Installing Circuit Boards In The Equipment Cabinet
CAUTION
Circuit boards are susceptible to damage caused by electrostatic discharge, and you must keep this fact in
mind as you handle the circuit boards. Refer to the Comdial publication IMI01-005, Handling Of
Electrostatically Sensitive Components, for general information. Specific handling precautions are also
included in this installation instruction.
2.1
Creating A Static Safe Work Area
When servicing the common equipment cabinet at the installation location, it is a good practice to place a
conductive mat in front of the cabinet area and ground the mat to a good earth ground. (The third wire ground of
the AC power line is also an acceptable grounding point.) The grounded conductive mat provides a safe static
electric discharge path.
When removing the common equipment cabinet from the installation location for servicing, it is a good practice to
prepare a static-safe work area on which to place the cabinet.
You should supply yourself with a static discharge wrist strap, and wear it every time you handle electronic circuit
boards either at the cabinet mounting location or at your work area.
Static
Wrist
Strap
Backboard
Common Point Ground
dxp040
ESD Protective
Mat
Typical Earth
Ground
ESD Protective
Worksurface
Common
Equipment
Cabinet
Static 2
ESD Protective
Mat
Earth
Ground
Conductive
Mat
1 Meg Ohm
Resister
Static Discharge
Wrist Strap
Creating A Static Safe Work Area
Providing Static Protection At The Cabinet
Mounting Location
Installing The Multipurpose Line Board – 3
IMI89–213
2.2
Installing The Multipurpose Line Board
Installing Multipurpose Line Boards
1. Normally you should disconnect the AC power cord from the AC outlet and disconnect the optional battery
back-up assembly from the main cabinet power supply; however, when necessary, you can install a
multipurpose line board in an operating system. If you must do this, connect one end of a standard telephone
handset coil cord to the precharge port on the power supply. During step 6, you will connect the other end of
this coil cord to the precharge jack on the line board.
2. Install your static discharge wrist strap on your bare wrist; adjust it for a snug fit. Be sure that the strap is
touching bare skin and is not isolated by clothing. Connect the wrist strap cord between the wrist strap and an
AC or earth ground
3. Loosen the retaining hardware and lift the front panel away from the common equipment cabinet.
NOTE: With the common equipment in the installed position, the ground lug on the side of the cabinet is an
appropriate grounding point since it should have a heavy ground wire connected between it and a good
earth ground.
4. Each multipurpose line board is supplied in a static protection bag for safe keeping. When you are ready to
install the board, remove it from its static protection bag.
5. Locate the proper board slot.
•
In DXP main cabinets, line boards normally connect to line slots 1–4 and universal slots 3–5. You can
connect line boards in universal slots 1 and 2; however, you occupy the only two slots that are available for
auxiliary boards.
•
In DXP expansion cabinets, the line boards connect to any universal board slot.
6. If you are installing the line board in an operating system, connect the free end of the precharge cord that you
installed in step 1 to the precharge jack on the line board.
7. Orient the multipurpose line board with its top and bottom guides in main cabinet board cage. and press the
board firmly until its board edge connection properly mates with the connector on cabinet’s backplane. If you
connected handset cord between pre-charge port on DXP power supply and jack on multipurpose line board
(as directed in step 6), disconnect it after installing board.
CAUTION
When pressing circuit boards into place, press them only at the extractor lever locations.
If you apply pressure at other locations you may damage the board assembly.
8. Repeat steps 3 and 4 until all multipurpose line boards are installed.
9. Make a final inspection to ensure that all boards are, oriented correctly and mated properly.
10. Install and tighten the supplied screws to secure the circuit boards to the board cage.
Do not neglect this step! It is important because it helps in providing a protective ground condition for
the board and ensures proper functioning of E and M and ground-start lines.
4 – Installing The Multipurpose Line Board
Installing The Multipurpose Line Board
IMI89–213
Installing The Multipurpose Line Board
Installing The Multipurpose Line Board – 5
IMI89–213
Installing The Multipurpose Line Board
3.0 Connecting The Multipurpose Lines
The FCC specified jack configuration for the multipurpose board line connections to the switched network is the
(USOC) RJ2EX type and the facility interface code is TL11M. This specified connection is typically a type
66M-nn connector block.
CAUTION
When connecting the lines for multipurpose applications, be sure that you do not reverse the tip and ring
leads.
A 50-pin connector on the multipurpose line board provides its line terminations. You can cable connect the
multipurpose board to the CO line termination with a prepared cable that matches the termination requirements.
Snap the supplied ferrite collar around the cable to provide protection against radio frequency interference.
Before you connect the CO-supplied multipurpose lines to the board, program the system for proper operation.
1. Replace the front panel on the common equipment cabinet.
2. Plug the AC line cord into the AC outlet, reconnect any battery back up equipment and turn on the switch on
the power supply.
3. Connect the CO-supplied lines to the multipurpose board. The system will test each circuit for loop current
after you connect the lines to the board. If the multipurpose line board does not detect loop current for a line
(in either loop or ground start applications), it will ignore this line and show an idle condition on its status
light. If this happens, you must check the line connections for proper wiring.
4. Note the multipurpose board’s status light, and compare status with the following details:
Rapid Flash = Malfunctioning on-board processor,
Off with repeated 5 second blink on = Normal operation with all idle lines,
On with repeated 5 second blink off = Normal operation with at least one busy line, (lf a line is active but
the LED is showing off with repeated 5 second blink on, check the wiring for poor connections),
Three Rapid Flashes On Followed By 2.5 seconds Off = One or more lines out of service
NOTE: If the system operation includes the direct inward station access (DISA) feature on a particular line,
callers that use DISA to access a trunk group and place calls (trunk to trunk calling) may experience low
audio levels on their calls due to the normal line resistance of CO lines. Low audio level is usually only
noticeable on long line loops. If signal loss is a problem at your site, try adding a line amplifier (repeater)
in the DISA line. Comdial does not recommend DISA for use on loop start lines without disconnect
supervision. While DISA will function, Comdial will not be liable for its performance under any condition
where disconnect supervision is not provided.
3.1
Installing E&M Lines
When you install E&M tie lines to connect the DXP to a remote telephone system, you must follow the particular
wiring arrangement detailed in the following chart. From the chart, notice that line 3 of one system connects to
line 4 of the other system and that the E lead of one line connects to the M lead of the other line.
Local DXP
Line 3 Tip
Line 3 Ring
Line 3 E
Line 3 M
Line 4 Tip
Line 4 Ring
Line 4 E
Line 4 M
Remote DXP
Line 4 Tip
Line 4 Ring
Line 4 M
Line 4 E
Line 3 Tip
Line 3 Ring
Line 3 M
Line 3 E
6 – Installing The Multipurpose Line Board
Installing The Multipurpose Line Board
IMI89–213
Viewing Typical Multipurpose Line Connections
Installing The Multipurpose Line Board – 7
IMI89–213
3.1
Installing The Multipurpose Line Board
Understanding The DXP Line Port Numbering
The line numbers on every board ascend from the bottom line jack (lines 1 and 2) to the top line
jack (lines 7 and 8).
The line ports for both the main and expansion cabinet ascend from the rightmost slot to the leftmost slot. This
means that in the main cabinet, line ports 1–8 are in the rightmost board slot, line ports 9–17 are in the next slot to
the left, line ports 18–26 are in the next slot and so forth through line ports 65–72 located in the leftmost universal
slot. The main cabinet supports a total of 72 lines.
Line ports in the expansion cabinet begin at the rightmost board slots with line ports 73–80 and ascend to the left
at eight line ports per slot to end at the leftmost universal slot with line ports 121–128. The expansion cabinet
supports a total of 56 lines.
8 – Installing The Multipurpose Line Board
Installing The Multipurpose Line Board
3.2
IMI89–213
Understanding The Multipurpose Line Connections
25-Pair Connections
Wire Color
White-Blue
Blue-White
White-Orange
Orange-White
White-Green
Green-White
White-Brown
Brown-White
White-Slate
Slate-White
Red-Blue
Blue-Red
Red-Orange
Orange-Red
Red-Green
Green-Red
Red-Brown
Brown-Red
Red-Slate
Slate-Red
Black-Blue
Blue-Black
Black-Orange
Orange-Black
Black-Green
Green-Black
Black-Brown
Brown-Black
Black-Slate
Slate-Black
Yellow-Blue
Blue-Yellow
Yellow-Orange
Orange-Yellow
Yellow-Green
Green-Yellow
Yellow-Brown
Brown-Yellow
Yellow-Slate
Slate-Yellow
Violet-Blue
Blue-Violet
Violet-Orange
Orange-Violet
Violet-Green
Green-Violet
Violet-Brown
Brown-Violet
Violet-Slate
Slate-Violet
Pair
1
2
3
4
5
6
7
8
9
10
11
12
13
14
15
16
17
18
19
20
21
22
23
24
25
Pin
No.
26
1
27
2
28
3
29
4
30
5
31
6
32
7
33
8
34
9
35
10
36
11
37
12
38
13
39
14
40
15
41
16
42
17
43
18
44
19
45
20
46
21
47
22
48
23
49
24
50
25
Wire-Pair
Connections
Clip
Term.
1
2
3
4
5
6
7
8
9
10
11
12
13
14
15
16
17
18
19
20
21
22
23
24
25
26
27
28
29
30
31
32
33
34
35
36
37
38
39
40
41
42
43
44
45
46
47
48
49
50
Wire
Name
Tip
Ring
Tip
Ring
Tip
Ring
Tip
Ring
Tip
Ring
Tip
Ring
Tip
Ring
Tip
Ring
M
E
M
E
Tip
Ring
Tip
Ring
Line
Number
Line Type
1
Loop Start and Ground Start
2
Loop Start and Ground Start
3
4
Loop Start, Ground Start,
and E&M Voice
Loop Start, Ground Start,
and E&M Voice
5
Loop Start and Ground Start
6
Loop Start and Ground Start
7
Loop Start and Ground Start
8
Loop Start and Ground Start
3
E&M Control for Line 3
4
E&M Control for Line 4
2
Auxiliary Equipment
Interface (Busy Lead Detect)
1
Power Fail Station
Installing The Multipurpose Line Board – 9
IMI89–213
Installing The Multipurpose Line Board
4.0 Understanding Installer/User Information
Regarding FCC Rules And Regulations
This DXP digital communications system complies with Federal Communications Commission (FCC) Rules,
Part 68. The FCC registration label on the KSU contains the FCC registration number, the ringer equivalence
number, the model number, and the serial number or production date of the system.
Notification To Telephone Company
Unless a telephone operating company provides and installs the system, the telephone operating company which
provides the lines must be notified before a connection is made to them. The lines (telephone numbers) involved,
the FCC registration number, and the ringer equivalence number must be provided to the telephone company.
The FCC registration number and the ringer equivalence number of this equipment are provided on the label
attached to the common equipment. The user/installer is required to notify the telephone company when final
disconnection of this equipment from the telephone company line occurs.
Compatibility With Telephone Network
When necessary, the telephone operating company provides information on the maximum number of telephones
or ringers that can be connected to one line, as well as any other applicable technical information. The telephone
operating company can temporarily discontinue service and make changes which could affect the operation of this
equipment. They must, however, provide adequate notice, in writing, of any future equipment changes that would
make the system incompatible.
Installation Requirements
Connection of the electronic key system to the telephone lines must be through a universal service order code
(USOC) outlet jack supplied by the telephone operating company. If the installation site does not have the proper
outlet, ask the telephone company business office to install one. The correct outlet jack for this is a type RJ21X.
Party Lines And Coin Lines
Local telephone company regulations may not permit connections to party lines and coin lines by anyone except
the telephone operating company.
10 – Installing The Multipurpose Line Board
Installing The Multipurpose Line Board
IMI89–213
Troubleshooting
If a service problem occurs, first try to determine if the trouble is in the on-site system or in the telephone
company equipment. Disconnect all equipment not owned by the telephone company.
If this corrects the problem, the faulty equipment must not be reconnected to the telephone line until the problem
has been corrected. Any trouble that causes improper operation of the telephone network may require the
telephone company to discontinue service to the trouble site after they notify the user of the reason.
Repair Authorization
FCC regulations do not permit repair of customer owned equipment by anyone except the manufacturer, their
authorized agent, or others who might be authorized by the FCC. However, routine repairs can be made
according to the maintenance instructions in this publication, provided that all FCC restrictions are obeyed.
Radio Frequency Interference
The electronic key system contains incidental radio frequency generating circuitry and, if not installed and used
properly, may cause interference to radio and television reception. This equipment has been tested and found to
comply with the limits for a Class A computing device pursuant to Subpart J of Part 15 of FCC Rules. These
limits are designed to provide reasonable protection against such interference when operated in a commercial
environment. Operation of this equipment in a residential area may cause interference to radio and television
reception; in which case the user is encouraged to take whatever measures may be required to correct the
interference. If this equipment does cause interference to radio or television reception, which can be determined
by turning the equipment off and on, the user is encouraged to try to correct the interference by one or more of the
following measures: Reorient the television or radio’s receiving antenna, and/or relocate the KSU, the individual
telephone stations, and the radio or TV with respect to each other. If necessary, the user should consult the
manufacturer or an experienced radio/television technician for additional suggestions. The user may find the
following booklet prepared by the Federal Communications Commission helpful: “How to Identify and Resolve
Radio-TV Interference Problems.” This booklet is available from the Government Printing Office, Washington
D.C. 20402. Stock No. 004-000-00345-4.
This digital apparatus does not exceed the (Class A) limits for radio noise emissions from digital apparatus set out
in the Radio Interference Regulations of the Canadian Department of Communications.
Le présent appareil numérique n’émet pes de bruits radioélectriques dépassant les limites applicables aux appareils
numériques (de la class A) prescrites dans le Réglement sur le brouillage radioélectrique édicté par le ministére
des Communications du Canada.
Ringer Equivalence Number
The REN of each line is 0.4B. The FCC requires the installer to determine the total REN for each line, and record
it at the equipment.
Installing The Multipurpose Line Board – 11
R
Installing The DXPT1 Digital Carrier Transmission Option
In The DXP Digital Communications System
1.0 Introducing The DXPT1 Option
The digital carrier transmission option (DXPT1) gives the DXP digital communications system the capability to
handle up to 24 channels of voice and/or data transmissions over a single four-wire cable using multiplexing
techniques in superframe (SF) or extended superframe (ESF) format. The DXPT1 board includes a customer
service unit (CSU) to eliminate the need for a CSU external to the DXP.
Each DXPT1 board handles up to 24 channels. You can install up four DXPT1 boards in the DXP system. You
can install two boards at slots LINE2 and UNV5 in the main cabinet and slots UNV8 and UNV12 in the
expansion cabinet. Of course, any other line boards that you install, such as loop start, DID or multipurpose,
reduce the number of lines available for T1 service and may reduce the number of DXPT1 boards that you can
install.
Whenever you install one or more DXPT1 boards, and the DXP is receiving its timing signals from an external
source, you must install one synchronization card (DXOPT–SYN) on the services board. When you connect the
system to central office (CO) lines, you must include a synchronization card, and the DXP must be controlled by
CO signalling. In installations where the DXP supplies the clock signal for the distant system, there is no
requirement for DXOPT–SYN cards.
If you plan to use tone dial configured DID or E&M lines with the T1 digital carrier transmission option, you will
need to install one or more DTMF receiver cards in the DXP. Typically, you will need one DTMF receiver for
every six lines. This ratio indicates that you need to add one DTMF receiver card for each DXPT1 board that is
configured for 24 DID or E&M lines. In high traffic situations, you may need additional DTMF receiver cards.
NOTE: The DTMF receiver cards that you add for this purpose are in addition to any you may add to the system
to support industry-standard telephone station boards
If you are unfamiliar with the terms and component names associated with the T1 digital carrier transmission
option, refer to glossary of terms presented in Section 8 located at the end of this publication.
This manual has been developed by Comdial Corporation (the “Company”) and is intended for the use of its customers and service personnel. The information in this manual is subject to change
without notice. While every effort has been made to eliminate errors, the Company disclaims liability for any difficulties arising from the interpretation of the information contained herein.
The information contained herein does not purport to cover all details or variations in equipment or to provide for every possible contingency to be met in connection with installation, operation, or
maintenance. Should further information be desired, or should particular problems arise which are not covered sufficiently for the purchaser’s purposes, contact Comdial, Inside Sales Department,
Charlottesville, Virginia 22906.
Printed in U.S.A.
IMI89–214.01
11/95
IMI89–214
1.1
Installing The DXPT1 Line Board
Understanding The DXPT1 Board
Through time division multiplexing, the DXPT1 board greatly increases the efficiency and economy of the DXP
system by providing up to 24 channels on two twisted metallic pairs. This multiplexing technique allows two-way
voice or data communications at 1.544 Mbps (million bits per second) with either a central office (CO), public
branch exchange (PBX), or another digital communications system (DXP). The DXPT1 board includes a built-in
customer service unit (CSU) but there is no restriction on adding an external CSU.
When you connect two DXP systems together using E&M protocol through the T1 lines, designate one DXP as
the master and the other one as the slave. In this application, only the slave DXP system requires a DXOPT–SYN
card.
When the T1 option is installed, the DXP supports the following signaling protocols per channel.
•
•
•
•
Loop Start (subscriber end only)
Ground Start (subscriber end only)
E&M two- or four-wire tie lines
DID (direct inward dial)
Loop Start and Ground Start will support synchronized ring, hook flash, and pause. Dialing can be DTMF (tone)
or dial pulse. For E&M and DID tone operation, check the number of DTMF receiver cards needed in the system
E&M and DID will support wink start, delay dial, and immediate dial (dial pulse only). Dialing can be tone or dial
pulse.
1.2
Understanding The DXOPT-SYN Synchronization Card
The DXOPT–SYN card uses a reference timing frequency of 8 KHz that it derives from the 1.544 MHz frequency
supplied to the DXPT1 board by the central office (CO) or other external source. By referencing this 8 KHz with
8 KHz timing derived internally, the master 16.384 MHz voltage-controlled oscillator (VCO) can be
synchronized. The T1 transmit clock (1.544 MHz) is derived from the 16.384 MHz frequency on the DXPT1
board. If the 1.544 MHz received frequency is incorrect (not within a 200 Hz tolerance), the system may loose
synchronization with the CO or other external source. The DXOPT–SYN card reports this condition by turning on
the appropriate alarms on the DXPT1 board and DXOPT–SYN card. A loss of clock synchronization causes
frame slips that result in data communications errors.
The DXOPT–SYN card allows two timing references ( primary and secondary) to be selected. You can select
either automatic or manual (for maintenance mode). In the automatic mode, a loss of primary timing causes the
system to switch to the secondary timing reference. If both the primary and secondary timing references are lost,
the VCO oscillator on the DXOPT–SYN card is defaulted to the fixed 16.384 MHz oscillator on the services
board. This results in the loss of T1 clock synchronization.
2 – Installing The DXPT1 Line Board
Installing The DXPT1 Line Board
IMI89–214
2.0 Installing Circuit Boards In The Equipment Cabinet
CAUTION
Circuit boards are susceptible to damage caused by electrostatic discharge, and you must keep this fact in
mind as you handle the circuit boards. Refer to the Comdial publication IMI01-005, Handling Of
Electrostatically Sensitive Components, for general information. Specific handling precautions are also
included in this installation instruction.
2.1
Creating A Static Safe Work Area
When servicing the common equipment cabinet at the installation location, it is a good practice to place a
conductive mat in front of the cabinet area and ground the mat to a good earth ground. (The third wire ground of
the AC power line is also an acceptable grounding point.) The grounded conductive mat provides a safe static
electric discharge path.
When removing the common equipment cabinet from the installation location for servicing, it is a good practice to
prepare a static-safe work area on which to place the cabinet.
You should supply yourself with a static discharge wrist strap, and wear it every time you handle electronic circuit
boards either at the cabinet mounting location or at your work area.
Static
Wrist
Strap
Backboard
Common Point Ground
dxp040
ESD Protective
Mat
Typical Earth
Ground
ESD Protective
Worksurface
Common
Equipment
Cabinet
Static 2
ESD Protective
Mat
Earth
Ground
Conductive
Mat
1 Meg Ohm
Resister
Static Discharge
Wrist Strap
Creating A Static Safe Work Area
Providing Static Protection At The Cabinet
Mounting Location
Installing The DXPT1 Line Board – 3
IMI89–214
Installing The DXPT1 Line Board
3.0 Configuring The DXPT1 Board
Before you install the DXPT1 board, determine if you must meet special system requirements such as fractional
service (8 or 16 channel operation). If you do have special system requirements, use the dual in-line pin (DIP)
switches provided on the board to re-configure the DXPT1 board.
The DXPT1 board contains 28 DIP switches (three 8-position modules and one 4-position module). Rectangular
cutouts in the front-edge panel provide access to these switches.
The eight DIP switches nearest the bottom of the panel are accompanied by eight green LED indicators.
NOTE: These eight switches and their associated indicators are for factory diagnostic purposes only.
The remaining 20 DIP switches labeled SW1, SW2. and LIU are for configuring the DXPT1 board to meet
specific operating requirements.. The default setting for all of these switches is 0 (on the left as you face the front
edge of the board). This is the standard superframe (SF) configuration for most customer applications. However,
special customer needs may require that you reset one or more of these switches using the procedure given below.
1. Obtain a static discharge wrist strap (supplied with the main DXP cabinet) and attach it to one of your wrists.
Make sure to adjust the strap for a snug fit against your skin; do not apply the strap over any of your clothing.
2. Connect one end of the wrist strap-cord to the wrist strap and the other end to earth ground.
NOTE: With the DXP cabinet in the installed position, the ground lug on the right side of the cabinet is normally
a good grounding point since this lug should have a heavy ground wire connected between it and a good
earth ground.
3. Remove the DXPT1 board from its static protection bag and set it on a static-safe work area.
4. Using a ball-point pen or similar object, move the DIP switches from left (0 position) to right (1 position) as
needed. All DIP switches are facing left for typical applications. See Tables 1, 2, and 3 for descriptions of the
DIP switches.
4 – Installing The DXPT1 Line Board
Installing The DXPT1 Line Board
Reset Pushbutton
(Behind Hole)
DXPT1
Red
Yellow
RESET
Sync
SIG
Blue
Bipolar
CRC
SLIP
Unlock
B8ZS
COFA
LIU
1
(See Table 3)
SW1
0
(Default)
1
2
3
4
5
6
7
8
1
(See Table 1)
Mode
SW1
0
(Default)
1
2
3
4
IMI89–214
Mode
SW2
RLB
LLB
PAYL
LIU
Main
Diagnostic
Switches and LEDs
For Factory
Use Only
SW2
0
(Default)
1
2
3
4
5
6
7
8
1
(See Table 2)
Diagnostics
T1002
Locating The DIP Switches
Installing The DXPT1 Line Board – 5
IMI89–214
3.1
Installing The DXPT1 Line Board
Understanding The T1 Options (SW1–1 Through SW1–8)
The following T1 operating modes are described to help you understand the many options that you can select with
DIP switches SW1–1 through SW1–8 on the DXPT1 board.
3.1.1 T1 General Operation
T1 is the digital two-way transmission of telecommunications over a single high-speed circuit. Up to 24 separate
voice or data transmissions form digital pulses that are transferred at the rate of 1.544 million bits per second
(Mb/s) over the T1 trunk. At the receiving end, the digital pulses are decoded into 24 separate circuits.
Pulse characteristics such as repetition rate, pulse width, pulse amplitude, and average ones density ((ratio of one
(1) bits to zero (0) bits)) are as specified by digital signal level 1 (DS-1) described in American National
Standards Institute Specification, ANSI T1.403-1989.
3.1.2 Framing Modes
Digital data is handled most efficiently when it is organized into frames. A frame of digital information consists
of 193 bits (24 channels x one eight-bit word + one framing or control bit). The framing bit is used for frame
identification when multiple frames are used.
The frame repetition rate is eight thousand frames per second (8 Kf/s).
This option uses either of two framing formats—superframe (SF) and extended superframe (ESF).
The superframe format contains 12 frames. In the 6th and 12th frames, the voice information in the eighth (least
significant) bit positions is overwritten with signaling information. This signaling method is called robbed-bit
signaling. The robbed bits in the 6th and 12th frames are designated signaling bit A and B respectively.
The extended superframe format extends the framing boundaries to include 24 frames . The ESF format provides
improved maintenance capability over the SF format. In this format, 24 framing bits (or 8 Kb/s) are available to
provide the following:
•
•
•
framing synchronization (2 Kb/s)
facility data link (FDL) (4 Kb/s)
CRC-6 error check (2 Kb/s)
The robbed bits from the 6th, 12th, 18th, and 24th frames are used for signaling. Therefore, two additional
signaling paths are available—signaling bits C and D (future).
3.1.3 Signaling Type
Channel associated signaling (CAS) is a signaling method employing robbed bits. The signals using the robbed
bits are related to the same channel as the one carrying the information. CAS is currently the only signaling-type
option available for this equipment.
3.1.4 Yellow Alarm
A yellow alarm is a signal transmitted by a digital communications system when that system has lost
synchronization to the incoming signal. Communications can be restored if a a yellow alarm lasts less than four
seconds. After four seconds, a red alarm (out-of-service) is issued and all calls are set to on-hook. When the
system is using the superframe format, the transmitted yellow alarm signal contains binary zeros (0s) in the
second bit positions of all 24 channels. This is the default setting for DIP switch SW1–4.
The 12th frame method (used in Japan) forces the framing bit for the 12th channel to a binary one (1). This is
detected by the receiving system as a yellow alarm.
In the extended superframe format, the system that has lost synchronization to the incoming signal will transmit a
16-bit pattern consisting of eight one (1) bits followed by eight zero (0) bits over the facility data link (FDL) to
represent a yellow alarm.
6 – Installing The DXPT1 Line Board
Installing The DXPT1 Line Board
IMI89–214
3.1.5 Zero Suppression
There are two ways to avoid system timing problems when eight or more successive zero (0) bits are transmitted.
One method is B7 suppression and the other is bipolar 8-zero substitution (B8ZS). For pulse modulated voice
(PCM), eight consecutive zero (0) bits should never occur.
B7 suppression is a technique that forces a one (1) bit in the 7th bit position when all of the bits in a binary word
are zero (0). The resulting distortion in a voice circuit is negligible. However, this technique could induce errors if
it was used in digital data transmissions.
Digital information transmitted over T1 trunks is bipolar; that is, the binary ones (1s) pulses (marks) alternate
between a positive and a negative voltage level. The bipolar 8-zero substitution (B8ZS) method substitutes four
bits in bit positions four, five, seven, and eight when eight zero (0) bits occur in a binary word. The substituted
bits are inserted in a unique pattern that causes a bipolar error. The B8ZS binary words containing the deliberate
bipolar errors are detected at the receiving terminal where the errant bipolar pulses are removed and substituted
with all zero (0) bits. Because the received binary words are returned to their original bit patterns (all binary zero
bits), a clear channel is provided for error-free digital data transmission. Both ends of the communications link
must be configured to use B8ZS. (B8ZS is a feature designed for future requirements.)
3.1.6 Fractional T1
Fractional T1 is when you use only a portion of a T1 trunk, as needed. On the DXP you must set DIP switches
SW1–7 and SW1–8 for 24 channel operation. This setting allows the system to pass error information end-to-end
when operating fractional T1 with the ESF format.
Setting The SW1 DIP Switches
Switch
Number
Switch
Position
1 (top)
0 (default)
1
2
0 (default)
1
3
0 (default)
1
4
5,6
7,8
0 (default)
1
0, 0 (default)
0,1
1,0
1,1
0,0 default)
0,1
1,0
1,1
Function
FRAME MODE
superframe mode (SF)
extended superframe mode (ESF)
SIGNALING TYPE
channel associated signaling (CAS)
reserved
RESERVED FOR FUTURE USE
reserved
reserved
YELLOW ALARM TYPE
bit 2 of all channels method
12 frame method (Japanese)
ZERO SUPPRESSION
B7 suppression
B8ZS suppression (digital data)
no suppression
no suppression
CHANNEL CAPACITY
24 channel capacity
8 channel capacity (fractional)
16 channel capacity (fractional)
reserved
NOTE: SW1–1 through SW1–8 switches are read only when you apply power to the board or do a manual reset.
With power on, manually reset the board by inserting a slender object, such as a straightened-out paper
clip, into the small hole located between the Yellow and Syn LEDs on the front-edge panel. You can also
reset the board remotely from a video display terminal or personal computer. A reset causes a T1 service
disruption.
Installing The DXPT1 Line Board – 7
IMI89–214
3.2
Installing The DXPT1 Line Board
Understanding The T1 Options
(SW2–1 Through SW2–8 And LIU–1 Through LIU–4)
The following T1 operating modes are described to help you understand the many options that you can select with
DIP switches SW2–1 through SW2–8 and LIU–1 through LIU–4 on the DXPT1 board. DIP switches designated
LIU are associated with the DXPT1 board’s line interface unit.
3.2.1 Loopback
Loopback is the maintenance routine used to verify the receive function (local or remote) and to isolate system
problems. When using the superframe format, the customer interface (CI) loopback option from the network, if
provided, can be activated from the network via in-band signaling (per ANSI T1.403, 1989, SECTION 8.3.1.1).
Framed code words activate and deactivate loopback routines when the option is enabled with DIP switch
SW2–1. The default setting is off, but many central offices will support SF loopback. See your central office
representative to ensure that you are complying with their requirements.
You access remote and payload loopback operation via the facility data link when using the extended superframe
format.
You can manually make three different types of loopback requests depending on the option you select using DIP
switches SW2–7 and SW2–8. These are: local, remote, and payload loopback. When using payload loopback
(ESF format only), all channel bits maintain bit-sequence integrity but the framing bit is re-established.
3.2.2 Customer Service Unit (CSU) Identification Bit
You can set the message-oriented (C/R) bit transmitted over the ESF data link by DIP switch SW2-2 to be a zero
(0) bit or a one (1) bit. The C/R bit is used to identify the T1 signal origin as being either from customer premise
equipment (CPE) or carrier equipment such as a CSU.
Set C/R to be a zero (0) bit for customer premise equipment (CPE) or when using an external CSU (default).
Set C/R to be a one (1) bit if the network requires the T1 internal CSU to be classified as carrier equipment.
3.2.3 Cyclic Redundancy Check (CRC-6)
This is a method for checking the accuracy of data transmissions when using the ESF format. This method uses a
polynomial algorithm based on the content of a superframe of data. When CRC-6 checking is enabled via DIP
switch SW2–4, an alarm will be activated whenever a CRC code (checksum) is received over the ESF data link
that does not match the locally calculated code (checksum).
3.2.4 Yellow Alarm During ANSI Messages On The Facility Data Link
When using the ESF format, the facility data link is available for reporting transmission performance information
once a second. Normally, these transmissions are inhibited by yellow alarms. However, you can set DIP switch
SW2-5 to allow these transmissions during yellow alarms.
3.2.5 Green B8ZS/COFA LED Definition
The green LED on the DXPT1 board’s edge-panel labeled “B8ZS/COFA” indicates either that B8ZS code words
are being received or that a change of frame alignment (COFA) occurred during the last synchronization by the
external T1 source or carrier equipment. You can determine which condition you want reported by how you set
DIP switch SW2–6. The default setting is for “COFA” reporting.
3.2.6 Receive Sensitivity
The equalizer gain logic (EGL) determines how sensitive the receive circuits are to the incoming signals. You set
the level for -26 dB or -36 dB by using DIP switch LIU-1. (Normally, the -26 dB level setting is the better choice.)
8 – Installing The DXPT1 Line Board
Installing The DXPT1 Line Board
IMI89–214
3.2.7 Transmit Level Attenuation
You can manually set the transmit level for a particular value (0, -7.5, -15, or -22.5 dB) or select the automatic
feature that sets the transmit level automatically depending on the receive signal. A weak receive signal causes a
strong transmit signal and vice versa. Use DIP switch LIU–2 to select either the manual or the automatic setting.
If you select the manual setting, set the desired value with DIP switches LIU–3 and LIU–4. Normally, 0 dB is
used when connecting to a network interface box.
Setting The SW2 DIP Switches
Switch
Number
Switch
Position
1 (top)
0 (default)
1
2
0 (default)
1
3
0 (default)
1
4
0 (default)
1
5
0 (default)
1
6
0 (default)
1
7,8
Function
0,0 (default)
0,1
1,0
1,1
superframe NETWORK IN-BAND loopback
disabled
enabled
CSU ID (C/R) BIT (ESF MODE)
C/R bit = 0 designates customer premise equipment (CPE)
C/R bit = 1 designates carrier equipment
RESERVED FOR FUTURE USE
reserved
reserved
CRC (CYCLIC REDUNDANCY CHECK) FOR ESF MODE
disabled
enabled
FDL YELLOW ALARM DURING ANSI MESSAGES
disabled
enabled
B8ZS/COFA LED DEFINITION
COFA (change of frame alignment)
B8ZS detect
MANUAL loopback REQUEST
no loopback
local loopback request
remote loopback request
payload loopback request (ESF only)
NOTE: When changing DIP switch SW2–2 or SW2–5, you must reset the board before the switch is read. With
power on, manually reset the board by inserting a slender object, such as a straightened-out paper clip,
into the small hole located between the Yellow and Syn LEDs on the front-edge panel. You can also reset
the board remotely from a video display terminal or personal computer. A reset causes a T1 service
disruption.
Setting The LIU DIP Switches
Switch
Number
Switch
Position
1 (top)
0 (default)
1
2
0 (default)
1
3,4
0,0 (default)
0,1
1,0
1,1
Function
RECEIVE SIGNAL SENSITIVITY
-26 dB
-36 dB
TRANSMIT LEVEL MODE
Automatic (level set by receive signal)
Manual (level set by switches 3 and 4 below)
TRANSMIT LEVEL ATTENUATION
(LIU-2 must be “1")
0 dB
-7.5 dB
-15 dB
-22.5 dB
Installing The DXPT1 Line Board – 9
IMI89–214
Installing The DXPT1 Line Board
4.0 Installing The DXPT1 Board
1. Normally you should disconnect the AC power cord from the AC outlet and disconnect the optional battery
back-up assembly from the main cabinet power supply; however, when necessary, you can install a DID line
board in an operating system. If you must do this, connect one end of a standard telephone handset coil cord
to the precharge port on the power supply. During step 6, you will connect the other end of this coil cord to
the precharge jack on the line board.
2. Install your static discharge wrist strap on your bare wrist; adjust it for a snug fit. Be sure that the strap is
touching bare skin and is not isolated by clothing. Connect the wrist strap cord between the wrist strap and an
AC or earth ground
3. Loosen the retaining hardware and lift the front panel away from the common equipment cabinet.
NOTE: With the common equipment in the installed position, the ground lug on the side of the cabinet is an
appropriate grounding point since it should have a heavy ground wire connected between it and a good
earth ground.
4. Each DXPT1 line board is supplied in a static protection bag for safe keeping. When you are ready to install
the board, remove it from its static protection bag.
5. Locate the slot where you will install the DXPT1 board.
You can install the DXPT1 board in either the UNV5 or the LINE2 slot in the main cabinet. If the system
includes an expansion cabinet, install the board in either the UNV8 or UNV12 slot of the expansion cabinet.
Depending on the board’s configuration—8, 16, or 24 channel, and whether it is in a universal slot or a trunk
slot, certain constraints apply as detailed in the following chart.
Configuration Constraints
Channels
Slot
24
Universal
24
16
16
8
8
Line
Universal
Line
Universal
Line
Constraints
No trunk board in left two slots.
No station board in left one slot.
No trunk board on either side
No trunk board in left one slot
No trunk board in right one slot
No constraints
No constraints
CAUTION
If you violate the configuration constraints, the last board installed will not function and the status
indicator will be turned on.
6. If you are installing the DXPT1 line board in an operating system, connect the free end of the precharge cord
that you installed in step 1 to the precharge jack on the line board.
7. Orient the DXPT1 line board with its top and bottom guides in main cabinet board cage, and press the board
firmly until its board edge connection properly mates with the connector on cabinet’s backplane. If you
connected a handset cord between the pre-charge port on DXP power supply and the jack on DXPT1 line
board (as directed in step 6), disconnect it after installing board.
CAUTION
When pressing circuit boards into place, press them only at the extractor lever locations.
If you apply pressure at other locations you may damage the board assembly.
10 – Installing The DXPT1 Line Board
Installing The DXPT1 Line Board
IMI89–214
8. Repeat steps 3 and 4 until all DXPT1 line boards are installed.
9. Make a final inspection to ensure that all boards are, oriented correctly and mated properly.
10. Install and tighten the supplied screws to secure the circuit boards to the board cage. Do not neglect this step!
It is important because it helps in providing a protective ground condition for the board thus ensuring RFI
(radio frequency interference) and lightning protection.
Installing The DXPT1 Board
Installing The DXPT1 Line Board – 11
IMI89–214
4.1
Installing The DXPT1 Line Board
Connecting The T1 Trunk
Terminate the end of the T1 trunk with a miniature 8-pin modular plug, and plug it into the main jack on the front
edge of the DXPT1 board.
The DXPT1 board contains a built-in CSU that protects the DXP from voltage surges, provides transmission drive
up to 6,000 feet, and performs diagnostic tests for the network. Therefore, a customer-supplied CSU is not
necessary unless your customer requires this addition.
If a direct connection to a repeater is within a few hundred feet, the transmit signal from the DXPT1 board may
overdrive the repeater. Repeaters normally operate best with -7.5 to -23 dB input signals. Arrange LIU switches 2,
3, and 4 to set the transmit signal level (0 dB is default).
IMPORTANT CAUTION
To help ensure that external over-voltage surges do not damage the system, Comdial engineers suggest
that you install a properly-grounded gas discharge tube or a similar primary protection device on the T1
trunk where it enters the building. If the site includes a network interface box, verify that there is standard
lightning protection installed externally to the box on its network side. Primary protection where the cable
enters the building is necessary to prevent a fire hazard inside the building.
4.2
Detailing The T1 Cable Requirements
Normally, the DXPT1 board connection to a central office is via a network interface box (smart jack). The box is
usually small with an 8-pin modular telephone jack for connecting to the customer premise T1 equipment
(DXPT1). For short lengths of approximately 200 feet or less, use a standard telephone cable with an 8-pin
modular plug for connection to the DXPT1. Make straight-through connections for pins 1, 2, 4, and 5 when using
these plugs on both ends of the cable. (Do not connect Pins 7 and 8.)
When spanning distances greater than 200 feet, use a low-capacitance cable (data-grade cable) having two
twisted, solid-conductor wire pairs with shielding. The type of cable with metal shielding covering each twisted
pair provides the best immunity from electrical interference. Only connect the shielding to earth ground at one end
of the cable—do not ground the shielding at the other end of the cable.
NOTE: When connecting the local DXP directly to another DXP system, be sure to connect the transmit pair (pins
4 and 5) of the local system to the receive pair (pins 1 and 2) of the distant system. Likewise, connect the
receive pair (pins 1 and 2) of the local system to the transmit pair (pins 4 and 5) of the distant system.
12 – Installing The DXPT1 Line Board
Installing The DXPT1 Line Board
IMI89–214
Front View of Main Connector
On DXPT1 Board
1
2
3
4
5
6
7
8
R1 C1
T1 Receive
R
T
C1
Transmit
NOTE: No connections are allowed
to pins 7 or 8. (Issue 2 boards
ONLY.)
T1003A
Connecting The TI Trunk To The DXPT1 Circuit Board
Installing The DXPT1 Line Board – 13
IMI89–214
Installing The DXPT1 Line Board
5.0 Installing The Syncronization
Card And The Auxiliary Board
5.1
Attaching The Synchronization Card To The Auxiliary Board
Whenever you install one or more DXPT1 boards, and the DXP is receiving its timing signals from an external
source, you must install one synchronization card (DXOPT–SYN) on the auxiliary board using the following
procedure.
NOTE: Whenever you install one or more DXPT1 boards, and the DXP is receiving its timing signals from an
external source, you must install one synchronization card (DXOPT–SYN) on the auxiliary board. When
you connect the system to central office (CO) lines, you must include a synchronization card, and the DXP
must be controlled by CO signalling. In installations where the DXP supplies the clock signal for the
distant system, there is no requirement for DXOPT–SYN cards and you do not need to perform this
procedure.
1. Switch off the DXP power supply, disconnect the AC power cord from the AC outlet and disconnect the
optional battery back-up assembly from the main cabinet power supply
2. Install your static discharge wrist strap on your bare wrist; adjust it for a snug fit. Be sure that the strap is
touching bare skin and is not isolated by clothing. Connect the wrist strap cord between the wrist strap and an
AC or earth ground
3. Loosen the retaining hardware and lift the front panel away from the common equipment cabinet.
NOTE: With the common equipment in the installed position, the ground lug on the side of the cabinet is an
appropriate grounding point since it should have a heavy ground wire connected between it and a good
earth ground.
4. Locate the auxiliary board (if installed at either the UNV1/AUX or UNV2/AUX slots), loosen the retaining
screws, remove it from the main cabinet, place it in a static protection bag, and transport it to the static-safe
work area.
5. At the static-safe work area, with your wrist strap in place, remove the auxiliary board and the DXOPT–SYN
card from their static protection bags.
6. Refer to the illustration, and install the DXOPT–SYN card at the second position on the auxiliary board with
the supplied hardware. Avoid the top position because of possible physical interference, and reserve the lower
two positions on the auxiliary board for communication cad installation.
7. Use the method detailed in Section 5.1 to set the strapping switches on the services board. If you wish, refer to
step 8 for details, and transport the board assembly to the cabinet installation site before you set the strapping
switches.
8. Place the auxiliary board with the newly installed DXOPT–SYN card into a static protection bag and
transport the assembly back to the main cabinet.
14 – Installing The DXPT1 Line Board
Installing The DXPT1 Line Board
IMI89–214
DXP013
Precharge
Connector
(Not On All
Boards)
DO NOT PLACE THE
DXOPT-SYN CARD IN
THE TOP OPTION CARD
POSITION IF THE DXAUX
BOARD IS EQUIPPED WITH
A PRECHARGE CONNECTOR
DXOPT-SYN
Card
RECOMMENDED POSITION
FOR DXOPT-SYN CARD
Leave Third And
Fourth Positions
Open For Possible
Later Installation
Of DXOPT-COM
Cards
DXAUX
Board
#4-40 Machine
Screw (3X)
#4 Lockwasher (3X)
DXOPT-SYN
Card
1/4 Hex, #4-40
M-F Spacer (3X)
#6-20
ThreadForming
Screw
(2X)
#4 Lockwasher (3X)
DXAUX
Board
#4-40 Hex Nut (3X)
Installing The Synchronization Card On The Auxiliary Board
Installing The DXPT1 Line Board – 15
IMI89–214
5.2
Installing The DXPT1 Line Board
Installing The Auxiliary Board And Synchronization Card In the DXP
1. Switch off the DXP power supply, disconnect the AC power cord from the AC outlet and disconnect the
optional battery back-up assembly from the main cabinet power supply
2. Install your static discharge wrist strap on your bare wrist; adjust it for a snug fit. Be sure that the strap is
touching bare skin and is not isolated by clothing. Connect the wrist strap cord between the wrist strap and an
AC or earth ground1.
3. Remove the auxiliary board with its installed DXOPT-SYN board from the static bag.
4. On the auxiliary board, set the jumper on the pair of J10 (primary) pins corresponding to the DXP cabinet slot
where you installed the DXPT1 board. Do not jumper more than one pair of J10 pins. This designates the
primary clock source for the DXOPT-SYN card
NOTE:If you install more than one DXPT1 board, designate one board slot location as primary and the other one
as secondary. Then, set the jumper on the pair of J9 pins corresponding to the board slot location you
designated as secondary. Do not jumper more than one pair of J9 pins. If you installed only one DXPT1
board, you may set both the J9 and J10 jumpers for the board slot that the board is installed in. Even
though there is only one clock source, the DXOPT-SYN card functions as though it is receiving two; that
is, the system turns on both PRI and SEC LEDs on the front edge of the card.
5. Check the revision level of the integrated circuit component (IC chip) installed in U19 on the auxilairy board.
If the revision level of the chip is lower than 4A, replace it with one of revision 4A or higher. When replacing
the U19 chip, make sure to use your wrist strap and a chip removal tool. Figure 6 shows the exact location of
chip U19 and illustrates its proper installation.
6. Orient the auxiliary board (with attached DXOPT-SYN card) with the top and bottom guides at either slot
UNV1/AUX or slot UNV2/AUX in the main DXP cabinet. Press the board in firmly until its edge connector
properly mates with the connector on the DXP back plane.
CAUTION
7.
8.
9.
10.
When pressing the auxiliary board into place, press only at the extractor locations. If you apply pressure
at other locations, you may damage the board assembly.
Make a final inspection to ensure that the auxiliary board is located in the correct slot (UNV1/AUX or
UNV2/AUX), oriented correctly, and mated properly. Then, install and tighten the supplied screws to secure
the auxiliary board to the DXP cabinet.
Set the lower (larger) slide switch on the front edge of the DXOPT-SYN card to the AUTO position. Leave
the upper (smaller) switch in either position as it has no effect when the automatic mode is selected.
If applicable, plug the power cable from the optional external battery assembly into the DXP power supply.
Connect the AC power cord to the AC wall outlet and turn the power switch on. If no alarms are on (red
LEDs), and at least one of the green PRI or SEC LEDs is turned on, replace the DXP cover.
16 – Installing The DXPT1 Line Board
Installing The DXPT1 Line Board
IMI89–214
12
2
J10
2
12
1
11
J9
11
1
32
1
C31 14
U10
J2
33
54
2
12
1
11
J10
C28
28
C33 14 U7
U2
1
1
J9/J10 JUMPERS
33
A
B
C
D
E
F
Alignment Notch
J5
1
NOT USED
UNV5 SLOT
LINE2 SLOT
UNV8* SLOT
NOT USED
UNV12* SLOT
*EXPANSION CABINET SLOTS
32
1
3
54
3
15
U15
25
XU19
32
15
U18
U19
C26
20
1
3
J11
14
C6
20
C37
R12
TO THE BOARD LOCATION
OF THE DXPT1 BOARD YOU
WANT TO USE FOR THE
SYSTEM’S PRIMARY CLOCK
REFERENCE.
CONNECT THE PAIR OF
J6 2.
J9 PINS CORRESPONDING
TO THE BOARD LOCATION OF
THE DXPT1 BOARD YOU WANT
TO USE FOR THE SYSTEM’S
SECONDARY CLOCK
REFERENCE.
YOU CAN USE
THE SAME DXPT1 BOARD FOR
BOTH CLOCK REFERENCES
54 BY CONNECTING THE SAME
PAIR OF PINS IN BOTH J9
AND J10 JUMPER GROUPS.
U8
C34
U20
71
JUMPER INSTRUCTIONS
1. CONNECT THE PAIR OF
33 J10 PINS CORRESPONDING
XU20
C25
C5
11
1
1
XU1
C29
C27
J13
J8
1
J9
DXAUX Board
1
12
JUMPER LOCATIONS FOR J9 AND J10
SEE TABLE BELOW FOR DEFINITIONS
1
Chip U19
2
1
1
1
U4
1
R4
CR5
R9
C7
PA022-1
DXP014
Detailing The Auxiliary Board Jumpers
Installing The DXPT1 Line Board – 17
IMI89–214
Installing The DXPT1 Line Board
6.0 Understanding The T1 Alarms And Indicators
Most of the T1 alarms and indicators (LEDs) are located on the front-edge panel of the DXPT1 board, while
several are located on the front edge of the DXOPT-SYN card. The following sections discuss the alarms and
indicators.
NOTE: Red /Yellow LEDs, when lit, indicate errors or non-standard configuration for normal operation.
Red Alarm (red LED)
When this LED indicator is lit, the system cannot establish communications with
the network.
Yellow Alarm (yellow LED)
The yellow alarm is lit whenever the far end has lost synchronization to its
incoming signal. In the superframe format, a transmitted yellow alarm has a zero
(0) bit in the second bit position of every eighth-bit. In the extended superframe
format, a transmitted yellow alarm consists of repeating 16-bit patterns
containing eight binary one (1) bits followed by eight binary zero (0) bits on the
facility data link.
Sync Alarm (red LED)
This LED (labeled SYNC LOSS), when lit, indicates that the frame bit in the
received data cannot be found.
Signal Alarm (red LED)
The signal alarm (labeled SIG LOSS) turns on to indicate that the DXP has lost
its incoming signal.
Blue Alarm (red LED)
When this alarm indicator is lit, the alarm indication signal (AIS) consisting of
all one (1) bits is being received to indicate that the far end has lost its received
signal. The purpose of this signal is to maintain the system clocks during a link
failure.
Bipolar Alarm (red LED)
The system converts the digital bitstream in T1 communications to a bipolar
format through a process called alternate mark inversion (AMI). The voltage
polarity of the ones pulses (marks) alternates between Plus and minus with a zero
(space) represented by no pulse. A bipolar violation occurs whenever two
successive pulses are of the same polarity. This alarm LED indicates a bipolar
violation (BPV) has occurred. It is important to note that BPV errors are not
passed through regeneration points.
Cyclic Redundancy
Check (red LED)
When using the ESF format, the cyclic redundancy check (CRC) indicator lights
whenever there is a discrepancy in the check sum received for an incoming frame
from the originating system and the locally calculated check sum. This
discrepancy indicates a data error in the received frame. The CRC is enabled by
DIP switch SW2-4.
Slip (red LED)
This indicator is turned on whenever a frame slip is detected. This is caused by
the transmit clock not being synchronized with the receive clock.
Unlock (red LED)
The transmit frequency (1.544 Mhz) is not locked with the receive clock when
this indicator is lit.
18 – Installing The DXPT1 Line Board
Installing The DXPT1 Line Board
IMI89–214
B8ZS)/COFA (green LED)
This is a dual-purpose indicator. Depending on how you set DIP switch SW2-6,
this indicator reports either a change of frame alignment (COFA) at
re-synchronization time (default setting) or bipolar 8-zero substitution (B8ZS)
code words detected in the received data.
RLB, LLB, and
PAYL (red LEDs)
Whenever a loopback routine is active, either the remote loopback (RLB), local
loopback (LLB), or payback loopback (PAYL) mode (selected by DIP switches
SW2-7 and SW2-8) is indicated by the appropriate LED being lit.
PRI and SEC (green LEDs)
The PRI and SEC LEDs on the DXOPT-SYN card light to indicate where the
receive clock reference is originating from—the primary or secondary DXPT1
board location. When two or more DXPT1 boards are installed, you make the
primary and secondary assignments via jumpers on the the DXAUX board. If
only one DXPT1 board is installed, you can set the jumpers so that both LEDs
will light.
UNLOCKED (red LED)
When lit, the Unlocked LED indicates either the DXOPT-SYN card is defective
or the receive frequency is out of tolerance (1.544 Mhz ± 200 Hz).
MANUAL (red LED)
This LED, when lit, indicates that the manual mode has been selected via the
AUTO/MANUAL mode switch on the DXOPT-SYN card. When you select the
manual mode (normally for maintenance/troubleshooting ), you can select either
the primary or secondary timing reference by setting the PRI/SEC switch on the
DXOPT-SYN card. For normal operation, select the automatic mode. Do not
manually force the clock reference to primary or secondary if the appropriate
green LED is not lit. This will cause the VCO oscillator to default to its
minimum or maximum tolerance, and the T1 board(s) may not frequency-lock.
Installing The DXPT1 Line Board – 19
IMI89–214
6.1
Installing The DXPT1 Line Board
Viewing The DXPT1 Board Alarms And Indicators
LED*
LABEL
ERROR OR STATUS CONDITION WHEN LED IS LIT
l
(Status)
l
Red
Rapid flash = defective board
Steady on = board in wrong slot or board constraints violated
Off with repeated five second blink on = normal operation
(T1 trunk idle)
On with repeated five second blink off = normal operation
(T1 trunk busy)
Communications with network cannot be established
(out-of-service)
Disruption in remote T1 service
¤
Yellow
l
l
l
Sync
SIG
Blue
l
l
Bipolar
CRC
l
l
¡
SLIP
Unlock
B8ZS/COFA
l
l
l
RLB
LLB
PAYL
¡
¡
¡
¡
¡
¡
¡
¡
6.2
Loss of sync with the incoming signal
Loss of incoming signal
Alarm indication signal (AIS) being received (indicates loss
of signal at far end)
Bipolar violation detected
Cyclic redundancy check error in incoming frame if SW2-4
is enabled (ESF only)
Frame slip detected
Transmit frequency (1.544 MHz) not locked with receive clock
B8ZS/COFA (B8ZS zero suppress mode/change of frame
alignment) per SW2-6
Remote loopback active
Local loopback active
Payload loopback active
Diagnostics codes (for factory test only)
Diagnostics codes (for factory test only)
Diagnostics codes (for factory test only)
Diagnostics codes (for factory test only)
Diagnostics codes (for factory test only)
Diagnostics codes (for factory test only)
Diagnostics codes (for factory test only)
Diagnostics codes (for factory test only)
Viewing DXOPT-SYN Synchronization Card Alarms And Indicators
LED*
¡
¡
l
LABEL
PRI
SEC
UNLOCKED
l
MANUAL
ERROR OR STATUS CONDITION WHEN LED IS LIT
Timing reference is present from the DXPT1 primary board
Timing reference is present from the DXPT1 secondary board
Trouble (defective DXOPT-SYN card or receive frequency
out of tolerance (1.544 MHz ± 200 Hz))
The manual mode is active for selecting the DXPT1 reference
NOTE: Red /Yellow LEDs, when lit, indicate errors or non-standard configuration for normal operation. Green
LEDs indicate a normal condition.
*LED color legend
l = Red
¤ = Yellow
¡ = Green
20 – Installing The DXPT1 Line Board
Installing The DXPT1 Line Board
IMI89–214
Locating The Alarms And Indicators
Installing The DXPT1 Line Board – 21
IMI89–214
Installing The DXPT1 Line Board
7.0 Understanding Installer/User
Information Regarding FCC Rules and Regulations
This electronic key system complies with Federal Communications Commission (FCC) Rules, Part 68. The FCC
registration label on the DXP contains the FCC registration number, the ringer equivalence number, the model
number, and the serial number or production date of the system.
7.1
Notification To Telephone Company
Unless a telephone operating company provides and installs the system, the telephone operating company which
provides the lines must be notified before a connection is made to them. The lines (telephone numbers) involved,
the FCC registration number, and the ringer equivalence number must be provided to the telephone company.
The FCC registration number and the ringer equivalence number of this equipment are provided on the label
attached to the common equipment. The user/installer is required to notify the telephone company when final
disconnection of this equipment from the telephone company line occurs.
7.2
Compatibility With Telephone Network
When necessary, the telephone operating company provides information on the maximum number of telephones
or ringers that can be connected to one line, as well as any other applicable technical information. The telephone
operating company can temporarily discontinue service and make changes which could affect the operation of this
equipment. They must, however, provide adequate notice, in writing, of any future equipment changes that would
make the system incompatible.
7.3
Installation Requirements
Connection of the electronic key system to the telephone lines must be through a universal service order code
(USOC) outlet jack supplied by the telephone operating company. If the installation site does not have the proper
outlet, ask the telephone company business office to install one. The correct outlet jack for this system is either a
type RJ21X or type RJ14C.
7.4
Party Lines And Coin Lines
Local telephone company regulations may not permit connections to party lines and coin lines by anyone except
the telephone operating company.
7.5
Troubleshooting
If a service problem occurs, first try to determine if the trouble is in the on-site system or in the telephone
company equipment. Disconnect all equipment not owned by the telephone company.
If this corrects the problem, the faulty equipment must not be reconnected to the telephone line until the problem
has been corrected. Any trouble that causes improper operation of the telephone network may require the
telephone company to discontinue service to the trouble site after they notify the user of the reason.
7.6
Repair Authorization
FCC regulations do not permit repair of customer owned equipment by anyone except the manufacturer, their
authorized agent, or others who might be authorized by the FCC. However, routine repairs can be made
according to the maintenance instructions in this publication, provided that all FCC restrictions are obeyed.
22 – Installing The DXPT1 Line Board
Installing The DXPT1 Line Board
7.7
IMI89–214
Radio Frequency Interference
The electronic key system contains incidental radio frequency generating circuitry and, if not installed and used
properly, may cause interference to radio and television reception. This equipment has been tested and found to
comply with the limits for a Class A computing device pursuant to Subpart J of Part 15 of FCC Rules. These
limits are designed to provide reasonable protection against such interference when operated in a commercial
environment. Operation of this equipment in a residential area may cause interference to radio and television
reception; in which case the user is encouraged to take whatever measures may be required to correct the
interference. If this equipment does cause interference to radio or television reception, which can be determined
by turning the equipment off and on, the user is encouraged to try to correct the interference by one or more of the
following measures: Reorient the television or radio’s receiving antenna, and/or relocate the DXP, the individual
telephone stations, and the radio or TV with respect to each other. If necessary, the user should consult the
manufacturer or an experienced radio/television technician for additional suggestions. The user may find the
following booklet prepared by the Federal Communications Commission helpful: “How to Identify and Resolve
Radio-TV Interference Problems.” This booklet is available from the Government Printing Office, Washington
D.C. 20402. Stock No. 004-000-00345-4.
This equipment has been tested and found to comply with the limits of a Class A digital device, pursuant to Part
15 of the FCC Rules. These limits are designed to provide reasonable protection against harmful interference
when the equipment is operated in a commercial environment. This equipment generates, uses, and can radiate
radio frequency energy and, if not installed and used in accordance with the instruction manual, may cause
harmful interference to radio communications. Operation of this equipment in a residential area is likely to cause
harmful interference in which case the user will be required to correct the interference at his own expense.
This digital apparatus does not exceed the (Class A) limits for radio noise emissions from digital apparatus set out
in the Radio Interference Regulations of the Canadian Department of Communications.
Le pre’sent appareil nume’rique n’emet pes de bruits radioe’lectriques de’passant les limites applicables aux
appareils nume’riques (de la class A) prescrites dans le Re’glement sur le brouillage radioe’lectrique e’dicte’ par
le ministe’re des Communications du Canada.
CAUTION
Changes or modifications to this unit not expressly approved by the party responsible for compliance
could void the user’s authority to operate the equipment.
Installing The DXPT1 Line Board – 23
IMI89–214
7.0
Installing The DXPT1 Line Board
Knowing The Specifications
DXP Capacity
Four T1 boards
(main LINE2, UNV5– expansion UNV8, UNV12)
Modes
Superframe, extended superframe
Framing
D4
Channels Allocated
8, 16, or 24
Industry Standards
ANSI T1.403-1989
AT&T PUB 62411
Maximum Output
2.4V to 3.6V base to peak, short circuit
protection to 120 mA, rms
Line Rate
1.544 Mbps
Yellow Alarm Type
Superframe Mode
Extended Superframe Mode
Signaling
Signaling Protocols
Dialing
Bit 2 zero in all channels or Japanese 12th
frame method, selectable
Alternating bytes = all zeros and all ones;
(prohibiting ANSI FDL messaging during
yellow alarms is selectable)
Loop Start (subscriber end)
Ground Start (subscriber end)
E&M
Direct Inward Dial (DID)
DTMF or Dial Pulse
Line Code
Type
Zero Suppression
Bipolar AMI
B7 or B8ZS selectable
Protocol Type (DID, E&M) Wink, Delay-Dial, and Immediate Start
(dial pulse only for immediate start)
Receive Sensitivity
-26 dB or -36 dB selectable
DID Type Restriction
Impedance
100 Ohms
DXP Loss Insertion
Transmit
Receive
-6 dB (selectable to 0 and -3 dB per channel)
0 dB
Clocking
Synchronization
Limited to four of five types when mixing
tone/dial pulse/wink/delay dial/immediate
start)
Slave mode from DXOPT-SYN card on
Auxiliary board
T1 Connector
RJ48C, miniature 8-position, shielded
(per ANSI T1-403, 1989)
Min. RX Freq. Capture
1.544 MHz ± 200 Hz, T1 board;
16.384 MHz ± 2048 Hz, Sync card
T1 Cable
Up to 6,000 feet between DXPs, 22 AWG,
twisted-pair, no external components
TX Master Mode Freq.
1.544 MHz ± 75 Hz
CSU Function
Built-in; CPE or CARRIER selectable (ESF)
Transmit Attenuation
Manual
Automatic
0, -7.5, -15, or -22.5 dB selectable
Default
Loopback Modes
Superframe Mode
Local or remote loopback, manual
Network loopback inband command;
set 00001 5sec, reset 001 5 sec.
Input Jitter Tolerance
138 UI @ 1 Hz; 0.4 UI @ 10 KHz—100 KHz
(0 dB line); corner frequency = 6 Hz (attenuates
20 dB per decade above corner)
Extended Superframe ModeLocal, remote, payload loopback (manual)
FDL ANSI network remote loopback
FDL ANSI network payload loopback
Surge Protection
1 AMP fuse and transient protection for metallic
>6 volts P-P; Longitudinal (tip—ring and chassis
ground) protection 1500 volts minimum.
LED Alarms/Errors
Elastic Store
Two frames, no frame loss when slipping
Compliance
FCC Part 68/Doc
FCC Part 15
UL-1489/CSA (safety):
24 – Installing The DXPT1 Line Board
Status
Red Alarm
Yellow Alarm
Blue Alarm
Loss of receive synchronization
Loss of signal
Bipolar error(s)
CRC errors (ESF)
Slip errors
Phase Lock error
Installing The DXPT1 Line Board
IMI89–214
8.0 Defining The T1 Terms
Bipolar
A bipolar signal is composed of alternating pulses that both represent a digital logic 1. The positive pulse is a (+)
and the negative pulse is a (-). Zero volts represents a space, or digital logic 0.
Bipolar Violation (or error)
A bipolar error is a digital logic 1 (or mark) that has the same polarity as its predecessor.
NOTE: Every time the system regenerates the signal stream, it corrects any bipolar errors; therefore, it prevents
end-to-end error checking from using bipolar errors.
B8ZS (Binary Eight Zero Substitution)
This is a technique to send an all-zero channel without violating the ones-density requirement (a single one in
each channel and no more than 15 zeros in a row). Voice transmission will not allow an all zero channel. The
system accomplishes B8ZS suppression by inserting a special bipolar error that is interpreted, not as an error, but
an all zero channel. The B8ZS feature replaces the all-zero channel two different ways. The feature replaces the
all-zero channel with the sequence 000 + - 0 - + if the preceding pulse was a +, and the feature replaces the
all-zero channel with the sequence 000 - + 0 + - if the preceding pulse was -. The + represents a positive pulse,
the - represents a negative pulse, and 0 represents no pulse. Set the B8ZS feature with switches SW1–5 and
SW1–6.
CAS (Channel Associated Signalling)
The Channel Associated Signalling is the only inbound signalling method currently supported by the DXPT1
board.
COFA (Change of Frame Alignment)
When switch SW2-6 is off, the green LED on the DXPT1 indicates whether the network source or the network
span caused the last frame synchronization. (This indication disregards the first re-sync at cold start or a system
reset —cold start and reset causes the network source to re-sync.) A COFA occurs if the network source does a
re-sync. The COFA is a diagnostic tool that identifies the source of the loss of frame synchronization.
CPE/Carrier Equipment
The DXPT1 is normally classified as Customer Premise Equipment (CPE). If you use SW2–2 to configure the
DXPT1 board to use the internal CSU while in the ESF mode, the network may require that the system be
classified as Carrier Equipment (CE). The information packet that the DXPT1 board sends to the network
contains a facility data link (FDL) maintenance message that has a bit in it that provides this identification.
CRC (Cyclic Redundancy Check)
A method of checking errors from the transmission source to the destination. For T1 operation, CRC caculates a
checksum depending on the data in a frame. The system uses CRC in ESF mode exclusively. (You must enable
CRC with DIP switch SW2-4).
Delay Dial E&M, DID Protocol Type
Once seized by a calling system, the system being called makes A=1 and B=1 until it is ready to receive digits.
When it is ready to receive digits, it makes A=0 and B=0. The system uses a delay dial protocol when wink
protocol timing is not compatible to the network.
Dial Pulse – T1
Dial pulse is a method of sending address digits (numbers) using A and B bits logic bits instead of sending DTMF
tones. Some carriers may not support dial-pulse signalling. While the method is slower when compared with
tones, it requires no DTMF receivers.
Installing The DXPT1 Line Board – 25
IMI89–214
Installing The DXPT1 Line Board
Direct Inward Dial (DID) T1 Trunk
DID is a protocol for inbound calls where the network sends the extension number during the beginning of the
call. The system supports the 0 through 7 inbound digits. The network does not translate the digits to a valid
extension—the system’s DID translation tables perform this action.
DS-0 (Digital Signal-Level Zero)
Digital Signal-Level Zero is a single 64Kbit channel inside a T1 span.
E & M T1 Trunk
E&M is a signalling protocol that supports both inbound and outbound digits. Inbound digits from the network are
already translated to a 3–digit or 4–digit valid extension. E & M is symmetrical from both ends and ignores the
subscriber/office classification of other trunks. Use this signalling protocol for interconnecting two DXP Plus
systems.
Extended Superframe Mode (ESF)
Extended Superframe Mode consists of 24 frames. The frame bit uses only 6 frames leaving 18 bits for other
purposes. These spare 18 bits provide 6 bits for CRC information and 12 bits for a facility data link. The facility
data link is for maintenance information (as defined by the ANSI T1.403 specification). Like the superframe
mode, the 64–Kbit user channels have 24 frames available for use.
Ground Start T1 Trunks
Ground start is a call signalling protocol that monitors only outbound digits and supports disconnect supervision.
Ground start protocol supports only the subscriber end of the communications link
FDL (Facility Data Link)
The Facility Data Link is a 4–Kbit communication link from the network to the DXPT1 board only when the
board is operating in the ESF mode. The system sends preemptive messages (for example, yellow alarm and
loopback), if needed, and sends error packets to the network once a second. The packets contain alarm history in
accordance with the ANSI T1.403 specification.
Fractional T1
Fractional T1 is a T1 span where the user uses less than 24 channels. The DXPT1 board allocates eight or 16
channels to a fractional T1 but does not reallocate unused channels in the eight, 16, or 24 mode to other resources.
A fractional T1 in ESF mode will nullify the CRC and other error checking capability since the network shares
channels.
Immediate Start Protocol State
Once a calling system seizes a called system, the calling system sends address digits to the called system without
requiring an acknowledgement. Inbound immediate start protocol does not support tone dial. Dial-pulse is
adequate however. Immediate start protocol is applicable to DID and E&M tie lines.
Inband Signalling
A signalling method where the system sends overhead signalling along with channel traffic.
ISDN (Integrated Services Digital Network) Primary Rate (also called PRI)
Currently not offered by the DXPT1 board.
Loopback Local
An operation method that loops the DXPT1 board’s transmit output and receive input paths. The loopback
terminates all traffic and halts call processing. While in this idle condition, the system continues to transmit the T1
transmit stream to the network but it will not answer incoming calls. If the remote T1 equipment is the clock
source (primary or secondary) for the DXOPT-SYN card, the remote equipment terminates the reference signal
because the network receive circuit is open in local loopback. You initiate local loopback by setting the
appropriate SW1 switches. The main purpose of local loopback is to verify the DXPT1 board’s ability to
synchronize properly. Loopback local operation is applicable to superframe adn extended superframe modes.
26 – Installing The DXPT1 Line Board
Installing The DXPT1 Line Board
IMI89–214
Loopback Payload
The loopback payload feature is an ESF-only method of loopback which loops the network receive input path to
the remote T1 equipment’s transmit output path. This loopback method does not loop the first bit of each frame to
allow the DXPT1 board’s facility data link to continue to transmit maintenance information. You can use switches
SW2–7 and SW2–8 to manually initiate the payload loopback or you can allow the network to send an FDL
message to initiate or restore the payload loopback. The DXPT1 board goes out-of-service during the loopback
time.
Loopback Remote
The loopback remote feature loops the network receive input path to the remote T1 equipment’s transmit output
path. The remote loopback feature terminates all traffic and halt any call processing. You can use the SW2
switches to manually initiate remote loopback or you can allow the network to remotely initiate the condition. In
superframe mode with SW2–1 set to on, the network can send a special in-band pattern
(00010001000100010001.... min 5 seconds) to cause the DXPT1 board to automatically enter the remote
loopback mode. The network can disable the loopback by sending a different in-band pattern
(001001001001001001001.... min 5 seconds). In ESF mode, the DXPT1 board’s facility data link, or maintenance
channel, can enable and disable remote loopback automatically or you can set SW2–7 on and SW2–8 off to
manually enable remote loopback or set both switches off to manually disable the feature. Loopback remote
operation is applicable to superframd and extended superframe modes.
LIU Line Interface Unit
The line interface unit is the interface between the T1 copper wires and the DXPT1 board’s framing circuitry.
The LIU is responsible for separating the 1.544MHZ receive clock from the incoming stream and converting
bipolar Alternate Mark Inversion (AMI) to 5–volt digital logic. The LIU also supports the automatic line build-out
that regulates the transmit level according to the receive strength (LIU-2 switch).
Loop Start T1 Trunk
Loop Start T1 Trunk is a network protocol that monitors outbound digits to the DXPT1 board. This protocol does
not support disconnect supervision. Loop start protocol supports the subscriber end of the communications path
but does not support the office (network) end.
Primary Clock Reference
The straps on the DXAUX board designate the primary clock reference. Primary clock reference is the first choice
reference clock used to synchronize the DXP Plus to the incoming span. If the system looses synchronization, it
uses its secondary clock reference. If the secondary clock reference is not available, the DXOPT-SYN card’s
variable clock oscillator (VCO) switches to the fixed oscillator on the DXSRV (services) board. When it does
this, slips occur.
Repeater
A repeater is a amplifying device that central office technicians place at approximately one mile intervals along a
T1 circuit to boost the T1 signal. The T1 specifications allow a maximum of 50 repeaters along a communications
path.
Slip
This term describes the condition that exists when the transmit 1.544 MHz clock is different from the receive
1.544 MHz clock. When the system collects or looses a frame of information due to the span frequencies being
different, the system generates a slip error. Slip does not affect voice transmissions and may not affect modem
traffic; however slip does effect digital data traffic. The DXPT1 board does not currently support digital data
traffic. Also, at times a central office takes a T1 span out of service if too many slips occur—one or two a day is
permissible (the carrier supplier will furnish you with an an exact number if you request that information from
them).
Installing The DXPT1 Line Board – 27
IMI89–214
Installing The DXPT1 Line Board
Smart-Jack (Network Interface Box)
A smart jack is a demarcation box provided by the central office. A smart jack provides isolation and increased
signal drive (up to one mile) and can respond to loopback commands for diagnostic purposes. The central office
usually provides an 8–pin modular jack for T1 equipment connection. Pin 1 of the modular jack goes to pin 1 of
the DXPT1 modular jack, and so on. Only pins 1 and 2 (DXPT1 receive), 4 and 5 (DXPT1 transmit) require
connecting.
Superframe Mode (SF)
The standard T1 mode consists of 12 frames per superframe cycle. The first frame bit remains constant and
rotates through a 12-bit pattern. By identifying the frame pattern, the system can select the sixth and twelfth
frame for the AB bit signalling inband method. T1 parameters allow for 24 64–Kbit user channels.
Suppression
Suppression is a means to prevent more than 15 zeros in a row and not less than 1 pulse (mark) per channel. The
DXPT1 board supports two suppression methods. These are the B7 method and the B8ZS method (selected by
SW1–5 and SW1–6). The B7 method inserts a logic 1 in the seventh bit position of a channel if all bits are zeros.
The B8ZS method inserts a bipolar violation that will be identified and stripped at the receiving end (selected by
switches SW1–5, and SW1–6). Voice coding should not allow an all zero channel.
Unlock Alarm
On a normally operating DXPT1 board, the unlock alarm LED is always off. If this LED is on, it indicates that
the phase lock loop creating the transmit 1.544 MHz frequency is defective. For this indicator to be meaningful,
the DXOPT-SYN card must be synchronized (no red LEDs on). If the DXOPT-SYN card is not synchronized,
you must correct that situation.
Wink E&M, DID Protocol State
This effect is a quick response by a called system (A=1, B=1) to a calling system that seized the line. The
response indicates that the called system is ready to receive address digits.
Yellow Alarm
The yellow alarm indicates that the network has lost its incoming frame synchronization. The DXPT1 board
signalling is inactive for approximately three to four seconds during this alarm time, and the system halts all call
processing. If the system clears the received yellow alarm within the time limit, the DXPT1 board’s inactive state
terminates and call processing continues.
The system sends a yellow alarm to the network if it loses incoming frame synchronization or if the DXPT1 loses
communications to the CPU board. Received and transmitted yellow alarms can not exist at the same time. If such
a situation occurs, the system inhibits the transmitted alarm.
ZBTSI (Zero Byte Time Slot Interchange)
Zero Byte Time Slot Interchange is a complex technique to insure that the T1 transmission meets the pulse density
requirement. This ZBTSI technique is unpopular in the telephone industy, and the DXPT1 board does not support
the feature.
Accredited by the Dutch Council
for Certification for certification
and registration activities.
Comdial’s Quality Management System Is
Certified To The ISO 9001 Standard.
R
Charlottesville, Virginia 22901-2829
World Wide Web: http://www.comdial.com/
R
Installing and Programming The ISDN–PRI Interface
In The DXP Digital Communications System
Introducing The ISDN–PRI Interface
Integrated Services Digital Network (ISDN) provides integrated voice and data over a common telephone
company facility. There are two methods of ISDN access that are currently available: ISDN–BRI (basic) and
ISDN–PRI (primary). ISDN–BRI provides a way for subscribers to get digital service from the telephone
company supplier for two telephones or a telephone and a data device over one special pair of wires. ISDN–PRI
provides a way for subscribers to get digital service from the telephone company supplier for 24 lines over two
special pairs of wires. This latter method is the concern of this publication.
ISDN–PRI access directly connects a multiple-station, digital communications system to the telephone company’s
ISDN network through a single high-speed line. This high-speed line is commonly known as T1 in North America
and consists of 24 digitized channels. ISDN–PRI access consists of a grouping of 23 voice channels (B–channels)
and one signalling or control channel (D–channel). B–channels are clear channels suitable for voice or data
transmission while the D–channel is a packet-switched link for call set-up and signalling. When you use
ISDN–PRI access with T1, one of the T1 channels serves as the signalling channel. This arrangement is
sometimes referred to as 23B+D ISDN service.
The DXPRI is a circuit card that you install on a revision B or later DXPT1 line board with special-purpose
firmware to provide ISDN–PRI access to the digital communications system. The DXPRI card handles the
D–channel signalling protocol and passes messages to the DXPT1 board. A single DXPRI card can control
multiple DXPT1 boards when installers tie the boards together through board programming action. This
arrangement (known as NFAS or Network Facility Associated Signalling) allows the system to derive 24
B–channels from all boards except the one channel that it needs for signalling. When installers do this, the
DXPT1/DXPRI combination that provides the control is designated as DXPT1–PRI; and the boards being
controlled are designated as DXPT1–NFAS. The NFAS boards do not require a DXPRI card as they are slaves to
the master –PRI board. Throughout the remainder of this publication, the term T1/PRI means a T1 board
specifically configured for ISDN–PRI operation be it either a DXPT1–PRI or a DXPT1–NFAS board.
Since central office protocols differ, the DXPRI card supports several protocol arrangements and provides
interface support for several signalling types. The programmer and the end user can select the interface support
that the system needs for a particular application. The support that they choose determines the way that the
telephone company treats the signal.
The DXPRI card provides a calling number identification feature that provides the following services: delivery of
network provided calling numbers, calling line identification presentation (CLIP), or automatic number
identification (ANI). On originated calls, the system automatically provides the calling number if available;
otherwise, it provides the default directory number. For incoming calls, the called station displays the calling
number if available; otherwise, the display shows information determined by station class of service
programming. The system programmer can customize the caller ID parameters for outgoing calls as site
requirements dictate.
This manual has been developed by Comdial Corporation (the “Company”) and is intended for the use of its customers and service personnel. The information in this manual is subject to change
without notice. While every effort has been made to eliminate errors, the Company disclaims liability for any difficulties arising from the interpretation of the information contained herein.
The information contained herein does not purport to cover all details or variations in equipment or to provide for every possible contingency to be met in connection with installation, operation, or
maintenance. Should further information be desired, or should particular problems arise which are not covered sufficiently for the purchaser’s purposes, contact Comdial, Inside Sales Department,
Charlottesville, Virginia 22906.
Printed in U.S.A.
IMI89–262.01
12/96
IMI89–262
Installing And Programming The DXPRI Card
Introducing The T1/PRI Line Board
The revision B or later DXPT1 board with special-purpose firmware serves as host for the DXPRI card and gives
the digital communications system the capability to handle up to 24 channels of voice and/or data transmissions
over a single four-wire cable using multiplexing techniques. The DXPT1 board includes a customer service unit
(CSU) to eliminate the need for a external CSU.
Defining T1/PRI Operation
T1/PRI is the digital two-way transmission of telecommunications over a single high-speed circuit. Up to 24
separate voice or data transmissions form digital pulses that are transferred at the rate of 1.544 million bits per
second (Mbps) over the T1/PRI trunk. At the receiving end, the digital pulses are decoded into 24 separate circuits.
Pulse characteristics such as repetition rate, pulse width, pulse amplitude, and average ones density ((ratio of one
(1) bits to zero (0) bits)) are as specified by digital signal level 1 (DS-1) described in American National
Standards Institute Specification, ANSI T1.403-1989.
Detailing Where You Can Install T1/PRI Boards and Its Supporting Needs
The DXP supports a maximum of 128 lines and each T1/PRI board handles 24 channels, and this combination
determines the number of boards that you can install in the system. Of course, any other line boards that you
install, such as loop start, DID or multipurpose, reduce the number of lines available for T1/PRI service and thus
reduces the number of T1/PRI boards that you can install.
You can place T1/PRI boards in physical board slots 3, 5, and 8 in the main cabinet and physical board slots 12,
14, and 16 in the expansion cabinet. There are certain installation considerations associated with T1/E1 board
placement.
•
When a 24-port T1/E1 board occupies physical slots 3, 5, 12, 14, and 16, any analog line board type can occupy
physical slots 2, 4, 11, 13, and 15.
•
When a 24-port T1/E1 board occupies physical slot 8, any analog line board type can occupy physical slot 6;
however, no board of any type can occupy physical slots 7 and 9.
Whenever you install one or more T1/PRI boards, and the DXP is receiving its timing signals from an
external source, you must install one synchronization card (DXOPT–SYN) on the auxiliary board. This
means that when you connect the system to central office (CO) lines, you must include a synchronization card,
and the DXP clock must be controlled by CO signalling.
If you are unfamiliar with the terms and component names associated with the T1/PRI digital carrier transmission
option, refer to paragraph titled, Defining The T1/PRI Terms, at the end of this publication.
CAUTION
For operation with the DXP, the T1/PRI board must be Revision B or higher and have special-purpose
firmware installed.
2 – Introducing The T1/PRI Line Board
Installing And Programming The DXPRI Card
IMI89–262
Understanding The DXOPT-SYN Synchronization Card
The DXOPT–SYN card uses a reference timing frequency of 8 KHz that it derives from the 1.544 MHz frequency
supplied to the T1/PRI board by the central office (CO) or other external source. By referencing this 8 KHz with
8 KHz timing derived internally, the master 16.384 MHz voltage-controlled oscillator (VCO) can be
synchronized. The transmit clock (1.544 MHz) is derived from the 16.384 MHz frequency on the T1/PRI board. If
the 1.544 MHz received frequency is incorrect (not within a 200 Hz tolerance), the system may loose
synchronization with the CO or other external source. The DXOPT–SYN card reports this condition by turning on
the appropriate alarms on the T1/PRI board and DXOPT–SYN card. A loss of clock synchronization causes frame
slips that result in data communications errors.
The DXOPT–SYN card allows two timing references (primary and secondary) to be selected. You can select
either automatic or manual (for maintenance mode). In the automatic mode, a loss of primary timing causes the
system to switch to the secondary timing reference. If both the primary and secondary timing references are lost,
the VCO oscillator on the DXOPT–SYN card is defaulted to the fixed 16.384 MHz oscillator on the services
board. This results in the loss of clock synchronization.
Understanding The DXOPT-SYN Synchronization Card – 3
IMI89–262
Installing And Programming The DXPRI Card
Configuring The T1/PRI Board
When the factory arranges the T1/PRI board for ISDN–PRI support, it installs the DXPRI card and the
appropriate chip firmware on both boards. For field up-grade of existing T1 boards, you must install the DXPRI
card on your existing DXPT1 board and change the firmware on the DXPT1 board. For instructions to do this,
refer to the paragraph titled Up-Grading Your DXPT1 Board For ISDN–PRI Support, located at the end of this
publication.
Before you install a T1/PRI board in the digital communications system, determine if you must meet special
system requirements. If you do have special system requirements, use the dual in-line pin (DIP) switches provided
on the board to re-configure the T1/PRI board.
The board contains 28 DIP switches (three 8-position modules and one 4-position module). Rectangular cutouts in
the front-edge panel provide access to these switches.
The eight DIP switches nearest the bottom of the panel are accompanied by eight green LED indicators.
NOTE: These eight switches and their associated indicators are for diagnostic purposes only. The setting of these
switches does not affect the function of the T1/PRI board. The recommended setting for switches 1,2, and
4–8 is 0 and the setting for switch 3 is 1. These settings cause the green diagnostic lights to give
information about PRI layer 2 and 3 operation.
The remaining 20 DIP switches labeled SW1, SW2. and LIU are for configuring the T1/PRI board to meet
specific operating requirements. The default setting for all of these switches is 0 except for LIU–2, which you
should set to 1. This is the standard configuration for most customer applications. However, special customer
needs may require that you reset one or more of these switches using the procedure given below.
1. Obtain a static discharge wrist strap and attach it to one of your wrists. Make sure to adjust the strap for a
snug fit against your skin; do not apply the strap over any of your clothing.
2. Connect one end of the wrist strap-cord to the wrist strap and the other end to earth ground.
NOTE: With the DXP cabinet in the installed position, the ground lug on the right side of the cabinet is normally
a good grounding point since this lug should have a heavy ground wire connected between it and a good
earth ground.
3. Remove the T1/PRI board from its static protection bag and set it on a static-safe work area.
4. Using a ball-point pen or similar object, move the DIP switches from left (0 position) to right (1 position) as
needed. All DIP switches are facing left for typical applications. The paragraph titled, Setting The T1/PRI
Switches, details the DIP switch descriptions
4 – Configuring The T1/PRI Board
Installing And Programming The DXPRI Card
IMI89–262
SW1
LIU
1
0
(Default)
1
2
3
4
1
0
(Default)
1
2
3
4
5
6
7
8
Reset Pushbutton
(Behind Hole)
See Text
For Settings
See Text
For Settings
SW2
0
(Default)
1
2
3
4
5
6
7
8
1
See Text
For Settings
Diagnostic
Switches and LEDs
0
(Default)
1
2
3
4
5
6
7
8
1
See Text
For Settings
T1002f.cdr
Setting The DIP Switches
Configuring The T1/PRI Board – 5
IMI89–262
Installing And Programming The DXPRI Card
Setting The T1/PRI Switches
NOTE: The system only reads the SW1, SW2, and LIU DIP switches when you apply power to the board or do a
manual reset. With power on, manually reset the board by inserting a slender object, such as a
straightened-out paper clip, into the small hole located between the Yellow and Syn LEDs on the
front-edge panel. You can also reset the board remotely from a video display terminal or personal
computer. A reset causes a service disruption.
Setting Switch Options SW1–1 Through SW1–8
Down-Load PRI Code To Flash
The DXPRI card has internal software that resides in FLASH memory that you can up-grade from the DXP serial
data port. You must set SW1–8 for down load or for normal operation.
SW1 DIP
Switch
Number
1 (top)
2
3
4
5, 6, 7
8
Switch Position
0 (default)
0 (default)
0 (default)
0 (default)
0 (default)
0 (default)
1
6 – Setting The T1/PRI Switches
Function
Reserved for future use.
Reserved for future use.
Reserved for future use.
Reserved for future use.
Reserved for future use.
Down-load PRI Code To Flash
Normal (run)
Down-load
Installing And Programming The DXPRI Card
IMI89–262
Setting Switch Options LIU–1 Through LIU–4
Receive Sensitivity
The equalizer gain logic (EGL) determines how sensitive the receive circuits are to the incoming signals. You set
the level for -26 dB or -36 dB by using DIP switch LIU–1. (Normally, the -26 dB level setting is the better choice.)
Transmit Level Attenuation
You can manually set the transmit level for a particular value (0, -7.5, -15, or -22.5 dB) or select the automatic
feature that sets the transmit level automatically depending on the receive signal. A weak receive signal causes a
strong transmit signal and vice versa. Use DIP switch LIU–2 to select either the manual or the automatic setting.
If you select the manual setting, set the desired value with DIP switches LIU–3 and LIU–4. Normally, 0 dB is
used when connecting to a network interface box.
LIU DIP Switch
Number
Switch Position
1 (top)
0 (default)
1
2
0
1 (default)
3,4
0,0 (default)
0,1
1,0
1,1
Function
RECEIVE SIGNAL SENSITIVITY
-26 dB
-36 dB
TRANSMIT LEVEL MODE
Automatic (level set by receive signal)
Manual (level set by switches 3 and 4 below)
TRANSMIT LEVEL ATTENUATION
(LIU-2 must be “1")
0 dB
-7.5 dB
-15 dB
-22.5 dB
Setting The T1/PRI Switches – 7
IMI89–262
Installing And Programming The DXPRI Card
Setting Switch Options SW2–1 Through SW2–8
Loop-back
Loop-back is the maintenance routine used to verify the receive function (local or remote) and to isolate system
problems. The network can remotely activate the loop-back feature using ESF (ANSI T1.403) facility data link.
You can manually make three different types of loop-back requests depending on the option you select using DIP
switches SW2–7 and SW2–8. These are: local, remote, and payload loop-back.
•
•
Local loop-back returns transmitted signals back to the DXP.
•
Pay-load loop-back is similar to remote loop-back except the system reestablishes framing bit.
Remote loop-back returns received signals back to the network. The ANSI T1.403 specification refers to this
feature as line loop-back.
Customer Service Unit (CSU) Identification Bit
You can set the message-oriented (C/R) bit transmitted over the ESF data link by DIP switch SW2–2 to be a zero
(0) bit or a one (1) bit. The C/R bit is used to identify the T1 signal origin as being either from customer premise
equipment (CPE) or carrier equipment such as a CSU.
Set C/R to be a zero (0) bit for customer premise equipment (CPE) or when using an external CSU (default).
Set C/R to be a one (1) bit if the network requires the T1 internal CSU to be classified as carrier equipment.
Cyclic Redundancy Check (CRC-6)
This is a method for checking the accuracy of data transmissions when using the ESF format. This method uses a
polynomial algorithm based on the content of a super-frame of data. When CRC-6 checking is enabled via DIP
switch SW2–4, an alarm will be activated whenever a CRC code (checksum) is received over the ESF data link
that does not match the locally calculated code (checksum).
Yellow Alarm During ANSI Messages On The Facility Data Link
The facility data link is available for reporting transmission performance information once a second. Normally,
these transmissions are inhibited by yellow alarms. However, you can set DIP switch SW2-5 to allow these
transmissions during yellow alarms.
Green B8ZS/COFA LED Definition
The green LED on the DXPT1 board’s edge-panel labeled “B8ZS/COFA” indicates either that B8ZS code words
are being received or that a change of frame alignment (COFA) occurred during the last synchronization by the
external T1 source or carrier equipment. You can determine which condition you want reported by how you set
DIP switch SW2–6. The default setting is for “COFA” reporting.
8 – Setting The T1/PRI Switches
Installing And Programming The DXPRI Card
SW2 DIP
Switch
Number
Switch Position
1 (top)
0 (default)
1
2
0 (default)
1
3
0 (default)
1
4
0 (default)
1
5
0 (default)
1
6
0 (default)
1
7,8
0,0 (default)
0,1
1,0
1,1
IMI89–262
Function
Reserved for future use.
reserved
reserved
CSU ID (C/R) BIT (ESF MODE)
C/R bit = 0 designates customer premise equipment (CPE)
C/R bit = 1 designates carrier equipment
Reserved for future use.
reserved
reserved
CRC (CYCLIC REDUNDANCY CHECK)
disabled
enabled
FDL YELLOW ALARM DURING ANSI MESSAGES
disabled
enabled
B8ZS/COFA LED DEFINITION
COFA (change of frame alignment)
B8ZS detect
MANUAL loop back REQUEST
no loop back
local loop back request
remote loop back request
payload loop back request
Setting The T1/PRI Switches – 9
IMI89–262
Installing And Programming The DXPRI Card
Installing The Synchronization Card On The Auxiliary Board
Whenever you install one or more T1/PRI boards, and the DXP is receiving its timing signals from an external
source, you must install one synchronization card (DXOPT–SYN) on the auxiliary board using the following
procedure.
NOTE: Whenever you install one or more T1/PRI boards, and the DXP is receiving its timing signals from an
external source, you must install one synchronization card (DXOPT–SYN) on the auxiliary board. When
you connect the system to central office (CO) lines, you must include a synchronization card, and the CO
signalling must control the DXP.
1. Switch off the DXP power supply, disconnect the AC power cord from the AC outlet and disconnect the
optional battery back-up assembly from the main cabinet power supply
2. Install your static discharge wrist strap on your bare wrist; adjust it for a snug fit. Be sure that the strap is
touching bare skin and is not isolated by clothing. Connect the wrist strap cord between the wrist strap and an
AC or earth ground
3. Loosen the retaining hardware and lift the front panel away from the common equipment cabinet.
NOTE: With the common equipment in the installed position, the ground lug on the side of the cabinet is an
appropriate grounding point since it should have a heavy ground wire connected between it and a good
earth ground.
CAUTION
Do not remove or install the auxiliary board while the DXP is powered-on or severe system problems
may occur.
4. Locate the auxiliary board, loosen the retaining screws, remove it from the main cabinet, place it in a static
protection bag, and transport it to the static-safe work area.
5. At the static-safe work area, with your wrist strap in place, remove the auxiliary board and the DXOPT–SYN
card (if used) from their static protection bags.
6. Refer to the illustration, and install the DXOPT–SYN card at the second position on the auxiliary board with
the supplied hardware.
10 – Installing The Synchronization Card On The Auxiliary Board
Installing And Programming The DXPRI Card
IMI89–262
P013
Precharge
Connector
(Not On
Rev F and later
Boards)
DO NOT PLACE THE
DXOPT-SYN CARD IN
THE TOP OPTION CARD
POSITION
DXOPT-SYN
Card
RECOMMENDED POSITION
FOR DXOPT-SYN CARD
Leave Third And
Fourth Positions
Open For Possible
Later Installation
Of DXOPT-COM
Cards
DXAUX
Board
#4-40 Machine
Screw (3X)
#4 Lockwasher (3X)
DXOPT-SYN
Card
1/4 Hex, #4-40
M-F Spacer (3X)
#6-20
ThreadForming
Screw
(2X)
#4 Lockwasher (3X)
DXAUX
Board
#4-40 Hex Nut (3X)
Installing The Synchronization Card On The Auxiliary Board
Installing The Synchronization Card On The Auxiliary Board – 11
IMI89–262
Installing And Programming The DXPRI Card
Setting The Auxiliary Board Jumpers
On the auxiliary board, set the jumper on the pair of J10 (primary) pins corresponding to the DXP cabinet slot
where you will install the T1/PRI board. Do not jumper more than one pair of J10 pins. This designates the
primary clock source for the DXOPT-SYN card
NOTE:If you install more than one T1/PRI board, designate one board slot location as primary and the other one
as secondary. Then, set the jumper on the pair of J9 pins corresponding to the board slot location you
designated as secondary. Do not jumper more than one pair of J9 pins. If you installed only one DXPT1
board, you may set both the J9 and J10 jumpers for the board slot that the board is installed in. Even
though there is only one clock source, the DXOPT-SYN card functions as though it is receiving two; that
is, the system turns on both PRI and SEC LEDs on the front edge of the card.
Check the revision level of the integrated circuit component (IC chip) installed in U19 on the auxiliary board. If
the revision level of the chip is lower than 4A, replace it with one of revision 4A or higher. When replacing the
U19 chip, make sure to use your wrist strap and a chip removal tool. The illustration shows the exact location of
chip U19 and illustrates its proper installation.
When you finish setting the jumpers, place the auxiliary board with the newly installed DXOPT–SYN card into a
static protection bag and transport the assembly to the main cabinet.
12 – Installing The Synchronization Card On The Auxiliary Board
Installing And Programming The DXPRI Card
IMI89–262
A
E
A
E
1
1
10
1
11
PRI AR
1
32
1
C31 14
11
SE AR
U10
J2
33
54
A
E
A
E
1
1
10
C28
28
1
C33 14 U7
U2
1
1
11
J9/J10 JUMPERS
33
A
B
C
D
E
F
Alignment Notch
J5
1
UNV3 SLOT
UNV5 SLOT
LINE 8 SLOT
UNV12 SLOT
UNV14 SLOT
UNV16 SLOT
CONNECT THE PAIR OF
J6 2.
J9 PINS CORRESPONDING
*EXPANSION CABINET SLOTS
32
1
3
54
3
15
U15
25
XU19
32
15
U19
C26
20
XU20
14
C25
C5
1
3
J11
C6
20
C37
R12
U8
C34
U20
71
54
U18
TO THE BOARD LOCATION OF
THE DXPT1 BOARD YOU WANT
TO USE FOR THE SYSTEM'S
SECONDARY CLOCK
REFERENCE. YOU CAN USE
THE SAME DXPT1 BOARD FOR
BOTH CLOCK REFERENCES
BY CONNECTING THE SAME
PAIR OF PINS IN BOTH J9
AND J10 JUMPER GROUPS.
1
1
XU1
C29
C27
J13
J8
11
SE AR
JUMPER INSTRUCTIONS
1. CONNECT THE PAIR OF
J10 PINS CORRESPONDING
33 TO THE BOARD LOCATION
OF THE DXPT1 BOARD YOU
WANT TO USE FOR THE
SYSTEM'S PRIMARY CLOCK
REFERENCE.
DXAUX Board
1
1
JUMPER LOCATIONS FOR J9 AND J10
SEE TABLE BELOW FOR DEFINITIONS
1
Chip U19
PRI AR
1
1
1
U4
1
R4
CR5
R9
C7
PA022-1
01
Detailing The Auxiliary Board Jumpers
Installing The Synchronization Card On The Auxiliary Board – 13
IMI89–262
Installing And Programming The DXPRI Card
Installing Circuit Boards
CAUTION
Circuit boards are susceptible to damage caused by electrostatic discharge, and you must keep this fact
in mind as you handle the circuit boards. Refer to the Comdial publication IMI01-005, Handling Of
Electrostatically Sensitive Components, for general information. Specific handling precautions are also
included in this installation instruction.
Creating A Static Safe Work Area
When servicing the common equipment cabinet at the installation location, it is a good practice to place a
conductive mat in front of the cabinet area and ground the mat to a good earth ground. (The third wire ground of
the AC power line is also an acceptable grounding point.) The grounded conductive mat provides a safe static
electric discharge path.
When removing the common equipment cabinet from the installation location for servicing, it is a good practice to
prepare a static-safe work area on which to place the cabinet.
You should supply yourself with a static discharge wrist strap, and wear it every time you handle electronic circuit
boards either at the cabinet mounting location or at your work area.
Static
Wrist
Strap
ESD Protective
Mat
Common Point Ground
Typical Earth
Ground
ESD Protective
Worksurface
Static 2
ESD Protective
Mat
Creating A Static Safe Work Area
14 – Installing Circuit Boards
Installing And Programming The DXPRI Card
IMI89–262
Backboard
dxp040
Common
Equipment
Cabinet
Earth
Ground
Conductive
Mat
1 Meg Ohm
Resister
Static Discharge
Wrist Strap
Providing Static Protection At The Cabinet Mounting Location
Installing Circuit Boards – 15
IMI89–262
Installing And Programming The DXPRI Card
Installing The T1/PRI And Auxiliary Boards
NOTE: If you ever find it necessary to field-install a DXPRI card on a T1 board, refer to the paragraph titled,
Up-grading Your DXPT1 Board For ISDN–PRI Support, that is located at the end of this publication.
1. Normally you should disconnect the AC power cord from the AC outlet and disconnect the optional battery
back-up assembly from the main cabinet power supply; however, when necessary, you can install a T1/PRI
board in an operating system. If you must do this, connect one end of a standard telephone handset coil cord
to the pre-charge port on the power supply. During step 6, you will connect the other end of this coil cord to
the pre-charge jack on the line board.
2. Install your static discharge wrist strap on your bare wrist; adjust it for a snug fit. Be sure that the strap is
touching bare skin and is not isolated by clothing. Connect the wrist strap cord between the wrist strap and an
AC or earth ground
3. Loosen the retaining hardware and lift the front panel away from the common equipment cabinet.
NOTE: With the common equipment in the installed position, the ground lug on the side of the cabinet is an
appropriate grounding point since it should have a heavy ground wire connected between it and a good
earth ground.
4. Each board is supplied in a static protection bag for safe keeping. When you are ready to install the board,
remove it from its static protection bag.
CAUTION
If you are up-grading the software of a DXP to support T1/PRI operation from software that is earlier
than revision 10A, you will find that the up-grade software changes the system’s board layout. The
software up-grade includes a new board label that you must install on the equipment cabinets. This new
label details the proper board slot locations. Currently produced DXP systems have the proper location
labels factory installed.
5. You can place T1/PRI boards in physical board slots 3, 5, and 8 in the main cabinet and physical board slots
12, 14, and 16 in the expansion cabinet. There are certain installation considerations associated with T1/PRI
board placement.
•
When you install a 24-port T1/PRI board in physical slots 3, 5, 12, 14, and 16, you may install any analog
line board type in physical slots 2, 4, 11, 13, and 15.
•
When you install a 24-port T1/PRI board in physical slot 8, you may install any analog line board type in
physical slot 6; however, you must not install a board of any type in physical slots 7 and 9.
6. If you are installing the board in an operating system, connect the free end of the pre-charge cord that you
installed in step 1 to the pre-charge jack on the line board.
7. Orient the board with its top and bottom guides in main cabinet board cage, and press the board firmly until
its board edge connection properly mates with the connector on cabinet’s backplane. If you connected a
handset cord between the pre-charge port on DXP power supply and the jack on board. Disconnect it after
installing board.
CAUTION
When pressing circuit boards into place, press them only at the extractor lever locations.
If you apply pressure at other locations you may damage the board assembly.
8. With your static discharge wrist strap still properly installed, follow the directions of step 7, and install the
auxiliary board in the main cabinet.
9. If the installation includes a DXOPT–SYN card, make sure the lower (larger) slide switch on the front edge of
the card is in the up AUTO position. Leave the upper (smaller) switch in either position as it has no effect
when the automatic mode is selected.
10. Make a final inspection to ensure that all the boards are oriented correctly and mated properly.
16 – Installing The T1/PRI And Auxiliary Boards
Installing And Programming The DXPRI Card
IMI89–262
11. Install and tighten the supplied screws to secure the board assembly to the board cage. Do not neglect this
step! It is important because it helps in providing a protective ground condition for the board thus ensuring
RFI (radio frequency interference) and lightning protection.
12. If applicable, plug the power cable from the optional external battery assembly into the DXP power supply.
12. Connect the ISDN–PRI line to the system. (You may need to refer to the discussion on the next page titled
Connecting The ISDN–PRI Line To The System for complete details.)
14. Connect the AC power cord to the AC wall outlet and turn the power switch on. If no alarms are on (red
LEDs), and at least one of the green PRI or SEC LEDs is lit, replace the cabinet’s front panel; otherwise,
troubleshoot the installation for errors.
Physical Slots 10 through 16
As Viewed From Left To Right.
DXPT1 Line Boards Can Occupy
Slots 12, 14, and 16.
DXP031b.cdr
Physical Slots 1 and 2
As Viewed From Left To Right.
Auxiliary Boards Can Occupy
Slots 1 and 2.
Physical Slots 3, 4, and 5
As Viewed From Left To Right.
DXPT1 Line Boards Can Occupy
Slots 3 and 5.
Physical Slots 6 Through 9
As Viewed From Left To Right.
DXPT1 Board Can Occupy Slot 8.
Installing The Circuit Boards
Installing The T1/PRI And Auxiliary Boards – 17
IMI89–262
Installing And Programming The DXPRI Card
Connecting The ISDN–PRI Line To The System
Terminate the end of the ISDN–PRI line with a miniature 8-pin modular plug, and plug it into the main jack on
the front edge of the T1/PRI board.
The T1/PRI board contains a built-in CSU that protects the DXP from voltage surges, provides transmission drive
up to 6,000 feet, and performs diagnostic tests for the network. Therefore, a customer-supplied CSU is not
necessary unless your customer requires this addition.
If a direct connection to a repeater is within a few hundred feet, the transmit signal from the T1/PRI board may
overdrive the repeater. Repeaters normally operate best with -7.5 to -23 dB input signals. Arrange LIU switches 2,
3, and 4 to set the transmit signal level (0 dB is default).
IMPORTANT CAUTION
To help ensure that external over-voltage surges do not damage the system, Comdial advisors suggest
that you install a properly-grounded gas discharge tube or a similar primary protection device on the T1
trunk where it enters the building. If the site includes a network interface box, verify that there is standard
lightning protection installed externally to the box on its network side. Primary protection where the
cable enters the building is necessary to prevent a fire hazard inside the building.
Detailing the Cable Requirements
Normally, the ISDN–PRI connection to a central office is via a network interface box (smart jack). The box is
usually small with an 8-pin modular telephone jack for connecting to the customer premise T1 equipment. For
short lengths of approximately 200 feet or less, use a standard telephone cable with an 8-pin modular plug for
connection to the T1/PRI board. Make straight-through connections for pins 1, 2, 4, and 5 when using these plugs
on both ends of the cable.
When spanning distances greater than 200 feet, use a low-capacitance cable (data-grade cable) having two
twisted, solid-conductor wire pairs with shielding. The type of cable with metal shielding covering each twisted
pair provides the best immunity from electrical interference. Only connect the shielding to earth ground at one end
of the cable—do not ground the shielding at the other end of the cable.
18 – Connecting The ISDN–PRI Line To The System
Installing And Programming The DXPRI Card
IMI89–262
Front View of Main Connector
On DXPT1 Board
1
2
3
4
5
6
7
8
R1 C1
T1 Receive
R
T
C1
Transmit
T1003A
Connecting The ISDN–PRI Line To the T1/PRI Board
Connecting The ISDN–PRI Line To The System – 19
IMI89–262
Installing And Programming The DXPRI Card
Programming The System For ISDN–PRI Application
To arrange the DXP system for ISDN–PRI operation, you must take the following programming actions:
•
•
Use Board configuration programming to program the ISDN service features.
•
•
Use Line group programming to group together the lines that correspond to the T1/PRI channels.
•
•
Use Button mapping programming to map a restrict button on the ISDN station.
Use Line programming to make every ISDN line a PRI B Channel line type and make the DID/DNIS
programming choices.
Use Station programming menu to program the specific ISDN requirements in addition to the other station
programming needs.
Use Features numbering to add dialing codes for two ISDN-specific features.
Board Configuration
When you add a T1/PRI board in a common equipment cabinet board slot, that slot becomes programmable, and
you can make several programming choices that affect ISDN–PRI service.
Protocol—With the Protocol feature, match the software to the central office (CO) switch type. The switch types
that the software supports include the following items:
4ESS (AT&T* 4ESS switch protocol)
5ESS (AT&T* 5ESS switch protocol)
DMS100 (Northern Telecom** DMS100 switch protocol)
* Lucent Technologies, Murray Hill, NJ 07974
**Northern Telecom Limited, Richardson TX 75082
Default Number—This feature allows you to select a default value for the Calling Number ID. The system uses
this number to identify the calling party in the following cases: when you use the Calling Number ID Mode
feature to specify board level identification, when you do not program a calling number identification for a station
(see Station Programming for details), and when the call is a line-to-line call through the system.
Calling Number ID Mode—This feature allows you to set calling number identification at either a board level or
a station level. The selections include the following choices:
Default Number (selects board level identification such as the company’s main number)
Station Number (selects station level identification—requires that you program the Outbound
Calling Number ID and Station ID features in Station Programming)
Default With Station ID (future feature—selects board level identification for the calling number ID plus th
station ID if available.)
NFAS Membership Mode—Use this feature to specify a board’s role in a NFAS group.
Non-Member (specifies independent, stand-alone DXPT1–PRI board)
Member (specifies DXPT1–NFAS board with D-channel signalling provided by another board)
Primary (specifies DXPT1–PRI board that provides D-channel signalling for the NFAS group)
NOTE: When you are using Visual Man-Machine Interface (VMMI) to program, the system automatically applies
the Member setting where appropriate.
20 – Programming The System For ISDN–PRI Application
Installing And Programming The DXPRI Card
IMI89–262
Primary D-Channel Board—Designate the board that provides the D-channel signalling for a NFAS group with
this programming feature. Make the same designation for every board in a NFAS group including the primary
board.
NOTE: When you are using Visual Man-Machine Interface (VMMI) to program, the system automatically applies
the the Primary D-Channel Board setting where appropriate.
Interface Number—If you select any item except non-member for the NFAS membership mode, you must enter
the CO-supplied group interface number for each board in a NFAS membership group
NFAS Group Members—If the board that you are programming, is the controlling board in a NFAS group, use
this feature to designate the controlled NFAS members in the group. The list can include up to four controlled
members but must not include the primary or controlling board.
NOTE: When you are using Visual Man-Machine Interface (VMMI) to program, select NFAS Group Members
from a list of NFAS boards that are not assigned to any other group.
To understand how to program a NFAS group list, consider the example that follows below.
Assume the following parameters:
· a CO has a DMS 100 switch that provides your system with five T1 circuits configured for NFAS service,
· the CO representatives identify each circuit and specify interface numbers as 0 through 4 with interface
number 0 providing the D-channel for signalling,
· you’ve connected the T1/PRI circuits to boards five through nine in ascending slot order,
· the system requires station level calling party identification and that the main number is 804–555–1234.
For these parameters, you must program the boards to match the chart detailed below.
Logical Board
Number
Board Type
Protocol
Default Number
5
6
7
8
9
DXPT1–PRI
DXPT1–NFAS
DXPT1–NFAS
DXPT1–NFAS
DXPT1–NFAS
5
5
5
5
1
2
3
4
DMS 100
8045551234
Calling Number ID
Station Number
Mode
NFAS
Primary
Membership Mode
Primary
5
D-Channel Board
Interface Number
NFAS Group
Members
0
6, 7, 8, and 9
Programming The System For ISDN–PRI Application – 21
IMI89–262
Installing And Programming The DXPRI Card
Line Programming
Conditioning a line port as PRI B Channel.
When you plan for a line to provide ISDN–PRI service, you must program it to be a PRI B Channel line. The
system automatically defaults to this programming setting for any lines that you assign to a T1/PRI board. With
the line conditioned to be a PRI B Channel line, you must set the DID/DNIS parameters for the line.
Making The DID/DNIS Programming Choices
The common carrier supplies DNIS information as DTMF digits. When the DNIS feature is combined with the
Automatic Number identification (ANI) feature, the common carrier delimits the ANI information from the DNIS
routing information with the asterisk (✳) tone so that the system can process each portion properly.
The system uses information that you program in the DID/DNIS translation table to route the call to the proper
intercom number. The system also sends the called number information to the SMDR/SMDA line report and
makes the information available to devices that are connected to the Open Architecture Interface (OAI).
As a single service, if the call routes to an LCD speakerphone, the speakerphone’s display shows the name that
you programmed in the DID/DNIS translation table. If you have programmed no name there, the display shows
the DNIS/DID block name that you assigned to the DID/DNIS block. If you have programmed no name there, the
display shows the processed DNIS digits. (As a DNIS/ANI combined service, the display shows the processed
ANI digits.)
DID/DNIS Block Name—Choose a 7-character name to associate with each DID/DNIS block. End the
DID/DNIS block name with a space if you desire a blank space between the name and the CO digits when
they show on an LCD speakerphone’s display. Also, the number of CO digits that will show in the
display is dependent on the length of the DID/DNIS block name.
End the DID/DNIS block name with a space if you desire a blank space between the name and the CO
digits when they show on an LCD speakerphone’s display. Also, the number of CO digits that will show in
the display is dependent on the length of the DID/DNIS block name.
Expected CO Digits—Type quantity (0–7) of digits and press ENTER.
Obtain a block of numbers for use from the CO. The system supports a maximum of 400 numbers (for
example, 555–1000 through 555–1399). You can have a maximum of four DID blocks with each DID
block using its own name, signalling protocol, digit addressing method and number of digits needed to
avoid numbering conflicts. As a default, the system assigns all DID lines to block one. A DID block
represents a group of lines that the system will use to receive calls for one or more CO directory number
blocks.
You will derive maximum user convenience if you choose the CO block to match the intercom numbers
that you have assigned to the system. (For example, if your intercom numbers are 1000 - 1399, they
would match the sample CO block.)
Determine the quantity of unique digits in the string that you expect to receive from the CO. The number
of digits expected should be large enough to avoid numbering conflicts within a DID block and provide
future growth. In the case of the CO block mentioned above, the quantity of unique digits is three, which
covers 1000 through 1399. If the CO block was 555–1100 through 555–1192, the string quantity would
be two, which covers 00 through 480.
ANI Delivery—Press SPACE bar for Yes or No and press ENTER.
Enable or disable the system to process ANI information that is delivered by the long distance common
carrier as a T1 feature on dial 800 and dial 900 lines.
Information Digits—This option does not apply to T1/PRI. Be sure it remains disabled.
22 – Programming The System For ISDN–PRI Application
Installing And Programming The DXPRI Card
IMI89–262
DISA Voice Options—Type DVA message identification number (1–4) and press ENTER.
Use the DISA Voice Options 1 through 4 to select digital voice announce (DVA) message levels. For
example, selecting DISA voice option 2 will cause welcome greeting 2, day main menu 2, night main
menu 2, recall no answer 2, and recall busy 2 prompts to play whenever a DISA-configured DID line is
covered by DVA.
Alternate Routing—Type intercom number (up to four digits) for station to handle misdialed calls.
Use this procedure to select an attendant station to serve as an alternate routing station. The system will
route DID calls to this station if it cannot find the digits it receives from the CO in the translation table.
The system will ring this station with a distinctive ring tone or pattern that you program. If you do not
select an attendant station with this procedure, the system routes the call to the dial 0 station. If the dial 0
station is not available, the system returns a reorder tone to the caller.
Ring Code—Type code (1–8) to specify the ringing pattern for calls to the alternate station.
CFOS Enable—Press SPACE bar for choice and press ENTER.
Use this selection to enable Call Forward Outside System for this DID line block. CFOS allows the
system to forward incoming or transferred line calls to telephone numbers that are outside the system.
NOTE: If you save the changes and you have changed the expected digits value, additional prompts may appear.
Configuring The DID/DNIS Translation Tables
When you initialize a translation table, you must first enter the string of CO digits that you obtain from the
telephone company. Then you must enter the intercom number that you want to match with the first CO digit
sequence in the string. With this, the system automatically matches the remainder of the CO digit string to
consecutive intercom numbers beginning with the one that you entered. You can edit the translation table by
selecting the item number for each entry and making the changes that you deem necessary. The translation table
includes the following listed items:
CO Digit String: This is the actual string of digits expected from the CO. Within a table, each CO digit sequence
in the string must be unique. While each CO digit sequence must have an assigned extension number, you can
assign the same extension number to several CO digit sequences if you wish.
Name: As an option, you can enter a seven character name for each CO digit sequence in the string. If you assign
a name, the system will use it for LCD display during signalling.
Day Number: This personal or group intercom number is the one that the system will ring when a DID/DNIS call
arrives through the matching CO digit sequence during normal or daytime operations. DID/DNIS will not
support Delay Ring, Day 1 ring, or Day 2 ring modes.
Night Number: As an option, you can assign a personal or group intercom number that the system can ring when
a DID/DNIS call arrives through the matching CO digit sequence during night transfer (of ringing) operations.
Ring Code: As an option you can choose one of eight distinctive ringing codes for each CO digit sequence in the
string. Remember, the proprietary analog telephones provide only four distinctive ring possibilities.
Programming The System For ISDN–PRI Application – 23
IMI89–262
Installing And Programming The DXPRI Card
Line Group Programming (For ISDN–PRI Service)
When you provide ISDN–PRI service to system stations through a T1/PRI connection to the central office (CO),
you should do so through line group access rather than individual line connections. Remember, one T1/PRI
connection to the system yields 23 channels for communications to and from the stations (24 channels for
DXPT1–NFAS boards). While these channels correspond to line ports within the system, line designations such
as Line 1, Line 2 and so forth are meaningless for the T1 board’s CO connection designation. When the T1/PRI
board is called upon to pass an incoming or outgoing call between a station and the CO, it can do so through any
of the available channels. Having the system choose the channel is the most efficient method for call completion.
To best effect this, program the line ports that correspond to the 23 voice channels (plus 24 voice channels for
each DXPT1–NFAS board controlled by the D channel) into one line group, and assign that line group to the
stations that are to have ISDN–PRI service.
During operation, the system searches for an idle line in the line group in the same order that you program them
using this procedure.
Station Programming
In addition to the many other features that you can assign to a station, there are several features that are specific to
ISDN–PRI service.
Signal Type
The Signal Type feature selects the information transfer capability that the system requests during call setup for a
specific station port. The signal types that you can select include the following items:
Speech—digitized speech only–allows analog transmission, echo cancellation, and time-assigned
speech interpolation, (suitable for speech only)
3.1 Khz Audio—3.1 Khz digitized audio–allows analog transmission but does not
allow speech processing (suitable for modems),
56 Kbps Digital—56 Kbps digital data rate adapted to 64 Kbps (future feature),
Restricted Digital—64 Kbps digital data that is restricted so that there is no 8-bit zero
pattern allowed in any time slot (future feature),
Unrestricted Digital—64 Kbps digital data with no restriction on bit pattern (future feature).
Outbound Calling Number ID
The Outbound Calling Number ID feature allows you to choose the caller ID number that will identify the calling
station to a distant party. Usually you should set this feature if you specify station level identification as the
Calling Number ID Mode in Board Configuration Programming unless you want the default number to go out
instead (for example, for a shared telephone in a common area).
24 – Programming The System For ISDN–PRI Application
Installing And Programming The DXPRI Card
IMI89–262
Station ID (future feature)
The system can transmit a Station ID using ISDN display and/or sub-address messages. The system transmits the
station ID when you choose either station number or default with station ID in Board Configuration
Programming. This feature, when supported by the central office equipment, includes a station’s full name or
extension number as additional caller ID information. You can choose three different ID types:
None—no station ID information supplied for this station,
Extension—station’s extension number supplied as a sub-address,
Full Name—station’s full name field supplied as a sub-address.
Button Mapping
When you assign station level outbound calling number ID to a station through Station Programming, it is a good
practice to also map a RESTR (restrict) button on the station. By pressing the RESTR button, the station user can
block the outbound calling number ID whenever needed. Once enabled, the restriction remains in effect until you
deactivate it.
Remember, you can assign feature functions at a first level or at a second level at each button. If a function
requires status light feedback, assign that function to the first level because the system does not provide status
light feedback to buttons at the second level (press CONTROL N to display the second level).
Feature Numbering
Dialing codes for user features are flexible so that you can renumber them. This may be necessary if site
requirements dictate that personal or group intercom numbers fall within a certain block or sequence. Since new
number assignments can not conflict with existing numbers, the system provides a block of unassigned numbers
that you can use for renumbering. At default, the system assigns blocks of numbers in the following ranges:
101–292 = personal intercoms,
3101–3292, 4101–4292, 5000–5023 = group intercoms,
5024–5999 = unassigned,
600—899, T, # = feature codes
9 = line group 1
There are two features used with ISDN–PRI service that have no defaulted dialing code. Use this procedure to
assign dialing codes to these following features:
Signal Type—By providing a dialing code, you provide users with the ability to select the station’s signal type.
For example, a modem might dial the feature code for 3.1 Khz audio prior to making a data call and then return
the station to speech after the data call is complete.
Restrict Calling Number ID—By providing this code, you give users the ability to block outgoing Calling
Number ID information. Even though they block the information with this code, the system still transmits the
information but it tags it as restricted. This restriction tag prevents the called party from receiving the ID data
unless they are an emergency services provider (such as 911) or are paying for the call (such as a 1–800 number
provider). Once enabled, the restriction remains in effect until you deactivate it.
CAUTION
If a number conflict exists, the system will prompt you to remove the conflict. Before responding to this
prompt with a y (yes), be sure that doing so will not disturb other programmed features that depend upon
the removed extension number. It is possible to create a situation where you must make several
renumbering changes to completely resolve a number conflict.
Programming The System For ISDN–PRI Application – 25
IMI89–262
Installing And Programming The DXPRI Card
Understanding The T1/PRI Alarms And Indicators
Most of the T1 alarms and indicators (LEDs) are located on the front-edge panel of the T1/PRI board, while
several are located on the front edge of the DXOPT-SYN card. The following sections discuss the alarms and
indicators.
NOTE: Red /Yellow LEDs, when lit, indicate errors or non-standard configuration for normal operation.
T1/PRI Board Indicators
Red Alarm (red LED)
Yellow Alarm (yellow LED)
Sync Alarm (red LED)
Signal Alarm (red LED)
Blue Alarm (red LED)
Bipolar Alarm (red LED)
Cyclic Redundancy
Check (red LED)
Slip (red LED)
Unlock (red LED)
B8ZS)/COFA (green LED)
RLB, LLB, and
PAYL (red LEDs)
When this LED indicator is lit, the system cannot establish communications with
the network.
The yellow alarm is lit whenever the far end has lost synchronization to its
incoming signal. This alarm indicates a transmit problem..
This LED (labeled SYNC LOSS), when lit, indicates that the frame bit in the
received data cannot be found. this alarm indicates a receive problem.
The signal alarm (labeled SIG LOSS) turns on to indicate that the DXP Plus has
lost its incoming signal. This alarm indicates a receive problem.
When this alarm indicator is lit, the alarm indication signal (AIS) consisting of
all one (1) bits is being received to indicate that the far end has lost its received
signal. The purpose of this signal is to maintain the system clocks during a link
failure. This alarm indicates a transmit problem.
The system converts the digital bit stream in T1/PRI communications to a bipolar
format through a process called alternate mark inversion (AMI). The voltage
polarity of the ones pulses (marks) alternates between plus and minus with a zero
(space) represented by no pulse. A bipolar violation occurs whenever two
successive pulses are of the same polarity. This alarm LED indicates a bipolar
violation (BPV) has occurred. It is important to note that BPV errors are not
passed through regeneration points. This alarm indicates a receive problem.
The cyclic redundancy check (CRC) indicator turns on whenever there is a
discrepancy in the check sum received for an incoming frame from the
originating system and the locally calculated check sum. This discrepancy
indicates a data error in the received frame. The CRC is enabled by DIP switch
SW2-4. This light indicates a receive problem.
This indicator is turned on whenever a frame slip is detected. This is caused by
the transmit clock not being synchronized with the receive clock. This light
indicates a synchronization problem.
The transmit frequency (1.544 Mhz) is not locked with the receive clock when
this indicator is lit.
This is a dual-purpose indicator. Depending on how you set DIP switch SW2–6,
this indicator reports either a change of frame alignment (COFA) at
re-synchronization time (default setting) or bipolar 8-zero substitution (B8ZS)
code words detected in the received data.
Whenever a loop back routine is active, either the remote loop back (RLB), local
loop back (LLB), or payback loop back (PAYL) mode (selected by DIP switches
SW2-7 and SW2-8) is indicated by the appropriate LED being lit.
26 – Understanding The T1/PRI Alarms And Indicators
Installing And Programming The DXPRI Card
IMI89–262
DXOPT–SYN Board Indicators
PRI and SEC (green LEDs)
UNLOCKED (red LED)
MANUAL (red LED)
The PRI and SEC LEDs on the DXOPT-SYN card light to indicate where the
receive clock reference is originating from—the primary or secondary DXPT1
board location. When two or more DXPT1 boards are installed, you make the
primary and secondary assignments via jumpers on the the DXAUX board. If
only one DXPT1 board is installed, you can set the jumpers so that both LEDs
will light.
When lit, the Unlocked LED indicates either that the straps on the Auxiliary
board are set incorrectly, that the DXOPT-SYN card is defective, that the receive
frequency is out of tolerance (1.544 Mhz ± 200 Hz), or that no valid ISDN–PRI
line is connected..
This LED, when lit, indicates that the manual mode has been selected via the
AUTO/MANUAL mode switch on the DXOPT-SYN card. When you select the
manual mode (normally for maintenance/troubleshooting ), you can select either
the primary or secondary timing reference by setting the PRI/SEC switch on the
DXOPT-SYN card. For normal operation, select the automatic mode. Do not
manually force the clock reference to primary or secondary if the appropriate
green LED is not lit. This will cause the VCO oscillator to default to its
minimum or maximum tolerance, and the T1/PRI board(s) will not
frequency-lock.
Understanding The T1/PRI Alarms And Indicators – 27
IMI89–262
Installing And Programming The DXPRI Card
Viewing The Alarms And Indicators
T1PRI Board (in order from top to bottom)
LED*
l
Label
Error Or Status Condition When Led Is Lit
(Status)
Rapid flash = defective board
Steady on = board in wrong slot or board constraints violated
Off with repeated five second blink on = normal operation
(T1 trunk idle)
On with repeated five second blink off = normal operation
(T1 trunk busy)
Communications with network cannot be established
(out-of-service)
Network unable to frame sync to DXP
T1/PRI Board unable to frame sync to network
Loss of incoming signal
Alarm indication signal (AIS) being received (indicates loss
of signal at far end)
Bipolar violation detected
Cyclic redundancy check error in incoming frame if SW2-4
is enabled
Frame slip detected (check DXOPT–SYN settings)
Transmit frequency (1.544 MHz) not locked
with receive clock (check DXOPT–SYN settings)
B8ZS/COFA (B8ZS zero suppress mode/change of frame
alignment) per SW2-6
Remote loop back active
Local loop back active
Payload loop back active
Signalling message from DXP
NOTE: Diagnostic LEDs display PRI
Signalling message to DXP
layer 2 (D channel) activity
Future feature–T1/PRI in network mode
when you set the diagnostic
Not currently defined
switch to 00100000. Other
Not currently defined
switch settings cause factory
On = D channel (layer 2) is down
test diagnostic codes to be
D channel message to network
displayed. Refer to the
D channel message from network
discussion titled, Configuring
The T1/PRI board.
●
Red
¤
l
l
l
Yellow
Sync
SIG
Blue
l
l
Bipolar
CRC
l
l
SLIP
Unlock
¡
B8ZS/COFA
l
l
l
¡
¡
¡
¡
¡
¡
¡
¡
RLB
LLB
PAYL
Synchronization Card
LED*
¡
¡
l
Label
Error Or Status Condition When Led Is Lit
PRI
SEC
UNLOCKED
l
MANUAL
Timing reference is present from the T1/PRI primary board
Timing reference is present from the T1/PRI secondary board
Trouble (defective DXOPT–SYN card or receive frequency
out of tolerance (1.544 MHz ± 200 Hz)
The manual mode is active for selecting the T1/PRI reference
NOTE: Red /Yellow LEDs, when lit, indicate errors or non-standard configuration for normal operation. Green
LEDs indicate a normal condition.
*LED color legend
l = Red
¤ = Yellow
¡ = Green
28 – Viewing The Alarms And Indicators
Installing And Programming The DXPRI Card
IMI89–262
T1 Board
Auxiliary Board
Status
Red
Yellow
Status
Sync
Signal
Blue
Bipolar
CRC
Slip
Unlock
B8ZS/COFA
Primary
Secondary
Unlocked
Manual
Remote Loopback
Local Loopback
Payload Loopback
Synchronization
Card
Diagnostic Switches
and LEDs
T1004A
Viewing The Alarms And Indicators
Viewing The Alarms And Indicators – 29
IMI89–262
Installing And Programming The DXPRI Card
Defining The T1/PRI Terms
Bipolar
A bipolar signal is composed of alternating pulses that both represent a digital logic 1. The positive pulse is a (+)
and the negative pulse is a (-). Zero volts represents a space, or digital logic 0.
Bipolar Violation (or error)
A bipolar error is a digital logic 1 (or mark) that has the same polarity as its predecessor.
NOTE: Every time the system regenerates the signal stream, it corrects any bipolar errors; therefore, it prevents
end-to-end error checking from using bipolar errors.
B8ZS (Binary Eight Zero Substitution)
This is a technique to send an all-zero channel without violating the ones-density requirement (a single one in
each channel and no more than 15 zeros in a row). Voice transmission will not allow an all zero channel. The
system accomplishes B8ZS suppression by inserting a special bipolar error that is interpreted, not as an error, but
an all zero channel. The B8ZS feature replaces the all-zero channel two different ways. The feature replaces the
all-zero channel with the sequence 000 + - 0 - + if the preceding pulse was a +, and the feature replaces the
all-zero channel with the sequence 000 - + 0 + - if the preceding pulse was -. The + represents a positive pulse,
the - represents a negative pulse, and 0 represents no pulse. The B8ZS feature is standard with ISDN–PRI
service.
CAS (Channel Associated Signalling)
Channel Associated Signalling is a method of signalling where all signalling occurs on the channel being
controlled. Examples of CAS are loop start and T1 lines.
CCS (Common Channel Signalling)
Common Channel Signalling is a method of signalling were all signalling for a group of channels occurs on one
channel. ISDN is a CCS protocol.
COFA (Change of Frame Alignment)
When switch SW2-6 is off, the green LED on the DXPT1 indicates whether the network source or the network
span caused the last frame synchronization. (This indication disregards the first re-sync at cold start or a system
reset —cold start and reset causes the network source to re-sync.) A COFA occurs if the network source does a
re-sync. The COFA is a diagnostic tool that identifies the source of the loss of frame synchronization.
CPE/Carrier Equipment
The DXPT1 is normally classified as Customer Premise Equipment (CPE). If you use SW2–2 to configure the
DXPT1 board to use the internal CSU, the network may require that the system be classified as Carrier Equipment
(CE). The information packet that the T1/PRI board sends to the network contains a facility data link (FDL)
maintenance message that has a bit in it that provides this identification.
CRC (Cyclic Redundancy Check)
A method of checking errors from the transmission source to the destination. For T1/PRI operation, CRC
calculates a checksum depending on the data in a frame. (You must enable CRC with DIP switch SW2-4).
30 – Defining The T1/PRI Terms
Installing And Programming The DXPRI Card
IMI89–262
DS-0 (Digital Signal-Level Zero)
Digital Signal-Level Zero is a single 64Kbit channel inside a T1/PRI span.
Extended Super-frame Mode (ESF)
Extended Super-frame Mode consists of 24 frames. The frame bit uses only 6 frames leaving 18 bits for other
purposes. These spare 18 bits provide 6 bits for CRC information and 12 bits for a facility data link. The facility
data link is for maintenance information (as defined by the ANSI T1.403 specification). Like the super-frame
mode, the 64–Kbit user channels have 24 frames available for use. ESF is standard with ISDN–PRI service.
FDL (Facility Data Link)
The Facility Data Link is a 4–Kbit communication link from the network to the T1/PRI board. The system sends
preemptive messages (for example, yellow alarm and loop back), if needed, and sends error packets to the
network once a second. The packets contain alarm history in accordance with the ANSI T1.403 specification.
FDL is standard with ISDN–PRI service.
In band Signalling
A signalling method where the system sends overhead signalling along with channel traffic.
Loop-back Local
An operation method that loops the T1/PRI board’s transmit output and receive input paths. The loop back
terminates all traffic and halts call processing. While in this idle condition, the system continues to transmit the
T1/PRI transmit stream to the network but it will not answer incoming calls. If the remote T1/PRI equipment is
the clock source (primary or secondary) for the DXOPT-SYN card, the remote equipment terminates the reference
signal because the network receive circuit is open in local loop back. You initiate local loop back by setting the
appropriate SW1 switches. The main purpose of local loop back is to verify the T1/PRI board’s ability to
synchronize properly.
Loop-back Payload
The loop back payload feature is an ESF method of loop back which loops the network receive input path to the
remote T1/PRI equipment’s transmit output path. This loop back method does not loop the first bit of each frame
to allow the T1/PRI board’s facility data link to continue to transmit maintenance information. You can use
switches SW2–7 and SW2–8 to manually initiate the payload loop back or you can allow the network to send an
FDL message to initiate or restore the payload loop back. The T1/PRI board goes out-of-service during the loop
back time.
Loop-back Remote
The loop back remote feature loops the network receive input path to the remote T1/PRI equipment’s transmit
output path. The remote loop back feature terminates all traffic and halt any call processing. You can use the
SW2 switches to manually initiate remote loop back or you can allow the network to remotely initiate the
condition. The T1/PRI board’s facility data link, or maintenance channel, can enable and disable remote loop back
automatically or you can set SW2–7 on and SW2–8 off to manually enable remote loop back or set both switches
off to manually disable the feature.
Defining The T1/PRI Terms – 31
IMI89–262
Installing And Programming The DXPRI Card
LIU Line Interface Unit
The line interface unit is the interface between the copper wires and the T1/PRI board’s framing circuitry. The
LIU is responsible for separating the 1.544MHZ receive clock from the incoming stream and converting bipolar
Alternate Mark Inversion (AMI) to 5–volt digital logic. The LIU also supports the automatic line build-out that
regulates the transmit level according to the receive strength (LIU-2 switch).
Primary Clock Reference
The straps on the DXSRV–PLS board designate the primary clock reference. Primary clock reference is the first
choice reference clock used to synchronize the DXP to the incoming span. If the system looses synchronization, it
uses its secondary clock reference. If the secondary clock reference is not available, the DXOPT-SYN card’s
variable clock oscillator (VCO) switches to the fixed oscillator on the DXSRV (services) board. When it does
this, slips occur.
Repeater
A repeater is a amplifying device that central office technicians place at approximately one mile intervals along a
T1/PRI circuit to boost the T1/PRI signal. The T1/PRI specifications allow a maximum of 50 repeaters along a
communications path.
Slip
This term describes the condition that exists when the transmit 1.544 MHz clock is different from the receive
1.544 MHz clock. When the system collects or looses a frame of information due to the span frequencies being
different, the system generates a slip error. Slip does not affect voice transmissions and may not affect modem
traffic; however slip does effect digital data traffic. The T1/PRI board does not currently support digital data
traffic. Also, at times a central office takes a T1/PRI span out of service if too many slips occur—one or two a
day is permissible (the carrier supplier will furnish you with an an exact number if you request that information
from them).
32 – Defining The T1/PRI Terms
Installing And Programming The DXPRI Card
IMI89–262
Knowing The T1/PRI Specifications
Capacity
6 T1/PRI boards
Modes
Extended super-frame
Input Jitter Tolerance 138 UI @ 1 Hz; 0.4 UI @ 10 KHz—100 KHz
(0 dB line); corner frequency = 6 Hz (attenuates
20 dB per decade above corner)
Framing
D4
Surge Protection
Channels Allocated
24
1 AMP fuse and transient protection for metallic
>6 volts P-P; Longitudinal (tip—ring and chassis
ground) protection 1500 volts minimum.
Industry Standards
ANSI T1.403-1989
AT&T PUB 62411
CCITT 0.921
CCITT 0.931
Elastic Store
Two frames, no frame loss when slipping
Compliance
FCC Part 68/Doc
FCC Part 15
UL-1489/CSA (safety)
USOC = 6.0Y
FIC = 04DU9–1SN
Maximum Output
2.4V to 3.6V base to peak, short circuit
protection to 120 mA, rms
Line Rate
1.544 Mbps
Line Code
Type
Zero Suppression
Bipolar AMI
B8ZS
Receive Sensitivity
-26 dB or -36 dB selectable
Impedance
100 Ohms
DXP Loss Insertion
Transmit
Receive
-6 dB (selectable to 0 and -3 dB per channel)
0 dB
Connector
RJ48C, miniature 8-position, shielded
(per ANSI T1-403, 1989)
Cable
Up to 6,000 feet between DXPs, 22 AWG,
twisted-pair, no external components
CSU Function
Built-in; CPE or CARRIER selectable
Transmit Attenuation
Manual
Automatic
0, -7.5, -15, or -22.5 dB selectable
Default
Yellow Alarm Type
Alternating bytes = all zeros and all ones;
(prohibiting ANSI FDL messaging during
yellow alarms is selectable)
Clocking
Synchronization
Slave mode from DXOPT-SYN card on
Auxiliary board
Min. RX Freq. Capture
1.544 MHz ± 200 Hz, T1 board;
16.384 MHz ± 2048 Hz, Sync card
TX Master Mode Freq.
1.544 MHz ± 75 Hz
Loop back Modes
Extended Super-frame Mode Local, remote, payload loop back (manual)
FDL ANSI network remote loop back
FDL ANSI network payload loop back
LED Alarms/Errors
Status
Red Alarm
Yellow Alarm
Blue Alarm
Loss of receive synchronization
Loss of signal
Bipolar error(s)
CRC errors (ESF)
Slip errors
Phase Lock error
Knowing The T1/PRI Specifications – 33
IMI89–262
Installing And Programming The DXPRI Card
Up-Grading Your DXPT1 Board For ISDN–PRI Support
Up-grading existing revision B or later DXPT1 boards for ISDN–PRI service consists of adding a DXPRI card to
the T1 board, and changing the board’s chip firmware. When you do this, the T1 board/DXPRI card combination
with the new firmware becomes a DXPT1–PRI board.
If you add the ISDN–PRI firmware to an existing T1 board but do not install the DXPRI card, you create a NFAS
(Network Facility Associated Signalling) DXPT1–NFAS board. The NFAS boards are slaves to the master
DXPT1–PRI board in multiboard installations.
Installing The DXPRI Card
1. Be sure you are standing on the conductive mat that you have placed in front of the cabinet area and grounded
to a good earth ground. (The third wire ground of the AC power line is an acceptable grounding point if the
AC wall jack is properly grounded.) The grounded conductive mat provides a safe static electric discharge
path.
2. Install your static discharge wrist strap on your bare wrist; adjust it for a snug fit. Be sure that the strap is not
isolated by clothing. Connect the wrist strap cord between the wrist strap and an AC or earth ground.
NOTE: With the common equipment in the installed position, the ground lug on the side of the cabinet is an
appropriate grounding point since it should have a heavy ground wire connected between it and a good
earth ground.
3. Normally you should disconnect the AC power cord from the AC outlet and disconnect the optional battery
back-up assembly from the digital communications system’s main cabinet power supply; however, when
necessary, you can remove a DXPT1 board from an operating system. If you must do this, connect one end of
a standard telephone handset coil cord to the pre-charge port on the power supply. During step 5, you will
connect the other end of this coil cord to the pre-charge jack on the T1 board.
4. Loosen the retaining hardware and lift the front panel away from the common equipment cabinet.
5. Locate the DXPT1 board, and if you are removing the board from an operating system, connect the free end
of the pre-charge cord that you installed in step 3 to the pre-charge jack on the line board.
6. Loosen any retaining hardware, use the extractor levers to disconnect the board from the connector on
cabinet’s backplane, and slide the board free of the board cage. If you connected a handset cord between the
pre-charge port on DXP Plus power supply and the jack on board (as directed in step 4), disconnect it after
removing the board.
7. Place the board in a static protection bag for safe keeping, and transport it to a static safe work area.
8. At the static safe work area, with your wrist strap in place, remove the DXPT1 board and the DXPRI card
from their static protection bags.
7. Referring to the illustrations on the next page, orient the DXPT1 board and the DXPRI card, and attach them
with the supplied hardware.
34 – Up-Grading Your DXPT1 Board For ISDN–PRI Support
Installing And Programming The DXPRI Card
IMI89–262
Replacing The Firmware
1. With the DXPT1 board still at your static-safe work area and with your static discharge wrist strap on your
bare wrist and properly grounded, replace the chip-set firmware with the ISDN–PRI firmware (part number
FW201–000).
2. Locate the current chip firmware (U5 at the upper rear of the board—see the illustration), and note its
orientation in its socket.
3. Use a chip extraction tool to lift the chip free from its socket.
4. Remove the replacement chip from its static protection bag and orient it to match the orientation of the chip
that you just removed.
5. Press the chip into place in the socket.
CAUTION
Do not bend any of the chip’s pins so that they do not make contact with the socket.
6. Inspect the modified DXPT1 board for proper installation, and return it to its static protection bag.
7. Refer to the paragraph titled, Installing The T1/PRI Line Board, and re-install the modified DXPT1 board in
the system.
8. Store your old firmware in a static-safe environment in the event that you may need it in the future.
Firmware
Location
(Chip U5)
DXPT1
Board
DXPRI Card
ISDN2.cdr
Installing The DXPRI Card And ISDN–PRI Firmware
Up-Grading Your DXPT1 Board For ISDN–PRI Support – 35
IMI89–262
Installing And Programming The DXPRI Card
Understanding FCC Rules and Regulations
This electronic key system complies with Federal Communications Commission (FCC) Rules, Part 68. The FCC registration label on the
DXP contains the FCC registration number, the ringer equivalence number, the model number, and the serial number or production date of
the system.
Notification To Telephone Company
Unless a telephone operating company provides and installs the system, the telephone operating company which provides the lines must be
notified before a connection is made to them. Provide the telephone company with the lines (telephone numbers) involved, the FCC
registration number, the ringer equivalence number, the Facilities Interface Code (FIC), the Universal Service Ordering Code (USOC), and
the USOC jack required. The FCC registration number and the ringer equivalence number is provided on the label attached to the common
equipment. The FIC and USOC information is provided in the equipment’s general specifications found in equipment system manual. The
user/installer is required to notify the telephone company when final disconnection of this equipment from the telephone company line
occurs.
Compatibility With Telephone Network
When necessary, the telephone operating company provides information on the maximum number of telephones or ringers that can be
connected to one line, as well as any other applicable technical information. The telephone operating company can temporarily discontinue
service and make changes which could affect the operation of this equipment. They must, however, provide adequate notice, in writing, of
any future equipment changes that would make the system incompatible.
Installation Requirements
Connection of the electronic key system to the telephone lines must be through a universal service order code (USOC) outlet jack supplied
by the telephone operating company. If the installation site does not have the proper outlet, ask the telephone company business office to
install one. The correct outlet jack for this system is a type RJ48C.
Party Lines And Coin Lines
Local telephone company regulations may not permit connections to party lines and coin lines by anyone except the telephone operating
company.
Troubleshooting
If a service problem occurs, first try to determine if the trouble is in the on-site system or in the telephone company equipment. Disconnect
all equipment not owned by the telephone company.
If this corrects the problem, the faulty equipment must not be reconnected to the telephone line until the problem has been corrected. Any
trouble that causes improper operation of the telephone network may require the telephone company to discontinue service to the trouble
site after they notify the user of the reason.
Repair Authorization
FCC regulations do not permit repair of customer owned equipment by anyone except the manufacturer, their authorized agent, or others
who might be authorized by the FCC. However, routine repairs can be made according to the maintenance instructions in this publication,
provided that all FCC restrictions are obeyed.
Radio Frequency Interference
The electronic key system contains incidental radio frequency generating circuitry and, if not installed and used properly, may cause
interference to radio and television reception. This equipment has been tested and found to comply with the limits for a Class A computing
device pursuant to Subpart J of Part 15 of FCC Rules. These limits are designed to provide reasonable protection against such interference
when operated in a commercial environment. Operation of this equipment in a residential area may cause interference to radio and
television reception; in which case the user is encouraged to take whatever measures may be required to correct the interference. If this
equipment does cause interference to radio or television reception, which can be determined by turning the equipment off and on, the user
is encouraged to try to correct the interference by one or more of the following measures: Reorient the television or radio’s receiving
antenna, and/or relocate the DXP, the individual telephone stations, and the radio or TV with respect to each other. If necessary, the user
should consult the manufacturer or an experienced radio/television technician for additional suggestions. The user may find the following
booklet prepared by the Federal Communications Commission helpful: “How to Identify and Resolve Radio-TV Interference Problems.”
This booklet is available from the Government Printing Office, Washington D.C. 20402. Stock No. 004-000-00345-4.
This equipment has been tested and found to comply with the limits of a Class A digital device, pursuant to Part 15 of the FCC Rules.
These limits are designed to provide reasonable protection against harmful interference when the equipment is operated in a commercial
environment. This equipment generates, uses, and can radiate radio frequency energy and, if not installed and used in accordance with the
instruction manual, may cause harmful interference to radio communications. Operation of this equipment in a residential area is likely to
cause harmful interference in which case the user will be required to correct the interference at his own expense.
This digital apparatus does not exceed the (Class A) limits for radio noise emissions from digital apparatus set out in the Radio Interference
Regulations of the Canadian Department of Communications.
Le pre’sent appareil nume’rique n’emet pes de bruits radioe’lectriques de’passant les limites applicables aux appareils nume’riques (de la
class A) prescrites dans le Re’glement sur le brouillage radioe’lectrique e’dicte’ par le ministe’re des Communications du Canada.
CAUTION
Changes or modifications to this unit not expressly approved by the party responsible for compliance
could void the user’s authority to operate the equipment.
R
Charlottesville, Virginia 22901-2829
World Wide Web: http://www.comdial.com/
R
Installing The Expanded Memory Card And Software
Upgrade Card On The DXP Digital Communications
System
This publication provides instructions for installing both an expansion memory card (DXRAM-EXP68K) and a
software memory card (DXPSW-xxxx or DXPSW-xxx68K) on the central processor unit (DXCPU-68K) circuit
board of the DXP digital communications system. The DXRAM-EXP68K provides expanded memory capacity
for systems that store a large quantity of station message detailed accounting records. It replaces the
DXRAM-STD68K standard memory card normally installed. The software memory card provides the operating
system software data for the DXP. Whenever Comdial releases a software upgrade for the DXP, it releases it as a
revision of the DXPSW-xxxx or DXPSW-xxx68K card.
When you install a new memory card or upgrade the system software, follow the sequence presented in this
publication.
1.0 Prepare a static-safe work area.
2.0 Save the system database.
3.0 Install the memory card or upgrade the software on the memory card.
4.0 Master clear the system.
5.0 Restore the system database.
This manual has been developed by Comdial Corporation (the “Company”) and is intended for the use of its customers and service personnel. The information in this manual is subject to change
without notice. While every effort has been made to eliminate errors, the Company disclaims liability for any difficulties arising from the interpretation of the information contained herein.
The information contained herein does not purport to cover all details or variations in equipment or to provide for every possible contingency to be met in connection with installation, operation, or
maintenance. Should further information be desired, or should particular problems arise which are not covered sufficiently for the purchaser’s purposes, contact Comdial, Inside Sales Department,
Charlottesville, Virginia 22906.
Printed in U.S.A.
IMI89–226.01
11/95
IMI89–226
Installing The Expanded Memory Card
1.0 Prepare A Static-Safe Work Area.
CAUTION
Electronic circuit boards are susceptible to damage caused by electrostatic discharge and must be
handled accordingly. Refer to the Comdial publication IMI01-005, Handling Of Electrostatically
Sensitive Components, for general information. Specific handling precautions are also included in this
installation instruction. The expanded memory card (DXRAM-EXP68K) and the system software memory
card (DXPSW-xxx68K) are supplied in static protection bags. Do not open a static protection bag prior
to installation time.
When servicing electronic circuit boards, it is a good practice to do so at a static-safe work area prepared ahead of
time for this purpose. The illustration details a typical static-safe work area.
2 – Installing The Expanded Memory Card
Installing The Expanded Memory Card
IMI89–226
Backboard
dxp040
Common
Equipment
Cabinet
Earth
Ground
Conductive
Mat
1 Meg Ohm
Resister
Static Discharge
Wrist Strap
Providing Static Protection At The Cabinet Mounting Location
Static
Wrist
Strap
Common Point Ground
ESD Protective
Mat
Typical Earth
Ground
ESD Protective
Worksurface
Static 2
ESD Protective
Mat
Creating A Static Safe Work Area
Installing The Expanded Memory Card – 3
IMI89–226
Installing The Expanded Memory Card
2.0 Save The System Database
2.1
Saving The Database Externally
Use this feature to save the system database externally from the DXP before you install a memory card and
upgrade the software. Employ a personal computer with an XMODEM communications program to store the
database on a magnetic diskette. The saved database can include any or all of the following data: system
information, station parameters, line parameters, toll restriction and automatic route selection parameters, and
system speed dial numbers but it does not include the SMDA/SMDR records. If you need these SMDA/SMDR
records, you must make a printout of them before you perform the database storage. This is necessary because this
save/restore feature does not record the stored records and they will be lost.
NOTE: This programming procedure details steps that you would follow when using the communications
software program known as PROCOMM (produced by Datastorm Technologies). If you are using a
different communications software, your steps may be different.
1. Press CONTROL T for main menu.
2. From main menu, select system and press ENTER.
3. From system menu, select save/restore database menu and press ENTER.
4. From save/restore database menu, type item number for database parameter you wish to save and press
ENTER.
5. Press SPACE BAR to select option (YES = save the database, NO = do not save the database), and press
ENTER to accept selection and place cursor at next database parameter. Repeat step 5 for each database
parameter that you wish to save.
CAUTION
You must select YES, to save the data. If you select NO, the data will be lost.
6. Press ESCAPE twice.
7. To save the database,
(a) type t (transmit) and press ENTER,
(b) press page-down button on the VDT keyboard,
(c) type prompted number to choose XMODEM protocol,
(d) type name of file where database is to be stored, and press ENTER. Database save is automatic.
8. To quit, type q and press ENTER.
4 – Installing The Expanded Memory Card
Installing The Expanded Memory Card
2.2
IMI89–226
Saving The Database Internally
Use this feature to save a database internally within the memory of the DXP before you upgrade the software.
NOTE: Do not use this method if you are installing a new memory card as well as upgrading the software.
Saving the database in this manner eliminates the need for a personal computer with an XMODEM
communications program to translate the database between software upgrades. The saved database includes all of
the following data: system information, station parameters, line parameters, toll restriction and automatic route
selection parameters, and system speed dial numbers but it does not include the SMDA/SMDR records. If you
need these SMDA/SMDR records, you must make a printout of them before you can perform the database storage.
CAUTION
For this procedure to work properly, the system must include the expanded memory card
(DXRAM-EXP68K). If the system has the standard memory card (DXRAM-STD68K), you should use
external save procedure
1. Press CONTROL T for main menu.
2. From main menu, select system and press ENTER.
3. From system menu, select default and press ENTER.
4. From default menu, select on-board software upgrade and press ENTER.
5. Type y for yes to respond to prompt concerning SMDA/SMDR records. The system will save its database for
later restore. The system will then prompt you to turn off the AC power and change the software.
Installing The Expanded Memory Card – 5
IMI89–226
Installing The Expanded Memory Card
3.0 Install The Memory Card And Upgrade The Software
1. Loosen the retaining hardware and remove the front panel from the DXP main cabinet.
2. Turn off the AC power switch, and disconnect the AC power cord from the AC outlet. Disconnect the cable of
the optional battery back-up from the main cabinet power supply.
3. Place a conductive mat in front of the cabinet area and ground the mat to a good earth ground (the third wire
ground of the AC power line is an acceptable grounding point). The grounded conductive mat will provide a
safe static electric discharge path.
4. Install the static discharge wrist strap (supplied with the main cabinet) on your bare wrist; adjust it for a snug
fit. Be sure that the strap is touching bare skin and is not isolated by clothing. Connect the wrist strap cord
between the wrist strap and an AC or earth ground.
NOTE: With the common equipment in the installed position, the ground lug on the side of the cabinet is an
appropriate grounding point since it should have a heavy ground wire connected between it and a good
earth ground.
5. Locate the DXCPU-68K circuit board, loosen the retaining screws, remove it from the DXP main cabinet,
place it in a static protection bag, and transport it to the static-safe work area.
6. At the static-safe work area, with your wrist strap in place, remove the DXCPU-68K circuit board, the new
DXRAM-EXP68K expansion memory card and the new DXPSW-xxxx or DXPSW-xxx68K card software
memory card from their static protection bags.
7. Refer to illustration and remove the currently installed memory cards from the DXCPU-68K board.
NOTE: Do not remove the currently installed DXRAM-STD68K standard memory card or DXRAM-EXP68K
expanded memory card unless you are replacing it with a new one.
8. Orient the DXCPU-68K board and the new memory cards as shown in the illustration, and attach them with
the supplied hardware.
9. Place the old memory cards in static protection bags and store them as back-up replacements. Place the
DXCPU-68K board and newly installed memory cards into a static protection bag and transport back to the
DXP main cabinet.
10. With your wrist strap properly grounded, remove the DXCPU-68K circuit board from the static protection
bag. Orient it with the top and bottom guides in the main cabinet board cage, and press it in firmly until the
board edge connector properly mates with the backplane connector.
CAUTION
When pressing the DXCPU-68K board into place, press it only at the extractor lever locations. If you
apply pressure at other locations, you may damage the board assembly.
11. Make a final inspection to ensure that the DXCPU-68K circuit board is in the correct slot, oriented correctly
and mated properly; then install and tighten the supplied screws to secure it to the board cage.
6 – Installing The Expanded Memory Card
Installing The Expanded Memory Card
IMI89–226
DXP022
#4-40 Machine Screw
(Two Places
DXPSW-XXXXX
Circuit Card
Front Panel
DXRAM-XXXXX
Circuit Card
DXCPU
Circuit Board
#4-40 Machine Screw
#4 Lockwasher
DXPSW-XXXXX
1/4 Hex, #4-40
M-F Spacer,
.625 Long
Connectors
#4 Lockwasher
DXRAM-XXXXX
Connectors
Front
Panel
1/4 Hex, #4-40
M-F Spacer,
.625 Long
#4 Lockwasher
DXCPU
Board
#4-40 Hex Nut (3X)
Installing The Memory Card
Installing The Expanded Memory Card – 7
IMI89–226
Installing The Expanded Memory Card
4.0 Master Clear The System
If you do not master clear the system, it is possible the DXP will not perform properly with the new memory card.
The DXCPU-68K board provides a method for the master clear to occur automatically at the initial power up after
you have changed or upgraded the software card. When you perform an upgrade, you must execute the following
sequence of events exactly as they are stated here:
1. On the DXPCPU-68K circuit board, set DIP switch 8 to its ON position. This step enables the DXP to
perform the master clear and is a required step; otherwise, the software upgrade will not occur and the system
will not operate.
2. Connect the AC power cord to the AC outlet and turn on the ACpower switch. At power up, the DXP
automatically executes a master clear operation. Observe that the LED indicators on the DXCPU-68K board,
the DXSRV services board, and all installed station and line boards flash in a random pattern during the
master clear sequence. After the master clear sequence is complete, the indicators on the DXCPU-68K and
DXSRV boards turn on steady and the indicators on the station and line boards wink ON for four seconds and
OFF for four seconds.
3. After power up, set DIP switch 8 to its OFF position.
4. Press the RESET button on the CPU board to reset the system.
NOTE:The system performs the automatic master clear one time following the initial power up after you have
up-graded the software. It will not perform an automatic master clear operation again after subsequent
power ups. Because of this, you can leave DIP switch 8 ON if you wish. Leaving it ON will ensure that the
DXP will always power up in a master cleared and operational mode after you have performed a software
upgrade. However, by turning DIP switch 8 OFF, you prevent the DXP from becoming operational at
power up after you have performed a software upgrade. This is good because, should you forget to save
your database, it gives you an opportunity to reconsider your actions before the DXP erases the current
database.
5. Replace the front panel on the DXP main cabinet.
6. Use the procedure titled Restore The Database to restore the externally saved database.
NOTE: The system will automatically reload the internally saved database into the upgraded operating software
and then log out of the programming mode. The system takes an additional two to three minutes to power
up after it receives AC power because of the time required for this database restoring process. You will
observe random flashing indicators during the master clear sequence.
8 – Installing The Expanded Memory Card
Installing The Expanded Memory Card
IMI89–226
DXCPU-68K
DXRAM-xxx68K
Reset Button
1
2
3
4
OFF
1 2 3 4 ON
Set DIP Switch 8 ON
For Master Clear Upon
Initial Power Up After
Software Upgrade.
1 2 3 4
Set DIP Switch 1 ON
For Fixed Data Port
Parameters.
5
6
7
8
DXSW-xxx68K
DXP025
Locating DIP Switch 8 And The Reset Button
Installing The Expanded Memory Card – 9
IMI89–226
Installing The Expanded Memory Card
5.0 Restore The Database
5.1
Restoring The Externally Saved Database
Employ a personal computer with an XMODEM communications program to restore the database that you
previously recorded on a magnetic diskette using the Save The Database procedure.
NOTE: Remember, this programming procedure details steps that you would follow when using the
communications software program known as PROCOMM (produced by Datastorm Technologies). If you
are using a different communications software, your steps may be different.
1. Press CONTROL T for main menu.
2. From main menu, select system and press ENTER.
3. From system menu, select save/restore database menu and press ENTER.
4. From save/restore database menu, type item number for database parameter you wish to save and press
ENTER.
5. Press SPACE BAR to select option (YES = restore the database, NO = do not restore the database), and press
ENTER to accept selection and place cursor at next database parameter. Repeat step 5 for each database
parameter that you wish to restore.
6. Press ESCAPE twice.
7. To restore the database,
(a) type r (receive) and press ENTER,
(b) press page-up button,
(c) type prompted number to choose XMODEM protocol,
(d) type name of file where database is stored and press ENTER. Database restore is automatic.
8. Press the RESET button on the CPU board to reset the system.
5.2
Restoring The Internally Saved Database
After you upgrade the software, set DIP switch 8 on the DXPCPU-68K board to its ON position, and turn on the
AC power to the system. The system will automatically perform the master clear operation and reload the
internally saved database into the upgraded operating software. When it completes this task, it automatically logs
out of the programming mode. After the system logs out of the programming mode, press the RESET button on
the CPU board.
NOTE: The system takes an additional two to three minutes to power up after it receives AC power because of the
time required for the database restoring process. You will observe random flashing indicators during the
master clear and data base restoration sequence.
Accredited by the Dutch Council
for Certification for certification
and registration activities.
Comdial’s Quality Management System Is
Certified To The ISO 9001 Standard.
R
Charlottesville, Virginia 22901-2829
World Wide Web: http://www.comdial.com/
R
Installing And Programming
The DXMDM Serial Data Modem
1.1
Understanding The Modem
The DXMDM modem allows remote servicing and programming of the DXP digital communications system.
Software release 6.A supports operation with the DXMDM modem. The DXMDM is a general-purpose,
Hayes*-compatible, serial data modem that receives its operating power and configuration programming from the
DXP. The modem operating parameters are as detailed in the following chart.
Baud
Out
Baud
In
Data
Bits
Stop
Bits
Parity
Flow
Control
2400
2400
8
1
None
None
* Hayes is a registered trademark of Hayes Microcomputer Products.
Power
Cord
Sta
PW
RS
tus
R
3
Lin
P00
e
Serial Data Cord
Line Cord
This manual has been developed by Comdial Corporation (the “Company”) and is intended for the use of its customers and service personnel. The information in this manual is subject to change
without notice. While every effort has been made to eliminate errors, the Company disclaims liability for any difficulties arising from the interpretation of the information contained herein.
The information contained herein does not purport to cover all details or variations in equipment or to provide for every possible contingency to be met in connection with installation, operation, or
maintenance. Should further information be desired, or should particular problems arise which are not covered sufficiently for the purchaser’s purposes, contact Comdial, Inside Sales Department,
Charlottesville, Virginia 22906.
Printed in U.S.A.
IMI89–222.02
1/97
IMI89–222
1.2
Installing the Serial Data Modem
Installing The DXMDM Modem
The following procedure explains how to install the DXMDM modem. Figure 1 illustrates the relative position of
the modem and the location of its connections. The modem fits in the bottom left corner of the DXP board cage
just to the left of the services board (DXSRV) and directly below the interface board slot.
1. Locate DIP switch SW7 on the DXCPU board, and set it to its OFF position.
2. Insert the modem as illustrated in Figure 2. The modem rests on the bottom of the board cage.
3. Attach the modem to the cage with a single screw through the mounting-screw hole on the modem’s front
plate.
4. On the DXP power supply, located to the left of the modem, slide open the pre-charge port cover.
5. Connect the PWR cord from the modem to the pre-charge port, the modem’s STAT light should turn on.
6. Connect the serial data cord from the DXMDM to the serial data port labeled RS232/2 located on the CPU
board. This is the default port for the modem. When you use this connection, you will not need to take any
programming action. Alternately, you can connect the DXMDM to one of the serial data ports provided by the
DXP-COM card installed on the DXAUX board (if one is installed on your system). If you use a a serial data
port other than the default port, you must assign it for modem operation using the programming procedure
provided in Section 1.3.
7. Connect a telephone line into the modem’s line jack.
8. Set DIP switch SW7 to its ON position to ensure continuous modem operation. This step is necessary
because the DXMDM modem depends upon the DXP for both its power and configuration. With switch SW7
set ON, the system automatically matches the baud rate and serial data parameters of the modem regardless of
which port you choose for modem connection.
CAUTION
If you disconnect the modem PWR cord from the DXP, you must reset the modem after you reconnect the
PWR cord. Set switch SW7 to OFF, wait five seconds, and then return it to ON to reset the modem. (You
can also reset the modem from the programming station. To do so, enter the system-manager
programming mode and then dial 18#).
2 – Installing the Serial Data Modem
Installing the Serial Data Modem
IMI89–222
DXSRV
DXCPU
S
DXCPU
Board
RS232
1
DXPSM
MAIN CAB POWER SUPPLY
EXPANSION
UNIT
BATTERY
CONNECTION
DXMDM
Modem
Precharge
Port and
Modem
Power Port
RS232
2
BATTERY
BACKUP
CONNECTION
RS 232
1
RS 232
2
INPUT RATING
117V
5A
0M
S
PRECHARGE
PORT
PWR
RS232
EXPANSION UNIT
POWER CONNECTIONS
L
POWER
FUSE
15A 250V
NORMAL
OFF BLOW
ON
DXP00
Line Cord
from CO Line
Figure 1. Viewing the Position of the Modem and the Location of Its Connections
P010
Precharge
Port
RS232
2 Port
PWR
Cord
Sta
tus
PW
RS
R
3
Lin
P00
e
Serial Data Cord
Figure 2. Installing the Modem in the DXP Main Cabinet
Installing The Serial Data Modem – 3
IMI89–222
1.3
Installing the Serial Data Modem
Selecting a Modem Port
If you connect the modem to a serial data port other than the default port, you must program the modem port
number into the system database. Since the default port for both the modem and a SMDR printer is serial data
port RS232 2 on the CPU board, it is good practice to choose a different modem port if the site employs both
devices.
The following procedure explains how to program a new serial data port number into the system:
1. Set switch SW7 on the CPU board to its OFF setting.
2. From the VDT keyboard, type I✳746✳ and then press ENTER.
3. From main menu, select system and press ENTER.
4. From system menu, select serial ports and press ENTER.
5. From serial ports menu, select modem setup and press ENTER.
6. From modem setup menu, select port and press ENTER.
NOTE:You should never need to alter the modem’s default initialize string that also appears on this screen;
however, if you disturb the settings, you must return them to the following standard Hayes*-compatible
values: AT S0=1 M0 Q1 E0. The S0= value sets the rings-before-answer number (1= one ring, 2 = two
rings, and so forth). You can set the S0= value to something other than 1 if necessary.
7. Type the number for the modem port and press ENTER to accept setting.
8. When finished, press ESCAPE twice.
9. Type y to accept changes, n to reject them, or r to resume editing and press ENTER.
10. Set switch SW7 to its ON setting.
* Hayes is a registered trademark of Hayes Microcomputer Products.
Accredited by the Dutch Council
for Certification for certification
and registration activities.
Comdial’s Quality Management System Is
Certified To The ISO 9001 Standard.
R
Charlottesville, Virginia 22901-2829
World Wide Web: http://www.comdial.com/
R
Installing A Dual Tone Multiple Frequency (DTMF)
Receiver Card In The
DXP Digital Communications System
1.0 Introducing The DTMF Receiver Card
The DXP digital communications system supports the use of on-premise industry-standard telephones.
To support the DTMF dialing of industry standard telephones, the DXP CPU board provides on-board DTMF
receiver circuitry that supports simultaneous dialing of two industry-standard telephones at a time. This provision
is adequate, if your site requires only a few industry-standard telephones; however. if you intend to support a
population of industry-standard telephones that will generate a large volume of outgoing call traffic, you must
install one or more DTMF receiver cards to provide additional DTMF receivers for the telephones. Each DTMF
receiver card allows four industry-standard telephones to dial simultaneously. The number of cards that you need
to install in the system depends upon how active the industry-standard telephones will be at the site. See Section
1.1 for details.
If you do need to add receiver cards, you add an auxiliary board to the system and install up to four DTMF
receiver cards on it. The DXP system supports the use of two auxiliary boards installed at slots UNV1/AUX and
UNV2/AUX in the main common equipment cabinet.
This manual has been developed by Comdial Corporation (the “Company”) and is intended for the use of its customers and service personnel. The information in this manual is subject to change
without notice. While every effort has been made to eliminate errors, the Company disclaims liability for any difficulties arising from the interpretation of the information contained herein.
The information contained herein does not purport to cover all details or variations in equipment or to provide for every possible contingency to be met in connection with installation, operation, or
maintenance. Should further information be desired, or should particular problems arise which are not covered sufficiently for the purchaser’s purposes, contact Comdial, Inside Sales Department,
Charlottesville, Virginia 22906.
Printed in U.S.A.
IMI89–220.02
1/97
IMI89–220
1.2
Installing The DTMF Receiver Card
Determining The Board Configuration That You Will Need
Use the following specifications to determine the maximum number of station boards and DTMF receiver cards
that you may need.
•
Each eight-station circuit board supports up to eight telephones. (It will actually support 16 telephones—two
telephones at each port sharing a common intercom number.)
•
•
Each 16-station circuit board supports up to 16 telephones. (It will actually support 32 telephones—two
telephones at each port sharing a common intercom number)
•
•
You can bridge up to two industry-standard telephones at one station port as long as you do not exceed a
combined ringer equivalence number, or REN, of 2.0. (Remember, with two telephones at the same port,
they share a common intercom number.)
You can bridge up to two industry-standard telephones at one station port as long as you do not exceed a
combined ringer equivalence number, or REN, of 2.0. (Remember, with two telephones at the same port,
they share a common intercom number.)
Each receiver card allows four industry-standard telephones to dial simultaneously. (The number of cards that
you need to install in the system will depend upon how active the industry-standard telephones will be at the
site.)
•
You can install four receiver cards on a auxiliary board. With four receiver cards installed, an auxiliary
board supports simultaneous dialing of 16 industry-standard telephones (Remember, while you can install
up to two auxiliary boards in the system, each auxiliary board that you use occupies a slot where you could
install a station or line board.)
Based upon the above specifications, a fully-equipped DXP system provides the following industry-standard
telephone support:
•
a maximum of 352 industry-standard telephones (11 IST station boards times 16 telephones per board times
two telephones per station port —sharing the same extension number) with a maximum of 18 telephones
dialing simultaneously (four DTMF receiver cards times one auxiliary board times four DTMF receiver circuits
per card plus the two DTMF receiver circuits that are always provided by the CPU board),
•
a maximum of 320 industry-standard telephones (10 IST station boards times 16 telephones per board times
two telephones per station port —sharing the same extension number) with a maximum of 34 telephones
dialing simultaneously (eight DTMF receiver cards times two auxiliary boards plus the two CPU board
supplied DTMF receiver circuits).
A typical telephone system, experiences the following call traffic percentages. Your system may be similar.
•
•
•
Light Call Traffic = up to 15 percent of the telephones dial simultaneously
Moderate Call Traffic = up to 20 percent of the telephones dial simultaneously
Heavy Call Traffic = up to 30 percent of the telephones dial simultaneously
If you are not sure how many telephones will dial at the same time in your system, you can use these typical
system averages and the following formula to arrive at a usable estimate.
(Percent Of Simultaneous Dialing) x (Installed IST Telephones) = (Simultaneous Dialing Telephones)
An an example the system maximum is as follows: .106 x 320 = 34 telephones
You can use the following formula to determine how many receiver cards that you must install in your system.
(Simultaneous Dialing Telephones) – (2 Telephones Supported By CPU Board) = Total Number Of Receiver Cards
( 4 Telephones Supported Per Receiver Card)
As an example, the system maximum is as follows: (34 – 2) ÷ 4 = 8 cards
2 – Installing The DTMF Receiver Card
Installing The DTMF Receiver Card
IMI89–220
The following chart details typical hardware configurations for industry-standard telephone, auxiliary board, and
receiver card usage.
Call Traffic
Light
Moderate
Heavy
Light
Moderate
Heavy
Light
Moderate
Heavy
Light
Moderate
Heavy
Light
Moderate
Heavy
Light
Moderate
Heavy
Light
Moderate
Heavy
Light
Moderate
Heavy
Light
Moderate
Heavy
Light
Moderate
Heavy
Light
Moderate
Heavy
Telephone
Quantity
16
16
16
32
32
32
48
48
48
64
64
64
80
80
80
96
96
96
112
112
112
128
128
128
144
144
144
160
160
160
176
176
176
IST Board
Quantity
1
1
1
2
2
2
3
3
3
4
4
4
5
5
5
6
6
6
7
7
7
8
8
8
9
9
9
10
10
10
11
11
11
Auxiliary Board
Quantity
0*
0*
1
1
1
1
1
1
1
1
1
1
1
1
2
2
2
2
2
2
2
2
2
2
2
2
2
2
2
2
1
1
1
Receiver Card
Quantity
Simultaneous
Dialing
0*
0*
1
1
1
2
2
2
3
3
3
4
4
4
5
5
5
6
6
7
7
7
7
8
8
8
8
8
8
8
4
4
4
2
2
6
6
6
10
10
10
14
14
14
18
18
18
22
22
22
26
26
26
30
30
30
30
34
34
34
34
34
34
18
18
18
*The CPU board provides DTMF receivers that allow up to two industry-standard telephones to dial
simultaneously.
Installing The DTMF Receiver Card – 3
IMI89–220
1.3
Installing The DTMF Receiver Card
Complying With Underwriters Laboratories Regulations
Per The Underwriters Laboratories regulation 1459, 2nd edition, be aware of the following precautions when
installing telephone equipment that is to be directly connected to the telephone company network:
•
•
•
Never install telephone wiring during a lightning storm.
•
Use caution when installing or modifying telephone lines.
Never install telephone jacks in wet locations unless the jack is specifically designed for wet locations.
Never touch uninsulated telephone wires or terminals unless the telephone line has been disconnected at the
network interface.
2.0 Installing Circuit Boards
CAUTION
Circuit boards are susceptible to damage caused by electrostatic discharge, and you must keep this fact in
mind as you handle the circuit boards. Refer to the Comdial publication IMI01-005, Handling Of
Electrostatically Sensitive Components, for general information. Specific handling precautions are also
included in this installation instruction.
2.1
Creating A Static Safe Work Area
When servicing the common equipment cabinet at the installation location, it is a good practice to place a
conductive mat in front of the cabinet area and ground the mat to a good earth ground. (The third wire ground of
the AC power line is also an acceptable grounding point.) The grounded conductive mat provides a safe static
electric discharge path.
When removing the common equipment cabinet from the installation location for servicing, it is a good practice to
prepare a static-safe work area on which to place the cabinet.
You should supply yourself with a static discharge wrist strap, and wear it every time you handle electronic circuit
boards either at the cabinet mounting location or at your work area.
4 – Installing The DTMF Receiver Card
Installing The DTMF Receiver Card
IMI89–220
Backboard
dxp040
Common
Equipment
Cabinet
Earth
Ground
Conductive
Mat
1 Meg Ohm
Resister
Static Discharge
Wrist Strap
Providing Static Protection At The Cabinet Mounting Location
Static
Wrist
Strap
Common Point Ground
ESD Protective
Mat
Typical Earth
Ground
ESD Protective
Worksurface
Static 2
ESD Protective
Mat
Creating A Static Safe Work Area
Installing The DTMF Receiver Card – 5
IMI89–220
Installing The DTMF Receiver Card
3.0 Installing The Receiver Card
You can install four receiver cards on an auxiliary board.
1. Be sure you are standing on the conductive mat that you have placed in front of the cabinet area and grounded
to a good earth ground. (The third wire ground of the AC power line is an acceptable grounding point if the
AC wall jack is properly grounded.) The grounded conductive mat provides a safe static electric discharge
path.
2. Install your static discharge wrist strap on your bare wrist; adjust it for a snug fit. Be sure that the strap is not
isolated by clothing. Connect the wrist strap cord between the wrist strap and an AC or earth ground.
NOTE: With the common equipment in the installed position, the ground lug on the side of the cabinet is an
appropriate grounding point since it should have a heavy ground wire connected between it and a good
earth ground.
3. Turn off the power to the system, unplug the AC line cord, and disconnect the optional battery back up
equipment.
4. Loosen the retaining hardware, and lift the front panel away from the common equipment cabinet.
5. Loosen the retaining hardware and remove the auxiliary board from the cabinet, place it in a static protection
bag, and transport the board to the static-safe work area. Do the same for the interface board if you plan to add
a receiver card to it. Further, if the common equipment cabinet contains an auxiliary board and you plan to
add the receiver card to it, follow the same procedure.
6. At the static safe work area, with your wrist strap in place, remove the circuit boards and receiver cards from
their static protection bags.
7. Referring to the illustrations on the next page, orient the auxiliary board and the receiver card, and attach
them with the supplied hardware.
8. Place the auxiliary board and the newly installed receiver card into a static protection bag and transport them
back to the common equipment cabinet.
9. With your static strap on your wrist, remove the board assembly from the static protection bag and install the
board assembly in either slot UNV1/AUX or UNV2/AUX in the main common equipment cabinet.
CAUTION
When pressing circuit boards into place, press them only at the extractor lever locations.
If you apply pressure at other locations you may damage the board assembly.
9. Make a final inspection to ensure that the board assembly is oriented correctly and mated properly.
10. Install and tighten the supplied screws to secure the circuit board assembly to the board cage.
10. Plug the AC line cord into the AC outlet, reconnect any battery back up equipment, and turn on the switch on
the power supply.
11. Replace the front panel on the common equipment cabinet.
6 – Installing The DTMF Receiver Card
Installing The DTMF Receiver Card
IMI89–220
Connecting The Receiver Card On The Auxiliary Board
Installing The DTMF Receiver Card – 7
R
Installing The Ring Generator Assembly
In The DXP Digital Communications System
1.0 Introducing The Ring Generator Assembly Installation
The DXP digital communications system supports the use of on-premise industry-standard telephones. To do
this, it requires a ring generator assembly to supply ringing voltage to the industry-standard telephones to signal
incoming calls.
Regardless of the number of installed industry-standard telephones, you will need to install one ring generator in
the main cabinet. You will also need to install one ring generator in the expansion cabinet if the site includes an
expansion cabinet that contains IST station boards.
1.1
Complying With Underwriters Laboratories Regulations
Per The Underwriters Laboratories regulation 1459, 2nd edition, be aware of the following precautions when
installing telephone equipment that is to be directly connected to the telephone company network:
•
•
•
Never install telephone wiring during a lightning storm.
•
Use caution when installing or modifying telephone lines.
Never install telephone jacks in wet locations unless the jack is specifically designed for wet locations.
Never touch uninsulated telephone wires or terminals unless the telephone line has been disconnected at the
network interface.
This manual has been developed by Comdial Corporation (the “Company”) and is intended for the use of its customers and service personnel. The information in this manual is subject to change
without notice. While every effort has been made to eliminate errors, the Company disclaims liability for any difficulties arising from the interpretation of the information contained herein.
The information contained herein does not purport to cover all details or variations in equipment or to provide for every possible contingency to be met in connection with installation, operation, or
maintenance. Should further information be desired, or should particular problems arise which are not covered sufficiently for the purchaser’s purposes, contact Comdial, Inside Sales Department,
Charlottesville, Virginia 22906.
Printed in U.S.A.
IMI89–221.02
1/97
IMI89–221
Installing The Ring Generator Assembly
2.0 Creating A Static Safe Work Area
When servicing the common equipment cabinet at the installation location, it is a good practice to place a
conductive mat in front of the cabinet area and ground the mat to a good earth ground. (The third wire ground of
the AC power line is also an acceptable grounding point.) The grounded conductive mat provides a safe static
electric discharge path.
When removing the common equipment cabinet from the installation location for servicing, it is a good practice to
prepare a static-safe work area on which to place the cabinet.
You should supply yourself with a static discharge wrist strap, and wear it every time you handle electronic circuit
boards either at the cabinet mounting location or at your work area.
2 – Installing The Ring Generator Assembly
Installing The Ring Generator Assembly
IMI89–221
Backboard
dxp040
Common
Equipment
Cabinet
Earth
Ground
Conductive
Mat
1 Meg Ohm
Resister
Static Discharge
Wrist Strap
Providing Static Protection At The Cabinet Mounting Location
Static
Wrist
Strap
Common Point Ground
ESD Protective
Mat
Typical Earth
Ground
ESD Protective
Worksurface
Static 2
ESD Protective
Mat
Creating A Static Safe Work Area
Installing The Ring Generator Assembly – 3
IMI89–221
Installing The Ring Generator Assembly
3.0 Installing The Ring Generator Assembly
You can install the ring generator assembly in the main and expansion cabinets per the following steps.
1. Turn off the power to the system, unplug the AC line cord from the AC outlet, and disconnect the optional
battery back up equipment.
2. Install your static discharge wrist strap on your bare wrist; adjust it for a snug fit. Be sure that the strap is
touching bare skin and is not isolated by clothing. Connect the wrist strap cord between the wrist strap and an
AC or earth ground
NOTE: With the common equipment in the installed position, the ground lug on the side of the cabinet is an
appropriate grounding point since it should have a heavy ground wire connected between it and a good
earth ground.
3. Orient the ring generator assembly at the upper left of the common equipment cabinet just above the power
supply assembly, and connect its cable connector to the DXP backplane connector
4. Slide the ring generator into the cabinet on the rails provided for this purpose and secure it in place with the
supplied hardware.
5. Plug the AC line cord into the AC outlet, reconnect any battery back up equipment and turn on the switch on
the power supply.
6. Replace the front panel on the common equipment cabinet.
4 – Installing The Ring Generator Assembly
Installing The Ring Generator Assembly
IMI89–221
Installing The Ring Generator
Installing The Ring Generator Assembly – 5
R
Installing The Conference Board
In The DXP Digital Communications System
1.0 Introducing The Conferencing Board
The software timing for the DXP system, dedicates 26 time slots for conferencing operations. Different types of
conferencing actions require different quantities of time slots as detailed in the following list:
•
•
•
SOHVA = 2 time slots,
Executive Override = 6 time slots,
Four-Way Conference = 14 time slots,
•
•
•
Service Observing = 2 time slots,
Three-Way Conference = 6 time slots,
Five-Way Conference = 22 time slots,
The maximum conference combinations that the system allows at any one time are as follows:
•
•
one five-way plus two SOHVA,
•
one four-way plus two three-way,
four three-way plus one SOHVA
The optional conference board adds the capability for five additional three-way conferences. These are three-way
conferences consisting of three stations or two stations and one line. These additional three-way conferences do
not provide additional SOHVA or service observe capability.
When you install the conference board, the system uses its capacity of three-way conferences before using the
main system resources for additional conferencing.
1.2
Complying With Underwriters Laboratories Regulations
Per The Underwriters Laboratories regulation 1459, 2nd edition, be aware of the following precautions when
installing telephone equipment that is to be directly connected to the telephone company network:
•
•
•
Never install telephone wiring during a lightning storm.
•
Use caution when installing or modifying telephone lines.
Never install telephone jacks in wet locations unless the jack is specifically designed for wet locations.
Never touch uninsulated telephone wires or terminals unless the telephone line has been disconnected at the
network interface.
This manual has been developed by Comdial Corporation (the “Company”) and is intended for the use of its customers and service personnel. The information in this manual is subject to change without notice.
While every effort has been made to eliminate errors, the Company disclaims liability for any difficulties arising from the interpretation of the information contained herein.
The information contained herein does not purport to cover all details or variations in equipment nor to provide for every possible contingency to be met in connection with installation, operation, or maintenance.
Should further information be desired, or should particular problems arise which are not covered sufficiently for the purchaser’s purposes, contact Comdial, Inside Sales Department, Charlottesville, Virginia
22906.
Printed in U.S.A.
IMI89–225.01
11/95
IMI89–225
Installing The Conference Board
2.0 Installing Circuit Boards
CAUTION
Circuit boards are susceptible to damage caused by electrostatic discharge, and you must keep this fact in
mind as you handle the circuit boards. Refer to the Comdial publication IMI01-005, Handling Of
Electrostatically Sensitive Components, for general information. Specific handling precautions are also
included in this installation instruction.
2.1
Creating A Static Safe Work Area
When servicing the common equipment cabinet at the installation location, it is a good practice to place a
conductive mat in front of the cabinet area and ground the mat to a good earth ground. (The third wire ground of
the AC power line is also an acceptable grounding point.) The grounded conductive mat provides a safe static
electric discharge path.
When removing the common equipment cabinet from the installation location for servicing, it is a good practice to
prepare a static-safe work area on which to place the cabinet.
You should supply yourself with a static discharge wrist strap, and wear it every time you handle electronic circuit
boards either at the cabinet mounting location or at your work area.
2 – Installing The Conference Board
Installing The Conference Board
IMI89–225
Backboard
dxp040
Common
Equipment
Cabinet
Earth
Ground
Conductive
Mat
1 Meg Ohm
Resister
Static Discharge
Wrist Strap
Providing Static Protection At The Cabinet Mounting Location
Static
Wrist
Strap
Common Point Ground
ESD Protective
Mat
Typical Earth
Ground
ESD Protective
Worksurface
Static 2
ESD Protective
Mat
Creating A Static Safe Work Area
Installing The Conference Board – 3
IMI89–225
2.2
Installing The Conference Board
Installing Conference Boards In The Equipment Cabinet
Install one or more conference boards (as needed) in any unused universal board slots (UNV1/AUX,
UNV2/AUX, UNV3–UNV5).
1. Normally you should disconnect the AC power cord from the AC outlet and disconnect the optional battery
back-up assembly from the main cabinet power supply; however, when necessary, you can install a DXCNF
board in an operating system. If you must do this, connect one end of a standard telephone handset coil cord
to the precharge port on the power supply. During step 6, you will connect the other end of this coil cord to
the precharge jack on the station board.
2. Install your static discharge wrist strap on your bare wrist; adjust it for a snug fit. Be sure that the strap is
touching bare skin and is not isolated by clothing. Connect the wrist strap cord between the wrist strap and an
AC or earth ground
NOTE: With the common equipment in the installed position, the ground lug on the side of the cabinet is an
appropriate grounding point since it should have a heavy ground wire connected between it and a good
earth ground.
3. Loosen the retaining hardware, and lift the front panel away from the common equipment.
4. Each conference board is supplied in a static protection bag for safe keeping. When you are ready to install
the circuit board, remove it from its static protection bag.
5. Locate an unused universal board slot for conference board installation.
6. If you are installing the conference board in an operating system, connect the free end of the precharge cord
that you installed in step 1 to the precharge jack on the station board.
7. Orient the conference board with its top and bottom guides in the cabinet’s board cage. and press the board
firmly until its board edge connection properly mates with the connector on cabinet’s backplane.
CAUTION
When pressing circuit boards into place, press them only at the extractor lever locations.
If you apply pressure at other locations you may damage the board assembly.
8. Repeat steps 4–7 until all circuit boards are installed.
9. Make a final inspection to ensure that the conference board is oriented correctly and mated properly.
10. Install and tighten the supplied screws to secure the conference board to the board cage.
11. Plug the AC line cord into the AC outlet, reconnect any battery back up equipment, and turn on the switch on
the power supply.
12. Replace the front panel on the common equipment cabinet.
4 – Installing The Conference Board
Installing The Conference Board
IMI89–225
Viewing A Typical Conference Board Installation
Installing The Conference Board – 5
R
Installing The Communications Card
In The DXP Digital Communications System
1.0 Understanding The Communications Card
The DXP digital communications system supports the use of the DXOPT–COM communications card. The DXP
uses this card just like it uses the serial ports on the main CPU board (OAI communication, VDT programming,
printer functionality, for example). The communications card contains four serial communication ports and is
attached to an auxiliary board installed in the main DXP system. You can install up to two serial communication
cards on each auxiliary board, giving a total of 16 additional serial ports (if you have two auxiliary boards). You
can install the serial ports on either of the bottom two slots of the auxiliary board.
The DXOPT–COM card requires DXP software release 5.3 or higher.
1.1
Communications Card Connections
The interface connector between the external device and the communications card is the same type standard
modular jack used on the CPU board with the same pin configuration.
1.2
Data and Baud Rates
Each communication port can support various baud rates, data bits, stop bits, parity, and flow control. You can
program these various options using the VDT programming. The maximum baud rate that the system will support
is 9600, but there are some limitations involved. If a device is transmitting / receiving from the DXP at a high
rate, Comdial engineers recommend that you use a communications protocol (RTS / CTS or XON / XOFF) to
prevent buffer overrun and data loss.
NOTE: The auxiliary board can support one device active at any given time for 9600 baud transmit and receive.
If you program multiple serial ports for any rate above 1200 baud and more than one of those ports is
active in the same direction at the same time, the effective throughput may be less than the set value.
1.3
Connecting OAI Enterprise Applications To The DXP
Typically, PC applications that take advantage of Comdial’s Enterprise Open Architecture Interface (Quick Q
ACD, DXP Inntouch, for example) have a higher baud rate and throughput requirements. Comdial engineers
recommend that you connect any of these applications to the main COM ports, rather than to a communications
card.
1.4
Referring To Related Publications
You should also read and become familiar with the following applicable DXP publication:
✔IMI66-001, Installation Instructions DXP Main Cabinet Assembly
This manual has been developed by Comdial Corporation (the “Company”) and is intended for the use of its customers and service personnel. The information in this manual is subject to change
without notice. While every effort has been made to eliminate errors, the Company disclaims liability for any difficulties arising from the interpretation of the information contained herein.
The information contained herein does not purport to cover all details or variations in equipment or to provide for every possible contingency to be met in connection with installation, operation, or
maintenance. Should further information be desired, or should particular problems arise which are not covered sufficiently for the purchaser’s purposes, contact Comdial, Inside Sales Department,
Charlottesville, Virginia 22906.
Printed in U.S.A.
IMI89-227.01
11/95
IMI89–227
Installing The Communications Card
2.0 Preparing For Installation
In installing options in the DXP cabinet, you will be handling sensitive electronic equipment, and you should pay
careful attention to the following cautionary statement.
CAUTION
Electronic circuit boards are susceptible to damage caused by electrostatic discharge and must be
handled accordingly. Refer to the Comdial publication IMI01-005, Handling Of Electrostatically
Sensitive Components, for general information. Specific handling precautions are also included in this
installation instruction. The DXOPT-COM card, and the DXAUX board are supplied in static protection
bags. Do not open a static protection bag prior to installation.
Before you perform any work on the DXP, make that area static safe, and before you begin the installation of the
communications card on the auxiliary board, prepare a static-safe work area in which to do the work.
2.1
Preparing The DXP Work Area
Place a conductive mat in front of the cabinet area and ground the mat to a good earth ground. (The third wire
ground of the AC power line is an acceptable grounding point if the AC wall jack is properly grounded.) The
grounded conductive mat will provide a safe static electric discharge path.
2.2
Preparing A Static-Safe Work Area.
When servicing electronic circuit boards, it is a good practice to do so at a static-safe work area prepared ahead of
time. The drawings shown illustrate a typical static-safe work area.
2 – Installing The Communications Card
Installing The Communications Card
IMI89–227
Backboard
dxp040
Common
Equipment
Cabinet
Earth
Ground
Conductive
Mat
1 Meg Ohm
Resister
Static Discharge
Wrist Strap
Preparing The DXP Work Area
Static
Wrist
Strap
Common Point Ground
ESD Protective
Mat
Typical Earth
Ground
ESD Protective
Worksurface
Static 2
ESD Protective
Mat
Preparing A Static Safe Work Area
Installing The Communications Card – 3
IMI89–227
Installing The Communications Card
3.0 Installing The Communications Card
The following procedure explains how to install the communications card on the auxiliary board.
1. Be sure you are standing on the conductive mat that you have placed in front of the cabinet area and grounded
to a good earth ground. (The third wire ground of the AC power line is an acceptable grounding point if the
AC wall jack is properly grounded.) The grounded conductive mat provides a safe static electric discharge
path.
2. Install the static discharge wrist strap (supplied with the main cabinet) on your bare wrist, and adjust it for a
snug fit. Be sure that the strap is in direct contact with your skin and not your clothing. Connect the wrist
strap cord between the wrist strap and an AC or earth ground.
NOTE: With the common equipment in the installed position, the ground lug on the side of the cabinet is an
appropriate grounding point since it should have a heavy ground wire connected between it and a good
earth ground.
3. Disconnect the AC power cord from the AC outlet and disconnect the optional battery back-up assembly from
the main cabinet power supply
NOTE: If the DXP cabinet now contains an auxiliary board, follow step 4. If it does not, skip step 4 and go on
to step 5.
4. Locate the auxiliary board, loosen the retaining screws, remove it from the DXP main cabinet, place it in a
static protection bag, and transport it to the static-safe work area.
5. At the static safe work area, with your wrist strap in place, remove the auxilary board and the communications
card from their static protection bags.
6. Orient and attach the card to the board with the supplied hardware.
7. Place the auxiliary board and the newly installed communications card into a static protection bag and
transport it back to the DXP main cabinet.
8. With your wrist strap properly grounded, remove the auxiliary board, with its installed communications card,
from the static protection bag. Orient it with the top and bottom guides in the main cabinet board cage, and
press it in firmly until its board edge connector properly mates with the connector on the backplane.
You can install an auxiliary board in the main common equipment cabinet at board slots UNV1/AUX and
UNV2/AUX.
CAUTION
When pressing the board into place, press it only at the extractor lever locations. If you apply pressure
at other locations you may damage the board assembly.
9. Make a final inspection to ensure that the auxiliary board is located in the correct slot, oriented correctly, and
mated properly then install and tighten the supplied screws to secure it to the board cage.
10. Connect the appropriate cabling to the communication card connector, and then replace the front panel on the
DXP main cabinet.
4 – Installing The Communications Card
Installing The Communications Card
IMI89–227
Connecting The Communications Card To The Auxiliary Board
Installing The Communications Card – 5
IMI89–227
Installing The Communications Card
4.0 Identifying The Communications
Card’s Serial Data Port Connections
Each communications card provides four serial data ports. You can install two communications cards on each
auxiliary board, and you can install two auxiliary boards in the main DXP common equipment cabinet. This
combination provides 16 auxiliary serial data ports in addition to the two main serial data ports provided by the
CPU board. Each serial data port is a standard 6–conductor modular jack that serves as the interface connection
between an external data device and the DXP system. The system designates the location of each serial data port
for data processing purposes.
5.0 Connecting Data Communications
Equipment To The DXP
5.1
Selecting The Baud Rate
Each serial data communications port supports various baud rates, data bits, stop bits, parity, and flow control.
You can program these various options using the data base programming; however, the maximum baud rate that
you can assign to a serial data port is 9600 baud. Also, if a device is transmitting/receiving data from the DXP at a
high rate, engineering sources recommend that you use a communications protocol (such as RTS/CTS or
XON/XOFF) to prevent buffer overrun and data loss.
5.2
Making The Data Connections
When operating the serial data port at 9600 baud, your data cable run must be no longer than 500 feet.
Each serial data port is a standard 6–conductor modular jack that serves as the interface between an external data
device and the DXP system.
When preparing a data cable for connection to a data device, refer to the manufacturer’s manual for the equipment
being interfaced, and make the wiring connections detailed in the following list:
•
Wire the common equipment RD (data from device to common equipment) connection to the device TD
(transmit data) connection.
•
Wire the common equipment TD (data to device from common equipment) connection to the device RD
(receive data) connection.
•
•
Wire the common equipment SG (signal ground) connection to the device SG (signal ground) connection.
If required for proper operation, wire the common equipment CTS (clear-to-send status from device to common
equipment) connection to the device RTS (request-to-send) connection.
NOTE: The common equipment requires a positive voltage, with respect to signal ground, in order to send data.
If the cable has spare wires, be sure to ground them so that they will not act as antennas and induce interference
into the system. Further, if there is a source of RF power nearby (such as a radio transmitter), use shielded cable
and ground the shield at both ends.
CAUTION
As an added precaution against induced interference, route the data cable as far away from any
fluorescent lighting as you can reach, and make every effort to route the data cable perpendicular to other
wiring.
6 – Installing The Communications Card
Installing The Communications Card
IMI89–227
CAJS0 7
(Pin 3) RD
(Pin 2) CTS
Data Port
RS-232 1
(Pin 1) RTS
2
5
3
4
(Pin 6) PG
(Pin 5) SG
(Pin 4) TD
Serial Ports
3
4
First
COM Card
5
6
14
Serial Ports
Serial Ports
7
8
Serial Ports
11
Third
12 COM
Card
13
Second
COM Card
15
16
9
17
10
18
Auxiliary Board 1
(Board Slot: UNV 1/AUX)
Fourth
COM Card
Auxiliary Board 2
(Board Slot: UNV2/AUX)
Identifying The Serial Data Port Locations
Installing The Communications Card – 7
R
Installing The BBLDX External Battery Assembly
Introducing The BBLDX Assembly
The BBLDX external battery assembly is for use with the DXP digital communications system. The assembly
includes the following items:
•
Batteries: Five 6-volt, 20 ampere-hour, GC Portalac Model PE6V20* (Comdial product code BT000-131)
*GS Portalac, City Of Industry CA, 91748
•
Metal enclosure with wire harness, includes combination circuit breaker, on/off switch
Should the AC power to the system be interrupted, one BBLDX external battery assembly provides a minimum of
1.0 hour of operation for a fully loaded main cabinet assembly or .5 hours of operation for a fully loaded main
cabinet and expansion cabinet assembly. Add another BBLDX in parallel with the first assembly to extend the
time to a minimum of 2.0 hours of operation for a fully loaded main cabinet assembly or 1.0 hour of operation for
a fully loaded main cabinet and expansion cabinet assembly. The DXP system supports a maximum of two
external battery assemblies. Calculate the minimum battery backup time provided by one BBLDX assembly to a
fully configured DXP system using the following formula:
T=
Ke
1 + [(0.13) (N)]
T = Back-up time in hours
K = 0.6 (Constant)
e = 20 (ampere-hour capacity of BBLDX)
N = Total number of stations
Example:
Assume that a DXP main cabinet providing 80 station capacity is installed along with a BBLDX battery assembly
to provide back-up power.
T=
(.6)(20)
12.0
=
1 + [(0.13) (80)]
11.4
= 1.05 Hours
During AC operation, the DXP system provides re-charging current to maintain the voltage potential of the
BBLDX battery assembly at an operational level. The charging circuit may not provide an adequate charge if an
installed battery assembly has a current rating of greater than 40 ampere-hours.
NOTE: One BBLDX external battery assembly requires approximately 12 hours to completely re-charge to full
potential after it has been completely discharged and, in some cases, when initially installed. Adding
another battery assembly extends the required re-charge time to approximately 24 hours.
This manual has been developed by Comdial Corporation (the “Company”) and is intended for the use of its customers and service personnel. The information in this manual is subject to change without notice.
While every effort has been made to eliminate errors, the Company disclaims liability for any difficulties arising from the interpretation of the information contained herein.
The information contained herein does not purport to cover all details or variations in equipment nor to provide for every possible contingency to be met in connection with installation, operation, or maintenance.
Should further information be desired, or should particular problems arise which are not covered sufficiently for the purchaser’s purposes, contact Comdial, Inside Sales Department, Charlottesville, Virginia
22906.
Printed in U.S.A.
IMI89–223.02
8/96
IMI89–223
Installing The External Battery Assembly
Mounting The BBLDX Cabinet
This BBLDX external battery assembly is shipped from the factory with the harness installed in the enclosure, and
with the batteries packaged separately.
1. Remove the lid from the empty metal enclosure and save the retaining hardware.
2. Mount the empty cabinet near the DXP main cabinet either to its left or just below it. Note the location of an
expansion battery cabinet if the site requires one. When wall mounting the battery assembly directly to a wall,
drive the mounting screws into the underlying wall studs and not just into the wall material alone. If
necessary, attach a mounting board to the wall and then attach the battery assembly cabinet to the mounting
board.
3. When a site requires an expansion battery cabinet, remove the appropriate access plates from the main battery
cabinet and the expansion battery cabinet before mounting them.
24-1/2"
34-3/4"
18-5/16"
7"
Expansion
Cabinet
8-3/4"
3-31/32"
7"
48"
5"
Expansion Battery
Cabinet
5"
Main Battery
Cabinet
7"
10-31/32"
Main
Cabinet
CAJS052
16"
32"
64"
72"
Mounting The BBLDX Cabinets To The Left Of The DXP Cabinet
2 – Installing The External Battery Assembly
Installing The External Battery Assembly
IMI89–223
32"
24-1/2"
18-5/16"
3"
7"
Expansion
Cabinet
8-3/4"
3-31/32"
7"
60"
Main
Cabinet
8-3/4"
4-13/32"
5"
Main Battery
Cabinet
3-3/4"
5"
Expansion Battery
Cabinet
1-7/16"
CAJS051
16"
36"
Mounting The BBLDX Cabinets At The Bottom Of The DXP Cabinet
Installing The External Battery Assembly – 3
IMI89–223
Installing The External Battery Assembly
Assembling and Wiring The BBLDX
When Mounted To Left Of The DXP Cabinet
For expansion capability, route the two wires to the expansion battery cabinet through the access openings in the
top and bottom of the two cabinets.
1. Connect the wiring harness to the batteries per the illustration.
2. Install the batteries in the metal enclosure(s) per the illustration and replace the lid.
3. Connect the BBLDX to the DXP main cabinet per the instructions provided in the system manual supplied
with the DXP system.
Typical Access
Openings for Wiring
(Two per Cabinet)
Expansion
Battery
Cabinet
Main
Battery
Cabinet
This Cable
Not Used
Circuit
Breaker
DX
P0
Batteries
(Five per
Cabinet)
15
Installing The Batteries
4 – Installing The External Battery Assembly
Connect This
Cable To
Common
Equipment
Power Supply
Installing The External Battery Assembly
Expansion
Battery Cabinet
Assembly
_
+
IMI89–223
Main
Battery Cabinet
Assembly
-
_
+
6V
LB055103
6V
+
_
+
6V
_
6V
_
6V
_
6V
_
+
6V
+
_
+
6V
+
Cable
_
+
6V
+
To Common
Equipment
Power Supply
BK
WH
GN
RD
_
+
6V
Breaker
with Switch
NOTE: Press breaker firmly to insure actuation.
Wiring The Batteries
Installing The External Battery Assembly – 5
IMI89–223
Installing The External Battery Assembly
Assembling and Wiring The BBLDX
When Mounted To The Bottom Of The DXP Cabinet
For expansion capability, route the two wires to the expansion battery cabinet through the access openings in the
top and bottom of the two cabinets.
1. Connect the wiring harness to the batteries per the illustration.
2. Install the batteries in the metal enclosure(s) per the illustration and replace the lid.
3. Connect the BBLDX to the DXP main cabinet per the instructions provided in the system manual supplied
with the DXP system.
Typical Access
Openings for Wiring
(Two per Cabinet)
This Cable
Not Used
Connect This
Cable To
Common
Equipment
Power Supply
Expansion
Battery
Cabinet
Circuit
Breaker
Main
Battery
Cabinet
DX
P0
Batteries
(Five per
Cabinet)
16
Installing The Batteries
6 – Installing The External Battery Assembly
Installing The External Battery Assembly
Expansion
Battery Cabinet
Assembly
_
+
IMI89–223
Main
Battery Cabinet
Assembly
-
_
+
6V
LB055103
6V
+
_
+
6V
_
6V
_
6V
_
6V
_
+
6V
+
_
+
6V
+
Cable
_
+
6V
+
To Common
Equipment
Power Supply
BK
WH
GN
RD
_
+
6V
Breaker
with Switch
NOTE: Press breaker firmly to insure actuation.
Wiring The Batteries
Installing The External Battery Assembly – 7
IMI89–223
Installing The External Battery Assembly
Interfacing Currently Produced BBLDX Battery Assemblies
With Previously Produced BBLDX Battery Assemblies
You can interconnect the currently produced BBLDX Battery Assemblies with previously produced assemlies
currently installed in the field or stored in warehouse stock awaiting installation. Use the following illustrations
for connection details.
Currently Produced
Expansion
Battery Cabinet
Previously Produced
Main
Battery Cabinet
_
+
6V
+
Battery
12V
C
_
LB055104
To Common
Equipment
Power Supply
BK
WH
RD
GN
Cable
_
+
6V
Battery
12V
B
_
+
Battery
6V
A
6V
+
_
+
Fuse
_
_
+
6V
_
+
6V
Previously Produced
Expansion
Battery Cabinet
Currently Produced
Main Battery
Cabinet Assembly
To Common
Equipment
Power Supply
RD
GN
WH
BK
Battery
C
+
12V
6V
Cable
6V
_
+
+
+
+
Battery
12V _
B
Battery
A
_
+
_
6V
_
6V
_
_
+
6V
_
+
Breaker
with Switch
6V
Interconnecting Current And Previously Produced
Battery Assemblies Mounted To Left Of DXP Cabinet
8 – Installing The External Battery Assembly
Installing The External Battery Assembly
IMI89–223
Currently Produced
Main Battery
Cabinet Assembly
LB055102
To Common
Equipment
Power Supply
RD
GN
WH
BK
_
+
6V
Cable
Previously Produced
Expansion Battery
Cabinet Assembly
+
_
12V Battery
C
_
+
6V
+
_
12V
Battery
B
6V
Battery
A
_
+
6V
+
_
_
+
6V
Breaker
with Switch
_
+
6V
Previously Produced
Main Battery
Cabinet Assembly
To Common
Equipment
Power Supply
RD
GN
WH
BK
Cable
Currently Produced
Expansion Battery
Cabinet Assembly
_
_
+
12V
+
6V
Battery
C
_
_
_
_
Fuse
+
+
6V
Battery
12V
B
+
6V
Battery
A
+
6V
_
+
6V
_
+
6V
Interconnecting Current And Previously Produced Battery
Assemblies Mounted At The Bottom Of DXP Cabinet
Installing The External Battery Assembly – 9
IMI89–223
Installing The External Battery Assembly
Special Cautionary Battery Information
•
Do not dispose of batteries in a fire as the cells may explode. Check with the local codes for possible disposal
instructions.
•
Do not open or mutilate the batteries. Released electrolyte is corrosive and may cause damage to the eyes or
skin. It may be toxic if swallowed.
•
Exercise care in handling batteries in order not to short the battery with conducting materials such as rings,
bracelets, and keys. The battery may over-heat and cause burns.
•
Charge the batteries provided with or identified for use with the DXP digital communications system only in
accordance with the instructions and limitations specified in the system manual supplied with the DXP system.
•
•
•
Observe proper polarity orientation when installing the batteries.
Do not mix old and new batteries in the BBLDX assembly.
Do not mix batteries of different sizes or from different manufacturers in this product.
NOTICE
This symbol, when encountered on the equipment cabinet or on other
installed hardware, means: CAUTION—refer to the instruction manual.
Verifying The Battery Voltage
Every three months, use an accurate voltmeter to measure the no-load voltage of the BBLDX.
The measured voltage range should be within 27–35 volts.
If the BBLDX no-load voltage is lower than 27 volts, measure the charging voltage supplied by the
common equipment cabinet. The measured charging voltage must be within 34.5–35 volts.
If the charging voltage is not within range or if the voltage of a freshly-charged BBLDX is no greater
than 30 volts, contact your technical service representative.
Accredited by the Dutch Council
for Certification for certification
and registration activities.
Comdial’s Quality Management System Is
Certified To The ISO 9001 Standard.
R
Charlottesville, Virginia 22901-2829
World Wide Web: htt ://www.comdial.com/
R
Installing The DXP 120/230 Volt Power Supply Assembly
1.0 Introducting The Power Supply Assembly
This publication discusses the installation of the international IEC 950 approved, 120/230 volt power supply
assemblies for the DXP main and expansion common equipment cabinets.
Location
Main Cabinet
Expansion Cabinet
Product Code
DXPSM-INT
DXPSX-INT
Voltage Ranges
90–129 VAC at 50/60 Hz
200–254 VAC at 50 Hz
The power supply assembly is packed separately from the common equipment cabinet; therefore, you should
unpack and carefully inspect it for shipping damage and notify the shipper of any damages you find. Also, verify
that the package contains all parts and accessories needed for proper installation and operation.
Refer to IMI66-001, Installation Instructions DXP Main Cabinet Assembly for complete installation instructions
of the main DXP cabinet and to IMI66–002, Installation Instructions DXP Expansion Cabinet Assembly for
complete installation instructions of the DXP expansion cabinet.
Both the DXPSM-INT and DXPSX-INT power supply assemblies are protected with a 6.3A, 250V slow-blow
fuse. A replacement fuse must have the same rating. A compatible fuse is the Littlefuse 21806.3 or an equivalent
to it. (Littlefuse is a registered trademark of Littlefuse Inc., Des Planes, Ill., 60016.)
NOTE: Both the DXPSM-INT and DXPSX-INT power supply assemblies employ electronic switching circuitry in
their design. During operation, power supplies of this type generate an audible sound from their
switching regulators. This sound is normal and is not an indication that the power supply is operating
improperly.
This manual has been developed by Comdial Corporation (the “Company”) and is intended for the use of its customers and service personnel. The information in this manual is subject to change without notice.
While every effort has been made to eliminate errors, the Company disclaims liability for any difficulties arising from the interpretation of the information contained herein.
The information contained herein does not purport to cover all details or variations in equipment nor to provide for every possible contingency to be met in connection with installation, operation, or maintenance.
Should further information be desired, or should particular problems arise which are not covered sufficiently for the purchaser’s purposes, contact Comdial, Inside Sales Department, Charlottesville, Virginia
22906.
Printed in U.S.A.
IMI89–224.01
9/95
IMI89–224
Installing The 120/230 Volt Power Supply
2.0 Placing the Source Voltage Strap
Both the DXPSM-INT and DXPSX-INT power supply assemblies are shipped from the factory strapped for 230
VAC operation. They are designated as such by a label attached to the chasis If you plan to operate them from
120 VAC, you must re-strap them for that voltage source. If you re-strap them for 120 VAC operation, change
the label marking on the chassis to indicate this.
CAUTION
Be sure that you strap both the main and the expansion supplies for the same voltage source. If you fail to
do this, damage to the power supply assemblies could result.
To restrap the power supply assemblies to match the local AC voltage requirements,
1.
2.
3.
4.
Remove cover screws from left side of assembly and set cover aside.
Refer to illustration at left for orientation and location of strap.
Place strap on desired PWB terminal.
Replace cover and secure with screws removed in step 1.
2 – Installing The 120/230 Volt Power Supply
Installing The 120/230 Volt Power Supply
IMI89–224
Placing The Source Voltage Strap
Installing The 120/230 Volt Power Supply – 3
IMI89–224
Installing The 120/230 Volt Power Supply
3.0 Installing The Power Supply In The Main DXP Main Cabinet
1. Remove the DXPSM-INT power supply assembly from the carton. Be sure to save the small bag containing
the mounting hardware.
2. Verify that voltage strap on the power supply assembly, matches the source voltage. See page 2 for details.
3. Slide the DXPSM-INT into the opening at the left side of the main common equipment cabinet and lower the
front mounting holes over the threaded studs protruding up from the cabinet frame.
4. Route the power cable from behind the DXPSM-INT up to the connector on the backplane and connect it.
5. Remove the two #8-32 hex nuts and lock washers from the bag and install them on the threaded studs to
secure the power supply in place. Be sure to tighten them securely.
6. Note that the DXPSM-INT has a locking-screw held captive to the tab at the assembly. Tighten this screw
into to standoff located on the back of the cabinet.
7. Route the AC line cord through the square opening in the side of the main cabinet. Be sure to do this before
you install the AC power plug (see page 8)
CAUTION
DO NOT attach or secure the line cord to the surface of the mounting location.
8. The DXPSM-INT includes a ferrite collar. Snap this collar around the AC power cord to provide protection
against radio frequency interference.
9. If you plan to include battery back-up as part of the installation, route the DC cable to the main cabinet and
connect it to the battery back-up connector on the DXPSM-INT.
3.1
Grounding The Main Common Equipment Cabinet
Proper DXP grounding is necessary for trouble-free operation and personnel safety. The DXP has the following
three types of grounds:
•
•
Service Ground–a neutral power line wire that is connected to the ground bus in the premises’ AC power panel,
•
Frame Ground–a low impedence conductor that places the DXP’s chassis at reference ground potential. The
frame ground provides the greatest safety by limiting electrical potential between non-current carring parts of
the DXP system. The DXP provides a ground stud on its cabinet for access to its frame ground.
System Ground–a non-current carrying power line wire that is connected to the ground bus in the premises’ AC
power panel,
Effective grounding requires that you connect the DXP’s frame ground to a good earth ground. A good earth
ground is one such as the ground bus in the premises’ AC power panel or a public metalic cold water pipe at a
point immediately at its entrance to the premises and ahead of any meters, pumps, or insulating sections that have
been added for vibration reduction. Avoid using the premises’ structural steel frame as it may not be at earth
ground potential. Make the ground connection between the main cabinet and earth ground with #6 or larger
insulated, solid copper grounding wire. Keep this wiring separate from the three-wire AC line cord, do not splice
it, and keep it as short as possible.
The impedence of the wiring between the DXP and the earth ground must not exceed 0.25 ohms and the
impedence between the earth ground and the power company’s reference standard ground must not exceed 5
ohms. Use an acceptable low impedence measuring device to measure the impedence of these paths. The #6 or
larger wire size will minimize the wiring impedence; however, if the impedence between earth ground and the
power company’s standard reference ground exceeds 5 ohms, contact the local power company.
Be sure that all of the ground connections are visible for inspection and maintenance. Tag all of the ground
connections with a sign that reads: Do Not Remove Or Disconnect.
4 – Installing The 120/230 Volt Power Supply
Installing The 120/230 Volt Power Supply
IMI89–224
dxp009b
Power Cable
DXSRV
Captive Lock
Screw (1 Place)
Status
Power Connector
For Expansion
Cabinet Power
Supply
DXPSM
MAIN CAB. POWER SUPPLY
Battery Back-Up
Connector
Pre-Charge
Source Jack
and Modem
Power Source
DXCPU
EXPANSION
UNIT
BATTERY
CONNECTION
BATTERY
BACKUP
CONNECTION
RS-232
1
RS-232
2
INPUT RATING
117V
5A
60MZ
Status
PRECHARGE
PORT
AC Line Cord
EXPANSION UNIT
POWER CONNECTIONS
Ferrite Collar
#8-32 Hex Nut and
#8 Lockwasher (2 Places)
PWR
RS232
Line
POWER
FUSE
15A 250V
NORMAL
OFF BLOW
ON
Installing The Main Cabinet Power Supply
Grounding The Main Cabinet
Installing The 120/230 Volt Power Supply – 5
IMI89–224
Installing The 120/230 Volt Power Supply
4.0 Installing The Power Supply In The DXP Expansion Cabinet
1. Be sure to ground the common equipment expansion cabinet to the main cabinet with a #6 insulated, solid
copper wire. A ground stud is located on the common equipment expansion cabinet for this purpose. For best
protection, always keep the ground wire as short as possible.
2. Remove the DXPSX-INT power supply assembly from the carton. Be sure to save the small bag containing
the mounting hardware.
3. Verify that the voltage strap on the DXPSX-INT expansion cabinet power supply assembly, matches the strap
setting on the DXPSM-INT main cabinet power supply assembly.
4. Slide the DXPSX-INT into the opening at the left side of the expansion cabinet and lower the front mounting
holes over the threaded studs protruding up from the cabinet frame.
5. Remove the two #8-32 hex nuts and #8 lock washers from the bag and install them on the threaded studs to
secure the power supply assembly in place. Be sure to tighten them securely.
6. Note that the DXPSX-INT has a locking-screw held captive to the tab at the rear of the assembly. Tighten
this screw into to standoff located on the back of the cabinet.
7. Route the cable from the DXPSX-INT to the right edge and below the ring generator mounting rails up to the
connector on the backplane and connect it there.
8. Route the supplied power interface cable between the DXPSX-INT and the main cabinet power supply
assembly and connect it at both places.
9. Obtain the ferrite collar that is included with the DXPSX-INT, and snap it on the power interface cable.
10. Route the AC line cord from the DSPSX-INT through the front square openings in the bottom of the
expansion cabinet and the top of the main cabinet (exposed by removing the access plates during cabinet
installation) to the front of the main cabinet power supply assembly and connect it at both places.
4.1
Grounding The Expansion Cabinet
Use #10 or #12 or larger insulated, solid copper grounding wire to connect the frame ground of the expansion
cabinet (available through the ground stud on the cabinet’s side) to the frame ground of the main DXP cabinet.
Be sure that all of the ground connections are visible for inspection and maintenance. Tag all of the ground
connections with a sign that reads: Do Not Remove Or Disconnect.
6 – Installing The 120/230 Volt Power Supply
Installing The 120/230 Volt Power Supply
IMI89–224
Expansion
Cabinet
Power
Cable
Captive Lock
Screw (1 Place)
Power Supply
Power Interface
Cable Between
Expansion and
Main Cabinets
Ferrite Collar
#8-32 Hex Nut and
#8 Lockwasher (2 Places)
AC Line Cord
To Main Cabinet
DXP052
Installing The Expansion Cabinet Power Supply
Grounding The Expansion Cabinet
Installing The 120/230 Volt Power Supply – 7
IMI89–224
Installing The 120/230 Volt Power Supply
5.0 Installing The AC Power Plug
The line cord is terminated with a typical continental European plug matching the CEE 7/7 standard. If this plug
does not meet the site needs, you can install a plug of the proper type for your installation.
CAUTION
If you replace the plug, be sure to route the line cord through the DXP cabinet opening before you install
the plug on the cord.
To install a line cord plug,
•
familiarize yourself with the requirements for the plug that you plan to install on the unterminated line cord (the
illustration shows a typical continental European plug matching the CEE 7 standard),
•
•
•
•
•
•
strip off the insulation from the line cord wires according to the requirements for your plug,
open the plug and slide its outer shell onto the line cord,
connect the ground, neutral, and line wires according to the requirements for your plug,
if your plug includes a clamp, tighten it on the line cord,
reassemble the plug,
test the installation for open and short circuits using an ohm meter.
L1
L2
L3
Neutral (Blue)
Ground (Green/Yellow)
Line (Brown)
L1, L2, and L3= strip length requirements
PLUS069
Neutral (Blue)
Line (Brown)
Ground (Green/Yellow)
Clamp
Inside Of Plug
Standard Wire Color
Power
Source
Line
Wire Color
Europe
Brown
Installing A Typical Continental European AC Power Plug
8 – Installing The 120/230 Volt Power Supply
USA
Black
Installing The 120/230 Volt Power Supply
IMI89–224
6.0 Connecting The AC Power To The System
CAUTION
Do not connect the AC power cord until you have installed all of the circuit boards in the main and
expansion cabinets and checked the installation.
•
Employ a dedicated 15 AMP circuit, with a third-wire ground, supplied to a separate electrical outlet for the AC
power connection.
•
Install a plug-in power line surge protector between the power cord and the AC outlet to provide protection
against surges and spikes on the AC line.
Connecting The AC Power
Installing The 120/230 Volt Power Supply – 9
IMI89–224
Installing The 120/230 Volt Power Supply
7.0 Measuring The Power Supply Voltages
If needed, measure the power supply voltages at the connector end of the power cable with it disconnected from
the cabinet backplane circuit board and the power supply turned on.
Flat Side of Pin 1
(1) -36 Volts GND
(2) -36 Volt GND
(3) -36 Volt Supply
(4) -36 Volt Supply
(5) +5 Volt Supply
(6) -5 Volt Supply
DXSRV
(7) Digital and Analog
GND
(8) Power Fail
DXCPU
Status
Flat Side of Pin 8
FRONT VIEW OF CONNECTOR
(Orient With Flat Side of Pins 1And
8 To Right Side Of Connector.)
KSPSM
MAIN CAB. POWER SUPPLY
EXPANSION
UNIT
BATTERY
CONNECTION
BATTERY
BACKUP
CONNECTION
MEASURE
BETWEEN
Pin 1 and 3
Pin 5 and 7
Pin 6 and 7
Pin 7 and 8
RS-232
1
RS-232
2
INPUT RATING
117V
5A
60MZ
Status
PRECHARGE
PORT
PWR
RS232
EXPANSION UNIT
POWER CONNECTIONS
NOMINAL
VOLTAGE
-36 VDC
+5 VDC
-5 VDC
Under 5 VDC
Modem
Line Cord
Line
POWER
FUSE
ON 15A 250V
NORMAL
OFF BLOW
Fuse (15A, 250V, Little Fuse
314-015 or Equivalent)
Flat Side of Pin 1
DXP039
(1) -36 Volts GND
(2) -36 Volt GND
(3) -36 Volt Supply
Measuring The Main Power Supply Output
(4) -36 Volt Supply
(5) +5 Volt Supply
(6) -5 Volt Supply
(7) Digital and Analog
GND
(8) Power Fail
Flat Side of Pin 8
FRONT VIEW OF CONNECTOR
(Orient With Flat Side of Pins 1And
8 To Right Side Of Connector.)
MEASURE
BETWEEN
Pin 1 and 3
Pin 5 and 7
Pin 6 and 7
Pin 7 and 8
NOMINAL
VOLTAGE
-36 VDC
+5 VDC
-5 VDC
Under 5 VDC
DXP039A
Accredited by the Dutch Council
for Certification for certification
and registration activities.
Comdial’s Quality Management System Is
Certified To The ISO 9001 Standard.
Measuring The Expansion Power Supply Output
R
Charlottesville, Virginia 22901-2829
World Wide Web: http://www.comdial.com/
R
Troubleshooting The DXPT1 Digital Carrier Transmission Option
On The DXP Digital Communications System
What This Document Contains
1.
1.1
1.2
1.3
2.
2.1
2.2
2.3
2.4
3.
3.1
3.2
3.3
3.4
4.
4.1
4.2
4.3
4.4
4.5
4.6
4.7
4.8
5.
5.1
5.2
6.
A.
Defining The T1 Terms 2
Introducing The DXPT1 6
Describing The Channel Service Unit (CSU) 6
Considering Pre-Installation Details 7
Troubleshooting The Physical Layer 8
Selecting Functions With DIP Switches SW1-1 Through SW1-8 8
Selecting Functions With DIP Switches SW2-1 Through SW2-8 8
Selecting Functions With DIP Switches LIU-1 Through LIU-4 9
Setting Up The DXOPT-SYN (Sync) Card 9
Troubleshooting The Protocol Layer 10
Defining The Signalling Bits For The E & M Protocol 10
Defining The Signalling Bits For The Direct Inward Dial (DID) Protocol 11
Defining The Signalling Bits For The Ground Start Protocol 11
Defining The Signalling Bits For The Loop Start Protocol 12
Using The Diagnostic Function 13
Understanding The Diagnostic Switches And Indicators 13
Requesting Cold Start Information 14
Requesting Information On Received Signal Strength 15
Requesting Information On Switch Settings 16
Requesting AB Signalling 17
Requesting Information On Trunk Assignments 18
Requesting Information About Channel State 19
Using The Hexadecimal Codes For Remote Diagnostics 20
Selecting The T1 PAD Settings 21
Setting T1 Transmit Level 21
Setting T1 Receive Level 21
Solving T1 Problems 21
APPENDIX A (Superframe and Extended Superframe Formats) 22
Referring To Other Documents
Installing The DXPT1 Digital Carrier Transmission Option, IMI89–214
Carrier-To-Customer Installation DS1 Metallic Interface, ANSI T1.403–1989
Private Branch Exchange (PBX) Switching Equipment for Voiceband Applications, 4.10 “Digital
Signaling and Supervision”, EIA/TIA–464A
This manual has been developed by Comdial Corporation (the “Company”) and is intended for the use of its customers and service personnel. The information in this manual is subject to change
without notice. While every effort has been made to eliminate errors, the Company disclaims liability for any difficulties arising from the interpretation of the information contained herein.
The information contained herein does not purport to cover all details or variations in equipment or to provide for every possible contingency to be met in connection with installation, operation, or
maintenance. Should further information be desired, or should particular problems arise which are not covered sufficiently for the purchaser’s purposes, contact Comdial, Inside Sales Department,
Charlottesville, Virginia 22906.
Printed in U.S.A.
IMI89–171.02
9/95
IMI89–171
1
Troubleshooting The DXPT1 Installation
Defining The T1 Terms
Bipolar
A bipolar signal is composed of alternating pulses that both represent a digital logic 1. The positive pulse
is a (+) and the negative pulse is a (-). Zero volts represents a space, or digital logic 0.
Bipolar Violation (or error)
A bipolar error is a digital logic 1 (or mark) that has the same polarity as its predecessor.
NOTE: Every time the system regenerates the signal stream, it corrects any bipolar errors; therefore, it
prevents end-to-end error checking from using bipolar errors.
B8ZS (Binary Eight Zero Substitution)
This is a technique to send an all-zero channel without violating the ones-density requirement (a single
one in each channel and no more than 15 zeros in a row). Voice transmission will not allow an all zero
channel. The system accomplishes B8ZS suppression by inserting a special bipolar error that is
interpreted, not as an error, but an all zero channel. The B8ZS feature replaces the all-zero channel two
different ways. The feature replaces the all-zero channel with the sequence 000 + - 0 - + if the preceding
pulse was a +, and the feature replaces the all-zero channel with the sequence 000 - + 0 + - if the
preceding pulse was -. The + represents a positive pulse, the - represents a negative pulse, and 0
represents no pulse. Set the B8ZS feature with switches SW1–5 and SW1–6.
CAS (Channel Associated Signalling)
The Channel Associated Signalling is the only inbound signalling method currently supported by the
DXPT1 board.
COFA (Change of Frame Alignment)
When switch SW2-6 is off, the green LED on the DXPT1 indicates whether the network source or the
network span caused the last frame synchronization. (This indication disregards the first re-sync at cold
start or a system reset —cold start and reset causes the network source to re-sync.) A COFA occurs if the
network source does a re-sync. The COFA is a diagnostic tool that identifies the source of the loss of
frame synchronization.
CPE/Carrier Equipment
The DXPT1 is normally classified as Customer Premise Equipment (CPE). If you use SW2–2 to
configure the DXPT1 board to use the internal CSU while in the ESF mode, the network may require that
the system be classified as Carrier Equipment (CE). The information packet that the DXPT1 board sends
to the network contains a facility data link (FDL) maintenance message that has a bit in it that provides
this identification.
CRC (Cyclic Redundancy Check)
A method of checking errors from the transmission source to the destination. For T1 operation, CRC
caculates a checksum depending on the data in a frame. The system uses CRC in ESF mode exclusively.
(You must enable CRC with DIP switch SW2-4).
Delay Dial E&M, DID Protocol Type
Once seized by a calling system, the system being called makes A=1 and B=1 until it is ready to receive
digits. When it is ready to receive digits, it makes A=0 and B=0. The system uses a delay dial protocol
when wink protocol timing is not compatible to the network.
Dial Pulse – T1
Dial pulse is a method of sending address digits (numbers) using A and B bits logic bits instead of
sending DTMF tones. Some carriers may not support dial-pulse signalling. While the method is slower
when compared with tones, it requires no DTMF receivers.
2 – Troubleshooting The DXPT1 Installation
Troubleshooting The DXPT1 Installation
IMI89–171
Direct Inward Dial (DID) T1 Trunk
DID is a protocol for inbound calls where the network sends the extension number during the beginning
of the call. The system supports the 0 through 7 inbound digits. The network does not translate the digits
to a valid extension—the system’s DID translation tables perform this action.
DS-0 (Digital Signal-Level Zero)
Digital Signal-Level Zero is a single 64Kbit channel inside a T1 span.
E & M T1 Trunk
E&M is a signalling protocol that supports both inbound and outbound digits. Inbound digits from the
network are already translated to a 3–digit or 4–digit valid extension. E & M is symmetrical from both
ends and ignores the subscriber/office classification of other trunks. Use this signalling protocol for
interconnecting two DXP Plus systems.
Extended Superframe Mode (ESF)
Extended Superframe Mode consists of 24 frames. The frame bit uses only 6 frames leaving 18 bits for
other purposes. These spare 18 bits provide 6 bits for CRC information and 12 bits for a facility data link.
The facility data link is for maintenance information (as defined by the ANSI T1.403 specification). Like
the superframe mode, the 64–Kbit user channels have 24 frames available for use.
Ground Start T1 Trunks
Ground start is a call signalling protocol that monitors only outbound digits and supports disconnect
supervision. Ground start protocol supports only the subscriber end of the communications link
FDL (Facility Data Link)
The Facility Data Link is a 4–Kbit communication link from the network to the DXPT1 board only when
the board is operating in the ESF mode. The system sends preemptive messages (for example, yellow
alarm and loopback), if needed, and sends error packets to the network once a second. The packets
contain alarm history in accordance with the ANSI T1.403 specification.
Fractional T1
Fractional T1 is a T1 span where the user uses less than 24 channels. The DXPT1 board allocates eight or
16 channels to a fractional T1 but does not reallocate unused channels in the eight, 16, or 24 mode to
other resources. A fractional T1 in ESF mode will nullify the CRC and other error checking capability
since the network shares channels.
Immediate Start Protocol State
Once a calling system seizes a called system, the calling system sends address digits to the called system
without requiring an acknowledgement. Inbound immediate start protocol does not support tone dial.
Dial-pulse is adequate however. Immediate start protocol is applicable to DID and E&M tie lines.
Inband Signalling
A signalling method where the system sends overhead signalling along with channel traffic.
ISDN (Integrated Services Digital Network) Primary Rate (also called PRI)
Currently not offered by the DXPT1 board.
Loopback Local
An operation method that loops the DXPT1 board’s transmit output and receive input paths. The loopback
terminates all traffic and halts call processing. While in this idle condition, the system continues to
transmit the T1 transmit stream to the network but it will not answer incoming calls. If the remote T1
equipment is the clock source (primary or secondary) for the DXOPT-SYN card, the remote equipment
terminates the reference signal because the network receive circuit is open in local loopback. You initiate
local loopback by setting the appropriate SW1 switches. The main purpose of local loopback is to verify
the DXPT1 board’s ability to synchronize properly. Loopback local operation is applicable to superframe
adn extended superframe modes.
Throubleshooting The DXPT1 Installation – 3
IMI89–171
Troubleshooting The DXPT1 Installation
Loopback Payload
The loopback payload feature is an ESF-only method of loopback which loops the network receive input
path to the remote T1 equipment’s transmit output path. This loopback method does not loop the first bit
of each frame to allow the DXPT1 board’s facility data link to continue to transmit maintenance
information. You can use switches SW2–7 and SW2–8 to manually initiate the payload loopback or you
can allow the network to send an FDL message to initiate or restore the payload loopback. The DXPT1
board goes out-of-service during the loopback time.
Loopback Remote
The loopback remote feature loops the network receive input path to the remote T1 equipment’s transmit
output path. The remote loopback feature terminates all traffic and halt any call processing. You can use
the SW2 switches to manually initiate remote loopback or you can allow the network to remotely initiate
the condition. In superframe mode with SW2–1 set to on, the network can send a special in-band pattern
(00010001000100010001.... min 5 seconds) to cause the DXPT1 board to automatically enter the remote
loopback mode. The network can disable the loopback by sending a different in-band pattern
(001001001001001001001.... min 5 seconds). In ESF mode, the DXPT1 board’s facility data link, or
maintenance channel, can enable and disable remote loopback automatically or you can set SW2–7 on
and SW2–8 off to manually enable remote loopback or set both switches off to manually disable the
feature. Loopback remote operation is applicable to superframd and extended superframe modes.
LIU Line Interface Unit
The line interface unit is the interface between the T1 copper wires and the DXPT1 board’s framing
circuitry. The LIU is responsible for separating the 1.544MHZ receive clock from the incoming stream
and converting bipolar Alternate Mark Inversion (AMI) to 5–volt digital logic. The LIU also supports the
automatic line build-out that regulates the transmit level according to the receive strength (LIU-2 switch).
Loop Start T1 Trunk
Loop Start T1 Trunk is a network protocol that monitors outbound digits to the DXPT1 board. This
protocol does not support disconnect supervision. Loop start protocol supports the subscriber end of the
communications path but does not support the office (network) end.
Primary Clock Reference
The straps on the DXAUX board designate the primary clock reference. Primary clock reference is the
first choice reference clock used to synchronize the DXP Plus to the incoming span. If the system looses
synchronization, it uses its secondary clock reference. If the secondary clock reference is not available,
the DXOPT-SYN card’s variable clock oscillator (VCO) switches to the fixed oscillator on the DXSRV
(services) board. When it does this, slips occur.
Repeater
A repeater is a amplifying device that central office technicians place at approximately one mile intervals
along a T1 circuit to boost the T1 signal. The T1 specifications allow a maximum of 50 repeaters along a
communications path.
Slip
This term describes the condition that exists when the transmit 1.544 MHz clock is different from the
receive 1.544 MHz clock. When the system collects or looses a frame of information due to the span
frequencies being different, the system generates a slip error. Slip does not affect voice transmissions and
may not affect modem traffic; however slip does effect digital data traffic. The DXPT1 board does not
currently support digital data traffic. Also, at times a central office takes a T1 span out of service if too
many slips occur—one or two a day is permissible (the carrier supplier will furnish you with an an exact
number if you request that information from them).
4 – Troubleshooting The DXPT1 Installation
Troubleshooting The DXPT1 Installation
IMI89–171
Smart-Jack (Network Interface Box)
A smart jack is a demarcation box provided by the central office. A smart jack provides isolation and
increased signal drive (up to one mile) and can respond to loopback commands for diagnostic purposes.
The central office usually provides an 8–pin modular jack for T1 equipment connection. Pin 1 of the
modular jack goes to pin 1 of the DXPT1 modular jack, and so on. Only pins 1 and 2 (DXPT1 receive), 4
and 5 (DXPT1 transmit) require connecting.
Superframe Mode (SF)
The standard T1 mode consists of 12 frames per superframe cycle. The first frame bit remains constant
and rotates through a 12-bit pattern. By identifying the frame pattern, the system can select the sixth and
twelfth frame for the AB bit signalling inband method. T1 parameters allow for 24 64–Kbit user channels.
Suppression
Suppression is a means to prevent more than 15 zeros in a row and not less than 1 pulse (mark) per
channel. The DXPT1 board supports two suppression methods. These are the B7 method and the B8ZS
method (selected by SW1–5 and SW1–6). The B7 method inserts a logic 1 in the seventh bit position of a
channel if all bits are zeros. The B8ZS method inserts a bipolar violation that will be identified and
stripped at the receiving end (selected by switches SW1–5, and SW1–6). Voice coding should not allow
an all zero channel.
Unlock Alarm
On a normally operating DXPT1 board, the unlock alarm LED is always off. If this LED is on, it
indicates that the phase lock loop creating the transmit 1.544 MHz frequency is defective. For this
indicator to be meaningful, the DXOPT-SYN card must be synchronized (no red LEDs on). If the
DXOPT-SYN card is not synchronized, you must correct that situation.
Wink E&M, DID Protocol State
This effect is a quick response by a called system (A=1, B=1) to a calling system that seized the line. The
response indicates that the called system is ready to receive address digits.
Yellow Alarm
The yellow alarm indicates that the network has lost its incoming frame synchronization. The DXPT1
board signalling is inactive for approximately three to four seconds during this alarm time, and the system
halts all call processing. If the system clears the received yellow alarm within the time limit, the DXPT1
board’s inactive state terminates and call processing continues.
The system sends a yellow alarm to the network if it loses incoming frame synchronization or if the
DXPT1 loses communications to the CPU board. Received and transmitted yellow alarms can not exist at
the same time. If such a situation occurs, the system inhibits the transmitted alarm.
ZBTSI (Zero Byte Time Slot Interchange)
Zero Byte Time Slot Interchange is a complex technique to insure that the T1 transmission meets the
pulse density requirement. This ZBTSI technique is unpopular in the telephone industy, and the DXPT1
board does not support the feature.
tel: 800.766.3425
818.773.8888
www.kellatronics.com
fax: 800.720.1172
818.773.8899
[email protected]
Throubleshooting The DXPT1 Installation – 5
IMI89–171
1.1
Troubleshooting The DXPT1 Installation
Introducing The DXPT1
The DXPT1 is a digital interface board supporting up to 24 simultaneous calls on two pairs of wire. The
advantages of T1 over single-channel systems are largely:
•
•
•
•
•
Cost savings (much lower price per channel)
Greater reliability
Uses less copper wires
Improved voice reproduction
More features available
T1 is over 20 years old but the services have been upgraded during this time (for example, extended
superframe).
T1 uses time division multiplexing techniques which multiplexes 24 channels in a stream. Each channel
is 8 bits wide. The total is 24 channels x 8 bits = 192 bits for user information. An additional bit is added
at the beginning of the stream to identify the particular frame. A frame every 125 msec or 8000/second.
12 frames make up a superframe for standard T1. ESF mode requires 24 frames per superframe. The
frame bit in superframe mode is used 100% of the time. The sequence for the frame bits is:
100011011100. The first bit of each frame (frame bit) repeats over and over
|
|
A
B Of the 12 frames, the 6th and 12th contain the “A” and “B” signalling bits respectively.
The signalling is inband (mixed with the channel). For the two binary bits (A and B), only four combinations are possible (00, 01, 10, 11). These bits are assigned according to the signalling protocol (for
example, E&M, DID, Loop Start, and Ground Start). See section 3, “Troubleshooting The Protocol
Layer.”
The span speed is 1.544 MHz (193 x 8000/sec).
For extended superframe (ESF), the frame-related bits in the 24 frames are:
ESF Framing Format
mcm0mcm0mcm1mcm0mcm1mcm1...6 frame bits (0 or 1) on frames 4, 8, 12, 16, 20, 24 (2 Kbps)
12 maintenance bits (m) (4 Kbps)
6 CRC error checking bits (c), if enabled (2 Kbps)
Therefore, all of the 24 non-user bits (frame, maintenance, and error checking) use a bandwidth of 8 Kbps
out of the total bandwidth of 1.544 Mbps.
The A and B signalling bits are inserted over the least significant bits (LSB) of each channel in the 6th
and 12th frame respectively. This does not change the speech encoding enough to be detected by the user.
The A and B signalling bits are repeated in the 18th and 24th frames.
1.2
Describing The Channel Service Unit (CSU)
The DXPT1 board has a CSU built into the board. This allows direct connection to the network (DS1
level). If a CSU was not built-in, the connection would be DSX-1 and would only transmit 655 feet to the
nearest 66-type connector block. The CSU increases signal drive to 1 mile, provides electrical isolation
(1500 volts), and provides automatic line build out (ALBO). The output is set depending on the received
signal level strength. When a strong signal is received, the transmit level is -15 dB. When a weak signal is
received, the transmit level is 0 dB. This ability to adjust output levels prevents over driving a line
repeater in the network, if directly connected. If a customer still wants to add an external CSU, he/she
may do so. Normally, the DXPT1 is connected to a central office “smart” jack. The customer’s savings
from using the built-in CSU can easily amount to approximately one thousand dollars, at today’s prices.
NOTE: If an external CSU is added by the installer for the purposes described above, and the mode is
Extended Superframe, check the SW2-2 switch for the correct ID, if in conflict.
6 – Troubleshooting The DXPT1 Installation
Troubleshooting The DXPT1 Installation
1.3
IMI89–171
Considering Pre-Installation Details
CAUTION
For operation with the DXP, the T1 board must be Revision B or higher. If the T1 board that you are
installing is a lower revision, contact Comdial Technical Services (1–800–366–8224) for advice before
you proceed with the installation..
If you are the installer, you must consider the following things to ensure a proper installation.
A. Determine the T1 trunk configuration and communicate this to the central office and/or the network
for coordination and assignment of service.
B. Determine whether the dial type is tone or pulse.
C. If DID or E&M protocols are going to be used, determine the number of DTMF receivers needed.
D. If the above protocols are used, coordinate the blocks of numbers assigned with the data base.
E. For DID and E & M protocols, determine the type. Wink start, delay dial, or immediate start are
available. Wink start is very popular. If you choose immediate start inbound, select dial pulse over
tone dial to ensure that the DXP has enough time to react.
F. AT&T will not supply dial tone unless the customer ordered this feature. However, if you enable the
automatic route selection (ARS) feature, it will supply dial tone.
G. Configure an interface cable (8-conductor cable terminated with modular jacks) to connect to the
DXPT1. See section 4 in Installing The DXPT1 Digital Carrier Transmission Option, IMI89–193 for
more instructions. Pins 7 and 8 must be open at the DXP end for DXPT1 Issue 2 while Issue 3 boards
and above will not require pins 7 and 8 to be open. A smart-jack often connects pins 7 and 8 to
chassis ground. If the chassis ground is connected at the smart-jack, the DXP receive will most likely
show loss of signal. (Pins 1 and 2 are shorted to 7 and 8 to allow for an inverted cable to be used.)
H. Order spare boards, if needed.
I.
Make sure you have a synchronization card to install on the auxiliary board.
J.
Determine the optimum DXPT1 board configuration. If a T1 board occupies a universal slot, more
stations are possible than by using analog trunk boards.
K. If fractional T1 is being considered, decide whether 8-, 16-, or 24-channel mode is most beneficial.
L. Verify that primary lightning protection (such as gas discharge tubes) is provided where the T1
copper wires enter the building. This should be the case when a smart jack is installed by the central
office. Primary protection is a must since the DXPT1 contains only secondary protection.
M. For a DXP-to-DXP application, where no outside network exists, only one synchronization card is
required. The designated “master” DXP does not require a synchronization card.
Throubleshooting The DXPT1 Installation – 7
IMI89–171
2
Troubleshooting The DXPT1 Installation
Troubleshooting The Physical Layer
SW1, SW2, and the LIU switches must be set up according to the customer’s requirements. See Installing
The DXPT1 Digital Carrier Transmission Option, IMI89–193 for directions.
2.1
Selecting Functions With DIP Switches SW1-1 Through SW1-8
NOTE: SW1 switch contents will be updated only during a reset operation.
The mode, superframe or extended superframe, is critical. If set wrong, the board will not find frame sync
causing the red Sync LED to light.
Yellow alarm mode (SW1-4) is always off, unless the customer is in Japan.
Suppression is defaulted to B7. If digital data is ever presented to the DXPT1 board from a drop and
insert multiplexer (mux), or any other means, B8ZS will be required even though the channel is disabled
in the DXP. The digital data could be all zeros violating the ones density requirement of 1 in 8 bits in a
channel. The network or mux must also have B8ZS enabled. If B8ZS is being sent in any channel the
green LED above SW1 will flicker if SW2-6 is enabled. Do not set SW1-5 and SW1-6 to the “no
suppression” setting unless approved by Comdial Engineering. The “no suppression” setting is for
possible future needs.
SW1-7 and 8 are critical to the channel capacity required.
2.2
Selecting Functions With DIP Switches SW2-1 Through SW2-8
SW2-1 is valid only in the superframe mode. This switch must be “on” if the network is capable of
initiating an inband loopback. The switch will not cause a remote loopback but it will look for the
command from the network. Leaving the switch “on” does not hurt anything whether the network can
perform the loopback operation or not. A reset is not required when changing the switch.
SW2-2 is programmed at reset in the ESF mode only, and it will always be “off” (default) unless the
network requires the facility data link messages to be a different ID. The default is customer premise
equipment. If the network requests that the messages have a carrier-type header ID, turn the switch “on”
and reset the board. This will probably never need to be “on”.
SW2-4 is for reporting CRC errors in the ESF mode, if the network has the ability to support the CRC
feature. The default position is “off” to prevent false errors when the error checking is not supported by
the network.
SW2-5 is to allow or prevent the sending of facility data link message packets in ESF mode during a
preemptive yellow alarm and loopback messages. The ANSI specification allows FDL packets to be
stopped during a yellow alarm and loopback, but some customers/networks want the packets to continue.
Switch changes require a reset to be programmed.
SW2-6 defines the meaning of the green LED labeled “B8ZS/COFA.” A reset is not required when
changing this switch. When the switch is “off” (default), the LED indicates COFA detected. When the
switch is “on,” the LED indicates B8ZS detected. B8ZS detection is handy to verify if the network is
sending B8ZS. If so, and the B8ZS suppression is not set (SW1-5, 6), the B8ZS will be seen as bipolar
alarms, and recorded as such, even though they are not,
SW2-7, 8 are manual loopback requests for diagnostic reasons. Local loopback verifies the ability of the
DXPT1 to sync on itself to insure frame syncing problems are not caused by the DXPT1 board. These
switches are rarely used to enable remote loopback and payload loopback.
NOTE: A local loopback will disable the synchronization card reference causing an automatic switch to
the next reference. If only one reference is configured, the system defaults to the DXP Plus fixed
oscillator on the services board.
8 – Troubleshooting The DXPT1 Installation
Troubleshooting The DXPT1 Installation
2.3
IMI89–171
Selecting Functions With DIP Switches LIU-1 Through LIU-4
There are four LIU switches. The first switch will change the receive sensitivity from -26 dB to -36 dB.
Changing to -36 dB for extra long loops (1 mile) is not recommended unless the DXPT1 will not maintain
frame sync. In the -36 dB setting, noise could be a problem because of increased sensitivity.
The LIU-2 switch sets the transmit signal level. The transmit signal level has nothing to do with the audio
voice levels. The default is manual “on” and the transmit level is determined by LIU-3 and 4 settings.
LIU-3 and LIU-4 are defaulted “off” which corresponds to 0 dB (strong signal).
For applications where the DXPT1 is directly connected to a nearby repeater, the automatic mode is
preferred (LIU-2="off") to keep from over driving the repeater. Repeaters are very sensitive on their
inputs. In auto mode, the transmit is determined by the receive level according to the following chart:
LIU-3 and 4 are ignored in auto mode.
IF LEVEL RECEIVED IS
0 to -7.5 dB
-7.5 to -15 dB
-15 to -22.5 dB
-22.5 to -26 dB
LEVEL TRANSMITTED IS
-15 dB
-7.5 dB
-7.5 dB
0 dB
If in auto mode and LIU switch 3 or 4 is changed, a re-sync is required to reset the new setting.
Unplugging the T1 span in and out is an easy way to cause a re-sync.
2.4
Setting Up The DXOPT-SYN Synchronization Card
Program the synchronization card by strapping the two strap blocks on the auxiliary board. A reference
clock from each T1 board is presented. You can strap the board so that one T1 clock source is the primary
clock reference, and another T1 source is the secondary clock reference. The secondary clock reference is
then used in case the primary span fails. If only one T1 board is installed, we recommend that you strap
the auxiliary board so that the one T1 source is serving as both the primary and secondary reference.
Otherwise, don’t strap the secondary strapping block. See section 4, Installing The DXPT1 Digital Carrier
Transmission Option, IMI89–214. The green LEDs on the sync card verifies the presence of a reference
source. If the green LEDs are off, check the straps, and make sure that the DXPT1 board is not in the
local loopback mode.
If one or more of the green LEDs are lit, the sync card’s red LED (Unlocked) should be off. Do not place
the sync card’s switch in the manual mode during normal operation. The manual mode switch is for
maintenance when you want to force the use of the primary or secondary reference. The automatic mode
allows automatic selection of the secondary reference in the event that the primary reference is lost. If the
sync card does not synchronize, and the green LEDs are lit, the synchronization card is probably bad. The
only other possibility is that the sync card detection circuit on the services board is not working, which is
unlikely. If the DXPT1 board is in an expansion cabinet, be sure the interface boards are multilayer (that
is, not transparent). Earlier interface boards, of the non-multilayer type, are subject to electrical noise.
Throubleshooting The DXPT1 Installation – 9
IMI89–171
3
Troubleshooting The DXPT1 Installation
Troubleshooting The Protocol Layer
Four protocols are supported:
•
•
•
•
E&M
DID
Ground Start
Loop Start
Ground and loop start are subscriber-end only (DXP end) not office-end (network end).
Before starting protocol layer troubleshooting, make sure you have completed all physical layer
troubleshooting to ensure that no alarms are occurring and that the DXPT1 board has no red LEDs lit
except for the large status LED.
Troubleshooting the protocol layer consists of checking the A and B transmit and receive signalling bits.
Depending on the protocol that is active and on which function is occurring, A and B signalling bits can
be a digital one (“1") or a zero (”0"). In some cases, the level (“0" or ”1") doesn’t matter and could be
either one (X). These levels are designated by a “0,” “1,” or “X” in the following tables.
When the function involves a user dialing a number with a rotary dial, the signalling bit designated by
“DP” in the following tables, represents the dial pulse (make= 1 ; break = 0). For a ground start protocol,
the signalling bit representing a dial pulse will be a digital one (“1") when a tone dial is used in place of a
rotary dial.
NOTE: In the table below, an X is a don’t care. Signalling can be a 1 or 0. DP is a dial pulse (make = 1,
break = 0).
3.1
Defining The Signalling Bits For The E & M Protocol
FUNCTION
OUTGOING CALL
Idle
DXP off-hook
Wink
Wink
Dial pulsing
Wait for ANS
Far end ANSW
INCOMING CALL
Idle
CO goes off-hook
DXP sends wink
DXP after wink
Far end DP
Far end wait FR ANS
DXP answers call
TRANSMIT
RECEIVE
A
B
A
B
0
1
1
1
DP
1
1
0
1
1
1
DP
1
1
0
0
1
0
0
0
1
X
X
X
X
X
X
X
0
0
1
0
0
0
1
0
0
1
0
0
0
1
0
1
1
1
DP
1
1
X
X
X
X
X
X
X
10 – Troubleshooting The DXPT1 Installation
EIA/TIA 464-A
STANDARD
Wink on
Wink off
Make=1, Brk=0
Troubleshooting The DXPT1 Installation
3.2
Defining The Signalling Bits For The Direct Inward Dial (DID) Protocol
FUNCTION
INCOMING CALL
Idle
CO goes off-hook
DXP sends wink
DXP after wink
Far end DP
Far end wait FR ANS
DXP answers call
3.3
IMI89–171
TRANSMIT
A
B
0
0
1
0
0
0
1
0
0
1
0
0
0
1
RECEIVE
A
B
0
0
1
1
DP
1
1
X
X
X
X
X
X
X
EIA/TIA 464-A
STANDARD
Make=1, Break=0
Defining The Signalling Bits For The Ground Start Protocol
FUNCTION
OUTGOING CALL
Idle
PBX grounds ring
PBX grounds tip
PBX removes ring ground
PBX loop closed
Dial pulsing
Dialing CMPL
INCOMING CALL
Idle
CO grounds tip
Ringing interval
PBX presents call
PBX answers call
Normal talking STAT
DISCONNECT PBX
Talking state
PBX opens loop
CO removes tip ground
CO ABANDONS INCOM...
Talking State
CO removes tip ground
PBX opens loop
PBX ABANDONS BEFORE
CO HAS RETURNED TIP
GROUND
PBX waiting tip ground
PBX removes ring ground
TRANSMIT
A
B
RECEIVE
A
B
EIA/TIA 464-A
STANDARD
0
0
0
0
1
DP
1
1
0
0
1
1
1
1
1
1
0
0
0
0
0
X
X
X
X
X
X
X
0
0
0
0
1
1
1
1
1
1
1
1
1
0
0
0
0
0
X
1
0
1
X
X
1
0
0
1
1
1
0
0
0
X
X
1
Idle state
1
0
0
1
1
1
0
0
0
X
1
1
CO hangs up
Idle state
0
0
0
1
1
1
X
X
“1" vs DP for DTMF
Throubleshooting The DXPT1 Installation – 11
IMI89–171
3.4
Troubleshooting The DXPT1 Installation
Defining The Signalling Bits For The Loop Start Protocol
FUNCTION
OUTGOING CALL
Idle
PBX loop closed
PBX pulsing
Dialing CMPL
INCOMING CALL
Idle
CO sends ring
Interval between ring
PBX presents call
PBX answers call
Normal talking STAT
DISCONNECT PBX
PBX opens loop
Idle
CO ABANDONS INCOM...
CO applies ring
Interval between ring
CO abandons
PBX stop presenting
TRANSMIT
A
B
RECEIVE
A
B
0
1
DP
1
1
1
1
1
0
0
0
0
1
1
1
1
0
0
0
0
1
1
1
1
1
1
1
1
0
0
0
0
0
0
1
0
1
1
X
X
0
0
1
1
0
0
X
1
0
0
0
0
1
1
1
1
0
0
0
0
0
1
1
1
12 – Troubleshooting The DXPT1 Installation
EIA/TIA 464-A
STANDARD
Waiting for dial tone
“1" vs DP for DTMF
Troubleshooting The DXPT1 Installation
4
IMI89–171
Using The Diagnostic Function
The diagnostic function on the DXPT1 board provides a method for obtaining information about the T1
operation. You can do this either on-site or from a remote location by sending and receiving coded
messages. Remote operation is described in section 4.8.
4.1
Understanding The Diagnostic Switches And Indicators
The diagnostic portion of the DXPT1 board contains eight DIP switches, eight green LEDs, and a “clear”
pushbutton for clearing functions. Set the DIP switches to request certain T1 system information. When
testing from a remote location, using a computer and modem, you can similate the switch settings by
sending a coded message.
The system responds to your request for information by
lighting certain LEDs to provide you with the requested
information. If you are testing from a remote location,
the system responds by sending a coded message that
similates the lighted LEDs.
Use the clear pushbutton to stop any counting function
(denoted by the LEDs sequencing) and reset the counter.
Clear
Switch 1
Off
On
Diagnostics
The diagnostic port is a monitor mode only access. You
cannot cause harm to the equipment by moving the
switches or pushing the clear pushbutton. Leaving any
of the switches on will not cause any operational
problems.
LED 1
LED 8
Switch 8
Since the operation is cryptic, the customer normally
doesn’t use the diagnostic monitor. Functions of the port
are to simplify problem solving in the field
T1005
4.1.1 Determining Channel Number
DXPT1 Diagnostic Switches And Indicators
The letters ABCDE in switch positions 4 through 8 are
used to designate a channel number in many of the tables used on the following pages. See the table
below for the relationship between the letters ABCDE and channel numbers 1 through 24. (Example, a
DIP switch setting of 10100101 requests trunk assignments on channel 6).
CHANNEL
1
2
3
4
5
6
7
8
A
OFF
OFF
OFF
OFF
OFF
OFF
OFF
OFF
B
OFF
OFF
OFF
OFF
OFF
OFF
OFF
OFF
C
OFF
OFF
OFF
OFF
ON
ON
ON
ON
D
OFF
OFF
ON
ON
OFF
OFF
ON
ON
E
CHANNEL A
B
C
D
E CHANNEL A
B
C
D
E
ON OFF OFF OFF OFF
17
OFF ON OFF OFF OFF
9
OFF
ON OFF OFF OFF ON
18
OFF ON OFF OFF ON
10
ON
ON OFF OFF ON OFF
19
OFF ON OFF ON OFF
11
OFF
ON OFF OFF ON ON
20
OFF ON OFF ON ON
12
ON
ON OFF ON OFF OFF
21
OFF ON ON OFF OFF
13
OFF
ON OFF ON OFF ON
22
OFF ON ON OFF ON
14
ON
ON OFF ON ON OFF
23
OFF ON ON ON OFF
15
OFF
ON OFF ON ON ON
24
OFF ON ON ON ON
16
ON
Throubleshooting The DXPT1 Installation – 13
IMI89–171
4.2
Troubleshooting The DXPT1 Installation
Requesting Cold Start Information
When the DXP-T1 system is turned on, internal self-tests are run to determine the condition of the
system. When you use this request, you are asking the system to provide you with the results of these
tests. Upon making the cold start information request, the system verifies the following.
•
•
•
•
•
4.2.1
operating mode is superframe (SF) or extended superframe (ESF),
FDL daughterboard (used for ESF) is installed on the T1 board and okay or not installed (or defective),
channel capacity currently selected is 8, 16, or 24 channels,
static RAM is okay or has read/write errors,
internal CPU RAM is okay or has read/write errors.
Setting The DIP Switches For Cold Start Information
Set the DIP switches as shown in the following table. Switch 1 is the top switch. When the switch is
moved to the right, it is turned on. The hex code shown is used for remote operation only.
SWITCH SETTINGS
TYPE OF REQUEST
1
2
3
4
5
6
7
8 Provide results of all self-tests run during
ON ON ON OFF OFF OFF OFF ON system start-up (cold start).
4.2.2
HEX
CODE
E1
Reading The Cold Start Information From The LEDs
The Table below shows the cold start information that is revealed by the LEDs. LED 1 is at the top.
1
OFF
2
OFF
ON
3
LEDs
4
5
LED DEFINITIONS
6
7
8
Not used
SF mode
ESF mode
OFF
Always off
OFF
Either in SF mode or FDL board missing or bad
ON
FDL board recognized (ESF only)
OFF OFF
Selected channel capacity is 24
OFF ON
Selected channel capacity is 8
ON OFF
Selected channel capacity is 16
OFF
Static RAM has read/write errors
ON
Static RAM is okay
OFF Internal CPU RAM has read/write errors
ON Internal CPU RAM is okay
Example: If you see the following LED light pattern, you can determine the cold start results from the above
LED definitions. (For remote testing, the lFDL board recognized system would send hex code 53.)
m = LED off and | = LED on
m
| = ESF mode
m
| = FDL board recognized
m = 24-channel
m capacity
| = static RAM fully operational
| = internal CPU RAM fully operational
14 – Troubleshooting The DXPT1 Installation
Troubleshooting The DXPT1 Installation
4.3
IMI89–171
Requesting Information On Received Signal Strength
When you use this request, you are asking the system to provide the signal strength of its received signals.
Upon making the received signal strength request, the system supplies you with the following information:
•
4.3.1
the range in dB of the received signals.
Setting The DIP Switches For Received Signal Strength Information
Set the DIP switches as shown in the following table. Switch 1 is the top switch. When the switch is
moved to the right, it is turned on. The hex code shown is used for remote operation only.
SWITCH SETTINGS
1
2
3
4
ON ON ON ON
4.3.2
5
ON
6
ON
TYPE OF REQUEST
7
8 Provide the dB range of the received signal
ON ON strength.
HEX
CODE
FF
Reading The Received Signal Strength Information From The LEDs
The Table below shows the received signal strength information that is revealed by the LEDs. LED 1 is at
the top.
LEDs
LED DEFINITIONS
1
2
3
4
5
6
7
8
LEDs 1 through 4
OFF OFF OFF ON -7.5 to -15 dB (medium signal)
not used (off)
OFF OFF ON ON -15 to -22.5 dB (weak signal)
OFF ON ON ON -22 dB and below (spec is to -26 dB)
(very weak)
ON ON ON ON 0 to - 7.5 dB (strong signal)
HEX
CODE
01
03
07
0F
NOTE: If signal is very weak from a long span of a mile or more, and frame synchronization is not being
maintained, turn DIP switch LIU-1 on.
Throubleshooting The DXPT1 Installation – 15
IMI89–171
4.4
Troubleshooting The DXPT1 Installation
Requesting Information On Switch Settings
You can determine how particular DIP switches on the DXPT1 board are set by using one of the
following requests. Depending on which request you make, the system supplies you with the following
information:
•
•
•
4.4.1
DIP switch settings for SW1,
DIP switch settings for SW2,
DIP switch settings for LIU.
Requesting Information On DIP Switch Settings
Set the diagnostic DIP switches as shown in the following table. Switch 1 is the top switch. When the
switch is moved to the right, it is turned on. The hex code shown is used for remote operation only.
SWITCH SETTINGS
1
2
3
4
5
OFF OFF OFF OFF OFF
OFF OFF OFFOFFO OFF
OFF OFF OFF OFF OFF
OFF OFF OFF OFF ON
4.4.2
6
OFF
OFF
ON
OFF
TYPE OF REQUEST
7
OFF
ON
ON
OFF
8
ON
ON
ON
ON
Provide the DIP switch settings for SW1
Provide the DIP switch settings for SW1
Provide the DIP switch settings for LIU
Provide the DIP switch settings for the
diagnostic switches (the diagnostic LEDs
simply “mirror” the switch settings; that is,
LEDs 5 and 8 should be lit).
HEX
CODE
01
03
07
09
Reading The DIP Switch Settings Information From The LEDs
The diagnostic LEDs “mirror” the switch settings for the DIP switches requested. For example, if LED 1
is on, then switch 1 is on for the requested DIP switches. If LED 1 is off, then switch 1 is off, and so forth.
When requesting information on the LIU DIP switch settings, the system replies via LEDs 1 through 4.
LEDs 5 through 8 are not used in this application.
16 – Troubleshooting The DXPT1 Installation
Troubleshooting The DXPT1 Installation
4.5
IMI89–171
Requesting AB Signalling
When you use this request, you are asking the system to reveal the A and B bits. Upon making the AB
signalling request, the system supplies you with the following information:
•
•
•
•
4.5.1
A bit transmitted to the CO,
B bit transmitted to the CO,
A bit received from the CO,
B bit received from the CO.
Setting The DIP Switches To Request AB Signalling
Set the DIP switches as shown in the following table. Switch 1 is the top switch. When the switch is
moved to the right, it is turned on. Use switches 4 through 8 (designated in the table by A through E) to
select the channel you want to test (1 through 24). See the table in section 4.1.1 for the relationship
between the 24 different letter groups and channel numbers. For remote operation, determine the
corresponding hex code from Table 1.
SWITCH SETTINGS
1
2
3
OFF OFF ON
4.5.2
4
A
5
B
6
C
TYPE OF REQUEST
7
D
8
E Provide AB signalling on the channel
designated by ABCDE. See section 4.1.1.
HEX
CODE
see
Table
1
Reading The AB Signalling Information From The LEDs
The Table below shows samples of the AB signalling information that is revealed by the LEDs. LEDs 5
through 8 are off. LED 1 is at the top.
1
2
3
ON
OFF
OFF
OFF
OFF
ON
OFF
OFF
OFF
OFF
ON
OFF
LEDs
4
5
OFF
OFF
OFF
ON
6
7
8
LEDs 5-8 are off
LED DEFINITIONS
Transmitting A bit to central office
Transmitting B bit to central office
Receiving A bit from central office
Receiving B bit from central office
HEX
CODE
80
40
20
10
Throubleshooting The DXPT1 Installation – 17
IMI89–171
4.6
Troubleshooting The DXPT1 Installation
Requesting Information On Trunk Assignments
Make this request to receive information on the trunk assignments that have been made. Upon making
this request, the system provides you with the following information:
•
•
•
4.6.1
trunk type (ground start, DID, E&M, or loop start),
dial type (rotary or tone),
signalling protocol (immediate, wink, delay).
Setting The DIP Switches For Requesting Trunk Assignment Information
Set the DIP switches as shown in the following table to request trunk assignment information. Use
switches 4 through 8 (designated in the table by A through E) to select the channel you want to test
(1 through 24). See the table in section 4.1.1 for the relationship between the 24 different letter groups
and channel numbers. For remote operation, determine the corresponding hex code from Table 1. Switch
1 is the top switch.
SWITCH SETTINGS
1
2
3
ON OFF ON
4.6.2
4
A
5
B
6
C
TYPE OF REQUEST
7
D
8 Provide information about trunk
E assignments on the channel specified by the
letters ABCDE (see the table in section
4.1.1).
HEX
CODE
see
Table
1
Reading The Trunk Assignment Information From The LEDs
The Table below shows the trunk assignment information that is revealed by the LEDs. LED 1 is at the
top.
1
ON
ON
OFF
OFF
2
OFF
ON
ON
OFF
3
OFF
OFF
OFF
ON
LEDs
4
5
OFF
OFF
OFF
OFF
ON
6
7
8
OFF
OFF
OFF
ON
ON
OFF OFF OFF OFF OFF OFF OFF
18 – Troubleshooting The DXPT1 Installation
OFF
ON
OFF
ON
OFF
LED DEFINITIONS
Ground start
DID
E&M
Loop start
Tone dial
Not used
Wink start
Delay start
Immediate start
Not used
No trunk assignments made
Troubleshooting The DXPT1 Installation
4.7
IMI89–171
Requesting Information About Channel State
Use this request to determine the state of the channel specified in the request command. Upon making this
request, the system provides you with the following information:
•
4.7.1
channel state (idle or busy).
Setting The DIP Switches For Requesting Channel State Information
Set the DIP switches as shown in the following table to request the state of the channel specified in the
request command. Use switches 4 through 8 (designated in the table by A through E) to select the desired
channel.(1 through 24). See the table in section 4.1.1 for the relationship between the 24 different letter
groups and channel numbers. For remote operation, determine the corresponding hex code from Table 1.
Switch 1 is the top switch.
SWITCH SETTINGS
1
2
3
ON ON OFF
4.7.2
4
A
5
B
6
C
TYPE OF REQUEST
7
D
HEX
CODE
8 Provide information about the state of the
see
E channel specified by the letters ABCDE (see Table
the table in section 4.1.1).
1
Reading The Channel State Information From The LEDs
The Table below shows the channel state information that is revealed by the LEDs. LED 1 is at the top.
LEDs
LED DEFINITIONS
1
2
3
4
5
6
7
8
OFF OFF OFF OFF OFF OFF ON ON The selected channel is in the idle state.
HEX
CODE
03
Throubleshooting The DXPT1 Installation – 19
IMI89–171
4.8
Troubleshooting The DXPT1 Installation
Using The Hexadecimal Codes For Remote Diagnostics
You can similate the diagnostic DIP switch settings, that are usually made on-site, by sending the
following code sequence via modem to the remote DXPT1 board:
tkmsg<space>(valid port number)<space>7B,(hex code)
The hexadecimal value that you use for the field code corresponds to a bit pattern that you are using to
similate DIP switch settings. For example, to similate a switch setting of 11100001 (switches 1, 2, 3, and
8 on) use hex code E1 in the field position. (Switch 1 is the top switch as you look at the front edge of the
DXPT1 board. The switches are “on” when you move them to the right.).
After you have interrogated the DXPT1 board by transmitting a valid diagnostic code to it, the DXPT1
responds with a hex code that similarily represents a bit pattern that you can find in Table 1. This bit
pattern represents the diagnostic LEDs located adjacent to the DIP switches on the DXPT1 board. For
example, let’s assume you received the hex code 53 in response to a request for cold start information.
Since 53 (hex) represents a bit pattern of 01010011, it follows that LEDs 2, 4, 7, and 8 are lit. (LED 1 is
the top LED in the group of eight on the DXPT1 board.) See the example in section 4.2.2.
Table 1. Hexadecimal Codes Related To Bit Patterns
Bit Pattern
12345678
00000000
00000001
00000010
00000011
00000100
00000101
00000110
00000111
00001000
00001001
00001010
00001011
00001100
00001101
00001110
00001111
00010000
00010001
00010010
00010011
00010100
00010101
00010110
00010111
00011000
00011001
00011010
00011011
00011100
00011101
00011110
00011111
00100000
00100001
00100010
00100011
00100100
00100101
00100110
00100111
00101000
00101001
00101010
00101011
00101100
00101101
00101110
00101111
00110000
00110001
00110010
00110011
00110100
00110101
00110110
00110111
00111000
00111001
00111010
00111011
00111100
00111101
00111110
00111111
Hex Bit Pattern
Code
12345678
01000000
00
01000001
01
01000010
02
01000011
03
01000100
04
01000101
05
01000110
06
01000111
07
01001000
08
01001001
09
01001010
0A
01001011
0B
01001100
0C
01001101
0D
01001110
0E
01001111
0F
01010000
10
01010001
11
01010010
12
01010011
13
01010100
14
01010101
15
01010110
16
01010111
17
01011000
18
01011001
19
01011010
1A
01011011
1B
01011100
1C
01011101
1D
01011110
1E
01011111
1F
01 1 0 0 0 0 0
20
01100001
21
01100010
22
01100011
23
01100100
24
01100101
25
01100110
26
01100111
27
01101000
28
01101001
29
01101010
2A
01101011
2B
01101100
2C
01101101
2D
01101110
2E
01101111
2F
01110000
30
01110001
31
01110010
32
01110011
33
01110100
34
01110101
35
01110110
36
01110111
37
01111000
38
01111001
39
01111010
3A
01111011
3B
01111100
3C
01111101
3D
01111110
3E
01111111
3F
20 – Troubleshooting The DXPT1 Installation
Hex Bit Pattern
Code
12345678
10000000
40
10000001
41
10000010
42
10000011
43
10000100
44
10000101
45
10000110
46
10000111
47
10001000
48
10001001
49
10001010
4A
10001011
4B
10001100
4C
10001101
4D
10001110
4E
10001111
4F
10010000
50
10010001
51
10010010
52
10010011
53
10010100
54
10010101
55
10010110
56
10010111
57
10011000
58
10011001
59
10011010
5A
10011011
5B
10011100
5C
10011101
5D
10011110
5E
10011111
5F
10100000
60
10100001
61
10100010
62
10100011
63
10100100
64
10100101
65
10100110
66
10100111
67
10101000
68
10101001
69
10101010
6A
10101011
6B
10101100
6C
10101101
6D
10101110
6E
10101111
6F
10110000
70
10110001
71
10110010
72
10110011
73
10110100
74
10110101
75
10110110
76
10110111
77
10111000
78
10111001
79
10111010
7A
10111011
7B
10111100
7C
10111101
7D
10111110
7E
10111111
7F
Hex Bit Pattern
Code
12345678
11000000
80
11000001
81
11000010
82
11000011
83
11000100
84
11000101
85
11000110
86
11000111
87
11001000
88
11001001
89
11001010
8A
11001011
8B
11001100
8C
11001101
8D
11001110
8E
11001111
8F
11010000
90
11010001
91
11010010
92
11010011
93
11010100
94
11010101
95
11010110
96
11010111
97
11011000
98
11011001
99
11011010
9A
11011011
9B
11011100
9C
11011101
9D
11011110
9E
11011111
9F
11100000
A0
11100001
A1
11100010
A2
11100011
A3
11100100
A4
11100101
A5
11100110
A6
11100111
A7
11101000
A8
11101001
A9
11101010
AA
11101011
AB
11101100
AC
11101101
AD
11101110
AE
11101111
AF
11110000
B0
11110001
B1
11110010
B2
11110011
B3
11110100
B4
11110101
B5
11110110
B6
11110111
B7
11111000
B8
11111001
B9
11111010
BA
11111011
BB
11111100
BC
11111101
BD
11111110
BE
11111111
BF
Hex
Code
C0
C1
C2
C3
C4
C5
C6
C7
C8
C9
CA
CB
CC
CD
CE
CF
D0
D1
D2
D3
D4
D5
D6
D7
D8
D9
DA
DB
DC
DD
DE
DF
E0
E1
E2
E3
E4
E5
E6
E7
E8
E9
EA
EB
EC
ED
EE
EF
F0
F1
F2
F3
F4
F5
F6
F7
F8
F9
FA
FB
FC
FD
FE
FF
Troubleshooting The DXPT1 Installation
5
IMI89–171
Selecting The T1 PAD Settings
The system pad settings that you select through the DXP Plus system programming are very important for
the correct audio level to be transmitted and received and for echo suppression.
5.1
Setting T1 Transmit Level
For the older software, set to normal (uses low, very-low, normal, high, very-high settings). For software
using Gain1, Gain2, Nominal, Loss1, Loss2, Loss3, Loss4, and Loss5, use Nominal setting.
5.2
Setting T1 Receive Level
For the older software, set to Very-Low. For the Loss/Gain software, set to Loss4. If echo problems
occur, try Loss5.
6
Solving T1 Problems
See the following table for T1 problems you could encounter and their possible causes.
PROBLEM
Signalling bits are not being received properly
(no seize) or the network is not “seeing” the
seize.
POSSIBLE CAUSE
Associated multiplexer (mux) equipment may
be defective if installed between the DXP and
the central office (CO).
When the T1 option is installed in a DXP
system, the DXP shows massive seizes on the Incorrect trunk assignments. For example,
inbound channels.
ground start idle bits will cause seizes on DID
and E&M trunk assignments.
The DXPT1 is seizing outward A=1 and B=1
and channel is in the idle state.
Channel not assigned and not disabled. All
LEDs will be off upon making a request for
trunk assignment information (see section
4.6.2).
The SIG red LED on the DXPT1 board is lit
indicating no receive signal.
- If new install, cabling may be reversed.
- Wiring to DXPT1 board may be defective
- DXPT1 board may be defective. Verify by
installing local loopback.
Bipolar alarms are indicated when T1 option is
first installed.
- Only one receive wire connected. Check
cable.
- Noise sources or lightning.
The SLIP red LED on the DXPT1 board is lit
indicating frame slips are occurring.
DXOPT-SYN card may not be locked. There
should not be any red LEDs on this card lit.
Verify presence of primary or secondary
sources by the green LEDs lit on this card.
Echos are heard.
- Two- to four-wire hybrid conversions have
been made. Cut in echo suppressors to
eliminate echos on calls over 600 miles and
inform the network.
- Pad setting may be incorrect causing
acoustical feedback (see section 5, PAD
Settings). 0 dB (or -3 dB) is recommended
for transmitted data and -9 dB at an industry
standard telephone (IST).
Throubleshooting The DXPT1 Installation – 21
IMI89–171
A.
Troubleshooting The DXPT1 Installation
Appendix A
Appendix A consists of two tables showing superframe and extended superframe format. The
information for these tables is from the American National Standards Institute (ANSI) specification
T1.403-1989.
Table 2. Superframe Format
F Bits
Frame
Number
1
2
3
4
5
6
7
8
9
10
11
12
Bit Use In Each
Time Slot
Signalling Bit
Use Options
Signalling
Channel
Bit
Number
Term
Frame
(F1)
Signal
Frame
(F2)
Traffic
0
193
386
579
772
965
1158
1351
1544
1737
1930
2123
1
—
0
—
1
—
0
—
1
—
0
—
—
0
—
0
—
1
—
1
—
1
—
0
1-8
1-8
1-8
1-8
1-8
1-7
1-8
1-8
1-8
1-8
1-8
1-7
NOTES:
(1) Frame 1 transmitted first.
(2) Frames 6 and 12 are denoted signalling frames.
(3) Option T- Traffic (bit 8 not used for robbed-bit signalling).
22 – Troubleshooting The DXPT1 Installation
Signal
—
—
—
—
—
8
—
—
—
—
—
8
—
—
—
—
—
—
—
—
—
—
—
—
—
—
—
—
—
A
—
—
—
—
—
B
Troubleshooting The DXPT1 Installation
IMI89–171
Table 3. Extended Superframe Format
Bit Use In Each
Time Slot
F Bits
Frame
Number
1
2
3
4
5
6
7
8
9
10
11
12
13
14
15
16
17
18
19
20
21
22
23
24
Signalling Bit
Use Options
Bit
Number
FPS
DL
CRC
Traffic
Signal
T
2
4
16
0
193
386
579
772
965
1158
1351
1544
1737
1930
2123
2316
2509
2702
2895
3088
3281
3474
3667
3860
4053
4246
4439
—
—
—
0
—
—
—
0
—
—
—
1
—
—
—
0
—
—
—
1
—
—
—
1
m
—
m
—
m
—
m
—
m
—
m
—
m
—
m
—
m
—
m
—
m
—
m
—
—
C1
—
—
—
C2
—
—
—
C3
—
—
—
C4
—
—
—
C5
—
—
—
C6
—
—
1-8
1-8
1-8
1-8
1-8
1-7
1-8
1-8
1-8
1-8
1-8
1-7
1-8
1-8
1-8
1-8
1-8
1-7
1-8
1-8
1-8
1-8
1-8
1-7
—
—
—
—
—
8
—
—
—
—
—
8
—
—
—
—
—
8
—
—
—
—
—
8
—
—
—
—
—
—
—
—
—
—
—
—
—
—
—
—
—
—
—
—
—
—
—
—
—
—
—
—
—
A
—
—
—
—
—
A
—
—
—
—
—
A
—
—
—
—
—
A
—
—
—
—
—
A
—
—
—
—
—
B
—
—
—
—
—
A
—
—
—
—
—
B
—
—
—
—
—
A
—
—
—
—
—
B
—
—
—
—
—
C
—
—
—
—
—
D
NOTES:
(1) Frame 1 transmitted first.
(2) Frames 6, 12, 18, and 24 are denoted signalling frames.
(3) FPS = Framing Pattern Sequence (...001011...)
(4) DL = 4KBits/s Data Link (Message Bits m)
(5) CRC - CRC6 Cyclic Redundancy Check (Bits C1-C6)
(6) Option T = Traffic (Bit 8 not used for Robbed-Bit signalling)
(7) Option 2 = 2-State signalling (Channel A)
(8) Option 4 = 4-State signalling (Channels A and B)
(9) Option 16 = 16-State signalling (Channels A, B, C, and D)
tel: 800.766.3425
818.773.8888
www.kellatronics.com
fax: 800.720.1172
818.773.8899
[email protected]
Throubleshooting The DXPT1 Installation – 23
R
Understanding The System Diagnostics
1.0 Introducing System Diagnostics
The DXP provides you with the option of doing several different types of diagnostic checks on the system. This
chapter details the types of diagnostics and their functions.
NOTE: You should perform all diagnostic tests on an idle system and under the direction of a Comdial technician.
A busy system could produce invalid test results. Because there are numerous items that could contribute
to a failure of any of these tests, Comdial assistance is required in interpreting the results of the diagnostic
tests.
Diagnostics
1. Initialize Diagnostic Data
2. ROM Checksum Verification
3. Scratch RAM Test
4. Non-Volatile RAM Test
5. Time Switch Memory Test
6. Main CPU DTMF Receiver Test
7. AUX. Board DTMF Receiver Test
8. Speaker Coefficients
9. CPU Board Dip Switches
▲
PUSH
POWER
CONT
BRIGHT
ON
OFF
Viewing The Diagnostics Screen
This manual has been developed by Comdial Corporation (the “Company”) and is intended for the use of its customers and service personnel. The information in this manual is subject to change
without notice. While every effort has been made to eliminate errors, the Company disclaims liability for any difficulties arising from the interpretation of the information contained herein.
The information contained herein does not purport to cover all details or variations in equipment or to provide for every possible contingency to be met in connection with installation, operation, or
maintenance. Should further information be desired, or should particular problems arise which are not covered sufficiently for the purchaser’s purposes, contact Comdial, Inside Sales Department,
Charlottesville, Virginia 22906.
Printed in U.S.A.
IMI89–233.01
11/95
IMI89–233
Understanding The System Diagnostics
2.0 Defining System Diagnostics
2.1
Initialize Diagnostic Data
This option clears all previous diagnostic test results from memory.
2,2
ROM Checksum Verification
The ROM checksum test calculates and displays a checksum to test the integrity of the system software EPROMs.
2.3
Scratch RAM Test
This test checks the integrity of the scratch RAM area by writing and reading words in memory. The test works
by writing a known pattern, “55AA” into memory and then reading the area of memory back. The system then
writes and reads a second known pattern, “AA55.” This algorithm checks every byte in the the scratch RAM area.
If an error occurs, the system displays a message stating that the test failed. Scratch RAM is considered the
working area of memory for the DXP’s microprocessor. This area of memory is “volatile,” which means that any
data in this area is lost when the system loses power.
2.4
NonVolatile RAM test
This test checks the integrity of the NOV-RAM area of memory. The NOV-RAM area of memory is write
protected and backed up by super capacitors on the DXP’s RAM memory board. The programmed database and
SMDRs are stored in this area of memory. This test uses the same write/read algorithm as the scratch RAM
employs.
2.5
Time Switch Memory Test
This test checks all 256 timeslots with a write/read algorithm pattern similar to that of the scratch/NOV-RAM
test. All voice and tones into and out of the DXP pass through the timeswitch.
2.6
Main CPU DTMF Receiver Test
This diagnostic test checks the two main DTMF receivers on the CPU board for functionality. It performs its
check by connecting DTMF tones 0-9, ✳, and # through the timeswitch and confirming that the correct tone was
recognized by the receiver. If an error occurs, the system displays a message stating which receiver failed.
2– Understanding The System Diagnostics
Understanding The System Diagnostics
2.7
IMI89–233
AUX Board DTMF Receiver Test
This diagnostic test checks all of the DTMF receivers on the installed auxiliary boards. The same functional
DTMF tone check is performed as for the two main DTMF receivers. If an error occurs, the system displays a
message stating which DTMF receiver on which DTMF tone card and which AUX board has failed.
2.8
Speaker Coefficients
Certain models of Comdial digital telephones have performance characteristics that can be modified by using this
section of diagnostics. Do not attempt to modify any of the values found in this section unless you have been
directed to do so by a Comdial technician; doing so could severely impact the performance of the associated
telephone. Once modified, these values remain in the telephone’s permanent memory and are not affected by a
DXP master clear.
2.9
CPU Board and DIP Switches
This section displays the current settings of the eight DIP switches on the DXP CPU board. This screen updates
simultaneously as the switches are changed. This diagnostic is useful for determining the status of the switches
from a remote location.
The current switches used are as follows:
Switch 1—Fixes serial port baud rates to known values
Switch 7—Initializes DXP Modem—sets auto answer, for example. Switch should always be on to ensure that the
DXP will re-initialize the modem after a loss of power or reset.
Baud In
Baud Out
Data Bits
Stop Bits
Parity
Flow Ctrl..
Port 1
9600
9600
8
1
None
None
Port 2
300
300
7
2
None
None
Switch 8—Used for DXP software upgrades. Automatically performs a master clear when a different revision of
software is detected upon power up. If the software is changed to a different revision and this switch is not “on,”
the system won’t run.
Understanding The System Diagnostics –3
DXP
Digital Communications System
Video Display Terminal
Programming Instructions
The procedures included in this
publication reflect software
releases through 9A.
R
Printed in U.S.A.
IMI66-111.04
10/95
Accredited by the Dutch Council
for Certification for certification
and registration activities.
Comdial’s Quality Management System Is
Certified To The ISO 9001 Standard.
tel: 800.766.3425
818.773.8888
www.kellatronics.com
ii
fax: 800.720.1172
818.773.8899
[email protected]
VDT Programming Instructions
IMI66–111
Table Of Contents
1
Understanding General Programming Information
2
Reviewing General Programming Considerations
3
Understanding Keyboard And Terminal Definitions
3.1
3.2
3.3
4
Reviewing The Command Prompts And Error Reporting
4.1
4.2
5
Reviewing The Command Prompts
Reporting Errors
Performing The Terminal Emulation Programming
5.1
6
Reviewing The Keyboard Definitions
Reviewing the Control Key Definitions
Reviewing The Terminal Mode Definitions
Reviewing The Programming Progression
Programming System Features
6.1
6.2
6.3
6.4
6.5
6.6
6.7
6.8
6.9
6.10
6.11
6.12
6.13
6.14
6.15
Default Functional Programming
VDT Display Configurations (Terminal Setup)
Messaging
Database Storage
Serial Port (Serial Data Port Parameters)
Subdued Off-Hook Voice Announce (SOHVA) Programming
Speed Dial Programming
System Clock (Time and Date)
System Timing
System Parameters
Paging Zones (Paging Programming)
Password Programming (Change Password)
Feature Renumbering
Programming The T1 Status Log Parameters
Major Alarm Alerting
Table Of Contents iii
IMI66–111
7
VDT Programming Instructions
Programming Station Features
7.1
7.2
7.3
7.4
7.5
8
Programming Line Features
8.1
8.2
8.3
8.4
8.5
8.6
8.7
8.8
9
Modifying Intercom Numbers
Adding Intercom Numbers
Removing Intercom Numbers
Renumbering Intercom Numbers
Programming Call Costing and Station MessageDetail Accounting and Reports (SMDA/SMDR Programming)
10.1
10.2
10.3
10.4
10.5
11
Line Programming
Line Group Programming
Copy Model Line (Block Programming, Line)
Direct Inward Dialing (DID) Support
Ground Start Line Support
Loop Start Line Support
Tie Line Support
Direct Inward System Access (DISA) Programming
Programming Intercom Numbers
9.1
9.2
9.3
9.4
10
Programming Station Class Of Service Features
Programming Station Features
Square/Non-Square System (Button Mapping By Station)
Telephone Types (Phone Types)
Copy Model COS, Station, Button Map (Block Programming)
SMDA/SMDR Parameters
SMDA Reports
Account Codes (Forced, With Positive Verification)
Emergency Numbers
Authorization Code
Programming Toll Restriction
11.1
11.2
11.3
11.4
11.5
11.6
11.7
iv Table Of Contents
Toll Restriction Example 1
Toll Restriction Example 2
Toll Restriction Flow Diagram
Restriction Level Programming
Toll Groups Programming
Restricted Numbers Programming
Exception Number Programming
VDT Programming Instructions
12
IMI66–111
Enabling Automatic Route Selection
12.1
12.2
12.3
12.4
12.5
12.6
Automatic Route Selection Diagram
ARS Enable
Line Groups for ARS
Route Tables (ARS
Costing Information (ARS)
Automatic Route Selection For Speed Dial Numbers
13
Selecting System Printouts (Printer Interface)
14
Programming For Peripheral Devices
14.1
14.2
14.3
14.4
14.5
14.6
Caller ID Programming
Tracker Paging System Programming
Digital Voice Announce Programming
PC Attendant Position Programming
Voice Mail Programming
Modem Setup
Table Of Contents v
IMI66–111
VDT Programming Instructions
This page remains blank intentionally.
vi Table Of Contents
VDT Programming Instructions
1
IMI66–111
Understanding General
Programming Information
It is best that you program the DXP digital communications system from a video display terminal
(VDT) that supports the ANSI standard escape sequences for cursor and video control. The VDT must
be a serial-data, RS-232 type, asynchronous device. The DXP system supports ANSI standard, ANSI
color, and WYSE 50 terminals with full screen editing of database information. Other types of
terminals use a line-by-line editing approach instead of a full screen editing approach and make
programming harder to do.
You can employ a personal computer (PC) if it will run a communications software program that allows
it to emulate a data terminal device (DTE equipment). Many communications software programs are
available for this purpose. One such program that works effectively is known as PROCOMM produced
by Datastorm Technologies; however, you can use any that match the following data communications
parameters:
•
•
full duplex,
XMODEM communication protocol (8 bit data required).
Regardless of the type of programming terminal that you employ, connect it to the common equipment
data port per the discussion found in IMI66-085, Installation Instructions For The DXP Digital
Communications System Main Cabinet Assembly.
You can program the DXP digital communications system remotely using the following equipment:
•
•
a VDT or a PC and appropriate software program,
a pair of data modems (one for your terminal and one for the remote site).
Refer to GCA40-075, Feature Applications For The DXP Digital Communications System, for complete
remote programming details.
It is possible for you to mismatch the data configurations of your programming terminal (VDT) with
those of the DXP and prevent data communications from occurring. You can reconfigure your VDT
until you match the data parameters of the DXP; however, the DXCPU-68K board provides a DIP
switch that changes the DXP data configuration to a fixed set of parameters. You can match your VDT
to this fixed set of parameters and eliminate any configuration guess work. When you set DIP switch 1
to its ON position, you fix the DXP serial data ports to the following parameters:
Parameter
Baud Rate In
Baud Rate Out
Data Bits
Stop Bits
Parity Bits
Flow control
Data Port A
9600
9600
8
1
None
None
Data Port B
300
300
7
2
None
None
When you set the DIP switch to OFF, you can program the DXP data port configuration parameters
using the procedure detailed in Section 6.5, Serial Ports.
General Programming Information 1–1
VDT Programming Instructions
2
IMI66–111
Reviewing General
Programming Considerations
Since the programming procedure is menu driven, you should consider all of the following points.
•
•
•
•
•
•
•
•
The menu presents a list of selections for your consideration. Each selection differs in content and
requires a different response.
When you respond to each selection, it either causes the system to present a further breakdown of
selections or causes a particular programming action to take place.
Menu lines prompt you for the required response and, where appropriate, will repeat prompts to
allow programming of more than one device without you having to make another menu selection.
All of the menus operate in a similar manner. They differ in only the required response that you
must make.
Some menus contain more than one page. On these menus, you can press and hold the CONTROL
key while you type the N key to display the next page (or type P to display the previous page).
Each prompt requires a response followed by a Carriage Return (RETURN). A more common label
for this control on most PC keyboards is ENTER.
Most menu responses usually consists of a one-, two-, or three-digit number or a string of numbers
(or alpha-numeric characters when programming names and messages). Successive entries are
separated by a space or a comma (n n n or n,nn,nnn) while blocks of numbers are indicated by
hyphen (n-nnn).
Should programmers introduce a numbering conflict while renumbering a feature dialing code, the
system will prompt them to remove the conflict. They may have to renumber several features to
completely clear any conflicting numbers.
Programming Considerations 2–1
VDT Programming Instructions
Understanding Keyboard And
Terminal Definitions
3
3.1
IMI66–111
Reviewing The Keyboard Definitions
The following list describes the functional keys on the keyboard.
•
Number keys:
Use keys 0–9 for selecting menu items, lines of data to edit, or
for editing numeric prompts.
•
Alphabetic keys:
Use keys A–Z and a–z for entering string information such as
names and messages. Always begin names of stations, lines, and
so forth with a letter or a space.
•
ESCAPE key:
Either of these keys will return you to the previous command
prompt and cancel whatever input was in progress. This action
may or may not cause the previous screen to be redrawn
depending on the current mode. When you enter a change at
most of the programming menus, you must press the ESCAPE
key and type a y followed by the ENTER key to save the change.
•
Punctuation and Symbol keys:
Except for comma (which is a field delimiter), use the
punctuation and symbols on the keyboard just as you use the
alphabetic keys.
•
RETURN or ENTER key:
Use this key to terminate the response to a command prompt or
to end the editing of a data field. The system ignores a
RETURN without any preceding input except when you are
editing database information. During this operation, the
RETURN key moves the cursor to the next vertical editing
position.
•
SPACE BAR:
The space bar steps through the choices for program selections
that provide multiple choices.
•
Tab Key:
Use this key during table editing to position the cursor to the
next horizontal editing position.
•
Question mark (?):
This key will display any help available concerning the currently
displayed screen.
Keyboard and Terminal Definitions 3–1
IMI66–111
3.2
VDT Programming Instructions
Reviewing The Control Key Definitions
The following list describes the control key functions. Unless otherwise noted, control keys are valid
input at any time during programming.
•
•
Control C (C for Cancel):
This key will cancel the current mode or function and return you
to the last command prompt.
Control E (E for Edit or Erase): Use this key to edit a selected field or entry. On “smart”
terminals, most fields will be automatically cleared when the
first character is entered. Some fields allow the you to add to
the current entry. On these types of fields, Control E will clear
the entry and position the cursor at the beginning of the field.
You can also use this key to erase a field that has blanks for
valid input such as an autodial number.
•
Control I (I for Increment):
Use this key during table editing to position the cursor to the
next horizontal editing position.
•
Control N (N for Next):
Use this key to switch to the next page of data for those database
items that fill more that one screen. There will always be an on
screen note when this key is valid.
•
Control P (P for Previous):
This key is identical to the Control N key except that it displays
the previous page of information.
•
Control R (R for Redraw):
When you press this key the system will redraw the current
screen display. Usually, you use this key when the terminal
display is configured in brief mode.
•
Control X (X for eXit):
Either of these keys will return you to the previous command
prompt and cancel whatever input was in progress. This action
may or may not cause the previous screen to be redrawn
depending on the current mode. When you enter a change at
most of the programming menus, you must press the ESCAPE
key and type a y followed by the ENTER key to save the change.
Control S (S for Stop):
Use this key to stop printouts.
Control T (T for Top):
Use this key to cancel whatever input was in progress and return
to the top level menu. The top level menu will always be
redrawn.
Control V:
Use this key to turn the entry field prompting on or off.
•
•
•
3.3
Reviewing The Terminal Mode Definitions
•
Control A:
Use this key to cause the system to send and receive data to an
ANSI style terminal.
•
Control D:
Use this key to cause the system to send and receive data to a
“dumb” terminal.
•
Control W:
Use this key to cause the system to send and receive data to a
Wyse 50 compatible terminal.
3–2 Keyboard and Terminal Definitions
VDT Programming Instructions
4
4.1
IMI66–111
Reviewing The Command
Prompts and Error Reporting
Reviewing The Command Prompts
There are four different types of command prompts.
•
•
•
•
Menu Selection Prompt: Use this prompt to make a menu selection. The system requires a numeric
input and displays the valid range of numbers in the prompt that corresponds to the number of menu
items displayed.
Edit Line Prompt: Use this prompt on database editing screens to get to the desired line number to
be edited. The system requires a numeric input and displays the valid range of numbers in the
prompt that corresponds to the number of menu items displayed. Entering a RETURN (ENTER) at
this prompt will automatically select the first item.
Station, Line or Class Of Service Prompt: Use this prompt to get to the particular item or items
that are to be edited. This prompt is waiting for numbers, a range of numbers, or names. You may
specify a single item or multiple items separated by commas. Select a range of items by entering
two numbers separated by a dash. The prompt shows the valid range of numbers but the system will
accept names. The system accepts an item as a name if the first character is not a number. The
system displays the database information of each item one at a time for viewing or editing. When
you use the ESCAPE key to exit the database information screen, the system displays the next item
in the list. When you use CONTROL C to exit the screen, all list processing stops and the prompt
display returns. When you use CONTROL T to exit the screen, the system stops all list processing
and displays the top level menu.
Multiple Choice Question Prompt: This type of prompt asks a specific question concerning the
current screen or function and shows the valid responses. Enter these responses as a single character
followed by a RETURN (ENTER).
4.2
Reporting Errors
Pressing unexpected keys (such as letters when only numbers are allowed) or entering an out-of-range
value at a prompt causes the keyboard alarm to sound. The system responds to other types of input
errors by displaying an error message on the screen as soon as it detects the error. If the system detects
a value-out-of-range error, and if the valid range is not currently shown in the display, the error message
includes the valid range of values for reference.
There is one circumstance for which the system does not report an entry error and this is when you are
listing items at a station, line or COS prompt. In this case, the system processes valid items in the list up
to the first invalid item that it encounters. It does not report the encountered invalid item as an error.
Command Prompts and Error Reports 4–1
VDT Programming Instructions
5
IMI66–111
Performing The VDT Programming
Once successfully entered, the programming mode causes the VDT to display a welcoming menu. From the
welcoming menu, type I ✳ 7 4 6 ✳ (note that you must type a Capital I ), and then press ENTER to display the
main programming menu.
/////////////
/////////////
//////////////
//////
//////
//////
//////
//////
//////
//////
//////
//////
//////
///////////////
//////////////
//////////////
/////// //////
////////////
/////// //////
/////////////
////// //////
/////
/////
////// //////
/////
/////
///////////
//////////////
////////
/////////////
///////////
/////
////// //////
/////
////// //////
/////
//////
//////
/////
//////
//////
/////
COMDIAL DIGITAL EXPANDABLE
REV xxx
Note that the main menu shows
the latest software release number.
From the main programming menu, choose the type of programming that is required. Type the number of the
choice and press ENTER.
Main Menu
1. System
2. Stations
3. Lines
4. Intercom Numbers
5. SMDA / SMDR
6. Toll / ARS
7. Printouts
8. Diagnostics
9. Peripherals
10. Logout
Enter Selection (1-9):
VDT Programming 5–1
IMI66–111
5.1
VDT Programming Instructions
Reviewing The Programming Progression
Program the system in the sequence
shown in the following flow diagram.
Determine system programming
parameters. Record them for future
reference in IMI66-110 Records Chart
For The DXP Digital Communications
System.
Turn on AC power to
system and to VDT.
Press ENTER key. (VDT
displays program title as
shown on previous page)
Perform MASTER CLEAR procedure.
(Initial installation procedure only! This action
initializes system prior to programming and clears
all memory.)
Perform SYSTEM CLOCK
procedure*. (Sets time
displayed at LCD
speakerphones to current
time.)
* Set the system clock even if no
LCD speakerphones are used.
If analog telephones or consoles are employed, use
TELEPHONE TYPES procedure to identify
telephone types to station ports. If digital stations
are installed, they automatically identify themselves
to ports at power up; however, if they are not
installed until after power up,use TELEPHONE
TYPES procedure to identify them to the ports.
Program System, Line,
Station COS, and Station
Features in any order desired
and on an as needed basis.
5–2 VDT Programming
VDT Programming Instructions
IMI66–111
Programming System Features
6
•
Default Functional Programming . . . . . . . . . . . . . 6.1
•
VDT Display Configurations (Terminal Setup) . . . . . . . 6.2
•
Messaging . . . . . . . . . . . . . . . . . . . . . . 6.3
•
Database Storage . . . . . . . . . . . . . . . . . . . 6.4
•
Serial Port (Serial Data Port Parameters)
•
Subdued Off-Hook Voice Announce
(SOHVA) Programming . . . . . . . . . . . . . . . . 6.6
•
Speed Dial Programming . . . . . . . . . . . . . . . . 6.7
•
System Clock (Time and Date)
•
System Timing . . . . . . . . . . . . . . . . . . . . 6.9
•
System Parameters . . . . . . . . . . . . . . . . .
6.10
•
Paging Programming
. . . . . . . . . . . . . . . .
6.11
•
Password Programming (Change Password) . . . . . . .
6.12
•
Feature Renumbering . . . . . . . . . . . . . . . .
6.13
. . . . . . . . . 6.5
. . . . . . . . . . . . . 6.8
System Feature Programming 6–1
IMI66–111
VDT Programming Instructions
6.1
Default Functional Programming
6.1.1
Master Clear
Description:
The master clear feature in an on-line procedure that returns the entire system to the default
operating parameters, clears all stored speed dial numbers, and clears any other custom
programming as well. Master clear is not part of the off-line PCMMI programming procedure.
The system takes 15 to 20 seconds to exercise a master clear command depending upon the
system size.
You can take one of three different master clear options.
With master clear mode 1 option, the system assumes a set of parameters that reflect a key
system arrangement. This means that multiline telephones, except stations 101 and 102, receive
direct line appearances in their button maps but have no group intercoms assigned to their hunt
lists. Stations 101 and 102 have four group intercom numbers assigned to their hunt lists and are
button mapped accordingly.
With master clear mode 2 option, the system assumes a set of parameters that reflect a hybrid,
or PBX-like, system arrangement. This means that multiline telephones have no direct line
appearances in their button maps; however, they do have two unique group intercoms assigned
to their button maps and to their hunt lists.
With master clear mode 3 option, the system assumes a set of parameters, that does not map any
station buttons, assigns no group intercom access or personal intercom numbers to the stations,
and disables both zone and all-call paging features.
Programming:
1. Press CONTROL T for main menu.
2. From main menu, select system and press ENTER.
3. From system menu, select defaults and press ENTER.
4. Select master clear and press ENTER.
5. Type y or n (yes or no) to confirm master clear; press ENTER.
6. Select system default mode (1 = mode 1, 2 = mode 2, 3 = mode 3) and press ENTER.
CAUTION
You can only exercise the master clear when you enter the programming session with
the installer password; however, in a defaulted system, the administrator password is
the same as the installer password thus giving master clear privileges to the
administrator as well. Refer to Section 6.12, Password Programming to customize the
passwords.
6–2 System Feature Programming
VDT Programming Instructions
IMI66–111
Central Processor Unit Switched Master Clear
Description:
When following the installation procedures for software replacement as described in publication
IMI89–095, Installation Instructions DXP Digital Communications System Expanded Memory
Card and Software Upgrade Card, you are told to save the data base, master clear the system,
and replace the memory card. If you do not master clear the system, it is possible the DXP will
not perform properly with the new memory card. The DXCPU-68K board provides a method
for the master clear to occur automatically at the initial power up after you have changed or
upgraded the software card. When you perform an upgrade, you must execute the following
sequence of events exactly as they are stated here:
Programming:
1. Save the system data base. This step is critical. Refer to Section 6.4, Database Storage
for programming details.
2. Turn off the AC power to the DXP and replace the memory card on the DXCPU-68K board.
Refer to IMI89-095 for mechanical details.
3. Set DIP switch 8 to its ON position. This step enables the DXP to perform the
master clear and is a required step; otherwise, the software upgrade will not occur.
4. Install the DXCPU-68K board and new software card in the DXP, and turn on the
AC power. The DXP automatically executes a master clear operation.
5. After system powers up, set DIP switch 8 to its OFF position, and restore the data base
using the Section 6.4 procedure.
NOTE: The system performs the automatic master clear once following the initial power up after you
have up-graded the software. It will not perform an automatic master clear operation again after
subsequent power ups.
System Feature Programming 6–3
IMI66–111
6.1.2
VDT Programming Instructions
System Default
Description:
The system default sets the system configuration features to the default operating parameters.
When the system default is performed, certain programmed data, such as custom LCD messages
and system speed dial numbers, are lost.
Programming;
1.
2.
3.
4.
5.
6.1.3
Press CONTROL T for main menu.
From main menu, select system and press ENTER.
From system menu, select defaults and press ENTER.
From defaults menu, select system and press ENTER.
Type y to confirm default or n to deny.
Class Of Service Default
Description:
There are 32 station class of service (COS) feature sets or grouping of features. Each set can
have differently configured features. This default programming returns one or all station COS
sets to the default configured parameters.
Programming:
1.
2.
3.
4.
5.
6.1.4
Press CONTROL T for main menu.
From the main menu, select system and press ENTER.
From the system menu, select defaults and press ENTER.
From the defaults menu, select station COS and press ENTER.
Type 1-32 to enter class of service to be defaulted. Enter the
numbers for the COS sets to be defaulted (n,n,nn) or enter a range of numbers (n–nn).
Station Default
Description:
Each station can have individually configured operating features. The station default sets the
configuration of these features to the default parameters. Personal speed dial numbers and
autodial numbers are cleared with the station default action.
Programming:
1.
2.
3.
4.
5.
Press CONTROL T for main menu.
From main menu, select system and press ENTER.
From system menu, select defaults and press ENTER.
From defaults menu, select stations and press ENTER.
Type intercom number or station name.
6–4 System Feature Programming
VDT Programming Instructions
6.1.5
IMI66–111
Button Map Default
Description:
Every programmable button at each telephone connected to the system provides line selection,
direct station selection, or other functions. Programming action for a particular station assigns a
function to each button. Unique button function assignment, known as button mapping, at each
station is possible. This default erases all unique button function assignments.
Programming:
1.
2.
3.
4.
5.
6.1.6
Press CONTROL T for main menu.
From main menu, select system and press ENTER.
From system menu, select defaults and press ENTER.
From defaults menu, select button maps and press ENTER.
Type intercom number or station name.
Line Default
Description:
Each line can have individually configured operating conditions. The line default sets these
conditions to the default parameters.
Programming:
1.
2.
3.
4.
5.
6.
6.1.7
Press CONTROL T for main menu.
From main menu, select system and press ENTER.
From system menu, select defaults and press ENTER.
From defaults menu, select lines and press ENTER.
Type line port number (1-128) or name.
Enter the numbers for the lines to be defaulted (n,n,nn) or enter a range of numbers (n–nnn).
Tables Default
Description:
Various system-wide operating features depend upon tables of information to control their
parameters. These tables are programmable to let the features match a broad range of site
requirements. This table default procedure resets the following programmable tables to the
default conditions: SOHVA tables, toll restriction tables, ARS route tables, modify digits tables,
and account code verify tables.
CAUTION
Remember, the system erases all programmed entries when you take this
defaulting action.
Programming:
1.
2.
3.
4.
5.
Press CONTROL T for main menu.
From main menu, select system and press ENTER.
From system menu, select defaults and press ENTER.
From defaults menu, select tables and press ENTER.
Type y to confirm default or n to deny.
System Feature Programming 6–5
IMI66–111
6.1.8
VDT Programming Instructions
DID Translation Table, Default
Description:
If you have programmed translation tables for DID use (Section 8.4.4, DID Translation Table
Programming), you can clear them with this procedure.
Programming;
1.
2.
3.
4.
5.
6.
7.
6.1.9
Press CONTROL T for main menu.
From main menu, select system and press ENTER.
From system menu, select defaults and press ENTER.
From defaults menu, select DID translation table and press ENTER.
Type DID table number (1–4) and press ENTER.
Repeat step 5 until finished.
Press ESCAPE to end.
Clear System Status Log
Description:
If you have enabled system status reporting (Section 6.10.6, System Status Reporting) at a
station, you can turn off its status light by using this procedure. Use the Section 13 procedure to
view the status report before turning off the light at the status reporting station.
Programming;
1.
2.
3.
4.
5.
Press CONTROL T for main menu.
From main menu, select system and press ENTER.
From system menu, select defaults and press ENTER.
From defaults menu, select clear system status log and press ENTER.
Press ESCAPE to end.
6–6 System Feature Programming
VDT Programming Instructions
6.1.10
IMI66–111
Voice Prompts/Programming Default
Description:
If your system includes a Digital Voice Announcer (DVA) you can use the following procedure
to clear voice messages, the translation digits, and the voice analysis report of all existing
information. Refer to Section 14.3.3, Programming for DVA Operation, for the programming
discussion about these features.
Programming:
1.
2.
3.
4.
5.
6.
6.2
Press CONTROL T for main menu.
From main menu, select system and press ENTER.
From system menu, select defaults and press ENTER.
From defaults menu, select voice prompts/programming and press ENTER.
Type letter code for DVA feature to be defaulted.
Press ESCAPE to end.
Terminal Setup (VDT Display Configurations)
Description:
You must match the system to the type of VDT that you use to program it.
Programming:
1.
2.
3.
4.
5.
6.
7.
Press CONTROL T for main menu.
From main menu, select system and press ENTER.
From system menu, select terminal setup and press ENTER.
From terminal setup menu, type selection (1–4) for terminal choice.
Press SPACE bar to change or ENTER to maintain.
When finished, press ESCAPE twice.
Type y to accept changes, n to reject them, or r to resume editing and press ENTER.
System Feature Programming 6–7
IMI66–111
VDT Programming Instructions
6.3
Messaging
6.3.1
LCD Messaging
Description:
This procedure enables a class of service messaging feature. It allows station users to set a
message at their stations that will be displayed on calling LCD speakerphones. You can use the
second part of this procedure to program the actual LCD messages. Alternately, The attendant
can program the LCD messages using procedures found in the attendant guide.
Also refer to Section 6.3.2, Message Deposit.
Programming:
To enable feature for class of service,
1. Press CONTROL T for main menu.
2. From main menu, select stations and press ENTER.
3. From stations menu, select COS programming and press ENTER.
4. Type class of service number (1-32) and press ENTER.
5. From COS programming menu Type item number for feature and press ENTER.
6. Press SPACE bar for feature setting.
7. When finished, press ESCAPE twice.
8. Type y to accept changes, n to reject them, or r to resume editing and press ENTER.
9. Repeat steps 4-8 for each COS or press ESCAPE to end.
To program LCD Messages,
1. Press CONTROL T for main menu.
2. From main menu, select system and press ENTER.
3. From system menu, type item number for feature and press ENTER.
4. From LCD messages menu, type selection (1–10) and press ENTER.
5. Type message and press ENTER. Message can be 16 characters long.
6. Repeat steps 4 and 5 for all messages. Press CONTROL N for more LCD message lines.
7. When finished, press ESCAPE twice.
8. Type y to accept changes, n to reject them, or r to resume editing and press ENTER.
Operation:
Turn message on: press INTERCOM, dial S 02, then dial message code ( 01 through 30) #.
Turn Message off: press INTERCOM, dial # 02.
6–8 System Feature Programming
VDT Programming Instructions
6.3.2
IMI66–111
Message Deposit (Response Messaging)
Description:
This procedure enables a class of service messaging feature that allows station users to call an
LCD speakerphone and arrange for a message to be left on its display. The message is for the
called party to read if she or he is unable to answer the caller. Refer to Section 6.3.1, LCD
Messaging, for details about programming the LCD messages that can be deposited. Also, you
can use the procedure detailed in Section 7.3, Square/Nonsquare System–Button Mapping By
Station, to assign a Response Message button to the telephone; however, users can do this for
themselves if they need the button.
Programming:
1.
2.
3.
4.
5.
7.
8.
9.
6.3.3
Press CONTROL T for main menu.
From main menu, select stations and press ENTER.
From stations menu, select COS programming and press ENTER.
Type class of service number (1–32) and press ENTER.
From COS programming menu, type item number for feature and press ENTER.
When finished, press ESCAPE twice.
Type y to accept changes, n to reject them, or r to resume editing and press ENTER.
Repeat steps 4-8 for each COS or press ESCAPE to end.
Message Waiting (Message Wait Originate)
Description:
When you enable this feature, a station user can dial a feature code to control the message
waiting light at another station.
Programming:
1.
2.
3.
4.
5.
6.
7.
8.
9.
Operation:
Turn message waiting light on: press INTERCOM, dial ✷ 3.
Turn message waiting light off: press INTERCOM, dial # 3.
Press CONTROL T for main menu.
From main menu, select stations and press ENTER.
From stations menu, select COS programming and press ENTER.
Type class of service number (1–32) and press ENTER.
From COS programming menu, type item number for feature and press ENTER.
Press SPACE bar for feature setting.
When finished, press ESCAPE twice.
Type y to accept changes, n to reject them, or r to resume editing and press ENTER.
Repeat steps 4-8 for each COS or press ESCAPE to end.
System Feature Programming 6–9
IMI66–111
VDT Programming Instructions
6.4
Database Storage
6.4.1
Save/Restore Database
Description:
This feature will save a database externally from the DXP and restore it after you have turned
the DXP off and upgraded the operating system software. Also, you can use this feature anytime
to back up the stored programming as a security measure. Employ a personal computer with an
XMODEM communications program to store the database on a magnetic diskette and reload it
from the diskette after software upgrades. The saved and reloaded database includes the
following data: system information, station parameters, line parameters, toll restriction and
automatic route selection parameters, and system speed dial numbers but it does not include the
SMDA/SMDR records. If you need these SMDA/SMDR records, you must make a printout of
them before you perform the database storage. This is necessary because this save/restore
feature does not record the stored records and they will be lost. Use the Section 13, Selecting
System Printouts, procedure for this purpose. Also refer to Section 6.4.2, Software Upgrade, for
software upgrade considerations.
NOTE: This programming procedure details steps that one follows when using the communications
software program known as PROCOMM (produced by Datastorm Technologies). If you are using
a different communications software, your steps may be different.
During programming, the system stores feature data at several places in its database. To ensure
that a database save procedure includes all of a feature’s stored data, the system saves the entire
database whenever you perform the save/restore database programming procedure.
Programming:
To save the database,
1. Press CONTROL T for main menu.
2. From main menu, select system and press ENTER.
3. From system menu, select save/restore database menu and press ENTER.
4. Type item number for save database and press ENTER.
5. Press page-down button.
6. Type prompted number to choose XMODEM protocol.
7. Type name of file where database is to be stored, and press ENTER.
Database save is automatic.
8. To quit, press ESCAPE.
To restore the database,
1. Press CONTROL T for main menu.
2. From main menu, select system and press ENTER.
3. From system menu, select save/restore database menu and press ENTER.
4. Type item number for restore database and press ENTER,
5. Press page-up button.
6. Type prompted number to choose XMODEM protocol.
7. Type name of file where database is stored and press ENTER.
Database restore is automatic.
8. To quit, press ESCAPE.
6–10 System Feature Programming
VDT Programming Instructions
6.4.2
IMI66–111
Software Upgrade
Description:
This feature will save a database internally within the memory of the DXP and restore that
database after you have turned the DXP off and upgraded the operating system software.
Saving the database in this manner eliminates the need for a personal computer with an
XMODEM communications program to translate the database between software upgrades. The
saved and reloaded database includes all of the following data: system information, station
parameters, line parameters, toll restriction and automatic route selection parameters, and
system speed dial numbers but it does not include the SMDA/SMDR records. If you need these
SMDA/SMDR records, you must make a printout of them before you can perform the database
storage. This is necessary because this save/restore feature overwrites the current stored records
and they will be lost. Use the Section 6.13, Feature Renumbering, procedure for this purpose.
CAUTION
For this procedure to work properly, the system must include the expanded memory
card (DXRAM-EXP68K). If the system has the standard memory card
(DXRAM-STD68K), you should use the procedures detailed in Sections 6.1.1, Master
Clear, and 6.4.1, Save/Restore Database.
Programming:
1. Press CONTROL T for main menu.
2. From main menu, select system and press ENTER.
3. From system menu, select default and press ENTER.
4. From default menu, select onboard software upgrade and press ENTER.
5. Type y for yes or n for no to respond to prompt concerning SMDA/SMDR records.
6. After the system saves the database, turn off the AC power to the system,
upgrade the operating software, and turn the AC power back on. The system will
automatically reload the saved database into the upgraded operating software and log
out of the programming mode.
NOTE: The system will take an additional two to three minutes to power up after it receives AC power
because of the time required for the database restore processing.
System Feature Programming 6–11
IMI66–111
6.5
VDT Programming Instructions
Serial Ports (Serial Data Port Parameters)
Description:
The DXP provides two main serial data ports on the CPU board. In addition, it provides four
auxiliary serial ports on each DXOPT-COM communications card that your installer adds to
each DXAUX auxiliary circuit board. Since a DXAUX board accepts two DXOPT-COM cards
and the system accepts two DXAUX boards, the DXP can provide a maximum of 16 auxiliary
serial data ports. Coupled with the two main serial data ports, the system provides a total of 18
serial data ports. Every serial data port provides an RS-232 interface that you can use for such
things as VDT and data printer connection. The system recognizes the serial data ports by
unique number identifiers. The main serial data ports are 1 and 2, and the serial data ports on the
first DXAUX board are 3–6 (upper slot) and 7–10 (lower slot). The serial data ports on the
second DXAUX board are 11–14 (upper slot) and 15–18 (lower slot). The port numbering of
the auxiliary serial data ports are fixed. This means that if the system provides only one
DXOPT-COM located in the lower slot on the first DXAUX board, the auxiliary serial data
ports are 7–10.
Use this procedure to set the data communications parameters of the serial data ports. The serial
data parameters that you set using this procedure remain in effect until you reprogram them.
The settings will not change even if you perform a master clear of the system unless you use the
switched master clear method detailed in Section 6.1, Central Processor Unit Switched Master
Clear. With that procedure, the system also defaults its serial data ports.
Programming:
1.
2.
3.
4.
Press CONTROL T for main menu.
From main menu, select system and press ENTER.
From system menu, select serial ports and press ENTER.
From serial ports menu, type item number for main port or for auxiliary port
and press ENTER.
5. From serial port type menu, select the serial port number and press ENTER.
6. Press SPACE bar for feature setting
7. Press TAB for next parameter.
8. Repeat steps 6 and 7 for all parameters.
9. Press ENTER to accept settings.
10. When finished, press ESCAPE twice.
11. Type y to accept changes, n to reject them, or r to resume editing and press ENTER.
12. Press ESCAPE to end.
6–12 System Feature Programming
VDT Programming Instructions
6.6
Subdued Off-Hook Voice Announce
(SOHVA) Programming
6.6.1
Busy On SOHVA
IMI66–111
Description:
At default, the system returns a ring back tone to users who make SOHVA calls to busy
stations; however, this procedure allows you to arrange for telephone users to receive a busy
signal instead of the ring back tone. This feature lets non-LCD telephone users know that a
called station is busy.
Programming:
1.
2.
3.
4.
5.
6.
7.
8.
9.
6.6.2
Press CONTROL T for main menu.
From main menu, select stations and press ENTER.
From stations menu, select station programming and press ENTER.
Type personal intercom number or previously assigned name and press ENTER.
From station programming menu, type item number for feature and press ENTER.
Press SPACE BAR for feature setting and press ENTER.
When finished, press ESCAPE twice.
Type y to accept changes, n to reject them, or r to resume editing and press ENTER.
Repeat steps 4–8 for each station or press ESCAPE to end.
SOHVA Beeps (SOHVA Tone Bursts)
Description:
You can choose the number of tone bursts that each telephone user hears preceding a SOHVA
message to be from one to six.
Programming:
1.
2.
3.
4.
5.
6.
7.
8.
9.
Press CONTROL T for main menu.
From main menu, select station and press ENTER.
From stations menu, select station programming and press ENTER.
Type personal intercom number or previously assigned name for station and press ENTER.
From station programming menu, type item number for feature and press ENTER.
Type choice (1–6) and press ENTER.
Press ESCAPE twice.
Type y to accept changes, n to reject them, or r to resume editing and press ENTER.
Repeat steps 4–9 for each station or press ESCAPE to end.
System Feature Programming 6–13
IMI66–111
VDT Programming Instructions
6.6.3
SOHVA Groups
Description:
SOHVA calling groups control the pattern in which station ports receive and/or originate
SOHVA calls to one another. You must first form the SOHVA groups and then assign the
groups to individual stations. Use the Section 7.2.18, SOHVA Groups, procedure to assign
groups to individual stations.
Programming:
Form the SOHVA groups with this procedure.
1. Press CONTROL T for main menu.
2. From main menu, select system and press ENTER.
3. From system menu, select SOHVA table and press ENTER.
4. Type t, r, c to select transmit or receive group or to clear SOHVA table and press ENTER.
5. Type 1–16 ENTER to select SOHVA group for programming.
6. Type SOHVA groups (1–16) to receive from or transmit to selected SOHVA group.
Enter the numbers for the groups to be assigned (n,n,nn) or enter a range of numbers
(for example, n–nn) to set.
7. Press ENTER and repeat steps 5 and 6.
8. When finished, press ESCAPE.
9. Type y to accept changes, n to reject them, or r to resume editing and press ENTER.
EXAMPLE: As illustrated in the following menu, programming action enables group 12 to
transmit to groups 3, 5 and 7. System default enables each group to transmit
and receive with itself and enables group 16 to transmit and receive with all groups.
S O H V A
S
O
H
V
A
T
r
a
n
s
m
i
t
1
2
3
4
5
6
7
8
9
10
11
12
13
14
15
16
1
*
.
.
.
.
.
.
.
.
.
.
.
.
.
.
*
2
.
*
.
.
.
.
.
.
.
.
.
.
.
.
.
*
3
.
.
*
.
.
.
.
.
.
.
.
*
.
.
.
*
4
.
.
.
*
.
.
.
.
.
.
.
.
.
.
.
*
5
.
.
.
.
*
.
.
.
.
.
.
*
.
.
.
*
6
.
.
.
.
.
*
.
.
.
.
.
.
.
.
.
*
7
.
.
.
.
.
.
*
.
.
.
.
*
.
.
.
*
R e c e i v e
8
.
.
.
.
.
.
.
*
.
.
.
.
.
.
.
*
9 10 11 12 13 14 15 16
. . . . . . . *
. . . . . . . *
. . . . . . . *
. . . . . . . *
. . . . . . . *
. . . . . . . *
. . . . . . . *
. . . . . . . *
* . . . . . . *
. * . . . . . *
. . * . . . . *
. . . * . . . *
. . . . * . . *
. . . . . * . *
. . . . . . * *
* * * * * * * *
Use this procedure to assign stations to SOHVA groups.
1. Press CONTROL T for main menu.
2. From main menu, select stations and press ENTER.
3. From stations menu, select station programming and press ENTER.
4. Type personal intercom number or previously assigned name and press ENTER.
5. Select SOHVA groups and press ENTER.
6. Type group number 0–16 (n,n,nn or n-nn) and press ENTER.
7. When finished, press ESCAPE twice.
8. Type y to accept changes, n to reject them, or r to resume editing and press ENTER.
9. Repeat steps 4-8 for each station or press ESCAPE to end.
6–14 System Feature Programming
VDT Programming Instructions
6.7
Speed Dial Programming
6.7.1
Pause Time
IMI66–111
Description:
During speed dialing, it is sometimes necessary to have the system delay the sending of digits to
give host system switching equipment time to prepare to receive them. A pause, stored in the
speed dial number, provides this delay. This programming procedure determines the duration of
the pause. The person who stores the speed dial number must press the telephone’s HOLD
button at the point in the number digit sequence where he or she needs the pause (for example,
9—pause—18049782200).
Programming:
1.
2.
3.
4.
5.
6.
7.
6.7.2
Press CONTROL T for main menu.
From main menu, select system and press ENTER.
From system menu, type item number for feature and press ENTER
From system timing menu, type appropriate line number and press ENTER
Press SPACE bar for feature setting and press ENTER to accept setting.
When finished, press ESCAPE twice.
Type y to accept changes, n to reject them, or r to resume editing and press ENTER.
Speed Dial Groups
Description:
The system provides 500 system speed dial numbers. These numbers are divided into 50 groups
with 10 numbers available in each group. Assign none, one, or a range of groups (n–nn) to each
station class of service. Also refer to Section 6.7.4, System Speed Dial.
Programming:
1.
2.
3.
4.
5.
6.
7.
8.
9.
Press CONTROL T for main menu.
From main menu, select stations and press ENTER.
From stations menu, select COS programming and press ENTER.
Type class of service number (1–32) and press ENTER.
From COS programming menu, type item number for feature and press ENTER.
Type desired value (0–50) and press ENTER.
When finished, press ESCAPE twice.
Type y to accept changes, n to reject them, or r to resume editing and press ENTER.
Repeat steps 4–8 for each COS or press ESCAPE to end.
System Feature Programming 6–15
IMI66–111
6.7.3
VDT Programming Instructions
Speed Dial Sets
Description:
A speed dial set is a group of 10 speed dial locations. The system allocates three speed dial sets
to each telephone as a default but you can allocate up to 10 sets to a telephone if you wish.
When a DSS/BLF console is operated as a companion to a telephone, you can allocate speed
dial sets at the companion telephone that the system will then share with the console. The
system reserves one speed dial set for the telephone’s dial pad buttons 0–9.
Programming:
1.
2.
3.
4.
5.
6.
7.
8.
9.
6.7.4
Press CONTROL T for main menu.
From main menu, select stations and press ENTER.
From stations menu, select station programming and press ENTER.
Type personal intercom number or previously assigned name and press ENTER.
From station programming menu, type item number for feature and press ENTER.
Type desired value for feature and press ENTER.
When finished, press ESCAPE twice.
Type y to accept changes, n to reject them, or r to resume editing and press ENTER.
Repeat steps 4-8 for each station or press ESCAPE to end.
System Speed Dial
Description:
Use this programming feature to provide a list of 500 speed dial numbers to all stations in the
system. Choose the prime line/last line used or designate the line or line group that the system
will automatically select for speed dialing. Store up to 32 digits including 1-9, S, #, Hookflash
signalling, and pauses. Also refer to Sections 6.7.2, Speed Dial Groups, and 12.6, Automatic
Route Selection For Speed Dial Numbers.
Beginning with software release 8.B, you can alternately choose the intercom to be
automatically selected for speed dialing. This enhancement allows you to store intercom
selection along with feature codes as speed dial numbers for true one-button access to features
(for example; store INTERCOM ✳11 and INTERCOM #1 at two locations for system wide
availability to music on and music off). This enhancement will not accept S#0S or S#746S as
programming entries and it ignores any entered pauses or hookflashes.
Programming:
1.
2.
3.
4.
Press CONTROL T for main menu.
From main menu, select system and press ENTER.
From system menu, select speed dials and press ENTER.
From speed dial menu, type item number to edit or press ENTER for line 1.
NOTE: Pressing ENTER causes the system to accept the entry and move the cursor vertically one location
downward. Pressing TAB causes the system to accept the entry and move the cursor horizontally
one location to the right. Pressing and holding CONTROL while typing an E erases a number.
5. Press TAB to set cursor to preset column.
6. Press SPACE bar to choose intercom, prime/last (line), line, line group, or ARS.
7. Enter 1–128 for line port, 1–16 for line group, or 1–128 for ARS line to store
as prefix to speed dial number.
8. Press TAB for number entry column.
9. Type speed dial number (up to 32 digits of: 0–9, ✳, #, P = pause, F = hookflash)
and press ENTER.
10. Repeat steps 4–9 for all speed dial numbers
11. When finished, press ESCAPE twice.
12. Type y to accept changes, n to reject them, or r to resume editing and press ENTER.
Operation:
While on hook, dial ✳ 100 through ✳ 599.
6–16 System Feature Programming
VDT Programming Instructions
6.8
IMI66–111
System Clock (Time and Date)
Description:
The system clock provides time and date information for display on LCD speakerphones and for
SMDR/SMDA timing and reporting. You must set the correct time and date to allow the system
to operate properly.
Programming:
1.
2.
3.
4.
Press CONTROL T for main menu.
From main menu, select system and press ENTER.
From system menu, type item number for feature and press ENTER.
Type time in 24 hour format (hh:mm) using leading
zeros for entries less than 10 and then press ENTER.
5. Type date (mm–dd–yy) using leading zeros for entries less than 10 and press ENTER.
6.9
System Timing
6.9.1
Call Park Recall
Description:
A call that is left in a park orbit longer than the length of time that you program with this feature will
automatically return to a hold recall condition at the parking station. Also refer to Section 7.1.6, Call Park.
Programming:
6.9.2
1.
2.
3.
4.
5.
6.
7.
Press CONTROL T for main menu.
From main menu, select system and press ENTER.
From system menu, select timing and press ENTER
From system timing menu, type item number for feature and press ENTER.
Press SPACE bar for feature setting and press ENTER to accept setting.
When finished, press ESCAPE twice.
Type y to accept changes, n to reject them, or r to resume editing and press ENTER.
Page Recall
Description:
This timing feature determines the amount of time that a Tracker page remains in a Tracker
page orbit before recalling to the paging station. Refer to Section 14.2, Tracker Paging System
Programming for complete Tracker programming information.
Programming:
1.
2.
3.
4.
5.
6.
7.
Press CONTROL T for main menu.
Form main menu, select system and press ENTER.
From system menu, select system timing and press ENTER.
From the system timing menu, type item number for feature and press ENTER.
Press SPACE bar for feature setting and press ENTER to accept setting.
When finished, press ESCAPE twice.
Type y to accept changes, n to reject them, or r to resume editing and press ENTER.
System Feature Programming 6–17
IMI66–111
6.9.3
VDT Programming Instructions
Camp-On Tone
Description:
Use this procedure to set the duration of the call waiting tone that the system sends to a busy
station. Also refer to Section 7.1.8, Call Waiting .
Programming:
1.
2.
3.
4.
5.
6.
7.
6.9.4
Press CONTROL T for main menu.
Form main menu, select system and press ENTER.
From system menu, select system timing and press ENTER.
From the system timing menu, type item number for feature and press ENTER.
Press SPACE bar for feature setting and press ENTER to accept setting.
When finished, press ESCAPE twice.
Type y to accept changes, n to reject them, or r to resume editing and press ENTER.
DTMF Extended Dialing (Tone Length)
Description:
Use this programming feature to set the length of the DTMF tones. The system generates
DTMF tones of extended length when users take their telephones off-hook and then wait until
after the system sounds the extended dialing tone burst before they engage automatic dialing
(for example, press speed dial buttons or saved number redial button) at their stations. Also, if
analog telephone users take their telephones off-hook and then wait to begin manually dialing
until after the system sounds the extended dialing tone burst, the system will extend the length
of the manually dialed DTMF tones. After setting this extended DTMF tone length, you must
enable the feature’s use at each station where it is needed (Section 7.2.31, Extended DTMF
Dialing).
Programming:
1.
2.
3.
4.
5.
6.
7.
Press CONTROL T for main menu.
From the main menu, select system and press ENTER.
From the system menu, select timing and press ENTER.
From the system timing menu, type item number for feature and press ENTER.
Press SPACE bar for feature setting and press ENTER to accept setting.
When finished, press ESCAPE twice.
Type y to accept changes, n to reject them, or r to resume editing and press ENTER.
6–18 System Feature Programming
VDT Programming Instructions
6.9.5
IMI66–111
Timed Recall (Held And Transferred Calls)
Attendant Hold Recall
Description:
After a call has been on hold at an attendant station for a programmed length of time it recalls to
the attendant station. Use this procedure to set the length of the recall time for a held call at an
attendant station.
Programming:
1.
2.
3.
4.
5.
6.
7.
Press CONTROL T for main menu.
From main menu, select system and press ENTER.
From system menu, select timing and press ENTER
From system timing menu, type item number for feature and press ENTER.
Press SPACE bar for feature setting and press ENTER to accept setting.
When finished, press ESCAPE twice.
Type y to accept changes, n to reject them, or r to resume editing and press ENTER.
Hold Recall
Description:
After a call has been on hold at a station for a programmed length of time it recalls to the station
that placed it on hold. Use this procedure to set the length of the recall time for a held call.
Programming:
1.
2.
3.
4.
5.
6.
7.
Press CONTROL T for main menu.
From main menu, select system and press ENTER.
From system menu, select timing and press ENTER
From system timing menu, type item number for feature and press ENTER.
Press SPACE bar for feature setting and press ENTER to accept setting.
When finished, press ESCAPE twice.
Type y to accept changes, n to reject them, or r to resume editing and press ENTER.
Station Transfer Recall
Description:
After a transferred call has been waiting at a station for a programmed length of time it recalls
to the station that transferred it. Use this procedure to set the recall time for a transferred call.
Programming:
1.
2.
3.
4.
5.
6.
7.
Press CONTROL T for main menu.
From main menu, select system and press ENTER.
From system menu, select timing and press ENTER
From system timing menu, type item number for feature and press ENTER.
Press SPACE bar for feature setting and press ENTER to accept setting.
When finished, press ESCAPE twice.
Type y to accept changes, n to reject them, or r to resume editing and press ENTER.
System Feature Programming 6–19
IMI66–111
6.9.6
VDT Programming Instructions
Paging Access
Description:
If you have enabled paging transmit capability (see Section 6.11.3, Paging Transmit) at a
station, it has access to external paging equipment. With this procedure, you can set the
maximum length of time that the station can stay connected to the equipment.
Programming:
1.
2.
3.
4.
5.
6.
7.
6.9.7
Press CONTROL T for main menu.
From main menu, select system and press ENTER.
From system menu, select timing and press ENTER.
From system timing menu, type item number for feature and press ENTER.
Press SPACE bar for feature setting and press ENTER to accept setting.
When finished, press ESCAPE twice.
Type y to accept changes, n to reject them, or r to resume editing and press ENTER.
Pause Time
Description:
During speed dialing, it is sometimes necessary to have the system delay the sending of digits to
give host system switching equipment time to prepare to receive them. A pause, stored in the
speed dial number, provides this delay. This programming procedure determines the duration of
the pause. The person who stores the speed dial number must press the telephone’s HOLD
button at the point in the number digit sequence where he or she needs the pause (for example,
9—pause—18049782200). Also see Section 6.7, Speed Dial Programming.
Programming:
1.
2.
3.
4.
5.
6.
7.
6.9.8
Press CONTROL T for main menu.
From main menu, select system and press ENTER.
From system menu, type item number for feature and press ENTER
From system timing menu, type appropriate line number and press ENTER
Press SPACE bar for feature setting and press ENTER to accept setting.
When finished, press ESCAPE twice.
Type y to accept changes, n to reject them, or r to resume editing and press ENTER..
Recall/Flash
Description:
A station can generate either a line disconnect signal (recall) or a host system feature access
signal (flash) when its user presses the telephone’s TAP button. Use this procedure to arrange
for either the recall or the flash signal.
Programming:
1.
2.
3.
4.
5.
6.
7.
Press CONTROL T for main menu.
From main menu, select system and press ENTER.
From system menu, select timing and press ENTER.
From timing menu, type item number for feature and press ENTER.
Press SPACE bar for feature setting and press ENTER.
When finished, press ESCAPE twice.
Type y to accept changes, n to reject them, or r to resume editing and press ENTER.
6–20 System Feature Programming
VDT Programming Instructions
6.9.9
IMI66–111
Periodic Tone Time
Description:
After you enable the periodic warning tones that remind users to keep conversations short on
certain outside lines (Section 7.1.31, Periodic Line Tone), use this procedure to set how often
that you wish the periodic warning tones to occur
Programming:
1.
2.
3.
4.
5.
6.
7.
6.9.10
Press CONTROL T for main menu.
From main menu, select systems and press ENTER.
From system menu, select timing and press ENTER.
From system timing menu, type item number for feature and press ENTER.
Press SPACE bar for feature setting and press ENTER to accept setting.
When finished, press ESCAPE twice.
Type y to accept changes, n to reject them, or r to resume editing and press ENTER.
Maximum Call Duration (Time)
Description:
After you enable the maximum call duration feature (Section 7.1.32, Maximum Call Duration),
use this procedure to set the cut off time.
Programming:
1.
2.
3.
4.
5.
6.
7.
6.9.11
Press CONTROL T for main menu.
From main menu, select systems and press ENTER.
From system menu, select timing and press ENTER.
From system timing menu, type item number for feature and press ENTER.
Press SPACE bar for feature setting and press ENTER to accept setting.
When finished, press ESCAPE twice.
Type y to accept changes, n to reject them, or r to resume editing and press ENTER.
Internal Interdigit Dialing
Description:
A timer starts running with the dialing of each digit during intercom number dialing. It also
starts running whenever the user accesses the intercom number path and does not dial any
digits. When the timer times out, the system returns the station to an idle state. Use this
procedure to set the intercom dialing time-out period for the entire system.
Programming:
1.
2.
3.
4.
5.
6.
7.
8.
Press CONTROL T for main menu.
From main menu, select system and press ENTER.
From system menu, select timing and press ENTER.
From system timing menu, type item number for feature and press ENTER.
Press SPACE bar for time and press ENTER.
When finished, press ESCAPE twice.
Type y to accept changes, n to reject them, or r to resume editing.
Press ENTER to end.
System Feature Programming 6–21
IMI66–111
6.9.12
VDT Programming Instructions
Line-To-Line Connect Duration
Description:
After you have given a station the ability to set up an unsupervised conference between two
lines (Section 7.1.36, Line-To-Line Transfer), you should use this procedure to set the
maximum amount of time that an unsupervised conference can continue between two lines.
When the time out occurs, the system recalls the station from where the user enabled the
unsupervised conference.
Programming:
1.
2.
3.
4.
5.
7.
8.
6.9.13
Press CONTROL T for main menu.
From main menu, select system and press ENTER.
From system menu, select timing and press ENTER.
From timing menu, type item number for feature and press ENTER.
Press SPACE bar for feature setting and press ENTER.
When finished, press ESCAPE twice.
Type y to accept changes, n to reject them, or r to resume editing and press ENTER.
Camp-On/Automatic Call Back Ring
Description:
After you use Section 7.1.8, Call Waiting Tone, to enable a call waiting tone, use this procedure
to set the duration of the camp-on/automatic ringback ring that the system sounds when it
returns a camp-on call to the original station..
Programming:
1.
2.
3.
4.
5.
6.
7.
6.9.14
Press CONTROL T for main menu.
Form main menu, select system and press ENTER.
From system menu, select system timing and press ENTER.
From the system timing menu, type item number for feature and press ENTER.
Press SPACE bar for time and press ENTER to accept setting.
When finished, press ESCAPE twice.
Type y to accept changes, n to reject them, or r to resume editing and press ENTER.
Out Dial Delay Time
Description:
The system will wait for a programmed length of time before sending automatically dialed
numbers over an outside line. This delay gives the host system time to return dial tone before
the system begins dialing the number. Different host systems require different periods of time
between when a line is picked up and when dial tone is returned. Use this procedure to match
this system to your host system.
Programming:
1.
2.
3.
4.
5.
6.
7.
Press CONTROL T for main menu.
From main menu, select system and press ENTER.
From system menu, select timing and press ENTER.
From system timing menu, type item number for feature and press ENTER.
Press SPACE bar for feature setting and press ENTER.
When finished, press ESCAPE twice.
Type y to accept changes, n to reject them, or r to resume editing and press ENTER.
6–22 System Feature Programming
VDT Programming Instructions
6.9.15
IMI66–111
Authorization Code Time-out
Description:
Use the Section 10.5, Authorization Code, procedure to enable authorization codes. Once a user
uses an authorization code feature to access his or her telephone features, they remain in effect
until any idle time at the telephone exceeds the authorization code time-out period that you
program with the following programming steps.
Programming:
1.
2.
3.
4.
5.
7.
8.
6.9.16
Press CONTROL T for main menu.
From main menu, select system and press ENTER.
From system menu, select timing and press ENTER.
From timing menu, type item number for feature and press ENTER.
Press SPACE bar for feature setting and press ENTER.
When finished, press ESCAPE twice.
Type y to accept changes, n to reject them, or r to resume editing and press ENTER.
IST Ring Time-out
Description:
Use this procedure to set the number of times that the system sends a ring signal to an
industry-standard telephone on a system-wide basis. Although the ringing stops at the
industry-standard telephone when the time-out occurs, the system continues to present the call
at the telephone for answering until the caller abandons it. See Section 7.2.35,
Industry-Standard Telephone Support, for other IST programming requirements.
Programming:
1.
2.
3.
4.
5.
6.
7.
6.9.17
Press CONTROL T for main menu.
From main menu, select system and press ENTER.
From system menu, select timing and press ENTER.
From timing menu, type item number for feature and press ENTER.
Press SPACE bar for time and press ENTER to accept setting.
When finished, press ESCAPE twice.
Type y to accept changes, n to reject them, or r to resume editing and press ENTER.
IST DTMF Receiver Time-out
Description:
You can program the amount of time that the system waits to receive a DTMF tone from an
industry-standard telephone, after the user has lifted the telephone’s handset and before he or
she has pressed a dial pad digit, on a system-wide basis. The system disconnects the telephone
after this time-out occurs. If this happens, the user must hang up the handset and lift it again to
re-establish the dial tone. See Section 7.2.35, Industry-Standard Telephone Support, for other
IST programming requirements.
Programming:
1.
2.
3.
4.
5.
6.
7.
Press CONTROL T for main menu.
From main menu, select system and press ENTER.
From system menu, select timing and press ENTER.
From system timing menu, type item number for feature and press ENTER.
Press SPACE bar for time and press ENTER to accept setting.
When finished, press ESCAPE twice.
Type y to accept changes, n to reject them, or r to resume editing and press ENTER.
System Feature Programming 6–23
IMI66–111
6.9.18
VDT Programming Instructions
IST Flash Time
Description:
You can program the timed length of the signal that results when a user of an industry-standard
telephone presses and releases the telephone hookswitch (or presses the TAP button if available
on his or her telephone) on a system-wide basis. Often, a signal with a short time length
(typically 500–750 ms) serves to alert the system to receive a feature code (flash) while a signal
with a long time length (typically 1.5–2.0 sec) serves to disconnect the line and re-establish dial
tone (recall). The value that you set with this procedure is the maximum value for recognizing a
flash from an industry-standard telephone. Beginning with software release 6.A, you can also
set the minimum value for recognizing a flash from an industry-standard telephone. See Section
7.2.35, Industry-Standard Telephone Support, for other IST programming requirements.
Programming:
1.
2.
3.
4.
5.
6.
7.
8.
6.9.19
Press CONTROL T for main menu.
From main menu, select system and press ENTER.
From system menu, select timing and press ENTER.
From timing menu, type item number for minimum flash time and press ENTER.
Press SPACE bar for minimum time and press ENTER to accept setting.
Press ENTER to select maximum flash time line item.
Press SPACE bar for maximum time and press ENTER to accept setting.
Type y to accept changes, n to reject them, or r to resume editing and press ENTER.
Voice Mail DTMF Tone
Description:
The system provides a means by which you can set the length of the DTMF tones that it
generates when a user dials a number from his or her telephone. Since the voice mail system
may require a different DTMF tone length than that which you have provided for the
telephones, the system provides a means for you to set a separate DTMF tone length for voice
mail station ports. It defaults the length to 80 msec, but you can program other lengths as
needed. Refer to Section 15, Voice Mail Programming, for other voice mail programming
requirements.
Programming:
1.
2.
3.
4.
5.
6.
7.
Press CONTROL T for main menu.
From main menu, select system and press ENTER.
From system menu, select timing and press ENTER.
From system timing menu, type item number for feature and press ENTER.
Press SPACE bar for time and press ENTER to accept setting.
When finished, press ESCAPE twice.
Type y to accept changes, n to reject them, or r to resume editing and press ENTER.
6–24 System Feature Programming
VDT Programming Instructions
6.9.20
IMI66–111
Pulse Dial Interdigit Time
Description:
You can set the interdigit time between dial pulses when the system pulse-dials a number over a
line. The DXP defaults this time to 200 msec. and provides a range of timing values between
100 msec. and one sec. that you can set in 100 msec. increments. Refer to Section 8.1.8, Dialing
Mode, to enable pulse dialing.
Programming:
1. Press CONTROL T for main menu,
2. From main menu, select system and press ENTER.
3. From the system menu, select timing and press ENTER,
4. From timing menu type item number for feature and press ENTER,
5. Press SPACE bar to select desired time and press ENTER to select setting.
6. Press ESCAPE twice,
7. Type y to accept changes, n to reject them, or r to resume editing and press ENTER.
6.9.21
Pulse Dial Make/Pulse Dial Break (Pulse Dial Ratio)
Description:
Use this procedure to set the make/break ratio for rotary dial signalling to match rotary dial line
requirements. You can set the line make/break ratio for rotary dial (pulse dial) signalling in a
more flexible manner to match many different rotary dial line requirements. You can set the
make time and the break time independently in one msec. increments to any time from one to 99
msec. Refer to Section 8.1.8, Dialing Mode, to enable pulse dialing.
Programming:
1.
2.
3.
4.
5.
6.
7.
8.
9.
6.9.22
Press CONTROL T for main menu,
From main menu, select system and press ENTER.
From system menu, select timing and press ENTER,
From timing menu, type item number for line pulse make and press ENTER.
Type desired time (1–99) and press ENTER,
From timing menu, type item number for line pulse break and press ENTER,
Type desired time (1–99) and press ENTER,
Press ESCAPE twice,
Type y to accept changes, n to reject them, or r to resume editing and press ENTER,
Dialing Complete
Description:
With systems operating with the E–1 Digital Carrier Line Board feature, you must use this
timing feature to set the maximum amount of time that a user can wait between digits when he
or she is dialing a number. In the E–1 operating environment, the central office system will not
wait indefinitely for the caller to completely dial a number. Refer to the central office
specifications for timing requirements.
Programming:
1. Press CONTROL T for main menu,
2. From main menu, select system and press ENTER.
3. From the system menu, select timing and press ENTER,
4. From system timing menu type item number for feature and press ENTER,
5. Press SPACE bar to select desired time and press ENTER to select setting.
6. Press ESCAPE twice,
7. Type y to accept changes, n to reject them, or r to resume editing and press ENTER.
System Feature Programming 6–25
IMI66–111
6.9.23
VDT Programming Instructions
Periodic Conference Tone
Description:
The conference advisory tone feature allows you to configure the system to provide an audible
tone whenever more than two parties are connected in a conference call. You can enable this
feature with a station class of service programming action (Section 7.1.47, Conference Advisory
Tone) as either a one time tone or as a periodic reoccurring tone. If you choose a reoccurring
tone, you must use the procedure herein to select the time interval between the reoccurring
tones. Also refer to Section 6.10.19, Location Code.
Programming:
1. Press CONTROL T for main menu,
2. From main menu, select system and press ENTER.
3. From the system menu, select timing and press ENTER,
4. From timing menu type item number for periodic conference tone and press ENTER,
5. Press SPACE bar to select desired time and press ENTER to select setting.
6. Press ESCAPE twice,
7. Type y to accept changes, n to reject them, or r to resume editing and press ENTER.
6.9.24
Periodic Executive Override Tone
Description:
The executive advisory tone allows you to configure the system to provide an audible tone
whenever a system user activates the executive override feature. You can enable this feature
with a station class of service programming action (Section 7.1.48, Executive Override Advisory
Tone) as either a one time tone or as a periodic reoccurring tone. If you choose a reoccurring
tone, you must use the procedure herein to select the time interval between the reoccurring
tones. Also refer to Section 6.10.19, Location Code, and Section 7.1.14, Executive Override
Programming.
Programming:
1. Press CONTROL T for main menu,
2. From main menu, select system and press ENTER.
3. From the system menu, select timing and press ENTER,
4. From timing menu type item number for periodic conference tone and press ENTER,
5. Press SPACE bar to select desired time and press ENTER to select setting.
6. Press ESCAPE twice,
7. Type y to accept changes, n to reject them, or r to resume editing and press ENTER.
6–26 System Feature Programming
VDT Programming Instructions
6.10
System Parameters
6.10.1
Synchronized Ringing
IMI66–111
Description:
The system can provide an audible distinction between internal and external call ringing when
needed. Enable or disable that feature with this programming procedure. This feature does not
apply to direct inward dial lines (Section 8.4, Direct Inward Dialing Support) and E&M lines
(Section 8.7, Tie Line Support).
Programming:
1. Press CONTROL T for main menu.
2. From main menu, select system and press ENTER.
3. From system menu, select system parameters and press ENTER.
4. From system parameters menu, select synchronized ringing.
5. Press SPACE bar for feature setting.
6. When finished, press ESCAPE twice.
7. Type y to accept changes, n to reject them, or r to resume editing and press ENTER.
8. Press ESCAPE to end.
6.10.2
Automatic Attendant Immediate Transfer
Description:
You should choose this automatic attendant immediate transfer mode for voice mail transfers.
It allows the system to transfer a call as soon as it answers. However, if you turn on the voice
mail screen and confirm options (see the voice mail programming manual for details), do not
turn on this immediate transfer mode. Immediate transfer is a system-wide parameter and
affects all telephones in the system.
Programming:
1.
2.
3.
4.
5.
6.
7.
Press CONTROL T for main menu.
From main menu, select system and press ENTER.
From system menu, select system parameters and press ENTER.
From system parameters menu, type item number for feature and press ENTER.
Press SPACE bar for feature setting and press ENTER.
When finished, press ESCAPE twice.
Type y to accept changes, n to reject them, or r to resume editing and press ENTER.
System Feature Programming 6–27
IMI66–111
6.10.3
VDT Programming Instructions
Automatic Route Selection (ARS Enable)
Description:
You can enable or disable automatic route selection on a system-wide basis. A defaulted
system has ARS disabled. Refer to Section 12, Enabling Automatic Route Selection, for other
ARS programming details.
Programming:
1.
2.
3.
4.
5.
6.
7.
6.10.4
Press CONTROL T for main menu.
From main menu, select system and press ENTER.
From the system menu, select system parameters and press ENTER.
From the system parameters menu, select ARS feature and press ENTER.
Press SPACE BAR to toggle between enable and disable.
Press ESCAPE twice.
Type y to accept changes, n to reject them, or r to resume editing and press ENTER to end.
ARS (Automatic Route Selection) Dial Tone
Description:
You can select one of three ARS dial tones that you hear whenever you enter the ARS access
code.
•
•
•
Programming:
1.
2.
3.
4.
5.
6.
7.
Dial Tone 1—steady intercom dial tone (dual tones of 480 Hz + 620 Hz),
Dial Tone 2—same as dial tone 1 only preceded by three short tones (200 ms on,
200 ms off)
Dial Tone 3—steady simulated central office ring back tone (dual tones of 440 Hz +
480 Hz).
Press CONTROL T for main menu.
From main menu, select system and press ENTER.
From system menu, select system parameters and press ENTER.
Select ARS dial tone from the system parameters and press ENTER.
Press SPACE bar to toggle between dial tone 1, dial tone 2, and dial tone 3.
When finished, press ENTER.
Press ESCAPE twice to end.
6–28 System Feature Programming
VDT Programming Instructions
6.10.5
IMI66–111
Toll / ARS Dialing Pause
Description:
To create toll restriction parameters for the system, program restricted numbers as entries in the
toll restriction table using programming details provided in Section 11.6, Restricted Number
Programming. From that discussion, learn about entering a pause as part of the restricted
number’s digit string. Use the following programming procedure to enable the system to accept
that pause entry at the end of a restricted number’s digit string.
Programming:
1.
2.
3.
4.
5.
6.
7.
6.10.6
Press CONTROL T for main menu.
From main menu, select system and press ENTER.
From system menu, select system parameters and press ENTER.
From system parameters menu, select toll/ARS dialing pause and press ENTER.
Press SPACE bar for feature setting.
When finished, press ESCAPE twice.
Type y to accept changes, n to reject them, or r to resume editing and press ENTER.
System Status Reporting
Description:
Use this procedure to enable system status reporting. If you enable status reporting, the system
will notify certain designated stations when system status conditions occur, and turn on an
status light at those stations. Refer to the Section 7.3, Square/Nonsquare System—Button
Mapping By Station, procedure to map a status light at a telephone.
Programming:
1. Press CONTROL T for main menu.
2. From main menu, select system and press ENTER.
3. From system menu, select system parameters and press ENTER.
4. From system parameters menu, select system status reporting and press ENTER.
5. Press SPACE bar for feature setting.
6. When finished, press ESCAPE twice.
7. Type y to accept changes, n to reject them, or r to resume editing and press ENTER.
Operation:
When the status light turns on, use the Section 13, Selecting System Printouts, procedure to
view status conditions, and then use the Section 6.1.9, Clear System Status Log, procedure to
turn off the status light at the status reporting station.
System Feature Programming 6–29
IMI66–111
6.10.7
VDT Programming Instructions
T1 Status Reporting
Description:
Use the following instructions to enable the T1 status reporting feature. Use the Section 6.14,
T1 Status Log Parameters, procedure to program the status reporting and alarm alerting
parameters. Refer to Section 8.9, Programming The T1 Parameters, for complete T1
programming details.
Programming:
1. Press CONTROL T for main menu.
2. From main menu, select system and press ENTER.
3. From system menu, select system parameters and press ENTER.
4. From system parameters menu, select T1 status reporting and press ENTER.
5. Press SPACE bar for feature setting.
6. When finished, press ESCAPE twice.
7. Type y to accept changes, n to reject them, or r to resume editing and press ENTER
6.10.8
Major Alarm Alerting (T1 Alarm Alerting)
Description:
Use the following instructions to enable the T1 alarm alerting feature. Use the Section 6.15,
Major Alarm Alerting, procedure to program the status reporting and alarm alerting parameters.
Refer to Section 8.9, Programming The T1 Parameters, for complete T1 programming details.
Programming:
1. Press CONTROL T for main menu.
2. From main menu, select system and press ENTER.
3. From system menu, select system parameters and press ENTER.
4. From system parameters menu, select major alarm reporting and press ENTER.
5. Press SPACE bar for feature setting.
6. When finished, press ESCAPE twice.
7. Type y to accept changes, n to reject them, or r to resume editing and press ENTER
6–30 System Feature Programming
VDT Programming Instructions
6.10.9
IMI66–111
Central Message Desk
Description:
Use this procedure to designate one station as the central message desk to take messages for
other system stations, control the message waiting light at those stations, and deliver messages
to their users upon request.
NOTE: Do not assign this feature to voice mail station ports since it activates only one port and inhibits
all other station ports from having message wait originate capability.
Programming:
6.10.10
1. Press CONTROL T for main menu.
2. From main menu, select system and press ENTER.
3. From system menu, select system parameters and press ENTER.
4. From system parameters menu, select central message desk and press ENTER.
5. Type personal intercom number or previously assigned name for desired station.
6. When finished, press ESCAPE twice.
7. Type y to accept changes, n to reject them, or r to resume editing and press ENTER.
8. Press ESCAPE to end.
IST Ringing Per Phase
Description:
While the installer typically connects one industry-standard telephone per IST station port, he or
she can connect two industry-standard telephones per IST station port; however, they will share
the same assigned intercom number. When he or she installs one telephone per port, you must
set the IST ringing per phase feature to 16. When the installer places two telephones at any IST
station port, you must change the IST ringing per phase feature to 8. A setting of 16 allows up
to 48 industry-standard telephones per cabinet (main cabinet and expansion cabinet) to ring
simultaneously. A setting of 8 reduces this simultaneous ringing total to 24 telephones per
cabinet. This programming selection is on a system-wide basis. See Section 7.2.35,
Industry-Standard Telephone Support, for other industry-standard telephone programming
features.
Programming:
1.
2.
3.
4.
5.
6.
Press CONTROL T for main menu.
From main menu, select system and press ENTER.
From system menu, select system parameters menu, and press ENTER.
From the system parameters menu, type item number for feature and press ENTER.
Press SPACE bar for feature setting and press ESCAPE once.
Type y to accept changes, n to reject them, or r to resume editing and press ENTER.
System Feature Programming 6–31
IMI66–111
6.10.11
VDT Programming Instructions
IST Ringing Patterns (Ring Mode)
Description:
You can program the ringing pattern for either IST ring mode one or IST ring mode two. Mode
one causes a two-second ring phase while mode two causes a shorter one second ring phase.
For this feature to function properly, insure that the DXIST (industry-standard telephone
interface board) contains firmware revision 2C or higher
Programming:
1.
2.
3.
4.
5.
6.
7.
6.10.12
Press CONTROL T for main menu.
From main menu, select system and press ENTER.
From system menu, select system parameters and press ENTER.
Select IST ring mode from the system parameters and press ENTER.
Press SPACE bar to toggle between mode 1 (default) and mode 2.
When finished, press ENTER.
Press ESCAPE twice to end.
IST Ring Frequency
Description:
The system will allow you to set a ring frequency of 25 Hz for international applications or set a
ring frequency of 21 Hz for domestic applications. Choose a setting that matches the ring
frequency of the installed ring generator.
Programming:
1.
2.
3.
4.
5.
6.
7.
Press CONTROL T for main menu.
From main menu, select system and press ENTER.
From system menu, select system parameters and press ENTER.
Select IST ring frequency from the system parameters and press ENTER.
Press SPACE bar to toggle between choices of 21 Hz and 25 Hz.
When finished, press ENTER.
Press ESCAPE twice to end.
6–32 System Feature Programming
VDT Programming Instructions
6.10.13
IMI66–111
Operator Station
Description:
You can designate the station that you want to ring when system users dial the operator. Usually
this station is an attendant position station; however, the operator station can be any station in
the system. In other words, the operator station does not have to be an attendant position station
(see Section 7.2.30, Attendant Position) if you do not want it to be one.
For more versatility, you can change the code that users dial to call the operator station from a
default of 0 to the dialing code of your choice.
Programming:
To designate the operator station, use the following procedure:
1. Press CONTROL T for main menu.
2. From main menu, select system and press ENTER.
3. From the system menu, select system parameters and press ENTER.
4. From the system parameters menu, select feature and press ENTER.
5. Type personal intercom number for station and press ENTER.
6. Press ESCAPE twice.
7. Type y to accept changes, n to reject them, or r to resume editing and press ENTER to end.
To change the operator dialing code, use the following procedure:
1. Press CONTROL T for main menu.
2. From main menu, select system and press ENTER.
3. From system menu, select feature renumbering and press ENTER.
4. From feature renumbering menu, select user feature menu and press ENTER
5. From user feature menu, type item number for operator access and press ENTER.
6. Press SPACE BAR to clear current code and type new code
(type up to four digits—nnnn) and press ENTER.
NOTE: The number block 5024–5999 is unassigned at default. You can use a number from this block for
code renumbering without causing a numbering conflict in the system..
CAUTION
If a number conflict exists between the new code that you need to assign and one that
is currently in use, the system will prompt you to remove the conflict. Before
responding to this prompt with a y (yes), be sure that doing so will not disturb other
programmed features. It is possible to enter a situation where you must make several
renumbering changes to completely resolve a number conflict.
7. When finished, press ESCAPE twice.
8. Type y to accept changes, n to reject them, or r to resume editing and press ENTER.
9. Press ESCAPE to end.
System Feature Programming 6–33
IMI66–111
6.10.14
VDT Programming Instructions
Line Disconnect Automatic Camp-On
Description:
If a user at a current station selects a line that a previous station has released from busy but the
system has not yet returned to idle, the system arranges for the current station to camp-on to the
line before the system makes the line idle. After the system makes the line idle, it immediately
connects the camped-on station to the line. With this feature disabled, a station can not select a
line until after the system has returned the line to idle. Refer to Section 8.1.10, Positive
Disconnect Time, to set the time that the system waits before it makes a line idle after a station
releases it from busy.
Programming:
1.
2.
3.
4.
5.
6.
7.
Press CONTROL T for main menu.
From main menu, select systems and press ENTER.
From system menu, select system parameters and press ENTER.
From system parameters menu, type item number for feature and press ENTER.
Press SPACE bar for feature setting and press ENTER to accept setting.
When finished, press ESCAPE twice.
Type y to accept changes, n to reject them, or r to resume editing and press ENTER.
6–34 System Feature Programming
VDT Programming Instructions
6.10.15
IMI66–111
Automatic Station Relocation
Description:
The system will automatically recognize a particular station should someone relocate it to a
different station port. After being installed at a new port location, a relocated station will
provide the same class of service parameters and station features that it provided at its original
port location. Also, the relocated station will respond to the same personal intercom number that
it responded to at its original port location. A relocated station prompts the user to take action to
either accept its original programming or accept the programming at the new port. If the user
takes no action, the station assumes the parameters and personal intercom number that is
determined by the Section 6.10.16, Default Relocation Response, programming procedure.
Consider these following points when you enable station relocation:
4 If someone does a station relocation, you must save the database programming to make
the relocation permanent (Section 6.4, Database Storage).
4 This relocation feature only applies to digital telephones.
4 Users must ensure that the vacated port remains unused until they complete a relocation.
If someone connects a telephone to the vacated port before users complete a
relocation, the relocated telephone will not retain its original programming.
4 When the user accept the original programming for the new port, the vacated port assumes
the programming currently assigned to the new port (that is, a parameter exchange takes
place between the vacated port and the new port).
4 If a DSS/BLF console was assigned to the telephone at its original location, the console
assignment follows the telephone to the new location even though the console is no longer
located physically near the telephone. If you relocate the console, you must connect it to the
desired station port and use the Section 7.4, Telephone Types, and Section 7.2.26, DSS/BLF
Console Installed, procedures to program it
for use at the new port.
4 The relocation feature also applies to relocated digital telephone boards, however, the
installer must ensure that the vacated port remains unused until the relocation is complete.
All stations connected to the relocated circuit board show the relocation prompt.
Programming:
1.
2.
3.
4.
5.
6.
7.
Operation:
For LCD speakerphone with interactive buttons,
- relocate telephone and note Keep Yes /No display,
- press YES to keep original programming or press NO to default the station parameters.
For LCD speakerphone without interactive buttons,
- relocate telephone and note Keep display and flashing HOLD light,
- press HOLD to keep original programming or press # to default station parameters.
For Non-LCD telephones,
- relocate telephone and note flashing HOLD light,
- press HOLD to keep original programming or press # to default station parameters.
For all telephone types,
- relocate telephone and take no action for 10 seconds,
- relocated telephone assumes parameters determined by Section 6.10.9, Central Message Desk,
programming.
Remember, station relocation only works with digital telephones.!
Press CONTROL T for main menu.
From main menu, select systems and press ENTER.
From system menu, select system parameters and press ENTER.
From system parameters menu, type item number for feature and press ENTER.
Press SPACE bar for feature setting and press ENTER to accept setting.
When finished, press ESCAPE twice.
Type y to accept changes, n to reject them, or r to resume editing and press ENTER.
System Feature Programming 6–35
IMI66–111
6.10.16
VDT Programming Instructions
Default Relocation Response
Description:
When someone relocates a digital telephone from one station port to another port, the relocated
telephone prompts the user to take action to determine the station parameters. The user can
either accept the parameters from the station’s original port or accept those from the new port.
He or she has 10 seconds to make the choice. If the user takes no action, the station assumes the
parameters determined by this Default Relocation Response programming procedure. If you set
the programming choice to YES, the relocated station assumes the parameters from the original
station port. If you set the programming choice to NO, the relocated station assumes the
parameters from the new port. Also refer to Section 6.10.15, Automatic Station Relocation, for
additional station relocation programming details.
Programming:
1.
2.
3.
4.
5.
6.
7.
6.10.17
Press CONTROL T for main menu.
From main menu, select systems and press ENTER.
From system menu, select system parameters and press ENTER.
From system parameters menu, type item number for feature and press ENTER.
Press SPACE bar for feature setting and press ENTER to accept setting.
When finished, press ESCAPE twice.
Type y to accept changes, n to reject them, or r to resume editing and press ENTER.
Ring Back Tone
Description:
By default, when callers call an intercom party, they receive an intercom ring back tone to tell
them that the called intercom station is ringing. Also, when callers call over the CO line, they
receive a CO-style ring back tone to tell them that the distant CO telephone is ringing. Some
system users find intercom ring back tone confusing. If you encounter this situation with your
users, you can take this programming action to assign CO-style ring back tone to intercom calls.
Programming:
1.
2.
3.
4.
5.
Press CONTROL T for main menu.
From main menu, select systems and press ENTER.
From system menu, select system parameters and press ENTER.
From system parameters menu, type item number for ring back tone and press ENTER.
Press SPACE bar for feature setting and press ENTER to accept setting.
Tone 1 = intercom ring back tone
Tone 2 = CO-style ring back tone
6. When finished, press ESCAPE twice.
7. Type y to accept changes, n to reject them, or r to resume editing and press ENTER.
6–36 System Feature Programming
VDT Programming Instructions
6.10.18
IMI66–111
Day 1, Day 2, and Night Ringing Begin and End Times
Description:
With this programming procedure, set the begin and end times of the day 1, day 2, and night
ringing time periods. Also refer to Section 7.2.13, Flexible Ringing Assignment for related
flexible ringing assignment programming.
Programming:
1. Press CONTROL T for main menu.
2. From main menu, select system and press ENTER.
3. From system menu, select system parameters and press ENTER.
4. From the system parameters menu, select day 1, day 2 or night ringing begin times
and press ENTER.
5. Type times in 24–hour format (hh:mm) and press ENTER.
6. Press ENTER (repeatedly if needed) to place cursor at next time desired setting.
7. Repeat step 5 and press ENTER.
8. Repeat steps 6 and 7 until all times are set and press ENTER.
9. When finished, press ESCAPE twice.
10. Type y to accept changes, n to reject them, or r to resume editing and press ENTER.
6.10.19
Location Code
Description:
The location code feature enhances system installation in the international community. When
you set this code for a particular nation where you have installed the DXP, the DXP system
automatically defaults certain system parameters to a setting that meets specifications set forth
by that nation’s technical standards. See also Section 6.9.23, Periodic Conference Tone, Section
6.9.24, Periodic Executive Override Tone, Section 7.1.47, Conference Advisory Tone, Section
7.1.48, Executive Override Advisory Tone, and Section 7.2.37, Line Out Softkey Options.
Programming:
1.
2.
3.
4.
5.
Press CONTROL T for main menu.
From main menu, select systems and press ENTER.
From system menu, select system parameters and press ENTER.
From system parameters menu, type item number for location code and press ENTER.
Press SPACE bar for feature setting (1–4) and press ENTER to accept setting.
1 = U.S.A.—Standard system default codes for all system features.
2 = South Africa —Standard system default codes for all system features except:
— transmission and receive levels set to meet local standards,
—frequency and cadence of call progress tones set to local standards.
3 = Brazil—Standard system default codes for all system features except:
— transmission and receive levels set to meet locate standards,
—frequency and cadence of call progress tones set to local standards,
—conference advisory tone turned on and set to provide periodic reoccurring tone,
—executive advisory tone turned on and set to provide periodic reoccurring tone,
—Selectable interactive button menu for LCD speakerphone displays set to substitute
a release (RLSE) button for the automatic redial (ARDL) button.
NOTE: Be sure to notify users of this button change as it is different from information provided in the
user’s guides.
4 = Argentina and Chile —Standard system default codes for all system features except:
— transmission and receive levels set to meet locate standards,
—frequency and cadence of call progress tones set to local standards.
6. When finished, press ESCAPE twice.
7. Type y to accept changes, n to reject them, or r to resume editing and press ENTER.
System Feature Programming 6–37
IMI66–111
VDT Programming Instructions
6.11
Paging Zones (Paging Programming)
6.11.1
Zone Programming
(Zone Names, Transmit Stations, Receive Stations)
Description:
Use this programming procedure to arrange stations to transmit and receive voice
announcements, to and from a particular group of stations or to all stations in the system. Also
use this procedure to assign names to paging zones when a site requires named zones.
Programming:
To place stations in paging zones and name the zones, use the following procedure.
1. Press CONTROL T for main menu.
2. From main menu, select system and press ENTER.
3. From systems menu, select paging zones and press ENTER.
4. From paging zones menu, select zone paging and press ENTER.
5. Enter zone number (1–8) and press ENTER.
6. From zone paging menu, type item number for zone name and press ENTER.
7. Type name (up to 16 character) and press ENTER.
8. From zone paging menu, type item number for transmit stations and press ENTER.
9. Press CONTROL E to edit station list, type a to add or r to remove and press ENTER.
10. Type station extensions (101–292) to add or remove them and press ENTER.
11. When finished, press ESCAPE.
12. Repeat steps 8–11 for receive stations and press ENTER.
13. When finished, press ESCAPE twice.
14. Type y to accept changes, n to reject them, or r to resume editing and press ENTER.
15. Repeat steps 4–15 for each zone or press ESCAPE to end.
Operation:
Press INTERCOM and dial 70 for zones 1–8 (all call) or dial 71–77 for zones 2–8.
6.11.2
Paging Access
Description:
If you have enabled paging transmit capability (Section 6.11.3, Paging Transmit) at a station, it
has access to external paging equipment. With the following procedure, you can set the
maximum length of time that the station can stay connected to that external equipment.
Programming:
1.
2.
3.
4.
5.
6.
7.
Press CONTROL T for main menu.
From main menu, select system and press ENTER.
From system menu, select timing and press ENTER.
From system timing menu, type item number for feature and press ENTER.
Press SPACE bar for feature setting and press ENTER to accept setting.
When finished, press ESCAPE twice.
Type y to accept changes, n to reject them, or r to resume editing and press ENTER.
6–38 System Feature Programming
VDT Programming Instructions
6.11.3
IMI66–111
Paging Transmit
Description:
Use this procedure to give a class of service of stations the ability to transmit voice
announcements to one or all other station monitor speakers. Also refer to Section 6.11.2, Paging
Access.
Programming:
1. Press CONTROL T for main menu.
2. From main menu, select stations and press ENTER.
3. From stations menu, select COS programming and press ENTER.
4. Type class of service number (1-32) and press ENTER.
5. From the COS programming menu, type item number for feature and press ENTER.
6. Press SPACE bar for feature setting.
7. When finished, press ESCAPE twice.
8. Type y to accept changes, n to reject them, or r to resume editing and press ENTER.
9. Repeat steps 4-8 for each COS or press ESCAPE to end.
6.11.4
Paging Receive
Description:
Use this procedure to give a class of service of stations the ability to receive voice
announcements with the station monitor speaker.
Programming:
1.
2.
3.
4.
5.
6.
7.
8.
9.
6.11.5
Press CONTROL T for main menu.
From main menu, select stations and press ENTER.
From stations menu, select COS programming and press ENTER.
Type class of service number (1-32) and press ENTER.
From COS programming menu, type item number for feature and press ENTER.
Press SPACE bar for feature setting.
When finished, press ESCAPE twice.
Type y to accept changes, n to reject them, or r to resume editing and press ENTER.
Repeat steps 4-8 for each COS or press ESCAPE to end.
Meet Me Answer Page
Description:
When you enable this feature at a station, its user can dial a code in response to an all-call or
zone page and meet the pager in a private conversation.
Programming:
1.
2.
3.
4.
5.
7.
8.
9.
Operation:
Hear a page, press INTERCOM and dial 78.
Press CONTROL T for main menu.
From main menu, select stations and press ENTER.
From stations menu, select COS programming and press ENTER.
Type class of service number (1-32) and press ENTER.
From COS programming menu, type item number for feature and press ENTER.
When finished, press ESCAPE twice.
Type y to accept changes, n to reject them, or r to resume editing and press ENTER.
Repeat steps 4-8 for each COS or press ESCAPE to end.
System Feature Programming 6–39
IMI66–111
6.11.6
VDT Programming Instructions
Relays (External Paging Equipment Control)
Description:
If your installer connects customer-supplied external paging equipment to the system’s external
paging port and that equipment requires external control, use this programming procedure to
assign a relay to control the paging equipment. Also refer to Section 6.11.9, External Paging
Port.
Programming:
1. Press CONTROL T for main menu.
2. From main menu, select system and press ENTER.
3. From systems menu, select paging zones and press ENTER.
4. From paging zones menu, select zone programming and press ENTER.
5. Enter zone number (1–8) and press ENTER.
6. From zone programming menu, type item number for relays and press ENTER.
7. Type relay number (1–4, 0 = none) and press ENTER.
8. When finished, press ESCAPE twice.
9. Type y to accept changes, n to reject them, or r to resume editing and press ENTER.
10. Repeat steps 4–9 for each zone or press ESCAPE to end.
6.11.7
Relays (Line Answer From Any Station)
Description:
Assign one or more of the four relays located on the central processor board to track the ring
signal of any or all line ports. You can arrange for a relay to track the ringing of the direct,
delayed, day 1, day 2, or night ringing modes. Typically, installers wire these relays to
control loud bells or other external ringers. Users, upon hearing the external ringers, can dial
feature codes to answer the call that is ringing on the associated lines.
Programming:
1.
2.
3.
4.
5.
6.
7.
8.
9.
Operation:
dial 65 = relay 1, dial 66 = relay 2, dial 67 = relay 3, dial 68 = relay 4,
dial 69 = relays 1 through 4 (when all are programmed with ringing)
Press CONTROL T to return to main menu.
From main menu, select system and press ENTER.
From the system menu, select paging zones and press ENTER.
From the paging zones menu, select relays and press ENTER.
From the relays menu, select relay 1–4 and press ENTER.
From the relay n menu, type item number for ring type and press ENTER.
Press CONTROL E for edit menu.
From edit menu, type a to add or r to remove and press ENTER.
Type line port numbers 1-128 (type as n,nn,nnn or n–nnn to add or remove
and press ENTER.
10. Press ESCAPE and repeat steps 6–9 for other ring types.
11. When finished press ESCAPE twice.
12. Type y to accept changes, n to reject them, or r to resume editing and press ENTER.
13. Repeat steps 5–12 for other relays.
14. Press ESCAPE to end.
6–40 System Feature Programming
VDT Programming Instructions
6.11.8
IMI66–111
Common Audible Ringer (Common Audible Ringer Interface)
Description:
If your installer connects customer-supplied external paging equipment to the system’s external
paging port, use this programming procedure to arrange for that equipment to sound the ring
signal of any or all lines. You can arrange for it to track the ringing of the direct, delayed, day
1, day 2, or night ringing modes. Upon hearing the ringing over the external paging equipment,
the user can dial feature codes to answer the call that is ringing on the associated lines. Refer to
Section 7.2.13, Flexible Ringing Assignments, to assign lines to the ringing modes.
NOTE: You can assign the same ringing pattern to an unused and unconnected relay (Section 6.11.2,
Relays–Line Answer From Any Station) that you assign to the external paging equipment with
the following procedure. If you do this, station users can dial the call pick up codes associated
with the assigned relays to answer the calls that sound over the external paging equipment.
Programming:
1. Press CONTROL T for main menu.
2. From main menu, select system and press ENTER.
3. From system menu, select paging zones and press ENTER.
4. From paging zones menu, select common audible ringer and press ENTER.
5. From common audible ringer menu, select ringing type and press ENTER.
6. Press CONTROL E.
7. Type a for add, r for remove and press ENTER.
8. Type line port number 1–128 (n-nnn or n, nn, nnn) and press ENTER.
9. Press ESCAPE once and repeat steps 5–7 for next ring type or press ESCAPE twice.
10. Type y to accept changes, n to reject them, or r to resume editing and press ENTER.
Operation:
Directed call pickup = press INTERCOM ✳ 4 then dial extension of ringing telephone
Group call pickup = INTERCOM # 4
Line pick up with relay assigned, press INTERCOM and dial relay code 66–68 or 69.
6.11.9
External Paging Port (External Paging Interface)
Description:
If your installer connects customer-supplied external paging equipment to the system’s external
paging port, use this programming procedure to assign the external paging port to a paging
zone. When users want to page through the external paging equipment they must dial the code
for the paging zone that you assign to the external paging port with this procedure. Also refer to
Section 6.11.6, Relays–External Paging Equipment Control.
Programming:
1.
2.
3.
4.
5.
6.
Press CONTROL T for main menu.
From main menu, select system and press ENTER.
From systems menu, select paging zones and press ENTER.
From paging zones menu, select zone programming and press ENTER.
Enter zone number (1–8) and press ENTER.
From zone programming menu, type item number for external paging port
and press ENTER.
7. Type 1 for yes or 0 for no and press ENTER.
8. When finished, press ESCAPE twice.
9. Type y to accept changes, n to reject them, or r to resume editing and press ENTER.
10. Repeat steps 4–9 for each zone or press ESCAPE to end.
System Feature Programming 6–41
IMI66–111
6.12
VDT Programming Instructions
Password Programming (Change Password)
You can use this programming procedure to change the VDT program entry password for both the installer and
the administrator and change the main programming station entry code for the system manager and the attendant.
The default sequence for both the installer and the administrator VDT password entries is: I ✳746 ✳.
You can change part or all of either or both of these passwords to a customized sequence of up to 15 digits and/or
letters. You can enter both upper and lower case letters if you desire but do keep in mind that the programmer
must enter the password later just as you program it here with the letters properly placed in either upper or lower
case. Thus, a new VDT entry password could be as follows: nnnnnnnnnnnnnnn, or nnn, or just n (n = any number
digit or any letter - for example 12345678, or Jane, or 1A, or any other combination that you pick.)
The default system manager station entry code is as follows: INTERCOM button, ✳ # 746 ✳.
You can change the default password portion of this station entry code (the 6 portion) to a custom value of up to
15 digits. Thus, a new station entry could be as follows: INTERCOM button, ✳ #74 nnnnnnnnnnnnnnn ✳.
You can also change the feature code portion of the system manager station entry (the ✳#74 sequence). You can
change the feature code from ✳#74 to a custom code of up to four digits (no letters allowed).
Thus, a new system manager entry could be as follows: INTERCOM button, nnnn 6 ✳.
Further, if you couple the allowed password change with the allowed feature code change, a system manager
station programming entry code could be as follows: INTERCOM button, nnnnnnnnnnnnnnnnnnn ✳.
The default attendant station entry code is as follows: INTERCOM button, ✳ #0 ✳.
The feature code part of this entry is the ✳#0 sequence. You can change the feature code from the ✳#0 code to a
custom code of up to four digits (no letters allowed).
Thus, a new attendant entry could be as follows: INTERCOM button, nnnn ✳.
6–42 System Feature Programming
VDT Programming Instructions
6.12.1
IMI66–111
Changing The Password
Description:
To change the password, follow this procedure.
Programming
1. Press CONTROL T for main menu.
2. From main menu, select system and press ENTER.
3. From system menu, select change password and press ENTER.
4. Type a for administrator, i for installer, or s for station and press ENTER.
5. Type the current password and press ENTER.
6. Type the new password and press ENTER.
7. Retype the new password and press ENTER.
8. Repeat steps 3–7 to create other new passwords.
6.12.2
Changing The Feature Code
(System Manager And Attendant Station Entry Code)
Description:
To change the feature code follow this procedure.
Programming:
1. Press CONTROL T for main menu.
2. From main menu, select system and press ENTER.
3. From system menu, select feature renumbering and press ENTER.
4. From the feature renumbering menu, select station programming and press ENTER.
5. From station programming menu, select row number for system manager or attendant
and press ENTER.
6. Type new feature code (up to four digits - can include # and ✳) and press ENTER.
NOTE: The new feature code must not conflict with existing dialing codes. Either choose a different
feature code or use the Section 6.13, Feature Renumbering, programming procedure to renumber
any dialing codes that conflict.
7. Repeat steps 5 and 6 to set the other entry code if needed.
8. When finished, press ESCAPE twice.
9. Type y to accept changes, n to reject them, or r to resume editing and press ENTER.
System Feature Programming 6–43
IMI66–111
6.13
VDT Programming Instructions
Feature Renumbering
Description:
Dialing codes for user features are flexible so that you can renumber them. This may be
necessary if site requirements dictate that personal or group intercom numbers fall within a
certain block or sequence. Since new number assignments can not conflict with existing
number, the system provides a block of unassigned numbers that you can use for renumber
assignment. At default, the system assigns blocks of numbers in the following ranges:
101–292 = personal intercom,
3101–3292, 4101–4292, 5000–5023 = group intercom,
5024–5999 = unassigned,
600—899, ✳, # = feature codes
9 = line group 1
Programming:
1.
2.
3.
4.
5.
6.
Press CONTROL T for main menu.
From main menu, select system and press ENTER.
From system menu, select feature renumbering and press ENTER.
From feature renumbering menu, select feature category and press ENTER.
From feature category menu, type item number for feature and press ENTER.
Type new code and press ENTER.
NOTE: The number block of 5024–5999 is unassigned at default. Use it for code renumbering.
7. When finished, press ESCAPE twice.
8. Type y to accept changes, n to reject them, or r to resume editing and press ENTER.
9. Press ESCAPE to end.
CAUTION
If a number conflict exists, the system will prompt you to remove the conflict. Before
responding to this prompt with a y (yes), be sure that doing so will not disturb other
programmed features that depend upon the removed extension number. It is possible
to create a situation where you must make several renumbering changes to completely
resolve a number conflict.
6–44 System Feature Programming
VDT Programming Instructions
6.14
IMI66–111
T1 Status Log Parameters
Description:
After you use Section 6.10.7, T1 Status Reporting, to enable reporting, use the procedure below
to program the T1 status log parameters. Also refer to Section 8.9, Programming The T1
Parameters, for complete T1 programming details.
Programming:
1.
2.
3.
4.
5.
6.
7.
8.
9.
6.15
Press CONTROL T to return to main menu.
From main menu, select system and press ENTER.
From the system menu, select T1 status log parameters and press ENTER.
From the T1 status log parameters menu, select the row number for the
error type you want to program. The cursor will move to the threshold entry field
for that error type. Select any of the following threshold values:
0 = never log the alarm
1 = always log the alarm
(2 to 999) = check this number of alarm occurrences during the selected time period
and decide whether or not to log the alarm. (The maximum threshold for the bipolar
and CRC alarm trigger is 255.)
After making your entry for the alarm threshold, press ENTER to advance to the next
line in the threshold entry field, or press TAB to advance to the time period entry field.
With the cursor in the time period entry field, toggle through the choices using the
space bar. When the system displays the time period you want to use, press ENTER to
go to the next line in the time period entry field, or press TAB to advance to the next
line in the threshold entry field.
When finished, press ESCAPE twice.
Type y to accept changes, n to reject them, or r to resume editing and press ENTER.
Press ESCAPE to end.
Major Alarm Alerting (T1 Parameters)
Description:
After you use Section 6.10.8, Major Alarm Alerting, to enable alarm alerting, use the procedure
below to program the audible alarms for the various T1 system errors. Also refer to Section 8.9,
Programming The T1 Parameters, for complete T1 programming details.
Programming:
1.
2.
3.
4.
5.
6.
7.
8.
9.
Press CONTROL T to return to main menu.
From main menu, select system and press ENTER.
From the system menu, select major alarm alerting and press ENTER.
Select the error type you want to program. The cursor will move to the threshold entry field
for that error type. From the threshold entry field, select any of the following threshold values:
0 = never go to alert status
1 = go to alert status if the alarm is ever logged
2 to 999 = check this number of occurrences during the selected time period to decide whether
or not to elevate the alarm to alert status.
After making the alarm threshold entry, press ENTER to advance to the next line in the
threshold entry field, or press TAB to place the cursor in the time period entry field.
With the cursor in the time-period entry field, toggle through the choices using the
space bar. When the system displays the time period you want to use, press ENTER to go to
the next line in the time period entry field, or press TAB to advance to the next line in the
threshold entry field.
Press ESCAPE twice.
Type y to accept changes, n to reject them, or r to resume editing and press ENTER.
Press ESCAPE to end.
System Feature Programming 6–45
VDT Programming Instructions
IMI66–111
Programming Station Features
7
•
Programming Class Of Service Features . . . . . . . . . . 7.1
•
Programming Station Features . . . . . . . . . . . . . . 7.2
•
Square/Non-Square System (Button Mapping by Station) . . . 7.3
•
Telephone Types (Phone Types) . . . . . . . . . . . . . 7.4
•
Copy Model COS, Station, Button Map (Block Programming) . 7.5
NOTE: When you program the station features, always perform the Section 7.4, Telephone Types,
procedure before you perform the Section 7.5, Square/Non-Square System (Button Mapping),
procedure.
Station Feature Programming 7–1
IMI66–111
VDT Programming Instructions
7.1
Programming Station Class Of Service Features
7.1.1
Account Codes (Forced with Positive Verification)
Description:
After you have enabled the account code feature for the system, set its parameters, and
programmed its list of account codes into the system (Section 10.3, Account Codes), use this
procedure to turn the feature on for a station class of service and make it either forced or
optional. If you make it a forced account code, the user must enter an account code before the
system will let him or her dial the number for an outgoing call. Also, on incoming calls a user
must enter an account code before the system will allow him or her to make any future outgoing
calls. See Section 10.4, Emergency Numbers, for an exception to forced account code entry.
Programming:
1.
2.
3.
4.
5.
6.
7.
8.
Press CONTROL T for main menu.
From main menu, select stations and press ENTER.
From stations menu, select COS programming and press ENTER.
Type class of service number (1–32) and press ENTER.
From the COS programming menu, type item number for account code and press ENTER.
Press SPACE BAR for feature setting.
When finished, press ESCAPE.
Press CONTROL N as necessary to display line number for forced account code
and press ENTER.
9. Type item number for forced account code and press ENTER.
10. Press SPACE BAR for feature setting.
11. When finished, press ESCAPE twice.
12. Type y to accept changes, n to reject them, or r to resume editing and press ENTER to end.
7–2 Station Feature Programming
VDT Programming Instructions
7.1.2
IMI66–111
Automatic Hold
Automatic Hold On Intercom Number
Description:
The system automatically places a current inside call on hold when a station user presses an
intercom button or line button other than the one for the active call.
Programming:
1.
2.
3.
4.
5.
6.
7.
8.
9.
Press CONTROL T for main menu.
From the main menu, select stations and press ENTER.
From the stations menu, select COS programming and press ENTER.
Type class of service number (1–32) and press ENTER.
From the COS programming menu type item number for feature and press ENTER.
Press SPACE bar for feature setting.
When finished, press ESCAPE twice.
Type y to accept changes, n to reject them, or r to resume editing and press ENTER.
Repeat steps 4–8 for each COS or press ESCAPE to end.
Automatic Hold On Lines
Description:
The system automatically places a current outside call on hold when a station user presses
another line or intercom button.
Programming:
1.
2.
3.
4.
5.
6.
7.
8.
9.
Press CONTROL T for main menu.
From the main menu, select stations and press ENTER.
From the stations menu, select COS programming and press ENTER.
Type class of service number (1–32) and press ENTER.
From the COS programming menu, type item number for feature and press ENTER.
Press SPACE bar for feature setting.
When finished, press ESCAPE twice.
Type y to accept changes, n to reject them, or r to resume editing and press ENTER.
Repeat steps 4–8 for each COS or press ESCAPE to end.
Station Feature Programming 7–3
IMI66–111
7.1.3
VDT Programming Instructions
Background Music
Description:
Music or other supplied audio information is available at a station through the telephone speaker
and is turned on or off by the station user when he or she dials the appropriate codes. Use this
procedure to assign background music to stations.
The music or information source is external to the common equipment and is customer
supplied. The system will accept two music sources. You can use one source for this feature and
the other source for the music on hold feature (Section 7.1.19, Music Or Tone On Hold).
Programming:
1.
2.
3.
4.
5.
6.
7.
8.
9.
Operation:
Music source one: on = INTERCOM ✳ 11
off = INTERCOM # 1
Music source two: on = INTERCOM ✳ 12
off = INTERCOM # 1
7.1.4
Press CONTROL T for main menu.
From the main menu, select stations and press ENTER.
From the stations menu, select COS programming and press ENTER.
Type class of service number (1–32) and press ENTER.
From COS programming menu, type item number for feature and press ENTER.
Press SPACE bar for feature setting.
When finished, press ESCAPE twice.
Type y to accept changes, n to reject them, or r to resume editing and press ENTER.
Repeat steps 4–8 for each COS or press ESCAPE to end.
Call Cost Display (Display Of Calls)
Description:
If you have arranged for the system to employ call costing (Section 12.5, Costing Information),
you can use this procedure to arrange for an LCD speakerphone to display the cost of a call
made from that station.
Programming:
1.
2.
3.
4.
5.
6.
7.
8.
9.
Press CONTROL T for main menu.
From main menu, select stations and press ENTER.
From stations menu, select COS programming and press ENTER.
Type class of service number (1–32) and press ENTER.
From COS programming menu, type item number for feature and press ENTER.
Press SPACE bar for feature setting.
When finished, press ESCAPE twice.
Type y to accept changes, n to reject them, or r to resume editing and press ENTER.
Repeat steps 4–8 for each COS or press ESCAPE to end.
7–4 Station Feature Programming
VDT Programming Instructions
7.1.5
IMI66–111
Call Forward
Call Forward Of All, Personal, Busy, or Ring–No Answer (RNA) Calls
Description:
Use this procedure to give users of an entire class of service of stations the ability to forward the
calls that they receive at their stations to another station for answering. This feature allows
these users to forward either all of the calls that their stations receive or just the calls they
receive on their prime line and personal intercom number. Further, it can limit them to
forwarding only the calls that their stations receive while it is busy or unattended (ring
no-answer calls). If you choose this last option you will have to arrange the call forwarding
default scheme at individual stations using the next procedure in this section titled, Call
Forward RNA, Ring (On) Busy.
Programming:
1.
2.
3.
4.
Operation:
All calls: INTERCOM ✳ 52 plus extension
Personal: INTERCOM ✳ 51 plus extension
Cancel: INTERCOM # 5
Press CONTROL T for main menu.
From the main menu, select stations and press ENTER.
From the stations menu, select COS programming and press ENTER.
From the COS programming menu, select the class of service to be programmed
and press ENTER.
5. From the COS programming menu, type the item number
for the style of call forwarding that you wish to enable and press ENTER.
6. Press SPACE bar for desired setting and press ENTER.
7. Press ESCAPE and repeat steps 5 and 6 for other call forwarding types to be enabled.
8. When finished, press ESCAPE twice.
9. Type y to accept changes, n to reject them, or r to resume editing and press ENTER.
10. Repeat steps 4–9 for each COS or press ESCAPE to end.
Station Feature Programming 7–5
IMI66–111
VDT Programming Instructions
Call Forward RNA, Ring (On) Busy (Enhanced Call Forwarding)
Description:
The call forward feature allows a station user to choose to receive several rings for RNA calls
before the system forwards them. At default, the system immediately forwards calls that reach a
busy station. You can take this programming action to allow calls to a busy station to ring in a
subdued manner before they forward if the user chooses them to do so. This subdued ringing of
calls to a busy station requires an idle intercom number at the busy station. Plus, if you have
assigned group intercoms to the station, you must program them into a hunt list, using the
Section 9.2.2, Intercom Hunt List, procedure, to ensure that this call forward feature will
function properly.
Programming:
1. Press CONTROL T for main menu.
2. From the main menu, select stations and press ENTER.
3. From the stations menu, select station programming and press ENTER.
4. Type personal intercom number or previously assigned name and press ENTER.
5. From the station programming menu, type item number for feature and press ENTER.
6. Press SPACE BAR to enable feature (choose yes) and press ENTER
7. Type y to accept changes, n to reject them, or r to resume editing and press ENTER.
8. Press ESCAPE and repeat steps 4–6 for other stations
9. When finished, press ESCAPE twice.
10. Type y to accept changes, n to reject them, or r to resume editing and press ENTER.
Operation:
All calls: INTERCOM ✳ 54 plus extension
Personal: INTERCOM ✳ 52 plus extension
Cancel: INTERCOM # 5
7–6 Station Feature Programming
VDT Programming Instructions
IMI66–111
Call Forward, Default Forward Type (For Busy Or Ring-No Answer Calls)
Description:
Use this procedure to arrange the call forward default scheme for individual stations. With this
feature, the system will automatically forward ringing calls to another station after a preset
number of rings. Since this is an automatic forwarding of the calls, the station users do not have
to take any action; however, any user-enabled call forwarding that they do take at their stations
will override this automatic call forwarding.
This procedure determines answers for the following questions: can busy/RNA call forwarding
take place at a station, to what intercom number will calls be forwarded to, and what type of
calls will the system forward?
You must also program the number of rings that must occur before this automatic call
forwarding can take place (Section 7.2.13, Flexible Ringing Assignment).
Programming:
1.
2.
3.
4.
5.
6.
Press CONTROL T for main menu.
From the main menu, select stations and press ENTER.
From the stations menu, select station programming and press ENTER.
Type personal intercom number or previously assigned name and press ENTER.
From the station programming menu, type item number for feature and press ENTER.
Press SPACE BAR to enable feature(choose yes) and press ENTER for
ITCM FWD To menu.
7. From the ITCM FWD To menu, type intercom number to receive forwarded calls
and press ENTER for FWD Type.
8. Press SPACE BAR to enable either personal calls or all calls and press ENTER.
9. When finished, press ESCAPE twice.
10. Type y to accept changes, n to reject them, or r to resume editing and press ENTER.
11. Repeat steps 4–10 for each station or press ESCAPE to end.
Recall Call Forward
Description:
When you enable this feature for a station, any held, parked, and transferred calls that recall to a
station while it is busy on another call follow the call forwarding path set up for that station.
Programming:
1.
2.
3.
4.
5.
6.
7.
8.
9.
Press CONTROL T for main menu.
From the main menu, select stations and press ENTER.
From the stations menu, select station programming and press ENTER.
Type personal intercom number or previously assigned name and press ENTER.
From the station programming menu. type item number for feature and press ENTER.
Press SPACE BAR to enable feature (choose yes) feature and press ENTER.
When finished, press ESCAPE twice.
Type y to accept changes, n to reject them, or r to resume editing and press ENTER.
Repeat steps 4−8 for each station or press ESCAPE to end.
Station Feature Programming 7–7
IMI66–111
7.1.6
VDT Programming Instructions
Call Park
Call Park Access
Description:
Access to call park enables the station user to place as many as nine calls in park zones, or
orbits, where they are retrievable by all system users.
Programming:
1.
2.
3.
4.
5.
6.
7.
8.
9.
Operation:
Park call: INTERCOM ✳ 91 through ✳ 99 (for orbits 91–99)
Pick up parked call: INTERCOM # 91 through # 99.
Press CONTROL T for main menu.
From main menu, select stations and press ENTER.
From stations menu, select COS programming and press ENTER.
Type class of service number (1−32) and press ENTER.
From COS programming menu, type item number for feature and press ENTER.
Press SPACE bar for feature setting.
When finished, press ESCAPE twice.
Type y to accept changes, n to reject them, or r to resume editing and press ENTER.
Repeat steps 4–8 for each COS or press ESCAPE to end.
Call Park Recall
Description:
A call that is left in a park orbit longer than the length of time that you program with this feature
will automatically return to a hold recall condition at the parking station.
Programming:
1.
2.
3.
4.
5.
6.
7.
Press CONTROL T for main menu.
From main menu, select system and press ENTER.
From system menu, select timing and press ENTER
From system timing menu, type item number for feature and press ENTER.
Press SPACE bar for feature setting and press ENTER to accept setting.
When finished, press ESCAPE twice.
Type y to accept changes, n to reject them, or r to resume editing and press ENTER.
7–8 Station Feature Programming
VDT Programming Instructions
7.1.7
IMI66–111
Call Pick-Up
Call Pick-Up, Enable
Description:
A station user can dial a code plus an intercom number of a ringing or on-hold station to answer
the ringing call or to pick up a held call at that station. Turn this call pick-up feature on for a
station class of service using this procedure. Remember, you must also assign this class of
service to the station that you wish to have this feature.
Programming:
1.
2.
3.
4.
5.
6.
7.
8.
9.
Operation:
INTERCOM ✳ 4 then dial intercom number of ringing or on hold station
Press CONTROL T for main menu.
From main menu, select stations and press ENTER.
From stations menu, select COS programming and press ENTER.
Type class of service number (1−32) and press ENTER.
From COS programming menu, type item number for feature and press ENTER.
Press SPACE bar for feature setting.
When finished, press ESCAPE twice.
Type y to accept changes, n to reject them, or r to resume editing and press ENTER.
Repeat steps 4–8 for each COS or press ESCAPE to end.
Call Pick-Up Group
Description:
Use this procedure to place a number of stations in a call pick-up group so that one station can
answer a call ringing at any other station in the group.
Programming:
1.
2.
3.
4.
5.
6.
7.
8.
9.
Operation:
INTERCOM # 4
7.1.8
Press CONTROL T for main menu.
From the main menu, select stations and press ENTER.
From the stations menu, select station programming and press ENTER.
Type personal intercom number or previously assigned name and press ENTER.
From station programming menu, type item number for feature and press ENTER.
Type desired value for feature (1–16 = groups 1–16, 0 = no group) and press ENTER.
When finished, press ESCAPE twice.
Type y to accept changes, n to reject them, or r to resume editing and press ENTER.
Repeat steps 4–8 for each station or press ESCAPE to end.
Call Waiting (Tone)
Description:
Use this procedure to provide a station with the ability to send a tone signal to a busy called
station. Refer to Section 7.1.11, Camp-On Programming, to enable basic camp-on ability at a
station. Refer to Section 6.9.3, Camp-On Tone, to set the time duration of the call waiting tone.
Programming:
1.
2.
3.
4.
5.
6.
7.
8.
9.
Press CONTROL T for main menu.
From main menu, select stations and press ENTER.
From stations menu, select COS programming and press ENTER.
Type class of service number (1−32) and press ENTER.
From COS programming menu, type item number for feature and press ENTER.
Press SPACE bar for feature setting.
When finished, press ESCAPE twice.
Type y to accept changes, n to reject them, or r to resume editing and press ENTER.
Repeat steps 4−8 for each COS or press ESCAPE to end.
Station Feature Programming 7–9
IMI66–111
7.1.9
VDT Programming Instructions
Tracker Access
Description:
Assign Tracker access to a particular station intercom or group of intercoms using the following
class of service (COS) programming. (The default is yes for COS1 and COS32.) Refer to
Section 14.2, Tracker Paging System Programming, for further Tracker programming.
Programming:
1. Press CONTROL T for main menu.
2. From main menu, select Stations and press ENTER.
3. From stations menu, select COS Programming and press ENTER.
4. From COS programming, type class (1–32) and press ENTER.
5. From COS (class number) programming, select Tracker Access.
6. Toggle the SPACE bar to select yes/no and press ESCAPE twice.
7. Type y to accept changes, n to reject them, or r to resume editing and press ENTER.
8. Press ESCAPE to end.
7.1.10
Enhanced LCD Display
Description:
In systems operating with software releases prior to 8.B, when users receive intercom calls,
their LCD-equipped telephone displays either the name of the calling station or its personal
intercom number if the station does not have an assigned name.
With software release 8.B, you can take programming action that enhances the display of an
LCD-equipped telephone so that it shows both the name of the calling station and its personal
intercom number.
Programming:
1.
2.
3.
4.
5.
6.
7.
8.
9.
Press CONTROL T for main menu.
From main menu, select stations and press ENTER.
From stations menu, select COS programming and press ENTER.
Type class of service number (1–32) that corresponds with class of service
that you wish to modify and press ENTER.
From COS programming menu, type row number that corresponds with
Enhanced LCD Display and press ENTER.
Press SPACE bar for feature setting.
When finished, press ESCAPE twice.
Type y to accept changes, n to reject them, or r to resume editing and press ENTER.
Press ESCAPE to end.
7–10 Station Feature Programming
VDT Programming Instructions
7.1.11
IMI66–111
Camp-On Programming
Camp-On Originate, Camp-On Receive (Camp-On/Call Back)
Description:
If a busy tone or a ring no-answer is encountered when one station calls another, the calling
station user can initiate a camp-on to the busy station and wait for it to become idle or initiate an
automatic callback when the called station becomes available. Use this procedure to enable this
feature for a class of service of stations. Also, use the Section 7.1.8, Call Waiting Tone,
procedure to enable a call waiting tone, and use Section following Camp-On/Automatic Call
Back Ring and Camp-On Tone procedures to set the duration of the camp-on/automatic callback
ring and the duration of a call waiting tone that the system sends to a busy station.
Programming:
To arrange for station to initiate and receive camp-on to another station.
1. Press CONTROL T for main menu.
2. From main menu, select stations and press ENTER.
3. From stations menu, select COS programming and press ENTER.
4. Type class of service number (1–32) and press ENTER.
5. From COS programming menu, type item number for camp-on initiate and press ENTER.
6. From COS programming menu, type item number for camp-on receive and press ENTER.
7. When finished, press ESCAPE twice.
8. Type y to accept changes, n to reject them, or r to resume editing and press ENTER.
9. Repeat steps 4-8 for each COS or press ESCAPE to end.
Camp-On/Automatic Call Back Ring
Description:
After you use the Section 7.1.8, Call Waiting Tone, procedure to enable a call waiting tone, use
this procedure to set the duration of the camp-on/automatic ringback ring that the system sounds
when it returns a camp-on call to the original station..
Programming:
1.
2.
3.
4.
5.
6.
7.
Press CONTROL T for main menu.
Form main menu, select system and press ENTER.
From system menu, select system timing and press ENTER.
From the system timing menu, type item number for feature and press ENTER.
Press SPACE bar for time and press ENTER to accept setting.
When finished, press ESCAPE twice.
Type y to accept changes, n to reject them, or r to resume editing and press ENTER.
Camp-On Tone
Description:
Use this procedure to set the duration of the call waiting tone that the system sends to a busy
station.
Programming:
1.
2.
3.
4.
5.
6.
7.
Press CONTROL T for main menu.
Form main menu, select system and press ENTER.
From system menu, select system timing and press ENTER.
From the system timing menu, type item number for feature and press ENTER.
Press SPACE bar for feature setting and press ENTER to accept setting.
When finished, press ESCAPE twice.
Type y to accept changes, n to reject them, or r to resume editing and press ENTER.
Station Feature Programming 7–11
IMI66–111
7.1.12
VDT Programming Instructions
Do Not Disturb Programming
Do Not Disturb Inhibit
Description:
This feature prevents a station from entering the do-not-disturb mode of operation.
Programming:
1.
2.
3.
4.
5.
6.
7.
8.
9.
Press CONTROL T for main menu.
From main menu, select stations and press ENTER.
From stations menu, select COS programming and press ENTER.
Type class of service number (1–32) and press ENTER.
From COS programming menu, type item number for feature and press ENTER.
Press SPACE bar for feature setting.
When finished, press ESCAPE twice.
Type y to accept changes, n to reject them, or r to resume editing and press ENTER.
Repeat steps 4–8 for each COS or press ESCAPE to end.
Do Not Disturb Override
Description:
This feature allows a station to override a do-not-disturb condition at another station.
Programming:
1.
2.
3.
4.
5.
6.
7.
8.
9.
Operation:
Make intercom call, hear DND tones, dial ✳ 03
Press CONTROL T for main menu.
From main menu, select stations and press ENTER.
From stations menu, select COS programming and press ENTER.
Type class of service number (1–32) and press ENTER.
From COS programming menu, type item number for feature and press ENTER.
Press SPACE bar for feature setting.
When finished, press ESCAPE twice.
Type y to accept changes, n to reject them, or r to resume editing and press ENTER.
Repeat steps 4-8 for each COS or press ESCAPE to end.
7–12 Station Feature Programming
VDT Programming Instructions
7.1.13
IMI66–111
Exclusive Hold
Description:
When you enable this feature, it prevents a telephone user at one station from picking up a call
that someone placed on hold at another station.
Programming:
1.
2.
3.
4.
5.
6.
7.
8.
7.1.14
Press CONTROL T for main menu.
From main menu, select stations and press ENTER.
From stations menu, select COS programming and press ENTER.
Type class of service number (1–32) and press ENTER.
From COS programming menu, type item number for feature and press ENTER.
Press SPACE bar for feature setting.
When finished, press ESCAPE twice.
Type y to accept changes, n to reject them, or r to resume editing
and press ENTER.
9. Repeat steps 4–8 for each COS or press ESCAPE to end.
Executive Override Programming
Executive Override (Enable or Disable)
Description:
You can program a class of stations so its users have the ability to override a busy or a do not
disturb condition at other stations.
Programming:
1.
2.
3.
4.
5.
6.
7.
8.
9.
Operation:
Make intercom call, hear DND tones, dial S 03
Press CONTROL T for main menu.
From the main menu, select stations and press ENTER.
From the stations menu, select COS programming and press ENTER.
Type class of service number (1–32) and press ENTER.
From the COS programming menu, type item number for feature and press ENTER.
Press SPACE bar for feature setting.
When finished, press ESCAPE twice.
Type y to accept changes, n to reject them, or r to resume editing and press ENTER.
Repeat steps 4–8 for each COS or press ESCAPE to end.
Executive Override Block
Description:
Use this procedure to arrange a station class of service that blocks executive overrides.
Programming:
1.
2.
3.
4.
5.
6.
7.
8.
9.
Press CONTROL T for main menu.
From the main menu, select stations and press ENTER.
From the stations menu, select COS programming and press ENTER..
Type class of service number (1–32) and press ENTER.
From COS programming menu, type item number for feature and press ENTER.
Press SPACE bar for feature setting.
When finished, press ESCAPE twice.
Type y to accept changes, n to reject them, or r to resume editing and press ENTER.
Repeat steps 4–8 for each COS or press ESCAPE to end.
Station Feature Programming 7–13
IMI66–111
VDT Programming Instructions
Periodic Executive Override Tone
Description:
The executive advisory tone allows you to configure the system to provide an audible tone
whenever a system user activates the executive override feature. You can enable this feature
with a station class of service programming action (Section 7.1.48, Executive Override Advisory
Tone) as either a one time tone or as a periodic reoccurring tone. If you choose a reoccurring
tone, you must use the procedure herein to select the time interval between the reoccurring
tones. Also refer to Section 6.10.19, Location Code.
Programming:
1. Press CONTROL T for main menu,
2. From main menu, select system and press ENTER.
3. From the system menu, select timing and press ENTER,
4. From timing menu type item number for periodic conference tone and press ENTER,
5. Press SPACE bar to select desired time and press ENTER to select setting.
6. Press ESCAPE twice,
7. Type y to accept changes, n to reject them, or r to resume editing and press ENTER.
7.1.15
Idle Line Programming
Idle Line Preference
Description:
With you enable this feature, a station automatically connects to an idle line when the user lifts
the telephone’s handset.
Programming:
1.
2.
3.
4.
5.
6.
7.
8.
9.
Press CONTROL T for main menu.
From main menu, select stations and press ENTER.
From stations menu, select COS programming and press ENTER.
Type class of service number (1–32) and press ENTER.
Fro COS programming menu, type item number for feature and press ENTER.
Press SPACE bar for feature setting.
When finished, press ESCAPE twice.
Type y to accept changes, n to reject them, or r to resume editing and press ENTER.
Repeat steps 4-8 for each COS or press ESCAPE to end.
Idle Line Priority
Description:
If you use preceding Idle Line Preference procedure to give a station the ability to automatically
connect to an idle assigned line when the user takes the handset off-hook, take this Idle Line
Priority programming action to set the priority in which the system chooses the idle lines for
use. You can place up to eight lines in this priority list.
Programming:
1.
2.
3.
4.
5.
6.
7.
8.
9.
Press CONTROL T for main menu.
From main menu, select stations and press ENTER.
From stations menu, select station programming and press ENTER.
Type personal intercom number or previously assigned name and press ENTER.
From station programming menu, type item number for feature and press ENTER.
Type any eight line numbers 1–128 (type as n,nn,nnn or n–nnn) and press ENTER.
When finished, press ESCAPE twice.
Type y to accept changes, n to reject them, or r to resume editing and press ENTER.
Repeat steps 4–8 for each station or press ESCAPE to end.
7–14 Station Feature Programming
VDT Programming Instructions
7.1.16
IMI66–111
IST Distinctive Ringing
Description:
An industry-standard telephone can sound one ring cadence for intercom calls and a different
ring cadence for outside calls or it can sound the same ring cadence for both types of calls. You
must select one of these ringing styles on a station class of service basis. All industry-standard
telephones with the same class of service have the same ringing style. See Section 7.2.35,
Industry-Standard Telephone Support, for other industry-standard telephone programming
requirements.
Programming:
1.
2.
3.
4.
5.
6.
7.
8.
9.
7.1.17
Press CONTROL T for main menu.
From main menu, select stations and press ENTER.
From stations menu, select COS programming and press ENTER.
Type class of service number (1–32) that corresponds with class of service assigned
to the IST and press ENTER.
From COS programming menu, type row number for IST distinctive ringing
and press ENTER.
Press SPACE bar for feature setting.
When finished, press ESCAPE twice.
Type y to accept changes, n to reject them, or r to resume editing and press ENTER.
Press ESCAPE to end.
LCD Messaging
Description:
This procedure enables a class of service messaging feature. It allows station users to set a
message at their stations that will be displayed on calling LCD speakerphones. You can use the
second part of this procedure to program the actual LCD messages. Alternately, The attendant
can program the LCD messages using procedures found in the attendant guide.
Also refer to Section 6.3.2, Message Deposit.
Programming:
To enable feature for class of service,
1. Press CONTROL T for main menu.
2. From main menu, select stations and press ENTER.
3. From stations menu, select COS programming and press ENTER.
4. Type class of service number (1-32) and press ENTER.
5. From COS programming menu Type item number for feature and press ENTER.
6. Press SPACE bar for feature setting.
7. When finished, press ESCAPE twice.
8. Type y to accept changes, n to reject them, or r to resume editing and press ENTER.
9. Repeat steps 4-8 for each COS or press ESCAPE to end.
To program LCD Messages,
1. Press CONTROL T for main menu.
2. From main menu, select system and press ENTER.
3. From system menu, type item number for feature and press ENTER.
4. From LCD messages menu, type selection (1–10) and press ENTER.
5. Type message and press ENTER. Message can be 16 characters long.
6. Repeat steps 4 and 5 for all messages. Press CONTROL N for more LCD message lines.
7. When finished, press ESCAPE twice.
8. Type y to accept changes, n to reject them, or r to resume editing and press ENTER.
Station Feature Programming 7–15
IMI66–111
7.1.18
VDT Programming Instructions
Meet Me Answer Page
Description:
When you enable this feature at a station, its user can dial a code in response to an all-call or
zone page and meet the pager in a private conversation.
Programming:
1.
2.
3.
4.
5.
7.
8.
9.
Operation:
Press INTERCOM and dial 78.
7.1.19
Press CONTROL T for main menu.
From main menu, select stations and press ENTER.
From stations menu, select COS programming and press ENTER.
Type class of service number (1–32) and press ENTER.
From COS programming menu, type item number for feature and press ENTER.
When finished, press ESCAPE twice.
Type y to accept changes, n to reject them, or r to resume editing and press ENTER.
Repeat steps 4–8 for each COS or press ESCAPE to end.
Message Deposit (Response Messaging)
Description:
This procedure enables a class of service messaging feature that allows station users to call an
LCD speakerphone and arrange for a message to be left on its display. The message is for the
called party to read if she or he is unable to answer the caller. Refer to Section 6.3.1, LCD
Messaging, for details about programming the LCD messages that can be deposited. Also, you
can use the procedure detailed in Section 7.3, Square/Nonsquare System (Button Mapping By
Station), to assign a response message button to the telephone; however, users can do this for
themselves if they need the button.
Programming:
1.
2.
3.
4.
5.
7.
8.
9.
Press CONTROL T for main menu.
From main menu, select stations and press ENTER.
From stations menu, select COS programming and press ENTER.
Type class of service number (1-32) and press ENTER.
From COS programming menu, type item number for feature and press ENTER.
When finished, press ESCAPE twice.
Type y to accept changes, n to reject them, or r to resume editing and press ENTER.
Repeat steps 4-8 for each COS or press ESCAPE to end.
7–16 Station Feature Programming
VDT Programming Instructions
7.1.20
IMI66–111
Message Wait Originate (Message Waiting)
Description:
When you enable this feature, a station user can dial a feature code to control the message
waiting light at another station.
Programming:
1.
2.
3.
4.
5.
6.
7.
8.
9.
Operation:
Turn message waiting light on: press INTERCOM, dial ✳ 3.
Turn message waiting light off: press INTERCOM, dial # 3.
7.1.21
Press CONTROL T for main menu.
From main menu, select stations and press ENTER.
From stations menu, select COS programming and press ENTER.
Type class of service number (1–32) and press ENTER.
From COS programming menu, type item number for feature and press ENTER.
Press SPACE bar for feature setting.
When finished, press ESCAPE twice.
Type y to accept changes, n to reject them, or r to resume editing and press ENTER.
Repeat steps 4–8 for each COS or press ESCAPE to end.
Music On Intercom Hold (Music Or Tone On Hold)
Description:
With this feature enabled, the system supplies music, tone bursts or other audio information to
callers while they are on hold. The music or information source is external to the common
equipment and is customer supplied. Since the system accepts two music sources, you can use
one source for this feature and the other source for the background music feature discussed in
Section 7.1.3, Background Music.
When the system supplies tone bursts to callers while they are on hold, it sounds two .1 second
long tone bursts separated by a 0.1 second interval of silence. It repeats this tone burst sequence
every 5 seconds.
Programming:
For intercom number,
1. Press CONTROL T for main menu.
2. From main menu, select stations and press ENTER.
3. From stations menu, select COS programming and press ENTER.
4. Type class of service number (1–32) and press ENTER.
5. From COS programming menu, type item number for feature and press ENTER.
6. Press SPACE bar for feature setting.
7. When finished, press ESCAPE twice.
8. Type y to accept changes, n to reject them, or r to resume editing and press ENTER.
9. Repeat steps 4–8 for each COS or press ESCAPE to end.
For lines,
1. Press CONTROL T for main menu.
2. From main menu, select lines and press ENTER.
3. From the lines menu, select line programming and press ENTER.
4. From line programming menu, type item number for feature and press ENTER.
5. Press SPACE bar for feature setting.
6. When finished, press ESCAPE twice.
7. Type y to accept changes, n to reject them, or r to resume editing and press ENTER.
8. Repeat steps 4–7 for each line or press ESCAPE to end.
Station Feature Programming 7–17
IMI66–111
7.1.22
VDT Programming Instructions
Paging Receive
Description:
Use this procedure to give a class of service of stations the ability to receive voice
announcements with the station handset and monitor speaker. For other paging requirements,
refer to Section 6.11, Paging Zone.
Programming:
1.
2.
3.
4.
5.
6.
7.
8.
9.
7.1.23
Press CONTROL T for main menu.
From main menu, select stations and press ENTER.
From stations menu, select COS programming and press ENTER.
Type class of service number (1–32) and press ENTER.
From COS programming menu, type item number for feature and press ENTER.
Press SPACE bar for feature setting.
When finished, press ESCAPE twice.
Type y to accept changes, n to reject them, or r to resume editing and press ENTER.
Repeat steps 4–8 for each COS or press ESCAPE to end.
Paging Transmit
Description:
Use this procedure to give a class of service of stations the ability to transmit voice
announcements to one or all other station handsets and monitor speakers. For other paging
requirements, refer to Section 6.11, Paging Zones. Also refer to Section 6.9.5, Paging Access.
Programming:
1. Press CONTROL T for main menu.
2. From main menu, select stations and press ENTER.
3. From stations menu, select COS programming and press ENTER.
4. Type class of service number (1–32) and press ENTER.
5. From the COS programming menu, type item number for feature and press ENTER.
6. Press SPACE bar for feature setting.
7. When finished, press ESCAPE twice.
8. Type y to accept changes, n to reject them, or r to resume editing and press ENTER.
9. Repeat steps 4-8 for each COS or press ESCAPE to end.
7–18 Station Feature Programming
VDT Programming Instructions
7.1.24
IMI66–111
Ringing Preference (Ringing Line Preference)
Description:
When you enable this feature, a station can automatically connect to a ringing line when a user
takes his or her telephone off-hook. Refer to Section 7.2.13, Flexible Ringing Assignments, for
other ringing considerations.
Programming:
1.
2.
3.
4.
5.
6.
7.
8.
9.
7.1.25
Press CONTROL T for main menu.
From the main menu, select stations and press ENTER.
From the stations menu, select COS programming and press ENTER.
Type class of service number (1–32) and press ENTER.
From the COS programming menu, type item number for feature and press ENTER.
Press SPACE bar for feature setting.
When finished, press ESCAPE twice.
Type y to accept changes, n to reject them, or r to resume editing and press ENTER.
Repeat steps 4–8 for each COS or press ESCAPE to end.
Day Route Access/Night Route Access
Description:
You must use Section 12.4, Route Tables, to build and assign automatic route selection (ARS)
route tables before the system can perform ARS on a dialed number. Each of the six routes of a
route table require a route access level of 1 to 4. ARS uses this route access level to determine
if the dialing station has access to dial out on the route. It does this by comparing a station’s
route access level to the required dial out access level. If the station route access level is greater
than or equal to the route access level that you assign to the route, the system allows the station
to access the route. Otherwise, the system will not accept the dialed number, and sounds an
error at the station’s speaker or handset. The route access level allows some stations to gain
access to the more costly routes in a route table while denying it to others. Just as you program
each route from least to most costly, you must also arrange the station’s route access level to
increase from a low level to a high level. This is necessary because once the system denies
access because of the access level, it will not try another route. The more costly the route is, the
higher the access level needed to access it.
Use the following programming procedure to assign a route access level of 1 to 4 to a station
class of service for both day and night operation.
Programming:
1.
2.
3.
4.
5.
6.
7.
7.
8.
9.
Press CONTROL T for main menu.
From the main menu, select stations and press ENTER.
From the stations menu, select COS programming and press ENTER.
Type class of service number (1–32) and press ENTER.
From the COS programming menu, type item number for day route access and press ENTER.
Type 1–4 for restriction level.
Press ENTER for night route access level, and type 1–4 for restriction level.
When finished, press ESCAPE twice.
Type y to accept changes, n to reject them, or r to resume editing and press ENTER.
Repeat steps 4–8 for each COS or press ESCAPE to end.
Station Feature Programming 7–19
IMI66–111
7.1.26
VDT Programming Instructions
Day Restriction Level/Night Restriction Level
Description:
Use restriction level programming (Section 11.4, Restriction Level Programming) to create as
many as eight different toll calling categories based on the freedom to dial various numbers or
the restriction from dialing them. You can assign one of eight different restriction (1–8) levels
or assign an allow all level or a deny all level. Level 8 is the least restrictive from a station
viewpoint but the most restrictive from a restriction table viewpoint. (For example, a station
with a restriction of 8 is only restricted from dialing always deny numbers and it can dial
numbers with restriction levels of 1–8. A station with a restriction level of 1–7 cannot dial a
number with a toll restriction table entry of 8.) The allow all entry ensures that the system
applies no dialing restriction to a number (example: 911). The deny all ensures that station user
can never a number (example: 1–900).
Use the following procedure to assign a restriction level to a station class of service. Program
the restriction level value that accurately reflects the toll restriction dialing freedom expected by
telephones with this class of service.
Programming:
1.
2.
3.
4.
5.
6.
7.
7.
8.
9.
7.1.27
Press CONTROL T for main menu.
From the main menu, select stations and press ENTER.
From the stations menu, select COS programming and press ENTER.
Type class of service number (1–32) and press ENTER.
From the COS programming menu, type item number for day restriction level
and press ENTER.
Type 1–8 for restriction level.
Press ENTER for night restriction level, and type 1–8 for restriction level.
When finished, press ESCAPE twice.
Type y to accept changes, n to reject them, or r to resume editing and press ENTER.
Repeat steps 4–8 for each COS or press ESCAPE to end.
System Speed Dial Groups
Description:
The system provides 200 system speed dial numbers. These numbers are divided into 20 groups
with 10 numbers available in each group. Assign none, one, or a range of groups (n - nn) to each
station class of service. Refer to Section 6.7, Speed Dial Programming, for additional speed dial
considerations.
Programming:
1.
2.
3.
4.
5.
6.
7.
8.
9.
Operation:
While on hook, dial 0–9 or press other speed dial buttons.
Press CONTROL T for main menu.
From main menu, select stations and press ENTER.
From stations menu, select COS programming and press ENTER.
Type class of service number (1–32) and press ENTER.
From COS programming menu, type item number for feature and press ENTER.
Type desired value (1–20) and press ENTER.
When finished, press ESCAPE twice.
Type y to accept changes, n to reject them, or r to resume editing and press ENTER.
Repeat steps 4–8 for each COS or press ESCAPE to end.
7–20 Station Feature Programming
VDT Programming Instructions
7.1.28
IMI66–111
Station Monitoring
Description:
When you enable this feature, the busy lamp field (BLF) light of an associated direct station
select select (DSS) button provides a visual indication of idle, busy, and ringing status of the
station it represents. A station user can press this DSS button to make a one-button pick-up of a
ringing station. When you disable this feature, the BLF shows only idle and busy conditions of
the DSS station.
Programming:
1.
2.
3.
4.
5.
6.
7.
8.
9.
7.1.29
Press CONTROL T for main menu.
From main menu, select stations and press ENTER.
From stations menu, select COS programming and press ENTER.
Type class of service number (1–32) and press ENTER.
From COS programming menu, type item number for feature and press ENTER.
Press SPACE bar for feature setting.
When finished, press ESCAPE twice.
Type y to accept changes, n to reject them, or r to resume editing and press ENTER.
Repeat steps 4–8 for each COS or press ESCAPE to end.
Directed Station Hold
Description:
This feature, when enabled, allows station users to pick up the last call a user placed on hold at
another station. This feature does not allow users to pick up exclusive hold calls or calls that are
in the process of being transferred. Also, the feature does not allow users to send a directed call
hold to a station where its user is scanning the currently held calls. In addition, this feature
allows users to place a call on hold at another station and have this call appear to be the one that
has been on hold there for the longest time. Features such as hold recall apply to the station that
sent the directed call hold and not to the station that received the directed call hold.
Programming:
1.
2.
3.
4.
5.
6.
7.
8.
9.
Operation:
Directed Hold:
Directed Pickup:
Press CONTROL T for main menu.
From main menu, select stations and press ENTER.
From stations menu, select COS programming and press ENTER.
Type class of service number (1–32) and press ENTER.
From COS programming menu, type item number for feature and press ENTER.
Press SPACE bar for feature setting.
When finished, press ESCAPE twice.
Type y to accept changes, n to reject them, or r to resume editing and press ENTER.
Repeat steps 4–8 for each COS or press ESCAPE to end.
INTERCOM ✳ 90 then dial intercom number of destination station
INTERCOM # 90 then dial intercom number of station where call is on hold
Station Feature Programming 7–21
IMI66–111
7.1.30
VDT Programming Instructions
Remote Station Disable
Description:
Software release 6.A provides this feature that, when enabled, allows users at stations with the
proper class of service to dial a code and remotely disable or enable another station. Normally,
you should give this capability to the system attendant but you can assign it to any class of
service that is appropriate.
Programming:
1.
2.
3.
4.
5.
6.
7.
8.
9.
Operation:
Disable Station:
Enable Station:
7.1.31
Press CONTROL T for main menu.
From main menu, select stations and press ENTER.
From stations menu, select COS programming and press ENTER.
Type class of service number (1–32) and press ENTER.
From COS programming menu, type item number for feature and press ENTER.
Press SPACE bar for feature setting.
When finished, press ESCAPE twice.
Type y to accept changes, n to reject them, or r to resume editing and press ENTER.
Repeat steps 4–8 for each COS or press ESCAPE to end.
INTERCOM ✳ 05, then dial intercom number of station
INTERCOM # 05, then dial intercom number of station
Remote Day Exception Number/Night Exception Number
Description:
A DISA caller may have access to an outside line where the toll restriction is based on the
DISA authorization code that is associated with a particular class of service. Remote day and
remote night exception numbers allow DISA callers to dial numbers that their toll restriction
normally prevents them from dialing. If a toll restriction table exception number matches one of
the exception numbers that you assign using this procedure, the system allows the DISA caller
to dial the number.
The exception number values that you can assign are 1 through 32 and NONE. You can assign
32 exception numbers to each DISA class of service. You also must assign one exception
number to each toll restriction table line entry (Section 11.7, Exception Number Programming).
Refer to Section 8.8, Direct Inward System Access (DISA) Programming, for DISA
programming details.
Programming:
1.
2.
3.
4.
5.
6.
7.
7.
8.
9.
Press CONTROL T for main menu.
From main menu, select stations and press ENTER.
From stations menu, select COS programming and press ENTER.
Type class of service number (1–32) and press ENTER.
From COS programming menu, type item number for day exception number
and press ENTER.
Type day exception number (0–32) (n, nn, n–nn, or 0 for none) and press ENTER.
Repeat step 6 for night exception number.
When finished, press ESCAPE twice.
Type y to accept changes, n to reject them, or r to resume editing and press ENTER.
Repeat steps 4–8 for each COS or press ESCAPE to end.
7–22 Station Feature Programming
VDT Programming Instructions
7.1.32
IMI66–111
Conference Advisory Tone
Description:
The conference advisory tone feature allows you to configure the system to provide an audible
tone whenever more than two parties are connected in a conference call. You can select this
tone as either a one time tone or as a periodic reoccurring tone. If you choose a reoccurring
tone, you must use the section 6.9.23, Periodic Conference Tone, procedure to select the time
interval between the reoccurring tones. Also refer to Section 6.10.19, Location Code.
Programming:
1.
2.
3.
4.
5.
7.1.33
Press CONTROL T for main menu.
From main menu, select stations and press ENTER.
From stations menu, select COS programming and press ENTER.
Type class of service number (1–32) and press ENTER.
From COS programming menu, type CTRL-N to get to the page with the selection
for conference advisory tone.
6. Select conference advisory tone and press ENTER.
7. Press SPACE bar to toggle your options.
8. When finished, press ESCAPE twice.
9. Type y to accept changes, n to reject them, or r to resume editing and press ENTER.
10. Press ESCAPE to end.
Executive Override Advisory Tone
Description:
The executive advisory tone allows you to configure the system to provide an audible tone
whenever a system user activates the executive override feature. You can select this tone as
either a one time tone or as a periodic reoccurring tone. If you choose a reoccurring tone, you
must use the Section 6.9.24, Periodic Executive Overriding Tone, procedure to select the time
interval between the reoccurring tones. Also refer to Section 6.10.19, Location Code.
Programming:
1.
2.
3.
4.
5.
Press CONTROL T for main menu.
From main menu, select stations and press ENTER.
From stations menu, select COS programming and press ENTER.
Type class of service number (1–32) and press ENTER.
From COS programming menu, type CTRL-N to get to the page with the selection
for executive override advisory tone.
6. Select executive override advisory tone and press ENTER.
7. Press SPACE bar to toggle your options.
8. When finished, press ESCAPE twice.
9. Type y to accept changes, n to reject them, or r to resume editing and press ENTER.
10. Press ESCAPE to end.
Station Feature Programming 7–23
IMI66–111
7.1.34
VDT Programming Instructions
Line Answer
Description:
This feature provides station access to a line for call answering purposes for an entire class of
service of stations. Also refer to Section 7.1.33, Line Originate. You must turn on both that
feature and this Line Answer feature for a line to be fully usable.
Programming:
1.
2.
3.
4.
5.
6.
7.
8.
7.1.35
Press CONTROL T for main menu.
From main menu, select stations and press ENTER.
From stations menu, select COS programming and press ENTER.
Type class of service number (1–32) and press ENTER.
From COS programming menu, type item number for feature and press ENTER.
Press CONTROL E.
Type a for add, r for remove and press ENTER.
Type line port 1–128 (type as n,nn,nnn or n–nnn) to be removed or added
and press ENTER.
9. Press ESCAPE three times.
10. Type y to accept changes, n to reject them, or r to resume editing and press ENTER.
11. Repeat steps 4–10 for each COS or press ESCAPE to end.
Line Originate
Description:
This feature provides station access to a line for call originating purposes for an entice class of
service of stations. Also refer to Section 7.1.32, Line Answer. Both that feature and this one
must be turned on for a line to be fully usable.
Programming:
1.
2.
3.
4.
5.
6.
7.
8.
9.
10.
11.
Press CONTROL T for main menu.
From main menu, select stations and press ENTER.
From stations menu, select COS programming and press ENTER.
Type class of service number (1–32) and press ENTER.
From COS programming menu, type item number for feature and press ENTER.
Press CONTROL E.
Type a for add, r for remove and press ENTER.
Type line port 1–128 ( n, nn,nnn or n–nnn) to be removed or added and press ENTER.
Press ESCAPE three times.
Type y to accept changes, n to reject them, or r to resume editing and press ENTER.
Repeat steps 4–8 for each COS or press ESCAPE to end.
7–24 Station Feature Programming
VDT Programming Instructions
7.1.36
IMI66–111
Periodic Line Tone
Description:
This when enabled, provides periodic warning tones to station users while they are busy on
certain lines. The warning tone consists of one 500 ms burst, a 100 ms off period, and one 100
ms burst. The tone reminds the users to keep their conversations short on these lines. You can
enable this feature for a class of service of telephones and then specify the particular lines that
you deem applicable. Further, you can select how often the tone sounds. Also refer to Section
7.1.35, Maximum Call Duration, for a related feature.
Programming:
1.
2.
3.
4.
5.
6.
7.
8.
9.
10.
11.
Press CONTROL T for main menu.
From main menu, select stations and press ENTER.
From stations menu, select COS programming and press ENTER.
Type class of service number (1–32) and press ENTER.
From COS programming menu, type item number for feature and press ENTER.
Press CONTROL E.
Type a for add, r for remove and press ENTER.
Type line port 1–128 (n, nn,nnn or n–nnn) to be removed or added and press ENTER.
Press ESCAPE three times.
Type y to accept changes, n to reject them, or r to resume editing and press ENTER.
Repeat steps 4–8 for each COS or press ESCAPE to end.
Periodic Line Tone Time
Description:
After you enable the periodic warning tones that remind users to keep conversations short on
certain outside lines, use this procedure to set how often that you wish the periodic warning
tones to occur
Programming:
1.
2.
3.
4.
5.
6.
7.
Press CONTROL T for main menu.
From main menu, select systems and press ENTER.
From system menu, select timing and press ENTER.
From system timing menu, type item number for feature and press ENTER.
Press SPACE bar for feature setting and press ENTER to accept setting.
When finished, press ESCAPE twice.
Type y to accept changes, n to reject them, or r to resume editing and press ENTER.
Station Feature Programming 7–25
IMI66–111
7.1.37
VDT Programming Instructions
Maximum Call Duration
Description:
The system provides the maximum call duration feature. This feature, when enabled,
automatically cuts off calls on certain lines after a preprogrammed time. The system will not cut
off calls made to an emergency number (Section 10.4, Emergency Numbers). The system
sounds a warning tone at the busy station 10 seconds before it disconnects the call. The warning
tone consists of one 800 ms burst followed by eight 100 ms bursts. Also refer to Section 7.1.34,
Periodic Line Tone, for a related feature.
Programming:
1.
2.
3.
4.
5.
6.
7.
8.
9.
10.
11.
Press CONTROL T for main menu.
From main menu, select stations and press ENTER.
From stations menu, select COS programming and press ENTER.
Type class of service number (1–32) and press ENTER.
From COS programming menu, type item number for feature and press ENTER.
Press CONTROL E.
Type a for add, r for remove and press ENTER.
Type line port 1–128 (n, nn,nnn or n–nnn) to be removed or added and press ENTER.
Press ESCAPE three times.
Type y to accept changes, n to reject them, or r to resume editing and press ENTER.
Repeat steps 4–8 for each COS or press ESCAPE to end.
Maximum Call Duration Time
Description:
After you enable the maximum call duration feature, use this procedure to set the cut off time.
Programming:
1.
2.
3.
4.
5.
6.
7.
Press CONTROL T for main menu.
From main menu, select systems and press ENTER.
From system menu, select timing and press ENTER.
From system timing menu, type item number for feature and press ENTER.
Press SPACE bar for feature setting and press ENTER to accept setting.
When finished, press ESCAPE twice.
Type y to accept changes, n to reject them, or r to resume editing and press ENTER.
7–26 Station Feature Programming
VDT Programming Instructions
7.1.38
IMI66–111
Line Group Access
Description:
Use this procedure to give a station access to line groups. Refer to Section 8.2, Line Group
Programming, for other line group considerations.
Programming:
1.
2.
3.
4.
5.
6.
7.
8.
9.
7.1.39
Press CONTROL T for main menu.
From main menu, select stations and press ENTER.
From stations menu, select COS programming and press ENTER.
Type class of service number (1–32) and press ENTER.
From COS programming menu, type item number for feature and press ENTER.
Type line groups (1–16, 0 = none, type as n,n,nn or n–nn) and press ENTER.
When finished, press ESCAPE twice.
Type y to accept changes, n to reject them, or r to resume editing and press ENTER.
Repeat steps 4–8 for each COS or press ESCAPE to end.
Line Group Queue
Description:
Use this procedure to give a station the ability to queue for an idle line in a line group. Refer to
Section 8.2, Line Group Programming, for other line group considerations.
Programming:
1. Press CONTROL T for main menu.
2. From main menu, select station and press ENTER.
3. From station menu, select COS programming and press ENTER.
4. From the COS programming menu, type item number for feature and press ENTER.
5. When finished, press ESCAPE twice.
6. Type y to accept changes, n to reject them, or r to resume editing and press ENTER.
7. Repeat steps 4–8 for each COS or press ESCAPE to end.
Station Feature Programming 7–27
IMI66–111
7.1.40
VDT Programming Instructions
Line-To-Line Transfer (Unsupervised Conference)
Description:
This programming feature gives a station the ability to set up an unsupervised conference
between two lines.
Programming:
1.
2.
3.
4.
5.
6.
7.
8.
9.
Press CONTROL T for main menu.
From main menu, select stations and press ENTER.
From stations menu, select COS programming and press ENTER.
Type class of service number (1–32) and press ENTER.
From COS programming menu, type item number for feature and press ENTER.
Press SPACE bar for feature setting.
When finished, press ESCAPE twice.
Type y to accept changes, n to reject them, or r to resume editing and press ENTER.
Repeat steps 4–8 for each COS or press ESCAPE to end.
Line-To-Line Connect Duration
Description:
After you have given a station the ability to set up an unsupervised conference between two
lines, use this procedure to set the maximum amount of time that an unsupervised conference
can continue between two lines. When the time out occurs, the system recalls the station from
where the user enabled the unsupervised conference.
Programming:
1.
2.
3.
4.
5.
7.
8.
Press CONTROL T for main menu.
From main menu, select system and press ENTER.
From system menu, select timing and press ENTER.
From timing menu, type item number for feature and press ENTER.
Press SPACE bar for feature setting and press ENTER.
When finished, press ESCAPE twice.
Type y to accept changes, n to reject them, or r to resume editing and press ENTER.
7–28 Station Feature Programming
VDT Programming Instructions
7.1.41
IMI66–111
Voice Announce Block
Description:
When you enable this programming feature a station has the ability to block voice announced
internal signalling when its user dials the proper code.
Programming:
1.
2.
3.
4.
5.
6.
7.
8.
9.
Operation:
On: INTERCOM ✳ 2
Off: INTERCOM # 2
7.1.42
Press CONTROL T for main menu.
From main menu, select stations and press ENTER.
From stations menu, select COS programming and press ENTER.
Type class of service number (1–32) and press ENTER.
From COS programming menu, type item number for feature and press ENTER.
Press SPACE bar for feature setting.
When finished, press ESCAPE twice.
Type y to accept changes, n to reject them, or r to resume editing and press ENTER.
Repeat steps 4–8 for each COS or press ESCAPE to end.
Internal IST Flash
Description:
If industry-standard telephone users access an outside line using the line group feature and then
quickly press and release (flash) the telephone’s hookswitch, the IST will react in one of two
different ways depending upon how you program this feature. Refer to Section 7.2.35,
Industry-Standard Telephone Support for other IST programming considerations.
With the internal IST flash feature disabled, IST users can flash the hookswitch while on
an outside line and generate a hookflash signal on the outside line; however, they cannot
flash the hookswitch to obtain intercom dial tone. (The Section 7.2.35 procedure sets the
hookflash signal time. This signal time determines whether the IST hookflash signal is long
enough to recall the outside line dial tone or short enough to access the outside line host
system features. Refer to the CO specifications for actual timing requirements.)
With the internal IST flash feature enabled, IST users can flash the hookswitch while on
an outside line and obtain intercom dial tone; however, if they need to generate a hookflash
signal on the outside line, they must flash for intercom and then dial S 08.
Dialing S 08 over the intercom, generates an outside line hookflash signal and returns the
telephone to the outside line.
Programming:
1.
2.
3.
4.
5.
6.
7.
8.
9.
Press CONTROL T for main menu.
From main menu, select stations and press ENTER.
From stations menu, select COS programming and press ENTER.
Type class of service number (1–32) that corresponds with class of service assigned
to the IST and press ENTER.
From COS programming menu, type row number for IST distinctive ringing
and press ENTER.
Press SPACE bar for feature setting.
When finished, press ESCAPE twice.
Type y to accept changes, n to reject them, or r to resume editing and press ENTER.
Press ESCAPE to end.
Station Feature Programming 7–29
IMI66–111
7.1.43
VDT Programming Instructions
Forced Account Codes
Description:
After you have enabled the account code feature for the system, set its parameters, and
programmed its list of account codes into the system, turn the feature on for a station class of
service and make it either forced or optional. If you make it a forced account code, the user
must enter an account code before the system will let him or her dial the number for an outgoing
call. Also, on incoming calls a user must enter an account code before the system will allow
him or her to make any future outgoing calls. See Section 10.3, Account Codes for other
account code programming considerations and to Section 10.4, Emergency Numbers for an
exception to forced account code entry.
Programming:
1.
2.
3.
4.
5.
6.
7.
8.
7.1.44
Press CONTROL T for main menu.
From main menu, select stations and press ENTER.
From stations menu, select COS programming and press ENTER.
Type class of service number (1–32) and press ENTER.
From the COS programming menu, type item number for account code and press ENTER.
Press SPACE BAR for feature setting.
When finished, press ESCAPE.
Press CONTROL N as necessary to display line number for forced account code
and press ENTER.
9. Type item number for forced account code and press ENTER.
10. Press SPACE BAR for feature setting.
11. When finished, press ESCAPE twice.
12. Type y to accept changes, n to reject them, or r to resume editing and press ENTER to end.
.
Allow Busy Display (Display Of Busy Status)
Description
When you activate this feature, users calling a busy station from an LCD speakerphone can read
the busy status of the called station on the telephone’s display. (for example, Busy with line 2).
With the feature inactive, the display shows busy but does not reveal the busy status.
Programming:
1.
2.
3.
4.
5.
6.
7.
8.
9.
Press CONTROL T for main menu.
From main menu, select stations and press ENTER.
From stations menu, select COS programming and press ENTER.
Type class of service number (1–32) and press ENTER.
From COS programming menu, type item number for feature and press ENTER.
Press SPACE bar for feature setting.
When finished, press ESCAPE twice.
Type y to accept changes, n to reject them, or r to resume editing and press ENTER.
Repeat steps 4–8 for each COS or press ESCAPE to end.
7–30 Station Feature Programming
VDT Programming Instructions
7.1.45
IMI66–111
Clear Major Alarm Ring
Description:
This feature allows users to clear the major alarm ring condition from a telephone station. To
make this feature available to users, you must first program a class of service as described
below and then assign that class of service to the user’s telephone station.
Programming:
1. Press CONTROL T for main menu.
2. From main menu, select stations and press ENTER.
3. From stations menu, select COS programming and press ENTER.
4. Type class of service number (1–32) and press ENTER.
5. From COS programming menu, type CTRL-N to get to the page with the selection for
clearing the major alarm ring.
6. Select clear major alarm ring and press ENTER.
7. Press SPACE bar to toggle between yes or no.
8. When finished, press ESCAPE twice.
9. Type y to accept changes, n to reject them, or r to resume editing and press ENTER.
10. Press ESCAPE to end.
Operation
Clear major alarm ring condition: INTERCOM #90
7.1.46
High Handset Volume (On Impact Telephones)
Description:
You can program the handset volume feature on Impact telephones to offer the station user
more choices in selecting the handset volume level locally from his or her telephone. Normally,
users have up to 8 volume levels that they can select. However, when you program the high
level, the user’s handset volume choices increase to 13.
Programming:
1.
2.
3.
4.
5.
Operation:
While on a call, press VOLUME UP or VOLUME DOWN once for each change of volume.
To set loudness default to a certain level,
– lift handset,
– adjust loudness using VOLUME UP or VOLUME DOWN,
– press INTERCOM and dial ✳✳7,
– hang up.
Press CONTROL T for main menu.
From main menu, select stations and press ENTER.
From stations menu, select COS programming and press ENTER.
Type class of service number (1–32) and press ENTER.
From COS programming menu, type CTRL-N to get to the page with the selection for high
level handset volume.
6. Select high level handset volume and press ENTER.
7. Press SPACE bar to toggle between yes or no.
8. When finished, press ESCAPE twice.
9. Type y to accept changes, n to reject them, or r to resume editing and press ENTER.
10. Press ESCAPE to end.
Station Feature Programming 7–31
IMI66–111
7.1.47
VDT Programming Instructions
Restrict ARS Hookflash
(Automatic Route Selection, Hookflash Restriction)
Description:
This feature enhances ARS response to hookflash action on an outside line when that action is
followed by dialed digits. With the feature enabled, the system delays response to a hookswitch
flash until after the ARS feature verifies as valid all subsequent dialed digits. With the feature
disabled, the system sends the hookflash over the line without waiting for the ARS feature to
verify the validity of subsequent dialed digits. This station class of service feature is applicable
only when the ARS feature is active.
Programming:
1.
2.
3.
4.
5.
6.
7.
8.
9.
7.1.48
Press CONTROL T for main menu.
From main menu, select stations and press ENTER.
From stations menu, select COS programming and press ENTER.
Type class of service number (1–32) that corresponds with class of service
that you wish to modify and press ENTER.
From COS programming menu, type row number that corresponds with
Restrict ARS Hookflash and press ENTER.
Press SPACE bar for feature setting.
When finished, press ESCAPE twice.
Type y to accept changes, n to reject them, or r to resume editing and press ENTER.
Press ESCAPE to end.
Quick Transfer
Description:
The quick transfer feature allows users to perform an automatic screened or unscreened transfer
of an incoming line call without pressing their telephone’s TRANS/CNF button. The transfer
occurs automatically as soon as the user who answers the call dials the intercom number or
access code for the transfer location. The system begins the call transfer process as soon as the
user dials a digit on his or her dial pad, and effects the transfer as soon as the user hangs up or
presses his or her telephone’s RELEASE button. When this feature is active, it greatly reduces
the keystrokes that users must take to transfer calls over a tie line.
Programming:
1.
2.
3.
4.
5.
6.
7.
8.
9.
Press CONTROL T for main menu.
From main menu, select stations and press ENTER.
From stations menu, select COS programming and press ENTER.
Type class of service number (1–32) that corresponds with class of service
that you wish to modify and press ENTER.
From COS programming menu, type row number that corresponds with
Quick Transfer and press ENTER.
Press SPACE bar for feature setting.
When finished, press ESCAPE twice.
Type y to accept changes, n to reject them, or r to resume editing and press ENTER.
Press ESCAPE to end.
7–32 Station Feature Programming
VDT Programming Instructions
7.2
Programming Station Features
7.2.1
Personal Intercom Number
IMI66–111
Description:
Use this programming procedure to change the station’s personal intercom number.
Also refer to Section 9.1, Modifying Intercom Numbers.
Programming:
1.
2.
3.
4.
5.
6.
7.2.2
Press CONTROL T for main menu.
From main menu, select stations and press ENTER.
From stations menu, select station programming and press ENTER.
Type personal intercom number or previously assigned name and press ENTER.
From station programming menu, type item number for personal intercom and press ENTER.
Type personal intercom number and press ENTER. The system indicates if a number
conflict exists and prompts you to select another number or take appropriate action.
7. When finished, press ESCAPE twice.
8. Type y to accept changes, n to reject them, or r to resume editing and press ENTER.
9. Repeat steps 4−8 for each station or press ESCAPE to end.
Display Name/Full Name (Station Name)
Description:
You can assign a display name and a full name to a station. A display name is composed of a
maximum of seven characters and shows in the display of an LCD speakerphone as a
identification aid. A full name is composed of a maximum of 20 characters and shows in some
voice mail and open architecture interface applications. You can compose a valid name from
any alpha-numeric character; however, the first character of a display name must be an
alphabetic character.
You can also add station names by following the procedure described in Section 9.1, Modifying
Intercom Numbers..
Programming:
To assign a name to a station,
1. Press CONTROL T for main menu.
2. From main menu, select station and press ENTER.
3. From stations menu, select station programming and press ENTER.
4. Type personal intercom number or previously assigned name and press ENTER.
5. From station programming menu, type item number for display name and press ENTER.
6. Type display name (a–z, A–Z, 0–9, punctuation, special characters, and so forth)
and press ENTER.
A display name can be up to seven characters long.
7. Type full name (a–z, A–Z, 0–9, punctuation, special characters, and so forth)
and press ENTER.
A full name can be up to 20 characters long.
8. When finished, press ESCAPE twice.
9. Type y to accept changes, n to reject them, or r to resume editing and press ENTER.
10. Repeat steps 4−8 for each station that requires a name or press ESCAPE to end.
Station Feature Programming 7–33
IMI66–111
7.2.3
VDT Programming Instructions
Class Of Service
Description:
You can assign a group of preprogrammed class of service station features to a station. The
system makes up to 32 different classes of service available, and you can program the feature
values differently in each one.
Programming:
1.
2.
3.
4.
5.
6.
7.
8.
9.
7.2.4
Press CONTROL T for main menu.
From main menu, select stations and press ENTER.
From stations menu, select station programming and press ENTER.
Type personal intercom number or previously assigned name and press ENTER.
From station programming menu, type item number for feature and press ENTER.
Type desired value for feature and press ENTER.
When finished, press ESCAPE twice.
Type y to accept changes, n to reject them, or r to resume editing and press ENTER.
Repeat steps 4−8 for each station or press ESCAPE to end.
Speed Dial Sets
Description:
A speed dial set is a group of 10 speed dial locations. The system allocates three speed dial sets
to each telephone as a default but you can allocate up to 10 sets to a telephone if you wish.
When a DSS/BLF console is operated as a companion to a telephone, you can allocate speed
dial sets at the companion telephone that the system will then share with the console. The
system reserves one speed dial set for the telephone’s dial pad buttons 0–9. For other speed dial
considerations, see Section 6.7, Speed Dial Programming.
Programming:
1.
2.
3.
4.
5.
6.
7.
8.
9.
Press CONTROL T for main menu.
From main menu, select stations and press ENTER.
From stations menu, select station programming and press ENTER.
Type personal intercom number or previously assigned name and press ENTER.
From station programming menu, type item number for feature and press ENTER.
Type desired value for feature and press ENTER.
When finished, press ESCAPE twice.
Type y to accept changes, n to reject them, or r to resume editing and press ENTER.
Repeat steps 4−8 for each station or press ESCAPE to end.
7–34 Station Feature Programming
VDT Programming Instructions
7.2.5
IMI66–111
Idle Line Priority
Description:
If you use Section 7.1.13, Idle Line Preference, to give a station the ability to automatically
connect to an idle assigned line when the user takes the handset off-hook, take this
programming action to set the priority in which the system chooses the idle lines for use. You
can place up to eight lines in this priority list.
Programming:
1.
2.
3.
4.
5.
6.
7.
8.
9.
7.2.6
Press CONTROL T for main menu.
From main menu, select stations and press ENTER.
From stations menu, select station programming and press ENTER.
Type personal intercom number or previously assigned name and press ENTER.
From station programming menu, type item number for feature and press ENTER.
Type any eight line numbers 1−128 (type as n,nn,nnn or n–nnn) and press ENTER.
When finished, press ESCAPE twice.
Type y to accept changes, n to reject them, or r to resume editing and press ENTER.
Repeat steps 4−8 for each station or press ESCAPE to end.
Intercom Hunt List
Description:
Place personal intercom and group intercom numbers in a list with this programming procedure.
Calls to a busy hunt list number will search the list for an idle number at which to ring. Up to
eight intercom numbers are allowed in a hunt list. These can be all group intercom numbers or
one personal intercom number and seven group intercom numbers. See Section 9,
Programming Intercom Numbers, for other intercom number considerations.
Programming:
1. Press CONTROL T for main menu.
2. From main menu, select station and press ENTER.
3. From station menu, select station programming and press ENTER.
4. Type personal intercom number of station being programmed and press ENTER.
5. From station programming menu, type item number for feature and press ENTER.
6. Type intercom numbers for list (up to eight allowed separated with commas - include the
personal intercom of station being programmed for intercom call hunting; otherwise,
only line calls to the station will hunt) and press ENTER.
7. When finished, press ESCAPE twice.
8. Type y to accept changes, n to reject them, or r to resume editing and press ENTER.
9. Repeat steps 4–8 for each station or press ESCAPE to end.
Station Feature Programming 7–35
IMI66–111
7.2.7
VDT Programming Instructions
Group Intercom Access
Description:
Use this procedure to add group intercom numbers to stations for their use. Also refer to
Section 7.3, Square/Nonsquare System–Button Mapping By Station, to map buttons for group
intercom number selection. See Section 9, Programming Intercom Numbers for other intercom
number considerations.
Programming:
1. Press CONTROL T for main menu.
2. From main menu, select station and press ENTER.
3. From station menu, select station programming and press ENTER.
4. Type personal intercom number or previously assigned name of station being programmed
and press ENTER.
5. From station programming menu, type item number for feature and press ENTER.
6. Type a for add or r for remove and press ENTER.
7. Type group intercom numbers ( type nnnn,nnnn, nnnn or type nnnn–nnnn)
and press ENTER.
8. When finished, press ESCAPE three times.
9. Type y to accept changes, n to reject them, or r to resume editing and press ENTER.
10. Repeat steps 4–9 for each station or press ESCAPE to end.
7–36 Station Feature Programming
VDT Programming Instructions
7.2.8
IMI66–111
Prime Line Programming
Prime Line Type
Description:
When you enable this feature, the station automatically selects a line, line group, or intercom
number for use when the station user takes the station off hook. Use the programming
procedures shown below to select the line port, line group, or intercom number to serve as the
prime station calling interface.
NOTE: You can create an intercom hot line telephone by taking special programming action when you
assign a prime intercom number. Refer to the paragraph titled Prime Intercom Number in this
section for details.
Programming:
1.
2.
3.
4.
5.
6.
7.
8.
9.
Press CONTROL T for main menu.
From main menu, select stations and press ENTER.
From stations menu, select station programming.
Type personal intercom number or previously assigned name and press ENTER.
From station programming menu, type item number for feature and press ENTER.
Press SPACE BAR for desired value and press ENTER.
When finished, press ESCAPE twice.
Type y to accept changes, n to reject them, or r to resume editing and press ENTER.
Repeat steps 4−8 for each station or press ESCAPE to end.
Prime Line
Description:
Use this procedure to choose the prime line.
Programming:
1.
2.
3.
4.
5.
6.
7.
8.
9.
Press CONTROL T for main menu.
From main menu, select stations and press ENTER.
From stations menu, select station programming and press ENTER.
Type personal intercom number or station name and press ENTER.
From station programming menu, type item number for feature and press ENTER.
From prime line menu, type 1–128 press ENTER.
When finished, press ESCAPE twice.
Type y to accept changes, n to reject them, or r to resume editing and press ENTER.
Repeat steps 4−8 for each station or press ESCAPE to end.
Station Feature Programming 7–37
IMI66–111
VDT Programming Instructions
Prime Line Group
Description:
Use this procedure to choose the prime line group.
Programming:
1.
2.
3.
4.
5.
6.
7.
8.
9.
Press CONTROL T for main menu.
From main menu, select stations and press ENTER.
From stations menu, select station programming and press ENTER.
Type personal intercom number or station name and press ENTER.
From station programming menu, select prime line group and press ENTER.
From prime line group menu, type 1−16 and press ENTER.
When finished, press ESCAPE twice.
Type y to accept changes, n to reject them, or r to resume editing and press ENTER.
Repeat steps 4−8 for each station or press ESCAPE to end.
Prime Intercom Number
Description:
Use this procedure to choose the prime intercom number.
NOTE: You can create an intercom hot line telephone by assigning one telephone’s personal intercom
number as the prime intercom of another telephone. When the user takes this programmed
telephone off hook, it automatically calls the other telephone.
Programming:
1.
2.
3.
4.
5.
6.
Press CONTROL T for main menu.
From main menu, select stations and press ENTER.
From stations menu, select station programming and press ENTER.
Type personal intercom number or station name and press ENTER.
From station programming menu type item number for feature and press ENTER.
From prime intercom menu, type personal intercom number and press ENTER.
NOTE: Remember, with this step, you can create an intercom hot line by typing a personal intercom
number of another telephone.
7. When finished, press ESCAPE twice.
8. Type y to accept changes, n to reject them, or r to resume editing and press ENTER.
9. Repeat steps 4−8 for each station or press ESCAPE to end.
7–38 Station Feature Programming
VDT Programming Instructions
7.2.9
IMI66–111
Tone Or Voice Signalling (Tone First)
Description:
Intercom calls are either tone or voice signalled as a first choice with the other mode available
as a second choice. Use this procedure to select the first choice in intercom signalling on a per
station basis.
Programming:
1.
2.
3.
4.
5.
6.
7.
8.
9.
7.2.10
Press CONTROL T for main menu.
From main menu, select stations and press ENTER.
From stations menu, select station programming and press ENTER.
Type personal intercom number or previously assigned name and press ENTER.
From station programming menu, type item number for feature and press ENTER.
Press SPACE BAR for feature value and press ENTER.
When finished, press ESCAPE twice.
Type y to accept changes, n to reject them, or r to resume editing and press ENTER.
Repeat steps 4−8 for each station or press ESCAPE to end.
Call Announce Beeps (Call Announce Tone Bursts)
Description:
You can set the number of call announce tone bursts to be a value of from one to five and you
can do this for each station in the system.
Programming:
1.
2.
3.
4.
5.
6.
7.
8.
9.
Press CONTROL T for main menu.
From main menu, select station and press ENTER.
From stations menu, select station programming and press ENTER.
Type personal intercom number or previously assigned name
for station you wish to program and press ENTER.
From station programming menu, type item number for feature and press ENTER.
Type choice (1–5) and press ENTER.
Press ESCAPE twice.
Type y to accept changes, n to reject them, or r to resume editing and press ENTER.
Repeat steps 4–9 for each station or press ESCAPE to end.
Station Feature Programming 7–39
IMI66–111
7.2.11
VDT Programming Instructions
Default Forward Type
Description:
Use this procedure to arrange the call forward default scheme for individual stations. With this
feature, the system will automatically forward ringing calls to another station after a preset
number of rings. Since this is an automatic forwarding of the calls, the station users do not have
to take any action; however, any user-enabled call forwarding (Section 7.1.5, Call Forward)
that they take at their stations will override this automatic call forwarding. This procedure
determines whether or not intercom busy/RNA call forwarding can take place at a station. You
must also program the number of rings that must occur before this automatic call forwarding
can take place (Section 7.2.13, Flexible Ringing Assignment).
Programming:
1. Press CONTROL T for main menu.
2. From the main menu, select stations and press ENTER.
3. From the stations menu, select station programming and press ENTER.
4. Type personal intercom number or previously assigned name and press ENTER.
5. From the station programming menu, type item number for feature and press ENTER.
6. Press SPACE BAR to enable feature (choose ITCM FWD) and press ENTER.
7. Type y to accept changes, n to reject them, or r to resume editing and press ENTER.
8. Repeat steps 4–10 for each station or press ESCAPE to end.
Intercom Number Forwarded To
Description:
Use this procedure to assign the intercom number of a station to receive another station’s
forwarded calls.
Programming:
1.
2.
3.
4.
5.
6.
7.
8.
9.
Press CONTROL T for main menu.
From main menu, select station and press ENTER.
From stations menu, select station programming and press ENTER.
Type personal intercom number or previously assigned name
for station you wish to program and press ENTER.
From station programming menu, type item number for feature and press ENTER.
Type intercom number for forward to station and press ENTER.
Press ESCAPE twice.
Type y to accept changes, n to reject them, or r to resume editing and press ENTER.
Repeat steps 4–9 for each station or press ESCAPE to end.
Forward Type (For Busy Or Ring - No Answer Calls)
Description:
Use this procedure to arrange what type of calls will forward from the station. You must also
program the number of rings that must occur before this automatic call forwarding can take
place (Section 7.2.13, Flexible Ringing Assignment).
Programming:
1. Press CONTROL T for main menu.
2. From the main menu, select stations and press ENTER.
3. From the stations menu, select station programming and press ENTER.
4. Type personal intercom number or previously assigned name and press ENTER.
5. From the station programming menu, type item number for feature and press ENTER.
6. Press SPACE BAR to enable either personal calls or all calls and press ENTER.
7. When finished, press ESCAPE twice.
8. Type y to accept changes, n to reject them, or r to resume editing and press ENTER.
9. Repeat steps 4–9 for each station or press ESCAPE to end..
7–40 Station Feature Programming
VDT Programming Instructions
7.2.12
IMI66–111
Forward RNA Ring Busy (Enhanced Call Forwarding)
Description:
The call forward feature allows a station user to choose to receive several rings for RNA calls
before the system forwards them. At default, the system immediately forwards calls that reach a
busy station. You can take this programming action to allow calls to a busy station to ring in a
subdued manner before they forward if the user chooses them to do so. This subdued ringing of
calls to a busy station requires an idle intercom number at the busy station. Plus, if you have
assigned group intercoms to the station, you must program them into a hunt list, using the
Section 9.2.2, Intercom Hunt List, procedure, to ensure that this call forward feature will
function properly at station. Refer to Section 7.1.5, Call Forward, for other call forwarding
considerations.
Programming:
1. Press CONTROL T for main menu.
2. From the main menu, select stations and press ENTER.
3. From the stations menu, select station programming and press ENTER.
4. Type personal intercom number or previously assigned name and press ENTER.
5. From the station programming menu, type item number for feature and press ENTER.
6. Press SPACE BAR to enable feature (choose Yes) and press ENTER
7. Type y to accept changes, n to reject them, or r to resume editing and press ENTER.
8. Press ESCAPE and repeat steps 4–6 for other stations
9. When finished, press ESCAPE twice.
10. Type y to accept changes, n to reject them, or r to resume editing and press ENTER.
Operation:
All calls: INTERCOM ✳ 54 plus extension
Personal: INTERCOM ✳ 52 plus extension
Cancel: INTERCOM # 5
Station Feature Programming 7–41
IMI66–111
7.2.13
VDT Programming Instructions
Flexible Ringing Assignments
Program ringing assignments on a per station/per line/per intercom number basis. Ringing can be immediate,
delayed, or special purpose. Use the procedures in this section to customize the ringing features for the system. If
needed, use the Section 6.11.7, Relays (Line Answer From Any Station) procedure to arrange for a relay to track
the ringing of the direct, delayed, day 1, day 2, or night ringing modes (use Section 6.10.18, Day 1, Day 2, And
Night Ringing Begin And End Times to program these ringing modes). Plus, if your installer connects
customer-supplied external paging equipment to the system’s external paging port, use the Section 6.11.6, Relays
(External Paging Equipment Control), procedure to arrange for that equipment to sound the ring signal of any or
all lines.
Direct Ringing
Description:
Use this procedure to choose the line ports that you want to ring at a station as soon as a call
appears. Direct ringing sounds during the day 1 and day 2 time periods but does not ring during
the night ringing mode or during the manual night transfer (of ringing) operation.
Programming:
1. Press CONTROL T for main menu.
2. From main menu, select stations and press ENTER.
3. From stations menu, select station programming and press ENTER.
4. Type personal intercom number or previously assigned name and press ENTER.
5. From station programming menu, type the item number for feature and press ENTER.
6. Press CONTROL E for edit.
7. Type a for add or r for remove and press ENTER.
8. Type line port number 1−128 (type as n,nn,nnn or n–nnn) and press ENTER.
9. When finished, press ESCAPE twice.
10. Type y to accept changes, n to reject them, or r to resume editing and press ENTER.
11 Repeat steps 4−10 for each station or press ESCAPE to end.
Delayed Ringing
Description:
Use this procedure to choose the line ports that you want to ring at a station after waiting a short
time period from when a call appears. Delayed ringing sounds during day 1, day 2 time periods,
during the night ringing mode, and during the manual night transfer (of ringing) operation.
Programming:
1.
2.
3.
4.
5.
6.
7.
8.
9.
Press CONTROL T for main menu.
From main menu, select stations and press ENTER.
From stations menu, select station programming and press ENTER.
Type personal intercom number or previously assigned name and press ENTER.
From station programming menu, type item number for feature and press ENTER.
Press CONTROL E.
Type a for add or r for remove and press ENTER.
Type line port number 1−128 (type as n,nn,nnn or n—nnn) and press ENTER.
When finished, press ESCAPE twice.
7–42 Station Feature Programming
VDT Programming Instructions
IMI66–111
Day 1 Ring
Description:
Use this procedure to choose the line ports that you want to ring at stations during the day 1
ringing mode time period. Refer to the paragraph below titled, Day 1, Day 2, and Night
Ringing Begin and End Times, to set the beginning and ending times of this ringing.
Programming:
1. Press CONTROL T for main menu.
2. From main menu, select stations and press ENTER.
3. From stations menu, select station programming and press ENTER.
4. Type personal intercom number or previously assigned name and press ENTER.
5. From station programming menu, type item number for feature and press ENTER.
7. Type a for add or r for remove and press ENTER.
6. Press CONTROL E to edit.
8. Type line port number 1−128 (n,nn,nnn or n–nnn) and press ENTER.
9. When finished, press ESCAPE twice.
10. Type y to accept changes, n to reject them, or r to resume editing and press ENTER.
11. Repeat steps 4–10 for each station or press ESCAPE to end.
Day 2 Ring
Description:
Use this procedure to choose the line ports that you want to ring at stations during the day 2
ringing mode time period. Refer to the paragraph below titled, Day 1, Day 2, and Night Ringing
Begin and End Times, to set the beginning and ending times of this ringing.
Programming:
1. Press CONTROL T for main menu.
2. From main menu, select stations and press ENTER.
3. From stations menu, select station programming and press ENTER.
4. Type personal intercom number or previously assigned name and press ENTER.
5. From station programming menu, type item number for feature and press ENTER.
6. Press CONTROL E to edit.
7. Type a for add or r for remove and press ENTER.
8. Type line port number 1−128 (type as n,nn,nnn or n–nnn) and press ENTER.
9. When finished, press ESCAPE twice.
10. Type y to accept changes, n to reject them, or r to resume editing and press ENTER.
11. Repeat steps 4−10 for each station or press ESCAPE to end.
Station Feature Programming 7–43
IMI66–111
VDT Programming Instructions
Day 1, Day 2, And Night Ringing Begin And End Times
Description:
With this programming procedure, set the begin and end times of the day 1, day 2, and night
ringing time periods.
Programming:
1. Press CONTROL T for main menu.
2. From main menu, select system and press ENTER.
3. From system menu, select system parameters and press ENTER.
4. From the system parameters menu, select day 1, day 2 or night ringing begin times
and press ENTER.
5. Type times in 24–hour format (hh:mm) and press ENTER.
6. Press ENTER (repeatedly if needed) to place cursor at next time desired setting.
7. Repeat step 5 and press ENTER.
8. Repeat steps 6 and 7 until all times are set and press ENTER.
9. When finished, press ESCAPE twice.
10. Type y to accept changes, n to reject them, or r to resume editing and press ENTER.
11. Repeat steps 4−10 for each station or press ESCAPE to end.
Night Ring (Night Transfer—Of Ringing)
Description:
Choose the line ports that you want to ring, along with the delayed ringing line ports, at stations
during the night ringing mode of operation. The ringing arrangement that you configure here is
the arrangement that is active both during the automatic night ringing time period and whenever
the attendant manually activates the night transfer (of ringing) operation. Do note that the
attendant commanded night ringing period supersedes the automatic night ringing period. Refer
to the above paragraph titled, Day 1, Day 2, and Night Ringing Begin and End Times, to set the
time for the automatic night ringing period.
Programming:
1. Press CONTROL T for main menu.
2. From main menu, select stations and press ENTER.
3. From stations menu, select station programming and press ENTER.
4. Type personal intercom number or previously assigned name and press ENTER.
5. From station programming menu, type item number for feature and press ENTER.
6. Press CONTROL E.
7. Type a for add or r for remove and press ENTER.
8. Type line port number 1−128 (type as n,nn,nnn or n–nnn) and press ENTER.
9. When finished, press ESCAPE twice.
10. Type y to accept changes, n to reject them, or r to resume editing and press ENTER.
11. Repeat steps 4−10 for each station or press ESCAPE to end.
Operation:
From an attendant station, On: INTERCOM ✳ # 0 ✳ 031
Off: INTERCOM ✳ #0 ✳ 032
7–44 Station Feature Programming
VDT Programming Instructions
IMI66–111
Caller ID Ring No-Answer (RNA)
Description:
This feature offers telephone users the ability to review calls that ring at their stations while
they are away. The system stores caller ID RNA records and allows users to review them and
use one-button dialing to return those calls that need returning. The feature also denotes the
identification of the last station that reviewed the records thus helping prevent multiple call
backs to the same number. After users review the caller ID RNA records, the system deletes the
records from their telephones yet retains them in the SMDA storage so that they can look at
them later if they must. For complete caller ID programming, refer to Section 14.1, Caller ID
Programming.
Programming:
1.
2.
3.
4.
Press CONTROL T for main menu.
From main menu, select station and press ENTER.
From stations menu, select station programming and press ENTER.
Type personal intercom number or previously assigned name for station
you wish to program and press ENTER.
5. From station programming menu, type item number for feature and press ENTER.
6. Press CONTROL E for edit table.
7. Type a to add or r to remove and press ENTER.
8. Enter caller ID line port numbers 1–128 (enter n, nn, nnn or n–nnn) to serve feature
at this station and press ENTER.
9. Press ESCAPE three times.
10. Type y to accept changes, n to reject them, or r to resume editing and press ENTER.
11. Repeat steps 4–9 for each station or press ESCAPE to end.
Ring No-Answer Rings
Description:
This procedure sets the amount of rings that sound at one station port before the call rolls over
to ring at another station port. Any system feature that requires a ring no-answer value (for
example, call forwarding) uses the setting that you program here.
The system defaults the ring no-answer value at regular station ports to four rings, and it
defaults ports programmed to function as voice mail ports to three rings. This insure that, at
default, the voice mail equipment will have sufficient time to answer a call before it rolls over
to the next port.
Programming:
1.
2.
3.
4.
5.
6.
7.
8.
9.
Press CONTROL T for main menu.
From main menu, select stations and press ENTER.
From stations menu, select station programming and press ENTER.
Type personal intercom number or previously assigned name
and press ENTER.
From station programming menu, type item number for feature and press ENTER.
Type number of rings 0–6 and press ENTER.
When finished, press ESCAPE twice.
Type y to accept changes, n to reject them, or r to resume editing
and press ENTER.
Repeat steps 4−8 for each station or press ESCAPE to end.
Station Feature Programming 7–45
IMI66–111
VDT Programming Instructions
Personalized Ringing Tone
Description:
Program a station to ring in one of several distinctive tones for proprietary digital telephones
and in one of four distinctive tones for analog telephones. While industry-standard telephones
do not provide personalized ringing, you can set distinctive ringing for them using the Section
7.2.35, Industry-Standard Telephone Support, procedure.
Programming:
1.
2.
3.
4.
5.
6.
7.
8.
9.
Operation:
INTERCOM ✳ ✳ 4 then dial ring code (1–8)
7.2.14
Press CONTROL T for main menu.
From main menu, select stations and press ENTER.
From stations menu, select station programming and press ENTER.
Type personal intercom number or previously assigned name and press ENTER.
From the station programming menu, type item number for feature and press ENTER.
Type ring tone choice and press ENTER.
When finished, press ESCAPE twice.
Type y to accept changes, n to reject them, or r to resume editing and press ENTER.
Repeat steps 4−8 for each station or press ESCAPE to end.
LCD Contrast (Digital Telephones—Only)
Description:
Adjust the intensity of the display on digital LCD speakerphones with this procedure. The user
can also change the display contrast at his or her telephone using instructions provided in the
system user’s guide.
Programming:
1.
2.
3.
4.
5.
6.
7.
8.
9.
Operation:
INTERCOM ✳ ✳ 51–58
Press CONTROL T for main menu.
From main menu, select station and press ENTER.
From stations menu, select station programming and press ENTER.
Type personal intercom number or previously assigned name and press ENTER.
From station programming menu, type item number for feature and press ENTER.
Type 1–8 and press ENTER.
When finished, press ESCAPE twice.
Type y to accept changes, n to reject them, or r to resume editing and press ENTER.
Repeat steps 4−8 for each station or press ESCAPE to end.
7–46 Station Feature Programming
VDT Programming Instructions
7.2.15
IMI66–111
Service Observing
This feature allows a station to enter an in-progress call in an unannounced, muted mode to monitor the
conversation. Use this procedure to give a station service observe capability and make other stations available for
service observing.
Initiating Service Observe
Description:
Allow a station to perform a service observe operation.
Programming:
1.
2.
3.
4.
5.
6.
7.
8.
9.
Operation:
INTERCOM # 03 then dial the extension
Press CONTROL T for main menu.
From main menu, select stations and press ENTER.
From stations menu, select station programming and press ENTER.
Type personal intercom number or previously assigned name and press ENTER.
From station programming menu, type item number for feature and press ENTER.
Press SPACE BAR for feature value and press ENTER.
When finished, press ESCAPE twice.
Type y to accept changes, n to reject them, or r to resume editing and press ENTER.
Repeat steps 4–8 for each station or press ESCAPE to end.
Making A Station Service Observable
Description:
Allow a station to be service observed.
Programming:
1.
2.
3.
4.
5.
6.
7.
8.
9.
Press CONTROL T for main menu.
From main menu, select stations and press ENTER.
From stations menu, select station programming and press ENTER.
Type personal intercom number or previously assigned name and press ENTER.
From station programming menu, type item number for feature and press ENTER.
Press SPACE BAR for feature value and press ENTER.
When finished, press ESCAPE twice.
Type y to accept changes, n to reject them, or r to resume editing and press ENTER.
Repeat steps 4–8 for each station or press ESCAPE to end.
Station Feature Programming 7–47
IMI66–111
7.2.16
VDT Programming Instructions
Day Exception Number/Night Exception Number
Description:
Exception numbers allow stations to dial numbers that they are not normally allowed to dial by
their automatic route selection/toll restriction levels. If the toll restriction table exception
number matches one of the exception numbers that you assign to the station using the following
procedure, the station is allowed to dial the number.
The exception number values that you can assign are 1 through 32 and NONE. You can assign
32 exception numbers to each station. You also must assign one exception number to each toll
restriction table line entry (Section 11.7, Exception Number Programming).
Programming:
1.
2.
3.
4.
5.
7.2.17
Press CONTROL T for main menu.
From main menu, select stations and press ENTER.
From stations menu, select station programming and press ENTER.
Type intercom number or name of station.
From station programming menu, type item number for Day (or Night)
exception number.
6. Type exception numbers 0–32 (n,nn or n–nn) or type 0 for none.
7. Press ENTER for Night (or Day) exception number and repeat step 6.
8. When finished, press ESCAPE twice.
9. Type y to accept changes, n to reject them, or r to resume editing and press ENTER.
10. Press ESCAPE to end.
SOHVA Beeps (SOHVA Tone Bursts)
Description:
You can choose the number of tone bursts that each telephone user hears preceding a SOHVA
message to be from one to six.
Programming:
1.
2.
3.
4.
5.
6.
7.
8.
9.
Press CONTROL T for main menu.
From main menu, select station and press ENTER.
From stations menu, select station programming and press ENTER.
Type personal intercom number or previously assigned name for station and press ENTER.
From station programming menu, type item number for feature and press ENTER.
Type choice (1–6) and press ENTER.
Press ESCAPE twice.
Type y to accept changes, n to reject them, or r to resume editing and press ENTER.
Repeat steps 4–9 for each station or press ESCAPE to end.
7–48 Station Feature Programming
VDT Programming Instructions
7.2.18
IMI66–111
SOHVA Groups
Description:
SOHVA calling groups control the pattern in which station ports receive and/or originate
SOHVA calls to one another. You must first form the SOHVA groups (Section 6.6.3, SOHVA
Groups) and then assign the groups to individual stations with the following procedure.
Programming:
1.
2.
3.
4.
5.
6.
7.
8.
9.
7.2.19
Press CONTROL T for main menu.
From main menu, select stations and press ENTER.
From stations menu, select station programming and press ENTER.
Type personal intercom number or previously assigned name and press ENTER.
Type item number for feature and press ENTER.
Type group number 0–16 (n,nn or n-nn) and press ENTER.
When finished, press ESCAPE twice.
Type y to accept changes, n to reject them, or r to resume editing and press ENTER.
Repeat steps 4-8 for each station or press ESCAPE to end.
Busy On SOHVA
Description:
At default, the system returns a ring back tone to users who make SOHVA calls to busy
stations; however, this procedure allows you to arrange for telephone users to receive a busy
signal instead of the ring back tone. This feature lets non-LCD telephone users know that a
called station is busy.
Programming:
1.
2.
3.
4.
5.
6.
7.
8.
9.
Press CONTROL T for main menu.
From main menu, select stations and press ENTER.
From stations menu, select station programming and press ENTER.
Type personal intercom number or previously assigned name and press ENTER.
From station programming menu, type item number for feature and press ENTER.
Press SPACE BAR for feature setting and press ENTER.
When finished, press ESCAPE twice.
Type y to accept changes, n to reject them, or r to resume editing and press ENTER.
Repeat steps 4–8 for each station or press ESCAPE to end.
Station Feature Programming 7–49
IMI66–111
7.2.20
VDT Programming Instructions
Pick-Up Groups
Description:
Use this procedure to place a number of stations in a call pick-up group so that one station can
answer a call ringing at any other station in the group.
Programming:
1.
2.
3.
4.
5.
6.
7.
8.
9.
Operation:
INTERCOM # 4
7.2.21
Press CONTROL T for main menu.
From the main menu, select stations and press ENTER.
From the stations menu, select station programming and press ENTER.
Type personal intercom number or previously assigned name and press ENTER.
From station programming menu, type item number for feature and press ENTER.
Type desired value for feature (1–16 = groups 1–16, 0 = no group) and press ENTER.
When finished, press ESCAPE twice.
Type y to accept changes, n to reject them, or r to resume editing and press ENTER.
Repeat steps 4-8 for each station or press ESCAPE to end.
Through Dialing (Thru-Dialing)
Description:
This procedure allows DTMF tones that are generated by an external device connected to the
system through necessary interface equipment to pass through the system and out to any line
connection.
Programming:
1.
2.
3.
4.
Press CONTROL T for main menu.
From main menu, select station and press ENTER.
From station menu, select station programming and press ENTER.
Type personal intercom number or previously assigned name of station being programmed
and press ENTER.
5. From station programming menu, type item number for feature and press ENTER.
6. Press SPACE bar for desired setting and press ENTER.
7. When finished, press ESCAPE twice.
8. Type y to accept changes, n to reject them, or r to resume editing and press ENTER.
9 . Repeat steps 4–8 level for each station or press ESCAPE to end.
7–50 Station Feature Programming
VDT Programming Instructions
7.2.22
IMI66–111
Single Line Tap (Single Line Proprietary Telephone TAP Button)
Description:
Use this procedure to set the function of the TAP button on single line proprietary telephones.
Programming:
1.
2.
3.
4.
7.2.23
Press CONTROL T for main menu.
From main menu, select station and press ENTER.
From station menu, select station programming and press ENTER.
Type personal intercom number or previously assigned name of station being programmed
and press ENTER.
5. From station programming menu, type item number for feature and press ENTER.
6. Press SPACE bar for desired setting and press ENTER.
7. When finished, press ESCAPE twice.
8. Type y to accept changes, n to reject them, or r to resume editing and press ENTER.
10. Repeat steps 4–8 level for each station or press ESCAPE to end.
Ringing On Busy (Enhanced Subdued Ringing)
Description:
When a telephone is busy on a call and another call comes to that telephone, the system subdues
the ringing of the second call to a lower volume but allows the call to continue to ring at this
subdued volume until the caller abandons it. The system shortens the ringing of another call to
model 8024S, 8124S, 8012S, and 8112S speakerphones that are busy in the speakerphone mode
to one quick tone burst; however, if these telephones are busy in an off-hook manner
(non-speakerphone mode), the system still subdues the ringing of the second call to a lower
volume and allows the call to continue to ring at this subdued volume until the caller abandons
the call.
If a user does not wish to hear subdued ringing while he or she is busy on a call (even the one
quick tone burst on those particular models that provide it) you can take this programming
action to eliminate all ringing by a second call.
Programming:
1.
2.
3.
4.
5.
6.
7.
8.
Press CONTROL T to return to the main menu.
From main menu, select stations and press ENTER.
From stations menu, select station programming and press ENTER.
Type the personal intercom number or the previously assigned name and press ENTER.
From station programming menu, type the item number for feature and press ENTER.
Press SPACE BAR to eliminate ringing on busy (set option to no) and press ENTER.
When finished press ESCAPE twice.
Type y to accept changes, n to reject them, or r to resume editing and press ENTER to end.
Station Feature Programming 7–51
IMI66–111
7.2.24
VDT Programming Instructions
Allow Ringer Off (Ringer Volume Off)
Description:
On some proprietary telephones, the user selects the ringer volume level by pressing a
rocker-type volume control repeatedly to select one of four different volume levels. The lowest
volume setting is essentially an off condition as the telephone sounds only one low-volume ring
burst when a call rings the station.
Sometimes users would rather not receive even one ring burst. For these cases, program the
system so that it completely silences the ringer at a telephone when its user selects the lowest
volume setting.
Programming:
1.
2.
3.
4.
5.
6.
7.
8.
7.2.25
Press CONTROL T to return to the main menu.
From main menu, select stations and press ENTER.
From stations menu, select station programming and press ENTER.
Type personal intercom number or the previously assigned name and press ENTER.
From station programming menu, type item number for feature and press ENTER.
Press SPACE BAR to turn ringer off (set option to yes) and press ENTER.
When finished press ESCAPE twice.
Type y to accept changes, n to reject them, or r to resume editing and press ENTER to end.
Disabled (Station Disable)
Description:
Disable a station port with this feature. Refer to Section 7.4, Telephone Types, for the
procedure for marking the station port as undefined after you disable the port. Use the Section
7.1.30, Remote Station Disable, procedure to give a station the capability to disable other
stations.
Programming:
1.
2.
3.
4.
5.
6.
7.
8.
9.
Press CONTROL T for main menu.
From main menu, select stations and press ENTER.
From stations menu, select station programming and press ENTER.
Type personal intercom number or previously assigned name and press ENTER.
From station programming menu, type item number for feature and press ENTER.
Press SPACE BAR for feature setting and press ENTER.
When finished, press ESCAPE twice.
Type y to accept changes, n to reject them, or r to resume editing and press ENTER.
Repeat steps 4–8 for each station or press ESCAPE to end.
7–52 Station Feature Programming
VDT Programming Instructions
7.2.26
IMI66–111
Consoles Installed (DSS/BLF Consoles Installed)
Description:
Use this procedure to assign DSS/BLF consoles to a station and to identify the ports that the
consoles occupy.
NOTE: Before you can assign a console and name the console port with this programming step, you must
use the Section 7.4, Telephone Types, programming procedure to identify the type of console and
the station port to which it is assigned.
Programming:
7.2.27
1.
2.
3.
4.
Press CONTROL T for main menu.
From main menu, select station and press ENTER.
From station menu, select station programming and press ENTER.
Type personal intercom number or previously assigned name of station being programmed
and press ENTER.
5. Type item number for the consoles installed and press ENTER.
6. Press SPACE bar for desired setting and press ENTER.
7. Type item number for console ports and press ENTER.
8. Type the port number for console ports (1–192, 0 for none—up to four allowed)
and press ENTER.
9. When finished, press ESCAPE twice.
10. Type y to accept changes, n to reject them, or r to resume editing and press ENTER.
11. Repeat steps 4–10 for each station or press ESCAPE to end.
Programming Port (Database Programming Station)
Description:
This procedure assigns limited database programming ability to a station.
NOTE: You must ensure that there is an LCD speakerphone connected to the station port that you choose
with this feature.
Programming:
1. Press CONTROL T for main menu.
2. From main menu, select stations and press ENTER.
3. From stations menu, select station programming and press ENTER.
4. Type personal intercom number or previously assigned name of station and press ENTER.
5. From station programming menu, type item number for the feature and press ENTER.
6. Press SPACE bar for desired setting and press ENTER.
7. When finished, press ESCAPE twice.
8. Type y to accept changes, n to reject them, or r to resume editing and press ENTER.
9. Repeat steps 4–8 level for each station or press ESCAPE to end.
Station Feature Programming 7–53
IMI66–111
7.2.28
VDT Programming Instructions
Automatic Transfer On Busy
Description:
You can enable automatic attendant transfer on busy for individual station ports if you wish.
With this feature enabled, the system will ring a busy telephone when the voice mail system is
attempting to transfer a call to it thus giving the user the option of leaving his or her present call
and taking the new one. With the feature disabled, the busy telephone is not signalled by the
presence of a new call and the voice mail system will automatically route it to the busy
telephone’s voice mail box. For complete voice mail programming, see Section 14.5, Voice
Mail Programming.
Programming:
1.
2.
3.
4.
5.
6.
7.
8.
9.
7.2.29
Press CONTROL T for main menu.
From main menu, select stations and press ENTER.
From stations menu, select station programming and press ENTER.
Type personal intercom number or previously assigned name of station
being programmed and press ENTER.
From station programming menu, type item number for feature and press ENTER.
Press SPACE bar for desired setting and press ENTER.
When finished press ESCAPE twice.
Type y to accept changes, n to reject them, or r to resume editing and press ENTER.
Repeat steps 4−8 for each station or press ESCAPE to end.
Headset
Description:
This procedure enables the use of a headset at a telephone.
Programming:
1.
2.
3.
4.
5.
6.
7.
8.
9.
Press CONTROL T for main menu.
From main menu, select station and press ENTER.
From station menu, select station programming and press ENTER.
Type personal intercom number or previously assigned name of station being programmed
and press ENTER.
From station programming menu, type item number for feature and press ENTER.
Press SPACE bar for feature setting and press ENTER.
When finished, press ESCAPE twice.
Type y to accept changes, n to reject them, or r to resume editing and press ENTER.
Repeat steps 4–8 for each station or press ESCAPE to end.
7–54 Station Feature Programming
VDT Programming Instructions
7.2.30
IMI66–111
Attendant Position (Alternate Attendant, Overflow Attendant)
Description:
The attendant position station provides incoming call direction, and controls system-wide
operating features. Additionally, the attendant position is responsible for certain programming
features. The system defaults two stations as attendant positions (101 and 102) but it does not
limit the number of attendant positions that it can support. Also refer to Section 6.10.13,
Operator Station.
Programming:
1. Press CONTROL T for main menu.
2. From main menu, select stations and press ENTER.
3. From stations menu, select station programming and press ENTER.
4. Type personal intercom number or previously assigned name and press ENTER.
5. From station programming menu. type item number for feature and press ENTER.
6. Press SPACE bar for setting and press ENTER.
7. Type personal intercom number for alternate attendant (if needed) and press ENTER.
8. Type personal intercom number for overflow attendant (if needed) and press ENTER.
9 . When finished, press ESCAPE twice.
10. Type y to accept changes, n to reject them, or r to resume editing and press ENTER.
11. Repeat steps 4–10 for each attendant position or press ESCAPE to end.
Station Feature Programming 7–55
IMI66–111
7.2.31
VDT Programming Instructions
Extended DTMF Dialing
Description:
You can enable the extended DTMF length dialing feature on a per station basis with this
programming procedure. The system generates DTMF tones of extended length when users take
their telephones off-hook and then wait until after the system sounds the extended dialing tone
burst before they engage automatic dialing. This feature also allows an analog station to
generate extended DTMF tones when its user manually dial numbers at the telephone’s dial pad
after hearing an extended dialing tone burst. Since digital telephones generate a DTMF tone for
as long as the user holds the dial pad button down during manual dialing, this feature is only
applicable on automatically dialed numbers at digital telephones. Refer to the following
paragraph for the procedure that sets the time length of the DTMF tone.
Programming:
1. Press CONTROL T for main menu.
2. From main menu, select stations and press ENTER.
3. From stations menu, select station programming and press ENTER.
4. Type personal intercom number or previously assigned name and press ENTER.
5. From station programming menu, type item number for feature and press ENTER.
6. Press SPACE bar for feature setting and press ENTER.
7. When finished, press ESCAPE twice.
8. Type y to accept changes, n to reject them, or r to resume editing and press ENTER.
9. Repeat steps 4–10 for each station or press ESCAPE to end.
DTMF Extended Dialing (Tone Length)
Description:
Use this programming feature to set the length of the DTMF tones. The system generates
DTMF tones of extended length when users take their telephones off-hook and then wait until
after the system sounds the extended dialing tone burst before they engage automatic dialing
(for example, press speed dial buttons or saved number redial button) at their stations. Also, if
analog telephone users take their telephones off-hook and then wait to begin manually dialing
until after the system sounds the extended dialing tone burst, the system will extend the length
of the manually dialed DTMF tones. After setting this extended DTMF tone length, you must
enable the feature’s use at each station where it is needed by performing the Extended DTMF
Dialing procedures shown above..
Programming:
1.
2.
3.
4.
5.
6.
7.
Press CONTROL T for main menu.
From the main menu, select system and press ENTER.
From the system menu, select timing and press ENTER.
From the system timing menu, type item number for feature and press ENTER.
Press SPACE bar for feature setting and press ENTER to accept setting.
When finished, press ESCAPE twice.
Type y to accept changes, n to reject them, or r to resume editing and press ENTER.
7–56 Station Feature Programming
VDT Programming Instructions
7.2.32
IMI66–111
Softkeys Setup (Interactive Button Support)
Description:
The system provides support for interactive buttons on LCD speakerphones with product codes
of 7010S and 7016S (all revisions), and 7700S (revision H and earlier). The three interactive
buttons and the associated expanded displays provide quick, easy access to system features and
straight-forward button programming without the need for dialing codes. At default, the
interactive button support is disabled; therefore, you must take programming action to enable it.
When you enable them, the system overrides any previous mapped function at the buttons with
this new assignment. If, after you have enabled the support, you take new action to button map
any of the interactive buttons to another assignment, the new assignment will take effect at that
button. In addition, the system will clear the remaining two buttons and disable the interactive
button support. If you replace any of these LCD speakerphones with a non-display telephone,
the system recognizes it as such and does not assign interactive buttons to it. Since the system
allows you to enable interactive buttons with station programming action, it does not provide a
means for assigning interactive buttons with the button mapping procedure. After you have
enabled the interactive buttons, you can look at the button assignments with the button mapping
procedure, and note that the system identifies them as SOFT1, SOFT2, and SOFT3.
Programming:
1.
2.
3.
4.
5.
6.
7.
8.
Press CONTROL T to return to the main menu.
From main menu, select stations and press ENTER.
From stations menu, select station programming and press ENTER.
Type personal intercom number or the previously assigned name and press ENTER.
From station programming menu, type the item number for feature and press ENTER.
Press SPACE BAR to enable interactive buttons (set option to “yes”) and press ENTER.
When finished press ESCAPE twice.
Type y to accept changes, n to reject them, or r to resume editing and press ENTER to end.
Station Feature Programming 7–57
IMI66–111
7.2.33
VDT Programming Instructions
IST Hold Confirmation
Description:
Industry-standard telephones sound a special hold confirmation tone when their users place
calls on hold. Prior to this software release, these telephones returned to intercom dial tone
when their users placed calls on hold. The system defaults with the special confirmation tone
enabled; however, you can disable the feature if you wish. The confirmation tone is three 80 ms.
on –80 ms. off tone bursts repeated at 800 ms. intervals. See Section 7.2.35, Industry-Standard
Telephone Support for other IST programming considerations.
Programming:
1.
2.
3.
4.
5.
7.2.34
From main menu, select stations and press ENTER.
From stations menu, select station programming and press ENTER.
Type personal intercom number or previously assigned name for IST and press ENTER.
From the station programming menu, type item number for feature and press ENTER.
Press SPACE bar to enable or disable feature (yes = enable, no = disable)
and press ENTER.
6. Press ESCAPE twice.
7. Type y to accept changes, n to reject them, or r to resume editing and press ENTER.
8. Repeat steps 3–7 for each station or press ESCAPE to end.
Transfer Ring Cadence
Description:
A telephone user can select the ringing cadence that announces a transferred line call. They
have two choices as follows: Ring cadence one provides a 2 sec. on–4 sec. off tone. Ring
cadence two provides a 0.5 sec.– 5.5sec. off tone. Ring cadence one is available to telephone
users as a default and they can select the other one as they need it. Use this procedure to select
the default cadence for each system station.
Programming:
1.
2.
3.
4.
5.
6.
7.
8.
9.
Press CONTROL T for main menu.
From main menu, select stations and press ENTER.
From stations menu, select station programming and press ENTER.
Type personal intercom number or previously assigned name and press ENTER.
From station programming menu, type item number for feature and press ENTER.
Press SPACE bar to select cadence choice for default.
When finished, press ESCAPE twice.
Type y to accept changes, n to reject them, or r to resume editing and press ENTER.
Repeat steps 4–8 for each station or press ESCAPE to end.
7–58 Station Feature Programming
VDT Programming Instructions
7.2.35
IMI66–111
Industry-Standard Telephone Support
The DXP digital communications system supports the use of industry-standard telephones. It does this through
the use of DXIST-8 and DXIST-16 industry-standard telephone station interface circuit boards and a DXRNG
ring generator assembly. Refer to the Comdial publication IMI89-078, Installation Instructions DXP Digital
Communications System Industry-Standard Telephone Support for installation details. Program the DXP system
to operate properly with industry-standard telephones by assigning values to DXP features using the procedures
given below. They are presented in a typical order of progression but you can perform them in any convenient
order.
IST Hold Confirmation
Description:
Industry-standard telephones sound a special hold confirmation tone when their users place
calls on hold. Prior to this software release, these telephones returned to intercom dial tone
when their users placed calls on hold. The system defaults with the special confirmation tone
enabled; however, you can disable the feature if you wish. The confirmation tone is three 80 ms.
on –80 ms. off tone bursts repeated at 800 ms. intervals
Programming:
1.
2.
3.
4.
5.
From main menu, select stations and press ENTER.
From stations menu, select station programming and press ENTER.
Type personal intercom number or previously assigned name for IST and press ENTER.
From the station programming menu, type item number for feature and press ENTER.
Press SPACE bar to enable or disable feature (yes = enable, no = disable)
and press ENTER.
6. Press ESCAPE twice.
7. Type y to accept changes, n to reject them, or r to resume editing and press ENTER.
8. Repeat steps 3–7 for each station or press ESCAPE to end.
Station Feature Programming 7–59
IMI66–111
VDT Programming Instructions
IST Ring Timeout
Description:
Use this procedure to set the number of times that the system sends a ring signal to an
industry-standard telephone on a system-wide basis. Although the ringing stops at the
industry-standard telephone when the time-out occurs, the system continues to present the call
at the telephone for answering until the caller abandons it.
Programming:
1.
2.
3.
4.
5.
6.
7.
Press CONTROL T for main menu.
From main menu, select system and press ENTER.
From system menu, select timing and press ENTER.
From timing menu, type item number for feature and press ENTER.
Press SPACE bar for time and press ENTER to accept setting.
When finished, press ESCAPE twice.
Type y to accept changes, n to reject them, or r to resume editing and press ENTER.
IST DTMF Receiver Timeout
Description:
You can program the amount of time that the system waits to receive a DTMF tone from an
industry-standard telephone, after the user has lifted the telephone’s handset and before he or
she has pressed a dial pad digit, on a system-wide basis. The system disconnects the telephone
after this time-out occurs. If this happens, the user must hang up the handset and lift it again to
re-establish the dial tone.
Programming:
1.
2.
3.
4.
5.
6.
7.
Press CONTROL T for main menu.
From main menu, select system and press ENTER.
From system menu, select timing and press ENTER.
From system timing menu, type item number for feature and press ENTER.
Press SPACE bar for time and press ENTER to accept setting.
When finished, press ESCAPE twice.
Type y to accept changes, n to reject them, or r to resume editing and press ENTER.
7–60 Station Feature Programming
VDT Programming Instructions
IMI66–111
IST Distinctive Ringing
Description:
An industry-standard telephone can sound one ring cadence for intercom calls and a different
ring cadence for outside calls or it can sound the same ring cadence for both types of calls. You
must select one of these ringing styles on a station class of service basis. All industry-standard
telephones with the same class of service have the same ringing style.
NOTE: Do not enable distinctive ringing for voice mail ports.
Programming:
1.
2.
3.
4.
5.
6.
7.
8.
9.
Press CONTROL T for main menu.
From main menu, select stations and press ENTER.
From stations menu, select COS programming and press ENTER.
Type class of service number (1–32) that corresponds with class of service assigned
to the IST and press ENTER.
From COS programming menu, type row number for IST distinctive ringing
and press ENTER.
Press SPACE bar for feature setting.
When finished, press ESCAPE twice.
Type y to accept changes, n to reject them, or r to resume editing and press ENTER.
Press ESCAPE to end.
IST Flash Time
Description:
You can program, on a system-wide basis, the timed length of the signal that results when a user
of an industry-standard telephone presses and releases the telephone hookswitch (or presses the
TAP button if available on his or her telephone). Often, a signal with a short time length
(typically 500–750 ms) serves to alert the system to receive a feature code (flash) while a signal
with a long time length (typically 1.5–2.0 sec) serves to disconnect the line and re-establish dial
tone (recall). The value that you set with this procedure is the maximum value for recognizing a
flash from an industry-standard telephone. You can also set the minimum value for recognizing
a flash from an industry-standard telephone.
Programming:
1.
2.
3.
4.
5.
6.
7.
8.
Press CONTROL T for main menu.
From main menu, select system and press ENTER.
From system menu, select timing and press ENTER.
From timing menu, type item number for minimum flash time and press ENTER.
Press SPACE bar for minimum time and press ENTER to accept setting.
Press ENTER to select maximum flash time line item.
Press SPACE bar for maximum time and press ENTER to accept setting.
Type y to accept changes, n to reject them, or r to resume editing and press ENTER.
Station Feature Programming 7–61
IMI66–111
VDT Programming Instructions
IST Ringing Per Phase
Description:
While the installer typically connects one industry-standard telephone per IST station port, he or
she can connect two industry-standard telephones per IST station port; however, the telephones
will share the same assigned intercom number. When he or she installs one telephone per port,
you must set the IST ringing per phase feature to 16. When the installer places two telephones
at any IST station port, you must change the IST ringing per phase feature to 8. A setting of 16
allows up to 48 industry-standard telephones per cabinet (main cabinet and expansion cabinet)
to ring simultaneously. A setting of 8 reduces this simultaneous ringing total to 24 telephones
per cabinet. This programming selection is on a system-wide basis.
Programming:
1.
2.
3.
4.
5.
6.
Press CONTROL T for main menu.
From main menu, select system and press ENTER.
From system menu, select system parameters menu, and press ENTER.
From the system parameters menu, type item number for feature and press ENTER.
Press SPACE bar for feature setting and press ESCAPE once.
Type y to accept changes, n to reject them, or r to resume editing and press ENTER.
IST Ringing On Busy
Description:
You can program industry-standard telephones to provide a ringing on busy signal to users.
With this feature, when an IST telephone is busy on a call and another call comes to that
telephone, the system sounds three quick tone bursts in the telephone’s handset receiver. If a
user does not wish to hear the ringing on busy tones while he or she is busy on a call, you can
take this programming action to eliminate it.
Programming:
1.
2.
3.
4.
5.
From main menu, select stations and press ENTER.
From stations menu, select station programming and press ENTER.
Type personal intercom number or previously assigned name for IST and press ENTER.
From the station programming menu, type item number for feature and press ENTER.
Press SPACE bar to enable or disable feature (yes = enable, no = disable)
and press ENTER.
6. Press ESCAPE twice.
7. Type y to accept changes, n to reject them, or r to resume editing and press ENTER to end.
7–62 Station Feature Programming
VDT Programming Instructions
IMI66–111
Internal IST Flash
Description:
If industry-standard telephone users access an outside line using the line group feature and then
they quickly press and release (flash) the telephone’s hookswitch, the IST will react in one of
two different ways depending upon how you program this feature.
With this feature disabled, IST users can flash the hookswitch while on an outside line
and generate a hookflash signal on the outside line; however, they cannot flash the
hookswitch to obtain an intercom dial tone. The previous Section 7.2.35 procedure titled,
IST Flash Time, sets the hookflash signal time. This time determines whether the IST
hookflash signal is long enough to recall the outside line dial tone or short enough to access
the outside line features. Refer to the CO specifications for actual requirements.
With this feature enabled, IST users can flash the hookswitch while on an outside line and
obtain intercom dial tone; however, they must dial ✳ 08 after they flash the hookswitch if
they need to generate a hookflash signal on the outside line.
Programming:
1.
2.
3.
4.
5.
6.
7.
8.
9.
Press CONTROL T for main menu.
From main menu, select stations and press ENTER.
From stations menu, select COS programming and press ENTER.
Type class of service number (1–32) that corresponds with class of service assigned
to the IST and press ENTER.
From COS programming menu, type row number for IST distinctive ringing
and press ENTER.
Press SPACE bar for feature setting.
When finished, press ESCAPE twice.
Type y to accept changes, n to reject them, or r to resume editing and press ENTER.
Press ESCAPE to end.
IST Ringing Patterns
Description:
You can program the ringing pattern for either IST ring mode one or IST ring mode two. Mode
one causes a two-second ring phase while mode two causes a shorter one second ring phase.
For this feature to function properly, insure that the DXIST (industry-standard telephone
interface board) contains firmware revision 2C or higher
Programming:
1.
2.
3.
4.
5.
6.
7.
Press CONTROL T for main menu.
From main menu, select system and press ENTER.
From system menu, select system parameters and press ENTER.
Select IST ring mode from the system parameters and press ENTER.
Press SPACE bar to toggle between mode 1 (default) and mode 2.
When finished, press ENTER.
Press ESCAPE twice to end.
Station Feature Programming 7–63
IMI66–111
VDT Programming Instructions
IST Ring Frequency
Description:
The system will allow you to set a ring frequency of 25 Hz for international applications or set a
ring frequency of 21 Hz for domestic applications. Choose a setting that matches the ring
frequency of the installed ring generator.
Programming:
1.
2.
3.
4.
5.
6.
7.
7.2.36
Press CONTROL T for main menu.
From main menu, select system and press ENTER.
From system menu, select system parameters and press ENTER.
Select IST ring frequency from the system parameters and press ENTER.
Press SPACE bar to toggle between choices of 21 Hz and 25 Hz.
When finished, press ENTER.
Press ESCAPE twice to end.
Ring Back On Busy
Description:
In systems operating with software releases prior to 8.B, when someone calls another telephone
and the calling party is busy on an outside line, the caller hears a ring back tone—not a busy
tone. When the caller is using a non-display telephone he or she has no means of knowing the
busy status of the called party. (Remember, LCD speakerphones display called party status—
for details on this feature, see Section 7.1.39, Allow Busy Display.)
With software release 8.B, you can take programming action that allows callers to hear a busy
tone instead of a ring back tone when they call a party who is busy on an outside line.
Programming:
1.
2.
3.
4.
5.
6.
7.2.37
Press CONTROL T to return to the main menu.
From main menu, select stations and press ENTER.
From stations menu, select station programming and press ENTER.
Type personal intercom number or previously assigned name and press ENTER.
From station programming menu, type the item number for feature and press ENTER.
Press SPACE BAR to choose setting( no = busy tone, yes = ring back tone)
and press ENTER.
7. When finished press ESCAPE twice.
8. Type y to accept changes, n to reject them, or r to resume editing and press ENTER to end.
Line Out Softkey Option
Description:
Beginning with software release 9A, you can select between two different interactive button
menu options that LCD speakerphones display when connected to outbound lines for outgoing
calls. Specifically, this action substitutes a release (RLSE) button for the automatic redial
(ARDL) button. This feature enhances DXP installations within the international community
because some nations have specifications in place that disallow automatic redialing.
Programming:
1.
2.
3.
4.
5.
Press CONTROL T to return to the main menu.
From main menu, select stations and press ENTER.
From stations menu, select station programming and press ENTER.
Type personal intercom number or previously assigned name and press ENTER.
From station programming menu, type the item number for line out softkey option
and press ENTER.
6. Press SPACE BAR to choose setting(CONF SAVE ARDL or CONF SAVE RLSE)
and press ENTER.
7. When finished press ESCAPE twice.
8. Type y to accept changes, n to reject them, or r to resume editing and press ENTER to end.
7–64 Station Feature Programming
VDT Programming Instructions
7.3
IMI66–111
Square/Non-Square System (Button Mapping By Station)
Description:
The system assigns certain functions to each of the station buttons as a default condition.
Re-assign the button functions with this programming feature. You can assign functions at a
first level or at a second level at each button. Assign functions at the first level that require
status light feedback because the system does not provide status light feedback to buttons at the
second level (press CONTROL N to display the second level).
You can also use this procedure to map the buttons on a DSS/BLF console (press CONTROL N
to display the console buttons) but first you must use the Section 7.2.26, Console Installed,
procedure to assign the console to the station and name the console port.
Programming:
To map the telephone buttons,
1. Press CONTROL T for main menu.
2. From main menu, select stations and press ENTER.
3. From stations menu, select button mapping and press ENTER.
4. Type prime intercom number or previously assigned name and press ENTER.
(Screen presents current button map for review.)
5. Type first level button code (L1–L25, 0–9) and press ENTER.
6. Type mnemonic of feature from list (below) and press ENTER. (Press and hold SHIFT
and type ? for mnemonic definitions—press any key to return to button map.)
NOTE: If you press ENTER without first typing a mnemonic, the system “blanks” that button. Users can
program “blanked” buttons as personal speed dial buttons.
7. Repeat steps 5 and 6 for all desired buttons.
8. Press CONTROL N and repeat steps 5 and 6 for second level (or DSS/BLF console).
9. Press ESCAPE and repeat steps 4–8 for each station.
10. When finished, press ESCAPE twice.
To map dial pad buttons with speed dial numbers,
1. Repeat steps 1 through 4 from the previous procedure.
2. Type dial pad button number (1–0) and press ENTER.
3. Type i for intercom, l for line, g for line group, or p for prime line or last line used, or a for
automatic route selection and press ENTER.
4. Type 1–128 to choose line or type 1–16 to choose line group and press ENTER.
5. Type speed dial number (up to 16 digits) and press ENTER.
6. Repeat steps 1–4 for all desired dial pad buttons and then repeat steps 7–9 from the
previous procedure.
Station Feature Programming 7–65
IMI66–111
7.3.1
ACCT
ALTRN
ANSWER
APAGE
ARD
ARECD
ARING
AUTH
BOTH
CAMP
CID
DND
DPKUP
DSTAT
EXOVR
FEATR
FWD-A
FWD-P
FWDRA
FWDRP
GPLSN
GPKUP
HDST
HOLD
ITCM
I####
LCDMS
LNG##
LN###
LOCK
MMEPG
MSGWT
MUSC#
NIGHT
OAI##
OVERFL
PAGE#
PARK#
PRVCY
QUEUE
RLSE
RSP##
S-OBS
SAVE
SDIAL
SILNT
SOHVA
SPLIT
SRIAL
SYSST
TAFS#
TBUSY
TRACK
VABLK
VOLSV
XVM##
VDT Programming Instructions
Feature Mnemonic List
(account code button): allows users to enter an account code
(alternate attendant button): places station in alternate attendant mode
(answer button): answers a ringing call
(auxiliary page button): allows auxiliary page operation (model 8024S and 7700S–rev I and later)
(automatic redial button): redials last dialed number 10 times with one minute off time
(auxiliary record button): allows auxiliary record operation (model 8024S and 7700S–rev I and later)
(auxiliary ring button): allows auxiliary ring operation (model 8024S and 7700S–rev I and later)
(authorization code button): prompts for authorization code entry
(both button): conferences current party with last party placed on hold
(camp on button): engages camp on feature at busy station or line
(caller ID button): sends caller ID RNA records to LCD
(do not disturb button): enables/disables do not disturb mode
(directed call pick up button): picks up call ringing at another station
(DSS status button): selects station DSS status view (line and intercom or just intercom)
(executive override button): allows executive override of another station
(feature button): use with feature code to access certain features
(forward all button): enable/disable all call forwarding
(forward personal button): enable/disable prime line and personal intercom call forwarding
(forward all RNA button): enable/disable all call after RNA forwarding
(forward personal RNA button): enable/disable prime line and personal intercom calls after RNA forwarding
(group listen button): allows group listen operation (digital multiline telephones)
(group pick up button): picks up a call that rings anywhere within a group of stations
(headset button): enables/disables headset mode
(hold button): places current call on hold and scrolls list of held calls
(intercom button): accesses personal intercom number
(intercom number button): group intercom number or station DSS
(LCD messaging button): enables/disables LCD message feature
(line group button 1–16): accesses one of 16 line groups
(line button 1–128): accesses one of 128 lines
(lock button): prevents/allows station use (prevents station use until someone dials an authorization code)
(meet me page button): answers a page by meeting intercom paging party on line
(message waiting button): turns on/turns off message waiting light at another station
(music source button 1, 2): turns on/turns off background music
(night mode button): allows attendant to place system in night transfer (of ringing) mode
(open architecture button): special Enterprise functions (used with Total Control PC Attendant and Enterprise Toolkit options)
(overflow button): turns on/turns off overflow mode
(paging zone button 1–8): allows group paging
(park orbit button 1–9): parks and retrieves calls
(privacy button): releases privacy on line so another station can join a call
(queue button): queues station at busy line group to await idle line
(release button): disconnects current call
(response button 1–30, S = universal): sends response message to another station for SOHVA and message deposit
(service observe button): enables station to service observe another station
(dynamic save button): saves last dialed number and line on which it was dialed
(speed dial): saves often dialed number at a button
(silent ringer button): mutes ringing for current call
(SOHVA button): sends SOHVA to another station
(split button): allows station user to talk to two different parties
(serial call button): transfers a serial call to specified stations
(system status report button): indicates system status report
(night answer button 1–4, S= all calls): answers call indicated by system’s ringing relay
(line test busy button): views status of busy line
(Tracker pager activate button): sends message to pager display
(voice announce block button): blocks/allows voice announcements
(save volume button): saves volume settings (digital multiline telephones)
(transfer to voice mail button 1–32): transfers call to voice mail box when used with DSS button
NOTE: Many of the feature buttons require programming action before they can
function as described.
7–66 Station Feature Programming
VDT Programming Instructions
7.4
IMI66–111
Telephone Types (Phone Types)
Description:
This programming feature allows you to identify the particular type of system telephone
equipment that you or your installer will connect to each station port.
You can also mark the station port equipment as undefined so that the system will not test the
port for a specific type of equipment and will not include the port in any menu presentations.
Also refer to Section 7.2.25, Disabled, for the procedure for disabling a station port.
Programming:
1.
2.
3.
4.
5.
Press CONTROL T for main menu.
From main menu, select stations and press ENTER.
From stations menu, select station programming and press ENTER.
From station programming menu, select phone types and press ENTER.
From the phone types menu, select desired equipment or none
(for undefined) and press ENTER.
NOTE: Depending upon which equipment you choose, the system will present different sub-menus that
allow you to further define the equipment as to the quantity of lines it can serve, whether it is a
speakerphone, whether it is a DSS/BLF console, and other defining characteristics. Follow the
sub-menu prompts and press ENTER after you have typed each selection.
6. Type the station port number (1–192) and press ENTER.
7. Press ESCAPE to end.
ExecuTech Telephone Types
DXP Menu List
Product Code
23 Line
6620, 6620E, 6620S, 6620T,
22 Line
6614, 6614E, 6614S, 6614T
17 Line
6600E, 6600S
Proprietary Single Line
6701X
32-Button Console
DB32S
70-Button Console
DB70
ATI-X
ATI-X
OPX-X
OPX-X
VMI-X
VMI-X
Comdial Express Telephone Types
DXP Menu List
Product Code
19 Line
6116X, 6116S, 6016S
10 Line
6110X, 6110S, 6010S
2 Line
6102X
Proprietary Single Line
6701X
32-Button Console
XB32X
64-Button Console
XB64X
ATI-X
ATI-X
OPX-X
OPX-X
VMI-X
VMI-X
ExecuTech 67xx Telephone Types
DXP Menu List
Product Code
14 Line
6714S, 6714X
12 Line
6700S
6 Line
6706X
2 Line
6702X
SLPS w/ Autodials
6709A*
32-Button Console
EB32X
DigiTech Telephone Types
DXP Menu List
Product Code
24 Line
7700S, 7714S, 7714X
Rev H and later
22 Line
7714X, 7714S
Rev H and earlier
17 Line
7700S
Single Line
7701X
32-Button Console
DD32X
Americom Telephone Types
DXP Menu List
Product Code
19 Line
7016S, 7116S, 7116X
10 Line
7010S, 7110S, 7110X
2 Line
7102X
Single Line
6701X
32-Button Console
not currently available
64-Button Console
XD64X
ATI-D-1PT
ATI-D-1PT
Impact Telephone Types
DXP Menu List
24 Line
12 Line
Single Line
64-Button Console
Product Code
8024S, 8124S
8012S, 8112S, 8112N
8101N
IB64X
Wireless Telephone Type
DXP Menu List
Wireless
Product Code
900MX
* Use the Section 7.3, Square/Nonsquare System, procedure to “blank” the 12 speed dial buttons
on this telephone so that users can custom program them for personal use.
Station Feature Programming 7–67
IMI66–111
VDT Programming Instructions
7.5
Copy Model COS, Station, Button Map (Block Programming)
7.5.1
Block Programming, Class-Of-Service
Description:
Program some or all class-of-service categories to match the programming of a model
class-of-service category.
Programming;
1.
2.
3.
4.
5.
7.5.2
Press CONTROL T for main menu.
From the main menu, select stations and press ENTER.
From the station menu, type item number for feature and press ENTER.
Select model COS by typing COS number 1-32 for source COS and press ENTER.
Type COS numbers of destination COS(s) (n,nn or n–nn) and press ENTER.
Values of source COS is assigned to destination COS(s), and programming is ended.
Block Programming, Station Features
Description:
Program some or all stations to have the same features as a model station. The system does not
copy the following features from the model station:
- station name,
- intercom numbers,
- personal speed dial numbers,
- DSS/BLF console installed,
- console port,
- alternate attendant,
- overflow attendant,
- interactive button support.
Programming:
1.
2.
3.
4.
7.5.3
Press CONTROL T for main menu.
From the main menu, select stations and press ENTER.
From the station menu, select model station and press ENTER.
Type personal intercom number or previously assigned name of source station
and press ENTER.
5. Type personal intercom numbers or previously assigned names of destination
stations (nnn,nnn or nnn–nnn) and press ENTER. Values of source station is assigned to
destination stations, and programming is ended.
Block Programming, Button Mapping
Description:
Program some or all stations to have the same button features as a model station.
Programming;
1.
2.
3.
4.
Press CONTROL T for main menu.
From the main menu, select stations and press ENTER.
From stations menu, type item number for feature and press ENTER.
Type personal intercom number or previously assigned name of
source station and press ENTER.
5. Type personal intercom numbers or previously assigned names of
destination stations (nnn,nnn,or nnn–nnn) and press ENTER.
Button map of source station is assigned to buttons of destination stations,
and programming is ended.
7–68 Station Feature Programming
VDT Programming Instructions
IMI66–111
Programming Line Features
8
•
Line Programming
•
Line Group Programming
•
Copy Model Line (Block Programming, Line) . . . . . . . 8.3
•
Direct Inward Dialing (DID) Support . . . . . . . . . . . 8.4
•
Ground Start Line Support . . . . . . . . . . . . . . . 8.5
•
Loop Start Line Support . . . . . . . . . . . . . . . . 8.6
•
Tie Line Support . . . . . . . . . . . . . . . . . . . 8.7
•
Direct Inward System Access Programming . . . . . . . . 8.8
•
Programming The T1 Parameters
. . . . . . . . . . . . . . . . . . 8.1
. . . . . . . . . . . . . . . 8.2
. . . . . . . . . . . . 8.9
Line Feature Programming 8–1
IMI66–111
VDT Programming Instructions
8.1
Line Programming
8.1.1
Line Name
Description:
You can assign a name to a line. A name shows in the display of an LCD speakerphone as a
identification aid. A valid name is composed of any seven alpha-numeric characters but the
first character must be an alphabetic character.
Programming:
To assign a name to a line,
1. Press CONTROL T for main menu.
2. From main menu, select lines and press ENTER.
3. From lines menu, select line programming and press ENTER.
4. Type line port number 1−128 number or previously assigned name and press ENTER.
5. From line programming menu, type item number for feature and press ENTER.
6. Type name (a–z, A–Z, 0–9) and press ENTER. A name can be up to seven characters long.
7. When finished, press ESCAPE twice.
8. Type y to accept changes, n to reject them, or r to resume editing and press ENTER.
9. Repeat steps 4−8 for each line port or press ESCAPE to end.
8.1.2
Line Type
Description:
Condition the line port as to the type of line or function that the port serves.
Programming:
1.
2.
3.
4.
5.
6.
7.
8.
9.
Press CONTROL T for main menu.
From main menu, select lines and press ENTER.
From lines menu, select line programming and press ENTER.
Type line port number 1−128 or previously assigned name and press ENTER.
From the line programming menu, type item number for feature and press ENTER.
Press SPACE bar for feature setting and press ENTER to accept setting.
When finished, press ESCAPE twice.
Type y to accept changes, n to reject them, or r to resume editing and press ENTER.
Repeat steps 4−8 for each line port or press ESCAPE to end.
Ground Start Line
Refer to Section 8.5, Ground Start Line Support, for a discussion about ground start lines.
Loop Start Line
Refer to Section 8.6, Loop Start Line Support, for a discussion about loop start lines.
E&M Tie Line
Refer to Section 8.7, Tie Line Support, for a discussion about E&M tie lines.
DID Line
Refer to Section 8.8, Direct Inward System Access (DISA) Programming for a discussion about DID lines.
Auxiliary Port
If you type-name a line port as an auxiliary port, you condition the line port to interface with external paging
equipment instead of a telephone line.
8–2 Line Feature Programming
VDT Programming Instructions
IMI66–111
E&M DNIS Line
Description:
Dialed Number Identification Service (DNIS) is a T1 service feature for E&M lines. Long
distance carriers offer DNIS as a feature to dial 800 and dial 900 lines. DNIS identifies the
numbers that callers dial to reach an internal telephone system. Businesses served by a dial 800
or dial 900 service allow calls to ring on any available line within an assigned block of lines and
then have their internal telephone system process the DNIS information to route the calls to
their proper destinations.
The common carrier supplies DNIS information as DTMF digits. When the DNIS feature is
combined with the Automatic Number identification (ANI) feature, the common carrier delimits
the ANI information from the DNIS routing information with the asterisk (✳) tone so that the
DXP system can process each portion properly.
The DXP uses information that you program in the DID/DNIS translation table to route the call
to the proper intercom number. The system also sends the called number information to the
SMDR/SMDA line report and makes the information available to devices that are connected to
the DXP’s Open Architecture Interface (OAI).
As a single service, if the call routes to an LCD speakerphone, the speakerphone’s display
shows the name that you programmed in the DID/DNIS translation table. If you have
programmed no name there, the display shows the DNIS/DID block name that you assigned to
the DID/DNIS block. If you have programmed no name there, the display shows the processed
DNIS digits. (As a DNIS/ANI combined service, the display shows the processed ANI digits.)
E&M DNIS lines access the Direct Inward System (DISA) feature when the DNIS digits
translate into the DISA access code.
Since the DXP system supports the DNIS only on tone dial lines, it supports both wink start and
delay start protocols but does not support the immediate start protocol.
Programming:
Program the line type to be E&M DINS using the Section 8.1.2, Line Type, procedure.
Program the E&M DNIS tie line attributes using the Section 8.4.3, DID/DNIS Programming,
procedure.
Program the DID/DNIS translation table using the Section 8.4.4, DID/DNIS Translation Table,
procedure.
Line Feature Programming 8–3
IMI66–111
8.1.3
VDT Programming Instructions
Line Disable
Description:
Take a line port out of service because of defect or other reason using this programming choice.
Programming:
1.
2.
3.
4.
5.
6.
7.
8.
9.
8.1.4
Press CONTROL T for main menu.
From main menu, select lines and press ENTER.
From line menu, select line programming and press ENTER.
Type line port 1−128 or previously assigned name and press ENTER.
From line programming menu, type item number for feature and press ENTER.
Press SPACE bar for feature setting.
When finished, press ESCAPE twice.
Type y to accept changes, n to reject them, or r to resume editing and press ENTER.
Repeat steps 4–8 for each line port or press ESCAPE to end.
Music Or Tone On Hold
Description:
With this feature enabled, the system will supply music, tone bursts or other audio information
to callers while they are on hold. The music or information source is external to the common
equipment and is customer supplied. The system will accept two music sources. You can use
one source for this feature and the other source for the background music feature discussed in
Section 7.1.3, Background Music. When the system supplies tone bursts to callers while they
are on hold, it sounds two .1 second long tone bursts separated by a .1 second interval of
silence. It repeats this tone burst sequence every 5 seconds.
Programming:
1.
2.
3.
4.
5.
6.
7.
8.
Press CONTROL T for main menu.
From main menu, select lines and press ENTER.
From the lines menu, select line programming and press ENTER.
From line programming menu, type item number for feature and press ENTER.
Press SPACE bar for feature setting.
When finished, press ESCAPE twice.
Type y to accept changes, n to reject them, or r to resume editing and press ENTER.
Repeat steps 4–7 for each line or press ESCAPE to end.
8–4 Line Feature Programming
VDT Programming Instructions
8.1.5
IMI66–111
Ringback On Transfer
Description:
Beginning with software release 8C, installers have the ability to control what outside parties
hear while the system transfers their calls to an internal extension. Prior to this software release,
outside parties hear whatever the music on hold source provides. With software release 8C,
programmers can select ringback tone in place of music on hold on a per line basis.
Programming:
1.
2.
3.
4.
5.
8.1.6
Press CONTROL T for main menu.
From main menu, select lines and press ENTER.
From the lines menu, select line programming and press ENTER.
Type line port number (1–128) or name and press ENTER.
From line programming menu, type item number for ringback on transfer
and press ENTER.
6. Press SPACE bar for feature setting and press ENTER
7. Type y to accept changes, n to reject them, or r to resume editing and press ENTER.
8. Repeat steps 4–7 for each line or press ESCAPE to end.
Automatic Privacy (Privacy Release)
Description:
Assign privacy release to a line so that a user can press the privacy button on his or her
telephone and change a private line into a non-private one as needed. When a line is private, a
station user has exclusive use of it during a call. Also refer to the Section 7.3,
Square/Nonsquare System—Button Mapping By Station, procedure to map a privacy button on
the user’s telephone.
Programming:
1.
2.
3.
4.
5.
6.
7.
8.
9.
Press CONTROL T for main menu.
From the main menu, select lines and press ENTER.
From the lines menu, select line programming.
Type line port number (1−128) or name and press ENTER.
From the line programming menu, type item number for feature and press ENTER.
Press SPACE bar for desired feature setting.
When finished, press ESCAPE twice.
Type y to accept changes, n to reject them, or r to resume editing and press ENTER.
Repeat steps 4−8 for each line port or press ESCAPE to end.
Line Feature Programming 8–5
IMI66–111
8.1.7
VDT Programming Instructions
SMDR Record
Description:
When you enable this feature, the system stores SMDR records for the specified line. Refer to
Section 10, SMDA/SMDR Programming, for other SMDA/SMDR programming considerations.
Programming:
1.
2.
3.
4.
5.
6.
7.
8.
9.
8.1.8
Press CONTROL T for main menu.
From main menu, select lines and press ENTER.
From lines menu, select line programming and press ENTER.
Type line port number (1−128) or name and press ENTER.
From line programming, type item number for feature and press ENTER.
Press SPACE bar for feature setting.
When finished, press ESCAPE twice.
Type y to accept changes, n to reject them, or r to resume editing and press ENTER.
Repeat steps 4−8 for each line port or press ESCAPE to end.
Cost Incoming
Description:
If you have arranged for the system to cost calls, you can arrange for it to also cost incoming
calls on a per line basis. You can arrange for the costing to begin as soon as the call arrives in
the system , begin after the user answers the call or begin after a programmed delay. Plus, you
can pick the call rate table that you want the system use when it costs the call. Refer to Section
12, Enabling Automatic Route Selection, for other automatic route selection programming
considerations.
Programming:
1.
2.
3.
4.
5.
6.
Press CONTROL T for main menu.
From the main menu, select lines and press ENTER.
From the lines menu, select line programming.
Type line port number (1−128) or name and press ENTER.
From the line programming menu, type item number for feature and press ENTER.
From cost incoming prompt, press SPACE bar for desired feature setting
and press RETURN.
7. From incoming cost delay prompt, press SPACE bar for desired feature setting
and press ENTER.
8. From incoming cost route prompt, type 1–32 for desired rate table.
9. When finished, press ESCAPE twice.
10. Type y to accept changes, n to reject them, or r to resume editing and press ENTER.
11. Repeat steps 4−8 for each line port or press ESCAPE to end.
8–6 Line Feature Programming
VDT Programming Instructions
8.1.9
IMI66–111
Pad Level—Transmit, Receive
(Gain And Attenuation Settings For Line Transmit And Receive)
Description:
This feature enhances the DXPT1 digital carrier transmission option, the pad level
programming feature adjusts voice levels for both the transmit and receive circuits in the
individual channels.
The choices include: Gain 2, Gain 1, Nominal, Loss 1, Loss 2, Loss 3, Loss 4, and Loss 5.
These settings provide an approximate +6 to -15 dB range of choices. Starting at the Nominal
setting, each gain level represents an approximate 3 dB amplification of the signal level from
the previous setting, and each loss level represents an approximate 3 dB attenuation of the
signal level from the previous setting. Because digital transmission does not lose volume level
as readily as analog transmission does, it is likely that the receive level may be noticeably
higher when using the T1 option. Therefore, you may need to select a low setting such as Loss 2
for the voice level receive parameter when programming this feature for T1 lines that are being
used exclusively for voice transmission. Further, if you choose a setting to increase the receive
gain, you should carefully examine speakerphone operation. It is possible to select a receive
gain that will, under certain conditions, interfere with proper speakerphone operation.
Programming:
1.
2.
3.
4.
5.
Press CONTROL T for main menu.
From main menu, select lines and press ENTER.
From the lines menu, select line programming and press ENTER.
Type line port number (1–128) or name and press ENTER.
From line programming menu, type item number for pad level—transmit
and press ENTER.
6. Press SPACE bar for feature setting and press ENTER for pad level—receive.
7. Press SPACE bar for feature setting.
8. Press ESCAPE twice.
9. Type y to accept changes, n to reject them, or r to resume editing and press ENTER.
10. Repeat steps 3–9 for each line or press ESCAPE to end.
Line Feature Programming 8–7
IMI66–111
8.1.10
VDT Programming Instructions
Pad Level—DISA
(Gain Setting For DISA Lines)
Description:
Callers that use the DISA feature to access a trunk group and place calls (trunk–to–trunk
calling) may experience low audio levels on their calls due to the normal line resistance of CO
lines. While low audio level is usually only noticeable on long line loops. Software 8C adds
+3dB of gain to the DISA lines as a default setting, and provides a means for you to disable this
gain if necessary.
The software enhancement also provides a means by which DISA callers can preselect the gain
on a DISA line before they select the line for use. They can dial a code to select either 0dB,
+3dB, or +6dB of gain.
NOTE: The unamplified line-to-line DISA connections often exhibit low audio levels due to double loop
copper losses. While adding gain to these connections will sometimes improve audio signal
levels, the added gain may also result in circuit instability in some connections. This instability
presents itself as a singing sound that can interfere with dialing or voice communications. If
callers experience dialing problems or hear singing in their calls, you may need to disable the
pad level for the DISA line or they may need to select a lower gain setting for use.
Programming:
1.
2.
3.
4.
5.
Press CONTROL T for main menu.
From main menu, select lines and press ENTER.
From the lines menu, select line programming and press ENTER.
Type line port number (1–128) or name and press ENTER.
From line programming menu, type item number for pad level—DISA
and press ENTER.
6. Press SPACE bar for feature setting and press ENTER
7. Type y to accept changes, n to reject them, or r to resume editing and press ENTER.
9. Repeat steps 4–7 for each line or press ESCAPE to end.
8–8 Line Feature Programming
VDT Programming Instructions
8.1.11
IMI66–111
Dialing Mode
Description:
Program the line port to match either a DTMF tone or a rotary (pulse) dialing line as supplied
by the central office (CO).
Programming:
1.
2.
3.
4.
5.
6.
7.
8.
Press CONTROL T for main menu.
From main menu, select lines and press ENTER.
From lines menu, select line programming and press ENTER.
Type line port number (1−128) or name and press ENTER.
From line programming menu, type item number for feature and press ENTER.
Press SPACE bar for feature setting and press ENTER to accept setting.
When finished, press ESCAPE twice.
Type y to accept changes, n to reject them, or r to resume editing
and press ENTER.
9. Repeat steps 4−8 for each line port or press ESCAPE to end.
Pulse Dial Make/Pulse Dial Break (Pulse Dial Ratio)
Description:
Use this procedure to set the make/break ratio for rotary dial signalling to match rotary dial line
requirements. You can set the line make/break ratio for rotary dial (pulse dial) signalling in a
more flexible manner to match many different rotary dial line requirements. You can set the
make time and the break time independently in one msec. increments to any time from one to 99
msec.
Programming:
1.
2.
3.
4.
5.
6.
7.
8.
9.
Press CONTROL T for main menu,
From main menu, select system and press ENTER.
From system menu, select timing and press ENTER,
From timing menu, type item number for line pulse make and press ENTER.
Type desired time (1–99) and press ENTER,
From timing menu, type item number for line pulse break and press ENTER.
Type desired time (1–99) and press ENTER.
Press ESCAPE twice,
Type y to accept changes, n to reject them, or r to resume editing and press ENTER.
Pulse Dial Interdigit Time
Description:
You can set the interdigit time between dial pulses when the system pulse-dials a number over a
line. The DXP defaults this time to 200 msec. and provides a range of timing values between
100 msec. and one sec. that you can set in 100 msec. increments.
Programming:
1. Press CONTROL T for main menu,
2. From main menu, select system and press ENTER.
3. From the system menu, select timing and press ENTER.
4. From timing menu type item number for feature and press ENTER.
5. Press SPACE bar to select desired time and press ENTER to select setting.
6. Press ESCAPE twice,
7. Type y to accept changes, n to reject them, or r to resume editing and press ENTER.
Line Feature Programming 8–9
IMI66–111
8.1.12
VDT Programming Instructions
Abandon Hold Release
Description:
When a distant party abandons a hold condition and his or her station disconnects from the line,
the central office sends a forward disconnect signal to the system. This signal is either 50 or
350 msec. in length. Use this procedure to program the line port to match the central office
signal length.
Programming:
1.
2.
3.
4.
5.
6.
7.
8.
9.
8.1.13
Press CONTROL T for main menu.
From main menu, select lines and press ENTER.
From lines menu, select line programming and press ENTER.
Type line port number (1−128) or name and press ENTER.
From line programming menu, type item number for feature and press ENTER for feature.
Press SPACE bar for feature setting and press ENTER to accept setting.
When finished, press ESCAPE twice.
Type y to accept changes, n to reject them, or r to resume editing and press ENTER.
Repeat steps 4−8 for each line port or press ESCAPE to end.
Positive Disconnect Time
Description:
When a station drops a line after its user has finished using it, the system waits a programmable
length of time before it allows another station to access that line. This time delay helps prevent
such conditions as call-collision. The system holds the line status light on during the time out
period.
Programming
1.
2.
3.
4.
5.
6.
7.
8.
9.
Press CONTROL T for main menu.
From main menu, select lines and press ENTER.
From lines menu, select line programming and press ENTER.
Type line port number 1−128 or previously assigned name and press ENTER.
From line programming menu, type item number for feature and press ENTER.
Press SPACE bar for feature setting and press ENTER to accept setting.
When finished, press ESCAPE twice.
Type y to accept changes, n to reject them, or r to resume editing and press ENTER.
Repeat steps 4−8 for each line port or press ESCAPE to end.
8–10 Line Feature Programming
VDT Programming Instructions
IMI66–111
8.1.14 Toll Groups
Description:
You must identify the individual lines that you do not want users to use when they dial toll
restricted numbers. Do this by first assigning the lines to toll groups and then assigning those
toll groups to the restricted number. There are 32 toll groups available for line assignment.
Assign one, several, or all lines to any desired toll group or combination of toll groups as
needed. See Section 11, Programming Toll Restriction, for complete toll restriction
programming details.
Programming:
1.
2.
3.
4.
5.
6.
7.
8.
9.
8.1.15
Press CONTROL T for main menu.
From main menu, select lines and press ENTER.
From lines menu, select line programming and press ENTER.
Type line name or line number and press ENTER.
From line programming, type item number for toll group and press ENTER.
Type line number (1–128) and press ENTER.
When finished, press ESCAPE twice.
Type y to accept changes, n to reject them, or r to resume editing and press ENTER.
Press ESCAPE to end..
DTMF Level
Description:
Adjust the audio level of the DTMF signals to a low (-5 db), medium (0 db), or high (+3 db)
setting. Certain sites may require a higher db level to over come line conditions that could
interfere with reliable dialing such as a long loop distance to the central office.
Programming:
1.
2.
3.
4.
5.
6
7.
8.
Press CONTROL T for main menu.
From main menu, select line and press ENTER.
From line menu, select line programming and press ENTER.
From line programming menu, type item number to select feature and press ENTER.
Press SPACE bar for desired setting and press ENTER.
When finished, press ESCAPE twice.
Type y to accept changes, n to reject them, or r to resume editing and press ENTER.
Repeat steps 4–7 for each line or press ESCAPE to end.
Line Feature Programming 8–11
IMI66–111
8.1.16
VDT Programming Instructions
Busy Lead Detection (Auxiliary Equipment Interface)
Description:
When you enable this feature, the system can detect an off-hook condition in a telephony device
such as a modem, FAX machine, industry-standard telephone, or similar device that an installer
has connected to a line ahead of the system. When the system detects the off-hook condition, it
makes a busy indication appear at system stations that have this line appearance.
Programming:
1.
2.
3.
4.
5.
6.
7.
8.
9.
8.1.17
Press CONTROL T for main menu.
From the main menu, select lines and press ENTER.
From the lines menu, select line programming and press ENTER.
Type line port number (1−128) or name and press ENTER.
From the line programming menu, type item number for feature and press ENTER.
Press SPACE bar for feature setting.
When finished, press ESCAPE twice.
Type y to accept changes, n to reject them, or r to resume editing and press ENTER.
Repeat steps 4−8 for each line port or press ESCAPE to end.
Disconnect Supervision
Description:
When you enable this feature, the system detects a break in loop current anytime one occurs
during an outside call.
Programming:
1.
2.
3.
4.
5.
6.
7.
8.
9.
Press CONTROL T for main menu.
From main menu, select lines and press ENTER.
From lines menu, select line programming and press ENTER.
Type line port number (1−128) or name and press ENTER.
From line programming menu, type item number for feature and press ENTER.
Press SPACE bar for feature setting.
When finished, press ESCAPE twice.
Type y to accept changes, n to reject them, or r to resume editing and press ENTER.
Repeat steps 4−8 for each line port or press ESCAPE to end.
8–12 Line Feature Programming
VDT Programming Instructions
8.1.18
IMI66–111
Caller ID Active
Description:
When caller identification (ID) information is available from the central office, take this
programming action to match the line port to the feature. You must also assign the caller ID
lines to the stations and assign special-purpose station buttons to control the feature. Refer to
Section 14.1, Caller ID Programming, for complete caller ID programming details.
Programming:
1. Press CONTROL T for main menu.
2. From the main menu, select lines and press ENTER.
3. From the lines menu, select line programming and press ENTER.
4. Type line port number (1–128) or name and press ENTER.
5. From the line programming menu, type item number for feature and press ENTER.
6. Press SPACE bar for feature setting.
7. When finished, press ESCAPE twice.
8. Type y to accept changes, n to reject them, or r to resume editing and press ENTER.
9. Repeat steps 4 through 8 for each line port or press ESCAPE to end.
10. Assign caller ID lines to stations—refer to Sections 7.1.32, Line Answer,
and 7.1.33, Line Originate, for details.
11. Assign caller ID button (mnemonic CID) and SAVE button (mnemonic SAVE) to stations
(refer to Section 7.3, Square/Nonsquare System—Button Mapping By Station, for details).
8.1.19
Voice Mail ID
Description:
You can assign an identification number to each line so that the voice mail system can provide
customized call handling on a per line basis. Use voice mail system programming to match this
ID number to a particular personal directory or transaction box within the voice mail system.
When the DXP routes a call that is ringing at a particular line to the voice mail system to be
answered, it routes it with the ID number. The voice mail system then sends the call to the box
that corresponds to the line’s ID number. You can use voice mail system programming to
construct customized answering prompts for the individual boxes. This allows the IDed DXP
lines to be answered in a customized manner by the voice mail system’s automatic attendant.
Refer to Section 14.5, Voice Mail Programming, for complete voice mail programming details.
Programming:
1.
2.
3.
4.
5.
6.
7.
8.
Press CONTROL T for main menu.
From main menu, select line and press ENTER.
Type port number of line to be programmed (1–128) and press ENTER.
From the line menu, select item number for feature and press ENTER.
Type the identification (ID) number and press ENTER.
Press ESCAPE twice.
Type y to accept changes, n to reject them, or r to resume editing and press ENTER.
Repeat steps 3–7 for each line or press ESCAPE to end.
Line Feature Programming 8–13
IMI66–111
8.1.20
VDT Programming Instructions
DISA And DISA Voice Options
Description:
Use the following programming instructions to enable or disable DISA capability on lines 1
through 240. Also, use the DISA Voice Options 1 through 4 to select digital voice announce
(DVA) messages. For example, selecting DISA voice option 2 will cause welcome greeting 2,
day main menu 2, night main menu 2, recall no answer 2, and recall busy 2 prompts to play
whenever a DISA line is covered by DVA. Refer to Section 14.3, Digital Voice Announce
Programming, for complete DVA programming details.
Programming
1.
2.
3.
4.
5.
6.
7.
8.
9.
8.2
Press CONTROL T for main menu.
From main menu, select Lines and press ENTER.
From the lines menu, select Line Programming and press ENTER.
Enter line number you want to program and press ENTER.
From the line (number) programming menu (page 2), select DISA and press ENTER.
Toggle the SPACE bar to select/deselect DISA and press ENTER.
Enter 1 through 4 for the DISA Voice Options and press ESCAPE twice.
Type y to accept changes, n to reject them, or r to resume editing and press ENTER.
Enter the number for the next line you want to program or press ESCAPE to end.
Line Group Programming
Description:
Use this procedure to group similar type line ports together for dial-up access. Up to 16
different line groups are available. During operation, the system searches for an idle line in the
line group in the same order that you program them using this procedure.
Programming:
1.
2.
3.
4.
5.
6.
7.
8.
9.
8.2.1
Press CONTROL T for main menu.
From main menu, select lines and press ENTER.
From lines menu, select line group programming and press ENTER.
Type line group number (1–16) and press ENTER.
From line group programming menu, type a to add lines, r to remove lines, or c to change
name of line group and press ENTER.
Type line to be removed, added or changed, then press ENTER.
When finished, press ESCAPE.
Type y to accept changes, n to reject them, or r to resume editing and press ENTER.
Repeat steps 4–7 for each line port or press ESCAPE to end.
Line Group Access
Description:
Use this procedure to give a station access to line groups.
Programming:
1.
2.
3.
4.
5.
6.
7.
8.
9.
Press CONTROL T for main menu.
From main menu, select stations and press ENTER.
From stations menu, select COS programming and press ENTER.
Type class of service number (1-32) and press ENTER.
From COS programming menu, type item number for feature and press ENTER.
Type line groups (1–16, 0 = none, type as n,n,nn or n–nn) and press ENTER.
When finished, press ESCAPE twice.
Type y to accept changes, n to reject them, or r to resume editing and press ENTER.
Repeat steps 4-8 for each COS or press ESCAPE to end.
8–14 Line Feature Programming
VDT Programming Instructions
8.2.2
IMI66–111
Line Group Queuing
Description:
Use this procedure to give a station the ability to queue for a busy line group.
Programming:
1. Press CONTROL T for main menu.
2. From main menu, select station and press ENTER.
3. From station menu, select COS programming and press ENTER.
4. From the COS programming menu, type item number for feature and press ENTER.
5. When finished, press ESCAPE twice.
6. Type y to accept changes, n to reject them, or r to resume editing and press ENTER.
7. Repeat steps 4-8 for each COS or press ESCAPE to end.
8.3
Copy Model Line (Block Programming, Line)
Description:
Program some or all line ports to have the same programming as a model line port.
Programming:
1.
2.
3.
4.
Press CONTROL T for main menu.
From the main menu, select lines and press ENTER.
From the lines menu, select model line and press ENTER.
Type line port number (1-128) or name of model line to be copied
and press ENTER.
5. Type line port numbers of lines to match model and press ENTER.
(Type line port numbers as n,n,nn or n–nn. )
6. Press ESCAPE to end.
Line Feature Programming 8–15
IMI66–111
8.4
VDT Programming Instructions
Direct Inward Dialing (DID) Support
The DID line board (DXPCO-DD4 and DD8) allows incoming CO calls to reach internal DXP intercom
extensions by direct dialing. No attendant assistance is necessary. Since DID lines are incoming only, their direct
appearance is limited to attendant stations where status indication may be useful. DID operation requires a group
of published directory numbers (400 maximum) provided by the telephone company central office (CO). These
directory numbers are incoming only and the DXP translates them to the appropriate personal or group intercom
number for ringing. The lines will accept outgoing DTMF digits during a call to support personal identification
number dialing and similar uses.
The DXP handles DID calls in the same manner that it handles regular intercom calls and will forward them via a
hunt list or a call forwarding scheme. An unanswered DID call will either continue to ring or route to a
programmed ring no-answer (RNA) destination. If neither forwarding nor RNA is available, the system provides
no routing.
The system returns a ringback signal to DID callers when a called station is in the do not disturb (DND) mode.
The system returns an off-hook indication to the CO when a DID line is disabled. The DXP synchronized ringing
feature does not have any affect on DID calls, and the Caller ID feature is not available.
The DID line is a reverse-battery, loop-start, two-wire voice circuit. (The term reverse battery means that it is the
DXP and not the CO that provides tip and ring supervisory battery for the loop.) The DXP sends and receives all
supervisory and voice signals across the voice pair and provides all necessary signal control at its line interface.
In the idle state, the loop is open at the CO end, with the DXP maintaining on-hook battery polarity on the circuit.
The CO requests service from the DXP by applying a resistance across the line causing a current flow to occur.
The DXP recognizes the current flow as a CO connection and prepares for the incoming call. The CO does not
send ringing since the DXP generates it internally and sends it to the stations.
After the DXP receives all of the address digits, it translates them based on the appropriate DID block translation
table and attempts to place the call to the desired station. To assure that the caller will always hear ringback prior
to the call being answered (for example, when answered by voice mail), the system delays the station ringing until
it applies ringback tone.
The called station sounds a distinctive ringing based on the ring code in the translation table. If the translation
table has a name for the CO digit sequence that the DID call is on, the LCD of the called station displays that
name. Otherwise, the station displays the DID block name followed by a portion of the CO digit string. If there is
neither CO digit string name nor DID block name programmed, the station displays the CO digit string alone.
If an incoming call is for either an unassigned or an uninstalled station, the DXP routes the call to the DID block
alternate extension. If the DID Block alternate extension is unavailable, the DXP routes the call to the Dial 0
attendant. If the Dial 0 attendant is unavailable, the DXP returns reorder tone to the caller.
The DXP returns call progress signals to the CO in the interval after it receives address signalling and before it
answers. It does this within 1.5 seconds after completion of address signalling.
When a called station answers a DID call, the DXP sends answer supervision to the CO by applying reverse
polarity to the line. The DXP maintains this polarity reversal until either the station goes on-hook or the CO
opens the loop.
The CO signals a line disconnect condition to the DXP by opening the loop. When the DXP detects the CO
disconnect, it returns the line to idle polarity and changes the line from busy to idle. The DXP signals a line
disconnect condition to the CO by returning the supervision battery polarity to the on-hook state. While
immediate start lines return to idle at once, wink and dela tart lines maintain busy status until the DXP detects CO
release.
8–16 Line Feature Programming
VDT Programming Instructions
8.4.1
IMI66–111
Direct Inward Dialing Line Examples
Example 1:
Jenny’s Bakery has the following CO numbering blocks:
555-3600 to 555-3619,
555-4520 to 555-4539,
555-1200 to 555-1399.
It will receive the 36nn and 45nn calls through CO lines 1–5 and the 1nnn calls through CO lines 6–8. The system
requires two DID blocks for use: block one for CO lines 1–5, and block two for CO lines 6–8. The numbers in
DID block one have two unique digits and the numbers in DID block two have three unique digits. Assume that
DID block one is configured as wink start, tone dial, has a 2-digit string, and is named SALES. Assume DID
block two is configured as delay start, tone dial, has a 3-digit string, and is named SERVICE.
Example 2:
Ed’s Telephone Mart starts with 20 CO numbers 555–2320 to 555–2339. Only one DID block is used and is
configured as wink start, pulse dial, with a 2-digit string. As the company grows, they add another 20 CO
numbers 555–3420 to 555–3439. You cannot simply add these numbers to the existing DID block translation
table. This is because a 2-digit string will not uniquely specify which number was dialed. You must either treat
these two CO blocks as two different DID blocks or increase the expected digit string quantity to three.
CAUTION
Increasing the expected digits for a DID translation block deletes all entries in that
block, and you must reprogram the table.
Line Feature Programming 8–17
IMI66–111
VDT Programming Instructions
8.4.2 DID Options
DID/DNIS Block Name
Description:
Choose a 7-character name to associate with each DID/DNIS block.
Programming:
Refer to Section 8.4.3, DID/DNIS Programming.
DID Control Signalling
Description:
Decide upon which address supervision signalling protocol that you will use. This decision will
depend upon the type of supervision that is compatible with the CO requirements.
Immediate Start: Use this protocol for rotary (pulse dial) lines. With this protocol, the CO will
not expect address supervision signalling and may begin pulsing the dialing digits as soon as 65
msec. after it connects to the line.
Wink Start: With this protocol, the CO will expect address supervision signalling. After the
CO connects to the line, the DXP will reverse the polarity of the line for a period of 200 msec
when it is ready to receive digits (that is, the DTMF receiver is available for tone dial lines).
This “wink” signal indicates to the CO that the DXP is ready to receive incoming digits. After
the wink occurs and the line polarity returns to normal, the CO will begin sending the dialing
digits. If the CO does not see the wink within 4 to 8 seconds (heavy traffic timings), it may
route the call to network reorder or retry the call on another line. Typically, a CO will try to
dial two times. A second failure will result in network reorder. Wink start protocol is the best
choice for its combination of integrity checks and retrial capabilities.
Delay Start: With this protocol, the CO will expect address supervision signalling.
Approximately 100 msec. after the CO connects to the line, the DXP will reverse the polarity of
the line for a period of at least 140 msec. It will hold this reversal until it is ready to receive
incoming digits. At that time, it will return the polarity to normal. After the line polarity
returns to normal, the CO will begin sending the dialing digits. If the CO does not see the line
polarity return to normal within 4 to 8 seconds, it will route the call to network reorder. There is
no requirement for the CO to retry failures on lines with delay dial signalling.
Programming:
Refer to Section 8.4.3, DID/DNIS Programming.
8–18 Line Feature Programming
VDT Programming Instructions
IMI66–111
Expected CO Digits
Description:
Obtain a block of numbers for use from the CO. The DXP supports a maximum of 400
numbers (for example, 555–1000 through 555–1399). You can have a maximum of four DID
blocks with each DID block using its own name, signalling protocol, digit addressing method
and number of digits needed to avoid numbering conflicts. As a default, the system assigns all
DID lines to block one. A DID block represents a group of lines that the system will use to
receive calls for one or more CO directory number blocks.
NOTE: You will derive maximum user convenience if you choose the CO block to match the intercom
numbers that you have assigned to the DXP system. (For example, if your intercom numbers are
1000–1399, they would match the sample CO block.)
Determine the quantity of unique digits in the string that you expect to receive from the CO.
The number of digits expected should be large enough to avoid numbering conflicts within a
DID block and provide future growth. In the case of the CO block mentioned above, the
quantity of unique digits is three to cover 1000 through 1399. If the CO block was 555–1100
through 555–1192, the string quantity would be two to cover 00 through 192.
Programming:
Refer to Section 8.4.3, DID/DNIS Programming.
Dialing Mode
Description:
Based upon the system’s expected incoming call volume and recommendations and
requirements of the CO, determine whether the CO will send address digits by DTMF tones or
by loop pulse (rotary) dialing. (Always choose DTMF tones if possible.)
Programming:
Refer to Section 8.4.3, DID/DNIS Programming.
ANI Delivery
Description:
Enable or disable the DXP to process ANI information that is delivered by the long distance
common carrier as a T1 feature on dial 800 and dial 900 lines. Refer to Section 8.7.4 for details
about the ANI feature.
Programming:
Refer to Section 8.4.3, DID/DNIS Programming.
DISA Voice Options
Description:
Use the DISA Voice Options 1 through 4 to select digital voice announce (DVA) message
levels. For example, selecting DISA voice option 2 will cause welcome greeting 2, day main
menu 2, night main menu 2, recall no answer 2, and recall busy 2 prompts to play whenever a
DISA-configured DID line is covered by DVA. Refer to Section 16, Digital Voice Announce
Programming, for complete DVA programming details.
Programming:
Refer to Section 8.4.3, DID/DNIS Programming.
DID Alternate Routing
Description:
Use this procedure to select an attendant station to serve as an alternate routing station. The
system will route DID calls to this station if it cannot find the digits it receives from the CO in
the translation table. The system will ring this station with a distinctive ring tone or pattern that
you program. If you do not select an attendant station with this procedure, the system routes the
call to the dial 0 station. If the dial 0 station is not available, the system returns a reorder tone to
the caller.
Programming:
Refer to Section 8.4.3, DID/DNIS Programming.
Line Feature Programming 8–19
IMI66–111
8.4.3
VDT Programming Instructions
DID/DNIS Programming
Programming:
1. Press CONTROL T for main menu.
2. From the main menu, type the selection for lines and press ENTER.
3. From the lines menu, type the selection for DID/DNIS block programming
and press ENTER.
4. From the DID/DNIS block prompt line, type the DID/DNIS block number
and press ENTER.
5. From the DID/DNIS block programming menu, select options, and press ENTER
6. From the options menu, set the parameters for the DID/DNIS block that you are
programming:
Name
Type up to seven characters and press ENTER.
NOTE: End the DID/DNIS block name with a space if you desire a blank space between the name and the
CO digits when they show on an LCD speakerphone’s display. Also, the number of CO digits
that will show in the display is dependent on the length of the DID/DNIS block name.
Control Signalling
Expected Digits
Dialing Mode
ANI Delivery
DISA Voice Options
Alternate Routing
Press SPACE bar for protocol choice and press ENTER.
Type quantity (0–7) of digits and press ENTER.
Press SPACE bar for choice and press ENTER.
Press SPACE bar for Yes or No and press ENTER.
Type DVA message identification number (1–4) and press ENTER.
Type intercom number (up to four digits) for station to handle
misdialed calls.
Ring Code
Type code (1–8) to specify the ringing pattern for calls to the
alternate station.
7. When finished, press ESCAPE.
8. Type y to accept changes, n to reject them, or r to resume editing
then press ENTER to return to the DID/DNIS block programming menu.
NOTE: If you save the changes and you have changed the expected digits value, additional prompts may
appear.
8–20 Line Feature Programming
VDT Programming Instructions
8.4.4
Description:
IMI66–111
DID/DNIS Translation Tables
When you initialize a translation table, you must first enter the string of CO digits that you
obtain from the telephone company. Then you must enter the intercom number that you want to
match with the first CO digit sequence in the string. With this, the system automatically
matches the remainder of the CO digit string to consecutive intercom numbers beginning with
the one that you entered. You can edit the translation table by selecting the item number for
each entry and making the changes that you deem necessary. The translation table includes the
following listed items:
CO Digit String: This is the actual string of digits expected from the CO. Within a table, each
CO digit sequence in the string must be unique. While each CO digit sequence must have an
assigned extension number, you can assign the same extension number to several CO digit
sequences if you wish.
Name: As an option, you can enter a seven character name for each CO digit sequence in the
string. If you assign a name, the system will use it for LCD display during signalling.
Day Number: This personal or group intercom number is the one that the system will ring
when a DID/DNIS call arrives through the matching CO digit sequence during normal or
daytime operations. DID/DNIS will not support Delay Ring, Day 1 ring, or Day 2 ring modes.
Night Number: As an option, you can assign a personal or group intercom number that the
system can ring when a DID/DNIS call arrives through the matching CO digit sequence during
night transfer (of ringing) operations.
Ring Code: As an option you can choose one of eight distinctive ringing codes for each CO
digit sequence in the string. Remember, the proprietary analog telephones provide only four
distinctive ring possibilities.
Line Feature Programming 8–21
IMI66–111
VDT Programming Instructions
DID Translation Tables Programming
Programming:
1. Press CONTROL T for main menu.
2. From the main menu, type the selection for lines and press ENTER.
3. From the lines menu, type the selection for DID/DNIS block programming
and press ENTER.
4. From the DID/DNIS block prompt line, type the DID block number and press ENTER.
5. From the DID/DNIS block programming menu, select initialize translation table,
and press ENTER.
NOTE: If you choose the initialize translation table entry, the system will prompt you to enter a range of
CO digit strings (system maximum is 400 strings and maximum digits per string is seven) and a
starting extension number corresponding to the first CO digit string. Once you confirm your
changes, the system will update the translation table with sequential extension numbers that are
associated with the sequence of CO digit strings. You can repeat this process, as needed, for
other sequences of numbers.
6. When finished, press ESCAPE to return to the DID/DNIS block programming menu.
7. From the DID/DNIS block programming menu, select edit translation table,
and press ENTER.
The screen shows a translation table in which you can perform selective editing.
NOTE: If there are more numbers in the DID/DNIS block than the screen can show, the system places
them on underlying pages. Press and hold CONTROL and type N or P to display each next or
previous page. The table will form the screen so the CO digits are displayed in sequential order.
You can add additional entries to the end of the table that will appear in sorted order the next
time you access the table.
8. When finished, press ESCAPE twice
9. Type y to accept changes, n to reject them, or r to resume editing and press ENTER.
10. Press ESCAPE three times to return to main menu.
You can erase the entries in the translation table using the system default menu.
1. From the main menu, select system and press ENTER.
2. From the system menu, select defaults, and press ENTER.
3. From the defaults menu, select DID translation tables and press ENTER.
4. Type the DID/DNIS block number (1–4), and press ENTER. The system automatically
removes all entries in the chosen table.
5. Press ESCAPE twice to return to main menu.
DID/DNIS Translation Table, Default
Description:
You can clear programmed translation tables with this procedure.
Programming;
1.
2.
3.
4.
5.
6.
7.
Press CONTROL T for main menu.
From main menu, select system and press ENTER.
From system menu, select defaults and press ENTER.
From defaults menu, select DID translation table and press ENTER.
Type DID/DNIS table number (1–4) and press ENTER.
Repeat step 5 until finished.
Press ESCAPE to end.
8–22 Line Feature Programming
VDT Programming Instructions
8.5
IMI66–111
Ground Start Line Support
Description:
The multipurpose line board (DXPCO-GD4, and GD8) provides system interface for loop start
lines, ground start lines, and E and M tie lines. These are typically the three different line types
that the central office (CO) makes available for connection to the public switched network.
With the ground start line type, the DXP momentarily grounds the ring lead to signal the CO to
establish a communications link for an outgoing call. When the CO detects this, it
acknowledges by momentarily grounding the tip lead. The DXP responds by removing its
ground connection and bridging itself across the tip and ring leads. The CO then removes its
ground connection and returns dial tone to the DXP.
For an incoming call, the CO grounds the tip lead and places an alternating voltage on the ring
lead for the DXP to sense. If you set the incoming alert signal to its ring optional setting, the
DXP detects tip-lead ground and then causes its ring generator to generate ringing to the station
being called. If you set the incoming alert signal to its ring required setting, the DXP waits until
the CO applies the alternating voltage before the DXP generates ringing to the station. When a
station answers the ringing, the circuit is completed as it is for outgoing calls.
Because ground start lines are controlled at both ends, they are capable of a release supervision
that provides a sure means of determining when a distant party hangs up his or her telephone.
This is very important in applications where the system costs the calls. Also, since the
signalling protocol indicates which end requests the line, it helps prevent call collisions and
glare and thus is useful in applications where there is a high volume of incoming and outgoing
calls occurring on the same lines.
Ground start lines are standard protocol for remote networking and are useful for connecting the
DXP to private branch exchange (PBX) equipment. For ground start lines to be dependable, you
must ensure that you have connected the DXP to a low resistant telephone company ground.
NOTE: The Federal Communications Commission (FCC) requires that you inform the central office that
the DXP is configured as an MF (multipurpose) registered device if you connect it to ground start
lines.
With ground start lines, set the following feature parameters:
-Incoming Alert Signal
For ring required, the DXP must detect a ring signal on the line before it will send a ring
signal to a station. This method is normally used with systems that use synchronized
ringing to prevent a long first ring.
For ring optional, the DXP sends a ring signal to a station as soon as it detects a ground on
the tip lead of the line (put there by the calling equipment) or when it detects a ring signal
on the line. This method allows the station to receive a ring signal in less time than the ring
required method does; however, phantom ringing can occur on poorly grounded lines or
lines that fail from the CO.
- Dialing Mode
-Toll Groups
- Busy Lead
- voice mail ID
Programming:
- Incoming Alert Signal
-DTMF Level
-Caller ID Active
- Line Group
Refer to Section 8.5.1, Ground Start Line Support Programming.
Line Feature Programming 8–23
IMI66–111
8.5.1
VDT Programming Instructions
Ground Start Line Support Programming
Programming:
1.
2.
3.
4.
5.
6.
7.
8.
9.
10.
Press CONTROL T for main menu.
From the main menu, select lines and press ENTER.
From the lines menu, select line programming and press ENTER.
Type line port number 1–128 or previously assigned name and press ENTER.
The system displays page 1 of the line programming menu.
From line programming menu, type item number for line type and press ENTER.
Press SPACE bar to toggle line type and press ENTER.
From line programming menu, type item number for another parameter and press ENTER.
Respond to prompt action for feature setting, and press ENTER to accept setting.
Repeat steps 7 and 8 for all required parameters.
Press CONTROL and type N and the system will display the menu page 2 of line
programming menu.
NOTE: The programming items shown on menu page 2 are for the line port type
that you selected in step 7. These items will be different for each line type.
11. From menu page 2 of line programming menu, type item number for feature
and press ENTER.
12. Respond to prompt line action for feature setting, and press ENTER to accept setting.
13. From menu page 2 of line programming menu, repeat steps 11 and 12 for
all required choices.
14. When finished, press ESCAPE twice.
15. Type y to accept changes, n to reject them, or r to resume editing and press ENTER.
16. Repeat steps for each line port or press ESCAPE to end.
8–24 Line Feature Programming
VDT Programming Instructions
8.6
IMI66–111
Loop Start Line Support
Description:
The multipurpose line board (DXCPO-GD4, and GD8) provides system interface for loop start
lines, ground start lines, and E and M tie lines. These are typically the three different line types
that the central office (CO) makes available for connection to the public switched network.
With the loop start line type, the DXP bridges a resistance across the tip and ring leads to signal
the CO to establish a communications link for an outgoing call. The CO detects the resulting
current flow and supplies dial tone to the DXP. The CO signals an incoming call to the DXP by
placing an alternating voltage (ring signal) on the tip lead for the DXP to sense. The DXP then
generates ringing to the DXP station being called. When a station answers the ringing, the
circuit is completed as it was for outgoing calls. Loop start lines can not provide any sure
means of determining when a distant party hangs up his or her telephone. For a system that
experiences moderate incoming and outgoing call volume and does not cost calls, loop start
lines provide an economical choice for connecting the DXP to the central office (CO)
equipment. When you use line 1 for the power-fail mode, you must program that line to be a
loop-start line unless the industry-standard telephone that you use as a power-fail station is a
ground-start device.
With loop start lines, set the following feature parameters:
–Dialing Mode
–Abandon Hold Release
–Positive Disconnect Time
–Toll Groups
–DTMF Level
–Busy Lead
–Disconnect Supervision –Caller ID Active
–Voice Mail ID
–Line Group
Programming:
1.
2.
3.
4.
5.
6.
7.
8.
9.
10.
Press CONTROL T for main menu.
From the main menu, select lines and press ENTER.
From the lines menu, select line programming and press ENTER.
Type line port number 1–128 or previously assigned name and press ENTER.
The system displays page 1 of the line programming menu.
From menu page 1 of line programming menu, type item number for line type
and press ENTER.
Press SPACE bar to toggle line type (choose loop start, ground start, or E and M tie line)
and press ENTER.
From menu page 1 of line programming menu, type item number for another line
parameter, press ENTER.
Press SPACE bar for feature setting, and press ENTER to accept setting.
From menu page 1 of line programming menu, repeat steps 8 and 9 for all required choices.
Press CONTROL and type N and the system will display the menu page 2 of line
programming menu.
NOTE: The programming items shown on menu page 2 are for the line port type
that you selected in step 7. These items will be different for each line type.
11. From menu page 2 of line programming menu, type item number for feature
and press ENTER.
12. Press SPACE bar for feature setting, and press ENTER to accept setting.
13. From menu page 2 of line programming menu, repeat steps 11 and 12 for
all required choices.
14. When finished, press ESCAPE twice.
15. Type y to accept changes, n to reject them, or r to resume editing and press ENTER.
16. Repeat steps for each line port or press ESCAPE to end.
Line Feature Programming 8–25
IMI66–111
8.7
VDT Programming Instructions
Tie Line Support
The multipurpose line board (DXCPO-GD4, and GD8) provides system interface for loop start lines, ground start
lines, and E and M tie lines. These are typically the three different line types that the central office (CO) makes
available for connection to the public switched network. The tie line connections (also known as tie trunk access)
are special circuits that allow, on either a dial-up or a continuous connection (hot line) basis, the DXP to
communicate with remotely located equipment such as: another DXP, a PBX, or other common carrier (OCC)
equipment for long distance calls.
NOTE: Tie lines are primarily for incoming calls to a DXP and depend upon software controlling the remote site.
Tie lines can be a part of a private or leased network and can be metallic, carrier current, T1, or microwave. The E
and M line provides control signalling between local and remote systems. When a local DXP puts a request for
service on the M lead, the remote equipment detects this request on its E lead. As an option it can also respond by
putting an alerting signal on its M lead.
8.7.1
Tie Line Parameters
Tie Line Types (Connect Mode)
Description:
The DXP supports two different types of E and M lines. The E and M Direct type is for direct
connection between two telephone systems and is also known as a metallic connection. The E
and M Carrier type is for tie lines that run through a central office (CO) interface; however,
some COs also provide a metallic connection interface.
Programming:
Refer to Section 8.7.2, Tie Line Support Programming.
Tie Line Standard-Protocol Signalling (Control Signalling)
Description:
The system can respond to either one of three different standard-protocols of E and M signalling. They are known
as: immediate signalling, wink signalling, and delayed signalling. You must program the desired protocol type to
match that provided by the CO or the remote equipment.
Immediate Signalling: With this signalling method, the called DXP answers as soon as the calling DXP initiates
the call. This signalling method is usually used if the line is programmed for hot line operation or is programmed
for pulse dialing. It is best to avoid this type of signalling in any other circumstances.
Wink Signalling: With this signalling method, the called DXP places a momentary signal reversal (wink) on its
M lead to alert the calling DXP system that it is ready to receive information. The calling DXP controls the status
of the M lead and watches for a return signal from the called DXP on the E lead. A wink occurs when the called
DXP is ready to receive dialed digits from the calling DXP. Dialing can begin only after the wink is complete.
After the wink occurs, the called DXP (if it is programmed for dialing) returns dial tone to the calling DXP as an
indication it is ready to receive digits. This signalling method is the preferred protocol for use between two DXP
systems.
Delayed Signalling: With delay dial signalling, the called DXP immediately responds to the calling DXP by
sending an off-hook signal on its M lead. It holds this off-hook condition until it is ready to receive digits and
then returns its M lead to on-hook. After this signal exchange occurs, the called DXP (if it is programmed for
dialing) returns dial tone to the calling DXP as an indication it is ready to receive digits. This signalling method is
most useful if the DXP is connected to another manufacturer’s PBX with incompatible wink timing parameters.
Programming:
Refer to Section 8.7.2, Tie Line Support Programming.
8–26 Line Feature Programming
VDT Programming Instructions
IMI66–111
Tie Line Non-Standard Protocol Signalling (Line Access)
Description:
You can program the system to respond to two types of non-standard tie line signalling
protocols. They are known as hot line and intercom dialing.
Hot Line: You can program the system for hot-line operation so that as soon as a user accesses
the tie line, the station or stations at the distant system that have access to the personal or group
intercom assigned to the hot line will ring. If you arrange for access by hot line, you must enter
the extension that will automatically ring when the tie line is seized by the calling DXP. If you
do not enter an extension, the system will ring the dial 0 station, and if it is unavailable, the
system will return dial tone to the caller.
Intercom Dialing: Alternately, you can program the system for intercom dialing mode so that
as soon as users access the tie line they will hear dial tone. Upon hearing dial tone, they can
dial either a personal or group intercom number at the distant system.
NOTE: Intercom feature codes of one DXP are not available to callers from the other DXP nor can those
callers access a line through the distant DXP using line group access codes.
Programming:
Refer to Section 8.7.2, Tie Line Support Programming.
Line Feature Programming 8–27
IMI66–111
VDT Programming Instructions
Automatic Number Identification (ANI) Delivery
Description:
Automatic Number Identification (ANI) is a T1 service feature for both E&M and DID lines.
Long distance common carriers offer ANI as a feature to dial 800 and dial 900 lines. The ANI
feature provides information to an internal telephone system that identifies the telephone
number of the calling party. Businesses served by a dial 800 or dial 900 service allow any
available user to answer the calls and have their internal telephone system process the ANI
information to identify the caller’s telephone number.
The common carrier supplies ANI information as DTMF digits. When the ANI feature is
combined with the Dialed Number Identification Service (DNIS) feature, the common carrier
also delimits the DNIS information from the ANI information with an asterisk (S) tone so that
the DXP can process each portion properly.
The DXP system decodes the ANI information and sends the caller’s number to the called
telephone and to the SMDR/SMDA line reports. If the called telephone is an LCD
speakerphone, its display shows the caller’s number. This display is shown for all conditions
(that is, transferred calls, call forward and so forth). The DXP also sends the calling number
information to the SMDR/SMDA line report and makes the information available to devices
that are connected to the DXP’s Open Architecture Interface (OAI).
When you assign ANI to lines that callers reach by dialing access codes, the DXP processes all
incoming digits as ANI digits until it encounters the delimiter. The DXP then processes the
remainder of the incoming digits as DNIS call routing digits. When you assign ANI to lines that
callers reach without dialing any digits (such as, E&M hot line or DID lines with 0 digits
expected), the DXP processes all incoming digits as ANI digits until it encounters the end
delimiter. The DXP then routes the call to one of the following intercom numbers: the one that
services the E&M hot line number, the one that serves as the DID/DNIS default, or the one that
serves as th operator for the system.
The DID, E&M DNIS, and E&M tie lines all can access the Direct Inward System Access
(DISA) feature when the caller dials the DISA access code or when the DID/DNIS digits
translate to the DISA access code. The system distinguishes the DISA code from the preceding
ANI information.
Since the DXP supports ANI only on tone dial lines, is supports both wink start and delay start
protocols but does not support the immediate start protocol.
Programming:
Use the Section 8.7.2, Tie Line Support Programming, procedure to enable DXP processing of
ANI information for tie lines and program the tie line attributes.
8–28 Line Feature Programming
VDT Programming Instructions
IMI66–111
Call Announce
Description:
This feature, when enabled, allows tie line callers from outside the system to voice announce
incoming calls to the DXP station after they hear an alert tone. You must also arrange the DXP
system to respond to voice announce intercom calls.
Programming:
Refer to Section 8.7.2, Tie Line Support Programming.
Dialing Mode
Description:
Program the tie line to match either a DTMF tone or a rotary (pulse) dialing line as supplied by
the central office (CO).
Programming:
Refer to Section 8.7.2, Tie Line Support Programming.
Toll Groups
Description:
You must identify the tie lines that you do not want users to use when they dial toll restricted
numbers. Do this by first assigning the tie lines to toll groups and then assigning those toll
groups to the restricted number. There are 32 toll groups available for line assignment. Assign
one, several, or all lines to any desired toll group or combination of toll groups as needed. See
Section 11 for complete toll restriction programming details.
Programming:
Refer to Section 8.7.2, Tie Line Support Programming.
DTMF Level
Description:
Adjust the audio level of the tie line’s DTMF signals to a low (-5 db), medium (0 db), or high
(+3 db) setting. Certain sites may require a higher db level to over come line conditions that
could interfere with reliable dialing.
Programming:
Refer to Section 8.7.2, Tie Line Support Programming.
DISA
Description:
Enable or disable DISA capability on the tie line.
Programming:
Refer to Section 8.7.2, Tie Line Support Programming.
DISA Voice Options
Description:
Use the DISA Voice Options 1 through 4 to select digital voice announce (DVA) message
levels. For example, selecting DISA voice option 2 will cause welcome greeting 2, day main
menu 2, night main menu 2, recall no answer 2, and recall busy 2 prompts to play whenever a
DISA-configured tie line is covered by DVA. Refer to Section 14.3, Digital Voice Announce
Programming for complete DVA programming details.
Programming:
Refer to Section 8.7.2, Tie Line Support Programming.
Line Feature Programming 8–29
IMI66–111
8.7.2
VDT Programming Instructions
Tie Line Support Programming
Programming:
1.
2.
3.
4.
5.
6.
7.
8.
9.
10.
Press CONTROL T for main menu.
From the main menu, select lines and press ENTER.
From the lines menu, select line programming and press ENTER.
Type line port number 1–128 or previously assigned name and press ENTER.
The system displays page 1 of the line programming menu.
From line programming menu, type item number for line type and press ENTER.
Press SPACE bar to toggle line type and press ENTER.
From line programming menu, type item number for another line parameter, press ENTER.
Respond to screen prompt action for feature setting, and press ENTER to accept setting.
Repeat steps 7 and 8 for all required parameter choices.
Press CONTROL and type N and the system will display the menu page 2 of line
programming menu.
NOTE: The programming items shown on menu page 2 are for the line port type
that you selected
in step 7. These items will be different for each line type.
11. From menu page 2 of line programming menu, type item number for feature
and press ENTER.
12. Respond to screen prompt action for feature setting, and press ENTER to accept setting.
13. Repeat steps 11 and 12 for all required parameter choices.
14. When finished, press ESCAPE twice.
15. Type y to accept changes, n to reject them, or r to resume editing and press ENTER.
16. Repeat steps for each line port or press ESCAPE to end.
8–30 Line Feature Programming
VDT Programming Instructions
8.8
IMI66–111
Direct Inward System Access (DISA) Programming
Through the DISA programming routines, you can configure a system to allow outside callers to call directly into
the system. DISA callers can dial authorization codes that allow them to use the system’s features that are
normally available only to inside callers.
NOTE: It is possible to use the automatic route selection (ARS) feature (Section 12, Enabling Automatic Route
Selection) along with the DISA feature to route DISA calls that pass through the system. If you enable this
application, you may need to add pauses in the ARS modify digits table (Section 12.4.4, ARS Modify
Digits Table) to account for the time delay the system experiences in obtaining the CO dial tone. The
amount of time delay varies for each installation; therefore, you must test your installation to determine
the time required to obtain a CO dial tone when using the DISA feature. You can then adjust the system
timing pause time or add multiple pauses to offset this delay.
8.8.1
DISA Specific Programming
Description:
The purpose of the DISA specific programming is to perform the following tasks:
- Enable extensions where day/night DISA calls will be routed when call-routing is necessary,
- Enable proprietary voice mail to receive DISA calls and route the calls to a dedicated mailbox
that holds the appropriate intercept greetings,
- Select access lockout time (the amount of time that the line remains locked-out from use
after invalid conditions occur—such as, when a caller repeatedly dials an invalid
authorization code),
- Select the timeout period for DISA extensions that ring without answer (RNA),
- Select the maximum timeout period for the reminder tone that sounds during an in-process
call when the DISA caller is using an outside line and the system has no disconnect
supervision. This tone sounds at set intervals to remind the caller that he or she must dial
a code (any single digit) or be disconnected within 10 seconds,
- Select the option to either route a DISA call or drop it after caller dials an invalid
authorization code
Programming:
1.
2.
3.
4.
5.
6.
7.
8.
Press CONTROL T for main menu.
From main menu, select Lines and press ENTER.
From the lines menu, select DISA configuration and press ENTER.
From the DISA configuration menu, select Day Routing Extension and press ENTER.
Type day routing extension number and press ENTER.
Type night routing extension number and press ENTER.
Type voice mail Routing ID (up to eight digits) and press ENTER.
Toggle the SPACE bar to select access lockout times (2, 5, 10, 15, 30 minutes)
and press ENTER.
9. Type the ring no answer (RNA) rings of 0 through 9, and press ENTER.
10. Toggle the SPACE bar to select Maximum Reminder Timeout periods of (2, 5, 10, 15, 30
minutes) and press ENTER.
11. Toggle the SPACE bar to select Route or Drop from Route/Drop Invalid Access field and
press ESCAPE twice.
12. Type y to accept changes, n to reject them, or r to resume editing and press ENTER.
13. Press ESCAPE to end.
Line Feature Programming 8–31
IMI66–111
8.8.2
VDT Programming Instructions
DISA And DISA Voice Options (Enabling Or Disabling DISA Lines)
Description:
Use the following programming instructions to enable or disable DISA capability on lines 1
through 128. Also, use the DISA Voice Options 1 through 4 to select digital voice announce
(DVA) messages. For example, selecting DISA voice option 2 will cause welcome greeting 2,
day main menu 2, night main menu 2, recall no answer 2, and recall busy 2 prompts to play
whenever a DISA line is covered by DVA. Refer to Section 14.3, Digital Voice Announce
Programming, for complete DVA programming details.
Programming
1.
2.
3.
4.
5.
6.
7.
8.
9.
8.8.3
Press CONTROL T for main menu.
From main menu, select Lines and press ENTER.
From the lines menu, select Line Programming and press ENTER.
Enter line number you want to program and press ENTER.
From the line (number) programming menu (page 2), select DISA and press ENTER.
Toggle the SPACE bar to select/deselect DISA and press ENTER.
Enter 1 through 4 for the DISA Voice Options and press ESCAPE twice.
Type y to accept changes, n to reject them, or r to resume editing and press ENTER.
Enter the number for the next line you want to program or press ESCAPE to end.
Programming DISA Authorization Codes
Description:
DISA callers with assigned authorization codes have access to advanced system features.
Authorization codes are associated with either personal or group intercom numbers; therefore,
when a DISA caller enters his or her authorization code, the code alerts the system as to what
features to make available to the caller. Once callers access features with authorization codes,
the access remains in effect until any idle time exceeds the authorization code time-out period.
Use this programming procedure to assign or modify authorization codes and to tie the
authorization codes to accompanying intercom numbers. Use the Section 8.8.4, Remote COS
Programming, procedure to assign a station class of service to the intercom numbers.
Programming:
1. Press CONTROL T for main menu.
2. From main menu, select SMDA/SMDR and press ENTER.
3. From SMDA/SMDR menu, type item number for authorization codes and press ENTER.
4. From authorization code menu, type line number to add, remove, or modify authorization
codes and press ENTER.
5. Type authorization code (up to 6 digits) and press ENTER.
NOTE: You can include a programmed pause as part of the authorization code by typing a p at the point
in the code where you wish a pause to occur. If you include a pause, a user must wait the
programmed pause time at the proper point when he or she dials the DISA authorization code
because the pause is now part of the code.
6. If adding or modifying a code, type intercom number that it is associated
with and press ENTER.
7. When finished, press ESCAPE once.
8. Type item number to display authorization codes for review and press ENTER.
9. When finished, press ESCAPE to end.
8–32 Line Feature Programming
VDT Programming Instructions
8.8.4
IMI66–111
Remote COS Programming
Description:
DISA callers that have assigned authorization codes have access to advanced system features.
The features that they have access to are controlled by the station class of service that you
assign with this programming procedure. The intercom number that is associated with this
remote COS assignment is the same intercom number that is associated with the caller’s DISA
authorization code that you set using the Section 8.8.3, Remote DISA Authorization Codes,
procedure.
Programming:
1. Press CONTROL T for main menu.
2. From main menu, select Intercom number and press ENTER.
3. From Intercom menu, select Modify Intercoms and press ENTER.
4. Enter intercom number and press ENTER. (Remember, this is the intercom number
that you set in Section 8.8.3, Remote DISA Authorization Codes, to correspond
with the DISA authorization code.)
5. Select Remote COS and press ENTER.
6. Enter station class of service number 1–32 and press ESCAPE twice.
7. Type y to accept changes, n to reject them, or r to resume editing and press ENTER.
8.8.5
Remote Day Exception Number/Night Exception Number
Description:
A DISA caller may have access to an outside line where the toll restriction is based on the
DISA authorization code that is associated with a particular class of service. Remote day and
remote night exception numbers allow DISA callers to dial numbers that their toll restriction
normally prevents them from dialing. If a toll restriction table exception number matches one of
the exception numbers that you assign using this procedure, the system allows the DISA caller
to dial the number.
The exception number values that you can assign are 1 through 32 and NONE. You can assign
32 exception numbers to each DISA class of service. You also must assign one exception
number to each toll restriction table line entry (Section 11.7, Exception Number Programming).
Programming:
1.
2.
3.
4.
5.
6.
7.
7.
8.
9.
Press CONTROL T for main menu.
From main menu, select stations and press ENTER.
From stations menu, select COS programming and press ENTER.
Type class of service number (1–32) and press ENTER.
From COS programming menu, type item number for day exception number
and press ENTER.
Type day exception number (0–32) (n, nn, n–nn, or 0 for none) and press ENTER.
Repeat step 6 for night exception number.
When finished, press ESCAPE twice.
Type y to accept changes, n to reject them, or r to resume editing and press ENTER.
Repeat steps 4–8 for each COS or press ESCAPE to end.
Line Feature Programming 8–33
IMI66–111
8.8.6
VDT Programming Instructions
Pad Level—DISA (Gain Setting For DISA Lines)
Description:
Callers that use the DISA feature to access a trunk group and place calls (trunk–to–trunk
calling) may experience low audio levels on their calls due to the normal line resistance of CO
lines. While low audio level is usually only noticeable on long line loops. software release 8C
adds +3dB of gain to the DISA lines as a default setting, and provides a means for you to
disable this gain if necessary.
The software enhancement also provides a means by which DISA callers can preselect the gain
on a DISA line before they select the line for use. They can dial a code to select either 0dB,
+3dB, or +6dB of gain.
NOTE: The unamplified line-to-line DISA connections often exhibit low audio levels due to double loop
copper losses. While adding gain to these connections will sometimes improve audio signal
levels, the added gain may also result in circuit instability in some connections. This instability
presents itself as a singing sound that can interfere with dialing or voice communications. If
callers experience dialing problems or hear singing in their calls, you may need to disable the
pad level for the DISA line or they may need to select a lower gain setting for use.
Programming:
8.9
Description:
1.
2.
3.
4.
5.
Press CONTROL T for main menu.
From main menu, select lines and press ENTER.
From the lines menu, select line programming and press ENTER.
Type line port number (1–128) or name and press ENTER.
From line programming menu, type item number for pad level—DISA
and press ENTER.
6. Press SPACE bar for feature setting and press ENTER
7. Type y to accept changes, n to reject them, or r to resume editing and press ENTER.
9. Repeat steps 4–7 for each line or press ESCAPE to end.
Programming The T1 Parameters
When the system is using the T1 option, you can program status and alarm alerting parameters.
Also, you can program the DXP loss insertion that affects audio levels in the individual T1
channels. The specific programming instructions for the T1 parameters are shown in the
following list:
•
•
•
•
•
•
enable T1 status reporting and major alarm alerting,
program status log parameters,
program major alarm alerting parameters,
assign system status button to station,
print and clear the status log,
program DXP loss insertion.
8–34 Line Feature Programming
VDT Programming Instructions
8.9.1
IMI66–111
Enabling T1 Status Reporting And Major Alarm Alerting
Description:
Use the following instructions to enable the T1 status reporting and major alarm alerting
features. Use the Section 8.9.2, Programming The Status Log Requirements, and Section 8.9.3,
Programming The Major Alarm Alerting Parameters, procedures to program the status
reporting and alarm alerting parameters.
Programming:
1.
2.
3.
4.
Press CONTROL T to return to main menu.
From main menu, select system and press ENTER.
From the system menu, select system parameters and press ENTER.
From the system parameters menu,
– select T1 status reporting, and press space bar to select enabled.
– select major alarm alerting and press space bar to select enabled
5. When finished, press ESCAPE twice.
6. Type y to accept changes, n to reject them, or r to resume editing and press ENTER.
7. Press ESCAPE to end.
Relays (External T1 Alarm Reporting)
Description:
Assign one of the four relays located on the central processor board to alert system users if a T1
alarm occurs. Typically, installers wire the relay to control loud bells or other external ringers,
but they can use visual devices if desired. Specified users, upon hearing this alarm, can dial a
feature code to turn off the alarm. Generally, you should use relays 2–4 for this purpose since
they are normally open. Because relay 1 is normally closed, you must use a specially configured
device when using this relay.
Programming:
1. Press CONTROL T to return to main menu.
2. From main menu, select system and press ENTER.
3. From the system menu, select paging zones and press ENTER.
4. From the paging zones menu, select relays and press ENTER.
5. From the relays menu, select 1-4 and press ENTER.
6. From the relay n menu, type item number for major alarm ring and press ENTER.
7. Press space bar to select options