1
Recording Process
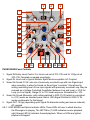
The RECord control toggles record on/ off. Starting with a Cleared Memory, pressing the RECord Button (16)
once (or sending a single Pulse to RECord Pulse IN, 15) starts the recording process, and pressing RECord
Button again (or sending a second, single Pulse to RECord Pulse IN) stops the recording process. If the end
of the Audio Buffer is reached before the user stops recording, RECord automatically stops. The Phonogene
begins looping the recording immediately upon completion of the record cycle (assuming the PLAY Pulse IN,
14, is held HIGH, which is the default state when there is nothing patched to the PLAY Pulse IN). It will be
necessary to adjust the SOS control (4) so that the desired source (or blend of sources) appears at the
Signal OUT. This initial recording sets the loop length, which is always minded, until the Audio Buffer is
cleared (see Erase Routine, page 5).
Sound On Sound
Once the initial recording is made, the RECord function then allows for punch IN/ OUT within the loop, and
layering of other sounds. Sound On Sound Control (3, 4) sets the balance of the Live Signal and previously
recorded Loop Signal. While the Phonogene will not record in reverse, it will playback in reverse while
recording for Sound On Sound, so it is possible to have two sounds playing in opposite directions. Once
SOS is complete, remember to adjust the SOS control so that the desired source (or blend of sources)
appears at the Signal OUT.
Splicing
The SPLICE button and SPLICE Pulse IN (18, 19), allows the user to non-destructively cut the loop into
pieces, which are then selected for playback using the ORGANIZE parameter (11, 12, 13). To Splice, have
the Phonogene set to playback the material to be spliced, and use either the SPLICE Button or SPLICE
Pulse IN to drop Splice markers on the recording as it plays through. When playback loops around to the
beginning, the Phonogene sees the new Splices, and looks at the voltage set by the ORGANIZE control in
order to select which Splice to play. To preview your Splices, turn the ORGANIZE Panel Control slowly, and
observe the VARI-SPEED and Splice Indicator LEDs (6, 7) for flashing to indicate new splice found. The
newly selected Splice will not play until the currently playing Splice reaches its end, at which point the End
Of Splice OUT (20) will generate a 4 ms pulse and the newly selected Splice will begin playing. The RECord
function will mind the boundaries of the currently selected Splice. This will allow for replacing sounds within a
musical phrase, or creating highly contrasting edits when building sound collages. To initiate RECord at the
start of Splice, patch the EOS Pulse (20) to RECord Pulse IN (15). To erase Splices, enter the Erase Routine
(see page 5). It is useful to slow and even stop the sound when Splicing, if precision is desired. To avoid
clicks, slow the sound to find spaces or low amplitude regions in which to place Splices. Use your ears. If
you want to Splice in real-time, let the loop play a few times, and learn the rhythm, thinking about where the
up-beats fall, and try to drop splices on those up-beats. See the “Recycler” patch page 15 for “auto-splicing.”
Another way to splice is to set the Gene-Size control as high as possible (without losing sound), and use
SLIDE to manually scrub the sound. When you get to the desired point, press SPLICE, and a splice will be
dropped at the start of the currently playing
Gene. Turn Gene-Size back down to 0% and listen to the results. This is a highly useful trick for more
precision splices, however, it is not as real-time and just manual dropping them as the loop plays.