1
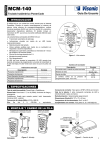
The PowerMax system is compatible with multi-button and
single button key-ring and hand-held transmitters that use
PowerCode and CodeSecure coding methods.
Multi-button PowerCode transmitters transmit the same
code each time the same button is pressed. They can be
used for emergency signaling, or for activating the PGM
output or for controlling appliances via X-10 units. They
can not be used for arming / disarming.
CodeSecure transmitters are of the rolling code type - they
transmit a new code each time the same button is pressed.
This provides a higher security level, especially in arming /
disarming applications, because the code can not be
copied (“grabbed”) by unauthorized people.
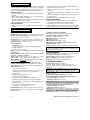
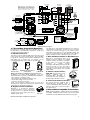
Following are the basic details of several compatible
transmitters. The possible applications for each pushbutton are indicated in each drawing.
A. MCT-234: Keyfob transmitter
- one unit is supplied with the
PowerMax. You can program
the AUX (auxiliary) button to
perform various tasks, in
accordance with the user’s
Figure 12. MCT-234
needs.
B. MCT-231 / 201: Singlebutton pendant units. The
MCT-231 (Code- Secure) and
the MCT-201 (PowerCode)
can be enrolled to perform
functions as shown. Both units
Figure 13. MCT-231 / 201
look alike.
C. MCT-134 / 104: 4-button
hand-held units. MCT-134
(CodeSecure) can replace the
MCT-234 keyfob. MCT-104
(PowerCode) can perform
emergency and non- alarm
functions. Both units look
Figure 14. MCT-134 / 104
alike.
D. MCT-132 / 102: 2-button
units.
MCT-132
(CodeSecure)
Can
perform
functions as shown. MCT-102
(Power-Code) can perform
emergency and non-alarm
tasks. Both units look alike.
Figure 15. MCT-132 / 102
E. MCT-131 / 101: Singlebutton units. The MCT-131
(CodeSecure) and the MCT101 (PowerCode) can be
enrolled to perform functions
as shown. Both units look
Figure 16. MCT-131 / 101
alike.
F. MCT-211: Water-proof, wristworn PowerCode transmitter.
Can be enrolled to perform
emergency
or
non-alarm
functions.
Figure 17. MCT-211
3.9 Mounting the RS232 Module
The control panel can be equipped with an optional RS232
module for serial data interchange with a local computer. If
this module is not supplied, a special plastic cap blocks the
niche designed to accommodate the module.
The following instructions are useful when adding the
RS232 module to an already installed PowerMax system:
1
Remove plastic cap
2
Insert the RS-232 adapter
into its male connector,
until a click is heard
RJ-45
or
RJ-31X
(USA)
Figure 18. Inserting the RS232 Module
Attention: For data download from a local computer, the
PowerMax must be set to the installer mode.
3.10 Installing an Optional X-10 Siren
If you need a “wireless” external siren, you may install an X10 siren module which is triggered by a signal transmitted
via the built-in electrical wiring of the protected site. This
siren can replace the regular external siren or complement
it without laying out additional wires. Of course, such a siren
can be used only in conjunction with an optional power-line
interface module.
The X-10 siren is ready to function upon connection to an
electrical power outlet, without re-programming the PowerMax. You only have to set the HOUSE CODE and the
UNIT CODE selectors on the X-10 siren as follows:
House Code: Set this selector to the letter that follows, by
alphabetical order, the letter that you programmed as a
house code for the protected premises. For example, if the
programmed house code is “J”, set the siren house code
selector to “K”.
Note: If the programmed house code letter is “P” (which is
the last programmable letter), select “A” for the siren.
Unit Code: The siren will function only if you set the unit
code selector to “1”.
4. TESTING PROCEDURES
PROCEDURES
4.1 Preparations
4.2 Diagnostic Test
Make sure all windows and doors are closed. If all zones
are secured (undisturbed), the display should read:
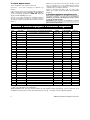
A comprehensive diagnostic test is required for two
reasons:
• To verify proper function of all detectors in the system.
• To assure that there is a safe 6 dB margin for signal
reception.
To perform this test, you must access item No. 8 in the
installer’s menu exactly as done when programming the
control panel:
READY
HH:MM
If the system is “NOT READY”, query the control panel by
pressing the <SHOW/OK> button repeatedly. The
source(s) of the problem(s) will be displayed and read
aloud. Take the necessary measures to eliminate the
problem(s) before testing the system.
6
DE5450 PowerMax Installation Instructions