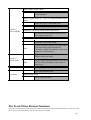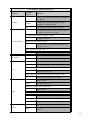
1
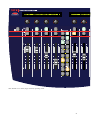
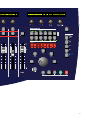
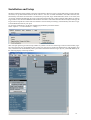
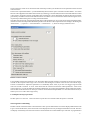
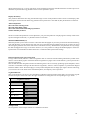
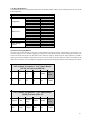
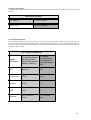
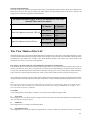
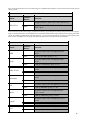
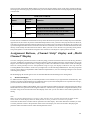
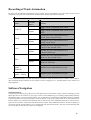
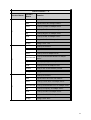
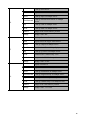
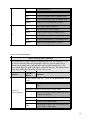
SAC 2K/2.2 Manual for
Logic Audio Platinum
1
SAC-2K/SAC-2.2 in LGC (Logic Control) operating mode
2
Dump
System
3
Copyright 2002 Radikal Technologies, Inc.
This manual cannot be reproduced, in whole or in part, without the express written permission from Radikal Technologies,
Inc. All company names and trademarks mentioned in this manual are the property of their respective owners.
4
Table of Content
Installation and Setup ................................................................................................................................................ 6
Relative control resolution ................................................................................................................. 7
Use multiple controls per parameter .................................................................................................. 7
Show long names while editing: .......................................................................................................... 7
Maximum MIDI bandwith (%). ........................................................................................................... 8
Button assignement in Logic Control mode ............................................................................................................. 8
Jog Wheel Buttons ............................................................................................................................. 8
Transport Field .................................................................................................................................... 8
SAC Mixer Mode Buttons ................................................................................................................... 9
The Software Navigation Buttons ....................................................................................................... 9
The Master Select Button .................................................................................................................. 10
The Channel Strip Buttons ................................................................................................................ 10
The Mute and Select Buttons ............................................................................................................. 11
The View Modes of the SAC ..................................................................................................................................... 11
First contact – the status of the SAC after loading the Logic Audio 5.1 Autoload Song. ....................................... 11
View Modes
........................................................................................................................................................ 11
1)Track View ....................................................................................................................................... 11
2)Global View ....................................................................................................................................... 11
3)Extended Track View ........................................................................................................................ 11
Assignment Buttons, „Channel Strip” display and „Multi Channel“ Display ...................................................... 13
1)Multi Channel display ...................................................................................................................... 13
2)Channel Strip display ....................................................................................................................... 14
Encoders and Faders in LGC Mode .......................................................................................................................... 14
Callup of Preset Values...................................................................................................................... 14
Editing in Fine Mode .......................................................................................................................... 14
Calling up Maximum and Minimum Values ...................................................................................... 14
Fader-Flip Mode .................................................................................................................................. 14
Motorfader Off ................................................................................................................................... 15
Overview of the Assignment buttons........................................................................................................................ 15
Recording of Track Automation .............................................................................................................................. 16
Software Navigation ................................................................................................................................................. 16
The function buttons ................................................................................................................................................ 16
The Cursor and Zoom functions .............................................................................................................................. 19
The Track Mixer Element functions ........................................................................................................................ 20
Setting Markers ...................................................................................................................................................... 22
1)Programming Markers .................................................................................................................... 22
2)Loading stored Marker Positions .................................................................................................... 22
3)Erasing a Marker Position............................................................................................................... 22
Nudge Operation ...................................................................................................................................................... 22
1)Moving the object by a fixed value..................................................................................................... 23
2)Direct Moving ................................................................................................................................... 23
3)Moving to the Song Position ............................................................................................................. 23
Drop-In Programming ............................................................................................................................................. 23
1)Determining a Drop In/Drop Out Zone ............................................................................................ 23
2)Editing the Drop Zone....................................................................................................................... 23
Cycle Mode Editing................................................................................................................................................... 23
1)Quickly repositioning the Cycle Locator ........................................................................................ 23
2)Cycle Editing .................................................................................................................................... 23
Transport Overview .................................................................................................................................................. 24
Attention!!
If a Logic Audio presents you with a dialog box when it recognizes the SAC-2K/2.2, suggesting you
update the firmware, press [Cancel].
5
Installation and Setup
The basic assumption of this manual concerning using the SAC-2K/2.2 in Logic Control mode is that you have already
connected, set up and installed the SAC-2K or SAC 2.2. You can use either the MIDI or the USB connection, the
functionality is the same. Once the SAC is connected to your system, Logic Audio Platinum (version 5.1 or better) will
“recognize” the SAC automatically as a Logic Control and activate the SAC’s LGC operation mode. When you start up
Logic Audio it scans all active MIDI Ports for hardware controllers. This Scan Function sends a brief Sysex message, the
Logic Control responds to if connected. Once the SAC receives this Sysex message, it automatically switches to Logic
Control Mode and waits for your input.
To verify the installataion or to edit the configuration parameters proceed as follows:
Select “Options” > “Control Surfaces” > “Setup…”
This will open up the Logic Control setup window. If you don’t see an icon of the Logic Control in this window, Logic
for some reason has not recognized the SAC. In this case, check your connections between SAC and computer once
more, switch the LGC mode manually in the system menu of the SAC and restart Logic. By now you should definitely see
the following display in the setup window:
6
Click on the Logic Control icon. On the left side of the setup window you should now see the parameters of the selected
control surface.
In the section “Special Parameters” you should definitely deactivate the option “Touchless movable faders”. Use of this
function with equipment with reliable touch sensitivity technology is not advisable, because in this mode fader movement
is also used to recognize activation of the fader. Such “intelligence” cannot distinguish accurately between movement
generated by manual movement of the fader and motor movement. This can result in this function becoming the source
of potential problems during the recording of automation data.
The other selection options, which appear further down on the parameter list, are not relevant for the general functionality
of the SAC and we will skip further detailed explanations at this time. More important are the settings in the dialog box
“Preferrences…” (“Options” > “Control Surfaces” > “Preferrences…”), which we will pay attention to next.
Relative control resolution
Logic’s default value for this parameter is 128. This means that an encoder will have a resolution of 128 steps per rotation,
in order for the complete value range to be covered in a full 360 degree revolution. This isn’t the case with the Logic
Control or with the SAC. Adjust this parameter to a considerably lower value, so you can cover bigger range of values
with one encoder revolution. A lower value means that the intervals between the edited parameter’s value ecome
coarser. However, you can still make fine parameter adjustments, by pressing the [Alt] Button while rotating the encoder.
The encoders of the SAC have 24 values per rotation. You should set this parameter to a value between 24 and 48, to
enable you to cover wide value ranges easily.
Use multiple controls per parameter
Set this option to a value of 1. Due to the SAC’s layout there is no benefit when this option is activated.
Show long names while editing:
Disable both the “Parameter Name” and “Parameter value” options. Because the sizes of the displays differ between the
Logic Control and the SAC, names and values can be displayed incorrectly if elongated information is used. The SAC
can display considerably more characters and its control elements are located further apart. The SAC is programmed to
7
display blank spaces for a correct replication of Track Names between the individual channels. If these options are
checked it is possible that long parameter names can be separated in pieces.
Display duration (s)
This parameter determines how long the alternate longer version of the parameter name is shown in the display, after
releasing the relevant encoder. If the long paramter names preference is switched off, this parameter has no function.
Allow multiple infos
Show info when selecting tracks
Show info when editing volume
Show value unit for Instrument/Plug-in parameters
Volume and other paramters
The above mentioned parameters can be adjusted to your personal preference. Displaying units usually results in the
expense of length of other info, i.e. parameter name or track name
Maximum MIDI bandwith (%).
With this paramter you are able to increase or decrease data throughput. If you notice performance fluctuations during
work with the SAC you can decrease the value. We never encountered such problems with our test systems. Of course
decreasing this parameter also causes a decrease in automation accuracy. With the SAC, this parameter can only change
the data throughput from Logic to the SAC. However, it is also possible to change the datathroughput in the SAC’s
System menu. You will find more details in the SAC 2.2 manual under System menu settings.
Button assignement in Logic Control mode
In Logic Control mode, the SAC’s button assignment does not conform with the labeling information printed on the
surface. You will find a graphic of the actual button assignments on pages 2 and 3 of this manual. (you can print the two
pages for referrence)
You can find the button assignment used in the following charts. We are currently producing special templates, which
will allow comfortable working with these button assignments, similar to earlier templates we produced for Digital
Performer and Pro Tools. We will be happy to send you these templates free of charge upon request. For the time being,
you can also write on the backs of the included templates, for temporary ease of operation.
Jog Wheel Buttons
This group of buttons is set up in a circle around the Jog Wheel. In the left column of the charts you can see the original
function inscription of the SAC and in the right column the according function corresponding to Logic Audio.
J o g -W h e e l Ta s te n
S A C -Ta s te
L C -F u n k tio n
S hift
S hift
S c rub
S c rub
F rom
N u dg e
S to re M a rker
M a r ker
To
D rop
R eca ll M a r ker
C y c le
Transport Field
The assignment of the transport buttons is as labeled on the SAC.
8
SAC Mixer Mode Buttons
Located Between the two fader groups of the SAC are the Mixer Mode buttons. In the following chart you can see the
LGC assignments.
SAC M ixe r M ode B uttons
Track
Send
Pan/Surround
Plugin
EQ
Instrument
MIDI-Tracks
Inputs
Audio-Tracks
Instrument
Aux
Busses
Output
User
Fader
n/a
Flip-Mode
Track-Group
switches
<
>
<<
>>
Assignment
Global View
The Software Navigation Buttons
Just above the Locator Display of the SAC are the Software Navigation buttons. The [Num] key of the SAC is of
particular importance. It is used for toggling the assignments of the remaining SAC Software Navigation buttons. We
will use the name SAC Option for this button in the following chapters. When the [SAC Option] button is pushed it
lights up and the third display momentarily shows the current status of the four functions which are assigned to the
upper first four buttons. You will find the assignments of the Software Navigation buttons in the following two charts.
SAC Software Navigation I - SAC Option Button
[NUM] not activated (LED off)
F1
F2
F3
F4
Option
SACOption
F5
F6
F7
F8
Alt
Control
SAC Software Navigation II - SAC Option Button
[NUM] activated (LED on)
Replace Click
SMPTE/BEAT
SOLO
Option
SACOption
Save
Cancel
Enter
Alt
Control
Undo
9
The Master Select Button
The [Master Select] button above the master fader has been assigned the [Global view] button function of the Logic
Control.
Master-Select Button
SAC Button
LC Mode Function
Master Select
Global View Button
The Channel Strip Buttons
The Channel Strip buttons of the SAC are used to activate the various automation modes of Logic Audio. The one
exception is the [Instrument] Channel Strip button. The Instrument button allows you to call up the integrated synth
editors of the SAC, just like in other SAC modes. When in LGC mode, double-click the [Instrument] button to call up the
Instrument editor section.
SAC Channel StripButtons
original
SAC Button
SAC Button
SAC Button function
function im Logic
im Logic Control
Control Mode, if
Mode, if the [NUM]
the [NUM] Button
Button is NOT lit.
is lit.
EQ's
Read/Off
Trim
Inserts/Sends
Touch
Group
Dynamics
Latch
n/a
MIDI
Write
n/a
Instrument
SAC Instrument
Editor
SAC Instrument
Editor
10
The Mute and Select Buttons
The Logic Control has 4 buttons per fader channel. They are assigned the functions Solo, Mute, Select and RecordReady. Since the SAC has only two buttons per fader channel, the [Solo/Mute] switch of the SAC is used for the
toggling of two alternate assignments of these buttons.
The Mute/Solo button toggles between two functions for each of the
channels Mute and Select buttons
SAC Buttons
LC Function
Mute-Buttons
Mute
Select-Buttons
Select
Mute-Buttons
Solo
Select-Buttons
Record-Enable
Mute/Solo Button not activated, LED off
Mute/Solo Button activated, LED on
The View Modes of the SAC
In the following section you will find a detailed description of all functions of the Logic Control implementation. It is safe
to assume that the implementation by Emagic might receive changes or improvements. You will be able to find instructions
and additions in the readme files of future Logic Audio Platinum updates. This manual was written based on the
possibilities of version 5.12 of Logic Audio Platinum.
First contact – the status of the SAC after loading the Logic Audio 5.1 Autoload Song.
You should always turn on the SAC first, then start up Logic Audio, in case you have not stored LGC mode as start-up
mode in your SAC-2.2. If you don’t, you will have to activate the LGC mode manually in the System menu of the SAC,
as Logic only searches for potential control surfaces during the start-up process. If you select the LGC mode in the SAC,
Logic will react to the messages which the SAC sends to Logic in this mode to alert the program of its presence.
After loading the Autoload song, all encoder settings, fader positions and display messages are updated. The Encoders
set the panorama of the selected tracks, the faders control their volumes and the [mute] and [select] buttons are active.
Note
Instructions for storing the startup operation mode can be found in your SAC manual. The Start-up mode can only
be stored with the SAC 2.2 model. Users of the SAC-2K can store their setting via MIDI dump to a computer. See
more about this in the SAC-2.2 Manual.
View Modes
Track Arrangements in the displays of the SAC can be done in three different display modes:
1)
Track View
The arrangement is in accordance with the Arrange window. If more than one track affects the same environment object,
only one channel is set up per object.
2)
Global View
The arrangement is in accordance with the track Mixer.
3)
Extended Track View
The arrangement is in accordance with the Arrange window. Contrary to Track view, all tracks are shown – even if more
11
than one is assigned to the same environment object. The [Masterselect] button is used for the selection of the various
display modes.
Global-View Buttons
Button
Modifier
Button
Function
-
Toggles between "Track View" and "Global View"
Shift
Toggles between "Track View" and "Extended
Track View"
Global View
You can select a specific track category in global view directly, by pushing the according category button. The category
button is located on the SAC in the middle section of the Mixer Mode button. When pushing a track category button the
global View Mode is automatically selected. However, you can also use the buttons for quick track navigation in the
track view or extended track view mode. The following chart shows all of the selection possibilities.
Track-Group Buttons
Button
Modifier
Button
Function
-
Activates Global View and displays MIDI
tracks
Shift
Calls up first fader group (1-8).
-
Activates Global View and displays Input
tracks
Shift
Calls up second fader group (9-16)
-
Activates Global View and displays Audio
tracks
Shift
Calls up third fader group (17-24)
-
Activates Global View and displays Instrument
tracks
Shift
Calls up forth fader group (25-32)
-
Activates Global View and displays Aux tracks
Shift
Calls up fifth fader group (33-40)
-
Activates Global View and displays Buss
Object tracks
Shift
Calls up sixth fader group (41-48).
-
Activates Global View and displays Output
tracks
Shift
Calls up seventh fader group (49-56).
-
Keine Funktion!
Shift
Calls up eighth fader group (57-64).
MIDI
Inputs
Audio Tracks
Instruments
Aux
Busses
Outputs
User
12
The lowest four of the Mixer Mode buttons are used for moving the display section of the mixer. Instead of directly
selecting a specific fader group (as just described) you can move the selection of the currently displayed track upwards
or downwards.
Bank-Select Buttons
Button
Modifier
Button
Function
-
displayed Tracks shift one at a time
Option
Jumps to the first or last Track position
-
displayed Tracks shift in groups of 8 at a time
Option
Jumps to the first or last Track position
<>
<< >>
In Track View or extended Track View the SAC always shows the tracks of a specific file. Normally they are located in the
uppermost level, the root file. If you have combined multiple tracks to a file, you have to first jump into the lower file level,
to be able to operate the channels within the sub-file. If you wish for a file to be shown in the display, all you have to do
is push the assigned encoder button to reach the lower file level. Thereafter you are able to reach all tracks of the file with
the help of the already introduced selection buttons. When you want to leave the file level, push the [cancel] button.
The [cancel] button is in the Software Navigation area of the SAC with the [SAC=Option] button activated.
Assignment Buttons, „Channel Strip” display and „Multi
Channel“ Display
Of course, setting the panorama of a track is not the only thing you can do with the encoders! You can edit any parameter
of a track. Included are all parameters of integrated software synths and editing functions of Insert Plugins. Even VST
Plugins can be edited using the encoders, as long as they are able to be edited from control surfaces. If the VST Plugins
allow for control generally but can’t send parameter strings to Logic, the displays of the SAC will only show the
according MIDI control numbers. In this case you might want to contact the Plugin Manufacturer. The more people that
express concern about incompatibilities and insufficient implementation, the more the Plugin designers will consider
reworking their products.
Bei der Belegung der Encoder gibt es zwei verschiedene Betriebsarten beziehungsweise Anzeigearten:
1)
Multi Channel display
In “Multi Channel” display mode, the selected parameter can be edited on up to eight channels simultaneously. This
mode is in accordance with the functions of a traditional mixer. If you connect multiple SACs or expansion units to Logic,
you will be able to edit more than eight channels at once.
To edit a parameter in Mutli Channel Mode, select one of the assignment buttons (the upper 6 buttons of the SAC Mixer
Mode buttons are the equivalent of the assignment buttons). After selection, a parameter is assigned immediately to the
encoders. Using the second encoder in the third display of the SAC you are now able to select another parameter for
editing
Note:
Make sure that the Zoom Function is not active. This function can be turned on and off with the third encoder
button under the third display. When the Zoom function is active, parameter selection is not possible.
The fourth encoder button switches between parameter and value display. This button determines whether you want
to see the parameter values or the parameter names in the lower display row above the encoders. Displaying the
parameter names will make selection of the desired parameters easier.
13
Parameters available for selection are shown blinking in the display. The selection won’t take place until you have
pushed the according encoder button.
Parameters which are not available for editing are not displayed in the SAC at all nor offered for selection. For instance,
if you would like to change the position [Pre/Post] of a FX Send, this FX send has to be activated. A FX Send becomes
active once it has been assigned to a Bus. Similarly you won’t be able to select the frequency of an EQ, when there is no
EQ active in the selected slot or none has been selected.
Logic Audio has multiple FX-Sends, Insert Slots and EQs. Using the first encoder under the third display you can select
the FX Send, EQ or Insert Number. You can view the current selection in the third display above the encoder.
There is also another alternate mode of operation for the selection of specific parameters. This one is of particular
interest to experienced Users. Select a non-lit assignment button and keep it depressed, a direct selection choice for the
desired parameter of the according assignment group will be displayed in the first two displays. They jump to the “multi
channel” display of the desired parameters when the assigned encoder button is used.
Now, as you work further with the SAC-2.2, you will undoubtedly encounter the “Channel Strip” display mode frequently,
as the assignment buttons always will switch between these two display modes.
2) Channel Strip display
When selecting “Channel Strip” display mode, up to eight parameters of a selected channel can be edited simultaneously.
It could be 8 EQ parameters, the parameters to a random plugin or the surround parameters of a track, for instance. You
can reach the Channel Strip display mode by pushing an already selected assignment button a second time. To leave the
channel strip, push the button again.
Additionally, the Channel Strip mode is called up automatically when you select an instrument or FX plugin with the
encoder and confirm the selection by pressing the encoder. The according plugin window will be opened automatically
in Logic Audio. You can change the track to be edited anytime with the [Select] button. If you have the arrange window
set in the foreground (you can open, close and move into the foreground the arrange window by using the button
combination [shift]+[Functionbutton F1], you can comfortably make a quick track selection with the first encoder under
the third display.
If a “Channel Strip” display makes multiple parameter pages available, you can select the pages with the second encoder
under the third display. The upper display row of the Channel Strip display will show you the current page number as
well as the number of available display pages.
To leave the Channel Strip, push the according assignment button a second time. Any Plugin window that may have
been opened by Logic before, will be automatically closed.
Encoders and Faders in LGC Mode
Callup of Preset Values
If you wish to reset a parameter quickly to a preset value, press the assigned encoder button. The value will be reset
immediately to the preset value. With parameters which offer only two possible values, the encoder button will toggle
between the two available values.
Editing in Fine Mode
By keeping the [Alt] button pushed during editing, you can make “fine” adjustments to the according parameters.
Calling up Maximum and Minimum Values
Holding the [Option] button pushed while editing a value with the encoder switches back and forth between the
maximum and minimum value of the parameter.
Fader-Flip Mode
By now you know how you can edit parameters of your choice using the encoders. However it is also possible to change
parameters with the faders of the SAC. For this operation, Logic Audio supports a Fader Flip Mode. By pushing the
[Flip] button, you can adjust the parameters simultaneously with the faders. When selecting the Flip function the faders
are automatically set to the paramter values.
14
By pushing down the [shift] button while pushing the [flip] button, Logic will activate a “Flip-Swap” mode. In this mode
the parameter assigned to the encoder will be assigned to the fader, while the fader parameter can be edited with the
encoder.
Motorfader Off
If you want quiet during listening, you can turn the movement of the motorfaders off. To do so, use the [Control] button
and the [Flip] button at the same time. Pushing the buttons a second time will active the fader movement again.
Overview of the Assignment buttons
Assignment Buttons
Button
Modifier
Button
Function
Track
-
Track Parameterr
Pan/Surround
-
Pan and Surround Parameters
EQ
-
EQ Parameter
Send
-
Send Parameter
Plugin
-
Plugin Selection or Plugin Editing
Instrument
-
Instrument Selection or Instrument Editing
-
Toggle between "Flip Off" and "Flip duplicate"
modes
Shift
Toggle between "Flip Off" und "Flip swap" modes
Control
Toggle between "Flip Off" und "Flip Zero" modes
(Fader motors off)
Flip
15
Recording of Track Automation
Of course you can automate all parameters in Logic Audio. To turn on automation you won’t need a mouse! You can
comfortably call up the various automation modes with the channel strip buttons of the SAC.
Automation Buttons
Modifier
Button
Function
-
Toggles "Read" Automation mode on/off
Option
Toggles "Read" Automation mode on/off on all
tracks
-
Switches the Track Automation mode to
"Touch" for the selected Track.
Option
Switches the Track Automation mode to
"Touch" for all Tracks.
-
Switches the Track Automation mode to
"Latch" for the selected Track.
Option
Switches the Track Automation mode to
"Latch" for all Tracks..
-
Switches the Track Automation mode to
"Write" for the selected Track.
Option
Switches the Track Automation mode to
"Write" for all Tracks.
Trim (SACOption +
Read/Off)
-
Function not yet implemented by Logic.
Group (SACOption + Touch)
-
Function not yet implemented by Logic.
Button
Read/Off
Touch
Latch
Write
Caution: Automation data is recorded continuously when the according automation mode is enabled. This is independent of whether the Record button in the Transport section is engaged or not. Automation data can be written even
during Playback.
Software Navigation
The function buttons
Using the function buttons [F1] to [F7] you can call up the first seven screensets of Logic Audio. Accordingly, you can
adjust these first seven screenset in your songs as well as in the default song to your liking. When holding down the
[shift] button when you press a Function button, you can alternatively open and close individual windows or put them
in the foreground in case they are partially covered by another. A list of the windows that can be controlled with the
function buttons can be found in the following chart, which also lists a few additional shortcuts for other functions,
which can be accessed in combination with the 8 function buttons. These additional functions can also be called up in
connection with the encoder buttons 1-8, by holding down the listed switch button. This way has the advantage that
you can actually see the selection choices in the displays.
16
Function Buttons 1 - 8
Function Button
Modifier
Button
Function
-
Calls up Screenset 1
Shift
Opens/closes the Arrange window.
Track
Calls up Volume on multiple tracks
Pan/Surround Calls up Pan/Surround on multiple tracks
F1
EQ
Calls up Bypass on multiple tracks
Send
Calls up Sends on multiple tracks
Marker
Jump to the first Marker position
Nudge
Nudge-Value: Tick
-
Calls up Screenset 2
Shift
Opens/closes the Track Mixer window.
Track
Calls up Pan on multiple tracks
Pan/Surround
Calls up Pan/Surround Radius on multiple
tracks
EQ
Calls up EQ-Type on multiple tracks
Send
Calls up Level on multiple tracks
Marker
Jump to the second Marker position
Nudge
Nudge-Value: Format
-
Calls up Screenset 3
Shift
Opens/closes the Event List window.
Track
Calls up Track mode on multiple tracks
F2
Pan/Surround Calls up Pan/Surround LFE on multiple tracks
F3
EQ
Calls up Frequency on multiple tracks
Send
Calls up Position on multiple tracks
Marker
Jump to the third Marker position
Nudge
Nudge-Value: Beat
17
-
Calls up Screenset 4
Shift
Opens/closes the Note Editor
Track
Calls up Input on multiple tracks
Pan/Surround
Calls up Pan/Surround Mode on multiple
tracks
EQ
Calls up Gain on multiple tracks
Send
Calls up Mute on multiple tracks
Marker
Jumps to the fourth Marker position
Nudge
Nudge-Value: Bar
-
Calls up Screenset 5
Shift
Opens/closes the Hyper Edit window
Track
Calls up Output on multiple tracks
F4
Pan/Surround Switches into Channel Strip display mode
F5
EQ
Calls up Q-Factor on multiple tracks
Send
Switches into Channel Strip" View
Marker
Jumps to the fifth Marker position
Nudge
Nudge-Value: Frame
-
Opens Screenset 6
Shift
Opens/closes the Matrix Editor
Track
Calls up Automation on multiple tracks
Pan/Surround Calls up Angle/Diversity on multiple tracks
F6
EQ
Calls up Channel Strip on multiple tracks
Send
Calls up Channel Strip 2 on multiple tracks
Marker
Jumps to the sixth Marker position
Nudge
Nudge-Value: 1/2 Frame
18
F7
-
Calls up Screenset 7
Shift
Opens/closes the Transport window
EQ
Calls up Frequency/Gain on multiple tracks
Send
Calls up Destination/Level on multiple tracks
Marker
Jumps to the seventh Marker position
-
Enter on the topmost window
Shift
Opens/closes the Audio window
Track
Calls up Track Setup on multiple tracks
EQ
Calls up Frequency/Gain on multiple tracks
Send
Calls up Destination/Level on multiple tracks
Marker
Jumps to the eighth Marker position
F8
The Cursor and Zoom functions
Cursor and Jog-Wheel Functions
The cursor keys of Logic Control are replaced on the SAC-2K and SAC-2.2 by
the first two Encoder under the third display. This way you can quickly dial in
extreme zoom-settings more efficiently than with repeated button presses. The
Zoom enable button is on the push-button of the third Encoder. The display shows
at any time whether the Zoom shot mode is active or not.
Element
Modifier
Button
Function
In the "Channel Strip EQ", "Send" or "Plugin/Instrument-Editor"
mode.
Encoder 1 Cursor up/down
Calls up the next EQ bands or the next Insert
Slots
Otherwise... (however, always in the Nudge mode)
Encoder steers the vertical cursor keys of the
computers keyboard.
In the "Zoom" Mode:
-
Verticle Zoom setting change
Shift
Momentarily suspends the Zoom function and
can be used to select tracks
19
In the "Multi Channel" Mode:
-
Call of the next or previous parameter for the
current operation
In the "Channel Strip EQ", "Send" or "Plugin/Instrument-Editor"
mode.
Encoder 2 Cursor left/right
-
Scrolls the pages of the current editor.
Alt
Scrolls the parameters of the current editor.
Otherwise... (however, always in the Nudge mode)
Encoder steers the horizontal cursor keys of
the computers keyboard.
In "Zoom" Mode:
-
Horizontal Zoom setting change
Shift
Counter-clockwise rotation: Sets the individual
zoom shot back on the selected track.
Clockwise rotation: Sets all tracks to the zoom
setting of the selected track.
-
Toggles between normal behavior of the cursor
Encoder and Zoom Mode.
Shift
Toggles between normal behavior of the cursor
Encoder and the simulation of the keyboard
cursor keys.
-
Ein- und Ausschalten der Scrub-Betriebsart.
-
Moves the playback wiper.
Encoder 3 "Zoom"-Taste
Scrub
Jog-Wheel
In the "Scrub" Mode:
-
Scrubs audio and MIDI
The Track Mixer Element functions
Track Mixer Elements are all control elements which are available for each channel individually. The following chart
shows the list of key combinations and shortcuts which are available.
20
Track M ixe r Ele me nt Functions
Ele me nt
Encoder
M odifie r
Button
Function
-
changes the value of the parameter assigned in
the display
Option
Changes the according parameter to the
maximum or minimum value
Alt
The Encoder works in finest resolution
-
Recalls the non-edited value of the parameter
or toggles between two options
If a selection was made (Display flashes)
Encoder Button
Confirms selection
In the case of a menu selection
-
Track function - the function assigned in the
display is released
If the selected track is a file
-
To the change the file level
-
Record enable all tracks
Option
Record safe all tracks
-
Solo a track
Option
un-solo all tracks
Rec/Ready
With Send Destination/Level on Multi C hannel display mode
Solo
-
Selects Pre/Post Send
With Send Destination/Level C hannel Strip display mode
-
Send Pre/Post change over switch.
-
Mutes tracks
option
Un-mutes all tracks
With EQ Frequency/Gain displayed
-
Bypass band
Mute
With Send Destination/Level multiple tracks displayed
-
Mutes the according FX send
With Send Destination/Level C hannel Strip displayed
-
Mutes the FX Sends on the according channel
-
Selects track
Shift
Sets Fader to unity gain and sends 0dB
volume
Select
21
-
Track volume
In the Duplicate Flip operating mode
-
Parameter currently controlled by encoder also
controlled by fader
In the Swap Flip operating mode
Fader
Exchanges parameter currently controlled by
the encoder and controls it with the fader
With Surround Angle/Diversity displayed
-
Surround Diversity control.
With EQ Frequency/Gain displayed
-
Controls Gain of EQ
With the Send Destination/Level Channel Strip active
-
Controls FX send
With Send Destination/Level Channel Strip displayed
-
Controls FX sends of selected tracks
Setting Markers
With the SAC controls you can program markers, erase them and call them up. You can do the latter by pressing the
[Store Marker] button and pressing the [REW] or [FWD] buttons. You can set the Marker Program Mode by pressing
[Shift] + [Marker], or by pressing the [Marker] button and keeping it down. You will see function names show up in the
display, which you can select using the assigned encoder buttons.
1) Programming Markers
To set a new Marker on a full bar position use the soft button “create” while pushing the [Marker] button. If you want
to create a Marker that doesn’t adhere to a particular bar/beat position, push the encoder button “CRw/o”
2) Loading stored Marker Positions
Keep the Marker button pushed down and select one of the function buttons [F1]-[F8]. Alternatively you can move
forward and backward in the markerlist by pushing the [Marker] button and using [FWD] and [RWD] in the transport
field.
3) Erasing a Marker Position
You can also erase a marker position. Select the marker position as describe above. Keep the Marker button down and
select the delete function with the according encoder button.
Nudge Operation
The nudge function is used to move sequences and audio objects in the arrange window. You access the nude mode by
holding down the [From] button or by activating the nudge mode via [shift]+[From]. Once the nudge mode is activated,
the cursor encoders become very important. They reflect the cursor buttons on the computer keyboard. This means you
can select the objects to be moved with the two cursor encoders.
There are three different ways to move an object. With the first one you determine a nudge value and move the object
by such value. With the second you can enter the move value directly and follow the result in the arrange window. In the
22
first display you can now see the currently set nudge value as well as the current position of the move object. In the third
mode the selected object will be moved to the selected song position.
1) Moving the object by a fixed value
Keep the [nudge] button pushed and use the [FWD] and [RWD] buttons in the transport field. The selected object will
be moved forward or backward by the set nudge value. You can adjust the value using the first encoder under the first
display. It is called Nudge in the display.
2) Direct Moving
You can move the selected object to you liking with the other assigned encoders. To keep things simple there are
different controls which cover different time formats. You can move objects relative to bar or time. The various possibilities
are shown in the display.
3) Moving to the Song Position
To move an object to current song position use the “pick-up” function, which is assigned to the second encoder button
of the SAC.
Drop-In Programming
The Drop button [Recall Marker] turns on the Drop-In Editor and activates the Drop-in Function. It is very simply to
determine a Drop-Zone:
1) Determining a Drop In/Drop Out Zone
Use the Jog Wheel to select the Drop In Position. Press and hold the Drop button [To] and after selection and push the
[<<] button in the transport field briefly. You have now set the drop in position.
Now use the Job Wheel to select the Drop Out Position. Use and hold the Drop button [To] button and push the [>>]
button briefly. You have now set the drop out position.
2) Editing the Drop Zone
You can also edit the Drop Zone. Use the [Shift] button, keep it pushed and press the Drop [Recall Marker] button. You
will see a Drop Channel Strip in the first and second displays.
In the displays the various functions will be shown. Using the first encoder button you can turn the Drop Mode on and
off.
The third and fourth Encoder allows moving the Drop Zone. The third moves the Zone by Bar and the fourth by Beat –
for instance in a 4/4 bar always by a quarter note to the left or right.
The fifth and sixth Encoder control the position of the Drop In. Here as well you can move the Zone by Bar or Beat.
The seventh and eighth encoder are used for moving the Drop Out Position.
To leave the [Drop] Channel Strip Display press an the Assignment button.
Cycle Mode Editing
The Cycle button [Recall Marker] activates the Cycle Mode, and turns on as the set value the cycle mode for the sector
between the first two markers (this is the default). If you push the [Recall Marker] button and use the [<<] and [>>]
buttons you can move the cycle region. Of course, this only works if you have programmed markers in the first place!
1) Quickly repositioning the Cycle Locator
You can also determine the Cycle region without existing marker. Use the Jog Wheels to select the Cycle Start Position.
Push and hold down the Cycle button [Recall Marker] and push the [<<] button in the transport field. The Cycle Start
position has now been set.
Now use the Jog Wheel to set the Cycle End Position. Push and hold down the Cycle button [Recall Marker] and push
the [>>] button. You now have set the Cycle End Position.
2) Cycle Editing
The Cycle Mode also has a Channel Strip for additional settings.
Push and hold down the [Shift] Button and push the Marker Button. In the first two display the following parameters are
being offered:
23
Encoder-Button 1 turns Cycle Mode off and on
Encoder Button 2 turns Cycle Mode On and Off according to the current selection in the arrange window
Encoder Button 3 moves the Cycle Zone by Bar
Encoder Button 5 sets the current song position as the left Locator Point
Turning Encoder 5 moves the left Locator by Bar
Turning Encoder 6 moves the left Locator by Beats.
Encoder Button 7 sets the current song position as the right Locator point
Turning Encoder 7 moves the right Locator by Bar
Turning Encoder 8 moves the right Locator in the units of the bar counter
You can leave Cycle Editing Mode by pushing any Assignment Button.
Transport Overview
You will find in the following chart the assignment of all transport buttons in a general overview:
Transport Buttons
Transport Button
Marker [Store
Marker]
Modifier
Buttons
Function
-
"Small Marker" Mode
Shift
"Large Marker" Mode
-
"Small Nudge" Mode
Shift
"Large Nudge" Mode
-
"Cycle" Mode
Shift
Edit "Cycle" Parameters
-
"Drop" Function.
Shift
Edit "Drop" Parameters
-
"Replace" Mode
-
Turns on/off the Metronome click
Shift
Switches between internal and external
synchronization as well as "MIDI Machine
control"
-
Solos the selected track
Shift
Enables the "Solo Lock" function
Nudge [From]
Cycle [Recall
Marker]
Drop [To]
Replace
Click
Solo
24
Rewind
-
Fast Rewind
Marker
Jumps to the previous Marker
Nudge
Shifts the current " Nudge" value to the left
Cycle
Turns on Cycle mode and brings the Cycle in
position to the current playback location
Drop
Turns on Drop mode and brings the Drop in
position to the current playback location
In "Marker" Mode
-
Jumps to the previous Marker
In "Nudge" Mode
FWD
-
Shifts the current " Nudge" value to the left
-
Fast Forward
Marker
Jumps to the next Marker
Nudge
Shifts the current " Nudge" value to the right
Cycle
Turns on Cycle mode and brings the Cycle out
position to the current playback location
Drop
Turns on Drop mode and brings the Drop out
position to the current playback location
In "Marker" Mode
-
Jumps to the next Marker
In "Nudge" Mode
Stop
-
Shifts the current " Nudge" value to the right
-
Stop
-
Play Song
Shift
Pause
-
Record !
Play
Record
* The [Cycle]-, [Solo]- and [Replace] buttons are located in the Software Navigation button field, and are
available when the SAC-Option button is lit.
25