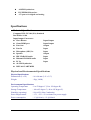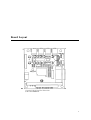
1
PCM-3201
USER MANUAL
Copyright notice
This document is copyrighted, 2000, by Advantech Co., Ltd. All rights are reserved. The
original manufacturer reserves the right to make improvements to the products described in
this manual at any time without notice.
No part of this manual may be reproduced, copied, translated or transmitted in any form or by
any means without the prior written permission of the original manufacturer. Information
provided in this manual is intended to be accurate and reliable. However, the original
manufacturer assumes no responsibility for its use, nor for any infringements upon the rights
of third parties which may result from its use.
Acknowledgements
Realtek is trademark of Realtek Corporation.
Sound Blaster Pro, Sound Blaster 16 and Wave Blaster are registered trademarks of Creative
Technology Ltd.
PC/104 and PC/104 logo are registered trademarks of the PC/104 Consortium.
Microsoft, MS-DOS, and MS are registered trademarks of Microsoft Corporation.
Windows, Windows 95, and Windows NT are registered trademarks of Microsoft
Corporation.
IBM, AT, OS/2 and Micro Channel are registered trademarks of International Business
Machines Corporation.
All other product names or trademarks are properties of their respective owners.
For more information on this and other Advantech products, please visit our website at:
http://www.advantech.com
For technical support and service, please visit our support website at:
http://www.advantech.com/support
This manual is for the PCM-3201.
Part No. 2006320100
1st Edition Printed in Taiwan September 2000
1
Packing Set
Before you begin installing PCM-3201 module, please make sure that the following
materials have been shipped:
1 PCM-3201 PC/104 Sound Module
1 CD title include user’s manual and driver and utility program
1 Startup manual
If any of these items is missing or damaged, contact your distributor or sales
representative immediately.
2
Contents
Chapter 1 General Information……………5
Product Highlights…………………………………………. 6
Introduction……………………………………..………….. 6
Features………………………..…………………………….6
Specification……………………………….……………….. 7
Technical Specifications…………………………………….. 7
Physical and Environmental Specifications………………… 7
Board Layout………………………………………………. 8
Chapter 2 Hardware Installation…………. 9
Jumper, connectors …………….…………………………..10
Locating jumpers, connectors………………………….…..11
Setting jumpers……………………………………………...12
Safety precautions……………………….…………………..12
Installing PCM-3201 Module…………………………….…13
Jumper configuration reference……………………………….13
External Devices connecting……………………………...…13
Wave Blaster/MIDI Extension Connector (J3)…..……………13
Game/Joystick/MIDI Connector (CN1&JP1)……...……….…13
Mono Input Connector (JP2)..…………………………..…….13
Mitsumi CD Audio Input Connector (J2)…….….……….…...13
IDE CD Audio Input Connector (J1)…………..……………...13
MIC Connector (CN2&J4)…..………………………………..14
Stereo Line In Connector (CN3&J5)…………..……………...14
Stereo Line Out Connector (CN4&J6)…………..…………....14
Speaker Out Connector (CN5&J7)……….…….……………..14
Chapter 3 Installation for Windows 3.1……15
Chapter 4 Installation for DOS…………..…17
3
Chapter 5 Installation for Windows 95….…19
Chapter 6 Installation for Windows 98
WDM…………………………………………21
Chapter 7 Installation for Windows
NT3.5/4.0………………………………...……23
Chapter 9 Setup Utility Program………...…25
A4CONFIG.EXE…………………………..…….………….…26
Trouble Shooting…………………….………………………...27
Problem in DOS……..…………………………………………27
Problem in Windows 3.1…………………………………….…28
Appendix A Installing PC/104 Modules....….29
Appendix B Pin Assignments………….....….31
PC/104 Connectors (P1, P2)………..……...……………….…..32
Wave Blaster/MIDI Extension Connector (J3)…………………33
Game/Joystick/MIDI Connector (CN1 / J9) ……………….….33
Mitsumi CD Audio Input Connector (J1)....……………………33
IDE CD Audio Input Connector (J2)………...….……….……..33
Microphone input (J4)………...….……………………………..34
Line Input Connector (J5)………...….……………….….……..34
Line Output Connector (J6)………...….……….…………..…..34
Speaker Output Connector (J7)………...……….……….……..34
PC Output Connector (J8)………...….……….……………..…34
4
CHAPTER
GENERAL
INFORMATION
This chapter gives background
Information on the PCM-3201.
(ALS120 Sound System).
You can find out:
Product Highlights
Product Features
Compatibility
Product Specifications
Module Layout
5
Product Highlights
PC/104 Embedded-PC Module.
Sound Blaster Pro & 16 compatible.
Built-in ALSFM Synthesizer.
Built-in w/external wavetable Synthesizer.
Built-in 3D Sound Effect Processor.
Enhance Game/MIDI port support.
Full duplex for concurrent recording and playback.
Proven Avance Logic compatibility, quality and reliability.
Introduction
The PCM-3201 sound module offers a wide range of flexible, economical and
expandable solutions that can satisfy diverse needs in audio application.
The kernel of PCM-3201 is the ALS120 chip that are the industry standard music
synthesizers found in most personal computer audio boards. The ALS uses FM
synthesis techniques that are proprietary to Avance Logic. The ALS120 single chip
audio solution integrates audio CODEC, DOS games compatibility and D/A
converter with FM synthesis in one package. The ALS120 replaces some of devices
used in current Soundblaster compatible audio subsystem.
Whatever the particular configuration, each of the PCM-3201 audio system can be
relied on the high levels of quality, compatibility and reliability. The PCM-3201
uses the first truly cost-effective implementation of wavetable synthesis in your
applications.
Features
Single, mixed-signal, high performance VLSI sound ASIC
Three software selectable DMA lines (0,1,3).
Software selectable interrupts lines (5,7,9,10,11).
Supports 8-bit ISA Plug & Play bus interface.
Supports 16-bit CD-ROM interface.
DMA interface with FIFO for full duplex.
Supports Enhance Game port.
MIDI port with input and output FIFO.
8-bit or 16-bit monaural/stereo digital audio from 4KHz to 48 KHz.
Software master volume control.
3D Sound Effect processor.
6
ALSFM Synthesizer.
IIC/EEPROM interface.
+5V power for digital and analog.
Specifications
Technical Specifications
Computer BUS: PC/104 (ISA) Standard
Bus Width: 16-bit
Input/Output Connectors:
Wave Blaster
Input/Output
Game/MIDI port
Input/Output
Line Out
Output
Line In
Input
Microphone (MIC) In
Input
Speaker
Output
IDE CD-ROM Audio
Input
Mitsumi CD-ROM Audio
Input
PC In
Input
ALSFM Synthesizer
MPU-401 UART MIDI
Physical and Environmental Specifications
Physical Specifications
Dimemsions (L x W)
Weight
: 96 x 90 mm (3.8" x 3.5")
: 82g (.180lb)
Environmental Specifications
Operating Temperature
: 0 to 70 degree C (32 to 158 degree K).
Storage Temperature
: -40 to 85 degree C (-40 to 185 degree F).
Humidity (operating)
: 0% to 95% Non-Condensing.
Power Requirements
: +5V, +12V +/-5% tolerance on power supply.
Power consumption
: +5 @180 mA, +12 @100mA
7
Board Layout
8
CHAPTER
Hardware
Installation
This chapter tells you how to set up the PCM-3201
(ALS120 Sound System) hardware, including instructions
on setting jumpers and connecting external devices.
Be sure to read all the safety precautions before you begin
the installation procedures.
9
Jumpers, Connectors
Connectors on the board link it to external audio devices and other PC/104 modules. In
addition, the board has a number of jumpers that allow you configure the audio
application to suit your systems.
Jumpers
Label
Function
JP1
JP2
open for mono microphone
select line output (1-2,4-5) or speaker output (2-3,5-6)
Connectors
Label
Function
P1
PC/104 ISA bus expansion
P2
PC/104 ISA bus expansion
J1
IDE CD-ROM audio input connector
J2
Mitsumi CD-ROM audio input connector
J3
wave blaster/MIDI extension connector
J8
PC audio input connector
CN1/J9
game/joystick/MIDI connector
CN2/J4
MIC input connector
CN3/J5
line input connector
CN4/J6
line output connector
CN5/J7
speaker output connector
10
Locating Jumpers, Connectors
11
Setting Jumpers
To match the needs of your application, you need to configure your PCM-3201 by setting
jumpers. A jumper is the simplest kind of electric switch. It consists of two metal pins and
a small metal clip (often protected by a plastic cover) that slides over the pins to connect
them. To “close” a jumper you connect the pins with the clip. To “open” a jumper you
remove the clip. Sometimes a jumper will have three pins label 1, 2, and 3. In this case
you would connect either pins 1 and 2 or 2 and 3.
The jumper settings are schematically depicted as follow:
A pair of needle –nose pliers may be helpful when working with jumpers.
If you have doubts about the best hardware configuration for your system application,
contact your local distributor or sales representative before you make any changes.
Safety Precautions
9
Warning
! Always completely disconnect the power cord from your chassis whenever
you are working on it. Do not make connections while the power is on
because sensitive electronic components can be damaged by the sudden rush
of power.
Only experienced electricians personnel should open the PC chassis.
Caution !
Always ground yourself to remove any static charge before touching the
module. Modern electronic devices are very sensitive to static electric charges.
Use a grounding wrist strap at all times. Place all electronic components on a
static-dissipative surface or in a static-shielded bag when they are not in the
chassis.
12
Installing PCM-3201 Module
Factory Default Settings
PCM-3201 Sound Module default configuration that supports the Plug & play 1.0a
specification will depend on the available system resources.
Jumper Configuration Reference
JP1 is closed for stereo microphone input.
JP2 is closed at 2-3,5-6 for speaker output
External Devices Connecting
Wave Blaster/MIDI Extension Connector (J3)
The wave table connector is used to attach an external wave table module for
playback, mixing, or recording.
Game/Joystick/MIDI Connector (CN1 & J9)
The Game/MIDI Port connectors (15-pin D-sub & 16-pin Header) are used to attach a
joystick for game interface or to attach an external FM synthesizer for playback, mixing,
or recording.
PC Input Connector (J8)
This connector is provided that allows routing of the PC speaker to the PCM-3201 sound
module. This allows the PC-speaker to be the output of the PCM-3201.
Mitsumi CD Audio Input connector (J2)
The Mitsumi CD audio input connector is used to connect the audio cable from
Mitsumi CD-ROM drive for playback, mixing, and recording.
IDE CD Audio Input Connector (J1)
The IDE CD audio input connector is used to connect the audio cable from IDE
CD-ROM drive for playback, mixing, and recording.
13
MIC connector (CN2/J4)
The Microphone in phone-jack is used to attach a microphone for live audio input for
playback, mixing, or recording. A 20db gain can be obtained internally. The microphone
input impedance will be around 1.8K ohm.
Stereo Line in Connector (CN3/J5)
The Stereo Line In phone-jack is used to attach stereo devices such as cassette, digital
audiotape, or minidisk players for playback, mixing, or recording.
Stereo Line out Connector (CN4/J6)
The Stereo Line Out phone-jack provides the non-amplified output for the stereo
channels (left and right). The output is for attaching powered speakers or an external
audio amplifier. When used in conjunction with the Speaker Out output, the surround
sound function will be activated.
Speaker Out Connector (CN5/J7)
The Speaker Out phone-jack provides the built-in power amplifier outputs for the left and
right stereo channels. When used in conjunction with Line out output, the surround sound
function will be active.
14
CHAPTER
Installation for Windows 3.1
15
1. Start Windows 3.1.
2. Insert the “PCM-3201 DOS/Windows 3.1/Windows 95 Drivers
and Utilities” diskette into diskette driver A (or B).
3. Select [RUN] from the Program Manager File menu and type A: setup on the command
line.
4. A Welcome dialog box will appear, Click [Next] to continue the installation.
5. A Choose Destination Location dialog box will appear. Click [Next] in the Choose
Destination dialog box to install the ALS120 sound driver to the default directory or click
on Browse if you want to install to different directory.
6. Setup will automatically create a folder and icons for the sound application.
7. A Modifying AUTOEXEC.BAT dialog box will appear and Click on [Next] to accept the
default to “Let Setup modifies
the AUTOEXEC.BAT. File”.
8. A Configuration Panel dialog box will appear for the first time installation and please
check each hardware settings and make changes according to hardware installed and also
if you do not hear music at tests.
9. Click on [Finish] Setup will configure
10. The hardware settings. Refer to the Setup
11. Utility Program in the next chapter to
12. Configure your sound module.
13. After the configuration is complete, remove the diskette drive.
16
CHAPTER
Installation for DOS
Use this chapter to install PCM-3201 driver for DOS
17
1. Install the PCM-3201 sound module (see “Hardware Installation” in Chapter2. Insert the
“PCM-3201 DOS/Windows 3.1/Windows 95 Drivers and Utilities” diskette into diskette
drive A (or B).
2. If Windows 3.1 is running, exit the application.
3. At the C:\> prompt, type a: (or b:) and press the Enter key. At the A:\> prompt, type
DOSINST>EXE and press the Enter key.
4. The Avance Sound Chip Installation Program screen will be displayed showing the
following defaults:
Avance software copy to: C:\A4SOUND
System boot up drive: C:\
To make changes to the defaults, select the parameter with the Up/Down Arrow keys
and press the Enter key. Then change the parameter and press the Enter key again to
accept the change.
When satisfied with the new parameters or to accept the defaults, select “accept the
above” with the Up/Down Arrow keys and press the Enter key.
5. The installation of the Avance Logic software drivers will now begin.
6. When all of the files are copied to the fixed disk, installation program will automatically
update the autoexec.bat, saving copies of the original files with the extension “.als”, and
the a4config.exe utility will automatically start. Use the instructions given in “Setup Utility
Program” on the next page to set up the ALS120 sound module.
7. When the installation and setup are complete, remove the diskette from the diskette drive.
18
CHAPTER
Installation for Windows95
Use this chapter to install PCM-3201 driver for Windows 95
19
1. Power on the system and when the “New Hardware Found” window comes up, click [OK]
to accept the default. Select “Driver from disk provided by hardware manufacturer”.
2. Click on [OK] when the “Install From Disk” dialog box appears.
3. Insert the “PCM-3201 DOS/Windows 3.1/Windows 95 Drivers and Utilities” diskette
into diskette drive A (or B), select the correct directory and click on [OK]. Windows 95
will automatically copy all of the needed files and configure the ALS120 sound module.
4. The sound application is included on this diskette and you have the option of installing it
now. If you do not need to install the application, remove the diskette from the diskette
drive and skip procedures 5 through 10.
5. Select [RUN] from the start menu, a Run dialog box appears:
6. Type A:\setup and Click on [OK].
7. Click [Next] in the Welcome dialog box.
8. A Choose Destination dialog box will appears, Click [Next] to install the sound driver to
the default directory or click on Browse if you want to install to a different directory.
9. Windows will automatically create a folder and icon for the sound application.
10. Click [Finish]. The installation is complete.
11. Remove the diskette from the diskette drive.
20
CHAPTER
Installation for Windows 98 WDM
Use this chapter to install PCM-3201 driver for Windows 98
WDM
21
1. Ensure that PCM-3201 is installed properly into an PC104 connector and power on the
system.
2. Windows 98 will prompt use with a “New Hardware Found” dialog box for PCM-3201
sound module is PC104 Plug & Play. To install the Windows 98 driver, select your hard
drive location in which the driver database exists under or insert the “PCM-3201 Win 98
Drivers and Utilities” diskette into the appropriate drive and select that drive from the
prompted dialog box and click on [NEXT]. Windows98 will copy all necessary files and
setup all the logical devices on the sound module automatically.
3. Install the ALSRACK(Avance MediaRack Player) by running the “SETUP.EXE” file
found in the PCM-3201 Win98 Drivers & Utilities disk/database. This will create the
Avance Sound Program Group by the ALSRACK utility icon. Please check “README”
file for full description of ALSRACK function.
22
CHAPTER
Installation for Windows NT 3.5/4.0
Use this chapter to install PCM-3201 driver for Windows NT
3.5/4.0
23
1. Ensure that PCM-3201 is installed property and power on the system.
2. Insert the “PCM-3201 Windows NT Drivers and Utilities” diskette into drive A: (or B:).
Go to [Control Panel/Multimedia /Device/Add] and choose [OK] for “Avance Logic, Inc.
Sound Chip”.
3. While installing, “Driver Exists” warning message will appear and ask whether to keep
the old ‘midimap.cfg’ or [re-install]. Please select [re-install] or else MIDI will not
function property.
4. Configure proper I/O’s and DMA’s if necessary as they appear on screen.
5. Re-boot system and remove driver diskette before driver will take into effect.
24
CHAPTER
Setup Utility Program
25
A4CONFIG.EXE
This utility is used to set up the PCM-3201 sound module. It is automatically started
when the Avance Logic software drivers are first installed in a DOS or Windows 3.1
application. It should be re-run anytime the system hardware configuration is changed or
a change to the PCM-3201 sound module configuration is desired. The a4 config.exe
utility resides in the directory into which the Avance Logic software drivers were stored.
To run the a4config.exe utility, perform the following:
1. If Windows 3.1 is running, exit the application and at the C:\> prompt, set the
current directory containing the a4config.exe utility (A4SOUND was the default
directory at installation time), type a4config.exe, and then press the Enter key to
execute the utility.
2. The ALS120 Sound Chip Configuration Program menu, screen will be displayed.
Use the Tab, Space, Enter, Down Arrow, and ESC keys and/or the mouse to select
and set options in menus, to move between menus, and to make and set changes to
values.
3. In the Sound Chip Configuration Program menu, the SB16 configuration screen
showing the I/O port, DMA, and IRQ settings will be displayed, and the default
settings are: I/O Port: 220, DMA1: 1, DMA2: 3 and IRQ: 5. Select and set any
changes or accept the defaults.
4. In the Sound Chip Configuration Program menu, select “MPU401” to configure the
external MIDI. The Enable/Disable box can be selected by using mouse or [space]
key. If the external MIDI is enabled, the I/O port and IRQ settings will be displayed
and can be changed by mouse or [down arrow] key. The default settings are: I/O
Port: 330 and IRQ: 9. Select and any changes or accept the defaults.
5. In the Sound Chip Configuration Program menu, select “CD-ROM” to configure
the CD-ROM. The Enable/Disable box can be selected by using mouse or [space]
key.
6. In the Sound Chip Configuration Program menu, select “ADLIB” to configure the
OPL3. The Enable /Disable box can be selected by using mouse or [space] key.
26
7. In the Sound Chip Configuration Program Menu, select “Game Port” to configure
the game port. The Enable/Disable box can be selected by using mouse or [space]
key.
8. In the Sound Chip Configuration Program menu, select “Set Volume”. The Setting
Volume screen will be displayed. Make and set any changes or accept the existing
settings and return to the Main Menu.
9. In the Sound Chip Configuration Program menu, 8-Bit Sound/16-Bit Sound/FM
music box will be displayed. Select each box and verify the correct operation of the
PCM-3201 Sound Module. Follow the instruction given for each mode. If the
sound module does not operate correctly in any mode, reconfigure it by rerunning
this procedure.
10. When satisfied with the operation of the PCM-3201 sound module, select [OK] to
exit the utility.
Trouble Shooting
The PCM-3201 sound module is designed to run trouble free once it is installed and set
up. Most problems will be encountered during installation and setup or will be
encountered later when something is changed in the system. The following are
descriptions of and solutions for the more common problems that you may encounter.
Please review these problems before requesting technical assistance.
Problem in DOS
1. Problem:
Cannot load the CD-ROM software driver
Cause:
The CD-ROM port may not be enable. Click the config.sys file for the
line “DEVICE=C:\A4SOUND\CDSETUP.SYS”. If it is not present,
perform the steps outlined in the Solution. If it is present, call for
technical assistance.
Solution:
Run the a4config.exe utility. In the Device menu, select “CD-ROM”
and press [OK] to configure the CD-ROM. Verify that the line
“device=c:\a4sound\cdsetup.sys” is now in the config.sys file and then
proceed to install the CD-ROM drive.
No sound when playing a DOS game
2. Problem:
Cause:
There may be a conflict in the SB16 settings.
Solution:
Rerun the a4config.exe utility and try another Port, DMA, or IRQ
27
address.
Problem in Windows 3.1
1. Problem:
Cause:
There is no “Sound” or “MIDI Sequence” item in the Device
pull-down menu in the Media Player or the ALSRACK.EXE
application does not work.
The MIDI software driver may not be load. Check the system.ini file
for the following lines. If any are missing, perform the steps outlined in
the Solution. If all are present, call for technical assistance.
[boot]
drivers=mmsystem.dii msmixmgr.dll
[drivers]
Wave=a4sndsys.drv
Aux=a4sndsys.drv
Mixer=a4sndsys.drv
Midi=a4opl.drv
Midi 1=a4mpu401.drv
[386Enh]
device=a4sndsys.386
Solution:
Run the a4config.exe utility in its entirety.
28
APPENDIX
Installing PC/104 Modules
This appendix gives instructions for installing PC/104 Modules.
29
Installing PC/104 modules
The CPU module’s PC/104 connectors give you the flexibility to attach PC/104
expansion modules. These modules perform the functions of traditional plug-in expansion
modules, but save space and valuable slots.
Modules include:
PCM-3335
PCM-3600
PCM-3420
PCM-3201
PCM-3810
PCM-3820
PCM-3115
PCM-3610
PCM-3660
PCM-3718
PCM-3724
PCM-3910
386 CPU Module w/Flat Panel/CRT Interface
FAX/Modem Module
Fast SCSI-2 Module
Sound Module
Solid State Disk Module
High Density Flash Disk Module
PCMCIA Module (two slots)
Isolated RS-232 and RS-422/485 Module
Ethernet Module
30KHz A/D Module
48-Channel DIO Module
Breadboard Module
Installing these modules on the CPU module is quick and simple. The following steps
show how to mount the PC/104 modules:
1. When remove the CPU module from your system, pay particular attention to the safety
instructions already mentioned.
2. Make any jumper or link changes required to the CPU module now. Once the PC/104
module is mounted you may have difficulty in accessing these.
3. Normal PC/104 modules have male connectors and mount directly onto the main
module. However, to ensure better bus matching, the connectors on the CPU module
and the PC/104 module are both female. For this reason, you may need to use the
“male-male” adapter included with the CPU module in order to properly connect your
PC/104 module. (Refer to the diagram on the following page.)
4. Mount the PC/104 module onto the CPU module by pressing the module firmly but
carefully onto the mounting connectors.
5. Secure the PC/104 module onto the CPU module using the four mounting spacers and
screws.
30
APPENDIX
Pin Assignments
This appendix contains information of a detailed or specialized nature.
It includes:
PC/104 Connector
Wave Blaster/MIDI Extension Connector
Game/Joystick/MIDI Connector
IDE CD Audio Connector
Mitsumi CD Audio Connector
Microphone Input
Line Input
Line Output
Speaker Output
31
PC/104 Connectors (P1, P2)
PCM-3201 PC/104 Connectors (P1, P2)
Pin
Signal
0
1
2
3
4
5
6
7
8
9
10
11
12
13
14
15
16
17
18
19
20
21
22
23
24
25
26
27
28
29
30
31
32
Row-A
Row-B
Row-C
Row-D
--0V
0V
IOCHCKH* 0V
SBHE*
MEMCS16*
SD7
RESETDRV LA23
IOCS16*
SD6
+5V
LA22
IRQ10
SD5
IRQ9
LA21
IRQ11
SD4
-5V
LA20
IRQ12
SD3
DRQ2
LA19
IRQ15
SD2
-12V
LA18
IRQ14
SD1
ENDXFR* LA17
DACK0*
SD0
+12V
MEMR* DRQ0
IOCHRDY N/C
MEMW* DACK5*
AEN
SMEMW* SD8
DRQ5
SA19
SMEMR* SD9
DACK6*
SA18
IOW*
SD10
DRQ6
SA17
IOR*
SD11
DACK7*
SA16
DACK3*
SD12
DRQ6
SA15
DRQ3
SD13
+5V
SA14
DACK1*
SD14
MASTER*
SA13
DRQ1
SD15
0V
SA12
REFRESH* KEY
0V
SA11
SYSCLK
--SA10
IRQ7
--SA9
IRQ6
--SA8
IRQ5
--SA7
IRQ4
--SA6
IRQ3
--SA5
DACK2*
--SA4
TC
--SA3
BALE
--SA2
+5V
--SA1
OSC
--SA0
0V
--0V
0V
---
* Active Low
32
Wave Blaster/MIDI Extension Connector (J3)
PCM-3201 Wave Blaster/MIDI Extension Connector
Pin
Signal
Pin
Signal
1
GND
2
NC
3
GND
4
MIDIOUT
5
GND
6
+5V
7
GND
8
NC
9
GND
10
+5V
11
GND
12
NC
13
NC
14
+5V
15
GND
16
NC
17
GND
18
AVDD+12V
19
GND
20
LINE IN LEFT
21
GND
22
AVDD-12V
23
GND
24
LINE IN RIGHT Pin
25
GND
26
RESETB
Game / Joystick / MIDI Connector (CN1/J9)
PCM-3201 Game/Joystick/MIDI Connector
Pin
Signal
Pin
Signal
1
VCC
2
GP4
3
GP0
4
GND
5
GND
6
GP1
7
GP5
8
VCC
9
VCC
10
GP6
11
GP2
12
TXD
13
GP3
14
GP7
15
RXD
IDE CD Audio Input Connector (J1)
PCM-3201 Panasonic CD Audio Input Connector
Pin
Signal
Pin
Signal
2
GND
1
Audio In Right
3
GND
4
Audio In Left
Mitsumi CD Audio Input Connector (J2)
PCM-3201 Mitsumi CD Audio Input Connector
Pin
Signal
Pin
Signal
1
Audio In Right
2
GND
3
Audio In Left
4
GND
33
Microphone Input (J4)
PCM-3201 Microphone input
Pin
Signal
Pin
1
MIC In Right
2
3
GND
4
Signal
GND
MIC In Left
Line Input (J5)
PCM-3201 Line Input
Pin
Signal
1
Line In Right
3
GND
Pin
2
4
Signal
GND
Line In Left
Pin
2
4
Signal
GND
Line Out Left
Line Output (J6)
PCM-3201 Line Output
Pin
Signal
1
Line Out Right
3
GND
Speaker Output (J7)
PCM-3201 Speaker Output
Pin
Signal
Pin
1
Speaker Out Right 2
3
GND
4
Signal
GND
Speaker Out Left
PC Output (J8)
PCM-3201 PC Output
Pin
Signal
Pin
1
Speaker Out Right 2
Signal
GND
34